

GME TX6100 User Manual
5 watt handheld UHF CB radio
I N S T R U C T I O N M A N U A L

CONTE NTS
ACCESSORIES SUPPLIED . . . . . . . . . . . 2
WARNING-SAFETY INFORMATION . . . 2
IMPORTANT INFORMATION . . . . . . . . . 3
Possible Issues . . . . . . . . . . . . . . . 4
TELEMETRY CHANNELS . . . . . . . . . . . . 4
FEATURES . . . . . . . . . . . . . . . . . . . . . . 5
CONTROLS . . . . . . . . . . . . . . . . . . . . . 5
LCD INDICATORS . . . . . . . . . . . . . . . . 6
POWERING THE RADIO . . . . . . . . . . . . 7
GENERAL OPERATION . . . . . . . . . . . . . 9
Power On/Off . . . . . . . . . . . . . . . 9
Adjusting the Volume . . . . . . . . . 9
Display Lighting . . . . . . . . . . . . . . 9
Receiving signals . . . . . . . . . . . . . 9
Transmitting . . . . . . . . . . . . . . . . 9
Selecting Channels . . . . . . . . . . 10
SQL Key . . . . . . . . . . . . . . . . . . 10
Duplex Button . . . . . . . . . . . . . . 10
ACCESS ORIES SU PPLIED
• Removable exible antenna
• Li-Ion battery pack 1700 mAh
• Desktop fast Charger
WAR NING: SA FETY INFOR MATION
The TX6100 is a radio frequency
transmitting device.
• When transmitting, keep the antenna
more than 25 mm from any part of the
head or body.
Scan Key . . . . . . . . . . . . . . . . . . 11
Keypad Lock Function . . . . . . . . 12
Mode Key. . . . . . . . . . . . . . . . . . 12
1. CTCSS Code Selection . . . . . . 12
2. Digitally Coded Squelch . . . . . 13
3. Transmitter Power . . . . . . . . . 14
4. VOX Settings . . . . . . . . . . . . . 14
5. Dual Watch Settings . . . . . . . . 15
6. Squelch Settings . . . . . . . . . . 15
7. Roger Beep Tone Settings . . . 16
8. Button Beep Tone Setting . . . . 16
9. Call Alarm Selection . . . . . . . . 16
CTCSS TONE FREQUENCIES . . . . . . . . 17
DCS TONE FREQUENCIES . . . . . . . . . 18
UHF CB OPERATING FREQUENCIES . . 19
SPECIFICATIONS . . . . . . . . . . . . . . . . 21
SC CONTRACT WARRANTY
AGAINST DEFECTS . . . . . . . . . . . . . . 22
• Carry case
• AC Adaptor
• Instruction manual
• Do not transmit near electrical
blasting equipment or in explosive
atmospheres.
• Do not allow children to operate a
radio transmitter unsupervised.
PA GE 2 IN ST RUCTION MANUA L TX 61 00

IM PORTANT
READ ALL INSTRUCTIONS carefully
and completely before operating your
radio and retain this manual for future
reference.
NEVER connect the radio to a power
source other than the supplied battery.
This may damage your product.
DO NOT place your radio in front of a
vehicle airbag.
DO NOT use your radio with a damaged
antenna.
DO NOT attempt to modify your radio
in any way.
ALWAYS charge your radio at normal
room temperature.
ALWAYS switch off your radio where
notices restrict the use of two-way radio
or mobile telephones.
ONLY use GME approved rechargeable
batteries with the supplied charger.
AVOID exposing your radio to water. It
is not waterproof.
AVOID storing or charging your radio in
direct sunlight.
AVOID storing or using your radio where
temperatures are below -20°C or above
+60°C.
IM PORTANT INFO RMATI ON CON CERNING UHF CB RA DIO
The use of the Citizen Band radio service
is licensed in Australia by the ACMA
Radio communications (Citizens Band
Radio Stations) Class Licence and in New
Zealand by the Ministry of Economic
Development New Zealand (MED). A
General User Radio Licence for Citizens
Band radio and operation is subject to
conditions contained in those licences.
The class licence for users and equipment
operating in the CB/PRS 477 MHz band
has been amended. This radio meets the
new 80 channel standard.
In simple terms the same amount of
spectrum is available; however,
TX 61 00 IN ST RUCTION MANUA L PA GE 3
radio
transceivers can now operate in a
narrower bandwidth and hence use less
spectrum. These radios are generally
referred to as narrowband or 12.5
kHz radios. By using 12.5 kHz channel
spacing instead of 25 kHz, the 40
channels originally allocated can now
be expanded to 80 channels thereby
doubling the channel capacity and
relieving congestion in the UHF
CB/PRS band.
Original 40 channel wideband Radios will
continue to operate on the original 40
channels, however they will not be able to
converse on the newer channels 41 – 80.

The newer narrowband radios will be
able to converse with all older 40 channel
wideband radios on all channels 1 to 40
as well as the newer channels allocated
from 41 to 80.
Possible issues
When a new narrowband radio receives a
transmission from an older wideband radio
the speech may sound loud and distorted
– simply adjust your radio volume for best
performance. When an older wideband
radio receives a signal from a new
narrowband radio, the speech may sound
quiet - simply adjust your radio volume for
best performance.
Depending on how close your receiving
radio is to another transmitting radio, there
can be interference from the transmitting
radio if it is using a channel adjacent to
the channel you are listening to. Simply try
going up or down a few channels from the
currently selected channel.
The above situations are not a fault of
the radio but a symptom of operating
wideband and narrowband radios in the
same bandwidth. This possible interference
The mixing of narrowband and
wideband radios in the same spectrum
can cause some possible operating
issues of interference and varying levels
of received volume.
will decrease over time as the population
of wideband radios ages and decreases.
Further information and updates
are available from the Australian
Communications and Media Authority
(ACMA) at www.acma.gov.au and the
Ministry of Economic Development (MED),
Radio Spectrum Management at:
www.rsm.govt.nz
The ACMA has allocated channels 5/35
for emergency use only. Channel 5 is the
primary Simplex Emergency Channel.
Where a Channel 5 repeater is available,
you should select Duplex on CH 5.
NOTE: Channel 35 is the input channel for
the Channel 5 repeater therefore Channel
35 should also not be used for anything
other than emergency transmissions.
TE LEMET RY CHA NNELS
ACMA regulations have allocated channels
22 and 23 for telemetry only applications
and have prohibited the transmission of
speech on these channels. Consequently
the TX6100 has a transmit-inhibit applied
to channels 22 and 23.
PA GE 4 IN ST RUCTION MANUA L TX 61 00
In the event that additional telemetry/
telecommand channels are approved
by the ACMA, these channels shall be
added to those currently listed where
voice transmission is inhibited. Currently
transmissions on channels 61, 62 and 63
are also inhibited and these channels are
reserved for future allocation.
• 5/1 watt RF power
• 80 Channels
• Removable flexible antenna
• Desktop fast charger
• Power save mode
• Keypad lock
• DCS
• Backlit LCD display
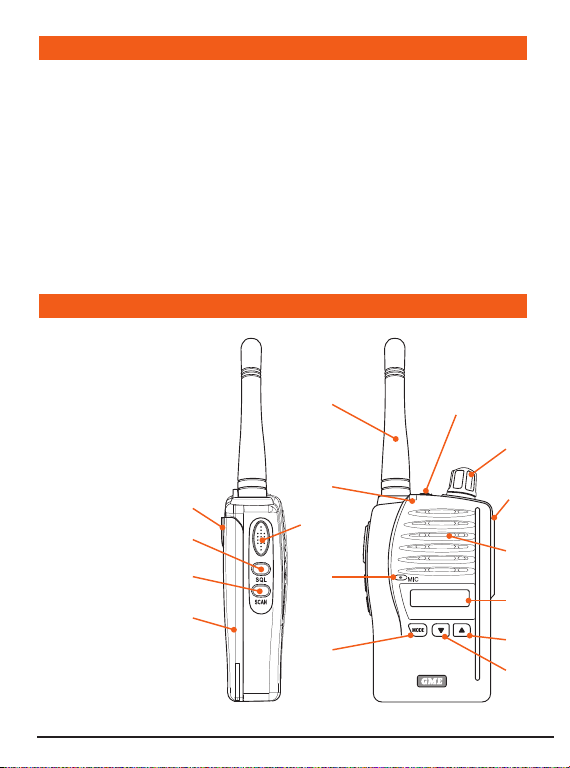
1. Battery
2. Scan
3. Squelch/CTCSS Key
4. Battery Release Clip
5. Push-To-Talk (PTT) Switch
6. Mode Key
7. Microphone
8. Indicator LED
9. Antenna
10. Duplex/Keypad
Lock Button
11. Volume On/Off
12. External Speaker/Mic
13. Speaker
14. LCD Display
15. Channel Up
16. Channel Down
4
3
2
1
FE ATURES
• Calling tone
• Roger beep
• Dual watch
• Signal strength indicator
• Memory scan
• Duplex
• CTCSS
• VOX (voice activated transmit)
CONTR OLS
5
9
10
11
8
12
13
7
5 Watt
6
14
15
16
TX6100
TX 61 00 IN ST RUCTION MANUA L PA GE 5

LC D I NDI CAT ORS
1 2 3 4 5 6 7 8 9
10 11 12 13 14 15 16 17
1. Dual Watch Icon: Appears when the
Dual Watch mode is active.
2. Voice Activated Transmission (VOX)
Appears when the VOX mode
Icon:
is activated.
3. Keypad Lock Icon: Appears when the
keypad is locked.
4. Button Beep Tone Icon: Appears
when the button beep conrmation
tone is selected.
5. High Power Icon: Appears when High
transmitter power is selected.
6. Low Power Icon: Appears when Low
transmitter power is selected.
7. Channel Memory Indicator: Appears
when selected channel is stored in
Scan Memory.
8. Scan Indicator Icon: Appears
when SCAN is enabled and the radio
is scanning.
9. Battery Level Icon: Indicates battery
10. Channel Display: Indicates the
channel number in use.
11. CTCSS (CTC) Icon: Indicates that
CTCSS tones are enabled on the
selected channel.
12. CTCSS Tone: Displays the selected
CTCSS tone (from 00 – 38) on the
selected channel.
13. DCS Icon: Indicates Digital Coded
Squelch is enabled.
14. Roger-Beep Tone Icon: Appears
when the Roger-Beep tone is
enabled.
15. Squelch/Monitor Icon: Appears
when the Monitor function is
activated. (Squelch is open)
16.
Transmit Icon: Appears when
transmitting.
17. Duplex Icon: Indicates that Duplex
communication has been enabled.
charge level. Flashes when battery is
almost empty.
PA GE 6 IN ST RUCTION MANUA L TX 61 00
POWER ING THE RAD IO
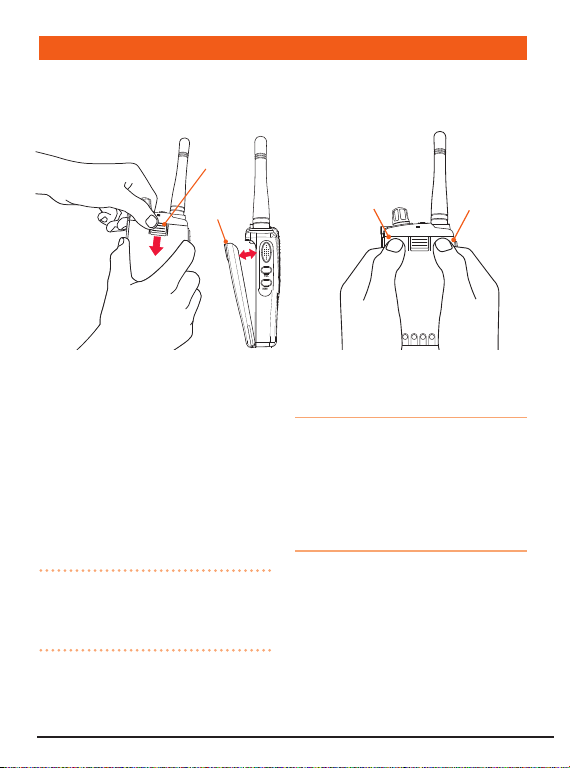
To Remove Battery Pack
Slide
Down
Swing
Away
Your TX6100 is powered by a 7.4 volt
1700 mAh Li-Ion battery pack. When the
battery pack is new, it should be fully
charged before being used for the rst
time. If left unused, your TX6100’s battery
pack will discharge itself within a few
months. If you have not used your TX6100
for some time, you will need to recharge
the battery pack before use.
WARNING: Use only the approved
GME charger. The use of other types may
be dangerous and will void your GME
warranty.
To Refit Battery Pack
Press Press
To fit the battery pack
1. Locate the bottom of the battery pack
into the two slots in the base of the
radio frame.
2. Press the top of the battery pack in to
place against the radio until it ‘clicks’.
To remove the battery pack
1. Slide the battery retaining clip
downward while pulling the top of the
battery away from the radio.
2. Lift the battery pack upward to clear
the slots at the bottom of the radio.
TX 61 00 IN ST RUCTION MANUA L PA GE 7

Charging the battery pack
Your TX6100 is supplied with an AC
adaptor and desktop fast charger. The
charger will charge a fully discharged
1700 mAh battery pack to full capacity in
around 1-2 hours.
1. Plug the charger into a standard 240
volt AC outlet.
2. Plug the lead from the charger into the
charging cradle.
3. Place the TX6100 into the cradle.
The RED LED will light to indicate the
battery is charging.
4. When the battery has charged, the
LED will change to GREEN.
Battery low alert
When the battery icon blinks on the
display, the battery level is low and the
battery pack should be recharged. If the
battery is not charged, an audio tone
will then sound to warn the user that the
battery is almost discharged.
Battery usage
The time taken to discharge the battery
pack will depend on how you use the
TX6100. The 1700 mAh battery pack
supplied is powerful enough for a full days
use under average conditions.
Conserving battery power
The TX6100 has built-in power saving
features to help you get the maximum
amount of time between charges from
your Li-Ion battery pack. If you need to
operate your TX6100 in a situation where
PA GE 8 IN ST RUCTION MANUA L TX 61 00
you require maximum battery life (e.g. a
remote site where there is no convenient
recharging facility nearby) the following
hints can greatly reduce the amount of
power drawn from the battery pack.
Standby mode
The TX6100 will automatically enter
‘Standby’ mode when it is inactive (i.e.
not transmitting or receiving signals.
While in Standby mode it will still check
for incoming signals but it will draw
considerably less power from the battery
pack. As soon as a signal is heard or the
keys are pressed the TX6100 will ‘wake
up’ again. This Standby mode is automatic
and by itself can extend the battery life by
many hours.
Using CTCSS
If you are expecting to receive signals on
a busy channel, you can program that
channel for CTCSS operation and get the
other person to call you using the same
CTCSS tone. Your radio will then remain
in Standby and ignore all other signals
until your selected CTCSS tone is received.
Scanning
The TX6100 draws more power from
the battery pack when scanning than
when monitoring a single channel. This
is because it must ‘wake up’ more often
to monitor each channel for activity. You
can squeeze that extra bit of life from the
battery pack by avoiding any unnecessary
scanning. In addition, scanning increases
the chance of nding a signal thereby
 Loading...