

GME TX4400 User Manual

TX4400
UHF CB RADIO
INSTRUCTION MANUAL
TX4400 INSTRUCTION MANUAL PAGE 1

PAGE 2 INSTRUCTION MANUAL TX4400
TABLE OF CONTENTS
GENERAL . . . . . . . . . . . . . . . . . . . . . . . . . . . . . . . . . . 3
FEATURES . . . . . . . . . . . . . . . . . . . . . . . . . . . . . . . . . 3
BASIC OPERATION .......................4
Front Panel Controls . . . . . . . . . . . . . . . . . . . . . . . . 4
Adjusting the Volume . . . . . . . . . . . . . . . . . . . . . . . 4
LCD Indicators .............................4
Squelch ..................................5
Monitoring Function . . . . . . . . . . . . . . . . . . . . . . . . 5
Selecting Channels . . . . . . . . . . . . . . . . . . . . . . . . . 5
Back Lighting ............................. 5
Duplex Switch . . . . . . . . . . . . . . . . . . . . . . . . . . . . 5
Priority Channel . . . . . . . . . . . . . . . . . . . . . . . . . . . 6
Signal Strength Meter .......................6
SCANNING . . . . . . . . . . . . . . . . . . . . . . . . . . . . . . . . 6
Scan Groups . . . . . . . . . . . . . . . . . . . . . . . . . . . . . . 6
Selecting a Scan Group ......................6
Programming Scan Channels ..................6
To Start Scanning ..........................7
Scanning in the Open Scan Mode . . . . . . . . . . . . . . 7
Ending the Scan ...........................7
Using the Group Scan Mode . . . . . . . . . . . . . . . . . . 7
Setting up the Group Scan ....................7
Scanning in the Group Scan Mode . . . . . . . . . . . . . 7
Ending the Scan . . . . . . . . . . . . . . . . . . . . . . . . . . . 8
Using the Group Scan as a Second Open Scan . . . . . 8
PROGRAMMING RECEIVE-ONLY CHANNELS . . 8
Activating the 'Programming' Mode . . . . . . . . . . . . 8
Programming the Receive-Only Channels ......... 9
Storing the Selected Frequency . . . . . . . . . . . . . . . . 9
Editing your Programmed Receive Channels . . . . . . 9
Disabling a Receive-Only Channel . . . . . . . . . . . . . . 9
Scanning . . . . . . . . . . . . . . . . . . . . . . . . . . . . . . . . 9
Receiving Selcalls on your Receive-Only Channels . 10
CTCSS . . . . . . . . . . . . . . . . . . . . . . . . . . . . . . . . . 10
SELECTIVE CALLING .......................10
What is Selcall ............................10
Selcall Identification Number (Ident) . . . . . . . . . . . 10
Selcall Ident Names ........................10
The QUIET Mode (Q) . . . . . . . . . . . . . . . . . . . . . . . 10
Selcall Memories ..........................10
Entering, Storing and Sending Selcalls . . . . . . . . . . 11
Call Acknowledge .........................11
Storing Selcall Idents .......................11
Recalling Selcall Idents from the Memory ........ 11
Recalling Fast Dial Memories .....................12
Naming your Selcall Idents . ..................12
Displaying ALPHA Names . . . . . . . . . . . . . . . . . . . 12
Entering and Storing a Selcall Name . . . . . . . . . . . 12
Receiving Selcalls . . . . . . . . . . . . . . . . . . . . . . . . . 12
Displaying the caller’s Ident or Name ...........13
The Selcall Alert ...........................13
Cancelling the Selcall Alert ...................13
Call Acknowledge Signal . . . . . . . . . . . . . . . . . . . . 13
QUIET MODE .............................. 13
Setting up the QUIET mode . . . . . . . . . . . . . . . . . . 13
Tagging individual channels for QUIET operation . . 13
Removing the QUIET Tag from Individual Channels . 13
Activating the QUIET Mode . . . . . . . . . . . . . . . . . . 13
De-activating the QUIET Mode ................14
Receiving Signals in the QUIET Mode ...........14
Scanning in the QUIET Mode .................14
Receiving Signals while Scanning in the QUIET Mode . .
14
GROUP CALLING . . . . . . . . . . . . . . . . . . . . . . . . . . 14
Programming and Sending Group Calls . . . . . . . . . 15
Sending the Selcall Ident . . . . . . . . . . . . . . . . . . . . 15
Call Acknowledge in Group Mode .............15
Storing Group Call Idents ....................15
Receiving Group Calls . . . . . . . . . . . . . . . . . . . . . . 15
PAGER (TRANSPOND) MODE . . . . . . . . . . . . . . . 15
Overview . . . . . . . . . . . . . . . . . . . . . . . . . . . . . . . 15
Selecting the Paging Channel . . . . . . . . . . . . . . . . 15
Setting the Paging Ident . . . . . . . . . . . . . . . . . . . . 15
Monitoring a Single channel while in Page Mode . . 16
Scanning in the Page Mode ..................16
Using Open Scan ..........................16
Using Group Scan . . . . . . . . . . . . . . . . . . . . . . . . . 16
Using the QUIET Mode .....................16
Returning a Call in the PAGE Mode . . . . . . . . . . . . 17
Deactivating the Page Mode . . . . . . . . . . . . . . . . . 17
CTCSS ....................................17
Monitor Function ..........................17
Selecting the required CTCSS Tones ............17
Enabling the CTCSS function on a channel .......18
CTCSS Tone Frequency Chart .................18
HOW TO DISABLE FEATURES . . . . . . . . . . . . . . . 18
REPEATERS ................................18
INSTALLATION .............................19
Fitting the microphone .....................20

Rear microphone connection . . . . . . . . . . . . . . . . . 20
DC Power Connection . . . . . . . . . . . . . . . . . . . . . . 21
High Voltage Warning . . . . . . . . . . . . . . . . . . . . . . 21
THE FOLLOWING ITEMS ARE INCLUDED WITH YOUR TX4400
Antenna Connection .......................21
SPECIFICATIONS . . . . . . . . . . . . . . . . . . . . . . . . . . 22
Warranty . . . . . . . . . . . . . . . . . . . . . . . . . . . . . . . 24
• TX4400 Radio
• Mounting Cradle
• Instruction Manual
• MC509B Microphone
• Microphone Clip
• DC Lead
• Screw Pack
GENERAL
Your GME TX4400 radio is Australian designed and built
and is one of the most advanced UHF Citizen Band radios
available.
The TX4400 combines the very latest in electronic
hardware with the most up-to-date computer aided
design and manufacturing techniques to produce an
extremely versatile mobile radio with outstanding
specifications and performance.
The TX4400's DIN sized case allows it to be conveniently
installed into a dashboard or console and its strong diecast
aluminium chassis makes it the most robust radio of its
kind. With just three rotary controls and five touch keys,
the TX4400's extensive features are easy to operate.
FEATURES
• Microprocessor Controlled Frequency Synthesiser:
Allows user programmable control of scanning, Selcall,
CTCSS, channel memories and selected feature options.
• Permanent Memory: Retains all user settings in non-
volatile memory even when the power has been removed.
• Programmable Scan Function: Scans up to 40 user
programmable channels with both Group and Open scan
functions available.
• User Programmable Receive-Only Channels: Use
the TX4400's front panel controls to program up to 20
of your own receive-only channels in the 465-485 MHz
frequency range.
• In-Built CTCSS: User selectable Continuous Tone Coded
Squelch System provides quiet channel operation (can be
enabled or disabled on individual channels).
• In-Built Selcall: Selective Calling of individuals or
groups with four or five digit ANI and fully user-adjustable
5 tone transmitted Selcall Ident. Also allows alphanumeric
naming of up to 10 Idents for easier caller identification.
If any items are missing or
damaged, please contact your
retailer or place of purchase.
• Front Facing Speaker: Projects the sound forward for
greater clarity.
• Individually Programmable DUPLEX function: User
selectable for only those individual channels in your area
that have repeaters, leaving the others free for use as
extra simplex channels.
• Priority Channel: A user programmable priority channel
feature allows your working or local repeater channel to
be instantly recalled at the press of a button.
• Large High Contrast Liquid Crystal Display: Fully
detailed LCD with large characters provides a visual
indication of the selected channel and all selected
functions at a glance. LED backlit for viewing at night
with DIM function.
• Quiet Mode: Selectable on individual channels,
the Quiet mode prevents incoming signals from being
heard on selected channels unless preceded by your
Selcall code.
• Unique Page (Transpond) mode: Allows you to
transfer an incoming Selcall to another radio if your
radio is unattended.
• Feature Disabling Function: Allows Scanning, Squelch,
Duplex, Priority, Channel selection and CTCSS features
to be enabled or disabled to make the radio simpler to
operate.
• Overvoltage Protection: Special overvoltage detection
circuitry protects the radio and warns of excessive voltage
conditions by flashing the display.
• Microphone Connection: Optional rear connecting
microphone facility allows for flexible installation.
• 20 Additional Channels: Room for an additional 20
Dealer programmable 'receive-only' channels.
• Australian Made: The TX4400 has been totally
designed and manufactured in Gladesville NSW to meet
the demanding needs of the Australian community.
TX4400 INSTRUCTION MANUAL PAGE 3
PAGE 4 INSTRUCTION MANUAL TX4400
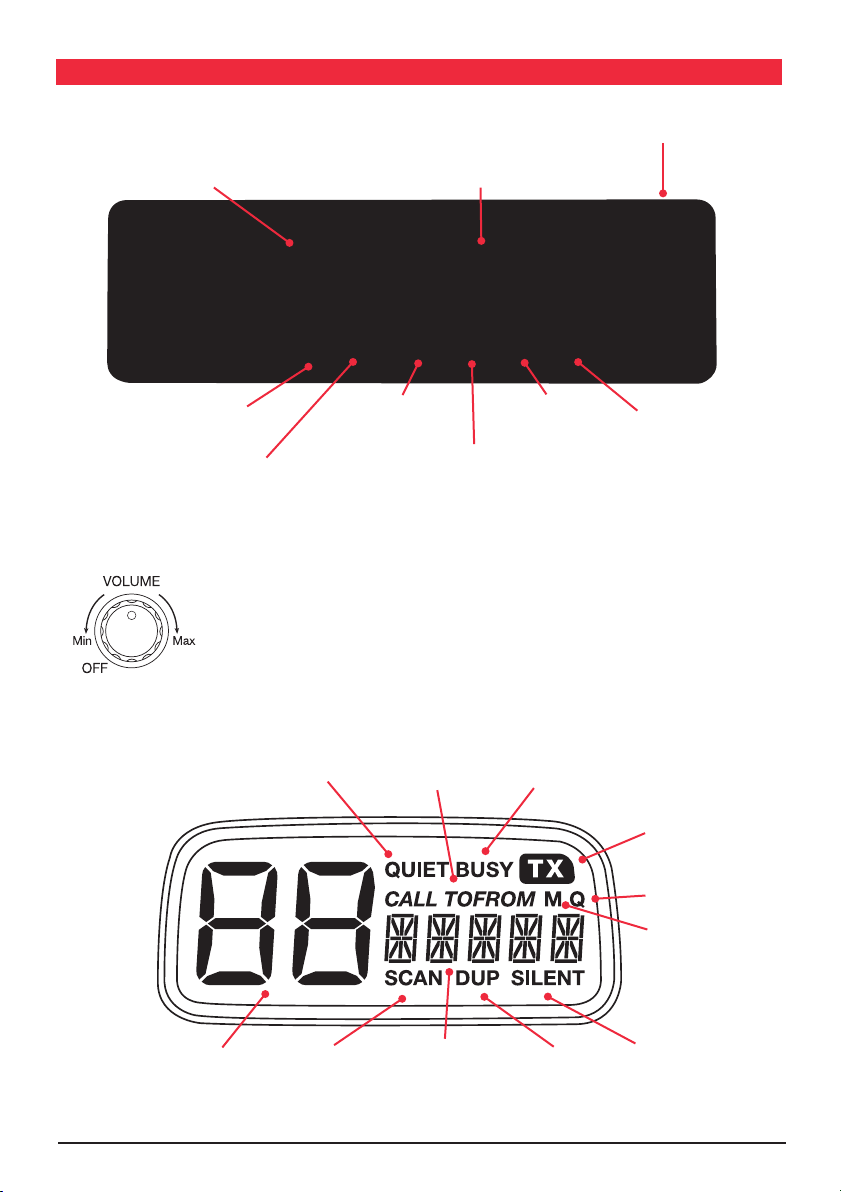
BASIC OPERATION
FRONT PANEL CONTROLS
Rotate for Channel Selection
Push for Priority Channel
Rotate for Squelch
Press for Monitor
Function
Press first to access
Functions
ADJUSTING THE VOLUME
Rotate the Volume control clockwise past the
‘click’ to turn the TX4400 ON. Adjust the volume
control for a comfortable listening level. If no
sound is heard, rotate the Squelch knob fully
counter-clockwise to temporarily un-mute the radio.
You can now adjust the volume by listening to
SCAN Selector.
Function: DIM
Display
Duplex Mode.
Function: ALPHA
OPEN/GROUP Scan.
Function: PAGE
Rotate for Volume
QUIET Mode.
Function: SILENT
the receiver's background noise. When finished,
rotate the Squelch knob clockwise again to remute the radio
LCD INDICATORS
QUIET Mode
Selcall
Call Mode
Receive
Indicator
Transmit
Indicator
QUIET Tag
Channel
Memory
Indicator
Channel Display
Selcall memory Location
Scan
Indicator
Selcall Ident Display
ALPHA name Display
Duplex
Indicator
CTCSS
Indicator

SQUELCH
MON
The Squelch is used to eliminate any annoying background
noise when there are no signals present. The TX4400
features a continuously variable Squelch control system
allowing the user to set the Squelch for optimum
performance.
To adjust the Squelch, first rotate the Squelch control
fully counter-clockwise until the background noise is
heard and the ‘BUSY’ indicator is displayed on the LCD.
Now advance the Squelch control slowly clockwise until
the noise is just extinguished and the ‘BUSY’ indicator
disappears. At this point the receiver will remain quiet while
no signals are present, but an incoming signal will override
the Squelch and be heard in the speaker. As the Squelch
control is advanced further clockwise the Squelch action is
progressively increased and stronger incoming signals are
needed to overcome it.
Note: If an incoming signal is very weak and is close to the
minimum squelch level, it may become broken or ‘chopped’
by the squelch action. To prevent this, simply turn the
Squelch control fully counter-clockwise to open the squelch,
which will allow the signal to be heard clearly.
MONITORING FUNCTION (MON)
When using CTCSS, press the Squelch knob to temporarily
open the Squelch to allow you to listen for signals on the
channel. For a full description of the MON function refer to
the CTCSS section.
SELECTING CHANNELS
Select the required channel by rotating the channel selector
knob. Rotate the knob clockwise to select higher channels
and counter-clockwise to select lower channels. The selected
channel is displayed in large numbers on the LCD.
BACK LIGHTING
The Liquid Crystal Display and function keys are backlit for
easy viewing at night or in low light situations. The LED
back lighting is on at all times while the TX4400 is
turned on.
To DIM the backlighting, briefly press the F key, followed
by the DIM key. Repeat the sequence to restore the
backlighting to full brightness.
DUPLEX SWITCH
Duplex operation allows the TX4400 to transmit on a
different frequency to that which it receives. This allows
operation through any repeater stations in your area.
Repeaters automatically re-transmit your signal over a
wider area, providing greatly increased range.
The Duplex function operates only on channels 1 - 8.
When Duplex is selected on one of these channels, the
TX4400 receives on that channel but actually transmits
30 channels higher.
Channel
Selected
Receive
Channel
Transmit
Channel
The TX4400 allows you to select duplex operation on
individual channels. This is particularly useful in country
areas where there may only be one or two repeaters. The
unused repeater channels can then be used for normal
simplex or direct radio-to-radio communications.
To select Duplex on individual channels:
1. Select the required channel 1 - 8.
2. Briefly press the DUP key. ‘DUP’ will appear on the
display accompanied by a high beep.
To remove Duplex from a channel:
1. Select the required channel 1 - 8. ‘DUP’ will be visible on
the display.
2. Briefly press the DUP key. ‘DUP’ will disappear from the
display accompanied by a low beep.
1 2 3 4 5 6 7 8
1 2 3 4 5 6 7 8
31 32 33 34 35 36 37 38
TX4400 INSTRUCTION MANUAL PAGE 5
PAGE 6 INSTRUCTION MANUAL TX4400
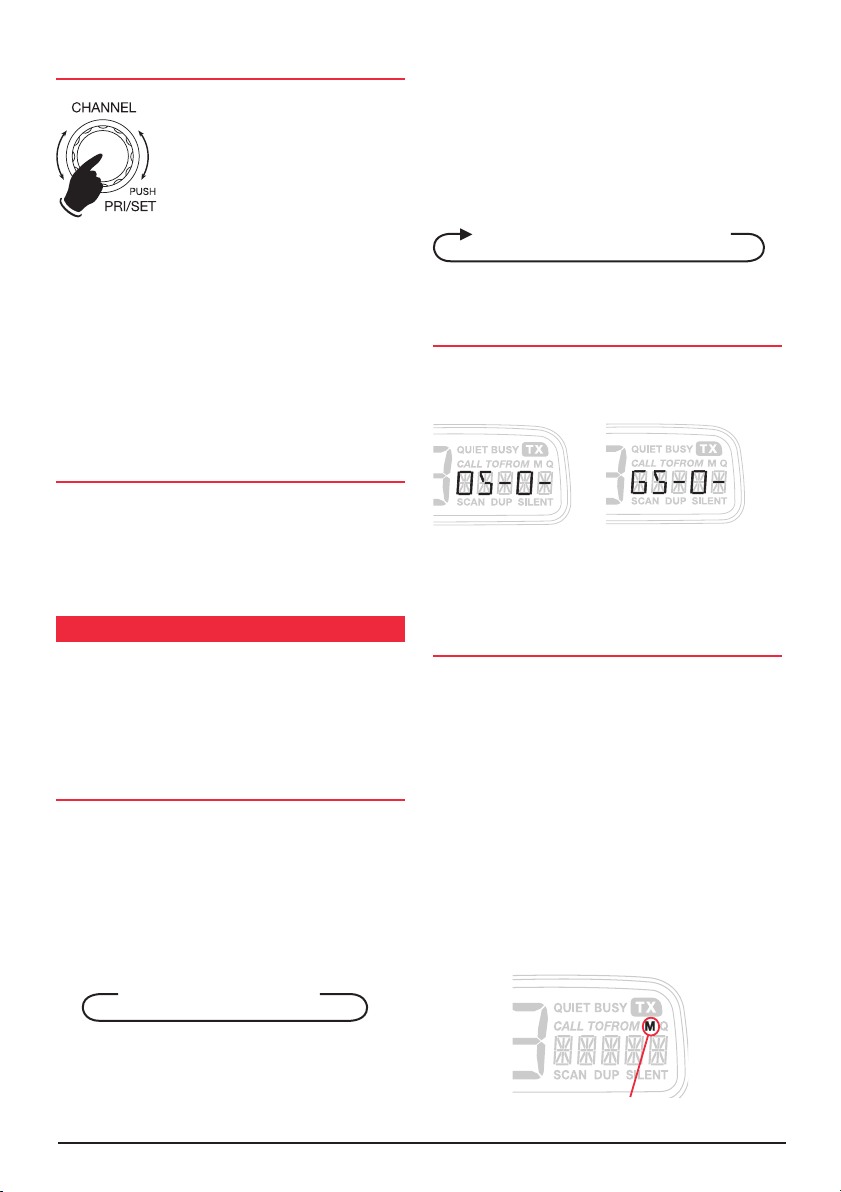
PRIORITY CHANNEL
The Priority Channel feature allows you
to store one of the 40 Channels in the
TX4400 as a priority Channel that can
be instantly recalled at the press of a
key. This can be used to provide instant
access to your working Channel or
your Local Repeater Channel.
To Store Priority Channel:
1. Select the required Channel.
2. Press and hold the Channel Knob. The Channel display
will flash for a moment then a high beep will be heard as
the selected Channel is stored.
To recall the Priority Channel:
Briefly press the Channel Knob. The TX4400 will
immediately switch to the Priority Channel accompanied by
a high beep.
SIGNAL STRENGTH METER
The TX4400 has a digital signal strength meter that is
displayed on the LCD. When in the normal receive mode
(scan not selected) the received signal strength is displayed
as numbers from 0 to 9 (with 9 being the strongest) on the
lower right of the display.
SCANNING
The TX4400 is provided with a SCAN function to allow
groups of user programmable Channels to be scanned for
signals. Channels can be scanned at up to 10 Channels
per second. When a signal is found, scanning will pause on
that Channel to allow the signal to be heard, then resume
scanning when the Channel is clear again.
SCAN GROUPS
The TX4400 features two scan groups -
Open Scan and Group Scan. Open Scan allows any of the
fitted Channels to be scanned for activity in an ascending
sequence (i.e. from the lowest Channel to the highest). If
a busy Channel is found, scanning will pause to allow the
signal to be heard. Once the Channel has been clear for 5
seconds, scanning will resume automatically.
Group Scan also allows any of the fitted Channels to
be scanned for activity in an ascending sequence, but in
addition, it also inserts your Priority Channel into the scan
sequence. This means that your Priority Channel will be
monitored regularly while scanning to ensure that no calls
are missed. Any signals received on your Priority Channel
will have priority over any signals received on the
other Channels.
1- 2 - 3 - 4 - 20 - 5 - 6 - 7 - 8 - 20
Example: Scanning Channels 1 - 8 with Priority
Channel 20 in Group Scan
SELECTING A SCAN GROUP
The current scan group is shown on the display as OS for
Open Scan or GS for Group Scan.
Open scan mode Group Scan Mode
To change the selected scan group, briefly press the OS/GS
key. A beep will be heard and the display will change to
reflect the scan group you have selected.
PROGRAMMING SCAN CHANNELS
Your TX4400 is supplied with all 40 UHF CB Channels
programmed into the Open Scan memory. Any Channels
not required can be removed as necessary. The Group
Scan memory is empty by default and you will need to add
Channels to it before use.
To add or remove Channels from either scan memory:
1. Check that the radio is not already scanning. If it is,
briefly press the SCAN key to cancel the scan function.
2. Select the required scan group by pressing the
OS/GS key.
3. Select the required Channel by rotating the
Channel selector.
1- 2 - 3 - 4 - 5 - 6 - 7 - 8
Example: Scanning Channels 1 - 8 in Open Scan
Channel is in Memory

• I f ‘M’ is visible to right of the display, the selected
Channel is presently in the scan memory. It can be
removed by holding the SCAN key in for a few seconds
until a low beep is heard. ‘M’ will then disappear
indicating the Channel is no longer in memory.
• If ‘M’ is not visible to right of the display, then the
selected Channel is not in the memory. To add it, hold
the SCAN key in for a few seconds until a high beep is
heard. ‘M’ will now appear to the right of the display.
4. Repeat step 3 to add or remove other Channels in the
scan memory.
TO START SCANNING
To scan in the selected scan mode, briefly press the SCAN
key. A high beep will be heard, ‘SCAN’ will appear in the
display and the radio will begin scanning.
Note: If there are less than 2 Channels programmed in the
scan memory in Open Scan or one Channel in Group Scan
when you press the SCAN key, a long low beep will be
heard and the command will be ignored.
SCANNING IN THE OPEN SCAN MODE
• If a busy Channel is found, scanning will pause on that
Channel to allow the signal to be heard and will remain
there for as long as the Channel remains busy. Once
the Channel has been clear for 5 seconds, scanning will
resume automatically.
• If your radio pauses on a busy Channel and you don't
wish to listen to that conversation, briefly press the CALL
button on top of the microphone. The radio will skip
over that Channel and resume scanning from the next
Channel in the sequence.
• To transmit while paused on a busy Channel, simply
press the Push-To-Talk (PTT) button on the microphone.
The SCAN mode will be put on hold and the radio will
stay on that Channel. You can now converse on that
Channel in the usual way. When you have finished your
conversation, briefly press the CALL button to
resume scanning.
• If your radio is paused on a busy Channel and you wish
to remain there, briefly press the SCAN key. The radio
will exit the Scan mode and remain on the busy Channel.
• If your radio is scanning and you need to use your
Priority Channel (for an urgent call or an emergency),
briefly press the Channel knob. The Scan mode will be
cancelled and the radio will jump straight to the
Priority Channel.
Note: In the Open Scan mode your TX4400 will not allow
you to transmit while it is scanning. If the PTT button is
pressed while scanning, the radio will give a low beep and
will ignore the command. Your radio will only transmit while
it is paused on a busy Channel.
ENDING THE SCAN
To stop scanning, briefly press the SCAN key. A low beep
will be heard and ‘SCAN’ will disappear from the display. As
long as the radio was not on a busy Channel, it will return
to the last Channel you selected, otherwise it will stay on
the busy Channel.
USING THE GROUP SCAN MODE
Group Scan allows you to transmit and receive normally
on your priority (working) Channel, but between breaks in
the conversation, the TX4400 will scan and listen to several
other Channels. The receiver will continue to scan the other
Channels ONLY WHILE THERE ARE NO SIGNALS ON
THE PRIORITY Channel.
If a signal appears on the priority Channel it will override
any signals being received on any of the other Channels. In
addition, if you press the PTT switch on the microphone at
any time, the radio will transmit on the priority Channel in
the usual way.
SETTING UP THE GROUP SCAN
To setup your radio for Group Scan:
1. Select the Group Scan mode by pressing the OS/GS key
so that ‘GS’ is displayed.
2. Program your Priority Channel memory with your
preferred working Channel.
3. Program the required ‘other’ Channels into your Group
Scan memory.
SCANNING IN THE GROUP SCAN MODE
To scan in the Group Scan mode, briefly press the SCAN
key. A high beep will be heard, ‘SCAN’ will appear in the
display and the radio will begin scanning.
Note: If there are no Channels programmed in the Group
Scan memory when you press the SCAN key, a low beep
will be heard and the command will be ignored.
When scanning, the TX4400 scans all the Channels
programmed into the Group Scan memory, with the priority
Channel being scanned after every fourth Channel.
• If a signal is heard on a scanned Channel, scanning
will pause on that Channel and remain there for as
long as the Channel is busy, and for 5 seconds after the
Channel has cleared, as long as there are no signals on
the priority Channel. During this time the receiver will
continue to check the priority Channel for signals every
2 seconds, resulting in a series of small 'breaks' in the
TX4400 INSTRUCTION MANUAL PAGE 7

PAGE 8 INSTRUCTION MANUAL TX4400
reception of the 'paused' Channel. If no signals are heard
after 5 seconds, the radio will resume scanning.
• If a signal appears on the priority Channel at any time
(even when paused on a scan Channel) the receiver will
switch straight to the priority Channel and will stay there
for as long as the Channel is busy. During this time you
can transmit on the priority Channel in the usual way.
Once there has been no activity on the priority Channel
for 5 seconds, the radio will resume scanning the other
Channels.
• To talk on the priority (working) Channel AT ANY TIME,
simply press the PTT switch on the microphone. The radio
will switch straight to the priority Channel. When you
have finished your conversation and there has been no
further activity on the priority Channel for 5 seconds, the
radio will resume scanning the other Channels.
• If your radio pauses on a busy Channel and you don't
wish to listen to that conversation, briefly press the CALL
button on top of the microphone. The radio will skip
over that Channel and resume scanning from the next
Channel in the sequence.
• If your radio is paused on a busy Channel and you wish
to remain there, briefly press the SCAN key. The radio
will exit the Scan mode and remain on the busy Channel.
Note that the radio will no longer be monitoring the
Priority Channel (unless it is the busy Channel). To
resume scanning, press the SCAN key again.
• To go directly to the Priority Channel, briefly press the
Channel knob. The radio will exit the Scan function.
ENDING THE SCAN
To cancel the Group Scan mode, briefly press the SCAN
key. A low beep will be heard and ‘SCAN’ will disappear
from the display. If the radio was on a busy Channel it will
remain on that Channel, otherwise it will return to the
priority Channel.
USING THE GROUP SCAN AS A SECOND
OPEN SCAN
There may be applications where you have no need for
the priority Channel and would prefer to have two Open
Scan modes with separate Channel groups in each. This
would allow you to scan either Channel group without the
interruption caused by monitoring a priority Channel.
Your TX4400 can be Dealer programmed to convert the
Group Scan function into a second Open Scan mode. If
you would prefer this feature over the present Group Scan
option you should contact your GME Dealer to arrange for
this feature to be enabled.
When the second Open Scan mode is enabled, the original
Open Scan mode becomes Scan 1 while the new additional
Open Scan mode becomes Scan 2. To select the required
scan mode briefly press the OS/GS key. S1 is displayed for
Scan 1 and S2 for Scan 2.
The two Open Scan modes are identical in operation. To
program and operate each Open Scan mode refer to the
section earlier on Open Scan
Open Scan 1 Open Scan 2
Note: Enabling or disabling the second Open Scan mode is
not a user selectable option. Once enabled by your Dealer,
the additional Open Scan mode becomes a permanent part
of the TX4400’s features and replaces the standard Group
Scan function. If you find later that you need the Group
Scan function re-enabled, you will need to return your
TX4400 to your Dealer.
PROGRAMMING RECEIVE-ONLY CHANNELS
Your TX4400 has provision for an extra 20 Receive-Only
Channels, in addition to the standard 40 UHF CB Channels
provided. These extra Channels can be user programmed
into Channel positions 41 through 60, within the frequency
range of 465 to 485 MHz. Frequencies are selected in 25
kHz steps. Note that the standard CB Channels 1 through
40 are fixed and cannot be altered.
ACTIVATING THE 'PROGRAMMING' MODE
Your TX4400 is supplied from the factory with the ReceiveOnly Channels deactivated. You can activate and program
them yourself as follows:
1. Turn the radio OFF.
2. Press and hold the Channel selector while turning the
radio ON.
3. Release the Channel selector. The radio is now in
'Programming' Mode.
Rotate the Channel selector clockwise past Channel 40.
You will now find that you can select additional Channel
numbers 41 through 60. Initially, these Channels will have
no frequencies installed in them and are in effect, turned
OFF. Each individual Channel will need to be turned ON
and programmed with the receive frequency of your choice.
 Loading...