

GME TX3420 User Manual
TX3420
REMOTE MOUNT
UHF RADIO

cO NTE N Ts
INTRODUCTION . . . . . . . . . . . . . . . . . . . . . . . . . . 2
IMPORTANT INFORMATION
CONCERNING UHF CB RADIO . . . . . . . . . . . . . . . . 2
EMERGENCY CHANNELS. . . . . . . . . . . . . . . . . . . . 3
TELEMETRY CHANNELS . . . . . . . . . . . . . . . . . . . . . 3
FEATURES . . . . . . . . . . . . . . . . . . . . . . . . . . . . . . . 3
GENERAL OPERATION . . . . . . . . . . . . . . . . . . . . . . 4
Function Key . . . . . . . . . . . . . . . . . . . . . . . . . . . 4
Volume Key . . . . . . . . . . . . . . . . . . . . . . . . . . . 4
Keylock Feature . . . . . . . . . . . . . . . . . . . . . . . . 4
Selecting Channels . . . . . . . . . . . . . . . . . . . . . . 4
Transmitting . . . . . . . . . . . . . . . . . . . . . . . . . . . 4
Squelch Control . . . . . . . . . . . . . . . . . . . . . . . . 4
Squelch Sensitivity . . . . . . . . . . . . . . . . . . . . . . 5
Priority Channel . . . . . . . . . . . . . . . . . . . . . . . . 5
Duplex Operation . . . . . . . . . . . . . . . . . . . . . . . . . 5
CTCSS . . . . . . . . . . . . . . . . . . . . . . . . . . . . . . . . . . 6
SCANNING . . . . . . . . . . . . . . . . . . . . . . . . . . . . . . 6
TH E F O ll Ow ING IT EMs AR E I Nc lUD E D w IT H yOU R T X 34 20
• TX3420 Radio
• Mounting Cradle
• Instruction Manual
• Microphone
• Microphone Clip
• DC Lead
OPEN SCAN MODE . . . . . . . . . . . . . . . . . . . . . . . . 7
GROUP SCAN MODE . . . . . . . . . . . . . . . . . . . . . . . 7
SELECTIVE CALLING . . . . . . . . . . . . . . . . . . . . . . . 8
USING SELCALL . . . . . . . . . . . . . . . . . . . . . . . . . . 9
GROUP CALLING. . . . . . . . . . . . . . . . . . . . . . . . . 12
LISTENING CHANNELS . . . . . . . . . . . . . . . . . . . . 13
SEEK MODE . . . . . . . . . . . . . . . . . . . . . . . . . . . . 14
MENU SETTINGS . . . . . . . . . . . . . . . . . . . . . . . . . 16
INSTALLATION . . . . . . . . . . . . . . . . . . . . . . . . . . 18
CTCSS TONE FREQUENCY CHART . . . . . . . . . . . . 21
UHF CB OPERATING FREQUENCIES . . . . . . . . . . . 22
SPECIFICATIONS . . . . . . . . . . . . . . . . . . . . . . . . . 23
WARRANTY . . . . . . . . . . . . . . . . . . . . . . . . . . . . 24
GME After Sales service . . . . . . . . . . . . . . . . . 24
• Screw Pack
If any items are missing or
damaged, please contect your
retailer or place of purchase.
IN T RO D Uc T I ON
Your GME TX3420 radio is Australian designed and built
and is the most advanced UHF Citizen Band radio available.
The TX3420 combines the very latest in electronic hardware
with the most up-to-date computer aided design and
manufacturing techniques to produce an extremely compact
mobile radio with outstanding specifications
and performance.
The TX3420's small size means it can be mounted in almost
any convenient location and its strong diecast aluminium
chassis makes it the most robust transceiver of its kind.
With just two rotary controls and four touch keys, the
TX3420 is easy to operate.
IM P OR TA NT IN F OR M ATI O N
cO NcE RN I NG UH F c B R A D IO
The use of the citizen band radio service is licensed in
Australia by the ACMA Radiocommunications (Citizens
Band Radio Stations) Class License and in New Zealand by
PA GE 2 I N ST RU C TI ON M AN UA L T X 34 20
the Ministry of Economic Development New Zealand (MED).
A General User Radio License for Citizens band Radio, and
operation is subject to conditions contained in
those licenses.
As of the 1 January 2011 there have been some amendments to the class licence for users and equipment operating in the CB/PRS 477MHz band.
In simple terms the same amount of spectrum is available,
however, radio transceivers can now operate in a narrower
bandwidth and hence use less spectrum. These radios are
generally referred to as narrowband or 12.5 KHz radios. By
using 12.5 kHz channel spacing instead of 25 kHz, the 40
channels originally allocated can now be expanded thereby
doubling the channel capacity and relieving congestion in
the UHF CB/PRS band.
Current 40 channel wideband Radios will not become
obsolete and will continue to operate on the original 40
channels, however they will not be able to converse on the
newer channels 41 – 80*. The newer narrowband radios

will be able to converse with all older 40 channel wideband
radios on all channels 1 to 40 and the newer channels
allocated between 41 to 80*.
The mixing of narrowband and wideband radios in the
same spectrum can however cause some possible operating
issues of interference and varying levels of received volume.
POSSIBLE ISSUES
When a new narrowband radio receives a transmission
from an older wideband radio the speech may sound loud
and distorted - simply adjust your radio volume for best
performance.
When an older wideband radio receives a signal from a new
narrowband radio, the speech may sound quiet - simply
adjust your radio volume for best performance.
Depending on how close your receiving radio is to another
transmitting radio, there can be interference from the
transmitting radio if it is using a channel adjacent to the
channel you are listening to. Simply try going up or down a
few channels from the currently selected channel.
The above situations are not a fault of the radio but a
symptom of operating wideband and narrowband radios
in the same bandwidth. This possible interference will
decrease over time as the population of wideband radios
ages and decreases.
Further information and updates are available from the
Australian Communications and Media Authority (ACMA) at
www.acma.gov.au and the Ministry of Economic Development (MED), Radio Spectrum Management at http://www.
rsm.govt.nz
EM E RGE N c y cHA N NE l s
The ACMA has allocated channels 5/35 for emergency use
only. Channel 5 is the primary Simplex Emergency Channel.
Where a Channel 5 repeater is available, you should select
Duplex on CH 5.
Note: Channel 35 is the input channel for the Channel 5
repeater therefore Channel 35 should also not be used for
anything other than emergency transmissions.
TE lEM E TRy c H AN N El s
ACMA regulations have allocated channels 22 and 23
for telemetry only applications and have prohibited the
transmission of speech on these channels. Consequently the
TX3420 has a transmit inhibit applied to channels 22 and 23.
In the event additional telemetry/telecommunication
channels are approved by the ACMA, these channels shall
be added to those currently listed where voice transmission
is inhibited.
FE AT UR E s
Microprocessor Controlled Frequency Synthesiser:
•
Allows user programmable control of scanning, channel
memories and selected feature options.
Permanent Memory: Retains all user settings in non-
•
volatile memory even when the power has
been removed.
Programmable Scan Function: Scans the programmable
•
UHF CB or Receive-only channels with both Group and
Open scan functions available.
Remote or Local Installation Option: The TX3420 can
•
be mounted either remotely using the separate control
head, or locally with the control head attached to the
main unit.
Individually Programmable DUPLEX function: User
•
selectable for only those individual channels in your area
that have repeaters, leaving the others free for use as
extra simplex channels.
Priority Channel: A user programmable priority channel
•
feature allows your working or local repeater channel to
be instantly recalled at the press of a button.
High Contrast Liquid Crystal Display: Fully detailed LCD
•
provides a visual indication of the selected channel and
all selected functions at a glance. Backlit for viewing
at night.
In-Built Selcall: Selective Calling with five digit ANI
•
and fully user-adjustable 5 tone transmitted Selcall
Ident. Also allows naming of Idents for easier caller
identification.
Quiet Mode: Selectable on individual channels, Quiet
•
mode prevents incoming signals from being heard on
selected channels unless preceded by your Selcall code.
CTCSS: A built-in Continuous Tone Coded Squelch
•
System option provides quiet channel operation.
Overvoltage Protection: Special overvoltage detection
•
circuitry protects the radio and warns of excessive
voltage conditions by flashing the display.
Surface Mount Technology: The very latest surface
•
mount component types, design and assembly
techniques and quality control procedures are used
to ensure the highest performance and reliability.
Designed and Manufactured in Australia: The TX3420
•
has been totally designed and manufactured in
Gladesville N.S.W. to meet the demanding needs of
the Australian community.
T X 34 20 IN ST RU CT IO N MA NUA L P AG E 3
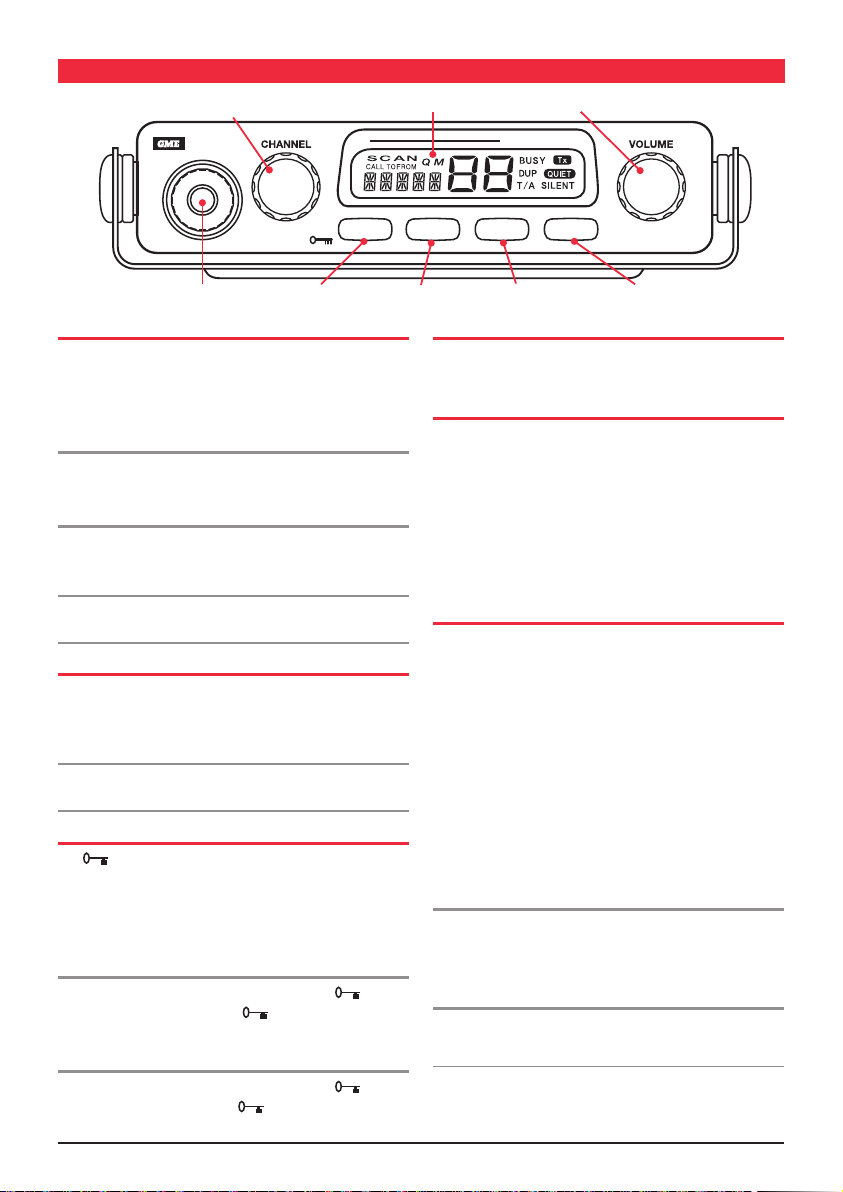
Channel Selector/PRI Key
GE N ERA l O PER AT IO N
iquid Crystal Display Volume Control
L
T X 3 4 2 0
PUSH
MENU
PRI
M
icrophone Port
M
enu Key/F KeyScan Key/OS/GS Quiet Key/Duplex KeySquelch KeyAlpha Key
FUNCTION KEY
The four keys beneath the TX3420’s display have both
primary and secondary functions. Their primary functions
are printed in Black while their secondary functions are
printed in Red.
To access the primary functions
Simply press the required key. e.g. To control the Squelch,
briefly press the SQL key.
To access the secondary functions
Press the F key followed immediately by the required key.
e.g. To lock the radio, briefly press the F key (‘F’ is displayed),
then press the Channel knob. The radio will lock.
Note: If the secondary key is not pressed within 10 seconds
the F key selection will be cancelled.
VOLUME KEY
Rotate the Volume control clockwise past the ‘click’ to turn
the TX3420 ON. Continue to advance the control clockwise
to increase the volume. Rotate the control counter clockwise
to turn the radio OFF.
Note: At minimum volume setting there is still sufficient
volume to be heard in a quiet cabin environment.
KEYLOCK FEATURE
The key locks the keys on the unit to prevent
unintentional key presses from altering your TX3420
settings. While the keys are locked, only the Push-To-Talk
(PTT), on/off Volume control and the Keylock key will
continue to function.
To lock the keys
Briefly press the F key, then press and hold the key
until a high beep is heard. The ‘ ’ symbol will appear
on the display.
To unlock the keys
Briefly press the F key, then press and hold the key
until a low beep is heard. The ‘ ’ symbol will disappear
from the display.
PA GE 4 I N ST RU C TI ON M AN UA L T X 34 20
SCAN
OS/GS
F
QUIET
DUP
SQL
ALPHA
SELECTING CHANNELS
Rotate the Channel knob to step upwards or step
downwards one or more channels.
TRANSMITTING
Prior to transmitting, always check the channel is not being
used. This can be done by either listening or by checking the
‘Busy’ indicator is not lit.
To transmit, press the PTT (Push-to-Talk) button on the
microphone. Hold the microphone about 5-8 cm from your
face and speak at a normal voice level. The microphone is
quite sensitive so it is not necessary to raise your voice or
shout. Release the PTT when you have finished talking.
SQUELCH CONTROL
Squelch control is used to eliminate the background noise
when there are no signals present. The TX3420 features
a preset Squelch system. The Squelch sensitivity has been
factory set to provide optimum performance in most
environments, however the sensitivity can be altered by the
user if required, to suit varying environmental situations.
The Squelch can be opened or closed with the SQL key.
When the Squelch is open, the receiver’s background noise
can be heard and ‘BUSY’ is displayed. When the Squelch is
closed, the receiver remains quiet when there are no signals
present but an incoming signal will override the squelch and
be heard in the speaker.
To open the Squelch
Briefly press the SQL key. A low beep will be heard. If
there are no signals present you will hear the receiver’s
background noise.
To close the Squelch
Briefly press the SQL key again. A high beep will be heard
and the receiver will become quiet.
Note: If an incoming signal is very weak and is close to the
minimum squelch level, it may become broken or ‘chopped’
by the squelch action. To prevent this, simply open the Squelch
to allow the signal to be heard clearly. Alternatively you can
reduce the Squelch sensitivity as described as follows.
SQUELCH SENSITIVITY
The sensitivity of the Squelch to incoming signals can
be set to suit your operating environment. For example,
excessively noisy environments may cause the squelch
to open on local noise. The TX3420 has nine (9) preset
Squelch sensitivity settings that can be selected using the
MENU function.
2. Briefly press the F key followed by the DUP key. ‘DUP’
will appear on the display accompanied by a high beep.
To remove Duplex from a channel
1. Select the required channel 1-8 or 41-48. ‘DUP’ will be
visible on the display.
2. Briefly press the F key followed by the DUP key.
‘DUP’ will disappear from the display accompanied
by a low beep.
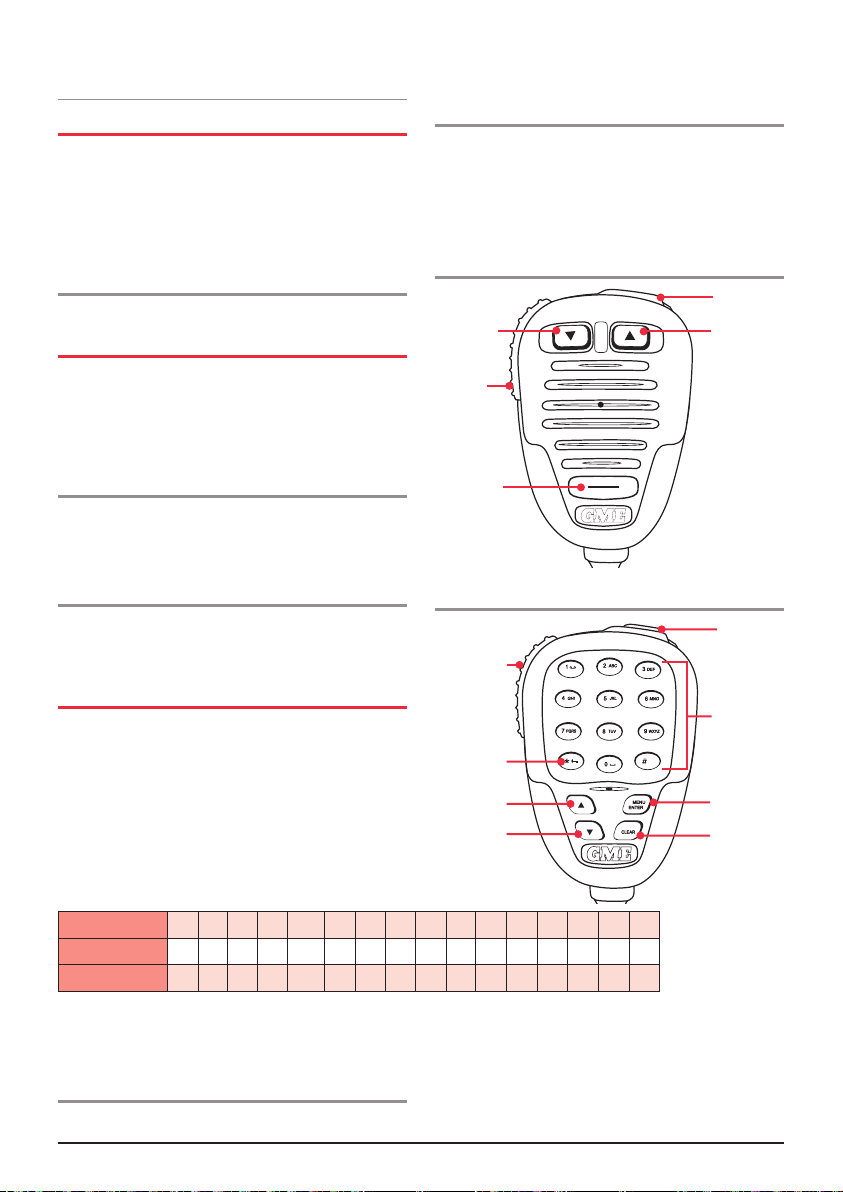
Standard Microphone MC503B
To adjust the pre-set Squelch sensitivity
Please refer to the MENU SETTINGS on page 16.
PRIORITY CHANNEL
The Priority Channel feature allows you to store one of
the channels as a Priority Channel that can be instantly
recalled at the press of a key. This can be used to provide
instant access to your working channel or your local
repeater channel.
To store a Priority Channel
1. Select the required channel.
2. Press and hold the PRI key until a high beep is heard.
The selected channel will be stored.
To Recall a Priority Channel
Briefly press the PRI key. The radio will switch straight to
the selected Priority Channel. Any active functions (such
as scanning or Quiet) will be cancelled.
Channel
Down
Push To
Talk PPT
Priority
Optional Microphone MC540B
Push to Talk
DUPLEX OPERATION
Duplex operation allows the radio to transmit on a different
frequency to which it receives. This allows operation
through local repeater stations. These repeater stations
automatically re-transmit your signal over a wider area,
providing greatly increased range.
Duplex operation is only available on channels 1-8 and
41-48. When duplex is selected on these channels, the
radio receives on that channel but actually transmits 30
channels higher, e.g.
Channel Selected 1 2 3 4 5* 6 7 8 41 42 43 44 45 46 47 48
Receive Channel 1 2 3 4 5* 6 7 8 41 42 43 44 45 46 47 48
Transmit Channel 31 32 33 34 35* 36 37 38 71 72 73 74 75 76 77 78
* Emergency Channel only
The TX3420 allows you to pre-select Duplex operation
individually on each channel.
Keylock Key
Up Key
Down Key
To select Duplex on individual channels
1. Select the required channel 1-8 or 41-48.
Skip / Call
Channel
Up
Skip / Call
Direct
Channel
Entry
Keypad
Menu/
Enter Key
Clear Key
T X 34 20 IN ST RU CT IO N MA NUA L P AG E 5

cTc ss
CTCSS (Continuous Tone Coded Squelch System) is a
squelch quieting system that allows several groups of users
to share the same channel without disturbing each other.
It uses a preset sub-audible (very low frequency) tone to
open and close the squelch on your radio. There are up to
50 tones available in two optional tone sets. The system
applies a continuous low-level tone to your transmission
and uses a matching tone decoder to control your receiver’s
squelch. With CTCSS enabled, the channel remains quiet
to all incoming signals unless they carry the correct tone.
When a transmission with the correct tone is received, the
squelch opens and remains open for as long as the signal is
present. When the transmission ends, the channel becomes
quiet again. Transmissions that do not use the correct tone
will not be heard.
The TX3420 allows CTCSS to be enabled or disabled on
individual channels.
Note: The CTCSS tone you select will be used for all CTCSS
enabled channels in your radio.
MONITORING THE CHANNEL
It is useful to be able to temporarily open your radio’s
Squelch to allow you to listen for signals from other CTCSS
users outside your group. Because their CTCSS tone is
different to yours, your Squelch would normally remain
closed, preventing you from hearing them. You can use
the SQL key to open the squelch and listen to the channel
to check that it is clear before transmitting. This will help
prevent you from accidentally transmitting over the top
of another transmission.
1. Rotate the Channel knob to select the required channel.
2. Press and hold the SQL key. A high beep will be heard
and ‘SILENT’ will appear on the display.
You may activate CTCSS on as many channels as you wish
except channel 5 which is designated for emergency use.
DISABLING CTCSS ON A CHANNEL
Repeat steps 1 and 2 above. A low beep will be heard and
‘SILENT’ will disappear from the display.
Note: You will not be able to activate CTCSS if the CTCSS
tone is set to ‘oF’.
Please see the CTCSS Tone Frequency Chart on page 21
sc A NNI N G
The TX3420 has a SCAN function that allows groups of user
programmable channels to be scanned for signals. Channels
can be scanned at 20 channels per second. When a signal
is found, scanning will pause on that channel to allow the
signal to be heard, then resume scanning when the channel
is clear again.
SCAN GROUPS
The TX3420 features two scan groups - Open Scan and
Group Scan.
Open Scan
Allows any of the installed channels to be scanned for
activity. If a busy channel is found, scanning will pause to
allow the signal to be heard. Once the channel has been
clear for 5 seconds, scanning will resume automatically.
To monitor the channel
Press the SQL key. If there are no signals present, you will
hear the usual hiss of an empty channel. Press the SQL key
again to restore the Squelch to its previous setting.
SELECTING THE TONE SET
There are two standard tones sets available, one comprising
50 tones and the other comprising 38 tones. Both tone sets
are included in the TX3420 to provide compatibility with
other GME radio systems.
SELECTING THE REQUIRED CTCSS TONE
To pre-select the CTCSS tone on your radio, please refer to
the MENU SETTINGS on page 16.
e.g. Scanning channels 1-8 in Open Scan
Group Scan
Also allows any of the installed channels to be scanned
for activity, but in addition, it also inserts your Priority
Channel into the scan sequence. This means that your
Priority Channel will be monitored regularly while scanning
to ensure that no calls are missed. Any signals received on
your Priority Channel will take precedence over any signals
received on the other channels.
21 3 4 5 6 7 8
ENABLING CTCSS ON A CHANNEL
If a CTCSS tone has been selected, it can be enabled on
individual channels.
PA GE 6 I N ST RU C TI ON M AN UA L T X 34 20
e.g. Scanning channels 1-8 with Priority Channel 20
in Group Scan
21 3 4 20 5 6 7 8 20

SELECTING A SCAN GROUP
To pre-select a scan group
The radio is initially set to Open Scan mode. To change to
Group Scan mode, press the F key then the OS/GS key to
select Group Scan.
PROGRAMMING SCAN CHANNELS
Your TX3420 is supplied with all 80 UHF CB channels
programmed into the Open Scan memory. Any channels
not needed, can be removed if required. The Group Scan
memory is empty by default and you will need to add
channels to it before use.
To add or remove channels from either
scan memory:
1. Ensure that the radio is not already scanning. If it is,
briefly press the SCAN key to cancel the scan function.
2. Ensure you have the required scan group pre-selected.
3. Select the required channel by rotating the
channel knob.
• If ‘M’ is visible to the right of the channel number,
the selected channel is already in the scan memory.
To remove the selected channel, press and hold the
SCAN key for a few seconds until a beep is heard.
‘M’ will then disappear indicating the channel is no
longer in memory.
• If ‘M’ is not visible, then the selected channel is not
in the memory. To add the selected channel, press
and hold the SCAN key for a few seconds until
a high beep is heard. ‘M’ will now appear.
4. Repeat step 3 to add or remove other channels in the
scan memory.
To start scanning
To begin scanning, briefly press the SCAN key. A high
beep will be heard, ‘SCAN’ will appear in the display and
the radio will begin scanning. In addition the selected scan
group will be displayed below the channel number.
Note: If there is only one channel programmed into the
Open Scan memory or none in the Group Scan memory,
a long low beep will be heard when you press the SCAN
key and the command will be ignored.
To stop scanning
To cancel the scan, briefly press the SCAN key. A low beep
will be heard and ‘SCAN’ will disappear from the display.
OP E N s c AN MO D E
USING SCAN IN THE OPEN SCAN MODE
• If a busy channel is found, scanning will pause on that
channel to allow the signal to be heard and will remain
there for as long as the channel remains busy. Once
the channel has been clear for 5 seconds, scanning
will resume automatically.
• If your radio pauses on a busy channel and you don’t
wish to listen to that conversation, briefly press the SKIP
button on the microphone. The radio will skip over that
channel and resume scanning from the next channel in
the sequence.
• If your radio is paused on a busy channel and you wish to
remain there, briefly press the SCAN key. The radio will
exit Scan mode and remain on the busy channel.
• To transmit while paused on a busy channel, simply
press the PTT button. The radio will exit Scan mode and
remain on the busy channel. You can now converse on
that channel in the usual way. When you have finished
your conversation, briefly press the SCAN key to
resume scanning.
• If your radio is scanning and you need to use your
Priority Channel (for an urgent call or an emergency),
briefly press the PRI key. The Scan mode will be
cancelled and the radio will jump straight to the
Priority Channel.
Note: In Open Scan mode your TX3420 will not allow you
to transmit while it is scanning. If the PTT button is pressed
while scanning, the radio will give a low beep and will
ignore the command. Your radio will only transmit while
it is paused on a busy channel.
GR O UP sc A N M O DE
Group Scan allows you to transmit and receive normally on
your Priority (working) Channel, while continuing to scan
several other channels. The receiver will scan the other
channels ONLY WHILE THERE ARE NO SIGNALS ON
THE PRIORITY CHANNEL.
If a signal appears on the Priority Channel it will override
any signals being received on any of the other channels.
In addition, if you press the PTT button at any time, the
radio will transmit on the Priority Channel in the usual way.
SETTING UP THE GROUP SCAN
Referring to the appropriate sections of this manual:
1. Pre-select the Group Scan mode.
2 . Store your preferred working channel into the Priority
Channel memory (see Priority Channel on page 4).
T X 34 20 IN ST RU CT IO N MA NUA L P AG E 7

3. Program the required ‘other’ channels into your Group
Scan memory (see Programming Scan Channels on
page 6).
SCANNING IN THE GROUP SCAN MODE
To scan in the Group Scan mode, briefly press the SCAN
key. A high beep will be heard, ‘SCAN’ will appear in the
display and the radio will begin scanning.
Note: If there are no channels programmed in the Group
Scan memory when you press the SCAN key (or there
is only one channel programmed and it is the same as
the Priority Channel), a low beep will be heard and the
command will be ignored.
When scanning, the TX3420 scans all the channels
programmed into the Group Scan memory, with the Priority
Channel being scanned after every fourth channel (retailer
programmable option, if you require different timing for
your priority channel, please contact your retailer).
• If a signal appears on the Priority Channel - at any
time - the receiver will switch straight to the Priority
Channel and will stay there for as long as the channel
is busy. During this time you can transmit on the Priority
Channel in the usual way. Once there has been no
activity for 5 seconds, the radio will resume scanning
the other channels.
• If a signal appears on one of the other channels,
scanning will pause on that channel and will remain
there while the channel is busy, as long as there are
no signals on the Priority Channel. During this time the
receiver will continue to check the Priority Channel for
signals every 2 seconds, resulting in a series of small
‘breaks’ in the reception of the paused channel. Once
there has been no activity on any channel for 5 seconds,
the radio will resume scanning.
• I f your radio pauses on a busy channel and you don’t
wish to listen to that conversation, briefly press the
SKIP key on the microphone. The radio will skip over
that channel and resume scanning from the next
channel in the sequence.
• If your radio is paused on a busy channel and you wish to
remain there, briefly press the SCAN key. The radio will
exit Scan mode and remain on the busy channel.
Note: The radio will no longer be monitoring
the Priority Channel (unless it is the same as the
busy channel). To resume scanning, press the SCAN
key again.
• To transmit on the Priority (working) Channel AT ANY
TIME, simply press the PTT key while the radio is
scanning. The radio will switch straight to the Priority
PA GE 8 I N ST RU C TI ON M AN UA L T X 34 20
Channel. When you have finished your conversation
and there has been no further activity on the Priority
Channel for 5 seconds, the radio will resume scanning
the other channels.
• To go directly to the Priority Channel, briefly press the
PRI key. The radio will exit Scan mode.
USING TWO GROUP SCAN
OR TWO OPEN SCAN MODES
If you prefer, the TX3420 can be re-programmed to have
two Group Scan modes or two Open Scan modes instead
of one of each.
For example there may be applications where you have
no need to scan the Priority Channel and would prefer to
have two separate Open Scan modes. Alternatively you may
have applications where you prefer to have two Group Scan
modes with different Scan groups in each.
Your TX3420 can be retailer programmed to convert the
Group Scan mode into a second Open Scan mode and vice
versa. If you would prefer to have two Group Scan or two
Open Scan modes, you should contact your GME retailer
to arrange for this feature to be enabled (when using two
Group Scan modes the Priority Channel will be the same
channel for both scan groups).
When the second Open or Group Scan mode is enabled,
the resulting two Scan modes become Scan 1 and Scan 2.
To select the required scan mode
When enabled, the two scan modes will be identical in
operation. To program and operate each, refer to the Open
Scan/Group Scan sections above.
Note: Enabling or disabling the second Open or Group
Scan mode is not a user selectable option. Once enabled
by your GME retailer, the changed Scan mode becomes
a permanent part of the TX3420’s features and replaces
the standard Scan selection. If you find later that you need
the original Group or Open Scan function re-enabled,
you will need to return your TX3420 to your retailer for
re-programming.
sE lEc T I VE c A ll IN G
Your TX3420 has a Selective Calling system known
as Selcall that operates like a telephone. Your radio is
preprogrammed with its unique Selcall Identification
Number. If this number is called by another radio, your
TX3420 will beep to alert you. If you do not want to hear
any other activity while waiting on a channel, you can select
QUIET mode. This will force the radio to remain quiet to all
incoming signals until your Selcall number is called.
 Loading...