

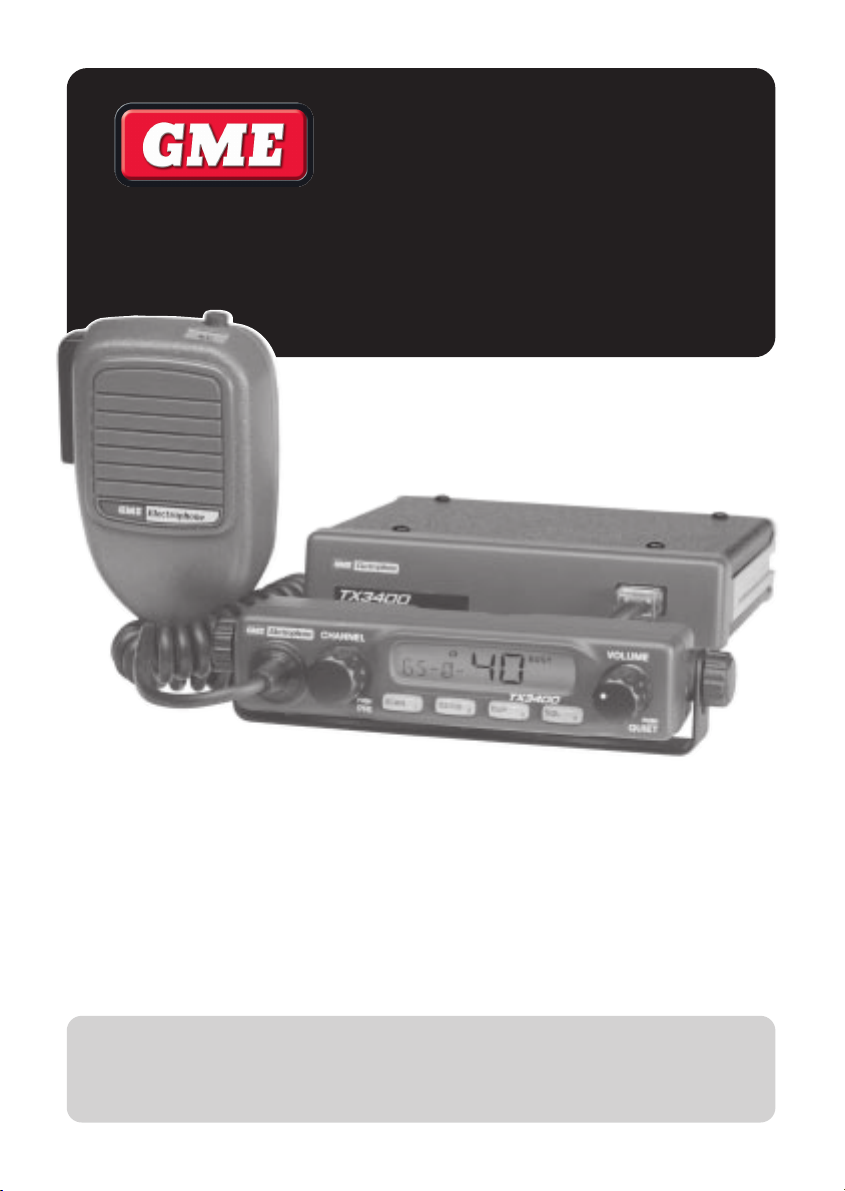
GME TX3400 User Manual
INSTRUCTION MANUAL
TX3400
UHF TRANSCEIVER

2
CONTENTS
Contents . . . . . . . . . . . . . . . . . . . . . . . . . . . . . . . . . . . 2
Introduction
. . . . . . . . . . . . . . . . . . . . . . . . . . . . . . . . 2
Features . . . . . . . . . . . . . . . . . . . . . . . . . . . . . . . . . . . . 2
Operation
. . . . . . . . . . . . . . . . . . . . . . . . . . . . . . . . . . 3
Scanning . . . . . . . . . . . . . . . . . . . . . . . . . . . . . . . . . . . 5
Selective Calling
. . . . . . . . . . . . . . . . . . . . . . . . . . . 8
Using the Quiet Mode
. . . . . . . . . . . . . . . . . . . . . 12
Group Calls. . . . . . . . . . . . . . . . . . . . . . . . . . . . . . . . .13
Page Mode
. . . . . . . . . . . . . . . . . . . . . . . . . . . . . . . . . 14
CTCSS
. . . . . . . . . . . . . . . . . . . . . . . . . . . . . . . . . . . . . . 16
CTCSS Tone Frequency Chart
. . . . . . . . . . . . 17
Disabling Functions . . . . . . . . . . . . . . . . . . . . . . . 18
Installation
. . . . . . . . . . . . . . . . . . . . . . . . . . . . . . . . . 18
Repeaters . . . . . . . . . . . . . . . . . . . . . . . . . . . . . . . . . . 21
Channel Frequency Chart
. . . . . . . . . . . . . . . . . 22
Specifications
. . . . . . . . . . . . . . . . . . . . . . . . . . . . . .23
Warranty. . . . . . . . . . . . . . . . . . . . . . . . . . . . . . . . . . . . 24
Your GME Electrophone TX3400 transceiver is
Australian designed and built and is the most
advanced UHF Citizen Band radio available.
The TX3400 combines the very latest in
electronic hardware with the most up-to-date
computer aided design and manufacturing
techniques to produce an extremely compact
mobile radio with outstanding specifications
and performance.
The TX3400's small size means it can be
mounted in almost any convenient location and
its strong diecast aluminium chassis makes it
the most robust transceiver of its kind. With
just two rotary controls and four touch keys,
the TX3400 is easy to operate.
FEATURES
• Microprocessor Controlled Frequency
Synthesiser: Allows user programmable
control of scanning, channel memories and
selected feature options.
• Permanent Memory: Retains all user
settings in non-volatile memory even when
the power has been removed.
• Programmable Scan Function: Scans up
to 40 user programmable channels with
both Group and Open scan functions
available.
• Remote or Local Installation Option: The
TX3400 can be mounted either remotely
using the separate control head, or locally
with the control head attached to the main
unit.
INTRODUCTION
The following items are included with your TX3400
If any items are missing or damaged, please contact your dealer or place of purchase.
• TX3400 Transceiver with Remote Head Unit
• Microphone
• Microphone Clip
• Instruction Manual
• Mounting Cradle for Main Unit
• Mounting Bracket for Remote Unit
• Screw Pack
• DC Lead

Microphone
Socket
•
Scan
•
Selcall
Mem 1.
•
Open Scan /
Group Scan
•
Selcall Mem 2.
•
Duplex
•
Selcall
Mem 3.
•
Squelch
•
Silent
•
Pager Mem.
•
Channel Selector
•
Priority Channel
Liquid Crystal
Display
•
Volume ON/OFF
•
Quiet Mode Selector
SQLOS/GS
P321
PUSH
QUIET
PUSH
PRI
CALL TOFROM
SCAN
QM
BUSY
DUP
T/A SILENT
QUIET
Tx
• Individually Programmable DUPLEX
function: User selectable for only those
individual channels in your area that have
repeaters, leaving the others free for use as
extra simplex channels.
• Priority Channel: A user programmable
priority channel feature allows your working
or local repeater channel to be instantly
recalled at the press of a button.
• High Contrast Liquid Crystal Display:
Fully detailed LCD provides a visual
indication of the selected channel and all
selected functions at a glance. Backlit for
viewing at night.
• In-Built Selcall: Selective Calling with four
or five digit ANI and fully user-adjustable 5
tone transmitted Selcall Ident. Also allows
naming of Idents for easier caller
identification.
• Quiet Mode: Selectable on individual
channels, the Quiet mode prevents
incoming signals from being heard on
selected channels unless preceded by your
Selcall code.
• Unique Page (Transpond) Mode: Allows
you to transfer an incoming Selcall to
another radio if your radio is unattended.
• CTCSS Ready: A built-in Continuous Tone
Coded Squelch System option provides
quiet channel operation (when approved by
the Australian Communications Authority).
• Feature Disabling Function: Allows
Scanning, Squelch, Duplex, Priority,
Channel selection and CTCSS (when active)
features to be enabled or disabled to make
the radio simpler to operate.
• Overvoltage Protection: Special
overvoltage detection circuitry protects the
radio and warns of excessive voltage
conditions by flashing the display.
• Surface Mount Technology: The very latest
surface mount component types, design
and assembly techniques and quality
control procedures are used to ensure the
highest performance and reliability.
• Designed and Manufactured in Australia:
The TX3400 has been totally designed and
manufactured in Gladesville NSW to meet
the demanding needs of the Australian
community.
3
OPERATION

VOLUME
Rotate the volume control clockwise past the
"click" to turn the TX3400 on. Adjust the
volume control for a comfortable listening level.
If no sound is heard, temporarily unmute the
radio by briefly pressing the SQL key. You can
now adjust the volume by listening to the
receiver's background noise. When finished,
briefly press the SQL key again to re-mute the
radio.
BACK LIGHTING
The Liquid Crystal Display and function keys
are backlit for easy viewing at night or in low
light situations. The back lighting is on at all
times while the TX3400 is turned on.
SELECTING CHANNELS
Select the required channel by rotating the
channel selector knob. Rotate the knob
clockwise to select higher channels and
counter-clockwise to select lower channels.
The selected channel is displayed on the LCD.
SQUELCH
The squelch is used to eliminate any annoying
background noise when there are no signals
present. The TX3400 features a preset squelch
system. The squelch level has been set to
provide optimum performance.
The Squelch can be Opened or Closed with the
SQL key. When the Squelch is Open, the
receiver's background noise can be heard and
'BUSY' is displayed. When the Squelch is
closed, the receiver remains quiet when there
are no signals present but any incoming signals
will override the Squelch and be heard in the
speaker.
To open the Squelch, briefly press the SQL key.
A low beep will be heard. If there are no signals
present you will hear the receiver's background
noise.
To close the Squelch, briefly press the SQL key
again. A high beep will be heard and the
receiver will become quiet.
NOTE: If an incoming signal is very weak and is
close to the minimum squelch level, it may
become broken or “chopped” by the squelch
action. To prevent this, simply open the squelch
to allow the signal to be heard clearly.
Alternatively, you can reduce the squelch
sensitivity as described below.
Setting the Squelch Sensitivity.
The sensitivity of the squelch to incoming
signals can be set to suit your operating
environment. The TX3400 has three preset
squelch sensitivity settings which can be
selected using a front panel key sequence.
• SQL1: Maximum Sensitivity.
The squelch will open even on very weak
signals. This is the best setting for quiet
country or rural locations where there are
very few weak stations or little locally
generated interference.
• SQL2: Medium Sensitivity.
The squelch will open on most signals, but
will not be as sensitive to very weak signals
or local interference. Suitable for general or
suburban use.
• SQL3: Minimum Sensitivity.
The squelch will open on reasonably strong
signals and weak signals will not be heard.
Suitable for inner city applications or areas
of severe interference.
To pre-select the squelch sensitivity.
1. Turn the TX3400 OFF at the Volume control.
2. Hold the DUP and SQL keys while turning
the unit back on again.
3. Rotate the Channel switch to select SQL1,
SQL2 or SQL3.
4. Turn the unit OFF again to store the setting.
DUPLEX SWITCH
Duplex operation allows the TX3400 to transmit
on a different frequency to that which it
receives. This allows operation through any
repeater stations in your area. Repeaters
4

automatically re-transmit your signal over a
wider area, providing greatly increased range.
The Duplex function operates only on channels
1 - 8. When Duplex is selected on one of these
channels, the TX3400 receives on that channel
but actually transmits 30 channels higher.
E.g.
The TX3400 allows you to select duplex
operation on individual channels. This is
particularly useful in country areas where there
may only be one or two repeaters. Then
unused repeater channels can be used for
normal simplex or direct radio-to-radio
communications.
To select Duplex on individual channels:
1. Select the required channel 1 - 8.
2. Briefly press the DUP key. ‘DUP’ will appear
on the display accompanied by a high beep.
To remove Duplex from a channel:
1. Select the required channel 1 - 8. ‘DUP’ will
be visible on the display.
2. Briefly press the DUP key. ‘DUP’ will
disappear from the display accompanied by
a low beep.
PRIORITY CHANNEL
The Priority channel feature allows you to store
one of the 40 channels in the TX3400 as a
priority channel that can be instantly recalled at
the press of a key. This can be used to provide
instant access to your working channel or your
local repeater channel.
To store a Priority channel:
1. Select the required channel.
2. Press and hold the Channel Knob. The
channel display will flash for a moment then
a high beep will be heard as the selected
channel is stored.
To recall a Priority channel:
Briefly press the Channel Knob. The TX3400
will immediately switch to the Priority channel
accompanied by a high beep.
The TX3400 features two scan groups - Open
Scan and Group Scan.
• Open Scan allows any of the fitted channels
to be scanned for activity in an ascending
sequence (i.e. from the lowest channel to
the highest). Channels are scanned at a rate
of 20 channels per second. If a busy
channel is found, scanning will pause to
allow the signal to be heard. Once the
channel has been clear for 5 seconds,
scanning will resume automatically.
• Group Scan also allows any of the fitted
channels to be scanned for activity in an
ascending sequence, but in addition, it also
inserts your Priority channel into the scan
sequence. This means that your Priority
channel will be monitored regularly while
scanning to ensure that no calls are missed.
Any signals received on your Priority
channel will have priority over any signals
received on the other channels.
Example showing Group Scan channels 1 to 8
with priority channel 20.
5
Channel Selected 1 2 3 4 5 6 7 8
Receive Channel 1 2 3 4 5 6 7 8
Transmit Channel 31 32 33 34 35 36 37 38
SCANNING
1 - 2 - 3 - 4 - . . . . . . . . . . - 39 - 40
1 - 2 - 3 - 4 - 20 - 5 - 6 - 7 - 8 - 20

Selecting a Scan Group.
The current scan group is shown on the display
as OS for Open Scan or GS for Group Scan.
To change the selected scan group:
• Briefly press the OS/GS key.
A beep will be heard and the display will
change to reflect the scan group you have
selected.
Programming Scan Channels.
Your TX3400 is supplied with all 40 UHF CB
channels programmed into the Open Scan
memory. Any channels not required can be
removed as necessary. The Group Scan
memory is empty by default and you will need
to add channels to it before use.
To add or remove channels from either scan
memory:
1. Check that the radio is not already
scanning. If it is, briefly press the SCAN key
to cancel the scan function.
2. Select the required scan group by pressing
the OS/GS key.
3. Select the required channel using the rotary
channel selector switch.
• If ‘M’ is displayed to the upper left of the
channel number, the selected channel is
presently in the scan memory. It can be
removed by holding the SCAN key in for a
few seconds until a low beep is heard. ‘M’
will then disappear indicating the channel is
no longer in memory.
• If ‘M’ is not visible to the upper left of the
channel number, then the selected channel
is not in the memory. To add it, hold the
SCAN key in for a few seconds until a high
beep is heard. ‘M’ will now appear to the
upper left of the channel number.
4. Repeat step 3 to add or remove other
channels in the scan memory.
To Start Scanning:
To scan in the selected scan mode, briefly
press the SCAN key. A high beep will be heard,
‘SCAN’ will appear in the display and the radio
will begin scanning.
NOTE: If there are less than 2 channels
programmed in the scan memory in Open Scan
or one channel in Group Scan when you press
the SCAN key, a long low beep will be heard
and the command will be ignored.
Scanning in the Open Scan Mode.
• If a busy channel is found, scanning will
pause on that channel to allow the signal to
be heard and will remain there for as long as
the channel remains busy. Once the channel
has been clear for 5 seconds, scanning will
resume automatically.
• If your radio pauses on a busy channel and
you don't wish to listen to that conversation,
briefly press the CALL button on top of the
microphone. The radio will skip over that
channel and resume scanning from the next
channel in the sequence.
• To talk while paused on a busy channel,
simply press the Push-To-Talk (PTT) button
on the microphone. The SCAN mode will be
put on hold and the radio will stay on that
channel. You can now converse on that
channel in the usual way. When you have
finished your conversation, briefly press the
CALL button to resume scanning.
• If your radio is paused on a busy channel
and you wish to remain there, briefly press
the SCAN key. The radio will exit the Scan
mode and remain on the busy channel.
• If your radio is scanning and you need to
use your Priority channel (for an urgent call
or an emergency), briefly press the channel
knob. The Scan mode will be cancelled and
the radio will jump straight to the Priority
channel.
NOTE: Your TX3400 will not allow you to
transmit while it is scanning channels in the
Open Scan mode. If the PTT button is pressed
6

while scanning, the radio will give a low beep
and will ignore the command. Your radio will
only transmit in the Open Scan mode while it is
paused on a busy channel.
Ending the Open Scan.
To stop scanning, briefly press the SCAN key
again. A low beep will be heard and “SCAN”
will disappear from the display. As long as the
radio was not on a busy channel, it will return
to the last channel you selected, otherwise it
will stay on the busy channel.
Group Scan Mode.
With Group Scan selected, you can transmit
and receive normally on your priority (working)
channel, but between breaks in the
conversation, the radio will scan and listen to
several other channels. The receiver will
continue to scan the other channels ONLY
WHILE THERE ARE NO SIGNALS ON THE
PRIORITY CHANNEL.
If a signal appears on the priority channel it will
override any signals being received on any of
the other channels. In addition, if you press the
Push-To-Talk switch on the microphone at any
time, the radio will transmit on the priority
channel in the usual way.
Setting up your Group Scan.
To setup your radio for Group Scan:
1. Select the Group Scan mode by pressing
the OS/GS key so that ‘GS’ is displayed.
2. Program your Priority channel memory with
your preferred working channel.
(a) Select the required channel.
(b) Press and hold the Channel knob for a
couple of seconds. The channel display will
flash for a moment then a high beep will be
heard as the selected channel is stored.
3. Program the required ‘other’ channels into
your Group Scan memory.
(a) Select the required channel.
(b) If ‘M’ is displayed to the upper left of the
channel number, the selected channel is
presently in the scan memory. It can be
removed by holding the SCAN key in for a
few seconds until a low beep is heard. ‘M’
will then disappear indicating the channel is
no longer in memory.
(c) If ‘M’ is not visible to the upper left of the
channel number, then the selected channel
is not in the memory. To add it, hold the
SCAN key in for a few seconds until a high
beep is heard. ‘M’ will now appear to the
upper left of the channel number.
(d) Repeat steps (a) to (c) to add or remove
other channels in the scan memory.
To Start Scanning.
To scan in the Group Scan mode, briefly press
the SCAN key. A high beep will be heard,
‘SCAN’ will appear in the display and the radio
will begin scanning.
NOTE: If there are no channels programmed in
the Group Scan memory when you press the
SCAN key, a low beep will be heard and the
command will be ignored.
Scanning in the Group Scan Mode.
When scanning, the Group Scan feature scans
all the channels programmed into the scan
memory, with the priority channel being
scanned after every fourth channel.
• If a signal is heard on a scan channel, the
receiver will "lock" onto it and remain there
for as long as the channel is busy, and for 5
seconds after the channel has cleared, as
long as there are no signals on the priority
channel. During this time the receiver will
continue to check the priority channel for
signals every 2 seconds, resulting in a series
of small 'breaks' in the reception of the
'locked' channel. If no signals are heard
after 5 seconds, the radio will resume
scanning.
• If a signal appears on the priority channel at
any time (even when locked on a scan
channel) the receiver will switch straight to
7

8
SELECTIVE CALLING
the priority channel and will stay there for as
long as the channel is busy. During this time
you can transmit on the priority channel in
the usual way. Once there has been no
activity on the priority channel for 5
seconds, the radio will resume scanning the
other channels.
• To talk on the priority (working) channel
while scanning, simply press the Push-To-
Talk switch on the microphone. The radio
will switch straight to the Priority channel.
When you have finished your conversation
and there has been no further activity on the
priority channel for 5 seconds, the radio will
resume scanning the other channels.
• If your radio pauses on a busy channel and
you don't wish to listen to that conversation,
briefly press the CALL button on top of the
microphone. The radio will skip over that
channel and resume scanning from the next
channel in the sequence.
• If your radio is paused on a busy channel
and you wish to remain there, briefly press
the SCAN key. The radio will exit the Scan
mode and remain on the busy channel. Note
that the radio will no longer be monitoring
the Priority channel (unless it is the busy
channel). To resume scanning, press the
SCAN key again.
• To go directly to the Priority channel, briefly
press the Channel knob. The radio will exit
the Scan function.
Ending the Group Scan.
To cancel the Scan mode, briefly press the
SCAN key. A low beep will be heard and
‘SCAN’ will disappear from the display. If the
radio was on a busy channel it will remain on
that channel, otherwise it will return to the
priority channel.
GENERAL OVERVIEW
What is Selcall.
Your TX3400 has a Selective Calling (Selcall)
system which operates like your telephone.
Your radio has been programmed with its own
unique number. When this number is called,
your TX3400 will beep to alert you.
If you do not want to hear any other activity
while on the channel, you can push a QUIET
button. The radio will then remain quiet until
your number is called.
Your radio allows you to store up to four of your
most frequently called numbers in memory.
Each number can be labelled with a 5 letter
name for easy identification.
Selcall Identification Number (Ident).
Your TX3400 is factory programmed with its
own unique Selcall Identification Number
(Ident). This number identifies your radio from
others in your area. You will need to make your
Ident known to anyone who may need to call
you with Selcall. Whenever your TX3400 hears
a Selcall signal, it compares the incoming Ident
with its own. If the two Idents match, the radio
knows it is being called and sounds an alarm to
alert you to the call.
The Selcall Ident for your radio is printed on the
label on the rear panel of the main unit. The
Ident is the last 5 digits of the radio’s serial
number.
The Selcall Ident is also displayed in the
bottom left of the LCD for a second each time
the radio is turned on.
NOTE: Although your radio’s Selcall Ident is
pre-programmed at the factory, you can
arrange to have your dealer change it if
required.
 Loading...