

Page 1

RX1300
MULTIBAND
SCANNING RECEI VER
INSTRUCTION MANUAL
Page 2

PAGE 2 INSTRUCTION MANUAL RX1300
CAUTIoN
Please read these instructions carefully before operating your receiver. Your scanner
is a complex and powerful unit with many functions. Please retain this manual for
future reference.
· Never connect the receiver to a
power source other than the specified
battery otherwise damage to your
receiver may occur.
· Do Not place the receiver in front of
a vehicle airbag.
· Do Not operate the receiver on board
an aircraft.
· Always charge the receiver at normal
room temperature.
· Always replace the accessory jack
cover when the jack is not in use.
· Use only GME approved
rechargeable batteries in your receiver.
· Do Not expose the receiver to
water. It is not waterproof.
· Avoid storing or charging the
receiver in direct sunlight.
· Avoid storing the receiver in
temperatures below -20°C or
above +60°C.
CoNTENTS
ACCESSORIES SUPPLIED . . . . . . . . . .3
FITTING AND REMOVING
THE BATTERY PACK ..............3
INSTALLING THE ANTENNA ........4
INSTALLING THE LANYARD . . . . . . . .4
CHARGING THE BATTERY . . . . . . . . . 4
CONTROLS . . . . . . . . . . . . . . . . . . . . 5
Keypad. . . . . . . . . . . . . . . . . . . . .6
LCD DISPLAY ...................8
GENERAL OPERATION ............8
SELECTING FREQUENCIES .........9
FREQUENCY BANDS ............11
FREQUENCY SEARCH . . . . . . . . . . . 11
Band search ................11
Full search .................12
Limited search . . . . . . . . . . . . . . 12
Priority search . . . . . . . . . . . . . .13
MEMORY BANKS . . . . . . . . . . . . . .15
Manual memories . . . . . . . . . . .15
Automatic memories . . . . . . . . .15
Limited search memories . . . . . . 15
Dual Watch memories. . . . . . . . . 15
Storing frequencies into the
memories ..................16
MENU SETTINGS ...............19
Page 3
RX1300 INSTRUCTION MANUAL PAGE 3
COPYING FREQUENCIES BETWEEN
MEMORY BANKS . . . . . . . . . . . . . .20
CLONING STORED MEMORIES WITH
ANOTHER UNIT ................22
DCS TONE FREQUENCY CHART ....23
CTCSS TONE FREQUENCY CHART . . 24
WARRANTY . . . . . . . . . . . . . . . . . .25
SPECIFICATIONS ...............27
ACCESSoRIES SUppLIED
• ScannerReceiver
• Antenna
• RechargeableBatteryPack
• Earphone
• ChargerCradle
• Power Adaptor
• LanyardStrap
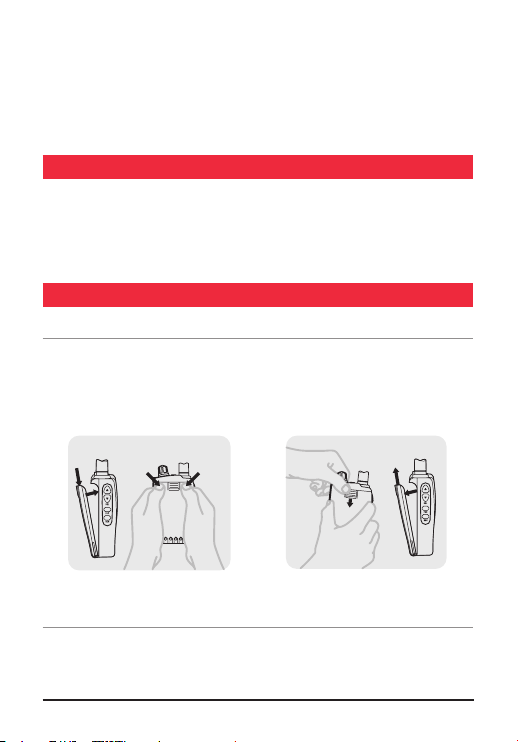
FITTING AND REMoVING ThE BATTERy pACk
Fitting
1. Ensure the receiver is switched off.
2. Align the bottom of the battery pack with the securing slots in the base of
the receiver.
3. Press the top of the battery pack into the back of the receiver until it ‘clicks’.
Fitting the Battery
Removing the Battery
Removing
1. Ensure the receiver is switched off.
2. Holding the receiver in one hand, press down on the battery release catch.
3. Swing the top of the battery pack away from the receiver.
Page 4

PAGE 4 INSTRUCTION MANUAL RX1300
INSTALLING ThE ANTENNA
RX1300
RX13 00
RX1300
RX13 00
RX1300
RX13 00
1. Place the antenna onto the antenna
socket on top of the radio.
Rotate the antenna clockwise to screw
2.
into place.
3. Do not over tighten.
INSTALLING ThE LANyARD
1. Slide the small end loop of the
lanyard through the slot in the rear of
the receiver’s top panel.
2. Feed the large end of the lanyard
through the loop and tighten
ChARGING ThE BATTERy
Your scanner receiver is supplied with
a rechargeable battery back, desktop
charging cradle and AC adaptor.
To charge the battery:
1. Fit the battery to the receiver (see
instructions left). Ensure the receiver
is switched off.
2.
Connect the AC adaptor to the
charging cradle.
4. Insert the receiver into the charging
cradle until it ‘clicks’ home. The
charging LED will glow RED and
charging will begin.
Charging LED
If the charging LED blinks RED and
GREEN or does not light at all, remove
the receiver from the cradle and
reinsert it.
The charging time for a discharged
battery is typically 12–15 hours. When
the battery is fully charged, the LED will
turn GREEN.
Note: If you find yourself in a position
where you need to charge the battery
but the charging cradle is not available,
you can plug the AC adaptor directly
into the receiver’s charging socket
located under the accessory jack cover.
3.
Plug the AC adaptor into a mains
power outlet
.
Page 5

RX1300 INSTRUCTION MANUAL PAGE 5
CoNTRoLS
1
10
9
12
13
7
8
11
14
4
6
5
3
2
D
W
P
R
I
T
O
N
E
A
T
T
C
A
N
C
M
O
D
E
S
K
I
P
L
M
T
A
W
M
W
M
R
D
L
Y
RX1300
MENU
FUNC
SQL
1. Power On/Off Lock Button
2. Control Knob
3. Up/Down Keys
4. Squelch Up/Down Keys
5. Function Key
6. Menu Key
7. Enter/VFO Key
8. Keypad
9. Memory Cloning/Charging Jack
10. Ear phone Jack
11. LCD Display
12. Jack Cover Securing Point
13. Antenna
14. Lanyard Slot
Page 6
PAGE 6 INSTRUCTION MANUAL RX1300
1. Power On/Off Lock Button – turns
D
W
P
R
I
T
O
N
E
A
T
T
C
A
N
C
M
O
D
E
S
K
I
P
L
M
T
A
W
M
W
M
R
D
L
Y
the receiver on and off. Also Locks
the keypad.
2. Control Knob – selects frequencies
and channels and selects values
from menus.
3. Up/Down Keys – adjusts the
Volume and selects Menu items and
frequency steps.
4. Squelch Up/Down Keys – opens
and closes the squelch.
5. Function Key – enables extended
keypad functions.
6. Menu Key –
setup menus.
provides access to
7. Enter/VFO Key – confirms selections
8. Keypad – allows direct entry of
frequencies and selection
of functions.
9. Accessory Jack – provides charging
and earphone jacks.
10. LCD Display – shows frequencies
and selected functions.
11. Jack Cover Securing Point –
holds the accessory jack cover
in place.
12. Antenna – provides reception
of signals.
13. Lanyard Slot – allows connection
of the Lanyard to protect the
receiver from being
accidentally dropped.
and selects the VFO Mode.
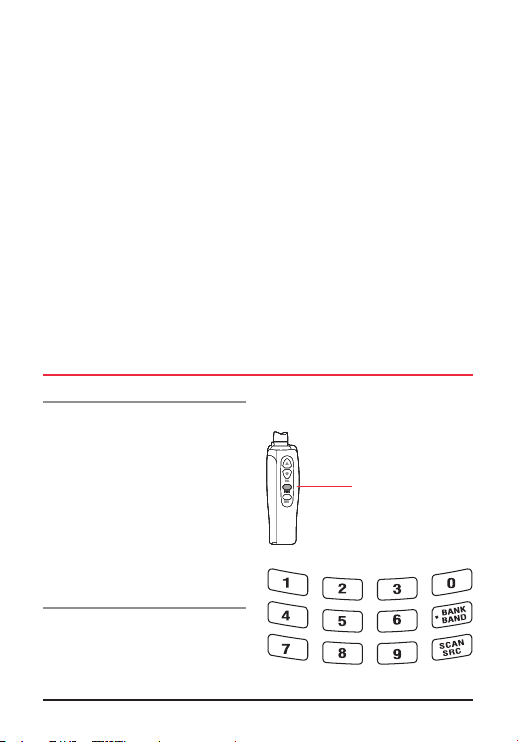
kEypAD
Direct Input Keys
1. Number Keys – used to enter
frequencies in VFO Mode and to
make direct selection of Banks in
memory Read Mode.
2. Bank/Band Key – used to change
Memory Banks or Frequency Bands.
3. Scan/Search Key – used to activate
or deactivate the Scan function in
memory read Mode or the Search
function in VFO Mode.
Extended Function Keys
The Keypad Keys on the front panel
have secondary functions which
are printed below each key. These
secondary functions are accessed after
pressing the FUNC key.
See chart on following page for
key functions.
FUNCTION KEY
Page 7

RX1300 INSTRUCTION MANUAL PAGE 7
KEY FUNCTION DESCRIPTION
1 - AW Automatic Write Automatically stores scanned frequencies in the
2 - MW Manual Write Allows manual storage of frequencies into the
3 - MR Memory Read Allows reading of the frequencies in the
4 - CANC Cancel
automatic memory storage area.
manual memory storage area.
stored memories.
Used to cancel an incorrect input.
5 - Mode Mode Selects the receiver Modes
(AM, FM, WFM or Automatic).
6 - SKIP Skip Used to skip channels when scanning or skip
frequencies when searching.
7 - DW Dual Watch Activates or deactivates the Dual Watch function.
8 - PRI Priority Channel
Activates or deactivates the selection of a
Priority Channel.
9 - TONE Tone Activates Activates or deactivates the selected CTCSS/
DCS tone. The required tone is selected from
the menu function in VFO Mode.
0 - DLY Delay Activates or deactivates the delay timer which
determines how long the radio will wait on a
frequency after a signal has disappeared. The
delay time is set from the menu function.
BANK
BAND
Limit: Allows the entry of upper and lower frequency
limits when searching.
LMT
SCAN SRC
ATT
Attenuator: Activates or deactivates the signal attenuator
to reduce the receiver’s sensitivity in strong
signal conditions.
Page 8
PAGE 8 INSTRUCTION MANUAL RX1300
1 3 1 4
21
1 7
19
1 5 1 6 1 8
20
42 7 9
1 0 1 2
3 8
1 1
651
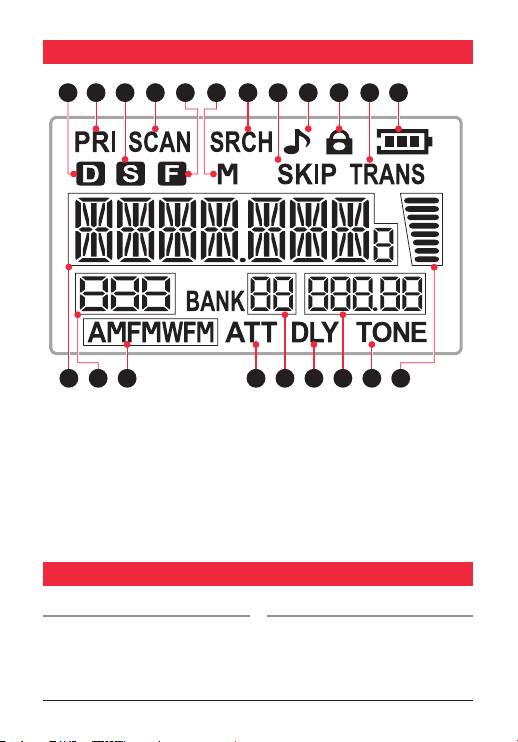
LCD DISpLAy
1. Dual Watch
2. Priority Channel
3. Power Save
4. Scan
5. Function
6. Memory
7. Search
8. Skip
9. Key Tone & Beep Tone
10. Keypad Lock
11. Data Transfer
12. Battery Charge Level
13. Frequency Display
14. Channel Indicator
15. AM, FM, WFM Mode
16. Attenuator
17. Bank Number
18. Scan Delay Timer
19. Frequency Step
20. Tone
21. Signal Meter
GENERAL opERATIoN
Turning the unit On or Off
Press and hold the RED Button on the
top of the unit to turn the unit ON. Press
and hold the RED Button again to turn
the unit OFF.
KEY Lock
Briefly press the RED Button on the top
of the unit to turn the Key Lock ON.
Briefly press the RED Button again to
turn the Key Lock OFF again.
Page 9

RX1300 INSTRUCTION MANUAL PAGE 9
Volume
Press the key to increase the volume.
key to decrease the volume.
Press the
The volume level will be displayed from
00 to 31.
Squelch
Press the key on the side of the radio
to increase the Squelch setting and
key on to decrease the Squelch
the
setting. The Squelch level will be
displayed from 00 to 09. At maximum
Squelch setting, ‘AT’ is selected which
represents an automatic (preset)
level setting.
Function Key
The Function key provides access to
secondary functions associated with
the front panel keys. The secondary
function labels are printed below their
respective keys.
Menu Key
The Menu key provides access to the
radios settings. The settings menus will
vary depending on which Mode the
receiver is in.
E/VFO Key [Enter/VFO]
Press the E/VFO key to select the VFO
(Variable Frequency Oscillator) Mode.
Frequencies can now be entered directly
from the keyboard. Press the E/VFO key
to Enter (accept) the selected frequency.
Note: The receiver always selects the
VFO Mode each time it is turned on.
Control Knob
The Control knob is used to change the
current display option.
In VFO Mode, rotate the Control knob
to change the displayed frequency at
the selected frequency steps. Rotate
clockwise to increase the frequency and
counter clockwise to decrease
the frequency.
In Menu Mode, rotate the Control knob
to change the selected setting.
In Channel memory Mode, rotate the
Control knob to step up or down
through the memories.
SELECTING FREQUENCIES
The receiver always selects the VFO
Mode when it is turned on. You can
select frequencies using one of the
following methods:
Direct Frequency Input
Enter frequencies using the numbered
keypad. Don’t forget to include the
decimal point where applicable.
When you have entered the required
frequency, press the E/VFO key to accept
it. If the frequency you have entered is
not within the selected frequency step, it
is automatically corrected to the nearest
correct frequency.
e.g. Entering 456.25 followed by E/VFO
results in 456.2500 being selected.
The frequency step can be changed
to allow more precision of desired
frequency.
Page 10

PAGE 10 INSTRUCTION MANUAL RX1300
Using the Control Knob
First select the required starting
frequency using the direct frequency
input method, then rotate the control
knob to step up or down in frequency
from the starting point. The frequency
will change in the selected
frequency step.
· To change frequency in 1 MHz steps,
press the FUNC key, then press the
or keys to change the frequency.
(F is displayed while the ‘Func’ Mode
is active).
· To change frequency in 10 MHz steps,
press the Func key then rotate the
control knob to change the frequency.
(F is displayed while the ‘Func’ Mode
is active).
Note: The Func Mode clears a few
seconds after the last key press or
control knob change.
Mode Selection
By default, the receiver automatically
selects the modulation Mode most
commonly used for each band (see the
Frequency Band chart for the default
Modes for each band) To manually
select a different Mode, press ‘Func’
followed by the Mode key.
Each press will step through the Mode
settings in the following order:
-> AM -> FM -> WFM (Wideband FM)
-> Auto ->
To automatically have the receiver select
the Mode for the band you are on,
select the Auto Mode.
Frequency Step Selection
By default, the receiver automatically
selects the frequency Steps most
commonly used for each band (see the
Frequency Band chart for the default
Steps for each band).
To select a different step:
1. In VFO Mode press MENU.
2. Press the Volume
STEP is displayed.
3. Turn the Control knob until the
desired frequency step is displayed.
4. Press E/VFO to confirm the selection.
The following Frequency Steps
are available:
5 kHz
6.25 kHz
8.33 kHz (108 MHz - 135.975 MHz)
9 kHz (below 1.620 MHz ONLY)
10 kHz
12.5 kHz
15 kHz
20 kHz
25 kHz
30 kHz
50 kHz
100 kHz
500 kHz
Auto
or keys until
Page 11

RX1300 INSTRUCTION MANUAL PAGE 11
If Auto is selected the receiver will automatically select the appropriate default
Frequency Step for each band.
FREQUENCy BANDS
The scanner supports the following Frequency Bands:
Frequency Band Startup Frequency Default Mode Default Step
150 kHz to 495 kHz
504 kHz to 1.620 MHz
1.625 MHz to 29.995 MHz
30 MHz to 87.975 MHz
88 MHz to 107.950 MHz
108 MHz to 135.975 MHz
136 MHz to 255.100 MHz
255.1125 MHz to 382.100 MHz
382.125 MHz to 769.800 MHz
769.8125MHz to 960.100 MHz
960.125 MHz to 1309.975 MHz
1.5 MHz AM 5 kHz
5 MHz AM 5 kHz
51 MHz FM 25 kHz
88 MHz WFM 100 kHz
118 MHz AM 25 kHz
150 MHz FM 25 kHz
370 MHz FM 12.5 kHz
430 MHz FM 25 kHz
850 MHz FM 12.5 kHz
1295 MHz FM 25 kHz
FREQUENCy SEARCh
Band Search
Use the Search function to locate active frequencies in one or more bands
1. Press the E/VFO key to select VFO Mode. (Note: the receiver automatically selects
the VFO Mode when it is turned on).
2. Press the BAND key to select the required Band. There are 10 factory preset
bands to choose from (see Frequency Band Table).
3. Set the Squelch level using the Squelch
or keys so that the noise
just disappears.
AM 5 kHz
Page 12

PAGE 12 INSTRUCTION MANUAL RX1300
4. Select a start frequency to search
from. To do this, enter the frequency
on the keypad, then press E/VFO key.
5. Press the SCAN SRC key briefly. The
‘SRCH’ icon will be displayed and the
receiver will search the selected band
starting from the start frequency.
Once the end of the band is reached
the search continues at the beginning
of the selected band.
6. To stop the search, press the SCAN
SRC key again.
During the search, press the BANK
•
BAND key to move to the next band.
•Tochangethesearchdirection
rotate the control knob clockwise or
counter clockwise.
•Thereceiverwillstayonanactive
channel according to the Scan Timer
settings in the VFO Menu. If the
Scan Timer is set to ‘5 seconds’,
the receiver will continue searching
after 5 seconds even if the channel
is still busy. If the Scan Timer is set
to ‘Busy’, the receiver will remain on
the busy frequency for as long as it
stays busy, then resume searching
when the signal disappears.
Full Search
The Full Search function searches the
entire scanner frequency range
for signals.
1. Press the E/VFO key to select
VFO Mode. (Note: the receiver
automatically selects the VFO Mode
when it is turned on).
2. Set the Squelch level using the
Squelch keys so that the noise
just disappears.
3. Press and hold the SCAN SRC key
for 2 seconds. The ‘SRCH’ icon will
be displayed and the receiver will
search the entire frequency range of
the receiver.
4. To stop the search, press the SCAN
SRC key again.
•Duringthesearch,presstheBANK
BAND key to move to the next Band.
•Tochangethesearchdirectionrotate
the control knob clockwise or counter
clockwise.
•Thereceiverwillstayonanactive
channel according to the Scan Timer
settings in the VFO Menu. If the
Scan Timer is set to ‘5 seconds’, the
receiver will continue searching after
5 seconds even if the channel is still
busy. If the Scan Timer is set to ‘Busy’,
the receiver will remain on the busy
frequency for as long as it stays busy,
then resume searching when the
signal disappears.
LIMITED SEARCh
You can limit the search between two
user-selectable frequency limits.
1. Press the E/VFO key to select
VFO Mode. (Note: the receiver
automatically selects the VFO Mode
when it is turned on).
Page 13

RX1300 INSTRUCTION MANUAL PAGE 13
2. Set the Squelch level using the
Squelch keys so that the noise just
disappears.
3. Press Func followed by the LMT key.
[L1] is displayed.
4. Enter the First frequency using the
keypad or the control knob.
5. Press E/VFO when done. [L2]
is displayed.
6. Enter the Second frequency using the
keypad or the control knob.
7. Press SCAN SRC. The Limited Search
will begin, searching upwards from
the first frequency to the second in a
continuous cycle.
8. To stop the Search, press the SCAN
SRC key again.
•TochangetheSearchdirectionrotate
the control knob clockwise or
counter clockwise.
•Thereceiverwillstayonanactive
channel according to the Scan Timer
settings in the VFO Menu. If the
Scan Timer is set to ‘5 seconds’, the
receiver will continue Searching after
5 seconds even if the channel is still
busy. If the Scan Timer is set to ‘Busy’,
the receiver will remain on the busy
frequency for as long as it stays busy,
then resume searching when the
signal disappears.
NOTE: The Limit Search always searches
upwards in frequency. If the first
frequency is lower than the second it
will search between the two frequencies.
If the first frequency is higher then the
second it will search outside the
two frequencies.
L1 L2
L2 L1
2nd
Frequency
Upper Band
Edge
Upper Band
Edge
Frequencies
Searched
50 –> 87.975,
30 –> 40 MHz
L1 is a lower frequency than L2
Lower Band
Edge
Lower Band
Edge
L1 is a higher frequency than L2
1st
Frequency
40 MHz 50 MHz 40 –> 50 MHz
50 MHz 40 MHz
pRIoRITy SEARCh
Priority Search allows you to insert a
Priority Channel into the frequency
search. When the search is activated,
the receiver will visit the Priority channel
or frequency at an interval set by the
‘Priority Time’ in the Menu setup.
Page 14

PAGE 14 INSTRUCTION MANUAL RX1300
To perform a Priority Search using a
frequency as the Priority Channel:
1. Enter the required Priority Channel
frequency using the Keypad then
press E/VFO.
2. Press Func PRI. The selected
frequency is now the Priority Channel.
3. Press Band/Bank to select the
require frequency band you wish
to scan.
4. Press Scan/Src. The receiver will
begin scanning the selected band and
will switch to the Priority channel at
an interval set by the ‘Priority Time’
setting in the setup menu.
5. Press FUNC PRI to deselect current
priority channel. Follow steps 1-4 to
add new priority channel.
To perform a Priority Search using a
stored channel as the Priority Channel:
1. Press Func MR to select the Memory
Read Mode.
2. Press Bank/Band to select the
required memory bank.
3. Rotate the Control Knob to select
the required channel.
4. Press Func PRI. The selected channel
is now the Priority Channel.
5. Press Band/Bank to select the
require frequency band you wish
to scan.
6. Press Scan/Src. The receiver will
begin scanning the selected band and
will switch to the Priority Channel at
an interval set by the ‘Priority Time’
setting in the setup menu.
•Ifasignalisreceived,thereceiverwill
remain on the active frequency for the
duration of the ‘Busy Timer’ setting
in the Menu setup. If the ‘Busy timer’
is set to Busy the receiver will stay on
the active channel for as long as the
signal is present.
To change the frequency band while
•
searching, briefly press Band/Bank key.
•Tochangethesearchdirectionwhile
searching, rotate the control knob
clockwise or counter clockwise.
Dual Watch
The Dual Watch function lets you
constantly monitor two frequencies for
activity.
To set the Dual Watch function:
1. Enter one of the required frequencies
using the Keypad then press E/VFO.
2. Adjust the squelch so that the
receiver is muted.
3. Press Func DW.
4. Enter the second frequency using the
Keypad then press E/VFO.
5. The Dual watch begins automatically.
If a signal is received, the receiver will
remain on the active frequency for the
duration of the ‘Busy Timer’ setting in
the Menu setup. If the ‘Busy timer’ is
set to Busy the receiver will stay on the
active channel for as long as the signal
is present.
Page 15

RX1300 INSTRUCTION MANUAL PAGE 15
To stay on an active frequency
indefinitely or to stop the Dual Watch
function press Func DW again. The
receiver will exit the Dual Watch function.
MEMoRy BANkS
The scanner memory storage area has
a capacity of 1300 locations. These are
split into specific segments as follows:
1000 Manual Storage Memories.
200 Automatic Storage Memories.
50 Limited Search Memories
(2 x 25 pairs).
50 Dual Watch memories (2 x 25 Pairs).
MANUAL MEMoRIES
The Manual Memory area allows the
user to manually store up to 1000
individual frequencies. It is split into
memory banks with a maximum capacity
of 40 memory banks, each containing
25 memory locations (40 x 25 = 1000).
However the memory capacity of each
bank is flexible up to a maximum of 100
memories per bank, but at a reduction
in the number of banks available. For
example, in an extreme case where each
bank is programmed with the maximum
100 memories, the number of banks
available would be reduced to 10
(10 banks x 100 memories = 1000
memory capacity).
The default Manual memory banks are
labelled 00 to 39.
AUToMATIC MEMoRIES
The Automatic Memory area can store
up to 200 frequencies in two banks
of 100 memories. The automatic
memory is used when searching a
band of frequencies. The scanner
can automatically store any active
frequencies it finds while searching. The
Automatic Memory banks are labelled
A0 and A1.
LIMITED SEARCh MEMoRIES
The Limited Search Memories consists
of 50 memory locations split into 25
pairs of frequencies. The Limited Search
function allows you to specify the upper
and lower frequency limits of a section
of frequency band that you wish to scan.
These frequency limit ‘pairs’ can be
stored in the Limited Search memories
for recall at a later time.
The Limited Search Memory Upper and
Lower limits are identified as A and b.
The 25 pairs are therefore labelled A00,
b00 to A24, b24.
DUAL WATCh MEMoRIES
The Dual Watch function allows the
radio to switch between two selected
frequencies. The Dual Watch Memories
consists of 50 memory locations split
into 25 pairs of frequencies.
The two Dual Watch frequencies are
identified as A and b. The 25 pairs are
therefore labelled A00, b00 to
A24, b24.
Page 16

PAGE 16 INSTRUCTION MANUAL RX1300
SToRING FREQUENCIES
INTo ThE MEMoRIES
Manual memories
To manually store a frequency into one
of the manual memories:
1. Press the E/VFO key to select
VFO Mode.
2. Press the BAND key to select the
required Band.
3. Select the frequency that you want to
store using the number keys or the
control knob.
4. Press Func MW to enter the Memory
Write Mode.
5. The receiver will find and display an
empty memory bank and memory
location automatically.
6. If required, use the number keys to
select a new memory bank e.g. For
memory bank 16 press 1 and 6.
7. To change the memory location,
rotate the control knob.
8. Press Func MW again to store
the frequency.
To recall a frequency from the
manual memories:
1. Press the E/VFO key to select
VFO Mode.
2. Press Func MR. The receiver will
enter the Memory Read Mode.
3. To step through the memory banks
press the BANK key or enter the
memory bank directly using the
numbered keys. Memory banks are
numbered 00 to 39.
4. Select the required channel using the
control knob.
Automatic Memories
The Automatic Memory holds
frequencies that are stored automatically
while doing a Band Search.
To store frequencies into the
Automatic Memories:
1. Press the E/VFO key to select
VFO Mode.
2. Select the band and frequency that
you wish to begin searching from.
3. Set the Squelch level to a point where
the receiver is just quiet.
4. Press Func AW to select the
Automatic Write Mode.
5. Press the Bank key to select the
required memory bank (A0 or A1).
6. Press the SCAN/SRC key to
begin scanning.
7. As active frequencies are found they
are automatically stored in the select
memory bank. When all 100 channels
are fully stored the receiver will Beep.
8. To exit from the Automatic memory
Mode, press the E/VFO key.
To recall frequencies from the
Automatic Memories:
1. Press the E/VFO key to select
VFO Mode.
2. Press Func MR. The receiver will
enter the Memory Read Mode.
3. Press the BANK key repeatedly to
step through the memory banks until
A0 or A1 are selected.
Page 17

RX1300 INSTRUCTION MANUAL PAGE 17
4. Select the required channel using the
control knob.
Limited Search Memories
Here you will be storing a pair of
frequencies that represents the
upper and lower limits of a section of
frequency band you wish to search for
signals.
To store a pair of frequency limits into
the Limited Search Memories.
Here you will be storing a pair of
frequencies that represents the
upper and lower limits of a section of
frequency band you wish to search for
signals.
To store a pair of frequency limits into
the Limited Search Memories.
1. Press the E/VFO key to select
VFO Mode.
2. Press the Band key to select the
required band.
3. Enter the frequency that represents
one end of the range you wish
to search.
4. Press Func LMT. L1 will flash on
the display to indicate that you are
entering the first frequency limit.
5. Press the E/VFO key to accept. L2
will flash on the display to indicate
you are now entering the second
limit frequency.
6. Enter the second frequency limit then
press E/VFO to accept it.
7. Now press Func MW. The receiver
enters the Memory Write Mode and
selects the Pr memory bank.
8. Use the control knob to select an
empty channel to store the
frequency pair.
9. Press Func MW again to store
the frequencies.
The selected frequencies limits will be
stored as a pair of channels in locations
Axx and bxx where xx is the channel
number you selected in step 8.
To recall a frequency limit pair from the
Limited Search Memories.
1. Press the E/VFO key to select
VFO Mode.
2. Press Func MR. The receiver will
enter the Memory Read Mode.
3. Press the BANK key repeatedly to
step through the memory banks until
Pr is displayed.
4. Select the required channel using the
control knob.
5. Set the squelch level to a point where
the receiver is just quiet.
6. Briefly press SCAN/SRC. The radio
will begin scanning between the
selected frequency limits.
Dual Watch Memories
The Dual Watch memories are used to
store a pair of frequencies that will be
monitored when the Dual Watch feature
is enabled. Up to 50 frequencies
(25 pairs) can be stored.
Page 18

PAGE 18 INSTRUCTION MANUAL RX1300
To store a pair of Dual Watch frequency into the Dual Watch Memories.
1. Press the E/VFO key to select VFO Mode.
2. Press the Band key to select the required band.
3. Adjust the Squelch so the receiver is muted.
4. Enter one of the frequencies that you wish to monitor.
5. Press Func DW. The ‘D’ Dual Watch icon
will be displayed.
6. Enter a second frequency using the control knob or the number keys.
7. Press the E/VFO key to accept. The Dual Watch function will begin.
8. Now press Func MW. The receiver enters the Memory Write Mode and selects
the Du (Dual Watch) memory bank.
9. Use the control knob to select an empty channel to store the frequency pair.
10. Press Func MW again to store the two frequencies. They will be stored Axx and
bxx where xx is the empty channel you selected.
To recall a pair of Dual Watch frequencies from the Dual Watch Memories.
1. Press the E/VFO key to select VFO Mode.
2. Set the squelch level to a point where the receiver is just quiet.
3. Press Func MR. The receiver will enter the Memory Read Mode.
4. Press the BANK key repeatedly to step through the memory banks until Du
is selected.
5. Select the required channel using the control knob.
6. Briefly press the SCAN/SRC key. Dual Watch will begin with the receiver
monitoring the channels in the selected Dual Watch memory.
Page 19

RX1300 INSTRUCTION MANUAL PAGE 19
MENU SETTINGS
The Menu settings will vary depending on the selected Mode.
· Press the MENU Key to access the Menu settings.
· Press the volume
· Rotate the Control knob to change the values of each Menu item.
keys to step through the Menu items.
VFO Mode
FUNCTION DESCRIPTION VALUES
Delay Determines how long the radio will wait on a
Beep Activates or deactivates the keypress beeps. ON, OFF
Step Sets the Frequency Step in kHz. When Auto
Memory Shows the available Manual Memory left in
Priority
Time
Tone Selects the required CTCSS or DCS tone.
Busy Timer Determines how long the receiver will wait on
frequency after a signal has disappeared while
scanning or Searching
is selected the receiver automatically uses a
factory preset frequency step for each band.
the receiver
Sets how long the receiver will wait before
visiting the selected Priority channel when
Scanning or Searching
The tone is then activated or deactivated by
pressing Func TONE
a busy channel while Scanning or Searching.
When ‘Busy’ is selected, the receiver will stay
on the busy channel as long as it remains busy.
1 -10 Seconds
5, 6.5, 8.33,
9, 10, 12.5,
15, 20, 25, 30,
50,100, 500,
Auto
0 - 1000
1 – 10 Seconds
See CTCSS/DCS
Table (pg18)
Busy, 5 Seconds
Page 20

PAGE 20 INSTRUCTION MANUAL RX1300
Memory Read Mode
FUNCTION MEANING DESCRIPTION
bA Copy Bank Copy Copies a bank of frequencies to
CH Copy Channel Copy Copies a frequency from one channel
CH Move Channel Move Moves a frequency from one channel
ALL CLR All Clear Erases all memories in the receiver
bA CLR Bank Clear Erases all the channels in the selected Bank
CH CLR Channel Clear Erases the selected channel
another Bank
to another
to another
CopyING FREQUENCIES BETWEEN MEMoRy BANkS
Bank Copy
To copy one bank of frequencies
to another;
Select the bank that you would like to
1.
copy from by pressing Func/ MR.
2. Press Menu, then use the control
knob or the volume
‘bA Copy’.
3. Press E/VFO to accept
Now select the bank you wish to copy it
4.
to using the number keys or the BANK/
BAND key.
5. Press
E/VFO
original bank to the new bank. The
original bank will remain unchanged.
keys to select
again to copy the
Channel Copy
To copy one channel to another;
Func/MR
1. Press
2. Select the channel that you would like
to copy from.
3. Press Menu then use the control knob
or the volume
‘CH Copy’.
4. Press
will then automatically select the next
empty channel in the same bank.
5. If you don’t wish to use the empty
channel selected by the receiver, use
the
the
preferred channel and bank.
.
E/VFO
to accept. The receiver
Control
Knob, number keys or
BANK/BAND
keys to select
key to select the
Page 21

RX1300 INSTRUCTION MANUAL PAGE 21
6. Press
E/VFO
original channel to the new channel.
The original channel will
remain unchanged.
again to copy the
Channel Move
To move one channel to another;
1. Select the channel that you would like
to move from.
2. Press Menu then use the control knob
or the volume
‘CH Move.
3. Press E/VFO to accept. The receiver
will then automatically select the next
empty channel in the same bank.
4. If you don’t wish to use the empty
channel selected by the receiver, use
the Control Knob, number keys or
the BANK/BAND key to select the
preferred channel and bank.
5. Press E/VFO again to move the
frequency to the new channel. The
original channel will now be empty.
keys to select
All Clear
To erase ALL data from the memories;
Func/MR
1.Press
2. Press Menu, then use the control
knob or the volume
‘ALL CLR’.
3. Press E/VFO. ‘dEF yES’ will
be displayed.
4. To continue with the All Clear, press
E/VFO again.
5. To cancel the All Clear, use the
Control knob to select ‘dEF NO’ then
press E/VFO.
keys to select
Bank Clear
To erase a channel from the memory;
Func/MR
1.Press
2. Select a channel within the Bank that
you wish to erase.
3. Press MENU, then use the control
knob or the volume 5/6 keys to select
‘bA CLR’.
4. Press E/VFO. ‘dEF yES’ will
be displayed.
5. To continue with the Bank Clear,
press EVFO again.
6. To cancel the Bank Clear, use the
Control knob to select ‘dEF NO’ then
press E/VFO.
Channel Clear
To erase a channel from the memory;
Func/MR.
1. Press
2. Select the channel you wish to erase.
3. Press MENU, then use the control
knob or the volume
select ‘CH CLR’.
4. Press E/VFO to erase the channel.
keys to
Page 22

PAGE 22 INSTRUCTION MANUAL RX1300
CLoNING SToRED MEMoRIES WITh ANoThER UNIT
RX1300
D
W
P
R
I
T
O
N
E
A
T
T
C
A
N
C
M
O
D
E
S
K
I
P
L
M
T
A
W
M
W
M
R
D
L
Y
RX1300
D
W
P
R
I
T
O
N
E
A
T
T
C
A
N
C
M
O
D
E
S
K
I
P
L
M
T
A
W
M
W
M
R
D
L
Y
The memories stored in your receiver
can be transferred to or from another
RX1300 receiver. To perform this
function you will need a cloning cable
(available separately).
Cloning is performed as follows:
1. Place the two receivers side by side
and connect the cloning cable as
shown in the diagram below.
2. Switch both radios on as follows;
a. On the MASTER unit (the receiver
you are copying from) press and
hold the FUNC and MODE keys
while turning the unit On. The radio
will display CLON TX
b. On the SLAVE unit (the receiver
you are copying to) press and hold
the FUNC and MODE keys while
turning the unit On. The radio will
display CLON TX. Rotate the knob
to display CLON RX.
3. To begin cloning, press the E/VFO key
on BOTH radios.
4. DATA TX is displayed on both radios
and the radio beeps as each memory
bank is cloned.
5. When cloning is completed both
radios display CLON OK.
6. If cloning fails, FAIL will be displayed
on the MASTER radio. To try again,
repeat step 3.
If repeated cloning attempts fail, repeat
the entire procedure from step 1.
Once cloning has completed successfully,
switch both radios off and remove the
cloning cable. You can now switch the
cloned (SLAVE) radio on and access the
frequencies you have transferred.
Page 23

RX1300 INSTRUCTION MANUAL PAGE 23
DCS ToNE FREQUENCIES
CH CODE CH CODE CH CODE CH CODE
1 023 27 152 53 311 79 466
2 025 28 155 54 315 80 503
3 026 29 156 55 325 81 506
4 031 30 162 56 331 82 516
5 032 31 165 57 332 83 523
6 036 32 172 58 343 84 526
7 043 33 174 59 346 85 532
8 047 34 205 60 351 86 546
9 051 35 212 61 356 87 565
10 053 36 223 62 364 88 606
11 054 37 225 63 365 89 612
12 065 38 226 64 371 90 624
13 071 39 243 65 411 91 627
14 072 40 244 66 412 92 631
15 073 41 245 67 413 93 632
16 074 42 246 68 423 94 654
17 114 43 251 69 431 95 662
18 115 44 252 70 432 96 664
19 116 45 255 71 445 97 703
20 122 46 261 72 446 98 712
21 125 47 263 73 452 99 723
22 131 48 265 74 454 100 731
23 132 49 266 75 455 101 732
24 134 50 271 76 462 102 734
25 143 51 274 77 464 103 743
26 145 52 306 78 465 104 754
Page 24

PAGE 24 INSTRUCTION MANUAL RX1300
CTCSS ToNE FREQUENCIES
CTCSS Frequency Hz CTCSS Frequency HzCTCSS Frequency Hz
1 67.0 14 107.2 27 167.9
2 71.9 15 110.9 28 173.8
3 74.4 16 114.8 29 179.9
4 77.0 17 118.8 30 186.2
5 79.7 18 123.0 31 192.8
6 82.5 19 127.3 32 203.5
7 85.4 20 131.8 33 210.7
8 88.5 21 136.5 34 218.1
9 91.5 22 141.3 35 225.7
10 94.8 23 146.2 36 233.6
11 97.4 24 151.4 37 241.8
12 100.0 25 156.7 38 250.3
13 103.5 26 162.2
Page 25

RX1300 INSTRUCTION MANUAL PAGE 25
STANDARD CoMMUNICATIoNS CoNTRACT WARRANT y
1. STATUToRy WARRANTIES
1.1 The Trade Practices Act Part V, Division 2A
and other legislation imply conditions,
warranties and other obligations on us
to consumers that cannot be excluded,
restricted or modified. Those provisions
apply to the extent required by law.
1.2 We exclude all other conditions, warranties
and obligations which would otherwise be
implied concerning the activities covered
by this agreement.
1.3 We limit our liability where we are allowed
to do so. Examples of where we are
allowed to limit liability are (a) you acquire goods from us for
re-supply;
(b) the goods or services we supply are
not of a kind ordinarily acquired for
personal, domestic or household use or
consumption.
1.4 Where we are allowed to limit our liability,
to the extent permitted by law, our sole
liability for breach of a condition, warranty
or other obligation implied by law is
limited.
(a) in the case of goods we supply, to any
one of the following as we decide -
(i) the replacement of the goods or the
supply of equivalent goods;
(ii) the repair of the goods;
(iii) the payment of the cost of repairing the
goods or of acquiring equivalent goods;
(iv) the payment of the cost of having the
goods repaired; or
(b) in the case of services we supply, to any
one of the following as we decide -
(i) the supplying of the services again;
(ii) the payment of the cost of having the
services supplied again.
2. ADDITIoNAL WARRANTIES
2.1 The warranties in this clause are in
addition to the statutory warranties
referred to in the previous clause.
2.2 We warrant our goods to be free from
defects in materials and workmanship for
one year from the date of original sale (or
another period we agree to in writing).
During this period and as our sole liability
to you under this warranty, we agree to,
at our option, either repair or replace
goods which we are satisfied are defective.
We warrant replacement parts for the
remainder of the period of warranty for the
goods into which they are incorporated.
2.3 We warrant our other repairs to be
free from defects in materials and
workmanship for three months from the
date of the original repair. During this
period and as our sole liability to you for
the repair, we agree to repair or replace (at
our option) repaired goods which we are
satisfied are defective.
2.4 We warrant that we will perform services
with reasonable care and skill and agree
to investigate any complaint made in good
faith that we have performed services
unsatisfactorily. If we are satisfied that
the complaint is justified, and as our sole
liability to you under this warranty, we
agree to supply those services again at no
extra charge to you.
2.5 If you want warranty service under this
clause you must give us an original or copy
of the sales invoice from the transaction
or some other evidence showing details of
the transaction.
Page 26

PAGE 26 INSTRUCTION MANUAL RX1300
3. oThER LIMITATIoNS
3.1 You may not rely on any representation, warranty or other provision by or for us
which is not covered by clause [ 1 ] or repeated in this agreement in clear terms.
3.2 We are not liable (nor are our employees, contractors and agents) for any
damage, economic loss or loss of profits whether direct, indirect, general, special
or consequential -
(a) arising out of any breach of any implied or express term, condition or
warranty; or
(b) suffered as a result of our negligence (or that of our employees, contractors
or agents)
apart from liability as set out in the previous two clauses.
3.3 The liability of a party under this agreement (whether arising in contract,
tort or by statute) is to be reduced by the same proportion as represents the
proportion of the loss or damage caused or contributed to by the other party, its
contractors or agents.
GME AFTER SALES SERVICE
Your GME RX1300 is especially designed for the environment encountered in
mobile or portable applications. The use of all solid state circuitry, careful design
and rigorous testing, result in high reliability. Should failure occur however,
GME maintain a fully equipped service facility and spare parts stock to meet the
customer’s requirements long after expiry of the warranty period.
Page 27

RX1300 INSTRUCTION MANUAL PAGE 27
SpECIFICATIoNS
Frequency Range: 150 kHz – 1309.995 MHz continuous
Frequency Steps: (kHz) 5, 6.25, 8.33, 9, 10, 12.5, 15, 20, 25,
30, 50,100, 500
Memory Banks: 1000 Manual Storage Memories
200 Automatic Storage Memories
50 Limited Search Memories
50 Dual Watch memories
Sensitivity: 150 kHz to 495 kHz : -112dBm
504 kHz to 1.620 MHz : -112dBm
1.625 MHz to 29.995 MHz : -116dBm
30 MHz to 87.975 MHz : -120dBm
88 MHz to 107.950 MHz : -110dBm
108 MHz to 135.975 MHz : -120dBm
136 MHz to 255.100 MHz : -120dBm
255.1125 MHz to 382.100 MHz : -120dBm
382.125 MHz to 769.800 MHz : -116dBm
769.8125 MHz to 960.100 MHz : -112dBm
960.125 MHz to 1309.975 MHz : -110dBm
Battery: 3.7 V 1900 mAh Lithium Ion Rechargeable
Specifications are typical unless otherwise indicated and may be subject to change without
notice or obligation.
Page 28

Part Number: 310441 Drawing Number: 44364-6
 Loading...