

Page 1
RM600D
REMOTE UNIT
TO SUIT GX600D
I N F O R M A T I O N L E A F L E T
RM600D INSTRU CT ION MANUA L PA G E 1
Page 2
PL EAs E NOT E
The GME RM600D is a remote unit to suit the
GX600D. Please refer to your GX600D manual for
operating instructions and operator qualifications.
IN TRO DUCT ION
Congratulations on your purchase of the GME RM600D.
With its compact size and waterproof design it can easily be
installed into almost any panel mounting location in your fly
bridge or cabin.
The RM600D is totally designed and manufactured at our
factory in Gladesville, Australia. Precision robots and the
very latest manufacturing techniques ensure a consistent
high quality is maintained, resulting in a communications
system of extreme reliability and performance.
ACCE ssO RIEs sU PPLI ED
The RM600D is supplied with the following.
• Mounting bracket and Gimball knobs
• DC battery lead
• Remote interconnecting cable
• MC504 microphone
• Mounting hardware
• Information leaflet
Please immediately contact your point of purchase if any
of these components are missing.
RM 600 D RE MOTE UNI T
The RM600D remote unit provides a remote head
connection to allow operation of the GX600D from
a flybridge or second station on your vessel.
The RM600D conveniently plugs into the GX600D using
an interconnecting cable and no additional interface
wiring is required.
The RM600D is supplied with a DC lead for connection
to a 12 Volt power source and 5 metres of terminated
interconnecting cable. Additional terminated cables are
available in 5 and 10 metre lengths.
When connected, the RM600D can duplicate all functions
of the GX600D. In addition it includes an Intercom feature
that allows internal communications between the GX600D
and the RM600D.
The RM600D is supplied with a standard PTT microphone
which is interchangeable with the alphanumeric
microphone supplied with the GX600D: Because of the
additional functions accessible from the alphanumeric
microphone, master control is given to whichever device
has the alphanumeric microphone connected: However
the main unit GX600D always has priority. If the GX600D
is switched off the system will not operate and no back
lighting will show on the RM600D LCD display. Before
changing the microphones, both units should be
switched off.
Note: Only one alphanumeric microphone should be
connected to any GX600D/RM600D combination.
RE sTR ICTI ONs OF UsE
European Telecommunications Standard Institute (ESTI) has
stipulated the specific requirements (EN 301 025-1/2/3) for
marine radio with class D DSC feature. This equipment is not
for use on SOLAS vessels or vessels on inland waterways. This
radio is intended for use in European countries: DK, FI, FR,
DE, GR, IE, IT, MT, NL, PT, ES, SE, GB, IS, NO AND TR.
0168 !
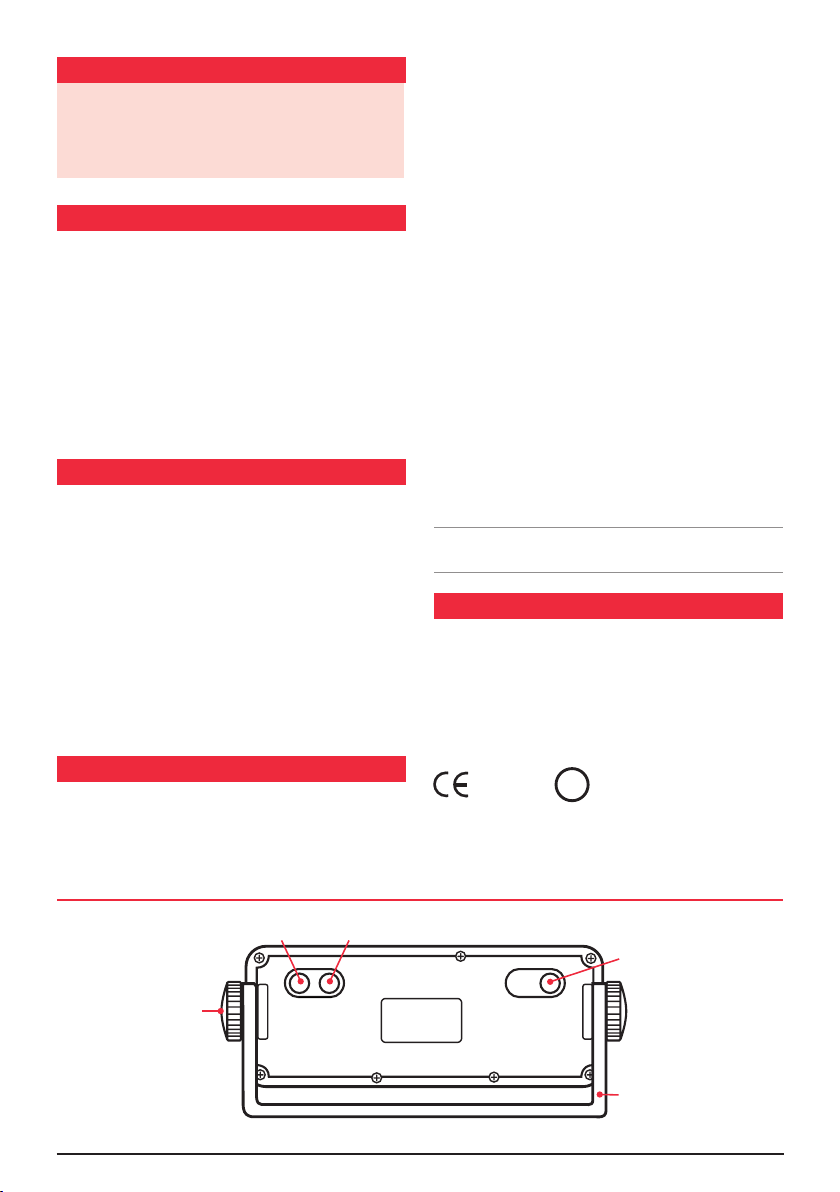
REAR PANEL CONNECTIONs
DC Power Cable Extension Speaker Socket
Inter Connecting
Cable to main unit
Gimbal Knob
Mounting Bracket
PA G E 2 INSTRU CT ION MANUA L RM600D
Page 3

sP ECI FICATION s
ELECTRICAL
Supply Voltage: 12 Volt Nominal
10.5-15.6 Volt Max. range
Negative earth
Current Consumption: Muted <200 mA
Full Volume 700 mA
ENVIRONMENTAL
Temperature Range: -10˚C to 55˚C
Solar Radiation: Case UV stabilised
Water & Dust Resistance: TP67 excluding external
cabling
Compass Safe Distance: 300 mm
MECHANICAL
Dimensions: 164(W) x 65(H) x 55(D) mm
Weight: 450 grams
AUDIO OUTPUT POWER
External 4 Ohm Speaker: 4 Watts average
Internal Speaker: 2 Watts average
EXTERNAL CONNECTIONs
Microphone: 6 pin RJ12 Socket
D.C. Supply: 2 pin Polarized Blade Socket
External Speaker: 3.5 mm mini phono line
socket (mono)
OVERCURRENT PROTECTION
Fuse: Inline 2 Amp 3 AG
sELECTING A LOCATION
It is advisable to spend a little time selecting the best
location for your RM600D. The mounting bracket can be
rotated above, below or behind the radio enabling the radio
to be mounted in a wide range of locations. In addition,
using the optional flush mounting kits (MK600, MK001,
MK002) the RM600D can be mounted directly in a panel or
dashboard. The flush mounting kits allow for installation or
replacement of any existing VHF radio.
REPLACING THE MICROPHONE
It is recommended that the microphone be left permanently
connected to the RM600D, but if it must be disconnected,
proceed as follows:
1. Insert a small screw driver between the rubber boot
and the lip of the raised area on the front panel.
2. Ease the rubber boot out of the cable entry hole and
slide it along the cable away from the front panel.
3. Identify the plug locking lever, work the screwdriver
blade behind it and move the lever towards the plug
body. At the same time gently pull the plug from the
socket. (see diagram below).
Screwdriver
Locking Lever
Cable
If required, replacement microphones are available with
plug and rubber boot already fitted.
move to left to
release Plug
Cable entry hole
IN sTALLAT ION
INsTALLING THE UNIT
After choosing your location, hold the unit with the
mounting bracket attached into the desired position and
mark the location with a pencil. Remove the mounting
bracket from the radio and drill the mounting holes. Bolt or
screw the bracket in place using hardware suitable for the
mounting surface. The unit is supplied with stainless steel
screws; however, if the mounting surface is unsuitable for
screws you may need to replace these with stainless steel
bolts. Remember the fixings for overhead mounted units
may have to withstand heavy pounding when the vessel is
in rough water or being towed on a trailer.
RM600D INSTRU CT ION MANUA L PA G E 3
WATER PROOFING CONNECTIONs
Although the RM600D itself is designed to resist the
ingress of water, the cable connectors are not completely
waterproof. After installation, the speaker and remote
connectors should be wrapped in waterproof tape or similar
to minimise the risk of corrosion or water damage. Do
not use normal electrical tape as this will not provide an
adequate seal against water. The connectors should then
be positioned where they are not directly exposed to the
elements.
Page 4

WARR ANT Y
GME limit this warranty to the original purchaser of the
equipment.
GME warrant the RM600D to be free from defects in
material and workmanship for a period of twelve (12)
months from the date of purchase from their authorised
retailer.
Should the product require servicing during this period,
all labour and parts used to effect repairs will be supplied
free of charge. GME reserve the right to determine whether
damage has been occasioned by accident, misuse or
improper installation whereby the warranty would be void,
including equipment which has been damaged due to:
(a) Incorrect or reverse polarity connection to a battery or
power supply or to an incorrect supply voltage.
(b) Operation of the main unit GX600 without an
antenna or by connection to an antenna which has
been incorrectly installed, resulting in damage to
the radio’s output circuit.
(c) Non-factory modifications.
NATIONAL DIsTRIbUTOR DETAILs:
Procedure to be followed by Claimant: In the event of a
defect occurring during the warranty period, the original
purchaser may return the defective unit along with suitable
proof of purchase date (i.e. receipt, docket, credit card slip
etc.) and a full description of the defect to the retailer from
whom the unit was purchased. All freight charges incurred
for transportation by the retailer or GME are the purchaser’s
responsibility.
GME AFTER sALEs sERVICE
Your GME radio is especially designed for the environment
encountered in marine installations. The use of all solid
state circuitry, careful design and rigorous testing, result in
high reliability. Should failure occur however, GME maintain
a fully equipped service facility and spare parts stock to
meet the customer’s requirements long after expiry of the
warranty period.
A Division of:
Head Office: sYDNEY- Locked Bag 2086, North Ryde N.S.W. 1670, Australia. Tel: +61 2 9844 6666, Fax: +61 2 9844 6600.
MELbOURNE ADEL AIDE PERTH bRIsbA NE sYDNEY AUCkL AND
7 Mircro Circuit 14 Phillips St. Unit 1 Unit 1 Unit B Unit F
Dandenong South Thebarton 10-12 Harvard Way 89-101 Factory Rd. 22-24 College St. 35 Neilpark Dr.
Vic. 3175 S.A. 5031 Canning Vale Oxley Gladesville East Tamaki
Tel: +62 3 9798 0988 Tel: +61 8 8234 2633 W.A. 6155 Qld. 4075 N.S.W. 2111 N.Z. 2141
Fax: +62 3 9798 0177 Fax:+61 8 8234 5138 Tel: +61 8 9455 5744 Tel: +61 7 3278 6444 Tel: +61 2 9879 8888 Tel: +64 9 274 0955
Fax: +61 8 9455 3110 Fax:+61 7 3278 6555 Fax: +61 2 9816 4722 Fax: +64 9 274 0959
For customers outside Australia and New Zealand, please contact your local GME retailer or email to: export@gme.net.au
Part Number: 310351 Drawing Number: 4 3 90 1- 2
www.gme.net.au
 Loading...