

Page 1

MARINE
ENTERTAINMENT
SYSTEM
INSTRUCTION MANUAL
Page 2

CONTENTS
FEATURES ............................................................................3
ACCESSORIES SUPPLIED .......................................................4
INTRODUCTION .................................................................. 4
CONTROLS ...........................................................................5
LIQUID CRYSTAL DISPLAY .....................................................6
MEDIA INPUTS ..................................................................... 7
INSTALLATION ..................................................................... 7
Installation Precautions................................................. 7
Location ...................................................................... 7
Mounting the Remote Head ......................................... 8
Flush Mounting ......................................................... 10
Mounting the Multimedia Hub .................................... 12
ELECTRICAL WIRING AND CONNECTIONS .......................... 13
G-DEK INSTRUCTION MANUAL PAGE 2
DC Connections.......................................................... 13
Speaker Connections .................................................. 15
Antenna Connections ................................................. 15
Auxiliary Inputs .......................................................... 15
Microphone/PA Connection ........................................16
Remote Head Connections .......................................... 16
Low Level Outputs ...................................................... 16
Sub Woofer Output ..................................................... 16
Reset Button .............................................................. 16
Fuse Replacement ...................................................... 17
GENERAL OPERATION ........................................................17
General Functions. ......................................................17
RADIO OPERATION ............................................................18
AM/FM Tuner. .............................................................18
DAB Tuner ..................................................................20
USING AN iPOD/iPHONE .................................................... 21
PLAYING USB/SD MULTIMEDIA FILES .................................. 22
PUBLIC ADDRESS (PA) SYSTEM ........................................... 26
REMOTE CONTROL ............................................................26
Remote control battery replacement. ...........................27
FUNCTION MENU .............................................................. 28
SYSTEM SETUP ...................................................................28
OPTIONAL ACCESSORIES .................................................... 29
SPECIFICATIONS ................................................................29
MULTIMEDIA SUPPORT ...................................................... 30
WARRANTY ....................................................................... 31
Page 3

FEATURES
• AM/FM radio
• DAB radio (GM550)
• Made for iPod and iPhone*
• MP3 via USB/SD card
• 4 x 45 watt peak power output
• Conformally coated PCBs for harsh marine environment.
• Rugged construction, made using high impact
UV protected plastics.
• Media hub ingress protection to IPX5
• Remote head waterproof to IPX7
• Backlit LCD screen
• Infrared remote control
• Portable MP3 player input
• Optional second wired remote
FCC PART 15 COMPLIANCE
This equipment has been tested and found to comply with
the limits for a Class B digital device, pursuant to part
15 of the FCC Rules. These limits are designed to provide
reasonable protection against harmful interference in a
residential installation. This equipment generates, uses and
can radiate radio frequency energy and, if not installed and
used in accordance with the instructions, may cause harmful
interference to radio communications.
However, there is no guarantee that interference will not occur
in a particular installation. If this equipment does cause harmful
interference to radio or television reception, which can be
determined by turning the equipment off and on, the user is
encouraged to try to correct the interference by one or more of
the following measures:
• Reorient or relocate the receiving antenna.
• Increase the separation between the equipment and receiver.
• Connect the equipment into an outlet on a circuit different
from that to which the receiver is connected.
• Consult the dealer or an experienced radio/TV technician
for help.
• Available in black or white
G-DEK INSTRUCTION MANUAL PAGE 3
Page 4

ACCESSORIES SUPPLIED
The G-DEK Multimedia Entertainment System is supplied with
the following standard accessories:
• Multimedia hub
• R1 remote head
• Remote head 5 m extension cable – LE024
• R1 remote head mounting template
• Remote control handset
• R1 remote sensor and cable
• DC/Speaker cable harness
• Mount support kit and template
• Instruction manual
Please immediately contact your point of purchase if any of
these components are missing.
*
Made for:
iPhone 4S, iPhone 4, iPhone 3GS, iPod touch
(2nd generation), iPod classic, iPod nano
(5th generation) and iPod nano (3rd generation).
INTRODUCTION
Congratulations on purchasing the GME G-DEK series marine
multimedia entertainment system, arguably the finest marine
entertainment product available today. Your G-DEK has been
designed with both the music buff and boat owner in mind.
The G-DEK is a complete digital entertainment system designed
specifically for playing music and video from a full range of
multimedia sources. With industry-first inclusions such as
DAB radio, (GM550) SD and USB inputs, iPod
connectivity and generic MP3 player support, the G-DEK
multimedia system is destined to become the standard by
which all marine entertainment systems are measured.
The G-DEK has all the attributes expected in a superior
entertainment system including a public address feature
iPod and iPhone
iPod, iPhone, iPod touch, iPod classic and iPod nano are
registered trademarks of Apple Computer, Inc. Registered in
the US and other countries.
“Made for iPod,” “Made for iPhone,” mean that an electronic
®
and iPhone
that allows the G-DEK to be used to broadcast voice
announcements on your vessel.
The G-DEK marine multimedia system has been developed
utilising a combination of the very latest in digital electronic
technology and the design expertise gained by GME engineers
over several decades of marine product development. With
all circuitry conformally coated, exposed metalwork protected
against the harsh marine environment and contained in a UV
stabilised water resistant polycarbonate housing, the G-DEK
will ensure many years of reliable service.
Read this instruction booklet carefully, plug in your favourite
music selection, sit back and enjoy the sounds that cannot fail
to impress even the most critical audiophile.
to iPod and iPhone respectively and has been certified by the
developer to meet Apple performance standards. Apple is not
responsible for the operation of this device or its compliance
with safety and regulatory standards. Please note that the use
of this accessory with iPod and iPhone may affect wireless
performance.
accessory has been designed to connect specifically
G-DEK INSTRUCTION MANUAL PAGE 4
Page 5

R1 REMOTE HEAD
CONTROLS
Power On/Off
Search Forward
Audio Source
Stereo/Mono
Local/Distant
Liquid Crystal Display
Equaliser Settings
Selector Options
G-DEK INSTRUCTION MANUAL PAGE 5
Mute
Selector Knob
Search Backwards
Auto Memory Store
Band Select
Memory Buttons
Loudness
Display/Clock
Page 6
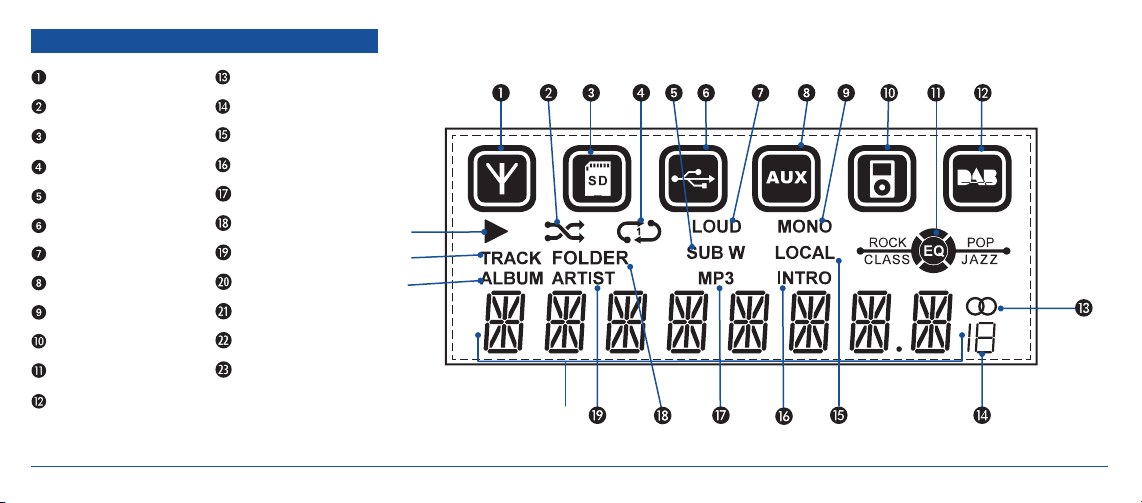
LIQUID CRYSTAL DISPLAY
Source - AM/FM Receiver
Random Tracks
Source - SD Card
Repeat
Sub Woofer Enabled
Source - USB
Loudness Mode
Source - AUX
Mono Mode
Source iPod
Equaliser Setting
Source - Digital Radio
(GM550)
G-DEK INSTRUCTION MANUAL PAGE 6
Stereo Indicator
Station Memory
Local/DX Mode
Intro Mode
MP3 File Playing
Searching Folder
Searching Artist
Text/Frequency
Searching Album
Searching Track
File Playing
2#
2@
2!
2)
Page 7
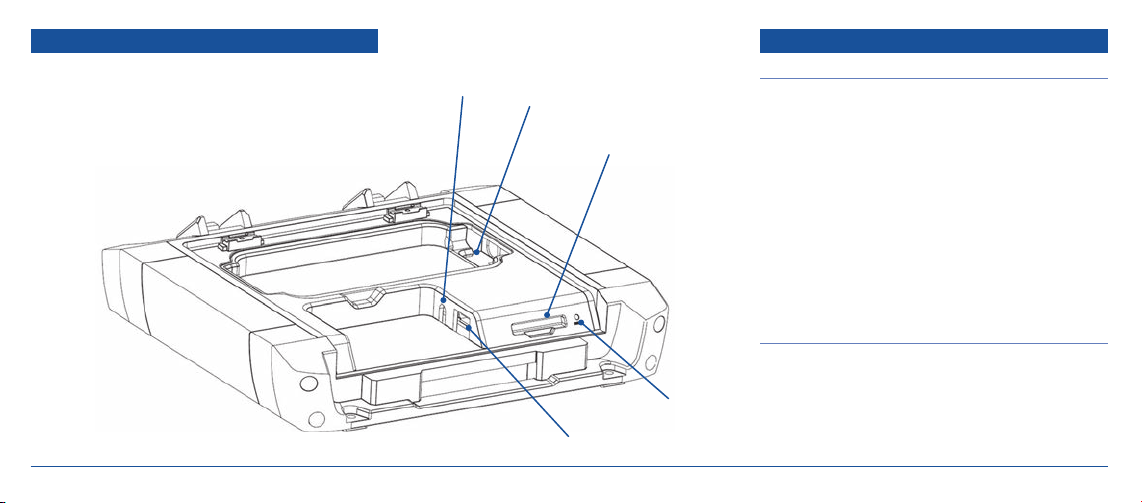
MEDIA INPUTS
The G-DEK supports audio and video playback from a number
of external sources including USB memory drives, SD cards, an
iPhone or iPod (via the in-built Apple interface), generic media
players (via a 3.5 mm interface cable), CD players, DVD players
and digital set top boxes.
G-DEK MEDIA HUB
G-DEK INSTRUCTION MANUAL PAGE 7
Auxiliary
Phono Input
iPOD Connector
SD Card Slot
USB Input
Reset Button
INSTALLATION PRECAUTIONS
If you are connecting your G-DEK for the first time or have
just reconnected your boat battery and you are experiencing
problems with the unit’s operation, we recommend you reset
the unit. The reset button is located under the lid to the right of
the SD card slot. Gently press the reset button with a paper clip
or similar object.
The preset station memories and clock time are retained only
while the yellow ‘Memory B+’ lead is connected (see Electrical
Wiring and Connections Section). If the yellow ‘Memory B+’ is
disconnected or switched off at the master switch or the unit is
removed from the vessel, the station memories will be lost and
the clock will need to be reset.
LOCATION
The G-DEK remote head can be either gimbal mounted or
installed directly to a flat panel in an accessible position
near your vessels steering position. GME recommends
that the location should be free from direct sunlight and
excessive vibration.
INSTALLATION
Page 8
The G-DEK multimedia hub can be mounted nearby or installed
ABOVE SHELF
in a separate location inside the cabin using an extension lead.
The cover on the multimedia hub should remain accessible to
Mounting Surface
allow access for connecting your MP3 music source via iPod/
iPhone, USB memory stick, SD card or generic MP3 player.
MOUNTING THE REMOTE HEAD
The G-DEK remote head can be neatly flush mounted on
a bulkhead or gimbal mounted using the gimbal brackets
supplied. The G-DEK rremote head is supplied with a cabin
cover. When the G-DEK is not in use the cabin cover should be
fitted to protect it from the elements.
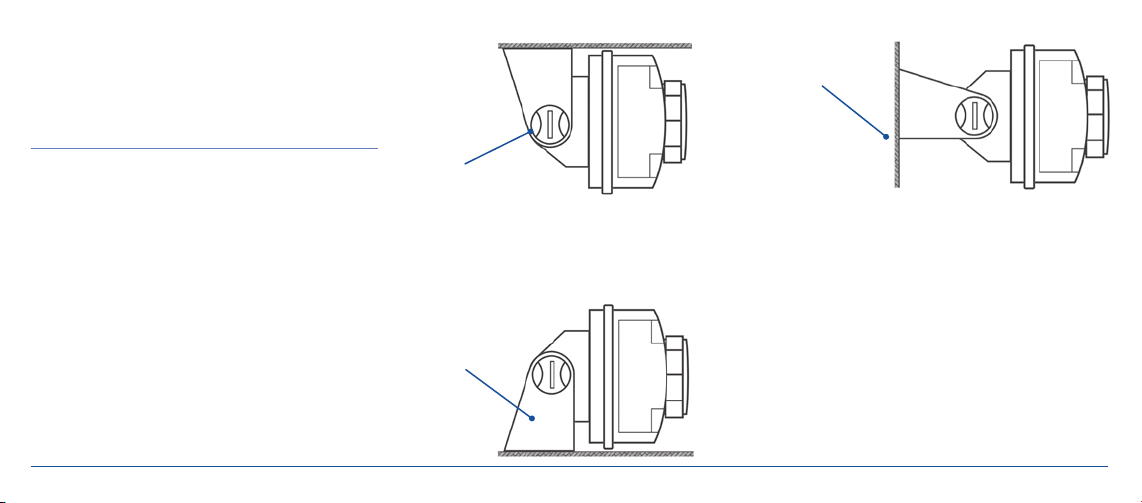
Gimbal Mounting
The gimbal mount can be used to mount the remote head
above or below a shelf. It can also be used to mount the remote
head on flat surface or vertical bulkhead where flush mounting
is not possible due to limited access behind the bulkhead.
Gimbal Knob
UNDER SHELF
Mounting Bracket
VERTICAL BULKHEAD
1. Fit the two gimbal mounts to the rear of the remote head
using the screws provided.
2. Temporarily fit the remote head assembly to the mounting
bracket and position the assembly in the desired location.
3. Using the mounting bracket as a template, mark the location
of the mounting screws.
4. Remove the bracket, drill the holes and screw the bracket
into place.
5. Refit the remote head to the mounting bracket using the
gimbal knobs. Adjust the remote head to the desired
viewing angle and tighten the gimbals.
G-DEK INSTRUCTION MANUAL PAGE 8
Page 9

FITTING THE GIMBAL MOUNTS FITTING THE MOUNTING BRACKET
G-DEK Remote Head
Gimbal Mount
Gimbal Mount
Gimbal Knob
Gimbal Knob
Mounting Bracket
Mounting Bolts
G-DEK INSTRUCTION MANUAL PAGE 9
Page 10
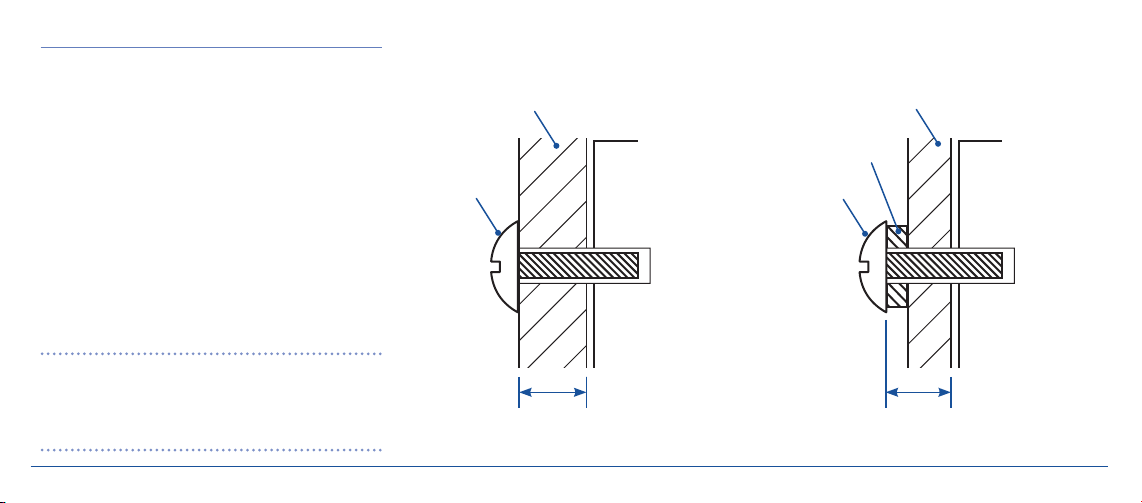
FLUSH MOUNTING
FIG.1
FIG.2
Before starting, select a suitable panel for the mounting
location then examine behind the panel to determine that
there is sufficient access for routing the cable and fitting the
mounting screws. A template is included for marking the
mounting locations.
Place the supplied template against the panel or bulkhead
then mark and drill the location of the four mounting screws
and the connecting cable.
Panel 6 – 9 mm
12 mm Screw
Remote Head
12 mm Screw
Panel < 6 mm
Add
Spacer
Remote Head
For panels of 6 – 9 mm thickness such as aluminium, plywood
or fibreglass, the unit can be mounted using the 12 mm
screws supplied. (See fig.1)
Feed the connecting cable through the centre hole and
position the remote head against the panel with the mounting
holes aligned. Install the 4 screws from behind the panel.
IMPORTANT: If the panel is less than 6 mm thick please
add additional washers or spacers to the screws to make a
minimum total depth of 6 mm otherwise you will not be able
to tighten the remote head against the panel. DO NOT over
6 mm Minimum
6 mm Minimum
tighten. (See fig.2)
G-DEK INSTRUCTION MANUAL PAGE 10
Page 11

FLUSH MOUNT USING SCREWS
FLUSH MOUNT USING THREADED RODS
4 x 12 mm
Screws
Where the panel or bulkhead is made from thicker material
such as wood or laminated fibreglass, install the remote head
using the 4 x 25 mm threaded rods, stainless steel washers and
4 x 25 mm
Threaded Rods
nuts provided.
Screw the rods into the 4 threaded holes at the rear of the
Remote Head as shown and tighten firmly. Do not over tighten.
G-DEK INSTRUCTION MANUAL PAGE 11
Page 12

Nut
Washer
Threaded
Rod
Remote Head
Bulkhead
FLUSH MOUNT USING ADHESIVE TAPE
Feed the cable through the centre hole in the panel then peel
the remaining backing from the adhesive tape and carefully
position the remote head against the panel, ensuring it is level.
The adhesive is pressure sensitive so press firmly and hold for
several seconds to allow the adhesive to grip.
MOUNTING THE MULTIMEDIA HUB
The multimedia hub can be mounted in almost any convenient
location however it should be protected from sunlight and
water spray where possible. The multimedia hub contains inputs
for your SD card, USB memory stick, iPod/iPhone and generic
MP3 player so you will need to be mounted it in a location
where it can be accessed such as inside the cabin of
your vessel.
The multimedia hub can be fixed to any flat surface using
screws or bolts via the four mounting points provided. The
mounting location should be free from direct sunlight, water
and excessive vibration and there should be sufficient room
to open the cover. When fully opened, the cover will latch into
place and will maintain its position no matter what the angle
of installation.
Feed the connecting cable through the centre hole then align
the 4 threaded rods with the mounting holes. Fasten from
behind the panel using the 4 stainless steel washers and
M3 nuts.
G-DEK INSTRUCTION MANUAL PAGE 12
Clean these
surfaces and
apply adhesive
tape
Page 13

MULTIMEDIA HUB MOUNTING POINTS
ELECTRICAL WIRING AND
CONNECTIONS
DC CONNECTIONS
Caution: The G-DEK is designed for vessels with a 12 volt
negative ground electrical system only!
Referring to the connections diagram:
1. Connect the Yellow wire directly to the positive terminal of
the vessel’s battery, or to a point that has +12 volt available
at all times. This lead maintains the memories within the
G-DEK and is the main power source for the unit.
2. Connect the Red wire to the vessel’s +12 volt supply via
an appropriate isolating switch or circuit breaker. This lead
enables the radio to be switched ON and OFF. Alternatively,
this wire can be connected directly to the battery’s positive
terminal and the G-DEK switched ON and OFF using its
own controls.
G-DEK INSTRUCTION MANUAL PAGE 13
Page 14

CONNECTIONS
G-DEK MULTIMEDIA HUB
FM ANTENNA
VIDEO IN
VIDEO OUT
MICROPHONE IN
IR REMOTE
REMOTE HEAD 1
REMOTE HEAD 2
DAB ANTENNA
BLUE/BLACK
BLACK/BLACK
YELLOW/BLACK
YELLOW/BROWN
G-DEK INSTRUCTION MANUAL PAGE 14
REAR RIGHT OUT
REAR LEFT OUT
FRONT RIGHT OUT
GREY
AUX2 RIGHT IN
FRONT LEFT OUT
BROWN
AUX2 LEFT IN
SUBWOOFER OUT
REAR RIGHT SPEAKER
MEMORY BACKUP (B+)+ IGNITION SW (B+)
+
YELLOW
REAR LEFT SPEAKER
+_+_+_+
RED
GREEN
GREEN/BLACK
AUTO ANTENNA
GROUND (B-)
_
BLACK
GREEN
BLUE
BLACK
FRONT LEFT SPEAKER
FRONT RIGHT SPEAKER
_
GREY
WHITE
VIOLET
GREY/ BLACK
WHITE/BLACK
VIOLET/BLACK
Page 15

IMPORTANT: Your G-DEK is able to maintain its memories
when it is switched off by the button by drawing power
directly from your battery via the Yellow ‘MEMORY B+’ lead.
Although the memory backup current is very small (about 20
mA) it could eventually discharge your battery if left connected
indefinitely. The time taken to completely discharge your battery
could vary depending on its amp-hour rating and battery
condition.
If you do not run your boat’s motor regularly or your battery is
not kept charged between outings (e.g. solar or wind charger),
we recommend you disconnect the Yellow lead each time you
secure or trail your boat. This is easily done by connecting the
Yellow ‘MEMORY B+’ lead via a master switch, which can be
switched off after each outing. This will mean you will lose all
your preset station memories and clock settings.
The blue (auto antenna) wire on the wiring loom supplies
12 volts when the G-DEK is switched on and can be used to
turn on an external device whenever the G-DEK is switched on.
SPEAKER CONNECTIONS
CAUTION: The G-DEK is a four-speaker system that requires
two separate wires for each speaker. Do not touch the speaker
wires together or allow them to touch other wiring.
G-DEK INSTRUCTION MANUAL PAGE 15
A range of GME speakers are available from your local GME retailer.
When connecting the speakers, observe the correct polarity
as shown in the connections diagram on page 13. Incorrect
polarity will result in a reduction of bass response and stereo
effect. The use of speakers with an impedance of less than 4
Ohms is not recommended, as they will cause excessive loading
of the G-DEK’s output circuit and may result in the radio
overheating.
Connect all four speakers as shown in the connections diagram.
Adjust the Fader control for the required front/rear balance. If
you wish to connect only two speakers, connect these to the
rear speaker wires. The remaining speaker wires should be
insulated to ensure they cannot short circuit together or to the
vessel’s 12 volt or negative electrical Bus. If using only two rear
speakers, adjust the Fader control to the rear speakers.
ANTENNA CONNECTIONS
The G-DEK includes an AM/FM tuner (the GM550 also includes
a DAB receiver). As these operate on different frequency bands,
a separate antenna is required for each. For information on
suitable AM/FM and DAB antennas, contact your nearest GME
dealer.
Connect the AM/FM antenna to the larger antenna socket
(bayonet connector). The DAB antenna connects to the smaller
SMA socket (GM550).
AM/FM ANTENNA SOCKET (BAYONET)
DAB ANTENNA SOCKET (SMA)
AUXILIARY INPUTS
There are two auxiliary inputs to allow connection of audio/
video from other external sources. Auxiliary input selection is
made using the
button on the remote head unit.
• Aux 1: The auxiliary 1 input accepts an audio input via a
3.5 mm phono connector. This connector is located under
the cover to the left of the USB input socket. The Aux 1 input
Page 16

allows the connection of generic MP3 or other audio media
players. The selection and playback of your media files is
controlled by the connected media player.
For best audio performance, set the volume on your media
player to its mid-volume point then adjust it as necessary to
achieve an output volume consistent with the volume level
of the G-DEK’s AM/FM radio. If the output from the media
player sounds distorted, reduce its volume level until the
distortion has gone.
• Aux 2: The auxiliary 2 input accepts low level audio from a
CD, DVD player, digital set top box or similar device. The left
and right audio channels from the device should connect to
the G-DEK’s left and right AUX 2 input leads. If the device is
a DVD player or set top box, connect the video output from
the device to the G-DEK’s video input lead. The G-DEK’s video
output lead should be connected to the video input of a
television or LCD monitor.
In this way, both video and audio from the device will be
selected automatically whenever the AUX 2 input is selected.
The selection and playback of your media files is controlled
by the connected Media Player.
G-DEK INSTRUCTION MANUAL PAGE 16
NOTE: For the Aux 1 input, GME offers a custom interface
cable for personal MP3 player connections; Part # LE68. When
using this cable, it is necessary to use the functions on the
portable device to control play.
MICROPHONE/PA CONNECTION
The G-DEK accepts a microphone input via the 3.5 mm
connector fly lead extending from the rear panel. This provides
a Public Address (PA) function for making voice announcements
over the speaker system and is useful in situations found in
commercial vessels or public transport vehicles. A suitable
plug-in microphone MC517BPA is available through your GME
dealer.
REMOTE HEAD CONNECTIONS
Up to two separate remote heads can be connected to
the G-DEK to allow control from two separate locations. If
connecting only one control head, it can be connected to either
remote head socket.
LOW LEVEL OUTPUTS
The G-DEK provides low level audio outputs for both front and
rear channels. These can be used to feed audio to a separate
high powered amplifier system for installations that require
increased output power.
SUB WOOFER OUTPUT
A Sub Woofer output allows the connection of a separate active
Sub Woofer for a superior bass response. If a Sub Woofer is
connected the Sub Woofer output should be enabled through
the ‘Sub Woofer’ option in the
menu.
RESET BUTTON
When the installation is complete, it is recommended to press
the Reset Button using a paper clip or similar object (the reset
button is under the lid to the right of the SD card slot). This will
ensure the G-DEK is ready to operate for the first time. If at
any time the controls do not seem to work (after replacing the
vessel’s battery for example), press the Reset Button to reset
the microcomputer inside the G-DEK.
Reset Button
Page 17

FUSE REPLACEMENT
If any of the fuses blow, replace them with a standard 30 mm
3 AG type of the same rating, if the fuse blows a second time
contact your GME dealer for advice.
The following fuse ratings are used:
Yellow ‘Memory B+’ lead: 15 amp.
Red ‘Ignition Switch’ lead: 1 amp.
GENERAL OPERATION
GENERAL FUNCTIONS
Power ON/OFF
To turn the G-DEK on, press the
display ‘WELCOME’ then resume the mode and settings that
were selected when last turned off.
To turn the G-DEK off, press and hold the
will display ‘GOODBYE’ and will switch off. While the G-DEK is
switched off it will display the clock.
button. The unit will
button. The unit
Back Lighting
While the G-DEK is switched on, briefly press the
button
to change the brightness of the back lighting. There are three
levels of back lighting available – off, dim and bright.
Audio Controls
The VOLUME, BASS, TREBLE, MID RANGE, BALANCE, FADER
and SUB WOOFER settings are adjusted using the large selector
knob. The default control setting is the Volume.
To adjust the Volume, rotate the knob.
To select an alternative audio control, press the
button
repeatedly until the desired function is displayed on the LCD
(‘BAS’, ‘TRE’, ‘MID’, ‘BAL’, ‘FAD’ or ‘SUBW’). Adjust the selected
control using the knob.
If no adjustment is made for five seconds the control returns to
the Volume setting.
NOTE: The BASS, MID and TREBLE settings on the
button
are only available when the Equaliser is set to manual (the icon
is displayed). See instructions below to adjust the equaliser
settings.
Equaliser
The G-DEK has four preset Graphic Equaliser settings to enhance
your audio listening pleasure. These are ‘Classic’, ‘Pop’, ‘Rock’
and ‘Jazz’. Each setting provides a preset adjustment of Bass,
Midrange and Treble settings to suit the selected music style.
To cycle through the preset Equaliser settings, press the
button repeatedly. Icons for Classic , Pop
Rock or Jazz will be displayed on the LCD.
If you prefer to manually adjust the Bass, Midrange and Treble
controls set the Equaliser to Off . The Bass, Midrange and
Treble settings can now be selected and adjusted manually
using the button.
Loudness
The Loudness function provides a low frequency Bass boost
to the audio output at lower volume settings. There are three
Loudness settings – Loud 01, Loud 02 and Off. Loud 01
provides a small increase in bass while Loud 02 results in a
greater boost.
To cycle through the loudness settings press the
button
repeatedly. The selected Loudness setting is displayed
momentarily along the bottom edge of the LCD. Whenever
the Loudness function is active the ‘LOUD’ icon is displayed.
G-DEK INSTRUCTION MANUAL PAGE 17
Page 18

Mute
Press the
button to temporarily silence the audio output.
‘MUTE’ will flash on the display to confirm the G-DEK has been
muted and the speakers will remain quiet. Press the
button again to restore the previously selected audio level.
Clock
The clock will normally be displayed whenever the G-DEK is
switched off. To manually display the clock at any time, briefly
press the
(display) button. After five seconds the display
will automatically return to its original status.
To adjust the time:
1. Press and hold the
button. The time will flash.
2. Turn the selector knob clockwise to adjust the minutes or
counter clockwise to adjust the hours.
3. When the correct time is displayed, briefly press the selector
knob to store the time and return to the normal display.
The time can be displayed in either 12 hour or 24 hour mode.
Refer to the MENU settings for details.
G-DEK INSTRUCTION MANUAL PAGE 18
Input Source Selection
Press the
button repeatedly to cycle through the G-DEK’s
available input sources. The icon for the selected input source
will be displayed. Inputs include AM/FM tuner, SD card, USB
memory stick, auxiliary inputs 1 & 2, iPod and DAB tuner
(GM550).
NOTE: Only input sources that are connected can be selected.
The G-DEK will automatically skip over input sources that are
not available (connected) e.g. if an SD card is not inserted the
SD card source cannot be selected.
Whenever the G-DEK is switched ON it will automatically
attempt to return to the input source that was last selected.
RADIO OPERATION
AM/FM TUNER
To select the AM/FM tuner press the
until the icon is displayed.
Country Selection
The G-DEK supports both European and USA band settings. The
settings control the different band edges and frequency tuning
button repeatedly
steps used by these countries (for details on frequencies and
tuning steps see ‘Specifications’ at the end of this manual).
When first connected, the G-DEK will default to the European
setting which is compatible with most countries (including
Australia). For operation in the USA, select the USA country setting.
To switch between European and USA band sets:
1. While the radio is on, hold the
memory button while
pressing the button. The radio will display ‘Goodbye’ and
switch off.
2. Press the
button to switch the radio ON again. ‘USA’ or
‘Europe’ will be displayed to confirm the selected band.
NOTE: If all power is disconnected from the G-DEK, the unit will
automatically return to the default European frequency bands.
Band Selector
There are three FM bands labelled FM1, FM2 and FM3 and
two AM bands labelled AM1 and AM2. Each band has six
station memories allowing you to store up to 18 FM and 12 AM
stations. To step through the available FM and AM frequency
bands press the
button repeatedly.
Page 19

Manual Frequency Tuning
To manually tune the radio to the desired frequency, briefly
press the
or buttons. The button will step upwards
in frequency and the button will step downwards in
frequency.
Automatic Tuning (Seek)
To automatically tune a station, hold the
or buttons
for 1 second. Holding the button will tune upwards in
frequency while the button will tune downwards. The
tuning will stop when a station with a strong, clear signal is
found.
Manual Programming of Stations
Each band has its own six station memory providing storage for
a total of 12 AM and 18 FM stations.
To store a station into one of the memories;
1. Select the required AM or FM band.
2. Tune to the desired station using the
or buttons.
Repeat to store other stations. If more than six stations
memories are required, press the key to select the next
band and continue the steps above to store further stations.
Automatic Programming of Stations using AMS
The AMS (Auto Memory Store) feature scans the selected AM
or FM band for stations and automatically stores them into
memory. Scanning continues until all the memories within the
selected band have been filled.
NOTE: The AMS function will overwrite all stations that were
previously stored in the station memories.
To use the AMS feature:
1. Select the required band (AM or FM).
2. Press and hold the
button. The G-DEK will begin
searching for radio stations. As each station is found, it is
stored into the next available memory location. When the
memories in band 1 are full, additional stations will be stored
in the other available bands until all memories have been filled.
3. Press and hold one of the six numbered station memory
buttons. A beep will be heard and the selected memory
number will appear on the lower-right of the LCD.
G-DEK INSTRUCTION MANUAL PAGE 19
Recalling Station Memories
Briefly press the
key to select the desired band then
briefly press the desired station memory button 1 – 6. The
G-DEK will jump immediately to that station and the memory
number will appear on the LCD.
Local/Distance Mode
Sometimes very strong radio transmissions can interfere with
the reception of other stations on adjacent frequencies resulting
in distortion of the desired signal. If these conditions occur,
briefly press the
button to select ‘Local’ mode. ‘LOC ON’
will appear briefly on the display and the ‘LOCAL’ icon will be
visible. The receiver will now be less sensitive to strong signals
which may help reduce the interference.
To listen to more distant stations, briefly press the
button
again. ‘LOC OFF’ will appear briefly and the ‘LOCAL’ icon will
disappear. The receiver will now be more sensitive to distant
stations.
Stereo/Mono Selector
button is used to switch between Mono or Stereo
The
reception while on the FM Band. For normal listening on the
FM bands, the Stereo option should be selected, however if FM
signals become weak or noisy, selecting Mono can reduce the
Page 20

background noise and improve reception quality by disabling
stereo detection.
To select
, briefly press the button. ‘MONO’ will
appear briefly on the bottom edge of the LCD and the ‘MONO’
icon will be displayed. To return to Stereo mode, briefly press
the button again. ‘STEREO’ will appear briefly on the
bottom edge of the LCD and the icon will be displayed.
DAB TUNER (GM550)
The GM550 G-DEK includes a tuner for receiving high quality
Digital Audio Broadcast (DAB) radio signals in areas where
these are supported. To select the DAB digital tuner press the
button repeatedly until the icon is displayed.
NOTE: The
(Local) and (Stereo) button functions are
not available in DAB receiver mode.
When the DAB tuner is first selected, it will automatically scan
for local digital stations and ‘DAB SCAN’ will be displayed. This
process may take a few seconds depending on the number
of stations available. As DAB stations are found they will
be automatically stored into the DAB band memories. Once
scanning is complete the G-DEK will begin playing the station
stored in the first memory location.
G-DEK INSTRUCTION MANUAL PAGE 20
Tuning DAB Stations
To tune to a specific DAB station, briefly press the
or
buttons. Press the button to tune upwards or the
button to tune downwards. ‘TUNING’ will appear until a station
is found then the station identification and description will
scroll on the display and the broadcast will be heard in the
speakers.
Station Memories and Band Selector
The G-DEK has three DAB bands labelled DAB1, DAB2 and
DAB3. Each band is identical but has its own 6 station memory
storage allowing a total of 18 DAB stations to be stored across
the three bands.
To select a station from the memory, first press the
button to select the desired band (DAB1, DAB2 or DAB3) then
briefly press the desired station memory button 1 – 6. The
G-DEK will jump immediately to that station and the memory
number will appear on the LCD.
Manually Storing Stations in Memory
During the initial ‘DAB SCAN’, the first 18 DAB stations that
are located are automatically stored into the available DAB
memories. If your preferred stations were not stored or
you wish to move your preferred stations to other memory
locations you can select and store them manually.
1. Briefly press the
key to select the desired band (DAB1,
DAB2 or DAB3).
2. Press the
or buttons to tune to the desired DAB
radio station.
3. Press and hold the chosen memory button 1 – 6. The G-DEK
will beep and the memory number will appear on the display.
Manual AMS (Auto Memory Store)
To manually force a search for new stations, press the
button. ‘DAB SCAN’ will flash as the radio searches for digital
stations. The first 18 DAB stations that are located will be
automatically stored into the DAB memories.
Displaying Station Information
Some DAB stations may display additional information such
as station identification, electronic program guide (EPG) etc
as scrolling text across the display. The content may vary from
station to station. To browse the available content, briefly press
button.
the
Page 21

USING AN IPHONE/IPOD
Connecting an iPhone/iPod*
The G-DEK can be connected directly to an iPhone or iPod via
the in-built Apple interface lead. The G-DEK is compatible with
the iPod Nano, Classic, Touch and iPhone models up to the
iPhone 4S that use a 30 pin connector. The iPhone 5 is currently
not supported.
When an Apple device is connected, the iPhone/iPod source
can be selected using the
selections can be made from the G-DEK or directly from the
iPhone/iPod itself. Any selections will be displayed on both the
iPhone/iPod screen and the G-DEK display.
The iPod/iPhone battery will be charged while it is connected
to the G-DEK.
The G-DEK is supplied with two ‘nests’ to suit the iPhone 4/4S
and the iPod Nano 3, 4 and 5. For other models simply remove
the nests and rest the device on the rubber pad inside the
G-DEK Multimedia Hub.
Switch the G-DEK on using the
connector into the iPhone/iPod. The excess cable on the Apple
button. Album, track and artist
button. Plug the Apple
iPod cavity. The G-DEK will automatically select the iPhone/
iPod input source and will begin playing the last played song
or movie on your device. The iPhone/iPod media can also be
manually selected using the button.
Searching and Selecting your Music
Although music and videos on your iPhone/iPod can be selected
either directly from the device or from the controls on the
G-DEK, we recommend you always use the G-DEK controls to
make your selections so that your iPhone/iPod remains safely
protected inside the media hub.
If switching back and forth between your iPod/iPhone and the
G-DEK to make your selections, media data synchronisation
issues may occur. This could result in a mismatch between the
currently playing song/movie and the title being displayed on
the G-DEK. If this occurs simply disconnect then reconnect your
iPod/iPhone. To prevent this from occurring we recommend you
use only the G-DEK controls to make your selections.
NOTE: While in the iPod/iPhone mode, the
, and
buttons on the G-DEK have no function.
connector can be inserted into the slot at the end of the
G-DEK INSTRUCTION MANUAL PAGE 21
SONG Search
1. Press the selector knob. ‘SEARCH’ is displayed.
2. Rotate the knob to select ‘SONG’ then press to confirm your
selection. The title of the first song is displayed.
3. Rotate the knob to select the desired song then press to
confirm your selection.
The song will begin playing.
ALBUM Search
1. Press the selector knob. ‘SEARCH’ is displayed.
2. Rotate the knob to select ‘ALBUM’ then press to confirm your
selection. The title of the first Album is displayed (album titles
are displayed in alphabetical order).
3. Rotate the knob to select the desired Album then press to
confirm your selection. The first song on the selected album
is displayed.
4. Rotate the knob to select the desired song then press to
confirm your selection.
The song will begin playing.
Page 22

ARTIST Search
1. Press the selector knob. ‘SEARCH’ is displayed.
2. Rotate the knob to select ‘ARTIST’ then press to confirm
your selection. The title of the first Artist is displayed
(artist names are displayed in alphabetical order).
3. Rotate the knob to select the desired Artist then press to
confirm your selection. The first song from the selected artist
is displayed.
4. Rotate the knob to select the desired song then press to
confirm your selection.
The song will begin playing.
PLAYLIST Search
1. Press the selector knob. ‘SEARCH’ is displayed.
2. Rotate the knob to select ‘PLAYLIST’ then press to confirm
your selection. The title of the first Playlist is displayed
(playlists are displayed in alphabetical order).
3. Rotate the knob to select the desired Playlist then press to
confirm your selection. The first song in the selected playlist
is displayed.
G-DEK INSTRUCTION MANUAL PAGE 22
4. Press the knob to begin playing songs in the playlist or rotate
the knob to select a specific song then press to confirm your
selection.
The song will begin playing.
To pause the current song, press the
button. Press the
button again to restore play.
VIDEO Search
1. Press the selector knob. SEARCH is displayed.
2. Rotate the knob until VIDEO is displayed then press to
confirm your selection.
3. Rotate the knob to select the desired video title then press to
confirm your selection.
The video will begin playing and the image will appear on the
attached video screen.
While a video is playing, press the
button to pause the
video. Press the button again to restore play.
PLAYING USB/SD MULTIMEDIA FILES
The G-DEK can play multimedia files directly from an SD card or
a USB memory stick. The following file formats are supported:
AUDIO MP3, WMA
VIDEO AVI (.avi/.divx), MPG (.mpg/.mpeg), DAT
(.dat), FLV (.flv), RMVB (.rm/.rmvb/.rmv/.
ra), VOB (.vob), MP4/MOV (.mp4/.mov),
OGG (.ogg), ASF (.asf)
For more details on supported file formats please refer to the
specifications on page 29.
NOTE: GME accepts no responsibility for data lost on USB, SD
cards or devices connected to the G-DEK.
General MP3 File Information
MP3 (MPEG-1 Layer 3) is a format for the compression of audio
files to approximately 8% of their original size. This permits a
large number of files to be stored on a single SD card or USB
memory drive.
Page 23

The G-DEK will play MP3 and WMA files. While playing, the
display will continuously cycle the track number and playing
time, the filename and the song title. If the file is an MP3 file,
the MP3 icon will be displayed.
USB Flash Memory
The G-DEK accepts USB flash memory drives up to 32GB in
size. The G-DEK does not support portable USB hard drives or
other USB devices that draw significant power resources from
the USB port.
When a USB flash memory drive is first inserted into the USB
The card can only be inserted one way. Do not force it.
If inserted correctly it should easily fit into the slot and
lock into place.
To remove the card, press the card inwards until it
clicks, then release it. Pull the card out of the slot.
Slot
Bevelled
Corner
To select the SD input manually, briefly press the
button
until the icon is displayed.
Connecting a TV/Video Monitor
Connecting a video monitor or TV to your G-DEK makes viewing
and selection of multimedia files much easier, especially when
used in conjunction with the remote control. Please refer to the
installation instructions for connection details.
port the G-DEK will automatically switch to the USB input and
begin playing the media on the memory drive.
To select the USB input manually, briefly press the
until the icon is displayed.
button
SD Card
SD Card
The G-DEK accepts SD cards up to 32GB in size.
To install an SD card, hold the card with the label facing
upwards and the bevelled corner towards the G-DEK and
When an SD card first installed the G-DEK will
automatically switch to the SD input and begin
playing the media on the card.
carefully insert it into the slot until it clicks into place.
G-DEK INSTRUCTION MANUAL PAGE 23
Page 24

Multimedia Controls
Playback Pause
To pause the playback, briefly press the
button. Press the
button again to resume playback.
Fast forward/Rewind
To select and play the next track, briefly press the
button.
To select and play the previous track, briefly press the
button.
To advance through the present track at high speed, press and
hold the
button. To rewind the present track at high speed
press and hold the button.
To continue normal play speed at the current position, briefly
press the
button.
Intro Scan
The Intro Scan feature cycles through the entire library of songs
playing the first 10 seconds of each track. To select Intro Scan
press the
button. ‘INTRO’ will be displayed along with
the track number and elapsed time for each song.
To stop the Intro Scan and continue playing the current track,
press the
G-DEK INSTRUCTION MANUAL PAGE 24
button.
Repeat Play
The Repeat function allows you to either repeat the current
track, repeat the current folder or repeat all the songs in your
music library.
Briefly press the
button to select the required option.
> Press once to repeat the current track. ‘RPT ONE’ is displayed
and the
icon is visible.
> Press again to repeat the current folder. ‘RPT FOLD’ is
displayed and the
icon is visible.
> Press again to repeat all the songs. ‘RPT ALL’ is displayed and
icon is visible.
the
> Press again to cancel the Repeat function. ‘RPT OFF’ is
displayed the
icon disappears.
Random Play
Random play will select and play songs at random.
Briefly press the
button. ‘RANDOM’ will be displayed
and the icon will appear.
To cancel Random Play, press the
button again.
‘NORMAL will be displayed and the icon will disappear.
Search
The G-DEK allows you to search for specific files on the media
source. To access the Search function, briefly press the selector
knob. ‘MUSIC’ will be displayed. Rotate the knob to select from
‘MUSIC’, ‘VIDEO’ or ‘PICTURES’.
To exit the Search Menu at any time press the
button.
Searching Music
Rotate the knob to display ‘MUSIC’ then press the knob. Rotate
the knob to choose from Track Search or Root Search. ‘TRK
SCH’ or ‘ROOT SCH’ will be displayed.
Track Search
While in ‘MUSIC’ search mode, select ‘TRK SCH’ and press
the knob.
For tracks 1 – 9 simply rotate the knob to select the required
track number then press the knob to play that track.
For tracks 10 – 999, rotate the knob to select the first (left
hand) digit in the track number then wait. The digit on the
display will move left. Repeat for the remaining digits until the
required track number is displayed then press the knob to play
that track.
Page 25

Example 1: To select track 5
TRK -- -- --
TRK -- -- --
TRK -- -- 1
TRK -- 1 2
TRK 1 2
TRK 1 2 4
Select the ‘TRK SCH’ mode.
Rotate the knob to select ‘5’.
is displayed.
is displayed.
Press the knob to play track 5.
Example 2: To select track 124
Select the ‘TRK SCH’ mode.
Rotate the knob to select ‘1’.
is displayed.
is displayed.
Wait. The display changes to
Rotate the knob to select ‘2’.
is displayed.
Wait. The display changes to
Rotate the knob to select ‘4’.
is displayed.
Press the knob to play track 124.
Root Search
Use Root Search to select from folders in the root directory of
your media storage device then select individual tracks within
those folders.
G-DEK INSTRUCTION MANUAL PAGE 25
While in ‘MUSIC’ search mode, select ‘ROOT SCH’ and press the
knob. The number of folders in the root directory of your media
storage device is displayed.
Rotate the knob to display a folder number, then wait. The
folder’s name will be displayed. Repeat until the desired folder
is selected then press the knob. The number of tracks within
that folder is displayed. Rotate the knob to select a track, then
wait. The name of the track will be displayed. Repeat until the
desired track is displayed then press the knob to play that track.
Picture Search
The G-DEK will display photos/pictures from the USB media or
SD card onto a connected monitor or TV.
To select photos or images from your media device, press the
selector knob to enter the Search mode then rotate the knob
until ‘PICTURES’ is displayed. Press the knob to select.
If no track is selected the photos will be displayed on the
monitor in a slide show.
To manually step forward or backwards through the slide show
briefly press the
or buttons. To pause the slide show,
press the button. Press the button to resume the
slide show.
NOTE: To adjust the timing of the slide show, refer to the
VIDEO SETUP option in the ‘System Setup’ menu.
To repeat pictures in the slide show, press the
> Press once to repeat (hold) the current picture. ‘RPT ONE’ is
displayed and the
icon is visible.
> Press again to repeat the pictures in the current folder. ‘RPT
FOLD’ is displayed and the
icon is visible.
> Press again to repeat all the pictures. ‘RPT ALL’ is displayed
and the
icon is visible.
> Press again to cancel the Repeat function. ‘RPT OFF’ is
displayed the
icon disappears.
To manually select individual photos while in Picture mode,
press the knob. ‘TRK SCH’ is displayed. Press the knob to select
it then rotate the knob to display the required picture/track
number. Press the knob again to select it. The selected picture
will be displayed on the monitor.
To return to Music, press the knob to enter the Search mode
then rotate it to select MUSIC.
button.
Page 26

PUBLIC ADDRESS (PA) SYSTEM
The G-DEK has a built-in Public Address (PA) system which
can be used to make announcement over the speakers. This
PA system is especially useful for G-DEK installations on
commercial vessels or coaches.
The operation of the PA system requires the addition of an
MC517BPA microphone. The microphone must be plugged into
the rear Microphone input.
Operating the PA System
1. To make an announcement over the speakers, press the PTT
button on the microphone. The current audio source will be
muted and ‘MIC’ will appear on the display.
2. Hold the microphone 5 – 8 cm from your mouth and speak
across the microphone in a normal voice. Your voice will be
heard in the speakers.
3. To control the microphone gain to the speakers, adjust the
selector knob while speaking into the microphone. During
this time ‘MIC-V’ will be displayed along with the selected
microphone gain level. The microphone level is adjustable
from ‘00’ (minimum) to ‘20’ (maximum).
G-DEK INSTRUCTION MANUAL PAGE 26
NOTE: When the PTT is released, the adjusted microphone
gain setting will be stored for future PA announcements. The
microphone gain setting is separate from the normal volume
adjustment.
Preventing Audio Feedback when using the PA Mode
Setting the microphone gain too high may cause audio
feedback resulting in a loud squeal in the speakers. If this
happens, reduce the microphone gain until the squeal stops.
To reduce audio feedback even further, it is recommended to
position the speakers so that the sound is projected away from
the microphone rather than towards it.
REMOTE CONTROL
The GME G-DEK includes a wireless remote control (RCU
G-DEK). The remote control makes adjusting the G-DEK much
easier, especially when selecting USB or SD card media files or
viewing movies and pictures. The remote will permit the direct
control of all major G-DEK functions from a distance of up to
3 metres.
Before initial operation:
1. Ensure the remote control sensor is connected to the G-DEK
as shown in the connections diagram.
2. Ensure the battery is installed and any battery protection tab
is removed from the battery compartment in the end of the
remote handset.
Point the remote handset at the G-DEK remote sensor and
select the required option on the keypad.
Cautions
• The remote control handset is not waterproof and should be
kept well away from water at all times.
• The remote control should not be left in direct sunlight for
prolonged periods, excessive sunlight and heat could cause
damage to the keypad resulting in incorrect operation or non
function.
The descriptions in the remote diagram have been colour
coded to show which operating modes the various controls
are most commonly associated with.
Page 27

MOVE LEFT
POWER ON/OFF
PLAY/PAUSE
SETUP MENU
INCREASE VOLUME
EXIT CURRENT MEDIA FILE
REWIND/PREVIOUS
DECREASE VOLUME
LOCAL/DISTANT
DISPLAY/ADJUST
CLOCK
BAND AM/FM
STATION MEMORIES
SEARCH/PLAY MOVIES
SEARCH/PLAY MUSIC
POWER
SETUP
RETURN
SEEK-
LOC
BND
1
4
MUSIC
VOL+
OK
VOL–
DISP
2
5
MOVIE
ENTER
AMS
SEEK+
LOUD
EQ
3
6
PHOTO
SRC
SEL
ST
ZOOM
SLOW
SCAN
OSD
MOVE UP
MOVE RIGHT
MOVE DOWN
SELECT INPUT SOURCE
SELECT BASS, TREBLE ETC
AUTO MUSIC SEARCH
STEREO/MONO
FAST FORWARD/NEXT
LOUDNESS
EQUALISER
ON SCREEN DISPLAY
MUTE
GENERAL
USB/SD MEDIA
AM/FM/DAB TUNER
SEARCH/PLAY PHOTOS
G.DEK INSTRUCTION MANUAL PAGE 27
REMOTE CONTROL BATTERY REPLACEMENT
Should the working range of the remote handset become
reduced, or functions fail to operate correctly, the battery
should be replaced:
1. Turn the remote over, insert a thumb nail between grooves
on the battery cover latch and slide the lever to the right to
pull out the battery tray.
2. Replace the battery, (type CR 2025 or equivalent), with the
positive side facing upwards.
3. Slide the battery tray back into the handset.
Open
Push
Page 28

FUNCTION MENU
The Function menu allows adjustment of the G-DEK’s general
user functions. A list of the configurable options is shown.
To enter the Function menu, press and hold the selector
knob. The first available menu option will be displayed.
Briefly press the knob to cycle through each of the available
menu options.
Rotate the knob to change the setting for the displayed option
then press the knob to accept the change.
To exit the menu, briefly press the
a few seconds for the menu to time-out.
G-DEK INSTRUCTION MANUAL PAGE 28
button or simply wait
FUNCTION OPTION DESCRIPTION
Beep On, Off Enable, disable button beeps
Volume Last, Default Set preset ON volume level
Clock On, Off Enables clock on display
Clock format 12, 24 Sets 12 or 24 hr clock display
SYSTEM SETUP
The System Setup allows access to the G-DEK’s full system
configuration menu. To access the System Setup menu press
the SETUP button on the remote control. The following options
are available.
MAIN MENU SUB MENU OPTIONS
SYSTEM
SETUP
LANGUAGE
SETUP
VIDEO
SETUP
TV System NTSC
TV Type 4:3 PS (Pan & Scan)
Default Restore
OSD Language English, Spanish,
Brightness
Contrast
Hue
Saturation
Sharpness
Photos Interval 5 Sec, 20 Sec,
PAL
AUTO
4:3 LB (Letter Box)
16:9 (Widescreen)
Chinese, French,
German, Portuguese
Level Adjustment
Level Adjustment
Level Adjustment
Level Adjustment
Level Adjustment
10 Sec, 40 Sec
Page 29

OPTIONAL ACCESSORIES
• Marine speakers
• Comprehensive range of AM/FM and DAB antennas
• Interface cable for MP3 devices (Part No. LE68)
• Wired remote 5 m extension cable (Part No. LE024)
• MK008 flush mount kit
• MK010 flush mount upgrade kit
(upgrade from a GD96XX installation).
• PA microphone (Part No. MC517BPA)
• Additional remote head (Model No. R1W white/ R1B black)
These high quality GME accessories are available through your
local GME dealer. Should you have any difficulty obtaining
them, contact your local GME sales office (in Australia and New
Zealand). Contact details are on the back page of this manual.
International customers should visit:
www.gme.net.au/export for details of your local importer.
* iPod is a trademark of Apple Computer Inc., registered in the U.S.
and other countries.
From time to time GME may introduce new and additional products to
the range or discontinue existing accessories. Details of any changes may
be found on our website.
G-DEK INSTRUCTION MANUAL PAGE 29
FM Radio
Frequency Range:
Frequency Step:
Intermediate Frequency:
Sensitivity (30 dB S/N):
Channel Separation:
Station Memories:
AM Radio
Frequency Range:
Frequency Step:
Intermediate Frequency:
Sensitivity (20 dB S/N):
Station Memories:
DAB Radio (GM550)
Frequency Range:
Sensitivity (20 dB S/N):
Station Memories:
Specifications are typical unless otherwise indicated and may be
subject to change without notice or obligation.
87.5 – 108 MHz (Eu/Aust/NZ)
87.5 – 108 MHz (USA)
100 kHz
10.7 MHz
13 dBuV
>22 Db
18
522 – 1620 MHz (Eu/Aust/NZ)
520 – 1720 MHz (USA)
9 kHz (Eu/Aust/NZ)10 kHz (USA)
455 kHz
25 dBuV
30
BAND III 174 – 240 MHz
-95 dBm Typical
18
SPECIFICATIONS
Audio Amplifier
Speaker Impedance:
Frequency Response:
Bass Adjustment Range:
Treble Adjustment Range:
Video Player
Video Output Level:
Horizontal Resolution:
General
Ingress protection rating:
Audio Output:
Aspect Ratio:
Video System:
DC Supply Input:
Memory Back-up:
Back-up Current:
Overall Size:
Weight:
(4 channels x 45 W Peak = 180 W
Peak) @ 10% THD
4 Ohm
40 Hz – 18 kHz
+/- 8 dB @ 100 kHz
+/- 10 dB @ 10 kHz
4:3 Letter Box
4:3 Pan & Scan
16:9
1.00 V Peak to Peak (75 Ohms Imp)
500
Auto/PAL/NTSC
11 – 16 volts Negative Ground
External Back-up Memory Wire
Approximately 20 mA
211 (W) x 50 (H) x 190 (D) mm
Approx 400 g
Media Hub – IPX5
Remote Head – IPX7
Page 30

8 – 48kHz
8 – 48kHz
720 x 480
720 x 576
(30fps)
720 x 480
720 x 576
(30fps)
720 x 480
720 x 576
(30fps)
720 x 480
720 x 576
(30fps)
1280 x 720
(30fps)
720 x 576
(30fps)
720 x 480
720 x 576
(30fps)
(.ogg)
WMA8, WMA9
WMA, WMA7,
(CBR,VBR)
change without notice or obligation.
NOTE: Specifications are typical unless otherwise indicated and may be subject to
ASF
(.asf)
16kbps – 320 kbps
16kbps – 320 kbps
Dolby Digital (AC3) 720 x 480
Dolby Digital (AC3)
WMA/LPCM
AAC-LC(2ch)
MPEG-Audio
(MP1/MP2/MP3)
OGG
Dolby Digital (AC3)
WMA/PCM/LPCM
AAC-LC (2ch)
MPEG-Audio
(MP1/MP2/MP3)
Dolby Digital (AC3)
LPCM
MPEG-Audio
(MP1/MP2/MP3)
Dolby Digital (AC3)
LPCM
MPEG-Audio
(MP1/MP2/MP3)
LPCM/MP3
AAC-LC (2ch)
COOK
AAC-LC (2ch)
Dolby Digital (AC3)
MULTIMEDIA SUPPORT
MP4V
DIVX3.xx/4.xx/5.
xx/6.xx
Xvid
MPEG-1
MPEG-1/MPEG-2
AUDIO
Format Bit Rate Sampling Rate
MP3
WMA7, WMA8,
WMA9 (CBR, VBR)
VIDEO
Format Video Codec Audio Codec Resolution
AVI
(.avi, .divx)
G.DEK INSTRUCTION MANUAL PAGE 30
MPG
(.mpg,
.mpeg)
MPEG-1/MPEG-2
DAT
(.dat)
H.263
FLV
(.flv)
RV8/9/10
RMVB
(.rm, .rmvb,
MPEG-1/MPEG-2
.rmv, .ra)
VOB
(.vob)
MP4V
MP4 / MOV
(.mp4, .mov)
OGG Vorbis
Page 31

STANDARD COMMUNICATIONS CONTRACT WARRANTY AGAINST DEFECTS
This warranty against defects is given by Standard
Communications Pty Ltd ACN 000 346 814 (We, us, our
or GME). Our contact details are set out in clause 2.7. This
warranty statement only applies to products purchased in
Australia. Please contact your local GME distributor for
products sold outside of Australia. Local distributor details at
www.gme.net.au/export.
1. Consumer Guarantees
1.1 Our goods come with guarantees that cannot be excluded
under the Australian Consumer Law. You are entitled
to a replacement or refund for a major failure and for
compensation for any other reasonably foreseeable loss or
damage. You are also entitled to have the goods repaired
or replaced if the goods fail to be of acceptable quality and
the failure does not amount to a major failure.
1.2 To the extent we are able; we exclude all other conditions,
warranties and obligations which would otherwise be
implied.
G-DEK INSTRUCTION MANUAL PAGE 31
2. Warranty against Defects
2. 1 This warranty is in addition to and does not limit,
exclude or restrict your rights under the Competition and
Consumer Act 2010 (Australia) or any other mandatory
protection laws that may apply.
2.2 We warrant our goods to be free from defects in materials
and workmanship for the warranty period (see warranty
table) from the date of original sale (or another period
we agree to in writing). Subject to our obligations under
clause 1.2, we will at our option, either repair or replace
goods which we are satisfied are defective. We warrant
any replacement parts for the remainder of the period of
warranty for the goods into which they are incorporated.
2.3 To the extent permitted by law, our sole liability for breach
of a condition, warranty or other obligation implied by law
is limited
(a) in the case of goods we supply, to any one of the following
as we decide –
(i) the replacement of the goods or the supply of equivalent
goods;
(ii) the repair of the goods;
(iii) the cost of repairing the goods or of acquiring equivalent
goods;
(b) in the case of services we supply, to any one of the
following as we decide
(i) the supplying of the services again;
(ii) the cost of having the services supplied again.
2.4 For repairs outside the warranty period, we warrant
our repairs to be free from defects in materials and
workmanship for three months from the date of the
original repair. We agree to re-repair or replace (at our
option) any materials or workmanship which we are
satisfied are defective.
2.5 We warrant that we will perform services with reasonable
care and skill and agree to investigate any complaint
Page 32

regarding our services made in good faith. If we are
satisfied that the complaint is justified, and as our sole
liability to you under this warranty (to the extent permitted
at law), we agree to supply those services again at no extra
charge to you.
2.6 To make a warranty claim you must before the end of the
applicable warranty period (see warranty table), at your
own cost, return the goods you allege are defective, provide
written details of the defect, and give us an original or copy
of the sales invoice or some other evidence showing details
of the transaction.
2.7 Send your claim to:
Standard Communications Pty Ltd.
PO Box 96, Winston Hills, NSW 2153, Australia.
Tel: 1300 463 463
Email: servadmin@gme.net.au
2.8 If we determine that your goods are defective, we will pay
for the cost of returning the repaired or replaced goods to
you, and reimburse you for your reasonable expenses of
sending your warranty claim to us.
3. What this warranty does not cover
3.1 This warranty will not apply in relation to:
(a) goods modified or altered in any way;
(b) defects and damage caused by use with non Standard
Communications products;
(c) repairs performed other than by our authorised
representative;
(d) defects or damage resulting from misuse, accident, impact
or neglect;
A division of Standard Communications Pty Ltd.
Head Office: PO Box 96, Winston Hills, NSW 2153, Australia.
New Zealand (09) 274 0955 All other international enquiries email: export@gme.net.au
(e) goods improperly installed or used in a manner contrary to
the relevant instruction manual; or
(f) goods where the serial number has been removed or made
illegal.
4. Warranty period
4.1 We provide the following warranty on GME and Kingray
products. No repair or replacement during the warranty
period will renew or extend the warranty period past the
period from original date of purchase.
PRODUCT TYPE WARRANTY PERIOD
Entertainment systems 2 years
Part Number: 310604 Drawing Number: 46959-2
Page 33

16.5
DRILL HOLE ø3.5 x 4
73.3
166
DRILL HOLE
16.0
ø
33.0
65
146.5
Mounting template G-Dek Remote Head flush mount template
DN: 46904-1 PN: 310596
 Loading...