

Page 1
www.glow-worm.co.uk
Instructions for Use
Climapro
Programmable Room Thermostat
Climapro RF
Radio Controlled Programmable
Room Thermostat
Page 2

2
Page 3

3
Customer Service:
01773 828100
Technical Helpline:
01773 828300
General and Sales enquiries:
Tel. 01773 824639
Fax: 01773 820569
The instructions are an integral part of the control
and must, to comply with the current issue of the Gas
Safety (Installation and Use) Regulations, be handed
to the user on completion of the installation.
General
Page 4

4
Page
General Information
General, Documents, Application,
Servicing & Recycling 4-5
Instructions for Use
Control buttons 7
Main display 7
Description of buttons 8
Display symbols 9
Choosing the operating mode 10
Setting the Comfort temperature 11
Setting the “Eco” temperature 12
Domestic hot water temperature adjustments 13
Domestic hot water advance 14
“Holiday” function 15
Setting the day, time and date 16
Setting the 7 day central heating programme 17
Setting the 7 day DHW heating programme 20
Central Heating Temporary Override 24
Information menu 25
Battery Replacement 27
Fault nding 29
Contents
Page 5

5
Controls Description
The Climapro is a programmable room thermostat with
separate 7 day programmes for heating and hot water.
This control gives you personalised heating comfort
according to your requirements and will improve the energy
efciency of your heating system.
The modulating regulation built into this thermostat changes
the temperature of the radiators to suit the desired ambient
temperature.
Any other use is considered as inappropriate and is
forbidden.
The manufacturer will not be responsible for any damage
caused by another use. In that case the user shall be
responsible.
General
The installation and the commissioning of the control has
to be carried out by a competent person who is responsible
for the compliance of the installation and the commissioning
according to current regulations.
Maintenance should be carried out by a competent person
in accordance with the rules in force.
Documents
Please keep this manual as well as any documents
enclosed with it safe for future reference.
We accept no liability in case of damage due to the noncompliance of the instructions of the present manual.
General Information
Page 6

6
Cleaning
DO NOT use any abrasive cleaning products as they could
damage the housing or plastic case.
Clean the case of the Climapro with damp cloth.
Make sure that no water goes inside the Climapro.
Recycling
The Climapro comprises of many recyclable parts and
should be disposed of according to the current WEEE
regulations.
The packaging should also be disposed of according to the
current regulations.
General Information
Page 7

7
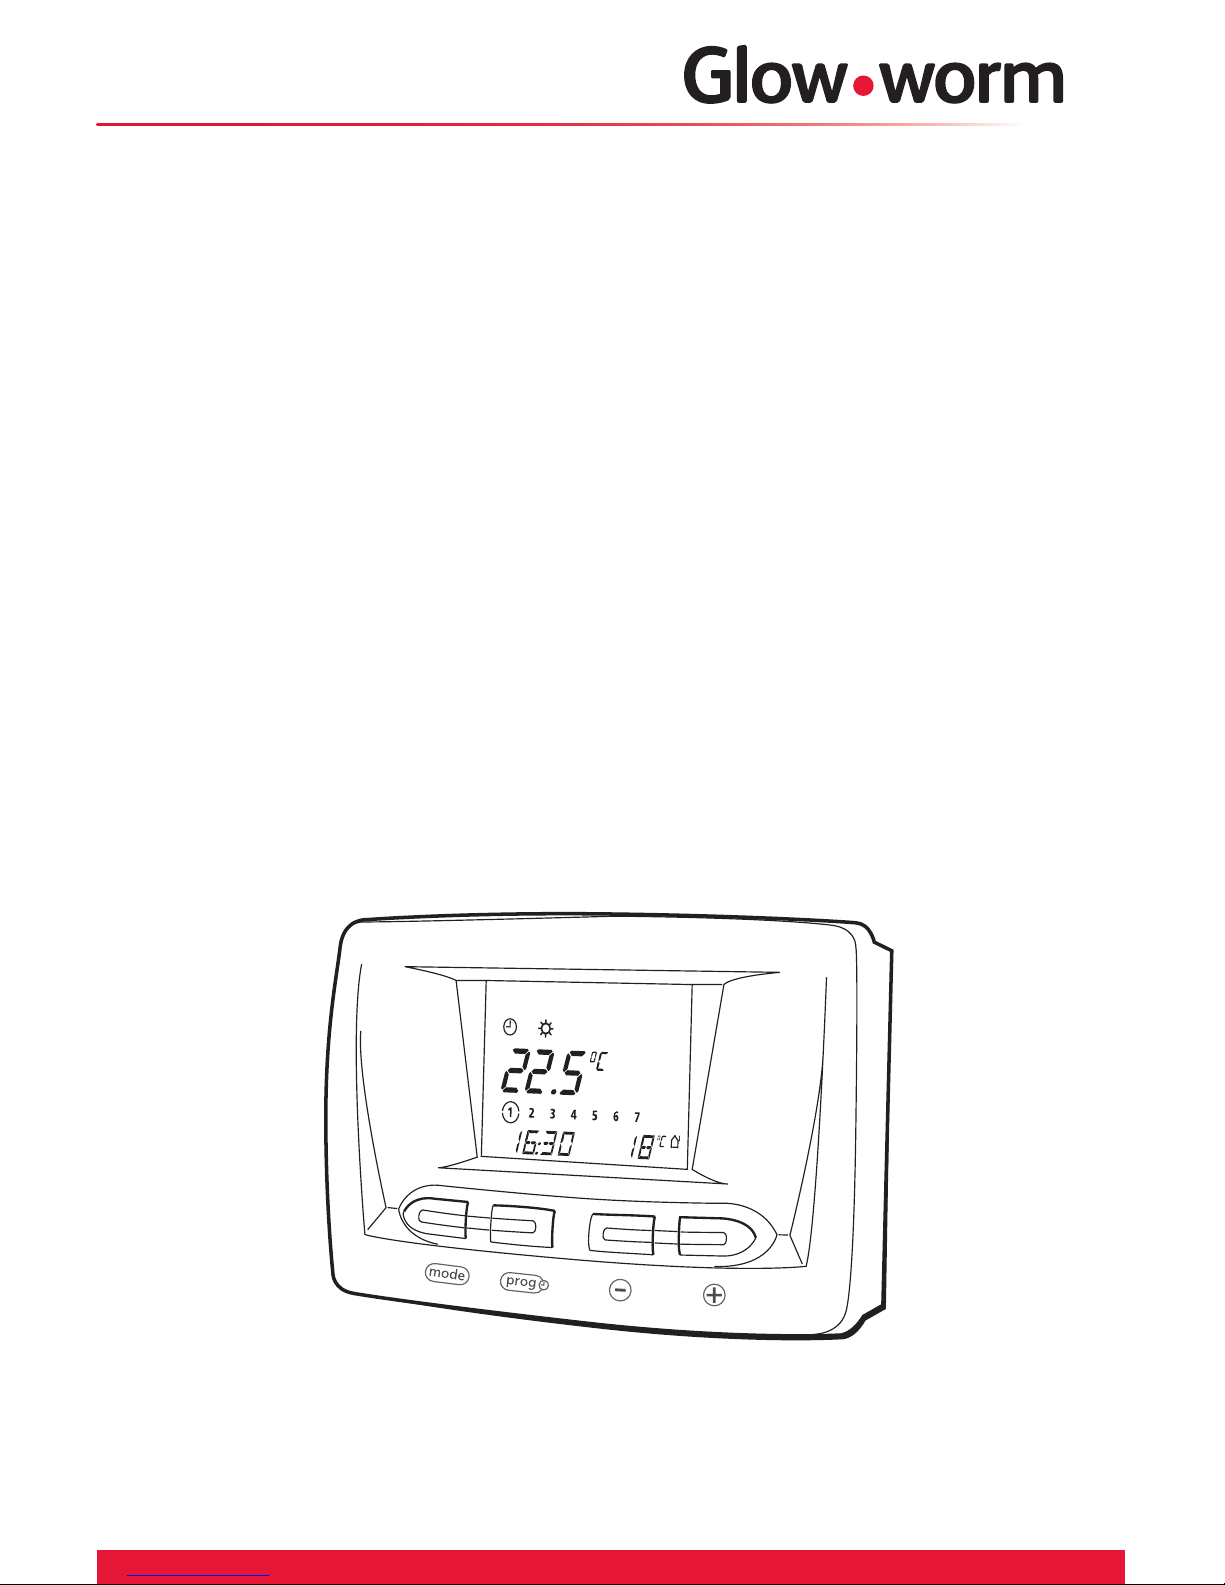
Control Buttons
Diagram 1
Main Display
The LCD will display the following as shown in diagram 2.
(*) Display only possible if an outside sensor is connected to
the boiler.
DISPLAY
MODE
BUTTON
MINUS
BUTTON
PLUS
BUTTON
PROGRAMME
BUTTON
Diagram 2
Current operating
mode
Ambient room
temperature
Current time
Current day
Outside
temperature (*)
Outside sensor
present symbol (*)
Domestic hot
water programme
(when in use)
Page 8

8
Description of Buttons
Page 9
9
Display Symbols
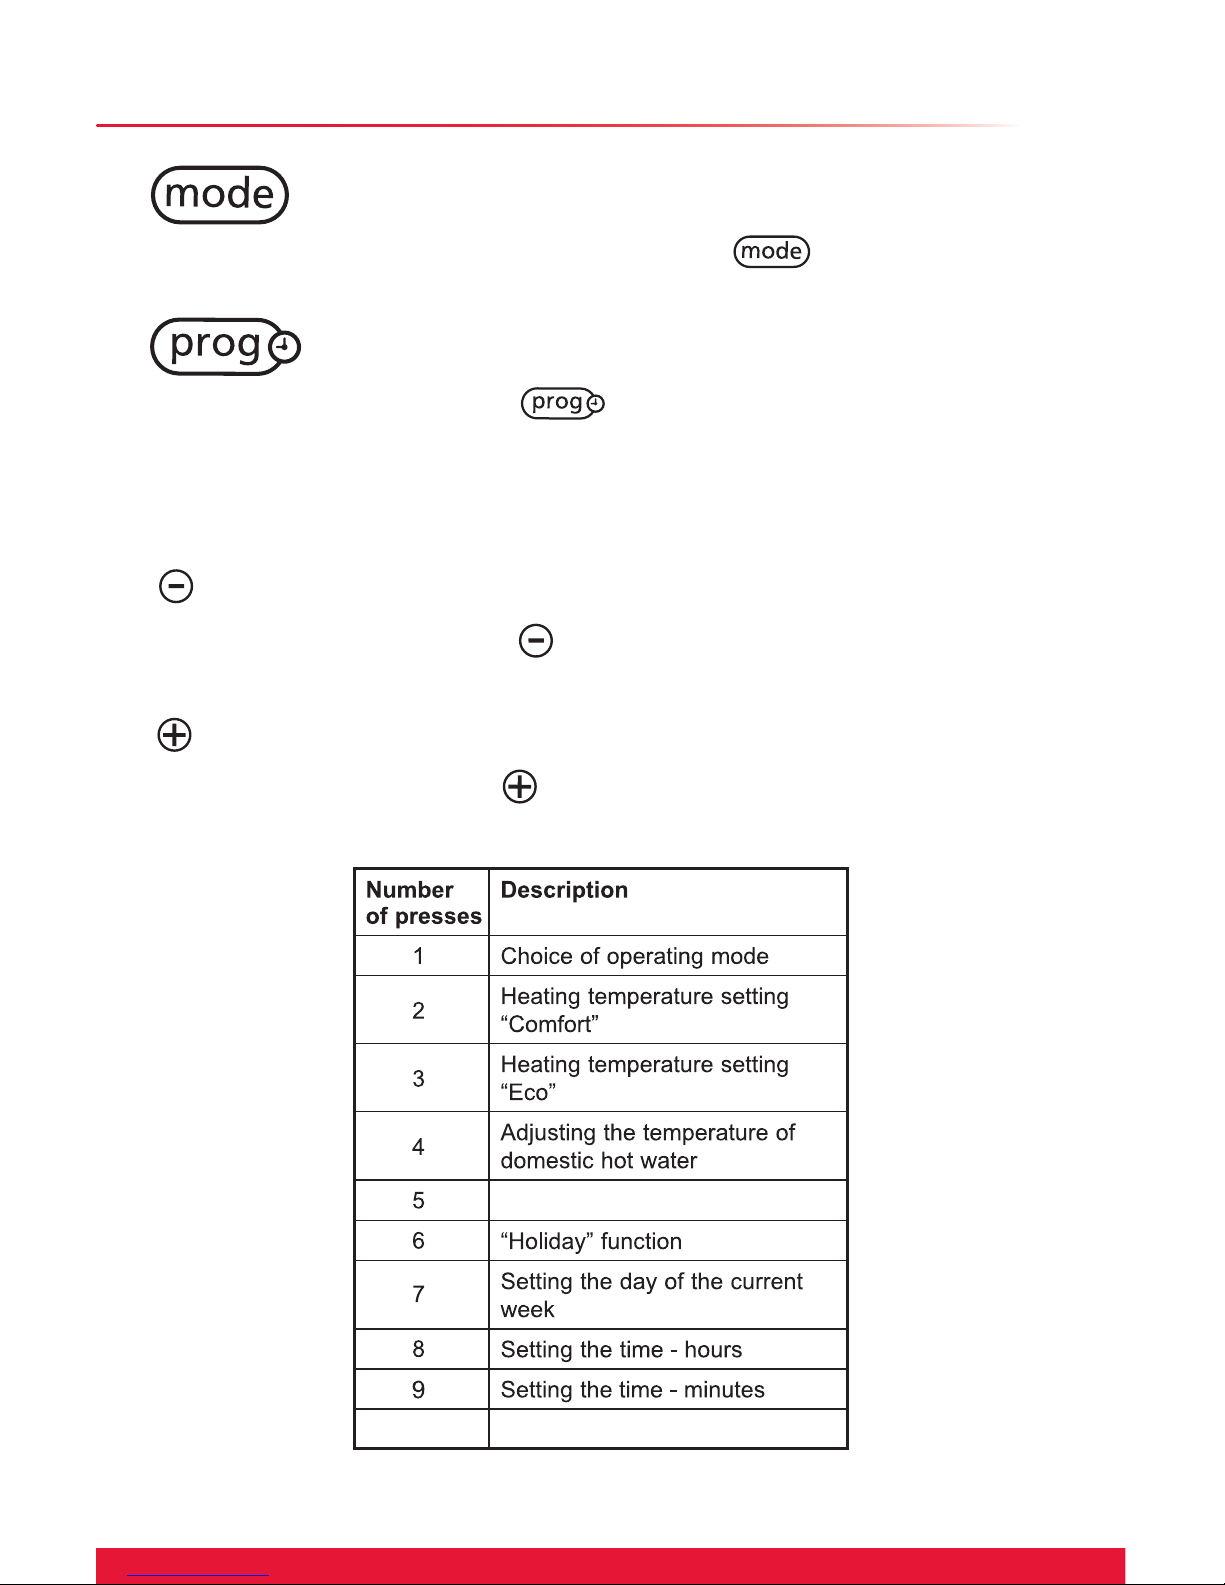
Button
By pressing several times on the
button, you will
access the following settings, see table below.
Button
By pressing on the
button several times you can
see the different programmes.
By pressing and holding for 5 seconds you can modify
the heating programme.
Button
By pressing on the
button, you reduce the value of
the setting.
Button
By pressing on the
button, you increase the value of
the setting.
10 Setting the date
Domestic hot water advance
Mode button settings
Page 10

10
Choosing the Operating Mode
1. To change the operating mode, press once.
2. Press
until the desired mode ashes.
3. The setting is saved after 10 seconds or by pressing the
button, which will then continue to the next setting.
Off: Heating is off but the domestic hot water is
still operating at the set temperature.
Eco: Heating on at Eco (minimum)
temperature
Comfort: Continuous heating on at Comfort
(desired) temperature
Timed:
The heating will operate to the
programmed on and off times Comfort or
Eco.
Page 11

11
Setting the Comfort temperature
The comfort temperature is the temperature you require
when the room is in use and the heating is on.
1. Press the button twice, the temperature will ash.
2. Use the
and buttons to set the “Comfort”
temperature, min. 5°C, max. 30°C, recommended 20°C.
3. The setting is saved after 10 seconds or by pressing the
button.
Page 12

12
Setting the “Eco” temperature
1. From the main display, press the button 3 times.
2. Use the
and buttons to set the “ECO”
temperature, min. 5°C, max. 30°C, recommended 15°C.
3. The setting is saved after 10 seconds or by pressing the
button.
The
temperature allows you to set the minimum
temperature of the room when not in use, e.g. at night
Page 13

13
Domestic hot water temperature adjustments
1. Press the button 4 times.
2. Use the
and buttons to set the temperature of
domestic hot water, min. 38°C, max. 65°C, recommended
60°C.
3. The setting is saved after 10 seconds or by pressing the
button.
If you have a Glow-worm combination boiler, the domestic
hot water temperature can be adjusted using the Climapro.
If you have a system or open vent boiler with a domestic hot
water cylinder this is controlled using the tank thermostat.
Page 14

14
This function allows you to advance the timed DHW
programme. This function will stay activated until the end of
the following programmed DHW timed period.
1. Press the button 5 times: OFF is displayed.
2. Press the
button to activate DHW advance: ON is
displayed.
3. The
symbol is displayed.
The function is active until the end of the following
programmed DHW timed period. Once the end of
the programmed DHW timed period is reached the
DHW advance function is switched off automatically.
To manually switch off the DHW advance function,
press
button 5 times.
From the DHW advance display press the
button.
OFF is displayed. The function is now deactivated.
Domestic hot water advance
Page 15

15
1. Press the button 6 times: the holiday duration
setting
ashes for approximately 10 seconds.
2. Press the
and buttons to select the number of
days (1 to 99) during which you are absent.
The symbol
is displayed.
3. The setting is saved after 10 seconds or by pressing the
button to continue to the next setting.
4. The function is then activated for the number of days
programmed. Once the programmed duration of the holiday
has been reached, the “Holiday” function
is automatically
deactivated.
To deactivate the function, press once on the
button
and the symbol will no longer be displayed.
“Holiday” function
The Climapro has a “Holiday” function that enables you to
set the number of days you are absent. The heating will
automatically come on at your return, allowing you to return
to a warm house. When the control is in the “Holiday” mode,
the operating mode is set to OFF and the frost protection
automatically activated.
NOTE: This will not affect the Frost Protection of your boiler.
Page 16

16
Setting the time
1. Press the button 8 times.
2. Use the
and buttons to set the current time.
3. Press the button. Use the and buttons to set
the minutes.
4. The setting is saved after 10 seconds or by pressing the
button to continue to the next setting.
NOTE: The “Yearly Calendar” will automatically switch
between Summer and Winter.
Setting the date
1. Press the
button 10 times.
2. Use the
and buttons to set the current date: Day/
Month/Year.
3. The setting is saved after 10 seconds or by pressing the
button.
= Monday = Friday
= Tuesday
= Saturday
= Wednesday
= Sunday
= Thursday
Setting the day, time and date
Setting the current day of the week
1. Press the
button 7 times.
2. Use the
and buttons to set the current day of the
week. The selected day ashes.
Page 17

17
The 7 day central heating programme allows you to select
up to 3 “Comfort” heating timed periods for each day of the
week. The control is factory set as shown in the table.
Setting the 7 day central heating programme
The 7 day heating programme is only active in timed
operating mode .
NOTE: If a 24 hour programme is preferred, contact the
installer for further assistance.
Page 18

18
Up to 3 separate time periods can be programmed in one
24hr period for different days of the week.
IMPORTANT: The three time periods must not overlap.
For example:-
Mon. to Fri.
Time period [ 1 ] Morning 5:30am - 7:00am
[ 2 ] Midday 11:00am - 1:00pm
[ 3 ] Evening 5:30pm - 10:30pm
Sat. Sun.
Time period [ 1 ] Morning 10:00am - 12:00pm
[ 2 ] Evening 5:00pm - 11:00pm
[ 3 ] Not used
Setting the 7 day central heating programme
Page 19

19
Day or groups
of days
Start time
Timed mode
“Comfort”
time period
Programming
menu
End time
Central heating
programme
1. Press the button for approximately 5 seconds.
2. The
symbol ashes, press to conrm selection
of central heating. The time period [ 1 ] is displayed ashing.
3. Press the
button and using the and buttons
choose the day of the week or the day groups for the
selected time period according to your requirements.
4. Press the
button and using the and buttons,
choose the start time then the end time for the time period.
Setting the 7 day central heating programme
5. Press the button once more to programme the
following time period.
Repeat the previous programming steps.
6. To exit the programming menu, press the
button for
approximately 10 seconds.
Page 20

20
The domestic hot water heating programme will provide
either a timed preheat function on a combination boiler,
allowing a quicker response of hot water to the tap or timed
hot water from a domestic hot water cylinder (system or
open vent boilers).
The programme allows you to select up to 3 timed periods
for each day of the week. The control is factory set as
shown in the table.
Setting the 7 day DHW heating programme
The programme is only active in timed operating mode .
NOTE: If you would like to switch to 24 hour only, rather
than 7 day programming, contact a competent person.
Page 21

21
Up to 3 separate time periods can be programmed in one
24hr period for different days of the week.
IMPORTANT: The three time periods must not overlap.
For example:-
Mon. to Fri.
Time period [ 1 ] Morning 5:30am - 6:30am
[ 2 ] Midday 11:00am - 12:00pm
[ 3 ] Evening 5:30pm - 8:30pm
Sat. Sun.
Time period [ 1 ] Morning 10:00am - 12:00pm
[ 2 ] Evening 5:00pm - 9:00pm
[ 3 ] Not used
Setting the 7 day DHW heating programme
Page 22

22
Day or groups
of days
Start time
Timed
mode
Time
period
Programming
menu
End time
Domestic
hot water
programme
1. Press the button for approximately 5 seconds.
2. Press
to select the tap symbol, then press , the
time period “[ 1 ]” ashes. Select the time period that you
would like to programme using the and buttons.
3. Press the
button and using the and buttons
choose the day of the week or the day groups for the
selected time period according to the table below.
Setting the 7 day DHW heating programme
Page 23

23
Setting the 7 day DHW heating programme
4. Press the button and using the and buttons,
choose the start time then the end time for the time period.
5. Press the
button once more to programme the
following time period.
Repeat the previous programming steps.
6. Press for approximately 10 seconds on the
button
to exit the programming menu.
Page 24

24
This adjustment allows the modication of the set room
temperature until the next temperature change in the
heating programme.
This setting is only possible in timed operating mode
.
1. From the main display, press the or buttons to
display the set room temperature.
2. The symbol
is displayed and the previous set
temperature ashes.
Press the
or buttons to set the desired ambient room
temperature, 50C min. to 300C max.
Central Heating Temporary Override
3. The setting is saved after 10 seconds or after pressing
the button.
At the next temperature change in the heating programme,
the symbol
will no longer be displayed.
To make this setting void, press the
button and the
key message will be displayed.
The main display will refresh after 3 seconds and the symbol
will no longer be displayed.
Page 25

25
This function enables you to scroll through the Climapro’s
control menus.
Press the
button once and the symbol will be
displayed on the following menus.
Press the
button again to scroll to the next menu.
● Display of the set “Comfort” temperature value.
● Display of the set “Eco” temperature value.
● Displaying the value of the set DHW temperature.
● Display of the time zones set for the heating programme.
● Display of the date (if the function “Yearly Calendar” has
been activated by your installer).
● Display of the control’s commercial name.
After scrolling through the settings, leave the controller for
10 seconds and the display will revert to the main screen.
Information menu
Page 26

26
Frost protection will operate when:
● The ambient temperature in the room where the appliance
is installed falls below 3°C.
● The outside temperature falls below 5°C (protection
possible only if an outside sensor is connected to the boiler).
● The “Holiday”
function is in use (see chapter “Holiday
function”).
● The control operating mode is set to
.
If the property is to be vacated for some time, please refer to
the boiler literature.
NOTE: The boiler will operate out of timed periods to protect
your home from frost damage and maintain the minimum
(ECO) temperature.
Frost protection
Page 27

27
Climapro RF only:
When “BATT” appears on the display, the battery life span is
equivalent to approximately one month.
Comments:
If the batteries are not replaced in time, the boiler works
without taking the room thermostat into account.
Programme settings will not be lost.
• Clean the battery compartment before inserting new
batteries.
• Do not mix new and used batteries of different types.
• Do not use rechargeable batteries.
• Never expose the batteries to excessive heat or a
naked ame, never try to take them apart and
make sure they are never short circuited.
• Do not keep the batteries in the controller. If electrolyte
leaks and comes in contact with skin or clothing, rinse
them immediately with water.
Battery Replacement
Page 28

28
13699
To replace the batteries see diagram. Remove the controller
from the back box with reference to the order of operation (A)
to (C), carefully replace the batteries (D) respecting the polarity
(direction of “+” and “-”).
Battery Replacement
Page 29

29
WARNING:
The service or repair of the control must only be undertaken
by a competent person.
Fault nding
In the event of a fault, a
message will be displayed
in the multifunctional
display zone, see diagram
and the appropriate table
overleaf.
Page 30

30
FaultDisplay
Power supply failure
Check the power supply to your home with your
provider.
Check the cable and connection between control
and boiler.
Check that the boiler is switched on.
If any of the above faults persists, call your Installation/Servicing company or Glow-worm service
Fault nding
Climapro
Page 31

31
Climapro RF
Fault nding
Page 32

32
Because of our constant endeavour for improvement, details may
vary slightly from those shown in these instructions.
Glow-worm
Nottingham Road, Belper, Derbyshire.
DE56 1JT
0020071550-04 06.09
 Loading...