

Page 1
0
Instruction Manual
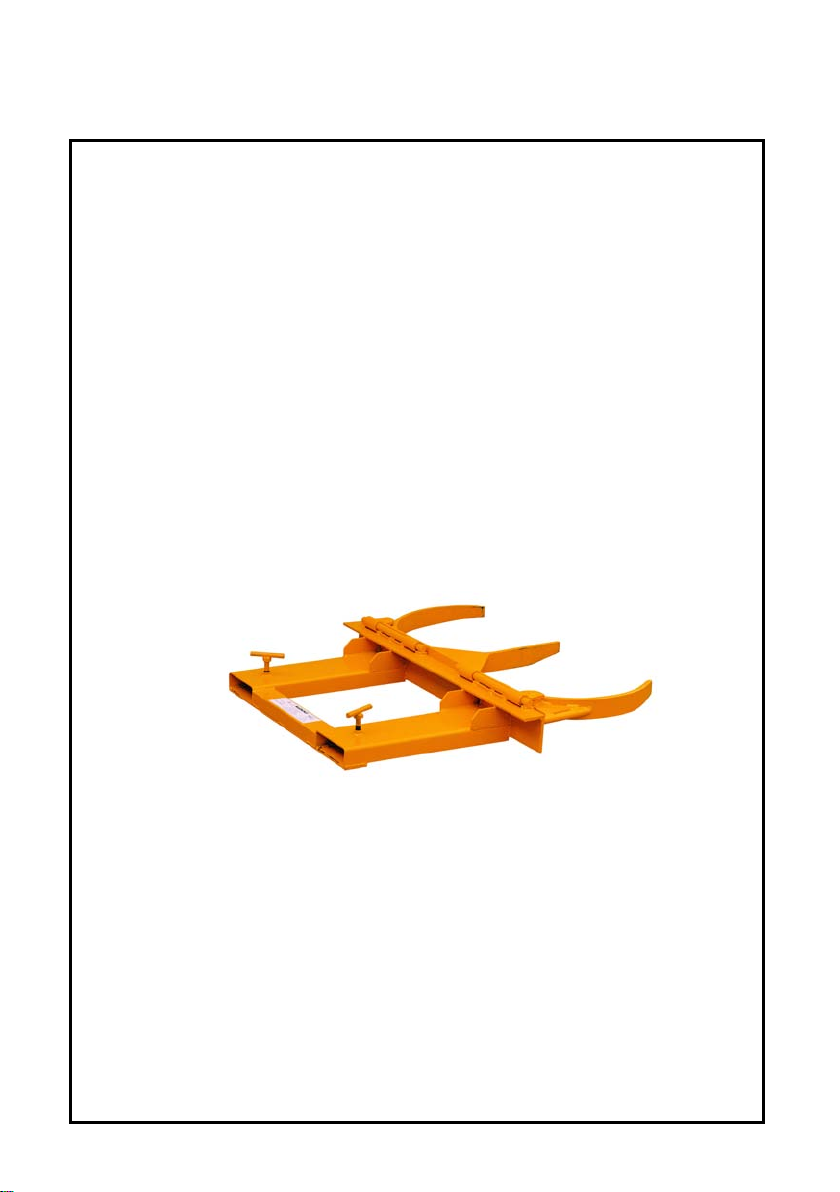
DRUM GRAB
Note: The Owner/Operat or must read carefully and under stand
all the information presented here before operation.
Page 2

1
Contents
1 Str uct ur e and relevant parts descri p ti on………. 2
2 Specification……………………………………… 3
3 Unpacking………………………………………… 3
4 General safety information……………………... 3
5 Operation…………………………………………. 4
6 Maintenance……………………………………… 6
7 For warranty service…………………………….. 6
8 For non-warranty service……………………….. 6
Page 3
2
THANK YOU FOR CHOOSING OUR DRUM GRAB. FOR YOUR
SAFETY AND CORRECT OPERATION, PLEASE CAREFULLY READ
THE MANUAL BEFORE USE.
NOTE: All of the information reported herein is b ased on data available at
the time of printing. The factory reserves the right to modify its own
products at any time without notice or incurring in any sanction. Please
verify with the factory for p ossi ble updates.
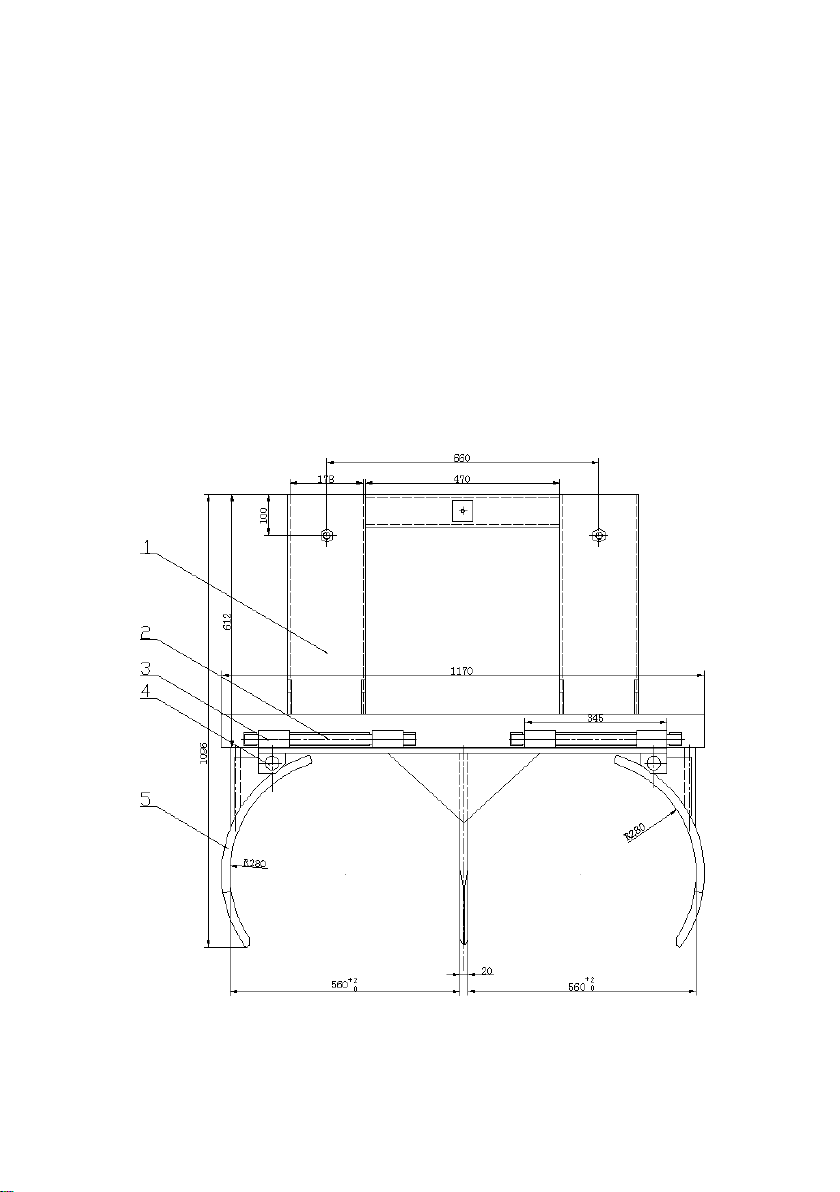
1. STRUCTURE AND RELEVANT PARTS DESCRIPTION
Page 4

3
Item No. Description Remark
Fork
(Inch)
Net
(lbs)
1 Supporting rack
2 Axle
3 Axle base
4 Bolt
5 Clamp
LOAD RATING: 1500 lbs/per drum, 55 gallon drum
2. SPECIFICATION
Model Drum Type
DG20
Double Steel
Drum
Capacity
(lbs / per drum)
1500 55 7*2
Drum
(gallon)
Pockets
1
/4 198
weight
3. UNPACKING
When unpacking your unit, check carefully for shipping damage. If
damage has occurred, file a claim with the delivering carrier within 24
hours and notify the dealer from whom the unit was purchased.
4. GENERAL SAFETY INFORMATION
WARNING: The Drum Grabs are designed for specific functions. To
insure proper use, the foll owing instructions must be adhered to:
1. DO NOT USE YOUR UNIT FOR LOADS EXCEEDING THE RATED
CAPACITY.
2. The Drum Grabs are designed for use only with the drums shown the
previous list. Do not use for open head drums containing liquid or
powder. Do not use on fiber or plastic drums. Drums must have rolling
ribs and should not be sev er ely dented or otherwise misshapen.
3. Adhere to all local codes regarding drum use and storage.
4. Before using this product, contact the manufacturer of your industrial
truck and obtain their written approval that t he t r uck has t he capacity to
Page 5

4
be used with this attachment.
5. Don not use drum grabs with manually operated stackers.
6. Do not use to lift personnel or to carr y loads over people.
7. Do not leave with a loads suspended i n air unattended.
8. Do not remove or obscure capacit y warning label.
9. Inspect unit daily before use. Remove unit from service immediately if
damaged or malfunctioning until such time as repairs have been
made.
10. Do not modify this product in any way.
11. Use only replacement parts with the manufacturer offered when
servicing.
5. OPERATION
The following outlines the general operation of Drum Grabs. Differences
for specific models follow this sectio n.
1. Place unit on floor or flat surface easily accessible to fork truck. Be
sure that “T” bolts are sufficiently unthreaded to allow forks to enter
pockets.
2. Carefully slide forks (do not use fork extensions) into drum grab’s fork
pockets. Be sure for ks ar e in pockets as far as possible.
3. Hand tighten “T” bolts to secure unit to forks (hand tool may be used
but is not necessary). Recheck bolts periodically during use for
tightness.
4. If not already done, unfold grab jaws.
5. Raise unit and approach drum so that the jaws come in contact with
the drum just below the upper rol ling rib of the drum. (Figure 1)
Page 6

5
Figure 1
6. Move unit forward onto drum, lowering jaws slowly as you move. Jaws
will open and close aroun d dr um. (Figure 2)
Figure 2
7. When jaws surround drum, raise forks until jaws rest under upper
rolling rib. Drum can now be raised and moved where desired. (Figure
3).
Figure 3
Page 7

6
8. To release drums, return to floor, lowering drum grab slowly as you
pull back.
9. Follow same procedure with tow drums at same time. For easier
pickup, drums should touch each other. Be sure that drum weights are
similar to insure balanced load.
10. Adjusting Jaws: Jaws must be properly positioned for 55 gallon
drums by raising to 90 degr ees and sliding jaws to location on s haft.
6. MAINTENANCE
Lubricate moving parts periodically
7. FOR WARRANTY SERVICE
If unit does not work properly, contact your dealer or the factory for units
less than ninety days old.
8. FOR NON-WARRANTY S ERVICE
For units older than ninety days, repairs can be made easily with factory
authorized parts.
NOTE: Do not send units to the factory for service without obtaining a
“returned goods authorization number” fr om the service department. We
will not be responsible for goods returned without proper authorization.
 Loading...