

Page 1

Gigaset DL580 / SUG UK-IE en / A30350-M216-L101-2-7643 / Cover_front_bw.fm / 16.10.18
DL580
Template A6 for NEO, Version 1, 20.04.2016
Page 2
Gigaset DL580 / SUG UK-IE en / A30350-M216-L101-2-7643 / overview.fm / 16.10.18
1
7
6
5
4
3
2
8
9
10
11
12
13
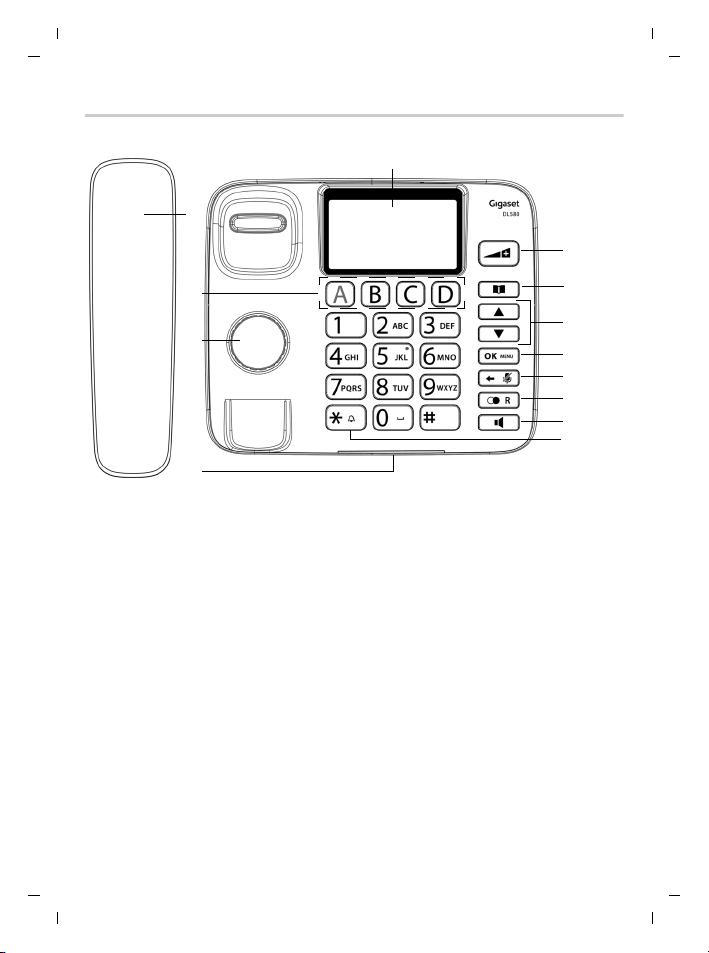
Overview
Overview
0
Template A6 for NEO, Version 1, 20.04.2016
Page 3

Gigaset DL580 / SUG UK-IE en / A30350-M216-L101-2-7643 / overview.fm / 16.10.18
1Handset
2Display
Shows current date and time and further
information depending on situation
3 Quick-dial keys A - D
Save special phone numbers for easy
access
4 Speaker
5 Incoming call indicator
6 Sound boost key
During a call: boost the receiver/loudspeaker volume
In the menu: return to idle mode
7Directory key
Open the directory: short press
Open the black list: long press
8Up / Down keys
In the menu and lists: scroll up/down
In i dle mo de: ope n the in comin g calls list
In input fields: move the cursor to the
left/right
Incoming call: adjust ringtone volume
9OK / Menu key
In idle mode: open the menu
In the menu: confirm selection
10 Back / Mute key
During a call: mute the microphone
Incoming call: mute the ringtone
In the menu: return to the previous
menu level
In input fields: delete characters
11 Recall / Flash key
In idle mode: open the outgoing calls list
12 Handsfree key
Incoming call: accept call through the
handsfree function
During a call: switch from handset to
handsfree mode
13 Star / Do not disturb key
Disable ringtone
Overview
Template A6 for NEO, Version 1, 20.04.2016
1
Page 4

Gigaset DL580 / SUG UK-IE en / A30350-M216-L101-2-7643 / security.fm / 16.10.18
Safety precautions
Safety precautions
Read the safety precautions and the user guide before use.
Th e de vi ce c ann ot be u sed in the eve nt o f a pow er f ai lur e. I n c ase of a po wer fai lur e
it is also not possible to make emergency calls.
Do not use the devices in environments with a potential explosion hazard
(e.g. paint shops).
The devices are not splashproof. For this reason do not inst all them in a damp environment such as bathrooms or shower rooms.
Use only the power adapter indicated on the device.
Remove faulty devices from use or have them repaired by our Service team.
Do not use the device if the display is cracked or broken. Broken glass or plastic can
cause injury to hands and face. Send the device to our Service department to be
repaired.
Extra loud / Sound boost function
• This setting can result in harm to health in persons with a normal hearing ability and is only intended for persons with a hearing impairment or reduced
hearing.
• Disruptive noises on the phone line can be increased.
2
Template A6 for NEO, Version 1, 20.04.2016
Page 5

Gigaset DL580 / SUG UK-IE en / A30350-M216-L101-2-7643 / operating.fm / 16.10.18
2
1
1
2
4
3
5
6
345
6
Getting started
Getting started
The device is designed for use in enclosed, dry rooms within a temperature range of +5 °C to +45 °C.
The device's feet do not usually leave any marks on surfaces. However,
due to the multitude of different varnishes and polishes used on furniture, contact marks on the surfaces cannot be completely ruled out.
Never expose the telephone to heat sources, direct sunlight or other
electrical devices.
Protect your telephone from moisture, dust, corrosive liquids and
vapours.
Connecting the phone
¤ Insert one end of the supplied
telephone line cord into the connection socket at the base of
the phone, then insert the other
end into the receiver .
¤ Insert one end of the supplied
phone cable into the connection
soc ket at t he rear of the device,
then insert the other end into the
phone socket .
¤ Insert the power cable of the
power adapter into the connection socket at the rear of the
device, then insert the power
adapter into the power socket .
Template A6 for NEO, Version 1, 20.04.2016
3
Page 6
Gigaset DL580 / SUG UK-IE en / A30350-M216-L101-2-7643 / operating.fm / 16.10.18
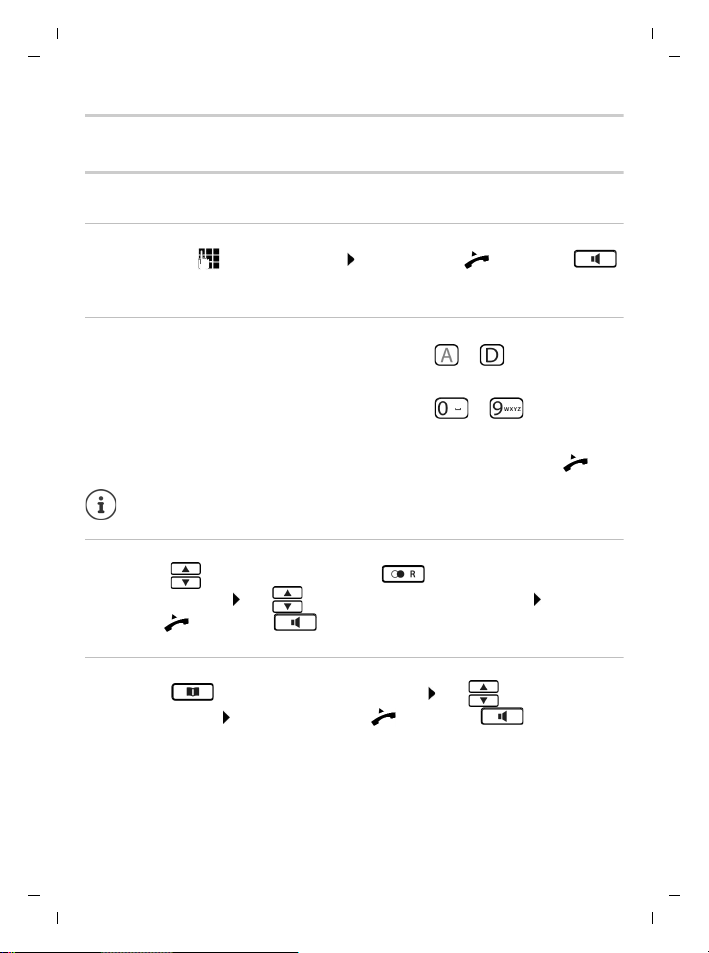
Making calls
Making calls
Calling
Dialling
¤ In idle mode, enter the number lift the receiver or press the
key . . . the number is dialled
Quick-dial
If a telephone number is assigned to one of the keys to
¤ Press the concerning key . . . the assigned number is dialled immediately
If a telephone number is assigned to one of the keys to
¤ Press and hold the digit key . . . the assigned number is dialled immediately
The call is established via loudspeaker. If requested, pick up the receiver .
The quick-dial keys are set up via the directory configuration.
Dialling from a calls list
¤ Press the key (incoming calls) or the key (outgoing calls) . . . the
calls list is opened use to select the number to be dialled pick up the
receiver or press the key
Dialling from the directory
¤ Press the key . . . the directory is opened use to select the num-
ber to be dialled pick up the receiver or press the key
4
Template A6 for NEO, Version 1, 20.04.2016
Page 7

Gigaset DL580 / SUG UK-IE en / A30350-M216-L101-2-7643 / operating.fm / 16.10.18
Making calls
Incoming calls
An incoming call is indicated by a ringtone, a display on the screen and the flashing call indicator. The caller's phone number is displayed, if available. If the caller's
number is saved in the directory, the name is displayed.
The number of new incoming calls that have not been answered is
shown on the top right of the display next to the symbol.
Accepting a call
¤ Pick up the receiver or press the key
Adjusting the ringer volume
¤ Use to adjust the ringer volume during an incoming call
Muting the ringtone
If you do not want to be disturbed by an incoming call, you can mute the ringtone.
¤ Press the key
Do not disturb
If activated, the telephone will not ring in the case of an incoming call.
¤ Press and hold the key . . . the display shows the symbol
Reactivating the ringtone: press and hold the key again
The function can also be activated/deactivated in a time-controlled
manner via the menu setting DO NOT DISTURB.
5
Template A6 for NEO, Version 1, 20.04.2016
Page 8

Gigaset DL580 / SUG UK-IE en / A30350-M216-L101-2-7643 / operating.fm / 16.10.18
Making calls
During a call
Switching to handsfree mode
¤ Press the key hang up the receiver
Adjust earpiece/loudspeaker volume
¤ Adjust the earpiece and loudspeaker volume by pressing during the call.
Boosting the receiver/loudspeaker volume
If the volume is not loud enough during a call, you can temporarily enhance it. The
setting will then apply until you end the call.
¤ During the call, press the key
Muting the microphone
When the microphone is switched off, callers will no longer be able to hear you.
¤ During the call, press the key
Reactivating the microphone: press the key again
Terminating a call
¤ Hang up the receiver
Calls lists
The phone saves up to 99 incoming and 15 outgoing calls in calls lists.
Opening a calls list
Incoming calls list: press the or key
Outgoing calls list: press the key
¤ Use to scroll through the list
The caller‘s phone number is displayed. The number of the currently displayed
entry in the list is shown on the top right of the display next to the symbol.
6
Template A6 for NEO, Version 1, 20.04.2016
Page 9

Gigaset DL580 / SUG UK-IE en / A30350-M216-L101-2-7643 / operating.fm / 16.10.18
Making calls
Missed calls
Missed calls are stored in the incoming calls list. If there are missed calls, the symbol in the top right corner of the display will flash. The number of new missed
calls is shown alongside this.
¤ Open the incoming calls list . . . the last received missed call is shown
first, the caller‘s number is displayed
¤ Use to scroll through the list.
If you have viewed a missed call, the symbol changes to .
Copying a number from the calls list to the directory
You can save numbers contained in a calls list to the directory.
¤ Open the calls list use to select the desired entry
¤ select COPY TO DIR. use to enter the relevant name
. . . the entry is stored
Deleting an entry/the list
You can delete one specific entry or the entire calls list.
¤ Open the calls list
Deleting an entry:
Deleting the list: ¤ select DELETE LIST DELETE?
¤ use to select an entry select
DELETE ENTRY DELETE?
7
Template A6 for NEO, Version 1, 20.04.2016
Page 10

Gigaset DL580 / SUG UK-IE en / A30350-M216-L101-2-7643 / operating.fm / 16.10.18
Making calls
Directory
The directory stores up to 99 names and numbers.
Opening the directory
¤ Press the key use to scroll through the directory entries
Adding a new entry
¤ Press the key select NEW ENTRY
¤ Use to enter the number use to enter the name
. . . the entry is stored
Editing an entry
¤ Press the key use to select the desired entry
select EDIT ENTRY
¤ Press to remove the characters to the left of the cursor
¤ Use to revise the entry
Deleting an entry / the list
You can delete one specific entry or the entire directory.
¤ Press the key
Deleting an entry:
Deleting the directory:
¤ use to select an entry select
DELETE ENTRY DELETE?
¤ select DELETE LIST DELETE?
8
Template A6 for NEO, Version 1, 20.04.2016
Page 11

Gigaset DL580 / SUG UK-IE en / A30350-M216-L101-2-7643 / operating.fm / 16.10.18
Making calls
Quick-dial keys
For quick-dial, you can assign a telephone number to one of the keys to .
The key is coloured red and should be allocated with a number to be called in
emergency situations. When pressing a quick-dial key, the assigned telephone
number is dialled immediately.
Additionally, the to keys can be allocated with numbers for quick-dialling.
A number that is to be used for quick-dial, must first be stored in the
directory.
Assigning/deleting a telephone number to a quick-dial key
¤ Press the key . . . the directory is opened use to select the entry
that is to be assigned to a quick-dial key
Assigning an entry:
Deleting an entry:
To check which number is assigned to keys to :
¤ select QUICK-DIAL select A - D or
0 - 9 . . . the number is assigned to the key
¤ select QUICK-DIAL select A - D or
0 - 9 press the key
¤ Press and hold the appropriate key
¤ Return to idle mode: press the key
9
Template A6 for NEO, Version 1, 20.04.2016
Page 12

Gigaset DL580 / SUG UK-IE en / A30350-M216-L101-2-7643 / operating.fm / 16.10.18
Making calls
Black list
Calls from numbers stored in the black list are not shown. The phone will not ring
and will hang-up automatically. The black list can contain up to ten entries.
Calls from numbers stored in the black list will be saved as missed calls in
the incoming calls list.
Opening the black list
¤ Press and hold the key for three seconds use to scroll through
the list the memory position is shown on the top right of the display
Adding an entry to the black list
¤ Press and hold the key for three seconds use to select the
desired memory position use to enter the number that is to be
added to the list . . . the entry is stored
If the memory position is not empty: use to remove the digits to the left
of the cursor
Deleting a number from the black list
¤ Press and hold the key for three seconds use to select the num-
ber to be deleted press until all characters are removed
confirm with
10
Template A6 for NEO, Version 1, 20.04.2016
Page 13

Gigaset DL580 / SUG UK-IE en / A30350-M216-L101-2-7643 / operating.fm / 16.10.18
Settings
All settings have to be performed in idle mode.
Settings
General
Enter the setting mode:
Select a menu entry or setting:
Confirm your selection:
Return to the previous menu level:
Move the cursor left/right in a text field:
Return to idle mode without saving the settings:
¤ Press
¤ Press or
¤ Press
¤ Press
¤ Press or
¤ Press
Language
You can choose between different display languages.
¤ Press select LANGUAGE
¤ Use to select the desired language
Ringer
Ring volume
Adjust the ring volume in seven levels or select ASCEND. VOLUME, which means,
that the volume will increase gradually.
¤ Press select RING VOLUME
¤ Use to select the desired level
Ringtone
Choose between ten different melodies for the ringtone.
¤ Press select RING TONE
¤ Use to select the desired ringtone (1-10)
11
Template A6 for NEO, Version 1, 20.04.2016
Page 14

Gigaset DL580 / SUG UK-IE en / A30350-M216-L101-2-7643 / operating.fm / 16.10.18
Do not disturb
If this function is activated, the phone will not ring in case of an incoming call.
¤ Press select DO NOT DISTURB
¤ Use to turn the function ON/OFF
When turning on:
¤ Press use to enter the start time SET TIME
END use to enter the end time
Display contrast
You can set the display contrast in three levels. Default: level 3
¤ Press select CONTR AST
¤ Use to select the desired level
Date and time
Setting date and time manually
¤ Press select DATE + TIME
¤ Use to enter the date and time at the cursor location
Settings
Use to move the cursor to the left/right.
Network clock
The date and time can be set automatically via the telephone network. If activated,
the date and time that has been manually set will be overwritten.
¤ Press select NETWORK CLOCK
¤ Use to turn the automatic time setting ON/OFF
12
Template A6 for NEO, Version 1, 20.04.2016
Page 15

Gigaset DL580 / SUG UK-IE en / A30350-M216-L101-2-7643 / operating.fm / 16.10.18
Alarm clock
¤ Press select ALARM CLOCK
¤ Use to turn the alarm clock ON/OFF
¤ Use to enter the alarm time at the cursor location
Switching off the alarm: press
If you are just dialling or the phone is busy or rings, the alarm clock will
not be triggered.
Provider/PABX specific settings
PABX access code
Setting the access code (e.g. "0") for dialling using the fixed line network.
¤ Press select PAB X CO DE
¤ Use to enter the access code
Example: The code is set to "0"
Pre-dial the number 123456 Initiate dialling process . . . the dialled number is
0123456
Flash time
Adapting the flash time (interruption period) of the key to the needs of your
PABX/telephone line. Possible values: 90ms/100ms/120ms/270ms/300ms/600ms.
¤ Press select FLASH TIME
¤ Use to select the desired flash time
Settings
13
Template A6 for NEO, Version 1, 20.04.2016
Page 16

Gigaset DL580 / SUG UK-IE en / A30350-M216-L101-2-7643 / appendix.fm / 16.10.18
Service (Customer Care)
Service (Customer Care)
Step by step towards your solution with Gigaset Customer Care
www.gigaset.com/service
Please note that if the Gigaset product is not sold by authorised dealers in the national territory the product
may not be fully compatible with the national telephone network. It is clearly specified on the box near the
CE mark for which country/countries the equipment has been developed. If the equipment is used in a
manner inconsistent with this advice or with the instructions of t he manual and on the product itself, this may
have implications on the conditions for warranty or guarantee claims (repair or exchange of product).
In order to make use of the warranty, the product purchaser is asked to submit a receipt which proves the
date of purchase (date from which the warranty period starts) and the type of goods that have been
purchased.
.
Visit our Customer Care pages
Here you will find:
• Frequently asked questions
• Free software and user manual downloads
• Compatibility checks
Contact our Customer Care team
Couldn't find a solution in the FAQs section?
We are happy to help...
... online:
via our contact form on the customer service page
... by telephone:
United Kingdom
Service Hotline: 020 36953111
(local call cost charge)
Ireland
Service Hotline: 0818 200 033
(6.6561 Ct./Call)
Please have your proof of purchase ready when calling.
14
Template A6 for NEO, Version 1, 20.04.2016
Page 17

Gigaset DL580 / SUG UK-IE en / A30350-M216-L101-2-7643 / appendix.fm / 16.10.18
Service (Customer Care)
Guarantee Certificate - United Kingdom and Ireland
Without prejudice to any claim the user (customer) may have in relation to the dealer or retailer, the customer
shall be granted a manufacturer’s Guarantee under the conditions set out below:
• In the case of new devices and their components exhibiting defects resulting from manufacturing and/
or material faults within 24 months of purchase, Gigaset Communications shall, at its own option and free
of charge, either replace the device with another device reflecting the current state of the art, or repair
the said device. In respect of parts subject to wear and tear (including but not limited to, batteries, keypads, casing), this warranty shall be valid for six months from the date of purchase.
• This Guarantee shall be invalid if the device defect is attributable to improper care or use and/or failure
to comply with information contained in the user manuals. In par ticular claims under the Guarantee cannot be made if:
• The device is opened (this is classed as third par ty intervention)
• Repairs or other work done by persons not authorised by Gigaset Communications.
• Components on the printed circuit board are manipulated
• The software is manipulated
• Defects or damage caused by dropping, breaking, lightning or ingress of moisture. This also applies if
defects or damage was caused by mechanical, chemical, ra dio interference or thermal factors (e.g.: microwave, sauna etc.)
• Devices fitted with accessories not authorised by Gigaset Communications
• This Guarantee shall not apply to or extend to services per formed by the authorised dealer or the customer themselves (e.g. installation, configuration, software downloads). User manuals and any software
supplied on a separate data medium shall be excluded from the Guarantee.
• The purchase receipt, together with the date of purchase, shall be required as evidence for invoking the
Guarantee. Claims under the Guarantee must be submitted within two months of the Guarantee default
becoming evident.
• Ownership of devices or components replaced by and returned to Gigaset Communications shall vest in
Gigaset Communications.
• This Guarantee shall apply to new devices purchased in the European Union. For Products sold in the
United Kingdom and in the Republic of Ireland the Guarantee is issued by: Gigaset Communications UK
Limited, 2 White Friars, Chester, CH1 1NZ.
• Any other claims resulting out of or in connection with the device shall be excluded from this Guarantee.
Nothing in this Guarantee shall attempt to limit or exclude a Customers Statutory Rights, nor the manufacturer’s liability for death or personal injury resulting from its negligence.
• The duration of the Guarantee shall not be extend ed by services rendered under the terms of the Guarantee.
• Insofar as no Guarantee default exists, Gigaset Communications reserves the right to charge the customer for replacement or repair.
• The above provisions do not imply a change in the burden of proof to the detriment of the customer.
To invoke this Guarantee, please contact the Gigaset Communications helpdesk. This number is also to be
found in the accompanying user guide.
15
Template A6 for NEO, Version 1, 20.04.2016
Page 18

Gigaset DL580 / SUG UK-IE en / A30350-M216-L101-2-7643 / appendix.fm / 16.10.18
Australia.............................................61 1300 780 878
Austria ..........................................0043 1 311 3046
Bahrain ................................................31 73 11 173
Belgium.................................................07815 6679
Bosnia Herzegovina............................033 276 649
Brazil
Grandes Capitais e Regiões Metropolitanas:
..................................................................4003 3020
......................................... (Preço de uma ligação local)
Demais localidades:
.......................................................... 0800 888 3020
..............................................................................(Gratuito)
Bulgaria .........................................+359 2 9710666
Canada ...........................................1-866 247-8758
China.......................0 21 400 670 6007 (RMB 0.11)
Croatia ................................................01 / 2456 555
Czech Republic....................................233 032 727
Denmark ..........................................+45 43682003
Finland ....................................+358 (0)9725 19734
France ............................................ (0)1 57 32 45 22
Germany........................................02871 / 912 912
Greece ........................................+30 2111 98 1778
Hong Kong..............................................2763 0203
............................................................................ 2389 7285
Hungary ...........................................06(1)267-2109
India.................................................Please refer to your
...........................................................local warranty card
Indonesia ..................................... (62-21) 5673813
...................................................(62-21) 888856000
Ireland ................................................0818 200 033
Italy................................................... 02.600.630.45
(Il numero è di tipo “urbano nazionale” e può
essere chiamato da qualunque operatore di rete
fissa o mobile. Il costo della chiamata è inerente al
proprio piano tariffario definito con l’operatore
telefonico, ad esempio in caso di un contratto con
tariffa FLAT, non ci sono costi aggiuntivi per la chiamata a questo numero, in quanto si tratta di un
numero urbano nazionale.)
Jordan...................................00962 6 5625460/1/2
Kuwait .......................+965 -22458737/22458738
Lebanon ...........................................+9611240259/
............................................................+9611236110
Luxembourg.................................. (+352) 8002 3811
Malaysia ........................................+603-8076 9696
Malta..............................+39 02360 46111 (0,10 €)
Mexico
..........01800 999 4442738 (01800 999 GIGASET)
Netherlands.....................................0900-3333102
New Zealand .....................................0800 780 878
Norway............................................+47 2231 0845
Oman............................+968 70928 Ext. 49/21/75
Poland ..................................................801 140 160
Portugal .................................. (+351) 308 804 760
.....................................(custo de uma chamada local)
Romania.....................................+40 021 204 9130
Russia..............................................8-800 333 4956
Serbia .................................................0800 222 111
Singapore................................................ 6735 9100
Slovak Republic.................................044 5567 988
Slovenija.....................................+386 (1) 5466 511
South Africa ......................................0800 98 08 42
Spain...........................................(+34) 910 920 931
Sweden .................................... +46 (0)8502 52347
Switzerland ........................................0848 212 000
Taiw an ................................................02 266 24343
Turk ey......... Son kullanıcı için +90 212 888 6346
Bayi için +90 212 888 6347
Ukraine....................................+380-44-451-71-72
United Arab Emirates ....................+97144458255
..........................................................+97144458254
United Kingdom ............................. 020 36953111
USA .................................................1-866 247-8758
...................................................................................tollfree
Service (Customer Care)
Customer Service & Assistance
Do you have any questions? As a Gigaset customer, you can find help quickly in this User Manual and in the
service section of our Gigaset online portal www.gigaset.com/service.
Please register your phone online right after purchase.
This enables us to provide you with even better service regarding questions or a warranty claim. In order to
contact our customer service via email, please use the email contact form from our Gigaset online portal after
selecting your home country.
Our representatives are also available on the telephone hotlines for consultation.
Template A6 for NEO, Version 1, 20.04.2016
16
Page 19

Gigaset DL580 / SUG UK-IE en / A30350-M216-L101-2-7643 / appendix.fm / 16.10.18
Manufacturer's advice
Manufacturer's advice
Authorisation
This device is intended for analogue phone lines in the UK and on the Irish net work (see label at the phone).
Country-specific requirements have been taken into consideration.
We, Gigaset Communications GmbH, declare that this device meets the essential requirements and other
relevant regulations laid down in Directives 2014/30/EU and 2014/35/EU.
The full text of the EU declaration of conformity is available at the following internet address:
www.gigaset.com/docs
This declaration could also be available in the "International Decla rations of Conformity" or "European
Declarations of Conformity" files.
Therefore please check all of these files.
Environment
.
Environmental management system
Gigaset Communications GmbH is certified pursuant to the international st andards ISO 14001
and ISO 9001.
ISO 14001 (Environment): Certified since September 2007 by TÜV SÜD Management Service
GmbH.
ISO 9001 (Quality): Certified since 17/02/1994 by TÜV SÜD Management Servi ce GmbH.
Disposal
Batteries should not be disposed of in general household waste. Observe the local waste disposal regulations,
details of which can be obtained from your local authority.
All electrical and electronic equipment must be disposed of separately from general household waste using
the sites designated by local authorities.
For further information on disposing of your used equipment, please contact your local authority or your
refuse collection service.
Care
Wipe the device with a damp cloth or an antistatic cloth. Do not use solvents or microfibre cloths.
Never use a dry cloth; this can cause static.
In rare cases, contact with chemical substances can cause changes to the device’s exterior. Due to the wide
variety of chemical products available on the market, it was not possible to test al l substances.
Impairments in high-gloss fin ishes can be carefully removed using display polishes for mobile phones.
Template A6 for NEO, Version 1, 20.04.2016
If a product displays this symbol of a crossed-out rubbish bin, the produc t is subject to
European Directive 2012/19/EU.
The appropriate disposal and separate collection of used equipment serve to prevent potential
harm to the environment and to health. They are a precondition for the re-use and recycling of
used electrical and electronic equipment.
17
Page 20

UK-IE / SUG UK-IE en / A30350-M216-L101-2-7643 / Cover_back_bw.fm / 16.10.18
Issued by
Gigaset Communications GmbH
Frankenstr. 2a, D-46395 Bocholt
© Gigaset Communications GmbH 2018
Subject to availability.
All rights reserved. Rights of modification reserved.
www.gigaset.com
A30350-M216-L101-2-7643
Template A6 for NEO, Version 1, 20.04.2016
 Loading...