

Page 1
C530 IP
Congratulations
By purchasing a Gigaset, you have chosen a brand that is fully
committed to sustainability.
This product’s packaging is eco-friendly!
To learn more, visit www.gigaset.com.
BC
Page 2

Gigaset C530 IP – Your perfect companion
Gigaset C530 IP – Your perfect companion
... with impressive internal qualities. The large TFT display, user-friendly keypad and clearly laid
out menu are very simple to use. Your Gigaset can do a lot more than just make calls:
Ethernet port
Connect your Gigaset to the Internet and your PC via Ethernet. Use public and private
directories online (
the PC simultaneously.
Directory for 200 vCards – appointments
Save phone numbers and other data to the local directory (¢ page 74). Enter anniversaries in
the phonebook and set reminders (
Use your Gigaset as a PABX
Register up to six handsets. Assign each device its own phone number.
It's easy to configure your Gigaset thanks to the wizards
The wizards help you to configure the VoIP connections for your phone and to assign the
receive and send connections to the registered handsets.
Go online with your Gigaset
Use your phone's Info Centre and have information specifically provided for the phone from
the Internet shown on the display (
Other practical information
Transfer the phonebook from an existing Gigaset handset (¢ page 76), use the
programmable digit and display keys (
functions, read your e-mail messages on your phone (without a PC).
¢ page 77). Update the pho nebook on your Gigaset and your directory on
¢ page 88).
¢ page 61).
¢ page 48) for quick dial or quick access to important
Environment
Gigaset Green Home – Be environmentally aware when using your phone. You can find details
on our ECO DECT products at www.gigaset.com/service
Further information on your phone can be found online at
www.gigaset.com/C530ip
After purchasing your Gigaset phone, please register it at www.gigaset.com/service – this will
enable us to help you more quickly if you have any questions or need to make a claim on the
guarantee!
Have fun using your new phone!
1
.
.
Page 3
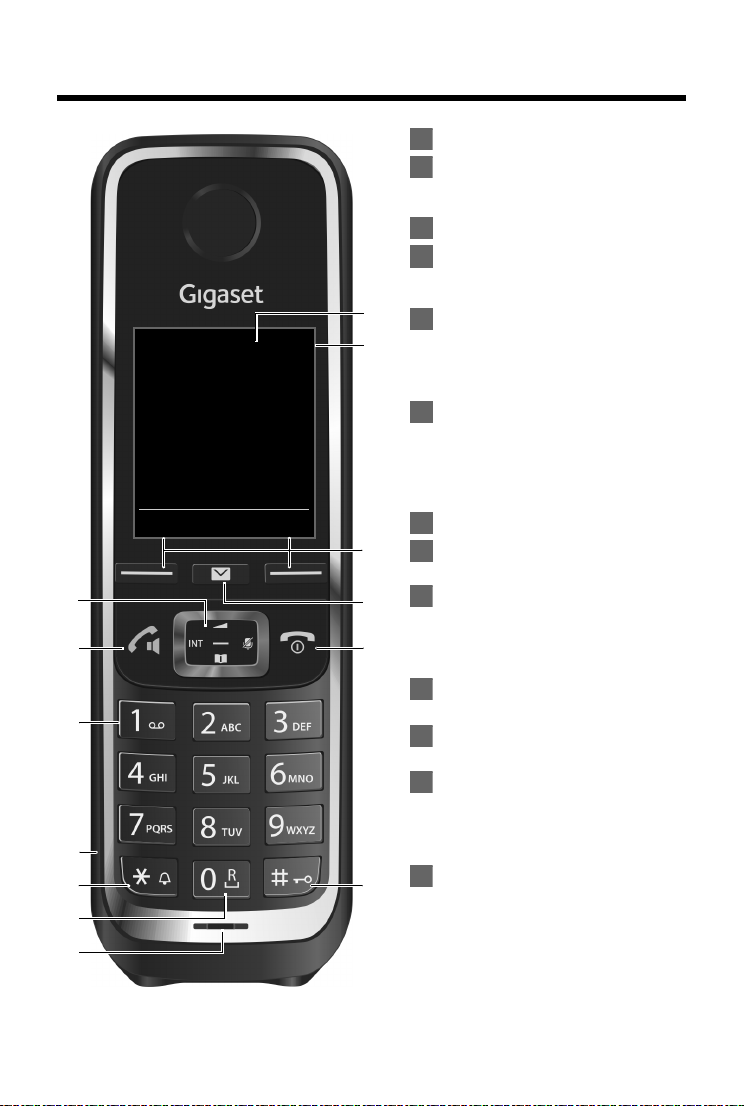
Overview of handset
i
V
07:15
INT 1 14 Oct
Calls Calendar
1
2
3
4
5
6
7
11
12
13
8
9
10
1
234
56789
10
111213
Overview of handset
Display in idle status
Status bar
Icons display current settings and
operating status of the phone
Display keys (¢ page 27)
Message Key
Access to the calls and message lists;
Flashing: new message or new call
(¢ page 28)
End call key, On/off key
End call; cancel function; go back one
menu level (press briefly); go back to idle
status (press and hold); switch handset
on/off (press and hold in idle status)
Hash key
Keypad lock on/off (press and hold in idle
status);
Toggle between upper/lower case and
digits;
Insert a dialling pause (press and hold)
Microphone (¢ page 34)
Recall key
Consultation call (flash) (press and hold)
Star key
Ringtone on/off (press and hold in idle
status);
Open special characters table
(when inputting text)
Connection socket for headset
(¢ page 23)
Key 1
Dial network mailbox (press and hold)
Tal k key / Handsfree key
Dial number displayed;
Accept call; switch from earpiece to
handsfree mode;
Open the redial list (press briefly)
Control key / Menu key
(¢ page 26)
2
Page 4

Overview of base station
Paging key
Lit up: LAN connection active (phone is
connected to router)
Flashing: Data transfer to LAN connection
Start paging, display IP address on
handset:
¤ Press briefly
Set base to registration mode:
¤ Press and hold
Overview of base station
3
Page 5

Contents
Contents
Gigaset C530 IP – Your perfect companion . . . . . . . . . . . . . . . . . . . . . . . . . . . . . . . . . . . . . . . . . . . . . . . . . 1
Overview of handset . . . . . . . . . . . . . . . . . . . . . . . . . . . . . . . . . . . . . . . . . . . . . . . . . . . . . . . . . . . . . . . . . . . . . . 2
Overview of base station . . . . . . . . . . . . . . . . . . . . . . . . . . . . . . . . . . . . . . . . . . . . . . . . . . . . . . . . . . . . . . . . . . . 3
Safety precautions . . . . . . . . . . . . . . . . . . . . . . . . . . . . . . . . . . . . . . . . . . . . . . . . . . . . . . . . . . . . . . . . . . . . . . . . . 5
Getting started . . . . . . . . . . . . . . . . . . . . . . . . . . . . . . . . . . . . . . . . . . . . . . . . . . . . . . . . . . . . . . . . . . . . . . . . . . . . 6
Understanding the operating steps in the user guide . . . . . . . . . . . . . . . . . . . . . . . . . . . . . . . . . . . . . . 25
Getting to know your phone . . . . . . . . . . . . . . . . . . . . . . . . . . . . . . . . . . . . . . . . . . . . . . . . . . . . . . . . . . . . . . 26
Making calls . . . . . . . . . . . . . . . . . . . . . . . . . . . . . . . . . . . . . . . . . . . . . . . . . . . . . . . . . . . . . . . . . . . . . . . . . . . . . . 30
Using provider-specific functions (network services) . . . . . . . . . . . . . . . . . . . . . . . . . . . . . . . . . . . . . . . 37
Making cost-effective calls . . . . . . . . . . . . . . . . . . . . . . . . . . . . . . . . . . . . . . . . . . . . . . . . . . . . . . . . . . . . . . . . 43
Adjusting the telephone settings . . . . . . . . . . . . . . . . . . . . . . . . . . . . . . . . . . . . . . . . . . . . . . . . . . . . . . . . . 44
Configuring the system settings . . . . . . . . . . . . . . . . . . . . . . . . . . . . . . . . . . . . . . . . . . . . . . . . . . . . . . . . . . 51
E-mail notifications . . . . . . . . . . . . . . . . . . . . . . . . . . . . . . . . . . . . . . . . . . . . . . . . . . . . . . . . . . . . . . . . . . . . . . . 58
Info Centre – continuous Internet access from your phone . . . . . . . . . . . . . . . . . . . . . . . . . . . . . . . . . 61
Network mailbox . . . . . . . . . . . . . . . . . . . . . . . . . . . . . . . . . . . . . . . . . . . . . . . . . . . . . . . . . . . . . . . . . . . . . . . . . 66
Multiple handsets . . . . . . . . . . . . . . . . . . . . . . . . . . . . . . . . . . . . . . . . . . . . . . . . . . . . . . . . . . . . . . . . . . . . . . . . 69
Directories . . . . . . . . . . . . . . . . . . . . . . . . . . . . . . . . . . . . . . . . . . . . . . . . . . . . . . . . . . . . . . . . . . . . . . . . . . . . . . . 74
Call lists . . . . . . . . . . . . . . . . . . . . . . . . . . . . . . . . . . . . . . . . . . . . . . . . . . . . . . . . . . . . . . . . . . . . . . . . . . . . . . . . . . 85
ECO DECT . . . . . . . . . . . . . . . . . . . . . . . . . . . . . . . . . . . . . . . . . . . . . . . . . . . . . . . . . . . . . . . . . . . . . . . . . . . . . . . . 87
Alarm clock . . . . . . . . . . . . . . . . . . . . . . . . . . . . . . . . . . . . . . . . . . . . . . . . . . . . . . . . . . . . . . . . . . . . . . . . . . . . . . 87
Calendar . . . . . . . . . . . . . . . . . . . . . . . . . . . . . . . . . . . . . . . . . . . . . . . . . . . . . . . . . . . . . . . . . . . . . . . . . . . . . . . . . 88
Baby monitor . . . . . . . . . . . . . . . . . . . . . . . . . . . . . . . . . . . . . . . . . . . . . . . . . . . . . . . . . . . . . . . . . . . . . . . . . . . . . 89
Operating the telephone on a PABX . . . . . . . . . . . . . . . . . . . . . . . . . . . . . . . . . . . . . . . . . . . . . . . . . . . . . . . 91
Display icons . . . . . . . . . . . . . . . . . . . . . . . . . . . . . . . . . . . . . . . . . . . . . . . . . . . . . . . . . . . . . . . . . . . . . . . . . . . . . 93
Menu overview . . . . . . . . . . . . . . . . . . . . . . . . . . . . . . . . . . . . . . . . . . . . . . . . . . . . . . . . . . . . . . . . . . . . . . . . . . . 95
Configuring the phone via the Web configurator . . . . . . . . . . . . . . . . . . . . . . . . . . . . . . . . . . . . . . . . . . 98
Questions and answers . . . . . . . . . . . . . . . . . . . . . . . . . . . . . . . . . . . . . . . . . . . . . . . . . . . . . . . . . . . . . . . . . . 121
Environment . . . . . . . . . . . . . . . . . . . . . . . . . . . . . . . . . . . . . . . . . . . . . . . . . . . . . . . . . . . . . . . . . . . . . . . . . . . . 129
Appendix . . . . . . . . . . . . . . . . . . . . . . . . . . . . . . . . . . . . . . . . . . . . . . . . . . . . . . . . . . . . . . . . . . . . . . . . . . . . . . . 130
FCC / ACTA Information . . . . . . . . . . . . . . . . . . . . . . . . . . . . . . . . . . . . . . . . . . . . . . . . . . . . . . . . . . . . . . . . . . 133
Service (Customer Care) . . . . . . . . . . . . . . . . . . . . . . . . . . . . . . . . . . . . . . . . . . . . . . . . . . . . . . . . . . . . . . . . . 137
Glossary . . . . . . . . . . . . . . . . . . . . . . . . . . . . . . . . . . . . . . . . . . . . . . . . . . . . . . . . . . . . . . . . . . . . . . . . . . . . . . . . . 141
Mounting the base on the wall . . . . . . . . . . . . . . . . . . . . . . . . . . . . . . . . . . . . . . . . . . . . . . . . . . . . . . . . . . . 153
Mounting the charging cradle on the wall . . . . . . . . . . . . . . . . . . . . . . . . . . . . . . . . . . . . . . . . . . . . . . . . 154
Index . . . . . . . . . . . . . . . . . . . . . . . . . . . . . . . . . . . . . . . . . . . . . . . . . . . . . . . . . . . . . . . . . . . . . . . . . . . . . . . . . . . . 155
4
Page 6
Safety precautions
Safety precautions
- Read the safety precautions and the user guide before use.
a
- Explain their content and the potential hazards associated with using the device to your children.
- The device cannot be used in the event of a power failure. It is also not possible to transmit
emergency calls.
- Emergency numbers cannot be dialled if the keypad/display lock is activated!
Do not use the devices in environments with a potential explosion hazard (e.g., paint shops).
The devices are not splashproof. For this reason do not install them in a damp environment such as
bathrooms or shower rooms.
Use only the power adapter indicated on the device.
Use only rechargeable batteries that correspond to the specification (see "Specifications"). Never
use a conventional (non-rechargeable) battery or other battery types as this could result in significant
health risks and personal injury. Rechargeable batteries, which are noticeably damaged, must be
replaced. Do not charge the handset in charging unit or base station while the headset is connected.
If you give your Gigaset to a third party, make sure you also give them the user guide.
Remove faulty devices from use or have them repaired by our Service team, as these could interfere
with other wireless services. Disconnect the telephone network connector (TNV circuit connector).
Do not use the device if the display is cracked or broken. Broken glass or plastic can cause injury to
hands and face. Send the device to our Service department to be repaired.
Do no t hold the rear of the handset t o your ear when it is ringing o r when spe aker mode is activa ted.
Otherwise you risk serious and permanent damage to your hearing.
Your Gigaset is compatible with the majority of digital hearing aids on the market. However, perfect
function with all hearing aids cannot be guaranteed.
The phone may cause interference in analogue hearing aids (humming or whistling) or cause them
to overload. If you require assistance, please contact the hearing aid supplier.
Using your telephone may a ffect nearby medi cal equipment. Be aware of the technical conditions in
your particular environment, e.g., doctor's surgery.
If you use a medical device (e.g., a pacemaker), please contact the device manufacturer. They will be
able to advise you regarding the susceptibility of the device to external sources of high frequency
energy (for the specifications of your Gigaset product see "Specifications").
5
Page 7

Getting started
1 3
4
5 8
9
10
2
6
11
7
Getting started
Checking the contents of the package
1 Gigaset C530 IPbase
2 Power adapter to connect the base to the mains power supply
3 Phone cable (flat) to connect the base to the analogue fixed line network
4 Ethernet (LAN) cable to connect the base to the router (LAN/Internet)
5 Gigaset C530H handset
6 Two batteries for the handset (not charged)
7 Battery cover for the handset
8 Belt clip for the handset
9 Charging cradle for the handset
6
Page 8

Getting started
10
11
Power adapter to connect the charging cradle to the mains power supply
Brief introduction with installation wizard for your telephone, license texts, warranty
agreement and links to important websites.
In the event of any firmware updates for your base, the user guide is also updated if
necessary and available to download online from www.gigaset.com
.
Firmware updates
This user guide describes the functions of your phone from firmware version 080 onwards.
Whenever there are new or improved functions for your Gigaset, firmware updates are made
available for you to download to your base (
changes when using your phone, a new version of this user guide or the necessary
amendments will be published on the Internet at
www.gigaset.com
Select the product to open the relevant product page for your base, where you will find a
link to the user guides.
To find out what version of firmware is currently loaded,
.
¢ page 55). If this results in operational
¢ page 128.
Installing the base station and charging cradle
The base and charging cradle are designed for use in closed, dry rooms within a temperature
range of +5°C to +45°C.
¤ Set up the base at a central point in the building or house, or mount the base on the wall
(
¢ page 154).
The phone's feet do not usually leave any marks on surfaces. However, due to the multitude of
different varnishes and polishes used on today's furnishings, marks on the surfaces cannot be
completely ruled out.
Caution
u Never expose the telephone to heat sources, direct sunlight or other electrical
appliances.
u Protect your Gigaset from moisture, dust, corrosive liquids and fumes.
u Pay attention to the range of the base. This is up to 100 ft inside buildings and up to 700 ft
in unobstructed outdoor areas. The range is reduced when Maximum Range is
deactivated (
7
¢ page 87).
Page 9

Getting started
4
6
5
2
3
1
Connecting the telephone (overview)
The following diagram is an overview of all connections for your telephone. The individual
connections are described in detail below. In order for you to make calls on your phone via the
fixed line network and VoIP, you need to connect the base to the fixed line network and Internet.
Follow the steps in the order given below:
1 Prepare the handset: Insert and charge batteries (
2 Connect the charging cradle to the mains power supply (
3 Connect the phone cable and power cable to the base (
4 Connect the base to the telephone network and the mains power supply (
5 Connect the base to the router for accessing the Internet and for configuring the base using
the Web configurator (connection via router and modem or via router with integrated
modem)
6 PC in LAN (optional) - for further configuration of the Gigaset C530 IP base
You can then connect a wire-bound headset to the handset (
8
¢ page 9)
¢ page 9)
¢ page 11)
¢ page 11)
¢ page 23).
Page 10

Getting started
¤ Plug the power adapter into the power
socket 2.
¤ Connect the flat plug from the power
adapter 1.
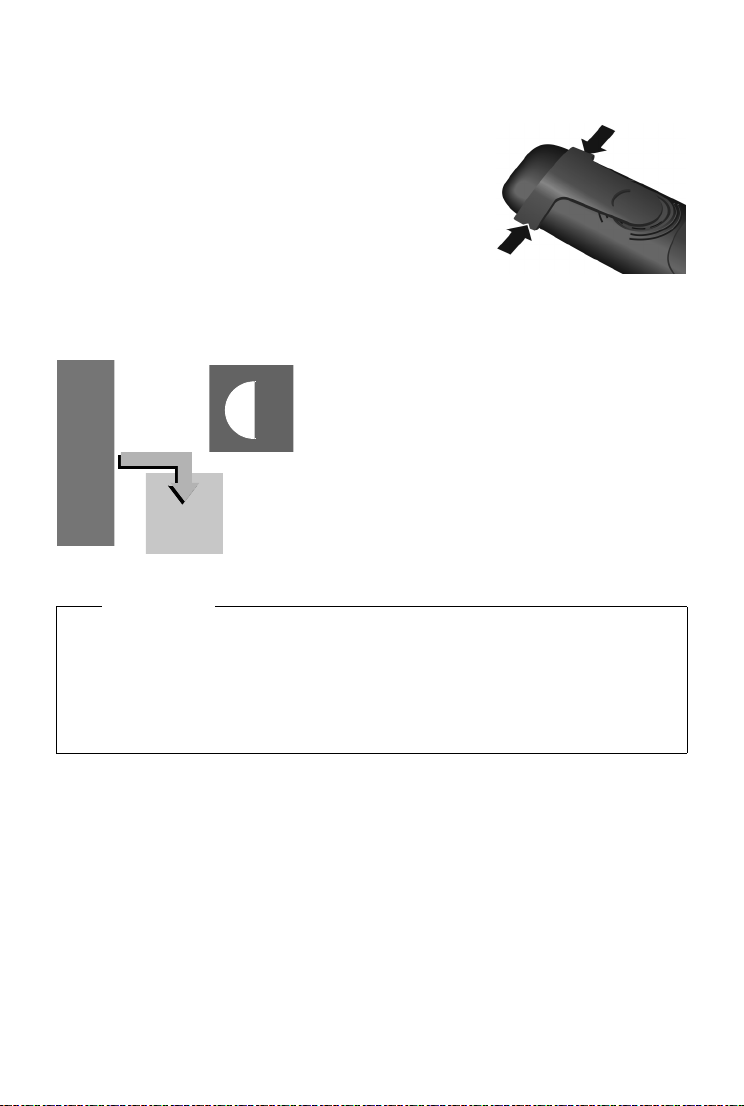
To rem ove th e plu g from the c hargi ng cradl e
again:
¤ Disconnect the power adapter from the
mains power supply.
¤ Press the release button 3 and
disconnect the plug 4.
1
2
3
4
¤ Insert the batteries
with the polarity in
the right direction
(for correct +/direction, see
diagram).
¤ Insert the battery cover
from the top 1.
¤ Press the cover until it
clicks into place 2.
To open the battery cover:
¤ Grip the notch on the
cover 3 and slide it
downwards 4.
4
3
1
2
Connecting the charging cradle
Setting up the handset for use
The display is protected by a plastic film. ¤ Please remove the protective film!
Inserting the batteries and closing the battery cover
Caution
Use only rechargeable batteries recommended by Gigaset Communications GmbH
(
¢ page 130), as this could otherwise result in significant health risks and personal injury.
For example, the outer casing of the batteries could be destroyed or the batteries could
explode. The phone could also malfunction or be damaged as a result of using batteries that
are not of the recommended type.
9
Page 11
Getting started
¤ Charge the handset in the charging cradle for
6hours.
The charge status is shown on the idle display:
xy xy x{ x{ (empty to full).
6h
Attaching the belt clip
The handset has notches on each side to attach the belt clip.
u To attach — press the belt clip onto the back of the handset
so that the tabs on the belt clip click into place in the
notches.
u To re move — press the centre of the belt clip firmly with
your right thumb, push the fingernail of your left thumb up
between the clip and the casing and pull the clip in an
upward direction.
Charging the batteries
The batteries are supplied partially charged. Please charge completely before use. The batteries
are fully charged when the power icon
Notes
u The handset may only be placed in the designated base/charging cradle.
u The battery may heat up during charging. This is not dangerous.
u After a time, the charge capacity of the battery will decrease for technical reasons.
u Handsets contained in the package have already been registered to the base. If, however,
a handset has not been registered ("Please register handset" or "Place handset in base"
is displayed), please register it manually (
disappears from the display.
¢ page 69).
10
Page 12

Getting started
1
5
2
3
4
Connecting the base station to the telephone network and the
mains power supply
¤ Insert the phone cable into
the lower connection socket
at the rear of the base 1.
¤ Insert the power cable of the
power adapter into the
upper connection socket 2
at the rear of the base.
¤ Insert both cables into the
appropriate cable channels
3.
¤ Insert the phone cable into
the fixed line network
connection 4.
¤ Connect the power adapter
into the power socket 5.
Caution
u Use only the supplied network cable and phone cable. Pin connections on telephone
cables can vary (pin connections
u The power cable must always be connected in order to function, as the phone will not
operate without a power supply.
¢ page 131).
You can now use your phone to make calls via the fixed line network and can be reached on
fixed line network number.
your
11
Page 13

Getting started
Connecting the base to a router (Internet)
Data protection notice
When the device is connected to the router, it automatically contacts the Gigaset support
server to make it easier for you to configure the devices and to enable communication with
the Internet services.
For this purpose, every device sends the following device-specific information once a day:
u Serial number/item number
u MAC address
u Private IP address for the Gigaset in the LAN/its port numbers
u Device name
u Software version
On the support server, this information is linked to the existing device-specific information:
u Gigaset.net phone number
u System-related/device-specific passwords
Further information about the Gigaset.net service data saved can be found at:
www.gigaset.net/privacy-policy
When you connect the base to a router, your telephone can establish an Internet connection. An
Internet connection is required for the following functions:
u Internet telephony VoIP (Voice over Internet Protocol)
u Notification as soon as new software is available for your phone on the Internet
u Configuring date and time with a time server on the Internet
u Info services and online directories.
For Internet access, you need a router connected to the Internet via a modem (this may be
integrated in the router).
You can also connect a PC to the router if you want to set your phone via its Web configurator.
Note
For telephony via the Internet, you need a broadband Internet connection (e.g. DSL) with flat
rate (recommended) or volume rate and a router that connects your phone to the Internet.
You can find a list of recommended routers on the Internet at:
www.gigaset.com/service
From here, go to the FAQ page and select your Gigaset IP telephone. Search for "Router", for
example.
12
Page 14
Getting started
1
2
¤ Insert a plug from the
Ethernet cable supplied
(Cat 5 with 2 RJ45 modular
jacks) into the LAN
connection socket at the side
of the base 1.
¤ Then insert the second plug
from the Ethernet cable into
a LAN socket on the router
2.
As soon as the cable between the telephone and the
router is plugged in and the router is switched on, the
key on the front of the base lights up (paging key).
You are now able to establish VoIP connections within Gigaset.net (¢ page 35).
Note
¤ If you want to change the display language ¢ page 44
Setting up the phone – installation wizard
Before you can use the Internet (VoIP) to phone other numbers on the Internet, the fixed line
network or the mobile network, you need the services of a VoIP provider who supports the VoIP
SIP standard.
¤ Register with at least one VoIP provider and set up at least one VoIP account.
You will receive from your provider:
u either access data (username, authentication name, password etc.)
u or an auto configuration code (activation code)
The installation wizard on your Gigaset phone supports you in setting up your VoIP account.
13
Page 15

Getting started
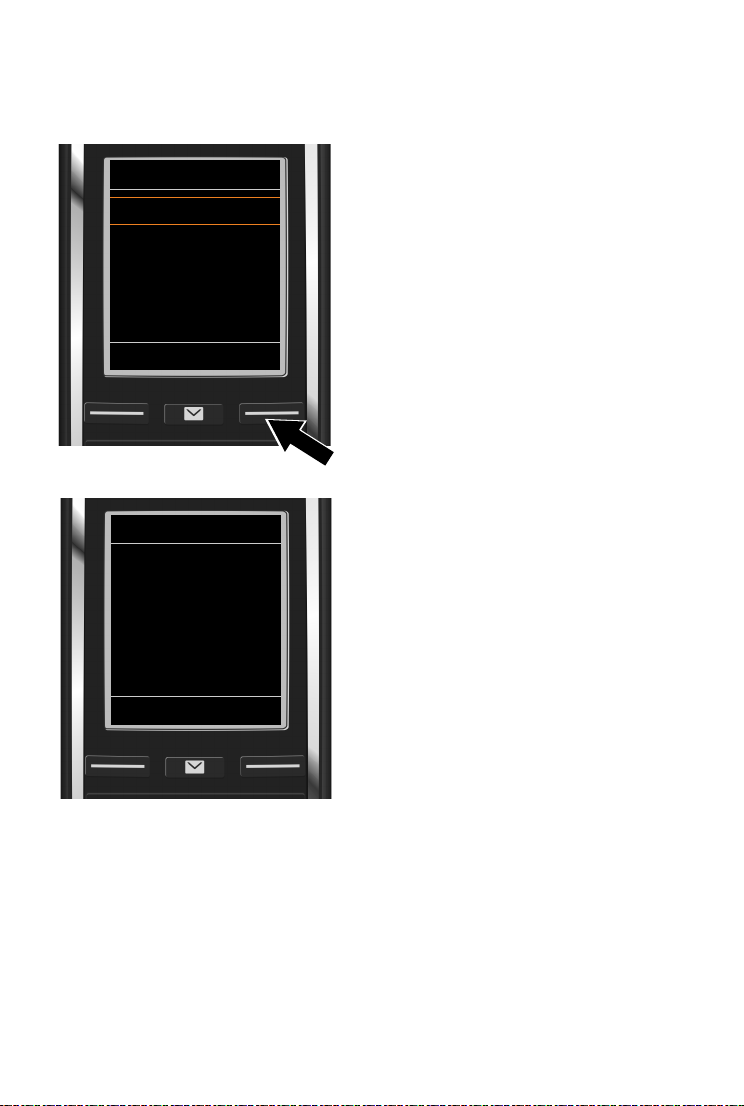
IP Wizard
?
Start IP
installation wizard?
No
Yes
IP Wizard
Ð
This wizard helps
you to configure an
IP account and
register it at your
provider so you -
V
OK
Two individual wizards are combined to form the installation wizard:
1 VoIP wizard for setting up a VoIP account
2 Connection wizard for assigning send and receive connections (
¢ page 19)
Note
You can configure up to 6 VoIP connections. When you get started with the phone, you can
initially only set up one VoIP connection. You can set up additional VoIP connections later
with the VoIP wizard (
¢ page 53) or with the Web configurator.
Starting the installation wizard
As soon as the handset battery has sufficient charge,
the message key
f on your handset will flash.
¤ Press the Message Key f.
If "New firmware available" is shown on the display, there is a firmware update available for
your telephone. Press the right display key Yes . The new firmware will be downloaded. This
takes approx. 6 minutes. The Message Key
f then flashes again.
¤ To start configuration: Press the Message Key f.
VoIP wizard – Configuring VoIP settings
¤ Press the key below the display screen
Ye s (= right display key) to launch the
VoIP wizard.
14
¤ Press down on the control key s to
scroll through.
¤ Press the display key OK to continue.
Page 16
Getting started
Select IP Account
IP 1
´
IP 2
´
IP 3
´
IP 4
´
IP 5
´
V
Back
OK
IP Wizard
?
Do you have a
code for auto
configuration?
No
Yes
If the connection wizard does not launch as normal or if you cancel the connection wizard, you
can launch it via the following menu on the handset:
¤ vControl key ¤ Ï ¤ Te l ep ho n y ¤ VoIP Wizard
A list of all possible IP connections will be
shown in the display (IP 1 to IP 6). VoIP
connections that are already configured are
marked with
³.
¤ Select a connection with the control key
s if necessary.
¤ Press the display key OK to continue.
u Your VoIP provider has supplied you with
an authentication name/password and,
where applicable, a username:
¤ Press the display key No.
¤ For further information, please see:
"Downloading VoIP provider data"
¢ page 17.
u You ha ve re cei ve d a n auto-configuration
code (activation code) from your VoIP
provider:
¤ Press the display key Yes .
¤ For further information, please see:
"Entering the auto configuration
code"
15
¢ page 16.
Page 17

Getting started
No Internet connection:
If an Internet connection cannot be established, one of the following messages is displayed:
u IP address not available: No connection to the router.
Check the plug connection between the router and the base and check the settings on
the router.
Your phone is preconfigured for dynamic assignment of the IP address. In order for your
router to "recognise" the phone, dynamic IP address assignment must also be activated
on the router, i.e. the router's DHCP server must be activated.
If the DHCP server cannot or should not be activated, you must assign a fixed IP address
to the phone (
u Internet connection not available: No connection to the Internet.
The IP server may be temporarily unavailable. In this case, try to make a connection again
later.
Otherwise: Check the plug connection between the router and the modem or DSL
connection and check the settings on the router.
¢ page 52).
¤ If you press OK, the VoIP wizard will close.
You will then need to call up the wizard later via the menu to configure the IP connection.
Entering the auto configuration code
Auto configuration:
The configuration process for VoIP connections is automated for some VoIP providers. The
provider creates a configuration file with all required VoIP access data. This file is placed on a
configuration server on the Internet for downloading to your phone.
Your provider supplies you with a configuration code. The installation wizard (
prompts you to enter the code. All the required VoIP data is then downloaded automatically
onto your phone.
The configuration file is only transferred via a secure connection (TLS authentication). If the
TLS authentication fails, the message key
message Certificate error - Please check your certificates in the Web configurator. is
displayed. Press the right display key to confirm the message.
Log in to the Web configurator (
The web page Security (
established and what you can do.
If the configuration file fails to download (e.g. because the configuration server is not
available), the phone keeps trying to establish a connection until the file is downloaded
successfully to the phone.
¢ page 100).
¢ page 107) tells you why the secure connection could not be
f flashes. If you press the message key, the
¢ page 14)
16
Page 18
Getting started
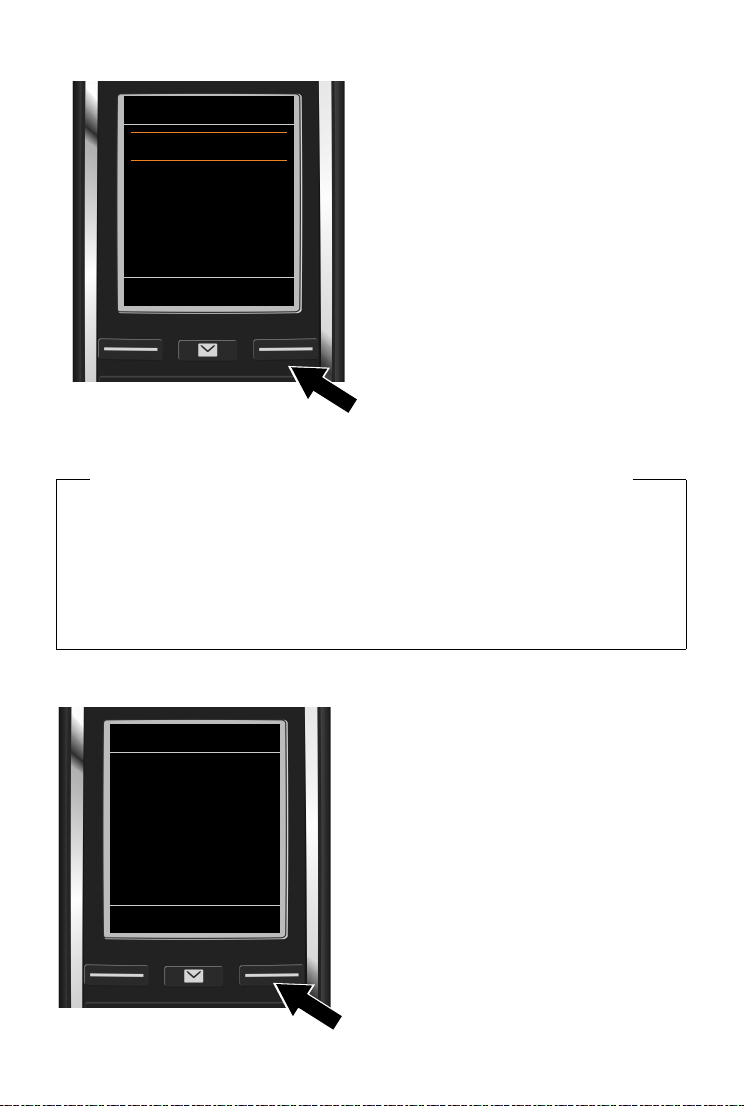
IP Wizard
Activation code for
autoconfiguration:
< C
OK
Select your country
Country 1
Country 2
Country 3
Country 4
Country 5
V
Back
OK
¤ Using the keypad, enter the auto
configuration code you received from the
provider (max. 32 characters).
¤ Press the display key OK.
All data required for VoIP telephony is downloaded directly from the Internet to your telephone.
When all the data has been successfully downloaded to your phone, Your IP account is
registered at your provider. appears on the display.
¤ For further information, please see: "Connection wizard" page 19.
Downloading VoIP provider data
The connection wizard establishes a connection with the Gigaset configuration server on the
Internet. Various profiles with general access data for different VoIP providers can be
downloaded here.
A list of countries is loaded.
¤ With the control key q, select the
country in which you want to use the
telephone.
17
¤ Press the display key OK to confirm the
selection.
Page 19
Getting started
Select a Provider
Provider 1
Provider 2
Provider 3
Provider 4
Provider 5
V
Back
OK
Provider Data
User ID
:
Abc
< C
OK
A list of the VoIP providers for which a profile
with the general access data is available on
the configuration server is displayed.
¤ Se le ct you r Vo IP pro vi der wi th t he co ntr ol
key
q.
¤ Press the display key OK to confirm the
selection.
The general access data for your VoIP provider is downloaded and saved on your phone.
You have not been able to download your provider's data
If your VoIP provider does not appear in the list, i.e. its general data is not provided for
download, cancel the VoIP wizard:
¤ Press and hold the End call key a. The handset returns to idle status.
You must then make the required VoIP provider and IP account settings using the Web
configurator (
You can change the assignment of the VoIP connection as send/receive connection at a later
time via the telephone menu or the Web configurator.
¢ page 108).
Entering user data for your VoIP account
You will now be prompted to enter your
personal access data for your VoIP account.
The following are provider-dependent:
- User ID,
18
-Password
-User name
¤ Enter registration details that you have
received from your VoIP provider.
¤ Confirm each entry with the display key
OK.
If the User name is identical to the User ID,
simply press the display key OK.
Page 20

Getting started
Please note ...
... when entering access data, it is case sensitive.
¤ To switch between upper/lower case and digit input: ¤ Press the # key (multiple
times if required). You can see briefly in the display whether upper case, lower case or
digit input is selected.
¤ To delete incorrectly entered characters: ¤ Press the display key Ñ. The character to
the left of the cursor is deleted.
¤ To navigate within an input field: ¤ Press the control key r.
If you have entered all the VoIP data fully and correctly, the message "Your IP account is
registered at your provider." will be shown in the display shortly afterwards. The VoIP wizard
will then close.
The connection wizard starts.
Connection wizard
Use the connection wizard to assign previously configured connections (fixed line network
connection, Gigaset.net connection
internal participants as receive or, if applicable, as send connections. Internal participants are the
registered handsets.
u Receive connections are the phone numbers (connections) on which you can be called.
Incoming calls are only forwarded to the internal participants (end devices) for which the
relevant connection is assigned as a receive connection.
u Send connections are the numbers that are sent to the called participant. The network
provider calculates charges based on the send connections. You can assign each internal
participant a number or the associated connection as a send connection.
u Each connection (number) of your phone can be both a send as well as a receive connection.
You can assign each connection to several internal participants as a send and/or receive connection.
¢ page 35 and the VoIP connections ¢ page 14) to the
Default assignment
All configured connections are assigned as receive connections at registration/start-up.
The fixed line network connection is assigned to the handsets as a send connection.
19
Page 21
Getting started
Connection Wizard
?
Assign connections -
to handset
INT1?
No
Yes
Rec. Connections
INT1
Ð
receives calls for
Fixed Line: 4560123
IP 1: 12345602
Gigaset.net: 12345#9
Change
OK
a.
¤ Press the display key Yes if you want to
change the setting for send and receive
connections of the handset with the
internal name INT1.
¤ Press the display key No if you do not
want to change the setting for this
handset.
b. The list of currently assigned receive
connections will be displayed.
Scroll through the list with the control key
s if required.
¤ Press the display key Change if you want
to change the receive connection
setting.
Continue from
£ c.
¤ Press the display key OK if you do not
want to change the setting.
Continue from
£ d.
20
Page 22
Getting started
INT 1
Receive calls for
IP 1:
< Ye s >
Receive calls for
Gigaset.net:
Back
Save
Send Connections
Ð
INT1
sends calls with
Fixed Li ne:
4560123
Change
OK
c. If no calls to the VoIP connection IP1 are to
be signalled on the handset:
¤ Press right on the control key v to set
to No.
¤ Press down on the control key s to
switch to the next connection. Set Yes or
No as described above.
¤ Repeat the steps for each connection.
¤ Press the display key Save once you have
finished configuring the settings for the
handset.
The display will show the up-to-date list of receive connections for verification once again.
¤ Press the display key OK to confirm the assignment.
d. The send connection that is currently set for
the handset is displayed:
Fixed Line.
¤ Press the display key OK if you do not
want to change the setting. The
following step is skipped.
¤ Press the display key Change if you want
to change the setting.
21
Page 23
Getting started
INT 1
Connection for
outgoing calls:
< IP 1 >
Back
Save
i
V
07:15
INT 1
14 Oct
Calls
e. If the handset is to make calls via a different
connection/phone number:
¤ Press right on the control key v as
often as required until the desired
connection is displayed (in example IP1).
¤ Press the display key Save to save the
settings.
Instead of a connection, you can also select Sel. at each call. Each time you make a call, you can
then select the connection you wish to use on this handset.
If other handsets are already registered to the base, you are requested to assign send and receive
connections for the handsets. The following is shown in the display:
Assign connections to handset ?
¤ Perform the steps a. to e. for each registered handset.
After successfully configuring the settings, you will briefly see the display Connection
assignment complete.
Completing the installation
The handset then returns to idle status (an example of the display in idle status):
Displays
u Reception between the base and handset:
- good to poor:
-no reception: ¼ (red)
Colour green: Maximum Range deactivated.
u Battery charge status:
{ White: charged over 66%
-
-
{ White: charged between 34% and 66%
y White: charged between 11% and 33%
-
y Red: charged below 11%
-
-
y Flashes red: Battery almost empty (less than ten minutes of talktime)
xy xy x{ x{ White: Battery is charging
-
u INT 1: Internal name of the handset
22
Ð i Ñ Ò
Page 24

Getting started
Note
To protect your phone and its system settings from unauthorised access, you can define
a 4-digit number code (system PIN) known only to yourself. This code must also be entered
before you can register/de-register handsets, or alter the VoIP or LAN settings of your phone.
The default system PIN is 0000 (4 x zero).
For instructions on changing the PIN,
¢ page 51.
Date and time
There are two methods of setting the date and time:
u By default, your phone is configured so that the date and time are transferred from a time
server on the Internet, provided it is connected to the Internet.
You can activate/deactivate the synchronisation with a time server via the Web configurator
¢ page 116).
(
u You can also set the date and time manually via the menu on one of the registered handsets
¢ page 51).
(
To ensure you have the correct time for incoming calls and to use the alarm clock and calendar,
the date and time must be set.
Connecting the headset to the handset (optional)
You can connect a headset with a 2.5 mm jack connector. For
information on recommended headsets, see the relevant product
page at www.gigaset.com
23
.
Page 25

Getting started
Proceeding
After successfully setting up the phone, you can make calls straight away, customise your
Gigaset according to your requirements (
operation (
Making external calls and accepting calls ¢ page 30
Setting the ringtone melody and volume ¢ page 45
Storing your own area code in the telephone ¢ page 52
Configuring ECO DECT settings ¢ page 87
Operating the telephone on a PABX ¢ page 91
¢ page 26).
¢ page 44) or firstly familiarise yourself with the
Registering available Gigaset handsets to the base and transferring their
phonebook entries to the new handset
Using online directories ¢ page 77
Entering additional VoIP accounts ¢ page 53
Configuring the phone via the Web configurator ¢ page 98
If you have any questions about using your phone, please read the tips on
troubleshooting (
¢ page 121) or contact our Customer Care team (¢ page 137).
¢ page 69
¢ page 76
24
Page 26

Understanding the operating steps in the user guide
Understanding the operating steps in the user guide
The keys on your Gigaset handset are set out in these operating instructions as follows:
c / v / a Talk key / Menu key / End call key
Q to O Number / Letter keys
* / # Star key / Hash key
f / S Messages key / R key
Example: Activating/deactivating Auto Answer
Illustration in the user guide:
¤ Ï ¤ OK ¤ q Telepho ny ¤ OK ¤ Auto Answer ¤ Change (³ =activated)
v
Follow this procedure:
¤ v: With the handset in idle status, press right on the control key to open the main menu.
¤ Ï: Navigate to the Ï icon using the control key p.
¤ OK: Press the display key OK or the centre of the control key w to open the submenu
Settings.
¤ q Tel epho ny: Scroll to the entry Te l ep h on y with the control key q.
¤ OK: Press the display key OK or the centre of the control key w to open the submenu
Te le ph o ny .
¤ Auto Answer: The activate/deactivate auto answer function is selected.
¤ Change (³ = ac tivated): Press the display key Change or the centre of the control key w to
alternate between activating or deactivating (³ =activated, ´ = deactivated).
25
Page 27
Getting to know your phone
Getting to know your phone
Activating/deactivating the handset
¤ Press and hold the End call key a to switch the handset on or off.
Locking/unlocking the keypad
The keypad lock prevents any accidental use of the phone. If you press a key when the keypad is
locked, a message is displayed.
¤ Press and hold the # key to lock or unlock the keypad.
If the keypad lock is activated, you will see a message when you press a key.
The keypad lock deactivates a utomatically when you receive a call. It is reactivated when the call
is finished.
Control key
The side of the control key (up, down, right, left, centre) that you need
to press in each operating situation is marked in black below, e.g.
"press right on the control key" or
key".
The control key allows you to navigate within menus and entry fields. In
idle status or during an external call, it has the following functions:
When the handset is in idle status
w for "press the centre of the control
s Press briefly: Open the handset phonebook.
Press and hold: Open the list of available online directories.
vor w Open the main menu.
u Open the list of handsets.
t Bring up the menu for setting the handset's call volume (¢ page 45).
During an external call
s Open the phonebook.
u Initiate an internal consultation call.
t Adjust the loudspeaker volume for earpiece and handsfree mode.
Functions when pressing the centre of the control key
The key has different functions, depending on the operating situation.
u In idle status, it opens the main menu.
u In submenus, selection and entry fields, the key takes on the function of the display keys
OK, Ye s, Save, Select or Change.
Note
These instructions demonstrate opening the main menu by pressing right on the control key
v and confirming the functions by pressing the appropriate display key. However, if you
prefer, you can use the control key as described above.
v for
26
Page 28

Getting to know your phone
Back
Save
Current display key functions
Display keys
Options
OK
Û
Back
Save
Þ
Settings
Ë
Ê
Ì Ç
É Ï
Back
OK
Display keys
The display keys have a function preset by default in idle status, but the keys can be re-assigned
¢ page 49).
(
The functions of the display keys change depending on the operating situation. Example:
Some of the important display keys are:
Open a menu for further functions.
Confirm selection.
Delete key: Delete character/word from right to left.
Skip back one menu level or cancel operation.
Save entry.
Open redial list.
Overview of icons on the display keys (
¢ page 94).
Menu guidance
The functions of your telephone are displayed on a menu that consists of several levels. Menu
overview
¢ page 95.
Main menu (first menu level)
¤ When the handset is in idle status, press right on the control key v to open the main menu.
The main menu functions are shown in the display as icons. The
icon for the selected function is highlighted in orange and the
name of the associated function appears in the display header.
Accessing a function, i.e. opening the corresponding submenu
(next menu level):
¤ Use the control key p to navigate to the required function
and press the display key OK.
Returning to idle status: Briefly press the display key Back or End
call key a.
27
Page 29

Getting to know your phone
Settings
Date/Time
Audio Settings
Display
Language
Registration
Back
OK
Example
i
V
07:15
INT 1
14 Oct
à ™
02 10 08
Calls
Calendar
Example
Submenus
The functions in the submenus are displayed as lists (see the
example on the right).
To access a function:
¤ Scroll to the function using the control key q. ¤ Press OK.
To return to the previous menu level: Briefly press the display key
Back or the End call key a.
Returning to idle status
From any menu:
¤ Press and hold the End call key a.
Or:
¤ The display automatically returns to idle status after 2 minutes.
Any settings you have not confirmed by pressing OK, Yes , Save or Change will be discarded.
Message lists
Any messages you receive are saved in the message lists. If a new
message is present on the network mailbox , the Message Key
f also flashes (if activated, ¢ page 116). The flashing stops
when you press the key. In idle status, the display shows an icon
for the new message:
Ã
on the network mailbox (¢ page 66)
™ in the missed calls list (
î in the e-mail list (
in the missed appointments list (¢ page 88)
The icon for the network mailbox is always displayed, provided
the number is stored in the telephone. The other lists are only
displayed if they contain messages.
To view the messages list:
To open the list: q Select required list.
Exception: If you select the network mailbox, the number of the network mailbox will be
selected (
¢ page 66). Lists are not opened on the display.
¢ page 85)
¢ page 58)
¤ Press the Message Key f.
¤ OK
28
Page 30

Getting to know your phone
New Entry
First Name:
I
Surname:
Phone (Home):
Abc
x
Û
Save
Entering numbers and text
If several number and/or text fields are displayed (e.g. First Na me
and Surname in a phonebook entry), the field is automatically
activated. The following fields must be activated by navigating
with the control key q. A field is activated when a cursor is
flashing inside it.
Correcting incorrect entries
u To de lete characters before the cursor: press the display key
Ñ briefly.
u To del et e words before the cursor: press and hold the display
key Ñ.
Entering text
u Letters/Characters: Multiple letters and characters are assigned to each key between Q
and O. The characters are shown according to the key in a selection line at the bottom left
of the display. The selected character is highlighted. Briefly press the key several times in
succession to select the required letter/character.
u Placing the cursor: Letters/characters are inserted at the cursor position. You can change the
place of the cursor by pressing the control key r, or q in fields with multiple rows.
u Typing lower case, upper case and numbers: Press the hash key # to switch between
lower case, upper case or numbers for the following letters.
When editing a phonebook entry, the first letter and each letter following a space is
automatically in upper case.
u Special characters: Press the star key * to open the special characters table. Navigate to
the character desired using the star key and press the display key Insert to select it.
u Special letters: Umlauts or other marked/diacritic characters can be selected by pressing the
corresponding letter several times. See the character table (
¢ page 132).
29
Page 31

Making calls
Making calls
Note
You can make up to three external calls at the same time via your base, depending on the
quality of your DSL connection.
Making an external call
External calls are calls made via the public telephone network (fixed line network or mobile
network) and via the Internet (VoIP).
To make an external call, you need to define one of the phone connections as a send connection.
You have the following options:
u Assign a connection to the handset as a send connection permanently (
If necessary, you can use a "fallback" connection via a display key (
u Select a send connection on the handset each time you make a call.
Permanently assigned send connection
¤ Enter the number. ¤ Press the Talk key c briefly. The number is dialled.
Or:
¤ Press and hold the Talk key c. ¤ qSelect a connection. ¤ Dial / w ¤ Enter number. The
number is dialled approximately 3.5 seconds after the last digit is entered.
Notes
u If a dialling plan has been defined for the dialled phone number (¢ page 111), then the
connection specified in the dialling plan will be used to establish the connection instead
of the send connection. If the phone number is blocked by a dialling plan, it will not be
dialled. Not possible is displayed.
u If you use VoIP to make a call to the fixed line network, you may also have to dial the area
code for local calls (depending on the provider). You can avoid having to dial your own
area code by entering it in the configuration and activating the Predial area code for
local calls via VoIP option (see Web configurator).
u You have activated the Automatic Fallback to Fixed Line option with the Web
configurator. If an attempt to make a call via a VoIP connection fails, the phone
automatically attempts to establish the connection via the fixed line network.
u Gigaset.net numbers ending with the suffix #9 are automatically dialled via the
Gigaset.net connection. The calls are free of charge (
¢ page 35).
¢ page 55).
¢ page 48).
30
Page 32

Making calls
Selecting a connection at each call
Prerequisite: Instead of a send connection, "Sel. at each call" is assigned to the handset
¢ page 55).
(
¤ Enter the number. ¤ Press the Talk key c. ¤ q Select a connection. ¤ Dial / w.
Notes
u You can cancel the dialling process with the End call key a.
u You can see the duration of the call while the call is in progress.
u If you have registered multiple handsets to the base, you can make internal calls free of
Using an alternative connection/connection list on the display key
Prerequisite: You have assigned an "alternative connection" or the list with all configured
connections to a display key (
charge (
¢ page 71).
¢ page 48).
¤ Press the display key Sel. Line. ¤ q Select a connection. ¤ c / Dial. ¤ Enter the number.
The number is dialled approximately 3.5 seconds after the last digit is entered.
Any dialling plan that has been defined for the dialled phone number (
The selected send connection is always used.
¢ page 111) is ignored.
Calling an IP address (provider-dependent)
You can also dial an IP address instead of a phone number using VoIP.
¤ Press the star key * to separate the sections of the IP address (e.g. 149*246*122*28).
¤ If necessary press the hash key # to attach the SIP port number of the person you are
calling to the IP address (e.g. 149*246*122*28#5060).
If your VoIP provider does not support the dialling of IP addresses, each part of the address will
be interpreted as a normal phone number.
Dialling with the redial list
The redial list contains the 20 numbers last dialled with the handset. You can manage this
similarly to your phone's message lists (
¢ page 28).
¤ Open the redial list: Press the display key Ò.
¤ q Select an entry. ¤ Press the Talk key c. The number is dialled.
If a name is displayed, you can display the corresponding phone number:
¤ View / w ¤ r View next/previous number, if necessary.
If you have assigned a line (e.g. to initiate an external consultation call):
number with OK.
31
¤ Dial the selected
Page 33

Making calls
i V
07:15
INT 1 22 Feb
?
OneTouchCall active
0891234567
OFF
Managing entries in the redial list
¤ Open the redial list. ¤ q Select an entry. ¤ Options
Copy to Directory:
Display number:
¤ OK ¤ Copy an entry to the phonebook (¢ page 74).
¤ OK ¤ Copy a number into the display, change or add to if necessary.
¤ Dial with c or save as a new entry in the phonebook with Ó.
Delete entry:
Delete all:
Dialling from the call list
v ¤ Ê ¤ OK ¤ q Select the list. ¤ OK
¤ q Select an entry. ¤ c. The number is dialled.
u You can also bring up the call list using the display
key Calls, but you must assign a display key
accordingly (
u You can also open the Missed calls list using the
Message Key f.
Dialling with the phonebook
s Open the phonebook. ¤ q Select an entry. ¤ c
If multiple numbers are entered:
¤ OK. The entry is deleted.
¤ OK. All entries are deleted.
Notes
¢ page 50).
¤ r Select a number. ¤ Press the Talk key c or OK. The number is dialled.
Note
You can also dial from a public phonebook¢ page 77, from your private online phonebook
¢ page 79 or from your Gigaset.net phonebook ¢ page 81.
One touch call
You can set up your phone so that you can dial a specific number when you press any key on the
keyboard. This allows children, for example, who are unable to enter a number, to call a certain
number.
v
¤ É ¤ OK ¤ q One Touch Call ¤ OK
Activation:
Call to:
¤ r On / Off
¤ Enter or change the number.
¤ Save
The activated One Touch Call appears on the idle display. The saved
number is dialled by pressing any key. Cancel dialling with a.
The phone is blocked for other calls (including emergency calls).
To end on e touch ca ll:
¤ Press the display key OFF. ¤ Press and hold the # key.
¤ Press and hold the # key.
Or:
32
Page 34

Making calls
Dialling emergency numbers
Dialling plans for emergency numbers (e.g. the local police emergency number) are preset on
the phone for certain countries. Emergency numbers are dialled by default via the fixed line
network. However, you can change the connection through which each emergency number
should be called (e.g. if the phone is not connected to the fixed line network) (
Please note: If no dialling plans are defined for emergency numbers and you have set an
automatic area code, the area code will also be put in front of the emergency numbers when
dialled via a VoIP connection.
¢ page 111).
Ending a call
¤ Press the End call key a.
Accepting a call
An incoming call is indicated by ringing, by a display on the screen and by the flashing Talk
d.
key
Note
Only calls to the receive connections assigned to the handset are signalled (¢ page 55).
The following applies if VoIP connections are configured on your base:
u If you have not assigned the receive connections on your phone, all incoming calls are
signalled on all registered handsets.
u If you have assigned connections but not assigned a connection to any handset as the
receive connection, calls on this connection will not be signalled.
u If a call cannot be assigned to any connection on the phone, this call is signalled on all
handsets.
Options for answering the call:
¤ Press the Talk key c.
¤ If Auto Answer is switched on (¢ page 45), remove the handset from the charging cradle.
¤ Accepting a call with the Gigaset L410 handsfree clip: ¤ Press the Talk key on the Gigaset
L410.
Prerequisite: The Gigaset L410 must be registered to the base. You can find further
information in the Gigaset L410 user guide.
Declining a call:
¤ Switch off ringtone: ¤ Silence. You can accept the call while it is displayed on the screen.
¤ Rejecting a call (only for VoIP connection): ¤ Press the End call key a. For a call to the fixed
line network connection, only the ringtone is deactivated.
33
Page 35

Making calls
Accepting/rejecting call waiting
If you receive a call while conducting an external call, you will hear the call waiting tone. If the
number is transferred, you will see this number or the name of the caller on the display.
To r ejec t a call:
To accept a call:
When you accept a call, the previous call is placed on hold.
Returning to the call on hold:
¤ Reject
¤ Accept
¤ a.
Switching the handsfree mode on/off
If you are going to let someone listen in, you should tell the other participant that this is
happening.
Activating/deactivating handsfree mode during a call and when establishing a connection:
¤ Press c.
To place the handset in the charging cradle during a call:
¤ Press and hold c for a further 2 seconds while placing the handset in the charging cradle.
For instructions on changing the loudspeaker volume,
¢ page 45.
Switching the microphone on/off (muting)
If you turn the microphone off during a call, your caller can no longer hear you.
¤ Press v to switch the microphone on/off.
Phone number display
Calling Line Identification
The caller's phone number is displayed. If the caller's number is stored in your phonebook, the
number type and name are displayed.
No Calling Line Identification
Instead of name and number, the following is displayed:
u External: No number has been transferred.
u Withheld: Caller has withheld Calling Line Identification.
u Unavailable: Caller has not requested Calling Line Identification.
CNIP (Calling Name Identification Presentation)
In addition to the number, the registered name (and location) of the caller are displayed. The
name of the phonebook entry appears if you have saved the number in the phonebook.
34
Page 36

Making calls
Notes on phone number display for CLIP
By default, the number of the caller is shown on your telephone, ¢ page 122 or
¤ www.gigaset.com/service
Transferring the name from the online phonebook
Instead of the phone number appearing in the call display, you can display the name under
which the caller is saved in the online phonebook.
Prerequisites:
u The provider of the online phonebook you have set for your telephone supports this
function.
u You have activated the "Display caller name" function via the Web configurator
¢ page 116).
(
u The caller has requested Calling Line Identification and has not withheld the function.
u Your telephone is connected to the Internet.
u The caller's number is not saved in the handset's local phonebook.
VoIP telephony via Gigaset.net
You can use Gigaset.net to make free phone calls via the Internet directly to other Gigaset.net
users without having to set up an account with a VoIP provider or make any further settings. You
simply have to connect your phone to the power supply and to the Internet and, if necessary,
enter yourself in the Gigaset.net online phonebook under a name of your choice (
Gigaset.net is a VoIP service provided by Gigaset Communications GmbH to which all users of a
Gigaset VoIP device can subscribe.
You can call other participants to Gigaset.net free of charge, i.e. there are no telephone charges
other than the costs for your Internet connection. Connections to/from other networks are not
possible.
Numbers ending with the suffix #9 are automatically dialled via the Gigaset.net connection.
¢ page 83).
Note
Gigaset.net supports broadband telephony: Gigaset.net calls that you make from your
phone with a different broadband-capable terminal have excellent sound quality.
Every Gigaset VoIP device is assigned a Gigaset.net phone number by default (
registered participants are included in the Gigaset.net phonebook, which you are able to access.
An echo service is available for you to check your VoIP connection.
The echo service is available in six languages:
u 12341#9 (English)
u 12342#9 (Dutch)
u 12343#9 (Italian)
u 12344#9 (French)
u 12345#9 (German)
u 12346#9 (Spanish)
After an announcement, the echo service immediately sends back the voice data received from
you in the form of an echo.
35
¢ page 128). All
Page 37

Making calls
Exclusion of liability
Gigaset.net is a voluntary service provided by Gigaset Communications GmbH without
guarantee or liability for the availability of the network and service provision.
Notes
If you do not use your Gigaset.net connection for six months, it is automatically disabled. You
cannot be reached for calls from Gigaset.net.
The connection is reactivated as soon as you:
u Start a search in the Gigaset.net phonebook
u Make a call via Gigaset.net (dial a number with #9 at the end) or
u Activate the connection via the Web configurator.
Gigaset HDSP – telephony with brilliant sound quality
Your Gigaset phone supports the broadband codec G.722. You can
therefore use it to make calls with brilliant sound quality (High
Definition Sound Performance).
If you register broadband-capable handsets to your base, internal calls
between these handsets will also be made via broadband.
telephone:
u For internal calls:
The handsets involved are broadband-capable, i.e. they support codec G.722.
u For external calls via VoIP:
- You make the call from a broadband-capable handset.
- You have selected codec G.722 for outgoing calls.
- Your VoIP provider supports broadband connections.
- The recipient's phone supports codec G.722 and accepts the establishment of a
broadband connection.
The following are prerequisites for broadband connections on your
Note
The Gigaset.net VoIP ser vice (¢ page 35) supports broadband connections.
36
Page 38

Using provider-specific functions (network services)
Using provider-specific functions (network services)
Network services depend on and must be requested from your network provider (which may
incur additional charges). Network services fall into two distinct groups:
u Network services that are activated for the following call or all subsequent calls when no call
is being made (for example calling anonymously). You can activate/deactivate these network
services via the menu Ç.
u Network services that are activated during an external call e.g. "consultation call". These ser-
vices are provided to you during an external call in the options bar (e.g Ext. Call, Conf.).
You will find a general description of the features on your network provider's website or at one
of their store branches.
Notes
u To activate/deactivate the following services, a code is generally sent to the telephone
network.
¤ After a confirmation tone from the telephone network, press a.
u All functions that can be activated under menu item Ç are services made available by
your network provider. If you require assistance, please contact your network provider.
u It is not possible to reprogram the network services.
u Some settings cannot be made simultaneously on multiple handsets. If this is the case,
you will hear a negative acknowledge tone.
Configuring general settings for all calls
Anonymous calling – withholding Calling Line Identification
If you withhold your number (CLIR = Calling Line Identification Restriction), your number will not
be displayed for the caller. You are calling anonymously.
Note
Anonymous calls are only possible via VoIP connections through providers that support the
"anonymous calling" function. You may have to ask your VoIP provider to activate this
function.
The setting applies for all calls via the fixed line network and VoIP connections, along with all
registered handsets.
v ¤ Ç Select Services ¤ OK ¤ q All Calls Anonym. ¤ Change (μ =activated).
To cancel Calling Line Identification for the next call only
37
¢ page 40.
Page 39

Using provider-specific functions (network services)
General Call Forwarding (CD)
When diverting a call, the call is forwarded to another connection.
A distinction is made between
u Diverting calls internally and
u Diverting calls to an external phone number
Call Forwarding to an external connection
You can set up Call Forwarding differently for each connection, i.e. for each connection (fixed line
network number and VoIP connection), that is assigned to the handset as a receive connection.
v ¤ Ç Select Services ¤ OK ¤ q Call Divert ¤ OK ¤ q Select receive connection.
¤ OK
¤ r On / Off
Status:
To Phone Number:
You can specify a different fixed line network, VoIP or mobile number for every connection.
You must specify another Gigaset.net number when diverting a call from your Gigaset.net
number.
When:
¤ r All Calls / When Busy / No Answer
All Calls: Calls are forwarded immediately, i.e. no more calls to this connection are signalled
on your phone.
No Answer: Calls are diverted if no one accepts the call within several rings.
When Busy: Calls are forwarded if your line is busy.
¤ Enter the number to which the call is to be forwarded.
¤ Send
For diverting calls from the fixed line network:
A connection is established to the telephone network to activate/deactivate Call Forwarding.
¤ After confirmation from the fixed line network, press the End call key a.
Please note
Diverting calls to your phone numbers can incur additional costs. Please consult your
provider.
38
Page 40

Using provider-specific functions (network services)
Internal Call Forwarding
You can di ver t all external calls intended for a receive connection on the handset to a different
handset.
v ¤ Ç Select Services ¤ OK ¤ q Call Divert ¤ OK ¤ q Internal ¤ OK.
Activation:
To Han ds et:
Ring Delay: r None / 10 sec. / 20 sec. / 30 sec.
¤ r On / Off
¤ r Select internal participant.
No Handset is displayed if internal Call Forwarding has not been set previously or if the
previously set handset is no longer registered.
Delay time for the ring delay. If you prefer to have a delay before the call is diverted, select
the length of the delay. If you select None, the call is not signalled on the handset and is
diverted immediately.
¤ Save
The internal Call Forwarding is single-stage only, i.e. if calls for the handset are diverted to a
different handset (e.g. HS1) on which a Call Forwarding is also active (e.g. to HS2), this second
Call Forwarding is not activated. The calls are signalled on handset HS1.
Notes
u Any call for the handset that has been diverted is entered in the call lists.
u If a call to a receive connection that is only assigned to the handset is diverted to a
handset that is not available (e.g. the handset is deactivated), the call is rejected after a
short time.
Activating/deactivating call waiting for external calls
If the function is activated, you will hear a call waiting tone during an external call to signal that
another external caller is trying to get through. If you have CLIP, the number of the waiting caller
or the corresponding phonebook entry is shown in the display. The caller will hear the ringing
tone.
When call waiting is deactivated, the caller will hear the busy tone if you are already making a
call and you are the only participant of this connection.
Prerequisite for calls via VoIP: Parallel VoIP connections are permitted on your telephone
(default setting; setting can be changed via the Web configurator).
v ¤ Ç Select Services ¤ OK ¤ q Call Waiting ¤ OK
¤ r On / Off
Status:
¤ Send
Call waiting is activated/deactivated for all connections to the telephone and all registered
handsets.
39
Page 41

Using provider-specific functions (network services)
Special settings for calls via VoIP
Activating/deactivating call transfer – ECT (Explicit Call Transfer)
If the Transfer (ECT) function is activated, you can connect two external callers on a VoIP
connection with each other by pressing the End call key
v ¤ Ç Select Services ¤ OK ¤ q Trans fer (EC T) ¤ Change (³ = activated).
Note
You can use the Web configurator to change further settings for the call transfer on a VoIP
connection (
¢ page 114).
a.
Special settings for calls via the analogue fixed line network
Unknown call rejection
Calls to your fixed line network number for which the caller has withheld Calling Line
Identification (CLIR) are rejected.
v ¤ Ç Select Services ¤ OK ¤ q Unknown Call Reject
Status:
¤ r On / Off
¤ Send
¤ After confirmation from the telephone network, press the End call key a.
Configuring settings for the next call
Activating "anonymous calling" for the next call
You can withhold your phone number for the next call (CLIR = Calling Line Identification
Restriction).
v ¤ Ç Select Services ¤ OK ¤ q Next Call Anonym. ¤ OK
¤ Enter the number or copy from the phonebook. ¤ Dial / c
The number is dialled.
Withhold your number for all calls,
¢ page 37.
Suppress call waiting for the next call (fixed line network)
Prerequisite: You have selected a fixed line network connection as the send connection.
Call waiting will not be signalled for the next call, even if "call waiting" is activated (
v ¤ Ç Select Services ¤ OK ¤ q Next Call ¤ OK ¤ Call Waiting
¢ page 39).
¤ Enter the phone number. ¤ Dial / c. The number is dialled.
Note
The phone number is stored, together with the setting, in the redial list.
40
Page 42

Using provider-specific functions (network services)
Configuring settings during an external call
Please note
For VoIP telephony, the services described below are only available if parallel IP connections
are permitted.
Initiating ringback when busy/no answer (fixed line network)
Note
A display key/menu function for activating ringback only appears if the exchange supports
this feature.
If the person you are calling does not answer or their line is busy, you can initiate ringback.
Ringback when busy: The ringback takes place as soon as the participant in question terminates
the current call.
Ringback when the call is not answered: The ringback takes place as soon as the participant in
question has made a call.
Initiating ringback
Prerequisite: You have dialled a number and set your fixed line network connection as the send
connection.
Options
¤ q Ringback ¤ OK
If ringback has been successfully activated, a message to this effect is displayed. The call is
ended. The handset returns to idle status.
If ringback has not been successfully activated in the exchange, a message to this effect is
displayed.
¤ aPress the End call key.
Initiating ringback during an external consultation call
You wish to initiate a n extern al consultation call during an ex ternal call. The line is busy or there
is no answer.
Options
¤ q Ringback ¤ OK ¤ End
You return to the participant on hold.
Notes
u You can only activate one ringback at a time. If you activate a second ringback, the first
one is automatically deleted.
u The ringback is initiated on the previously used send connection.
u The ringback can only be received on the handset that activated the ringback.
41
Page 43

Using provider-specific functions (network services)
Consultation calls (external)
You can call a second external caller. The first call is placed on hold.
During an external call:
¤ Press the display key Ext. Call. The previous call is placed on hold. The caller hears an
announcement or music on hold.
¤ Enter the second participant's telephone number. The phone number is dialled. You are
connected to the second participant.
If the participant does not respond:
Ending a consultation call
Options ¤ q End active call
You will be reconnected to the first call participant.
If you have established the consultation call via your fixed line network connection, you can also
end the consultation call by pressing the End call key
and you will receive a recall. As soon as the receiver is lifted, you are reconnected to the first call
participant.
This on ly applies to VoIP con necti ons if the call tr ansfer is not activated by ending the call ("ECT"
¤ End. You return to the first participant.
a. The connection is briefly interrupted
¢ page 40 and "Transfer Call by On-Hook" ¢ page 114).
Transferring calls
Transferring a call to an internal participant
You are making a n external call and would like to transfer it to another handset.
¤ Set up an internal consultation call (¢ page 71). ¤ Press the End call key a (even before
the other participant has answered) to transfer the call.
Transferring a call externally – ECT (Explicit Call Transfer)
Prerequisites:
u The feature is supported by the relevant network provider.
u You have activated the function Transfer Call by On-Hook (
Web configurator.
You are making a n external call via a VoIP connection and wish to transfer the call to another
external participant.
¢ page 114)) for VoIP with the
¤ Press the End call key a (during a conversation or before the second participant has
answered).
Functions after a call
Cancelling ringback
Prerequisite: Ringback is activated for your fixed line network connection (¢ page 41).
v ¤ Ç Select Services ¤ OK ¤ q Ringback Off ¤ OK
¤ After confirmation from the telephone network, press the End call key a.
Note
If the ringback was signalled before you could cancel it, you can end it using Cancel.
42
Page 44

Making cost-effective calls
Making cost-effective calls
Make phone calls through a network provider who offers particularly low-cost call rates
(preselection; fixed line network only). Using the Internet (VoIP) is the preferred cost-effective
way of making calls.
Defining dialling plans
You can also use your phone's cost control function for calls to fixed line network or mobile
networks. In addition to your fixed line network connection, you can open accounts with various
VoIP providers offering favourable rates for calls to other networks. In the phone configuration,
define the best connections (account), e.g. for specific regional, national and mobile network
codes, to be used when calls are made (
specifying rules for telephony, page 111). Or define the send connection to be used when you
actually dial the number (dialling via line selection,
Linking a number with a call-by-call number
You can predial call-by-call numbers for calls via your fixed line network connection. Use the
call-by-call numbers to select the network of a cost-effective provider for a call. You can store the
call-by-call numbers from several network providers in the local phonebook (
Prefix a number with a call-by-call number ("linking"):
¤ s Briefly press. The local phonebook is opened. ¤ s Select an entry
(call-by-call number).
The call-by-call number is shown on the display.
¤ Options ¤ q Display number ¤ OK
¤ Enter the phone number. c Press the Talk key.
Or:
¤ s Briefly press again to copy the number from the local phonebook. ¤ q Select an entry
¢ page 74). ¤ If there are several numbers stored in the entry: q Select the number. ¤
(
OK
¤ Press the Talk key c. Both numbers are dialled.
¢ Web configurator, User-defined dialling plans –
¢ page 31).
¢ page 74).
Displaying the call duration
The duration of each call appears in the display for all external calls
u During the conversation
u Until approximately 3 seconds after replacing the earpiece.
Note
The actual duration of the call can vary from what is shown by a few seconds.
43
Page 45

Adjusting the telephone settings
Screensaver
Activation
<On >
Selection:
Analog Clock
Back Save
Example
Adjusting the telephone settings
The handset and base station are preconfigured, but you can change the settings to suit your
individual requirements.
The settings can be changed via the Settings menu whilst on a call or in idle status.
Changing the display language
v ¤ Ï ¤ OK ¤ q Language ¤ OK ¤ q Select language
¤ Select (Ø =selected)
If you accidentally choose a language you do not understand:
v ¤ L5 ¤ q Select the correct language. ¤ Press the right display key.
Setting the display
Setting a screensaver
You can set a screensaver for the display when in idle status. The
options are: Analogue Clock, Digital Clock, Image, Info Services.
v
¤ Ï ¤ OK ¤ q Display ¤ OK
¤ Screensaver (μ =activated) ¤ Edit
Activation: r On / Off
Selection: r Digital Clock / Analog Clock / [Images] / Info
Services
View screensaver:
¤ Save
The screensaver is activated approx. 10 seconds after the display
has changed to idle status.
End screensaver:
¤ r Select screensaver ¤ View
¤ Press and hold the End call key a. The idle display will be displayed.
Note
Prerequisites for displaying info services:
u Info Services must be activated via the Web configurator (
u The telephone must have an Internet connection.
The type of info service available to your phone is set on the Internet on the Gigaset.net
server. You can change the setting (
If no information is currently available, the digital time (Clock) is displayed instead until
information is available again.
Toge the r wit h th e inf orm atio n, d ispl ay k eys t hat o pen the I nfo Cent re se lec tio n men u ca n be
shown.
44
¢ page 65).
¢ page 116).
Page 46

Adjusting the telephone settings
Activating/deactivating the information ticker
You can display text information from the Internet that is set for the screensaver Info Services as
a scrolling message in the idle display.
v ¤ Ï ¤ OK ¤ q Display ¤ OK ¤ q Info Ticker ¤ Edit (³= activated)
The ticker starts as soon as the telephone changes to idle status. If a message is shown in the idle
display, the information ticker is not displayed.
Setting the colour scheme
You can set the display to show a dark or a light background.
v ¤ Ï ¤ OK ¤ Display ¤ OK ¤ Colour Schemes ¤ OK ¤ q Colour Scheme 1 / Colour
Scheme 2
¤ Select (Ø = selected)
Setting the display backlight
The display backlight is always activated when the handset is not in the base/charging cradle or
when a key is pressed. Any digit keys pressed appear on the display for pre-dialling.
You can activate/deactivate the display backlight for idle status:
v
¤ Ï ¤ OK ¤ q Display ¤ OK ¤ q Backlight ¤ OK
In Charger:
Out of Charger:
¤ r On / Off
¤ r On / Off
¤ Save
Note
The On setting can significantly reduce the standby time of the handset.
Activating/deactivating Auto Answer
When set to Auto Answer, the handset accepts an incoming call as soon as you remove it from
the charging cradle.
v ¤ Ï ¤ OK ¤ q Tel e ph on y ¤ OK ¤ Auto Answer ¤ Change (³=activated).
Regardless of the Auto Answer setting, the connection ends as soon as you place the handset
back in the charging cradle. Exception: Press and hold c for a further 2 seconds while placing
the handset in the charging cradle.
Changing the handsfree/earpiece volume
You can set the volume of the earpiece and speaker at 5 levels independently of each other.
t Handset Volume
Or:
v
¤ Ï ¤ OK ¤ q Audio Settings ¤ OK ¤ Handset Volume ¤ OK
¤ r Set earpiece volume. ¤ s Scroll to the Speaker: line.
¤ r Set speaker volume. ¤ Save
Setting the volume during a call:
automatically saved after approx. 3 seconds.)
If
t is assigned to another function:
¤ Options ¤ q Volume ¤ OK ¤ Make the setting.
45
¤ t ¤ r Select the volume. ¤ Save (The setting is
Page 47

Adjusting the telephone settings
Volu me
For internal calls
and alarms:
< ‡ >
External Calls:
ˆ
Back Save
Example
Setting the earpiece profile
You can set various earpiece profiles to optimally adapt your phone to your environment. Check
which is the most comfortable for you.
Earpiece Profiles: High and Low. The default is Low.
v
¤ Ï ¤ OK ¤ q Audio Settings ¤ OK ¤ q Earpiece Profiles ¤ OK
¤ q Select profile ¤ Select (Ø =selected)
Setting the handset ringtones
Setting the ringtone volume
v ¤ Ï ¤ OK ¤ q Audio Settings ¤ OK ¤ q Ringtones
(Handset)
q For internal calls and alarms / External Calls
r Volume can be set at 5 levels or crescendo (increasing
volume).
¤ OK ¤ Volu me ¤ OK
¤ Save
Setting the ringtone
v ¤ Ï ¤ OK ¤ q Audio Settings ¤ OK ¤ q Ringtones
(Handset)
¤ q Melodies ¤ OK ¤ q Select the connection.
¤ OK
You can set different ringtones for:
- internal calls and anniversaries
- external calls to each individual receive connection of the phone
(Landline, IP1 to IP6, Gigaset.net)
Or select the same ringtone for All calls.
¤ r Select each ringtone/melody. ¤ Save
Activating/deactivating the ringtone
Activating/deactivating the ringtone permanently: ¤ Press and hold the star key *.
When the ringtone is deactivated, ó appears in the status bar.
Deactivating the ringtone for the current call:
¤ Press Silence or a.
Activating/deactivating the alert tone (beep)
You can activate an alert tone (beep) instead of the ringtone.
¤ Press and hold the star key * and within three seconds press the display key Beep.
When the alert tone is activated, ñ appears in the status bar.
Deactivating the alert tone:
46
¤ Press and hold the star key *.
Page 48

Adjusting the telephone settings
Time Control
For external calls:
On
Suspend ring. from:
22:00
Suspend ring. until:
07:00
Back Save
Example
Setting time-controlled signalling for external calls
You can specify a time period when you do not want the handset
to signal external calls e.g. during the night.
Prerequisite: Date and time are set.
v ¤ Ï ¤ OK ¤ q Audio Settings ¤ OK ¤ q Ringtones
(Handset)
For external calls:
For external calls = On:
¤ OK ¤ Time Control
¤ r On / OFF
Suspend ring. from / Suspend ring. until:
and end of the period in 4-digit format.
¤ Enter the start
¤ Save
Note
During this period, your phone will continue to ring for numbers to which you have assigned
a VIP group in the phonebook.
Activating/deactivating the ringtone for anonymous calls
You can set your handset not to ring if a caller withholds their number. The call is only signalled
on the display.
v ¤ Ï ¤ OK ¤ q Audio Settings ¤ OK ¤ q Ringtones (Handset) ¤ OK ¤ Anon. Calls
Silent
¤ Change (³= ringtone is deactivated for anonymous calls).
Activating/deactivating the ringtone
You can deactivate the ringtone on your handset before you answer a call or when the handset
is in idle status; the ringtone can be deactivated permanently or just for the current call. The
ringtone cannot be re-activated while an external call is in progress.
u Deactivating the ringtone permanently:
appears in the display.
u Reactivating the ringtone:
u Deactivating the ringtone for the current call:
¤ Press and hold the star key *.
¤ Press and hold the star key *. The ó icon
¤ Silence
Activating/deactivating the alert tone
You can activate an alert tone ("Beep") instead of the ringtone.
¤ Press and hold the star key *. ¤ Within 3 sec.: Press the display key Beep.
A call will now be signalled by one short alert tone. The display shows
47
ñ.
Page 49

Adjusting the telephone settings
Activating/deactivating advisory tones
Your handset uses advisory tones to tell you about different activities and statuses. These
advisory tones can be activated/deactivated independently of each other.
v
¤ Ï ¤ OK ¤ q Audio Settings ¤ OK ¤ q Advisory Tones ¤ OK
Key Tones: r On / Off
Tone when keys are pressed.
Confirmation: r On / Off
Confirmation/error tone after making entries, advisory tone when a new message has been
received.
Battery: r On / Off
Warning tone when there are fewer than 10 minutes of talktime remaining (every
60 seconds). There is no battery warning when the baby monitor is activated.
¤ Save
Activating/deactivating music on hold
You can activate/deactivate music on hold for external calls during consultation and forwarding.
¤ Ï ¤ OK ¤ q Audio Settings ¤ OK ¤ q Music on hold
v
¤ Change (³ =activated)
Resetting a handset to the default settings
You can reset any individual settings and changes that you have made.
The following settings are not affected by a reset
u Registering the handset to the base
u Date and time
u Directory entries, the call lists
v ¤ Ï ¤ OK ¤ q System ¤ OK ¤ q Handset Reset ¤ OK ¤ Ye s
Quick access to numbers and functions
u Number keys: The keys Q and 2 to O can be assigned to a number from the
phonebook.
u Display keys: The left and right display keys have a function preset by default, but the keys
can be re-assigned (
You can then dial the number or start the function by simply pressing a key.
48
¢ page 50).
Page 50

Adjusting the telephone settings
Assigning a number to digit keys (quick dial)
Prerequisite: No number has been assigned to the digit key.
¤ Press and hold the digit key
Or:
¤ Briefly press the digit key. ¤ Press the display key Quick Dial.
The phonebook is opened.
¤ q Select an entry. ¤ OK ¤ r Select number ¤ OK
The entry is saved to the corresponding digit key.
Note
If you delete or edit the entry in the phonebook at a later date, this will not affect the
assignment to the number key.
Selecting numbers/changing an assignment
Prerequisite: A number has been assigned to the digit key.
When the handset is in idle status
Dialling a number:
¤ Press and hold the digit key. The number is dialled immediately.
Or:
¤ Briefly press the digit key. ¤ Press the left display key with the number/name (abbreviated
if necessary).
Changing digit key assignments:
¤ Briefly press the digit key. ¤ Change. The phonebook is opened.
Changing the assignment:
Delete the assignment:
¤ Select entry ¤ OK ¤ Select the number if necessary ¤ OK.
¤ Press the display key Clear Key.
49
Page 51

Adjusting the telephone settings
Assigning display keys, changing assignments
¤ Press and hold the left or right display key. The list of possible key assignments is opened.
¤ Select function. ¤ OK.
The following functions are available:
Baby Monitor: Set and activate/deactivate the baby monitor (
Alarm Clock: Set and activate/deactivate the alarm clock (
Calendar: Open calendar (
One Touch Call: Set up one touch call (
Redial: Show redial list (
eMail: Open the e-mail submenu for receiving and reading e-mail
notifications (
More Functions... You can also choose further functions:
Send Connection Assign an alternative send connection to a key.
¢ page 88)
¢ page 32).
¢ page 31).
¢ page 58)
¢ page 90)
¢ page 87)
¤ Select a connection as a (further) send connection for the
handset.
Use this display key if you wish to use the alternative send
connection (temporarily) for the next call (instead of the send
connection for the handset) (
Line Selection Assign the list of connections for your phone to a key.
Select the send connection for each call from the list (
Call Lists Show call list (
Withhold Number Withhold phone number identification for next call (
Call Divert Activate/deactivate Call Forwarding (
eMail Open the e-mail submenu for receiving and reading e-mail
Info Centre Start the Info Centre and open the list of available information
Network directories Display list of network directories (
Central Net Dir. Display company directory, if available
public network
directory
notifications (
services – go online (
Display personal online phonebook if you have set one up
(
¢ page 79)
¤ OK
¢ page 19).
¢ page 31).
¢ page 85).
¢ page 40).
¢ page 38)
¢ page 58)
¢ page 63).
¢ page 77)
Starting a function
With the telephone in idle status: ¤ Briefly press the display key. The assigned function is
performed.
50
Page 52

Configuring the system settings
Configuring the system settings
You can make the following settings via the menu on the relevant handset or on a registered
Gigaset C530H, E630H, C620H, S820H, SL910H, SL930H handset or via the Web configurator on
the phone.
Setting the date and time manually
To ensure you have the correct time for incoming calls and to use the alarm clock and calendar,
the date and time must be set.
Note
The address of a time server on the Internet is stored on your phone. The date and time are
taken from this time server provided that the phone is connected to the Internet and
synchronisation with the time server is activated. Manual settings are overwritten in this
case.
If the date and time have not yet been set on the handset, the display key Time appears.
¤ Press the display key Time.
Or:
v ¤ Ï ¤ OK ¤ q Date/Time ¤ OK
¤
Date:
Enter the month, day and year in 8-digit format, e.g.
Q42Q for 01/14/2011.
Time:
¤ Enter hours and minutes in 4-digit format,
QM5 for 07.15.
e.g.
¤ Switch between am and pm if applicable with the display key am/pm.
¤ Save
Changing the system PIN
Protect the system settings of your phone with a PIN known only to you. You have to enter the
system PIN if you register or de-register a handset, change local network settings, perform a
firmware update or reset the phone to default settings.
You can change the 4-digit system PIN of the base (default setting: 0000).
v ¤ Ï ¤ OK ¤ q System ¤ OK ¤ q System PIN ¤ OK ¤ Enter the current system PIN if
necessary.
51
¤ OK ¤ Enter the new system PIN. ¤ OK
Page 53

Configuring the system settings
Entering your own local area code
Please note the following for local calls (calls using the local fixed line network):
u For local calls using your fixed line network, you generally (depending on the exchange) do
not have to dial an area code. All the calls in the call list are saved with area codes. In order to
be able to ca ll b ack a cal ler f rom th e ca ll li st, y ou h ave to sav e the loca l ar ea co de in the pho ne
for the area your phone is in (Own Area Code). If your phone is in a "multiple area code" area,
you also have to enter the other area codes for this area as Extra Area Codes.
u You have to dial the area code for local calls using your VoIP connection. If you have saved
your local area code in the phone and activated the Predial long distance access code for
VoIP calls option using the Web configurator (
without a local area code, the local area code that has been entered is included automatically
(e.g. when dialling from the phonebook).
¢ page 113), when numbers are dialled
Entering your own local area code
v ¤ Ï ¤ OK ¤ q Te lephon y ¤ q Own Area Code ¤ OK ¤ Enter your own area code
(a maximum of three characters; digits and the characters, "*", "#").
¤ Save
Entering extra codes
v ¤ Ï ¤ OK ¤ q Tel eph ony ¤ q Extra Area Codes ¤ OK
¤ q Select an entry ("–––" = empty entry). ¤ Ñ Delete a previously entered extra code if
necessary.
are permitted).
¤ Enter the extra code (maximum 3 characters; digits and the characters "*", "#"
¤ Repeat the steps above until you have entered all the extra codes for your area. You can save
a maximum of five extra codes.
¤ Save
Activating/deactivating music on hold
v ¤ Ï ¤ OK ¤ q Audio Settings ¤ OK ¤ q Music on hold ¤ Change (³= activated).
Setting the IP address of the base in LAN
Prerequisite: Your base is connected to a router or a PC (¢ page 12).
An IP address is required in order for the LAN to "recognise" your phone.
The IP address can be assigned to the phone automatically (by the router) or manually.
u If the address is assigned dynamically, the router's DHCP server automatically assigns an IP
address to the phone. The IP address can be changed according to router settings.
u With manual/static assignment, you assign a static IP address to the phone. This may be
necessary depending on your network configuration (e.g. if your phone is connected directly
to a PC).
Note
To assign the IP address dynamically, the DHCP server on the router must be activated.
Please also read the user guide for your router.
v ¤ Ï ¤ OK ¤ q System ¤ OK ¤ q Local Network ¤ OK
¤ If system PIN is something other than 0000: Enter the system PIN. ¤ OK
52
Page 54

Configuring the system settings
IP Address Type:
With IP Address Type Dynamic:
The following fields show the current settings that the phone obtained from the router.
These settings cannot be changed.
With IP Address Type Static:
You must manually define the IP address and the subnet mask for the phone as well as the
default gateway and DNS server in the following fields.
IP Address:
The default is 192.168.1.2. For information on the IP address, see the glossary (
Subnet Mask:
The default is 255.255.255.0.
For information on the subnet mask, see the glossary (
DNS Server:
The DNS server (Domain Name System,
(DNS name) into the public IP address for the server when the connection is made.
You can specify your router's IP address here. The router forwards phone address requests to
its DNS server.
The default is 192.168.1.1.
Default Gateway:
The local network is connected to the Internet via the standard gateway. This is generally
your router. Your phone requires this information to be able to access the Internet.
The default is 192.168.1.1.
¤ r Static / Dynamic
¤ Enter the IP address (overwriting the current settings).
¢ page 146).
¤ Enter the subnet mask (overwriting the current settings).
¢ page 151).
¤ Enter the IP address of the preferred DNS server.
¢ page 143) converts the symbolic name of a server
¤ Enter the IP address of the standard gateway (¢ page 145).
¤ Save
Note
You can make local network settings also via the Web configurator (¢ page 107).
Configuring VoIP connections
Note
If auto configuration is used to download the VoIP data to your phone (provider-specific,
¢ page 16), the VoIP wizard is not available. In this case you cannot change the VoIP
settings manually.
You can configure up to 6 VoIP connections to your phone, i.e. you can assign up to 6 VoIP phone
numbers to your phone.
You need to set up an IP account (VoIP account) with a VoIP provider for each connection. You
must save the access data for this IP account on your phone. The VoIP wizard will help you to do
this.
53
Page 55

Configuring the system settings
IP Wizard
?
Start IP
installation wizard?
No
Yes
Launching the IP wizard:
v
¤ Ï ¤ OK ¤ q Tel epho ny ¤ OK ¤ q VoIP Wizard ¤ OK
You will see the following in the display:
The procedure for the VoIP wizard is described on page 14.
Each time you run the VoIP wizard you can configure/reconfigure
one VoIP connection (IP account).
¤ Restart the VoIP wizard if you wish to configure/reconfigure
another VoIP connection.
Note
You can also use the Web configurator to configure and
manage VoIP connections (
¢ page 109).
Automatic update for the VoIP provider settings
After the first download of the VoIP provider settings, your phone will check daily whether a
newer version of the file for your VoIP provider is available via the Internet on the configuration
server.
Auto configuration has been used to download VoIP settings (¢ page 16)
If there is new configuration data, this is automatically downloaded to your phone (without
notification).
Manual VoIP configuration with the IP wizard
If there is new provider data, the idle display on the handset displays the message New profile
available.
¤ Confirm prompt by pressing Ye s . ¤ Enter the system PIN if required. ¤ OK
The new data for your VoIP provider will be downloaded and saved on the phone.
If you respond to the prompt with No, the handset returns to idle status. Your telephone will not
remind you of this new profile again. The message will only be shown again if a newer version of
the provider data is available.
A profile update will only be started if no other profile or firmware update is taking place at the
time.
Assigning send and receive connections to internal participants
If you have several connections configured for your telephone system, you can do the following
for each internal participant:
u Assign a send connection or allow the internal participant to select the connection for each
external call (select line).
u Assign one or several receive connections. Only calls received via one of the assigned
connections are signalled on the device.
54
Page 56

Configuring the system settings
Assigning a send connection
Prerequisite: You have configured at least one VoIP connection on your phone.
v ¤ Ï ¤ OK ¤ q Tel epho ny ¤ OK ¤ q Send Connections ¤ OK
A list of handsets is displayed.
¤ q Select the handset that should be assigned a new send connection. ¤ OK
¤ r Choose a connection as the send connection. All configured connections are offered
with the names you have set.
If more than one connection is configured, Sel. at each call is also offered. For each call, you can
then select a connection over which the relevant conversation should be established.
The Gigaset.net connection is not included in the selection for the send connections.
Gigaset.net numbers (suffix #9) are automatically dialled via Gigaset.net.
Note
If the send connection on a handset is deleted or deactivated, the fixed line network
connection is assigned to it as the send connection.
Assigning receive connection(s)
Prerequisite: Several connections are configured for your phone.
v ¤ Ï ¤ OK ¤ q Tel epho ny ¤ q Rec. Connections ¤ OK
The internal participants (handsets) are displayed.
¤ Save
¤ q Select the internal p articipants that should be assigned new receive connec tions. ¤ OK
All configured connections and the Gigaset.net connection are displayed.
¤ r Select Ye s if you want the relevant connection to be the receive connection for the
internal participant. Select No if it should not be the receive connection.
¤ s Switch to the next connection.
¤ Repeat the steps for each connection. ¤ Save
Notes
u If a new connection is configured, it is assigned as the receive connection to all internal
participants and answer machine Answer Machine 1.
u If a connection is not assigned as the receive connection to any internal participant, calls
on this connection will not be signalled.
Updating the phone firmware
If necessary, you can update your phone's firmware.
The firmware update is downloaded directly from the Internet by default. The relevant web page
is preconfigured in your phone.
Prerequisite:
u The phone is connected to the Internet (i.e. connected to a router, ¢ page 12).
u The phone is in idle status i.e. no calls are being made, there is no internal connection
between the registered handsets, the base menu is not open in any of the handsets.
55
Page 57

Configuring the system settings
Starting the firmware update manually
v ¤ Ï ¤ OK ¤ q System ¤ q Update Firmware ¤ OK ¤ Enter system PIN. ¤ OK
The phone establishes a connection to the Internet.
¤ Start the firmware update with Ye s .
Notes
u The firmware update can take up to six minutes, depending on the quality of your DSL
connection.
u When updating from the Internet, checks are made to ensure that no newer version of
the firmware exists. If this is not the case, the operation is terminated and a message is
issued to that effect.
Updating firmware automatically
Your phone will check daily whether a newer firmware version is available from the Internet on
the configuration server. If firmware updates are available, the message New firmware available
is displayed in the idle display of the handset.
¤ Press the display key Yes to confirm the prompt.
The firmware will be downloaded to your phone.
Note
If the telephone is not connected to the Internet at the time when the check for new firmware is to be performed (e.g. because the router is deactivated), the check is performed as
soon as the phone is reconnected to the Internet.
You can deactivate the automatic version check via the Web configurator.
Restarting the base
v ¤ Ï ¤ OK ¤ q System ¤ OK ¤ q Base Restart ¤ OK
This is restarted. This process takes about 20 seconds.
Checking the base MAC address
Depending on your network configuration, you may have to enter your base MAC address in
your router's access control list, for example. You can check the MAC address on the handset.
v ¤ *#Q5# 2 Q The MAC address is displayed.
Returning to idle status:
56
¤ Back
Page 58

Configuring the system settings
Restoring phone to default setting
The individual settings are reset.
Resetting the base via the menu
When the settings are reset
u Handsets are still registered
u The system PIN is not reset
The following settings in particular are reset to the default settings (you can change the settings
marked "*)" via the Web configurator):
u The entered VoIP connections (are deleted)
u The assignment of send and receive connections
u Audio settings for VoIP connections *)
u DTMF settings *)
u Own area code
u Settings for the local network
u The names of the handsets
u Eco Mode are deactivated
u PABX connection settings
u Digit and display key assignments as well as the
u Settings for network services: Call Forwardings
The following lists are deleted:
u Call lists
v ¤ Ï ¤ OK ¤ q System ¤ OK ¤ q Base Reset ¤ OK ¤ Enter system PIN. ¤ OK ¤ Ye s
After the reset, the base is restarted. The restart takes around ten seconds.
The installation wizard is launched (
¢ page 13).
key
Resetting the base using a key on the base
As with resetting the base via the menu, all individual settings are reset. The system PIN will
also be reset to "0000" and all handsets registered above and beyond the delivery scope are
deregistered.
Note
For instructions on re-registering the handsets after a reset (where applicable) ¢ page 69.
¤ Remove the cable connections from the base station to the router and fixed line network.
¤ Remove the base station mains unit from the socket.
¤ Press and hold the registration/paging key (¢ page 3).
¤ Plug the power adapter back into the power socket.
¤ Press and hold the registration/paging key (at least 20 seconds).
¤ Release the registration/paging key. The base has now been reset.
57
Page 59

E-mail notifications
eMail Incoming
Frank.Miller@mailp.com
02/10/11 3:40pm
Happy Birthday
Anna Sand
02/10/11 10:38am
Read
Delete
E-mail notifications
You can set your phone to periodically connect to your incoming e-mail server and check
whether you have new messages.
Prerequisites:
u You have set up an e-mail account with an ISP.
u The incoming e-mail server uses the POP3 protocol.
u The name of the incoming e-mail server and your personal access data (account name,
password) are stored in the phone (
Your handset display will show when a new e-mail message has been received: An advisory tone
sounds, the message key
f flashes and the Ë icon is displayed in the idle display.
Notes
u If you have also activated the authentication of the phone with the incoming e-mail
server via a secure connection in the Web configurator (TLS authentication) and this fails,
the e-mail messages are not downloaded to your phone.
In this case, pressing the flashing message key
Please check your certificates in the Web configurator. notification.
¤ Confirm message by pressing OK.
¤ Log in to the Web configurator (¢ page 100). The web page Security (¢ page 107)
tells you why the secure connection could not be established and what you can do.
Opening the incoming e-mail list
v ¤ Ë Messaging ¤ OK ¤ q eMail
Or, if new e-mail messages have been received (the message key
f ¤ q eMail
The phone establishes a connection to the incoming e-mail ser ver. A list of e-mail messages that
are stored there is displayed.
New unread messages appear above old read messages.
The following details are displayed for each e-mail: name or e-
mail address of the sender (one line, abbreviated if necessary)
and date and time (date and time will only display correct values
if sender and recipient are located in the same time zone).
Bold: New message. E-mail messages that were not present in
the incoming e-mail server when the inbox was last opened are
identified as "new", regardless of whether or not they have been
read.
If the incoming message list on the incoming e-mail server is
empty, No entries will appear in the display.
58
¢ page 115).
f will display the Certificate error -
f flashes):
Example of the display:
Page 60

E-mail notifications
Note
Many e-mail providers activate spam protection measures by default. E-mail messages
classified as spam are stored in a separate folder and are therefore not shown in the
incoming mail list.
Some e-mail providers allow you to change this setting:
display spam e-mails in the incoming email list.
Other e-mail providers may send a message to the inbox when a new spam e-mail is
received. This is to inform you that a suspected spam e-mail has been received.
The date and sender of this mail are repeatedly updated, so that it is always displayed as a
new message.
¤ Deactivate spam protection or
Messages when establishing a connection
The following problems may occur when connecting to the incoming e-mail server. The
messages are displayed in the display for a few seconds.
Server not accessible
The connection to the incoming e-mail server could not be established. This may have the
following causes:
- Incorrect entry for the name of the incoming e-mail server (
- Tempor ary pro blem s with th e inc oming e-m ail se rver (s erve r is d own or is not c onnec ted
to the Internet).
¢ Web configurator).
¤ Check settings in the Web configurator.
¤ Try again later.
Currently not possible
The resources your phone requires to make the connection are busy, e.g.:
- The permitted number of VoIP connections has already been reached.
- One of the registered handsets is currently connected to the incoming e-mail server.
¤ Try again later.
Login failed
Error when logging in to the incoming e-mail server. This may have the following cause:
- Incorrect entries for name of incoming e-mail server, user name and/or password.
¤ Check settings (¢ Web configurator).
Mailbox settings incomplete
Incomplete entries for name of incoming e-mail server, user name and/or password.
¤ Check/add to settings (¢ Web configurator).
59
Page 61

E-mail notifications
eMail
Subject:
Invitation
Tex t:
Hi Anna, I
passed my test!
Back Options
Example:
eMail
From:
Anna.Sand@mailp.com
Back Options
Example:
Viewing the message header and text of an e-mail
Prerequisite: You have opened the inbox (¢ page 58).
¤ q Select an e-mail entry. ¤ Read.
The subject of the e-mail (maximum 120 characters) and the first
few characters of the text (maximum 560 characters) are displayed.
To return to inbox:
¤ Press the End call key a.
Note
If the e-mail does not contain any standard text, the
message eMail can’t be displayed will briefly appear.
View e-mail sender's address
Prerequisite: You have opened the e-mail notification for reading
(
¢ page 60).
¤ From ¤ OK
Options
The sender's e-mail address is displayed, over several lines if
necessary (maximum 60 characters).
To r etur n to inb ox:
¤ Back
Deleting e-mail messages
Prerequisite: You have opened the incoming e-mail list
¢ page 58) or the header or sender's address for an e-mail is
(
displayed (
Options
The e-mail is deleted from the incoming e-mail server.
¢ page 60):
¤ Delete ¤ OK ¤ Answer security question with Yes .
60
Page 62

Info Centre – continuous Internet access from your phone
Info Centre – continuous Internet access from
your phone
Data protection notice
The information services enable you to use a Gigaset telephone to call up selected
information, such as weather forecasts.
The inventory data corresponds to that of the VoIP service.
When you use the service for the first time, a standard profile is created with configuration
data for the device. You can then change and store the configuration data specific to your
device, for example, the city for the weather forecast or the date of birth for the biorhythm.
You can delete this configuration data again at any time.
The information services use the HTTP protocol.
Further information about the Gigaset.net service data saved can be found at:
www.gigaset.net/privacy-policy
You can use your phone to retrieve online content from the Internet, i.e. request info services
that are provided specifically for the telephone. The info services available are constantly
updated. A default selection has already been made.
Information on the gigaset.net info services is available on the Internet at:
www.gigaset.com/nextg/apps
Note
You can launch the Info Centre and display info services with every registered Gigaset
C530H, E630H, C620H, S820H, SL910H or SL930H handset.
Customising info services
You can change the default setting for the Info Centre (standard profile) and add new services.
Visit the Gigaset.net page www.gigaset.net
services.
on the Internet and compile your personal info
¤ Open the Web configurator page Settings ¤ Info Services (¢ page 116) on the PC.
¤ Click the link gigaset.net/myaccount.
You are automatically logged in with the username and password that have been assigned
to your phone by default.
Or:
¤ Enter the following address in the address field of your PC's web browser:
www.gigaset.net
¤ Enter your Gigaset.net user ID and password on the Gigaset.net page. You will find your user
ID and password on the Web configurator page specified above.
In both cases, your Gigaset.net web page is displayed, where you can customise info services for
your Info Centre ("Info Centre" tab) and the info services for the Info Services screensaver
("Screensaver" tab).
61
Page 63

Info Centre – continuous Internet access from your phone
1
33
2
The "Info Centre" tab has an icon for every info service provided by Gigaset.net (e.g. weather,
horoscope), and an icon for personal applications that you want to add to your Info Centre.
Activating/deactivating a service
An info service is displayed on your Gigaset phone if the relevant icon is orange and the option
at the top right of the icon is activated.
(Example):
1 Icon for an activated info service (orange). The info service is displayed in the Info Centre on your Gigaset
phone.
2 Icon for a deactivated info service (grey). The info service is not displayed on your phone.
3 Option to activate or deactivate the info service.
¤ Click the option for an icon to activate/deactivate the corresponding info service
³ =activated).
(
All activated info services are provided in the display of the registered handsets when you open
the Info Centre.
Customising info services
For some info services, you can customise the information that you want from your Gigaset
phone yourself.
¤ Click the icon that belongs to an info service (e.g. weather). This will open another web page
where you can customise the RSS feeds.
The web pages for the individual info services describe which settings you can make.
Example "Weather information"
¤ Click the icon for the weather information. This will open a web page where you can
configure the weather information for your Info Centre.
The world weather is already set.
You can also set up to nine other locations (worldwide) that you can request weather
information for.
¤ Enter the name of the location that you want to access weather information for in the
editable field.
¤ Click on the magnifying glass icon .
This will list the locations that start with the specified name.
¤ Click the list icon to open the list and select the required location.
¤ Right-click the arrow icon to add this location to your Info Centre.
The web page lists all the locations for which the Info Centre provides weather information.
¤ If a location needs to be deleted from the list, click the trash icon next to the location
name.
62
Page 64

Info Centre – continuous Internet access from your phone
¤ Click the disk icon at the top right of the web page to save your settings.
Note
You can also configure weather information on the handset itself:
¤ Start Info Centre: ¤ v ¤ ÉAdditional Features ¤ Info Centre.
¤ s Select weather information. ¤ OK ¤ Select the entry "Add location". ¤ OK ¤ Enter
a location.
city/location.
¤ OK. This will show a list of locations with the name specified. ¤ Select a
¤ OK ¤ Confirm selection once again with OK.
Starting Info Centre, selecting info services
v ¤ É Additional Features ¤ OK ¤ q Info Centre
Your Info Centre menu i.e. a list of available info ser vices is displayed. You can navigate between
the info services.
¤ q Select an info service. ¤ OK.
To access certain info services (personalised services), you have to log in with a user name and
password.
Messages when loading requested information
The information is loaded from the Internet. Wait a few seconds until the information is
displayed. The display shows "Please wait...".
If the information for an info service cannot be displayed, one of the following messages
appears:
Requested page can’t be reached.
Possible causes:
- Time limit exceeded (timeout) when loading the information
- The Internet server for the info services cannot be accessed.
¤ Check your Internet connection and repeat the request at a later date.
Coding error on requested page
The content of the requested info service is coded in a format that the handset cannot
display.
Can’t display requested page
General error when loading the info service.
Login failed.
Possible causes:
- You have not entered your login data correctly.
¤ Reselect the info service and repeat the login process. Please remember that data is case
sensitive.
- You are not entitled to access this info service.
63
Page 65

Info Centre – continuous Internet access from your phone
Logging in for personalised info services
If a special login process with user name and password is required to access an info service, enter
the required data:
¤ Enter Authent. Name. ¤ Save ¤ Enter Password. ¤ Save
If login was successful, the requested info service is displayed.
If login failed, a message to this effect appears on the display
requested information, page 63.
Note
Please remember that login data is case sensitive. For instructions on entering text
£ Messages when loading
¢ page 29.
Operating Info Centre
Depending on the type of info service requested, you can perform the following operations:
u To scroll within an info service:
u To skip back to the previous page:
u To skip back to the Info Centre menu:
u To go "offline":
u To en te r t ex t:
field.
¤ Enter the text (¢ page 29). ¤Press the right display key to complete the entry and
send the data.
u To ma ke sel ection s:
selection.
u To set options:
¤ Press and hold the End Call key a. The handset returns to idle status.
¤ q Select line into which you wish to enter text. The cursor flashes in the tex t
¤ q Select a line in which a selection is possible. ¤ r Make a
¤ Press the left display key to complete the selection and send the data.
¤ q Select line that offers the options. The line is highlighted.
¤ q Press the control key.
¤ Press the left display key.
¤ Briefly press the End call key a.
¤ v Activate/deactivate option (or press the left display key (e.g. OK)).
¤ Press the left display key to complete the entry and send the data.
Hyperlink to further information:
A hyperlink to further information is displayed using the g icon.
If a page with hyperlinks is opened, the first hyperlink is highlighted.
¤ q Select another hyperlink if required. ¤ Press the display key Link to open the associated
page.
Hyperlink to a phone number:
A hyperlink to a phone number offers the Call function on the right display key.
u Copy an entry to the local phonebook:
u Dial phone number (Click-2-Call):
Depending on the provider, the number is dialled directly or appears first in the display. You
must first confirm the number with Ye s before it is dialled.
¤ q Select hyperlink. ¤ Press the display key Ó.
¤ Press the display key Call.
64
Page 66

Info Centre – continuous Internet access from your phone
Accessing info services using quick dial
Each info service that is provided via Gigaset.net is assigned a quick dial that you can use to
access the service. Examples:
Info service Quick dial Info service Quick dial
News 1#92 Horoscope 7#92
Weather 2#92 Biorhythm 8#92
My eBay 3#92 My Friends 9#92
Encyclopaedia 4#92 My Applications 99#92
Translator 5#92 (personal info services/applications
Unit converter 6#92
1 The list of info services is one example. Each info service is provider-dependent.
2 The numbers 11 to 98 are reserved for info services/applications that are provided via Gigaset.net.
that you have defined)
¤ Enter the quick dial for a service. ¤ Press the Talk key c.
The Info Centre page with this service/application is loaded and shown on the display.
Note
If you enter the quick dial for an info service into the local phonebook and you assign this
phonebook entry to a digit key on your handset (
this digit key will show the relevant page of the Info Centre on the display.
¢ page 49), simply pressing and holding
Displaying information from the Internet as a screensaver
You can configure your handset to display one of the info services from the Info Centre (e.g.
weather reports, news feeds) in the idle display of the handset.
To do this, you must switch on the Info Services (
activate the display of info services via the Web configurator (
The text information appears on the display approximately ten seconds after the handset
returns to idle status.
Depending on the information feed selected, a display key appears on the right of the
screensaver.
u To open further information:
u To revert to idle status:
¤ Press the right display key.
¤ Press and hold the End call key a.
¢ page 44) screensaver on your handset and
¢ page 116).
Selecting information for the screensaver
The default setting for the Info Services screensaver is the weather forecast. You can change this
setting:
u On the PC using your account on the Gigaset.net server (
u On the handset using the Info Centre
¢ page 61)
v ¤ ÉAdditional Features ¤ OK ¤ q Info Centre
The menu for your Info Centre appears.
¤ s Select Screensaver. ¤ OK ¤ r Select information service. ¤ s Scroll to the next
line, if necessary.
65
¤ r Make further settings for the information service selected. ¤ Save.
Page 67

Network mailbox
Network mailbox
Some VoIP providers offer answer machines on the network – network mailboxes.
Each network mailbox accepts incoming calls made via the corresponding line (fixed line
network or corresponding VoIP phone number). To record all calls, you should therefore set up
network mailboxes for both the fixed line network and for each of your VoIP connections.
You need to have requested the network mailbox for your fixed line network connection from
your network provider. You can store the number of the network mailbox for the fixed line
network in the phone.
You can activate/deactivate the network mailboxes for your VoIP connections using the handset
or the Web configurator. To do this, you only require the phone number of the network mailbox.
Activating/deactivating network mailbox, entering number
On the handset, you can manage the network mailboxes that are assigned to one of its receive
connections.
v ¤ Ì Answer Machine ¤ OK ¤ q Network Mailboxes ¤ OK
The list of connections (VoIP and fixed line network) that are assigned to the handset as receive
connections is displayed. Net AM: xxx are displayed, where xxx is replaced by the relevant
default name of the connection (Net AM: IP1 to Net AM: IP6, Net AM: Fixed Line).
If several receive connections have been assigned to the handset:
¤ q Select an entry ¤ OK
VoIP connection
Status ¤ r On / Off
Network Mailbox
The number that is currently stored for the network mailbox is displayed.
¤ Enter or change the phone number for the network mailbox if necessary.
With some VoIP providers your network mailbox phone number is downloaded together
with the general VoIP provider data, saved to your base and displayed under Network
Mailbox.
¤ Save
Fixed line network/connection
¤ Enter or change the phone number for the network mailbox.
¤ Save
You cannot activate/deactivate the network mailbox for the fixed line network connection via
the handset. For instructions on activating/deactivating the network mailbox, see the
information provided by the network provider.
66
Page 68

Network mailbox
Configuring a network mailbox for fast access
You can use fast access to make direct calls to a network mailbox.
Assigning key 1, changing assignment
Fast access settings are device-specific. You can assign a different network mailbox to key
on each registered handset.
No network mailbox is preconfigured for fast access in the default settings.
¤ Press and hold the key.
Or:
¤ v ¤ Ì Answer Machine ¤ OK ¤ q Set Key 1
The list of VoIP connections and the fixed line network connection assigned to the handset as
receive connections is displayed. Net AM: xxx are displayed, where xxx is replaced by the
relevant default name of the connection (Net AM: IP1 to Net AM: IP6, Net AM: Fixed Line).
¤ s Select an entry. ¤ Select (Ø =activated).
If a number is already stored for this network mailbox, fast access is activated immediately.
¤ Press and hold the End call key a(idle status).
If no number is saved for the network mailbox, you are asked to enter the number of the network
mailbox.
¤ s Switch to the Network Mailbox line. ¤ Enter the number of the network mailbox.
¤ Save ¤ Press and hold the End call key a (idle status).
Fast access is activated.
Note
You can only assign fast access to one network mailbox.
You can also call the network mailboxes of the handset's receive connections directly via the
message key (
¢ page 68).
Calling the network mailbox via fast access
¤ Press and hold.
If you have set a network mailbox for fast access, you are connected directly to this network
mailbox.
¤ d If necessary, press the handsfree key.
You will hear the network mailbox announcement.
¤ q Select an answer machine. ¤ OK
Displaying new messages in the idle display of the handset
If a new message is present on one of the network mailboxes that is assigned to the handset via
its receive connection, or on the local answer machine, the icon
messages are displayed in idle display. The
67
f message key flashes.
à and the number of new
Page 69

Network mailbox
1
2
3
4
Messages & Calls
Net AM: Fixed Line
(1)
Mailbox IP 1:
(1)
Mailbox IP 2:
Mailbox IP 3:
Mailbox IP 4:
Back OK
1 Net AM: Fixed Line is the network mailbox for the fixed line
network connection
2 If there are new messages in the network mailbox, the list entry
is shown in bold. The number of new messages is shown in
brackets following the list entry.
3 Mailbox IP 1:, Mailbox IP 2: and so on are the network
mailboxes for the VoIP connections. "IP1", "IP2" and so on are
the default names of the corresponding VoIP connections. The
default names are always displayed regardless of which
connection name you specified during configuration.
4 If there are no new messages, no number is shown after the list
entry for the network mailbox. The number of messages stored
in the network mailbox is not displayed.
Calling the network mailbox using the message key
Under the message key f you wil l fi nd a li st fo r ea ch net wor k ma ilb ox t hat ful fil s th e fo llo win g
prerequisites:
u The corresponding connections are assigned to the handset as receive connections
u The network mailbox phone number is saved on the phone.
You can use the list to call the network mailboxes directly and listen to the messages.
¤ Press the Message Key f.
The following is displayed (example):
Net AM: Fixed Line / Mailbox IP 1: / ... / Mailbox IP 6:
¤ Select the network mailbox entry ¤ OK
You are connected directly to the network mailbox and can hear its announcement. Messages
can generally be played back using your handset keypad (digit codes). Listen to the
announcement.
Notes
u The network mailbox is automatically called via the corresponding connection. An
automatic area code specific to your phone is not prefixed.
u Network mailbox messages can generally be played back using your phone's keypad
(digit codes). For VoIP, you need to define how the digit codes are to be converted to
DTMF signals and transmitted (
Ask your VoIP provider which type of DTMF transmission it supports.
68
¢ page 114).
Page 70

Multiple handsets
Multiple handsets
You can register up to six handsets to your base.
Ea ch reg is ter ed dev ic e is as si gne d a n in te rna l n um ber (1 –6) an d a n in te rna l n am e (INT 1 – INT 6).
You can change the number assignment and names.
If all internal numbers have already been assigned on your base, you must de-register a handset
that is no longer required before registering a new one.
When you register a Gigaset handset, the base transfers entries for the following online
directories to the local phonebook on the handset to enable you to use the online directories on
your new handset as well.
Prerequisite: The handset can send and receive phonebook entries (see handset user guide).
u The currently set online directory (
u The currently set Yellow Pages (
u The private phonebook currently set with the name Prv.NetDir.
u The Gigaset.net phonebook with the name Gigaset.net.
Successful registration is acknowledged with the message Data Transfer x entries received for
this reason.
Registering handsets
A Gigaset C530H handset can be registered to up to four bases.
Manually registering Gigaset C530H to Gigaset C530 IP
On the handset:
u The handset is not registered to a base:
u The handset is already registered to a base:
Register Handset
u The handset is already registered to four bases:
¤ OK
¤ Enter the system PIN for the base if required. ¤ OK
The handset searches for a base that is ready for registration.
On the base station:
¤ Within 60 seconds, press and hold (approx. 3 seconds) the registration/paging key on the
¢ page 3).
base (
Once registration is complete, the handset returns to idle status. The internal number of the
handset appears in the display, e.g. INT 1. If not, repeat the procedure.
Note
All base connections are assigned to a handset as receive connections as soon as registration is
complete.
The fixed line network connection is assigned to the handset as a send connection.
You can change the assignment
¢ page 116) with a provider-specific name.
¢ page 116) with a provider-specific name.
¤ Press the display key Register.
¤ v ¤ Ï ¤ q Registration ¤ OK ¤ q
¤ s Select base ¤ OK
¢ page 54.
69
Page 71

Multiple handsets
ØåÚ
Paging
IP: 192.168.1.2
Silence
Registering other handsets
You can register other Gigaset handsets and handsets for other devices with GAP functionality
as follows:
On the handset:
On the base station:
(
¢ page 3).
¤ Start registration as described in its operating instructions.
¤ Press and hold (approx. 3 sec.) the registration/paging key on the base
De-registering handsets
You can de-register any other registered handset from any registered Gigaset C530H handset.
v ¤ Ï ¤ q Registration ¤ OK ¤ q De-register Handset ¤ OK ¤ sSelect the handset
you wish to deregister.
System PIN something other than 0000:
¤ OK (The handset you are currently using is indicated by
¤ Enter current system PIN. ¤ OK ¤ Ye s
f
.)
Locating a handset, finding the phone's IP address ("paging")
You can locate your handset using the base.
¤ Briefly press the Registration/paging key on the base (¢ page 3).
All handsets will ring at the same time ("paging"), even if the ringtones are switched off.
The current (local) IP address for the base appears in the handset
displays.
Ending the search
¤ Briefly press the Registration/paging key on the base
¢ page 3).
(
¤ Press the Talk key c on the handset.
Or:
Or:
¤ Press the display key Silence on the handset.
¤ Do not press any key on the base or handset.
Or:
After approx. 30 seconds, the paging call will end automatically.
Notes
u An incoming external call will not interrupt the paging process.
u If there are already two internal connections between the handsets,then paging is not pos-
sible.
u A paging call is also signalled acoustically on handsets where the ringtone is permanently
deactivated (
¢ page 47).
Changing the base
If your handset is registered to more than one base, you can set it to a particular base or to the
base that has the best reception (Best Base).
v ¤ Ï ¤ q Registration ¤ OK ¤ q Select Base ¤ OK ¤ s Select one of the registered
bases or select Best Base.
70
¤ Select
Page 72

Multiple handsets
Making internal calls
Internal calls to other handsets registered on the same base are free.
Calling a specific handset
u
Start the internal call. ¤ Enter the number of the handset.
Or:
u Start the internal call. ¤ s Select the handset. ¤ Press the Talk key c.
You hear the busy tone if:
u There are already two internal connections.
u The handset being called is not available (deactivated, outside range).
u The internal call is not accepted within three minutes.
Calling all handsets ("group call")
Start the internal call: ¤ Briefly press u. ¤ * Press the star key
Or:
¤ Briefly press u. ¤ Call all ¤ Press the Talk key c.
¤ Press and hold u.
Or:
All handsets are called.
Ending a call
¤ Press the End call key a.
Transferring a call to another handset
You can transfer (connect) an external call to another handset.
¤ u Open list of handsets. The external participant hears music on hold, if activated
¢ page 52). ¤ s Select handset or Call all ¤ OK
(
u When the internal participant answers:
Or before the internal participant answers: ¤ a
The external call is transferred to the other handset.
u If the internal participant does not respond or is busy:
You return to the external call. If the internal participant does not answer or the line is busy,
the call will automatically return to you.
¤ Announce the external call, if necessary. ¤ a
¤ End
Initiating an internal consultation/conference
When you are conducting an external call, you can call an internal participant at the same time
for consultation or hold a conference call between all 3 participants.
u Open list of handsets. The external participant hears music on hold, if activated
(
¢ page 52). ¤ s Select the handset. ¤ OK. You are connected to the internal participant.
u Back to external call:
You are reconnected with the external participant.
u Initiate conference call:
All 3 participants are connected with each other.
If the internal participant does not answer:
71
¤ Options ¤ q End active call ¤ OK
¤ Conference
¤ End. You return to the external caller.
Page 73

Multiple handsets
Ending a conference call
¤ Press the End call key a.
If an internal participant presses the End call key
the external participant.
External call waiting during an internal call
If you get an external call while conducting an internal call, you will hear the call waiting tone
(short tone). The caller's number or name will appear in the display if Calling Line Identification
is enabled.
Ignoring the external call
a, the other handset remains connected to
¤ Press the display key Reject.
The call waiting tone is turned off. You remain connected with the internal participant.
For calls to a VoIP connection: The external caller will hear the busy tone.
For calls to the fixed line network connection: The call continues to be signalled on the
registered handsets.
Accepting an external call/putting an internal participant on hold
¤ Press the display key Accept.
Ending an internal call
¤ Press the End call key a.
The external call is signalled as an incoming call. You can accept the call (
Internal call waiting during an internal/external call
If an internal participant attempts to call you while you are involved in an external or i nternal call,
this call is shown on the display (internal call waiting). You can either accept or reject this call.
u End display:
u Accepting an internal call:
The internal call is signalled as per usual. You can accept the call.
¤ Press any key.
¤ End your current call.
¢ page 33).
Changing the name of an internal participant
The base assigns the handset a free internal number during registration (possible numbers:
1– 6). The internal number is shown on the handset display e.g. INT 2. You can change these
names. The name must be no longer than 10 characters. The changed name is displayed in every
handset's list.
u Open list of handsets. Your own handset is indicated by
¤ s Select the handset. ¤ Options ¤ q Rename ¤ OK ¤ Enter names.
¤ Save
72
f
.
Page 74

Multiple handsets
Changing the internal number of an internal participant
The next unassigned internal number (1-6) is automatically assigned to the handset as it is
registered. If all the slots are occupied, the most recently registered handset is deregistered as
soon as it is in idle status. You can change the internal numbers of all registered handsets (1–6).
u Open list of handsets. Your own handset is indicated by
¤ q Assign Handset No. ¤ OK ¤ q Select the handset, if necessary. ¤ OK
¤ r Select or enter the internal number.
¤ q Switch to another handset, if necessary. ¤ r Select number etc.
¤ Save
You will hear the error tone if an internal number has been assigned twice.
f
. ¤ Options
¤ Repeat the procedure with a free number.
73
Page 75

Directories
Directories
The options are:
u (Local) phonebook
u Public online directory and Yellow Pages (
u Personal online directory (
u Gigaset.net phonebook (
¢ page 79)
¢ page 81)
Local handset phonebook
You can save a total of 200 entries in the phonebook.
You can create a personalised phonebook for your own individual handset. You can also send
entries to other handsets (
Note
With the Gigaset Contacts Push app you can easily transfer your smartphone contacts to
your Gigaset handset. The app can be downloaded free of charge from Google Play
App Store.
Phonebook entries
You can save the following information in a phonebook entry:
u First name and surname
u Up to three numbers
u Anniversary with reminder
u VIP ringtone with VIP icon.
Length of the entries
3 numbers: Max. 32 digits each
First name and surname: Max. 16 characters each
¢ page 76).
¢ page 77)
TM
or the
Note
You can assign numbers from the phonebook to the digit/display keys for quick access (quick
¢ page 48).
dial) (
Opening phonebook
¤ Press the s key in idle status or, depending on the situation, the display key ö.
74
Page 76

Directories
Example
New Entry
First Nam e:
Robert
Surname:
I
Phone (Home):
Abc
x
Û Save
Creating a new entry
¤ Open phonebook. ¤ q <New Entry> ¤ OK
¤ Switch between the input fields using q and enter the
relevant components of the entry (names, numbers,
anniversary, VIP ringtone, e-mail).
Navigate downwards to display further components.
¤ Save
To create an entry, you must enter at least one number. If you
have assigned a Caller Melody (VIP), the entry in the
phonebook is supplemented with the icon Æ.
Displaying/changing an entry
¤ Open phonebook. ¤ q Select desired entry. ¤ View
¤ Edit
Or:
¤ Open phonebook. ¤ q Select desired entry. ¤ Options
¤ q Edit entry ¤ OK
Deleting an entry
¤ Open phonebook. ¤ q Select desired entry. ¤ Options
¤ q Delete entry ¤ OK
Delete all entries in the phonebook:
¤ Open phonebook. ¤ Options ¤ q Delete List ¤ OK
Setting the order of the phonebook entries
You can define whether the entries are to be sorted by first name or surname.
¤ Open phonebook. ¤ Options ¤ q Sort by Surname / Sort by First Name
If no name was entered, the default number is shown in the surname field. These entries appear
at the beginning of the list, regardless of how the entries are sorted.
The sort order is as follows:
Space | Digits (0-9) | Letters (alphabetical) | Other characters.
Displaying the number of entries that are available in the phonebook
¤ Open phonebook. ¤ Options ¤ q Available Memory ¤ OK
Selecting a phonebook entry, searching in the phonebook
¤ Open phonebook. ¤ q Scroll to the name you are searching for.
Scroll through phonebook: qPress and hold
Or:
¤ Open phonebook. ¤ Enter the first letters (max. 8 letters). The display jumps to the first name
that begins with these letters.
75
¤ q If necessary, scroll on to the desired entry.
Page 77

Directories
Transferring an entry/phonebook to another handset
Prerequisites:
u The sending and receiving handsets must both be registered to the same base.
u The other handset and the base can send and receive phonebook entries.
You can transfer the entire phonebook, an individual entry or several individual entries.
Notes
u An external call interrupts the transfer.
u Caller pictures and sounds are not transferred. Only the date is transferred for an
anniversary.
u When transferring an entry between two vCard handsets:
If the recipient does not yet have an entry with that name, a new entry is created.
If there is already an entry with that name, this entry is expanded with the new numbers.
If the entry contains more numbers than allowed by the recipient, a second entry is
created with the same name.
u If the recipient is not a vCard handset: A separate entry is created and sent for each
number.
u Your handset receives entries from a non-vCard handset: Entries with numbers that are
already stored are discarded, otherwise a new entry is created.
Transferring individual entries
¤ Open phonebook. ¤ q Select desired entry. ¤ Options ¤ q Co py Entry ¤ OK ¤ q to
Internal
After a successful transfer:
¤ OK ¤ q Select the recipient handset. ¤ OK
¤ Press Yes if you want to send another entry. Otherwise press No.
Transferring the entire phonebook
¤ Open phonebook. ¤ q Select desired entry. ¤ Options
¤ q Copy List ¤ OK ¤ q to Internal ¤ OK ¤ q Select the recipient handset. ¤ OK
Transferring a displayed number to the phonebook
You can add numbers to the phonebook:
u From a list e.g. the call list or the redial list
u From a public online directory or the Yellow Pages
u From your private online directory
u When dialling a number
The number is displayed or highlighted.
¤ Press the display key Ó or Options ¤ q Copy to Directory. ¤ OK
To create a new entry:
¤ Complete the entry. ¤ OK
To change an entry:
The number is entered or an existing number is overwritten.
¤ Answer prompt with Yes /No.
¤ <New Entry> ¤ OK ¤ r Select number type. ¤ OK
¤ q Select an entry. ¤ OK ¤ r Select number type. ¤ OK
¤ Save
76
Page 78

Directories
Transferring a number from the phonebook
In some operating situations, you can transfer a number from the phonebook, e.g. when dialling
(even after the entering a prefix).
¤ Depending on the operating situation, open the phonebook using ö or s. ¤ q Select
the phonebook entry.
If more than one number is entered:
¤ OK
¤ r Select number. ¤ OK
Online directories
You can use public online directories (online directories and classified directories e.g. "Yellow
Pages") depending on your provider.
You can configure the net directories you wish to use via the Web configurator.
Exclusion of liability
Gigaset Communications GmbH assumes no guarantee or liability for the availability of this
service. The service may be discontinued at any time.
Opening an online directory/Yellow Pages
Press and hold s.
The list of online directories with the provider-specific names is displayed.
¤ q Select the online directory from the list. ¤ OK
This establishes a connection to the online directory or the Yellow Pages. If there is only one
online directory available, a connection is immediately established.
Note
You can also establish a connection to the online phonebook as follows:
¤ When the handset is idle status, dial 1#91 and press the Talk key c.
¤ To establish a connection to the Yellow Pages, dial 2#91.
¤ To establish a connection to the Gigaset.net phonebook, dial 1188#9.
Calls to the online phonebook are always free of charge.
Searching an entry
¤ Enter search criteria:
Surname: (Online phonebook) or Category/Name: (Yellow Pages)
¤ Enter the name, part of a name or the category (max. 30 characters).
City: Enter the name of the city/location in which the participant you are searching for lives
(max. 30 characters).
If you have already searched for the entries, the names of the cities you last entered are
displayed (maximum of five).
¤ Enter a new name or select one of the city names displayed using s. ¤ OK
Number:
¤ Enter the number (max. 30 characters).
¤ Search / w
77
Page 79

Directories
1
2
Online Dir.
1/50
Sand, Marie Elisabe ...
0049123456789
Parkstrasse 11
Berlin 12345, Germany
View Options
1. 1/50: Consecutive number/total number of hits (only the
consecutive number is displayed if the total number of
hits is >99).
2. Four lines including participant's name, category,
telephone number and address (possibly abbreviated). If
a fixed line network number is not available, the mobile
number (if available) is displayed.
You must enter details in either Surname or Category/Name and in City or Number. Searching
by number is only possible if supported by the online directory you have selected. For
instructions on entering text
A list of the cities/locations found is displayed if the search returns more than one result:
¢ page 29.
¤ q Select a city/location. ¤ OK. If the name of a city/location is longer than one line, it is
abbreviated.
Display the full name:
If no matching city/location is found:
¤ View
¤ Change ¤ Change search criteria.
¤ Search
A corresponding message will appear on the display if no participant is found to match the
search criteria. You have the following options:
u Start a new search:
u Change search criteria:
No hits are displayed if the list of hits is too large. A message to this effect is displayed.
u Start a refined search (
Or
u Provider dependent: Depending on the provider, you can view the list if the number of hits
is also shown on the display.
Search result (hit list)
The search result is shown as a list on the display. Example:
¤ New
¤ Change
¢ page 79): ¤ Refine
¤ View
u Scroll through the list:
u Display the full entry:
This displays the full details of the entry (name, category where applicable, address,
telephone numbers). You can scroll through the hit list with
u Refine search criteria and restrict hit list:
u Start a new search:
u Copy an entry to the local phonebook:
If an entry contains several numbers, they are displayed in a selection list. A new entry is
created for the selected number. The surname is transferred to the Surname field of the local
phonebook (
78
¢ page 75).
¤ q
¤ View.
¤ Options ¤ New Search
q.
¤ Options ¤ Refine Search (¢ page 79).
¤ Options ¤ Copy to Directory
Page 80

Directories
u Transfer the selected entry to the private online directory:
¤ Copy to Priv.NetDir.
The private directory and online directory must be provided by the same provider.
Depending on your provider, you can add a nickname to the entry in your private
phonebook.
¤ Options
Calling participants
¤ q Select an entry. ¤ Press the Talk key c.
If the entry only contains one phone number, this is the one that is dialled.
A list of numbers appears if there is more than one number.
¤ q Select number. ¤ Dial
Start a refined search
You can use the search options available in the refined search (first name and/or street) to limit
the number of hits returned by a previous search.
¤ Refine or ¤ Options ¤ Refine Search ¤ OK
The search criteria from the previous search are copied and entered in the corresponding fields.
¤ Change or add search criteria, e.g. enter first name or street. ¤ Search
Using a private online directory
Some providers offer users the option of creating and managing a private online directory on
the Internet. You can call up online directory entries from any telephone or PC, e.g. from your
VoIP phone in the office or your PC at a hotel.
Prerequisites:
u Create your private online directory using your PC's web browser.
u Create and manage entries in the online directory via your PC's web browser.
u Activate the online directory on your phone using the Web configurator. You must save the
username and password in particular for accessing your personal online directory on the
phone.
You can use the directory from every registered handset.
Opening online directory
¤ s Press and hold.
This opens the list of (online) directories. The provider-specific name is displayed for the private
online directory.
¤ q Select the private online directory from the list. ¤ OK
Your private online directory is opened.
Note
If there is no other online directory available apart from the private online directory:
¤ s Briefly press. The private online directory is opened.
¤ s Press and hold. The handset's local phonebook is opened.
79
Page 81

Directories
The entries in the online directory are sorted alphabetically according to the first non-space field
in the entry. This is generally the nickname or surname.
Selecting, viewing and managing entries in the online directory
¤ s Scroll to the entry you are searching for.
Or:
¤ Enter the first letter of the name. ¤ s If necessary, scroll to the entry. ¤ View.
The detailed view with the complete entry opens. You can scroll through the entry with the
control key
The following data is shown, if available (in the sequence specific to the provider):
Nickname, name, first name, phone number, mobile number, VoIP number, street, house
number, post code, town/city, company name, business type, date of birth, e-mail.
Using other functions
q.
¤ Options ¤ q Select option:
Edit nickname: Edit or delete the nickname of an entry.
Copy to Directory: Copy an entry to the local phonebook (
Note
You can copy numbers from a public phonebook to your private online directory
¢ page 79).
(
Calling up an entry in the online directory
¤ Save
¢ page 75).
¤ q Select entry (open the detailed view, if necessary). ¤ Press the Talk key c.
If the entry only contains one phone number, this is the one that is dialled.
If the entry contains more than one phone number (e.g. mobile number and phone number),
they are offered to you for selection.
¤ q Select the number to be dialled. ¤ OK
The selected phone number is dialled.
Transferring the local phonebook to the private online directory
You can save entries in the local phonebook in vCard format as a vcf file on your PC using the
Web configurator (
Several providers support functions on your web pages that you can use to copy these files to
the online directory.
80
¢ Web configurator on page 116).
Page 82

Directories
Own Details
Your Gigaset.net
nickname:
Gi
Abc
Back
Save
Using the Gigaset.net phonebook
¤ Press and hold s. The list of online directories opens. ¤ q Gigaset.net ¤ OK
The Gigaset.net phonebook is opened.
Notes
u Calls to the Gigaset.net phonebook are always free of charge.
u You can also open the Gigaset.net phonebook by dialling 1188#9 (phone number of the
Gigaset.net phonebook) and pressing the Talk key
If no connection to the Gigaset.net phonebook can be established, an error message will be sent
and the handset will switch to idle status.
c.
Opening the Gigaset.net phonebook for the first time
When you open the Gigaset.net phonebook for the first time, you
are asked to enter a nickname for your connection. You are
entered into the Gigaset.net phonebook under this name.
¤ Press and hold down on the control key s.
¤ Select Gigaset.net.
¤ Press the display key §OK§.
¤ Press the display key §Options§.
¤ Select Own Details.
¤ Press the display key §OK§.
¤ Press the display key §Edit§.
¤ Enter the name under which you would like to be entered into the Gigaset.net phonebook
(max. 25 characters).
¤ Press the display key §Save§.
Data protection notice
If you enter a nickname at this point, it is stored on a central Gigaset server. The nickname
appears in the Gigaset.net phonebook, and other participants that use the Gigaset.net
service can call you using this nickname.
By entering your information, you agree for this data to be saved. If you do not wish this
to happen, you can cancel the operation at this point.
Cancel operation:
¤ Do not enter a name and press the display key Save. You can use the phonebook to
search for other Gigaset.net participants and call them. However, no nickname is entered
for you (your phone).
Or:
¤ Press and hold the End call key a to exit the Gigaset.net phonebook (without
performing a search).
Further information about the Gigaset.net service data saved can be found at:
www.gigaset.net/privacy-policy
If an entry with this name already exists, the message Nickname already exists. Please change.
is displayed. You are prompted to enter a name again.
81
Page 83

Directories
2
1
Gigaset.net 1/5
Saal, Frank
Sailor, Ben
Sailor, Anna
Sand, Marie Elisabe ....
Sand, Otto
View Options
Example:
1. 1/5: Entry number/number of
hits
2. Name of an entry, possibly
abbreviated
Searching for participants on Gigaset.net
Once the connection to the Gigaset.net phonebook has been established, you are asked to enter
a name that you want to search for.
Gigaset.net name:
If the search has been successful, a hit list is displayed
containing all the names that begin with the specified
character string.
¤ Enter the name or part of a name (max. 25 characters). ¤ Search
¤ Scroll through the hit list with q.
If no matching entry is found, a corresponding message is
displayed. You have the following options:
u Start a new search:
u Change search criteria:
The name you previously entered in the search field is used
as the search criterion. You can then expand or edit as
required.
If there are too many matching entries in the Gigaset.net
phonebook, the message Too many entries found is displayed
instead of a hit list.
u Start a refined search:
The previously entered name is copied and you can edit/
expand it.
¤ New.
¤ Change
¤ Refine
Calling participants
¤ q Select the participant from the hit list. ¤ Press the Talk key c.
Viewing the participant's number
¤ q Select the participant from the hit list. ¤ View
The display shows the Gigaset.net number and the participant's name. The name may appear
over a number of lines.
¤ q Display the name and number of the next/previous participant in the hit list.
Notes
u Connections to Gigaset.net are always established via the Internet. This is regardless of
the send connection configured/selected on your handset.
u You can open the Gigaset.net phonebook and establish connections, even if you have
not entered yourself in the Gigaset.net phonebook.
82
Page 84

Directories
Using other functions
Prerequisite: The hit list is displayed.
¤ q Select entry ¤ Options ¤ q Choose option:
Copy to Directory: Copy the number to the phonebook of the handset. The number and
name (abbreviated if necessary, max. 16 characters) are copied to the local phonebook.
¤ Edit and save the entry where necessary (¢ page 75).
The hit list is displayed again.
New Search: Start a search with a new name (
Refine Search: Start a refined search. The name previously searched for is copied and you can
edit/expand it.
Own Details: See "Entering, editing and deleting your own entry".
¢ page 82).
Note
If you select a Gigaset.net number from the local phonebook, the connection is
automatically established via Gigaset.net (Internet).
Entering, editing and deleting your own entry
Viewing your own entry
You are connected to the Gigaset.net phonebook and have performed a search. A hit list is
displayed:
¤ Options ¤ Own Details ¤ OK
Your Gigaset.net number and, where applicable, your current name are displayed.
Entering/editing a name
¤ Change ¤ Edit name or enter a new name (max. 25 characters). ¤ OK.
You can delete the name with
If there is no existing entry with this name in the Gigaset.net phonebook, the name is saved. A
message to this effect is displayed. The handset switches to idle status.
If there is already an entry with this name, or the entered name contains impermissible
characters, you are requested to enter a different name.
If an entry has been created successfully in the Gigaset.net phonebook, the message "Saved" is
displayed.
Ñ.
Notes
u Please note the data protection notice when saving a name, ¢ page 81.
u If you delete the name, your entry is deleted from the phonebook. You are no longer
"visible" to other Gigaset.net participants. However, you can still be reached via your
Gigaset.net number. For instructions on displaying the number,
u You can also enter/edit your Gigaset.net name via the Web configurator.
83
¢ page 128.
Page 85

Directories
Calling a Gigaset.net participant
You can call a Gigaset.net participant directly via the Gigaset.net phonebook (see above) or via
their Gigaset net number:
¤ Enter the Gigaset.net number (including the #9) or ¤ sselect it from the local phonebook.
¤ Press the Talk key c.
Every number ending with #9 is dialled via Gigaset.net.
84
Page 86

Call lists
All calls
™ . . . 12345678901
Smith, Frank
for IP2
02/.18.11 03:40pm
View Options
Example of list entries:
Call lists
Prerequisite: Calling Line Identification (CLIP, ¢ page 34)
Your base stores calls in various lists:
u Accepted calls (max. 30 entries)
u Outgoing calls (max. 60 entries)
u Missed calls (max. 30 entries)
Opening the lists:
u Via the display key:
u Via the menu:
u Missed calls list:
Viewing an entr y:
¤ q Select an entry. ¤ View. All available information is displayed, e.g. the corresponding
number when a name is displayed.
Calling back a caller:
¤ q Select an entry. ¤ Press the Talk key c.
Deleting an entry/list:
¤ Options ¤ q Delete entry or Delete all.
Copying a number to the phonebook:
¤ Options ¤ q Copy to Directory (¢ page 76).
Note
You can receive information on unknown numbers free of charge via the reverse search in
the online directory (
¤ Calls
¤ v ¤ Ê ¤ OK ¤ q Select list. ¤ OK
¤ Message key f ¤ q Missed Calls: ¤ OK
¢ page 77).
List entry
The following information is displayed in the list entries:
u The list type (in the header row)
u Icon for the type of entry:
™ (Missed calls), › (Accepted calls), š (Outgoing calls)
u Caller's number.
u CNIP information
u Name of the connection to which the missed/accepted
call was directed (for receive connection), or via which the
outgoing call was dialled (via send connection). The connection name you have assigned is displayed where available. Otherwise, the standard name is used.
u Date and time of call (if set)
85
Page 87

Call lists
Note
Multiple calls from the same number are stored once in the missed calls list (the latest call).
The number of calls from this number is shown in brackets after the entry.
One Unavailable entry is created for all missed calls for which the number of the caller was
withheld.
Equally, one entry Unavailable is created for every call for which the number was not transferred.
¤ Call back the selected caller: ¤ Press the Talk key c.
¤ Additional information: ¤ Press the display key View. If you have CNIP, then the name and
town that is registered with your network provider for this number is displayed. If the name
and location are not shown, it means that the caller has not requested Calling Line
Identification or that Calling Line Identification has been withheld.
¤ Options ¤ q Select option:
Copy to Directory: Copy number to the phonebook.
Delete entry: Delete the selected entry.
Delete List: Delete all entries.
When you exit the call lists, all entries are set to the status "old", i.e. the next time you call up the
list, they will no longer be shown in bold.
Note
In the case of each handset, only those accepted/missed calls directed to its receive
connections are shown.
86
Page 88

ECO DECT
ECO DECT
ECO DECT uses less energy and reduced transmission power.
Reducing transmission power (radiation)
In normal operation (default setting):
The device range is set to maximum as default. This guarantees optimum wireless management.
In idle status, the handset will not function (as it is not transmitting). Only the base will maintain
contact with the handset via a low wireless signal. During a call, the transmission power
automatically adapts to the distance between the base and handset. A closer distance to the
base means lower transmission power.
Reducing the range and thereby lowering transmission power by up to 80%
In many spaces such as apartments, business facilities and offices, the maximum range is not
necessary. If you deactivate the Maximum Range setting, you can reduce the transmission
power during a call by up to 80%, using half of the range.
v
¤ Ï ¤ OK ¤ q ECO DECT ¤ OK ¤ q Maximum Range ¤ Change (³ =activated)
Display icon for reduced range
¢ page 93.
Alarm clock
Prerequisite: Date and time are set.
Activating/deactivating the alarm clock and setting the wake-up time
v ¤ É ¤ OK ¤ q Alarm Clock ¤ OK
Activation:
Time:
Occurrence:
Volu me:
Melodie:
¤ r On / Off
¤ Enter the wake-up time in 4-digit format.
¤ Monday-Friday / Daily
¤ r Set the volume.
¤ r Select melody.
¤ Save
¼icon and wake up time are shown in idle display.
The
A wake-up call is shown on the display (
melody. The wake-up call sounds for 60 seconds. If no key is pressed, the wake-up call is
repeated twice at five minute intervals and then switched off.
During a call, the alarm is only indicated by a short tone.
Deactivating the wake-up call/repeating after a pause (snooze mode)
Deactivate the wake-up call: ¤ Press the display key OFF.
Repeat the wake-up call:
The wake-up call is deactivated and then repeated after 5 minutes. After the second repetition
the wake-up call is deactivated completely.
87
¤ Press the display key Snooze or any key.
¢ page 94) and signalled with the selected ringtone
Page 89

Calendar
May 2013
Back OK
Mo Tu We Th Fr Sa Su
01 02 03 04 05
06 07 08 09 10 11 12
13 14 15 16 17 18 19
20 21 22 23 24 25 26
27 28 29 30 31
Calendar
You can remind yourself of up to 30 appointments.
In the calendar, the current day is outlined in white; on days with
appointments, the numbers are displayed in colour. When a day
is selected, it will be highlighted.
You can create the calendar display using a display key in idle
status (
¢ page 50).
Saving appointments to the calendar
Prerequisite: Date and time are set (¢ page 51).
v
¤ É ¤ OK ¤ q Calendar ¤ OK
¤ p Select the desired day. ¤ OK
u Appointments that have already been stored are shown.
Enter further appointments:
u If no appointments have been entered, the data input window will open immediately to add
the new appointment.
Activation:
Date: The selected day is preset.
Time:
Tex t :
Signal:
¤ r On / Off
¤ Enter time (hour and minute) of the appointment.
¤ Appointment name (e.g. dinner, meeting).
¤ r Select the melody of the reminder signal or deactivate the acoustic signalling.
¤ Save
¤ <New Entry> ¤ OK.
¤ Enter new data to change.
Signalling of appointments/anniversaries
Anniversaries are transferred from the phonebook and displayed as an appointment. An
appointment/anniversary is displayed in idle status and signalled for 60 seconds with the
selected ringtone.
You can deactivate the reminder call:
¤ Acknowledge and end the reminder call: ¤ Press the display key OFF.
When you are on the phone, a reminder call is indicated on the handset with a single advisory
tone.
Displaying missed appointments/anniversaries
The following appointments and anniversaries are stored in the Missed Alarms list:
u The appointment/anniversary call was not acknowledged.
u The appointment/anniversary was signalled during a phone call.
u The handset was switched off at the time of the appointment/anniversary.
The last 10 entries are stored. The
display. The most recent entry appears at the top of the list.
Opening the list
¤ Message Key f ¤ q Missed Alarms ¤ OK
88
icon and the number of new entries are shown in the
Page 90

Baby monitor
Or:
¤ Using the menu: v ¤ É ¤ OK ¤ q Missed Alarms ¤ OK
¤ q Scroll in the list if required
Each entry is displayed with the number or name, date and time. The most recent entry appears
at the top of the list.
u To delete an appointment/anniversary:
¤ Delete
Displaying/changing/deleting saved appointments
v ¤ É ¤ OK ¤ q Calendar ¤ OK ¤ p Select the desired day. ¤ OK
The appointment list is displayed.
u To display appointment details:
u To change appointment:
Or:
¤ Options ¤ Edit entry ¤ OK
u To activate/deactivate an appointment:
u To delete an appointment:
u To delete all appointments for a day:
¤ q Select the desired appointment.
¤ View. The appointment settings are displayed.
¤ View ¤ Edit
¤ Options ¤ Activate/Deactivate ¤ OK
¤ Options ¤ Delete entry ¤ OK
¤ Options ¤ Delete all Appoints. ¤ OK ¤ Ye s
Baby monitor
When the baby monitor is switched on, the stored (internal or external) destination number is
called as soon as a defined noise level is exceeded in the vicinity of the handset. The baby
monitor alarm to an external number is cancelled after approximately 90 seconds.
In baby monitor mode, incoming calls are only signalled on the display (without ringtone). The
display backlight is reduced to 50%. Advisory tones are deactivated. All keys are locked, with the
exception of the display keys and pressing the centre of the control key.
You can answer the baby monitor alarm using the Two Way Talk function. Deactivate/activate
the speaker of the handset with this function.
If you accept an in coming call, the baby monitor mode is suspended for the duration of the call,
but the function remains activated. The baby monitor mode is not deactivated by switching the
handset off and on again.
Caution
Ensure the following points:
u The handset should be positioned 1 to 2 metres away from the baby. The microphone
must be pointed towards the baby.
u Activating the function reduces the operating time of your handset. If necessary, place
the handset in the charging cradle.
u The baby monitor is activated 20 seconds after switching on.
Please always check the functionality when you switch on the function:
u Test the sensitivity.
u Check the connection if you are forwarding the baby monitor alarm to an external
number.
u Make sure that an answer machine is deactivated at the target number.
89
Page 91

Baby monitor
i V
07:15
INT 1 22 Feb
Á
Baby Monitor
0891234567
OFF Options
Activating the baby monitor function and entering the 'call to' number
v ¤ É Additional Features ¤ OK ¤ q Baby Monitor ¤ OK
Activation:
Send alarm to:
External:
(press the display key ö).
Internal:
registered handsets
In idle display, the destination number or the internal
destination number is displayed.
Two Way Talk:
handset's speaker
Sensitivity:
noise level.
¤ r On / Off
¤ r Internal / External
¤ Enter the number or select from the phonebook
¤ Change ¤ Select handset or Call all to call all
¤ OK.
¤ r On / Off. Deactivate/activate the
¤ r Low / High. Select the sensitivity for the
¤ Save
Cancelling/deactivating the baby monitor alarm
Ending call when the baby monitor alarm is activated: ¤ Press the End call key a.
Deactivate baby monitor alarm mode:
¤ In idle status press the display key OFF.
Deactivating the baby monitor alarm remotely
Prerequisites:
u The telephone must support tone dialling
u The baby monitor alarm is forwarded to an external destination number.
u If baby monitor alarm is activated via a VoIP connection, the DTMF signalling must be done
via SIP info or RFC2833 (
¢ page 113).
¤ Accept the baby monitor alarm call. ¤ Press keys 9 ;.
The call is ended. The baby monitor is deactivated and the handset is in idle status. The baby
monitor alarm settings on the handset (e.g. no ringtone) will, however, remain activated until
you press the display key OFF on the handset.
Reactivate baby monitor alarm with the same number:
¤ Re-activate. ¤ Save
90
Page 92

Operating the telephone on a PABX
Operating the telephone on a PABX
The following settings are only necessary if your PABX requires them; see the PABX user guide.
Dialling modes and flash time
Changing the dialling mode
You can choose between tone dialling (Ton e) and pulse dialling (Pulse).
v ¤ Ï ¤ OK ¤ q Tel e ph on y ¤ OK ¤ q Dialling Mode ¤ OK
¤ q Select dialling mode ¤ Select (Ø=selected).
Regardless of the setting, the phone automatically switches to tone dialling (DTMF) after dialling
or during a call, e.g. for controlling an answer machine remotely.
Setting flash time (fixed line network)
By default, your phone is set for operation on the main connection (flash time 250 ms). For
operation on a PABX, you may have to change this value. Please refer to the user guide of your
PA BX .
v ¤ Ï ¤ OK ¤ Tel e ph on y ¤ OK ¤ Recall ¤ q Select flash time ¤ Select (Ø =selected).
Possible values: 80 ms, 100 ms, 120 ms, 180 ms, 250 ms, 300 ms, 400 ms, 600 ms, 800 ms.
Saving an access code (outside line code)
If you must enter an access code in front of the phone number for external calls using your PABX
(e.g. "0"), you can enter an access code for dialling via the fixed line network and for dialling via
VoIP.
v ¤ Ï ¤ OK ¤ q Tel e ph on y ¤ OK ¤ q Access Code ¤ OK
Fixed line
network:
VoIP: Access external line with:
¤ For:
¤ Save
Access external line with:
¤ Enter or change access code, max. 3 digits.
¤ Enter or change access code, max. 4 digits.
r Call Lists: The access code is prefixed only to numbers dialled from one of the following
lists: accepted calls list, missed calls list.
r All calls: The access code is prefixed to all numbers dialled.
r Off: The access code for the fixed line network is deactivated. It is not prefixed to any
phone number.
Note
The access code never prefixes any emergency numbers.
91
Page 93

Operating the telephone on a PABX
Setting pauses (fixed line network)
v ¤ *#Q5# ¤ Enter one of the following function-specific codes:
u Pause after line seizure
L ¤ ¤ OK (for 1 sec.)
L ¤ 2 ¤ OK (for 3 sec.)
L ¤ 3 ¤ OK (for 7 sec.)
u Pause after Recall key
2 ¤ ¤ OK (for 800 ms.)
2 ¤ 2 ¤ OK (for 1600 ms.)
2 ¤ 3 ¤ OK (for 3200 ms.)
u Dialling pause (Pause after access code)
¤ ¤ OK (for 1 sec.)
¤ 2 ¤ OK (for 2 sec.)
¤ 3 ¤ OK (for 3 sec.)
¤ 4 ¤ OK (for 6 sec.)
Enter a dialling pause when dialling:
¤ Press R key S for around 2 seconds. An R appears in the display.
Switching temporarily to tone dialling (DTMF)
If your PABX still operates with pulse dialling (PD), but you need tone dialling for a connection
(e.g. to listen to the network mailbox), you must switch to tone dialling for the call.
Prerequisite: You are conducting a call or have already dialled an external number.
¤ Press the star key *briefly.
Or:
¤ Options ¤ Tone Dialling ¤ OK
After the call ends, pulse dialling is automatically reactivated.
92
Page 94

Display icons
Ð
white, if Maximum
Range is on;
green, if Maximum
Range is off
}
i
Ñ
Ò
¼
ó
ñ
˝
Display icons
Icons in the status bar
The following icons are displayed in the status bar depending on the settings and the operating
status of your telephone:
Icon Meaning
Signal strength
76% - 100%
51% - 75%
26% - 50%
1% - 25%
Red: no connection to the base
Ringtone deactivated
"Beep" ringtone activated
Key lock
Message display
New messages:
On the network mailbox (¢ page 85)
Ã
In the missed calls list (¢ page 85)
™
Ë
In the e-mail list (¢page 58)
In the missed appointments list
¢ page 88)
(
Icon Meaning
Battery charge status:
{
{
y
y
y
xy 0% - 10%
xy 11% - 33%
x{ 34% - 66%
x{ 67% - 100%
White: charged over 66%
White: charged between 34% and
66%
White: charged between 11% and
33%
Red: charged below 11%
Flashes red: battery almost empty
(approx. 5 minutes talktime
remaining)
Battery is charging
(current charge status):
Menu icons
Messaging
Ë
Call Lists
Ê
Select Services
Ç
Additional Features
É
Settings
Ï
93
Page 95

Display icons
z
W
X
ØÙÚ
ØãÚ
Ø
ðÚ
ØáÚ
ØìÚ
зÛ
‰
Õ
Display key icons
The following icons indicate the current function of the display keys according to the operating
situation:
Icon Action
Ò
Ñ
Last number redial
Delete text
Display icons for signalling of
Establishing a call
(outgoing call)
External call Internal call Reminder call for
Reminder call for
appointment
Other display icons
Information
Action complete
(green)
Icon Action
ö
Ó
Connection
established
Alarm call
(Security) prompt Please wait...
Action failed (red)
Open phonebook
Copy number to the phonebook
No connection
established/connection
terminated
anniversary
94
Page 96

Menu overview
Open main menu: ¤ With the handset in idle status press v:
Messaging
Ë
eMail ¢ page 58
Menu overview
Call Lists
Ê
All calls
Outgoing calls
Accepted calls
Missed calls
Answer Machine
Ì
Play Messages Net AM: Fixed Line ¢ page 66
Net AM: IP1 to IP6
Network Mailboxes Net AM: Fixed Line
Net AM: IP1 to IP 6
Set Key 1 Net AM: Fixed Line
Net AM: IP1 to IP 6
Ç
Select Services
Next Call Withhold Number ¢ page 40
Call Waiting fixed line network only
Call Divert Internal
Fixed Line
IP1 to IP6
Call Waiting
All Calls Anonym.
Unknown Call Reject fixed line network only
Transfe r (ECT)
Ringback Off
¢ page 85
¢ page 66
¢ page 67
¢ page 39
¢ page 38
¢ page 39
¢ page 37
¢ page 40
¢ page 40
¢ page 42
95
Page 97

Menu overview
Additional Features
É
Info Centre ¢ page 61
Calendar
Alarm Clock
Baby Monitor
One Touch Call
Missed Alarms
Settings
Ï
Date/Time ¢ page 51
Audio Settings Handset Volume
Earpiece Profiles
Advisory Tones
Ringtones (Handset) Volume
Melodies
Time Control
Anon. Calls Silent
¢ page 88
¢ page 87
¢ page 89
¢ page 32
¢ page 88
¢ page 45
¢ page 48
¢ page 46
¢ page 46
¢ page 47
¢ page 47
Music on hold
Display Screensaver
Info Ticker
Colour Schemes
Backlight
Language
Registration Register Handset
De-register Handset
Select Base
96
¢ page 52
¢ page 44
¢ page 45
¢ page 45
¢ page 45
¢ page 44
¢ page 69
¢ page 70
¢ page 70
Page 98
Menu overview
Telephony Auto Answer ¢ page 45
VoIP Wiza rd
Send Connections INT 1 ... INT 6
¢ page 53
¢ page 55
Rec. Connections INT 1 ... INT 6
Dialling Mode Tone
Recall
Access Code
Own Area Code
Extra Area Codes
System Handset Reset
Handset PIN
Base Reset
Base Restart
Local Network
Update Firmware
System PIN
ECO DECT Maximum Range
¢ page 55
¢ page 91
Pulse
¢ page 91
¢ page 52
¢ page 52
¢ page 57
¢ page 57
¢ page 56
¢ page 52
¢ page 55
¢ page 51
¢ page 87
97
Page 99

Configuring the phone via the Web configurator
Configuring the phone via the Web configurator
The Web configurator for your Gigaset telephone enables you to change the settings for your
phone conveniently on your PC.
u You can make settings that are also possible using your telephone handset using the web
browser on your PC as an alternative, e.g. configure VoIP connections, download firmware
updates or start Eco Mode.
u You can make additional settings that are not possible via the handset, e.g. meet particular
prerequisites for connecting the phone to a company network or adjust the voice quality on
VoIP connections.
u On the base, you can save data that is required to access specific services on the Internet.
These services include access to public and private online directories, to the incoming e-mail
server for your e-mail account and synchronising date/time with a time server.
u You can save data for your phone (base and handsets) in files on the PC and, in the event of
an error, you can download them onto your phone again.
Below you will find a list of the Web configurator functions and the navigation paths to the Web
configurator pages where the functions are available. See the online help for the Web
configurator for a detailed description of the web pages and the required entries (
Connecting the PC with the telephone's Web configurator
Prerequisites:
u A standard web browser is installed on the PC, e.g. Internet Explorer version 7.0 or higher,
Firefox version 3.5 or higher or Apple Safari version 3.x.
u The phone and PC are directly connected with each other via a router. The settings of any
existing firewall installed on your PC allow the PC and phone to communicate with each
other.
There are two ways of connecting your PC to the phone's Web configurator:
u Via the phone's IP address in the local network
u Via the Gigaset configuration service, if the phone and PC are connected to the Internet
¢ page 99).
(
¢ page 104).
Notes
u Depending on your VoIP provider, it is possible that you will be unable to change
individual settings in the Web configurator.
u The phone is not blocked while you select your settings in the Web configurator. You can
make calls with your phone or modify settings at the same time.
u While you are connected to the Web configurator, it is blocked to other users. It cannot
be accessed by more than one user at any one time.
98
Page 100

Configuring the phone via the Web configurator
Establishing a connection via the phone's IP address
¤ Establish the telephone's current IP address on the handset:
You can see the phone's current IP address in the handset display by briefly pressing the
registration/paging key on the base.
Your phone's IP address can change if you have activated dynamic IP address assignment
(
¢ page 52).
Caution
If one of the four parts of the IP address contains leading zeros (e.g. 002), these zeros must
not be entered in the web browser’s address field. Otherwise, the web browser will not be
able to establish a connection to the Web configurator.
Example: The IP address 192.168.002.002 is displayed on the phone. 192.168.2.2 should be
entered in the address field.
¤ Open the web browser on your PC.
¤ Enter http:// and the phone's current IP address (for example: http://192.168.2.2) into the
web browser’s address field.
¤ Press the return key.
A connection is established to the phone's Web configurator.
Establishing a connection via Gigaset config
Prerequisite: PC and telephone are connected to the Internet.
¤ Open the web browser on your PC.
¤ Enter the following URL into the web browser’s address field:
http://www.gigaset-config.com
¤ Press the return key.
You will receive a message stating that the connection has been forwarded to your phone.
If several Gigaset phones can be reached via your Internet connection, you are asked which of
these phones you would like to be connected to.
After successfully forwarding the connection, the Web configurator's Login page is displayed in
the web browser.
Note
The connection between the PC and the Web configurator is a local connection (LAN
connection). The Internet is only accessed to establish the connection.
99
 Loading...