

Gigabyte nForce series, nVIDIA nForce4-4X, nVIDIA nForce3 250/Ultra, nVIDIA nForce2 MCP RAID Configuration
Page 1

Table of Contents
Configuring SATA Hard Drive(s) (Controller: nVIDIA nForce4-4X; nVIDIA nForce3 250/Ultra; nVIDIA
nForce2 MCP RAID) ..................................................................................................................... 2
(1) Installing SATA hard drive(s) in your computer .......................................................................... 2
(2) Configuring SATA controller mode and boot sequence in BIOS Setup .................................... 3
(3) Configuring RAID set in RAID BIOS ............................................................................................. 5
(4) Making a SATA controller driver disk .......................................................................................... 8
(5) Installing SATA controller driver during OS installation ............................................................ 10
(6) Configuring a bootable RAID array with Microsoft Windows 2000 ........................................ 13
Page 2

SATA Hard Drive Configurations (nForce series) - 2 -
Ác
Åé
¤¤
¤å
Configuring SATA Hard Drive(s) (Controller: nVIDIA nForce4-4X;
nVIDIA nForce3 250/Ultra; nVIDIA nForce2 MCP RAID)
"*" Skip this step if you do not want to create RAID array on the SATA controller.
To configure SATA hard drive(s), follow the steps below:
(1) Install SATA hard drive(s) in your system.
(2) Configure SATA controller mode and boot sequence in BIOS Setup.
(3)* Configure RAID set in RAID BIOS.
(4) Make a floppy disk containing the SATA controller driver.
(5) Install the SATA controller driver during OS installation.
Before you begin
Please prepare:
(a) Two SATA hard drives (to ensure optimal performance, it is recommended that you use two hard
drives with identical model and capacity). If you do not want to create RAID with the SATA
controller, you may prepare only one hard drive.
(b) An empty formatted floppy disk.
(c) Windows XP/2000 setup disk.
(d) Driver CD for your motherboard.
(1) Installing SATA hard drive(s) in your computer
Attach one end of the SATA signal cable to the rear of the SATA hard drive and the other end to available
SATA port(s) on the motherboard. (If there are more than one SATA controller on your motherboard, you
may check the name of the SATA connector to identify the SATA controller for the connector. For example,
SATA0_SB/SATA_SB is controlled by the SATA controller on South-Bridge.) Then connect the power
connector from your power supply to the hard drive.
Page 3
SATA Hard Drive Configurations (nForce series)- 3 -
(2) Configuring SATA controller mode and boot sequence i n BIOS Setup
You have t o make sure w hether the SATA controller is configured correctly in syst em BIOS Set up and
set BIOS boot sequence f or the SATA hard driv e(s).
Step 1:
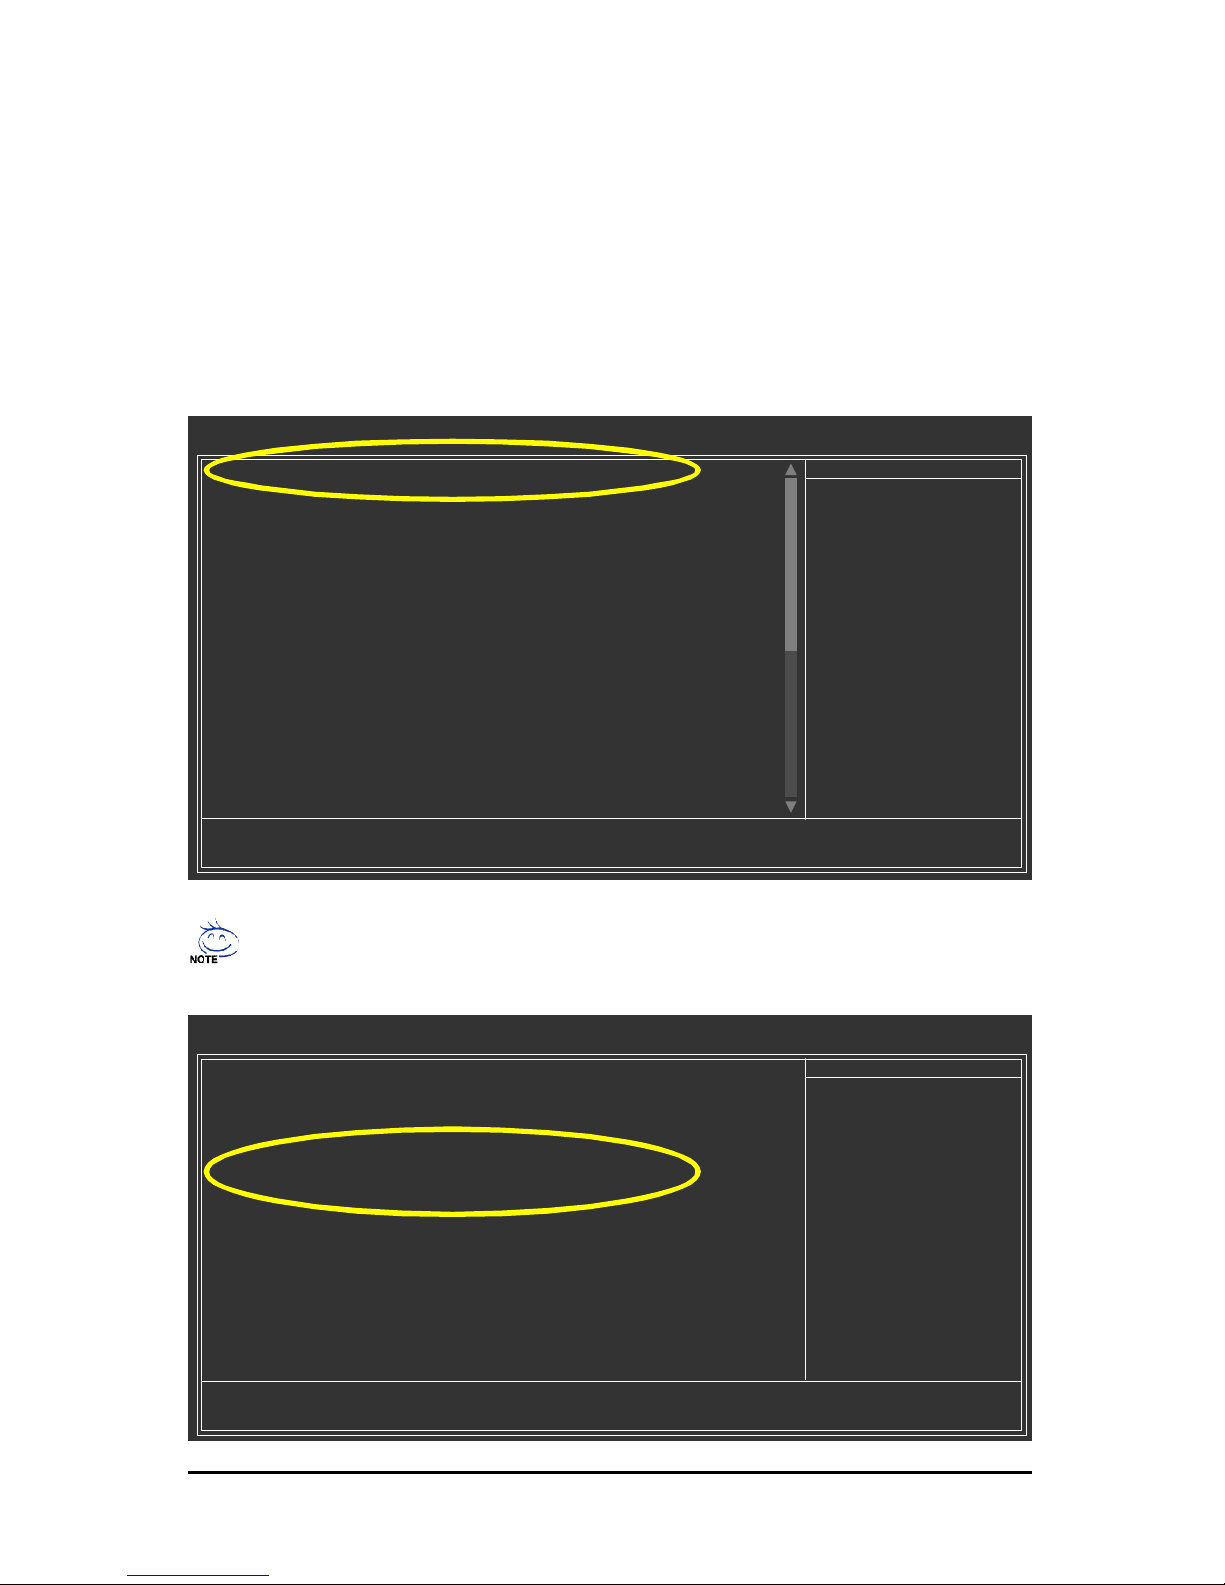
Turn on your computer and press Del to enter BIOS Setup during POST (Power-On Self Test). If you want
to creat e RAID, select I DE Fun ction Setup under the Integrated Perip herals m enu and t hen press
ENTER (Figure 1). Change the SAT A Primary Master RAID and SA TA Secondary Master RA ID items
to Enabled (Disabled by default ) (Figure 2). Skip this step and leav e the two items to Disabled by default
if you do not want to c reate RAID .
Figure 1 (This BIOS setup s creen is capt ured f rom GA-K8N SNXP-939, BIOS ver. : D24)
CMOS Setup Utility-Co pyright (C) 1984-2004 Award Software
Integrated Peripherals
IDE Function Setup [Press En ter]
On-Chip Primary PCI IDE [Enabled]
On-Chip Seco ndary PCI IDE [Enabled]
USB Host Controller [V1.1+V2.0]
USB Keyboard Support [Disabled]
USB Mouse Support [Disabled]
Serial-ATA 2(In tern al PHY) [Enabled]
AC97 Audio [Auto]
On-Chip LAN(nVIDIA) [Auto]
Onboard Serial ATA [En abled]
Serial ATA Function [R AID]
Onboard 1394 [Enabled]
Onboard LAN Contro l [Enabled]
Onboard LAN Boot ROM [Disabled]
Onboard Serial Port 1 [3F8/IRQ4]
Onboard Serial Port 2 [2F8/IRQ3]
Onboard Parallel Port [378/IRQ7]
Parallel Port Mo de [SPP]
x ECP Mode Use DMA 3
higf: Move Enter: Select +/-/PU/PD: Value F10: Save ESC: Exit F1: General Help
F5: Previous Values F6: Fail-Safe Defaults F7: Optimized Defaults
Item Help
Menu Level}
Figure 2
CMOS Setup Utility-Co pyright (C) 1984-2004 Award Software
IDE Function Setup
IDE RAID [Enabled]
IDE Channel 0 Master RAID [Disabled]
IDE Channel 0 Slave RAID [Disabled]
IDE Channel 1 Master RAID [Disabled]
IDE Channel 1 Slave RAID [Disabled]
SATA Primary Master RAID [Enabled]
SATA Secn dry Master R AID [Enabled]
higf: Move Enter: Select +/-/PU/PD: Value F10: Save ESC: Exit F1: General Help
F5: Previous Values F6: Fail-Safe Defaults F7: Optimized Defaults
Item Help
Menu Level}
The BIOS Setup menus des cribed in this sec tion may not s how the ex ac t settings for y our
motherboard. The actual BI OS Setup menu options you will see shall depend on the motherboard
you hav e and the BIOS version.
Page 4
SATA Hard Drive C onfigurations (nForce series) - 4 -
Ác
Åé
¤¤
¤å
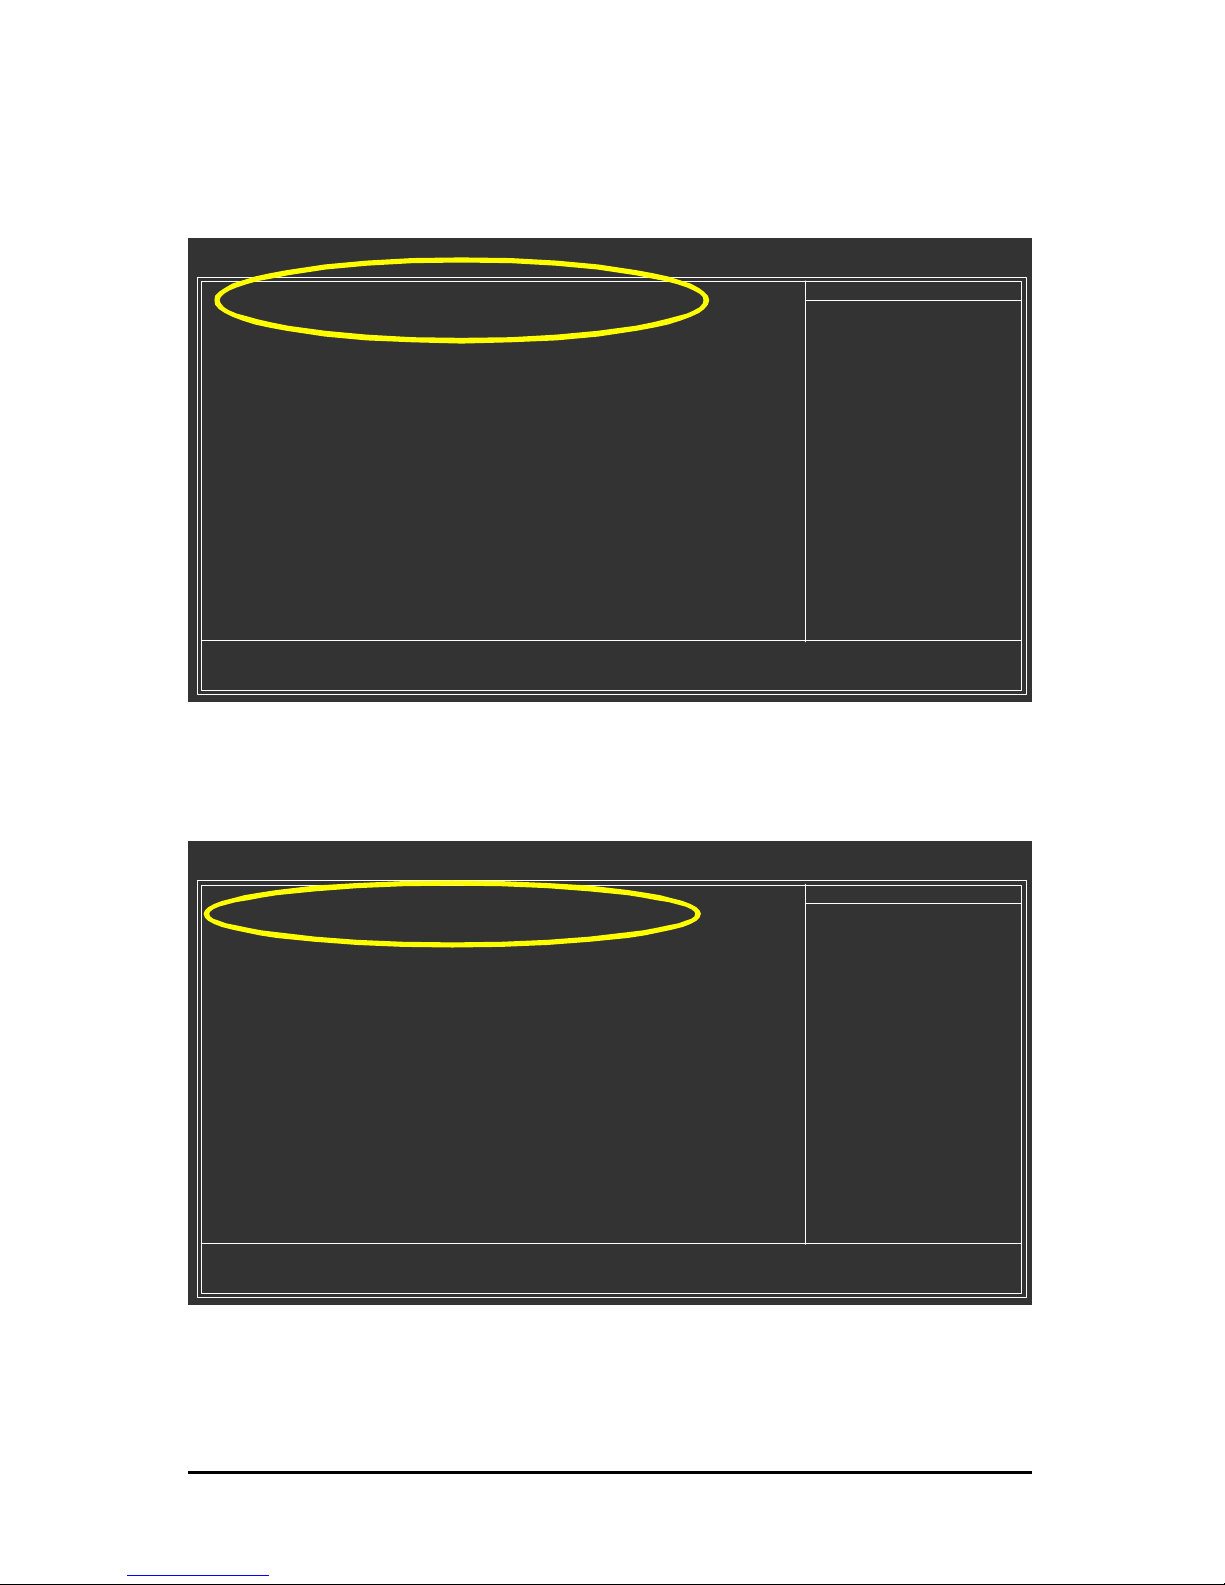
Step 2:
Later, select Hard Disk B oot Priori ty under t he Ad vanced BIOS Featur es menu. I n the Hard D isk
Boot Priority submenu, s elect the model of the SATA hard drive onto which you int ent to install Microsoft
Windows 2000/XP (F igure 3).
Figure 3
CMOS Setup Utility-Co pyright (C) 1984-2004 Award Software
Hard Disk Boot Priority
1. CH2 M. : S_ATA1-ST3120026AS
2. CH3 M. : S_ATA2-ST3120026AS
3. Bootable Add-in Card s
hi: Move PU/PD/+/-: Change Priority F10: Save ESC: Exit
Item Help
Menu Level }}
Use <h> or <i> to
select a device, th en
press <+> to move it
up, or <-> to move it
down the list. Press
<ESC> to exit this
menu.
Step 3:
Set First B oot Device under the A dvanced B IOS F eatures m enu to CDROM t o boot from CD-ROM
drive af ter syst em rest arts (Figure 4).
CMOS Setup Utility-Co pyright (C) 1984-2004 Award Software
Advanced BIOS Featu res
} Hard Disk Bo ot Priority [Press En ter]
First Boot Device [CDROM]
Second Boot Device [Hard Disk]
Third Boot Device [CDROM]
Boot Up Floopy Seek [Disabled]
Password Check [Setup]
Flexible AGP 8X [Auto]
Init Display First [AGP]
higf: Move Enter: Select +/-/PU/PD: Value F10: Save ESC: Exit F1: General Help
F5: Previous Values F6: Fail-Safe Defaults F7: Optimized Defaults
Item Help
Menu Level}
Step 4:
Save and exit BIOS Setup.
Figure 4
Page 5
SATA Hard Drive Configurations (nForce series)- 5 -
(3) Configuri ng RAID set in RAID BIOS
Enter the R AID BIOS setup utility to configure a RAID array. Skip this step and proceed t o Sect ion 4 if
you do not want t o creat e RAID.
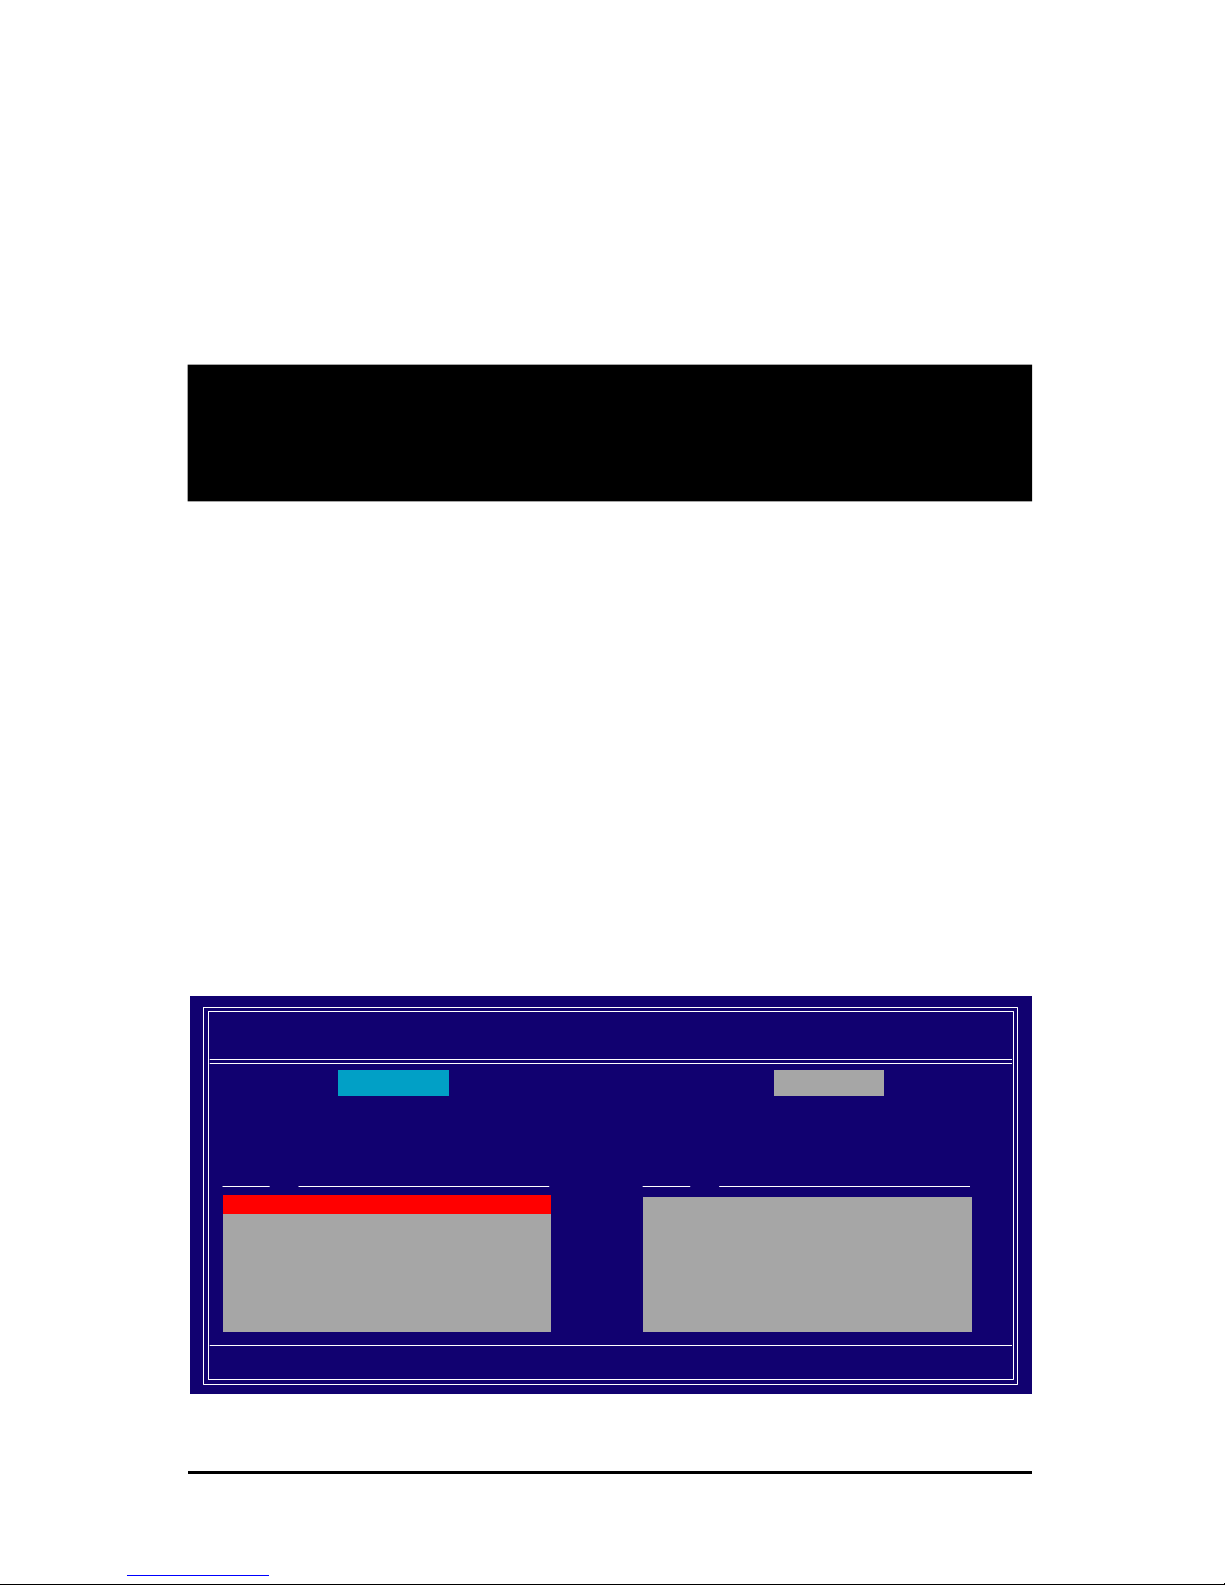
Step 1:
After the POST m emory t est begins and before the operating system boot begins , look f or a m essage
which says "Press F10 to enter RAID setup utilit y" (Figure 5). Hit the F10 key t o enter the RAID BIOS
setup utility.
Figure 5
NVIDIA RAID IDE ROM BIOS 4.22
Copyright (C) 2003 NVIDIA Co rp.
Detecting array ...
Press F10 to enter RAID set up utility ...
NVI DIA RAI D Utilit y Ma y 10 2004
- Define a Ne w A rr ay -
RA ID Mod e: M ir ro ring Str iping Bl ock: Op tim al
Fr ee Dis ks
L oc Disk Mod el N am e
1. 0. M ST 3120026A S
1. 1. M ST 3120026A S
Ar ray Di sk s
L oc Disk Mod el Nam e
[g ] Add
[f ] Del
[F6] Bac k [F7] Finish [TAB] Navigate [hi] Select [ENTER] Popu p
Step 2:
The Define a New Array sc reen is the first option screen when you enter the NVID IA RAID setup utility.
(Figure 6). You can press the T AB key to highlight through options. The following below is an example
of RAID 0 array creation.
Step 3:
In the RAID Mode field, use the UP or DOWN ARROW key to s elect a RAID mode. The supported RAI D
modes inc lude Mirroring (default), Striping, Stripe Mirroring, and Spanning.
Step 4:
If RAID 0 is selec ted, you can manually set the s triping bloc k siz e. In the Striping Block field, use the
UP or DOWN ARROW key to set t he Striping Block size. The KB is the standard unit of St riping Bloc k
size. We recommend y ou leav ing it to the def ault sett ing--Optimal (64K). The s ize range is from 4K to
128K.
Figure 6
Page 6

SATA Hard Drive C onfigurations (nForce series) - 6 -
Ác
Åé
¤¤
¤å
Step 6:
Press F7 aft er s electing the target hard disks . A mes sage w hich says "Clear disk data?" w ill appear.
If you are sure to clear the data in the selected hard drives, press Y. (I f the hard driv es contain previously
created R AID array , you need to press Y to c lear t he data from the hard drives. )
Figure 8
NVI DIA RAI D Utilit y Ma y 10 2004
- Define a Ne w A rr ay -
RA ID Mod e: M ir ro ring Str iping Bl ock: Op tim al
Fr ee Dis ks
L oc Disk Mod el N am e
Ar ray Di sk s
L oc Disk Mod el Nam e
[g ] Add
[f ] Del
[F6] Bac k [F7] Finish [TAB] Navigate [hi] Select [ENTER] Popu p
1. 0. M ST 3120026A S
1. 1. M ST 3120026A S
Figure 7
Step 5:
Next, select the hard drives which you wish to be included in the dis k array . The Free Disks section
displays t he information about the currently installed SAT A hard drives . Press the TAB k ey to move t o
the Free Disks section. Select the target hard drives and use t he RIGHT ARROW key to add the hard
drives t o the Array Dis ks section (Figure 7).
NVI DIA RAI D Utilit y Ma y 10 2004
- Define a Ne w A rr ay -
RA ID Mod e: M ir ro ring Str iping Bl ock: Op tim al
Fr ee Dis ks
L oc Disk Mod el N am e
Ar ray Di sk s
L oc Disk Mod el N am e
[g ] Add
[f ] Del
[F6] Bac k [F7] Finish [TAB] Navigate [hi] Select [ENTER] Popu p
1. 0. M ST 3120026A S
1. 1. M ST 3120026A S
Clear disk da ta ?
[Y] YES [N ] NO
Page 7

SATA Hard Drive Configurations (nForce series)- 7 -
If you want to read more inf ormation about the RAI D array, press ENTER to ent er the Array Detail screen
(Figure 10), where you can see detailed inf ormation about RAID mode, disk block size, disk model name,
and dis k capac ity, etc.
Figure 10
Figure 9
After that, the Array Lis t screen displaying the RAID array you creat ed will appear (Figure 9).
If you want to set t he disk array as boot device, use the U P or DOWN ARROW key to select the array
and press B.
NVI DIA RAI D Utilit y Ma y 10 2004
- Arra y Li st -
[Ctrl-X] Exit [hi] Select [ B] Set Boot [ N] New A rray [EN TER] Det ail
Bo ot I d St atu s Ven d or Ar ra y Mo de l Na me
BBS 2 H e alth y NV I D IA MIR RO R 11 1. 79G
Ar ray 2 : NVID IA MI RROR 111 .79G
- Array De ta il -
RA ID Mod e: Mirro ring
Striping Width : 1 St riping Block :
Ad apt Ch ann e l M/S In de x Di sk Mode l Nam eC ap ac it y
1 0 M as ter 0 ST3120026 AS 11 1 .79 GB
1 1 M as ter 1 ST3120026 AS 11 1 .79 GB
[R] Rebu ild [D] Delete [ C] Clea r Disk [ENTER] Return
If you need to clear the data in the hard disk, press C in t his screen. W hen t he Clear disk data s creen
appears, press Y t o conf irm or N to c ancel. Press ENT ER to ret urn t o the Array List screen.
To exit the Nvidia RAID utility, pres s CTRL+X.
Now, you can proc eed to ins tall t he SATA c ontroller driver and operating system.
Page 8

SATA Hard Drive C onfigurations (nForce series) - 8 -
Ác
Åé
¤¤
¤å
(4) Making a SATA controller driver disk
To install Windows 2000/XP ont o a SATA hard drive on the nVIDIA nForce3 250/ Ultra or nVIDIA nForce2
MCP RAI D SATA cont roller succes sfully, you need to install required driver for the SATA controller
during OS installation. Without the driver, the hard drive may not be recognized during the Windows s etup
process.
First of all, y ou need to copy t he driver for the SAT A cont roller f rom the motherboard driver CD to a
floppy disk. The inst ruct ions below ex plain how to c opy the driver.
Step 1: F ind an available syst em and insert t he motherboard driv er CD int o t he CD-ROM drive. T he
installation utility will appear automatically. Quit the inst allation utility first.
Step 2: Go t o My Comp uter and right-click t he CD-ROM drive icon and select Open (Figure 11).
Figure 12
Figure 11
Step 3: Go to the B ootDrv folder and look for an executable program named MENU.exe (Figure 12).
Page 9

SATA Hard Drive Configurations (nForce series)- 9 -
Figure 14
Figure 13
Step 5:
Insert an empty floppy disk and pres s E to select E)nVIDIA Ser ies ATA(XP) if you want to install Windows
XP; press F to select F)nVID IA Series AT A(2K) if you want to install Windows 2000. Then it will take
about one minute to copy t he SATA driver from t he motherboard driver C D to t he floppy disk.
Step 6:
Press 0 to exit when the procedure is complete (Figure 14). You have copied the SATA driver succ essfully.
Step 4:
Double-click MEN U.exe. An MS-DOS prom pt screen s imilar to Figure 13 below will appear.
Page 10

SATA Hard Drive C onfigurations (nForce series) - 10 -
Ác
Åé
¤¤
¤å
Figure 15
Windows Setup
Press F6 if you need to install a 3rd party SCSI o r RAID driver.
(5) Installing SATA controller driver during OS installation
Now that you have prepared the SATA driver disk and configured BIOS set tings, you are ready to install
Windows 2000/ XP onto your SATA hard drive wit h the driver. The f ollowing is an example of Windows
XP installat ion.
Step 1: Restart your sy stem to boot from the Window s 2000/XP Setup disk and press F6 as soon as
you see the "Press F6 if you need to inst all a 3rd party SCSI or R AID driver" message (Figure 15). After
pressing F6, there will be a few moments of som e files being loaded before you s ee t he next screen.
Figure 16
Windows Setup
S=Specify Additional Device ENTER=Continue F3=Exit
Setup could no t determine the ty pe of one or more mass sto rage d evices
installed in you r system, o r you have chosen to manu ally specify an adapter.
Currently, Setup will load support for th e fo llowing mass storage devices(s )
<none>
* To specify add itional SCSI adapters, CD-ROM drives, or special
disk controllers for use with Windows , including those for
which you have a device support disk from a mass storage device
manufacturer, press S.
* If you do not have any device sup port disks fro m a mass storage
device manufactu rer, or do not want to specify additio nal
mass storage d evices for u se with Wind ows, press ENTER.
Step 2:
When a screen similar t o that below appears (F igure 16), insert the floppy dis k containing the SATA driver
and press S.
Page 11

SATA Hard Drive Configurations (nForce series)- 11 -
Step 3:
If Setup correctly recognizes the driver in t he floppy disk , a controller menu similar to Figure 17 below
will appear. Use the ARR OW keys t o s elect N VIDIA R AID C LASS D RIVER* (Figure 17) and press
ENTER. Later, when a screen similar to Figure 18 appears, you must press S to select additional driver.
The screen will return to previous screen as show n in Figure 17. Select NVIDIA NForce Sto rage
Controller and pres s ENT ER, and then it will begin to load the SATA driver from the f loppy disk.
Figure 17
"*" If you want to create RAID, select both NVIDIA R AID CL ASS DR IVER and then NVID IA
NForce Storag e Co ntrol ler.
If you do not create RAID, select NVIDIA NForce Storage Controll er only.
Figure 18
Windows Setup
S=Specify Additional Device Enter=Continue F3=Exit
Setup will load support for the following mass storage device(s):
NVIDIA RAID CLASS DRIVER
* To specify add itional SCSI adapters, CD-ROM drives, or special
disk controllers for use with Windows , including those for
which you have a device support disk from a mass storage device
manufacturer, press S.
* If you do not have any device sup port disks fro m a mass storage
device manufactu rer, or do not want to specify additio nal
mass storage d evices for u se with Wind ows, press ENTER.
Windows Setup
ENTER=Select F3=Exit
You h ave chos en to configure a SCSI Adapter for use with Windows ,
using a device support disk provided by an adap ter manufacturer.
Select the SCSI Ad apter yo u want from the following list, or press ESC
to return to the previous screen.
NVIDIA RAID CLASS DRIVER
NVIDIA NForce Storage C ontroller
If a message appears saying one or som e file(s) c annot be found, please chec k the floppy disk
or copy t he correc t SATA driver again from the motherboard driver C D.
Page 12

SATA Hard Drive C onfigurations (nForce series) - 12 -
Ác
Åé
¤¤
¤å
Figure 20
Step 4:
When the next screen (Figure 19) appears, press ENTER to continue t he SATA driv er inst allation f rom
the floppy dis k. The driver installation w ill be f inis hed in about one minute.
Figure 19
Windows Setup
S=Specify Additional Device Enter=Continue F3=Exit
Setup will load support for the following mass storage device(s):
NVIDIA RAID CLASS DRIVER
NVIDIA NForce Storage Controller
* To specify add itional SCSI adapters, CD-ROM drives, or special
disk controllers for use with Windows , including those for
which you have a device support disk from a mass storage device
manufacturer, press S.
* If you do not have any device sup port disks fro m a mass storage
device manufactu rer, or do not want to specify additio nal
mass storage d evices for u se with Wind ows, press ENTER.
WindowsXP Profession al Setup
Welcome to Setup.
This port of the Setup p rogram prepares Microsoft(R)
Windows (R) XP to run on you r comp uter.
To set u p Windows XP now, press ENTER.
T o repair a Windows XP installation using
Recovery Console, press R .
To quit Setup without installing Windows XP, press F3.
Enter= Continue R=Rep air F3=Exit
After the SATA controller driver ins tallation is completed, y ou should see a sc reen as below . It indicates
that you hav e inst alled t he SAT A controller driver succ essfully. You can proc eed w ith the W indows
2000/XP inst allation.
Page 13

SATA Hard Drive Configurations (nForce series)- 13 -
(6) Configuring a bootable RAID array with Microsoft Wi ndows 2000
Problem: Users cannot install Windows 2000 with Service Pack 2 (or prev ious versions) t o a bootable
RAID volum e.
There are t wo s olutions to resolv e this issue.
Solution s 1:
Use the NVRAID t ool (nForce Driver Version 5. xx) to c onvert the boot volume to a RAID array. Here
are the detailed s tep-by-s tep instruct ions:
Step 1:
Install Window s 2000 onto a select ed hard drive. Download and ins tall Windows 2000 Serv ice Pack 4
from Mic rosoft's website.
Step 2:
After system restarts, press Del to enter s ystem BIOS Set up during POST (Power-On Self Test). Select
RAID Co nfig under the Integ rated Peripherals menu (Figure 21), and set the SATA disk (the one
containing the Window s 2000) item to Enabled (Disabled by default)(Figure 22). Save settings and exit
the BIOS s etup.
CMOS Setup Utility-Co pyright (C) 1984-2004 Award Software
Integrated Peripherals
} IDE Function Setup [Press Enter]
} RAID Con fig [Press En ter]
OnChip USB [V1.1+V2.0]
USB Keyboard Support [Disabled]
USB Mouse Support [Disabled]
AC97 Audio [Auto]
Onboard H/W LAN* [Enabled]
Onboard Serial Port 1 [3F8/IRQ4]
Onboard Serial Port 2 [2F8/IRQ3]
UART Mode Select [Norm al]
x UR2 Duplex Mode Half
Onboard Parallel Port [378/IRQ7]
Parallel Port Mo de [ECP]
ECP Mode Use DMA [3]
Game Port Address [201]
Midi Port Address [Disab led]
x Midi Port IRQ 10
higf: Move Enter: Select +/-/PU/PD: Value F10: Save ESC: Exit F1: General Help
F5: Previous Values F6: Fail-Save Defaults F7: Optimized Defaults
Item Help
Menu Level}
CMOS Setup Utility-Co pyright (C) 1984-2004 Award Software
RAID Config
higf: Move Enter: Select +/-/PU/PD: Value F10: Save ESC: Exit F1: General Help
F5: Previous Values F6: Fail-Save Defaults F7: Optimized Defaults
Item Help
Menu Level}
IDE Channel0 Master RAID [Disab led]
IDE Channel0 Slave RAID [Disabled]
IDE Channel1 Master RAID [Disab led]
IDE Channel1 Slave RAID [Disabled]
SATA Primary Master RAID [Disabled]
SATA Secn dry Master R AID [Disabled]
Figure 22
Figure 21 (This BIOS s etup sc reen is c aptured from GA-7N400S-L , BIOS ver. E 17)
Page 14

SATA Hard Drive C onfigurations (nForce series) - 14 -
Ác
Åé
¤¤
¤å
NVI DIA RAI D Utilit y Ma y 10 2004
- Define a Ne w A rr ay -
RAID Mod e: St riping Str iping Bl ock: Op tim al
Fr ee Dis ks
L oc Disk Mod el N am e
1. 0. M ST 3120026A S
1. 1. M ST 3120026A S
Ar ray Di sk s
L oc Disk Mod el N am e
[g ] Add
[f ] Del
[F6] Bac k [F7] Finish [TAB] Navigate [hi] Select [ENTER] Popu p
Step 3:
After system restarts , press F10 to enter the NVI DIA RAID setup utility. Select Striping in the RAI D Mode
filed (Figure 23). Move to the Free D isks s ection with the TAB k ey. Select t he desired disk and use the
RIGHT AR ROW key t o add it to Array D isks menu.
Figure 23
Step 4:
After all the settings, press F7 to complete the configuration. When prompted to Clear Disk Data (F igure
24), press N. Then press CTRL+X to exit the NVIDIA RAID BIOS. Restart the computer to boot into Windows
2000.
Figure 24
NVI DIA RAI D Utilit y Ma y 10 2004
- Define a Ne w A rr ay -
RAID Mod e: St riping Str iping Bl ock: Op tim al
Fr ee Dis ks
L oc Disk Mod el N am e
Ar ray Di sk s
L oc D isk Mod el Name
[g ] Add
[f ] Del
[F6] Bac k [F7] Finish [TAB] Navigate [hi] Select [ENTER] Popu p
1. 0. M ST 3120026A S
1. 1. M ST 3120026A S
Clear disk da ta ?
[Y] YES [N ] NO
Page 15

SATA Hard Drive Configurations (nForce series)- 15 -
Step 5:
Install the NVID IA nForc e Driv er Package while in Windows 2000 and reboot the system. Go to
START>Programs>N vidia Corpo ration and s elect NVR AID manager. You should see the s ingle dis k
RAID array (in striping mode) t hat was created from the boot disk. Selec t the single boot disk RAID Array
by clicking on it. Select Convert Array under the System Tasks and select Next following the instructions.
Select the desired type of R AID array you want to c onvert and then s elect Next. You are prom pted to
select the desired F ree D isk(s) to add to the bootable RAID array. Press Fin ish then NVR AID will s tart
converting the single disk RAID array into a m ulti-disk R AID array in a bootable format.
Note: C onversion may take 1~2 hours depending on disk s ize.
Solution s 2:
Users must creat e a combinat ion installat ion CD that includes W indow s 2000 and Service Pack 3 or
Service Pack 4 f ixes integrated in. T o create the combination installation CD , refer t o t he following
website:
http:/ /www.m icrosof t.c om/windows2000/downloads /serv icepac ks/s p4/HFdeploy.htm
Note: If users choose not to install W indows 2000 Service Pac k 3 or 4, RAID is still supported on Windows
2000. However, users will not be able t o create a bootable RAID volum e.
 Loading...