

DRAFT
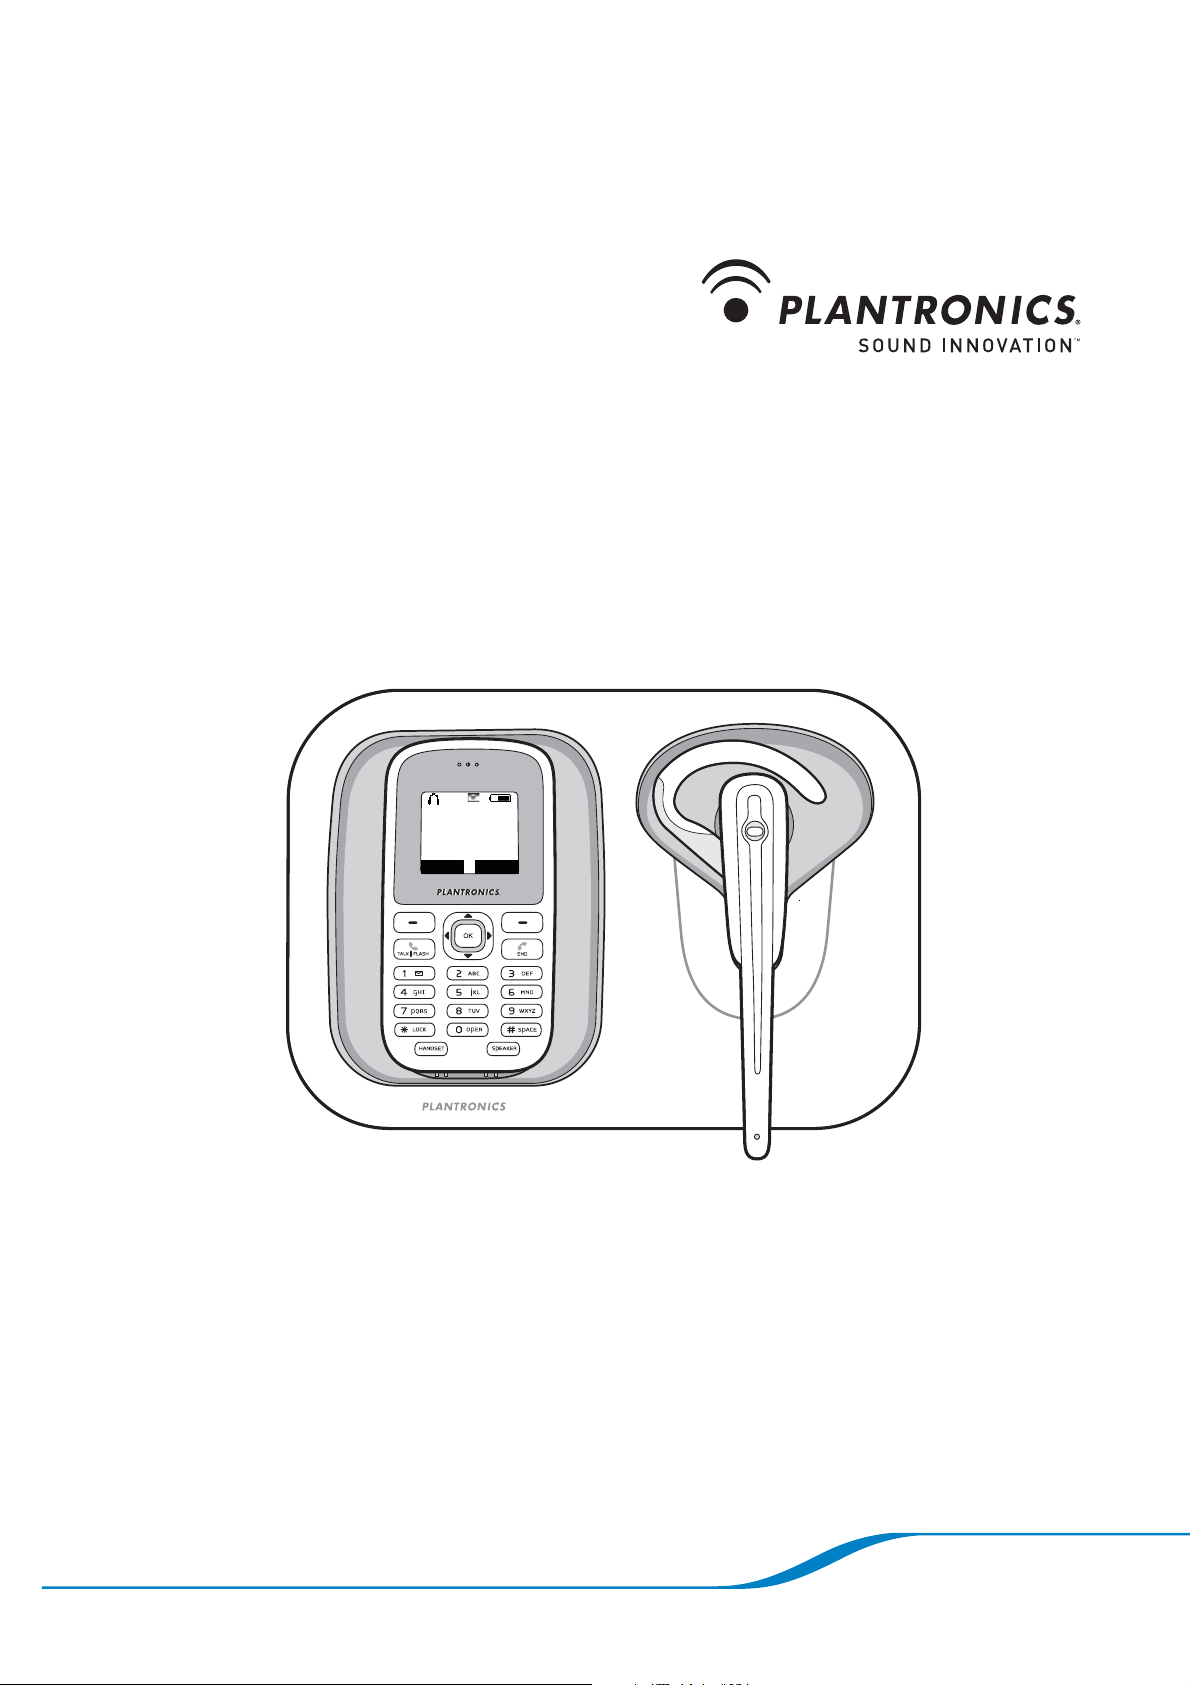
Calisto™ Pro Series
Home phone with multi-function
®
Bluetooth
headset
Incoming Call
John Smith
123-456-7890
Ignore Answer
User Guide

DRAFT
Contents
Contents .............................................1
Components ..........................................2
Setup ................................................4
Wearing the headset and handset ........................4
Changing the battery ..................................5
Powering the Headset On and Off ..........................6
Powering your headset on ..............................6
Powering your headset off ..............................6
Using Your Headset with Your Handset ......................7
Placing calls ........................................7
Receiving calls ......................................7
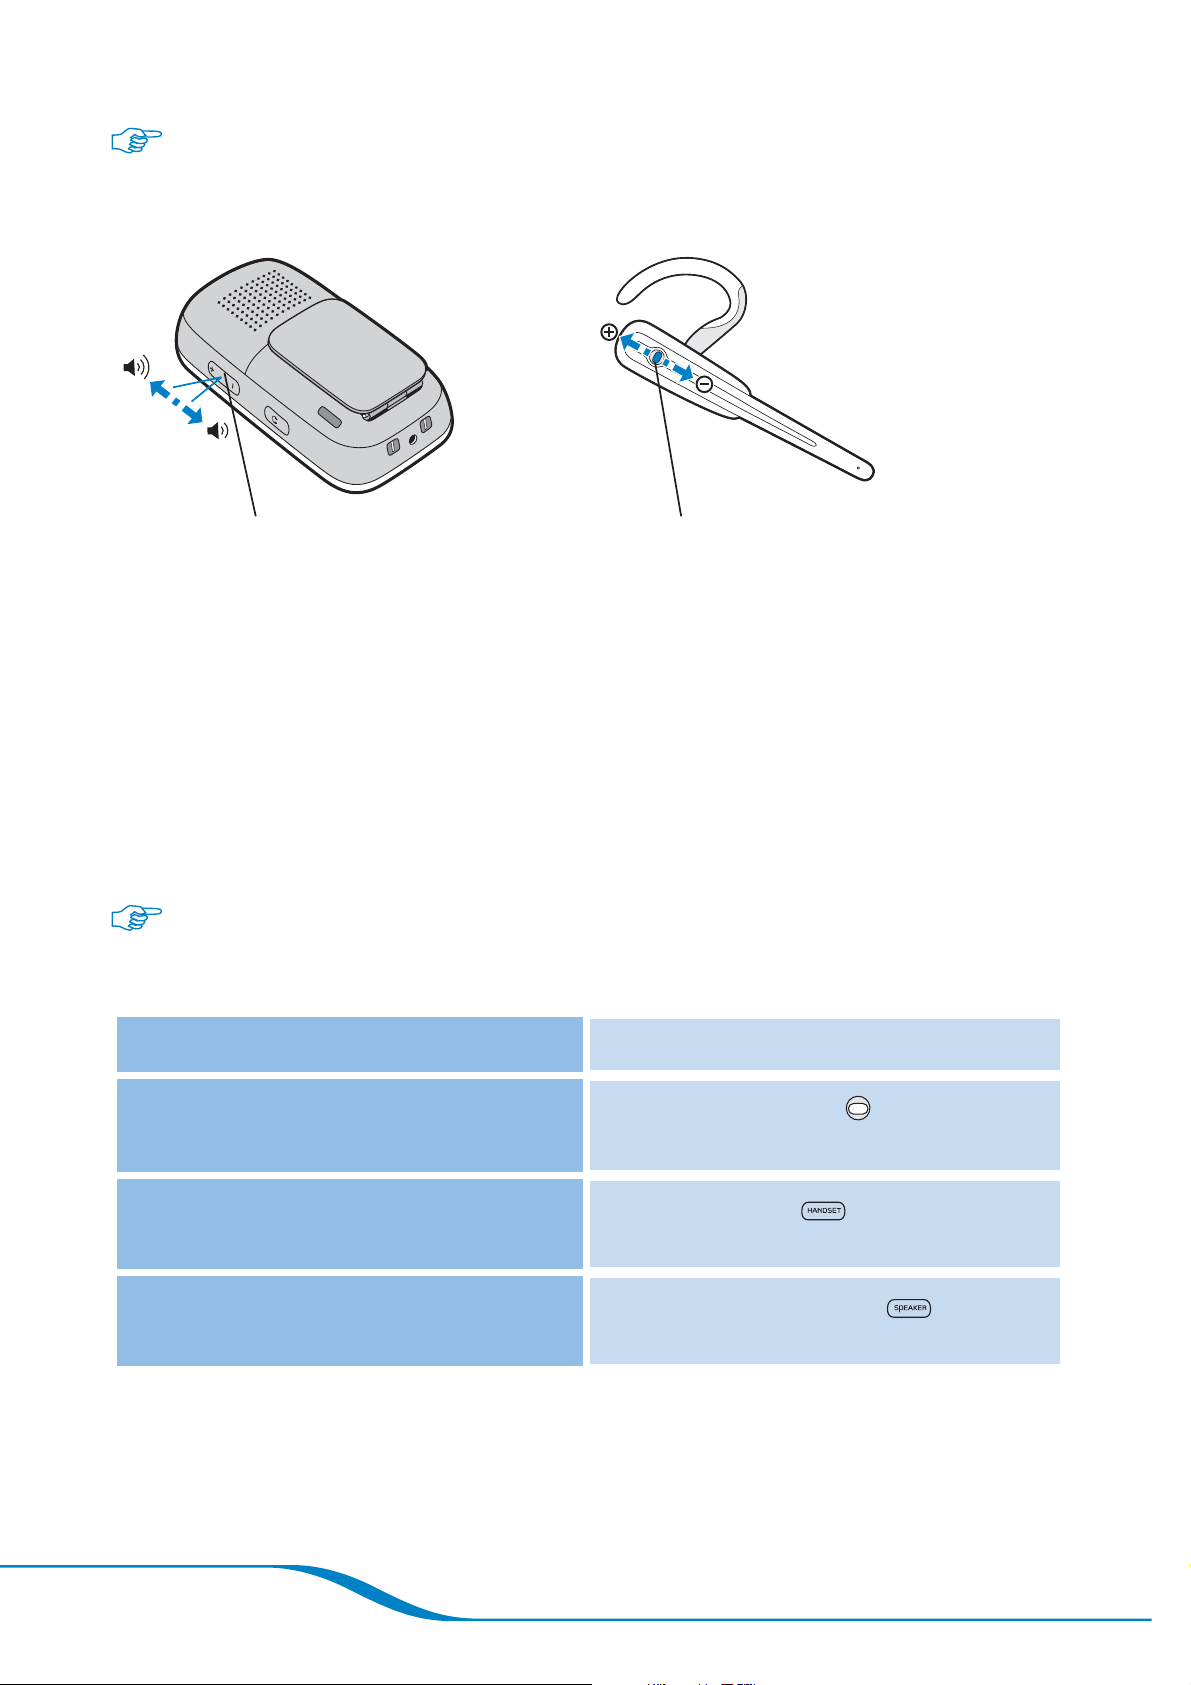
Adjusting call volume ..................................8
Switching calls between handset, headset, and speakerphone . 8
Ending calls .........................................9
Locating the headset from the handset ....................9
Using Your Headset with Your Mobile Phone .................10
Pairing your headset with your mobile phone ..............10
Placing calls .......................................11
Receiving calls using your headset ......................12
Adjusting call volume using your headset .................12
Ending calls using your headset ........................13
Using the Phonebook ...................................14
Adding a contact manually ............................14
Adding a contact from a call ...........................15
Editing a contact ....................................15
Deleting a contact ...................................16
Calling Features: Basics .................................17
Caller ID. . . . . . . . . . . . . . . . . . . . . . . . . . . . . . . . . . . . . . . . . . . 17
Speakerphone ......................................17
Last number redial ..................................17
Receiving a second incoming call .......................18
Muting a call .......................................19
Page i

DRAFT
Settings .............................................23
Using speed dial keys ................................19
Viewing and editing the Call Log ........................20
Table 1: Headset button functions .......................21
Table 2: Headset alerts ...............................21
Table 3: Handset screen icons .........................22
Adjusting the ringer volume ............................23
Turning the ringer off .................................23
Selecting a ring tone .................................23
Adjusting the screen brightness ........................24
Setting the date and time .............................24
Setting the default language ...........................25
Turning the keypad tone on or off .......................25
Locking the keypad ..................................25
Switching between tone dialing and pulse dialing ...........26
Voicemail ............................................27
Setting up voicemail .................................27
Checking voicemail ..................................27
Transferring Contacts from Your Computer ..................28
System requirements ................................28
Installing the software ................................28
Using the Outlook
®
Phonebook Utility ....................29
Phonebook storage ..................................31
Creating an Outlook contact ...........................31
Editing an Outlook contact ............................32
Deleting an Outlook contact ...........................33
Restoring your phonebook ............................33
Customizing the Outlook Phonebook Utility ...............33
Viewing your updated contacts on your handset ............33
Answering Calls from Your Computer’s VoIP Program ..........34
System requirements ................................34
Installing the software ................................34
Using the PerSonoCall VoIP Utility .......................34
PerSonoCall system tray icons .........................35
Page ii

DRAFT
Setting basic options .................................36
Viewing the current status screen .......................37
Using the Handset with the Charging Base ..................38
Locating the handset from the charging base ..............38
Registering your handset with the charging base ...........38
Using a Different Headset ...............................39
Pairing with a new headset ............................39
Using a corded headset ..............................39
Troubleshooting .......................................40
Product Specifications ..................................45
Headset specifications ...............................45
Handset specifications ...............................45
Help/Contact .........................................46
Technical assistance .................................46
FCC/Regulatory Notices ................................47
FCC Compliance Class B Digital Device ..................47
FCC Declaration of Conformity .........................47
Canadian Compliance ...............................48
Federal Communications Commission (FCC) Part 68 Statement 48
Safety Information .....................................50
Warranty ............................................51
Limited warranty ....................................51
Page iii
DRAFT
Contents
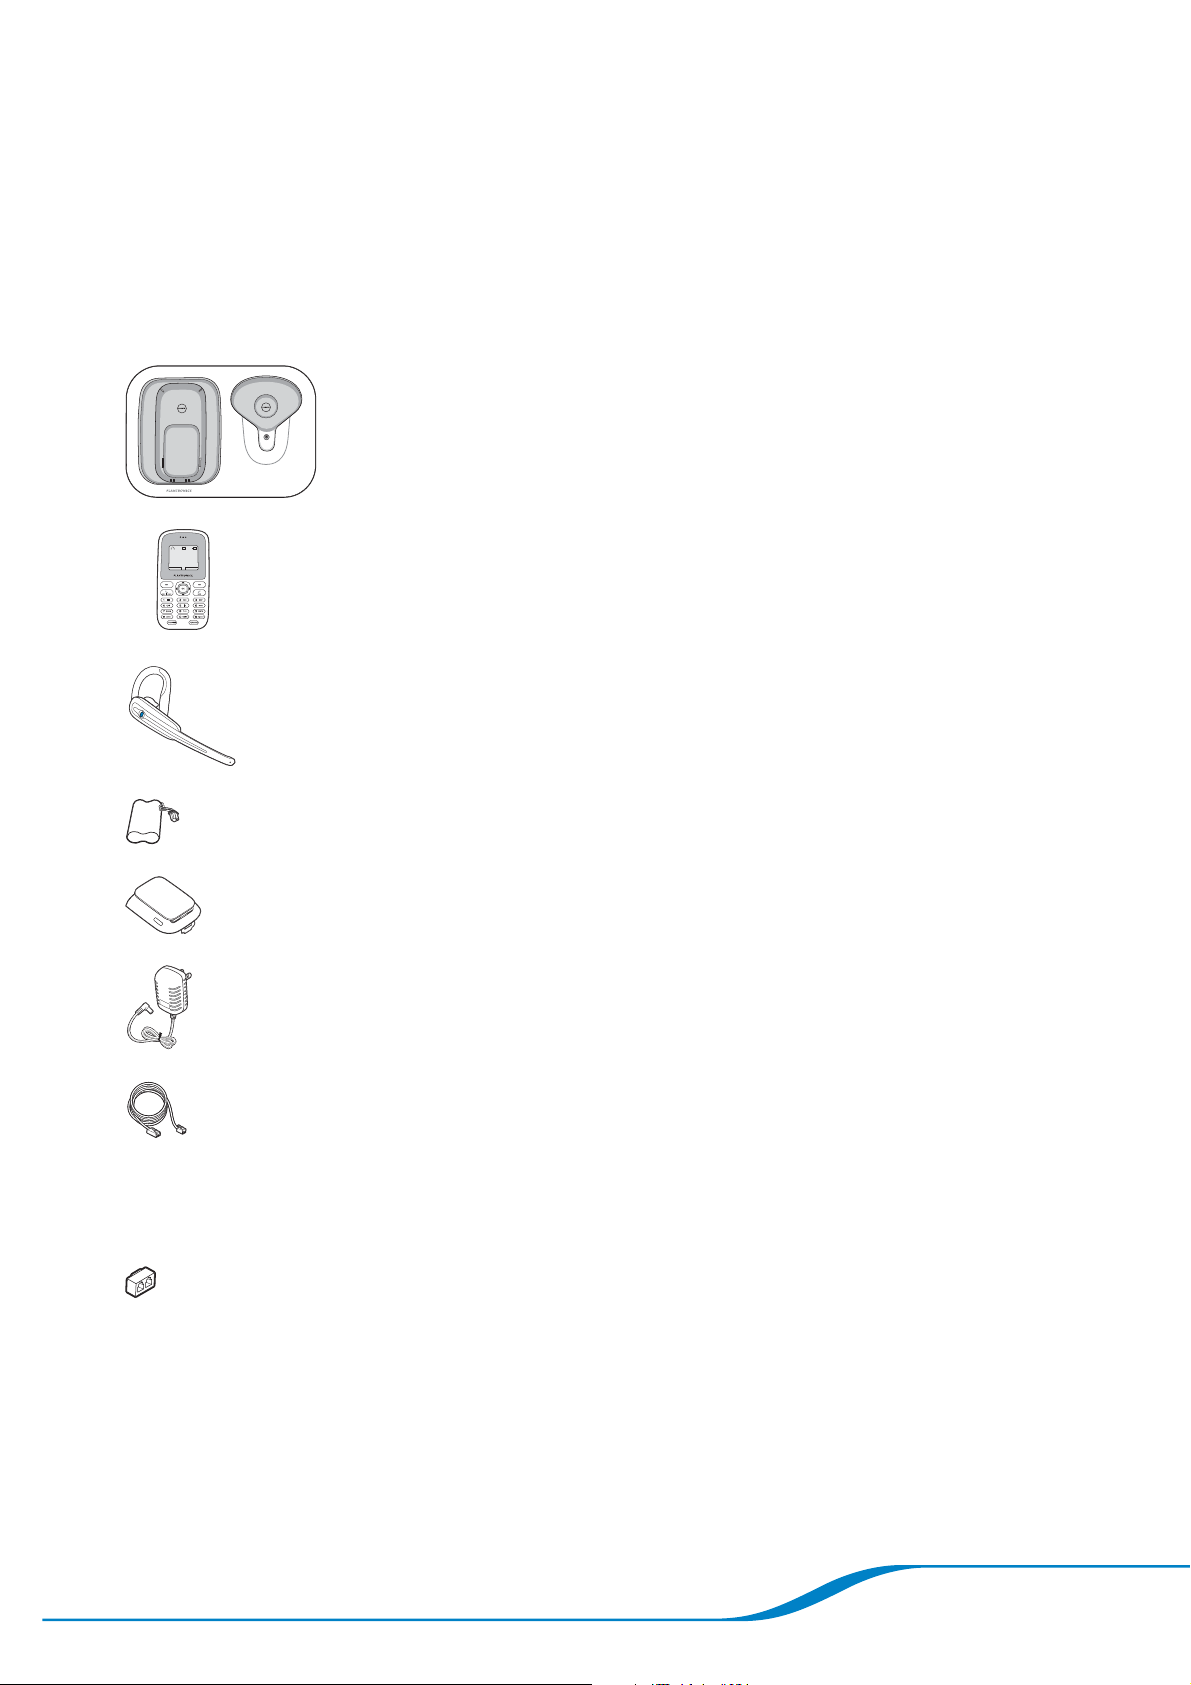
When you open the package, the battery, cables, and adapter can be
found in the compartment beneath the Calisto charging base.
Product & Accessories Documentation
Charging base
Handset/Phone
QuickStart Guide
QuickTips
(stored under base)
Headset
Handset/Phone battery
Handset/Phone battery
door
AC power adapter
Telephone cord
USB cable
Splitter cable
(to use your phone jack with
more than one phone)
Software CD
Page 1

DRAFT
Safety Information
IMPORTANT SAFETY AND OPERATIONAL INFORMATION
Please read the following safety and operational instructions before using your Bluetooth® headset.
Please keep these instructions for your reference. When using your Bluetooth headset, these basic
safety precautions and warnings should be followed to reduce the risk of fire, electric shock, injury to
persons and damage to property.
This symbol
WARNINGS
•
CHILDREN. Never allow children to play with the product—small parts may be a choking hazard.
•
Check local laws regarding use of a mobile phone and headset while driving.
•
If you use the headset while driving, ensure your attention and focus remain on driving safely.
•
Observe all signs that require an electrical device or RF radio product to be switched off in
designated areas, such as hospitals, blasting areas, potentially explosive atmospheres, and aircraft.
•
On aircraft, obey the airline regulations for use of wireless equipment.
•
To reduce the risk of electric shock, explosion or fire use only the supplied charger or Class 2 AC
adapter to charge the headset. Ensure that the voltage rating (e.g. 120v, 60 Hz) corresponds to the
power supply you intend to use.
•
Do not disassemble the AC adapter as this may expose you to dangerous voltages or other risks.
Incorrect reassembly can cause electric shock or fire when the product is subsequently used.
•
Do not insert anything into the product because this may cause damage to the internal components
or cause injury to you.
•
Avoid contact with liquids. Do not locate this product near water, for example, near a bathtub, or
sink, in a wet basement, or near a swimming pool.
•
Discontinue use of product and contact Plantronics if the product overheats, has a damaged cord
or plug, if the product has been dropped or damaged, or if the product has come into contact with
liquids.
•
This product should never be placed over or near a heat register and should not be placed in a
built-in installation unless proper ventilation is provided.
•
Exposure to high volume sound levels may damage your hearing. Although there is no single
volume setting that is appropriate for everyone, you should always use your headset or headphones
with the volume set at moderate levels and avoid prolonged exposure to high volume sound levels.
The louder the volume, the less time is required before your hearing could be affected. You may
experience different sound levels when using your headset or headphones with different devices.
The device you use and its settings affect the level of sound you hear. If you experience hearing
discomfort, you should stop listening to the device through your headset or headphones. To protect
your hearing, some hearing experts suggest that you:
1.
Set the volume control in a low position before putting the headset or headphones on your ears.
2.
Limit the amount of time you use headsets or headphones at high volume.
3.
Avoid turning up the volume to block out noisy surroundings.
4.
Turn the volume down if the sound from the headset or headphones prevents you from hearing
people speaking near you.
See
BATTERY WARNINGS
To reduce the risk of fire or injury to persons, read and follow these instructions.
•
Charge the headset according to the instructions supplied with the unit.
•
Do not expose the battery to high temperatures.
•
Do not puncture or otherwise damage the battery. The cell contains corrosive materials which may
damage eyes and skin and may be toxic if swallowed.
•
Do not short-circuit the battery, as this may result in a sudden rise in temperature.
•
Do not incinerate the battery.
•
Never put batteries in mouth. If swallowed, contact your physician or local poison control center.
•
Dispose or recycle the battery according to local and regional regulatory requirements.
identifies and alerts the user to the presence of important safety warnings.
www.plantronics.com/healthandsafety for more information on headsets and hearing.
Page 50

DRAFT
Components
(to select screen
Soft keys
options)
HANDSET
For descriptions of these
icons, see page 22.
Incoming Call
John Smith
123-456-7890
Ignore Answer
Menu navigation
Talk/Flash button
Voicemail
speed dial
Keypad lock
Handset button
(illuminated when
handset is active)
OK button
Call end button
Keypad
Speakerphone button
(illuminated when
speakerphone is active)
Page 2
Volume button
Waist clip
Corded headset jack
CHARGING BASE
Handset locator button
DRAFT
Earloop
Indicator light
Headset button
Headset charging cradleHandset charging cradle
HEADSET
Eartip
Microphone
Page 3
DRAFT
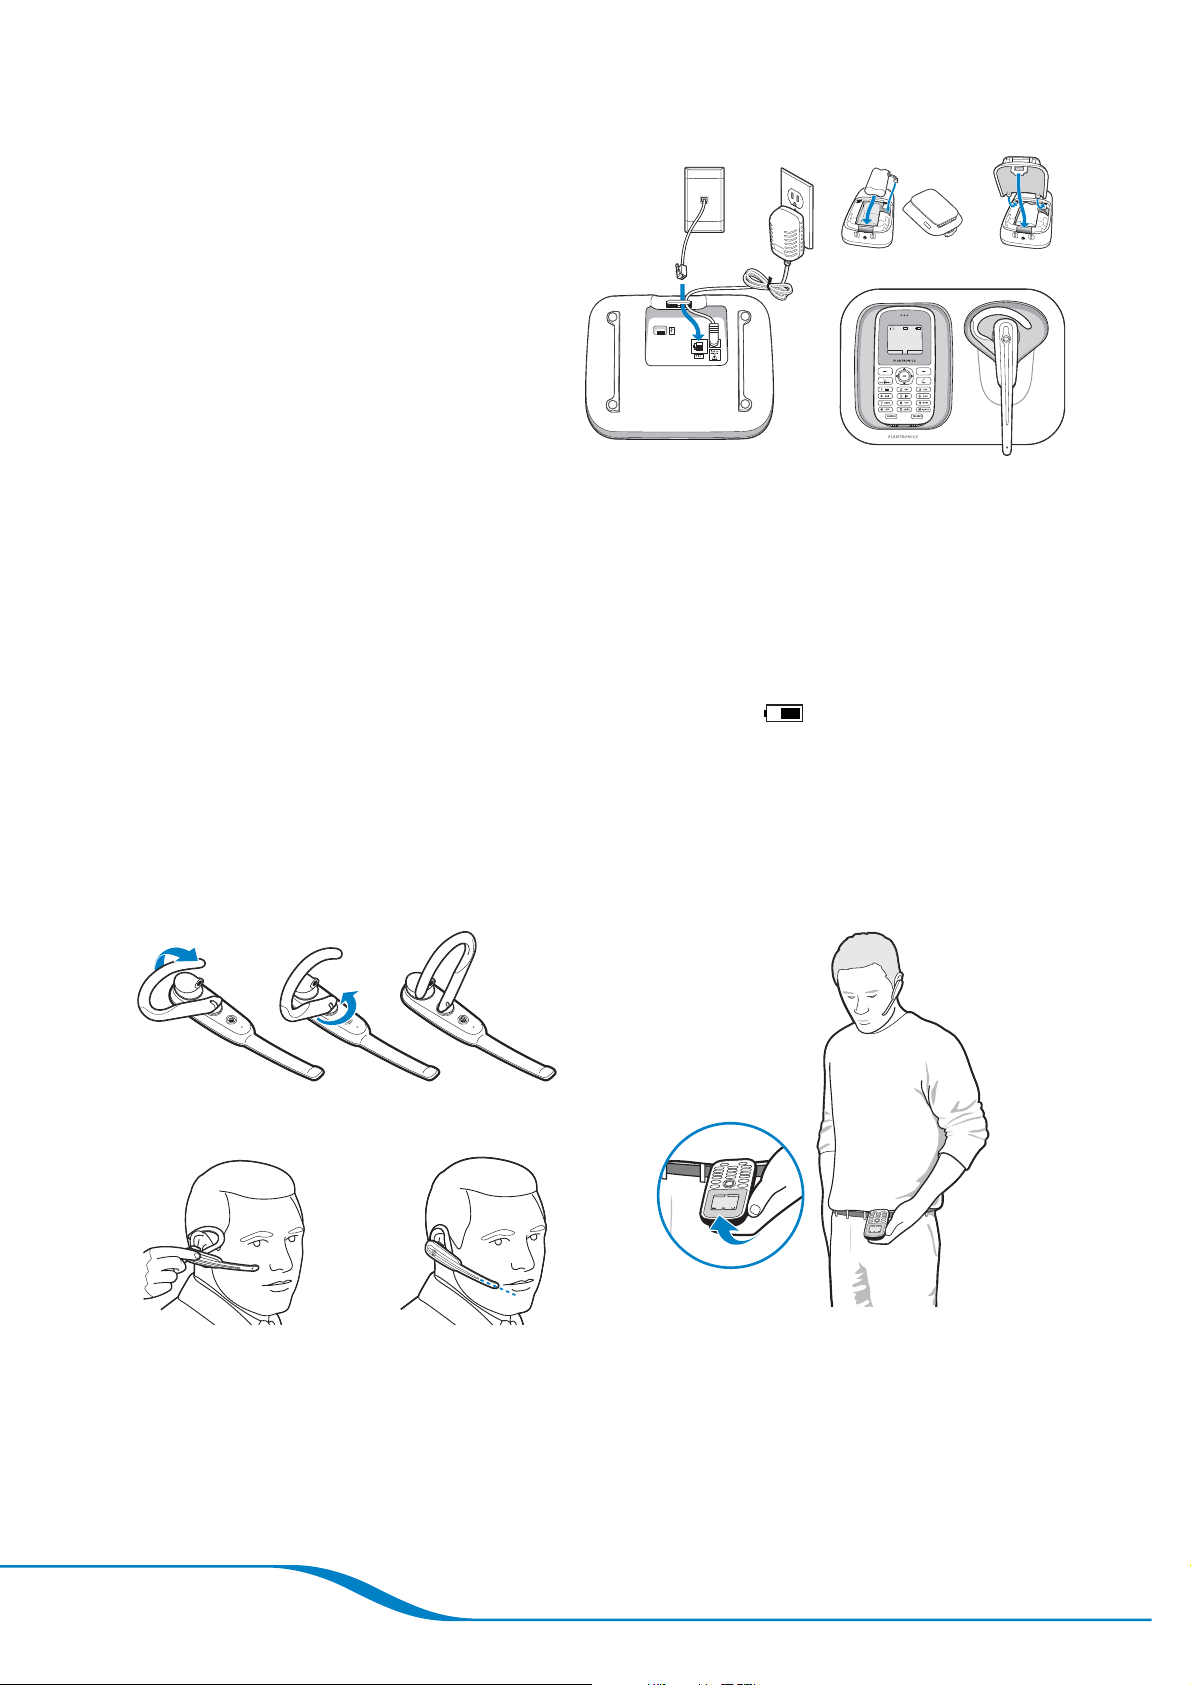
Setup
For complete setup instructions,
see the QuickStart Guide.
1.
Connect the charging base
Step 2
and the cables.
2.
Install the handset battery.
3.
Charge the headset and
Step 1
Step 3
handset.
Handset: Charge for up to 15 hours before first use. When fully
16
charged, screen displays “Charging Done.”
Headset: Charge for at least 3 hours before first use.
TIP: Place handset and headset in cradle regularly to keep charged, or when
the battery icon on the screen indicates a low charge
every 30 seconds when the battery is low. The handset screen displays
“Charging Done” when fully charged. The headset indicator light glows solid
blue when the headset is in the charging cradle and is fully charged.
. The headset beeps
Wearing the headset and handset
Figure 1
Figure 2
Headset:
either ear. Flip the earloop to the side
and twist to position it over your left or
right ear (Figure 1). Point the microphone
toward your mouth (Figure 2).
You can wear the headset on
Handset: Slide the waist clip onto your
belt or your waistband. Handset is worn
upside-down so you can lift it and view
the display.
Figure 3
Page 4
DRAFT
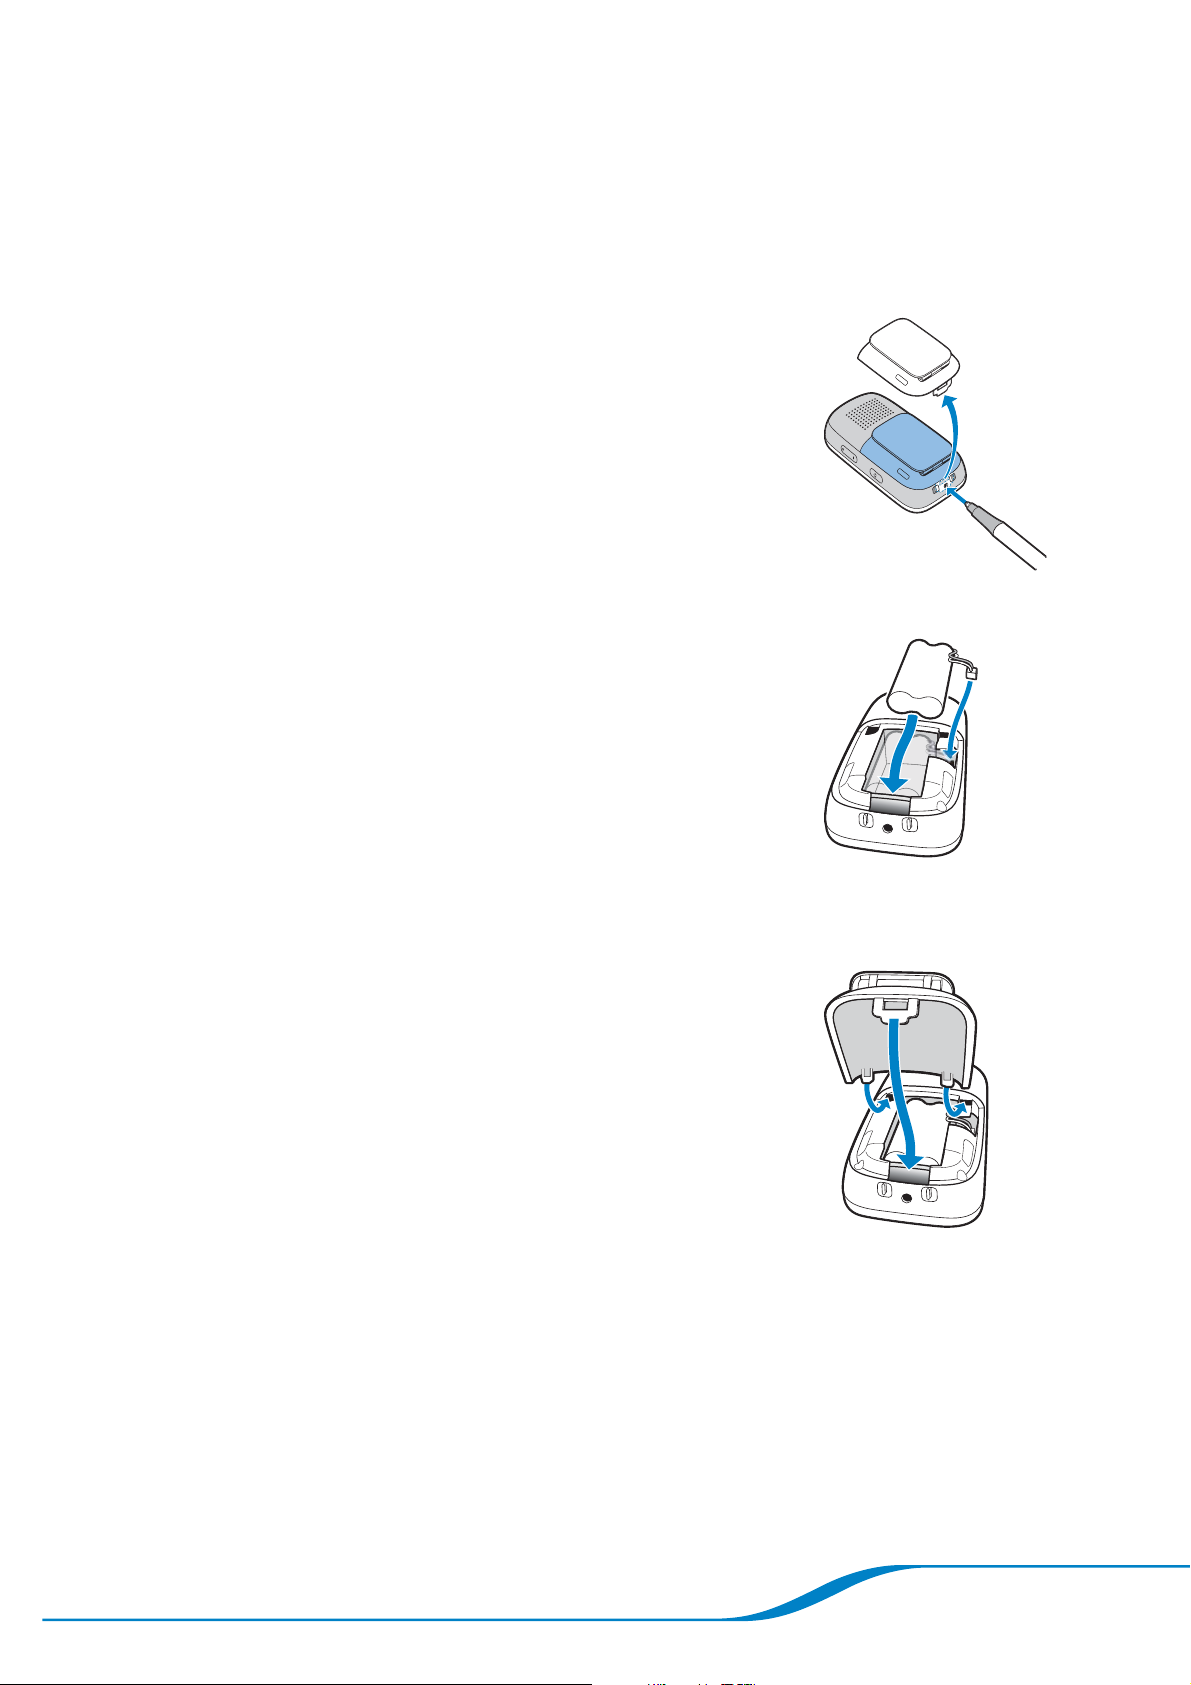
Changing the battery
If your handset battery does not keep a charge, you can replace the
battery.
Using the tip of a pen, press the notch at the
1.
bottom of the handset battery cover to remove
the cover.
Remove the old battery from the compartment.2.
Place the new battery into battery
3.
compartment.
Plug the battery pack connector into the white jack inside the
4.
compartment.
Slide the battery cover onto the handset and
5.
place the handset onto the base to charge it.
Charge the new battery for up to 15 hours before using it the first
6.
time.
16
Page 5
DRAFT
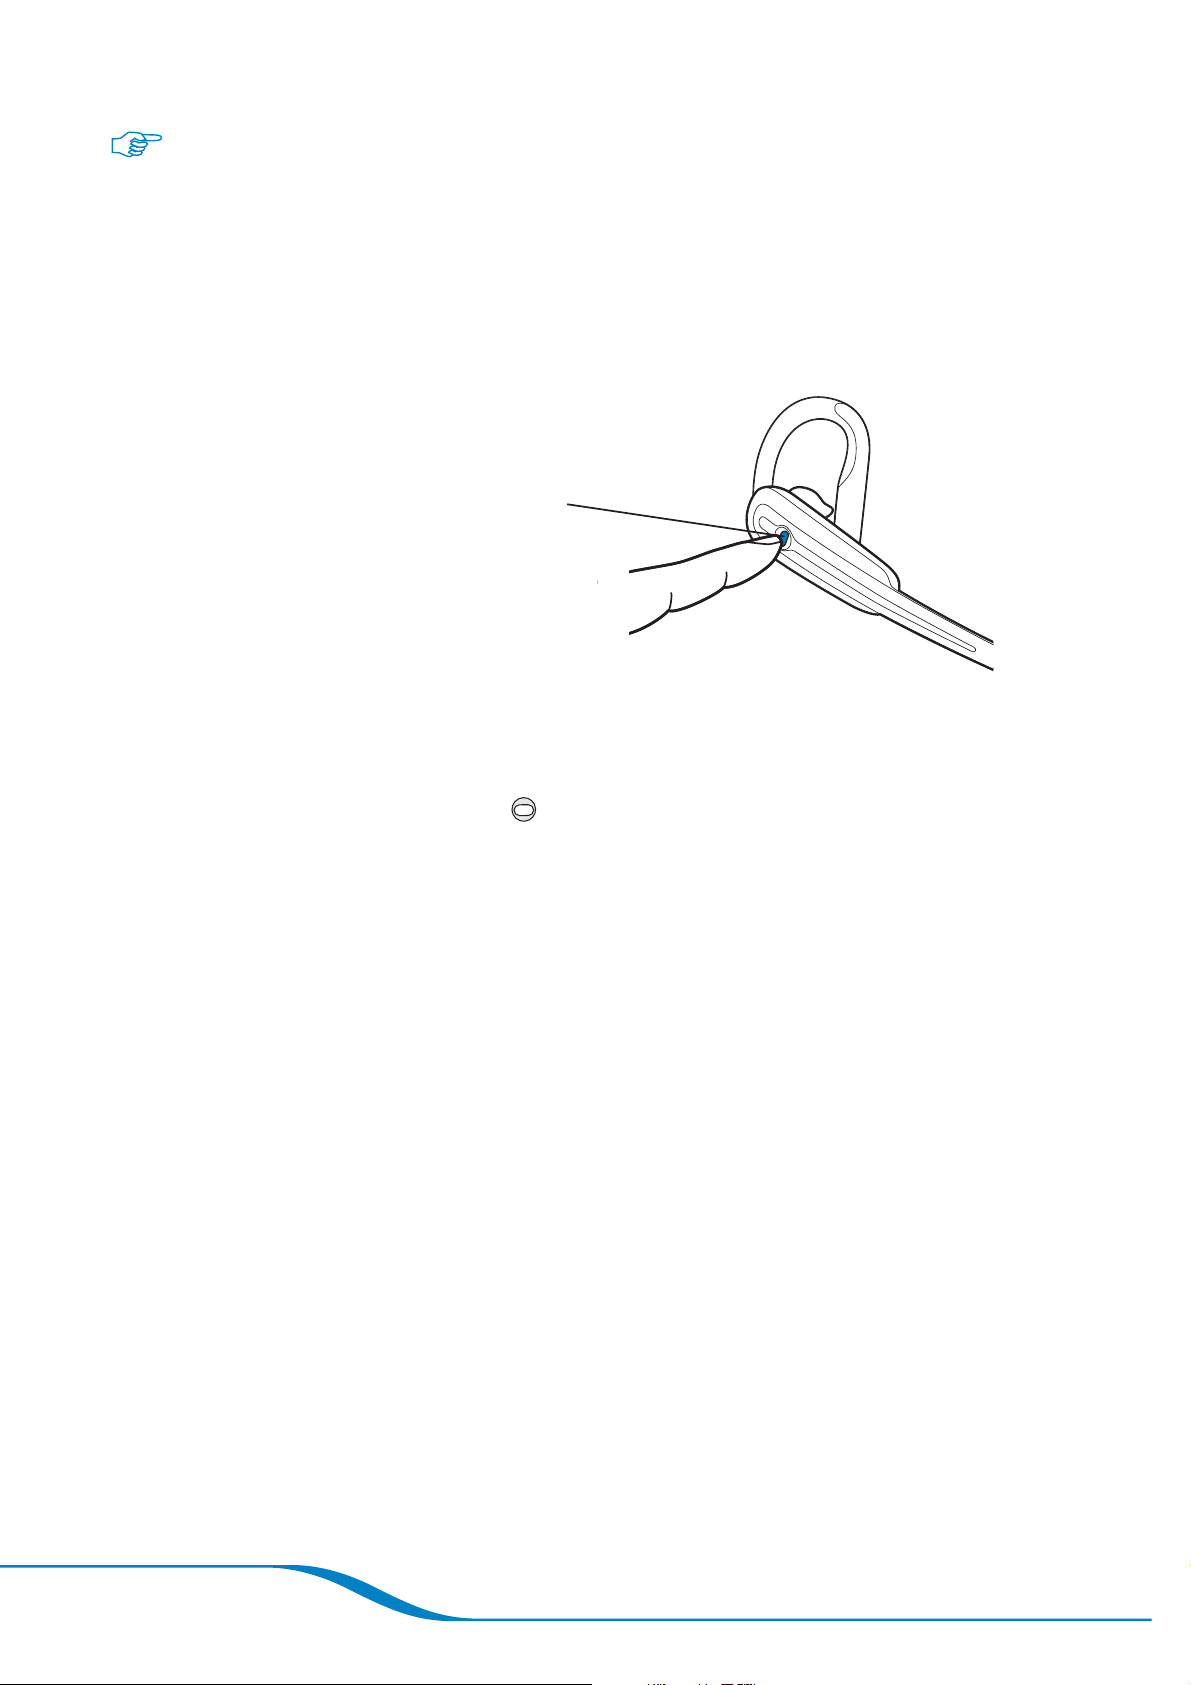
You must turn on the headset before first use and anytime after it has
been powered off.
Powering your headset on
Press and hold for 2 seconds until the
indicator light flashes blue every 10
seconds or you hear 4 ascending beeps
Powering the Headset On and Off
Powering your headset off
Press and hold the Headset button for 4 seconds until the
indicator light flashes red for 4 seconds or you hear 4 descending
beeps.
TIP: It is not necessary to power off your headset between uses. When you
are not using your headset, you can simply store it on the charging base.
However, you may want to power off your headset if you are using it away
from home and want to save battery power.
Page 6
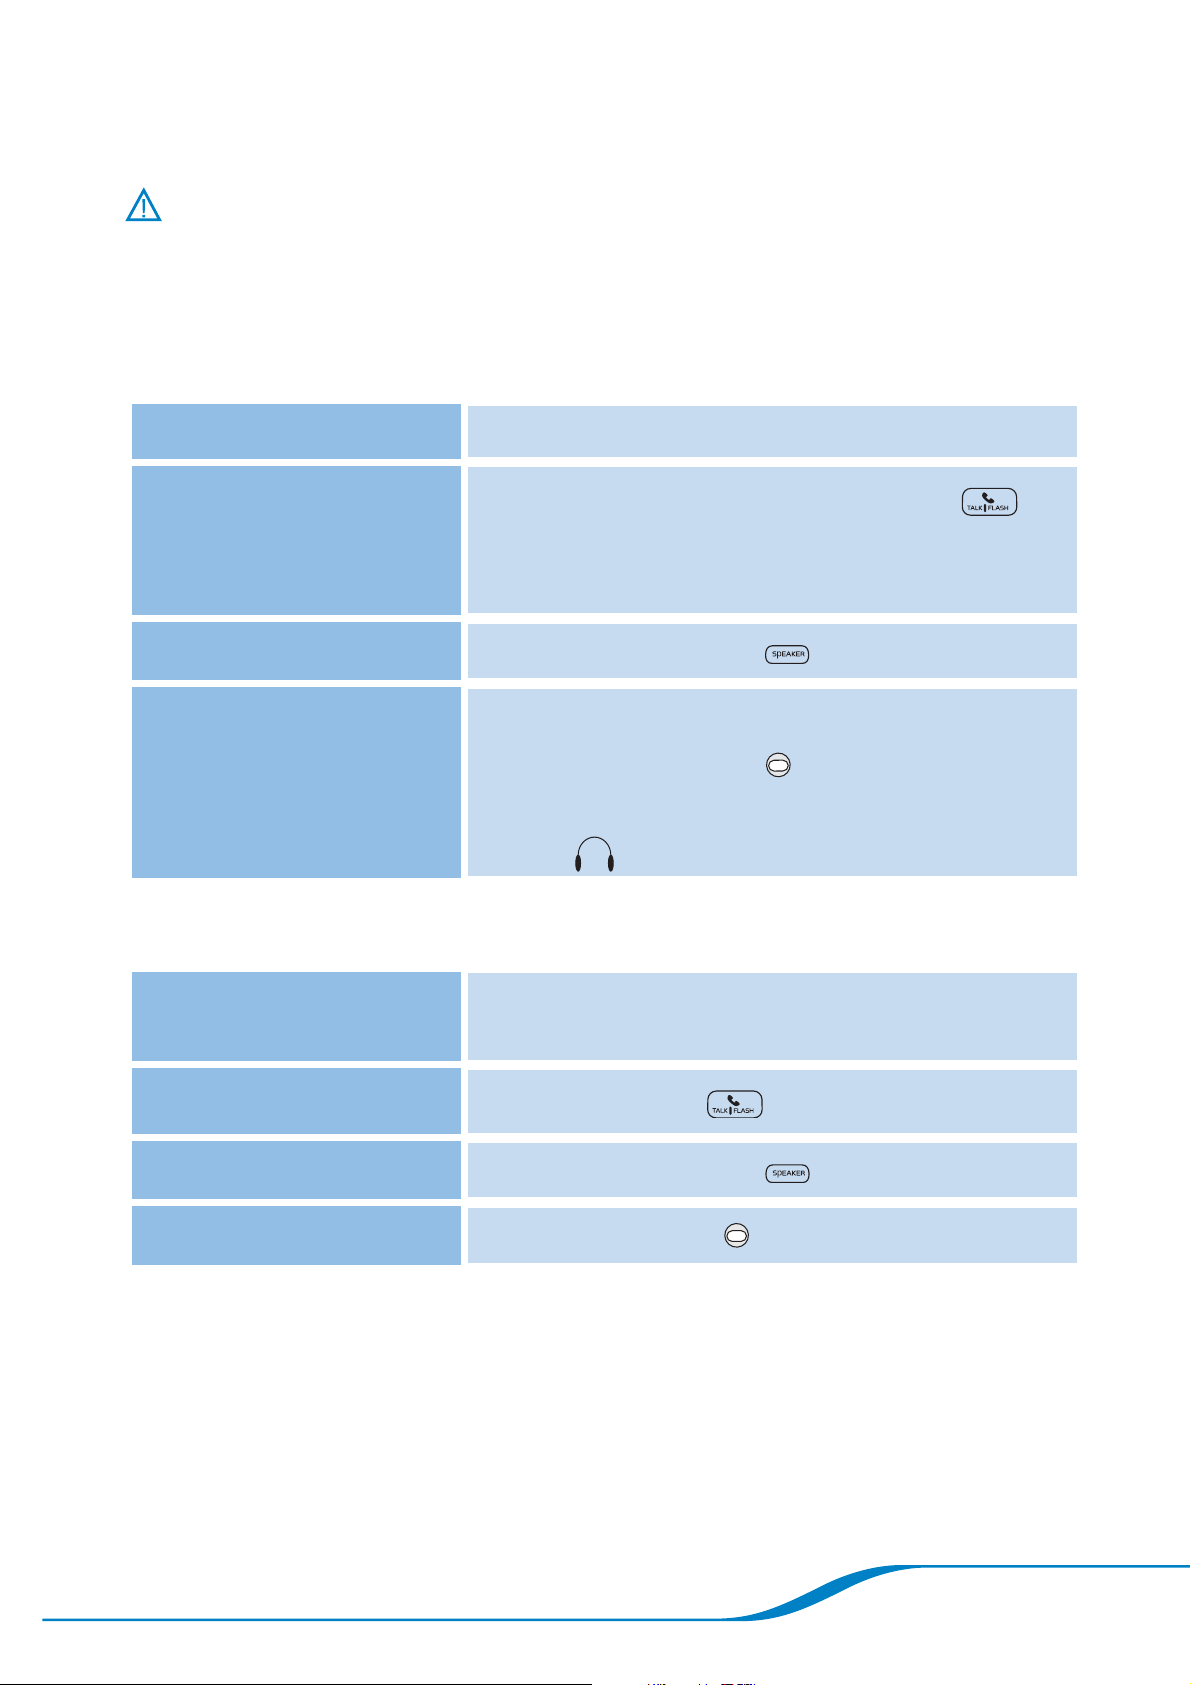
Using Your Headset with Your Handset
TIP: When using your handset and headset, the headset must be within
33 feet of the handset, and the handset must be within 300 feet of the
charging base.
Placing calls
To call using: Do the following:
DRAFT
Handset
Speakerphone
Headset Dial the number on handset.
Dial the number and press Talk /Flash
TIP: You can also press Talk /Flash first and
then dial the number.
Press Speakerphone
1.
2.
Press the Headset
TIP: When you’re on a call using the headset,
an icon
appears on the handset screen.
and dial the number.
button for 1 second.
Receiving calls
To answer a call
using:
Do the following:
.
Handset
Speakerphone
Headset
TIP: To answer a second incoming call, see “Receiving a second incoming
call” on page 18 .
Press Talk /Flash
Press Speakerphone
Press the Headset
.
button for 1 second.
.
Page 7
DRAFT
Adjusting call volume
Handset Headset
Press up or down to adjust call volume
when you are using your handset,
speakerphone, or headset.
TIP: For your comfort and health, always listen to calls at a moderate volume.
For complete safety information, see page 50.
Press up (towards the indicator light) or
down (towards the microphone) to adjust
call volume when you are using your
headset.
TIP: Do not press the button
inwards to adjust volume.
Switching calls between handset, headset, and
speakerphone
To switch call: Do the following:
From handset or speakerphone to
headset
Press the Headset button for
1 second.
From headset or speakerphone to
handset
From handset or headset to
speakerphone
Page 8
Press Handset
Press Speakerphone
.
.
Ending calls
To end a call, press either of the following buttons:
Handset Headset
DRAFT
Press End.
Press for 1 second.
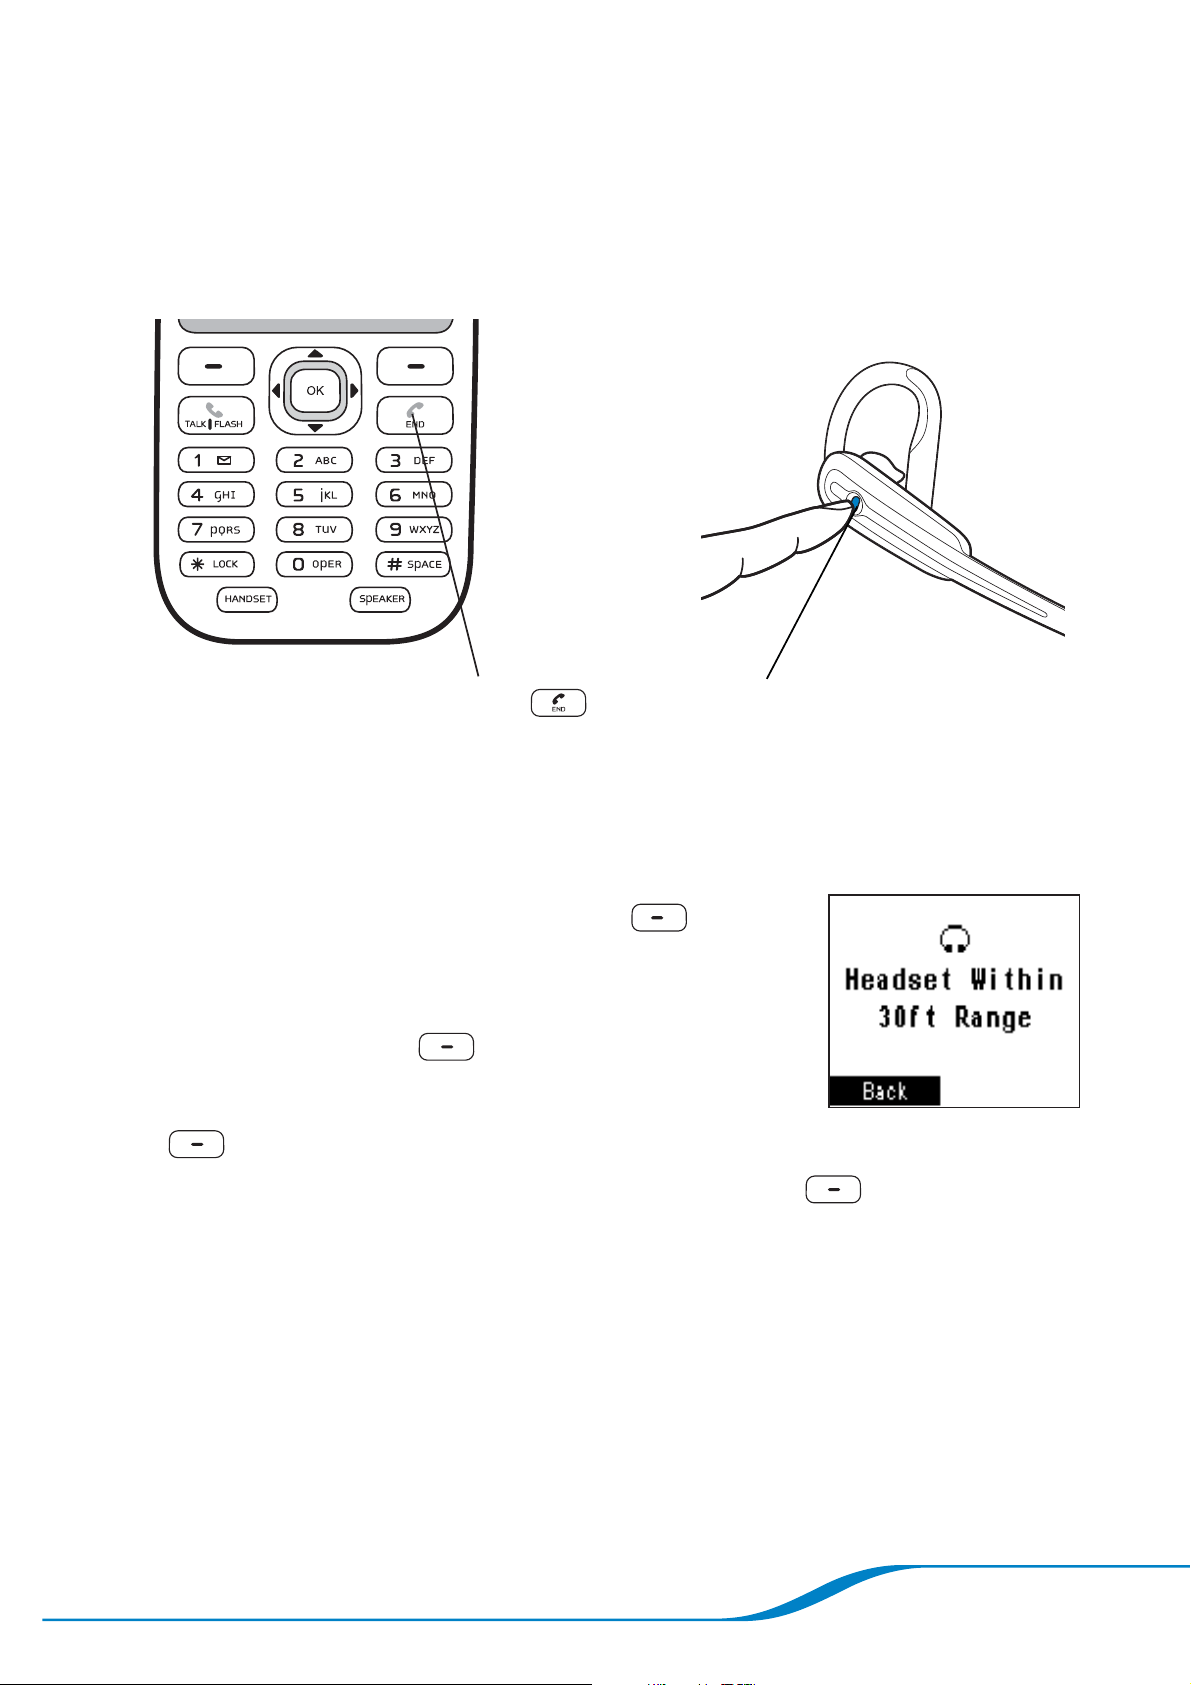
Locating the headset from the handset
You can determine whether your headset is within 33 feet of your
handset.
1.
On the main screen, press Menu
(left soft key).
Use the navigator to highlight Initial Setup,
2.
and press Select
3.
Highlight Headset/Base, and press Select
(right soft key).
(right soft key).
4.
Highlight Locate Headset, and press Select
(right soft key).
TIP: If your headset is more than 33 feet away from your handset, your screen
displays “Headset Out of Range.” While searching for your headset, you can
carry your handset with you until the screen displays “Headset Within Range.”
Page 9

DRAFT
Using Your Headset with Your Mobile
Phone
The Calisto headset functions like a traditional Bluetooth® headset
when used with your mobile phone. It has the ability to operate
completely separate from the Calisto handset/phone and has many
of the same features as the most popular Bluetooth headsets on the
market, including redial and voice dialing.
To use the Calisto headset with your Bluetooth compatible mobile
phone, the headset first needs to be paired with that device. You
Pairing your headset with your mobile phone
will need to refer to the user’s manual for your mobile phone for
specifics on how to pair Bluetooth devices. You can also refer to the
Plantronics website to see if there are instructions specific to your
mobile phone.
TIP: Note that your headset can be connected to both your handset and a
mobile phone at the same time, so you can make and answer calls from both
using the headset.
Once the headset and mobile phone are paired, you can use the
headset with both the Calisto and your mobile phone. You need to
pair the headset with your mobile phone only once.
Before you begin, make sure your mobile phone is Bluetooth
1.
compatible. You may need to refer to the user’s guide for your
mobile phone to find out this information.
Turn the headset off by pressing and holding the Headset
2.
www.plantronics.com/easytopair
button for 4 seconds, or until you hear 4 descending beeps.
3.
Refer to your mobile phone’s user’s manual for specific instructions
about activating Bluetooth pairing.
4.
Once your mobile phone is ready for Bluetooth devices, press and
hold the Headset
until the indicator light flashes red and blue.
Page 10
button on the headset for 4 to 6 seconds or
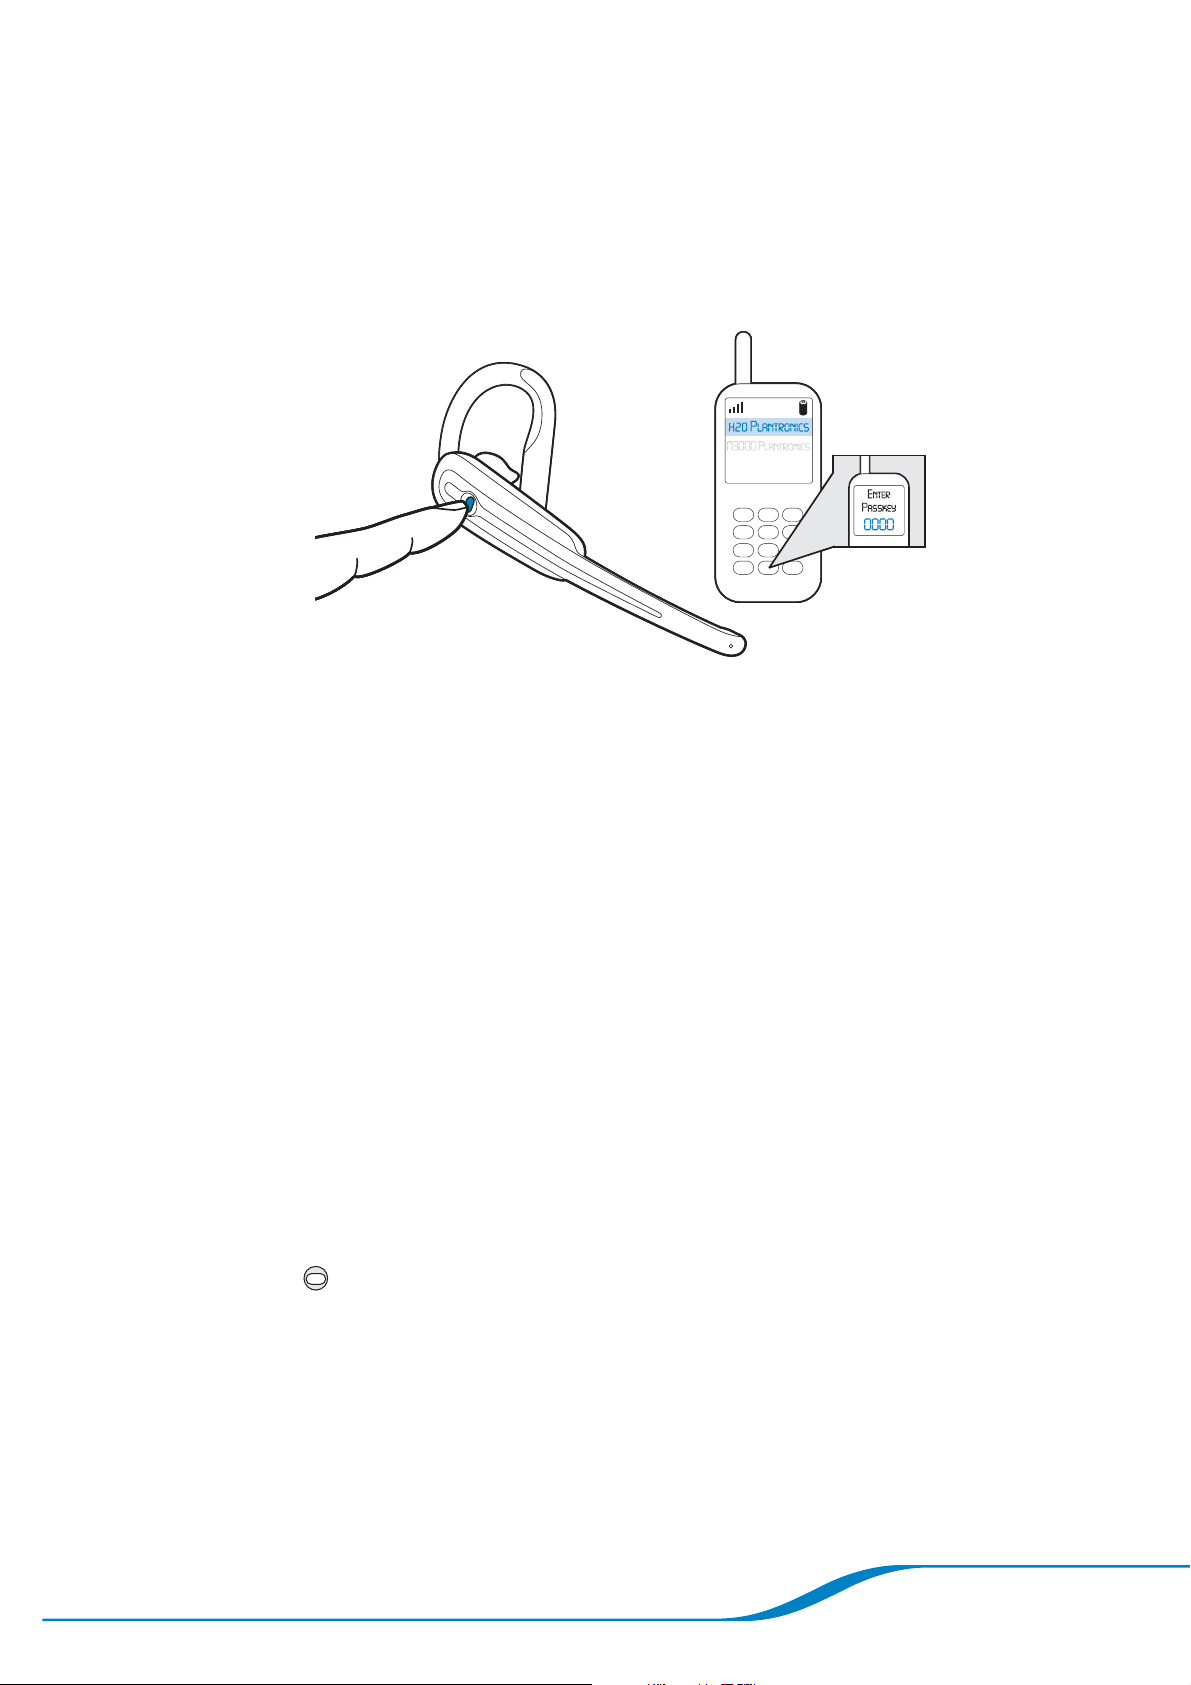
5.
When the mobile phone detects the headset, select Calisto PLT
from the list of found devices.
6.
When the mobile phone prompts you for a passcode, enter “0000”
on the mobile phone keypad as shown.
Your headset is now paired
with your mobile phone and
is ready to use!
DRAFT
TIP: To use the headset with your mobile phone, the headset must be within
33 feet of the phone.
TIP: You can pair your headset with more than one mobile phone, but you
can use your headset with only one mobile phone at a time. Your headset
will automatically connect to the mobile phone that is powered on and within
range of your headset. If more than one mobile phone is on and within range
of your headset, the headset will connect to the last mobile phone with which
it was used.
Placing calls
1.
If prompted on your mobile phone, select the option to accept the
connection with your headset.
2.
Dial the number on your mobile phone.
3.
If the call is not automatically transferred to the headset, press the
Headset
button for 1 second.
Page 11
DRAFT
Receiving calls using your headset
TIP: You can use the headset to answer a second incoming call; see
“Receiving a second incoming call” on page 18.
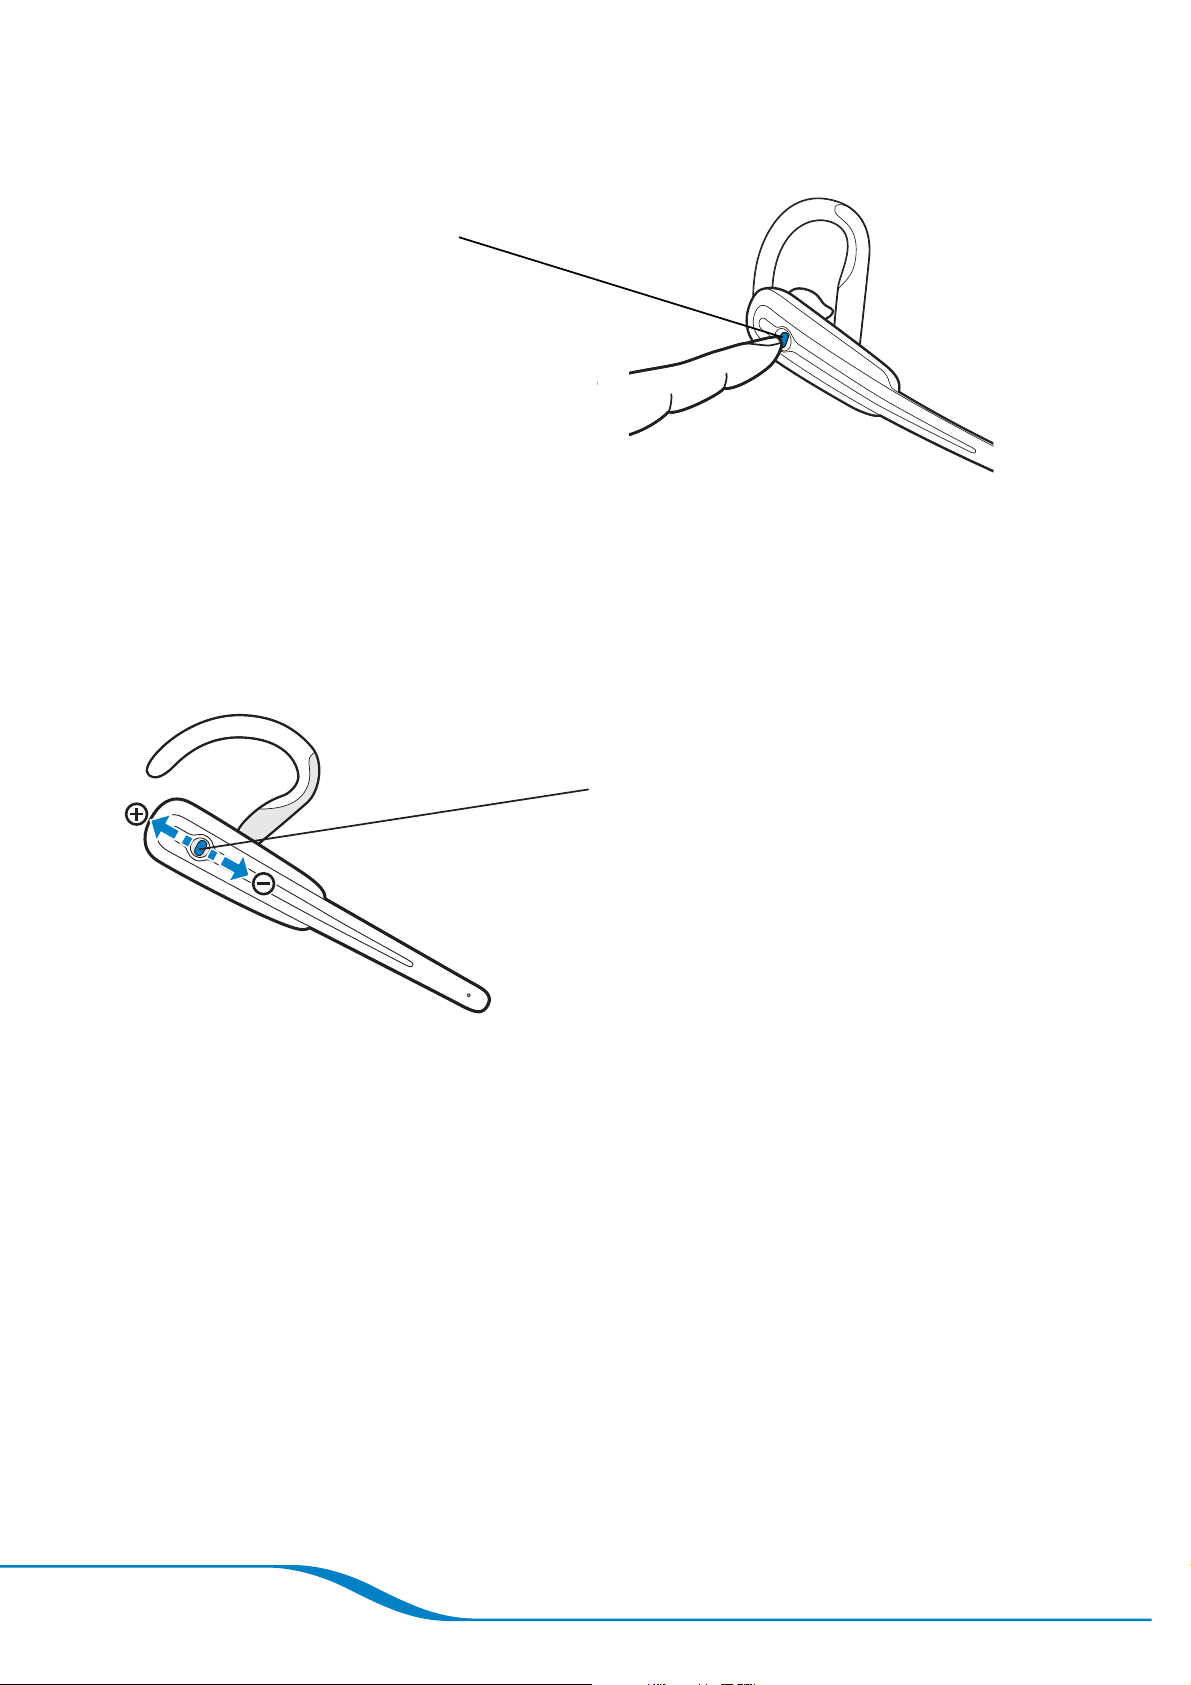
Press for 1 second
Adjusting call volume using your headset
Press up or down to adjust call volume
when you are using your headset (do
not press inward).
TIP: For your comfort and health, always listen to calls at a moderate volume.
For complete safety information, see page 50.
Page 12

Ending calls using your headset
Press for 1 second
DRAFT
Page 13
DRAFT
Using the Phonebook
You can store 3 numbers apiece for up to 200 contacts in your
Calisto’s phonebook. You can add entries manually, add them by
saving from an incoming or outgoing call, or transfer them from your
computer’s Outlook
Your Computer” on page 28).
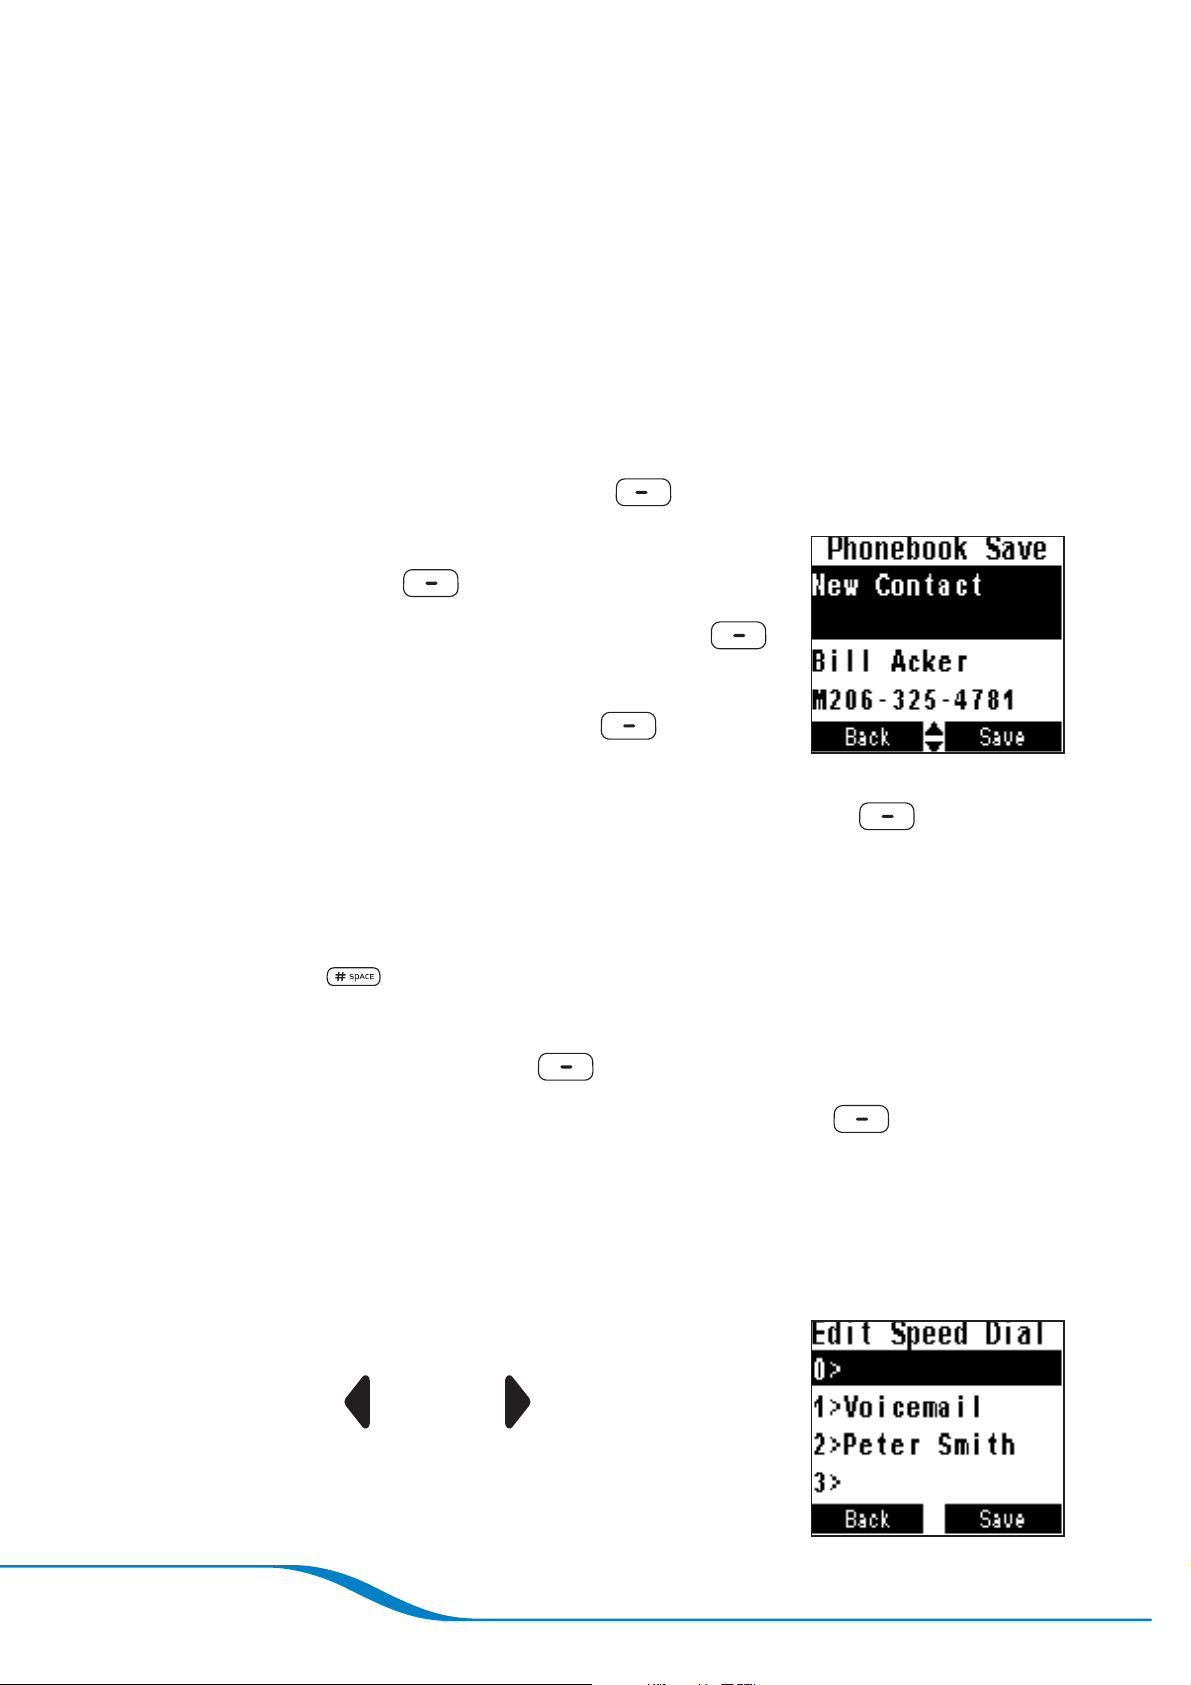
Adding a contact manually
1.
2.
®
email program (see “Transferring Contacts from
On the main screen, press Menu (left soft key).
Use the navigator to highlight Phonebook,
and press Select
3.
Highlight New Contact, and press Edit
(right soft key).
4.
Highlight Name, and press Edit
soft key).
5.
Use the keypad to enter the name, and press Save
key).
TIP: To enter the second letter on a key—for example, the B on the 2 key—
press the key twice. To enter the third letter, press the key three times, and so
on. Press the “#”
Highlight any of the number fields (M = Mobile, H = Home,
6.
W = Work), and press Edit
7.
Enter the correct phone number, and press Save
key).
key to enter a space.
(right soft key).
(right
(right soft
(right soft key).
(right soft
Repeat steps 6 and 7 to enter other numbers for the contact.
8.
To enter a speed dial key for one of the contact numbers, do the
9.
following:
Highlight Spd Dial.
–
Press Left
–
to select whether the speed dial key is
for the mobile (M), home (H), or work (W)
number.
Page 14
or Right on the navigator
–
Press Edit (right soft key).
–
Highlight the number you want to use as the speed dial key, and
DRAFT
press Save
TIP: If you enter a speed dial key number that is already being used for
another number, the new number overwrites the old number for that key.
The 1 key is pre-assigned to your voicemail number, so you won’t be able to
overwrite that number after you have entered it.
10.
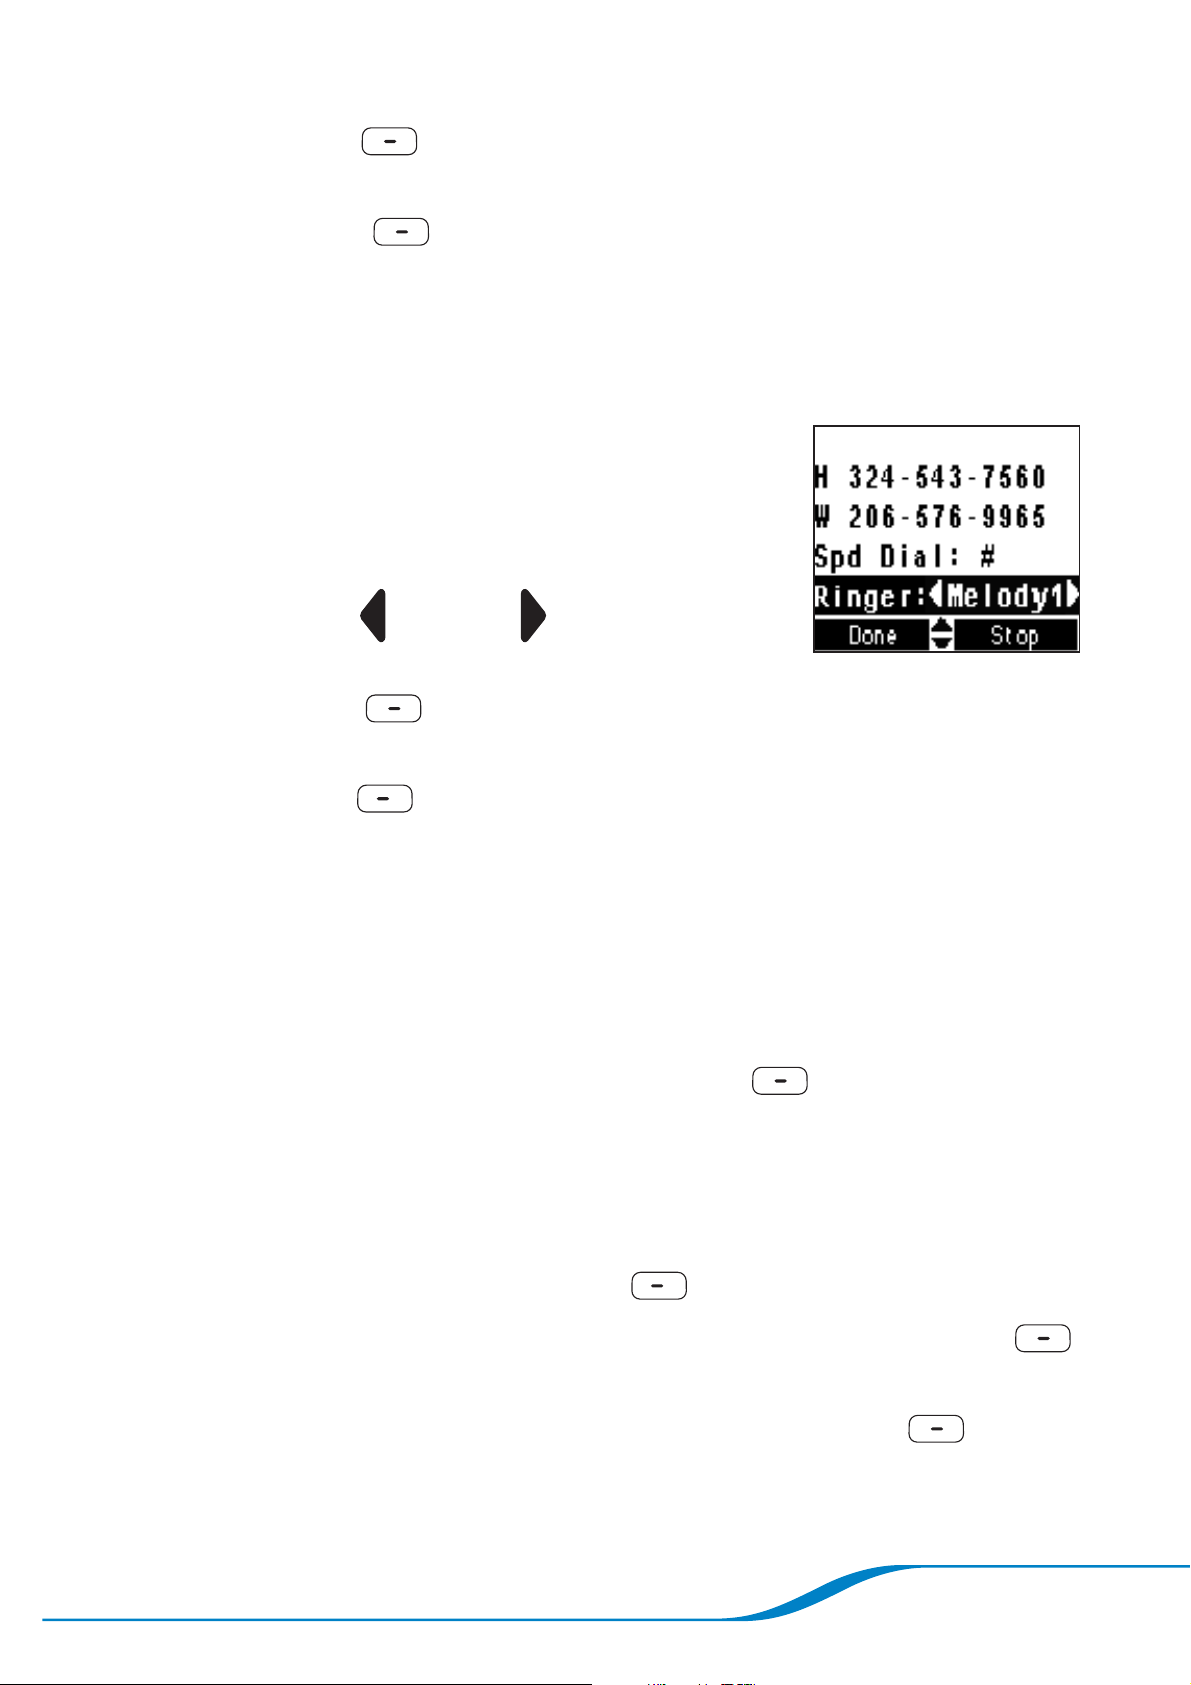
To select a special ringtone for this contact,
do the following:
–
Highlight Ringer (option located under
SpDial).
–
Press Left
to scroll through the available ring tones.
Press Play
–
highlighted ring tone.
Press Done
11.
(right soft key).
or Right on the navigator
(right soft key) to hear a preview of the
(left soft key) to save the new contact
information.
Adding a contact from a call
When you make a call to or receive a call from someone whose
number is not in your phonebook, when you end the call, a message
appears on the screen asking if you want to save the number to your
phonebook. To save the number, press Save
then follow the steps in “Adding a contact manually” on page 14 to
create a contact for the number.
(right soft key), and
Editing a contact
On the main screen, press Menu (left soft key).
1.
Use the navigator to highlight Phonebook, and press Select
2.
(right soft key).
Highlight the contact you want to edit, and press Edit
3.
(right soft key).
Page 15

DRAFT
4.
TIP: There are several ways to delete a character in an entry:
Edit the contact information following steps 4–11 in “Adding a
contact manually” on page 14.
1) Press BackSp
2) press and hold BackSp
3) press Left
or Right on the navigator to move the cursor.
(left soft key) to delete the preceding character;
(left soft key) to delete an entire line;
Deleting a contact
1.
On the main screen, press Menu (left soft key).
2.
Use the navigator to highlight Phonebook, and press Select
(right soft key).
3.
Highlight the contact you want to delete, and press Delete
(left soft key).
4.
Press OK
(right soft key).
Page 16
DRAFT
Calling Features: Basics
Caller ID
If your home phone calling plan includes the caller ID feature, this
feature is supported on your Calisto handset. Incoming caller
numbers appear on the handset screen.
Speakerphone
Press Speakerphone once to answer a call with the built-in
speakerphone, or to transfer a call from the handset or headset to the
speakerphone.
Last number redial
Handset Headset
Press OK twice.
TIP: Pressing the OK button on the handset redials the last landline number
dialed. Pressing the headset button also dials the last landline number dialed,
Press twice.
unless the handset is out of range. When the handset is out of range, pressing
the headset button twice redials the last number called on your mobile phone.
Page 17

DRAFT
While you are on a landline or mobile call, the headset emits 3 beeps
to inform you that there is a second incoming landline or mobile call.
Since the Calisto phone does not control your mobile phone, you
cannot toggle back and forth between landline (or VoIP) and mobile
calls. In order to switch from a landline call to an incoming mobile call
or from a mobile call to an incoming landline call, you will have to end
the first call.
Receiving a second incoming call
If you are on this
type of call:
Landline (or VoIP) Landline (or VoIP)
Landline (or VoIP) Mobile
And this type of
call comes in:
Do the following:
Press either Talk/ Fl a sh
or Answer
key) on screen to answer
incoming call.
Switch back and forth
between calls using Talk /
Flash
options.
Press Headset
once to hang up landline call
and a second time to answer
incoming mobile call.
or on-screen
(right soft
button
Mobile Landline (or VoIP)
Page 18
Press Headset
once to hang up mobile call
and a second time to answer
incoming landline call.
button
Muting a call
DRAFT
While on a call, press Mute (left soft key)
Connected
Connected
Peter Smith
on the handset, or select the option to mute a
call on your mobile phone. There is no mute
Peter Smith
(M)
(M)
00:09
00:09
Mute PhoneBK
Mute PhoneBK
04:04
04:04
feature on the headset.
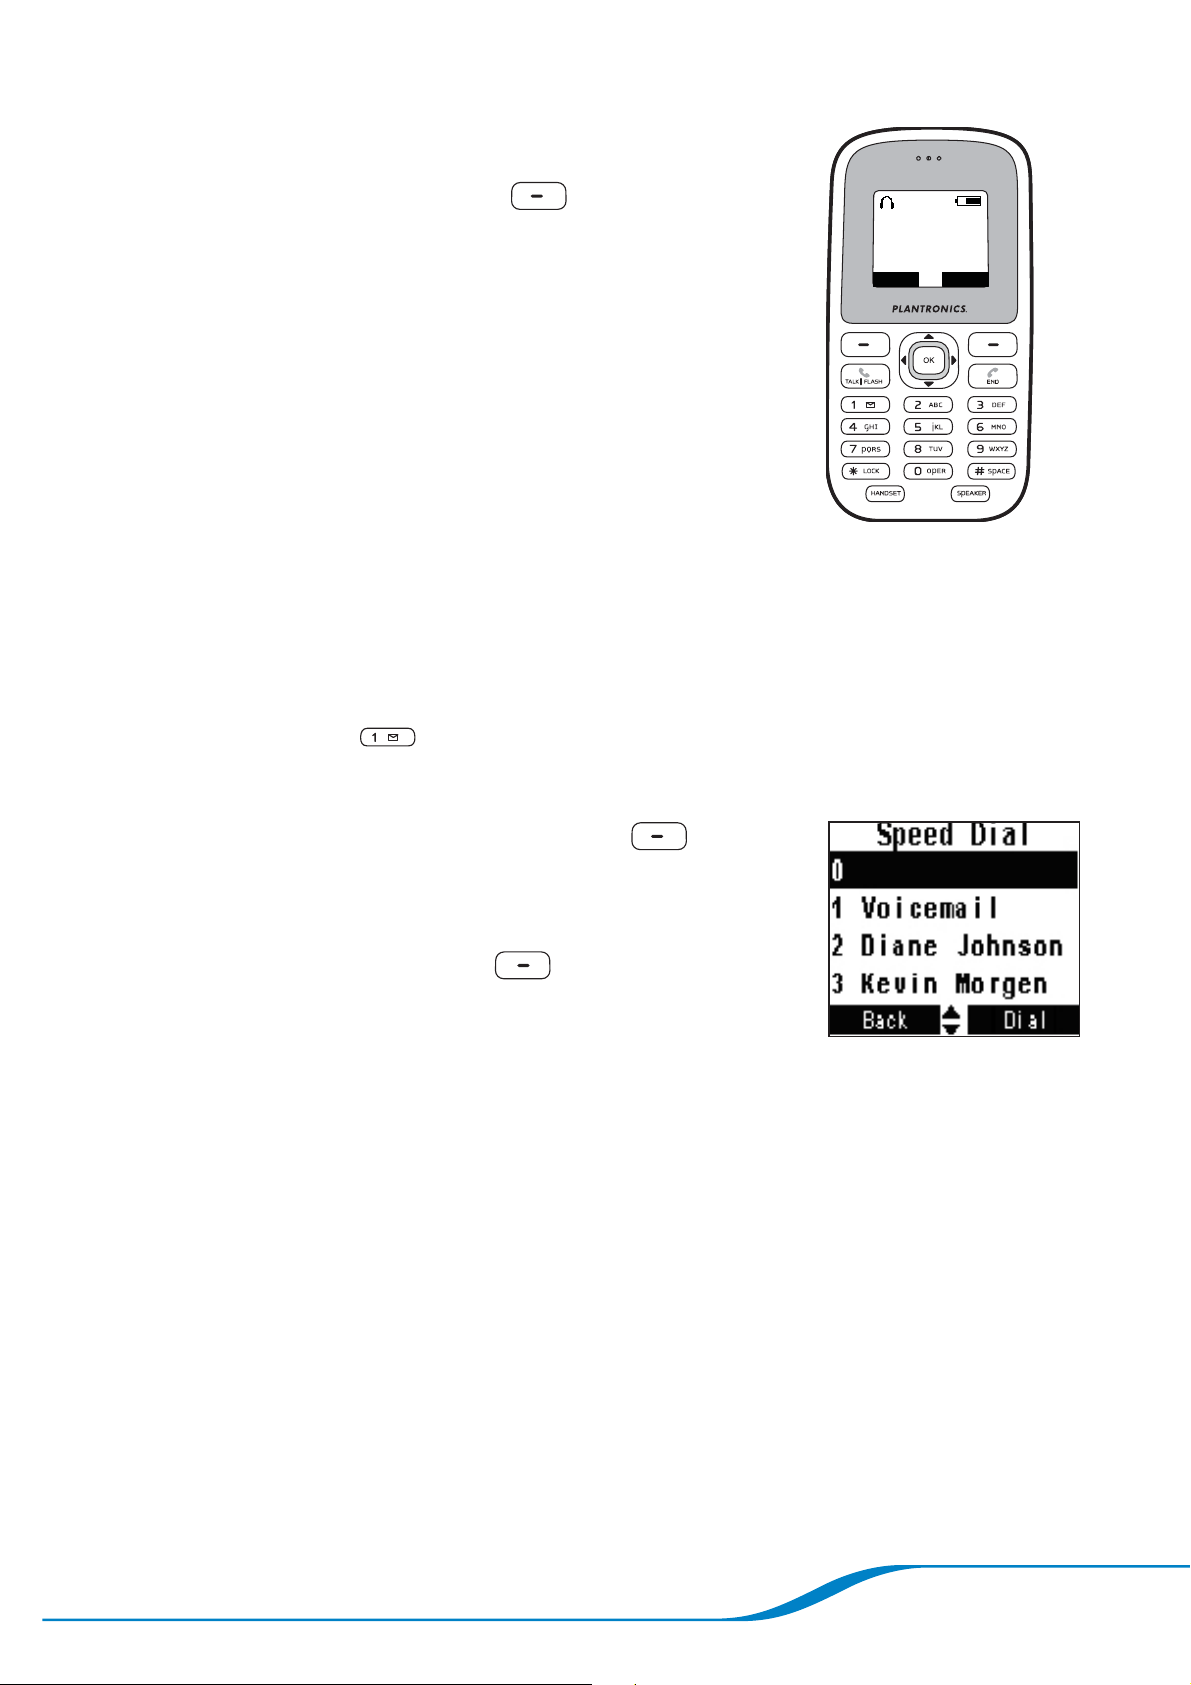
Using speed dial keys
After you assign speed dial keys (see “Adding
a contact manually” on page 14), you can use
them to quickly dial your most frequently called
numbers.
To use a speed dial key, press and hold the key for 3 seconds to dial
the number associated with the key.
TIP: After you set up your voicemail number (see “Setting up voicemail” on
page 27) the 1 key
dials your voicemail number by default.
You can also view your currently assigned speed dial keys.
1.
On the main screen, press Menu
(left soft key).
Use the navigator to highlight View Speed
2.
Dial, and press Select
(right soft key).
TIP: To change your speed dial keys, see “Editing a
contact” on page 15.
Page 19
DRAFT
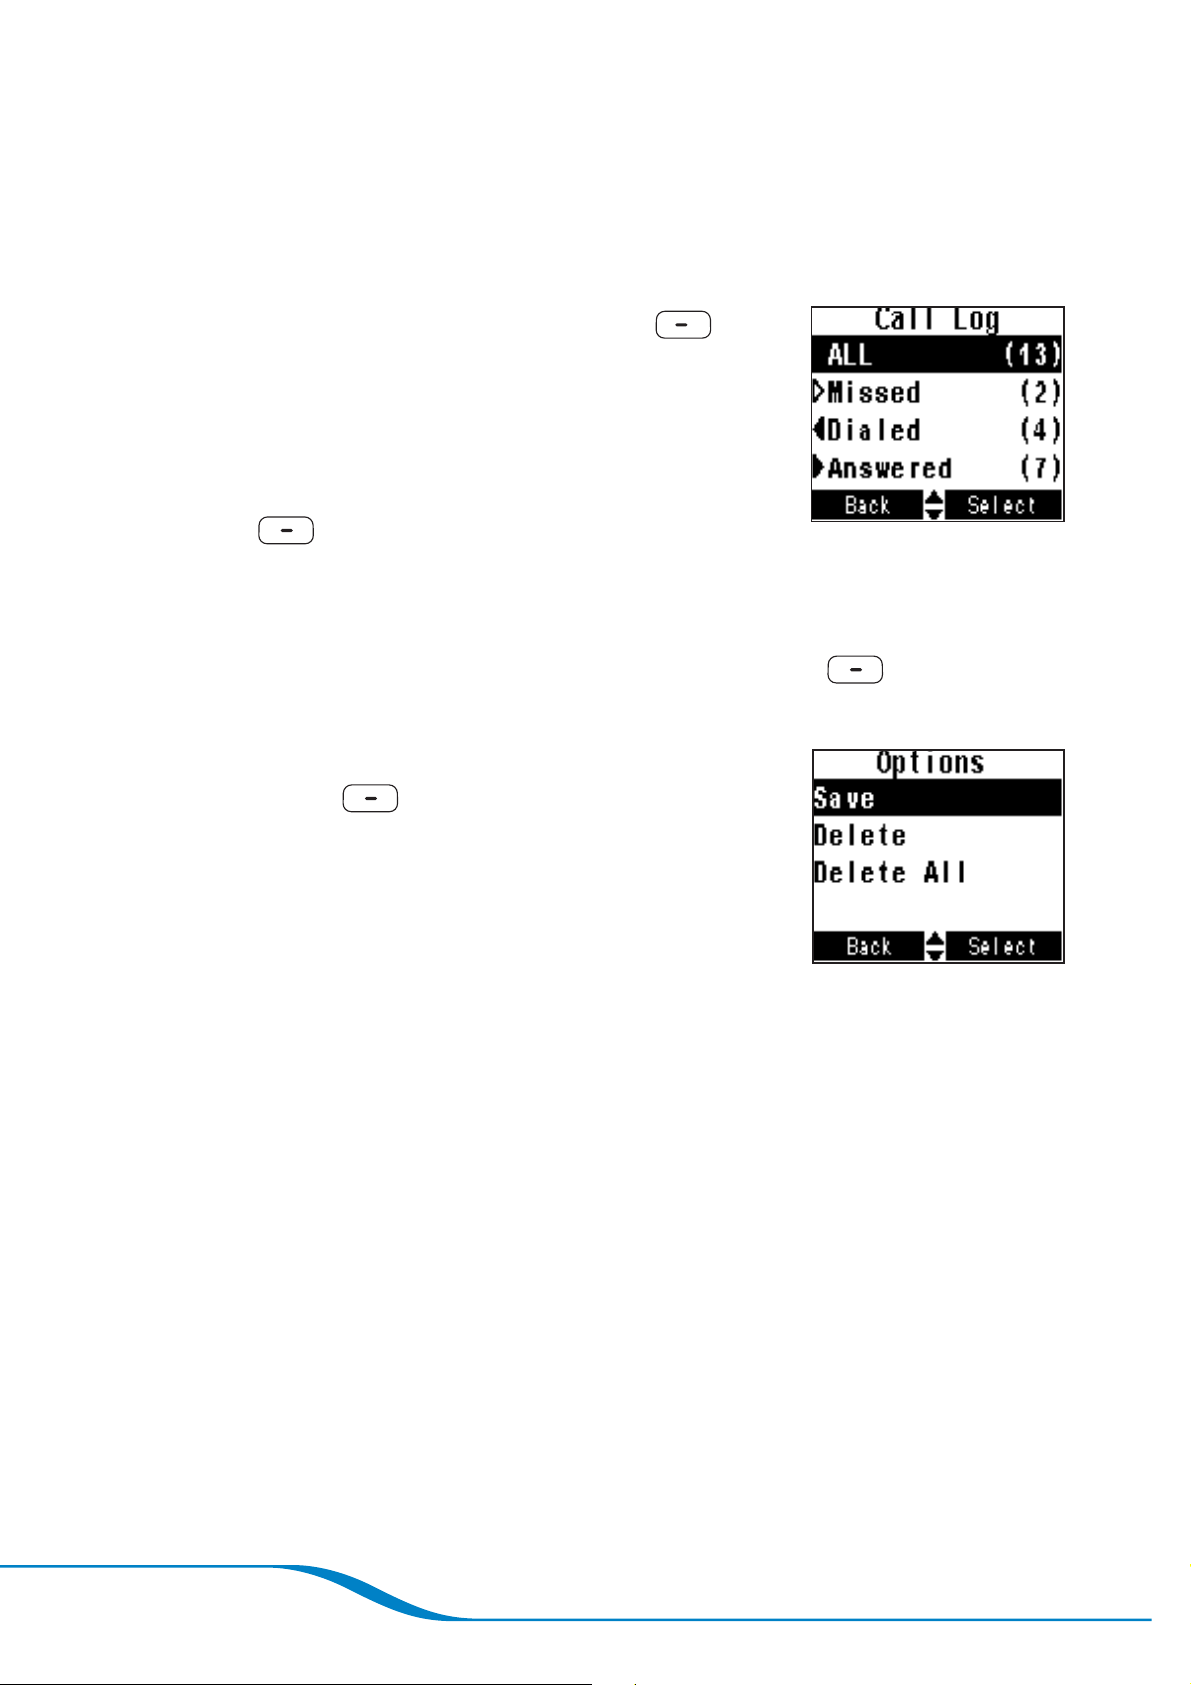
Viewing and editing the Call Log
The Call Log lists the last 25 missed, dialed, and answered calls.
You can quickly save phone numbers to your phonebook from the
Call Log.
1.
2.
On the main screen, press Call Log
(right soft key).
Use the navigator to highlight the category
of calls (All, Missed, Dialed, or Answered)
you want to view or edit, and press
Select
TIP: You can press either Select or OK to select the highlighted item.
Use the navigator to scroll and view the list of calls. To edit an entry
3.
on the list, highlight the entry and press Options
key).
4.
Highlight one of the following options, and
press Select
Save: Save the number to your phonebook
–
(see “Adding a contact manually” on
page 14).
Delete: Delete the selected number from
–
the Call Log.
Delete All: Delete all numbers from the Call Log for the
–
category you selected: missed, dialed, or answered. If you are
(right soft key).
(right soft
(right soft key):
in All Calls, selecting Delete All deletes all numbers in all three
categories.
Page 20

Table 1: Headset button functions
Function Button Action Indicator Light Sounds
DRAFT
Turn headset onPress and hold for
2 seconds
Turn headset
off
Answer/end
a call
Adjust
volume
Redial last
number
Pair with
mobile
phone
Press and hold for
4 seconds
Press for 1 second
Press up or down
(not inward)
Press twice
With power off,
press and hold for
6 seconds
Flashes blue
every 10 seconds
Glows solid red
for 4 seconds
Alternates flashing
blue and red
4 increasing
beeps
4 decreasing
beeps
1 beep
2 beeps
when maximum/
minimum volume
is reached
2 beeps
1 beep
at beginning,
1 beep
Table 2: Headset alerts
Alert Indicator Light Sounds
Incoming call Flashes blue 3 times with
each ring
Low battery Flashes red 3 times every
3 seconds
Charging Glows solid red
Fully charged Glows solid blue
3 rapid beeps
with each ring
3 beeps
every 30 seconds
when pairing
completed
Page 21
DRAFT
Table 3: Handset screen icons
Icon Meaning Action
You have new voicemail
If set up as a speed dial,
messages
Battery is fully charged
Battery is partially charged Charge battery if desired
Battery is low Place handset in handset
Headset is out of range of
handset, has low batteries, or
is powered off
press and hold 1
retrieve messages (see
“Checking voicemail” on
page 27) ; otherwise, dial your
voicemail number and press
Talk/ Flash
charging cradle to charge
Bring handset within range,
charge headset, or power on
headset
.
to
Call is active on headset (not
on handset or speakerphone)
Ringer is turned off Increase ringer volume if
Keypad is locked
For troubleshooting, see page 40.
Press Handset
Speakerphone
audio from headset.
desired (see “Adjusting the
ringer volume” on page 23)
Press and hold *
unlock keypad (see “Locking
the keypad” on page 25)
or
to move
to
Page 22
Settings
Adjusting the ringer volume
On the main screen, press Menu
1.
DRAFT
(left soft key).
Use the navigator to highlight Settings, and
2.
press Select
3.
Highlight Ringer Vol/Off, and press Select
(right soft key).
Press Up
4.
Press Save
5.
(right soft key).
or Down on the navigator to adjust the volume.
(right soft key).
Turning the ringer off
Permanently: To permanently mute the ringer, follow steps 1–3 in
“Adjusting the ringer volume,” above, and then press Down
the navigator until all the boxes are empty. Press Save
soft key). An icon
permanently muted.
appears on the main screen when the ringer is
(right
on
Temporarily : To temporarily mute the ringer, press Down on the
Volume button until the ringing is muted.
Volume down
Selecting a ring tone
On the main screen, press Menu (left soft key).
1.
Use the navigator to highlight Settings, and press Select
2.
(right soft key).
Page 23
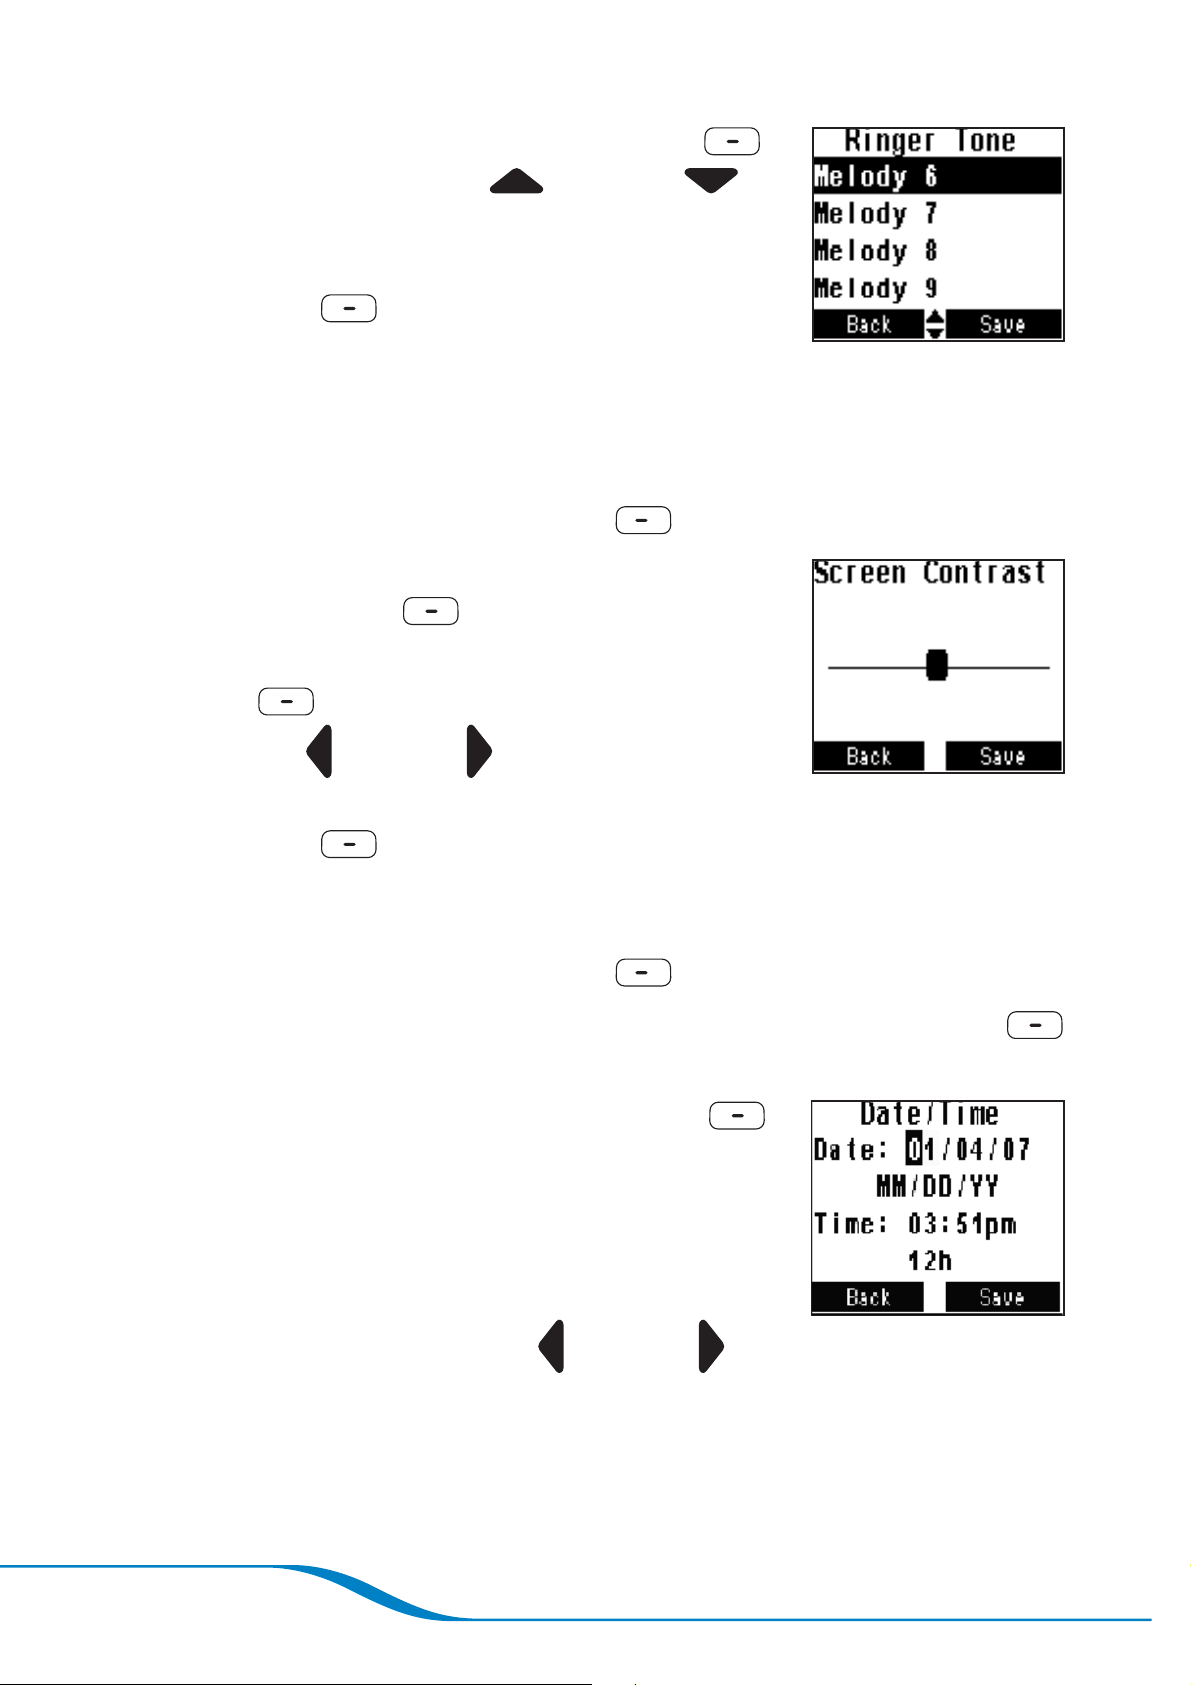
DRAFT
3.
Highlight Ringtones, and press Select
(right soft key).Press Up
the navigator to highlight a ringtone. A preview
of the sound plays.
4.
Press Save
TIP: You can also assign a ringtone to a specific
contact. See “Adding a contact manually” on page 14.
(right soft key).
or Down on
Adjusting the screen brightness
1.
On the main screen, press Menu (left soft key).
2.
Use the navigator to highlight Settings,
and press Select
Highlight Screen Contrast, and press
3.
Select
4.
Press Left
(right soft key).
or Right on the navigator to
(right soft key).
adjust the brightness and contrast.
Press Save
5.
(right soft key).
Setting the date and time
On the main screen, press Menu (left soft key).
1.
Use the navigator to highlight Initial Setup, and press Select
2.
(right soft key).
Highlight Date/Time, and press Select
3.
(right soft key).
Select any of the following options:
4.
Date: Use the keypad to enter the correct
–
date.
MM/DD/YY: Press Left
–
or Right on the navigator
to change the date format to between MM/DD/YY and
DD/MM/YY.
Time: Use the numbers on the keypad to enter the correct time.
–
Page 24

12h: Press Left or Right on the navigator to change the
–
time format from a 12-hour clock to a 24-hour clock and back.
DRAFT
Press Save
5.
(right soft key).
Setting the default language
On the main screen, press Menu (left soft key).
1.
Use the navigator to highlight Initial Setup,
2.
and press Select
Highlight Language, and press Select
3.
(right soft key).
Highlight English, Francais, or Espanol.
4.
Press Save
5.
(right soft key).
(right soft key).
Turning the keypad tone on or off
When the keypad tone is on, you hear a sound when you press a key.
You can turn the tone off if you prefer not to hear the sound.
On the main screen, press Menu
1.
(left soft key).
Use the navigator to highlight Initial Setup,
2.
and press Select
Highlight Keypad Tone, and press Select
3.
(right soft key).
Highlight ON or OFF.
4.
Press Save
5.
(right soft key).
(right soft key).
Locking the keypad
Lock the keypad if you don’t want to accidentally dial numbers on
your handset.
Press and hold the “*”
appears on the main screen when the keypad is locked.
To unlock the keypad, press and hold the “*”
3 seconds.
key for 3 seconds. A lock icon
key again for
Page 25

DRAFT
Switching between tone dialing and pulse dialing
By default, your Calisto Pro uses tone dialing. You can switch to pulse
dialing if you are in an area that requires it.
On the main screen, press Menu
1.
(left soft key).
Use the navigator to highlight Initial Setup,
2.
and press Select
Highlight Dial Mode, and press Select
3.
(right soft key).
Highlight Tone or Pulse.
4.
Press Save
5.
(right soft key).
(right soft key).
Page 26

DRAFT
Voicemail
You must have voicemail service set up with your phone provider to
use the voicemail feature on your Calisto Pro.
Setting up voicemail
1.
On the main screen, press Menu
(left soft key).
2.
Use the navigator to highlight Initial Setup,
and press Select
3.
Highlight Voicemail Setup, and press
Select
4.
Highlight Number, and press Select
(right soft key). Use the keypad to enter the
number you call to access your voicemail, and
press Save
TIP: If you make a mistake when entering the number,
press BackSP
(right soft key).
(right soft key).
(right soft key).
(left soft key).
Checking voicemail
When you have a voicemail message, the voicemail indicator icon
appears at the top of the main screen, unless you’ve turned it off (see
“Setting up voicemail,” above).
To dial your voicemail number, do one of the following:
•
Press and hold the 1
or
•
Enter the voicemail phone number on the keypad and press
Talk /Fl ash
If the voicemail indicator icon
of your voicemail mesages, you can reset the icon. Follow steps 1–3
in “Setting up your voicemail,” above, and then highlight Indicator
Off and press Select
new voicemail message, the icon appears on the screen.
.
key for 3 seconds.
appears after you have retrieved all
(right soft key). The next time you get a
Page 27

DRAFT
Using the Handset with the Charging
Base
Locating the handset from the charging base
Press the handset locator button on the charging base. The
handset rings. After you have located the headset, press End
stop the ringing.
Press here
Note: The handset will
not ring if the battery
has run out of charge
Registering your handset with the charging base
to
Your handset comes pre-registered with the base. If the handset
screen displays “Searching for base” even when the handset is on
the base and the AC power adapter and phone cord are properly
connected, follow these steps to re-register the handset with the
base.
On the main screen, press Menu
1.
(left soft key).
2.
Use the navigator to highlight Initial Setup,
and press Select
3.
Highlight Headset/Base, and press Select
(right soft key).
4.
Highlight Register to Base, and press Select
key).
(right soft key).
(right soft
Page 38

Using a Different Headset
Pairing with a new headset
You Calisto handset can be used with other Plantronics Bluetooth
headsets. You can pair only one headset at a time with the Calisto
handset.
1.
On the main screen, press Menu
(left soft key).
DRAFT
2.
Use the navigator to highlight Initial Setup, and press Select
(right soft key).
3.
Highlight Headset/Base, and press Select
4.
Highlight Pair New Headset, and press Select
key).
Select either of the following options:
5.
–
Pair Headset: To pair with a new headset,
or to re-pair with your original headset if the
icon is consistently displayed on the
screen (see “Troubleshooting” on page 40),
highlight this option, press
Select
instructions. The steps are the same as in “Pairing your headset
with your mobile phone” on page 10.
(right soft key), and follow the onscreen
(right soft key).
(right soft
Remove Headset: To stop pairing with the current headset,
–
you can either pair a new headset (this automatically replaces
the current pairing), or you can manually disconnect. To
manually remove a headset, highlight this option, press Select
(right soft key), and then press Delete (right soft key).
Using a corded headset
Insert a corded headset into the corded headset jack on the right side
of the handset. When a corded headset is connected to the Calisto
handset, calls are automatically sent to the headset. To use the
handset or the speakerphone, remove the corded headset.
Page 39

DRAFT
6
Troubleshooting
Problem Solution
Handset is not working. Make sure the battery is properly installed
and fully charged. A full charge my take up to
15 hours. The screen displays a full battery icon
1
and the words “Charging Done” when the
battery is fully charged.
Make sure the base is plugged in correctly.
The handset may not be registered to the base
properly. Follow the steps in “Registering your
handset with the charging base” on page 38 to
re-register the handset with the base.
The handset will not work if it is connected to
your computer and the Outlook Phonebook
Utility is running on the computer. Close the
Outlook Phonebook software on your computer.
Headset is not working. The headset battery is dead. Place the headset
onto the charging base to charge. The LED
indicator glows red when the headset is
charging and glows blue when the headset is
fully charged.
If the headset is not working with a mobile
phone, follow the steps in “Pairing your headset
with mobile phone” on page 10.
If the headset is not working with the handset,
follow the steps in “Pairing with a new headset”
on page 39.
Page 40

DRAFT
Handset and/or headset
does not ring.
The ringer is turned off. Follow the steps
in “Turning the ringer off” on page 23 for
instructions on how to turn the ringer back on.
The headset is not properly paired with the
handset. Press the Headset
and see if the headset icon is displayed on the
handset screen. If the icon is not displayed,
follow the steps in “Pairing with a new headset”
on page 39 to pair your headset with your
handset.
The base is not properly connected to a
telephone jack.
The headset battery is dead. Place the headset
onto the charging base to charge. The LED
indicator glows red when the headset is
charging and glows blue when the headset is
button once
The handset/headset
does not ring for VoIP
calls, or VoIP calls are
not working.
fully charged.
PerSonoCall is not installed or not configured
correctly.
Make sure you have the latest version of
PerSonoCall. Please check
com/support
Downloads” to make sure you have the latest
version.
The USB cable is disconnected or damaged.
Unplug and replug the cable into both your
handset and your computer.
You are using an older version of the VoIP
application on your computer that is not
supported by your Calisto Pro. Download the
latest version of your VoIP software.
and click on “Software
www.plantronics.
Make sure Calisto is selected as the audio
device in the options on your VoIP software and
that it is not muted.
Microsoft Windows is having problems. Make
sure you have the latest updates from Microsoft.
Try to restart your computer.
Page 41

DRAFT
There is no dial tone. Check the phone line connection from the base
to the wall phone line jack to make sure they are
properly connected.
Plug another working phone into the same
jack. If there is still no dial tone, check with your
phone service provider for assistance.
If the headset does not have a dial tone but the
handset does, check to see if the headset is
paired with handset properly. Press the Headset
button once and see if the headset icon is
displayed on the handset screen. If the icon is
not displayed, follow the steps in “Pairing with a
new headset” on page 39 to pair your headset
Caller ID is not
displaying.
The caller cannot hear
me.
with your handset.
Make sure you subscribe to caller ID service.
Check with your phone service provider.
The incoming call party has caller ID blocking
and is restricting the displaying number.
Check the handset screen to make sure the
handset is not muted.
If you are using the headset, make sure you
have transferred the call to the headset. See
“Switching calls between handset, headset, and
speakerphone” on page 8 for instructions.
Make sure the headset microphone is
pointed toward your mouth for optimal audio
performance.
The call has low volume.
Page 42
If you experience low volume on the headset,
increase the volume of the headset. See
“Adjusting call volume using your headset” on
page 12 for instructions.
If volume is low on the handset, increase the
volume of the handset. See “Adjusting call
volume” on page 8 for instructions.

DRAFT
There is static and/or
interference on the call.
I am having problems
Your handset might be out of range of the
base. Move the handset closer to the base. The
maximum handset-to-base range is 300 feet.
Your headset might be out of range of the
handset. Move the headset closer to the
handset. The maximum handset-to-base range
is 33 feet.
If the base is in close proximity of microwaves,
ovens, TVs, and any electrical appliances, try
moving it away from those devices.
If you have DSL on the same phone line, be sure
that you are using a DSL filter between the base
and the telephone jack. You may obtain a DSL
filter from your DSL service provider.
If you have another headset paired with your
pairing the headset with
a mobile phone.
The headset does not
respond when I page it.
The handset does not
respond when I page it.
Outlook sync of contacts
to the handset is not
working.
mobile phone, you must disconnect that
headset from your phone before you pair the
phone with your Calisto Pro headset.
Turn your mobile phone off and back on, then
try the pairing process again.
The headset is out of range of the handset.
The handset is out of range of the base.
Make sure the base is connected to your
computer using the supplied USB cable.
Make sure you have the latest version of the
Outlook Phonebook Utility software.
Make sure the Outlook Utility software
recognizes your Calisto Pro by showing it is
connected at the lower left of the screen.
Page 43

DRAFT
The voicemail indicator
icon
Handset battery life is
short.
Caller ID does not add
is not working.
Voicemail is not set up properly. See “Setting up
voicemail” on page 27 for setup instructions.
Your voicemail service provider is having issues.
Contact the provider.
You need to subscribe to voicemail service to
use this feature. Contact your phone service
provider.
The handset is not fully charged. Place the
handset back in the charging base and charge
for up to 15 hours.
The handset battery is old and will not charge
well. Replace the battery; see “Changing the
battery” on page 4 for instructions.
If you want to use the Caller ID display to save a
16
a “1” in front of the area
code before saving to
the phonebook.
Caller ID added the area
code and/or a “1” to the
front of the area code,
but I am located in the
same area code as the
number, so I do not need
to dial the area code to
call out.
number to the phonebook or to return the call,
press the # key once on your handset to add
a “1” in front of the displayed caller ID number
before saving to the phonebook or dialing out.
Press the # key once to remove the “1” in
front of the phone number, or press the # key
repeatedly until the area code is removed from
the display.
Page 44

Product Specifications
Headset specifications
Battery Life/Talk Time: Up to 8 hours*
•
Standby Time: Approximately 240 hours**
•
6.5 hours*
DRAFT
Charge Time: 2 hours
•
Power Requirements: 5V DC–300 mA
•
Battery Type: Lithium Ion Polymer
•
Storage and Usage Temperature: 50F–104F (10C–40C)
•
Bluetooth version v1.2 supports eSCO standard; up to 33 ft. range
•
from headset to compatible device
Compatible with Bluetooth-enabled mobile phones or Bluetooth
•
devices supporting headset or hands-free profiles
Weight: .65 oz.
•
Noise-canceling microphone
•
Call Answer/End, Volume, Redial functions
•
* Performance may vary by device.
Up to 3 hours
** Headset can last up to four days without charging, based on average talk time of 1.5 hours per day.
Handset specifications
Battery Life/Talk Time: Up to 8 hours
•
Standby Time: Up to 100 hours
•
Replaceable Battery: 2x AAA Ni-MH battery pack, 700~750mAh
•
Charge Time: Typical 16 hours
•
Multi-language Menu: English/French/Spanish
•
LCD Type and Resolution FSTN/128*80 dots B/W
•
LCD Size 28.14 mm X 23.98 mm (L x W)
•
Up to16 hours
6.5 hours
Page 45

DRAFT
Help/Contact
Technical assistance
Visit our Web site at www.plantronics.com/support for technical
support including frequently asked questions, compatibility, and
accessibility information.
For additional assistance, reference the QuickTips card that is placed
under the charging base or call 1-888-237-557 to speak to a Calisto
support specialist.
Page 46

DRAFT
FCC/Regulatory Notices
FCC Compliance Class B Digital Device
This equipment has been tested and found to comply with the limits
for a Class B digital device, pursuant to Part 15 of the FCC Rules.
These limits are designed to provide reasonable protection against
harmful interference in a residential installation. This equipment
generates, uses, and can radiate radio frequency energy and, if not
installed and used in accordance with the instructions, may cause
harmful interference to radio communications. However, there is no
guarantee that interference will not occur in a particular installation. If
this equipment does cause harmful interference to radio or television
reception, which can be determined by turning the equipment off and
on, the user is encouraged to try to correct the interference by one of
the following measures:
Reorient or relocate the receiving antenna.
•
Increase the separation between the equipment and receiver.
•
Connect the equipment into an outlet on a circuit different from
•
that to which the receiver is connected.
Consult the dealer or an experienced radio/TV technician for help.
•
CAUTION: Changes or modifications not expressly approved by
Plantronics for compliance could void the user’s authority to operate
the equipment. This device complies with Part 15 of the FCC Rules.
Operation is subject to the following two conditions: (1) This device
may not cause harmful interference, and (2) this device must accept
any interference received, including interference that may cause
undesired operation.
FCC Declaration of Conformity
Plantronics, Inc. 345 Encinal St. Santa Cruz, CA 95060 declares that
this cordless phone complies with 47 CFR Parts 2 and 15 of the FCC
Rules as Class B digital devices.
* Privacy of communications may not be ensured when using this phone.
Page 47

DRAFT
Canadian Compliance
This Class B digital apparatus complies with Canadian ICES-003. Cet
appareil numérique de la classe B est conforme á la norme NMB-003
du Canada.
Federal Communications Commission (FCC) Part 68
Statement
This cordless phone complies with Part 68 of the FCC rules and the
requirements adopted by the Administrative Council for Terminal
Attachments (ACTA). On the bottom of this equipment is a label that
contains, among other information, a product identifier in format US:
AAAEQ##TXXXX. If requested, this information must be provided to
the telephone company. The Ringer Equivalence Number (REN) is
used to determine the number of devices that may be connected to
the telephone line. Excessive RENs on the telephone line may result
in the devices not ringing in response to an incoming call. In most, but
not all areas, the sum of the RENs should not exceed five (5.0). To be
certain of the number of devices that may be connected to the line, as
determined by the total RENs, contact the telephone company. For
products approved after July 23, 2001, the REN for this product is part
of the product identifier that has the format US: AAAEQ##TXXXX. The
digits represented by ## are the REN without a decimal point (e.g., 03
is a REN of 0.3). For earlier products, the REN is separately shown on
the label. This equipment uses the following USOC jack: RJ11C. A
plug and jack used to connect this equipment to the premise’s wiring
and telephone network must comply with the applicable FCC Part 68
rules and requirements adopted by the ACTA. A compliant telephone
cord and modular plug is provided with this product. It is designed
to be connected to a compatible modular jack that is also compliant.
See installation instructions for details. Connection to Party Line
Service is subject to state tariffs. Contact the state public utility
commission, public service commission, or corporation commission
for information. If this equipment causes harm to the telephone
network, the telephone company will notify you in advance that the
temporary discontinuance of services may be required. If advance
notice is not practical, the telephone company will notify the customer
as soon as possible. Also, you will be advised of your right to file a
Page 48

DRAFT
complaint with the FCC if you believe it is necessary. The telephone
company may make changes in its facilities, equipment, operations,
or procedures that could affect the operation of the equipment. If this
happens, the telephone company will provide advance notice in order for
you to make necessary modifications to maintain uninterrupted service.
If trouble is experienced with this equipment, for repair or warranty
information, please contact Plantronics, Inc. at 1-800-544-4660. If the
equipment is causing harm to the telephone network, the telephone
company may request that you disconnect the equipment from the
network until the problem is solved. This equipment is hearing aid
compatible.
If your home has specially wired alarm equipment connected to the
telephone line, ensure the installation of the cordless phone does
not disable your alarm equipment. If you have questions about what
will disable alarm equipment, consult your telephone company or a
qualified installer.
RF Exposure Statement: To maintain compliance with the FCC’s RF
exposure guidelines place the base unit at least 20 cm (approximately
one foot) from nearby persons. For body worn operation, this phone
has been tested and meets the FCC RF exposure guidelines when
used with the belt clip supplied or designated for this product. Use of
other accessories may not ensure compliance with FCC RF exposure
guidelines. Industry Canada CS-03 Declaration of Conformity This
product meets the applicable Industry Canada technical specifications.
The Ringer Equivalence Number (REN) is an indication of the maximum
number of devices allowed to be connected to a telephone interface.
The termination on an interface may consist of any combination of
devices subject only to the requirement that the sum of the RENs
of all the devices does not exceed five. If this equipment does
cause harmful interference to radio or television reception, which
can be determined by turning the equipment on and off, the user
is encouraged to try to correct the interference with one or more of
the following measures: Reorient or relocate the receiving antenna
(that is, the antenna for the radio or television that is “receiving” the
interference). Reorient or relocate and increase the separation.
Page 49

Warranty
52
Limited warranty
•
This warranty covers defects in materials and workmanship of
products manufactured, sold or certified by Plantronics which were
purchased and used in the United States.
•
This warranty lasts for one year from the date of purchase of the
products.
•
This warranty extends to you only if you are the end user with the
original purchase receipt.
•
We will, at our option, repair or replace the products that do not
DRAFT
conform to the warranty. We may use functionally equivalent
reconditioned/refurbished/remanufactured/ pre-owned or new
products or parts.
•
To obtain service in the U.S., contact Plantronics at (800) 5444660 ext. 5538.
•
THIS IS PLANTRONICS’ COMPLETE WARRANTY FOR THE
PRODUCTS.
•
This warranty gives you specific legal rights, and you may also
have other rights that vary from state to state. Please contact
your dealer or our service center for the full details of our limited
warranty, including items not covered by this limited warranty.
Page 51

For more information about Plantronics Calisto or
other Plantronics products, visit our Web site at:
www.plantronics.com
TEL: 800-544-4660 in USA and CANADA
831-458-7700 (OUTSIDE USA)
© 2007 Plantronics, Inc. All rights reserved. Plantronics, the logo design, Calisto,
and Sound Innovation are trademarks or registered trademarks of Plantronics, Inc.
The Bluetooth
such marks by Plantronics, Inc. is under license.
®
word mark is owned by the Bluetooth SIG, Inc., and any use of

DRAFT
Calisto™ Pro Series
Home phone with multi-function
®
Bluetooth
headset
Incoming Call
John Smith
123-456-7890
Ignore Answer
User Guide

DRAFT
With the Calisto Pro Series, you get maximum flexibility for handling all
of your calls:
•
Make and answer landline and VoIP calls using either the handset,
the built-in speakerphone, or the wireless headset.
®
•
Use the headset with other devices enabled with Bluetooth
technology, such as your Bluetooth mobile phone.
This User Guide provides comprehensive information on how to use
your Calisto Pro Series and all of its features.
TIP: For complete setup instructions, see the printed QuickStart Guide
included in the product package. For a quick reference to common features,
see the QuickTips card, which slides out from the charging base of your
Calisto Pro Series. When you see this symbol
Guide, it means that you can find a quick reference for this topic on the
QuickTips card located under charging base.
next to a topic in this User
Page 2

DRAFT
Contents
Contents .............................................1
Components ..........................................2
Setup ................................................4
Wearing the headset and handset ........................4
Changing the battery ..................................5
Powering the Headset On and Off ..........................6
Powering your headset on ..............................6
Powering your headset off ..............................6
Using Your Headset with Your Handset ......................7
Placing calls ........................................7
Receiving calls ......................................7
Adjusting call volume ..................................8
Switching calls between handset, headset, and speakerphone . 8
Ending calls .........................................9
Locating the headset from the handset ....................9
Using Your Headset with Your Mobile Phone .................10
Pairing your headset with your mobile phone ..............10
Placing calls .......................................11
Receiving calls using your headset ......................12
Adjusting call volume using your headset .................12
Ending calls using your headset ........................13
Using the Phonebook ...................................14
Adding a contact manually ............................14
Adding a contact from a call ...........................15
Editing a contact ....................................15
Deleting a contact ...................................16
Calling Features: Basics .................................17
Caller ID. . . . . . . . . . . . . . . . . . . . . . . . . . . . . . . . . . . . . . . . . . . 17
Speakerphone ......................................17
Last number redial ..................................17
Receiving a second incoming call .......................18
Muting a call .......................................19
Page i

DRAFT
Settings .............................................23
Using speed dial keys ................................19
Viewing and editing the Call Log ........................20
Table 1: Headset button functions .......................21
Table 2: Headset alerts ...............................21
Table 3: Handset screen icons .........................22
Adjusting the ringer volume ............................23
Turning the ringer off .................................23
Selecting a ring tone .................................23
Adjusting the screen brightness ........................24
Setting the date and time .............................24
Setting the default language ...........................25
Turning the keypad tone on or off .......................25
Locking the keypad ..................................25
Switching between tone dialing and pulse dialing ...........26
Voicemail ............................................27
Setting up voicemail .................................27
Checking voicemail ..................................27
Transferring Contacts from Your Computer ..................28
System requirements ................................28
Installing the software ................................28
Using the Outlook
®
Phonebook Utility ....................29
Phonebook storage ..................................31
Creating an Outlook contact ...........................31
Editing an Outlook contact ............................32
Deleting an Outlook contact ...........................33
Restoring your phonebook ............................33
Customizing the Outlook Phonebook Utility ...............33
Viewing your updated contacts on your handset ............33
Answering Calls from Your Computer’s VoIP Program ..........34
System requirements ................................34
Installing the software ................................34
Using the PerSonoCall VoIP Utility .......................34
PerSonoCall system tray icons .........................35
Page ii

DRAFT
Setting basic options .................................36
Viewing the current status screen .......................37
Using the Handset with the Charging Base ..................38
Locating the handset from the charging base ..............38
Registering your handset with the charging base ...........38
Using a Different Headset ...............................39
Pairing with a new headset ............................39
Using a corded headset ..............................39
Troubleshooting .......................................40
Product Specifications ..................................45
Headset specifications ...............................45
Handset specifications ...............................45
Help/Contact .........................................46
Technical assistance .................................46
FCC/Regulatory Notices ................................47
FCC Compliance Class B Digital Device ..................47
FCC Declaration of Conformity .........................47
Canadian Compliance ...............................48
Federal Communications Commission (FCC) Part 68 Statement 48
Safety Information .....................................50
Warranty ............................................51
Limited warranty ....................................51
Page iii

DRAFT
Contents
When you open the package, the battery, cables, and adapter can be
found in the compartment beneath the Calisto charging base.
Product & Accessories Documentation
Charging base
Handset/Phone
QuickStart Guide
QuickTips
(stored under base)
Headset
Handset/Phone battery
Handset/Phone battery
door
AC power adapter
Telephone cord
USB cable
Splitter cable
(to use your phone jack with
more than one phone)
Software CD
Page 1

DRAFT
Components
(to select screen
Soft keys
options)
HANDSET
For descriptions of these
icons, see page 22.
Incoming Call
John Smith
123-456-7890
Ignore Answer
Menu navigation
Talk/Flash button
Voicemail
speed dial
Keypad lock
Handset button
(illuminated when
handset is active)
OK button
Call end button
Keypad
Speakerphone button
(illuminated when
speakerphone is active)
Page 2
Volume button
Waist clip
Corded headset jack

CHARGING BASE
Handset locator button
DRAFT
Earloop
Indicator light
Headset button
Headset charging cradleHandset charging cradle
HEADSET
Eartip
Microphone
Page 3

DRAFT
Safety Information
IMPORTANT SAFETY AND OPERATIONAL INFORMATION
Please read the following safety and operational instructions before using your Bluetooth® headset.
Please keep these instructions for your reference. When using your Bluetooth headset, these basic
safety precautions and warnings should be followed to reduce the risk of fire, electric shock, injury to
persons and damage to property.
This symbol
WARNINGS
•
CHILDREN. Never allow children to play with the product—small parts may be a choking hazard.
•
Check local laws regarding use of a mobile phone and headset while driving.
•
If you use the headset while driving, ensure your attention and focus remain on driving safely.
•
Observe all signs that require an electrical device or RF radio product to be switched off in
designated areas, such as hospitals, blasting areas, potentially explosive atmospheres, and aircraft.
•
On aircraft, obey the airline regulations for use of wireless equipment.
•
To reduce the risk of electric shock, explosion or fire use only the supplied charger or Class 2 AC
adapter to charge the headset. Ensure that the voltage rating (e.g. 120v, 60 Hz) corresponds to the
power supply you intend to use.
•
Do not disassemble the AC adapter as this may expose you to dangerous voltages or other risks.
Incorrect reassembly can cause electric shock or fire when the product is subsequently used.
•
Do not insert anything into the product because this may cause damage to the internal components
or cause injury to you.
•
Avoid contact with liquids. Do not locate this product near water, for example, near a bathtub, or
sink, in a wet basement, or near a swimming pool.
•
Discontinue use of product and contact Plantronics if the product overheats, has a damaged cord
or plug, if the product has been dropped or damaged, or if the product has come into contact with
liquids.
•
This product should never be placed over or near a heat register and should not be placed in a
built-in installation unless proper ventilation is provided.
•
Exposure to high volume sound levels may damage your hearing. Although there is no single
volume setting that is appropriate for everyone, you should always use your headset or headphones
with the volume set at moderate levels and avoid prolonged exposure to high volume sound levels.
The louder the volume, the less time is required before your hearing could be affected. You may
experience different sound levels when using your headset or headphones with different devices.
The device you use and its settings affect the level of sound you hear. If you experience hearing
discomfort, you should stop listening to the device through your headset or headphones. To protect
your hearing, some hearing experts suggest that you:
1.
Set the volume control in a low position before putting the headset or headphones on your ears.
2.
Limit the amount of time you use headsets or headphones at high volume.
3.
Avoid turning up the volume to block out noisy surroundings.
4.
Turn the volume down if the sound from the headset or headphones prevents you from hearing
people speaking near you.
See
BATTERY WARNINGS
To reduce the risk of fire or injury to persons, read and follow these instructions.
•
Charge the headset according to the instructions supplied with the unit.
•
Do not expose the battery to high temperatures.
•
Do not puncture or otherwise damage the battery. The cell contains corrosive materials which may
damage eyes and skin and may be toxic if swallowed.
•
Do not short-circuit the battery, as this may result in a sudden rise in temperature.
•
Do not incinerate the battery.
•
Never put batteries in mouth. If swallowed, contact your physician or local poison control center.
•
Dispose or recycle the battery according to local and regional regulatory requirements.
identifies and alerts the user to the presence of important safety warnings.
www.plantronics.com/healthandsafety for more information on headsets and hearing.
Page 50


DRAFT
Setup
For complete setup instructions,
see the QuickStart Guide.
1.
Connect the charging base
Step 2
and the cables.
2.
Install the handset battery.
3.
Charge the headset and
Step 1
Step 3
handset.
Handset: Charge for up to 15 hours before first use. When fully
16
charged, screen displays “Charging Done.”
Headset: Charge for at least 3 hours before first use.
TIP: Place handset and headset in cradle regularly to keep charged, or when
the battery icon on the screen indicates a low charge
every 30 seconds when the battery is low. The handset screen displays
“Charging Done” when fully charged. The headset indicator light glows solid
blue when the headset is in the charging cradle and is fully charged.
. The headset beeps
Wearing the headset and handset
Figure 1
Figure 2
Headset:
either ear. Flip the earloop to the side
and twist to position it over your left or
right ear (Figure 1). Point the microphone
toward your mouth (Figure 2).
You can wear the headset on
Handset: Slide the waist clip onto your
belt or your waistband. Handset is worn
upside-down so you can lift it and view
the display.
Figure 3
Page 4

DRAFT
Changing the battery
If your handset battery does not keep a charge, you can replace the
battery.
Using the tip of a pen, press the notch at the
1.
bottom of the handset battery cover to remove
the cover.
Remove the old battery from the compartment.2.
Place the new battery into battery
3.
compartment.
Plug the battery pack connector into the white jack inside the
4.
compartment.
Slide the battery cover onto the handset and
5.
place the handset onto the base to charge it.
Charge the new battery for up to 15 hours before using it the first
6.
time.
16
Page 5

DRAFT
You must turn on the headset before first use and anytime after it has
been powered off.
Powering your headset on
Press and hold for 2 seconds until the
indicator light flashes blue every 10
seconds or you hear 4 ascending beeps
Powering the Headset On and Off
Powering your headset off
Press and hold the Headset button for 4 seconds until the
indicator light flashes red for 4 seconds or you hear 4 descending
beeps.
TIP: It is not necessary to power off your headset between uses. When you
are not using your headset, you can simply store it on the charging base.
However, you may want to power off your headset if you are using it away
from home and want to save battery power.
Page 6

Using Your Headset with Your Handset
TIP: When using your handset and headset, the headset must be within
33 feet of the handset, and the handset must be within 300 feet of the
charging base.
Placing calls
To call using: Do the following:
DRAFT
Handset
Speakerphone
Headset Dial the number on handset.
Dial the number and press Talk /Flash
TIP: You can also press Talk /Flash first and
then dial the number.
Press Speakerphone
1.
2.
Press the Headset
TIP: When you’re on a call using the headset,
an icon
appears on the handset screen.
and dial the number.
button for 1 second.
Receiving calls
To answer a call
using:
Do the following:
.
Handset
Speakerphone
Headset
TIP: To answer a second incoming call, see “Receiving a second incoming
call” on page 18 .
Press Talk /Flash
Press Speakerphone
Press the Headset
.
button for 1 second.
.
Page 7

DRAFT
Adjusting call volume
Handset Headset
Press up or down to adjust call volume
when you are using your handset,
speakerphone, or headset.
TIP: For your comfort and health, always listen to calls at a moderate volume.
For complete safety information, see page 50.
Press up (towards the indicator light) or
down (towards the microphone) to adjust
call volume when you are using your
headset.
TIP: Do not press the button
inwards to adjust volume.
Switching calls between handset, headset, and
speakerphone
To switch call: Do the following:
From handset or speakerphone to
headset
Press the Headset button for
1 second.
From headset or speakerphone to
handset
From handset or headset to
speakerphone
Page 8
Press Handset
Press Speakerphone
.
.

Ending calls
To end a call, press either of the following buttons:
Handset Headset
DRAFT
Press End.
Press for 1 second.
Locating the headset from the handset
You can determine whether your headset is within 33 feet of your
handset.
1.
On the main screen, press Menu
(left soft key).
Use the navigator to highlight Initial Setup,
2.
and press Select
3.
Highlight Headset/Base, and press Select
(right soft key).
(right soft key).
4.
Highlight Locate Headset, and press Select
(right soft key).
TIP: If your headset is more than 33 feet away from your handset, your screen
displays “Headset Out of Range.” While searching for your headset, you can
carry your handset with you until the screen displays “Headset Within Range.”
Page 9

DRAFT
Using Your Headset with Your Mobile
Phone
The Calisto headset functions like a traditional Bluetooth® headset
when used with your mobile phone. It has the ability to operate
completely separate from the Calisto handset/phone and has many
of the same features as the most popular Bluetooth headsets on the
market, including redial and voice dialing.
To use the Calisto headset with your Bluetooth compatible mobile
phone, the headset first needs to be paired with that device. You
Pairing your headset with your mobile phone
will need to refer to the user’s manual for your mobile phone for
specifics on how to pair Bluetooth devices. You can also refer to the
Plantronics website to see if there are instructions specific to your
mobile phone.
TIP: Note that your headset can be connected to both your handset and a
mobile phone at the same time, so you can make and answer calls from both
using the headset.
Once the headset and mobile phone are paired, you can use the
headset with both the Calisto and your mobile phone. You need to
pair the headset with your mobile phone only once.
Before you begin, make sure your mobile phone is Bluetooth
1.
compatible. You may need to refer to the user’s guide for your
mobile phone to find out this information.
Turn the headset off by pressing and holding the Headset
2.
www.plantronics.com/easytopair
button for 4 seconds, or until you hear 4 descending beeps.
3.
Refer to your mobile phone’s user’s manual for specific instructions
about activating Bluetooth pairing.
4.
Once your mobile phone is ready for Bluetooth devices, press and
hold the Headset
until the indicator light flashes red and blue.
Page 10
button on the headset for 4 to 6 seconds or

5.
When the mobile phone detects the headset, select Calisto PLT
from the list of found devices.
6.
When the mobile phone prompts you for a passcode, enter “0000”
on the mobile phone keypad as shown.
Your headset is now paired
with your mobile phone and
is ready to use!
DRAFT
TIP: To use the headset with your mobile phone, the headset must be within
33 feet of the phone.
TIP: You can pair your headset with more than one mobile phone, but you
can use your headset with only one mobile phone at a time. Your headset
will automatically connect to the mobile phone that is powered on and within
range of your headset. If more than one mobile phone is on and within range
of your headset, the headset will connect to the last mobile phone with which
it was used.
Placing calls
1.
If prompted on your mobile phone, select the option to accept the
connection with your headset.
2.
Dial the number on your mobile phone.
3.
If the call is not automatically transferred to the headset, press the
Headset
button for 1 second.
Page 11

DRAFT
Receiving calls using your headset
TIP: You can use the headset to answer a second incoming call; see
“Receiving a second incoming call” on page 18.
Press for 1 second
Adjusting call volume using your headset
Press up or down to adjust call volume
when you are using your headset (do
not press inward).
TIP: For your comfort and health, always listen to calls at a moderate volume.
For complete safety information, see page 50.
Page 12

Ending calls using your headset
Press for 1 second
DRAFT
Page 13

DRAFT
Using the Phonebook
You can store 3 numbers apiece for up to 200 contacts in your
Calisto’s phonebook. You can add entries manually, add them by
saving from an incoming or outgoing call, or transfer them from your
computer’s Outlook
Your Computer” on page 28).
Adding a contact manually
1.
2.
®
email program (see “Transferring Contacts from
On the main screen, press Menu (left soft key).
Use the navigator to highlight Phonebook,
and press Select
3.
Highlight New Contact, and press Edit
(right soft key).
4.
Highlight Name, and press Edit
soft key).
5.
Use the keypad to enter the name, and press Save
key).
TIP: To enter the second letter on a key—for example, the B on the 2 key—
press the key twice. To enter the third letter, press the key three times, and so
on. Press the “#”
Highlight any of the number fields (M = Mobile, H = Home,
6.
W = Work), and press Edit
7.
Enter the correct phone number, and press Save
key).
key to enter a space.
(right soft key).
(right
(right soft
(right soft key).
(right soft
Repeat steps 6 and 7 to enter other numbers for the contact.
8.
To enter a speed dial key for one of the contact numbers, do the
9.
following:
Highlight Spd Dial.
–
Press Left
–
to select whether the speed dial key is
for the mobile (M), home (H), or work (W)
number.
Page 14
or Right on the navigator

–
Press Edit (right soft key).
–
Highlight the number you want to use as the speed dial key, and
DRAFT
press Save
TIP: If you enter a speed dial key number that is already being used for
another number, the new number overwrites the old number for that key.
The 1 key is pre-assigned to your voicemail number, so you won’t be able to
overwrite that number after you have entered it.
10.
To select a special ringtone for this contact,
do the following:
–
Highlight Ringer (option located under
SpDial).
–
Press Left
to scroll through the available ring tones.
Press Play
–
highlighted ring tone.
Press Done
11.
(right soft key).
or Right on the navigator
(right soft key) to hear a preview of the
(left soft key) to save the new contact
information.
Adding a contact from a call
When you make a call to or receive a call from someone whose
number is not in your phonebook, when you end the call, a message
appears on the screen asking if you want to save the number to your
phonebook. To save the number, press Save
then follow the steps in “Adding a contact manually” on page 14 to
create a contact for the number.
(right soft key), and
Editing a contact
On the main screen, press Menu (left soft key).
1.
Use the navigator to highlight Phonebook, and press Select
2.
(right soft key).
Highlight the contact you want to edit, and press Edit
3.
(right soft key).
Page 15

DRAFT
4.
TIP: There are several ways to delete a character in an entry:
Edit the contact information following steps 4–11 in “Adding a
contact manually” on page 14.
1) Press BackSp
2) press and hold BackSp
3) press Left
or Right on the navigator to move the cursor.
(left soft key) to delete the preceding character;
(left soft key) to delete an entire line;
Deleting a contact
1.
On the main screen, press Menu (left soft key).
2.
Use the navigator to highlight Phonebook, and press Select
(right soft key).
3.
Highlight the contact you want to delete, and press Delete
(left soft key).
4.
Press OK
(right soft key).
Page 16

DRAFT
Calling Features: Basics
Caller ID
If your home phone calling plan includes the caller ID feature, this
feature is supported on your Calisto handset. Incoming caller
numbers appear on the handset screen.
Speakerphone
Press Speakerphone once to answer a call with the built-in
speakerphone, or to transfer a call from the handset or headset to the
speakerphone.
Last number redial
Handset Headset
Press OK twice.
TIP: Pressing the OK button on the handset redials the last landline number
dialed. Pressing the headset button also dials the last landline number dialed,
Press twice.
unless the handset is out of range. When the handset is out of range, pressing
the headset button twice redials the last number called on your mobile phone.
Page 17

DRAFT
While you are on a landline or mobile call, the headset emits 3 beeps
to inform you that there is a second incoming landline or mobile call.
Since the Calisto phone does not control your mobile phone, you
cannot toggle back and forth between landline (or VoIP) and mobile
calls. In order to switch from a landline call to an incoming mobile call
or from a mobile call to an incoming landline call, you will have to end
the first call.
Receiving a second incoming call
If you are on this
type of call:
Landline (or VoIP) Landline (or VoIP)
Landline (or VoIP) Mobile
And this type of
call comes in:
Do the following:
Press either Talk/ Fl a sh
or Answer
key) on screen to answer
incoming call.
Switch back and forth
between calls using Talk /
Flash
options.
Press Headset
once to hang up landline call
and a second time to answer
incoming mobile call.
or on-screen
(right soft
button
Mobile Landline (or VoIP)
Page 18
Press Headset
once to hang up mobile call
and a second time to answer
incoming landline call.
button

Muting a call
DRAFT
While on a call, press Mute (left soft key)
Connected
Connected
Peter Smith
on the handset, or select the option to mute a
call on your mobile phone. There is no mute
Peter Smith
(M)
(M)
00:09
00:09
Mute PhoneBK
Mute PhoneBK
04:04
04:04
feature on the headset.
Using speed dial keys
After you assign speed dial keys (see “Adding
a contact manually” on page 14), you can use
them to quickly dial your most frequently called
numbers.
To use a speed dial key, press and hold the key for 3 seconds to dial
the number associated with the key.
TIP: After you set up your voicemail number (see “Setting up voicemail” on
page 27) the 1 key
dials your voicemail number by default.
You can also view your currently assigned speed dial keys.
1.
On the main screen, press Menu
(left soft key).
Use the navigator to highlight View Speed
2.
Dial, and press Select
(right soft key).
TIP: To change your speed dial keys, see “Editing a
contact” on page 15.
Page 19

DRAFT
Viewing and editing the Call Log
The Call Log lists the last 25 missed, dialed, and answered calls.
You can quickly save phone numbers to your phonebook from the
Call Log.
1.
2.
On the main screen, press Call Log
(right soft key).
Use the navigator to highlight the category
of calls (All, Missed, Dialed, or Answered)
you want to view or edit, and press
Select
TIP: You can press either Select or OK to select the highlighted item.
Use the navigator to scroll and view the list of calls. To edit an entry
3.
on the list, highlight the entry and press Options
key).
4.
Highlight one of the following options, and
press Select
Save: Save the number to your phonebook
–
(see “Adding a contact manually” on
page 14).
Delete: Delete the selected number from
–
the Call Log.
Delete All: Delete all numbers from the Call Log for the
–
category you selected: missed, dialed, or answered. If you are
(right soft key).
(right soft
(right soft key):
in All Calls, selecting Delete All deletes all numbers in all three
categories.
Page 20

Table 1: Headset button functions
Function Button Action Indicator Light Sounds
DRAFT
Turn headset onPress and hold for
2 seconds
Turn headset
off
Answer/end
a call
Adjust
volume
Redial last
number
Pair with
mobile
phone
Press and hold for
4 seconds
Press for 1 second
Press up or down
(not inward)
Press twice
With power off,
press and hold for
6 seconds
Flashes blue
every 10 seconds
Glows solid red
for 4 seconds
Alternates flashing
blue and red
4 increasing
beeps
4 decreasing
beeps
1 beep
2 beeps
when maximum/
minimum volume
is reached
2 beeps
1 beep
at beginning,
1 beep
Table 2: Headset alerts
Alert Indicator Light Sounds
Incoming call Flashes blue 3 times with
each ring
Low battery Flashes red 3 times every
3 seconds
Charging Glows solid red
Fully charged Glows solid blue
3 rapid beeps
with each ring
3 beeps
every 30 seconds
when pairing
completed
Page 21

DRAFT
Table 3: Handset screen icons
Icon Meaning Action
You have new voicemail
If set up as a speed dial,
messages
Battery is fully charged
Battery is partially charged Charge battery if desired
Battery is low Place handset in handset
Headset is out of range of
handset, has low batteries, or
is powered off
press and hold 1
retrieve messages (see
“Checking voicemail” on
page 27) ; otherwise, dial your
voicemail number and press
Talk/ Flash
charging cradle to charge
Bring handset within range,
charge headset, or power on
headset
.
to
Call is active on headset (not
on handset or speakerphone)
Ringer is turned off Increase ringer volume if
Keypad is locked
For troubleshooting, see page 40.
Press Handset
Speakerphone
audio from headset.
desired (see “Adjusting the
ringer volume” on page 23)
Press and hold *
unlock keypad (see “Locking
the keypad” on page 25)
or
to move
to
Page 22

Settings
Adjusting the ringer volume
On the main screen, press Menu
1.
DRAFT
(left soft key).
Use the navigator to highlight Settings, and
2.
press Select
3.
Highlight Ringer Vol/Off, and press Select
(right soft key).
Press Up
4.
Press Save
5.
(right soft key).
or Down on the navigator to adjust the volume.
(right soft key).
Turning the ringer off
Permanently: To permanently mute the ringer, follow steps 1–3 in
“Adjusting the ringer volume,” above, and then press Down
the navigator until all the boxes are empty. Press Save
soft key). An icon
permanently muted.
appears on the main screen when the ringer is
(right
on
Temporarily : To temporarily mute the ringer, press Down on the
Volume button until the ringing is muted.
Volume down
Selecting a ring tone
On the main screen, press Menu (left soft key).
1.
Use the navigator to highlight Settings, and press Select
2.
(right soft key).
Page 23

DRAFT
3.
Highlight Ringtones, and press Select
(right soft key).Press Up
the navigator to highlight a ringtone. A preview
of the sound plays.
4.
Press Save
TIP: You can also assign a ringtone to a specific
contact. See “Adding a contact manually” on page 14.
(right soft key).
or Down on
Adjusting the screen brightness
1.
On the main screen, press Menu (left soft key).
2.
Use the navigator to highlight Settings,
and press Select
Highlight Screen Contrast, and press
3.
Select
4.
Press Left
(right soft key).
or Right on the navigator to
(right soft key).
adjust the brightness and contrast.
Press Save
5.
(right soft key).
Setting the date and time
On the main screen, press Menu (left soft key).
1.
Use the navigator to highlight Initial Setup, and press Select
2.
(right soft key).
Highlight Date/Time, and press Select
3.
(right soft key).
Select any of the following options:
4.
Date: Use the keypad to enter the correct
–
date.
MM/DD/YY: Press Left
–
or Right on the navigator
to change the date format to between MM/DD/YY and
DD/MM/YY.
Time: Use the numbers on the keypad to enter the correct time.
–
Page 24

12h: Press Left or Right on the navigator to change the
–
time format from a 12-hour clock to a 24-hour clock and back.
DRAFT
Press Save
5.
(right soft key).
Setting the default language
On the main screen, press Menu (left soft key).
1.
Use the navigator to highlight Initial Setup,
2.
and press Select
Highlight Language, and press Select
3.
(right soft key).
Highlight English, Francais, or Espanol.
4.
Press Save
5.
(right soft key).
(right soft key).
Turning the keypad tone on or off
When the keypad tone is on, you hear a sound when you press a key.
You can turn the tone off if you prefer not to hear the sound.
On the main screen, press Menu
1.
(left soft key).
Use the navigator to highlight Initial Setup,
2.
and press Select
Highlight Keypad Tone, and press Select
3.
(right soft key).
Highlight ON or OFF.
4.
Press Save
5.
(right soft key).
(right soft key).
Locking the keypad
Lock the keypad if you don’t want to accidentally dial numbers on
your handset.
Press and hold the “*”
appears on the main screen when the keypad is locked.
To unlock the keypad, press and hold the “*”
3 seconds.
key for 3 seconds. A lock icon
key again for
Page 25

DRAFT
Switching between tone dialing and pulse dialing
By default, your Calisto Pro uses tone dialing. You can switch to pulse
dialing if you are in an area that requires it.
On the main screen, press Menu
1.
(left soft key).
Use the navigator to highlight Initial Setup,
2.
and press Select
Highlight Dial Mode, and press Select
3.
(right soft key).
Highlight Tone or Pulse.
4.
Press Save
5.
(right soft key).
(right soft key).
Page 26

DRAFT
Voicemail
You must have voicemail service set up with your phone provider to
use the voicemail feature on your Calisto Pro.
Setting up voicemail
1.
On the main screen, press Menu
(left soft key).
2.
Use the navigator to highlight Initial Setup,
and press Select
3.
Highlight Voicemail Setup, and press
Select
4.
Highlight Number, and press Select
(right soft key). Use the keypad to enter the
number you call to access your voicemail, and
press Save
TIP: If you make a mistake when entering the number,
press BackSP
(right soft key).
(right soft key).
(right soft key).
(left soft key).
Checking voicemail
When you have a voicemail message, the voicemail indicator icon
appears at the top of the main screen, unless you’ve turned it off (see
“Setting up voicemail,” above).
To dial your voicemail number, do one of the following:
•
Press and hold the 1
or
•
Enter the voicemail phone number on the keypad and press
Talk /Fl ash
If the voicemail indicator icon
of your voicemail mesages, you can reset the icon. Follow steps 1–3
in “Setting up your voicemail,” above, and then highlight Indicator
Off and press Select
new voicemail message, the icon appears on the screen.
.
key for 3 seconds.
appears after you have retrieved all
(right soft key). The next time you get a
Page 27

DRAFT
Transferring Contacts from Your
Computer
The Calisto Pro Series has a USB port and software CD that lets you
transfer contacts from your computer’s Microsoft Outlook program to
the Phonebook on your handset.
To use this feature, you must first install the software from the Calisto
Pro Series CD.
System requirements
•
•
Operating systems: Windows 2000, XP, Vista
Outlook: Outlook 2000, 2002, 2003, 2007 (TBC), Outlook Express
Installing the software
Insert the Installation CD into your computer’s CD/DVD drive.
1.
If the CD doesn’t automatically run, double-click the My
2.
Computer icon on your computer desktop and select the CD.
Double-click the icon for the program Setup.exe.
Follow the onscreen instructions to install the software.
3.
Page 28

Using the Outlook® Phonebook Utility
Connect your computer to the bottom
1.
of the charging base using the USB
cable. The smaller end of the cable
goes into the base; the larger end
goes into a USB port on your
computer.
Click the Calisto Phonebook icon
2.
on your computer. The Plantronics
Phonebook Editor screen shows the list of contacts currently in
your Calisto phonebook.
DRAFT
Click Synchronize to Outlook.
3.
Click here
Page 29

DRAFT
4.
The Outlook Synchronization screen shows contacts that are new
or have been changed since the last transfer between Outlook and
your Calisto phonebook. New contacts are automatically marked
for transfer to your Calisto phonebook. Do either of the following:
–
To mark additional contacts for transfer, click in the
column
to the left of the contact name.
–
To unmark a contact for transfer, click the checkmark in the
column to the left of the contact name.
Click here to mark or unmark contacts for transfer
5.
Click Transfer to Phonebook. The Plantronics Phonebook Editor
screen now shows the list of contacts currently in your Calisto
phonebook, including the contacts you just transferred.
Click here
6.
When you are done transferring new and changed contacts, close
the window.
Page 30

DRAFT
Phonebook storage
Your Calisto phonebook can store 200 names, with 3 phone numbers
for each contact. If the contacts you are trying to transfer will
cause your phonebook to exceed 200 names, a message appears
prompting you to delete some contacts. Do either of the following:
Uncheck some contacts on the Outlook Synchronization screen to
•
transfer fewer contacts.
Delete some contacts on the Plantronics Phonebook Editor screen
•
(see “Deleting an Outlook Contact” on page 33).
TIP: If you make a mistake transferring contacts to your phonebook, you can
return to an earlier version of the phonebook (see “Restoring your phonebook”
on page 33).
Creating an Outlook contact
1. On the Plantronics Phonebook Editor screen, click Add New
Contact.
2. Enter the updated information, and click Add.
Click here
Page 31

DRAFT
Editing an Outlook contact
1.
On the Plantronics Phonebook Editor screen, click inside the cell
of the contact information (name, phone number, and so on) you
want to edit.
Enter the updated information, and press Enter.
2.
Page 32

Deleting an Outlook contact
1.
On the Plantronics Phonebook Editor screen, highlight the row
containing the contact you want to delete.
2.
On your computer keyboard, press Delete.
Restoring your phonebook
1.
On the Plantronics Phonebook Editor screen, click Restore
Phonebook.
2.
Click OK to confirm that you want to overwrite the current contacts
and go back to the phonebook entries stored on the handset
before you transferred the contacts.
DRAFT
Customizing the Outlook Phonebook Utility
On the Plantronics Phonebook Editor screen, click Config.
1.
Select any of the following options:
2.
Program Updates: Select this option if you want to be alerted
–
of software upgrades available for download in the future.
Outlook Synchronization: Select the version of Outlook you
–
want to use to transfer contacts, if you have more than one
version on your computer.
Item Colors: Select this option to personalize the colors of the
–
Outlook Synchronization screen.
Click OK.
3.
Viewing your updated contacts on your handset
On the main screen, press Menu (left soft key).
1.
Use the navigator to highlight Phonebook, and press Select
2.
(right soft key).
Page 33

DRAFT
Answering Calls from Your Computer’s
VoIP Program
You can use your Calisto Pro to answer VoIP calls from your
computer. To use this feature, you must first install the software from
the Calisto Pro Series CD.
Plantronics PerSonoCall VoIP Utility software provides the link
between your Calisto Pro and the VoIP software on your computer.
PerSonoCall software provides the ability to remotely detect and
answer/end a VoIP call using the Calisto headset or handset.
System requirements
•
Operating systems: Windows 2000, XP, Vista
•
VoIP service providers supported: Skype™, Yahoo!
Windows Live™ Messenger (VoIP calling service not included;
prior subscription to a supported VoIP service required)
®
Voice,
Installing the software
1.
Insert the Installation CD into your computer’s CD/DVD drive.
2.
If the CD doesn’t automatically run, double-click the My
Computer icon on your computer desktop and select the CD.
Double-click the icon for the program Setup.exe.
3.
Follow the onscreen instructions to install the software.
Using the PerSonoCall VoIP Utility
Connect your computer to the bottom
1.
of the charging base using the USB
cable. The smaller end of the cable
goes into the base; the larger end
goes into a USB port on your
computer.
Make sure your computer VoIP call
2.
software is running.
Page 34

Do one of the following:
3.
To place a call: Place the call as your normally
–
do using your VoIP software. Your handset
screen displays “Calling Internet.”
TIP: You must dial calls from the VoIP software on your
computer; you cannot dial VoIP calls from the handset.
To receive a call: When a VoIP call arrives,
–
you handset screen displays “Internet
Incoming Call.” Answer the call as you normally
would using the handset, speakerphone, or
headset (see “Receiving calls” on page 7).
To end a call: End a VoIP call in the same
–
DRAFT
way you normally would using the handset or
the headset (see “Ending calls” on page 9).
TIP: When you are on a VoIP call, you can talk as you
normally would from the handset, or transfer the call between the handset,
speakerphone, and headset (see “Switching calls between handset, headset,
and speakerphone” on page 8). If you are on a VoIP call and answer an
incoming mobile call, the VoIP call is dropped (see “Receiving a second
incoming call” on page 18).
PerSonoCall system tray icons
After the software is installed, four icons appear in the system tray
at the bottom of your computer screen indicating the status of your
headset’s connection to PerSonoCall, as follows:
Calisto Pro not detected.
Calisto Pro connected.
Calisto Pro connected, and call is active.
Calisto Pro connected, and call is locked on.
Page 35

DRAFT
Setting basic options
To set basic options, right-click the PerSonoCall system tray icon and
select Options.
Note: Some PerSonoCall features are not applicable to the Calisto Pro. These
options are grayed out on the screen.
Launch PerSonoCall when Windows starts: Check this box to
automatically launch the PerSonoCall application whenever you start
your computer. We recommend that you select this option.
Lock Radio headset link on: Check this box to prevent
PerSonoCall from turning off the radio link with your Calisto Pro when
no calls are active.
Show warning is Calisto radio link is left on for a long time:
Check this box to see an alert is the Calisto Pro radio link is left on for
more than 30 minutes.
Launch Audio Device Control Panel: Click this link to open the
audio device control panel, where you can adjust your audio settings
for Calisto Pro. If you experience any audio problems, make sure the
Sound Playback and Sound Recording lists have Calisto Pro selected
as the default device.
Page 36

DRAFT
Viewing the current status screen
To view the current status screen right-click the PerSonoCall system
tray icon and select Options.
Note: Some PerSonoCall features are not applicable to the Calisto Pro. These
options are grayed out on the screen.
Headset Status Box: Provides information you may need for
technical assistance. The Headset Indicators listed will be checked if
they are active.
Softphone Status Box: Lists the selectable outgoing lines as well as
the number of calls active, ringing, on hold, and completed.
Note: In some cases, compatible softphones may not show the available
outgoing line in the Softphone Status Box. This does not affect how the
softphone operates with PerSonoCall.
Call Status Box: Shows the current status and call logs placed
through your VoIP software using Calisto Pro.
Page 37

DRAFT
Using the Handset with the Charging
Base
Locating the handset from the charging base
Press the handset locator button on the charging base. The
handset rings. After you have located the headset, press End
stop the ringing.
Press here
Note: The handset will
not ring if the battery
has run out of charge
Registering your handset with the charging base
to
Your handset comes pre-registered with the base. If the handset
screen displays “Searching for base” even when the handset is on
the base and the AC power adapter and phone cord are properly
connected, follow these steps to re-register the handset with the
base.
On the main screen, press Menu
1.
(left soft key).
2.
Use the navigator to highlight Initial Setup,
and press Select
3.
Highlight Headset/Base, and press Select
(right soft key).
4.
Highlight Register to Base, and press Select
key).
(right soft key).
(right soft
Page 38

Using a Different Headset
Pairing with a new headset
You Calisto handset can be used with other Plantronics Bluetooth
headsets. You can pair only one headset at a time with the Calisto
handset.
1.
On the main screen, press Menu
(left soft key).
DRAFT
2.
Use the navigator to highlight Initial Setup, and press Select
(right soft key).
3.
Highlight Headset/Base, and press Select
4.
Highlight Pair New Headset, and press Select
key).
Select either of the following options:
5.
–
Pair Headset: To pair with a new headset,
or to re-pair with your original headset if the
icon is consistently displayed on the
screen (see “Troubleshooting” on page 40),
highlight this option, press
Select
instructions. The steps are the same as in “Pairing your headset
with your mobile phone” on page 10.
(right soft key), and follow the onscreen
(right soft key).
(right soft
Remove Headset: To stop pairing with the current headset,
–
you can either pair a new headset (this automatically replaces
the current pairing), or you can manually disconnect. To
manually remove a headset, highlight this option, press Select
(right soft key), and then press Delete (right soft key).
Using a corded headset
Insert a corded headset into the corded headset jack on the right side
of the handset. When a corded headset is connected to the Calisto
handset, calls are automatically sent to the headset. To use the
handset or the speakerphone, remove the corded headset.
Page 39

DRAFT
Troubleshooting
Problem Solution
Handset is not working. Make sure the battery is properly installed
and fully charged. A full charge my take up to
15 hours. The screen displays a full battery icon
16
and the words “Charging Done” when the
battery is fully charged.
Make sure the base is plugged in correctly.
The handset may not be registered to the base
properly. Follow the steps in “Registering your
handset with the charging base” on page 38 to
re-register the handset with the base.
The handset will not work if it is connected to
your computer and the Outlook Phonebook
Utility is running on the computer. Close the
Outlook Phonebook software on your computer.
Headset is not working. The headset battery is dead. Place the headset
onto the charging base to charge. The LED
indicator glows red when the headset is
charging and glows blue when the headset is
fully charged.
If the headset is not working with a mobile
phone, follow the steps in “Pairing your headset
with mobile phone” on page 10.
If the headset is not working with the handset,
follow the steps in “Pairing with a new headset”
Page 40
on page 39.

DRAFT
Handset and/or headset
does not ring.
The ringer is turned off. Follow the steps
in “Turning the ringer off” on page 23 for
instructions on how to turn the ringer back on.
The headset is not properly paired with the
handset. Press the Headset
and see if the headset icon is displayed on the
handset screen. If the icon is not displayed,
follow the steps in “Pairing with a new headset”
on page 39 to pair your headset with your
handset.
The base is not properly connected to a
telephone jack.
The headset battery is dead. Place the headset
onto the charging base to charge. The LED
indicator glows red when the headset is
charging and glows blue when the headset is
button once
The handset/headset
does not ring for VoIP
calls, or VoIP calls are
not working.
fully charged.
PerSonoCall is not installed or not configured
correctly.
Make sure you have the latest version of
PerSonoCall. Please check
com/support
Downloads” to make sure you have the latest
version.
The USB cable is disconnected or damaged.
Unplug and replug the cable into both your
handset and your computer.
You are using an older version of the VoIP
application on your computer that is not
supported by your Calisto Pro. Download the
latest version of your VoIP software.
and click on “Software
www.plantronics.
Make sure Calisto is selected as the audio
device in the options on your VoIP software and
that it is not muted.
Microsoft Windows is having problems. Make
sure you have the latest updates from Microsoft.
Try to restart your computer.
Page 41

DRAFT
There is no dial tone. Check the phone line connection from the base
to the wall phone line jack to make sure they are
properly connected.
Plug another working phone into the same
jack. If there is still no dial tone, check with your
phone service provider for assistance.
If the headset does not have a dial tone but the
handset does, check to see if the headset is
paired with handset properly. Press the Headset
button once and see if the headset icon is
displayed on the handset screen. If the icon is
not displayed, follow the steps in “Pairing with a
new headset” on page 39 to pair your headset
Caller ID is not
displaying.
The caller cannot hear
me.
with your handset.
Make sure you subscribe to caller ID service.
Check with your phone service provider.
The incoming call party has caller ID blocking
and is restricting the displaying number.
Check the handset screen to make sure the
handset is not muted.
If you are using the headset, make sure you
have transferred the call to the headset. See
“Switching calls between handset, headset, and
speakerphone” on page 8 for instructions.
Make sure the headset microphone is
pointed toward your mouth for optimal audio
performance.
The call has low volume.
Page 42
If you experience low volume on the headset,
increase the volume of the headset. See
“Adjusting call volume using your headset” on
page 12 for instructions.
If volume is low on the handset, increase the
volume of the handset. See “Adjusting call
volume” on page 8 for instructions.

DRAFT
There is static and/or
interference on the call.
I am having problems
Your handset might be out of range of the
base. Move the handset closer to the base. The
maximum handset-to-base range is 300 feet.
Your headset might be out of range of the
handset. Move the headset closer to the
handset. The maximum handset-to-base range
is 33 feet.
If the base is in close proximity of microwaves,
ovens, TVs, and any electrical appliances, try
moving it away from those devices.
If you have DSL on the same phone line, be sure
that you are using a DSL filter between the base
and the telephone jack. You may obtain a DSL
filter from your DSL service provider.
If you have another headset paired with your
pairing the headset with
a mobile phone.
The headset does not
respond when I page it.
The handset does not
respond when I page it.
Outlook sync of contacts
to the handset is not
working.
mobile phone, you must disconnect that
headset from your phone before you pair the
phone with your Calisto Pro headset.
Turn your mobile phone off and back on, then
try the pairing process again.
The headset is out of range of the handset.
The handset is out of range of the base.
Make sure the base is connected to your
computer using the supplied USB cable.
Make sure you have the latest version of the
Outlook Phonebook Utility software.
Make sure the Outlook Utility software
recognizes your Calisto Pro by showing it is
connected at the lower left of the screen.
Page 43

DRAFT
The voicemail indicator
icon
Handset battery life is
short.
Caller ID does not add
is not working.
Voicemail is not set up properly. See “Setting up
voicemail” on page 27 for setup instructions.
Your voicemail service provider is having issues.
Contact the provider.
You need to subscribe to voicemail service to
use this feature. Contact your phone service
provider.
The handset is not fully charged. Place the
handset back in the charging base and charge
for up to 15 hours.
The handset battery is old and will not charge
well. Replace the battery; see “Changing the
battery” on page 4 for instructions.
If you want to use the Caller ID display to save a
16
a “1” in front of the area
code before saving to
the phonebook.
Caller ID added the area
code and/or a “1” to the
front of the area code,
but I am located in the
same area code as the
number, so I do not need
to dial the area code to
call out.
number to the phonebook or to return the call,
press the # key once on your handset to add
a “1” in front of the displayed caller ID number
before saving to the phonebook or dialing out.
Press the # key once to remove the “1” in
front of the phone number, or press the # key
repeatedly until the area code is removed from
the display.
Page 44

Product Specifications
Headset specifications
Battery Life/Talk Time: Up to 8 hours*
•
Standby Time: Approximately 240 hours**
•
6.5 hours*
DRAFT
Charge Time: 2 hours
•
Power Requirements: 5V DC–300 mA
•
Battery Type: Lithium Ion Polymer
•
Storage and Usage Temperature: 50F–104F (10C–40C)
•
Bluetooth version v1.2 supports eSCO standard; up to 33 ft. range
•
from headset to compatible device
Compatible with Bluetooth-enabled mobile phones or Bluetooth
•
devices supporting headset or hands-free profiles
Weight: .65 oz.
•
Noise-canceling microphone
•
Call Answer/End, Volume, Redial functions
•
* Performance may vary by device.
Up to 3 hours
** Headset can last up to four days without charging, based on average talk time of 1.5 hours per day.
Handset specifications
Battery Life/Talk Time: Up to 8 hours
•
Standby Time: Up to 100 hours
•
Replaceable Battery: 2x AAA Ni-MH battery pack, 700~750mAh
•
Charge Time: Typical 16 hours
•
Multi-language Menu: English/French/Spanish
•
LCD Type and Resolution FSTN/128*80 dots B/W
•
LCD Size 28.14 mm X 23.98 mm (L x W)
•
15
6.5 hours
Page 45

DRAFT
Help/Contact
Technical assistance
Visit our Web site at www.plantronics.com/support for technical
support including frequently asked questions, compatibility, and
accessibility information.
For additional assistance, reference the QuickTips card that is placed
under the charging base or call 1-888-237-557 to speak to a Calisto
support specialist.
Page 46
 Loading...