

Page 1
IT3500 User’s Guide
KEM-PK35603
Page 2
Safety precautions
Make sure to follow the directions below to prevent personal injury, accidents or damage to the Cube.
Failure to follow the directions below may lead to serious injury or
death.
h Make sure the power plug is firmly in place when inserted.
h Do not use a damaged power plug, power cable, or damaged outlet.
h Do not use force to remove the power cable from the device.
h Do not touch the power plug with wet hands.
h Do not connect more than one device to a single outlet.
h Do not place anything heavy on the power cable.
h Make sure to power off the Cube and disconnect the power plug from the outlet before moving it.
h Make sure to disconnect any linked cables from other devices before moving the Cube.
Changes or modifications to this equipment not expressly approved by the
party responsible for compliance could void the user's authority to operate the equipment.
This equipment has been tested and found to comply with the limits for a Class B digital device,
pursuant to Part 15 of the FCC Rules. These limits are designed to provide reasonable protection
against harmful interference in a residential installation. This equipment generates uses and can
radiate radio frequency energy and, if not installed and used in accordance with the instructions, may
cause harmful interference to radio communications. However, there is no guarantee that interference
will not occur in a particular installation. If this equipment does cause harmful interference to radio or
television reception, which can be determined by turning the equipment off and on, the user is
encouraged to try to correct the interference by one or more of the following measures:
‧ Reorient or relocate the receiving antenna.
‧ Increase the separation between the equipment and receiver.
‧ Connect the equipment into an outlet on a circuit different from that to which the receiver is
connected.
‧ Consult the dealer or an experienced radio/TV technician for help.
FCC RF Radiation Exposure Statement
Caution: To maintain the compliance with the FCC’s RF exposure guideline, place the base unit at
least 20 cm from nearby persons.
Failure to follow the directions below may lead to personal injury
or property damage.
2
Page 3

h Hold and pull out the plug by its body when disconnecting it from the outlet, as pulling the plug out
by the cable may cause it to be damaged. This may cause a fire, or the Cube may not turn on
normally.
h Ensure that the power plug is disconnected before cleaning the Cube. Failing to do so may cause
electric shock or fire.
h Do not let water come into contact with the power adaptor, as this may cause electric shock or fire.
h Do not use the Cube outdoors in snowy or rainy weather, or near any water.
h When cleaning the floor with water, avoid any water contact with the power adaptor.
h Do not place the power adaptor near a heater, as this may cause fire.
Installation
Failure to follow the directions below may lead to personal injury or
property damage.
h When installing the Cube on a cabinet or shelf, do not let the front of the Cube project beyond its
front edge. This may cause the Cube to fall, resulting in damage to the device or personal injury.
h Do not place the power cable near a heater, as it may melt, causing electric shock or fire.
h Do not install the Cube in a car or in a location exposed to oil, smoke, moisture, water, or rainwater.
Contact of these materials with the Cube may cause electric shock or fire.
h Disconnect the power plug when there is thunder or lightning. Failing to do so may cause electric
shock or fire.
h Electric outlets for any AC devices should be near the equipment and easily accessible.
h Only use the power adaptor provided (5VDC, 2000mA).
3
Page 4

IMPORTANT SAFETY INSTRUCTIONS
When using your Wireless Internet Cube and accessories, basic safety precautions should always be
followed to reduce the risk of fire, electric shock and injury to persons, including the following:
h Do not use near water, for example, near a bathtub, wash bowl, kitchen sink or laundry tub, in a wet
basement or near a swimming pool.
h Electric outlets for any AC devices should be near the equipment and easily accessible.
h Use only the power cable and batteries indicated in this manual. Do not dispose of batteries in a fire,
as they may explode. Check local requirements for disposal of batteries.
SA VE THESE INSTRUCTIONS
4
Page 5

Table of Contents
Controls...................................................................................................................................1
Key Description .............................................................................................................. 1
General Controls ............................................................................................................ 2
Soft keyboard .................................................................................................................2
Power on ........................................................................................................................5
Power off ........................................................................................................................5
Main Menu .....................................................................................................................5
Photo........................................................................................................................................6
Folder or Thumbnail View .............................................................................................. 7
During Slideshow or Still view ........................................................................................ 8
Organizer.................................................................................................................................9
Clock ............................................................................................................................ 10
Alarm............................................................................................................................ 10
Alarm activated view .................................................................................................... 12
Calendar....................................................................................................................... 12
Calendar navigation ..................................................................................................... 13
Music......................................................................................................................................13
List View....................................................................................................................... 14
Play View .....................................................................................................................15
Internet Radio.......................................................................................................................16
List View....................................................................................................................... 16
Play view ......................................................................................................................17
My Favorites................................................................................................................. 18
User-defined Stations................................................................................................... 18
Web Content.........................................................................................................................22
FrameChannel Activation ............................................................................................. 22
FrameChannel .............................................................................................................23
Folder or Thumbnail ..................................................................................................... 23
Slide Show/Still view .................................................................................................... 23
Settings..................................................................................................................................24
Slideshow Settings....................................................................................................... 26
Setting the Date & Time ............................................................................................... 26
Effect Settings .............................................................................................................. 27
Information ................................................................................................................... 28
Main Settings ...............................................................................................................28
Wi-Fi Settings............................................................................................................... 29
Other.......................................................................................................................................33
Message Prompt .......................................................................................................... 33
USB slave mode .......................................................................................................... 34
Warranty....................................................................................................................... 35
Technical Support.........................................................................................................36
5
Page 6
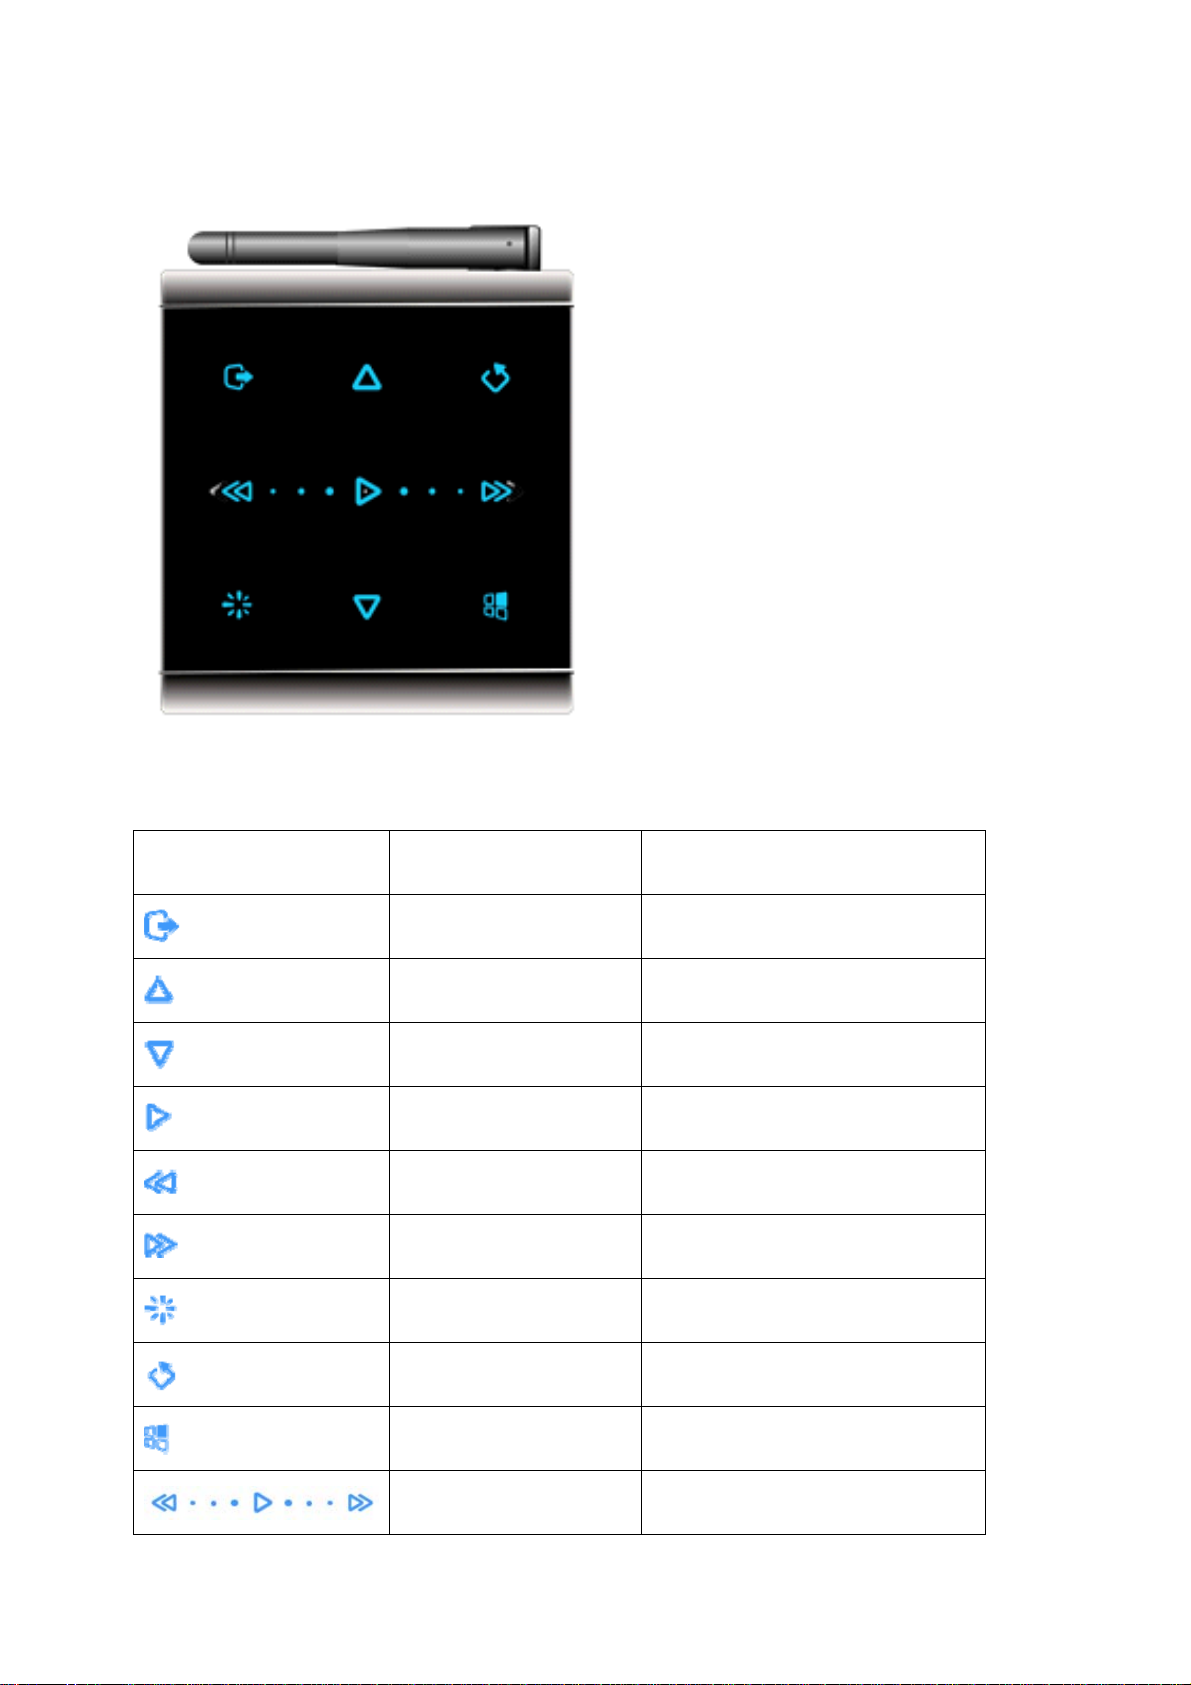
Wireless Internet Cube Overview
Controls
Key Description
Icon Key Functions
Hot Displays a pop-up options menu
Up Move up/Volume up
Down Move down/Volume down
Open Confirm/Open/Play/Pause/Stop
Left Move left
Right Move right
Standby Enter Standby mode/View
Esc Back to last view/Cancel
Mode Back to previous main menu
Slider
Slide picture from left to right or go
back/go forward
1
Page 7
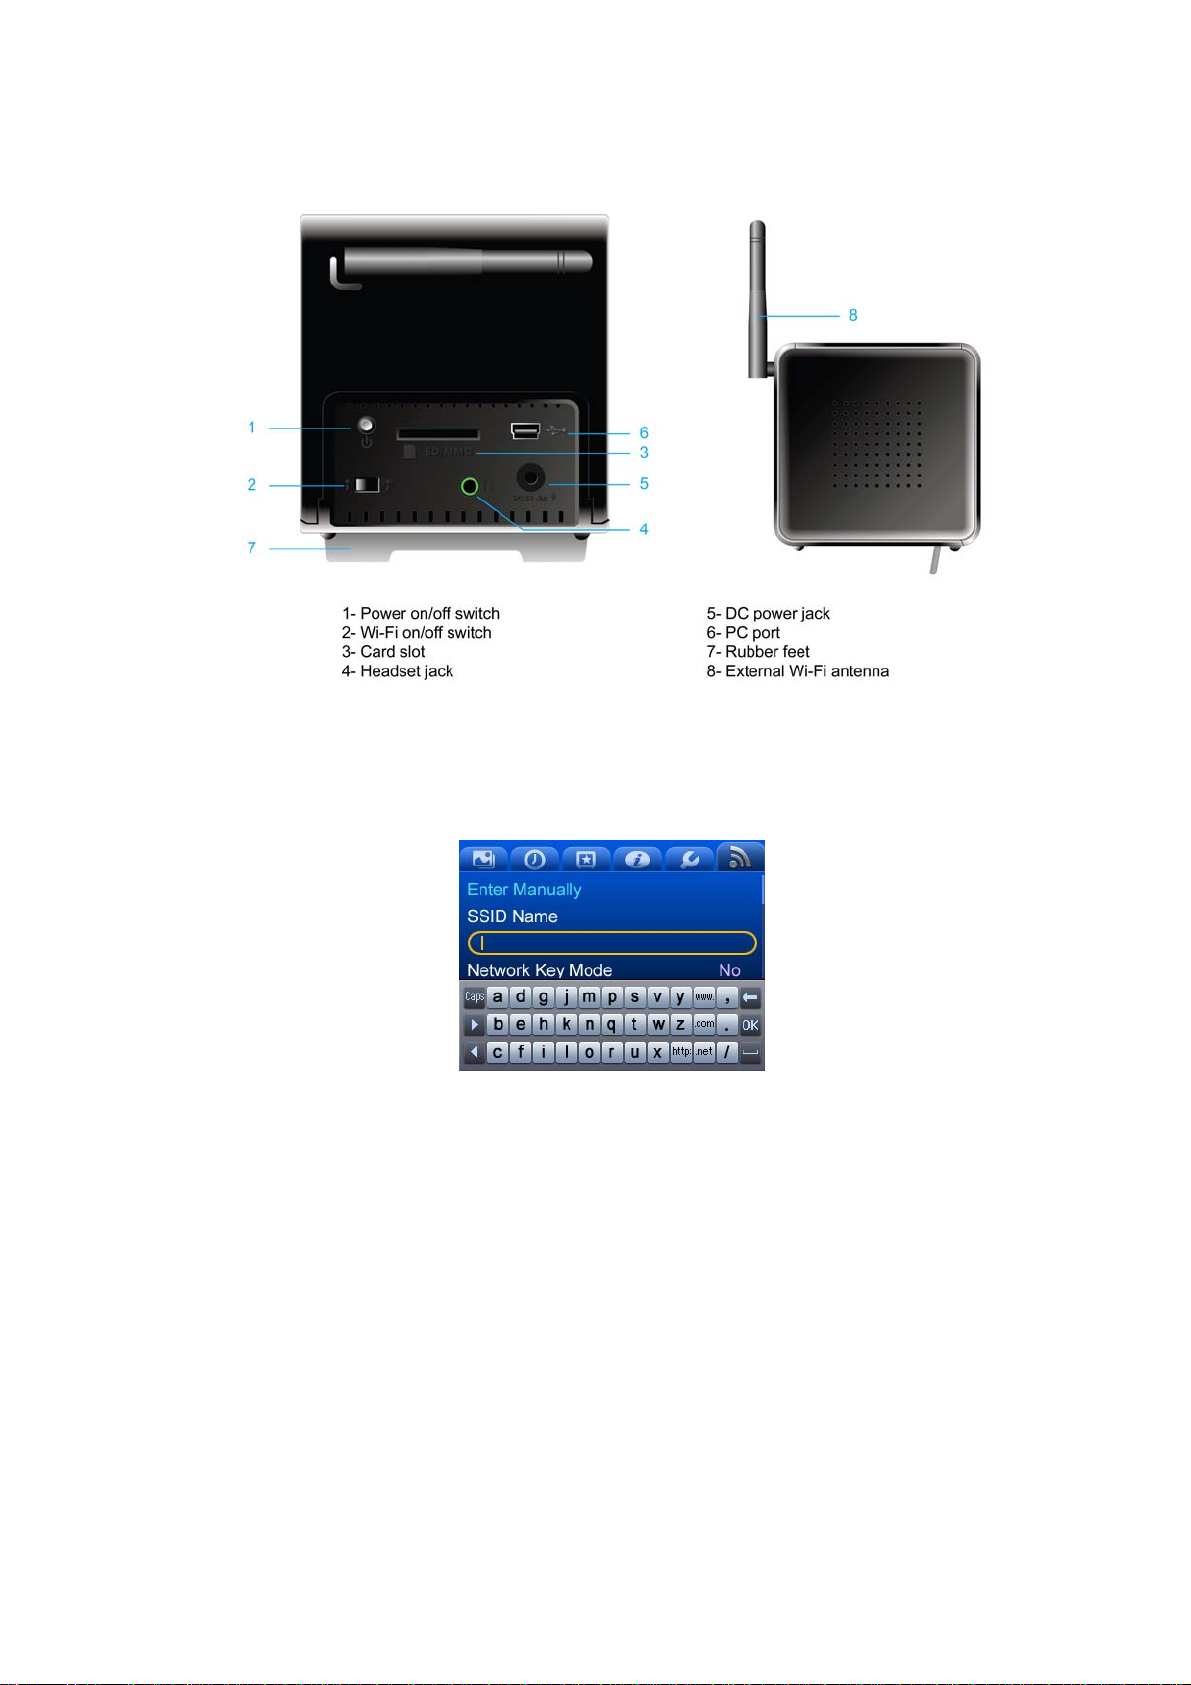
General Controls
Soft keyboard
■ Soft keyboard layout
The soft keyboard layout contains 3 lines and each line contains 13 keys.
Total: 39 keys.
Select one row (3 keys) at a time
3 categories: English, Number & Symbol, Special characters
Default soft keyboard: English lowercase board
2
Page 8
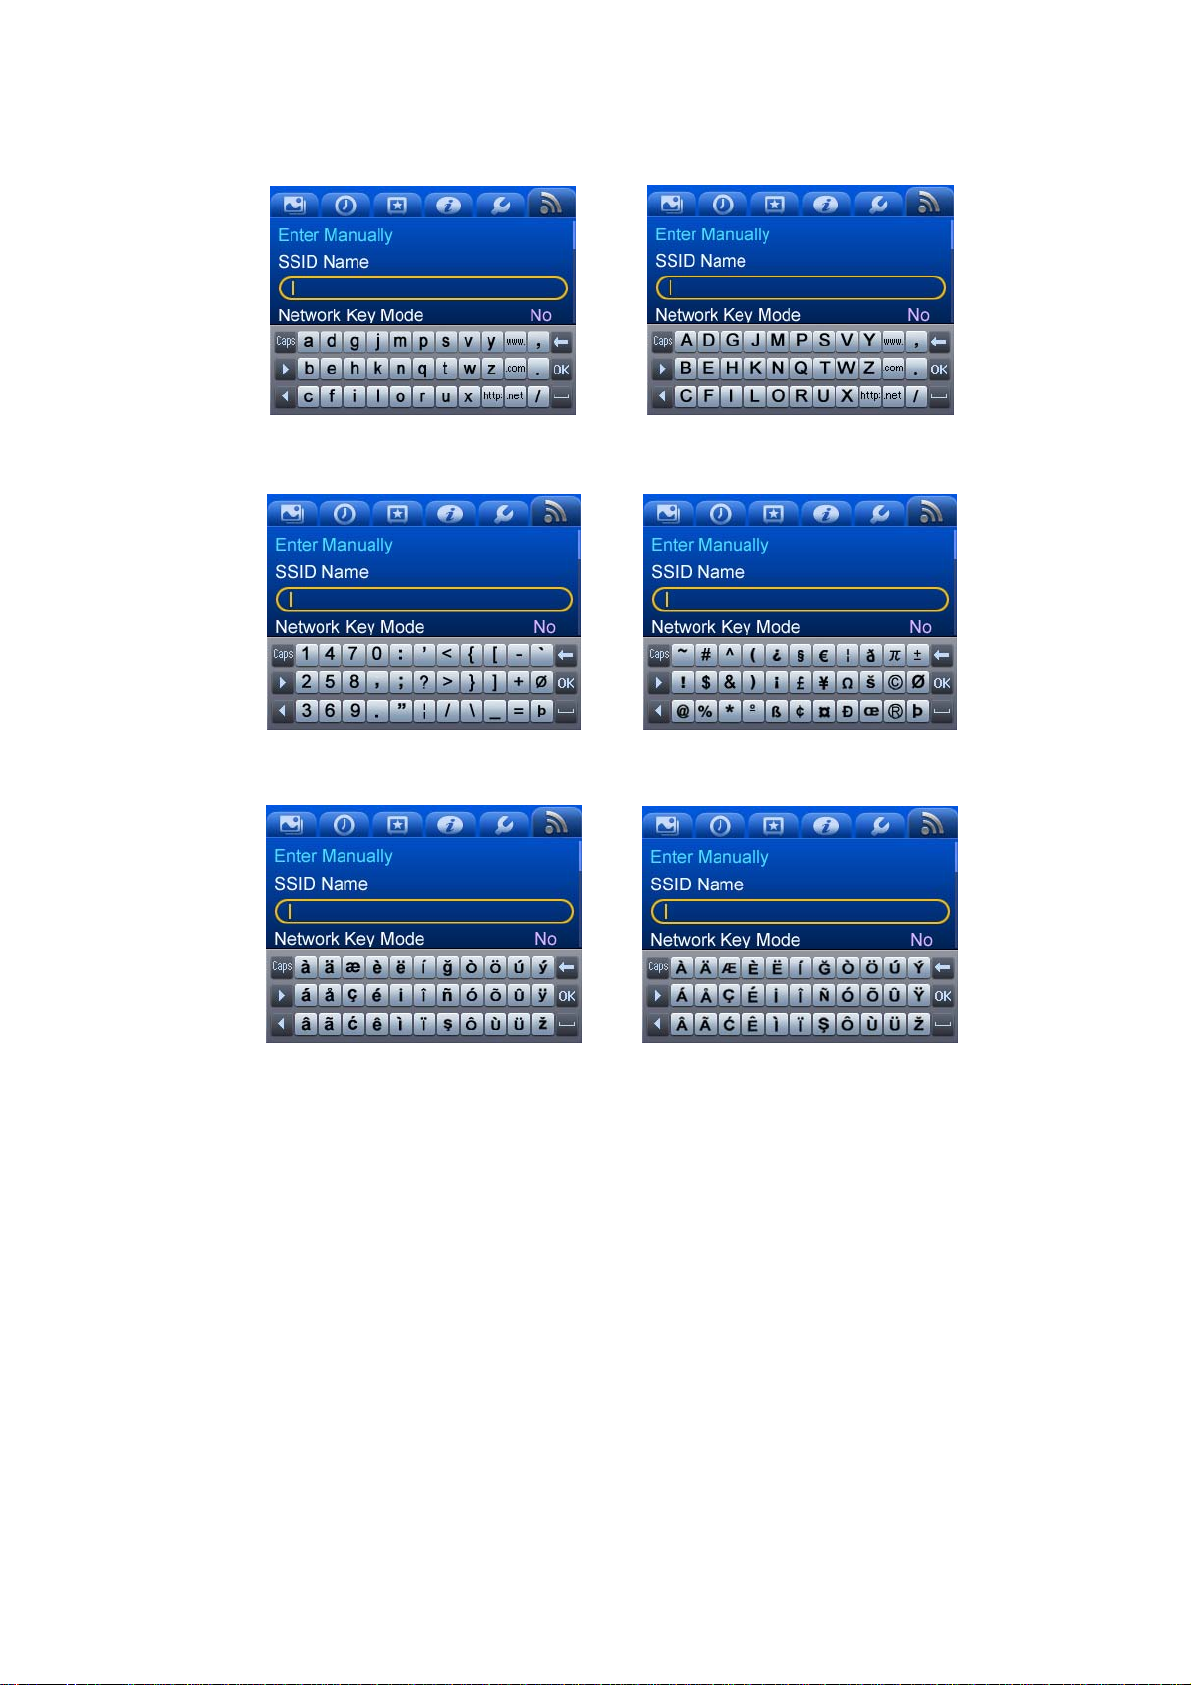
■ English soft keyboard
■ Number/Symbol soft keyboard
■ Multilanguage soft keyboard
3
Page 9
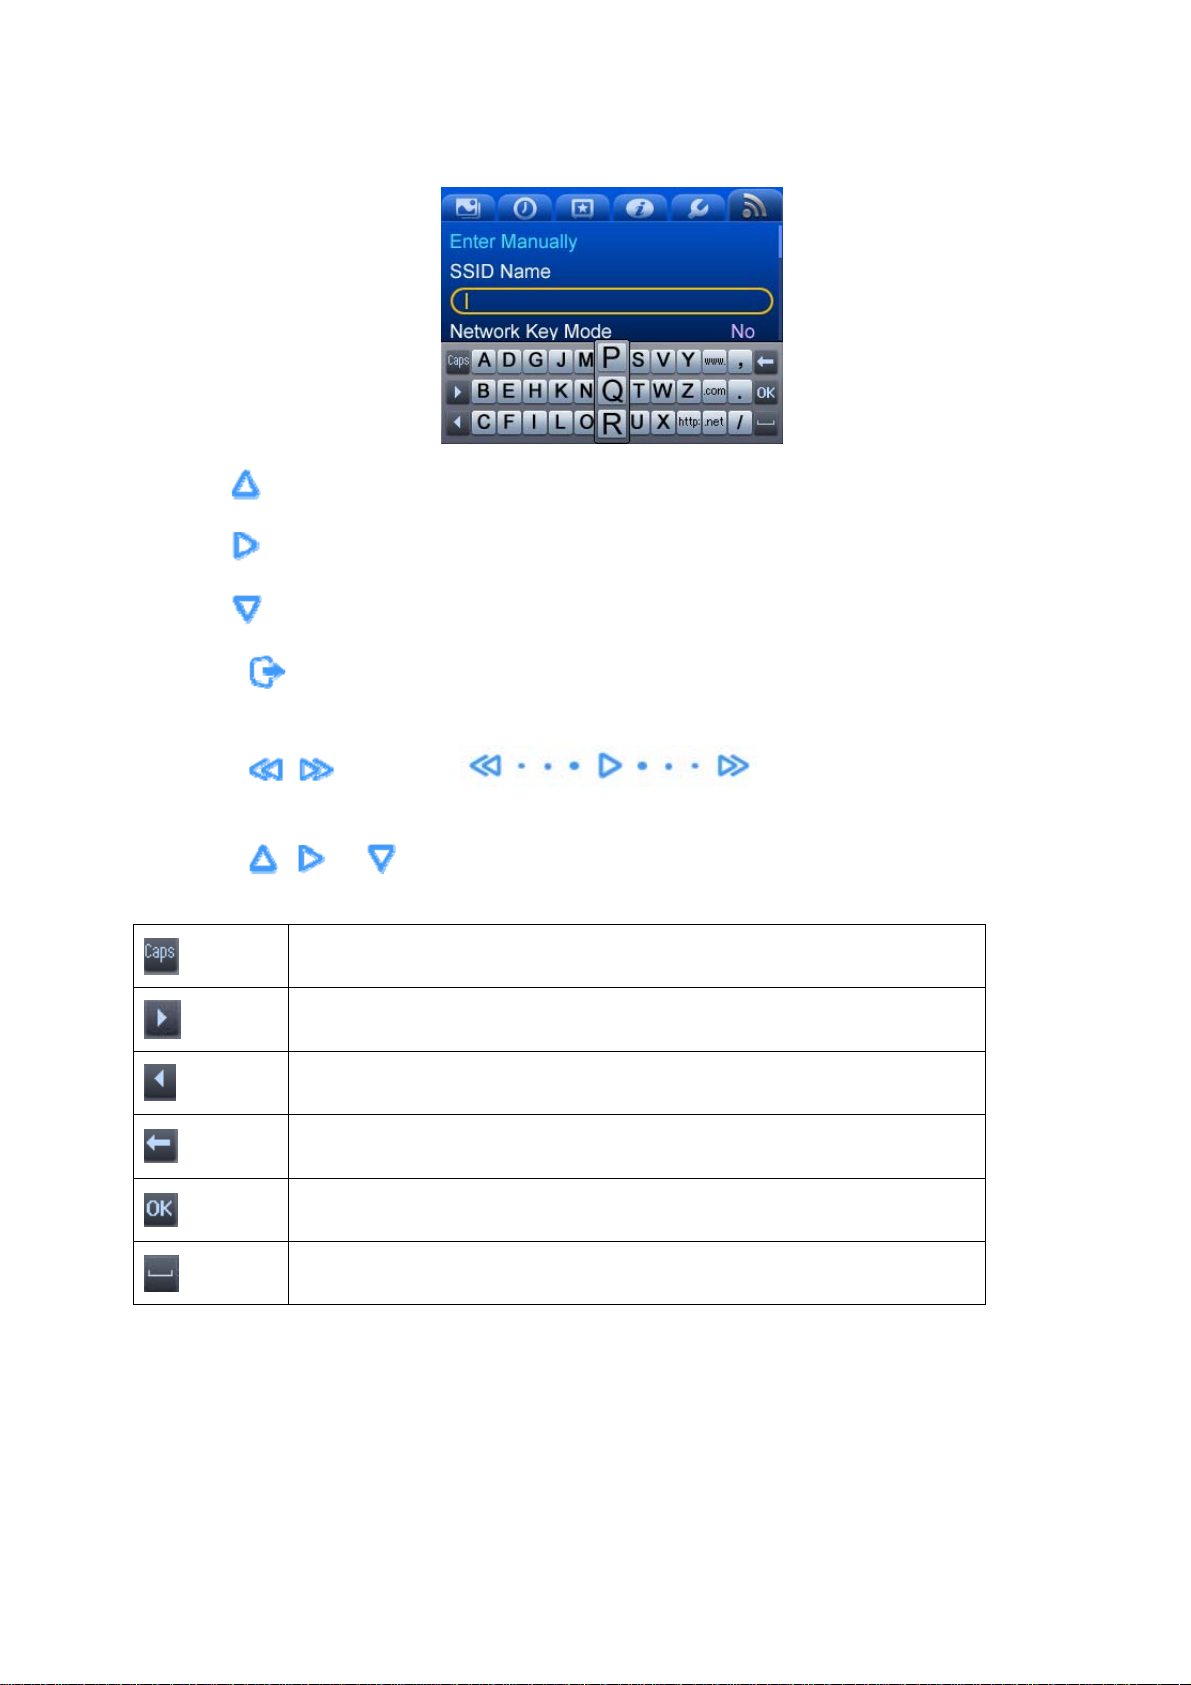
Letters are selected in columns.
z Use
z Use
z Use
z Touch
characters).
z Touch
selected row.
z Touch
to access the letter at the top (P)
to access the letter in the middle (Q)
to access the letter at the bottom (R)
to switch between soft keyboard layouts (English, Number & Symbol, and Special
, , or slide with to select insert line and enlarge the
, or to insert special characters.
Switch Lowercase/Uppercase or Number/ Symbol
Move cursor right
Move cursor left
Delete a character
Save and exit
Spacebar
4
Page 10
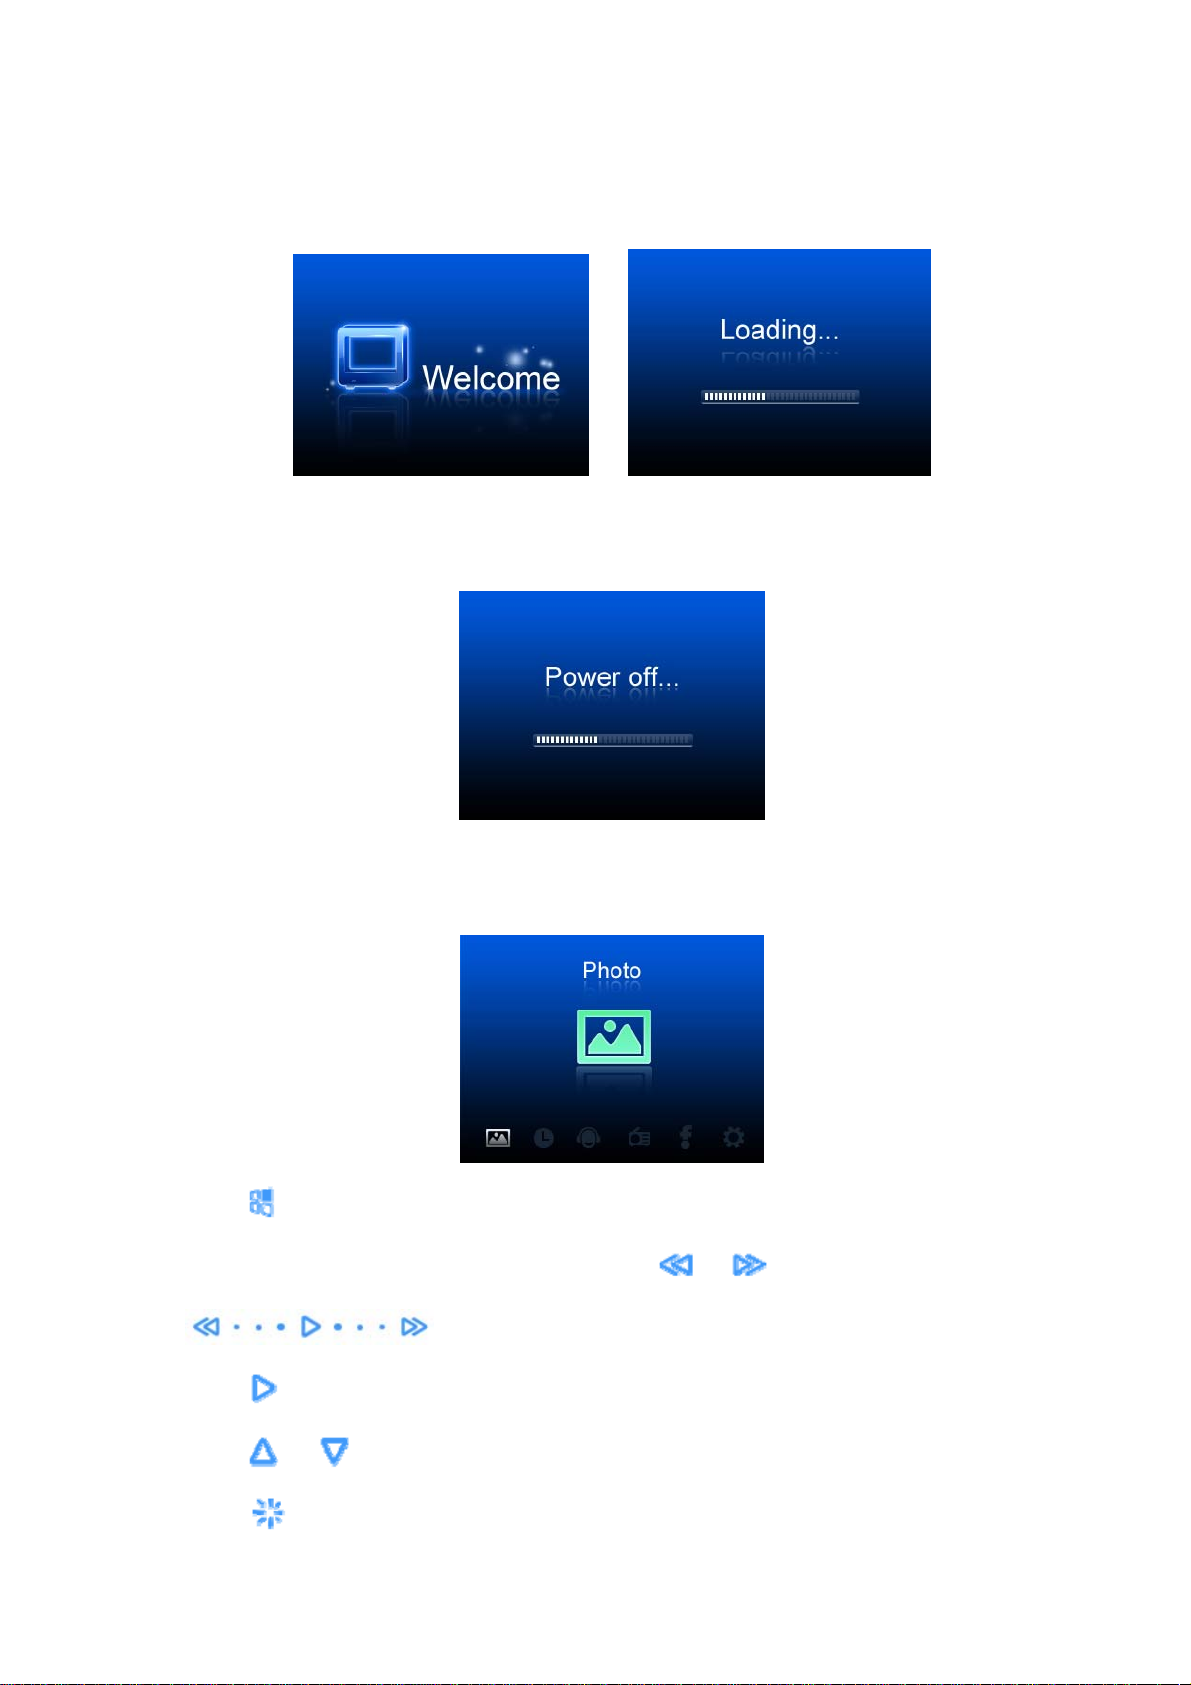
Power on
After you connect the power cable, turn on the power switch. The device will display a welcome screen.
Power off
After you turn off the power switch, the device will show a shut-down bar as it powers off.
Main Menu
After turning on the Cube, the main menu and the following screen will display:
z Touch
Music, Internet Radio, Web Content, Settings. Touch
to browse through the 6 features displayed on the bottom of the screen: Photo, Organizer,
or or slide with
to go to the previous or next feature.
z Touch
z Touch
z Touch
to open your selected feature.
or to adjust the volume.
to enter standby mode. Touch any key to exit and return to last view.
5
Page 11
z Touch to display or close pop-up options menu:
1) Start music / Stop radio / Stop music
2) Now playing
Options menu operation:
Touch
Touch
Touch
Photo
or to browse options.
or to go back to options menu or browse sub-options (if any).
to select your desired option.
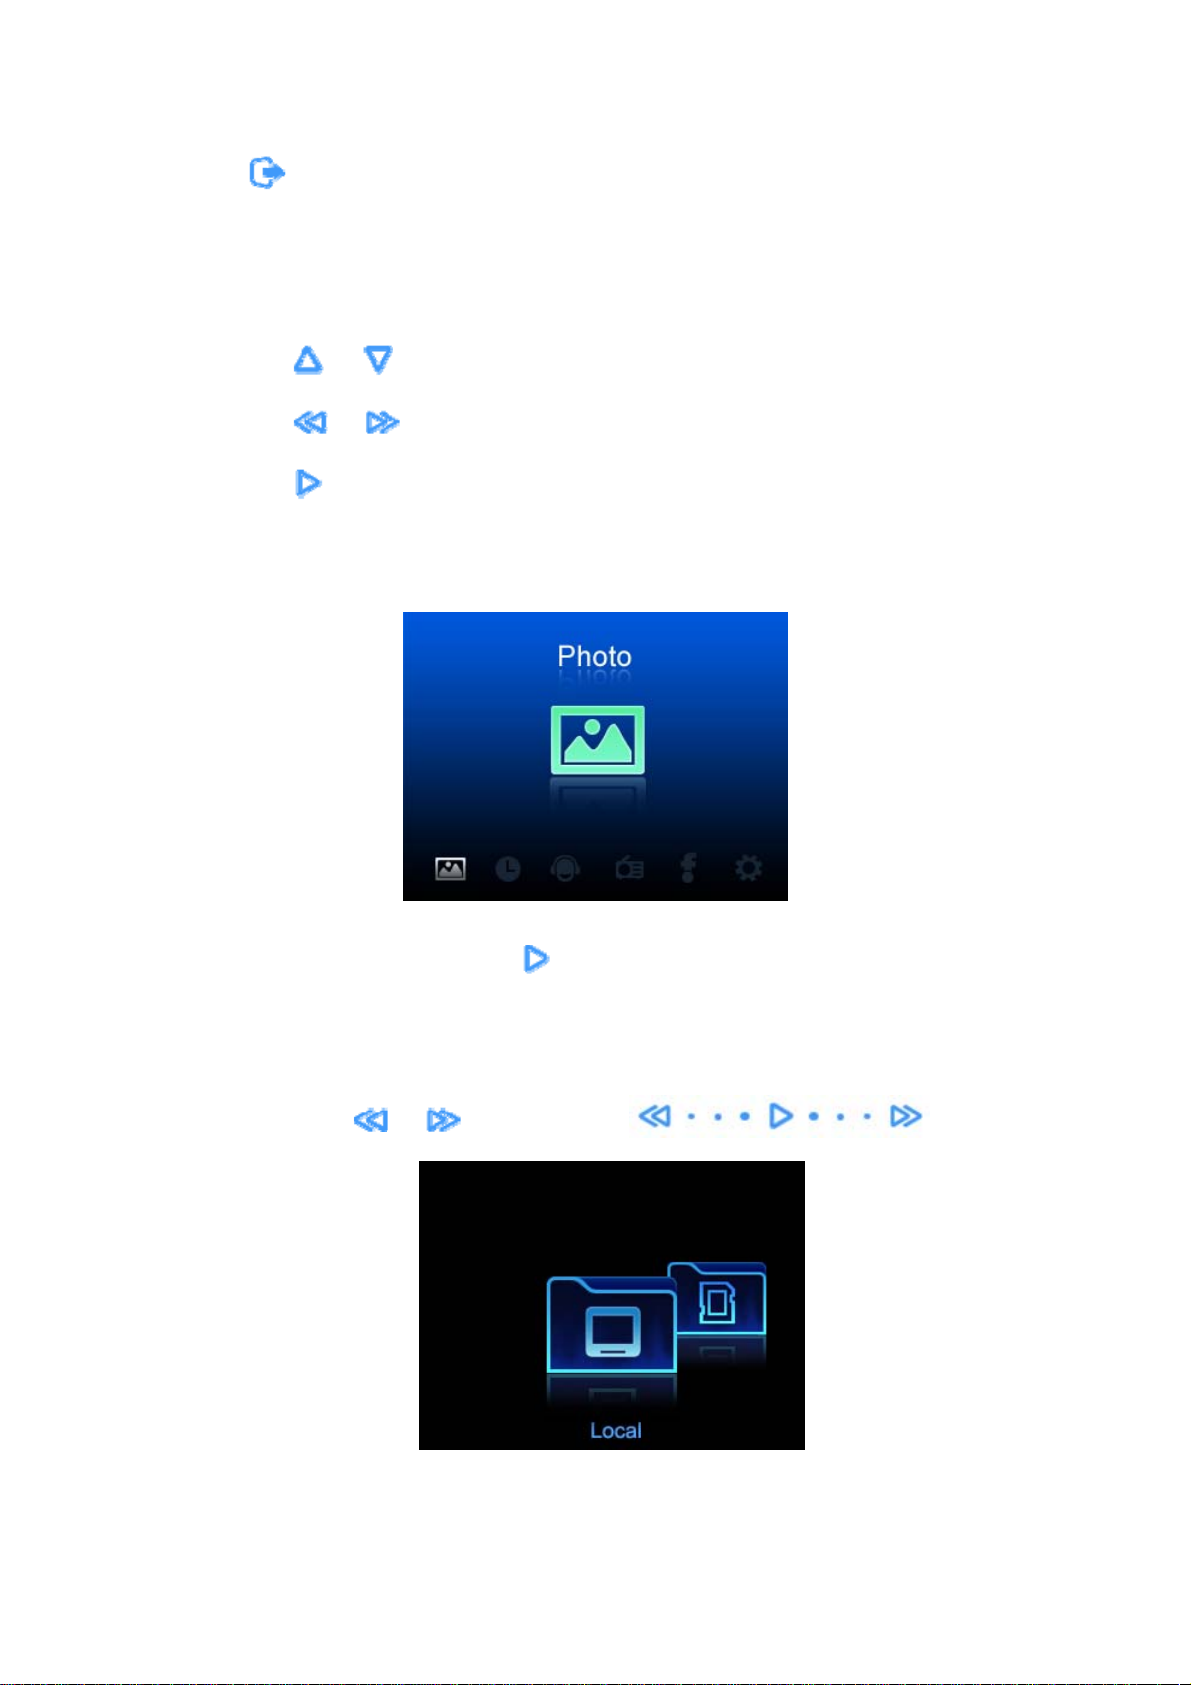
When the Photo icon is highlighted, touch
z If you have inserted a SD/MMC card, the unit will display two icons: Local and SD. If a device is not
attached, the SD icon will not be displayed. You can move between the Local icon and the SD icon
either by touching
or , or by sliding with .
to use the Photo feature.
6
Page 12

Folder or Thumbnail View
When either of these two icons (Local, SD) is selected you can touch
To browse pictures by thumbnail you can:
z Touch
Local icon.
z If there are folders within the Local folder, touch
z If there are pictures in this folder, it will display the thumbnails.
z Display previous picture or next picture with
z Touch
z When a picture is selected (i.e. magnified in the foreground), touching
from current picture.
z Touch
or , or slide with to change your selection to the
to open the folder.
or or slide with
.
to return to the previous menu.
to pop-up or close the options menu (5 items):
to open the folder.
will begin a slideshow
1) Start slide show: Show all pictures in the current folder in slideshow mode
2) Copy: Copy current file or folder to internal memory/SD
3) Delete: Delete current file or folder
4) Start music /Stop radio /Stop music
5) Now playing: Go to “now playing” view
7
Page 13

During Slideshow or Still view
z Touch
z Touch
z Touch
1) Start Slide Show
2) Rotate
z Touch
to go back to Thumbnail view.
to stop or play slideshow.
to pop-up or close options menu (7 items):
to open rotate view mode -- 2 icons (clockwise and counterclockwise) will appear.
z Touch
z Touch
z Touch
3) Zoom
z Touch
to rotate counterclockwise 90º.
to rotate clockwise 90º.
to go back to Still View.
to enter Zoom View and 2 icons will appear (zoom in/zoom out).
z Touch
z Touch
to zoom in until zoom is maximized.
to zoom out until zoom is minimized.
8
Page 14
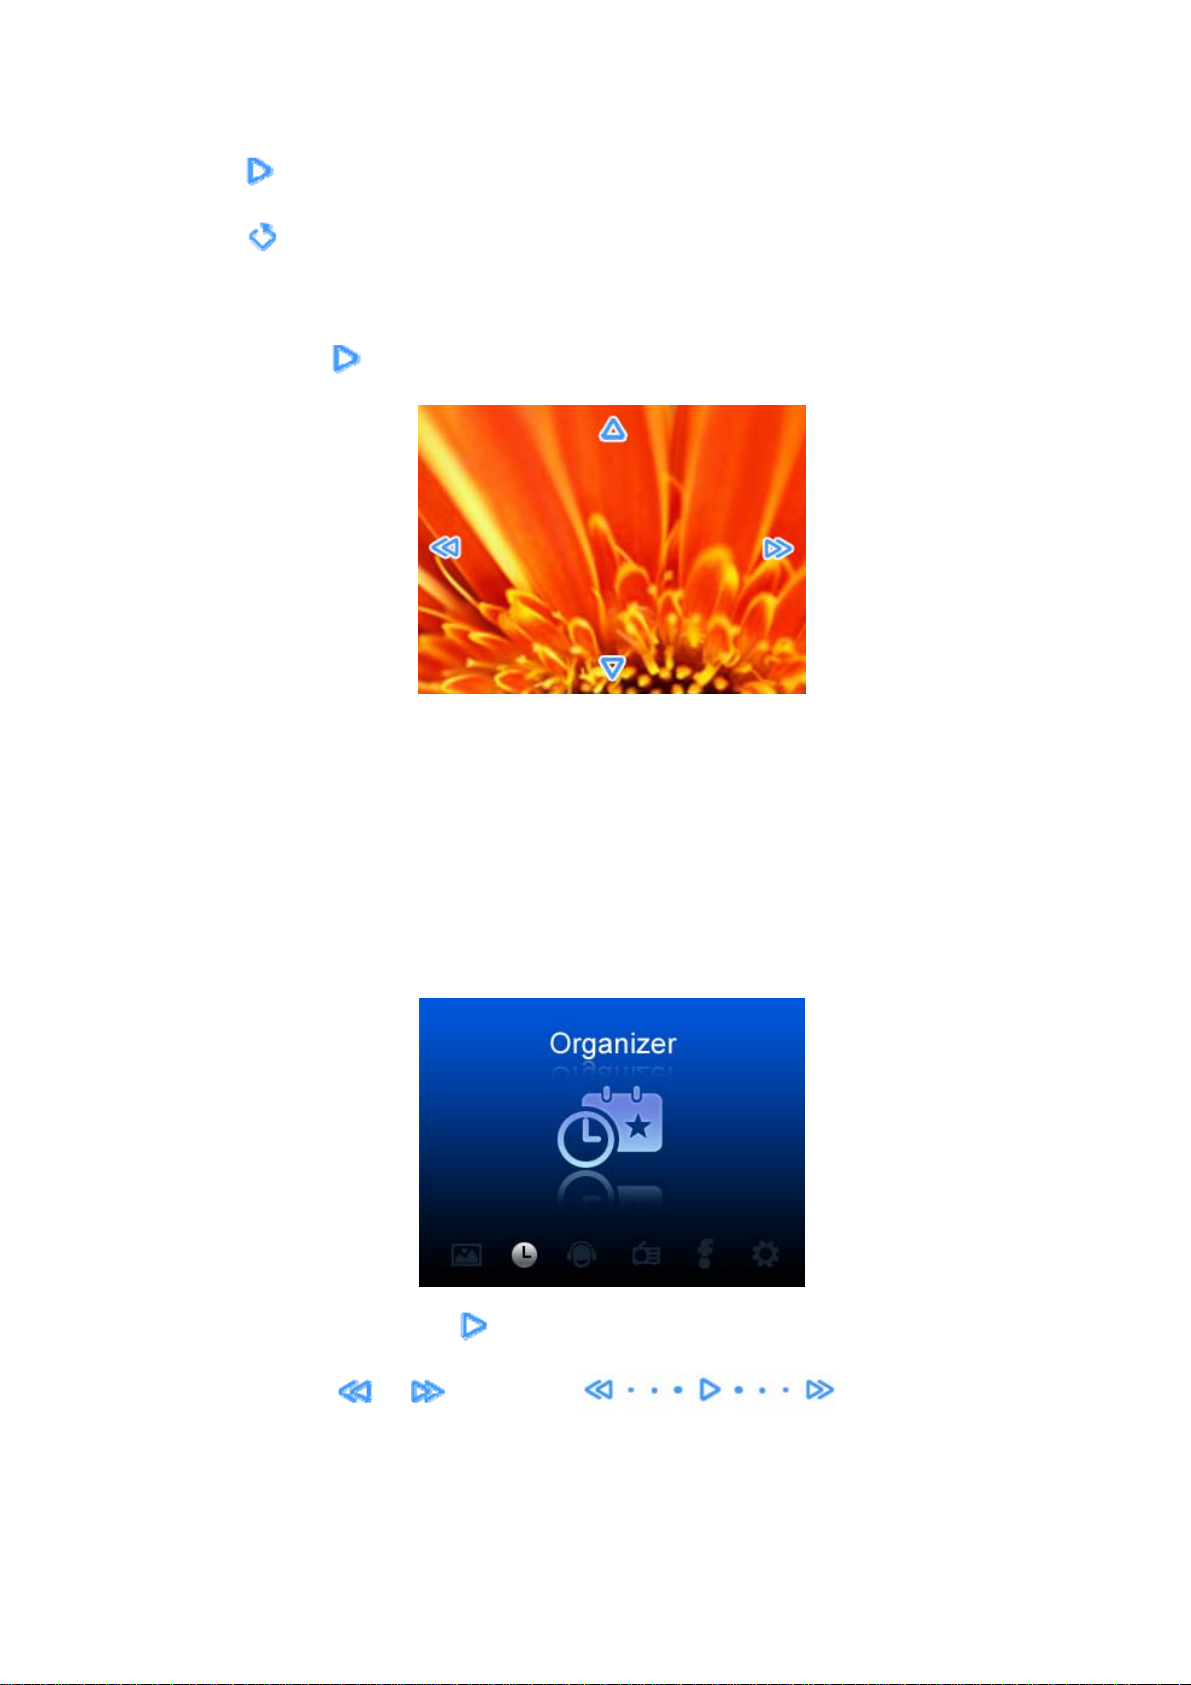
z Touch to open movable zoom view.
z Touch
Movable Zoom view:
In Zoom view, touch
Remaining options:
4) Copy
5) Delete
6) Start Music
7) Now Playing
to go back to Still view.
Organizer
to open movable view. 4 icons (up/down/left/right) will be displayed.
When Organizer is selected, touch
calendar by touching
or or sliding with .
to open the application. You can switch between clock, alarm or
9
Page 15
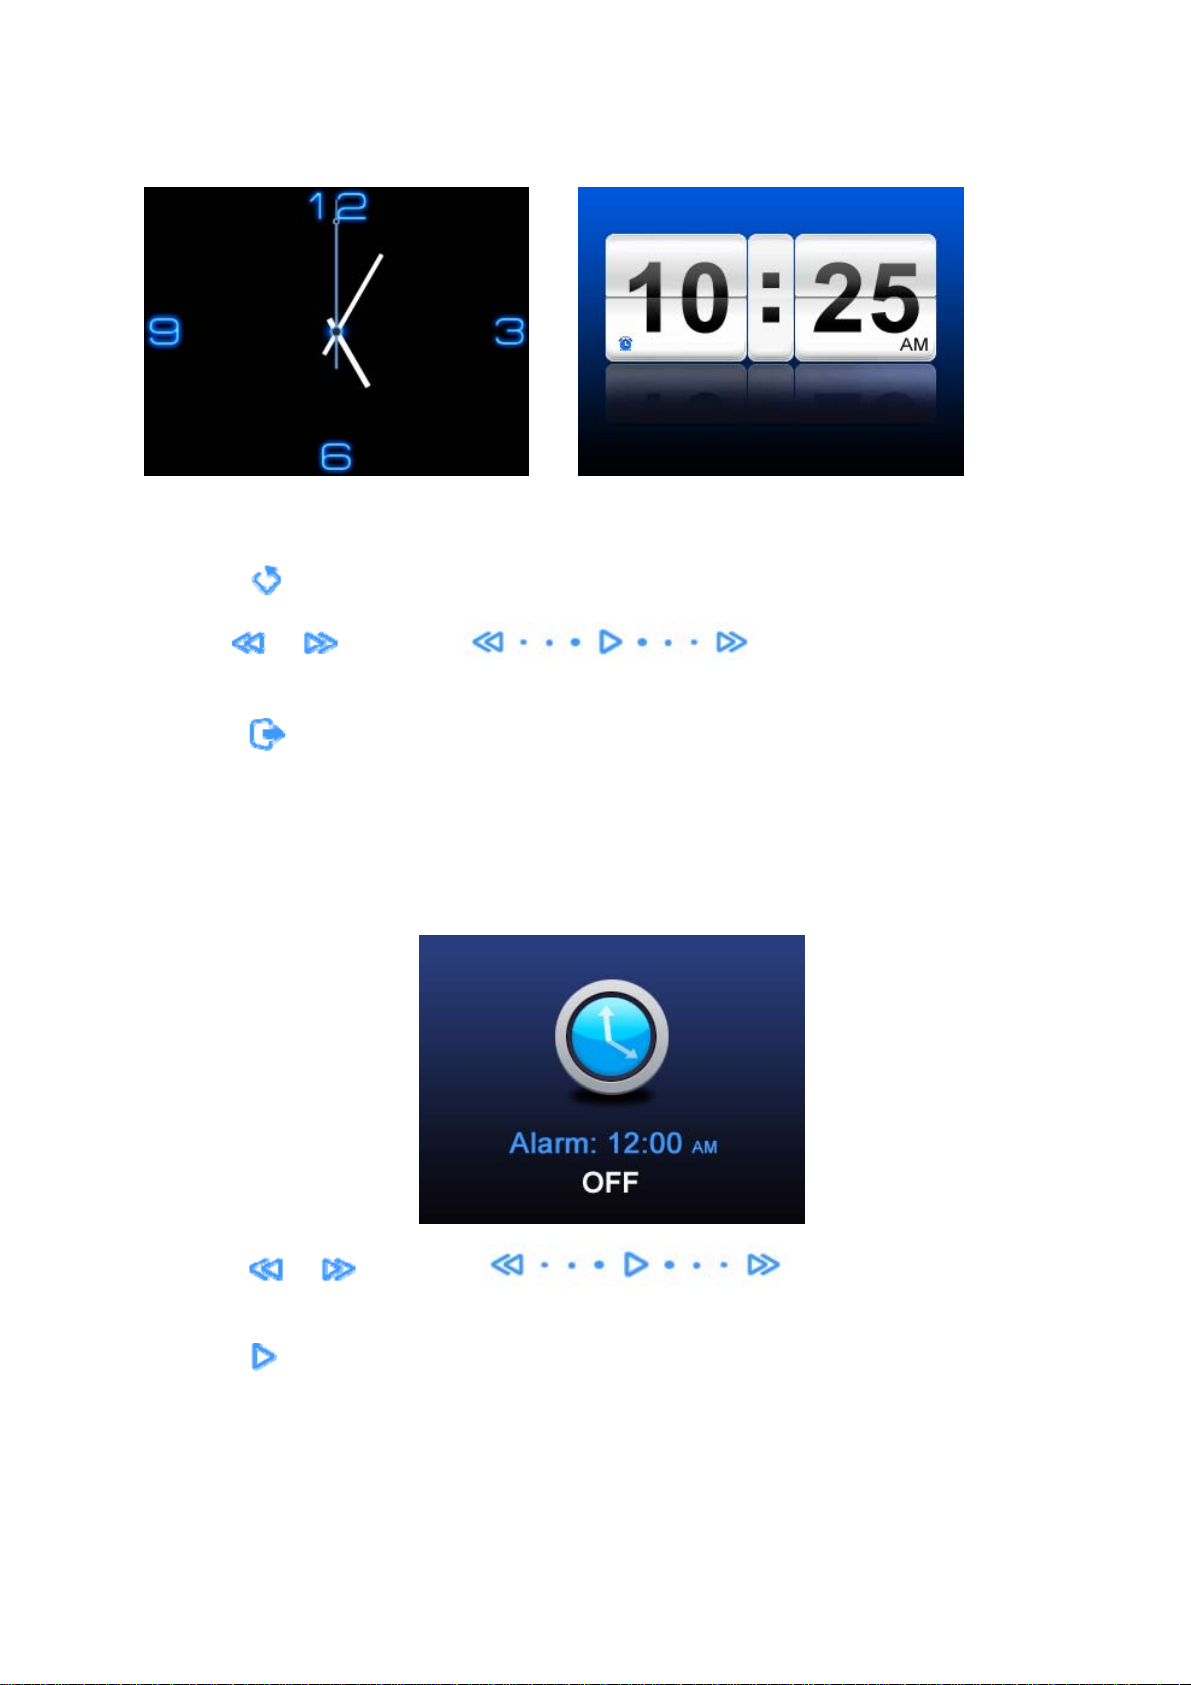
Clock
z Show the clock in analog or digital mode using the Clock options. The default is digital.
z The alarm icon will display if the alarm is on.
z Touch
z Use
calendar.
z Touch
1) Clock mode: Switch between digital and analog
2) Start music /Stop radio /Stop music
3) Now playing: Return to “now playing” view
Alarm
to return to the main menu.
or or slide with to switch between clock, alarm, and
to pop-up or close the options menu (3 items):
z Touch
and calendar.
z Touch
or or slide with to switch between clock, alarm,
to set the alarm on/off.
10
Page 16
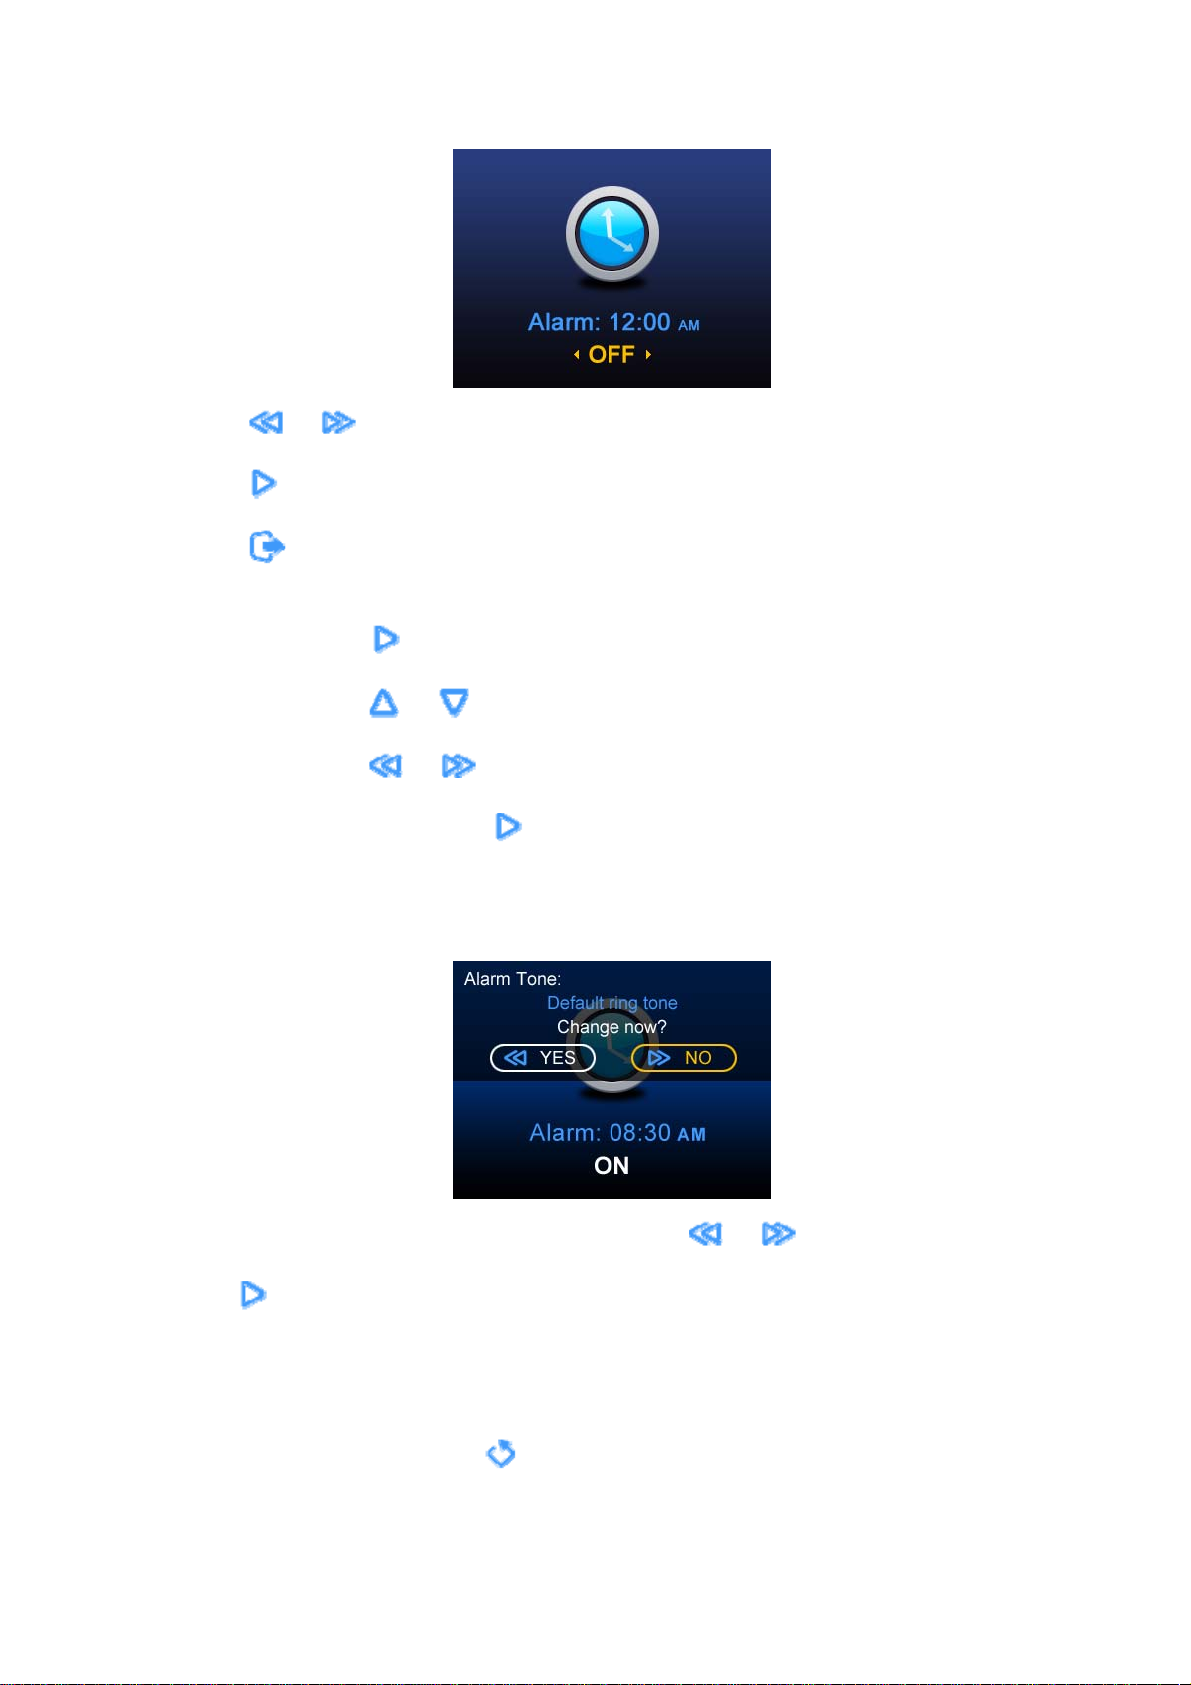
z Touch
z Touch
z Touch
1) Alarm time:
After you set the alarm time, touch
2) Alarm mode: Once, Weekday (Monday to Friday), Daily
3) Snooze Time: 5 minutes, 10 minutes, 15 minutes
4) Alarm tone:
or to switch ON/OFF.
to confirm setting.
to pop-up the options menu (6 items):
• Touch
• Touch
• Touch
to edit alarm time.
or to set desired time from highlighted digit.
or to select Hour/Minute (24h) or Hour/Minute/AM/PM.
to confirm and return to alarm view.
z This option displays the current alarm tone name. Touch
touch
z Select “NO” to cancel change.
z If you select “YES”, the device will go to Music mode, and then you can set the desired music as the
alarm tone. (Refer to the option “Use as alarm tone” in Music to set alarm tone.)
z Once the alarm tone is set, press
to confirm.
twice to return to the alarm setting view.
or to select “YES” or “NO” and
11
Page 17
5) Start music /Stop radio /Stop music
6) Now playing
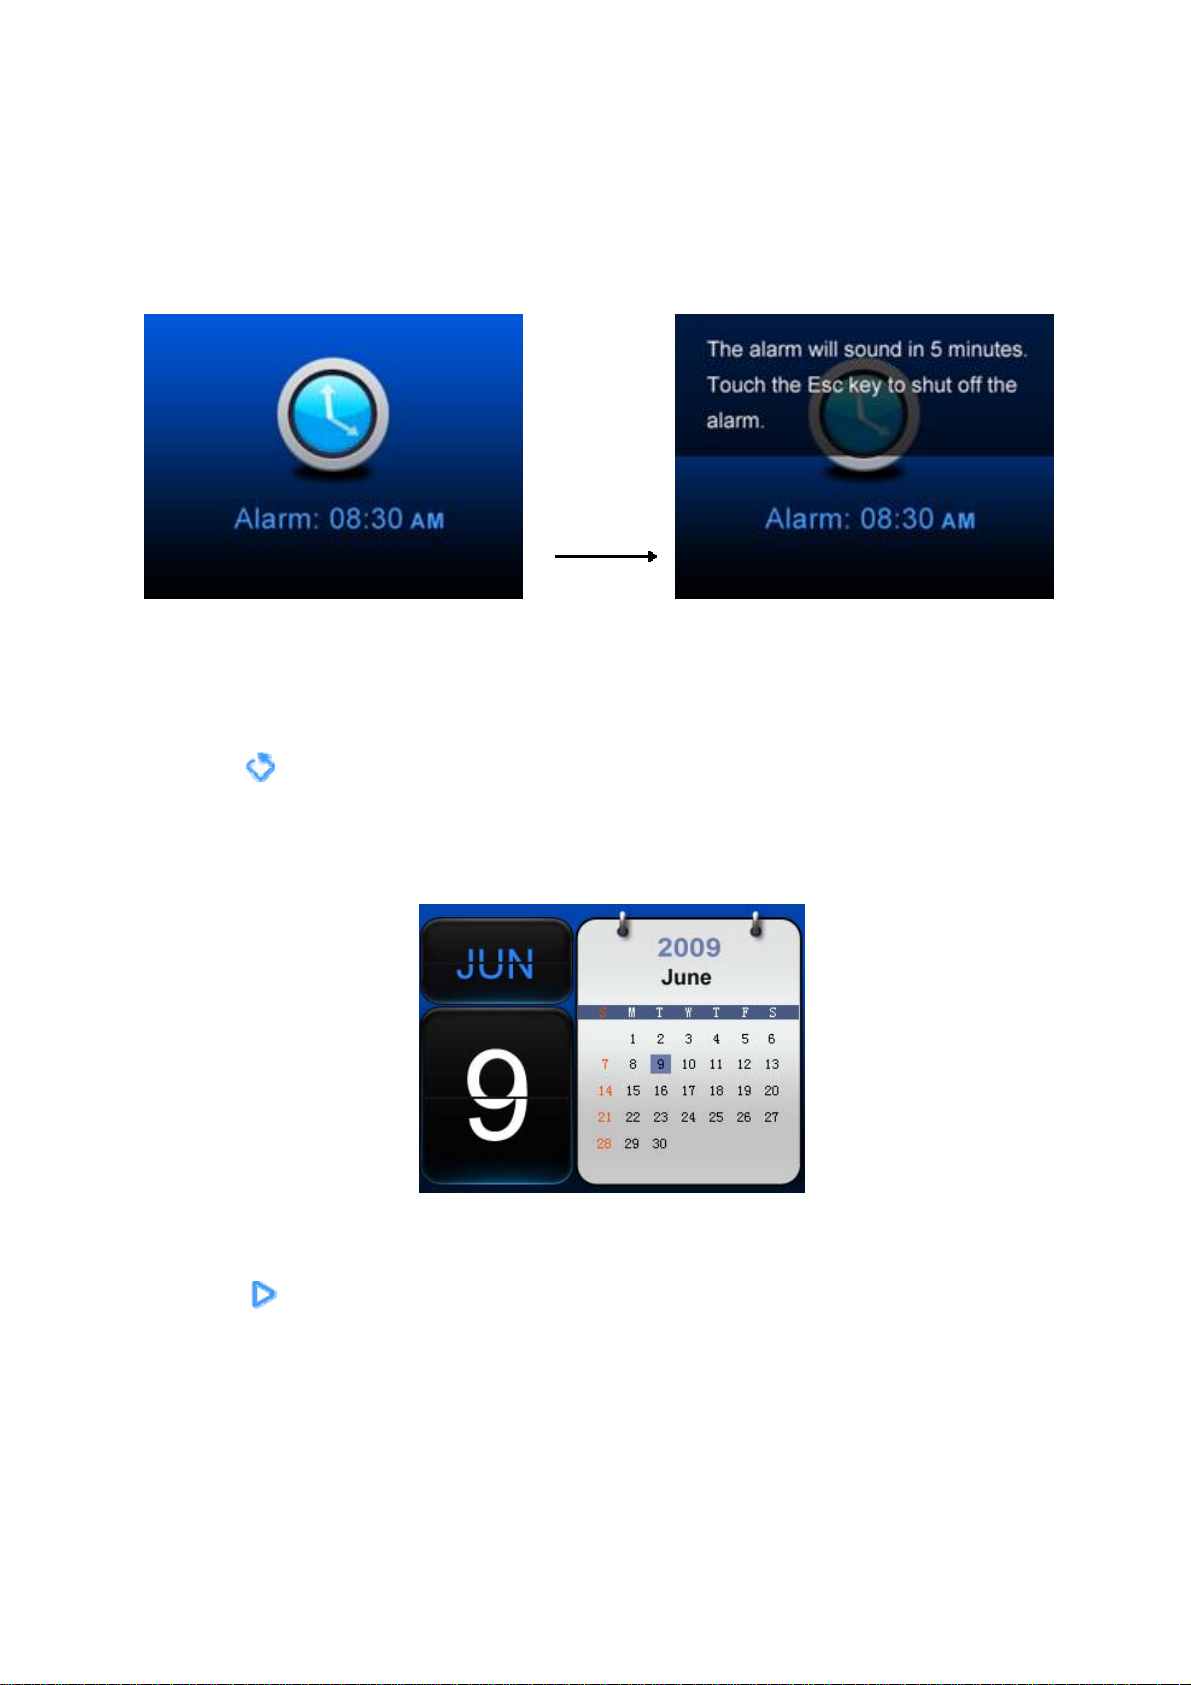
Alarm activated view
Press
any
key
z The alarm is in effect in all device modes.
z During the alarm sound, touch any key to switch to Snooze mode (the alarm will repeat at 5/10/15
minute intervals).
z Touch
z The alarm sound will last 1 minute and repeat 4 times if the alarm is on.
Calendar
z The current day is highlighted in blue.
z Touch
to shut off the alarm. Touch any other key or wait 10 seconds to close prompt.
to open navigation view.
12
Page 18
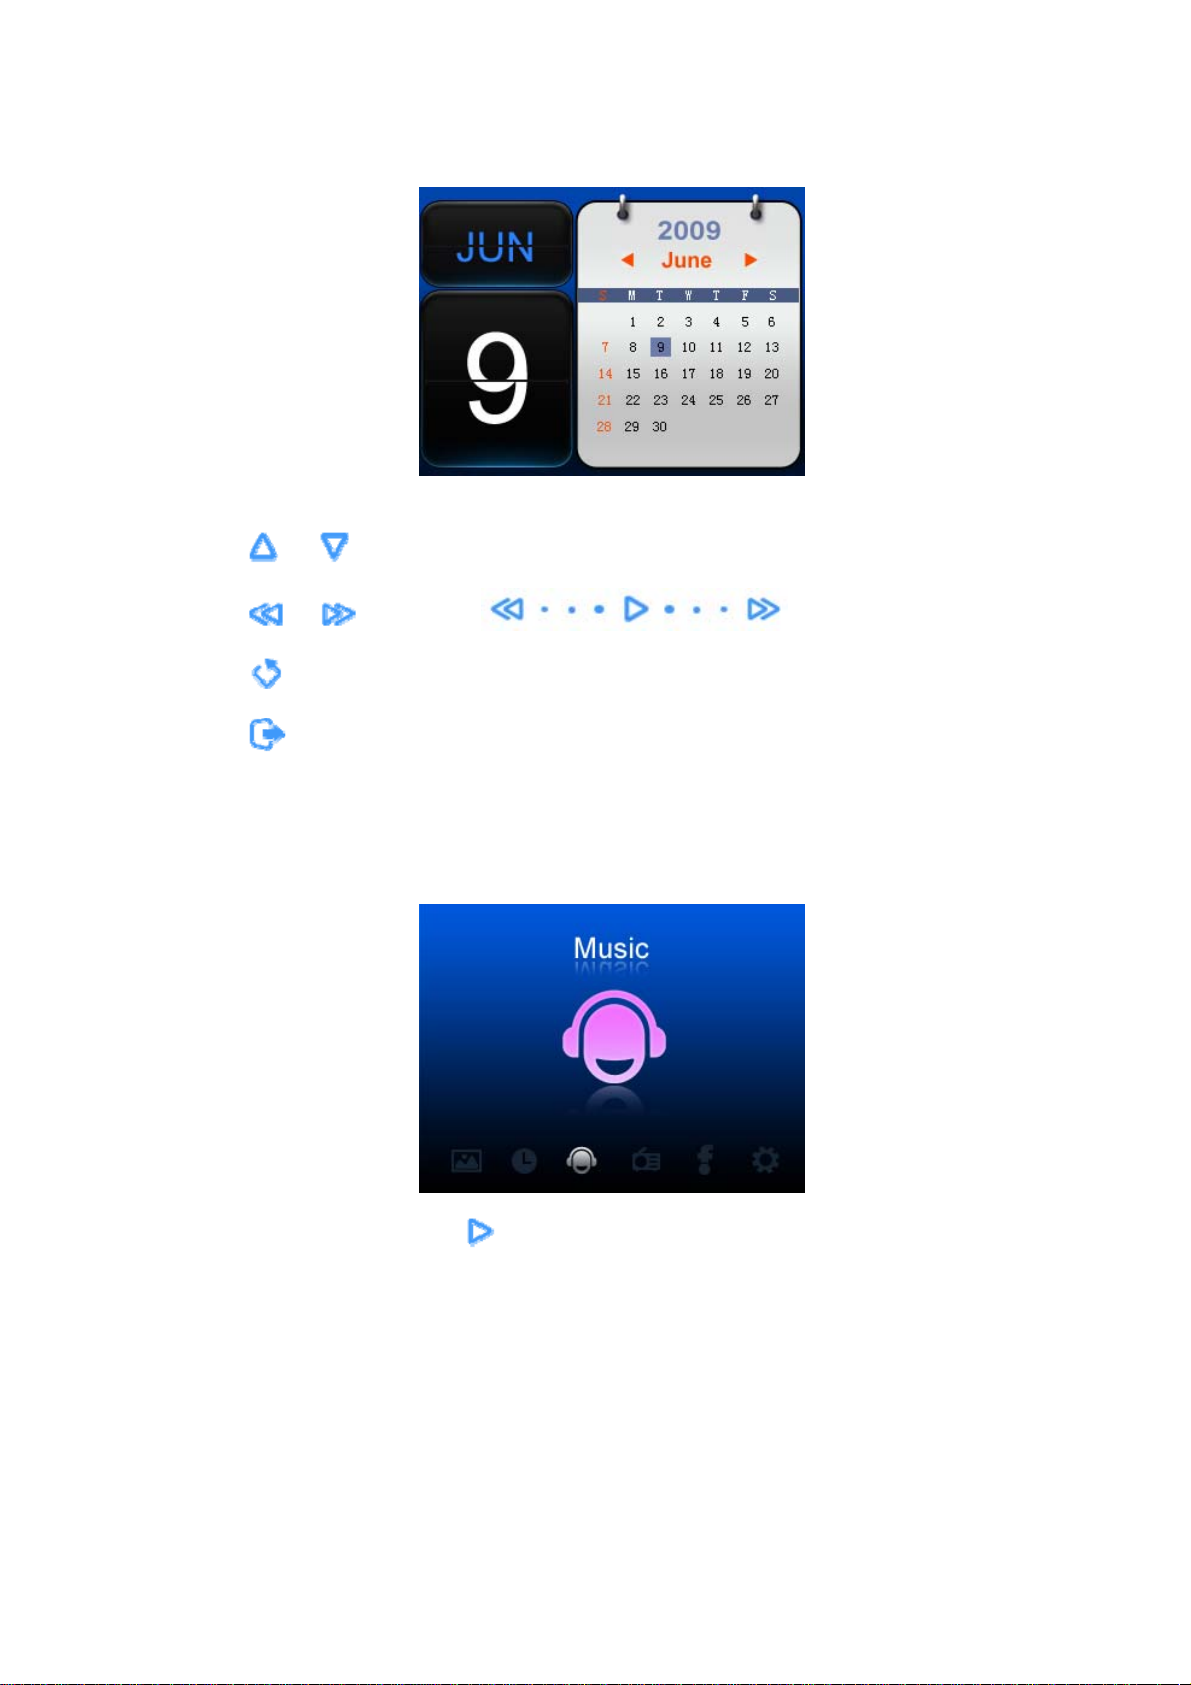
Calendar navigation
z Touch
z Touch
z Touch
z Touch
1) Start music /Stop radio /Stop music
2) Now playing
or to highlight year or month.
or or slide with to change year or month.
to return to calendar view.
to display pop-up options menu, (2 items):
Music
z When Music is selected, touch
z If you have inserted a SD/MMC card, the screen will display two icons: Local and SD. If the device is
not attached, the SD icon will not be shown.
to open the Music mode.
13
Page 19
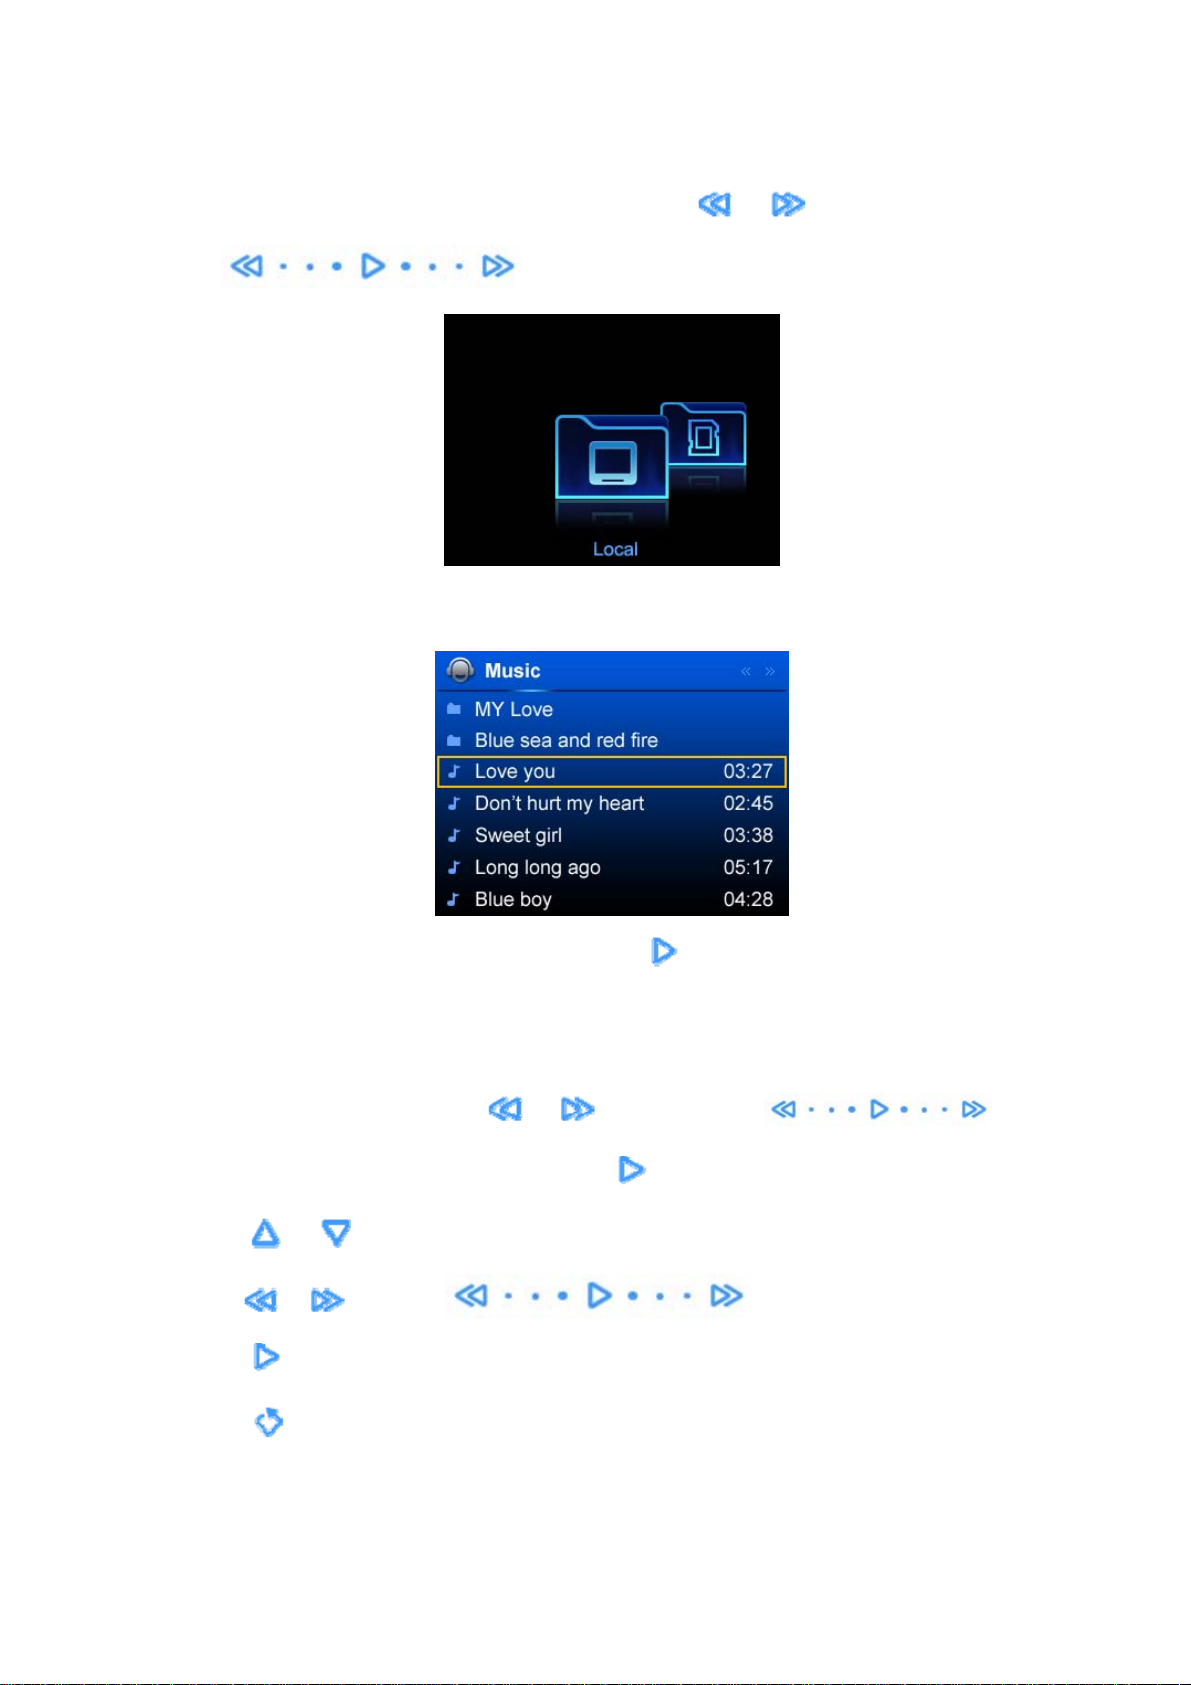
z You can move between the Local or SD icon by touching
with
List View
.
or , or by sliding
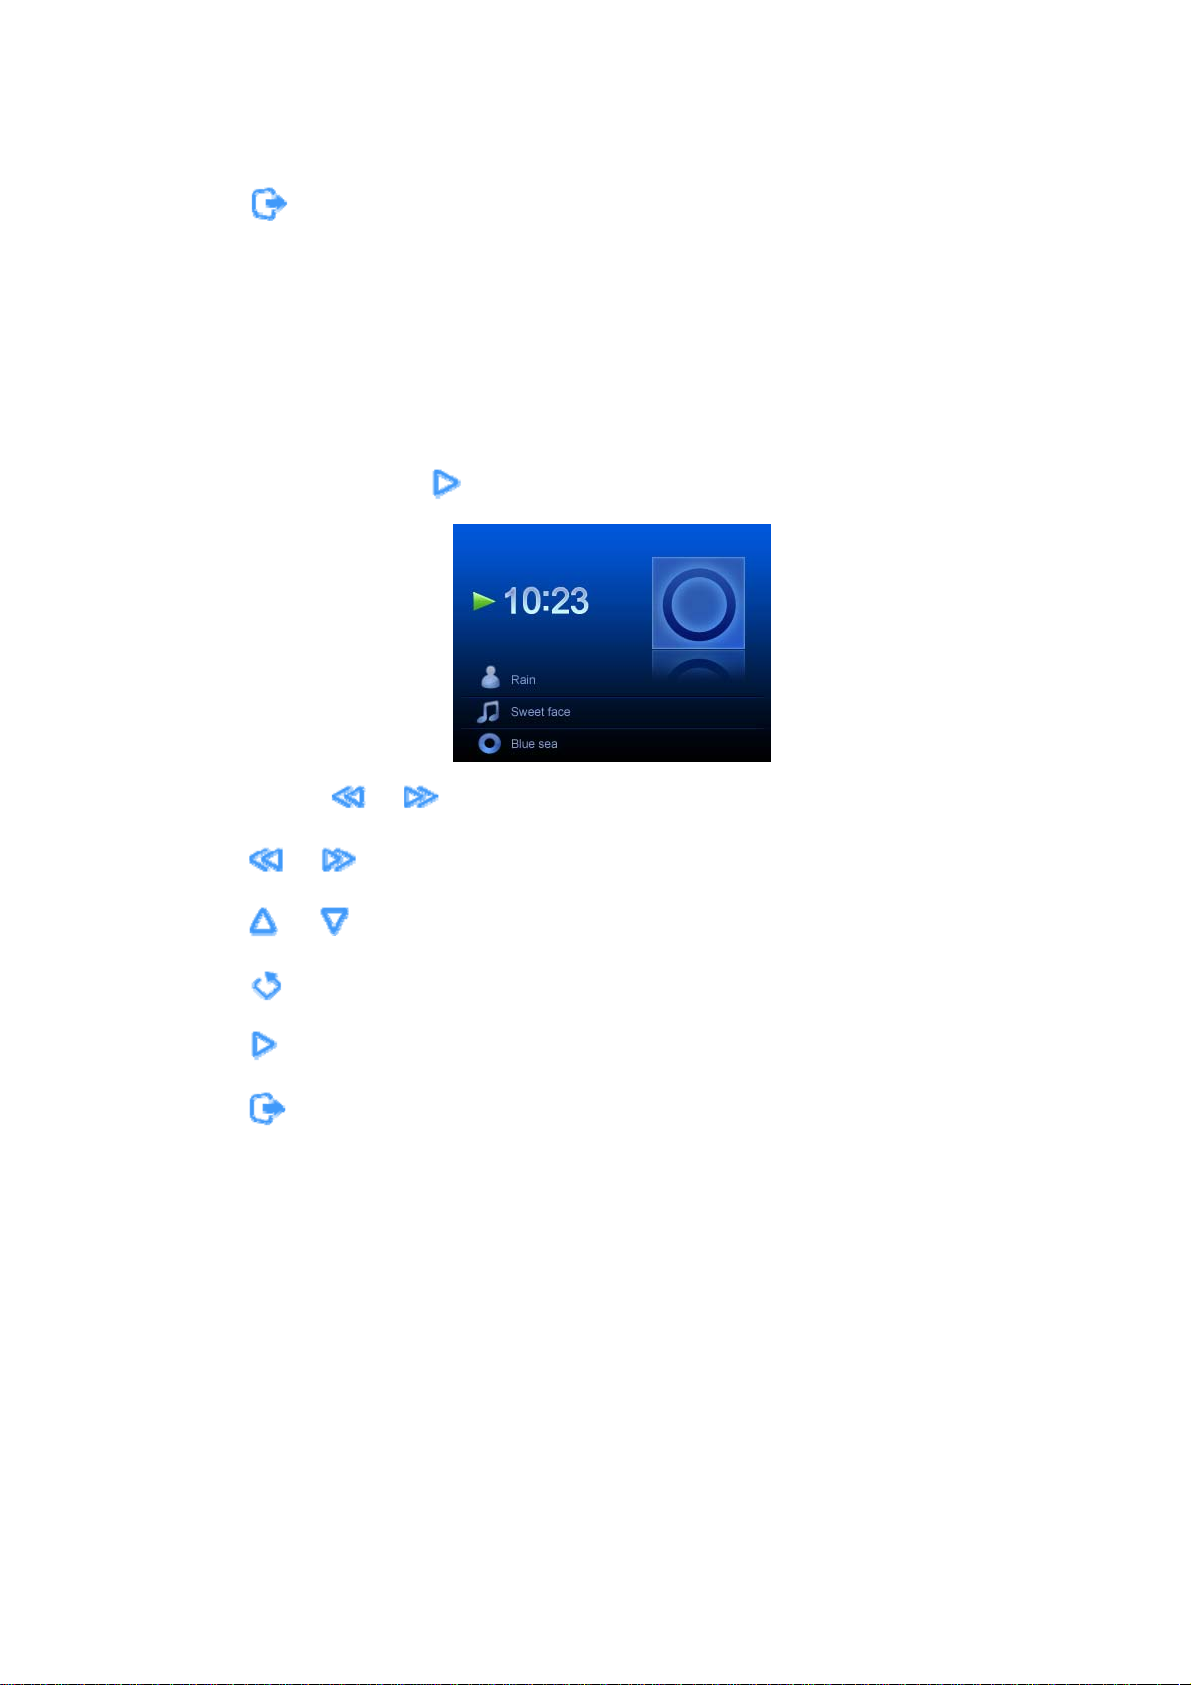
When one of the folders (Local or SD) is selected, touch
folder.
To play music, in the Local folder, for example:
z Select the Local icon by touching
z If there are folders within the Local folder, touch
z Touch
z Touch
z Touch
z Touch
or to select the previous or next item.
or or slide with to page up or down the screen.
to play the highlighted song.
to return to previous menu.
or , or by sliding with .
to display the list view of the music in the
to show the song list of the selected folder.
14
Page 20
z Touch
1) Delete
2) Copy
3) Use as Alarm tone: Use current song as alarm tone
4) Start music /Stop radio /Stop music
5) Now playing
Play View
When a song is selected, touch
to display or close pop-up options menu (5 items):
to play it.
z Touch and hold
z Touch
z Touch
z Touch
z Touch
z Touch
1) Stop music & return
2) Copy
3) Use as alarm tone
4)
or to play previous or next song.
or to adjust volume.
to return to list view.
to play or pause a song.
to display or close pop-up options menu (6 items):
Play mode: Repeat all / Repeat one / Shuffle
or to fast forward or rewind.
15
Page 21
Internet Radio
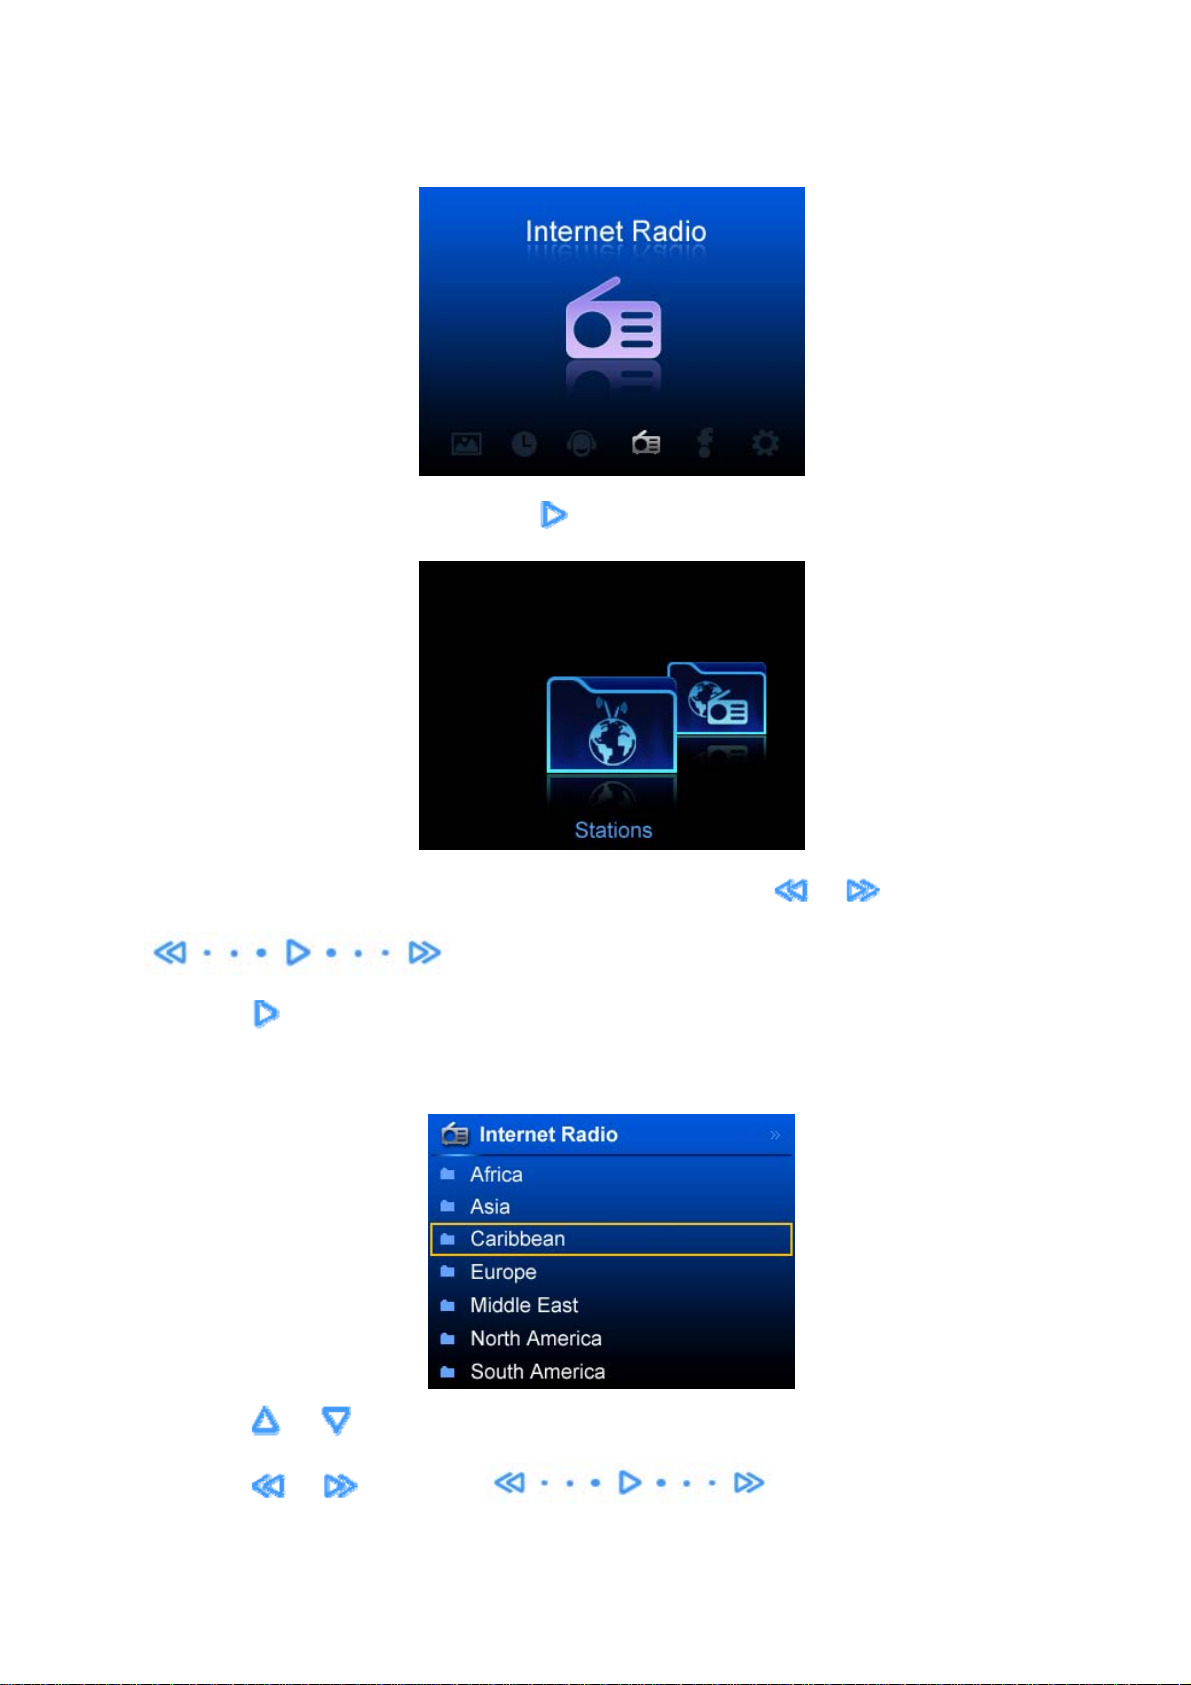
z When Internet Radio is selected, touch
You can move between the stations or more folders either by touching
.
z Touch
List View
to open a list view of folders or stations.
to enter Internet Radio mode.
or , or by sliding with
z Touch
z Touch
or to select the previous or next item.
or , or slide with to page up or down the screen.
16
Page 22
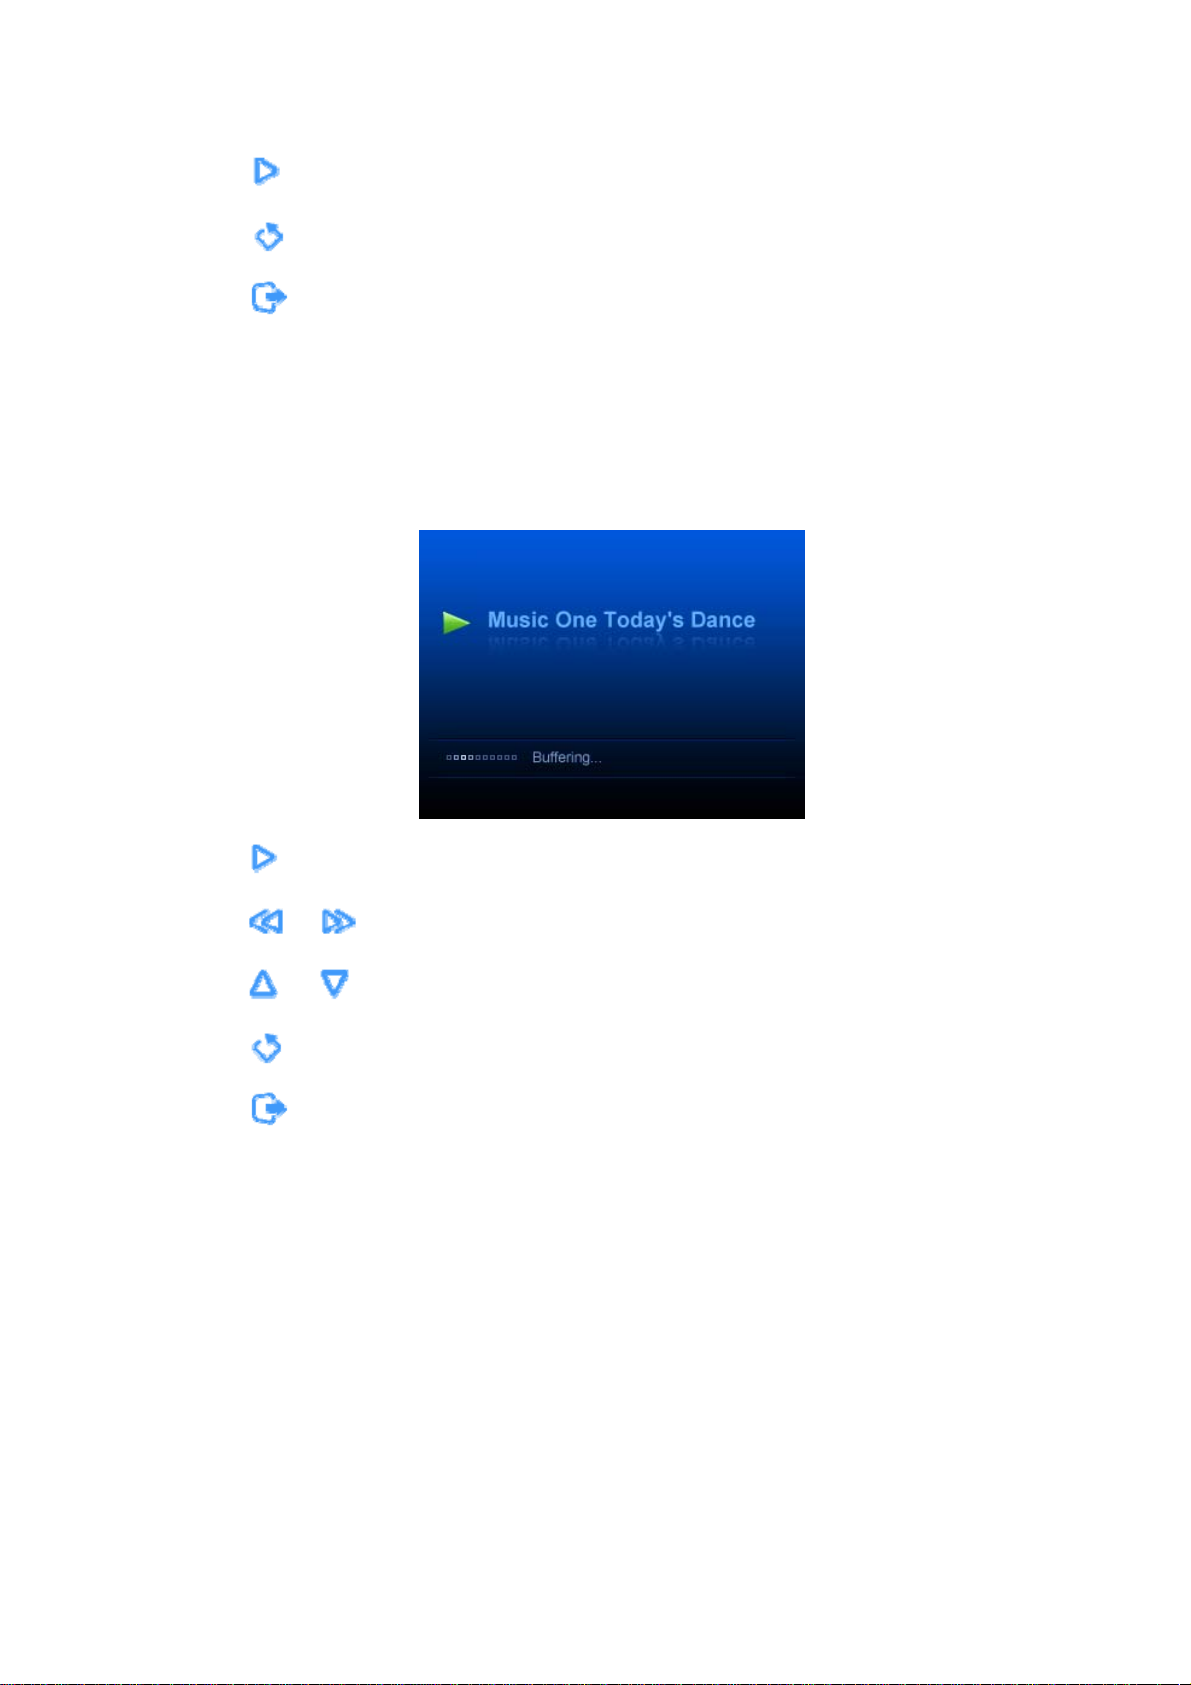
z Touch to play the highlighted station and open play view.
z Touch
z Touch
1) Add to Favorites: Add current highlighted station to My Favorites
2) Search stations: Enter the station name to list matching stations
3) Start music /Stop radio/Stop music
4) Now playing
Play view
to return to previous menu.
to display or close pop-up options menu (4 items):
z Touch
z Touch
z Touch
z Touch
z Touch
1) Add to Favorites: Add the current highlighted station to My Favorites
2) Stop radio & return: Stop the radio and return to list view, highlight current station
to play or pause.
or to select the previous or next station.
or to adjust the volume.
to return to list view.
to display or close pop-up options menu (2 items):
17
Page 23
My Favorites
You can select the “More” either by touching
Then touch
Added Stations, New Stations and Most Popular Stations.
z Touch
1) Delete: Delete currently highlighted station from Favorites
2) Search Stations
3) Start music /Stop radio/Stop music
4) Now playing
z When the My Added Stations prompt "No Added Stations", touch
options menu (3 items):
1) Start music/ Stop radio/ Stop radio
2) Search Stations
3) Now playing
User-defined Stations
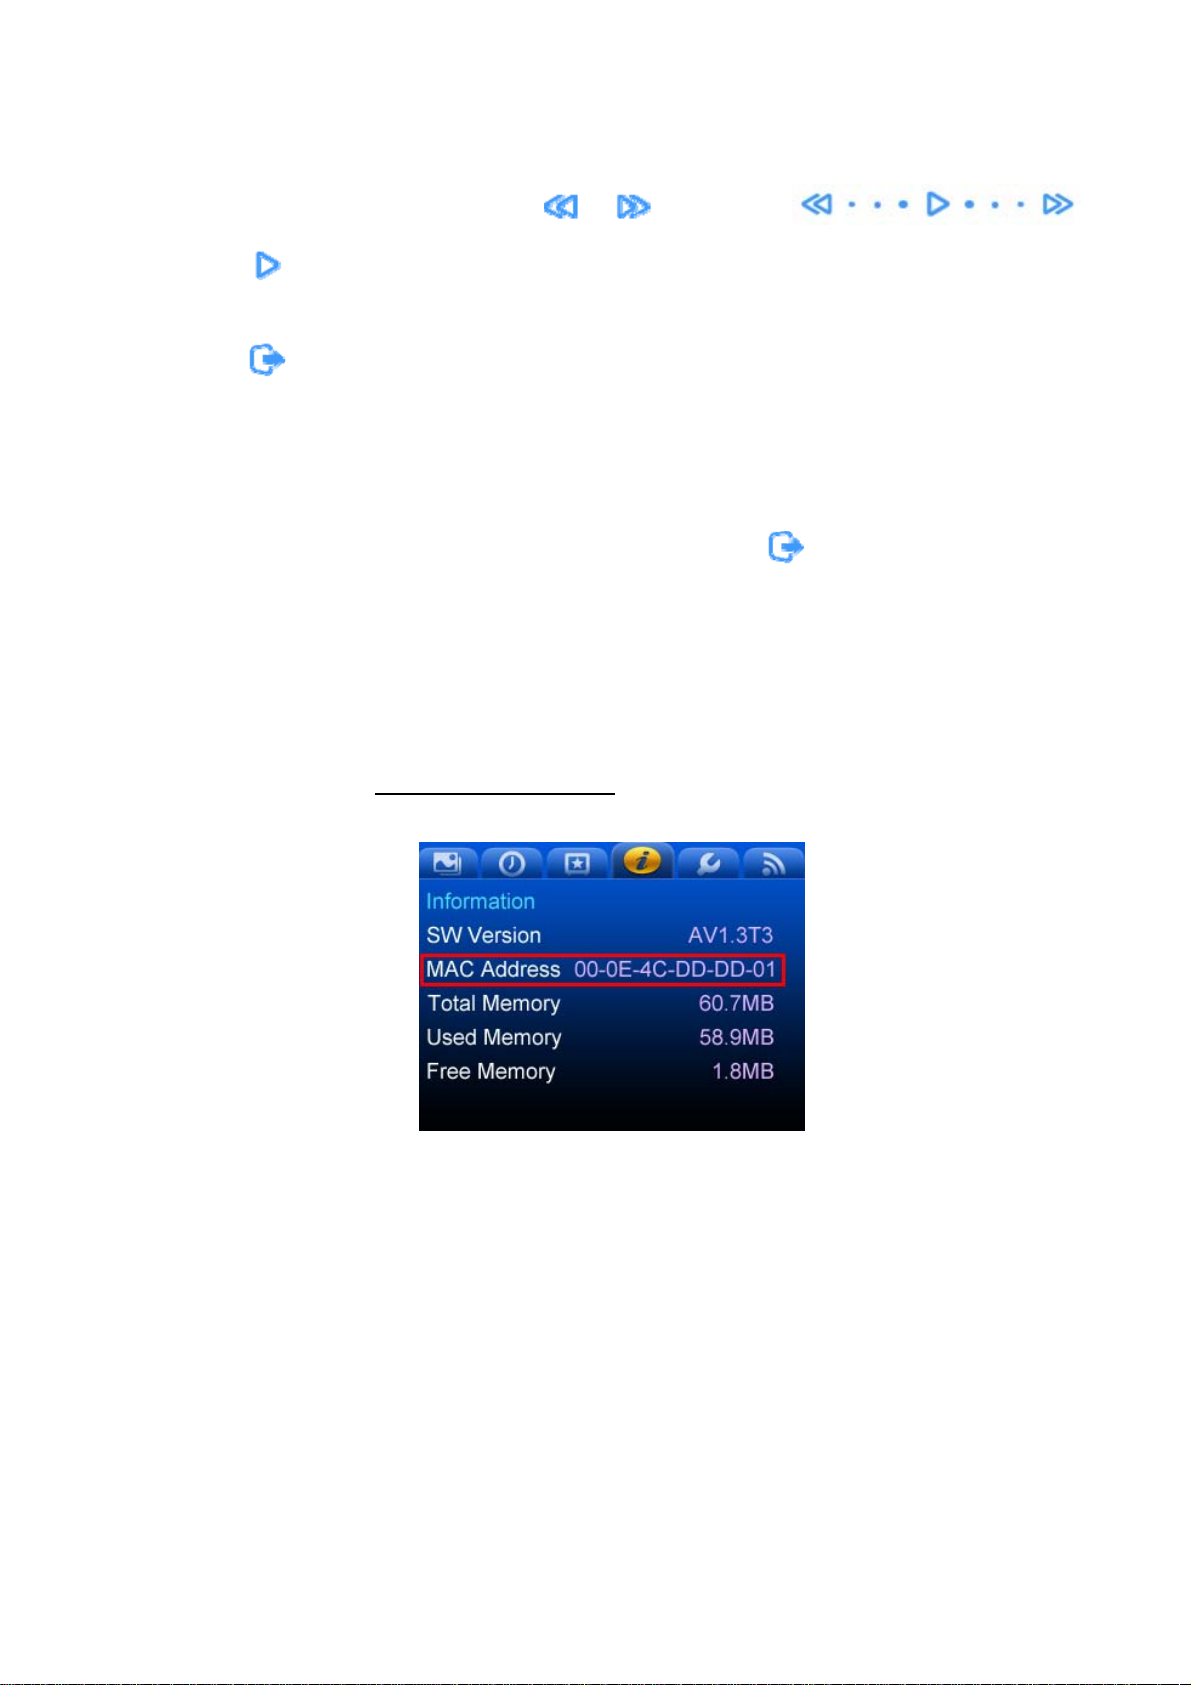
z Access the website http://intouch.vtuner.com
z Input the MAC address, you can find it in Settings>Information
to open the “More”. There are 5 folders in the “More” list: Favorites, Recent Launches, My
to display or close pop-up options menu (4 items):
or or sliding with .
to display or close pop-up
18
Page 24
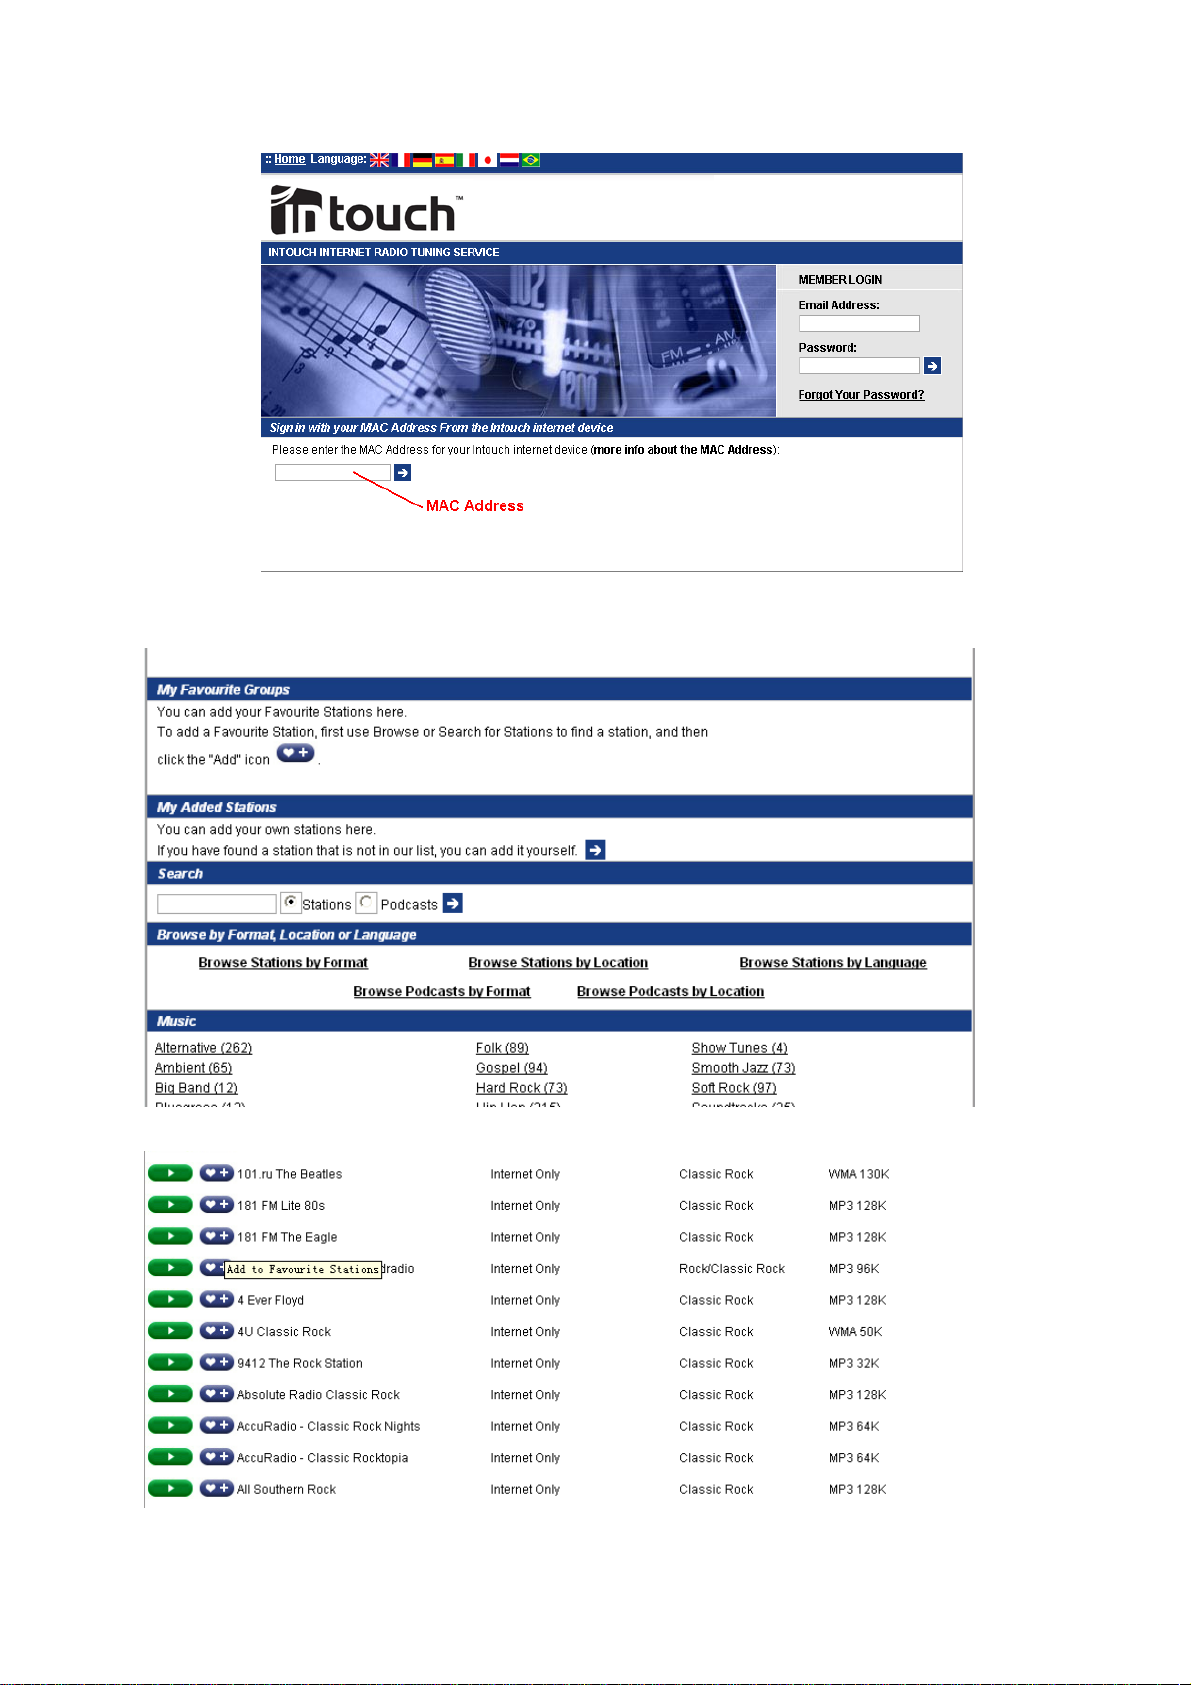
z When you log in, you will see the page below, which contains more detailed information about how to
add stations.
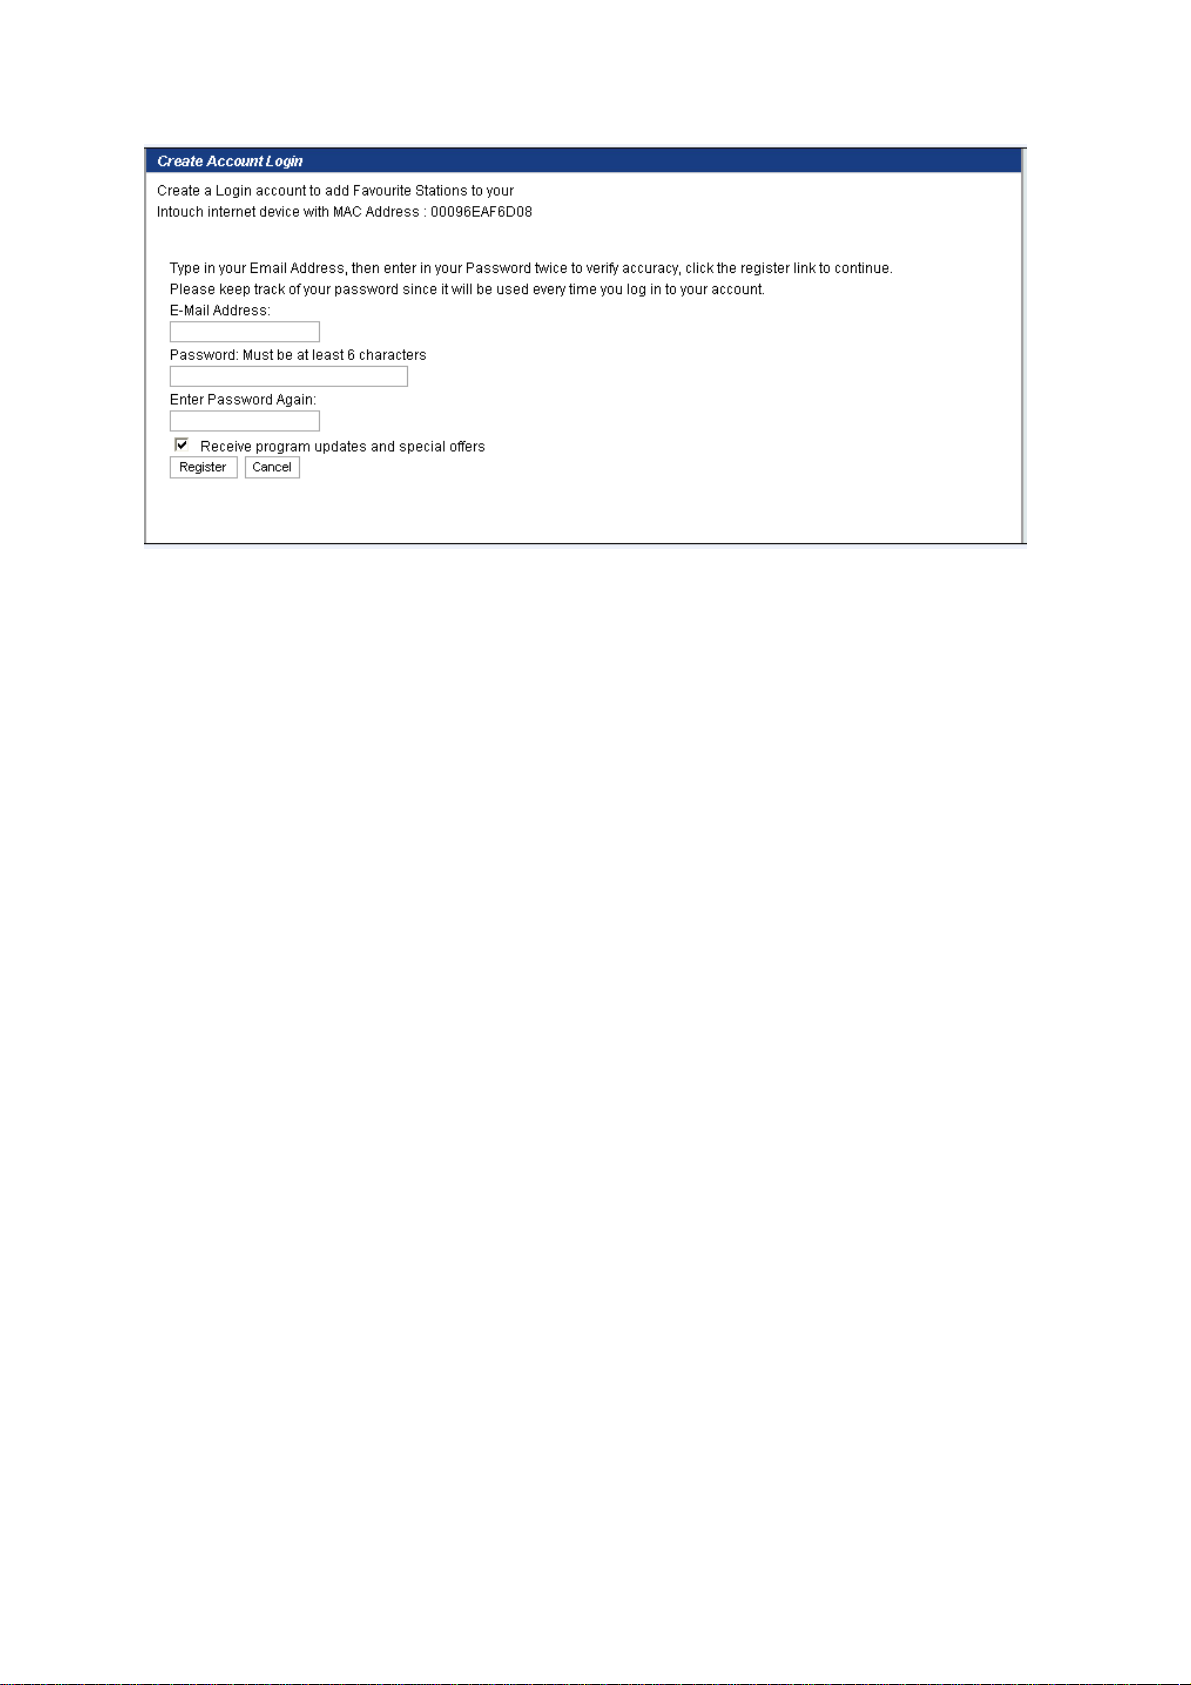
z You need to create an account before you can use this feature.
19
Page 25
20
Page 26
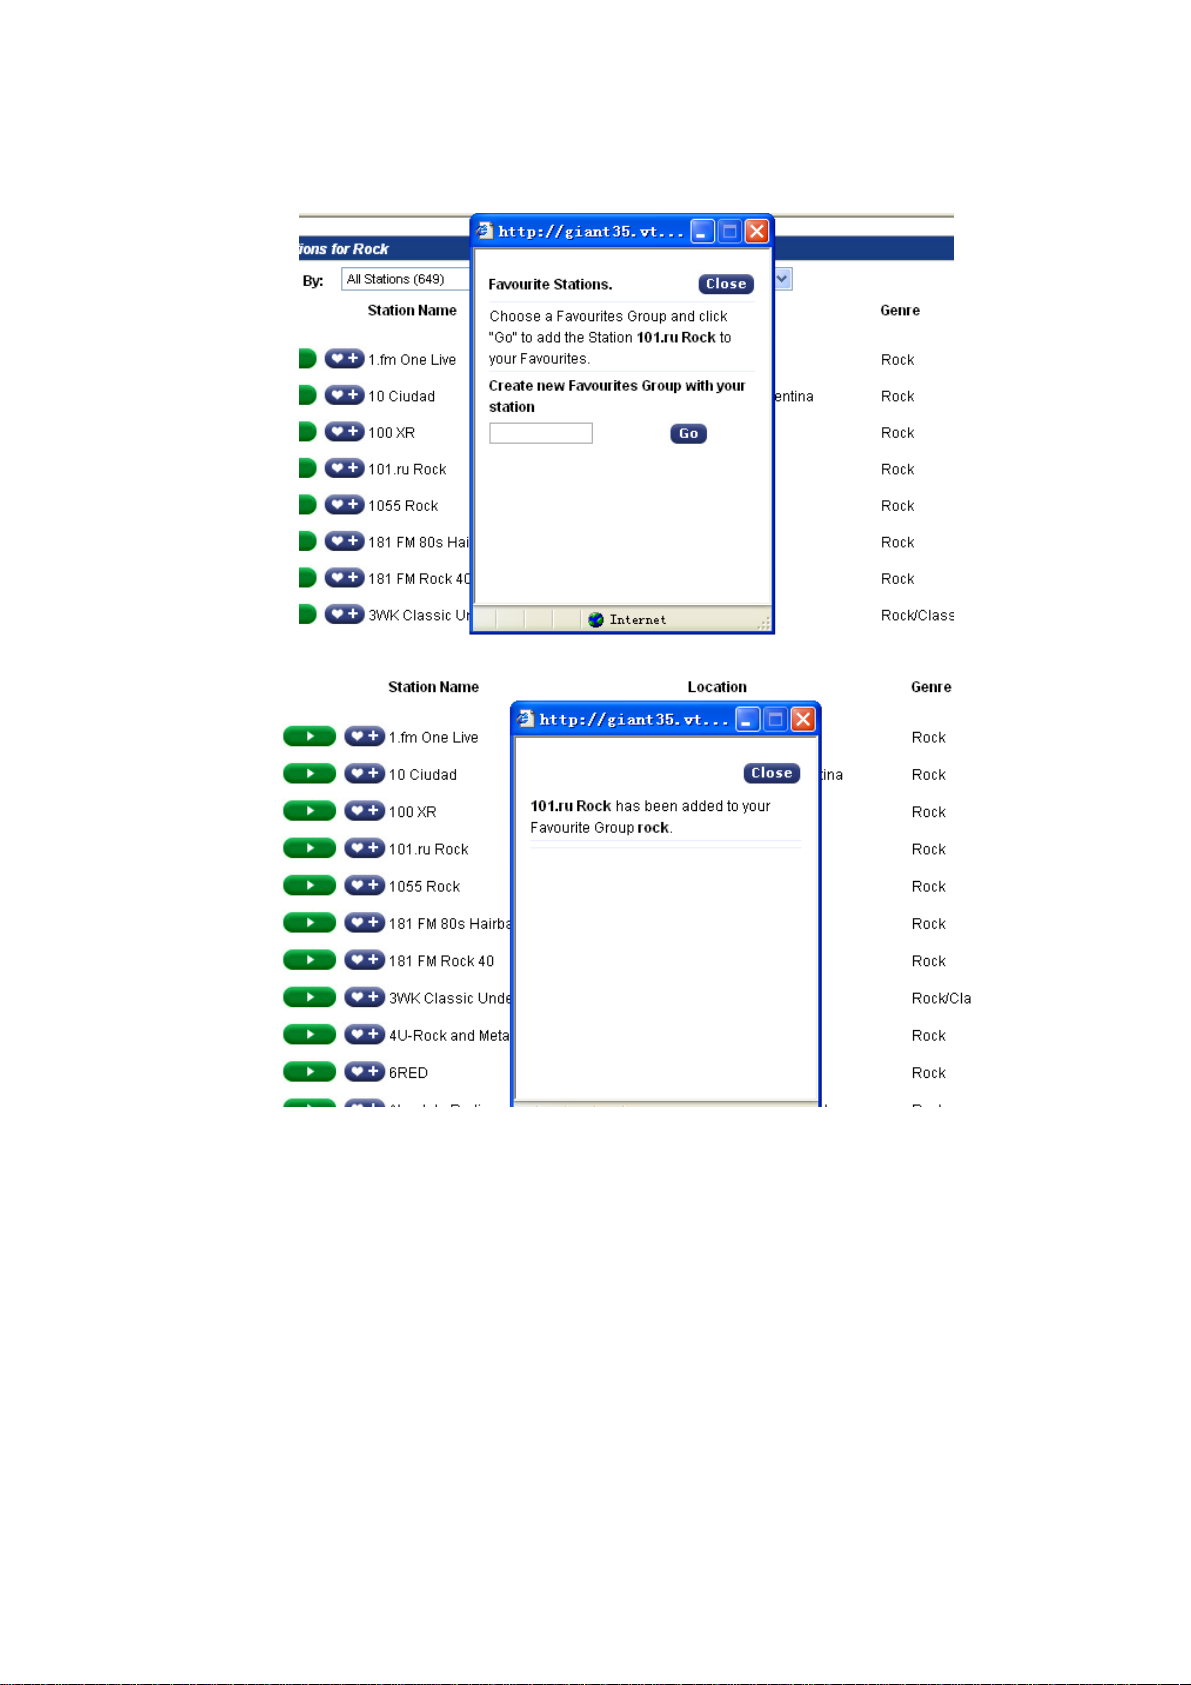
z You can add stations after you complete your registration.
You can enter “My Added Stations” to play desired Radio channel after adding successfully..
21
Page 27
Web Content
z When Web Content is selected, touch
FrameChannel account online before using this feature.
z FrameChannel provides access to a Photo channel, an RSS channel, a Weather channel, a User
channel and other web content.
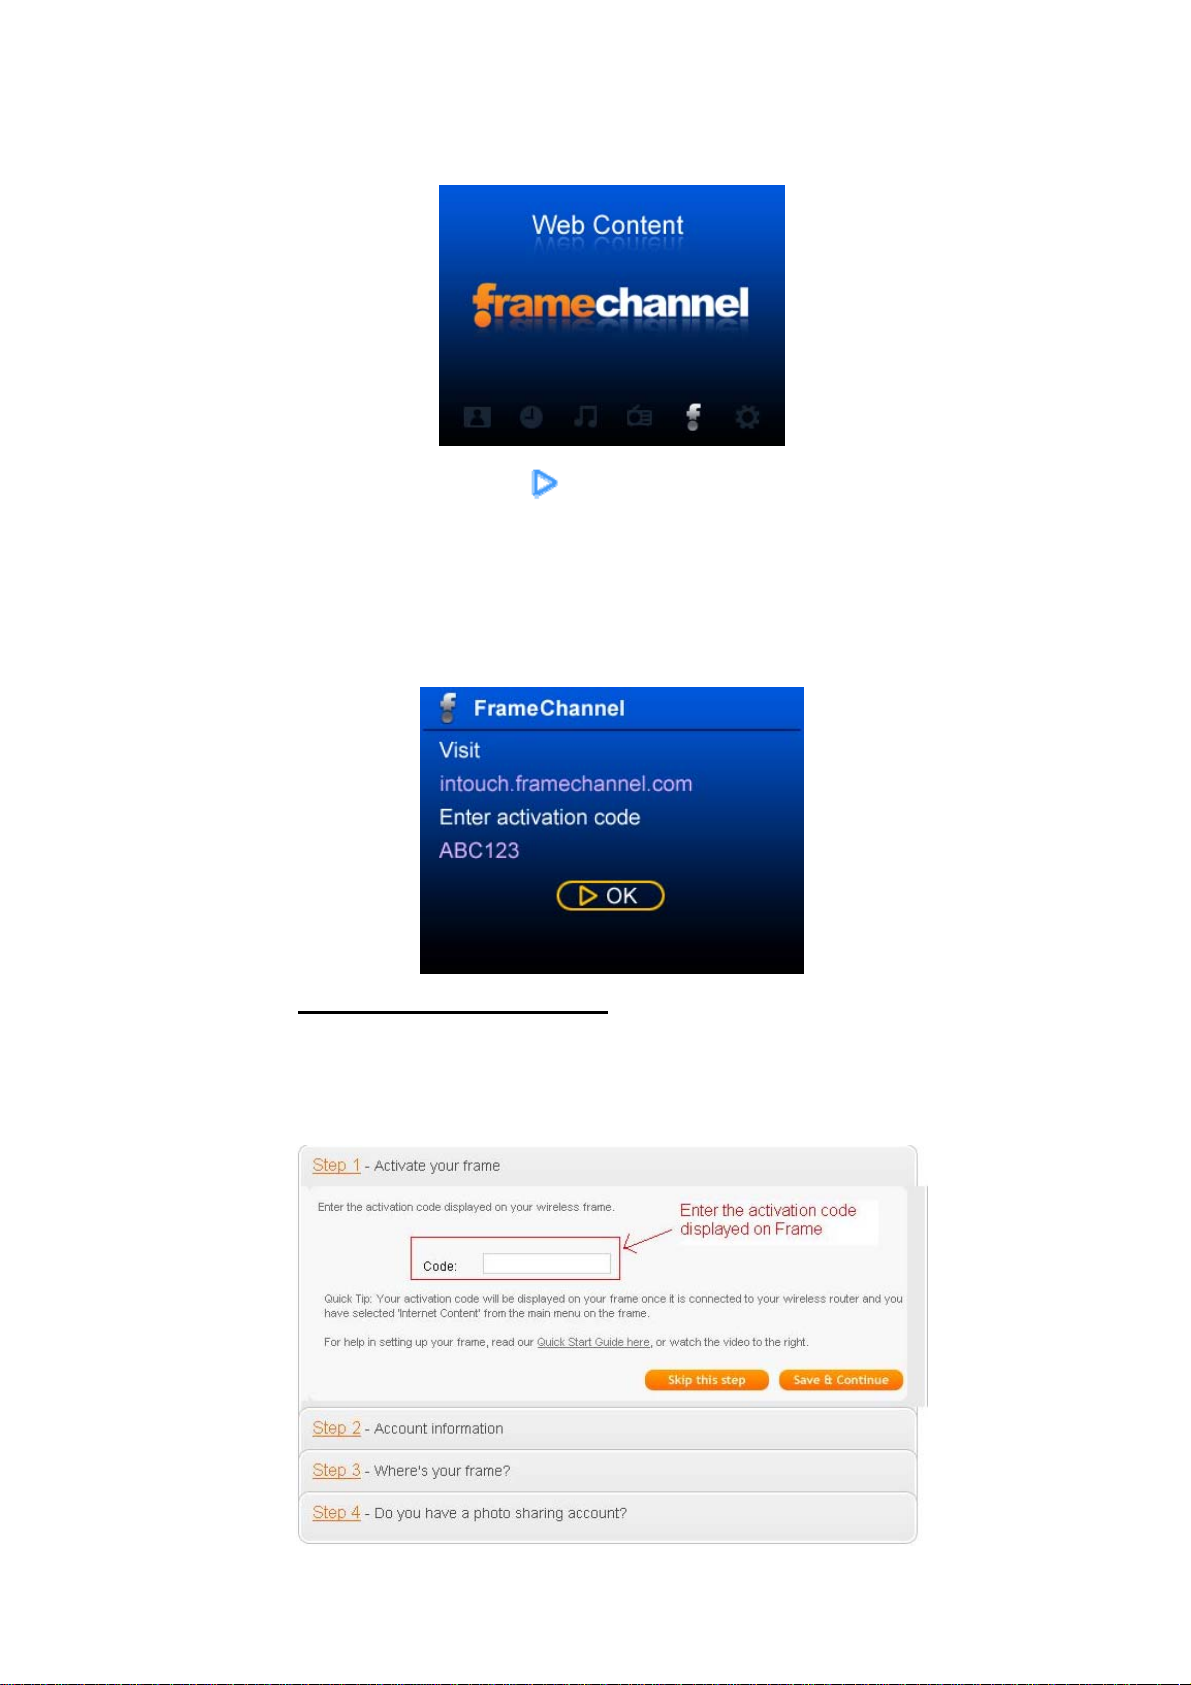
FrameChannel Activation
1) Access
2) Click Create an account.
3) Enter the Activation Code displayed on the screen.
4) Sign up for a FrameChannel account.
http://intouch.framechannel.com from your PC.
to open the FrameChannel feature. You need to create a
22
Page 28
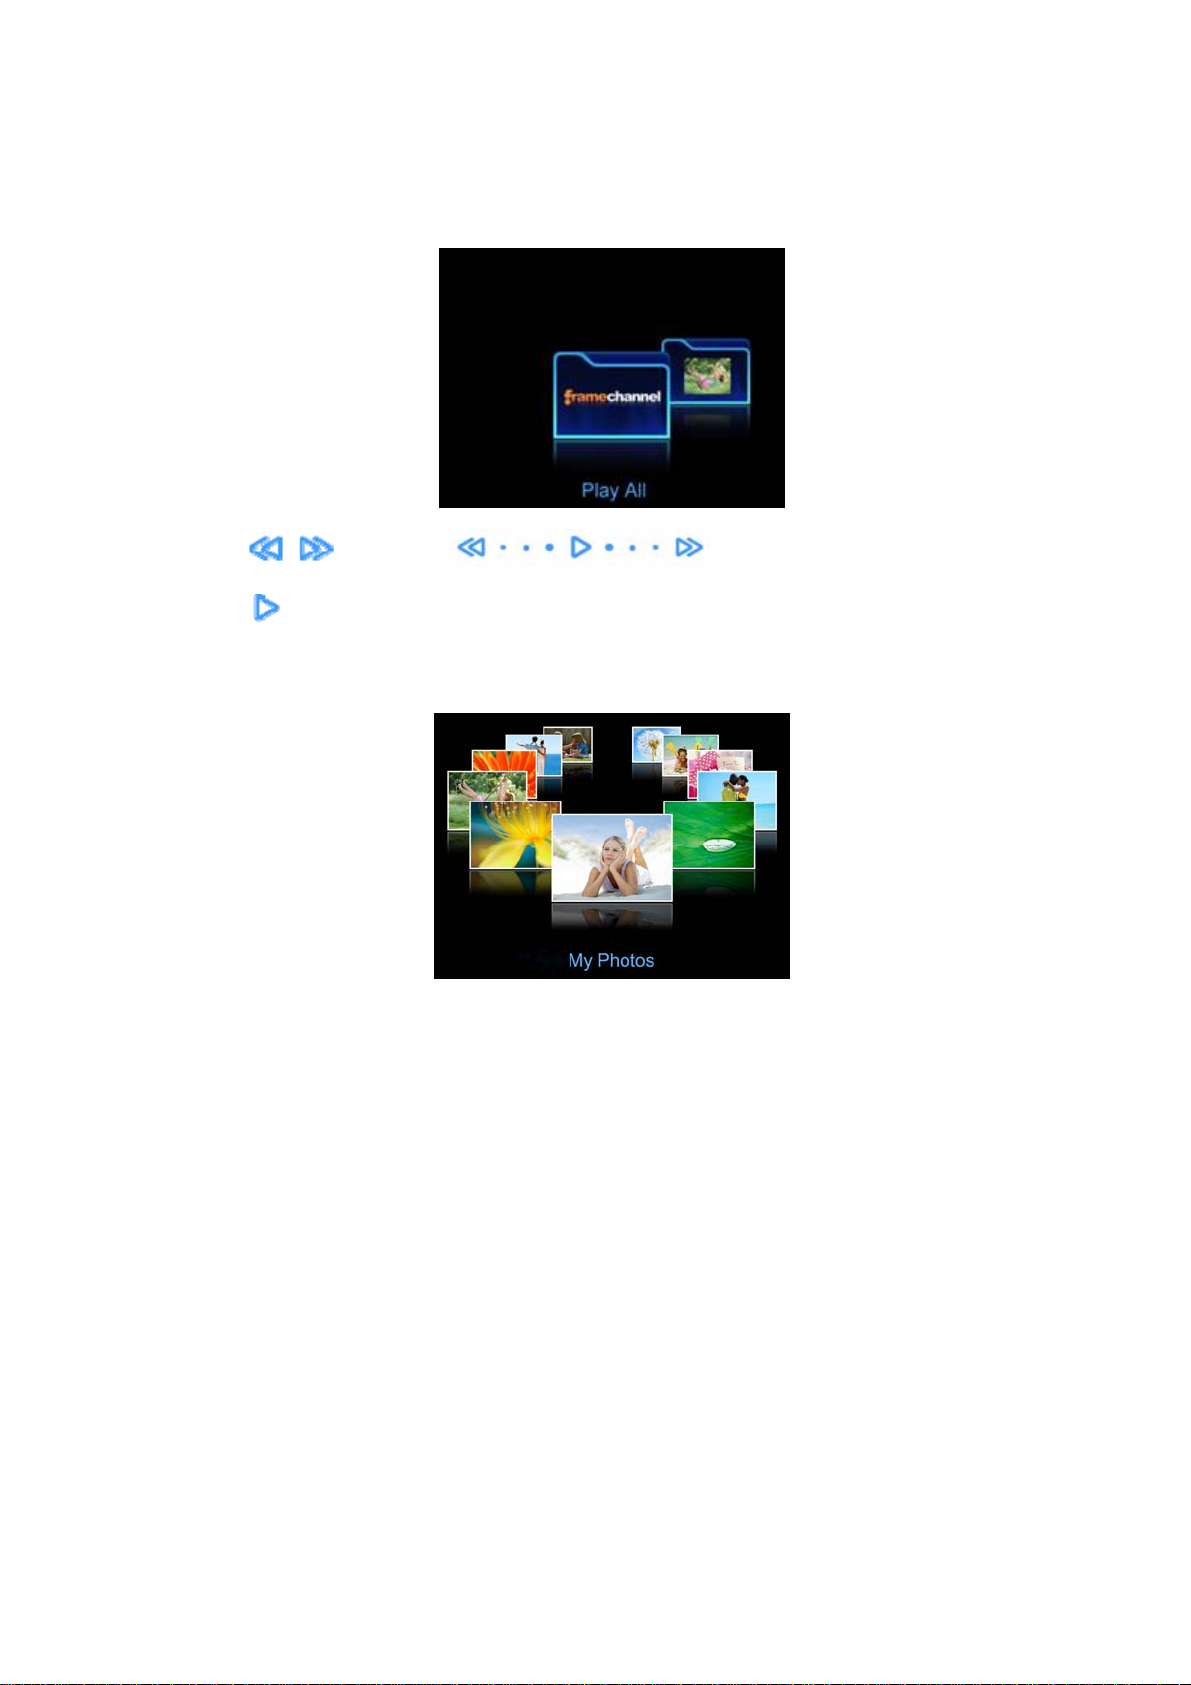
FrameChannel
Once your account is active, you can enjoy FrameChannel on your Cube.
z Touch
z Touch
Thumbnail
This works the same as the Photo mode option described previously.
Slide Show/Still view
This works the same as the Photo mode option described previously.
, or slide with to select the desired content.
to play the contents.
23
Page 29
Settings
z When Settings is selected, Touch
z When the Tab icon is selected, touch
settings.
When the Tab icon is selected:
z Touch
or to switch between tab items.
to open.
or or slide with to switch
z Touch
z Touch
to return to the main menu.
, or slide with to switch between settings.
24
Page 30
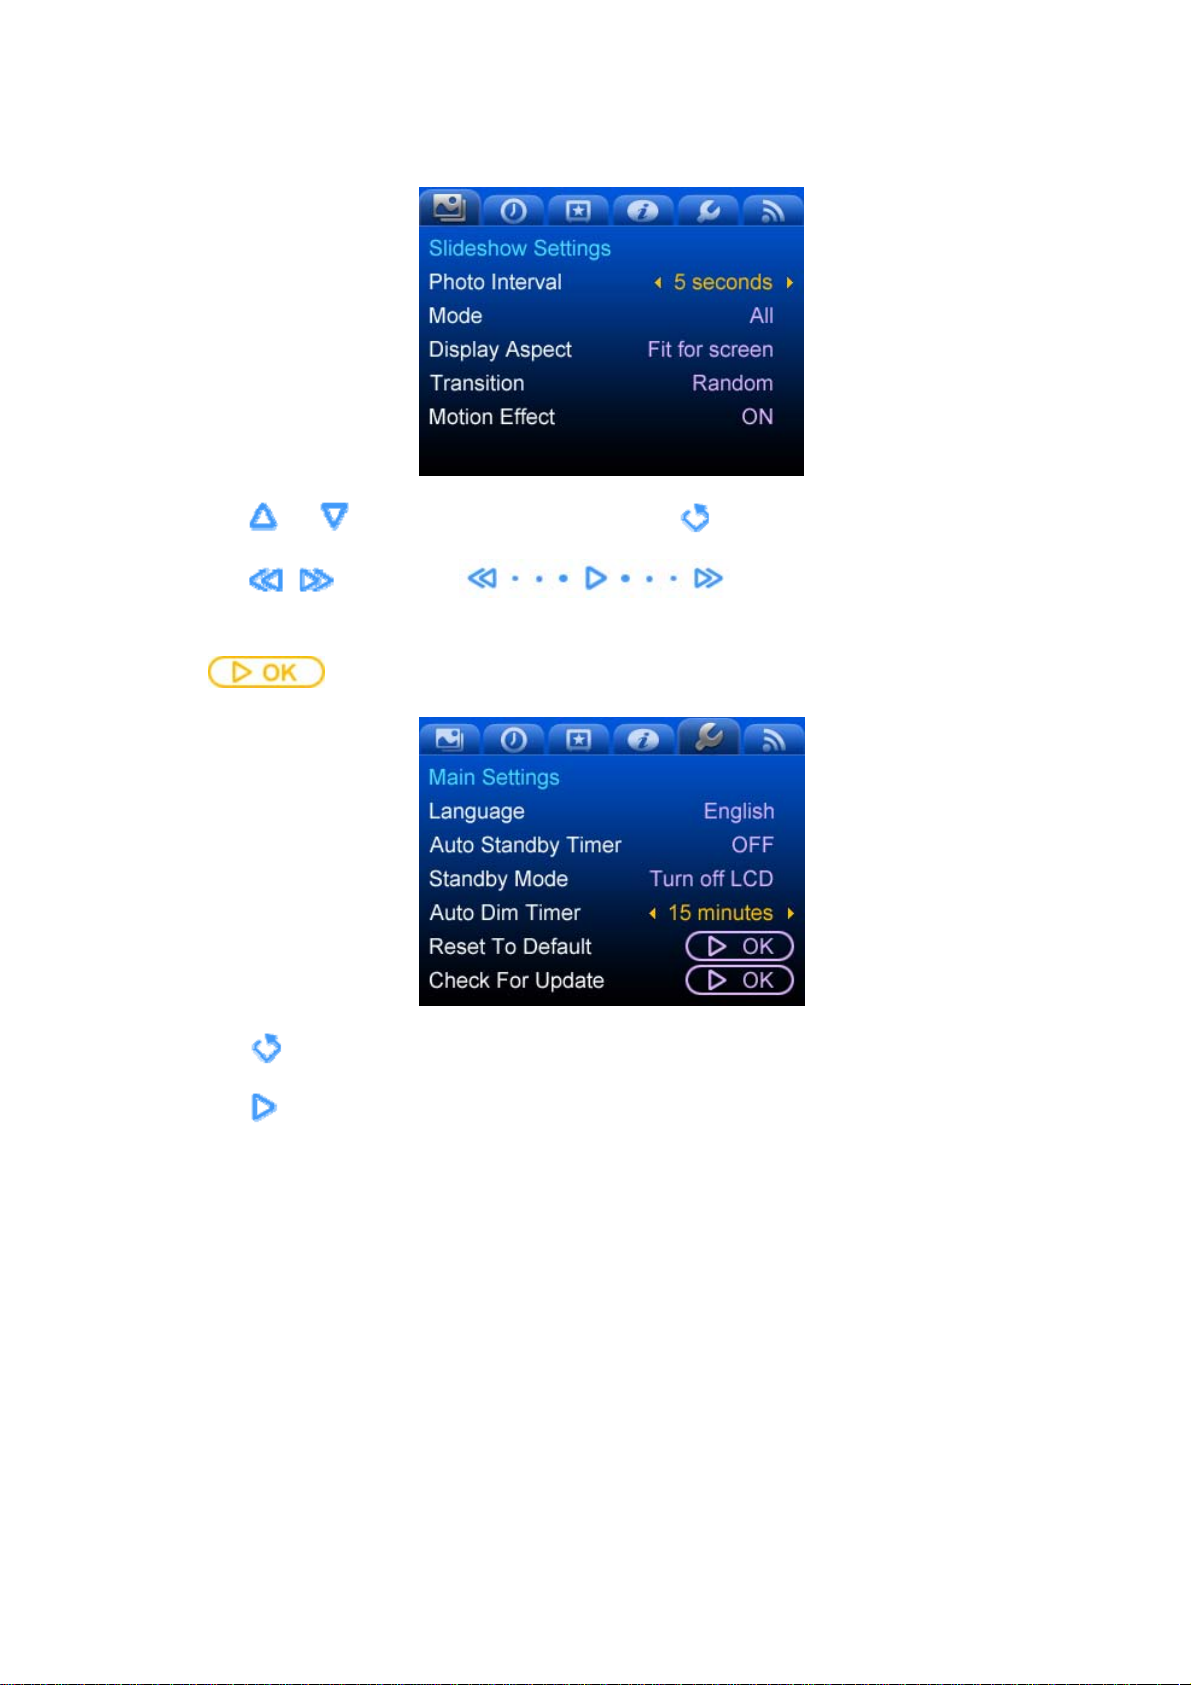
When a slideshow setting option is selected:
z Touch
z Touch
When
z Touch
or to switch between tab items. Touch to select the current Tab.
, or slide with to switch your selection.
is selected:
to select the current Tab.
z Touch
to confirm your selection.
25
Page 31
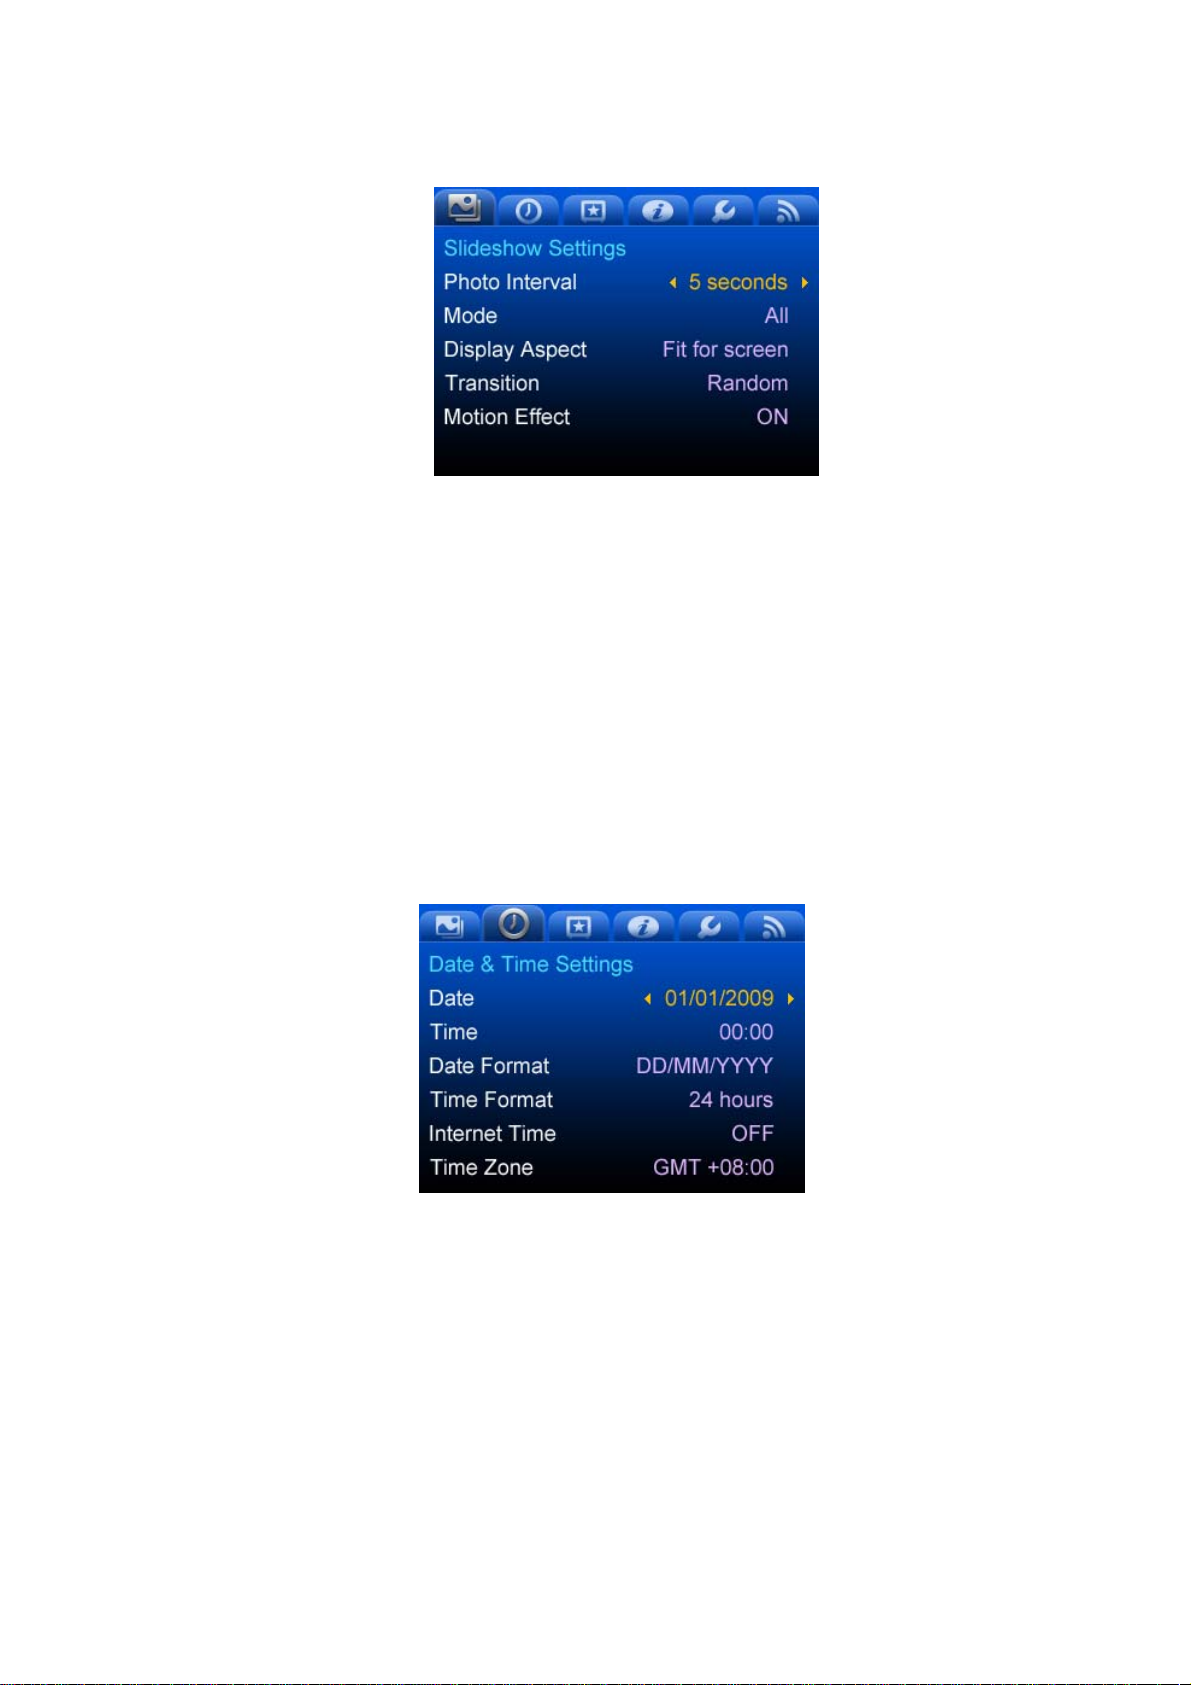
Slideshow Settings
z Photo Interval: Time between slides is displayed .
z Mode: Folder/All
z Display aspect: Original, Fit to screen
Fit to screen:
When the image Width/Height < 1.3, the device zooms the picture until it reaches the closest
screen border. The picture is not cropped.
When Width/Height >1.3, the device zooms the picture according to the proportion of its width and
height, thus eliminating any black border around the image. This will crop the picture if its width or
height exceeds the screen border.
z Transitions: Slide Show transition mode
z Motion Effect: On/off effect of photo enlargement and movement
Setting the Date & Time
26
Page 32
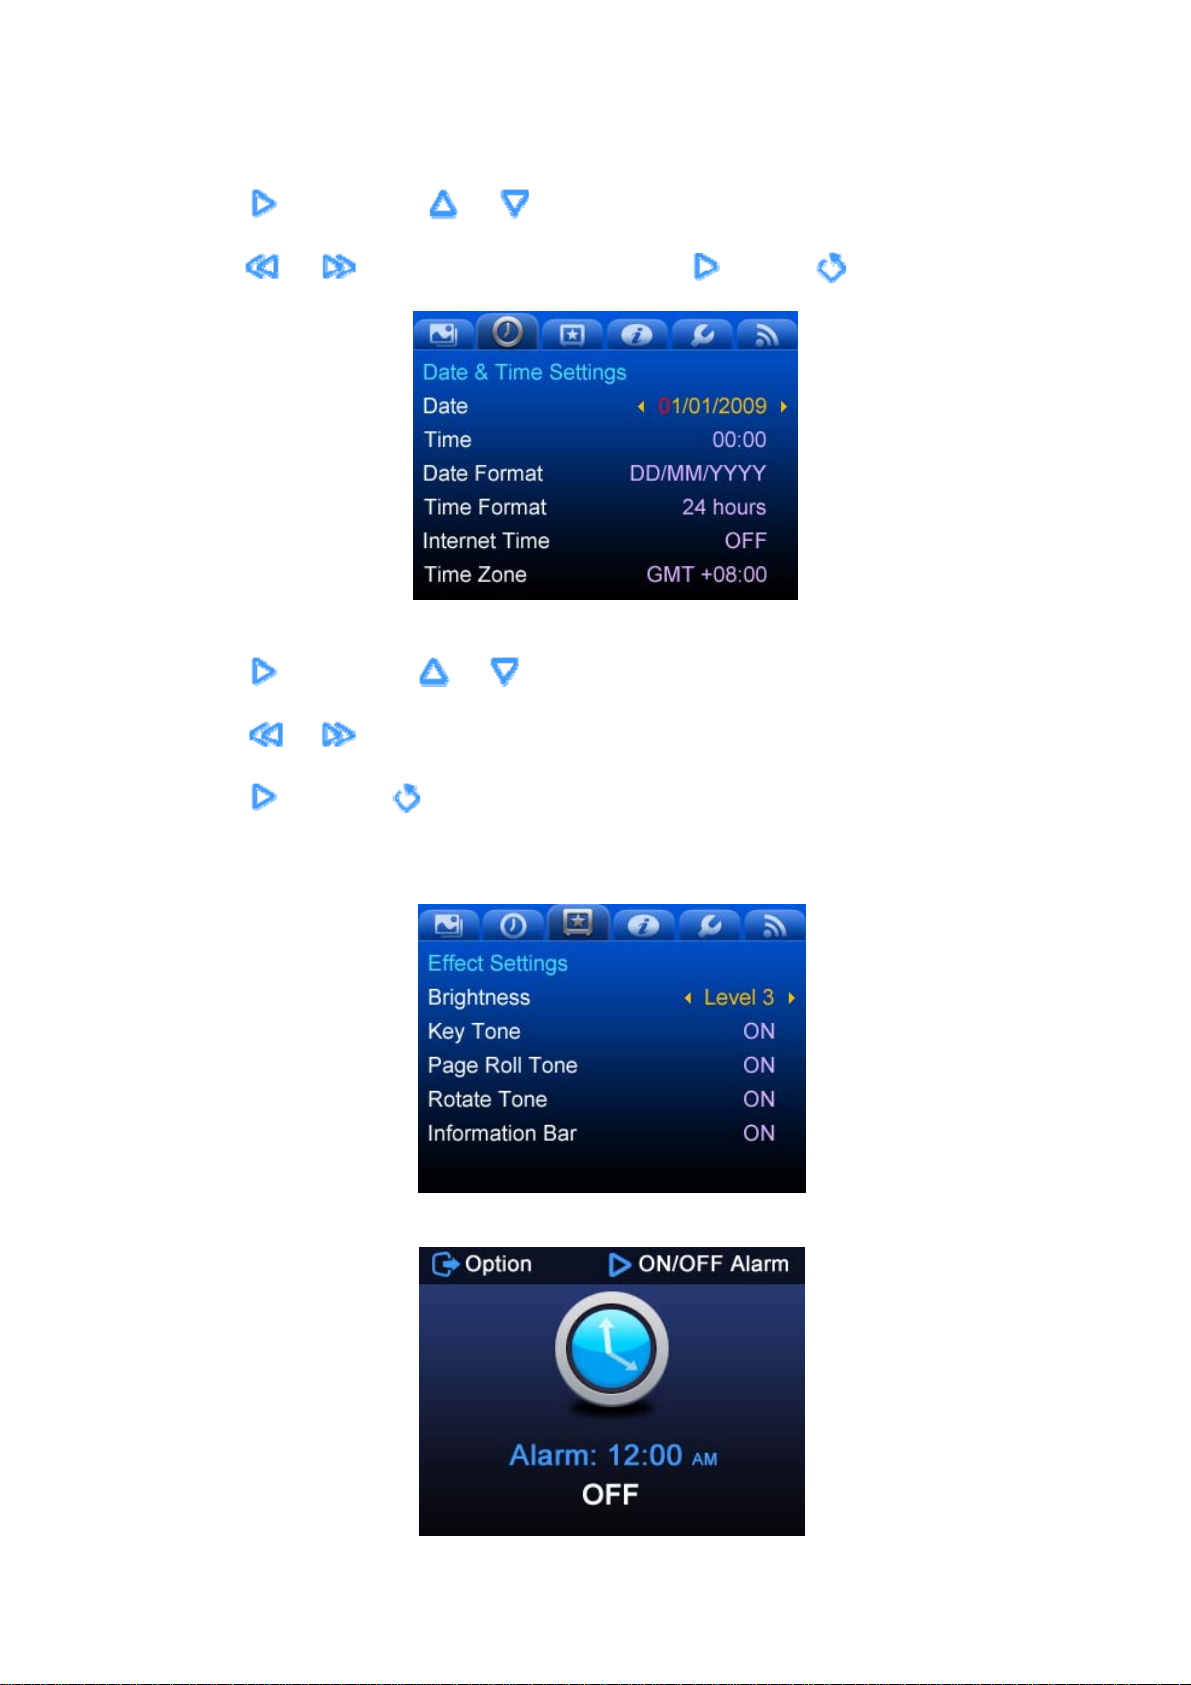
Setting the Date
z Touch
z Touch
Setting the Time
z Touch
z Touch
to edit. Touch or to modify date.
or to highlight Year, Month, or Day. Touch to save or to exit without saving.
to edit. Touch or to modify time.
or to highlight Hour, Minute or Hour, Minute, AM/PM.
z Touch
Effect Settings
z Information bar: Shows settings icons and closes automatically after 3 seconds.
to save or to exit without saving.
27
Page 33
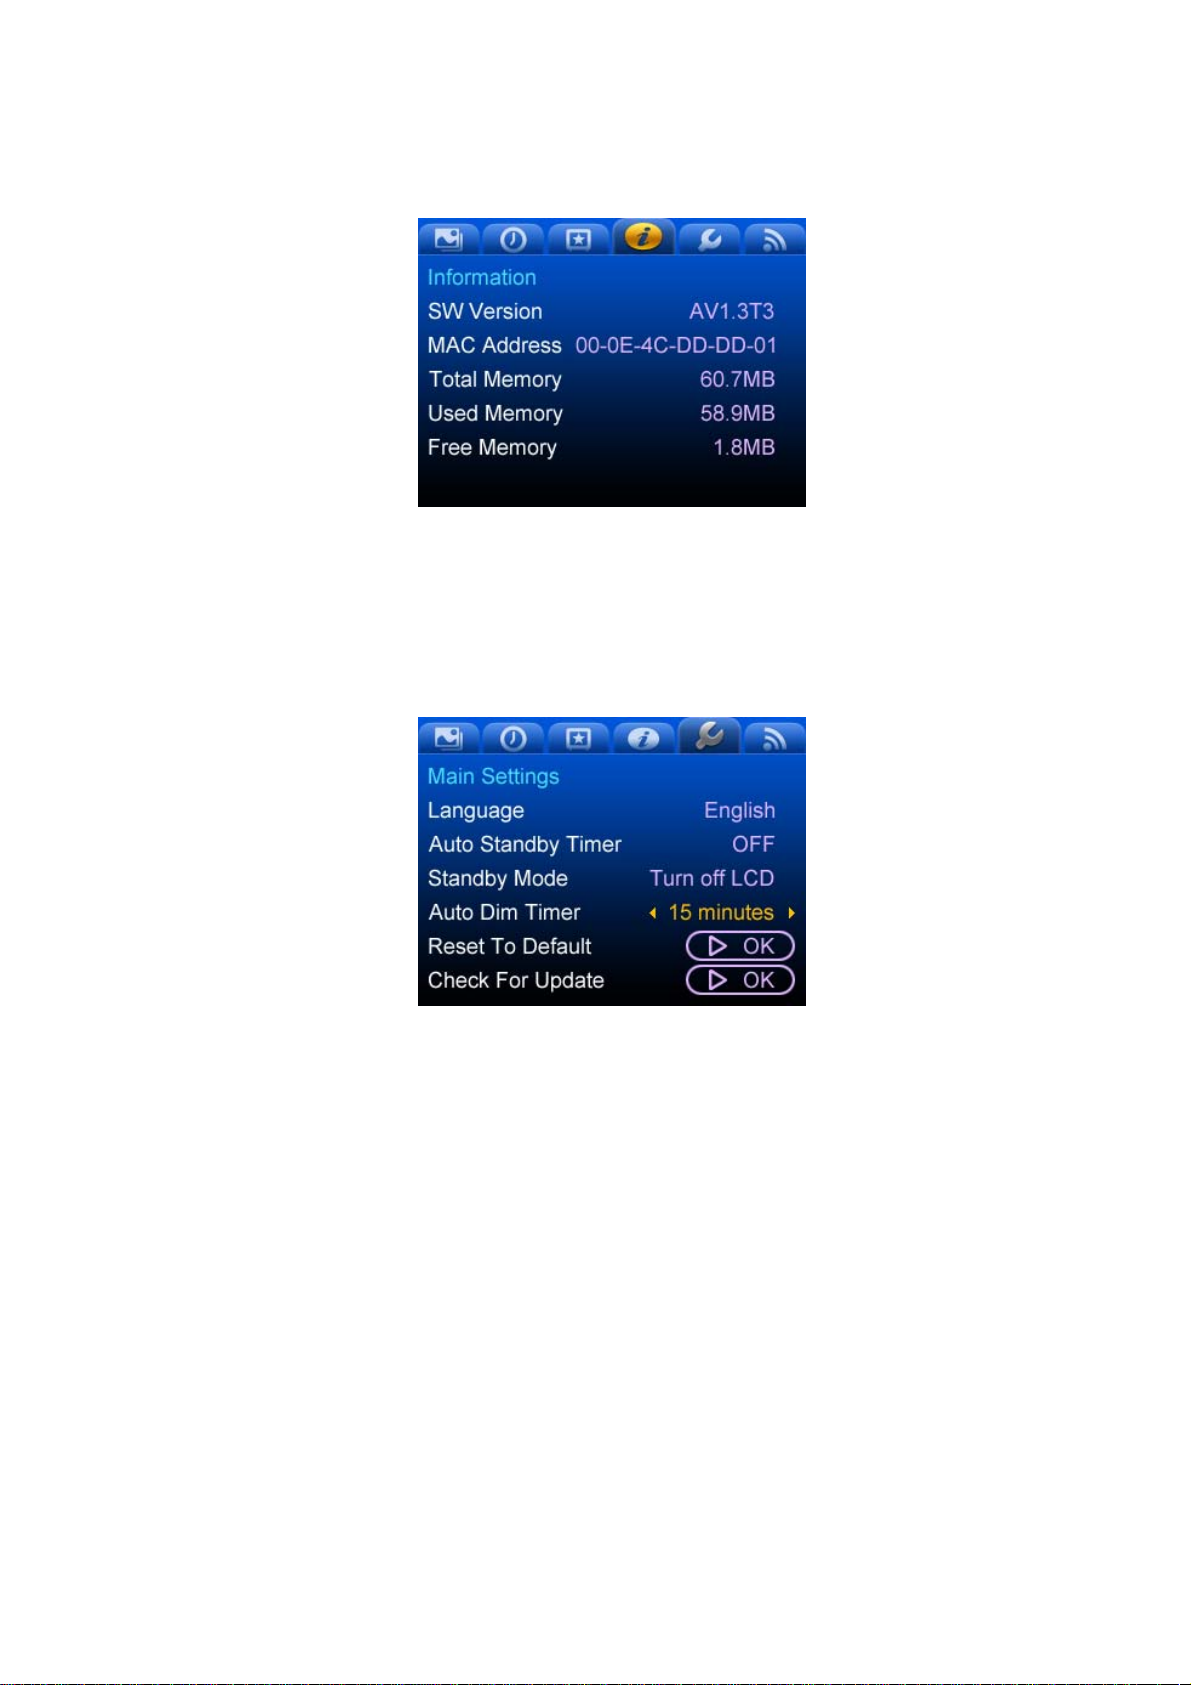
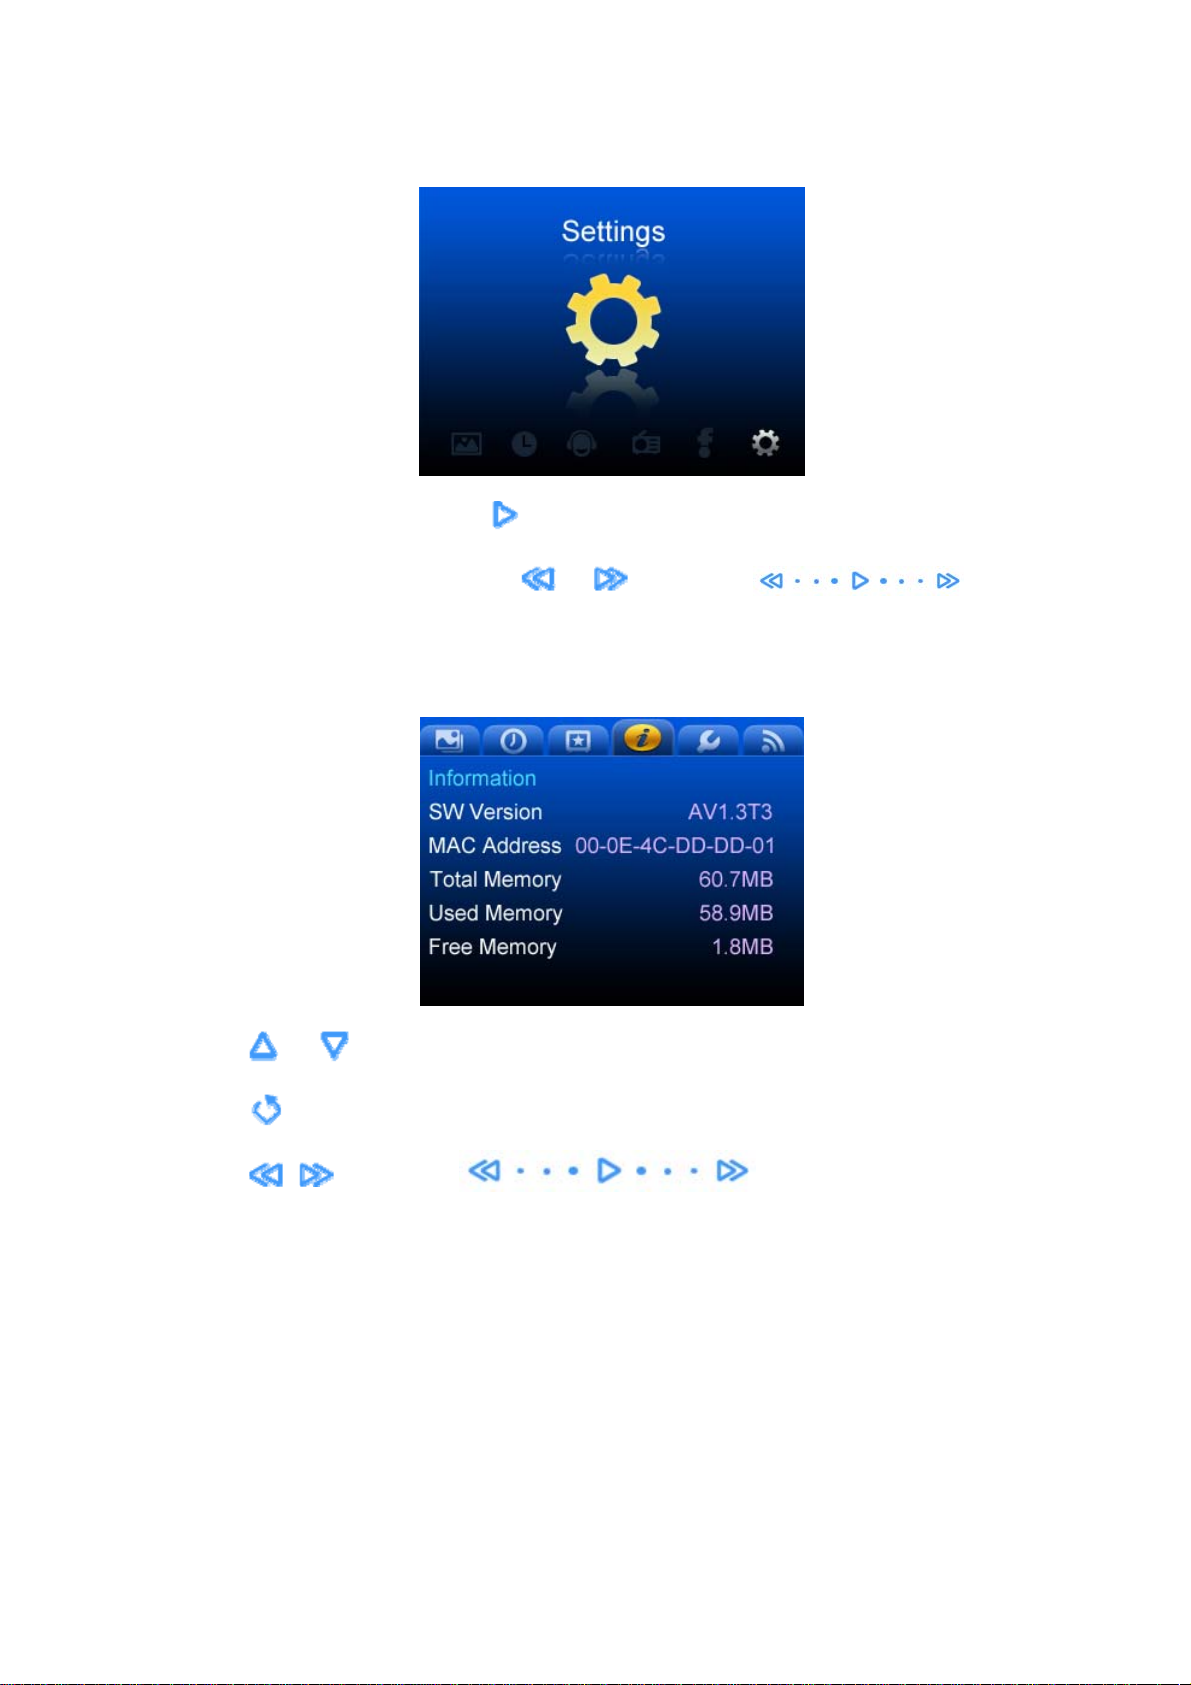
Information
Information view:
1) SW Version: provided by manufacturer
2) MAC Address: provided by manufacturer
3) Used Memory/Free memory/Total memory: MB/KB(<1MB)
Main Settings
z Language options: English and French.
z Auto Standby Timer: Set the timeout duration to enter standby mode.
z Standby mode: Set to display one of the following in Standby mode: Clock, Calendar, Slide show,
Slide show with clock, Slide show with date & time, Web Content, Turn off LCD (screen dark).
z Auto Dim Timer: Set the timeout duration to dim LCD display.
z Reset to defaults: Reset all of settings to defaults, including settings, alarm settings, music play mode,
and clock mode.
z Check for update: Check for new version and update of software.
28
Page 34
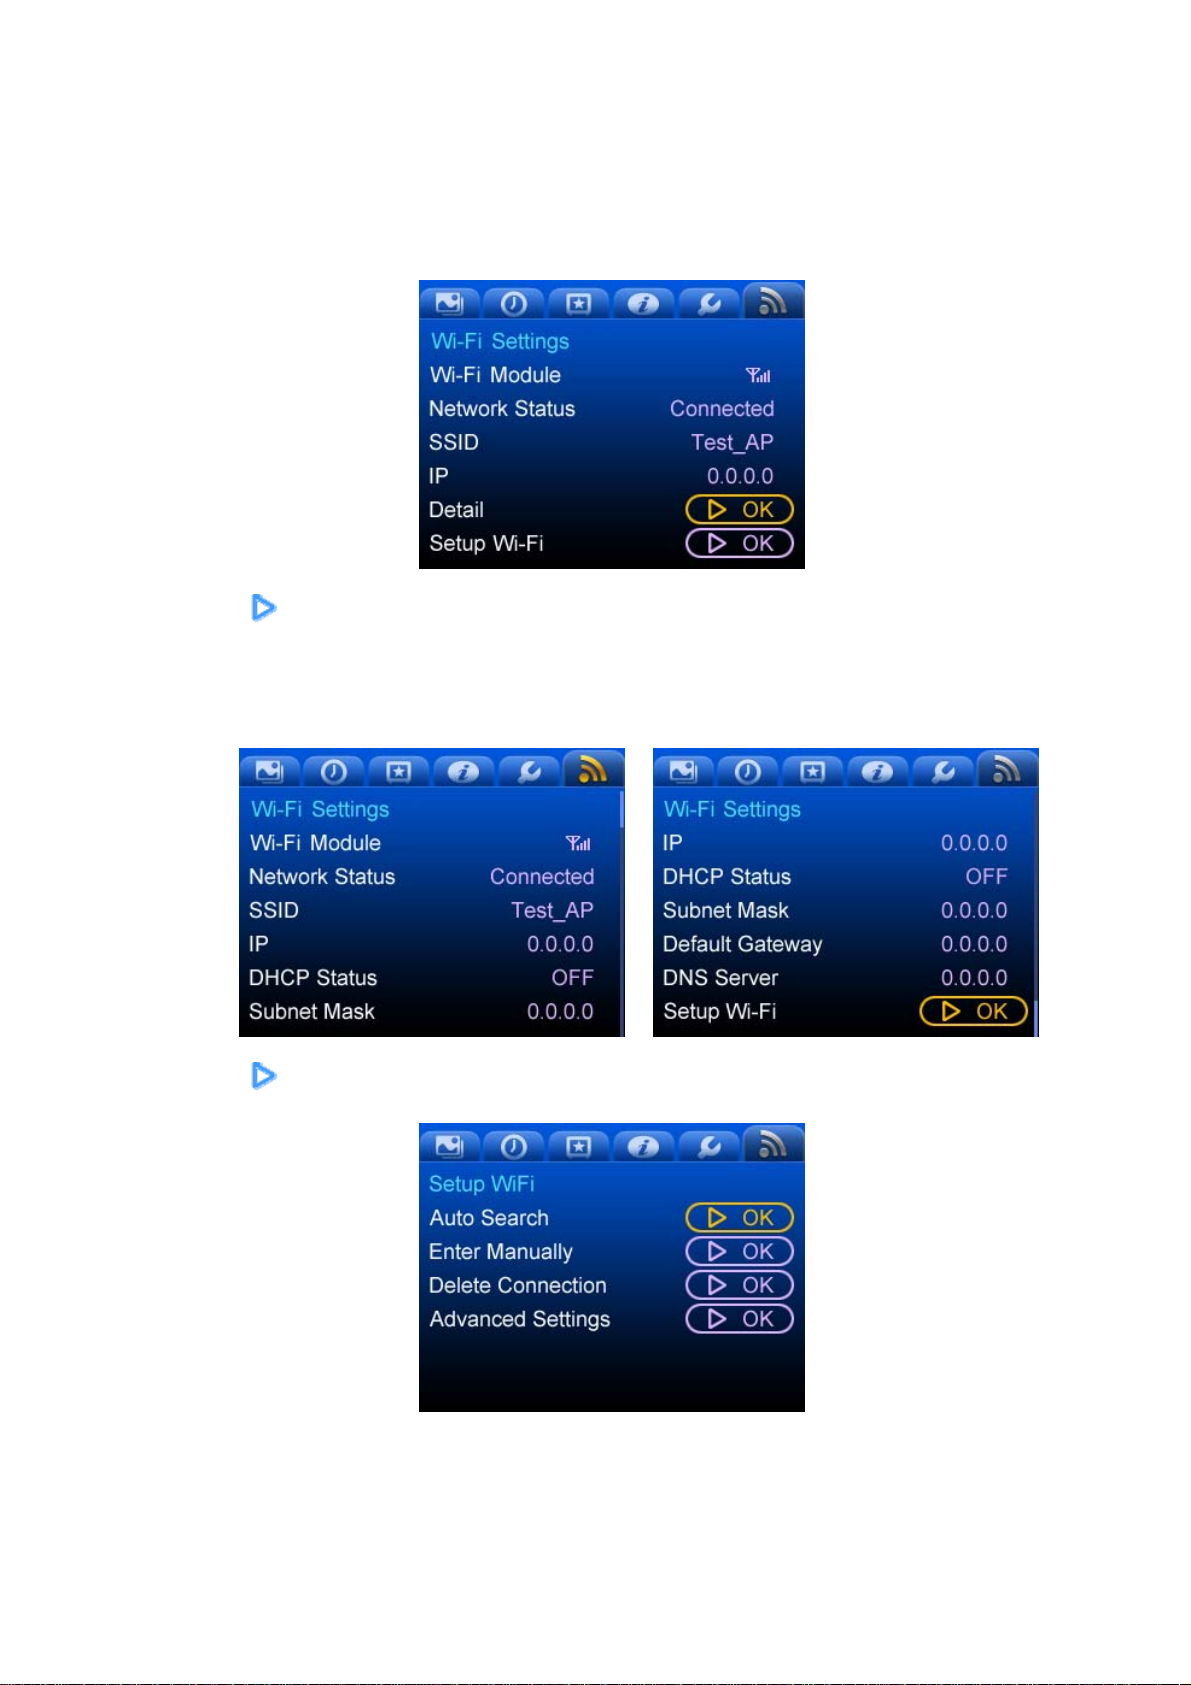
Wi-Fi Settings
Main page:
Main page: Shows Wi-Fi status only.
z Touch
Show Wi-Fi module/Network status/SSID/IP/DHCP status/Subnet mask/Default gateway/DNS server.
Detail Page
z Touch
to display detail, if applicable.
to start Wi-Fi setup if applicable.
29
Page 35
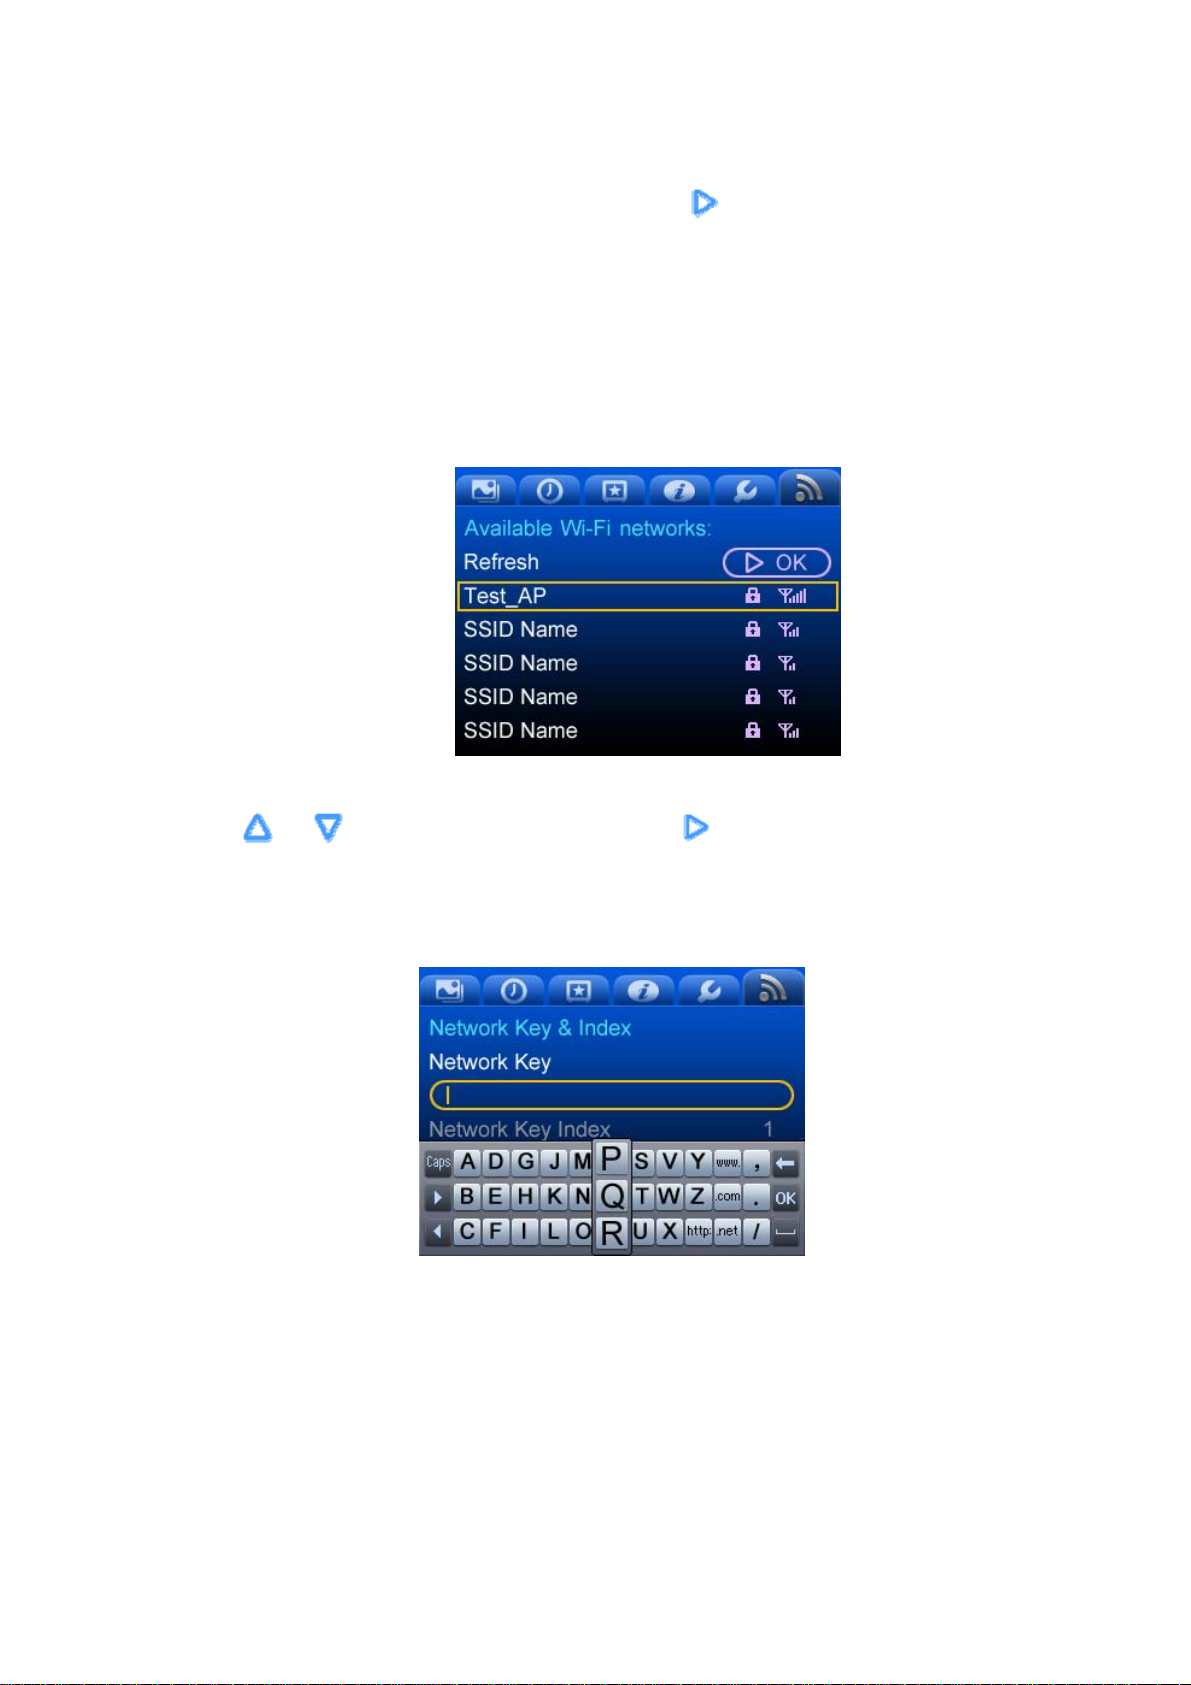
z Auto search: List all the available Wi-Fi networks. Touch
and return to main page to connect.
z Enter manually: Enter SSID name/network mode/key. Save and return to main page to connect.
z Delete connection: Delete current connected network.
z Advanced Setting: Configure DHCP. Default: ON.
Auto Search Setting Page
to select. Enter Key if applicable. Save
z Touch
z A screen will display to prompt you to input the network key.
z Use the keyboard to enter your network key. (This step will be skipped if you selected a connection to
an unsecured wireless network.)
or to select the desired network. Touch to connect to the selected network.
30
Page 36
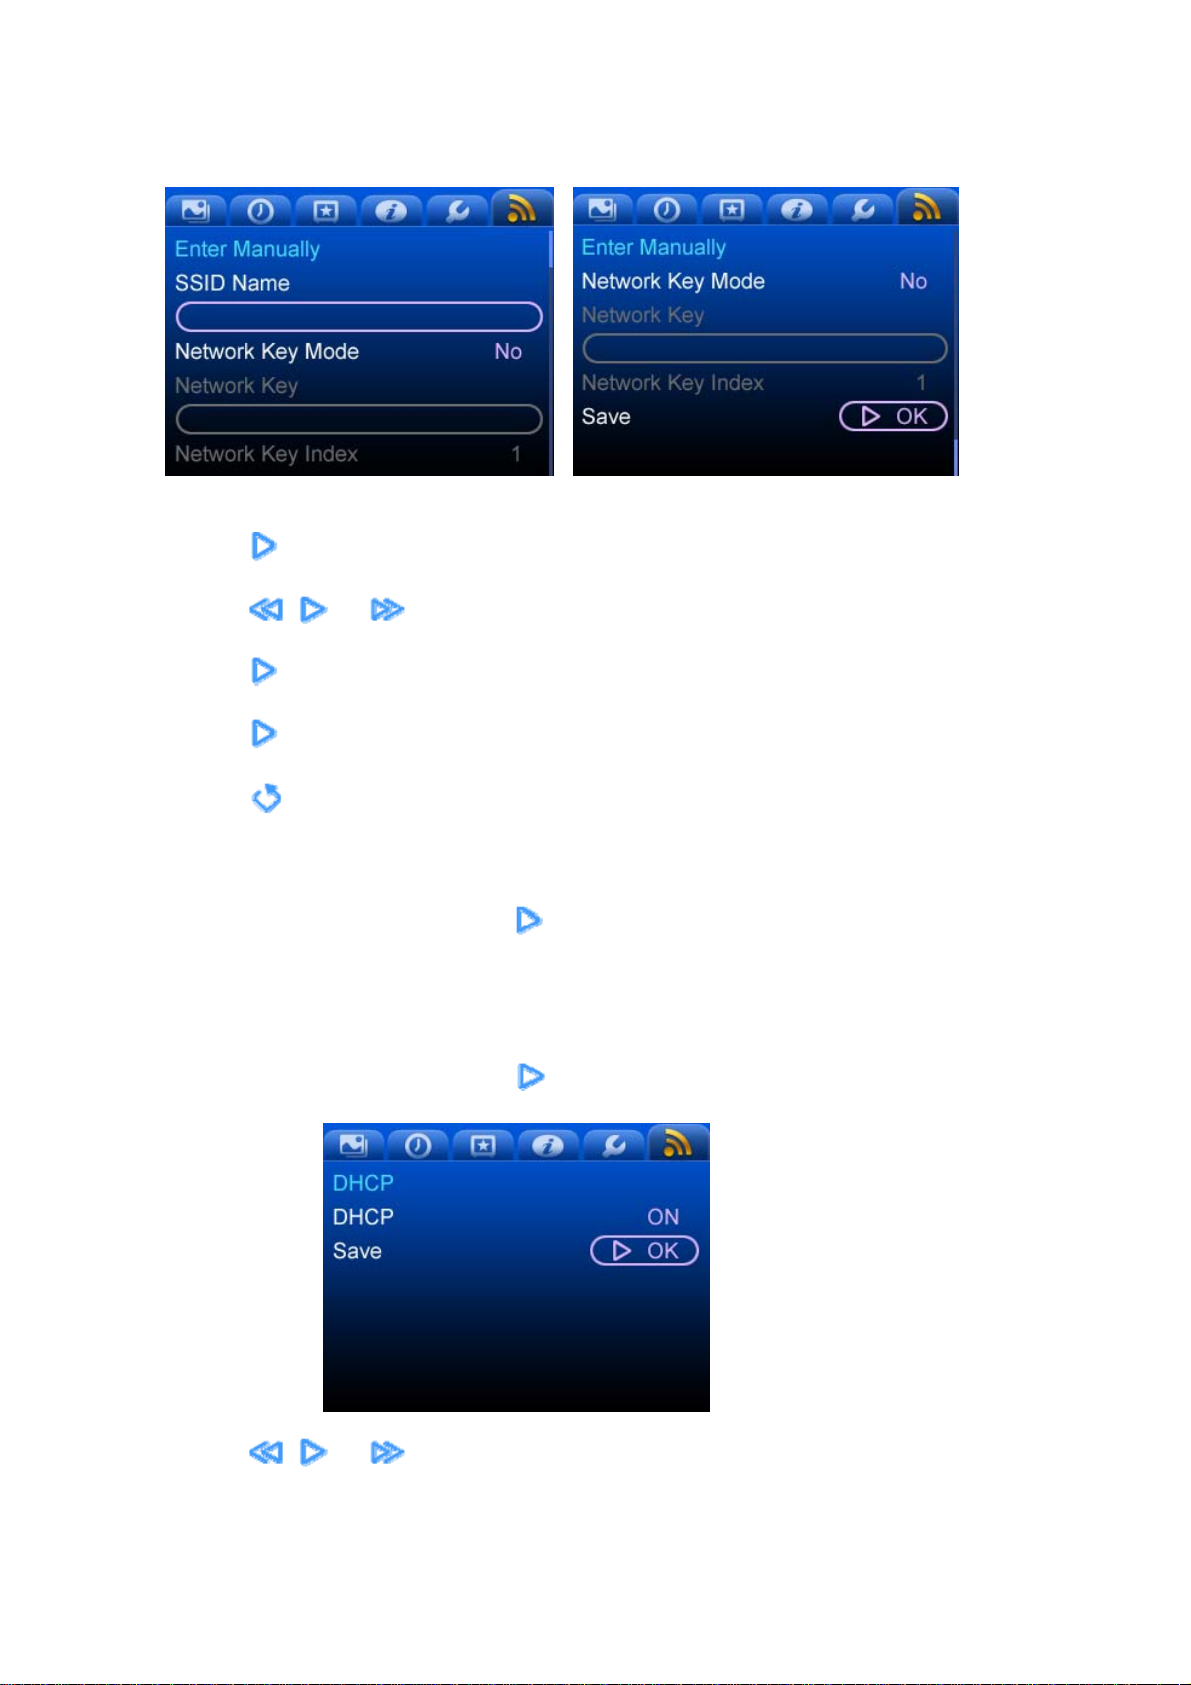
Manual Wi-Fi Settings Page
z Touch
z Touch
z Touch
z Touch
z Touch
Delete Connection
z Selected "Delete Connection", touch
DHCP page
z Selected "Advanced Settings", touch
to open SSID name when applicable.
, , or to select Network key mode when applicable.
to enter Network key when applicable.
to save when save button is present and return to main page.
to return to Setup Wi-Fi page.
to delete current connection.
to set DHCP.
z Touch
DHCP ON
, , or to select DHCP mode when applicable.
31
Page 37
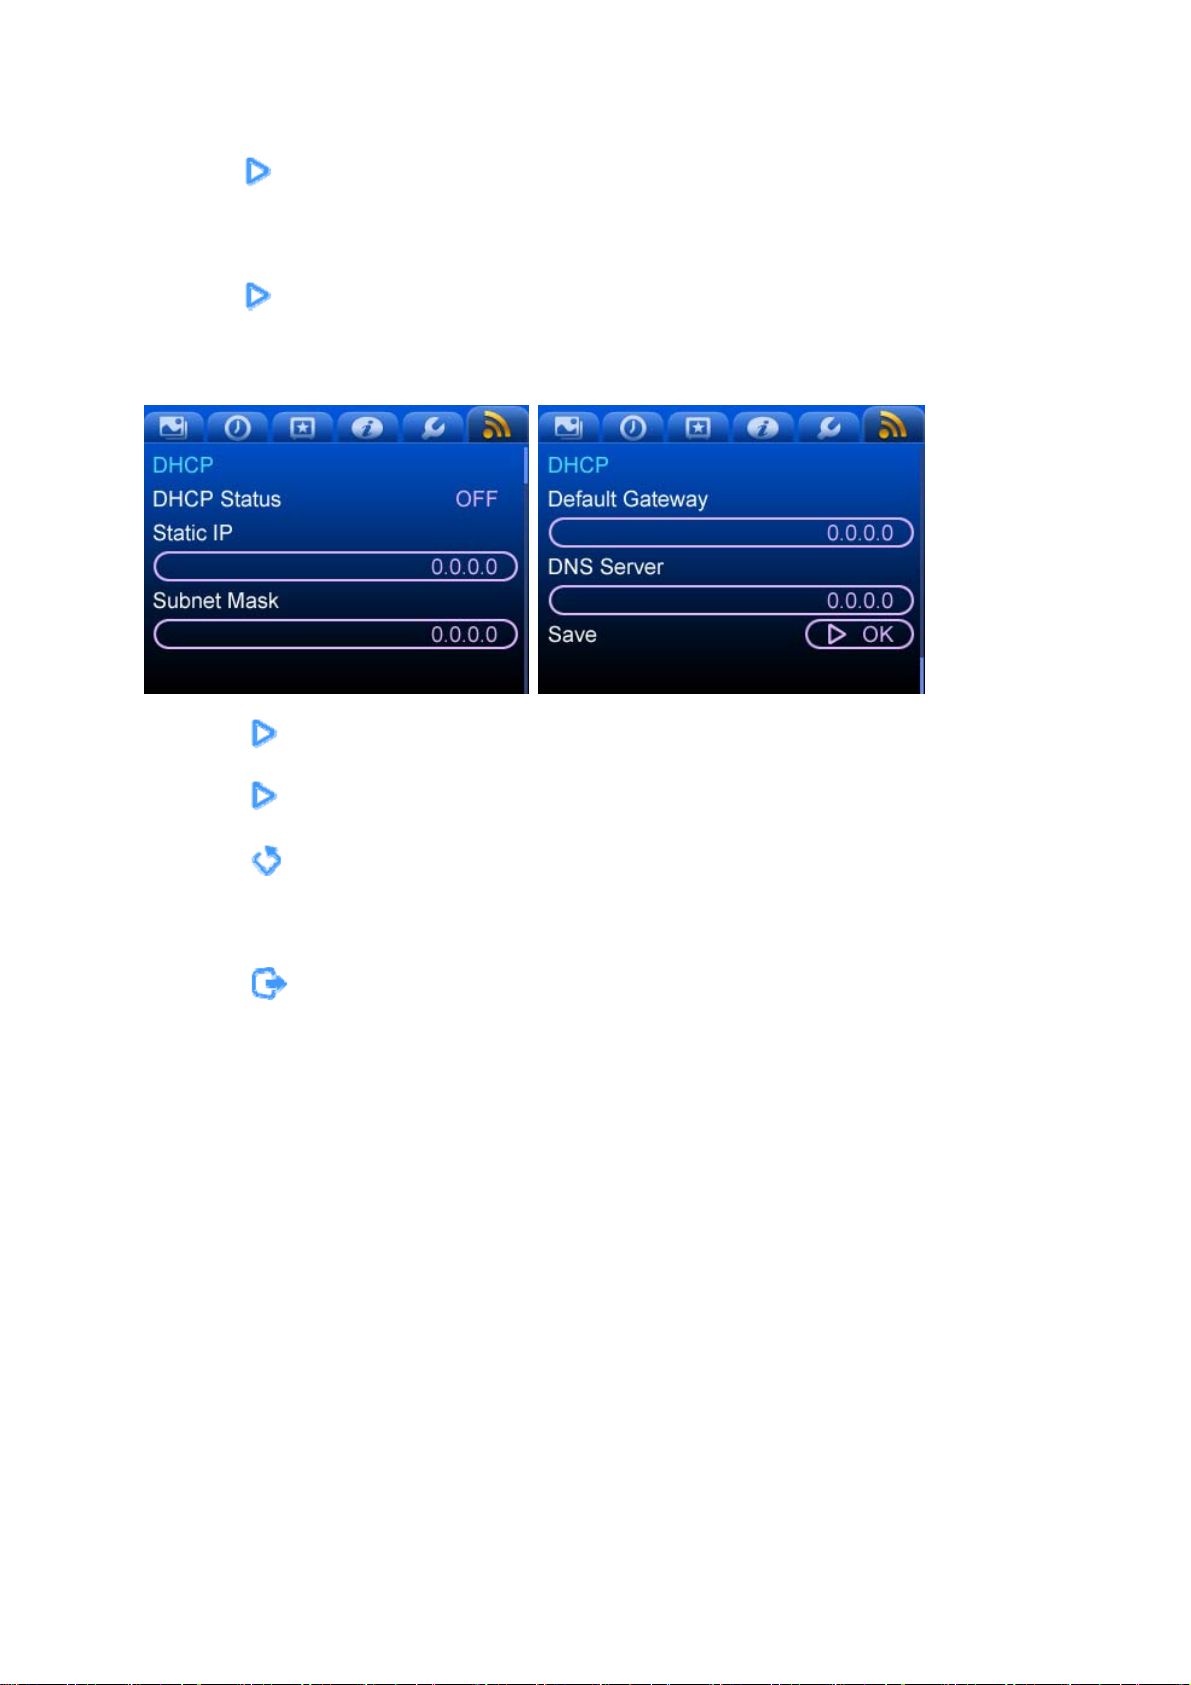
■ Touch to save when the save button is present and return to main page.
DHCP OFF
■ Touch
DHCP-No page
z Touch
z Touch
z Touch
to save when the save button is present and return to DHCP-No page.
to open Static IP/Subnet mask/Default Gateway/DNS Server when applicable.
to save when the save button is present and return to main page.
to return to the DHCP page.
Options
z Touch
1) Start music/Stop radio/Stop music
2) Now playing
to display or close pop-up options menu, (2 items):
32
Page 38
Other
General Information: Prompts/USB flash disk (“USB slave”) mode
Message Prompt
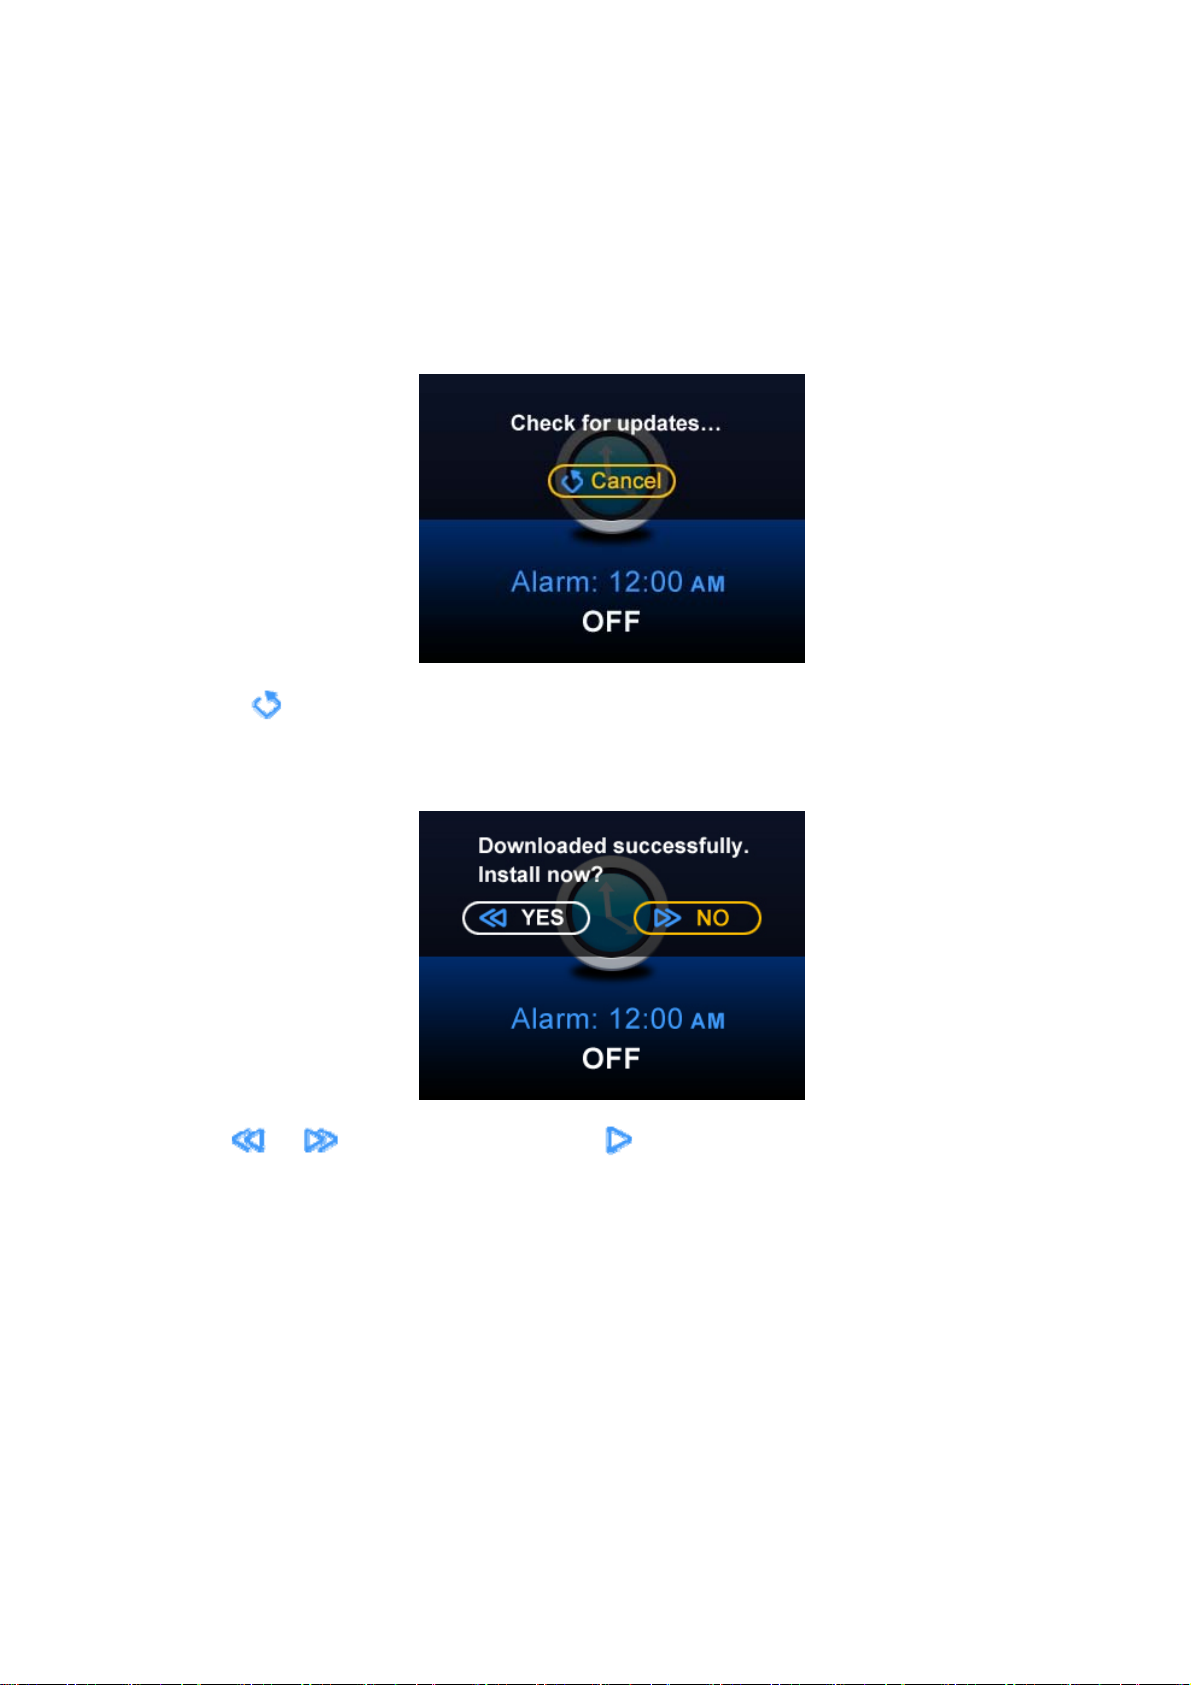
Prompt Types: Processing prompt, Choose prompt, Information prompt.
Processing prompt
z Touch
Choose prompt
z Use
z Select “YES” to, e.g. install.
z Select “NO” to cancel. Default highlights the “NO” button.
to cancel current process and close prompt.
or to select “YES”/”NO”. Touch to confirm selection.
33
Page 39
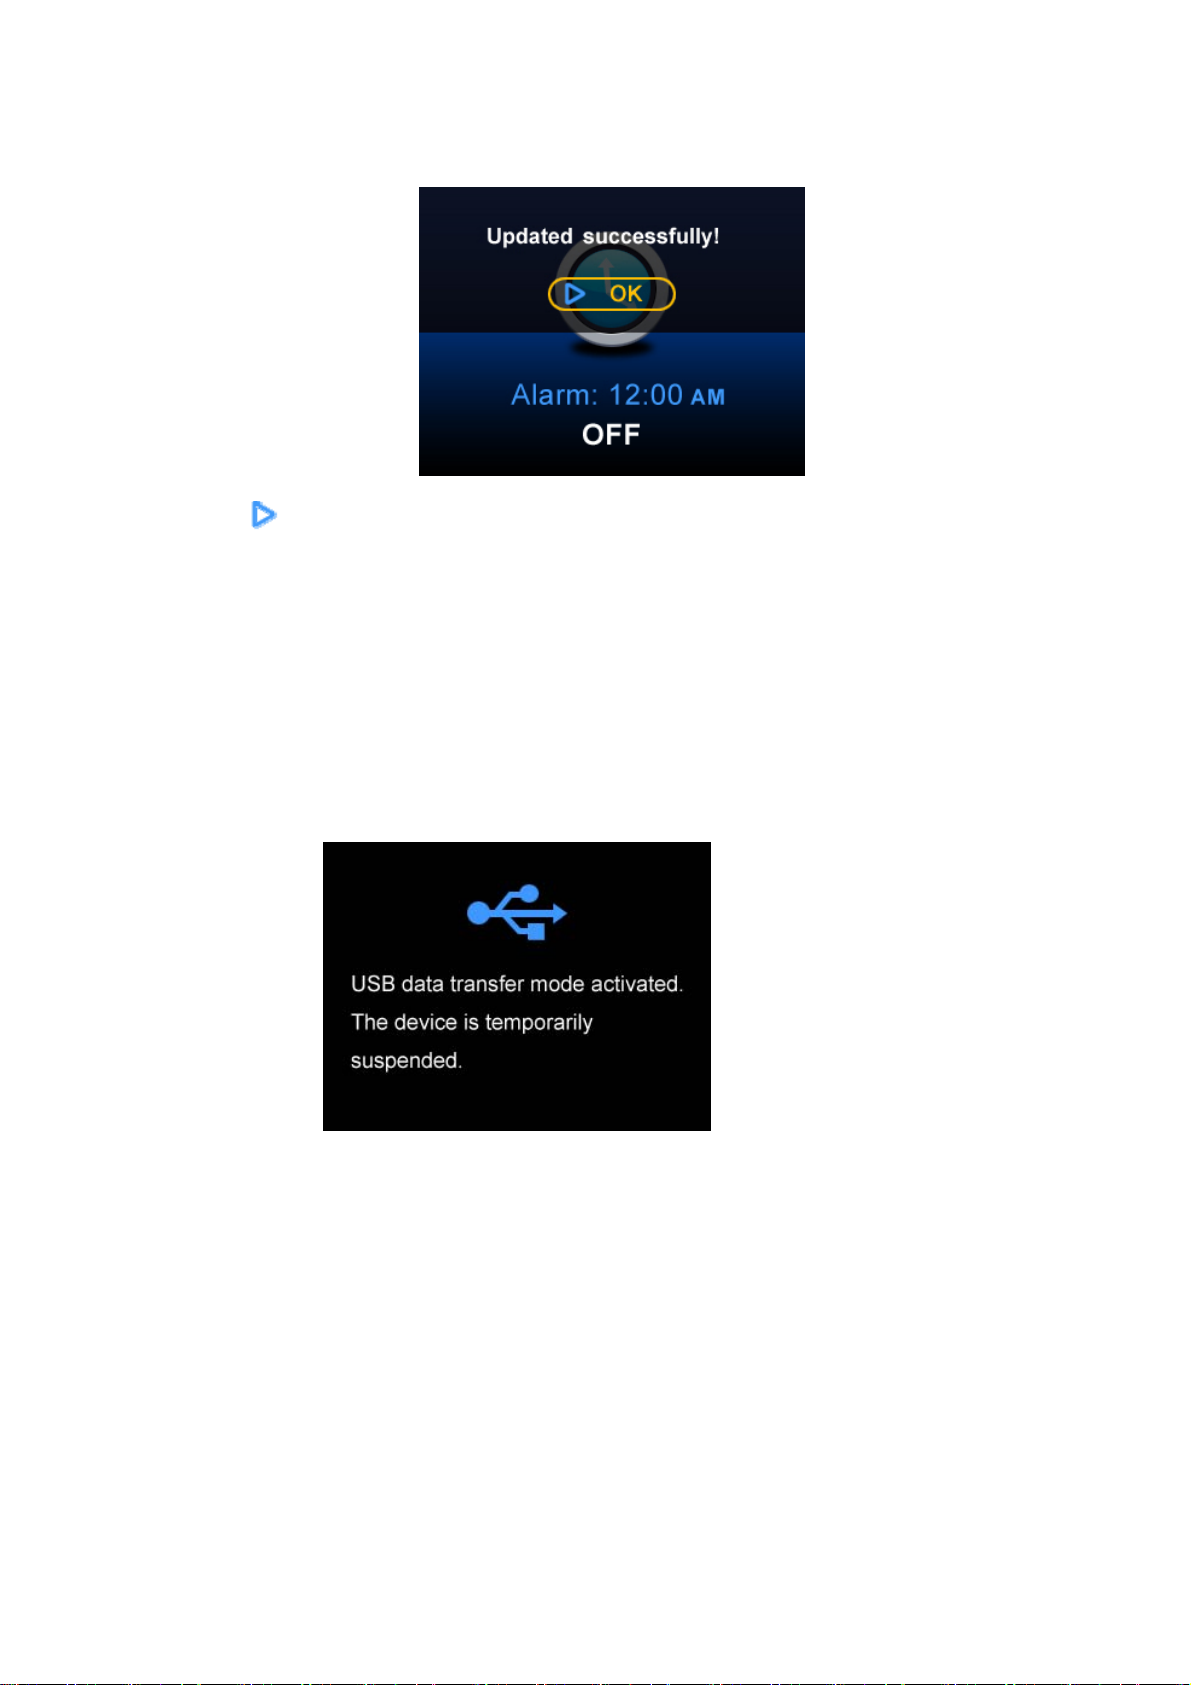
Information prompt
z Touch
z The prompt closes in 3 seconds if there is no action.
USB slave mode
Mass storage: The Cube may be used as a USB Flash Disk for another device.
When connecting the Cube to a PC’s USB port, stop any running application (e.g., stop music, radio,
slideshow, or alarm). The device will display the phrase “USB data transfer mode activated. The device is
temporarily suspended.”
to close current prompt.
34
Page 40

Warranty
What does this warranty cover?
Giant International Ltd. warrants that the Intouch-branded products it manufactures (“Cubes”), and the
Intouch-branded or certified accessories sold for use with these Cubes (“Accessories”) are free from
defects in materials and workmanship under normal usage for the period(s) outlined below. This limited
warranty is the customer’s exclusive remedy, and applies to new Intouch-branded Products and
Accessories purchased by customers in the United States which are accompanied by this written warranty.
Warranty durations are as follows: Product: One (1) year from the date of purchase by the first customer
purchaser of the product unless otherwise provided for below. This excludes the battery. Accessories and
batteries: Ninety (90) days from the date of purchase by the first consumer purchaser of the product.
Products and Accessories that are repaired or replaced: The balance of the original warranty or ninety (90)
days from the date returned to the customer, whichever is longer.
Who is covered?
This warranty extends only to the first customer purchaser of the product. This warranty is not transferable.
Exclusions
Normal wear and tear. Periodic maintenance, repair and replacement of parts due to normal wear and tear
are excluded from coverage.
Batteries. Only batteries whose fully charged capacity falls below 80% of their rated capacity and batteries
that leak are covered by this limited warranty.
Abuse and misuse. Defects or damage that results from: (a) improper operation, storage, misuse or
abuse, accident or neglect, such as physical damage (cracks, scratches, etc.) to the surface of the product
resulting from misuse; (b) contact with liquid, water, rain, extreme humidity or heavy perspiration, sand, dirt
or the like, extreme heat, or food; (c) use of the Product or Accessory to abnormal usage or conditions; or
(d) other acts which are not the fault of Giant International Ltd. are excluded from coverage.
Use of Non-Intouch branded products and accessories. Defects or damage that result from the use of
Non-Intouch branded or certified products, accessories, software or other peripheral equipment are
excluded from coverage.
Unauthorized service or modification. Defects or damages resulting from service, testing, adjustment,
installation, maintenance, alteration, or modification in any way by someone other than Giant International
Ltd. or its authorized distributors, are excluded from coverage.
Altered products. Products or accessories with (a) serial numbers or date tags that have been removed,
altered or obliterated; (b) broken seals that show evidence of tampering; (c) mismatched board serial
numbers; or (d) nonconforming or non-Intouch branded housings, or parts, are excluded from coverage.
Communication services. Defects, damages, or the failure of Products or Accessories due to any
communication service or signal you may subscribe to or use with the Products or Accessories is excluded
from coverage.
35
Page 41

What other limitations are there?
Any implied warranties, including without limitation the implied warranties of merchantability and fitness for
a particular purpose, shall be limited to the duration of this limited warranty, otherwise the repair,
replacement, or refund as provided under this express limited warranty is the exclusive remedy of the
customer, and is provided in lieu of all other warranties, express or implied. In no event shall Giant
International Ltd. be liable, whether in contract or tort (including negligence) for damages in excess of the
purchase price of the product or consequential damages of any kind, or loss of revenue or profits, loss of
business, loss of information or other financial loss arising out of or in connection with the ability or inability
to use the products or accessories to the full extent these damages may be disclaimed by law. Some states
and jurisdictions do not allow the limitation or exclusion of incidental or consequential damages, or limitation
on the length of an implied warranty, so the above limitation or exclusions may not apply to you. This
warranty gives you specific legal rights, and you may also have other rights that vary from state to state or
from one jurisdiction to another.
How to obtain warranty service or other information.
Contact Giant International Ltd. at 1-800-860-4530 or e-mail [email protected]
To obtain service, you must include; (a) a copy of your receipt, bill of sale or other comparable proof of
purchase; (b) a written description of the problem; (c) the name of your retailer, if applicable; and, most
importantly; (d) your address and telephone number.
2009 Giant International Limited. All rights reserved. All registered trademarks and trade dress are the
property of the respective owners.
Technical Support
Customers may contact Intouch Customer Service by phone.
United States (Hours of Operation: M-F 9 a.m. – 8 p.m. EST)
Consumers and Dealers call 1-800-860-4530 or e-mail: [email protected]
36
 Loading...