

Page 1

User Manual
Model BL300-1/BL300-2
Digital Cordless Phone
Page 2

TABLE OF CONTENTS
Important Safety Instructions..................................................................................................... 3
Safety Instructions for Handset Battery Pack ............................................................................ 4
LCD Display .............................................................................................................................. 6
Getting Started............................................................................................................................ 7
Install and Charge the Battery Pack ........................................................................................... 7
Basic Operation........................................................................................................................ 10
Making Internal Calls...............................................................................................................10
Making External Calls.............................................................................................................. 10
Receiving External Calls.......................................................................................................... 11
Receiving Internal Call............................................................................................................. 11
Redialing .................................................................................................................................. 11
Dialing from the Phone Book................................................................................................... 13
Muting the Microphone............................................................................................................ 13
Muting the Ringer volume ....................................................................................................... 13
Call Transfer / Forwarding ....................................................................................................... 13
Three Party Conference............................................................................................................ 14
Changing the Earpiece Volume ................................................................................................ 14
Paging the Handset................................................................................................................... 14
Handset Speaker Phone............................................................................................................ 14
Key Lock .................................................................................................................................. 14
Short Key Definition ................................................................................................................ 14
Phone Book .............................................................................................................................. 15
Date & Time ............................................................................................................................. 17
Call List.................................................................................................................................... 17
Display Setup ...........................................................................................................................18
Base Setup ................................................................................................................................19
Ringer ....................................................................................................................................... 19
Dial Mode................................................................................................................................. 20
MW Indication .........................................................................................................................20
Reset Base ................................................................................................................................20
HS Settings............................................................................................................................... 20
Ringer Setup............................................................................................................................. 21
Set Alarm................................................................................................................................. 22
Auto Talk.................................................................................................................................. 23
Registration .............................................................................................................................. 23
Select Base ............................................................................................................................... 24
Tones On/Off............................................................................................................................ 24
Reset Handset........................................................................................................................... 24
GFM Guarantee........................................................................................................................ 27
2
Page 3

Important Safety Instructions
BEFORE USING YOUR TELEPHONE EQUIPMENT, BASIC SAFETY PRECAUTIONS SHOULD
WAYS BE FOLLOWED TO REDUCE THE RISK OF FIRE, ELECTRIC SHOCK AND INJURY
AL
TO PERSON, INCLUDING THE FOLLOWING:
1. Read and understand all instructions.
2. Follow all warnings and instructions m
3. Unplug this product from the wall outlet before cleaning.
cleanser. Use a damp cloth for cleaning.
4. Do not use this product near water, for example, ne
tub, in a wet basement, or near a swimming pool.
5. Do not place this product on an unstable cart, stand,
damage to the product.
6. Slots and openings in the cabinet and the back or bottom are provided for ventilation. To protect it
overheating, these openings must not be blocked or covered. The openings should never be
from
blocked by placing the product on the bed, sofa, rug, or other similar surface. This product should
never be placed near or over a radiat or or hea t register. This produc t should not be pl aced in a built-in
installation unless proper ventilation is provided.
7. This product should be operated only from the type of power source indicated on the label. I
not sure of the type of power supply to your home, consult your dealer or local power company.
8. Do not allow anything to rest on the power cord. Do
damaged by persons walking on it.
9. Do not overload wall outlet extensio
arked on the product.
Do not use liquid cleanser or aerosol
ar a bath tub, wash bowl, kitchen sink, laundry
or table. The product may fall, causing serious
f you are
not locate this product where the cord will be
n cords, as this can result in the risk of fire or electric shock.
10. Never push objects of any kind into this product thr
voltage points or short out parts that could result in a risk of fire or electric shock. Never spill liquid of
any kind on this product.
11. To reduce the risk of electric shoc
required, take the unit to a qualified technician. Opening or remo vi n g covers may expose you to
dangerous voltages or other risks. Incorrect reassembly can cause electric shock when the appliance is
subsequently used.
12. Use only the power cord and batteries indicate
They may explode.
13. Unplug this product from the wall outlet
following conditions:
a. When the power supply cord or plug is damaged or frayed.
b. If liquid has been spilled into the product.
c. If the product has been exposed to rain or water.
d. If the product does not operate normally by following the operating instructions. Adjust only those
rols that are covered by the operating instructions because improper adjustment of other controls
cont
may result in damage and will often require extensive work by a qualified technician to restore the
product to normal operation.
k, do not disassemble this product. Instead, when repair work is
and refer servicing to a qualified service personnel under the
ough cabinet slots as they may touch dangerous
d in this manual. Do not dispose of batteries in a fire.
3
Page 4

e. If the product has been dropped or cabinet has been damaged.
f. If the product exhibits a distinct change in performance.
14. Avoid using a telephone (other than a cordl ess type) during
risk of electrical shock from lightning.
15. Do not use the telephone to report a gas leak in the vicinity of the leak.
16. This power unit is intended to be correctly oriented in a vertical or floor mount position.
an electrical storm. There may be a remote
17.
Use only with Class (Class 2) power source 7.5VDC 320mA.
SAVE THESE INSTRUCTIONS
Safety Instructions for Handset Battery Pack
CAUTION:
There is danger of explosion if the battery is incorrectly replaced. Use only an approved
battery pack in the handset of your Cordless Telephone System. To reduce the risk of fire or
injury, always do the following when replacing, discarding, or charging battery. When
handling the batteries, be careful not to short the battery with conducting materials such as
rings, bracelets, and keys. The Battery or conducting material may overheat and cause
burns. Risk of explosion if battery is replaced by an Incorrect type. Dispose of used batteries
according to the instructions. Use only with (GPI GP60AAAH2BMJZR; (2.4V,600mAH)
NiMH rechargeable battery) / LEXEL LH065-3A43C2BRJS1P (2.4V,600mAH) NiMH
rechargeable battery)
CONTAINS NICKEL-METAL HYDRIDE BATTERY. BATTERY MUST
BE RECYCLED OR DISPOSED OF PROPERLY
18. Do not dispose of the battery in a fire. The cell may explode. Check with local codes for possible special
disposal instructions.
19. Do not open or mutilate the battery. Released e
eyes or skin. It may be toxic if swallowed.
20. Exercise care in handling batteries in order not to s
rings, bracelets and keys. The battery or conductor may overheat and cause burns.
21. Charge the batteries provided with, or ide ntified f or use
instructions and limitations specified in this manual.
22. Observe proper polarity orientation between the batter
23. Do not mix old and new batteries in this product.
24. Do not mix batteries of diffe
rent sizes or from different manufacturers in this product.
lectrolyte is corrosive and may cause damage to the
hort the battery with conducting materials such as
, with this product only in accordance with the
y(ies) and the battery charger.
SAVE THESE INSTRUCTIONS
4
Page 5
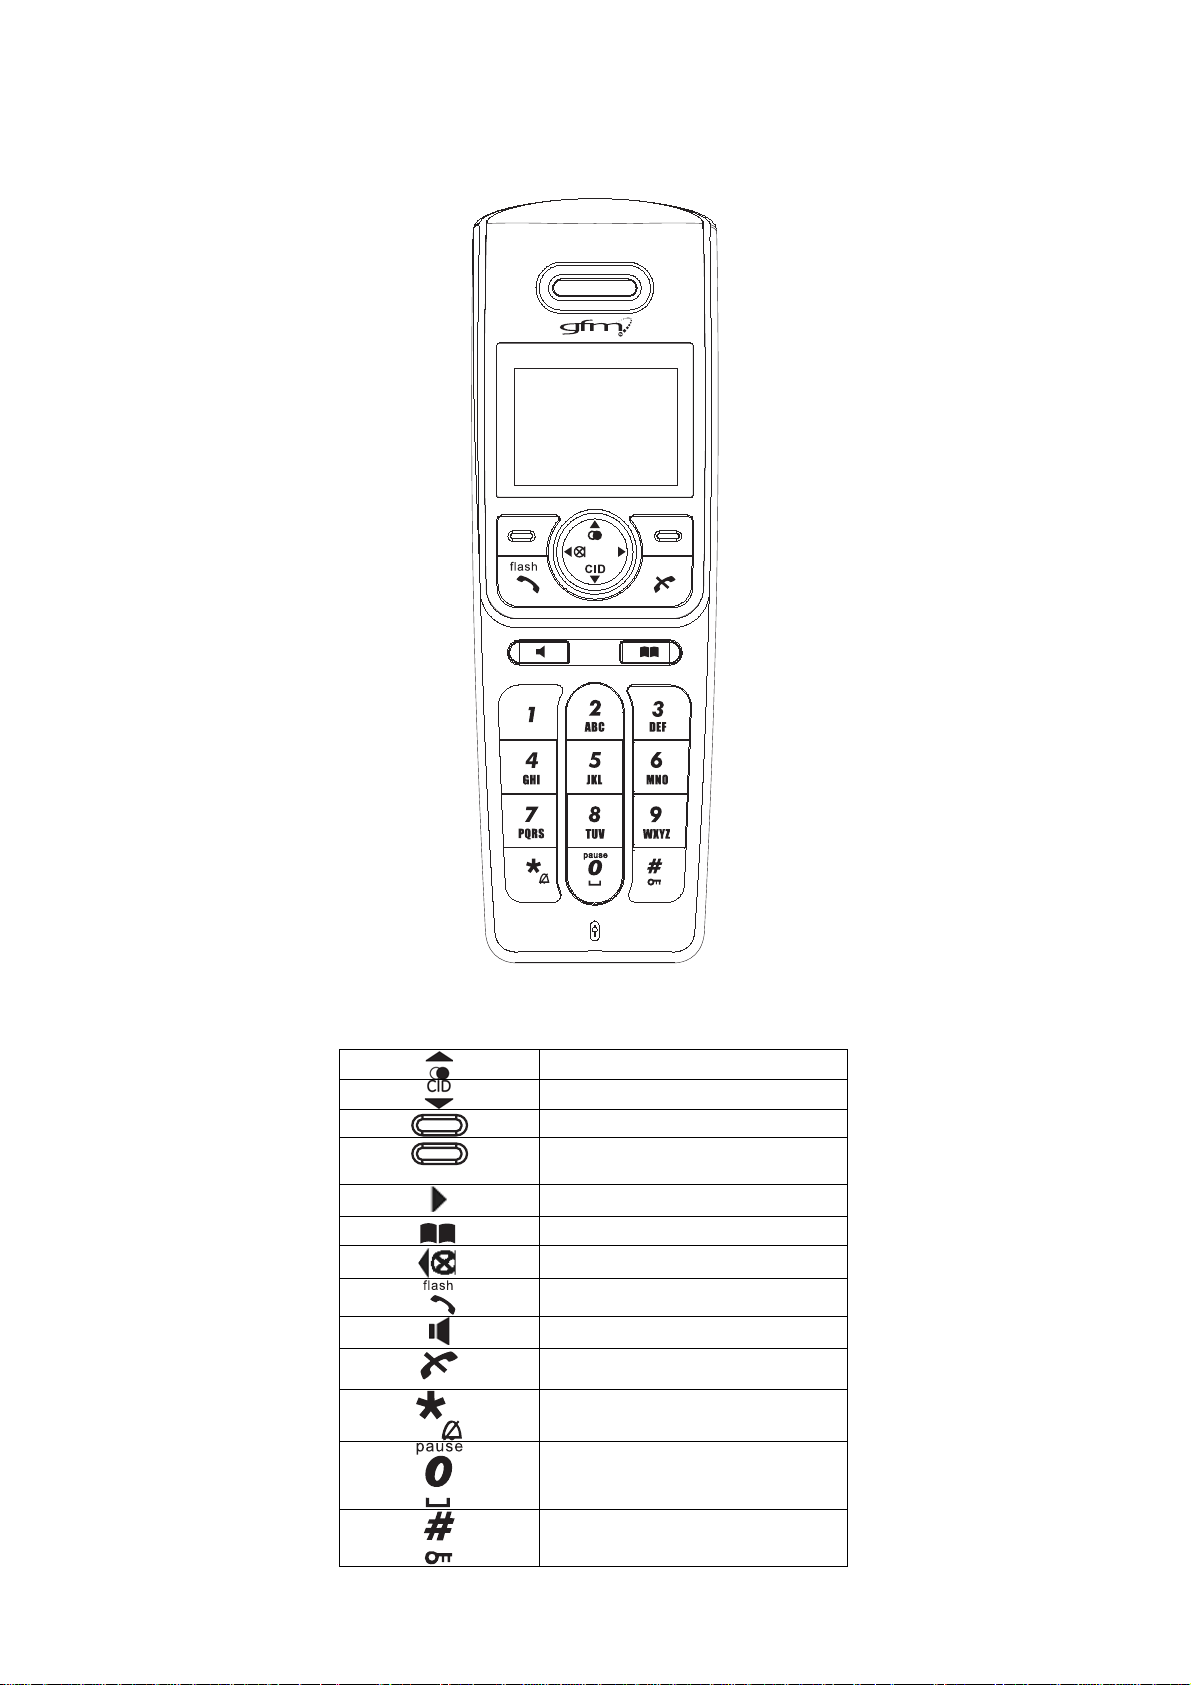
Handset Layouts
Redial / Up key
CID key / down key
Left soft key ( SKL ) /Menu OK key
Right soft key ( SKR ) / Intercom
key
Right key
Phonebook key
Left key/Mute key
External Call key/Flash key
Speaker phone key
End call key
Asterisk / Ringer off key
Pause / Space key
Hash key / Lock key
5
Page 6
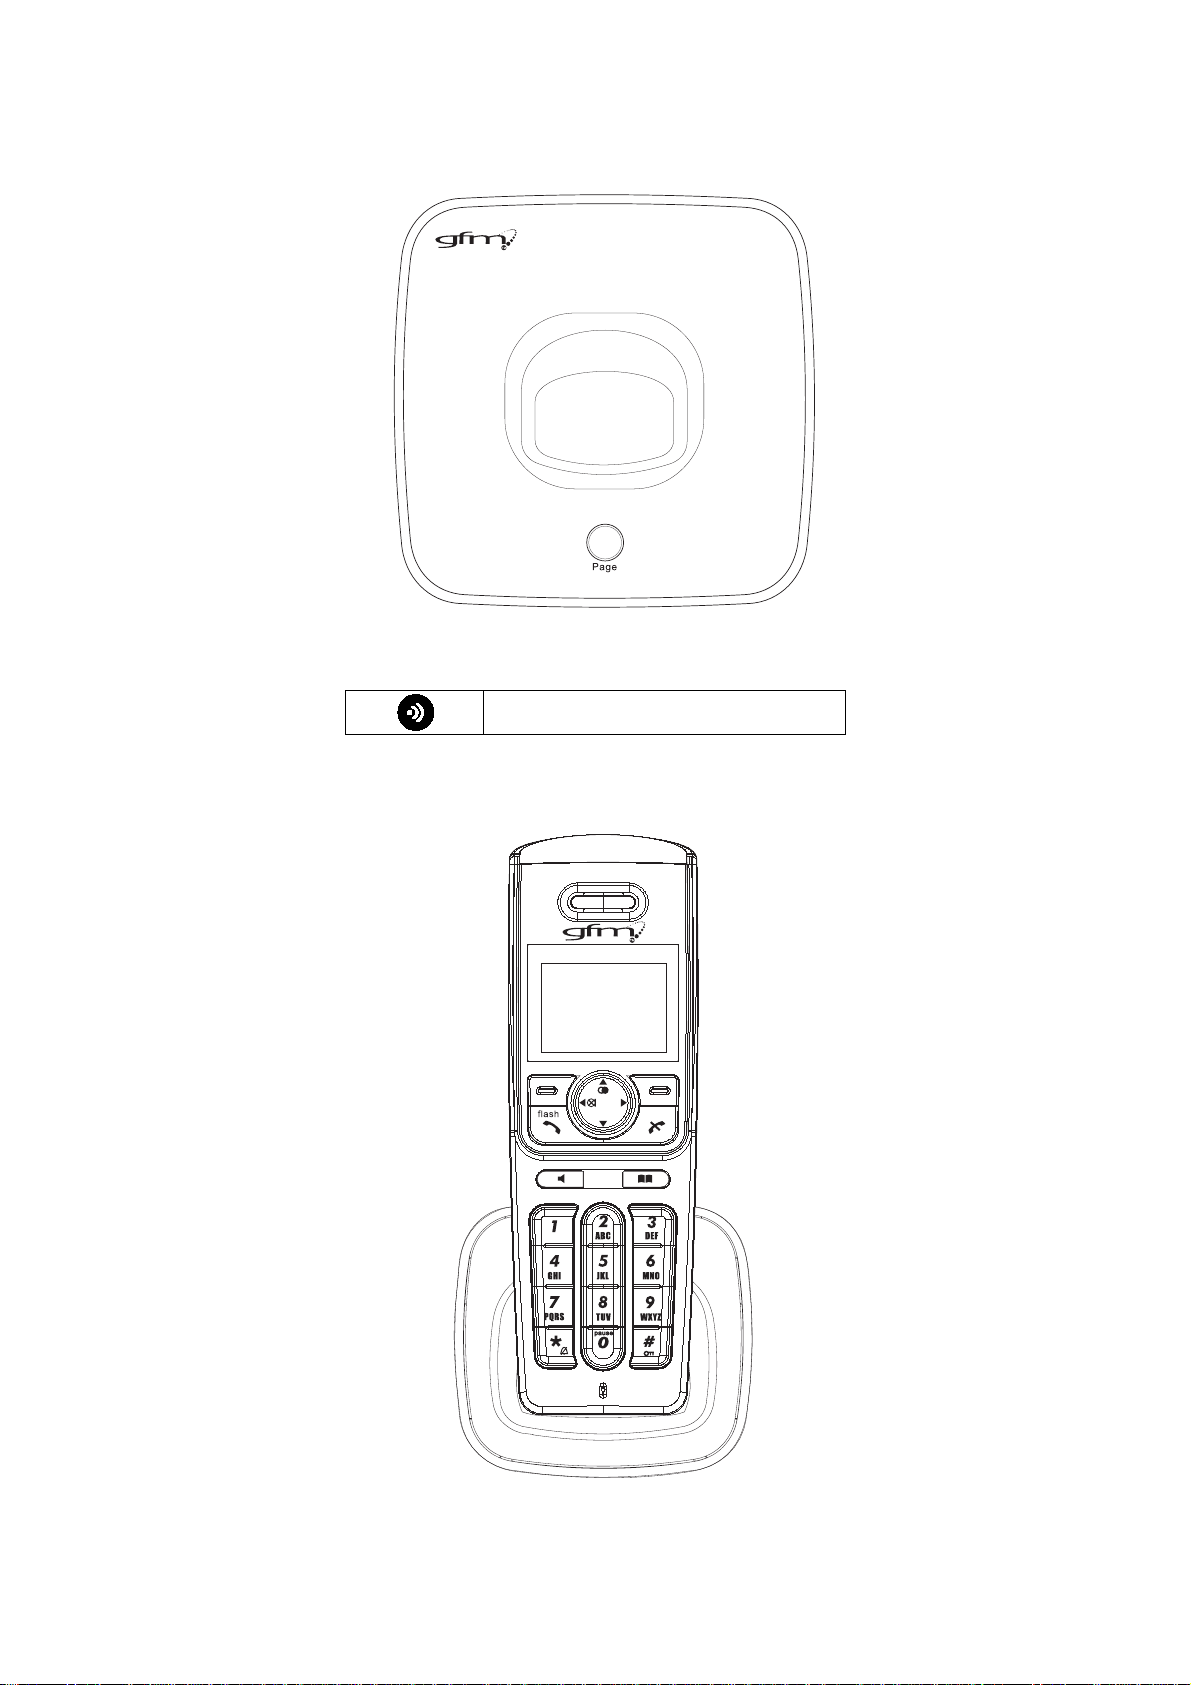
Base layouts
Paging
CID
Charger suitable for Model BL300-2
6
Page 7
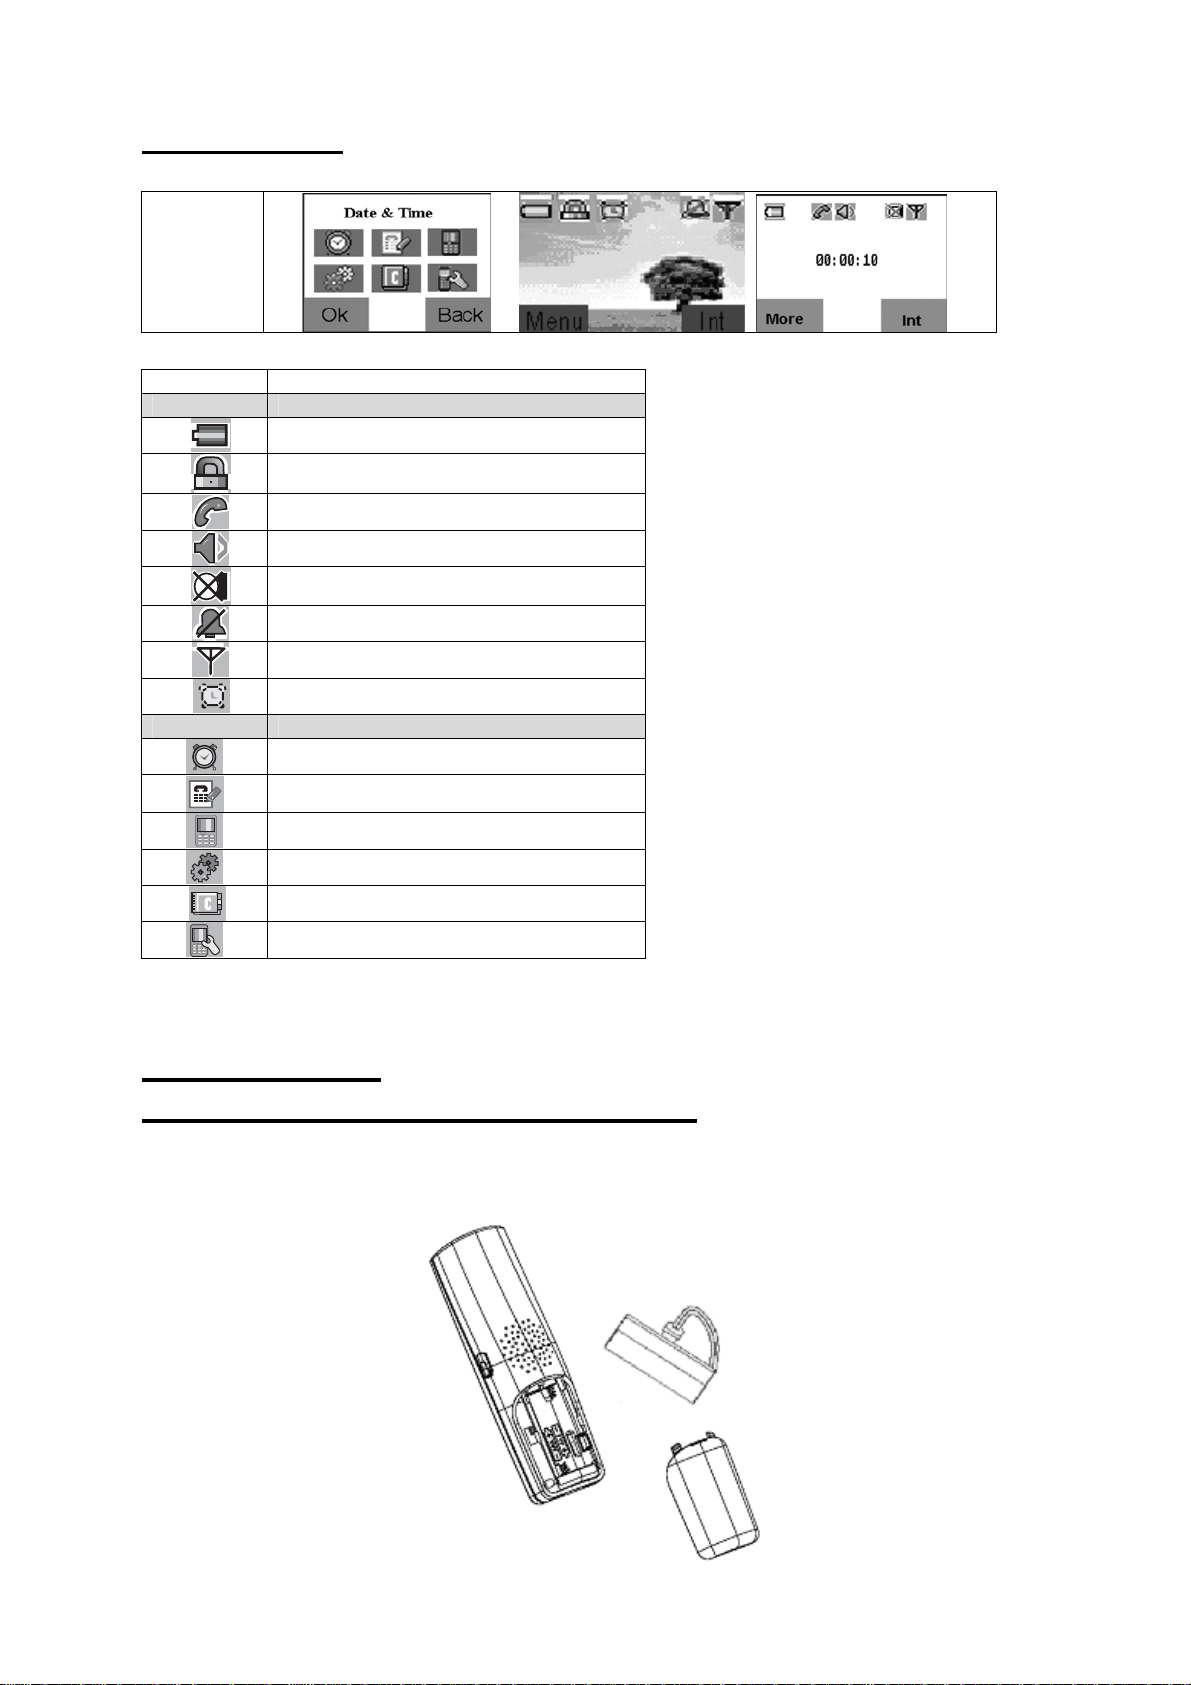
LCD Display
Main Menu idle
Icon Icon Name
Small Icon
Battery icon
Key lock icon
Line in use icon
Speak phone icon
Mic mute icon
No ring icon
Signal icon
Large Icon
Alarm icon
Date & Time icon
Calls List icon
Display Setup icon
Base Setup icon
Phone Book icon
HS Settings icon
Getting Started
Install and Charge the Battery Pack
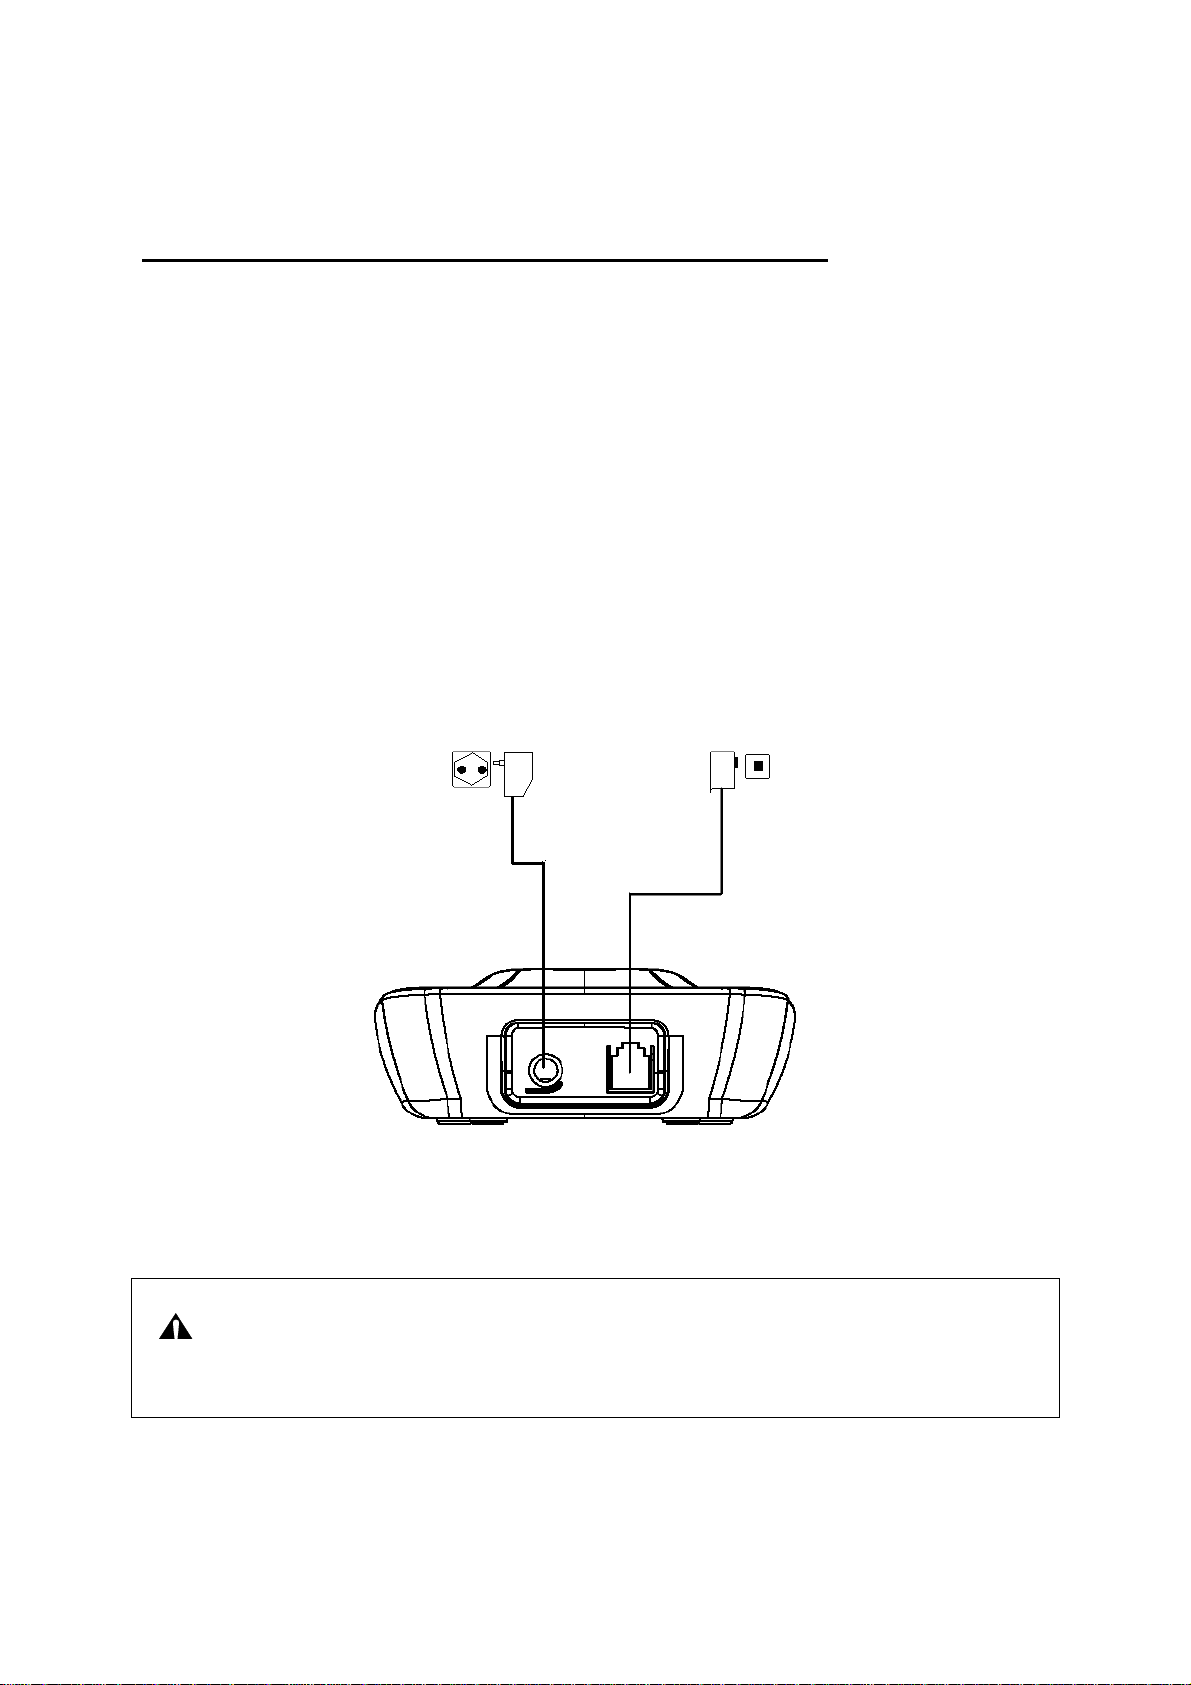
1 Open the battery compartment by sliding the cover down.
2 Plug the Battery Pack c
compartment.
3 Slide the
battery cover back into place.
onnector into the Handset socket, then place the battery pack and wires in the
7
Page 8
Place the handset in the base station to charge for 16 hours prior for first use. If you don’t
properly charge the phone, battery performance will be compromised.
Connecting the Base Station and Power Plug
Connecting the plugs to the corresponding sockets in the base station (they can not be
connected incorrectly because the sockets and plugs are designed prevent reverse poling). Lay
the cable under the telephone to the rear. Plug the telephone line in the telephone connection
socket. Insert the power plug at the other end in the power outlet. The base station is now ready
to operate.
Only use the connection cable supplied.
AC power outlet Phone jack
CAUTION:
Plug the adapter to the socket outlet that near the equipment and shall be easily
accessible. Use only the power supply that came with this unit. Using other power supplies
may damage the unit.
8
Page 9

Features
We are very pleased that you have purchased this highly sophisticated, cordless telephone
which is equipped with the following features:
1. Digital cordless telephone complying to DECT standards
Operation instruction in 3 languages
2.
3. Teleconference
4. Call transfer/forwarding
5. Internal, free communication between handsets
6. Automatic call answering on/off
7. Phone book group function (6 group
8. Color display with icon
9. Phone book for 50 entries
10. Extended redialing for 10 call numbers
. Caller ID* function with 30 name/number call list
11
Microphone and ringer muting function
12.
13. Low battery and out of range indicato
14. Key lock
15. Key tone on/off
16. 14 incoming call ringing melodies
17. Ringing volume control (5 levels)
18. Internal/External call separate ring tone
19. DTMF/Pulse dialing
20. Operation of up to 4 handse
21. Paging function from base station to han
22. Up to100 hours standby
23. Up to 10 hours continuous call time.
driven menu
ts
s)
rs
dset
24. Operation with 2 standard AAA batteries
25. Adjustable
flash time
*DECT Digital Enhanced Cordless Tele
communication = Standard for Cordless Telephones.
(NiMH)
9
Page 10

Using the Handset Telephone
asic OperationB
Making Internal Calls
If more than one handset is registered on the base station internal calls can be made free of charge.
Press [SKR] key.
Press
Press [SKL] key to carry out the conversation.
Press key to end the call.
or key to select the required handset (Handset 1, Handset 2…).
,
Note: During the conversation, you can use or key to adjust the speaking volume (5
levels).
rnal CallsMaking Exte
Pre-dialing:
Press key and wait for a dialing tone.
Dial the telephone number as required.
It will start counting when the call is connected, the call timer format is HH:MM:SS.
onnection is established, user can view Redial、Calls List、Phone Book by pressing [SKL] button. After the c
Press key to terminate the call.
Note: Dur g the conversation, you canin use or key to adjust the speaking volume (5
levels).
Post-dialing:
Dial the telephone number.
Delete any incorrect entries by pressing [SKR] button.
key aled and a connection established.
Press
●
It will start counting when the call is connected, the call timer format is HH:MM:SS.
. The number entered is di
10
Page 11
After the connection is established, user can view Redi Calls List、Phone Book by pressing [SKL] button. al、
Press
●
key to terminate the call.
rnal CallsReceiving Exte
When an external call is received, all handsets registered and the base station ring , and flashes in the handset
display, if configured, the telephone number of the calle
entered in your phone book, the name appears.
●
Press
If auto answer is enabled, the line can also be au
● Press
key to establish the connection.
tomatically connected after the handset is lifted up from the base.
key to terminate the call.
r appears (network depended). If the caller has been
Receiving Internal Call
When an internal call arrives, the handset will ring and show the caller’s handset number, and flashes in the
handset display.
Press
●
If auto an er is enabled, the line can also be ausw t
Press
●
key to establish the connection.
omatically connected after the handset is lifted up from the base.
key to terminate the call.
Redialing
The phone stores the last 10 numbers dialed in the redialling memory
Dial a number form the Redial Memory
s ● Pres key to view the dialed calls.
t ling memory, empty information will display Note: If here is no record in the redia
● Press or key to select the desired record.
● Press
key to redial the desired record.
●
Press
key to terminate the call.
11
Page 12
Save Redial Memory
● Press key to view the dialed calls.
● Press
● Press [S key to enter Redial menu.. KL]
● Press
Enter name (max. 15 characters) and press [SKL] key when finished.
●
Press
●
or key to select the desired record.
or key to select [Save Number] and press [SKL] key.
or key to select a group a nd press [SKL] key.
e MemoryDelet a Single Redial
● Press key to view the dialed calls.
● Press
● Press [SKL] key to enter Redial menu..
or key to select the desired record.
ss
● Pre
or key to select [Delete Entry] and press [SKL] key , the LCD will display “Delete?” , press [SKL]
nf key to co irm.
Delete all Single Redial Memory
● Press key to view the dialed calls.
● Press
●
Press [SKL] key to enter Redial menu..
● Pres
key to confirm.
or key to select the desired record.
s
or key to select [Delete All] and press [SKL] key , the LCD will display “Delete All?”, press [SKL]
Use Number
● Press key to view the dialed calls.
Press
●
●
Press [SKL] key to enter Redial menu.
or key to select the desired record.
12
Page 13

● Press or key to select [Use Number]
● Press [SKL] b
number cannot be saved i
utton to use the telephone number, you may edit the number and make the call, but the edited
n this option.
Dialing from the Phon
● Press bu n when in standby mode, the first etto ntry in the phone book appears.
Note: If there is no record in phone
● Pres
s or key to select the required subscriber from the phone book.
● Press
● Press
key to dial the number.
key to terminate the call.
e Book
book, empty information will display
Note: How to store entries in the phone book is explained in the Chapter “Phone Book”.
Muting the Microphone
● Press the button to switch the microphone on or off during a call.
Muting the Ringer Volume
● Press and hold key in idle mode to activate or deactivate the handset Ringer. The icon turns on or off.
Call Transfer / Forwarding
It is possible to put external calls on hold and call other handsets registered to the base or to forward calls.
● Press [SKR] key to hold the external call and initiate an internal call.
● Press
The target handset will ring. After the internal connection is made, press
desired handset.
ote: 1. There must be more than two handsets registered to the base, otherwise the call
N
transfer/forwarding function will be invalid;
answer the internal call, the call transfer pro
regained;
or key to select the required handset (Handset 1, Handset 2…).
key to transfer the external call to the
2. If [SKR] key is pressed before another handset
cedure will be cancelled and the external call is
13
Page 14
Three Party Conference
After have received an external call, it is possible to include a second han set in the conversation (three way
conference).
●
Press [SKR] key to hold the external call and initiate an internal call.
s
Pres
conference (e.g. 2).
Press [SKL] key to establish the conference call after the other handset answered the internal call.
●
● Press
or ● key to select the required handset (Handset 1, Handset 2…) that needs to participate in the
key to disconnect from the conference call and the other handset continues with the external call.
d
Note: There is another way to enter conference, the second handset off hook will also enter
conference.
Changing t
he Earpiece Volume
● Press or key as often as necessary to change the earpiece volume during a call.
Paging the Handset
If a handset has been misplaced, it is possible to call all the handsets. The handset ring at full volume .
Press page k
To stop the page call:
Short press
ey briefly on the base station. ●
key or key or the key on the handset or press page key briefly on the base.
Handset Speaker Phone
● Press key to activate / deactivate the handset speaker.
Key Lock
It is possible to lock the handset keys against the functioning. Incoming calls can still be received.
Press and he
hold t●
key for 2 seconds to activate or deactivate the key lock.
Short Key Definition
There are hree short key: t , and .
14
Page 15
In standby mode, press key to access Redial
In standby mode, press
In standby mode, press
key to access Call List
key to enter Phone Book.
Phone Book
The telephone can store up 50 ries i he p to ent n t hone book. Store numbers frequently used in order to be able to
dial them quickly and easily. When the function is sup
han
dset displays the nam the caller (when store
e of d in the phone book).
ported by the telephone provider service and the caller, the
New Entry
● Press [SKL] button to ter the main menu. en
● Press
●
Press [SKL] button to enter [phone Book].
or key to select [phone Book].
● Press [SKL] button to enter phone Book menu.
Press
●
Enter number (max. 24 digits) and press [SKL] key
Enter name (max. 15 characters) and press [SKL] key when finished.
● Press
[School] , [Others] and [No Group].
● Press [SKL] button to confirm the selection
Note: 1. When the capacity is full, Memor
or key to select [New Entry] and press [SKL] key.
when finished.
or key to select a group ,the pre-set caller groups are: [VIP], [Business], [Family], [Friends],
and complete storing the entry.
y full will display.
2. Any incorrect input can be deleted by pressing [SKR] button.
User can al save number into phone book through call log and Redial mem
“Redial Memory Operation”).
so ory (refer to chapter “Call Log Operation” and
Delete Entry
● Press [SKL] button to enter the main menu.
● Press
● Press [SKL] button to enter [phone Book].
● Press
or key to select [phone Book].
or key to select a desired entry.
15
Page 16

● Press [SKL] key to access phone book menu, and then press or to select the submenu [Delete Entry].
● Press [SKL] key to dele
Press [SKL] button to confirm.
●
te the entry, and the LCD will show “Delete?”
Edit Entry
● Press [SKL] button to enter the main menu.
● Press
● Press [SKL] button to enter [phone Book].
● Press
● Press [SKL] key to access phone book menu, and then press
● Press [SKL] to start
to select caller groups .
Press [SKL] key to confirm.
●
Note: Press [SKR] key to delete any inco
or key to select [phone Book].
or key to select a desired entry.
Number edition and press [SKL] key again to start Name edition and press [SKL] key again
rrect input
Delete All
● Press [SKL] button to enter the main menu.
or to select the submenu [Edit Entry].
● Press
● Press [SKL] button to enter [phone Book].
●
Press [SKL] key to access phone book menu, and then press
Press [SKL] key
● Press [SKL] button to confirm.
Use Number
Press or to select the required record from the phone book.
Press [SKL] button.
Press
Press [SKL] button to use the telephone number, you may edit the number and make the call, but the edited number
cannot be saved in this option.
or key to select [phone Book].
or to select the submenu [Delete All].
to delete the entry, and the LCD will show “Delete All PB?”
or to select [Use Number].
Note: User can access Phone Book directly from standby mode by pressing
16
button.
Page 17

Date & Time
● Pres [SKL button to enter the main menu. s ]
● Press
● Press [SKL] button to enter [Date&Time].
Enter the date (MM:DD:YY).
● Press [SKL] button.
Enter the time (HH:MM).
Press 4).
Press [SKL] button to confirm the date/time setting.
●
or key to select [Date&Time].
key to switch the format(am/pm/2●
Call List
IMPORTANT: To use the “Call List” func
Identification (CLI) service.
Call List can contain up to 30 r
ecords.
tion, you must subscribe to your network operator’s Caller Line
Press [SKL] button to en
●
● Press or
● Press [SKL] button to enter [Call List].
Note: If th
● Pres
● Press [SKL] button
● Pres
If you choose [ elete Entry]:
● Press [SKL] key to delete the entry, and the LCD will show “Delete?”
Press [SKL] button to confirm.
●
If you choose [Save Number]:
key to select [Call List].
ere is no record in call log, empty information will display
or key to find the desired record.
s
or key to choose the selection [Delete Entry]、[Save Number]、[Delete All] or [Use number] .
s
D
ter the main menu.
● Press [SKL] key to start Name edition and press [SKL] key again to select caller groups .
●
Press [SKL] k y to save the record to the phone
e book.
Note: Press [SKR] key to delete any incorrect input.
17
Page 18

If you choose [Delete All],
● Press [SKL] key to delete the entry, and the LCD will show “Delete All?”
Press [SKL] button to confirm.
●
I ess [SKL] key to view user number.
f you choose [Use Number], pr
Display Setup
● Press [SKL] button to enter the main menu.
● Press
● Press [SKL] button.
or key to select [Display Setup].
Wallpaper
s or ● Pres key to choose the selection [Wallpaper] through the submenu [Display Setup].
Press [SKL] button.
● Press
● Press [SKL] button to confirm the selection.
or key to select the desired wallpaper or [Wallpaper off ].
Handset Nam
● Press or key to choose the selection [Handset Name] through the submenu [Display Setup].
● Press [SKL] button.
●
e
Enter the handset name (press [SKR] button to delete any incorrect input)
● Press [SKL] button to confirm the input.
Display Contrast
● Press or key to choose the selection [Display Contrast] through the submenu [Display Setup].
● Press [SKL] button.
● Pres
● Press [SKL] button to confirm the setting.
or key to adjust the contrast level (1-8).
s
18
Page 19
Language
● Press or key to choose the selection [Language] through the submenu [Display Setup].
● Press [SKL] button.
● Press
● Press [SKL] button to confirm the setting.
or key to select the language.
Base Setup
● Press [SKL] button to enter the main menu.
● Press
● Press [SKL] button to access Base Setup menu.
or key to select [Base Setup].
Ringer
● Press or key to choose the selection [Ringer] through the submenu [Base Setup].
● Press [SKL] button.
Ringer Volume
s or ● Pres key to choose the selection [Ringer Volume] rough the submenu [Ringer].
● Press [SKL] button.
● Press
[Ringer Volum
● Press [SKL] button to confirm.
Ringtone
● Press or key to choose the selection [Ringtone] through the submenu [Ringer].
● Press [SKL] button.
● Pres
s
or key to select a ringer volume:[Ringer Volume 1], [Ringer Volume 2], [Ringer Volume 3],
e 4], [Ringer Volume 5] or [Off].
or key to choose the selection [Ring Tone 1], [Ring Tone 2], [Ring Tone 3], [Ring Tone 4] or
19
Page 20

[Ring Tone 5] , [Ring Tone 6]
Press [SKL] button to confirm the selection.
●
Dial Mode
● Press or key to choose the selection [Dial Mode] through the submenu [Base Setup].
● Press [SKL] button.
● Pres
s
or key to select [Tone] or [PULSE].
● Press [SKL] button to confir
m the selection.
MW Indication
If you have subscribed to a voice messaging service, the icon will be displayed to alert you if you have a new
messages waiting.
You can turn Visual Message Waiting Indication (VMWI) off
● Pres
● Press [SKL] button.
You will be prompted ‘VMWI OFF?’
● Press [SKL] button to confir
or key to choose the selection [MW Indication] through the submenu [Base Setup].
s
m the setting.
Note: This service need subscription to local operator and it supports the FSK CLI system only.
Reset Base
● Press or key to choose the selection [Reset Base] through the submenu [Base Setup].
● Press [SKL] button, “Default Reset?” display.
Press [SKL] button to reset to the de
fault settings or press [SKR] button to cancel. ●
HS Settings
● Press [SKL] button to enter the main menu.
s
● Pres
● Press [SKL] button.
or
key to select [HS Settings].
20
Page 21
Ringer Setup
Ringer Volume
s or ● Pres key to choose the selection [Ringer Setup] through the submenu [HS Settings].
●
Press [SKL] button.
● Press
Press [ L] button.
● Press
[Ringer Volume 4], [Ringer
Press [SKL] button to confirm. ●
or key to choose the selection [Ringer Volume]
SK●
or key to select a ri
nger volume: [Ringer Volume 1], [Ringer Volume 2], [Ringer Volume 3],
Volume 5] or [Off].
Ext.Ringtone
● Press or key to choose the selection [Ext.Ringtone] through the submenu [Ringer Setup].
● Press [SKL] button.
● Press
● Press [SKL] button to confirm the ring type.
or key to select one type of ring tone (14 ring melodies).
Int.Ringtone
Press or ● key to choose the selection [Int.Ringtone] through the submenu [Ringer Setup].
●
Press [SKL] button.
● Press
or key to select one type of ring tone (14 ring melodies).
● Press [SKL] button to confirm the ring type.
21
Page 22
Group Melody
s or ● Pres key to choose the selection [Group Melody] through the submenu [Ringer Setup].
● Press [SKL] button. There are 6 pre-set caller groups: [VIP], [Business], [Family], [Friends], [School] and
[Others].
● Press
Press [ L] button.
● Press
Press [SKL] button to confirm. ●
or key to choose one of the groups.
SK●
or key to select one type of ring tone (14 ring melodies).
Set Alarm
● Press or key to choose the selection [Set Alarm] through the submenu [HS Settings].
● Press [SKL] button.
s
● Pres
● Press [SKL] button .
or
key to choose [Set Alarm] or [Alarm Tone]
If you select ‘Set Alarm’,
● Press
Press [SKL] button.
●
Enter the time (HH:MM).
● Press key switch the format(am/pm). to
●
Press [SKL] button to
If you select ‘Alarm Tone’,
● Pres
● Press [SKL] button to c
or key to select [Off] ,[Once] or [Daily].
con
s
or key to select one type of ring tone (14 ring melodies).
firm the setting.
onfirm the setting
22
Page 23

Auto Talk
The automatic talk function enables the incoming call to be taken immediately when the handset is removed from
the base station.
● Press or
●
Press [SKL] button.
● Pres
● Press [SKL] button to confirm the setting
key to choose the selection [Auto Talk] through the submenu [HS Settings].
s
or key to select [Off] or [On].
R
egistration
● Press or key to choose the selection [Registration] through the submenu [HS Settings].
Press [SKL] bu
tton. ●
Register Handset
s or ● Pres key to choose the selection [Register Handset] through the submenu [Registration].
● Press [SKL] button.
● Press
● Press [SKL] button.
andset display shows Searching….
H
Press and hold Page key o
or key to select [Base1],[Base2],[Base3]or [Base4].
n the base station for 10 seconds until acknowledgement signal is heard.
Note: 1.Once the registration procedure is complete, the new handset will automatically be
allocated the next available handset number.
2. The base w
hold for more than 10 second
available for registration. “se
ill be ready for registration for 2 minutes when the Page key is pressed and
s. During the handset searching for a base station which is
arching” will be shown on the LCD display .
Deregister HS
● Press or key to choose the selection [Deregister HS] through the submenu [Registration].
● Press [SKL] button.
If necessary, use
or key to select the handset and press [SKL] key. “Deregister HS?” will
23
Page 24
show on the display.
● Press [SKL] key to confirm.
Select Base
● Press or key to choose the selection [Select Base] through the submenu [HS Settings].
● Press [SKL] button.
● Press
● Press [SKL] button to confirm the selection.
Tones On/Of
● Press or k to choose the selection [Tones on/off] through the submenu [HS Settings]. ey
●
Press [SKL] button.
● Press
●
Press [ L] button.
● Pres
● Press [SKL] button to confirm the sele
or key to select a Base.
f
or key to choose [Key tone], [Battery Low] and [Out of Range].
SK
s
or key to select [Off] or [On].
ction.
Reset Handset
● Press or key to choose the selection [Reset Handset] through the submenu [HS Settings].
● Press [SKL] b tton, “Default Reset?” dispaly.
Press [SKL] button to
●
u
reset to the default settings or press [SKR] button to cancel.
24
Page 25

Consumer Information
1. This equipment complies with Part 68 of the FCC rules and the requirements adopted by the ACTA. On the
ck hi n the format
ba of t s equipment is a label that contains, among other information, a product identifier i
US: DDKW401BBL300X. If requested, th
2. An applicable certification jacks Universal Service Order Codes (USOC) for the equipment is provided (i.e.,
RJ11C) in the packaging with each piece of approve
3. A plug and jack used to connect this equipment to the premises wiring and telephone network must comply
with the applicable FCC part 68 rules and requirements adopted by the ACTA. A compliant telephone cord
and modular plug is provided with this product. It is designed to be connected to a compatible modular jack
that is also compliant. See“Getting Started ”section for details.
The REN is used to determine the number of devices that may be connected to a telephone line. Excessive
4.
RENs on a telephone line may result in the devices not ringing in response to an incoming call. In most but
not all areas, the sum of RENs should not exceed five (5.0). To be certain of the number of devices that
may be connected to a l he local telephone company. The
REN for this product is 00X. The
digits represented by 01 are the REN without a decimal point (e.g., 03 is a REN of 0.3). The REN is
arately shown on the label too.
sep
5. If this equipment causes harm to the telephone network, the telephone company will notify you in advance
that temporary discontinuance of service may be required. But if advance notice isn’t practical, the
ine, as determined by the total RENs, contact t
part of the product identifier that has the format US: DDKW401BBL3
is number must be provided to the telephone company.
d terminal equipment.
hone company will notify the customer as soon as possible. Also, you w
telep
file a complaint with the FCC if you believe it is necessary.
6. T
7. Please follow instructions for repairi
8. Co
9. T
e telephone company may make changes in its facilities, equipment, operations or procedures that could
h
affect the operation of the equipment. If this happens the telephone company will provide advance notice
in order for you to make necessary modifications to maintain uni
ng if any (e.g. battery replacement section); otherwise do not alternate
or repair any parts of device except specified.
nnection to party line service is subject to state tariffs. Contact the state public utility commission, public
service commission or corporation commission for information.
his equipment is hearing aid compatible.
nterrupted service.
ill be advised of your right to
NOTICE:
1)
If yo on of
ur home has specially wired alarm equipment connected to the telephone line, ensure that the installati
this ph
one does not disable your alarm equipment. If you have questions about what will disable alarm equipment,
consul
t your telephone company or a qualified installer.
c
2) A cording to telephone company reports, AC electrical su
very de
structive to telephone equipment connected to AC power sources. To minimize damage from these types of
surges,
a surge protector is recommended.
rges, typically resulting from lightning strikes, are
25
Page 26

3) is device complies with part 15 of the FCC Rules. Operation is subject to the following two conditions: (1)
Th
vice may not cause harmful interference; and (2
This de ) This device must accept any interference received,
including interference that may cause undesired operation.
body worn operation, this handset has been tested and meets the F
4) For CC RF exposure guidelines. Use of
accessories may not ensure compliance with FCC
)The FCC ID for base of this product is: RAQBL300BS,fo
5
en
he equipm
If t
di
sconnect th
t is causing harm to the telephone network, the telephone company may request that you
e equipment until the problem is resolved.
RF exposure guidelines.
r handset is RAQBL300US.
WARNING: Changes or modifications to th
is unit not expressly approved by the party
responsible for compliance could void the user's authority to operate the equipment.
CAUTION: To maintain compliance w
20 cm from nearby persons.
NOTE: This equipment has been tested and found to co
pursuant to Part 15 of the FCC Rules. These limits are designed to provide reasonable protection agai
harm
ful interference in a residential installation. This equipment gene
frequency energy and, if not installed and used in accordance with
interference to radio communications. However, there is no guarant
ith the FCC's RF exposure guidelines place the base unit at least
mply with the limits for a Class B digital device,
rates, uses and can radiate radio
the instructions, may
ee that interference will not o
cause harmful
ccur in
nst
a particular installation. If this equipment does caus
reception, which can be d
correct the interferenc
•
Reorient or relocate the receiving antenna.
Increase the separation between the equipment and receiver. •
•
Connect the equipment into an outlet on a circuit different from that to which the receiver is needed.
• Consult the dealer or an experience
ou can purchase a suitable headset through service center or retailer shop. For servicing or
Y
etermined by turning the equipment off and on, the user is encouraged to try to
e by one or more of the following measures:
d radio TV technician for help.
e harmful interference to radio or television
replacement please contact us for suitable headset.
Giant International Ltd.
3500
Lenox Road, Suite 630 Atlanta, GA 30326
Contact person: Terry Uhrich
26
Page 27

uct,yo
If you are not totally satisfied with this GFM prod
for a full refund within 6 months(180days)of purchase when accompanied by a receipt.
u may return it to any Meijer store
For customer suppor
t,please call(866)845-9436 or go to www.gfmproducts.com.
Dist.by wholesale Merchandisers,Inc.,
2929 Walker,NW,
Grand Rapids,MI 49544
Made in China
27
 Loading...