


Intouch
Version –B
User Guide Version 0. 1
IT7350&IT7340
Safety Precautions
Make sure to follow the directions below to prevent personal injury, accidents and damage to the product.
Warning:
h Make sure to insert the power plug until it is firmly in place.
h Do not use a damaged power plug, power cord, or plug into a damaged outlet.
h Do not use force to pull the power cord.
h Do not touch the power pl ug with wet hands.
h Do not connect more than one appliance to a single outlet.
h Do not place anything heavy on the power cord.
h Make sure to turn the power off and disconnect the power plug from the outlet before moving the product.
h Make sure to disconnect any connected cables from other devices as well.
Caution:
h Hold and pull out the plug by its body when disconnecting it from the outlet, as pulling the plug out by the cord may cause it to be damaged. Failing to do
To reduce the risk of bodily injury, electrical shock, fire, and damage to the equipment, observe the following precautions:
Failure to follow the accompanying directions may lead to minor personal injury or property damage.
so, may cause fire, or the product may not turn on normally.
h Ensure that the power plug is disconnected before cleaning the product. Failing to do so, may cause electric shock or fire.
h Do not let water come into contact with or enter the pow er ad ap ter, as this may caus e electric sho ck or fire.
h Do not use the product outdoors in snowy or rainy weather, or near any water.
h When cleaning the floor with water, avoid any water contact with the power adapter.
h Do not place the powe r adapter near a heater, as this may cause fire.
Installation
Warning:
Caution:
Failure to follow the accompanying directions may lead to serious injury or death.
Plug the adapter to the socket o utlet that near the equipment a nd shall be ea sily acces sible. Use on ly the E-TEK (Output: 5.0V / 3.0A,
Input: AC 100 -240V ~ 50 / 60 Hz 0.8A) power supply that came with this unit. Using other power supplies may damage the unit.

h When installing the product on a cabinet or shelf, do not let the front end of the product project beyond its front edge. Failing to do so, may cause the
product to fall, resulting in a product malfunction or personal injury.
h Do not place the power cord near a heater, as the power cord may melt, causing electric shock or fire.
h Do not install the product in a car or a location exposed to oil, smoke, moisture, water, or rainwater. Any contact of these materials with the product may
cause electric shock or fire.
h Disconnect the power plug when there is thunder or lightning. Failing to do so, may cause electric shock or fire.
h For Pluggable Equipment, the socket-outlet shall be installed near the equipment and shall be easily accessible
IMPORTANT SAFETY INSTRUCTIONS
h When using your wireless internet frame and equipment, basic safety precautions should always be followed to reduce the risk of fire, electric shock and
injury to persons, including the following:
h Do not use this product near water, for example, near a bath tub, wash bowl, kitchen sink or laundry tub, in a wet basement or near a swimming pool.
h The socket-outlet shall be installed near the equipment and shall be easily accessible
h Use only the power cord and batteries indicated in this manual. Do not dispose of batteries in a fire. They may explode. Check with local codes for
possible special disposal instructions.
SAVE THESE INSTRUCTIONS
Caution:
h Place the product down gently when installing it. Failing to do so may cause product damage or personal injury.
h Do not install the product in a location easily reached by children. As the product may fall and cause personal injury.
Failure to follow the accompanying directions may lead to minor personal injury or property damage.
DECLARATION OF CONFORMITY
iii

Interference Information
This device complies with Part 15 o f the FC C R ules. Opera tion is subject t o the following two conditions: (1) This device may not caus e harm ful inte rf eren ce,
and (2) This device must accept any interference received, including interference that may cause undesired operation.
Changes or modifications to this unit not expressly approved by the party responsible for compliance could void the user's
Warning:
This equipment has been tested and found to comply with the limits for a Class B digital device, pursuant to Part 15 of the FCC Rules. These limits are
designed to provide reasonable protection against harmful interference in a residential installation. This equipment generates, uses and can radiate radio
frequency energy and, if not installed and used in accordance with the instructions, may cause harmful interference to radio communications.
However, there is no guarantee that interference will not occ ur in a particular installation. If this equipment does cause harmful interf erence to radio or television
reception, which can be determined by turning the equipment off and on, the user is encouraged to try to correct the interference by one or more of the following
measures:
h Reorient or relocate the receiving antenna.
h Increase the separation between the equipment and receiver.
h Connect the equipment into an outlet on a circuit different from that to which the receiver is connected.
h Consult the dealer or an experienced radio/TV technician for help.
authority to operate the equipment.
FCC RF Radiation Exposure Statement
This equipment complies with FCC RF radiation exposure limits set forth for an uncontrolled environment. This equipment should be installed and operated
with a minimum distance of 20 centimeters between the radiator and your body.
Shielded cables must be used with this unit to ensure compliance with the Class B FCC limits.
This class B digital apparatus complies with Canadian ICES-003.
Cet appareil numérique de la classe B est conforme à la norme NMB-003 du Canada.
iv

Table of Contents
Getting Started....................................................................1
Package Contents..............................................................................1
Wireless Internet Frame Overview...................................................2
Front panel......................................................................................2
Back panel..................................................................... ... .... ........ ..3
Left Panel........................................................................................4
Right Panel............... ......................................................................4
Connecting the AC/DC Power Adapter and USB cable.................5
General Button Description..............................................................6
Turning your Frame on ......................................................7
Standing the Frame up................................................................ .... ..7
Calibrate the Touch Screen...................... .... .... .... ....... .... ... .... .... .... ..7
Language Selection...................................................... .... ... .... .... ......7
End User License Agreement (EULA) ................ .... .... .... .... ... .... .... ..8
The Home Screen .................................... .. .. .. ... .. .. .. .. ... .. .. .. .9
Home Screen Overview.................................................... ... .... .... .... ..9
For a slide show as the wallpaper................................................14
Slide Show Control Buttons..........................................................15
Clock and Calendar..........................................................16
Setting up the Calendar ................................................................. .16
Set the Date.................................................................. ........ ... .... .16
Set Date Format.................................... ........ .... ... .... .... .... .... ... .... .16
Calendar Preview.................................................. ...........................17
Using the Calendar preview.........................................................17
Setting up the Clock....... .... .... ....... .... .... ... .... .... .... ... .... ........ .... ... .... .17
Set the Time.............................................. .... .... ... .... .... ........ ... .... .18
Select Time Format......................................................................18
Select Internet Time Synchronization...........................................18
Select Time Zone .........................................................................18
Setting up and using the Clock Alarm...........................................19
To set an Alarm............................................................................19
To change an alarm......................................................................20
Alarm Control............................................................ .... .... ... .... .... .20
Home Settings Screen............................................................. .... ....10
Additional Home Settings........................... .... ....... .... .... .... ... .... ....11
Power Icon........................................... ... .... .... .... ... .... .... .... ....... .... ....11
Wi-Fi icon..........................................................................................12
News Bar...........................................................................................12
Wallpaper Settings ..........................................................................13
For a still picture as wallpaper......................................................13
v
Frame Tools .... .. .......................... ... .. .......................... .. .. .. .21
Main Menu ................................................. .... .... .... ... ........ .... ... .... .... .21
Tools Screen ....................................................................................21
Keyboard ............................................ ..............................................22
On-Screen Display Bar....................................................................23
Open and close the On-Screen Display (OSD) Bar.....................23
OSD Bar Description............................. .... .... ....... .... .... .... .... ... .... .23

Adjust LCD Brightness using OSD Bar........................................24
Adjust Volume Level using OSD Bar............................................24
Lock / Unlock the screen using OSD Bar.....................................24
Settings .............................................................................25
Network.............................................................................................26
Setup Wi-Fi Network - Access Point’s DHCP settings is On and the AP
SSID is not hidden........................................................................26
Setup Wi-Fi Network - Access Point’s DHCP settings is ON but the AP
SSID is hidden and no encryption key is needed.........................28
Manual Edit Wi-Fi Network Screen ............ .... ... .... .... .... .... ... ........29
Advanced Settings............................................................ ............30
Date / Time........................................................................................32
Display..............................................................................................32
Screen Calibration........................................................................32
Brightness.....................................................................................32
Auto Playback Demo Video..........................................................33
System Settings...............................................................................34
Photo Player Main Page controls...................................................40
Photo.................................................................................................41
Frame....................... .............................................. ...........................41
Slide Show Control Buttons..........................................................41
Zoom Control Buttons...................................................................42
Disk ...................................................................................................43
Home Network..................................................................................43
Adding Photos to the Library.............. ... .... .... .... ... .... .... .... ... .... .... .43
Checking Shared Photos..............................................................46
Sharing Settings for Accepting Connections from Your Frame.... 47
View for Sharing the Photos on your frame..................................48
Web ...................................................................................................49
Photo Setup......................................................................................49
Slide Show....................................................................................49
Setup Web Photo Account ...........................................................50
Content Service (Windows Live FrameIt)......................................52
Language......................................................................................34
Firmware Upgrade................................................. .... .... ... .... .... ....34
Factory Reset ...............................................................................36
Show Details.................................................................................36
Motion Sensor (Model IT7350 only) .............................................37
Screen Taps Sound......................................................................37
Power Management............ .... .... .... .... ... .... ........ ... .... .... .... ... .... .... ....38
Sleep Mode...................................................................................38
Interval Time (Sleep Interval Time) ..............................................38
Battery Profile...............................................................................39
Photo / Content Service................. .. ... .. .. .. .. .. ... .. .. .. .. .. ... .. .40
vi
Account.........................................................................................52
Setup Windows Live FrameIt Account .........................................52
Content Service (Framechannel ) ..................................................54
Account.........................................................................................55
Setup Framechannel Account........ .... ... .... .... .... .... ... .... ........ ... .... .55
Copy/ Delete Photos........................................................................56
Copy One .....................................................................................56
Copy All ........................................................................................57
Delete One ...................................................................................57
Delete All ............................................... .......................................57

RSS News Reader (RSS2.0).............................................58
RSS News Feed screen.......... .... .... .... ... ........ .... ... .... .... .... ... .... ........58
News Feed List screen....................................................................59
RSS News Reader............................................................................60
RSS News Reader Control Buttons / Icons..................................60
News Text Content.......................................................................60
News Media Player.......................................................................60
RSS News Reader > News Text Content.....................................61
Refresh / Delete News.....................................................................61
Refresh RSS News Feed screen .................................................61
Delete One RSS News Headline..................................................62
Delete All RSS News Headlines...................................................62
Delete All RSS News Read Headlines.........................................62
Delete One in RSS News Reader Screen....................................62
News Setup.......................................................................................63
Set General Settings ....................................................................63
Media Setup......................................................................................71
Setup Media Playback................................................................. .71
Add a Station................................................................................72
Edit an added Internet Radio Station ...........................................73
Delete an added Internet Radio Station.......................................73
Copy / Delete Media Files................................................................74
Copy One .....................................................................................74
Copy All ........................................................................................74
Delete One ...................................................................................75
Delete All ............................................... .......................................75
Specifications ...................................................................76
Troubleshooting ...............................................................78
Add / Edit RSS News Feeds (Support RSS2.0 Format only) .......64
Get RSS News Feed Address from Internet ................................64
Add a new RSS News Feed.........................................................65
Edit a RSS News Feed.................................................................66
Delete a RSS News Feed.................................................. ... .... ....67
Media Player .. .. .. .. .. .. ... .. .. .. .. .. ... .......................... .. .. .. ..........68
Music / Video....................................................................................69
Internet Radio and Web TV............ ... .... .... ........ .... ... .... .... .... ... .... ....70
Stations, Podcast or Web TV .......................................................70
More..............................................................................................70
Add to Favorites ...........................................................................71
vii
Getting Started
Package Contents
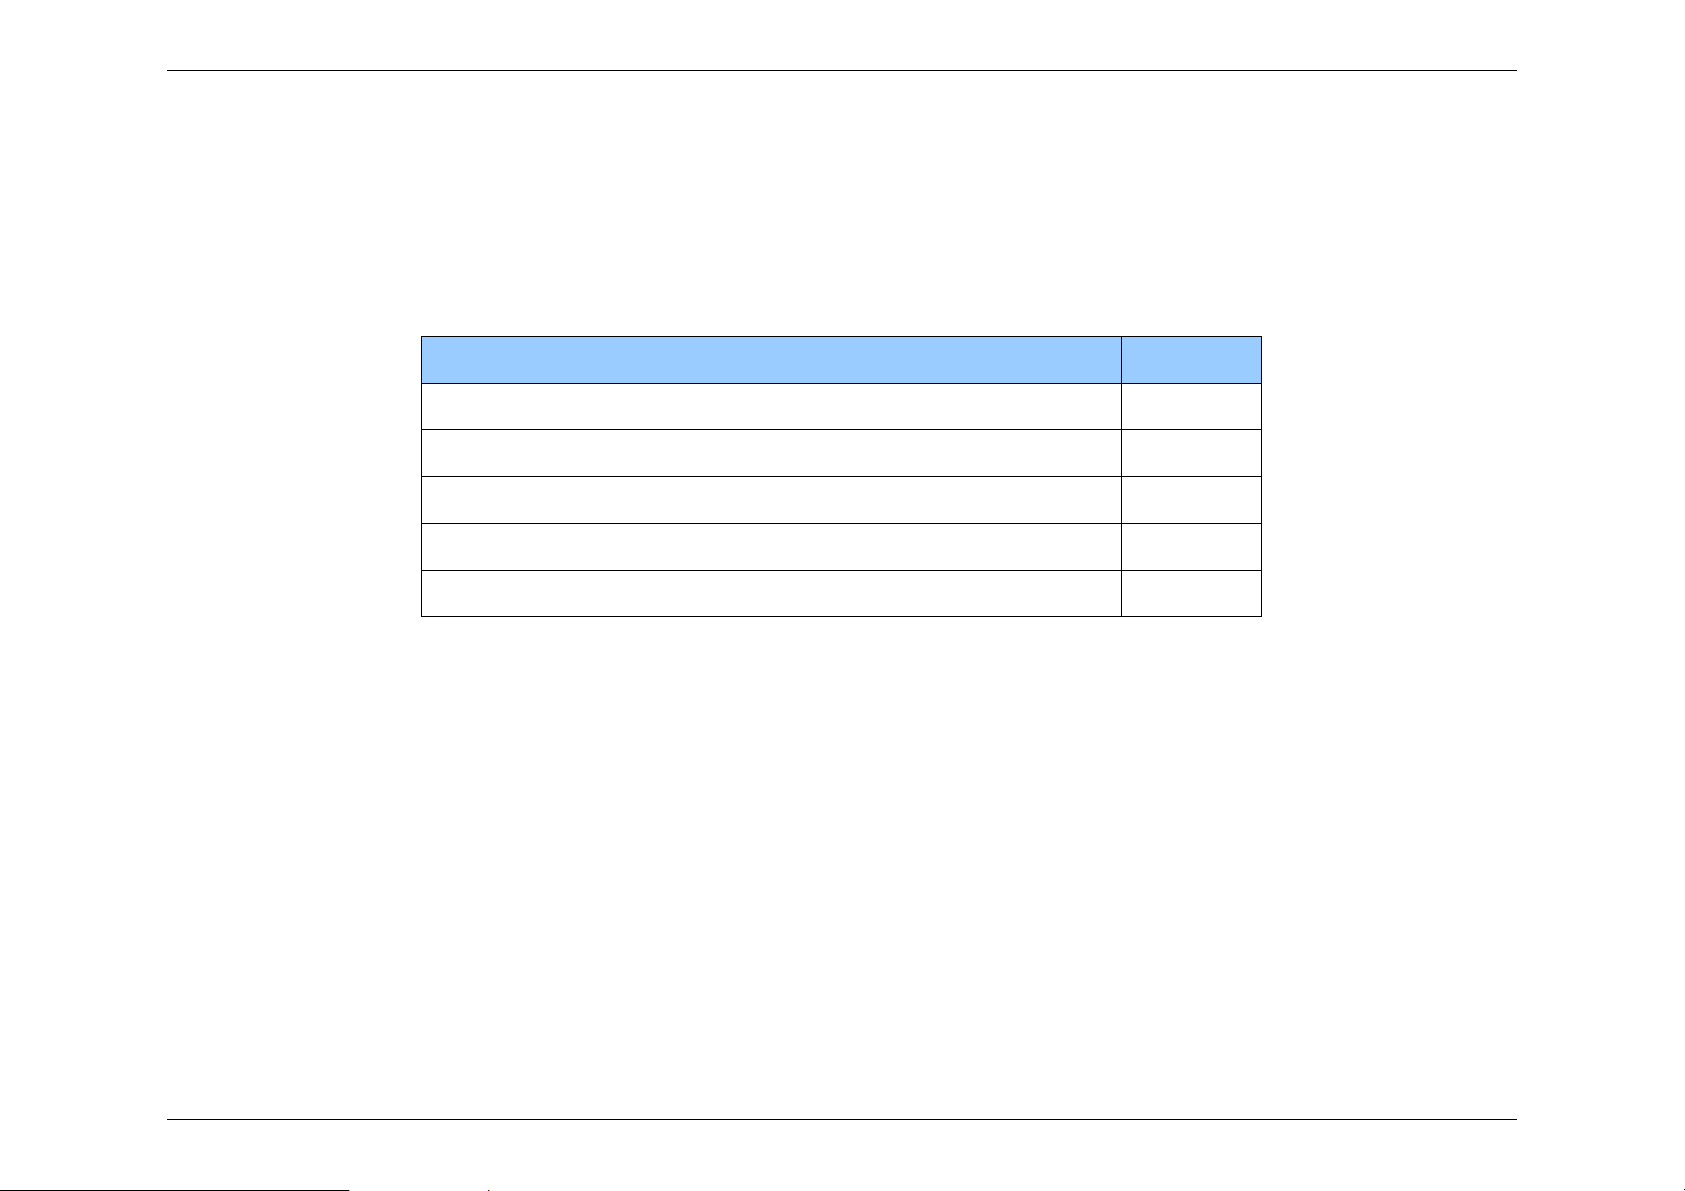
Please check to make sure that the following items are included in the box:
Item Quantity
Wireless Internet Frame 1
AC/DC Power Adaptor 1
Quick Start Guide 1
Customer Support Contact Sheet 1
CD-ROM (includes User Guide and Warranty Information) 1
1
(
Wireless Internet Frame Overview
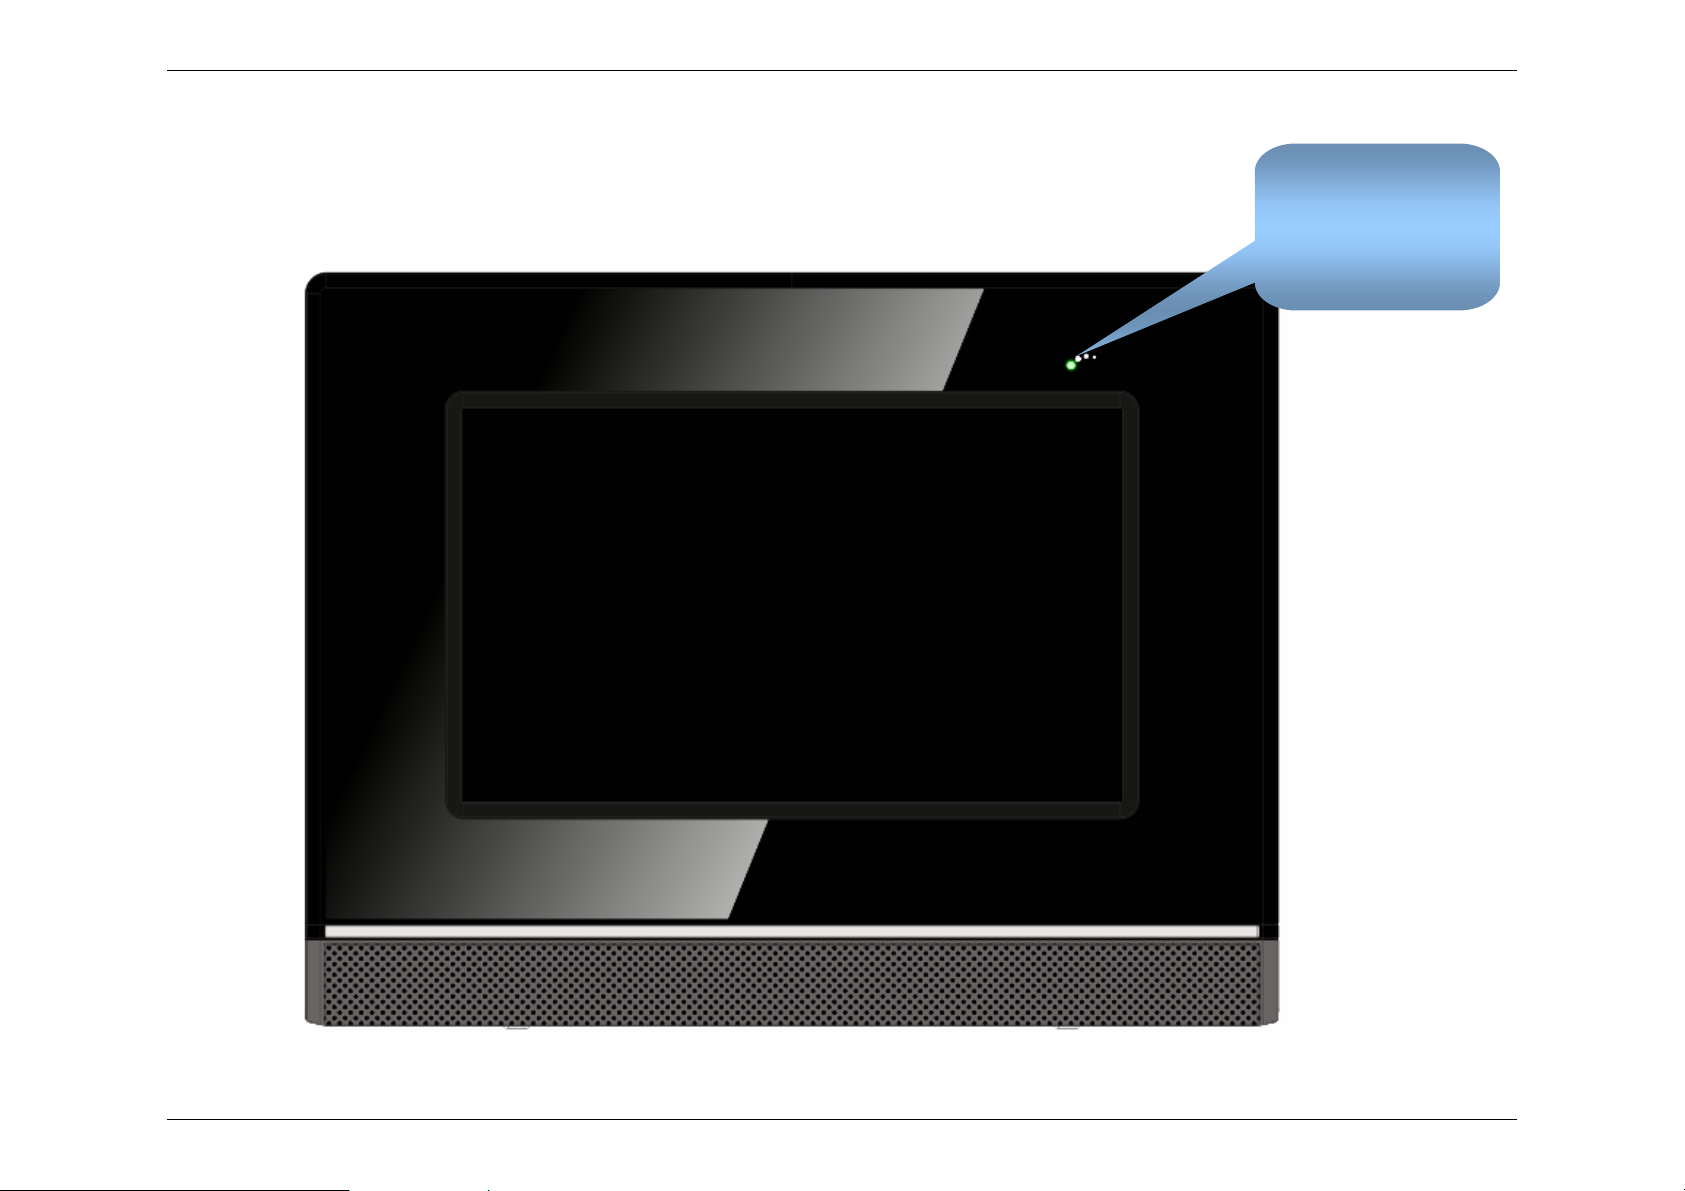
Front panel
Motion Sensor ON/OFF
indicator light
IT7350)
Only for
2

Back panel
Mode button
Press to display
On-Screen buttons.
USB port
Insert a USB flash
drive here that
contains stored
pictures, music and
video to access.
Battery
DC power jack
DC 5V / 3.0A
3
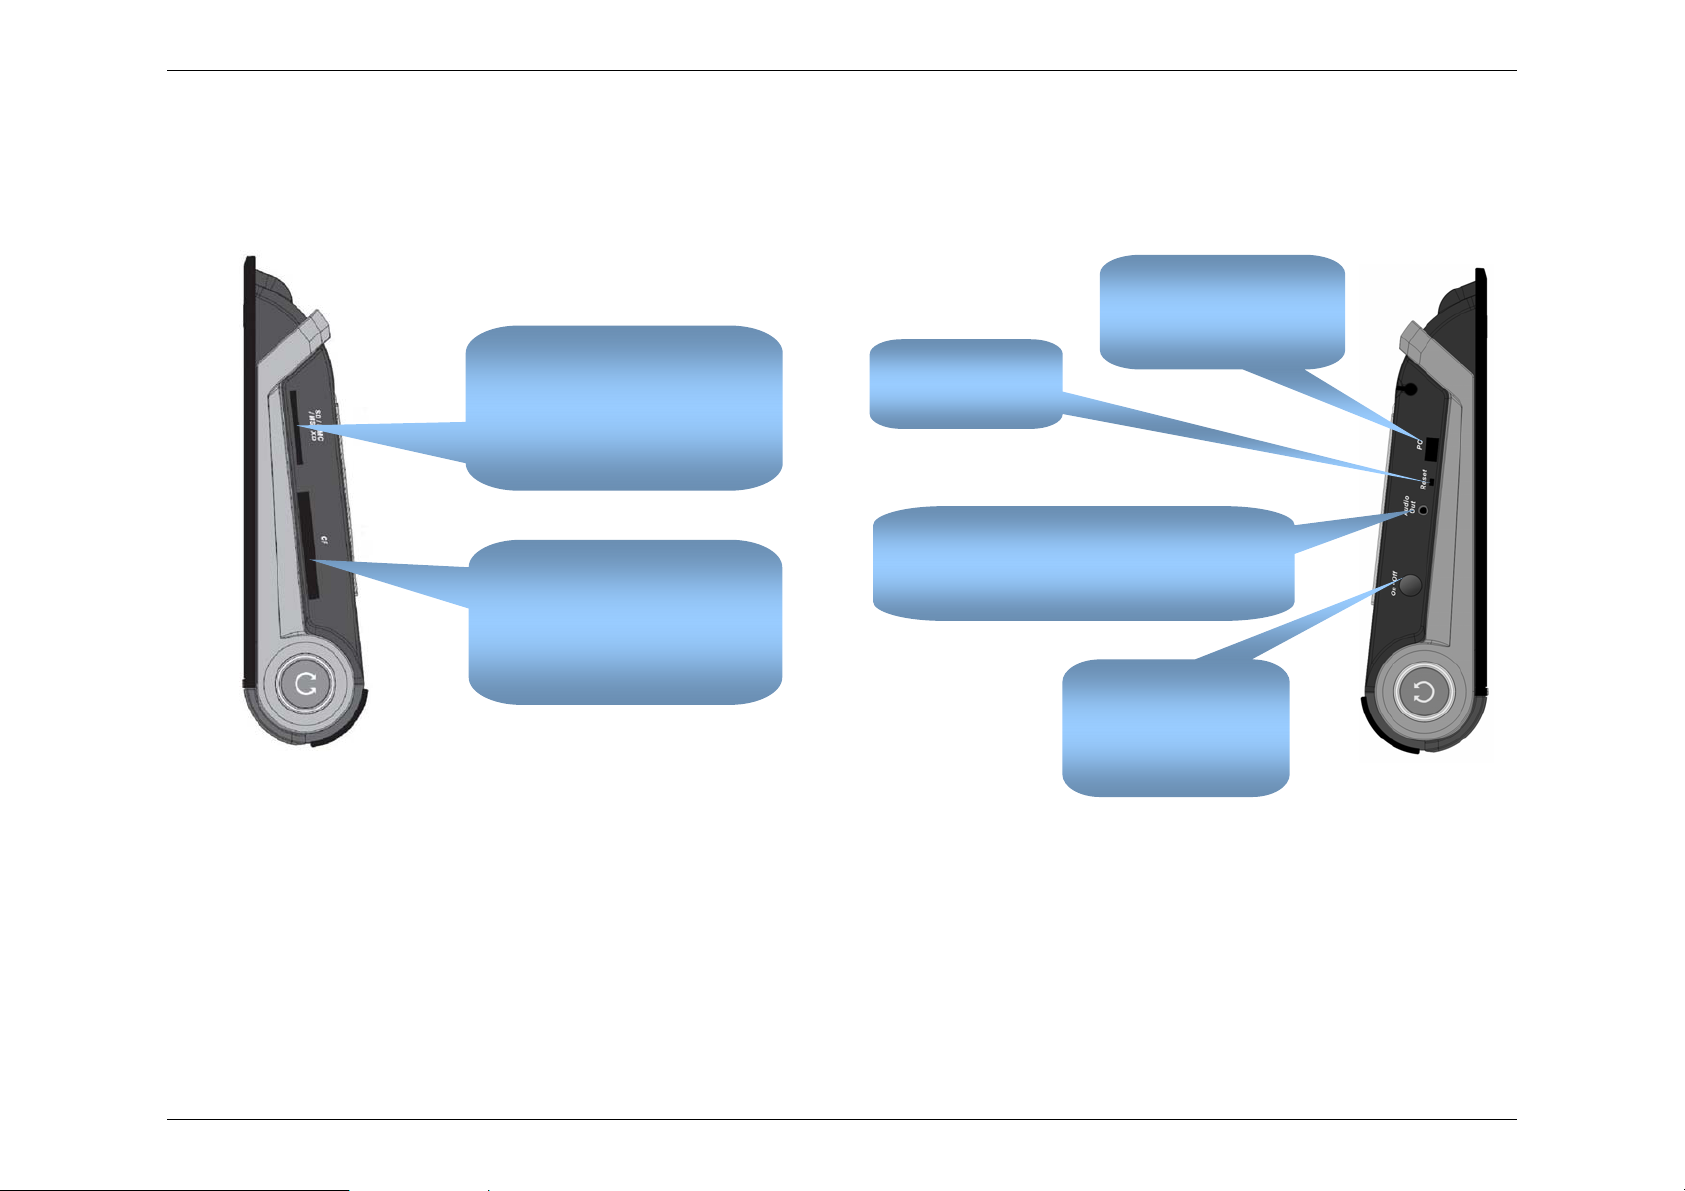
Left Panel Right Panel
PC (mini-USB) port
Connect to PC with
4-in-1 card slot
Insert a memory card here that
contains stored pictures, music,
or video that you would like to
access.
Reset button
Restart your frame
Audio output jack
provided USB cable.
CF (Compact Flash) card slot
Insert a compact flash here that
contains stored pictures, music
or video that you would like to
access.
4
Connect to external audio output (e.g.
earphones, headphones, speakers)
Soft Power switch
Press and hold this key
to turn power on and
off.
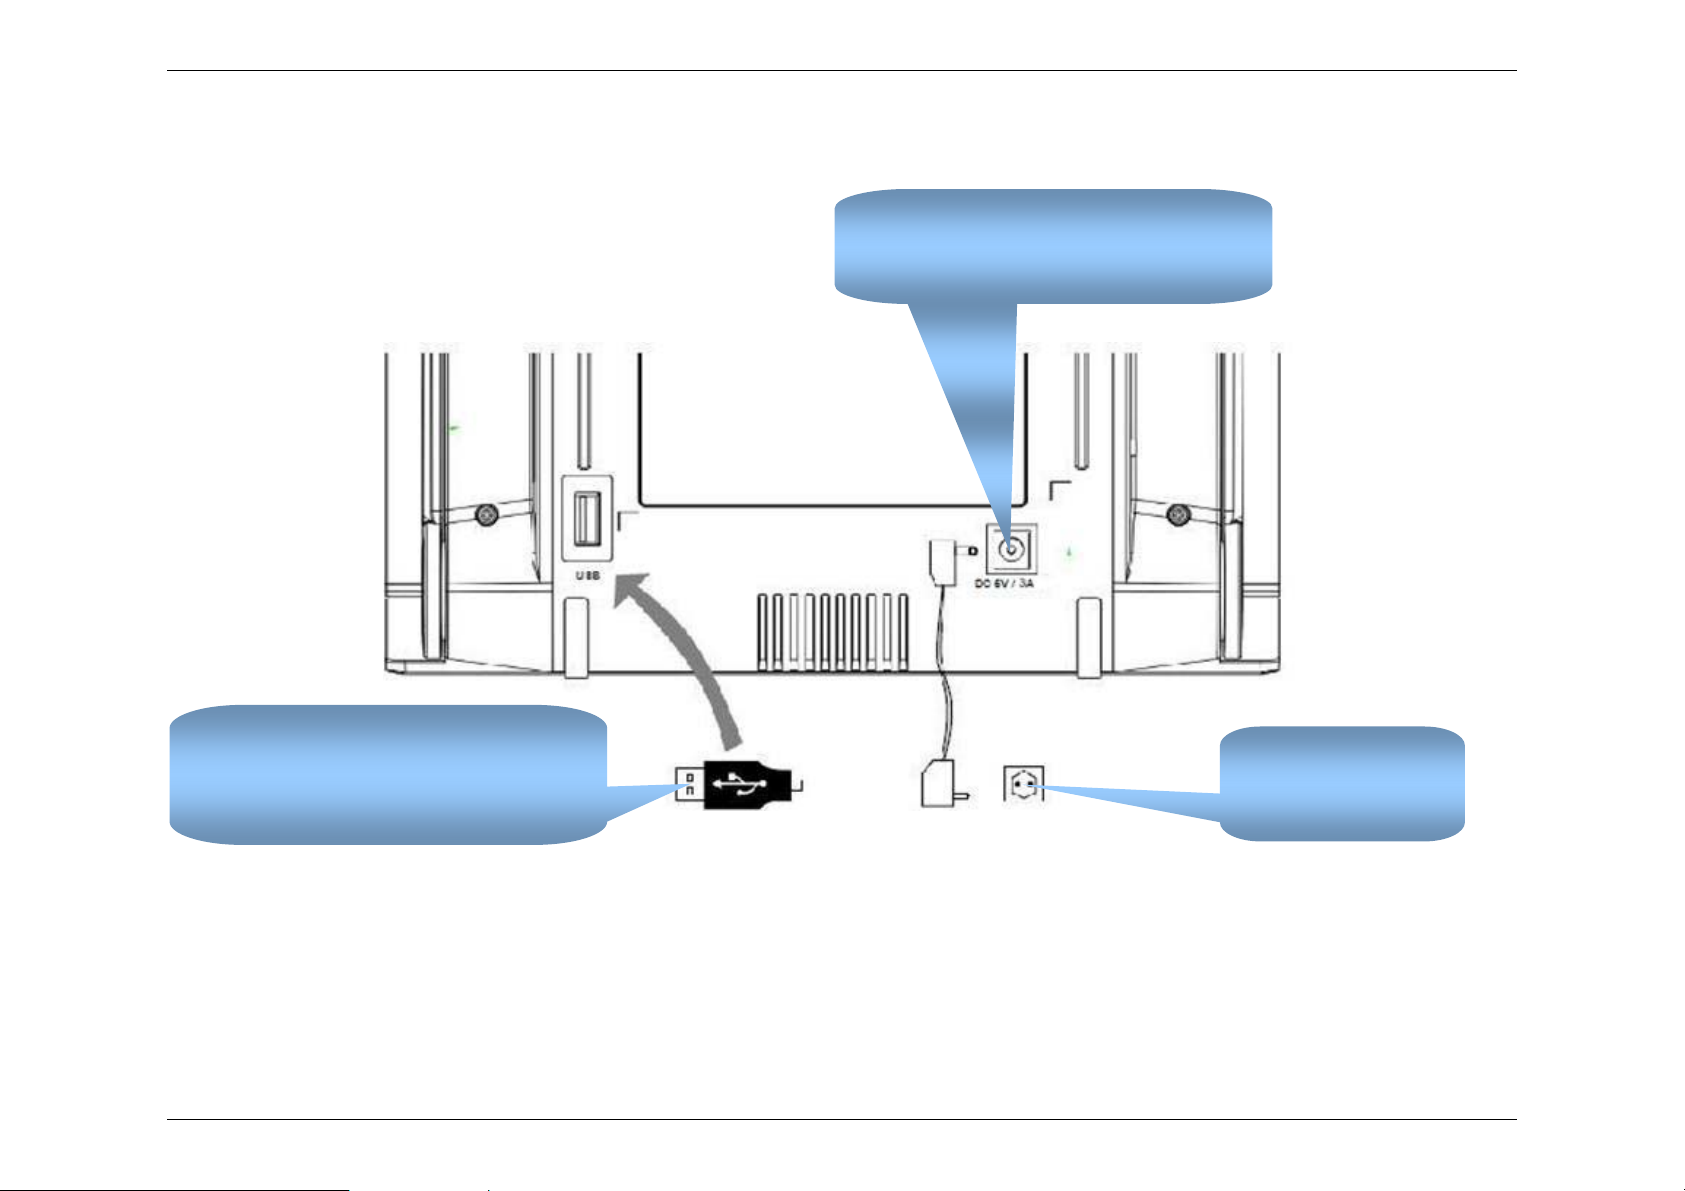
Connecting the AC/DC Power Adapter and USB cable
Connecting USB
To connect an external U SB supported device
to your frame, use an USB cable and plug it
into the USB jack on the back of the frame.
DC power adapter
Plug the DC power adapter end into the DC
5V/ 3.0A jack on the back of the frame.
AC power cord
Plug the AC power cord
into a nearby outlet.
Notes:
1) When connecting an external device to the USB port, use the USB cable provided with the external device.
2) Some external devices provide a cable that does not meet USB standards, which may cause a malfunction.
3) If an external storage device does not work normally when connected to your digital photo frame, try to connect it to your PC. If it still does not work
normally after re-connectin g to yo ur PC, then cont act a service center for that external device o r your PC .
5
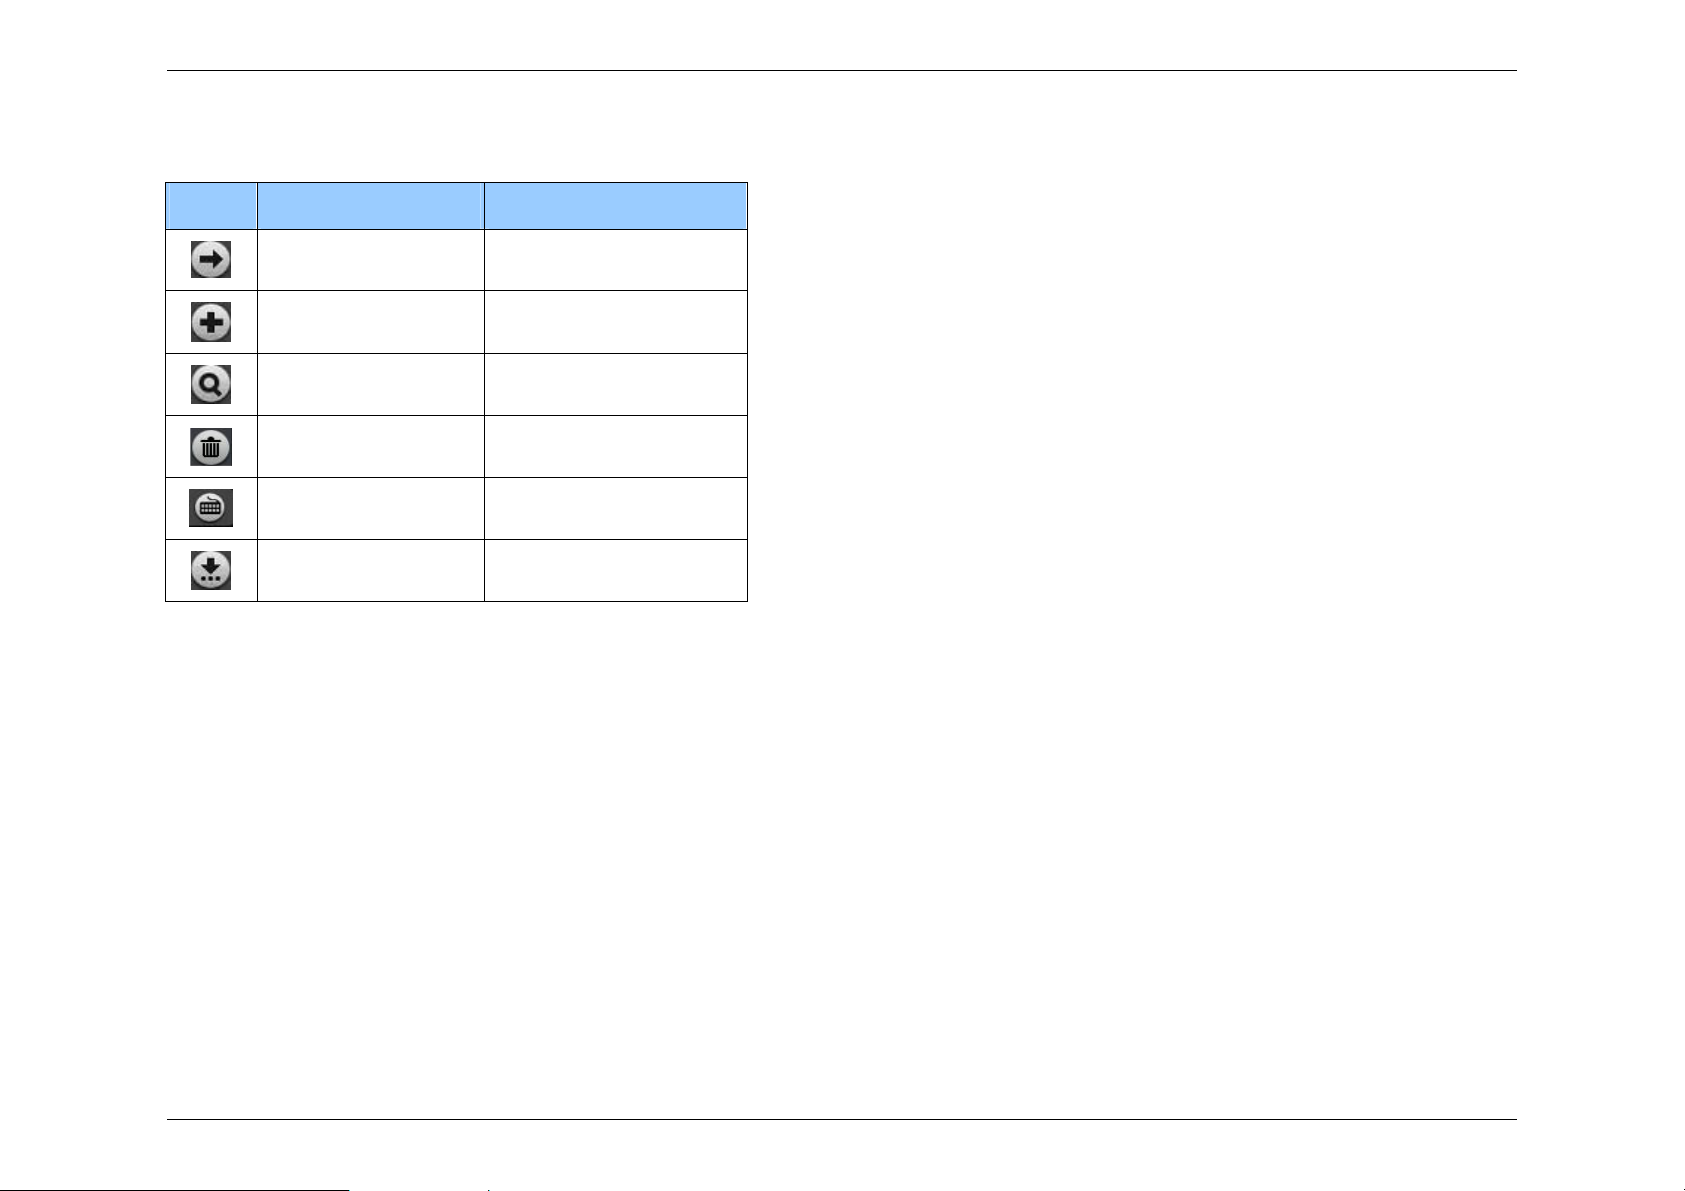
General Button Description
Icon Button Name Function
Submenu button Enter into submenu
Select option button Select option
Select file button Select file
Delete button Delete some setups
Keyboard button Input characters
More button View more details
6
Turning your Frame on
If it’s your first time turning on your frame, or you have reset the frame to factory presets, then you must calibrate the frame, select your language and accept
the End User License Agreement (EULA).
Standing the Frame up
Rotate the frame handle to the desired viewing angle. To release the handle, press on both ends at the same time to release the locking mechanism.
Calibrate the Touch Screen
1. Slide the OFF / ON switch to ON.
2. There are five (5) points (+) needed to tap to calibrate the touch screen. The first point (+) is in the center of the screen and there is one (1) point (+) in each
corner. Follow the on screen instructions to calibrate the frame.
3. After completing the calibration, the Language screen will appear.
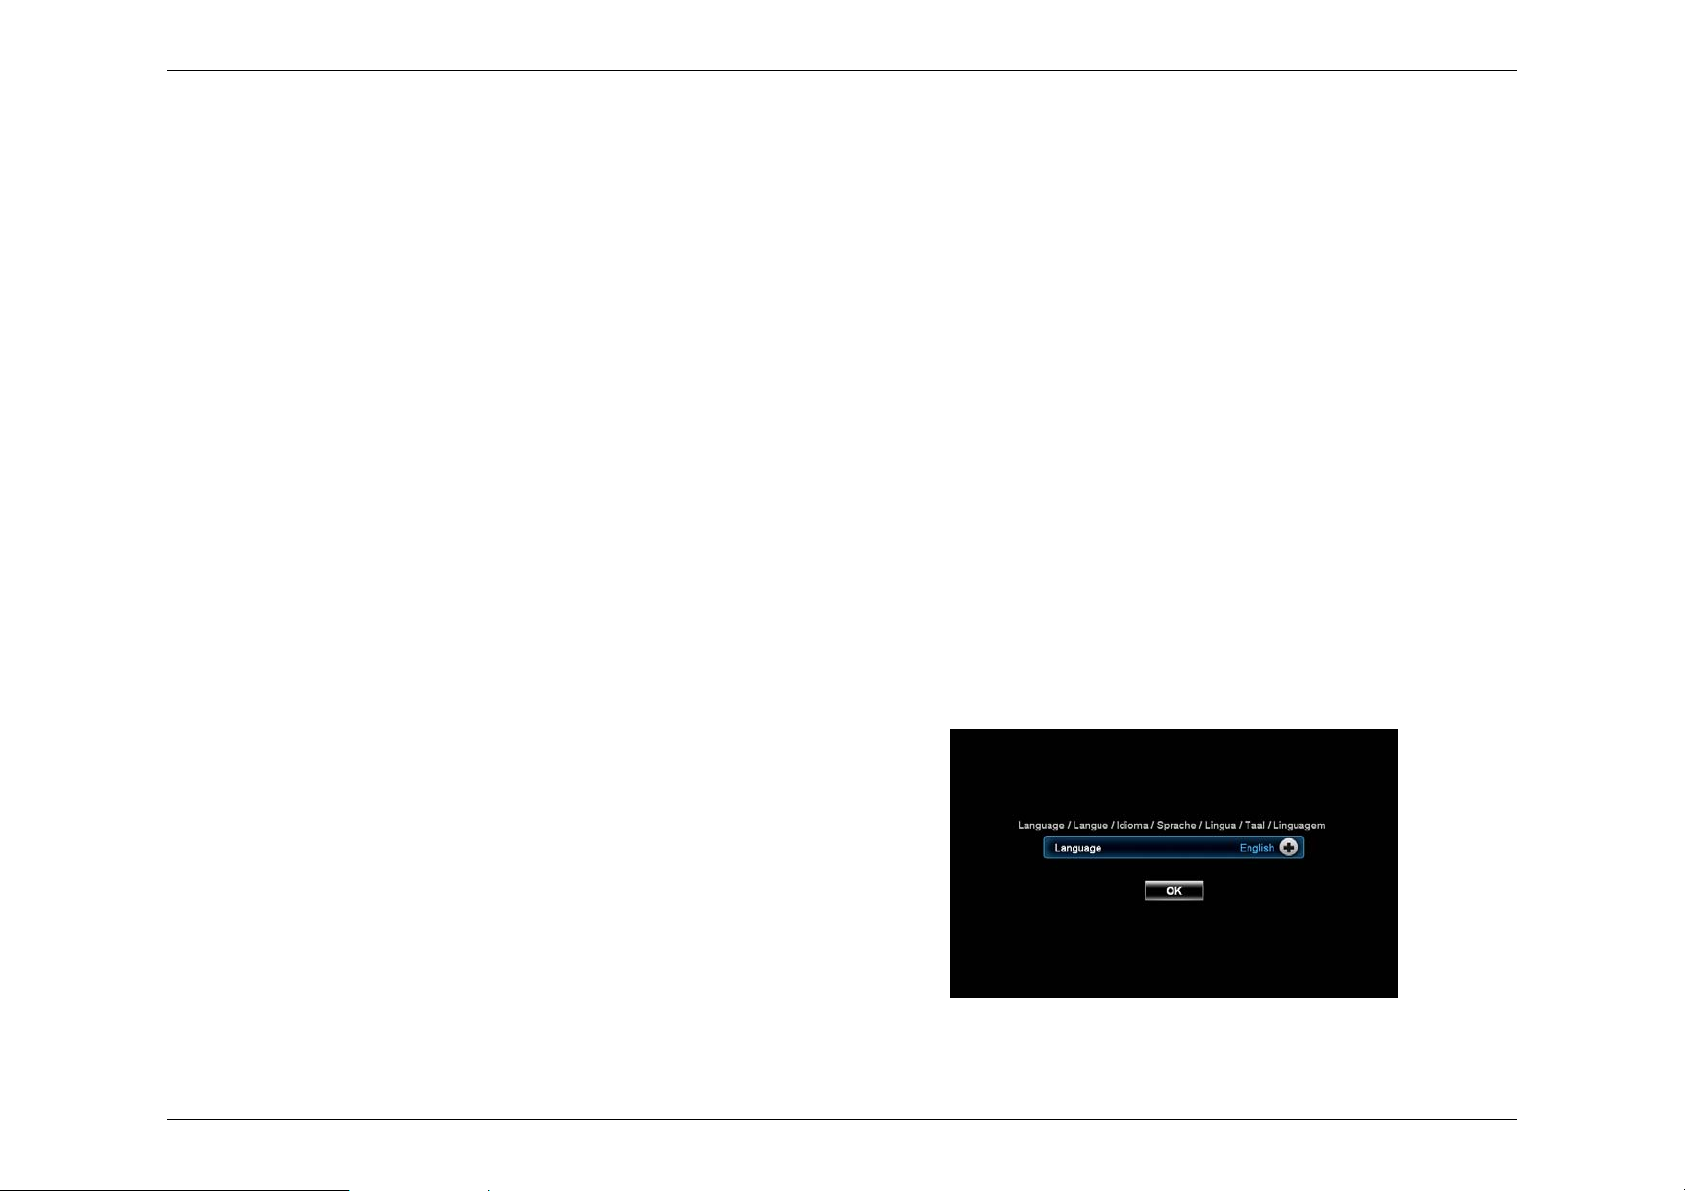
Language Selection
1. On the Language screen, tap on the language you want.
2. Next, tap OK to accept the selected language.
Language pop-up menu
7
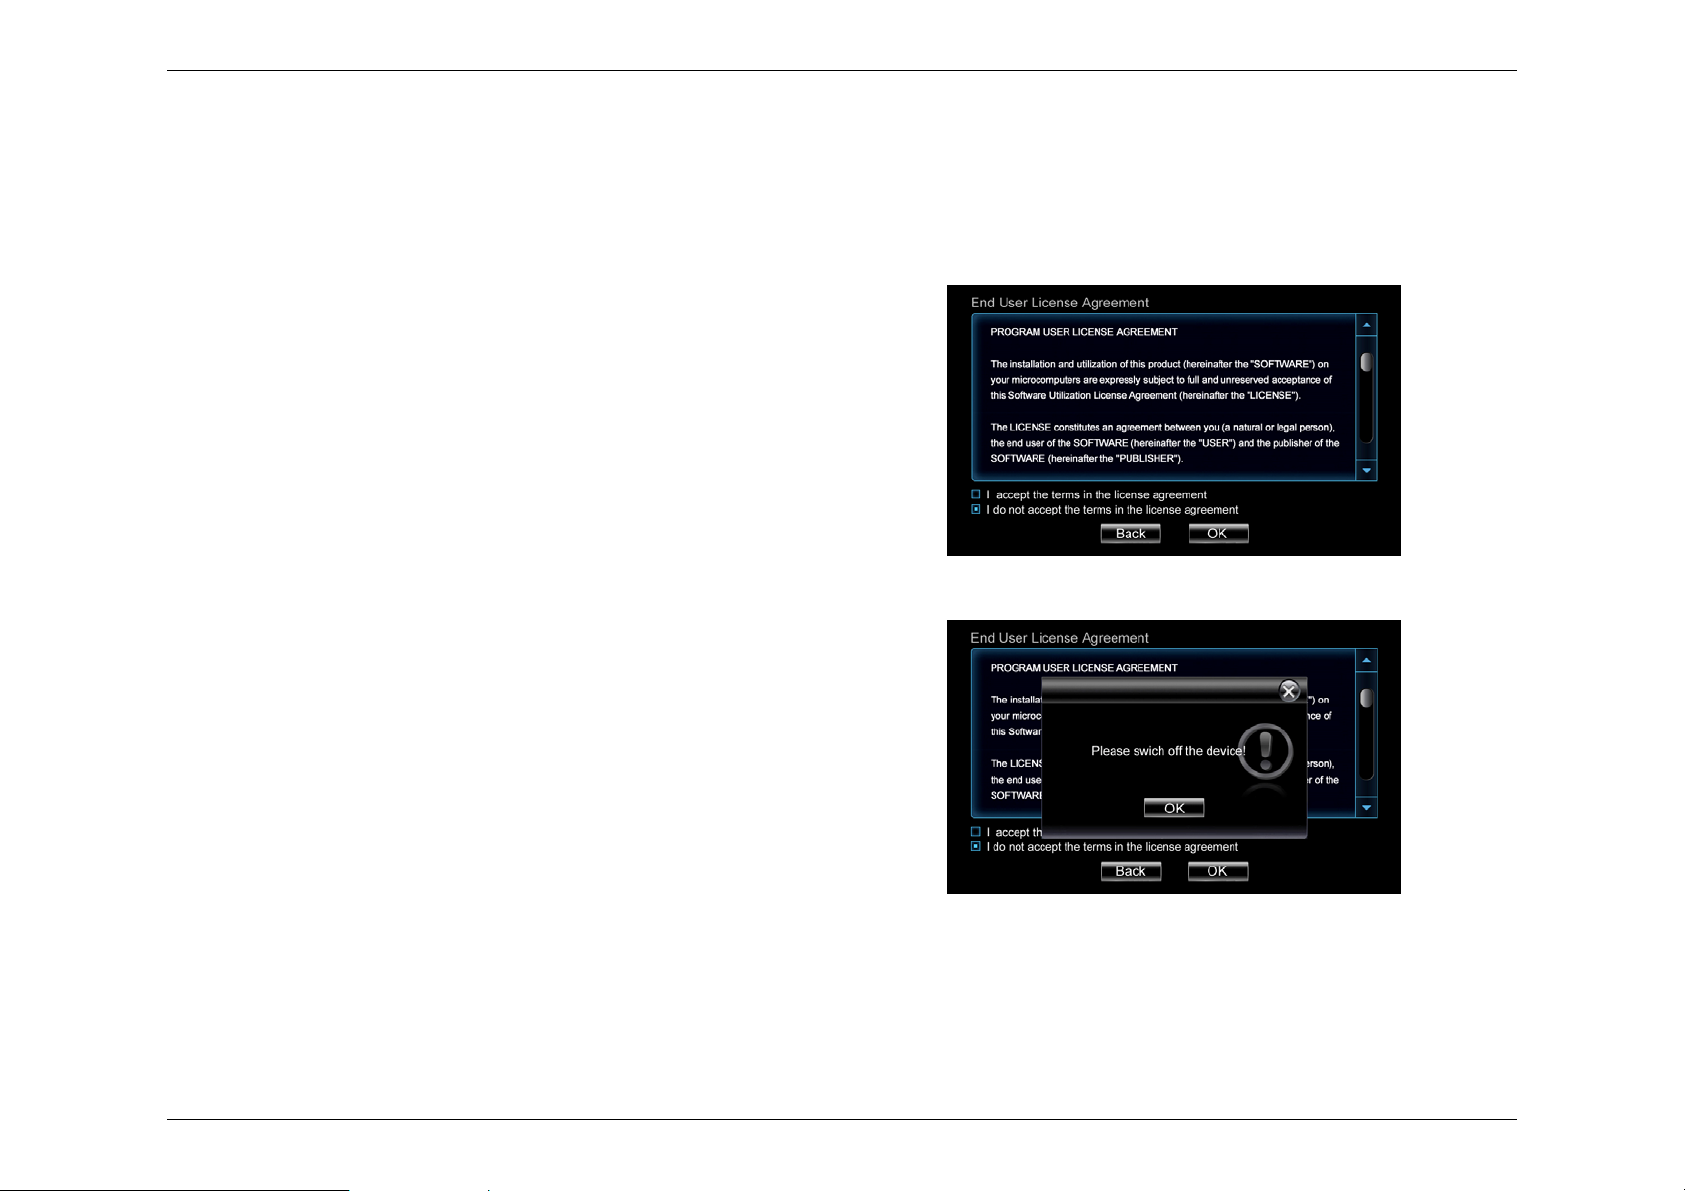
End User License Agreement (EULA)
After selecting the language, you must review the EULA
To accept the EULA:
1. To accept the EULA, tap the check box next to “I accept the terms in the
license agreement”.
2. Next, tap OK. The Home Screen will appear.
To not accept the EULA:
EULA
1. If you do not w ant to accept the terms of the E ULA then tap t he check box
next to “I do not accept the terms in the license agreement”.
2. Next, tap OK.
3. A pop-up screen will appear telling you to “Please switch off t he de vi ce”.
If you tap OK on the pop-up screen you will be sent back to the EULA screen.
EULA – no acceptance pop-up
8
The Home Screen
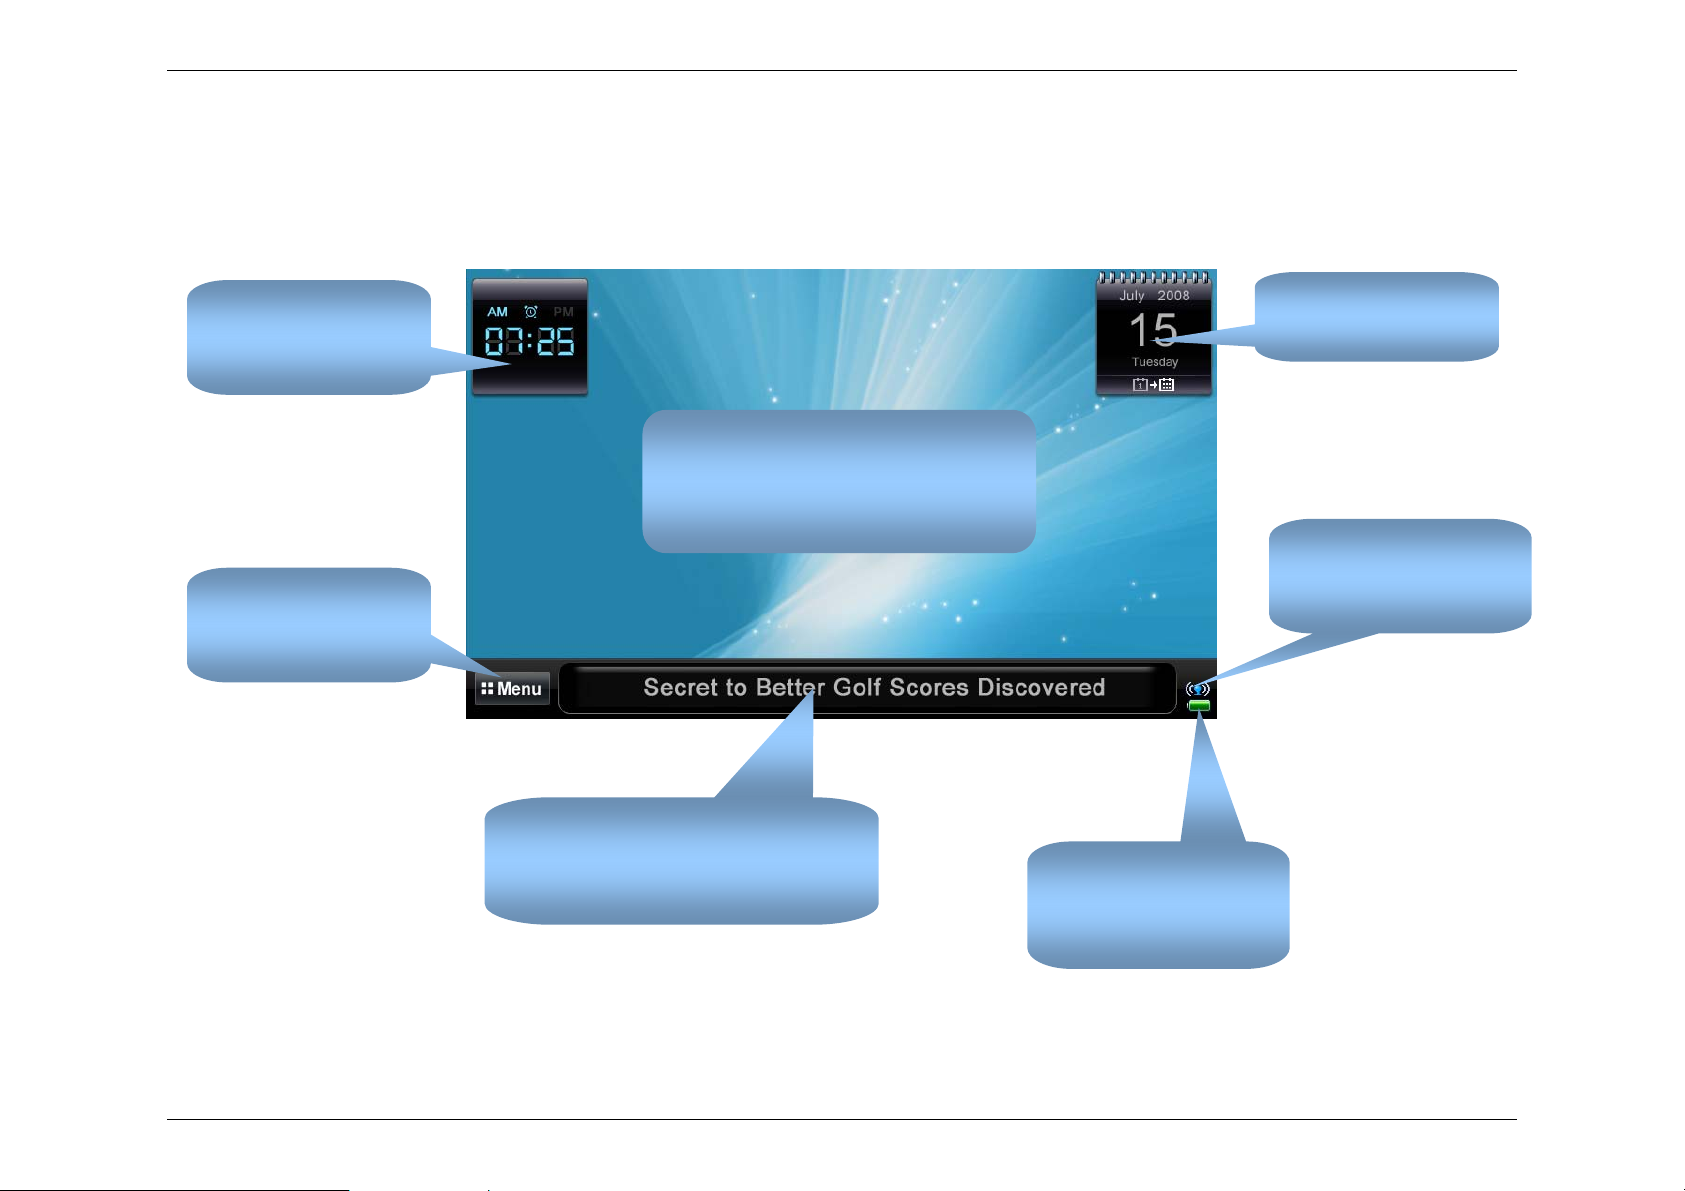
Home Screen Overview
Clock
Tap to set the clock’s
alarm.
Menu button
Tap to open the Main
Menu.
Wallpaper area
Tap to open the Home Settings screen to
change settings to the home display, e.g.
change background image or slideshow.
News Bar
Tap to open the news article (works when
connected to the internet).
Calendar
Tap to view calendar.
WiFi indicator
Indicates the network
connection status.
Power indicator
Indicates the rechargeable
battery power level.
9
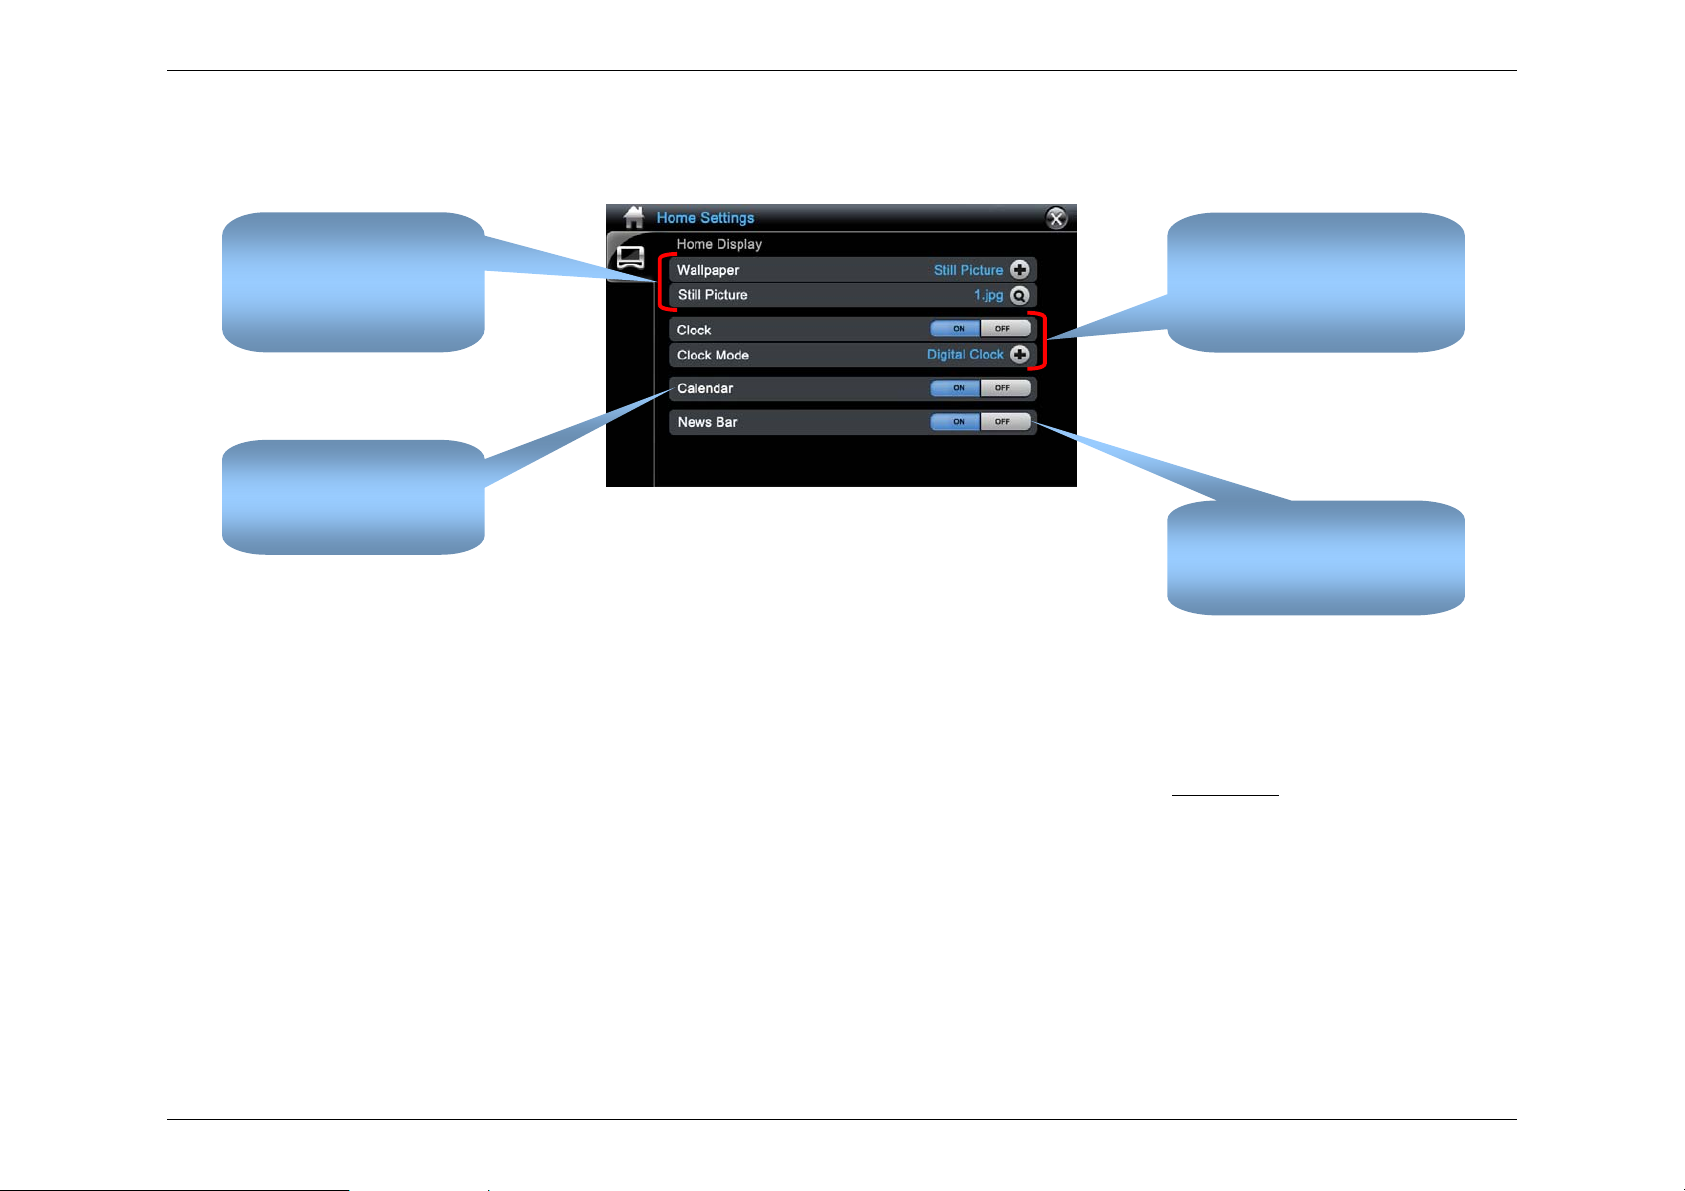
Home Settings Screen
Wallpaper
Choose a still picture or
slide show as wallpaper on
the Home Screen.
Calendar
Turn the Home Screen
calendar on or off.
Notes:
1) The wallpaper will default to the factory preset if you factory reset the frame.
2) The selected still picture used for the wallpaper is copied to internal memory. If you delete this picture in the Photo application, it will not be delet ed
from the internal memory.
3) To add background music or change other settings for the slide show in the Home Screen, please go to the Photo Setup
Home Settings screen
Clock
Choose between a digital or
analog clock on the Home
Screen, and turn it on or off.
News Bar
Turn it on or off on the Home
Screen.
section.
4) User can play a slide show from internal memory or card only, Web or Home Network selection IS NOT enabled for the Home Screen.
10
Additional Home Settings
In addition to the wallpaper settings, you can also make additional Home
Screen settings:
Clock – Allows you to turn the Home Screen clock on or off.
Clock Mode – Lets you select the display clock mode (digital or analog) in the
Home Screen.
Clock Mode is disabled when slide show is selected or the clock is turned off.
Calendar – Allows you to turn the Home Screen calendar on or off.
News Bar – Allows you to turn the News Bar display on or off in the Home
Screen.
News Bar is disabled when slide show is selected.
Home Display screen
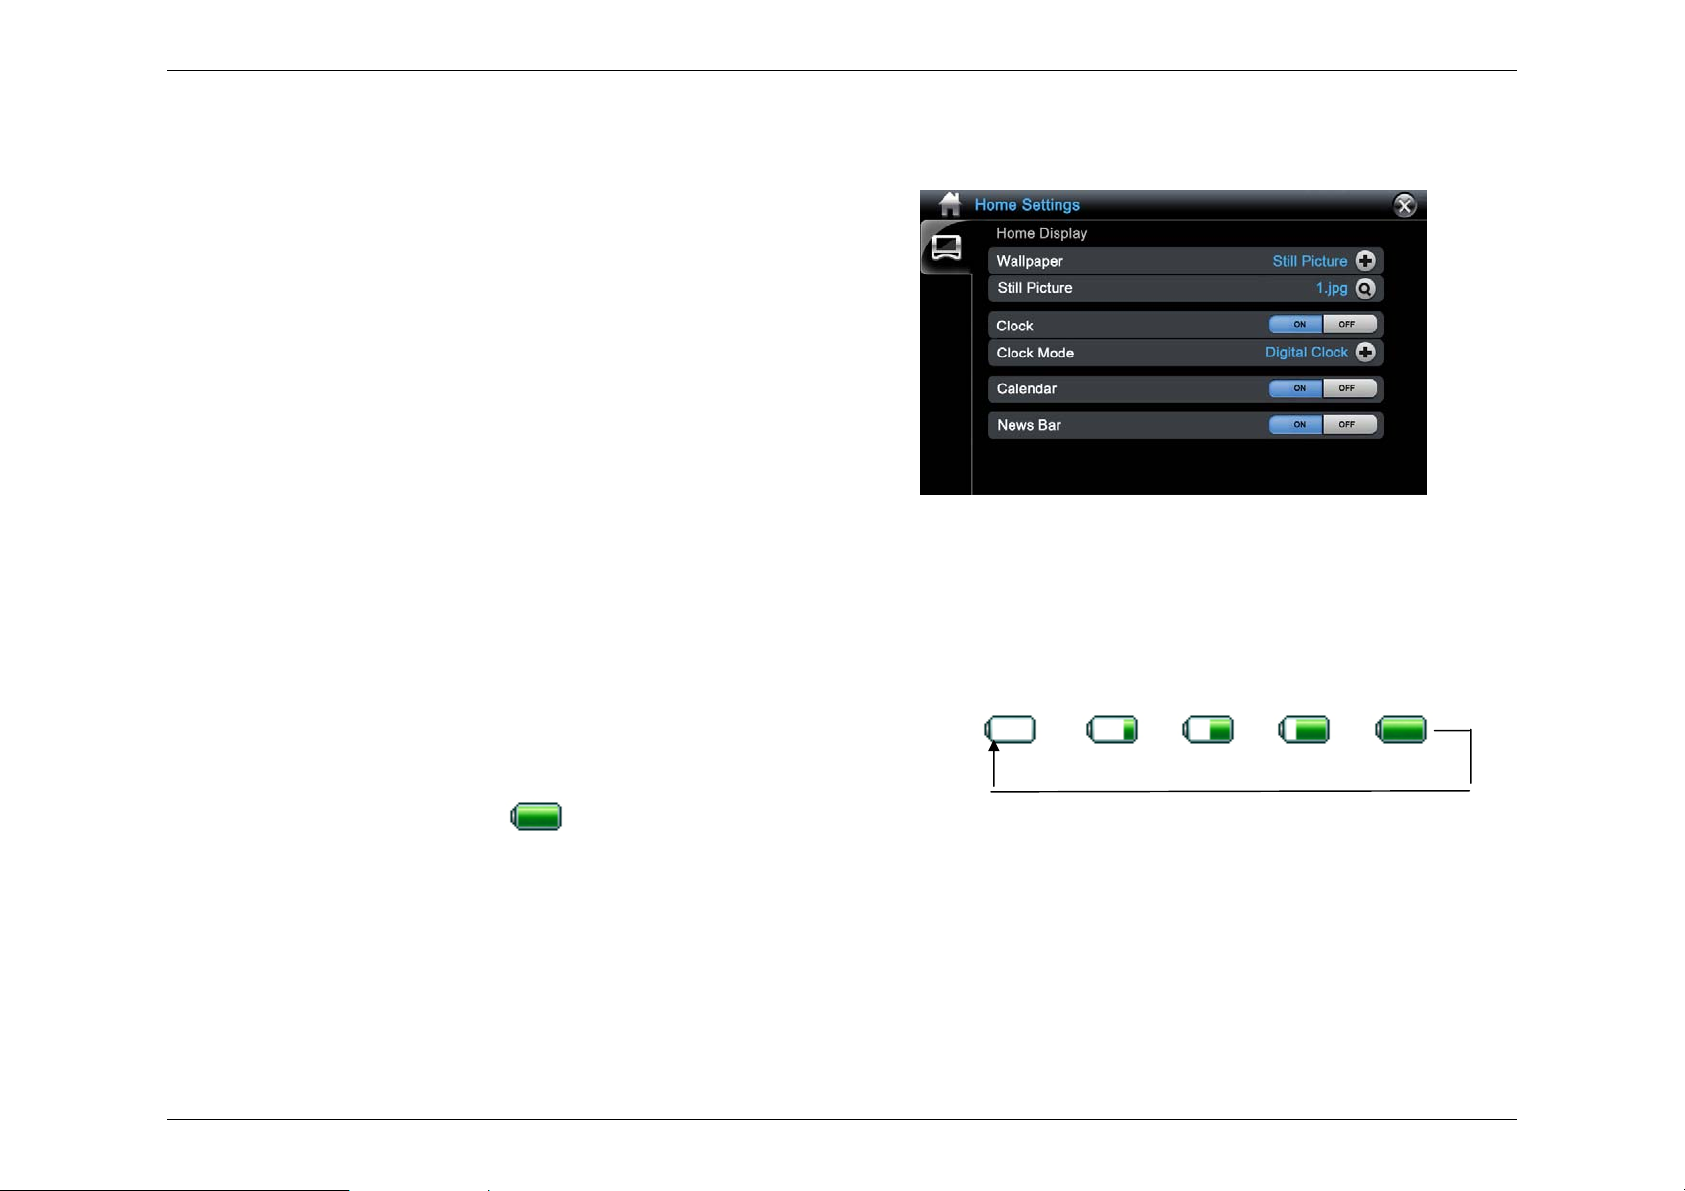
Power Icon
1. When the battery is empty, a pop-up sc reen will appear a nd thealarm will
sound.
2. When the battery is empty, connect the power adapter. The battery icon
will flash from empty to full repeatedly.
3. When the battery is full the battery
the battery is not full it displays the current battery status.
11
icon will be displayed. When
>>> >>> >>> >>> .
Battery status pop-up
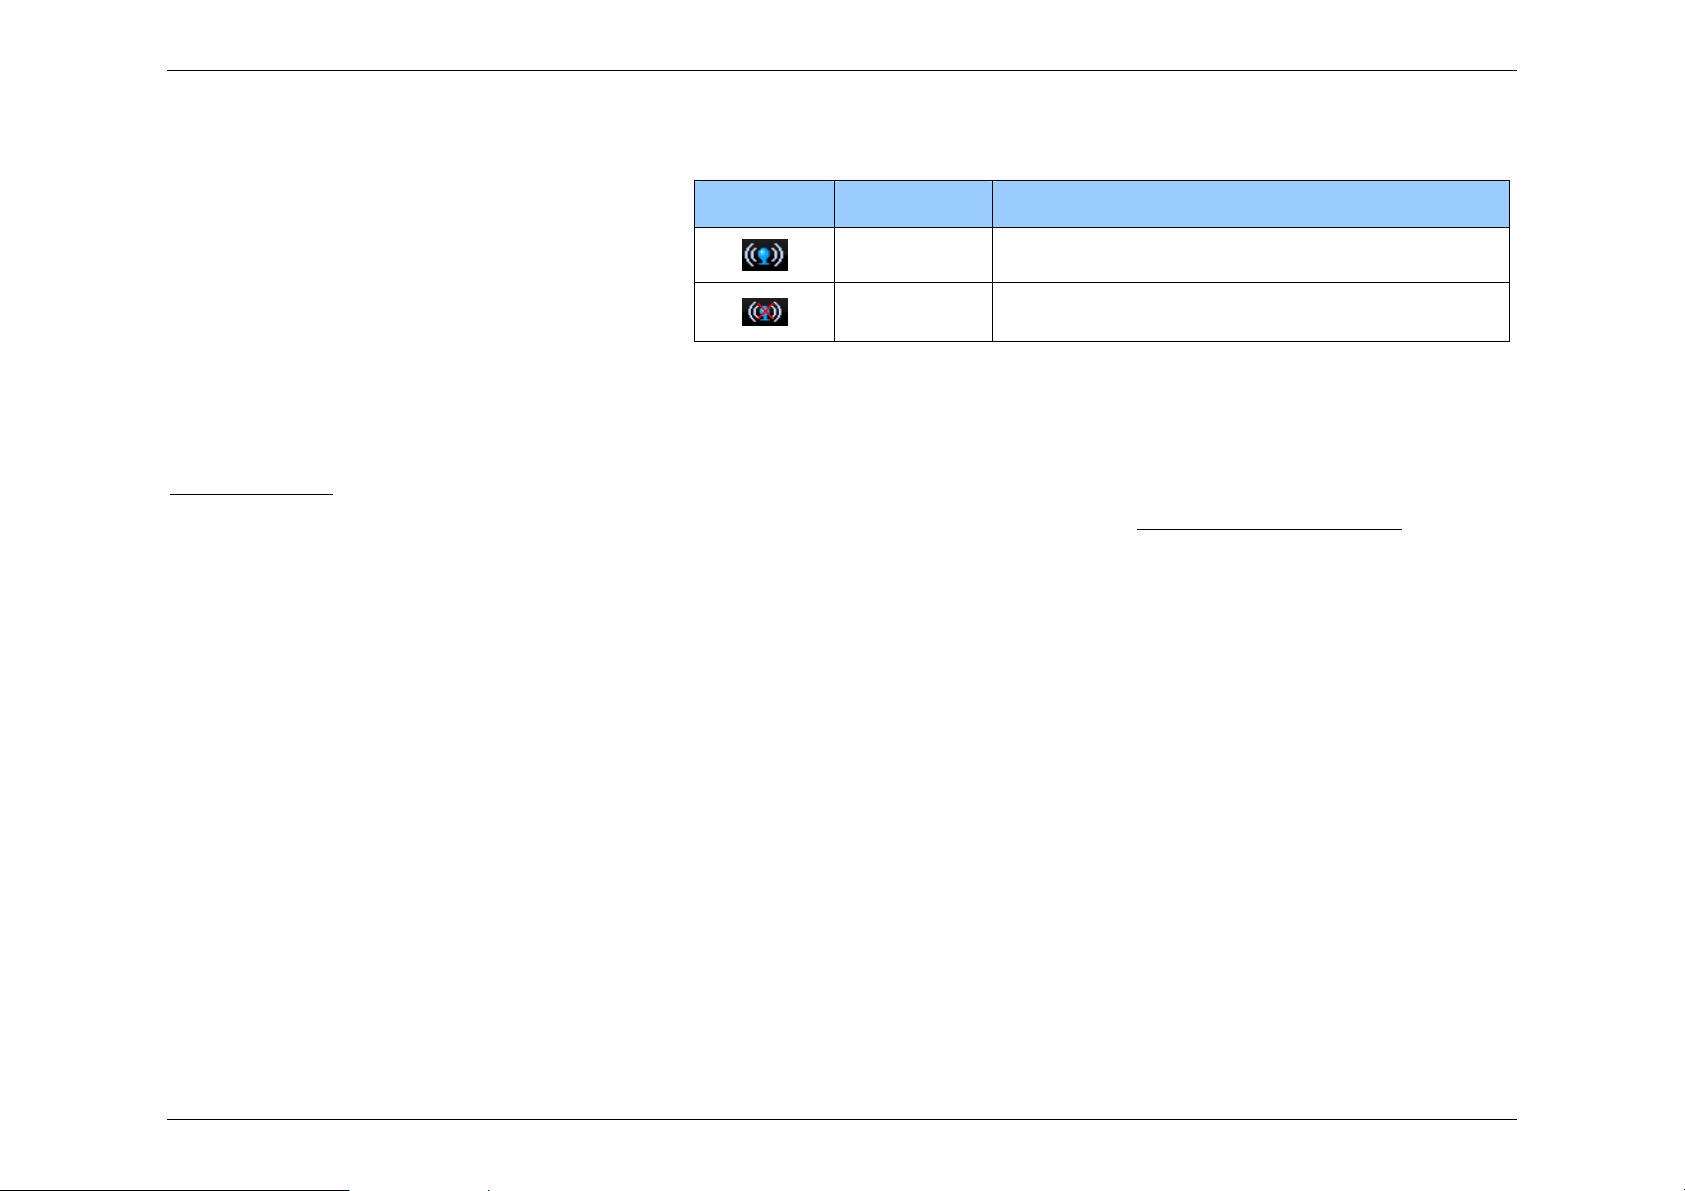
Wi-Fi icon
The WiFi icon on the Home Screen displays the status of
your network connection.
If the Wi-Fi icon is tapped, the screen will jump to the Wi-Fi
setting screen.
Icons Icon Name Description
Wi-Fi icon Connection to wireless access point is present.
No Wi-Fi icon Connection to wireless access point is not present.
News Bar
The News Bar lets you re ad news articles b y tapping on the artic le. The News Bar works only when the frame is connected to the internet. Please refer to the
RSS News Reader
The news feed on the Home Screen is pulled from the News Feeds listed in the RSS News Feeds screen (see News Feed Reader application
Bar will begin with the first news feed listed and displays the news articles in that feed, and then proceeds to the next news feed and displays all of its articles,
then goes to the next news feed, and so forth. This sequence is continuously repeated. The selection of news feeds and their sequence can not be changed.
section for more detailed instructions on how to set up the news feed.
). The News
12
Wallpaper Settings
For a still picture as wallpaper
1. On the Home Screen, tap the wallpaper area. The Home Settings
screen will appear.
2. Tap the
3. Tap Still Picture on the pop-up. Still Picture will appear on the
Wallpaper line.
4. Tap the
will appear.
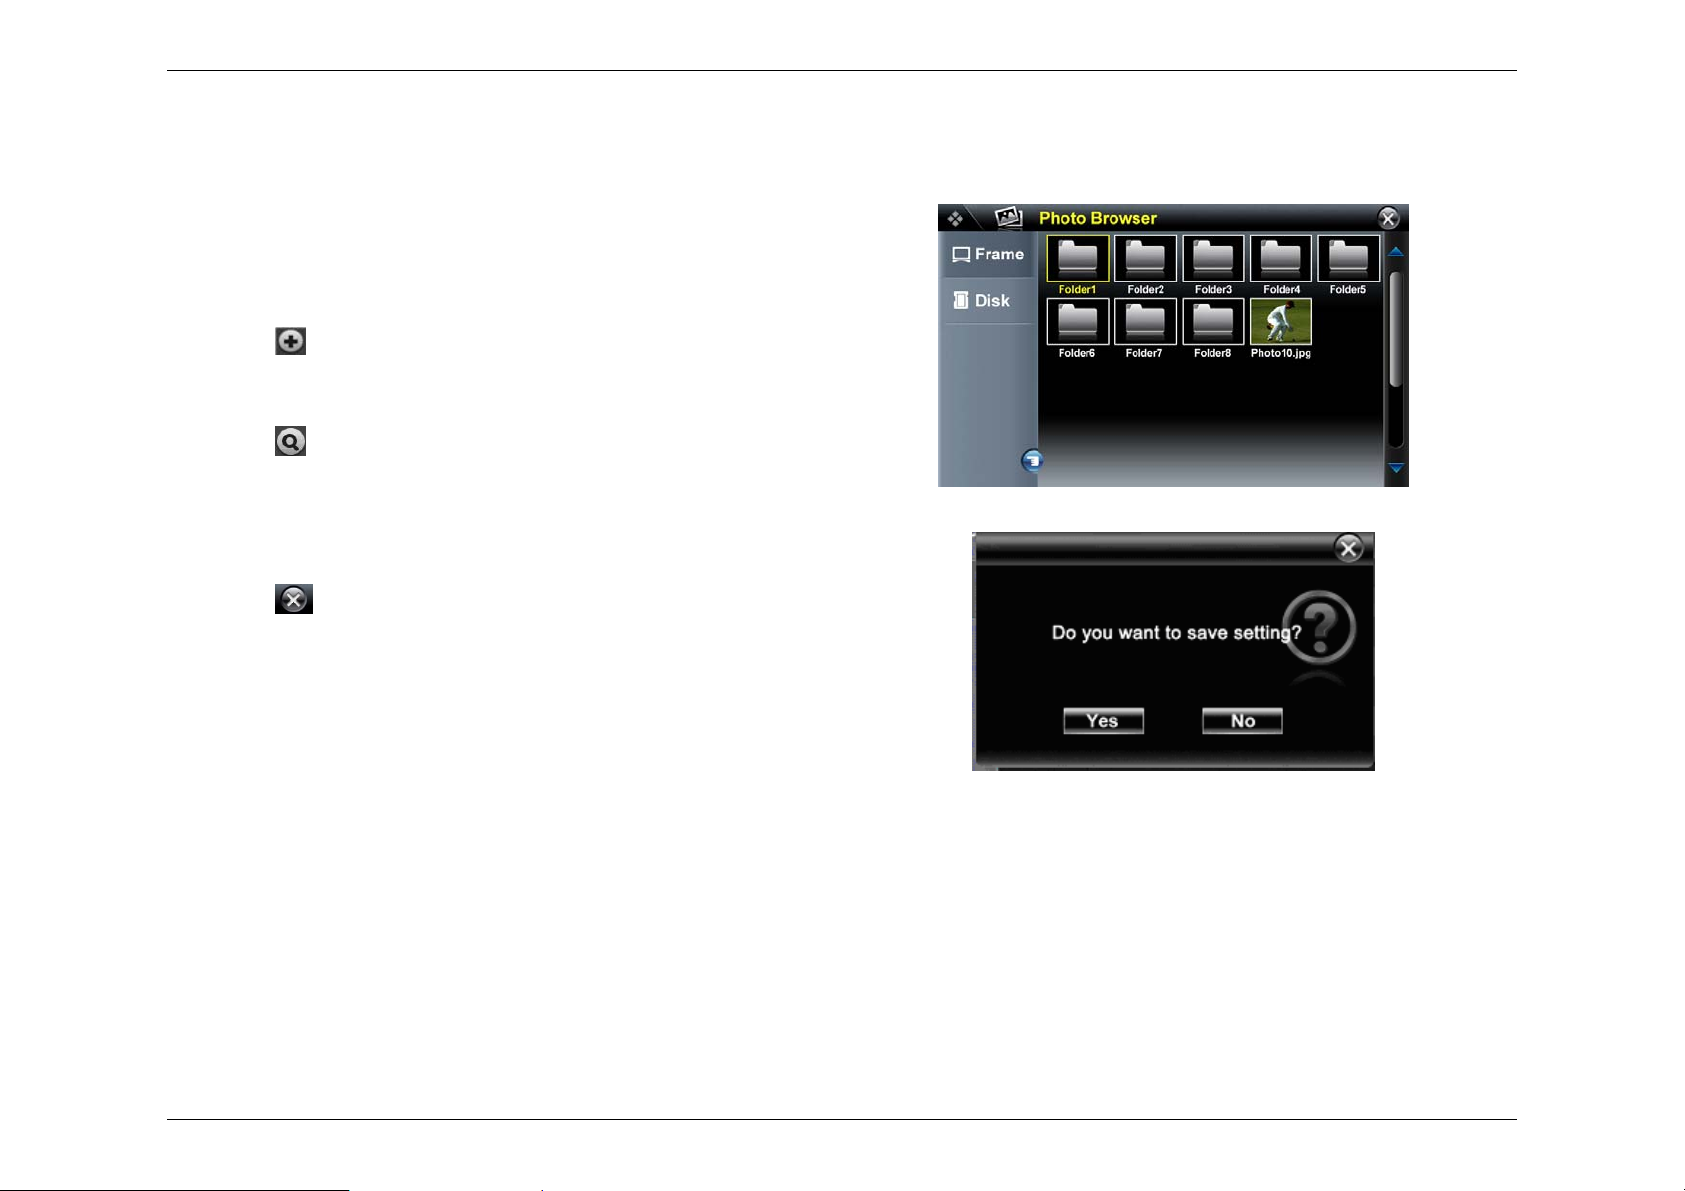
5. Tap Frame or Disk to select the picture location.
6. Double tap the picture you want. The picture you selected should appear
in the Still Picture line in the Home Settings screen.
7. Tap the button on the Home Setting screen.
8. On the Save Settings pop-up:
Tap Yes to save the setting. The Home Screen will appear with your
selected picture as the wallpaper.
Tap No to cancel the setting. The Home Screen will appear with
current picture or slide show as the wallpaper.
button on the Wallpaper line.
button on the Still Picture line. The Photo Browser screen
Photo Browser screen
Save pop-up box
13
For a slide show as the wallpaper
1. On the Home Screen, tap the wallpaper area. The Home Settings
screen will appear.
2. Tap the
3. Tap Slide Show on the pop-up. Slide Show will appear on the
Wallpaper line.
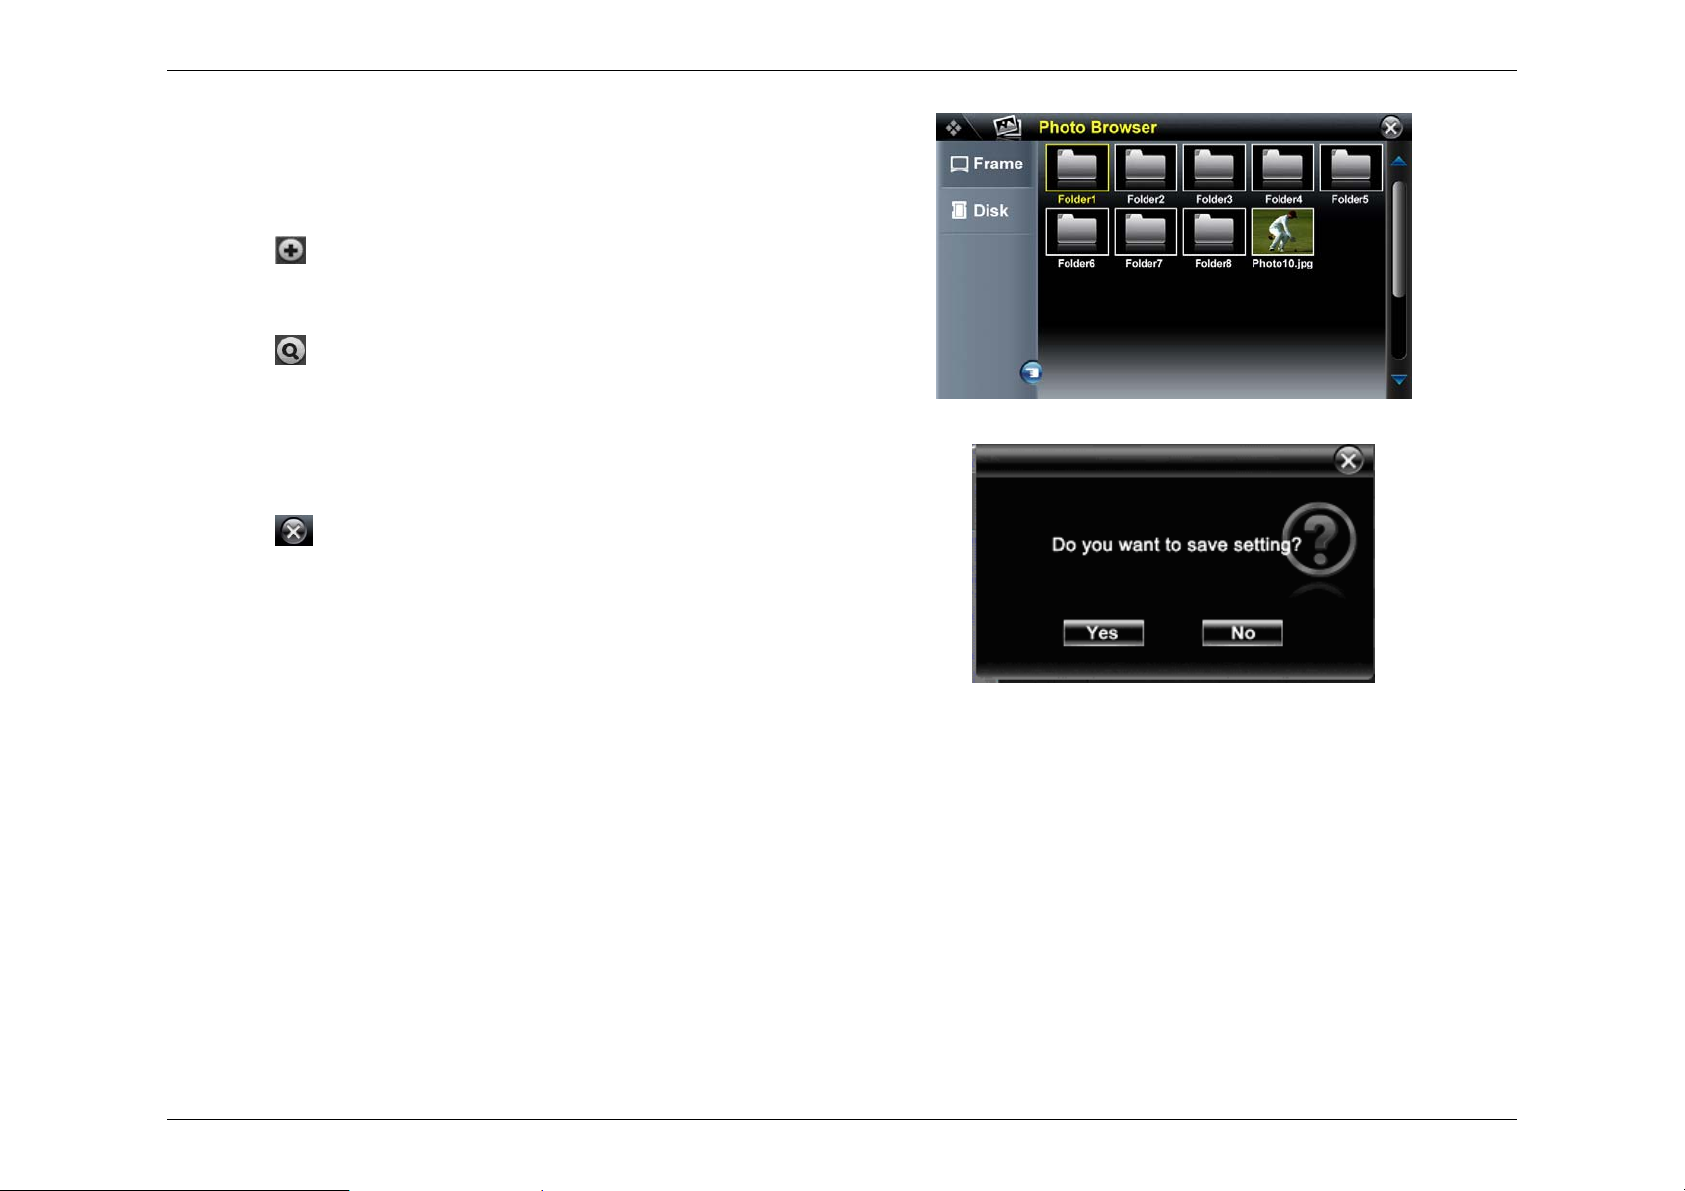
4. Tap the
Browser screen will appear.
5. Tap Frame or Disk to select location of pictures.
6. Double tap on one of the pictures in the photo display area. The picture
you selected should appear in the Play Slide Show from line in the Home
Settings screen.
7. Tap the
photo set that you selected will appear in the Home Screen.
8. On the Save Settings pop-up:
Tap Yes to save the setting. The Home Screen will appear and the
slide show will play from the picture selected.
Tap No to cancel the setting. The Home Screen will appear with
current picture or slide show as the wallpaper.
When Slide Show is selected as the wallpaper, the Home Screen will only
display the Clock and Calendar.
button on the Wallpaper line.
button on the Play Slide Show from line. The Photo
button on the Home Setting screen. The picture and the
Photo Browser screen
Save pop-up box
14
Slide Show Control Buttons
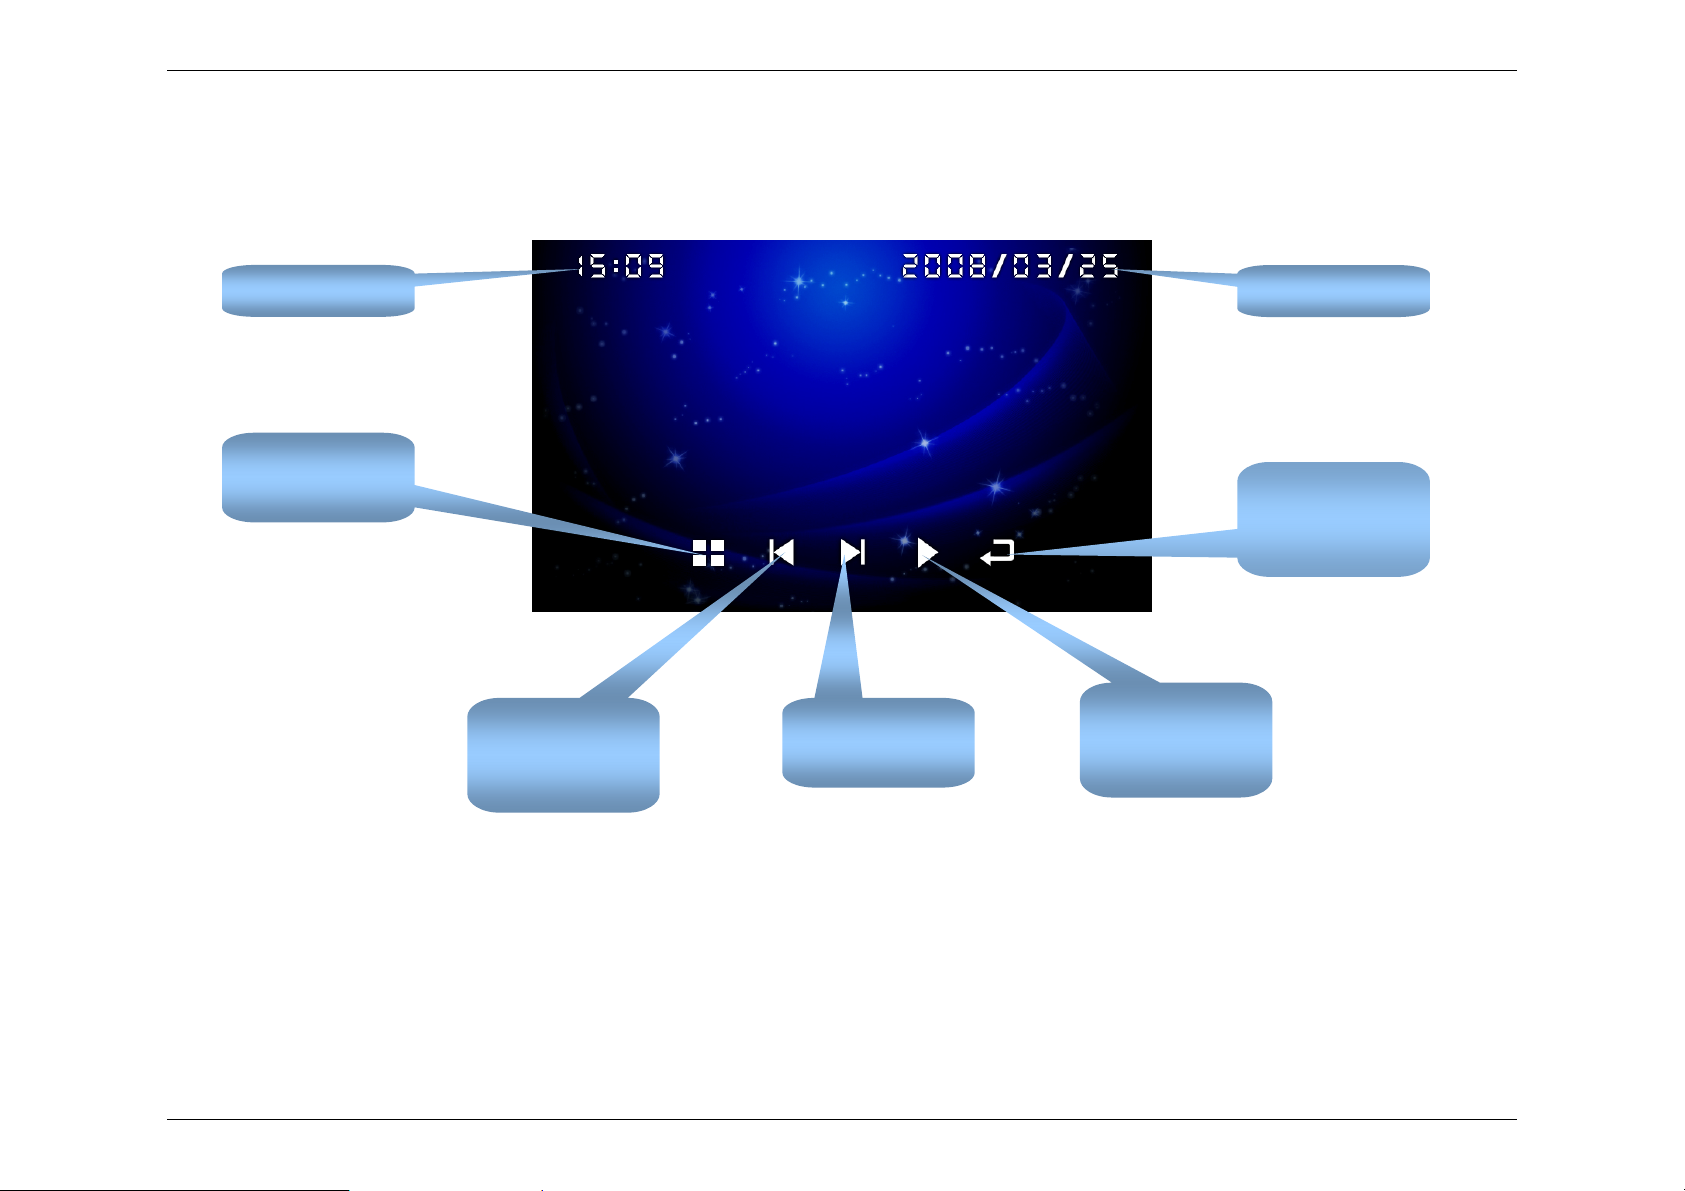
When using the slide show feature, tap the Home Screen wallpaper area to open the Slide Show Control Bar.
Clock
Menu button
Go to Main Menu.
Previous button
Go back to
previous photo.
Next button
Go to next photo.
Play button
Start slide show
playback.
Calendar
Back button
Go back to Home
Settings.
Note: When playing slide show in Home setting, user can control to move to next picture by shaking his hand in front of the sensor. Tap the screen, the
control button will appear. Motion sensor is effective either when slide show is being played or being paused (Only for IT7350).
15
Clock and Calendar
Setting up the Calendar
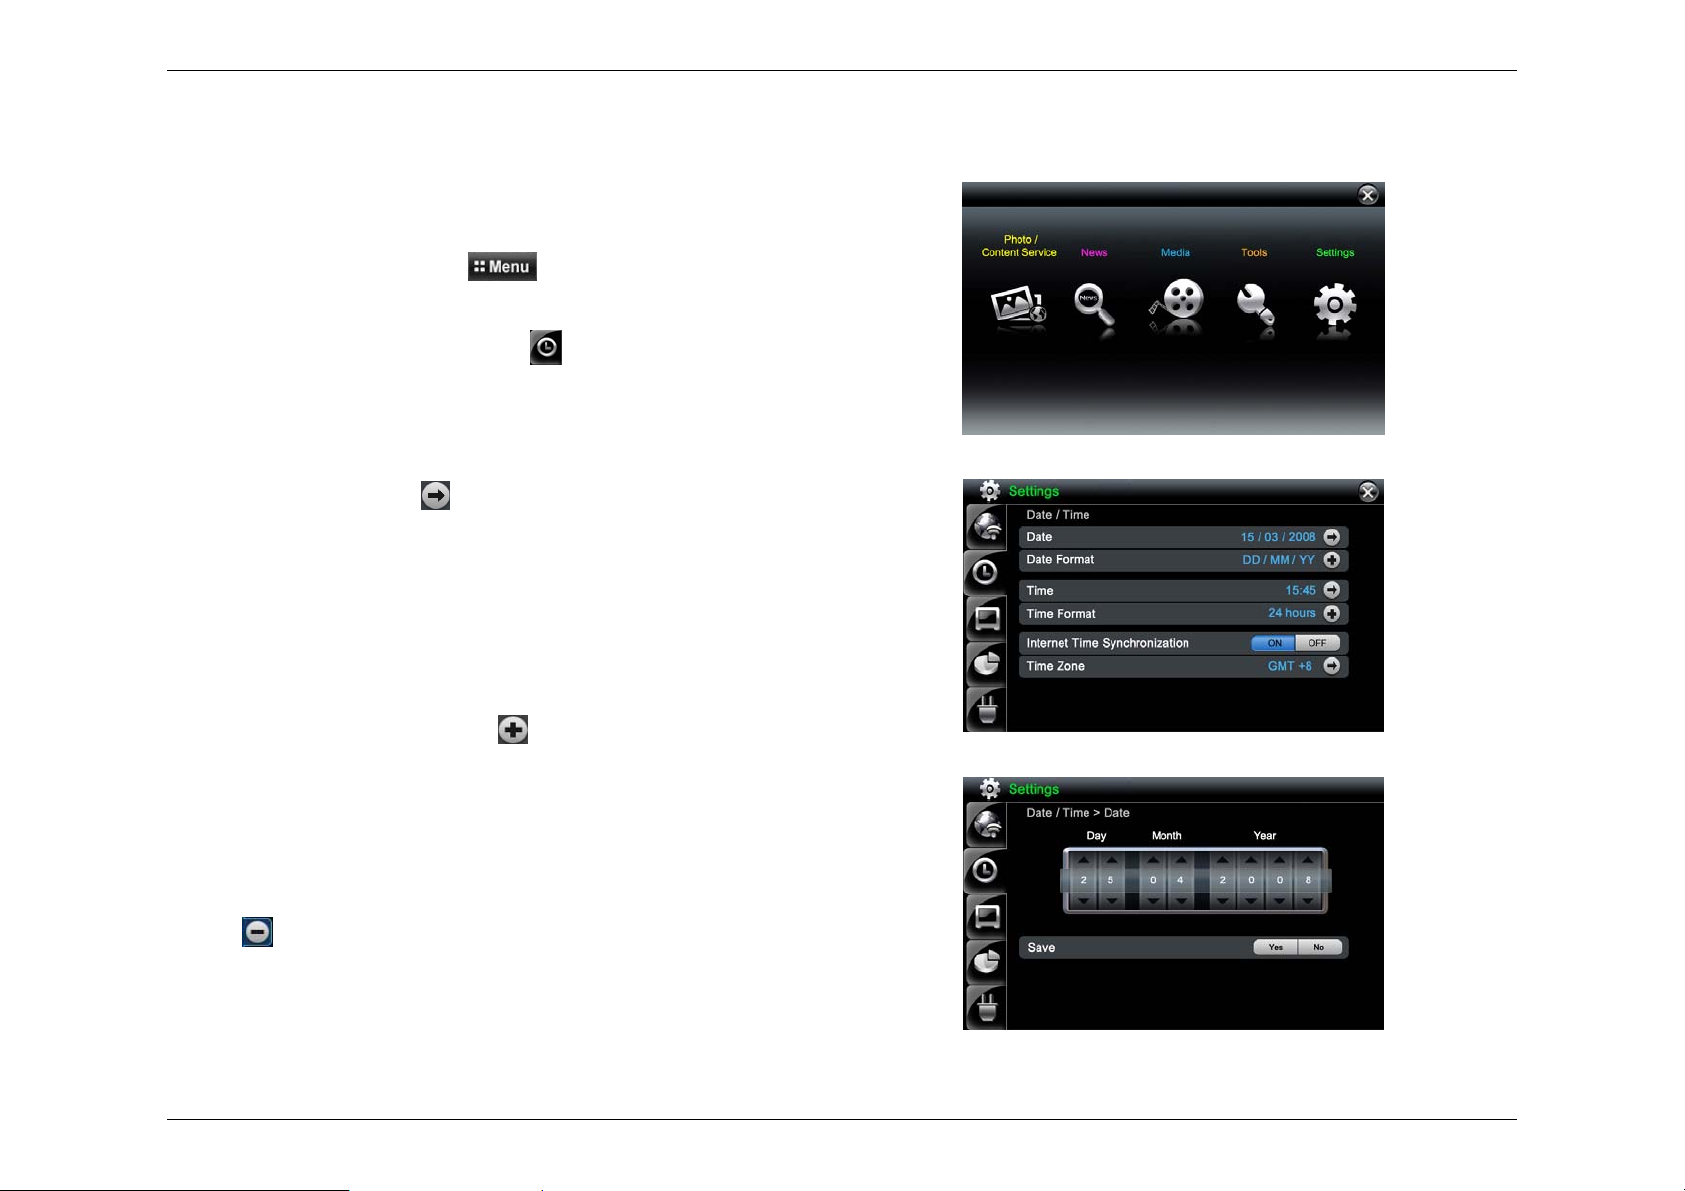
1. On the Home Screen, tap the button.
2. Next, on the Main Menu screen, tap the Settings icon.
3. Then on the Settings screen, tap the
4. The Settings > Date / Time screen will appear.
button.
Set the Date
1. On the Date line, tap the button.
2. The Date / Time > Date screen appears.
3. Tap the up and down arrows to set the day, month, an d y ear.
4. Tap Yes to save the settings or No to cancel the settings. You will be
returned back to the Settings > Date / Time screen.
Set Date Format
1. On the Date Format line, tap the button.
2. A pop-up will appear displaying the available date formats.
MM / DD / YYYY
DD / MM / YYYY
YYYY / MM / DD
3. Tap the desired format. To exit the pop-up without selecting a format tap
the
button.
Main Menu screen
Settings > Date / Time screen
4. You will be returned to the Settings > Date / Time screen.
5. The selected format will now be displayed on the Date Format line.
Date / Time > Date screen
16
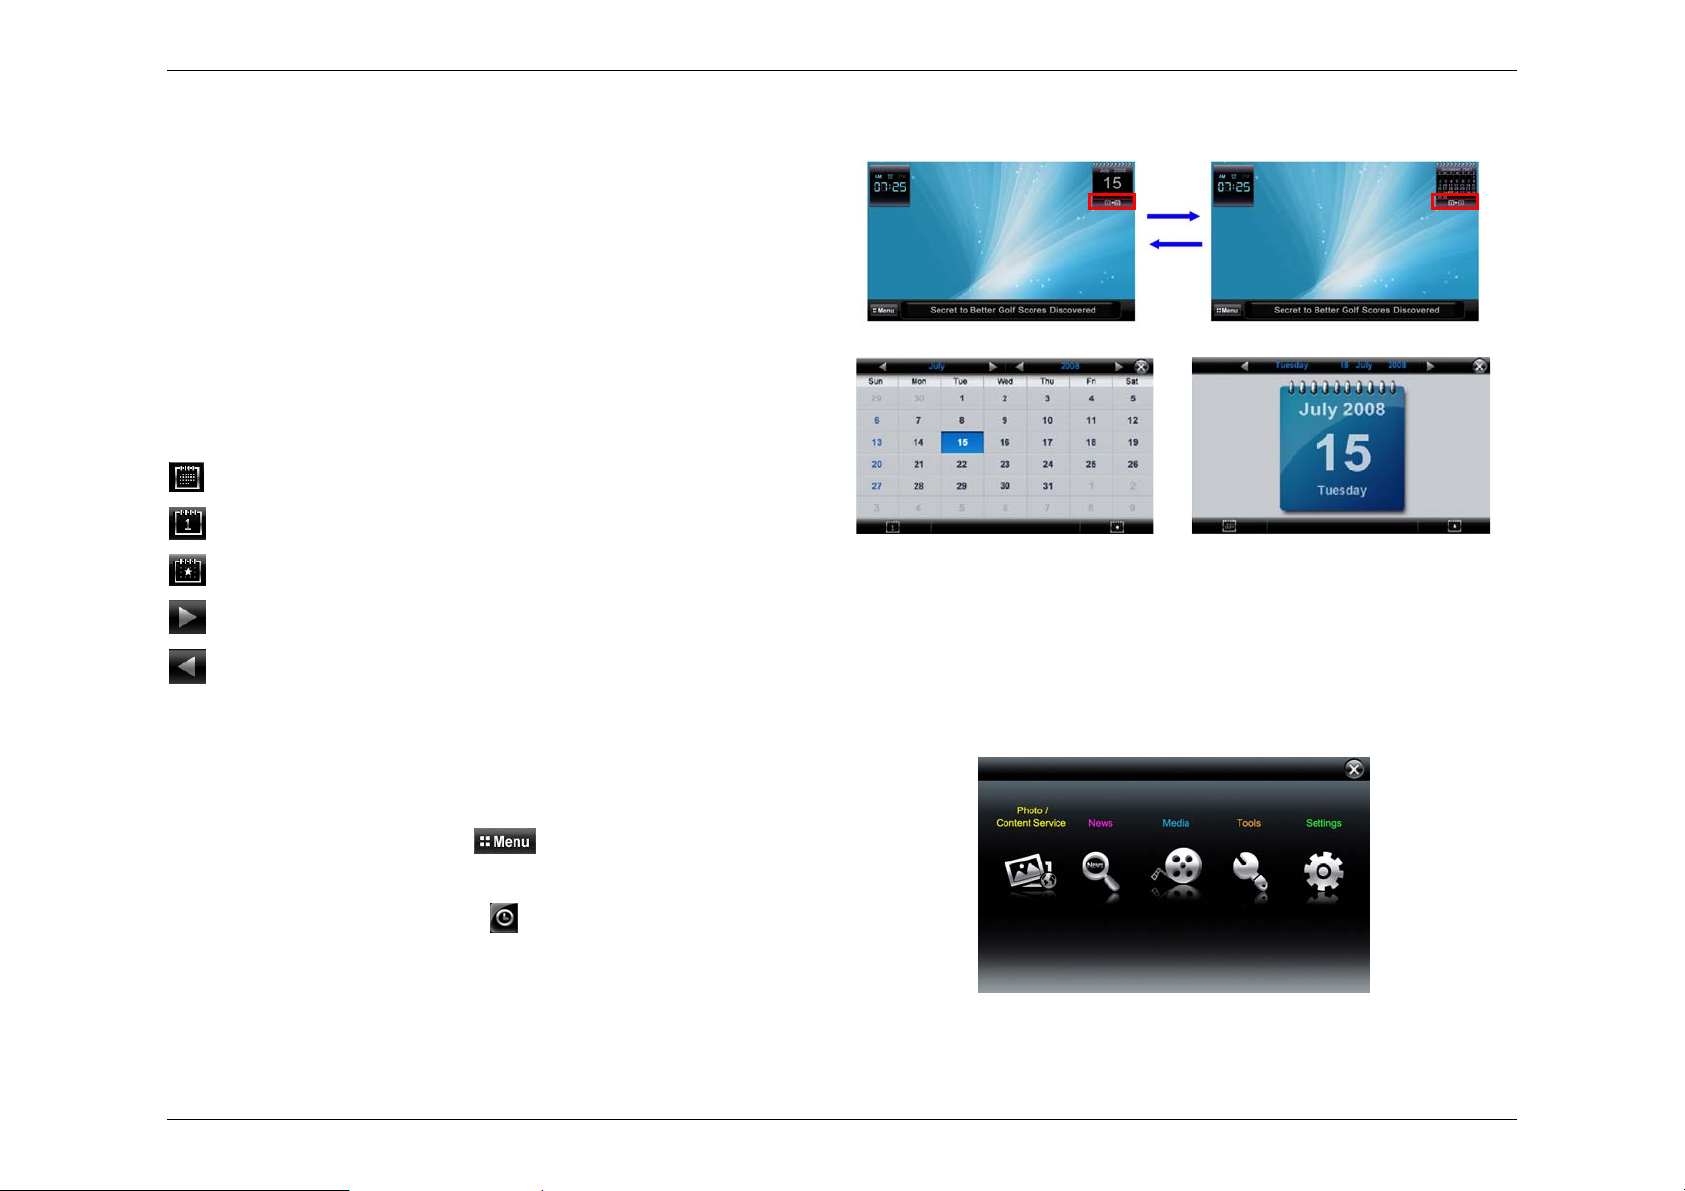
Calendar Preview
On the Home Screen, you can tap the area outlined in red to switch between
the Date Display and the Month Display.
Using the Calendar preview
1. On the Home Screen, tap the Calendar to view in full screen.
2. The calendar will be displayed in the day or month mode depending on
how it is set in the Home Screen.
3. Use the buttons listed below to change the calendar view.
Month button - change to month display
Day button - change to day display
Today button - jump to today display
Next button - Go to next day, next month or next year
Previous button - Go to previous day, previous month or previous year
Setting up the Clock
1. On the Home Screen, tap the button.
2. On the Main Menu screen, tap the Settings icon.
3. On the Settings screen, tap the
4. The Settings > Date / Time screen will appear.
button.
Calendar: Month Display
Main Menu screen
Calendar: Day Display
17
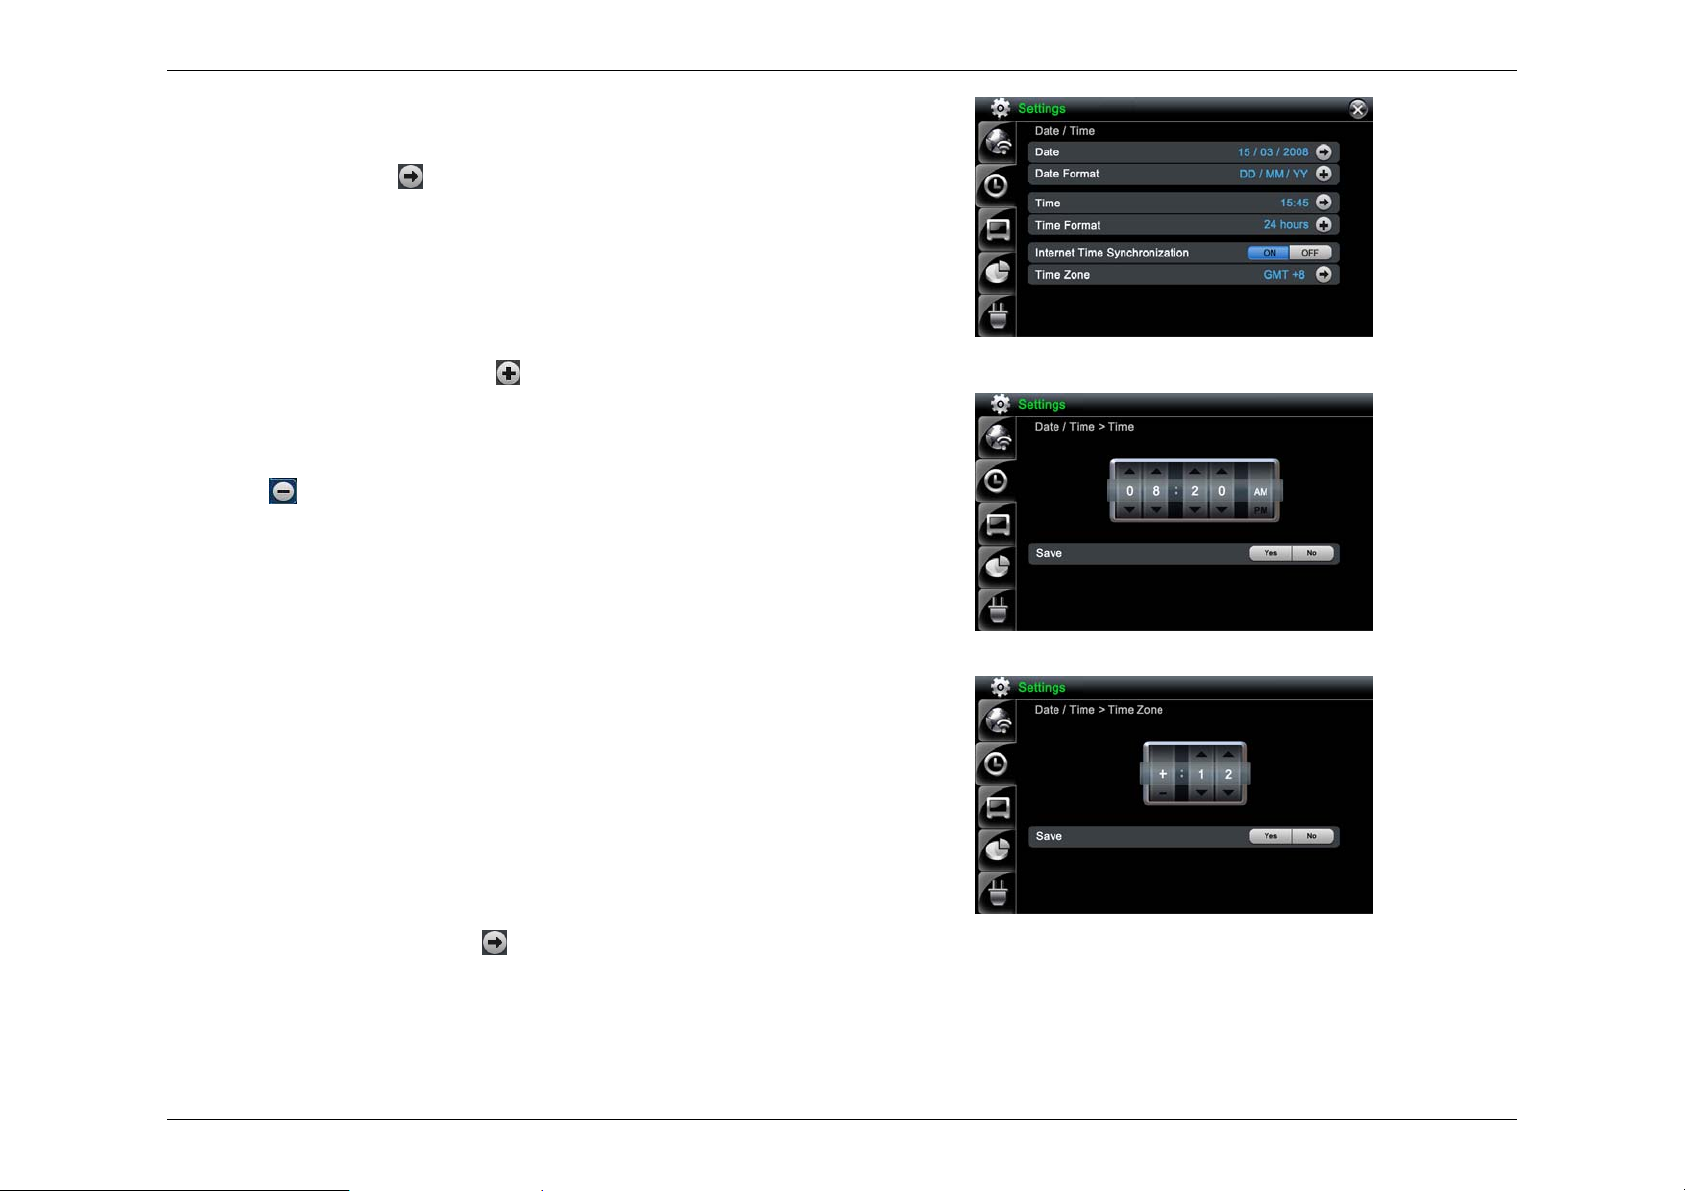
Set the Time
1. On the Time line, tap to open the Date / Time > Time screen.
2. Tap the up and down arrows to set the hour, minute, and AM / PM.
3. Tap Yes to save the settings or No to cancel the settings. You will be
returned back to the Settings > Date / Time screen.
Select Time Format
1. On the Time Format line, tap the button.
2. A pop-up will appear displaying the available time formats: 12 hours or 24
hours.
3. Tap on the desired format. To exit the pop-up without selecting a format,
tap the
4. You will be returned to the Settings > Date / Time screen.
6. The selected format will now be displayed on the Time Format line.
button.
Select Internet Time Synchronization
h If you select ON, the system time of your device would be synchronized
with network GMT time. The network GMT time is from the internet.
h If you select OFF, this function will be disabled and the Clock will use local
settings.
Select Time Zone
You only need to set the Time Zone when Internet Time Synchronization is
set to ON. Your Time Zone setting is used for adjusting the GMT time over the
internet.
1. On the Time Zone line, tap the
2. The Date / Time > Time Zone screen appears.
button.
Settings > Date / Time screen
Date / Time > Time screen
Date / Time > Time Zone screen
3. Tap on the up and down arrows to select the available selections:
GMT+00 to GMT+13 or GMT-01 to GMT-12
18
Setting up and using the Clock Alarm
To set an Alarm
You can set up to a maximum of four alarms.
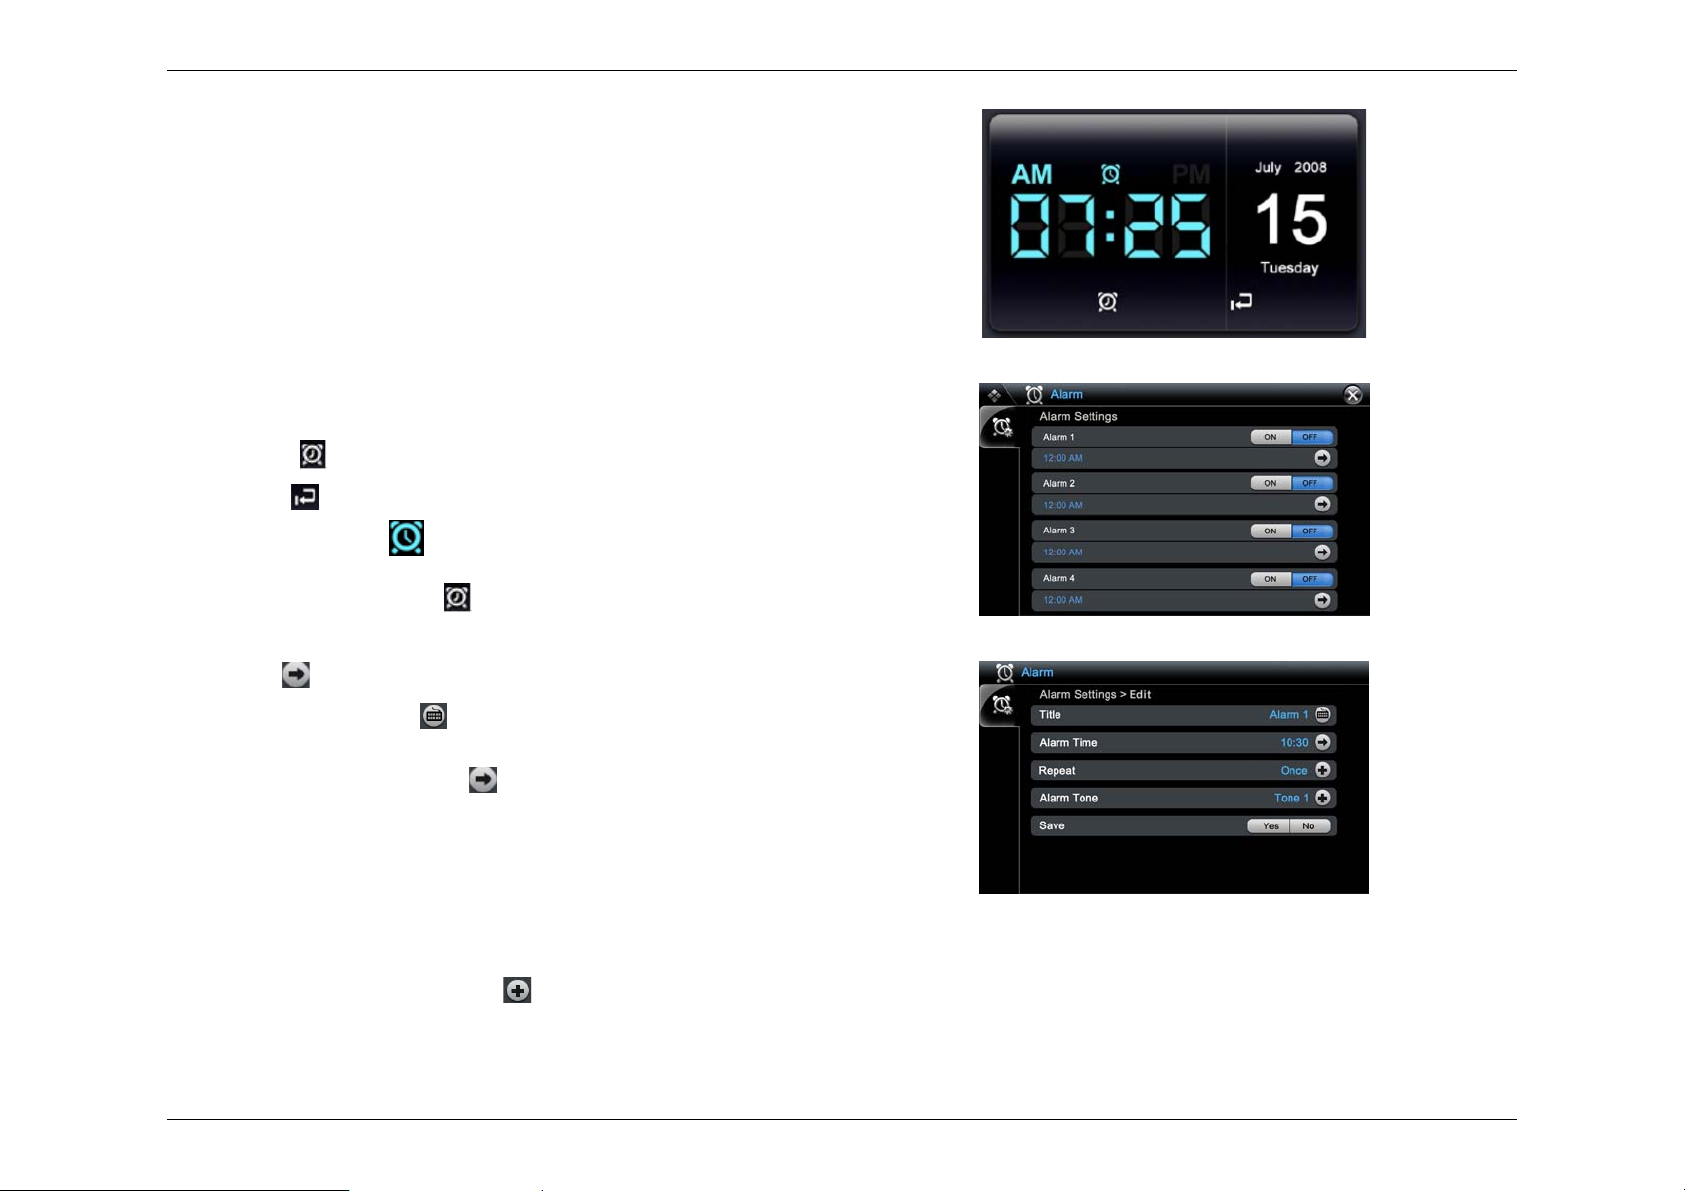
1. Open the Clock
On the Home Screen, tap the Clock to view in full screen.
On the Home Screen, tap Menu. Main Menu screen appears. Tap
Tools icon. Tools screen appears. Tap Clock icon.
2. Tap the Clock screen to bring up the Alarm and Back button icons.
Alarm icon - enter Alarm Settings.
Back icon - go back to previous page.
Note: The Alarm On/Off
3. On the Clock face, tap the
4. Tap the ON/OFF button to select turn ON/OFF the alarm.
5. Tap the
6. On the Title line tap the
title of the alarm. Tap OK when you are finished.
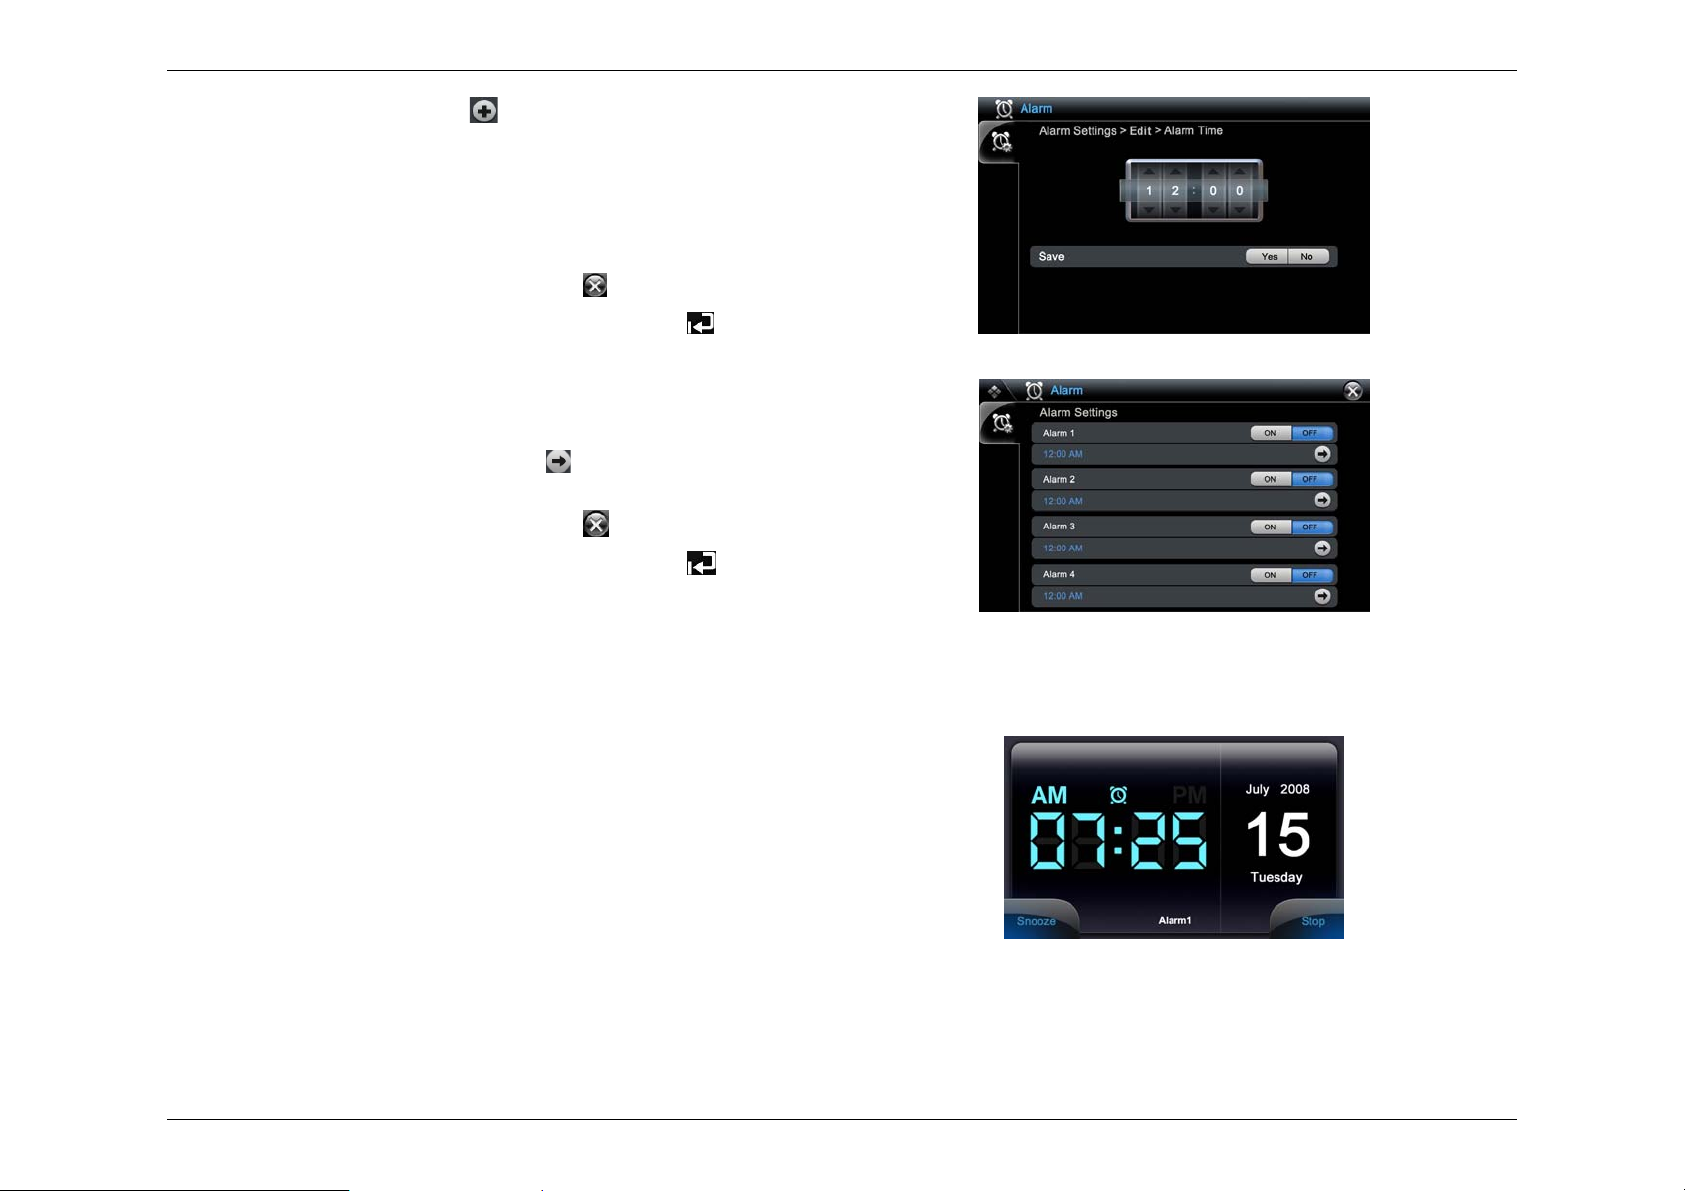
7. To set the alarm time, tap the
Alarm Settings > Edit > Alarm Time screen appears.
8. Adjust the time by tapping the up or down arrow button.
If user selects 24 hours time format in Settings > Date/Time > Time
Format, AM / PM will not be displayed.
9. Tap the Yes button to save settings or No to cancel settings. When
finished you will be returned to the Alarm Settings > Edit screen.
button to open the Alarm Settings > Edit screen.
icon is on when alarm is active.
icon to open the Alarm Settings screen.
button to open the Keyboard. Type in the
button on the Alarm Time line. The
Clock
Alarm Settings screen
Alarm Settings > Edit screen
10. To have the alarm repeat, tap the
11. A pop-up will appear. Select how you want the alarm to be repeated.
Available settings are Once / Every Day / Weekdays.
19
button on the Repeat Alarm line.
A
12. To set the alarm tone, tap the button on the Alarm Tone line.
13. A pop-up will appear. Select which tone you want from a list of 5 alarm
tones.
14. Back on the Alarm Settings >Edit screen, tap Yes to save your alarm
settings or No to cancel settings. You will then be returned to the
Settings screen.
larm
15. To exit the Alarm Settings screen, tap the
16. To exit the Clock, tap the clock’s face and then tap the
button.
button.
To change an alarm
1. Tap the ON/OFF button to select turn ON/OFF the alarm.
2. To change an alarm’s settings, tap the
want to change. Repeat the above step to change the alarm settings.
3. To exit the Alarm Settings screen, tap the
4. To exit the Clock, tap the clock’s face and then tap the
button on the alarm line you
button.
button.
Alarm Control
1. When the alarm time is reached, the selected alarm tone w ill be heard. At
the same time, the Alarm Control buttons are shown.
Snooze button – Tap this button to snooze the alarm. The alarm tone
will stop and then turn on again after 5 minutes.
Stop button – tap this button to turn the alarm off.
Alarm Settings > Edit > Alarm Time screen
Alarm Settings
2. If you don't tap any control button, it will beep the alarm tone for 5
minutes and then stop. After 5 minutes, it will beep again. The alarm will
repeat this sequence for 40 minutes. Afterwards, it will turn off
automatically.
20
Clock with Alarm Co ntrols

Frame Tools
Main Menu
1. On the Home Screen, tap the button.
2. The Main Menu screen appears. From here, you can enter the different
applications the frame has to offer.
Photo – tap to open the Photo application.
News – tap to open the RSS News Reader application.
Media – tap to open the Media Player application.
Tools – tap to go to the Tools application.
Settings – tap to open the System Settings screen.
Tools Screen
In Main Menu, tap the Tools button to open the Tools screen. It includes two
applications:
h Clock – The clock application lets you add, change, delete and control an
alarm. You can set up a maximum of 4 alarms. For more details on using
the alarm function see Setting up and using the Clock Alarm
You cannot use this application to set up the Home Screen clock's time,
format, or time zone.
h Calendar – The Calendar application allows you to use the calendar to
preview future, or past dates. For more details on using the Calendar
preview function, see Setting up the Calendar
You can not use this application to set the Home Screen calendar's date.
section.
section.
Main Menu screen
Tools screen
21

Keyboard
The Keyboard is used throughout the frame as a means to enter information
such as titles, names, etc.
It is based on the QWERTY layout used on standard keyboards. As you type
in your information, it will be displayed in the top half of the keyboard.
button – tap to accept your input.
button – tap to exit the Keyboard without saving your input.
Additional keys:
Special / Additional Characters key
Accent / Special Characters for Latin alphabets
Keyboard – Special / Additional Characters
Keyboard - Accent / Special Characters (lower case)
Keyboard
Keyboard - Accent / Special Characters (upper case)
22

On-Screen Display Bar
Use the On-Screen Display bar to easily navigate between applications without closing a running application and to have easy access to key settings like
brightness, volume control and screen lock.
Open and close the On -Screen Display (OSD) Bar
1. Open the OSD Bar by pressing the MODE button on the back of the frame. The OSD Bar will appear on the Home Screen.
2. Press Mode button again or tap the Home Screen wallpaper area to close the OSD Bar.
Note: The OSB Bar can only be accessed in some applications.
OSD Bar Description
Home button
Go back to Home Screen.
Media button
If Media Playeris hidden, user
can tap Media button to go to
the Media Player screen.
If the Media Player is not
hidden, the Media button is
disabled.
Main Menu button
Go to Main Menu screen.
Screen Lock buttons or
Lock or unlock the touch screen.
Volume buttons or
Adjust volume level.
Brightness button
Adjust the LCD brightness.
Home Screen with On-Screen Display (OSD) Bar
23

Adjust LCD Brightness using OSD Bar
1. Tap the icon once to open the LCD Brightness OSD buttons.
2. Tap the
Night icon: Adjust to this level for a darker environment.
Sun icon: Adjust to this level for a brighter environment.
3. Tap the
icon or icon to adjust the LCD brightness.
icon to close the LCD Brightness OSD.
Adjust Volume Level using OSD Bar
1. Tap the icon or icon once to open the Volume OSD buttons.
2. Tap the
3. Tap the
the
4. Tap the
icon or icon to adjust the volume level.
icon to mute the speaker. The icon will be shown. Tap
again to turn off mute.
icon or icon once again to close Volume OSD buttons.
Lock / Unlock the screen using OSD Bar
Lock or unlock the screen by tapping the respective icon on the OSD Bar:
Lock icon - locks the touch screen
OSD Bar – Brightness selected
OSD Bar – Volume Level selected
OSD Bar – Lock
Key icon – unlocks the touch screen
24

Settings
1. On the Home Screen, tap the Menu button.
2. The Main Menu screen appears. Tap on the Settings icon.
3. The Settings screen appears.
Network button – configure your wireless network
Date / Time button – configure the Home Screen clock and calendar
Display button – make screen settings
System button – make system settings
Power Management button – make power management settings
Main Menu screen
Settings screen (default view)
25

Network
Notes:
1) The frame does not sup port Hotspot login or web browser internet login.
2) Please make sure the Wi-Fi network is connected successfully before you use any network related applications, e.g. Web Photo, Internet Radio, or RSS
News Reader.
Setup Wi-Fi Network - Access Point’s DHCP settings is On and the AP SSID is not hidden
1. On the Setting screen, tap the button. The Network screen appears.
2. On the WiFi line, tap the On button to turn on WiFi.
3. Next, on the Search WiFi Network line, tap
available Access Points (AP).
All the available access points and their signal strength are listed in
Network > Search screen.
If the access point has a network key, the icon will be displayed.
4. On the SSID Name line for the network you want to connect, tap Connect.
If the access point has a network key, a screen will be prompt to remind
user to input the network key.
If you are using a Wi-Fi network other than your own, then you must consult the
Network Administrator for that network to get access (i.e. network key).
Note: If the AP Network Key Mode is W EP, a pop-up menu will appear after
tapping the Connect button. User must select the shared key or open key
and key 1.2.3.4. Tap
to confirm.
to begin searching for all
Network screen
Network Search screen
26

5. Tap button to bring up the Keyboard and type in the network key.
Step 5 will be skipped if connecting to an unsecured network.
6. Tap
7. A “Connecting…” dialog box appears.
8. After successfully connecting to the access point, you should see a green
checkmark icon next to AP SSID name.
9. Tap the
to return to Network screen.
10. Tap Clear button to disconnect curren t AP connection and clear all of the
settings in current AP, including the network key.
11. If connection fails, a pop up message, “Network Connection Failed”, will
appear. Tap OK and try connecting to the access point again.
Note: If the WiFi network can not work, please tap the Reset button. A pop up
message "Do you want to reset WiFi settings?" will appear. Tap
button to reset the WiFi settings and user must restart the frame. WiFi Reset will
clear the network key contents. Tap button to cancel the reset the WiF i
settings.
to confirm.
button to refresh the Wi-Fi AP list or tap the button
WEP Security Setting box
Network Key Input box
Wi-Fi Network Search Screen
Wi-Fi settings Reset
Network Connection Failed
27

Setup Wi-Fi Network - Access Point’s DHCP settings is ON but the AP SSID is hidden and no encryption
key is needed
Note: 1) Follow these steps ONLY if your AP SSID name is hidden. If you are using a Wi-Fi network other than your own, then you must consult the Network
Administrator for that network to get access (i.e. network key).
2) Since your AP SSID is hidden, you can’t see your AP in Wi-Fi Network Search Screen. After you input your AP details in Manual Edit Wi-Fi Network
Screen, your AP can be shown in Wi-Fi Network Search Screen.
1. On the Setting screen, tap the
appears.
2. On the WiFi line, tap the On button to turn on WiFi.
3. On the Manual Edit Wi-Fi Network line, tap
Edit screen appears.
4. Tap
and then tap OK to save.
5. On the Network Key Mode line tap the
appear. Tap on the network key mode you want. Available modes are:
No
WEP
WPA
WPA2
6. On the Authentication Type line tap the button. A pop-up list will
appear. Tap the authentication type you want. If Network Key Mode is
WPA or WPA2, the Authentication Type and Transmit Key can not be
selected.
7. On the Network Key line tap
your network key and then tap OK to save.
8. On the Save line tap Yes to save or tap No to cancel. You will be returned
to the Network screen.
to open the Keyboard screen. Type in your Wi-Fi AP SSID name
button. The Network screen
button. The Network >
button. A pop-up list will
to open the Keyboard screen. Type in
Network screen
Network Edit screen
28

9. On the Search WIFi Network line tap to open the Network Search
screen. You should see the newly entered Wi-Fi network name.
10. Tap Connect button to connect the newly added Wi-Fi network.
Manual Edit Wi-Fi Network Screen
1. On the Setting screen, tap the button. The Network screen
appears.
2. On the WiFi line, tap the On button to turn on WiFi.
3. On the Manual Edit Wi-Fi Network line, tap
Edit screen appears.
4. Tap
name and then tap OK to save.
5. On the Network Key Mode line tap the
appear. Tap on the network key mode you want.
6. On the Authentication Type line tap the
appear. Tap on the Authentication Type you want. If Network Key
Mode is WPA or WPA2, the Authentication Type an d Transmit Key
can not be selected.
7. On the Network Key line, tap
your network key and then tap OK to save.
8. On the Save line tap Yes to save or tap No to cancel. You will be
returned to the Network screen.
9. On the Search WIFi Network line, tap
screen. You should see the newly entered Wi-Fi network name.
10. Tap Connect button to connect the newly added Wi-Fi network.
If you are using a Wi-Fi network other than your own, then you must consult
the Network Administrator for that network to get access (i.e. network key).
to open the Keyboard screen. Type in your Wi-Fi AP SSID
to open the Keyboard screen. Type in
button. The Network >
button. A pop-up list will
button. A pop-up list will
to open the Network Search
Network screen
Network Edit screen
29

Advanced Settings
Notes:
1) Follow the steps of Advanced Settings ONLY if your access point’s
DHCP setting is OFF. The frame needs to use a fixed IP address to
connect to the AP.
2) If you are using a Wi-Fi network other than your own, then you must
consult the Network Administrator for that network to get access (i.e.
network key).
1. On Network screen, tap the
The Advanced Settings screen will appear.
2. On the DHCP line, select On or Off. Normally the DHCP is ON and the
frame can get the IP address assigned by the access point. If the DHCP
is OFF, the frame will use a fixed IP address to connect to the access
point.
3. If the DHCP is OFF, then you need to input the following settings:
IP Address
button on the Advanced Settings line.
Advanced Settings screen (DHCP is OFF)
Subnet Mask
Default Gateway
DNS Server
4. Tap
to open the Keyboard and type in the required settings. Tap OK
Network Settings screen
to save your entries.
5. On the Save line:
Tap Yes to save the advanced network settings and go back to the
Network screen.
Tap No to cancel without saving and go back to the Network screen.
6. On the WiFi line, tap the On button to turn on WiFi.
7. Next, on the Search WiFi Network line, tap
available Access Points (AP).
to begin searching for all
Wi-Fi Network Search screen
All the available access points and their signal strength are listed in
Network > Search screen.
30

A
If the access point has a network key, the icon will be displayed.
8. On the SSID Name line for the network you want to connect to, tap
Connect.
If the access point has a network key, the user will be prompted by a
pop-up screen to input the network key.
Note: If the AP Network Key Mode is W EP, a pop-up menu will appear after
tapping the Connect button. User must select the shared key or open
key and key 1.2.3.4. Tap
9. Tap
button to bring up the Keyboard and type in the network key.
10. Tap
to confirm.
to confirm.
11. A “Connecting…” dialog box appears.
12.
fter successfully connecting to the access point, you should see a green
checkmark icon next to AP SSID name.
13. If connection fails, a pop up message “Network Connection Failed” will
appear. Tap OK and try connecting to the access point again.
WEP Security Setting box
Network Key Input box
Wi-Fi Network Search screen
Notes:
1) If the connection is failed, the Status bar displays “Not Connected”
2) When the Status is showing “Connecting”, the device has just finished the ass oci ation w ith AP and is trying to m ake c onnec tion . Pl ease be patien t
until it shows “Connected”.
3) Tap the
button to view the network details, including IP Address, Subnet Mask, Default Gateway and DNS Server.
31

4) If you are using a Wi-Fi network other than your own then you must consult the Network Administrator for that network to get access (i.e. network key).
Date / Time
See the Clock and Calendar section for instructions on the Date / Time settings.
Display
On the Settings screen, tap button to enter the Display Screen.
Screen Calibration
You can calibrate the touch screen to have a greater sensitivity.
1. Tap the
2. There are five (5) points (+) needed to tap to calibrate the touch screen. The
first point (+) is in the middle of the screen and there is one (1) point (+) in
each corner. Follow the on screen instructions to calibrate the frame.
button to start calibrating the screen.
Brightness
1. On the Brightness line, tap the button. A pop-up list will appear. There
are eight (8) levels of brightness you can select from.
2. Tap on the brightness level you want.
You can also set the LCD brightness using the On-Screen Display Bar. See
Adjust LCD Brightness using OSD
section.
Display screen
32

Auto Playback Demo Video
1. On the Auto Playback Demo Video line, select ON or OFF.
If the user turns OFF the Auto Playback Demo Video, operation of frame
is normal.
If the user turns ON the Auto Playback Demo Video, the frame will
continuously play the demo video until the user touches the screen.
If no one touches the device for 3 minutes, even during slide show, music
or video playback the device will automatically return to playing the demo
video repeatedly.
Note: When the demo video plays, all functions of the frame are disabled. For
example: Alarm, Sleep mode, Auto check firmware upgrade…won’t work.
2. When the demo video is played, tap the screen. The video w ill be paused and
will display two icons.
3. Tap the Play icon to resume demo video playback. Tap the Back icon return
to Home screen.
Note: If the user deletes the” Intouch Video Demo “in the media application, the
function of “Auto Playback Demo Video” will be disabled.
The application recognizes the” Intouch Video Demo “by file name. So if
the user deleted the preset” Intouch Video Demo “,and then added a new
video named” Intouch Video Demo “into the media application, this video
will also be automatically played repeatedly.
Demo Video Screen
33

System Settings
On the Settings screen, tap the button to enter System screen.
Language
1. On the Language line, tap the button to open the language pop-up.
2. Next, tap on the desired language. Available languages are:
English
French
Spanish
German
Italian
Dutch
Portuguese
To exit the pop-up without selecting a language, tap the
3. You will be returned to the System screen and the selected language will
now be displayed on the Language line.
button.
Firmware Upgrade
Manual Firmware Upgrade
1. On the System screen, tap the button on the Firmware Upgrade
line to start checking for an upgrade.
System screen
You must be connected to the internet to check for a firmware upgrade.
2. If your current firmware version is the most current available, then you d o not
have to do anything.
34
Check for firmware upgrade dialog box

3. If there is a newer firmware version available, the dialog box appears asking
"Do you want to upgrade now?"
Tap to download the new firmware and the frame will start
downloading the new firmware.
Tap to cancel the download. You will be returned to the System
screen.
4. After downloading the firmware successfully, you will be required to restart
the frame. A dialog box will appear asking "New firmware downloaded
successfully! Do you want to restart to install new firmware?".
Tap to restart now.
Tap to restart later.
5. The new firmware will be automatically installed next time the frame is turned
on. Please wait while the firmware installs.
Warning: When the new firmware is installing, user can’t shut off the frame.
6. Tap OK to return to Home Screen after the upgrade process.
Note: In the process of upgrading, if the frame memory is not enough for
downloading the new firmware, a dialog box "No disk space!" will appear.
Firmware Found acceptance dialog box
Firmware Upgrade acceptance dialog box
Auto Firmware Upgrade
The device automatically checks for firmware updates when connected to the
internet. If new firmware has been found, then please follow the on-screen
instructions to complete the upgrade.
35
Firmware Upgrade acceptance dialog box

Factory Reset
1. On the Setting screen, tap the button.
2. A pop-up dialog box will appear asking "Do you want to reset factory
settings?"
3. Tap
to reset the factory settings or to cancel the reset. You
will then be returned to the System screen.
Note: Please do not Power Off during factory resetting!
Show Details
You can review system details using the System > Show Details screen. Details
that can be displayed are:
h Software Version – displays the software version installed
h MAC Address (Wireless) – displays the M AC address of the wireless
network
h End User License Agreement – tap the button to open the EULA.
Tap the
Frame Memory
button to exit the EULA.
System screen
Used – displays amount of used memory
Unused – displays amount of unused memory
Total – total amount of frame memory
System > Show Details screen
36

Tap the button to return to the System screen.
Motion Sensor (Model IT7350 only)
You can turn the Motion Sensor on or off using the buttons on the Motion Sensor
line.
If user selects [ON]
In Home Slideshow and Photo Slide show:
When playing slide show in Home screen and Photo Application, user can switch
to next picture by shaking his hand in front of the sensor, and the r e will be a “tick”
sound if the motion is recognized successfully.
If user taps the screen, slide show will be paused and control bar will appear. U ser
can also switch to next picture by shaking his hand in front of the sensor, and there
will be a “tick” sound if the motion is recognized successfully.
Note: The sensor’s effective space is 10cm. The Motion Sensor indicator will be
on only when slide show is started.
If user selects [OFF].
Motion sensor will be turned off, and will not response to hand shaking.
Screen Taps Sound
You can turn the screen tap sound on or off using the buttons on the Screen Taps
Sound line on the Settings screen.
System screen
37

Power Management
The Power Management screen is where you can set the Sleep Mode and
Interval Time. During the sleep time, the frame will be turned off to save power.
The alarm is still active during sleep mode. To wake up the frame press the Mode
button on the frame's back panel.
Sleep Mode
1. On the Settings screen, tap the button.
2. Tap the
Off – turns Sleep Mode off
Once – activates Sleep Mode once
Everyday - activates Sleep Mode every day
Interval Time (Sleep Interval Time)
This function is disabled when Sleep Mode is turned off.
1. On the Power Management screen, tap the
line to open the Interval Time Settings screen.
2. Use the up and down arrows to set the desired interval time.
button to select a sleep mode.
button on the Interval Time
Power Management Settings screen
Power Management > Interval Time Settings screen
38

Battery Profile
If the unit does not have a rechargeable battery, the unit will be powered by AC
adaptor.
1. On the Settings page, tap the
screen.
2. On the Power Save Mode line select either ON or OFF.
3. On the Turn Off Backlight line, tap the
screen's backlight to remain lit.
button to open the Battery Profile Settings
button to set the time limit for the
Battery Profile Settings screen
39

Photo / Content Service
The Photo Player application lets you view, add, delete, and config ure yo ur
photos. Photos can be viewed in a still picture or slide show configuration.
You can store photos internally to the frame, access them from an external
disk or flash drive, another PC on your home network, or from a photo
hosting/sharing web site.
1. To open the Photo Player application, on the Home Screen tap the
Menu button to open the Main Menu page.
2. Next, tap the Photo/Content Service icon to open the Photo /Content
Service application.
Photo Player Main Page controls
The following controls are used on the Photo Player Main screen.
closes the left sidebar
opens the left sidebar
opens the Photo Setup drop down menu
returns to the Main Menu screen
Slide bar – allows you to move up or down on the page
Main Menu screen
Photo / Content Service screen
displays internally stored photos
Photo Player Main screen (left side bar open)
40

T
displays photos stored on an external disk or flash drive
displays photos stored on another PC or server on your network
display photos stored on a photo hosting/sharing web site
Photo
1. To open the Photo Player application, on the Home Screen tap the
Menu button to open the Main Menu page.
2. Next, tap the Photo/Content Service icon to open the Photo /Content
Service screen.
3. Tap the Photo icon to enter into the photo screen
Photo Player Main screen (left sidebar closed)
Frame
The Frame is the internal memory of the device.
internal memory,
1. Tap on the photo you want to open in a full screen.
2. Tap the screen to open Slide Show Control buttons.
you can connect to PC, with the USB cable provided.
o manage your photo files in
Photo / Content Service screen
Slide Show Control Buttons
Rotate left button
Slide Show Control Buttons
41

Rotate right button
Previous button – display the previous picture
Next button - display the next picture
Wallpaper button – sets current picture as the Home Screen wallpaper
Play button – start slide show playback
Back button – go back to Photo Player Screen
Note: If user selects the Motion Sensor on when playing slide show in Photo
application, user can also control to move to next picture by shaking his
hand in front of the sensor. Tap the screen, the control button will
appear. Motion sensor is effective either when slide show is being
played or being paused (Only for IT7350).
Zoom Control Buttons
Actual size button – display actual s ize of the picture
Zoom in button
Zoom out button
moves up, down, left, right on the picture
42
Zoom Control Buttons

Disk
1. On the Photo Main screen tap on Disk to display all external memory
cards or USB devices currently connected to the frame.
2. Double tap on the external device to display the photos or the photo files.
Home Network
Photo screen
Adding Photos to the Library
Notes:
The following procedure can be used for wireless networks.
1) For wireless connection, access to shared folders on the PC when
connected via the Wi-Fi network.
2) The procedure assumes you are using the Microsoft Windows
firewall. If you are using a differen t firewall applic ation, please refer to
its documentation for setup. For additional information please go to:
http://www.microsoft.com/windows/windowsmedia/player/faq/sharing
.mspx
3) Windows Media Player v11 is recommended.
1. On your PC, open the Windows Media Player.
2. Click the Library tab at the top.
Windows Media Player
43

3. In the Library drop down menu, click Add to Library.
4. In the Add To Library screen, under the Select the folders to monitor
section, select My personal folders.
5. Click Add, a pop-up dialog "Add Folder" will appear.
Windows Media Player – Library drop down menu
Add to Library dialog box
44

A
6. In the Add Folder dialog box select the folder you want to share and then
click OK to add it.
Add Folder dialog box
7. When user click s OK, the Add To Library window will clos e and the
to Library by Searching Computer dialog box is displayed.
8. Wait until it finishes and then click Close.
Tip: To ensure that the frame can handle the amount of pictures yo u have
stored on your computer in a timely matter it is recommended that you
do the following:
1. On your computer in the My Documents folder, create a new folder with
only those pictures you would like to display.
2. Open Windows Media Player and go to the Add to Library dialog box.
Click the Add button.
3. Select the folder you just created.
4. Ignore all the other folders by highlighting the monitored folder and select
the ignore button on all but the one you want to display.
45
dd
Add to Library by Searching Computer dialog box

Checking Shared Photos
1. In the Window Media Player, set the Category, which is under the
symbol at the top left to Pictures.
2. Under Library, select All Pictures, Keywords, Date Taken, Rating,
Folder settings.
3. Check whether the added photos exist in the library.
Windows Media Player – Category drop down menu
Windows Media Player – Library drop down list
46

Sharing Settings for Accepting Connections from Your Frame
1. In the Library tab click on Media Sharing.
2. If your network is a Private network, then the Available Device list and
the Settings button will be displayed in the Library Sharing window.
3. In the Available Device list, select WiFi DPF.
4. Click the Allow button.
Media Sharing dialog box
Media Sharing dialog box
47

5. In the Library Sharing window, click on the Settings button. The
Library Sharing-Default Settings window appears.
6. In the Library Sharing-Default Settings window:
for Media Type select Pictures.
for Star Ratings select both All ratings and Only.
for Parental ratings select All ratings or a required rating under the
Default Settings section.
7. To add a device or computer to connect automatically to the library, check
the Allow new devices and computers automatically (not
recommended) checkbox.
View for Sharing the Photos on your frame
Media Sharing – Default Settings
1. Tap the Home Network button. You will see the PCs conne c ted to your
home network.
2. Double tap the PC icon you want. You can view the photos in this PC just
like in Frame and Disk.
Photo screen – Home Network
48

Web
1. On the Photo screen, tap the Web button.
2. Next, tap the Web icon you want. You can now view photos in it.
3. Supported web album account sites are:
Picasa
Windows Live Space
other sites
4. For the other web album accounts, the device may not display perfectly.
Photo Setup
Slide Show
You can show a slide show on the Home Screen or within the Photo
application. For detailed instructions on how to setup the slide show please
refer to For a slide show as the wallpaper
Slide Show Settings
1. On the Photo screen, tap the button. The Setup drop down menu
appears.
2. Tap Setup. The Slide Show screen appears.
3. On the Display Mode line, tap the
down list appears.
.
button. The Display Mode drop
Photo screen – Web
Photo screen
4. Select which display mode you want. Available modes are Original,
49

Auto fit, Fit to width and Fit to screen.
5. On the Transition Type line, tap the
drop down list appears.
6. Select which transition type you want. Available types are: Dissolve,
Slide, Blind, Wipe, Random and None
7. On the Photo Interval line, tap the
down list appears.
8. Select which interval you want. Available intervals are: 5 Seconds, 15
seconds, 30 Seconds and 1 Minute
9. On the Repeat line, tap ON to have all the photos in the current folder
play repeatedly. Tap OFF to turn off the Repeat feature.
10. On the Shuffle line, tap ON to have all the photos in the current folder
played randomly. Tap OFF to turn off the Shuffle feature.
11. On the Background Music line, tap ON to select a music file to use as
the background music for the slide show. Tap OFF to turn this feature off.
If you want to change the slide show background music (Music repeat / shuffle playback) please go to Media Setup
button. The Transition Type
button. The Photo Interval drop
Slide Show screen
to change the settings.
Setup Web Photo Account
Add Web Photo Account
1. On the Photo screen, tap the button. The Setup drop down menu
appears. Tap the Setup icon.
2. Tap Web Photo setup
3. On the Web Photo > Add an account line, tap the
drop down list appears.
50
button The Web Photo screen appears.
button. The Link
Web Photo screen

4. Tap on the sharing site you want. Current selections are Picasa,
Windows Live Space and Other.
Note: If your account is not one of the above listed, then your web photos may
not be displayed accurately. To learn how to get the web photo RSS
address from internet see Add RSS News Feed
.
5. On the Title line, tap the
desired Title and tap OK to save.
6. For both User Name (Option) and Pin (Option), on their respective line,
tap the
Pin code. Tap OK to save.
Note: For Picasa and Windows Live Space, user only needs to input
username. For Other, you need to input the whole RSS link in Link.
Note: If the User Name entered contains invalid characters, then a pop up
dialog will appear to prompt you re-enter the information.
7. The new created account will be displayed in Web photo setup screen,
like this:
8. On the Save line, tap Yes to save the web photo account settings or tap
No to cancel your settings. You will be returned to the Web Photo
screen.
button to open the Keyboard. Type in the User Name and
button to open the Keyboard. Type in your
Edit Web Photo Account
1. On the Photo account screen, tap the button in the account line that
you want to edit. The Web Photo > Add screen appears.
2. Follow the steps in Add Web Photo Account
settings.
section to change current
Delete Web Photo Account
Add Web Photo Account Screen
Invalid input pop-up
Photo account
On the Photo account screen, tap the button. A pop-up dialog box
appears asking "Do you want to delete the link?". Tap Yes to delete or
No to cancel without deleting.
51

Content Service (Windows Live FrameIt)
1. To open the Photo Player applicat ion, o n the Home Screen tap the Menu button
to open the Main Menu page.
2. Next, tap the Photo/Content Service icon to open the Photo /Content Service
screen.
3. Tap the Windows Live FrameIt icon to enter into the Windows Live FrameIt
screen.
Account
1. On the Windows Live FrameIt screen tap the Account button to display all
account folder currently registered to the frame.
2. Double tap the Account folder to display some folders about the photo category.
3. Select the category folder you want to display and tap the folder. The frame will
automatically slide show.
Setup Windows Live FrameIt Account
1. Tap the button a drop down menu will appear.
2. Tap Setup to open the Add an account screen.
Photo / Content Service screen
Windows Live FrameIt screen
3. Tap the button on Add an account line.
52
Add an account screen

4. On the Account Name line tap
to open the Keyboard screen. Type in your
account name and then tap OK to save.
5. Tap the Register button.
6. After Tap the Register button, server will send a token to t he frame . If th e C l aim
Token invalid, tap the Start Over Button can request a fresh claim token. After
finish website sign in or sign up, tap the Continue button to continue.
7. Server will send a Device ID after user taps Continue button. If fail to get the
Device ID, the frame will appear a pop up screen “Failed to get Device ID, please
Start over again.” If succeed to get the Device ID, tap Yes to finish the account
settings or tap No to cancel your settings. You will be returned to the Add an
account screen.
Add the FrameIt account screen
Add the FrameIt account screen
Add the FrameIt account screen
53

8. After a new account is added, user can see the added account in Add an account
screen.
Edit the FrameIt Account
On the Add an account screen, tap the button in the Account Name line that
you want to edit the Account Name.
Delete the FrameIt Account
On the Add an account screen, tap the button. A pop-up dialog box appears
asking " Do you want to delete the link?". Tap Yes to delete or No to cancel
without deleting.
Add an account screen
Content Service (Framechannel )
1. To open the Photo Player application, on the Home Screen tap the Menu button
to open the Main Menu page.
2. Next, tap the Photo/Content Service icon to open the Photo /Content Service
screen.
3. Tap the Windows Live FrameIt icon to enter into the Windows L ive FrameIt
screen
Photo / Content Service screen
54

Account
1. On the Framechannel screen tap the Account button to display all account
folder currently registered t o the frame.
2. Double tap the Account folder to display the folder about the photo category.
3. Select the category folder you want to display and tap the folder. The frame will
display the photo thumbnail.
Note: If user taps the folder of Play All, the frame will automatically slide show.
Framechannel screen
Setup Framechannel Account
On the Photo screen, tap the
the Setup icon.
1. Tap Setup to open the Add an account screen.
2. On the Add an account line, tap the button.
3. On the Title line, tap the
Title and tap OK to save.
4. For both User Name and Pin, on their respective line, tap the
the Keyboard. Type in the User Name and Pin code. Tap OK to save.
button. The Setup drop down menu appears. Tap
button to open the Keyboard. Type in your desired
Framechannel account screen
Add the Framechannel account
button to open
55

Note: If the User Name entered contains invalid characters, then a pop up dialog will
appear to prompt you re-enter the information.
5. On the Save line, tap Yes to save the account settings or tap No to cancel your
settings. You will be returned to the Add an account screen.
6. The new created account will be displayed in Add an account screen, like this:
Edit the Framechannel Account
1. On the Add an account screen, tap the button in the account line that you
want to edi t.
Delete the Framechannel Account
1. On the Add an account screen, tap the button. A pop-up dialog box appears
asking " Do you want to delete the link?". Tap Yes to delete or No to cancel
without deleting.
Copy/ Delete Photos
Copy One
Add an account screen
1. In the left side of the Photo screen, tap the location where the photo is that you
want to copy.
2. Select the photo you want to copy. Tap the
appear.
3. Tap Copy One to copy the selected photo. A dialog box will appear asking you to
“Choose a device for file copy”.
4. Tap your destination memory.
5. Tap Yes to confirm the copy or No to cancel.
56
button, a drop down menu will
Choose a device for file copy dialog box – Copy One

Copy All
1. In the left side of the Photo screen, tap the location where the photos are that you
want to copy.
2. Select any photo. Tap the
3. Tap Copy All to copy the selected photos. A dialog box will appear asking you to
“Choose a device for file copy”.
4. Tap your destination memory.
5. Tap Yes to confirm the copy or No to cancel.
button, a drop down menu will appear.
Delete One
1. In the left side of the Photo screen, tap the location where the photo is that you
want to delete.
2. Select the photo you want to delete. Tap the
appear.
3. Tap Delete One to delete your selected photo.
4. Tap Yes to confirm the deletion or No to cancel.
button, a drop down menu will
Delete All
1. In the left side of the Photo screen, tap the location where the photos are that you
want to delete.
Choose a device for file copy dialog box – Copy All
Do you want to delete this file? dialog box
2. Select any photo. Tap the
3. Tap Delete All to delete all the photo files in the selected directory.
4. Tap Yes to confirm the deletion or No to cancel.
5. In Home Network and Web, Delete One and Delete All buttons are disabled.
57
button, a drop down menu will appear.

RSS News Reader (RSS2.0)
Notes:
1. To ensure you can view RSS news normally, the feed you added should comply with the standard RSS 2.0 protocol. You can search a feed link on the
internet with your PC, and then add it to your RSS News Reader.
2. ATOM and KML format cannot be supported
RSS News Feed screen
1. On the Main Menu screen, tap the News icon. The RSS News Feed
screen appears.
By tapping different categories, the RSS News Feed is sorted in each
category. You can add a RSS feed to a specific category. See the News
Setup section.
RSS News Feed Control Buttons / Icons
All button – shows all RSS News feeds.
Local / World / Business / Science / Entertainment / Sports /
Society / Other buttons – these are the RSS News categories
provided with the frame.
More button – shows additional categories that are not displayed in
the current page.
News Feed
RSS News Feed screen
RSS Feed icon - represents one news feed. The News Feed
name is shown next to News Feed icon.
2. Double tap the News Feed name to open a News feed. The RSS News
List screen appears.
58
News
Categories

News Feed List screen
The RSS News List screen displays the news headlines of one feed. It
includes News Type icon, News Headlines, Date and Time of the news.
News Type icon > Text icon - the RSS News is text based with
photo or without photo.
The unread news is in white color. The read news is in grey color. If
it’s today news, it displays “Today” in date display. The time is from
the RSS News Feed, it represents the posted time of the news.
Double tap the news headline to read the details of the news in RSS News
Reader.
RSS News List screen
59

RSS News Reader
The RSS News Reader displays the news text content and the media files of
news.
RSS News Reader Control Buttons / Icons
Previous button – review previous news
Next button – review next news
News List button – return to RSS News List screen
News Text Content
Red Circle Area /Grey Arrow – This is an enlarge button that closes the
News Media Player area, which then enlarges the News Text Content to full
screen.
Up arrow button – page up the news content
Down arrow button – page down the news content
News Media Player
News Type icons – Supports news photo only.
Play button – plays the media file of ne ws
Mute button – turns on / off mute
Volume level buttons – adjusts volume
Note: The device is only capable of showing photos with the news article.
Video and Audio are not functional.
News Text
Content
RSS News Reader
Grey Arrow
News Media
Player
60

RSS News Reader > News Text Content
1. In RSS News Reader screen, tap the red circle area to close the News
Media Player area and display the N ews Text Content area full screen.
2. Tap the red circle area again to close the full screen News Text Content
area and open the News Media Player area.
3. Tap the News List
button to go back to the RSS News List screen.
News Text Content – full screen
Grey Arrow
Refresh / Delete News
Note: If your RSS news can’t be refreshed successfully, it might be because the RSS feed is not in RSS 2.0 standard, or your RSS feed might be
experiencing technical difficulties.
Refresh RSS News Feed s creen
1. On the RSS News List screen, tap the button to open the Setup drop
down menu.
2. Tap Refresh to refresh all of the RSS news feeds.
RSS News Feed screen
61

Delete One RSS News Headline
1. On the RSS News List screen, tap on the headline that you want to
delete.
2. Tap the
3. Tap on Delete One to remove the selected news headline.
button to open the drop down menu.
Delete All RSS News Headlines
1. On the RSS News List screen, tap the button to open the drop down
menu.
2. Tap on Delete All to remove all news headlines of the one feed.
Delete All RSS News Read Headlines
1. On the RSS News List screen, tap the button to open the drop down
menu.
2. Tap on Delete All Read (in grey color) to remove all read news.
Delete One in RSS News Reader Screen
1. On the RSS News Reader screen, tap the button to open drop down
menu.
RSS News List Screen – drop down menu
2. Tap Delete One to delete the news current in the RSS News Reader.
Note: Refresh / Delete All / Delete All Read is not supported in the RSS
News Reader Screen.
62

News Setup
Set General Settings
1. In the RSS News Reader screen, tap the button to open the drop
down menu.
2. Tap on Setup. The News > General screen appears.
Auto Download Media File
You can select to turn on or off the automatic download media files feature
when reading the news.
Keeps News For
You can choose how many days you want to keep the news history.
News > General Screen
Tap the
can select from one (1) to seven (7) days.
button on the Keep News For line to open the drop down list. You
Update Interval
You can choose how often you want the news to be updated.
Tap the
following:
Manually
5 minutes
10 minutes
30 minutes
1 Hour
12 Hours
24 Hours
63
button to open the drop down list. You can select from the

Add / Edit RSS News Feeds (Support RSS2.0 Format only)
Get RSS News Feed Address from Internet
Note: The Yahoo News website will be used for demonstrating how to add a
RSS News Feed.
1. On your PC, connect to http://www.yahoo.com/
2. Click on News.
3. Scroll down to News Services (usually located near the bottom of the
page).
4. Click on
5. The Yahoo News - RSS page will appear. All Yahoo news feeds will be
listed.
6. Click on the
.
icon next to the news category you want.
.
64

7. The selected RSS news feed page (or XML page) appears.
8. Copy the RSS address displayed in the Internet Explorer Address box.
This is the RSS link you need to enter on the frame. Make sure this is
RSS2.0 format.
Add a new RSS News Feed
1. On the RSS News > General screen, tap the button. The News >
Feeds screen will appear.
2. On the Add a News Feed (Support RSS2.0 format) line tap the
button. The Feeds > Add New screen appears.
Note: You can add up to 256 news feeds.
3. On the Link line, tap the
news feed address link. Tap OK to save. The RSS news feed address
will now appear in the Link line.
4. On the Title line, tap the
for the RSS news feed. Tap OK to save. The RSS news feed title will
now appear in the Title line.
5. On the Category line, tap the
containing the categories you can select from. They are: Local, World,
Business, Science, Entertainment, Sports, Society and Other.
6. Tap which category you want the RSS news feed to be located. The
selected category will now appear in the Category line.
7. When you are finished entering the information, tap the Yes button to
save or the No button to exit without saving.
button to open the Keyboard. Enter the RSS
button to open the Keyboard. Enter a title
button. A drop down list will appear
News > Feeds screen
Feeds > Add New screen
65

8. The newly created RSS news feed will now be displayed in News >
Feeds screen. It will be the last entry on the screen.
Edit a RSS News Feed
1. On the RSS News > General screen, tap the button. The News >
Feeds screen will appear.
2. On the news feeds line that you want to edit tap the
Feeds > Edit screen appears.
3. On the Link line, tap the
changes to the RSS news feed address link. Tap OK to save. The
updated RSS news feed address will now appear in the Link line.
4. On the Title line, tap the
changes to the RSS news feed title. Tap OK to save. The updated RSS
news feed title will now appear in the Title line.
5. On the Category line, tap the
containing the categories you can select from. They are: Local, World,
Business, Science, Entertainment, Sports, Society and Other.
6. Tap which category you want the RSS news feed to be located. The
selected category will now appear in the Category line.
66
button to open the Keyboard. Make your
button to open the Keyboard. Make your
button. A drop down list will appear
button. The
News > Feeds screen
News Feed items

7. When you are finished entering the information tap the Yes button to save
or the No button to exit without saving.
Delete a RSS News Feed
1. On the RSS News > General screen, tap the button. The News >
Feeds screen will appear.
2. On the news feeds line that you want to delete tap the
3. A pop-up dialog box will appear asking “Do you want to delete this
link?”.
4. Tap Yes to delete the link or No to exit without deleting. If you selected
Yes, then the link will be removed from the News > Feeds list.
button.
67

Media Player
You can enjoy music and internet radio while using other applications.
The Media Player consists of three (3) features:
Music – plays audio files
Video – plays video files
Internet Radio – plays internet radio stations
You can play audio and video files that are stored on the frame, from external disks,
or your home network.
1. To access the Media Player, from the Main Menu, tap the Media icon.
2. To hide the Media Player tap the
Playback Control Buttons
Search button – only the internet radio stations supplied by vTuner can be
searched
Now Playing button – switches from Play List screen to Now Playing screen
List button – switches from Now Playing screen to the Play List screen
Previous button – goes to previous media file or previous station
Next button – goes to next media file or next station
Play button – plays media file or internet radio station
Pause button – pauses the playback
Speaker button – tap once to mute
Silence button – tap once to cancel mute
Increase volume button – increases volume level
button on the Media screen.
Media Player
Playback Control Bar
Decrease volume button – decreases volume level
68

Music / Video
Frame
Frame is the internal memory of the device. You can connect to a PC with the
provided mini-USB cable to manage your audio and video files. Once you
have successfully connected to your PC, you should see a new Removable
Disk under My Computer in your PC.
Disk
After you insert an external memory card or USB device into the frame, tap the
Disk button to display the external memory disk.
Home Network
For more detailed information on PC control, please see Home Netw ork
section.
To access and play music or videos:
1. On the Media screen:
Tap Music to open the Music screen.
Audio Now Playing screen
Tap Video to open the Video Screen.
2. Tap once on the file / disk / folder you want to open
3. Double tap again to open a disk / folder or start playback media file.
4. The Now Playing screen for the selected music or video file will appear.
Notes:
1) When video file is playing, simply tap the video playback area once to scale to full screen. Tap anywhere again to exit full screen mode.
2) In order to provide the best video performance, the suggested video resolution is 320x240 or below and frame rate is 25fps or below.
69

A
Internet Radio and Web TV
Stations, Podcast or Web TV
1. On the Media Player screen, tap the WebTV / i. Radio tab. The WebTV
/ i.Radio screen appears.
2. Tap the Stations, Podcast or Web TV button to display a list of all
internet categories. This list is from the internet radio Server.
Note: Use the Scroll bar to move up or down to see additional listings.
1. Double tap on the category you want. It may take additional screens to
get to the actual program that you want to play. Make your selection
(double tap) on each screen until you get to the program to play.
2. Double tap on the station to begin play.
3. If the content does not load immediately, then a Loading prompt will
appear. Wait for the Loading prompt to close.
4. When you are connected to a station, the Now Playing Screen will be
displayed. You can monitor the connecting status message or buffering
status message on this screen.
5. If the program does not start playing it may be because the link is not
valid, the player might not support this format, or the network is busy at
the moment. Please select another program or try again later.
WebTV / i.Radio screen
More
1. Tap the More button to show a list of your added stations.
2. Double tap a station to begin play.
Note: To add additional stations to the More category please refer to the
a Station section.
70
dd
Now Playing screen

Add to Favorites
1. Select a station, procast or Web TV. Tap the button and a drop down
menu will appear.
2. Tap the Add to My Favorite button to add the current radio station. This
radio station can now be found in My Favori te Stations.
Media Setup
Setup Media Playback
1. In Media screen, tap the button. A drop down menu will appear.
2. Tap Setup to open the Music/Video Setting screen.
Repeat Mode
1. On the Music/Video Setting screen, tap the button. A pop-up menu
will appear.
2. Select the repeat mode for media playback. Selection are:
None
Repeat One – repeats current music/video file repeatedly.
Repeat All – repeats all songs/video in the current play list.
Shuffle
Music / Video Setting screen
1. On the Music/Video Setting screen, on the Shuffle line:
2. Tap ON to play the media files randomly.
3. Tap OFF to play the media files in sequence. The playback sequen ce is
sorted by file name.
71

Add a Station
Note: You can add up to a maximum of 256 stations.
1. In Media Setup, tap the
2. On the Add a Station line, tap the
button to open My Added Station screen.
button. The My Added Station >
Add screen appears.
3. On the My Added Station > Add screen, tap the
button to open the
Keyboard. Using the Keyboard you can input the following internet
radio station information:
Title
Link
Country
Genre
Language
4. Enter in the information you want then tap OK when you are finished.
5. To save the internet radio and it's information, on the Save line:
Tap Yes to save the newly added internet radio stations.
Tap No to exit without saving.
6. The newly added internet radio station(s) will be listed in My Added
Station screen.
My Added Stations screen
My Added Stations > Add screen
72

Edit an added Internet Radio Station
1. To edit an internet radio station, on the My Added Station screen tap the
button on the radio station name line. The My Added Station >
Add screen appears.
2. On the My Added Station > Add screen, tap the
Keyboard. Using the Keyboard you can change the following internet
radio station information:
Title
Link
Country
Genre
Language
3. Enter in the information you want, then tap OK when you are finished.
4. The updated information will be displayed in the My Added Station
screen.
button to open the
Delete an added Internet Radio Station
On the My Added Station screen, tap the button on the radio link line.
The radio station will be deleted from the My Added Station screen list of
stations.
My Added Station screen
73

Copy / Delete Media Files
Copy One
1. In the left side of the Media screen, tap the location where the media file
is that you want to copy.
2. Select a media file you want to copy. Tap the
menu will appear.
3. Tap Copy One to copy the selected media file. A dialog box will appear
asking you to “Choose a device for file copy”.
4. Tap your destination memory.
5. Tap Yes to confirm the copy or No to cancel.
button. A drop down
Copy All
1. In the left side of the Media screen, tap the location where the media files
are that you want to copy.
2. Select any media file. Tap the
appear.
3. Tap Copy All to copy all the media files in the current folder. A dialog box
will appear asking you to “Choose a device for file copy”.
4. Tap your destination memory.
5. Tap Yes to confirm the copy or No to cancel.
button. A drop down menu will
Copy One Media screen
Copy All Media screen
74

Delete One
1. In the left side of the Media screen, tap the location where the media file
is that you want to delete.
2. Select a media file you want to delete. Tap the
menu will appear.
3. Tap Delete One to delete your selected media file.
4. Tap Yes to confirm the deletion or No to cancel.
button. A drop down
Delete All
1. In the left side of the Media screen, tap the location where the media files
are that you want to delete.
2. Select any media file. Tap the
appear.
3. Tap Delete All to delete all the media files in the selected directory.
4. Tap Yes to confirm the deletion or No to cancel.
Note: In Home Network and Web, the Delete One and Delete All buttons are
disabled.
button. A drop down menu will
Delete One Media scree n
75

Specifications
Item Specification
Panel
Built-in memory
Network
USB
Memory
Card
Type 7’’ TFT display with touch panel
Resolution 800X480
Standard WiFi IEEE 802.11b/g, 2.4GHz, 54Mbps
Network Security Non, WEP, WPA, WPA2
Internet Protocol DHCP / Fixed IP
Channels Support 1-14 channels, subject to country regulation
Standard USB2.0 (Full Speed)
Port USB port (Host) and Mini USB port (Slave)
4 in 1 Card Slot Support SD, MMC, MS/MS Duo, XD
CF Card Slot Support CF Card
256 MB of internal memory (some is reserved for internal use)
*Suggest to use 2GB or below
*Suggest to use 2GB or below
Audio
Power
Adaptor
76
Adaptor
Manufacture Name
Model No.
Output 5.0V / 3.0A
Input AC 100 -240V ~ 50 / 60 Hz 0.8A
1W x 2 built-in stereo speakers
E-TEK Electronics Manufactory Ltd.
ZDA050300US

Item Specification
Battery
Language
Format
Photo Slide Show
Stream Photos/Music/Video from
PC
Battery model A0427-LF
Battery
Manufacturer Name
Battery Capacity 2100mAh
Battery Voltage 3.7V
Photo JPEG, BITMAP, GIF
Audio WMA
Internet Radio WMA
Video WMV, MPEG1(320x240, 25fps)
RSS News RSS2.0 standard
EVE Energy CO., LTD.
English, French, Spanish, German, Italian, Dutch and Portuguese.
Slide show with music / internet radio
Support Microsoft Windows Media Player 11
77

Troubleshooting
This section lists various problems and solutions encountered by users while using the Wireless Internet Fram e. When encoun tering a problem, first check the
list below and follow the suggested action if one matches your problem. If the problem still persists, contact or visit the nearest service center.
Symptom Suggested Actions
The Wireless Internet Frame does not
turn on.
The power turns on but the screen is
blank.
It takes some time to display an image. 1. Loading an image from an external memory disk may take several seconds depending on the file format and
In Home Network, nothing displayed in
“Home Network” of Photo Player / Media
Player.
I added a web photo account but the
photos cannot be displayed on the
Wireless Internet Frame.
Check the power c onnection between the Wireless Internet Frame and the power ad apter.
The Wireless Internet Frame may be in sleep mode. Press [Mode] button to turn on the product
photo resolution.
2. It is recommended that the maximum of one photo resolution is 12 Mega pixels. If the photo resolution is
larger than 12 Mega pixels, it takes more time to load.
1. Make sure your Wireless Internet Frame is connected to the same wireless network with your PC.
2. Make sure you have added some photos / Media files to your sharing center through Windows Media
Player11 and have allowed the Wireless Internet Frame to visit them.(see the Photo Player -> Home Network
part in the manual)
3. In Home Network, if the shared folders contain more files than the frame memory limit, it may not display the
files on frame or it will display “Too many files“. Please remove some files from shared folders.
1. Make sure your Wireless Internet Frame has been connected to a network which can access Internet.
2. Make sure the link you added is correc t.
3. Check whether the web photo link you added is RSS 2.0 format and the account is Picasa/ /Windows Live
Space.
Some photos in my web account cannot
be displayed.
The Wireless Internet Frame cannot
detect the U disk or memory card I
inserted.
78
1. It may be related to your photo format and size.
2. We suggest the photo format is JPEG.
3. We suggest the maximum web photo resolution is 800 x 480 or below. If the resolution is larger than 800 x
480, it takes more time to download.
1. Restart the Wireless Internet Frame.
2. Reinsert the U disk / memory card.

Symptom Suggested Actions
3. Make sure your memory card is SD, MMC, MS, xD or CF.
4. Make sure the U disk or memory card has been inserted into the correct slot.
It takes some time to load the news 1. Confirm the network strength you connected is strong enough.
2. Close the News application and open again.
The news feed cannot be refreshed
successfully.
The news feed I added can not be played. Make sure the feed is in RSS 2.0 format.
If the video can not play smoothly. Please make sure the video format is WMV or MPEG1 and the resolution less than or equal to 320X240, 25fps.
It may response slowly when connecting
to the internet radio.
The internet radio station may stop
playing when network connection is good.
If the internet radio connect fails. 1. It may the internet radio server is shut down temporarily
1. Confirm your WiFi network can access internet.
2. Try to refresh again by selecting “Refresh” in the drop down menu.
3. Check whether the feed can be visited normally in your computer, if not, the Wireless Internet Frame cannot
be displayed also, please contact the provider or wait for some time and try again.
1. Make sure the Wireless Internet Frame has been connected to a network which can access the internet, and
the network is in a good s tatus.
2. Make sure the internet radio format is supported.
1. Try to pause the playing and play again.
2. The digital photo frame needs some time to buffering the audio source, please be patient.
3. The buffering status is subject to station provider’s server loading and network status.
4. Some radio stations do not broadcast 24 hours per day, and some stations are not always on-line. Please try
again later.
2. Confirm your Wi-Fi network can access internet.
The internet radio I added cannot be
played.
In WiFi settings, when the user enter the
correct network Key, but the unit can not
be connected.
Notes:
79
Make sure the format of the station is WMA, if not, the station cannot be supported.
Check that your firewall is not blocking any outgoing ports. To configure the Access Port Control, you must read the
instructions supplied with the wireless access point.

1. Under the influence of electrical fast trans ient phenomenon, the product may malfunction and require user to power reset.
2. Under the influence of electrostatic phenomenon, the product may malfunction and require user to power reset.
3. Under the environment with Voltage Dips and Interruptions, the communication link of the sample may loss and require user to reset the sample.
80

81
 Loading...