

High-Def Digital Monitor
08024
User Guide
©2007 Dorel Juvenile Group. All Rights Reserved.
www.djgusa.com (800) 544-1108
www.safety1st.com
Made in CHINA. Hecho en CHINA.
Styles and colors may vary. Los estilos y los colores pueden variar.
Distributed by (distribuido por) Dorel Juvenile Group, Inc.,
2525 State St., Columbus, IN 47201-7494
Dorel Distribution Canada, 873 Hodge, St. Laurent, QC H4N 2B1
10/05/07 4358-4323A
Monitor High-Def Digital
08024
Guía del Usuario
WARNING:
PLEASE READ THE FOLLOWING WARNINGS AND ALL ASSEMBLY
INSTRUCTIONS CAREFULLY BEFORE USING THE HIGH-DEF
DIGITAL MONITOR. KEEP THESE INSTRUCTIONS FOR FUTURE
REFERENCE.
TERMS USED IN WARNINGS: The term “Receiver” corresponds
to “Parent’s Unit” and the term “Transmitter” corresponds to
“Baby’s Unit” in the rest of this instruction booklet.
• The High-Def Digital Monitor is not intended to replace
responsible and proper parental supervision.
• Check your child’s activity at regular intervals as this monitor
will not alert parents to the silent activities of a child.
• Before using your High-Def Digital Monitor:
- Read and follow all instructions carefully.
- Read and observe all warnings on the product and in this
instruction booklet.
• To prevent entanglement with the adapter cord, NEVER PLACE
THE CORD IN OR NEAR A CRIB OR PLAYPEN. DO NOT place the
Receiver anywhere its AC adapter cord is within reach of children.
• ALWAYS KEEP THE TRANSMITTER, RECEIVER AND AC
ADAPTERS OUT OF REACH OF CHILDREN.
• This product is not intended to be used as a medical monitor
and its use should not replace adult supervision.
• It is essential to check reception regularly. Please see the
Testing Reception section for complete instructions.
• The High-Def Digital Monitor is intended for indoor use only.
• NEVER use the Transmitter or Receiver near water. For example,
do not use near a bathtub, bathroom sink, laundry tub, kitchen
sink, in a wet basement, etc.
• Always unplug the AC adapters from wall outlets during long
periods of non-use.
• Position the Transmitter, Receiver and AC adapters to allow
adequate ventilation and prevent these components from
overheating.
• To prevent overheating, keep the Transmitter, Receiver and AC
adapters away from heat sources such as radiators, heat registers,
stoves or other appliances (including amplifiers) which produce
heat. Also keep these components out of direct sunlight.
• Use only the AC adapters provided. Use of any other adapters
may damage the Transmitter and/or Receiver. Plug the AC
adapters into standard household current only (120V AC outlet)!
To prevent entanglement and overheating, DO NOT use
extension cords.
• The AC adapters may become slightly warm to the touch during
operation. This is normal.
• Position the AC adapter cords so that they are not walked on or
pinched by items placed upon or against them, paying particular
attention to cords at AC adapter plugs, wall plugs, and the point
at which the cords attach to the Transmitter and Receiver.
(continued)
1
ADVERTENCIA:
POR FAVOR LEA DETENIDAMENTE LAS SIGUIENTES ADVERTENCIAS
Y TODAS LAS INSTRUCCIONES DE MONTAJE ANTES DE UTILIZAR EL
MONITOR HIGH-DEF DIGITAL. GUARDE ESTAS INSTRUCCIONES
PARA SU USO FUTURO.
TÉRMINOS USADOS EN LAS ADVERTENCIAS: El término “Receptor”
corresponde a la “Unidad de los padres” y el término “Transmisor”
corresponde a la “Unidad del bebé” en el resto de este folleto de
instrucciones.
• El
Monitor High-Def Digital
supervisión responsable y adecuada por parte de los padres.
• Compruebe la actividad de su hijo/a a intervalos regulares, ya que este
monitor no alertará a los padres de las actividades silenciosas de un niño.
•
Antes de utilizar el Monitor High-Def Digital:
-
Lea y siga cuidadosamente todas las instrucciones.
-
Lea y observe todas las advertencias en el producto y en
este folleto de instrucciones.
• Para evitar enredos con el cable del adaptador, NUNCA COLOQUE EL
CABLE DENTRO DE UNA CUNA O CORRAL, O CERCA DE ELLOS. NO
coloque el receptor en ningún lugar donde el cable del adaptador de CA
quede al alcance de los niños.
• SIEMPRE MANTENGA EL TRANSMISOR Y EL RECEPTOR Y LOS
ADAPTADORES DE CA FUERA DEL ALCANCE DE LOS NIÑOS.
•
Este producto no está pensado para utilizarse como monitor médico
y su uso no debe reemplazar la supervisión por parte de adultos.
•
Es esencial comprobar con regularidad la recepción. Por favor
consulte la sección “Cómo comprobar la recepción”, para obtener
instrucciones completas.
• El
Monitor High-Def Digital está indicado solamente para usarse en
ambientes interiores.
• NUNCA use el transmisor o receptor cerca del agua. Por ejemplo, no
los use cerca de una bañera, un lavabo, fregadero de la lavandería o
de la cocina, en un sótano con humedad, etc.
• Siempre desenchufe los adaptadores de CA de los tomacorrientes de la
pared cuando no se vayan a usarse durante periodos prolongados.
• Coloque el transmisor, el receptor y los adaptadores de CA de manera
que tengan ventilación adecuada, para evitar que estos componentes
se recalienten.
•
Para evitar el sobrecalentamiento, mantenga
y los adaptadores de CA
registros de calefacción, estufas y otros electrodomésticos (incluyendo
amplificadores) que producen calor. Mantenga siempre estos
componentes alejados de la luz directa del sol.
• Use solamente los adaptadores de CA proporcionados. El uso de
cualquier otro adaptador podría dañar el receptor y/o el receptor.
Enchufe los adaptadores de CA solamente en un tomacorrientes
estándar de la casa (120 V CA). Para evitar enredos y
sobrecalentamiento, NO utilice cables de extensión.
•
Los adaptadores de CA podrían sentirse ligeramente calientes al
tacto durante el funcionamiento. Esto es normal.
•
Coloque los cables de los adaptadores de CA de manera que no
se camine sobre ellos, ni queden apresados por objetos que se
coloquen sobre o junto a ellos, prestando especial atención a los
cables de los enchufes de los adaptadores de CA, tomacorrientes de
pared, y el lugar en el que los cables se unen
•
Solamente el personal calificado de servicio de Dorel Juvenile
no está pensado para reemplazar la
el transmisor, el receptor
alejados de fuentes de calor como radiadores,
el transmisor y receptor.
(continuación)
• This product should be serviced only by qualified service
personnel at Dorel Juvenile Group when:
- An AC adapter or its plug is damaged,
- The Transmitter or Receiver have fallen,
- Liquid has spilled into the Transmitter or Receiver or
- The Transmitter or Receiver do not appear to operate
normally or exhibit a marked change in performance.
• DO NOT attempt to service this product beyond that described
in the Troubleshooting section at the end of these instructions.
All other servicing should be referred to qualified personnel at
Dorel Juvenile Group.
WARNING
TO REDUCE THE RISK OF FIRE OR ELECTRICAL SHOCK, DO NOT
EXPOSE THIS PRODUCT TO WATER OR MOISTURE. NEVER
ATTEMPT TO OPEN THE CASE OF THE PRODUCT. THIS IS
DANGEROUS AND WILL VOID THE WARRANTY.
PARTS INSIDE. REFER SERVICING TO DOREL JUVENILE GROUP
CONSUMER RELATIONS (800) 544-1108.
NO SERVICEABLE
Group debe realizar el servicio de mantenimiento o reparación de este
producto cuando:
-
Un adaptador de CA o su enchufe hayan sufrido daño,
- Se cayó el transmisor o el receptor,
- Se derramó líquido en el transmisor o receptor o,
- Parece que no funciona normalmente el transmisor o el receptor, o
uestran un cambio en el rendimiento.
m
NO intente realizar tareas de servicio a este producto, excepto lo
•
escrito en la sección de “Localización y reparación de averías” al
d
final de estas instrucciones. Cualquier otro servicio se debe solicitar
al personal calificado de Dorel Juvenile Group.
ADVERTENCIA
PARA REDUCIR EL RIESGO DE INCENDIO O DESCARGA ELÉCTRICA,
NO EXPONGA ESTE PRODUCTO AL AGUA NI A LA HUMEDAD. NUNCA
INTENTE ABRIR LA CAJA DEL PRODUCTO. ESTO ES PELIGROSO Y
ANULARÁ LA GARANTÍA.
EQUIPO QUE REQUIERAN MANTENIMIENTO POR PARTE DEL
USUARIO. SOLICITE SERVICIO A DOREL JUVENILE GROUP,
RELACIONES CON EL CONSUMIDOR, LLAMANDO AL (800) 544-1108.
NO HAY PIEZAS EN EL INTERIOR DEL
CAUTION:
•
When using batteries, check batteries regularly. DO NOT use
monitor system in portable mode when batteries are low.
• Batteries Must Be Recycled or Disposed of Properly.
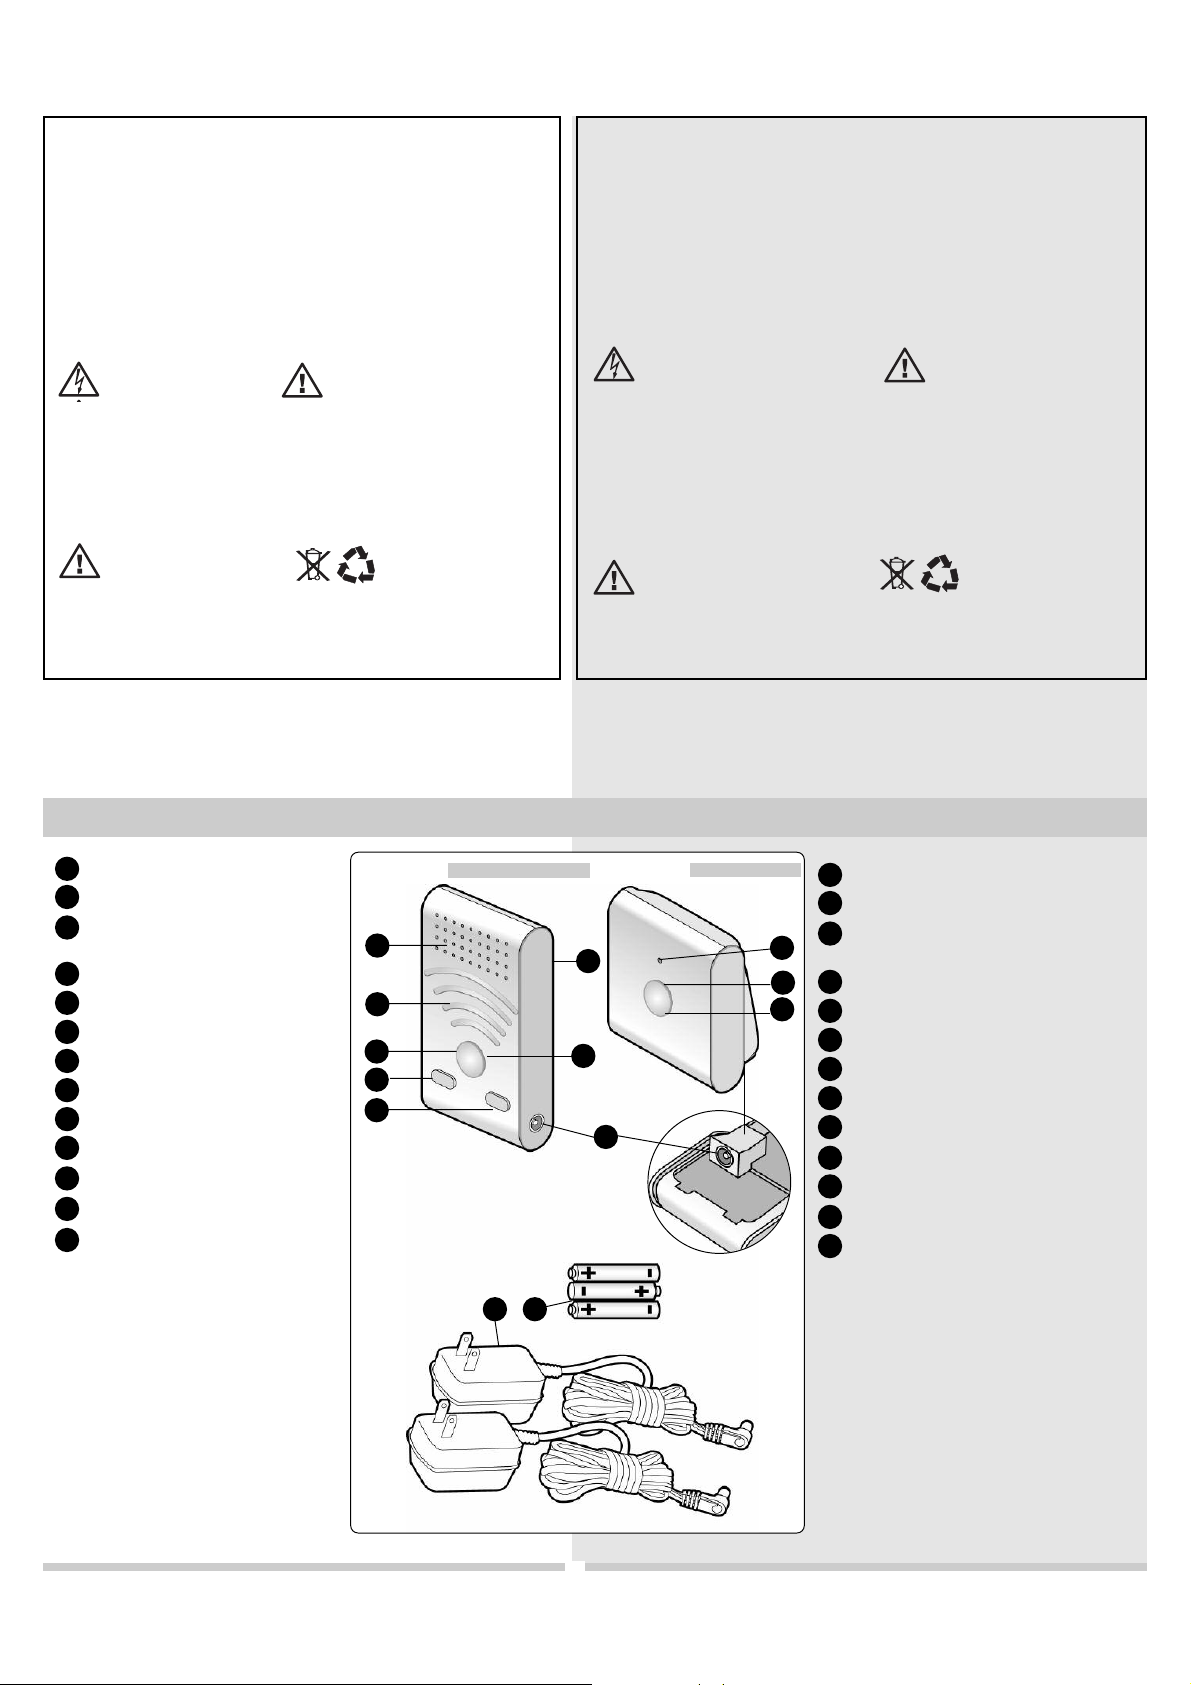
Features and Components Características y componentes
Speaker
A
Sound Lights & Volume Indicator
B
Link, Low Battery Indicator &
C
Page Indicator
On/Off
D
Volume
E
F
G
H
I
J
K
L
M
Down (-)
Volume
Up (+)
Belt Clip
AC Port
Microphone
Page Button & Link
On/Off
AC Adapt
Rechargeable batteries (3)
ers (2)
Parent’s Unit
A
B
C
E
F
Unidad de los padres
PRECAUCIÓN:
•
Al utilizar baterías, compruébelas regularmente. NO utilize el sistema de
monitor en el modo portátil si las baterías tienen poca carga.
•
Las baterías deben ser recicladas o desechadas adecuadamente.
Baby’s Unit
G
D
H
Unidad de bebé
I
J
K
Altavoz
A
Luces de sonido e indicador de volumen
B
Enlace, indicadores de batería baja y
C
de localizador
Encendido/apagado
D
Bajar volumen (-)
E
Subir volumen (+)
F
Clip para cinturón
G
Puerto de CA
H
Micrófono
I
Botón de localizador y enlace
J
Encendido/apagado
K
Adaptadores de CA (2)
L
Baterías recargables (3)
M
• Tool needed: Phillips head screwdriver
(not included). DO NOT use power tools.
• If any parts are missing, email
consumer@djgusa.com, call Consumer
Relations at (800) 544-1108, or fax at
(800) 207-8182. You can also visit our
website at www.safety1st.com. Have the
model number (08024) ready and date
code (manufacture date) located inside
battery compartment of Parent’s Unit.
Herramienta necesaria: Destornillador tipo
L
M
2
•
Phillips (no incluida). NO utilice herramientas
eléctricas.
• Si falta alguna pieza, envíe un correo
electrónico a consumer@djgusa.com, llame al
Departamento de Relaciones con el
Consumidor al (800) 544-1108, o envíe un fax
al (800) 207-8182. También puede visitar
nuestro sitio web en www.safety1st.com. Tenga
a mano el número de modelo (08024) y el
código de fecha (fecha de fabricación), que se
encuentra dentro del compartimento de las
baterías de la unidad de los padres.
Setup Instalación
1 Guidelines for good reception:
This monitor uses DECT digital monitoring technology and is designed to
automatically connect you to provide clear sound with no static, no
interference and a private channel.
IMPORTANT: When choosing locations to set up the Baby’s Unit
and Parent’s Unit follow these guidelines:
• For best performance: place Baby’s Unit 4 to 6’ (1.5 to 2 m) away
from the baby.
Check reception regularly.
•
•
Use the Parent’s Unit far enough away from the Baby’s Unit so
as not to get feedback.
• This monitor has indoor/outdoor range limitation. During use of
the monitor, if the sound quality deteriorates you may be reaching
the limits of the monitor’s range. If this happens, you will need to
move the Parent’s Unit in closer proximity to the Baby’s Unit.
• Adjust the volume to a comfortable level for your environment.
CAUTION
•
Check batteries regularly. Yellow LED indicates the batteries are low.
DO NOT use monitor system in portable mode when batteries are
low. Use AC when batteries are low.
NOTE:
The Parent Unit MUST BE USED WITH
BATTERIES. When using the AC adapter, batteries
must also be installed. For initial use, plug in Parent
Unit for 10 hours to fully charge. The Baby Unit
uses AC power only.
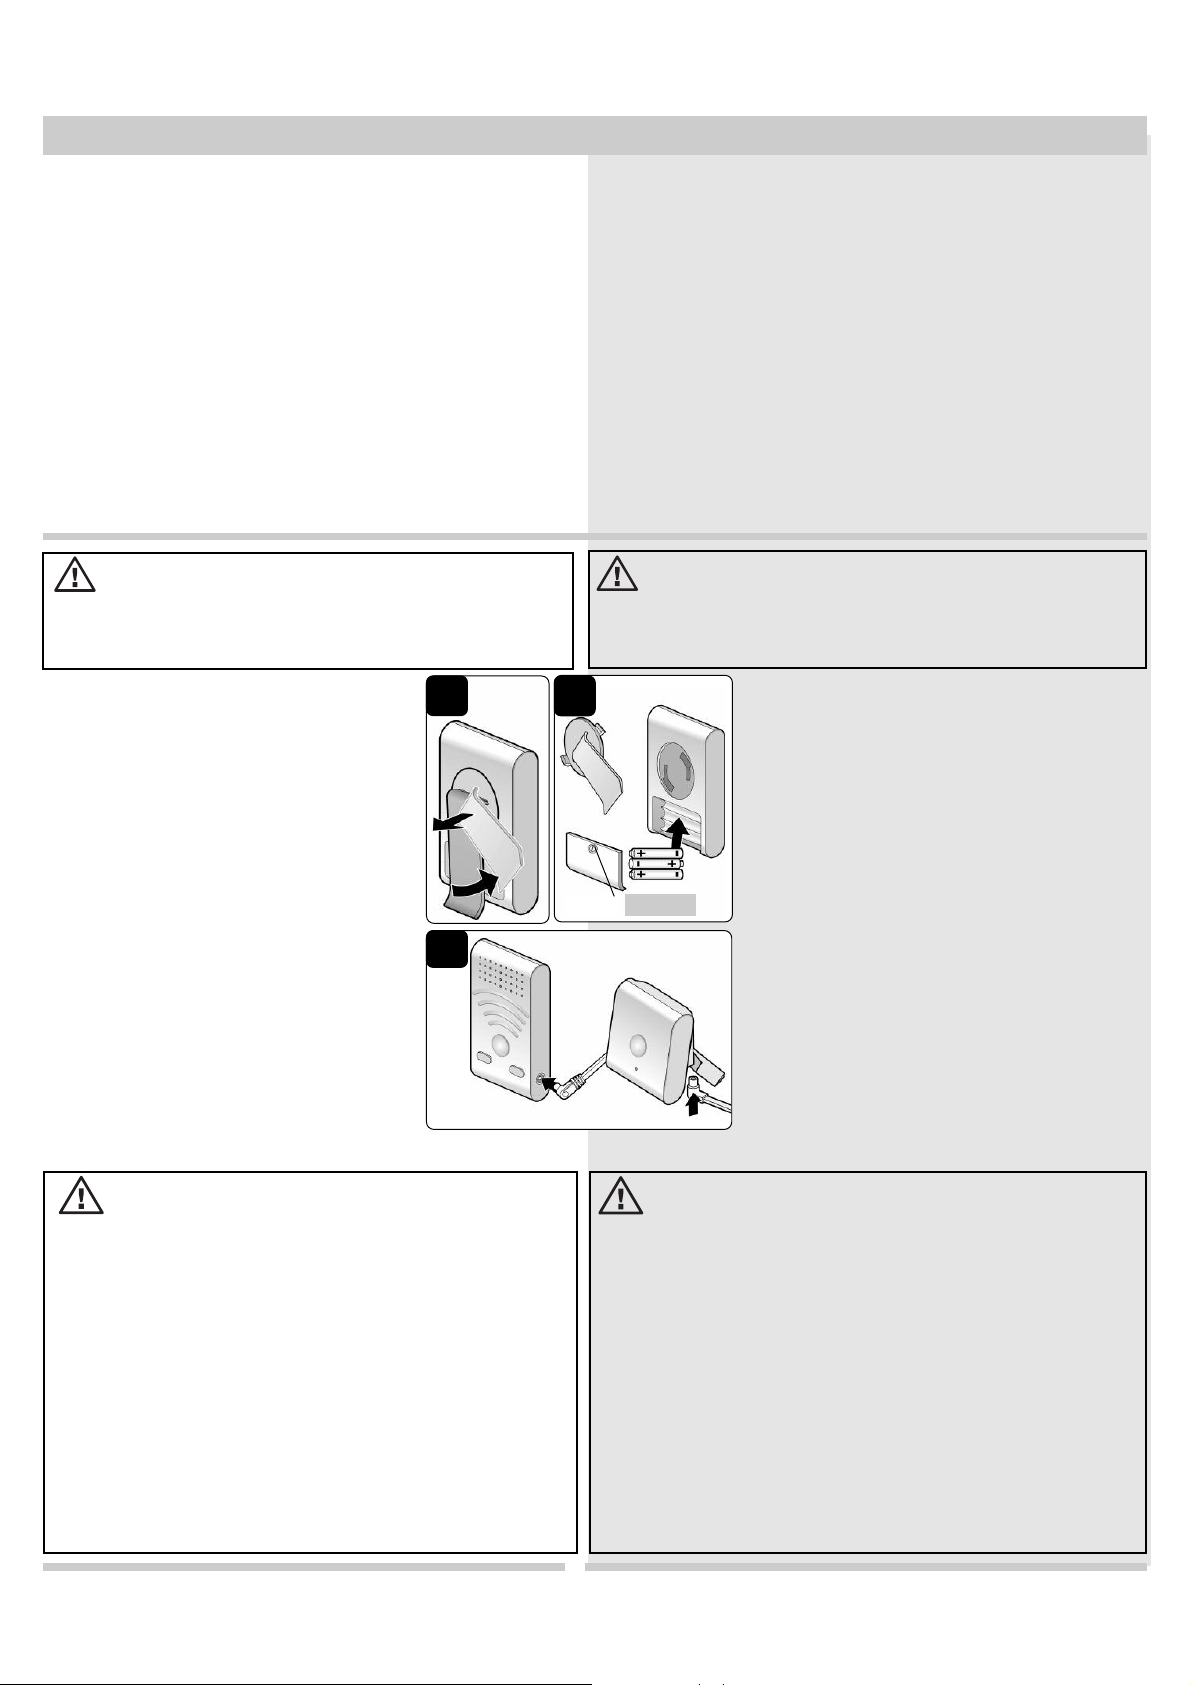
2 To set up; recharge is required.
Remove and discard static clings from the
front of each unit.
Parent Unit
clip left and remove
screw at the back of the Parent’s Unit. Remove
the battery door and confirm that the included
3 AAA rechargeable batteries are properly
installed. Match polarity shown in Figure 1b.
Secure door with the screw. Insert belt clip into
slots and rotate right to secure.
Recharge and AC use: It is important to fully
charge the Parent’s Unit as a part of your initial
set up. You can use the Parent’s Unit while
recharging, or for a quicker charge, you can
charge with the power off.
adapter into each (Figure c). Connect the AC
adapter into a power outlet. CAUTION: DO
NOT use an adapter that did not come
with this product.
Battery Installation: Rotate belt
(Figure a)
. Unscrew the
Connect an AC
a
c
1 Pautas para tener buena recepción de sonido:
Este monitor utiliza tecnología de monitoreo digital DECT y está diseñado
para conectar el sistema automáticamente y proporcionar un sonido claro
y sin estática o interferencias, mediante un canal privado.
IMPORTANTE: Cuando elija los lugares para instalar las unidades del
bebé y de los padres, siga estas pautas:
• Para el mejor rendimiento: coloque la unidad del bebé a una
distancia de aproximadamente 4 a 6 pies (1.5 a 2 m) del niño.
•
Verifique con regularidad la recepción.
•
Utilice la unidad de los padres suficientemente lejos de la unidad
del bebé para que no haya retroalimentación.
• Este monitor tiene alcance limitado en interiores y exteriores.
Durante el uso del monitor, si la calidad del sonido empeora, es
probable que el monitor se encuentre cerca del límite de su alcance.
Si esto ocurre, tendrá que acercar la unidad de los padres a la
unidad del bebé.
• Compruebe con regularidad la recepción siguiendo el paso 9 indicado
anteriormente.
PRECAUCIÓN
• Verifique las baterías con regularidad.
El diodo luminoso amarillo indica que las baterías se están agotando. Si las
baterías tienen poca carga, NO utilice el sistema de monitor en el modo portátil.
Utilice el adaptador de CA cuando las baterías se estén agotando.
NOTA:
b
La unidad de los padres DEBE SER UTILIZADA
CON BATERÍAS. Cuando use el adaptador de CA, las
baterías también deben estar instaladas. Para el primer
uso, enchufe la unidad de los padres durante 10 horas
para cargarla completamente. La unidad del bebé util
2 Para configurar; es necesaria la recarga.
Retire y deseche la película adherida a la parte
delantera de cada unidad.
Cómo instalar la unidad de los padres: Gire el clip para
cinturón hacia la izquierda y retírelo (Figura a). Desatornille
el tornillo en la parte trasera de la unidad de los
Screw
Tornillo
padres. Retire la tapa del compartimento de las
baterías y confirme que las tres baterías recargables
tipo “AAA” estén instaladas correctamente. Haga
coincidir la polaridad como se muestra en la Figura 1b.
Fije la tapa del compartimento con el tornillo. Inserte el
clip para cinturón en las ranuras y gírelo hacia la
derecha para asegurarlo.
Recargar y uso del adaptador de CA: Es importante
cargar la unidad de los padres completamente como
parte de la configuración inicial. Puede usar la unidad de
es mientras se está recargando o, para una carga
los padr
más rápida, puede cargarla mientras se encuentra
apagada. Conecte un adaptador de CA a cada unidad
(Figura c). Conecte el adaptador de CA a un
tomacorriente. PRECAUCIÓN: NO utilice un adaptador
que no haya sido provisto con este producto.
BATTERY CAUTION:
• Keep these instructions as they contain important information.
• Use included 1.2V 750 mAH NiMH AAA size rechargeable batteries only.
• THERE IS A RISK OF EXPLOSION IF THE BATTERIES ARE REPLACED BY AN
INCORRECT TYPE.
• DO NOT mix old and new batteries.
• DO NOT mix alkaline, standard (carbon zinc), or rechargeable (nickel-
cadmium) batteries.
• Non rechargeable batteries are not to be recharged.
• Check that all contact surfaces are clean and bright before installing
batteries.
• The supply terminals are not to be short-circuited.
• DO NOT submerge any part of the product in water.
• Dispose of batteries safely.
• Remove batteries when stored for long periods of non-use.
• Unplug power cord before replacing batteries.
• Use only the adapters supplied with this product. Incorrect adapter polarity
or voltage can seriously damage the product.
ADVERTENCIA SOBRE LAS BATERÍAS:
• Guarde estas instrucciones, ya que contienen información importante.
• Utilice únicamente las baterías recargables incluidas de níquel-hidruro metálico
(NiMH) tipo “AAA” de 1.2 V y 750 mAh.
• SI LAS BATERÍAS SON REEMPLAZADAS POR UN TIPO DE BATERÍAS
INCORRECTO, EXISTE RIESGO DE EXPLOSIÓN.
• NO mezcle baterías viejas y nuevas.
• NO mezcle baterías alcalinas, estándar (carbón-zinc) o recargables (níquel-cadmio).
• Las baterías no recargables no deben ser recargadas.
• Antes de instalar las baterías, verifique que todas las superficies de contacto estén
limpias y brillantes.
• Los terminales eléctricos no deben cortocircuitarse.
• NO sumerja ninguna parte del producto en agua.
• Deseche las baterías en forma segura.
• Retire las baterías cuando desee guardar el producto por un largo período sin uso.
• Antes de volver a colocar las baterías, desenchufe el cable de alimentación.
• Utilice únicamente el adaptador de corriente provisto con este producto. La polaridad
o la tensión incorrectas del adaptador pueden provocar daños severos al producto.
3

Features Características y componentes
3 Power up : To power up both the Parent and Child
unit, press the On/Off button, and hold for 5 seconds, then
release. The LED light around the On/Off button will flash green
while linking. Red volume LEDs will illuminate on Parent’s Unit to
indicate volume level.
Volume down , volume up : Press volume up or
down buttons repeatedly to adjust volume. More LED sound bars
will illuminate as volume increases. There are eight volume levels.
When increasing volume, on the ninth press, all four sound bars
illuminate to indicate maximum volume level is reached.
Sound bars : The four sound bars on the Parent’s Unit
indicate the sound level of the baby. As baby’s sound level
increases, the sound bars will illuminate
upward.
Pager operation : While Parent Unit
and Baby Unit are linked, press On/Off button
once for 1 second on Baby Unit to activate
PAGE. Parent Unit will give 5 cycles of 2 short
beeps. Find Parent Unit. Press On/Off button on
Baby Unit once to stop beep. For peace of
mind, once both units are located, be sure to
double check that both units are powered on
and linked.
Recharge batteries : When LED
indicator is flashing yellow, you need to
recharge batteries. Plug AC adapter into Parent
Unit. While charging, LED will flash yellow to green. Once fully
charged, LED will illuminate solid yellow.
KD
FE
B
J
B
C J
M
DE F
Out of range alert:
When Parent Unit is too far from Baby Unit, you will hear a
beep every 8 seconds.
LED indicators :
WHEN PLUGGED IN: For proper function you must have
batteries in the Parent Unit while plugged in. When your Parent
Unit is plugged in, it is recharging. You cannot overcharge. The LED
around the On/Off will flash while charging. Once fully charged the
LED around the On/Off stops flashing.
IN PORTABLE MODE: In portable mode the LEDs work differently.
The LED around the On/Off is a solid green to assure you of a
good connection. If batteries are low, the light will flash yellow,
indicating it is time to recharge. For more specific details see chart
on page 5.
JC
3 Encendido : Para encender la unidad de los padres y la
unidad del bebé, presione el botón de encendido/apagado durante
5 segundos. El indicador LED de encendido/apagado se encenderá
intermitentemente de color verde cuando se establezca el enlace.
En la unidad de los padres, se encenderán los indicadores LED
rojos de volumen para indicar el nivel del volumen.
Bajar volumen, subir volumen : Si desea ajustar el
volumen, oprima los botones para subirlo o bajarlo. Aparecerán más
barras de sonido de LED a medida que el volumen aumente. Hay
ocho niveles de volumen. Cuando suba el volumen, la novena vez
que presione el botón se encenderán las cuatro barras de sonido
para indicar que se ha alcanzado el nivel máximo de volumen.
K
localizadas, asegúrese de verificar que estén encendidas y que hayan
establecido el enlace.
Cómo recargar las baterías : Cuando el indicador LED
emita una luz amarilla intermitente, debe recargar las baterías. Enchufe
el adaptador de CA en la unidad de los padres. Durante la carga, el
indicador LED emitirá una luz verde y amarilla intermitente. Cuando la
carga esté completa, el indicador LED emitirá una luz amarilla.
KD
FE
Barras de sonido : Las cuatro barras de
sonido de la unidad de los padres indican el nivel de
sonido del bebé. A medida que los sonidos del bebé
aumenten, las barras de sonido se irán iluminando
hacia arriba.
Operación del localizador : Cuando la
unidad de los padres y la unidad del bebé hayan
establecido el enlace, presione una vez el botón de
encendido/apagado en la unidad del bebé durante 1
segundo para activar el LOCALIZADOR. Al alcanzar el
volumen máximo, la unidad de los padres emitirá 5 ciclos
de 2 tonos cortos. Localice la unidad de los padres.
Presione una vez el botón de encendido/apagado de la
unidad del bebé para interrumpir el tono. Para mayor
tranquilidad, una vez que ambas unidades estén
B
J
M
Aviso de fuera de alcance:
Cuando la unidad de los padres se encuentre demasiado lejos
de la unidad del bebé, se oirá un tono cada 8 segundos.
Indicadores LED :
CUANDO LA UNIDAD ESTÁ ENCHUFADA: Para un funcionamiento
adecuado, las baterías deben estar colocadas en la unidad de los
padres mientras esté enchufada. Cuando la unidad de los padres está
enchufada, sus baterías se recargan. No pueden sobrecargarse. El
indicador LED de encendido/apagado se encenderá intermitentemente
mientras la unidad se esté cargando. Una vez que la unidad esté
completamente cargada, el indicador LED dejará de parpadear.
JC
EN MODO PORTÁTIL: En el modo portátil, los indicadores LED
funcionan de otro modo. El indicador LED del botón de
encendido/apagado emite una luz verde continua para indicar que
tiene una buena conexión. Si las baterías están agotadas, la luz se
tornará de color amarillo, para indicar que hay que recargar. Para más
detalles, vea la tabla de la página 5.
4

D
s
e
e
g
d
n
n
x
Features (continued) Características y componentes (continued)
r
D
o
l
o
a
n
n
LLEED
IInnddiiccaattoorrs
Flashing
Green
Flashing
Green with
Beep
Solid Green Power on
Flashing
Yellow
Flashing
Yellow to
Green
Solid Yellow Power is On and
Flashing
Red
Solid Red Power is Off and
No Light Power is Off To turn on, press
&&
JC
PPoorrttaabblle
UUsse
RReecchhaarrggiinng
oorr PPlluuggggeed
IIn
IInnddiiccaattiioon
Units are linking N/A
FFiix
Cycles of 1 quick
beep: Parent Unit
is not linking to
Child Unit.
C
ycles of 2 quick
beeps: Parent
Unit is lost and
being paged.
Good connection
Low Batteries Plug in to
Power is On and
recharging
fully charged
Power is Off and
recharging
fully charged
Cycles of 1 quick
beep:
1. Be sure Child
Unit is On.
2. Move closer to
Child Unit.
C
ycles of 2 quick
beeps:
1. Press On/Off
to end page.
N/A
recharge
N/A
N/A
N/A
To turn on, press
and hold On/Off
for 5 seconds
and hold On/Off
for 5 seconds
IInnddiiccaaddoor
eess LLEED
yy
Luz verde
intermitente
Luz verde
intermitente
con tonos
Luz verde
continua
Luz amarilla
intermitente
Luz amarilla
y verde
intermitentes
Luz amarilla
continua
Luz roja
intermitente
Luz roja
continua
Luz apagada La unidad está
JC
ppoorrttááttiil
UUsso
RReeccaarrggaannddo
oo eenncchhuuffaadda
IInnddiiccaacciióón
Las unidades están
estableciendo el
enlace
Ciclos de 1 tono
rápido: La unidad
de los padres no
ha establecido el
enlace con la
unidad del niño.
Ciclos de 2 t
rápidos: La
unidad de los
padres se ha
perdido y está
siendo localizada.
Encendida
Conexión buena
Batería baja Enchufe para
Encendida y
recargando
Encendida y
carga completa
Apagada y
recargando
Apagada y carga
completa
apagada
No corresponde
Ciclos de 1 tono
rápido:
1. Asegúrese de
que la unidad del
niño esté
encendida.
2. Acérquese a la
onos
unidad del niño.
Ciclos de 2 t
rápidos:
1. Presione el
botón de
encendido/apagado
para desactivar el
localizador.
No corresponde
recargar
No corresponde
No corresponde
No corresponde
Para encender,
mantenga
presionado el
botón de
encendido/apagado
durante 5 segundos.
Para encender,
mantenga
presionado el
botón de
encendido/apagad
o durante 5
segundos.
SSoolluucciióón
onos
5

Troubleshooting Localización de averías
PROBLEM POSSIBLE CAUSE SOLUTION
1
Parent’s Unit has no
sound
2
Power glows yellow
3
On/Off button does
not illuminate
4
Weak sound coming
from Parent’s Unit
5
Audio feedback
(squealing)
6
Weak sound coming
from Parent’s Unit
7
Product is shutting
down with out
warning
Can’t turn off page
8
Volume is too low
Out of range
Batteries are low
Unit is not turned on
Batteries are dead
Power is turned off
AC Adapter not
properly connected
Battery may be low
Baby is too far away
from Baby’s Unit
Parent’s Unit is too
close to the Baby’s
Unit
Battery may be low
Baby is too far away
from Baby’s Unit
No batteries in Parent
Unit. Even when
plugging product in,
this product requires
batteries.
Holding the On/Off
button for 5 seconds
will turn off the unit.
Adjust the volume
Bring Parent’s Unit closer to
Baby’s Unit
Recharge batteries by
plugging in or use AC
Push the button on the front
of Parent’s Unit to the On
position
Charge battery / Make
certain that any light
switches that control the
power flow to the wall outlet
are on (when using AC).
Check AC Adapter jack-tosocket and plug-to-outlet
c
Adjust the volume
Bring Parent’s Unit closer to
Baby’s Unit
Move the Baby’s Unit within
4’ to 6’ of Baby
Recharge batteries
Move the Parent’s Unit further
away from the Baby’s Unit
Lower the volume on the
Parent’s Unit
Recharge batteries
Move the Baby’s Unit within
4’ to 6’ of Baby
Install the 3 AAA NiMH
rechargeable batteries
(included).
A quick, 1 second press of the
On/Off button on the Parent
Unit will turn off the page.
onnections
PROBLEMA CAUSA POSIBLE SOLUCIÓN
1
a unidad de los
L
padres no tiene
onido
s
2
El encendido tiene
una luz ámbar
3
El botón de
encendido/apagado
no se enciende
4
El sonido de la unidad
de los padres es muy
bajo
5
Retroalimentación de
audio (sonido agudo)
6
El sonido de la unidad
de los padres es muy
bajo
7
El producto se está
apagando sin aviso
8 No es posible
desactivar el
localizador
l volumen está muy
E
bajo
uera del alcance
F
Las baterías tienen
poca carga
La unidad no está
encendida
Las baterías están
totalmente agotadas
La unidad no está
encendida
El adaptador de CA no
está debidamente
conectado
La batería puede estar
agotada
El niño está demasiado
lejos de la unidad del
bebé
La unidad de los
padres está demasiado
cerca de la unidad del
bebé
La batería puede estar
agotada
El niño está demasiado
lejos de la unidad del
bebé
La unidad de los
padres no tiene
baterías. Para enchufar
este producto necesita
baterías.
Si oprime el botón de
encendido/apagado
durante 5 segundos, la
unidad se apagará.
juste el volumen
A
Acerque la unidad de los
adres a la unidad del bebé
p
Enchufe las baterías para
recargarlas o utilice el
adaptador de CA
Presione el botón en la parte
delantera de la unidad de los
padres hasta encendido
Cargue la batería. Asegúrese de
que cualquier interruptor que
controle el flujo de electricidad
del tomacorriente de pared esté
encendido (en caso de utilizar
corriente alterna).
Verifique las conexiones entre el
receptáculo y el conector del
adaptador de CA, y entre el
enchufe y el tomacorriente
Ajuste el volumen
Acerque la unidad de los
padres a la unidad del bebé
Coloque la unidad del bebé a
una distancia de 4 a 6 pies del
iño
n
Recargue las baterías
Aleje la unidad de los padres de la
unidad del bebé
Baje el volumen en la unidad de
los padres
Recargue las baterías
Coloque la unidad del bebé a
una distancia de 4 a 6 pies del
niño
Inserte las tres baterías
recargables tipo “AAA” de
níquel-hidruro metálico (NiMH)
incluidas.
Presione rápidamente el botón
de encendido/apagado en la
unidad de los padres durante 1
segundo para desactivar el
localizador.
NOTE:
Please do not return this product to the place of purchase.
If you are having difficulty using this product email consumer@djgusa.com,
call Consumer Relations at (800) 544-1108, or fax at (800) 207-8182. You
can also visit our website at ww
w.safety1st.com
NOTA:
No devuelva este producto al lugar donde lo compró. Si falta alguna pieza,
envíe un correo electrónico a consumer@djgusa.com, llame al Departamento de
Relaciones con el Consumidor al (800) 544-1108, o envíe un fax al (800) 207-8182.
También puede visitar nuestro sitio web en www.safety1st.com
6

Compliance Information
This device complies with part 15 of the FCC Rules and ICES-003 of Industry
Canada. Operation is subject to the following two conditions: (1) This device may not
cause harmful interference, and (2) this device must accept any interference received,
including interference that may cause undesired operation. This device complies also
with RSS-213 of Industry Canada.
Cet appareil numerique de la classe B est conforme a la norme NMB-003 du Canada.
RF Radiation Exposure Statement
For body worn operation, both baby and parent units have been tested and meets the
FCC RF exposure guidelines. Use of accessories may not ensure compliance with
FCC RF exposure guidelines.
Radio Interference
This equipment has been tested and found to comply with the limits for a Class B
digital device, pursuant to Part 15 of the FCC Rules and applicable Industry Canada
specifications. These limits are designed to provide reasonable protection against
harmful interference in a residential installation. This equipment generates, uses and
can radiate radio frequency energy and, if not installed and used in accordance with
the instructions, may cause harmful interference to radio communications. However,
there is no guarantee that interference will not occur in a particular installation. If this
equipment does cause harmful interference to radio or television reception, which can
be determined by turning the equipment off and on, the user is encouraged to try to
correct the interference by one or more of the following measures:
- Reorient or relocate the receiving antenna.
- Increase the separation between the equipment and receiver.
- Connect the equipment into an outlet on a circuit different from that to which
the receiver is connected.
- Consult the dealer or an experienced radio/TV technician for help.
WARNING: Changes and modifications not expressly approved by Dorel Juvenile
Group can void your authority to operate this equipment under Federal
Communications Commissions rules.
 Loading...