

Page 1
GV-SDI-204 Card
The GV-SDI-204 Card provides up to 4 video channels of HD-SDI cameras, recording up to
120 /100 fps (NTSC / PAL) in total at 1080p with H.264 hardware compression. You can
install up to four GV-SDI-204 Cards for a total of 16 channels. The new technology of
resolution is employed to enhance the live image without DSP Overlay. Even in multi views,
the image on the largest division view can remain at high-quality resolution without DSP
Overlay.
Minimum System Requirements
32-bit Windows XP / Vista / 7 / 8 / Server 2008
OS
64-bit Windows 7 / 8 / Server 2008 R2 / Server 2012
GV-SDI-204 Core 2 Duo E4400, 2.00 GHz
GV-SDI-204 x 2 Core 2 Quad Q9400, 2.66 GHz
CPU
GV-SDI-204 x 3 Core i3-2130, 3.40 GHz
GV-SDI-204 x 4 Core i3-2130, 3.40 GHz
GV-SDI-204
RAM
GV-SDI-204 x 4
GV-SDI-204 500 GB
HDD
GV-SDI-204 x 4 2 TB
Graphic Card
DirectX 9.0c
AGP or PCI-Express, 800 x 600 (1280 x 1024 recommended), 32bit color
Packing List
2 x 1 GB Dual Channels
May 13, 2013
1. GV-SDI-204 Card x 1
2. SATA Power Converter Cable x 1
3. Hardware Watchdog Jumper Wire x 1
4. USB Dongle x 1
5. Software DVD x 1
1
Page 2
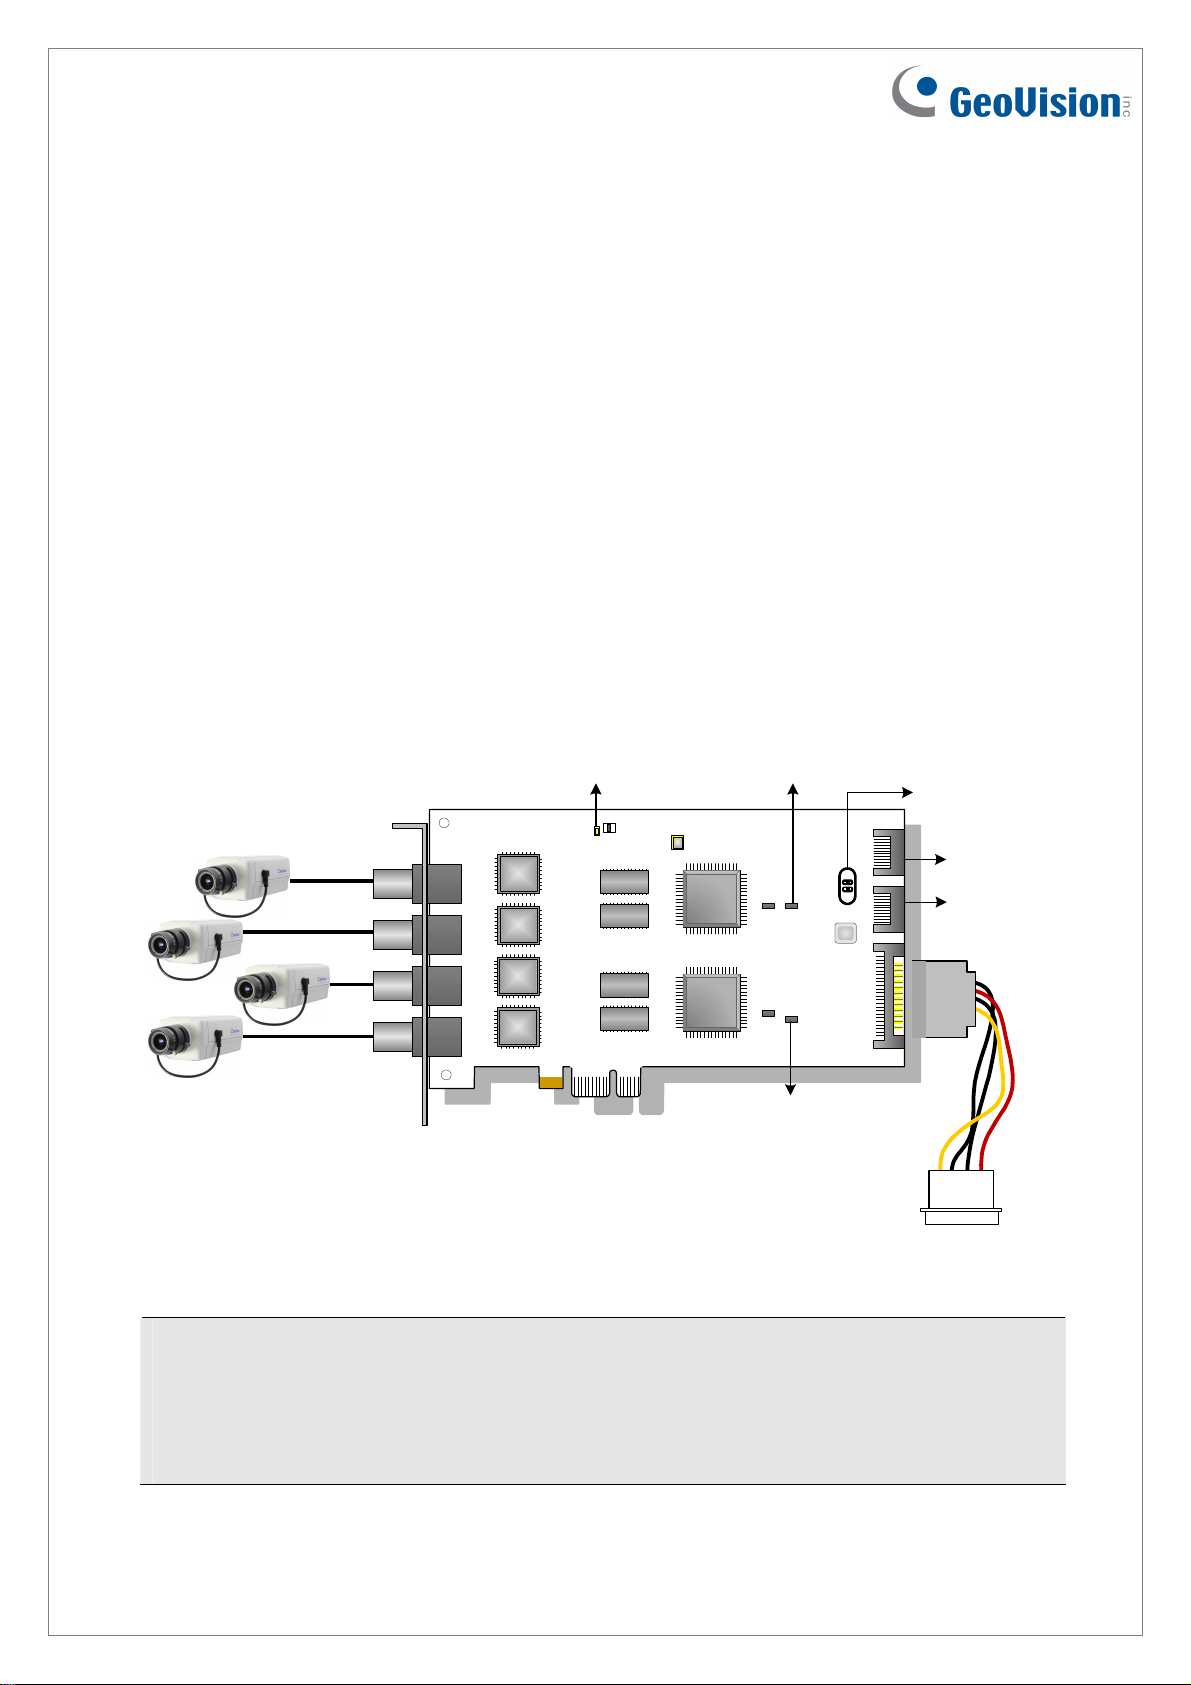
Connecting the GV-SDI-204 Cards
Up to four GV-SDI-204 Cards can be connected. GV-SDI-204 Cards can also be installed
with other types of GV-Video Capture Cards including GV-900A, GV-800B, GV-650B, GV600B, and GV-1480A / 1240A / 1120A Combo Cards, GV-1480B / 1240B / 1120B Combo
Cards, GV-4008 and GV-5016. With the combination of different video capture cards, the
total number of channels cannot exceed 32 channels.
•
Connect the HD-SDI cameras to the GV-SDI-204 Card using BNC cables.
•
Using the supplied SATA Power Converter Cable, connect the GV-SDI-204 Card to
power supply.
•
Connect the supplied Hardware Watchdog Jump Wire (Figure 2).
•
After you turn on the computer, the Power LED (D1) and Status LED (D10 and D18)
should be lit in green to indicate the card is ready for use.
Video 1 ~ 4
Power LED (D1)
GV-SDI-204 Card
Figure 1
Status LED (D10)
Status LED (D18)
SATA Power
Converter Cable
Hardware
Watchdog
Not
Functional
Note:
1. The GV-SDI-204 Card only works when the supplied USB Dongle is inserted to PC.
2. The connected HD-SDI cameras must have a resolution under 1080p_30, 720p_60 or
1080i_60. The Video Lost message will be displayed when the connected channels
have higher resolution.
2
May 13, 2013
Page 3
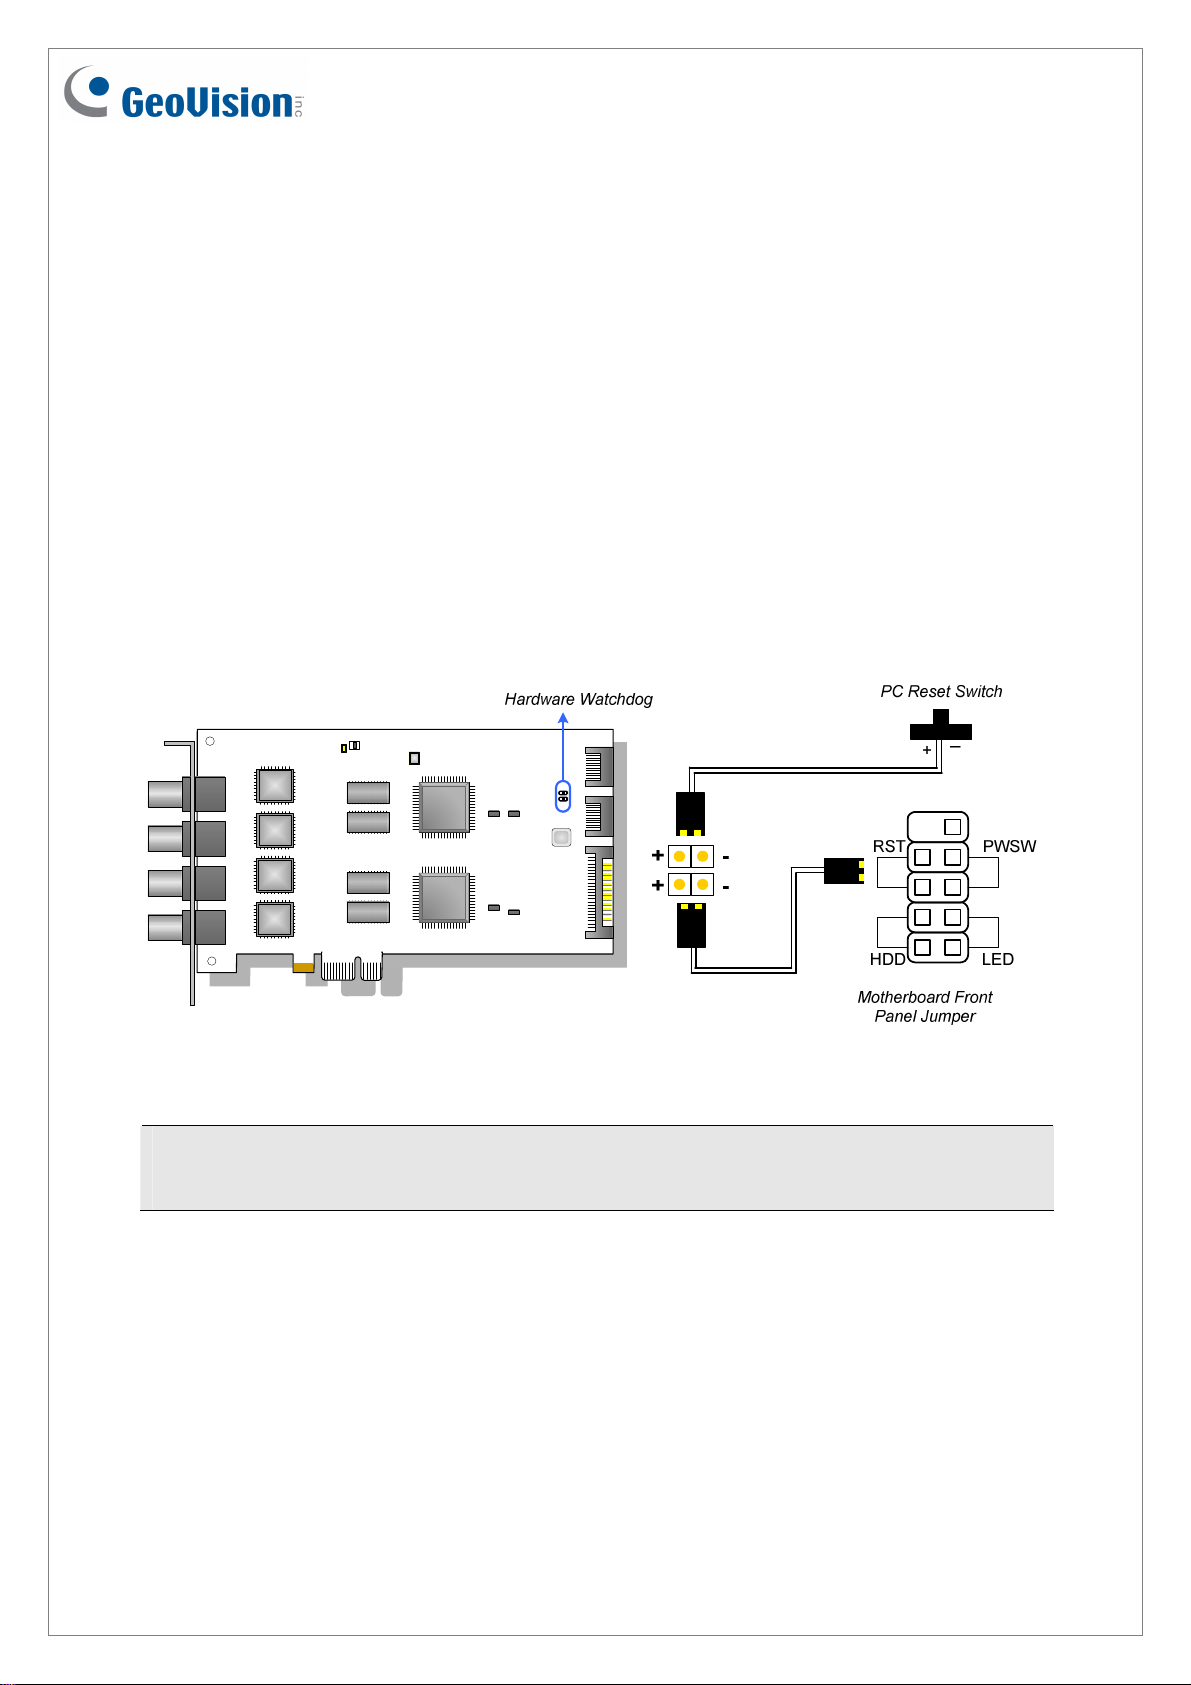
Connecting Hardware Watchdog
Insert the Hardware Watchdog Jumper Wire to the 2-pin connectors on the Card. The (+) pin
on the Card must connect to the Reset (+) pin on the motherboard, and the (-) pin on the
Card to the Ground (-) pin on the motherboard. Ensure the connection is correct; otherwise
the hardware watchdog will not work.
When installing multiple capture cards, the Hardware Watchdog can be connected to any of
the GV-SDI-204 cards, no matter if the cards are all GV-SDI-204 cards or a combination of
GV-SDI-204 cards and other capture cards. If you are installing GV-SDI-204 cards in addition
to existing video capture cards and the Hardware Watchdog has already been connected,
you do not need to change the connection to a GV-SDI-204 card.
Figure 2
Note: To locate the motherboard’s Reset (+) pin and (-) pin, please refer to the
motherboard’s user manual.
May 13, 2013
3
Page 4

Installing Drivers
After installing the GV-SDI-204 Card in the computer, insert the software DVD to install GVSeries drivers. The DVD will run automatically and an installation window will pop up. Select
Install or Remove GeoVision GV-Series Driver, and select the following two options to
install card and USB dongle drivers.
•
Install or Remove GeoVision GV-Series Card Drivers: installs card drivers.
•
Install GeoVision USB Device Drivers: installs USB dongle drivers.
To verify the drivers are installed correctly, go to Windows Device Manager and see if their
entries are listed. The image below is an example of installing one GV-SDI-204 card.
Figure 3
Expand the DVR-Devices field, you can see:
GV-SDI-204 Card Entry
Single-card mode
Four-card mode
GV-SDI-204
GV-Series USB Protector
GV-SDI-204
GV-SDI-204
GV-SDI-204
GV-SDI-204
GV-Series USB Protector
4
May 13, 2013
Page 5

Adjusting the Video Settings in the Main System
One distinct feature of GV-SDI-204 Cards is their ability of hardware compression, providing
you with higher system performance and DVD recording quality.
To take full advantage of GV-SDI-204 Cards, you can adjust the video settings, including the
recording quality and frame rate, before running the GV-System.
Setting up the video settings of the recorded files:
Considering computer performance or recording quality, you may adjust the settings to meet
your needs.
1. On the Main System, click the Configure button, select System Configure, select
Camera Install, and click Hardware Compression Setup. This dialog box appears.
Figure 4
2. Select the cameras you want to set up, and click the Configure button. This dialog box
appears.
May 13, 2013
Figure 5
5
Page 6

3. In the Select Hardware-compressed Camera section, select one camera to be configured.
4. Select the recording quality.
5. The Enable hardware-compressed data FIFO option is disabled by default. When the
option is enabled, the hardware-compressed data from the video IP device, such as IP
camera, video server and compact DVR, will be transmitted directly to remote servers
instead of being compressed again on the DVR. The remote servers include CMS-related
servers and WebCam Server. This feature can decrease the system load of DVR but
increase that of remote servers.
6. To use standard H.264 codec in recording, enable Standard codec in the Recording
codec format section.
7. To apply the same setting to all cameras, click the Finger button in each section.
8. To access the frame rate settings, on the Main System, click the Configure button, select
System Configure, and select Camera Configure. This dialog box appears.
Figure 6
9. In the Rec Control section, click the Arrow button. The Hardware Rec. Frame Rate
Setting dialog box appears.
10. Set the maximum frame rate for motion and non-motion periods to save disk space when
possible.
6
May 13, 2013
Page 7

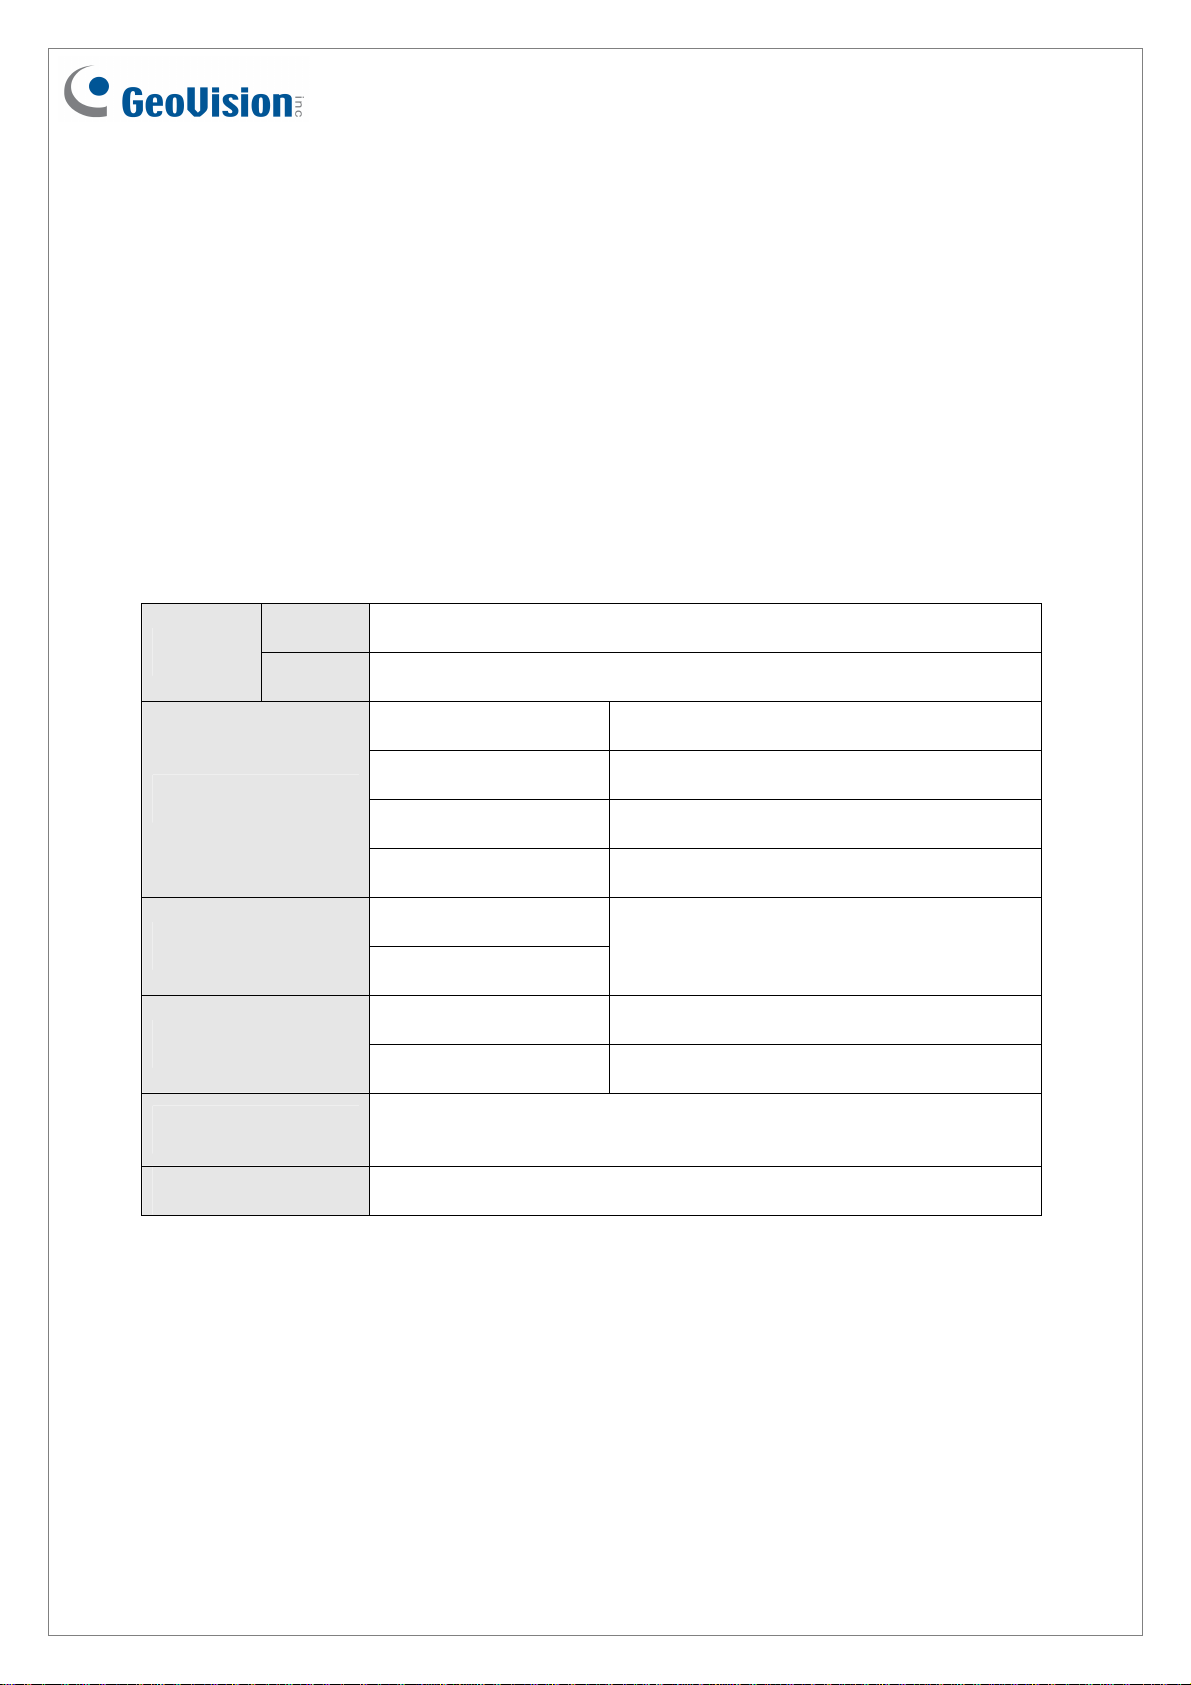
Specifications
GV-SDI-204
Interface PCI-E (x1)
Input Type BNC
Video Input 4 Cams
Audio Input N/A
NTSC 120 fps
1080p
PAL 100 fps
Recording Rate
and Display
Rate
720p
1080i
NTSC 240 fps
PAL 200 fps
NTSC 120 fps
PAL 100 fps
1080p 1920 x 1080
H/W
Video
Resolution
S/W
Video Compression
Format
Bit Rate Range 10M ~ 20M
GV-NET/IO Card Support Yes (Note 3)
GV-Multi Quad Card Support No
GV-Loop Through Card Support No
Dimensions (W x H) 158 x 111 mm / 6.22 x 4.37 in
720p 1280 x 720
1080i 1920 x 1080
1080p 960 x 540, 480 x 270
720p 640 x 360
1080i 960 x 540, 480 x 270
H/W H.264
S/W Geo MPEG4, Geo H.264
May 13, 2013
Note:
1. GV-SDI-204 does not support the TV-Out function.
2. GV-SDI-204 is currently not compatible with VIA series and ATI series chipset
motherboards.
3. To work together with GV-SDI-204, GV-NET/IO Card V3.1 must be set in the I/O Box
Mode and connected to the PC through USB or DB9.
7
 Loading...