
Genius EasyPen i405X, MousePen i608X (6x8"") User Manual

Federal Communications Commission (FCC) Notice

This device complies with Part 15 of the FCC Rules. Operation is subject to the following two conditions: (1) this device may not cause harmful interference, and (2) this device must accept any interference received, including interference that may cause undesired operation.

This equipment has been tested and found to comply with the limits of a Class B digital device, pursuant to Part 15 of the FCC Rules. These limits are designed to provide reasonable protection against harmful interference in a residential installation.

This equipment generates, uses and can radiate radio frequency energy and, if not installed and used in accordance with the instructions, may cause harmful interference to radio communications. However, there is no guarantee that interference will not occur in particular installations, if this equipment does cause harmful interference to radio or television reception, which can be determined by turning the equipment off and on, the user is encouraged to try to correct the interference by one or more of the following measures:

1.Reorient / Relocate the receiving antenna.

2.Increase the separation between the equipment and receiver.

3.Connect the equipment into an outlet on a circuit different from that the receiver is connected.

4.Consult the dealer or an experienced radio / TV technician for help. CAUTION: Changes or modifications not expressly approved by the manufacturer responsible for compliance could void the user’s authority to operate the equipment.

Disclaimer

The following does not apply to any country where such provisions are inconsistent with local law: KYE Systems Corp. makes no warranties with respect to this documentation, whether expressed or implied. All material is provided “as is”. This includes, but is not limited to, any implied warranties of merchantability and fitness is for a particular purpose. The information covered in this document is subject to change without notice.

KYE Systems Corp. assumes no responsibility for any errors that may appear in this document.

All brand names mentioned in this manual are trademarks or registered trademarks of their respective companies.

Copyright © 2011 KYE Systems Corp. All rights reserved.

Paint.NET

Copyright (C) dotPDN LLC and Rick Brewster. Portions Copyright (C) Chris

Crosetto, Tom Jackson, Michael Kelsey, Brandon Ortiz, Craig Taylor, Chris

Trevino, and Luke Walker. All Rights Reserved.

Paint.NET is a registered trademark of dotPDN LLC.

Paint.NET is free for use in any environment, including but not necessarily

limited to: personal, academic, commercial, government, business, non-profit,

and for-profit. "Free" in the preceding sentence means that there is no cost

or charge associated with the installation and use of Paint.NET. Donations are

always appreciated, of course! http://www.getpaint.net/donate.html

Permission is hereby granted, free of charge, to any person obtaining a copy of this software (the "Software"), to use the Software without restriction, including the rights to use, copy, publish, and distribute the Software, and to permit persons to whom the Software is furnished to do so.

You may not modify, adapt, rent, lease, loan, sell, or create derivative works based upon the Software or any part thereof. However, certain icons used in the Paint.NET user interface are from or adapted from those in the "Crystal" icon set, http://www.everaldo.com/crystal/, or the "Oxygen" icon set, http://www.oxygen-icons.org/. These icons are covered by the LGPL license, http://www.gnu.org/copyleft/lesser.html. These icons are stored as "loose" PNG image files in the Resources\en-US\ directory where Paint.NET is installed.

The above copyright notice and this permission notice shall be included in all copies of the Software.

THE SOFTWARE IS PROVIDED "AS IS", WITHOUT WARRANTY OF ANY KIND, EXPRESS OR IMPLIED, INCLUDING BUT NOT LIMITED TO THE WARRANTIES OF MERCHANTABILITY, FITNESS FOR A PARTICULAR PURPOSE AND NONINFRINGEMENT. IN NO EVENT SHALL THE AUTHORS OR COPYRIGHT HOLDERS BE LIABLE FOR ANY CLAIM, DAMAGES OR OTHER LIABILITY, WHETHER IN AN ACTION OF CONTRACT, TORT OR OTHERWISE, ARISING FROM, OUT OF OR IN CONNECTION WITH THE SOFTWARE OR THE USE OR OTHER DEALINGS IN THE SOFTWARE.

Paint.NET is a registered trademark of dotPDN LLC. All other trademarks are the property of their

respective owners.

Symbol for Separate Collection in European Countries

This symbol indicates that this product is to be collected separately.

The following apply only to users in European countries: This product is designated for separate collection at an

appropriate collection point. Do not dispose of as household waste.

For more information, contact the retailer or the local authorities in charge of waste management.

Símbolo de recogida selectiva en países europeos

Este símbolo indica que este producto debe eliminarse por separado.

Las cláusulas siguientes se aplican únicamente a los usuarios de países europeos:

Este producto debe recogerse separadamente en un punto de recogida adecuado. No elimine este producto con la basura normal.

Para más información, póngase en contacto con el vendedor o las autoridades locales encargadas de la gestión de residuos.

Symbol für Mülltrennung in der Europäischen Union

Dieses Symbol bedeutet, dass dieses Produkt separat entsorgt werden muss.

Folgendes gilt nur für Benutzer in der Europäischen Union:

Dieses Produkt muss an einem geeigneten Sammelplatz angeliefert werden.

Entsorgen Sie das Produkt nicht im Haushaltmüll.

Weitere Information erhalten Sie von Ihrem Einzelhändler oder von der für Entsorgung zuständigen örtlichen Behörde.

Símbolo para a recolha separada em países da Europa

Este símbolo indica que este produto tem de ser recolhido separadamente.

Os seguintes pontos aplicam-se somente a utilizadores de países europeus:

Este produto está designado para a recolha separada num ponto de recolha apropriado. Não elimine este produto como lixo doméstico.

Para mais informações contacte o vendedor ou as autoridades locais responsáveis pela gestão do lixo.

Symbole de collecte séparée dans les pays européens

Ce symbole indique que ce produit doit faire l’objet d’une collecte séparée.

Ce qui suit ne s’applique qu’aux utilisateurs résidant dans les pays européens :

Ce produit a été conçu afin de faire l’objet d’une collecte séparée dans un centre de tri adéquat. Ne vous débarrassez pas de ce produit avec vos ordures ménagères.

Pour plus d’informations, contactez votre revendeur ou le service assurant l’élimination des déchets.

Simbolo per la raccolta differenziata nei paesi europei

Il simbolo indica che questo prodotto si può raccogliere separatamente.

Quanto segue si applica soltanto agli utenti dei paesi europei:

Questo prodotto è stato progettato per la raccolta differenziata presso un punto di raccolta appropriato. Non gettarlo insieme ai rifiuti di casa.

Per maggiori informazioni, rivolgersi al rivenditore o all'autorità locale responsabile della gestione dei rifiuti.

Symbool voor gescheiden afvalophaling in Europese landen

Dit symbool geeft aan dat dit product afzonderlijk moet worden opgehaald.

Het volgende geldt alleen voor inwoners van Europese landen:

Dit product werd ontworpen voor gescheiden inzameling op een geschikt inzamelingspunt. Het hoort niet bij het huishoudelijk afval.

Neem voor meer informatie contact op met de verkoper of de plaatselijke overheid, belast met het afvalbeheer.

Symbol pro třídění odpadu v evropských zemích

Tento symbol označuje, že tento výrobek je třeba zlikvidovat jako tříděný odpad.

Pro uživatele v evropských zemích platí následující zásady: Tento výrobek je třeba zlikvidovat jako tříděný odpad v příslušné sběrně. Nelikvidujte s běžným komunálním

odpadem.

Další informace vám poskytne prodejce nebo místní orgány zodpovědné za likvidaci odpadu.

Az elkülönített hulladék-elhelyezésre figyelmeztető szimbólum az európai országokban

A szimbólum arra figyelmeztet, hogy a terméket külön hulladéklerakókban kell gyűjteni.

A következő figyelmeztetés kizárólag az európai felhasználókra vonatkozik:

A terméket az elkülönített hulladékgyűjtést figyelembe véve tervezték. Ne dobja ki a készüléket háztartási szeméttárolóba. További információkért vegye fel a kapcsolatot a viszonteladóval vagy a helyi hulladékgazdálkodásért felelős hatósággal.

Sümbol eraldi kogumiseks Euroopa maades

See sümbol näitab, et seda toodet tuleb koguda eraldi. Alljärgnev kehtib ainult kasutajatele Euroopa maades: Seda toodet tuleb kasutada eraldi vastavas

kogumispunktis. Ärge likvideerige seda kui olmejääki. Kui teil on vaja enam teavet, võtke ühendus jaemüüja

või kohaliku autoriteediga, kes on vastutav jäätmekorralduse teeninduse eest.

Symbol zbiórki selektywnej w krajach europejskich

Symbol ten wskazuje, że produkt powinien być zbierany selektywnie.

Poniższe uwagi dotyczą wyłącznie użytkowników w krajach europejskich:

Ten produkt jest przeznaczony do zbiórki selektywnej w odpowiednim punkcie zbiórki. Nie należy pozbywać się go razem z odpadami gospodarstw domowych.

W celu uzyskania dalszych informacji należy skontaktować się ze sprzedawcą lub z miejscowymi władzami odpowiedzialnymi za gospodarkę odpadami.

Atsevišķas atkritumu savākšanas simbols Eiropas valstīs

Šāds simbols norāda, ka izstrādājums ir jānošķir no citiem atkritumiem

Šie norādījumi attiecas tikai uz lietotājiem Eiropas valstīs: Izstrādājumu paredzēts savākt atsevišķi no citiem

atkritumiem tam piemērotā savākšanas vietā. To nedrīkst izmest kopā ar sadzīves atkritumiem. Lai iegūtu papildu informāciju, sazinieties ar

mazumtirgotāju vai vietējām institūcijām, kas atbild par atkritumu apsaimniekošanu.

Σύμβολο για χωριστή περισυλλογή στις ευρωπαϊκές χώρες

Simbolis atskiram atliekų išmetimui įvairiose Europos šalyse

Το σύμβολο αυτό υποδεικνύει ότι το συγκεκριμένο προϊόν πρέπει να περισυλλέγεται χωριστά.

Τα ακόλουθα ισχύουν μόνο για χρήστες σε ευρωπαϊκές χώρες:

Το προϊόν προορίζεται για χωριστή περισυλλογή σε κάποιο ενδεδειγμένο σημείο αποκομιδής απορριμμάτων. Μην το απορρίπτετε ως κοινό οικιακό απόρριμμα.

Για περισσότερες πληροφορίες, επικοινωνήστε με το κατάστημα λιανικής που σας προμήθευσε το προϊόν ή με τις αρχές που είναι αρμόδιες για τη διαχείριση απορριμμάτων.

Šis simbolis nurodo, kad šis produktas turi būti išmetamas atskirai.

Sekanti informacija taikoma tik Europos šalių vartotojams: Šis produktas sukurtas atskiram išmetimui tam tikrame

atliekų surinkimo taške. Neišmeskite kaip buitinių šiukšlių.

Dėl tolimesnės informacijos, susisiekite su mažmenininku arba vietinės valdžios organais atsakingais už atliekų tvarkymą.

Genius EasyPen i405X, MousePen i608X (6x8

Table of Contents

English

1-2

Pусский

3-4

Deutsch

5-6

Français

7-8

Italiano

9-10

Español

11-12

Brasil

13-14

Nederlands

15-16

Norsk

17-18

Svenska

19-20

Česky

21-22

Magyar

23-24

Polski

25-26

Slovensko

27-28

Slovenčina

29-30

Hrvatski/Bosanski/Srpski

31-32

Română

33-34

Български

35-36

Ελληνικά

37-38

Türkçe

39-40

Українська

41-42

Eesti

43-44

Latviešu

45-46

Lietuviškai

47-48

аза

49-50


51-52


53-54

ENGLISH

G E N I U S G R A P H I C TA B L E T

Q U I C K I N S T A L L A T I O N G U I D E

C A U T I O N : P L E A S E I N S E RT T H E D R I V E R C D I N TO Y O U R C O M P U T E R F I R S T A N D T H E N F O L L O W T H E I N S T R U C T I O N S TO C O M P L E T E Y O U R S E T U P

P R O C E S S .

N O T E : R E M O V E T H E S C R E E N P R O T E C T O R B E F O R E U S I N G T H E TA B L E T.

I N T R O D U C T I O N

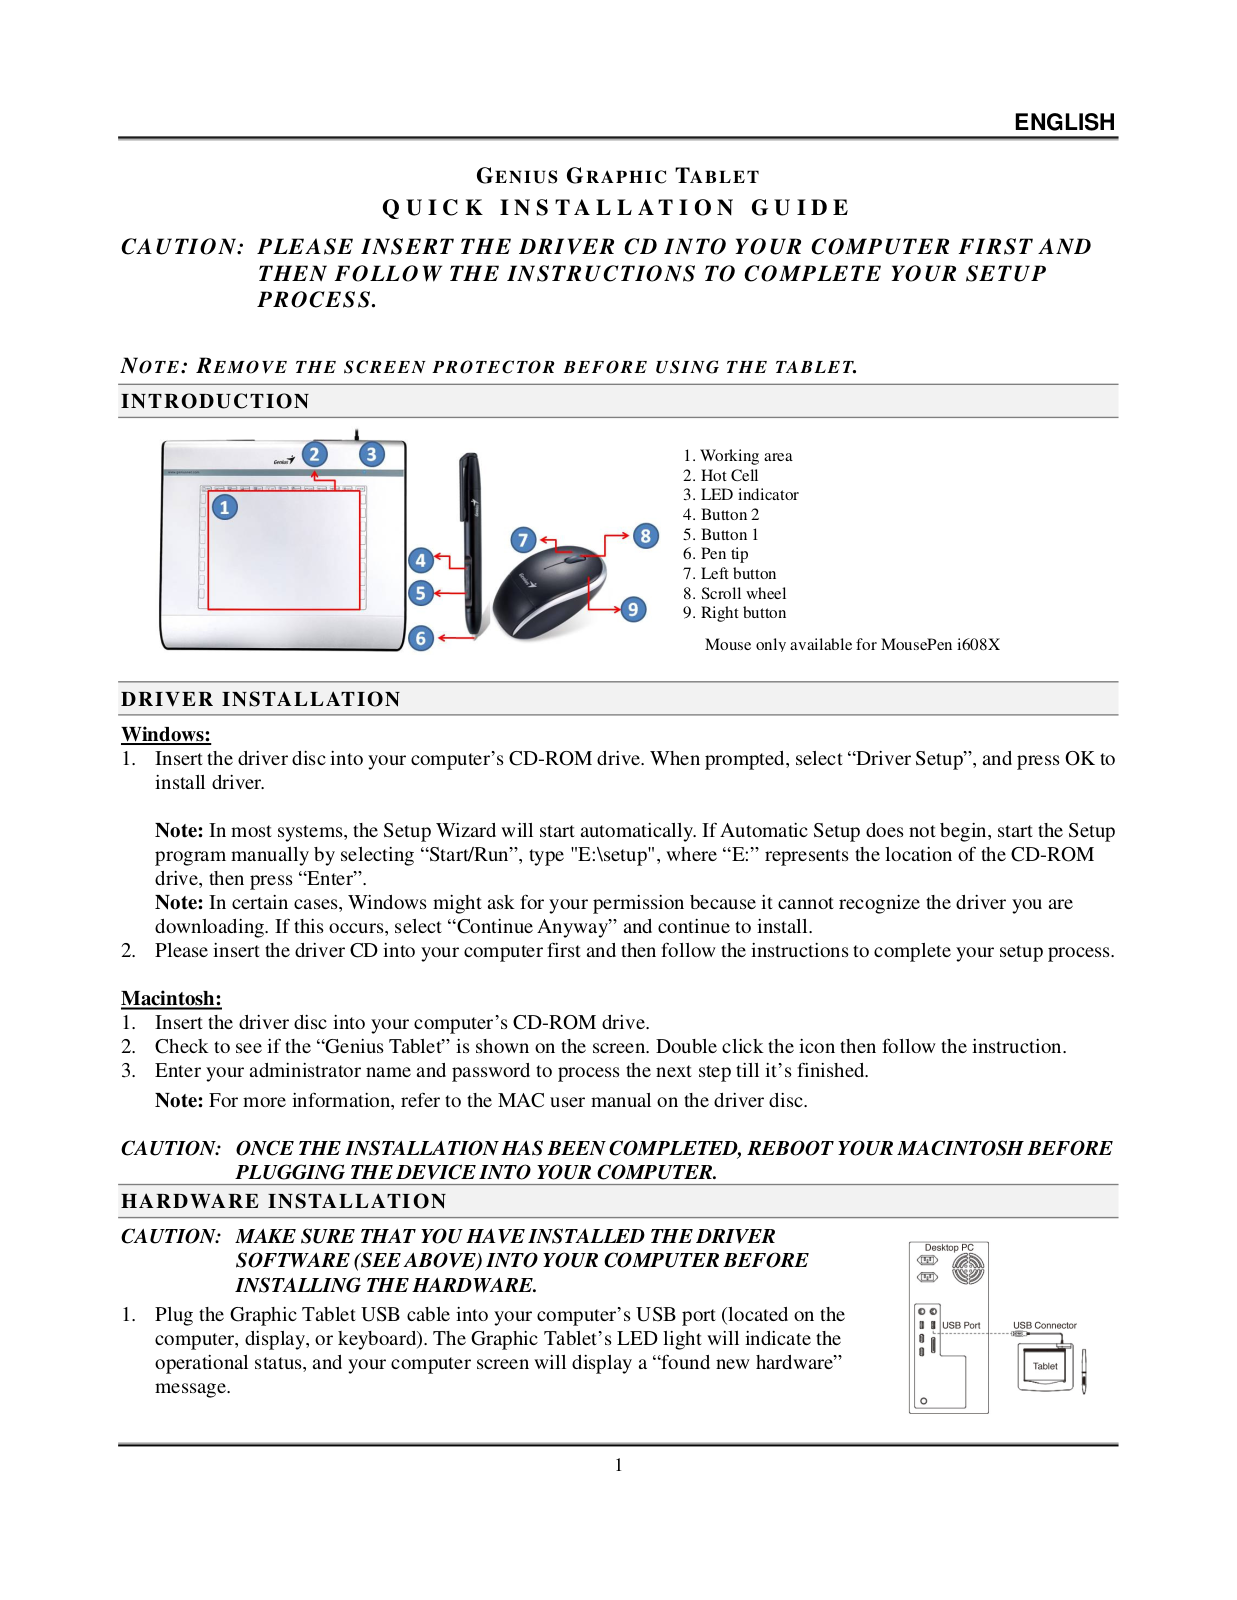
1. Working area

2. Hot Cell

3. LED indicator

4. Button 2

5. Button 1

6. Pen tip

7. Left button

8. Scroll wheel

9. Right button

Mouse only available for MousePen i608X

D R I V E R I N S TA L L AT I O N

Windows:

1.Insert the driver disc into your computer’s CD-ROM drive. When prompted, select “Driver Setup”, and press OK to install driver.

Note: In most systems, the Setup Wizard will start automatically. If Automatic Setup does not begin, start the Setup program manually by selecting “Start/Run”, type "E:\setup", where “E:” represents the location of the CD-ROM drive, then press “Enter”.

Note: In certain cases, Windows might ask for your permission because it cannot recognize the driver you are downloading. If this occurs, select “Continue Anyway” and continue to install.

2.Please insert the driver CD into your computer first and then follow the instructions to complete your setup process.

Macintosh:

1.Insert the driver disc into your computer’s CD-ROM drive.

2.Check to see if the “Genius Tablet” is shown on the screen. Double click the icon then follow the instruction.

3.Enter your administrator name and password to process the next step till it’s finished.

Note: For more information, refer to the MAC user manual on the driver disc.

CAUTION: ONCE THE INSTALLATION HAS BEEN COMPLETED, REBOOT YOUR MACINTOSH BEFORE PLUGGING THE DEVICE INTO YOUR COMPUTER.

H A R D WA R E I N S TA L L AT I O N

CAUTION: MAKE SURE THAT YOU HAVE INSTALLED THE DRIVER

SOFTWARE (SEE ABOVE) INTO YOUR COMPUTER BEFORE

INSTALLING THE HARDWARE.

1.Plug the Graphic Tablet USB cable into your computer’s USB port (located on the computer, display, or keyboard). The Graphic Tablet’s LED light will indicate the operational status, and your computer screen will display a “found new hardware” message.

1

ENGLISH

V E R I F Y I N G T H E I N S TA L L AT I O N

To ensure that everything has been installed properly, please follow the procedures below. Check the User’s manual on the CD-ROM for more information.

VERIFYING HARDWARE AND DRIVER FUNCTIONS

The LED light on the Tablet Plate is the main indicator for hardware operation. The light normally stays off, and will come on and off in response to various conditions. Watch the status of the Tablet Plate LED light as you go through these steps. None of the tests, except the last two, require the tablet driver to be installed.

1.For the cordless pen (stylus) or the wireless mouse , tap on any surface or press the left button of the mouse to “wake it up”, in case the pen or the mouse has gone to "sleep" after it is not used for a few minutes.

2.As soon as the Tablet Plate receives power, the LED light will come on briefly, and will normally stay off.

3.When the working area (Plate) detects the presence of the pen, the LED light will flash slowly. This happens when the pen tip is directly above the working area of the tablet plate and is low enough.

4.When you press a button on the body of the pen or the mouse, the LED light will come on.

5.When you press the pen tip against the tablet plate anywhere in the working area, the light will also come on.

6.If the tablet driver has been properly installed, a small tablet icon () will appear in system Task Bar area, normally at the lower right corner of the screen.

7.With the tablet driver properly installed, moving the pen tip or the mouse over the working area will cause the cursor on the screen to move accordingly.

TO C H A N G E T H E P E N T I P

1.Place the Pen tip into the tip remover.

2.Simply pull the Pen tip out, and then insert a new tip.

Note: Pliers (not included in package) may also be used to remove the pen tip.

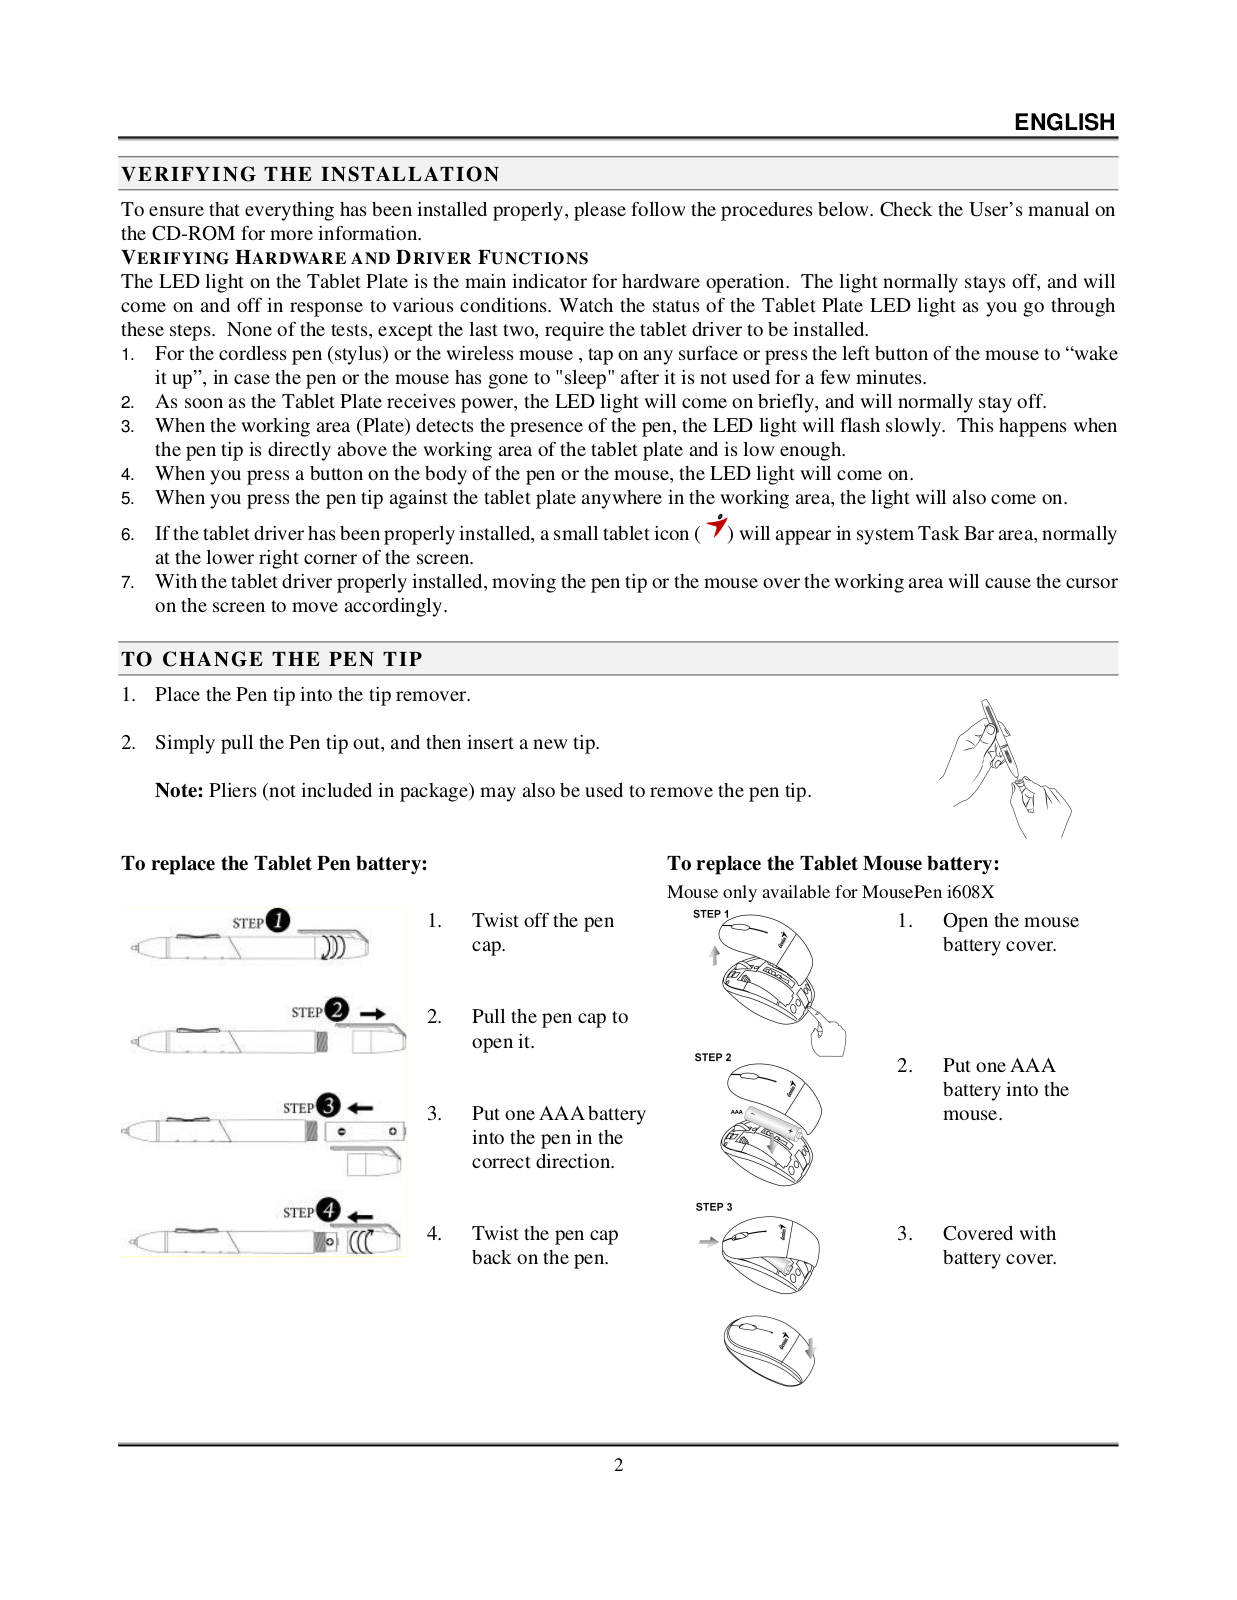
To replace the Tablet Pen battery:

1. Twist off the pen cap.

2. Pull the pen cap to open it.

3. Put one AAA battery into the pen in the correct direction.

4. Twist the pen cap back on the pen.

To replace the Tablet Mouse battery:

Mouse only available for MousePen i608X

1. Open the mouse battery cover.

2. Put one AAA battery into the mouse.

3. Covered with battery cover.

2

Русский

ГРАФИЧЕСКИЙ ПЛАНШЕТ G E N I U S

КРАТ К О Е Р У К О В О Д С Т В О П О У С Т А Н О В К Е

Внимание! Для завершения процесса установки вставьте компакт-диск с драйвером в компьютер и следуйте инструкциям.

ПРИМЕЧАНИЕ. ДО НАЧАЛА РАБОТЫ С ПЛАНШЕТОМ СНИМИТЕ С ЭКРАНА ЗАЩИТНУЮ ПЛЕНКУ.

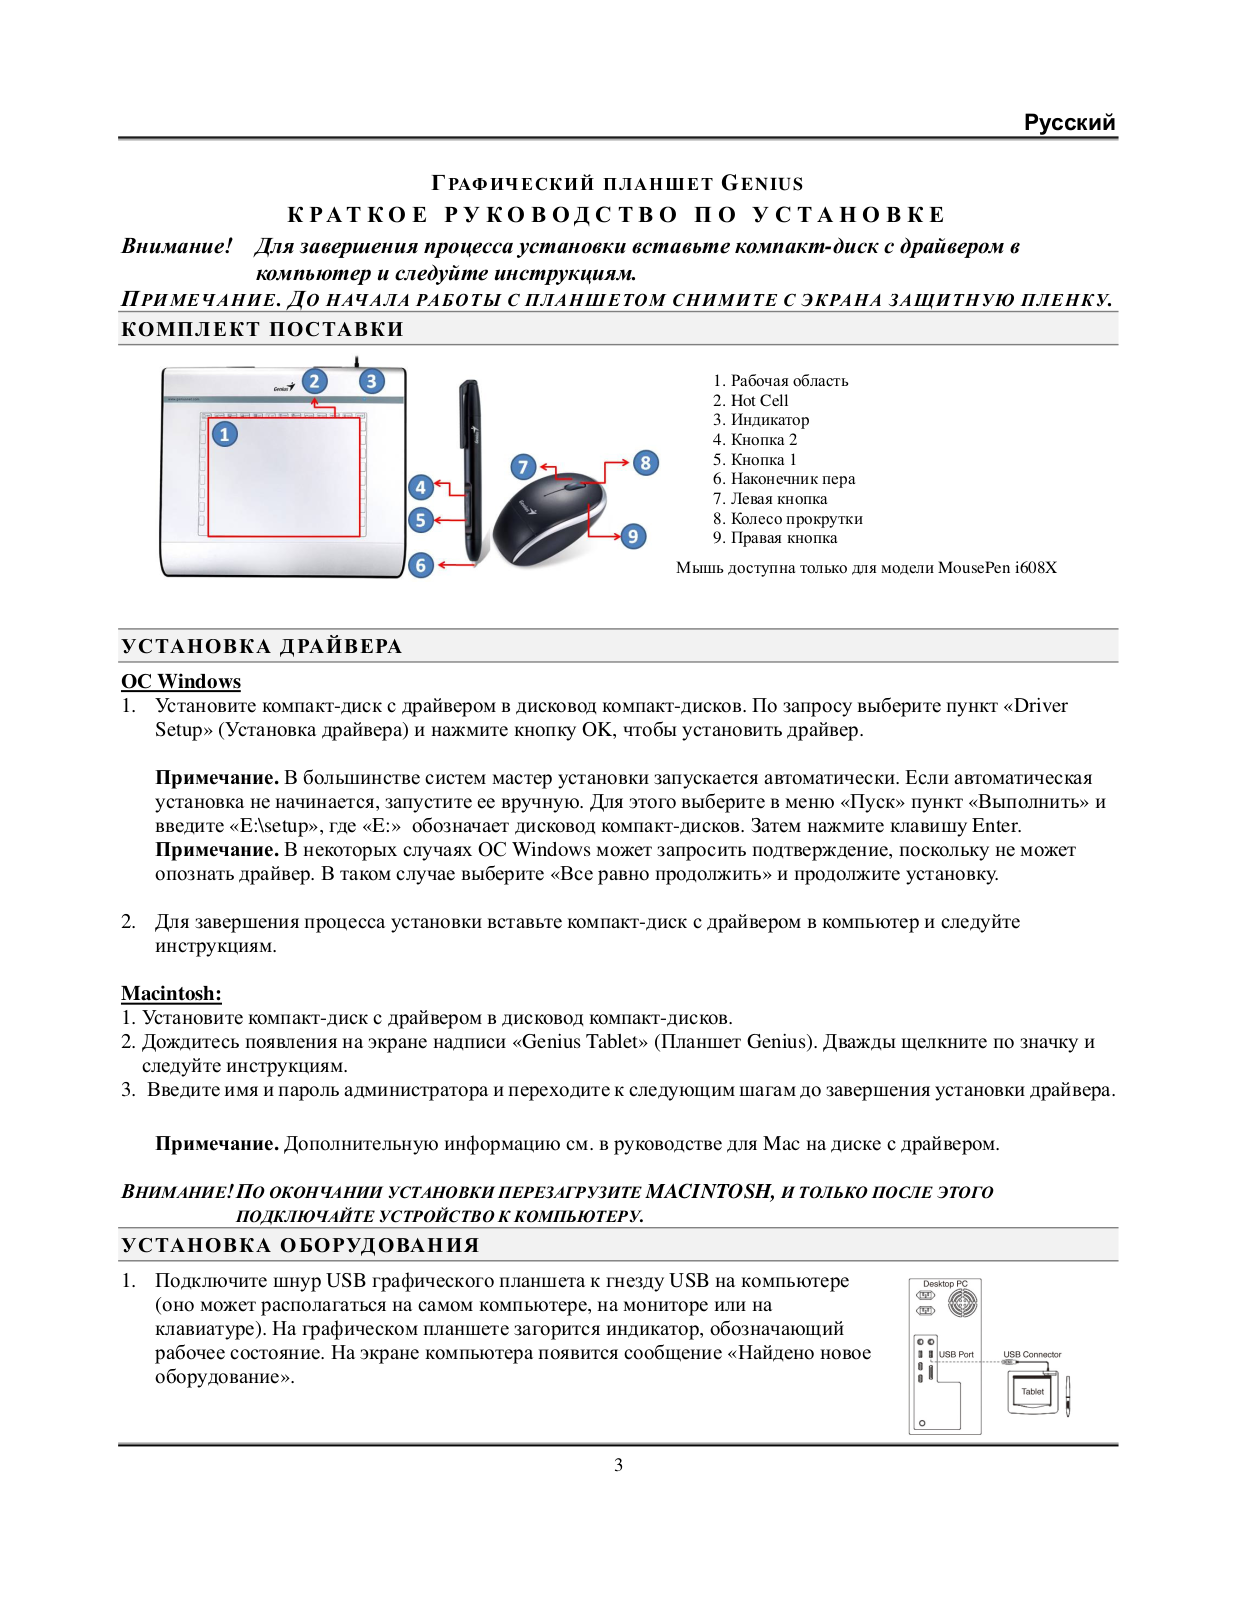
КОМПЛЕКТ ПОСТАВКИ

1. Рабочая область

2. Hot Cell

3. Индикатор

4. Кнопка 2

5. Кнопка 1

6. Наконечник пера

7. Левая кнопка

8. Колесо прокрутки

9. Правая кнопка

Мышь доступна только для модели MousePen i608X

УСТАНОВКА ДРАЙВЕРА

ОС Windows

1.Установите компакт-диск с драйвером в дисковод компакт-дисков. По запросу выберите пункт «Driver Setup» (Установка драйвера) и нажмите кнопку OK, чтобы установить драйвер.

Примечание. В большинстве систем мастер установки запускается автоматически. Если автоматическая установка не начинается, запустите ее вручную. Для этого выберите в меню «Пуск» пункт «Выполнить» и

введите «E:\setup», где «E:» обозначает дисковод компакт-дисков. Затем нажмите клавишу Enter. Примечание. В некоторых случаях ОС Windows может запросить подтверждение, поскольку не может опознать драйвер. В таком случае выберите «Все равно продолжить» и продолжите установку.

2.Для завершения процесса установки вставьте компакт-диск с драйвером в компьютер и следуйте инструкциям.

Macintosh:

1.Установите компакт-диск с драйвером в дисковод компакт-дисков.

2.Дождитесь появления на экране надписи «Genius Tablet» (Планшет Genius). Дважды щелкните по значку и следуйте инструкциям.

3.Введите имя и пароль администратора и переходите к следующим шагам до завершения установки драйвера.

Примечание. Дополнительную информацию см. в руководстве для Mac на диске с драйвером.

ВНИМАНИЕ! ПО ОКОНЧАНИИ УСТАНОВКИ ПЕРЕЗАГРУЗИТЕ MACINTOSH, И ТОЛЬКО ПОСЛЕ ЭТОГО ПОДКЛЮЧАЙТЕ УСТРОЙСТВО К КОМПЬЮТЕРУ.

УСТАНОВКА ОБОРУДОВАНИЯ

1.Подключите шнур USB графического планшета к гнезду USB на компьютере (оно может располагаться на самом компьютере, на мониторе или на клавиатуре). На графическом планшете загорится индикатор, обозначающий рабочее состояние. На экране компьютера появится сообщение «Найдено новое оборудование».

3

Русский

ПРОВЕРКА УСТАНОВКИ

Чтобы убедиться в правильности всех выполненных действий следуйте описанной ниже процедуре.

ПРОВЕРКА РАБОТОСПОСОБНОСТИ ПЛАНШЕТА И ДРАЙВЕРА

Состояние планшета фиксируется светодиодным индикатором, размещенном на корпусе. Обычно индикатор не горит. Его включение и отключение вызывается изменениями в режиме работы планшета. При выполнении следующих операций внимательно следите за состоянием индикатора. Все эти тесты кроме двух последних могут выполнятся до установки драйвера.

1.Если вы работаете с беспроводным пером или беспроводной мышью и устройство в результате бездействия в течение нескольких минут перешло в режим ожидания, прикоснитесь пером любой поверхности или щелкните левой кнопкой мыши.

2.Как только будет включено питание планшета, вспыхнет светодиодный индикатор. В дальнейшем, при нормальной работе планшета индикатор перейдет в выключенное состояние.

3.При приближении пера к планшету индикатор начнет медленно увеличивать и уменьшать яркость свечения. Это произойдет в том случае, если кончик пера находится близко к поверхности планшета над его рабочей зоной.

4.При нажатии на кнопку, расположенную на корпусе пера или мыши, индикатор пера постепенно увеличит яркость свечения.

5.Индикатор также вспыхивает при касании пером планшета в любом месте рабочей области.

6.Если драйвер планшета установлен правильно, то через несколько секунд в правом нижнем углу экрана (на панели задач) появится небольшой значок ().

7.При правильной установке драйвера движение пера или мыши в пределах рабочей зоны планшета приводит к соответствующему перемещению курсора на экране компьютера.

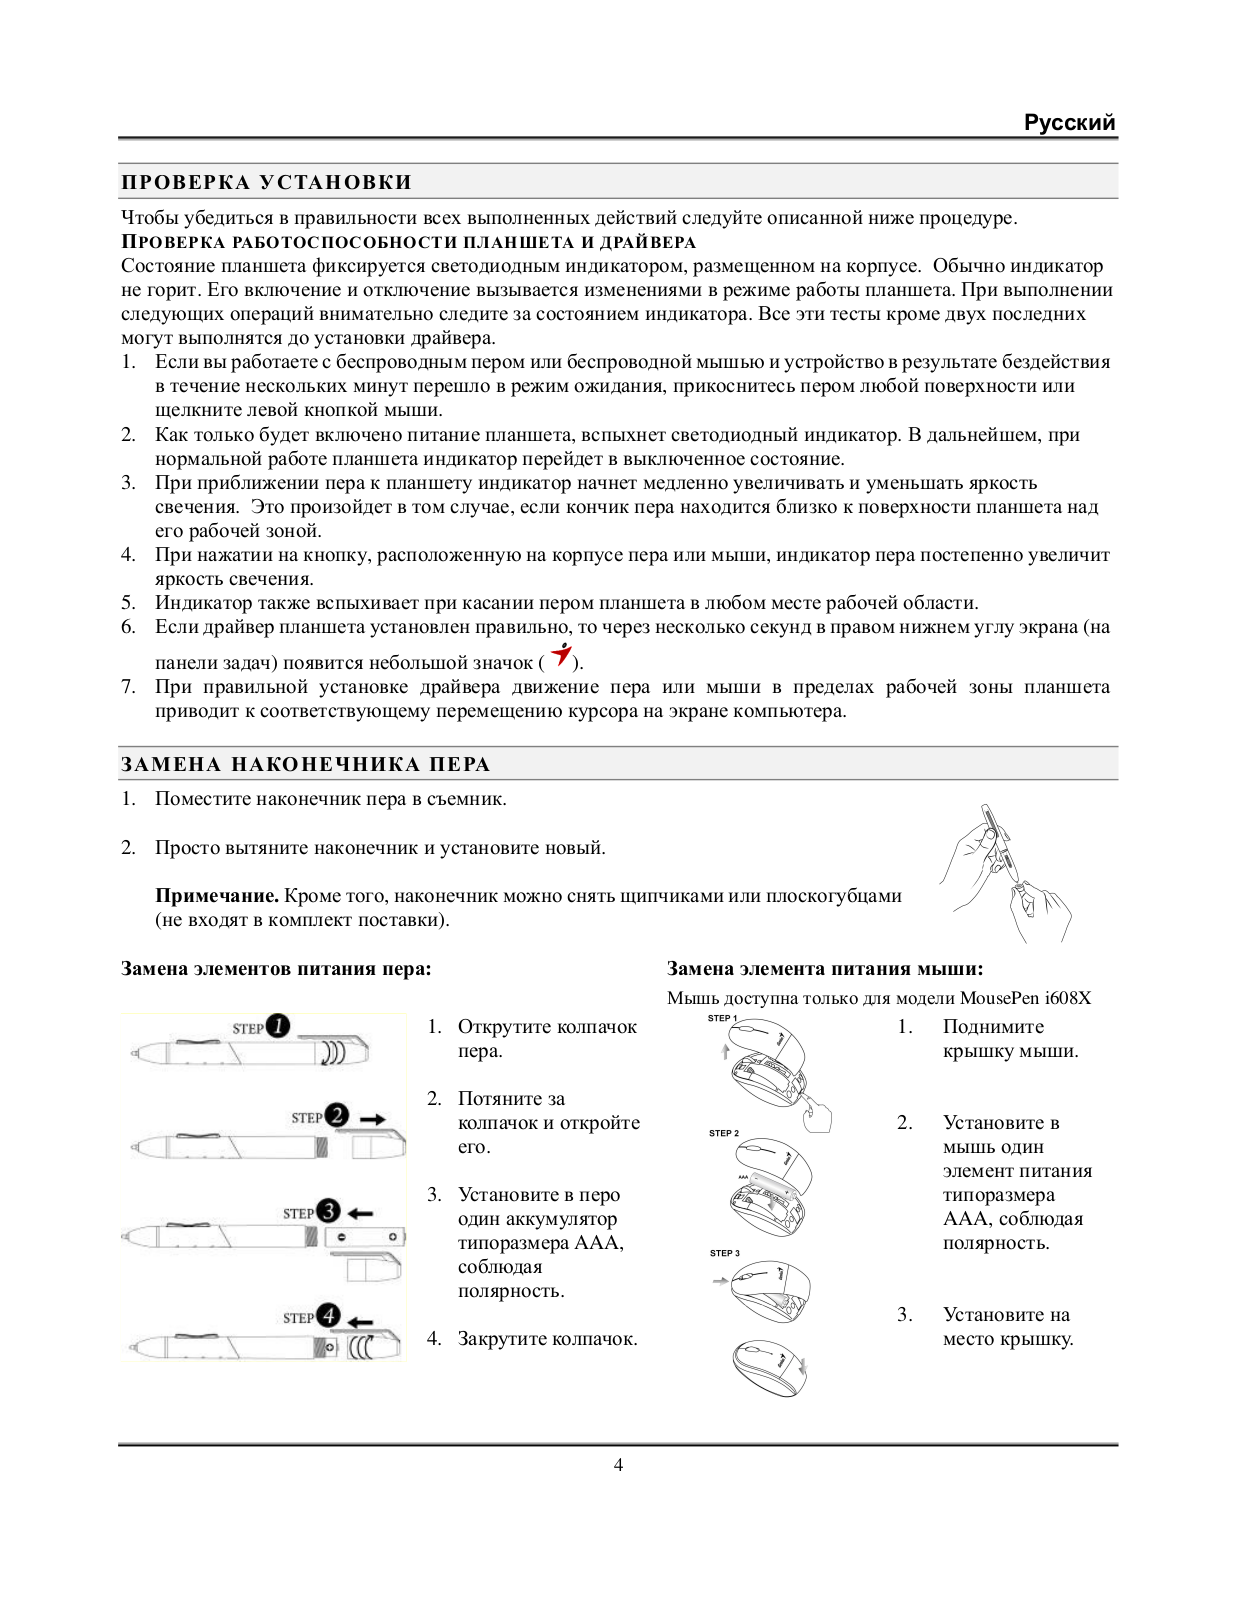
ЗАМЕНА НАКОНЕЧНИКА ПЕРА

1.Поместите наконечник пера в съемник.

2.Просто вытяните наконечник и установите новый.

Примечание. Кроме того, наконечник можно снять щипчиками или плоскогубцами (не входят в комплект поставки).

Замена элементов питания пера:


Замена элемента питания мыши:


Мышь доступна только для модели MousePen i608X


Открутите колпачок

1.

Поднимите


1.


пера.


крышку мыши.


2.

Потяните за


колпачок и откройте

2.

Установите в


его.


мышь один


элемент питания


3.

Установите в перо


типоразмера


один аккумулятор


AAA, соблюдая


типоразмера AAA,


полярность.


соблюдая


полярность.


3.

Установите на


4.

Закрутите колпачок.


место крышку.


4

DEUTSCH

G E N I U S GR A F I K TA B L E T T

K U R Z I N S T A L L A T I O N S A N L E I T U N G

VORSICHT: L E G E N S I E D I E T R E I B E R - CD I N I H R E N C O M P U T E R E I N U N D B E F O L G E N D I E

A N W E I S U N G E N , U M I H R E E I N S T E L L U N G E N A B Z U S C H L I E ß E N .

H I N W E I S : E N T F E R N E N S I E D I E B I L D S C H I R M S C H U T Z F O L I E B E VO R S I E D A S TA B L E T T B E N U T Z E N .

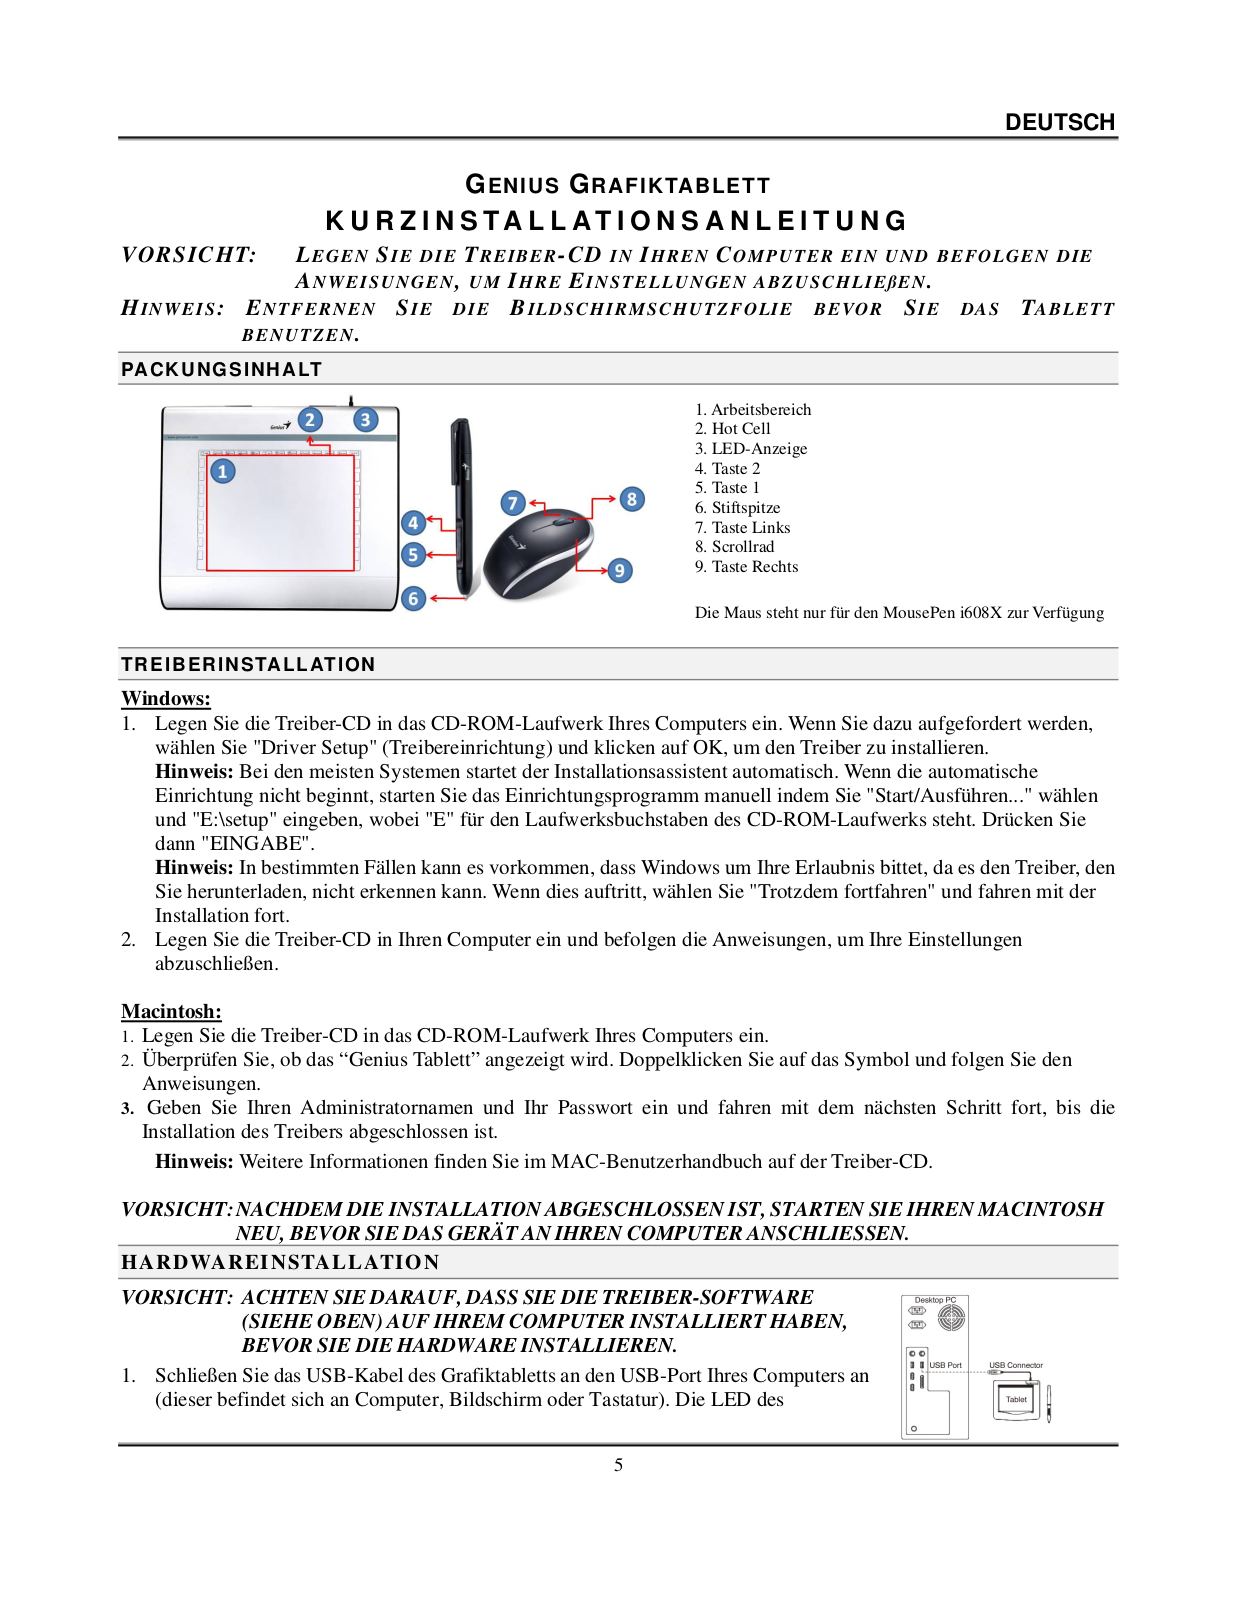
PA C K U N G S I N H A LT

1. Arbeitsbereich

2. Hot Cell

3. LED-Anzeige

4. Taste 2

5. Taste 1

6. Stiftspitze

7. Taste Links

8. Scrollrad

9. Taste Rechts

Die Maus steht nur für den MousePen i608X zur Verfügung

T R E I B E R I N S TA L L AT I O N

Windows:

1.Legen Sie die Treiber-CD in das CD-ROM-Laufwerk Ihres Computers ein. Wenn Sie dazu aufgefordert werden, wählen Sie "Driver Setup" (Treibereinrichtung) und klicken auf OK, um den Treiber zu installieren.

Hinweis: Bei den meisten Systemen startet der Installationsassistent automatisch. Wenn die automatische Einrichtung nicht beginnt, starten Sie das Einrichtungsprogramm manuell indem Sie "Start/Ausführen..." wählen und "E:\setup" eingeben, wobei "E" für den Laufwerksbuchstaben des CD-ROM-Laufwerks steht. Drücken Sie dann "EINGABE".

Hinweis: In bestimmten Fällen kann es vorkommen, dass Windows um Ihre Erlaubnis bittet, da es den Treiber, den Sie herunterladen, nicht erkennen kann. Wenn dies auftritt, wählen Sie "Trotzdem fortfahren" und fahren mit der Installation fort.

2.Legen Sie die Treiber-CD in Ihren Computer ein und befolgen die Anweisungen, um Ihre Einstellungen abzuschließen.

Macintosh:

1.Legen Sie die Treiber-CD in das CD-ROM-Laufwerk Ihres Computers ein.

2.Überprüfen Sie, ob das “Genius Tablett” angezeigt wird. Doppelklicken Sie auf das Symbol und folgen Sie den Anweisungen.

3.Geben Sie Ihren Administratornamen und Ihr Passwort ein und fahren mit dem nächsten Schritt fort, bis die Installation des Treibers abgeschlossen ist.

Hinweis: Weitere Informationen finden Sie im MAC-Benutzerhandbuch auf der Treiber-CD.

VORSICHT: NACHDEM DIE INSTALLATION ABGESCHLOSSEN IST, STARTEN SIE IHREN MACINTOSH NEU, BEVOR SIE DAS GERÄT AN IHREN COMPUTER ANSCHLIESSEN.

HARDWAREINSTALLATION

VORSICHT: ACHTEN SIE DARAUF, DASS SIE DIE TREIBER-SOFTWARE (SIEHE OBEN) AUF IHREM COMPUTER INSTALLIERT HABEN, BEVOR SIE DIE HARDWARE INSTALLIEREN.

1.Schließen Sie das USB-Kabel des Grafiktabletts an den USB-Port Ihres Computers an (dieser befindet sich an Computer, Bildschirm oder Tastatur). Die LED des

5

DEUTSCH

Grafiktabletts zeigt den Betriebsstatus an und Ihr Computerbildschirm zeigt eine

Meldung "Neue Hardware gefunden".

ÜBERPRÜFEN DER IN STALLATION

Um sicherzugehen, dass alles richtig installiert wurde, folgen Sie bitte den Anweisung auf der rechten Seite. Für weiterführende Informationen ziehen Sie das Anwenderhandbuch auf der CD-ROM zu Rate.

HARDWARE- UND TREIBERFUNKTIONEN ÜBERPRÜFEN

Die LED-Anzeige auf dem Tablett ist die Hauptanzeige für die Funktionen der Hardware. Normalerweise leuchtet sie nicht, geht aber je nach Zustand mal an und mal aus. Beobachten Sie die LED-Anzeige, während Sie die folgenden Schritte durchgehen. Keiner der Tests – außer der beiden letzten, verlangt einen installierten Tablett-Treiber.

1.Um sicherzugehen, dass alles richtig installiert wurde, folgen Sie bitte den Anweisungen weiter unten.

2.Sobald das Tablett angeschlossen ist, leuchtet die LED-Anzeige kurz auf, um dann im Normalfall aus zu sein.

3.Wenn die Arbeitsfläche des Tabletts den Stift erkennt, blinkt die LED-Anzeige langsam. Dies passiert, wenn sich die Stiftspitze direkt über der Arbeitsfläche des Tabletts befindet und niedrig genug ist.

4.Um den schnurlosen Stift oder die schnurlose Maus "aufzuwecken", wenn er/sie für eine Weile nicht genutzt wurde und er/sie in den Sleep-Modus gewechselt ist, tippen Sie ihn einfach auf irgendeine Oberfläche, oder drücken Sie die linke Maustaste.

5.Wenn Sie die Stiftspitze irgendwo auf die Arbeitsfläche aufsetzen leuchtet die LED-Anzeige ebenfalls.

6.Wurde der Tablett-Treiber korrekt installiert, so erscheint ein kleines Tablett-Symbol () in der System-Task-Leiste – normalerweise in der unteren rechten Ecke des Bildschirms.

7.Wenn Sie eine Taste auf dem Stift oder der Maus drücken, so leuchtet die LED-Anzeige auf.

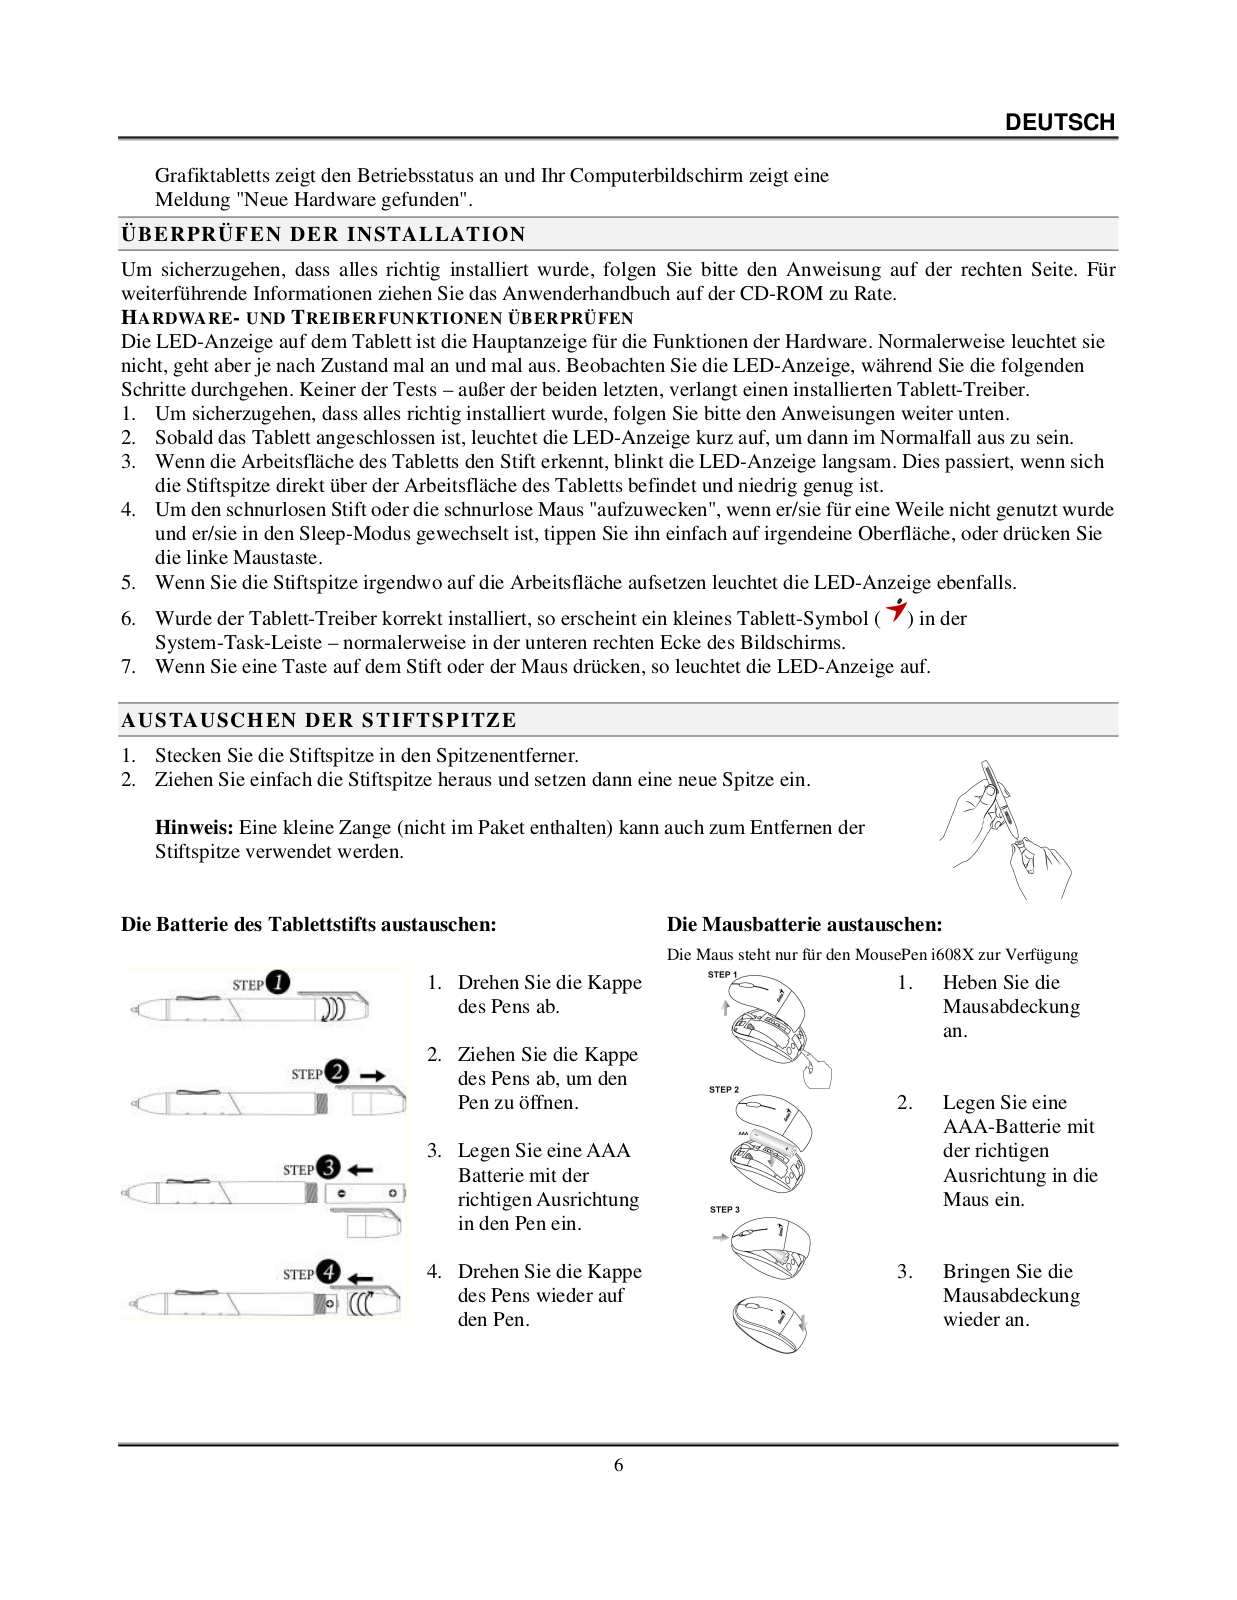
AUSTAU SCHEN DER STIFTSPITZE

1.Stecken Sie die Stiftspitze in den Spitzenentferner.

2.Ziehen Sie einfach die Stiftspitze heraus und setzen dann eine neue Spitze ein.

Hinweis: Eine kleine Zange (nicht im Paket enthalten) kann auch zum Entfernen der Stiftspitze verwendet werden.

Die Batterie des Tablettstifts austauschen:

1. Drehen Sie die Kappe des Pens ab.

2. Ziehen Sie die Kappe des Pens ab, um den Pen zu öffnen.

3. Legen Sie eine AAA Batterie mit der richtigen Ausrichtung in den Pen ein.

4. Drehen Sie die Kappe des Pens wieder auf den Pen.

Die Mausbatterie austauschen:

Die Maus steht nur für den MousePen i608X zur Verfügung

1. Heben Sie die Mausabdeckung an.

2. Legen Sie eine AAA-Batterie mit der richtigen Ausrichtung in die Maus ein.

3. Bringen Sie die Mausabdeckung wieder an.

6

FRANÇAIS

TA B LE T TE G R A P H I Q U E GE N I U S

G U I D E D ' I N S T A L L A T I O N R A P I D E

AV E RT I S S E M E N T : I N S E R E Z T O U T D A B O R D L E C D D U P I L O T E D A N S V O T R E O R D I N AT E U R ,

P U I S S U I V E Z L E S I N S T R U C T I O N S P O U R PA R A C H E V E R LI N S TA L L AT I O N . R E M A R Q U E : R E T I R E Z L E P R O T E C T E U R D E C R A N AVA N T D U T I L I S E R V O T R E TA B L E T T E .

C O N T E N U D E L ' E M B A L L A G E

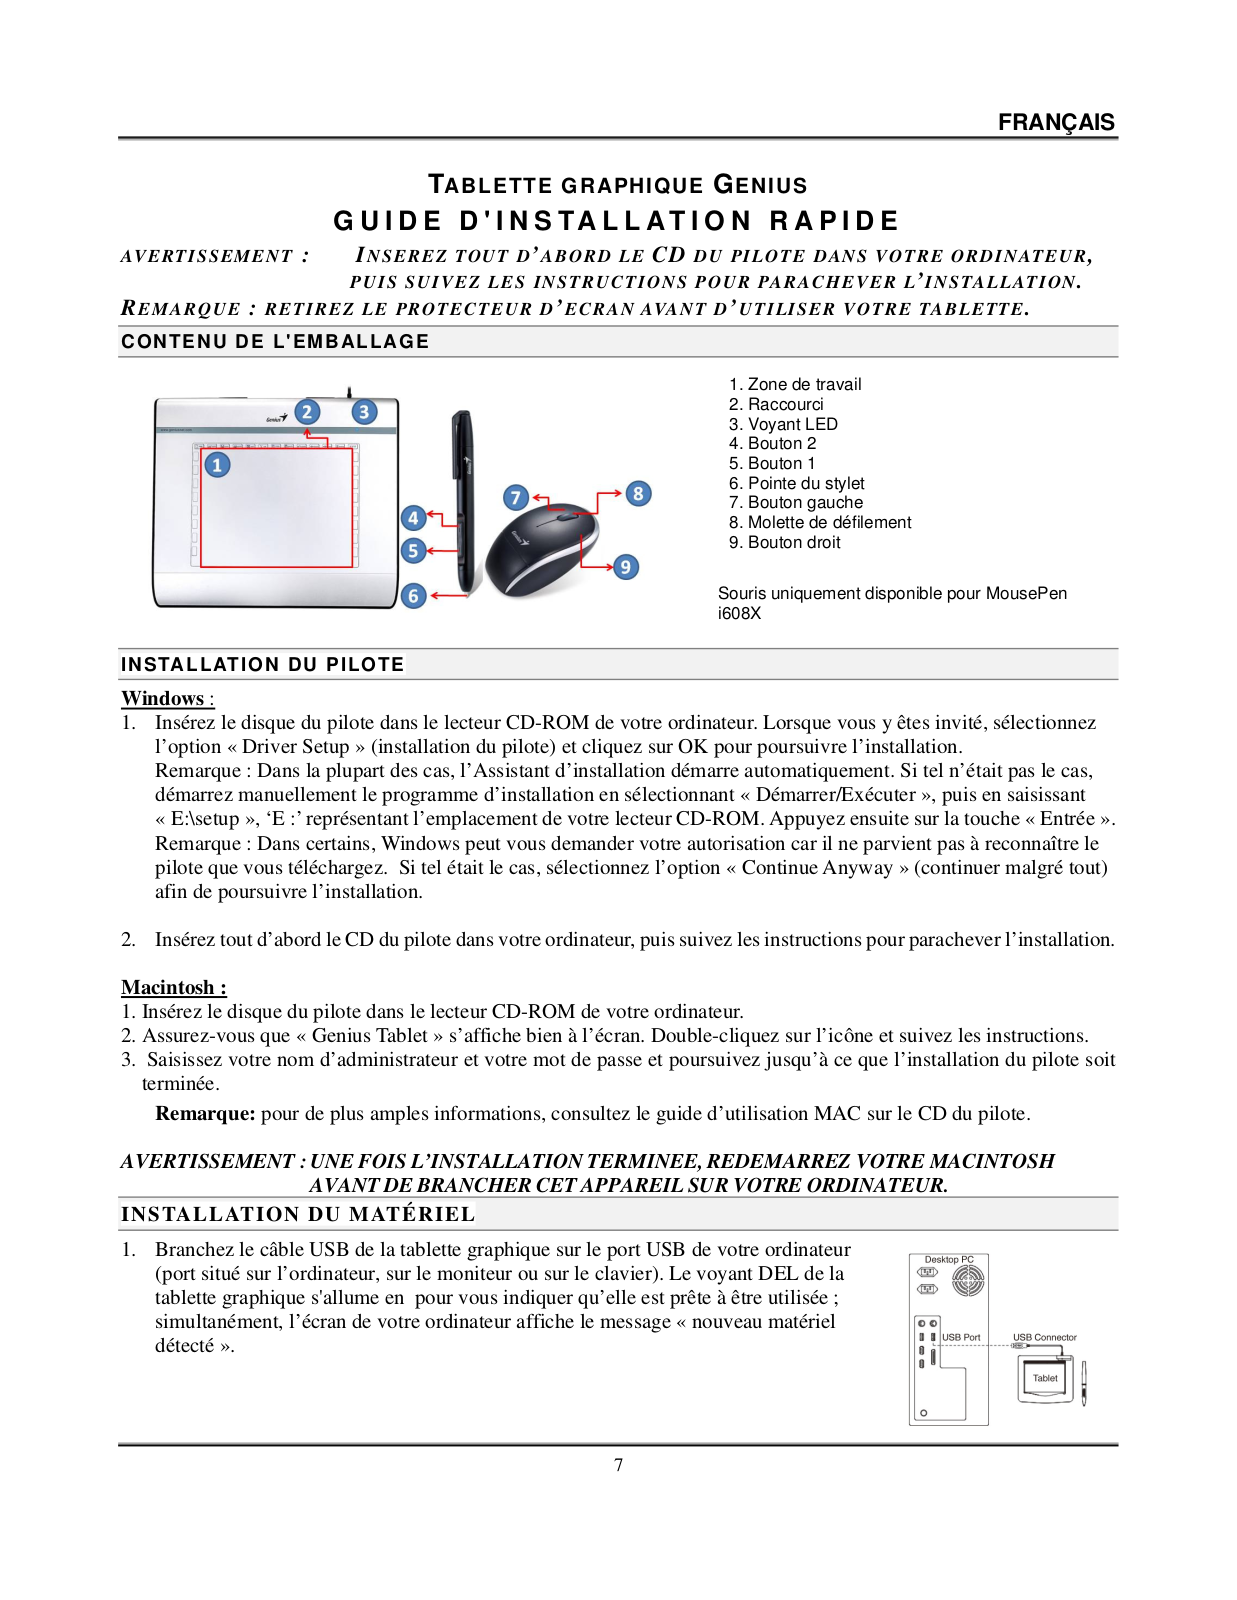
1. Zone de travail

2. Raccourci

3. Voyant LED

4. Bouton 2

5. Bouton 1

6. Pointe du stylet

7. Bouton gauche

8. Molette de défilement

9. Bouton droit

Souris uniquement disponible pour MousePen i608X

I N S TA L L AT I O N D U P I L O T E

Windows :

1.Insérez le disque du pilote dans le lecteur CD-ROM de votre ordinateur. Lorsque vous y êtes invité, sélectionnez l’option « Driver Setup » (installation du pilote) et cliquez sur OK pour poursuivre l’installation.

Remarque : Dans la plupart des cas, l’Assistant d’installation démarre automatiquement. Si tel n’était pas le cas, démarrez manuellement le programme d’installation en sélectionnant « Démarrer/Exécuter », puis en saisissant

« E:\setup », ‘E :’ représentant l’emplacement de votre lecteur CD-ROM. Appuyez ensuite sur la touche « Entrée ». Remarque : Dans certains, Windows peut vous demander votre autorisation car il ne parvient pas à reconnaître le pilote que vous téléchargez. Si tel était le cas, sélectionnez l’option « Continue Anyway » (continuer malgré tout) afin de poursuivre l’installation.

2.Insérez tout d’abord le CD du pilote dans votre ordinateur, puis suivez les instructions pour parachever l’installation.

Macintosh :

1.Insérez le disque du pilote dans le lecteur CD-ROM de votre ordinateur.

2.Assurez-vous que « Genius Tablet » s’affiche bien à l’écran. Double-cliquez sur l’icône et suivez les instructions.

3.Saisissez votre nom d’administrateur et votre mot de passe et poursuivez jusqu’à ce que l’installation du pilote soit terminée.

Remarque: pour de plus amples informations, consultez le guide d’utilisation MAC sur le CD du pilote.

AVERTISSEMENT : UNE FOIS L’INSTALLATION TERMINEE, REDEMARREZ VOTRE MACINTOSH AVANT DE BRANCHER CET APPAREIL SUR VOTRE ORDINATEUR.

I N S TA L L AT I ON D U M ATÉ R I E L

1.Branchez le câble USB de la tablette graphique sur le port USB de votre ordinateur (port situé sur l’ordinateur, sur le moniteur ou sur le clavier). Le voyant DEL de la tablette graphique s'allume en pour vous indiquer qu’elle est prête à être utilisée ; simultanément, l’écran de votre ordinateur affiche le message « nouveau matériel détecté ».

7

FRANÇAIS

V E R I F I C AT I ON D E L’ I N S TA L LAT I ON

Afin de vous assurer que l’ensemble du dispositif est correctement configuré, suivez les instructions indiquées ci-dessous.

VERIFICATION DES FONCTIONNALITES DU MATERIEL ET DU PILOTE

Le voyant sur la tablette est le témoin de fonctionnement du matériel. La lumière est normalement éteinte, mais s’allume et s’éteint selon les différentes conditions d’utilisation. Observez l’état du voyant lumineux de la tablette lorsque vous passez par les étapes suivantes. Le pilote de la tablette n’a besoin d’être installé que pour les deux dernières opérations.

1.Uniquement pour le stylet ou la souris sans fil : touchez brièvement n’importe quelle zone de la surface ou appuyez sur le bouton gauche de la souris pour "réveiller" le dispositif dans le cas celui-ci serait en "pause" après ne pas avoir été utilisé pendant plusieurs minutes.

2.Dès que la tablette est alimentée, le voyant lumineux s’allume brièvement, puis s’éteint.

3.Lorsque la zone de travail (tablette) détecte la présence du stylet, le voyant clignote lentement. Cela se produit lorsque la pointe du stylet est située directement sur la zone de travail de la tablette et est suffisamment proche.

4.Si vous appuyez sur l'un des boutons situés sur le corps du stylet ou de la souris, le voyant lumineux s’allumera.

5.Si vous appuyez sur la tablette avec la pointe du stylet sur tout point de la zone de travail, le voyant doit également s’allumer.

6.Si le pilote de la tablette est correctement installé, une petite icône représentant une tablette () devrait s’afficher sur la barre des tâches du système, en général dans l’angle inférieur droit de l’écran.

7.Lorsque le pilote de la tablette est correctement installé, le curseur affiché à l’écran se déplace en fonction du mouvement de la pointe du stylet sur la surface de travail.

R E M PL A C EM EN T D E L A P O I N T E D U S T Y L E T

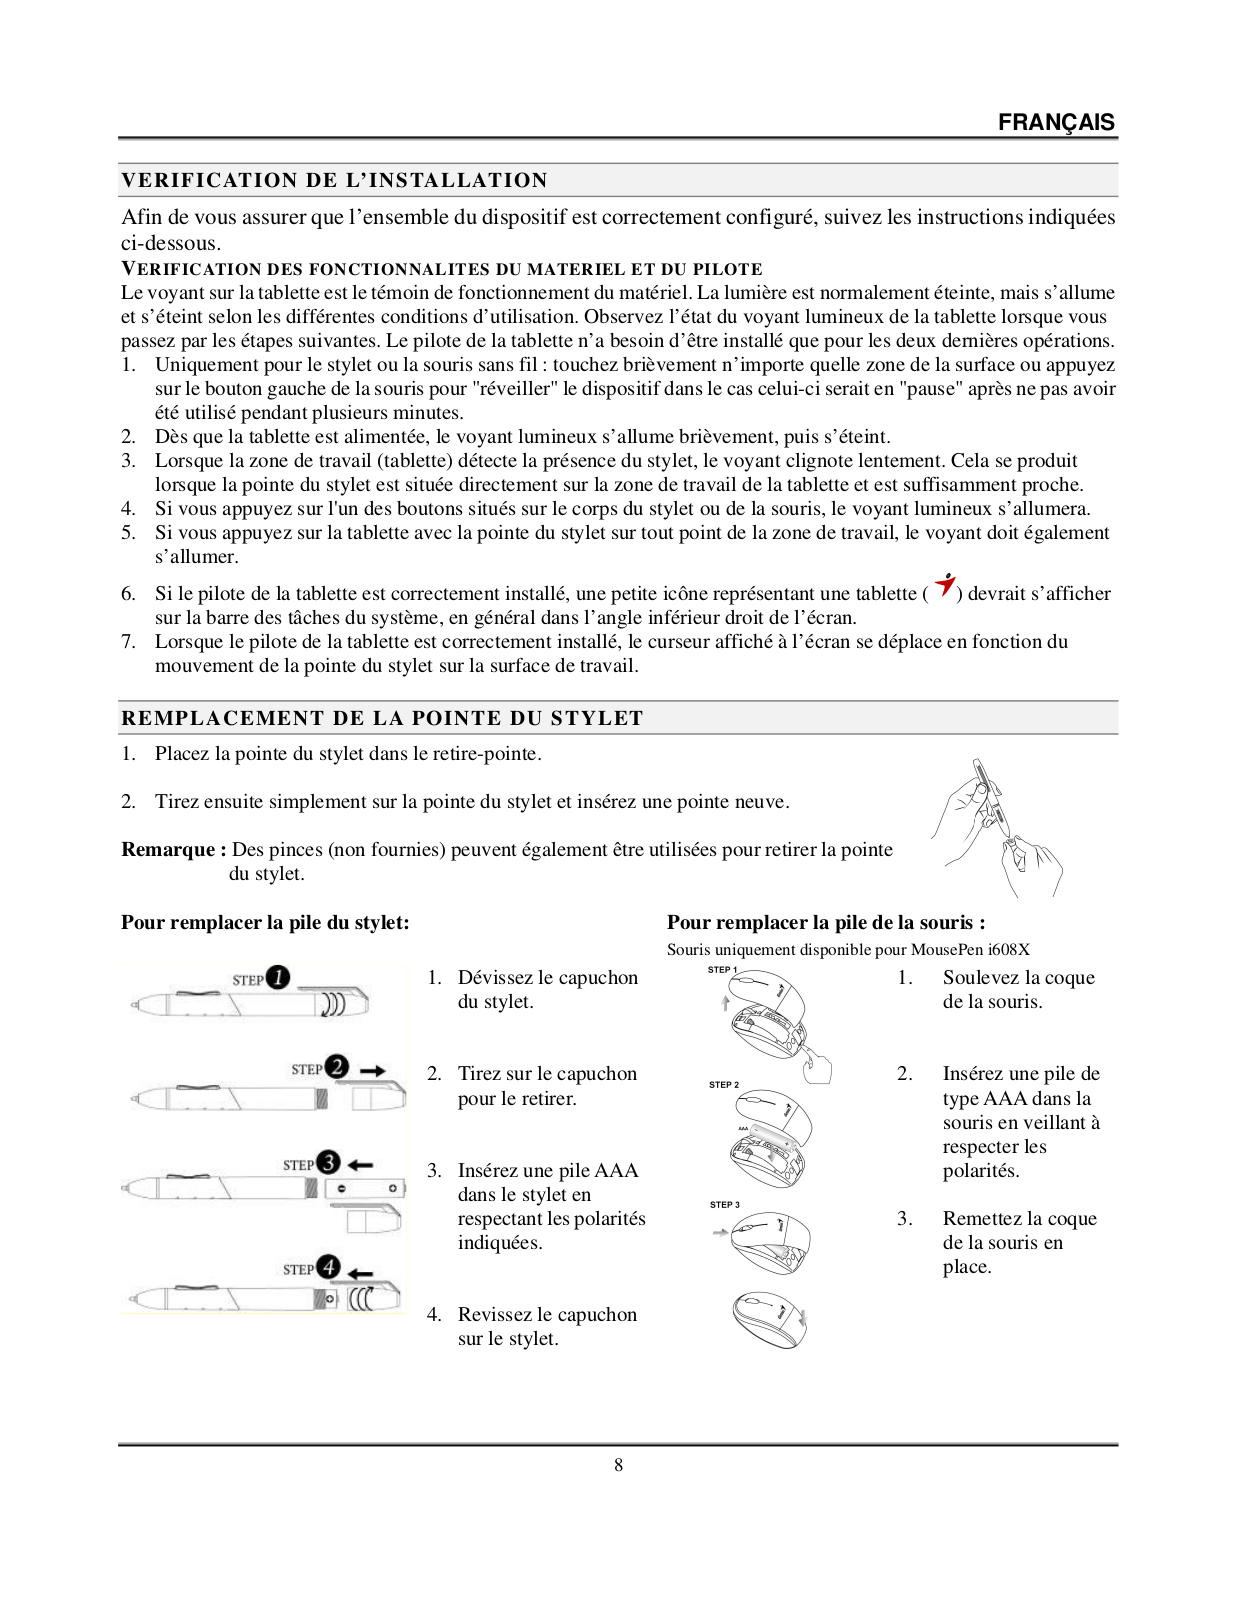
1.Placez la pointe du stylet dans le retire-pointe.

2.Tirez ensuite simplement sur la pointe du stylet et insérez une pointe neuve.

Remarque : Des pinces (non fournies) peuvent également être utilisées pour retirer la pointe du stylet.

Pour remplacer la pile du stylet:

Pour remplacer la pile de la souris :


Souris uniquement disponible pour MousePen i608X

1.Dévissez le capuchon du stylet.

2.Tirez sur le capuchon pour le retirer.

3.Insérez une pile AAA dans le stylet en respectant les polarités indiquées.

4.Revissez le capuchon sur le stylet.

1.Soulevez la coque de la souris.

2.Insérez une pile de type AAA dans la souris en veillant à respecter les polarités.

3.Remettez la coque de la souris en place.

8

ITALIANO

G E N I U S TA B L E T G R A F I C A

G U I D A I N S T A L L A Z I O N E R A P I D A

AT T E N Z I O N E : I N S E R I R E I L D R I V E R C D N E L V O S T R O C O M P U T E R P R I M A E P O I S E G U I R E L E I S T R U Z I O N I P E R C O M P L E TA R E L A P R O C E D U R A D E L LI M P O S TA Z I O N E .

N O TA : R I M U O V E R E L A P R O T E Z I O N E D E L L O S C H E R M O P R I M A D I U T I L I Z Z A R E L A TA B L E T.

C O N T E N U T I D E L L A C O N F E Z I O N E

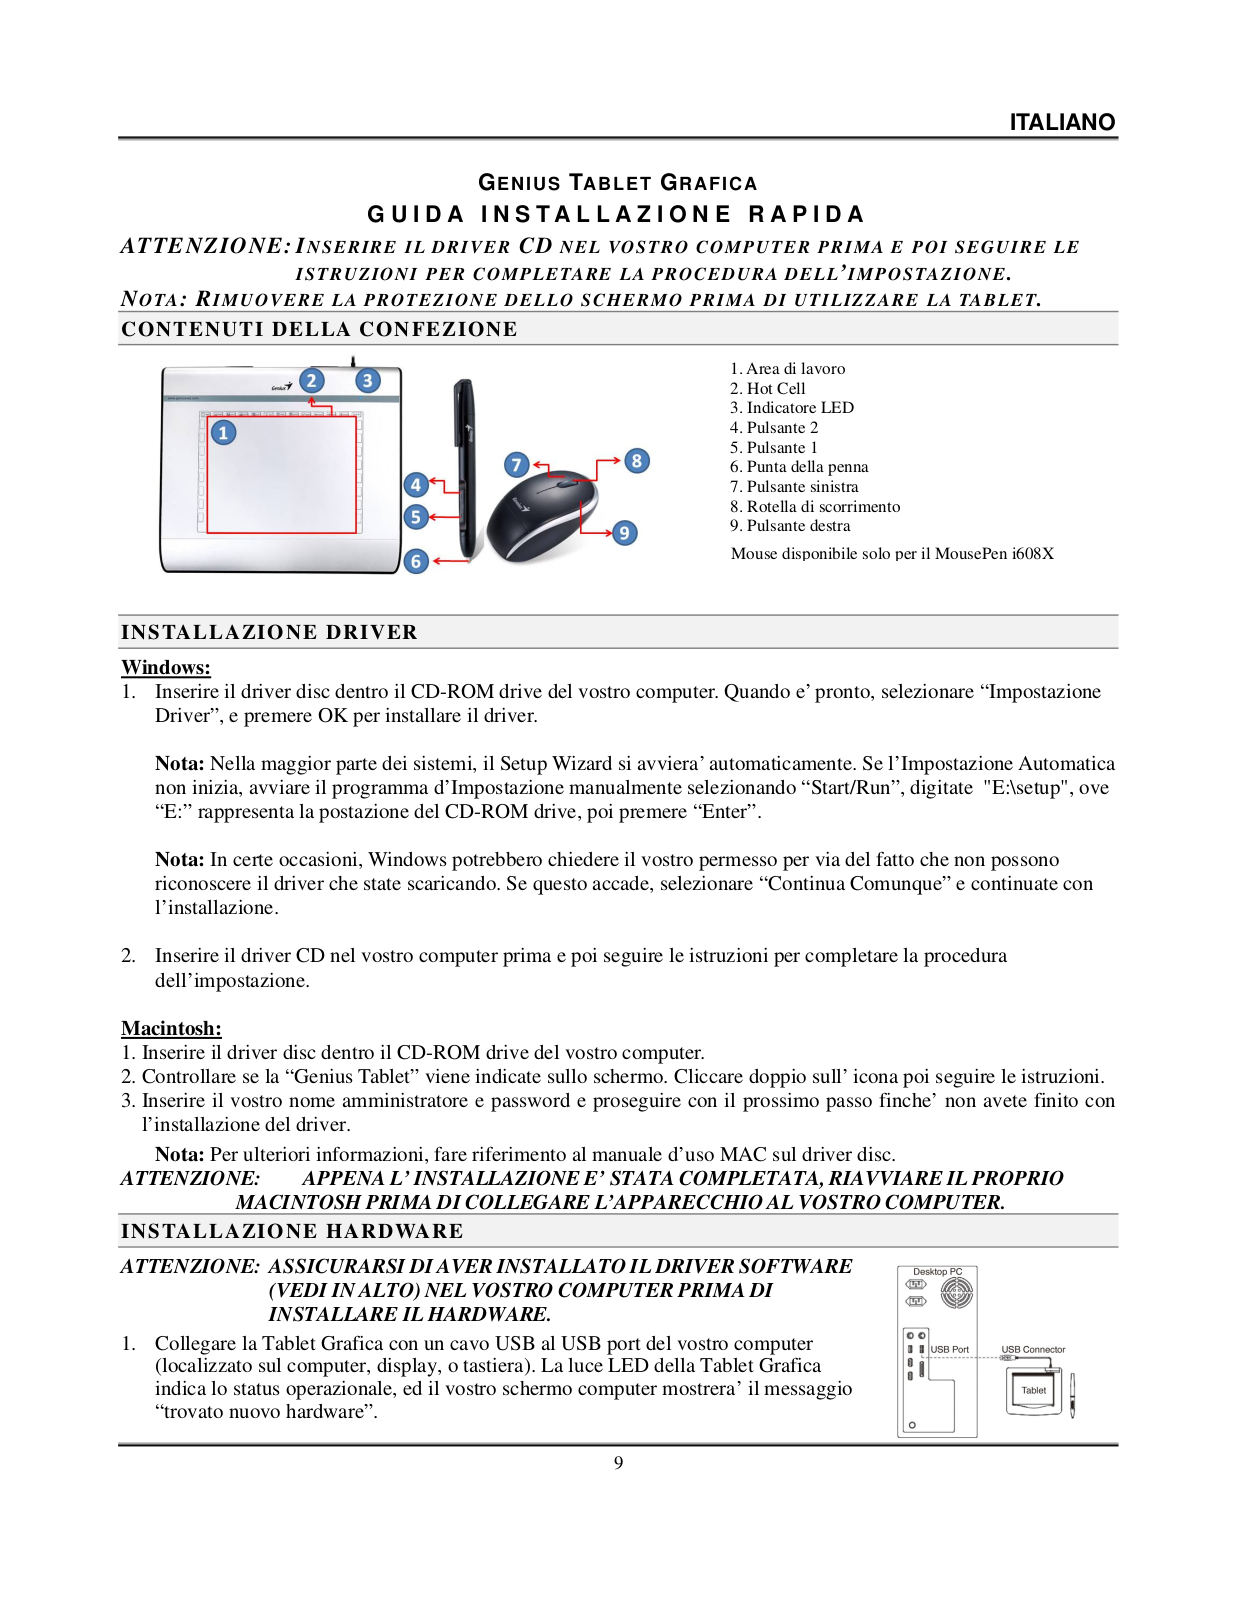
1. Area di lavoro

2. Hot Cell

3. Indicatore LED

4. Pulsante 2

5. Pulsante 1

6. Punta della penna

7. Pulsante sinistra

8. Rotella di scorrimento

9. Pulsante destra

Mouse disponibile solo per il MousePen i608X

I N S TA L L A Z I O N E D R I V E R

Windows:

1.Inserire il driver disc dentro il CD-ROM drive del vostro computer. Quando e’ pronto, selezionare “Impostazione Driver”, e premere OK per installare il driver.

Nota: Nella maggior parte dei sistemi, il Setup Wizard si avviera’ automaticamente. Se l’Impostazione Automatica non inizia, avviare il programma d’Impostazione manualmente selezionando “Start/Run”, digitate "E:\setup", ove “E:” rappresenta la postazione del CD-ROM drive, poi premere “Enter”.

Nota: In certe occasioni, Windows potrebbero chiedere il vostro permesso per via del fatto che non possono riconoscere il driver che state scaricando. Se questo accade, selezionare “Continua Comunque” e continuate con l’installazione.

2.Inserire il driver CD nel vostro computer prima e poi seguire le istruzioni per completare la procedura dell’impostazione.

Macintosh:

1.Inserire il driver disc dentro il CD-ROM drive del vostro computer.

2.Controllare se la “Genius Tablet” viene indicate sullo schermo. Cliccare doppio sull’ icona poi seguire le istruzioni.

3.Inserire il vostro nome amministratore e password e proseguire con il prossimo passo finche’ non avete finito con l’installazione del driver.

Nota: Per ulteriori informazioni, fare riferimento al manuale d’uso MAC sul driver disc.

ATTENZIONE: APPENA L’ INSTALLAZIONE E’ STATA COMPLETATA, RIAVVIARE IL PROPRIO MACINTOSH PRIMA DI COLLEGARE L’APPARECCHIO AL VOSTRO COMPUTER.

I N S TA L L A Z I O N E H A R D WA R E

ATTENZIONE: ASSICURARSI DI AVER INSTALLATO IL DRIVER SOFTWARE (VEDI IN ALTO) NEL VOSTRO COMPUTER PRIMA DI INSTALLARE IL HARDWARE.

1.Collegare la Tablet Grafica con un cavo USB al USB port del vostro computer (localizzato sul computer, display, o tastiera). La luce LED della Tablet Grafica indica lo status operazionale, ed il vostro schermo computer mostrera’ il messaggio “trovato nuovo hardware”.

9

ITALIANO

V E R I F I C A D E L L’ I N S TA L L A Z I O N E

Allo scopo di eseguire una corretta installazione, attenersi alle seguenti procedure.

VERIFICA DELLE FUNZIONI HARDWARE E DEL DRIVER

Il LED a luce sulla Tavoletta Grafica costituisce il principale indicatore della funzionalità hardware. Normalmente la luce è spenta, e lampeggia in risposta a varie condizioni. Mano a mano che si procede con le varie fasi dei test, controllare lo stato del LED sulla Tavoletta Grafica. Nessuno dei seguenti test, eccetto gli ultimi due, richiede l’installazione del driver della Tavoletta.

1.Penna (stilo) o mouse senza fili: battere leggermente la penna su una qualsiasi superficie o premere il pulsante sinistro del mouse per “svegliarli”, nel caso in cui si fossero “addormentati” perché inutilizzati da qualche minuto.

2.Quando la Tavoletta Grafica verrà accesa, il LED lampeggerà brevemente e poi rimarrà spento (condizione normale).

3.Non appena l’area di lavoro della Tavoletta rileverà la presenza della penna, il LED lampeggerà lentamente. Affinché ciò accada, la punta della penna deve trovarsi direttamente sopra l’area di lavoro della Tavoletta Grafica, ad una distanza non eccessiva.

4.Premendo un pulsante sulla penna o sul mouse, il LED si accende.

5.Il LED si accende anche quando si preme la punta della penna su un qualunque punto dell’area di lavoro della Tavoletta.

6.Se il driver della tavoletta grafica è stato installato correttamente, nella barra delle applicazioni apparirà una piccola icona rappresentante una tavoletta (), generalmente nell’angolo in basso a destra dello schermo.

7.Se il driver della tavoletta grafica è stato installato correttamente, lo spostamento della punta della penna o del mouse sull’area di lavoro corrisponderà al relativo spostamento del cursore sullo schermo.

P E R C A M B I A R E L A P U N TA D E L L A P E N N A

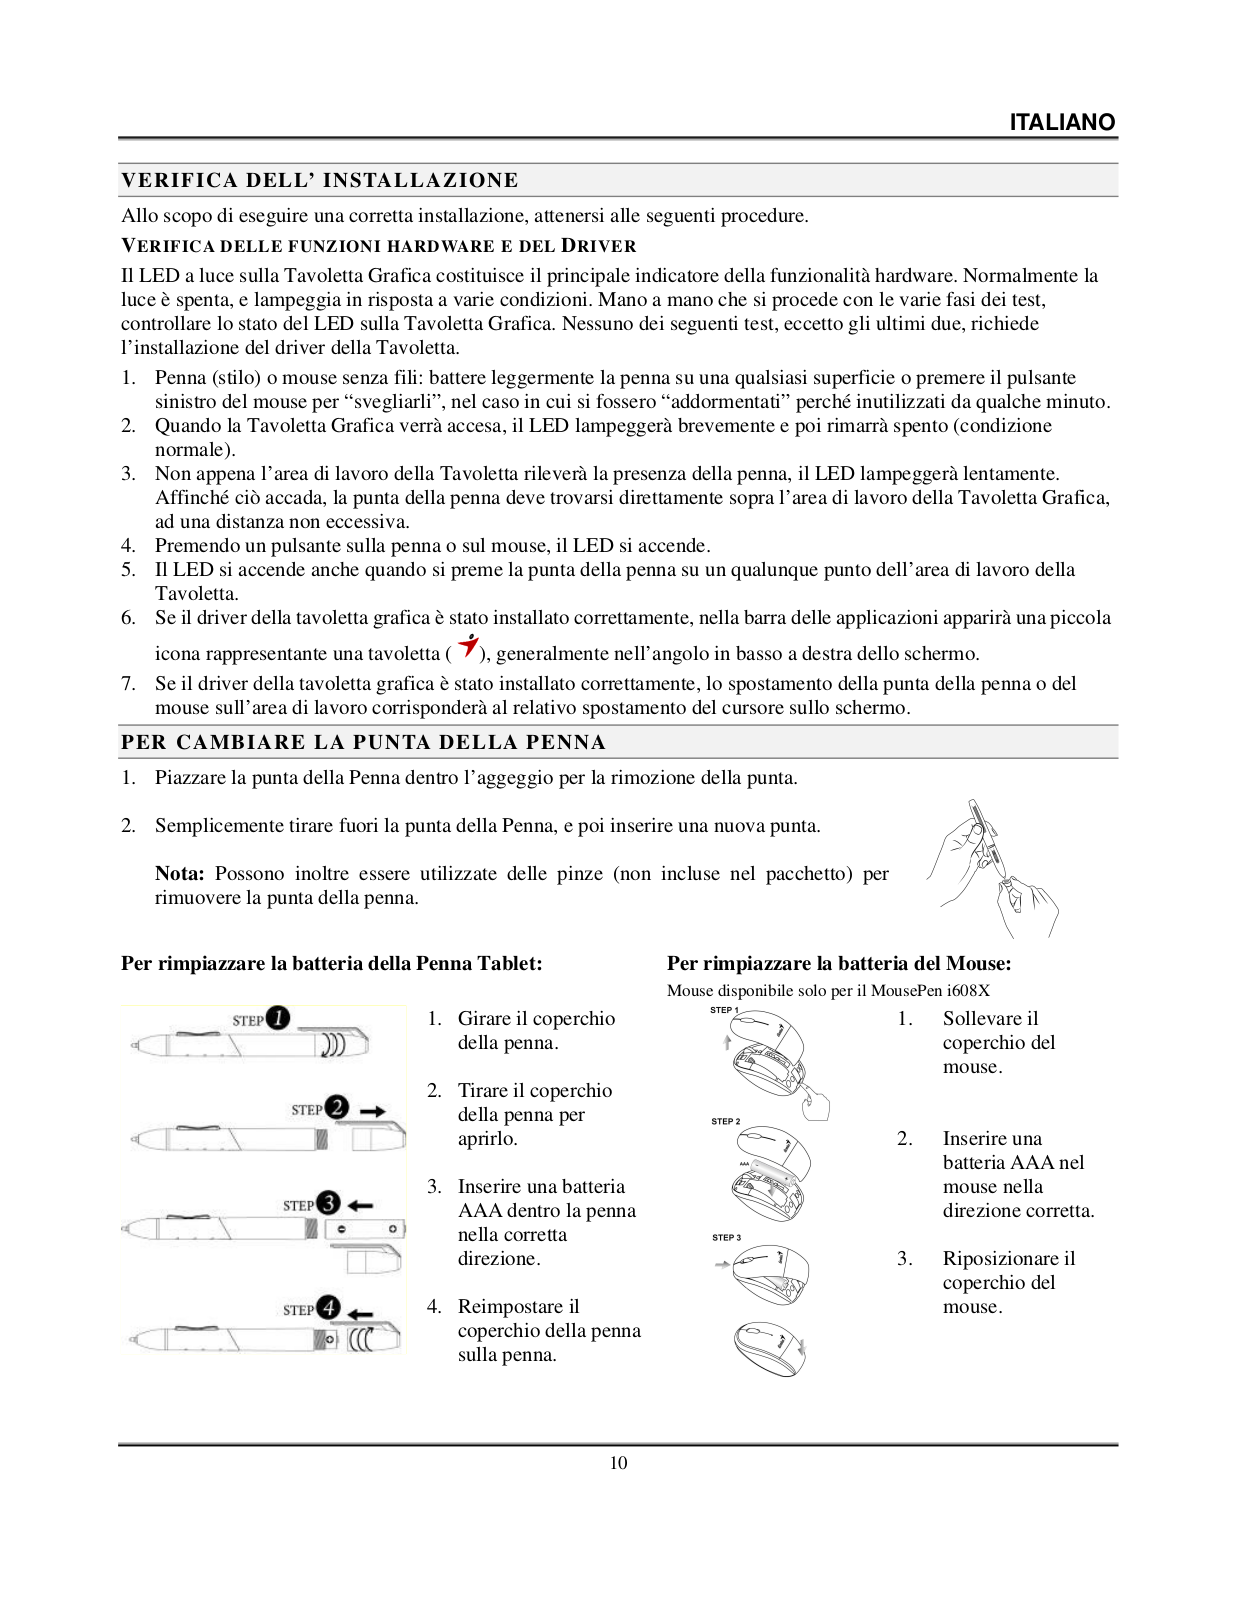
1.Piazzare la punta della Penna dentro l’aggeggio per la rimozione della punta.

2.Semplicemente tirare fuori la punta della Penna, e poi inserire una nuova punta.

Nota: Possono inoltre essere utilizzate delle pinze (non incluse nel pacchetto) per rimuovere la punta della penna.

Per rimpiazzare la batteria della Penna Tablet:

Per rimpiazzare la batteria del Mouse:


Mouse disponibile solo per il MousePen i608X


Girare il coperchio

1.

Sollevare il


1.


della penna.


coperchio del


mouse.


2.

Tirare il coperchio


della penna per


aprirlo.

2.

Inserire una


batteria AAA nel


3.

Inserire una batteria


mouse nella


AAA dentro la penna


direzione corretta.


nella corretta


direzione.

3.

Riposizionare il


coperchio del


4.

Reimpostare il


mouse.


coperchio della penna


sulla penna.


10

ESPAÑOL

TA B L E TA G R Á F I C A C O N

G U Í A R Á P I D A D E I N S T A L A C I Ó N

PRE CA UCIÓ N: P R I M E R O I N S E RT E E L C D C O N C O N T R O L A D O R E S E N S U O R D E N A D O R Y L U E G O S I G A L A S I N S T R U C C I O N E S PA R A C O M P L E TA R S U P R O C E S O D E I N S TA L A C I Ó N .

N O TA : R E T I R E E L P R O T E C TO R D E L A PA N TA L L A A N T E S D E U S A R L A TA B L E TA .

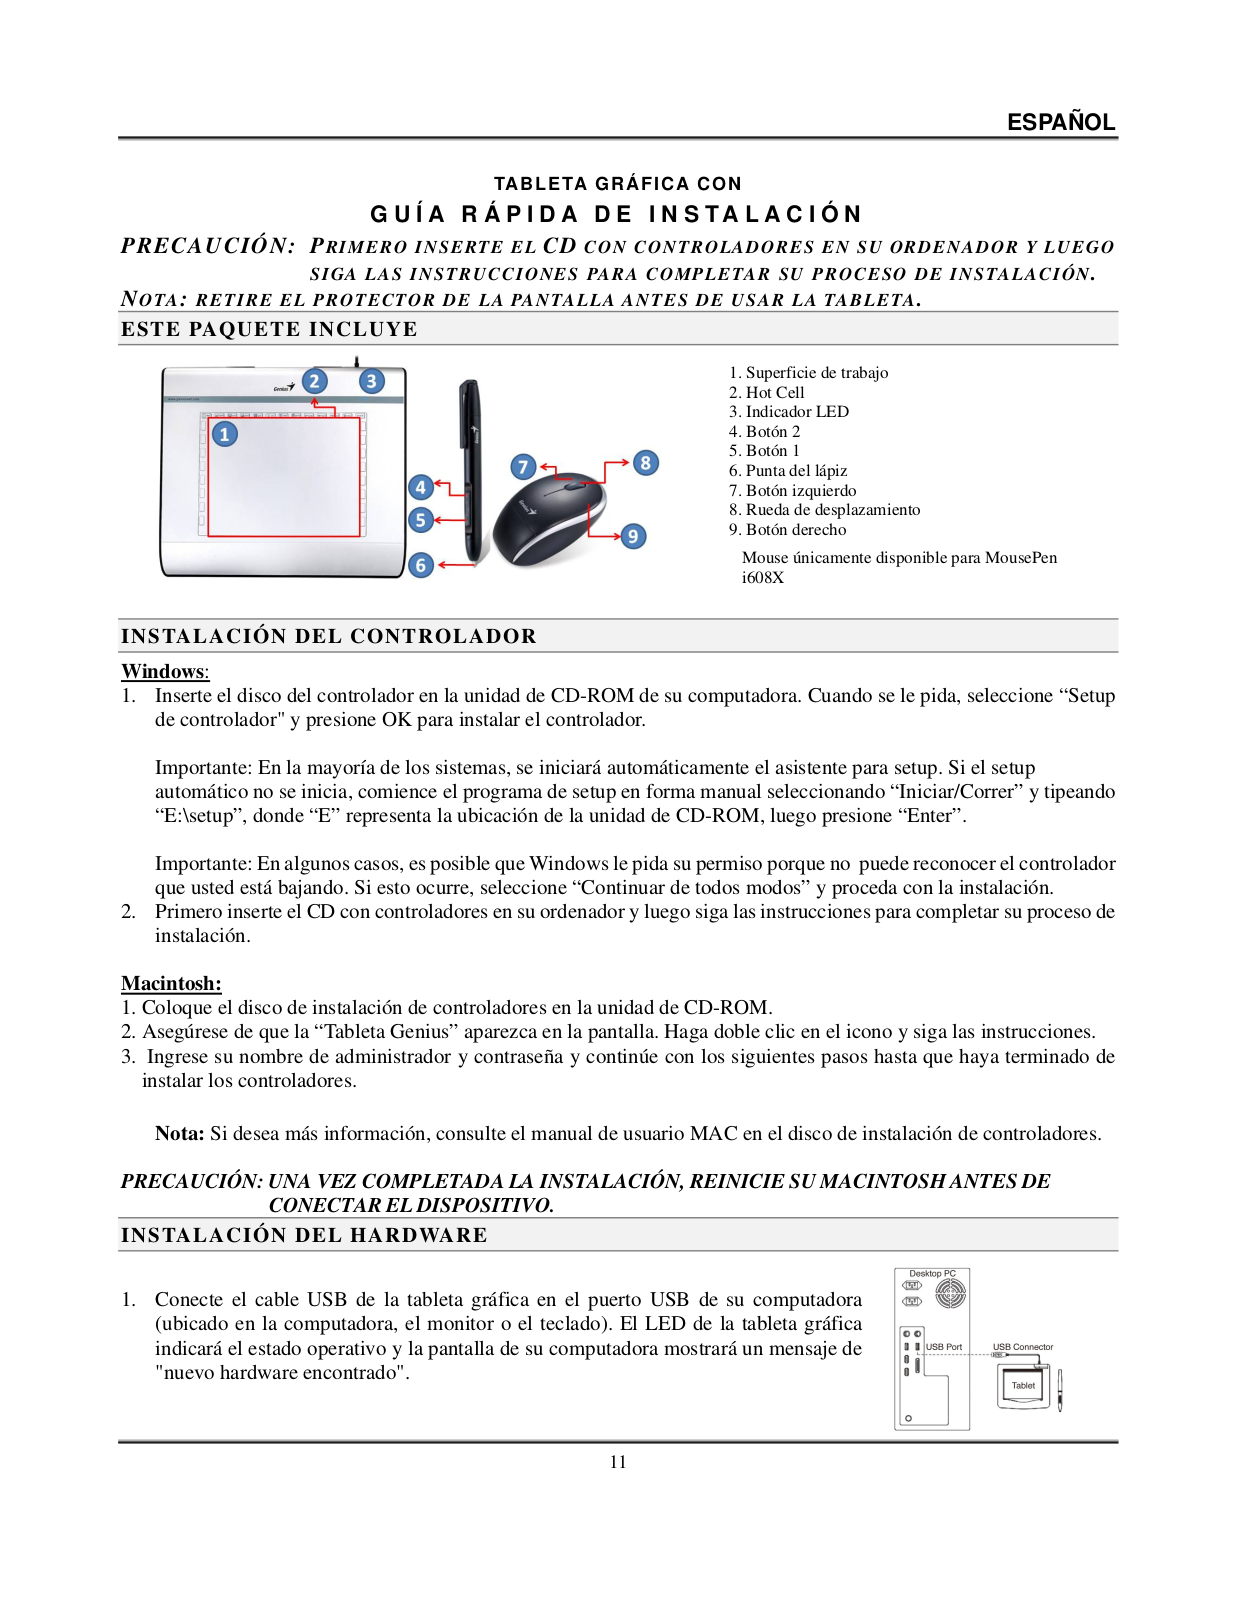
ESTE PAQUETE INCLUYE

1. Superficie de trabajo

2. Hot Cell

3. Indicador LED

4. Botón 2

5. Botón 1

6. Punta del lápiz

7. Botón izquierdo

8. Rueda de desplazamiento

9. Botón derecho

Mouse únicamente disponible para MousePen i608X

INSTALACIÓN DEL CONTROLADOR

Windows:

1.Inserte el disco del controlador en la unidad de CD-ROM de su computadora. Cuando se le pida, seleccione “Setup de controlador" y presione OK para instalar el controlador.

Importante: En la mayoría de los sistemas, se iniciará automáticamente el asistente para setup. Si el setup automático no se inicia, comience el programa de setup en forma manual seleccionando “Iniciar/Correr” y tipeando “E:\setup”, donde “E” representa la ubicación de la unidad de CD-ROM, luego presione “Enter”.

Importante: En algunos casos, es posible que Windows le pida su permiso porque no puede reconocer el controlador que usted está bajando. Si esto ocurre, seleccione “Continuar de todos modos” y proceda con la instalación.

2.Primero inserte el CD con controladores en su ordenador y luego siga las instrucciones para completar su proceso de instalación.

Macintosh:

1.Coloque el disco de instalación de controladores en la unidad de CD-ROM.

2.Asegúrese de que la “Tableta Genius” aparezca en la pantalla. Haga doble clic en el icono y siga las instrucciones.

3.Ingrese su nombre de administrador y contraseña y continúe con los siguientes pasos hasta que haya terminado de instalar los controladores.

Nota: Si desea más información, consulte el manual de usuario MAC en el disco de instalación de controladores.

PRECAUCIÓN: UNA VEZ COMPLETADA LA INSTALACIÓN, REINICIE SU MACINTOSH ANTES DE CONECTAR EL DISPOSITIVO.

INSTALACIÓN DEL HARDWARE

1.Conecte el cable USB de la tableta gráfica en el puerto USB de su computadora (ubicado en la computadora, el monitor o el teclado). El LED de la tableta gráfica indicará el estado operativo y la pantalla de su computadora mostrará un mensaje de "nuevo hardware encontrado".

11

ESPAÑOL

VERIFICANDO LA INSTALACIÓN

Para verificar la instalación, realice los pasos indicados a continuación.

VERIFICAR EL FUNCIONAMIENTO DEL HARDWARE Y DEL CONTROLADOR

El LED de la tableta es el indicador de funcionamiento. Generalmente estará apagado y se encenderá y apagará según las condiciones operativas. Vigile el estado del indicador LED de la tableta mientras ejecute los pasos siguientes. Sólo los últimos dos tests requieren que tenga instalado el controlador de la tableta.

1.Toque una superficie con el lápiz o el ratón inalámbrico o pulse el botón izquierdo del ratón para "despertarlo" en caso de que el dispositivo se haya quedado "dormido" después de no haberse utilizado durante varios minutos.

2.En cuanto la tableta reciba corriente eléctrica, se encenderá el indicador LED momentáneamente para apagarse en seguida.

3.Si el área de trabajo detecta la presencia del lápiz, el indicador LED parpadeará lentamente. Esto sucede cuando el lápiz se encuentra directamente sobre el área de trabajo y a una distancia lo suficientemente pequeña.

4.Cuando pulse un botón del lápiz o del ratón, se encenderá el indicador LED

5.Si toca con la punta del lápiz en un punto cualquiera del área de trabajo, el indicador también se encenderá.

6.Si el ya ha instalado el controlador de la tableta, aparecerá un pequeño icono () en la barra del sistema (en la esquina inferior derecha de la pantalla).

7.Una vez instalado correctamente el controlador, al mover la punta del lápiz o el ratón sobre el área de trabajo, el cursor se moverá en pantalla.

CAMBIO DE PUNTA DE LÁPIZ

1.Coloque la punta del lápiz en la herramienta para retirar puntas.

2.Tire de la punta hacia afuera, e inserte una nueva.

Nota: También podrá usar pinzas (no incluidas) para retirar la punta del lápiz.

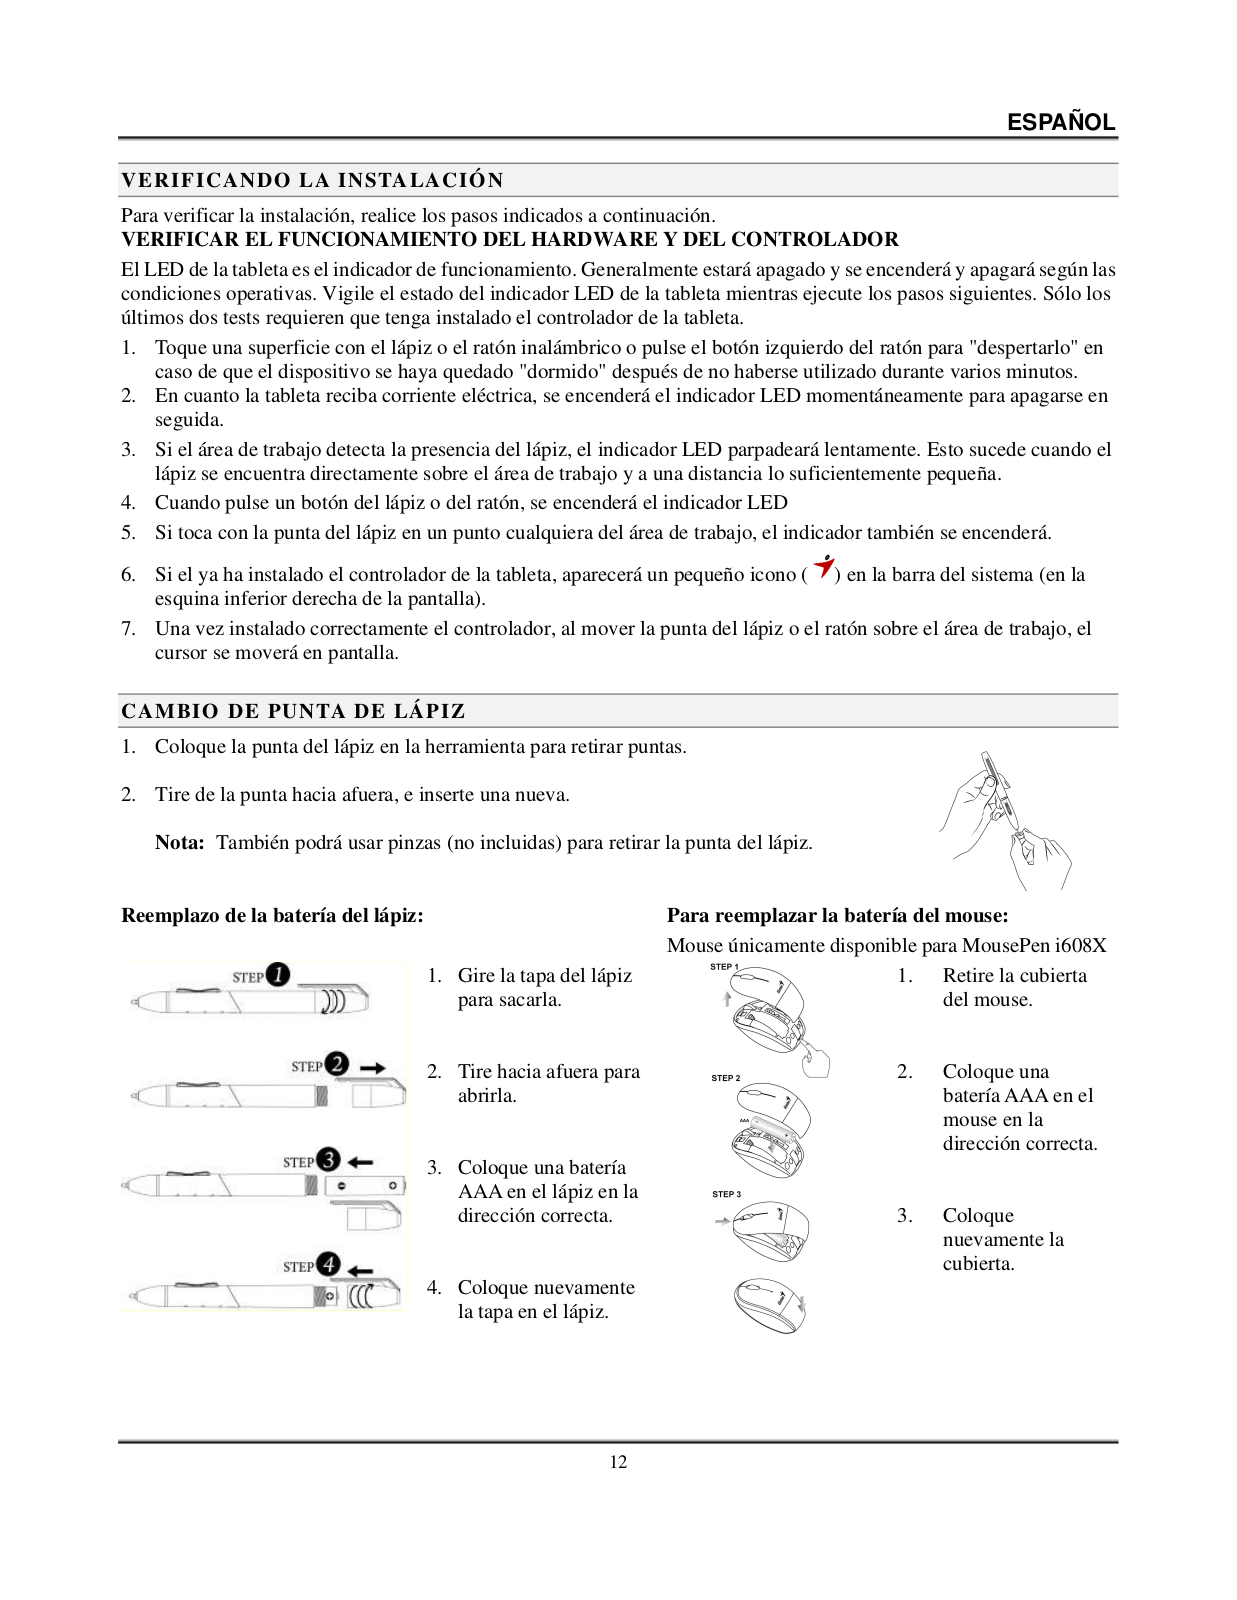
Reemplazo de la batería del lápiz:

1. Gire la tapa del lápiz para sacarla.

2. Tire hacia afuera para abrirla.

3. Coloque una batería AAA en el lápiz en la dirección correcta.

4. Coloque nuevamente la tapa en el lápiz.

Para reemplazar la batería del mouse:

Mouse únicamente disponible para MousePen i608X

1. Retire la cubierta del mouse.

2. Coloque una batería AAA en el mouse en la dirección correcta.

3. Coloque nuevamente la cubierta.

12

Loading...
+ 42 hidden pages