

Page 1

English
WEEE Warning Message
Symbol for Separate Collection in European Countries
This symbol indicates that this product is to be collected
separately.
The following apply only to users in European countries:
z This product is designated for separate collection at an
appropriate collection point. Do not dispose of as
household waste.
z For more information, contact the retailer or the local
authorities in charge of waste management.
FCC STATEMENT
This device complies with Part 15 of the FCC Rules. Operation is subject to the following
two conditions:
(1) This device may not cause harmful interference, and
(2) This device must accept any interference received, including interference that may
cause undesired operation.
Note:
This equipment has been tested and found to comply with the limits for Class B digital
devices, pursuant to Part 15 of the FCC rules. These limits are designed to provide
reasonable protection against harmful interference in a residential installation. This
equipment generates uses and can radiate radio frequency energy and, if not installed
and used in accordance with the instructions, ma y cause harmful interference to radio
communications. However, there is no guarantee that interference will not occur in a
particular installation. If this equipment does cause harmful interference to radio or
television reception, which can be determined by turning the equipment off and on, the
user is encouraged to try to correct the interference by one or more of the following
measures:
• Reorient or relocate the receiving antenna.
• Increase the separation between the equipment and receiver.
• Connect the equipment into an outlet on a circuit different from that to which the
receiver is connected.
Use of shielded cable is required to comply with Class B limits in Subpart B of Part 15 of
the FCC rules. Do not make any changes or modifications to the equipment unless
otherwise specified in the manual. If such changes or modifications should be made, you
could be required to stop operation of the equipment.
-1-
Page 2

English
READ THIS FIRST
Notice:
1. Product design and specifications are subject to change without notice. This inc ludes
primary product specifications, software, software drivers, and user's manual. This
User Manual is a general reference guide for the product.
2. The product and accessories that come with your camera may be different from those
described in this manual. This is due to the fact that different retailers often specify
slightly different product inclusions and accessories to suit their mar ket requirements,
customer demographics, and geographical preferences. Products very often vary
between retailers especially with accessories such as batteries, memory cards, cables,
pouches, and language support. Occasionally a retailer will specify a unique product
color, appearance, and internal memory capacity. Contact your dealer for precise
product definition and included accessories.
3. The illustrations in this manual are for the purpose of explanation and may differ from
the actual design of your camera.
4. The manufacturer assumes no liability for any errors or discrepancies in this user's
manual.
5. For driver updates and revisions to this manual, please refer to our website
www.geniusnet.com
SAFETY INSTRUCTIONS
Read and understand all Warnings and Cautions before using this product.
WARNING
If foreign objects or water have entered the camera, turn the power
OFF and remove the batteries.
Continued use in this state might cause fire or electric shock. Consult the
store of purchase.
If the camera has fallen or its case has been damaged, turn the
power OFF and remove the battery.
Continued use in this state might cause fire or electric shock. Consult the
store of purchase.
Do not disassemble, change or repair the camera.
This might cause fire or electric shock. For repair or internal inspection,
ask retailer where you purchased it.
Use the specified batteries.
Use with any other type of batteries might cause explosion or influence
the camera’s performance.
Do not use the camera in areas near water.
This might cause fire or electric shock. Take special care during rain,
snow, on the beach, or near the shore.
-2-
Page 3
English
Do not place the cam era on inclined or un stable surface s .
This might cause the camera to fall or tilt over, causing injury.
Keep the batteries out of the reach of children.
Swallowing batteries might cause poisoning. If the battery is acciden ta l l y s w al l o w ed,
immediately consult a physician.
Do not use the ca mera while you are walking, dr iving or riding a motorcycle.
This might cause you to fall over or result in a traffic accident.
CAUTION
If foreign objects or water have entered the camera, turn the pow er
OFF and remove the batteries.
Continued use in this state might cause fire or electric shock. Consult the
store of purchase.
Do not fire the flash close to anyone’s eyes.
This might cause damage to the person’s eyesight.
Do not subject the LCD monitor to impact.
This might damage the glass on the screen or cause the internal fluid to
leak. If the internal fluid enters your eyes or comes into contact with your
body or clothes, rinse with fresh water.
If the internal fluid has entered your eyes, consult a physician to receive
treatment.
A camera is a precision instrument. Do not drop it, strike it or use
excessive force when handling the camera.
This might cause damage to the camera.
Do not use the camera in humid, steamy, smoky, or dusty places.
This might cause fire or electric shock.
Do not remove the battery immediately after long perio d of
continuous use.
The battery becomes hot during use. Touching a hot battery might cause
burns.
Do not wrap the camera or place it in cloth or blankets.
This might cause heat to build up and deform the case, resulting in fire.
Use the camera in a well-ventilated place.
Do not leave the camera in places where the temperature may rise
significantly, such as inside a car.
This might adversely affect the case or the parts inside, resulting in fire.
Before you move the camera, disconnect cords and cables.
Failure to do this might damage cords and cables, resulting in fire and
electric shock.
-3-
Page 4

English
Notes on Battery Usage
When you use the battery, carefully read and strictly observe the Safety Instructions
and the notes described below:
Use only the specified battery.
Avoid using the battery in extremely cold environments as low temperatures can
shorten the battery life and reduce camera performance.
When you are using the new rechargeable battery or rechargeable battery that has
not been used for an extended period of time (the battery that passed the expiry date
is an exception) might affect the number of images that can be captured. Therefore,
to maximize its performance and lifetime, we recommend that you fully charge the
battery and discharge it for at least one complete cycle before use.
The battery may feel warm after long period of continuous use of t he camera or the
flash. This is normal and not a malfunction.
The camera may feel warm after long period of continuous use. This is normal and
not a malfunction.
If the battery is not to be used for a long period of time, remove it from the camer a t o
prevent leakage or corrosion.
If the battery is not to be used for a long period of time, store it after no battery power
left. If the battery is stored for a long time in a fully charged state, its performanc e
may be impaired.
Always keep the battery terminals in a clean state.
Risk of explosion if battery is replaced by an incorrect type.
Dispose of used batteries according to the instructions.
We recommend the battery should be charged 8 hours for first time use.
-4-
Page 5

English
Contents
1. INTRODUCING THE CAMERA......................................................8
1.1
SYSTEM REQUIREMENTS..............................................................8
1.2 FEATURES ..................................................................................8
1.3
UNPACKING ................................................................................9
1.4 ABOUT THE CAMERA..................................................................10
1.4.1 Front view....................................................................10
1.4.2 Top view ......................................................................10
1.4.3 Back view.................................................................... 11
2. GETTING STARTED....................................................................13
2.1
INSERTING AN SD CARD.............................................................13
2.2 INSERTING THE BA TTER Y............................................................14
2.3 CHARGING THE BATTERY............................................................15
2.4
TURNING ON FOR THE FIRST TIME ...............................................15
2.5 CHANGING MODES ....................................................................16
2.6 BEFORE YOU ST AR T...................................................................16
2.6.1 Setting the date and time.............................................16
2.6.2 Setting the language....................................................17
2.7
TAKING PICTURES......................................................................18
2.7.1 Taking your first still picture..........................................18
2.7.2 Browsing Pictures.........................................................18
2.8
VIDEO RECORDING....................................................................22
2.8.1 Video...........................................................................22
2.8.2 Video playback............................................................23
2.9
SOUND RECORDING...................................................................25
2.9.1 Sound.........................................................................25
2.9.2 Playing the sound file ..................................................27
2.10
CONNECTING TO A COMPUTER..................................................28
2.10.1 Mass Storage..............................................................28
2.10.2 PC camera..................................................................29
2.11
CONNECTING TO A TV..............................................................29
3. USING THE CAMERA.............................. ....................................30
3.1
PHOTO MODE............................................................................30
3.1.1 Icons............................................................................30
-5-
Page 6

English
3.1.2 Setting the flash...........................................................31
3.1.3 Setting the size............................................................31
3.1.4 Quality.........................................................................31
3.1.5 White balance..............................................................32
3.1.6 Color effect..................................................................32
3.1.7 Date Stamp..................................................................32
3.2
VIDEO RECORDER MODE............................................................33
3.2.1 Icons............................................................................33
3.2.2 Setting the size............................................................34
3.2.3 Quality.........................................................................34
3.2.4 White Balance.............................................................34
3.2.5 Color effect..................................................................34
3.2.6 File format...................................................................34
3.3
SOUND RECORDING MODE.........................................................35
3.3.1 Icons............................................................................35
3.4
SETUP MODE ............................................................................35
3.4.1 Setting the date and time.............................................36
3.4.2 Setting the b eep function.............................................36
3.4.3 Setting the language....................................................36
3.4.4 Auto Display Off...........................................................36
3.4.5 Auto Power Off............................................................37
3.4.6 Format.........................................................................37
3.4.7 TV Standard ................................................................38
3.4.8 Defaultl........................................................................38
3.4.9 Memory Status ............................................................39
3.4.10 Frequency...................................................................39
3.5
FM RADIO MODE.......................................................................40
3.5.1 Sound recording icon...................................................40
3.5.2 Operation instructions..................................................40
3.6
MUSIC PLAYER MODE ................................................................42
3.6.1 Icons............................................................................42
3.6.2 Operation instructions..................................................42
3.7
MOVIE PLAYER MODE.................................................................44
3.7.1 Mode icons..................................................................44
3.7.2 Operation instructions..................................................44
3.8
PHOTO VIEWER MODE................................................................46
3.8.1 Operation instructions..................................................46
3.9
GAME MODE .............................................................................47
-6-
Page 7

English
3.9.1 Boxman.......................................................................48
3.9.2 Tetris................ ............................................................49
3.9.3 Memory (game)...........................................................50
3.9.4 Gobang........................................................................51
4. RECORDING THE TV PROGRAM...............................................52
4.1
OPERATION INSTRUCTIONS ........................................................52
5. HOW TO PLAY A MOVIE AND VIEW PICTURES........................53
5.1
INSTALL ARCSOFT MEDIA CONVERTER........................................54
5.2 RUNNING THE ARCSOFT MEDIA CONVERTER AND CONVERTING FILES
.....................................................................................................57
5.3
PLAYING THE CONVERTED FILES .................................................62
6. INSTALLING SOFTWARE AND DRIVERS..................................63
6.1
DRIVERS ..................................................................................63
6.1.1 Mass Storage ..............................................................63
6.2
PRESTO! VIDEO WORKS 6 .........................................................64
6.3
PRESTO! MR. PHOTO 3..............................................................64
6.4 XVID CODEC FOR PC ................................................................64
7 . TROUBLESHOOTING ................................................................68
7.1
PROBLEMS AND REMEDIES.........................................................68
APPENDIX.......................................................................................69
S
PECIFICATION ...............................................................................69
-7-
Page 8

1. Introducing the camera
Read this section to learn about the features and functions of the camera.
1.1 System requirements
English
The camera requires a host PC with the following specifications:
• Windows
• Intel® Pentium III 500 MHz CPU or higher
• At least 256 MB of RAM or higher
• Standard USB 1.1 port or higher
• 4 x speed CD-ROM drive or higher
• At least 200 MB of available disk space
Note: A USB 1.1 port will enable you to transfer files to and from your host PC, but
transfer speeds will be much faster with a USB 2.0 port.
®
XP, 2000, ME, 98SE operating system
1.2 Features
The camera offers a variety of features and functions including:
• Digital still camera (max. 12.0 Mega pixels)
• Digital camcorder
• TV/AV-in Recording
• FM Radio
• Voice recorder
• Movie player
• Music player
• Photo viewer
• Games
Additionally, the camera also features 4X digital zoom, mass storage device and a SD
card reader function.
-8-
Page 9
English
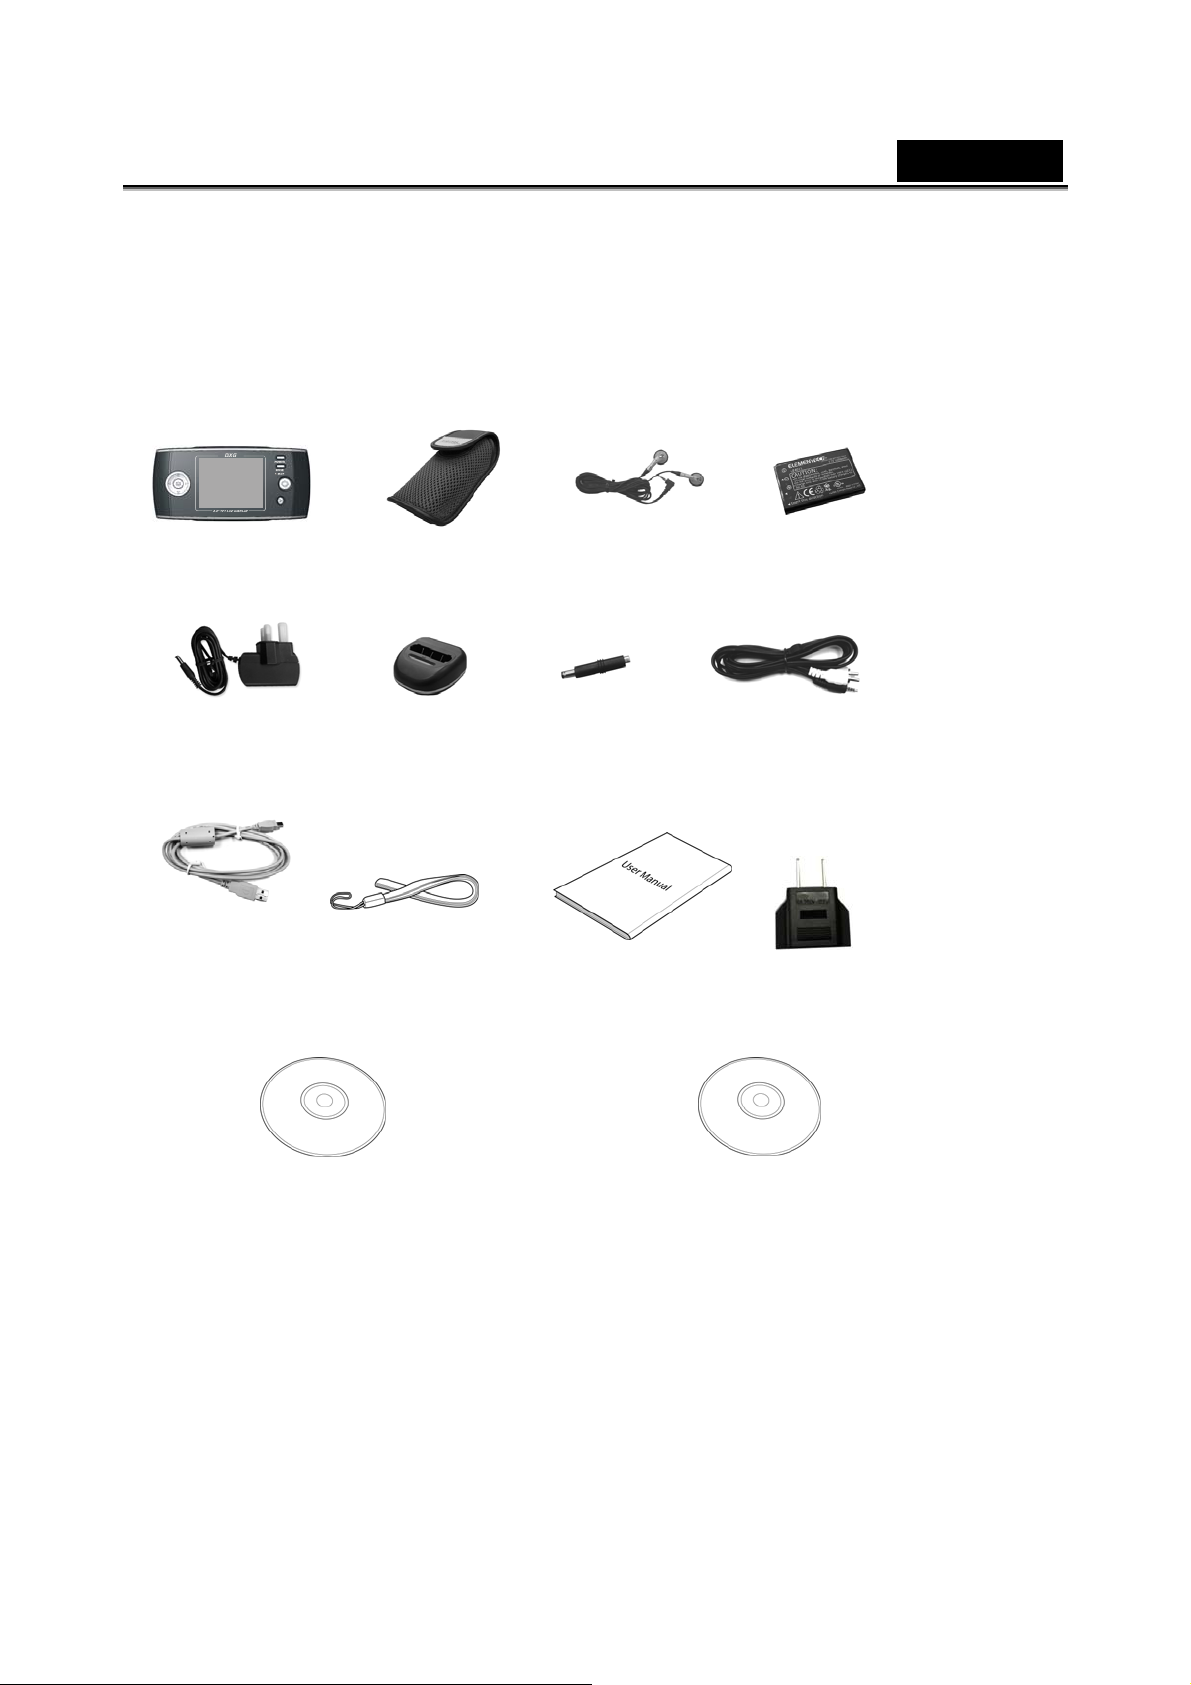
1.3 Unpacking
All the following items should be present in the camera package. If any item is missing or
appears damaged, contact your dealer immediately.
Digital Camera Camera Pouch Earphone Li-ion Battery
DC-IN 5V Adaptor Battery
USB Cable Wrist Strap Quick Guide AC Plug adaptor for
Charger Stand
DC-IN
Connector
AV Cable
EU to US
(Driver, Manual)
CD-ROM I
CD-ROM II
(Arcsoft media Converter Software)
-9-
Page 10
English
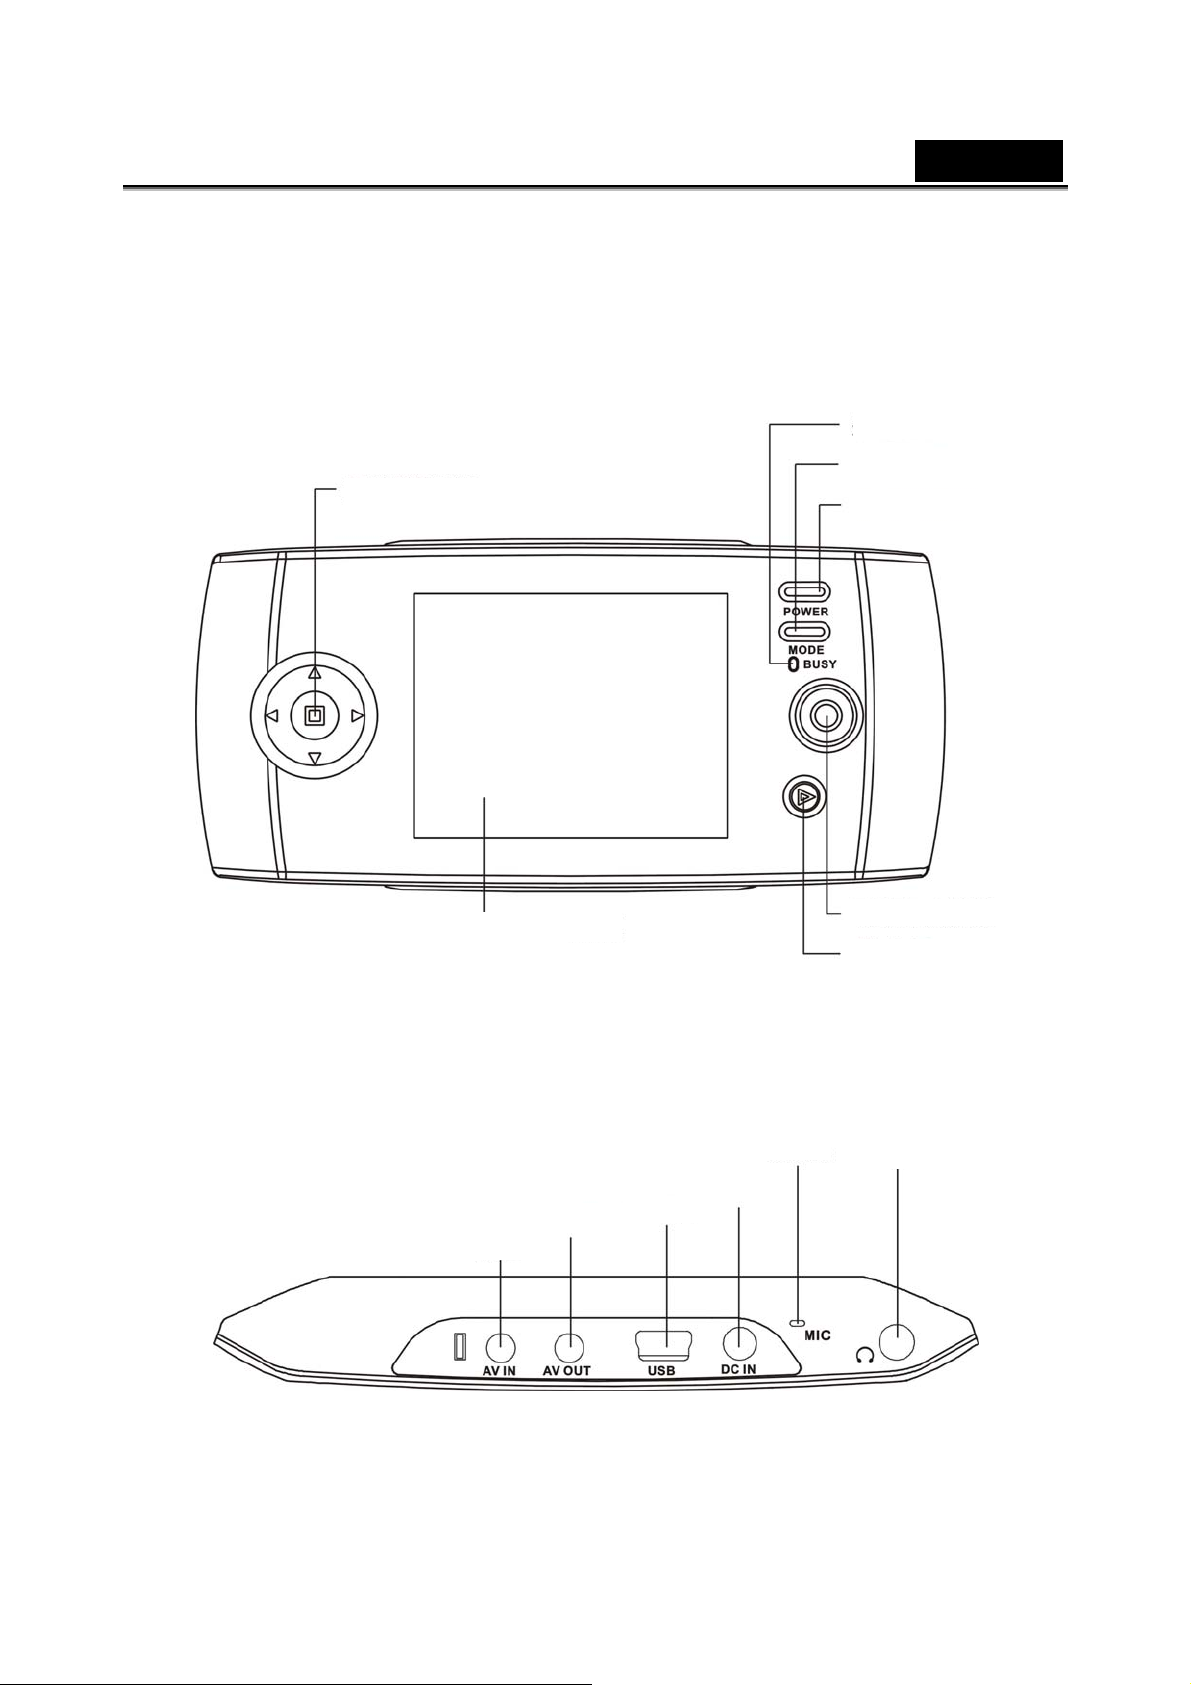
1.4 About the camera
Refer to the following diagrams to familiarize yourself with the buttons and controls of the
camera.
1.4.1 Front view
Indicator
Mode Button
Direction
Power
1.4.2 Top view
LCD screen
AV OUT jack
AV IN jack
OK
Browse
Microphone
DC IN jack
USB
Earphones jack
-10-
Page 11
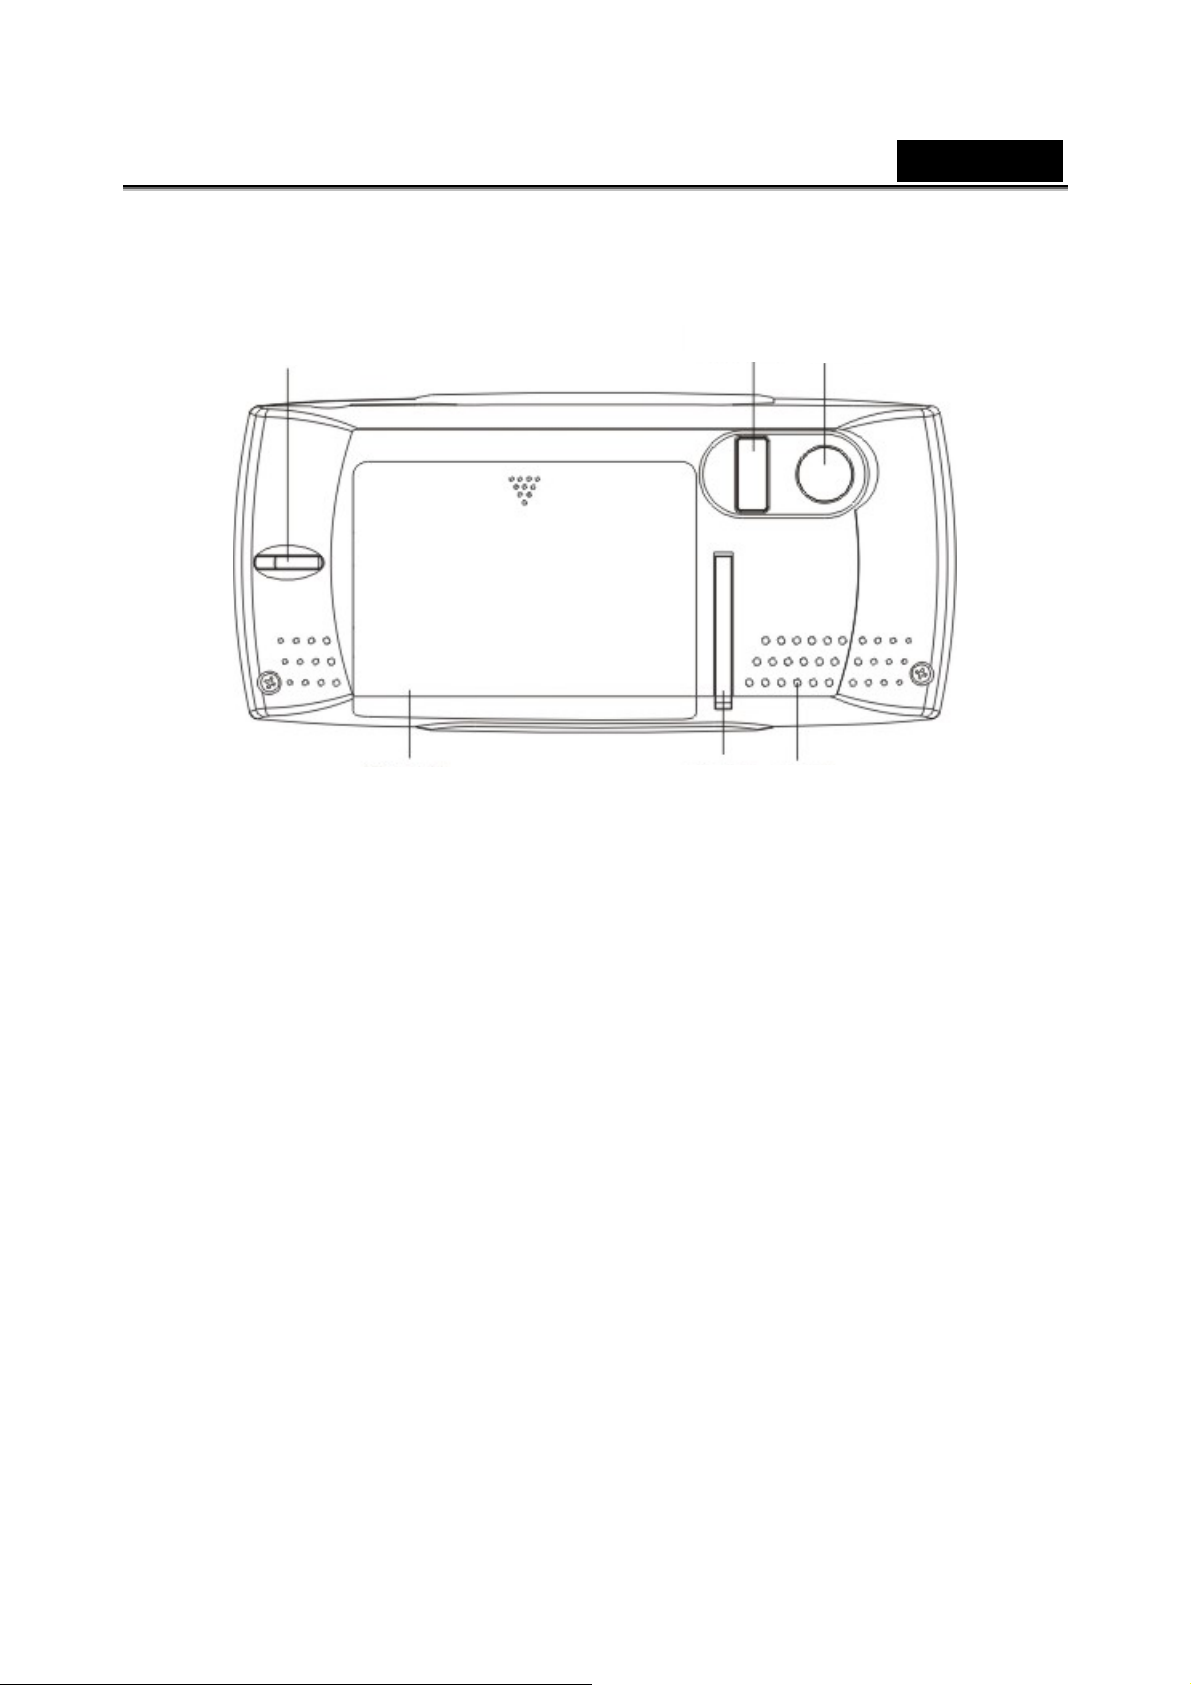
1.4.3 Back view
English
Wrist Strap
Buckle
Battery Cover
Holder
Flash
Speaker
Lens
-11-
Page 12

See the table below for a description of each button’s function.
Button Name Function
z Press to turn power on or off.
z When the camera is in work/standby
Power
Mode
status, the green indicator lights.
z When the camera is in “Flash charging”
status, the red indicator lights.
Press this Mode button to switch to the
z
following modes: Camera mode, Music
Playback mode, Video mode, Photo
Playback mode, Movie playback mode,
Record Voice mode, Radio mode,
Game mode, System mode.
English
Direction
OK
Browse button
Standby/Busy
(green indicator)
Flash charging
(red indicator)
z Use this button to execute different
operations with different mode, such as
selecting, moving up/down/left/right.
z Adjust EV value and self-capturing time,
zoom and flash charging in Photo mode.
z Adjust EV value and zoom in Video
mode.
z Use this button with Direction and Mode
button to finish the related selection and
setup.
z Press to capture in the Photo mode.
z Press to start/stop recording video/sound
in the Video/Sound recording mode.
z Press this button in the Photo, Video or
Sound recording mode to enter the
Playback mode (quick browse), and
press again to return to the Photo, Video
or Sound recording mode.
z When the camera is in work/standby
status, the green indicator lights.
z When the camera is in use and “Flash
charging” status, the red indicator lights.
-12-
Page 13
English
2. Getting started
Read this section to learn how to start using the digital camera. This section covers only
basic functions, such as inserting the battery and memory card, turning on/off and initial
setup. See later chapters for details about advanced functions.
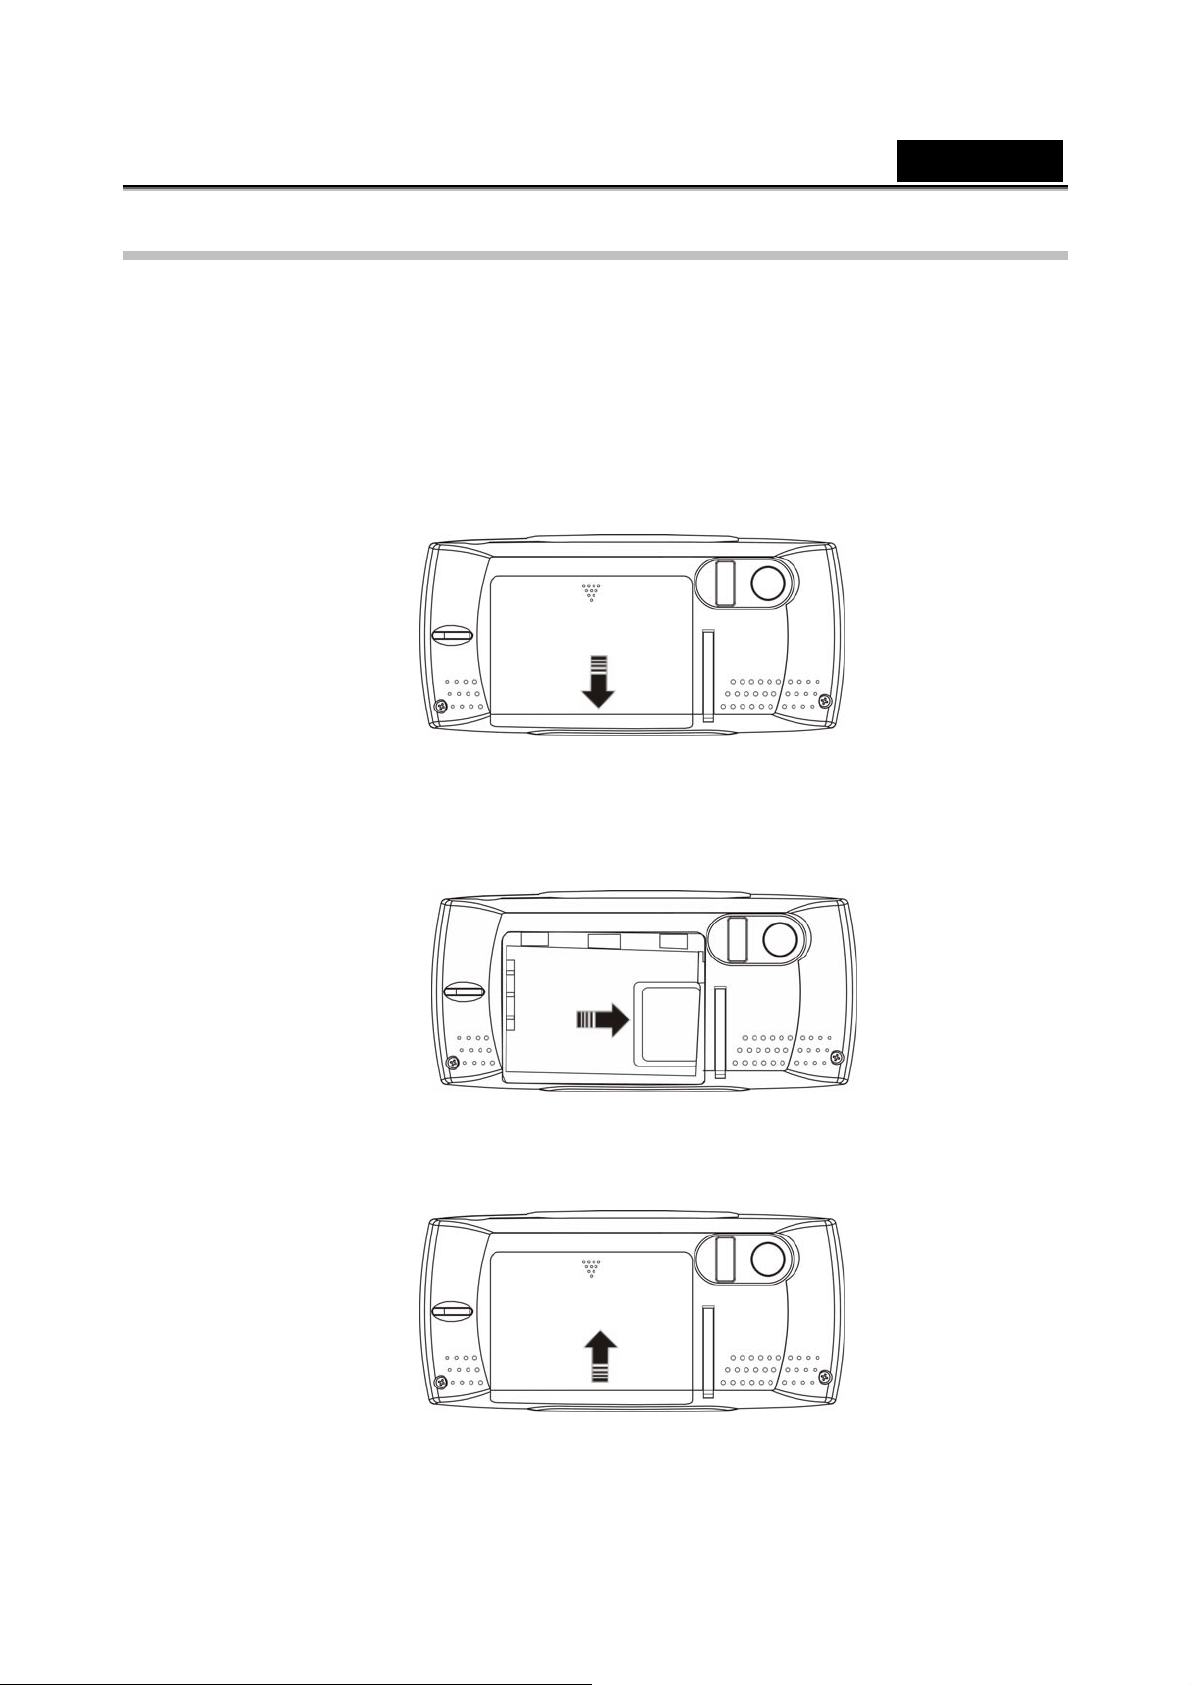
2.1 Inserting an SD card
An SD card can be installed in the camera to provide additional storage space for still
images, video, MP3 or other files.
1. Open the battery door.
2. Insert an SD card as shown. Make sure the gold contacts are facing down as
shown.
3. Close the battery door.
-13-
Page 14
English
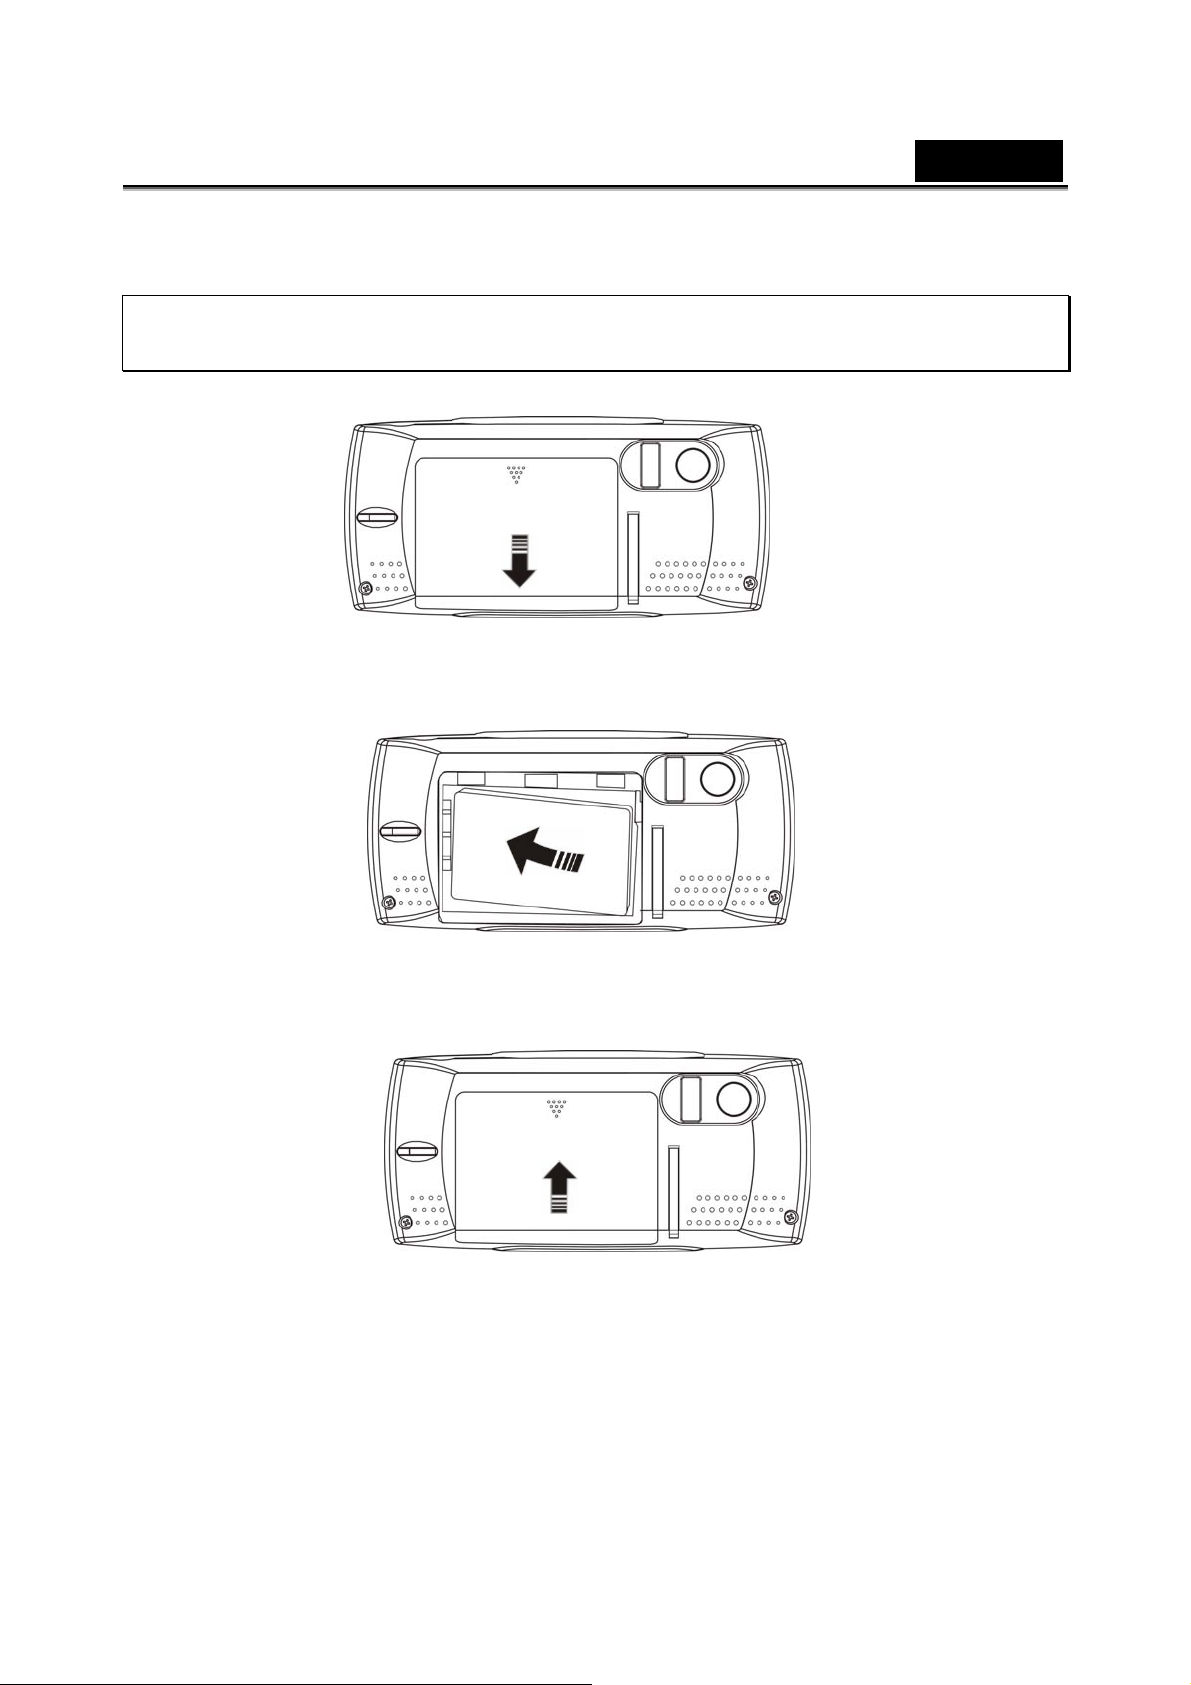
2.2 Inserting the battery.
The camera is designed to use a rechargeable Li-ion battery.
Note: Install the battery exactly as described here. Installing the batteries incorrectly
could cause damage to the camera and possibly start a fire.
1. Open the battery door.
2. Insert the battery as shown.
3. Close the battery door.
-14-
Page 15
English
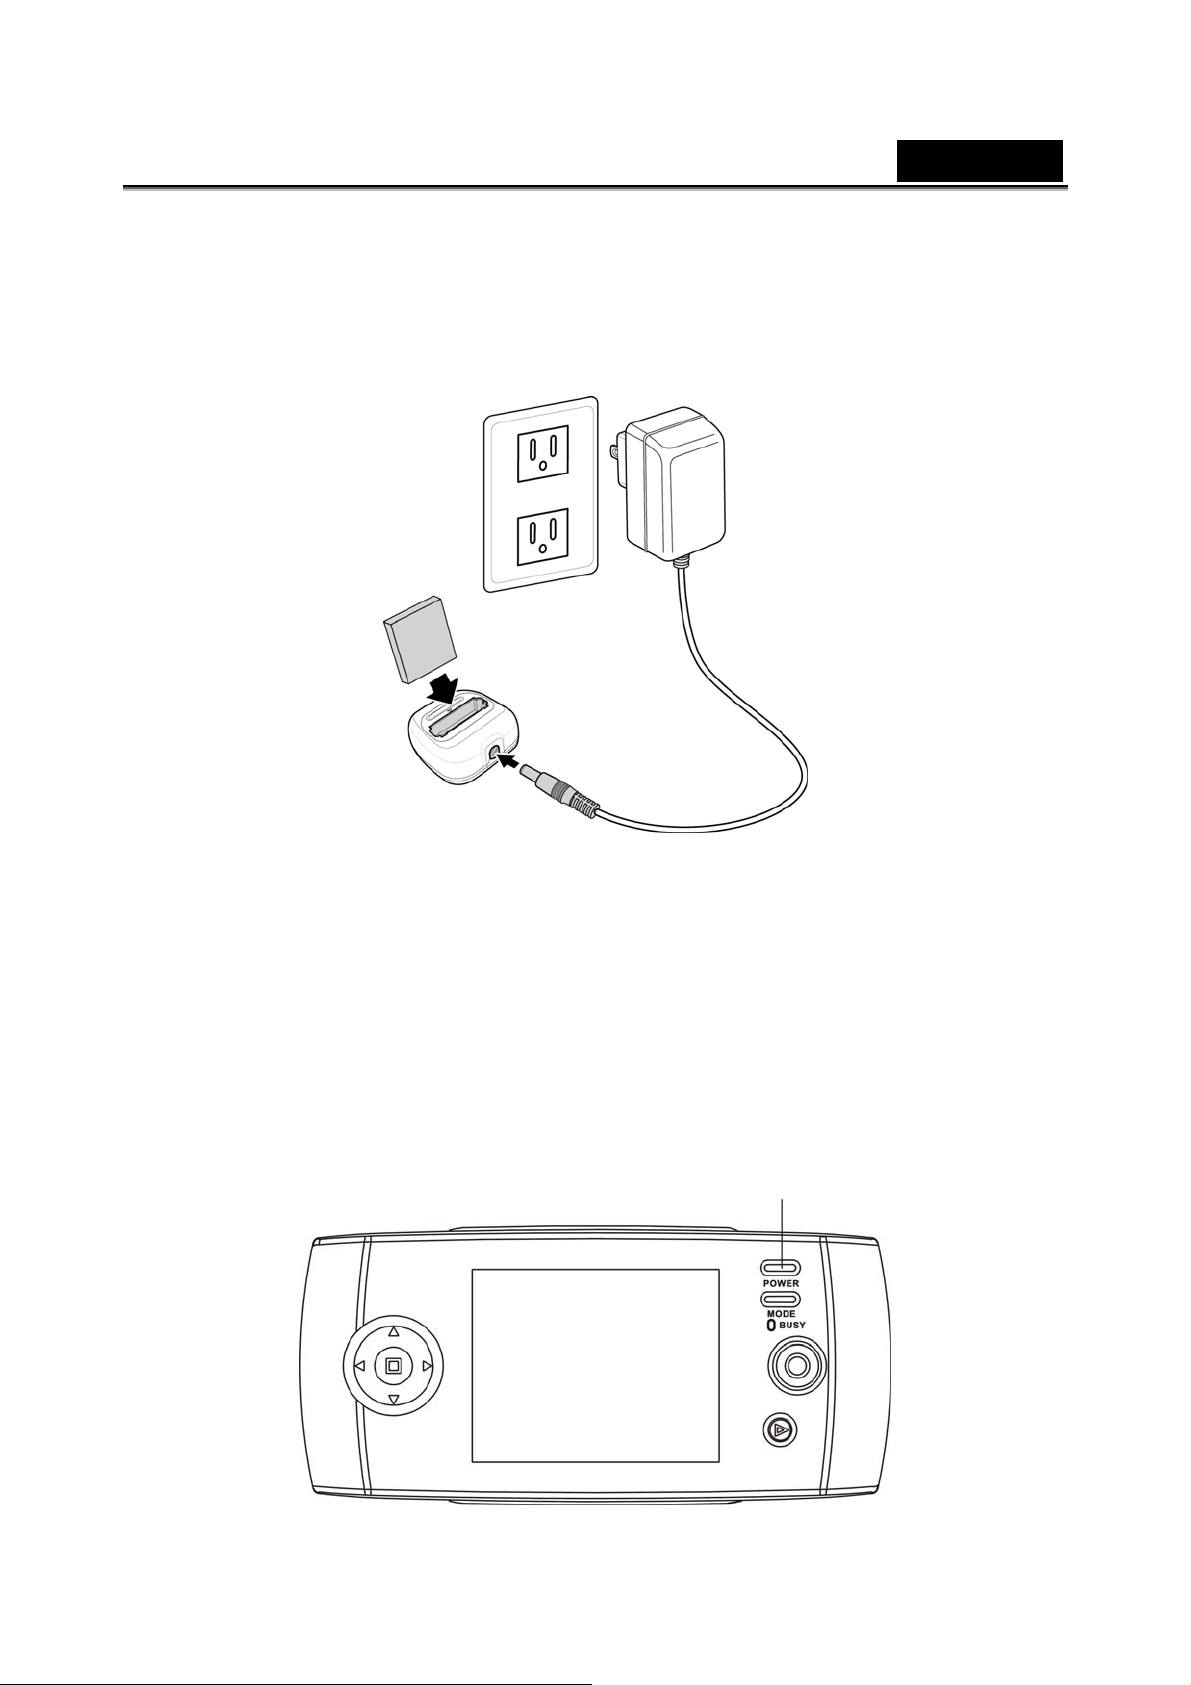
2.3 Charging the battery
Insert the battery into the charger as shown and connect the power supply to the
charging unit and the outlet.
The indicator on the charger will turn to red. It takes five hours to charge the battery from
empty to full. When the charging is finished, the indicator on the charge will turn into
green.
2.4 Turning on for the first time
Press and hold the power button for two seconds to turn on/off the camera. The green
LED on the camera lights.
Power key
-15-
Page 16
English
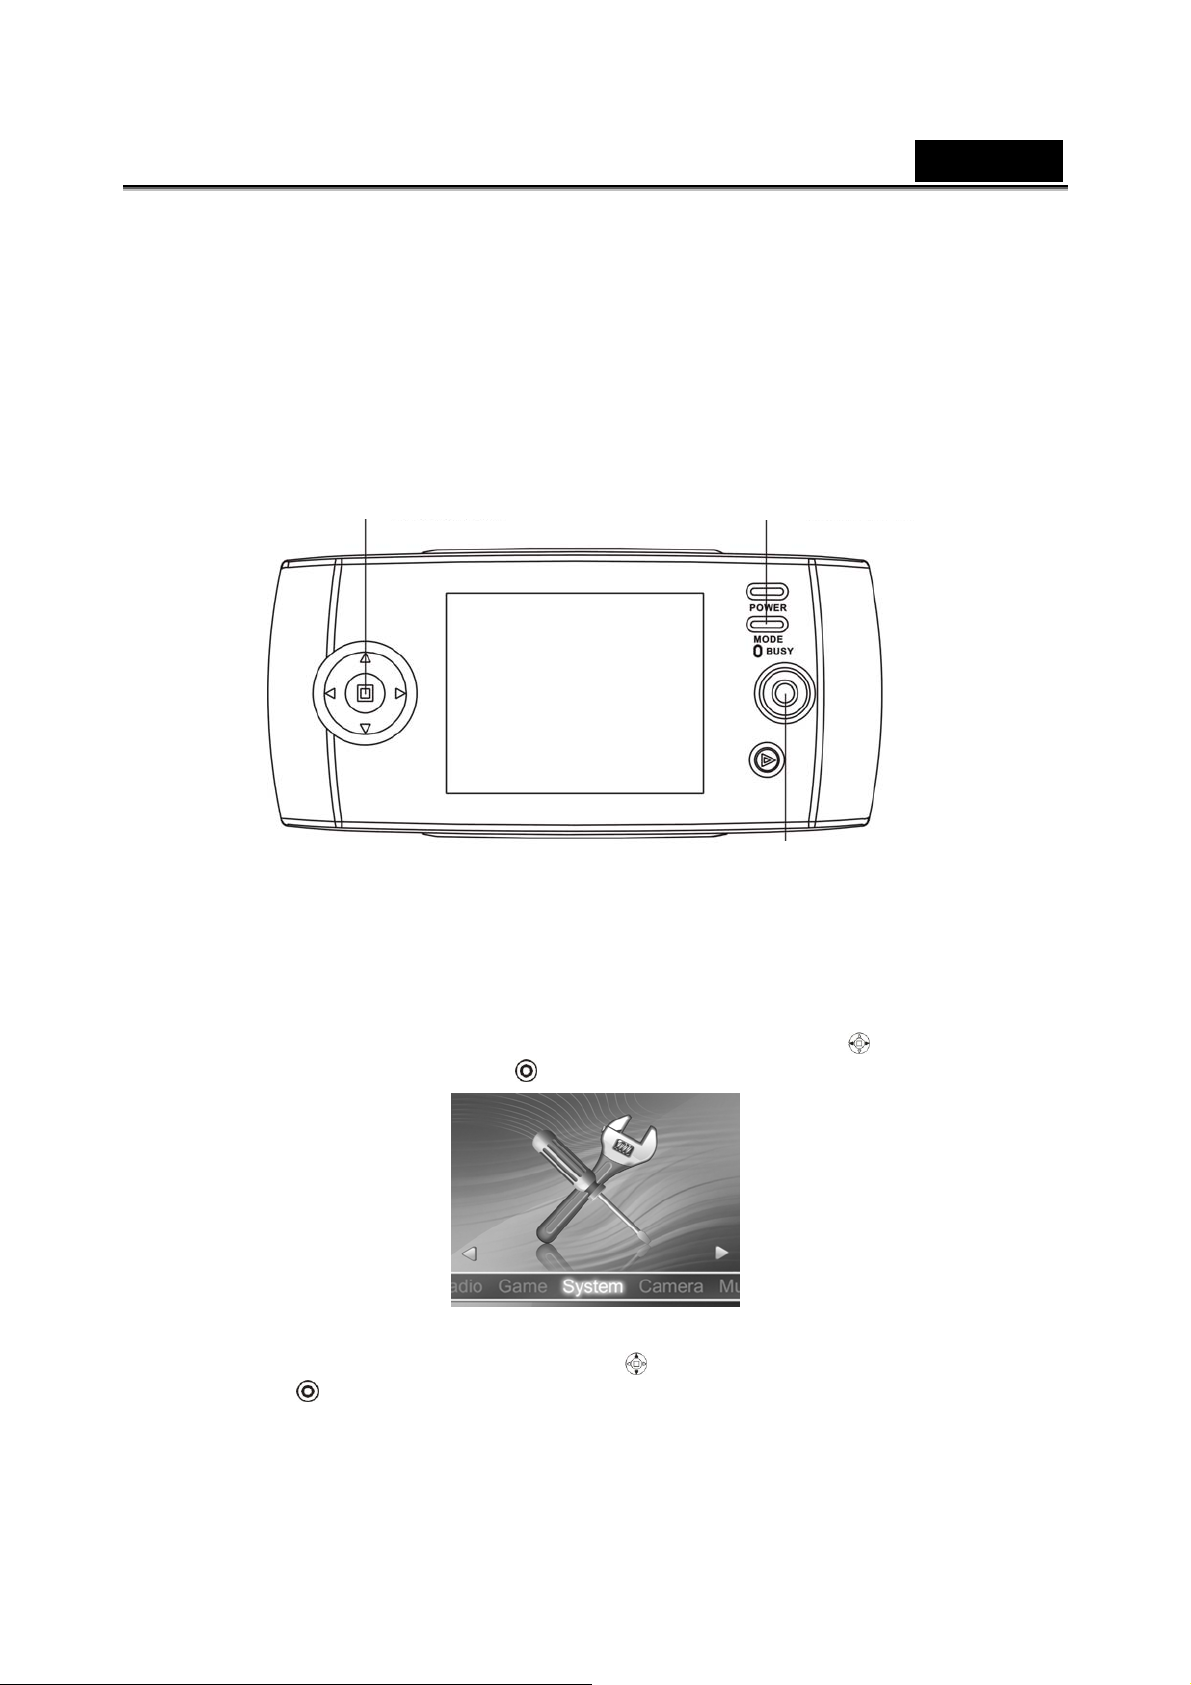
2.5 Changing modes
The camera can operate in nine modes, Camera mode, Music Playback mode, Video
mode, Photo Playback mode, Movie playback mode, Record Voice mode, Radio
mode, Game mode, System mode. Press the mode button to display modes. Use the
Direction button to select a mode, and press the OK to enter when selected.
Direction button
Mode Button
OK
2.6 Before you start
Before you can use your camera there are some basic settings to configure in the
following sections.
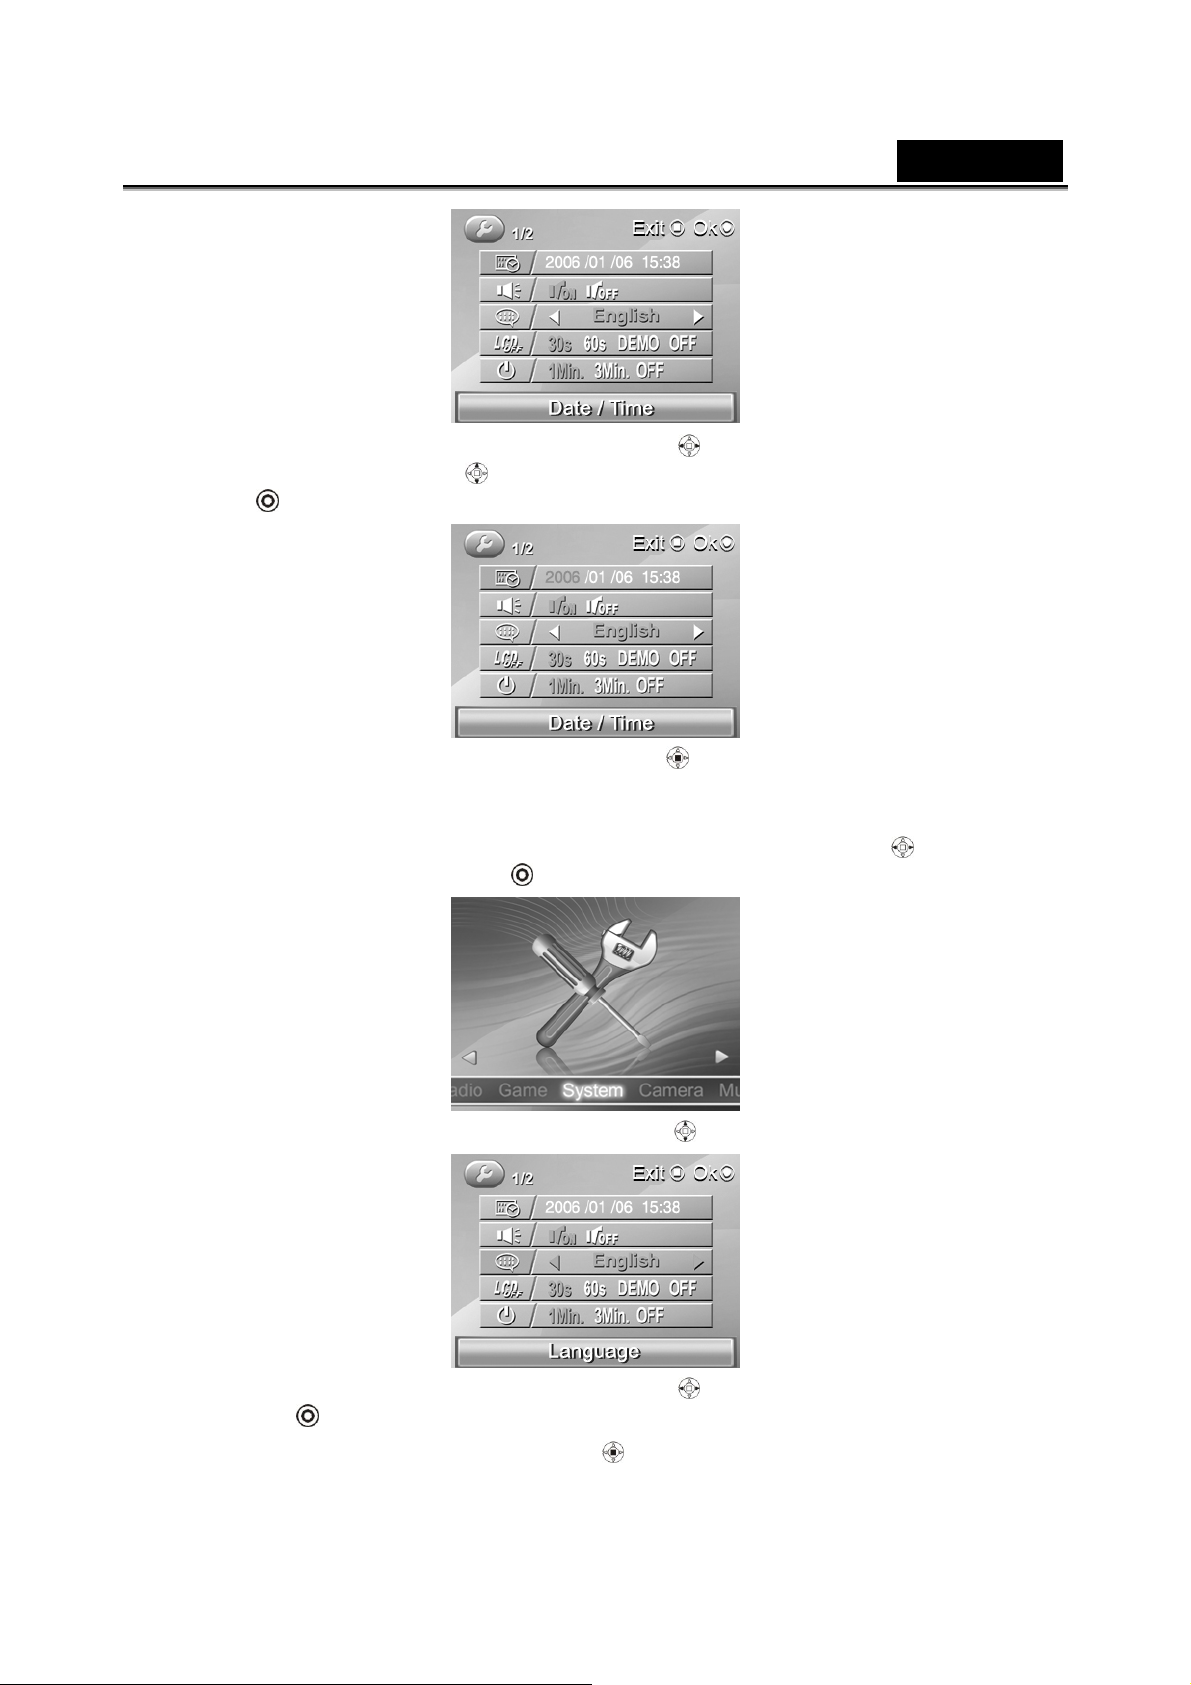
2.6.1 Setting th e date and time
1. Turn the camera on, use Direction button (Left/R i ght button ) to setup the
camera, and then press OK
2. Use Direction button (Up/Down button
the OK
and the submenu flashes.
.
) to select the Date/Time option. Press
-16-
Page 17
English
3.
Use the Direction button (Left/Right button ) to select the field, and use it
again (Up/Down button
OK
4. Press the Direction button (ENTER button ) or Mode button to exit the menu.
to confirm.
) to adjust the value. When finishing changing, use the
2.6.2 Setting the language
1. Turn the camera on, and use Direction button (Left/Right button ) to setup the
system, and then press OK
2. Use the Direction button (Up/Down button ) to select the Language option.
3. Use the Direction button (Left/Right button ) to select languages, and press
the OK
to confirm.
.
4. Press the Direction (ENTER button
-17-
) or Mode button to leave the menu.
Page 18
English
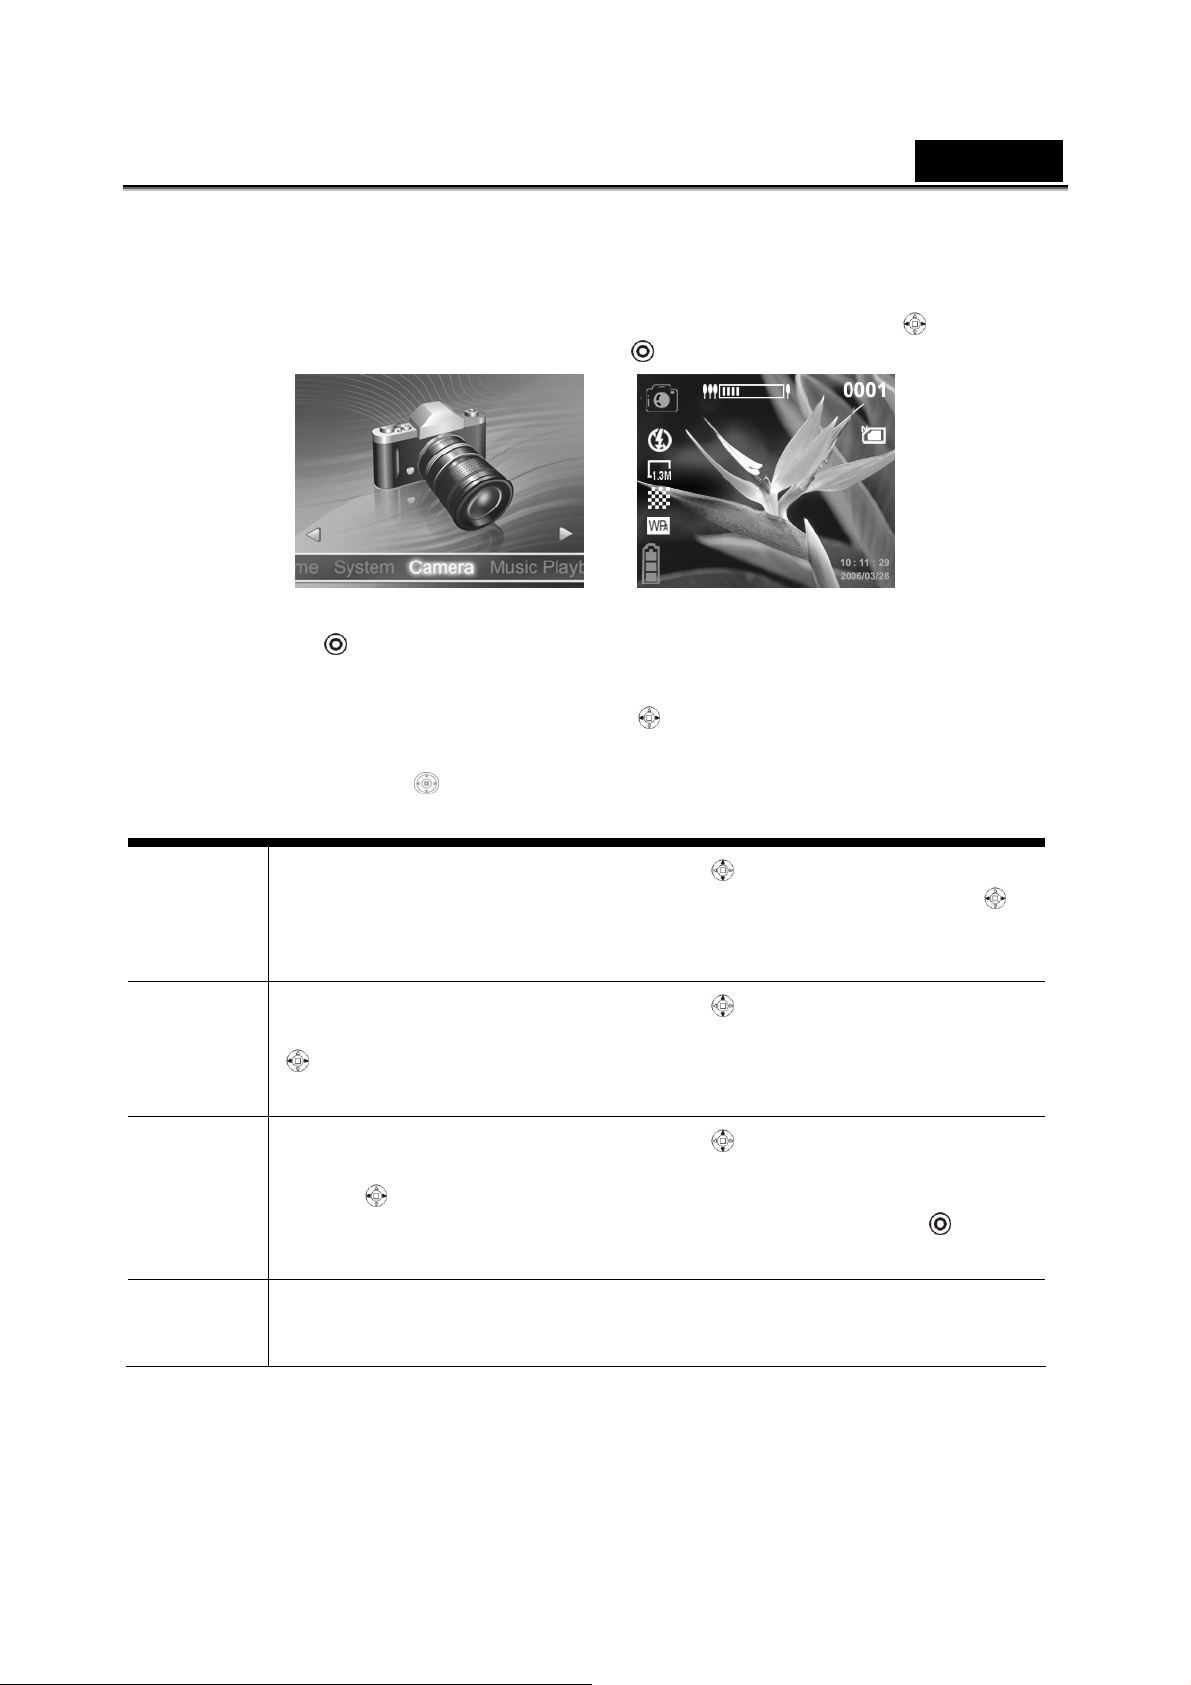
2.7 Taking pictures
2.7.1 Taking your first still picture
1. Turn the camera on, and use Direction button (Left/Right button ) to scroll
through Photo unit, and then press OK
2. Use the LCD screen to frame the picture.
to enter the Photo mode.
3. Press OK
4. The picture will automatically be saved with a unique file name.
5. Use Direction button (Left/Right button
icons on the screen.
You can use the Direction
taking pictures:
Digital
zoom
Exposur
e value
Self
timer
setting
to take a still picture.
) to erase the display of part or all the
button to execute the following functions while
Use Direction button (Up/Down button ) until the upper of the
screen appears zoom display, and use it again (Left/Right button
again to adjust the digital zoom. The screen will appear the digital
zoom ratio.
Use Direction button (Up/Down button ) until the center of the
screen displays the exposure value. Use it again (Left/Right button
) to adjust exposure values, and the screen will display the exposure
value –2.0~+2.0.
Use Direction button (Up/Down button ) until the center of the
screen displays the auto capturing icon, and use it again (Left/Right
button
value: Off, 5 seconds, 10 seconds, 30 second. Press the OK
start self- capturing after selecting.
) to adjust the self timer. The screen will display the self timer
)
to
Flash
Refer to the section 3.1.2 “Setting the flash”.
setting
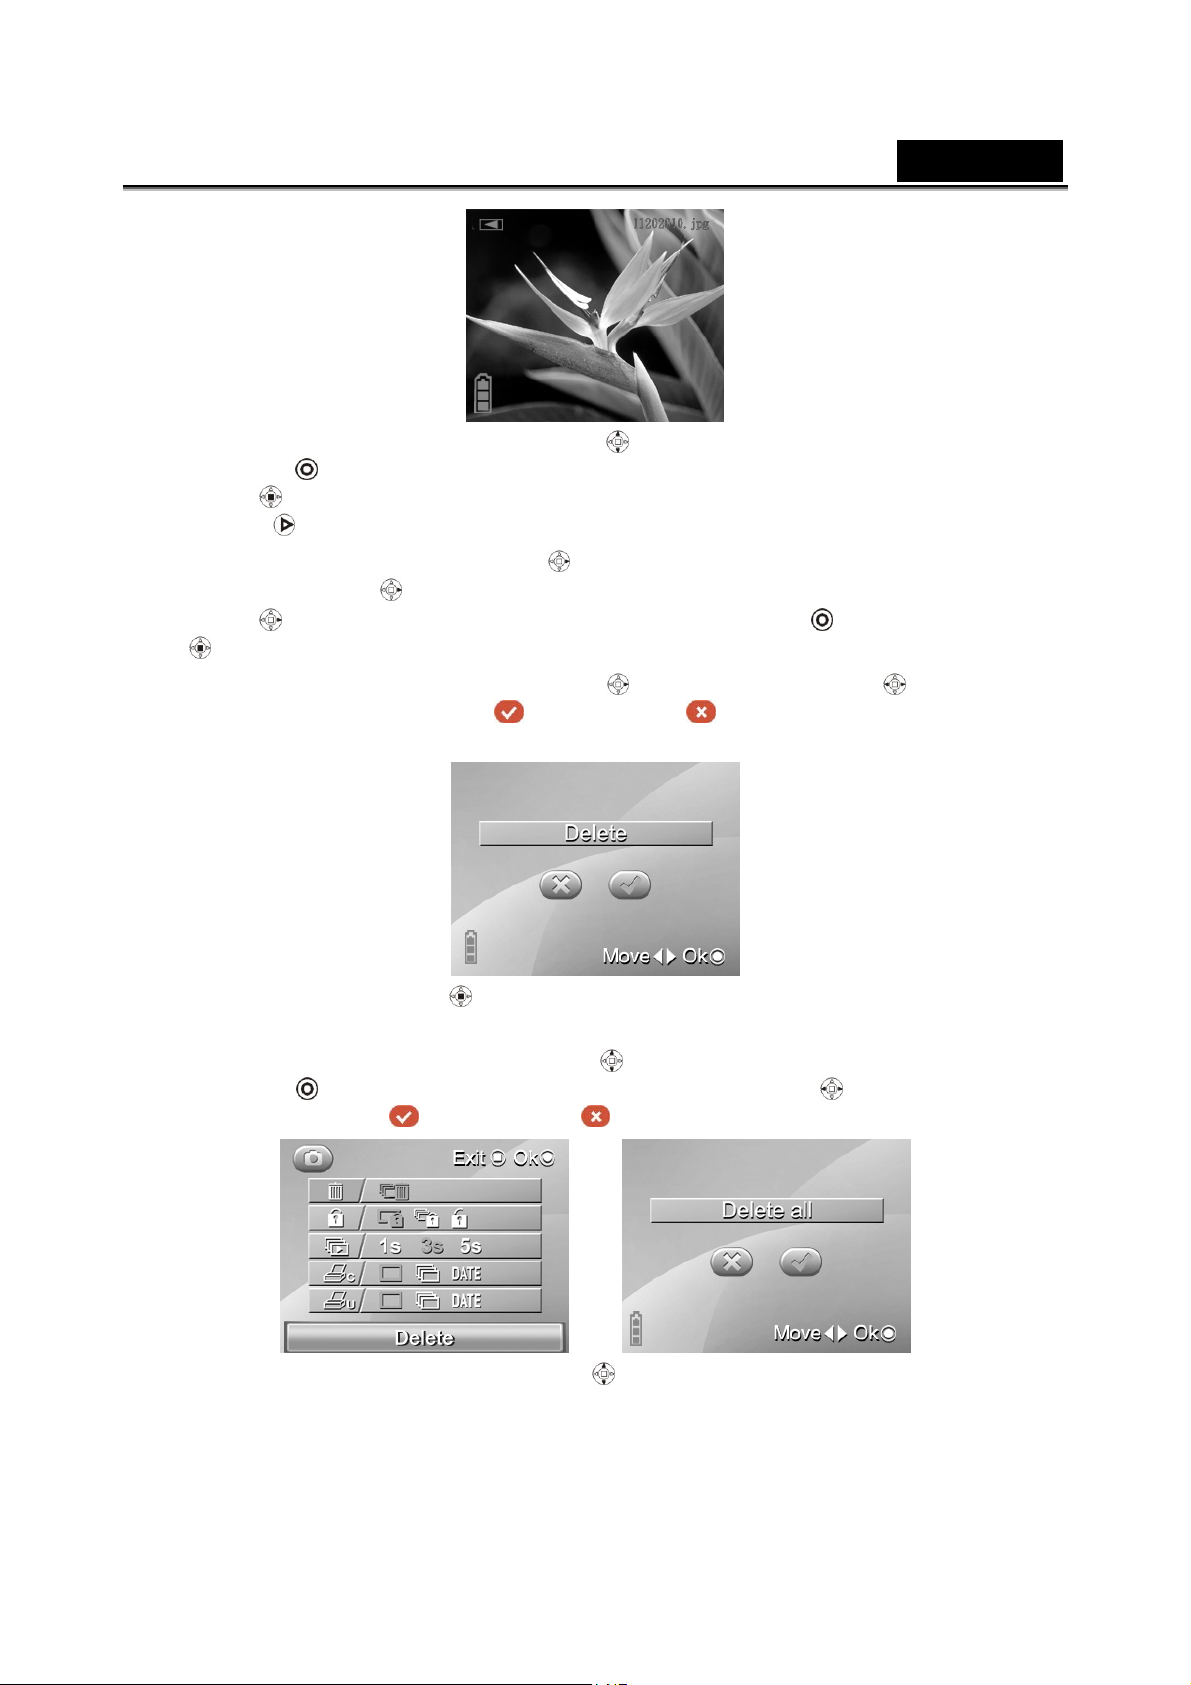
2.7.2 Browsing Pictures
1. Press Browse to enter the picture playback mode, and the last files will display on
the LCD screen.
-18-
Page 19
2. Use Direction button (Up/Down button
Press OK
button
Browse
to enlarge (zoom in ratio 1.0-8.0). Press Direction button (ENTER
) to reduce the enlarged picture (zoom out ratio 8.0-1.0). Press the
to exit while enlarging/reducing.
English
) to select the previous/next picture.
3. Use Direction button (Left button
again (Left button
button
) to display the picture by ratio 1:1.
(
4. Use the Direction (first the right button
delete pictures or not (select
confirm.
) to display the picture by ratio 1:9. Press the OK or Direction button
) to display the picture by ratio 1:4, and press it again (Left
) to change the ratio of the picture. Press it
, then Left/Right button ) to select to
to delete, but to not), and press the OK to
5. Press Direction button ( ), and the screen will appear the Setup menu under the
Playback mode.
(1) Use the Direction (Up/Down button
the OK
all or not (select
to enter. Use the Direction (Left/Right button ) to select to delete
to delete, but to not), and press the OK to confirm.
) to select the Delete option, and press
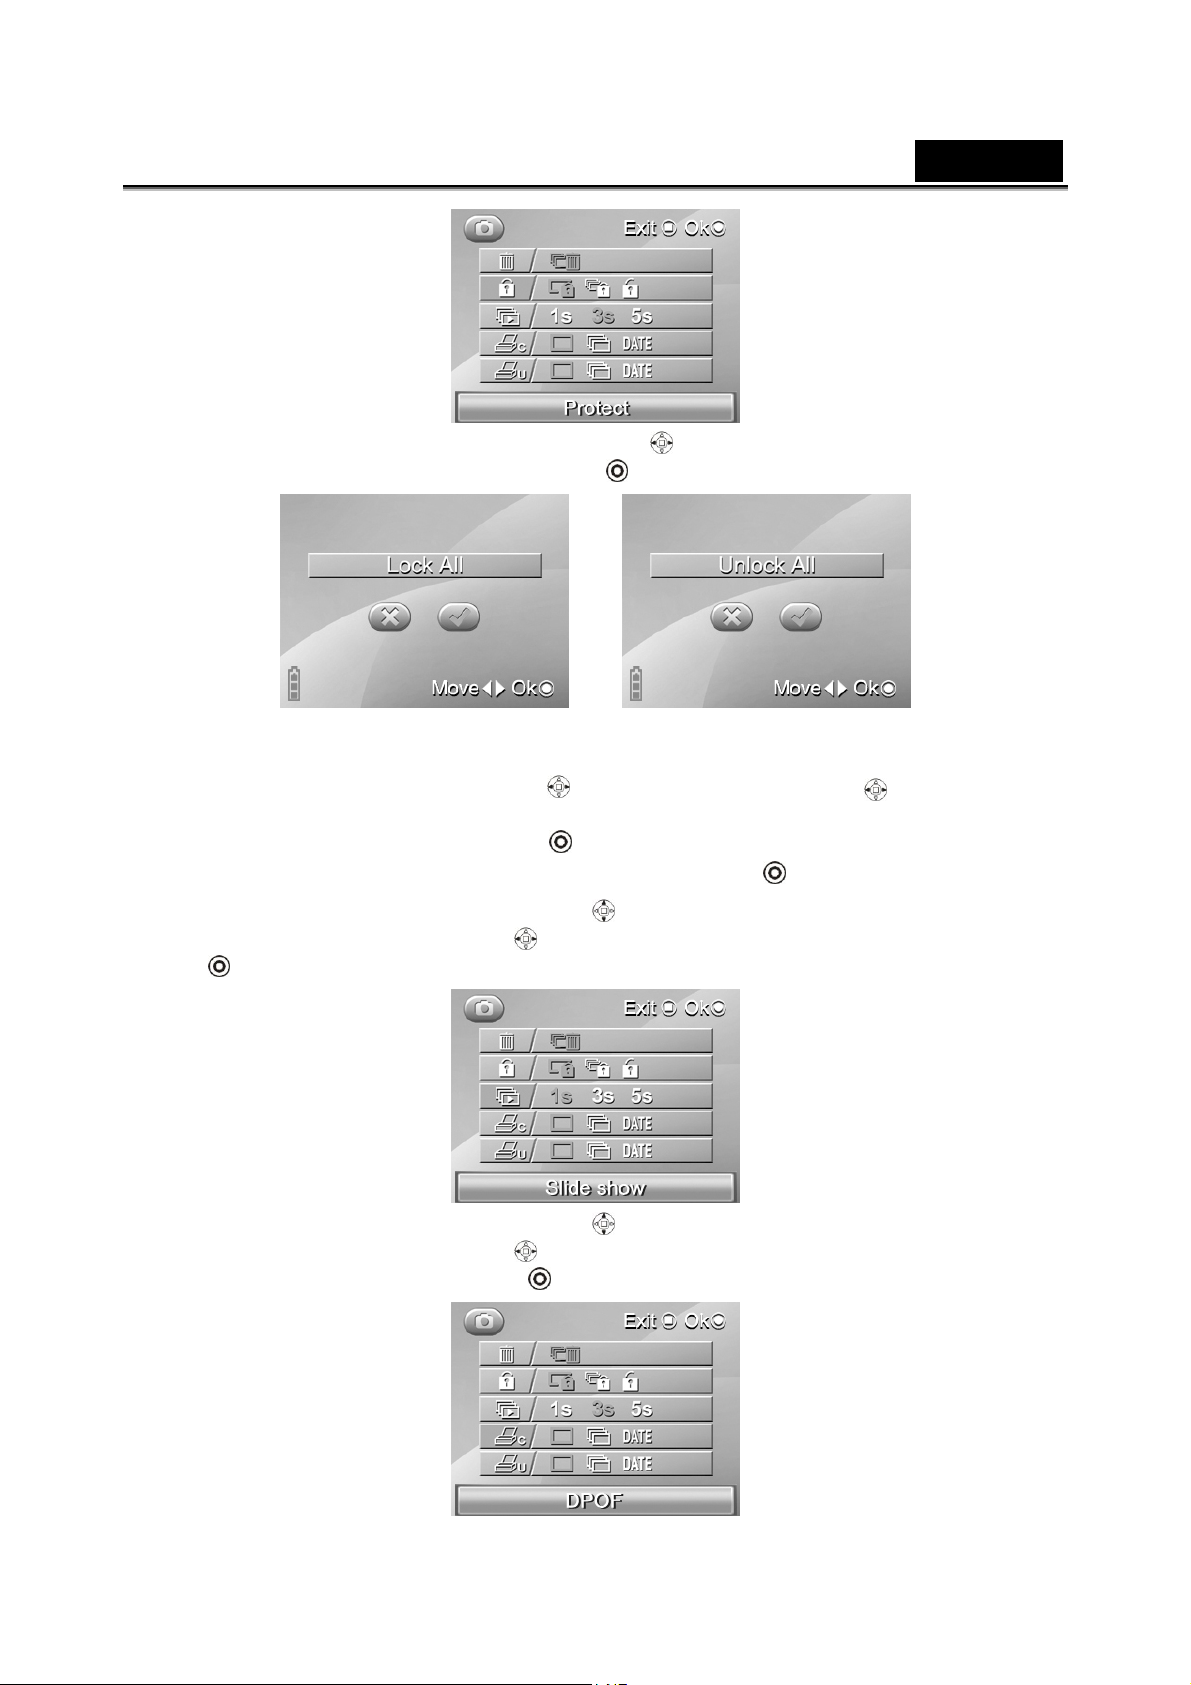
(2) Use the Direction Up/Down button ) to select the Protect option.
-19-
Page 20
English
Use the Direction (Left/Right button ) again to select Protect One, Protect
All or Cancel, and press the OK
If selecting Protect All,
shown as above, then use
the Direction (left/right
button) to select to Lock All
or not. Press the OK to
confirm.
to confirm.
If selecting Cancel, shown
as above, then use the
Direction (left/right
button) to select to cancel
all protection or not. Press
the OK to
confirm.
(3) Use the Direction Up/Down button
Direction (Left/Right button
to view the pictures automatically:
) again to select 1s, 3s, or 5s, and press the OK
) to select the Slide show option. Use the
(4) Use the Direction Up/Down button ) to select the DPOF option. Use the
Direction (Left/Right button
Print Date, and press the OK
) again to select Setup One, Select All or Select
to confirm:
-20-
Page 21
English
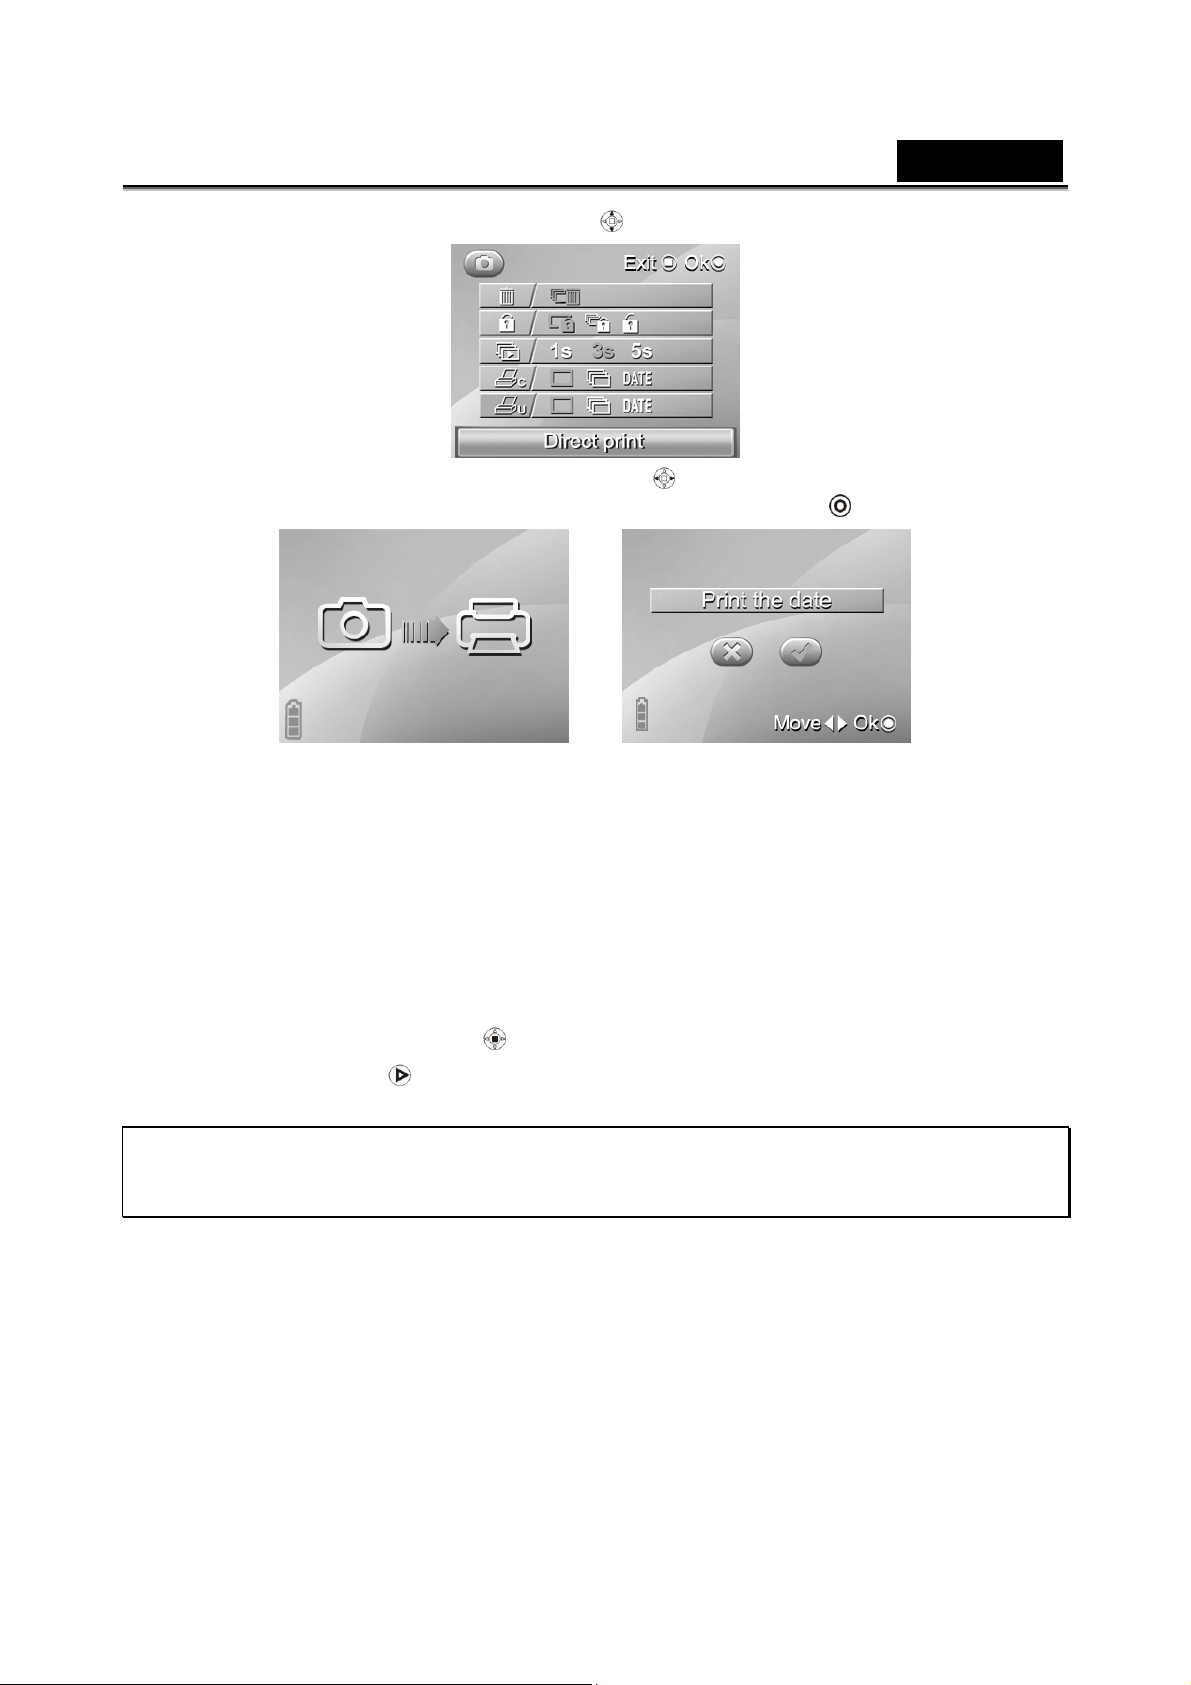
(5) Use the Direction Up/Down button ) to select the Direct Print option.
Use the Direction (Left/Right button ) again to select Direct Print One,
Direct Print all or Print Date or not, and press the OK
If selecting Print One or
Print All photos directly,
the screen appears as
above.
to confirm:
※ When the camera is connected to the printer, whether the printer is compatible with
the camera depends on the printer type.
(6) Press the ENTER button
6. Press the Browse
mode.
※ If there isn’t any saved picture in the camera memory or memory card, the screen will
show “No files” message while using the Replay mode.
again to leave the playback mode and return to the Photo
to return to the playback mode.
-21-
Page 22

English
Possible number of shots (still image)
The table below shows the approximate number of shots that you can take at each setting based on
internal memory and SD memory card.
Resolution Quality
4048X3040
12MP
2592X1944
5MP
2048X1536
3MP
Fine 6 22 44 91 179 373 764
Normal 9 26 50 103 202 420 865
Basic 11 30 60 124 242 504 1038
Fine 10 51 102 207 405 845 1675
Normal 18 61 122 249 486 1014 2083
Basic 29 75 149 304 596 1241 2546
Fine 17 82 159 323 632 1318 2708
Normal 29 101 197 401 779 1622 3347
Basic 46 123 239 486 959 2005 4125
32MB 64MB 128MB 256MB 512MB 1GB 2GB
SD Memory Card
1280X960
1.3MP
800X600
SVGA
* The above data shows the standard testing results. The actual capacity varies acc o rd ing to th e
shooting conditions and settings.
Fine 45 205 402 813 1594 3288 6805
Normal 76 246 497 1003 1945 4018 8303
Basic 120 309 608 1219 2372 4940 10225
Fine 105 476 959 1943 3741 7790 16080
Normal 181 600 1218 2439 4588 9553 19770
Basic 285 717 1445 2893 5721 11640 24140
2.8 Video recording
2.8.1 Video
1. Turn the camera on, and use Direction (Left/Right button ) to s croll through
Video unit, and then press the OK
to enter the Video mode.
2. Use the LCD screen to frame your video.
3. Press tOK
4.
Press the OK button again to stop recording.
in this mode, and the camera starts recording.
5. The video is automatically saved with a unique file name.
6. Use Direction (Left/Right button
) to erase the display of part or all the icons
on the screen.
-22-
Page 23

English
Note: Use the Direction to setup the Digital Focus and Exposure Value. The steps
are the same as those in Photo mode.
Possible recording time / sec (video clip)
Format
AVI
MOV
ASF
* The data shows the standard testing results. The actual capacity varies according to the shooting
conditions and settings
Image
size
640
x
480
320
x
240
640
x
480
320
x
240
640
x
480
320
x
240
Quality
Fine
Normal
Basic
Fine
Normal
Basic
Fine
Normal
Basic
Fine
Normal
Basic
Fine
Normal
Basic
Fine
Normal
Basic
32
MB
55
sec.
64
sec.
99
sec.
217
sec.
226
sec.
406
sec.
52
sec.
64
sec.
99
sec.
212
sec.
225
sec.
328
sec.
55
sec.
63
sec.
99
sec.
202
sec.
324
sec.
300
sec.
64
MB
4min
11sec.
6min
6min
35sec.
13min
37sec.
18min
39sec.
23min
33sec.
3min
12sec.
3min
35sec.
6min
25sec.
11min
4sec.
19min
6sec.
26min
6sec.
3min
56sec.
4min
33sec.
5min
33sec.
12min
59sec.
19min
33sec.
33min
28sec.
SD card capacity
128
MB
9min
10sec.
10min
51sec.
12min
10sec.
29min
59sec.
39min
37sec.
46min
22sec.
6min
34sec.
8min
26sec.
11min
13sec.
29min
15sec.
40min
29sec.
59min
26sec.
6min
49sec.
9min
7sec.
11min
6sec.
26min
11sec.
68min 120min 218min 349min 632min
95min 160min 277min 478min 898min
256
MB
17min
28sec.
20min
3sec.
25min
37sec.
60min 127min 238min 397min
76min 140min 275min 499min
95min 172min 296min 594min
11min3
5sec.
15min
8sec.
23min
35sec.
48mi
14sec.
80min 150min 283min 509min
136min 238min 396min 772min
12min
40sec.
18min
33sec.
22min
2sec.
52min
21sec.
512
MB
39min
47sec.
41min
12sec.
50min
16sec.
24min
17sec.
33min
28sec.
50min
16sec.
98min 177min 356min
21min
44sec.
37min
48sec.
50min
16sec.
105min 185min 355min
1GB 2GB
67min 117min
80min 135min
134min 235min
46min
42sec.
78min 149min
106min 203min
31min 101min
88min 169min
116min 234min
94min
2.8.2 Video playback
1. Ensure the digital camera is in Video mode.
2. Press the Browse
to enter the video playback mode, and the last file will
display on the LCD screen.
-23-
Page 24

3. Use the Direction (Up/Down button
press OK
to play the video clip.
English
) to select previous/next video clip, and
4. To pause playing the video, please press OK
5. Use the Direction (Up/Down button
Direction (Left/Right button
the Direction (Left/Right button
Fast Forward and Fast Reverse is only supported when playing AVI format files.
Fast Forward and Fast Reverse are not supported during playback of ASF and
MOV format files).
6. Use the Direction (first the right button
delete movies or not (select
confirm.
) to select the previous/next video, and long press
to delete, but to not), and press OK to
) to adjust the volume. Short press the
) to fast reverse/forward (2x, 4x, 8x). (Note:
, then Left/Right button ) to select to
again.
7. Press the Direction (ENTER button ), and the screen will show the Setup
menu under the Playback mode.
(1) Use the Direction (Up/Down button
press OK
delete videos or not (select
confirm.
to enter. Use the Direction (Left/Right button ) to select to
to delete all, but to not), and press OK to
) to select the Delete option, and
(2) Use Direction Up/Down button ) to select the Protect option.
-24-
Page 25

English
Use Direction (Left/Right button ) again to select Protect One, Protect All
or Cancel, and press OK
If selecting Protect All, the screen
appears as above, then use the
Direction (Left/Right
to select to Lock All or not. Press
OK
to confirm.
button)
to confirm.
(3) Press the ENTER button
8. Press Browse
※ If there isn’t any saved video in the camera memory or memory card, the screen will
show “No files” message while using the Replay mode.
again to exit the playback mode and return to Video mode.
to return to the playback mode.
2.9 Sound recording
2.9.1 Sound
1. Turn the camera on, and use Direction (Left/Right button ) to scroll through
Sound Recording unit, and then press OK
to enter Sound Recording mode.
-25-
Page 26

English
2. Press the OK
3. Press the OK
4. The camera will save the sound file automatically with the built-in file name.
to start recording.
again to stop recording.
-26-
Page 27

2.9.2 Playing the sound file
1. Ensure the digital camera is in Sound recording mode.
English
2. Press the Browse
(Up/Down button
play the recording.
to enter the recording playback mode. Use Direction
) to select previous/next recording, and press the OK to
3. Use Direction (Up/Down button ) to adjust the volume, and press OK
again to pause playing recording file. Press the Browse
recording files.
4. Use Direction (first the right button
delete recording files or not (select
, then Left/Right button ) to select to
to delete, but to not), and press OK
to stop playing
to confirm.
5. Press Browse again to exit the playback mode and return to Sound
recording mode.
※ If there isn’t any saved recording in the camera memory or memory card, the screen
will show “No files” message while using the Replay mode.
-27-
Page 28

English
2.10 Connecting to a computer
Read this section carefully to learn how to transfer files to a PC. Use the supplied USB
cable to connect the digital camera to the computer.
2.10.1 Mass Storage
The digital camera has a mass storage function which is the same as a card reader.
1. Use the USB cable to connect the digital camera to the computer as shown above.
2. When the digital camera is connected to the PC by USB cable, the digital c amera
will automatically pop up two function modes Mass Storage and PC Camera for the
choosing to connect the computer by USB.
3. Use Direction (Up/Down button
OK
4. When you finish installing the system, the Mass Storage item will be added to My
Computer of the system.
5. You can start using the added mass storage which is the SD card reader provided
by the camera. There are five folders in mass storage: DCIM/ 100FSCAM, MOVIE,
MUSIC, PHOTO and DEMO.DCIM/ 100FSCAM is used to save the files generated
by capturing, shooting the video and sound recording. MOVIE is used to save the
AVI and ASF movie files stored externally. MUSIC is used to save the MP3 and
WAV music files stored externally.
PHOTO is used to save the JPEG picture files stored externally. DEMO is used to
save the AVI, ASF, and MOV movie files and JPG picture files stored externally.
to confirm the selection. The screen turns off.
) to select the Mass Storage item, and press
-28-
Page 29

English
y
r
2.10.2 PC camera
This digital camera can work as a PC camera or web camera.
1. Use the USB cable to connect the digital camera to the computer as shown above.
2. When the digital camera is connected to the PC by USB cable, the digital c amera
will automatically pop up two function modes Mass Storage and PC Camera for
choosing to connect the computer by USB.
3. Use Direction (Up/Down button
OK
4. You can use the PC camera function provided by the camera with the software
supplied in the CD-ROM or another software.
to confirm the setting. The camera starts framing.
) to select the PC Camera item, and press the
2.11 Connecting to a TV
Use the supplied AV cable to connect the camera to a TV as shown.
Insert the yellow connector of
the AV cable to the Video-in
port of TV, VCR or DVD Playe
Insert the white and red
connectors of the AV cable to
the Video-in port of TV, VCR
or DVD Pla
er
-29-
Page 30

English
3. Using the camera
Read this section to learn how to use the camera.
3.1 Photo mode
Use the Photo mode to capture pictures, and store them in internal memory or on an
SD card.
3.1.1 Icons
The following screen shows the photo mode icons and their symbols.
See the table below for a description of each button’s function.
1
2 Display the number of saved pictures
3
4
5
6
7
8
9 Display the date of taking pictures
10 The icon of built-in memory or SD/MMC card storage status
Photo mode indicator
Digital zoom status
Battery status indicator
Flash mode indicator
Image size indicator
Image quality indicator
White balance indicator indicates the settings of white balance
-30-
Page 31

English
3.1.2 Setting the fla s h
While in Photo mode, use Direction (Up/down button ) to highlight the Flash option,
and use the Direction (Left/Right button
See the table below for a description of each button’s function.
) to switch to the Flash mode.
Flash is turned off
Auto flash, fires only when needed.
Force flash, the flash is always on.
3.1.3 Setting the si ze
While in Photo mode, press Direction (ENTER button ) to enter the Setup menu to
adjust the size of the file.
1. Use Direction (Up/Down button
2. Use Direction (Left/Right button
press OK
to confirm.
) to select the Size option.
) to select 12M, 5M, 3M, 1.3M or SVGA and
3. Press the Direction (ENTER button
) again to leave the menu.
3.1.4 Quality
The Quality option lets you setup the quality of the captured picture. A larger size picture
contains more content; therefore it takes more memory space.
1. While in Photo mode, press the Direction (ENTER button
menu.
2. Use the Direction (Up/Down button
) to select the Quality option.
) to enter the Setup
-31-
Page 32

English
3. Use the Direction (Left/Right button
press OK
4. Press the Direction (ENTER button
to confirm.
) to select Fine, Normal, or Basic, then
) again to exit the menu,
3.1.5 White balance
Use the white balance option to correct the color for different lighting conditions.
1. While in Photo mode, press Direction (ENTER button
menu.
2. Use the DirectionUp/Down button ) to select the White Balanceoption.
3. Use the Direction (Left/Right button ) to select Auto, Sunny, Cloudy, Tungsten,
Fluorescent, then press the OK
4. Press the Direction (ENTER button
to confirm.
) again to leave the menu,
) to enter the Setup
3.1.6 Color effect
The camera can capture standard color images, black and white images or sepia tone
images.
1. While in Photo mode, press the Direction (ENTER button
menu.
2. Use the Direction Up/Down button
) to select the Color Effect option.
) to enter the Setup
3. Use the Direction (Left/Right button ) to select Color Effect, W/B or Sepia.
4. Press the Direction (ENTER button
) again to leave the menu.
3.1.7 Date Stamp
Use this option to open/close the date stamp when taking pictures.
1. While in Photo mode, press Direction (ENTER button
menu.
2. Use Direction Up/Down button
) to select the Date Stamp option.
-32-
) to enter the Setup
Page 33

English
3. Use the Direction (Left/Right button ) to select if the date stamp is displayed.
4. Press the Direction (ENTER button
) again to exit the menu,
3.2 Video recorder mode
Use this mode to capture video clips, and store them in internal memory or on an SD
card.
3.2.1 Icons
Use the following picture to familiarize yourself with the Video mode icons and symbols.
See the table below for a description of each button’s function.
1
2 Recording Timing
3
4
5 Display the number of saved video clips
6
7
8
9 Video file formats
10 Display system date/time
11 The logo of built-in memory or SD/SMM card storage status
Video mode
Battery status
Digital zoom status
Image size indicator
Image quality indicator
White balance indicator indicates the settings of white balance
-33-
Page 34

English
3.2.2 Setting the si ze
1. While in Photo mode, press Direction (ENTER button ) to enter the Setup menu
to adjust the file format.
2. Use the Direction (Up/Down button
3. Use the Direction (Left/Right button
to confirm.
4. Press the Direction (ENTER button
3.2.3 Quality
Refer to “3.1.4 Quality” section.
3.2.4 White Balance
Refer to “3.1.5 White Balance” section.
3.2.5 Color effect
) to select the Size option.
) to select VGA or QVGA, and press the OK
) again to exit the menu.
Refer to “3.1.6 Color effect” section.
3.2.6 File format
1. While in Photo mode, press Direction (ENTER button ) to enter the Setup menu to
adjust the file format.
2. Use the Direction Up/Down button
3. Use the Direction (Left/Right button
to confirm.
4. Press the Direction (ENTER button
) to select the File Format option.
) to select AVI, ASF or MOV, and press OK
) again to exit the menu.
-34-
Page 35

English
3.3 Sound Recording mode
Use the Sound Recording mode to record the sound files, and then save them in the
internal memory or SD card.
3.3.1 Icons
Use the following picture to familiarize yourself with the Sound Recording mode icons
and symbols.
See the table below for a description of each button’s function.
3 1
2 5 4
1 Display the number of saved files
2
3
4 Recording status
5 Recording Timing
Battery status
Sound recording icon
3.4 Setup mode
You can set some special settings in this mode. This mode contains two menu pages.
They are system menu 1/2 and system menu 2/2.Turn the camera on, and use the
Direction (Left/Right button
to enter. The following settings are made in Setup mode.
) to setup the system (shown below), and then press OK
-35-
Page 36

English
3.4.1 Setting th e date and time
Refer to the section 2.6.1 “Setting the date and time”.
3.4.2 Setting the be ep function
1. Turn the camera on, and use Direction (Left/Right button ) to setup the system,
and then press OK
to enter Setup mode.
2. Use the Direction (Up/Down button
appears as below.
) to select the Beep option. The screen
3. Use the Direction (Left/Right button ) to select Beep On or Beep Off, and press
OK
4. Press Direction (ENTER button
to confirm.
) or Mode button to exit the menu.
3.4.3 Setting the language
Refer to the section 2.6.2 “Setting the language”.
3.4.4 Auto Display Off
Use the auto power off function to set a period of inactivity after which the camera will
switch the LCD screen off.
1. Turn the camera on, and use Direction (Left/Right button
and then press OK
2. Use the Direction (Up/Down button
The screen appears as below.
to enter Setup mode.
) to select the Auto Display Off option.
) to setup the system,
3. Use the Direction (Left/Right button ) to select 30s, 60s, DEMO, OFF and
press the OK
automatically play the movie and picture files in the DEMO folder repeatedly after
30 seconds. It’s the same as a screensaver.
4. Press Direction ( ENTER button
to confirm. If the option is set to DEMO, the camera will
) or mode button to exit the menu.
-36-
Page 37

English
Note: Convert the demo movie and picture files to the format supported by this camera
before saving them in the camera. Refer to chapter 5 “How to play a movie and browse
pictures”. Please save the converted movie and picture files or the folder with converted
movie and picture files in the DEMO folder of the camera, or the camera can’t execute
the DEMO function. If you delete all the movie and picture files in DEMO folder by
formatting or through the computer, the current option of Auto Display Off is setup to 30S
automatically.
3.4.5 Auto Power Off
Use the auto power off function to set a period of inactivity after which the camera will
switch itself off.
1. Turn the camera on, and use Direction (Left/Right button
and then press OK
2. Use Direction (Up/Down button
screen appears as below.
to enter Setup mode.
) to select the Auto Power Off option. The
) to setup the system,
3. Use the Direction (Left and right button ) to select 1Min, 3Min, OFF and press
the OK
4. Press the Direction (ENTER button
to confirm.
) or mode button to exit the menu.
3.4.6 Format
Use the option to format the current storage media. This function will delete all the files in
the storage media.
1. Turn the camera on, and use Direction (Left/Right button ) to setup the system,
and then press OK
to enter Setup mode.
2. Use Direction (Up/Down button
as below. Press OK
to select
3. Press the OK to confirm.
or .
to enter the option. Use the Direction (Left/Right button )
) to select Format option. The screen appears
-37-
Page 38

English
4. Press Direction (ENTER button
) or mode button to leave the menu.
3.4.7 TV Standard
Use the TV option to set up the applicable local TV system.
1. Turn the camera on, and use Direction (Left/Right button
then press OK
2. Use Direction (Up/Down button
appears as below.
to enter Setup mode.
) to select the TV Standard option. The screen
3. Use the Direction (Left/Right button ) to select NTSC/PAL, and press OK to
confirm.
4. Press the Direction (ENTER button
) or Mode button to exit the menu.
) for system setup, and
3.4.8 Defaultl
Use this option to reset all settings to the factory default.
1. Turn the camera on, and use Direction (Left/Right button
and then press OK
2. Use the Direction (Up/Down b utton
screen appears as below. Press OK
) to select or .
3. Press OK to confirm.
4. Press the Direction (ENTER button
to enter Setup mode.
) to select the Default option, and the
to use the Direction (Left/Right button
) or mode button to leave the menu.
) for system setup,
-38-
Page 39

English
3.4.9 Memory Status
1. Turn the camera on, and use Direction (Left/Right button ) for system setup,
and then press OK
to enter Setup mode.
2. Use Direction (Up/Down button
screen appears as follow. Press OK
) to select the Memory Status option. The
to display the current storage status.
3. Press OK to return to Setup menu.
4. Press the Direction (ENTER button
) or mode button to exit the menu.
3.4.10 Frequency
1. Turn the camera on, and use Direction (Left/Right button ) for system setup,
and then press OK
2. Use Direction (Up/Down button
appears as below.
to enter Setup mode.
) to select the Frequency option. The screen
3. Use the Direction (Left/Right button ) to select 50Hz or 60 Hz, and press the OK
to confirm.
4. Press the Direction (ENTER button
Note: Press the Mode button
interface in any mode.
, and the camera system will switch to mode selection
) or Mode button to leave the menu.
-39-
Page 40

English
3.5 FM Radio mode
Use FM Radio to receive radio from frequency FM76~108MHz, and save them in the
internal memory or on a SD card.
3.5.1 Sound recording icon
Use the following picture to familiarize yourself with the FM Radio mode icons and
symbols.
See the table below for a description of each button’s function.
3
2 186 7 4 5
1 Recording time
2
3
4 Recording status
5
6 Channel display
7 Manual search
8 Receiving Station
Battery status
FM radio mode icon
Volume
3.5.2 Operation instructions
1. Turn the camera on, and use Direction (Left/Right button ) to scroll through FM
radio unit, and then press OK
to enter FM radio mode.
-40-
Page 41

English
2. Long press the Direction (ENTER button ), and the camera will start searching
for the station frequency automatically. Press OK
frequency during this process. When finishing auto search, the camera will save the
station automatically. Use the Direction (Left/Right button
searched automatically.
3. Press the Direction (ENTER button
) to search manually. Press the Direction (Up button ) and the current channel
is +0.1MHz. Press the Direction (Down button
-0.1MHz.
), and press the Direction (Up/Down button
to stop receiving the
) to select the station
) and the current channel is
4. Choose the station you want to receive. Press OK
OK
5. Use the Direction (Up/Down button
the Direction (Up button
Direction (Down button
6. Press and hole Browse
the Browse
7. Press the Mode button
interface.
Note: Use the earphone as an antenna when searching for a station.
again to stop recording.
) to increase or decrease the volume. Press
) and the current volume increases. Press the
) and the current volume decreases.
to lock all the buttons of the camera. Press and hold
again to unlock the buttons.
, and the camera system will switch to mode selection
to start recording, and press
-41-
Page 42

English
3.6 Music Player mode
Use the Music player mode to play music in mp3, wav format in the internal memory or
on a SD card.
3.6.1 Icons
Use the following picture to familiarize yourself with the Music Player mode icons and
symbols.
3
2
See the table below for a description of each button’s function.
1 Playing time
2
3
4 Repeat mode
5
6 Audio mode
Battery status
Music Player mode icon
Volume
46
76
5
7 Display the sequence number of the song
3.6.2 Operation instructions
1. Turn the camera on, and use Direction (Left/Right button
player, and then press OK
to enter Music Player mode.
-42-
) to go to the music
Page 43

English
2. Use the Direction (first left
delete all music files (select
deleting), or to delete single music file (select
file, select
or single selected music file.
3. In song selection menu mode, use the Direction (Up/Down button
songs you want to play, and press the OK
The music file name displays with four-digit number incrementally.)
to cancel deleting). Press OK to confirm deleting all music files
or right , and then left/right button ) to select
to delete all music files, select to cancel
to delete single selected music
to enter the playback mode. (Note:
) to select the
4. While playing music, use the Direction (Up/Down button
5. While playing music, long press the Direction (ENTER button
Normal, Pop, Classical, Rock and Bass. Short press the Direction (
repeat modes for playing music: Play in Order
Shuffle
6. While playing music, use the Direction (Left/Right button
previous/next song. Press OK
to the playlist.
7. Press and hold Browse to lock all the buttons of the c a mera. Press and hold
Browse
8. Press the Mode button
。
to pause playing, and press Browse to return
again to unlock the buttons.
, and the camera system will switch to mode selection
, Repeat One , Repeat All ,
) to adjust the volume.
) to switch the EQ:
) to switch the
) to switch to the
interface.
-43-
Page 44

English
Note: the music file formats supported by this camera are MP3 and WAV. Please save
the music files of these two formats into the MUSIC folder of the camera, or the music
player can’t find music files.
3.7 Movie player mode
Use the Movie player mode to play the movie in AVI, ASF or MOV format in the internal
memory or on a SD card.
3.7.1 Mode icons
Use the following picture to familiarize yourself with the Movie Player mode icons and
symbols.
See the table below for a description of each button’s function.
1
2
3 Playing time
4 Movie file name
5
6
Playback mode
Battery status
Repeat mode
Volume
3.7.2 Operation instructions
1. Turn the camera on, and use Direction (Left/Right button
and then press OK
to enter Movie Player mode.
) to go to movie player,
-44-
Page 45

English
2. Use the Directio n (first left
movie files (select
delete single movie file (select
cancel deleting). Press OK
movie file.
3. In this mode, use the Direction (Up/Down button
to play, and press OK
just display numerals and letters, the other symbols will display as random codes.)
to delete all movie files, select to cancel deleting), or to
or right , and then left/right button ) to delete all
to delete single selected movie file, select to
to confirm deleting all movie files or single selected
) to select the movie you want
to enter playback mode.(Note: the movie file name can
4. While playing the movie, use the Direction (Up/Down button
volume.
5. While playing a movie, short press the Direction (ENTER button
repeat modes for playing the movie: Play in Order
All
6. While play a movie, short press the Direction (Left/Right button
previous/next section, and long press the Direction (Left/Right button
rewind/forward (2x, 4x, 8x). Press OK
to return to the menu for selecting movies. (Note: Fast Forward and Fast Reverse is
only supported when playing AVI format files. Fast Forward and Fast Reverse are
not supported during playback of ASF format files).
, Shuffle 。
to pause playing, and press Browse
, Repeat One , Repeat
) to adjust the
) to switch the
) to switch to the
) to fast
-45-
Page 46

English
7. Press the Mode button
interface.
Note: Convert the movie files to the format supported by this camera before saving them
in the camera, such as AVI and ASV (converting to AVI file format is highly suggested).
Please refer to chapter 5 “How to play a movie and browse pictures”. Please save the
converted movie files or the folder with converted movie files in the MOVIE folder of the
camera, or the picture viewer can’t find the movie files.
, and the camera system will switch to mode selection
3.8 Photo viewer mode
Use the Photo Viewer mode to play the pictures in the internal memory or SD memory
card.
3.8.1 Operation instructions
1. Turn the camera on, and use Direction (Left/Right button
and then press OK
to enter Photo viewer mode.
) to go to movie player,
2. Use the Direction (first left
delete all picture files (select
deleting), or to delete single picture file (select
file, select
or single selected picture file.
to cancel deleting). Press OK to confirm deleting all picture files
or right , and then left/right button ) to select to
to delete all picture files, select to cancel
to delete single selected picture
-46-
Page 47

English
3. In this mode, use the Direction (Up/Down button ) to select the picture you want
to view, and press the OK
name can just display numerals and letters, other symbols will display as random
codes.)
to enter the playback mode.(Note: the picture file
4. When viewing pictures, use the Direction (Up/Down button
you want to view. Press the OK
Direction (ENTER button
8.0-1.0). Press Browse
5. When viewing pictures, use the Direction (Left/Right button
level, picture name, etc.
6. When viewing pictures, press Browse
7. Press the Mode button
interface.
Note: Convert the picture files to the format JPEG supported by this camera before
saving them in the camera. Please refer to chapter 5 “How to play a movie and browse
pictures”. Please save the converted picture files or the folder with converted picture files
in the PHOTO folder of the camera, or the picture viewer can’t find the picture files.
) to reduce the enlarged picture (zoom out ratio
to exit while enlarging/reducing.
, and the camera system will switch to mode selection
to enlarge (zoom in ratio 10-8.0). Press the
to return to picture menu.
) to select the picture
) to display battery
3.9 Game mode
Use the Game mode to operate the four built-in games in this camera: Boxman, Tetris,
Memory, Gobang.
Turn the camera on, and use Direction (Left/Right button
(shown below), and then press OK
to enter Game mode.
) to scroll through the game
-47-
Page 48

English
3.9.1 Boxman
Boxman game is also called pushing the box. It’s designed to let the player push the box
onto the ball to make the box blue, and develop the user’s thinking ability by this.
1. Use the Direction (Left/Right button
press OK
select the Boxman option.
2. Press OK
3. Under the Boxman menu mode, use the Direction (Up/Down button
Start option, and press OK
the Boxman menu.
to enter the Game menu. Use the Direction (Up/Down button ) to
to enter the Boxman menu.
to enter the game. Press Browse to return to
) to scroll through the Game mode, and
) to select
4. Under the Boxman menu mode, use the Direction (Up/Down button
the Level option, and use the Direction (Left/Right button
(1~30). Press OK
menu.
5. Under the Boxman menu mode, use the Direction (Up/Down button
Exit option, and press OK
6. While playing the game, please use the Direction (Left/Right
move the figure and push the box. If you take the wrong step, you can press OK
to undo the previous action. When you push all the boxes to the locations marked
with a little ball, you win. The screen will appear “Next map”, and you can go to the
next map.
7. Press the Mode button
interface.
to enter the game. Press Browse to return to the Boxman
to exit the Boxman menu and return to Game Menu.
, and the camera system will switch to mode selection
-48-
) to adjust the level
Up/Down ) to
) to select
) to select
Page 49

English
3.9.2 Tetris
The Tetris game is designed to develop your reaction ability by filling in the empty space
with the blocks.
1. Use the Direction (Left/Right button ) to scroll through the Game mode, and
press OK
select the Tetris option.
2. Press OK
to enter the Game menu. Use the Direction (Up/Down button ) to
to enter the Tetris menu.
3. Under the Tetris game menu mode, use Direction (Up/Down button
Start option, and press OK
the Tetris game menu.
4. Under the Tetris menu mode, use Direction (Up/Down button
Level option, and use Direction (Left/Right button
Press OK
5. Under the Tetris menu mode, use the Direction (Up/Down button
option, and press OK
6. While playing games, use the Direction (Left/Righ t button
move the blocks, and press OK
button
continue the game. The upper right of the game screen will appear the shape of
next block. The area at the bottom of the game screen will appear the score you get.
When the score of each level reaches 1500, the screen will show “Next level” for
the next level (the falling speed of the blocks become faster).
7. Press the Mode button
interface.
to enter the game. Press Browse to return to the Tetris menu.
to exit the Tetris menu and return to Game Menu.
) to pause the game, and use the Direction (Up button ) again to
to enter the game. Press Browse to return to
) to adjust the level (1~7).
Down button ) to
to turn the blocks. Use the Direction (Up
, and the camera system will switch to mode selection
) to select
) to select the
) to select Exit
-49-
Page 50

English
3.9.3 Memory (game)
The memory game trains your memory ability by opening two of the same objects
continuously.
1. Use the Direction (Left/Right button ) to scroll through the Game mode, and
press OK
select the Memory option.
2. Press OK
to enter the Game menu. Use the Direction Up/Down button ) to
to enter the MEMORY game menu.
3. Under the Memory menu mode, use Direction (Up/Down button
option, and press OK
Memory menu.
4. Under the Memory menu mode, use the Direction (Up/Down button
Exit option, and press OK
5. Use the Direction (Left/Right
playing games. Press OK
Remember the picture of this location. When you open the same picture again, both
the same pictures will be erased. If different, the previous two pictures will be
covered again when opening the third picture. You will win the game when all the
pictures are erased. The screen will appear message “You win”, and then return to
the Memory menu. The lower left corner of the game screen will display the number
of erased pictures. The lower right corner of the game screen will display the
elapsed time of the game.
6. Press the Mode button
interface.
to enter the game. Press Browse to return to the
to exit the Memory menu to return to Game Menu.
Up/down button) to move the light mark while
to open the picture which the light mark is on.
, and the camera system will switch to mode selection
) to select Start
) to select
-50-
Page 51

English
3.9.4 Gobang
The Gobang game is designed to develop your thinking ability by aligning five pieces in a
line.
1. Use Direction (Left/Right button ) to scroll through the Game mode, and press
OK
the Gobang option.
2. Press OK
to enter the Game menu. Use the Direction (Up/Down button ) to select
to enter the Gobang menu.
3. Under the Gobang menu mode, use the Direction (Up/Down button
Start option, and press OK
the Gobang menu.
4. Under the Gobang menu mode, use the Direction (Up/Down button
Exit option, and press OK
5. Use the Direction (Left/Right
playing games. Press OK
mark is. After you put one piece, your opponent (camera) also puts one white piece.
When you put five black pieces in a line, you win. The screen will show the
message “You win”, and then return to the Gobang menu. Instead, when the
camera puts five white pieces in a line, you lose. The screen will appear message
“Fail”, and then return to the Gobang menu. When the board is full of pieces and
you tie with the camera, the screen will show the message “Draw”, and then return
to the Gobang menu. The lower right corner of the game screen will indicate that
you use the black piece, and the camera uses the white piece.
6. Press the Mode button
interface.
to enter the game. Press Browse to return to
to exit the Gobang menu to return to Game Menu.
Up/down button) to move the light mark while
to put the black piece on the place which the light
, and the camera system will switch to mode selection
) to select
) to select
-51-
Page 52

English
4. Recording the TV program
For more information on recording the TV program, refer to this section.
4.1 Operation instructions
1. Use the AV cable to connect the camera to external audio equipme nts, and the
camera will pop up in the AV IN interface.
2. Use the Direction (first the right button
record programs or not (select
to confirm.
3. The display of pictures by the screen and the playing of the sound by the speaker
are synchronized with the external audio/video. Press OK
start recording.
4. Press OK
5. The setting of the function and replaying is the same as that of Photo mode.
6. Press the Mode
Note: do not press any button while recording. If SD card/MMC card or NAND FLASH is
full, the camera will prompt.
again to stop recording.
button to return to AV IN interface.
to record, but to not), and press the OK
, then Left/Right button ) to select to
and the camera will
-52-
Page 53

English
5. How to play a movie and view pictures
If you want to see a movie or picture any time, you can use the camera as a portable
media player to see movies or pictures at any time.
Before seeing the movies and pictures, you have to convert the current movie or picture
files into the formats supported by the camera. To convert these files, you can use the
ArcSoft Media Converter software in the supplied CD-ROM.
To install and run ArcSoft Media Converter, your computer system needs the following
minimum requirements:
• Windows® XP, 2000, ME, 98 SE operation system
• 50 MB free hard disk space
• 256 MB RAM
• DirectX 9 (DirectX 9c recommended)
• Microsoft Windows Media Player 9.0 (used to convert WMA and WMV files)
• Apple QuickTime 6.5 (used to convert MOV files)
File formats supported for converting:
•Video:
The video files are converted and saved to the folder you choose, and the MPEG-4
coded AVI files, WMV files or MPEG-4 coded ASF files are kept. File formats supported
for converting include: AVI (Microsoft Video 1 format, Cinepak, Intel Indeo,
uncompressed etc.); MPEG-1 & MPEG-2 in MPEG, MPG, MPE or VOB format; MPEG-4
in AVI format; DAT; ASF; QuickTime MOV; and WMV. To convert QuickTime MOV and
WMV files, you have to install QuickTime 6.5 and Windows Media Player 9.0 or higher
on the system. If there’s third-party coded tool installed, it may support the conversion of
other file types.
•Audio: (the camera supports most MP3 and WAV files. We recommend you do not have
to convert these two file formats.)
The audio files are converted and copied to the folder you choose, and kept in the form
of MP3 files. File formats supported for converting include: MP3, WMA and WAV. To
convert WMA files, you have to install Windows Media Player 9.0 on the system.
•Photo:
The picture files are converted and copied to the folder you choose, and kept in the form
of JPEG files. File formats supported for converting include: JPEG, TIFF, GIF, PNG,
BMP, TGA, FPX, PCX and PCD.
The conversion process is as follows:
-53-
Page 54

English
5.1 Install ArcSoft Media Converter
The installation process is as follows:
1. Insert the CD-ROM and double click on the installation file “Setup.exe”. The Welcome
screen appears, then click Next.
2. Click Yes to accept the license agreement.
-54-
Page 55

English
3. Select the installation folder and click Next. The default installation folder is
C:\Program Files\ArcSoft\MediaConverter. In addition, you can click Browse to select
another installation folder.
4. Choose Start Menu folder and click Next. You can input your favorite Start Menu
folder.
-55-
Page 56

English
5. Click Next to install ArcSoft Media Converter on your computer. When finished
installing, the following screen appears. Click Finish, and you can use the ArcSoft
Media Converter.
-56-
Page 57

English
5.2 Running the ArcSoft Media Converter and
converting files
Please refer to the following steps to easily use the ArcSoft Media Converter to convert
your files.
Step 1: choose media files
Add the files yo u want to convert:
1. Click the “Select Media” button.
2. The screen appears for opening files. Select the folder you want for converting files.
a. Click the drop down arrow of “Files of type” to choose the file types you want to
display.
b. You can use the highlighted file to make sure if it’s the file you want to convert. If
the AutoPlay is selected, the preview windows will start replaying the file
automatically after you click the certain file.
-57-
Page 58

English
3. Repeat the steps 1 and 2 until you add all the files you want to convert. Except for the
above method, you can directly drag the files to the file list of ArcSoft MediaConverter.
Group files
The files you select will list in the application window. You can group the files by
name, size or file format. Just click the title in the field for grouping.
Removing files
Highlight the file to delete, and then click “X” icon to delete the file from the file list.
Step 2: Select Destination
Click the “Select Destination” button to choose the folder to save the converted files.
The default folder is “C:\Documents and Settings\[current user]\My documents”. You can
also save the converted files onto your portable device. In this case, you have to confirm
that your device is connected with computer, and then click “Selection Destination” to
save the files onto the selected device.
-58-
Page 59

English
Settings
There are many settings that can be finished by clicking Settings button. It has three
settings Photo, Audio and Video, and each is marked with a different icon.
There are two settings of each setting option for you to choose: “Optimize for the
selected device” and “Use custom conversion settings ”
Optimize for the selected device
This is a default setting. The application will setup the conversion parameter
automatically according to the selected device.
Use custom conversion settings
If you decide to use this option, you can setup the different conversion parameter
manually. The different setting (Photo, Audio and Video) has different options.
Photo Setting
If you select the “Optimize for the selected device” option, the application will
convert photo files by resolution 320 x 240 and quality 100.The selectable resolutions
include 320 x 240, 640 x 480, 800 x 600 and 1024 x 768. The range of Quality setting is
0~100.
Select the desired resolution from the Resolution drop-down menu, and then click and
drag the slider of Quality to setup the photo quality you want.
-59-
Page 60

English
-60-
Page 61

English
Video setting (Suggest to use default value)
When converting video files, you can setup the following seven parameters:
Resolution: 320 x 240, 352 x 240, 352 x 288, VGA (640 x 480) [Default], 720 x 480,
720 x 576
File Format: MPEG-4 coded AVI files
Video Encoding: ArcSoft MPEG-4 Codec
Audio Encoding: ArcSoft MPEG-1 Layer-2
Video Bitrate: 2.0 MB, 2.5 MB [default], 3.0 MB
Audio Bitrate: 96 KB, 128 KB [default], 192 KB
Frame Per Second: 15.00 fps, 20.00 fps, 24.00 fps, 25.00 fps, 29.97 fps[Default],
Keep Original [This can keep the original frame rate of the video]
If applicable, please select the “Optimize for the selected device” to use the default value
as above.
main interface. If you want to keep these changes, click Save, otherwise click Cancel.
When viewed or changed these different settings, select Save or Cancel to return to
Step 3: Converting
When you are ready, please highlight the file you want to convert from the list, and
then click Convert button to start converting.
-61-
Page 62

English
There will be a progress bar to show the current status of conversion process. The
screen may show different dialog boxes for you to confirm. For example, the application
could come across files, which are already converted. In this case, the application will
ask if you want to convert that file or skip to convert the other files. The screen will also
show one dialog box to notify you to group them in the folder you choose when the
conversion is finished.
5.3 Playing the converted files
1. Locate the files successfully converted.
2. Use the camera as the Mass Storage to connect to the computer (For more
information on connection, refer to “2.10 How to connect to the computer”.
3. Copy the successful converted files to the directory: MOVIE/ or PHOTO/ of the
camera, then you can play them when finishing copying.
4. To play the movie, please turn on the camera, and then enter the movie player mode.
Select the corresponding file and play it (the same as playing the movie recorded by
the camera. For more information on playing, please refer to the “Movie player
mode” described earlier.)
5. To browse the photos, please turn on the camera, and then enter the photo viewer
mode. Select the corresponding file and play it (the same as playing the photo
captured by the camera. For more information on browsing, please refer to the “Photo
viewer mode” described earlier.
-62-
Page 63

English
6. Installing software and drivers
Read this section to learn how to install drivers and software for the video camera.
6.1 Drivers
You can use the “Mass Storage” functions of the video camera on the PC.
6.1.1 Mass Storage
The digital camera offers Mass Storage function as a card reader device. You can treat
this digital camera as an SD device.
You will only need to install a driver for the camera if your operating system is Windows
98SE. Windows XP/ME/2000 is plug and play and do not require a driver to be manually
loaded.
When the driver has been installed and the camera is connected, the camera memory
and any installed mini SD card will appear as Mass Storage in Windows Explorer. Files
can be dragged and dropped in the same way as on an ordinary disk.
Please follow the instructions below:
1. Insert the supplied CD-ROM in the CD-ROM drive.
2. If the CD-ROM doesn’t automatically boot, use Windows Explorer to execute the
InstallMgr.exe file in the root directory.
3. Click the install button to install the driver.
4. Follow the on-screen instructions.
5. Click Finish to restart the computer and finish the video camera driver installation.
-63-
Page 64

English
6.2 Presto! Video Works 6
Presto! Video Works 6 is advanced application software for video editing.
Install Presto! Video Works 6:
Insert the included CD into the CD-ROM.
If the CD does not auto-run, use Windows file manager to run the executable
InstallMgr.exe under the root directory on the CD.
Pres s the install button and follow the on screen instructions.
After application is started, you can find more information on Presto! V id e o W o r ks 6 i n
the help files.
6.3 Presto! Mr. Photo 3
Presto! Mr. Photo 3 is advanced application software for photo editing.
Install Presto! Mr. Photo 3:
1. Insert the included CD into the CD-ROM.
If the CD does not auto-run, use Windows file manager to run the executable
InstallMgr.exe under the root directory on the CD.
Pres s the install button and follow the on screen instructions.
After application is started, you can find more information on Presto! Mr. Photo 3 in
the help files.
6.4 XviD codec for PC
This Video Camera supports 2 MPEG4 video file formats; please make sure you use the
correct software while playing the videos on PC:
AVI: please install XviD codec (included in the Software CD).
ASF: Window Media player 9.0 or above is recommended.
Installing the XviD codec program
1. Insert the Software CD supplied into the CD-ROM drive
2. Double click on the "My Computer" icon on the desktop. Then double click the
CD-ROM drive icon and click the setup file of Xvid in the root directory.
3. Click "XviD.exe" to start the installation. The setup screen will appear, please click
"Next" to continue.
-64-
Page 65

English
4. Click "I accept the agreement" to accept the conditions of Software License
Agreement and click "Next" to continue.
5. Click "Browse" to select the folder location and click "Next" to continue.
-65-
Page 66

English
6. Click "Browse" if you want to select a different program folder or click "Next" to
continue.
7. Enter the additional tasks setup screen and press "Next" to continue.
8. Enter the main program setup screen and press "Install" to start the installation.
-66-
Page 67

9. During the installation, press "Cancel" if you want to stop setup.
English
10. The following screen will appear after the installation is completed. Click "Finish" to
complete the installation.
-67-
Page 68

English
7 . Troubleshooting
This chapter describes the common problems and their remedies while operating the
camera.
7.1 Problems and remedies
The camera is down and can’t be operated while using. Please check
The camera
is down
Error occurs
when
entering the
Direct Print
mode
the contact of battery, and restart the camera. If the camera cannot be
restarted, please make sure if improper operation damaged the
camera. Do not disassemble it by yourself and return it for service.
The error prompt displays when entering the Direct Print mode. Please
unplug the USB connector from the camera and check to see if the
printer is normal and the battery is full, and then restart the camera.
Connect to the printer with proper operation procedures to start
printing.
The camera
is down
while
removing
the card
The camera
can’t format
the memory
card
Media File
Not Found
Do not remove the memory card while the camera is operating. The
camera could fail by doing that. If this happens, please restart it.
It’s not guaranteed by the digital camera to format all kinds of memory
cards. If the camera can’t format the memory card, please format it into
FAT file system by the computer .
Please check that the media file was stored in the appropriate folder.
Also check that the file and path name length is shorter than 64
characters. (Note: This camera system’s file search function is limit ed
to a maximum of 1000 files)
-68-
Page 69

Appendix
Specification
Imaging sensor 1/1.8” 5.17 Mega pixel CMOS sensor
Active pixels 5.0 Mega pixel
Storage media Built-in 32MB Flash memory
SD/MMC card (Up to 2GB)
Sensor sensitivity Auto ISO
Lens F3.0/8.0,f=8.54mm
Focus range 1.5m ~ infinity
English
Still image
Movie clips MPEG-4 (AVI, ASF, MOV)
Audio Support for audio playback
Zoom 4x digital zoom
TFT screen 2.5-inch LTPS
Flash Auto/Off/Force
White balance Auto/Sunny/Cloudy/Tungsten/fluorescent
EV compensation -2.0 EV ~ +2.0 EV
Self timer Off, 5 seconds, 10 seconds, 20 seconds (user definable)
PC interface USB 2.0 Full speed
Formats: JPEG (EXIF), DPOF, Direct Print (DPS)
Resolution: 4048 x 3040 (firmware interpolation)
2592 x 1944, 2048x1536, 1280 x 960, 800x600
Quality: Fine, Normal, Basic
640 x 480 30 fps/320 x 240 30 fps
TV out format NTSC/PAL
Shutter 1/4~1/500 second
Auto power off Off, 1 or 3 minutes (user definable)
Power supply Single rechargeable Li-ion battery
Dimension 120 (L) x 56 (W) x 23 (H) mm
Weight 102g (with batteries)
-69-
 Loading...