

Page 1

*Built in the USA using domestic
and foreign parts
Operator’s Manual
OneWASH™ Power Washer
www.generac.com or 1-888-436-3722
Page 2

WARNING!
California Proposition 65
Engine exhaust and some of its constituents are known to the state of California to cause cancer,
birth defects, and other reproductive harm.
WARNING!
California Proposition 65
This product contains or emits chemicals known to the state of California to cause cancer,
birth defects, and other reproductive harm.
ii
Page 3

Table of Contents
Section 1 - Introduction............................................. 1
1.1 Introduction.......................................................... 1
Section 2 - Safety........................ ... ... .... ..................... 3
2.1 Safety Rules................... .... ... ... ... .... ... ... ............... 3
Section 3 - General Information................................ 7
3.1 Know Your Power Washer................................... 7
3.2 Product Specifications ......................................... 8
3.3 Emissions Information.......................................... 8
3.4 High Altitude Operation........................................ 8
3.5 Unpacking............................................................ 9
Section 4 - Set-up........ ... ... ... .... ... ... ... .... ... ... ... .......... 11
4.1 Assembly ........................................................... 11
4.2 Add Engine Oil................................................... 12
4.3 Add Fuel............................................................. 13
4.4 Connect Hose and Water Supply to Pump........ 13
4.5 How to Use Nozzles........................................... 15
Section 5 - Operation........... .... ... ... ... .... ... ... ... .... ... ... 19
5.1 Operation........................................................... 19
5.2 Power Washer Location............................... ... ... 19
5.3 Checklist Before Starting Engine....................... 19
5.4 How to Start Your Power Washer...................... 19
5.5 Automatic Cool Down System
(Thermal Relief)................................................. 21
5.6 How to Stop Your Power Washer...................... 21
Section 6 - Maintenance.......................................... 23
6.1 Maintenance Recommendations ....................... 23
6.2 Maintenance Schedule ...................................... 23
6.3 Pump Oil.................................. ... ... .... ... ... ... .... ... 24
6.4 Emissions Control.............................. ... ... ... .... ... 24
6.5 Power Dial Settings ........................................... 24
6.6 Power Washer Maintenance.............................. 24
6.7 Check and Clean Inlet Screen........................... 24
6.8 Check High Pressure Hoses................. ... ... .... ... 24
6.9 Check Detergent Siphoning Tube............... .... ... 24
6.10 Check Spray Gun .............................................. 24
6.11 Chemical Tank Maintenance ............................. 24
6.12 Nozzle Maintenance .......................................... 25
6.13 Engine Maintenance.......................................... 26
6.14 Engine Oil Recommendations ........................... 26
6.15 Service Air Cleaner............................................ 27
6.16 Service Spark Plug ............................................ 28
6.17 Inspect Muffler and Spark Arrester.................... 28
6.18 After Each Use................................................... 29
6.19 Winter Storage................................................... 29
6.20 Long Term Storage............................................ 29
6.21 Other Storage Instructions................................. 30
6.22 Transporting/Tipping of the Unit ........................ 30
Section 7 - Troubleshooting ................................... 31
7.1 Troubleshooting Guide ...................................... 31
iii
Page 4

This page intentionally left blank.
iv
Page 5

Section 1 Introduction
1.1 — INTRODUCTION
Thank you for purchasing this power washer manufactured by Generac Power Systems, Inc. This model is a
high performance, air-cooled, engine-driven power
washer that operates at 3100 psi.The units feature custom designed wheels, axial cam pump with stainless
steel pistons, automatic cool down system, quick connect
nozzles, high pressure hose, detergent siphoning hose
and chemical tank.
Common sense and strict compliance with the special instructions are essential to preventing accidents. The operator must read this manual and
thoroughly understand all of the instructions and warnings before using the equipment. If any portion of the
manual is not understood, contact the nearest Au thorized
Dealer for starting, operating and servicing procedures.
The owner is responsible for proper and safe use of the
equipment.
The power washer can operate safely, efficiently and reliably only if it is properly located, operated and maintained. Before operating, servicing or storing:
• Study all warnings in this manual and on the product
carefully.
• Become familiar with this manual and the unit before
use.
• Refer to the Assembly section of the manual for
instructions on final assembly procedures. Follow the
instructions completely.
The manufacturer cannot anticipate every possible circumstance that might involve a hazard. The warnings in
this manual, and on tags and decals affixed to the unit
are, therefore, not all inclusive. If using a procedure, work
method or operating technique that the manufacturer
does not specifically recommend, ensure that it is safe for
others. Also make sure the procedure, work method or
operating technique utilized does not render the power
washer unsafe.
THE INFORMATION CONTAINED HEREIN WAS
BASED ON MACHINES IN PRODUCTION AT THE
TIME OF PUBLICATION. GENERAC RESERVES THE
RIGHT TO MODIFY THIS MANUAL AT ANY TIME.
Save these instructions for future reference. If you
loan this device to someone, always loan these
instructions and the Owner's Manual to the individual as well.
1.1.1 — Where to Find Us
You can contact Generac Customer Service by phone at
1-888-436-3722, or on the internet at www.generac.com.
Record the important information of the unit in the following chart for future reference and/or service inquiries.
Model Number
Serial Number
Date Purchased
OneWASH™ Power Washer 1
Page 6

This page intentionally left blank.
Introduction
2 OneWASH™ Power Washer
Page 7
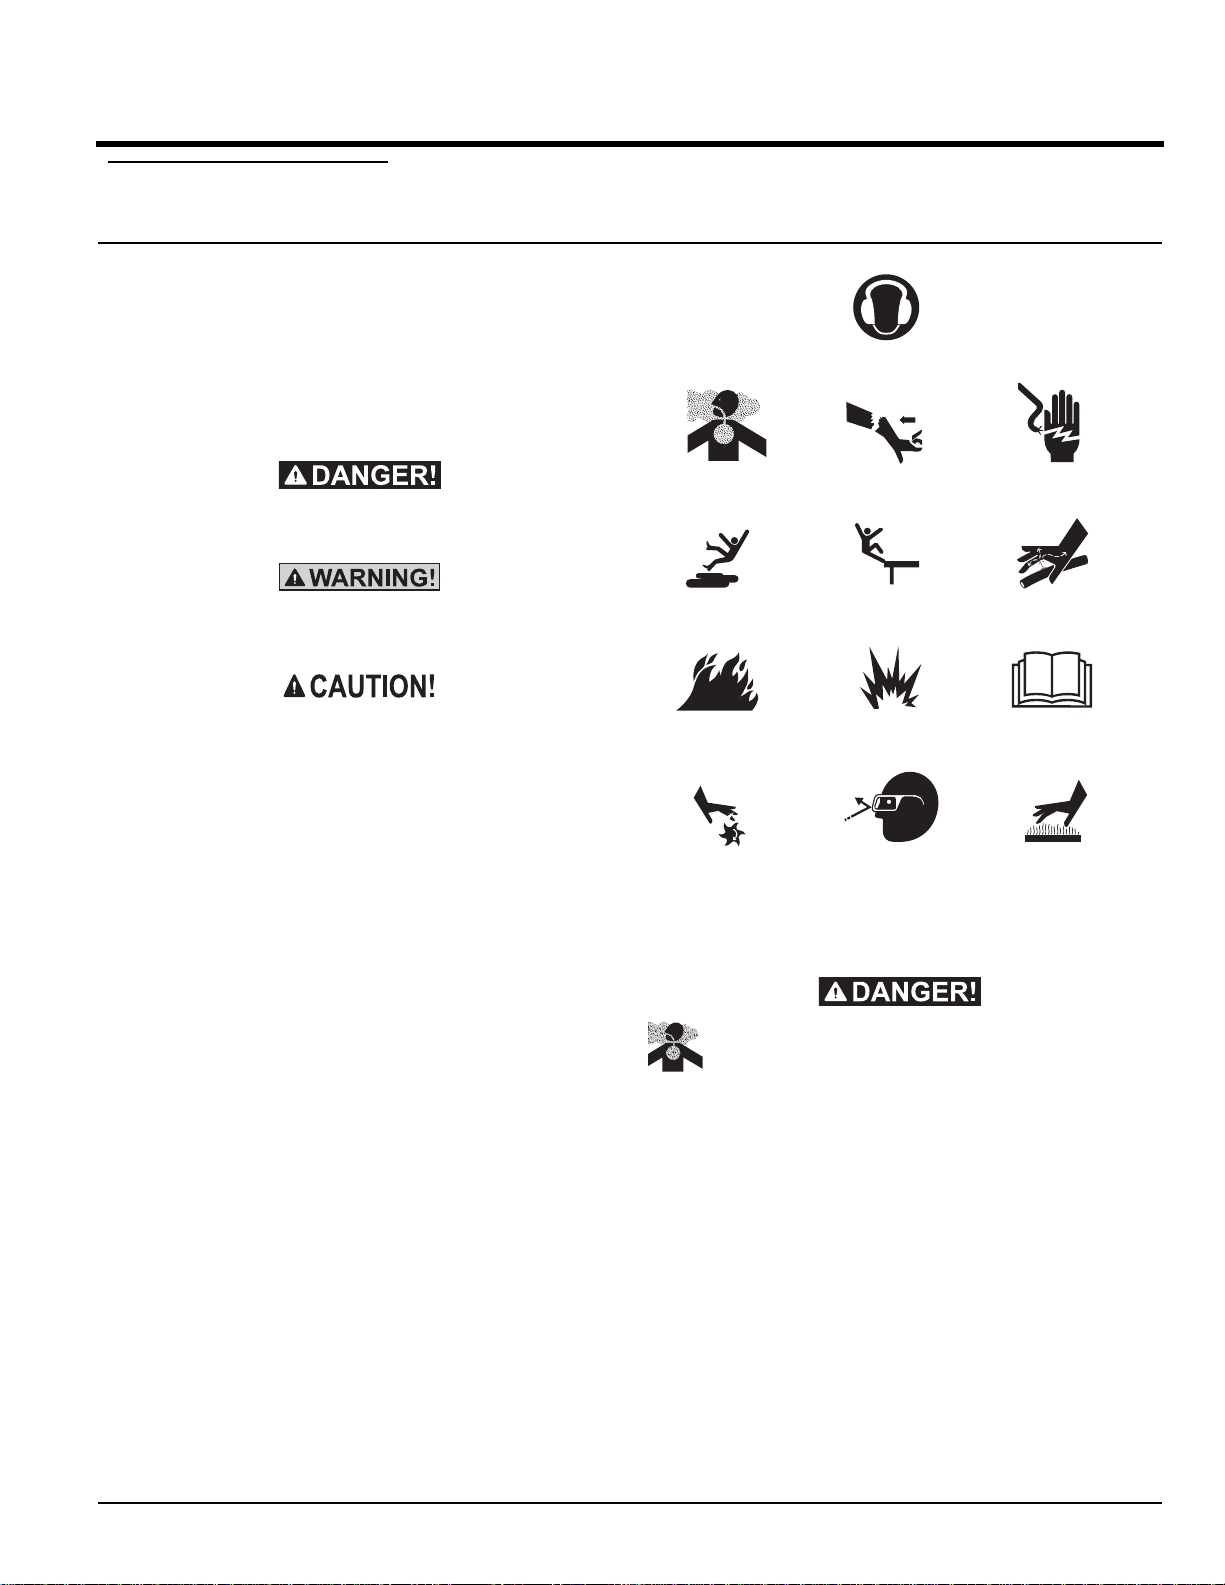
KickbackToxic Fumes Electrical Shock
Fluid InjectionFall
Fire Explosion Operator’s Manual
Slippery Surface
Moving Parts Flying Objects Hot Surface
Hearing Protection
Section 2 Safety
2.1 — SAFETY RULES
Throughout this publication, and on tags and decals
affixed to the power washer, DANGER, WARNING, CAUTION and NOTE blocks are used to alert personnel to
special instructions about a particular operation that may
be hazardous if performed incorrectly or carelessly.
Observe them carefully. Their definitions are as follows:
Indicates a hazardous situation or action which, if
not avoided, will result in death or serious injury.
Indicates a hazardous situation or action which, if
not avoided, could result in death or serious injury.
Indicates a hazardous situation or action which, if
not avoided, could result in minor or moderate injury.
NOTE:
Notes contain additional informatio n important to a
procedure and will be found within the regular text
body of this manual.
These safety warnings cannot eliminate the hazard s th at
they indicate. Common sense and strict compliance with
the special instructions while performing the action or
service are essential to preventing acciden ts.Safety
Symbols and Meanings.
2.1.1 — Exhaust Hazards
OneWASH™ Power Washer 3
Carbon monoxide produced during use can
kill in minutes. NEVER use indoors, in a vehicle, or in other sheltered areas, EVEN IF doors
and windows are open. Only use OUTSIDE
and far away from windows, doors and vents.
Some chemicals or detergents may be harmful if inhaled or ingested, causing severe nausea, fainting, or poisoning.
• Operate power washer ONLY outdoors.
• A running engine gives off carbon monoxide.
• Carbon monoxide is an odorless, colorless, poisonous
gas. Breathing carbon monoxide can cause headache,
fatigue, dizziness, vomiting, confusion, seizures, nausea, fainting or death. If you start experiencing any of
these symptoms, IMMEDIATELY move to fresh air.
Seek medical attention.
Page 8
Safety
• Keep exhaust gas from entering a confin e d ar ea
through windows, doors, ventilation intakes, or other
openings. Warn any occupants inside about the symptoms of carbon monoxide so they know to move to
fresh air if they begin to feel ill.
• The use of a carbon monoxide detector inside any
occupied premises between the power washer and the
occupant is recommended.
• NEVER start or run engine indoors, in a vehicle, or in
an enclosed area, even if windows and doors are open.
• Use a respirator or mask whenever there is a chance
that harmful gas or vapors may be inhaled.
• Read all instructions with respirator or mask so you are
certain the respirator or mask will provide the necessary protection against inhaling harmful gas or vapors.
If you begin to experience any of the CO sympto m s
listed above, IMMEDIATELY move to fresh air.
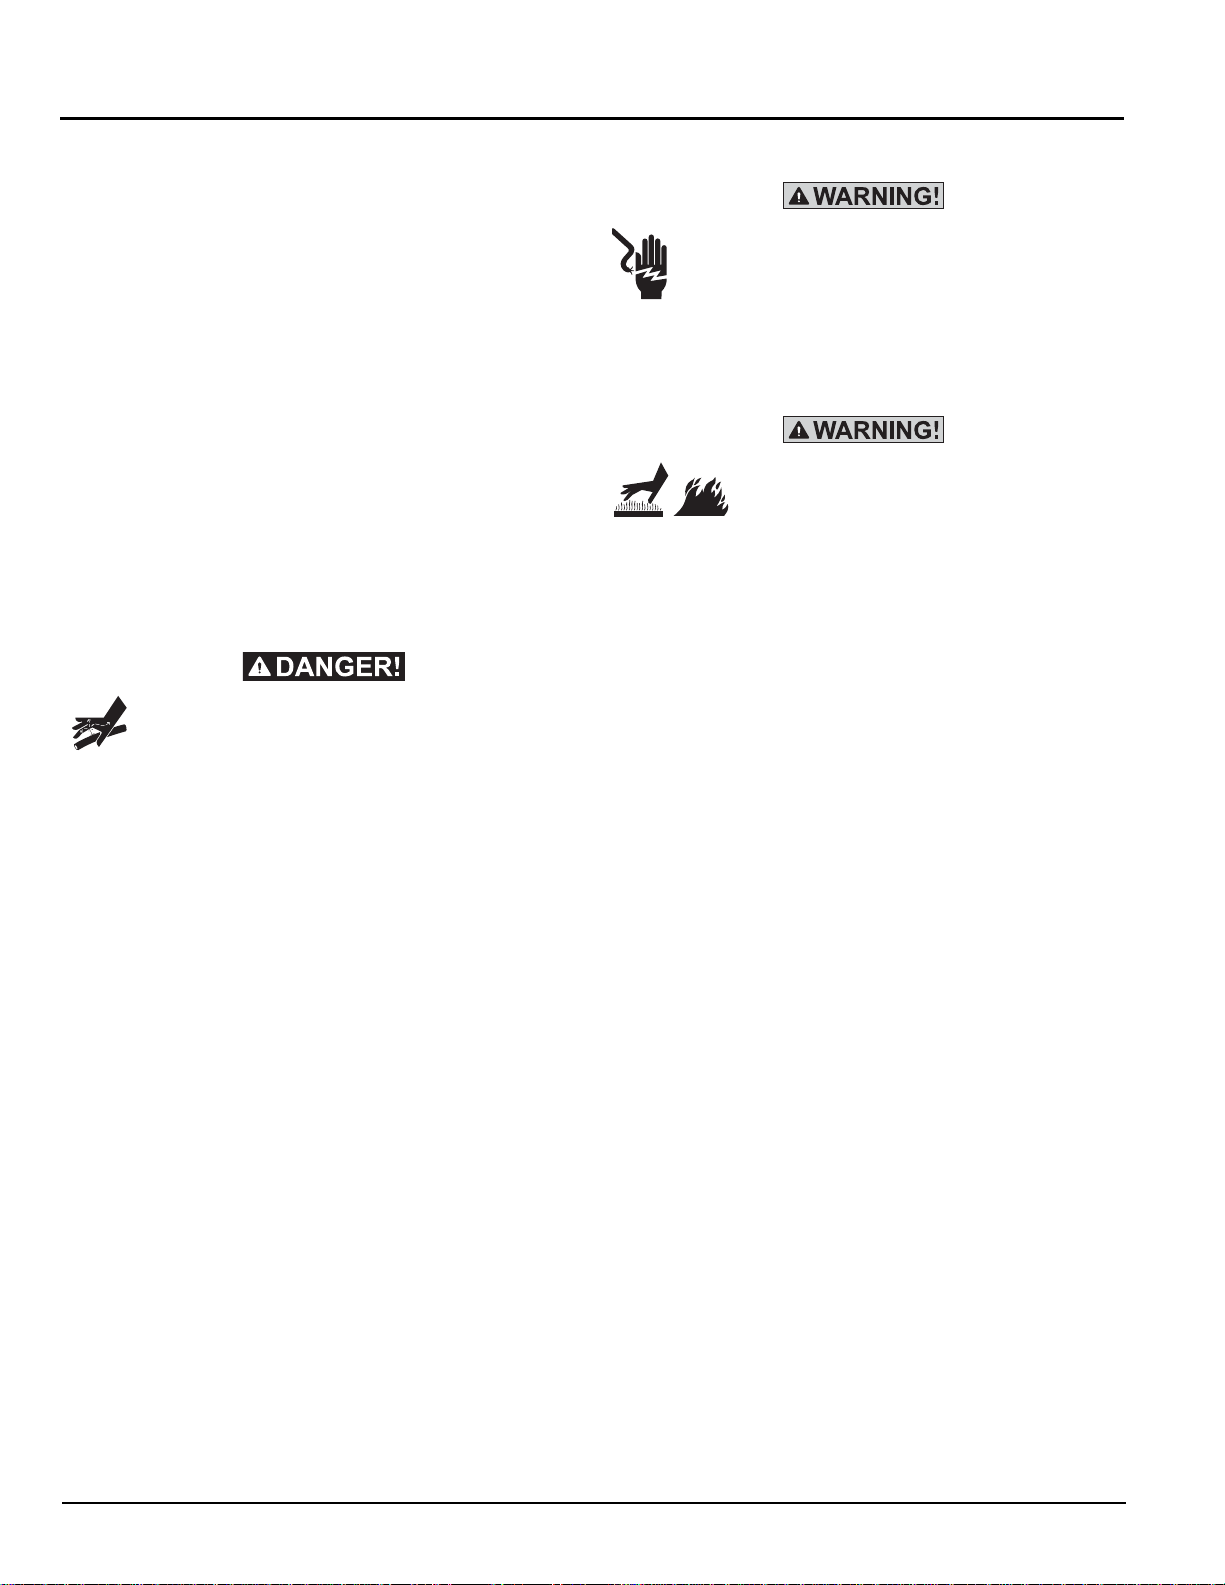
2.1.2 — Fluid Injection Hazard
NEVER aim spray gun at people, animals, or
electrical devices. Serious injury or death will
result. ALWAYS point spray gun in safe direction, squeeze spray gun trigger to release
high pressure, every time you stop engine.
Engage trigger lock when not in use.
• The high pressure stream of water that this equipment
produces can cut through skin and its underlying tissues, leading to serious injury, possible amputation or
death. Spray gun tra ps high water pressure, even
when engine is stopped and water is disconnected,
which can cause injury.
• NEVER allow CHILDREN to operate power washer or
play nearby. This is NOT a toy.
• NEVER repair high pressure hose. Replace it.
• NEVER repair leaking connections with sealant of any
kind. Replace o-ring or seal.
• NEVER connect high pressure hose to nozzle extension.
• Keep high pressure hose connec ted to pump and
spray gun while system is pressurized.
• NEVER secure spray gun in open position.
• NEVER leave spray gun unattended while machine is
running.
• NEVER use a spray gun which does not have a trigger
lock or trigger guard in place and in working order.
• Always be certain spray gun, nozzles and accessories
are correctly attached.
2.1.3 — Electrical Shock Hazard
Risk of electrocution.
Contact with power source can cause ele ctric
shock or burn.
• NEVER spray near power source.
2.1.4 — Hot Surfaces Hazard
Contact with muffler area can result in
serious burns. Exhaust heat/gases can
ignite combustibles, structures or
damage fuel tank causing a fire.
• DO NOT touch hot parts and AVOID hot exhaust
gases.
• Allow equipment to cool before touching.
• Keep at least five (5) feet (152 cm) of clearance on all
sides of power washer including overhead.
• It is a violation of California Public Resource Code,
Section 4442, to use or operate the engine on any forest-covered, brush-covered, or grass-covered land
unless the exhaust system is equipped with a spark
arrester , as defined in Section 4442, maintained in
effective working order. Other states or federal jurisdictions may have similar laws. Contact the original equipment manufacturer, retailer, or dealer to obtain a spark
arrester designed for the exhaust system installed on
this engine.
• Replacement parts must be the same and installed in
the same position as the original parts.
4 OneWASH™ Power Washer
Page 9
Safety
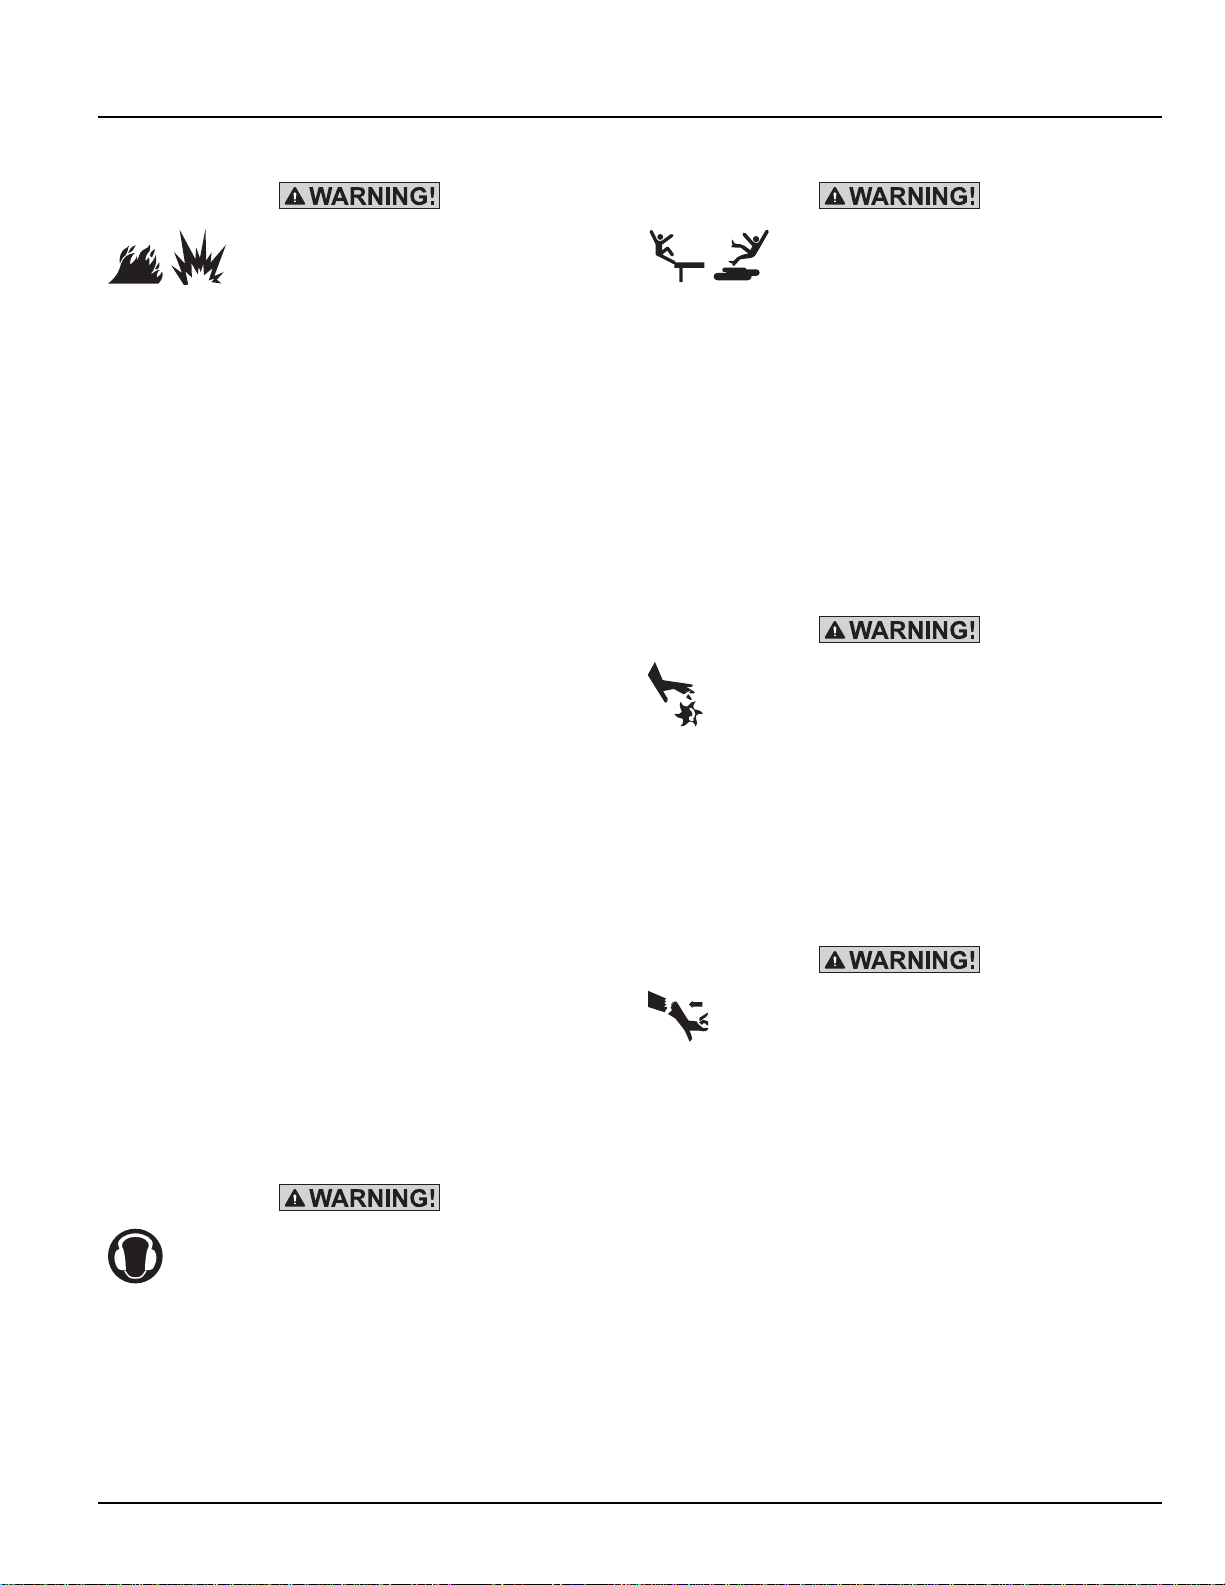
2.1.5 — Fire Hazards
Fuel and its vapors are extremely flammable and explosive. Fire or explosion
can cause severe burns or death.
WHEN ADDING OR DRAINING FUEL
• Turn power washer OFF and let it cool at least two (2)
minutes before removing fuel cap. Loosen cap slowly
to relieve pressure in tank.
• Fill or drain fuel tank outdoors.
• DO NOT overfill tank. Allow space for fuel expansion.
• If fuel spills, wait until it evaporates before starting
engine.
• Keep fuel away from sparks, open flames, pilot lights,
heat, and other ignition sources.
• DO NOT light a cigarette or smoke.
WHEN STARTING EQUIPMENT
• Ensure spark plug, muffler, fuel cap, and air cleaner
are in place.
• DO NOT crank engine with spark plug removed.
WHEN OPERATING EQUIPMENT
• DO NOT tip engine or equipment at angle which
causes fuel to spill.
• DO NOT spray flammable liquids.
WHEN TRANSPORTING OR REPAIRING EQUIPMENT
• Transport/repair with fuel tank EMPTY.
• Disconnect spark plug wire.
WHEN STORING FUEL OR EQUIPMENT WITH FUEL
IN TANK
• Store away from furnaces, stoves, water heaters,
clothes dryers, or other appliances that have pilot light
or other ignition source because they can ignite fuel
vapors.
2.1.6 — Hearing Protection Hazard
Hearing Protection Recommended.
2.1.7 — Fall Hazard
Use of power washer can create puddles and slippery surfaces. Kickback
from spray gun can cause you to fall.
• Use only on a level surface.
• The cleaning area should have adequate slopes and
drainage to reduce the possibility of a fall due to slippery surfaces.
• Do not use on elevated surfaces where chance of kickback could result in a serious fall.
• Firmly grasp spray gun with both hands when using
high pressure spray to avoid injury when spray gun
kicks back.
2.1.8 — Moving Parts Hazard
Starter and other rotating parts can entangle
hands, hair, clothing, or accessories.
• NEVER operate power washer without protective
housing or covers.
• DO NOT wear loose clothing, jewelry or anything that
may be caught in the starter or other rotating parts.
• Tie up long hair and remove jewelry.
2.1.9 — Kickback Hazard
Starter cord kickback (rapid retraction) can
result in bodily injury . Kickback will pull hand
and arm toward engine faster than you can
let go. Broken bones, fractures, bruises, or
sprains could result.
• NEVER pull starter cord without first relieving spray
gun pressure.
• To relieve trapped pressure, point gun in safe direction
and release pressure by pulling/actuating trigger on
spray gun.
• When starting engine, pull cord slowly until resistance
is felt and then pull rapidly to avoid kickback.
• After each starting attempt, where engine fails to run,
always point spray gun in safe direction, and squeeze
spray gun trigger to release high pressure.
• Firmly grasp spray gun with both hands when using
high pressure spray to avoid injury when spray gun
kicks back.
OneWASH™ Power Washer 5
Page 10
Safety
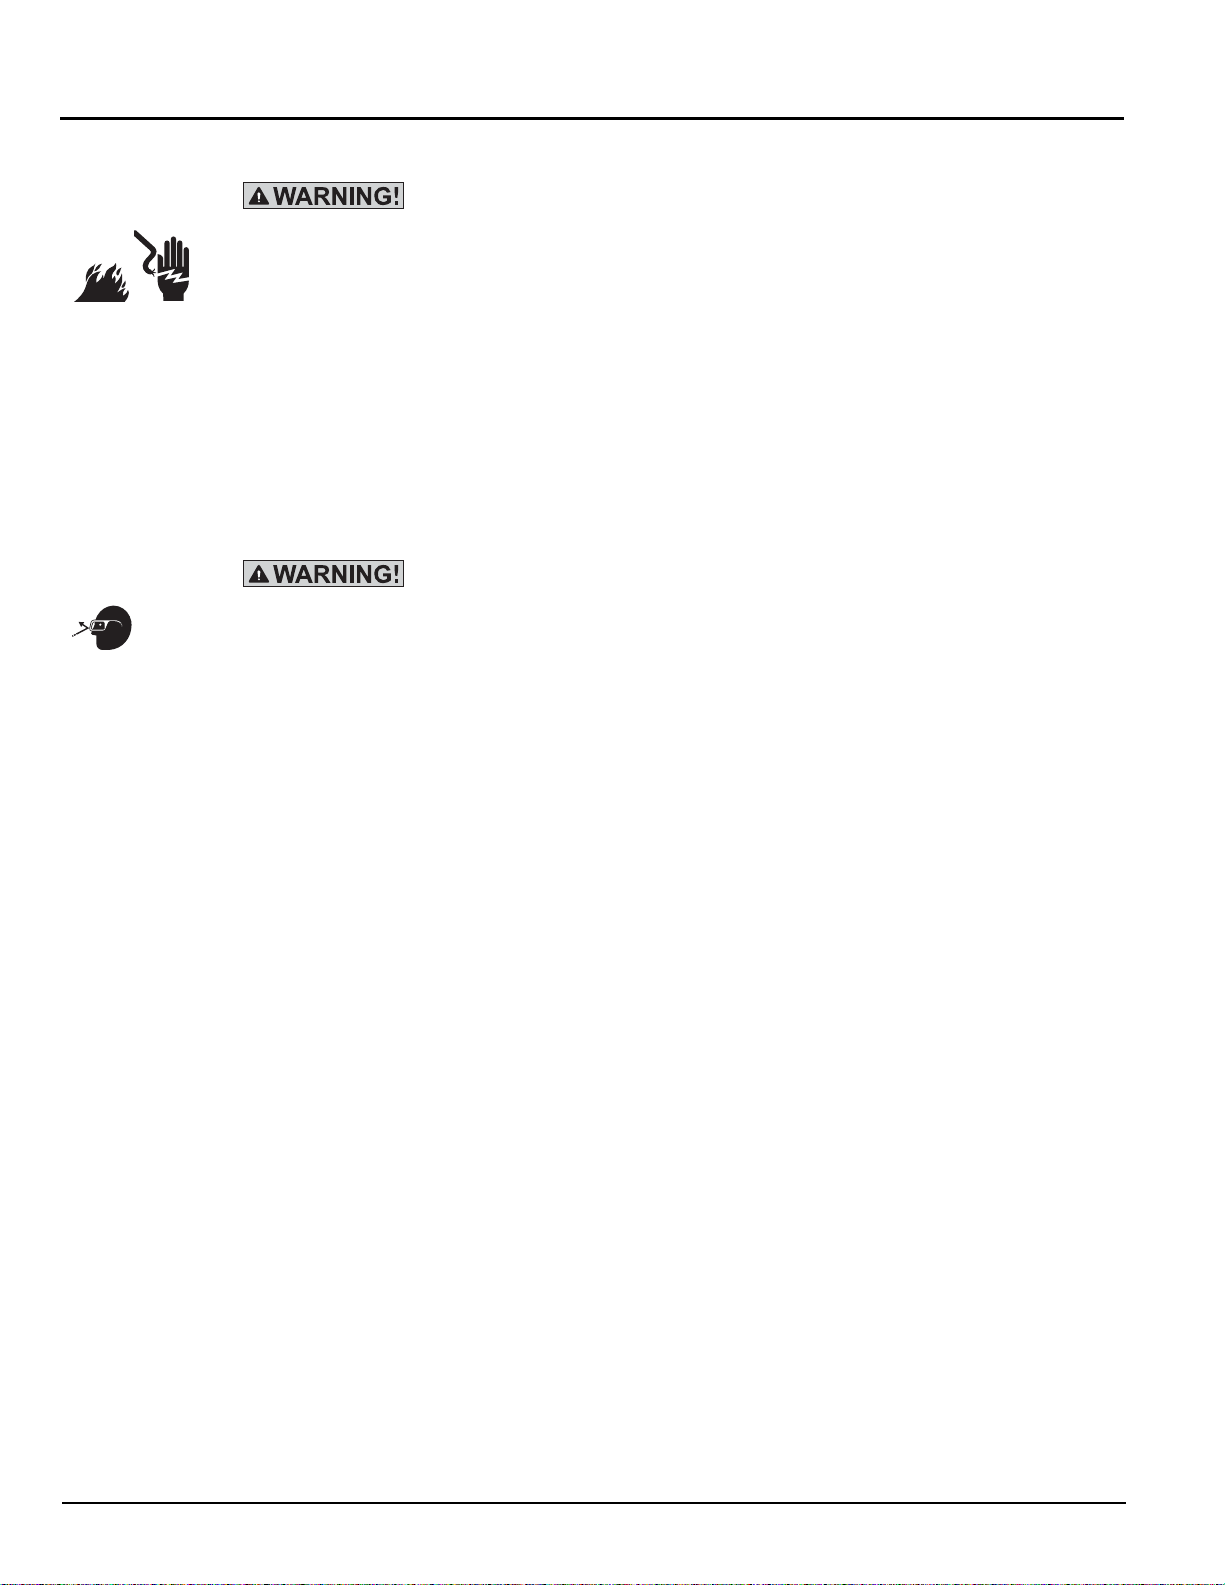
2.1.10 — Spark Hazards
Unintentional sparking can result in
fire or electric shock.
WHEN ADJUSTING OR MAKING
REP AIRS TO YOUR Power washer.
• Disconnect the spark plug wire from the sp ark plug and
place the wire where it cannot contact sp ark plug.
WHEN TESTING FOR ENGINE SPARK
• Use approved spark plug tester.
• DO NOT check for spark with spark plug removed.
2.1.11 — Splash Hazards
Risk of eye injury. Spray can splash back or
propel objects.
• Always wear safety goggles when using this equipment or in vicinity of where equipment is in use.
• Before starting the power washer, be sure you are
wearing adequate safety goggles.
• NEVER substitute safety glasses for safety goggles.
NOTE:
High pressure spray may damage fragile items
including glass.
• DO NOT point spray gun at glass when using red (0°)
MAX nozzle.
• NEVER aim spray gun at people, animals, electrical
devices or plants.
NOTE:
Improper treatment of power washer can damage it
and shorten its life.
• If you have questions about intended use, ask dealer
or contact qualified service center.
• NEVER operate units with broken or missing parts, or
without protective housing or covers.
• DO NOT by-pass any safety device on this machine.
• DO NOT operate power washer above rated pressure.
• DO NOT modify power washer in any way.
• Before starting power washer in cold weather , check all
parts of the equipment to be sure ice has not formed
there.
• NEVER move machine by pulling on hoses. Use handle provided on unit.
• Check fuel system for leaks or signs of deterioration,
such as chafed or spongy hose, loose or missing
clamps, or damaged tank or cap. Correct all defects
before operating power washer.
• This equipment is designed to be used with Generac
authorized parts ONLY. If equipment is used with parts
that DO NOT comply with minimum specifications, user
assumes all risks and liabilities.
6 OneWASH™ Power Washer
Page 11
I
U
O
Q
P
S
D
R
S
W
V
F
H
B
A
Section 3 General Information
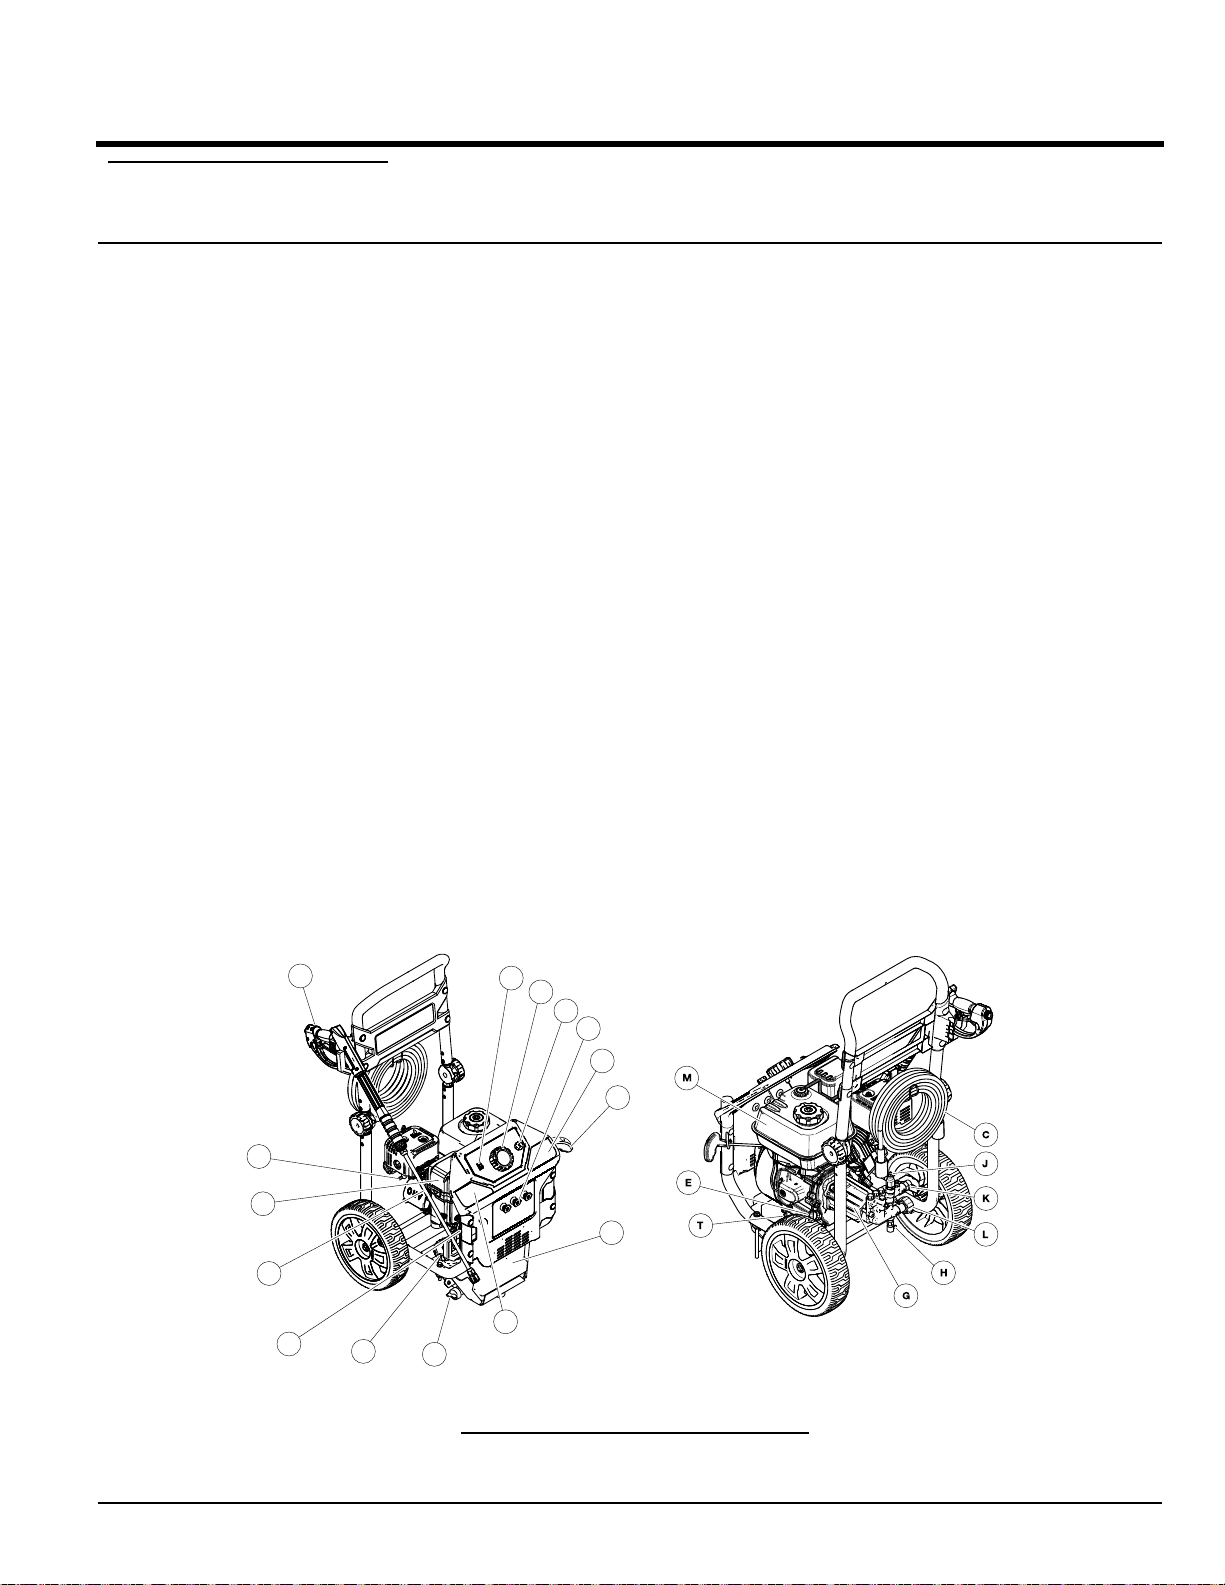
3.1 — KNOW YOUR POWER WASHER
Read this owner’s manual and safety rules before operating your high power washer. If you loan this device to
someone, ALWAYS loan these instructions AND the
owner’s manual to the individual as well. Compare the
illustrations with your high power washer to familiarize
yourself with the locations of various controls
(Figure 3-1). Save this manual for future reference.
Replacement owner’s manuals can be printed from the
Generac Web site.
A-Spray Gun – Controls the application of water onto
the cleaning surface with trigger device. Includes a
trigger lock.
B -Lance with Quick Connect – Allows you to switch
between different nozzles.
C -High Pressure Hose – Connect one end to water
pump and the other to the spray gun.
D -Recoil Starter – Use for starting the engine.
E -Oil Fill – Check and add engine oil.
F-Air Filter – Protects engine by filtering dust and
debris out of the intake air.
G-Pump – Develops high pressure.
H -Thermal Relief Valve – Cycles water through the
pump when water reaches 125°F warm water w ill
discharge from pump onto ground. This prevents
internal pump damage.
I -Engine On/Off Switch – Turn this switch to “ON”
before using the recoil starter. Turn the switch to
“OFF” to stop the engine.
J -Unloader Valve – Controls the high pressure output.
K -High Pressure Outlet – Connection for high pres-
sure hose.
L -Water Inlet – Connection for Garden Hose.
M -Fuel Tank – Fill tank with regular unleaded fuel.
Always leave room for fuel expansion.
O -Choke – Prepares a cold engine for starting.
P-Power Dial – Provides optimal cleaning power for
each desired application.
Q -Nozzles – Chemical injection, Blast (0°), Wash (25°),
Detergent for various high pressure cleaning applications.
R -Chemical Tank – A drain-able tank used to hold
power washer safe detergents to be siphoned into
the low pressure stream.
S -Prepare/Start Instruction – Identifies proper proce-
dure to set up and start/stop power washer.
T -Drain Plug – Used to drain engine oil.
U -Serial Number Location
V -Chemical Tank Fill Cap
W -Chemical Tank Drain Cap
OneWASH™ Power Washer 7
Figure 3-1. Features and Controls
Page 12

General Information
3.1.1 — ITEMS NOT SHOWN
Identification Label (on engine blower housing) –
Provides model and serial number of power washer.
Please have these readily available if calling for assistance.
Detergent Siphoning T ube/Filter – Use to siphon power
washer safe detergents into the low pressure stream.
3.2 — PRODUCT SPECIFICATIONS
Pressure - (PSI / BAR) .............................. 3100/213 Max
Flow Rate - (GPM / LPM)............................ 2.8/10.6 Max
Water supply temperature - (°F / C°)............. 100/38 Max
Hose length - (Feet / Meters)..................................30/9.1
Chemical Tank(s) - Number per unit...............................1
Chemical Tank - Capacity (Gal) N/A..........................0.75
Nozzles - Number per unit..............................................3
Lance Length (Inches / cm).....................................20/51
Gun.....................................................................Standard
Engine Displacement - (Cubic Inch / cc) ............12.9/212
Spark Plug Type .................................F7TC or equivalent
Spark Plug Gap - (Inches / mm) ....0.028-0.031/0.70-0.80
Fuel Capacity - (Quarts / Liters) ............................ 3.7/3.5
Oil Capacity - (Oz / Liters)...... ... ... .... ... ... ... .... ... ... ... 20/0.6
On/Off Switch ............................................................. Yes
• Hard starting or stalling after starting
• Rough idle
• Misfiring or backfiring under load
• Afterburning (backfiring)
• Black exhaust smoke or high fuel consumption
3.4 — HIGH ALTITUDE OPERATION
The fuel system on this engine may be influenced by
operation at higher altitudes. Proper operation can be
ensured by installing an altitude kit when required. See
the table below to determine when an altitude kit is
required. Operating this engine without the proper altitude kit installed may increase the engine’s emissions
and decrease fuel economy and performance. Kits may
be obtained from any Dealer and should be inst alled by a
qualified individual.
Altitude* Kit Number PSI
0 - 5000 Feet Not Required 3100
5000 - 7000 Feet 0K2016 3100
* Elevation above sea level.
3.3 — EMISSIONS INFORMATION
The U.S. Environmental Protection Agency (and California Air Resource Board for equipment certified to CA
standards) requires that this engine comply with exhaust
and evaporative emission standards. Locate the emissions compliance decal on the engine to determine what
standards the engine meets, and to determine which
emissions warranty applies. The engine is certified to
meet the applicable emission standards on gasoline. It is
important to follow the maintenance specifications in the
Maintenance section to ensure that the engine com plie s
with the applicable emission standards for the duration of
the product’s life. This engine utilizes lean carburetion
settings and other systems to reduce emissions. Tampering with or altering the emission control system may
increase emissions and may be a violation of Federal or
California Law. Act s that co nstitute t amper ing include but
are not limited to:
• Removal or alteration of any part of the intake, fuel, or
exhaust systems
• Altering or defeating the governor linkage or speedadjusting mechanism to cause the engine to operate
outside its design parameters
NOTE:
If the altitude kit has been installed and the engine
will be operated at an altitude where the kit is not
required, the engine should be returned to the original factory configuration. Operating the engine at
lower altitudes with the kit installed may cause the
engine to overheat and result in serious engine damage, and may result in decreased performance and
increased emissions.
If you are aware of any of the following symptoms, have
your engine inspected and repaired by your servicing
dealer:
8 OneWASH™ Power Washer
Page 13

General Information
3.5 — UNPACKING
1. Remove the parts bag, accessories, and inserts
included with power washer.
2. Open carton completely by cutting each corner from
top to bottom.
3. Ensure you have all included items prior to assembly.
• Main Unit
• Handle Assembly
• High Pressure Hose
• Siphon Hose & Filter
• Spray Gun
• Lance with Quick Connect Fitting
• Oil Bottle
• Hose Hook Wire form
• Parts Bag (which includes the following):
— Operator’s Manual
— Warranty Statement
— Emission Warranty Statement
— CARB Emission Warranty Statement
— Owner’s Registration Card
— Bag containing Color-coded Nozzles
— 4mm Allen wrench
— Screw (Qty 4)
— Tree clips (Qty 4)
— Plastic Gun Holder
— Plastic Lance Holder
4. If you are missing any items from your carton, please
call Generac Customer Service at 1-888-436-3722.
When calling for assistance, please have the model
and serial number from the data tag available.
5. Fill out and send in registration card. Write Model
number , Serial number & date of purchase in the
table located in the “Where to Find Us” section.
OneWASH™ Power Washer 9
Page 14

This page intentionally left blank.
General Information
10 OneWASH™ Power Washer
Page 15
B
A
Section 4 Set-up
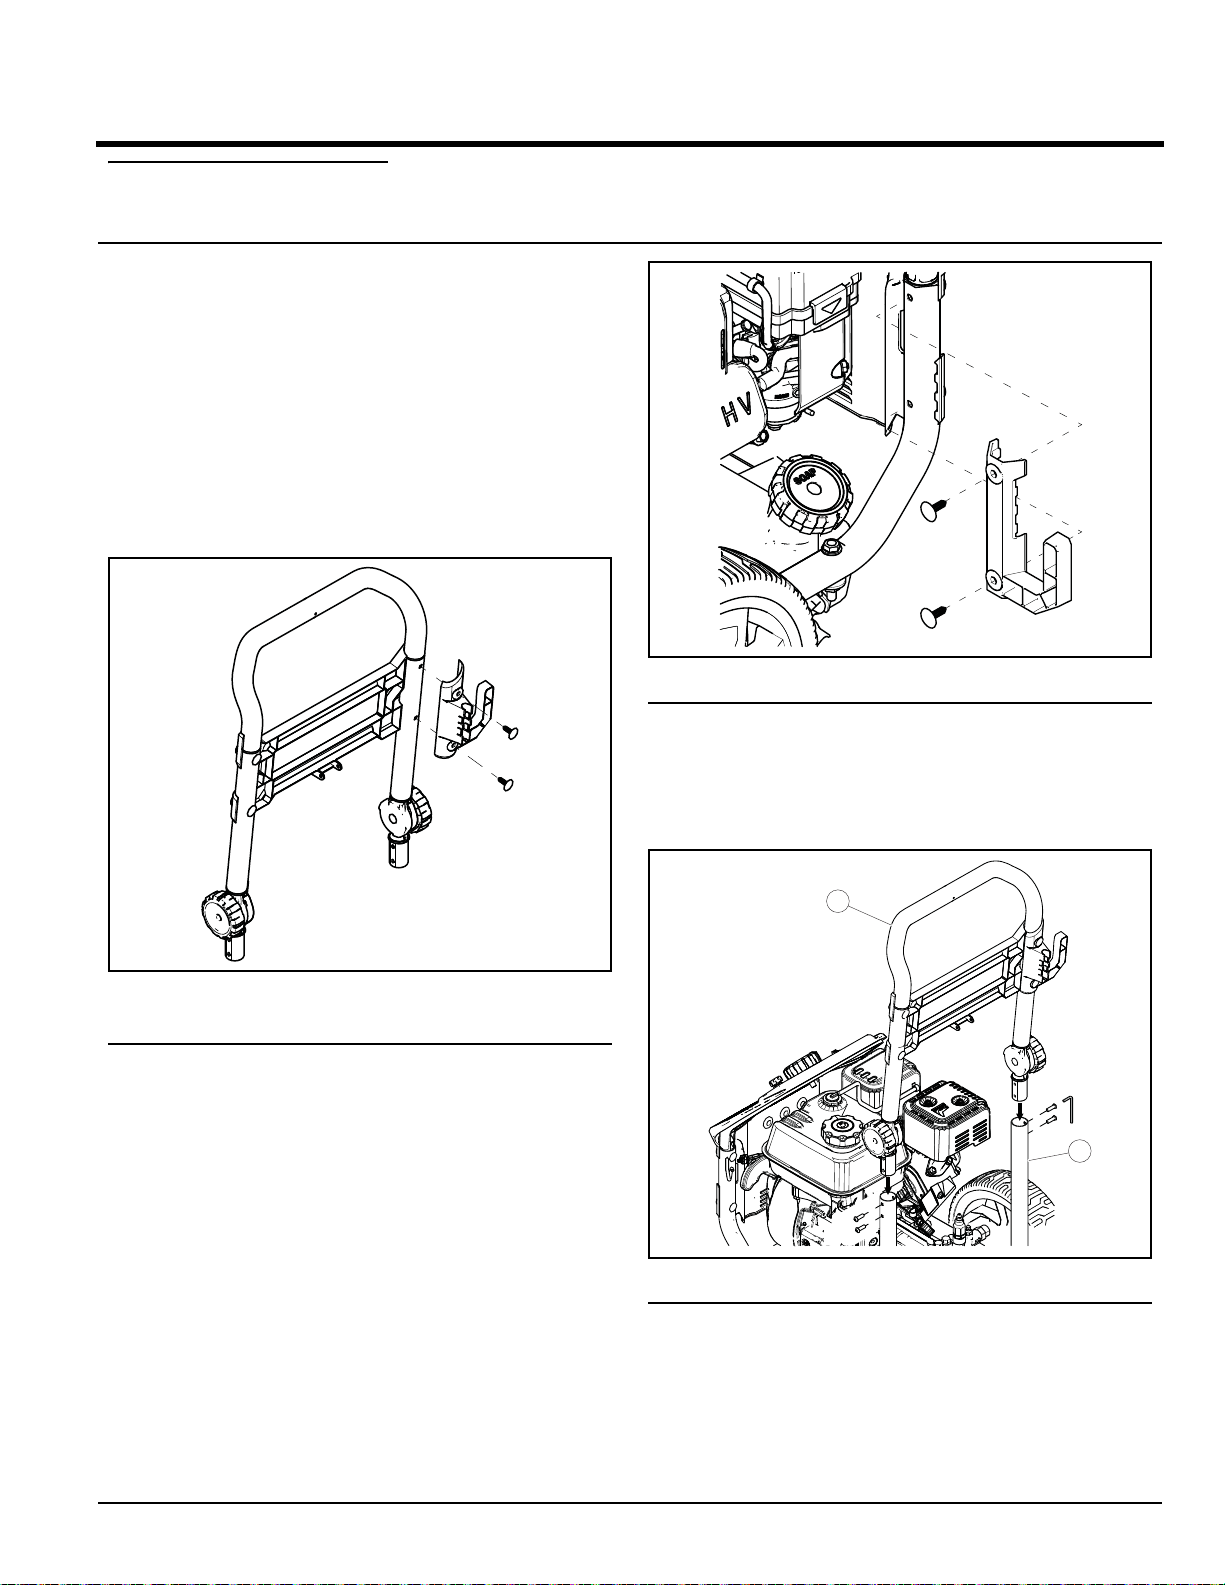
4.1 — ASSEMBLY
Read entire operator’s manual before you attempt to
assemble or if you have any problems with the assembly
of your power washer, please call Generac Customer
Service at 1-888-436-3722. When calling for assistance,
please have the model and serial number from the data
tag available.
1. Install gun hook to handle assembly using the (2)
supplied tree clips. Align holes and push the tree
clips into holes until they sit flush with gun hook
(Figure 4-1).
Figure 4-2. Attach Lance Hook to Unit
3. Place handle assembly (A) onto cradle supports (B).
Allow handle to slide into position. Locate the (4)
screws and Allen wrench. Install the four screws
using supplied Allen wrench as shown in
(Figure 4-3).
Figure 4-1. Attach Gun Hook to Handle
Assembly
2. Install lance hook to unit frame using (2) supplied
tree clips. Align holes and push the tree clips into
holes until they sit flush with gun hook (Figure 4-2).
Figure 4-3. Attach Handle to Unit
OneWASH™ Power Washer 11
Page 16
Set-up
A
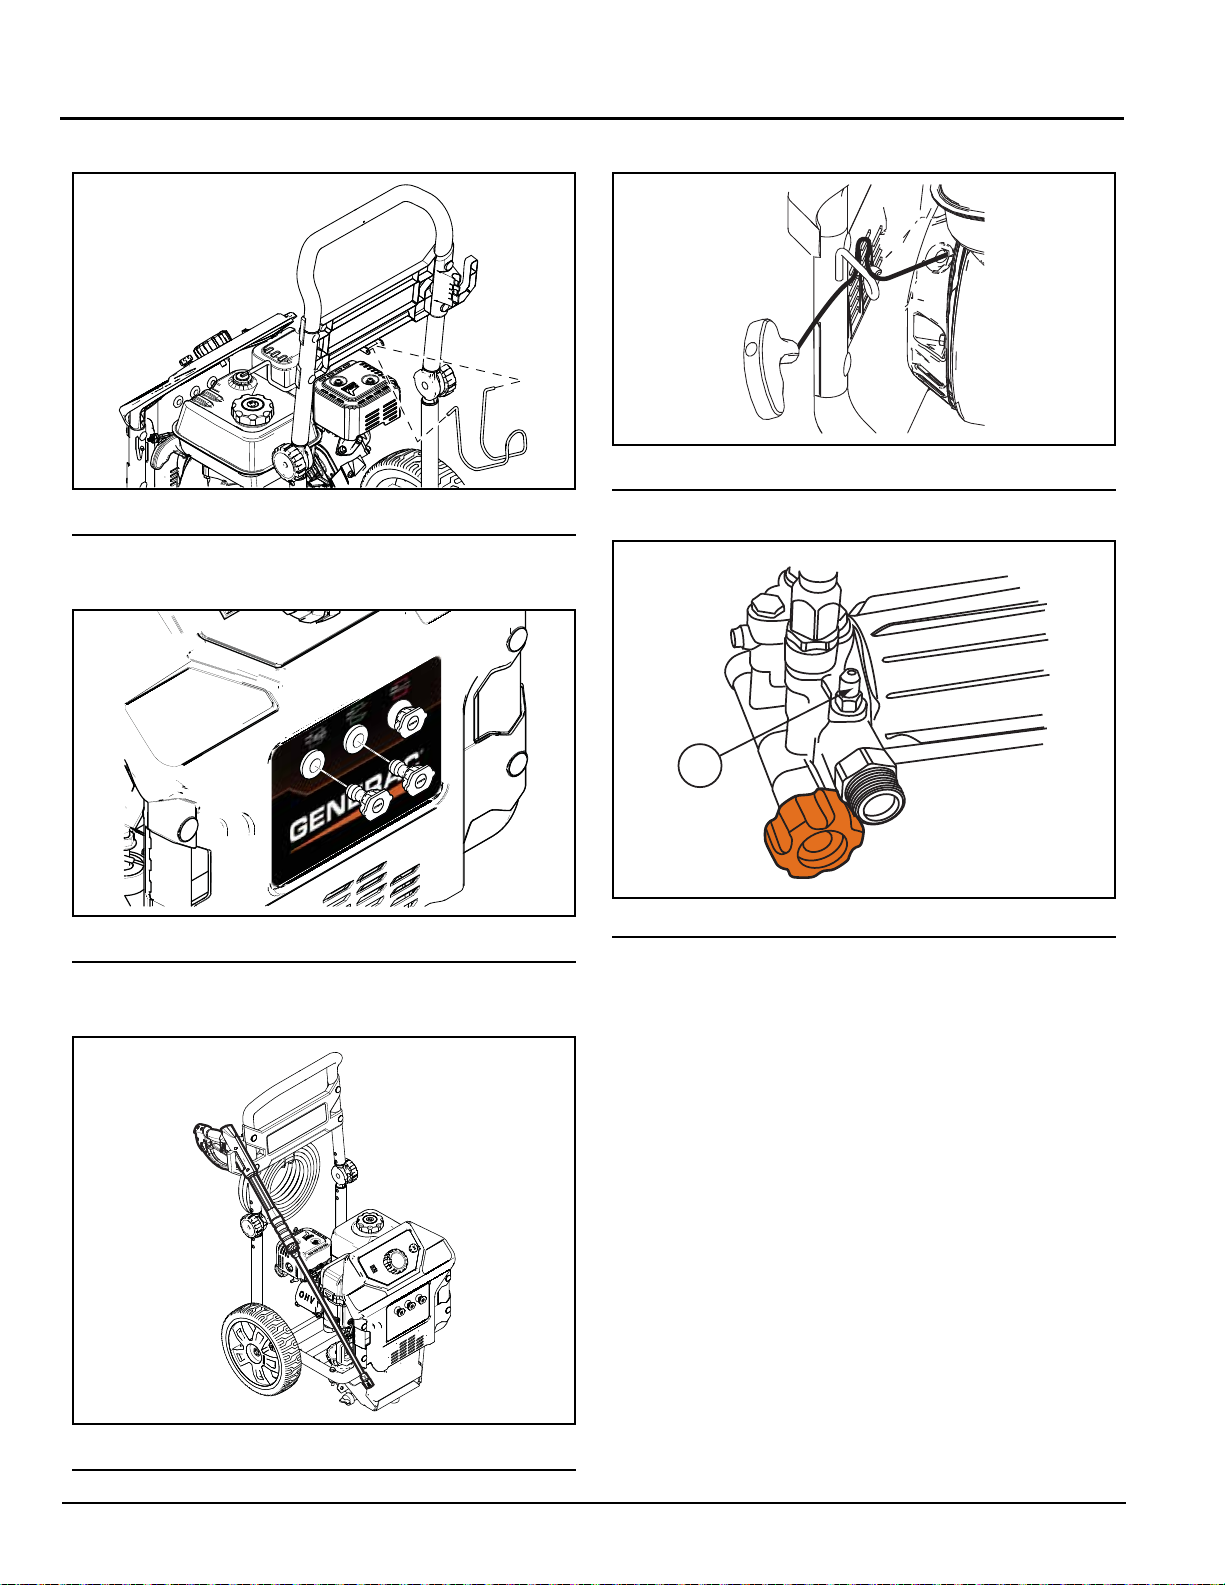
4. Install hose hook (Figure 4-4).
Figure 4-4. Install Hose Hook
5. Insert color–colored nozzles in spaces provided in
front panel (Figure 4-5).
7. Place recoil rope into holder as shown (Figure 4-7).
Figure 4-7. Recoil Rope Hook
8. Attach siphon tube to location A (Figure 4-8).
Figure 4-5. Insert Nozzles
6. Place spray gun/lance extension onto spray gun
holder as shown (Figure 4-6).
Figure 4-6. Gun/Lance
Figure 4-8. Siphon Tube Location
4.2 — ADD ENGINE OIL
1. Place power washer on a flat, level surface.
2. Clean area around oil fill and remove orange oil fill
cap/dipstick.
3. Using oil funnel, slowly pour oil into fill opening. See
“Maintenance” section for oil type recommendation.
NOTE:
On some units there is more than one oil fill location.
In these instances it is only necessary to use one of
the oil fill points.
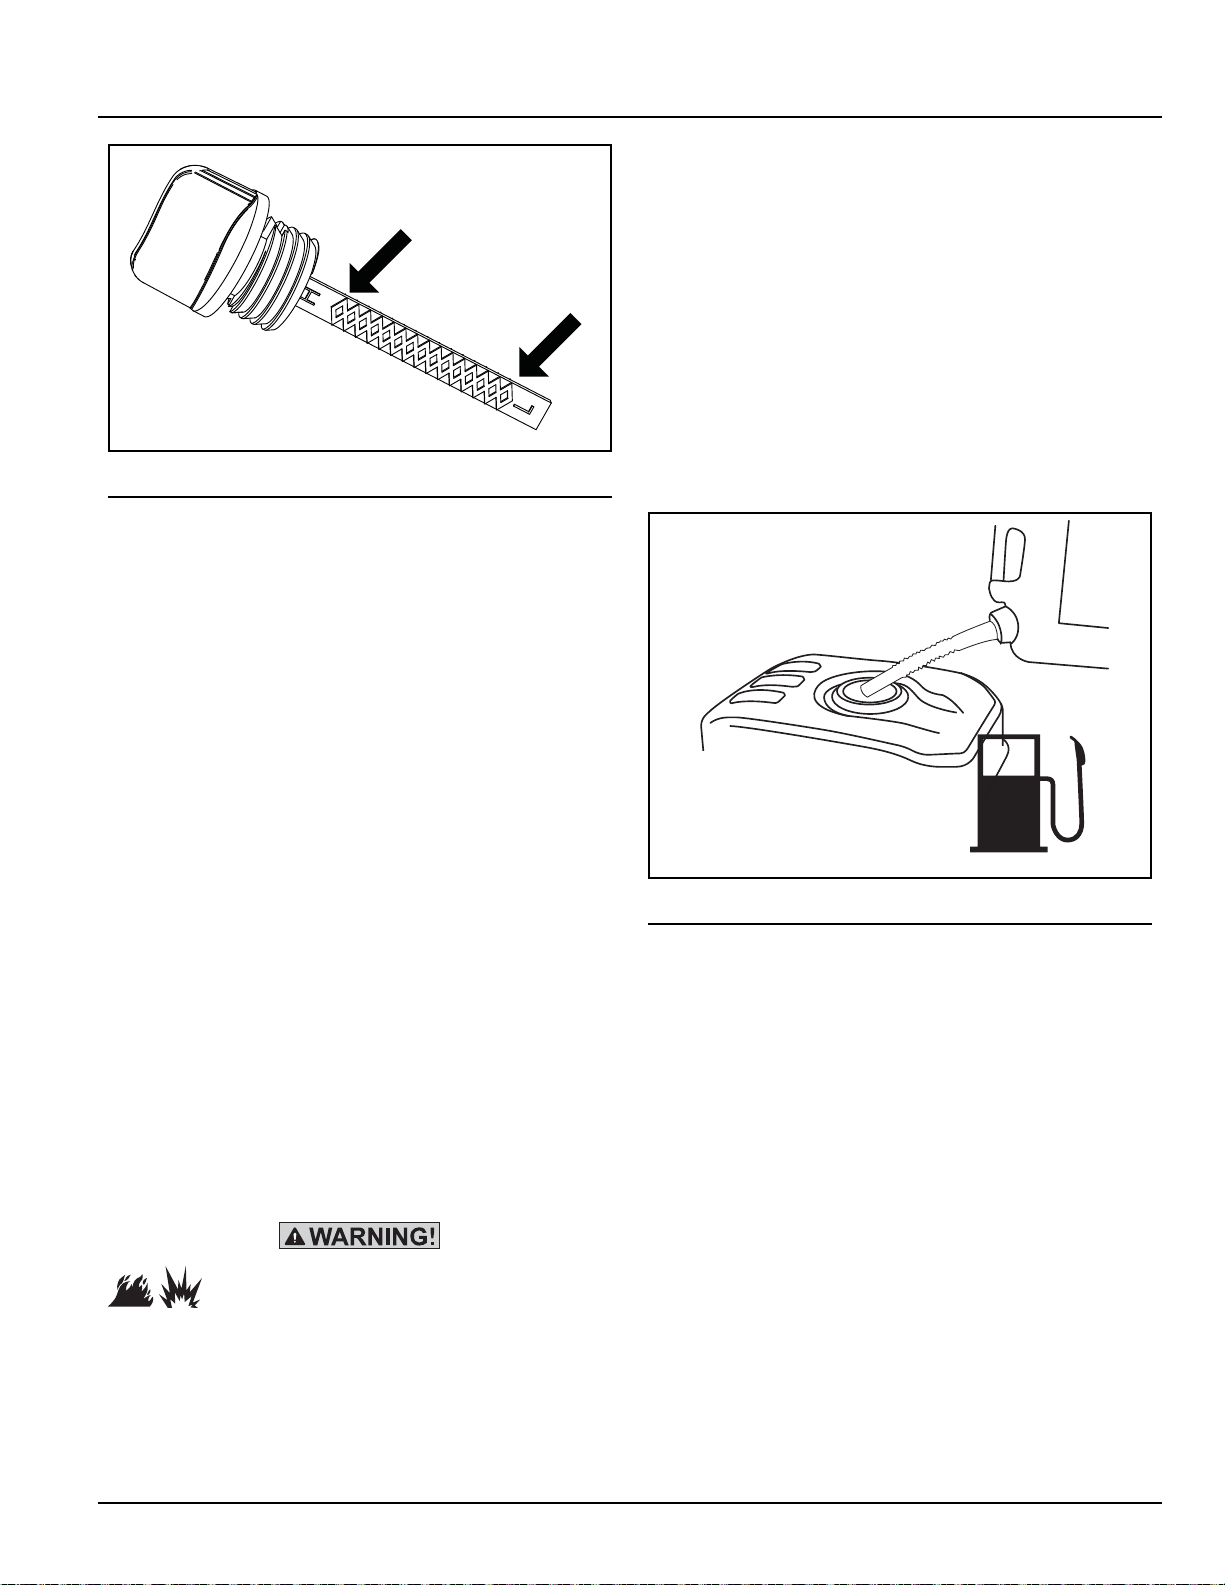
4. Check periodically until the oil level is between “L”
and “H” on the dipstick (Figure 4-9). Do not overfill.
12 OneWASH™ Power Washer
Page 17
Set-up
Acceptable Oil
Level Range
Figure 4-9. Dipstick
NOTE:
Any attempt to crank or start the engine before it has
been properly serviced with the recommend oil may
result in engine failure.
5. Replace oil fill cap/dipstick and fully tighten.
• Fill fuel tank outdoors.
• DO NOT overfill tank. Allow space for fuel expansion.
• If fuel spills, wait until it evaporates before starting
engine.
• Keep fuel away from sparks, open flames, pilot lights,
heat, and other ignition sources.
• DO NOT light a cigarette or smoke.
1. Clean area around fuel fill cap, remove cap.
2. Slowly add regular unleaded fuel to fuel tank. Be
careful not to overfill. Fill to bottom of filter screen,
this will allow for fuel expansion (Figure 4-10).
3. Install fuel cap and let any spilled fuel evaporate
before starting engine.
4.3 — FUEL
Fuel must meet these requirements:
• Clean, fresh, unleaded gasoline.
• A minimum of 87 octane/87 AKI (91 RON).
• Gasoline with up to 10% ethanol (gasohol) is acceptable.
NOTE:
Avoid power washer damage. Failure to follow Operator’s Manual for fuel recommendations voids warranty.
• DO NOT use unapproved gasoline such as E85.
• DO NOT mix oil in gasoline.
• DO NOT modify engine to run on alternate fuels.
To protect the fuel system from gelling, mix in a fuel stabilizer when adding fuel. See Storage. All fuel is not the
same. If you experience starting or performanc e pr ob lems after using fuel, switch to a different fuel pro vider or
change brands.
Fuel and its vapors are extremely flammable and explosive. Fire or explosion can
cause severe burns or death.
4.3.1 — WHEN ADDING FUEL
• Turn power washer OFF and let it cool at least two (2)
minutes before removing fuel cap. Loosen cap slowly
to relieve pressure in tank.
Figure 4-10. Adding Fuel
4.4 — CONNECT HOSE AND WATER
UPPLY TO PUMP
S
NOTE:
DO NOT run the pump without the water supply connected and turned on. Damage to equipment resulting from failure to follow this instruction will void
warranty.
NOTE:
Remove and discard the shipping cap from the
pump’s water inlet before attaching hose.
1. Run water through your garden hose for 30 seconds
to clean out any debris.
2. Before connecting garden hose to water inlet, inspect
inlet screen (A) (Figure 4-11). Clean screen if it contains debris or have it replaced if damaged . DO NOT
run power washer if inlet screen is damaged.
OneWASH™ Power Washer 13
Page 18
Set-up
A
IMPORTANT: DO NOT siphon standing water for the
water supply. Use ONL Y cold water (less than 100°F).
Water supply must be adequate to handle greater than
3.8 gallons per minute and no less than 30 psi.
NOTE:
Using a One Way Valve (vacuum breaker or check
valve) at pump inlet can cause pump or inlet connector damage.
• There MUST be at least ten feet of unrestricted garden
hose between the power washer inlet and any device,
such as a vacuum breaker or check valve.
• Damage to equipment resulting from failure to follow
this instruction will void warranty.
• Always wear safety goggles when using this equipment or in vicinity of equipment in use.
• Before starting the power washer, be sure you are
wearing adequate safety goggles.
• NEVER substitute safety glasses for safety goggles.
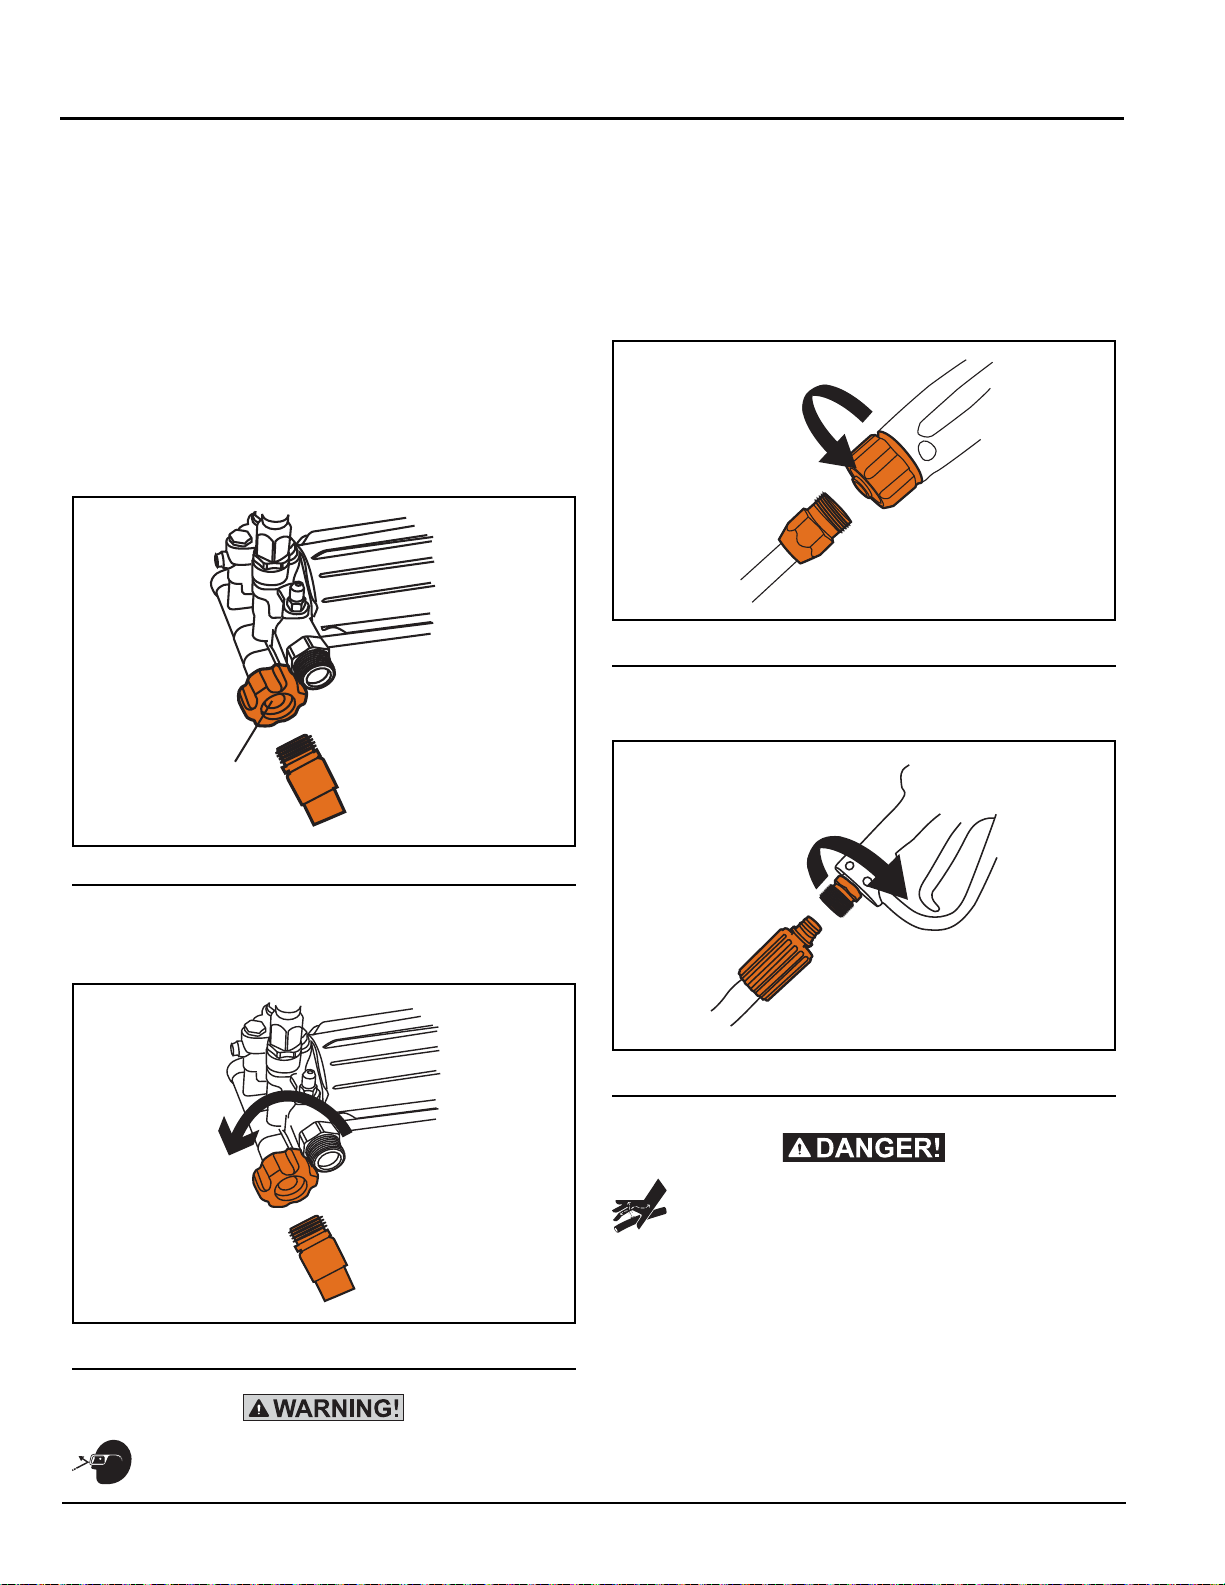
4. Connect lance to spray gun (Figure 4-13). T ighten b y
hand.
Figure 4-13. Attach Lance
5. Attach end of high pressure hose to base of spray
gun (Figure 4-14). Tighten by han d.
Figure 4-11. Inspect Inlet Screen
3. Connect the garden hose (not to exceed 50 feet in
length) to the water inlet (Figure 4-12). Tighten by
hand.
Figure 4-12. Connect Garden Hose
Risk of eye injury. Spray can splash back or
propel objects.
Figure 4-14. Connect Hose to Spray Gun
The high pressure stream of water that this
equipment produces can cut through skin and
its underlying tissues, leading to serious
injury and possible amputation.
• NEVER connect high pressure hose to lance.
• Keep high pressure hose connected to pump and
spray gun while system is pressurized.
• Always be certain spray gun, nozzles and accessories
are correctly attached.
14 OneWASH™ Power Washer
Page 19
Set-up
6. Connect high pressure hose to pump (uncoil hose
before connecting to pump or spray gun)
(Figure 4-15). Tighten by hand.
The hose can be damaged if it comes in contact with a hot engine or muffler.
Figure 4-15. Connect High Pressure Hose
to Pump
• If you get nozzle too close, especially using a high
pressure nozzle (RED), you may damage surface
being cleaned.
The high pressure stream of water that this
equipment produces can cut through skin and
its underlying tissues, leading to serious
injury and possible amputation.
• NEVER exchange nozzles without the trigger lock
being engaged on the spray gun.
• DO NOT twist nozzles while spraying.
NOZZLE PSI GPM
Blast 3100 2.4
Wash 2600 2.8
The OneWash power washer is equipped with a Power
dial to provide optimal cleaning power for each application (Figure 5-4).
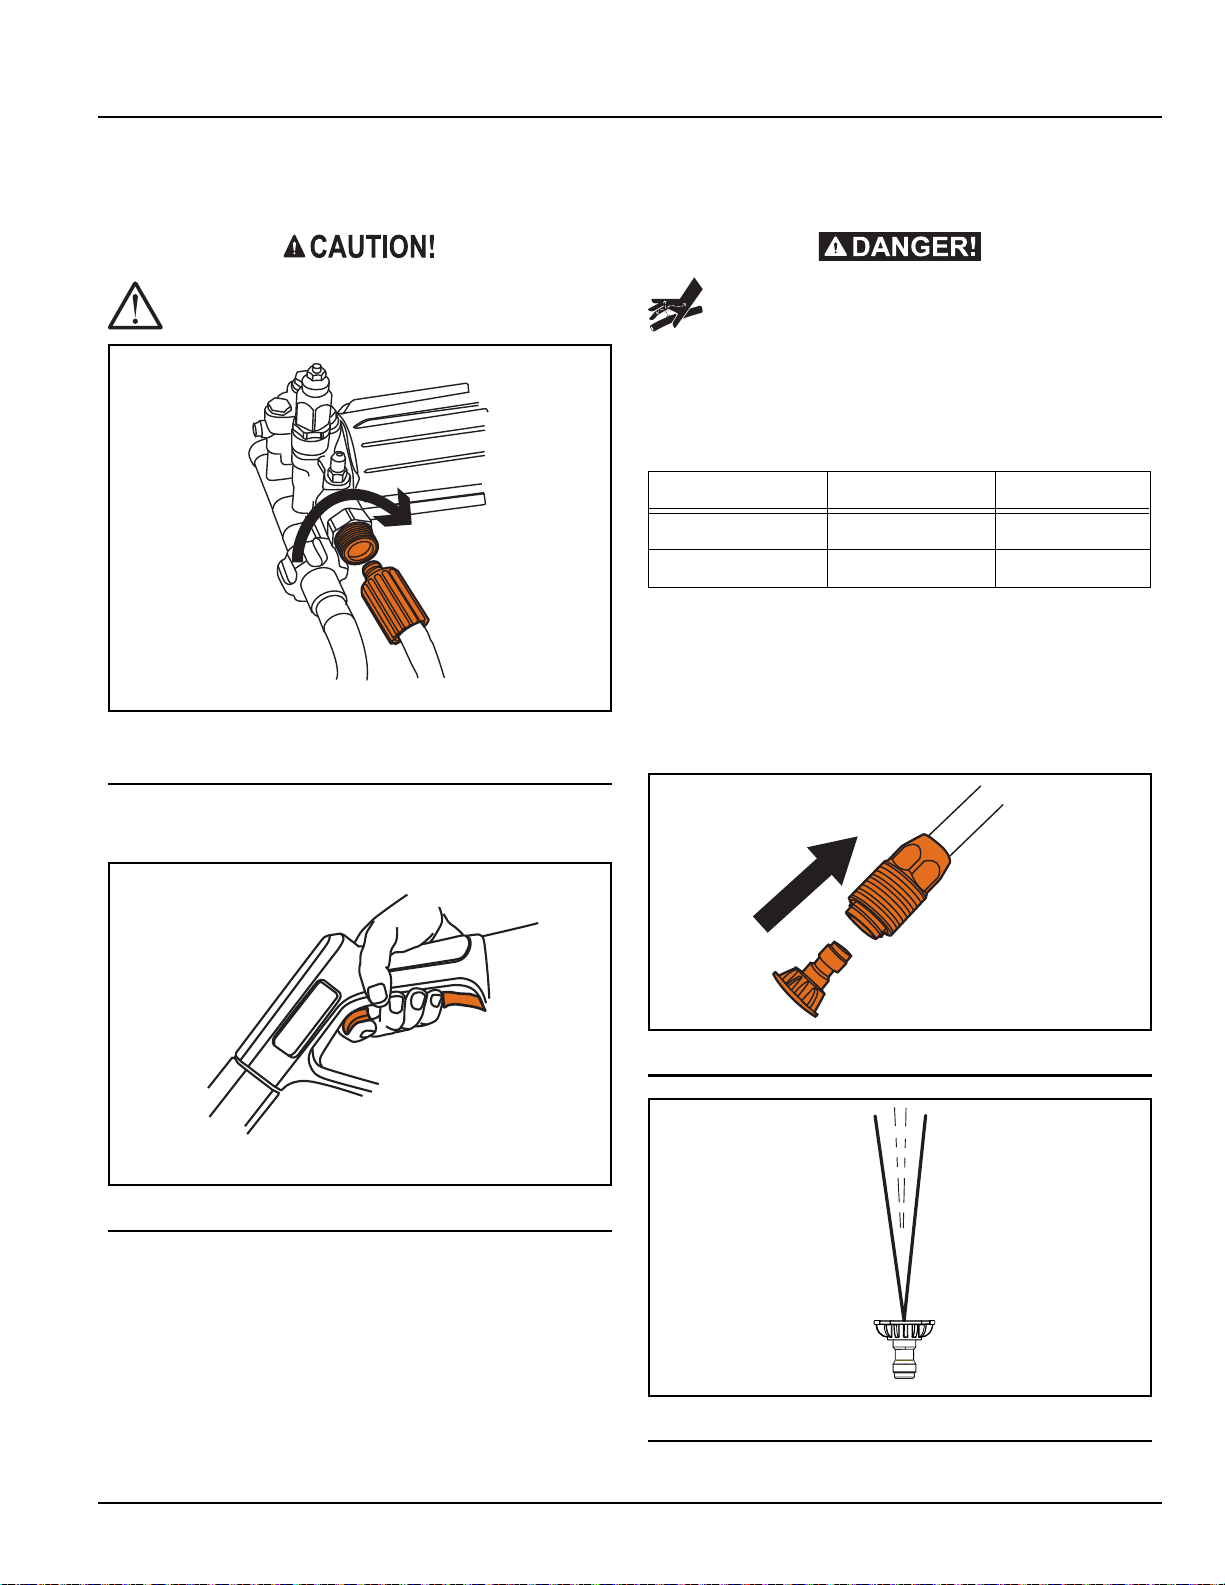
1. Pull back collar on quick–connect lance (Figure 4-17)
and install the GREEN wash nozzle (Figure 4-18) for
the following cleaning applications.
7. Turn ON the water, squeeze the trigger to purge the
pump system of air (Figure 4-16) .
Figure 4-16. Squeeze T rigger
4.5 — HOW TO USE NOZZLES
The quick–connect on the nozzle lance allows you to
switch between different nozzles. Nozzles can be
changed while power washer is running once spray gun
trigger is locked in the safety position. The nozzles vary
the pressure and spray pattern.
• For most effective cleaning, keep nozzle from 8 to 24
inches (20 to 61 cm) away from cleaning surface.
Figure 4-17. Nozzles
Figure 4-18. Wash Pressure Nozzle (Green)
OneWASH™ Power Washer 15
Page 20
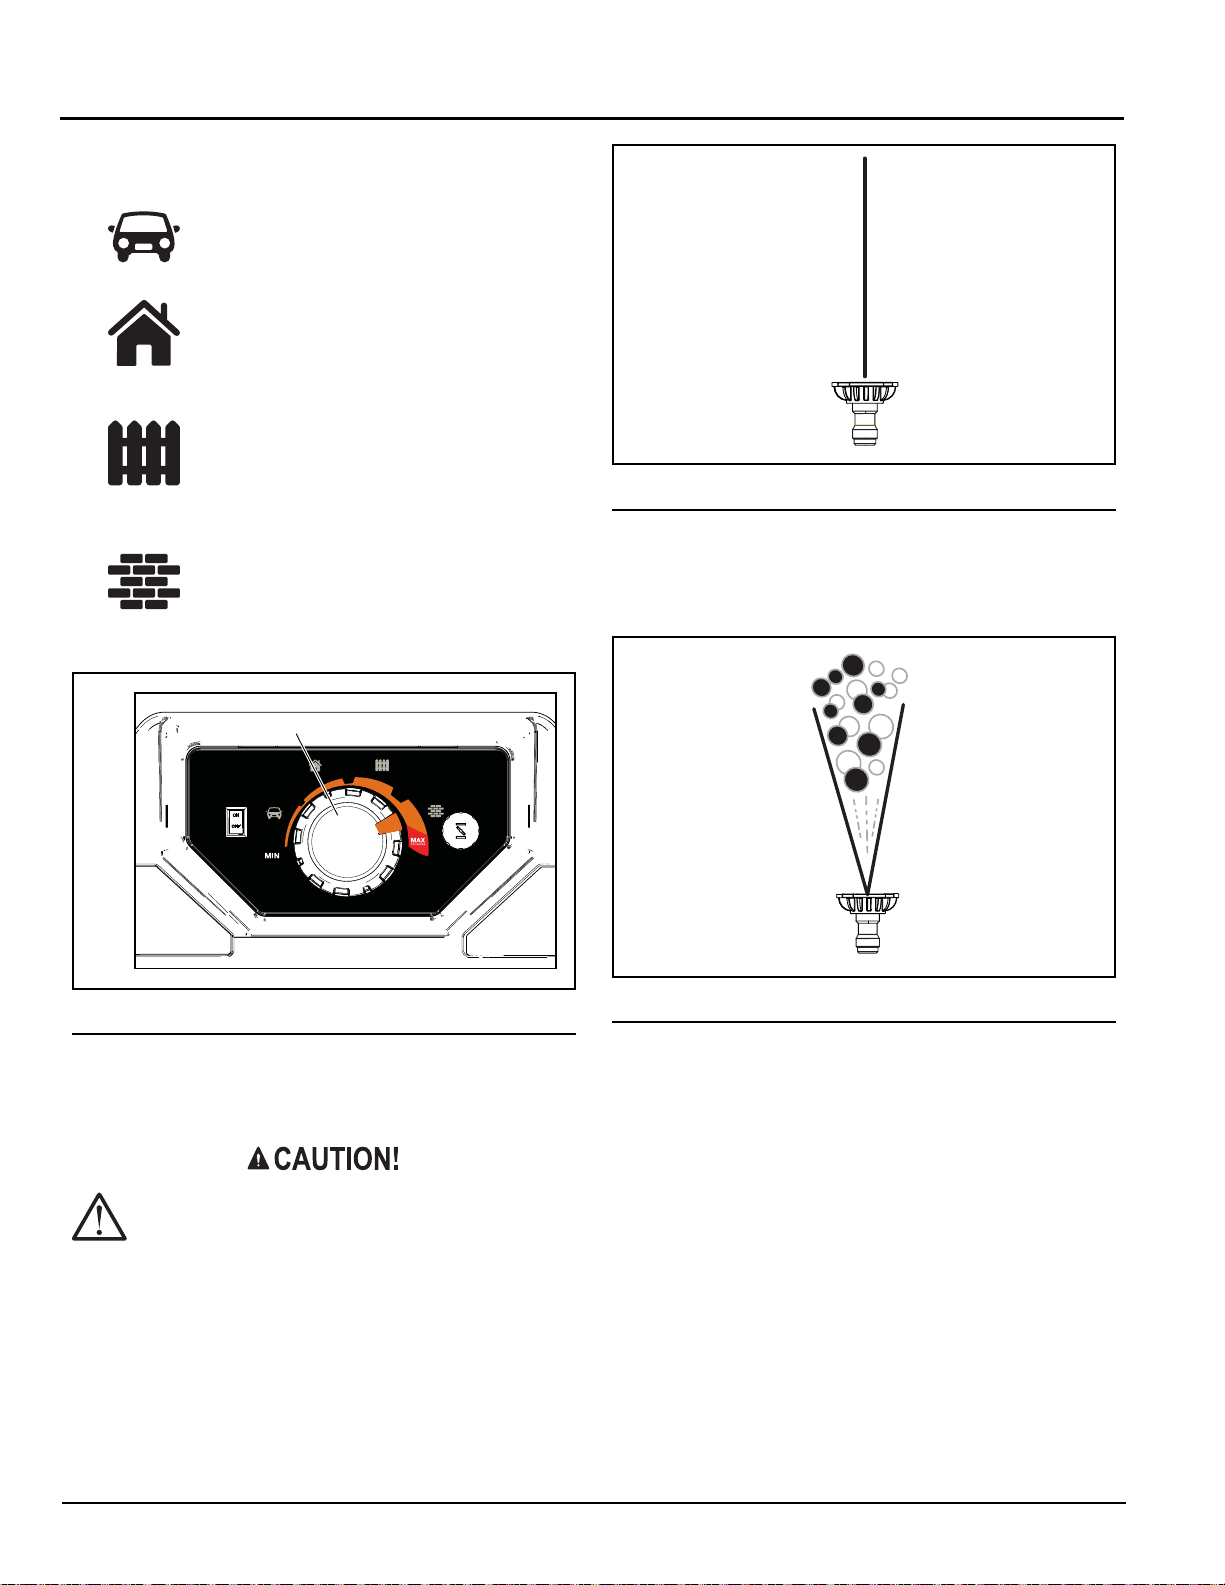
2. Turn the Power Dial so that it matches the material
DELICATE
2000 PSI
HEAVY DUTY
3100 PSI
PRESSURE CONTROL
you would like to clean (Figure 4-19).
Car icon - This setting is best for cleaning
cars, boats and RV’s as it delivers the right
balance of power and flow to clean these
types of surfaces effectively.
House Icon - This setting is best for cleaning vinyl and aluminum siding on your
home, as it delivers the right balance of
power and flow to clean these types of surfaces effectively.
Wood Fence Icon - This setting is best for
cleaning wood decks fences and siding on
your home, as it delivers the right balance
of power and flow to clean these types of
surfaces effectively.
Brick Icon - This setting is best for cleaning brick, concrete and masonry materials,
as it delivers the right balance of power and
flow to clean these types of surfaces effectively.
Set-up
Figure 4-20. Blast Pressure Nozzle (Red)
• When applying detergent, use only the black nozzle
(Figure 4-21). Only use power washer safe detergents/
soaps to help break down stubborn dir t and g rime on a
variety of surfaces.
Figure 4-19. Power Dial
Figure 4-21. Detergent Nozzle (Black)
3. To remove persistent stains on concrete or masonry
surfaces, use the red blast nozzle within the stained
area (Figure 4-20).
This tip (Red Nozzle) can damage work surface if it is too close or held in one position for
an extended time.
16 OneWASH™ Power Washer
Page 21
Set-up
4.5.1 — Cleaning and Applying Detergent
Chemicals can cause bodily injury, and/or
property damage.
• NEVER use caustic liquid with power washer.
• Use ONLY power washer safe detergents/soaps. Fol-
low all manufacturer's instructions.
To apply detergent, follow these steps:
1. Review use of nozzles.
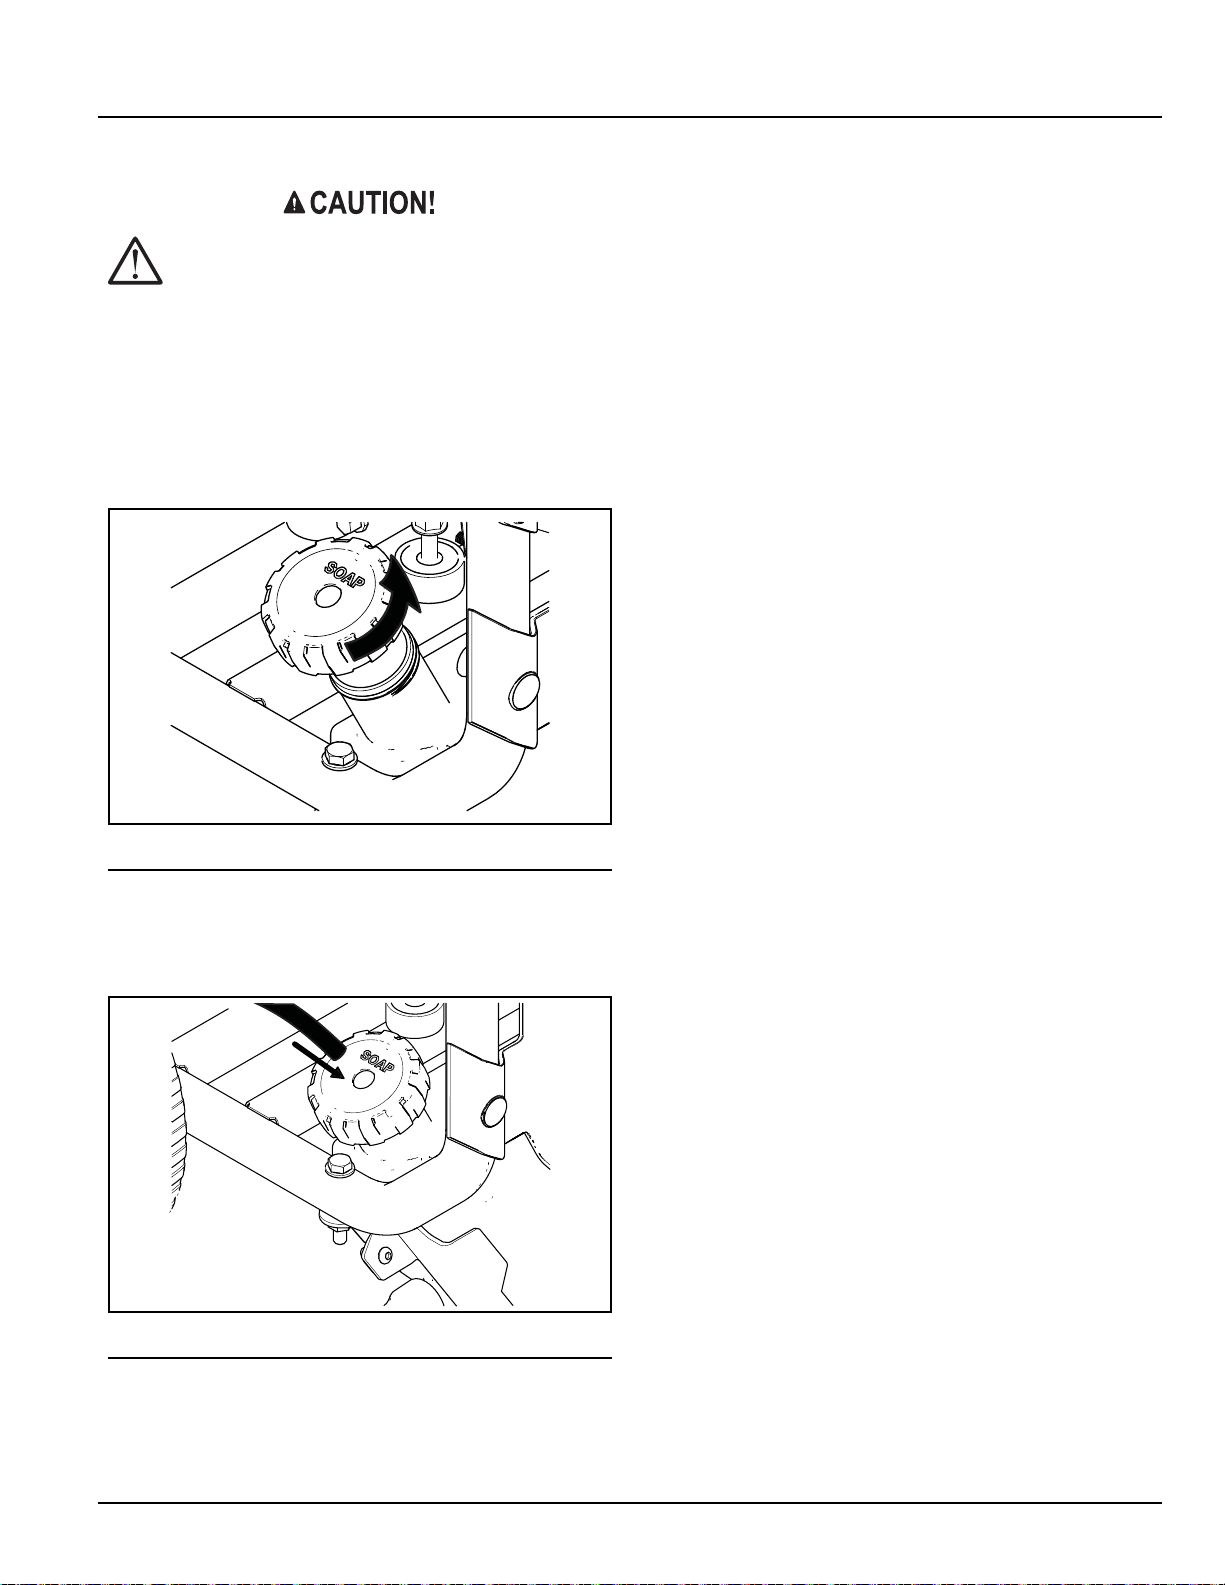
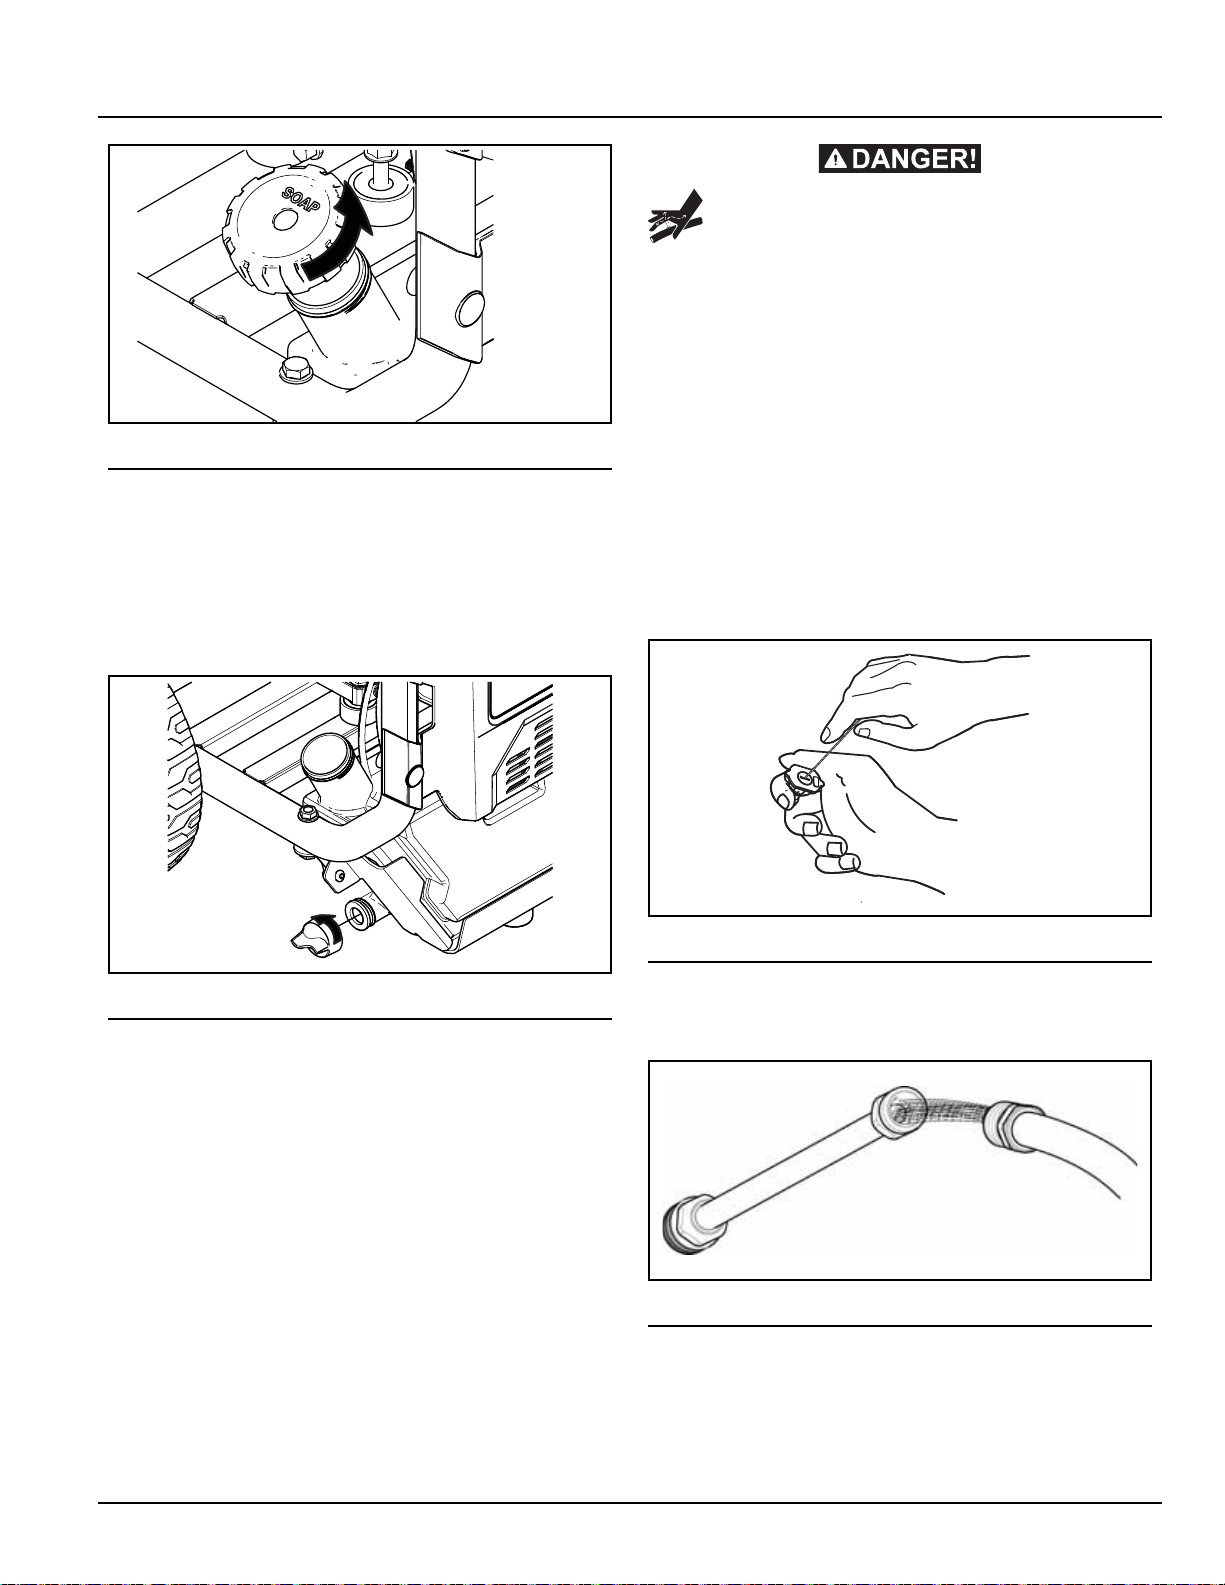
2. Remove chemical tank cap (Figure 4-22).
3. Prepare detergent solution as required by job.
Figure 4-22. Chemical Tank & Cover
4. Insert filter on end of siphoning tube through the hole
in the chemical tank cap (Figure 4-23).
5. Make sure siphoning tube remains fully submerged
into detergent.
NOTE:
Make sure the filter remains fully submerged in
detergent while applying detergent.
NOTE:
Contact with the hot muffler can damage detergent
siphoning tube.
• When inserting the siphon into a detergent solution
bottle, route the tube so as to keep it from inadvertently
contacting the hot muffler.
6. Make sure black detergent nozzle is installed.
NOTE:
Detergent cannot be applied with the high pressure
nozzle (Green or Red). Only use the Black nozzle with
detergent.
7. Confirm set-up instructions have been followed.
NOTE:
You must attach all hoses before you start the
engine.
• Starting the engine without all the hoses connected
and without the water turned ON will damage the
pump.
• Damage to equipment resulting from failure to follow
this instruction will void warranty.
8. Start engine following instructions How to Start Your
Power Washer.
9. Apply detergent to a dry surface, starting at lower
portion of area to be washed and work upward using
long, even, overlapping strokes.
10. Allow detergent to “soak in” for 3-5 minutes before
washing and rinsing. Reapply as needed to prevent
surface from drying. DO NOT allow detergent to dry
on surface being cleaned (prevents streaking).
IMPORTANT: You must flush the detergent siphoning
system after each use by placing the filter into a bucket of
clean water, then run the power washer in low pressure
for 1-2 minutes.
4.5.2 — Power Washer Rinsing
1. Remove black detergent nozzle from lance.
2. Select and install desired high pressure nozzle fol-
lowing instructions How to Use Nozzles.
3. Point spray gun in safe direction and away from pe o-
ple, animals and plants. Squeeze trigger to flush a ny
Figure 4-23. Install Siphoning Tube
OneWASH™ Power Washer 17
remaining chemical from system.
4. Keep spray gun a safe distance from area you plan
to spray.
Page 22

Kickback from spray gun can cause
you to fall.
• Use only on a level surface.
• Do not use on elevated surface to prevent the risk of a
serious fall.
• Firmly grasp spray gun with both hands when using
high pressure spray to avoid injury when spray gun
kicks back.
5. Apply a high pressure spray to a small area and then
check surface for damage. If no damage is found,
you can assume it is okay to continue rinsing.
6. Start at top of area to be rinsed, working down with
same overlapping strokes as you used for cleaning.
4.5.3 — Cleaning Detergent Siphoning Tube
If you used the detergent siphoning tube, you must flush
it with clean water before stopping the engine.
Set-up
1. Place detergent siphoning tube/filter in a bucket full
of clean water.
2. Remove high pressure nozzle from nozzle extension.
3. Select and install black detergent nozzle following
instructions “How to Use Nozzles”.
4. Flush for 1-2 minutes.
5. Shut off engine following instructions How to Stop
Power Washer and turn off water supply.
6. AL W A YS point spray gun in a safe direction, squeeze
spray gun trigger to release retained high wa te r pres sure. Engage trigger lock when not in use.
IMPORTANT: S pray gun trap s high water pressur e, even
when engine is stopped and water is disconnected.
The high pressure stream of water that this
equipment produces can cut through skin and
its underlying tissues, leading to serious
injury and possible amputation. Spray gun
traps high water pressure, even when engine
is stopped and water is disconnected, which
can cause injury.
• Keep high pressure hose connec ted to pump and
spray gun while system is pressurized.
• ALWAYS point spray gun in safe direction, and
squeeze spray gun trigger to release high pressure,
every time you stop engine. Engage trigger lock when
not in use.
18 OneWASH™ Power Washer
Page 23
5 Foot Minimum
Section 5 Operation
5.1 — OPERATION
If you have any problems operating your power washer,
please call Generac customer service at
1-888-436-3722.
5.2 — POWER WASHER L OCATION
5.2.1 — Clearances and Air Movement
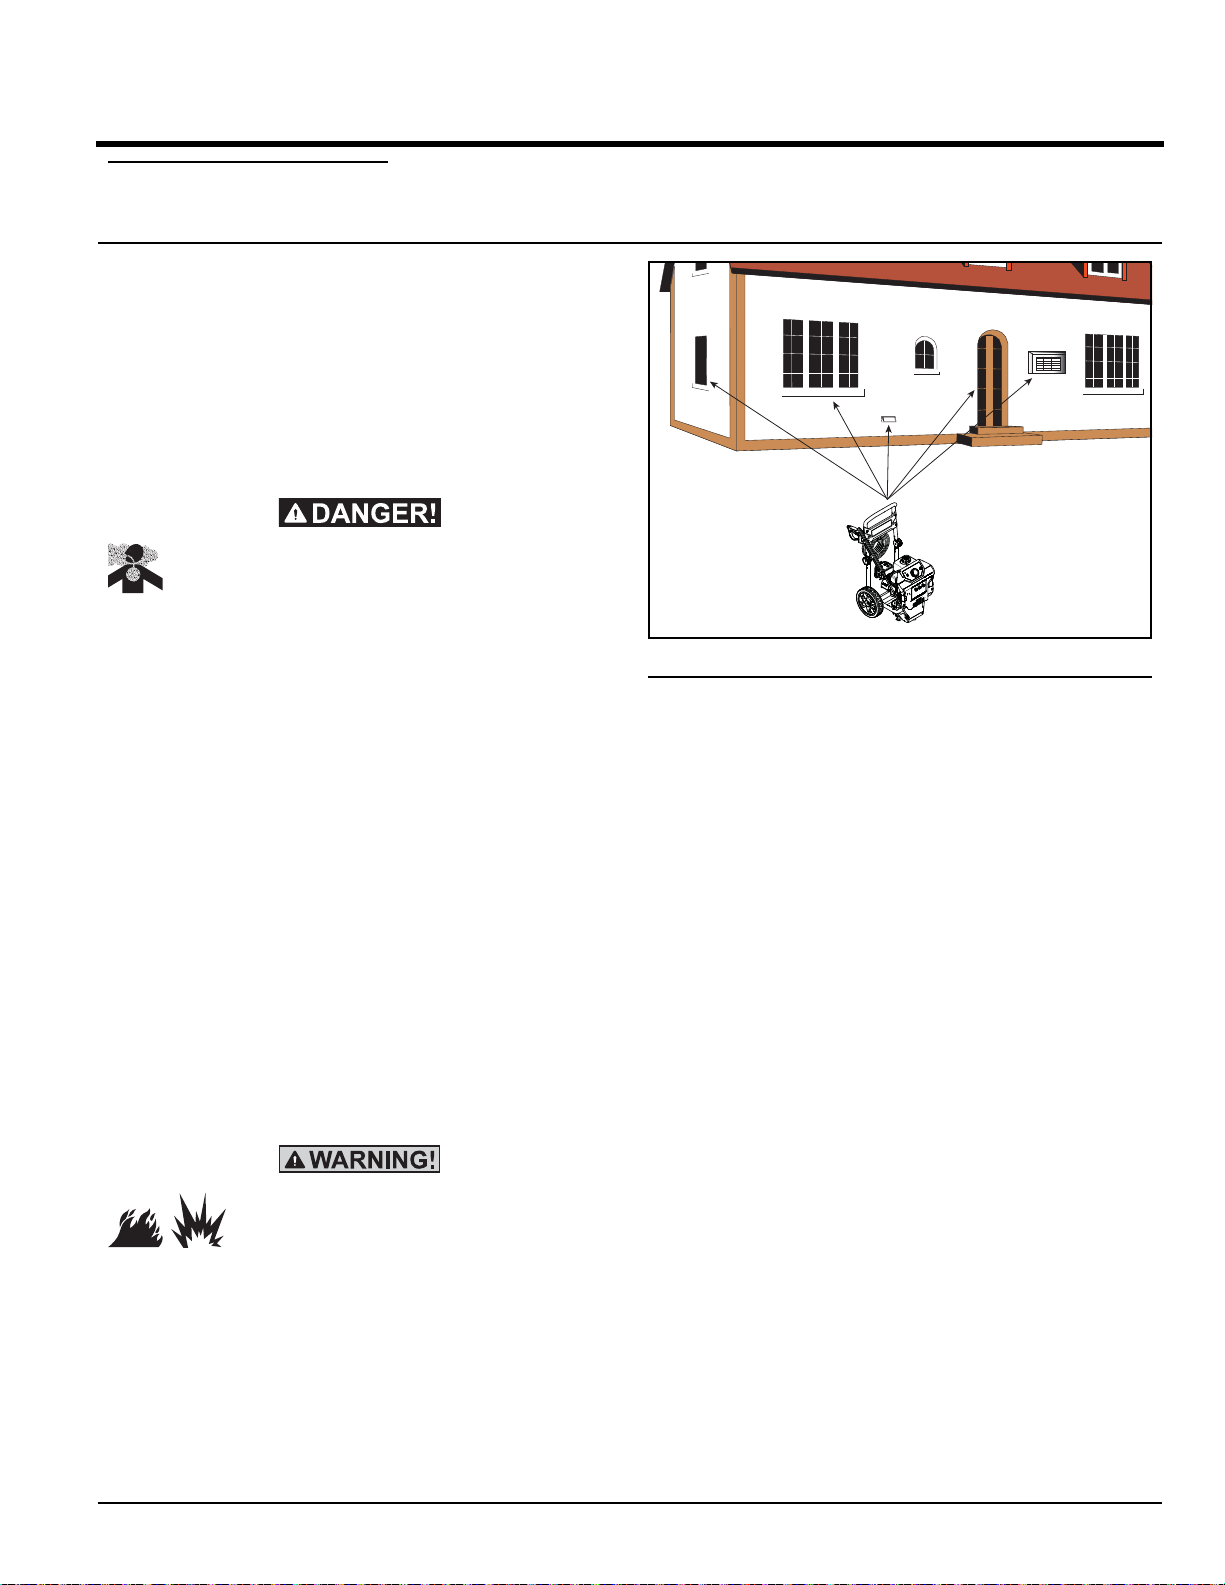
Running engine gives off carbon monoxide,
an odorless, colorless, poisonous gas.
Breathing carbon monoxide can caus e he ad ache, fatigue, dizziness, vomiting, confusion,
seizures, nausea, fainting or death. For more
information, reference the CO warnings in the
“Safety” section.
Figure 5-1. Building Clearances
Place power washer outdoors in an area that will not
accumulate deadly exhaust gas. NEVER place power
washer where exhaust gas could accumulate and enter
inside or be drawn into a potentially occupied building.
Ensure exhaust gas is kept away from any windows,
doors, ventilation intakes, or other openings that can
allow exhaust gas to collect in a confined area. Prevailing
winds and air currents should be ta ken into consideration
when positioning power washer (Figur e 5-1).
• Operate power washer ONLY outdoors.
• Keep exhaust gas from entering a co nf in e d ar ea
through windows, doors, ventilation intakes, or other
openings.
• NEVER start or run engine indoors, in a vehicle or in
an enclosed area, EVEN if windows and doors are
open.
Exhaust heat/gases can ignite combustibles, structures or damage fuel tank
causing a fire.
• Keep at least 5 ft. (152 cm) clearance on all sides of
power washer including overhead.
5.3 — CHECKLIST BEFORE STARTING
NGINE
E
1. Be sure to read and understand the “Safety” section
and “Operation” section before using power washer.
2. Check that the oil is at the full mark on the dipstick,
and that fuel has been added to the fuel tank.
3. Review the unit’s assembly and ensure fitting are
properly secured and make sure there are no kinks,
cuts, or damage to high pressure hose.
4. Provide a proper water supply at an adequate flow,
clear screens of debris, and confirm that the system
is purged of air.
5. Confirm unit is secure on level ground and surrounding work area is clear.
5.4 — HOW TO START YOUR POWER
ASHER
W
NOTE:
DO NOT run the pump without the water supply connected and turned on. Damage to equipment resulting from failure to follow this instruction will void
warranty.
OneWASH™ Power Washer 19
Page 24
1. Turn the ON/OFF switch to the “ON” position
DELICATE
2000 PSI
HEAVY DUTY
3100 PSI
ON/OFF SWITCH
DELICATE
2000 PSI
HEAVY DUTY
3100 PSI
PRESSURE CONTROL
DELICATE
2000 PSI
HEAVY DUTY
3100 PSI
CHOKE “ON”
CHOKE “OFF”
STARTER
GRIP
(Figure 5-2).
Figure 5-2. ON/OFF Switch
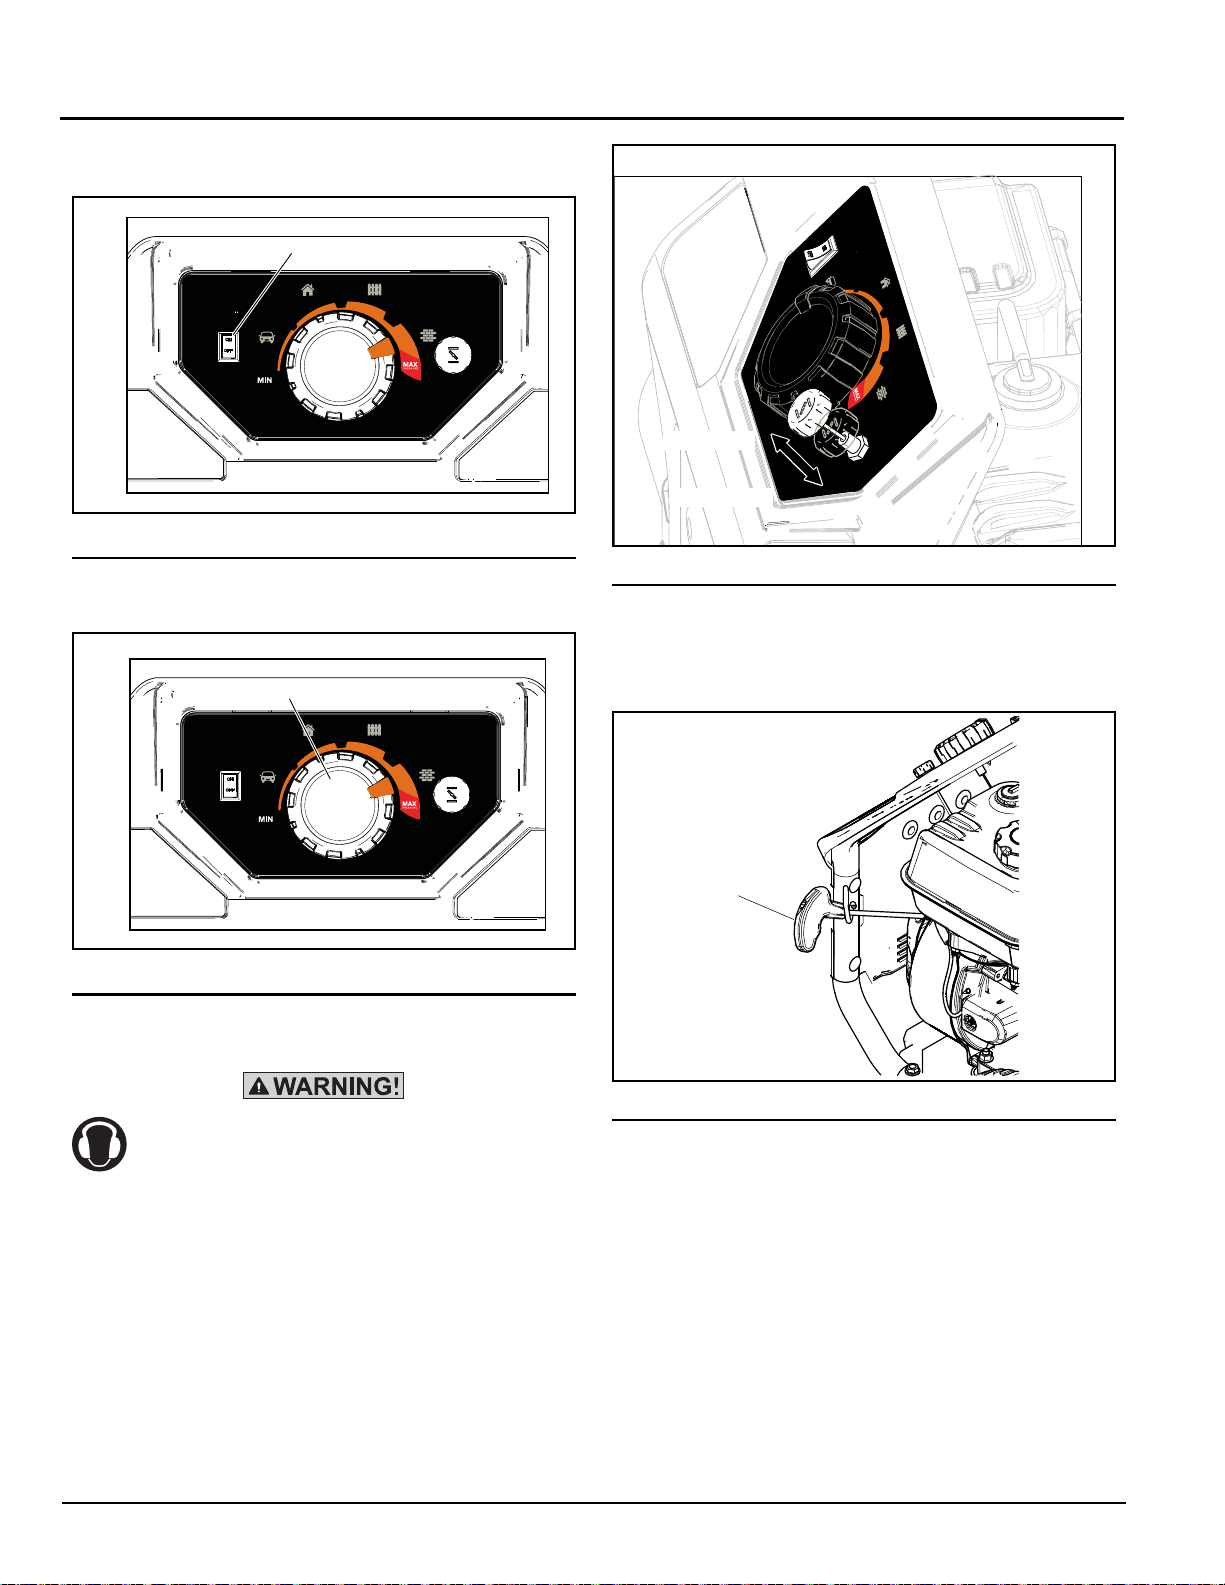
2. Rotate pressure control knob to the position show n
on “Start” decal (Item #2) (Figure 5-3).
Operation
Figure 5-4. Choke Knob
4. Secure unit from movement when pulling recoil.
5. When starting the engine, grasp starter grip handle
(Figure 5-5) and pull slowly until you feel some resistance. Then pull rapidly to start engine.
Figure 5-3. Power Dial
3. Choke the engine by slowly pulling out on the choke
knob until it stops in the “ON” position (Figure 5-4).
Figure 5-5. Starting the Engine
Hearing Protection Recommended.
6. Return starter grip handle slowly. DO NOT let rope
“snap back” against holder.
NOTE:
For a warm engine, push the choke knob down until
it stops in the “OFF” position (Figure 5-4).
20 OneWASH™ Power Washer
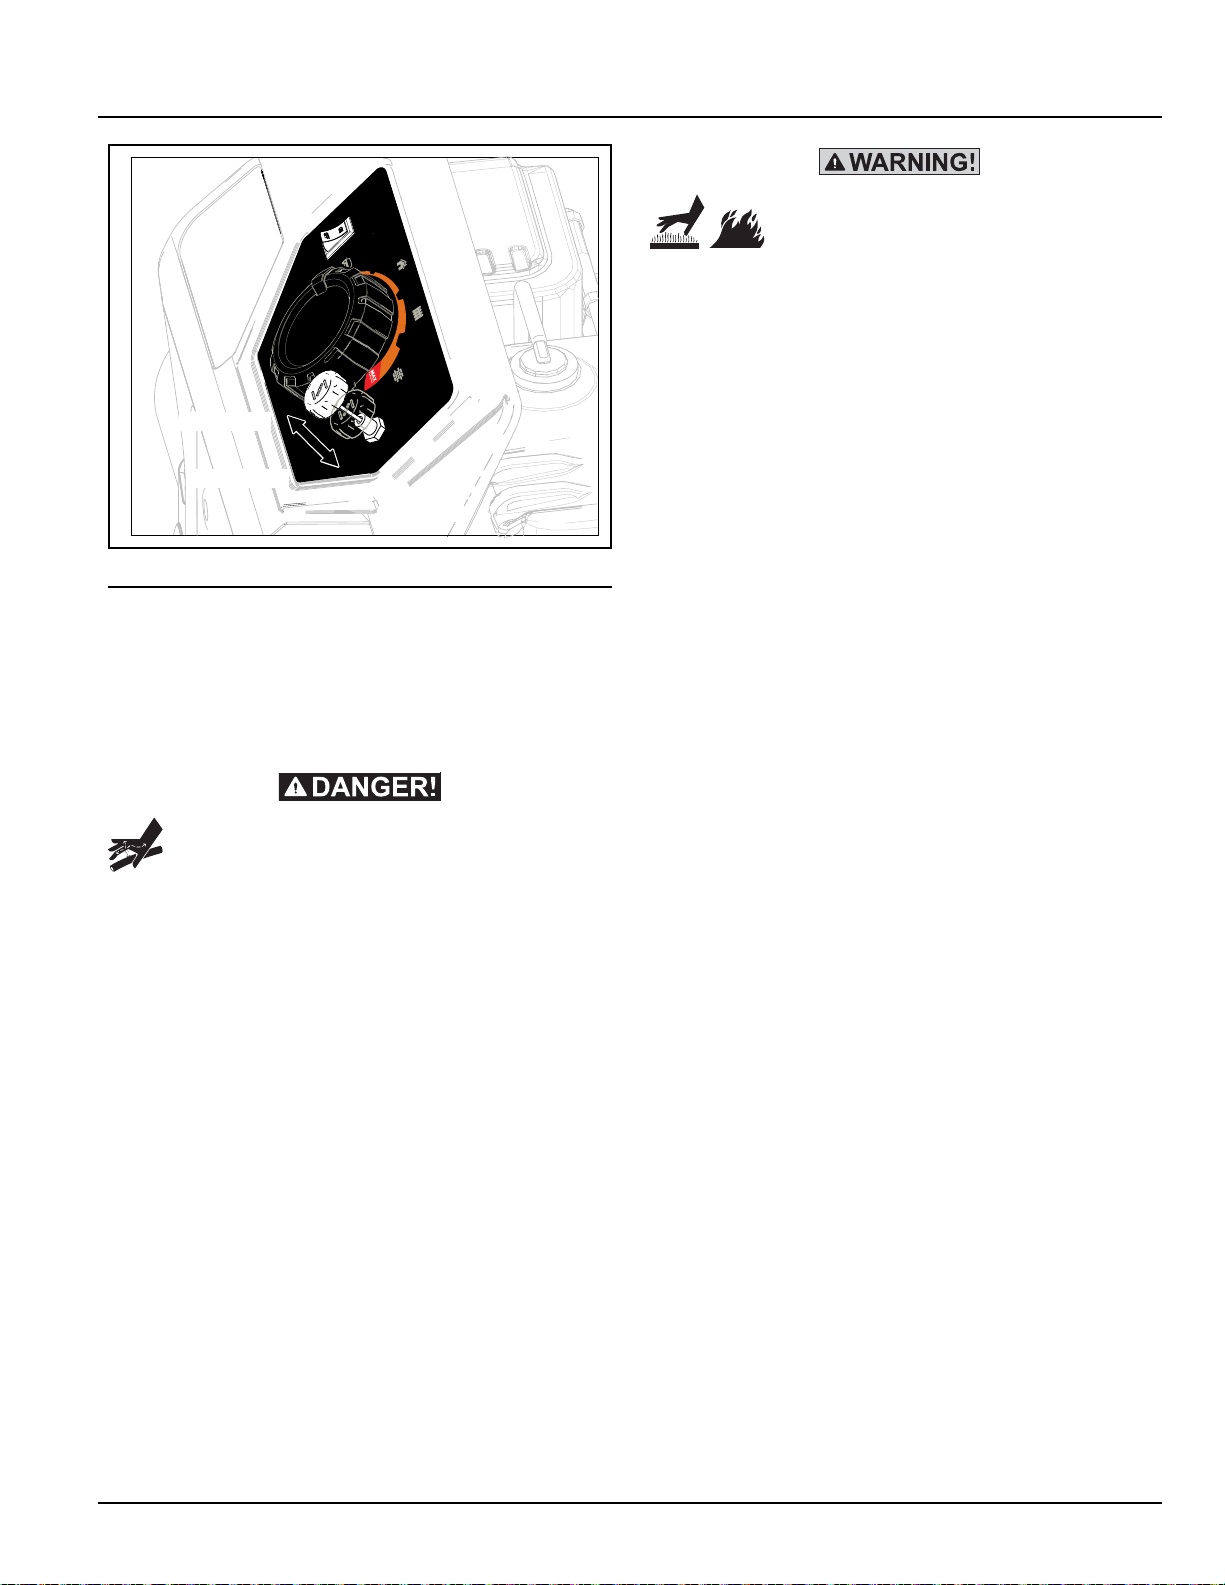
7. When engine starts, slowly push the choke knob in to
the “OFF” position as engine warms. If engine falters,
pull choke knob out to the “ON” position, then push in
to the “OFF” position (Figure 5-6).
Page 25
Operation
DELICATE
2000 PSI
HEAVY DUTY
3100 PSI
CHOKE “ON”
CHOKE “OFF”
Figure 5-6. Choke Knob
8. After each starting attempt, where engine fails to run,
always point gun in safe direction, and squeeze
spray gun trigger to release high pressure.
9. If engine fails to start after six pulls, push choke knob
in to the “OFF” position, and repeat steps 6 through
10.
Contact with muffler area can result in
serious burns. Exhaust heat/gases can
ignite combustibles, structures or
damage fuel tank causing a fire.
• DO NOT touch hot parts and AVOID hot exhaust
gases.
• Allow equipment to cool before touching.
• Keep at least 5 feet (152 cm) of clearance on all sides
of power washer including overhead.
• It is a violation of California Public Resource Code,
Section 4442, to use or operate the engine on any forest-covered, brush-covered, or grass-covered land
unless the exhaust system is equipped with a spark
arrester , as defined in Section 4442, maintained in
effective working order. Other states or federal jurisdictions may have similar laws.
• Replacement parts must be the same and installed in
the same position as the original parts.
5.5 — AUTOMATIC COOL DOWN SYSTEM
HERMAL RELIEF)
(T
The high pressure stream of water that this
equipment produces can cut through skin and
its underlying tissues, leading to serious
injury and possible amputation. Spray gun
traps high water pressure, even when engine
is stopped and water is disconnected, which
can cause injury.
• DO NOT allow CHILDREN to operate power washer or
play nearby.
• Keep high pressure hose connec ted to pump and
spray gun while system is pressurized.
• NEVER aim spray gun at people, animals or electrical
devices. Serious injury will result.
• DO NOT secure spray gun in open position.
• DO NOT leave spray gun unattended while machine is
running.
• NEVER use a spray gun which does not have a trigger
lock or trigger guard in place and in working order.
• Always be certain spray gun, nozzles and accessories
are correctly attached.
If you run the engine on your power washer for 3-5 min utes without pressing the trigger on the spray gun, circulating water in the pump can reach temperatures above
125°F. The system engages to cool the pump by discharging the warm water onto the ground.
5.6 — HOW TO STOP YOUR POWER
ASHER
W
1. Release spray gun trigger.
2. Turn the engine ON/OFF switch to the “OFF” position
(Figure 5-7).
3. ALWAYS point spray g un in a safe direction, and
squeeze spray gun trigger to release retained high
water pressure. Engage trigger lock when not in use.
4. Turn OFF water supply.
OneWASH™ Power Washer 21
Page 26

Figure 5-7. ON/OFF Switch
DELICATE
2000 PSI
HEAVY DUTY
3100 PSI
ON/OFF SWITCH
IMPORTANT: S pray gun trap s high water pressur e, even
when engine is stopped and water is disconnected.
The high pressure stream of water that this
equipment produces can cut through skin and
its underlying tissues, leading to serious
injury and possible amputation. Spray gun
traps high water pressure, even when engine
is stopped and water is disconnected, which
can cause injury.
Operation
• Keep high pressure hose connec ted to pump and
spray gun while system is pressurized.
• ALWAYS point spray gun in safe direction, squeeze
spray gun trigger to release high pressure, every time
you stop engine. Engage trigger lock when not in use.
22 OneWASH™ Power Washer
Page 27

Section 6 Maintenance
6.1 — MAINTENANCE RECOMMENDATIONS
Regular maintenance will improve the performance and
extend the life of the power washer. See any qualified
dealer for service.
The power washer’s warranty does not cover items that
have been subjected to operator abuse o r negligence. To
receive full value from the warranty, the operator must
maintain the power washer as instructed in this manual,
including proper storage as detailed in “Winter Storage”
and “Long Term Storage”.
NOTE:
Should you have questions about replacing components on your power washer, please call
1-888-436-3722 for assistance.
Some adjustments will need to be made periodically to
properly maintain your power washer.
All service and adjustments should be made at least
once each season. Follow the requireme nts in the “Maintenance Schedule” chart.
NOTE:
Once a year you should clean or replace the spark
plug, clean or replace the air filter, and check the
spray gun and nozzle extension assembly for wear. A
new spark plug and clean air filter assure prop er fuelair mixture and help your engine run better and last
longer.
6.2 — MAINTENANCE SCHEDULE
Follow the hourly or calendar intervals, whichever occurs
first. More frequent service is required when operating in
adverse conditions.
First 5 Hours
Change engine oil
Every 8 Hours or Daily
Check/clean water inlet screen*
Check high pressure hose
Check detergent siphoning hose/filter
Check spray gun and assembly for leaks
Clean debris
Check engine oil level
Every 20 Hours or Every Season
Change engine oil**
Every 50 Hours or Every Season
Check/clean air cleaner filter**
Inspect muffler and spark arrester*
Every 100 Hours or Every Season
Service spark plug
* Clean if clogged. Replace if perforated or torn.
** Service more often under dirty or dusty conditions.
OneWASH™ Power Washer 23
Page 28
Maintenance
6.3 — PUMP OIL
DO NOT attempt any oil maintenance on this pump. The
pump is pre-lubricated and sealed from the factory,
requiring no additional maintenance for the life of the
pump.
6.4 — EMISSIONS CONTROL
Maintenance, replacement, or rep air of the emissions
control devices and systems may be performed by
any non-road engine repair establishment or individual. However, to obtain “no charge” emissions control
service, the work must be performed by a factory authorized dealer. See the Emissions Warranty.
6.5 — POWER DIAL SETTINGS
Tampering, maintenance, adjustment or replacement of
the throttle settings will impact the performance and may
void the warranty of the unit.
6.6 — POWER WASHER MAINTENANCE
6.6.1 — Clean Debris
Daily or before use, clean accumulated debris from
cleaning system. Keep linkage, spring and controls
clean. Keep area around and behind muffler free from
any combustible debris. Inspect cooling air slots and
openings on the power washer. These openings must be
kept clean and unobstructed.
Power washer parts should be kept clean to reduce the
risk of overheating and ignition of accumulated debris.
• Use a damp cloth to wipe exterior surfaces c lea n.
NOTE:
Improper treatment of power washer can damage it
and shorten its life.
• DO NOT insert any objects through cooling slots.
• Use a soft bristle brush to loosen caked on dirt, oil, etc.
• Use a vacuum cleaner to pick up loose dirt and debris.
6.7 — CHECK AND CLEAN INLET SCREEN
Examine the screen on the pump’s water inlet. Clean it if
the screen is clogged or replace it if screen is damaged.
6.8 — CHECK HIGH PRESSURE HOSES
The high pressure hoses can develop leaks from wear,
kinking, or abuse. Inspect the hoses each time before
using them. Check for cuts, leaks, abrasions or bulging of
cover, damage or movement of couplings. If any of these
conditions exist, replace the hose immediately.
The high pressure stream of water that this
equipment produces can cut through skin and
its underlying tissues, leading to serious
injury and possible amputation.
• NEVER repair high pressure hose. Replace it.
• Replacement hose rating MUST meet or exceed maximum pressure rating of unit.
6.9 — CHECK DETERGENT SIPHONING
UBE
T
Examine the filter on the detergent tube and clean if
clogged. The tube should fit tightly on the barbed fitting.
Examine the tube for leaks or tears. Replace the filter or
tube if either is damaged.
6.10 — CHECK SPRAY GUN
Examine the hose connection to the spray gun and make
sure it is secure. Test the trigger by pressing the trigg er , it
“springs back” into place when you release it. Replace
spray gun immediately if it fails to “spring back”.
6.11 — CHEMICAL TANK MAINTENANCE
Periodically you will need to drain and clean the chemical
tank.
Use the following these instructions:
1. Shut off engine and turn off water supply.
2. AL W A YS point spray g un in a safe direction, squeeze
spray gun trigger to release retained high water pressure.
3. Remove chemical fill cap and siphon hose
(Figure 6-1).
4. Obtain a container to drain the excess chemical into.
24 OneWASH™ Power Washer
Page 29
Maintenance
Figure 6-1. Chemical Cap/Siphon Hose
5. Place container under the chemical tank drain.
(Figure 6-2).
6. Remove drain cap and allow chemical to drain.
7. Insert garden hose into fill neck allow water to flush
out tank.
8. Once tank is clean re install drain cap with gasket, do
not over tighten.
The high pressure stream of water that this
equipment produces can cut through skin and
its underlying tissues, leading to serious
injury and possible amputation. Spray gun
traps high water pressure, even when engine
is stopped and water is disconnected, which
can cause injury.
• Keep high pressure hose connected to pump and
spray gun while system is pressurized.
• ALWAYS point spray gun in safe direction, and
squeeze spray gun trigger to release high pressure
every time you stop engine. Engage trigger lock when
not in use.
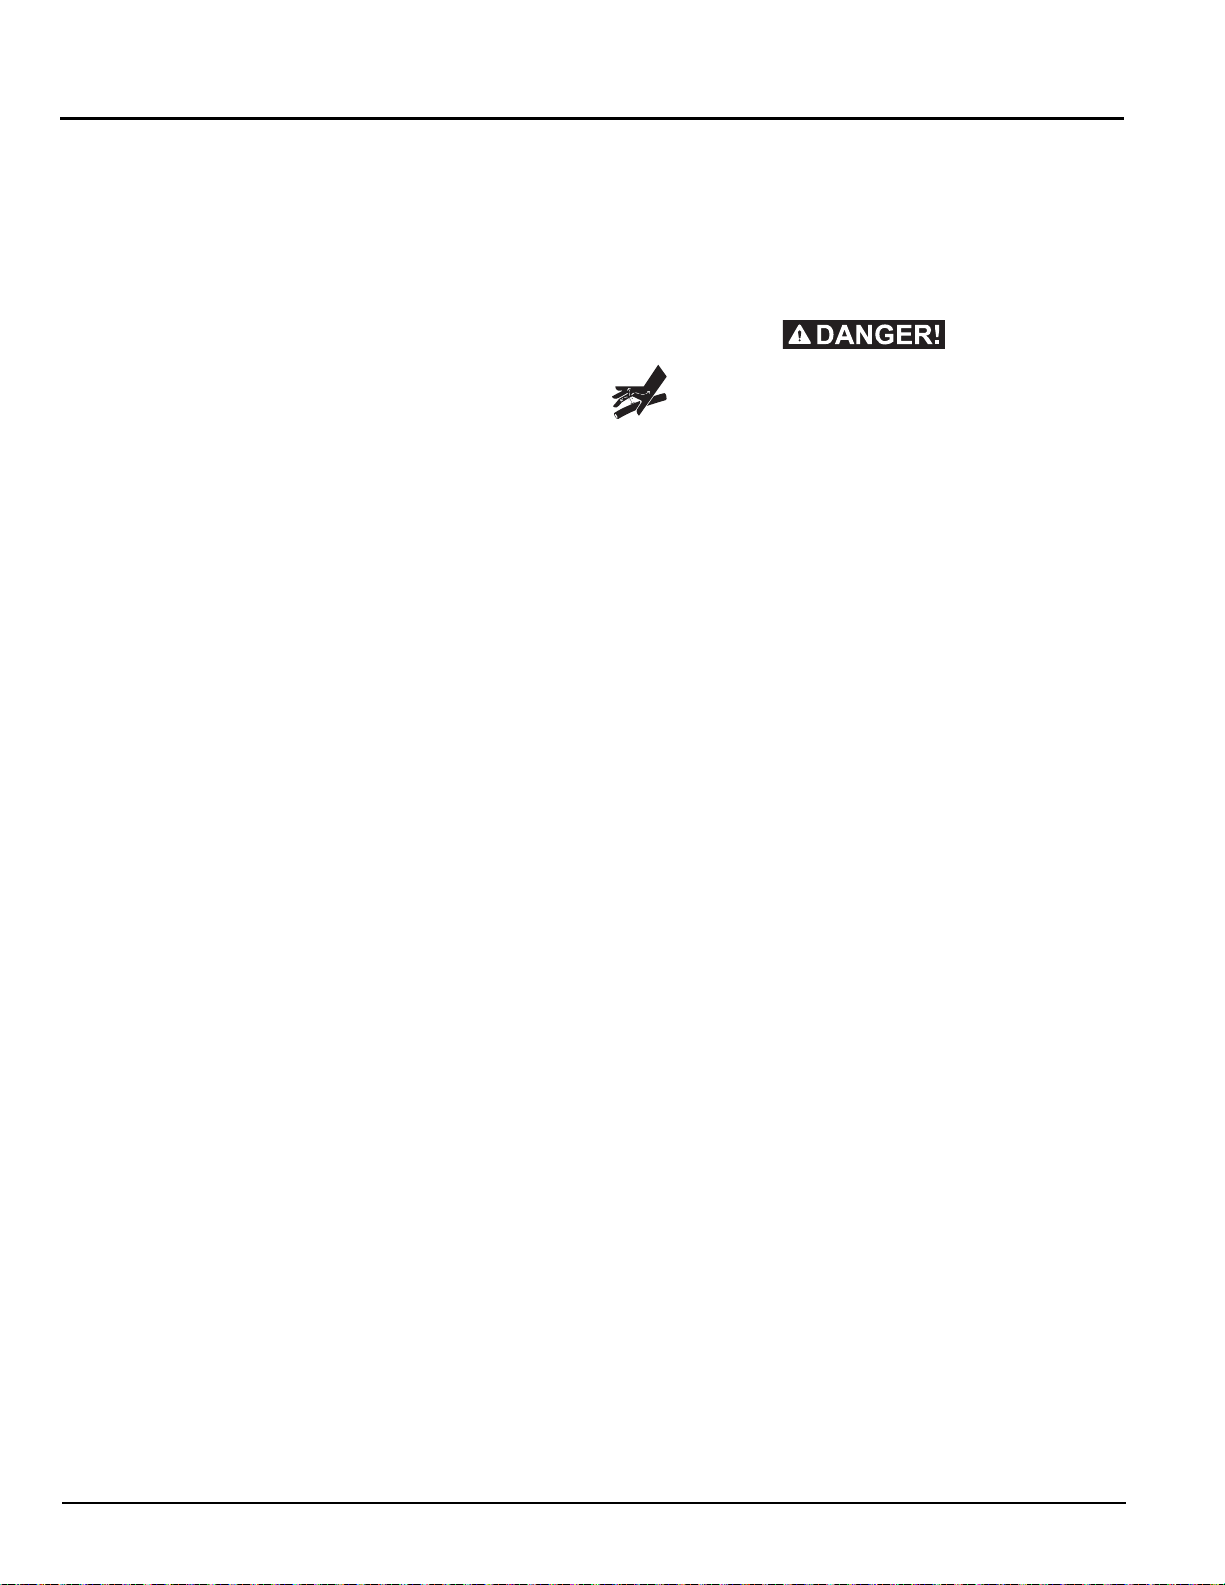
3. Remove nozzle from end of nozzle extension.
4. Use a small paper clip to free any foreign material
clogging or restricting nozzle (Figure 6-3).
5. Remove lance from spray gun.
Figure 6-3. Free Foreign Material
Figure 6-2. Chemical Drain Cap
6. Using a garden hose, remove additional debris by
back flushing water through lance (Figure 6-4). Back
flush between 30 to 60 seconds.
6.12 — NOZZLE MAINTENANCE
A pulsing sensation felt while squeezing the spray gun
trigger may be caused by excessive pump pressure. The
principal cause of excessive pump pressure is a nozzle
clogged or restricted with foreign materials, such as dirt,
etc. To correct the problem, immediately clean the nozzle
following these instructions:
1. Shut off engine and turn off water supply.
2. AL W A YS point spray gun in a safe direction, squeeze
spray gun trigger to release retained high water pressure.
OneWASH™ Power Washer 25
7. Reinstall nozzle into lance.
8. Reconnect lance to spray gun.
9. Make sure garden hose is connected to pump water
Figure 6-4. Back Flush Lance
inlet. Check that high pressure hose is connected to
spray gun and pump. Turn on water.
Page 30
Maintenance
SA E 30 *
10 W- 30 **
5W -3 0
Acceptable Oil
Level Range
10. Start engine following instructions “How to Start Your
Power Washer”.
11. Test power washer by operating with each quick connect nozzle.
6.13 — ENGINE MAINTENANCE
Unintentional sparking can result in fire
or electric shock.
WHEN ADJUSTING OR MAKING REPAIRS TO YOUR
POWER WASHER
• Disconnect the spark plug wire from the sp ark plug and
place the wire where it cannot contact sp ark plug.
WHEN TESTING FOR ENGINE SPARK
• Use approved spark plug tester.
• DO NOT check for spark with spark plug removed.
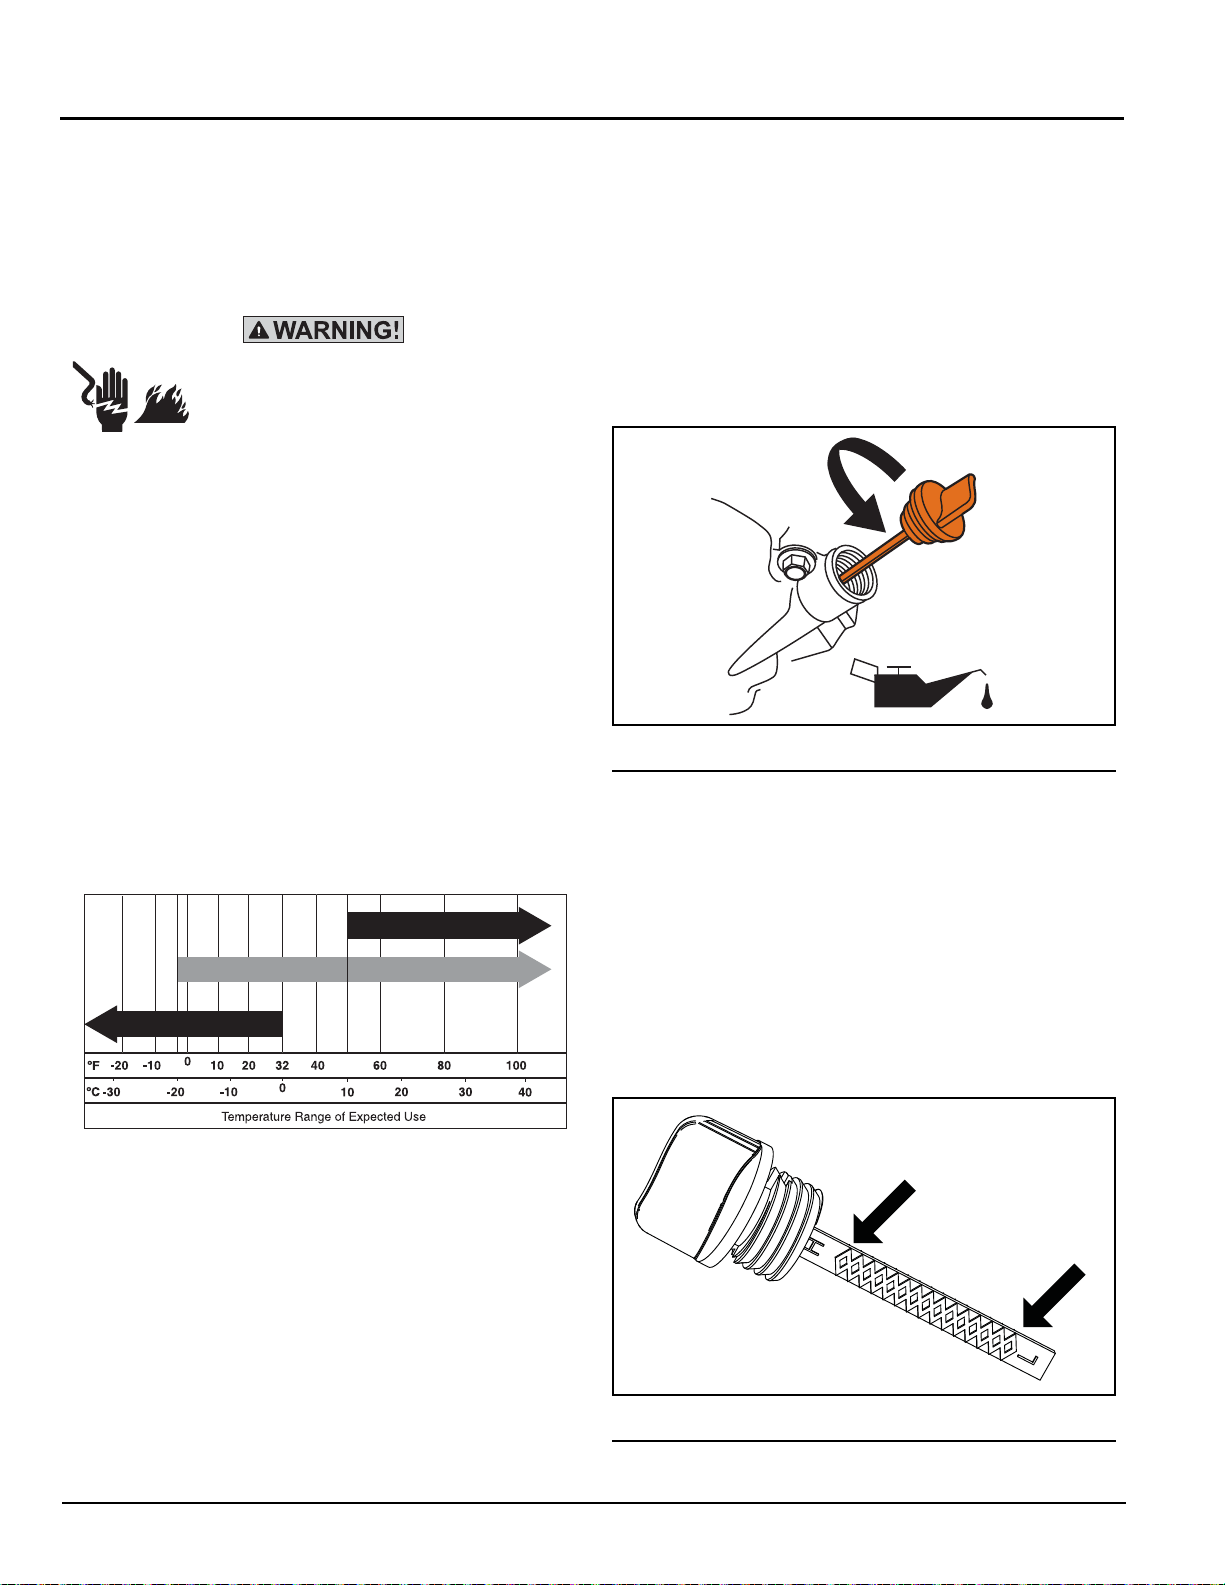
6.14 — ENGINE OIL RECOMMENDATIONS
We recommend the use of high-quality detergent oils
acceptable if classified for service SF, SG, SH, SJ or
higher. DO NOT use special additives.
Outdoor temperatures determine the proper oil viscosity
for the engine. Use the chart to select the best viscosity
for the outdoor temperature range expected.
SAE 30*
10W-30**
5W-30
6.14.1 — Check Oil Level
Oil level should be checked prior to each use or at least
every 8 hours of operation. Keep oil level maintained.
1. Make sure power washer is on a flat, level surface.
2. Clean area around oil fill and wipe dipstick clean
remove oil fill cap (Figure 6-5).
3. Verify oil is at the proper level on the dipstick.
4. Insert the dipstick into filler neck but do not screw it
in.
5. Replace and tighten oil fill cap.
Figure 6-5. Fill Engine Oil
6.14.2 — Adding Engine Oil
1. Make sure power washer is on a flat, level surface.
2. Check oil level as described in Checking Oil Level.
3. If needed, slowly pour oil into oil fill opening until the
proper level on the dipstick is reached.
4. Insert the dipstick into filler neck but do not screw it
in.
5. If level is low, fill until the oil level is between “L” and
“H” on the dipstick (Figure 6-6).
6. Replace and tighten oil fill cap.
* Below 50°F (10°C) the use of SAE 30 will result in hard start-
ing.
** Above 80°F (27°C) the use of 10W30 may cause increased
oil consumption. Check oil level more frequently.
NOTE:
Synthetic oil meeting ILSAC GF-2, API certification
mark and API service symbol with “SJ/CF ENERGY
CONSERVING” or higher, is an acceptable oil at all
temperatures. Use of synthetic oil do e s no t alte r
required oil change intervals.
26 OneWASH™ Power Washer
Figure 6-6. Dipstick
Page 31

Maintenance
A
Air Cleaner
Cover
Paper Filter
Element
Foam Filter
Element
Gasket
Wing Nut
Latch
6.14.3 — Changing Engine Oil
If you are using your power washer under extremely dirty
or dusty conditions, or in extremely hot weather, change
the oil more often.
Avoid prolonged or repea ted skin cont act with
used motor oil.
• Used motor oil has been shown to cause skin cancer in
certain laboratory animals.
• Thoroughly wash exposed areas with soap and water.
KEEP OUT OF REACH OF CHILDREN.
• Don’t pollute. Conserve resources. Return used oil to
collection centers.
Allow the engine to cool down and then change oil as follows:
1. Make sure power washer is on a flat, level surface.
2. Disconnect the spark plug wire from the spark plug
and place the wire where it cannot contact spark
plug.
3. Clean area around oil drain plug (A) (Figure 6-7). The
oil drain plug is located at base of engine, opposite
carburetor.
4. Remove oil fill cap (Figure 6-6).
5. Remove oil drain plug and drain oil completely into a
suitable container.
6. Reinstall oil drain plug and tighten securely.
7. Slowly pour oil (about 20 oz.) into oil fill opening to
the proper level on the dipstick. DO NOT overfill.
8. Reinstall oil fill cap. Finger tighten cap securely.
9. Wipe up any spilled oil.
10. Properly dispose of oil in an accordance with all local
regulations.
6.15 — SERVICE AIR CLEANER
Your engine will not run properly and may be damaged if
you run it with a dirty air cleaner. Service more often if
operating under dirty or dusty conditions.
To service the air cleaner, follow these step s:
1. Pull on air cleaner cover latch and remove cover
(Figure 6-8).
Figure 6-8. Service the Air Cleaner
2. Loosen wing nut.
3. Carefully remove filter assembly.
4. Remove foam filter.
5. To clean cartridge, gently tap on a flat surface.
6. Reinstall foam filter.
7. Reinstall clean or new cartridge assembly.
8. Reinstall wing nut and tighten.
9. Install cover by snapping latch closed.
Figure 6-7. Oil Drain Plug
OneWASH™ Power Washer 27
Page 32

6.16 — SERVICE SPARK PLUG
A
A
B
Changing the spark plug will help your engine to start
easier and run better.
1. Clean area around spark plug.
2. Remove and inspect spark plug (Figure 6-9).
3. Check electrode gap with wire feeler gauge and reset
spark plug gap to recommended gap if necessary
(see Specifications).
4. Replace spark plug if electrodes are pitted, burned or
porcelain is cracked. Use the recommended replacement plug. See Specifications.
5. Install spark plug and tighten firmly.
Maintenance
Figure 6-10. Remove Heat Shield
Figure 6-9. Change the Spark Plug
6.17 — INSPECT MUFFLER AND SPARK
RRESTER
A
Inspect the muffler for cracks, corrosion, or other damage. Remove the spark arrester, if equipped, and inspect
for damage or carbon blockage. If replacement parts are
required, make sure to use only original equipment
replacement parts.
6.17.1 — Remove Spark Arrester Screen
Tools Required: 8mm Box Wrench
1. Remove heat shield from the muffler by loosening
the four (4) Bolts (A) (Figure 6-10).
2. Remove the spark arrester from the muffler by loosening the two (2) Bolts (B) (Figure 6-11).
3. Inspect the spark arrester, replace if torn, perforated
or otherwise damaged (part number 0K1851). DO
NOT USE A DEFECTIVE SCREEN.
4. If screen is not damaged, clean it with a commercial
solvent and replace.
Figure 6-11. Remove Spark Arrester
Contact with muffler area can result in
serious burns. Exhaust heat/gases can
ignite combustibles, structures or damage fuel tank causing a fire.
• DO NOT touch hot parts and AVOID hot exhaust
gases.
• Allow equipment to cool before touching.
• Keep at least 5 feet (152 cm) of clearance on all sides
of power washer including overhead.
28 OneWASH™ Power Washer
Page 33

Maintenance
• It is a violation of California Public Resource Code,
Section 4442, to use or operate the engine on any forest-covered, brush-covered, or grass-covered land
unless the exhaust system is equipped with a spark
arrester, as defined in Section 4442, maintained in
effective working order. Other states or federal jurisdictions may have similar laws. Contact the original equipment manufacturer, retailer, or dealer to obtain a spark
arrester designed for the exhaust system installed on
this engine.
• Replacement parts must be the same and installed in
the same position as the original parts.
6.18 — AFTER EACH USE
Water should not remain in the unit for long periods of
time. Sediments or minerals can deposit on pump parts
and freeze pump action. Follow these procedures after
every use:
1. Shut off engine, turn off water supply, point gun in a
safe direction, and squeeze trigger to relieve trapped
pressure, and let engine cool.
The high pressure stream of water that this
equipment produces can cut through skin and
its underlying tissues, leading to serious
injury and possible amputation. Spray gun
traps high water pressure, even when engine
is stopped and water is disconnected, which
can cause injury.
• Keep high pressure hose connec ted to pump and
spray gun while system is pressurized.
• AL WAYS point spray gun in safe direction and squeeze
spray gun trigger, to release high pressure, every time
you stop engine. Engage trigger lock when not in use.
2. Disconnect hoses from spray gun and high pressure
outlet on pump. Drain water from hoses, spray gun,
and lance. Use a rag to wipe off the hose.
3. Empty pump of all pumped liquids. Check that the
engine ON/OFF switch is in the OFF position. Then
pull the recoil handle about six times. This should
remove most liquid in pump.
4. Store unit in a clea n, dry area.
5. If storing for more than 30 days, see the “Long Term
Storage ” on page 29.
WHEN STORING FUEL OR EQUIPMENT WITH FUEL
IN TANK
• Store away from furnaces, stoves, water heaters,
clothes dryers, or other appliances that have pilot light
or other ignition source because they can ignite fuel
vapors.
Fuel and its vapors are extremely flammable and explosive. Fire or explosion
can cause severe burns or death.
WHEN STORING FUEL OR EQUIPMENT WITH FUEL
IN TANK
• Store away from furnaces, stoves, water heaters,
clothes dryers, or other appliances that have pilot light
or other ignition source because they can ignite fuel
vapors.
6.19 — WINTER STORAGE
NOTE:
You must protect your unit from freezing temperatures.
• Failure to do so will permanently damage your pump
and render your unit inoperable.
• Freeze damage is not covered under warranty.
To protect the unit from freezing temperatures:
1. Follow steps 1-3 in the previous section “After Each
Use”.
2. Use pump saver to treat pump. This minimizes
freeze damage and lubricates pistons and seals .
3. If pump saver is not available, connect a 3-foot sec-
tion of garden hose to water inlet adapter. Pour RVantifreeze (antifreeze without alcohol) into hose. Pull
recoil handle twice. Disconnect 3-foot hose.
4. Store unit in a clean, d ry area.
6.20 — LONG TERM STORAGE
If you do not plan to use the power washer for more than
30 days, you must prepare the engine and pum p for lo ng
term storage.
Fuel and its vapors are extremely flammable and explosive. Fire or explosion
can cause severe burns or death.
OneWASH™ Power Washer 29
Page 34

Maintenance
6.20.1 — Protect Fuel System
Fuel can become stale when stored over 30 days. Stale
fuel causes acid and gum deposits to form in the fuel system or on essential carburetor parts. To keep fuel fresh,
use a fuel stabilizer, available as a liquid additive or a drip
concentrate cartridge.
There is no need to drain gasoline from the engine if a
fuel stabilizer is added according to instructions. Run the
engine for 2 minutes to circulate the stabilizer throughout
the fuel system. The engine and fuel can then be stored
up to 24 months.
If gasoline in the engine has not been treated with a fuel
stabilizer, it must be drained into an approved container.
Run the engine until it stops from lack of fuel. The use of
a fuel stabilizer in the storage container is recommended
to maintain freshness.
Hearing Protection Recommended.
6.20.2 — Protect Engine
1. Change engine oil.
2. Remove spark plug.
3. Pour a tablespoon (5-10 cc) of clean engine oil into
the cylinder.
4. Pull the starter rope several times to distribute the oil
in the cylinder.
5. Reinstall the spark plug.
6. Pull the starter rope slowly until resistance is felt.
This will close the valves so moisture cannot enter
the engine cylinder. Return the starter rope gently.
• Freeze damage is not covered under warranty.
To protect the unit from freezing temperatures:
1. Follow steps 1-3 in the previous section “After Each
Use” on page 29.
2. Use pump saver to treat pump. This minimizes
freeze damage and lubricates pistons and seals .
3. If pump saver is not available, connect a 3-foot section of garden hose to water inlet adapter. Pour RVantifreeze (antifreeze without alcohol) into hose. Pull
recoil handle twice. Disconnect 3-foot hose.
4. Store unit in a clean, d ry area.
6.21 — OTHER STORAGE INSTRUCTIONS
1. DO NOT store fuel from one season to another
unless it has been treated as described in Protect
Fuel System.
2. Replace fuel container if it starts to rust. Rust and/or
dirt in fuel can cause problems if it’s used with this
unit.
3. Cover unit with a suitable protective cover that does
not retain moisture.
Storage covers can be flammable.
• DO NOT place a storage cover over a hot power
washer.
• Let equipment cool for a sufficient time before placing
the cover on the equipment.
4. Store unit in a clean and dry area.
6.20.3 — Change Oil
Allow the engine to cool down and then drain oil from
crankcase. Refill with recommended grade. See “Changing Engine Oil” on page 27.
Hot oil may cause burns. Allow engine to cool
before draining oil. Avoid prolonged or
repeated skin exposure with used oil. Thoroughly wash exposed areas with soap.
6.22 — TRANSPORTING/TIPPING OF THE
NIT
U
Do not operate, store or transport the unit at an angle
greater than 15 degrees.
6.20.4 — Protecting the Pump
To protect the pump from damage caused by mineral
deposits or freezing, use PumpSaver or RV-antifreeze to
treat the pump. This prevents freeze damage and lubricates pistons and seals.
• Failure to do so will permanently damage your pump
and render your unit inoperable.
30 OneWASH™ Power Washer
Page 35

Section 7 Troubleshooting
7.1 — TROUBLESHOOTING GUIDE
PROBLEM CAUSE CORRECTION
Detergent fails to mix with
spray.
Engine runs well at no-load
but bogs when load is
added.
Engine will not start; or
starts and runs rough.
Engine shuts down during
operation.
1. Detergent siphoning tube is not
submerged.
2. Detergent siphoning tube/filter is clogged
or cracked.
3. High pressure nozzle installed.
1. Engine speed is too slow. 1. Contact a local service facility to adjust throttle
1. Dirty air cleaner.
2. Out of fuel.
3. Stale fuel.
4. Spark plug wire not connected to spark
plug.
5. Bad spark plug.
6. Water in fuel.
7. Excessively rich fuel mixture.
1. Out of fuel. 1. Fill fuel tank.
1. Insert detergent siphoning tube into detergent.
2. Clean or replace fil ter/detergent siphoning
tube.
3. Replace with low pressure nozzle.
mechanism.
1. Clean or replace air cleaner.
2. Fill fuel tank.
3. Drain fuel tank; fill with fresh fuel.
4. Connect wire to spark plug.
5. Replace spark plug.
6. Drain fuel tank; fill with fresh fuel.
7. Contact local service facility.
Engine lacks power. 1. Dirty air filter. 1. Replace air filter.
OneWASH™ Power Washer 31
Page 36

Part No. 0K6212 Rev B 02/12/14 © Generac Power Systems, Inc. All rights reserved Specifications are subject to change without notice. No reproduction allowed in any form without prior written consent from Generac Power Systems, Inc.
Generac Power Systems, Inc.
S45 W29290 Hwy. 59
Waukesha, WI 53189
1-888-GENERAC (1-888-436-3722)
generac.com
Page 37

*Construido en EE. UU. usando
piezas locales y extranjeras
Manual del operador
Hidrolavadora OneWASH™
www.generac.com o 1-888-436-3722
Page 38

¡ADVERTENCIA!
Proposición 65 de California
¡ADVERTENCIA!
Proposición 65 de California
El escape del motor y algunos de sus componentes son conocidos por el estado de California como
causantes de cáncer, defectos congénitos y otros daños reproductivos.
Este producto contiene o emite sustancias químicas que son conocidas por el estado de California
como causantes de cáncer, defectos congénitos y otros daños reproductivos.
ii
Page 39

Índice
Sección 1 - Introducción ........................................... 1
1.1 Introducción ......................................................... 1
Sección 2 - Seguridad ............................................... 3
2.1 Reglas de seguridad ............................................ 3
Sección 3 - Información general............................... 7
3.1 Conozca su hidrolavadora ................................... 7
3.2 Especificaciones del producto ............................. 8
3.3 Información sobre emisiones ............................... 8
3.4 Funcionamiento a gran altitud.............................. 8
Sección 4 - Configuración...................................... 11
4.1 Armado .............................................................. 11
4.2 Cómo añadir aceite de motor............................. 12
4.3 Combustible ....................................................... 13
4.4 Conexión de la manguera y suministro
de agua a la bomba ........................................... 13
4.5 Cómo usar las boquillas..................................... 15
Sección 5 - Operación ............................................. 19
5.1 Operación .......................................................... 19
5.2 Ubicación de la hidrolavadora............................ 19
5.3 Lista de comprobación antes de dar arranque al
motor 19
5.4 Cómo poner en marcha su hidrolavadora.......... 19
5.5 Sistema de enfriamiento automático
(Alivio térmico) ...................................................21
5.6 Cómo parar su hidrolavadora ............................ 21
Sección 6 - Mantenimiento...................................... 23
6.1 Recomendaciones de mantenimiento ............... 23
6.4 Control de emisiones ......................................... 24
6.5 Ajustes del cuadrante de potencia..................... 24
6.6 Mantenimiento de la hidrolavadora.................... 24
6.7 Comprobación y limpieza de la rejilla
de entrada .......................................................... 24
6.9 Comprobación del tubo para sifón
de detergente ..................................................... 24
6.10 Comprobación de la pistola de pulverización .... 24
6.11 Mantenimiento del tanque para sustancias
químicas ............................................................ 24
6.12 Mantenimiento de la boquilla ............................. 25
6.13 Mantenimiento del motor ................................... 26
6.14 Recomendaciones sobre el aceite de motor ..... 26
6.15 Servicio del filtro de aire .................................... 27
6.16 Servicio de la bujía ............................................ 28
6.17 Inspección del silenciador y el supresor
de chispas .......................................................... 28
6.18 Después de cada uso ........................................ 29
6.19 Almacenamiento en el invierno.......................... 29
6.20 Almacenamiento a largo plazo .......................... 29
6.21 Otras instrucciones de almacenamiento............ 30
6.22 Transporte e inclinación de la unidad ................ 30
Sección 7 - Resolución de problemas ................... 31
7.1 Guía de resolución de problemas...................... 31
iii
Page 40

Esta página se ha dejado en blanco intencionalmente.
iv
Page 41

Sección 1 Introducción
1.1 — INTRODUCCIÓN
Muchas gracias por haber comprado esta hidrolavadora
fabricada por Generac Power Systems, Inc. Este modelo es
una hidrolavadora accionada por motor, de alto
rendimiento, enfriada por aire, que funciona a 3100 psi. Las
unidades presentan ruedas de diseño personalizado,
bomba de cámara axial con pistones de acero inoxidable,
sistema de enfriamiento automático, boquillas de conexión
rápida, manguera de alta presión, manguera de sifón para
detergente y tanque para sustancias químicas.
El sentido común y el cumplimiento estricto de las
instrucciones especiales son esenciales para la
prevención de accidentes. El operador debe leer
completamente este manual y comprender completamente
todas las instrucciones y advertencias antes de usar el
equipo. Si una parte del manual no se comprende,
comuníquese con el concesionario autorizado más cercano
para conocer los procedimientos de arranque,
funcionamiento y mantenimiento. El propietario es
responsable del uso correcto y seguro del equipo.
La hidrolavadora puede funcionar de manera segura,
eficiente y fiable solo si se ubica, opera y mantiene
correctamente. Antes de operar, dar servicio o almacenar:
• Estudie minuciosamente todas las advertencias
indicadas en este manual y en el producto.
• Familiarícese con este manual y la unidad antes del uso.
• Consulte la sección Armado del manual para las
instrucciones sobre los procedimientos de armado
finales. Siga las instrucciones completamente.
El fabricante no puede prever todas las circunstancias
posibles que podrían involucrar un peligro. Las
advertencias de este manual y los rótulos y etiquetas
adhesivas fijados en la unidad, por lo tanto, no son
exhaustivos. Si usa un procedimiento, método de trabajo o
técnica de funcionamiento que el fabricante no recomienda
específicamente, asegúrese de que sea seguro para otras
personas. Asegúrese también de que el procedimiento,
método de trabajo o técnica de funcionamiento utilizado no
vuelvan insegura a la hidrolavadora.
LA INFORMACIÓN QUE FIGURA AQUÍ SE BASÓ EN
MÁQUINAS QUE ESTABAN EN PRODUCCIÓN EN EL
MOMENTO DE PUBLICACIÓN. GENERAC SE RESERVA
EL DERECHO DE MODIFICAR ESTE MANUAL EN
CUALQUIER MOMENTO.
Guarde estas instrucciones para referencia en el futuro.
Si facilita este equipo a alguien, SIEMPRE facilítele
también estas instrucciones Y el Manual del
propietario.
1.1.1 — Dónde encontrarnos
Puede ponerse en contacto con Servicio al cliente de
Generac por teléfono al 1-888-436-3722 o en Internet en
www.generac.com. Registre la información importante de la
unidad en la tabla siguiente para referencias y/o consultas
sobre servicio en el futuro.
Número de
modelo
Número de serie
Fecha de
compra
Hidrolavadora OneWASH™ 1
Page 42

Esta página se ha dejado en blanco intencionalmente.
Introducción
2 Hidrolavadora OneWASH™
Page 43

¡PELIGRO!
¡ADVERTENCIA!
¡PRECAUCIÓN!
¡PELIGRO!
ContragolpeEmanaciones tóxicas Choque eléctrico
Inyección de fluidoCaída
Incendio Explosión Manual del operador
Superficie resbaladiza
Piezas en movimiento Objetos despedidos Superficie caliente
Protectores de oídos
Sección 2 Seguridad
2.1 — REGLAS DE SEGURIDAD
En toda esta publicación, en los rótulos y en las etiquetas
adhesivas fijadas en la hidrolavadora, los bloques de
PELIGRO, ADVERTENCIA, PRECAUCIÓN y NOTA se
usan para alertar al personal sobre instrucciones
especiales acerca de una operación en particular que
puede ser peligrosa si se efectúa de manera incorrecta o
imprudente. Obsérvelos cuidadosamente. Sus
definiciones son las siguientes:
Indica una situación o acción peligrosa que, si no se
evita, ocasionará la muerte o lesiones graves.
Indica una situación o acción peligrosa que, si no se
evita, podrá ocasionar la muerte o lesiones graves.
Indica una situación o acción peligrosa que, si no se
evita, podría ocasionar lesiones leves o moderadas.
NOTA:
Las notas contienen información adicional
importante para un procedimiento y se encuentran
dentro del texto del cuerpo de este manual.
Estas advertencias de seguridad no pueden eliminar los
peligros que indican. El sentido común y el cumplimiento
estricto de las instrucciones especiales mientras se
desarrolla la acción o el servicio son esenciales para la
prevención de accidentes. Símbolos de seguridad y sus
significados.
2.1.1 — Peligros del escape
El monóxido de carbono producido durante el
uso puede matar en minutos. NUNCA la use en
interiores, en un vehiculo o en otras zonas
techadas, AÚN SI las puertas y ventanas están
abiertas. Úsela únicamente en EXTERIORES, y
alejada de ventanas, puertas y ventilaciones.
Hidrolavadora OneWASH™ 3
Algunas sustancias químicas o detergentes
pueden ser dañinos si se inhalan o ingieren,
causando graves náuseas, desvanecimiento o
envenenamiento.
• Haga funcionar la hidrolavadora SOLO en exteriores.
• Un motor funcionando despide monóxido de carbono.
• El monóxido de carbono es un gas inodoro, incoloro y
venenoso. Respirar monóxido de carbono puede causar
dolor de cabeza, fatiga, mareo, vómitos, confusión,
calambres, náuseas, desvanecimiento o la muerte. Si
comienza a experimentar cualquiera de estos síntomas,
trasládese INMEDIATAMENTE al aire fresco. Busque
atención médica.
Page 44

Seguridad
¡PELIGRO!
¡ADVERTENCIA!
¡ADVERTENCIA!
• Impida que los gases de escape ingresen en una zona
confinada a través de ventanas, puertas, entradas de
ventilación y otras aberturas. Advierta a todos los
ocupantes en el interior acerca de los síntomas de
monóxido de carbono de manera que sepan lo de
trasladarse al aire fresco si comienzan a sentirse
enfermos.
• Se recomienda el uso de un detector de monóxido de
carbono dentro de cualquier local ocupado entre la
hidrolavadora y el ocupante.
• NUNCA arranque o haga funcionar el motor en interiores,
en un vehiculo, o en una zona cerrada, aún si las
ventanas y puertas están abiertas.
• Use un respirador o máscara siempre que haya una
posibilidad de gases o vapores dañinos puedan ser
inhalados.
• Lea todas las instrucciones sobre respirador o máscara,
de manera de tener la certeza de que el respirador o la
máscara proporcionan la protección necesaria contra la
inhalación de gases o vapores dañinos. Si comienza a
experimentar cualquiera de los síntomas de CO listados
precedentemente, trasládese INMEDIATAMENTE al aire
fresco.
2.1.2 — Peligro de inyección de fluido
NUNCA apunte la pistola de pulverización a
personas, animales, o dispositivos eléctricos.
Se producirán lesiones graves o la muerte.
SIEMPRE apunte la pistola de pulverización
hacia una dirección segura y apriete el gatillo de
la pistola de pulverización para liberar alta
presión cada vez que pare el motor. Coloque el
seguro de gatillo cuando la pistola de
pulverización no esté en uso.
• El chorro de agua a alta presión que produce este equipo
puede atravesar la piel y sus tejidos subyacentes, lo que
conduce a lesiones graves, posible amputación o la
muerte. La pistola de pulverización atrapa agua a alta
presión, aunque el motor esté parado y el agua
desconectada, lo que puede causar lesiones.
• NUNCA permita que los NIÑOS accionen la
hidrolavadora o jueguen en las proximidades. Esto NO es
un juguete.
• NUNCA repare la manguera de alta presión. Sustitúyala.
• NUNCA repare conexiones con fugas con un sellador de
cualquier tipo. Sustituya la junta tórica o junta.
• NUNCA conecte la manguera de alta presión a la
extensión de la boquilla.
• Mantenga la manguera de alta presión conectada a la
bomba y pistola de pulverización mientras el sistema está
presurizado.
• NUNCA fije la pistola de pulverización en posición
abierta.
• NUNCA deje la pistola de pulverización sin atención
mientras la máquina está funcionando.
• NUNCA use una pistola de pulverización que no tenga
un seguro de gatillo u una protección de gatillo en su
lugar y en buenas condiciones de trabajo.
• Siempre cerciórese de que la pistola de pulverización,
boquillas y accesorios estén fijados correctamente.
2.1.3 — Peligro de choque eléctrico
Riesgo de electrocución.
El contacto con una fuente de alimentación
puede causar choque eléctrico o
quemaduras.
• NUNCA pulverice cerca de una fuente de
alimentación.
2.1.4 — Peligro de superficies calientes
El contacto con la zona del silenciador
puede causar quemaduras graves. El
calor y los gases de escape pueden
encender combustibles y estructuras o
dañar el tanque de combustible,
causando un incendio.
• NO toque piezas calientes y EVITE los gases de
escape calientes.
• Permita que el equipo se enfríe antes de tocarlo.
• Mantenga por lo menos cinco (5) pies (152 cm) de
separación en todos los costados de la hidrolavadora,
incluso hacia arriba.
• Es una violación al Public Resources Code (Código de
recursos públicos de California), Sección 4442, usar u
operar el motor en tierras cubiertas de bosque, maleza
o pasto excepto si el sistema de escape tiene un
supresor de chispas, como se define en la
Sección 4442, mantenido en condiciones de trabajo
eficaces. Otros estados o jurisdicciones federales
pueden tener leyes similares. Tome contacto con el
fabricante, minorista o concesionario de equipo
original para obtener un supresor de chispas diseñado
para el sistema de escape instalado en este motor.
• Las piezas de repuesto deben ser las mismas y estar
instaladas en la misma posición que las piezas
originales.
4 Hidrolavadora OneWASH™
Page 45

Seguridad
¡ADVERTENCIA!
¡ADVERTENCIA!
¡ADVERTENCIA!
¡ADVERTENCIA!
¡ADVERTENCIA!
2.1.5 — Peligros de incendio
El combustible y sus vapores son
extremadamente inflamables y
explosivos. Los incendios y explosiones
pueden causar quemaduras graves o la
muerte.
AL AÑADIR O VACIAR COMBUSTIBLE
• Coloque la hidrolavadora en OFF y déjela enfriar dos
(2) minutos como mínimo antes de retirar la tapa de
combustible. Afloje la tapa lentamente para aliviar
presión en el tanque.
• Llene o vacíe el tanque de combustible en exteriores.
• NO llene el tanque en exceso. Deje espacio para la
expansión del combustible.
• Si se derrama combustible, espere hasta que se
evapore antes de dar arranque al motor.
• Mantenga el combustible alejado de llamas, luces
piloto, calor y otras fuentes de encendido.
• NO encienda un cigarrillo ni fume.
AL ARRANCAR EL EQUIPO
• Asegúrese de que la bujía, silenciador, tapa de
combustible y filtro de aire estén en su lugar.
• NO haga girar el motor con la bujía retirada.
AL OPERAR EL EQUIPO
• NO incline el motor o el equipo con un ángulo que
cause el derrame de combustible.
• NO pulverice líquidos inflamables.
AL TRANSPORTAR O REPARAR EL EQUIPO
• Transporte/reparación con el tanque de combustible
VACÍO.
• Desconecte el cable de la bujía.
AL ALMACENAR COMBUSTIBLE O EQUIPOS CON
COMBUSTIBLE EN EL TANQUE
• Almacene alejado de hornos, estufas, calentadores de
agua, secadores de ropa u otros artefactos que tengan
luces piloto u otras fuentes de encendido porque
pueden encender los vapores de combustible.
2.1.6 — Peligro de protección de oídos
Recomendamos usar protectores de oídos.
2.1.7 — Peligro de caída
El uso de la hidrolavadora puede crear
charcos y superficies resbaladizas. El
contragolpe de la pistola de
pulverización puede hacerlo caer.
• Úsela solo en una superficie a nivel.
• La zona de limpieza debe tener pendientes y vaciados
adecuados para reducir la posibilidad de caídas debido a
superficies resbaladizas.
• No la use en superficies elevadas donde la posibilidad de
contragolpe puede causar una caída grave.
• Tome firmemente la pistola de pulverización con ambas
manos al usar pulverización de alta presión para evitar
lesiones cuando la pistola de pulverización retroceda.
2.1.8 — Peligro de piezas en movimiento
El arrancador y otras piezas giratorias pueden
atrapar las manos, cabello, ropa o accesorios.
• NUNCA haga funcionar la hidrolavadora sin carcasa o
cubiertas protectoras.
• NO use ropa suelta, alhajas o algo que pueda ser
atrapado en el arrancador u otras piezas giratorias.
• Recoja el cabello suelto y retire las alhajas.
2.1.9 — Peligro de contragolpe
El contragolpe de la cuerda del arrancador
(retracción rápida) puede producir lesiones. El
contragolpe tirará de la mano y el brazo hacia
el motor más rápido de lo que puede soltarla.
Puede dar por resultado huesos rotos,
fracturas, magulladuras o esguinces.
• NUNCA tire de la cuerda del arrancador sin aliviar
primero la presión de la pistola de pulverización.
• Para aliviar la presión atrapada, apunte la pistola hacia
una dirección segura y libere la presión tirando/
accionando el gatillo de la pistola de pulverización.
• Al arrancar el motor, tire lentamente de la cuerda hasta
que sienta resistencia y luego tire rápidamente para evitar
el contragolpe.
• Después de cada intento de arranque en el que el motor
falló en arrancar, siempre apunte la pistola hacia una
dirección segura y apriete el gatillo de la pistola de
pulverización para liberar alta presión.
• Tome firmemente la pistola de pulverización con ambas
manos al usar pulverización de alta presión para evitar
lesiones cuando la pistola de pulverización retroceda.
Hidrolavadora OneWASH™ 5
Page 46

Seguridad
¡ADVERTENCIA!
¡ADVERTENCIA!
2.1.10 — Peligro de chispas
Producir chispas en forma no
intencional puede dar por resultado
incendio o choque eléctrico.
AL AJUSTAR O HACER
REPARACIONES EN SU
HIDROLAVADORA.
• Desconecte el cable de la bujía y coloque el cable donde
no pueda hacer contacto con la bujía.
AL PROBAR LA CHISPA DEL MOTOR
• Use un probador de bujías aprobado.
• NO compruebe la chispa con la bujía retirada.
2.1.11 — Riesgo de salpicadura
Riesgo de lesión ocular. La pulverización
puede salpicar hacia atrás o propulsar objetos.
• Siempre use gafas de seguridad cuando use este equipo
o en la vecindad de un equipo en uso.
• Antes de poner en marcha la hidrolavadora, asegúrese
de estar usando gafas de seguridad adecuadas.
• NUNCA sustituya gafas de seguridad con lentes de
seguridad.
NOTA:
La pulverización de alta presión puede dañar los
artículos frágiles, incluso el cristal.
• NO apunte la pistola de pulverización a cristales cuando
use la boquilla roja (0°) MÁX.
• NUNCA apunte la pistola de pulverización a personas,
animales, dispositivos eléctricos o plantas.
NOTA:
El tratamiento incorrecto de la hidrolavadora puede
dañarla y acortar su vida útil.
• Si tiene preguntas acerca del uso previsto, pregunte a su
concesionario o comuníquese con un centro de servicio
calificado.
• NUNCA haga funcionar esta máquina con piezas rotas o
faltantes o sin la carcasa o cubiertas protectoras.
• NO pase por alto ningún dispositivo de seguridad de esta
máquina.
• NO haga funcionar la hidrolavadora por arriba de la
presión nominal.
• NO modifique la hidrolavadora de ninguna manera.
• Antes de dar arranque a la hidrolavadora en clima frío,
compruebe todas las piezas del equipo para asegurar
que no se haya formado hielo allí.
• NUNCA mueva la máquina tirando de las mangueras.
Use el asa provista con la unidad.
• Compruebe el sistema de combustible en busca de fugas
o señales de deterioro como mangueras con rozaduras o
esponjosas, abrazaderas flojas o faltantes, o tanque o
tapa dañados. Corrija todos los defectos antes de hacer
funcionar a la hidrolavadora.
• Este equipo está diseñado para ser usado SOLO con
piezas autorizadas por Generac. Si el equipo se usa con
piezas que NO cumplan las especificaciones mínimas, el
usuario asume todos los riesgos y responsabilidades.
6 Hidrolavadora OneWASH™
Page 47

I
U
O
Q
P
S
D
R
S
W
V
F
H
B
A
Sección 3 Información general
3.1 — CONOZCA SU HIDROLAVADORA
Lea este Manual del propietario y reglas de seguridad antes
de operar su hidrolavadora. Si facilita este equipo a alguien,
SIEMPRE facilite al individuo también estas instrucciones Y
el Manual del propietario. Compare las ilustraciones con su
hidrolavadora para familiarizarse a sí mismo con las
ubicaciones de los diferentes controles (Figura 3-1). Guarde
este manual para referencia en el futuro. Los manuales del
propietario de repuesto se pueden imprimir en el sito Web de
Generac.
A - Pistola de pulverización - Controla la aplicación de
agua sobre la superficie a limpiar con un dispositivo de
gatillo. Incluye un seguro de gatillo.
B - Lanza con conexión rápida - Le permite cambiar entre
las diferentes boquillas.
C - Manguera de alta presión - Conecte un extremo a la
bomba de agua y el otro a la pistola de pulverización.
D - Arrancador con cuerda - Se usa para dar arranque al
motor.
E - Llenado de aceite - Compruebe y añada aceite al
motor.
F - Filtro de aire - Protege el motor filtrando polvo y
residuos del aire de admisión.
G-Bomba - Desarrolla alta presión.
H - Válvula de alivio térmico - Hace recircular el agua a
través de la bomba cuando el agua llega a la
temperatura de 125 °F. El agua caliente se descargará
de la bomba al suelo. Esto evita daños internos de la
bomba.
I - Interruptor de motor ON/OFF - Ponga este interruptor
en “ON”antes de usar el arrancador con cuerda.
Coloque este interruptor en “OFF”para parar el motor.
J - Válvula de descarga - Controla la salida de alta
presión.
K - Salida de alta presión - Conexión para la manguera de
alta presión.
L - Entrada de agua - Conexión para la manguera de
jardín.
M - Tanque de combustible - Llene el tanque con
combustible normal sin plomo. Siempre deje lugar para
la expansión del combustible.
O-Cebador - Prepara un motor frío para el arranque.
P - Cuadrante de potencia - Proporciona potencia de
limpieza óptima para cada aplicación deseada.
Q -Boquillas - Inyección de sustancias químicas, chorro
(0°), lavado (25°), detergente para varias aplicaciones
de limpieza a alta presión.
R - Tanque para sustancias químicas - Un tanque que se
puede vaciar, usado para contener los detergentes
seguros para la hidrolavadora para ser introducidos por
efecto sifón en la corriente de agua a baja presión.
S - Instrucción de preparación y arranque - Identifica el
procedimiento correcto para configurar y dar arranque/
parar la hidrolavadora.
T - Tapón de vaciado - Se usa para vaciar el aceite del
motor.
U - Ubicación del número de serie
V -Tapa de llenado del tanque para sustancias
químicas
W - Tapón de vaciado del tanque de sustancias
químicas
Hidrolavadora OneWASH™ 7
Figura 3-1. Características y controles
Page 48

Información general
3.1.1 — ÍTEMS NO MOSTRADOS
Etiqueta de identificación (en el alojamiento del
ventilador del motor) - Proporciona el número de
modelo y número de serie de la hidrolavadora. Tenga
éstos disponibles a mano si llama para obtener ayuda.
Tubo/filtro para sifón de detergente - Usado para
introducir los detergentes seguros para la hidrolavadora
por efecto de sifón en la corriente de baja presión.
3.2 — ESPECIFICACIONES DEL PRODUCTO
Presión - (psi/bar) ...........................................3100/213 máx.
Caudal - (gal./min - l/min) .................................2.8/10.6 máx.
Temperatura de suministro de agua - (°F/C°)....100/38 máx.
Largo de la manguera - (pies/m).................................. 30/9.1
Tanque(s) para sustancias químicas -
Cantidad por unidad ............................................................. 1
Tanque para sustancias químicas -
Capacidad (gal.) N/C....................................................... 0.75
Boquillas - Cantidad por unidad........................................... 3
Largo de la lanza (in/cm)...............................................20/51
Pistola....................................................................... Estándar
Cilindrada del motor - (in3/cm3)...............................12.9/212
Tipo de bujía ...........................................F7TC o equivalente
Separación de electrodos de bujía- (in/mm)..... 0.028-0.031/
0.70-0.80
Capacidad de combustible - (Qt/l)...............................3.7/3.5
Capacidad de aceite - (Oz/l).........................................20/0.6
Interruptor ON/OFF .............................................................Sí
• Alteración o anulación del varillaje del regulador o el
mecanismo de ajuste de velocidad a fin de que el motor
funcione fuera de sus parámetros de diseño
Si observa alguno de los siguientes síntomas, pida al
concesionario de servicio que inspeccione y repare su
motor:
• Dificultad para arrancar o calada después del arranque
• Ralentí irregular
• Fallo de encendido o contraexplosiones bajo carga
• Postcombustión (contraexplosiones)
• Humo de escape negro o alto consumo de combustible
3.4 — FUNCIONAMIENTO A GRAN ALTITUD
El sistema de combustible de este motor puede verse
afectado por el funcionamiento en altitudes más elevadas.
Para garantizar el funcionamiento correcto, puede
instalarse un kit para altitud cuando sea necesario. Vea la
tabla a continuación para determinar cuándo se requiere un
kit para altitud. El uso de este motor sin el kit para altitud
apropiado puede aumentar las emisiones del motor y
disminuir la economía de combustible y el rendimiento. Los
kits pueden obtenerse en cualquier concesionario y deben
ser instalados por una persona cualificada.
Altitud* Número de kit psi
3.3 — INFORMACIÓN SOBRE EMISIONES
La Agencia de Protección Ambiental de los EE. UU. (EPA)
(y la Junta de Recursos del Aire de California [CARB] para
los equipos certificados conforme a las normas de
California) requieren que este motor cumpla las normas de
emisiones de escape y evaporación. Ubique la etiqueta
adhesiva sobre cumplimiento de las normas referidas a
emisiones colocada sobre el motor para determinar qué
normas satisface el generador, y para determinar qué
garantía de emisiones corresponde. El motor cuenta con la
certificación de satisfacer las normas de emisiones
correspondientes a las gasolinas. Es importante seguir las
especificaciones de mantenimiento indicadas en la sección
Mantenimiento para asegurar que el producto cumpla las
normas de emisiones correspondientes durante toda su
vida útil. Este motor usa ajustes de carburación
empobrecida y otros sistemas para reducir las emisiones.
La manipulación indebida o la alteración del sistema de
control de emisiones pueden aumentar las emisiones y
constituye una infracción de la ley federal o la ley de
California. Las acciones que constituyen manipulación
indebida incluyen, entre otras:
• Retiro o alteración de cualquier parte de los sistemas de
admisión, combustible o escape.
0 - 5000 pies No se requiere 3100
5000 - 7000 pies 0K2016 3100
* Elevación sobre el nivel del mar.
NOTA:
Si se ha instalado el kit para altitud y el motor se
utilizará a una altitud en la que no se requiere el kit,
el motor se debe volver a ajustar con la
configuración de fábrica. El uso de un motor en
altitudes más bajas con el kit instalado puede causar
el sobrecalentamiento del motor, ocasionar daños
graves al motor, y causar un menor rendimiento y
mayores emisiones.
8 Hidrolavadora OneWASH™
Page 49

Información general
3.5 — DESEMBALAJE
1. Retire la bolsa de piezas, accesorios e insertos
incluidos con la hidrolavadora.
2. Abra la caja completamente cortando cada esquina de
arriba abajo.
3. Asegúrese de tener todos los ítems incluidos antes de
armar.
• Unidad principal
• Conjunto de asa
• Manguera de alta presión
• Manguera y filtro del sifón
• Pistola de pulverización
• Lanza con accesorio de conexión rápida
• Botella de aceite
• Gancho de alambre con forma para manguera
• Bolsa de piezas (que incluye lo siguiente):
— Manual del operador
— Declaración de garantía
— Declaración de garantía de emisiones
— Declaración de garantía de emisiones
de la CARB
— Tarjeta de registro del cliente
— Bolsa conteniendo boquillas con códigos de
color
— Llave Allen de 4 mm
— Tornillo (Cantidad 4)
— Broche de fijación escalonado (Cantidad 4)
— Soporte plástico de la pistola
— Soporte plástico de la lanza
4. Si falta alguno de los ítems de su caja, llame a Servicio
al cliente de Generac al 1-888-436-3722. Al llamar para
obtener ayuda, tenga disponible el número de modelo
y el número de serie de la etiqueta.
5. Llene y envíe la tarjeta de registro. Escriba el número
de modelo, número de serie y fecha de compra en la
tabla ubicada en la sección “Dónde encontrarnos".
Hidrolavadora OneWASH™ 9
Page 50

Esta página se ha dejado en blanco intencionalmente.
Información general
10 Hidrolavadora OneWASH™
Page 51

B
A
Sección 4 Configuración
4.1 — ARMADO
Lea el Manual del operador completo antes de intentar
armar la hidrolavadora , si tiene problemas con el
armado de ella, llame a Servicio al cliente de Generac al
1-888-436-3722. Al llamar para obtener ayuda, tenga
disponible el número de modelo y el número de serie de
la etiqueta.
1. Instale el gancho para la pistola en el conjunto de
asa usando (2) broches de fijación escalonados
suministrados. Alinee los agujeros y empuje los
broches de fijación escalonados hasta que asienten
a ras con el gancho para pistola (Figura 4-1).
Figura 4-2. Fijación del gancho para lanza
en la unidad
3. Coloque el conjunto de asa (A) en los soportes del
carro (B). Permita que el asa se desplace a su
posición. Ubique los tornillos (4) y la llave Allen.
Instale los cuatro tornillos usando la llave Allen
suministrada que se muestra en la (Figura 4-3).
Figura 4-1. Fijación del gancho para pistola
en el conjunto de asa
2. Instale el gancho para la lanza en el bastidor de la
unidad usando (2) broches de fijación escalonados
suministrados. Alinee los agujeros y empuje los
broches de fijación escalonados hasta que asienten
a ras con el gancho para pistola (Figura 4-2).
Figura 4-3. Fijación del asa en la unidad
Hidrolavadora OneWASH™ 11
Page 52

Configuración
A
4. Instale le gancho para manguera (Figura 4-4).
Figura 4-4. Instale le gancho para manguera.
5. Inserte las boquillas con código de color en los
espacios provistos en el panel delantero (Figura 4-5).
7. Coloque la cuerda de arranque en el soporte como
se muestra (Figura 4-7).
Figura 4-7. Gancho para la cuerda de
arranque
8. Fije el tubo de sifón en la ubicación A (Figura 4-8).
Figura 4-5. Inserción de las boquillas
6. Coloque la pistola de pulverización/lanza de
extensión en el soporte de la pistola de pulverización
como se muestra (Figura 4-6).
Figura 4-8. Ubicación del tubo de sifón
4.2 — CÓMO AÑADIR ACEITE DE MOTOR
1. Coloque la hidrolavadora en una superficie plana y
nivelada.
2. Limpie la zona alrededor de la abertura de llenado de
aceite y retire la tapa color naranja de llenado de aceite
y la varilla de medición.
3. Con el embudo para aceite vierta lentamente aceite en
la abertura de llenado. Vea la sección “Mantenimiento”
para las recomendaciones sobre el tipo de aceite.
NOTA:
En algunas unidades hay más de una ubicación de
llenado de aceite. En eso caso, solo es necesario
usar uno de los puntos de llenado de aceite.
4. Compruebe periódicamente hasta que el nivel de
aceite esté entre “L”y “H”en la varilla de medición
12 Hidrolavadora OneWASH™
Figura 4-6. Pistola/lanza
(Figura 4-9). No llene en exceso.
Page 53

Configuración
¡ADVERTENCIA!
Intervalo de nivel
de aceite aceptable
Figura 4-9. Varilla de medición
NOTA:
Cualquier intento de girar o arrancar el motor antes de
que haya sido correctamente preparado con el aceite
recomendado puede ocasionar un fallo del motor.
5. Coloque en su lugar y apriete la tapa de llenado/varilla
de medición.
• Llene el tanque de combustible en exteriores.
• NO llene el tanque en exceso. Deje espacio para la
expansión del combustible.
• Si se derrama combustible, espere hasta que se
evapore antes de dar arranque al motor.
• Mantenga el combustible alejado de llamas, luces
piloto, calor y otras fuentes de encendido.
• NO encienda un cigarrillo ni fume.
1. Limpie la zona alrededor de la tapa de llenado de
combustible, retire la tapa.
2. Añada lentamente combustible normal sin plomo al
tanque de combustible. Sea cuidadoso de no llenar
en exceso. Llene hasta el fondo de la rejilla del filtro,
esto permitirá la expansión de combustible
(Figura 4-10).
3. Instale la tapa y permita evaporar todo el combustible
derramado antes de dar arranque al motor.
4.3 — COMBUSTIBLE
El combustible debe satisfacer estos requisitos:
• Gasolina limpia, fresca y sin plomo.
• Un mínimo de 87 octanos/87 AKI (91 RON).
• Es aceptable la gasolina con hasta 10% de alcohol
(gasohol).
NOTA:
Evite dañar la hidrolavadora. No seguir las
recomendaciones sobre combustible del Manual del
operador anula la garantía.
• NO use gasolina no aprobada como la E85.
• NO mezcle aceite en la gasolina.
• NO modifique el motor para funcionar con combustibles
de alternativa.
Para proteger el sistema de combustible de la formación de
gel, mezcle un estabilizador de combustible cuando añada
combustible. Vea Almacenamiento. No todos los
combustibles son iguales. Si experimenta problemas de
arranque o rendimiento después de usar combustible,
cambie a un proveedor de combustible diferente o cambie
de marca.
El combustible y sus vapores son
extremadamente inflamables y explosivos.
Los incendios y explosiones pueden
causar quemaduras graves o la muerte.
4.3.1 — AL AÑADIR COMBUSTIBLE
• Coloque la hidrolavadora en OFF y déjela enfriar dos
(2) minutos como mínimo antes de retirar la tapa de
combustible. Afloje la tapa lentamente para aliviar
presión en el tanque.
Figura 4-10. Cómo añadir combustible
4.4 — CONEXIÓN DE LA MANGUERA Y
SUMINISTRO DE AGUA A LA BOMBA
NOTA:
NO haga funcionar la bomba sin el suministro de agua
conectado y abierto. El daño al equipo por no seguir
esta instrucción anulará la garantía.
NOTA:
Retire y deseche la tapa de transporte de la entrada de
agua a la bomba antes de fijar la manguera.
1. Haga correr agua a través de su manguera de jardín
durante 30 segundos para limpiar y expulsar los
residuos.
2. Antes de conectar la manguera de jardín a la entrada
de agua inspeccione el colador de entrada (A)
(Figura 4-11). Limpie la rejilla de entrada si contiene
residuos o ha sido sustituida por estar dañada. NO
haga correr agua si la rejilla de entrada está dañada.
Hidrolavadora OneWASH™ 13
Page 54

Configuración
¡ADVERTENCIA!
¡PELIGRO!
A
IMPORTANTE: NO haga sifón con agua estacionada para
el suministro de agua. Use SOLO agua fría (a menos de
100 °F). El suministro de agua debe ser adecuado para
responder a un caudal de 3.8 gal./min y no menos de 30 psi.
NOTA:
Usar una válvula de una vía (válvula igualadora de
presión o de retención) en la entrada de la bomba
causará daño a la bomba o al conector de entrada.
• DEBE haber por lo menos diez pies de manguera de
jardín sin restricciones entre la entada de la hidrolavadora
y cualquier dispositivo, como una válvula igualadora de
presión o de retención.
• El daño al equipo por no seguir esta instrucción anulará la
garantía.
• Siempre use gafas de seguridad cuando use este
equipo o en la vecindad de un equipo en uso.
• Antes de poner en marcha la hidrolavadora, asegúrese
de estar usando gafas de seguridad adecuadas.
• NUNCA sustituya gafas de seguridad con lentes de
seguridad.
4. Vuelva a conectar la lanza en la pistola de
pulverización (Figura 4-13). Apriete con la mano.
Figura 4-13. Fijación de la lanza
5. Fije el extremo de la manguera de alta presión a la
base de la pistola de pulverización (Figura 4-14).
Apriete con la mano.
Figura 4-11. Inspección de la rejilla de entrada
3. Conecte la manguera de jardín (que no exceda los
50 pies [15 m] de largo) en la entrada de agua
(Figura 4-12). Apriete con la mano.
Figura 4-12. Conexión de la manguera
de jardín
Riesgo de lesión ocular. La pulverización
puede salpicar hacia atrás o propulsar
objetos.
Figura 4-14. Conexión de la manguera a la
pistola de pulverización
El chorro de agua a alta presión que produce
este equipo puede atravesar la piel y sus
tejidos subyacentes, lo que conduce a
lesiones graves y posible amputación.
• NUNCA conecte la manguera de alta presión a la lanza.
• Mantenga la manguera de alta presión conectada a la
bomba y pistola de pulverización mientras el sistema está
presurizado.
• Siempre cerciórese de que la pistola de pulverización,
boquillas y accesorios estén fijados correctamente.
14 Hidrolavadora OneWASH™
Page 55

Configuración
¡PRECAUCIÓN!
¡PELIGRO!
6. Conecte la manguera de alta presión a la bomba
(desenrosque la manguera antes de conectarla a la
bomba o pistola de pulverización) (Figura 4-15). Apriete
con la mano.
La manguera se puede dañar si entra en
contacto con un motor o silenciador caliente.
Figura 4-15. Conexión de la manguera de
alta presión a la bomba
• Si acerca mucho su boquilla, especialmente si usa una
boquilla de alta presión (ROJA), puede dañar la superficie
limpiada.
El chorro de agua a alta presión que produce
este equipo puede atravesar la piel y sus
tejidos subyacentes, lo que conduce a
lesiones graves y posible amputación.
• NUNCA intercambie boquillas sin el seguro de gatillo
enganchado en la pistola de pulverización.
• NO retuerza las boquillas mientras pulveriza.
BOQUILLA psi gal./min
Chorro 3100 2.4
Lavado 2600 2.8
La hidrolavadora OneWash tiene un cuadrante de
potencia para proporcionar la potencia de limpieza
óptima para cada aplicación (Figura 5-4).
1. Tire el collar hacia atrás en la conexión rápida de la
lanza (Figura 4-17) e instale la boquilla de lavado
VERDE (Figura 4-18)) para las siguientes
aplicaciones de limpieza.
7. Conecte el agua y apriete el gatillo para purgar de aire
el sistema de la bomba (Figura 4-16).
Figura 4-16. Apriete del gatillo
4.5 — CÓMO USAR LAS BOQUILLAS
La conexión rápida de la boquilla de la lanza le permite
cambiar entre diferentes boquillas. Las boquillas se pueden
cambiar mientras la hidrolavadora está funcionando una
vez que el gatillo de la pistola de pulverización está
bloqueado en la posición de seguridad. Las boquillas verían
la presión y el patrón de pulverización.
• Para la limpieza más efectiva, mantenga la boquilla entre
8 y 24 in (20 y 61 cm) alejada de la superficie a limpiar.
Figura 4-17. Boquillas
Figura 4-18. Boquilla de presión para lavado
(Verde)
Hidrolavadora OneWASH™ 15
Page 56

2. Gire el dial de potencia de manera que coincida con
¡PRECAUCIÓN!
DELICADO
2000 PSI
SERVICIO PESADO
3100 PSI
CONTROL DE PRESIÓN
MÍN.
ON
OFF
MÁX.
PRESIÓN
el material que desea limpiar (Figura 4-19).
Icono de automóvil - Este ajuste es el
mejor para limpiar automóviles, botes y
vehículos recreativos dado que entrega el
equilibrio correcto de potencia y flujo para
limpiar estos tipos de superficie con
efectividad.
Icono de casa - Este ajuste es el mejor
para limpiar revestimientos de vinilo y
aluminio dado que entrega el equilibrio
correcto de potencia y flujo para limpiar
estos tipos de superficie con efectividad.
Icono de cerca de madera - Este ajuste
es el mejor para limpiar plataformas, cercas
revestimientos de madera en su hogar
dado que entrega el equilibrio correcto de
potencia y flujo para limpiar estos tipos de
superficie con efectividad.
Icono de ladrillo - Este ajuste es el mejor
para limpiar materiales de ladrillo, concreto
y mampostería dado que entrega el
equilibrio correcto de potencia y flujo para
limpiar estos tipos de superficie con
efectividad.
Configuración
Figura 4-20. Boquilla de presión de chorro
fuerte (Roja)
• Cuando aplique detergente use solo la boquilla Negra
(Figura 4-21). Solo use detergentes/jabones seguros
para la hidrolavadora para ayudar a disgregar
suciedad o mugre resistente sobre diferentes
superficies.
Figura 4-21. Boquilla para detergente
(Negra)
Figura 4-19. Selector de potencia
3. Para quitar manchas persistentes en superficies de
concreto o mampostería, use la boquilla de chorro
roja dentro de la zona manchada (Figura 4-20).
16 Hidrolavadora OneWASH™
Esta punta (Boquilla roja) puede dañar la
superficie de trabajo si está muy cerca o se
mantiene en una posición un tiempo
prolongado.
Page 57

Configuración
¡PRECAUCIÓN!
4.5.1 — Limpieza y aplicación de detergente
Las sustancias químicas pueden causar
lesiones corporales y/o daños a la propiedad.
• NUNCA use líquidos cáusticos con la hidrolavadora.
• Use SOLO detergentes/jabones seguros para la
hidrolavadora. Siga todas las instrucciones del fabricante.
Para aplicar detergente, siga estos pasos:
1. Revisión del uso de boquillas.
2. Retire la tapa del tanque para sustancias químicas
(Figura 4-22).
3. Prepare la solución de detergente como sea necesario
para el trabajo.
Figura 4-22. Tanque para sustancias
químicas y cubierta
4. Inserte el filtro en el extremo del tubo de sifón a
través del agujero en la tapa del tanque para
sustancias químicas (Figura 4-23).
5. Asegúrese de que el tubo de sifón permanezca
completamente sumergido en detergente.
NOTA:
Asegúrese de que el filtro permanezca completamente
sumergido en detergente mientras aplica detergente.
NOTA:
El contacto con el silenciador caliente puede dañar el
tubo de sifón para detergente.
• Al insertar el sifón en una botella de solución de
detergente, tienda el tubo de manera de evitar que
inadvertidamente haga contacto con el silenciador
caliente.
6. Asegúrese de que esté instalada la boquilla negra para
detergente.
NOTA:
El detergente no se puede aplicar con una boquilla de
alta presión (Verde o Roja). Use solo la boquilla negra
con el detergente.
7. Confirme haber seguido las instrucciones de
configuración.
NOTA:
Debe fijar todas las mangueras antes de dar arranque
al motor.
• Dar arranque al motor sin todas las mangueras
conectadas y sin agua conectada dañará la bomba.
• El daño al equipo por no seguir esta instrucción anulará
la garantía.
8. De arranque al motor siguiendo las instrucciones Cómo
poner en marcha su hidrolavadora.
9. Aplique detergente a una superficie seca, comenzando
en la porción inferior de la zona a ser lavada y trabaje
hacia arriba usando pasadas largas, uniformes y
superpuestas.
10. Permita que el detergente “empape”durante 3-5
minutos antes de lavar y enjuagar. Vuelva a aplicar
como sea necesario para evitar que la superficie se
seque. NO permita que el detergente se seque sobre la
superficie a ser limpiada (evita las vetas).
Figura 4-23. Instalación del tubo de sifón
Hidrolavadora OneWASH™ 17
IMPORTANTE: Debe lavar el sistema de sifón para
detergente después de cada uso colocando el filtro en un
cubo de agua limpia, luego haciendo funcionar la
hidrolavadora a baja presión durante 1-2 minutos.
4.5.2 — Enjuague de la hidrolavadora
1. Retire la boquilla negra para detergente de la lanza.
2. Seleccione e instale la boquilla de alta presión deseada
siguiendo las instrucciones Cómo usar las boquillas.
3. Apunte la pistola hacia una dirección segura y alejada
de personas, animales y plantas. Apriete el gatillo para
expulsar por lavado cualquier sustancia química
remanente hacia afuera del sistema.
4. Mantenga la pistola de pulverización a una distancia
segura de la zona que planifica pulverizar.
Page 58

Configuración
¡ADVERTENCIA!
¡PELIGRO!
El contragolpe de la pistola de
pulverización puede hacerlo caer.
• Úsela solo en una superficie a nivel.
• No la use en una superficie elevada para evitar el
riesgo de caída grave.
• Tome firmemente la pistola de pulverización con
ambas manos al usar pulverización de alta presión
para evitar lesiones cuando la pistola de pulverización
retroceda.
5. Aplique pulverización de alta presión a una
superficie pequeña y luego compruebe la superficie
en busca de daños. Si no se encuentra ningún daño,
puede suponer que es correcto y continúe
enjuagando.
6. Comience en la parte superior de la zona a ser
enjuagada, trabajando hacia abajo con la misma
superposición de carreras que la que usó para
limpiar.
4.5.3 — Tubo para sifón de detergente de
limpieza
Si usó el tubo de sifón para detergente, debe lavarlo con
agua limpia antes de parar el motor.
El chorro de agua a alta presión que produce
este equipo puede atravesar la piel y sus
tejidos subyacentes, lo que conduce a
lesiones graves y posible amputación. La
pistola de pulverización atrapa agua a alta
presión, aunque el motor esté parado y el
agua desconectada, lo que puede causar
lesiones.
• Mantenga la manguera de alta presión conectada a la
bomba y pistola de pulverización mientras el sistema
está presurizado.
• SIEMPRE apunte la pistola de pulverización hacia una
dirección segura y apriete el gatillo de la pistola de
pulverización para liberar alta presión cada vez que
pare el motor. Coloque el seguro de gatillo cuando la
pistola de pulverización no esté en uso.
1. Coloque el tubo/filtro de sifón para detergente en un
cubo lleno con agua limpia.
2. Retire la boquilla de alta presión de la extensión de
la boquilla.
3. Seleccione e instale la boquilla para detergente
negra siguiendo las instrucciones “Cómo usar las
boquillas”.
4. Lave durante 1-2 minutos.
5. Apague el motor siguiendo las instrucciones Cómo
parar la hidrolavadora y cierre el suministro de agua.
6. SIEMPRE apunte la pistola de pulverización hacia
una dirección segura, apriete el gatillo de la pistola
de pulverización para liberar el agua retenida a alta
presión. Coloque el seguro de gatillo cuando la
pistola de pulverización no esté en uso.
IMPORTANTE: La pistola de pulverización atrapa agua
a alta presión, aunque el motor esté parado y el agua
desconectada.
18 Hidrolavadora OneWASH™
Page 59

¡PELIGRO!
¡ADVERTENCIA!
5 pies (1.5 m) como mínimo
Sección 5 Operación
5.1 — OPERACIÓN
Si tiene algún problema operando su hidrolavadora,
llame a Servicio al cliente de Generac al
1-888-436-3722.
5.2 — UBICACIÓN DE LA HIDROLAVADORA
5.2.1 — Separaciones y movimiento de aire
El motor funcionando despide monóxido de
carbono, un gas inodoro, incoloro y
venenoso. Respirar monóxido de carbono
puede causar dolor de cabeza, fatiga, mareo,
vómitos, confusión, calambres, náuseas,
desvanecimiento o la muerte. Para más
información, consulte las advertencias sobre
CO en la sección “Seguridad”.
Coloque la hidrolavadora en exteriores en una zona que
no acumule gases de escape mortales. NUNCA coloque
la hidrolavadora donde los gases de escape se puedan
acumular y entrar a interiores, o ser aspirados a un
edificio potencialmente ocupado. Asegúrese de que los
gases de escape se mantengan alejados de toda
ventana, puerta, entradas de ventilación u otras
aberturas que puedan permitir que los gases de escape
se acumulen en una zona confinada. Deben tomarse en
consideración los vientos y corrientes de aire
prevalecientes al colocar en posición la hidrolavadora
(Figura 5-1).
• Haga funcionar la hidrolavadora SOLO en exteriores.
• Impida que los gases de escape ingresen en una zona
confinada a través de ventanas, puertas, entradas de
ventilación y otras aberturas.
• NUNCA arranque o haga funcionar el motor en
interiores, en un vehiculo, o en una zona cerrada, AÚN
si las ventanas y puertas están abiertas.
El calor y los gases de escape pueden
encender combustibles y estructuras o
dañar el tanque de combustible,
causando un incendio.
• Mantenga por lo menos 5 ft (152 cm) de separación en
todos los costados de la hidrolavadora, incluso hacia
arriba.
Figura 5-1. Separación de edificios
5.3 — LISTA DE COMPROBACIÓN ANTES
DE DAR ARRANQUE AL MOTOR
1. Asegúrese de leer y comprender la sección
“Seguridad” y la sección “Operación” antes de usar
la hidrolavadora.
2. Compruebe que el aceite esté en la marca de lleno
en la varilla de medición y que se haya añadido
combustible en el tanque de combustible.
3. Revise el conjunto de la unidad y asegúrese de que
los accesorios estén fijados correctamente.
Asegúrese de que no haya dobleces, cortes o daños
en la manguera de alta presión.
4. Proporcione un suministro de agua apropiado, libere
suciedad de las rejillas y confirme que el aire se ha
purgado del sistema.
5. Confirme que la unidad esté fija sobre terreno
nivelado y que la zona de trabajo circundante esté
libre.
5.4 — CÓMO PONER EN MARCHA SU
HIDROLAVADORA
NOTA:
NO haga funcionar la bomba sin el suministro de
agua conectado y abierto. El daño al equipo por no
seguir esta instrucción anulará la garantía.
Hidrolavadora OneWASH™ 19
Page 60

1. Ponga el interruptor de motor ON/OFF en la posición
¡ADVERTENCIA!
DELICADO
2000 PSI
SERVICIO PESADO
3100 PSI
CONTROL DE PRESIÓN
MÍN.
ON
OFF
MÁX.
PRESIÓN
MANIJA DEL
ARRANCADOR
“OFF”(Figura 5-2).
Operación
INTERRUPTOR ON/OFF
DELICADO
2000 PSI
MÍN.
SERVICIO PESADO
3100 PSI
MÁX.
PRESIÓN
Figura 5-2. Interruptor ON/OFF
2. Gire la perilla de control de presión a la posición
mostrada en la etiqueta “Arranque”(Ítem núm. 2)
(Figura 5-3).
DELICADO
2000 PSI
SERVICIO PESADO
3100 PSI
CEBADOR "CONECTADO"
CEBADOR "DESCONECTADO"
Figura 5-4. Perilla del cebador
4. Fije la unidad contra movimientos al tirar de la
cuerda de arranque.
5. Para arrancar el motor, tome la manija del
arrancador (Figura 5-5) y tire lentamente hasta que
sienta alguna resistencia. Luego tire rápidamente
para dar arranque al motor.
3. Coloque el cebador del motor tirando levemente
Para un motor caliente, empuje la perilla del cebador
hacia abajo hasta que se detenga en la posición
“OFF”(Figura 5-4).
20 Hidrolavadora OneWASH™
Figura 5-3. Selector de potencia
hacia afuera de la perilla del cebador hasta que se
detenga en la posición de “ON”(Figura 5-4).
Recomendamos usar protectores de oídos.
NOTA:
Figura 5-5. Arranque el motor
6. Devuelva lentamente la manija del arrancador.
NO deje que la cuerda golpee de regreso contra el
soporte.
7. Cuando arranque el motor, empuje lentamente la
perilla del cebador a la posición de “OFF”a medida
que el motor se calienta. Si el motor falla
intermitentemente, tire de la perilla del cebador hacia
fuera, luego empújela hacia adentro a la posición de
“OFF”(Figura 5-6).
Page 61

Operación
¡PELIGRO!
¡ADVERTENCIA!
DELICADO
2000 PSI
SERVICIO PESADO
3100 PSI
CEBADOR "CONECTADO"
CEBADOR "DESCONECTADO"
Figura 5-6. Perilla del cebador
8. Después de cada intento de arranque en el que el
motor falló en arrancar, siempre apunte la pistola
hacia una dirección segura y apriete el gatillo de la
pistola de pulverización para liberar alta presión.
9. Si el motor falla en el arranque después de seis
tirones, empuje la perilla del cebador hacia la
posición “OFF”y repita los pasos 6 a 10.
El contacto con la zona del silenciador
puede causar quemaduras graves. El
calor y los gases de escape pueden
encender combustibles y estructuras o
dañar el tanque de combustible,
causando un incendio.
• NO toque piezas calientes y EVITE los gases de escape
calientes.
• Permita que el equipo se enfríe antes de tocarlo.
• Mantenga por lo menos 5 ft (152 cm) de separación en
todos los costados de la hidrolavadora, incluso hacia
arriba.
• Es una violación al Public Resources Code (Código de
recursos públicos de California), Sección 4442, usar u
operar el motor en tierras cubiertas de bosque, maleza o
pasto excepto si el sistema de escape tiene un supresor
de chispas, como se define en la Sección 4442,
mantenido en condiciones de trabajo eficaces. Otros
estados o jurisdicciones federales pueden tener leyes
similares.
• Las piezas de repuesto deben ser las mismas y estar
instaladas en la misma posición que las piezas originales.
• NO permita que los NIÑOS accionen la hidrolavadora
• Mantenga la manguera de alta presión conectada a la
• NUNCA apunte la pistola de pulverización a personas,
• NO fije la pistola de pulverización en posición abierta.
• NO deje la pistola de pulverización sin atención
• NUNCA use una pistola de pulverización que no tenga
• Siempre cerciórese de que la pistola de pulverización,
El chorro de agua a alta presión que produce
este equipo puede atravesar la piel y sus tejidos
subyacentes, lo que conduce a lesiones graves
y posible amputación. La pistola de
pulverización atrapa agua a alta presión,
aunque el motor esté parado y el agua
desconectada, lo que puede causar lesiones.
o jueguen en las proximidades.
bomba y pistola de pulverización mientras el sistema
está presurizado.
animales o dispositivos eléctricos. Producirá lesiones
graves.
mientras la máquina está funcionando.
un seguro de gatillo u una protección de gatillo en su
lugar y en buenas condiciones de trabajo.
boquillas y accesorios estén fijados correctamente.
5.5 — SISTEMA DE ENFRIAMIENTO
AUTOMÁTICO (ALIVIO TÉRMICO)
Si hace funcionar el motor de su hidrolavadora durante
3-5 minutos sin presionar el gatillo de la pistola de
pulverización, el agua que circula en la bomba puede
llegar a temperaturas superiores a 125 °F. El sistema se
acopla para enfriar la bomba descargando el agua
caliente al suelo.
5.6 — CÓMO PARAR SU HIDROLAVADORA
1. Suelte el gatillo de la pistola de pulverización.
2. Ponga el interruptor de motor ON/OFF en la posición
“OFF”(Figura 5-7).
3. SIEMPRE apunte la pistola de pulverización hacia
una dirección segura y apriete el gatillo de la pistola
de pulverización para liberar el agua retenida a alta
presión. Coloque el seguro de gatillo cuando la
pistola de pulverización no esté en uso.
4. Cierre el suministro de agua.
Hidrolavadora OneWASH™ 21
Page 62

Figura 5-7. Interruptor ON/OFF
¡PELIGRO!
DELICADO
2000 PSI
SERVICIO PESADO
3100 PSI
INTERRUPTOR ON/OFF
MÍN.
MÁX.
PRESIÓN
IMPORTANTE: La pistola de pulverización atrapa agua
a alta presión, aunque el motor esté parado y el agua
desconectada.
Operación
El chorro de agua a alta presión que produce
este equipo puede atravesar la piel y sus tejidos
subyacentes, lo que conduce a lesiones graves
y posible amputación. La pistola de
pulverización atrapa agua a alta presión,
aunque el motor esté parado y el agua
desconectada, lo que puede causar lesiones.
• Mantenga la manguera de alta presión conectada a la
bomba y pistola de pulverización mientras el sistema
está presurizado.
• SIEMPRE apunte la pistola de pulverización hacia una
dirección segura y apriete el gatillo de la pistola de
pulverización para liberar alta presión cada vez que
pare el motor. Coloque el seguro de gatillo cuando la
pistola de pulverización no esté en uso.
22 Hidrolavadora OneWASH™
Page 63

Sección 6 Mantenimiento
6.1 — RECOMENDACIONES DE
MANTENIMIENTO
El mantenimiento regular mejorará el rendimiento y
extenderá la vida útil de la hidrolavadora. Vea a cualquier
concesionario cualificado para servicio.
La garantía de la hidrolavadora no cubre elementos que
hayan sido sometidos a abuso o negligencia del
operador. Para recibir el valor completo de la garantía, el
operador debe mantener la hidrolavadora como se
instruye en este manual, incluso el almacenamiento
apropiado como se detalla en “Almacenamiento en el
invierno” y “Almacenamiento a largo plazo”.
NOTA:
Si tiene preguntas acerca componentes de repuesto
de su hidrolavadora, llame al 1-888-436-3722 para
obtener ayuda.
Se deben hacer algunos ajustes periódicamente para
mantener la hidrolavadora de manera apropiada.
Todos los servicios y ajustes deben ser hechos por lo
menos una vez por estación. Siga los requisitos
indicados en la tabla “Programa de mantenimiento”.
NOTA:
Una vez por año debe limpiar o sustituir la bujía,
limpiar o sustituir el filtro de aire y comprobar el
conjunto de pistola de pulverización y extensión de
la bomba química en busca de desgaste. Una bujía
nueva y un filtro de aire limpio aseguran una mezcla
de aire-combustible apropiada y ayudan a que su
motor funcione mejor y dure más.
6.2 — PROGRAMA DE MANTENIMIENTO
Siga los intervalos de horas de funcionamiento o de
calendario, el que ocurra primero. Se requiere el servicio
más frecuente cuando funciona en condiciones
adversas.
Primeras 5 horas
Cambio de aceite de motor
Cada 8 horas o diariamente
Comprobación/limpieza de la rejilla de entrada de agua*
Comprobación de la manguera de alta presión
Comprobación de la manguera/filtro de sifón para
detergente.
Comprobación de la pistola de pulverización y el conjunto en
busca de fugas.
Limpieza de residuos
Comprobación del nivel de aceite de motor
Cada 20 horas o cada estación
Cambio de aceite de motor**
Cada 50 horas o cada estación
Comprobación/limpieza del filtro del depurador de aire**
Inspeccione el silenciador y el supresor de chispas*
Cada 100 horas o cada estación
Servicio de la bujía
* Limpie si está obstruido. Sustituya si está perforado o
roto.
** De servicio más a menudo en condiciones de suciedad o
polvo.
Hidrolavadora OneWASH™ 23
Page 64

Mantenimiento
¡PELIGRO!
6.3 — ACEITE DE LA BOMBA
NO intente efectuar ningún mantenimiento del aceite de
esta bomba. La bomba fue prelubricada y sellada en la
fábrica, y no requiere mantenimiento adicional durante la
vida útil de la bomba.
6.4 — CONTROL DE EMISIONES
El mantenimiento, sustitución o reparación de los
dispositivos y sistemas de control de emisiones puede
ser efectuado por cualquier establecimiento o
individuo de reparación de motores que no sean para
usar en carretera. Sin embargo, para obtener el servicio
de control de emisiones “sin cargo", el trabajo debe ser
efectuado por un concesionario autorizado de la fábrica.
Vea la garantía de emisiones.
6.5 — AJUSTES DEL CUADRANTE DE
POTENCIA
La manipulación indebida, el mantenimiento, ajuste o
sustitución de la configuración del acelerador harán
impacto en el rendimiento y pueden anular la garantía de la
unidad.
6.6 — MANTENIMIENTO DE LA
HIDROLAVADORA
6.6.1 — Limpieza de residuos
Diariamente o antes del uso, limpie los residuos
acumulados por la limpieza del sistema. Mantenga limpios
el varillaje, resortes y controles. Mantenga la zona
alrededor y detrás del silenciador sin residuos de
combustible. Inspeccione las ranuras de aire de
enfriamiento y las aberturas de la hidrolavadora. Estas
aberturas deben mantenerse limpias y sin obstrucciones.
Las piezas de la hidrolavadora deben mantenerse limpias
para reducir el riesgo de sobrecalentamiento y encendido
de los residuos acumulados.
• Use un paño húmedo para limpiar las superficies
exteriores.
NOTA:
El tratamiento incorrecto de la hidrolavadora puede
dañarla y acortar su vida útil.
• NO inserte ningún objeto a través de las ranuras de
enfriamiento.
• Use un cepillo de cerdas finas para aflojar la suciedad,
aceite, etc. compactada.
• Use una aspiradora para recoger la suciedad y residuos
sueltos.
6.7 — COMPROBACIÓN Y LIMPIEZA DE LA
REJILLA DE ENTRADA
Examine la rejilla en la entrada de agua de la bomba.
Límpielo si la rejilla está obstruida o sustitúyala si la rejilla
está dañada.
6.8 — COMPROBACIÓN DE LAS
MANGUERAS DE ALTA PRESIÓN
Las mangueras de alta presión pueden desarrollar fugas
como producto del desgaste, dobleces o abuso.
Inspeccione las mangueras cada vez antes de usarlas.
Compruebe si hay cortes, fugas, abrasiones o
protuberancias de la cubierta, daño o movimiento de los
acoplamientos. Si existe alguna de estas condiciones,
sustituya la manguera de inmediato.
El chorro de agua a alta presión que produce
este equipo puede atravesar la piel y sus tejidos
subyacentes, lo que conduce a lesiones graves
y posible amputación.
• NUNCA repare la manguera de alta presión. Sustitúyala.
• La clasificación de la manguera de repuesto DEBE
satisfacer o exceder la clasificación de presión máxima
de la unidad.
6.9 — COMPROBACIÓN DEL TUBO PARA
SIFÓN DE DETERGENTE
Examine el filtro en el tubo para detergente y límpielo si
está obstruido. El tubo debe ajustar apretadamente en el
accesorio dentado. Examine el tubo en busca de fugas o
desgarramientos. Sustituya el filtro o el tubo si alguno está
dañado.
6.10 — COMPROBACIÓN DE LA PISTOLA DE
PULVERIZACIÓN
Examine la conexión de la manguera a la pistola de
pulverización y asegúrese de que esté fija. Pruebe el gatillo
presionándolo. Debe “volver a resorte”a su lugar cuando lo
suelta. Sustituya la pistola de pulverización de inmediato si
falla en “volver a resorte".
6.11 — MANTENIMIENTO DEL TANQUE PARA
SUSTANCIAS QUÍMICAS
Periódicamente deberá vaciar y limpiar el tanque para
sustancias químicas.
Use las instrucciones siguientes:
1. Apague el motor y cierre el suministro de agua.
2. SIEMPRE apunte la pistola de pulverización hacia una
dirección segura, apriete el gatillo de la pistola de
pulverización para liberar el agua retenida a alta
presión.
3. Retire la tapa de llenado y la manguera de sifón de
sustancias químicas (Figura 6-1).
4. Obtenga un recipiente para vaciar el excedente de
sustancias químicas.
24 Hidrolavadora OneWASH™
Page 65

Mantenimiento
¡PELIGRO!
Figura 6-1. Tapa/manguera de sifón para
sustancias químicas
5. Coloque el recipiente debajo de la tapa de vaciado del
tanque para sustancias químicas. (Figura 6-2).
6. Retire la tapa de vaciado y permita que se vacíen las
sustancias químicas.
7. Inserte la manguera de jardín en el cuello de llenado y
permita que el agua lave el tanque.
8. Una vez que el tanque esté limpio, vuelva a instalar la
tapa de vaciado con la junta, no apriete en exceso.
• Mantenga la manguera de alta presión conectada a la
bomba y pistola de pulverización mientras el sistema está
presurizado.
• SIEMPRE apunte la pistola de pulverización hacia una
dirección segura y apriete el gatillo de la pistola de
pulverización para liberar alta presión cada vez que pare el
motor. Coloque el seguro de gatillo cuando la pistola de
pulverización no esté en uso.
3. Retire la boquilla del extremo de la extensión de la
boquilla.
4. Use un clip para papeles pequeño para liberar cualquier
material extraño que obstruya o restrinja la boquilla
(Figura 6-3).
5. Retire la lanza de la pistola de pulverización.
Figura 6-3. Liberación de materiales extraños
6. Con una manguera de jardín, retire los residuos
adicionales lavando con agua hacia atrás a través de la
lanza (Figura 6-4). Lave hacia atrás entre 30 y
60 segundos.
Figura 6-2. Tapa de vaciado del tanque
6.12 — MANTENIMIENTO DE LA BOQUILLA
Una sensación de pulsación sentida mientras se aprieta el
gatillo de la pistola de pulverización puede ser causada por
presión excesiva de la bomba. La causa principal de presión
de bomba excesiva es una boquilla obstruida o restringida
con materiales extraños como suciedad, etc. Para corregir
este problema, limpie inmediatamente la boquilla siguiendo
estas instrucciones:
1. Apague el motor y cierre el suministro de agua.
2. SIEMPRE apunte la pistola de pulverización hacia una
dirección segura, apriete el gatillo de la pistola de
pulverización para liberar el agua retenida a alta presión.
El chorro de agua a alta presión que produce este
equipo puede atravesar la piel y sus tejidos
subyacentes, lo que conduce a lesiones graves y
posible amputación. La pistola de pulverización
atrapa agua a alta presión, aunque el motor esté
parado y el agua desconectada, lo que puede
causar lesiones.
Hidrolavadora OneWASH™ 25
Figura 6-4. Lavado hacia atrás de la lanza
7. Vuelva a instalar la boquilla en la lanza.
8. Vuelva a conectar la lanza en la pistola de
pulverización.
9. Asegúrese de que la manguera de jardín esté
conectada a la entrada de agua de la bomba.
Compruebe que la manguera de alta presión esté
conectada a la pistola de pulverización y bomba.
Abra el agua.
Page 66

Mantenimiento
¡ADVERTENCIA!
10 W- 30 **
Intervalo de nivel
de aceite aceptable
10. De arranque al motor siguiendo las instrucciones
“Cómo poner en marcha su hidrolavadora”.
11. Pruebe la hidrolavadora operando con cada boquilla de
conexión rápida.
6.13 — MANTENIMIENTO DEL MOTOR
Producir chispas en forma no intencional
puede dar por resultado incendio o
choque eléctrico.
AL AJUSTAR O HACER REPARACIONES EN SU
HIDROLAVADORA
• Desconecte el cable de la bujía y coloque el cable donde
no pueda hacer contacto con la bujía.
AL PROBAR LA CHISPA DEL MOTOR
• Use un probador de bujías aprobado.
• NO compruebe la chispa con la bujía retirada.
6.14 — RECOMENDACIONES SOBRE EL
ACEITE DE MOTOR
6.14.1 — Comprobación del nivel de aceite
El nivel de aceite debe ser revisado antes de cada uso o al
menos cada 8 horas de funcionamiento. Mantenga el nivel
de aceite.
1. Asegúrese de que la hidrolavadora esté en una
superficie plana y nivelada.
2. Limpie la zona alrededor de la abertura de llenado de
aceite, retire la tapa de llenado de aceite y limpie la
varilla de medición (Figura 6-5).
3. Verifique que el aceite esté con el nivel apropiado en la
varilla de medición.
4. Inserte la varilla de medición en el cuello de llenado
pero no la enrosque.
5. Vuelva a colocar y apriete la tapa de llenado de aceite.
Recomendamos el uso de aceites de alta calidad con
detergente aceptables si tienen la clasificación SF, SG, SH,
SJ o superior. NO use aditivos especiales.
Las temperaturas de exteriores determinan la viscosidad de
aceite apropiada para el motor. Use la tabla para
seleccionar la mejor viscosidad para el intervalo de
temperatura esperada en exteriores.
SAE 30*
10W-30**
5W-30
Intervalo de temperatura de uso esperado
* Debajo de 50 °F (10 °C) el uso de SAE 30 dará por resultado un
arranque difícil.
** Arriba de 80 °F (27 °C) el uso de 10W30 puede causar
incremento en el consumo de aceite. Compruebe el nivel de
aceite más frecuentemente.
NOTA:
El aceite sintético que satisface la norma ILSAC GF-2,
con marca de certificación API y símbolo de servicio
API con “SJ/CF ENERGY CONSERVING”(Ahorro de
energía SJ/CF) o superior, es un aceite aceptable para
todas las temperaturas. El uso de aceite sintético no
altera los intervalos de cambio de aceite requeridos.
Figura 6-5. Llenado de aceite de motor
6.14.2 — Cómo añadir aceite de motor
1. Asegúrese de que la hidrolavadora esté en una
superficie plana y nivelada.
2. Compruebe el nivel de aceite como se describe en
Comprobación del nivel de aceite.
3. De ser necesario, vierta lentamente aceite en la
abertura de llenado hasta alcanzar el nivel apropiado
en la varilla de medición.
4. Inserte la varilla de medición en el cuello de llenado
pero no la enrosque.
5. Si el nivel es bajo, llene hasta que el nivel de aceite
esté entre “L”y “H”en la varilla de medición (Figura 6-6).
6. Vuelva a colocar y apriete la tapa de llenado de aceite.
Figura 6-6. Varilla de medición
26 Hidrolavadora OneWASH™
Page 67

Mantenimiento
¡PRECAUCIÓN!
A
Junta
Tuerca mariposa
Pestillo
Elemento de
filtro de papel
Elemento de
filtro de espuma
Cubierta del
filtro de aire
6.14.3 — Cambio de aceite de motor
Si utiliza su hidrolavadora en condiciones extremas de
suciedad o polvo, o en clima extremadamente caluroso,
cambie el aceite más frecuentemente.
Evite el contacto prolongado o repetido de la
piel con aceite usado.
• Se ha mostrado al aceite de motor usado como causante
de cáncer de piel en ciertos animales de laboratorio.
• Lave cuidadosamente con jabón y agua las zonas
expuestas.
MANTÉNGALO FUERA DEL ALCANCE DE LOS
NIÑOS.
• No contamine. Conserve los recursos. Devuelva el aceite
usado a los centros de recolección.
Deje que el motor se enfríe y luego cambie el aceite como
sigue:
1. Asegúrese de que la hidrolavadora esté en una
superficie plana y nivelada.
2. Desconecte el cable de la bujía y coloque el cable donde
no pueda hacer contacto con la bujía.
3. Limpie la zona alrededor del tapón de vaciado de aceite
(A) (Figura 6-7). El tapón de vaciado de aceite está
ubicado en la base del motor, opuesto al carburador.
4. Retire la tapa de llenado de aceite (Figura 6-6).
5. Retire el tapón de vaciado de aceite y vacíe el aceite
completamente en un recipiente adecuado.
6. Vuelva a instalar el tapón de vaciado y apriételo con
seguridad.
7. Vierta aceite lentamente (20 oz aproximadamente) en la
abertura de llenado de aceite hasta el nivel apropiado en
la varilla de medición. NO llene en exceso.
8. Vuelva a instalar la tapa de llenado de aceite. Apriete la
tapa con seguridad con la mano.
9. Recoja y limpie el aceite que pueda haberse derramado.
10. Deseche apropiadamente el aceite de acuerdo con
todos los reglamentos locales.
6.15 — SERVICIO DEL FILTRO DE AIRE
Su motor no funcionará correctamente y se puede dañar
si lo usa con un filtro de aire sucio. De servicio más a
menudo si funciona en condiciones de suciedad o polvo.
Para dar servicio al filtro de aire, siga estos pasos:
1. Tire del pestillo de la cubierta del depurador de aire y
retire la cubierta (Figura 6-8).
Figura 6-8. Servicio del filtro de aire
2. Suelte la tuerca mariposa.
3. Retire cuidadosamente el conjunto de filtro.
4. Retire el filtro de espuma.
5. Para limpiar el cartucho, golpee levemente en forma
repetida sobre una superficie plana.
6. Vuelva a instalar el filtro de espuma.
7. Vuelva a instalar un conjunto de cartucho limpio o
nuevo.
8. Vuelva a instalar y apretar la tuerca mariposa.
9. Instale la cubierta trabando el pestillo en posición de
cerrado.
Hidrolavadora OneWASH™ 27
Figura 6-7. Tapón de vaciado de aceite
Page 68

6.16 — SERVICIO DE LA BUJÍA
¡ADVERTENCIA!
LLAVE PARA
BUJÍAS
0.28-0.031
in
A
A
B
El cambio de la bujía ayudará al motor a arrancar más
fácilmente y funcionar mejor.
1. Limpie la zona alrededor de la bujía.
2. Retire e inspeccione la bujía (Figura 6-9).
3. Compruebe la separación de electrodos con un
calibre de espesores de alambre y, de ser necesario,
vuelva a ajustar la separación de la bujía a la
recomendada (vea Especificaciones).
4. Sustituya la bujía si los electrodos están picados,
quemados o la porcelana está rajada. Use la bujía
de repuesto recomendada. Vea Especificaciones.
5. Instale la bujía y apriétela firmemente.
Mantenimiento
Figura 6-10. Retiro del protector de calor
Figura 6-9. Sustitución de la bujía
6.17 — INSPECCIÓN DEL SILENCIADOR Y
EL SUPRESOR DE CHISPAS
Inspeccione el silenciador en busca de rajaduras,
corrosión y otros daños. Retire el supresor de chispas, si
tiene, e inspeccione en busca de daños o bloqueo con
carbón. Si se requieren piezas de repuesto, asegúrese
de usar solo piezas de repuesto originales del equipo.
6.17.1 — Retire la rejilla del supresor de
chispas
Herramientas requeridas: Llave cerrada de 8 mm
1. Retire el protector de calor del silenciador aflojando
los cuatro (4) pernos (A) (Figura 6-10).
2. Retire el supresor de chispas del silenciador
aflojando los dos (2) pernos (B) (Figura 6-11).
3. Inspeccione el supresor de chispas, sustitúyalo si
está desgarrado, perforado o dañado de alguna otra
forma (número de pieza 0K1851). NO USE UNA
REJILLA DEFECTUOSA.
4. Si la rejilla no se encuentra dañada, límpiela con
algún solvente comercial y vuelva a colocarla.
Figura 6-11. Retiro del supresor de chispas
El contacto con la zona del silenciador
puede causar quemaduras graves. El
calor y los gases de escape pueden
encender combustibles y estructuras o
dañar el tanque de combustible,
causando un incendio.
• NO toque piezas calientes y EVITE los gases de
escape calientes.
• Permita que el equipo se enfríe antes de tocarlo.
• Mantenga por lo menos 5 ft (152 cm) de separación en
todos los costados de la hidrolavadora, incluso hacia
arriba.
28 Hidrolavadora OneWASH™
Page 69

Mantenimiento
¡PELIGRO!
¡ADVERTENCIA!
¡ADVERTENCIA!
• Es una violación al Public Resources Code (Código de
recursos públicos de California), Sección 4442, usar u
operar el motor en tierras cubiertas de bosque, maleza o
pasto excepto si el sistema de escape tiene un supresor
de chispas, como se define en la Sección 4442,
mantenido en condiciones de trabajo eficaces. Otros
estados o jurisdicciones federales pueden tener leyes
similares. Tome contacto con el fabricante, minorista o
concesionario de equipo original para obtener un
supresor de chispas diseñado para el sistema de escape
instalado en este motor.
• Las piezas de repuesto deben ser las mismas y estar
instaladas en la misma posición que las piezas originales.
El combustible y sus vapores son
extremadamente inflamables y
explosivos. Los incendios y explosiones
pueden causar quemaduras graves o la
muerte.
AL ALMACENAR COMBUSTIBLE O EQUIPOS CON
COMBUSTIBLE EN EL TANQUE
• Almacene alejado de hornos, estufas, calentadores de
agua, secadores de ropa u otros artefactos que tengan
luces piloto u otras fuentes de encendido porque pueden
encender los vapores de combustible.
6.18 — DESPUÉS DE CADA USO
El agua no debe permanecer en la unidad de períodos
prolongados. Los sedimentos o materiales se pueden
depositar sobre piezas de la bomba y congelar la acción de
la bomba. Siga estos procedimientos después de cada uso:
1. Apague el motor, cierre el suministro de agua, apunte
la pistola hacia una dirección segura y apriete el gatillo
para aliviar la presión atrapada. Deje enfriar el motor.
El chorro de agua a alta presión que produce
este equipo puede atravesar la piel y sus tejidos
subyacentes, lo que conduce a lesiones graves
y posible amputación. La pistola de
pulverización atrapa agua a alta presión,
aunque el motor esté parado y el agua
desconectada, lo que puede causar lesiones.
• Mantenga la manguera de alta presión conectada a la
bomba y pistola de pulverización mientras el sistema está
presurizado.
• SIEMPRE apunte la pistola de pulverización hacia una
dirección segura y apriete el gatillo de la pistola de
pulverización para liberar alta presión cada vez que pare
el motor. Coloque el seguro de gatillo cuando la pistola de
pulverización no esté en uso.
2. Desconecte las mangueras de la pistola de
pulverización y la salida de alta presión de la bomba.
Vacíe el agua de las mangueras, pistola de
pulverización y lanza. Use un trapo para limpiar la
manguera.
3. Vacíe la bomba de todos los líquidos bombeados.
Compruebe que el interruptor ON/OFF del motor esté
en la posición OFF. Luego tire de la manija de la cuerda
de arranque seis veces aproximadamente. Esto debe
quitar la mayor parte del líquido de la bomba.
4. Almacene la unidad en una zona limpia y seca.
5. Si va a almacenar más de 30 días, vea
“Almacenamiento a largo plazo" en la página 29.
El combustible y sus vapores son
extremadamente inflamables y
explosivos. Los incendios y explosiones
pueden causar quemaduras graves o la
muerte.
AL ALMACENAR COMBUSTIBLE O EQUIPOS CON
COMBUSTIBLE EN EL TANQUE
• Almacene alejado de hornos, estufas, calentadores de
agua, secadores de ropa u otros artefactos que tengan
luces piloto u otras fuentes de encendido porque pueden
encender los vapores de combustible.
6.19 — ALMACENAMIENTO EN EL INVIERNO
NOTA:
Debe proteger su unidad de las temperaturas de
congelación.
• No hacerlo dañará permanentemente su bomba y
pondrá su unidad en condición de inoperable.
• El daño por congelación no está cubierto por la garantía.
Para proteger la unidad de las temperaturas de
congelación:
1. Siga los pasos 1-3 de la sección anterior “Después de
cada uso”.
2. Use protector para bombas para tratar la bomba. Esto
minimiza los daños por congelación y lubrica los
pistones y juntas.
3. Si no hay disponible protector para bombas, conecte
una sección de manguera de jardín de 3 pies (91 cm)
en el adaptador de entrada de agua. Vierta RVantifreeze (anticongelante sin alcohol) en la manguera.
Tire dos veces de la manija de la cuerda de arranque.
Desconecte la manguera de 3 pies.
4. Almacene la unidad en una zona limpia y seca.
6.20 — ALMACENAMIENTO A LARGO PLAZO
Si no planifica usar la hidrolavadora durante más de
30 días, debe preparar el motor y la bomba para
almacenamiento de largo plazo.
Hidrolavadora OneWASH™ 29
Page 70

Mantenimiento
¡ADVERTENCIA!
¡PRECAUCIÓN!
¡ADVERTENCIA!
6.20.1 — Protección del sistema de
combustible
El combustible se puede vencer cuando se almacena más
de 30 días. El combustible vencido causa la formación de
depósitos ácidos y de goma en el sistema de combustible o
en piezas esenciales del carburador. Para mantener fresco
al combustible, use un estabilizador de combustible,
disponible como aditivo líquido o por goteo de un cartucho
de concentrado.
No es necesario vaciar la gasolina del motor si se añade un
estabilizador de combustible de acuerdo con las
instrucciones. Haga funcionar el motor durante 2 minutos
para hacer circular el estabilizador a través del sistema de
combustible. El motor y el combustible pueden entonces
mantenerse almacenados hasta 24 meses.
Si la gasolina del motor no ha sido tratada con un
estabilizador de combustible, debe vaciarse en un
recipiente aprobado. Haga funcionar el motor hasta que se
pare por falta de combustible. Se recomienda el uso de un
estabilizador de combustible en el recipiente de
almacenamiento para mantener la frescura.
Recomendamos usar protectores de oídos.
6.20.2 — Protección del motor
1. Cambie el aceite de motor.
2. Retire la bujía.
3. Vierta una cuchara sopera (5-10 cm3) de aceite de
motor limpio en el cilindro.
4. Tire de la cuerda de arranque varias veces para
distribuir el aceite en el cilindro.
5. Vuelva a instalar la bujía.
6. Tire de la cuerda de arranque lentamente hasta que
sienta resistencia. Esto cerrará las válvulas de manera
que la humedad no pueda ingresar en el cilindro del
motor. Devuelva suavemente la cuerda de arranque.
6.20.4 — Protección de la bomba
Para proteger la bomba contra daños causados por
depósitos minerales o congelación, use PumpSaver o RVantifreeze para tratar la bomba. Esto evita daños por
congelación y lubrica los pistones y juntas.
• No hacerlo dañará permanentemente su bomba y
pondrá su unidad en condición de inoperable.
• El daño por congelación no está cubierto por la garantía.
Para proteger la unidad de las temperaturas de
congelación:
1. Siga los pasos 1-3 de la sección anterior “Después de
cada uso" en la página 29.
2. Use protector para bombas para tratar la bomba. Esto
minimiza los daños por congelación y lubrica los
pistones y juntas.
3. Si no hay disponible protector para bombas, conecte
una sección de manguera de jardín de 3 pies (91 cm)
en el adaptador de entrada de agua. Vierta RVantifreeze (anticongelante sin alcohol) en la manguera.
Tire dos veces de la manija de la cuerda de arranque.
Desconecte la manguera de 3 pies.
4. Almacene la unidad en una zona limpia y seca.
6.21 — OTRAS INSTRUCCIONES DE
ALMACENAMIENTO
1. NO almacene combustible de una estación a la otra
salvo que haya sido tratado como se describió en
Protección del sistema de combustible.
2. Sustituya el recipiente de combustible si comienza a
oxidarse. El óxido y/o la suciedad en el combustible
pueden causar problemas si se usa con esta unidad.
3. Cubra la unidad con una cubierta protectora adecuada
que no retenga humedad.
Las cubiertas para almacenamiento pueden
ser inflamables.
6.20.3 — Cambio de aceite
Permita que el motor se enfríe y luego vacíe el aceite del
cárter. Llene con el grado recomendado. Vea "Cambio de
aceite de motor" en la página 27.
El aceite caliente puede provocar quemaduras.
Espere a que el motor se enfríe antes de vaciar
el aceite. Evite la exposición prolongada o
repetida de la piel al aceite usado. Lave
cuidadosamente con jabón las zonas
expuestas.
30 Hidrolavadora OneWASH™
• No coloque una cubierta para almacenamiento sobre una
hidrolavadora caliente.
• Deje que el equipo se enfríe durante un tiempo suficiente
antes de colocar la cubierta en el equipo.
4. Almacene la unidad en una zona limpia y seca.
6.22 — TRANSPORTE E INCLINACIÓN DE
LA UNIDAD
No haga funcionar, almacene o transporte la unidad con
un ángulo mayor que 15 grados.
Page 71

Sección 7 Resolución de problemas
7.1 — GUÍA DE RESOLUCIÓN DE PROBLEMAS
PROBLEMA CAUSA SOLUCIÓN
El detergente no se mezcla
con la pulverización.
El motor funciona bien sin
carga pero tiende a pararse
cuando se añaden cargas.
El motor no arranca; o
arranca y funciona con
dificultad.
1. El tubo para sifón de detergente no está
sumergido.
2. El tubo/filtro para sifón de detergente está
obstruido o rajado.
3. Está instalada la boquilla de alta presión.
1. La velocidad del motor es muy lenta. 1. Comuníquese con una instalación de servicio
1. Depurador de aire sucio.
2. Sin combustible.
3. Combustible vencido.
4. El cable de distribución no se encuentra
conectado a la bujía.
5. Bujía averiada.
6. Agua en el combustible.
7. Mezcla de combustible excesivamente rica.
1. Inserte el tubo para sifón de detergente en
detergente.
2. Limpie o sustituya el filtro/tubo para sifón de
detergente.
3. Sustituya con una boquilla de baja presión.
local para ajustar el mecanismo del acelerador.
1. Limpie o sustituya el filtro de aire.
2. Llene el tanque de combustible.
3. Vacíe el tanque de combustible, llene con
combustible nuevo.
4. Conecte el cable a la bujía.
5. Sustituya la bujía.
6. Vacíe el tanque de combustible, llene con
combustible nuevo.
7. Comuníquese con la instalación de servicio
local.
El motor se para durante el
funcionamiento.
Falta potencia del motor. 1. Filtro de aire sucio. 1. Sustituya el filtro de aire.
Hidrolavadora OneWASH™ 31
1. Sin combustible. 1. Llene el tanque de combustible.
Page 72

Pieza Núm. 0K6212 Rev B 12/02/14 © Generac Power Systems, Inc. Todos los derechos reservados Las especificaciones están sujetas a cambios sin aviso. No se permite la reproducción bajo ninguna forma sin previo consentimiento escrito de Generac Power Systems, Inc.
Generac Power Systems, Inc.
S45 W29290 Hwy. 59
Waukesha, WI 53189, EE. UU.
1-888-GENERAC (1-888-436-3722)
generac.com
Page 73

*Fabriqué aux États-Unis avec
des pièces nationales et étrangères
CONÇU ET FABRIQUÉ
AUX É.-U.*
Manuel du propriétaire
Laveuse à pression OneWASH™
www.generac.com ou 1-888-436-3722
Page 74

AVERTISSEMENT!
California Proposition 65
L’échappement du moteur et certains de ses composants sont reconnus par l’État de la Californie comme
pouvant causer le cancer, des anomalies congénitales ou d’autres problèmes reproducteurs.
AVERTISSEMENT!
California Proposition 65
Ce produit contient ou émet des produits chimiques reconnus par l’État de la Californie comme
pouvant causer le cancer, des anomalies congénitales ou d’autres problèmes reproducteurs.
ii
Page 75

Table des matières
Section 1 - Introduction............................................. 1
1.1 Introduction .......................................................... 1
Section 2 - Sécurité.................................................... 3
2.1 Règles de sécurité ............................................... 3
Section 3 - Informations générales .......................... 7
3.1 Se familiariser avec la laveuse à pression........... 7
3.2 Caractéristiques techniques du produit................ 8
3.3 Informations relatives aux émissions ................... 8
3.4 Fonctionnement à haute altitude.......................... 8
3.5 Déballage............................................................. 9
Section 4 - Réglage................................................. 11
4.1 Assemblage ....................................................... 11
4.2 Ajouter de l'huile de moteur ............................... 12
4.3 Carburant........................................................... 13
4.4 Raccorder le tuyau et l'alimentation en eau à la
pompe ................................................................ 14
4.5 Comment utiliser les buses................................ 15
Section 5 - Fonctionnement.................................... 19
5.1 Fonctionnement ................................................. 19
5.2 Emplacement de la laveuse à pression ............. 19
5.3 Liste de contrôle avant de démarrer le moteur .. 19
5.4 Comment démarrer votre laveuse à pression.... 20
5.5 Système de refroidissement automatique
(décharge thermique) .........................................21
5.6 Comment arrêter votre laveuse à pression........ 22
Section 6 - Entretien ................................................ 23
6.1 Recommandations en matière d'entretien ......... 23
6.2 Programme d'entretien ...................................... 23
6.3 Huile de la pompe.............................................. 24
6.4 Contrôle des émissions ..................................... 24
6.5 Réglages de la jauge de pression ..................... 24
6.6 Entretien de la laveuse à pression..................... 24
6.7 Vérifier et nettoyer le tamis de la prise d'eau..... 24
6.8 Vérifier les tuyaux à haute pression................... 24
6.9 Vérifier le tube de siphonnement du détergent.. 24
6.10 Vérifier le pistolet de pulvérisation ..................... 24
6.11 Entretien du réservoir à produits chimiques ...... 25
6.12 Entretien de la buse........................................... 25
6.13 Entretien du moteur ........................................... 26
6.14 Recommandations en matière
d'huile de moteur ....................................................... 26
6.15 Entretenir le filtre à air........................................ 28
6.16 Entretenir la bougie d'allumage ......................... 28
6.17 Inspecter le silencieux et le pare-étincelles ....... 29
6.18 Après chaque utilisation..................................... 30
6.19 Entreposage hivernal......................................... 30
6.20 Entreposage à long terme ................................. 30
6.21 Autres instructions en matière d'entreposage.... 31
6.22 Transport/inclinaison de l'appareil ..................... 32
Section 7 - Dépannage ............................................ 33
7.1 Guide de dépannage ......................................... 33
iii
Page 76

Page laissée en blanc intentionnellement.
iv
Page 77

Section 1 Introduction
1.1 — INTRODUCTION
Merci d'avoir acheté cette laveuse à pression fabriquée
par Generac Power Systems, Inc. Ce modèle de laveuse
à pression haute performance, refroidie à l'air et
entraînée par moteur fonctionne à 3100 psi. Les
appareils sont dotés de roues spécialement conçues,
d'une pompe à came axiale avec pistons en acier
inoxydable, d'un système de refroidissement
automatique, de buses à branchement rapide, d'un tuyau
à haute pression, d'un tuyau de siphonnement de
détergent et d'un réservoir à produits chimiques.
Le bon sens et un respect strict des consignes sont
essentiels afin de prévenir les accidents. L'opérateur
doit lire ce manuel et comprendre entièrement
l'ensemble des consignes et des avertissements avant
d'utiliser cet équipement. Si vous ne comprenez pas une
partie du manuel, veuillez communiquer avec le détaillant
agréé le plus près afin d'obtenir les procédures de
démarrage, d'utilisation et d'entretien. Le propriétaire est
responsable de faire une utilisation appropriée et
sécuritaire de l'équipement.
La laveuse à pression peut être utilisée de manière
sécuritaire, efficace et fiable seulement si celle-ci est
positionnée, utilisée et entretenue correctement. Avant
d'utiliser l'appareil, d'en effectuer l'entretien ou de
l'entreposer :
• Étudiez attentivement tous les avertissements se
trouvant dans ce manuel et sur le produit.
• Familiarisez-vous avec ce manuel et avec l'appareil.
• Veuillez consulter la section Assemblage de ce manuel
afin d'obtenir les consignes portant sur les procédures
d'assemblage finales. Suivez les consignes à la lettre.
Le fabricant ne peut pas anticiper toutes les
circonstances possibles pouvant être source de danger.
Les avertissements de ce manuel ainsi que ceux qui se
trouvent sur les étiquettes et les autocollants fixés sur
l'appareil ne préviennent pas tous les risques. Si vous
utilisez une procédure, une méthode de travail ou une
technique d'utilisation n'étant pas spécifiquement
recommandée par le fabricant, veuillez vous assurer de
sa sécurité pour les autres. Veuillez également vous
assurer que la procédure, la méthode de travail ou la
technique d'utilisation ne fait pas en sorte que la laveuse
à pression devienne non sécuritaire.
LES INFORMATIONS CONTENUES DANS LE
PRÉSENT DOCUMENT SONT BASÉES SUR DES
APPAREILS EN PRODUCTION AU MOMENT DE LA
PUBLICATION. GENERAC SE RÉSERVE LE DROIT DE
MODIFIER CE MANUEL À TOUT MOMENT.
Conservez ces consignes pour consultation future.
Si vous prêtez cet appareil à quelqu'un, prêtez-le-lui
toujours accompagné de ces instructions et du
manuel du propriétaire.
1.1.1 — Où nous trouver
Vous pouvez joindre le service à la clientèle de Generac
par téléphone, au 1-888-436-3722, ou sur Internet, au
www.generac.com. Veuillez noter les renseignements
importants relatifs à votre appareil dans le tableau
suivant pour toute référence future ou demande de
services d'entretien ou de réparation.
Numéro de modèle
Numéro de série
Date d'achat
Laveuse à pression OneWASH™ 1
Page 78

Page laissée en blanc intentionnellement.
Introduction
2 Laveuse à pression OneWASH™
Page 79

DANGER!
AVERTISSEMENT!
ATTENTION!
DANGER!
RebondVapeurs toxiques Décharge électrique
Injection de fluideChute
Feu Explosion Manuel du propriétaire
Pièces mobiles Objets projetés en l'air Surface chaude
Protections auditives
Section 2 Sécurité
2.1 — RÈGLES DE SÉCURITÉ
Des encarts DANGER, AVERTISSEMENT, MISE EN
GARDE et REMARQUE apparaissent ponctuellement
dans cette publication ainsi que sur les étiquettes et
autocollants fixés à la laveuse à pression pour attirer
l'attention du personnel sur des consignes propres à
certaines opérations pouvant présenter des risques si
elles sont réalisées de manière incorrecte ou inattentive.
Veuillez les respecter attentivement. Voici leur définition :
Indique une situation ou une action dangereuse qui,
si elle n'est pas évitée, entraînera la mort ou des
blessures graves.
Indique une situation ou une action dangereuse qui,
si elle n'est pas évitée, pourrait entraîner la mort ou
des blessures graves.
Surface glissante
Indique une situation ou une action dangereuse qui,
si elle n'est pas évitée, pourrait entraîner des
blessures légères ou moyennement graves.
REMARQUE :
Les remarques contiennent des informations
supplémentaires importantes à propos des
procédures et sont intégrées au corps du texte
de ce manuel.
Ces avertissements en matière de sécurité ne peuvent
éliminer les dangers qu'ils décrivent. Le bon sens et un
respect strict des consignes particulières lors du
fonctionnement et de l'entretien sont essentiels afin
de prévenir les accidents. Symboles de sécurité et
signification.
2.1.1 — Risques relatifs aux gaz
d'échappement
Le monoxyde de carbone généré lors de
l'utilisation peut entraîner la mort en quelques
minutes. N'utilisez JAMAIS l'appareil à
l'intérieur, dans un véhicule ou dans tout
endroit abrité MÊME SI les portes et les
fenêtres sont ouvertes. N'utilisez l'appareil
qu'à l'EXTÉRIEUR, loin des fenêtres, des
portes et des conduits d'aération.
Certains produits chimiques et détergents
peuvent être dangereux s'ils sont inhalés ou
ingérés. Ils peuvent entraîner des nausées
sévères, des évanouissements ou un
empoisonnement.
• N'utilisez la laveuse à pression qu'à l'EXTÉRIEUR.
• Un moteur en marche génère du monoxyde de carbone.
Laveuse à pression OneWASH™ 3
Page 80

Sécurité
DANGER!
AVERTISSEMENT!
AVERTISSEMENT!
• Le monoxyde de carbone est un gaz toxique inodore et
incolore. Respirer du monoxyde de carbone peut causer
des maux de tête, de la fatigue, des étourdissements, des
vomissements, de la confusion, des crises épileptiques,
des nausées, l'évanouissement ou la mort. Si vous
commencez à ressentir l'un de ces symptômes, rendezvous IMMÉDIATEMENT à l'air frais. Obtenez des soins
médicaux.
• Veillez à ce que les gaz d'échappement ne pénètrent pas
dans une zone confinée par une fenêtre, une porte, un
conduit d'aération ou toute autre ouverture. Décrivez à
toute personne se trouvant à l'intérieur les symptômes
causés par une exposition au monoxyde de carbone afin
qu'elle sache qu'elle doit se rendre à l'air frais si elle
commence à ressentir un malaise.
• Il est recommandé d'utiliser un détecteur de monoxyde
de carbone dans tout lieu occupé séparant la laveuse à
pression et l'occupant.
• NE JAMAIS démarrer ni faire tourner le moteur à
l'intérieur, dans un véhicule ou un espace fermé, même si
les fenêtres et les portes sont ouvertes.
• Utilisez un respirateur ou un masque s'il est possible que
vous inhaliez des gaz ou des vapeurs toxiques.
• Lisez toutes les instructions fournies avec le respirateur
ou le masque afin de vous assurer qu'il offre la protection
nécessaire contre l'inhalation de gaz ou de vapeurs
toxiques. Si vous commencez à ressentir l'un des
symptômes liés au monoxyde de carbone décrits plus
haut, rendez-vous IMMÉDIATEMENT à l'air frais.
• NE réparez JAMAIS un raccordement qui fuit à l'aide d'un
scellant, quel qu'il soit. Remplacez la bague en O ou le
joint.
• NE raccordez JAMAIS le tuyau à haute pression à la
rallonge de la buse.
• Veillez à ce que le tuyau à haute pression reste raccordé
à la pompe et au pistolet de pulvérisation lorsque le
système est sous pression.
• NE verrouillez JAMAIS le pistolet de pulvérisation en
position ouverte.
• NE laissez JAMAIS le pistolet de pulvérisation sans
surveillance lorsque la machine est en marche.
• N'utilisez JAMAIS un pistolet de pulvérisation qui n'est
pas muni d'un verrou ou d'une garde pour la gâchette en
place et en état de fonctionner.
• Soyez toujours certain que le pistolet de pulvérisation, les
buses et les accessoires sont correctement raccordés.
2.1.3 — Risque de décharge électrique
Risque d'électrocution.
Le contact avec une source d'alimentation
électrique peut causer une décharge
électrique ou des brûlures.
• NE pulvérisez JAMAIS à proximité d'une source
d'alimentation électrique.
2.1.2 — Risque relatif à l'injection de fluides
Ne pointez JAMAIS le pistolet de pulvérisation
vers des gens, des animaux ou des appareils
électriques. Cela pourrait causer des blessures
graves ou même la mort. Pointez TOUJOURS le
pistolet de pulvérisation dans une direction
sécuritaire et appuyez sur la gâchette du
pistolet de pulvérisation pour libérer la haute
pression chaque fois que vous éteignez
l'appareil. Enclenchez le verrou de la gâchette
lorsqu'il n'est pas utilisé.
• Le jet d'eau à haute pression produit par cet appareil peut
déchirer la peau et les tissus sous-cutanés, entraînant
des blessures graves et possiblement une amputation ou
la mort. Le pistolet de pulvérisation emprisonne de l'eau
sous haute pression, même lorsque le moteur est éteint
et que l'alimentation en eau est coupée, ce qui peut
causer des blessures.
• NE laissez JAMAIS un ENFANT utiliser la laveuse à
pression ou jouer autour de l'appareil. Cet appareil N'EST
PAS un jouet.
• NE réparez JAMAIS le tuyau à haute pression.
Remplacez-le.
2.1.4 — Risque relatif aux surfaces chaudes
Un contact avec la région du silencieux
pourrait causer de graves brûlures. La
chaleur et les gaz du silencieux peuvent
enflammer des combustibles ou des
structures, ou endommager le réservoir
de carburant et causer un incendie.
• NE touchez PAS aux pièces chaudes et ÉVITEZ les
gaz d'échappement chauds.
• Laissez l'équipement refroidir avant d'y toucher.
• Gardez un dégagement d'au moins 152 cm (5 pieds)
sur chaque côté de la laveuse à pression, dont un
dégagement vertical au-dessus de l'appareil.
• Le fait d'utiliser ou d'opérer l'appareil sous un couvert
forestier ou dans un environnement de brousse ou
d'herbes constitue une violation de l'article 4442 du
California Public Resource Code (Code des
ressources publiques de l'État de la Californie), à
moins que le système d'échappement de l'appareil ne
soit doté d'un pare-étincelles maintenu en état de
marche effectif, comme énoncé dans l'article 4442.
D'autres juridictions fédérales ou étatiques peuvent
avoir des lois similaires. Communiquez avec le
fabricant, le détaillant ou le concessionnaire de
4 Laveuse à pression OneWASH™
Page 81

Sécurité
AVERTISSEMENT!
AVERTISSEMENT!
AVERTISSEMENT!
AVERTISSEMENT!
l'équipement original pour l'installation d'un pareétincelles conçu pour le système d'échappement de
cet appareil.
• Les pièces de rechange doivent être les mêmes que
les pièces d'origine et elles doivent être installées de la
même façon.
2.1.5 — Risques d'incendie
Le carburant et ses vapeurs sont
hautement inflammables et explosifs.
Un incendie ou une explosion pourrait
entraîner des brûlures graves et même
la mort.
LORS DE L'AJOUT OU DE LA VIDANGE DE
CARBURANT
• Mettez la laveuse à pression en position ARRÊT
(« OFF ») et laissez-la refroidir pendant deux (2)
minutes avant de retirer le bouchon de l'orifice de
remplissage de carburant. Dévissez doucement le
bouchon afin d'éliminer la pression accumulée dans le
réservoir.
• Procédez au remplissage et à la vidange du carburant
à l'extérieur.
• NE remplissez PAS trop le réservoir. Prévoyez de
l'espace pour l'expansion du carburant.
• Si une fuite de carburant se produit, attendez que le
carburant se soit évaporé avant de faire démarrer le
moteur.
• Gardez le carburant à distance des étincelles, des
flammes nues, des veilleuses et de toute autre source
d'inflammation.
• N'ALLUMEZ PAS de cigarette et ne fumez pas.
LORS DU DÉMARRAGE DE L'APPAREIL
• Assurez-vous que la bougie d'allumage, le silencieux,
le bouchon du carburant et le filtre à air sont en place.
• NE démarrez PAS le moteur lorsque la bougie
d'allumage n'est pas en place.
LORS DE L'UTILISATION DE L'APPAREIL
• N'inclinez PAS le moteur ou l'appareil à un angle
pouvant entraîner une fuite de carburant.
• NE pulvérisez PAS de liquides inflammables.
LORS DU TRANSPORT OU DE LA RÉPARATION DE
L'APPAREIL
• Transportez/réparez l'appareil lorsque le réservoir de
carburant est VIDE.
• Débranchez la bougie d'allumage.
LORS DE L'ENTREPOSAGE DU CARBURANT OU
DE L'ÉQUIPEMENT AVEC DU CARBURANT DANS
LE RÉSERVOIR
• Rangez le carburant dans un endroit éloigné des
chaudières, cuisinières, chauffe-eau, sécheuses et
autres appareils ménagers munis d'une veilleuse ainsi
que des autres sources d'allumage, car ils pourraient
enflammer les vapeurs de carburant.
2.1.6 — Risque pour l'ouïe
Le port de protections auditives est
recommandé.
2.1.7 — Risque de chute
L'utilisation de la laveuse à pression
peut créer des flaques d'eau et des
surfaces glissantes. L'effet de rebond
du pistolet de pulvérisation pourrait
vous faire chuter.
• N'utilisez l'appareil que sur une surface de niveau.
• La région à laver devrait être dotée d'une inclinaison et
d'un drainage adéquats pour réduire la probabilité de
chutes dues aux surfaces glissantes.
• N'utilisez pas l'appareil sur une surface surélevée, où
l'effet de rebond pourrait entraîner une chute grave.
• Tenez le pistolet de pulvérisation fermement à deux
mains lorsque vous utilisez le jet à haute pression afin
d'éviter de vous blesser en raison de l'effet de rebond
du pistolet.
2.1.8 — Risque relatif aux pièces mobiles
Le démarreur et les autres pièces rotatives
peuvent enchevêtrer les mains, les cheveux,
les vêtements et les accessoires.
• N'utilisez JAMAIS la laveuse à pression sans enceinte
ou couvercle de protection.
• NE portez PAS de vêtements amples, de bijoux ou
d’autres éléments pouvant s'enchevêtrer dans le
démarreur ou les autres pièces rotatives.
• Si vous avez les cheveux longs, attachez-les; retirez
vos bijoux.
Laveuse à pression OneWASH™ 5
Page 82

Sécurité
AVERTISSEMENT!
AVERTISSEMENT!
AVERTISSEMENT!
2.1.9 — Risque relatif à l'effet de rebond
L'effet de rebond (rétraction rapide) de la
corde du démarreur peut entraîner des
blessures corporelles. L'effet de rebond
entraînera la main et le bras vers l'appareil
plus rapidement que vous ne pourriez le
lâcher. Cela pourrait entraîner des fractures
des os, des ecchymoses ou des entorses.
• NE tirez JAMAIS sur la corde du démarreur sans au
préalable avoir relâché la pression contenue dans le
pistolet de pulvérisation.
• Pour relâcher la pression emprisonnée, pointez le
pistolet dans une direction sécuritaire et libérez la
pression en tirant/actionnant la gâchette du pistolet de
pulvérisation.
• Lorsque vous allumez le moteur, tirez doucement sur
la corde jusqu'à ce que vous sentiez une résistance,
puis tirez rapidement pour éviter l'effet de rebond.
• Après chaque tentative de démarrage où le moteur n'a
pas démarré, pointez toujours le pistolet de pulvérisation
dans une direction sécuritaire et appuyez sur la gâchette
du pistolet pour relâcher la haute pression.
• Tenez le pistolet de pulvérisation fermement à deux
mains lorsque vous utilisez le jet à haute pression afin
d'éviter de vous blesser en raison de l'effet de rebond
du pistolet.
2.1.10 — Risques d'étincelles
Un allumage non intentionnel peut
entraîner un incendie ou une décharge
électrique.
LORSQUE VOUS EFFECTUEZ UNE
MISE AU POINT OU UNE RÉPARATION
SUR VOTRE laveuse à pression.
• Débranchez le câble de la bougie d'allumage et
placez-le de manière à ce qu'il ne puisse pas entrer en
contact avec la bougie.
LORSQUE VOUS TESTEZ L'ALLUMAGE DU MOTEUR
• Utilisez un testeur de bougie d'allumage approuvé.
• NE vérifiez PAS l'allumage si la bougie d'allumage a
été retirée.
2.1.11 — Risques d'éclaboussures
• Portez toujours des lunettes à coques étanches lors de
l'utilisation de l'équipement ou à proximité de
l'équipement lors de son utilisation.
• Assurez-vous de porter des lunettes de protection à
coques étanches avant de démarrer la laveuse à
pression.
• NE remplacez JAMAIS des lunettes à coques
étanches par des lunettes de sécurité.
REMARQUE :
Le jet à haute pression peut endommager les articles
fragiles, dont le verre.
• NE POINTEZ pas le pistolet de pulvérisation vers du
verre lors de l'utilisation de la buse rouge (0°) MAX.
• Ne pointez JAMAIS le pistolet de pulvérisation vers
des gens, des animaux, des appareils électriques ou
des plantes.
REMARQUE :
Un traitement inapproprié de la laveuse à pression peut
entraîner des dommages et réduire sa durée de vie.
• Si vous avez des questions quant à l'utilisation prévue,
posez-les au détaillant ou communiquez avec un
centre de services agréé.
• N'utilisez JAMAIS des appareils comportant des pièces
défectueuses ou manquantes, ou sans enceinte ou
couvercle de protection.
• NE court-circuitez AUCUN dispositif de sécurité sur cet
appareil.
• Ne faites PAS fonctionner la laveuse à pression audelà des pressions nominales.
• NE modifiez D'AUCUNE FAÇON la laveuse à
pression.
• Avant de mettre en marche la laveuse à pression par
temps froid, vérifiez chacune des pièces de l'équipement
afin de veiller à ce qu'aucune glace ne se soit formée.
• NE déplacez JAMAIS l'appareil en tirant sur les tuyaux.
Utilisez la poignée de l'appareil.
• Vérifiez le système d'alimentation en carburant afin de
détecter des fuites ou des signes de détérioration,
comme un tuyau éraillé ou spongieux, des pinces
desserrées ou manquantes, ou encore un réservoir ou
un bouchon endommagé. Réparez toutes les
défectuosités avant d'utiliser la laveuse à pression.
• Cet équipement est conçu pour être utilisé
UNIQUEMENT avec des pièces Generac autorisées.
Si l'équipement est utilisé avec des pièces NON
conformes aux spécifications minimales, l'utilisateur
devra en assumer tous les risques et responsabilités.
Risque de blessure aux yeux. Le jet de
pulvérisation peut éclabousser ou propulser
des objets.
6 Laveuse à pression OneWASH™
Page 83

I
U
O
Q
P
S
D
R
S
W
V
F
H
B
A
Section 3 Informations générales
3.1 — SE FAMILIARISER AVEC LA LAVEUSE
À PRESSION
Lisez ce manuel du propriétaire et les règles de sécurité
avant d'utiliser votre laveuse à haute pression. Si vous
prêtez cet appareil à quelqu'un, prêtez-le-lui TOUJOURS
accompagné de ces instructions ET du manuel du
propriétaire. Comparez les illustrations avec votre
laveuse à pression afin de vous familiariser avec
l'emplacement des multiples commandes (Figure 3-1).
Conservez ce manuel pour référence ultérieure. Des
manuels du propriétaire de remplacement peuvent être
imprimés depuis le site Web de Generac.
A -Pistolet de pulvérisation — Contrôle l'application
d'eau sur la surface de nettoyage à l'aide d'un
dispositif de déclenchement. Comprend un verrou
pour la gâchette.
B -Lance à branchement rapide — Vous permet de
passer d'une buse à l'autre.
C - Tuyau à haute pression — Raccordez une extrémité à
la pompe à eau et l'autre au pistolet de pulvérisation.
D -Lanceur à rappel — Utilisé pour démarrer le moteur.
E - Orifice de remplissage d'huile — Permet de
vérifier le niveau et d'ajouter de l'huile de moteur.
F - Filtre à air — Protège le moteur en filtrant la
poussière et les débris de l'air d'admission.
G-Pompe — Crée une forte pression.
H -Clapet de décharge thermique —Lorsque l'eau
circulant dans la pompe atteint 51,66 °C (125 °F), le
clapet de décharge thermique déverse l'eau de la
pompe sur le sol. Cela permet de prévenir les
dommages internes à la pompe.
I -Interrupteur marche/arrêt du moteur — Placez cet
interrupteur à « MARCHE » (« ON ») avant d'utiliser
le lanceur à rappel. Placez l'interrupteur à
« ARRÊT » (« OFF ») pour éteindre le moteur.
J -Clapet de marche à vide — Contrôle la sortie de
haute pression.
K -Sortie haute pression — Branchement pour le
tuyau à haute pression.
L - Prise d'eau — Branchement pour le tuyau d'arrosage.
M -Réservoir de carburant — Remplissez le réservoir
avec de l'essence sans plomb ordinaire. Laissez
toujours de l'espace pour l'expansion du carburant.
O -Étrangleur — Prépare un moteur froid au démarrage.
P - Jauge de pression — Assure une puissance de
nettoyage optimale pour chacune des applications
souhaitées.
Q-Buses — Injection de produits chimiques, soufflage
(0°), lavage (25°) et détergent pour plusieurs
applications de nettoyage à haute pression.
R -Réservoir à produits chimiques — Un réservoir
pouvant être vidangé contenant les détergents
pouvant être utilisés de manière sécuritaire avec la
laveuse à pression et qui seront siphonnés vers le jet
à basse pression.
S - Instructions de préparation/démarrage —
Permettent de déterminer la procédure appropriée pour
configurer et démarrer/éteindre la laveuse à pression.
T - Bouchon de vidange d'huile — Utilisé pour
vidanger l'huile de moteur.
U -Emplacement du numéro de série
V - Bouchon de remplissage du réservoir à produits
chimiques
W -Bouchon de vidange du réservoir à produits
chimiques
Laveuse à pression OneWASH™ 7
Figure 3-1. Caractéristiques et commandes
Page 84

Informations générales
3.1.1 — ÉLÉMENTS NON ILLUSTRÉS
Étiquette d'identification (sur le boîtier du ventilateur
du moteur) — Affiche le numéro du modèle et le numéro
de série de la laveuse à pression. Veillez à avoir ces
informations sous la main lors de demandes
d'assistance.
Tube/filtre de siphonnement de détergents — Utilisé
pour siphonner des détergents pouvant être utilisés de
manière sécuritaire avec la laveuse à pression dans le jet
à basse pression.
3.2 — CARACTÉRISTIQUES TECHNIQUES
DU PRODUIT
Pression — (psi/bar)................................. 3100/213 max.
Débit — (gal/min/l/min) ............................... 2,8/10,6 max.
Température de l'alimentation
en eau — (°F/°C).......................................... 100/38 max.
Longueur du tuyau — (pieds/mètres) ..................... 30/9,1
Réservoir(s) à produits chimiques —
Quantité par unité........................................................... 1
Réservoir à produits chimiques —
Capacité (gal/l) .................................................. 0,75/2,84
Buses — Quantité par unité ........................................... 3
Longueur de la lance (pouces/cm) .......................... 20/51
Pistolet................................................................Standard
Cylindrée — (po³/cm³) ........................................ 12,9/212
Type de bougie d'allumage................F7TC ou équivalent
Écartement des électrodes — (pouces/mm) ........ 0,028 à
0,031/0,70 à 0,80
Capacité du réservoir de carburant —
(pintes/litres) .......................................................... 3,7/3,5
Capacité du réservoir d'huile — (oz/litres).............. 20/0,6
Interrupteur marche/arrêt.............................................Oui
3.3 — INFORMATIONS RELATIVES AUX
ÉMISSIONS
risque d'augmenter ces dernières et peut constituer une
violation des lois fédérales ou californiennes. Ce qui suit
constitue une liste non exhaustive d'altérations :
• l'enlèvement ou l'altération de toute pièce des
systèmes d'admission, d'échappement ou de carburant
• l'altération ou la défaillance de la tringlerie du
régulateur ou du mécanisme de régulation de vitesse
qui provoquerait le fonctionnement du moteur hors des
paramètres pour lesquels il est conçu
Si vous avez connaissance de l'un des symptômes
suivants, faites vérifier et réparer votre moteur par votre
fournisseur de services d’entretien :
• démarrage difficile ou calage après le démarrage
• ralenti irrégulier
• ratés d'allumage ou effets de retour de flamme sous
charge
• postcombustion (retour de flamme)
• fumée d'échappement noire ou importante
consommation de carburant
3.4 — FONCTIONNEMENT À HAUTE ALTITUDE
Le système de carburant de ce moteur peut être sensible
à un fonctionnement à haute altitude. Vous pouvez
garantir son bon fonctionnement en installant une trousse
pour utilisation en altitude lorsque cela est nécessaire.
Consultez le tableau suivant pour savoir quand la trousse
pour utilisation en altitude est nécessaire. Si la trousse
pour utilisation en altitude adaptée n'est pas installée, le
fonctionnement de ce moteur peut augmenter les
émissions du moteur et réduire les économies de
carburant et les performances. Les trousses peuvent être
achetées chez tous les détaillants et doivent être installées
par une personne qualifiée.
Altitude* Numéro de trousse psi
L'Agence américaine de protection de l'environnement
(et le Comité des ressources de l'air de la Californie pour
les appareils certifiés selon les normes CA) exige que ce
moteur soit conforme aux normes d'émissions
d'échappement et par évaporation. Trouvez l'étiquette
contenant les informations au sujet de la conformité aux
normes d'émissions apposée sur le moteur pour
déterminer quelles sont les normes satisfaites par le
moteur et quelle est la garantie applicable en la matière.
Ce moteur est certifié pour les normes d'émission
applicables sur l'essence. Il est important de respecter
les spécifications d'entretien décrites dans la section
Entretien afin de s'assurer que le moteur reste conforme
aux normes d'émission applicables pendant toute sa
durée de vie. Ce moteur utilise les paramètres d'une
carburation pauvre ainsi que d'autres systèmes
permettant de réduire les émissions. Toute manipulation
ou altération du système de contrôle des émissions
8 Laveuse à pression OneWASH™
0 - 1524 m
(0 - 5000 pi)
1524 - 2133 m
(5000 - 7000 pi)
* Hauteur au-dessus du niveau de la mer.
Si la trousse d'altitude a été installée et que le moteur
doit fonctionner à une altitude où celle-ci n'est pas
requise, il est nécessaire de remettre le moteur dans
sa configuration d'origine. Le fait de faire fonctionner
le moteur à des altitudes inférieures lorsque la
trousse est installée peut provoquer sa surchauffe et
sérieusement l'endommager; cela peut également
réduire les performances et augmenter les émissions.
Non requise 3100
0K2016 3100
REMARQUE :
Page 85

Informations générales
3.5 — DÉBALLAGE
1. Retirez le sac de pièces, les accessoires et les
plaquettes compris avec la laveuse à pression.
2. Ouvrez complètement le carton en coupant chaque
coin de haut en bas.
3. Assurez-vous d'avoir tous les éléments avant de
procéder à l'assemblage.
• Unité principale
• Ensemble de la poignée
• Tuyau à haute pression
• Tuyau de siphonnement et filtre
• Pistolet de pulvérisation
• Lance avec raccord de branchement rapide
• Burette
• Crochet pour tuyau en fil formé
• Sac de pièces (comprenant les éléments
suivants) :
— Manuel du propriétaire
— Déclaration de garantie
— Déclaration de garantie en matière
d'émissions
— Déclaration de garantie en matière
d'émissions de carbone
— Fiche d'inscription du propriétaire
— Sac contenant des buses à code de couleur
— Clé hexagonale de 4 mm
— Vis (qté : 4)
— Pinces à coulisse (qté : 4)
— Support de pistolet en plastique
— Support de lance en plastique
4. Si des éléments sont manquants, veuillez
communiquer avec le service à la clientèle de
Generac au 1-888-436-3722. Veillez à avoir sous la
main le numéro de modèle et le numéro de série
inscrits sur l'étiquette de données de votre appareil
lors des demandes d'assistance.
5. Remplissez et envoyez la fiche d'inscription. Écrivez
le numéro de modèle, le numéro de série et la date
de l'achat dans le tableau se trouvant dans la section
« Où nous trouver ».
Laveuse à pression OneWASH™ 9
Page 86

Page laissée en blanc intentionnellement.
Informations générales
10 Laveuse à pression OneWASH™
Page 87

B
A
Section 4 Réglage
4.1 — ASSEMBLAGE
Lisez le manuel du propriétaire au complet avant
d'essayer d'assembler votre laveuse à pression. Si vous
éprouvez des problèmes lors de l'assemblage, veuillez
téléphoner au service à la clientèle de Generac au
1-888-436-3722. Veillez à avoir sous la main le numéro
de modèle et le numéro de série inscrits sur l'étiquette
de données de votre appareil lors des demandes
d'assistance.
1. Installez le crochet du pistolet sur l'ensemble de la
poignée au moyen des (2) pinces à coulisse fournies.
Alignez les trous et insérez les pinces à coulisse
dans les trous jusqu'à ce qu'elles soient au même
niveau que le crochet du pistolet (Figure 4-1).
Figure 4-2. Attacher le crochet de la lance à
l'appareil
3. Placez l'ensemble de la poignée (A) sur les supports
arqués (B). Laissez la poignée glisser en place.
Repérez les (4) vis et la clé hexagonale. Installez les
quatre vis à l'aide de la clé hexagonale fournie,
comme illustré à la (Figure 4-3).
Figure 4-1. Attacher le crochet du pistolet à
l'ensemble de la poignée
2. Installez le crochet de la lance au châssis de
l'appareil à l'aide des (2) pinces à coulisses fournies.
Alignez les trous et insérez les pinces à coulisse
dans les trous jusqu'à ce qu'elles soient au même
niveau que le crochet du pistolet (Figure 4-2).
Figure 4-3. Attacher la poignée à l'appareil
Laveuse à pression OneWASH™ 11
Page 88

Réglage
A
4. Installez le crochet du tuyau (Figure 4-4).
Figure 4-4. Installer le crochet du tuyau
5. Insérez les buses à code de couleur dans les
espaces prévus sur le panneau avant (Figure 4-5).
7. Placez la corde du lanceur à rappel dans le support,
comme illustré (Figure 4-7).
Figure 4-7. Crochet de la corde du lanceur à
rappel
8. Attachez le tube de siphonnement à l'emplacement A
(Figure 4-8).
Figure 4-5. Insérer les buses
6. Placez le pistolet de pulvérisation / la rallonge de la
lance sur le support de pistolet, comme illustré
(Figure 4-6).
Figure 4-6. Pistolet/lance
Figure 4-8. Emplacement du tube de
siphonnement
4.2 — AJOUTER DE L'HUILE DE MOTEUR
1. Placez la laveuse à pression sur une surface plane
et de niveau.
2. Nettoyez la zone entourant l'orifice de remplissage
d'huile et retirez le bouchon/jauge orange de l'orifice
de remplissage d'huile.
3. À l'aide de l'entonnoir, versez l'huile lentement dans
l'orifice de remplissage. Voir la section “Entretien”
pour connaître les recommandations en matière de
type d'huile.
REMARQUE :
Certains appareils comportent plus d'un orifice de
remplissage d'huile. Dans ces cas, l'utilisation d'un
seul de ces orifices de remplissage d'huile est
nécessaire.
12 Laveuse à pression OneWASH™
Page 89

Réglage
AVERTISSEMENT!
Plage de niveaux
d'huile acceptables
4. Vérifiez de façon périodique jusqu'à ce que le niveau
d'huile se situe entre les marques « L » et « H » sur
la jauge (Figure 4-9). Ne remplissez pas trop le
réservoir.
Figure 4-9. Jauge
REMARQUE :
Toute tentative de lancer ou de démarrer le moteur
avant qu'il ait fait l'objet d'un entretien adéquat avec
la quantité d'huile recommandée peut entraîner une
panne de moteur.
5. Replacez le bouchon/jauge et serrez complètement.
4.3 — CARBURANT
Le carburant doit répondre à ces exigences :
• De l'essence propre, fraîche et sans plomb.
• Un minimum de 87 octanes / indice d'octane de 87
(IOR de 91).
• Il est aussi possible d'utiliser de l'essence comportant
jusqu'à 10 % d'éthanol (essence-alcool).
REMARQUE :
Évitez tout dommage à la laveuse à pression. Le nonrespect du manuel du propriétaire quant aux
recommandations en matière de carburant entraînera
l'annulation de la garantie.
• N'utilisez PAS de l'essence non approuvée comme
de l'E85.
• NE mélangez PAS de l'huile à l'essence.
• Ne modifiez PAS le moteur afin qu'il puisse fonctionner
avec d'autres types de carburants.
Afin de protéger le système de carburant contre la
gélification, mélangez du stabilisateur de carburant lors de
l'ajout de carburant. Voir la section Entreposage. Les
carburants ne sont pas tous semblables. Si vous rencontrez
des difficultés lors du démarrage ou des problèmes de
performance après avoir ajouté du carburant, changez de
fournisseur ou de marque de carburant.
Le carburant et ses vapeurs sont
hautement inflammables et explosifs. Un
incendie ou une explosion pourrait entraîner des brûlures graves et même la mort.
4.3.1 — LORS DE L'AJOUT DE CARBURANT
• Mettez la laveuse à pression en position ARRÊT
(« OFF ») et laissez-la refroidir pendant deux (2)
minutes avant de retirer le bouchon de l'orifice de
remplissage de carburant. Dévissez doucement le
bouchon afin d'éliminer la pression accumulée dans le
réservoir.
• Remplissez le réservoir de carburant à l'extérieur.
• NE remplissez PAS trop le réservoir. Prévoyez de
l'espace pour l'expansion du carburant.
• Si une fuite de carburant se produit, attendez que le
carburant se soit évaporé avant de faire démarrer le
moteur.
• Gardez le carburant à distance des étincelles, des
flammes nues, des veilleuses et de toute autre source
d'inflammation.
• N'ALLUMEZ PAS de cigarette et ne fumez pas.
1. Nettoyez la zone entourant le bouchon de l'orifice de
remplissage; retirez le bouchon.
2. Ajoutez lentement de l'essence ordinaire sans plomb
dans le réservoir de carburant. Faites attention à ne
pas trop remplir le réservoir de carburant. Afin de
laisser de l'espace pour l'expansion du carburant,
remplissez le réservoir jusqu'au bas du filtre
(Figure 4-10).
3. Remettez le bouchon de remplissage et attendez
que tout le carburant déversé s'évapore avant de
démarrer le moteur.
Figure 4-10. Ajouter du carburant
Laveuse à pression OneWASH™ 13
Page 90

4.4 — RACCORDER LE TUYAU ET
AVERTISSEMENT!
A
L'ALIMENTATION EN EAU À LA POMPE
REMARQUE :
NE faites PAS tourner la pompe sans que
l'alimentation en eau soit raccordée et ouverte. Tout
dommage à l'équipement causé par le non-respect de
cette instruction entraînera l'annulation de la garantie.
REMARQUE :
Retirez et jetez le bouchon d'expédition de la prise
d'eau de la pompe avant de raccorder le tuyau.
1. Faites circuler de l'eau à l'aide de votre tuyau
d'arrosage pendant 30 secondes afin d'éliminer
tout débris.
2. Avant de raccorder un tuyau d'arrosage à la prise
d'eau, inspectez le tamis de la prise d'eau (A)
(Figure 4-11). Nettoyez le tamis s'il contient des
débris ou faites-le remplacer s'il est endommagé. NE
faites PAS fonctionner la laveuse à pression si le
tamis de la prise d'eau est endommagé.
Réglage
Figure 4-11. Inspecter le tamis de la prise
d'eau
3. Raccordez le tuyau d'arrosage (sa longueur ne doit
pas dépasser 15 mètres [50 pieds]) à la prise d'eau
(Figure 4-12). Serrez à la main.
IMPORTANT : NE siphonnez PAS d'eau stagnante pour
l'alimentation en eau. Utilisez UNIQUEMENT de l'eau
froide (à moins de 37,77 °C [100 °F]). L'alimentation en
eau doit être adéquate afin d'assurer une alimentation
supérieure à 14,4 litres (3,8 gallons) par minute et une
pression minimale de 30 psi.
REMARQUE :
L'utilisation d'une valve de retenue (valve
d'isolement de casse-vide ou clapet antiretour) à
l'entrée de la pompe peut causer des dommages à la
pompe ou au raccord d'entrée.
• Une longueur de tuyau d'arrosage d'au moins 3 mètres
(10 pieds) DOIT être libre de toute restriction entre
l'entrée de la laveuse à pression et tout dispositif,
comme une valve d'isolement de casse-vide ou un
clapet antiretour.
• Tout dommage à l'équipement causé par le nonrespect de cette instruction entraînera l'annulation
de la garantie.
Figure 4-12. Raccorder le tuyau d'arrosage
Risque de blessure aux yeux. Le jet de
pulvérisation peut éclabousser ou propulser
des objets.
• Portez toujours des lunettes à coques étanches lors de
l'utilisation de l'équipement, ou à proximité de
l'équipement lors de son utilisation.
• Assurez-vous de porter des lunettes de protection à
coques étanches avant de démarrer la laveuse à
pression.
• NE remplacez JAMAIS des lunettes à coques
étanches par des lunettes de sécurité.
4. Raccordez la lance au pistolet de pulvérisation
(Figure 4-13). Serrez à la main.
14 Laveuse à pression OneWASH™
Page 91

Réglage
DANGER!
ATTENTION!
DANGER!
Figure 4-13. Attacher la lance
5. Attachez l'extrémité du tuyau à haute pression à la
base du pistolet de pulvérisation (Figure 4-14).
Serrez à la main.
Figure 4-15. Raccorder le tuyau à haute
pression à la pompe
7. Ouvrez l'eau et appuyez sur la gâchette pour purger
l'air du système de pompage (Figure 4-16).
Figure 4-14. Raccorder le tuyau au pistolet
de pulvérisation
Le jet d'eau à haute pression produit par cet
appareil peut déchirer la peau et les tissus
sous-cutanés, entraînant des blessures
graves et possiblement l'amputation.
• NE raccordez JAMAIS le tuyau à haute pression à la
lance.
• Veillez à ce que le tuyau à haute pression reste
raccordé à la pompe et au pistolet de pulvérisation
lorsque le système est sous pression.
• Soyez toujours certain que le pistolet de pulvérisation, les
buses et les accessoires sont correctement raccordés.
6. Raccordez le tuyau à haute pression à la pompe
(déroulez le tuyau avant de le raccorder à la pompe
ou au pistolet de pulvérisation) (Figure 4-15). Serrez
à la main.
Le tuyau peut être endommagé s'il entre en
contact avec un moteur ou un silencieux chaud.
Figure 4-16. Appuyer sur la gâchette
4.5 — COMMENT UTILISER LES BUSES
La fonction de branchement rapide de la lance à buse
vous permet d'utiliser différents types de buses. Les
buses peuvent être remplacées lorsque la laveuse à
pression fonctionne, une fois que la gâchette du pistolet
de pulvérisation est verrouillée en position sécurisée. Les
buses font varier la pression et le tracé du jet.
• Pour un nettoyage d'une efficacité optimale, maintenez
la buse à une distance de 20 à 61 cm (8 à 24 po) de la
surface à nettoyer.
• Si vous approchez trop la buse, particulièrement lors
de l'utilisation d'une buse à haute pression (ROUGE),
vous pourriez endommager la surface.
Le jet d'eau à haute pression produit par cet
appareil peut déchirer la peau et les tissus
sous-cutanés, entraînant des blessures
graves et possiblement l'amputation.
Laveuse à pression OneWASH™ 15
Page 92

Réglage
ATTENTION!
DÉLICAT
2000 PSI
HAUT RENDEMENT
3100 PSI
CONTRÔLE DE LA PRESSION
MIN
MAR
CHE
ARRÊ
MAX
PRESS
• NE changez JAMAIS de buse sans que le verrou de la
gâchette soit enclenché sur le pistolet de pulvérisation.
• NE faites JAMAIS tourner la buse lors de la pulvérisation.
BUSE PSI GAL/MIN
Soufflage 3100 2.4
Lavage 2600 2.8
La laveuse à pression OneWash est équipée d'une jauge
de pression afin d'offrir une puissance de nettoyage
optimale pour chaque application (Figure 5-3).
1. Tirez sur le collet de la lance à branchement rapide
(Figure 4-17) et installez la buse de lavage VERTE
(Figure 4-18) pour les applications de lavage
suivantes.
Icône de maison – Ce réglage est parfait
pour nettoyer les parements en vinyle et en
aluminium de votre domicile, car il offre le
bon équilibre de puissance et de débit pour
nettoyer efficacement ces types de surfaces.
Icône de clôture en bois – Ce réglage est
parfait pour nettoyer les clôtures et les
parements en bois de votre domicile, car il
offre le bon équilibre de puissance et de
débit pour nettoyer efficacement ces types
de surfaces.
Icône de brique – Ce réglage est parfait
pour nettoyer les briques, le béton et les
matériaux de maçonnerie, car il offre le bon
équilibre de puissance et de débit pour
nettoyer efficacement ces types de surfaces.
Figure 4-17. Buses
Figure 4-18. Buse de lavage à pression
(verte)
2. Tournez la jauge de pression de manière à ce qu'elle
corresponde à ce que vous souhaitez laver
(Figure 4-19).
Icône de voiture – Ce réglage est parfait
pour nettoyer des voitures, des bateaux et
des VR, car il offre le bon équilibre de
puissance et de débit pour nettoyer
efficacement ces types de surfaces.
Figure 4-19. Jauge de pression
3. Afin de faire disparaître les taches tenaces sur le
béton ou les surfaces maçonnées, utilisez la buse de
soufflage rouge sur la surface tachée (Figure 4-20).
Cet embout (buse rouge) peut endommager la
surface de travail si elle est maintenue trop
près ou si elle reste au même endroit pendant
une longue période.
Figure 4-20. Buse de soufflage (rouge)
16 Laveuse à pression OneWASH™
Page 93

Réglage
ATTENTION!
• Lorsque vous appliquez du détergent, utilisez
uniquement la buse noire (Figure 4-21). N'utilisez que
des détergents ou des savons pouvant être utilisés de
manière sécuritaire avec la laveuse à pression afin
d'aider à dissoudre la crasse ou les taches tenaces sur
une grande variété de surfaces.
Figure 4-21. Buse à détergent (noire)
4.5.1 — Lavage et application de détergent
Les produits chimiques peuvent causer des
lésions corporelles et des dommages matériels.
• N'utilisez JAMAIS de liquide caustique avec votre
laveuse à pression.
• Utilisez UNIQUEMENT des détergents ou des savons
pouvant être utilisés de manière sécuritaire avec la
laveuse à pression. Suivez l'ensemble des instructions
du fabricant.
Veuillez suivre les étapes suivantes afin d'appliquer du
détergent :
1. Vérifiez l'utilisation des buses.
2. Enlevez le bouchon du réservoir à produits
chimiques (Figure 4-22).
3. Préparez la solution détergente requise pour le travail.
Figure 4-22. Réservoir à produits chimiques
et couvercle
4. Insérez le filtre à l'extrémité du tube de
siphonnement à travers le trou dans le bouchon du
réservoir à produits chimiques (Figure 4-23).
5. Assurez-vous que le tube de siphonnement demeure
complètement immergé dans le détergent.
Figure 4-23. Installer le tube de
siphonnement
REMARQUE :
Assurez-vous que le filtre demeure complètement
immergé dans le détergent lors de l'application de
détergent.
REMARQUE :
Le contact avec le silencieux chaud peut
endommager le tube de siphonnement du détergent.
• Lors de l'insertion du siphon dans une bouteille de
détergent liquide, placez le tube de manière à ce qu'il
n'entre pas accidentellement en contact avec le
silencieux chaud.
6. Assurez-vous que la buse noire à détergent est
installée.
REMARQUE :
Les détergents ne peuvent être appliqués au moyen
de la buse à haute pression (verte ou rouge). Utilisez
uniquement la buse noire pour appliquer des
détergents.
7. Vérifiez que les instructions de configuration ont été
suivies.
REMARQUE :
Vous devez raccorder tous les tuyaux avant de
démarrer le moteur.
• Démarrer le moteur sans que tous les tuyaux soient
raccordés et sans que l'alimentation en eau soit
OUVERTE endommagera la pompe.
• Tout dommage à l'équipement causé par le non-
respect de cette instruction entraînera l'annulation de
la garantie.
Laveuse à pression OneWASH™ 17
Page 94

Réglage
AVERTISSEMENT!
DANGER!
8. Démarrez le moteur en suivant les instructions de la
section « Comment démarrer votre laveuse à
pression ».
9. Appliquez du détergent sur une surface sèche, en
commençant par la partie inférieure de la zone à
laver, et procédez en montant avec de longs tracés
égaux et se chevauchant.
10. Laissez le détergent être absorbé par la surface
pendant 3 à 5 minutes avant de laver et de rincer.
Réappliquez au besoin afin d'éviter que la surface ne
sèche. NE laissez PAS le détergent sécher sur la
surface nettoyée (afin d'éviter les traînées).
IMPORTANT : Vous devez nettoyer le système de
siphonnement de détergent après chaque utilisation en
plaçant le filtre dans un seau d'eau propre, puis en
faisant fonctionner la laveuse à pression à basse
pression pendant 1 à 2 minutes.
4.5.2 — Rinçage de la laveuse à pression
1. Retirez la buse noire à détergent de la lance.
2. Sélectionnez et installez la buse à haute pression
souhaitée en suivant les instructions de la section
« Comment utiliser les buses ».
3. Pointez le pistolet de pulvérisation dans une direction
sécuritaire et loin des gens, des animaux et des
plantes. Appuyez sur la gâchette afin de purger le
système de tout produit chimique résiduel.
4. Maintenez le pistolet de pulvérisation à une bonne
distance de la zone que vous prévoyez laver.
L'effet de rebond du pistolet de
pulvérisation pourrait vous faire chuter.
• N'utilisez l'appareil que sur une surface de niveau.
• Afin de prévenir le risque de chutes majeures, n'utilisez
pas cet équipement sur une surface surélevée.
• Tenez le pistolet de pulvérisation fermement à deux
mains lorsque vous utilisez le jet à haute pression afin
d'éviter de vous blesser en raison de l'effet de rebond
du pistolet.
5. Appliquez le jet à haute pression sur une petite zone
et vérifiez la présence de dommages sur la surface.
Si aucun dommage n'est apparu, vous pouvez tenir
pour acquis qu'il est approprié de continuer à rincer.
6. Commencez sur la partie supérieure de la zone à
rincer, puis procédez vers le bas avec les mêmes
tracés se chevauchant que vous avez utilisés lors du
nettoyage.
4.5.3 — Nettoyage du tube de siphonnement
du détergent
Si vous avez utilisé le tube de siphonnement du
détergent, vous devez le nettoyer avec de l'eau claire
avant d'arrêter le moteur.
1. Placez le tube/filtre de siphonnement du détergent
dans un seau rempli d'eau propre.
2. Retirez la buse à haute pression de la rallonge de
buse.
3. Sélectionnez la buse noire à détergent en suivant les
instructions fournies dans la section « Comment
utiliser les buses ».
4. Nettoyez pendant 1 à 2 minutes.
5. Arrêtez le moteur en suivant les instructions de la
section « Comment arrêter la laveuse à pression et
fermer l'alimentation en eau ».
6. Orientez TOUJOURS le pistolet de pulvérisation
dans une direction sécuritaire et appuyez sur la
gâchette pour évacuer l'eau sous haute pression
restante. Enclenchez le verrou de la gâchette
lorsqu'il n'est pas utilisé.
IMPORTANT : Le pistolet de pulvérisation emprisonne
de l'eau sous haute pression, et ce même lorsque le
moteur est arrêté et que l'alimentation en eau n'est pas
raccordée.
Le jet d'eau à haute pression produit par cet
appareil peut déchirer la peau et les tissus
sous-cutanés, entraînant des blessures
graves et possiblement l'amputation. Le
pistolet de pulvérisation emprisonne de l'eau
sous haute pression, même lorsque le moteur
est éteint et que l'alimentation en eau est
coupée, ce qui peut causer des blessures.
• Veillez à ce que le tuyau à haute pression reste
raccordé à la pompe et au pistolet de pulvérisation
lorsque le système est sous pression.
• Orientez TOUJOURS le pistolet de pulvérisation dans
une direction sécuritaire et appuyez sur la gâchette
pour évacuer l'eau sous haute pression chaque fois
que vous arrêtez le moteur. Enclenchez le verrou de la
gâchette lorsqu'il n'est pas utilisé.
18 Laveuse à pression OneWASH™
Page 95

DANGER!
AVERTISSEMENT!
Distance minimale de
152 cm (5 pi)
Section 5 Fonctionnement
5.1 — FONCTIONNEMENT
Si vous rencontrez des difficultés lors de l'utilisation de
votre laveuse à pression, veuillez communiquer avec le
service à la clientèle de Generac au 1-888-436-3722.
5.2 — EMPLACEMENT DE LA LAVEUSE À
PRESSION
5.2.1 — Dégagement et circulation d'air
Le moteur en marche produit du monoxyde de
carbone, un gaz inodore, incolore et toxique.
Respirer du monoxyde de carbone peut
causer des maux de tête, de la fatigue, des
étourdissements, des vomissements, de la
confusion, des crises épileptiques, des
nausées, l'évanouissement ou la mort. Pour
plus de renseignements, reportez-vous aux
avertissements relatifs au CO dans la section
«Sécurité».
Placez la laveuse à pression à l'extérieur, dans un
endroit où les gaz d'échappement mortels ne
s'accumuleront pas. Ne placez JAMAIS la laveuse à
pression dans un endroit où les gaz d'échappement
pourraient s'accumuler et entrer ou être aspirés dans un
immeuble potentiellement occupé. Assurez-vous que les
gaz d'échappement sont maintenus loin des fenêtres,
des portes, des conduits d'aération ou d'autres
ouvertures qui pourraient permettre l'accumulation de
gaz dans un endroit confiné. Les vents dominants et les
courants d'air devraient être pris en considération lors du
positionnement de la laveuse à pression (Figure 5-1).
• N'utilisez la laveuse à pression qu'à l'EXTÉRIEUR.
• Veillez à ce que les gaz d'échappement ne pénètrent
pas dans une zone confinée par une fenêtre, une
porte, un conduit d'aération ou toute autre ouverture.
• Ne faites JAMAIS démarrer ou tourner le moteur à
l'intérieur, dans un véhicule ou dans un espace fermé,
MÊME si les fenêtres et les portes sont ouvertes.
• Maintenez un dégagement d'au moins 152 cm (5 pi)
sur tous les côtés de la laveuse à pression, dont un
dégagement vertical au-dessus de l'appareil.
Figure 5-1. Dégagement autour des
bâtiments
5.3 — LISTE DE CONTRÔLE AVANT DE
DÉMARRER LE MOTEUR
1. Veillez à lire et à bien comprendre les sections
« Sécurité » et « Fonctionnement » avant d'utiliser la
laveuse à pression.
2. Vérifiez que le niveau de l'huile atteint le repère de
quantité maximale de la jauge et que le carburant a
été ajouté au réservoir de carburant.
3. Passez en revue l'assemblage de l'appareil, puis
assurez-vous que les raccords sont adéquatement
maintenus et que le tuyau à haute pression ne
présente pas de plis, de coupures ou de dommages.
4. Assurez-vous de la présence d'une alimentation en
eau appropriée à une pression adéquate, puis retirez
tout débris des filtres et assurez-vous que l'air a été
purgé du système.
5. Vérifiez que l'appareil est bien en place sur un terrain
de niveau et que le périmètre de la zone de travail
est dégagé.
La chaleur et les gaz du silencieux
peuvent enflammer des combustibles
ou des structures, ou endommager le
réservoir de carburant et causer un
incendie.
Laveuse à pression OneWASH™ 19
Page 96

Fonctionnement
AVERTISSEMENT!
DÉLICAT
2000 PSI
HAUT RENDEMENT
3100 PSI
INTERRUPTEUR MARCHE/ARRÊT
MIN
MAX
PRESSION
MARCHE
ARRÊT
DÉLICAT
2000 PSI
HAUT RENDEMENT
3100 PSI
CONTRÔLE DE LA PRESSION
MIN
MAR
CHE
ARRÊ
MAX
PRESS
DÉLICAT
2000 PSI
HAUT RENDEMENT
3100 PSI
ÉTRANGLEUR SUR
« MARCHE »
ÉTRANGLEUR SUR
« ARRÊT »
POIGNÉE DU
DÉMARREUR
5.4 — COMMENT DÉMARRER VOTRE
LAVEUSE À PRESSION
REMARQUE :
NE faites PAS tourner la pompe sans que
l'alimentation en eau soit raccordée et ouverte. Tout
dommage à l'équipement causé par le non-respect
de cette instruction entraînera l'annulation de la
garantie.
1. Mettez l'interrupteur MARCHE/ARRÊT en position
« MARCHE » (« ON ») (Figure 5-2).
Figure 5-2. Interrupteur MARCHE/ARRÊT
2. Faites tourner le bouton de contrôle de la pression
jusqu'à la position indiquée sur l'autocollant
« Démarrer » (« Start ») (article no 2) (Figure 5-3).
REMARQUE :
Si le moteur est chaud, poussez sur le bouton de
l'étrangleur jusqu'à ce qu'il atteigne la position
« ARRÊT » (« OFF ») (Figure 5-4).
Figure 5-4. Bouton de l'étrangleur
4. Positionnez l'appareil de manière à ce qu'il ne puisse
pas bouger avant de tirer sur la corde du lanceur à
rappel.
5. Lors du démarrage du moteur, agrippez la poignée
de démarrage (Figure 5-5) et tirez lentement jusqu'à
ce que vous sentiez une résistance. Tirez ensuite
rapidement afin de démarrer le moteur.
Figure 5-3. Jauge de pression
3. Étranglez le moteur en tirant lentement sur le bouton
de l'étrangleur jusqu'à ce qu'il atteigne la position
20 Laveuse à pression OneWASH™
« MARCHE » (« ON ») (Figure 5-4).
Le port de protections auditives est
recommandé.
Figure 5-5. Démarrer le moteur
6. Remettez lentement en place la poignée de
démarrage. NE laissez PAS la corde fouetter le
support.
Page 97

Fonctionnement
DANGER!
AVERTISSEMENT!
DÉLICAT
2000 PSI
HAUT RENDEMENT
3100 PSI
ÉTRANGLEUR SUR
« MARCHE »
ÉTRANGLEUR SUR
« ARRÊT »
7. Lors du démarrage du moteur, poussez lentement
sur le bouton de l'étrangleur jusqu'à la position
« ARRÊT » (« OFF ») pendant que le moteur
chauffe. Si le moteur faiblit, tirez sur le bouton de
l'étrangleur jusqu'à ce qu'il atteigne la position
« MARCHE » (« ON »), puis poussez-le jusqu'à la
position « ARRÊT » (« OFF ») (Figure 5-6).
Figure 5-6. Bouton de l'étrangleur
8. Après chaque tentative de démarrage au cours de
laquelle le moteur ne démarre pas, pointez le pistolet
de pulvérisation vers une direction sécuritaire et
appuyez sur la gâchette du pistolet de pulvérisation
afin de libérer la haute pression.
9. Si le moteur refuse de démarrer après 6 tentatives,
poussez le bouton de l'étrangleur à la position
« ARRÊT » (« OFF »), puis répétez les étapes 6 à 10.
Le jet d'eau à haute pression produit par cet
appareil peut déchirer la peau et les tissus
sous-cutanés, entraînant des blessures
graves et possiblement l'amputation. Le
pistolet de pulvérisation emprisonne de l'eau
sous haute pression, même lorsque le moteur
est éteint et que l'alimentation en eau est
coupée, ce qui peut causer des blessures.
• NE permettez PAS aux ENFANTS d'utiliser la laveuse
à pression ou de jouer à proximité de celle-ci.
• Veillez à ce que le tuyau à haute pression reste
raccordé à la pompe et au pistolet de pulvérisation
lorsque le système est sous pression.
• Ne pointez JAMAIS le pistolet de pulvérisation vers
des gens, des animaux ou des appareils électriques.
Cela pourrait causer des blessures graves.
Laveuse à pression OneWASH™ 21
• NE verrouillez PAS le pistolet de pulvérisation en
position ouverte.
• Ne laissez PAS le pistolet de pulvérisation sans
surveillance lorsque la machine fonctionne.
• N'utilisez JAMAIS un pistolet de pulvérisation qui n'est
pas muni d'un verrou ou d'une garde pour la gâchette
en place et en état de fonctionner.
• Soyez toujours certain que le pistolet de pulvérisation, les
buses et les accessoires sont correctement raccordés.
Un contact avec la région du silencieux
pourrait causer de graves brûlures. La
chaleur et les gaz du silencieux peuvent
enflammer des combustibles ou des
structures, ou endommager le réservoir
de carburant et causer un incendie.
• NE touchez PAS aux pièces chaudes et ÉVITEZ les
gaz d'échappement chauds.
• Laissez l'équipement refroidir avant d'y toucher.
• Maintenez un dégagement d'au moins 152 cm (5 pi)
sur tous les côtés de la laveuse à pression, dont un
dégagement vertical au-dessus de l'appareil.
• Le fait d'utiliser ou d'opérer l'appareil sous un couvert
forestier ou dans un environnement de brousse ou
d'herbes constitue une violation de l'article 4442 du
California Public Resource Code (Code des
ressources publiques de l'État de la Californie), à
moins que le système d'échappement de l'appareil ne
soit doté d'un pare-étincelles maintenu en état de
marche effectif, comme énoncé dans l'article 4442.
D'autres juridictions fédérales ou étatiques peuvent
avoir des lois similaires.
• Les pièces de rechange doivent être les mêmes que
les pièces d'origine et elles doivent être installées de la
même façon.
5.5 — SYSTÈME DE REFROIDISSEMENT
AUTOMATIQUE (DÉCHARGE THERMIQUE)
Si vous faites tourner le moteur de votre laveuse à
pression de 3 à 5 minutes sans appuyer sur la gâchette du
pistolet de pulvérisation, l'eau qui circule dans la pompe
peut atteindre une température supérieure à 52 °C
(125 °F). Le système fait refroidir la pompe en
déchargeant l'eau chaude au sol.
Page 98

5.6 — COMMENT ARRÊTER VOTRE
DANGER!
DÉLICAT
2000 PSI
HAUT RENDEMENT
3100 PSI
INTERRUPTEUR MARCHE/ARRÊT
MIN
MAX
PRESSION
MARCHE
ARRÊT
LAVEUSE À PRESSION
1. Relâchez la gâchette du pistolet de pulvérisation.
2. Mettez l'interrupteur MARCHE/ARRÊT du moteur à
la position « ARRÊT » (Figure 5-7).
3. Pointez TOUJOURS le pistolet de pulvérisation dans
une direction sécuritaire et appuyez sur la gâchette
du pistolet de pulvérisation afin de libérer l'eau sous
haute pression. Enclenchez le verrou de la gâchette
lorsqu'il n'est pas utilisé.
4. FERMEZ l'alimentation en eau.
Fonctionnement
Figure 5-7. Interrupteur MARCHE/ARRÊT
IMPORTANT : Le pistolet de pulvérisation emprisonne
de l'eau sous haute pression, et ce même lorsque le
moteur est arrêté et que l'alimentation en eau n'est pas
raccordée.
Le jet d'eau à haute pression produit par cet
appareil peut déchirer la peau et les tissus
sous-cutanés, entraînant des blessures
graves et possiblement l'amputation. Le
pistolet de pulvérisation emprisonne de l'eau
sous haute pression, même lorsque le moteur
est éteint et que l'alimentation en eau est
coupée, ce qui peut causer des blessures.
• Veillez à ce que le tuyau à haute pression reste
raccordé à la pompe et au pistolet de pulvérisation
lorsque le système est sous pression.
• Pointez TOUJOURS le pistolet de pulvérisation dans
une direction sécuritaire et appuyez sur la gâchette du
pistolet de pulvérisation pour libérer la haute pression
chaque fois que vous éteignez l'appareil. Enclenchez
le verrou de la gâchette lorsqu'il n'est pas utilisé.
22 Laveuse à pression OneWASH™
Page 99

Section 6 Entretien
6.1 — RECOMMANDATIONS EN MATIÈRE
D'ENTRETIEN
Un entretien régulier fera en sorte d'améliorer les
performances et d'allonger la durée de vie de la laveuse
à pression. Veuillez consulter un détaillant agréé afin
d'obtenir des services d'entretien et de réparation.
La garantie de la laveuse à pression ne couvre pas les
éléments ayant été soumis à une utilisation abusive ou à
la négligence de l'utilisateur. Pour bénéficier pleinement
de la garantie, l'utilisateur doit entretenir la laveuse à
pression selon les instructions fournies dans ce manuel
et l'entreposer de la manière décrite dans « Entreposage
hivernal » et dans « Entreposage à long terme ».
REMARQUE :
Si vous avez des questions quant au remplacement
de composants de votre laveuse à pression, veuillez
composer le 1-888-436-3722 afin d'obtenir de
l'assistance.
Certaines mises au point devront être effectuées
périodiquement afin d'entretenir adéquatement votre
laveuse à pression.
L'entretien et l'ensemble des mises au point devraient
être effectués au moins une fois par saison. Suivez les
consignes du tableau « Programme d'entretien ».
REMARQUE :
Une fois par année, vous devriez nettoyer ou
remplacer la bougie d'allumage, nettoyer ou
remplacer le filtre à air et vérifier l'assemblage du
pistolet de pulvérisation et de la rallonge à buse afin
d'y détecter la présence d'usure. Une nouvelle
bougie d'allumage et un filtre à air propre assurent
un mélange carburé approprié et font en sorte que
votre moteur fonctionne mieux et dure plus
longtemps.
6.2 — PROGRAMME D'ENTRETIEN
Suivez les intervalles horaires ou ceux du calendrier,
selon la première occurrence. Il est nécessaire de
procéder à un entretien plus fréquent en cas d'utilisation
dans des conditions difficiles.
5 premières heures
Changer l'huile du moteur
Toutes les 8 heures ou quotidiennement
Vérifier/nettoyer le tamis de la prise d'eau*
Vérifier le tuyau à haute pression
Vérifier le tuyau/filtre de siphonnement du détergent
Vérifier le pistolet de pulvérisation et l'assemblage afin d'y
détecter la présence de fuites
Nettoyer les débris
Vérifier le niveau d'huile du moteur
Toutes les 20 heures ou chaque saison
Changer l'huile du moteur**
Toutes les 50 heures ou chaque saison
Vérifier/nettoyer le filtre à air**
Inspecter le silencieux et le pare-étincelles*
Toutes les 100 heures ou chaque saison
Entretenir la bougie d'allumage
* Nettoyer si obstrué. Remplacer s'il est perforé ou déchiré.
** Entretenir plus fréquemment si l'appareil est utilisé dans
un environnement sale ou poussiéreux.
Laveuse à pression OneWASH™ 23
Page 100

Entretien
DANGER!
6.3 — HUILE DE LA POMPE
NE tentez AUCUN entretien de l'huile de cette pompe. La
pompe a été prélubrifiée et scellée à l'usine; aucun
entretien additionnel n'est requis pendant la durée de vie
de la pompe.
6.4 — CONTRÔLE DES ÉMISSIONS
L'entretien, le remplacement ou la réparation des
dispositifs et systèmes de contrôle des émissions
peuvent être effectués par tout établissement ou
individu spécialisé en réparation de moteurs non
routiers. Cependant, pour obtenir des services liés au
contrôle des émissions « sans frais », le travail doit être
effectué par un détaillant agréé par le fabricant.
Consultez la garantie en matière d'émissions.
6.5 — RÉGLAGES DE LA JAUGE DE
PRESSION
La manipulation, l'entretien, la mise au point ou le
remplacement des réglages de l'organe d'étranglement
aura un impact sur la performance de l'appareil et
pourrait entraîner l'annulation de sa garantie.
6.7 — VÉRIFIER ET NETTOYER LE TAMIS DE
LA PRISE D'EAU
Examinez le tamis de la prise d'eau de la pompe.
Nettoyez le tamis s'il est engorgé, ou remplacez-le s'il est
endommagé.
6.8 — VÉRIFIER LES TUYAUX À HAUTE
PRESSION
Les tuyaux à haute pression peuvent fuir en raison de
l'usure, de la formation de plis ou d'une utilisation
abusive. Inspectez les tuyaux flexibles avant chaque
utilisation. Vérifiez la présence de coupures, de fuites,
d'usure abrasive ou de renflement du revêtement, de
dommages ou de mouvement des raccords. Si vous
constatez l'existence de l'un de ces phénomènes,
remplacez immédiatement le tuyau.
Le jet d'eau à haute pression produit par cet
appareil peut déchirer la peau et les tissus
sous-cutanés, entraînant des blessures
graves et possiblement l'amputation.
6.6 — ENTRETIEN DE LA LAVEUSE À
PRESSION
6.6.1 — Nettoyer les débris
Retirez les débris accumulés dans le système de
nettoyage quotidiennement ou avant chaque utilisation.
Veillez à garder les liens, les ressorts et les commandes
propres. Veillez à garder la zone autour et à l'arrière du
silencieux exempte de tout débris combustible. Inspectez
les fentes d'air de refroidissement et les ouvertures de la
laveuse à pression. Ces ouvertures doivent toujours être
propres et non obstruées.
Les pièces de la laveuse à pression doivent toujours être
propres afin de réduire les risques de surchauffe et
d'ignition des débris accumulés.
• Utilisez un linge humide pour nettoyer les surfaces
extérieures.
REMARQUE :
Un traitement inapproprié de la laveuse à pression peut
entraîner des dommages et réduire sa durée de vie.
• N'insérez AUCUN objet dans les fentes de
refroidissement.
• Utilisez une brosse à soies souples pour éliminer la
saleté, l'huile ou toute autre substance collée.
• Utilisez un aspirateur pour éliminer la saleté et les
débris volatils.
• NE réparez JAMAIS le tuyau à haute pression.
Remplacez-le.
• Le tuyau de remplacement DOIT répondre aux normes
en matière de pression nominale de l'appareil ou les
dépasser.
6.9 — VÉRIFIER LE TUBE DE
SIPHONNEMENT DU DÉTERGENT
Examinez le filtre du tube du détergent et nettoyez-le s'il
est engorgé. Le tube doit être fermement ajusté au
raccord cannelé. Vérifiez la présence de fuites ou d'usure
sur le tube. Remplacez le filtre ou le tube si l'un d'eux est
endommagé.
6.10 — VÉRIFIER LE PISTOLET DE
PULVÉRISATION
Examinez le raccord du tuyau flexible au pistolet de
pulvérisation et assurez-vous qu'il est bien fixé. Testez la
gâchette en y appliquant une pression; elle se
« décompresse » et reprend sa position initiale quand
vous la relâchez. Si la gâchette ne se « décompresse »
pas, remplacez immédiatement le pistolet de
pulvérisation.
24 Laveuse à pression OneWASH™
 Loading...