

Page 1
OPERA TORS MANUAL
BEDIENUNGSHANDBUCH
MANUAL DEL OPERADOR
MANUEL D’INSTRUCTIONS
CS-19/CS-19R
CLUB INST ALLATION MIXER
MEZCLADOR PARA CLUBES
CLUB INSTALLATION MISCHPULT
MÉLANGEUR RÉSERVÉ AUX CLUBS
M
ULTI
ENGLISH........................................................................................................................PAGE 4
DEUTSCH......................................................................................................................PAGE 9
ESP AÑOL....................................................................................................................PAGE 14
FRANCAIS...................................................................................................................PAGE 19
-L
Page 1
ANGUAGE
I
NSTRUCTIONS
Page 2
CS-19
42
18
18
3
14
14
36
14
36
18
36
14
36
18
22
21
36
39
37
38
33
Page 2
15
5
43
6
4
16
17
20
7
9
7
40
8
29
19
15
16
17
20
15
16
17 17
19
20
28
19
15
16
20
19
23
24
25
27
30
26
11
2
13
10
41
12
ON
32
34
35
31
19
19
CS-19R
19
19
26
Page 3
Page 3
51
51
51
54
54
51
52
50
45
45
65
64
57
57
56
56
55
55
49
60
60
62
59
59
62
62
47
66
63
1
0 -6dB -12dB
44
44
46
46
47
61
61
58
58
62
48
53
Page 4

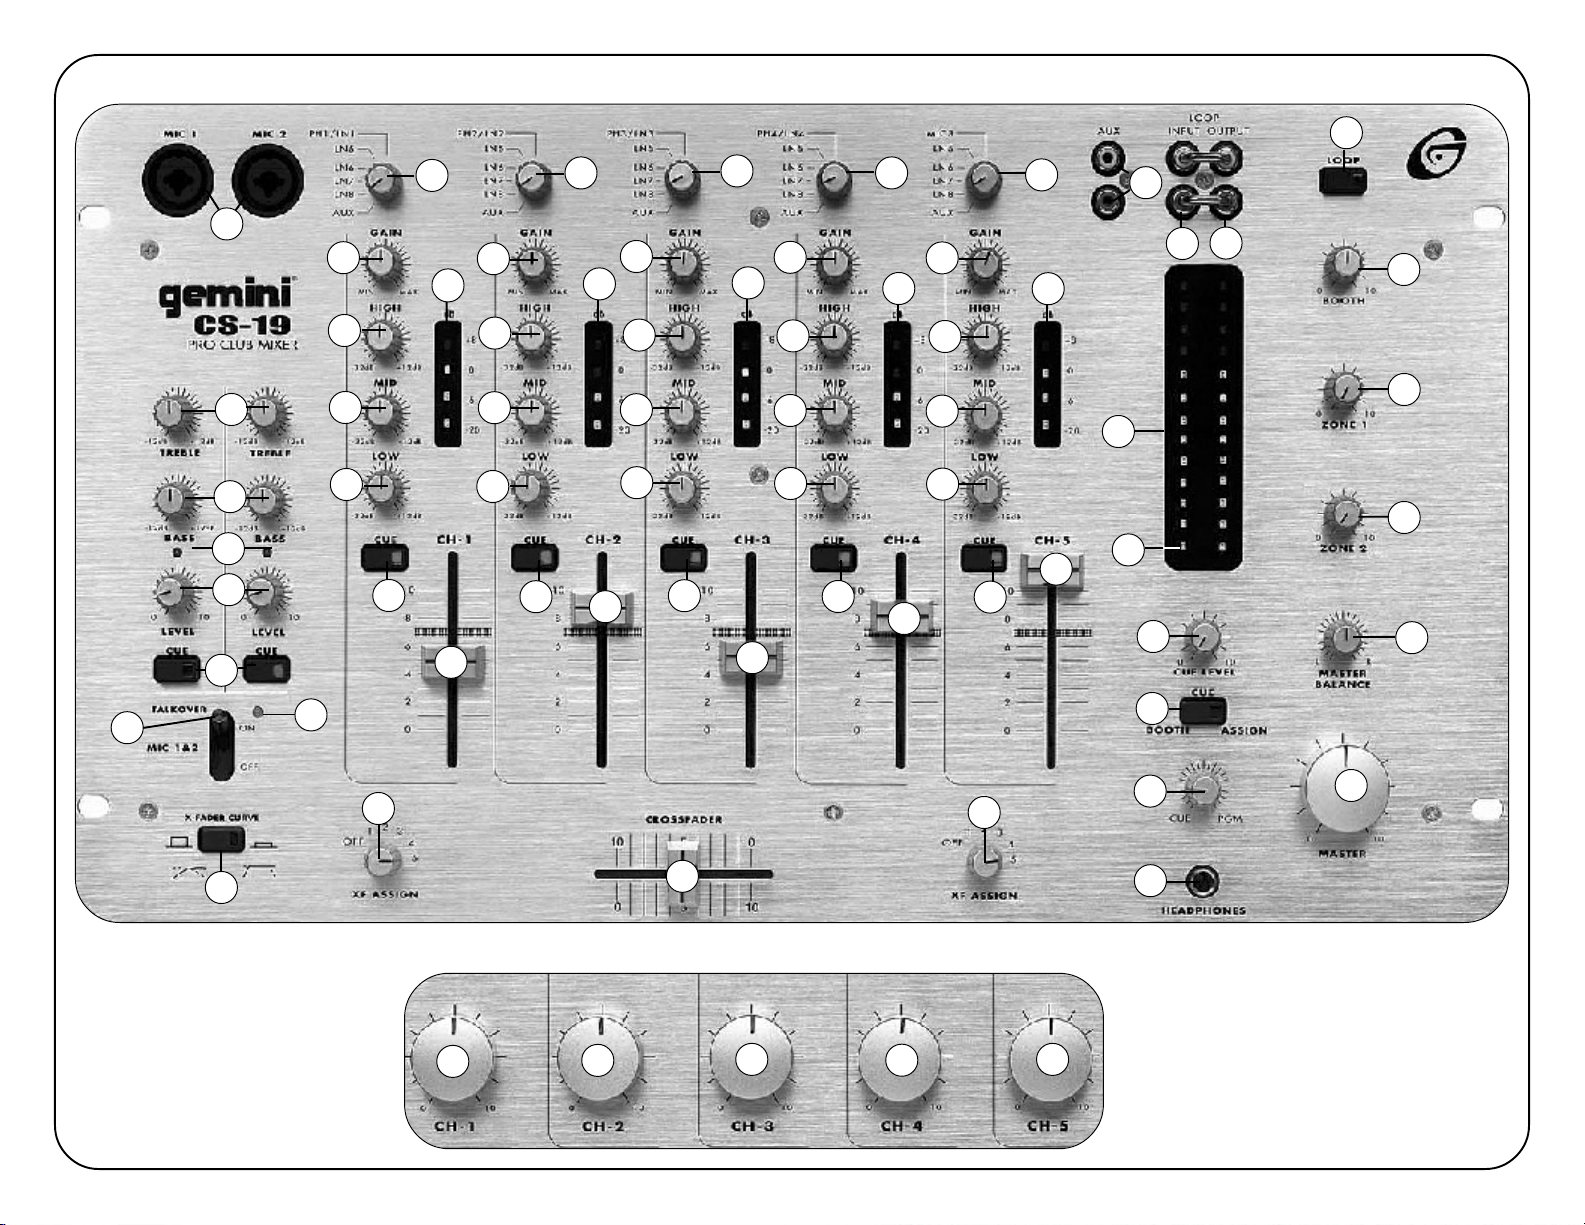
FEA TURE DESCRIPTIONS:
1
POWER SWITCH: Turns power to unit on and off. Press the switch into the upright position to turn the unit ON, and press
the switch into the downright position to turn the unit OFF.
POWER LED: Glows anytime the unit is connected to an appropriate power source and the unit is turned ON.
2
MIC 1 & MIC 2 INPUTS: Neutrik Combo Connectors accept an XLR jack or 1/4” phono jack. This gives you the advantage
3
of being able to adapt this mixer to any situation and sound system. You can use microphones that come with standard 1/4”
connectors or XLR connectors.
MIC TREBLE CONTROL: Adjusts the high frequency response of MIC 1 and MIC 2. Rotate this knob clockwise to increase
4
the high frequency response, and counterclockwise to decrease it. This gives you a wide variety of sound allowing for special
effects.
MIC BASS CONTROL: Adjusts the low frequency response of MIC 1 and MIC 2. Rotate this knob clockwise to increase the
5
low frequency response, and counterclockwise to decrease it. This gives you a wide variety of sound allowing for special
effects.
6
MIC LEVEL CONTROL: Adjusts the volume of MIC 1 and MIC 2. Rotate this knob clockwise and you will increase the
volume of MICS 1 & 2. Rotate the knob counterclockwise to decrease the volume.
CUE BUTTON: Sends MIC 1 and MIC 2 output to the Cue Mix. Press this button and your microphone can now be monitored
7
in your headphones and booth monitors along with the cue mix.
MIC INDICA TOR: Glows to indicate that MIC 1 & MIC 2 are ON. When this LED is glowing you will be able to speak into
8
your microphone and hear it in your program and/or cue mix.
9
MIC T ALKOVER SWITCH: The purpose of the talkover section is to allow the program playing to be muted so that the mic
can be heard above the music. The MIC/T ALKOVER SWITCH controls MIC 1 and MIC 2 and has three settings. When the
MIC/T ALKOVER SWITCH is in the “OFF” position, MIC 1 and MIC 2 and talkover are off. When the MIC/T ALKOVER
SWITCH is in the “MIC 1 & 2” position MIC 1 and MIC 2 are on, the MIC INDICA T OR will glow, but talkover is off. When
the MIC/T ALKOVER SWITCH is in the “TALKOVER” position, MIC 1 and MIC 2 and talkover will be on and the volume of
all sources except the MIC 1 & 2 inputs are lowered by 16 dB.
10
CUE LEVEL: Adjusts the cue volume without affecting the overall mix. Rotate this knob clockwise to increase the volume of
the cue mix. Rotate it counterclockwise to decrease the volume.
11
PEAK HOLD LED METER: Indicates the Master Output left and right channel levels. By viewing this meter, you will be able
to optimize your sound quality and eliminate distortion in the system.
CUE PGM P AN CONTROL: By rotating the CUE PGM P AN CONTROL to the left you will be able to monitor the
12
assigned cue signal. Rotating to the right will monitor the PGM (program) output.
13
HEADPHONE JACK: A 1/4” stereo jack allows for the insertion of stereo headphones
14
CHANNEL GAIN CONTROL: Adjusts the GAIN for Channels 1, 2, 3, 4. Rotate this knob clockwise to increase the gain to
the channel. Rotate the knob counterclockwise to decrease the gain to the channel.
15
CHANNEL HIGH EQ CONTROL: Contour the high frequency response for Channels 1, 2, 3 and 4. Rotate this knob
clockwise to increase the high frequency response, and counterclockwise to decrease it. This gives you a wide variety of
sound possibilities allowing for special effects.
CHANNEL MID EQ CONTROL: Contour the mid frequency response for Channels 1, 2, 3 and 4. Rotate this knob
16
clockwise to increase the mid frequency response, and counterclockwise to decrease it. This gives you a wide variety of
sound possibilities allowing for special effects.
17
CHANNEL LOW EQ CONTROL: Contour the low frequency response for Channels 1, 2, 3 and 4. Rotate this knob
clockwise to increase the low frequency response, and counterclockwise to decrease it. This gives you a wide variety of
sound possibilities allowing for special effects.
INPUT SELECT SWITCH: Allows you to select the input source for Channels 1, 2, 3, 4. Select Phono1/Line 1, Line 5,
18
Line 6, Line 7, Line 8 or AUX. The level and EQ features will affect only the input that is selected for that channel.
19
CHANNEL SLIDE/KNOB: Controls the relative levels of each of the four Input mixing Channels (Channels 1, 2, 3, 4).
20
CHANNEL CUE ASSIGN BUTTON: Engaging any single or combination of CUE pushbuttons sends any program present
at the respective Channel’s source control SELECT SWITCH to the headphone cue section. The pushbuttons will illuminate
when the switch is engaged.
Page 4
Page 5

CHANNEL 5 INPUT SELECT SWITCH: Allows you to select the input source for Channel 5. Select MIC3, Line 5,
21
Line 6, Line 7, Line 8 or AUX. The level and EQ features will affect only the input that is selected for that channel. (MIC #3
input on this channel)
CHANNEL 5 GAIN CONTROL: Adjusts the GAIN for Channel 5. Rotate this knob clockwise to increase the gain to
22
the channel. Rotate the knob counterclockwise to decrease the gain to the channel.
CHANNEL 5 HIGH EQ CONTROL: Contour the high frequency response for Channel 5. Rotate this knob clockwise to
23
increase the high frequency response, and counterclockwise to decrease it. This gives you a wide variety of sound
possibilities allowing for special effects.
CHANNEL 5 MID EQ CONTROL: Contour the mid frequency response for Channels 1, 2, 3 and 4. Rotate this knob
24
clockwise to increase the mid frequency response, and counterclockwise to decrease it. This gives you a wide variety of
sound possibilities allowing for special effects.
CHANNEL 5 LOW EQ CONTROL: Contour the low frequency response for Channel 5. Rotate this knob clockwise to
25
increase the low frequency response, and counterclockwise to decrease it. This gives you a wide variety of sound
possibilities allowing for special effects.
26
CHANNEL 5 SLIDE/KNOB: Controls the relative levels of Channel 5.
CHANNEL 5 CUE ASSIGN BUTTON: Engaging any single or combination of CUE pushbuttons sends any program present
27
at Channel 5’s source control SELECT SWITCH to the headphone cue section. The pushbuttons will illuminate
when the switch is engaged.
CROSSFADER: Allows the mixing of one source into another. This crossfader controls the levels of any two channels
28
assigned to it by the left and right Crossfade ASSIGN SWITCHES.
LEFT ASSIGN SWITCH: Assigns the left side of the Crossfader to any of the five Input Channels
29
RIGHT ASSIGN SWITCH: Assigns the right side of the Crossfader to any of the five Input Channels
30
31
MASTER BALANCE: Adjusts the balance of the Master LEFT and RIGHT channels
MASTER: Determines the program and mic level at the Main Outputs
32
BOOTH CONTROL: Adjusts the level of the Booth Output
33
ZONE 1 CONTROL: Adjusts the level of the Zone 1 Output
34
35
ZONE 2 CONTROL: Adjusts the level of the Zone 2 Output
PREF ADER INPUT LEVEL LED METERS: Reflect the Gain, High, Mid & Low adjustments
36
LOOP INPUTS: Brings the signal back to the mixer from an outboard signal processor
37
LOOP OUTPUTS: Sends the signal out from the mixer to an outboard signal processor. The unit comes with jumpers to be
38
used with the loop inputs and outputs. Keep the jumpers in the unit if you are not using the loop to prevent interruptions in
your music program.
AUX INPUTS: Allow easy access for connecting an additional device (tape deck, etc.). This is a useful feature if you need to
39
connect another sound source temporarily. You do not have to disconnect any of the devices you already have connected to
use an additional device.
CROSSF ADER CURVE BUTTON: The CROSSF ADER CUR VE BUTT ON allows you to adjust the kind of curve the
40
crossfader has. Depress the CROSSF ADER CUR VE BUTTON to make the curve steep and cutting (perfect for
scratching). Release the CROSSF ADER CUR VE BUTTON to make the curve gradual and gentle.
CUE BUTTON: When you press the CUE BUTTON you will send your cue mix (the same mix you hear in your
41
headphones) to the booth monitors.
LOOP BUTTON: Activates the LOOP inputs and outputs. When activated this pushbutton will illuminate.
42
MIC OVERLOAD LEDS: Light if the signal to MIC inputs 1 & 2 is too high. When these LEDs light, you should reduce the
43
gain of that channel to prevent distortion.
44
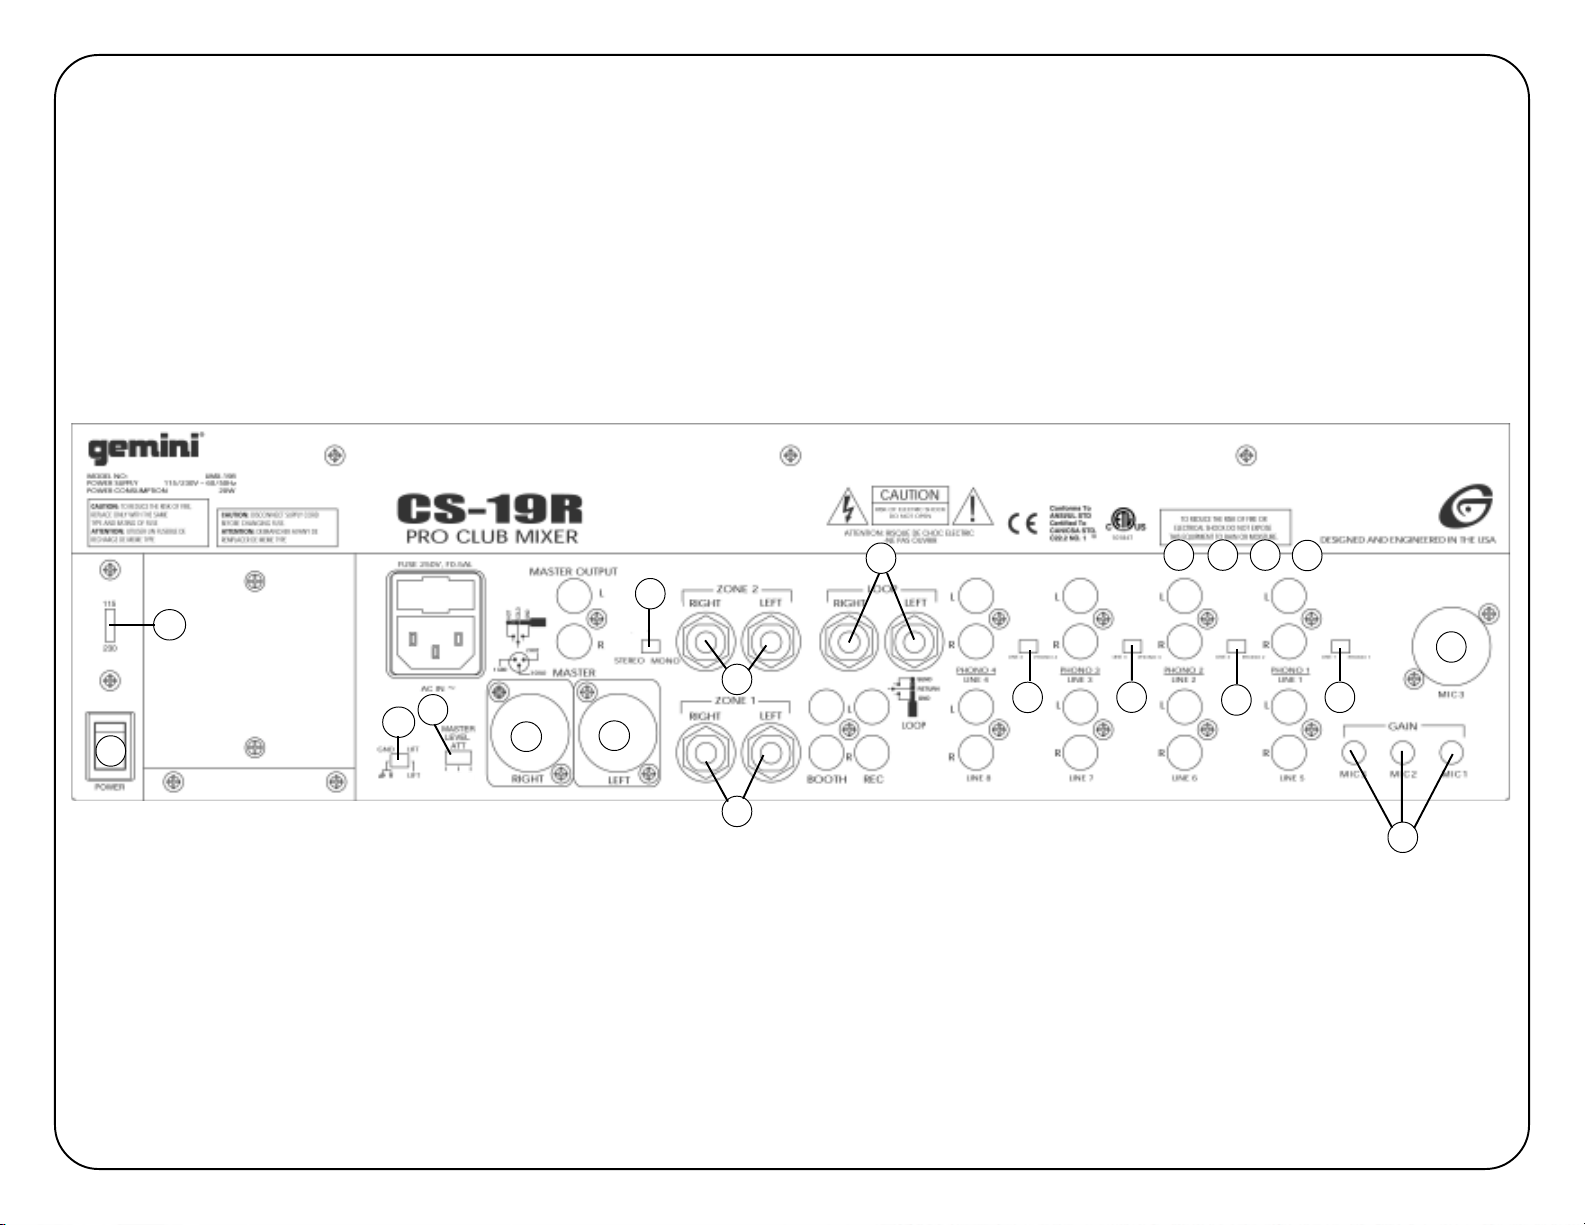
MASTER OUTPUTS (BALANCED): Uses XLR connectors. Provides a fully balanced main output signal. Pin 2 is (+), pin 3
is (-) and pin 1 is signal ground. Use these outputs to connect to your main amplifier and speaker system.
MASTER OUTPUTS (UNBALANCED): Provides main output signal using RCA connectors. Use these outputs to connect
45
to your main amplifier and speaker system.
BOOTH OUTPUT JACKS: Used to connect to amplifier in the DJ Booth. Uses RCA connectors.
46
Page 5
Page 6

47
RECORD OUT JACKS: Allow you to record to a cassette recorder, etc. Uses RCA connectors
48
ZONE 1 OUTPUT JACKS: Used to connect to an additional amplifier. Uses 1/4” phono connectors
ZONE 2 OUTPUT JACKS: Used to connect to an additional amplifier. Uses 1/4” phono connectors
49
50
VOL T AGE SELECT OR SWITCH: Push this switch to the up position to select 115V and to the down position to select 230V
51
GROUND SCREWS: Four ground screws are provided on the rear panel to allow easy grounding of your turntables
MIC 3 INPUT : Allows you to connect a third microphone. This input also utilizes a Neutrik Combo jack enabling you to
52
connect microphones with both XLR connectors as well as 1/4” phono connectors.
MIC 1, 2, 3 GAINS: Separate gains for each of the 3 microphones
53
PHONO 1 / LINE 1 INPUT : These inputs will accept either a line level input or phono input. The phono inputs will only
54
accept turntables with a magnetic cartridge.
PHONO 2 / LINE 2 INPUT : These inputs will accept either a line level input or phono input. The phono inputs will only
55
accept turntables with a magnetic cartridge.
PHONO 3 / LINE 3 INPUT : These inputs will accept either a line level input or phono input. The phono inputs will only accept
56
turntables with a magnetic cartridge.
57
PHONO 4 / LINE 4 INPUT : These inputs will accept either a line level input or phono input. The phono inputs will only
accept turntables with a magnetic cartridge.
LINE 5 INPUT : This input accepts a line level input (such as a CD player or cassette player). T urntables must be connected
58
to the Phono/Line inputs (54, 55, 56, 57)
LINE 6 INPUT : This input accepts a line level input (such as a CD player or cassette player). T urntables must be connected
59
to the Phono/Line inputs (54, 55, 56, 57)
LINE 7 INPUT : This input accepts a line level input (such as a CD player or cassette player). T urntables must be connected
60
to the Phono/Line inputs (54, 55, 56, 57)
LINE 8 INPUT : This input accepts a line level input (such as a CD player or cassette player). T urntables must be connected
61
to the Phono/Line inputs (54, 55, 56, 57)
62
PHONO/LINE SWITCH: Allows you to set the Phono/Line Inputs to Phono or Line. Put this switch into the PHONO
position for that particular input to accept a turntable with a magnetic cartridge. Select LINE for the input to accept a CD
Player, cassette player , etc.
GROUND LIFT SWITCH: Separates chassis ground from signal ground. Normally, this switch should be in the GND
63
(ground) position. In some circumstances, moving it to the opposite position eliminates stubborn hum and buzz. Always
turn off your power amplifiers before changing the ground to avoid damage to your system.
64
LOOP INPUTS/OUTPUTS: 1/4” balanced (tip= send, ring= return, sleeve= ground) LOOP INPUT/OUTPUT JACKS
on the rear panel, which are connected in series with the LOOP INPUTS/OUTPUTS on the front panel so you can add
additional effects or signal processors.
65
STEREO/MONO SWITCH: Assigns outputs as a MONO signal or STEREO signal. This includes the MASTER
OUTPUTS, BOOTH OUTPUTS , RECORD OUTPUTS as well as the ZONE 1 and ZONE 2 OUTPUTS.
66
MASTER LEVEL A TTENUA TION: Allows you to preset the output level of the Master Outputs to 3 presets: 0dB,
-6dB and -12dB.
Page 6
Page 7

Introduction
Congratulations on purchasing the Gemini CS-19 or CS-19R PRO
CLUB MIXER. This unique state of the art mixer is backed by a three
year warranty, excluding crossfader and channel slides. Prior to
use, we suggest that you carefully read all the instructions.
Features
• 5 Stereo Channels
• Master Level Attenuation
• State of the Art Cue Section with Assignable Cue Output
• 8 Lines, 4 Phono, 3 Mic Inputs, 1 AUX
• Crossfader Curve Button and Crossfader Assign Controls
• Gain, High, Mid and Low Tone Controls for each channel
• Talkover
• Master Outputs, Booth Output, 2 Zone Outputs
• Mic 1, 2, 3 Gains on rear panel
• Mic 1 & 2 Output Overload LED Indicators
• Illuminated push-button switches
Cautions
1. Always test equipment before rack mounting. Retain a copy of your
sales receipt for warranty purposes.
2. All operating instructions should be read before using this equipment.
3. To reduce the risk of electrical shock, do not open the unit. There are
NO USER REPLACEABLE PARTS INSIDE. Please refer servicing to a
qualified service technician.
In the U.S.A., if you have any problems with this unit,
call 1-732-738-9003 for customer service. Do not retur n
equipment to your dealer.
4. Do not expose this unit to direct sunlight or to a heat source such as a
radiator or stove.
5. This unit should be cleaned only with a damp cloth. Avoid solvents or
other cleaning detergents.
6. When moving this equipment, it should be placed in its original carton
and packaging. This will reduce the risk of damage during transit.
7. DO NOT EXPOSE THIS UNIT TO RAIN OR MOISTURE.
8. DO NOT USE ANY SPRAY CLEANER OR LUBRICANT ON ANY
CONTROLS OR SWITCHES.
Connections
1. Before plugging in the power cord, make sure that the VOLTAGE
SELECTOR SWITCH (50) is set to the correct voltage.
NOTE: This product is double insulated and not intended to be
grounded.
2. Make sure that the POWER SWITCH (1) is in the OFF position.
3. The CS-19 and CS-19R are supplied with 2 sets of amp output jacks.
The BALANCED MASTER OUTPUT JACKS (44) are used to connect
to your main amplifier using standard XLR cables. We recommend
using the BALANCED MASTER OUTPUT JACKS if the cables to your
amp are 25 feet or more. Balanced outputs have three separate
conductors, two of which are signal (positive and negative) and one
shield (ground). Pin 1 is ground (shield). Pin 2 is signal hot (positive).
Pin 3 is signal cold (negative). The MASTER OUTPUT JACKS (45) are
unbalanced and used to connect to your main amplifier. The OUTPUT
BOOTH JACKS (46) allow you to hook up an additional amplifier. The
RECORD OUTPUT JACKS (47) allow you to record your mix to a
cassette recorder, CD recorder, etc. The ZONE 1 OUTPUT (48) and
ZONE 2 OUTPUT (49) can be used to connect to additional amplifiers.
4. The MIC 1 and MIC 2 (3) INPUTS (found on the front panel) are
Neutrik Combo connectors, which accept either an XLR jack or a
standard 1/4” jack. Each MIC input has its own individual TREBLE
CONTROL (4), BASS CONTROL (5), LEVEL CONTROL (6), CUE
BUTTON (7) and OVERLOAD LED (43). MIC 3 INPUT (52) is located
on the rear panel. GAIN CONTROLS (53) for MICS 1, 2 & 3 are located
on the rear panel.
The MIC OVERLOAD LEDS (43) will light if the signal to MIC INPUTS 1
& 2 is too high.
5. On the rear panel are 4 stereo PHONO/LINE INPUTS (54, 55, 56, 57),
and 4 stereo LINE INPUTS (58, 59, 60, 61). The PHONO/LINE SWITCH
(62) enables you to set the PHONO/LINE INPUTS (54, 55, 56, 57) to
Phono or Line. The phono inputs will accept only turntables with a
magnetic cartridge. GROUND SCREWS (51) for you to ground your
turntables are located on the rear panel. The stereo line inputs will
accept any line level input such as a CD player, cassette player, etc.
6. Headphones can be plugged into the front panel mounted HEADPHONE
JACK (13).
Using the Ground Lift Switch
Depending on your system configuration, sometimes applying the
ground will create a quieter signal path. Sometimes lifting the ground
can eliminate ground loops and hum to create a quieter signal path.
1. With the mixer on, listen to the system in idle mode (no signal present)
with the ground applied (the GROUND LIFT SWITCH (63) in the “GND”
position).
2. Then turn the power OFF before moving the GROUND LIFT SWITCH
(63). Lift the ground by moving the GROUND LIFT SWITCH (63) to the
“LIFT” position, turn the power back on and listen to determine which
position will provide a signal free of background noise and hum. Keep
the GROUND LIFT SWITCH (63) in the “GND” position if the noise level
remains the same in either position.
CAUTION: DO NOT TERMINATE THE AC GROUND ON THE POWER
MIXER IN ANY WAY. TERMINATION OF THE AC GROUND CAN
BE HAZARDOUS.
Operation
1. POWER ON: Once you have made all the equipment connections to
your mixer, press the POWER SWITCH (1). The power will turn on and
the POWER LED (2) will glow.
2. CHANNEL 1: The GAIN (14), HIGH (15), MID (16), and LOW (17)
controls allow you to fully adjust the selected source. Switch # (18)
allows you to select the PHONO 1/LINE 1 or the LINE 5, 6, 7, 8 or AUX
input. The CHANNEL SLIDE or KNOB (19) controls the input level of
this channel. The illuminated CUE BUTTON (20) allows you to cue the
channel.
3. CHANNEL 2: The GAIN (14), HIGH (15), MID (16), and LOW (17)
controls allow you to fully adjust the selected source. Switch # (18)
allows you to select the PHONO 2/LINE 2 or the LINE 5, 6, 7, 8 or
AUX INPUT. The CHANNEL SLIDE or KNOB (19) controls the input
level of this channel. The illuminated CUE BUTTON (20) allows you to
cue the channel.
4. CHANNEL 3: The GAIN (14), HIGH (15), MID (16), and LOW (17)
controls allow you to fully adjust the selected source. Switch #
(18)allows you to select the PHONO 3/LINE 3 or the LINE 5, 6, 7, 8 or
AUX INPUT. The CHANNEL SLIDE or KNOB (19) controls the input
level of this channel. The illuminated CUE BUTTON (20) allows you to
cue the channel.
5. CHANNEL 4: The GAIN (14), HIGH (15), MID (16), and LOW (17)
controls allow you to fully adjust the selected source. Switch # (18)
allows you to select the PHONO 4/LINE 4 or the LINE 5, 6, 7, 8 or
AUX INPUT. The CHANNEL SLIDE or KNOB (19) controls the input
level of this channel. The illuminated CUE BUTTON (20) allows you to
cue the channel.
Page 7
Page 8

6. CHANNEL 5: The GAIN (22), HIGH (23), MID (24), and LOW (25)
controls allow you to fully adjust the selected source. Switch # (21)
allows you to select the MIC 3 or the LINE 5, 6, 7, 8 or AUX INPUT.
The CHANNEL SLIDE or KNOB (26) controls the input level of this
channel. The illuminated CUE BUTTON (27) allows you to cue the
channel.
7. CROSSFADER SECTION: The CROSSF ADER (28) allows the mixing of
one source into another. The CS-19 and CS-19R feature an assignable
crossfader. The ASSIGN SWITCHES (29, 30) allow you to select
which channel will play through each side of the crossfader. The
ASSIGN SWITCH (29) has 6 settings (OFF, 1, 2, 3, 4 or 5) and allows
you to select channel 1, 2, 3, 4 or 5 to play through the left side of the
crossfader. The ASSIGN SWITCH (30) has 6 settings (OFF, 1, 2, 3, 4
or 5) and allows you to select channel 1, 2, 3, 4 or 5 to play through
the right side of the crossfader. With the ASSIGN SWITCH in the OFF
position, that side of the crossfader will be inactive.
The CROSSFADER CURVE BUTTON (40) allows you to adjust the kind
of curve the crossfader has. Depress the CROSSFADER CURVE
BUTTON (40) to make the curve steep and cutting (perfect for
scratching). Release the CROSSFADER CURVE BUTTON (40) to
make the curve gradual and gentle.
8. OUTPUT CONTROL SECTION: The level of the MASTER OUTPUT (44,
45) is controlled by the MASTER BALANCE (31) and the MASTER
(32). The BOOTH CONTROL (33) adjusts the level of the BOOTH
OUTPUT (46). HINT: The BOOTH OUTPUT is used by some DJs to
run monitor speakers in their DJ booth. The ZONE 1 (34) and ZONE 2
(35) CONTROLS are used to control the level to another ZONE or
AMPLIFIER. This balanced line uses a standard tip-sleeve connection.
(Tip= hot or positive (+), ring= cold or negative (-), and sleeve=
shield/ground.) The illuminated LOOP BUTTON (42) will light when the
loop is activated. The STEREO/MONO SWITCH (65) assigns ALL
OUTPUTS (44, 45, 46, 47, 48, 49) as a mono signal or stereo signal.
The MASTER LEVEL ATTENUATION (66) allows you to preset the
output level of the MASTER OUTPUTS (44, 45) with a choice of 3
settings (0, -6dB and -12dB).
9. TALKOVER SECTION: The purpose of the talkover section is to allow
the program playing to be muted so that the mic can be heard above
the music. The MIC/TALKOVER SWITCH (9) controls MIC 1 and MIC 2
and has three settings. When the MIC/TALKOVER SWITCH (9) is in
the “OFF” position, MIC 1 and MIC 2 and talkover are off. When the
MIC/TALKOVER SWITCH (9) is in the “MIC 1 & 2” position MIC 1 and
MIC 2 are on, the MIC INDICATOR (8) will glow, but talkover is off.
When the MIC/TALKOVER SWITCH (9) is in the “TALKOVER” position,
MIC 1 and MIC 2 and talkover will be on and the volume of all sources
except the MIC 1 & 2 inputs are lowered by 16 dB. The TREBLE (4) and
BASS (5) CONTROLS allow you to fully adjust the tone of MIC 1 and
MIC 2. MIC 1 LEVEL (6) and MIC 2 LEVEL (6) control the individual
levels of MIC 1 and MIC 2.
10. CUE SECTION: Pressing the MIC CUE BUTTON (7) allows you to send
your MIC output to your cue mix. By connecting a set of headphones
to the HEADPHONE JACK (13), you can monitor any or all of the
channels. A unique feature of the CS-19 and CS-19R is the CUE
BUTTON (41). When you press the CUE BUTTON (41) you will send
your cue mix (the same mix you hear in your headphones) to the booth
monitors. Press the CUE ASSIGN BUTTONS (20, 27) for channels 1 5 to select the channel or channels to be monitored and the buttons will
illuminate. The channels selected will be included in your cue mix and
can be monitored through your booth monitor speakers and/or
headphones.
Use the CUE LEVEL CONTROL (10) to adjust the cue volume without
affecting the overall mix. By rotating the CUE PGM PAN CONTROL
(12) to the left you will be able to monitor the assigned cue signal.
Rotating to the right will monitor the PGM (program) output.
1 1. DISPLA YS: The PEAK HOLD LED METER (11) indicates the MASTER
OUTPUT (44, 45) left and right channel levels. The individual channels
each have their own PREFADER INPUT LEVEL LED METERS (36)
which reflect the GAIN, HIGH, MID, and LOW rotary control
adjustments. The CHANNEL CONTROLS (19, 26, 33, 40, 47) will not
affect the PREFADER INPUT LEVEL LED METERS (36).
12.There are LOOP INPUTS (37) and LOOP OUTPUTS (38). If you are
using an outboard signal processor, you can use the LOOP OUTPUTS
(38) to send the signal to the device and the LOOP INPUTS (37) to
bring the signal back in to the mixer. The unit comes with jumpers to be
used with the loop inputs and outputs. Keep the jumpers in the unit if
you are not using the loop to prevent interruptions in your music
program. There are also 1/4” balanced (tip= send, ring= return, sleeve=
ground) LOOP INPUT/OUTPUT JACKS (64) on the rear panel, which
are connected in series with the LOOP INPUTS/OUTPUTS (37, 38) on
the front panel so you can add additional effects or signal processors.
13. AUX INPUTS: The AUX INPUTS (39) on the front of the mixer allow
easy access for connecting an additional device such as a tape deck,
CD player, etc. EQ, Gain and Level of the AUX INPUTS (39) can be
controlled by assigning them to a channel by setting the INPUT
SELECT SWITCH (18, 21) on any channel to the “AUX” position.
Specifications
INPUTS:
Phono........................................................................4.5mV
47Kohm Mic 1, 2, 3........................2.5mV, 2Kohm, Balanced
Line...........................................................150 mV 27Kohm
Aux............................................................150 mV 27Kohm
OUTPUTS:
Master/Zone 1, 2 (balanced/unbalanced).......0 dB 2V , 400ohm
Booth(unbalanced)......................................0dB, 1V, 400ohm
Max..............................20V Peak to Peak
Rec..............................................................150mV 5Kohm
Infrasonic Filter.........................................15Hz, 18dB/octave
GENERAL:
Bass(Mic1,2)............................................................± 12dB
Treble (Mic 1, 2)........................................................± 12dB
Gain (Mic 1, 2, 3).................................................0 to -40dB
Low (Channels 1-5)........................................+ 12dB/- 32 dB
Mid (Channels 1-5)........................................+ 12dB/- 32 dB
High (Channels 1-5).......................................+ 12dB/- 32 dB
Gain (Channels 1-5)..............................................0 to -30dB
Master Output Attenuation .........................0dB, -6dB, -12dB
Frequency Response...........................20Hz - 20KHz +/- 2dB
Distortion....................................................less than 0.02%
S/N Ratio....................................................better than 80dB
Talkover Attenuation.....................................................16dB
Power Source...................................115/230V 50/60Hz 20W
Dimensions........................................19”w x 10.5”h x 4.75”d
Weight..................................................................11.28 lbs
Page 8
Page 9

FUNKTIONSBESCHREIBUNGEN:
1
NETZSCHALTER: Schaltet den Strom zum Gerät ein und aus. Den Schalter in die obere Position schieben, um das Gerät
einzuschalten (ON), und dann den Schalter in die untere Position schieben, um das Gerät auszuschalten (OFF).
LEISTUNGS-LED: Glimmt jedesmal, wenn das Gerät an der vorschriftsmäßigen Stromquelle angeschlossen und eingeschaltet ist.
2
3
MIC 1 & MIC 2 EINGÄNGE: Diese Neutrik Combo-Stecker nehmen XLR-Buchsen oder 6,2 mm Phonobuchsen auf. Dies bietet
Ihnen den Vorteil, dieses Mischpult einer jeden Situation und T onaufnahmeanlage anzupassen. Sie können Mikrofone benutzen,
die mit 6,2 mm Standardanschlüssen oder XLR-Anschlüssen geliefert werden.
MIC-PEGELREGLER: Regelt das Hochfrequenzverhalten von MIC 1 und MIC 2. Diesen Knopf im Uhrzeigersinn drehen, um das
4
Hochfrequenzverhalten zu erhöhen, oder gegen den Uhrzeigersinn drehen, um es zu reduzieren. Dieser Regler bietet Ihnen ein
breites Klangsortiment und ermöglicht Spezialeffekte einzusetzen.
MIC-TIEFENREGLER: Regelt das Niederfrequenzverhalten von MIC 1 und MIC 2. Diesen Knopf im Uhrzeigersinn drehen, um das
5
Niederfrequenzverhalten zu erhöhen, oder gegen den Uhrzeigersinn drehen, um es zu reduzieren. Dies bietet Ihnen ein breites
Klangsortiment und ermöglicht, Spezialeffekte einzusetzen.
MIC-PEGELREGLER: Regelt die Lautstärke von MIC 1 und MIC 2. Diesen Knopf im Uhrzeigersinn drehen, um die Lautstärke von
6
MIC 1 und MIC 2 zu steigern, oder gegen den Uhrzeigersinn drehen, um sie zu reduzieren.
CUE-T ASTE: Sendet die MIC 1- und MIC 2-Ausgänge zum Cue-Mischpult. Drücken Sie diese T aste, und Ihr Mikrofon kann nun
7
im Kopfhörer und in der Kabine zusammen mit dem Cue-Mischpult kontrolliert werden.
MIC-ANZEIGE: Dieses Anzeigegerät glimmt, um anzuzeigen, dass MIC 1 & MIC 2 eingeschaltet (ON) sind. W enn diese LED
8
glimmt, können Sie ins Mikrofon sprechen und dies in Ihrem Programm und/oder Cue-Mischpult hören.
MIC-T ALKOVER-SCHAL TER: Der Zweck des T alkover-T eils ist, das gespielte Programm zu dämpfen, so dass man das Mikrofon
9
über die Musik hören kann. Der MIC/TALKOVER-Schalter regelt MIC 1 und MIC 2 und hat drei Einstellungen. W enn der MIC/
T ALKOVER-Schalter in “OFF”-Position steht, sind MIC 1 und MIC 2 und T alkover ausgeschaltet. W enn der MIC/T ALKOVERSchalter in “MIC 1 und MIC 2”-Position steht, sind MIC 1 und MIC 2 und T alkover eingeschaltet, die MIC-ANZEIGE glimmt, aber
T alkover ist ausgeschaltet. W enn der MIC/T ALKOVER-Schalter in “T ALKOVER”-Position steht, sind MIC 1 und MIC 2 und
T alkover eingeschaltet, und die Lautstärke aller Quellen, außer den MIC 1 und MIC 2-Eingängen, ist um 16 dB reduziert.
CUE-PEGEL: Regelt die Cue-Lautstärke ohne dabei die allgemeine Klangmischung zu beeinträchtigen. Diesen Knopf im
10
Uhrzeigersinn drehen, um die Lautstärke der Cue-Klangmischung zu erhöhen und gegen den Uhrzeigersinn drehen, um sie zu
reduzieren.
PEAK HOLD LED METER (Spitzenwert LED-Anzeige): Zeigt die linken und rechten Kanalpegel des Master Output an. Dieser
11
Anzeige ermöglicht Ihnen, die Klangqualität Ihres Geräts zu optimieren und Klirren im System zu eliminieren.
CUE PGM P AN CONTROL (Cue Programm-Schwenkregler): W enn Sie den CUE PGM P AN-Schwenkregler nach links drehen,
12
können Sie das zugewiesene Cue-Signal überwachen. Wird er nach rechts gedreht, wird der Programm-Ausgang überwacht.
KOPFHÖRERBUCHSE: Eine 6,2 mm Stereo-Buchse kann am Stereo-Kopfhörer angeschlossen werden.
13
CHANNEL GAIN CONTROL (V erstärkungsregelung: Reguliert das GAIN (Verstärkung) für Kanäle 1, 2, 3, 4. Diesen Knopf im
14
Uhrzeigersinn drehen, um die V erstärkung zum Kanal zu erhöhen. Den Knopf gegen den Uhrzeigersinn drehen, um die Verstärkung
zum Kanal zu reduzieren.
CHANNEL HIGH EQ CONTROL (Hochfrequenz-Entzerrungsregler): Den Hochfrequenzgang für Kanäle 1, 2, 3, 4 anpassen.
15
Diesen Knopf im Uhrzeigersinn drehen, um den Hochfrequenzgang zu steigern, und gegen den Uhrzeigersinn drehen, um ihn zu
reduzieren. Dies bietet Ihnen ein breites Sortiment von Klangmöglichkeiten, um damit Spezialeffekte zu erzielen.
CHANNEL MID EQ CONTROL (Mittelfrequenz-Entzerrungsregler): Den Mittelfrequenzgang für Kanäle 1, 2, 3, 4 anpassen.
16
Diesen Knopf im Uhrzeigersinn drehen, um den Mittelfrequenzgang zu steigern, und gegen den Uhrzeigersinn drehen, um ihn zu
reduzieren. Dies bietet Ihnen ein breites Sortiment von Klangmöglichkeiten, um damit Spezialeffekte zu erzielen.
CHANNEL LOW EQ CONTROL (Niederfrequenz-Entzerrungsregler): Den Niederfrequenzgang für Kanäle 1, 2, 3, 4 anpassen.
17
Diesen Knopf im Uhrzeigersinn drehen, um den Niederfrequenzgang zu steigern, und gegen den Uhrzeigersinn drehen, um ihn zu
reduzieren. Dies bietet Ihnen ein breites Sortiment von Klangmöglichkeiten, um damit Spezialeffekte zu erzielen.
INPUT SELECT SWITCH (Eingangswählschalter): Ermöglicht Ihnen, die Eingangsquelle für Kanäle 1, 2, 3, 4 auszuwählen.
18
Phono 1/Line 1, Line 5, Line 6, Line 7, Line 8 oder AUX auswählen. Der Pegel und die EQ-Funktionen werden nur den für diesen
Kanal ausgewählten Eingang beeinträchtigen.
CHANNEL-Schieber/-drehknopf: Reguliert die relativen Pegel für jeden der vier Eingangs-Mischkanäle (Kanäle 1, 2, 3, 4).
19
Page 9
Page 10

CHANNEL CUE ASSIGN-T aste: Das Betätigen einer einzelnen bzw . einer Kombination von CUE-Drucktasten sendet jedes
20
Programm am SELECT SWITCH (Wählschalter) des Quellenreglers des jeweiligen Kanals zum Kopfhörer-Cue-Teil. Die Drucktasten
erleuchten, wenn der Schalter betätigt wird.
21
CHANNEL 5-EINGANGSWÄHLSCHAL TER: Ermöglicht Ihnen, die Eingangsquelle für Kanal 5 auszuwählen. MIC 3/Line 5, Line
6, Line 7, Line 8 oder AUX auswählen. Der Pegel und die EQ-Funktionen werden nur den für diesen Kanal ausgewählten Eingang
beeinträchtigen. (MIC 3-Eingang auf diesem Kanal)
22
CHANNEL 5 GAIN CONTROL (V erstärkungsregelung): Reguliert die V erstärkung für Kanal 5. Diesen Knopf im Uhrzeigersinn
drehen, um die V erstärkung zum Kanal zu erhöhen. Den Knopf gegen den Uhrzeigersinn drehen, um die Verstärkung zum Kanal zu
reduzieren.
23
CHANNEL 5 HIGH EQ CONTROL (Hochfrequenz-Entzerrungsregler): Den Hochfrequenzgang für Kanal 5 anpassen. Diesen
Knopf im Uhrzeigersinn drehen, um den Hochfrequenzgang zu steigern, und gegen den Uhrzeigersinn drehen, um ihn zu
reduzieren. Dies bietet Ihnen ein breites Sortiment von Klangmöglichkeiten, um damit Spezialeffekte zu erzielen.
CHANNEL 5 MID EQ CONTROL (Mittelfrequenz-Entzerrungsregler): Den Mittelfrequenzgang für Kanal 5 anpassen. Diesen
24
Knopf im Uhrzeigersinn drehen, um den Mittelfrequenzgang zu steigern, und gegen den Uhrzeigersinn drehen, um ihn zu
reduzieren. Dies bietet Ihnen ein breites Sortiment von Klangmöglichkeiten, um damit Spezialeffekte zu erzielen.
25
CHANNEL 5 LOW EQ CONTROL (Niederfrequenz-Entzerrungsregler): Den Niederfrequenzgang für Kanal 5 anpassen.
Diesen Knopf im Uhrzeigersinn drehen, um den Niederfrequenzgang zu steigern, und gegen den Uhrzeigersinn drehen, um ihn zu
reduzieren. Dies bietet Ihnen ein breites Sortiment von Klangmöglichkeiten, um damit Spezialeffekte zu erzielen.
CHANNEL 5 Schieber/Drehknopf: Reguliert die relativen Pegel für Kanal 5.
26
27
CHANNEL 5 CUE ASSIGN-T aste: Das Betätigen einer einzelnen bzw . Einer Kombination von CUE-Drucktasten sendet jedes
Programm am SELECT SWITCH (Wählschalter) des Quellenreglers von Kanal 5 zum Kopfhörer-Cue-Teil. Die Drucktasten
erleuchten, wenn der Schalter betätigt wird.
28
CROSSFADER (Überblender): Der Überblender ermöglicht das Mischen eine T onquelle mit einer anderen. Dieser Überblender
reguliert die Pegel von zwei beliebigen Kanälen, die ihm durch den linken und rechten Überblender-Zuweisungsschalter
zugewiesen sind.
LINKER ZUWEISUNGSSCHAL TER: W eist die linke Seite des Zuweisungsschalters einem der fünf Eingangskanäle zu.
29
30
RECHTER ZUWEISUNGSSCHAL TER: W eist die rechte Seite des Zuweisungsschalters einem der fünf Eingangskanäle zu.
31
REGIEPUL T-BALANCE: Reguliert die Balance des Regiepults LINKS und RECHTS.
32
REGIEPULT: Bestimmt das Programm und die Mikrofon-T onstärke an den Hauptausgängen.
KABINENREGLER: Regelt den Pegel des Kabinenausgangs.
33
34
ZONE 1 REGLER: Reguliert den Pegel des Ausgangs von Zone 1.
35
ZONE 2 REGLER: Reguliert den Pegel des Ausgangs von Zone 2.
36
VORREGLER DER EINGANGSPEGEL LED-ANZEIGEN: Zeigt die V erstärkungs-, Höhen-, Mittel- und T ieftonregulierungen an.
37
REGELKREISEINGÄNGE: Führt das Signal vom Außenbordsignalprozessor zurück zum Mischpult.
38
REGELKREISAUSGÄNGE: Sendet das Signal vom Mischpult zu einem Außenbordsignalprozessor . Das Gerät wird mit
Steckbrücken geliefert, die mit den Regelkreiseingängen und -ausgängen zu benutzen sind. W enn Sie den Regelkreis nicht
benutzen, sollten die Steckbrücken im Gerät bleiben, um Unterbrechungen im Musikprogramm durch versehentliches Berühren der
Regelkreistaste zu verhindern.
AUX INPUTS (Hilfseingänge): Bietet leichten Zugang zum Anschluss mit zusätzlichen V orrichtungen (Kassettengerät, CD-Spieler
39
usw.). Dies ist eine nützliche Funktion, wenn kurzfristig an eine andere Klangquelle angeschlossen werden soll. Um eine
zusätzliche Vorrichtung zu benutzen, brauchen Sie keine der angeschlossenen Vorrichtungen vom Gerät zu trennen.
CROSSF ADER CURVE-T aste: Die CROSSF ADER CUR VE-T aste ermöglicht Ihnen, die jeweilige Kurve des Überblenders
40
einzustellen. Die CROSSF ADER CUR VE-T aste drücken, um eine steile Kurve und Unterbrechung zu erzeugen (ideal für
Raspelgeräusch). Die CROSSF ADER CUR VE-T aste zurückspringen lassen, um eine sanfte Kurve zu erzeugen.
CUE-Taste: Wenn Sie die CUE-T aste drücken, werden Sie Ihre Cue-Klangmischung (die gleiche Klangmischung, die Sie im
41
Kopfhörer hören) an beide Monitor senden.
42
LOOP-Taste: Aktiviert die LOOP-Eingänge und -Ausgänge. W enn diese T aste aktiviert ist, glimmt sie.
43
MIC ÜBERLAST-LEDS: Erleuchten, wenn das Signal zu den MIC-Eingängen 1 & 2 zu hoch ist. W enn die LEDs erleuchten,
sollten Sie die V erstärkung dieses Kanals reduzieren, um Verzerren zu verhindern.
Page 10
Page 11

HAUPT AUSGÄNGE (BALANCIERT): Benutzt XLR-Stecker . Liefert ein vollständig balanciertes Hauptausgangssignal. Stift 2 ist
44
(+), Stift 3 ist (-), und Stift 1 ist die Signalmasse. Benutzt diese Ausgänge, um das Hauptverstärker- und Lautsprechersystem zu
verbinden.
45
HAUPT AUSGÄNGE (UNBALANCIERT): Liefert das Hauptausgangssignal über RCA-Stecker . Benutzt diese Ausgänge, um das
Hauptverstärker- und Lautsprechersystem zu verbinden.
46
KABINEN-AUSGANGSBUCHSEN: Wird benutzt, um den Verstärker in der DJ-Kabine zu verbinden. Benutzt RCA-Stecker .
AUFNAHME-AUSGANGSBUCHSEN: Ermöglicht Ihnen, Aufnehmen mit einen Kassettenrecorder usw. zu machen. Benutzt RCA-
47
Stecker .
ZONE 1 AUSGANGSBUCHSEN: Wird benutzt, um an einem zusätzlichen Verstärker angeschlossen zu werden. Benutzt 6,2 mm
48
Phono-Stecker.
ZONE 2 AUSGANGSBUCHSEN: Wird benutzt, um an einem zusätzlichen Verstärker angeschlossen zu werden. Benutzt 6,2 mm
49
Phono-Stecker.
SP ANNUNGSWAHLSCHALTER: Diesen Schalter in die obere Position schieben, um 115 V auszuwählen, oder in die untere
50
Position schieben, um 230 V auszuwählen.
ERDUNGSSCHRAUBE: Vier Erdungsschrauben zur leichten Erdung des Plattenspielers sind an der Rückwand angebracht.
51
52
MIC 3 EINGANG: Ermöglicht Ihnen, das dritte Mikrofon anzuschließen. Dieser Eingang benutzt ebenfalls eine Neutrik Combo-
Buchse, die Ihnen ermöglicht, Mikrofone sowohl mit XLR-Steckern als auch mit 6,2 mm Phono-Steckern zu verbinden.
MIC 1, 2, 3 VERSTÄRKUNGSREGELUNGEN: Separate V erstärkungsregelungen für jede der drei Mikrofone.
53
54
PHONO 1 / LINE 1 EINGANG: Diese Eingänge nehmen entweder einen Leitungspegel- oder Phonoeingang auf. Die
Phonoeingänge werden nur Plattenspieler mit magnetischem T onabnehmer aufnehmen.
55
PHONO 2 / LINE 1 EINGANG: Diese Eingänge nehmen entweder einen Leitungspegel- oder Phonoeingang auf. Die
Phonoeingänge werden nur Plattenspieler mit magnetischem T onabnehmer aufnehmen.
PHONO 3 / LINE 1 EINGANG: Diese Eingänge nehmen entweder einen Leitungspegel- oder Phonoeingang auf. Die
56
Phonoeingänge werden nur Plattenspieler mit magnetischem T onabnehmer aufnehmen.
57
PHONO 4 / LINE 1 EINGANG: Diese Eingänge nehmen entweder einen Leitungspegel- oder Phonoeingang auf. Die
Phonoeingänge werden nur Plattenspieler mit magnetischem T onabnehmer aufnehmen.
LINE 5 EINGANG: Dieser Eingang nimmt einen Leitungspegeleingang auf (wie ein CD-Spieler oder Kassettenspieler).
58
Plattenspieler müssen an den Phono/Line-Eingängen angeschlossen sein (54, 55, 56, 57).
LINE 6 EINGANG: Dieser Eingang nimmt einen Leitungspegeleingang auf (wie ein CD-Spieler oder Kassettenspieler).
59
Plattenspieler müssen an den Phono/Line-Eingängen angeschlossen sein (54, 55, 56, 57).
60
LINE 7 EINGANG: Dieser Eingang nimmt einen Leitungspegeleingang auf (wie ein CD-Spieler oder Kassettenspieler).
Plattenspieler müssen an den Phono/Line-Eingängen angeschlossen sein (54, 55, 56, 57).
61
LINE 8 EINGANG: Dieser Eingang nimmt einen Leitungspegeleingang auf (wie ein CD-Spieler oder Kassettenspieler).
Plattenspieler müssen an den Phono/Line-Eingängen angeschlossen sein (54, 55, 56, 57).
PHONO/LINE-SCHALTER: Ermöglicht Ihnen, die Phono/Line-Eingänge auf Phono oder Line zu stellen. Diesen Schalter in
62
PHONO-Position stellen, so dass ein bestimmter Eingang einen Plattenspieler mit magnetischem T onabnehmer aufnehmen kann.
Eine Leitung für den Eingang auswählen, um einen CD-Spieler, Kassettenspieler usw aufzunehmen.
63
MASSETRENNSCHALTER: Das Chassis und das Signal haben eine getrennte Erdung. Normalerweise sollte dieser Schalter in
GND-Position (Erdung) stehen. In einigen Fällen, wenn er in die entgegengesetzte Richtung gestellt wird, kann man dadurch
beharrendes Brummen eliminieren. Vor dem Umschalten der Erdung, darauf achten, dass der Leistungsverstärker ausgeschaltet ist,
um Beschädigung des Systems zu vermeiden.
LOOP INPUTS/OUTPUTS (Regelkreiseingänge/-ausgänge): 6,2 mm balancierte (Spitze = senden, Ring = Rücklauf, Muffe =
64
Erdung) Regelkreiseingangs-/Ausgangsbuchsen an der Hinterwand, die mit den Regelkreiseingänge/-ausgängen reihenweise an
der Vorderwand angeschlossen sind, so dass Sie zusätzliche Effekte oder Signalprozessoren anschließen können.
STEREO/MONO-Schalter: Ordnet Ausgänge als ein MONO-Signal oder STERO-Signal zu. Dies beinhaltet die MASTER
65
OUTPUTS (Hauptausgänge), RECORD OUTPUTS (Aufnahmeausgänge) sowie die Ausgänge von ZONE 1 und ZONE 2.
66
HAUPTPEGEL-DÄMPFUNG: Ermögliche drei Voreinstellungen der Ausgangspegel der Hauptausgänge: 0 dB, -6 dB und -12 dB.
Page 11
Page 12

EINFÜHRUNG
Wir bedanken uns für Ihren Kauf eines CS-19 oder CS-19R PRO
CLUB MISCHPULTS von Gemini. Dieses hochmoderne Mischpult hat
eine dreijährige Herstellergarantie, ausschließlich Überblender und
Kanalschieber. Lesen Sie diese Bedienungsanleitung vor der
Inbetriebnahme des Geräts sorgfältig durch.
Funktionen
• 5 Stereokanäle
• Hauptpegeldämpfung
• Modernes Cue-Teil mit zuordenbarem Cue-Ausgang
• 8 Leitungen, 4 Phono-Eingänge, 3 MIC-Eingänge, 1 AUX-Eingang
• Überblender-Kurventaste und Überblender-Zuordnungsregler
• Höhen-, Tiefen- und Tonstärkenregler für jeden Kanal
• Talkover
• Hauptausgänge, Kabinenausgang, 2 Zonen-Ausgänge
• MIC 1, 2, 3 Verstärkung an der Rückwand
• MIC 1 & 2 Überlast-LED-Anzeigen
• Erleuchtete Drucktastenschalter
Hinweise zur Sicherheit
1. Das Gerät immer vor der Gestellmontage testen. Bewahren Sie eine
Kopie des Kassenbelegs für Garantiezwecke auf.
2. Lesen Sie diese Bedienungsanleitung vor der Inbetriebnahme
vollständig durch.
3. Um die Gefahr eines elektrischen Schlages auszuschließen, darf das
Gerät nicht geöffnet werden. Dieses Gerät enthält KEINE
AUSTAUSCHBAREN KOMPONENTEN. Wenden Sie sich im Falle eines
Reparaturbedarfs nur an qualifizierte Fachleute.
Falls Sie in den USA irgendwelche Probleme mit Ihrem Gerät
haben, wenden Sie sich an den Gemini-Kundendienst unter
1-732-969-9000. Das Gerät bitte nicht an Ihren Händler
zurückschicken.
4. Setzen Sie das Gerät keiner direkten Sonnenstrahlung oder
Wärmequellen wie Heizung oder Ofen aus.
5. Dieses Gerät darf nur mit einem feuchten Tuch gesäubert werden.
Keine Lösungs- oder Reinigungsmittel benutzen.
6. Bei Umzügen sollte das Gerät in seinem Originalkarton und verpackung transportiert werden, um Beschädigungen zu vermeiden.
7. SETZEN SIE DAS GERÄT NIEMALS REGEN ODER FEUCHTIGKEIT
AUS.
8. VERWENDEN SIE KEINE REINIGUNGSSPRAYS ODER
SCHMIERSTOFFE FÜR DIE SCHALTER UND REGLER.
spannungsführend (positiv). Stift 3 dient für das Signal und ist
spannungslos (negativ). Die HAUPTAUSGANGSBUCHSEN (45) sind
nicht balanciert und werden benutzt, und werden zum Anschluss an
den Hauptverstärker benutzt. Die KABINENAUSGANGSBUCHSEN
(46) werden benutzt, um einen zusätzlichen Verstärker
anzuschließen. Die AUFNAHME-AUSGANGSBUCHSEN (47)
ermöglichen Ihnen, Ihre Klangmischung mit einem Kassettenrecorder,
CD-Recorder usw. aufzunehmen. Die Ausgänge von ZONE 1 (48)
und ZONE 1 (49) können benutzt werden, um zusätzliche Verstärker
anzuschließen.
4. Die MIC 1 und MIC 2 (3) Eingänge (an der Vorderwand) sind Neutrik
Combi-Anschlüsse, die entweder eine XLR-Buchse oder einen 6,2 mm
Standardbuchse aufnehmen. Jeder MIC-Eingang hat seinen eigenen
individuellen TREBLE-Regler (4), BASS-Regler (5), LEVEL-Regler (6),
CUE-Taste (7) und OVERLOAD-LED (43). Der MIC 3-Eingang (52)
befindet sich an der Rückwand. Die GAIN-Regler (53) für MICS 1, 2 &
3 befindet sich an der Rückwand.Die MIC OVERLOAD-LEDs (43)
werden aufleuchten, wenn das Signal zum den MIC-Eingängen 1 & 2
zu hoch ist.
5. An der Rückwand befinden sich 4 PHONO/LINE Stereo-Eingänge (54,
55, 56, 57) und LINE Stereo-Eingänge (58, 59, 60, 61). Der PHONO/
LINE Schalter (62) ermöglicht Ihnen, die PHONO/LINE Eingänge (54,
55, 56, 57) auf Phono oder Line zu stellen. Die Phono-Eingänge
werden nur Plattenspieler mit magnetischem Tonabnehmer aufnehmen.
ERDUNGSSCHRAUBEN (51), um den Plattenspieler zu erden,
befindet sich an der Rückwand. Die Stereo-Leitungseingänge werden
jegliche Leitungspegel-Eingänge aufnehmen, die sich an der
Rückwand befinden. Die Stereo-Leitungseingänge werden einen
jeglichen Leitungspegel-Eingang aufnehmen wie beispielsweise ein
CD-Spieler, Kassettenspieler usw.
6. Kopfhörer können an der HEADPHONE-Buchse (13) an der
Vorderwand angeschlossen werden.
Benutzung des Massetrennschalters
Abhängig von Ihrer Systemkonfiguration wird das Anlegen von Masse
manchmal einen ruhigeren Signalpfad erzeugen. Manchmal kann die
Trennung der Masse Schleifen und Brummen eliminieren, um einen
ruhigeren Signalpfad erzeugen.
1. Wenn das Mischpult eingeschaltet ist, das System in Ruheposition
(ohne Signal) und bei angelegter Masse abhören (der
Massetrennschalter (GROUND LIFT) (63) befindet sich in GNDPosition).
2. Dann den Strom abschalten (OFF), bevor der Massetrennschalter
(63) betätigt wird. Den Massetrennschalter (63) in LIFT-Position stellen,
den Strom wieder anschalten und hören, um festzustellen, welche
Position signalfrei ist, ohne Hintergrundrauschen und Brummen. Den
Massetrennschalter (63) in der GND-Position halten, wenn der
Geräuschpegel in jeder Position gleich bleibt.
VORSICHT: DIE WECHSELSTROM-MASSE DE LEISTUNGSMISCHERS
IN KEINER WEISE ABSCHALTEN, DA EIN ABSCHALTEN DER
WECHSELSTROM-MASSE GEFÄHRLICH SEIN KANN.
ANSCHLUSSVERBINDUNGEN
1. Vor dem Anschließen des Anschlusskabels darauf achten, dass der
VOLTAGE SELECTOR-Schalter (50) auf die vorschriftsmäßige
Spannung geschaltet ist.
HINWEIS: Dieses Produkt ist doppelt isoliert und darf nicht
geerdet werden.
2. Stellen Sie sicher, dass der POWER-Schalter (1) in OFF-Position steht.
3. Der CS-19 und der CS-19R werden mit zwei Garnituren VerstärkerAusgangsbuchsen geliefert. Die BALANCIERTEN
HAUPTAUSGANGSBUCHSEN (44) werden benutzt, um die den
Hauptverstärker mit den XLR-Standardkabeln anzuschließen. Wir
empfehlen, die BALANCIERTEN HAUPTAUSGANGSBUCHSEN
anzuwenden, wenn die zu Ihrem Verstärker führenden Kabel 7,50 m
oder länger sind. Die balancierten Ausgänge verfügen über drei
verschiedene Leiter von denen zwei ein Signal (ein positives und ein
negatives) sind sowie eine Abschirmung (Masse). Stift 1 dient für die
Masse (Abschirmung). Stift 2 dient für das Signal und
Bedienung
1. POWER ON (STROM EIN): Nachdem Sie das Gerät am Mischpult
angeschlossen haben, drücken Sie auf die POWER-Taste (1). Der Strom
wird eingeschaltet und die POWER-LED (2) wird glimmen.
2. CHANNEL (KANAL) 1: Die Regelelemente GAIN (14), HIGH (15), MID
(16) und LOW (17) ermöglichen ein vollkommenes Regulieren der
ausgewählten Tonquelle. Schalter Nr. (18) ermöglicht Ihnen, den Eingang
PHONO 1/LINE 1 oder LINE 5, 6, 7, 8 oder AUX auszuwählen. Der
CHANNEL-Schieber oder -Drehknopf (19) regelt den Eingangspegel
dieses Kanals. Die erleuchtete CUE-Taste (20) ermöglicht Ihnen, den
Kanal mitzuhören.
3. CHANNEL (KANAL) 2: Die Regelelemente GAIN (14), HIGH (15), MID
(16) und LOW (17) ermöglichen ein vollkommenes Regulieren der
ausgewählten Tonquelle. Schalter Nr. (18) ermöglicht Ihnen, den Eingang
PHONO 2/LINE 2 oder LINE 5, 6, 7, 8 oder AUX auszuwählen. Der
CHANNEL-Schieber oder -Drehknopf (19) regelt den Eingangspegel dieses
Kanals. Die erleuchtete CUE-Taste (20) ermöglicht Ihnen, den Kanal
mitzuhören.
Page 12
Page 13

4. CHANNEL (KANAL) 3: Die Regelelemente GAIN (14), HIGH (15), MID
(16) und LOW (17) ermöglichen ein vollkommenes Regulieren der
ausgewählten Tonquelle. Schalter Nr. (18) ermöglicht Ihnen, den
Eingang PHONO 3/LINE 3 oder LINE 5, 6, 7, 8 oder AUX auszuwählen.
Der CHANNEL-Schieber oder -Drehknopf (19) regelt den
Eingangspegel dieses Kanals. Die erleuchtete CUE-Taste (20)
ermöglicht Ihnen, den Kanal mitzuhören.
5. CHANNEL (KANAL) 4: Die Regelelemente GAIN (14), HIGH (15), MID
(16) und LOW (17) ermöglichen ein vollkommenes Regulieren der
ausgewählten Tonquelle. Schalter Nr. (18) ermöglicht Ihnen, den
Eingang PHONO 4/LINE 4 oder LINE 5, 6, 7, 8 oder AUX auszuwählen.
Der CHANNEL-Schieber oder -Drehknopf (19) regelt den
Eingangspegel dieses Kanals. Die erleuchtete CUE-Taste (20)
ermöglicht Ihnen, den Kanal mitzuhören.
6. CHANNEL (KANAL) 5: Die Regelelemente GAIN (14), HIGH (15), MID
(16) und LOW (17) ermöglichen ein vollkommenes Regulieren
der ausgewählten Tonquelle. Schalter Nr. (21) ermöglicht Ihnen,
MIC 3 oder Die Kanalschieber oder -Knopf (26) reguliert den
Eingangspegel dieses Kanals. Die erleuchtete CUE-Taste (27)
ermöglicht Ihnen, den Kanal mitzuhören.
7. ÜBERBLENDER-TEIL: Der CROSSFADER (Überblender) (28)
ermöglicht das Mischen von Tonquellen. Das CS-19 und das CS-19R
verfügt über einen zuweisbaren Überblender. Die ASSIGN-Schalter
(29, 30) ermöglichen Ihnen auszuwählen, welcher Kanal durch jede
Seite des Überblenders spielt. Der ASSIGN-Schalter (29) hat sechs
Einstellungen (OFF, 1, 2, 3, 4 oder 5) und ermöglicht Ihnen, Kanal 1, 2,
3, 4 oder 5 auszuwählen, um die Musik durch die linke Seite des
Überblenders zu spielen. Der ASSIGN-Schalter (30) hat sechs
Einstellungen (OFF, 1, 2, 3, 4 oder 5) und ermöglicht Ihnen, Kanal 1, 2,
3, 4 oder 5 auszuwählen, um die Musik durch die rechte Seite des
Überblenders zu spielen. Wenn der ASSIGN-Schalter in OFF-Position
steht, wird diese Seite des Überblenders deaktiviert sein.
Die CROSSF ADER CURVE-Taste (40) ermöglicht Ihnen, die Kurve
des Überblenders einzustellen. Die CROSSFADER CURVE-Taste (40)
drücken, um eine steile Kurve und Unterbrechung zu erzeugen (ideal
für Raspelgeräusch). Die CROSSFADER CURVE-Taste (40)
zurückspringen lassen, um eine sanfte Kurve zu erzeugen.
8. AUSGANGSREGLER-TEIL: Der Pegel der HAUPT AUSGÄNGE (44,
45) wird von der HAUPTBALANCE (31) und vom REGIEPULT (32)
reguliert. Der KABINEN-Regler (33) reguliert den Pegel des KABINEN-
Ausgangs (46). TIPP: Einige DJs benutzen den
KABINENAUSGANG, um die Monitor-Lautsprecher in ihrer DJKabine zu betreiben. Die Regler der ZONE 1 (34) und ZONE 2 (35)
werden benutzt, um den Pegel zu einer anderen ZONE und eines
anderen VERSTÄRKERS zu regulieren. Diese balancierte Leitung
benutzt eine Standard-Spitzenmuffen-Verbindung (Spitze =
spannungsführend bzw. positiv (+), Ring = spannungslos bzw. negativ
(-), Muffe = Abschirmung/Erdung). Die LOOP-Taste (42) wird
aufleuchten, wenn der Kreis aktiviert ist. Der STEREO/MONO-Schalter
(65) ordnet ALLE AUSGÄNGE (44, 45, 46, 47, 48, 49) als ein
Monosignal oder Stereosignal zu. Die HAUPTPEGELDÄMPFUNG (66)
ermöglicht Ihnen, den Ausgangspegel der HAUPTAUSGÄNGE (44, 45)
mit eine Auswahl von drei Einstellungen (0, -6 dB und -12 dB)
voreinzustellen.
9. TALKOVER-TEIL: Der Zweck des Talkover-Teils ist, das gespielte
Programm zu dämpfen, so dass man das Mikrofon über der Musik
hören kann. Der MIC/TALKOVER-Schalter (9) regelt MIC 1 und MIC 2
und hat drei Einstellungen. Wenn der MIC/T ALKOVER-Schalter in
“OFF”-Position steht, sind MIC 1 und MIC 2 und Talkover ausgeschaltet.
Wenn der MIC/TALKOVER-Schalter (9) in “MIC 1 und MIC 2”-Position
steht, sind MIC 1 und MIC 2 und Talkover eingeschaltet, die MIC-
ANZEIGE (8) glimmt, aber Talkover ist ausgeschaltet. Wenn der MIC/
TALKOVER-Schalter (9) in “TALKOVER”-Position steht, sind MIC 1 und
MIC 2 und Talkover eingeschaltet und die Lautstärke alle Quellen außer
den MIC 1 und MIC 2-Eingängen ist um 16 dB reduziert. Die TREBLE-
(4) und BASS-Regler (5) ermöglichen Ihnen, den Klang von MIC 1 und
MIC 2 vollkommen zu regulieren. Die Regler MIC 1 LEVEL (6) und MIC
2 LEVEL (6) regulieren die individuellen Pegel von MIC 1 und MIC 2.
10.CUE-TEIL: Das Drücken der MIC CUE-Taste (7) ermöglicht Ihnen,
den MIC-Ausgang zur Cue-Klangmischung zu senden. Indem Sie die
Kopfhörer an der HEADPHONE-Buchse (13) anschließen, können Sie
alle Kanäle oder den Ausgang des Programms überwachen. Eine
einzigartige Funktion des CS-19/CS-19R Mischpults ist die CUE-Taste
(41). Wenn Sie die CUE-Taste (41) drücken, senden Sie die Cue-
Klangmischung (die gleiche Klangmischung, die Sie im Kopfhörer
hören, zu beiden Monitoren. Drücken Sie den CUE ASSIGN-Tasten
(20, 27) für Kanäle 1 - 5 und die zu überwachenden Kanäle aus, und
die Tasten werden erleuchten. Die ausgewählten Kanäle werden in
der Cue-Klangmischung enthalten sein und können über die MonitorLautsprecher und/oder Kopfhörer überwacht werden.
Benutzen Sie den CUE LEVEL-Regler (10), um die Cue-Lautstärke
einzustellen, ohne dabei die allgemeine Klangmischung zu
beeinträchtigen. Indem Sie den CUE PGM PAN-Regler (12) nach links
drehen, können Sie das zugewiesene Cue-Signal überwachen. Wird
er nach rechts gedreht, wird der PGM- (Programm) Ausgang
überwacht.
11. ANZEIGEN: Der SPITZENWERT LED-ANZEIGE (1 1) zeigt die linken
und rechten Kanalpegel des Hauptausgangs (44, 45) an. Die
individuellen Kanäle sind je mit ihrer eigenen VORREGLER-
EINGANGSPEGEL LED-ANZEIGE (36) ausgerüstet, welche die
Drehregeleinstellungen GAIN, HIGH, MID und LOW anzeigt. Die
CHANNEL-Regler (19, 26, 33, 40, 47) werden die VORREGLEREINGANGSPEGEL LED-ANZEIGE (36) nicht beeinträchtigen.
12.Das Gerät enthält den REGELKREISEINGANG (37) und den
REGELKREISAUSGANG (38): Wenn Sie einem
Außenbordsignalprozessor benutzen, können Sie den
REGELKREISEINGANG (38) benutzen, und das Signal an das Gerät
und den REGELKREISAUSGANG (37) senden, um das Signal zum
Mischpult zurückzuführen. Das Gerät wird mit Steckbrücken geliefert.
Die Steckbrücken im Gerät lassen, wenn Sie den Regelkreis nicht
benutzen, um Unterbrechungen im Musikprogramm zu verhindern.
Ebenfalls enthält es 6,2 mm balancierte (Spitze = senden, Ring =
Rücklauf, Muffe = Erdung) REGELKREIS-EINGANGSBUCHSEN (64)
an der Rückwand, die mit den REGELKREISEINGÄNGEN (37, 38)
hintereinander geschaltet sind an der Vorderwand angeschlossen
sind, so dass Sie zusätzliche Effekte oder Signalprozessoren
hinzufügen können.
13.Die HILFSEINGÄNGE (39) an der Vorderwand des Mischpults
ermöglichen Ihnen leichten Zugang zwecks Anschluss mit
zusätzlichen Vorrichtungen wie ein Kassettengerät, CD-Spieler usw.
Der Entzerrer, die Verstärkungsregelung und der Pegel der
HILFSEINGÄNGE (39) kann geregelt werden, indem sie einem Kanal
zugeordnet werden, indem der INPUT SELECT-Schalter (18, 21) an
einem beliebigen Kanal in die “AUX”-Position geschaltet wird.
TECHNISCHE DATEN
EINGÄNGE:
Phono................................................................................4,5 mV, 47 K-Ohm
MIC 1,2,3...........................................................2,5 mV, 2 K-Ohm, balanciert
Leitung.............................................................................150 mV, 27 K-Ohm
Zusatzleitung:..................................................................150 mV, 27 K-Ohm
AUSGÄNGE:
Mischpult/Zone 1,2 (balanciert/unbalanciert)..................0 dB 2 V, 400 Ohm
Kabine (unbalanciert)......................................................0 dB 1 V, 400 Ohm
Max....................................20 V Spitze-Spitze
Infraakustische Filter:..............................................15 Hz, 18 dB/Oktavfilter
ALLGEMEINES:
Tiefenregler (Mikrofon 1,2)................................................................± 12 dB
Mittenregler (Mikrofon 1,2).................................................................± 12 dB
Pegelregler (Mikrofon 1,2,3)........................................................0 bis -40 dB
Niederfrequenz (Kanäle 1-5)...................................................+12 dB/-32 dB
Mittelfrequenz (Kanäle 1-5).....................................................+12 dB/-32 dB
Hochfrequenz (Kanäle 1-5).....................................................+12 dB/-32 dB
Verstärkung (Kanäle 1-5)............................................................0 bis -30 dB
Hauptausgangsdämpfung...............................................0 dB, -6 dB, -12 dB
Frequenzgang..........................................................20 Hz - 200 kHz ± 2 dB
Klirrfaktor weniger...........................................................................als 0,02%
Störabstand.........................................................................besser als 80 dB
Talkover-Dämpfung.............................................................................-16 dB
Stromversorgung..................................................115/230 V, 50/60 Hz, 15 V
Abmessungen......................................................................48 x 26 x 12 cm
Gewicht................................................................................................2,5kg
*Die technischen Daten können zu Verbesserungszwecken ohne
vorherige Bekanntgabe geändert werden.
Page 13
Page 14

DESCRIPCIONES DE LAS CARACTERISTICAS:
POWER SWITCH: Prende y apaga el poder del aparato. Oprima el interruptor hacia arriba para prender el aparato y oprímalo haca
1
abajo para apagar el aparato.
POWER LED: Brilla cuando el aparato esté conectado en una fuente de poder apropiada y el aparato esté prendido.
2
MIC 1 & MIC 2 INPUTS: Los conectores Neutrik Combo aceptan un jack XLR o un jack fonográfico de ¼”. Esto le da la ventaja
3
de poder adaptar este mezclador a cualquier situación y sistema audio. Se puede utilizar micrófonos con
conectores comunes de ¼” o conectores XLR.
MIC TREBLE CONTROL: Ajusta la respuesta de alta frecuencia de los micrófonos 1 y 2. Gire este botón en el sentido horario
4
para aumentar la respuesta de alta frecuencia y en el sentido antihorario para reducirla. Esto le da una gran variedad de sonido con
efectos especiales.
MIC BASS CONTROL: Ajusta la respuesta de baja frecuencia de los micrófonos 1 y 2. Gire este botón en el sentido horario para
5
aumentar la respuesta de baja frecuencia y en el sentido antihorario para reducirla. Esto le da una gran variedad de sonido con
efectos especiales.
6
MIC LEVEL CONTROL: Ajusta el volumen de los micrófonos 1 y 2. Gire este botón en el sentido horario para aumentar el
volumen de los micrófonos 1 y 2.Gire el botón en el sentido antihorario para reducir el volumen.
CUE BUTTON: Manda la salida del micrófono 1 y del micrófono 2 a la mezcla Cue. Oprima este pulsador y ahora su micrófono
7
estará monitoreado en su casco de auriculares y los monitores en la cabina con su mezcla Cue.
MIC INDICA TOR: Brilla para indicar que los micrófonos 1 y 2 están prendidos. Cuando brilla este DEL, Ud podrá hablar en el
8
micrófono y escucharlo en su programa musical y/o en su mezcla Cue.
MIC TALKOVER SWITCH: El propósito de la sección talkover es de permitir la atenuación del programa reproducido
9
para que el micrófono pueda ser escuchado por encima de la música. El MIC/T ALKOVER SWITCH controla el MIC 1 y
el MIC 2 y tiene tres posiciones. Cuando el MIC/T ALKOVER SWITCH ocupa la posición “OFF”, el MIC 1 y el MIC 2 así
como la función talkover están apagados. Cuando el MIC/T ALKOVER SWITCH ocupa la posición “MIC1 & 2”, el MIC 1 y
el MIC 2 están prendidos; el MIC INDICA TOR brillará pero la función talkover está apagada. Cuando el MIC/TALKOVER
SWITCH está en la posición “T ALKOVER”, el MIC 1 y el MIC 2 así como la función talkover estarán prendidos y el
volumen de todas las fuentes excepto las entradas de MIC 1 & 2 está atenuado de 16 dB.
CUE LEVEL: Ajusta el volumen Cue sin afectar la mezcla general. Gire este botón en el sentido horario para aumentar
10
el volumen de la mezcla. Gire el botón en el sentido antihorario para reducir el volumen.
PEAK HOLD LED METER: Indica los niveles de los canales izquierda y derecha de la salida del Master. Mirando este
11
contador DEL, Ud podrá optimizar la calidad del sonido y eliminar la distorsión del sistema.
CUE PGM P AN CONTROL: Girando el CUE PGM P AN CONTROL a la izquierda, Ud podrá monitorear la señal Cue asignada.
12
Girándolo a la derecha, podrá monitorear la salida del programa (PGM).
HEADPHONE JACK: Un jack estéreo de ¼” le permite insertar los auriculares estereofónicos.
13
CHANNEL GAIN CONTROL: Ajusta el GAIN/GANANCIA para los canales 1, 2, 3, 4. Gire el botón en el sentido horario
14
para aumentar la ganancia hacia el canal. Gire el botón en el sentido antihorario para reducir la ganancia hacia el canal.
CHANNEL HIGH EQ CONTROL: Configure la respuesta de alta frecuencia para los canales 1, 2, 3 y 4. Gire este botón
15
en el sentido horario para aumentar la respuesta de alta frecuencia y en el sentido antihorario para reducirla. Esto le da
una gran variedad de posibilidades sonoras para efectos especiales.
16
CHANNEL MID EQ CONTROL: Configure la respuesta de media frecuencia para los canales 1, 2, 3 y 4. Gire este botón
en el sentido horario para aumentar la respuesta de media frecuencia y en el sentido antihorario para reducirla. Esto le
da una gran variedad de posibilidades sonoras para efectos especiales.
CHANNEL LOW EQ CONTROL: Configure la respuesta de baja frecuencia para los canales 1, 2, 3 y 4. Gire este botón
17
en el sentido horario para aumentar la respuesta de baja frecuencia y en el sentido antihorario para reducirla. Esto le da
una gran variedad de posibilidades sonoras para efectos especiales.
INPUT SELECT SWITCH: Le permite escoger la fuente de entrada para los canales 1, 2, 3, 4. Escoja Phono1/Line 1,
18
Line 5, Line 6, Line 7, Line 8 o AUX. Las características de volumen y EQ solamente afectarán la entrada escogida para
tal canal.
CHANNEL SLIDE/KNOB: Controla los niveles relativos de cada una de los cuatros canales de mezcla de entrada (canales 1, 2, 3, 4).
19
Page 14
Page 15

CHANNEL CUE ASSIGN BUTTON: El hecho de activar cualquier pulsador o una combinación de pulsadores CUE manda
20
cualquier programa presente en el SELECTOR de control de la fuente del canal respectivo a la sección Cue del auricular . Los
pulsadores se prenderán cuando el interruptor esté activado.
CHANNEL 5 INPUT SELECT SWITCH: Le permite seleccionar la fuente de entrada para el canal 5. Seleccione MIC3, Line 5, Line
21
6, Line 7, Line 8 o AUX. Las características de nivel y EQ afectarán solamente la entrada seleccionada para tal canal. (Entrada de
MIC#3 en este canal).
22
CHANNEL 5 GAIN CONTROL: Ajusta la ganancia (GAIN) para el canal 5. Gire este botón en el sentido horario para aumentar la
ganancia de tal canal. Gire el botón en el sentido antihorario para reducir la ganancia hacia tal canal.
23
CHANNEL 5 HIGH EQ CONTROL: Configure la respuesta de alta frecuencia para los canales 1, 2, 3 y 4. Gire este botón en el
sentido horario para aumentar la respuesta de alta frecuencia y en el sentido antihorario para reducirla. Esto le da una gran variedad
de posibilidades sonoras para efectos especiales.
24
CHANNEL 5 MID EQ CONTROL: Configure la respuesta de media frecuencia para los canales 1, 2, 3 y 4. Gire este botón en el
sentido horario para aumentar la respuesta de media frecuencia y en el sentido antihorario para reducirla. Esto le da una gran
variedad de posibilidades sonoras para efectos especiales.
25
CHANNEL 5 LOW EQ CONTROL: Configure la respuesta de baja frecuencia para los canales 1, 2, 3 y 4. Gire este botón en el
sentido horario para aumentar la respuesta de baja frecuencia y en el sentido antihorario para reducirla. Esto le da una gran
variedad de posibilidades sonoras para efectos especiales.
26
CHANNEL 5 SLIDE/KNOB: Controla los niveles relativos del canal 5.
CHANNEL 5 CUE ASSIGN BUTTON: El hecho de activar cualquier pulsador o una combinación de pulsadores CUE manda
27
cualquier programa presente en el SELECTOR de control de la fuente del canal 5 a la sección cue del auricular . Los pulsadores se
prenderán cuando el interruptor esté activado.
28
CROSSFADER: Permite mezclar una fuente con otra. Este crossfader controla los niveles de dos canales cualesquiera asignados
por los ASSIGN SWITCHES izquierdo y derecho del CROSSF ADER .
LEFT ASSIGN SWITCH: Asigna el lado izquierdo del crossfader a cualquiera de los cinco canales de entrada.
29
RIGHT ASSIGN SWITCH: Asigna el lado derecho del crossfader a cualquiera de los cinco canales de entrada.
30
31
MASTER BALANCE: Ajuste el equilibrio de los canales izquierdo y derecho del Master.
MASTER: Determina el programa y el volumen del micrófono en las salidas principales.
32
BOOTH CONTROL: Ajusta el volumen de salida de la cabina.
33
ZONE 1 CONTROL: Ajusta el volumen de salida de la Zona 1.
34
35
ZONE 2 CONTROL: Ajusta el volumen de salida de la Zona 2.
PREF ADER INPUT LEVEL LED METERS: Indican los ajustes de Ganancia, Alta, Media y Baja.
36
37
LOOP INPUTS: Retorna la señal al mezclador desde un procesor de señal externo.
38
LOOP OUTPUTS: Manda la señal del mezclador hacia un procesor de señal externo. La unidad está suministrada con hilos
volantes o puentes para el uso con las entradas y salidas de bucle. Mantenga los hilos volantes o puentes dentro de la unidad si
no va a utilizar el bucle para prevenir interrupciones en su programa musical.
AUX INPUTS: Permiten el acceso fácil para conectar un aparato adicional (lector de cintas, etc.). Se trata de un
39
accesorio útil si hace falta conectar otra fuente sonora temporalmente. No hace falta desconectar ninguno de los
aparatos ya conectados para utilizar este aparato adicional.
CROSSF ADER CURVE BUTTON: Este pulsador le permite ajustar el tipo de curva del crossfader . Apriete el CROSSF ADER
40
CUR VE BUTTON para producir curvas rígidas y cortantes (perfecto para el “scratching”). Libere el CROSSF ADER CUR VE
BUTTON para producir una curva progresiva y suave.
CUE BUTTON: Cuando se aprieta el CUE BUTTON, la mezcla Cue (la misma que se oye en los auriculares) a los monitores de la
41
cabina.
LOOP BUTTON: Activa las entradas y las salidas de LOOP/BUCLE. Cuando se active, este pulsador se prenderá.
42
43
MIC OVERLOAD LEDS: Brilla cuando la señal hacia las entradas MIC 1 & 2 es excesivamente alta. Cuando estos DELs se
prenden, hace falta reducir la ganancia hacia tal canal para prevenir distorsiones.
MASTER OUTPUTS (BALANCED): Utiliza conectores XLR. Suministra una señal de salida principal totalmente equilibrada. La
44
patilla 2 es (+), la patilla 3 es (-) y la patilla 1 es la tierra de la señal. Utilice estas salidas para la conexión a su amplificador principal
y al sistema de altavoces.
Page 15
Page 16

45
MASTER OUTPUTS (UNBALANCED): Suministra la señal de salida principal con conectores RCA. Utilice estas salidas para la
conexión a su amplificador principal y al sistema de altavoces.
BOOTH OUTPUT JACKS: Se utilizan para la conexión al amplificador en la cabina del DJ. Utiliza conectors RCA.
46
47
RECORD OUTPUT JACKS: Le permite registrar hacia un grabador de cintas, etc. Utiliza conectores RCA.
48
ZONE 1 OUTPUT JACKS: Se utiliza para conectar a un amplificador adicional. Utiliza conectores fonográficos de ¼”.
49
ZONE 2 OUTPUT JACKS: Se utiliza para conectar a un amplificador adicional. Utiliza conectores fonográficos de ¼”.
50
VOL T AGE SELECTOR SWITCH: Empuje este selector hacia arriba para seleccionar 1 15 V y abajo para seleccionar 230 V.
GROUND SCREWS: Se suministran cuatro tornillos de tierra en el panel trasero para permitir una puesta a tierra fácil de sus
51
giradiscos.
MIC 3 INPUT : Le permite conectar un tercer micrófono. Esta entrada utiliza también un jack Neutrik Combo lo que le permite
52
conectar micrófonos con conectores XLR y conectores fonográficos de ¼”.
53
MIC 1, 2, 3 GAINS: Ganancias separadas para cada uno de los 3 micrófonos.
54
PHONE 1/LINE 1 INPUT : Estas entradas aceptarán sea una entrada de nivel de línea sea una entrada fonográfica. Las entradas
fonográficas solamente aceptarán giradiscos con cartucho magnético.
PHONE 2/LINE 2 INPUT : Estas entradas aceptarán sea una entrada de nivel de línea sea una entrada fonográfica. Las entradas
55
fonográfica solamente aceptarán giradiscos con cartucho magnético.
56
PHONE 3/LINE 3 INPUT : Estas entradas aceptarán sea una entrada de nivel de línea sea una entrada fonográfica. Las entradas
fonográficas solamente aceptarán giradiscos con cartucho magnético.
57
PHONE 4/LINE 4 INPUT : Estas entradas aceptarán sea una entrada de nivel de línea sea una entrada fonográfica. Las entradas
fonográficas solamente aceptarán giradiscos con cartucho magnético.
LINE 5 INPUT : Esta entrada acepta una entrada de nivel de línea (tal como un lector DC o de cintas). Giradiscos deben de ser
58
conectados a las entradas Fono/Línea (54, 55, 56, 57).
59
LINE 6 INPUT : Esta entrada acepta una entrada de nivel de línea (tal como un lector DC o de cintas). Giradiscos deben de ser
conectados a las entradas Fono/Línea (54, 55, 56, 57).
60
LINE 7 INPUT : Esta entrada acepta una entrada de nivel de línea (tal como un lector DC o de cintas). Giradiscos deben de ser
conectados a las entradas Fono/Línea (54, 55, 56, 57).
61
LINE 8 INPUT : Esta entrada acepta una entrada de nivel de línea (tal como un lector DC o de cintas). Giradiscos deben de ser
conectados a las entradas Fono/Línea (54, 55, 56, 57).
PHONO/LINE SWITCH: Le permite arreglar las entradas fono/línea en fono o línea. Ponga este interruptor en la posición PHONO
62
para tal entrada particular para aceptar un giradiscos con cartucho magnético. Seleccione LINE para que la
entrada acepte un lector DC, lector de cintas, etc.
63
GROUND LIFT SWITCH: Separa la tierra del bastidor de la tierra/masa de la señal. Normalmente, este interruptor debería
encontrarse en la posición GND (tierra). En ciertas circunstancias, el hecho de moverlo hacia la posición opuesta elimina un
zumbido y ruido resistente.Siempre apague los amplificadores antes de cambiar la tierra para evitar daños al sistema.
LOOP INPUTS/OUTPUTS: Estos son los LOOP INPUT/OUTPUT JACKS equilibrados de ¼” (punta = mandar; anillo =
64
volver, manga = tierra) en el panel trasero, que se conectan en serie con los LOOP INPUTS/OUTPUTS en el panel
frontal para que Ud pueda añadir efectos adicionales o procesores de señal adicionales.
STEREO/MONO SWITCH: Asigna salidas como señal MONO o señal STEREO. Esto incluye les MASTER OUTPUTS,
65
BOOTH OUTPUTS, RECORDS OUTPUTS así como las ZONE 1 y ZONE 2 OUTPUTS.
66
MASTER LEVEL A TTENUATION: Le permite preestablecer el volumen de las salidas del Master en 3 valores
preestablecidos: 0 dB, -6 dB, y –12 dB.
Page 16
Page 17

Introducción
Felicitaciones con su compra del PRO CLUB MIXER CS-19 o CS-19R
de Gemini. Este aparato singular ultramoderno está apoyado por una
garantía de tres años, salvo el crossfader y los deslizadores de
canales. Antes de su uso, le recomendamos que lea cuidadosamente
todas las instrucciones.
Características
• 5 canales estéreofónicas
• Atenuación del volumen del Master
• Sección Cue ultramoderna con salida Cue Asignable
• 8 líneas, 4 fono, 3 entradas de micrófono, 1 AUX
• Pulsador de curva del crossfader y mandos de asignación del
crossfader
• Mandos de ganancia, y de tono alto, medio y bajo para cada canal
• Función Talkover
• Salidas Master, Salida de cabina, salidas de 2 zonas
• Ganancias de los micrófonos 1, 2,3 en el panel trasero
• Indicadores DEL de sobrecarga de la salida de los micrófonos 1 & 2
• Pulsadores alumbrados
Precauciones
1. Siempre someta el aparato a un ensayo antes de instalarlo en el
bastidor. Guarde una copia de su recibo de venta para propósitos de
garantía.
2. Lea todas las instrucciones de funcionamiento antes de utilizar este
equipo.
3. Para reducir el riesgo de choques eléctricos, no abra el aparato. NO
CONTIENE EN SU INTERIOR NINGUNA PIEZA A REEMPLAZAR POR EL
USUARIO. Por favor, confíe el servicio a un técnico calificado.
En los EE.UU., si Ud tiene problemas con el aparato, por favor
llame al Servicio Post-Venta al 1-732-738-9003. No devuelva el
aparato a la tienda donde lo compró.
4. No exponga este aparato a los rayos directos del sol ni a una fuente
de calor tal como radiadores o estufas.
5. Este aparato debería ser limpiado exclusivamente con un trapo
húmedo. Evite el uso de solventes o de otros productos químicos de
limpieza.
6. Cuando se mueve el equipo, póngalo en su embalaje y su caja original.
Esto reducirá el riesgo de daños durante el tránsito.
7. No exponga este aparato a la lluvia o a la humedad.
8. No use ningun producto de limpieza o lubricante en forma de spray
sobre los mandos o interruptores.
1. Antes de enchufar el cordón eléctrico, cerciórese de que el VOLTAGE
SELECTOR SWITCH – SELECTOR DE VOLTAJE (50) se encuentre en
el voltaje correcto.
NOTA: Este producto tiene doble aislamiento y no debería ser
puesto a tierra.
2. Cerciórese de quel el POWER SWITCH – INTERRUPTOR DE PODER
(1) esté en la posición “OFF” (apagado).
3. Los aparatos CS-19 y CS-19R se suministran con 2 juegos de jacks
de salida del amplificador. Los BALANCED MASTER OUTPUT JACK –
JACKS DE SALIDAS MASTER EQUILIBRADAS (44) se usan para
conectar a su amplificador principal con cables XLR corrientes.
Recomendamos que use estos JACKS si los cables de conexión con
su amplificador miden 8 metros o más. Las salidas equilibradas tiene
tres conductores separados, dos para señal (positiva y negativa) y
uno de protección (tierra/masa). La patilla 1 corresponde a tierra
(protección). La patilla 2 corresponde a la señal positiva. La patilla 3
corresponde a la señal negativa. Los MASTER OUTPUT JACKS –
JACKS DE SALIDA DEL MASTER (45) son desequilibrados y se usan
para la conexión a su amplificador principal. Los OUTPUT BOOTH
JACKS – JACKS DE SALIDA DE CABINA (46) le permiten conectar
otro amplificador adicional. Los RECORD OUTPUT JACKS – JACKS
DE SALIDA DE GRABADO (47) le permiten grabar su mezcla en un
grabador de cintas, grabador DC, etc. La ZONE 1 OUTPUT – SALIDA
DE ZONA 1 (48) y la ZONE 2 OUTPUT – SALIDA DE ZONA 2 (49) se
pueden utilizar para la conexión a amplificadores adicionales.
4. Las MIC 1 y MIC 2 INPUTS – ENTRADAS DE MICROFONOS 1 & 2
(3) (encontradas en el panel frontal) son conectores Neutrik Combo las
cuales aceptan un jack XLR o un jack corriente de ¼”. Cada entrada de
micrófono tiene su proprio TREBLE CONTROL – MANDO DE AGUDOS
(4), BASS CONTROL – MANDO DE BAJOS(5), LEVEL CONTROL –
MANDO DE VOLUMEN (6), CUE BUTTON – PULSADOR CUE (7) y
OVERLOAD LED-DEL DE SOBRECARGA (43). La MIC 3 INPUT –
ENTRADA MIC 3 (52) se encuentra en el panel trasero. Los GAIN
CONTROLS – MANDOS DE GANANCIA (53) para los micrófonos 1, 2
& 3 se encuentran en el panel trasero.
Los MIC OVERLOAD LEDS – DELS DE SOBRECARGA DE
MICROFONOS (43) se prenderán si la señal hacia las ENTRADAS MIC
1 & 2 es demasiado alta.
5. En el panel trasero, hay 4 PHONO/LINE INPUTS – ENTRADAS
FONO/LINEA (54, 55, 56, 57) y cuatro LINE INPUTS – ENTRADAS
LINEA (58, 59, 60, 61). El PHONO/LINE SWITCH – CONMUTADOR
FONO/LINEA (62) le permite de arreglar las PHONO/LINE INPUTS –
ENTRADAS FONO/LINEA (54, 55, 56, 57) en fonógrafo o línea. Las
entradas fono aceptarán solamente ….. con cartucho magnético. Los
GROUND SCREWS – TORNILLOS DE TIERRA (51) para la puesta a
tierra/masa de sus …. están situados en el panel trasero. Las
entradas línea estéreo aceptarán cualquier entrada de nivel de la línea
tal como un lector DC, un lector de cintas, etc.
6. Los auriculares pueden ser enchufados en el HEADPHONE JACK –
JACK PARA AURICULARES (13) en el panel frontal.
USO DEL SEPARADOR DE TIERRA
Según la configuración de su sistema, la aplicación de tierra/masa a
veces crea una pista de señal más quieta. A veces la supresión o la
separación de la tierra elimina los bucles y el ruido para crear una pista
de señal más quieta.
1. Escuche el sistema con el aparato en la posición ON (activado) en la
modalidad de pausa (sin presencia de señal) y con la tierra aplicada (el
GROUND LIFT SWITCH (63) debería estar en la posición “GND”).
2. Corte el poder antes de mover el GROUND LIFT SWITCH (63). Separe
la tierra/masa moviendo el GROUND LIFT SWITCH (63) hacia la
posición “LIFT”, aplique otra vez el poder y escuche para determinar
cual posición ofrece una señal sin zumbido y ruido en el
fondo.Mantenga el GROUND LIFT SWITCH (63) en la posición “GND” si
el volumen de ruido es igual en cualquier posición.
ADVERTENCIA: NO TERMINE LA TIERRA C.A. EN EL CABLE DE
PODER. LA TERMINACION DE LA TIERRA C.A. PUEDE SER
PELIGROSA.
FUNCIONAMIENTO
1. POWER ON – PODER ACTIVADO: Cuando se hayan hecho todas las
conexiones de equipo a su mezclador, oprima el POWER SWITCH –
PULSADOR DE PODER (1). El aparato se activa y el POWER LED –
DEL DE PODER (2) brilla.
2. CHANNEL 1 – CANAL 1: Los mandos GAIN (14), HIGH (15), MID (16)
y LOW (17) le permiten ajustar completamente la fuente seleccionada.
El interruptor # (18) le permite seleccionar la entrada PHONO 1/LINE 1
– FONO 1/LINEA 1 o LINE/LINEA 5, 6, 7, 8 o AUX. El CHANNEL SLIDE
or BUTTON – DESLIZADOR/BOTON DE CANAL (19) controla el nivel
de entrada de este canal. El CUE BUTTON – PULSADOR CUE (20)
prendido le permite realizar la función Cue para el canal.
3. CHANNEL 2 – CANAL 2: Los mandos GAIN (14), HIGH (15), MID (16)
y LOW (17) le permiten ajustar completamente la fuente seleccionada.
El interruptor # (18) le permite seleccionar la entrada PHONO 2/LINE 2
Page 17
Page 18

– FONO 2/LINEA 2 o LINE/LINEA 5, 6, 7, 8 o AUX. El CHANNEL SLIDE
or BUTTON – DESLIZADOR/BOTON DE CANAL (19) controla el nivel
de entrada de este canal. El CUE BUTTON – PULSADOR CUE (20)
prendido le permite realizar la función Cue para el canal.
4. CHANNEL 3 – CANAL 3: Los mandos GAIN (14), HIGH (15), MID (16)
y LOW (17) le permiten ajustar completamente la fuente seleccionada.
El interruptor # (18) le permite seleccionar la entrada PHONO 3/LINE 3
– FONO 3/LINEA 3 o LINE/LINEA 5, 6, 7, 8 o AUX. El CHANNEL SLIDE
or BUTTON – DESLIZADOR/BOTON DE CANAL (19) controla el nivel
de entrada de este canal. El CUE BUTTON – PULSADOR CUE (20)
prendido le permite realizar la función Cue para el canal.
5. CHANNEL 4 – CANAL 4: Los mandos GAIN (14), HIGH (15), MID (16)
y LOW (17) le permiten ajustar completamente la fuente seleccionada.
El interruptor # (18) le permite seleccionar la entrada PHONO 1/LINE 1
– FONO 1/LINEA 1 o LINE/LINEA 5, 6, 7, 8 o AUX. El CHANNEL SLIDE
or BUTTON – DESLIZADOR/BOTON DE CANAL (19) controla el nivel
de entrada de este canal. El CUE BUTTON – PULSADOR CUE (20)
prendido le permite realizar la función Cue para el canal.
6. CHANNEL 5 – CANAL 5: Los mandos GAIN (14), HIGH (15), MID (16)
y LOW (17) le permiten ajustar completamente la fuente seleccionada.
El interruptor # (21) le permite seleccionar mic 3 o LINE/LINEA 5, 6, 7, 8
o AUX. El CHANNEL SLIDE or BUTTON – DESLIZADOR/BOTON DE
CANAL (26) controla el nivel de entrada de este canal. El CUE
BUTTON – PULSADOR CUE (27) prendido le permite realizar la función
Cue para el canal.
7. CROSSFADER SECTION – SECCION CROSSF ADER: El CROSSFADER
(28) le permite mezclar una fuente con otra. El aparato CS-19 y CS19R tienen un crossfader asignable. Los ASSIGN SWITCHES –
INTERRUPTORES DE ASIGNACION (29, 30) le permiten seleccionar el
canal que será reproducido por cada lado del crossfader. El ASSIGN
SWITCH – INTERRUPTOR DE ASIGNACION (29) tiene 6 posiciones
(OFF, 1, 2, 3, 4 y 5) y le permite seleccionar el canal 1, 2, 3, 4, ó 5 para
la reproducción a través del lado izquierdo del crossfader. El ASSIGN
SWITCH – INTERRUPTOR DE ASIGNACION (30) tiene 6 posiciones
(OFF, 1, 2, 3, 4 y 5) y le permite seleccionar el canal 1, 2, 3, 4, ó 5 para
la reproducción a través del lado derecho del crossfader. Con el
ASSIGN SWITCH en la posición OFF, este lado del crossfader estará
inactivo.
El CROSSFADER CURVE BUTTON – BOT ON DE CURV A DEL
CROSSFADER (40) le permite ajustar el tipo de curva del crossfader.
Apriete el CROSSFADER CURVE BUTTON (40) para producir una
curva aguda y cortante (perfecto para el scratching). Libere el
CROSSFADER CURVE BUTTON (40) producir una curva progresiva y
suave.
8. OUTPUT CONTROL SECTION – SECCION MANDO DE SALIDA: El
volumen de MASTER OUTPUT – SALIDA DEL MASTER (44, 45) se
controla por el MASTER BALANCE – EQUILIBRIO MASTER (31) y el
MASTER (32). El BOOTH CONTROL – MANDO CABINA (33) ajusta el
nivel de la BOOTH OUTPUT – SALIDA CABINA (46). Sugerencia: La
SALIDA CABINA se usa por ciertos DJs para utilizar altavoces de
control en la cabina. Los MANDOS ZONE 1 – ZONA 1(34) y ZONE 2 –
ZONA 2 (35) CONTROLS se usan para controlar el volumen hacia otra
ZONA u otro AMPLIFICADOR. Esta línea equilibrada usa una conexión
corriente de punta-manga. (Punta = positivo (+), anillo = negativo (-), y
manga = protección/tierra). El LOOP BUTTON – PULSADOR DE
BUCLE (42) se prenderá cuando se activa el bucle. El STEREO/MONO
SWITCH – INTERRUPTOR ESTEREO/MONO (65) asigna TODAS LAS
SALIDAS (44, 45, 46, 47, 48, 49) como señal mono o estéreo. El
MASTER LEVEL ATTENUA TION – A TENUACION DEL VOLUMEN
MASTER (66) le permite preestablecer el volumen de salida de las
SALIDAS MASTER (44, 45) con una selección de 3 arreglos (0, -6 dB
y –12 dB).
TALKOVER SECTION – SECCION TALKOVER: El propósito de la
sección talkover es de permitir la atenuación del programa reproducido
para que se oiga el micrófono por encima de la música. El MIC/
TALKOVER SWITCH – INTERRUPT OR MICRO/TALKOVER (9)
controla los micrófonos 1 y 2 y tiene tres arreglos. Cuando este
interruptor (9) ocupa la posición “OFF”, los micrófonos 1 y 2 y la
función Talkover están apagados. Cuando el MIC/TALKOVER
SWITCH (9) ocupa la posición “MIC 1 & 2”, los micrófonos están
prendidos, el MIC INDICATOR – INDICADOR MIC (8) brillará pero la
función talkover estará apagada. Cuando el MIC/TALKOVER SWITCH
(9) ocupa la posición “Talkover”, los MIC 1 & 2 y la función Talkover
estarán prendidos y el volumen de todas las fuentes salvo las
entradas MIC 1 & 2 será reducido por 16 dB. Los MANDOS TREBLE –
AGUDOS (4) y BASS – BAJOS (5) le permiten ajustar completamente
el tono de los MICs 1 & 2. El MIC 1 LEVEL – VOLUMEN MIC 1 (6) y
MIC 2 LEVEL – VOLUMEN MIC 2 (6) controlan los volúmenes
individuales del MIC 1 y del MIC 2.
10.CUE SECTION – SECCION CUE: El hecho de apoyar en el MIC CUE
BUTTON – PULSADOR CUE MIC (7) le permite mandar su salida MIC a
su mezcla Cue. Conectando un juego de auriculares al HEADPHONE
JACK – JACK PARA AURICULARES (13), se puede monitorear
cualquier de los canales o todos. Una característica singular de los
aparatos CS-19 y CS-19R es el CUE BUTTON – PULSADOR CUE (41).
Al oprimir el CUE BUTTON (41), Ud mandará su mezcla Cue (la misma
mezcla que se oye en sus auriculares) a los monitores en la cabina.
Oprima los CUE ASSIGN BUTTONS (20, 27) para los canales 1-5 para
seleccionar el canal o los canales a ser seguidos y los botones se
prenderán. Los canales seleccionados serán incluidos en su mezcla
Cue y podrán ser seguidos desde los altavoces y/o auriculares en la
cabina.
Utilice el CUE LEVEL CONTROL – MANDO DE VOLUMEN CUE (10)
para ajustar el volumen Cue sin afectar la mezcla global. Girando el
CUE PGM PAN CONTROL (12) a la izquierda, Ud podrá monitorear la
señal Cue asignada. Girando el mando a la derecha, se puede
monitorear la salida del programa (PGM).
11. DISPLAYS – P ANT ALLAS: El PEAK HOLD LED METER (1 1) indica los
volúmenes de los canales izquierdas y derechas de la MASTER
OUTPUT – SALIDA MASTER (44, 45). Los canales individuales tienen
cada uno sus propios PREFADER INPUT LEVEL LED METERS (36) los
cuales indican los ajustes del mando girador GAIN, HIGH, MID and
LOW. Los CHANNEL CONTROLS – MANDOS DE CANAL (19, 26, 33,
40, 47) no afectarán los PREFADER INPUT LEVEL LED METERS (36).
12.Hay LOOP INPUTS – ENTRADAS BUCLE (37) y LOOP OUTPUTS –
SALIDAS BUCLE (38). Si Ud utiliza un procesor de señal exterior, se
puede utilizar las LOOP OUTPUTS (38) para mandar la señal al
aparato y las LOOP INPUTS (37) para retornar la señal al mezclador.
La unidad está suministrada con hilos volantes o puentes que se usan
con las entradas y salidas del bucle. Mantenga los hilos volantes en el
aparato si Ud no utiliza el bucle para prevenir interrupciones en su
programa musical. Hay también LOOP INPUT/OUTPUT JACKS –
JACKS DE ENTRADA/SALIDA BUCLE (64) equilibrados de ¼” (punta
= mandar; anillo = volver, manga = tierra) en el panel trasero, que están
conectados en serie con las LOOP INPUTS/OUTPUTS – ENTRADAS/
SALIDAS DE BUCLE (37/38) en el panel frontal para que pueda añadir
efectos adicionales o procesores de señal adicionales.
13.Las AUX INPUTS – ENTRADAS AUX (39) en la parte frontal del mezclador
permiten el acceso fácil para conectar un aparato adicional tal como un
grabador de cintas, lector DC, etc. El EQ, la ganancia y el volumen de las
ENTRADAS AUX (39) pueden ser controlados al asignarlos a una canal
reglando el INPUT SELECT SWITCH – SELECTOR DE ENTRADA (18, 21) en
cualquier canal en la posición “AUX”.
ESPECIFICACIONES
ENTRADAS:
Fono @ 1 kHz........................................................................4,5 mV, 47 kOhmios
MIC 1, MIC 2 y MIC 3.............................................2,5 Mv, 2 kOhmios equilibrados
Línea....................................................................................150 mV 27 kOhmios
AUX.....................................................................................150 mV 27 kOhmios
SALIDAS:
Master/Zona 1,2 (equilibrada/desequilibrada).............................0 dB 2 V 400 Ohmios
Cabina (desequilibrada)........................................................0 dB, 1 V, 400 Ohmios
Máxima.................................................................................20 V cresta a cresta
Grabado.................................................................................150 mV 5 kOhmios
Filtra infrasónico....................................................................15 Hz, 18 dB/octavo
GENERALIDADES:
Bass – Bajo (MIC 1, MIC 2).....................................................................+/- 12 dB
Treble – Agudo (MIC 1, MIC 2).................................................................+/- 12 dB
Ganancia (Mic 1, 2, 3)......................................................................de 0 a –40 dB
Low (Canales 1-5)..........................................................................+ 12 dB/-32 dB
Mid (Canales 1-5)...........................................................................+ 12 dB/-32 dB
High (Canales 1-5).........................................................................+ 12 dB/-32 dB
Ganancia (Canales 1-5)....................................................................de 0 a –30 dB
Atenuación de salida Master......................................................0 dB, -6 dB, -12 dB
Características de frecuencia..............................................20 Hz – 20 kHz +/- 2dB
Distorsión.................................................................................menos de 0,02 %
Relación señal/ruido.....................................................................superior a 80 dB
Atenuación Talkover....................................................................................16 dB
Fuente de poder.......................................................115/230 V 50/60 Hz 20 vatios
Dimensiones.......................................................................48, 3 cms de ancho x
..........................................................26,67 cms de alto x 12,06 cms de profundo
Peso.....................................................................................................5,07 kgs
*Las especificaciones y el diseño pueden cambiar sin preaviso por
Page 18
razones de mejoras.
Page 19

DESCRIPTION DES CARACTÉRISTIQUES:
1
INTERRUPTEUR DE PUISSANCE: S’utilise pour mettre l’appareil en marche et au repos. Appuyez l’interrupteur en haut pour
mettre l’appareil en marche et appuyez l’interrupteur en bas pour le mettre au repos.
2
DEL DE PUISSANCE: Elle brille quand l’appareil est branché à une source de puissance appropriée et l’appareil est en marche.
ENTRÉES MICRO 1 ET MICRO 2: Les connecteurs Neutrik Combo acceptent un jack XLR ou un jack phono de ¼”. Ceci vous
3
donne l’avantage de pouvoir adapter ce mélangeur à n’importe quelle situation et système sonore. Vous pouvez utiliser des
microphones pourvus de connecteurs courants de ¼” ou de connecteurs XLR.
4
RÉGLAGE DES AIGUS DES MICROS: Ajuste la réponse haute fréquence des MIC 1 et MIC2. Tournez ce bouton dans le sens
horaire pour augmenter la réponse haute fréquence et dans le sens antihoraire, pour réduire celle-ci. Ceci vous donne une grande
variété sonore permettant des effets spéciaux.
5
REGLAGES DES GRA VES DES MICROS: Ajuste la réponse basse fréquence des MIC 1 et MIC 2. T ournez ce bouton dans le
sens horaire pour augmenter la réponse basse fréquence et dans le sens antihoraire, pour réduire celle-ci. Ceci
vous donne une grande variété sonore permettant des effets spéciaux.
6
REGLAGE DU VOLUME DES MICROS: Ajuste le volume des MIC 1 et MIC 2. T ournez ce bouton dans le sens horaire pour
augmenter le volume des Micros 1 et 2. T ournez le bouton dans le sens antihoraire pour réduire le volume.
7
TOUCHE CUE: Transmet la sortie des micros 1 et 2 vers le mélange de repère. Appuyez sur cette touche et vous pourrez suivre le
micro dans vos écouteurs et les appareils témoins de cabine avec le mélange de repère.
8
INDICA TEUR MICROS: Brille pour indiquer que les micros 1 et 2 sont activés. Lorsque cette DEL brille, vous pourrez parler dans
votre microphone et l’entendre dans votre programme et/ou mélange de repère.
9
INTERRUPTEUR TALKOVER MICRO: Le but de la section talkover est de vous permettre d’abaisser le niveau sonore du
programme musical pour que le micro puisse être entendu par-dessus la musique. L ’INTERRUPTEUR T ALKOVER MICRO
commande les micros 1 et 2 et comporte trois positions. Lorsque cet interrupteur occupe la position “OFF” (désactivé), les micros 1
et 2 et la fonction T alkover ne marchent pas. Lorsque l’interrupteur occupe la position “MIC 1 & 2”, les micros 1 et 2 sont activés;
l’INDICA TEUR MICRO brillera mais la fonction T alkover est désactivée. Lorsque l’INTERRUPTEUR MIC/T ALKOVER occupe la
position “T ALKOVER”, les micros 1 et 2 et la fonction Talkover sont activés et le volume de toutes les sources sauf les entrées
micros 1 et 2 sera abaissé de 16 dB.
NIVEAU DE REPÈRE: Ajuste le volume de repère sans affecter le mélange global. T ournez ce bouton dans le sens horaire pour
10
augmenter le volume du mélange de repère. Tournez le bouton dans le sens contraire pour réduire le volume.
PEAK HOLD LED METER – COMPTEUR DEL POUR MAINTENIR LA QUALITE OPTIMALE: Indique les volumes des voies
11
gauche et droite de la Sortie Principale. En regardant ce compteur, vous pourrez optimiser la qualité sonore et éliminer les
distorsions dans le système.
CUE PGM P AN CONTROL: En tournant cette commande à gauche, pour pourrez surveiller le signal de repère assigné. Si vous le
12
tournez à droite, la sortie du programme (PGM) sera surveillée.
JACK POUR LES ÉCOUTEURS: Un jack stéréo de ¼” permet l’insertion d’écouteurs stéréo.
13
CHANNEL GAIN CONTROL – COMMANDE GAIN DES VOIES: Ajuste le GAIN des voies 1, 2, 3, 4. T ournez ce bouton dans le
14
sens horaire pour augmenter le gain allant vers la voie. T ournez le bouton dans le sens antihoraire pour abaisser le gain allan t vers
la voie.
15
CHANNEL HIGH EQ CONTROL – COMMANDE HAUTE FRÉQUENCE DES VOIES: Configurez la réponse haute fréquence
pour les voies 1, 2, 3 et 4. Tournez ce bouton dans le sens horaire pour augmenter la réponse haute fréquence, et dans le sens
antihoraire pour l’abaisser. Ceci vous donne une grande variété de possibilités sonores permettant des effets spéciaux.
16
CHANNEL MID EQ CONTROL – COMMANDE FRÉQUENCE MOYENNE DES VOIES: Configurez la réponse moyenne
fréquence pour les voies 1, 2, 3 et 4. T ournez ce bouton dans le sens horaire pour augmenter la réponse moyenne fréquence, et
dans le sens antihoraire pour l’abaisser. Ceci vous donne une grande variété de possibilités sonores permettant des effets spéciaux.
CHANNEL LOW EQ CONTROL – COMMANDE BASSE FRÉQUENCE DES VOIES: Configurez la réponse basse
17
fréquence pour les voies 1, 2, 3 et 4. Tournez ce bouton dans le sens horaire pour augmenter la réponse basse fréquence, et dans le
sens antihoraire pour l’abaisser. Ceci vous donne une grande variété de possibilités sonores permettant des effets spéciaux.
INPUT SELECT SWITCH – SÉLECTEUR D’ENTRÉE: Il vous permet de choisir la source d’entrée pour les voies 1, 2, 3,
18
4. Choisissez Phono 1/Ligne 1, Ligne 5, Ligne 6, Ligne 7, Ligne 8 ou AUX. Le volume et les caractéristiques EQ n’affecteront que
l’entrée choisie pour cette voie.
CHANNEL SLIDE/KNOB – COULISSE/BOUTON DES VOIES: Commande les volumes relatifs de chacune des quatre voies de
19
mélange d’entrée (voies 1, 2, 3, 4).
CHANNEL CUE ASSIGN BUTTON – TOUCHE DE REPÈRE D’ASSIGNA TION DES VOIES: L ’activation d’une touche de
20
repère unique ou d’une combinaison de celles-ci envoie n’importe quel programme présent au SÉLECTEUR de la commande de
source de la voie respective vers la section de repère des écouteurs. Les touches s’allumeront lorsque le sélecteur est activé.
CHANNEL 5 INPUT SELECT SWITCH – SELECTEUR D’ENTRÉE DE LA VOIE 5: Vous permet de choisir la source d’entrée
21
pour la voie 5. Choisissez MIC3, Ligne 5, Ligne 6, Ligne 7, Ligne 8 ou AUX. Les caractéristiques de volume et EQ n’affecteront que
l’entrée choisie pour cette voie. (Entrée MIC #3 pour cette voie).
CHANNEL 5 GAIN CONTROL – COMMANDE DE GAIN DE LA VOIE 5: Ajuste le GAIN pour la voie 5. T ournez ce
22
bouton dans le sens horaire pour augmenter le gain allant vers cette voie. Tournez le bouton dans le sens antihoraire pour réduire
le gain allant vers cette voie.
Page 19
Page 20

CHANNEL 5 HIGH EQ CONTROL – COMMANDE HAUTE FRÉQUENCE DE LA VOIE 5: Configurez la réponse basse
23
fréquence pour la voie 5. Tournez ce bouton dans le sens horaire pour augmenter la réponse haute fréquence, et dans le
sens antihoraire pour l’abaisser. Ceci vous donne une grande variété de possibilités sonores permettant des effets spéciaux.
CHANNEL 5 MID EQ CONTROL – COMMANDE MOYENNE FRÉQUENCE DE LA VOIE 5: Configurez la réponse
24
moyenne fréquence pour la voie 5. Tournez ce bouton dans le sens horaire pour augmenter la réponse moyenne fréquence, et dans
le sens antihoraire pour l’abaisser. Ceci vous donne une grande variété de possibilités sonores permettant des
effets spéciaux.
CHANNEL 5 LOW EQ CONTROL – COMMANDE BASSE FRÉQUENCE DE LA VOIE 5: Configurez la réponse basse fréquence
25
pour la voie 5. Tournez ce bouton dans le sens horaire pour augmenter la réponse basse fréquence, et dans le sens antihoraire pour
l’abaisser. Ceci vous donne une grande variété de possibilités sonores permettant des effets spéciaux.
26
CHANNEL 5 SLIDE/KNOB – COULISSE/BOUTON DE LA VOIE 5: Commande les volumes relatifs de la voie 5.
CHANNEL 5 CUE ASSIGN BUTTON – TOUCHE DE REPÈRE D’ASSIGNA TION DE LA VOIE 5: L ’activation d’une touche de
27
repère unique ou d’une combinaison de celles-ci envoie n’importe quel programme présent au SÉLECTEUR de la commande de
source de la voie 5 vers la section de repère des écouteurs. Les touches s’allumeront lorsque le sélecteur est activé.
CROSSF ADER – MÉLANGEUR TRANSVERSAL: Permet le mélange d’une source avec une autre. Ce crossfader commande les
28
volumes de n’importe quelles deux voies assignées par les INTERRUPTEURS D’ASSIGNA TION gauche et droit du crossfader .
LEFT ASSIGN SWITCH – INTERRUPTEUR D’ASSIGNA TION GAUCHE: Assigne le côté gauche du crossfader à n’importe
29
laquelle des cinq voies d’entrée.
30
RIGHT ASSIGN SWITCH – INTERRUPTEUR D’ASSIGNA TION DROIT : Assigne le côté droit du crossfader à n’importe
laquelle des cinq voies d’entrée.
MASTER BALANCE – EQUILIBRE DES VOIES MASTER: Ajuste l’équilibre des voies GAUCHE et DROITE du master .
31
MASTER: Détermine le volume des micros et du programme aux sorties principales.
32
BOOTH CONTROL – COMMANDE CABINE: Ajuste le volume de la sortie de la cabine.
33
ZONE 1 CONTROL – COMMANDE ZONE 1: Ajuste le volume de la sortie de la Zone 1.
34
ZONE 2 CONTROL – COMMANDE ZONE 2: Ajuste le volume de la sortie de la Zone 2.
35
PREFADER INPUT LEVEL LED METERS – COMPTEURS DEL DES NIVEAUX D’ENTRÉE DU PREF ADER: Ils indiquent les
36
réglages Gain, Haut, Moyen et Bas.
LOOP INPUTS – ENTRÉES DE BOUCLE: Ramène le signal au mélangeur à partir d’un processeur de signal externe.
37
LOOP OUTPUTS – SORTIES DE BOUCLE: Envoie le signal du mélangeur à un processeur de signal externe. L ’appareil est muni
38
de cavaliers pour l’emploi avec les entrées et sorties de la boucle. Gardez les cavaliers dans l’appareil si vous n’utilisez pas la
boucle pour prévenir des interruptions de votre programme musical.
AUX INPUTS – ENTRÉES AUX: Elles permettent l’accès facile pour brancher un appareil supplémentaire (p.e. platine de
39
magnétophone, etc.). Il s’agit d’une caractéristique utile si vous devez brancher temporairement une autre source
sonore. Vous ne devez débrancher aucun accessoire déjà branché pour utiliser un dispositif supplémentaire.
CROSSF ADER CURVE BUTTON – T OUCHE DE COURBE DU CROSSFADER: Cette touche vous permet d’ajuster la
40
courbe du crossfader. Appuyez sur cette touche pour rendre la courbe inclinée et tranchante (parfait pour le grattement). Libérez la
touche pour rendre la courbe progressive et faible.
41
CUE BUTTON – TOUCHE DE REPÈRE: Lorsque vous appuyez sur la touche de repère, vous allez envoyer votre mélange de
repère (le même mélange que vous entendez dans les écouteurs) vers les moniteurs de la cabine.
LOOP BUTTON – TOUCHE DE BOUCLE: Elle active les entrées et sorties de la boucle. Une fois activée, cette touche s’allumera.
42
MIC OVERLOAD LEDS – DELs DE SURCHARGE DES MICROS: Elles s’allument si le signal allant vers les entrées 1 & 2 des
43
micros est trop élevé. Quand ces DELS s’allument, vous devez réduire le gain de ladite voie pour prévenir la distorsion.
MASTER OUTPUTS (BALANCED) – SORTIES (EQUILIBRÉES) DU MASTER: Elles utilisent des connecteurs XLR. Elles
44
fournissent un signal de sortie principale entièrement équilibré. La broche 2 est (+), la broche 3 est (-) et la broche 1 est la masse du
signal. Utilisez ces sorties pour les branchements à votre système d’amplicateur et de haut-parleurs.
MASTER OUTPUTS (UNBALANCED) – SORTIES (DÉSÉQUILIBRÉES) DU MASTER: Elles fournissent un signal de sortie
45
principale à l’aide de connecteurs RCA. Utilisez ces sorties pour les branchements à votre système d’amplificateur et de hautparleurs principal.
BOOTH OUTPUT JACKS – JACKS DE SORTIE CABINE: Ils s’utilisent pour les branchements à l’amplificateur dans la cabine
46
du DJ. Ils utilisent des connecteurs RCA.
RECORD OUTPUT JACKS – JACKS DE SORTIE D’ENREGISTREMENT : Ils vous permettent d’enregistrer vers un enregistreur
47
à cassette, etc. Ils utilisent des connecteurs RCA.
ZONE 1 OUTPUT JACKS – JACKS DE SORTIE DE LA ZONE 1: Ils s’utilisent pour le branchement à un amplificateur
48
supplémentaire. Ils utilisent des connecteurs phono de ¼”.
ZONE 2 OUTPUT JACKS – JACKS DE SORTIE DE LA ZONE 1: Ils s’utilisent pour le branchement à un amplificateur
49
supplémentaire. Ils utilisent des connecteurs phono de ¼”.
VOL T AGE SELECTOR SWITCH – SÉLECTEUR DE TENSION: Poussez ce sélecteur en haut pour choisir 1 15 V et en bas pour
50
choisir 230 V .
Page 20
Page 21

GROUND SCREWS – VIS DE TERRE: Quatre vis de terre sont fournies sur le panneau arrière pour permettre une mise à la terre
51
facile de vos plateaux.
52
MIC 3 INPUT – ENTRÉE MICRO 3: Vous permet de brancher un troisième microphone. Cette entrée utilise également un jack
Neutrik Combo ce qui vous permet de brancher des microphones au moyen de connecteurs XLR et de connecteurs phono de ¼”.
53
MIC 1, 2, 3, GAINS – GAINS MICROS 1, 2, 3: Des gains séparés pour chacun des 3 microphones.
54
PHONO 1/LINE 1 INPUT – ENTRÉE PHONO 1/ LIGNE 1: Ces entrées accepteront une entrée de volume de ligne ou
une entrée phono. Les entrées phono n’accepteront que des plateaux ayant une cartouche magnétique.
55
PHONO 2/LINE 2 INPUT – ENTRÉE PHONO 2/LIGNE 2: Ces entrées accepteront une entrée de volume de ligne ou une
entrée phono. Les entrées phono n’accepteront que des plateaux ayant une cartouche magnétique.
56
PHONO 3/LINE 3 INPUT – ENTRÉE PHONO 3/LIGNE 3: Ces entrées accepteront une entrée de volume de ligne ou une
entrée phono. Les entrées phono n’accepteront que des plateaux ayant une cartouche magnétique.
57
PHONO 4/LINE 4 INPUT – ENTRÉE PHONO 4/LIGNE 4: Ces entrées accepteront une entrée de volume de ligne ou une
entrée phono. Les entrées phono n’accepteront que des plateaux ayant une cartouche magnétique.
58
LINE 5 INPUT – ENTRÉE DE LIGNE 5: Cette entrée accepte une entrée de volume de ligne (p.e. lecteur DC ou
magnétophone). Les platines doivent être branchées aux entrées Phono/Ligne (54, 55, 56, 57).
59
LINE 6 INPUT – ENTRÉE DE LIGNE 6: Cette entrée accepte une entrée de volume de ligne (p.e. lecteur DC ou
magnétophone). Les platines doivent être branchées aux entrées Phono/Ligne (54, 55, 56, 57).
LINE 7 INPUT – ENTRÉE DE LIGNE 7: Cette entrée accepte une entrée de volume de ligne (p.e. lecteur DC ou
60
magnétophone). Les platines doivent être branchées aux entrées Phono/Ligne (54, 55, 56, 57).
LINE 8 INPUT – ENTRÉE DE LIGNE 8: Cette entrée accepte une entrée de volume de ligne (p.e. lecteur DC ou
61
magnétophone). Les platines doivent être branchées aux entrées Phono/Ligne (54, 55, 56, 57).
62
PHONO/LINE SWITCH – COMMUTATEUR PHONO/LIGNE: Vous permet de régler les entrées phono/ligne sur Phono
ou Ligne. Mettez ce commutateur sur la position PHONO pour que cette entrée particulière accepte un plateau avec
cartouche magnétique. Choisissez LINE pour que l’entrée accepte un lecteur DC, un magnétophone, etc.
GROUND LIFT SWITCH – SÉP ARATEUR DE LA TERRE: Sépare la terre/masse du châssis de la terre/masse du
63
signal. Normalement, ce commutateur doit se trouver sur la position GND (terre/masse). Dans quelques circonstances,
le fait de le mouvoir sur la position opposée élimine le ronronnement et les bruits ennuyeux. Mettez toujours vos
amplificateurs au repos avant de changer la terre pour éviter l’endommagement du système.
64
LOOP INPUTS/OUTPUTS – ENTREES/SORTIES DE LA BOUCLE: Des JACKS D’ENTRÉE/DE SOR TIE DE LA
BOUCLE DE ¼” EQUILIBRES (pointe = envoi, anneau = retour, gaine = terre) sur le panneau arrière, qui sont branchés
en série aux ENTREES/SOR TIES DE LA BOUCLE sur le panneau frontal pour que vous puissiez ajouter des effets
supplémentaires ou des processeurs de signaux.
STEREO/MONO SWITCH – COMMUT A TEUR STÉRÉO/MONO: Assigne les sorties en tant que signal MONO ou
65
STEREO. Ceci inclut les SOR TIES MASTER, SORTIES DE CABINE, SOR TIES D’ENREGISTREMENT ainsi que les
SORTIES de ZONE 1 et de ZONE 2.
66
MASTER LEVEL A TTENUATION – A TTENUA TION DU NIVEAU MASTER: V ous permet de préétablir le volume de sortie
des sorties master selon 3 valeurs préétablies: 0 db, -6 dB et –12 dB.
Page 21
Page 22

Introduction
Nos félicitations à l’occasion de votre achat du PRO CLUB MIXER
CS-19 ou CS-19R de Gemini. Cet appareil unique ultramoderne est
soutenu par une garantie de trois ans, à l’exclusion du crossfader et
des coulisses des voies. Avant son emploi, nous vous recommandons
de lire soigneusement toutes les instructions.
Caractéristiques
• 5 voies stéréo
• Atténuation du niveau Master
• Section de repère ultramoderne avec Sortie de Repère
Assignable
• 8 entrées de ligne, 4 entrées phono, 3 entrées micro, 1
AUX
• Touche de courbe de crossfader et commandes
d’assignation du crossfader
• Commandes sonores gain, haut, moyen et bas pour
chaque voie
• Talkover
• Sorties principales, Sortie cabine, 2 sorties de zone
• Gains des micros 1, 2, 3 sur le panneau arrière
• Indicateurs DEL de surcharge des sorties micros 1 & 2
• Boutons-poussoirs allumés
PRÉCAUTIONS
1. Soumettez les appareils toujours à une épreuve avant de les monter
sur une étagère. Gardez une copie de votre reçu de vente pour des
raisons de garantie.
2. Lisez toutes les instructions de fonctionnement avant de
vous servir de cet appareil.
3. Pour réduire le risque de chocs électriques, n’ouvrez pas cet appareil.
IL N’Y A PAS DE PIÈCES À REMPLACER P AR L ’UTILISA TEUR À
L’INTÉRIEUR. Confiez l’entretien à un technicien qualifié.
Aux États-Unis, si vous cet appareil vous donne des
problèmes, appelez le Service Après-Vente au 1-732-738-9003.
Ne renvoyez pas l’appareil au détaillant.
4. N’exposez pas cet appareil aux rayons directs du soleil ni à une
source de chaleur tel qu’un radiateur ou un poêle.
5. Ne nettoyez cet appareil qu’avec un chiffon humide. Évitez l’emploi de
solvants ou de produits détergents de nettoyage.
6. Lorsque vous déplacez cet appareil, faites-le dans son carton et son
emballage d’origine. Ceci réduira le risque d’endommagement durant le
transport.
7. N’exposez pas cet appareil à la pluie ni à l’humidité
8. N’utilisez pas d’agent de nettoyage ou de lubrifiant sous forme de
spray sur aucune commande ou sur aucun commutateur.
1. Avant de brancher le cordon électrique, assurez-vous que le
VOL TAGE POWER SWITCH – SELECTEUR DE PUISSANCE (50) se
trouve sur la tension correcte.
REMARQUE: Ce produit comporte un double isolement et
il ne doit pas être mis à la terre.
2. Assurez-vous que le POWER SWITCH – INTERRUPTEUR
DE PUISSANCE (1) occupe la position OFF (Désactivée).
3. Les appareils CS-19 et CS-19R sont fournis avec 2 jeux de jacks de
sortie d’amplificateur. Les BALANCED MASTER OUTPUT JACKS –
JACKS DE SORTIES EQUILIBREES DU MASTER (44) sont utilisés pour
le branchement à votre amplificateur principal à l’aide de câbles XLR
courants. Nous recommandons l’emploi de ces JACKS si les câbles
allant vers votre amplificateur mesurent 8 mètres ou plus. Les sorties
équilibrées ont trois conducteurs séparés; deux de ceux-ci sont
destinés au signal (positif et négatif) et un à la protection (terre/
masse). La broche 1 correspond à la terre/masse (protection). La
broche 2 correspond au signal positif. La broche 3 correspond au
signal négatif. Les ASTER OUTPUT JACKS – LES JACKS DE
SORTIES DU MASTER (45) ne sont pas équilibrés et sont utilisés
pour le branchement à votre amplificateur principal. Les OUTPUT
BOOTH JACKS – JACKS DE SORTIES CABINE (46) permettent le
branchement d’un amplificateur supplémentaire. Les RECORD OUTPUT
JACKS – JACKS DE SORTIES D’ENREGISTREMENT (47) vous
permettent d’enregistrer votre mélange à un enregistreur à cassette,
enregistreur DC, etc. La ZONE 1 OUTPUT – SORTIE DE LA ZONE 1
(48) et la ZONE 2 OUTPUT – SORTIE DE LA ZONE 2 (49) peuvent être
utilisées pour le branchement à des amplificateurs supplémentaires.
4. Les MIC 1 et MIC 2 (3) INPUTS – ENTRÉES DES MICROS 1 ET 2 (3)
(retrouvées sur le panneau avant) sont des connecteurs Neutrik
Combo qui acceptent un jack XLR ou un jack courant de ¼”. Chaque
entrée micro dispose de sa propre TREBLE CONTROL (4), BASS
CONTROL (5), LEVEL CONTROL (6) , CUE BUTTON (7) et
OVERLOAD LED (43). La MIC 3 INPUT – ENTRÉE MICRO 3 (52) se
trouve sur le panneau arrière. Les GAINS CONTROLS –
COMMANDES DES GAINS (53) pour les micros 1, 2 & 3 sont situés
sur le panneau arrière. Les MIC OVERLOAD LEDS – DELS DE
SURCHARGE DES MICROS (43) s’allumeront si le signal allant vers les
ENTRÉES MICROS 1 & 2 est trop élevé.
5. Sur le panneau arrière se trouvent 4 STEREO PHONO/LINE INPUTS –
ENTRÉES PHONO/LINE STEREO (54, 55, 56, 57) et 4 STEREO LINE
INPUTS – ENTREES LINE STEREO (58, 59, 60, 61). Le PHONO/LINE
SWITCH – COMMUTATEUR PHONO/LINE (62) vous permet de régler
les PHONO/LINE INPUTS – ENTREES PHONO/LINE (54, 55, 56, 57) sur
Phono ou Ligne. Les entrées phono n’accepteront que des plateaux
avec cartouche magnétique. Les GROUND SCREWS – VIS DE TERRE
(51) pour la mise à la terre/masse des plateaux sont situées sur le
panneau arrière. Les entrées de ligne stéréo accepteront n’importe
quelle entrée de volume de ligne comme p.e. lecteur DC,
magnétophone, etc.
6. Des écouteurs peuvent être enfichés dans le HEADPHONE JACK –
JACK DES ÉCOUTEURS (13) se trouvant sur le panneau avant.
Emploi du Ground Lift Switch Séparateur de terre/masse
Selon la configuration du système, parfois la mise en place d’une terre/
masse produira une voie de signalisation moins bruyante. Parfois, la
suppression de la terre/masse peut éliminer les boucles de terre
et le ronronnement pour créer une voie de signal moins bruyante.
1. L’amplificateur de puissance étant sous tension, écoutez le système
dans le mode de repos (aucun signal n’est présent) tout en ayant la
terre/masse en place (le GROUND LIFT SWITCH – SÉPARATEUR
DE TERRE (63) occupe la position “GND”).
2. Mettez l’appareil hors tension avant de mouvoir le GROUND LIFT
SWITCH (63). Supprimez la terre/masse en déplaçant le GROUND LIFT
SWITCH (63) à la position “LIFT”, mettez l’appareil de nouveau
sous tension et écoutez pour déterminer quelle position fournira un
signal sans bruit de fond et sans ronronnement. Gardez le GROUND
LIFT SWITCH (63) dans la position “GND” (terre/masse) si le niveau de
bruit reste le même dans l’une ou l’autre position.
ATTENTION: NE TERMINEZ JAMAIS LA TERRE A.C. SUR
L’AMPLIFICATEUR DE PUISSANCE. LA TERMINAISON
DE LA TERRE C.A. PEUT POSER UN DANGER.
Fonctionnement
1. POWER ON – SOUS TENSION: Une fois tous les branchements
effectués à votre mélangeur, appuyez sur POWER SWITCH –
INTERRUPTEUR DE PUISSANCE (1). L’appareil se mettra en marche et
le POWER LED – DEL DE PUISSANCE (2) brillera.
2. CHANNEL 1 – VOIE 1: Les commandes GAIN (14), HIGH (15), MID (16)
et LOW (17) vous permettent de régler entièrement la source choisie.
L’interrupteur # 18 vous permet de choisir l’entrée PHONO 1/LINE 1 ou
LINE 5, 6,7, 8 ou AUX. Le CHANNEL SLIDE ou KNOB – COULISSE
ou BOUTON DE LA VOIE (19) commande le niveau d’entrée de cette
voie. Le CUE BOUTON – TOUCHE DE REPERE (20) vous permet de
repérer la voie.
3. CHANNEL 2 – VOIE 2: Les commandes GAIN (14), HIGH (15),
MID (16) et LOW (17) vous permettent de régler entièrement la source
choisie. L’interrupteur # 18 vous permet de choisir l’entrée PHONO 2/
LINE 2 ou LINE 5, 6, 7, 8 ou AUX. Le CHANNEL SLIDE ou KNOB –
COULISSE ou BOUTON DE LA VOIE (19) commande le niveau
d’entrée de cette voie. Le CUE BOUTON – TOUCHE DE REPERE (20)
vous permet de repérer la voie.
4. CHANNEL 3 – VOIE 3: Les commandes GAIN (14), HIGH (15), MID (16)
et LOW (17) vous permettent de régler entièrement la source choisie.
L’interrupteur # 18 vous permet de choisir l’entrée PHONO 3/LINE 3 ou
Page 22
Page 23

LINE 5, 6, 7, 8 ou AUX. Le CHANNEL SLIDE ou KNOB – COULISSE
ou BOUTON DE LA VOIE (19) commande le niveau d’entrée de cette
voie. Le CUE BOUTON – TOUCHE DE REPERE (20) vous permet de
repérer la voie.
5. CHANNEL 4 – VOIE 4: Les commandes GAIN (14), HIGH (15),
MID (16) et LOW (17) vous permettent de régler entièrement la source
choisie. L’interrupteur # 18 vous permet de choisir l’entrée PHONO 4/
LINE 4 ou LINE 5, 6,7, 8 ou AUX. Le CHANNEL SLIDE ou KNOB –
COULISSE ou BOUTON DE LA VOIE (19) commande le niveau
d’entrée de cette voie. Le CUE BOUTON – TOUCHE DE REPERE (20)
vous permet de repérer la voie.
6. CHANNEL 5 – VOIE 5: Les commandes GAIN (22), HIGH (23),
MID (24) et LOW (17) vous permettent de régler entièrement la source
choisie. L’interrupteur # 21 vous permet de choisir le MICRO 3 ou
l’entrée LINE 5, 6, 7, 8 ou AUX. Le CHANNEL SLIDE ou KNOB –
COULISSE ou BOUTON DE LA VOIE (26) commande le niveau d’entrée
de cette voie. Le CUE BOUTON – TOUCHE DE REPERE (27) vous
permet de repérer la voie.
7. SECTION CROSSF ADER – CROSSF ADER DE SECTION :
Le CROSSFADER (28) permet le mélange d’une source avec une autre.
Les appareils CS-19 et CS-19R disposent d’un crossfader assignable.
Les ASSIGN SWITCHES – INTERRUPTEUR D’ASSIGNA TION (29, 30)
vous permettent de choisir la voie de reproduction sur chaque côté du
crossfader. L’ASSIGN SWITCH (29) a 6 positions (OFF, 1, 2, 3, 4 ou 5)
et vous permet de choisir la voie 1, 2, 3, 4 ou 5 pour la reproduction via
le côté gauche du crossfader. L’ASSIGN SWITCH (30) a 6 positions
(OFF, 1, 2, 3, 4 ou 5) et vous permet de choisir la voie 1, 2, 3, 4 ou 5
pour la reproduction via le côté droit du crossfader. Si l’ASSIGN
SWITCH se trouve dans la position OFF, ce côté du crossfader sera
inactif.
Le CROSSF ADER CURVE BUTTON – T OUCHE DE COURBE DU
CROSSFADER (40) vous permet d’ajuster la courbe du crossfader.
Appuyez sur la touche CROSSFADER CURVE (40) pour rendre la
courbe inclinée et tranchante (parfait pour le grattement). Relâchez la
touche CROSSFADER CURVE (40) pour rendre la courbe progressive
et faible.
8. OUTPUT CONTROL SECTION – SECTION DE COMMANDE DE LA
SORTIE: Le volume du MASTER OUTPUT – SORTIE DU MASTER (44,
45) est commandé par le MASTER BALANCE – ÉQUILIBRE DU
MASTER (31) et le MASTER (32). La BOOTH CONTROL –
COMMANDE DE CABINE (33) ajuste le volume de la BOOTH
OUTPUT – SORTIE CABINE (46). SUGGESTION: La SORTIE
CABINE est utilisée par certains disque-jockeys pour exploiter des
haut-parleurs témoins dans leur cabine. Les ZONE 1 (34) et ZONE 2
(35) CONTROLS – COMMANDES ZONE 1 (32) ET ZONE (2) sont
utilisées pour commander le volume allant vers une autre zone ou un
autre amplificateur. Cette ligne équilibrée utilise une connexion pointegaine courante. (Pointe = positif (+), anneau = négatif (-) et gaine =
protection/terre). La LOOP BUTTON – TOUCHE DE BOUCLE (42)
s’allumera lorsque la boucle est activée. Le STEREO/MONO SWITCH –
INTERRUPTEUR STÉRÉO/MONO (65) assigne ALL OUTPUTS –
TOUTES LES SORTIES (44, 45, 46, 47, 48, 49) en tant que signal
mono ou signal stéréo. Le MASTER LEVEL ATTENUATION –
ATTÉNUATION DU VOLUME DU MASTER (66) vous permet de
préétablir le volume de sortie des MASTER OUTPUTS –
SORTIES MASTER (44, 45) avec un choix de 3 positions ( 0, -6 dB et
–12 dB).
TALKOVER SECTION – SECTION TALKOVER: but de la section
talkover est de permettre au programme reproduit d’être abaissé en
volume pour que le micro puisse être entendu par-dessus de la
musique. Le MIC/TALKOVER SWITCH – INTERRUPTEUR MICRO/
TALKOVER (9) commande les MICROS 1 et 2 et il a trois positions.
Lorsque le MIC/TALKOVER SWITCH (9) occupe la position “MIC 1 &
2”, les micros 1 et 2 sont activés, le MIC INDICATOR – INDICATEUR
MICRO (8) brillera mais le talkover est éteint. Lorsque le MIC/
TALKOVER SWITCH (9) occupe la position “TALKOVER”, les micros 1
et 2 et la fonction talkover seront activés et le volume de toutes les
sources sauf les entrées MIC 1 & 2 sera abaissé de 16 dB.
Les TREBLE (4) et BASS (5) CONTROLS – REGLAGES DES AIGUS
(4) ET GRAVES (5) vous permettent d’ajuster entièrement la tonalité
ton des micros 1 et 2. MIC 1 LEVEL (6) et MIC 2 LEVEL (6)
commandent les volumes individuels des micros 1 et 2.
10. CUE SECTION - SECTION DE REPÈRE : Le fait d’appuyer sur le MIC
CUE BUTTON – TOUCHE DE REPÈRE MICRO (7) vous permet
d’envoyer votre sortie micro à votre mélange de repère. En
branchant un jeu d’écouteurs au HEADPHONE JACK – JACK DES
ÉCOUTEURS (13), vous pouvez suivre n’importe laquelle ou toutes les
voies. Une caractéristique unique des appareils CS-19 et CS-19R est
la touche CUE – REPÈRE (41). Lorsque vous appuyez sur la touche
CUE (41), vous envoyez votre mélange de repère (le même mélange
que vous entendez dans vos écouteurs) aux moniteurs de cabine.
Appuyez sur les CUE ASSIGN BUTTONS (20, 27) pour les voies 1-5
pour choisir la voie ou les voies à surveiller et les touches s’allumeront.
Les voies choisies seront inclues dans votre mélange de repère et
peuvent être surveillées via les haut-parleurs et/ou les écouteurs de
surveillance de la cabine.
Utilisez le CUE LEVEL CONTROL- COMMANDE DU NIVEAU DE
REPÈRE (10) pour ajuster le volume de repère sans affecter le
mélange global. En tournant le CUE PGM PAN CONTROL (12) à
gauche, vous pourrez surveiller le signal de repère assigné. Si vous le
tournez à droite, la sortie du programme sera surveillée.
11. DISPLAYS - AFFICHAGES: Le PEAK HOLD LED METER (11) indique
les volumes des voies gauche et droite des SORTIES MASTER (44,
45). Les voies individuelles ont chacune leurs propres PREFADER
INPUT LEVEL LED METERS (36) qui indiquent les réglages de la
commande rotative GAIN, HAUT , MOYEN et BAS. Les CHANNEL
CONTROLS – COMMANDES DES VOIES (19, 26, 33, 40, 47)
n’affecteront pas les PREFADER INPUT LEVEL LED METERS (36).
12. Il y a des LOOP INPUTS – ENTRÉES DE BOUCLE (37) et des LOOP
OUTPUTS – SORTIES DE BOUCLE (38). Si vous utilisez un
processeur de signal externe, vous pouvez utiliser les LOOP
OUTPUTS (38) pour envoyer le signal à l’appareil et les LOOP INPUTS
(37) pour ramener le signal au mélangeur. L’appareil est livré avec des
cavaliers qui s’utilisent avec les entrées et sorties de boucle. Gardez
les cavaliers dans l’appareil si vous n’utilisez pas la boucle pour
prévenir des interruptions dans votre programme musical. Il y a
également des LOOP INPUT/OUTPUT JACKS – JACKS D’ENTRÉE/
SORTIE DE LA BOUCLE (64) équilibrés de ¼” (pointe = envoi, anneau
= retour, gaine = terre/masse) sur le panneau arrière qui sont
branchés en série aux LOOP INPUTS/OUTPUTS – ENTRÉES/SORTIES
DE BOUCLE (37, 38) sur le panneau avant pour que vous puissiez
ajouter des effets supplémentaires ou des processeurs de
signal.
13. Les AUX INPUTS – ENTRÉES AUX(39) sur le devant du mélangeur
vous permettent l’accès facile pour brancher des accessoires
supplémentaires tels qu’ un lecteur DC, magnétophone, etc. Les
fonctions EQ, Gain et Volume des AUX INPUTS – ENTRÉES
AUX (39) peuvent être commandées en les attribuant à une voie en
réglant l’INPUT SELECT SWITCH – SELECTEUR D’ENTRÉE (18, 21)
pour n’importe quelle voie sur la position “AUX”.
SPECIFICATIONS
ENTRÉES:
Phono...................................................................................4,5 mV, 47 Kohm
Micros 1,2,3...........................................................2,5 mV, 2 Kohm équilibrés
Ligne...................................................................................150 mV, 27 Kohm
Aux.....................................................................................150 mV, 27 Kohm
SORTIES
Master/Zone 1, 2 (équilibrée/déséquilibrée).......................0 dB 2V, 400 ohm
Cabine (déséquilibrée).....................................................0 dB, 1 V, 400 ohm
Max.................................…. 20 V crête-crête
Enregistrement......................................................................150 mV 5 Kohm
Filtre infrasonique..........................................................15 Hz, 18 dB/octave
GÉNÉRALITÉS
Graves (Mic 1, 2)...............................................................................+ 12 dB
Aigus (Mic 1, 2)..................................................................................+ 12 dB
Gain (Mic 1, 2, 3)...........................................................................0 à –40 dB
Bas (voies 1-5).......................................................................+ 12 dB/-32 dB
Moyen (voies 1-5)..................................................................+ 12 dB/-32 dB
Haut (voies 1-5)......................................................................+ 12 dB/-32 dB
Gain (voies 1-5)............................................................................0 à –30 dB
Atténuation de sortie principale.......................................0 dB, -6 dB, -12 dB
Réponse de fréquence............................................20 Hz – 20 KHz +/- 2 dB
Distorsion..............................................................................moins de 0,02%
Rapport Signal/Bruit...........................................................supérieur à 80 dB
Atténuation talkover...............................................................................16 dB
Source de puissance............................................115/230 V 50/60 Hz 20 W
Dimensions................48,26 cm de large x 26, 67 cm de haut x 12,06 cm de
......................................................................................................profondeur
Poids...................................................................................................5,07 kg
*Les spécifications et la conception peuvent changer sans
préavis pour des raisons d’amélioration.
Page 23
Page 24

In the USA: If you experience problems with this unit,
call 1-732-738-9003 for Gemini Customer Service.
Do not attempt to return this equipment to your dealer.
Parts of the design of this product may be protected by worldwide
patents.
Information in this manual is subject to change without notice and does
not represent a commitment on the part of the vendor. Gemini Sound
Products Corp. shall not be liable for any loss or damage whatsoever
arising from the use of information or any error contained in this
manual.
No part of this manual may be reproduced, stored in a retrieval system or
transmitted, in any form or by any means, electronic, electrical,
mechanical, optical, chemical, including photocopying and recording, for
any purpose without the express written permission of Gemini Sound
Products Corp.
It is recommended that all maintenance and service on this product is
performed by Gemini Sound Products Corp. or its authorized agents.
Gemini Sound Products Corp. will not accept liability for loss or damage
caused by maintenance or repair performed by unauthorized personnel.
Worldwide Headquarters • 120 Clover Place, Edison, NJ 08837 • USA
T el: (732) 738-9003 • Fax: (732) 738-9006
France • G.S.L. France • 1 1, Avenue Leon Harmel, Z.I. Antony, 92160 Antony, France
Germany • Gemini Sound Products GmbH • Ottostrasse 6, 85757 Karlsfeld, Germany
UK • Gemini Sound Products • Unit C4 Hazleton Industrial Estate, Waterlooville, UK P08 9JU
Spain • Gemini Sound Products S.A. • Rosello, 516, Barcelona, Spain, 08026
© Gemini Sound Products Corp. 2002 All Rights Reserved
Tel: + 33 (0) 1 55 59 04 70 • Fax: + 33 (0) 1 55 59 04 80
Tel: 08131 - 39171-0 • Fax: 08131 - 39171-9
Tel: 087 087 00880 • Fax: 087 087 00990
Tel: 349-3435-0814 • Fax: 3493-347-6961
Page 24
 Loading...