

Page 1

OPERA TIONS MANUAL
Bedienungsanleltung
Manual de funcionamiento
Manual de fonctionnement
Manual del utente
CD-12
PROFESSIONAL CD PLA YER
MUL TI LANGUAGE INSTRUCTIONS
English............................................................................Page 2
Deutsch..........................................................................Page 4
Español...........................................................................Page 6
Francais...........................................................................Page 8
Italiano.............................................................................Page 10
Page 1
Page 2
3 4 5
6 7
8
Page 2
1
18
LINE OUT
L
R
2 9
10 11 12 13 14
17
11
14
15
10
6
16
4
7
12
13
Page 3

INTRODUCTION
Congratulations on purchasing a Gemini CD-12 CD Player. This state of
the art professional CD player is backed by a three year warranty,
excluding lasers. One year warranty on CD lasers. Prior to use, we
suggest that you carefully read all the instructions.
CAUTIONS
Do not use this CD Player at temperatures below 41°F/5°C or higher
than 95°F/35°C.
Place the unit in a clean and dry location.
Do not place the unit in an unstable location.
When disconnecting the power cord from an AC outlet, always grasp it
by the plug. Never pull the power cord.
To prevent electric shock, do not remove the cover or the bottom screws.
There are no user serviceable parts inside. Please refer servicing to a
qualified technician.
Do not use chemical solvents to clean the unit.
Keep the laser pickup clean by keeping the drawer closed.
Keep this manual in a safe place for future reference.
SAFETY CERTIFICATIONS
Laser Diode Properties
Material: Ga - Al - As
Wavelength: 755 - 815 nm (25° C)
Laser Output: Continuous Wave, max. 0.5mW
LINE VOLTAGE SELECTION
Model CD-12 is a dual voltage unit. It will operate at 115 or 230 volts. To
set the proper voltage follow these steps:
1. Place the head of a screw driver in the center of the VOLTAGE
SELECTOR SLIDE SWITCH (17) found on the rear panel.
2. Slide the switch left for 115 volts or push the switch right for 230 volts.
3. Do not force or twist the switch. Excessive force may cause damage.
If the switch does not move smoothly, contact a qualified technician.
CONNECTIONS
1. Plug one end of a set of RCA connectors into each of the LINE
OUTPUT JACKS (18).
2. Plug the other end of the RCA connectors into any available line level
input jacks on your mixer. If you are playing the CD-12 through a
receiver, you can plug the RCA connectors into the CD or AUX input
jacks on your receiver. If there are no CD or AUX inputs, use any line
level (not phono) inputs.
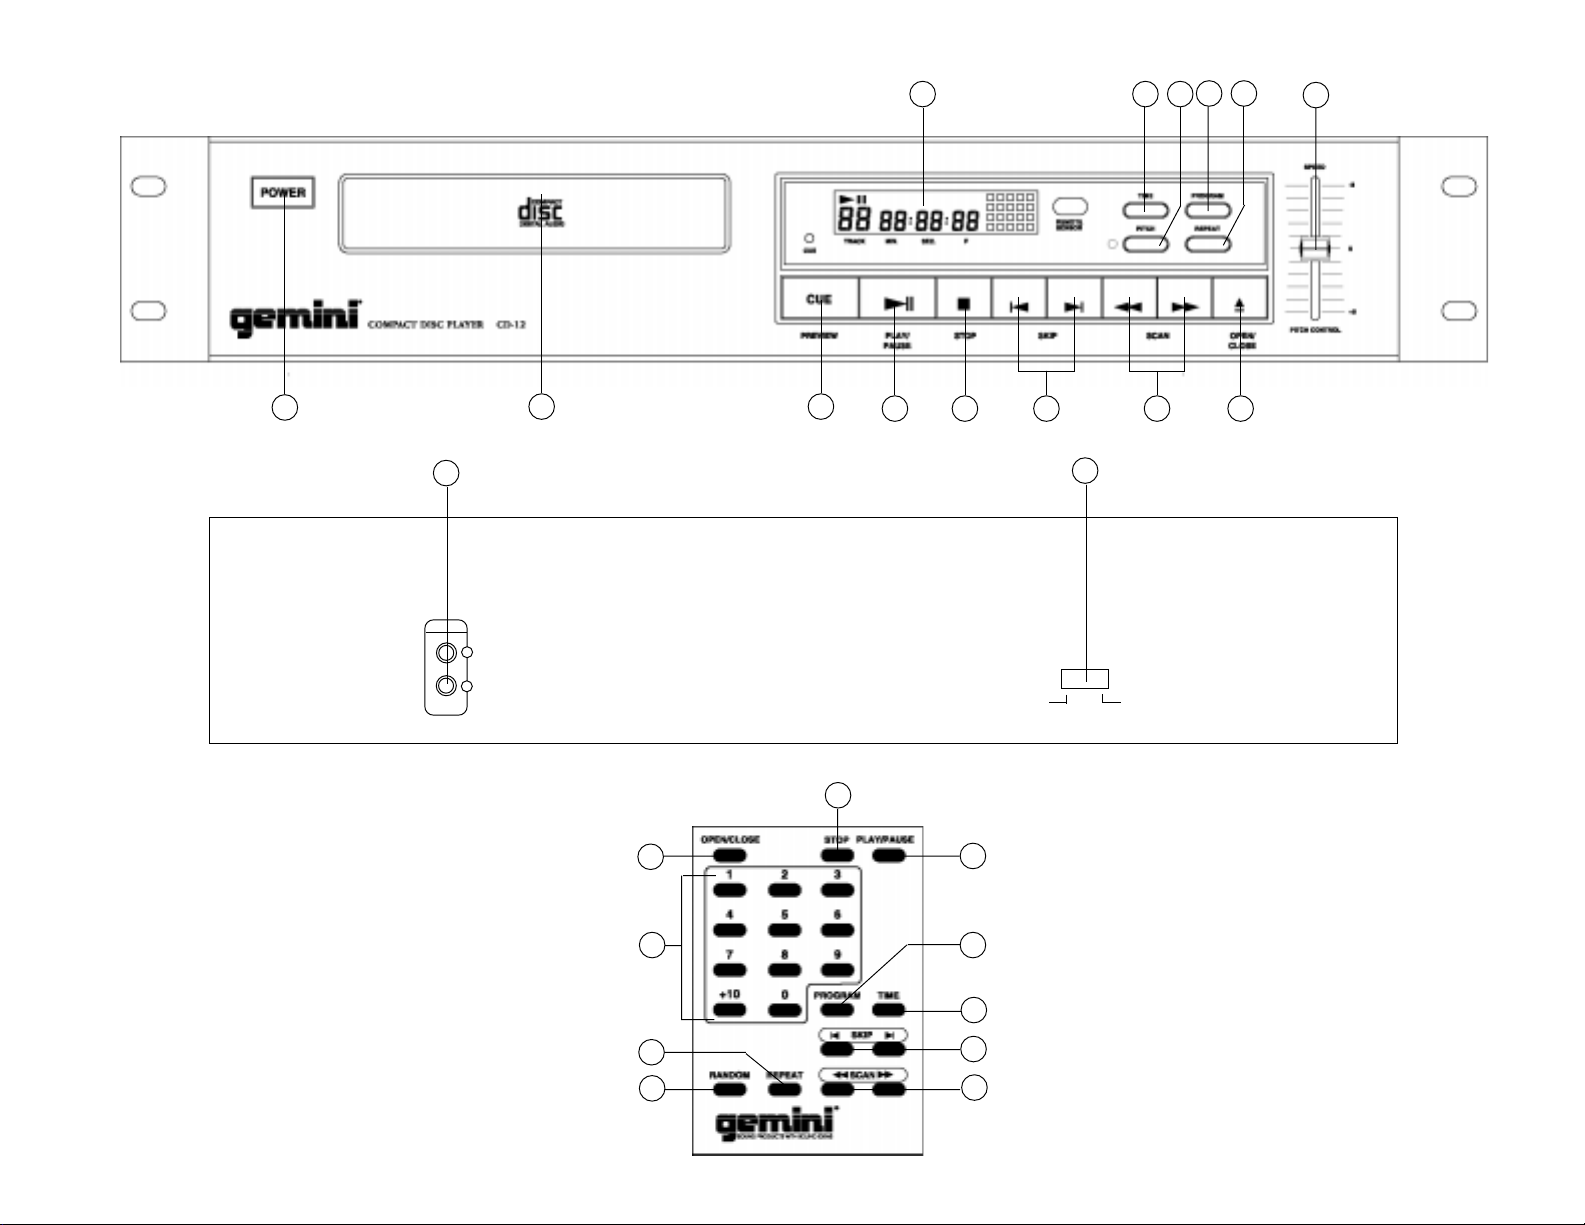
FUNCTION DESCRIPTIONS
POWER SWITCH: After making sure that the VOLTAGE SELECTOR
SLIDE SWITCH (17), found on the rear panel, is properly set, plug
the unit in and press the POWER SWITCH (1). The unit will turn on.
Pushing the POWER SWITCH (1) a second time will turn the unit off.
DISC TRAY: The DISC TRAY (2) is where the CD is held during loading,
unloading and playback. Pressing the disc tray OPEN/CLOSE
BUTTON (14), will open or close the tray. The DISC TRAY (2) holds
both 12 cm and 8 cm CDs. Please note, if the CD-12 is in the play
mode, the tray will not open.
OPEN/CLOSE BUTTON : Press the OPEN/CLOSE BUTTON (14) to
load or remove a CD from the DISC TRAY (2).
DISPLAY: The DISPLAY (3) shows the track numbers, play mode, pause
mode, and 3 different time displays. These time displays are time
elapsed on the track, time remaining on the disc and time remaining
on the track.
PLAY/PAUSE : Each press of the PLAY/PAUSE BUTTON (10)
causes the operation to change from play to pause or from pause
back to play. See the CUE INSTRUCTIONS section for more
information.
TRACK SKIP
the track to play.
SCAN BUTTONS
move foward or reverse while in play mode. The SCAN BUTTONS
(13) are also used to accurately position the disc at the point where
you wish the track to start playing. This position on the track is
memorized as the cue point. See the CUE INSTRUCTIONS section
for more information.
STOP/CLEAR : The STOP/CLEAR BUTTON (11) will end the playing
of the CD. Also use the STOP/CLEAR BUTTON (11) to clear
selections when programming. See the PROGRAMMING INSTRUCTIONS section for more information.
TIME: The TIME BUTTON (4) switches the time display between the
three available choices listed under DISPLAY.
CUE: With the unit in the play mode, and after memorizing the cue point,
pressing the CUE BUTTON (9) will cause the CD player to enter the
pause mode at the memorized cue point. Holding down the cue
button changes the cue function to preview (allowing you to hear the
music play from the cue point) and releasing the cue button returns
you to the preset cue point. If a cue point is not memorized, pressing
the CUE BUTTON (9) will cause the unit to return to the beginning of
that track.
PITCH: Pushing the PITCH BUTTON (5) activates the pitch section of
the unit. The pitch of the CD will change according to the position of
the PITCH CONTROL (9).
REPEAT: Press the repeat button to repeat one OR all tracks.
RANDOM: Press the random play button to have tracks play in a random
order.
: The TRACK SKIP BUTTONS (12) let you select
: The SCAN BUTTONS (13) are used to
OPERATING INSTRUCTIONS
1. Make sure that the VOLTAGE SELECTOR SLIDE SWITCH (17),
found on the rear panel, is set for the proper voltage. Plug the unit in
and press the POWER SWITCH (1). The unit will turn on. Pushing
the POWER SWITCH (1) a second time will turn the unit off.
2. Press the OPEN/CLOSE BUTTON (14), place a CD in the DISC
TRAY (2) and press the OPEN/CLOSE BUTTON (14) again. The tray
will close into the unit. The display will initially show the number of
tracks and the total time of the CD.
3. Push the TRACK SKIP BUTTONS (12) to select the track you want
to play.
4. Press the PLAY/PAUSE BUTTON (10) and the unit will instantly play.
CUE INSTRUCTIONS
1. To start the play at a point other than the beginning of a track, follow
these instructions:
First choose the track you wish to play, and then press the PLAY/
PAUSE BUTTON (10) so the unit goes into the play mode. Press the
PLAY/PAUSE BUTTON (10) to pause play at the spot where you
want the play to start, the CUE POINT. Use the SCAN BUTTONS
(13) to pick the precise spot you want play to begin, then Press
the PLAY/PAUSE BUTTON (10) again to save the cue point. Press
the CUE BUTTON (9) to pause play at the cue point (the unit will go
into the pause mode and the location indicated on the display will
be the memorized cue point). You can preview the cue point by
pressing and holding down the CUE BUTTON (9). Press the PLAY/
PAUSE BUTTON (10) to begin play from the cue point.
2. Once you have saved a cue point you can fine tune or change the
memorized cue point:
To change a cue point, push the PLAY/PAUSE BUTTON (10) so the
unit plays from the cue point, then press the PLAY/PAUSE BUTTON
(10) at the spot you wish your new cue point. Press the PLAY/PAUSE
BUTTON (10) again to save the cue point. The unit will go into the
pause mode and the location indicated on the display will be the new
Page 3
memorized cue point.
Page 4

To fine tune a cue point, pause play at the memorized cue point, then
use the SCAN BUTTONS (13) to scan frame by frame (1/75th of a
second) to where you want play to begin. Press the PLAY/PAUSE
BUTTON (10) to save the new cue point.
Note: During fine tuning there will be a stutter effect (to help you
find the beat). The stuttering effect will end when you press the
PLAY/PAUSE BUTTON (10) to save the cue point. Also, during
fine tuning if you hold down the SCAN BUTTONS (13), the unit
will scan quickly after 10 frames.
PROGRAMMING INSTRUCTIONS
1. To program the unit to play songs in the order you select using the
TRACK NUMBERS (15) on the remote control, follow these instructions:
In stop mode, press the PROGRAM BUTTON (6) and then choose
the tracks you wish to play by pressing the TRACK NUMBERS (15)
on the remote control. Press the PLAY/PAUSE BUTTON (10) to play
your programmed selections.
2. To program the unit to play songs in the order you select using the
SCAN BUTTONS (13), follow these instructions:
In stop mode, press the PROGRAM BUTTON (6) and then choose
the track you wish to play using the TRACK SKIP BUTTONS (12).
Press the PROGRAM BUTTON (6) to save the track. Repeat the
process until you are ready to start playing your selections. Press the
PLAY/PAUSE BUTTON (10) to play your programmed selections.
3. To clear items from your program, press the STOP/CLEAR BUTTON
(11).
TROUBLE SHOOTING
• If the disk will not play, check to see if the disc was loaded correctly
(label side up). Also check the disc for excessive dirt, scratches, etc.
• If the disc turns but there is no sound, check the cable connections. If
they are okay, check your amplifier or receiver.
• If the CD skips, check the CD for dirt or scratches. Do not assume
that the CD player is defective. Many CDs are recorded out of spec
and will skip on most or all CD players. Before sending the unit in for
repair, try playing a CD that you are sure plays properly.
SPECIFICATIONS
GENERAL:
Type....................Compact Disc Player w/wireless remote
Disc Type............................... Standard Compact discs (12 cm & 8 cm)
Time Display.....................Track Elapsed, Track Remain, or Total remain
Variable Pitch...........................+/- 8% Slider with Resume Switch
Start....................................................Within 0.03 seconds
Track Selection....................................................1 to 99 Tracks
Installation...............................................19" Rack Mountable
AUDIO SECTION:
Quantization......................................1 Bit Linear/Channel, 3 Beam Laser
Oversampling Rate..................................................................8 Times
Sampling Frequency......................................................44.1 kHz
Frequency Response....................................20 Hz to 20 kHz
Total Harmonic Distortion......................................Less Than 0.05%
Signal to Noise Ratio...................................................>96 dB
Dynamic Range.................................................................>94 dB
Output Level (nominal).............................................1.9 Volts R.M.S.
Power Supply......................................AC 120/230V, 60/50 Hz
Dimensions...............................16.5” x 10.6” x 3.5” (420 x 270 x 90 mm)
Weight...........................................................7.75 lbs. (3.5 kg)
* Specifications and design are subject to change without notice for
purpose of improvement.
Page 4
Page 5

EINLEITUNG
Wir gratulieren Ihnen zum Kauf eines Gemini CD-12 CD Players. Dieser
moderne CD-Spieler enthält dreijährige Garantie, ausschließlich Laser.
Einjährige Garantie für CD Laser. Vor Anwendung der Einheit lesen Sie
bitte alle Anleitungen sorgfältig durch.
VORSICHTSMASSNAHMEN
Dieser CD-Spieler darf nicht in einem Bereich gebraucht werden, in dem
die Temperatur 5° C/41° F unterschreitet oder 35° C/95° F überschreitet.
Die Einheit an einer sauberen, trockenen Stelle aufstellen.
Die Einheit nicht so aufstellen, daßes nicht ausreichend gestützt ist.
Wenn das Netzkabel aus einer Steckdose gezogen wird, immer am
Stecker ziehen, nicht am Kabel selbst.
Um das Risiko elektrischen Schocks zu vermeiden, weder das Gehäuse
noch die unteren Schrauben entfernen. Es befinden sich keine vom
Anwender zu wartenden Teile im Gehäuse. Die Wartung ist von einem
qualifizierten Techniker vorzunehmen.
Die Einheit nicht mit chemischen Lösungsmitteln reinigen.
Den Laser-Tonabnehmer sauber halten, in dem die Schublade
geschlossen bleibt.
Dieses Handbuch als Nachschlagewerk gut aufbewahren.
SICHERHEITSBESCHEINIGUNG
Eigenschaften der Laserdiode
Material: Ga - Al - As
Wellenlänge: 755-815 nm (25° C)
Laserabgabe: kontinuierliche Welle, max. 0,5 mW
WAHL DER NETZSPANNUNG
Das Modell CD-12 ist eine Doppelspannungseinheit, die bei 115 oder
230 Volt in Gebrauch genommen werden kann. Um die richtige
Spannung einzustellen, sind folgende Schritte zu befolgen:
1. Einen Schraubenzieherkopf in die Mitte des SpannungswahlSchiebereglers VOLTAGE SELECTOR SLIDE SWITCH (17) auf der
hinteren Schalttafel einstecken.
2. Den Schalter nach rechts schieben, um auf 115 V zu schalten, oder
nach rechts schieben, um auf 230 V zu schalten.
3. Den Schalter nicht mit übermäßiger Kraft schieben oder drehen. Falls
der Schalter sich nicht bewegen läßt, wenden Sie sich an einen
qualifizierten Techniker.
ANSCHLÜSSE
1. Ein Ende von einem Satz RCA-Stecker in jeden der Anschlüsse LINE
OUTPUT (18) (Leitungsausgang) einstecken.
2. Das andere Ende der RCA-Stecker in einen beliebigen Anschluß
Leitungseingang des Mischpults einstecken. Wenn der CD-12 durch
einen Empfangsgerät gespielt wird, können die RCA-Stecker in die
Eingangsanschlüsse CD oder AUX des Empfangsgeräts eingesteckt
werden. Wenn kein CD oder AUX Eingang vorhanden ist, kann jeder
Leitungseingang (nicht Phono) verwendet werden.
FUNKTIONSBESCHREIBUNG
NETZSCHALTER: Nachdem sichergestellt wurde, daßder Schieberegler
VOLTAGE SELECTOR (17) auf der hinteren Schalttafel richtig
eingestellt ist, die Einheit einstöpseln und den Netzschalter POWER
(1) einschalten. Damit wird die Einheit eingeschaltet. Wenn der
Schalter POWER (1) ein zweites Mal gedrückt wird, wird es
ausgeschaltet.
CD-FACH: Beim Laden, Entladen und Abspielen befindet sich die CD im
CD-Fach (2). Wenn die Taste OPEN/CLOSE (14) (Öffnen/Schließen)
des CD-Fachs gedrückt wird, wird das Fach geöffnet bzw.
geschlossen. Das CD-Fach (2) kann 12 cm und 8 cm große CDs
aufnehmen.
TASTE OPEN/CLOSE (Öffnen/Schließen): Die Taste OPEN/CLOSE
(14) drücken, um eine CD in das CD-Fach (2) einzulegen bzw. aus
dem CD-Fach zu entfernen.
DISPLAY: Das DISPLAY (3) zeigt die Spurnummer, den Abspielmodus,
den Pausenmodus sowie drei verschiedene Zeitanzeigen. Die
Zeitanzeigen sind abgelaufene Zeit der Spur, auf der CD
verbleibende Zeit und auf der Spur verbleibende Zeit.
PLAY/PAUSE (Spielen/Pause): Jedesmal, wenn die Taste PLAY/
PAUSE (10) gedrückt wird, schaltet die Einheit von Spielen auf Pause
bzw. von Pause wieder auf Spielen. Im Abschnitt MERKANLEITUNG
befinden sich zusätzliche Informationen.
SPUR ÜBERSPRINGEN
überspringen) erlauben eine Auswahl der Spur, die gespielt werden
soll.
SCAN-TASTEN
dazu, während dem Spiel-Modus auf der CD vorwärts und rückwärts
zu laufen. Die Tasten SCAN (13) dienen ebenfalls dazu, die CD
genau an der Stelle zu positionieren, an der die Spur mit dem Spielen
anfangen soll. Diese Stelle der Spur wird als Merkstelle gespeichert.
Im Abschnitt MERKANLEITUNG finden Sie weitere Informationen.
STOP/CLEAR (Stoppen/Löschen): Die Taste STOP/CLEAR (11)
beendet das Abspielen der CD. Ebenfalls wird die Taste STOP/
CLEAR (11) beim Programmieren die Auswahlen löschen. Im
Abschnitt PROGRAMMIERANLEITUNG finden Sie weitere
Informationen.
TIME (Zeit): Die Taste TIME (4) schaltet die Zeitanzeige auf eine der
verschiedenen Zeitanzeigen, die unter DISPLAY aufgeführt sind.
CUE: Wenn die Einheit in den Abspiel-Modus geschaltet und nachdem
die Merkstelle gespeichert worden ist, wird ein Drücken der Taste
CUE (9) dafür sorgen, daßder CD-Spieler den Pause-Modus an der
gespeicherten Stelle eingibt. Wenn Sie die Cue-Taste gedrückt
halten, ändert sich die Cue-Funktion und gibt eine Vorschau (wobei
Sie die Musik von der Merkstelle an hören können), und eine
Freigabe der Taste führt Sie zur voreingestellten Merkstelle zurück.
Falls eine Merkstelle nicht gespeichert ist, wird ein Drücken der Taste
CUE (9) dafür sorgen, daßdie Einheit zum Beginn der Spur
zurückgeführt wird.
PITCH (Tonlage): Wenn die Taste PITCH (5) gedrückt wird, wird die
Tonlagenteil der Einheit betätigt. Die Tonlage der CD wird je nach
Stellung der Steuervorrichtung PITCH CONTROL (9) geändert.
REPEAT (Wiederholen): Diese Taste für Wiederholung einer ODER aller
Spuren drücken.
RANDOM (Beliebig): Diese Taste für das Abspielen der Spuren in
beliebiger Reihenfolge drücken.
: Die Tasten TRACK SKIP (12) (Spur
(Abtasten): Die Tasten SCAN (13) dienen
BEDIENUNGSANLEITUNG
1. Sicherstellen, daßder Schieberegler VOLTAGE SELECTOR (17)
(Spannungswähler) auf der hinteren Schalttafel auf die richtige
Spannung eingestellt ist. Die Einheit einstöpseln und den
Netzschalter POWER (1) einschalten. Damit wird die Einheit
eingeschaltet. Wenn der Schalter POWER (1) ein zweites Mal
gedrückt wird, wird sie ausgeschaltet.
2. Die Taste OPEN/CLOSE (14) drücken, eine CD in das CD-Fach (2)
legen und die Taste OPEN/CLOSE (14) nochmals drücken. Das Fach
bewegt sich zurück in die Einheit und schließt sich. Zunächst
erscheint auf dem Display die Anzahl der Spuren und die Gesamtzeit
der CD.
3. Die Tasten TRACK SKIP (12) drücken, um die gewünschte Spur zu
wählen.
4. Die Taste PLAY/PAUSE (10) drücken und die Einheit fängt sofort an
zu spielen.
Page 5
Page 6

MERKANLEITUNG
FEHLERSUCHE
1. Um das Abspielen an einer anderen Stelle als am Anfang einer Spur
einsetzen zu lassen, sind folgende Anleitung zu befolgen:
Zuerst die Spur auswählen, die abgespielt werden soll, dann die
Taste PLAY/PAUSE (10) drücken, damit der CD-Spieler in den
Abspiel-Modus übergeht. Dann die Taste PLAY/PAUSE (10) drücken,
um das Abspielen an der gewünschten Stelle,dem CUE POINT - zu
starten. Benutzen Sie die SCAN TASTEN (13), um den exakten
Punkt auszuwählen, den Sie Spiel anfangen wünschen, dann die
Taste PLAY/PAUSE (10) nochmals drücken, um den Merkpunkt zu
speichern. Die Taste CUE (9) drücken, um das Abspielen an der
gewünschten Stelle zu unterbrechen (die Einheit geht in den PauseModus, und die Stelle auf der Anzeige wird die gespeicherte
Merkstelle sein). Eine Vorschau der Merkstelle erhalten Sie, indem
Sie die Taste CUE (9) drücken und gedrückt halten. Das Drücken der
Taste PLAY/PAUSE (10) wird das Abspielen von der Merkstelle an
starten.
2. Wenn Sie die eine Merkstelle gespeichert haben, können Sie diese
feineinstellen oder ändern:
Um die Merkstelle zu ändern, drücken Sie die Taste PLAY/PAUSE
(10), damit die Einheit von der Merkstelle an abspielt; dann die Taste
PLAY/PAUSE (10) an derjenigen Stelle drücken, an der die neue
Merkstelle sein soll. Die Taste PLAY/PAUSE (10) nochmals drücken,
um die neue Merkstelle zu speichern. Die Einheit geht in den PauseModus, und die auf der Angezeige angezeigte Stelle ist die neue
gespeicherte Merkstelle.
Das Feineinstellen einer Merkstelle geschieht, indem man das
Abspielen an der gespeicherten Merkstelle unterbricht und dann mit
den Tasten SCAN (13) Rahmen um Rahmen abtastet (1/75 einer
Sekunde), wo das Abspielen beginnen soll. Die Taste PLAY/PAUSE
(10) drücken, um die neue Merkstelle zu speichern.
Hinweis: Während des Feinsinstellens wird ein Stottereffekt erzeugt
(hilft Ihnen, den Beat zu finden). Der Stottereffekt wird enden,
wenn Sie die Taste PLAY/PAUSE (10) drücken, um die Merkstelle
zu sichern. Beim Feineinstellen können Sie ebenfalls die Tasten
SCAN (13) drücken; das System wird schnell nach 10 Rahmen
abtasten.
PROGRAMMIERANLEITUNG
1. Um die Einheit so zu programmieren, daßdie Songs in der mit Hilfe
der von den TRACK NUMBERS (15) ausgewählten Reihenfolge
abgespielt werden, sind folgende Anweisungen zu beachten:
Im Stop-Modus die Taste PLAY/PAUSE (10) drücken, und dann die
gewünschte Spur auswählen, indem Sie TRACK NUMBERS (15) an
der Fernsteuerung drücken. Die Taste PLAY/PAUSE (10) drücken,
um die programmierten Auswahlen abzuspielen.
2. Um die Einheit so zu programmieren, daßdie Songs in der mit Hilfe
der von den Tasten SCAN (13) ausgewählten Reihenfolge abgespielt
werden, sind folgende Anweisungen zu beachten:
Im Stop-Modus die Taste PLAY/PAUSE (10) drücken, und dann die
gewünschte Spur auswählen, indem Sie die Tasten TRACK SKIP
(12) drücken. Die Taste PROGRAM (6) drücken, um die Spur zu
speichern. Diesen Vorgang wiederholen, bis Sie bereit sind, die
gewünschte Auswahl abzuspielen. Die Taste PLAY/PAUSE (10)
drücken, um die ausgewählte Auwahl abzuspielen.
3. Um Posten vom Programm zu löschen, die Taste STOP/CLEAR (11)
drücken.
• Wenn die CD nicht spielt, nachprüfen ob die CD richtig eingelegt
wurde (mit der beschrifteten Seite nach oben). Auch auf
Verunreinigung, Kratzer usw. überprüfen.
• Wenn die CD sich dreht, aber kein Ton zu hören ist, die
Kabelanschlüsse überprüfen. Wenn diese in Ordnung sind, den
Verstärker bzw. das Empfangsgerät überprüfen.
• Wenn die CD springt, ist sie auf Schmutz oder Kratzer zu überprüfen.
Man darf nicht sofort annehmen, daßder CD-Spieler defekt ist. Viele
CDs werden nicht spezifikationsgemäßaufgezeichnet und springen
auf den meisten oder allen CD-Spielern. Bevor Sie die Einheit zur
Reparatur einsenden, versuchen Sie, eine CD abzuspielen.
TECHNISCHE DATEN
ALLGEMEINES:
Typ.............................CD-Spieler mit verdrahteter Fernsteuerung
CD-Typ................................Standard-Compact-Discs (12cm und 8cm)
Zeitdisplay...............abgelaufene Zeit der Spur, auf der Spur
verbleibende Zeit und auf der CD verbleibende Zeit
Tonlagenänderung......+/- 8% Schieberegler mit Wiederaufnahmeschalter
Start........................................................innerhalb von 0,03 Sekunden
Spurauswahl..........................................................1 bis 99 Spuren
Installation...............................19" gestellmontierbare Spielereinheit
AUDIOTEIL:
Quantisierung......................................1 Bit Linear/Kanal, 3-Strahlen-Laser
Oversamplingrate............................................................8mal
Samplingfrequenz...........................................................44,1 KHz
Frequenzantwort...............................................................20 Hz bis 20 Khz
Digitale ausgangsubchse................................................................IEC958
Harmonische Gesamtverzerrung......................weniger als 0.05%
Verhältnis Signal/Rauschen................................................>96 dB
Dynamikbereich................................................................>94 dB
Kanaltrennung............................................................90 dB (1 KHz)
Ausgangspegel..............................................................1,9 Volt
Stromversorgung.............................Wechselstrom 120/230 V, 60/50 Hz
Abmessungen............................................................90 x 420 x 270 mm
Gewicht...........................................................................3.5 kg
*Die technischen Daten und die Konstruktion können zu
Verbesserungszwecken ohne vorherige Bekanntgabe geändert werden.
Page 6
Page 7

INTRODUCCIÓN
Felicitaciones por su compra de un reproductor de discos compactos, el
CD-12 de Gemini. Este reproductor profesional de la más avanzada
tecnología está respaldado por una garantía de tres años, salvo los
láseres. Garantía de un año para CD láseres. Antes de usarlo, le
recomendamos leer cuidadosamente todas las instrucciones.
PRECAUCIONES
No use este reproductor de discos compactos donde la temperatura esté
por debajo de 41°F/5°C o exceda 95°F/35°C.
Instale la unidad en un lugar limpio y seco.
No coloque la unidad en un sitio de poca estabilidad.
Para desconectar el cordón de alimentación de un receptáculo, tómelo
del enchufe. Nunca tire del cordón.
Para evitar choques eléctricos, no quite la tapa ni los tornillos de la base.
No contiene piezas susceptibles de recibir atención del usuario. Sírvase
obtenir servicio de un técnico experto.
No use solventes químicos para limpiar el aparato.
Conserve el captor láser limpio manteniendo cerrada la gaveta.
Conserve este manual en un sitio apropiado para referencia futura.
CERTIFICACIONES DE SEGURIDAD
Características del diodo láser:
Material: Ga - Al - As
Longitud de onda: 755 - 815 nm (25°C)
Salida láser: onda continua; máx. 0,5 mVatios
SELECCIÓN DEL VOLTAJE DE LÍNEA
El modelo CD-12 es un modelo de doble voltaje. Puede funcionar con
115 ó 230 voltios. Para cambiar el voltaje, siga los pasos siguientes:
1. Coloque la punta de un destornillador en el centro de la LLAVE
CORREDIZA DE SELECCIÓN DE VOLTAJE (17) que se encuentra
en el panel posterior.
2. Deslice la llave hacia la izquierda para 115 voltios o hacia la derecha
para 230 voltios.
3. No fuerce ni tuerza la llave. El hecho de aplicar fuerza excesiva
puede causar daño. Si la llave no se mueve con suavidad, póngase
en contacto con un técnico calificado.
CONEXIONES
1. Enchufe un extremo de un juego de conectores tipo RCA en cada
uno de los REC LINE OUTPUT JACKS (18) (RECEPTÁCULOS DE
SALIDA DE LÍNEA).
2. Enchufe el otro extremo de los conectores tipo RCA en cualquier
receptáculo de entrada de nivel de línea disponible en el mezclador.
Si está reproduciendo la señal del CD-12 por intermedio de un
receptor, puede enchufar los conectores tipo RCA en los
receptáculos de entrada CD (corriente continua) o AUX del receptor.
Si el receptor no tiene entradas CD (corriente continua) o AUX, use
cualquier entrada de nivel de línea (no fonográfica).
DESCRIPCIÓN DE LAS FUNCIONES
LLAVE DE ALIMENTACIÓN: Después de asegurarse de que la LLAVE
CORREDIZA DE SELECCIÓN DE VOLTAJE (17), que se encuentra
en el panel posterior, está en posición correcta, enchufe la unidad y
apriete la LLAVE DE ALIMENTACIÓN (1). La unidad se activará. La
unidad se inactiva cuando se vuelve a apretar la LLAVE DE
ALIMENTACIÓN (1).
BANDEJA DE DISCOS: Durante la carga, descarga y reproducción, el
disco compacto permanece en la BANDEJA DE DISCOS (2). La
bandeja se abre o se cierra al apretar el BOTÓN DE ABRIR/
CERRAR (14). La BANDEJA DE DISCOS (2) acepta discos
compactos de 12 cms y de 8 cms.
BOTÓN DE ABRIR/CERRAR : Apriete el BOTÓN DE ABRIR/
CERRAR (14) para cargar o sacar un disco compacto de la
BANDEJA DE DISCOS (2).
VISUALIZADOR: El VISUALIZADOR (3) muestra los siguientes datos:
números de pista, modalidad de reproducción, modalidad de pausa y
3 cifras horarias diferentes. Estas cifras corresponden al tiempo de
pista transcurrido, el tiempo remanente de disco y el tiempo
remanente de pista.
REPRODUCCIÓN/PAUSA : Cada vez que se aprieta el BOTÓN
REPRODUCCIÓN/PAUSA (10), el funcionamiento cambia de
reproducción a pausa o de pausa a reproducción. Véase la sección
INSTRUCCIONES DE PUNTO DE REFERENCIA para mayor
información.
SELECCIÓN DE PISTA : El BOTÓN DE SELECCIÓN DE PISTA
(12) le permite seleccionar la pista a reproducir.
BOTONES DE BÚSQUEDA : Los BOTONES DE BÚSQUEDA
(13) se emplean para mover el disco adelante o atrás durante la
modalidad de reproducción. Los BOTONES DE BUSQUEDA (13) se
usan también para posicionar con precisión el disco al punto preciso
donde se desea que comience la reproducción de la canción. Esta
posición de la pista se retiene como un punto de referencia. Véase la
sección de las INSTRUCCIONES DE PUNTO DE REFERENCIA
para mayor información.
PARADA/SUPRESIÓN : El BOTÓN DE PARADA/SUPRESIÓN (11)
detiene la reproducción del disco compacto. Haga también uso del
BOTÓN DE PARADA/SUPRESIÓN (11) para suprimir las
selecciones durante la programación. Véase la sección de
INSTRUCCIONES DE PROGRAMACIÓN para mayor información.
TIEMPO: El BOTÓN DE TIEMPO (4) hace desplegar sucesivamente los
tres datos horarios enumerados en VISUALIZADOR.
PUNTO DE REFERENCIA: Con el aparato en la modalidad de
reproducción, y después de haber memorizado el punto de
referencia, el hecho de apretar el BOTÓN DE PUNTO DE
REFERENCIA (9) hace entrar el reproductor de discos compactos en
la modalidad de pausa al llegar al punto de referencia memorizado.
Si Ud mantiene el dedo en el pulsador CUE, la función CUE pasará a
PREVIEW (lo que le permitirá escuchar la música desde el punto de
referencia). Si Ud saca el dedo del pulsador CUE, le lleva de nuevo
al punto CUE pre-establecido. Si un punto de referencia no está
memorizado, el hecho de apretar el botón CUE (9) hace regresar el
aparato al principio de esta pista.
TONO: Apretando el BOTÓN TONO (5) se activa la sección tono de la
unidad. El tono del reproductor de discos cambiará según la posición
del CONTROL TONO (9).
REPETICIÓN: Apriete este botón o pulsador para repetir una ó todas las
pistas.
AL AZAR: Apriete el botón o pulsador de reproducción al azar para
reproducir las pistas en una secuencia al azar.
INSTRUCCIONES DE MANEJO
1. Asegúrese de que la LLAVE CORREDIZA DE SELECCIÓN DE
VOLTAJE (17), que se encuentra en el panel posterior, esté en la
posición correcta. Enchufe el cordón de alimentación y apriete la
LLAVE DE ALIMENTACIÓN (1). La unidad se activa. Apretando la
LLAVE DE ALIMENTACIÓN (1) por segunda vez se inactiva la
unidad.
2. Apriete el BOTÓN DE ABRIR Y CERRAR (14), coloque un disco
compacto en la BANDEJA DE DISCOS (2) y apriete el BOTÓN DE
ABRIR Y CERRAR (14) nuevamente. La bandeja se cierra. El
visualizador mostrará inicialmente el número de pistas y el tiempo
total del disco.
3. Para seleccionar la pista que quiera escuchar, apriete los BOTONES
DE SELECCIÓN DE PISTA (12).
4. Apriete el BOTÓN REPRODUCCIÓN/PAUSA (10) y la unidad
comenzará a reproducir instantáneamente.
Page 7
Page 8

INSTRUCCIONES DE PUNTO DE REFERENCIA
RESOLUCIÓN DE PROBLEMAS
1. Para comenzar la reproducción en un punto distinto al comienzo de
la pista, siga estas instrucciones.
Primero, seleccione la pista que quiere reproducir, después apriete el
BOTON REPRODUCCIÓN/PAUSA (10) para memque el aparato
pase a la modalidad de reproducción. Apriete el BOTÓN DE
REPRODUCCION/PAUSA (10) para pausar en el lugar donde Ud
quiere que empiece la reproducción, el PUNTO DE REPRODUCCIÓN.
Utilice los BOTONES DE BUSQUEDA (13) para escoger el punto
exacto que usted quisiera que el juego comenzara, entonces
apriete el BOTÓN REPRODUCCIÓN/PAUSA (10) otra vez para
memorizar el punto de referencia. Apriete el BOTON DE
REFERENCIA (9) para pausar en el punto de referencia (el aparato
pasa a la modalidad de pausa y el lugar indicado en el visualizador
será el punto de referencia memorizado). Ud puede ver el punto de
referencia en adelante al apretar y al mantener el dedo en el BOTÓN
DE REFERENCIA (9). Apriete el BOTÓN REPRODUCCIÓN/PAUSA
(10) para empezar la reproducción desde el punto de referencia.
2. Una vez el punto de referencia memorizado, se puede sintonizarlo o
cambiarlo:
Para cambiar el punto de referencia, apriete el BOTÓN DE
REPRODUCCIÓN/PAUSA (10) de manera que la unidad reproduzca
desde el punto de referencia, y después apriete el BOTÓN
REPRODUCCIÓN/PAUSA (10) en el lugar donde Ud requiere el
nuevo punto de referencia. Apriete el BOTÓN REPRODUCCION/
PAUSA (10) otra vez para memorizar el punto de referencia. El
aparato pasará a la modalidad de pausa y el lugar indicado en el
visualizador será el nuevo punto de referencia memorizado.
Para sintonizar (afinar) el punto de referencia, haga la pausa en el
punto de referencia memorizada y después utilice los BOTONES DE
BÚSQUEDA (13) para buscar segmento por segmento (1/75to de un
segundo) hasta donde a Ud le gustaría empezar la reproducción.
Apriete el BOTÓN REPRODUCCIÓN/PAUSA (10) para memorizar el
nuevo punto de referencia.
Nota: Durante la sintonía habrá un efecto de tartamudeo (para
ayudarle a encontrar el ritmo). Este efecto se terminará cuando
Ud apriete el BOTÓN REPRODUCCIÓN/PAUSA (10) para
memorizar el punto de referencia. También durante la sintonía
de gran precisión, si Ud mantiene el dedo sobre los BOTONES
DE BÚSQUEDA (13), el aparato buscará rápidamente después de
10 segmentos.
INSTRUCCIONES DE PROGRAMACIÓN
1. Para programar el aparato para que reproduzca selecciones en la
secuencia seleccionada utilizando los NÚMEROS DE PISTA (15) con
el control remoto, siga estas instrucciones:
En la modalidad de parada, apriete el BOTÓN DE PROGRAMA (10)
y después seleccione las pistas que desea reproducir apretando los
NÚMEROS DE PISTA (15) con el control remoto. Apriete el BOTÓN
REPRODUCCIÓN/PAUSA (10) para reproducir sus selecciones
programadas.
2. Para programar el aparato para que reproduzca selecciones en la
secuencia seleccionada utilizando los BOTONES DE BÚSQUEDA
(13), siga estas instrucciones:
En la modalidad de parada, apriete el BOTÓN DE PROGRAMA (10)
y después seleccione la pista que desea reproducir utilizando los
BOTONES DE SELECCION DE PISTA (12). Apriete el BOTON DE
PROGRAMA (6) para memorizar la pista. Repita el proceso hasta
que esté listo para empezar a reproducir sus selecciones. Apriete el
BOTÓN REPRODUCCION/PAUSA (10) para reproducir sus
selecciones programadas.
• Si el disco no reproduce, compruebe si el disco está colocado
correctamente (cara escrita hacia arriba). Compruebe además si el
disco tiene suciedad excesiva, rayaduras, etc.
• Si el disco gira pero no se oye sonido, compruebe las conexiones de
los cables. Si éstas están bien, compruebe el amplificador y el
receptor.
• Si el disco omite sonidos, compruebe si el disco tiene suciedad o
rayaduras. No dé por supuesto que el defecto está en el reproductor.
Muchos discos compactos se graban fuera de especificaciones y
omiten en muchos o todos los reproductores. Antes de enviar la
unidad a ser reparada, pruebe un disco que le funciona
correctamente.
ESPECIFICACIONES
GENERALES:
Tipo..............Reproductor de discos compactos con remoto sin cableTipo
de disco.......................Discos compactos estándares (12 cms y 8 cms)
Visualizador horario......................Tiempo de pista transcurrido, tiempo
remanente de pista, remanente total
Variación de tono.......Llave corrediza de +/-8% con llave de reanudación
Comienzo instantáneo........................Dentro de los 0.03 segundos
Selección de pistas del............................................1 a 99 pistas
Instalación.....................................para estante de 19 pulgadas (48.5 cm)
SECCIÓN AUDIO:
Cuantificación...........................Canal/linear de 1 bitio, laser de 3 destallos
Exceso de muestreo.......................................................8 veces
Frecuencia de muestreo.............................................44.1 KHz
Respuesta en frecuencia..................................de.20 Hz a 20 Khz
Distorsión armónica total..................................................menos de 0.05%
Proporción señal/ruido....................................................................>96 dB
Variación dinámica..........................................................................>94 dB
Nivel de salida....................................1.9 voltios eficaces
Alimentación.........................................................CA 120/230V, 60/50 Hz
Dimensiones........................................90 x 420 x 270 mm
Peso.................................................................................3.5 kg
*Las especificaciones y el diseño están sujetos a cambios sin previo
aviso con fines de perfeccionamiento.
Page 8
Page 9

INTRODUCTION
Nos félicitations à l’occasion de votre achat d’un lecteur CD-12 de
Gemini. Cet appareil très moderne est couvert par une garantie de trois
ans, à l’exclusion des lasers. Garantie d’un an pour les lasers CD. Avant
de l’employer, lisez attentivement toutes les instructions ci-après.
PRÉCAUTIONS
N’utilisez pas ce lecteur de CD là où la température descend en-dessous
de 41° F/5° C ou dépasse 95°F/35°C.
Placez l’appareil dans un endroit propre et sec.
Ne placez pas l’appareil dans un endroit instable.
Quand vous débranchez le cordon d’alimentation d’une prise, saisissez
toujours la fiche électrique. Ne jamais tirer directement sur le cordon
d’alimentation.
Pour empêcher un choc électrique, n’enlevez pas le couvercle ou les vis
inférieures. Il n’y a pas de pièces réparables par l’usager à l’intérieur.
Pour le service d’entretien/de réparation, veuillez vous adresser à un
technicien compétent.
N’utilisez pas de solvants chimiques pour nettoyer l’appareil.
Conservez la tête de lecture au laser en état de propreté en tenant le
tiroir fermé.
Conservez le présent manuel dans un endroit sûr aux fins de référence
future.
CERTIFICATIONS DE SÉCURITÉ
Propriétés de la diode laser:
Matière: GA - Al - As
Longueur d’onde: 755 - 815 nm (25°C)
Sortie de laser: Onde continue, max. 0,5 mW
CHOIX DE LA TENSION DU SECTEUR
Le modèle CD-12 est un appareil à double tension. Il fonctionne en 115
ou 230 volts. Pour régler la tension appropriée, suivez les étapes ciaprès:
1. Placez la tête d’un tournevis au centre du VOLTAGE SELECTOR
SLIDE SWITCH (17) qui se trouve sur le panneau arrière.
2. Glissez l’interrupteur à gauche sur 115 volts ou poussez-le à droite
sur 230 volts.
3. Ne forcez pas ou ne tordez pas le sélecteur de tension. Une force
excessive pourrait endommager l’appareil. Si l’interrupteur ne se
déplace pas facilement, prenez contact avec un technicien
compétent.
CONNEXIONS
1. Enfichez une extrémité d’un jeu de connecteurs RCA dans chacun
des LINE OUTPUT JACKS (18).
2. Enfichez l’autre extrémité des connecteurs RCA dans tout jack
d’entrée du niveau de ligne disponible sur votre mélangeur. Si vous
utilisez le CD-12 par l’intermédiaire d’un récepteur, vous pouvez
enficher les connecteurs RCA dans les jacks d’entrée CD ou AUX sur
votre récepteur. S’il n’y a pas d’entrées CD ou AUX, utilisez n’importe
quelles entrées de niveau de ligne (pas de phono).
DESCRIPTIONS DES FONCTIONS
INTERRUPTEUR GÉNÉRAL: Après s’être assuré que le VOLTAGE
SELECTOR SLIDE SWITCH (17), qui se trouve sur le panneau
arrière, est convenablement réglé, branchez l’appareil et appuyez sur
le POWER SWITCH (1) (Interrupteur général). L’appareil sera sous
tension. Le fait de pousser le POWER SWITCH (1) une deuxième
fois, coupera le courant à l’appareil.
TIROIR DE CHARGEMENT (DISC TRAY): Le CD est gardé dans le
TIROIR DE CHARGEMENT (2) durant le chargement, le
déchargement et la lecture. Le fait d’appuyer sur l’OPEN/CLOSE
BUTTON (14) (bouton d’ouverture et de fermeture du tiroir) ouvrira ou
fermera le tiroir. Le TIROIR DE CHARGEMENT (2) peut accueillir les
CD de 8 cm et 12 cm de diamètre.
BOUTON OUVERT/FERMÉ : Appuyez sur l’ OPEN/CLOSE BUTTON
(14) pour charger ou enlever un CD du DISC TRAY (2) (TIROIR DE
CHARGEMENT).
AFFICHAGE: L’écran DISPLAY (3) indique les numéros de la piste, le
mode de lecture, le mode pause, ainsi que 3 affichages de temps
différents. Ces affichages du temps sont les suivants: temps écoulé
sur la piste, temps restant sur disque, temps restant sur la piste.
LECTURE/PAUSE : Chaque fois que l’on appuie sur le PLAY/
PAUSE BUTTON (10) (bouton lecture/pause) il fait en sorte que le
fonctionnement passe de lecture à pause ou revient de pause à
lecture. Voir la section CUE INSTRUCTIONS (consignes d’insertion)
pour de plus amples renseignements.
SAUT DE PISTE
saut de piste) vous permettent de choisir la piste que vous désirez
écouter.
BOUTONS DE RECHERCHE
(boutons de recherche): Les SCAN BUTTONS (13) s’utilisent pour
aller en avant ou en arrière dans le mode de lecture. Les SCAN
BUTTONS (13) s’utilisent également pour positionner le disque avec
précision à l’endroit où vous désirez commencer la lecture. Cette
position sur la piste est mémorisée comme étant le point d’insertion.
Reportez-vous à la section CUE INSTRUCTIONS (consignes
d’insertion) pour de plus amples renseignements.
STOP/CLEAR : Le STOP/CLEAR BUTTON (11) (le bouton d’arrêt/
d’effacement) fera cesser la lecture du CD. Utilisez également le
STOP/CLEAR BUTTON (11) pour effacer les sélections durant la
programmation. Reportez-vous à la section INSTRUCTIONS DE
PROGRAMMATION pour de plus amples informations.
HEURE: Le TIME BUTTON (4) (bouton de réglage de temps) assure la
commutation de l’affichage du temps entre trois choix disponibles qui
figurent sous DISPLAY (Affichage).
CUE: L’appareil se trouvant en mode lecture, et après avoir mémorisé
votre point d’insertion, le fait d’appuyer sur le CUE BUTTON (9)
(bouton d’insertion) fait passer le CD-12 en mode pause au point
d’insertion mémorisé. Si vous gardez le doigt sur la touche CUE, la
fonction CUE deviendra la fonction PREVIEW (ce qui vous permet
d’écouter la musique à partir du point de repère). La libération de la
touche CUE vous renvoie au point CUE préréglé. Si un point de
repère n’est pas mémorisé, le fait d’appuyer sur le CUE BUTTON (9)
renverra l’appareil au début de la piste.
PITCH (réglage du son): Le fait d’appuyer sur le PITCH BUTTON (5)
active la section du son de l’appareil. Le son du CD changera en
fonction de la position du PITCH CONTROL (9).
REPEAT (Répétition): Appuyez sur ce bouton pour répéter une OU
toutes les pistes.
RANDOM (au hasard): Appuyez sur ce bouton pour faire la lecture des
pistes dans une séquence au hasard.
: Les TRACK SKIP BUTTONS (12) (boutons de
: Les SCAN BUTTONS (13)
CONSIGNES D’EXPLOITATION
1. Assurez-vous que le VOLTAGE SELECTOR SLIDE SWITCH (17)
(sélecteur de tension à glissière) qui se trouve sur le panneau arrière,
est mis sur la tension appropriée. Branchez l’appareil et appuyez sur
le POWER SWITCH (1) (interrupteur général). L’appareil se mettra
sous tension. Le fait d’appuyer sur le POWER SWITCH (1) une
deuxième fois mettra l’appareil hors tension.
2. Appuyez sur le OPEN/CLOSE BUTTON (14) (bouton ouvert/fermé),
placez un CD sur le DISC TRAY (2) et appuyez sur de nouveau l’
OPEN/CLOSE BUTTON (14). Le tiroir rentrera dans l’appareil.
L’affichage montrera initialement le nombre de pistes et la durée
totale du CD.
3. Appuyez sur les TRACK SKIP BUTTONS (12) (boutons de saut de
piste) pour choisir la piste que vous désivoulez entendre.
Page 9
Page 10

4. Appuyez sur le PLAY/PAUSE BUTTON (10) (bouton lecture/pause)
et l’appareil jouera instantanément.
CONSIGNES D’INSERTION
1. Pour commencer à lire un disque en un endroit autre que le début
d’une piste, respectez les consignes suivantes:
Choisissez d’abord la piste que vous voulez entendre; puis, appuyez
sur le PLAY/PAUSE BUTTON (10) (BOUTON DE LECTURE/PAUSE)
pour que l’appareil passe en mode lecture. Appuyez sur le PLAY/
PAUSE BUTTON (10) pour interrompre la lecture à l’endroit ou vous
voulez faire commencer la lecture, le CUE POINT (POINT DE
REPÈRE). Utilisez les SCAN BUTTONS (13) (boutons de recherche)
pour sélectionner la tache précise que vous voulez que le jeu
commence, puis appuyez de nouveau sur le PLAY/PAUSE BUTTON
(10) pour mémoriser cet endroit. Appuyez sur le CUE BUTTON (9)
pour interrompre la lecteur au point de repère (l’appareil passera en
mode pause et l’endroit indiqué sur l’affichage sera le point de repère
mémorisé). Vous pouvez passer en revue ce point de repère en
appuyant et en gardant le doigt sur le CUE BUTTON (9). Appuyez
sur le PLAY/PAUSE BUTTON (10) pour commencer la lecture à partir
du point de repère.
2. Une fois le point de repère mémorisé, vous pouvez faire un réglage
précis du point d’insertion mémorisé ou le changer:
Pour changer un point de repère, appuyez sur le bouton PLAY/
PAUSE BUTTON (10) de façon à ce que l’appareil passe en mode
lecture à partir du point de repère; puis, appuyez sur le bouton PLAY/
PAUSE BUTTON (10) à l’endroit de votre nouveau point de repère.
Appuyez de nouveau sur le bouton PLAY/PAUSE BUTTON (10) pour
mémoriser cet endroit. L’appareil passera en mode pause et l’endroit
indiqué sur l’affichage deviendra le nouveau point d’insertion
mémorisé.
Pour le réglage précis d’un point de repère, mettez la lecture en
pause au point de repère mémorisé; puis, utilisez les SCAN
BUTTONS (13) pour avancer segment par segment (1/75ème d’une
seconde) jusqu’à l’endroit où vous voulez commercer la lecture.
Appuyez sur le bouton PLAY/PAUSE BUTTON (10) pour mémoriser
ce nouveau point de repère.
Remarque: Durant le réglage précis, il y aura un effet de bégaiement
(pour vous aider à trouver la mesure). Cet effet s’arrêtera lorsque
vous appuyez sur le bouton PLAY/PAUSE BUTTON (10) pour
mémoriser le point de repère. Aussi, durant le réglage précis, si
vous gardez le doigt sur les boutons SCAN BUTTONS (13),
l’appareil fera rapidement la recherche après 10 segments.
INSTRUCTIONS DE PROGRAMMATION
1. Pour programmer l’appareil pour qu’il joue des chansons dans la
séquence choisie à l’aide des TRACK NUMBERS (15) (NUMÉROS
DE PISTE) sur la commande à distance, suivez les instructions ciaprès:
Dans le mode d’arrêt, appuyez sur le bouton PROGRAM BUTTON
(6), puis choisissez les pistes que vous voulez écouter en pressant
les TRACK NUMBERS (15) sur la commande à distance. Appuyez
sur le bouton PLAY/PAUSE BUTTON (10) pour écouter vos choix
programmés.
2. Pour programmer l’appareil pour qu’il joue des chansons dans la
séquence choisie à l’aide des boutons SCAN BUTTONS (13), suivez
les instructions ci-après:
Dans le mode d’arrêt, appuyez sur le bouton PROGRAM BUTTON
(6), puis choisissez la piste que vous voulez écouter à l’aide des
boutons TRACK SKIP BUTTONS (12) (boutons pour sauter de piste
en piste). Appuyez sur le bouton PROGRAM BUTTON (6) pour
mémoriser la piste. Répétez ce processus jusqu’à ce que vous soyez
prêt à écouter vos choix. Appuyez sur le bouton PLAY/PAUSE
BUTTON (10) pour écouter vos choix programmés.
3. Pour effacer des chansons de votre programme, appuyez sur le
bouton STOP/CLEAR BUTTON (11).
DÉPANNAGE
• Si l’appareil n’arrive pas à lire un disque, vérifiez si ce dernier a été
chargé correctement dans le tiroir de lecture (côté écrit vers le haut).
Contrôlez aussi le disque pour s’assurer qu’il n’y a pas de saleté
excessive, d’égratignures, etc..
• Si le disque tourne mais qu’il n’y a pas de son, contrôlez les
connexions du câble. Si celles-ci sont bien faites, contrôlez votre
amplificateur ou votre récepteur.
• Si le CD patine, vérifiez si le CD est exempt de poussières et/ou
d’égratignures. Ne supposez pas que le lecteur de CD est
défectueux. De nombreux disques CD sont enregistrés selon des
normes incompatibles et ils sauteront sur la plupart ou sur tous
lecteurs de CD. Avant d’envoyer l’appareil pour réparation, faites un
essai avec un CD dont vous êtes certain de son fonctionnement
correct.
SPÉCIFICATIONS TECHNIQUES
GÉNÉRALITÉS:
Type..........Lecteur de disque compact avec commande à distance sans fil
Type de disque.......................................Disques compacts standard
(12 cm & 8 cm)
Affichage temps........................Piste écoulée, piste restante ou total restant
Son variable................................Patin avec interrupteur de reprise +/- 8 %
Démarrage instantané............................................En 0,03 secondes
Choix de piste....................................................................de 1 à 99 pistes.
Installation........................................Module à baie(s) de 19 pouces
SECTION AUDIO:
Quantification..............................Canal/linéaire 1 bit, laser à 3 rayons
Taux de suréchantillonnage.............................................8 fois
Fréquence d’échantillonnage..........................................44,1 KHz
Réponse en fréquences.....................................20 Hz à 20 Khz
Distorsion harmonique...................................................Moins de 0,05 %
Rapport signal/bruit...........................................................>96 dB
Dynamique de mesure.......................................................>94 dB
Séparation des canaux....................................90 db (l KHz)
Niveau de sortie (nominal).............................1,9 volts efficace
Alimentation électrique...............................c.a. 120/230V, 60/50 Hz
Dimensions............................................................90 x 420 x 270 mm
Poids...........................................................................3.5 kg
*Les caractéristiques et la conception sont sujettes à des changements
sans préavis.
Page 10
Page 11

INTRODUZIONE
Complimenti per l’acquisto di questo Lettore Compact Disc Gemini CD-12.
Questo lettore compact disc d’avanguardia offre una garanzia di tre
anni, escluso i laser. Garanzia di un anno per CD laser. Prima dell’uso
leggere attentamente queste istruzioni per poter utilizzare il lettore in
modo corretto.
PRECAUZIONI
Non usare il lettore di CD nei poste dove la temperatura è inferiore a
41°F/5°C o superiore a 95°F/35°C.
Collocare l’apparecchio in un posto pulito e asciutto.
Poggiare l’apparecchio su superfici in piano.
Per staccare il cavo di alimentazione CA dalla presa, afferrare bene la
spina. Non tirare mai dal cavo di alimentazione.
Per evitare scosse elettriche, non rimuovere il coperchio o le viti inferiori.
Internamente non ci sono componenti sostituibili dall’utente. Per le
riparazioni rivolgersi solo a personale qualificato.
Non usare solventi chimici per pulire il lettore di CD.
Tenere il pick-up laser pulito ed il cassetto chiuso.
Tenere questo manuale in un posto sicuro per futuri riferimenti.
CERTIFICAZIONI DI SICUREZZA
Con proprietà di diodi laser
Materiale: GA-Al-As
Lunghezza d’onda: 755-815 nm (25°C)
Potenza laser: onda continua (massima 0,5 mW)
SELEZIONE DEL VOLTAGGIO
Il modello CD-12 è un apparecchio con doppio voltaggio. Funziona a 115
o 230 volts. Per impostare il voltaggio corretto seguire i seguenti punti:
1. Mettere la punta di un cacciavite al centro del VOLTAGE SELECTOR
SLIDE SWITCH (17) che si trova sul pannello posteriore.
2. Far scorrere l’interruttore a sinistra per impostarlo su 115 volts o sulla
destra per impostarlo su 230 volts.
3. Non forzare o ruotare l’interruttore. Una pressione eccessiva potrà
danneggiare l’apparecchio. Se l’interruttore si sposta con difficoltà,
rivolgersi a personale qualificato.
COLLEGAMENTI
1. Inserite un’estremità dei cavi RCA in ogni dei LINE OUTPUT JACKS
(18).
2. Inserite l’altra estremità dei cavi RCA in qualsiasi jack di entrata di
livello linea che é a disposizione sul vostro mixer. Se state ascoltando
il CD-12 tramite un ricevitore, potete inserite i cavi RCA dentro i jack
di entrata CD o AUX che si trovano sul vostro ricevitore. Se i jack di
entrata CD o AUX non ci sono, usate i jack di entrata di livello linea
(non quelli fono).
DISPLAY: Il DISPLAY (3) mostra il numero della pista, la posizione
lettura, la posizione pausa e 3 diversi indicatori di tempi. Questi sono
il tempo trascorso sulla pista, il tempo che rimane sul dischetto e il
tempo che rimane sulla pista.
PLAY/PAUSE : Ogni volta che si preme il PLAY/PAUSE BUTTON
(10) il programma cambia da “lettura” a “pausa” o da “pausa” di
nuovo a “lettura”. Vedete la parte CUE INSTRUCTIONS per ulteriori
informazioni.
TRACK SKIP
scegliere che pista ascoltare.
SCAN BUTTONS : I SCAN BUTTONS (13) servono per
spostare in avanti o indietro nel modo lettura. Anche servono per
mettere il dischetto nella posizione giusta per cominciare a suonare
al punto desiderato. Questa posizione sulla pista sarà memorizzata
come punto di partenza. Vedete la parte CUE INSTRUCTIONS per
ulteriori informazioni.
STOP/CLEAR
CD. Il STOP/CLEAR BUTTON (11) serve anche per eliminare
selezzioni durante la programmazione. Vedete la parte ISTRUZIONI
PER LA PROGRAMMAZIONE per ulteriori informazioni.
TIME: Il TIME BUTTON (4) cambia la visualizzazione del tempo da uno
dei tre tempi disponibili all’altro dei tre elencate sotto DISPLAY.
CUE: Mentre il lettore CD sta nel modo lettura e dopo che avete
memorizzato il punto di partenza, premete il CUE BUTTON (9) per
mettere il lettore CD in posizione “pausa” nel punto di partenza
memorizzato. Tenere premuto il pulsante CUE cambia la funzione
CUE a PREVIEW (previsione) (consentendoti di ascoltare la musica
a qualsiasi tempo dal punto di partenza). Rilasciare il tasto per
tornare al punto CUE prestabilito. Se il punto di partenza non é stato
memorizzato, premendo il CUE BUTTON (9) ritornerà il lettore CD
all’inizio della pista.
PITCH: Premendo il PITCH BUTTON (5) la parte riguardante il tono del
lettore CD sarà attivata. Il tono del CD cambierà in accordo con la
posizione del PITCH CONTROL (9).
REPEAT: Premete il tasto REPEAT per ripetere una pista o tutte.
RANDOM: Premete il tasto di lettura a caso per la lettura di piste in
sequenza a caso.
: I TRACK SKIP BUTTONS (12) vi permettono di
: Il STOP/CLEAR BUTTON (11) fermerà la lettura del
ISTRUZIONI PER L’USO
1. Assicuratevi che il VOLTAGE SELECTOR SLIDE SWITCH (17) che
si trova sul pannello posteriore é fissato per il voltaggio appropriato.
Inserite la spina del lettore CD e premete il POWER SWITCH (1). Il
lettore CD si accenderá. Se premete una seconda volta il lettore CD
si spegnerà.
2. Premete l’OPEN/CLOSE BUTTON (14), mettete un CD nel DISC
TRAY (2) e premete l’OPEN/CLOSE BUTTON (14) di nuovo. Il
raccoglitore si chiuderà dentro il lettore CD. Il display (visualizzatore)
mostrerà all’inizio il numero di piste e il tempo totale del
3. Premete i TRACK SKIP BUTTONS (12) per scegliere la pista che
volete ascoltare.
4. Premete il PLAY/PAUSE BUTTON (10) e il lettore CD comincerà
subito a suonare.
DESCRIZIONI DELLE FUNZIONI
POWER SWITCH: Dopo che siete sicuri che il VOLTAGE SELECTOR
SLIDE SWITCH (17), che si trova sul pannello posteriore, é fissato
bene, inserite la spina del lettore CD e premete il POWER SWITCH
(1). Il lettore CD si accenderá. Se premete una seconda volta il
POWER SWITCH (1), il lettore CD si spegnerà.
DISC TRAY: Il DISC TRAY (2) raccoglie il CD durante il caricameto, lo
scarico e la lettura. Premendo il tasto OPEN/CLOSE BUTTON (14)
del DISC TRAY, il raccoglitore si aprirà o si chiuderà. Il DISC TRAY
(2) raccoglie sia CD di 12 cm che di 8 cm.
OPEN/CLOSE BUTTON : Premete l’OPEN/CLOSE BUTTON (14) per
raccogliere o rimuovere un CD dal DISC TRAY (2).
ISTRUZIONI PER FISSARE I PUNTI DI
PARTENZA
1. Per cominciare ad ascoltare il CD da un altro punto rispetto a quello
d’inizio della pista, applicate le seguenti istruzioni.
Scegliete la pista che volete ascoltare e poi premete il PLAY/PAUSE
BUTTON (10) cosí il lettore CD comincierà a funzionare. Premete il
PLAY/PAUSE BUTTON (10) per mettere il lettore CD in pausa nel
posto dove volete cominciare l’inizio della lettura, il CUE POINTPUNTO DI PARTENZA. Utilizzi i tasti di esplorazione SCAN BUTTONS (13) per selezionare il punto che preciso desiderate il gioco
cominciare, allora premete il PLAY/PAUSE BUTTON (10) una
seconda volta per memorizzare questo punto. Premete il CUE
BUTTON (9) per mettere il lettore CD in pausa in questo punto di
partenza (il lettore andrà in pausa ed il posto indicato nel display
sarà il punto di partenza memorizzato). Si può vedere in anteprima il
Page 11
Page 12

punto di partenza premendo e tenendo il dito nel CUE BUTTON (9).
Premete il PAUSE/PLAY BUTTON (10) per cominciare la lettura dal
punto di partenza.
2. Con il punto di partenza memorizzato, potrete fissare meglio o
cambiare il punto di partenza:
Per cambiare un punto di partenza, premete il PLAY/PAUSE
BUTTON (10) finchè il lettore CD comincia a funzionare dal punto di
partenza, poi premete il PLAY/PAUSE BUTTON (10) nel punto scelto
come il nuovo punto di partenza. Premete il PLAY/PAUSE BUTTON
(10) una seconda volta per memorizzare questo punto. Il lettore
andrà in pausa ed il punto indicato nel display sarà il nuovo punto di
partenza memorizzato.
Per fissare meglio il punto di partenza, mettete il lettore CD in pausa
nel punto di partenza memorizzato, poi usate i SCAN BUTTONS (13)
per spostare il punto di partenza un cuadro alla volta (1/75esimo di
un secondo) fino al posto desiderato. Premete il PLAY/PAUSE
BUTTON (10) per memorizzare il nuovo punto di partenza.
Nota: Durante la regolazione della sintonia, si presenta un effetto di
“balbuzie” (per ritrovare la battuta della musica). Questo effetto
finirà cuando si preme il PLAY/PAUSE BUTTON (10) per
memorizzare il punto di partenza. Anche, durante la regolazione
della sintonia, tenendo il dito negli SCAN BUTTONS (13), il
lettore esplorarà rapidamente dopo 10 cuadri.
ISTRUZIONI PER LA PROGRAMMAZIONE
1. Per programmare il lettore per la lettura dei piste nella sequenza
scelta usando gli TRACK NUMBERS (15) con il comando a distanza,
applicate le seguenti istruzioni:
In modo Stop, premete il PROGRAM BUTTON (6) e poi scegliete i
piste che volete ascoltare premendo i TRACK NUMBERS (15) con il
comando a distanza. Premete il PLAY/PAUSE BUTTON (10) per
ascoltare i piste programmati.
2. Per programmare il lettore CD nella sequenza selezzionata usando i
SCAN BUTTONS (13), applicate le seguenti istruzioni:
In modo Stop, premete il PROGRAM BUTTON (6) e poi scegliete i
piste che volete ascoltare premendo i TRACK SKIP BUTTONS (12).
Premete il PROGRAM BUTTON (6) per memorizzare la pista.
Ripetete il processo finchè siete pronti a ascoltare vostri selezioni.
Premete il PLAY/PAUSE BUTTON (10) per ascoltare vostri selezioni
programmati.
3. Per eliminare piste del vostro programma, premete il STOP/CLEAR
BUTTON (11).
LOCALIZZAZIONE ED ELIMINAZIONE DI UN
GUASTO
• Se il dischetto non suona, controllate se il CD dischetto é stato
caricato correttamente (con la parte scritta superiormente). Anche
controllate se il dischetto ha polvere eccessiva, graffi, ecc.
• Se il dischetto gira ma non suona, controllate i collegamenti. Se sono
buoni, controllate il vostro amplificatore o ricevitore.
• Se il CD salta, controllate se il CD ha polvere o graffi. Non assumete
che il lettore CD é difettato. Molti CD non sono perfettamente
registrati e saltano sulla maggior parte o tutti i lettori CD. Prima di
portare il lettore CD per manutenzione, provate a suonare un CD che
siete sicuri che si legga bene.
CARATTERISTICHE
CARATTERISTICHE GENERALI:
Tipo..........................Lettore compact disc con comando a distanza
Tipo di dischetti..................Compact disc standard (di 12 cm e di 8 cm)
Indicatore dei tempi..........................Tempo trascorso, tempo che rimane
sulla pista e tempo che rimane sul dischetto
Toni variabili.......................+/- 8% guida scorrevole e tasto per la ripresa
Inizio instantaneo........................................................entro 0.03 secondi
Selezione della pista.........................................dalla pista 1 alla 99esima
Installazione......................lettore adatto per uno scaffale di 19 pollici
CARATTERISTICHE DEL CENTRO AUDIO:
Quantizzazione......................................1 bit lineare/canale, 3 raggi laser
Ripetizione della campionatura.................................................8 volte
Frequenza di campionatura.............................................44.1 kHz
Risposta di frequenza..................................................da 20 Hz a 20 kHz
Distorsione armonica totale.........................................meno dello 0.05%
Rapporto segnale/rumore................................................>96 dB
Gamma dinamica............................................................................>94 dB
Livello di uscita (nominale)..................................................1.9 volts R.M.S.
Alimentazione.....................................................AC 120/230 V, 60/50 Hz
Dimensioni...........................................................90 x 420 x 270 mm
Peso.......................................................................................3.5 kg
* Le caratteristiche e il disegno sono soggetti a cambiare senza avviso
per motivi di miglioramento.
Parts of the design of this product may be protected by worldwide patents. Information in this manual is subject to change without notice and does not represent
a commitment on the part of the vendor. Gemini Sound Products Corp. shall not be liable for any loss or damage whatsoever arising from the use of information
or any error contained in this manual.
No part of this manual may be reproduced, stored in a retrieval system or transmitted, in any form or by any means, electronic, electrical, mechanical, optical,
chemical, including photocopying and recording, for any purpose without the express written permission of Gemini Sound Products Corp..
It is recommended that all maintenance and service on the product should be carried out by Gemini Sound Products Corp. or it’s authorized agents. Gemini Sound
Products Corp. cannot accept any liability whatsoever for any loss or damage caused by service, maintenance or repair by unauthorized personnel.
© Gemini Sound Products Corp. 1999 All Rights Reserved
Page 12
Page 13

In the USA: If you experience problems with this unit,
call 1-732-738-9003 for Gemini Customer Service.
Do not attempt to return this equipment to your dealer.
Parts of the design of this product may be protected by worldwide patents.
Information in this manual is subject to change without notice and does
not represent a commitment on the part of the vendor. Gemini Sound
Products Corp. shall not be liable for any loss or damage whatsoever
arising from the use of information or any error contained in this manual.
No part of this manual may be reproduced, stored in a retrieval system or
transmitted, in any form or by any means, electronic, electrical, mechanical,
optical, chemical, including photocopying and recording, for any purpose
without the express written permission of Gemini Sound Products Corp.
It is recommended that all maintenance and service on this product is
performed by Gemini Sound Products Corp. or its authorized agents.
Gemini Sound Products Corp. will not accept liability for loss or damage
caused by maintenance or repair performed by unauthorized personnel.
Worldwide Headquarters • 120 Clover Place, Edison, NJ 08837 • USA
Tel: (732) 738-9003 • Fax: (732) 738-9006
France • G.S.L. France • 11, Avenue Leon Harmel, Z.I. Antony, 92160 Antony, France
Germany • Gemini Sound Products GmbH • Ottostrasse 6, 85757 Karlsfeld, Germany
UK • Gemini Sound Products • Unit C4 Hazleton Industrial Estate, Waterlooville, UK P08 9JU
Spain • Gemini Sound Products S.A. • Rosello, 516, Barcelona, Spain, 08026
© Gemini Sound Products Corp. 2002 All Rights Reserved
Tel: + 33 (0) 1 55 59 04 70 • Fax: + 33 (0) 1 55 59 04 80
Tel: 08131 - 39171-0 • Fax: 08131 - 39171-9
Tel: 087 087 00880 • Fax: 087 087 00990
Tel: 349-3435-0814 • Fax: 3493-347-6961
 Loading...