

Page 1
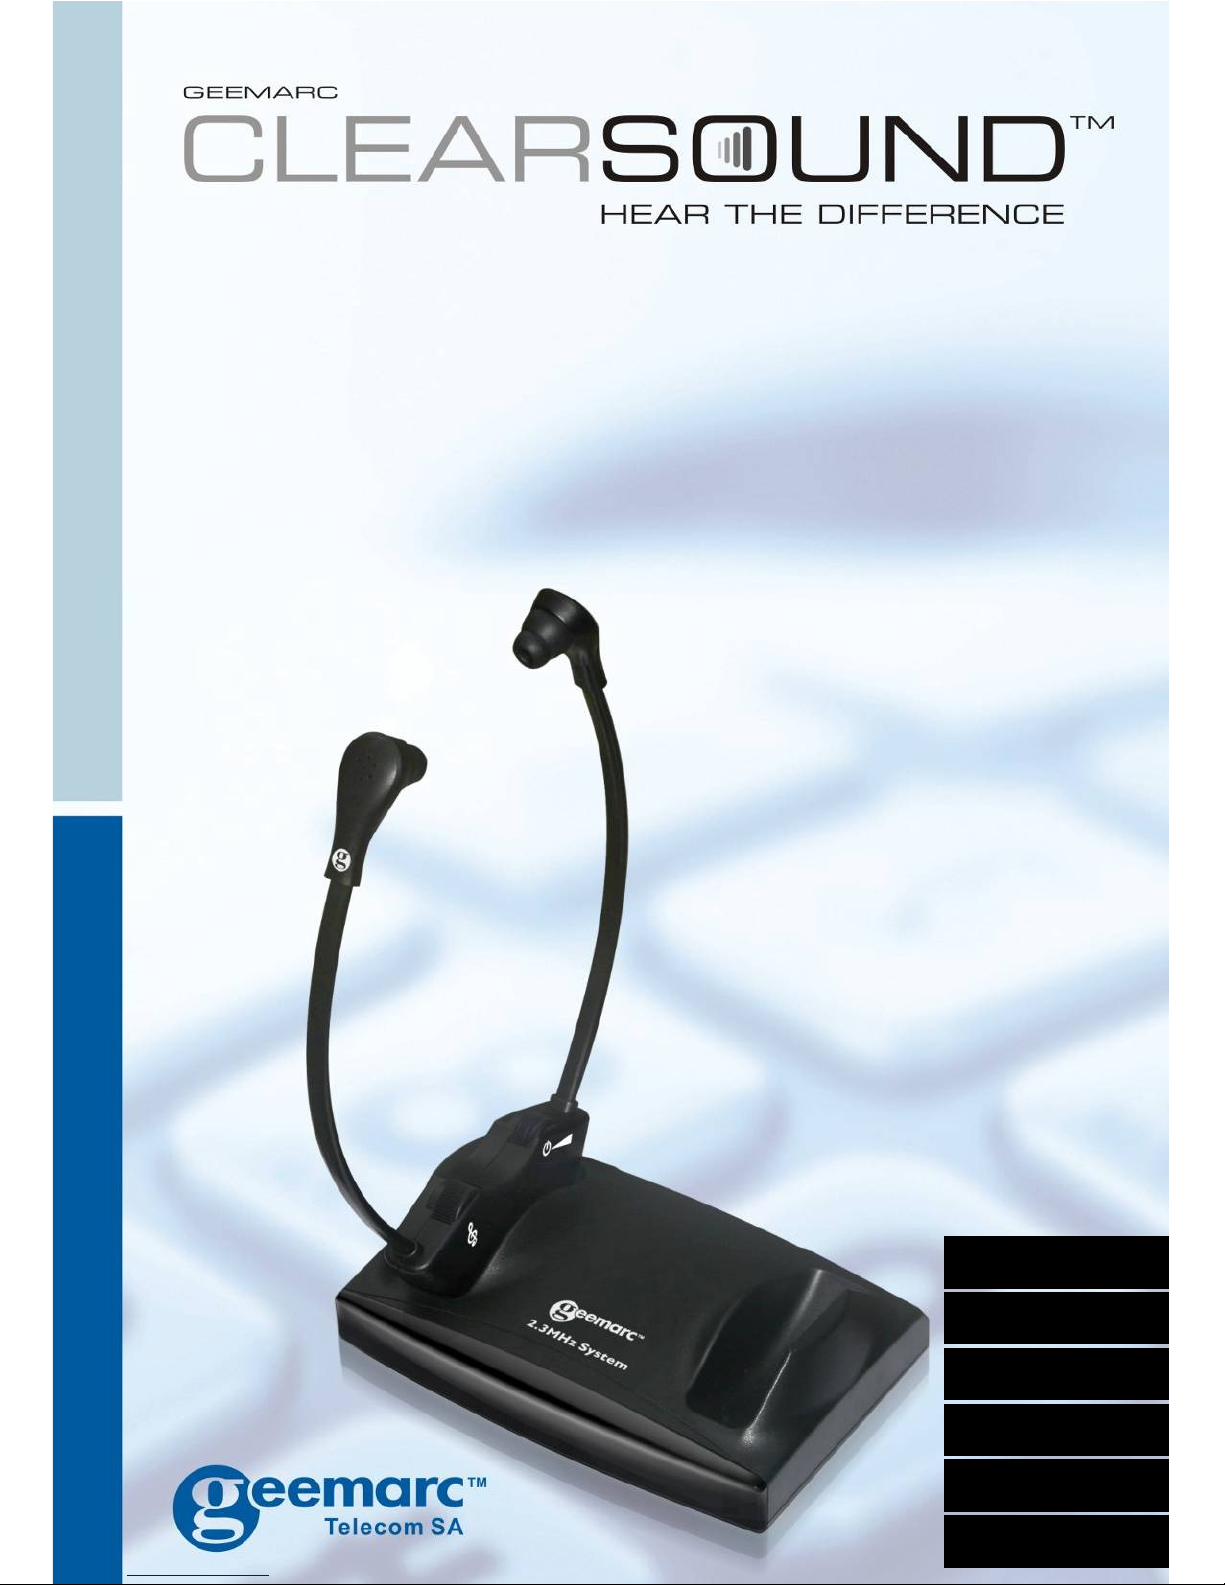
CL
7
1
00
TV Infra Red Listening System
Casque TV Infrarouge
Infrarot-Fernsehkopfhörer
TV Infrarood Luister Systeem
Sistema vía infrarroja para escuchar la televisión
Sistema di ascolto TV a raggi infrarossi
English P1
Français P14
Deutsch P27
Nederlands P41
Italiano P67
Español P54
Page 2
1
INTRODUCTION
The CL7100 is a Personal Sound Amplifier which can be
used by people with impaired hearing or by people with
normal hearing.
It can be used to listen to TV or other audio equipment
without disturbing others.
It uses a 2.3MHz Infra-red(IR) system.
WARNING: This product can produce high sound
pressure levels in order to assist people with impaired
hearing. Excessive sound pressure levels can cause
hearing damage so it is recommended to initially set the
volume to a low level and gradually increase it to a
comfortable level.
INTRODUCTION
Page 3
2
PRODUCT CONTENTS
PRODUCT CONTENTS
Page 4
3
(1) Transmitter / Charger
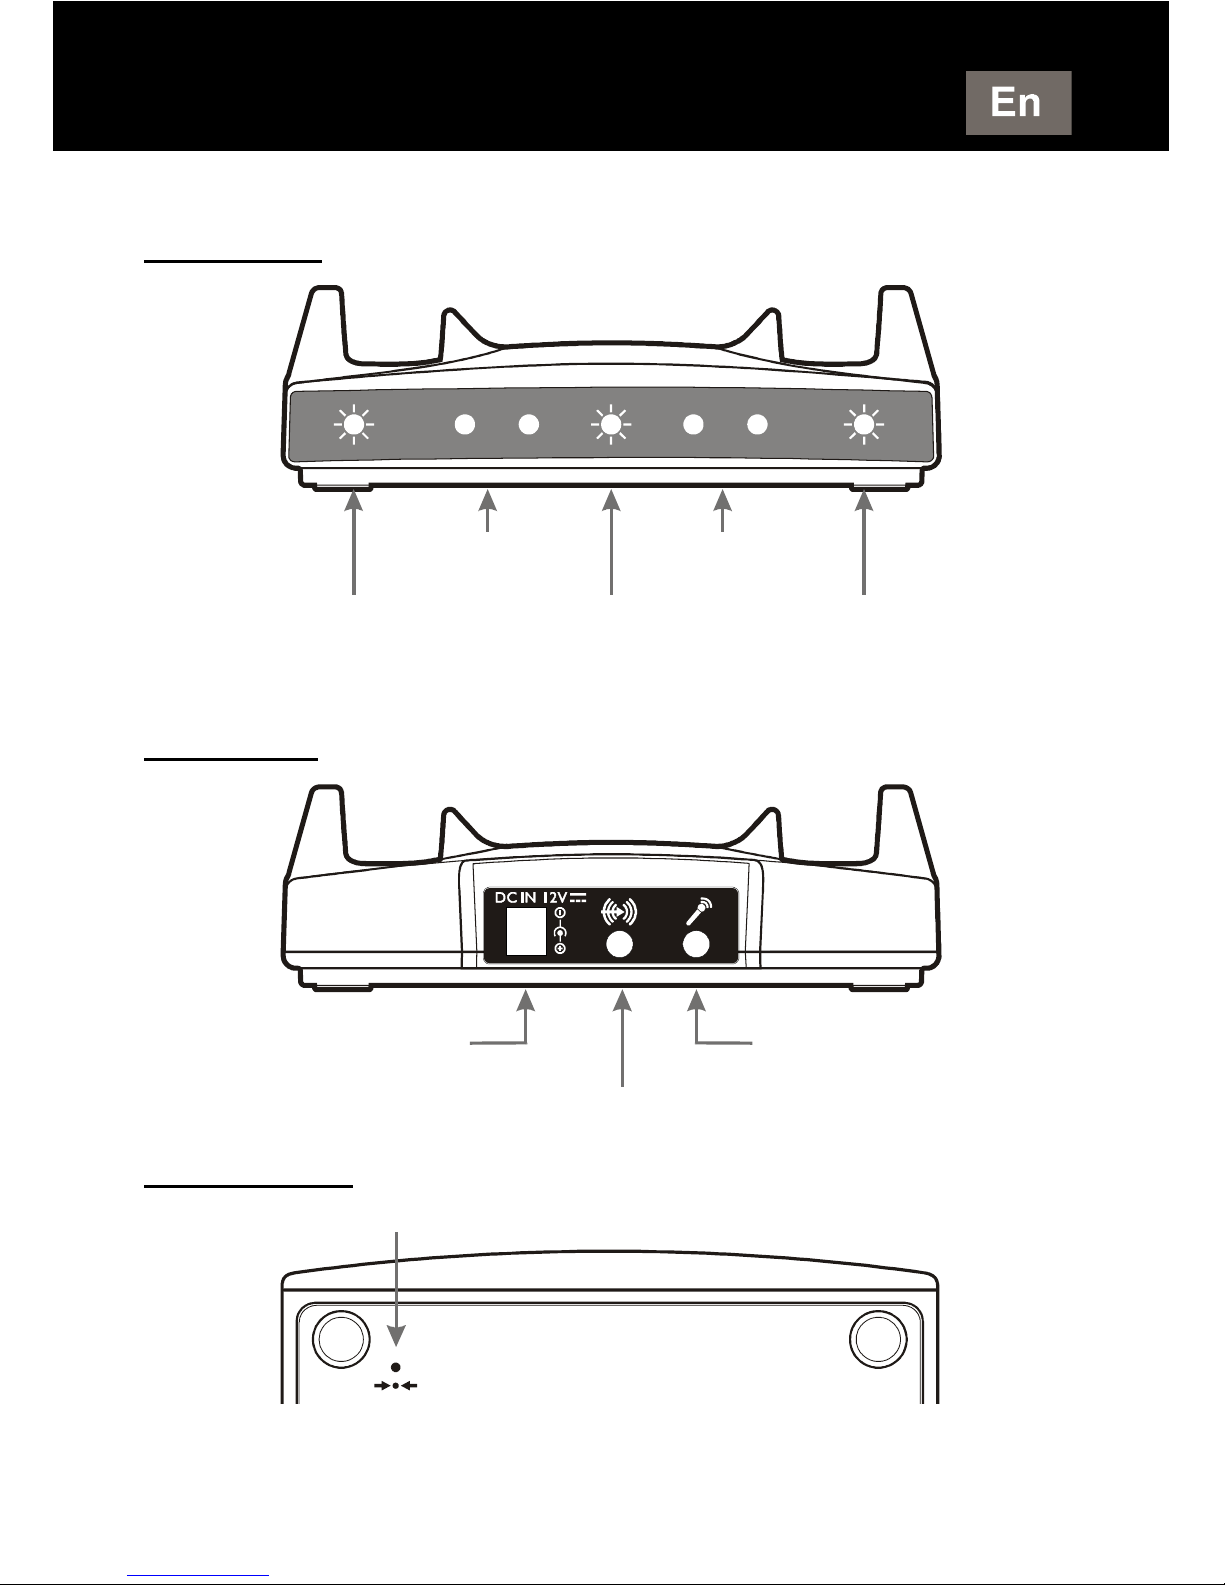
Front View
Back View
Bottom View
NOTE: The transmitter/charger can charge one or two headsets.
PRODUCT CONTENTS
Left Cradle Charging
indicator (RED)
Power and
Emission indicator
Right Cradle Charging
indicator (RED)
IR EMITTER IR EMITTER
DC 12V Power
Jack
Microphone Input
Jack
Audio Input Jack
Reset
Page 5
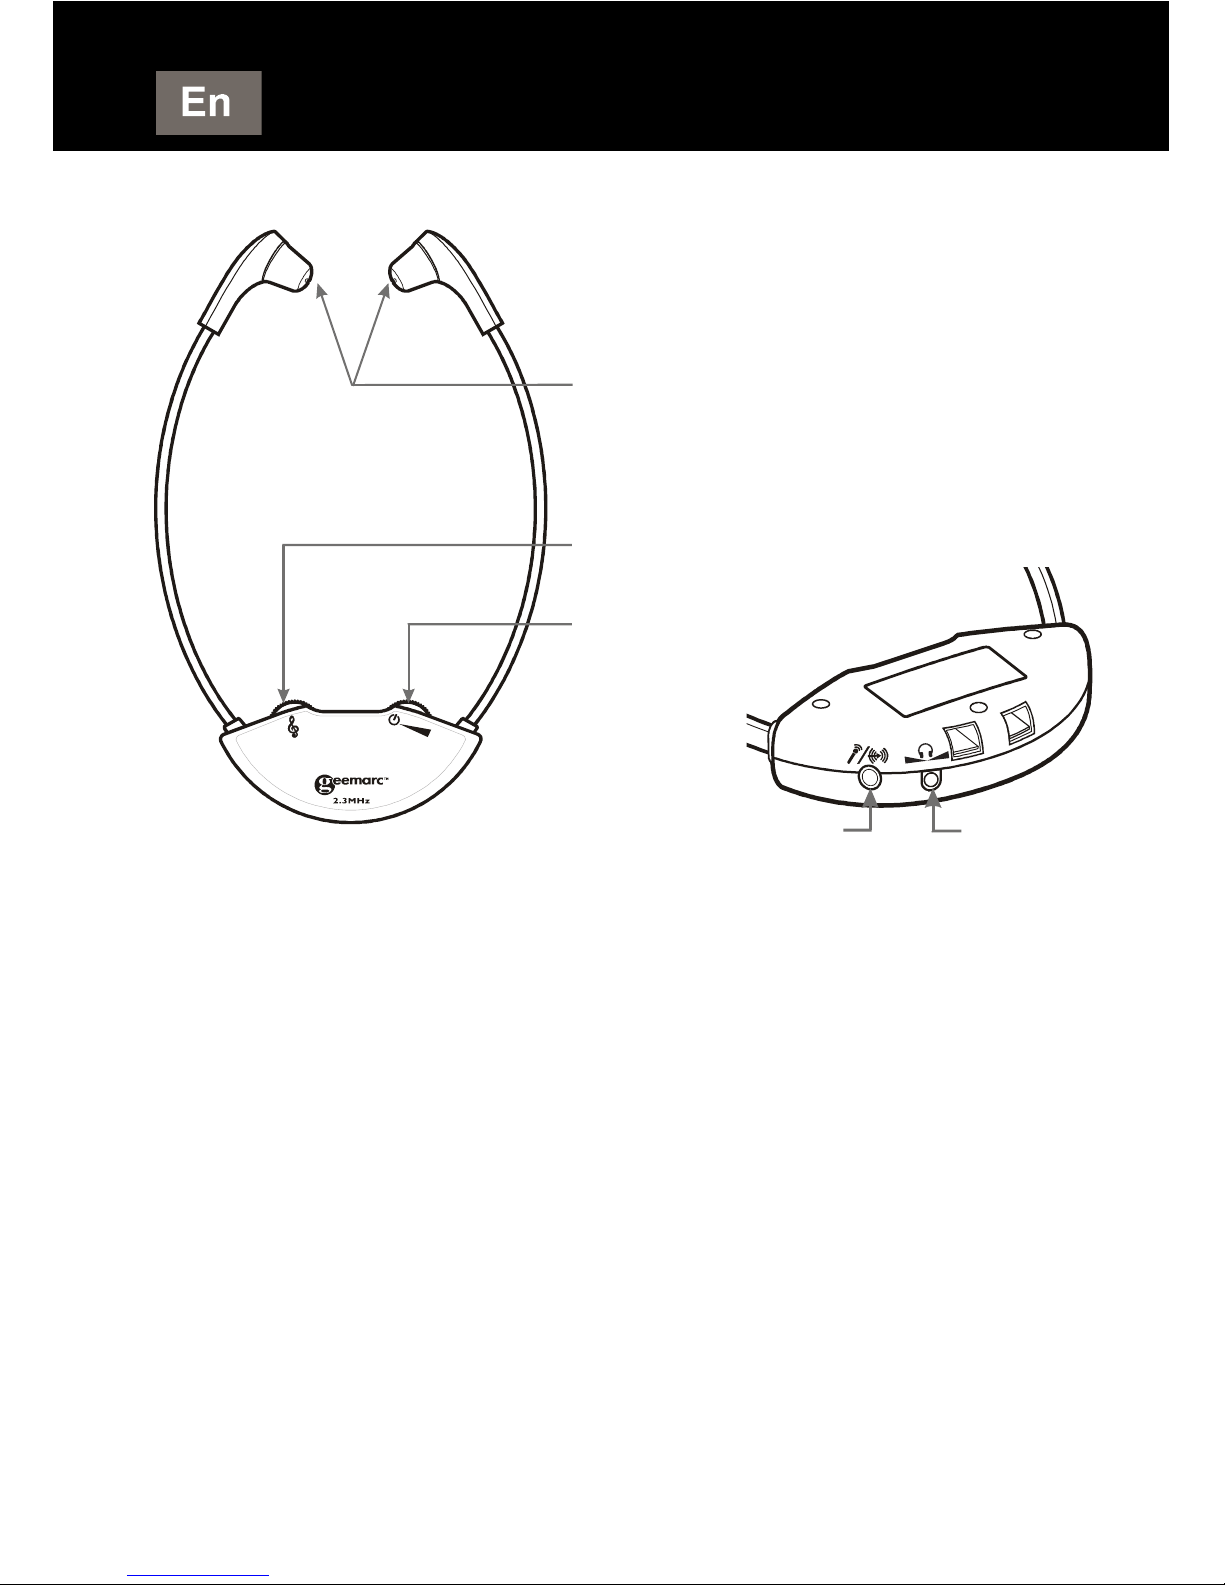
4
(2) Headset
NOTE: Depending on the model purchased there may be either
one or two headsets in the box.
(3) Power Supply (AC – DC Adapter, 100 - 240V)
(4) RCA(red/white) to 3.5mm audio cable
(5) Spare ear tips. There are 3 styles of ear tip.
PRODUCT CONTENTS
Microphone/
Line-
IN input
Balance
Adjust
Replaceable
Silicone Ear Tips
TONE Control
Replaceable
Silicone Ear Tips
Page 6
5
(6) Lithium Polymer Rechargeable battery(Sealed
inside the headset) 3.7V/200mAH
NOTE:
1. This type of battery should last for many years and normally
should not need replacing.
2. We recommend that the battery be charged for about 2 hours
before the system is used for the first time.
3. Place the headset in the charging cradle. Verify that the LED
charging indicator(RED) is lit. The LED turns off when the
battery is fully charged.
4. It is not possible to overcharge the battery. We recommend that
the headset be placed in the charging cradle when not in use.
BATTERY WARNINGS
Do not attempt to change or remove the battery
Do not dispose in fire
Keep away from children
Do not short circuit the charging terminals in the
bottom of the headset.
Note: This series of CL7100 products comes in 2 models
variations and spare headsets as below and this Instruction
Manual covers all of them.
1) CL7100 Wireless Single Headset System
2) CL7100 Wireless Double Headset System
3) Extra Wireless Headset
PRODUCT CONTENTS
Right cradle
charging
indicator
Left cradle
charging
indicator
Page 7
6
INSTALLATION
INSTALLATION
Page 8

7
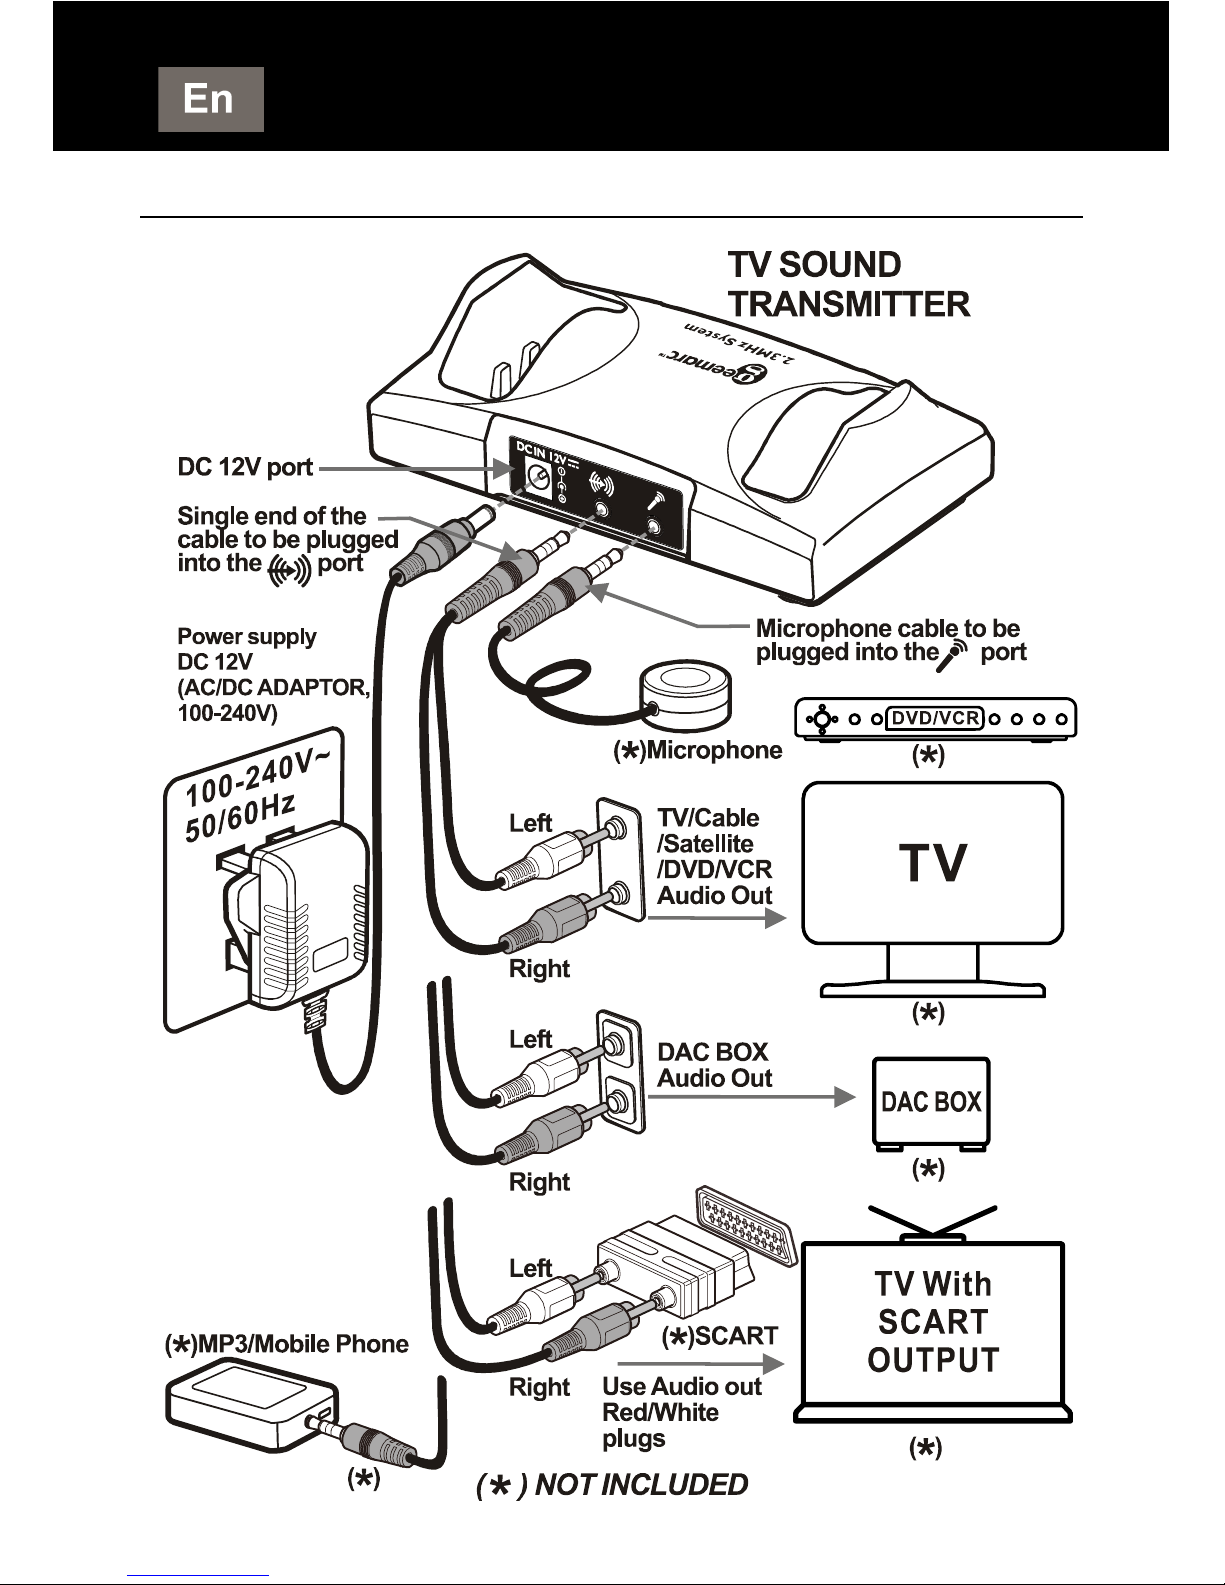
(1) Connect the power supply as shown in the diagram
(2) The transmitter/charger must be connected to the audio
OUTPUT sockets of the TV, audio equipment, cable or
satellite box, DVD or VCR player, etc. When an RCA type
cable is used the outputs jacks are red and white. Refer to
the diagram
A Scart adapter(not included) may also be used. Use only
the red and white terminals
NOTE: If the system is connected to a cable or satellite box
and to a DVD or VCR player it is necessary to turn off the
device which is not in use at the time. When using the DVD
or VCR player turn off the cable or satellite box. When
watching TV turn off the DVD and VCR player.
(3) Connecting to a digital converter box(DAC)
Connect the digital audio output from the TV or audio device
to the DAC using an appropriate cable (optical or coaxial
cable). Then use the supplied RCA type cable to connect
from the red and white output terminals of the DAC to the
audio input socket of the transmitter/charger.
NOTE: If you wish to use the system to listen to TV while
the CL7100 is muted so as not to disturb others the TV audio
output must be set to FIXED. Refer to the user manual of
your TV for instructions as to how to set to FIXED.
POSITIONING
The infra-red(IR) signals need a direct line-of-sight
connection between the transmitter and the headset.
Position the transmitter such that there is a direct line-ofsight connection with the headset when in use. The IR
signals may be blocked by objects such as walls, doors,
furniture, newspapers, books, etc. The IR diodes are lit
during use.
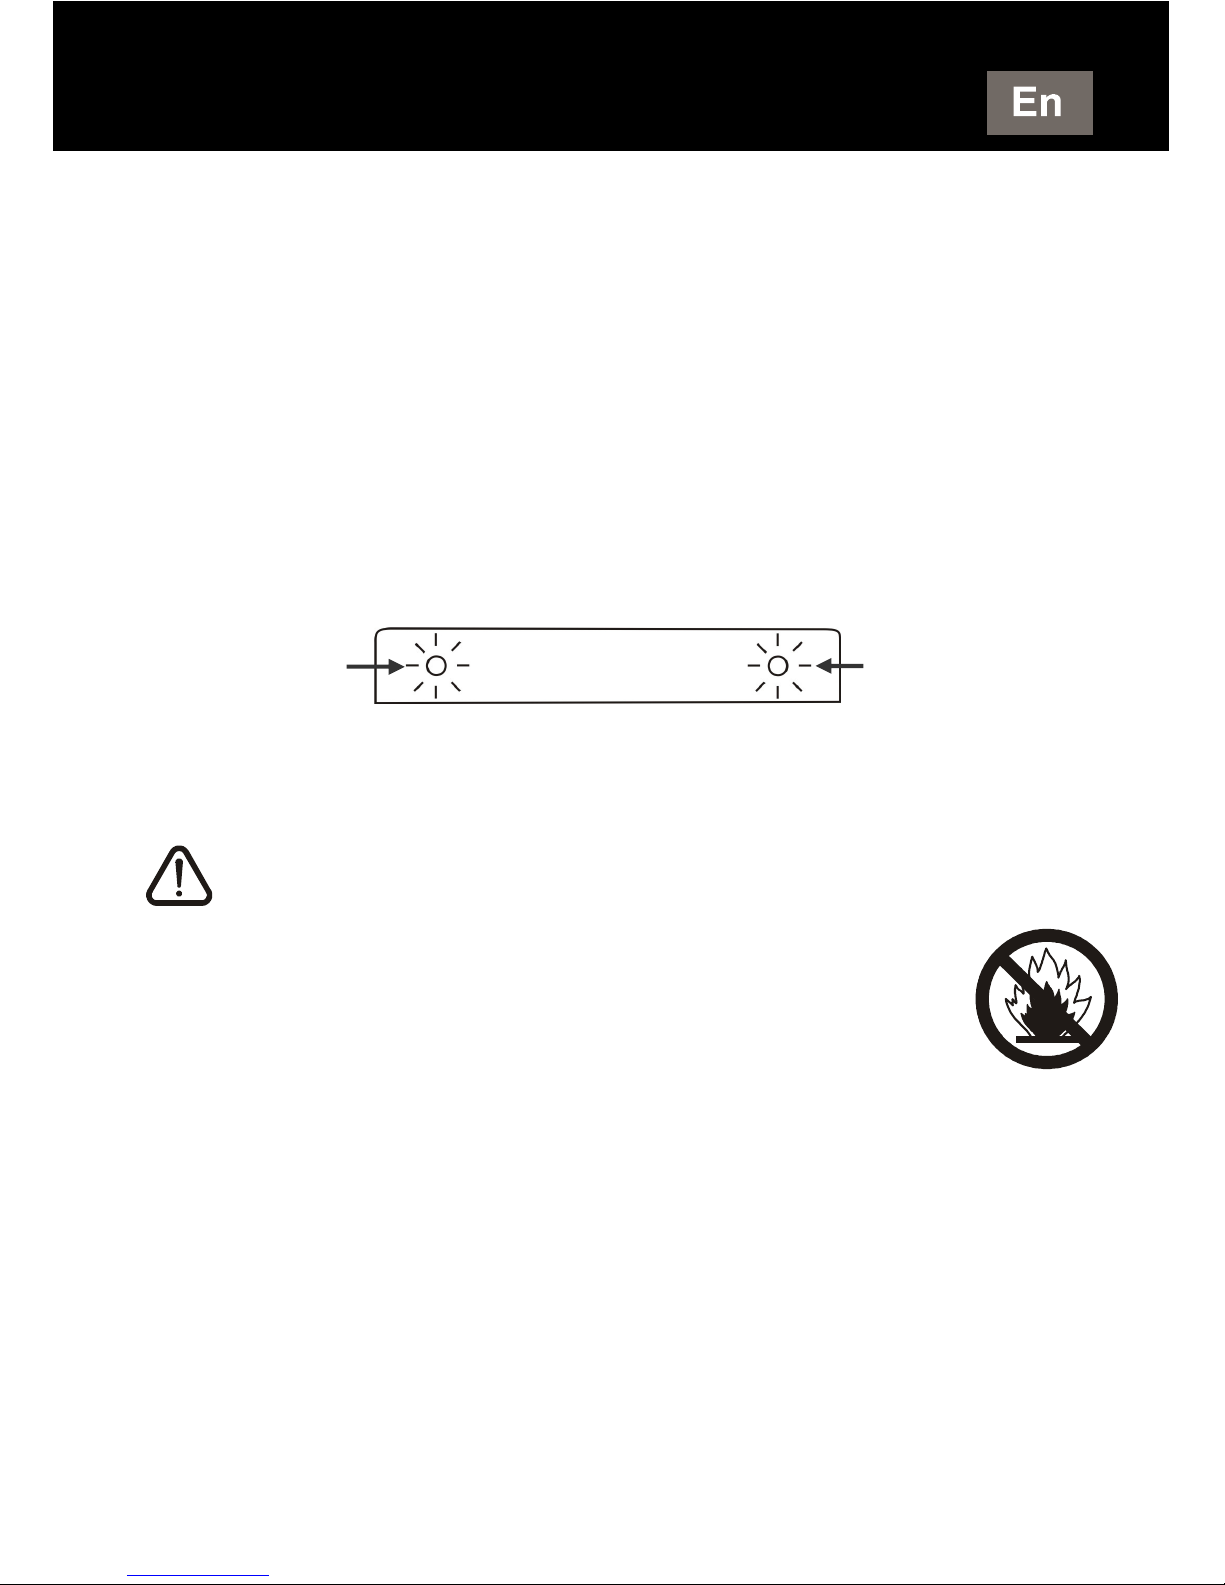
NOTE: When there is no audio input to the
transmitter/charge transmission is turned off automatically
and is resumed automatically when audio signal is restored.
INSTALLATION
Page 9
8
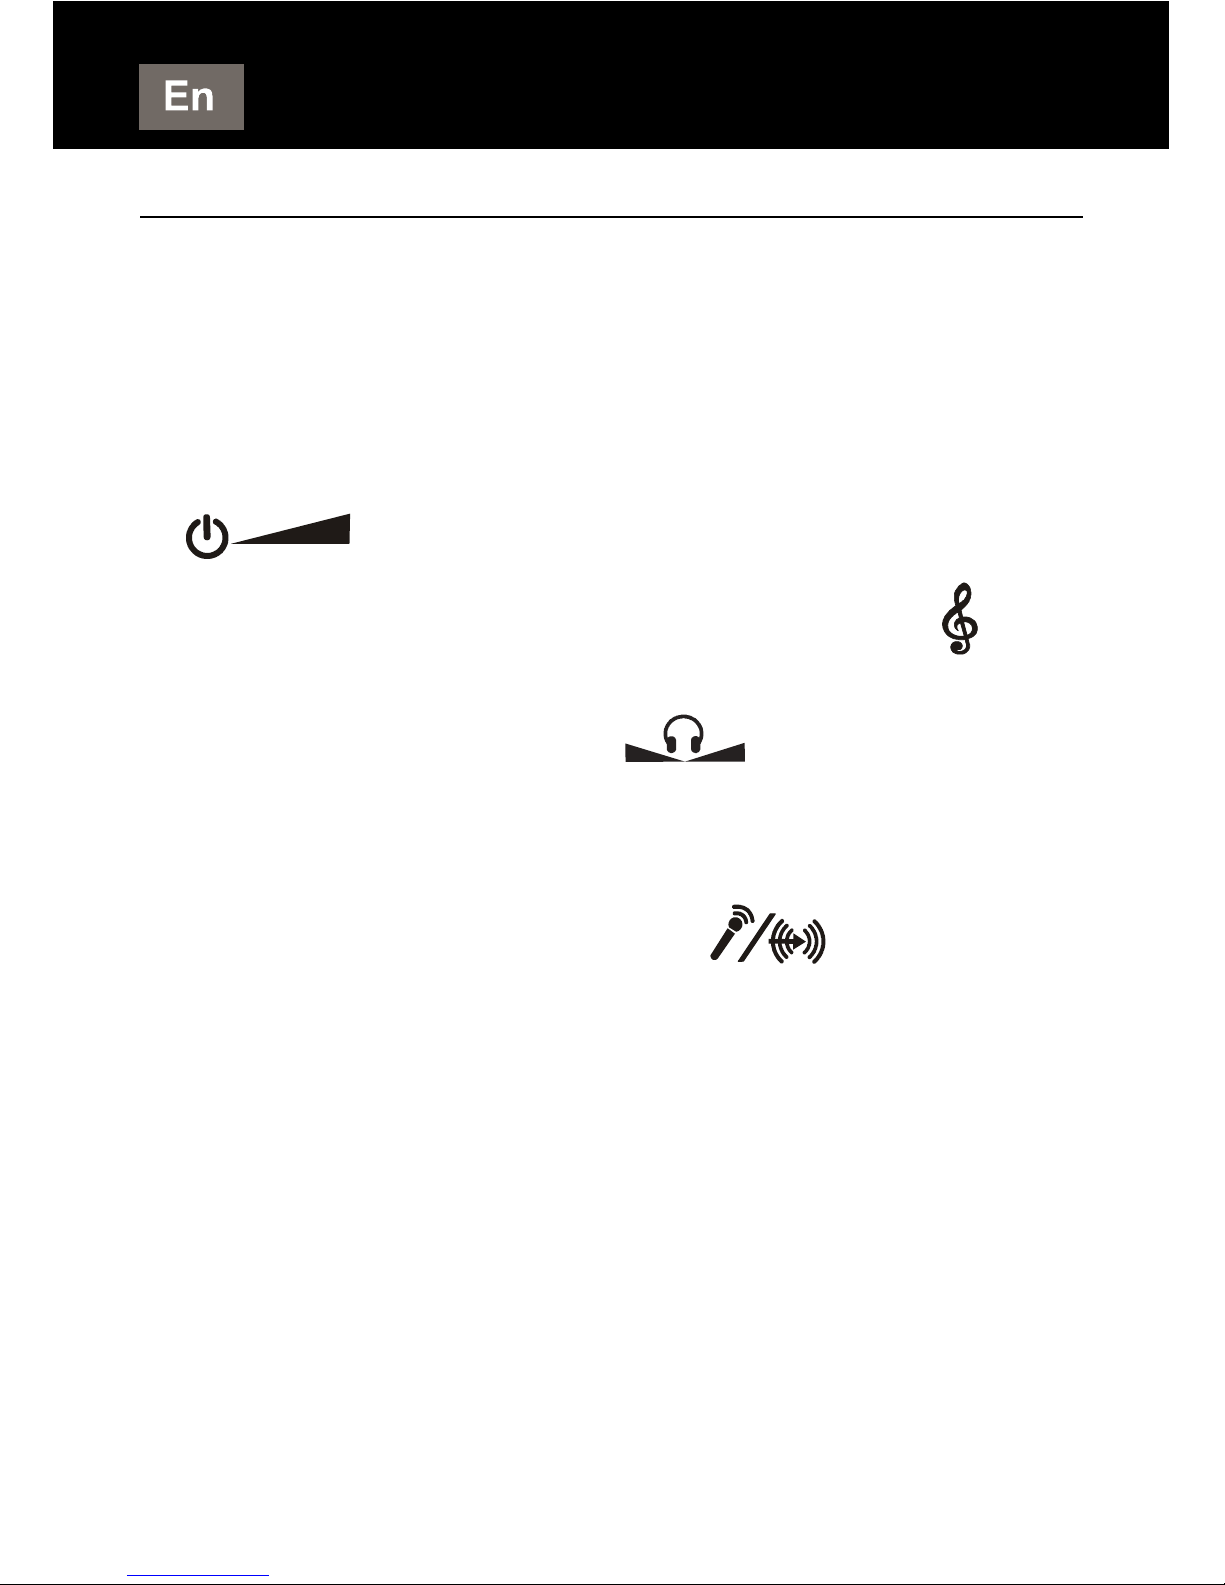
OPERATION
1. Make sure that the transmitter/charger is correctly
connected to the mains supply using the supplied
adapter.
2. Put on the headset such that the front(silkscreened)
part of the headset is facing the transmitter.
3. Turn on the headset using the ON/OFF/VOLUME
control and adjust the volume.
4. Use the tone control wheel to adjust the tone
frequency to suit your needs.
5. Use the included balance control tool to
adjust the volume balance between the left and right
ears. This control is on the headset.
6. If needed, insert a condenser (electret) microphone
jack into the Mic/Line In socket on the
headset or connect the audio output of a cell phone
into the same socket using a cable with a 3.5mm jack.
7. When you are finished using the system carefully
place the headset in the charging cradle making sure
that it fits snugly in the cradle. Check that the charging
light turns on.
OPERATION
Page 10

9
SAFETY, CARE AND MAINTENANCE
▪ The system which is designed to operate from a 100-
240V AC supply does not have an integral on/off switch.
To disconnect the power switch the mains power point
switch to OFF or unplug the power supply(AC-DC
adapter);
▪ Clean the headset and ear tips regularly ----- use a
damp cloth for the headset and warm water and a mild
detergent for the ear tips(after removal from the
headset);
▪ Keep away from heat sources such as hot-plates, and
heat generating appliances;
▪ Keep away from water and other fluids;
▪ Repairs must be carried out by qualified personnel;
▪ We suggest that a power surge protector is connected
between the mains supply power point and the AC-DC
adapter.
SAFETY, CARE AND MAINTENANCE
Page 11

10
PROBLEMS AND SOLUTIONS
The sound is not clear (static/interference)
▪ Check the line-of-sight connection.
▪ Make sure that the LEDs are lit.
▪ Check the transmitter location (height above the floor).
▪ Keep away from any window or interfering device.
▪ Check if the audio cable is connected to an analogue
(RCA) audio-OUT jack on TV, cable or satellite
decoder /receiver.
▪ Check that the audio cable is NOT connected to a
digital audio-out jack.
▪ The power outlet may already be in use with another
device.
▪ Audio cable is connected to the transmitter’s audio
jack.
The transmitter’s LED lights are not on
▪ Check the connection to the wall socket or power
outlet.
▪ Check the connection to the CL7100 12V jack.
The charging lights do not come on when the
earphone set is in the cradle.
▪ Realign earphone set; if necessary, move around in
the cradle.
▪ Ensure that the charging cradle is connected to mains
power.
PROBLEMS AND SOLUTIONS
Page 12

11
PRODUCT SPECIFICATIONS
General data :
Frequency: 2.3MHz
Modulation: Infrared, mono
Approx. range: 60 sq.m (approx. 600 sq. ft.)
Audio frequency response: 100-16,000 Hz
Total harmonic distortion: < 1%
Signal to noise Ratio: 70 dB
Auto ON/OFF
Headset :
Max. sound pressure level (SPL): 119 dB
Battery requirement: Lithium Polymer Rechargeable
battery, 3.7V / 200mAH
Operating time: Max.10 hrs.
Weight: approx. 58 – 60 g
Transmitter :
Audio connection: Mini headphone/RCA cable.
Power Supply: DC Power Supply 12V, 500mA
Weight: Approx. 171 g
Dimensions (H x W x D): 4.8 x 10.5 x 15.4 cm
RESET SWITCH: Sometimes computers malfunction due
to electrostatic discharge or other electrical disturbances, or
when DC Jack is plugged. If this happens push a thin rod
into the RESET hole
in the base of transmitter unit
and press down for about one second. This Resets the
computer, clears its memory and returns it to normal
operation.
PRODUCT SPECIFICATIONS
Page 13
12
General information
Guarantee
From the moment your Geemarc product is purchased, Geemarc
guarantee it for the period of one year. During this time, all repairs
or replacements (at our discretion) are free of charge. Should you
experience a problem then contact our Helpline or visit our
website at www.geemarc.com.
The guarantee does not cover accidents, negligence or breakage
to any parts.
The product must not be tampered with or taken apart by anyone
who is not an authorised Geemarc representative.
The Geemarc guarantee in no way limits your legal rights.
Important: YOUR RECEIPT IS PART OF YOUR GUARANTEE
AND MUST BE RETAINED AND PRODUCED IN THE EVENT
OF A WARRANTY CLAIM.
Please note: The guarantee applies to the United Kingdom only.
EEC Declaration
Geemarc Telecom SA hereby declares that this product is in
compliance with the essential requirements and other relevant
provisions of the Radio and Telecommunications Terminal
Equipment Directive 1999/5 EEC.
The declaration of conformity may be consulted at
www.geemarc.com
GENERAL INFORMATION
Page 14

13
Disposal information
Disposal of old electrical & electronic equipment (applicable
in the European Union and other European countries with
separate collection systems)
The symbol on the product or its packaging indicates that this
product may not be treated as household waste. Instead it should
be handed over to the applicable collection point for the recycling
of electrical and electronic equipment.
By ensuring this product is disposed of correctly, you will help
prevent potential negative consequences for the environment and
human health, which could otherwise be caused by inappropriate
waste handling of this product.
For more detailed information about recycling this product, please
contact your local council office, your household waste disposal
service or the shop where the product was purchased.
Customer support
For product support and help, visit our website at
www.geemarc.com
For our Customer Helpline
Telephone:
01707 384438
Fax: 01707 832529
GENERAL INFORMATION
Page 15
14
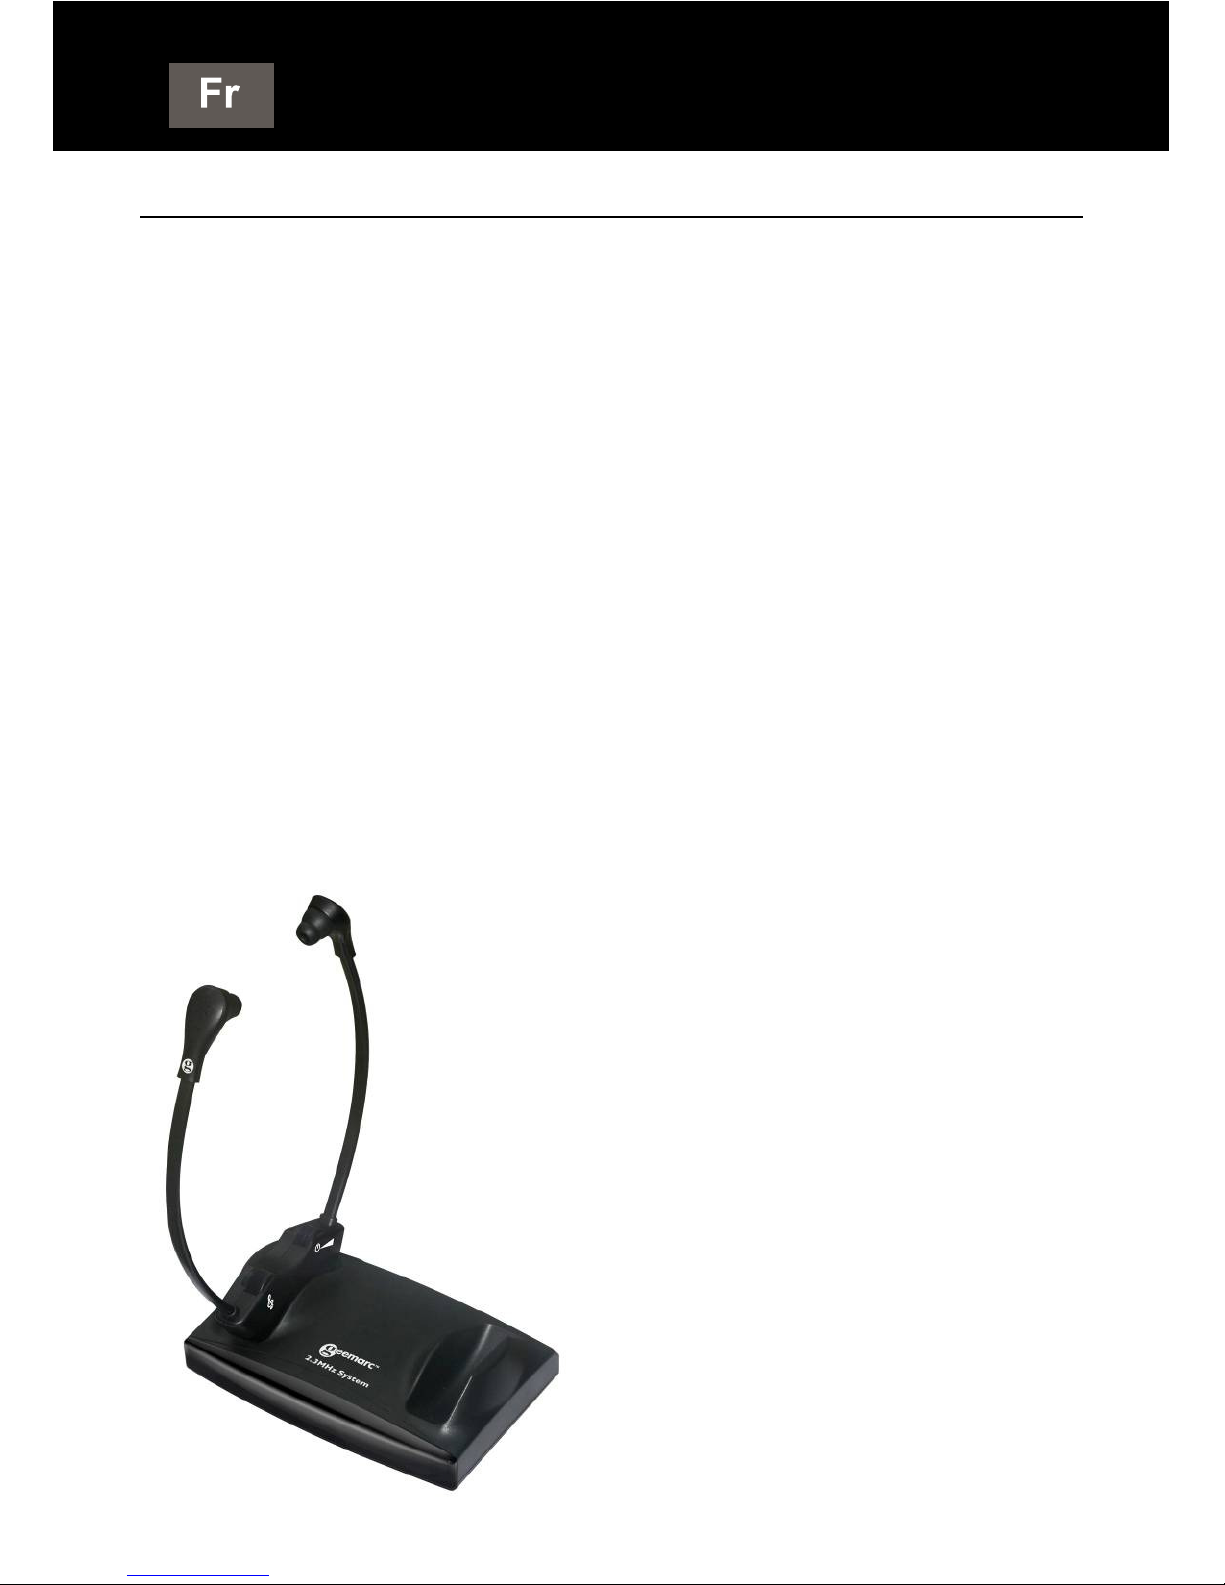
INTRODUCTION
Le CL7100 est un casque qui permet d’amplifier toutes
sources audio comme par exemple un téléviseur ou une
chaine HI-FI équipés d’une sortie RCA.
Ce casque permet de ne pas géner les autres
personnes présentes dans la même piéce.
Il utilise un système infrarouge (IR) de 2.3 MHz.
AVERTISSEMENT: Un niveau sonore trop important
diffusé par un casque d’écoute peut provoquer des
pertes d’audition. Il est donc recommandé de régler le
volume au minimum avant de mettre le casque, puis de
monter progressivement le volume jusqu’à un niveau
d’écoute confortable.
INTRODUCTION
Page 16
15
CONTENU DE L’EMBALLAGE
CONTENU DE L’EMBALLAGE
Page 17

16
(1) Base
REMARQUE: La base permet de recharger un ou deux casques
simultanément.
CONTENU DE L’EMBALLAGE
Voyant (ROUGE) de
recharge
Voyant
d’alimentation et
de transmission
Émetteur
infrarouge
P
rise d’alimentation
DC 12V
Entrée micro
Entrée audio
Remise
Émetteur
infrarouge
Voyant (ROUGE) de
recharge
Page 18
17
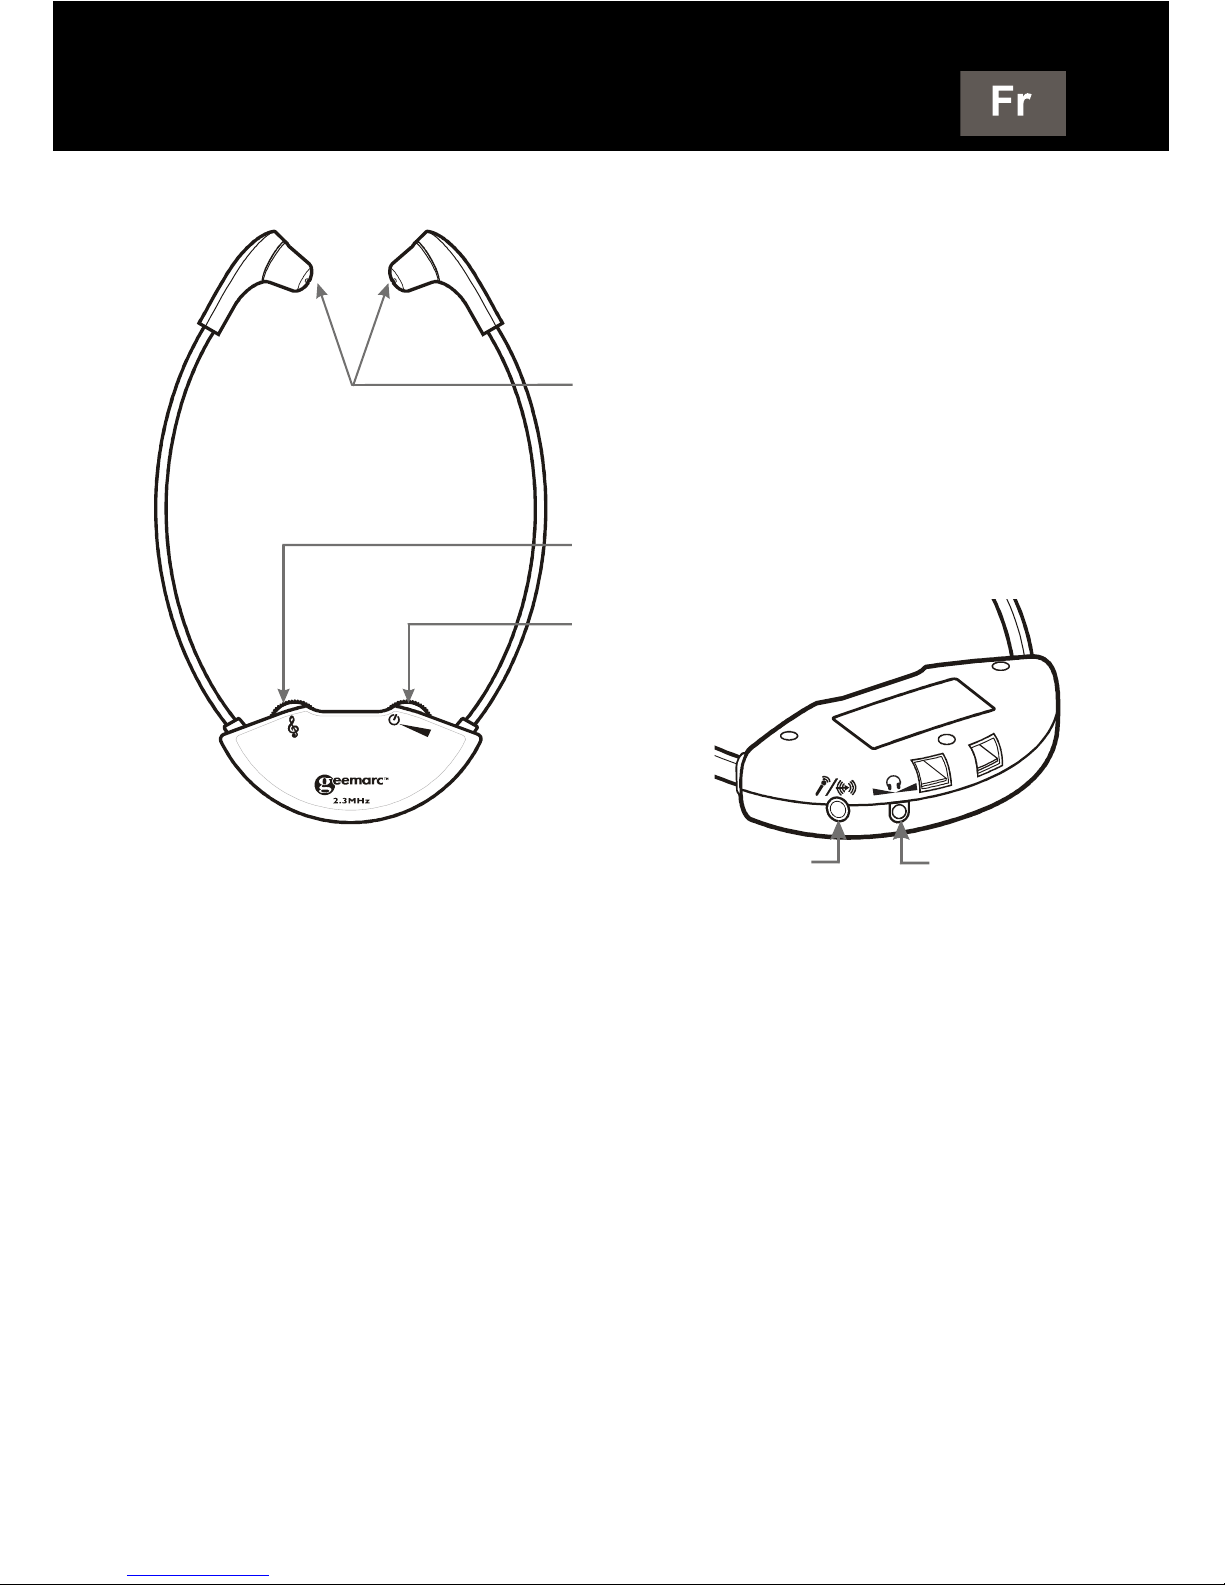
(2) Casque
REMARQUE: En fonction du modèle acheté, un ou deux
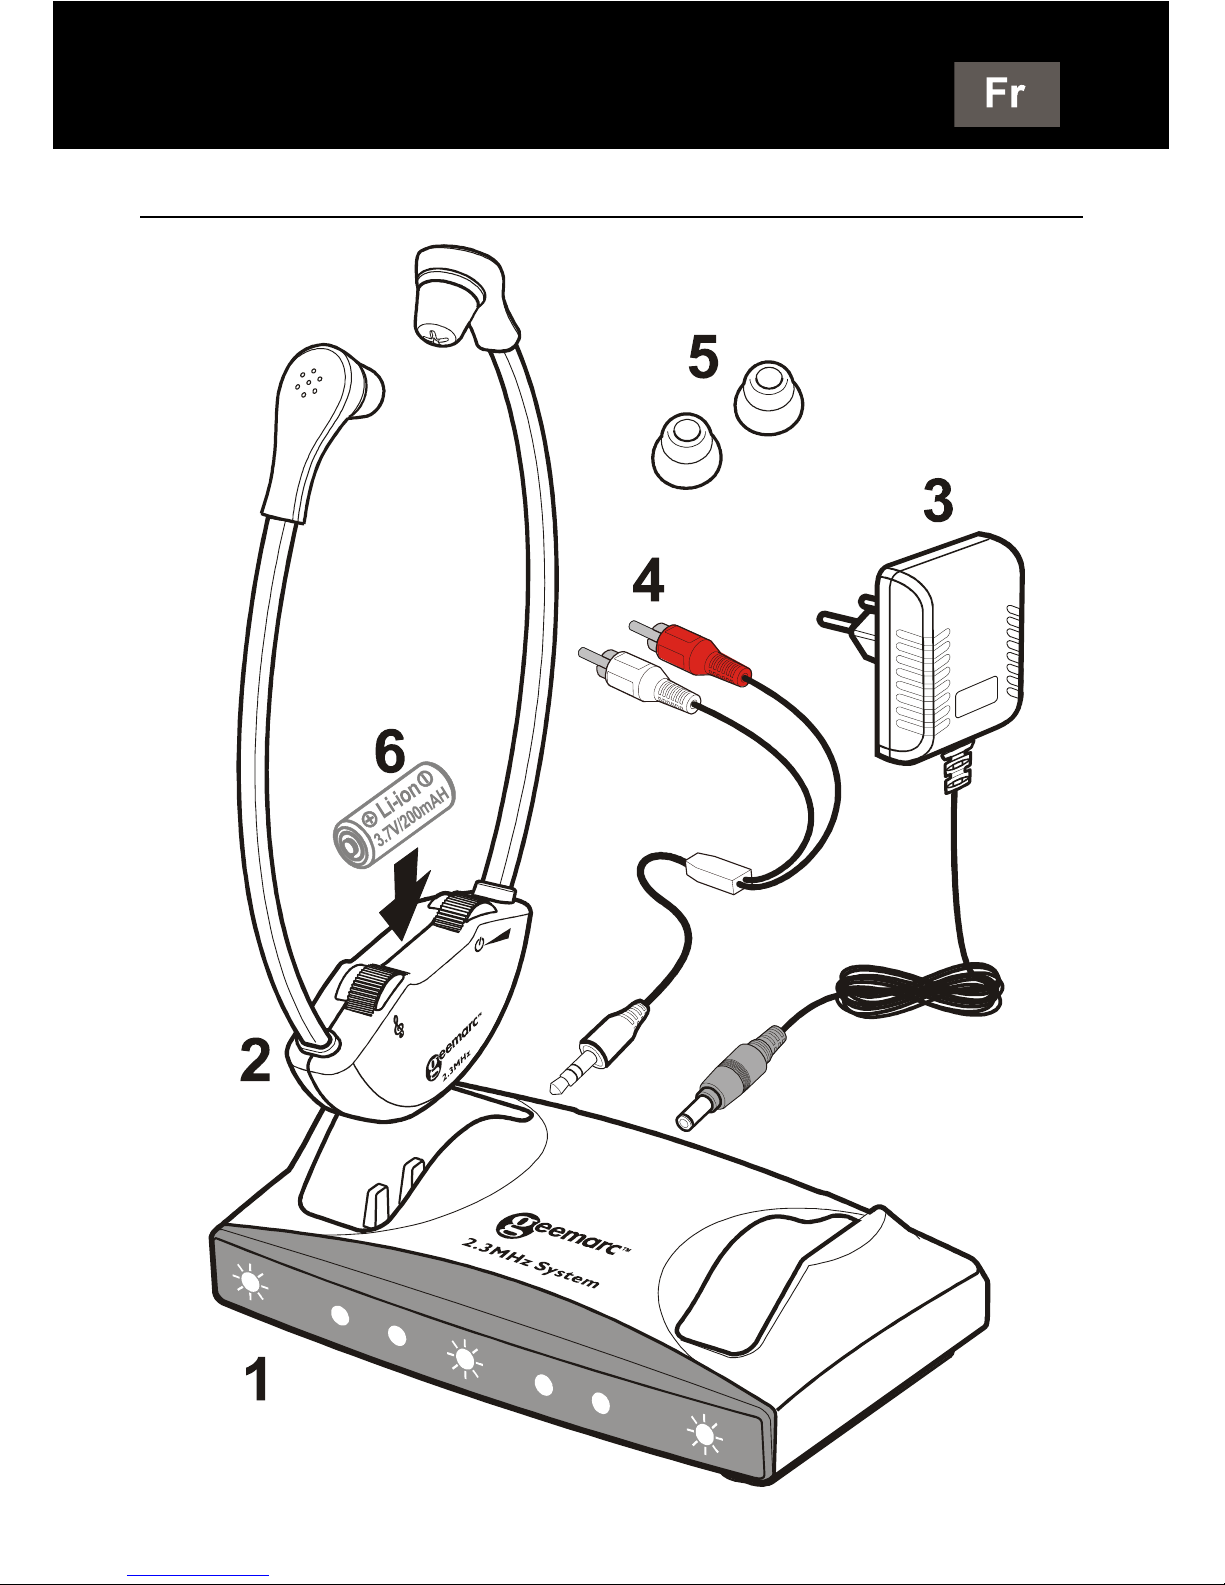
casques sont fournis.
(3) Alimentation (adaptateur secteur, 12V DC).
(4) Câble audio RCA 3,5 mm (rouge/blanc).
(5) Embouts d’écoutes de rechange. 3 styles
d’embouts sont fournis.
CONTENU DE L’EMBALLAGE
Entrée audio
/Micro
Réglage de
la balance
Embouts d’écoutes
remplaçables en
silicone
Réglage de la tonalité
Bouton marche-arrêt
/Volume
Page 19
18
(6) Batterie rechargeable lithium-polymère (scellée à
l’intérieur du casque). 3,7V/200mAH.
REMARQUE
1. Ce type de batterie peut généralement être utilisé pendant
plusieurs années et n’a normalement pas à être remplacé.
2. Nous vous recommandons de recharger la batterie 2 heures
environ avant d’utiliser l’appareil pour la première fois.
3. Placez le casque sur son chargeur. Vérifiez que le voyant LED
de recharge (ROUGE) est allumé. La LED s’éteint quand la
batterie est complètement rechargée.
4. Un dispositif de protection empêche la surcharge de la batterie.
Nous vous recommandons de toujours placer le casque sur le
chargeur quand vous ne l’utilisez pas.
MISES EN GARDE CONCERNANT LA BATTERIE
N’essayez pas de changer ou de retirer la batterie. Ne
jetez pas l’appareil dans un feu.
Veillez à ce que l’appareil reste hors de portée des
enfants.
Ne court-circuitez pas les contacts de recharge
présents au bas du casque.
Remarque: La gamme des produits CL7100 comprend 2
modèles :
1) Casque sans fil d’écoute CL7100
2) Casque additionnel sans fil CL7100
Cette notice d’utilisation fourni les instructions d’utilisation pour
tous ces modèles
CONTENU DE L’EMBALLAGE
Voyant de
recharge
Voyant de
recharge
Page 20
19
INSTALLATION
D
D
Page 21

20
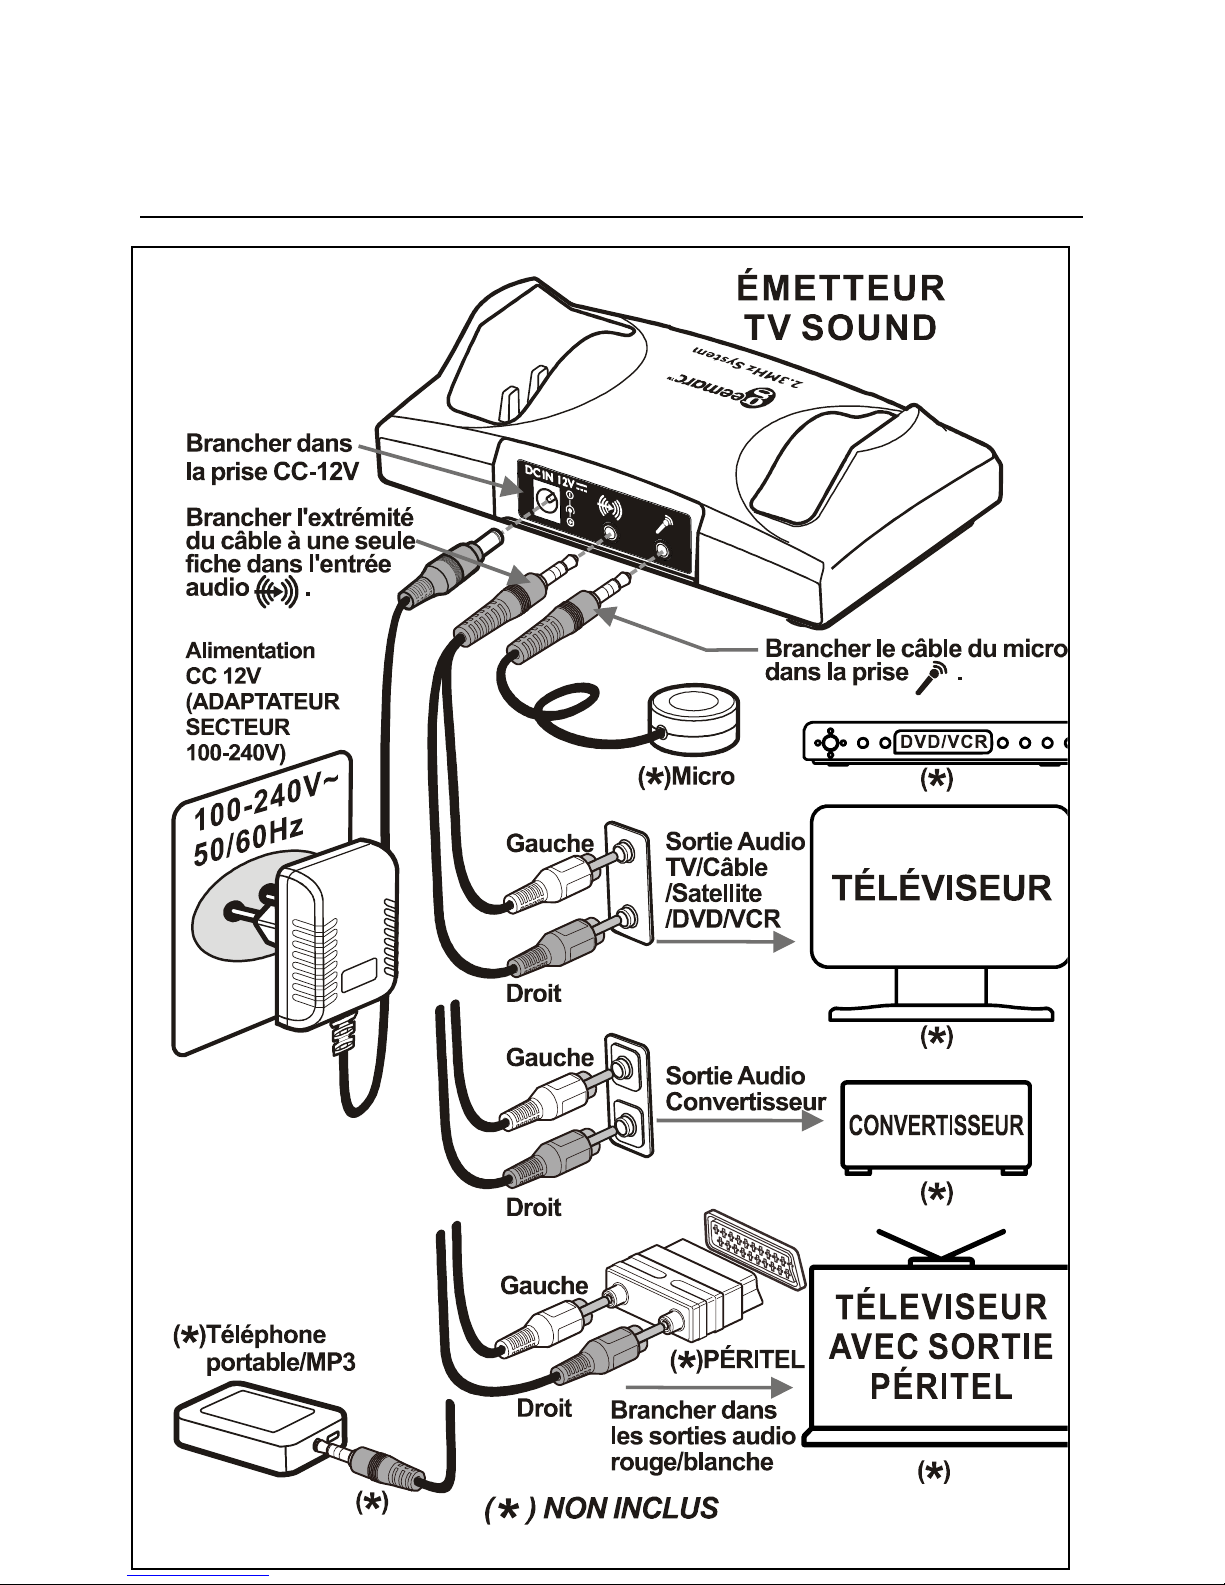
(1) Branchez l’appareil sur une prise électrique en procédant
comme décrit sur le schéma.
(2) La base doit être connectée sur la SORTIE RCA (audio
output/ Sortie audio) d’un téléviseur, appareil audio,
décodeur satellite ou câble, lecteur DVD, magnétoscope,
etc.
Dans le cas de l’utilisation d’un câble RCA, branchez-le sur
les sorties rouge et blanche. Consultez le schéma.
Vous pouvez également utiliser une prise péritel (non fourni).
Utilisez uniquement les prises rouge et blanche.
REMARQUE: En utilisant la connection par la prise péritel,
des perturbations peuvent provenir d’autres appareils tels
qu’un lecteur DVD, magnétoscope. Veillez à mettre en veille
les sources non utilisées.’
(3) Si aucune des solutions précédentes fonctionnent sur
votre écran, regardez si votre téléviseur posséde une sortie
optique pour brancher un convertisseur numérique (DAC).
Branchez la sortie audio numérique d’un téléviseur ou d’un
appareil audio sur le convertisseur avec un câble adapté
(câble optique ou coaxial). Puis, avec le câble RCA fourni,
connectez les sorties audio rouge et blanche du
convertisseur sur l’entrée audio de la base .
REMARQUE: Si vous utilisez le système pour écouter la
télévision, le son des haut-parleurs du téléviseur est coupé
afin de ne pas gêner les autres personnes, la sortie audio du
téléviseur doit être réglée sur FIXE. Consultez la notice
d’utilisation de votre téléviseur pour savoir comment la régler
sur FIXE.
POSITIONNEMENT
Les signaux infrarouges (IR) sont transmis en ligne droite
par l’émetteur au casque. Positionnez l’émetteur en sorte
qu’il soit visuellement en ligne directe avec le casque
pendant l’utilisation. Les signaux infrarouges sont bloqués
par les objets tels que les murs, portes, meubles, journaux,
livres, etc. Les diodes infrarouges s’allument pendant la
transmission des signaux.
INSTALLATION
INSTALLATION
Page 22
21
REMARQUE: Quand aucun signal audio n’est transmis à la
base par la connexion filaire, la transmission infrarouge
s’arrête automatiquement. Elle reprend quand la base reçoit
à nouveau un signal audio.
UTILISATION
1. Veillez à ce que la base soit correctement branchée
sur une prise électrique avec l’adaptateur fourni.
2. Portez le casque en dirigeant sa partie frontale
(portant des inscriptions) vers la base.
3. Allumez le casque avec son bouton MARCHE /
ARRÊT / VOLUME et réglez le volume.
4. Réglez la tonalité en fonction de vos préférences
avec la molette de réglage de la tonalité .
5. Réglez la balance entre les oreillettes droite et
gauche avec le dispositif de réglage de la
balance . Celui-ci se trouve sur le casque.
6. Si nécessaire, branchez la fiche d’un micro à un
condensateur (électret) dans l’entrée ligne/micro
du casque ou branchez la sortie audio d’un
téléphone portable dans une entrée audio avec un
câble audio muni d’une fiche de 3.5 mm (Non fourni).
7. Lorsque vous avez fini d’utiliser le système, remettez
précautionneusement le casque sur la base en
veillant à le positionner correctement. Vérifiez que le
voyant rouge de recharge s’allume.
UTILISATION
Page 23

22
SÉCURITÉ, ENTRETIEN ET MAINTENANCE
• Le système est conçu pour être branché sur une prise
secteur de 100 à 240V, il ne comporte pas
d’interrupteur marche/arrêt. Pour l’éteindre,
débranchez-le de la prise électrique (adaptateur
secteur) ou mettez la prise électrique hors tension en
actionnant son interrupteur.
• Nettoyez le casque et les embouts d’écoutes
régulièrement. Utilisez un chiffon humidifié pour
nettoyer le casque, ou de l’eau tiède et un détergent
doux pour nettoyer les embouts d’écoutes (après les
avoir retirés du casque).
• Veillez à ce que l’appareil soit toujours éloigné des
sources de chaleur, par exemple des tables de cuisson
et des appareils dégageant de la chaleur.
• Veillez à ce que l’appareil ne soit jamais exposé à de
l’eau, ni à aucun autre liquide.
• Les réparations doivent être confiées à un
professionnel qualifié.
• Nous vous conseillons d’utiliser un parasurtenseur
entre la prise électrique et l’adaptateur secteur.
SÉCURITÉ, ENTRETIEN ET MAINTENANCE
Page 24

23
DÉPANNAGE
Le son n’est pas clair (interférences/parasites).
• Vérifiez qu’il n’y ai aucun obstacle entre la base et le
casque, et qu’ils soient dirigés l’un vers l’autre.
• Vérifiez que les LED soient allumées.
• Vérifiez que l’emplacement de l’émetteur soit
approprié (hauteur par rapport au sol).
• Veillez à ce que le produit reste éloigné des fenêtres et
de tous les appareils générant des interférences.
• Vérifiez que le câble audio soit branché sur les
SORTIES audio (RCA) analogiques d’un téléviseur,
d’un décodeur/récepteur satellite ou câble.
• Vérifiez que le câble audio NE SOIT PAS BRANCHÉ
sur une sortie audio numérique.
• Vérifiez que la sortie du téléviseur ne soit pas déjà
utilisée par un autre appareil.
• Vérifiez que le câble audio ne soit pas branché sur la
prise audio de la base.
Les LED de la base ne sont pas allumées.
• Contrôlez le branchement sur la prise murale ou
électrique.
• Contrôlez le branchement sur la fiche DC 12V de la
base CL7100.
Les voyants de recharge ne s’allument pas quand le
casque est posé sur la base.
• Réalignez le casque. Si nécessaire, déplacez-le sur le
deuxième emplacement de la base.
• Vérifiez que la base soit branchée sur une prise
secteur.
DÉPANNAGE
Page 25

24
SPÉCIFICATIONS TECHNIQUES
Spécifications générales:
Fréquence: 2,3 MHz
Modulation: Infrarouge, mono
Portée: 60 m2 environ
Réponse en fréquence: 100-16 000 Hz
Distorsion harmonique totale: < 1%
Rapport signal/bruit: 70 dB
Allumage et extinction automatiques
Casque:
Niveau de pression acoustique max. (SPL): 119 dB
Batterie: Batterie rechargeable lithium-polymère
3,7V/200 mAh
Autonomie: 10h environ
Poids: 58-60g environ
Émetteur:
Connexion audio: Mini écouteurs/Câble RCA
Alimentation: 12V DC, 500 mA
Poids: 171g environ
Dimensions (HxLxP): 4,8x10,5x 15,4 cm
RÉINITIALISATION (Reset): Les décharges
électrostatiques, les autres perturbations électriques et le
branchement de la fiche d’alimentation peuvent provoquer
un dysfonctionnement. Si cela se produit, enfoncez un objet
fin dans le trou de RÉINITIALISATION (Reset)
présent au dos de la base et appuyez pendant une seconde
environ. Cela permet de réinitialiser l’appareil et d’effacer sa
mémoire afin qu’il retrouve un fonctionnement normal.
SPÉCIFICATIONS TECHNIQUES
Page 26

25
Informations générales
Garantie
Geemarc garantit cet appareil pour une durée d'un an pièces et
main-d'oeuvre à partir de la date d'achat. Pendant cette période,
Geemarc réparera (ou remplacera si nécessaire) votre appareil
gratuitement. En cas de problème, n’hésitez pas à contacter notre
service client ou à consulter notre site Internet sur
www.geemarc.com.
La garantie ne couvre pas les accidents, les pièces cassées, les
problèmes causés par l'orage, par les liquides renversés, ni par la
négligence de l'utilisateur. Seuls les techniciens agréés Geemarc
sont autorisés à intervenir sur votre appareil.
La garantie Geemarc ne limite en aucun cas les droits que vous
accorde la loi.
Important : VOTRE FACTURE D'ACHAT EST UN ÉLÉMENT
ESSENTIEL DE VOTRE GARANTIE. ELLE VOUS SERA
DEMANDÉE EN CAS D'INTERVENTION SOUS GARANTIE.
Remarque: La garantie s'applique uniquement en France..
DÉCLARATION DE COMPATIBILITÉ :
Ce produit respecte les exigences de compatibilité
électromagnétique et de sécurité électrique demandées par la
directive européenne RTTE 1999/5/EEC.
Vous pouvez consulter la déclaration de conformité sur
www.geemarc.com.fr
INFORMATIONS GÉNÉRALES
Page 27

26
Recyclage
Mise au rebut des équipements électriques et électroniques
usagés (applicable au sein de l’Union Européenne et dans les
autres pays européens utilisant des systèmes de collecte
séparée).
La présence du symbole sur le produit ou son emballage signifie
que le produit ne doit pas être traité comme les déchets
ménagers. Ce produit doit être apporté à un point de collecte pour
recyclage des matériels électriques et électroniques.
En respectant les consignes de recyclage de votre appareil, vous
participez à la protection de l’environnement et de la santé.
Pour en savoir plus sur le recyclage de cet appareil, contactez
votre revendeur, les services municipaux ou la déchetterie de
votre localité.
Service client
Pour obtenir des informations et de l’aide sur nos produits,
consultez notre site Internet www.geemarc.com
Notre Service Client est disponible par telephone au
03.28.58.75.99 ou par fax: 03.28.58.75.76
INFORMATIONS GÉNÉRALES
Page 28

27
EINLEITUNG
Das CL7100 ist ein Personal Sound Amplifier für
Personen mit und ohne Hörbehinderungen.
Es kann zum Hören von TV oder anderen AudioGeräten benutzt werden, ohne dass andere gestört
werden. Es wird mit einem 2,3 MHz Infrarot(IR)-System
betrieben.
WARNUNG: Dieses Produkt kann bei der Benutzung
durch Personen mit Hörbehinderungen einen hohen
Schalldruck erzeugen. Außergewöhnlich hoher
Schalldruck kann zu Hörbeschädigungen führen und wir
empfehlen, die Lautstärke niedrig zu halten und nach
und nach zu erhöhen, bis ein angenehmes
Lautstärkeniveau erreicht ist.
EINLEITUNG
Page 29

28
VERPACKUNGSINHALT
VERPACKUNGSINHALT
Page 30

29
(1) Transmitter/Aufladegerät
Vorderansicht Rückansicht
HINWEIS: Der Transmitter/das Aufladegerät kann ein oder zwei
Kopfhörer aufladen.
VERPACKUNGSINHALT
DC 12V
Anschlussbuchse
Mikrofon InputBuchse
Audio Input -Buchse
Aufladeanzeige Linke
Gabel (ROT)
An/Aus und
Sendeanzeige
IR SENDER IR SENDER
Aufladeanzeige
Rechte Gabel (ROT)
Rückstellen
Page 31

30
(2) Kopfhörer
HINWEIS: Je nach Modell befinden sich ein oder zwei
Kopfhörer in der Verpackung.
(3) Stromzufuhr (AC – DC Adapter, 100 - 240V).
(4) RCA (Rot/Weiß) bis 3,5mm Audiokabel.
(5) Zusätzliche Ohrstöpsel. Es gibt 3 verschiedene
Ohrstöpsel.
VERPACKUNGSINHALT
Mikrofon/
Line-
IN Input
BalanceEinstellung
Austauschbare
Silikon-Ohrstöpsel
TON-Einstellung
AN/AUS/ Lautstärke
-
Einstellung
Page 32

31
(6) Wieder aufladbare Lithium-Polymer Batterie (im
Kopfhörer versiegelt) 3.7V/200mAH.
HINWEIS:
1. Diese Batterieart hat normalerweise eine Lebensdauer von
mehreren Jahren und ein Austausch sollte nicht notwendig sein.
2. Wir empfehlen, die Batterie 2 Stunden lang vor der Erstnutzung
des Systems aufzuladen.
3. Legen Sie den Kopfhörer auf die Aufladegabel. Stellen Sie
sicher, dass die LED-Aufladeanzeige (ROT) aufleuchtet. Die
LED-Aufladeanzeige erlischt, wenn die Batterie vollständig
aufgeladen ist.
4. Die Batterie kann nicht überladen werden. Wir empfehlen, den
Kopfhörer bei Nichtbenutzung auf die Aufladegabel zu legen.
BATTERIE-VORSICHTSMASSNAHMEN
Versuchen Sie nicht, die Batterie auszutauschen oder
zu entnehmen.
Entsorgen Sie die Batterie nicht im Feuer.
Halten Sie die Batterie von Kindern fern.
Verursachen Sie keinen Kurzschluss der
Aufladestecker unten am Kopfhörer.
Hinweis: Die CL7100 - Produktreihe bietet 2 Modellvariationen
und Zusatz-Kopfhörer wie unten beschrieben und wird in dieser
Bedienungsanleitung besprochen.
1) CL7100 Wireless Single Kopfhörer-System
2) CL7100 Wireless Double Kopfhörer-System
3) Zusätzlicher kabelloser Kopfhörer
VERPACKUNGSINHALT
Aufladeanzeige
Rechte Gabel
Aufladeanzeige
Linke Gabel
Page 33

32
INSTALLIERUNG
INSTALLIERUNG
Page 34

33
(1) Stromzufuhr wie in der Abbildung gezeigt verbinden.
(2) Der Transmitter/das Aufladegerät muss mit den
Audio OUTPUT Ausgängen des TV-Geräts, den
Audiogeräten, der Kabel- oder Satellitenbox, dem DVDoder Videospieler etc. verbunden werden. Bei
Benutzung eines RCA-Kabels sind die OutputAnschlüsse rot und weiß. Bitte Abbildung beachten.
Ein Scart-Adapter (nicht enthalten) kann auch benutzt
werden. Nur die roten und weißen Anschlüsse
benutzen.
HINWEIS: Ist das System mit einer Kabel- oder
Satellitenbox und mit einem DVD- oder Videospieler
verbunden, dann muss das aktuell nicht benutzte Gerät
ausgeschaltet werden. Bei der Benutzung eines DVDoder Videospielers schalten Sie die Kabel- oder
Satellitenbox ab. Beim Fernsehen schalten Sie den
DVD- und Videospieler ab.
(3) Verbindung mit einer digitalen Konverter-Box (DAC).
Verbinden Sie den digitalen Audio Output des TV-
Gerätes oder des Audio-Gerätes mit Hilfe eines
entsprechenden Kabels (optisch oder koaxial) mit dem
DAC. Benutzen Sie dann das mitgelieferte RCA-Kabel,
um die roten und weißen Output-Anschlüsse des DAC
mit der Audio Input-Buchse des Transmitters/dem
Aufladegerät zu verbinden.
INSTALLIERUNG
Page 35

34
HINWEIS: Wenn Sie mit dem System TV-Audio hören
möchten, während der TV auf Stummschaltung
geschaltet ist, so dass andere nicht gestört werden,
dann muss der TV Audio Output auf FIXED eingestellt
werden. Bitte ersehen Sie aus der Bedienungsanleitung
Ihres TV-Gerätes, wie die FIXED-Einstellung
vorgenommen wird.
PLATZIERUNG
Die Infrarot-Signale (IR) erfordern eine hindernisfreie
Verbindung zwischen dem Transmitter und dem
Kopfhörer. Platzieren Sie den Transmitter so, dass keine
Hindernisse zwischen dem Transmitter und dem
Kopfhörer die Übertragung blockieren. Die IR-Signale
können durch Objekte wie Wände, Türen, Möbel,
Zeitungen, Bücher usw. blockiert werden. Die IR-Dioden
leuchten während der Benutzung auf.
HINWEIS: Wird kein Audio Input zu dem
Transmitter/Aufladegerät hergestellt, dann stellt sich die
Übertragung automatisch ab und dann wieder ein, wenn
das Audio-Signal wieder hergestellt wird.
INSTALLIERUNG
Page 36

35
BETRIEB
1. Stellen Sie sicher, dass der Transmitter/das
Aufladegerät ordnungsgemäß mit dem im
Lieferumfang enthaltenen Adapter an die Steckdose
angeschlossen ist.
2. Setzen Sie den Kopfhörer auf, so dass die
Vorderseite (mit Silkscreen) auf den Transmitter zeigt.
3. Stellen Sie den Kopfhörer mit der
AN/AUS/LAUTSTÄRKE an und stellen die
Lautstärke ein.
4. Stellen Sie die Ton-Frequenz mit der Ton-Einstellung
wie gewünscht ein.
5. Stellen Sie die Lautstärke mit der Balance-Einstellung
ein, um die Lautstärke auf dem rechten und
linken Ohr wie gewünscht anzupassen. Diese
Einstellung befindet sich am Kopfhörer.
6. Schließen Sie bei Bedarf einen Mikrofon-Kondensator
(elektret) an den Mic/Line In-Anschluss am
Kopfhörer oder verbinden Sie den Audio Output eines
Handys mit Hilfe eines Kabels mit einem 3,5 mmStecker mit dem gleichen Anschluss.
7. Nach Beendigung der Benutzung legen Sie den
Kopfhörer vorsichtig und ordnungsgemäß auf die
Aufladegabel. Stellen Sie sicher, dass die
Aufladeanzeige aufleuchtet.
BETRIEB
Page 37

36
SICHERHEIT, PFLEGE UND WARTUNG
• Das System ist für den Betrieb mit 100-240V AC
vorgesehen und verfügt nicht über einen integralen
AN/AUS-Schalter. Zum Ausschalten stellen Sie den
Hauptschalter auf AUS oder ziehen den Stecker aus
der Steckdose (AC-DC Adapter).
• Reinigen Sie den Kopfhörer und die Ohrstöpsel
regelmäßig mit einem feuchten Tuch für den Kopfhörer
und mit warmem Wasser und einem milden
Reinigungsmittel für die Ohrstöpsel (nachdem Sie
diese von dem Kopfhörer abgenommen haben).
• Halten Sie das Gerät von Hitzequellen wie Herdplatten
und hitzeerzeugenden Haushaltsgeräten fern.
• Halten Sie das Gerät von Wasser und anderen
Flüssigkeiten fern.
• Reparaturen müssen von qualifiziertem Fachpersonal
durchgeführt werden.
• Wir empfehlen den Anschluss eines
Überspannschutzes zwischen der Steckdose und dem
AC-DC Adapter.
SICHERHEIT, PFLEGE UND WARTUNG
Page 38

37
FEHLERBEHEBUNG
Kein klarer Ton (Rauschen/Interferenzen).
• Stellen Sie sicher, dass sich zwischen dem
Transmitter und dem Kopfhörer keine Hindernisse
befinden.
• Stellen Sie sicher, dass alle LED-Anzeigen
aufleuchten.
• Überprüfen Sie die Transmitter-Platzierung (Höhe).
• Stellen Sie das Gerät nicht in der Nähe von Fenstern
oder interferierenden Geräten auf.
• Stellen sie sicher, dass das Audiokabel mit einem
analogen (RCA) Audio-Ausgang am TV-Gerät oder am
Kabel- oder Satelliten Decoder/Empfänger verbunden
ist.
• Stellen Sie sicher, dass das Audiokabel NICHT mit
einem digitalen Audio-Ausgang verbunden ist.
• Die Steckdose ist vielleicht mit einem anderen Gerät
verbunden.
• Das Audiokabel ist mit dem Audioanschluss des
Transmitters verbunden.
LED-Anzeige des Transmitters leuchtet nicht.
• Überprüfen Sie die Verbindung mit der Wandsteckdose
oder der Steckdose.
• Überprüfen Sie die Verbindung mit dem CL7100 12VAnschluss.
Die Aufladeanzeige leuchtet nicht auf wenn der
Kopfhörer auf der Aufladegabel aufliegt.
• Legen Sie den Kopfhörer erneut auf und bewegen ihn
etwas auf der Aufladegabel, wenn nötig.
FEHLERBEHEBUNG
Page 39

38
• Stellen Sie sicher, dass die Aufladegabel mit der
Steckdose verbunden ist.
Produkt Spezifikationen
Allgemeine Daten:
Frequenz: 2,3MHz
Einstellung: Infrarot, Mono
Ungefähre Betriebsreichweite: 60 Quadratmeter (ca.
600 Quadratfuß)
Audio-Frequenzgang: 100-16,000 Hz
Harmonische Verzerrung: < 1%
Signal-Rauschverhältnis: 70 dB
Autom. AN/AUS
Kopfhörer:
Max. Schalldruck (SPL): 119 dB
Erforderliche Batterie: Wieder aufladbare 3,7V LithiumPolymer Batterie,200mAH.
Betriebszeit: Max.10 Stunden
Gewicht: ca. 58-60g
Transmitter:
Audioverbindung: Mini Kopfhörer /RCA-Kabel.
Stromzufuhr: DC-Strom 12V, 500mA
Gewicht: ca. 171g
Abmessungen (HxBxT): 4,8x10,5x15,4 cm
RESET: Es kommt vor, dass Computer aufgrund
elektrostatischer Entladungen oder anderen elektrischen
Störungen oder bei der Verbindung mit einem DC-Anschluss
Betriebsstörungen aufweisen. Drücken Sie in diesem Fall mit
einem dünnen Gegenstand in die RESET-Öffnung
auf der Rückseite des Transmitters und halten die Öffnung
ca. eine Sekunde lang gedrückt. Dies führt zu einem
Produkt Spezifikationen
Page 40

39
Zurücksetzen des Computers, erneuert den Speicher und
der normale Betrieb wird wieder aufgenommen.
Allgemeine Angaben
Garantie
Geemarc gewährt eine zweijährige Garantie ab Kaufdatum dieses
Geemarc-Gerätes. Während dieses Zeitraums werden sämtliche
Reparaturen und Ersatzteile kostenlos (nach unserem Ermessen)
bereitgestellt. Wenden Sie sich bei Störungen an unsere Hotline
oder besuchen Sie unsere Webseite unter www.geemarc.com.
Von dieser Garantie sind Unfälle, unsachgemäße Bedienung oder
mangelnde Sorgfalt ausgeschlossen.
Veränderungen oder ein Auseinandernehmen des Gerätes sind
ausschließlich durch qualifizierte Geemarc-Mitarbeiter zulässig.
Ihre Rechte werden von dieser Geemarc-Garantie in keiner Weise
beeinträchtigt.
Wichtig: IHR KAUFBELEG IST TEIL DER GARANTIE UND
MUSS AUFBEWAHRT UND IM GARANTIEFALL VORGELEGT
WERDEN.
Bitte beachten Sie: Diese Garantie ist nur für Deutschland gültig.
EWG-Erklärung:
Geemarc Telecom SA erklärt hiermit, dass dieses Produkt die
notwendigen Voraussetzungen sowie die weiteren betreffenden
Bestimmungen der Richtlinie 1999/5/EG über Funkanlagen und
Telekommunikationsendeinrichtungen erfüllt.
Die Konformitätserklärung ist unter www.geemarc.com/de
verfügbar
Allgemeine Angaben
Page 41

40
Hinweise zur Entsorgung
Entsorgung von elektrischen und elektronischen Altgeräten
(gültig innerhalb der Europäischen Gemeinschaft und in
anderen europäischen Ländern mit getrennter
Müllsammlung).
Dieses Symbol auf dem Produkt oder der Verpackung weist
darauf hin, dass dieses Produkt nicht mit dem normalen Hausmüll
entsorgt werden darf. Dieses Produkt sollte stattdessen an eine
entsprechende
Sammelstelle zum Recycling elektrischer oder elektronischer
Geräte gegeben werden.
Durch eine ordnungsgemäße Entsorgung dieses Produktes
tragen Sie dazu bei, mögliche Umweltschäden und Gefahren für
die Gesundheit zu vermeiden, was bei einer nicht fachgerechten
Entsorgung dieses Produktes nicht gewährleisten wäre.
Weitere und detaillierte Informationen zum Recycling dieses
Produktes erhalten Sie bei Ihrer Stadt- bzw.
Gemeindeverwaltung, bei Ihrem Entsorgungsunternehmen oder
beim Händler, bei dem Sie dieses Produkt erworben haben.
Kundenbetreuung
Produktsupport und Hilfe erhalten Sie auf unserer Webseite unter
www.geemarc.com
Telefonnummer der Kunden-Hotline unter der Rufnummer:
+49(0)228/ 74 87 09 0
Fax: +49(0)228/ 74 87 09 20
Allgemeine Angaben
Page 42

41
INLEIDING
De CL7100 is een persoonlijke geluidsversterker die kan
worden gebruikt door mensen met een beschadigd of
normaal gehoor.
Het apparaat kan worden gebruikt om naar de TV of een
audio-apparaat te luisteren zonder anderen te storen.
Het apparaat gebruikt een 2,3MHz infrarood (IR)
systeem.
WAARSCHUWING: Dit product kan hoge
geluidsdrukniveaus voortbrengen om mensen met een
beschadigd gehoor te helpen. Overmatige
geluidsdrukniveaus kunnen gehoorschade veroorzaken.
Het is aanbevolen om het volume eerst op een laag
niveau in te stellen en deze geleidelijk aan tot een
comfortabel niveau te verhogenau erreicht ist.
INLEIDING
Page 43

42
INHOUD VAN DE VERPAKKING
INHOUD VAN DE VERPAKKING
Page 44

43
(1) Zender/Oplader
Vooraanzicht
Achteraanzicht
INHOUD VAN DE VERPAKKING
DC 12V
stroomaansluiting
Microfoon
ingangsaansluiting
Audio
ingangsaansluiting
Linker oplaad
-
controlelampje
(RED)
Stroom en uitzend-
controle- lampje
IR ZENDER IR ZENDER
Rechter oplaad
-
controlelampje
(RED)
Reset
Page 45

44
OPMERKING: De zender/oplader kan één of twee headsets
opladen.
(2) Headset
OPMERKING: Afhankelijk van het gekochte model kunnen
er zich één of twee headsets in de verpakking bevinden.
(3) Voeding (AC – DC adapter, 100 - 240V).
(4) RCA (rood/wit) naar 3,5mm audiokabel.
INHOUD VAN DE VERPAKKING
Microfoon/ Line-
IN
ingang
Balansafstelling
Vervangbare silicone oordopjes
TOON-regeling
INFORMATION
I
Page 46

45
(5) Reserveoordopjes. Er zijn 3 verschillende stijlen
van oordopjes.
(6) Lithium-polymeer oplaadbare batterij (In de
headset ingebouwd) 3,7V/200mAH.
OPMERKING:
1. Dit type batterij gaat over het algemeen vele jaren mee en dient
niet te worden vervangen.
2. We bevelen aan om de batterij circa 2 uur op te laden alvorens
het systeem voor de eerste keer te gebruiken.
3. Plaats de headset in het oplaadstation. Controleer of het LEDoplaadcontrolelampje (ROOD) brandt. De LED dooft eenmaal
de batterij volledig is opgeladen.
4. Het is niet mogelijk om de batterij te overladen. We bevelen
aan om de headset in het oplaadstation te plaatsen wanneer
niet in gebruik.
WAARSCHUWINGEN OVER BATTERIJEN
Probeer niet om de batterij te wijzigen of uit te halen.
Gooi geen batterijen in vuur.
Houd batterijen uit de buurt van kinderen.
Sluit de oplaadklemmen onderaan de
headset niet kort.
Opmerking: Deze reeks van CL7100 producten komt in 2
modelvariaties en reserveheadsets zoals hieronder beschreven.
Deze gebruiksaanwijzing beschrijft ze allemaal.
1) CL7100 draadloze, enkele headsetsysteem.
INHOUD VAN DE VERPAKKING
Rechter oplaadcontrolelampje
Linker oplaad-
controlelampje
Page 47

46
2) CL7100 draadloze, dubbele headsetsysteem.
3) Extra draadloze headset.
INSTALLATIE
INSTALLATIE
Page 48

47
(1) Sluit de voeding aan zoals weergegeven in het
schema.
(2) Sluit de zender/oplader op de UITGANG
aansluitingen van de TV, audio-apparatuur, kabel- of
satellietdoos, DVD- of VCR-speler, enz. aan. Als een
RCA type kabel wordt gebruikt, zijn de uitgangsstekkers
rood en wit. Zie het schema.
Een Scartadapter (niet meegeleverd) kan tevens worden
gebruikt. Gebruik alleen de rode en witte
aansluitklemmen.
OPMERKING: Als het systeem op zowel een kabel- of
satellietdoos als een DVD- of VCR-speler is
aangesloten, is het nodig om het apparaat dat niet wordt
gebruikt uit te schakelen. Tijdens het gebruik van de
DVD of VCR-speler, schakel de kabel- of satellietdoos
uit. Tijdens het TV kijken, schakel de DVD- en VCRspeler uit.
(3) Aansluiting op een digitale omzettingsdoos (DAC).
Sluit de digitale audio-uitgang vanaf de TV of audio-
apparaat op de DAC aan met behulp van een geschikte
kabel (optische of coaxiale kabel). Gebruik vervolgens
de meegeleverde RCA type kabel om een aansluiting
vanaf de
INSTALLATIE
Page 49

48
rode en witte uitgangsterminals van de DAC naar de
audio-ingangsaansluiting van de zender/oplader te
maken.
OPMERKING: Als u het systeem wilt gebruiken om naar
de TV te luisteren terwijl het TV-geluid gedempt is om
anderen niet te storen, stel de TV audio-uitgang op
FIXED (VAST) in. Zie de gebruiksaanwijzing van uw TV
hoe de TV op FIXED (VAST) in te stellen.
PLAATSBEPALING
De infrarood (IR) signalen vereisen een directe
zichtverbinding tussen de zender en de headset. Plaats
de zender op een dergelijke manier zodat er een directe
zichtverbinding met de headset is wanneer in gebruik.
De IR-signalen kunnen worden geblokkeerd door
voorwerpen zoals muren, deuren, meubilair, kranten,
boeken, enz. De IR diodes branden tijdens gebruik.
OPMERKING: Als er geen audio-invoer naar de
zender/oplader is, wordt de transmissie automatisch
uitgeschakeld en automatisch hervat eenmaal het
audiosignaal is hersteld.
INSTALLATIE
Page 50

49
WERKING
1. Zorg dat de zender/oplader op een juiste manier op
de netvoeding is aangesloten met behulp van de
meegeleverde adapter.
2. Draag de headset zodat het voorste (zeefgedrukte)
deel van de headset naar de zender is gericht.
3. Schakel de headset in met behulp van de
AAN/UIT/VOLUME regeling en regel het
volume.
4. Gebruik het toonregelwiel om de gewenste
toonfrequentie in te stellen.
5. Gebruik de geïntegreerde balansregeling om
de volumebalans tussen het linker- en rechteroor aan
te passen. Deze regelknop is op de headset te vinden.
6. Indien nodig, steek een condenser (electret)
microfoonstekker in de Mic/Line In aansluiting
op de headset of sluit de audio-uitgang van een
mobiele telefoon op dezelfde aansluiting aan met
behulp van een kabel met een 3,5mm stekker.
7. Na gebruik van het systeem, plaats de headset
voorzichtig in het oplaadstation. Zorg dat de headset
nauwsluitend in het station zit. Controleer of het
oplaadcontrolelampje brandt.
WERKING
Page 51

50
VEILIGHEID, ONDERHOUD EN REINIGING
• Het systeem, dat is ontworpen om met 100-240V AC
voeding te werken, is niet voorzien van een integrale
aan/uit-schakelaar. Om de stroom uit te schakelen, stel
de netvoedingschakelaar op OFF (UIT) in of haal de
stekker van de AC-DC adapter uit het stopcontact.
• Maak de headset en oordopjes regelmatig schoon ----
gebruik een vochtige doek voor de headset en warm
water met een mild reinigingsmiddel voor de oordopjes
(na verwijdering van de headset).
• Houd het apparaat uit de buurt van warmtebronnen
zoals warmteplaaten en warmte producerende
apparatuur.
• Houd het apparaat uit de buurt van water en andere
vloeistoffen.
• Reparaties mogen alleen door gekwalificeerd
personeel worden uitgevoerd.
• We bevelen het gebruik van een
stroompiekonderbreker tussen het stopcontact en de
AC-DC adapter aan.
VEILIGHEID, ONDERHOUD EN REINIGING
Page 52

51
PROBLEEMOPLOSSING
Het geluid is niet zuiver (statisch/geruis).
• Controleer de zichtverbinding.
• Zorg dat de LEDs branden.
• Controleer de locatie van de zender (hoogte boven de
vloer).
• Houd het apparaat uit de buurt van een venster of
apparaat die storing veroorzaakt.
• Controleer of de audiokabel op een analoge (RCA)
audio-OUT aansluiting van de TV, kabel- of
satellietdecoder/ontvanger is aangesloten.
• Controleer of de audiokabel NIET op een digitale
audio-out aansluiting is aangesloten.
• Het stopcontact kan reeds door een ander apparaat
worden gebruikt.
• De audiokabel is op de audio-aansluiting van de
zender aangesloten.
De LED-lampjes van de zender branden niet.
• Controleer de aansluiting op het stopcontact.
• Controleer de aansluiting met de CL7100 12V
aansluiting.
De oplaadcontrolelampjes branden niet wanneer de
headset zich in het oplaadstation bevindt.
• Pas de positie van de headset in het oplaadstation
aan.
PROBLEEMOPLOSSING
Page 53

52
• Zorg dat het oplaadstation op de netvoeding is
aangesloten.
PRODUCTSPECIFICATIES
Algemene gegevens:
Frequentie: 2,3MHz
Modulatie: Infrarood, mono
Bereik: circa 60 m2
Audio frequentieresponsie: 100-16.000 Hz
Totale harmonische distorsie: < 1%
Signaal-/ruisverhouding: 70 dB
Automatisch AAN/UIT
Headset:
Max. geluidsdrukniveau (SPL): 119 dB
Benodigde batterij: Lithium-polymeer oplaadbare
batterij, 3,7V / 200mAH
Werkingsduur: Max.10 uur
Gewicht: circa 58–60 g
Zender:
Audioverbinding: Minikoptelefoon/RCA-kabel.
Voeding: DC-voeding 12V, 500mA
Gewicht: Circa 171 g
Afmetingen (HxBx H): 4,8x10,5x15,4 cm
RESETSCHAKELAAR (Reset): Het kan voorkomen dat
computers niet naar behoren werken door elektrostatische
ontlading of andere elektrische storingen, of wanneer de DCaansluiting is aangesloten. Als dit zich voordoet, duw een
dun staafje in de RESET opening achteraan de
zender en houd deze gedurende circa één seconde
PRODUCTSPECIFICATIES
Page 54

53
ingedrukt. De computer wordt gereset, het geheugen wordt
gewist en keert vervolgens terug naar de normale werking.
Algemene Informatie
EEG verklaring
Hierbij verklaart Geemarc dat dit product voldoet aan de
essentiële vereisten en andere relevante condities van de
Richtlijn 1999/5/EG betreffende radioapparatuur en
telecommunicatie-eindapparatuur.
De nakomingsverklaring kan ingezien worden op
www.geemarc.com.
Informatie over afvalverwerking
Lozing van oude elektrische en elektronische apparaten
(geldend in de EU en andere Europese landen met
gescheiden afvalverwerking).
De symbolen op het product en de verpakking geven aan dat dit
product niet als huishoudelijk afval behandeld mag worden. In
plaats daarvan moet het ingeleverd worden bij de verzamelpunten
voor het recyclen van elektrische en elektronische apparaten.
Door ervoor te zorgen dat dit product op de juiste manier wordt
weggegooid, helpt u potentiële negatieve gevolgen voor het
milieu en de gezondheid van mensen, die veroorzaakt kunnen
worden door onjuiste afvalverwerking van dit product, te
voorkomen.
Voor gedetailleerde informatie over het recyclen van dit product
neemt u contact op met de plaatselijke autoriteiten, de
vuilophaaldienst of de winkel waar u het product gekocht heeft.
Klantenservice
Voor productondersteuning en hulp gaat u naar onze
website op www.geemarc.com.
E-mail : customerservices@geemarc.com
Algemene Informatie
Page 55

54
INTRODUCCIÓN
D El CL7100 es un amplificador de sonido personal que
puede ser utilizado por personas con discapacidad
auditiva o por personas con una audición normal.
Se puede utilizar para escuchar la televisión u otros
equipos de audio sin molestar a otras personas.
Utiliza un sistema por infrarrojos (IR) de 2,3MHz.
ADVERTENCIAS: Este producto puede proporcionar
unos niveles altos de presión acústica, los cuales tienen
como finalidad asistir a aquellas personas con
discapacidad auditiva. Unos niveles de presión acústica
demasiado altos pueden ocasionar lesiones auditivas,
por lo que se recomienda ajustar el volumen a un nivel
más bajo y aumentarlo gradualmente hasta que alcance
un nivel adecuado.
INTRODUCCIÓN
Page 56

55
CONTENIDO DEL EMBALAJE
CONTENIDO DEL EMBALAJE
Page 57

56
(1) Transmisor/Cargador
Vista frontal
Vista trasera
CONTENIDO DEL EMBALAJE
Toma de
alimentación DC
12V
Entrada de
micrófono
Entrada de audio
Indicador de carga
izquierdo de la base
(ROJO)
Indicador de
encendido
EMISOR DE IR EMISOR DE IR
Indicador de carga
derecho de la base
Reajustar
Page 58

57
NOTA: El transmisor/cargador puede recargar hasta dos
auriculares.
(2) Auriculares
NOTA: En función del modelo adquirido, puede que se
incluyan uno o dos auriculares en la caja.
(3) Fuente de alimentación (Adaptador de
alimentación CA-CC, 100-240V).
(4) Cable de audio RCA (rojo/blanco) de 3,5mm.
CONTENIDO DEL EMBALAJE
Entrada de
micrófono / Line-
In
Ajuste del
balance
Ada
ptadores auditivos de
silicona reemplazables
Control de TONO
ON/OFF / Control de
Page 59

58
(5) Adaptadores auditivos de repuesto Se incluyen 3
estilos de adaptadores auditivos.
(6) Batería recargable de polímero de litio (sellada
en la cincha de los auriculares). 3,7V/200mAh.
NOTA:
1. Este tipo de batería debería tener una larga vida útil, por lo que
no es necesario reemplazarla.
2. Le recomendamos cargar la batería durante 2 horas antes de
utilizar el dispositivo por primera vez.
3. Coloque los auriculares en la base de recarga. Compruebe que
el indicador de luz LED (ROJO) esté iluminado. La batería se
habrá recargado por completo cuando la luz LED se apague.
4. No es posible sobrecargar la batería. Le recomendamos
colocar los auriculares en la base de recarga cuando no los
esté utilizando.
ADVERTENCIAS SOBRE LA BATERÍA
No intente cambiar o quitar la batería.
No la deseche arrojándola al fuego.
Mantenga fuera del alcance de los niños.
No realice un cortocircuito en los bornes de carga de
la parte inferior de los auriculares.
Nota: Los serie de productos CL7100 incluye 2 variaciones de
este modelo y unos auriculares de repuesto, que se detalla más
abajo. Este manual de instrucciones es aplicable a todos ellos.
1) Sistema CL7100 con un juego de auriculares inalámbricos.
CONTENIDO DEL EMBALAJE
Indicador de
carga derecho
de la base
Indicador de
carga izquierdo
de la base
Page 60

59
2) Sistema CL7100 con dos juegos de auriculares inalámbricos.
3) Auriculares inalámbricos adicionales.
INSTALACIÓN
INSTALACIÓN
Page 61

60
(1) Conecte la fuente de alimentación como se muestra
en la ilustración.
(2) El transmisor/cargador debe conectarse a la
SALIDA de audio del televisor, dispositivo de audio,
receptor de televisión por cable o satélite, reproductor
de DVD o VCR, etc. Cuando se utilice un cable RCA,
las clavijas roja y blanca son las salidas de audio.
Remítase a la ilustración.
También se puede utilizar un adaptador de
Euroconector (no incluido). Utilice solamente las clavijas
roja y blanca.
NOTA: Si el sistema está conectado a un receptor de
televisión por cable o satélite y a un reproductor de DVD
o VCR, será necesario apagar el dispositivo que no se
esté utilizando en ese momento. Cuando utilice un
reproductor de DVD o VCR, apague el receptor de
televisión por cable o satélite. Cuando esté viendo la
televisión, apague el reproductor de DVD o VCR.
(3) Conexión a un dispositivo de conversión digitalanalógica (DAC).
Conecte la salida de audio digital del televisor a un
dispositivo DAC mediante el cable apropiado (cable
óptico o coaxial). A continuación, utilice el cable RCA
INSTALACIÓN
Page 62

61
suministrado para conectar las clavijas roja y blanca de
la salida de audio del dispositivo DAC a la entrada de
audio del transmisor/cargador.
NOTA: Si quiere usar el sistema para escuchar la
televisión mientras el sonido del televisor está
desactivado para no molestar a otras personas, la salida
de audio del televisor debe estar configurada como
FIJA. Consulte el manual de instrucciones de su
televisor parar configurar la salida de audio como FIJA.
POSICIONAMIENTO
La señales infrarrojas (IR) necesitan una conexión con
una línea de visibilidad directa entre el transmisor y los
auriculares. La posición del transmisor debe ser tal que
tenga una conexión de una línea de visibilidad directa
con los auriculares cuando se esté utilizando. Las
señales IR se pueden quedar bloqueadas por objetos
como paredes, puertas, muebles, periódicos, libros, etc.
Los diodos IR está encendidos durante el uso del
dispositivo.
NOTA: Cuando no llega una señal de audio al
transmisor/cargador, éste se apagará automáticamente
hasta que la señal de audio lo encienda de nuevo.
INSTALACIÓN
Page 63

62
FUNCIONAMIENTO
1. Asegúrese de que el transmisor/cargador está
conectado correctamente a la fuente de alimentación
mediante el adaptador de alimentación suministrado.
2. Coloque los auriculares de manera que la parte
frontal (serigrafiada) de los auriculares estén
apuntando hacia el transmisor.
3. Encienda los auriculares con el control
ON/OFF/VOLUME y ajuste el volumen.
4. Utilice la ruedecilla de control tonal para ajustar la
frecuencia tonal según sus necesidades.
5. Utilice el control del balance para ajustar el
balance del sonido entre los auriculares derecho e
izquierdo. Este control se encuentra en los auriculares.
6. Si fuera necesario, inserte la clavija de un micrófono
de condensador (electret) en la entrada del Mic/LineIn de los auriculares o conecte la salida de
audio del teléfono móvil en la misma entrada
mediante un cable con conector de 3,5mm.
7. Cuando haya terminado de usar el dispositivo,
coloque con cuidado los auriculares en la base de
recarga, asegurándose de que se ajusten bien a la
base. Compruebe que el indicador de carga esté
iluminado.
FUNCIONAMIENTO
Page 64

63
SEGURIDAD, CUIDADO Y MANTENIMIENTO
• Este dispositivo, que está diseñado para ser
alimentado de un suministro eléctrico de 100-240V, no
incorpora un interruptor de encendido/apagado. Para
apagar el dispositivo, apague desde el interruptor de la
toma de corriente o desenchufe directamente de la
fuente de alimentación (adaptador de alimentación
CA/CC).
• Limpie los auriculares y los adaptadores auditivos con
regularidad ----- Utilice un paño húmedo para limpiar
los auriculares y agua caliente con jabón para limpiar
los adaptadores auditivos (una vez que los ha retirado
de los auriculares).
• Mantenga alejado de las fuentes de calor, como placas
calientes y aparatos que generen calor.
• Mantenga alejado del agua y otros líquidos.
• Las reparaciones deben ser realizadas por personal
cualificado.
• Le recomendamos que conecte un protector de
sobretensión entre la toma de corriente y el adaptador
de alimentación.
SEGURIDAD, CUIDADO Y MANTENIMIENTO
Page 65

64
El sonido no es claro (interferencias)
The sound is not clear (static/interference)
• Compruebe que haya una conexión con una línea de
visibilidad directa.
• Asegúrese de que las luces LED estén iluminadas.
• Compruebe la ubicación del transmisor (altura
respecto al suelo).
• Mantenga alejado de las ventanas y de dispositivos
que produzcan interferencias.
• Compruebe que el cable de audio esté conectado a la
salida de audio analógica (RCA) del receptor
/decodificador de televisión por cable o satélite.
• Compruebe que el cable de audio NO esté conectado
a una salida de audio digital.
• Puede que la toma de corriente también esté siendo
utilizada por otro dispositivo.
• El cable de audio está conectado a la entrada de
audio del transmisor.
La luces LED del transmisor no se iluminan
• Compruebe la conexión con la toma de corriente.
• Compruebe la conexión a la toma de alimentación de
12V de CL7100.
Los indicadores luminosos de carga no se iluminan
cuando los auriculares están la base de recarga.
RESOLUCIÓN DE PROBLEMAS
Page 66

65
• Vuelva a colocar los auriculares en la base, moviendo
su posición.
• Asegúrese de que la base de recarga esté conectada
a la toma de corriente.
ESPECIFICACIONES TÉCNICAS DEL PRODUCTO
Datos generales :
Frecuencia nominal: 2,3MHz
Modulación: Infrarrojos, mono
Alcance aprox.: 60 m2 (unos 600 ft2)
Respuesta en frecuencia: 100-16,000 Hz
Distorsión armónica total: < 1%
Relación señal/ruido: 70 dB
Encendido/apagado automático
Auriculares :
Nivel máximo de presión acústica (SPL): 119 dB
Requisitos de la batería: Batería recargable de polímero
de litio: 3,7V/ 200mAh
Autonomía: 10 horas máx.
Peso aprox.: 58–60 g
Transmisor :
Conexión de audio: Auriculares mini/Cable RCA.
Fuente de alimentación: Fuente de alimentación CC de
12V, 500mA
Peso: ~171g
Dimensiones (Alto x Largo x Ancho):
4,8 x 10,5 x 15,4 cm
BOTÓN DE RENICIO (Reset): Algunas veces el dispositivo
no funciona bien debido a descargas electrostáticas o a otro
tipo de perturbaciones cuando está conectada la toma de
alimentación. En estos casos, inserte un objeto fino por el
ESPECIFICACIONES TÉCNICAS DEL PRODUCTO
Page 67

66
orificio de RESET (Reinicio), en la parte posterior del
transmisor, y déjelo presionado durante un segundo. Esto
restablecerá el dispositivo, borrará su memoria y lo
devolverá a su estado normal de funcionamiento.
Información general
Declaración EEC
Geemarc Telecom SA declara que este producto cumple los
requisitos esenciales y otras provisiones relevantes de la
Directiva 1999/5/EEC sobre equipo terminal de radio y
telecomunicaciones.
La declaración de cumplimiento puede consultarse en
www.geemarc.com.
Información para la eliminación
Eliminación de equipo eléctrico y electrónico viejo (válido en
la Unión Europea y en otros países europeos con sistemas
de recolección separados)
El símbolo en el producto o en su empaque indica que no se lo
puede tratar como residuo residencial. Por el contrario se los
debe entregar a los puntos de recolección correspondientes para
el reciclado de equipo eléctrico y electrónico.
Al asegurar de que este producto sea eliminado correctamente,
ayudará a prevenir consecuencias potencialmente negativas para
la salud y el medio ambiente que la manipulación inadecuada de
los residuos de este producto podría causar.
Para recibir información más detallada sobre el reciclado de este
producto, contacte a la oficina de su ayuntamiento, el servicio de
eliminación de residuos residenciales o la tienda en la que
compró el producto.
Soporte al cliente
Información general
Page 68

67
Para soporte al cliente y ayuda visite nuestro sitio Web en
www.geemarc.com.
E-mail : customerservices@geemarc.com
INTRODUZIONE
CL7100 è un amplificatore acustico personale che può
essere usato da persone ipoudenti e da persone udenti.
Può essere usato per ascoltare la TV o impianti audio
senza disturbare gli altri.
Utilizza un sistema a Infrarossi (IR) 2,3 MHz.
AVVERTENZA: Questo dispositivo può produrre elevati
livelli di pressione sonora per assistere le persone
ipoudenti. Eccessivi livelli di pressione sonora possono
danneggiare l’udito, perciò si raccomanda di impostare
inizialmente il volume su un livello basso per poi
aumentarlo gradualmente fino a un livello adeguato.
INTRODUZIONE
Page 69

68
CONTENUTO DELLA CONFEZIONE
CONTENUTO DELLA CONFEZIONE
Page 70

69
(1) Trasmettitore/Caricabatteria
Vista frontale
Vista posteriore
CONTENUTO DELLA CONFEZIONE
Ingresso
alimentazione DC
12V
Ingresso
microfono
Ingresso audio
Indicatore di carica
sinistro (SPIA
ROSSA)
Indicatore di
accensione ed
emissione
EMETTITORE
IR
EMETTITORE
IR
Indicatore di carica
destro (SPIA
ROSSA)
R
eset
Page 71

70
NOTA: Il trasmettitore/caricabatteria può caricare una o due cuffie.
(2) Cuffia
NOTA: A seconda del modello acquistato la confezione
includerà una o due cuffie.
(3) Alimentatore (Adattatore AC–DC, 100-240 V).
(4) Cavo audio RCA (rosso/bianco)/3,5 mm.
CONTENUTO DELLA CONFEZIONE
Ingresso
microfono/Line-
IN
Controllo
bilanciamento
Cuscinetti auricolari in silicone,
sostituibili
Controllo tono
ON/OFF
/Controllo volume
Page 72

71
(5) Cuscinetti auricolari di ricambio, 3 grandezze
diverse.
(6) Batteria ricaricabile ai polimeri di litio (sigillata
all’interno della cuffia) 3,7V / 200mAH.
NOTA:
1. Questo tipo di batteria solitamente dura diversi anni e non è
necessario sostituirla.
2. Si raccomanda di caricare la batteria per circa 2 ore prima di
utilizzare il dispositivo per la prima volta.
3. Collocare le cuffie nell’alloggiamento per la carica. Verificare
che l’indicatore di carica (spia rossa) sia acceso. L’indicatore si
spegnerà quando la batteria è completamente carica.
4. Non è possibile sovraccaricare la batteria. Si raccomanda di
collocare la cuffia nell’alloggiamento per la carica quando non
in uso.
AVVERTENZE RELATIVE ALLA BATTERIA
Non tentare di modificare o di rimuovere la batteria.
Non gettarla nel fuoco.
Tenerla fuori dalla portata dei bambini.
Non cortocircuitare i terminali di carica alla base delle
cuffie.
CONTENUTO DELLA CONFEZIONE
Indicatore di
carica destro
Indicatore di
carica sinistro
Page 73

72
Nota: Questa serie di prodotti CL7100 comprende 2 varianti e
cuffie acquistabili separatamente (elencati di seguito) e questo
manuale è valido per ogni modello.
1) Sistema wireless CL7100 cuffia singola.
2) Sistema wireless CL7100 cuffia doppia.
3) Cuffia wireless aggiuntiva.
INSTALACIÓN
INSTALACIÓN
Page 74

73
(1) Collegare l’alimentatore come mostrato in figura.
(2) Il trasmettitore/caricabatteria deve essere collegato
alle prese di USCITA audio di TV, impianto audio,
decoder TV via cavo/satellitare, lettore DVD o VCR, ecc.
Le prese di uscita per il cavo di tipo RCA sono rossa e
bianca. Fare riferimento alla figura.
E’ possibile usare anche un adattatore Scart (non
incluso). Utilizzare solo i terminali bianco e rosso.
NOTA: Se il sistema è collegato a un decoder TV via
cavo o satellitare e a un lettore DVD o VCR, è
necessario spegnere il dispositivo che non verrà usato.
Spegnere il decoder TV via cavo/satellitare quando si
usa il lettore DVD o VCR. Spegnere il lettore DVD o
VCR quando si guarda la TV.
(3) Connessione a un convertitore digitale-analogico
(DAC).
Collegare l’uscita audio digitale della TV o dell’impianto
audio al DAC usando un cavo appropriato (cavo ottico o
coassiale). Quindi utilizzare il cavo di tipo RCA fornito
INSTALACIÓN
Page 75

74
per collegare i terminali rosso e bianco del DAC alla
presa di ingresso audio del trasmettitore/caricabatteria.
NOTA: Se si desidera utilizzare il sistema per ascoltare
la TV quando il suono della TV è disattivato per non
disturbare gli altri, l’uscita audio della TV deve essere
impostata su FIXED (fissa). Fare riferimento al manuale
della TV per istruzioni su come impostarla su FIXED
(fissa).
POSIZIONAMENTO
I segnali infrarossi (IR) necessitano di una connessione
diretta in linea retta tra il trasmettitore e la cuffia.
Posizionare il trasmettitore in modo da consentire una
connessione diretta in linea retta con le cuffie quando
sono in uso. I segnali IR potrebbero essere bloccati da
oggetti come muri, porte, mobile, giornali, libri, ecc. I
diodi IR sono accesi quando in uso.
NOTA: Quando non c’è connessione audio con il
trasmettitore/caricabatteria, la trasmissione si spegne
automaticamente e si riattiva automaticamente quando il
segnale audio è ripristinato.
INSTALACIÓN
Page 76

75
FUNZIONAMENTO
1. Accertarsi che il trasmettitore/caricabatteria sia
correttamente collegato alla corrente usando
l’alimentatore fornito.
2. Indossare la cuffia in modo tale che la parte frontale
della cuffia sia rivolta verso il trasmettitore.
3. Accendere la cuffia utilizzando il controllo
ON/OFF/VOLUME e regolare il volume.
4. Utilizzare la rotellina di controllo del tono per
regolare la frequenza del tono a seconda delle proprie
necessità.
5. Utilizzare il controllo del bilanciamento incluso
per regolare il bilanciamento del volume tra
l’orecchio destro e sinistro. Questo controllo è sulla
cuffia.
6. Se necessario, inserire il connettore di un microfono a
condensatore (electret) nella presa Mic/LineIn
della cuffia o collegare l’uscita audio di un telefono
cellulare nella stessa presa utilizzando un cavo con
un connettore da 3,5 mm.
FUNZIONAMENTO
Page 77

76
7. Quando il dispositivo non è in uso, collocare
accuratamente la cuffia sull’alloggiamento per la
carica assicurandosi che sia ben fissato
nell’alloggiamento. Controllare che l’indicatore di
carica sia acceso.
SICUREZZA E MANUTENZIONE
• Il dispositivo, che è progettato per funzionare con
alimentazione AC 100-240V, non ha un interruttore
integrale di accensione/spegnimento. Per scollegarlo
dalla corrente, disattivare la rete elettrica o scollegare
l’alimentatore (adattatore AC-DC).
• Pulire la cuffia e i cuscinetti auricolari regolarmente;
utilizzare un panno umido per la cuffia e acqua calda
con un detergente delicato per i cuscinetti auricolari
(dopo averli rimossi dalla cuffia).
• Tenere lontano da fonti di calore come piastre calde e
apparecchi che generano calore.
• Tenere lontano da acqua e altri fluidi.
• Le riparazioni devono essere effettuate da personale
qualificato.
• Si consiglia di collegare un dispositivo di protezione da
sovratensione tra la rete elettrica e l’adattatore AC-DC.
SICUREZZA E MANUTENZIONE
Page 78

77
RISOLUZIONE DEI PROBLEMI
Il suono non è pulito (statico/interferenze)
• Controllare che la connessione sia in linea retta.
• Assicurarsi che le spie siano accese.
• Controllare il posizionamento del trasmettitore (altezza
da terra).
• Tenere lontano da finestre o da dispositivi che
causano interferenze.
• Verificare che il cavo audio sia collegato a una presa
di USCITA audio analogica (RCA) della TV o del
decoder TV via cavo o satellitare.
• Verificare che il cavo audio NON sia collegato a una
presa di uscita audio digitale.
• La presa di corrente potrebbe essere usata da un altro
dispositivo.
• Verificare che il cavo audio sia collegato alla presa
audio del trasmettitore.
Le spie del trasmettitore non sono accese.
• Controllare la connessione alla presa di corrente.
• Controllare la connessione alla presa CL7100.
RISOLUZIONE DEI PROBLEMI
Page 79

78
Gli indicatori di carica non si accendono quando la
cuffia è nell’alloggiamento.
• Riallineare la cuffia; se necessario, muoverla
all’interno dell’alloggiamento.
• Assicurarsi che il trasmettitore/caricabatteria sia
collegato alla corrente.
SPECIFICHE TECNICHE
Dati generali :
Frequenza: 2,3 MHz
Modulazione: Infrarossi, mono
Portata appross.: 60 m2 (circa 600 ft2)
Risposta audio in frequenza: 100-16000 Hz
Distorsione armonica totale: < 1%
Rapporto segnale-rumore: 70 dB
ON/OFF automatici
Cuffie :
Massimo livello di pressione sonora (SPL): 119 dB
Batteria: Batteria ricaricabile ai polimeri di litio, 3,7 V /
200 mAH.
Durata operativa: max 10 ore
Peso: circa 58 – 60 g
Trasmettitore :
Connessione audio: cavo RCA/3,5 mm
Alimentazione: DC 12V, 500mA
Peso: circa 171 g
Dimensioni (HxLxL): 4.8x10.5x15.4 cm
SPECIFICHE TECNICHE
Page 80

79
PULSANTE RESET: A volte il dispositivo potrebbe non
funzionare correttamente a causa di scariche elettrostatiche
o altre interferenze elettriche o quando il cavo di
alimentazione viene inserito. Se si verificano
malfunzionamenti, inserire uno spillo nel foro RESET sul
retro del trasmettitore e premere per circa un secondo.
Questo resetterà il sistema, cancellerà la memoria e
riporterà il dispositivo a un funzionamento normale.
Informazioni generali
Dichiarazione di conformità CEE
Geemarc Telecom SA con la presente dichiara che il proprio
prodotto è conforme con i requisiti di base e con quanto altro
previsto dalla Direttiva sugli Apparati Radio e Terminali di
Comunicazione 1999/5 CEE.
La dichiarazione di conformità può essere consultata su
www.geemarc.com.
Informazioni per lo smaltimento
Lo smaltimento di vecchie apparecchiature elettriche ed
elettroniche (applicabile nell’Unione Europea e in altri paesi
europei con sistema di raccolta differenziata)
Il simbolo apposto sul prodotto indica che il prodotto o la sua
confezione non possono essere considerati rifiuti domestici.
Invece devono essere portati nel punto di raccolta per il riciclo di
apparecchiatura elettrica ed elettronica.
Assicurandovi che il prodotto sia smaltito correttamente
impedirete le potenziali conseguenze negative per l’ambiente e la
salute umana che potrebbero verificarsi a causa di un
inappropriato smaltimento di questo prodotto.
Informazioni generali
Page 81

80
Per maggiori e più dettagliate informazioni sul riciclo di questo
prodotto si prega di contattare il proprio ufficio comunale, il
servizio di smaltimento rifiuti o il negozio presso il quale è stato
acquistato il prodotto.
Supporto al cliente
Per supporto circa il prodotto e aiuto visitate il nostro sito
web: www.geemarc.com.
E-mail : customerservices@geemarc.com
Page 82

81
Page 83

82
Page 84

83
Page 85

84
UGAmpliPOWER40/50_It_Ver 1.0
UGCL7100_EnFrGeNLSpIt_v0.1
 Loading...