

Page 1

2.4 GHz Wireless Digital Quality Sound
Casque sans fil 2.4 GHz Son Qualité HiFi
2.4 GHz Funk-Kopfhörer mit kristallklarem Stereosound
Control remoto inalámbrico de 2,4 GHz con sonido de calidad digital
Cuffia a 2.4 GHz wireless qualità del suono HiFi
2,4 GHz draadloos en digitaal kwaliteitsgeluid
2.4GHz תוינזוא ב לילצ םע תויטוחלא תוילטיגיד עמשההובג תוכיא
2,4 GHz trådlös digital ljudkvalitet
2.4 GHz-es vezeték nélküli technológia, minőségi hangzás
2,4 GHz Trådløs digital kvalitetslyd
Trådløse hodetelefoner 2,4 GHz med Hi-Fi-lydkvalitet
Bezprzewodowa cyfrowa transmisja dźwięku(2.4 GHz)
Page 2

1
Unpacking
Contenu du Colis
Auspacken
Desempaque
Estrarre dall’imballaggio
Uitpakken
הקירפ
Packa upp
Kicsomagolás
Udpakning
Innholdet i pakken
Zawartość
Page 3

2
Installation
Installation
Installation
Instalación
Installazione
Installatie
הנקתה
Installation
Üzembe helyezés
Installation
Installasjon
Instalacja
Page 4

3
Installation
Installation
Installation
Instalación
Installazione
Installatie
הנקתה
Installation
Üzembe helyezés
Installation
Installasjon
Instalacja
Page 5

4
Installation
Installation
Installation
Instalación
Installazione
Installatie
הנקתה
Installation
Üzembe helyezés
Installation
Installasjon
Instalacja
Page 6

5
Charging
Chargement
Aufladen
Carga
Ricarica
Opladen
הניעט
Laddar
Töltés
Opladning
Lading
Ładowanie
MicroUSB
not included
non inclus
nicht enthalten
no incluido
non incluso
niet inbegrepen
לולכ אל
inte ingår
nincs a csomagban
ikke inkluderet
følger ikke med
brak w zestawie
Page 7

6
How to use
Utilisation
Bedienungsanleitung
Cómo se usa
Come usare
Hoe gebruikt u het
שמתשהל דציכ
Hur använder man
Használat
Tag i brug
Bruk
Instrukcja obsługi
Page 8

7
: Your CL7400 is now set up to the recommended levels. For further
personalisation (if required) see pages 8 - 14.
: Votre CL7400 est prêt à l'emploi. Si vous souhaitez régler la balance
(grave/aigu) ou la tonalité, merci de vous reporter aux pages 8 - 14.
: Ihr CL7400 wurde nun mit den empfohlenen Werten eingestellt. Für
weitere Personalisierung (falls erforderlich) siehe Seite 8 - 14.
: Su CL7400 se encuentra configurado a los niveles recomendados.
Para personalizar aún más (en caso de ser requerido) ver páginas 8 - 14.
: L’apparecchio CL7400 è ora impostato sui livelli raccomandati. Per
ulteriore personalizzazione (se richiesta) fare riferimento alle pagine 8 - 14.
: Uw CL7400 is momenteel ingesteld op de aanbevolen niveau’s.
Indien nodig, kijk op pagina’s 8 - 14 voor meer informatie over persoonlijke
instellingen.
: Din CL7400 är nu inställd till rekommenderade nivåer. För
ytterligare anpassning (vid behov) se sid. 8 - 14.
: A CL7400 beállítása ezzel megtörtént. További személyre szabási
lehetőségekért (ha szükséges) lásd 8 -14. oldal.
: Din CL7400 er nu indstillet til de anbefalede niveauer. For yderligere
personlig tilpasning (hvis ønsket) se side 8 - 14.
: CL7400 er klar til bruk. Hvis du ønsker å justere balansen
(bass/diskant) eller klangen, kan du se side 8 –14.
: Twój CL7400 jest ustawiony na zalecany poziom. Dalsze zmiany
ustawień zostały opisane na stronach 8-14.
Setting
Réglage
Einstellung
Ajuste
Impostazione
Instellen
הרדגה
Inställning
Beállítások
Indstilling
Justering
Ustawienia
Page 9

8
Volume
Volume
Lautstärke
Volumen
Volume
Volume
תמצוע עמש
Volym
Hangerő
Lydstyrke
Volum
Głośność
Page 10
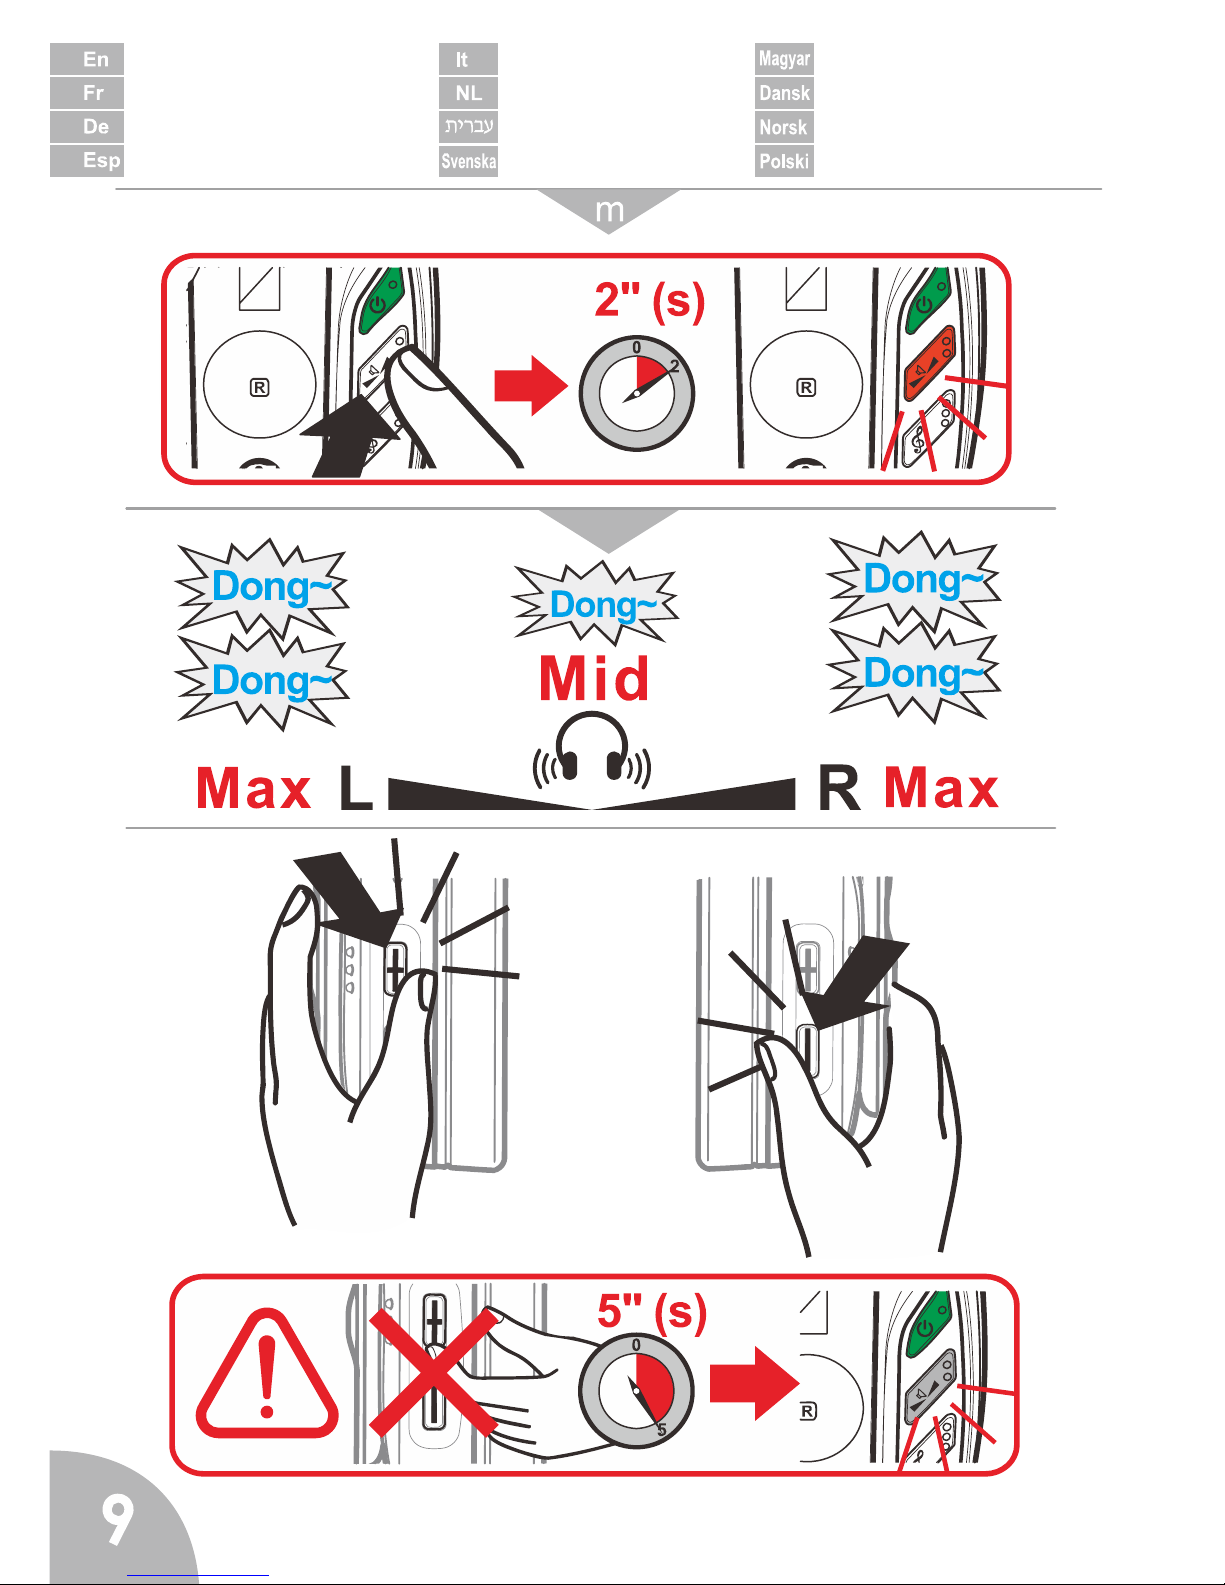
9
Balance Setting
Réglage de la balance
Balanceregelung
Ajuste del equilibrio
Equilibratura
Balansinstelling
ןוזיא תרדגה
Balansinställning
Balansz beállítása
Balance indstilling
Justering av balansen
Ustawienia balansu
Page 11

10
Tone Setting
Réglage de la tonalité
Toneinstellung
Ajuste el tono
Regolazione tono
Tooninstelling
לילצ תרדגה
Toninställning
Hangszín beállítása
Tone indstilling
Justering av klangen
Ustawienia tonalne
Page 12
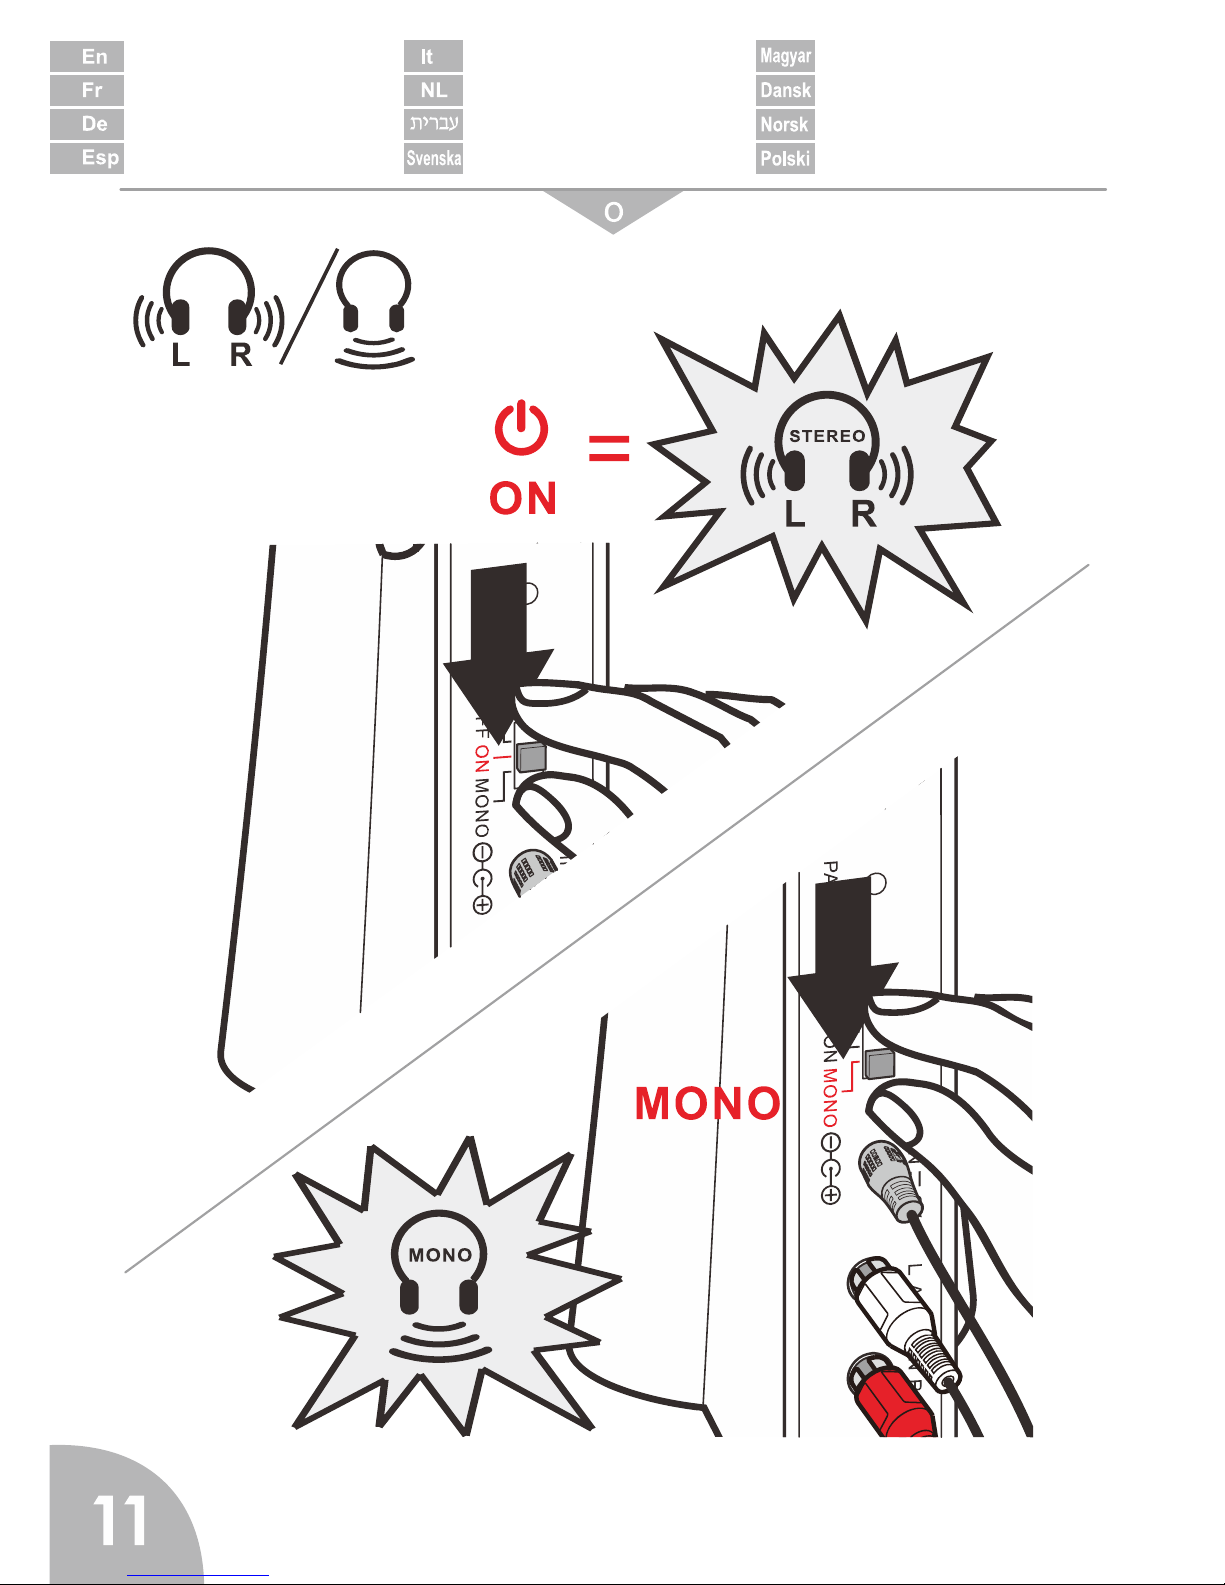
11
Stereo/Mono Setting
Stéréo/Mono réglage
Stereo/Mono-Einstellung
Estéreo/Mono ajuste
Impostazione stereo/mono
Instelling stereo/mono
ואירטס תרדגה/ונומ
Stereo/Mono-inställning
Sztereó/Monó beállítása
Stereo/Mono indstilling
Justering av stereo/mono
Ustawienia mono/stereo
Page 13

12
En: The headset had already paired with transmitter.
Fr: Le casque est déjà jumelé avec son émetteur.
De: Das Headset bereits mit Sender gepaart.
Esp: El auricular ya se había emparejado con el transmisor.
It: L'auricolare è già accoppiato con trasmettitore.
NL: De headset had al gekoppeld met zender.
רדשמל ומאתוה רבכ תוינזואה : תירבע
Svenskq:Headsetet hade redan parats ihop med sändare.
Magyar: A fejhallgató már csatlakozott a jeladóhoz.
Dansk: Høretelefonen er allerede koblet til senderen.
Norsk: Hodetelefonene er allerede paret med senderen.
Polski: Słuchawka jest teraz sparowana z nadajnikiem.
Pairing
Enregistrement
Anmelden
Emparejamiento
Accoppiare
Paarvorming
המאתה
Parning
Csatlakoztatás
Sammenkobling
Paring
Parowanie
Page 14

13
Warning
Attention
Achtung
Aviso
Avviso
Waarschuwing
הרהזה
Varning
En: DO NOT remove the ear pad as it is very
difficult to replace
Fr: Ne pas retirer les housses des écouteurs
car cela est difficile de les remettre.
De: Die Ohrpolster bitte nicht entfernen. Das
Wiederaufsetzen ist schwierig.
Esp: NO remueva las almohadillas de los
auriculares debido a su dificultad de
colocación.
It: NON rimuovere il cuscinetto dalla cuffia
auricolare, è difficile sostituirlo.
NL: Het oorkussen NIET verwijderen want het
is moeilijk te vervangen.
תירבע :ןיא ןזואה תדיפר תא ריסהל ,השקש ןוויכמ
הפילחהל דואמ
.
Svenska: Avlägsna INTE öronsnäckan då
den är mycket svår att ersätta.
Magyar: NE távolítsa el a fülpárnát, mivel
nagyon nehéz visszahelyezni.
Dansk: FJERN IKKE ørepuden, da den er
meget svær at sætte på igen.
Norsk: Ikke fjern trekket på øreklokkene,
ettersom det er vanskelig å få det på igjen.
Polski: Nie zdejmuj ochronnej nakładki,
ponieważ bardzo trudno ją wymienić.
Figyelmeztetés
Advarsel
OBS!
Uwagi
Page 15

14
En: Up to 90% less emission operating in ECO mode.
Fr: Jusqu’à 90% d’Emission en moins en mode Repos.
De: Bis zu 90 % Strahlungsreduktion im ECO-Modus.
Esp:
Hasta un 90% menos de las radiaciones al operar en modo ECO.
It: Radiazioni ridotte del 90% nel funzionamento in modalità ECO.
NL: In de ECO stand werkt het met max. 90% minder uitstraling.
בעתיר : דע לש הדירי90% בצמב הלעפהב הנירקבECO )ינוכסח(
Svenska: Upp till 90 % mindre strålning i
ECO-läge.
Magyar: Akár 90%-kal kisebb kibocsátás ÖKO-üzemmódban.
Dansk: Op til 90 % mindre emission ved funktion i ECO modus.
Norsk: Opptil 90 % mindre strømforbruk i hvilemodus.
Polski: Do 90% mniej emisji w trybie Eco.
Eco mode
Mode éco
Eco-Modus
Modo Eco
Modalità Eco
Eco-modus
Eco
בצמ
Eco-läge
Öko-üzemmód
Eco modus
Hvilemodus
Tryb Eco
Page 16

15
Wired mode
Mode câblé
Kabelgebunden
Modo cable
Modalità cablata
Wired-modus
בצמ תיטוח
Kabelfunktionsläge
Vezetékes üzemmód
Med ledning
Kabelmodus
Podłączenie przez kabel
Page 17

16
Safety & Care advice
To make the best use of this product and to use it safely, please read these
instructions thoroughly before use and keep safe for future reference.
Warning: This product can be very loud. Take care to prevent others from
using this product, if they do not have the same level of hearing loss. Excessive
sound pressure from earphones and headphones can cause hearing loss.
Caution: Electric shock. DO NOT insert unattached plug heads in to mains
power sockets. Plug heads MUST be fitted to the power adaptor.
Electrical connection: The unit is designed to operate from a 100-240VAC 50/60Hz supply. (Classified as 'hazardous voltage' according to EN 60950
standard).
The unit does not incorporate an integral power on/off switch. To disconnect
the power, either switch off supply at the mains power socket or unplug the AC
adaptor. When installing the unit, ensure that the mains power socket is readily
accessible.
Caution: Risk of explosion if battery is replaced by an incorrect type.
Dispose of used batteries according to the instructions.
DO NOT cover the ventilation.
DO NOT remove the ear pad as it is very difficult to replace.
Keep the unit away from heat sources.
DO NOT expose the unit to direct sunlight.
Clean the Headset and ear pads regularly.
DO NOT modify the unit in any way.
Please note: The unit may be subject to interference from appliances that
generate strong electrical or magnetic fields e.g. microwaves, mobile phones,
lighting transformers etc.
Battery Warnings:
• DO NOT attempt to dismantle.
• DO NOT dispose of in fire.
• DO NOT swallow.
• Keep away from children.
• Batteries are to be inserted with the correct polarity.
• DO NOT short-circuit the supply terminals.
• Exhausted batteries are to be removed from the product.
• Do NOT use another type of battery or non-rechargeable batteries to replace
the rechargeable batteries.
• When the headphones are not in use or the batteries are charging, switch
OFF the headphones to avoid damaging the batteries.
• The batteries must be fully charged when use for the first time. An initial 5
hours charge is required.
English
Page 18

17
Troubleshooting:
NO SOUND
1. Ensure that the mains adapter is pushed fully into the power outlet and that
its cable is properly connected to the DC IN 6V connector on the transmitter.
2. Ensure that the headphones On/Off switch is switched to the On Position
and the switch is illuminant Green.
3. The headphones battery charge level may be too low. please replace the
headset back on it's cradle to recharge the batteries until the green light is
illuminated on the left hand headset.
4. Ensure that your DVD, TV set, Hi-Fi system or audio component is switched
on and set to a channel that broadcasts an audio signal.
5. Use the headphones volume control to increase the sound level (only when
use as a wireless headphone).
6. The audio signal input level is too low. Increase the volume from the audio
source of Hi-Fi, CD, or TV, etc.
7. The connected audio/video equipment may not be in playback mode. Start
playback on by the equipment.
8. The headphones output level is set too low. Adjust the volume to a suitable
level.
DISTORTION
9. Restart the Pairing process. Press the “Pair” button 3sec on the transmitter
and the headphone. The process is finished when both LEDs are in Green.
10.The headphone’s batteries charge level may be too low. Recharge the
batteries.
11.Ensure that the volume setting is correct.
12.The headphones may be too far away from the transmitter. Move closer to it.
13.The audio signal input level is too strong. decrease the volume from the
audio source of Hi-Fi, CD, or TV, etc.
NOTE: In the event of the television not having the standard red and
white audio output RCA, or the audio jack, then most likely the TV will have an
optical audio output. By purchasing a Geemarc optical converter (our reference
CL7XX_OPT) this will allow the CL7400 to connect to the TV's optical output
successfully.
English
Page 19

18
Customer support
For product support and help, visit our website at www.geemarc.com
For our Customer Helpline
Telephone: 01707 384438
Fax: 01707 832529
General information
Features
• 2.4GHz FHSS digital technology with equalizer features for tone and
balance adjustments.
• High quality stereo sound that is virtually interference-free
• Transmission is not restricted solely to line of sight
• Digital Pairing System on Headphone & Transmitter
• Electronic volume vontrol on headphones
• Built-in Pin-charger on transmitter
• Auto shut-off on headphone
• Auto On/Off RF function on transmitter
• 3.5mm Line in feature for wired headphone application
• Operating distance up to 50 meters
Technical specifications
Transmission mode : 2.4GHz digital FHSS stereo
Carrier frequenc
y
: 2.4GHz
Operating voltage : Transmitter 6 V 600 m
A
: Receiver 3.7V 1000mA
(built-in Lithium rechargeable battery)
Frequency response : 20 Hz
–
20 KHz (electrical)
Distortion : 0.5 %
Signal-to-noise ratio : 75 dB
Channel separation : 60 dB
Range : 50 meters (open area)
English
Page 20

19
Guarantee
From the moment your Geemarc product is purchased, Geemarc guarantee it
for the period of two years. During this time, all repairs or replacements (at our
discretion) are free of charge. Should you experience a problem then contact
our Helpline or visit our website at www.geemarc.com
.
The guarantee does not cover accidents, negligence or breakage to any parts.
The product must not be tampered with or taken apart by anyone who is not an
authorised Geemarc representative.
The Geemarc guarantee in no way limits your legal rights.
The product is covered by the legal guarantee of conformity as provided by
applicable law.
Important: YOUR RECEIPT IS PART OF YOUR GUARANTEE AND MUST
BE RETAINED AND PRODUCED IN THE EVENT OF A WARRANTY CLAIM.
Please note: The guarantee applies to the United Kingdom only.
EEC Declaration
Geemarc Telecom SA hereby declares that this product is in compliance with
the essential requirements and other relevant provisions of the Radio and
Telecommunications Terminal Equipment Directive 2014/53/UE.
The declaration of conformity may be consulted at www.geemarc.com
To prevent possible hearing damage, DO NOT listen at high
volume levels for long periods.
This device complies with Industry Canada Licence-exempt RSSs. Operation is
subject to the following two conditions: (1) this device may not cause harmful
interference, and (2) this device must accept any interference, including
interference that may cause undesired operation of the device.
FCC Statement
This device complies with Part 15 of the FCC Rules. Operation is subject to the
following two conditions: (1)this device may not cause harmful interference,
and (2)this devise must accept any interference received, including interference
that may cause undesired operation.
Warning: Changes or modifications to this unit not expressly approved by the
party responsible for compliance could void the user’s authority to operate the
equipment.
NOTE: This equipment has been tested and found to comply with the limits for
a Class B digital device, pursuant to Part 15 of FCC Rules. These limits are
English
Page 21

20
designed to provide reasonable protection against harmful interference in a
residential installation. This equipment generates, uses and can radiate radio
frequency energy and, if not installed and used in accordance with the
instructions, may cause harmful interference to radio communications.
However, there is no guarantee that interference will not occur in a particular
installation. If this equipment does cause harmful interference to radio or
television reception, which can be determined by turning the equipment off and
on, the user is encouraged to try to correct the interference by one or more of
the following measures:
• Re-orient or relocate the receiving antenna.
• Increase the separation between the equipment and receiver.
• Connect the equipment into an outlet on a circuit different from that to which
the receiver is connected.
• Consult the dealer or an experienced radio TV technician for help.
FCC ID: VHC-AAI-DH1250-00
IC: 9197A-CL7400
Disposal information
Disposal of old electrical & electronic equipment (applicable in the
European Union and other European countries with separate collection
systems)
The symbol on the product or its packaging indicates that this product may not
be treated as household waste. Instead it should be handed over to the
applicable collection point for the recycling of electrical and electronic
equipment.
By ensuring this product is disposed of correctly, you will help prevent potential
negative consequences for the environment and human health, which could
otherwise be caused by inappropriate waste handling of this product.
For more detailed information about recycling this product, please contact your
local council office, your household waste disposal service or the shop where
the product was purchased.
All electrical and electronic products including batteries should be disposed of
separately from the municipal waste stream via designated collection facilities
appointed by the government or the local authorities.
CAN ICES-3(B)/NMB-3(B)
English
Page 22

21
Sécurité & Précautions
Lisez attentivement ces instructions pour utiliser au mieux le casque, en toute
sécurité. Conservez ce manuel pour y revenir plus tard.
Attention : cet appareil peut fournir un son très puissant. Son usage est
prévu pour les malentendants. Un niveau sonore trop important diffusé par un
casque d’écoute peut provoquer des pertes d’audition.
Attention risque d’électrocution : Connectez la fiche de l’adaptateur secteur
àl’arrière de la base en premier et ensuite connectez votre adaptateur à la
prise de courant pour éviter tout problème d'électrocution.
Raccordement électrique : l’appareil est conçu pour fonctionner sur 100240VAC - 50/60Hz (“tension dangereuse” selon la norme EN 60950).
L’appareil ne comporte pas d’interrupteur marche/arrêt général. Pour mettre
l’appareil hors tension, retirez l’adaptateur secteur. Lorsque vous mettez
l’appareil en place, vérifiez que la prise de courant est bien accessible.
Attention : l’utilisation d’une batterie inadaptée peut provoquer des
dommages. Respectez les instructions de recyclage des batteries.
Ne pas recouvrir les trous d’aérations.
Ne pas retirer les housses des écouteurs car cela est difficile de les remettre.
Maintenez l’appareil à distance des sources de chaleur.
N’exposez pas l’appareil aux rayons du soleil.
Nettoyez régulièrement le casque et les embouts d’écoute.
N’apportez aucune modification à l’appareil.
Remarque : l’appareil peut subir les interférences provenant d’autres appareils
générant un champ magnétique ou électrique puissant (four à micro-ondes,
téléphone portable, transformateur d’éclairage, etc.).
Attention:
• Ne jamais démonter une batterie
• Ne jamais jeter une batterie au feu
• Ne jamais avaler une batterie
• Conserver hors de portée des enfants
• Respecter les polarités de branchement
• Ne jamais court-circuiter les bornes de l’adaptateur
• Ne jamais laisser une batterie morte dans le casque.
• Ne pas utiliser d’autre modèle de batterie rechargeable pour remplacer celle
actuelle. Veuillez contacter le service après-vente.
• Quand le casque n’est pas utilisé ou que la batterie est rechargée, veuillez
placer l’interrupteur situé à l’arrière du socle sur OFF (Arrêt) pour éviter tout
dommage des batteries.
• La batterie doit être rechargée totalement la première fois. Une charge de 5
heures est préconisée.
Français
Page 23

22
Dépannage:
Pas de son dans la casque
1. Vérifier que l’adaptateur secteur est correctement connecté dans la prise
secteur et à l’arrière du socle DC IN 6V.
2. Vérifier que l’interrupteur On/Off du socle est sur la position ON (Marche) et
que le voyant est vert sur le coté (un signal doit être envoyé sur le socle).
3. Le niveau de charge de la batterie du casque peut-être trop faible.
Rechargez la batterie.
4. Vérifier que votre DVD, TV, système Hi-Fi ou audio est en fonctionnement et
envoi un signal audio.
5. Utilisez la commande volume du casque pour augmenter le niveau de
réception (seulement en mode casque uniquement).
6. Le niveau du signal d’entrée est trop faible. Augmenter le niveau de la
source audio de votre TV, système Hi Fi, CD, etc.
7. L’appareil audio/vidéo peut ne pas être en mode lecture. Lancez la lecture
de votre appareil.
8. Le niveau de sortie de votre casque est faible. Ajustez l’écoute au niveau
souhaité.
DISTORSION
9. Refaire la procédure d’enregistrement de la page 14. Appuyez sur le bouton
Pair à l’arrière du socle pendant 3 sec et 5 sec sur le bouton marche arrêt du
casque. La procédure est terminée quand les 2 voyants sont verts.
10. Le niveau de charge de la batterie du casque peut être trop faible, mettre le
casque en charge.
11. Vérifier que le niveau du volume est correct.
12. Le casque peut être trop éloigné de la base. Rapprochez vous de la base.
13. Le niveau du signal d’entré est trop fort, veuillez diminuer le volume de
votre source Hi-Fi, CD, ou TV, etc.
REMARQUE: Si votre téléviseur ne possède pas de sortie audio ou
RCA, votre TV a certainement une sortie audio optique. En achetant un
convertisseur optique Geemarc (ref : CL7XX_OPT), cela vous permet de
connecter votre CL7400 à votre sortie optique de votre téléviseur avec succès.
Français
Page 24

23
Service client
Pour obtenir des informations et de l’aide sur nos produits, consultez notre site
Internet www.geemarc.com
Notre Service Client est disponible au : 03.28.58.75.99
Fax: 03.28.58.75.76
Informations générales
Caractéristiques
• Transmission numérique 2,4 GHz AFHSS (modulation adaptive à sauts de
fréquence) avec la possibilité de modifier la tonalité et la balance
• Son stéréo de haute qualité sans bruit de fond
• La transmission ne se limite pas uniquement à la ligne de mire
• Système de couplage numérique entre le casque et le socle
• Control du volume par le casque
• Grand plots de charge sur le socle
• Arrêt automatique du casque
• Interrupteur Marche/Arrêt sur le socle
• Câble audio 3.5mm pour connexion sur entrée casque TV
• Distance d’utilisation jusqu’à 50 mètres en extérieur
Technical specifications
Mode de transmission : 2.4GHz numérique FHSS stéréo
Fréquence d’utilisation : 2.4GHz
Tension d’alimentation : Base 6 V 600 mA
: Casque 3.7V 1000mA
(batterie rechargeable au lithium)
Réponse en fréquence audio : 20 Hz – 20 KHz
Distorsion DHT : 0.5 %
Rapport bruit signal : 75 dB
Séparation canal : 60 dB
Portée : 50 mètres (en extérieur)
Français
Page 25

24
Garantie
Geemarc garantit cet appareil pour une durée de deux ans pièces et maind'oeuvre à partir de la date d'achat. Pendant cette période, Geemarc réparera
(ou remplacera si nécessaire) votre appareil gratuitement. En cas de problème,
n’hésitez pas à contacter notre service client ou à consulter notre site Internet
sur www.geemarc.com
.
La garantie ne couvre pas les accidents, les pièces cassées, les problèmes
causés par l'orage, par les liquides renversés, ni par la négligence de
l'utilisateur. Seuls les techniciens agréés Geemarc sont autorisés à intervenir
sur votre appareil.
La garantie Geemarc ne limite en aucun cas les droits que vous accorde la loi.
Le produit est couvert par la garantie légale de conformité telle que prévue par
la réglementation applicable.
Important : VOTRE FACTURE D'ACHAT EST UN ÉLÉMENT ESSENTIEL DE
VOTRE GARANTIE. ELLE VOUS SERA DEMANDÉE EN CAS
D'INTERVENTION SOUS GARANTIE.
Remarque: La garantie s'applique uniquement en France.
DÉCLARATION DE COMPATIBILITÉ :
Ce produit respecte les exigences de compatibilité électromagnétique et de
sécurité électrique demandées par la directive européenne RTTE
2014/53/UE.
Vous pouvez consulter la déclaration de conformité sur www.geemarc.com.fr
Pour éviter d’endomager votre système auditif, ne pas mettre le
volume au maximum durant une longue durée.
Cet appareil est conforme avec l’Industrie au Canada, exempts de licence
RSSs. Son fonctionnement est soumis aux deux conditions suivantes: (1) ce
dispositif ne doit pas causer d'interférences nuisibles et (2) cet appareil doit
accepter toute interférence, y compris les interférences qui peuvent entraîner
un mauvais fonctionnement de l'appareil.
Déclaration de conformité de la FCC
Cet appareil est conforme à la partie 15 des règles de la FCC. Son
fonctionnement est soumis aux deux conditions suivantes : (1)Cet appareil ne
doit pas provoquer de brouillage préjudiciable, et (2)Il doit accepter tout
brouillage reçu, y compris le brouillage pouvant entraîner un mauvais
fonctionnement.
Français
Page 26

25
ATTENTION : Tout changement apporté à cet appareil non expressément
approuvé par la partie responsable de la conformité est susceptible d'annuler
le droit de l'utilisateur à se servir de cet équipement.
NOTE : Cet appareil a été testé et déclaré conforme aux limites imposées aux
appareils numériques de la classe B, en vertu de la partie 15 des règles de la
FCC. Ces limites sont conçues pour fournir une protection suffisante contre les
interférences nuisibles dans les installations résidentielles. Cet appareil génère,
utilise et peut dégager de l'énergie de radiofréquence et, s'il n'est pas installé et
utilisé conformément aux instructions du fabricant, provoquer un brouillage
préjudiciable aux communications radio.
Il n'existe toutefois aucune garantie qu'un appareil particulier ne sera pas
victime du brouillage. Si cet appareil entraîne un brouillage préjudiciable à la
réception des émissions radio ou de télévision, identifiable en mettant le
terminal hors puis sous tension, il est recommandé à l'utilisateur de tenter de
résoudre ce problème au moyen d'une ou plusieurs des mesures suivantes :
• Orienter l'antenne réceptrice différemment ou la changer de place.
• Augmenter la distance séparant l'équipement du récepteur.
• Connecter l'équipement à une prise sur un circuit différent de celui sur lequel
est branché le récepteur.
• Obtenir de l'aide auprès du revendeur ou d'un technicien radio/TV
expérimenté.
FCC ID: VHC-AAI-DH1250-00
IC: 9197A-CL7400
Recyclage
Mise au rebut des équipements électriques et électroniques usagés
(applicable au sein de l’Union Européenne et dans les autres pays
européens utilisant des systèmes de collecte séparée).
La présence du symbole sur le produit ou son emballage signifie que le produit
ne doit pas être traité comme les déchets ménagers. Ce produit doit être
apporté à un point de collecte pour recyclage des matériels électriques et
électroniques.
En respectant les consignes de recyclage de votre appareil, vous participez à
la protection de l’environnement et de la santé.
Pour en savoir plus sur le recyclage de cet appareil, contactez votre revendeur,
les services municipaux ou la déchetterie de votre localité.
Tous les produits électriques et électroniques incluant des batteries doivent
être jetés séparément, dans le flux de déchets municipaux par l'intermédiaire
des installations de collecte désignés par le gouvernement ou les autorités
locales.
CAN ICES-3 (B) / NMB-3 (B)
Français
Page 27

26
Sicherheits - und Pflegehinweise
Bitte lesen Sie für einen optimalen und sicheren Einsatz dieses Gerätes diese
Bedienungsanleitung vor der Verwendung aufmerksam durch und bewahren Sie
sie zum späteren Nachschlagen auf.
Achtung: Dieses Produkt kann einen sehr lauten Ton erzeugen. Achten Sie
darauf, dass das Gerät nicht von Personen ohne ähnlich starke Hörschäden
genutzt wird. Ein übermäßiger Schalldruck der Kopfhörer kann zu Hörverlust
führen.
Vorsicht: Gefahr von Stromschlägen. Die Netzanschlussstecker niemals an
einer Netzsteckdose anschließen. Die Netzanschlussstecker müssen an den
Netzadapter angeschlossen werden.
Elektrischer Anschluss: Dieses Gerät ist für den Anschluss an eine Stromquelle
mit 100-240 V Wechselstrom bei 50/60 Hz vorgesehen. (Klassifizierung als‚
gefährliche Spannung‘ gemäß Norm EN 60950).
Das Gerät besitzt keinen eigenen Netzschalter. Um die Stromversorgung zum
Gerät zu trennen, muss entweder der Netzschalter der Netzsteckdose, falls
vorhanden, betätigt oder der Netzadapter von der Steckdose abgezogen werden.
Der Netzstecker sollte nach dem Anschluss des Gerätes leicht zugänglich sein.
Vorsicht: Beim Einlegen eines falschen Batterietyps besteht
Explosionsgefahr.
Verbrauchte Batterien gemäß den Hinweisen entsorgen.
Die Lüftung bitte nicht abdecken.
Die Ohrpolster bitte nicht entfernen. Das Wiederaufsetzen ist schwierig.
Das Gerät nicht in der Nähe von Wärmequellen verwenden.
Das Gerät KEINER direkten Sonneneinstrahlung aussetzen.
Kopfhörer und Ohrpolster regelmäßig reinigen.
Das Gerät in keiner Weise verändern.
Bitte beachten Sie: Das Gerät ist möglicherweise Störstrahlungen von anderen
Geräten in der Nähe ausgesetzt, die starke elektrische oder magnetische Felder
erzeugen, wie beispielsweise Mikrowellengeräte, Mobiltelefone,
Lampentransformatoren, usw.
Sicherheitshinweise zur Batterie:
• Batterien NIEMALS auseinandernehmen.
• Batterien NIEMALS in offenes Feuer werfen.
• Batterien NIEMALS verschlucken.
• Batterien außerhalb der Reichweite von Kindern aufbewahren.
• Die Batterien müssen mit der richtigen Polung eingelegt werden.
• Die Anschlussstifte NIEMALS kurzschließen.
Deutsch
Page 28
27
• Verbrauchte Batterien müssen aus dem Gerät genommen werden.
• Es sollten keine nicht-aufladbaren Batterien oder Batterien eines anderen
Typs verwendet werden.
• Wenn Sie den Kopfhörer nicht benützen oder laden, schalten Sie den
Kopfhörer aus, um Schaden zu vermeiden.
• Vor dem gebrauch müssen die Akkus vollständig aufgeladen werden. Dieser
Ladevorgang dauert 5 Stunden.
Fehlerbehebung:
KEIN TON
1. Prüfen sie daβ das Netzteil an der DC IN 6V Anschluβbuchse der Basis
richtig angeschlossen ist.
2. Prüfen Sie daβ die Basis auf An geschaltet ist und die grüne LED leuchtet.
3. Die Akkus sind zu schwach. Laden Sie die Batterien wieder auf.
4. Stellen Sie sicher, daβ das DVD, TV oder Audiogerät eingeschaltet ist und
ein Audio-Signal sendet.
5. Stellen Sie die Lautstärke am Kopfhörer ein. (Nur wenn Sie den Kopfhörer
ohne Kabel verwenden)
6. Das Audio-Eingang Signal ist zu schwach. Erhöhen Sie die Lautstärke des
DVD, TV oder Audiogeräts.
7. Die angeschlossene Audio-/Video-Geräte sind möglicherweise nicht im
Wiedergabe-Modus. Starten Sie die Wiedergabe.
8. Die Kopfhörerlautstärke ist zu niedrig. Stellen Sie die Lautstärke ein
VERZERRUNG
9. Wiederholen Sie die Anmeldeprozedur. Drücken Sie am Kopfhörer und
Basis auf “Pair” 3 Sekunden lang. Der Vorgang ist abgeschlossen, wenn
beide LED grün leuchten.
10. Die Akkus sind zu schwach. Laden Sie die batterien wieder auf
11. Prüfen Sie die Lautstärke.
12. Die Entfernung zur Basis ist zu groβ. Nähern Sie sich der Basisstation.
13. Das Audio-Eingang Signal ist zu stark. verringern Sie die Lautstärke des
DVD, TV oder Audiogeräts.
HINWEIS: Falls Ihr Fernsehgerät über keinen standard Cinch-Anschluß
(Audio-Ausgang mit den rot-weißen Buchsen) oder keine 3.5mm JackKlinkenbuchse verfügt, dann hat es sicherlich einen optischen Audio-Ausgang.
Dank des Geemarc optischen Konverters (Unsere Referenz: CL7XX_OPT)
können Sie den CL7400 an den Fernseher anschließen.
Deutsch Deutsch Deutsch
Page 29

28
Kundenbetreuung
Produktsupport und Hilfe erhalten Sie auf unserer Webseite unter
www.geemarc.com
E-mail : customerservices@geemarc.com
Telefon : 00 49 (0)228 548 89 932
Allgemeine Angaben
Technische Daten
• Digitale 2.4 GHz AFHSS-Übertragung mit Tonhöhen- und Balanceregelung.
• Hohe Stereo-Klangqualität ohne Hintergrundgeräusche
• 360° Strahlungsfeld
• Digitale Funkverbindung zwischen Basis und Kopfhörer
• Lautstärkeeinstellung am Kopfhörer
• Breite Ladekontakte für den Kopfhörer auf der Basisstation
• Kopfhörer schaltet automatisch aus
• An/Aus Schalter auf der Basis
• Kabel mit 3.5mm Jack-Klinkenstecker.
• Reichweite bis zu 50 Meter
Technical specifications
Übertragungsmodus : 2.4GHz digital FHSS Stereo
Nutzungsfrequenz : 2.4GHz
Stromspannung : Basis 6 V 600 mA
: Kopfhörer 3.7V 1000mA
(Batterie aus Lithium-polymer)
Frequenzgang : 20 Hz – 20 KHz
Verzerrung : 0.5 %
Signal-Rauschverhältnis : 75 dB
Reichweite : 50 Meter (im Freifeld)
Übertragungsmodus : 2.4GHz digital FHSS Stereo
Deutsch
Page 30
29
Garantie
Geemarc gewährt eine zweijährige Garantie ab Kaufdatum dieses GeemarcGerätes. Während dieses Zeitraums werden sämtliche Reparaturen und
Ersatzteile kostenlos (nach unserem Ermessen) bereitgestellt. Wenden Sie
sich bei Störungen an unsere Hotline oder besuchen Sie unsere Webseite
unter www.geemarc.com
.
Von dieser Garantie sind Unfälle, unsachgemäße Bedienung oder mangelnde
Sorgfalt ausgeschlossen.
Veränderungen oder ein Auseinandernehmen des Gerätes sind ausschließlich
durch qualifizierte Geemarc-Mitarbeiter zulässig.
Ihre Rechte werden von dieser Geemarc-Garantie in keiner Weise
beeinträchtigt.
Das Produkt ist durch die gesetzliche Garantie der Konformität abgedeckt wie
gesetzlich vorgesehen.
Wichtig: IHR KAUFBELEG IST TEIL DER GARANTIE UND MUSS
AUFBEWAHRT UND IM GARANTIEFALL VORGELEGT WERDEN.
Bitte beachten Sie: Diese Garantie ist nur für Deutschland gültig.
EWG-Erklärung:
Geemarc Telecom SA erklärt hiermit, dass dieses Produkt die notwendigen
Voraussetzungen sowie die weiteren betreffenden Bestimmungen der
Richtlinie 2014/53/UE über Funkanlagen und
Telekommunikationsendeinrichtungen erfüllt.
Die Konformitätserklärung ist unter www.geemarc.com/de
verfügbar
Um Gehörschaden zu verhindern, betreiben Sie es nicht über
längere Zeit mit hoher Lautstärke.
Dieses Gerät entspricht die Industry Canada Lizenzen-außer RSSs. Die
Inbetriebnahme unterliegt folgenden zwei Bedingungen: (1) Dieses Gerät darf
keine schädlichen Interferenzen verursachen, und (2) dieses Gerät muss alle
Störungen aufnehmen können, auch die Störungen, die einen unerwünschten
Betrieb zur Folge haben.
FCC-Erklärung :
Dieses Gerät entspricht Teil 15 der FCC-Bestimmungen. Der Betrieb unterliegt
den folgenden zwei Bedingungen: (1) Das Gerät darf keine Interferenzen
verursachen, und (2) Das Gerät muss unanfällig gegenüber beliebigen
empfangenen Störungen sein, einschließlich solcher, die einen unerwünschten
Betrieb verursachen.
Achtung: Veränderungen oder Modifikationen, die nicht ausdrücklich vom
Hersteller genehmigt wurden, können zum Verlust der Erlaubnis für den
Betrieb dieses Gerätes führen.
Deutsch
Page 31

30
Hinweis: Das vorliegende Gerät erfüllt die Grenzwertbestimmungen für digitale
Geräte der Klasse B nach Teil 15 der FCC-Regeln zur Funkentstörung. Ziel
dieser Bestimmungen ist es, beim Betrieb des Gerätes innerhalb einer
Wohnumgebung einen angemessenen Schutz gegen störende Interferenzen
zu gewährleisten. Dieses Gerät erzeugt und nutzt Hochfrequenzenergie und
kann diese auch ausstrahlen. Wird es nicht gemäß den hier gegebenen
Anweisungen angeschlossen und genutzt, kann das Gerät Funkübertragungen
erheblich stören.
Es ist jedoch trotz Befolgen der Anweisungen möglich, dass bei bestimmten
Geräten Störungen auftreten. Sollten durch das Gerät Störungen beim Radiobzw. Fernsehempfang auftreten, was z.B. durch Ein- und Ausschaltung des
Geräts geprüft werden kann, versuchen Sie, diese durch folgende Maßnahmen
zu beheben:
• Richten Sie die Empfangsantenne neu aus.
• Erhöhen Sie den Abstand zwischen Gerät und Empfänger.
• Schließen Sie das Gerät an eine Netzquelle auf einem anderen Kreislauf an,
als dem, an den der Empfänger angeschlossen ist.
• Wenden Sie sich an Ihren Fachhändler oder einen erfahrenen Radio- und
Fernsehtechniker für Hilfe.
FCC ID: VHC-AAI-DH1250-00
IC: 9197A-CL7400
Hinweise zur Entsorgung
Entsorgung von elektrischen und elektronischen Altgeräten (gültig
innerhalb der Europäischen Gemeinschaft und in anderen europäischen
Ländern mit getrennter Müllsammlung).
Dieses Symbol auf dem Produkt oder der Verpackung weist darauf hin, dass
dieses Produkt nicht mit dem normalen Hausmüll entsorgt werden darf. Dieses
Produkt sollte stattdessen an eine entsprechende
Sammelstelle zum Recycling elektrischer oder elektronischer Geräte gegeben
werden.
Durch eine ordnungsgemäße Entsorgung dieses Produktes tragen Sie dazu
bei, mögliche Umweltschäden und Gefahren für die Gesundheit zu vermeiden,
was bei einer nicht fachgerechten Entsorgung dieses Produktes nicht
gewährleisten wäre.
Weitere und detaillierte Informationen zum Recycling dieses Produktes
erhalten Sie bei Ihrer Stadt- bzw. Gemeindeverwaltung, bei Ihrem
Entsorgungsunternehmen oder beim Händler, bei dem Sie dieses Produkt
erworben haben.
Alle Elektro- und Electronikgeräte einschließlich Batterien sind getrennt vom
allgemeinen Hausmüll über dafür staatlich vorgesehene Stellen zu entsorgen.
CAN ICES-3(B)/NMB-3(B)
Deutsch
Page 32

31
Consejos de seguridad y cuidados
Para lograr el mejor uso de este producto y utilizarlo en forma segura, lea
todas estas instrucciones antes de usar y manténgalas en un lugar seguro
para una referencia futura.
Advertencia: Este producto puede tener un sonido muy alto. Evite que
otras personas lo utilicen si no tienen el mismo nivel de pérdida auditiva. Una
presión de sonido excesiva por los audífonos y los auriculares puede causar
pérdida auditiva.
Precaución: Choque eléctrico. NO inserte cabezales de enchufes sueltos en
los tomas de corriente de la red eléctrica. Los cabezales de los enchufes
DEBEN estar fijados al adaptador de alimentación.
Conexión eléctrica: La unidad está diseñada para operar a partir de
alimentación de 100-240 VCA – 50/60 Hz. (Clasificado como “tensión
peligrosa” de acuerdo con el estándar EN60950).
La unidad no incorpora un interruptor de encendido / apagado (ON/OFF) de
alimentación. Para desconectar la alimentación, cierre el toma de alimentación
de la red eléctrica o desenchufe el adaptador CA. Cuando instale la unidad
asegúrese de que el toma de alimentación en la red eléctrica sea fácilmente
accesible.
Precaución: Si se reemplaza la batería con un tipo incorrecto existe el
riesgo de explosión. Elimine las baterías usadas de acuerdo con las
instrucciones.
NO cubra la ventilación.
NO remueva las almohadillas de los auriculares debido a su dificultad de
colocación.
Mantenga la unidad alejada de fuentes de calor.
NO exponga la unidad a luz solar directa.
Limpie el auricular y las almohadillas auditivas regularmente.
NO modifique la unidad de ninguna manera.
Tenga en cuenta que: La unidad puede sufrir interferencias de aparatos que
generan campos eléctricos o magnéticos fuertes, por ejemplo, microondas,
teléfonos móviles, transformadores de iluminación, etc.
Advertencias relacionadas con las baterías:
• NO intente desmantelarlas.
• NO las elimine en el fuego.
• NO las mastique. Manténgalas fuera del alcance de los niños.
• Las baterías deben ser insertadas con la polaridad correcta.
• NO cortocircuite las terminales de alimentación.
• Las baterías agotadas deben ser retiradas del producto.
• NO utilice otro tipo de batería ni baterías no recargables para sustituir a las
baterías recargables.
Español
Page 33

32
• Cuando los auriculares no se utilicen o cuando las baterías estén siendo
cargadas, desconecte los auriculares para evitar dañar las baterías.
• Las baterías deberán estar completamente cargadas cuando se usen por
primera vez. Se requiere una carga inicial de 5 horas.
Detección y eliminación de fallas:
NO HAY SONIDO
1. Verifique que el adaptador principal esté totalmente conectado a la toma de
corriente y que el cable esté conectado de manera correcta al conectar de
CC de 6V en el transmisor.
2. Verifique que el interruptor de Encendido/Apagado de los auriculares se
encuentre en la posición Encendida (On) y el interruptor se encuentre
iluminado en verde.
3. El nivel de carga de las baterías puede estar muy bajo. Vuelva a colocar los
auriculares en su base para recargar las baterías, hasta que la luz verde se
encienda en el auricular izquierdo, o reemplace las baterías por otras
cargadas totalmente.
4. Verifique que su componente de audio (DVD, TV, Sistema de alta fidelidad)
se encuentre encendido (On) y en un canal que emite la señal de audio.
5. Utilice el control de volúmen de los auriculares para aumentar el nivel de
sonido (solamente cuando se utilicen como auriculares inalámbricos).
6. El nivel de la señal de entrada de audio es muy bajo. Aumente el volúmen
de la fuente de audio del equipo de alta fidelidad, CD, TV, etc.
7. El equipo conectado de audio/video puede no estar en el modo de
reproducción. Comience la reproducción en el equipo.
8. El nivel de salida de las auriculares está configurado en un nivel muy bajo.
Ajuste el volúmen a un nivel adecuado.
DISTORCIÓN
9. Reinicie el proceso de apareo. Pulse el botón “Par” (“Pair”) 3 segundos en
el transmisor y los auriculares. El proceso finaliza cuando ambas luces LED
estén en Verde.
10. El nivel de carga de las baterías puede estar muy bajo. Recargue las
baterías
11. Verifique que la fijación de la perilla de volumen sea correcta.
12. Los auriculares se encuentran muy lejos del transmisor. Acérquelos.
13. El nivel de la señal de entrada de audio es muy alto. Disminuya el volumen
de la fuente de audio del equipo de alta fidelidad, CD, TV, etc.
NOTA: En el caso que la televisión no posea la toma de salida de audio
estándar de colores rojo y blanco, o el conector RCA, entonces lo más
probable es que la TV posea una salida de audio óptica. Con la compra de un
convertidor óptico Geemarc (nuestra referencia CL7XX_OPT) le permitirá que
el CL7400 se pueda conectar a la salida óptica del televisor de manera exitosa.
Español
Page 34

33
Soporte al cliente
Para soporte al cliente y ayuda visite nuestro sitio Web en www.geemarc.com.
E-mail : customerservices@geemarc.com
Información general
Características
• La tecnología digital FHSS de 2.4 GHz con carácterísticas de ecualizador
para ajustes de tono y balance.
• Sonido de alta calidad estereofónica virtualmente sin interferencias
• La transmisión no está limitada exclusivamente a la línea visual
• Sistema de apareo digital para auriculares y transmisor
• Control de volúmen electrónico para los auriculares
• Cargador de pin incluido en el transmisor
• Auriculares con desconexión automática
• Función de encendido/apagado de RF automático en el transmisor
• Cable de entrada de 3.5mm para la aplicación de auriculares con cables
• Distancia de operación hasta 50 metros
Especificaciones técnicas
Modo de transmisión: Digital de 2.4GHz FHSS estereofónico
Frecuencia del portador: 2,4GHz
Voltaje de operación: Transmisor: 6 Volts, 600mAmp
Receptor: 3.7 Volts, 1000mAmp
(Batería recargable imbuida de Lithio)
Respuesta a la frecuencia: De 20 Hz a 20 KHz (eléctrica).
Distorsión: 0,5 %
Relación señal a ruido: 75 dB
Separación de canales: 60 dB
Español
Page 35

34
Garantía
Desde el momento que su producto Geemarc es adquirido, Geemarc le brinda
garantía por dos años. Durante éste tiempo, todas las reparaciones o
sustituciones (a nuestro criterio) son totalmente gratuitas. En caso de tener
algún problema contacte nuestra línea de ayuda o visite nuestro sitio de
Internet www.geemarc.com
.
La garantía no cubre accidentes, negligencia ni roturas de cualesquiera de los
componentes.
El producto no puede haber sido manipulado ni desarmado por personas que
no sean representantes autorizados Geemarc
La garantía Geemarc no limita en ningún aspecto sus derechos legales.
El producto está cubierto por la garantía legal en conformidad con la ley
aplicable.
Importante: SU RECIBO ES PARTE DE SU GARANTÍA DEBERÁ
GUARDARSE Y PRESENTARSE EN CASO DE UN RECLAMO DE
GARANTÍA.
Declaración EEC:
Geemarc Telecom SA declara que este producto cumple los requisitos
esenciales y otras provisiones relevantes de la Directiva 2014/53/UE sobre
equipo terminal de radio y telecomunicaciones.
La declaración de cumplimiento puede consultarse en www.geemarc.com
.
Para evitar daños a la audición, EVITE escuchar a niveles de alto
volumen durante largos períodos.
Este dispositivo cumple con la exepción de la Licencia de la industria de
Canadá RSSs. La operación está sujeta a las dos condiciones siguientes: (1)
este dispositivo no puede causar interferencias perjudiciales y (2) este
dispositivo debe aceptar cualquier interferencia, incluidas las interferencias que
puedan causar un funcionamiento no deseado del dispositivo.
Declaración de la FCC
Este dispositivo cumple con la parte 15 de las Reglas de la Comisión Federal
de Comunicaciones. La operación está sujeta a las dos condiciones siguientes:
(1) este dispositivo no puede causar interferencias perjudiciales y (2) este
dispositivo debe aceptar cualquier interferencia recibida, incluidas las
interferencias que puedan causar un funcionamiento no deseado.
Advertencia: Los cambios o modificaciones a esta unidad no aprobados
expresamente por la parte responsable del cumplimiento podrían anular la
autoridad del usuario para operar el equipo.
Español
Español Español
Page 36

35
NOTA: Este equipo ha sido probado y cumple con los límites para un
dispositivo digital de Clase B, de acuerdo con la Parte 15 de las normas FCC.
Estos límites han sido diseñados para proporcionar una protección razonable
contra las interferencias perjudiciales en una instalación residencial. Este
equipo genera, utiliza y puede irradiar energía de radiofrecuencias y, si no se
instala y utiliza de acuerdo con las instrucciones, puede causar interferencias
perjudiciales en las comunicaciones de radio.
Sin embargo, no hay garantía de que no se producirán interferencias en una
instalación particular. Si este equipo causara interferencias perjudiciales en la
recepción de radio o televisión, lo cual puede comprobarse encendiéndolo y
apagándolo, se recomienda al usuario que intente corregir la interferencia
realizando una o más de las siguientes medidas:
• Reorientar o reubicar la antena receptora.
• Aumentar la separación entre el equipo y el receptor.
• Conectar el equipo a una toma de un circuito distinto de aquel al que está
conectado el receptor.
• Consulte al distribuidor o a un técnico de radio y televisión para obtener
ayuda.
FCC ID: VHC-AAI-DH1250-00
IC: 9197A-CL7400
Información para la eliminación
Eliminación de equipo eléctrico y electrónico viejo (válido en la Unión
Europea y en otros países europeos con sistemas de recolección
separados).
El símbolo en el producto o en su empaque indica que no se lo puede tratar
como residuo residencial. Por el contrario se los debe entregar a los puntos de
recolección correspondientes para el reciclado de equipo eléctrico y
electrónico.
Al asegurar de que este producto sea eliminado correctamente, ayudará a
prevenir consecuencias potencialmente negativas para la salud y el medio
ambiente que la manipulación inadecuada de los residuos de este producto
podría causar.
Para recibir información más detallada sobre el reciclado de este producto,
contacte a la oficina de su ayuntamiento, el servicio de eliminación de residuos
residenciales o la tienda en la que compró el producto.
Todos los productos eléctricos y electrónicos, incluyendo las baterías deberán
eliminarse de forma separada del resto de los residuos urbanos utilizando
puntos de recogida designados por el gobierno o por las autoridades locales.
CAN ICES-3(B)/NMB-3(B)
Español
Page 37
36
Precauzioni e manutenzione
Per far buon uso di questo prodotto e per utilizzarlo in sicurezza vi preghiamo
di leggere con attenzione queste istruzioni prima dell’uso e tenerle a portata di
mano per future consultazioni.
Attenzione: Questo prodotto può avere un volume di ascolto molto
elevato. Non fate utilizzare il prodotto ad altri, tranne nel caso in cui abbiano il
vostro stesso livello di perdita uditiva. Un volume troppo elevato degli auricolari
e delle cuffie può causare danni all’udito.
Avvertenza: Scossa elettrica. NON inserite gli spinotti nelle prese di corrente
senza prima inserirli nell’adattatore. Gli spinotti DEVONO essere inseriti
nell’adattatore.
Collegamento elettrico: L’apparato è studiato per il funzionamento con un
voltaggio di 100-240VAC – 50/60Hz. (Classificato come “voltaggio pericoloso”
in base alla norma EN 60950).
L’apparato non ha un interruttore di accensione / spegnimento. Per
interrompere l’alimentazione elettrica spengete la presa di corrente a muro o
staccate l’adattatore. Quando installate l’apparato assicuratevi che la presa di
corrente sia facilmente accessibile.
Avvertenza: Rischio di esplosione se la batteria viene sostituita con una
di tipo non adatto. Smaltire le batterie usate secondo le istruzioni.
NON impedire la ventilazione.
NON rimuovere il cuscinetto dalla cuffia auricolare, è difficile sostituirlo.
Tenere il dispositivo lontano da fonti di calore.
NON esponete il dispositivo alla luce diretta del sole.
Pulite regolarmente le cuffie e le spugnette auricolari.
NON modificate mai il dispositivo.
Fate attenzione: L’unità può essere soggetta ad interferenze da altre
apparecchiature che generano forti campi elettrici o magnetici, ad es.
microonde, telefoni cellulari, trasformatori, etc.
Avvisi Batterie:
• NON tentare di smontare
• NON buttarle nel fuoco
• NON inghiottire.
• Tenere lontano dai bambini.
• Le batterie vanno inserite con la giusta polarità.
• NON cortocircuitare i terminali.
• Le batterie esaurite devono essere rimosse dal dispositivo.
• NON usare un altro tipo di batteria o batterie non ricaricabili per sostituire le
batterie ricaricabili.
Italiano
Page 38

37
• Quando la cuffia non è in uso o le batterie sono in fase di ricarica, spegnere
OFF la cuffia per evitare danni alle batterie.
• Le batterie devono essere caricate del tutto quando usate per la prima volta.
È richiesto un periodo di carica iniziale di 5 ore.
Ricerca guasti:
NESSUN SUONO
1. Assicurare che la spina del cavo di alimentazione elettrica sia introdotta
completamente nella presa di rete e che il cavo sia adeguatamente
connesso al connettore DC IN 6V del trasmettitore.
2. Assicurare che l'interruttore On/Off della cuffia si trovi in posizione e che
l'interruttore stesso sia illuminato di luce verde.
3. Il livello di carica delle batterie della cuffia potrebbe essere troppo basso.
Appoggiare la cuffia sulla sua base per ricaricare le batterie, fino a quando
la luce verde si accende sull’auricolare sinistro della cuffia, o sostituire le
batterie con batterie completamente cariche.
4. Assicurare che DVD, apparecchio TV, sistema Hi-Fi o componenti audio
siano accesi e regolare su un canale che trasmetta un segnale audio.
5. Usare la regolazione del volume della cuffia auricolare per aumentare il
livello acustico (solo se in uso quale cuffia auricolare wireless).
6. Il segnale acustico in ingresso è troppo basso. Aumentare il volume della
sorgente audio di Hi-Fi, CD, o TV, ecc.
7. La strumentazione audio/video connessa può non essere regolata sulla
modalità di riproduzione. Impostare la riproduzione nella strumentazione.
8. Il livello di uscita della cuffia è troppo basso. Regolare il volume a un livello
idoneo.
DISTORSIONE
9. Riavviare il processo di accoppiamento. Premere il pulsante “Pair” per 3 sec
sul trasmettitore e sulla cuffia. Il processo è completo quando entrambi i
LED sono verdi.
10. Il livello di carica delle batterie della cuffia può essere troppo basso.
Ricaricare le batterie.
11. Assicurare che la regolazione del volume sia corretta.
12. La cuffia può essere troppo distante dal trasmettitore. Avvicinatela.
13. Il segnale acustico in ingresso è troppo basso. Aumentare il volume della
sorgente audio di Hi-Fi, CD, o TV, ecc.
NOTA: Nel caso in cui l’apparecchio televisivo non è dotato delle prese
d’uscita standard audio rossa e bianca o della presa per attacco RCA, molto
probabilmente è dotato dell’uscita audio ottica. Ma, acquistando un convertitore
ottico Geemarc (nostro articolo CL7XX_OPT), si potrà collegare con successo
il dispositivo CL7400 all’uscita ottica dell’apparecchio TVy.
Italiano
Page 39

38
Assistenza al cliente
Per assistenza nell’uso del prodotto visitate il nostro sito web:
www.geemarc.com
E-mail : customerservices@geemarc.com
Informazioni generali
Caratteristiche
• Tecnologia digitale 2.4GHz FHSS con funzioni di equalizer per le
regolazioni di tonalità e bilanciamento.
• Suono stereo di alta qualità, virtualmente esente da interferenze.
• La trasmissione non si limita solamente alla linea visiva
• Sistema di accoppiamento digitale tra cuffia e trasmittente
• Controllo elettronico del volume sulla cuffia
• Attacco di ricarica incorporato sulla trasmittente
• Arresto automatico sulla cuffia
• Funzione automatica On/Off RF sulla trasmittente
• Cavo da 3,5 mm per collegamento della cuffia in linea
• Funzionamento fino alla distanza di 50 metri
Caratteristiche tecniche
Modalità di trasmissione: Stereo digitale 2.4GHz FHSS
Frequenza portante: 2,4GHz
Tensione d'esercizio: Trasmettitore: 6 V 600 mA
Ricevitore: 3.7V 1000mA
(batteria ricaricabile al litio incorporata)
Frequenza di risposta: 20 Hz – 20 KHz (elettrica)
Distorsione: 0,5 %
Rapporto segnale-disturbo: 75 dB
Portata: 50 metri (area aperta)
Italiano
Page 40
39
Garanzia
Dal momento in cui il prodotto Geemarc viene acquistato, Geemarc lo
garantisce per il periodo di due anni. Durante tale periodo, tutte le riparazioni o
le sostituzioni (a nostra discrezione) sono gratuite. Se si verifica un guasto,
contattare il nostro servizio d'assistenza helpline o visitare il nostro sito web
www.geemarc.com
La garanzia non copre incidenti, negligenza o la rottura di una parte.
Il prodotto non deve essere manomesso o smontato da persona che non sia un
rappresentante autorizzato Geemarc.
La garanzia Geemarc non limita in alcun modo i vostri diritti legali.
Il prodotto è coperto da garanzia legale di conformità come richiesto dalle leggi
in vigore.
Importante: LA RICEVUTA FA PARTE DELLA GARANZIA E DEVE ESSERE
CONSERVATA ED ESIBITA NEL CASO DI UN RECLAMO IN GARANZIA.
Dichiarazione di conformità CEE
La Geemarc Telecom SA con la presente dichiara che il proprio prodotto è
conforme con i requisiti di base e con quanto altro previsto dalla Direttiva sugli
Apparati Radio e Terminali di Comunicazione 2014/53/UE.
La dichiarazione di conformità può essere consultata su www.geemarc.com
Per prevenire Danni all'udito, NON restare in ascolto per lunghi
periodi ad alto volume.
Questo dispositivo è compatibile con l'esenzione RSSs della Norma Industry
Canada Licence. Il suo funzionamento è soggetto alle due condizioni che
seguono: (1) questo dispositivo non deve essere causa di interferenze nocive,
e (2) questo dispositivo deve accettare qualsiasi interferenza, compresa
un'interferenza che può causare un funzionamento indesiderato del dispositivo.
Dichiarazione FCC
Questo dispositivo è conforme alla parte 15 delle norme FCC. Il funzionamento
è soggetto alle due seguenti condizioni: (l) Questo dispositivo non deve
causare interferenze dannose, e (2) questo dispositivo deve accettare ogni
interferenza ricevuta, compresa un'interferenza che può causare
funzionamento non desiderato.
Avvertenza: Alterazioni o modifiche non esplicitamente approvate dai
responsabili alla compatibilità possono comportare l’annullamento
dell’autorizzazione all’uso della strumentazione conferita all’utente.
Italiano Italiano
Page 41

40
NOTA: Questo apparecchio è stato collaudato ed è risultato conforme ai limiti
relativi ai dispositivi digitali di Classe B previsti dalla Parte 15 delle norme FCC.
Tali limiti hanno lo scopo di garantire un ragionevole livello di protezione da
eventuali interferenze dannose nell’ambito di un’installazione residenziale. La
strumentazione genera, fa uso e può irraggiare energia a radio-frequenza e, se
non installato ed usato secondo le istruzioni, può provocare dannose
interferenze alle comunicazioni radio.
Non vi è quindi la certezza che non avvengano interferenze in un determinato
impianto. Se l’apparecchio causa interferenze di disturbo alla ricezione
radiotelevisiva, rilevabili mediante lo spegnimento e la riaccensione
dell’apparecchio, l’utente è invitato a tentare di eliminare le interferenze
adottando uno o più dei seguenti metodi:
• Riorientare o riposizionare l’antenna di ricezione.
• Aumentare la distanza tra l’apparecchio e il ricevitore.
• Collegare l’apparecchio a una presa di rete posta su un circuito diverso da
quello cui è collegato il ricevitore.
• Richiedere l’assistenza del distributore oppure un esperto tecnico elettronico.
FCC ID: VHC-AAI-DH1250-00
IC: 9197A-CL7400
Informazioni per lo smaltimento
Lo smaltimento di vecchie apparecchiature elettriche ed elettroniche
(applicabile nell’Unione Europea e in altri paesi europei con sistema di
raccolta differenziata)
Il simbolo apposto sul prodotto indica che il prodotto o la sua confezione non
possono essere considerati rifiuti domestici. Invece devono essere portati nel
punto di raccolta per il riciclo di apparecchiatura elettrica ed elettronica.
Assicurandovi che il prodotto sia smaltito correttamente impedirete le potenziali
conseguenze negative per l’ambiente e la salute umana che potrebbero
verificarsi a causa di un inappropriato smaltimento di questo prodotto.
Per maggiori e più dettagliate informazioni sul riciclo di questo prodotto si
prega di contattare il proprio ufficio comunale, il servizio di smaltimento rifiuti o
il negozio presso il quale è stato acquistato il prodotto.
Ogni prodotto elettrico ed elettronico, incluse le batterie, debe essere smaltito
separatamente dal sistema di smaltimento municipale dei rifiuti con mezzi di
raccolta appositi stabiliti dal governo o dalle autorità locali.
CAN ICES-3(B)/NMB-3(B)
Italiano
Page 42
41
Veiligheids- en Verzorgingsadvies
Lees deze instructies zorgvuldig voorafgaande aan het gebruik om dit product
optimaal en veilig te gebruiken. Bewaar deze instructies voor raadpleging in de
toekomst.
Waarschuwing: Dit product kan zeer luid zijn. Voorkom dat andere mensen,
die niet in dezelfde mate aan gehoorverlies lijden, dit product gebruiken.
Bovenmatig geluidsdruk van oor- en koptelefoons kunnen gehoorverlies
veroorzaken.
Voorzichtig: ELEKTRISCHE SCHOKKEN. Steek de onverbonden
stekkerkoppen NIET in wandcontactdozen. Stekkerkoppen MOETEN in de
voedingsadapter worden gestoken.
Elektrische verbinding: Het apparaat is ontworpen om met een 100 - 240V
wisselstroom van 50/60HZ te werken (Geclassificeerd als ‘gevaarlijk voltage’
volgens de EN60950 norm.)
Het apparaat heeft geen geïntegreerde AAN/UIT schakelaar. Om de voeding
uit te schakelen moet u de voeding van het lichtnet uitschakelen of de
wisselstroomadapter uit de wandcontactdoos halen. Zorg ervoor dat u
gemakkelijk bij de wandcontactdoos kunt komen wanneer u het apparaat
installeert.
Voorzichtig: Risico van explosie als de batterijen door een verkeerd type
worden vervangen. Werp gebruikte batterijen weg volgens de
voorschriften.
De ventilatie NIET bedekken.
Het oorkussen NIET verwijderen want het is moeilijk te vervangen.
Houdt het apparaat uit de buurt van warmtebronnen.
Het apparaat NIET aan direct zonlicht blootstellen.
Maak de koptelefoon en oorkussens regelmatig schoon.
Maak op GEEN enkele manier veranderingen aan het apparaat.
N.B.: Het apparaat kan storing ondervinden van apparaten die een sterk
elektrisch of magnetisch veld produceren zoals magnetrons, mobiele telefoons
en lichttransformatoren.
Waarschuwingen m.b.t. de batterijen:
• Probeer NIET om ze uit elkaar te halen.
• NIET weggooien in vuur.
• NIET inslikken.
• Uit de buurt van kinderen houden.
• Batterijen moeten met de juiste polariteit erin gestoken worden.
• GEEN kortsluiting veroorzaken tussen de voedingsklemmen.
• Lege batterijen moeten uit het apparaat verwijderd worden,
• Gebruik NOOIT batterijen van een ander type of niet-oplaadbare batterijen
om de oplaadbare batterijen te vervangen.
Nederlands
Page 43

42
• Zet de koptelefoon UIT als deze niet gebruikt wordt of als de batterijen
worden opgeladen om beschadiging van de batterijen te voorkomen.
• De batterijen moeten volledig opgeladen zijn als u het apparaat voor het eerst
gebruikt. In eerste instantie is een oplaadtijd van 5 uur vereist.
Problemen oplossen:
GEEN GELUID
1. Zorg er voor dat de voedingsadapter helemaal in de wandcontactdoos is
gestoken en dat de kabel goed verbonden is met de 6V gelijkstroomingang
van de zender.
2. Verzeker u ervan dat de Aan/Uit schakelaar van de koptelefoon in de Aan-
stand staat en dat de schakelaar Groen oplicht.
3. Het niveau van de batterijvoeding kan te laag zijn. Plaats om de batterijen op
te laden de koptelefoon terug op de basis, totdat het groene lampje aan de
linkerkant begint te branden, of vervang de batterijen door volledig
opgeladen batterijen.
4. Zorg dat uw DVD, TV, hifi of ander geluidsapparaat AAN staat en stel een
kanaal in dat geluidssignalen uitzendt.
5. Gebruik de volumeregeling van de koptelefoon om het geluidsniveau te
verhogen (alleen bij draadloos gebruik van de koptelefoon).
6. Het invoerniveau van het geluidssignaal is te laag. Verhoog het volume van
uw geluidsapparaat (CD, TV, hifi, enz.).
7. Het verbonden geluids- en/of videoapparaat is niet in de afspeelstand. Zet
het apparaat is de afspeelstand.
8. Het uitgangsniveau van de koptelefoon is te laag ingesteld. Stel het volume
in op een acceptabel niveau.
VERVORMING
9. Herstart het Koppelproces. Druk gelijktijdig de Koppelknop op zowel de
zender als de koptelefoon 3 seconden lang in. Het proces is afgelopen als
beide LED lampjes groen worden.
10. Het niveau van de batterijvoeding kan te laag zijn. Laad de batterijen
opnieuw op.
11. Zorg dat de volume-instelling correct is.
12. De koptelefoon kan te ver van de zender verwijderd zijn. Maak de afstand
kleiner.
13.Het invoerniveau van het geluidssignaal is te hoog. Verlaag het volume van
de geluidsbron (hifi, CD, TV, enz.).
NB: Als de televisie geen standaard rode en witte geluidsuitgang of een
RCA stekerbus heeft, dan heeft de TV hoogstwaarschijnlijk een optische
geluidsuitgang. U moet dan een Geemarc optische convertor (artikelnummer
CL7XX_OPT) aanschaffen en installeren zodat u de CL7400 kunt verbinden
met deze optische uitgang.
Nederlands
Page 44

43
Klantenservice
Voor productondersteuning en hulp gaat u naar onze website op
www.geemarc.com
.
E-mail: customerservices@geemarc.com
Algemene Informatie
Kenmerken
• 2,4GHz FHSS digitale technologie met equalizer eigenschappen voor
toon- en balansregeling
• Nagenoeg storingsvrij stereogeluid van hoge kwaliteit
• Uitzending is niet gelimiteerd tot het gezichtsveld.
• Digitaal koppelsysteem op koptelefoon en zender
• Elektronische volumeregeling op de koptelefoon
• Ingebouwde Pinlader op de zender
• Automatische uitschakeling van de koptelefoon
• Automatische AAN/UIT radiofrequentie functie op de zender
• 3,5GHz ingang voor bedraad koptelefoongebruik
• Tot op 50 meter bereik
Technische specificaties
Uitzendingstand: 2,4GHz digitaal FHSS stereo
Draagfrequentie: 2,4GHz
Bedrijfsspanning v/d zender: 6V, 600 mA
Bedrijfsspanning v/d
ontvanger:
3,7V, 1000mA
(met ingebouwde oplaadbare Lithium batterij)
Frequentiebereik: 20Hz – 20KHz (elektrisch)
Vervorming: 0,5 %
Signaal-ruis verhouding: 75dB
Bereik: 50 meter (op open terrein)
Nederlands
Page 45
44
Garantie
Vanaf het moment dat u uw Geemarc product heeft gekocht, garandeert
Geemarc het voor twee jaar. Tijdens deze periode zijn alle reparaties of
vervangingen (aan ons de keuze) gratis. Mocht u problemen ondervinden,
neem dan contact op met onze Helpdesk of ga naar onze website op
www.geemarc.com
.
Ongelukken, verwaarlozing of breuk aan welk onderdeel dan ook worden niet
door de garantie gedekt.
Er mag niet geknoeid worden met het product of uit elkaar gehaald worden
door iemand die niet een erkende Geemarc vertegenwoordiger is.
De Geemarc garantie beperkt op geen enkele manier onze wettelijke rechten.
Dit product valt onder de wettelijke garantie van conformiteit zoals
voorgeschreven door de van toepassing zijnde wetgeving.
Belangrijk: UW ONTVANGSTBEWIJS IS ONDERDEEL VAN UW GARANTIE
EN MOET BEWAARD EN GETOOND WORDEN VOOR HET GEVAL DAT U
GARANTIE CLAIMT
EEG verklaring
Hierbij verklaart Geemarc dat dit product voldoet aan de essentiële vereisten
en andere relevante condities van de Richtlijn 2014/53/UE betreffende
radioapparatuur en telecommunicatie-eindapparatuur.
De nakomingsverklaring kan ingezien worden op www.geemarc.com
.
Luister nooit voor langere tijd naar geluid op een hoog
volumeniveau om schade aan uw gehoor te voorkomen.
Dit apparaat voldoet aan de RSSs Vergunningsvrijstelling van de Canadese
industrie van radio-apparatuur. De werking is onderhevig aan de volgende
twee voorwaarden: (1) dit apparaat mag geen schadelijke interferentie
veroorzaken; (2) dit apparaat moet elke interferentie accepteren, inclusief
interferentie die kan resulteren in ongewenste werking van het apparaat.
FCC verklaring
Dit apparaat voldoet aan Deel 15 van de FCC voorschriften. Gebruik van het
apparaat is uitsluitend toegestaan onder de volgende twee voorwaarden: (1) dit
apparaat mag geen schadelijke storing veroorzaken, en (2) dit apparaat moet
eventuele ontvangen storing accepteren. Dit geldt ook voor storing die kan
leiden tot een ongewenste werking.
Waarschuwing: Wijzigingen of aanpassingen aan deze apparatuur die niet
uitdrukkelijk zijn goedgekeurd door de partij die verantwoordelijk is voor de
Nederlands
Nederlands Nederlands
Page 46

45
naleving van de voorschriften, kunnen het recht van de gebruiker om deze
apparatuur te bedienen ongeldig maken.
NB: Deze apparatuur is getest en in overeenstemming bevonden met de
limieten van een digitaal apparaat uit klasse B, conform Deel 15 van de FCC
voorschriften. Deze beperkingen zijn opgesteld om een redelijke bescherming
te bieden tegen schadelijke storingen in een woonomgeving. Deze apparatuur
genereert en maakt gebruik van radiofrequente straling en kan deze afgeven.
Indien deze apparatuur niet volgens de instructies wordt geïnstalleerd en
gebruikt, kan deze schadelijke storing van radiocommunicatie veroorzaken.
Er is echter geen garantie dat in bepaalde situaties geen storing zal optreden.
Als deze apparatuur schadelijke storing in radio- of televisieontvangst
veroorzaakt, wat kan worden vastgesteld door de apparatuur in en uit te
schakelen, kan de gebruiker proberen deze storing op één of meer van de
volgende manieren op te heffen:
• De ontvangstantenne verplaatsen of anders richten.
• De afstand tussen de apparatuur en de ontvanger vergroten.
• De apparatuur aansluiten op een ander stopcontact in een ander circuit dan
dat waarop de ontvanger is aangesloten.
• Raadpleeg voor hulp je dealer of een ervaren radio-/televisiemonteur.
FCC ID: VHC-AAI-DH1250-00
IC: 9197A-CL7400
Informatie over afvalverwerking
Lozing van oude elektrische en elektronische apparaten (geldend in de
EU en andere Europese landen met gescheiden afvalverwerking)
De symbolen op het product en de verpakking geven aan dat dit product niet
als huishoudelijk afval behandeld mag worden. In plaats daarvan moet het
ingeleverd worden bij de verzamelpunten voor het recyclen van elektrische en
elektronische apparaten.
Door ervoor te zorgen dat dit product op de juiste manier wordt weggegooid,
helpt u potentiële negatieve gevolgen voor het milieu en de gezondheid van
mensen, die veroorzaakt kunnen worden door onjuiste afvalverwerking van dit
product, te voorkomen.
Voor gedetailleerde informatie over het recyclen van dit product neemt u
contact op met de plaatselijke autoriteiten, de vuilophaaldienst of de winkel
waar u het product gekocht heeft.
Alle elektrische en elektronische producten inclusief batterijen moeten
afgescheiden van de gemeentelijke afvalstroom worden weggegooid via
daartoe bestemde inzamelpunten aangewezen door de regering of de lokale
autoriteiten.
CAN ICES-3(B)/NMB-3(B)
Nederlands
Page 47
46
עדימבנרצומב לופיטל תוצעו תוחיטב אשו
החטבב וב שמתשהלו הז רצומב שומישהמ בטימה תא קיפהל ידכ , ןויעב הלא תוארוה ארק
דיתעב ןהב ןייעל לכותש ידכ חוטב םוקמב ןתוא רומשו שומישה ינפל.
הרהזא:
דואמ תוהובג לוק תומצועל עיגהל לוכי הז רצומ. שמתשהל םירחאמ עונמל דפקה
רצומבהז ,ךתעימש העגפנש תומרב ןיידע המגפנ אל םתעימש םא . תוינזואהמ ידמ בר לוק ץחל
העימש ןדבואל םורגל לולע.
תוריהז :
תולמשחתה. למשחה יעקשל סינכהל ןיא
םירבוחמ אל עקת ישאר . ישאר תא רבחל שי
חוכ םאתמל עקתה.
למשח רוביח: קפסמ הלעפהל תדעוימ הדיחיה100-240VAC - 50/60Hz) .מכ גווס' חתמ
ןכוסמ ,' ןקתל םאתהבEN 60950.(
הלעפהל הנבומ חוכ קספמ תללוכ הניא הדיחיה/יוביכ .למשחה םרזמ רישכמה תא קתנל ידכ ,
למשחה עקשמ עקתה תא אצוה וא למשחה עקשב קפסה תא
הבכ .הדיחיה תנקתה תעב , אדו
שיגנ למשחה עקשש.
תוריהז:
ופתה תנכס תמייקתוצצ ,לוסה תא םיפילחמ םאןוכנ אל הללוס גוסב הל . תא קלס
תוארוהל םאתהב הפשאל תוללוסה.
ןיא רורוואה יחתפ תא תוסכל.
ןיא ןזואה תדיפר תא ריסהל ,הפילחהל דואמ השקש ןוויכמ.
יה תא קחרהוח תורוקממ הדיחם.
ןיאתורישי שמש ינרקל הדיחיה תא ףושחל.
שי ןהלש תודיפרה תאו תוינזואה תא תועיבקב תוקנל.
ןיא לןפוא םושב הדיחיב םייוניש עצב.
בל םיש:
וא םיילמשח תודש םירצויה םירישכממ תוערפהל הנותנ תויהל הלולע הדיחיה
םיקזח םייטנגמ ,לגורקימ ירונת ומכ ,םידיינ םינופלט ,דועו הרואת יאנש
.
הללוס תורהזא:
• ןיא הללוסה תא קרפל תוסנל.
• ןיא היח שאל הללוסה תא ךילשהל.
• ןיא בלהללוסה תא עול.
• שי םידלי לש םדי גשיהמ הללוסה תא קיחרהל.
• שי ןוכנה תויבטוקה ןוויכב הללוסה תא סינכהל.
• ןיא אה תודוקנב רצק םורגלהקפס.
• שי תוקיר תוללוס רצומהמ איצוהל
.
•
ןיא תונעטנ תוללוס תפלחה םשל תונעטנ ןניאש תוללוסב וא רחא גוסמ הללוסב שמתשהל.
•
זואה רשאכשומישב ןניא תוינ ,הניעטב תוללוסה רשאכ וא ,הבכ תמירג עונמל ידכ תוינזואה תא
תוללוסל קזנ.
• הנושארה םעפב ןהב םישמתשמשכ ןאולמב תונועט תויהל תוללוסה לע . הניעט השורד
ךשמב תיתלחתה5 תועש.
תירבע
Page 48

47
תולקת ןוקית
:
לוק ןיא
1. מ לבכהשו למשחה עקש לא ואולמב סנכוה למשחה םאתמש אדו הנוכנ הרוצב רבוח
רבחמלDC IN 6V רדשמה לע.
2. תוינזואה גתמש אדו'לעפומ/יובכ 'קוריב ריאמ גתמהשו לעפומ בצמל ןווכמ.
3. ידמ הכומנ תוינזואה תללוס לש הניעטה תמרש ןכתיי . ןהלש תבשותל תוינזואה תא רזחה
תוללוסה תא שדחמ ןועטל
ידכ ,תילאמשה היינזואב הקוריה הרונה קולדתש דע , וא ףלחה
ןאולמב תונועט תוללוסב ןתוא.
4. הש אדו-DVD ,היזיוולטה ,ה תכרעמ-Hi-Fi ץורעל םינווכמו םילעפומ עמשה ביכר וא
עמש תוא רדשמה.
5. לוקה תא ריבגהל ידכ תוינזואה תמצוע דקפב שמתשה) תוינזואכ ןהב שומישה תעב קר
תויטוחלא.(
6. ידמ
הכומנ עמשה תוא תסינכ תמר . רוקממ המצועה תא רבגהה לש עמשה-Hi-Fi ,
וכו היזיוולטה וא רוטילקתה'.
7. עמשה דויצש ןכתיי/העמשה בצמב היהי אל רבוחמה ואידיו . ידי לע העמשהה תא לעפה
דויצה.
8. ידמ הכומנכ תרדגומ תוינזואה תאיצי תמר .המיאתמ המרל המצועה תא ןנווכ.
תוויע
9. המאתהה ךילהת תא שדחמ לחתה . שקמ לע ץחל"םאתה " ךשמב3 תוינש רדשמה לע
תוינזואהו .ה תורונ יתש רשאכ םייתסמ ךילהתה-LED קוריב תוריאמ.
10. ידמ הכומנ תוינזואה לש תוללוסה לש הניעטה תמרש ןכתיי .תוללוסה תא בוש ןעט.
11. הנוכנ המצועה תרדגהש אדו.
12. רדשמהמ ידמ
תוקוחר תוינזואהש ןכתיי .וילא ןתוא ברק.
13. ידמ הכומנ עמשה תוא תסינכ תמר .ה תא רבגהה לש עמשה רוקממ המצוע-Hi-Fi ,
היזיוולטה וא רוטילקתה ,וכו'.
.
הרעה :ןבלו םודא עבצב ליגר עמש תאיצי םאתמ היזיוולטל ןיא םא , םאתמ ואRCA , ריבס
תיטפוא עמש תאיצי היזיוולטל שיש חינהל דואמ . לש יטפוא ריממ שוכרת םאGeemarc ) רפסמ
אוה ונלש ןיכומיסהCL7XX_OPT( ,בחל לכות םגדמ תוינזואה תא החלצהב רCL7400 האיציל
היזיוולטה לש תיטפואה.
תוחוקל תכימת
הרזעלו רצומב הכימתל , תבותכב ונלש טנרטניאה רתאב רקבwww.geemarc.com
אוה ונלש עויסה וקב ןופלטה רפסמ:
סקפ: 03 – 5710794
תירבע
Page 49

48
יללכ עדימ
תונוכת
• תטישב תילטיגיד היגולונכטFHSS ,2.4GHz ע לילצ ינונווכל רזיילוקא תונוכת ם
ןוזיאו.
• תוערפה אלל טעמכ ההובג תוכיאב ואירטס לוק
• הייאר וקל קר לבגומ וניא רודישה.
• רדשמו תוינזוא לע תילטיגיד המאתה תכרעמ
• תוינזואה לע תינורטקלא עמש תמצוע תרקב
• רדשמ לע הנבומ םיניפ ןעטמ
• תוינזואה לע יטמוטוא קספמ
• הלעפה תייצקנופ/וביכ יRF תיטמוטוא
• תנוכת3.5mm Line in תויטוח תוינזואל
• דע הלעפה קחרמ50 מ'
םיינכט םיטרפמ
רודיש בצמ:
תטישב ילטיגיד ואירטס רודישFHSS
,2.4GHz
אשונ רדת:
2.4GHz
הלעפה חתמ: רדשמ: 6 V 600 m
A
טלקמ: 3.7V 1000mA
)תינבומ תנעטנ םויתיל תללוס(
רדת תבוגת:
20 Hz
–
20 KHz
)
ילמשח
(
תוויע:
0.5%
תוא סחי-שער:
75 dB
םיצורע תדרפה:
60 dB
חווט:50 מ ')חותפ חטש(
תוירחא
תרצותמ רצומה תא תשכרש עגרהמGeemarc ,הקינעמ הרבחה תוירחא םייתנש ךשמב
השיכרה ךיראתמ .הז ןמז קרפ ךשמב , תופלחההו םינוקיתה לכ)ונתעד לוקיש יפ לע ( םיעצבתמ
םניחב . םאהיעבב לקתנ התא , תבותכב ונלש טנרטניאה רתאב רקב וא עויסה וקב ונילא הנפ
www.geemarc.com
.
תונואת הסכמ הניא תוירחאה ,םיקלח תריבש וא תונלשר.
לש השרומ גיצנ וניאש ימ לע רוסיא לחGeemarc וקרפל וא רצומב קסעתהל.
הקינעמש תוירחאהGeemarc ךיתויוכז תא הז אוהכ הליבגמ הניא קוח יפ לע.
תומיאתל תיטפשמ תוירחא ידי לע הסוכמ רצומה ,יטנוולרה קוחה ידי לע הנתומש יפכ.
יפוריאה דוחיאה תרהצה
Geemarc Telecom SA םיאנתבו תוינויחה תושירדב דמוע רצומה יכ תאזב הריהצמ
תינורטקלא תרושקתו וידר דויצל היחנהה לש םירחא םייטנוולר2014/53/UE.
ןייעל ןתינ טנרטניאה רתאב תומיאתה תרהצהב
www.geemarc.com
.
העימשל ירשפא קזנ עונמל ידכ , ןמז יקרפל תוהובג לוק תומצועב ליעפהל ןיא
םיכורא.
תירבע
Page 50

49
תשירדב דמוע הז רישכמRSSs ןוישירמ רוטפ הנקמה ידנקה היישעתה דרשמ לש .
נתה ינשל הפופכ ותלעפהםיאבה םיא: )1 ( ןכו תוקיזמ תוערפהל םורגי רישכמהש רוסא)2 (
הערפה לכ לבקל בייח הז רישכמ ,ולש היוצר אל הלועפל םורגל הלולעש הערפה תוברל.
תרהצהFCC
קלח תושירדב דמוע הז רישכמ15 יקוח לשFCC . םיאבה םיאנתה ינשל הפופכ הלעפהה:
)1 (ו תוקיזמ תוערפהל םורגי רישכמהש רוסא ןכ)2 ( הערפה לכ לבקל בייח הז רישכמ
תטלקנש ,היוצר אל הלועפל םורגל הלולעש הערפה תוברל.
הרהזא: וז הדיחיב תומאתה וא םייוניש , יארחאש דצה ידי לע שרופמ
ןפואב ורשוא אלש
תושירדב הדימעל ,דויצה תא ליעפהל שמתשמל הנתינש תושרה לוטיב ידיל איבהל םילולע.
הרעה: ןחבנ הז דויצ המרב ילטיגיד ןקתה לש תולבגהב דמוע אצמנוB , קלחל םאתהב15
יקוח לשFCC. םירוגמ רוזאב הקיזמ הערפה ינפמ הריבס הנגה קפסל ודעונ ולא תולבגה.
וידר ילג רדתב היגרנא קיפמ
הז דויצ , היגרנא ןירקהל תלוכי לעבו וז היגרנאב שומיש השוע
אל םא וא ןקתוה אל אוה םאו וידר ילג רדתב תויחנהל םאתהב וב םישמתשמ , לולע אוה
וידרה תרושקתב הקיזמ הערפהל םורגל.
תאז םע דחי ,תמיוסמ הנקתהב שחרתת אל וזכ הערפהש ךכל הבורע ןיא. הז דויצ םא
היזיוולט וא וידר תטילקל
הקיזמ הערפהל םרוג , דויצה תלעפה ידי לע עובקל ןתינש רבד
ויוביכו , תא ןקתל הסני שמתשמהש ץלמומתואבה םיכרדהמ תחאב הערפהה:
• הטילקה תנטנא תא שדחמ םקמל וא שדחמ ןווכל.
• טלקמל דויצה ןיב קחרמה תא לידגהל.
• טלקמה רבוחמ וילאש הזמ הנוש ילמשח לגעמב עקשל דויצה תא רבחל.
• הסונמ וידר וא היזיוולט יאנכט םע וא קפסה םע ץעייתהל ,הרזע ךרוצל.
FCC ID: VHC-AAI-DH1250-00
IC: 9197A-CL7400
הפשא קוליס תודוא עדימ
ןשי ינורטקלאו ילמשח דויצ קוליס) תויאפוריא תונידמלו יפוריאה דוחיאל יטנוולר
תודרפנ ףוסיא תוכרעמ תוקיזחמה תורחא(
רצומב לפטל ןיאש ךכ לע דיעמ ותזירא לע וא רצומה לע למסהכ הזבפהליגר תיתיב תלוס ,
תמה ףוסיאה תדוקנ לא וריבעהל שי אלאינורטקלאו ילמשח דויצ רוזח ִמל המיא.
הנוכנ הרוצב רצומה קוליס
תא חיטבת םא , תוילילש תוילאיצנטופ תואצות תעינמב רוזעת
םדאה תואירבלו הביבסל ,הז רצומב םלוה יתלב לופיט בקע םרגיהל תולולע רשא.
הז רצומ רוזח ִמ תודוא ףסונ עדימל ,תימוקמה הצעומה דרשמ םע רשק רוצ , תורישל
סלרצומה תא תינק הנממש תונחל וא תיתיב הפשא קולי.
םיינורטקלאהו םיילמשחה םירצומה לכ ,תוללוס םיללוכה ,תינוריעה תלוספהמ דרפנב וקלוסי ,
תוימוקמה תויושרה ידי לע וא הלשממה ידי לע ועבקייש םיידועיי ףוסיא ינקתמ ךרד.
CAN ICES-3(B)/NMB-3(B)
תירבע
Page 51

50
Säkerhets- och skötselråd
För att på bästa sätt använda denna produkt och för att använda den på ett
säkert sätt, läs dessa instruktioner noggrant före användning och spara dem på
ett säkert ställe för framtida referens.
Varning: Denna produkt kan vara väldigt hög. Var noga med att hindra
andra från att använda denna produkt, om de inte har samma grad av
hörselnedsättning. För högt ljudtryck från öronsnäckor och hörlurar kan orsaka
hörselskador.
Observera: Elektrisk stöt. SÄTT INTE I ej anslutna stift i eluttaget. Stiften
MÅSTE monteras till nätadaptern.
Elektronisk anslutning: Enheten är avsedd att drivas från ett 100-240VAC 50/60 el-nät. (Klassificerad som "farlig spänning" enligt EN 60950 standard).
Enheten inkluderar inte en integrerad på/av-omkopplare. För att koppla bort
strömmen, stänger du antingen av strömförsörjningen vid eluttaget eller kopplar
ur AC-adaptern. När du installerar enheten, se till att eluttaget är lättåtkomligt.
Observera: Om du ersätter batteriet mot en felaktig typ kan det explodera.
Kassera använda batterier enligt instruktionerna.
Täck INTE ventilationen.
Avlägsna INTE öronsnäckan då den är mycket svår att ersätta.
Håll enheten på avstånd från värmekällor.
UTSÄTT INTE enheten för direkt solljus.
Rengör headset och hörlurskåpor regelbundet.
Modifiera INTE enheten på något sätt.
Vänligen observera: Enheten kan utsättas för störningar från apparater som
genererar starka elektriska eller magnetiska fält, t.ex. mikrovågsugnar,
mobiltelefoner, belysningstransformatorer etc.
Batterivarningar:
• Plocka INTE isär.
• Kasta INTE in i en eld.
• Svälj INTE.
• Förvara oåtkomligt för barn.
• Batterierna ska sättas i med rätt polaritet.
• Kortslut INTE batterikontakterna.
• Förbrukade batterier ska tas bort från produkten.
• Använd INTE någon annan typ av batteri eller icke-laddningsbara batterier
för att ersätta de uppladdningsbara batterierna.
• När hörlurarna inte används eller batterierna laddar, stäng AV hörlurarna för
att undvika att batterierna skadas.
• Batterierna måste vara fulladdade vid första användning. Ladda första
gången i 5 timmar.
Svenska
Page 52

51
Felsökning:
INGET LJUD
1. Se till att nätadaptern är ordentligt inkopplad i eluttaget och att kabeln är
ordentligt ansluten till DC IN 6V-uttaget på sändaren.
2. Se till att hörlurarnas PÅ/AV-omkopplare slås om till PÅ-läget och att
omkopplaren lyser grönt.
3. Hörlurarnas batterinivå kan vara för lågt. Placera headsetet i hållaren för att
ladda batterierna, tills den gröna lampan lyser på headsetets vänstra sida
eller ersätt batterierna mot fulladdade batterier.
4. Se till att din DVD, TV, Hi-Fi-system eller ljudkomponent är i påkopplat läge
och inställt på en kanal som sänder en ljudsignal.
5. Använd hörlurarnas volymkontroll för att höja ljudnivån (endast vid
användning som en trådlös hörlur).
6. Ljudsignalens ingångsnivå är för låg. Höj volymen från ljudkällan på din Hi-
Fi, CD, eller TV, etc.
7. Den anslutna ljud/video-utrustningen kanske inte är i uppspelningsläge.
Starta uppspelning med utrustning.
8. Hörlurarnas utgångsnivå är för lågt inställd. Justera volymen till en lämplig
nivå.
DISTORTION
9. Starta om parningsprocessen. Tryck på knappen “Para” på sändaren och
hörluren i 3 sekunder. Processen är klar när båda lysdioderna lyser grönt.
10. Hörlurarnas batteriladdningsnivå kan vara för låg. Ladda om batterierna.
11. Se till att volymen är rätt inställd.
12. Hörlurarna kan vara för långt borta från sändaren. Flytta närmare sändaren.
13. Ljudsignalens ingångsnivå är för låg. Höj volymen från ljudkällan på din Hi-
Fi, CD, eller TV, etc.
OBS: Om TV-apparaten inte är utrustad med det vanliga röda och vita
ljuduttaget, eller RCA-uttaget, har TV:n sannolikt en optisk ljudutgång. Genom
att köpa en Geemarc optisk omvandlare (vår referens CL7XX_OPT) kan du
ansluta CL7400 till TV:ns optiska utgång.
Svenska
Page 53

52
Kundtjänst
För produktstöd och hjälp, besök vår webbplats på www.geemarc.com
E-post: customerservices@geemarc.com
Allmän information
Funktioner
• 2.4GHz FHSS digital teknik med equalizer-funktioner för justering av ton
och balans.
• Högkvalitativt stereoljud som är praktiskt taget störningsfritt
• Transmission är inte begränsad till siktlinjen
• Digitalt parningssystem på hörlur och sändare
• Elektronisk volymkontroll på hörlurar
• Inbyggd stiftladdare på sändare
• Automatisk avstängning på hörlurar
• Automatisk På/Av RF-funktion på sändare
• 3.5mm linjeingångfunktion för trådbundna hörlur
• Räckvidd upp till 50 meter
Tekniska specifikationer
Sändningsläge: 2.4GHz digital FHSS-stereo
Bärfrekvens: 2.4GHz
Driftsspänning: Sändare: 6 V 600 mA
Mottagare: 3.7V 1000mA
(inbyggt laddningsbart litiumbatteri)
Frekvensrespons: 20 Hz – 20 KHz (elektrisk)
Distortion: 0.5 %
Signal-till-brus-förhållande: 75 dB
Kanaldelning: 60 dB
Intervall: 50 meter (öppet område)
Svenska
Page 54

53
Garanti
Från det datum du införskaffar din Geemarc-produkt, garanterar Geemarc den
under en period på två år. Under denna tid är alla reparationer eller byten (efter
eget gottfinnande) gratis. Skulle du stöta på ett problem kontakta vår hjälplinje
eller besök vår webbplats på www.geemarc.com
.
Garantin täcker inte olyckor, försumlighet eller bräckage på någon del.
Produkten får inte manipuleras eller plockas isär av någon som inte är en
auktoriserad Geemarc-representant.
Geemarc-garantin begränsar inte på något sätt dina lagliga rättigheter.
Produkten omfattas avden rättsliga garantin om konformitet enligt tillämlig lag.
Viktigt: KVITTOT ÄR EN DEL AV DIN GARANTI OCH MÅSTE SPARAS OCH
UPPVISAS VID ETT GARANTIANSPRÅK.
EEC deklaration
Geemarc Telecom SA deklarerar härmed att denna produkt är i
överensstämmelse med väsentliga krav och andra relevanta bestämmelser i
radio-och teleterminalutrustning direktiv 2014/53/UE.
Du hittar försäkran om överensstämmelse på www.geemarc.com
För att förhindra eventuella hörselskador, lyssna INTE på hög
volym under långa perioder.
Den här enheten uppfyller Industry Canada Licence-exempt RSSs. Drift är
föremål för följande två villkor: (1) denna enhet får inte orsaka skadliga
störningar, och (2) denna enhet måste acceptera alla störningar, inklusive
störningar som kan orsaka oönskad drift av enheten.
FCC-uttalande
Denna enhet överensstämmer med del 15 av FCC-reglerna. Användningen är
underställd följande två villkor: (1) denna enhet får inte orsaka skadliga
störningar, och (2) denna enhet måste acceptera eventuella störningar,
inklusive störningar som kan orsaka oönskad drift.
Varning: Ändringar eller modifieringar av denna enhet som inte uttryckligen
godkänts av den part som ansvarar för överensstämmelsen kan upphäva
användarens rätt att använda utrustningen.
OBS: Denna utrustning har testats och befunnits uppfylla gränserna för en
digital enhet av klass B, i enlighet med del 15 av FCC-reglerna. Dessa gränser
Svenska
Page 55

54
är avsedda att ge ett rimligt skydd mot skadliga störningar i en
bostadsinstallation. Denna utrustning genererar, använder och kan utstråla
radiofrekvent energi och om den inte installeras och används i enlighet med
instruktionerna, kan den orsaka störningar på radiokommunikation.
Det finns dock ingen garanti för att störningar inte kommer att ske i en viss
installation. Om denna utrustning orsakar störningar på radio- eller TVmottagning, vilket kan avgöras genom att utrustningen stängs av och sätts på,
uppmanas användaren att försöka korrigera störningen genom en eller flera av
följande åtgärder:
• Rikta om eller flytta mottagarantennen.
• Öka avståndet mellan utrustningen och mottagaren.
• Anslut utrustningen till ett uttag på en annan krets än den mottagaren är
ansluten till.
• Be återförsäljaren eller en erfaren radio- och TV-tekniker om du behöver
hjälp.
FCC ID: VHC-AAI-DH1250-00
IC: 9197A-CL7400
Information om kassering
Kassering av gammal elektrisk och elektronisk utrustning (gällande i EU
och andra europeiska länder med separata insamlingssystem)
Symbolen på produkten eller dess förpackning anger att denna produkt inte får
hanteras som hushållsavfall. Istället bör den överlämnas till lämplig
återvinningsstation för återvinning av elektrisk och elektronisk utrustning.
Genom att garantera att produkten hanteras på rätt sätt bidrar du till att
förhindra potentiella negativa konsekvenser för miljön och människors hälsa,
vilket annars kan orsakas av olämplig avfallshantering av denna produkt.
För mer detaljerad information om återvinning av denna produkt, kontakta din
kommun, din sophämtningstjänst eller affären där produkten köptes.
Alla elektriska och elektroniska produkter, inklusive batterier ska kasseras
separat från hushållsavfallet via för ändamålet avsedda
uppsamlingsanläggningar som utses av regeringen eller lokala myndigheter.
CAN ICES-3(B)/NMB-3(B)
Svenska
Page 56
55
Biztonsági és gondozási tanácsok
Hogy a termék legtöbb előnyét élvezhesse és biztonságosan használhassa azt,
kérjük, használat előtt figyelmesen olvassa el ezeket az instrukciókat, és tartsa
azokat bizto helyen a jövőbeni használat esetére.
Figyelmeztetés: Ez a termék nagyon hangos lehet. Figyeljen rá, hogy
mások, akik nem rendelkeznek hasonló szintű halláskárosodással, ne
használják a terméket. A fül- és fejhallgatókból érkező túlzott hangnyomás
halláskárosodáshoz vezethet.
Figyelem: Áramütés. NE dugjon be csatlakozás nélküli dugaszt a hálózati
dugaljba. A dugaszt a hálózati adapterhez KELL illeszteni.
Elektromos kapcsolat: Az eszközt 100-240VAC – 50/60Hz-es
áramforrásokkal való használatra tervezték. (Ez az EN 60950 szabvány szerint
„veszélyes feszültség”).
Az egységnek nem része beépített be/kikapcsoló gomb. Áramtalanításhoz
kapcsolja ki az áramot a hálózati csatlakozónál vagy húzza ki az AC adaptert.
Az egység beszerelésekor bizonyosodjon meg róla, hogy a hálózati csatlakozó
könnyen és gyorsan elérhető.
Figyelem: Robbanásveszély, ha az akkumulátort hibás típusúra cserélik.
A használt akkumulátort az utasításoknak megfelelően dobja el.
NE fedje le a szellőztetőt.
NE távolítsa el a fülpárnát, mivel nagyon nehéz visszahelyezni
Az egységet minden hőforrástól tartsa távol.
NE tegye ki az egységet közvetlen napfénynek.
A fejhallgatót és a fülpárnákat rendszeresen tisztítsa ki.
Semmilyen módon NE módosítsa az egységet.
Megjegyzés: Az egységben interferenciát okozhatnak az erős elektromos vagy
mágneses teret generáló berendezések, például mikrohullámú sütők,
mobiltelefonok, villámhárítók, stb.
Akkumulátorral kapcsolatos figyelmeztetése:
• NE próbálja meg szétszedni.
• NE dobja tűzbe.
• NE nyelje le.
• Gyermekektől távol tartandó.
• Az akkumulátort a megfelelő polaritás szerint kell behelyezni.
• NE zárja rövidre az áramszolgáltató terminált.
• Az elhasznált akkumulátort el kell távolítani a termékből.
• NE használjon más típusú akkumulátort vagy nem újratölthető elemet az
újratölthető akkumulátor lecserélésére.
• Amikor nem használja a fejhallgatót vagy tölti az akkumulátort, kapcsolja KI a
fejhallgatót, ellenkező esetben az akkumulátor károsodhat.
• Első használat előtt az akkumulátort teljesen fel kell tölteni. 5 órás kezdeti
töltésre van szükség.
Magyar
Page 57

56
Problémamegoldás:
NINCS HANG
1. Bizonyosodjon meg róla, hogy a dugasz teljesen be van-e dugva a dugaljba
és hogy a kábele megfelelően illeszkedik-e a DC IN 6V csatlakozóhoz a
jeladón.
2. Bizonyosodjon meg róla, hogy a fejhallgató be/kikapcsoló gombja a „be”
helyzetre van állítva, és hogy a kapcsoló zölden világít.
3. Lehetséges, hogy a fejhallgató töltöttségi szintje túl alacsony. Kérjük,
helyezze vissza a fejhallgatót a töltőállomásra, és addig töltse, amíg a bal
oldali fejhallgatón a zöld fény világít.
4. Bizonyosodjon meg róla, hogy DVD-lejátszója, televíziója, Hi-Fi rendszere
vagy más, hangot kiadó eszköze be van-e kapcsolva és olyan csatornára
van-e állítva, mely hangjelet ad ki.
5. Használja a fejhallgató hangerőszabályzóját a hangerő megemelésére (csak
vezeték nélküli használat esetén).
6. A bemenő hangjel túl gyenge. Emelje meg a hangerőt a Hi-Fi, CD vagy TV,
stb. hangforrásán.
7. A csatlakoztatott hang- vagy videolejátszó eszköz nincs lejátszási módban.
Indítsa el a lejátszást az eszközön.
8. A fejhallgató kimeneti szintje túl alacsonyra van állítva. Állítsa a hangerőt
megfelelő szintre.
TORZÍTÁS
9. Indítsa újra csatlakoztatási folyamatot. Nyomja a „Csatlakoztatás” gombot 3
másodpercig a jeladón és a fejhallgatón is. A folyamat akkor sikeres, ha
mindkét LED zölden világít.
10. A fejhallgató töltöttségi szintje túl alacsony. Töltse fel az akkumulátort.
11. Bizonyosodjon meg róla, hogy a hangerő-beállítás megfelelő-e.
12. Lehetséges, hogy a fejhallgató túl messze van a jeladótól. Menjen közelebb
hozzá.
13. A bemenő hangjel túl erős. Csökkentse a Hi-Fi, CD vagy TV, stb.
hangforrásának hangerejét.
MEGJEGYZÉS: Amennyiben televíziója nem rendelkezik a szabványos
piros és fehér RCA hangkimenettel, vagy audio jack-kel, akkor a tévé
valószínűleg optikai hangkimenettel rendelkezik. A Geemarc optikai átalakító
(javaslatunk: CL7XX_OPT) megvásárlásával lehetővé teszi a CL7400 sikeres
kapcsolódását a televízió optikai kimenetéhez.
Magyar
Page 58

57
Vevőszolgálat
A termékkel kapcsolatos támogatásért és segítségért látogassa meg
honlapunkat www.geemarc.com
Segélyvonalunk:
E-mail: customerservices@geemarc.com
Általános információk
Tulajdonságok
• 2.4GHz-es FHSS digitális technológia equalizer funkcióval, a hangszín és
a balansz beállításának lehetőségével.
• Gyakorlatilag interferencia-mentes, magas minőségű sztereó hangzás
• Sugárzás a látótéren kívülre is
• Digitális kapcsolódási rendszer a fejhallgatón és a jeladón
• Elektronikus hangerőszabályzó a fejhallgatón
• Beépített töltő a jeladón
• Automatikus kikapcsoló a fejhallgatón
• Autmatikus RF be/kikapcsolás funkció a jeladón
• 3.5mm-es csatlakoztatási lehetőség a vezetékes használathoz
• Akár 50 méteres működési távolság
Műszaki adatok
Sugárzás módja : 2.4GHz-es digitális FHSS sztereó
Hordozó frekvencia : 2.4GHz
Működési feszültség : Jeladó 6 V 600 m
A
: Fogadó 3.7V 1000mA
(beépített lítium újratölthető akkumulátor)
Frekvenciaválasz : 20 Hz
–
20 KHz (elektromos)
Torzítás : 0.5 %
Jel-zaj aránya : 75 dB
Csatornaelválasztás : 60 dB
Hatótávolság : 50 méter (szabad területen)
Magyar
Page 59

58
Garancia
A Geemarc a termék megvásárlásának pillanatától fogva két éven át biztosít
garanciát a Geemarc termékre. Ebben az időszakban minden javítás vagy
csere (a mi belátásunk szerint) ingyenes. Ha problémát tapasztal, vegye fel a
kapcsolatot Segélyvonalunkkal vagy keresse fel honlapunkat a
www.geemarc.com
címen.
A garancia nem vonatkozik balesetekre, gondatlan kezelésre vagy bármely
alkatrész eltörésére.
A terméket kizárólag a Geemarc engedéllyel rendelkező képviselői szerelhetik
szét vagy módosíthatják.
A Geemarc garancia semmilyen mértékben nem korlátozza az Ön jogainak
gyakorlását.
A terméken a szerződésnek való megfelelés elve szerinti törvényi jótállás (az
alkalmazandó jogszabályok szerint) is érvényes.
Fontos: A NYUGTA A GARANCIA RÉSZÉT KÉPEZI, AZT MEG KELL
TARTANI ÉS GARANCIÁS KÖVETELÉSEK ESETÉN BEMUTATNI.
EEC Nyilatkozat
A Geemarc Telecom SA ezzel megerősíti, hogy a termék megfelel a
rádióberendezésekről és a távközlő végberendezésekről szóló 2014/53/UE
irányelvben lefektetett alapvető követelményeknek és más vonatkozó
intézkedéseknek.
A megfelelésről szóló nyilatkozat a www.geemarc.com
oldalon megtekinthető
Az esetleges hallássérülés megelőzése érdekében NE hallgassa
hosszabb ideig nagy hangerővel.
A készülék megfelel a kanadai iparági nem engedélyköteles RSSs
szabványnak. Működése a következő két feltételhez van kötve: (1) a készülék
nem okozhat káros interferenciát, valamint (2) a készüléknek fogadnia kell
minden rá háruló interferenciát, beleértve azt is, amely a készülék
nemkívánatos működését okozza.
FCC-nyilatkozat
A készülék megfelel az FCC előírások 15. cikkének. A készülék csak a
következő két feltétel teljesülése esetén működtethető: (1) a készülék nem
okozhat káros interferenciát, illetve (2) a készüléknek el kell fogadnia minden
kívülről érkező interferenciát, beleértve a működési rendellenességeket okozó
interferenciákat is.
Magyar
Page 60

59
Figyelmeztetés: A készüléknek a megfelelőséget garantáló fél által nem
kifejezetten jóváhagyott módosítása érvénytelenítheti a felhasználó engedélyét
annak kezelésére.
MEGJEGYZÉS: A készülék az elvégzett tesztek alapján, az FCC előírások 15.
cikkének értelmében megfelel a B kategóriájú digitális eszközökre vonatkozó
követelményeknek. A követelmények célja, hogy elégséges védelmet
nyújtsanak a káros interferencia ellen lakossági környezetben. A berendezés
rádiófrekvenciájú energiát használ, generál, és sugároz, és amennyiben nem
az utasításoknak megfelelően telepítik, káros interferenciát okozhat a
rádiófrekvenciás kommunikációban.
Nem garantálható azonban, hogy egy konkrét berendezés káros interferenciát
fog okozni. Amennyiben ez a berendezés mégis interferenciát okoz a rádióvagy televíziós adások vételében, melyet a berendezés ki- és bekapcsolásával
állapíthat meg, a kezelő a következő intézkedések egyikével megkísérelheti
orvosolni a problémát :
• Helyezze át a vevőantennát, vagy változtassa meg annak helyzetét.
• Növelje meg a berendezés és a vevő közötti távolságot.
• Csatlakoztassa a berendezést egy, a vevőtől elkülönített áramkörhöz.
• Kérjen segítséget szakképzett technikustól, illetve a berendezés
értékesítőjétől.
FCC ID: VHC-AAI-DH1250-00
IC: 9197A-CL7400
Hulladékkezelési információk
Az elöregedett elektromos és elektronikus felszerelések eldobása
(érvényes az Európai Unióban és más, szelektív hulladékgyűjtő
rendszerekkel rendelkező európai országokban)
A terméken vagy csomagolásán elhelyezett jelzés mutatja, hogy ezt a terméket
nem szabad háztartási hulladékként kezelni. Ehelyett át kell adni az elektromos
és elektronikus termékek újrahasznosításáért felelős gyűjtési ponton.
Azzal, hogy biztosítja, hogy a termék megfelelően lett eldobva, segít megelőzni
a termék esetleges káros hatásait a környezetre és az emberi egészségre,
melyeket ellenkező esetben kiválthat a termék nem megfelelő hulladékként
való kezelése.
A termék újrahasznosításával kapcsolatos részletesebb információkért keresse
fel a helyi önkormányzatot, a helyi háztartásihulladék-kezelő szolgálatot vagy
az üzletet, ahol a terméket vásárolta.
Minden elektromos és elektronikus terméket, köztük az akkumulátorokat is a
háztartási hulladéktól elkülönítve kell ártalmatlanítani, a kormányzat vagy a
helyi hatóságok által arra kijelölt gyűjtési pontokon.
CAN ICES-3(B)/NMB-3(B)
Magyar
Page 61
60
Råd om sikkerhed og behandling
For den bedste udnyttelse og sikker brug af dette produkt læs venligst disse
instruktioner grundigt før brug. Opbevar dem på et sikkert sted for fremtiden.
Advarsel: Dette produkt kan være meget højlydt. Vær forsigtig og afhold
andre fra at bruge dette produkt, hvis de ikke har samme grad af høretab.
Overdrevent lydtryk fra høretelefoner kan forårsage høretab.
Vær forsigtig: Elektrisk chok. MAN MÅ IKKE putte uforbundne hanstik i de
almindelige elektriske stik. Hanstik SKAL passe til strømadapteren.
Elektrisk forbindelse: Denne enhed er designet til at fungere fra 100-240VAC
- 50/60Hz forsyning. (Klassificeret som 'hazardous voltage' ifølge EN 60950
standard).
Enheden inkorporerer ikke en integral til/fra [on/off] strømafbryderkontakt. For
at slukke for elektriciteten, skal man enten afbryde strømmen ved
hovedkontakten eller tage vekselstrømsadapteren ud af stikket. Når enheden
installeres, skal man være opmærksom på, at en kontakt til strømafbrydelse er
tilgængelig.
Vær forsigtig: Risiko for eksplosion, hvis batteriet udskiftes med en
forkert type. Afskaf brugte batterier ifølge instruktionerne.
DÆK IKKE ventilationen til.
FJERN IKKE ørepuden, da den er meget svær at sætte på igen.
Hold enheden væk fra varmekilder.
UDSÆT IKKE enheden for direkte sollys.
Rens lytteapparatet og ørepropperne regelmæssigt.
LAD VÆRE med på nogen måde at ændre på enheden.
Bemærk venligst: Enheden kan blive udsat for støj fra andre apparater, der
skaber stærke elektriske eller magnetiske felter, f.eks. mikroovn, mobil
telefoner, transformere til lys etc.
Advarsler om batteriet:
• PRØV IKKE forsøg på skille ad.
• SMID IKKE på ilden.
• PRØV IKKE PÅ at sluge.
• Hold det borte fra børn.
• Batterierne skal sættes i til de rette poler.
• KORTSLUT IKKE de strømførende terminaler.
• Færdigbrugte batterier skal fjernes fra produktet.
• BRUG IKKE en anden type batteri eller ikke-genopladelige batterier som
udskiftning for de genopladelige batterier.
• Når hovedtelefonerne ikke er i brug eller batterierne er under opladning, sluk
medFRA for hovedtelefonerne for at undgå skade på batterierne.
• Batterierne skal oplades fuldt i 5 timer før første brug.
Dansk
Page 62

61
Problemløsning:
INGEN LYD
1. Kontroller, at adapteren i stikket er presset helt ind i strømudtaget og at
kablet er forbundet korrekt til jævnstrøm IN 6V konnektoren på senderen.
2. Kontroller, at TIL/FRA [ON/OFF] kontakten på hovedtelefonerne står i TIL
position og at kontakten lyser grønt.
3. Hovedtelefonernes batteri opladeniveau kan være for lavt. Sæt venligst
hovedtelefonen tilbage i dens holder for at genoplade batterierne, indtil det
grønne lys lyser på det venstre telefonsæt.
4. Kontroller at din DVD, dit TV sæt, Hi-Fi system eller audio komponent er
tændt og indstillet til en kanal, der sender et audio signal.
5. Brug hovedtelefonens lydstyrkekontrol til at skrue op for lyden (kun når den
bruges som trådløs hovedtelefon).
6. Audio signalets input niveau er for lavt. Skru op for lydstyrken fra din audio
kilde på Hi-Fi, CD, eller TV, etc.
7. Det forbundne audio/video udstyr er måske ikke sat til afspilning. Start
afspilning med til på apparatet.
8. Hovedtelefonens output niveau er for lavt. Reguler lydstyrken til et passende
niveau.
FORVRÆNGNINGER
9. Genstart sammenkoblings processen. Tryk på “Pair” knappen
[sammenkoblingen] i 3 sek. på senderen og på hovedtelefonen. Processen
er slut, når begge LED lyser grønt.
10. Hovedtelefonens batterier kan have for lavt opladningsniveau. Genoplad
batterierne.
11. Kontroller at lydstyrken er korrekt indstillet.
12. Hovedtelefonen kan være for langt væk fra senderen. Flyt nærmere til
senderen.
13. Audio signal input niveauet er for stærkt. Skru ned for lydstyrken fra din
audio kilde på Hi-Fi, CD, eller TV, etc.
OBS: Hvis TV’et ikke har standard rødt og hvidt audio output RCA, eller
et audio stik, har TV'et sandsynligvis et optisk audio output. Ved at købe en
Geemarc optisk konverter (vor reference CL7XX_OPT) kan CL7400 med held
forbindes til dit TV's optiske output.
Dansk
Page 63

62
Kundeservice
For produkt service og hjælp, se vores website www.geemarc.com
For vores kundeservice hjælpelinje
E-mail: customerservices@geemarc.com
Almen information
Beskrivelse
• 2,4GHz FHSS digitale teknologi med equalizer karakteristik for tone og
balance regulering.
• Høj kvalitet stereo lyd, der nærmest er fri for forstyrrelser
• Transmission er ikke begrænset udelukkende til direkte synsfelt
• Digital sammenkobling [Pairing] system til hovedtelefon & sender
• Elektronisk lydstyrke kontrol på hovedtelefoner
• Indbygget Pin-charger til sender
• Auto sluk-fra på hovedtelefon
• Auto Til/Fra [On/Off] funktion på sender
• 3,5 mm Linje karakteristik for ledningsforbundet hovedtelefon applikation
• Funktions afstand op til 50 meters
Tekniske specifikationer
Transmission modus : 2,4GHz digital FHSS stereo
Bærefrekvens : 2,4GHz
Spænding ved brug: : Transmitter 6 V 600 m
A
: Modtager 3,7V 1000mA
(indbygget Lithium genopladeligt batteri)
Frekvens response : 20 Hz
–
20 KHz (elektrisk)
Forvrængninger : 0,5 %
Signal-til-støj ratio : 75 dB
Kanal adskillelse : 60 dB
Rækkevidde : 50 meter (åbent areal)
Dansk
Page 64

63
GARANTI
Fra det øjeblik du har købt dit Geemarc produkt, er det garanteret af Geemarc i
to år. I løbet af dette år er alle reparationer og udskiftninger (efter vort skøn)
gratis. Skulle der opstå et problem, kontakt da venligst vores hjælpeservice
eller vores website på www.geemarc.com
.
Garantien dækker ikke ulykker, skødesløshed eller brud på dele.
Produktet må ikke ændres eller skilles ad af andre end en autoriseret
repræsentant for Geemarc.
Geemarcs garanti begrænser ikke på nogen måde dine lovmæssige
rettigheder.
Produktet er dækket af den lovpligtige garanti, der anvendes i
overensstemmelse med gældende regler.
Vigtigt: DIN KVITTERING ER EN DEL AF DIN GARANTI OG SKAL
OPBEVARES OG FREMVISES I TILFÆLDE AF GARANTIKRAV.
OBS: Garantien er kun gyldig inden for Danmarks grænser.
EEC Deklaration
Geemarc Telecom SA erklærer herved, at dette produkt er i overensstemmelse
med de basale krav og andre relevante regulativer for Radio og
Telecommunications Terminal Equipment Directive 2014/53/UE.
Erklæringen om overensstemmelse kan ses på www.geemarc.com
For at forhindre mulig høreskade, må man IKKE lytte ved høje
støjniveauer i længere tid.
Dette apparat er i overensstemmelse med Industry Canada Licence-exempt
RSSs. Det kan anvendes på følgende to betingelser: (1) apparatet må ikke
forårsage skadelig interferens, og (2) apparatet skal acceptere interferens,
endog hvis den forårsager uønsket funktion af apparatet.
FCC Erklæring
Dette apparat er i overensstemmelse med FCC regler sektion 15. Det kan
anvendes på følgende to betingelser: (1) apparatet må ikke forårsage skadelig
interferens, og (2) apparatet skal acceptere modtagen interferens, endog hvis
den forårsager uønsket funktion af apparatet.
Advarsel: Ændringer og modifikationer af dette apparat, der ikke udtrykkeligt
er anerkendt af den ansvarshavende for overensstemmelse, kan gøre
brugerens tilladelse til at bruge udstyret ugyldigt.
Dansk
Page 65

64
Bemærk: Dette apparat er blevet testet og fundet I overensstemmelse med
grænserne for et Klasse B digital apparat ifølge FCC regler Part 15. Disse
grænser er beregnet til at yde rimelig beskyttelse mod skadelig interferens ved
brug I et boligområde. Dette apparat skaber, burger og kan udsende radio
frekvens energi, og kan derfor, hvis det ikke er installeret og brugt ifølge
instruktionerne, forårsage skadelig interferens til radiokommunikation.
Der er dog ingen garanti for, at der ikke vil være tilfælde af interferens I en
specifik installation. Skulle dette apparat forårsage skadelig interferens til radioeller tv-modtagelse, hvilket kan konstateres ved at slukke og tænde for
apparatet, anbefales det brugeren at forsøge at korrigere interferensen på en
eller flere af følgende måder:
• Drej eller flyt modtageantennen.
• Øg afstanden mellem apparat og modtager.
• Forbind apparatet til et andet stik, end det, hvortil modtageren er forbundet.
• Rådfør dig med forhandleren eller en erfaren radio-tv-tekniker for at få hjælp.
FCC ID: VHC-AAI-DH1250-00
IC: 9197A-CL7400
Information om afskaffelse
Afskaffelse af brugt elektrisk & elektronisk udstyr (for anvendelse i den
Europæiske Union og i andre Europæiske lande med separate
afhentningssystemer)
Symbolet på produktet eller dets emballage indikerer, at dette produkt ikke må
smides ud med husholdningsaffaldet. I stedet skal det afleveres på det rette
opsamlingspunkt til genbrug af elektrisk og elektronisk udstyr.
Ved at sikre, at dette produkt bliver afhændet korrekt, hjælper du til med at
forebygge potentielle negative konsekvenser for miljøet og for menneskers
sundhed, som ellers kunne opstå ved uansvarlig afskaffelse af produktet.
For mere detaljeret information om genbrug af dette produkt, kontakt venligst
din lokale kommune, din service for opsamling af skrald eller forretningen, hvor
produktet blev købt.
Alle elektriske og elektroniske produkter inklusive batterier bør ikke afskaffes
gennem kommunens almindelige affaldssystem, men på specielt dertil
indrettede opsamlingssteder opsat af regering eller lokale myndigheder.
CAN ICES-3(B)/NMB-3(B)
Dansk
Page 66

65
Sikkerhets- og forsiktighetsregler
Les nøye gjennom disse instruksjonene for å få best nytte av hodetelefonene
og bruke dem på en trygg måte. Ta vare på denne håndboken, slik at du kan ta
den frem igjen senere.
OBS! Dette apparatet kan avgi svært kraftig lyd. Det er tiltenkt for personer
som hører dårlig. For høy lyd fra hodetelefoner kan føre til hørselsskader.
OBS! Risiko for dødelig elektrosjokk: Sett først strømadapterens kontakt inn
på baksiden av baseenheten og deretter kobler du adapteren til strømuttaket
for å unngå elektrosjokk.
Tilkobling til strøm: Apparatet er utviklet for å fungere ved 100–240 V
vekselstrøm ~ 50/60 Hz ("farlig høy spenning" i henhold til standarden EN
60950).
Apparatet har ingen generell på/av-bryter. Trekk ut strømadapteren for å koble
apparatet fra strøm. Når du setter apparatet på plass, må du sørge for at
strømuttaket er lett tilgjengelig.
OBS! Bruk av feil type batteri kan føre til skader. Respekter
instruksjonene for resirkulering av batterier.
Ikke dekk til ventilasjonshullene.
Ikke fjern trekket på øreklokkene, ettersom det er vanskelig å få det på igjen.
Hold apparatet unna varmekilder.
Ikke utsett apparatet for direkte sol.
Rengjør regelmessig hodetelefonene og øreklokkene.
Du må ikke foreta noen som helst endring av apparatet.
Merk: Apparatet kan bli påvirket av kraftig elektromagnetisk forstyrrelse fra
andre apparater (for eksempel mikrobølgeovn, mobiltelefon,
belysningstransformator osv.).
OBS!
• Du må aldri ta fra hverandre et batteri.
• Du må aldri sette fyr på et batteri.
• Du må aldri svelge et batteri.
• Oppbevares utenfor barns rekkevidde.
• Sørg for å sette inn batteriet med polene i riktig retning.
• Du må aldri kortslutte adapterens kontakter.
• Du må aldri la et dødt batteri bli værende i hodetelefonene.
• Du må aldri skifte ut batteriet med et oppladbart batteri av en annen type.
Kontakt kundeservice.
• Når hodetelefonene ikke er i bruk eller batteriet lades, må du sette bryteren
bak på baseenheten i posisjonen OFF (av) for å unngå skade på batteriet.
• Batteriet må lades helt opp første gang. Det anbefales å lade batteriet i 5
timer.
Norsk
Page 67

66
Feilsøking:
Ingen lyd i hodetelefonene.
1. Kontroller at strømadapteren er riktig koblet til strømuttaket og til kontakten
på baksiden av baseenheten, DC IN 6V.
2. Kontroller at på/av-bryteren på baseenheten står i posisjonen ON (på), og at
lampen lyser grønt på siden (slik at den kan motta et signal).
3. Ladenivået til batteriet i hodetelefonene kan være for lavt. Lad batteriet.
4. Kontroller at DVD-spilleren, TV-en, Hi-Fi-anlegget eller lydanlegget fungerer
og sender et lydsignal.
5. Bruk volumkontrollen på hodetelefonene for å øke mottaksvolumet (bare i
hodetelefonmodus).
6. Inngangssignalet er for svakt. Øk volumet på TV-en, Hi Fi-anlegget, CD-
spilleren el.l.
7. Det kan hende at lyd-/videoapparatet ikke er i lesemodus. Sett apparatet i
lesemodus.
8. Utgangssignalet fra hodetelefonene er for svakt. Juster volumet til ønsket
nivå.
FORVRENGNING
9. Gjenta paringsprosessen på side 14. Trykk på og holde inne knappen Pair
(Koble sammen) på baksiden av baseenheten i 3 sekunder, og hold inne
på/av-bryteren på hodetelefonene i 5 sekunder. Prosessen er fullført når de
to lampene lyser grønt.
10. Ladenivået til batteriet i hodetelefonene kan være for lavt. Sett
hodetelefonene til lading.
11. Kontroller at volumet er riktig.
12. Det kan hende at hodetelefonene er for langt unna baseenheten. Flytt deg
nærmere baseenheten.
13. Inngangssignalet er for kraftig. Senk volumet på for eksempel Hi-Fi-, CD-
eller TV-kilden.
MERK: Hvis TV-en ikke har noen lyd- eller RCA-utgang, har den helt
sikkert en optisk lydutgang. Du kan kjøpe en optisk omformer fra Geemarc (ref.:
CL7XX_OPT), noe som gjør at du vil kunne koble CL7400-apparatet til den
optiske utgangen på TV-en.
Norsk
Page 68

67
Kundeservice
Hvis du ønsker informasjon om eller hjelp med produkter, kan du besøke
nettstedet www.geemarc.com
.
Du kan kontakte kundeservice på:
E-mail: customerservices@geemarc.com
Generell informasjon
Funksjoner
• 2,4 GHz AFHSS-teknologi (Adaptive Frequency Hopping Spread Spectrum)
for digital sending med mulighet for å justere klangen og balansen.
• Stereolyd av høy kvalitet uten bakgrunnsstøy.
• Sendingen er ikke avhengig av at det er en rett linje mellom
hodetelefonene og baseenheten.
• Digital forbindelse mellom hodetelefonene og baseenheten.
• Volumet kan justeres på selve hodetelefonene.
• Store ladekontakter på baseenheten.
• Hodetelefonene slår seg automatisk av.
• På/av-bryter på baseenheten.
• 3,5 mm-lydkabel som kan kobles til hodetelefoninngangen på TV-en.
• Har en rekkevidde på 50 meter utendørs.
Tekniske spesifikasjoner
Sendemodus : 2,4 GHz, digital, FHSS, stereo
Frekvens : 2,4 GHz
Spenning : Baseenhet 6 V, 600 mA
: Hodetelefoner 3,7 V 1000 mA
(oppladbart litiumbatteri)
Frekvensgang for lyd : 20 Hz–20 KHz
Totalklirrfaktor (THD) : 0,5 %
Støy-/signalforhold : 75 dB
Kanalseparasjon : 60 dB
Rekkevidde : 50 meter (utendørs).
Norsk
Page 69
68
Garanti
Geemarc gir to års garanti fra og med kjøpsdatoen for dette apparatet for deler
og arbeid. I denne perioden får du reparert (eller om nødvendig erstattet)
apparatet gratis av Geemarc. I tilfelle du får problemer, kan du kontakte
kundeservice eller besøke nettstedet vårt, www.geemarc.com
.
Garantien dekker ikke ulykker, ødelagte deler, problemer forårsaket av
tordenvær, av væske som er sølt over apparatet, eller av forsømmelse fra
brukerens side. Apparatet skal bare repareres av teknikere som er godkjent av
Geemarc.
Geemarcs garanti begrenser ikke rettighetene du har i henhold til loven.
Produktet dekkes av den juridiske konformitetserklæringen som følger av
gjeldende lovgivning.
Viktig: KJØPSDOKUMENTET UTGJØR EN VIKTIG DEL AV GARANTIEN.
DU BLIR BEDT OM Å VISE FREM DETTE I TILFELLE DU MÅ BENYTTE DEG
AV GARANTIEN.
Merk: Garantien gjelder bare i Frankrike.
KONFORMITETSERKLÆRING:
Dette produktet oppfyller kravene til elektromagnetisk kompatibilitet og elektrisk
sikkerhet i R&TTE-direktivet
2014/53/UE.
Du finner konformitetserklæringen på www.geemarc.com
.
For å hindre eventuelle hørselsskader må man ikke lytte ved høye
volumnivåer over lengre perioder.
Denne enheten er i samsvar med Industry Canada Licence-fritak RSSs.
Bruken er underlagt følgende to betingelser: (1) Denne enheten skal ikke
forårsake skadelig interferens, og (2) denne enheten må godta eventuell
interferens, inkludert interferens som kan forårsake uønsket drift av enheten.
FCC erklæring
Denne enheten er i samsvar med del 15 av FCC-reglene. Bruken er underlagt
følgende to betingelser: (1) Denne enheten må ikke forårsake skadelig
interferens, og (2) denne enheten må godta eventuell mottatt interferens,
inkludert interferens som kan forårsake uønsket drift.
Advarsel: Ved endringer eller modifikasjoner som ikke er uttrykkelig godkjent
av ansvarlig for samsvar kan brukeren bli fratatt retten til å bruke utstyret.
Norsk
Page 70

69
MERK: Dette utstyret er testet og funnet i samsvar med grensene for en Klasse
B digital enhet, i henhold til del 15 av FCC-reglene. Disse grensene er utformet
for å gi rimelig beskyttelse mot skadelig interferens i en boliginstallasjon. Dette
utstyret genererer, bruker og kan utstråle radiofrekvensenergi, og hvis det ikke
installeres og brukes i samsvar med instruksjonene, kan det forårsake
skadelige forstyrrelser for radiokommunikasjon.
Det er imidlertid ingen garanti for at det ikke vil oppstå interferens i en bestemt
installasjon. Hvis dette utstyret forårsaker skadelig interferens ved radio- eller
TV-mottak, noe som kan fastslås ved å slå utstyret av og på, oppfordres
brukeren til å prøve å korrigere interferensen på en eller flere måter:
• Snu eller flytt mottakerantennen.
• Øk avstanden mellom utstyret og mottakeren.
• Koble utstyret til et uttak på en annen krets enn den mottakeren er koblet til.
• Kontakt forhandleren eller en erfaren radio- eller TV-tekniker for å få hjelp.
FCC ID: VHC-AAI-DH1250-00
IC: 9197A-CL7400
Resirkulering
Avhending av brukt elektrisk og elektronisk utstyr (gjelder i EU og i andre
europeiske land med systemer for separat innsamling).
Hvis produktet eller emballasjen er merket med dette symbolet, betyr det at
produktet ikke skal kastes sammen med vanlig husholdningsavfall. Produktet
må leveres inn på en gjenvinningsstasjon for elektriske og elektroniske
produkter.
Ved å respektere apparatets instruksjoner for gjenvinning bidrar du til å
beskytte miljøet og menneskers helse.
Hvis du ønsker å vite mer om gjenvinning av dette apparatet, kan du kontakte
forhandleren din, de kommunale tjenestene der du bor, eller
gjenvinningsstasjonen der du bor.
Alle elektriske og elektroniske produkter med batterier må avhendes separat
fra husholdningsavfallet på spesielle gjenvinningsstasjoner godkjent av statlige
eller lokale myndigheter.
CAN ICES-3(B)/NMB-3(B)
Norsk
Page 71
70
Bezpieczeństwo i pielęgnacja urządzenia
Aby korzystać z urządzenia w najlepszy możliwy sposób, zapoznaj się z
poniższymi uwagami.
Uwaga: urządzenie może działać bardzo głośno. Upewnij się, że osoby z
innym ubytkiem słuchu niż Twój, nie będą używały tego urządzenia. Nadmierne
ciśnienie akustyczne wytwarzane przez słuchawki może być przyczyną
powstania ubytku słuchu.
Uwaga: napięcie elektryczne. Nigdy nie wkładaj odłączonej od słuchawek
wtyczki przewodu zasilającego do gniazdka elektyczengo.
Połączenie elektryczne: urządzenie działa na 100-240VAC - 50/60 Hz
(napięcie prądu sklasyfikowane jako niebezpieczne dla zdrowia według normy
EN 60950).
Urządzenie nie ma własnego włącznika/wyłącznika. By odłączy
ć zasilanie,
odłącz źródło zasilania lub adapter. Podczas instalacji upewnij się, że gniazdko
jest łatwo dostępne.
Uwaga: ryzyko eksplozji w przypadku używania niewłaściwego rodzaju baterii.
Utylizuj baterie zgodnie z instrukcją.
Nie zakrywaj wentylacji.
Nie zdejmuj nakładki ochronnej, ponieważ trudno ją założyć.
Trzymaj z dala od źródeł ciepła.
Nie wystawiaj na działanie promieni słonecznych.
Czyść słuchawki regularnie.
Nie modyfikuj urządzenia.
Uwaga: urządzenie może być podatne na elektromagnetyczne zakłócenia
pochodzące od innych urządzeń, takich jak kuchenka mikrofalowa, telefon
komórkowy czy transformator.
Ostrzeżenia dotyczące akumulatorów:
• Nie wolno rozmontowywać.
• Nie wolno wrzucać do ognia.
• Nie wolno połykać.
• Trzymaj z dala od dzieci.
• Baterie wkładaj odpowiednią stroną.
• Nie wolno podłączać do innych źródeł zasilania.
• Zawsze wyjmuj zużyte baterie z urządzenia.
• Nie używaj innych baterii niż akumulatory.
• Kiedy nie używasz słuchawek lub baterie się ładują, wyłącz je, by uniknąć
uszkodzenia akumulatorów.
• Akumulator należy naładować do pełna przed pierwszym użyciem. Wymaga
się, aby pierwsze ładowanie trwalo 4 godziny.
Polski
Page 72
71
Rozwiązywanie problemów:
Brak dźwięku
1. Upewnij się, że adapter jest dobrze wetknięty do gniazdka, a przewód
odpowiednio podłączony do konektora DC IN 6V w urządzeniu.
2. Upewnij się, że słuchawki są włączone (pozycja ON, wskaźnik świeci na
niebiesko).
3. Zbyt niski poziom naładowania akumulatora. Naładuj go, wskaźnik na
słuchawce będzie zielony.
4. Upewnij się, że Twój system DVD, TV lub HiFi lub inne źródło dźwięku jest
włączone i ustawione na kanał do transmisji audio.
5. Zwiększ głośność w słuchawkach (tylko kiedy korzystasz z
bezprzewodowego zestawu).
6. Wyjście audio jest zbyt cicho. Zwiększ głośność źródła audio.
7. Podłączone urządzenia audio/video nie są w trybie odtwarzania. Włącz ten
tryb.
8. Słuchawki są za cicho. Zwię
ksz głośność.
Zakłócenia
9. Powtórz parowanie. Naciśnij przycisk parowania przez 3 sek., na nadajniku i
słuchawce. Parowanie skończy się, kiedy oba wskaźniki LED zapalą się na
zielono.
10. Akumulator jest rozładowany. Naładuj go.
11. Upewnij się, że poziom głośności jest odpowiedni.
12.Słuchawki mogą być za daleko od nadajnika. Zbiliż się.
13.Wyjście audio jest za głośno. Zmniejsz głośność źródła audio.
Ważne: w przypadku gdy odbiornik telewizyjny nie mam standardowego
wyjścia audio RCA (białe i czerwone), powinien mieć optyczne wyjście.
Nabywając optyczny konwerter firmy Geemarc (zalecany model to
CL7XX_OPT) będziesz mógł podłączyć słuchawki CL7400 do tego wyjścia.
Polski
Page 73

72
Kontakt
Aby uzyskać informacje wejdź na stronę: www.geemarc.com
E-mail: customerservices@geemarc.com
Informacje ogólne
Funkcje
• Cyfrowa transmisja 2.4 GHz FHSS, z możliwością ustawienia tonu i
balansu.
• Wysoka jakość stereo praktycznie wolna od zakłóceń.
• Transmisja odbywa się, nawet gdy urządzenia się nie "widzą".
• Cyfrowy proces parowania nadajnika i słuchawek.
• Eletroniczna regulacja głośności w słuchawkach.
• Wbudowana ładowarka w nadajniku.
• Automatyczne wyłączanie słuchawek.
• Automatyczna funkcja ON/OFF RF w nadajniku.
• Gniazdo 3.5 mm dla transmisji przewodowej.
• Zasięg działania do 50 m.
Dane techniczne
Transmisja : Cyfrowa, stereo 2.4 GHx FHSS
Częstotliwość : 2.4GHz
Pobór moc
y
: Najadnik 6 V 600 m
A
: Odbiornik 3.7V 1000mA
(wbudowany akumulator litowy)
Odpowiedź częstotliwościowa : 20 Hz
–
20 KHz (elektryczna)
Zakłócenia : 0.5 %
SNR : 75 dB
Separacja kanałów : 60 dB
Zasięg : 50 meters (w terenie otwartym)
Polski
Page 74

73
Gwarancja
Firma Phonak Polska Sp. z o.o. udziela dwóch lat gwarancji, liczonej od daty
sprzedaży wyrobu. W okresie gwarancji wszystkie naprawy lub wymiana części
idbywają się bezpłatnie. W przypadku wystąpienia trudności w eksploatacji
naszego wyrobu, prosimy o skontaktowanie się z serwisem firmy Phonak
Polska.
Gwarancja obejmuje wady fabryczne i materiałowe, nie obejmuje uszkodzeń
powstałych w wyniku zaniedbań lub uszkodzeń mechanicznych jakichkolwiek
części oraz użytkowania niezgodnego z instrukucją. Wszelkie próby ingerencji
przez osoby nieupowaznione przez firmę Phonak Polska, spowodują utratę
gwarancji. Gwarancja obowiązuje na terenie Rzeczpospolitej Polskiej.
Niniejsza gwaranacja nie wyłącza, nie ogranicza ani nie zawiesza uprawnień
Kupującego wynikających z niezgodności z umową.
WAŻNE: TWÓJ RACHUNEK STANOWI CZĘŚĆ GWARANCJI, NALEŻY GO
PRZECHOWAĆ I PRZEDSTAWIĆ W RAZIE REKLAMACJI.
Deklaracja EEC
Firma Geemarc Telecom SA deklaruje, że niniejszy wyrób zgodny jest ściśle z
wymaganiami i odpowiednimi warunkami dyrektywy 2014/53/UE
- Radio and Telecommunications Terminal Equipment, artykuł 3, paragraf 1a,
1b oraz paragraf 2.
Deklarację zgopdności można sprawdzić na stronie www.geemarc.com
Głośne słuchanie przez dłuższy okres czasu może uszkodzić
słuch.
To urządzenie jest zgodne z wymaganiami Industry Canada Licence-exempt
RSSs. Urządzenie działa po spełnieniu następujących warunków: (1) to
urządzenie nie powoduje żadnych szkodliwych zakłóceń, oraz (2) to
urządzenie musi akceptować różne zakłócenia, nawet te, które mogą
powodować niepożądane działanie urządzenia.
Zgodność z FCC
To urządzenie jest zgodne z punktem 15 wymagań FCC. Urządzenie działa po
spełnieniu następujących warunków: (1) to urządzenie nie powoduje żadnych
szkodliwych zakłóceń, oraz (2) to urządzenie musi akceptować różne
zakłócenia, nawet te, które mogą powodować niepożądane działanie
urządzenia.
Ostrzeżenie: Zmiany lub modyfikacje urządzenia niezatwierdzone przez
jednostkę odpowiedzialną za zgodność mogą unieważnić użytkownikowi
pozwolenie na korzystanie z urządzenia.
Polski
Page 75

74
Uwaga: Urządzenie zostało przetestowane i spełnia limity urządzeń cyfrowych
klasy B, zgodnie z punktem 15 wymagań FCC. Normy te zapewniają
odpowiednią ochronę przed szkodliwymi zakłóceniami w mieszkaniu.
Urządzenie to generuj i emituje częstotliwości radiowe, i, jeśli jest
nieodpowiednio zainstalowane i używane niezgodnie z instrukcją, może
powodować zakłócenia w komunikacji radiowej.
Nie ma jednak gwarancji, że zakłócenia nie pojawią się w specyficznych
warunkach. Jeśli urządzenie powoduje zakłócenia w odbiorze sygnału
radiowego lub telewizyjnego, co można sprawdzić wyłączając i włączając
urządzenie, użytkownik może poprawić jakość przez:
• przekierowanie lub zmianę miejsca położenia anteny odbiorczej.
• zwiększenie przerwy pomiędzy urządzeniem a odbiornikiem.
• podłączenie urządzeń do obwodu, w którym nie jest podłączony odbiornik.
• poprosić o poradę eksperta od telewizji lub dostawcę urządzeń.
FCC ID: VHC-AAI-DH1250-00
IC: 9197A-CL7400
Informacje o utylizacji
Utylizacja starego sprzętu elektrycznego i elektronicznego (dotyczy Unii
Europejskiej i innych krajów europejskich z wydzielonymi systemami
zbierania odpadów)
Symbol przekreślonego pojemnika na odpady oznacza, że produkt ten nie
może być utylizowany w sposób, jak zwykłe domowe odpady. Wszystkie stare i
nieużywane urządzenia należy zutylizować w miejscach przeznaczonych na
odpady elektroniczne i elektryczne.
Przestrzegając zasad właściwej utylizacji sprzętu dbasz o zdrowie i chronisz
środowisko naturalne.
Aby uzyskać więcej szczegółowych informacji na temat recyklingu tego
produktu, należy skontaktować się z lokalnym dostawcą usług utylizacji
odpadów lub sklepem, w którym produkt został zakupiony.
Wszystkie elektryczne oraz elektroniczne zużyte urządzenia, włączając baterie
muszą być utylizowane zgodnie z obowiązującym prawem, w oddzielnych,
specjalnie do tego przeznaczonych miejscach, wyznaczonych przez lokalne
władze.
CAN ICES-3(B)/NMB-3(B)
©
03 Feb, 2016
Polski
Page 76
75
UGCL7400_V1.9
 Loading...