


Title: GEAR4 PG534 HouseParty Rise MANUAL
Date: 05/05/2011
Version: V1.1
Artwork Owner:
kim@disruptivegroup.com
MODEL NO: PG534
POWER ADAPTER: ZDA090200m-N / SFF0900200U1BA
100-240V~50/60Hz 0.8A max
INPUT:
OUTPUT:
9.0V⎓2.0A V1.1
Finished Dimensions:
Height: 124mm
Width: 124mm
HouseParty™ Rise
User Manual
Notice d’utilisation | Benutzerhandbuch
Thank you for buying the HouseParty Rise,
app-enhanced clock radio for iPod and iPhone.
Please read over this manual before use and
retain it for future reference.
Merci d’avoir choisi le système HouseParty Rise,
radio réveil à l’heure des app pour iPod et iPhone.
Veillez à lire attentivement cette notice d’utilisation
avant de l’utiliser, et conservez-la pour vous y
référer par la suite.
Wir freuen uns, dass Sie sich für den Kauf des
HouseParty Rise, einem durch eine App optimierten
Radiowecker für iPod und iPhone, entschieden
haben. Lesen Sie sich dieses Benutzerhandbuch
vor der Verwendung bitte sorgfältig durch, und
bewahren Sie es zum späteren Nachschlagen auf.
open
GEAR4_PG534_HouseParty_Rise_Manual_V1.1.indd 1 05/05/2011 16:08

1
6
12
18
36
24
42
30
47
52
GEAR4_PG534_HouseParty_Rise_Manual_V1.1.indd 1 05/05/2011 16:09

HouseParty Rise Please read before use.
Product features:
■ App-enhanced clock radio
■ 12 / 24 hour clock with alarm - wake up
to radio, your iPod / iPhone music library
or buzzer
■ Sleep countdown timer
■ Dimmable LED display
■ 2 programmable alarms
■ FM radio with programmable presets
■ Volume & snooze control dial
■ Charges iPod / iPhone
■ Line-in port for use with other music players
APP-ENHANCED:
Smarter than your average speaker, free app
available from the App Store;
■ Use your iPhone or iPod touch to control
the speaker wirelessly. To use this feature,
dock a 2nd iPhone or iPod touch, ensure
both devices are connected to Wi-Fi and
select the control speaker feature in the
SmartLink app.*
■ Auto-tune and save your favourite stations.
The app screen displays what you’re
listening to.**
1 GEAR4 | HouseParty Rise | User Manual
■ Auto-Sync time and alarms between your
iPhone and the speaker. Dim both screens
using swipe gestures on the clock display.
■ Access your music library through the app
and display your favourite album art.
N.B. App-enhanced features require GEAR4
SmartLink app for iPhone 4, iPhone 3GS,
iPhone 3G or iPod touch (2nd, 3rd and 4th
generation only) with iOS 3.1.3, iOS 4.0 or
higher. Available FREE on the App Store. App
screens correct at time of print. Wireless remote
control feature requires a 2nd docked iOS
device, using SmartLink and Wi-Fi.
*Please ensure that you ‘allow remote’ in the
SmartLink settings menu from the 2nd docked
iOS device.
**Where RDS broadcast is available.
Getting started:
■ Plug the power cable into the back of the unit
and then into the mains supply.
■ Install the coin-cell battery into the battery
compartment on the bottom of the unit. This
battery keeps clock settings from being lost in
the event of a loss of power.
■ To activate the speaker, press the POWER
button.
GEAR4_PG534_HouseParty_Rise_Manual_V1.1.indd 1 05/05/2011 16:09

■ To select the mode, press the MODE button to
scroll between the options (iPod / FM / AUX).
■ Press the brightness button on the speaker or
remote to adjust the LED screen brightness.
There are 5 adjustable brightness levels.
For use with iPod / iPhone:
■ Press the MODE button to select iPod mode.
■ Carefully insert your iPod / iPhone into
the dock.
■ Press play on your iPod / iPhone and
control the music using your device or
use the remote control to navigate the
iPod / iPhone menus.
For use with FM radio:
■ Press the MODE button to select FM mode.
or to scan to the frequency
■ Press
desired.
■ Press and hold
to the next clear frequency.
■ To select a preset radio station, press
and scroll between presets.
TO SAVE A PRESET FREQUENCY:
■ You can save up to 9 FM presets.
■ Adjust the radio to your desired frequency
then press and hold the
display flashes. Input the desired memory
position by pressing the
Press the
or to scan automatically
button until the
/ buttons.
button again to save.
To set the clock:
■ Turn off any active alarms (so no alarm icons
are displayed).
■ Press and hold the SET button untill the
display flashes.
/ buttons to select either 24 hour
■ Press
or 12 hour. Press the SET button to save.
■ The hour display will start flashing. Press
/ adjust the hour. Press the SET button
to save.
■ The minute display will start flashing. Press
/ to adjust the minute. Press the SET
button to save.
■ One of the days of the week will start flashing.
/ to select the day of the week you
Press
require. Press the SET button to save.
To activate and deactivate
the alarms:
■ Press the Alarm button on the speaker or
remote until the alarm you wish to activate
is illuminated.
To set the alarm:
■ Press the ALARM button until the alarm you
want to set is illuminated.
■ Press the SET button.
■ The hour display will start flashing. Press
/ to adjust the hour. Press the SET
button to save.
User Manual | HouseParty Rise | GEAR4
2
GEAR4_PG534_HouseParty_Rise_Manual_V1.1.indd 2 05/05/2011 16:09

■ The minute display will start flashing. Press
/ to adjust the minutes. Press the SET
button to save.
■ The days of the week will start flashing.
/ to choose between weekends,
Press
weekdays or all week. Press the SET button
to save.
■ Press the
modes – iPod, FM or buzzer. Press the SET
button to save.
■ Press the
Press the SET button to save.
/ button to scan through alarm
/ button to set the volume.
Sleep / snooze functions:
■ Snooze: When the alarm sounds, press the
VOLUME / SNOOZE button on the speaker
or the ‘zZz’ button on the remote once to
delay the alarm by 10 minutes.
■ Press any button to stop the alarm for
that day.
■ The alarm will ring for 1 hour if no buttons
are pressed.
■ Sleep: The sleep timer switches the unit off
automatically after a set interval.
■ To activate the sleep timer, press the SLEEP
button repeatedly to select the desired time
(OFF, 10min, 20min, 30min, etc).
■ Leave the desired number on the screen to
set. After a few seconds it will disappear and
has now been saved. SLEEP will be
displayed on the screen.
■ To turn off the sleep timer, press the SLEEP
button and OFF will be displayed.
N.B. When setting the above functions, the
speaker will return to previous display after 3
seconds of no activity.
Register your HouseParty Rise to activate your
warranty and receive product updates at
www.gear4.com/register
Please ensure that your iPod / iPhone is
using the latest software version. To update
the software, connect your iPod / iPhone to
iTunes. If there is a newer software version
available you will be prompted to upgrade.
Copyright © 2011 Disruptive Limited. All rights
reserved. Reproduction in part or in whole is
prohibited. GEAR4, SmartLink and HouseParty
are trade marks of Disruptive Limited. iPhone,
iPod, iPod nano, iPod classic and iPod touch
are trade marks of Apple Inc., registered in the
U.S. and other countries.
“Made for iPod” and “Made for iPhone” mean
that an electronic accessory has been designed
to connect specifically to iPod or iPhone
respecitively and has been certified by the
developer to meet Apple performance standards.
Apple is not responsible for the operation of
this device or its compliance with safety and
regulatory standards.
3 GEAR4 | HouseParty Rise | User Manual
GEAR4_PG534_HouseParty_Rise_Manual_V1.1.indd 3 05/05/2011 16:09
WARNING
To reduce the risk of fire or electric shock, do
not expose this unit to rain or moisture.
CAUTION
Use of controls or adjustments of performance
or procedures other than those specified may
result in hazardous radiation exposure.
UNPACKING AND INSTALLATION
Unpack your unit carefully. We recommend that
you save the packaging in case you ever need
to store your unit. To avoid damage, never place
the unit or its batteries near radiators, in front of
heating vents, under direct sunlight or near water.
FOR YOUR SAFETY
‒ When disconnecting the power supply, pull
the plug first. Do not pull the cord by itself.
‒ Never handle the power plug with wet hands,
as this could cause fire or electric shock.
‒ Refer servicing to qualified personnel only.
‒ Do not open the housing.
‒ Do not twist or pinch the power supply cord.
If the plug or power supply cord needs to be
replaced, ensure that it complies with the
manufacturer’s recommendation.
‒ Unplug the unit during lightning storms and
when unused for extended periods of time.
DISPOSAL
According to the European Directive 2002/96/
EC all electrical and electronic products must be
collected separately by a local collection system.
Please act according to your local rules and
do not dispose of your old products with your
normal household waste.
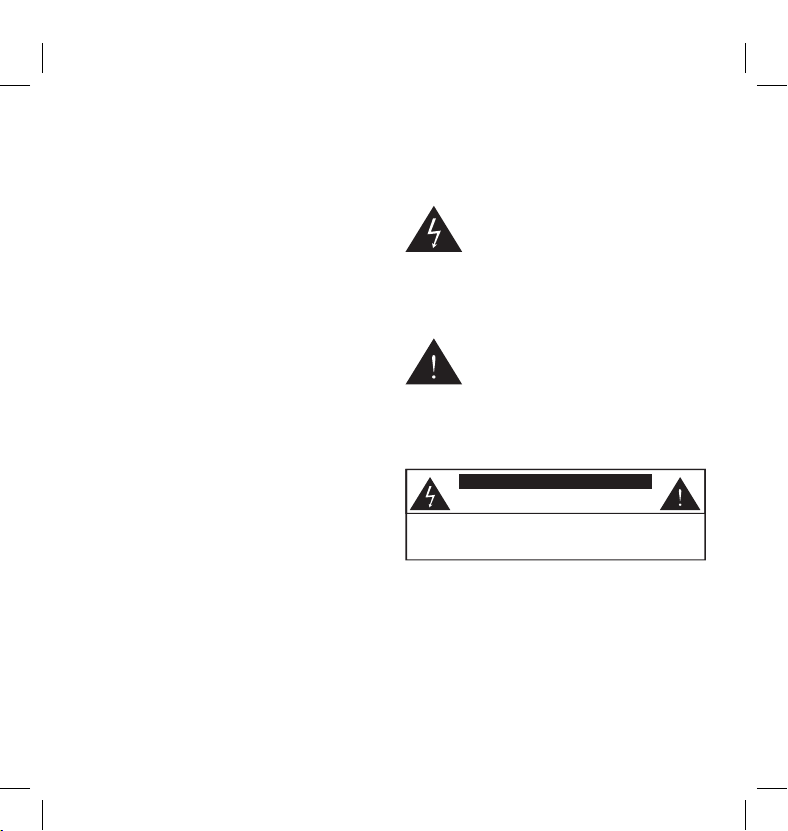
The lightning flash with arrowhead
symbol, within an equilateral triangle,
is intended to alert user to the
presence of uninsulated ‘Dangerous Voltage’
within the product’s enclosure that may be of
sufficient magnitude to constitute risk of electric
shock to person.
The exclamation point within an
equilateral triangle is intended to
alert user to the presence of
important operating and maintenance
(servicing) instruction in the literature
accompanying the appliance.
CAUTION
RISK OF ELECTRIC SHOCK DO N OT OPEN
CAUTION: TO REDUCE THE RISK OF ELECTRIC SHOCK, DO NOT REMOVE
COVER (OR BACK). NO USER-SERVICEABLE PARTS INSIDE.
REFER SERVICING TO QUALIFIED SERVICE PERSONNEL.
FCC RULES
You are cautioned that changes or modifications
not expressly approved by the part responsible
for compliance could void the user’s authority
to operate the equipment. This equipment has
been tested and found to comply with the limits
for a Class B digital device, pursuant to part 15
of the FCC rules.
User Manual | HouseParty Rise | GEAR4
4
GEAR4_PG534_HouseParty_Rise_Manual_V1.1.indd 4 05/05/2011 16:09

These limits are designed to provide reasonable
protection against harmful interference in
a residential installation. This equipment
generates, uses and can radiate radio frequency
energy and, if not installed and used in
accordance with the instructions, may cause
harmful interference to radio communications.
However, there is no guarantee that interference
will not occur in a particular installation. If this
equipment does cause harmful interference
to radio or television reception, which can be
determined by turning the equipment off and
on, the user is encouraged to try to correct the
interference by one or more of the following
measures:
‒ Reorient or relocate the receiving antenna.
‒ Increase the separation between the
equipment and receiver.
‒ Connect the equipment into an outlet on a
circuit different from that to which the receiver
is connected.
‒ Consult the dealer or an experienced radio/
TV technician for help.
Operation is subject to the following two
conditions:
1) This device may not cause interference and
2) This device must accept any interference,
including interference that may cause undesired
operation of the device.
5 GEAR4 | HouseParty Rise | User Manual
GEAR4_PG534_HouseParty_Rise_Manual_V1.1.indd 5 05/05/2011 16:09

Veuillez lire avant utilisation. HouseParty Rise
Commandes de
HouseParty Rise :
➊ ASSOMBRIR
➋ MODE
➌ ALARME
➍ RÉGLAGE
➎ ARRÊT MOMENTANÉ / VEILLE / VOLUME
➏ MARCHE / ARRÊT
➐ RETOUR RAPIDE
➑ LECTURE / PAUSE
➒ AVANCE RAPIDE
➓ ENTRÉE CC
11
PRISE D’ENTRÉE POUR AUTRES
LECTEURS
Caractéristiques du produit :
■ Radio réveil commandée par des app
■ Radio-réveil 12 / 24 heures avec alarme
■ Programmation du mode Veille
■ LED à luminosité réglable
■ 2 alarmes programmables
■ Radio FM avec stations préréglées
programmables
■ Molette d’arrêt momentané / volume
■ Charge l’iPod / iPhone
■ Prise d’entrée pour d’autres lecteurs
de musique
BÉNÉFICIEZ DE LA PUISSANCE DES APP :
Bien plus qu’un simple haut-parleur, app gratuite
disponible sur App Store:
■ Télécommandez votre haut-parleur sans fil
avec votre iPhone ou iPod touch. Posez
simplement un deuxième iPhone ou iPod
touch sur la station d’accueil, assurez-vous
que les deux appareils sont connectés en
Wi-Fi et sélectionnez l’option de contrôle du
haut-parleur dans l’app SmartLink.*
■ Réglage automatique et enregistrement de
vos stations préférées. L’écran de l’App
affiche ce que vous écoutez.**
■ Synchronisation automatique de l’heure et
des alarmes entre l’iPhone et le haut-parleur.
Réduction de la luminosité sur les deux
écrans en appliquant des gestes de
glissement sur l’horloge.
■ Accès à votre bibliothèque de musique
depuis l’app et affichage des graphismes de
votre album préféré.
6Notice d’utilisation | HouseParty Rise | GEAR4
GEAR4_PG534_HouseParty_Rise_Manual_V1.1.indd 6 05/05/2011 16:09

Remarque : Les fonctions gérées par des
app nécessitent l’app GEAR4 SmartLink pour
iPhone 4, iPhone 3GS, iPhone 3G ou iPod
touch (2e, 3e et 4e génération uniquement)
avec iOS 3.1.3, iOS 4.0 ou plus récent.
Disponible GRATUITEMENT sur App Store.
Écrans d’App corrects lors de la mise sous
presse. La télécommande sans fil nécessite un
2e périphérique iOS connecté avec SmartLink
ou par Wi-Fi.
* Assurez-vous que le périphérique distant est
autorisé dans les paramètres de SmartLink, sur
le deuxième périphérique iOS.
**Lorsque la diffusion RDS est disponible.
Prise en main :
■ Branchez le câble de courant alternatif au
dos de l’appareil, puis branchez l’autre
extrémité au secteur.
■ Installez la pile bouton dans son
compartiment, situé sous l’unité. Cette pile
permet de conserver les paramètres de
l’horloge en cas de coupure de courant.
■ Pour activer le haut-parleur, appuyez sur la
touche POWER.
■ Pour sélectionner le mode, appuyez sur la
touche MODE du haut-parleur, et faites
défiler les options (iPod / FM / AUX).
■ Appuyez sur la touche de luminosité du
haut-parleur ou de la télécommande pour
régler la luminosité de l’écran LED. 5 niveaux
de luminosité sont disponibles.
Utilisation avec l’iPod / l’iPhone :
■ Appuyez sur la touche MODE pour
sélectionner le mode iPod.
■ Insérez soigneusement votre iPod / iPhone
dans le dock.
■ Appuyez sur la touche de lecture de
l’iPod / iPhone et contrôlez la musique avec
votre appareil ou utilisez la télécommande
pour consulter les menus de l’iPod / iPhone.
Utilisation de la radio FM :
■ Appuyez sur la touche MODE pour
sélectionner le mode FM.
■ Appuyez sur la touche
sélectionner la fréquence désirée.
■ Maintenez enfoncée la touche
rechercher automatiquement la fréquence
audible suivante.
■ Pour sélectionner une station de radio
préréglée, appuyez sur la touche
défiler les stations.
MÉMORISATION D’UNE FRÉQUENCE
PRÉRÉGLÉE :
■ Vous pouvez prérégler jusqu’à 9 stations FM.
■ Réglez la radio sur la fréquence désirée et
appuyez sur la touche
l’écran clignote, puis choisissez la position en
/ pour
/ pour
et faites
jusqu’à ce que
7 GEAR4 | HouseParty Rise | Notice d’utilisation
GEAR4_PG534_HouseParty_Rise_Manual_V1.1.indd 7 05/05/2011 16:09
mémoire, en appuyant sur les touches / .
Rappuyez sur la touche
pour confirmer.
Réglage de l’horloge :
■ Coupez toutes les alarmes actives (aucune
icône d’alarme ne doit s’afficher).
■ Maintenez enfoncée la touche SET jusqu’à
ce que l’affichage clignote.
■ Appuyez sur les touches
sélectionner le format 24heures ou
12heures. Appuyez sur la touche SET
pour mémoriser.
■ L’heure s’affiche et commence à clignoter.
Appuyez sur la touche
l’heure. Appuyez sur la touche SET pour
mémoriser.
■ Les minutes s’affichent et commencent à
clignoter. Appuyez sur la touche
régler les minutes. Appuyez sur la touche
SET pour mémoriser.
■ L’un des jours commence à clignoter.
Appuyez sur
requis. Appuyez sur la touche SET pour
l’enregistrer.
/ pour sélectionner le jour
/ pour
/ pour régler
/ pour
Activation/désactivation
des alarmes :
■ Appuyez sur la touche Alarm du haut-parleur
ou de la télécommande pour illuminer
l’alarme voulue.
Réglage de l’alarme :
■ Appuyez sur la touche ALARM jusqu’à ce
que l’alarme désirée s’allume.
■ Appuyez sur la touche SET.
■ L’heure s’affiche et commence à clignoter.
Appuyez sur la touche
l’heure. Appuyez sur la touche SET pour
mémoriser.
■ Les minutes s’affichent et commencent à
clignoter. Appuyez sur la touche
régler les minutes. Appuyez sur la touche
SET pour mémoriser.
■ Les jours de la semaine commencent à
clignoter. Appuyez sur
entre les week-ends, les jours en semaine
ou toute la semaine. Appuyez sur la touche
SET pour mémoriser.
■ Appuyez sur la touche
mode de minuterie - iPod, FM or buzzer.
Appuyez sur la touche SET pour mémoriser.
■ Appuyez sur la touche
le volume. Appuyez sur la touche SET
pour mémoriser.
/ pour régler
/ pour
/ pour choisir
/ pour régler le
/ pour régler
Notice d’utilisation | HouseParty Rise | GEAR4
GEAR4_PG534_HouseParty_Rise_Manual_V1.1.indd 8 05/05/2011 16:09
8

Réglages sommeil / arrêt
momentané :
■ Arrêt momentané : Lorsque l’alarme sonne,
appuyez sur la touche VOLUME/ARRÊT
MOMENTANÉ du haut-parleur ou sur la
touche « zZz » de la télécommande pour
retarder l’alarme de 10 minutes.
■ Appuyez sur n’importe quel bouton pour
arrêter l’alarme pendant 24 heures.
■ L’alarme retentira pendant 1 heure, si aucune
touche n’est actionnée.
■ Temporisation : La temporisation éteint
l’unité automatiquement au bout de la
période spécifiée.
■ Pour activer la temporisation, appuyez
plusieurs fois sur la touche SLEEP pour faire
défiler les options et choisir la durée désirée
(OFF, 10min, 20min, 30min, etc.).
■ Laissez la durée désirée à l’écran. Au bout
de quelques secondes, elle disparaît. Elle est
maintenant mémorisée. Le mot SLEEP
s’affiche à l’écran.
■ Pour éteindre la temporisation de sommeil,
appuyez sur la touche SLEEP et l’option
OFF s’affiche.
Remarque : Lors du réglage des fonctions
ci-dessus, le haut-parleur rétablit l’affichage
précédent après 3 secondes d’inactivité.
Enregistrez votre HouseParty Rise pour activer
la garantie et bénéficier de mises à jour sur
www.gear4.com/register
Veuillez vérifier que votre iPod / iPhone utilise
la dernière version logicielle. Pour mettre le
logiciel à jour, connectez votre iPod / iPhone à
iTunes. Si une nouvelle version est disponible,
le système vous invitera à actualiser.
Copyright © 2011 Disruptive Limited. Tous droits
réservés. Toute reproduction totale ou partielle
strictement interdite. GEAR4, SmartLink et
HouseParty sont des marques de Disruptive
Limited. iPhone, iPod, iPod nano, iPod classic
et iPod touch sont des marques de commerce
d’Apple Inc., déposées aux États-Unis et dans
d’autres pays.
“Made for iPod” et “Made for iPhone” signifient
que l’accessoire électronique concerné a été
spécifiquement conçu pour se connecter à
l’iPod ou à l’iPhone et a été certifié aux normes
de performance Apple par le développeur.
Apple ne saurait être responsable du
fonctionnement de cet appareil ni de sa
conformité aux normes de sécurité et aux
réglementations en vigueur.
AVERTISSEMENT
Pour réduire le risque d’incendie ou
d’électrocution, ne pas exposer cet appareil
à la pluie ni à l’humidité.
9 GEAR4 | HouseParty Rise | Notice d’utilisation
GEAR4_PG534_HouseParty_Rise_Manual_V1.1.indd 9 05/05/2011 16:09

ATTENTION
L’utilisation des commandes ou les réglages
de performances par des procédures autres
que celles spécifiées risquent d’entraîner une
exposition à des radiations dangereuses.
DÉBALLAGE ET INSTALLATION
Déballer l’appareil avec soin. Nous
recommandons de conserver l’emballage, pour
tout stockage prolongé éventuel de l’appareil.
Pour éviter tout endommagement, ne jamais
placer l’appareil ou ses batteries près d’un
radiateur, près d’une bouche d’aération, sur un
rebord de fenêtre exposé au soleil ni près d’une
source d’eau.
DANS L’INTÉRÊT DE LA SÉCURITÉ
‒ Pour débrancher l’adaptateur d’alimentation,
tirer sur la fiche. Ne jamais tirer sur le cordon.
‒ Ne jamais manipuler la fiche d’alimentation
avec des mains mouillées, sous peine
d’électrocution ou d’incendie.
‒ Consulter exclusivement un personnel
qualifié pour toute réparation.
‒ Ne pas ouvrir le boîtier.
‒ Ne pas tordre ni pincer le cordon
d’alimentation. Si la fiche ou le cordon
doivent être remplacés, vérifier qu’ils
sont conformes aux recommandations
du fabricant.
‒ Débrancher l’appareil pendant les orages
avec foudre et lorsqu’il n’est pas utilisé
pendant une période prolongée.
MISE AU REBUT
Conformément à la directive européenne
2002/96/EC, tout appareil électrique ou
électronique doit être collecté séparément
par un système local de collecte des déchets
électriques et électroniques. Respecter les lois
et réglementations en vigueur et ne pas mettre
au rebut dans les déchets ménagers.
Le symbole de l’éclair dans un
triangle équilatéral a pour but
d’alerter l’utilisateur sur la présence
d’une tension dangereuse non isolée à
l’intérieur du boîtier du produit. Cette tension
peut suffire à électrocuter l’utilisateur.
Le symbole du point d’exclamation
dans un triangle équilatéral a pour
but d’alerter l’utilisateur sur la
présence d’instructions importantes d’utilisation
et de maintenance dans la documentation
accompagnant l’appareil.
ATTENTION
RISQUE D’ÉLECTROCUTI ON - NE PAS OUVRIR
ATTENTION: POUR RÉDUIRE LE RIS QUE D’ÉLECTROCUTION, NE PAS
RETIRER LE COUVERCLE NI LE FON D. CET APPAREIL NE CONTIENT
AUCUNE PIÈCE RÉPARABLE PAR L’UTILISATEUR. CONSULTER
LE PERSONNEL QUALIFIÉ POUR TOU TE RÉPARATION.
RÈGLES DE LA FCC
Toute modification non expressément
approuvée par la partie responsable de
la mise en conformité risque d’annuler le
droit d’utilisation de cet équipement. Cet
équipement a été testé et est conforme aux
Notice d’utilisation | HouseParty Rise | GEAR4
10
GEAR4_PG534_HouseParty_Rise_Manual_V1.1.indd 10 05/05/2011 16:09

limites imposées aux appareils numériques de
classeB, conformément à la section15 des
règles de laFCC.
Ces limites ont été conçues pour protéger
les installations domestiques contre les
interférences néfastes. Cet équipement génère,
utilise et émet de l’énergie sous forme de
fréquences radio et, en cas de non-respect des
instructions d’installation et d’utilisation, risque
de provoquer des interférences.
Il n’existe aucune garantie contre ces
interférences. En cas d’interférences radio ou
télévisuelles, pouvant être vérifiées en mettant
l’équipement hors tension puis sous tension,
l’utilisateur peut tenter de résoudre le problème
de l’une des façons suivantes:
‒ Réorienter ou déplacer l’antenne de
réception;
‒ Éloigner l’équipement du poste de réception;
‒ Brancher l’équipement sur une prise
appartenant à un circuit différent de celui du
poste de réception;
‒ Consulter le revendeur ou un technicien
radio/TV qualifié.
Son utilisation est assujettie aux deux conditions
suivantes:
1) Cet équipement ne doit pas provoquer
d’interférences, et
2) Ce périphérique doit tolérer les interférences,
ce qui inclut les interférences qui risquent
de provoquer un dysfonctionnement du
périphérique.
11 GEAR4 | HouseParty Rise | Notice d’utilisation
GEAR4_PG534_HouseParty_Rise_Manual_V1.1.indd 11 05/05/2011 16:09

Bitte vor Verwendung lesen. HouseParty Rise
Bedienelemente des
HouseParty Rise:
➊ DIMMEN
➋ MODUS
➌ WECKER
➍ EINSTELLEN
➎ SCHLUMMERN / SLEEP / LAUTSTÄRKE
➏ EIN- / AUSSCHALTEN
➐ ZUM VORHERIGEN TITEL
➑ WIEDERGABE / PAUSE
➒ ZUM NÄCHSTEN TITEL
➓ GLEICHSTROMEINGANG
11
AUDIO-EINGANG (FÜR ANDERE
MUSIKPLAYER)
Produktmerkmale:
■ Durch App optimierter Radiowecker
■ 24 / 12-h-Uhr mit Wecker
■ Sleep-Countdown-Timer
■ Dimmbares LED-Display
■ 2 programmierbare Alarme
■ Integriertes FM-Radio mit programmierbaren,
voreingestellten Sendern
■ Schlummer-Steuerung
■ Lädt iPod / iPhone auf
■ Audio-Eingang zur Verwendung mit anderen
Musikplayern
DURCH APP OPTIMIERT:
Intelligenter als normale Lautsprecher,
kostenlose App vom App Store erhältlich;
■ Verwenden Sie Ihr iPhone oder Ihren iPod
touch, um den Lautsprecher kabellos zu
steuern. Um diese Funktion zu verwenden,
docken Sie ein zweites iPhone oder einen
zweiten iPod touch an. Stellen Sie sicher,
dass beide Geräte an Wi-Fi angeschlossen
sind und wählen Sie die Funktion zur
Steuerung des Lautsprechers in der
SmartLink-App.*
■ Automatisches Einstellen und Speichern Ihrer
Lieblingssender. Das App-Display zeigt, was
Sie gerade hören.**
■ Automatisches Synchronisieren der Zeit und
Alarme von iPhone und Lautsprecher.
Dimmen beider Displays durch Streichen mit
dem Finger über die Uhr-Anzeige.
■ Zugriff auf Ihre Musikbibliothek über die App
und Anzeigen Ihrer Lieblingsalbumkunst.
Hinweis: Für die über die App erhältlichen
optimierten Funktionen ist die GEAR4
12Benutzerhandbuch | HouseParty Rise | GEAR4
GEAR4_PG534_HouseParty_Rise_Manual_V1.1.indd 12 05/05/2011 16:09

SmartLink-Applikation für iPhone 4, iPhone
3GS, iPhone 3G oder iPod touch (nur zweite,
dritte und vierte Generation) mit iOS 3.1.3,
iOS 4.0 oder höher erforderlich. KOSTENLOS
im App Store erhältlich. App-Screenshots
zum Zeitpunkt der Drucklegung korrekt. Zur
Verwendung als kabellose Fernbedienung
ist ein zweites angedocktes iOS-Gerät
in Verbindung mit SmartLink und Wi-Fi
erforderlich.
* Bitte lassen Sie für das zweite angedockte
iOS-Gerät im SmartLink-Einstellungsmenü den
Remotezugriff zu (‘Allow Remote’).
**Sofern RDS-Aussendung verfügbar ist.
Erste Schritte:
■ Stecken Sie das Wechselstromkabel in den
Anschluss auf der Rückseite des Geräts und
dann in den Netzanschluss.
■ Legen Sie die Knopfzelle in das Batteriefach
auf der Unterseite des Geräts ein. Diese
Batterie verhindert, dass die Zeiteinstellungen
bei einer Unterbrechung der
Stromversorgung verloren gehen.
■ Um den Lautsprecher zu aktivieren, drücken
Sie die POWER-Taste.
■ Um den Modus zu wählen, drücken Sie die
MODE-Taste, um zwischen den Optionen zu
wechseln (iPod / FM / AUX).
■ Zur Regelung der Helligkeit des LED-
Displays drücken Sie die Helligkeitstaste am
13 GEAR4 | HouseParty Rise | Benutzerhandbuch
Lautsprecher oder auf der Fernbedienung. Es
gibt 5 einstellbare Helligkeitsstufen.
Verwendung mit einem
iPod / iPhone:
■ Drücken Sie die MODE-Taste, um den
iPod-Modus zu wählen.
■ Stecken Sie den iPod / iPhone vorsichtig in
das Dock.
■ Drücken Sie die Play-Taste am iPod/iPhone
und steuern Sie die Musikwiedergabe über
Ihr Gerät oder verwenden Sie die
Fernbedienung zur Steuerung der iPod/
iPhone-Menüs.
Verwendung mit FM-Radio:
■ Drücken Sie die MODE-Taste, um den
FM-Modus zu wählen.
■ Drücken Sie die
gewünschte Frequenz zu wählen.
■ Drücken und halten Sie die
gedrückt, um automatisch zur nächsten
störungsfreien Frequenz zu gehen.
■ Drücken Sie
Voreinstellungen, um einen voreingestellten
Radiosender zu wählen.
VOREINGESTELLTE FREQUENZ SPEICHERN:
■ Sie können bis zu 9 FM-Voreinstellungen
speichern.
■ Um eine bestimmte Frequenz zu speichern,
/ Taste, um die
/ Taste
und gehen Sie durch die
GEAR4_PG534_HouseParty_Rise_Manual_V1.1.indd 13 05/05/2011 16:09

stellen Sie das Radio auf die gewünschte
Frequenz ein. Drücken Sie dann die
und geben Sie die gewünschte
Speicherplatznummer ein, indem Sie die
Tasten. Drücken Sie zur Bestätigung
-Taste
Uhrzeit einstellen:
■ Schalten Sie aktive Weckrufe aus (damit
keine Alarm-Symbole angezeigt werden).
■ Drücken und halten Sie die SET-Taste
gedrückt, bis die Anzeige blinkt.
■ Drücken Sie die
die 24- oder 12-h-Anzeige zu wählen. Zum
Speichern drücken Sie die SET-Taste.
■ Die Stundenanzeige beginnt zu blinken.
Drücken Sie
einzustellen. Zum Speichern drücken Sie die
SET-Taste.
■ Die Minutenanzeige beginnt zu blinken.
Drücken Sie
einzustellen. Zum Speichern drücken Sie die
SET-Taste.
■ Einer der Wochentage beginnt zu blinken.
Drücken Sie
Wochentag zu wählen. Zum Speichern
drücken Sie die SET-Taste.
/ Tasten, um entweder
/ , um die Stunde
/ , um die Minute
/ , um den gewünschten
Alarme aktivieren und
deaktivieren:
■ Drücken Sie die Alarm-Taste am
Lautsprecher oder auf der Fernbedienung,
bis der zu aktivierende Alarm beleuchtet ist.
Weckzeit einstellen:
/
.
■ Drücken Sie die ALARM-Taste, bis der
gewünschte Weckruf aufleuchtet.
■ Drücken Sie die SET-Taste.
■ Die Stundenanzeige beginnt zu blinken.
Drücken Sie
einzustellen. Zum Speichern drücken Sie die
SET-Taste.
■ Die Minutenanzeige beginnt zu blinken.
Drücken Sie
einzustellen. Zum Speichern drücken Sie die
SET-Taste.
■ Die Wochentage beginnen zu blinken.
Drücken Sie
Wochenende, wochentags oder ganze
Woche zu wählen. Zum Speichern drücken
Sie die SET-Taste.
■ Drücken Sie die
Alarm-Modus festzulegen - iPod, FM oder
buzzer. Zum Speichern drücken Sie die
SET-Taste.
■ Drücken Sie die
Lautstärke einzustellen. Zum Speichern
drücken Sie die SET-Taste.
/ , um die Stunde
/ , um die Minuten
/ , um zwischen
/ Taste, um den
/ Taste, um die
Benutzerhandbuch | HouseParty Rise | GEAR4
14
GEAR4_PG534_HouseParty_Rise_Manual_V1.1.indd 14 05/05/2011 16:09

Sleep / Schlummer /
-Einstellungen:
■ Schlummerfunktion: Wenn der Weckruf
ertönt, drücken Sie die VOLUME/SNOOZETaste am Lautsprecher oder die ‘zZz’-Taste
auf der Fernbedienung einmal, um den
Weckruf um 10 Minuten zu verzögern.
■ Drücken Sie eine beliebige Taste, um den
Alarm für diesen Tag auszuschalten.
■ Der Weckruf ertönt 1 Stunde lang, wenn
keine Tasten gedrückt werden.
■ Sleep-Timer: Der Sleep-Timer (Abschalt-
Timer) schaltet das Gerät nach
voreingestellten Intervallen automatisch ab.
■ Zum Einschalten des Sleep-Timers drücken
Sie die SLEEP-Taste mehrmals, um die
gewünschte Zeit zu wählen (OFF / AUS, 10
Minuten, 20 Minuten, 30 Minuten usw.).
■ Lassen Sie die Taste los, wenn die
gewünschte Zeit am Display angezeigt wird.
Nach einigen Sekunden verschwindet sie und
ist jetzt gespeichert. Am Display wird ‘SLEEP’
angezeigt.
■ Zum Ausschalten des Sleep-Timers drücken
Sie die SLEEP-Taste, woraufhin OFF (AUS)
angezeigt wird.
Hinweis: Beim Einstellen der obigen Funktionen
kehrt der Lautsprecher nach 3 Sekunden ohne
Aktivität zur vorherigen Anzeige zurück.
Um die Garantie zu aktivieren und ProduktUpdates zu erhalten, registrieren Sie Ihre
HouseParty Rise-Kopie unter
www.gear4.com/register
Bitte stellen Sie sicher, dass Ihr iPod / iPhone
die neueste Softwareversion verwendet. Um die
Software zu aktualisieren, schließen Sie Ihren
iPod / iPhone an iTunes an. Falls eine neuere
Softwareversion verfügbar ist, werden Sie zur
Aktualisierung aufgefordert.
Copyright © 2011 Disruptive Limited. Alle
Rechte vorbehalten. Eine teilweise oder
vollständige Vervielfältigung ist nicht zulässig.
GEAR4, SmartLink und HouseParty sind
Marken von Disruptive Limited. iPhone, iPod,
iPod nano, iPod classic und iPod touch sind in
den USA und anderen Ländern eingetragene
Marken von Apple Inc.
„Made for iPod“ und „Made for iPhone“
bedeutet, dass ein elektronisches Zusatzgerät
speziell für den Anschluss an den iPod bzw.
das iPhone konstruiert ist und vom Entwickler
dahingehend zertifiziert wurde, dass es den
Apple-Leistungsnormen entspricht.
Apple ist nicht verantwortlich für den Betrieb
dieses Geräts oder die Einhaltung von
Sicherheitsrichtlinien und gesetzlichen Standards.
WARNUNG
Um die Gefahr eines Brandes oder elektrischen
Schlages so gering wie möglich zu halten,
15 GEAR4 | HouseParty Rise | Benutzerhandbuch
GEAR4_PG534_HouseParty_Rise_Manual_V1.1.indd 15 05/05/2011 16:09

sollten Sie dieses Gerät vor Regen oder
Feuchtigkeit schützen.
VORSICHT
Durch die Verwendung von Bedienelementen
oder Einstellungen oder die Durchführung
von Abläufen, die nicht in dieser Anleitung
aufgeführt sind, können Benutzer gefährlicher
Strahlung ausgesetzt werden.
AUSPACKEN UND INSTALLIEREN
Packen Sie das Gerät vorsichtig aus. Es
empfiehlt sich, die Verpackung für den Fall
aufzubewahren, dass Sie das Gerät einmal
lagern müssen. Stellen Sie das Gerät oder seine
Akku nicht in der Nähe von Heizkörpern oder vor
einem Heizlüfter auf, und setzen Sie es weder
direkter Sonneneinstrahlung noch Feuchtigkeit
aus, um eine Beschädigung zu vermeiden.
ZU IHRER SICHERHEIT
‒ Ziehen Sie zuerst den Netzstecker heraus,
bevor Sie das Netzteil abtrennen. Ziehen Sie
nicht am Kabel selbst.
‒ Fassen Sie den Netzstecker nicht mit nassen
Händen an, da dies einen Brand oder
elektrischen Schlag verursachen kann.
‒ Überlassen Sie Wartungsarbeiten nur
qualifiziertem Personal.
‒ Öffnen Sie das Gehäuse nicht.
‒ Verdrehen oder klemmen Sie das Netzkabel
nicht ein. Wenn der Netzstecker oder das
Netzkabel ausgewechselt werden müssen,
sollten Sie unbedingt auf die Einhaltung der
Empfehlungen des Herstellers achten.
‒ Ziehen Sie bei Gewittern, und wenn das
Gerät längere Zeit nicht verwendet wird, den
Gerätestecker aus der Steckdose.
ENTSORGUNG
Gemäß der europäischen Richtlinie 2002/96/
EG müssen alle elektrischen und elektronischen
Produkte im Rahmen eines örtlichen
Sammelsystems getrennt entsorgt werden.
Bitte halten Sie die örtlichen Vorschriften ein
und entsorgen Sie Ihre alten Produkte nicht
zusammen mit dem normalen Hausmüll.
Das Blitzsymbol in einem
gleichseitigen Dreieck soll den
Benutzer auf nicht isolierte
„gefährliche Spannung“ im Gehäuse des
Produkts aufmerksam machen, die eventuell
stark genug ist, um elektrische Schläge zu
verursachen.
Das Ausrufezeichen in einem
gleichseitigen Dreieck soll den
Benutzer auf wichtige Anweisungen
für die Bedienung und Instandhaltung
(Wartung) in den begleitenden Unterlagen
aufmerksam machen.
VORSICHT
GEFAHR ELEKTRISCHER SCHLÄGE - NICHT ÖFFNEN.
VORSICHT: ENTFERNEN SIE NICHT DIE ABDECKUNG (ODER RÜCKSEITE), UM
ELEKTRISCHE SCHLÄGE ZU VERMEIDEN.GERÄTEINNENTEILE KÖNNEN VOM
BENUTZER NICHT GEWARTET WERDEN.LASSEN SIE WARTUNGSARBEITEN NUR
VON QUALIFIZIERTEM WARTUNGSPERSONAL AUSFÜHREN.
Benutzerhandbuch | HouseParty Rise | GEAR4
16
GEAR4_PG534_HouseParty_Rise_Manual_V1.1.indd 16 05/05/2011 16:09

FCC-RICHTLINIEN
Sie werden darauf hingewiesen, dass
Änderungen, die von der für die Einhaltung
der Vorschriften verantwortlichen Stelle nicht
ausdrücklich genehmigt wurden, zum Verlust
der Betriebsberechtigung des Benutzers führen
können. Dieses Gerät wurde geprüft und stimmt
gemäß Teil 15 der FCC-Richtlinien mit den
Grenzwerten für ein digitales Gerät der Klasse
B überein.
Diese Grenzwerte sollen einen angemessenen
Schutz vor schädlichen Störungen bei der
Installation in Wohngebieten gewährleisten.
Dieses Gerät erzeugt, verwendet und kann
Hochfrequenzenergie abgeben, und es kann
schädliche Störungen beim Funkverkehr
hervorrufen, wenn es nicht vorschriftsmäßig
installiert und anweisungsgemäß verwendet wird.
Es kann jedoch nicht garantiert werden,
dass bei einer bestimmten Installation keine
Störungen auftreten werden. Sollte dieses
Gerät schädliche Störungen beim Radio- oder
Fernsehempfang verursachen, was durch
Ein- und Ausschalten des Geräts festgestellt
werden kann, wird dem Benutzer geraten, die
Störung durch eine oder mehrere der folgenden
Maßnahmen zu beheben:
‒ Verändern Sie die Ausrichtung bzw. den
Standort der Empfangsantenne.
‒ Vergrößern Sie den Abstand zwischen Gerät
und Empfänger.
‒ Schließen Sie das Gerät an eine Steckdose
an, die auf einem anderen Stromkreis als die
des Empfängers liegt.
‒ Bitten Sie den Händler oder einen erfahrenen
Radio- und Fernsehtechniker um Hilfe.
Der Betrieb unterliegt den folgenden zwei
Bedingungen:
1) Dieses Gerät darf keine Störungen
verursachen.
2) Dieses Gerät muss alle Störungen vertragen,
einschließlich Störungen, die zu einem
unerwünschten Betrieb des Geräts führen
können.
17 GEAR4 | HouseParty Rise | Benutzerhandbuch
GEAR4_PG534_HouseParty_Rise_Manual_V1.1.indd 17 05/05/2011 16:09

Lee esta información antes de usar el producto. HouseParty Rise
Controles de
HouseParty Rise:
➊ ATENUAR
➋ MODO
➌ ALARMA
➍ ESTABLECER
➎ REPETICIÓN DE ALARMA /
DESACTIVACIÓN / VOLUMEN
➏ ENCENDIDO / APAGADO
➐ SALTAR HACIA ATRÁS
➑ REPRODUCIR / PAUSA
➒ SALTAR HACIA DELANTE
➓ ENTRADA DE CC
11
LÍNEA DE ENTRADA (PARA OTROS
REPRODUCTORES DE MÚSICA)
Características del producto:
■ Reloj y radio con mejora mediante aplicación
■ Reloj en formato de 24 / 12 horas con alarma
■ Temporizador de cuenta atrás de
desactivación
■ Pantalla LED atenuable
■ 2 alarmas programables
■ Radio FM incorporada con preajustes de
emisoras programables
■ Control de repetición de alarma
■ Carga el iPod / iPhone
■ Puerto de línea de entrada para uso con
otros reproductores de música
CON MEJORA MEDIANTE APLICACIÓN:
Más completo que un altavoz normal, aplicación
disponible gratis en la App Store;
■ Usa tu iPhone o iPod touch para controlar el
altavoz inalámbricamente. Para usar esta
función, conecta un segundo iPhone o iPod
touch, asegúrate de que ambos dispositivos
están conectados a Wi-Fi y selecciona la
función de control de altavoz en la aplicación
SmartLink.*
■ Sintoniza y guarda tus emisoras favoritas
automáticamente. La pantalla de la aplicación
muestra lo que estás escuchando.**
■ Sincroniza automáticamente la hora y las
alarmas entre el iPhone y el altavoz. Atenúa
ambas pantallas pasando el dedo por la
pantalla del reloj.
■ Accede a tu biblioteca de música a través
de la aplicación y muestra la portada de tu
disco favorito.
18Manual del usuario | HouseParty Rise | GEAR4
GEAR4_PG534_HouseParty_Rise_Manual_V1.1.indd 18 05/05/2011 16:09
 Loading...