

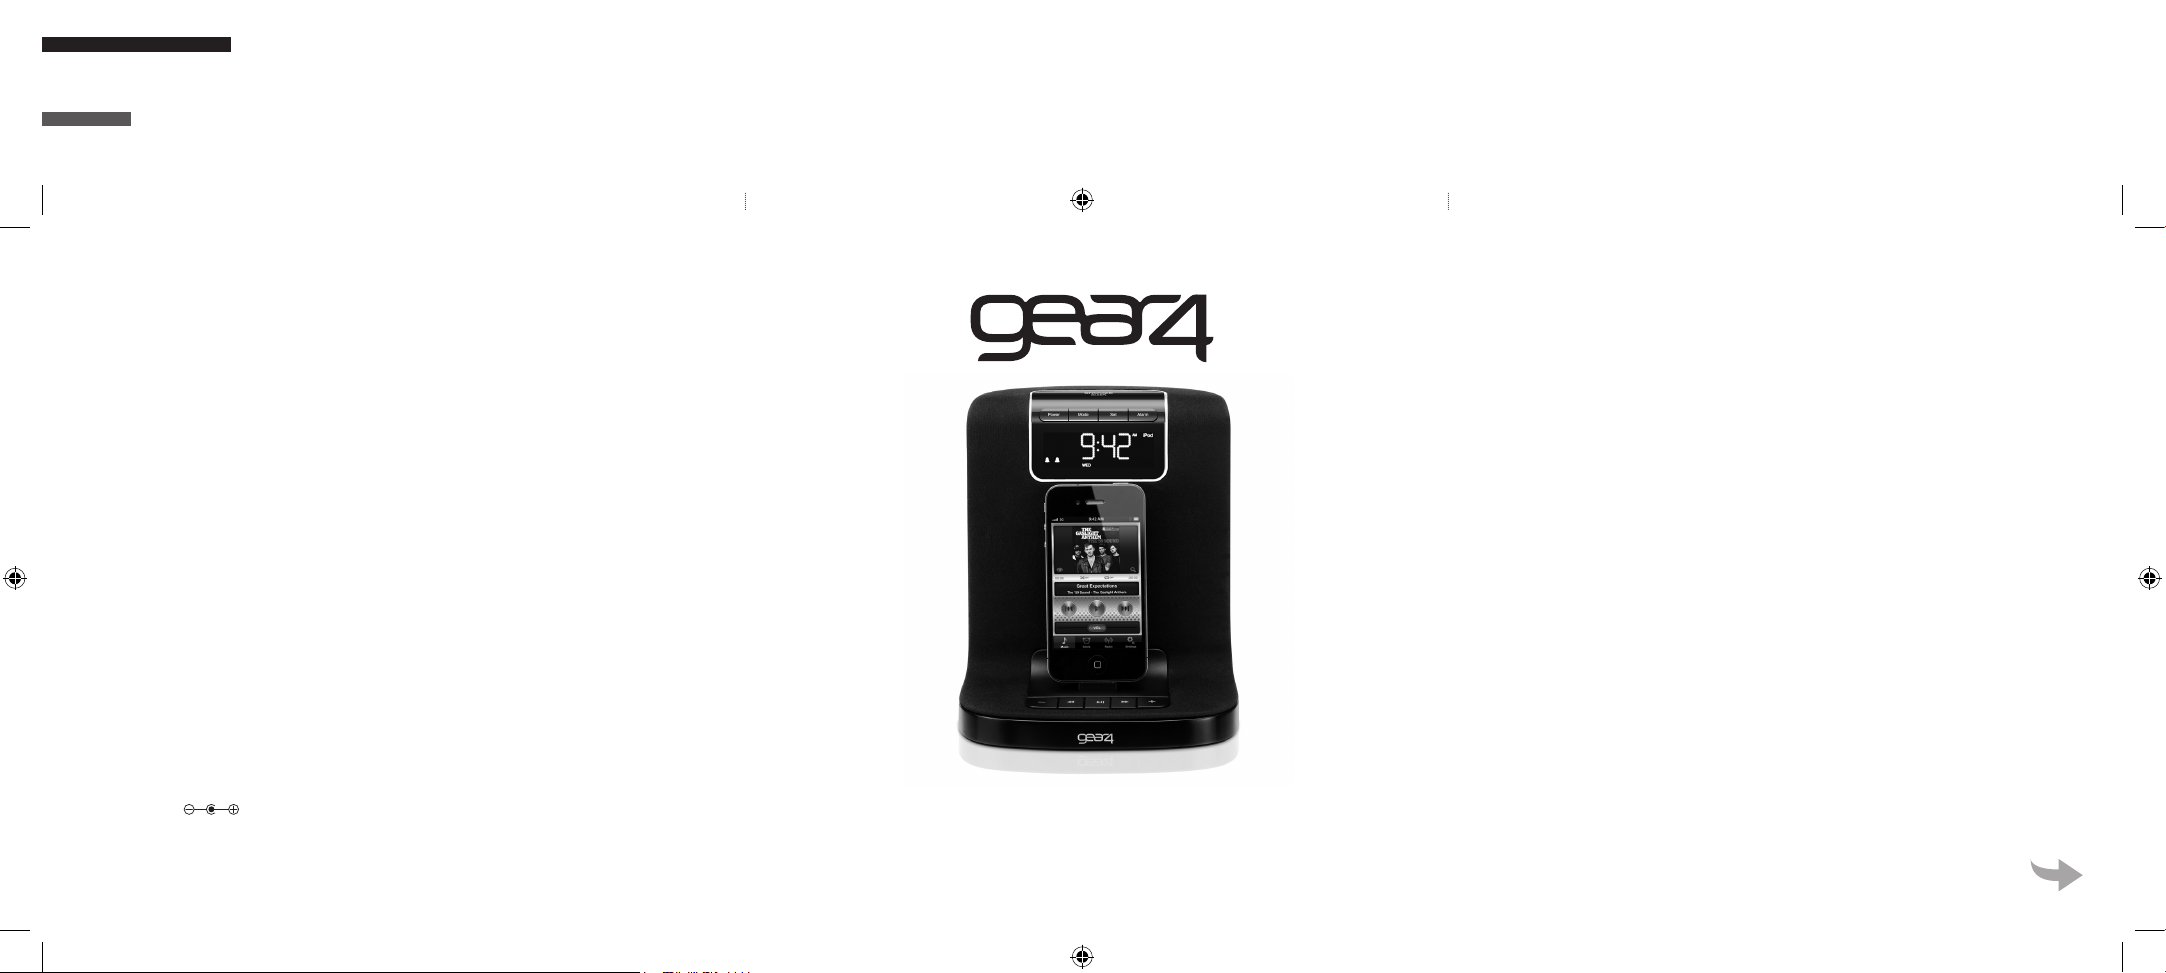
Title: GEAR4 PG548/PG549 AlarmDock Halo 2
Date: 04/08/2011
Version: V1.1
Artwork Owner:
design4@gear4.com
Finished Dimensions:
Height: 124mm
Width: 124mm
BACK COVER COVER INNER FLAP OUTER
Thank you for buying the AlarmDock Halo 2, appenhanced alarm clock for iPod and iPhone. Please
read over this manual before use and retain it for
future reference.
Merci d’avoir choisi le système AlarmDock Halo 2,
réveil géré par app pour iPod et iPhone. Veillez à
lire attentivement cette notice d’utilisation avant de
l’utiliser, et conservez-la pour vous y référer par
la suite.
Wir freuen uns, dass Sie sich für den Kauf des
AlarmDock Halo 2 Durch App optimierter Wecker
für iPod und iPhone entschieden haben. Lesen Sie
PRODUCT NO: PG548/PG549
POWER ADAPTER: SFF0900200U1BA
INPUT: 100~240v / 50/60Hz / 0.4A
OUTPUT: 9V / 2A
SideOneDummy 2009
The Gaslight Anthem © SideOneDummy 2009
For more information visit www.gaslightanthem.com
GEAR4_PG548_MANUAL_COVER_V1.1.indd 1 05/08/2011 13:23
BACK COVER COVER INNER FLAP OUTER
AlarmDock™ Halo 2
User Manual
Notice d’utilisation | Benutzerhandbuch
sich dieses Benutzerhandbuch vor der Verwendung
bitte sorgfältig durch, und bewahren Sie es zum
späteren Nachschlagen auf.
open

GEAR4_PG548_MANUAL_INNER_V1.1.indd 1 05/08/2011 13:29
1
126
24
3018
42 4736
52
GEAR4_PG548_MANUAL_INNER_V1.1.indd 2 05/08/2011 13:29

AlarmDock Halo 2 Please read before use.
Features:
■ FM radio with 9 programmable preset stations
■ Charges iPod / iPhone
■ 12 / 24 hour clock with alarm - wake up
to radio, your iPod / iPhone or buzzer
■ Dimmable LCD display
■ 2 programmable alarms
■ Snooze control
■ Sleep countdown timer
■ Line-in port for use with other music players
APP-ENHANCED:
Smarter than your average speaker, free app
available from the App Store;
■ Use your iPhone or iPod touch to control the
speaker wirelessly. To use this feature, dock
a 2nd iPhone or iPod touch, ensure both
devices are connected to Wi-Fi and select the
control speaker feature in the SmartLink
app.*
■ Auto-tune and save your favourite stations.
The app screen displays what you’re listening
to.**
■ Auto-Sync time and alarms between your
iPhone and the speaker. Dim both screens
1 GEAR4 | AlarmDock Halo 2 | User Manual
using swipe gestures on the clock display.
■ Access your music library through the app
and display your favourite album art.
N.B. App-enhanced features require GEAR4
SmartLink app for iPhone 4, iPhone 3GS,
iPhone 3G or iPod touch (2nd, 3rd and 4th
generation only) with iOS 3.1.3, iOS 4.0 or
higher. App screens correct at time of print.
Wireless remote control feature requires a 2nd
docked iOS device, using SmartLink and Wi-Fi.
*Please ensure that you ‘allow remote’ in the
SmartLink settings menu from the 2nd docked
iOS device.
**Where RDS broadcast is available.
Getting started:
■ Install the CR2025 coin-cell battery in the
battery compartment on the bottom of the
unit. This battery keeps clock settings form
being lost in the event of a loss of power.
■ Plug the power cable into the back of the unit
and then into the mains supply.
■ To activate the speaker, press the
POWER button.
■ To select the mode, press the MODE button
to scroll between the options (iPod / FM / AUX).
GEAR4_PG548_MANUAL_INNER_V1.1.indd 1 05/08/2011 13:29
■ When in Standby, Press the SNOOZE
button to adjust the LCD screen brightness.
There are 5 brightness levels.
■ The LCD can also be changed using
button on the remote control.
the
For use with iPod /
iPhone:
■ Carefully insert your iPod / iPhone into the
dock.
N.B. When connecting your iPhone or iPod touch
to AlarmDock Halo 2 for the first time, your device
will display a notification that the accessory
requires an application that is not installed. Tap
OK to go to the SmartLink App download page.
Tap the Install button to begin your download.
The GEAR4 SmartLink application is free of
charge.
■ Press the MODE button to select iPod mode.
■ Press play on your iPod / iPhone and control
the music using your device or use the
remote control to navigate the iPod / iPhone
menus.
For use with FM radio:
■ Press the MODE button to select FM mode.
or to scan to the frequency desired.
■ Press
■ Press and hold
to the next clear frequency.
or to scan automatically
■ To select a preset radio station, press
scroll between presets.
TO SAVE A PRESET FREQUENCY:
■ You can save up to 9 FM presets.
■ Adjust the radio to your desired frequency
then press and hold the
display flashes. Input the desired memory
position by pressing the
Press the
button again to save.
button until the
/ buttons.
To set the clock:
■ Turn off any active alarms (so no alarm
icons are displayed).
■ Press the SET button.
■ ‘12h’ will begin flashing. Press
to select either 24 hour or 12 hour. Press the
SET button to save.
■ The hour display will start flashing.
/ adjust the hour. Press the
Press
SET button to save.
■ The minute display will start flashing. Press
/ to adjust the minutes. Press the SET
button to save.
■ One of the days of the week will start
flashing. Press
of the week. Press the SET button to save.
/ to select the day
User Manual | AlarmDock Halo 2 | GEAR4
/ buttons
and
2
GEAR4_PG548_MANUAL_INNER_V1.1.indd 2 05/08/2011 13:29
To set the alarm:
■ Press the ALARM button until the alarm you
want to set is illuminated.
■ Press the SET button.
■ The hour display will start flashing. Press
/ to adjust the hour. Press the SET
button to save.
■ The minute display will start flashing. Press
/ to adjust the minutes. Press the SET
button to save.
■ The days that the alarm is set to will start
flashing. Press
weekends, weekdays or all week. Press the
SET button to save.
■ Press the
modes – iPod, FM or buzzer. Press the SET
button to save.
■ Press the
(between 0 and 32). Press the SET button
to save.
/ to choose between
/ button to scan through alarm
/ button to set the volume
■ Sleep: The sleep timer switches the unit off
automatically after a set interval.
■ To activate the sleep timer, press the SLEEP
button repeatedly to select the desired time
(OFF, 10min, 20min, 30min, etc).
■ Leave the desired number on the screen to
set. After a few seconds it will disappear and
has now been saved. SLEEP will be
displayed on the screen.
■ To turn off the sleep timer, press the SLEEP
button repeatedly until OFF is displayed.
Register your AlarmDock Halo 2 to activate your
warranty and receive product updates at www.
gear4.com/register
Please ensure that your iPod / iPhone is using
the latest software version. To update the
software, connect your iPod / iPhone to iTunes.
If there is a newer software version available
you will be prompted to upgrade.
Sleep / snooze functions:
■ Snooze: When the alarm sounds, press the
SNOOZE button once to delay the alarm by
10 minutes.
■ Press any other button to stop the alarm for
that day.
■ The alarm will ring for 1 hour if no buttons
are pressed.
3 GEAR4 | AlarmDock Halo 2 | User Manual
GEAR4_PG548_MANUAL_INNER_V1.1.indd 3 05/08/2011 13:29
Copyright © 2011 Disruptive Limited. All rights
reserved. Reproduction in part or in whole is
prohibited. GEAR4, SmartLink and AlarmDock
are trade marks of Disruptive Limited. iPhone,
iPod, iPod nano, iPod classic and iPod touch
are trade marks of Apple Inc., registered in the
U.S. and other countries.

“Made for iPod” and “Made for iPhone” mean
that an electronic accessory has been designed
to connect specifically to iPod or iPhone
respectively and has been certified by the
developer to meet Apple performance
standards.
Apple is not responsible for the operation
of this device or its compliance with safety
and regulatory standards.
WARNING
To reduce the risk of fire or electric shock,
do not expose this unit to rain or moisture.
CAUTION
Use of controls or adjustments of performance
or procedures other than those specified may
result in hazardous radiation exposure.
Danger of explosion if battery is incorrectly
replaced. Replace only with the same or
equivalent type.
Batteries (battery pack or batteries installed)
shall not be exposed to excessive heat such as
sunshine, fire or the like.
UNPACKING AND INSTALLATION
Unpack your unit carefully. We recommend
that you save the packaging in case you
ever need to store your unit. To avoid
damage, never place the unit or its
batteries near radiators, in front of
heating vents, under direct sunlight
or near water.
FOR YOUR SAFETY
‒ When disconnecting the power supply,
pull the plug first. Do not pull the cord
by itself.
‒ Never handle the power plug with
wet hands, as this could cause fire
or electric shock.
‒ Refer servicing to qualified personnel only.
‒ Do not open the housing.
‒ Do not twist or pinch the power supply cord.
If the plug or power supply cord needs to be
replaced, ensure that it complies with the
manufacturer’s recommendation.
‒ Unplug the unit during lightning storms and
when unused for extended periods of time.
‒ Where the MAINS plug or an appliance
coupler is used as the disconnect device,
the disconnect device shall remain readily
operable.
DISPOSAL
According to the European Directive 2002/96/
EC all electrical and electronic products must be
collected separately by a local collection system.
Please act according to your local rules and do
not dispose of your old products with your
normal household waste.
User Manual | AlarmDock Halo 2 | GEAR4
4
GEAR4_PG548_MANUAL_INNER_V1.1.indd 4 05/08/2011 13:29

The lightning flash with arrowhead
symbol, within an equilateral triangle,
is intended to alert user to the
presence of uninsulated ‘Dangerous Voltage’
within the product’s enclosure that may be of
sufficient magnitude to constitute risk of electric
shock to person.
The exclamation point within an
equilateral triangle is intended
to alert user to the presence
of important operating and maintenance
(servicing) instruction in the literature
accompanying the appliance.
CAUTION
RISK OF ELECTRIC SHOCK • DO NOT OPEN
CAUTION: TO REDUCE THE RISK OF ELECTRI C SHOCK
DO NOT REMOVE COVER (OR BACK).
NO USER-SERVICABLE PARTS INSIDE
REFER SERVICING TO QUALIFIED SERVICE PERSONNEL
FCC RULES
You are cautioned that changes or modifications
not expressly approved by the part responsible
for compliance could void the user’s authority
to operate the equipment. This equipment has
been tested and found to comply with the limits
for a Class B digital device, pursuant to part 15
of the FCC rules.
These limits are designed to provide reasonable
protection against harmful interference in
a residential installation. This equipment
generates, uses and can radiate radio frequency
energy and, if not installed and used in
accordance with the instructions, may cause
harmful interference to radio communications.
However, there is no guarantee that interference
will not occur in a particular installation. If this
equipment does cause harmful interference
to radio or television reception, which can be
determined by turning the equipment off and
on, the user is encouraged to try to correct the
interference by one or more of the following
measures:
‒ Reorient or relocate the receiving antenna.
‒ Increase the separation between the
equipment and receiver.
‒ Connect the equipment into an outlet on a
circuit different from that to which the receiver
is connected.
‒ Consult the dealer or an experienced radio /
TV technician for help.
Operation is subject to the following two
conditions:
1) This device may not cause interference and
2) This device must accept any interference,
including interference that may cause undesired
operation of the device.
5 GEAR4 | AlarmDock Halo 2 | User Manual
GEAR4_PG548_MANUAL_INNER_V1.1.indd 5 05/08/2011 13:29
Veuillez lire avant utilisation. AlarmDock Halo 2
Commandes de
AlarmDock Halo 2
➊MARCHE / ARRÊT
➋MODE
➌ ARRÊT MOMENTANÉ / SOMMEIL
(SOMBRE EN VEILLE)
➍RÉGLAGE
➎ALARME
➏VOLUME -
➐VOLUME +
RETOUR RAPIDE
➒AVANCE RAPIDE
➓LECTURE / PAUSE
11
PRISE D'ENTRÉE POUR AUTRES
LECTEURS
12
ENTRÉE CC
13
ANTENNE FM
14
COMPARTIMENT DES PILES
Caractéristiques
du produit :
■ Radio FM intégrée, 9 stations programmables
■ Recharge l’iPod / iPhone
■ Horloge 12 / 24heures avec réveil -
Réveillez-vous avec la radio, votre iPod /
iPhone ou la sonnerie
■ LCD à luminosité réglable
■ 2 alarmes programmables
■ Commande d’arrêt momentané
■ Compte à rebours du sommeil
■ Prise d’entrée pour d’autres lecteurs
de musique
BÉNÉFICIEZ DE LA PUISSANCE DES APP :
Bien plus qu’un simple haut-parleur, app gratuite
disponible sur App Store;
■ Télécommandez votre haut-parleur sans fil
avec votre iPhone ou iPod touch. Posez
simplement un deuxième iPhone ou iPod
touch sur la station d’accueil, assurez-vous
que les deux appareils sont connectés en
Wi-Fi et sélectionnez l’option de contrôle du
haut-parleur dans l’app SmartLink.*
■ Réglage automatique et enregistrement de
vos stations préférées. L’écran de l’App
affiche ce que vous écoutez.**
■ Synchronisation automatique de l’heure et
des alarmes entre l’iPhone et le haut-parleur.
Réduction de la luminosité sur les deux
6Notice d’utilisation | AlarmDock Halo 2 | GEAR4
GEAR4_PG548_MANUAL_INNER_V1.1.indd 6 05/08/2011 13:29

écrans en appliquant des gestes de
glissement sur l’horloge.
■ Accès à votre bibliothèque de musique
depuis l’app et affichage des graphismes de
votre album préféré.
Remarque : Les fonctions gérées par des
app nécessitent l’app GEAR4 SmartLink pour
iPhone 4, iPhone 3GS, iPhone 3G ou iPod
touch (2e, 3e et 4e génération uniquement)
avec iOS 3.1.3, iOS 4.0 ou plus récent. Écrans
d’App corrects lors de la mise sous presse.
La télécommande sans fil nécessite un 2e
périphérique iOS connecté avec SmartLink ou
par Wi-Fi.ou plus récent.
*Assurez-vous que le périphérique distant est
autorisé dans les paramètres de SmartLink, sur
le deuxième périphérique iOS.
**Lorsque la diffusion RDS est disponible.
Prise en main :
■ Installez la pile bouton CR2025 dans son
compartiment, situé sous l’unité. Cette pile
permet de conserver les paramètres de
l’horloge en cas de coupure de courant.
■ Branchez le câble de courant alternatif
au dos de l’appareil, puis branchez l’autre
extrémité au secteur.
■ Pour activer le haut-parleur, appuyez sur
la touche POWER.
■ Pour sélectionner le mode, appuyez sur
la touche MODE du haut-parleur, et faites
7 GEAR4 | AlarmDock Halo 2 | Notice d’utilisation
défiler les options (iPod / FM / AUX).
■ En mode veille, appuyez sur la touche
SNOOZE pour régler l’intensité de l’écran
LCD. Les niveaux d’intensité sont au
nombre de 5.
■ Il est également possible d’utiliser la touche
de la télécommande.
Utilisation avec un
iPod / iPhone :
■ Insérez soigneusement votre iPod / iPhone
dans le dock.
Remarque : Lorsque vous connectez votre iPhone
ou votre iPod touch au AlarmDock Halo 2 pour
la première fois, votre appareil affiche un avis
demandant une application qui n’est pas installée.
Sélectionnez OK pour vous rendre à l’App Store,
téléchargez la page et sélectionnez le bouton
Install. L’application GEAR4 SmartLink application
est gratuite.
■ Appuyez sur la touche MODE pour
sélectionner le mode iPod.
■ Appuyez sur la touche de lecture de l’iPod/
iPhone et contrôlez la musique avec votre
appareil ou utilisez la télécommande pour
consulter les menus de l’iPod/iPhone.
GEAR4_PG548_MANUAL_INNER_V1.1.indd 7 05/08/2011 13:29

Utilisation de la radio FM :
■ Appuyez sur la touche MODE pour
sélectionner le mode FM.
■ Appuyez sur la touche
sélectionner la fréquence désirée.
■ Maintenez enfoncée la touche
rechercher automatiquement la fréquence
audible suivante.
■ Pour sélectionner une station de radio
préréglée, appuyez sur la touche
faites défiler les stations.
MÉMORISATION D’UNE FRÉQUENCE
PRÉRÉGLÉE :
■ Vous pouvez prérégler jusqu’à 9 stations FM.
■ Réglez la radio sur la fréquence désirée et
appuyez sur la touche
l’écran clignote, puis choisissez la position en
mémoire, en appuyant sur les touches
Rappuyez sur la touche
/ pour
/ pour
et
jusqu’à ce que
/ .
pour confirmer.
Réglage de l’horloge :
■ Coupez toutes les alarmes actives
(aucune icône d’alarme ne doit s’afficher).
■ Appuyez sur la touche SET.
■ 12h s’affiche et commence à clignoter.
Appuyez sur les touches << / >> pour
sélectionner le format 24heures ou
12heures. Appuyez sur la touche SET pour
mémoriser.
■ L’heure s’affiche et commence à clignoter.
Appuyez sur la touche
l’heure. Appuyez sur la touche SET
pour mémoriser.
■ Les minutes s’affichent et commencent
à clignoter. Appuyez sur la touche
pour régler les minutes. Appuyez sur la
touche SET pour mémoriser.
■ L’un des jours de la semaine commence
à clignoter. Appuyez sur
sélectionner le jour de la semaine désiré.
Appuyez sur la touche SET pour mémoriser.
/ pour régler
/
/ pour
Réglage de l’alarme :
■ Appuyez sur la touche ALARM jusqu’à
ce que l’alarme désirée s’allume.
■ Appuyez sur la touche SET.
■ L’heure s’affiche et commence à clignoter.
Appuyez sur la touche
l’heure. Appuyez sur la touche SET pour
mémoriser.
■ Les minutes s’affichent et commencent à
clignoter. Appuyez sur la touche
régler les minutes. Appuyez sur la touche
SET pour mémoriser.
■ Les jours de la semaine commencent à
clignoter. Appuyez sur
/ pour régler
/ pour
/ pour choisir
Notice d’utilisation | AlarmDock Halo 2 | GEAR4
GEAR4_PG548_MANUAL_INNER_V1.1.indd 8 05/08/2011 13:29
8

entre les week-ends, les jours en semaine
ou toute la semaine. Appuyez sur la touche
SET pour mémoriser.
■ Appuyez sur la touche
le mode de minuterie - iPod, FM or buzzer.
Appuyez sur la touche SET pour mémoriser.
■ Appuyez sur la commande
le volume (de 0 à 32). Appuyez sur la touche
SET pour mémoriser.
/ pour régler
/ pour régler
Réglages sommeil / arrêt
momentané :
■ Arrêt momentané: quand l’alarme retentit,
appuyez une fois sur la touche SNOOZE
pour retarder l’alarme de 10 minutes.
■ Appuyez sur une autre touche pour arrêter
l’alarme.
■ L’alarme retentira pendant 1 heure,
si aucune touche n’est actionnée.
■ La temporisation éteint l’unité
automatiquement au bout de la
période spécifiée.
■ Pour activer la temporisation, appuyez
plusieurs fois sur la touche SLEEP pour faire
défiler les options et choisir la durée désirée
(OFF, 10min, 20min, 30min, etc.).
■ Laissez la durée désirée à l’écran. Au bout
de quelques secondes, elle disparaît.
Elle est maintenant mémorisée. Le mot
SLEEP s’affiche à l’écran.
9 GEAR4 | AlarmDock Halo 2 | Notice d’utilisation
■ Pour éteindre la temporisation de sommeil,
appuyez sur la touche SLEEP jusqu’à ce que
l’option OFF s’affiche.
Enregistrez votre AlarmDock Halo 2 pour activer
la garantie et bénéficier de mises à jour sur
www.gear4.com/register
Veuillez vérifier que votre iPod / iPhone utilise
la dernière version logicielle. Pour mettre le
logiciel à jour, connectez votre iPod / iPhone à
iTunes. Si une nouvelle version est disponible,
le système vous invitera à actualiser.
Copyright © 2011 Disruptive Limited. Tous droits
réservés. Toute reproduction totale ou partielle
strictement interdite. GEAR4, SmartLink et
AlarmDock sont des marques de Disruptive
Limited. iPhone, iPod, iPod nano, iPod classic
et iPod touch sont des marques de commerce
d’Apple Inc., déposées aux États-Unis et dans
d’autres pays.
“Made for iPod” et “Made for iPhone” signifient
que l’accessoire électronique concerné a été
spécifiquement conçu pour se connecter à
l’iPod ou à l’iPhone et a été certifié aux normes
de performance Apple par le développeur.
Apple ne saurait être responsable du
fonctionnement de cet appareil ni de sa
conformité aux normes de sécurité et aux
réglementations en vigueur.
GEAR4_PG548_MANUAL_INNER_V1.1.indd 9 05/08/2011 13:29

AVERTISSEMENT
Pour réduire le risque d’incendie ou
d’électrocution, ne pas exposer cet
appareil à la pluie ni à l’humidité.
ATTENTION
L’utilisation des commandes ou les réglages
de performances par des procédures autres
que celles spécifiées risquent d’entraîner une
exposition à des radiations dangereuses.
Danger d’explosion en cas de remplacement
incorrect des piles. Utilisez uniquement des
piles du même type.
Les piles (piles incluses ou installées) ne
doivent pas être exposées à une chaleur
excessive, notamment aux rayons direct du
soleil, à une flamme ou source similaire.
DÉBALLAGE ET INSTALLATION
Déballer l’appareil avec soin. Nous
recommandons de conserver l’emballage, pour
tout stockage prolongé éventuel de l’appareil.
Pour éviter tout endommagement, ne jamais
placer l’appareil ou ses batteries près d’un
radiateur, près d’une bouche d’aération, sur un
rebord de fenêtre exposé au soleil ni près d’une
source d’eau.
DANS L’INTÉRÊT DE LA SÉCURITÉ
‒ Pour débrancher l’adaptateur d’alimentation,
tirer sur la fiche. Ne jamais tirer sur le cordon.
‒ Ne jamais manipuler la fiche d’alimentation
avec des mains mouillées, sous peine
d’électrocution ou d’incendie.
‒ Consulter exclusivement un personnel
qualifié pour toute réparation.
‒ Ne pas ouvrir le boîtier.
‒ Ne pas tordre ni pincer le cordon
d’alimentation. Si la fiche ou le cordon
doivent être remplacés, vérifier qu’ils
sont conformes aux recommandations
du fabricant.
‒ Débrancher l’appareil pendant les orages
avec foudre et lorsqu’il n’est pas utilisé
pendant une période prolongée.
‒ Lorsqu’une prise secteur ou un connecteur
est utilisé en tant que dispositif de
déconnexion, le dispositif de déconnexion
doit rester opérationnel.
MISE AU REBUT
Conformément à la directive européenne
2002/96/EC, tout appareil électrique ou
électronique doit être collecté séparément
par un système local de collecte des déchets
électriques et électroniques. Respecter les lois
et réglementations en vigueur et ne pas mettre
au rebut dans les déchets ménagers.
Le symbole de l’éclair dans un
triangle équilatéral a pour but
d’alerter l’utilisateur sur la présence
d’une tension dangereuse non isolée à
l’intérieur du boîtier du produit. Cette tension
peut suffire à électrocuter l’utilisateur.
Notice d’utilisation | AlarmDock Halo 2 | GEAR4
10
GEAR4_PG548_MANUAL_INNER_V1.1.indd 10 05/08/2011 13:29
Le symbole du point d’exclamation
dans un triangle équilatéral a pour
but d’alerter l’utilisateur sur la
présence d’instructions importantes d’utilisation
et de maintenance dans la documentation
accompagnant l’appareil.
ATTENTION
RISQUE D’ÉLECTROCUTI ON - NE PAS OUVRIR
ATTENTION: POUR RÉDUIRE LE RIS QUE D’ÉLECTROCUTION, NE PAS
RETIRER LE COUVERCLE NI LE FON D. CET APPAREIL NE CONTIENT AUCUNE
PIÈCE RÉPARABLE PAR L’UTILISATEUR. CONSULTER LE PERSONNEL
QUALIFIÉ POUR TOUTE RÉPARATION.
RÈGLES DE LA FCC
Toute modification non expressément
approuvée par la partie responsable de la
mise en conformité risque d’annuler le droit
d’utilisation de cet équipement. Cet équipement
a été testé et est conforme aux limites
imposées aux appareils numériques de
classeB, conformément à la section15
des règles de laFCC.
Ces limites ont été conçues pour protéger
les installations domestiques contre les
interférences néfastes. Cet équipement génère,
utilise et émet de l’énergie sous forme de
fréquences radio et, en cas de non-respect
des instructions d’installation et d’utilisation,
risque de provoquer des interférences.
Il n’existe aucune garantie contre ces
interférences. En cas d’interférences radio ou
télévisuelles, pouvant être vérifiées en mettant
l’équipement hors tension puis sous tension,
l’utilisateur peut tenter de résoudre le problème
de l’une des façons suivantes:
‒ Réorienter ou déplacer l’antenne de
réception;
‒ Éloigner l’équipement du poste de réception;
‒ Brancher l’équipement sur une prise
appartenant à un circuit différent de celui du
poste de réception;
‒ Consulter le revendeur ou un technicien
radio/TV qualifié.
Son utilisation est assujettie aux deux conditions
suivantes:
1) Cet équipement ne doit pas provoquer
d’interférences, et
2) Ce périphérique doit tolérer les interférences,
ce qui inclut les interférences qui risquent
de provoquer un dysfonctionnement du
périphérique.
11 GEAR4 | AlarmDock Halo 2 | Notice d’utilisation
GEAR4_PG548_MANUAL_INNER_V1.1.indd 11 05/08/2011 13:29
Bitte vor Verwendung lesen. AlarmDock Halo 2
Bedienelemente des
AlarmDock Halo 2:
➊EIN- / AUSSCHALTEN
➋MODUS
➌SCHLUMMERN / SLEEP
(DIMMEN IM STANDBY-MODUS)
➍EINSTELLEN
➎WECKER
➏LAUTSTÄRKE -
➐LAUTSTÄRKE +
ZUM VORHERIGEN TITEL
➒ZUM NÄCHSTEN TITEL
➓WIEDERGABE / PAUSE
11
AUDIO-EINGANG (FÜR ANDERE
MUSIKPLAYER)
12
GLEICHSTROMEINGANG
13
FM-ANTENNE
14
BATTERIEFACH
Produktmerkmale:
■ Integriertes FM-Radio mit 9
programmierbaren, voreingestellten Sendern
■ Lädt iPod / iPhone auf
■ 24 / 12-h-Uhr mit Wecker - Lassen Sie sich vom
Radio, iPod / iPhone oder Summer wecken
■ Dimmbares LCD-Display
■ 2 programmierbare Alarmzeiten
■ Schlummer-Steuerung
■ Sleep-Countdown-Timer
■ Audio-Eingang zur Verwendung mit anderen
Musikplayern
DURCH APP OPTIMIERT:
Intelligenter als normale Lautsprecher, kostenlose
App vom App Store erhältlich;
■ Verwenden Sie Ihr iPhone oder Ihren iPod
touch, um den Lautsprecher kabellos zu
steuern. Um diese Funktion zu verwenden,
docken Sie ein zweites iPhone oder einen
zweiten iPod touch an. Stellen Sie sicher,
dass beide Geräte an Wi-Fi angeschlossen
sind und wählen Sie die Funktion zur
Steuerung des Lautsprechers in der
SmartLink-App.*
■ Automatisches Einstellen und Speichern Ihrer
Lieblingssender. Das App-Display zeigt, was
Sie gerade hören.**
■ Automatisches Synchronisieren der Zeit und
Alarme von iPhone und Lautsprecher.
Dimmen beider Displays durch Streichen mit
12Benutzerhandbuch | AlarmDock Halo 2 | GEAR4
GEAR4_PG548_MANUAL_INNER_V1.1.indd 12 05/08/2011 13:29
dem Finger über die Uhr-Anzeige.
■ Zugriff auf Ihre Musikbibliothek über die App
und Anzeigen Ihrer Lieblingsalbumkunst.
*Für die über die App erhältlichen optimierten
Funktionen ist die GEAR4 SmartLinkApplikation für iPhone 4, iPhone 3GS, iPhone
3G oder iPod touch (nur zweite, dritte und vierte
Generation) mit iOS 3.1.3, iOS 4.0 oder höher
erforderlich. App-Screenshots zum Zeitpunkt
der Drucklegung korrekt. Zur Verwendung
als kabellose Fernbedienung ist ein zweites
angedocktes iOS-Gerät in Verbindung mit
SmartLink und Wi-Fi erforderlich.
*Bitte lassen Sie für das zweite angedockte
iOS-Gerät im SmartLink-Einstellungsmenü den
Remotezugriff zu (‘Allow Remote’).
**Sofern RDS-Aussendung verfügbar ist.
Erste Schritte:
■ Legen Sie die CR2025-Knopfzelle in das
Batteriefach auf der Unterseite des Geräts
ein. Diese Batterie verhindert, dass die
Zeiteinstellungen bei einer Unterbrechung
der Stromversorgung verloren gehen.
■ Stecken Sie das Wechselstromkabel in den
Anschluss auf der Rückseite des Geräts und
dann in den Netzanschluss.
■ Um den Lautsprecher zu aktivieren, drücken
Sie die POWER-Taste.
■ Um den Modus zu wählen, drücken Sie die
MODE-Taste, um zwischen den Optionen zu
wechseln (iPod / FM / AUX).
■ Im Standby-Modus drücken Sie die SNOOZE-
Taste, um die Helligkeit des LCD-Displays zu
regeln. Es gibt 5 Helligkeitsstufen.
■ Die LCD kann auch mit der Taste
Fernbedienung geändert werden.
auf der
Verwendung mit einem
iPod / iPhone:
■ Stecken Sie den iPod / iPhone vorsichtig in
das Dock.
Hinweis: Wenn Sie Ihr iPhone oder iPod touch
zum ersten Mal an das AlarmDock Halo 2
anschließen, zeigt das Gerät eine Nachricht an,
dass das Zubehör eine Anwendung benötigt, die
nicht installiert ist. Tippen Sie auf OK, um zum
App Store zu gehen. Gehen Sie zur DownloadSeite und tippen Sie auf die Schaltfläche Install
(Installieren). Die GEAR4 SmartLink-Anwendung
ist kostenlos.
■ Drücken Sie die MODE-Taste, um den
iPod-Modus zu wählen.
■ Drücken Sie die Play-Taste am iPod/iPhone
und steuern Sie die Musikwiedergabe über
Ihr Gerät oder verwenden Sie die
Fernbedienung zur Steuerung der iPod/
iPhone-Menüs.
13 GEAR4 | AlarmDock Halo 2 | Benutzerhandbuch
GEAR4_PG548_MANUAL_INNER_V1.1.indd 13 05/08/2011 13:29
Verwendung mit
FM-Radio:
■ Drücken Sie die MODE-Taste, um den
FM-Modus zu wählen.
■ Drücken Sie die
gewünschte Frequenz zu wählen.
■ Drücken und halten Sie die
gedrückt, um automatisch zur nächsten
störungsfreien Frequenz zu gehen.
■ Drücken Sie
Voreinstellungen, um einen voreingestellten
Radiosender zu wählen.
VOREINGESTELLTE FREQUENZ
SPEICHERN:
■ Sie können bis zu 9 FM-Voreinstellungen
speichern.
■ Um eine bestimmte Frequenz zu speichern,
stellen Sie das Radio auf die gewünschte
Frequenz ein. Drücken Sie dann die
und geben Sie die gewünschte
Speicherplatznummer ein, indem Sie die
/ Tasten. Drücken Sie zur Bestätigung
/ Taste, um die
/ Taste
und gehen Sie durch die
Uhrzeit einstellen:
■ Schalten Sie aktive Weckrufe aus (damit
keine Alarm-Symbole angezeigt werden).
■ Drücken Sie die SET-Taste.
■ 12h beginnt zu blinken. Drücken Sie die
-Taste
/ Tasten, um entweder die 24- oder
12-h-Anzeige zu wählen. Zum Speichern
drücken Sie die SET-Taste.
■ Die Stundenanzeige beginnt zu blinken.
Drücken Sie
einzustellen. Zum Speichern drücken
Sie die SET-Taste.
■ Die Minutenanzeige beginnt zu blinken.
Drücken Sie
einzustellen. Zum Speichern drücken
Sie die SET-Taste.
■ Einer der Wochentage beginnt zu blinken.
Drücken Sie
Wochentag zu wählen. Zum Speichern
drücken Sie die SET-Taste.
/ , um die Stunde
/ , um die Minute
/ , um den entsprechenden
Weckzeit einstellen:
■ Drücken Sie die ALARM-Taste, bis der
gewünschte Weckruf aufleuchtet.
■ Drücken Sie die SET-Taste.
■ Die Stundenanzeige beginnt zu blinken.
Drücken Sie
einzustellen. Zum Speichern drücken
Sie die SET-Taste.
■ Die Minutenanzeige beginnt zu blinken.
Drücken Sie
einzustellen. Zum Speichern drücken
Sie die SET-Taste.
■ Die Wochentage beginnen zu blinken.
Drücken Sie
Wochenende, wochentags oder ganze
/ , um die Stunde
/ , um die Minuten
/ , um zwischen
Benutzerhandbuch | AlarmDock Halo 2 | GEAR4
14
GEAR4_PG548_MANUAL_INNER_V1.1.indd 14 05/08/2011 13:29
Woche zu wählen. Zum Speichern drücken
Sie die SET-Taste.
■ Drücken Sie die
Alarm-Modus festzulegen - iPod, FM oder
buzzer. Zum Speichern drücken Sie die
SET-Taste.
■ Drücken Sie die
Lautstärke einzustellen. Zum Speichern
drücken Sie die SET-Taste.
/ Taste, um den
/ Taste, um die
Sleep / Schlummer /
-Einstellungen:
■ Schlummerfunktion: Wenn der Weckruf
ertönt, drücken Sie die SNOOZE-Taste
einmal, um den Weckruf um 10 Minuten
zu verzögern.
■ Drücken Sie eine beliebige Taste, um den
Alarm für diesen Tag auszuschalten.
■ Der Weckruf ertönt 1 Stunde lang, wenn
keine Tasten gedrückt werden.
■ Der Sleep-Timer (Abschalt-Timer) schaltet
das Gerät nach voreingestellten Intervallen
automatisch ab.
■ Zum Einschalten des Sleep-Timers
drücken Sie die SLEEP-Taste mehrmals,
um die gewünschte Zeit zu wählen (OFF,
10 Minuten, 20 Minuten, 30 Minuten usw.).
■ Lassen Sie die Taste los, wenn die
gewünschte Zeit am Display angezeigt wird.
Nach einigen Sekunden verschwindet sie
15 GEAR4 | AlarmDock Halo 2 | Benutzerhandbuch
und ist jetzt gespeichert. Am Display wird
‘SLEEP’ angezeigt.
■ Zum Ausschalten des Sleep-Timers drücken
Sie mehrmals die SLEEP-Taste, bis OFF
(AUS) angezeigt wird.
Um die Garantie zu aktivieren und ProduktUpdates zu erhalten, registrieren Sie Ihre
AlarmDock Halo 2-Kopie unter
www.gear4.com/register
Bitte stellen Sie sicher, dass Ihr iPod / iPhone
die neueste Softwareversion verwendet.
Um die Software zu aktualisieren, schließen
Sie Ihren iPod / iPhone an iTunes an. Falls eine
neuere Softwareversion verfügbar ist, werden
Sie zur Aktualisierung aufgefordert.
Copyright © 2011 Disruptive Limited. Alle
Rechte vorbehalten. Eine teilweise oder
vollständige Vervielfältigung ist nicht zulässig.
GEAR4, SmartLink und AlarmDock sind Marken
von Disruptive Limited. iPhone, iPod, iPod nano,
iPod classic und iPod touch sind in den USA
und anderen Ländern eingetragene Marken von
Apple Inc.
„Made for iPod“ und „Made for iPhone“
bedeutet, dass ein elektronisches Zusatzgerät
speziell für den Anschluss an den iPod bzw.
das iPhone konstruiert ist und vom Entwickler
dahingehend zertifiziert wurde, dass es den
Apple-Leistungsnormen entspricht.
GEAR4_PG548_MANUAL_INNER_V1.1.indd 15 05/08/2011 13:29

Apple ist nicht verantwortlich für den
Betrieb dieses Geräts oder die Einhaltung
von Sicherheitsrichtlinien und gesetzlichen
Standards.
WARNUNG
Um die Gefahr eines Brandes oder elektrischen
Schlages so gering wie möglich zu halten,
sollten Sie dieses Gerät vor Regen oder
Feuchtigkeit schützen.
VORSICHT
Durch die Verwendung von Bedienelementen
oder Einstellungen oder die Durchführung
von Abläufen, die nicht in dieser Anleitung
aufgeführt sind, können Benutzer gefährlicher
Strahlung ausgesetzt werden.
Explosionsgefahr bei falschem Einlegen der
Batterie. Nur durch Batterien des gleichen Typs
oder eines gleichwertigen Typs ersetzen.
Batterien (Batteriesatz oder eingelegte
Batterien) dürfen nicht übermäßiger
Hitze ausgesetzt werden, wie z. B.
Sonneneinstrahlung, Feuer oder ähnlichem.
AUSPACKEN UND INSTALLIEREN
Packen Sie das Gerät vorsichtig aus. Es
empfiehlt sich, die Verpackung für den Fall
aufzubewahren, dass Sie das Gerät einmal
lagern müssen. Stellen Sie das Gerät oder
seine Akku nicht in der Nähe von Heizkörpern
oder vor einem Heizlüfter auf, und setzen
Sie es weder direkter Sonneneinstrahlung
noch Feuchtigkeit aus, um eine Beschädigung
zu vermeiden.
ZU IHRER SICHERHEIT
‒ Ziehen Sie zuerst den Netzstecker heraus,
bevor Sie das Netzteil abtrennen. Ziehen Sie
nicht am Kabel selbst.
‒ Fassen Sie den Netzstecker nicht mit nassen
Händen an, da dies einen Brand oder
elektrischen Schlag verursachen kann.
‒ Überlassen Sie Wartungsarbeiten nur
qualifiziertem Personal.
‒ Öffnen Sie das Gehäuse nicht.
‒ Verdrehen oder klemmen Sie das Netzkabel
nicht ein. Wenn der Netzstecker oder das
Netzkabel ausgewechselt werden müssen,
sollten Sie unbedingt auf die Einhaltung der
Empfehlungen des Herstellers achten.
‒ Ziehen Sie bei Gewittern, und wenn das
Gerät längere Zeit nicht verwendet wird,
den Gerätestecker aus der Steckdose.
‒ Wenn der Netzstecker oder ein Gerätestecker
als Abschalteinrichtung verwendet werden,
muss die Abschalteinrichtung jederzeit
zugänglich sein.
ENTSORGUNG
Gemäß der europäischen Richtlinie 2002/96/
EG müssen alle elektrischen und elektronischen
Produkte im Rahmen eines örtlichen
Sammelsystems getrennt entsorgt werden.
Bitte halten Sie die örtlichen Vorschriften ein
und entsorgen Sie Ihre alten Produkte nicht
zusammen mit dem normalen Hausmüll.
Benutzerhandbuch | AlarmDock Halo 2 | GEAR4
16
GEAR4_PG548_MANUAL_INNER_V1.1.indd 16 05/08/2011 13:29

Das Blitzsymbol in einem
gleichseitigen Dreieck soll
den Benutzer auf nicht isolierte
„gefährliche Spannung“ im Gehäuse
des Produkts aufmerksam machen,
die eventuell stark genug ist, um elektrische
Schläge zu verursachen.
Das Ausrufezeichen in einem
gleichseitigen Dreieck soll den
Benutzer auf wichtige Anweisungen
für die Bedienung und Instandhaltung
(Wartung) in den begleitenden Unterlagen
aufmerksam machen.
VORSICHT
GEFAHR ELEKTRISCHER SCHLÄGE - NICHT ÖFFNEN
“VORSICHT: ENTFERNEN SIE NICHT DIE ABDECK UNG (ODER RÜCKSEITE), UM
ELEKTRISCHE SCHL ÄGE ZU VERMEIDEN. GERÄTEINNENTEILE KÖNNEN VOM
BENUTZER NICHT GEWARTET W ERDEN. LASSEN SIE WARTUNGSARBEITEN
NUR VON QUALIFIZIERTEM WARTUNGSPERS ONAL AUSFÜHREN.”
FCC-RICHTLINIEN
Sie werden darauf hingewiesen, dass
Änderungen, die von der für die Einhaltung
der Vorschriften verantwortlichen Stelle nicht
ausdrücklich genehmigt wurden, zum Verlust
der Betriebsberechtigung des Benutzers
führen können. Dieses Gerät wurde geprüft
und stimmt gemäß Teil 15 der FCC-Richtlinien
mit den Grenzwerten für ein digitales Gerät
der Klasse B überein.
Diese Grenzwerte sollen einen angemessenen
Schutz vor schädlichen Störungen bei
der Installation in Wohngebieten gewährleisten.
17 GEAR4 | AlarmDock Halo 2 | Benutzerhandbuch
Dieses Gerät erzeugt, verwendet und
kann Hochfrequenzenergie abgeben,
und es kann schädliche Störungen beim
Funkverkehr hervorrufen, wenn es
nicht vorschriftsmäßig installiert und
anweisungsgemäß verwendet wird.
Es kann jedoch nicht garantiert werden,
dass bei einer bestimmten Installation keine
Störungen auftreten werden. Sollte dieses
Gerät schädliche Störungen beim Radio-
oder Fernsehempfang verursachen, was durch
Ein- und Ausschalten des Geräts festgestellt
werden kann, wird dem Benutzer geraten,
die Störung durch eine oder mehrere der
folgenden Maßnahmen zu beheben:
‒ Verändern Sie die Ausrichtung bzw.
den Standort der Empfangsantenne.
‒ Vergrößern Sie den Abstand zwischen
Gerät und Empfänger.
‒ Schließen Sie das Gerät an eine Steckdose
an, die auf einem anderen Stromkreis als die
des Empfängers liegt.
‒ Bitten Sie den Händler oder einen erfahrenen
Radio- und Fernsehtechniker um Hilfe.
Der Betrieb unterliegt den folgenden zwei
Bedingungen:
1) Dieses Gerät darf keine Störungen
verursachen.
2) Dieses Gerät muss alle Störungen
vertragen, einschließlich Störungen, die zu
einem unerwünschten Betrieb des Geräts
führen können.
GEAR4_PG548_MANUAL_INNER_V1.1.indd 17 05/08/2011 13:29

Lee esta información antes de usar el producto. AlarmDock Halo 2
Controles de
AlarmDock Halo 2
➊ENCENDIDO / APAGADO
➋MODO
➌REPETIR / DESACTIVACIÓN
(ATENUAR EN MODO DE ESPERA)
➍ESTABLECER
➎ALARMA
➏VOLUMEN -
➐VOLUMEN +
SALTAR HACIA ATRÁS
➒SALTAR HACIA DELANTE
➓REPRODUCIR / PAUSA
11
LÍNEA DE ENTRADA (PARA OTROS
REPRODUCTORES DE MÚSICA)
12
ENTRADA DE CC
13
ANTENA DE FM
14
COMPARTIMENTO PARA PILAS
Características del
producto:
■ Radio FM incorporada con 9 preajustes
de emisoras programables
■ Carga el iPod / iPhone
■ Reloj en formato de 24 / 12 horas con alarma
- Despierta con la radio, con el iPod / iPhone
o un timbre
■ Pantalla LCD atenuable
■ 2 alarmas programables
■ Control de repetición de alarma
■ Temporizador de cuenta atrás de
desactivación
■ Puerto de línea de entrada para uso
con otros reproductores de música
CON MEJORA MEDIANTE APLICACIÓN:
Más completo que un altavoz normal, aplicación
disponible gratis en la App Store;
■ Usa tu iPhone o iPod touch para controlar el
altavoz inalámbricamente. Para usar esta
función, conecta un segundo iPhone o iPod
touch, asegúrate de que ambos dispositivos
están conectados a Wi-Fi y selecciona la
función de control de altavoz en la aplicación
SmartLink.*
■ Sintoniza y guarda tus emisoras favoritas
automáticamente. La pantalla de la aplicación
muestra lo que estás escuchando.**
■ Sincroniza automáticamente la hora y las
alarmas entre el iPhone y el altavoz. Atenúa
18Manual del usuario | AlarmDock Halo 2 | GEAR4
GEAR4_PG548_MANUAL_INNER_V1.1.indd 18 05/08/2011 13:29

ambas pantallas pasando el dedo por la
pantalla del reloj.
■ Accede a tu biblioteca de música a través de
la aplicación y muestra la portada de tu disco
favorito.
Nota: Las funciones mejoradas mediante
aplicación requieren la aplicación GEAR4
SmartLink para iPhone 4, iPhone 3GS, iPhone
3G o iPod touch (2ª, 3ª y 4ª generación
solamente) con iOS 3.1.3, iOS 4.0 o superior.
Las pantallas de la aplicación son correctas
en el momento de la impresión. La función
de mando a distancia inalámbrico requiere un
segundo dispositivo iOS conectado, empleando
SmartLink y Wi-Fi.
*Asegúrate de que activas ‘allow remote’
(permitir conexión remota) en el menú de
ajustes de SmartLink desde el segundo
dispositivo iOS conectado.
**En lugares donde haya disponible
emisiones RDS.
Primeros pasos:
■ Instala la pila de botón CR2025 en el
compartimento para pilas situado en la parte
inferior de la unidad. Esta pila mantiene los
ajustes del reloj en el caso de que se
interrumpa el suministro eléctrico.
■ Conecta el cable de alimentación de CA a la
parte posterior de la unidad y luego a una
toma eléctrica.
19 GEAR4 | AlarmDock Halo 2 | Manual del usuario
■ Para activar el altavoz, pulsa el botón
POWER.
■ Para seleccionar el modo, pulsa MODE en el
altavoz para desplazarte entre las opciones
(iPod / FM / AUX).
■ En modo de espera, pulsa el botón SNOOZE
para ajustar el brillo de la pantalla LCD.
Hay 5 niveles de brillo.
■ La pantalla LCD también puede cambiarse
mediante el botón
del mando a distancia.
Para uso con iPod /
iPhone:
■ Introduce con cuidado el iPod / iPhone en el
dock.
Nota: Al conectar el iPhone o iPod a AlarmDock
Halo 2 por primera vez, el dispositivo mostrará
una notificación en la que se indica que el
accesorio requiere una aplicación que no está
instalada. Toca OK para ir a la App Store,
descarga la página y toca el botón Install
(instalar). La aplicación GEAR4 SmartLink es
gratuita.
■ Pulsa el botón MODE para seleccionar el
modo iPod.
■ Pulsa reproducir en tu iPod / iPhone y
controla la música mediante el dispositivo o
usa el mando a distancia para navegar por
los menús del iPod / iPhone.
GEAR4_PG548_MANUAL_INNER_V1.1.indd 19 05/08/2011 13:29

Para uso con radio FM:
■ Pulsa el botón MODE para seleccionar
el modo FM.
■ Pulsa el botón
la emisora deseada.
■ Mantén pulsado
automáticamente la siguiente
frecuencia vacía.
■ Para seleccionar una emisora predefinida,
pulsa
PARA GUARDAR UNA FRECUENCIA
PREAJUSTADA:
■ Puedes configurar un máximo de
9 preajustes para FM.
■ Ajusta la radio con la emisora deseada y
luego mantén pulsado el botón
parpadee la pantalla. Introduce la posición
de memoria deseada pulsando los botones
/ . Pulsa para guardar.
/ para seleccionar
/ para buscar
y desplázate entre los preajustes.
hasta que
Para ajustar la hora:
■ Desactivar todas las alarmas activas
(de manera que no se muestre ningún
icono de alarma).
■ Pulsa el botón SET.
■ 12h empezará a parpadear. Pulsa los
botones
12 horas. Pulsa el botón SET para guardar.
/ para seleccionar 24 horas o
■ La visualización de hora empezará a
parpadear. Pulsa
la hora. Pulsa el botón SET para guardar.
■ La visualización de minuto empezará a
parpadear. Pulsa
minutos. Pulsa el botón SET para guardar.
■ Uno de los días de la semana comenzará
a parpadear. Pulsa
el día de la semana actual. Pulsa el botón
SET para guardar.
/ para ajustar
/ para ajustar los
/ para seleccionar
Para configurar la hora de
alarma del despertador:
■ Pulsa el botón ALARM hasta que quede
iluminada la alarma que deseas configurar.
■ Pulsa el botón SET.
■ La visualización de hora empezará a
parpadear. Pulsa
Pulsa el botón SET para guardar.
■ La visualización de los minutos empezará a
parpadear. Pulsa
minutos. Pulsa el botón SET para guardar.
■ Los días de la semana comenzarán a
parpadear. Pulsa
fines de semana, días laborables o toda la
semana. Pulsa el botón SET para guardar.
■ Para ajustar el modo de alarma - iPod,
FM o buzzer, pulsa
SET para guardar.
Manual del usuario | AlarmDock Halo 2 | GEAR4
/ para ajustar la hora.
/ para ajustar los
/ para elegir entre
/ . Pulsa el botón
20
GEAR4_PG548_MANUAL_INNER_V1.1.indd 20 05/08/2011 13:29

■ Pulsa el botón / para establecer
el volumen (entre 0 y 32). Pulsa el botón
SET para guardar.
Configuración de
sleep / snooze:
■ Snooze: Cuando suene la alarma, pulsa el
botón SNOOZE una vez para retrasar la
alarma 10 minutos.
■ Pulsa cualquier otro botón para detener la
alarma para ese día.
■ La alarma suena durante 1 hora si no se
pulsa ningún botón.
■ El temporizador de sleep apaga la unidad
automáticamente una vez transcurridos los
intervalos configurados.
■ Para activar el temporizador de
desactivación, pulsa el botón SLEEP
repetidamente hasta seleccionar el tiempo
deseado (OFF, 10min, 20min, 30min, etc.).
■ Haz que se muestre en pantalla el tiempo
deseado. Cuando transcurran unos segundos,
desaparecerá y quedará guardado. Se
mostrará en la pantalla ‘SLEEP’.
■ Para desactivar el temporizador de
desactivación, pulsa el botón SLEEP
repetidamente hasta que aparezca OFF.
21 GEAR4 | AlarmDock Halo 2 | Manual del usuario
Registra AlarmDock Halo 2 en
www.gear4.com/register para activar la
garantía y recibir actualizaciones del producto.
Asegúrate de que el iPod / iPhone utiliza
la versión más reciente del software. Para
actualizar el software, conecta el iPod / iPhone
a iTunes. Si hay disponible una versión más
reciente del software, se te preguntará si
deseas actualizar.
Copyright © 2011 Disruptive Limited. Todos
los derechos reservados. Queda prohibida la
reproducción total o parcial. GEAR4, SmartLink
y AlarmDock son marcas comerciales
de Disruptive Limited. iPhone, iPod, iPod
nano, iPod classic y iPod touch son marcas
comerciales de Apple Inc., registradas en
EE.UU. y en otros países.
“Made for iPod” y “Made for iPhone” indican
que un accesorio electrónico ha sido diseñado
específicamente para su conexión a iPod
o iPhone y que el fabricante ha certificado
el cumplimiento de los estándares de
funcionamiento de Apple.
Apple no es responsable del funcionamiento
de este dispositivo ni de que cumpla las normas
de seguridad y las estipulaciones legales.
ADVERTENCIA
Para reducir el riesgo de fuego o descargas
eléctricas, no expongas esta unidad a la lluvia
o a la humedad.
GEAR4_PG548_MANUAL_INNER_V1.1.indd 21 05/08/2011 13:29

PRECAUCIÓN
El empleo de controles o ajustes o la realización
de procedimientos distintos a los especificados
puede ocasionar una peligrosa exposición
a radiaciones.
Peligro: la batería podría explotar si se sustituye
incorrectamente. Sustitúyela exclusivamente por
otra del mismo tipo o de un tipo equivalente.
Las baterías (baterías o pilas instaladas) no
deben exponerse a fuentes de calor excesivo,
como la luz solar, el fuego, etc.
DESEMBALAJE E INSTALACIÓN
Desembala la unidad con cuidado.
Te recomendamos que guardes el embalaje
por si alguna vez necesitas almacenar la
unidad. Para evitar daños, no coloques
nunca la unidad ni las pilas cerca de un
radiador, delante de rejillas de calefacción,
bajo la luz solar directa o cerca de agua.
POR TU SEGURIDAD
‒ Al desconectar el adaptador de alimentación,
tira primero del conector de alimentación.
No tires del cable.
‒ No manipules nunca el conector de
alimentación con las manos húmedas,
ya que podrías provocar fuego o sufrir
una descarga eléctrica.
‒ Acude exclusivamente a personal
cualificado si necesitas reparar la unidad.
‒ No abras la carcasa.
‒ No dobles ni aprisiones el cable de
alimentación. Si es necesario sustituir
el conector o el cable de alimentación,
asegúrate de que cumple las
recomendaciones del fabricante.
‒ Desconecta la unidad durante tormentas
con aparato eléctrico y cuando no lo vayas
a usar durante largo tiempo.
‒ Si se utiliza como dispositivo de desconexión
el enchufe o un conector de aparato, el
dispositivo de desconexión deberá poder
accionarse en todo momento.
DESECHO
De conformidad con la Directiva europea
2002/96/EC, todos los productos eléctricos
y electrónicos deben desecharse por
separado en el sistema de recogida de
residuos. Actúa conforme a la legislación
local y no tires los productos viejos junto
a los residuos domésticos.
El símbolo de rayo con punta de
flecha en el interior de un triángulo
equilátero tiene como objetivo
alertar al usuario de la presencia de ‘tensión
peligrosa’ no aislada en el interior de la
carcasa de este producto, tensión que puede
ser suficiente para constituir un riesgo de
descarga eléctrica a una persona.
El signo de admiración en el interior
de un triángulo equilátero tiene
como objetivo alertar al usuario
Manual del usuario | AlarmDock Halo 2 | GEAR4
22
GEAR4_PG548_MANUAL_INNER_V1.1.indd 22 05/08/2011 13:29

de la presencia de instrucciones importantes
de utilización y mantenimiento (servicio) en la
documentación que acompaña al dispositivo.
PRECAUCIÓN
RIESGO DE DESCARGA ELÉCTRICA; NO A BRIR.
PRECAUCIÓN: PARA REDUCIR EL RIESGO DE DESCAR GA ELÉCTRICA, NO
RETIRES LA CUBIERTA (NI LA PARTE POSTERIO R). EN EL INTERIOR NO
HAY NINGÚN COMPONENTE Q UE PUEDA REPARAR EL USUARIO. ACUDE
EXCLUSIVAMENTE A PERSONAL DE SERVICIO C UALIFICADO.
NORMAS DE LA FCC
Los cambios o modificaciones que no
hayan sido aprobados expresamente por
el responsable del cumplimiento de las
normas anularán la autorización concedida
para utilizar el equipo. Este equipo ha sido
sometido a pruebas que confirman su
cumplimiento de los límites para dispositivos
digitales de clase B, conforme a la parte
15 de las normas de la FCC.
Estos límites están diseñados para proporcionar
una protección razonable frente a interferencias
dañinas en instalaciones domésticas.
Este equipo genera, utiliza y puede irradiar
energía de radiofrecuencia, por lo que,
si no se instala y utiliza conforme a las
instrucciones, puede provocar interferencias
dañinas en comunicaciones de radio.
No obstante, no existe garantía alguna de
que no se produzcan interferencias en
instalaciones concretas. En el caso de que
este equipo provoque interferencias dañinas
en la recepción de radio o televisión, lo que
puede determinarse encendiendo y apagando
el equipo, el usuario deberá intentar corregir
dichas interferencias adoptando una o varias
de las siguientes medidas:
‒ Reoriente o cambie de lugar la
antena receptora.
‒ Aumente la distancia entre el equipo
y el receptor.
‒ Conecte el equipo a una toma de un
circuito distinto al del receptor.
‒ Consulte a su proveedor o a un técnico
con experiencia en radio / TV para
obtener ayuda.
Su utilización está sujeta a las siguientes
dos condiciones:
1) Este equipo no puede provocar
interferencias y
2) Este equipo debe aceptar cualquier
interferencia, incluidas las interferencias
que puedan provocar un funcionamiento
no deseado del dispositivo.
23 GEAR4 | AlarmDock Halo 2 | Manual del usuario
GEAR4_PG548_MANUAL_INNER_V1.1.indd 23 05/08/2011 13:29

Leggere prima dell’uso. AlarmDock Halo 2
Comandi di AlarmDock
Halo 2:
➊ACCENSIONE / SPEGNIMENTO
➋MODALITÀ
➌ SNOOZE / SLEEP
(ATTENUA IN STANDBY)
➍IMPOSTA
➎SVEGLIA
➏VOLUME -
➐VOLUME +
SALTA INDIETRO
➒SALTA AVANTI
➓RIPRODUCI / PAUSA
11
INGRESSO LINEA
(PER ALTRI LETTORI MUSICALI)
12
INGRESSO CC
13
ANTENNA FM
14
COMPARTO BATTERIE
Caratteristiche del
prodotto:
■ Radio FM incorporata con 9 stazioni
preimpostate programmabili
■ Carica iPod / iPhone
■ Orologio a 24 / 12 ore con sveglia -
Sveglia mediante la radio, l’iPod / l’iPhone
o l’allarme sonoro
■ Display LCD regolabile
■ 2 sveglie programmabili
■ Controllo snooze
■ Timer conto alla rovescia sleep
■ Porta di ingresso linea per altri lettori musicali
FUNZIONI ESTESE TRAMITE APP:
Più intelligente dei soliti diffusori, con l’app
gratuita disponibile su App Store;
■ Usa il tuo iPhone o iPod touch come
telecomando wireless. Per utilizzare questa
funzione, collegare un secondo iPhone o
iPod touch, verificare che entrambi i
dispositivi siano connessi al Wi-Fi e
selezionare la funzione di controllo diffusore
nell’app SmartLink.*
■ Sintonizzazione automatica e
memorizzazione delle stazioni FM preferite.
L’interfaccia dell’app mostra quello che si sta
ascoltando.**
■ Sincronizzazione automatica dell’ora e delle
sveglie tra iPhone e diffusore. Oscuramento
di entrambe le schermate mediante
24Manuale utente | AlarmDock Halo 2 | GEAR4
GEAR4_PG548_MANUAL_INNER_V1.1.indd 24 05/08/2011 13:29

sfioramento del display dell’orologio.
■ Accesso alla libreria musicale mediante l’app
e visualizzazione delle copertine di album
preferite.
N.B. Le funzioni estese tramite app richiedono
l’app GEAR4 SmartLink per iPhone 4, iPhone
3GS, iPhone 3G o iPod touch (solo seconda,
terza e quarta generazione) con iPhone iOS
3.1.3, iOS 4.0 o successivo. Le schermate
dell’app sono corrette al momento della
pubblicazione. La funzione di controllo remoto
wireless richiede un secondo dispositivo iOS
collegato, con SmartLink e Wi-Fi.
*Verificare che l’opzione di ‘autorizzazione remoto’
sia selezionata nel menu delle impostazioni
SmartLink per il secondo dispositivo iOS collegato.
**Dove è disponibile il segnale RDS.
Per iniziare:
■ Installare la batteria a bottone CR2025
nell’apposito scomparto situato nella parte
inferiore dell’unità. La batteria evita la perdita
delle impostazioni dell’orologio in caso di
interruzione dell’alimentazione.
■ Collegare il cavo di alimentazione CA al
retro dell’unità e alla presa di corrente.
■ Per attivare il diffusore, premere il pulsante
POWER.
■ Per selezionare la modalità, premere MODE
25 GEAR4 | AlarmDock Halo 2 | Manuale utente
sull’unità per scorrere le opzioni disponibili
(iPod / FM / AUX).
■ In modalità Standby, premere il pulsante
SNOOZE per regolare la luminosità
del display LCD. Sono disponibili 5 livelli
di luminosità.
■ Lo schermo LCD può essere regolato anche
mediante il pulsante
del telecomando.
Utilizzo con iPod / iPhone:
■ Inserire con cura l’iPod / iPhone nel dock.
N.B. Quando si collega l’iPhone o l’iPod touch a
AlarmDock Halo 2 per la prima volta, il dispositivo
emette un suono per avvisare che l’accessorio
richiede un’applicazione che non risulta installata.
Toccare OK per accedere alla pagina di
download di App Store, quindi toccare il pulsante
Installa. L’applicazione GEAR4 SmartLink è
gratuita.
■ Premere il pulsante MODE per attivare la
modalità iPod.
■ Premere il pulsante di riproduzione dell’iPod/
iPhone e controllare l’esecuzione mediante i
comandi del dispositivo oppure utilizzare il
telecomando per spostarsi tra i menu
dell’iPod/iPhone.
Utilizzo con la radio FM:
■ Premere il pulsante MODE per attivare la
modalità FM.
GEAR4_PG548_MANUAL_INNER_V1.1.indd 25 05/08/2011 13:29

■ Premere il pulsante / per selezionare
la frequenza desiderata.
■ Premere e tenere premuto
sintonizzarsi automaticamente sulla
successiva frequenza non disturbata.
■ Per selezionare una stazione radio
preimpostata, premere
le preimpostazioni.
PER SALVARE UNA FREQUENZA
PREIMPOSTATA:
■ È possibile impostare fino a 9 preselezioni FM.
■ Regolare la radio sulla frequenza desiderata,
quindi tenere premuto il pulsante
display non lampeggia. Inserire la posizione
desiderata in memoria premendo i pulsanti
/ Premere per confermare.
o per
e scorrere
finché il
Per impostare l’ora:
■ Disattivare le eventuali sveglie attive
(in modo che non sia visualizzata
alcuna icona di sveglia)
■ Premere il pulsante SET.
■ 12h inizierà a lampeggiare. Premere i
pulsanti
ore o a 12 ore. Premere il pulsante SET per
salvare.
■ L’indicazione dell’ora inizierà a lampeggiare.
Premere
pulsante SET per salvare.
/ per selezionare il formato a 24
/ per regolare l’ora. Premere il
■ L’indicazione dei minuti inizierà a
lampeggiare. Premere
minuti. Premere il pulsante SET per salvare.
■ Uno dei giorni della settimana inizierà a
lampeggiare. Premere
il giorno della settimana. Premere il pulsante
SET per salvare.
/ per regolare i
/ per regolare
Per impostare la sveglia:
■ Premere il pulsante ALARM finché non si
illumina la sveglia che si desidera impostare.
■ Premere il pulsante SET.
■ L’ora comincerà a lampeggiare. Premere
/ per regolare l’ora. Premere SET
per memorizzare.
■ I minuti cominceranno a lampeggiare.
Premere
Premere SET per memorizzare.
■ I giorni della settimana inizieranno a
lampeggiare. Premere
i weekend, i giorni feriali o tutta la settimana.
Premere il pulsante SET per salvare.
■ Per impostare la modalità della sveglia
(iPod, FM o segnale acustico), premere
■ Premere il pulsante
il volume (tra 0 e 32). Premere il pulsante
SET per salvare.
/ per regolare i minuti.
/ per scegliere
/ . Premere SET per memorizzare.
/ per impostare
Manuale utente | AlarmDock Halo 2 | GEAR4
26
GEAR4_PG548_MANUAL_INNER_V1.1.indd 26 05/08/2011 13:29

Impostazioni
sleep / snooze:
■ Snooze: quando la sveglia suona, premere
SNOOZE per ritardarla di altri 10 minuti.
■ Premere qualsiasi altro pulsante per fermare
la sveglia per quel giorno.
■ La sveglia suonerà per 1 ora se non viene
premuto nessun pulsante.
■ Il timer della modalità Sleep spegne
automaticamente l’unità dopo un intervallo
di tempo prestabilito.
■ Per attivare il timer della funzione sleep,
premere il pulsante SLEEP ripetutamente
per selezionare il tempo desiderato (OFF,
10min, 20min, 30min, ecc.).
■ Lasciare l’ora desiderata visualizzata sul
display. Dopo alcuni secondi scomparirà;
a quel punto la scritta “SLEEP” sarà
visualizzata sullo schermo.
■ Per disattivare il timer della funzione sleep,
premere più volte il pulsante SLEEP finché
non è visualizzato OFF.
Registrate AlarmDock Halo 2 su
www.gear4.com/register per attivare la
garanzia e ricevere gli aggiornamenti del
prodotto.
Assicuratevi che l’ iPod / iPhone utilizzi l’ultima
versione del software. Per aggiornare il
software, collegate l’iPod / iPhone a iTunes. Se è
disponibile una versione più recente del software,
vi verrà richiesto di effettuare l’aggiornamento.
Copyright © 2011 Disruptive Limited. Tutti i diritti
riservati. La riproduzione per intero o in parte
è vietata. GEAR4, SmartLink e AlarmDock
sono marchi commerciali di Disruptive Limited.
iPhone, iPod, iPod nano, iPod classic e iPod
touch sono marchi commerciali di Apple Inc.,
registrati negli Stati Uniti e in altri Paesi.
“Made for iPod” e “Made for iPhone”
significano che l’accessorio elettronico è
stato appositamente progettato per collegarsi
all’iPod o all’iPhone e che è stato certificato
dal produttore come conforme agli standard
prestazionali di Apple.
Apple non è responsabile del funzionamento
del dispositivo o della sua conformità ai requisiti
di sicurezza.
AVVERTENZA
Per ridurre il rischio di incendi o scosse
elettriche, non esporre questa unità alla
pioggia o all’umidità.
ATTENZIONE
Se si utilizzano i controlli e si regolano le
prestazioni diversamente da come specificato,
27 GEAR4 | AlarmDock Halo 2 | Manuale utente
GEAR4_PG548_MANUAL_INNER_V1.1.indd 27 05/08/2011 13:29

potrebbe verificarsi un’esposizione pericolosa
alle radiazioni.
La batteria può esplodere se non viene
sostituita correttamente. Sostituire la batteria
solo con una dello stesso tipo o equivalente.
Non esporre le batterie (gruppo batterie o
batterie installati) a temperature eccessive, ad
esempio alla luce diretta del sole, a fiamme o
simili.
DISIMBALLAGGIO E INSTALLAZIONE
Disimballare l’unità con cura. Si consiglia
di conservare l’imballaggio per riporvi l’unità
quando non la si utilizza per lungo tempo.
Per evitare danni, non posizionare l’unità
o le batterie vicino a un termosifone, davanti
a una fonte di calore, alla luce diretta del
sole o vicino all’acqua.
INFORMAZIONI PER LA SICUREZZA
‒ Per scollegare l’adattatore, estrarre prima
la spina, non tirare il cavo.
‒ Non toccare mai la spina con le mani
bagnate, in quanto questo potrebbe
provocare incendi o scosse elettriche.
‒ Per le riparazioni, rivolgersi esclusivamente
a personale qualificato.
‒ Non aprire l’alloggiamento.
‒ Non torcere o pizzicare il cavo di
alimentazione. Se è necessario sostituire la
spina o il cavo di alimentazione, assicurarsi
che corrisponda ai requisiti del produttore.
‒ Scollegare l’unità dall’alimentazione durante
i temporali e se non la si utilizza per lunghi
periodi di tempo.
‒ Se si usa come dispositivo di disconnessione
la spina dell’alimentazione elettrica o un
accoppiatore elettrico, il dispositivo di
disconnessione deve sempre rimanere pronto
per essere azionato.
SMALTIMENTO
In base alla direttiva europea 2002/96/CE,
tutte le apparecchiature elettriche ed
elettroniche devono essere smaltite
separatamente presso un punto di raccolta
locale autorizzato. Procedere in base alle
norme locali vigenti e non smaltire i prodotti
insieme ai normali rifiuti domestici.
Il simbolo del fulmine con punta
a freccia all’interno di un triangolo
equilatero avverte l’utente della
presenza di una ‘tensione pericolosa’
non isolata nello chassis del prodotto,
che potrebbe comportare il rischio di
scosse elettriche per le persone.
Il punto esclamativo all’interno di
un triangolo equilatero segnala la
presenza di istruzioni importanti
relative al funzionamento e alla manutenzione
(riparazione) nella documentazione fornita
in dotazione con l’apparecchio.
Manuale utente | AlarmDock Halo 2 | GEAR4
28
GEAR4_PG548_MANUAL_INNER_V1.1.indd 28 05/08/2011 13:29

ATTENZIONE
RISCHIO DI SCOSSE ELETTRICHE: NON APRIRE
ATTENZIONE: PER RIDURRE IL RISCHIO D I SCOSSE ELETTRICHE, NON
RIMUOVERE IL COPERCHIO (O IL L ATO POSTERIORE). NON VI SONO PARTI
RIPARABILI DALL’UTENTE ALL’INTERNO. PER LE RIPARAZIONI,
RIVOLGERSI A PERSONALE QUALIFICATO.
NORME FCC
Eventuali modifiche o alterazioni non
espressamente approvate dal responsabile
della conformità possono rendere nulla
l’autorizzazione dell’utente all’utilizzo
dell’apparecchiatura stessa. Questa
apparecchiatura è stata testata e trovata
conforme con i limiti previsti per un dispositivo
digitale di ClasseB, in osservanza della Parte
15 delle norme FCC.
Lo scopo di tali limiti è di garantire una
ragionevole protezione da interferenze
nocive in un’installazione residenziale.
Questa apparecchiatura genera, utilizza e
può irradiare energia di radiofrequenza e
se non viene installata e usata in base alle
istruzioni contenute nel manuale, può causare
interferenze dannose alle comunicazioni radio.
In ogni caso, non può essere garantito che
non si verifichi alcuna interferenza in una
particolare installazione. Se l’apparecchiatura
provoca interferenze dannose alla ricezione
radiotelevisiva, determinabili spegnendo e
riaccendendo la macchina, si raccomanda
all’utente di correggere il problema in uno dei
modi seguenti:
‒ Cambiare l’orientamento o la posizione
dell’antenna di ricezione.
‒ Aumentare la distanza tra l’apparecchiatura
e il ricevitore.
‒ Collegare l’apparecchiatura a una presa
appartenente a un circuito diverso rispetto
al ricevitore.
‒ Chiedere consulenza al rivenditore o a un
tecnico radiotelevisivo esperto.
L’uso del dispositivo è soggetto alle seguenti
due condizioni:
1) Il dispositivo non deve causare interferenze.
2) Il dispositivo deve accettare qualsiasi
interferenza, comprese quelle che potrebbero
causare problemi nel suo funzionamento.
29 GEAR4 | AlarmDock Halo 2 | Manuale utente
GEAR4_PG548_MANUAL_INNER_V1.1.indd 29 05/08/2011 13:29

Leia antes de usar. AlarmDock Halo 2
Controlos do AlarmDock
Halo 2:
➊ENERGIA
➋MODO
➌ SNOOZE / MODO DORMIR
(ESCURECER EM STANDBY)
➍DEFINIR
➎ALARME
➏VOLUME -
➐VOLUME +
ANTERIOR
➒SEGUINTE
➓TOCAR / PAUSA
11
ENTRADA AUXILIAR
12
ENTRADA DE FONTE DE ALIMENTAÇÃO
13
ANTENA FM
14
COMPARTIMENTO DAS PILHAS
Features:
■ Rádio FM com 9 memórias programáveis de
estações de rádio
■ Carrega o iPod / iPhone
■ Relógio de 12 / 24 horas com despertador
■ Ecrã LCD regulável
■ 2 alarmes programáveis
■ Controlo de Snooze
■ Despertador de contagem decrescente
■ Entrada de linha para uso com outros leitores
de música
MELHORÁVEL ATRAVÉS DE APLICAÇÃO:
Mais inteligente do que o seu altifalante comum,
com aplicações grátis disponíveis numa Loja de
Aplicações;
■ Utilize o seu iPhone ou iPod táctil para
controlar o altifalante sem fios. Para usar
estar característica, acoste um segundo
iPhone ou iPod táctil, certifique-se de que
ambos os aparelhos estão ligados via Wi-Fi e
seleccione a função de controlo de altifalante
na aplicação SmartLink.*
■ Sintonize de forma automática e guarde as
suas estações preferidas. A aplicação de
ecrã mostra o que está a ouvir.**
■ Sincronize de forma automática as horas e
os alarmes entre o seu iPhone e o altifalante.
Escureça ambos os ecrãs usando gestos
rápidos no ecrã do relógio.
Aceda à sua biblioteca de música através da
aplicação e ouça o seu álbum preferido.
Manual do Utilizador | AlarmDock Halo 2 | GEAR4 30
GEAR4_PG548_MANUAL_INNER_V1.1.indd 30 05/08/2011 13:29

Nota: As características do melhoramento
por aplicação requer a aplicação GEAR4
SmartLink para iPhone 4, iPhone 3GS, iPhone
3G ou iPod touch (apenas 2ª, 3ª e 4ª geração)
com iOS 3.1.3, iOS 4.0 ou posterior. Ecrãs de
aplicação correctos no momento de impressão.
A característica de comando sem fios requer
um 2º dispositivo acostado com iOS, a usar
SmartLink e Wi-Fi.
*Por favor certifique-se de seleccionar “allow
remote” (permitir controlo remoto) no menu
de Definições SmartLink no 2º aparelho iOS
acoplado.
**Onde a transmissão RDS estiver disponível.
Iniciação:
■ Instale a pilha em formato de botão, do tipo
CR2025, no compartimento das pilhas (na
base da unidade). Esta pilha impede a perda
das definições do relógio no caso de falta de
corrente eléctrica.
■ Ligue o cabo de alimentação primeiro à parte
de trás da unidade, depois à tomada de
corrente eléctrica.
■ Para activar a coluna prima o botão POWER.
■ Para seleccionar o modo prima o botão
MODE, para alternar entre as duas opções
(iPod / FM / AUX).
■ Quando estiver em Standby, Prima o botão
SNOOZE para ajustar o brilho do ecrã LCD.
Existem 5 níveis de brilho.
■ O LCD também pode ser alterado usando o
no telecomando.
botão
Para utilização com iPod /
iPhone:
■ Com cuidado insira o iPod / iPhone na doca.
Nota: Quando liga o seu iPhone ou iPod touch
ao AlarmDock Halo 2 pela primeira vez, o seu
aparelho irá mostrar uma notificação de que o
acessório precisa de uma aplicação que não
está instalada. Toque em OK para ir para a
App Store, descarregue a página e toque no
botão Install (Instalar). A aplicação GEAR4 da
SmartLink é grátis.
■ Prima o botão MODE para seleccionar o
modo de iPod.
■ Prima reproduzir no seu iPod / iPhone e
controle a musica utilizando o seu aparelho,
ou use o controlo remoto para navegar até
aos menus do iPod/iPhone.
Para utilização com
rádio FM:
■ Prima o botão MODE para seleccionar o
modo FM.
ou para varrer a frequência
■ Prima
desejada.
31 GEAR4 | AlarmDock Halo 2 | Manual do Utilizador
GEAR4_PG548_MANUAL_INNER_V1.1.indd 31 05/08/2011 13:29

■ Mantenha premido os botões ou para
procurar automaticamente a próxima estação.
■ Para seleccionar uma estação de rádio
memorizada, prima
memórias disponíveis.
PARA GUARDAR UMA FREQUÊNCIA EM
MEMÓRIA:
■ Pode memorizar o máximo de 9 estações
FM.
■ Ajuste o rádio para a frequência desejada e
depois mantenha premido o botão >|| até o
ecrã piscar. Introduza a posição de memória
desejada premindo os botões
novamente o botão
e escolha entre as
/ . Prima
para memorizar.
Para acertar o relógio:
■ Desligue quaisquer alarmes que tenha
activos (para que não sejam apresentados
quaisquer ícones de alarme).
■ Prima o botão SET.
■ 12h irá começar a piscar. Prima os botões
/ . para escolher entre 24 ou 12 horas.
Prima o botão SET para guardar.
■ A posição da hora irá começar a piscar.
/ para ajustar a hora. Pressione o
Prima
botão SET para guardar.
■ A posição de minutos irá começar a piscar.
/ para ajustar os minutos.
Prima
Pressione o botão SET para guardar.
■ Um dos dias da semana irá começar a
piscar. Prima
semana desejado. Pressione o botão SET
para guardar.
/ para seleccionar o dia da
Para configurar o alarme:
■ Prima o botão de ALARME até o símbolo do
alarme que deseja se iluminar.
■ Prima o botão SET.
■ A posição da hora irá começar a piscar.
/ para ajustar a hora. Pressione o
Prima
botão SET para guardar.
■ A posição de minutos irá começar a piscar.
/ para ajustar os minutos.
Prima
Pressione o botão SET para guardar.
■ Os dias da semana irão começar a piscar.
/ para escolher entre fins-de-
Prima
semana, dias de semana ou toda a semana.
Pressione o botão SET para guardar.
■ Prima o botão
modos de alarme - iPod, FM ou besouro.
Pressione o botão SET para guardar.
■ Prima o botão
Pressione o botão SET para guardar.
/ para percorrer os
/ para definir o volume.
Manual do Utilizador | AlarmDock Halo 2 | GEAR4 32
GEAR4_PG548_MANUAL_INNER_V1.1.indd 32 05/08/2011 13:29

Funções dormir / pausa
de despertador:
■ Snooze: Quando o alarme tocar, prima o
botão SNOOZE uma vez para atrasar o
alarme 10 minutos.
■ Prima qualquer botão para parar o alarme
desse dia.
■ Se não for premido nenhum botão o
despertador irá tocar durante 1 hora.
■ Dormir: O temporizador de modo de dormir
desliga a unidade automaticamente após
uma determinada duração.
■ Para activar o modo de dormir, prima
repetidamente o botão SLEEP para
seleccionar o tempo desejado (OFF, 10min,
20min, 30min, etc.).
■ Deixe no ecrã o número desejado para
activar esse valor. Após alguns segundos
este desaparecerá do ecrã, tendo sido
guardado. Será mostrada no ecrã a
indicação SLEEP (dormir).
■ Para desligar o temporizador de SLEEP,
prima o botão SLEEP várias vezes até
aparecer a mensagem OFF.
Registe o AlarmDock Halo 2, para activar a
Garantia e receber actualizações de produto,
em www.gear4.com/register
33 GEAR4 | AlarmDock Halo 2 | Manual do Utilizador
Verifique se o iPod / iPhone estão a usar
a versão mais recente de software. Para
actualizar o software ligue o iPod / iPhone ao
iTunes. Se houver uma versão de software mais
recente será convidado a fazer a actualização.
Copyright © 2011 Disruptive Limited. Todos os
direitos reservados. É proibida a reprodução
no todo ou em parte. GEAR4, SmartLink e
AlarmDock são marcas comerciais da Disruptive
Limited. iPhone, iPod, iPod nano, iPod classic
e iPod touch são marcas comerciais da Apple
Inc., registadas nos EUA e noutros países.
“Made for iPod” e “Made for iPhone” significa
que um acessório electrónico foi concebido para
se ligar especificamente ao iPod ou ao iPhone,
respectivamente, e foi certificado pela marca
como cumprindo as normas de desempenho da
Apple.
A Apple não é responsável pelo funcionamento
deste equipamento, nem pelo seu cumprimento
de normas de segurança e outras.
AVISO
Para reduzir o risco de incêndio ou choque
eléctrico não exponha este equipamento à
chuva nem à humidade.
CUIDADO
A utilização de controlos ou ajustes diferentes
dos especificados poder resultar em exposição
a radiação perigosa.
GEAR4_PG548_MANUAL_INNER_V1.1.indd 33 05/08/2011 13:29

Se a bateria for substituida incorrectamente
existe risco de explosão. Substitua apenas por
bateria do mesmo tipo ou equivalente.
As pilhas ou a bateria não devem ser expostas
a calor excessivo, tal como sol intenso, fogo ou
algo similar.
DESEMBALAGEM E INSTALAÇÃO
Desembale o seu equipamento com cuidado.
Recomendamos que guarde a caixa de
embalagem, para o caso de precisar de arrumar
o equipamento. Para evitar danos nunca
coloque o equipamento nem as pilhas perto de
radiadores, em frente de saídas de ar quente,
sob luz solar directa, ou perto da água.
PARA SUA SEGURANÇA
‒ Quando desligar a fonte de alimentação
puxe primeiro pela ficha. Não puxe pelo
cabo.
‒ Nunca manuseie a ficha eléctrica com as
mãos molhadas, pois isto poderia causar
choque eléctrico ou incêndio.
‒ Deixe qualquer reparação apenas a cargo de
um profissional qualificado.
‒ Não abra a caixa do equipamento.
‒ Não torça nem belisque o cabo da fonte
de alimentação. Se a ficha ou o cabo de
alimentação precisarem de ser reparados,
certifique-se de seguir as recomendações do
fabricante.
‒ Desligue o equipamento durante trovoadas e
quando não for usá-lo durante muito tempo.
‒ No caso da ficha de ligação à tomada de
corrente eléctrica ou a ficha de ligação ao
aparelho serem usadas como forma de
desligar o aparelho, estas devem ser de fácil
acesso e utilização.
ELIMINAÇÃO
De acordo com a Directiva Europeia 2002 / 96 /
EC todos os produtos eléctricos e electrónicos
têm de ser recolhidos separadamente através
de um sistema local de recolha. Queira agir de
acordo com as suas normas locais e não
eliminar os seus equipamentos antigos
juntamente com os residuos domésticos
normais.
O sinal com um raio e uma seta na
ponta, dentro de um triângulo
equilátero, destina-se a alertar o
utilizador para a presença de material de
‘Tensão Perigosa’ não isolado no interior do
produto, o qual pode ser de magnitude
suficiente para constituir risco de choque
eléctrico para a pessoa.
O ponto de exclamação dentro de
um triângulo equilátero destina-se a
alertar o utilizador para a presença
de instruções de utilização e manutenção
importantes na literatura que acompanha o
equipamento.
Manual do Utilizador | AlarmDock Halo 2 | GEAR4 34
GEAR4_PG548_MANUAL_INNER_V1.1.indd 34 05/08/2011 13:29

CUIdAdO
RISCO DE CHOQUE ELÉCTRI CO, NÃO ABRIR
CUIDADO: PARA REDUZIR O RISCO DE CHOQ UE ELÉCTRICO
NÃO REMOVA A TAMPA. NÃO EXISTEM NO INTERIOR PARTES
REPARÁVEIS PELO UTILIZADOR. ENTREGUE A MA NUTENÇÃO E
REPARAÇÃO A PESSOAL QUALIFICADO PARA O EFEITO.
NORMAS FCC
Fica avisado de que alterações ou modificações
não expressamente aprovadas pela entidade
responsável pela conformidade com normas
podem anular o direito do utilizador usar o
equipamento. Este equipamento foi testado e
encontrado em conformidade com os limites
para um equipamento digital da Classe B,
conforme a secção 15 das regras FCC.
Estes limites destinam-se a fornecer protecção
razoável contra interferência indesejada numa
instalação residencial. Este equipamento gera,
usa e pode emitir energia de frequência rádio e,
se não for instalado e usado de acordo com as
instruções, pode causar interferência prejudicial
nas comunicações rádio.
Contudo, não existe garantia de que não possa
ocorrer interferência numa dada instalação.
Se este equipamento causar interferências
prejudiciais à recepção de rádio ou de televisão,
o que pode ser determinado desligando e
voltando a ligar o equipamento, encoraja-se o
utilizador a tentar corrigir a interferência através
de uma, ou mais, das seguintes medidas:
‒ Mude a orientação ou a localização da
antena.
‒ Aumente a separação entre o equipamento
e o receptor.
‒ Ligue o equipamento a uma tomada eléctrica
de um circuito diferente daquele ao qual o
receptor está ligado.
‒ Consulte um revendedor ou um técnico de
rádio / TV para obter ajuda.
A utilização está sujeita às seguintes duas
condições:
1) Este equipamento não pode causar
interferência e
2) Este equipamento tem de aceitar qualquer
interferência, incluindo interferências que
possam causar funcionamento indesejado do
equipamento.
35 GEAR4 | AlarmDock Halo 2 | Manual do Utilizador
GEAR4_PG548_MANUAL_INNER_V1.1.indd 35 05/08/2011 13:29

A.u.b. vóór gebruik lezen. AlarmDock Halo 2
Bediening AlarmDock
Halo 2:
➊AAN / UIT
➋MODE
➌ SLUIMEREN / SLAPEN
(DIMMEN IN STANDBY)
➍INSTELLEN
➎WEKKER
➏VOLUME -
➐VOLUME +
ACHTERUIT
➒VOORUIT
➓AFSPELEN / PAUZEREN
11
LINE IN
(VOOR ANDERE MUZIEKSPELERS)
12
GELIJKSTROOMINVOER
13
FM-ANTENNE
14
BATTERIJVAK
Productkenmerken:
■ Ingebouwde FM-radio met 9
programmeerbare snelkeuzestations
■ Laadt iPod / iPhone op
■ 24 / 12-uurs klok met wekker - Word wakker
van de radio, je iPod / iPhone of zoemer
■ Dimbaar LCD-display
■ 2 programmeerbare wekkers
■ Sluimerbediening
■ Slaaptimer
■ Line-inpoort voor gebruik met andere
muziekspelers
MET UITBREIDINGS-APP:
Slimmer dan de gemiddelde luidspreker, gratis
app beschikbaar in de App Store;
■ Gebruik je iPhone of iPod touch om de
luidspreker draadloos te bedienen. Dock een
2e iPhone of iPod touch, zorg dat beide
apparaten met wifi zijn verbonden en
selecteer de functie luidspreker bedienen in
de SmartLink-app.*
■ Zoek automatisch je favoriete zenders en sla
ze op. Op het app-scherm wordt
weergegeven waar je naar luistert.**
■ Auto-sync tijd en wekkers tussen je iPhone
en de luidspreker. Dim beide schermen met
behulp van veegbewegingen op de
klokdisplay.
36Gebruikershandleiding | AlarmDock Halo 2 | GEAR4
GEAR4_PG548_MANUAL_INNER_V1.1.indd 36 05/08/2011 13:29

■ Ga naar je muziekbibliotheek via de app en
toon je favoriete album-afbeeldingen.
N.B. Voor functies van uitbreidings-app is de
GEAR4 SmartLink-app voor iPhone4, iPhone
3GS, iPhone 3G of iPod touch (alleen 2e, 3e en
4e generatie) met iOS 3.1.3., iOS 4.0 of hoger
nodig. App-schermen correct ten tijde van print.
Voor de functie draadloze afstandsbediening
is een 2e gedockt iOS-apparaat nodig, plus
SmartLink en wifi.
*Zorg dat je ‘allow remote’ in het SmartLinkinstellingsmenu op het 2e gedockte iOSapparaat aan hebt staan.
**Waar RDS beschikbaar is.
Aan de slag:
■ Plaats de CR2025-knoopbatterij in het
batterijvak onderop het apparaat. Deze
batterij zorgt ervoor dat de klokinstellingen
bewaard blijven indien de stroom uitvalt.
■ Steek het kleine uiteinde van de
netstroomkabel in de achterzijde van
het apparaat en steek vervolgens de
stekker in het stopcontact.
■ Druk op de knop POWER om de
luidspreker te activeren.
■ Om de modus te selecteren, druk je op de
MODE knop op de luidspreker om tussen
de opties te schakelen (iPod / FM / AUX).
■ Druk in standby op de knop SNOOZE om de
helderheid van het lcd-scherm aan te passen.
Er zijn 5 helderheidsniveaus.
■ Het lcd kan ook worden gewijzigd m.b.v. de
op de afstandsbediening.
knop
Voor gebruik met
iPod / iPhone:
■ Zet je iPod / iPhone voorzichting in het dock.
N.B. Als je de iPhone of iPod touch de eerste
keer op de AlarmDock Halo 2 aansluit, geeft het
apparaat een melding dat voor dit accessoire een
applicatie nodig is die niet is geïnstalleerd. Druk
op OK om naar de App Store te gaan, download
de pagina en selecteer de installeerknop. De
GEAR4 SmartLink-applicatie is gratis.
■ Druk op de knop MODE om de iPod-modus
te selecteren.
■ Druk op de afspeelknop van de iPod/iPhone
en bedien de muziek met het apparaat of
gebruik de afstandsbediening om door de
menu’s van de iPod/iPhone te navigeren.
Voor gebruik met
FM-radio:
■ Druk op de knop MODE om de FM-modus
te selecteren.
■ Druk op de knop
frequentie te selecteren.
/ om de gewenste
37 GEAR4 | AlarmDock Halo 2 | Gebruikershandleiding
GEAR4_PG548_MANUAL_INNER_V1.1.indd 37 05/08/2011 13:29

■ Houd of ingedrukt om automatisch naar
de volgende goede frequentie te zoeken.
■ Druk op
snelkeuzestanden om een vooraf ingestelde
radiozender te selecteren.
EEN VOORAF INGESTELDE FREQUENTIE
OPSLAAN:
■ Er kunnen maximaal 9 FM-presets
worden ingesteld.
■ Als je een bepaalde frequentie wilt opslaan,
zet je de radio op de gewenste frequentie,
druk je op
en voer je de gewenste geheugenpositie
met de knoppen
te bevestigen.
en schuif door de
otdat het scherm gaat knipperen
/ . Druk op om
De klok instellen:
■ Zet actieve wekkers uit (zodat er geen
wekkerpictogrammen meer worden
weergegeven).
■ Druk op de knop SET.
■ 12h gaat knipperen. Druk op de knoppen
/ om een 24-uurs- of 12-uursklok te
kiezen. Druk op SET om op te slaan.
■ Het uur gaat knipperen. Druk op
om het uur aan te passen. Druk op SET
om op te slaan.
/
■ De minuten gaan knipperen. Druk op
om de minuten aan te passen. Druk op SET
om op te slaan.
■ Een van de dagen van de week gaat
knipperen. Druk op
week te kiezen. Druk op SET om op te slaan.
/ om de dag van de
De wekker zetten:
■ Druk op de knop ALARM totdat de
gewenste wekker wordt verlicht.
■ Druk op de knop SET.
■ Het uur gaat knipperen. Druk op
om het uur aan te passen. Druk op SET
om op te slaan.
■ De minuten gaan knipperen. Druk op
om de minuten aan te passen. Druk op SET
om op te slaan.
■ De dagen van de week gaan knipperen.
Druk op
of de hele week te kiezen. Druk op SET
om op te slaan.
■ De wekkermodus instellen iPod, FM of
buzzer – druk op
om op te slaan.
■ Druk op de knop
te stellen (tussen 0 en 32). Druk op SET
om op te slaan.
/ om weekend, weekdagen
/ . Druk op SET
/ om het volume in
/
/
/
Gebruikershandleiding | AlarmDock Halo 2 | GEAR4
GEAR4_PG548_MANUAL_INNER_V1.1.indd 38 05/08/2011 13:29
38

Slaap- / sluimerstellingen:
■ Sluimeren: Als de wekker gaat, druk je
eenmaal op de knop SNOOZE om de wekker
na 10 minuten nog eens af te laten gaan.
■ Druk op elke andere knop om de wekker voor
die dag uit te zetten.
■ De wekker gaat 1 uur lang af als er geen
knoppen worden ingedrukt.
■ Slapen: De slaaptimer schakelt het
apparaat automatisch uit na een
vooraf ingesteld interval.
■ Je activeert de slaaptimer door de knop
SLEEP steeds in te drukken om de gewenste
tijd te selecteren (OFF, 10min, 20min,
30min enz.)
■ Laat de gewenste tijd op het scherm staan.
Deze verdwijnt na een paar seconden en is
dan opgeslagen ‘SLEEP’ wordt op het
scherm weergegeven.
■ Je zet de sleeptimer uit door steeds de knop
SLEEP in te drukken totdat OFF wordt
weergegeven.
Registreer AlarmDock Halo 2 om de garantie te
activeren en productupdates te ontvangen, op
www.gear4.com/register
Zorg dat je iPod / iPhone de meest recente
39 GEAR4 | AlarmDock Halo 2 | Gebruikershandleiding
softwareversie gebruikt. Verbind je
iPod / iPhone met iTunes om de software
bij te werken. Als er een nieuwere
softwareversie beschikbaar is, word je
gevraagd of je een update wilt uitvoeren.
Copyright © 2011 Disruptive Limited.
Alle rechten voorbehouden. Volledige of
gedeeltelijke reproductie is verboden. GEAR4,
SmartLink en AlarmDock zijn handelsmerken
van Disruptive Limited. iPhone, iPod, iPod nano,
iPod classic en iPod touch zijn handelsmerken
van Apple Inc., gedeponeerd in de VS en
andere landen.
‘Made for iPod’ en ‘Made for iPhone’ betekenen
dat een elektronische accessoire zodanig is
ontworpen dat het specifiek op een iPod of
iPhone past en dat het door de ontwikkelaar
is gecertificeerd om te voldoen aan
de prestatieverwachtingen van Apple.
Apple is niet verantwoordelijk voor de
werking van dit apparaat of de naleving van
veiligheids- en regelgevingsstandaarden.
WAARSCHUWING
Blootstelling van dit apparaat aan regen of
vocht kan brand of een elektrische schok
veroorzaken.
VOORZICHTIG
Gebruik van besturingsknoppen of aanpassing
van prestaties of procedures anders dan hier
GEAR4_PG548_MANUAL_INNER_V1.1.indd 39 05/08/2011 13:29

beschreven, kan resulteren in gevaarlijke
stralingsblootstelling.
Explosiegevaar indien batterij onjuist wordt
geplaatst. Vervang alleen door hetzelfde of
vergelijkbaar type.
Stel de batterijen (batterijpakket of
geïnstalleerde batterijen) niet bloot aan
overmatige hitte, zoals direct zonlicht, vuur en
dergelijke.
nieuwe kabel voldoet aan de
aanbevelingen van de fabrikant.
‒ Haal tijdens onweer en wanneer het
apparaat langdurig niet wordt gebruikt,
de stekker uit het stopcontact.
‒ Als de netstroomstekker of een
apparaatkoppeling wordt gebruikt als middel
om de verbinding te verbreken, moet deze te
allen tijde toegankelijk blijven.
UITPAKKEN EN INSTALLEREN
Pak het apparaat voorzichtig uit. Het is
raadzaam de verpakking te bewaren,
voor het geval het apparaat langere tijd
moet worden opgeborgen. Plaats het
apparaat of de batterijen nooit vlakbij een
radiator, vóór een heteluchtverwarming,
in direct zonlicht of vlakbij water om schade
te voorkomen.
VOOR JE EIGEN VEILIGHEID
‒ Trek alleen aan de stekker als je het
netstroomadapter wilt loskoppelen.
Trek nooit aan het snoer.
‒ Raak de netstroomstekker nooit aan met
AFVALVERWERKING
Volgens Europese Richtlijn 2002/96/EC moeten
alle elektrische en elektronische apparaten
apart worden ingezameld bij de gemeente.
Volg de verordeningen van de lokale gemeente
en gooi oude producten niet bij het normale
huishoudelijk afval.
Het bliksemsymbool met pijlkop
binnen een gelijkzijdige driehoek is
bedoeld om gebruikers te wijzen op
de aanwezigheid van niet-geïsoleerd ‘gevaarlijk
voltage’ binnen de behuizing van het product,
die voldoende kan zijn om een elektrische
schok te veroorzaken.
natte handen, omdat dit brand of een
elektrische schok kan veroorzaken.
‒ Laat reparatie over aan deskundig personeel.
‒ Open de behuizing niet.
‒ Draai of doorboor het netsnoer nooit.
Indien de stekker of het snoer moet
aanwezigheid van een belangrijke bedieningsen onderhouds- (service-) instructie in de
documentatie bij het apparaat.
Het uitroepteken binnen een
gelijkzijdige driehoek is bedoeld
de gebruiker te wijzen op de
worden vervangen, zorg dan dat de
Gebruikershandleiding | AlarmDock Halo 2 | GEAR4
GEAR4_PG548_MANUAL_INNER_V1.1.indd 40 05/08/2011 13:29
40

VOORZICHTIG
RISICO OP ELEKTRISC HE SCHOK – NIET OPENEN
VOORZICHTIG: VANWEGE RISIC O OP ELEKTRISCHE SCHOK, FRO NTJE (OF
ACHTERZIJDE) NIET OPENEN BE VAT GEEN ONDERDELEN DIE DOOR DE
GEBRUIKER KUNNEN WORDEN G EREPAREERD. LAAT REPARATIE OVER AAN
GEKWALIFICEER DE SERVICEMEDEWERKER S.
FCC-REGELS
U bent gewaarschuwd dat als de gebruiker
wijzigingen of aanpassingen aanbrengt die
niet uitdrukkelijk zijn toegestaan door de partij
die verantwoordelijk is voor naleving van de
regels, kan de gebruiker het gebruiksrecht
worden ontzegd. Deze apparatuur is getest
en voldoet aan de normen voor een digitaal
apparaat klasse B, volgens hoofdstuk 15
van de FCC-regels.
Deze normen zijn ingesteld om redelijke
bescherming te bieden tegen storing aan
een installatie in huis. Dit apparaat genereert
en gebruikt radiofrequentie-energie en kan
radiogolven uitzenden en kan, indien niet
geïnstalleerd en gebruikt volgens de instructies,
storing veroorzaken aan radiocommunicatie.
Er is echter geen garantie dat er geen enkele
storing zal optreden. Als dit apparaat wel storing
veroorzaakt aan radio- of televisieontvangst,
hetgeen kan worden vastgesteld door het
apparaat uit en weer aan te zetten, is het
raadzaam de storing te proberen te verhelpen
door een van de volgende maatregelen toe
te passen:
‒ Richt de ontvangstantenne anders of zet
deze op een andere plaats.
‒ Zet het apparaat verder van de ontvanger af.
‒ Sluit het apparaat aan op een stopcontact
dat op een ander circuit zit dan dat waarop
de ontvanger is aangesloten.
‒ Raadpleeg de dealer of een ervaren
radio / tv-monteur.
Werking is aan de volgende twee voorwaarden
onderhevig:
1) Dit apparaat mag geen storing veroorzaken en
2) Dit apparaat moet alle storing accepteren,
inclusief storing die ongewenste werking van
het apparaat veroorzaakt.
41 GEAR4 | AlarmDock Halo 2 | Gebruikershandleiding
GEAR4_PG548_MANUAL_INNER_V1.1.indd 41 05/08/2011 13:29

Läs före användning. AlarmDock Halo 2
AlarmDock Halo
2-kontroller:
➊ AV / PÅ
➋ MODE
➌ SNOOZE/SLEEP
(TONING I VÄNTELÄGET)
➍ SET
➎ ALARM
➏ VOLYM -
➐ VOLYM +
HOPPA BAKÅT
➒ HOPPA FRAMÅT
➓ SPELA / PAUS
11
EXTRA INGÅNG
12
DC-INGÅNG
13
FM-ANTENN
14
BATTERIFACK
Funktioner:
■ FM-radio med 9 programmerbara
förinställda stationer
■ Laddar iPod / iPhone
■ 12- / 24-timmars klocka med alarm – vakna
upp till radio, din iPod / iPhone eller summer
■ Dimbar LCD-skärm
■ Två programmerbara alarm
■ Snoozekontroll
■ Nedräkningstimer för sovfunktion
■ Port för linjeingång för användning
tillsammans med andra musikspelare
APP-STYRD:
Smartare än din vanliga högtalare – gratis app
från App Store:
■ Använd din iPhone eller iPod touch för att
styra högtalaren trådlöst. Så här använder du
funktionen: Docka en iPhone eller iPod touch
till, kontrollera att båda enheterna har
anslutits till det trådlösa nätet och välj
funktionen för högtalarstyrning i SmartLinkappen.*
■ Sök automatiskt och spara dina
favoritstationer. Appskärmen visar vad du
lyssnar på.**
■ Synkronisera tid och alarm mellan din iPhone
och högtalaren automatiskt. Tona ned båda
skärmarna genom att använda
svepnavigering på klockdisplayen.
■ Öppna ditt musikbibliotek via appen och visa
dina favoritomslag.
Obs! App-funktionerna kräver appen GEAR4
SmartLink för iPhone 4, iPhone 3GS, iPhone
42Användarhandbok | AlarmDock Halo 2 | GEAR4
GEAR4_PG548_MANUAL_INNER_V1.1.indd 42 05/08/2011 13:29

3G eller iPod touch (endast 2:a, 3:e och 4:e
generationen) med iOS 3.1.3, iOS 4.0 eller
senare. Appskärmen var korrekt vid tryck.
Funktionen för trådlös fjärrkontroll kräver två
dockade iOS-enheter, med SmartLink och Wi-Fi.
*Säkerställ att du tillåter fjärrstyrning på
SmartLink-inställningsmenyn på den andra
dockade iOS-enheten.
**Där RDS-sändning är tillgängligt.
Komma i gång:
■ Sätt i det runda, platta CR2025-batteriet i
batterifacket på enhetens undersida. Tack
vare batteriet försvinner inte klockans
inställningar vid elavbrott.
■ Anslut strömförsörjningsenheten till baksidan
av huvudenheten och sedan till elnätet.
■ Tryck på knappen POWER för att aktivera
högtalaren.
■ Tryck på knappen MODE för att växla mellan
alternativen (iPod / FM / AUX) och välja källa.
■ Tryck på knappen SNOOZE i vänteläge
för att ställa in LCD-skärmens ljusstyrka.
Det finns fem ljusstyrkenivåer.
■ LCD-skärmen kan även ändras med hjälp av
-knappen på fjärrkontrollen.
Använda enheten med
iPod / iPhone:
■ Sätt försiktigt din iPod / iPhone i dockan.Välj
43 GEAR4 | AlarmDock Halo 2 | Användarhandbok
och sätt i en dockningsadapter som passar
din iPod / iPhone.
Obs! Första gången du ansluter din iPhone
eller iPod touch till AlarmDock Halo 2 visas ett
meddelande på enheten om att ett program som
inte är installerats behövs. Tryck på OK för att
gå till App Store, nedladdningssidan och klicka
på installationsknappen. Programmet GEAR4
SmartLink är gratis.
■ Tryck på knappen MODE och välj iPod-läget.
■ Tryck på spelknappen på din iPod/iPhone
och styr musiken via din enhet eller använd
fjärrkontrollen för att navigera på iPod-/
iPhone-menyerna.
Använda enheten
med FM-radio:
■ Tryck på knappen MODE och välj FM-läget.
■ Tryck på knappen
önskad frekvens.
■ Tryck på och håll ned knappen
för att automatiskt söka efter nästa
rena frekvens.
■ Tryck på
kanaler för att välja en förinställd radiokanal.
SPARA EN FÖRINSTÄLLD FREKVENS:
■ Du kan spara upp till 9 förinställda kanaler.
■ Ställ in radion på önskad frekvens och tryck
sedan på och håll ned knappen
skärmen börjar blinka. Ange önskad
/ för att söka efter
eller
och scrolla mellan förinställda
tills
GEAR4_PG548_MANUAL_INNER_V1.1.indd 43 05/08/2011 13:29

minnesposition genom att trycka på
knappen
igen för att bekräfta.
/ . Tryck på knappen
Ställa in tid:
■ Stäng av alla aktiva alarm (så att inga
alarmikoner visas).
■ Tryck på knappen SET.
■ 12h börjar blinka. Tryck på knapparna
för att välja antingen 24 eller 12 timmar. Tryck
på knappen SET för att spara.
■ Timvisningen börjar blinka. Tryck på
för att ställa in timmen. Tryck på knappen
SET för att spara.
■ Minutvisningen börjar blinka. Tryck på
för att ställa in minuterna. Tryck på knappen
SET för att spara.
■ En veckodag börjar blinka. Tryck på
för att välja den aktuella veckodagen.
Tryck på knappen SET för att spara.
Ställa in alarmet:
■ Tryck på knappen ALARM tills det alarm
som du vill ställa in lyser.
■ Tryck på knappen SET.
■ Timvisningen börjar blinka. Tryck på
för att ställa in timmen. Tryck på knappen
SET för att spara.
■ Minutvisningen börjar blinka. Tryck på
för att ställa in minuterna. Tryck på knappen
SET för att spara.
/
/
/
/
/
/
■ Veckodagarna börjar blinka. Tryck på
för att välja mellan helger, vardagar eller hela
veckan. Tryck på knappen SET för att spara.
■ Tryck på knappen
alarmlägena – iPod, FM eller summer.
Tryck på knappen SET för att spara.
■ Tryck på knappen
in volymen (mellan 0 och 32). Tryck på
knappen SET för att spara.
/ . för att gå igenom
/ för att ställa
/
Sov- / snoozefunktioner:
■ Snooze: Tryck en gång på knappen SNOOZE
när alarmet ljuder, så fördröjs alarmet med
10 minuter.
■ Tryck på någon annan knapp för att stänga
av alarmet för den dagen.
■ Alarmet ringer i en timme om inga knappar
trycks in.
■ Sovfunktion: Sovtimern slår automatiskt av
enheten efter förinställda intervall.
■ Aktivera sovtimern genom att trycka flera
gånger på knappen SLEEP och välja önskad
tid (OFF (av), 10min, 20min, 30min osv).
■ Låt önskat nummer stå kvar på skärmen för
att ställa in det. Efter några sekunder sparas
numret och då försvinner det. SLEEP visas
på skärmen.
■ Om du vill stänga av sovtimern trycker du på
knappen SLEEP flera gånger tills OFF (av)
visas.
Användarhandbok | AlarmDock Halo 2 | GEAR4
44
GEAR4_PG548_MANUAL_INNER_V1.1.indd 44 05/08/2011 13:29

Registrera din version av AlarmDock Halo 2
på www.gear4.com/register för att aktivera
garantin och få produktuppdateringar.
Kontrollera att din iPod / iPhone använder
den senaste programvaruversionen. Du kan
uppdatera programvaran genom att ansluta
din iPod / iPhone till iTunes. Om en nyare
programvaruversion är tillgänglig uppmanas
du att uppgradera.
Copyright © 2011 Disruptive Limited. Med
ensamrätt. Fullständig eller delvis reproduktion
är förbjuden. GEAR4, SmartLink och AlarmDock
är varumärken som tillhör Disruptive Limited.
iPhone, iPod, iPod nano, iPod classic och iPod
touch är registrerade varumärken som tillhör
Apple Inc. Registrerade i USA och andra länder.
“Made for iPod” och “Made for iPhone” innebär
att ett elektriskt tillbehör har specialutformats
för anslutning till iPod respektive iPhone och
har certifierats av utvecklaren för uppfyllande
av Apples prestandakrav.
Apple ansvarar inte för driften av denna
enhet eller dess stöd av säkerhets- och
andra reglerade standarder.
VARNING
För att minska risken för eldsvåda eller
elektrisk chock, utsätt inte den här enheten
för regn eller fukt.
OBS!
Användning av kontroller eller justeringar
rörandes prestandan av procedurer som
45 GEAR4 | AlarmDock Halo 2 | Användarhandbok
inte finns angivna kan orsaka farlig strålning.
Explosionsrisk föreligger om du byter till fel typ
av batteri. När du byter ut batteriet måste du
se till att ersättningsbatteriet är av samma eller
likvärdig typ.
Batterier (batteripack eller installerade batterier)
får inte utsättas för stark värme som t.ex.
solsken eller öppen eld.
UPPACKNING OCH INSTALLATION
Packa upp enheten försiktigt. Vi rekommenderar
att du sparar förpackningen om du skulle
behöva förvara enheten en längre tid.
För att undvika skador på enheten ska den
eller dess batterier aldrig placeras nära element,
framför värmeventiler, under direkt solljus eller
nära vatten.
FÖR DIN SÄKERHET
‒ När du kopplar från nätadaptern ska du först
dra ut strömkontakten. Dra aldrig i sladden.
‒ Hantera aldrig strömkontakten med fuktiga
händer, eftersom detta kan leda till eldsvåda
eller elstötar.
‒ Kontakta kvalificerad servicepersonal
för service.
‒ Öppna aldrig höljet.
‒ Snurra eller kläm aldrig strömsladden.
Om kontakten eller strömsladden behöver
bytas ut ska du säkerställa att detta görs i
enlighet med tillverkarens rekommendationer.
‒ Dra ut strömmen till enheten vid åskväder
GEAR4_PG548_MANUAL_INNER_V1.1.indd 45 05/08/2011 13:29

och när den inte används under en längre tid.
‒ Om apparaten kopplas bort från
strömförsörjningen med nätkabelns eller
apparatens kontakt ska det vara lätt att
komma åt och använda denna kontakt.
AVFALLSHANTERING
Enligt EU-direktiv 2002/96/EC måste alla
elektriska och elektroniska produkter samlas
in separat genom ett lokalt insamlingssystem.
Följ de regler som gäller där du befinner dig
och kasta inte gamla produkter i det vanliga
hushållsavfallet.
Den blixtformade lampan, som
återfinns i en liksidig triangel,
är ämnad att varna användaren
för ‘Farlig Spänning’ som inte är isolerad inuti
produkten och som är stark nog att kunna
ge en människa en elektrisk stöt.
Utropstecknet inom en liksidig
triangel är ämnad att varna
användaren för behovet av underhåll
och service som nämns i användarhandboken.
VOORZICHTIG
RISK FÖR ELEKTRISK A STÖTAR - ÖPPNA EJ!
OBS! FÖR ATT MINSKA RISK EN FÖR ELEKTRISKA STÖTAR SKA
LOCKET (ELLER BAKSIDAN) INTE TAS BORT. DET FINNS IN GA DELAR
SOM ANVÄNDAREN KAN UNDER HÅLLA I ENHETEN. KONTAKTA
KVALIFICERAD SERVICEPERSONAL FÖR UNDERHÅLL.
FCC-REGLER
Observera att förändringar eller modifikationer
som inte uttryckligen är tillåtna av den part
som ansvarar för regelefterlevnad kan
ogiltiggöra användarens behörighet att använda
utrustningen. Utrustningen har testats och
befunnits uppfylla begränsningarna för en digital
enhet i klass B, enligt avsnitt 15 i FCC-reglerna.
Gränserna har utformats för att ge skäligt
skydd mot störningar i en installation för
hemmabruk. Utrustningen genererar, använder
och kan utstråla RF-energi och kan, om den
inte installeras och används i enlighet med
anvisningarna, störa radiokommunikation.
Det finns dock ingen garanti för att inte
störningar kan förekomma i en viss
installation. Om utrustningen stör radio- eller
tv-mottagningen, vilket kan avgöras genom
att du slår av / på utrustningen, uppmuntras
användaren att åtgärda detta genom att vidta
en eller flera av följande åtgärder:
‒ Rikta in den mottagande antennen åt
ett annat håll eller flytta den.
‒ Öka avståndet mellan utrustningen och
mottagaren.
‒ Anslut utrustningen till ett uttag i en annan
krets än den som mottagaren är ansluten till.
‒ Be återförsäljaren eller en erfaren
radio- / tv-tekniker om hjälp.
Användningen styrs av följande två villkor:
1) Enheten får inte orsaka störningar.
2) Enheten måste acceptera eventuella
störningar, inklusive störningar som kan leda
till att enheten inte fungerar på önskat sätt.
Användarhandbok | AlarmDock Halo 2 | GEAR4
46
GEAR4_PG548_MANUAL_INNER_V1.1.indd 46 05/08/2011 13:29

AlarmDock Halo 2 Luettava ennen käyttöä.
AlarmDock Halo 2
-ohjaimet:
➊ VIRTA
➋ TILA
➌ TORKKU / UNIAJASTIN
(HIMMEÄ VALMIUSTILASSA)
➍ ASETA
➎ HÄLYTYS
➏ ÄÄNENVOIMAKKUUS -
➐ ÄÄNENVOIMAKKUUS +
SIIRRY TAAKSEPÄIN
➒ SIIRRY ETEENPÄIN
➓ TOISTA / KESKEYTÄ
11
AUX-TULOLIITÄNTÄ
12
TASAVIRTALIITÄNTÄ
13
FM-ANTENNI
14
PARISTOLOKERO
Ominaisuudet:
■ FM-radiossa 9 ohjelmoitavaa asemapaikkaa
■ Lataa iPodin / iPhonen
■ 12 / 24 tunnin herätyskello – herätys radiolla,
iPodilla / iPhonella tai summerilla
■ Himmennettävä nestekidenäyttö
■ kaksi ohjelmoitavaa hälytystä
47 GEAR4 | AlarmDock Halo 2 | n käyttöohje
■ Torkkusäädin
■ Uniajastimen laskuri
■ Line-in portti muille musiikki soittimille
SOVELLUSYHTEENSOPIVA:
Keskivertokaiutinta älykkäämpi: ilmainen
sovellus saatavana App Storesta;
■ Hallitse kaiutinta langattomasti iPhonen tai
iPod touchin avulla. Käytä tätä toimintoa
seuraavasti: aseta toinen iPhone tai iPod
touch telakointiasemaan, varmista, että
molemmilla laitteilla on Wi-Fi-yhteys, ja valitse
SmartLink-sovelluksesta kaiuttimen
kaukosäätötoiminto.*
■ Viritä asemat automaattisesti ja tallenna
suosikkisi. Sovelluksen näyttö ilmoittaa
kuunneltavan aseman.**
■ Synkronoi kellonaika ja hälytykset
automaattisesti iPhonen ja kaiuttimen välillä.
Himmennä molemmat näytöt pyyhkäisemällä
kellonäyttöä.
■ Käytä musiikkikirjastoa sovelluksen kautta ja
näytä suosikkialbumiesi kuvitus.
Huomio: Sovellusyhteensopivien ominaisuuksien
käyttö edellyttää GEAR4 SmartLink -ohjelmaa
iPhone 4:lle, iPhone 3GS:lle, iPhone 3G:lle
tai iPod touchille (vain 2., 3. tai 4. sukupolvi),
jossa on iOS 3.1.3, iOS 4.0 tai uudempi.
GEAR4_PG548_MANUAL_INNER_V1.1.indd 47 05/08/2011 13:29

Sovellusnäytöt ovat painoajankohdan mukaiset.
Langaton kaukosäätö edellyttää toista telakoitua
iOS-laitetta, joka hyödyntää SmartLinkiä ja
Wi-Fiä.
* Säädä nestekidenäytön kirkkaus painamalla
kaiuttimen tai kaukosäätimen kirkkauspainiketta.
Käytettävissä on viisi säädettävää
kirkkaustasoa.
**RDS-lähetysten kuuluvuusalueella.
Käytön aloitus:
■ Asenna CR2025-nappiparisto yksikön
alaosassa olevaan paristolokeroon. Tämä
paristo säilyttää kelloasetukset virtakatkoksen
sattuessa.
■ Kytke virtalähdeyksikkö pääyksikön
takaosaan ja sitten pistorasiaan.
■ Ota kaiutin käyttöön painamalla
POWER-painiketta.
■ Valitse tila painamalla MODE-painiketta ja
selaamalla vaihtoehtoja (iPod / FM / AUX).
■ Säädä nestekidenäytön kirkkautta painamalla
SNOOZE-painiketta valmiustilassa.
Kirkkaustasoja on viisi.
■ Nestekidenäyttöä voi muuttaa myös
kaukosäätimen
-painikkeella.
Käyttö iPodin tai
iPhonen kanssa:
■ Aseta iPod / iPhone varovasti
telakointiasemaan.
Huomio: Kun iPhone tai iPod touch kytketään
AlarmDock Halo 2iin ensimmäistä kertaa, laite
ilmoittaa lisävarusteen vaativan sovelluksen, jota
ei ole asennettu. Siirry App Storen lataussivulle
valitsemalla OK ja valitse sitten Install-painike.
GEAR4 SmartLink-sovellus on ilmainen.
■ Valitse iPod-tila painamalla MODE-painiketta.
■ Paina iPodin/iPhonen toistopainiketta ja
hallitse musiikkia laitteen avulla tai selaa
iPodin/iPhonen valikkoja kaukosäätimellä.
Käyttö FM-radion kanssa:
■ Valitse FM-tila painamalla MODE-painiketta.
■ Viritä haluamasi taajuus painikkeella
■ Viritä seuraava selkeä taajuus automaattisesti
painamalla painiketta
sitä painettuna.
■ Valitse tallennettu radioasema painamalla
ja selaamalla tallennettuja radioasemia.
TAAJUUDEN TALLENNUS
MUISTIPAIKKAAN:
■ Voit tallentaa jopa 9 FM-esivalintaa.
■ Säädä haluamasi radiotaajuus ja paina sitten
-painiketta ja pidä sitä painettuna kunnes
näyttö alkaa vilkkua. Valitse haluamasi
muistipaikka painamalla painiketta
Vahvista valinta painamalla
uudestaan.
n käyttöohje | AlarmDock Halo 2 | GEAR4
/ ja pitämällä
painiketta
/ .
/ .
48
GEAR4_PG548_MANUAL_INNER_V1.1.indd 48 05/08/2011 13:29

Kellonajan asettaminen:
■ Poista käytöstä mahdollisesti aktiiviset
hälytykset (jolloin hälytyskuvakkeita ei
enää ole näkyvissä).
■ Paina SET-painiketta.
■ 12h alkaa vilkkua. Valitse 24 tunnin tai 12
tunnin kello painamalla
Tallenna painamalla SET-painiketta.
■ Tuntinäyttö alkaa vilkkua. Aseta tunnit
painamalla
painamalla SET-painiketta.
■ Minuuttinäyttö alkaa vilkkua. Aseta minuutit
painamalla
painamalla SET-painiketta.
■ Viikonpäivä alkaa vilkkua. Valitse päivä
painamalla
painamalla SET-painiketta.
/ -painiketta. Tallenna
/ -painiketta. Tallenna
/ -painiketta. Tallenna
/ -painiketta.
Hälytyksen asettaminen:
■ Paina ALARM-painiketta, kunnes haluttu
hälytys näkyy.
■ Paina SET-painiketta.
■ Tuntinäyttö alkaa vilkkua. Aseta tunti
painamalla painiketta
painamalla SET-painiketta.
■ Minuuttinäyttö alkaa vilkkua. Aseta minuutit
painamalla painiketta
painamalla SET-painiketta.
■ Viikonpäivät alkavat vilkkua. Valitse
49 GEAR4 | AlarmDock Halo 2 | n käyttöohje
/ . Tallenna
/ . Tallenna
viikonloppu, arkipäivät tai koko viikko
painamalla
painamalla SET-painiketta.
■ Paina
hälytysvaihtoehtoja – iPod, FM tai summeri.
Tallenna painamalla SET-painiketta.
■ Aseta äänenvoimakkuus (0–32) painamalla
painiketta
SET-painiketta.
/ -painiketta. Tallenna
/ -painiketta ja selaa
/ . Tallenna painamalla
Uniajastin- /
torkkutoiminnot:
■ Torkku: Kun painat SNOOZE-painiketta
kerran hälytyksen soidessa, hälytys soi
uudelleen 10 minuutin kuluttua.
■ Paina mitä tahansa muuta painiketta, jolloin
hälytys sammuu ja hälyttää jälleen
seuraavana päivänä.
■ Hälytys soi 1 tunnin ajan, jos mitään
painiketta ei paineta.
■ Uniajastin: Uniajastin katkaisee laitteen
virran asetetuin aikavälein automaattisesti.
■ Ota uniajastin käyttöön painamalla
SLEEP-painiketta useita kertoja ja
valitsemalla haluamasi aika (pois,
10 min, 20 min, 30 min jne.).
■ Aseta haluamasi asetus jättämällä se
näyttöön. Se poistuu näytöstä muutaman
sekunnin kuluttua, jolloin asetus on
tallennettu. Näytössä näkyy teksti SLEEP.
GEAR4_PG548_MANUAL_INNER_V1.1.indd 49 05/08/2011 13:29

■ Poista uniajastin käytöstä painamalla
SLEEP-painiketta, kunnes OFF (pois) tulee
näkyviin.
Aktivoi takuu rekisteröimällä AlarmDock Halo 2
osoitteessa www.gear4.com/register niin saat
jatkossa myös tuotepäivityksiä.
Varmista, että iPod- / iPhone-laitteessasi
on uusin ohjelmistoversio. Voit päivittää
ohjelmiston kytkemällä iPodin / iPhonen
iTunesiin. Jos saatavilla on uudempi
ohjelmistoversio, saat päivityskehotuksen
Copyright © 2011 Disruptive Limited. Kaikki
oikeudet pidätetään. Kopiointi kielletty. GEAR4,
SmartLink ja AlarmDock ovat Disruptive
Limited:n tavaramerkkejä. iPhone, iPod, iPod
nano, iPod classic ja iPod touch ovat Apple
Inc:n tavaramerkkejä, jotka on rekisteröity
USA:ssa ja muissa maissa.
“Made for iPod” tai “Made for iPhone” tarkoittaa,
että elektroninen lisävaruste on suunniteltu
nimenomaan iPodiin tai iPhoneen liitettäväksi
ja että valmistaja takaa sen täyttävän Applen
asettamat vaatimukset.
Apple ei ole vastuussa tämän tuotteen
toiminnoista tai sen noudattamisesta
turvallisuus ja sääntö standardeja.
VAROITUS
Välttääksesi tulipaloa tai sähköiskua älä jätä
tuotetta sateeseen tai kosteaan paikkaan.
HUOMIO
Säteilyvaara jos ei käytetä ohjekirjan mukaisesti.
Pariston virheellinen vaihto aiheuttaa
räjähtämisvaaran. Vaihda paristo aina
samanlaiseen tai samantyyppiseen paristoon.
Akut/paristot (akkupakkaus tai asennetut
paristot) on suojattava liialliselta kuumuudelta,
kuten auringonpaisteelta tai tulelta.
PAKKAUKSEN PURKAMINEN JA ASENNUS
Pura laite pakkauksesta varovasti. Pakkaus
kannattaa säästää siltä varalta, että haluat
myöhemmin varastoida laitteen. Älä koskaan
aseta laitetta tai sen akkuja patterin tai muun
lämmönlähteen lähelle, suoraan auringonvaloon
tai veden lähettyville.
TURVALLISUUSOHJEITA
‒ Kun irrotat virtalähteen, vedä
virtapistokkeesta, älä johdosta.
‒ Älä kosketa virtapistoketta märin käsin, koska
se saattaa aiheuttaa tulipalon tai sähköiskun.
‒ Laitetta saa huoltaa ainoastaan pätevä
ammattilainen.
‒ Älä avaa laitteen koteloa.
‒ Älä kierrä äläkä purista virtajohtoa.
Jos virtajohto tai -pistoke joudutaan
vaihtamaan, varmista että varaosa
vastaa valmistajan suosituksia.
‒ Irrota laitteen virtajohto ukonilman aikana
tai jos laitetta ei käytetä pitkään aikaan.
‒ Jos virtapistoketta tai kojepistokytkintä
n käyttöohje | AlarmDock Halo 2 | GEAR4
50
GEAR4_PG548_MANUAL_INNER_V1.1.indd 50 05/08/2011 13:29

käytetään virran katkaisulaitteena, siihen on
päästävä helposti käsiksi.
LAITTEEN HÄVITTÄMINEN
EU-direktiivin 2002/96/EY ja sähkö- ja
elektroniikkalaiteromusta annetun asetuksen
mukaisesti kaikki sähkö- ja elektroniikkalaitteet
kuuluvat erillisen keräysjärjestelmän piiriin.
Älä hävitä laitetta tavallisen sekajätteen mukana
vaan noudata paikallisia ohjeita SER-romun
keräyksen suhteen.
Salama kolmion sisällä -symboli
varoittaa käyttäjää eristämättömästä
suurjännitteestä laitteen sisällä ja
mahdollisesta sähköiskuvaarasta.
Huutomerkki kolmion sisällä -symboli
muistuttaa käyttäjää siitä, että
laitteen mukana toimitetuissa
oppaissa on tärkeitä käyttö- ja huolto-ohjeita.
VOORZICHTIG
EI SAA AVATA SÄHKÖISKUN VAARA
HUOMIO: VÄLTTÄÄKSESI SÄHKÖISKUN VAARA A, ÄLÄ POISTA KANTTA
(TAI TAKAOSAA). SISÄLLÄ EI OLE ITSE HU OLLETTAVIA OSIA.
OTA YHTEYS VALTUUTETTUUN HUOLTOON.
FCC-SÄÄDÖKSET
Huomaa, että ilman FCC-hyväksynnän hakijan
lupaa tehdyt muutokset saattavat mitätöidä
käyttäjän oikeuden käyttää laitetta. Tämä laite
on testattu, ja sen on todettu olevan luokan
51 GEAR4 | AlarmDock Halo 2 | Käyttöohje
B digitaalilaitteen rajojen mukainen FCCsäädösten osan 15 mukaisesti.
Nämä rajat on suunniteltu antamaan
kohtuullinen suoja haitallisia häiriöitä vastaan
kotikäytössä. Tämä laite synnyttää, käyttää
ja voi säteillä radiotaajuista energiaa, ja jos
sitä ei asenneta ja käytetä ohjeiden mukaan,
se saattaa aiheuttaa haitallisia häiriöitä
radioyhteyksiin.
Ei kuitenkaan voida taata, ettei häiriöitä esiinny
jossain tietyssä asennuksessa. Jos tämä
laite aiheuttaa haitallisia häiriöitä radio- tai
televisiovastaanottoon, mikä voidaan selvittää
katkaisemalla laitteen virta ja kytkemällä
se uudestaan, käyttäjän kannattaa yrittää
korjata häiriö yhdellä tai useammalla
seuraavista keinoista:
‒ Suuntaamalla tai sijoittamalla
vastaanottoantenni uudestaan.
‒ Siirtämällä laite etäämmäksi
vastaanottimesta.
‒ Kytkemällä laite pistorasiaan,
joka on eri piirissä kuin pistorasia,
johon vastaanotin on kytketty.
‒ Kääntymällä jälleenmyyjän tai kokeneen
radio-/televisioteknikon puoleen.
Käyttöä koskevat seuraavat kaksi ehtoa:
1) Tämä laite ei saa aiheuttaa häiriöitä ja
2) Tämän laitteen täytyy pystyä
vastaanottamaan häiriöitä, mukaan lukien
häiriöt, jotka saattavat haitata laitteen toimintaa.
GEAR4_PG548_MANUAL_INNER_V1.1.indd 51 05/08/2011 13:29

Læs venligst dette før brug. AlarmDock Halo 2
AlarmDock Halo
2-kontroller:
➊ POWER
➋ MODE
➌ SLUMRE / SLEEP
(NEDBLÆND I STANDBY)
➍ SET
➎ ALARM
➏ VOLUMEN -
➐ VOLUMEN +
SPRING TILBAGE
➒ SPRING FREM
➓ AFSPIL / PAUSE
11
AUX IN
12
DC-INDGANG
13
FM-ANTENNE
14
BATTERIRUM
Egenskaber:
■ FM-radio med 9 programmerbare,
forudindstillede stationer
■ Oplader din iPod / iPhone
■ 12 / 24-timers ur med alarm - vågn op til
radio, din iPod / iPhone eller brummelyd
■ LCD-display, der kan nedblændes
■ 2 programmerbare alarmer
■ Slumrekontrol
■ Nedtælling til aktivering af sleep
■ Indgangsport til brug sammen med andre
musikafspillere
APP-UDVIDET:
Smartere end gennemsnitshøjtaleren, gratis app
tilgængelig i App Store;
■ Brug din iPhone eller iPod touch til at styre
højtaleren trådløst. For at anvende denne
funktion skal du anbringe endnu en iPhone
eller iPod touch i dockingstationen, sikre dig
at begge enheder er tilsluttet det trådløse
netværk og vælge højtalerfunktionen i
SmartLink app’en.*
■ Indstil automatisk og gem dine
favoritstationer. Applikationens skærm viser,
hvad du lytter til.**
■ Synkroniser tiden og alarmerne automatisk
mellem din iPhone og højtaleren. Nedblænd
begge skærme med fingerstrøg på
urdisplayet.
■ Få adgang til dit musikbibliotek gennem
app’en og få vist dine foretrukne
albumillustrationer.
52Brugermanual | AlarmDock Halo 2 | GEAR4
GEAR4_PG548_MANUAL_INNER_V1.1.indd 52 05/08/2011 13:29

Bemaerk: App-udvidede funktioner kræver
GEAR4 SmartLink-applikationen til iPhone 4,
iPhone 3GS, iPhone 3G eller iPod touch (kun
2., 3. og 4. generation) med iOS 3.1.3, iOS 4.0
eller højere. Applikationskærme er korrekte ved
trykning. Funktionen trådløs fjernbetjening kræver
en yderligere iOS-enhed i dockingstationen, der
buger SmartLink og Wi-FI.
*Sørg for, at du ‘tillader fjernbetjening’ i
SmartLink-indstillingsmenuen fra den anden
iOS-enhed i dockingstationen.
**Hvor der er adgang til RDS-udsendelse.
Sådan kommer du i gang:
■ Indsæt CR2025-knapcellebatteriet i
batterirummet i enhedens bund. Dette batteri
modvirker, at urets indstillinger går tabt ved
strømsvigt.
■ Slut strømforsyningen til bagsiden af
hovedenheden og derefter til el-nettet.
■ Tryk på knappen POWER for at aktivere
højtaleren.
■ Tryk på knappen MODE for at vælge
tilstand og rulle mellem valgmulighederne
(iPod / FM / AUX).
■ Tryk på knappen SNOOZE i Standby-
tilstanden for at justere LCD-displayets
lysstyrke. Der er 5 lysstyrkeniveauer.
■ LCD-displayet kan også ændres med
knappen
53 GEAR4 | AlarmDock Halo 2 | Brugermanual
på fjernbetjeningen.
Til brug sammen med
iPod / iPhone:
■ Placér din iPod / iPhone forsigtigt i
dockingstationen for at starte opladningen.
Bemaerk: Første gang du tilslutter din iPhone
eller iPod touch til AlarmDock Halo 2, viser din
enhed en besked om, at tilbehøret kræver en
applikation der ikke er installeret. Bank let på
Ok for at gå til App Store, download side, og
bank let på knappen Install. GEAR4 SmartLinkapplikationen er gratis.
■ Tryk på knappen MODE for at vælge
iPod-tilstand.
■ Tryk på afspil på din iPod/iPhone og styr
musikken ved hjælp af din enhed eller brug
fjernbetjeningen til at navigere gennem iPod/
iPhone-menuerne.
Til brug sammen
med FM-radio:
■ Tryk på knappen MODE for at vælge
FM-tilstand.
■ Tryk på knappen
efter den ønskede frekvens.
■ Tryk og hold inde på knappen
søge automatisk efter den ønskede frekvens.
■ Tryk på
vælge forvalgte stationer.
/ for at søge
/ for at
for at søge gennem og
GEAR4_PG548_MANUAL_INNER_V1.1.indd 53 05/08/2011 13:29

SÅDAN GEMMER DU EN
FORUDINDSTILLET FREKVENS:
■ Du kan gemme op til 9 forudindstillede
FM-stationer.
■ Indstil radioen på din ønskede frekvens og
tryk så på og hold knappen
displayet blinker. Indtast den ønskede
hukommelsesplads ved at trykke på
knapperne
igen for at gemme.
/ . Tryk på knappen
nede indtil
Sådan indstilles uret:
■ Slå alle aktive alarmer fra (så der ikke
vises nogen aktiv alarm)
■ Tryk på knappen SET.
■ 12h begynder at blinke. Tryk på knapperne
/ for at vælge enten 24-timer eller
12-timer. Tryk på knappen SET for at gemme.
■ Timedisplayet begynder at blinke. Tryk på
/ för att ställa in timmen. Tryck på
knappen SET för att spara.
■ Minutdisplayet begynder at blinke. Tryk på
/ for at justere minutterne. Tryk på
knappen SET for at gemme.
■ En af ugedagene begynder at blinke.
Tryk på
ugedag. Tryk på knappen SET for at gemme.
/ for at vælge den korrekte
Sådan indstilles alarmen:
■ Tryk på knappen ALARM indtil alarmen,
der skal indstilles, lyser.
■ Tryk på knappen SET.
■ Timedisplayet begynder at blinke. Tryk på
/ for at indstille timen. Tryk på knappen
SET for at gemme.
■ Minutdisplayet begynder at blinke. Tryk på
/ for at indstille minutterne. Tryk på
knappen SET for at gemme.
■ Ugedagene begynder at blinke. Tryk på
/ for at vælge enten weekender,
ugedage eller hele ugen. Tryk på knappen
SET for at gemme.
■ Tryk på knappen
alarmtilstandene - iPod, FM eller alarm.
Tryk på knappen SET for at gemme.
■ Tryk på knappen
lydstyrken (mellem 0 og 32). Tryk på
knappen SET for at gemme.
/ . for at søge gennem
/ for at indstille
Sleep / snooze-funktioner:
■ Snooze: Tryk på knappen SNOOZE én
gang når alarmen lyder for at forsinke
alarmen med 10 minutter.
■ Tryk på en anden vilkårlig knap for at stoppe
alarmen for den pågældende dag.
■ Alarmen vil ringe i 1 time, hvis der ikke
trykkes på nogen knapper.
■ Sleep: Sleep-timeren slukker enheden
automatisk efter et forudindstillet antal
minutter.
■ Tryk på knappen SLEEP flere gange for at
aktivere sleep-timeren og vælge den ønskede
tid (OFF, 10 min, 20 min, 30 min, osv.).
Brugermanual | AlarmDock Halo 2 | GEAR4
54
GEAR4_PG548_MANUAL_INNER_V1.1.indd 54 05/08/2011 13:29

■ Lad det ønskede tal stå på skærmen,
så det kan indstilles. Efter et par sekunder
forsvinder det og er nu blevet gemt.
SLEEP vil blive vist på skærmen.
■ Tryk på knappen SLEEP flere gange, indtil
OFF vises, for at slukke for sleep-timeren
Registrér din kopi af AlarmDock Halo
2 for at aktivere garantien og modtage
produktopdateringer på
www.gear4.com/register
Sørg for, at din iPod / iPhone anvender den
seneste softwareversion. Opdatér softwaren
ved at forbinde din iPod / iPhone til iTunes.
Hvis der findes en nyere softwareversion,
vil du blive bedt o2.8m at opgradere.
Copyright © 2011 Disruptive Limited. Alle
rettigheder forbeholdes. Reproduktion af
dele eller helheden af dette dokument er ikke
tilladt. GEAR4, SmartLink og AlarmDock er
varemærker tilhørende Disruptive Limited.
iPhone, iPod, iPod nano, iPod classic og iPod
touch er varemærker tilhørende Apple Inc.,
registreret i USA og andre lande.
“Made for iPod” og “Made for iPhone” betyder,
at det elektroniske tilbehør er designet til
tilslutning til henholdsvis iPod eller iPhone,
og at det er blevet certificeret af udvikleren,
så det lever op til Apples standarder.
Apple har intet ansvar for apparatets
drift eller for dets opfyldelse af sikkerheds-
og lovgivningsmæssige standarder.
55 GEAR4 | AlarmDock Halo 2 | Brugermanual
ADVARSEL
For at mindske risikoen for brand eller elektrisk
stød må enheden ikke udsættes for regn eller fugt.
BEMÆRK
Brug af styring eller justeringer af ydelse
udover de specificerede kan føre til udsættelse
for farlig stråling.
Eksplosionsfare ved forkert udskiftning af
batteriet. Udskift det kun med samme type eller
tilsvarende.
Batterierne (batteripakken eller isatte batterier)
må ikke udsættes for stærk varme, f.eks. i form
af direkte sollys, ild eller lignende.
ÅBNING AF EMBALLAGEN OG INSTALLATION
Åbn enheden forsigtigt. Vi anbefaler, at du
gemmer emballagen, i fald du får brug for at
opbevare enheden. For at undgå skade bedes
du aldrig placere enheden eller dens batterier
i nærheden af radiatorer, foran varmeaftræk,
i direkte sollys eller nær vand.
AF HENSYN TIL DIN SIKKERHED
‒ Træk først strømforsyningsstikket ud, når
strømadapteren frakobles. Træk ikke blot
ledningen ud.
‒ Rør aldrig ved strømstikket med våde
hænder, da det kunne forårsage brand
eller elektrisk stød.
‒ Lad kun kvalificeret personale foretage
serviceeftersyn.
‒ Åbn ikke indfatningen.
‒ Vrid eller klem ikke strømforsyningskablet. Hvis
stikket eller ledningen skal udskiftes, så sørg
GEAR4_PG548_MANUAL_INNER_V1.1.indd 55 05/08/2011 13:29

for, at delen opfylder fabrikantens anbefaling.
‒ Træk stikket til enheden ud i lynvejr, eller
når den ikke anvendes i længere tidsrum.
‒ Hvis netstikket eller apparatets kobler
anvendes som afbryder, skal denne afbryder
være let at komme til.
BORTSKAFFELSE
I henhold til EU Direktiv 2002/96/EC skal alle
elektriske og elektroniske produkter indsamles
særskilt af et lokalt indsamlingssystem. Handl
venligst i henhold til dine lokale regler og
bortskaf ikke dine gamle produkter med dit
almindelige husholdningsaffald.
Lynsymbolet med pilehoved i
en ligesidet trekant er tiltænkt
som advarsel til brugeren om
tilstedeværelsen af ikke-isoleret “Farlig
Spænding” i produktets indfatning, som
kan være tilstrækkelig stærk til at udgøre
en risiko for elektrisk stød.
Udråbstegnet med en ligesidet
trekant er tiltænkt som advarsel
til brugeren om vigtige instrukser
om drift og vedligeholdelse (service) i
apparatets medfølgende brugsanvisninger.
VOORZICHTIG
RISIKO FOR ELEKTRISK STØD; MÅ IK KE ÅBNES
ADVARSEL: FJERN IKKE DÆKSLET (ELLER BAGDÆKSLET) AF HENSYN TI L
MINDSKELSE AF RISIKOEN FOR EL EKTRISK STØD. DER ER INGEN DELE,
SOM SKAL VEDLIGEH OLDES AF BRUGEREN INDENI. OVERLAD EF TERSYN
TIL KVALIFICEREDE SERVICETEKNIKERE.
FCC-REGLER
Du advares om, at ændringer eller modifikationer,
som ikke er udtrykkeligt godkendt af den part,
der er ansvarlig for overholdelse, kan bevirke,
at brugerens bemyndigelse til at betjene udstyret
gøres ugyldig.
Disse begrænsninger er beregnet til at tilvejebringe
rimelig beskyttelse mod skadelig interferens i en
installation i en bolig. Dette udstyr frembringer,
anvender og kan udsende højfrekvensenergi,
og kan, hvis det ikke installeres og anvendes i
overensstemmelse med vejledningen, forårsage
skadelig interferens på radiokommunikation.
Der er imidlertid ingen garanti for, at der ikke vil
opstå interferens i en bestemt installation. Hvis
dette udstyr forårsager skadelig interferens på
radio- eller tv-modtagelse, hvilket kan afgøres ved
at slukke og tænde for udstyret, opfordres brugeren
til at prøve at afhjælpe interferensen med en eller
flere af følgende metoder:
‒ Vend eller flyt modtageantennen.
‒ Forøg afstanden mellem udstyret
og modtageren.
‒ Tilslut udstyret til en kontakt på et andet
kredsløb end det, modtageren er tilsluttet.
‒ Henvend dig til forhandleren eller en erfaren
radio/tv-tekniker for hjælp.
Betjening er med forbehold af følgende to
betingelser:
Denne enhed må ikke forårsage interferens, og
1)
2) Denne enhed skal modtage enhver
interferens, inklusive interferens, som kan
forårsage uønsket funktion af enheden.
Brugermanual | AlarmDock Halo 2 | GEAR4
56
GEAR4_PG548_MANUAL_INNER_V1.1.indd 56 05/08/2011 13:29

GEAR4 One-Year Warranty
Disruptive Limited, who owns the GEAR4 brand, warrants this product to be free from defects in
workmanship and materials at the point of sale and that when this product is used in accordance
with the instructions for its use it shall continue to be free from defects, for a period of one (1) year
from the date of original purchase.
Any damage or defects caused by a failure to follow the instructions which relate to this product or
as the result of an accident, abuse, misuse, misapplication, product modification, faulty ancillary
equipment, improper voltage or current, lightning or other acts of God, commercial non-home use,
normal wear and tear, shipping damage or loss, damage to digital media players or damage caused
by service performed by anyone other than Disruptive Limited are expressly excluded from the
warranty stated above.
Disruptive Limited will, at its sole election, repair or replace any product that proves to be defective in
either or both of workmanship or materials and which is covered by this warranty. If the product is no
longer current or is out of stock, at its sole election, Disruptive Limited may replace your product with
a similar product. Disruptive Limited’s liability is limited to the repair or replacement, of any defective
product under warranty and any incidental or consequential damages are expressly excluded to the
fullest extent permitted by law. This warranty is not transferable and does not extend to users other
than the person who originally purchased the product.
This warranty gives you specific legal rights in addition to the ones afforded you by the laws of your
country and nor is this warranty intended nor does it operate to limit such legal rights.
GEAR4 | One-Year Warranty
GEAR4_PG548_MANUAL_INNER_V1.1.indd 57 05/08/2011 13:29

Return Policy / Warranty Service
Warranty claims will only be valid when accompanied with proof of purchase to evidence that
the product was purchased from an authorised dealer and that the claim is within allowed period.
To make a warranty claim you must first contact Disruptive Limited by email to support@gear4.com
stating your name, full postal address, telephone number, date and place of purchase and a detailed
description of the problem you are experiencing and don’t forget to include the name of the product
and its serial number.
If the defect is covered by this warranty then you will be provided with a Return to Manufacturer
Authorisation number and instructions for return shipment. Sending the product back to us under
this warranty shall be at your expense, and the return MUST be accompanied by the original proof of
purchase whilst we highly recommend that you retain a copy of this. Disruptive Limited shall not be
responsible for lost or damaged products during shipment. Any product returned without the original
proof of purchase will be returned without being examined or tested and such return shall be at the
customer’s expense.
To avoid any additional charges, all returns and exchanges must include the original packing
materials, product box, all included accessories which may include, but not necessarily be limited
to, power adapters or power cords, connecting cables, remote controls, adapters, insert cards and
instruction manuals. The absence of any of the aforementioned items may mean that you incur a
charge for their replacement. Disruptive Limited shall not be liable for any inconvenience, loss of
time, or loss of use of the product.
Return Policy / Warranty Service | GEAR4
GEAR4_PG548_MANUAL_INNER_V1.1.indd 58 05/08/2011 13:29

AlarmDock Halo 2 controls:
➌ SNOOZE / SLEEP
(DIM IN STANDBY)
➊ POWER ➋ MODE ➍ SET
➏ VOL –
➑ SKIP BACKWARDS
➓ PLAY / PAUSE
➒ SKIP FORWARDS
INNER FLAP INNER INNER COVER INNER BACK COVER
Declaration of Conformity
Product Name: GEAR4 AlarmDock Halo 2
Model: PG548/PG549
Distributor: Disruptive Limited
Address: Windsor House, Turnpike Road, High Wycombe, Bucks,
HP12 3NR United Kingdom.
Declare that the product described below is in conformity with the relevant provisions
of the following directives and National Laws and Regulations adopting these directives.
The Low Voltage Directive 2006/95/EC
The EMC Directive 2004/108/EEC
The product has been tested and assessed by application of the appropriate standards
or specifications. Together with all relevant National Technical Standards and Specifications
as applicable.
Standard Year Description
EN60065: 2002+A2:2010 Audio video and similar safety requirements
EN 55013: 2001+A2:2006 Sound and television broadcast receivers and
associated equipment
EN 55020: 2007 Electromagnetic Immunity
EN 61000-3-2: 2006+A2:2009 Limits for harmonic current emissions
EN 61000-3-3: 2008 Limitation of voltage change
Issued in:
High Wycombe, Bucks, United Kingdom Date: 05/08/2011
Authorised Representative: Thomas Sors Signature:
Position: Products Director
Made in China
➎ ALARM
11
➐ VOL +
Made for iPod touch (2nd, 3rd and 4th generation),
iPod classic (80Gb, 160Gb), iPod with video, iPod
nano (1st, 2nd, 3rd, 4th, 5th and 6th generation).
Made for iPhone 4, iPhone 3GS and iPhone 3G.
AUX IN
12
DC INPUT
13
FM ANTENNA
14
BATTERY COMPARTMENT
Box contents:
Contenu du coffret | Packungsinhalt
USER
MANUAL
AlarmDock Halo 2
Back-up battery
Batterie de rechange
Reservebatterie
Power supply (UK & EU)
Alimentation (GB & EU)
Netzteil (GB & EU)
Remote control
Télécommande
Fernbedienung
User manual
Notice d’utilisation
Benutzerhandbuch
GEAR4_PG548_MANUAL_COVER_V1.1.indd 2 05/08/2011 13:23
INNER FLAP INNER INNER COVER INNER BACK COVER
 Loading...