

Page 1
Model: VISR309JT
Washer
Owner’s Manual
Important Safety Information
Operating Instructions
The Controls on Your Washer
Other Washer Features
Preparing to Wash
Care of Product
Helpful Information
Specialized Fabric Guide
If Something Goes Wrong
2
3
10
11
General Electric Company, Appliance Park, Louisville, KY 40225 USA
175D1807P163
39-9350
7-96 CG
C Printed in the United States
Page 2

Important Safety Information
Read all safety information before using
Water Heater Safety
Under certain conditions
hydrogen gas may be produced
in a water heater that has not
been used for two weeks or more.
HYDROGEN GAS CAN BE
EXPLOSIVE UNDER THESE
CIRCUMSTANCES.
If the hot water has not been used
for two weeks or more, prevent
the possibility of damage or injury
by turning on all hot water taps
and allow them to run for several
minutes before using any electrical appliance which is connected
to the hot water system. This will
allow any hydrogen gas to escape.
Since the gas is flammable, do
not smoke or use an open flame
or appliance during this process.
SAVE THESE INSTRUCTIONS
2
Page 3

Warning
To reduce the risk of fire, electric shock, or injury to persons
when using your appliance, follow basic precautions, including
the following sections.
Safety Precautions
• Use this appliance only for its
intended purpose as described
in this Owner’s Manual.
— Properly ground to conform
with all governing codes and
ordinances. Follow details in
Installation Instructions.
— Install or store where it will not be
exposed to temperatures below
freezing or exposed to the weather.
• Do not repair or replace any
part of the appliance or attempt
any servicing unless specifically
recommended in this Owner’s
Manual or in published userrepair instructions that you
understand and have the skills
to carry out.
• Do not tamper with the controls.
• Never reach into the washer
while it is moving.
• Do not wash or dry articles that
have been cleaned in, washed
in, soaked in, or spotted with
combustible or explosive
substances (such as wax, oil,
paint, gasoline, degreasers,
dry-cleaning solvents, kerosene,
etc.) which may ignite or
explode. Do not add these
substances to the wash water.
Do not use these substances
around your washer and/or
dryer during operation.
• To minimize the possibility
of electric shock, unplug this
appliance from the power supply
or disconnect the washer at the
household distribution panel by
removing the fuse or switching
off the circuit breaker before
attempting any maintenance
or cleaning.
• Close supervision is necessary
if this appliance is used by or
near children or infirm persons.
Do not allow children to play
inside, on or with this appliance
or any discarded appliance.
Dispose of discarded appliances
and shipping/packing materials
properly. Before discarding
a washer, or removing from
service, remove the washer lid.
• NOTE: Turning the Cycle
Selector knob to an off position
does NOT disconnect the
appliance from the power supply.
3
Page 4
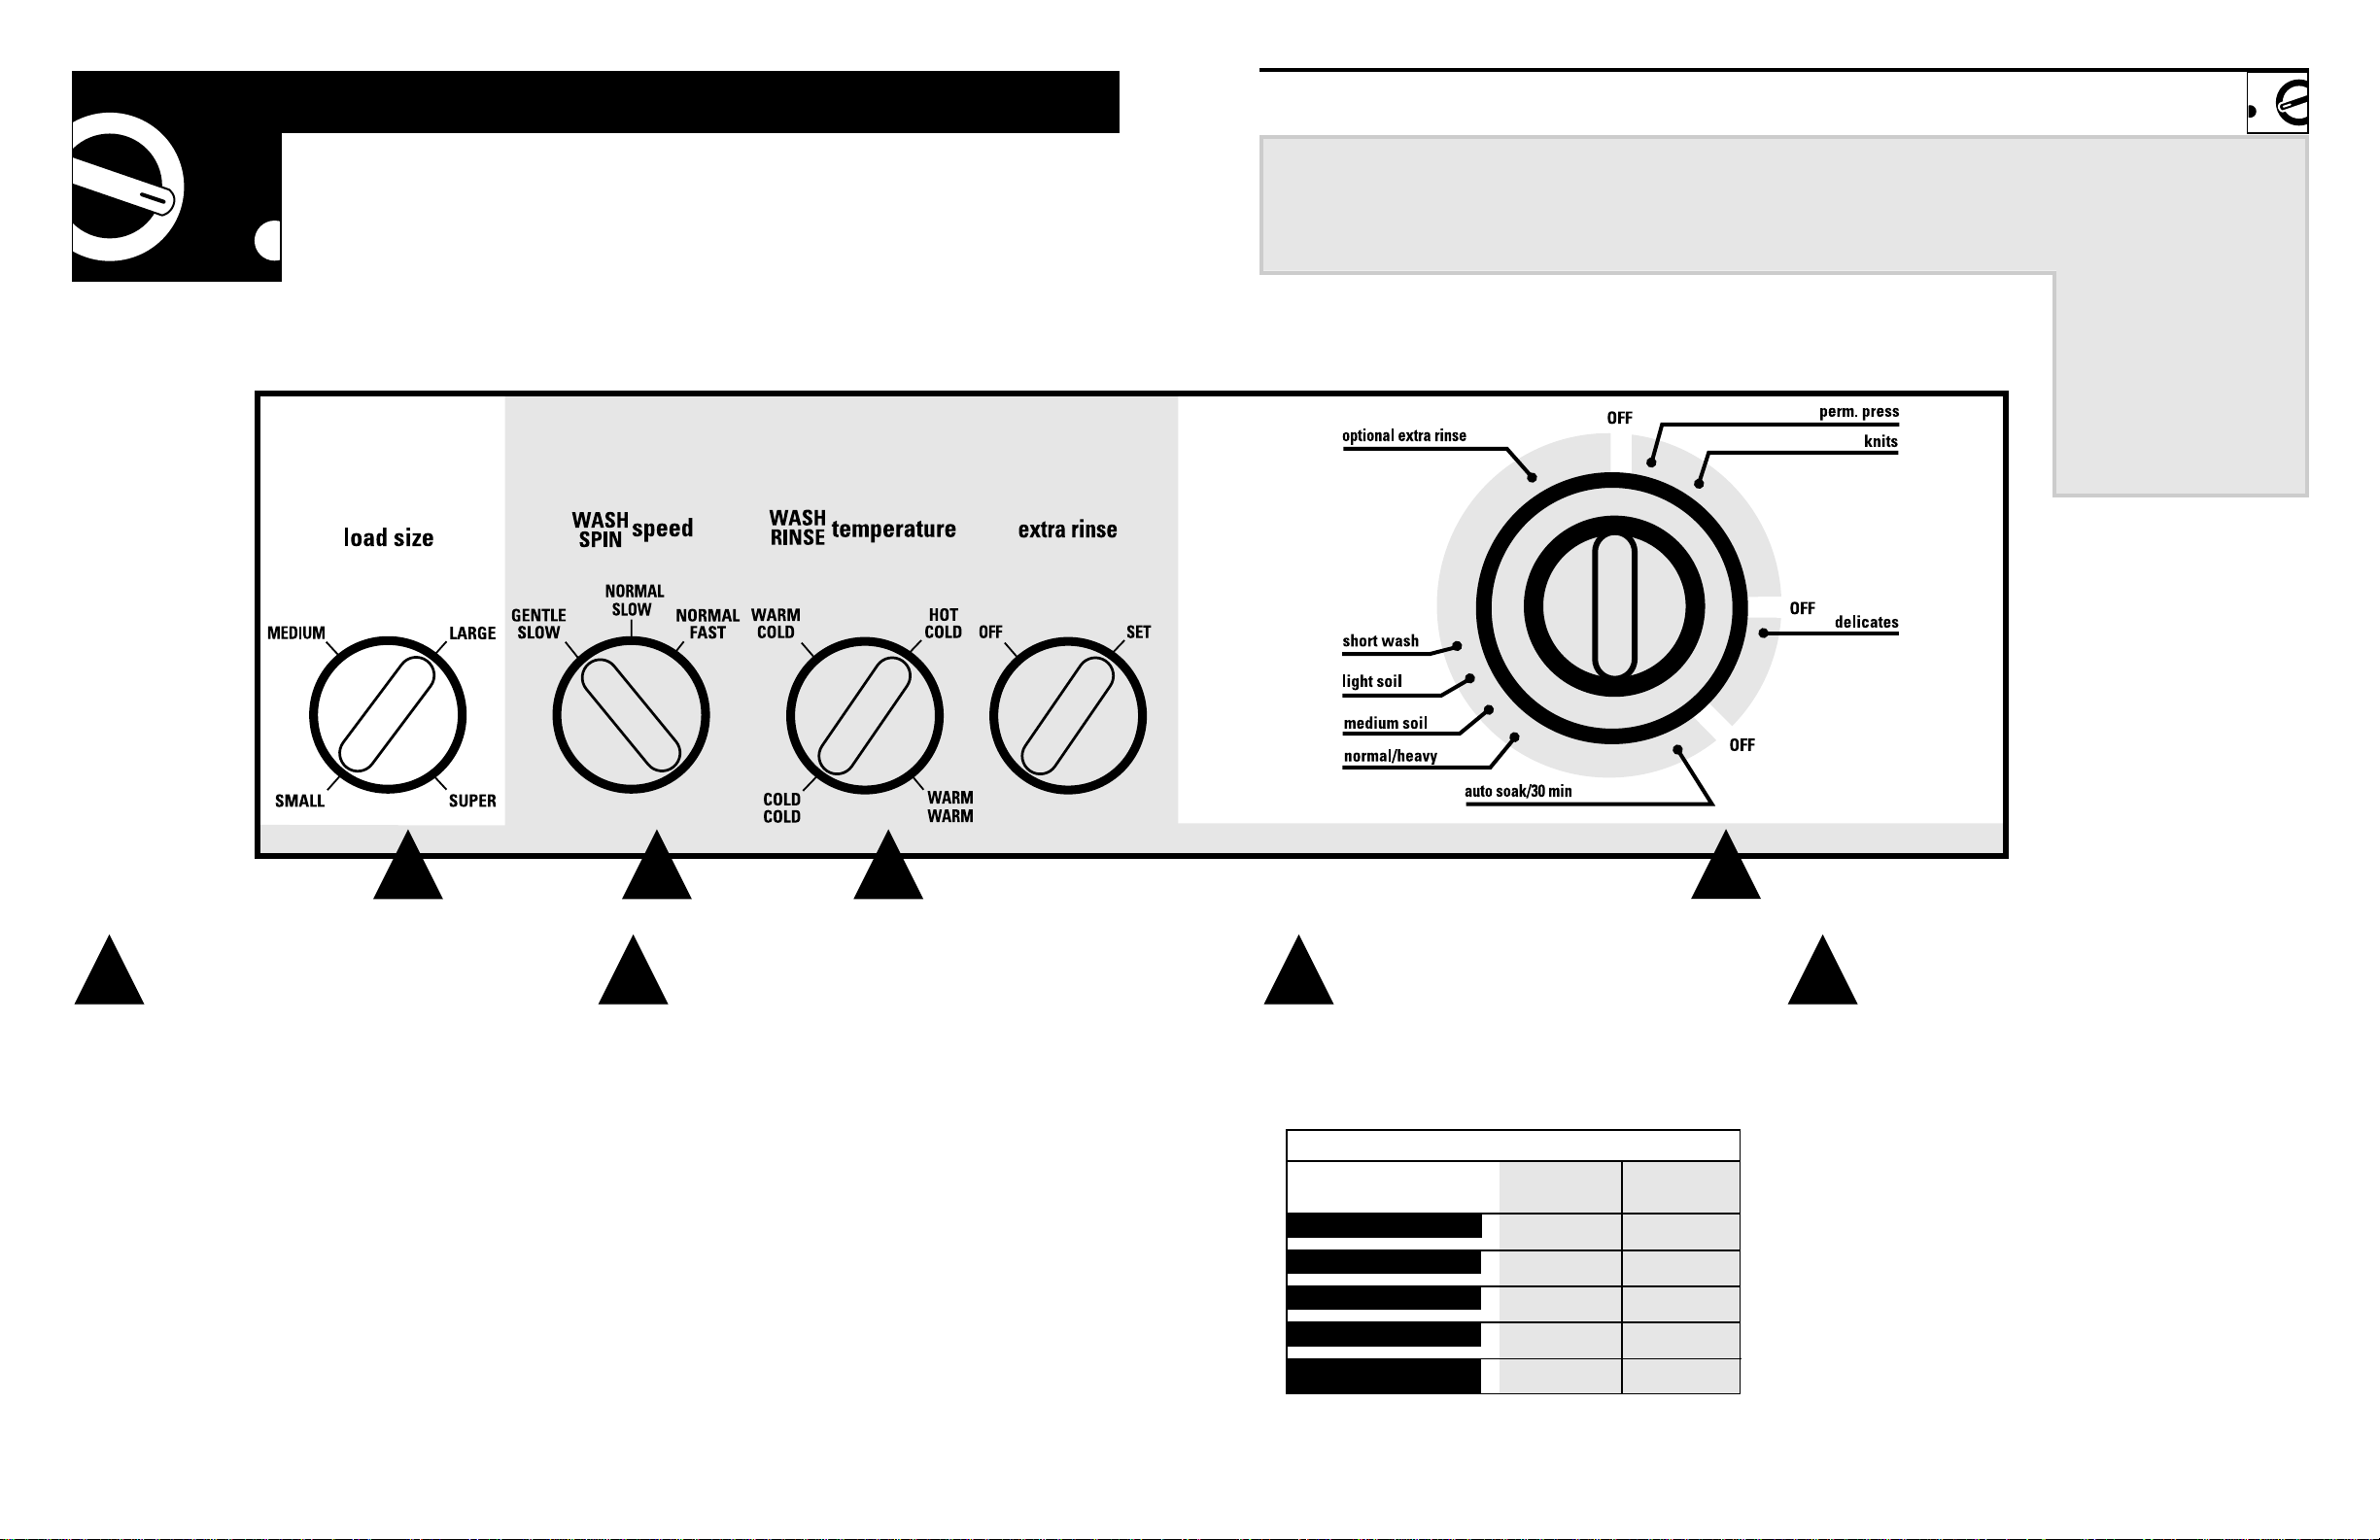
Operating Instructions
Cycle Descriptions
The
controls
on your
washer
REGULAR
For heavily to lightly
soiled cottons, linens,
work and play clothes.
PERM PRESS
For synthetics and
blends with normal soil.
KNITS
Specially designed for
normally soiled knits.
DELICATES
For lingerie and specialcare fabrics with light to
normal soil.
AUTO SOAK
For heavily soiled
clothes. Begins with a
brief agitation, soaks for
a specified period of
time, then moves
through the rest of the
cycle automatically.
1 2 3
Load Size Wash/Spin Speed
By selecting load size, you are setting the
water level. For the best results, select a size
appropriate for the load you are washing.
4
21
This refers to the speed of the agitator during
the wash and the basket during the spin.
With the Normal wash speed the agitator moves
faster. Use for cottons, denims and play clothes.
With the
slower. Use for delicate and knit items.
The Fast spin speed is for durable items.
The Slow spin speed is for delicate items like
sweaters and lingerie. Clothes will be less dry
than when using a fast spin speed.
Gentle wash speed the agitator moves
4
Wash/Rinse Temp
Always follow Fabric Manufacturer’s Care
Label or instructions when laundering. Use
this chart as a general guide.
Wash/Rinse Temperature Guide
wash
temperature
COTTONS WHITE
COTTONS COLORS
PERMANENT PRESS
DELICATES
WASHABLES WOOLENS
*Warm water is approximately 32°C. to 43°C. (90°F. to 110°F.) (hand comfortable).
For information on fabric care for specialty
items see the Specialty Care Guide.
hot
warm*
warm*
cold
warm*
rinse
temperature
cold
cold
cold
cold
warm*
43
Selecting Cycle/Starting Washer
• Push in the Cycle knob to select the desired
cycle. See the above Cycle Descriptions.
• Add detergent.
• Add clothes and close lid.
• Pull out the Cycle knob to start washer.
See next page for other washer features
5
Page 5
Operating Instructions
Other washer features your model may have
Extra Rinse
OFF
SET
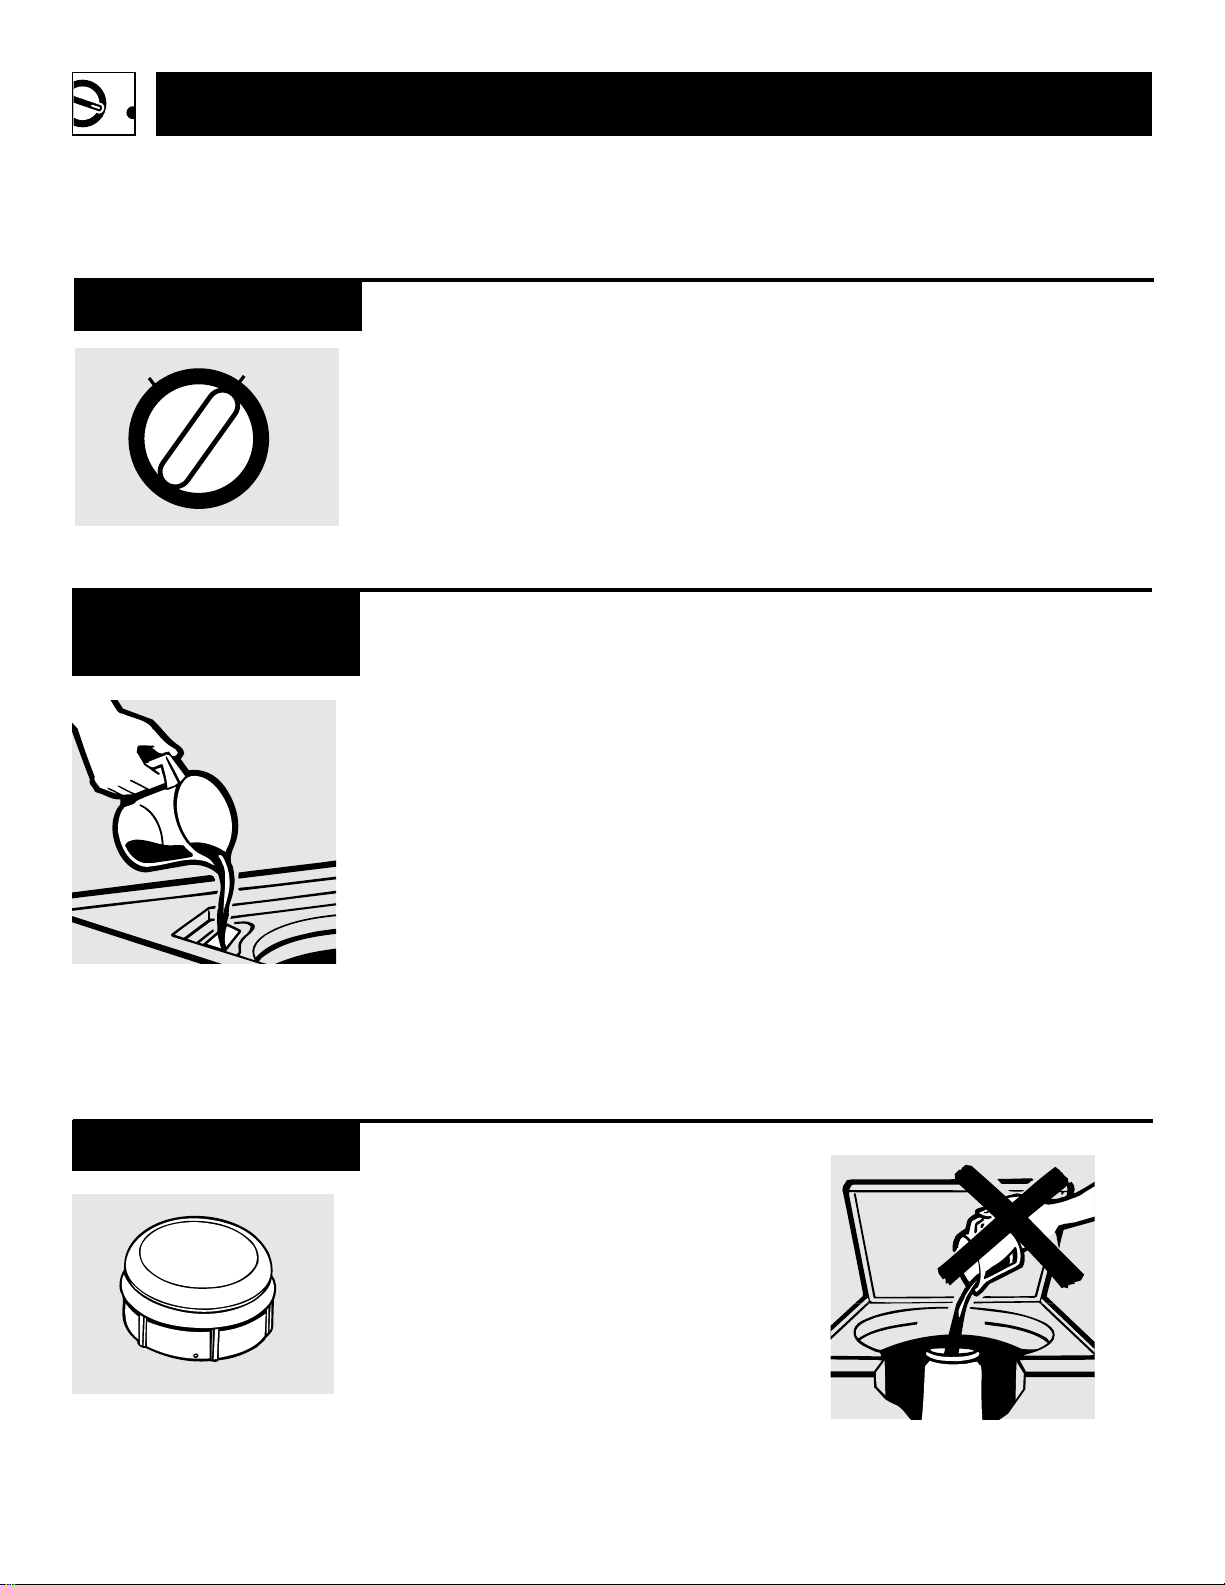
Liquid Bleach
Dispenser
Pour liquid bleach into bleach
dispenser
When you use extra detergent
or bleach to clean heavily soiled
clothes, you may want to use the
Extra Rinse option. This option
provides a second deep cold rinse
in the Cottons Regular cycle. Turn
the Extra Rinse knob to SET.
This dispenser dilutes liquid
chlorine bleach before it reaches
into your wash load. To use, follow
these steps:
1
Check clothing care labels for
special instructions.
2
Measure liquid bleach carefully,
following instructions on bottle.
3
Before starting the washer, pour
measured amount of bleach
directly into bleach dispenser.
Avoid
dispenser.
splashing or over-filling
The washer will pause for a few
minutes before the Extra Rinse
option begins.
NOTE:
•
Never pour undiluted liquid chlorine
bleach directly onto clothes or into
the wash basket.
•
Do not pour powdered bleach
into bleach dispenser. If you prefer
to use powdered bleach, pour it
into the wash basket with your
detergent.
Agitator Cap
6
This cap fits into the top of the agitator. If it accidentally comes off, simply put it back on.
Do not pour anything into the
agitator if the top is removed
Page 6

Fabric Softener
Dispenser
Pour liquid fabric softener
and water into fabric softener
dispenser
This dispenser automatically releases liquid fabric softener at the proper time during the cycle. To use,
follow these steps:
1
Make sure dispenser is securely
attached to agitator.
2
Pour liquid fabric softener
into dispenser, using amount
recommended on package.
3
Add water to dispenser until it
reaches the maximum fill line.
NOTE:
•
Do not stop the washer during
the first spin. This will cause
the dispenser to empty too soon.
•
Do not use the Fabric Softener
Dispenser with the Auto Soak.
•
Never pour fabric softener directly
on clothes. It will leave spots on
clothes.
•
Only use dispenser for liquid fabric
softeners. If dispenser gets clogged,
see Cleaning section below.
Cleaning Fabric
Softener Dispenser
Separate for cleaning
Lint Filter
1
Remove the dispenser from the
top of the agitator.
2
Separate the dispenser cup from
the cover by grasping the top and
pushing down on the inside of the
cup with your fingers. Dispenser
cup will pop free from the cover.
3
To clean dispenser, soak both the
dispenser cup and the dispenser
cover in a solution of warm water
and liquid detergent.
The lint filter is located under the
agitator. It is self-cleaning and
requires no maintenance.
Do not pour anything into the
agitator if the top is removed
4
If necessary, loosen build-up with
a clean, soft cloth after soaking.
Do not use a stiff brush; you may
roughen the surface of the dispenser.
5
Rinse and reassemble dispenser.
Place dispenser back on the
agitator.
7
Page 7

Operating Instructions
Preparing to Wash
Sort
Always follow Fabric Manufacturer’s
Care Label when laundering.
Sort by color
(Separate colorfast from
non-colorfast fabrics*)
• Whites
• Lights
• Darks
Separate by fabric type
• Cottons and linens
Permanent press cottons and
•
blends
• Synthetic and poly knits
• Delicates
Separate lint producers from
lint collectors
• Lint producers: terry cloth and
chenille
• Lint collectors: velveteen and
corduroy
Sort by soil
• Light
• Medium
• Heavy
* Non-colorfast fabrics may bleed or fade. Sort by
individual color.
Detergent
Always add detergent before
adding clothes so that the detergent can work effectively.
Using the correct amount of
detergent is one of the most
important things you can do to
make sure your wash comes out
clean. Always follow the detergent
package directions.
Using too little detergent is
a common cause of laundry
problems. Use more detergent if
you have hard water, large loads,
greasy or oily soils or lower water
temperature.
8
Page 8

Load
Load dry items loosely, spacing
evenly around agitator, and close
the lid.
A typical wash load: two twin sheets,
two tablecloths, four collared
shirts, three pillow cases, three
small bath
and three pairs of shorts
Place large items in bottom, small
items in the middle and medium
items on top.
towels, three t-shirts,
.
Wash bulky items like blankets
separately.
To add items after washer has
started, push in Cycle knob and
submerge additional items next to
the agitator. Close the lid and pull
Cycle knob out to restart.
To reduce wrinkling, give
permanent press items, synthetics
and poly knits room to move freely
in the washer.
When loading wet items make
sure you set the load/water level
high enough to allow the items to
move freely.
Care & Cleaning
The Washer
Leave the lid open after washing
to allow moisture to evaporate. The
wash basket is practically care free.
If you want to clean the washer use
a clean soft cloth dampened with
liquid detergent, then rinse. (Do
not use harsh or gritty cleaners.)
Fill Hoses—
washer to faucet should be replaced
every five years.
Hoses connecting
NOTE:
•
Do not wrap large items like sheets
around the agitator.
•
Do not wash fabrics containing
flammable materials (waxes, cleaning fluids, etc.) in your washer.
Moving and Storage—
technician to remove water from
drain pump and hoses. Contact
your local distributor for information on how to keep the tub stationary when moving the washer.
Long Vacations—
supply is shut off at taps. Drain all
water from hoses if weather will be
below freezing.
Ask the service
Be sure water
9
Page 9

Helpful Information
Specialty Care Guide
Always follow Fabric Manufacturer’s Care Label or instructions when laundering.
Otherwise use the information below as a general guide.
Item Suggested Care
Down-Filled Garments Always wash down-filled garments separately from other types
of garments. Wet down gives off an odor that will disappear when
the down is dried. Wash down items frequently to fluff up the
down and to retain down’s warmth. When washing make sure
the load is balanced. Add towels if necessary. Always tumble-dry
down garments.
Pillows Pillows are made from a variety of materials. Wash only if
recommended on the Pillow Manufacturer’s Care Label. Before
washing check pillows for weak seams or holes, and mend. Let
the washer fill with water and add detergent. Let the washer
agitate for several minutes and then add pillows in pairs. This
will keep the load balanced. Use the largest load/water level
available.
Blankets Let the washer fill with water, add detergent, allow detergent to
dissolve, then add blanket. Wash only one blanket at a time.
Permanent Press Clothes Select a larger load/water level than normal. This will provide
that are Line Dried more water to help reduce wrinkling and to allow clothes enough
room to move around. Remove clothes as soon as the wash cycle is
complete and hang them up immediately.
10
Page 10

If Something Goes Wrong
Problem Possible Causes What to Do
Washer Won’t Operate
Water Temperature
is Incorrect
Washer is unplugged • Make sure cord is plugged securely into a
working outlet.
Water supply is turned off • Turn both hot and cold taps fully on.
Controls are not set properly • Check controls and make sure Cycle knob
is pulled out to ON position.
Lid is open • Close lid and pull Cycle knob out to ON
position.
Circuit breaker/fuse is • Check house circuit breakers/fuses. Replace
tripped/blown fuses or reset breaker. Washer should have
separate outlet.
Control is not set properly • Check water temperature control and adjust.
Water supply is turned off • Turn both hot and cold taps fully on and
or improperly connected make sure hoses are connected to correct
taps.
Water valve screens are • Turn off the water source and remove the
stopped up
water connection hoses from the upper back
of the washer. Use a brush or toothpick to
clean the screens in the machine. Reconnect
the hoses and turn the water source back on.
Water Won’t Drain
House water heater is not set • Make sure house water heater is delivering
properly water at 48°C.–65°C. (120°F.–150°F.).
Drain hose is kinked or • Straighten drain hose and make sure
improperly connected washer is not sitting on it.
• Top of drain outlet should be less than
1m (3 ft.) above floor.
11
Page 11

If Something Goes Wrong
Problem Possible Causes What to Do
Water Leaks
Washer is Noisy
Fill hoses or drain hose is • Make sure hose connections are tight at taps
improperly connected and make sure end of drain hose is correctly
inserted in and secured to drain facility.
Household drain may
be clogged to call a plumber.
Constant water pressure to the • Tighten hoses at the taps and turn the water
fill hoses at the water source off after each use.
Washer is uneven • Make sure washer is level and firm
Washer load is unbalanced • Push the Cycle knob in to stop the
Shipping rod has not been • Remove the shipping rod on the bottom
removed right side of the washer just before sliding
•
Check household plumbing. You may need
•
Check condition of the fill hoses; they may
need replacement after 5 years.
to the floor.
washer, open the lid and redistribute
the load evenly. Close the lid and restart.
the washer in place. Do not use the washer
with the shipping rod in place.
Washer Pauses
in Cycle
Clothes too Wet
12
Water is draining • There will be a gurgling “sucking” sound
prior to the spin cycle. This is normal and
will stop as soon as the machine goes into
the spin cycle.
The washer normally pauses
between washing steps
Incorrect cycle • Make sure the cycle selected matches the
selected load you are washing.
This is normal for some fabrics
Page 12

Problem Possible Causes What to Do
Lint or Residue
on Clothes
Wrinkling
Incorrect sorting • Separate lint producers from
lint collectors.
Washing too long • Wash small loads for a shorter time than
larger loads.
Detergent not dissolving •
Overloading • Make sure load/water level setting matches
Too much bleach • Check bleach package for correct amount.
Not enough detergent • Try using more detergent.
Incorrect use of fabric softener • Check fabric softener package for
Improper loads • Avoid mixing heavy items (like work
For best performance always add detergent
before adding clothes. If you use powdered
detergent, pre-dissolve
before adding to washer.
• Try a liquid detergent.
• Use warmer water temperature.
load size.
instructions (see Fabric Softener
Dispenser section).
clothes) with light items (like blouses).
detergent in hot water
• Separate permanent press from
other laundry.
• Try a fabric softener.
Overloading or incorrect • Load your washer so clothes have enough
water level room to move freely.
Incorrect wash and dry cycles • Match Cycle selection to the type of fabric
you are washing (especially for permanent
press loads).
Repeated washing in water • Wash in warm or cold water with plenty
that is too hot of detergent.
13
Page 13

If Something Goes Wrong
Problem Possible Causes What to Do
Snags, Holes, Tears,
Rips, or Excessive
Wear
Pins, snaps, hooks, sharp • Fasten snaps, hooks, buttons, and zippers.
buttons, belt buckles,
zippers, and sharp objects
left in pockets
Undiluted chlorine bleach • Check bleach package instructions for
Small tears or holes • Repair tears and holes before washing.
present before wash
Chemicals like hair bleach, • Rinse items that may have chemicals
hair dye, permanent wave on them before washing.
solution and toilet bowl cleaners
Permanent press items • While this is not caused by the washer,
naturally fray (especially you can slow the fraying process by
collars and cuffs) washing small permanent press loads with
• Remove loose items like pins, objects in
pockets and sharp buttons.
• Turn knits (which snag easily) inside out.
proper amount.
• Never add undiluted bleach to wash or
allow clothes to come in contact with
undiluted bleach.
a higher load/water level setting.
• Avoid washing heavy items (like towels)
with permanent press items.
Shrinkage
14
Some fabrics will naturally • Hot water is more likely to cause shrinkage
shrink in the wash than cold water.
• Follow directions on fabric care label.
Page 14

Problem Possible Causes What to Do
Grayed Clothes
Not enough detergent • Try using more detergent (especially with
(larger loads, heavy soil, larger loads).
and hard water might
require more detergent)
Water is not hot enough • Make sure water heater is delivering water
Washer is overloaded • Make sure load/water level setting matches
Soak time is too short • Soak at least 30 minutes.
Soaking with too little detergent • Use more detergent (especially with
Detergent is not dissolving • Add detergent as wash basket fills with
To restore grayed clothes, • Put clothes through a wash cycle using hot
try one of the following water. (Check the garment’s manufacturing
• If you live in a hard water area try using
a water conditioner or install a water
softener.
at 48°C.–65°C. (120°F.–150°F.).
• Do not use the washer when hot water is
used for other needs (dishes, baths, etc.).
load size.
heavy soil).
water before you load clothes.
care label to see if hot water can be used.)
Add a non-precipitating water softener. Use
2 1⁄2 times more than is recommended
for normal water softening. Do not use
detergent or soap. Allow clothes to go
through a complete cycle. Repeat if
necessary.
• Soak your clothes using a water softener
instead of a soaking agent. Allow clothes
to soak for about 20 minutes.
15
Page 15

If Something Goes Wrong
Problem Possible Causes What to Do
Yellowed Clothes
Blue or Gray Spots
Not enough detergent • Always use recommended amount of
on a consistent basis detergent.
Chlorine bleach may yellow • Use non-chlorine bleach.
some fabrics
Iron or manganese in water may •
cause yellowing or yellow spots water softener dissolved in water and
Incorrect use of fabric softener • Check fabric softener package
Use extra detergent plus a non-precipitating
non-chlorine bleach.
• Run hot water for 2 minutes to help the
pipes clean out iron buildup.
• Drain your house water heater occasionally.
• To remove spots spread stain area over a pan
of boiling water and squeeze lemon juice
through the stain.
for instructions (see Fabric Softener
Dispenser section).
• To remove spots dampen the spots
and rub with undiluted liquid detergent.
Rewash, using chlorine bleach if it is safe
for the fabric.
Too Many Suds
Pilling
16
Type of detergent • Switch to a lower sudsing detergent brand
and follow instructions on package.
Very soft water • Try less detergent.
Result of normal wear on • While this is not caused by the washer,
poly-cotton blends you can slow the pilling process by washing
poly-cotton blends inside out.
 Loading...