


GE PSB9100SF4SS, PSB9100SF5SS Installation Guide

Installation
Instructions
Advantium® 120V Built-In
SpeedCook
& Convection 120V Built-In
Ovens
PSB9100DF
PSB9100SF
PWB7027EL
PWB7027SL
49-40775
MFL59060921
10-16 GEA
Español
For a Spanish version of this manual, visit
our Website at GEAppliances.com.
Para consultar una version en español de
este manual de instrucciones, visite nuestro
sitio de internet GEAppliances.com.
GE is a trademark of the General Electric Company. Manufactured under trademark license.
Safety Information
BEFORE YOU BEGIN
Read these instructions completely and
carefully.
IMPORTANT — Save these
instructions for local inspector’s use.
IMPORTANT — Observe all governing
codes and ordinances.
• Note to Installer — Be sure to leave these
instructions with the Consumer.
• Note to Consumer — Keep these
instructions with your Owner’s Manual for
future reference.
• Skill Level — Installation of this appliance
requires basic mechanical and electrical skills.
• Completion Time — 1 Hour.
• Proper installation is the responsibility of the
installer.
• Product failure due to improper installation is
not covered under the warranty. See Owner’s
Manual for warranty information.
IMPORTANT — Use this oven only
for its intended purpose. Never use the oven
for warming or heating a room. Prolonged use
of the oven without proper ventilation can be
hazardous.
CAUTION
For personal safety, remove house fuse or
oven circuit breaker before beginning
installation to avoid severe or fatal shock injury.
CONTENTS
Design Information
Models Available .............................................. 2
Product Dimensions and Clearances ............... 4
Tools Required ................................................ 4
Parts Supplied ................................................. 4
Advance Planning ........................................... 4
Installation Preparation
Electrical Requirements ...................................4
Prepare the Opening .....................................5,6
Remove the Packaging .................................... 6
Installation Instructions
Step 1, Slide the Oven into the Cutout ............ 7
Step 2, Install Bottom Trim ................................7
Step 3, Install Mounting Screws ....................... 7
Step 4, Finalize Installation .............................. 7
MODELS AVAILABLE
Profile Models:
PSB9100DFWW – White
PSB9100DFBB – Black
PSB9100SFSS – Stainless Steel
PWB7027EL – Slate*
PWB7027SL – Stainless Steel*
* Convection model
CAUTION
For personal safety, the mounting surface must
be capable of supporting the cabinet load, in
addition to the added weight of the 80-pound
oven and 30-pound drawer, plus additional
oven loads of up to 50 pounds or a total weight
of up to 160 pounds.
CAUTION
For personal safety this product cannot be
installed in cabinet arrangements such as an
island, a peninsula or below a countertop.
2
Design Information
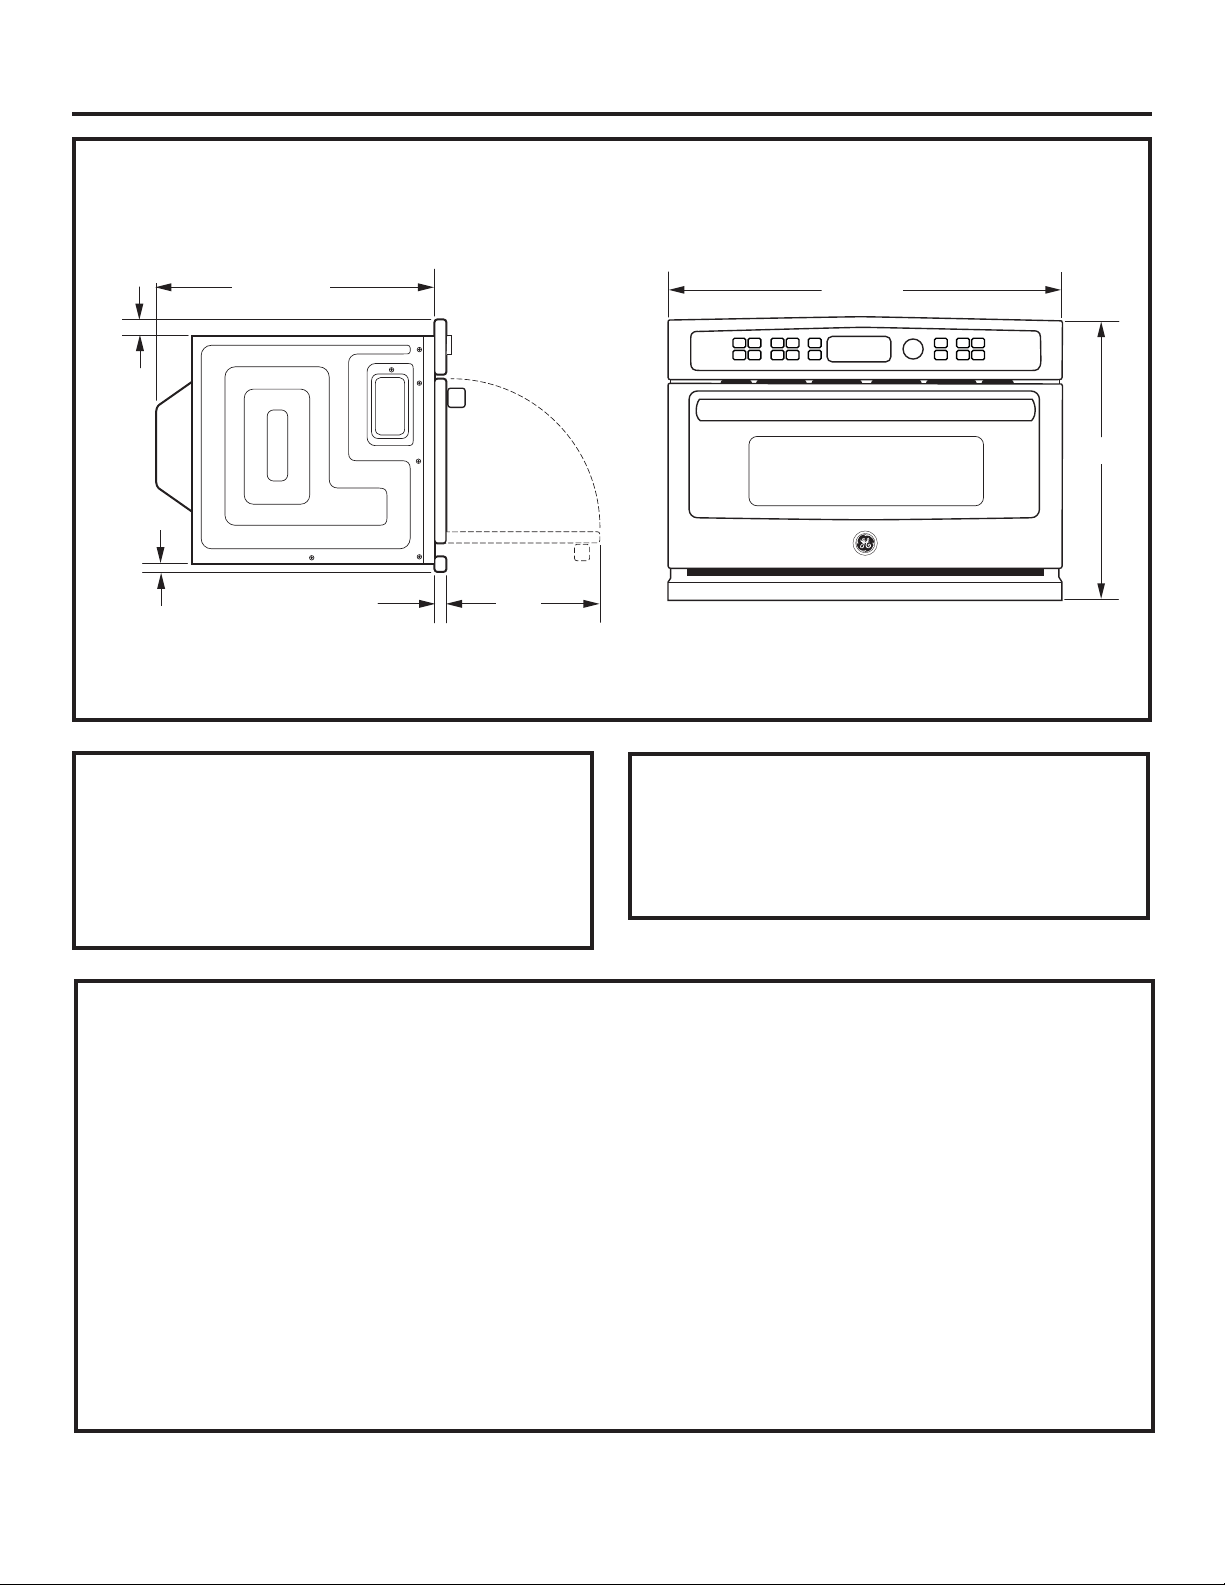
PRODUCT DIMENSIONS AND CLEARANCES
1-3/10”
1”
21-1/2”
TOOLS REQUIRED
• #2, Phillips screwdriver
• Handheld drill
• High-speed drill bit, 1/8” diameter
• 3/8”, slot-head screwdriver
26-3/4”
18-5/8”
13”
1-4/5”
NOTE: Appearance may vary slightly by model.
PARTS SUPPLIED
• 6 Brass screws (3 required, 3 extra)
• 5 Color-matched screws (4 required, 1 extra)
• Bottom trim
ADVANCE PLANNING
• These ovens may be installed directly into a 27”wide oven cabinet.
• The front surface of the oven will be nearly flush
with surrounding cabinetry doors.
• This oven can be installed over any GE
Appliances single electric built-in oven or a
warming drawer or both.
IMPORTANT: This oven is not approved for use
above another built-in SpeedCook oven, a side-byside installation or below a countertop.
• For personal safety, this oven cannot be installed
in a cabinet arrangement such as an island or
peninsula.
• The oven must be installed at least 36-3/4” above
the floor.
• Allow for clearance to adjacent corners, walls,
drawers, etc.
• Cabinets installed adjacent to wall ovens
must have an adhesion spec of at least 194ºF
temperature rating.
The oven must be securely installed in a cabinet
that is firmly attached to the house structure.
Weight on the oven door could cause the oven to
tip and result in injury. Never allow anyone to climb,
sit, stand or hang on the oven door.
3
Installation Preparation
ELECTRICAL REQUIREMENTS
Single Advantium/Convection 120
Installation:
This product requires a 120-volt, 60 Hz, 15-amp
circuit and draws 1.8 kilowatts. This product must
be connected to a supply circuit of the proper
voltage and frequency.
• Wire size must conform to the requirements of
the National Electrical Code or the prevailing local
code for this kilowatt rating.
• The power supply cord and plug should be
brought to a separate 15- or 20-ampere branch
circuit single grounded receptacle. The outlet box
should be located within reach of the 48” power
cord.
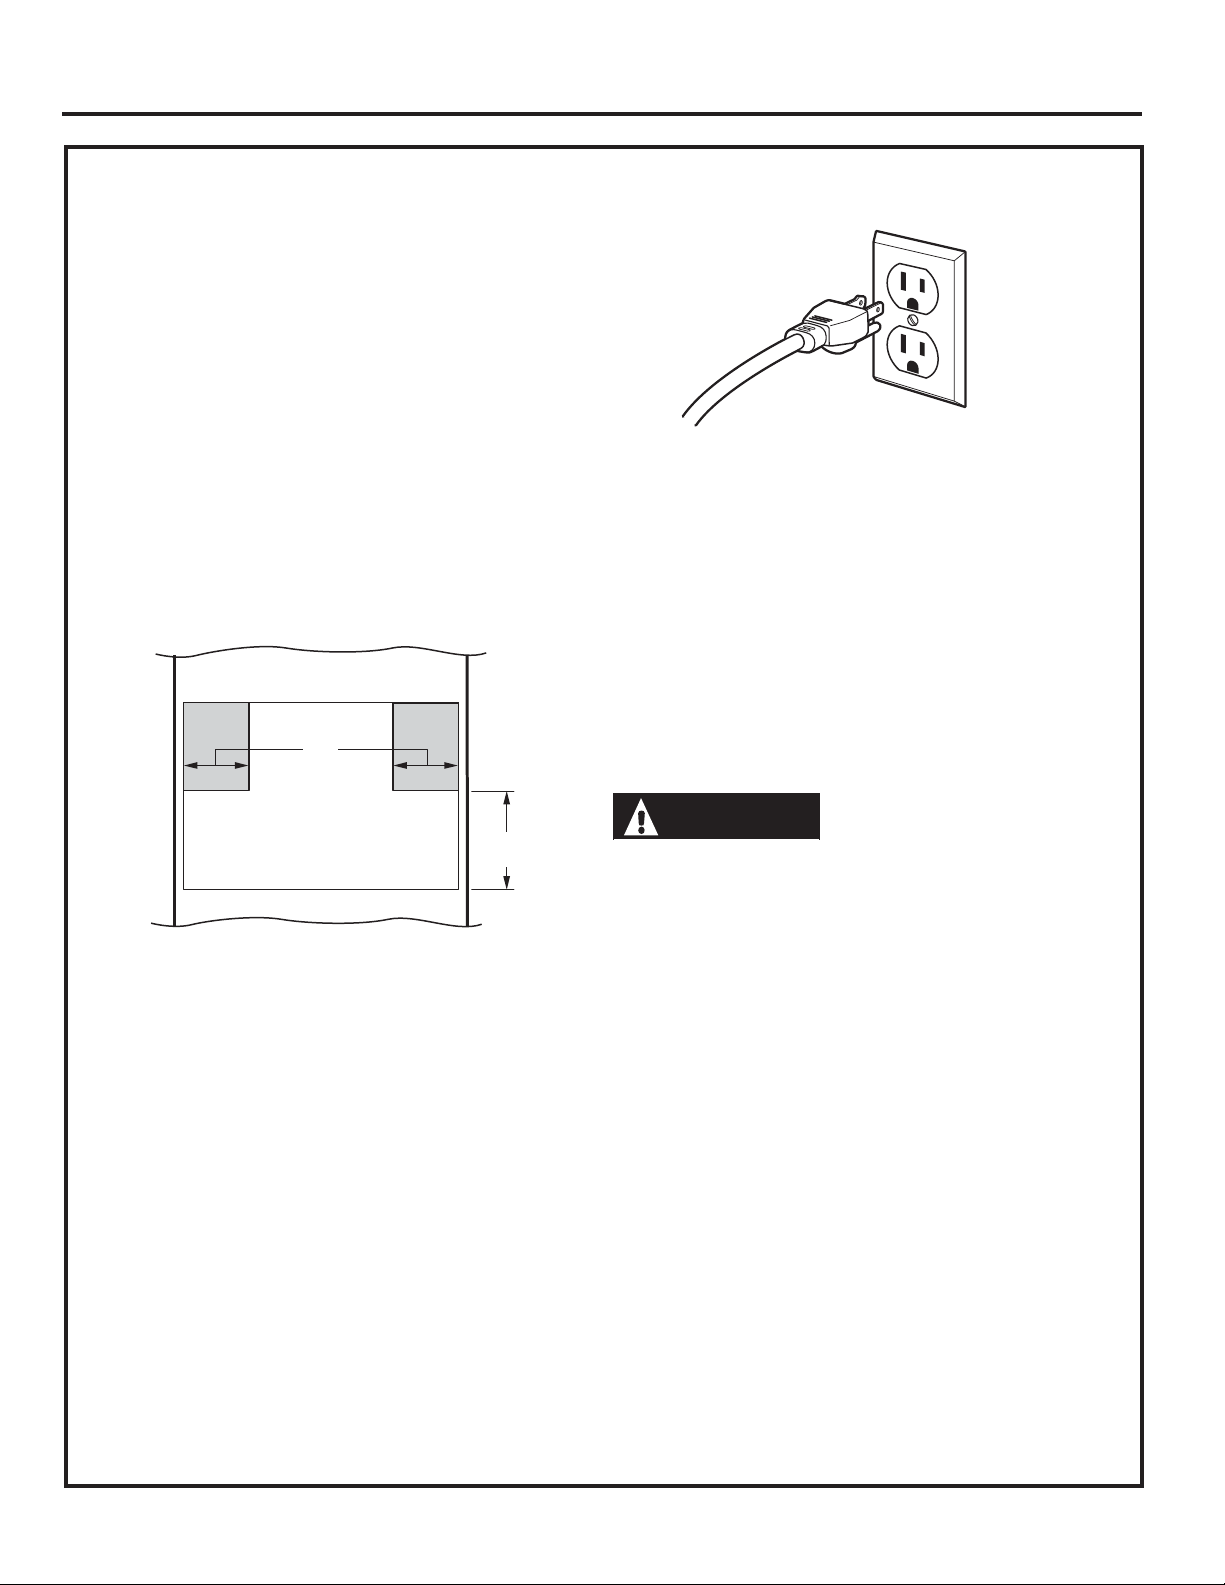
ELECTRICAL LOCATION
6”
GROUNDING
INSTRUCTIONS
This appliance must be grounded. In the event of
an electrical short circuit, grounding reduces the
risk of electric shock by providing an escape wire
for electric current. This appliance is equipped
with a cord having a grounding wire with a
grounding plug. The plug must be plugged into
an outlet that is properly installed and grounded.
9”
Locate outlet box in the shaded area
Install a recessed electrical outlet in the back
wall of the opening within 6” of either side and
at least 9” above the cutout floor.
WARNING
Improper use of the
grounding plug can result in a risk of
electric shock.
Important: (Please read carefully).
The power cord of this appliance is equipped with
a three-prong (grounding) plug that mates with a
standard three-prong grounding wall receptacle
to minimize the possibility of electric shock.
Consult a qualified electrician or serviceman if
the grounding instructions are not completely
understood, or if doubt exists as to whether the
appliance is properly grounded.
• Where a standard two-prong wall receptacle is
encountered, it is the personal responsibility and
obligation of the consumer to have it replaced with
a properly grounded three-prong wall receptacle.
Do not, under any circumstances, cut or remove
the third (ground) prong from the power cord.
DO NOT USE AN EXTENSION CORD. If the
power supply cord is too short, have a qualified
electrician or serviceman install an outlet near the
appliance.
4
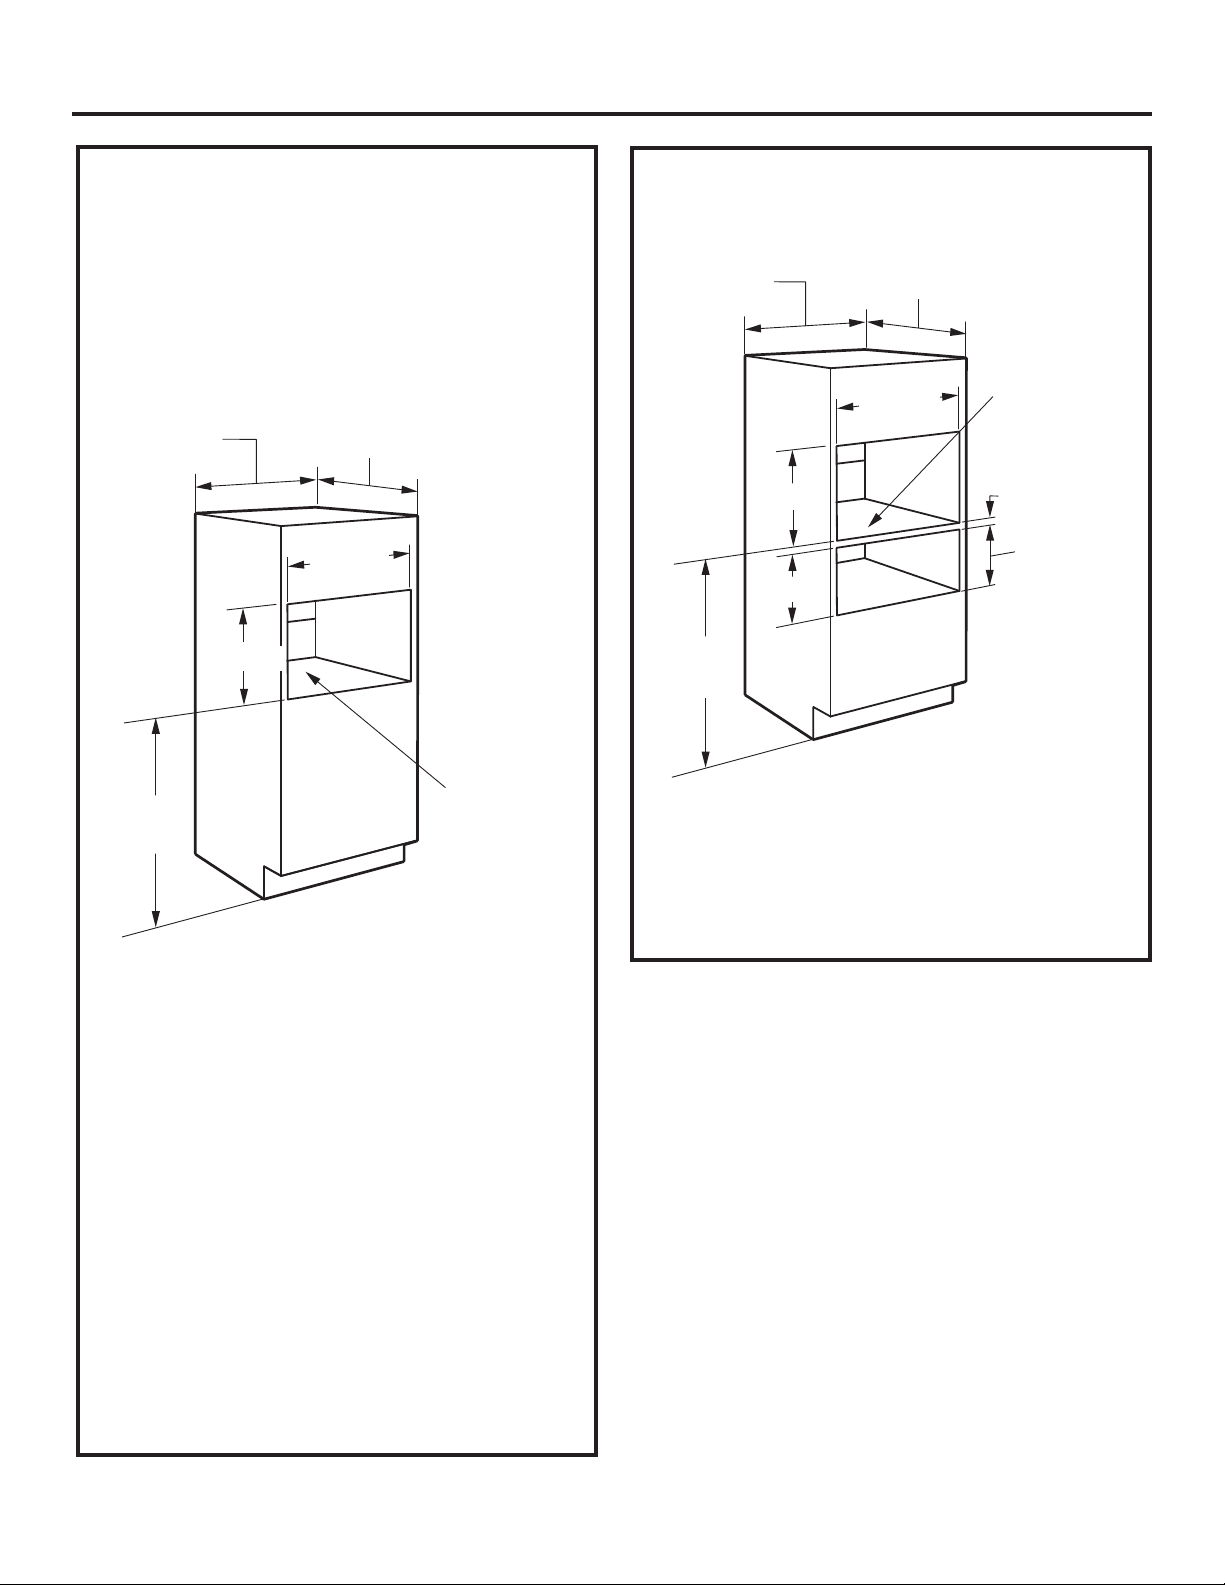
Installation Preparation
PREPARE THE OPENING
The Advantium/Convection 120 can be installed
in combination with other GE appliances. Always
follow each product’s Installation Instructions to
complete the installation.
Single Advantium/Convection 120
Installation:
Order a 27”-wide single oven cabinet or cut the
opening in a wall to the dimensions shown.
27”
17-1/2”
36-3/4”
Min.
• Always maintain 36-3/4” minimum height from
the floor to the cutout in any single or combined
installation.
• Allow 1-1/4” case trim overlap at the top and
7/8” overlap on the bottom and each side of the
opening.
• Oven overlaps will conceal cut edges on all
sides of the opening.
23-1/2”
25-1/8”
Construct
Base
Min. 3/8”
Plywood
Supported
by 2 x 4
or 1 x 2
Runners all
Four Sides
PREPARE THE OPENING (CONT.)
Installation over a GE Appliances Warming
Drawer:
27”
17-1/2”
9-1/4”
36-3/4”
Min.
NOTE: Additional clearances between the cutouts
may be required. Check to be sure the oven
supports above the Warming Drawer location do
not obstruct the required interior depth and height.
See Warming Drawer installation instructions for
details.
23-1/2”
25-1/8”
Construct
Solid Bottom
Min. 3/8”
Plywood
Supported
by 2 x 4 or
1 x 2
Runners
all Four Sides
2” Min.
Install 2 x 4 or
2 x 2
Runners or
Solid Bottom.
Must Support
100 lbs.
When installed over a single oven or a warming
drawer, allow at least 2” between the two
openings. This separation will provide clearance
for bottom overlap of the Advantium/Convection
120 and the other appliance overlaps.
Construct a solid oven floor of 3/8” min. thick
plywood supported by 2 x 4 runners on all sides.
• The support must be level and rigidly mounted,
flush with the bottom edge of the cutout.
5