

Page 1

•
GEAppliances.
CA
Safety
Operating
Control Settings
Storage
Ice
Care
Installation Instructions
Advanced
Refrigerator
Troubleshooting
Normal Operating
Problem
Consumer
Warranty
Consumer
Instructions ..............
Instructions
.......................
Drawers
Service
and
Solver
.......................
..............................
Cleaning
Planning.
(U.S.)
Support
..................
. . . . . . . . . . . . . . . . . . 8
Features
Support
..................
Tips
Sounds
...................
......................
..................
...........
2.
6,
10
11 12
'
15
16
3
4
s
6
7
9
Owner's
Installation
Manual
MTS18GT
MTS18GS
and
Instructions
•
L.
'+-
QJ
0::::
Write the model and serial
numbers here:
Model#
Serial#
You
the refrigerator.
______
-------
can find them on a label inside
_
350A4502P753 29-5942-03-14
Page 2
IMPORTANT
SAFETV
INFORMATION.
READ
A
Use
SAFETY
When
•
This
accordance
•
Do
in
seriously
•
Do
particularly
these
•
Do
liquids
•
In
with
heating
or
refrigerator
ALL
INSTRUCTIONS
WARNING!
this
appliance
using
refrigerator
not
allow
the
refrigerator.
injure
not
touch
extremely
not
store
in
the
refrigerators
the
moving
element
hands
on
only
PRECAUTIONS
electrical
must
with
the
children
They
themselves.
the
cold
when
hands
cold
or
use
vicinity
with automatic
parts
that
the
automatic
is
plugged
for
its
appliances,
be
properly
Installation
to
climb,
could
surfaces
are
damp
surfaces.
gasoline
of
this
of
the
releases
in.
or
or
ejector
ice
intended
basic
installed
Instructions
stand
or
damage
in
the
freezer
or
other
flammable
any
other
ice
makers,
mechanism.
the
cubes.
making
purpose
safety
and
before
hang
on
the
refrigerator
compartment,
wet.
Skin
appliance.
avoid
Do
not
mechanism
BEFORE
as
described
precautions
located
it
the
shelves
may
stick
vapors
contact
or
with
place
while
in
is
used.
and
to
and
the
fingers
the
should
USING.
in
this
Owner's
be
followed,
•
Keep
fingers
between
necessarily
in
the
area.
•
Unplug
the
NOTE:
We
performed
•
Turning
the
power
to
•
Do
not
refreeze
•
Before
replacing a burned-out
should
be
wire
filament.
replaced.)
Manual.
including
out of
the
the
doors
and
small.
Be
refrigerator
strongly
the
unplugged
recommend
by a qualified
control
to
light
circuit.
frozen
(A
burned-out light
the
"pinch
between
careful
before
individual.
the
COLD
foods
in
order
following:
point"
areas;
the
doors
closing
doors
cleaning
that
any
position
which
have
light
bulb,
to
avoid
bulb
clearances
and
cabinet
when
children
and
making
servicing
does
thawed
contact with a
may
be
not
completely.
the
refrigerator
break
when
are
are
repairs.
remove
live
being
A
DANGER!
PROPER
Child
entrapment
Junked
or
they
will
refrigerator,
accidents.
Before
DISPOSAL
and
abandoned
sit
for
'Just a few
please
You
Throw
Freezer:
•
Take
off
the
doors.
•
Leave
the
shelves
climb
inside.
USE
Because
OF
EXTENSION
of
potential
cord.
However,
extension
volts.
if
you
cord
must
having
2
RISK
suffocation
refrigerators
days."
follow
the
instructions
Away
Your
in
place
so
safety
hazards
use
an
extension
a grounding-type
OF
are
not
are
still
If
you
are
Old
that
children
CORDS
under
cord,
OF
THE
problems
dangerous
getting
below
CHILD
REFRIGERATOR
of
the
...
rid
of your
to
help
Refrigerator
may
not
easily
certain
conditions,
it
is
absolutely
plug
and
outlet
past.
even
old
prevent
or
necessary
and
Refrigerants
if
All
removed
old
disposal
we
that
the
ENTRAPMENT
refrigeration
refrigeration
strongly
that it
electrical
products
prior
to product
product,
about what
to
recommend
be a UL-listed,
rating
of
the
contain
disposal.
check
do.
against
3-wire,
cord
be
refrigerants.
If
you
with
the
the
grounding-type
15
amperes
are
company
use
of
which
must
getting
rid
handling
an
extension
appliance
(minimum)
of
and
be
an
the
120
Page 3
A
WARNING!
GEAppliances.
cA
HOW
Do
For
The
(grounding)
(grounding)
shock
Have
electrician
Where a standard
personal
properly
The
electrical
rating
READ
TO
not,
under
personal
power
cord
plug
wall
hazard
the
wall
to
responsibility
grounded
refrigerator
outlet
plate.
AND
any
safety,
of
outlet
from
outlet
make
should
which
CONNECT
circumstances,
this
appliance
this
which
this
and
sure
2-prong
3-prong
has a voltage
appliance
mates
to
appliance.
circuit
the
and
always
with a
minimize
checked
outlet
wall
outlet
obligation
wall
outlet
be
is
equipped
the
is
plugged
FOLLOW
ELECTRICITY
cut
or
remove
must
be
standard
possibility
by a qualified
properly
is
encountered,
to
have
into
rating
that
THIS
the
third
properly
with a 3-prong
3-prong
grounded.
it
replaced
its
matches
SAFETY
of
electric
own
grounded.
it
is
your
with
individual
the
INFORMA T/ON
(ground)
a
prong
This
provides
overloading
hazard
from
Never
unplug
Always
grip
Repair
or
replace
become
shows
end.
When
not to
frayed
cracks
moving
roll
over
from
the
power
cord.
the
best
performance
house
wiring
circuits
overheated
your
plug
or
or
the
or
wires.
refrigerator
firmly
and
immediately
otherwise
abrasion
damage
refrigerator
damage
pull
damaged.
the
CAREFULLY.
and
which
by
pulling
straight out
all
power
along
away
from
power
cord.
also
could
on
cords
Do
not
its
the
prevents
cause a fire
the
power
from
the
that
have
use a cord
length
or
wall,
be
cord.
outlet.
at
either
careful
that
SAVE
THESE
INSTRUCTIONS
3
Page 4
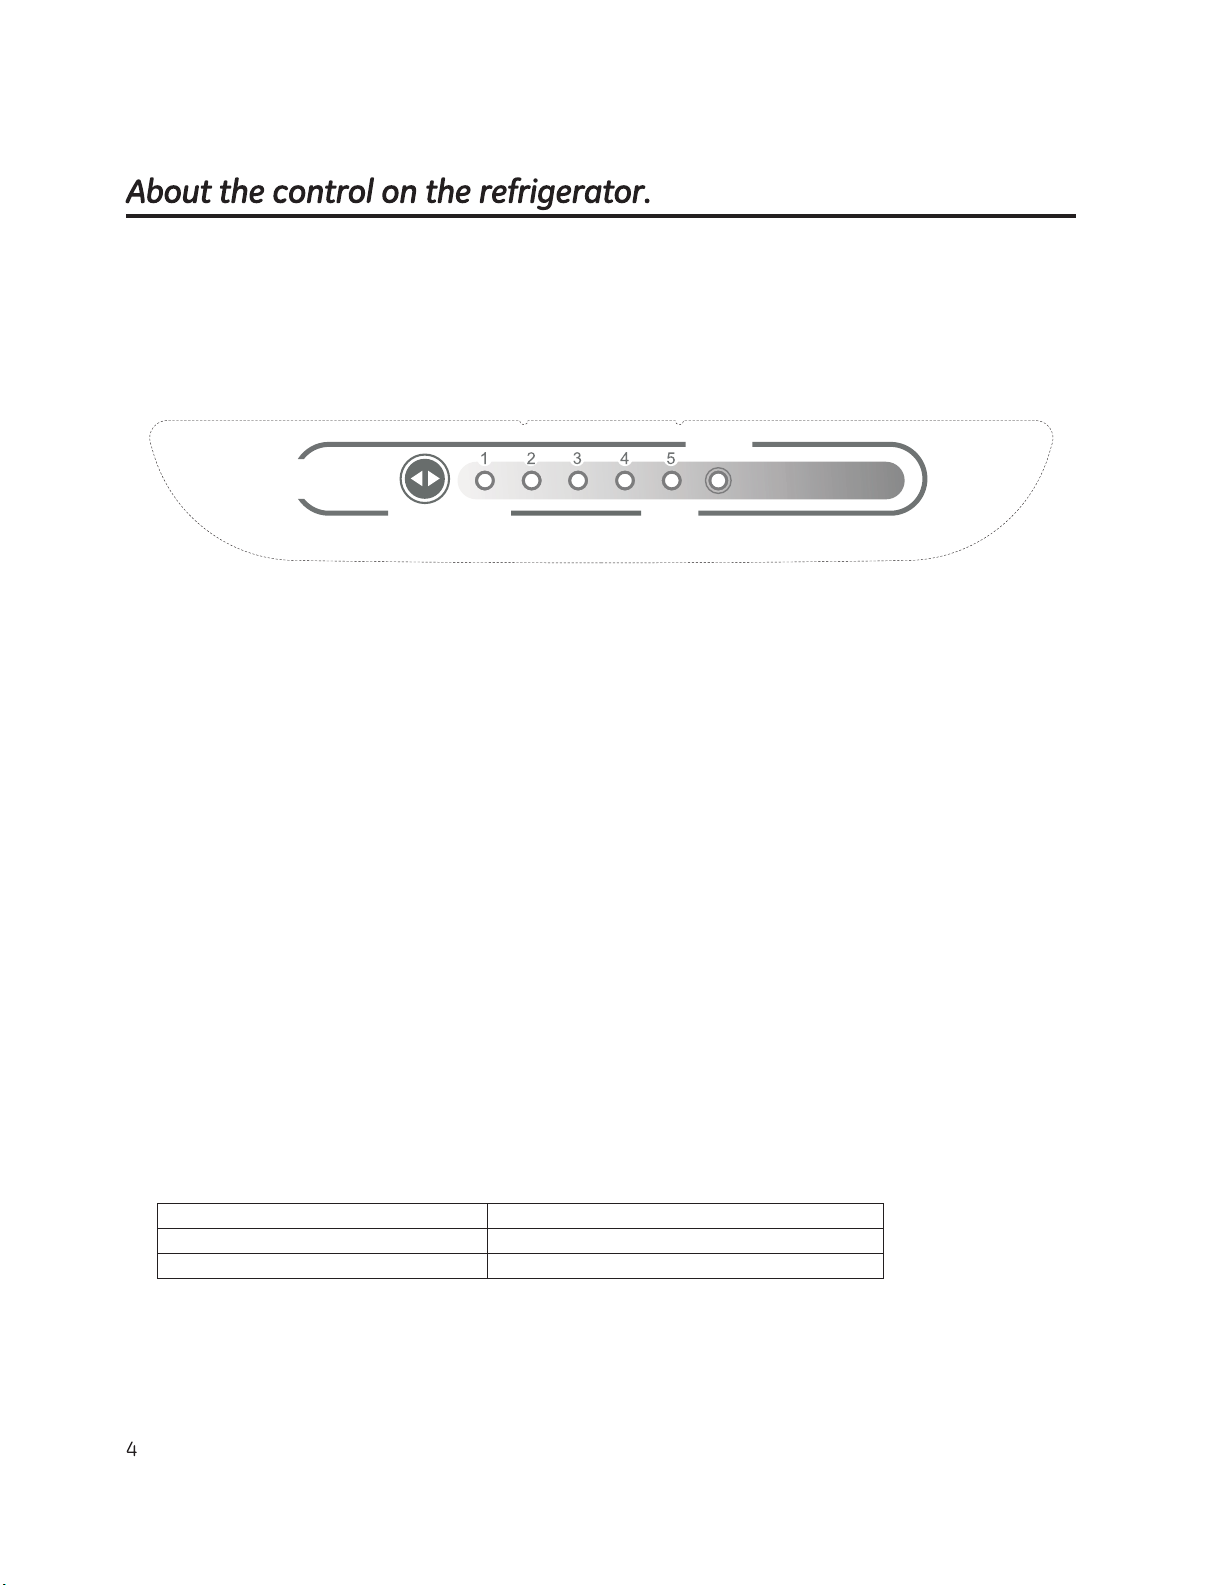
The controls are shown below:
Refrigerator Control
When first powered all lights are illuminated for 3 seconds .The factory setting 3 is displayed after 3
seconds.
Change setting by pressing SET key, each time you press it will advance by 1. Press until the desired
setting is achieved. Adjust controls one increment at a time to determine your preferred setting. Allow
12 hours after each adjustment for the refrigerator reach the temperature you have set. Setting 1 is the
warmest 5 is the coldest.
Standby Mode
When the refrigerator is in ON, Press SET for 3 seconds the refrigerator will go into standby mode, the
standby indicator light will be on.
Standby setting will stop cooling in both the refrigerator and freezer compartments but does not shut
off electrical power to the refrigerator.
Revert to normal operation by pressing the SET button ,the standby light will go off, it will go back to the
last setting.
Malfunction Indicator
Light 1&2 lit Refrigerator temperature sensor
Light 1&3 lit Freezer defrost sensor
Light 1&4 lit Ambient temperature sensor
STANDBY
Hol d SET-b utton f or 3-sc e
for s tandb y
Temperatu re
Control
SET
COLD
COLDEST
Page 5

Freezer Control
Start with the knob in the Mid position.
For higher freezer temperatures turn knob counter clock wise toward the Cold position.
For lower freezer temperature turn knob clock wise toward the Colder position.
Page 6

(if included)
Page 7

Replacing the Light Bulb
! WARNING: Light bulb may be hot .
Before replacing a burned-out light bulb, the refrigerator should be
unplugged in order to avoid contact with a live wire filament
(A burned-out light bulb may break when being replaced.)
Turning the control to the OFF position does not remove power to the
light circuit.
Maximum bulb wattage: 40W
1) Unplug the refrigerator
2) The bulb is located at the top of the refrigerator compartment.
Unfasten screw to remove light cover.
3) Replace bulb with a new one of the same or lower wattage
4) Reattach light cover using screw
5) Plug the refrigerator back in
Page 8

2
Page 9

(appearance and features may vary)
Temperature Cont rol Pa nel
Dairy Bi n
Adjustable Shelves
Crisper Cover
Fruit an d Vege table Cri spers
Levellin
g Legs
Control Dial
Door Shelf
Door Shelf
Page 10

Normal
operating
sounds.
GEAppliances.
CA
ITT
~
•
The
longer than your old refrigerator and you may hear a
high-pitched hum
it
•
You
This
•
You
the refrigerator
as the refrigerator cools
•
The
when attempting
up
• Expansion and contraction
after defrost can cause a cracking
•
On
cycle, you may hear the ice cubes dropping into the ice
bucket.
Newer refrigerators sound different from older refrigerators. Modern refrigerators
hove
more
features
Do
you hear what I
HUMMM
~HOOSH
new high efficiency compressor may run faster and
or
pulsating sound while
is
operating.
may hear a whooshing sound when the doors
is
due to pressure equalizing within the refrigerator.
CLICKS,
CRACKS
may hear cracking
is
first plugged in.
compressor may cause a clicking or chirping sound
to
restart (this could take
to
5 minutes).
models with an ice maker, after an ice making
and
use
newer
..
.
..
.
POPS,
and
CHIRPS
or
popping sounds when
This
happens
to
the correct temperature.
of
cooling coils during and
or
popping sound.
technology.
hear?
close.
These
sounds are
You
may hear the fans spinning
•
This
happens when the refrigerator
when the doors are opened frequently
amount
compartments.
the correct temperatures.
of
food
WATER
normal.
is
added
to
The
fans are helping
SOUNDS
at
the refrigerator
high speeds.
is
first plugged
or
to
0
•
The
flow
of
refrigerant through the freezer cooling coils
may make a gurgling noise like boiling water.
• Water dropping on the defrost heater can cause a
or
sizzling, popping
cycle.
• A
water
dripping noise may occur during the defrost
cycle
as
ice melts from the evaporator and flows into
the drain pan.
• Closing the door may cause a gurgling sound due
to
pressure equalization.
buzzing sound during the defrost
when a large
or
freezer
maintain
in,
10
Page 11

Before
you
call
for
service
...
GEAppliances.cA
Troubleshooting
Save
time
pages
first
and
and
Tips
money!
you
may
Review
Problem Possible
Refrigerator
operate
Vibration
(slight vibration
is
normal)
Motor operates for
long
cycles
frequently.
refrigerators with
more
space
freezer
operating time.
start and stop often
to maintain
temperaturesJ
does
or
rattling
periods or
on and
(Modern
storage
and a larger
require more
even
off
They
not
Refrigerator in defrost cycle.
Refrigerator is unplugged.
The fuse is blown/circuit
breaker
Front leveling legs need
adjusting.
Normal when refrigerator
is
first plugged in.
Often occurs when large
amounts
placed in refrigerator.
Door left open.
Hot weather
door openings.
Temperature control
set
at
the coldest setting.
not
need
Causes
is
tripped.
offood
or
the
charts
to
call
are
frequent
on
for
service.
the
following
What
To
Do
• Wait about
•
Push
the
plug
Replace
See
fuse
Leveling
24
hours
down.
is
normal.
to
see
is
normal.
About
•
•
•
Wait
cool
•
This
•
Check
•
This
•
See
30
minutes
completely
or
reset
Legs.
for
if a
the
control.
for defrost
the
the
refrigerator to
package
into
the
breaker.
is
holding
cycle
to
outlet
completely
door
end.
open.
Fresh
food
or
freezer
compartment too warm
Frost
or
ice
crystals
on
frozen
food
(frost within package
is
normal)
Ice
cubes
have
odor/taste
Slow
ice
cube
freezing
Temperature control
set cold enough.
Warm weather
door openings.
Door left open.
Door left open.
Too frequent
door openings.
Food
transmitting odor/taste
to
ice cubes.
Interior
needs cleaning.
Door left open.
Temperature control
set cold enough.
or
or
of
refrigerator
frequent
too
not
long
not
•
See
•
Set
See
•
Check
•
Check
•
Wrap
•
See
•
Check
•
See
About
the
the
temperature
About
the
to
see
to
see
foods
Care
and
to
see
About
the
control.
control.
if a
package
if a
package
well.
cleaning.
if
package
control.
control
is
one
is
holding
is
holding
holding
step
door
colder.
door
door
open.
open.
open.
11
Page 12

Before
you call for
service
...
Problem
Refrigerator
Moisture forms
outside
Moisture collects
(in
humid
carries moisture into
refrigerator
are
opened}
Interior light
not
work
has
of
refrigerator
weather,
when
does
odor
on
inside
air
doors
Possible
Foods
to refrigerator.
Interior
Not
of
Too
door
No
Light bulb
Causes
transmitting odor
needs
unusual
high
frequent or too
power
during
humidity.
openings.
at
outlet.
burned
cleaning.
periods
long
out
What
•
Foods
•
Keep
replace
•
See
•
Wipe
•
Replace
•
See
To
Do
with
strong
an
open
every
Care
and
surface
fuse
Replacing
odors
box
of
three
months.
cleaning.
dry.
or
reset
the
light
should
baking
the
breaker.
bulb.
soda
be
in
tightly
the
refrigerator;
wrapped.
12
Page 13

P
lease
Veuillez
place
meHre
in
envelope
dans
and mail
une
enveloppe
to:
et
envoyez
a :
OWNERSHIP
P.O. BOX
REGISTRATION
1780
MISSISSAUGA, ONTARIO
L4Y
4G1
(
FOR
POUR
CANADIAN
RESIDENTS
CONSUMERS
CANADIENS
ONLY·
SEULEMENT)
13
Page 14

------------------------------,--------------------------------------------------------------------------------,
l+I
For
Canadian
Customers
l+I
Po
ur
les
consommateurs
canadiens
------------------------------
' I
OWNERSHIP
Please
register
the
"'
Z-
"'
«:U
IO:
I-
I
01
a: w
«::x:
Uu
zW::
a:
~..J
UJ
a:
0 >-
zO
«:~
UJ UJ
z
:::;
~u
:x:-
I-
(.!) a.
z
00
..J U
""UJ
I-
::>
u
remote
and
to
allow
our
warranty, should the
UJ
R
EGISTER ON-LIN
:2:
ENR
EGI
STREMENT
D
MR.IM.
0
MISSIM
STREET
""
N
UJ
I-
UJ
N
UJ
::>
0'
NO
Cm' /
VILLE
I
AREA
CODE/
OIO
YOU
PURCHASE A SERVICE
AVEZ-VOUSACHETE
NAME
OF
SELLING
f{STAl.lATmOATEIOATEO'NSTPl..l.An:N
Y!A
I
do
nol
D
Je
ne
' '
~
--------------------------------------------------------------------------------J
REGISTRATION
your
product
to
safety
commu
need
. I
MME I FIRST
I
STREET
CONTRAT OE
00
any
recevoir
enable
notice
is i
nication
aris
e.
A:
NAME I PRENOM
NAME I RUE
CONTRACT
SERVICE
OU
MARCHAND
I
CORRESPONDENCE
CORRESPONOANCE D FRANl;AIS
promotional
d'offres
promolionnel~s
even
t a
for
efficient
E:
SUR INTERNET
D
MRS
LLE D MS.
IN"
R\JE
IND. R£G. I TELEPHONE/TELEPHONE
UN
DEALER I NOM
M
wish
lo
receive
desire
pas
CERTIFICATE-FICHE D'INSCRIPTION
us
to
contact
you
in
Veuillez
enregistrer
ssued
for
this
product
terms
plia
of
nces.ca
oommuniquer
ce
produit
vertu
under
the
www.geap
www.electromenagersge.ca
I
I E
-t.1AILICOURRIEL
FOR THIS
APPLIANCE
APPAREIL?
regaiding
ooncemanl
?
this
0 E
NGLISH
product
ce
produit
PCURCET
offers
de
LASTNAME I NOM
.
avec
eta
it
votre
garantie
~Wl
POSTEZA
YESIOUI
NO/NON
I
MODEL/
SERIAL I SERIE
emis
votre
vous
TO:
DU
produrt
si
jama
et
de
oommun
,
si
le
:
I
PROVINCE
D
D
MooELE
PROPRIETAIRE
afin
de
nous permettre
is
un avis
de
iquer facilement
besoin
s'en fail
P.O. BOX 1780, MISSISSAUGA
ONTARIO, L4Y
I
POSTAL
IF
YES/SI
OUI
EXP
,.
•
securite
avec
sentir
.
4G1
I
APT.NO/APP
COOEICOOE
IRATI
ON
de
concemant
vous
en
JRRll
POSTAL
OJ
I
'
14
Page 15

CA
1-800-561-3344.
This warranty is extended to the original purchaser and any succeeding owner for
products purchased in Canada for home use within Canada.
In-home warrant service will be provided in areas where it is available and deemed
reasonable by MC Commercial to provide.
Page 16

Consumer
GE
Have a question
day
Support.
Appliances
or
need
of
the
year!
Website
assistance
with
your
appliance?
Try
the
GE
Appliances
Website
GEAppliances.ca
24
hours a day,
any
~
Schedule
Expert
GE
Call
1.800.561.3344
Real
GE
supports
people
of
mental
abilities
ideas
for
people
In
Canada,
~~~~~!~
Parts
Consult
the
Instructions
should
be
unsafe
operation.
repair
Life
the
all
ages,
and
contact
and
yellow
contained
referred
SeNice
service
is
only
one
step
away from your
during normal
Design
Universal
with
Design
sizes
and
capabilities.
impairments.
disabilities,
Director,
,
~~~:~
Bureau
Moncton,
Customer
310, 1 Factory
business
hours.
Studio
concept-products,
We
recognize
For
details
of
check
out
our
Relations,
Lane
N.B.
ElC
9M3
,
t;~~
'1eoded
services
the
GE's
Universal
Website
today.
MC
Commercial
warroo~
Accessories
pages
for
the
in
to
qualified
this
nearest
manual
service
authorized
cover
procedures
personnel.
GE
parts distributor,
Caution
need
'"ppll•~
to
door.
and
to
Design
be
performed
must
environments
design
for a
applications,
or
call
by
be
exercised,
GEAppliances.ca
GEAppliances.ca
that
can
be
wide
range
of
including
kitchen
GEAppliances.ca
GEAppliances.ca
1.800.661.1616.
any
user.
Other
since
improper
used
by
physical
design
servicing
servicing
and
generally
may
cause
Contact
If
you
are
including
not
your
Us
satisfied
phone
Register
Register
your
new
communication
You
may
also
mail
with
number,
Your
appliance
and
prompt
in
the
the
service
you
receive
or
write
to:
Appliance
on-line-at
service
pre-printed
your
under
the
registration
from
GE,
Director,
Suite
Moncton,
convenience!
terms
of
your
card
included
contact
us
on
Consumer
310, 1 Factory
N.B.
ElC
Timely
product
warranty,
in
the
should
packing
our
Website
Relations,
Lane
9M3
registration
the
material.
MC
will
need
GEAppliances.ca
with
all
the
details
Commercial
GEAppliances.ca
allow
for
enhanced
arise.
16
 Loading...