

Page 1
Do not use in wet locations
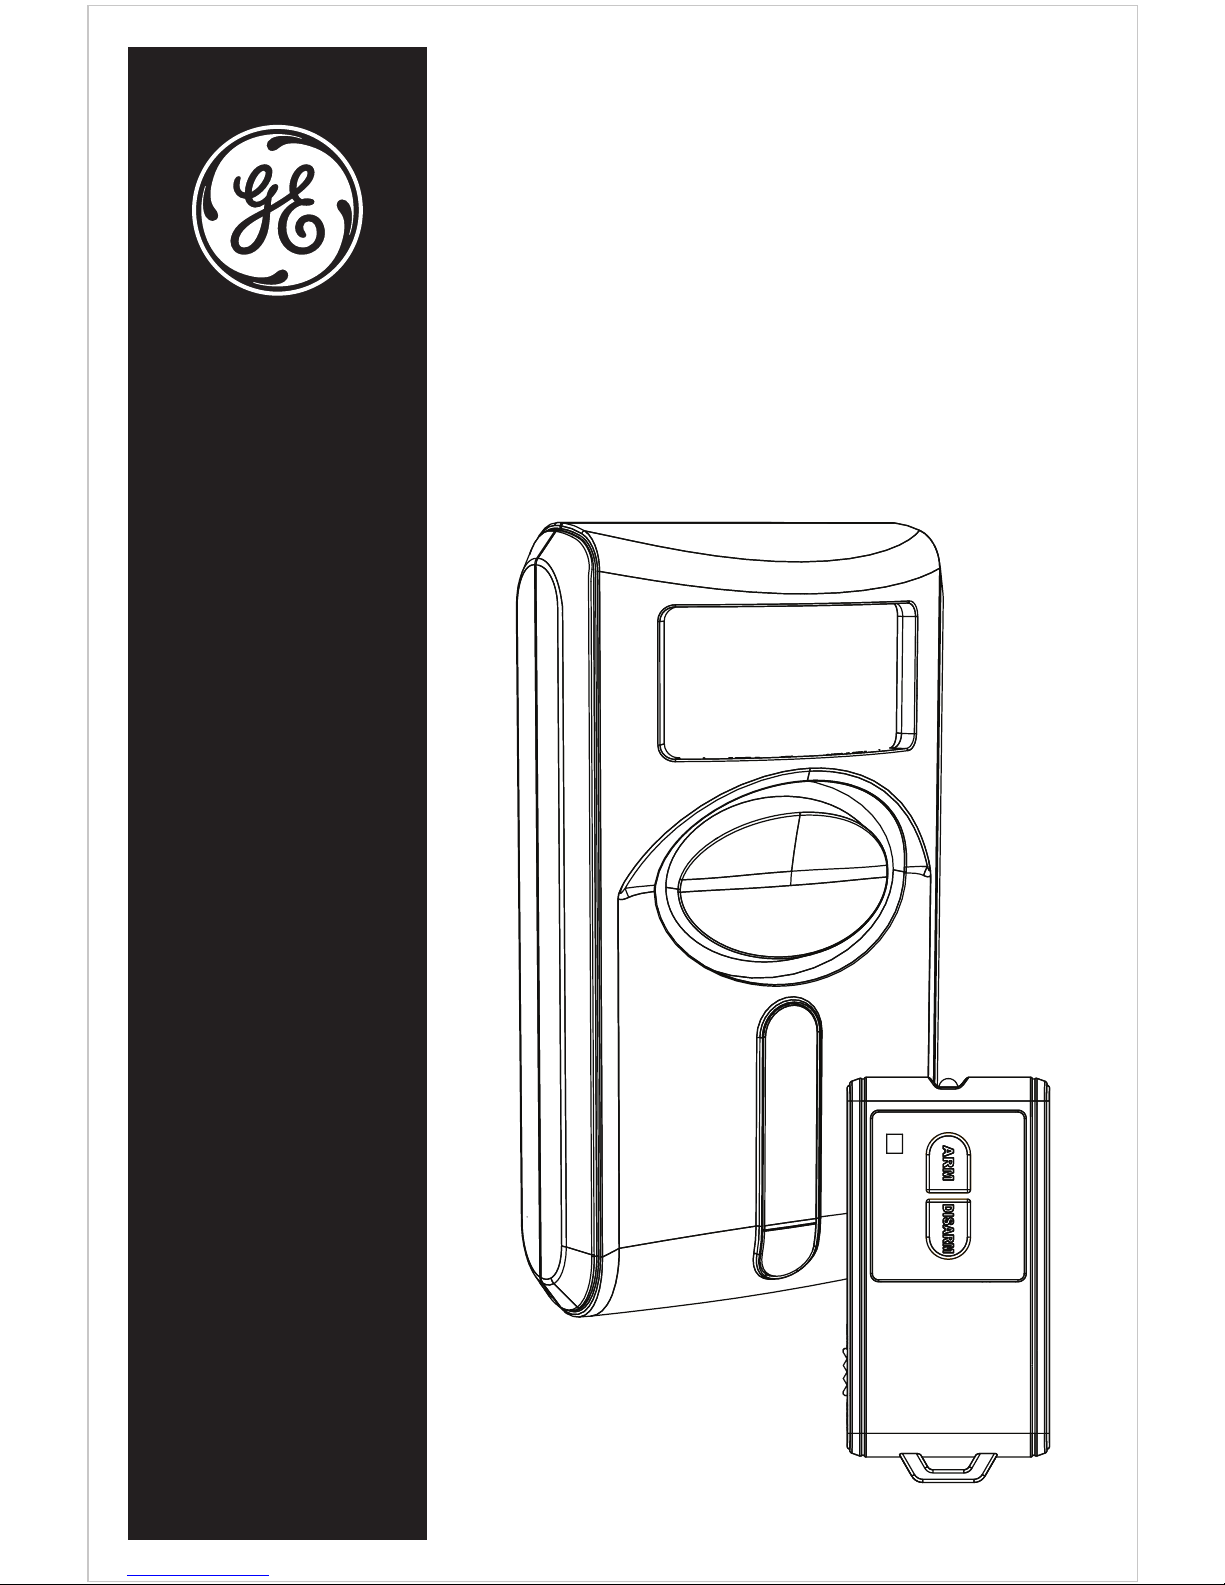
Personal Security
Motion Sensor
with Remote
User Manual
Page 2

Page 3
Motion Sensing Alarm
With Remote Control
Low Battery Indicator
The Motion Sensing Alarm has a low
battery indicator light. If the batteries
need to be replaced, the indicator light
will flash slowly. Average battery life for
typical usage is up to one year.
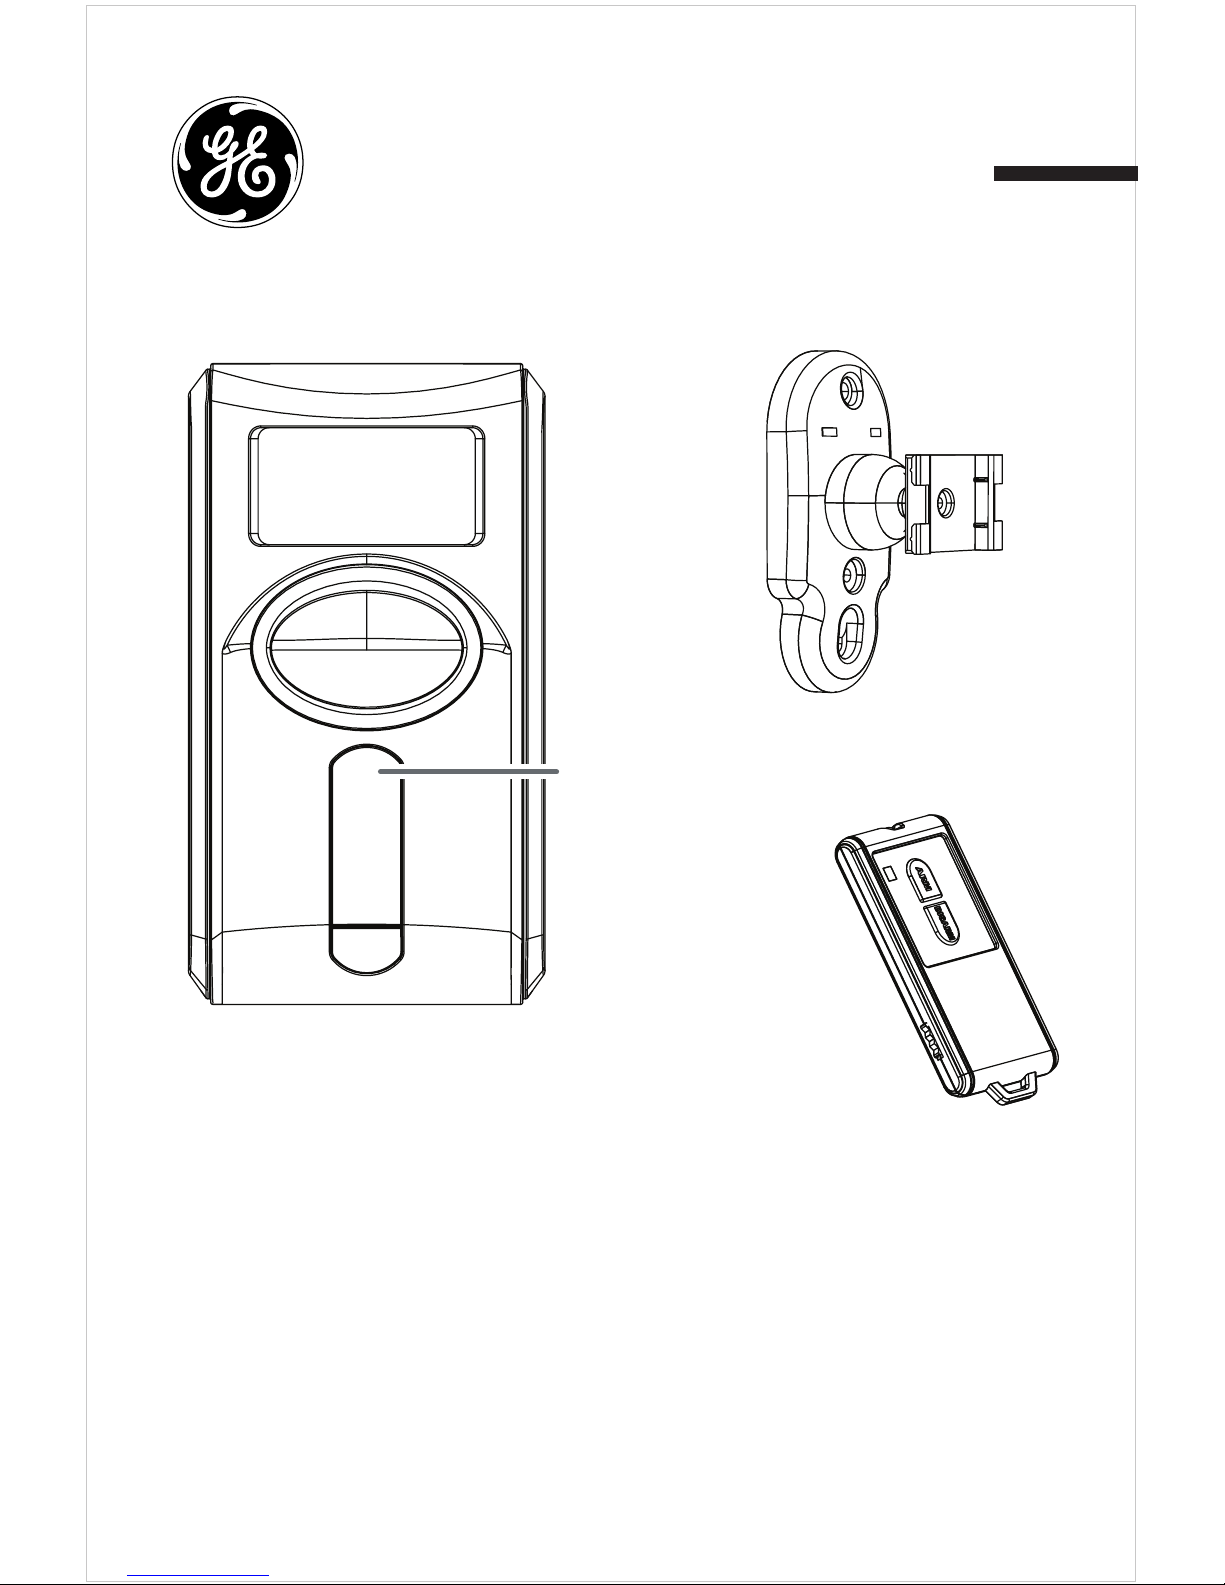
Wall
Mount
Keychain
Remote
Alarm/Chime Switch
Motion Sensing Alarm
Indicator Light
Page 4

4
INSTALLING BATTERIES
The Remote Controlled Motion Sensing
Alarm requires 3 AA Alkaline batteries (not
included).
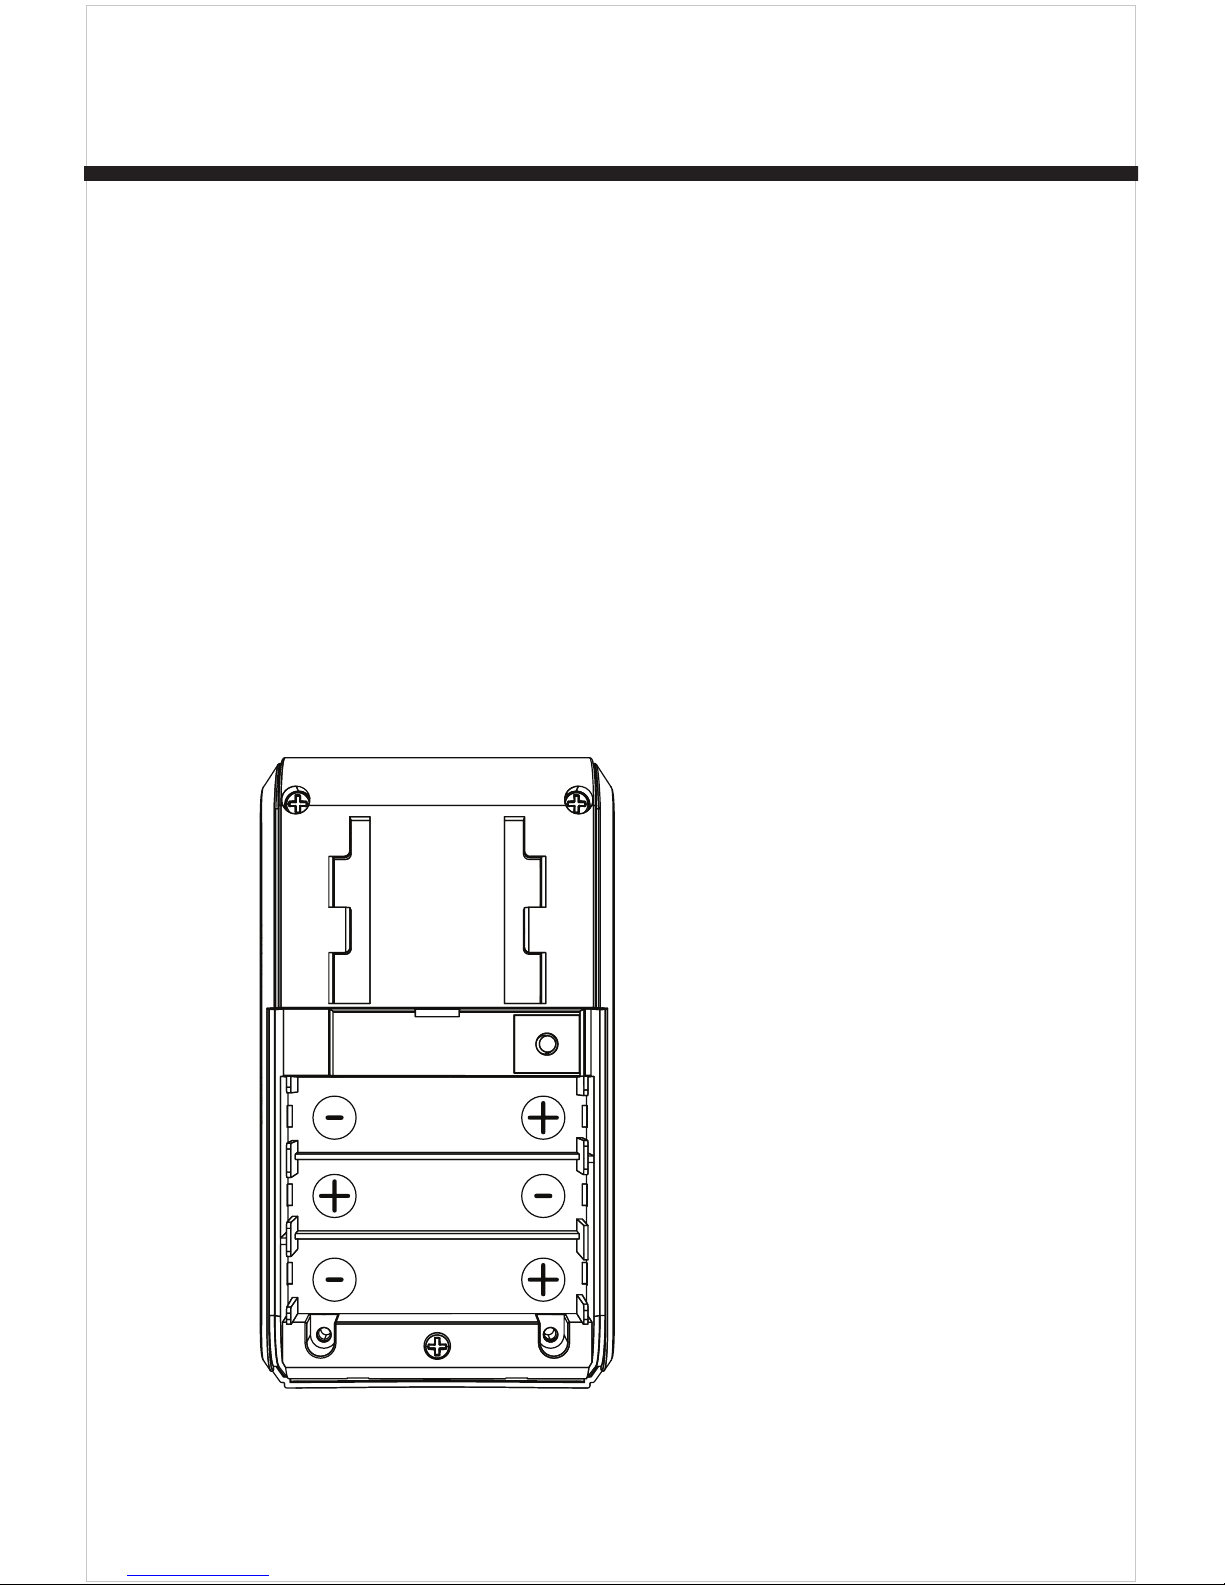
Installing Batteries in the Alarm
The battery compartment is located on
the back of the unit.
1. Remove the battery compartment
screw and slide off cover in the
direction of the open arrow.
2. Insert (3) AA batteries (not included) .
Take care to note the polarity diagram
inside the battery compartment.
3. Replace the cover and secure screw.
Installing batteries in the remote control
The Remote Control requires a CR2032
battery (included). Average battery life for
typical usage is one year.
1. Slide off battery compartment cover
Page 5
5
located on the back of the remote
control.
2. Insert a 2032 battery noting polarity
inside the battery compartment.
3. Replace cover.
Battery Compartments
Learn
Button
Remote
Page 6
6
LINKING THE REMOTE TO THE ALARM
Make sure you have installed the batteries
before proceeding.
1. Remove the battery compartment
screw and slide off cover in the
direction of the open arrow. Locate
LEARN button.
Battery Compartment
Learn
Button
Learn
2. Press the LEARN button.
Page 7

7
3. Immediately point the remote control
towards the front of the alarm unit
and press the ARM button. The alarm
will sound a single short tone, and the
light will stop flashing to confirm the
remote has been linked to the alarm.
The alarm unit will now respond to the
remote.
4. Replace cover to the battery
compartment of the main unit and
secure screw. The alarm is now in
standby mode.
NOTE: Additional remotes can be
added to the system by following the
same programming procedure.
INSTALLATION
The unit is designed to be wall mounted
with the ball and socket mount (included).
The ball and socket mount will provide the
flexibility to aim the motion sensor in a
particular direction.
Page 8
8
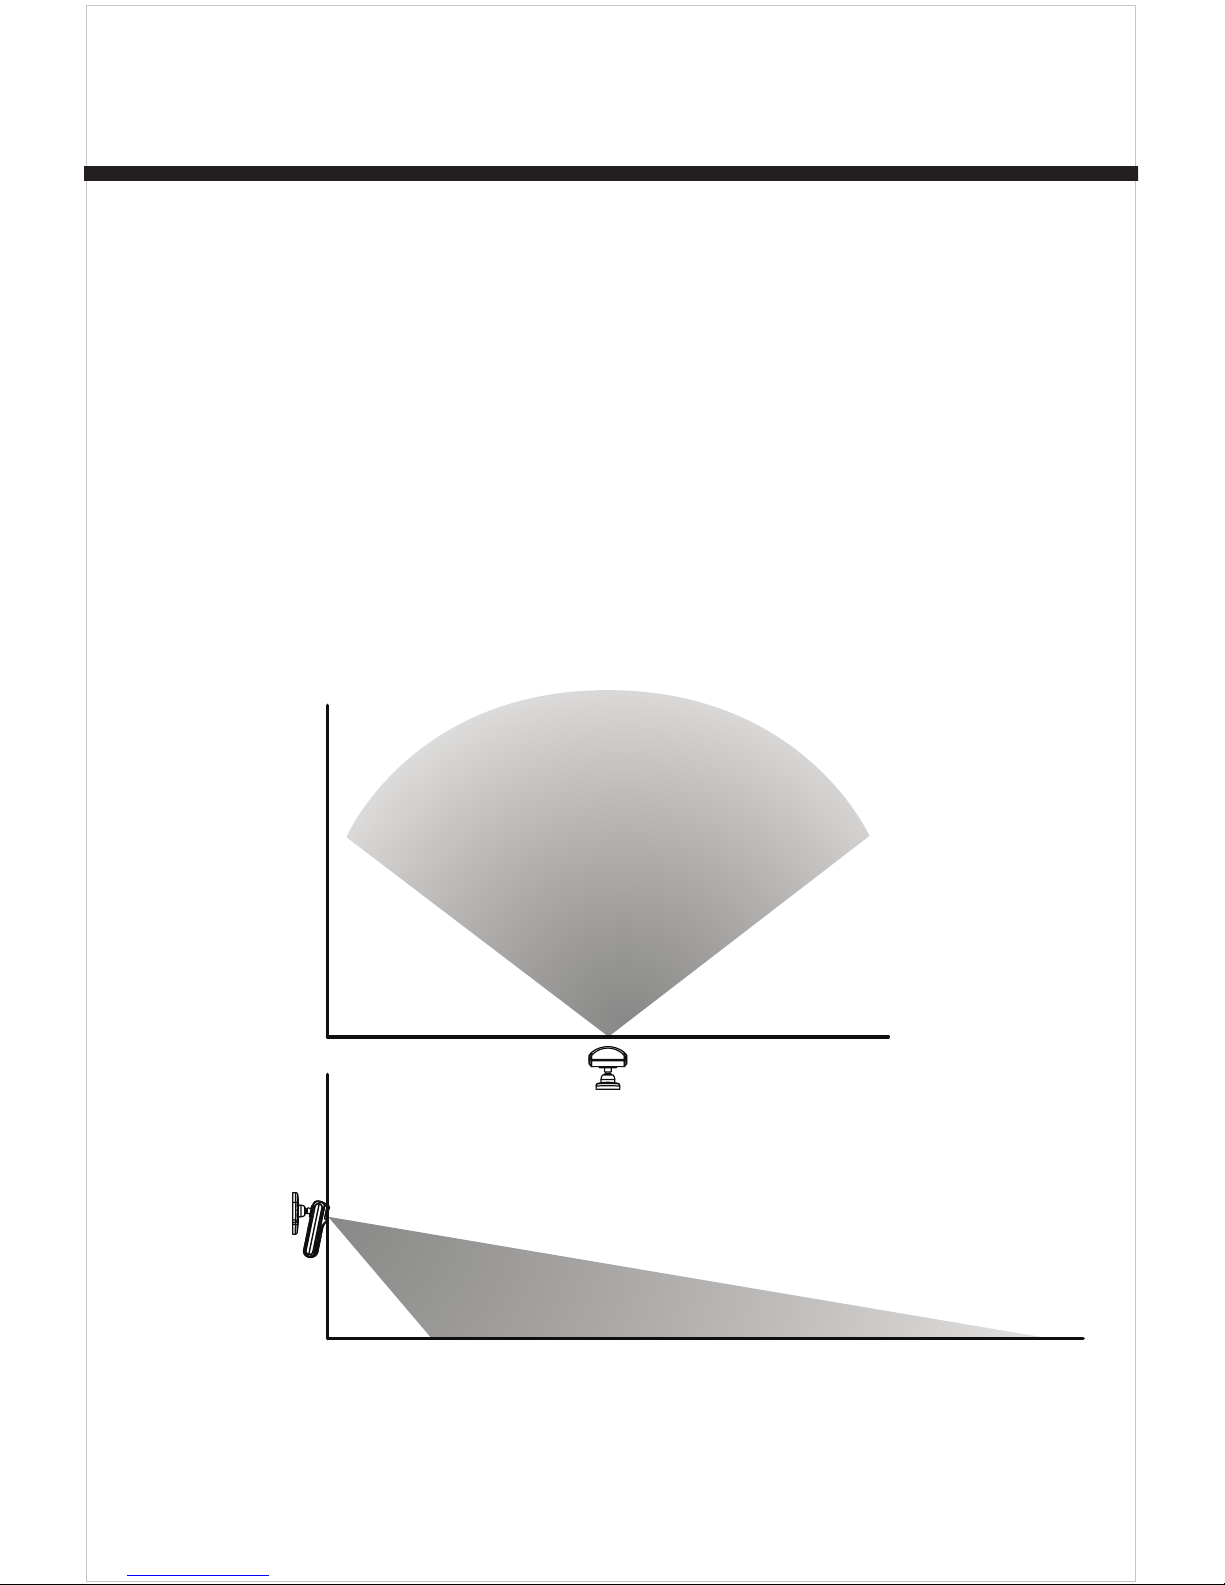
1. Choose your desired location, such
as the corner of the room. This will
provide maximum coverage. NOTE:
The sensor has a 15-20 ft. detection
zone, with approximate angles
of 110˚ horizontal x 70˚ vertical.
Recommended installation height is 6
to 8 feet.
110˚
20'
5'
20'15'10'5'
Feet
Feet
6'-8'
10'
15'
70˚
2. Secure ball and socket mount to the
Page 9

9
wall using either the provided wall
anchors or by screwing directly into a
wall stud. Once installed securely on
the wall, slide insert bracket of mount
into the back of the unit and lock
in place. The mount will click when
secured to the alarm.
OPERATING IN THE ALARM MODE
1. Locate the ALARM/CHIME switch on
the side of the remote.
Chime Alarm
2. Slide switch to ALARM mode.
Page 10

10
Arming the Alarm
1. Point the remote control at the front of
the alarm and press the ARM button.
The alarm will sound a tone and the
red indicator light will flash. There will
be a 45 second exit delay before the
unit is armed. The delay allows time
for you to leave the protected area
without triggering the alarm.
2. When motion is detected, the alarm
unit will sound a short tone and a red
light will flash. The alarm will activate
in 30 seconds. The siren will sound
for 30 seconds (unless disarmed by
the remote) and then turn off. In 15
seconds the alarm will check for
motion. If motion is detected, the siren
will sound again. The cycle will repeat
until the unit is disarmed with the
remote.
Page 11

11
Disarming the Alarm
When returning to the protected area, the
unit will beep once if motion is sensed.
1. Point the remote control at the front of
the alarm unit and press the DISARM
button within 30 seconds to disarm
the alarm.
2. If the remote control with the correct
security code is not used within 30
seconds, the alarm will sound. During
this entrance delay, the red indicator
light will flash. Use the remote control
at any time to deactivate the alarm.
NOTE: To test, a cloth can be used
to cover the alarm to reduce risk of
hearing damage.
Page 12

12
OPERATING IN THE CHIME MODE
The chime is used to notify you when
motion is sensed in the area.
1. Locate ALARM/CHIME switch on the
side of the remote.
Chime Alar
m
2. Slide switch to CHIME mode.
ACTIVATING THE CHIME
Activate the chime by pointing the remote
control at the alarm and pressing the
‘ARM’ button. The chime will now go off
once and again when motion is sensed.
DEACTIVATING THE CHIME
Deactivate the chime by pointing the
remote control at the alarm and pressing
the ‘DISARM’ button.
PANIC FEATURE
For immediate alarm with no delay, aim
Page 13

13
the remote at the front of the alarm and
press and hold the ARM and DISARM
buttons on the remote control for 2
seconds. To turn off the panic alarm, aim
the remote at the front of the alarm and
press the DISARM button.
TESTING MOTION SENSOR OPERATION
1. Set remote to CHIME mode and press
ARM button; the chime will sound
once.
2. After initial chime, wait 15 seconds
and wave hand in front of the sensor.
If chime sounds immediately, the
sensor is working properly.
3. To discontinue test, point remote at
front of alarm and press DISARM. Set
remote to ALARM mode.
CARE AND MAINTENANCE
To clean the alarm housing, use a soft
Page 14

14
cloth slightly dampened with water and
wipe dry. Do not use chemical agents as
this may damage and discolor the unit.
WARNING
Limitations of Alarm Products
This product should be tested periodically to make sure
it is working properly. The product, if used properly, may
reduce the risk of burglary, robbery, or other adverse
events. However, JASCO is not an insurer, this product
is neither insurance nor a guarantee that such an event
will be prevented, and users should protect themselves
with proper insurance. JASCO makes no representation
that this product cannot be compromised or
circumvented, that it will provide an adequate warning,
or that it will prevent any personal injuries, property
damage, or other losses. Like any alarm product,
including expensive commercial systems, it may be
bypassed, it is subject to compromise, and it may
fail to warn for a variety of reasons, including, but
not limited to: improper installation or positioning;
improper maintenance; tampering; dead or improperly
installed batteries; sensing limitations; component
failures; receivers; for infrared products, intrusions
may be outside of a product’s designed range
and certain environmental conditions may impact
performance and audible alarm signals may be outside
of hearing range, muted by doors, walls, and floors,
unheard by deep sleepers or the hearing-impaired, or
overwhelmed by other sounds.
Page 15

15
WARNING
Risk of personal injury
• Prolonged exposure to alarm siren may cause
permanent hearing loss
Battery Warning
• Remove batteries before storing the Alarm for
extended periods
• Batteries may leak harmful liquids or ignitable
materials or explode causing injury and product
damage
• Do not mix old and new or other battery types
• Replace all batteries at the same time
• Replace fully discharged batteries immediately
For indoor use only; do not use in wet locations.
For indoor use only; do not use in wet locations.
This Jasco product comes with a 90 day limited
warranty. Please contact Customer Service at
800-654-8483 between 7:30AM—5:00PM CST or via our
website (www.jascoproducts.com) if the unit should
prove defective within the warranty period.
is a trademark of the General Electric Company and
is used under license by Jasco Products Company LLC,
10 E. Memorial Road, Oklahoma City, OK 73114.
3555
51207-2
11/07/2012
Page 16

16
This device complies with part 15 of the FCC rules.
Operation is subject to the following two conditions:
(1) This device may not cause harmful interference.
(2) This device must accept any interference received,
including interference that may cause undesired
operation.
FCC NOTE: The manufacturer is not responsible for
any radio or TV interference caused by unauthorized
modifications to this equipment. Such modifications could
void the user’s authority to operate the equipment.
NOTE: This equipment has been tested and found to
comply with the limits for a Class B digital device, pursuant
to Part 15 of the FCC Rules. These limits are designed
to provide reasonable protection against harmful
interference in a residential installation. This equipment
generates, uses and can radiate radio frequency energy
and, if not installed and used in accordance with the
instructions, may cause harmful interference to radio
communications. However, there is no guarantee that
interference will not occur in a particular installation. If this
equipment does cause harmful interference to radio or
television reception, which can be determined by turning
the equipment off and on, the user is encouraged to try to
correct the interference by one or more of the following
measures:
• Reorient or relocate the receiving antenna.
• Increase the separation between the equipment
and receiver.
• Connect the equipment into an outlet on a circuit
different from that to which the receiver is connected.
• Consult the dealer or an experienced radio/TV technician
Page 17

Seguridad Personal
Alarma Con Sensor
De Movimiento
Y Control Remoto
Manual Del Usuario
No utilizar en lugares húmedos
Page 18

Page 19

Alarma Con Sensor De Movimiento
Con Control Remoto
Soporte de
pared
Control
remoto
Interruptor de
Alarma/Campana
Motion Alarma con sensor
de movimiento
Luz indicadora
Indicador de batería baja
La alarma con sensor de movimiento
tiene una luz indicadora de batería
baja. Cuando las baterías deban
ser cambiadas, la luz indicadora se
encenderá y apagará lentamente. La vida
promedio de las baterías es de hasta un
año para una utilización normal.
Page 20

4
CÓMO INSTALAR LAS BATERÍAS
La alarma con sensor de movimiento
y control remoto funciona con tres (3)
baterías alcalinas AA (no vienen incluidas).
Para instalar las baterías en la alarma
El compartimento para baterías se
encuentra en la parte de atrás de la
unidad.
1. Retire el tornillo del compartimento
para baterías y deslice la tapa en
dirección de la flecha de abrir.
2. Inserte tres (3) baterías AA (no vienen
incluidas). Fíjese en el diagrama de
polaridad que se encuentra dentro del
compartimento para baterías.
3. Vuelva a colocar la tapa y asegure el
tornillo.
Cómo instalar las baterías en el control remoto
El control remoto funciona con una
batería CR2032 (incluida). La vida
Page 21

5
promedio de las baterías es de hasta un
año para una utilización normal.
1. Retire la tapa del compartimento para
baterías que se encuentra en la parte
de atrás del control remoto.
2. Inserte una batería 2032 teniendo
en cuenta la polaridad dentro del
compartimento para baterías.
3. Vuelva a colocar la tapa.
Compartimentos Para Baterías
Botón
Crear
Learn
Remoto
Page 22

6
CÓMO CONECTAR EL CONTROL REMOTO
A LA ALARMA
Cerciórese de que ha instalado las
baterías antes de proceder.
1. Retire el tornillo del compartimento
para baterías y deslice la tapa en
dirección de la flecha para abrir.
Ubique el botón CREAR.
Compartimentos Para Baterías
Botón
Crear
2. Presione el botón CREAR.
Page 23

7
3. Inmediatamente apunte el control
remoto hacia la parte frontal de la
unidad de la alarma y presione el
botón ACTIVAR. La alarma producirá
un tono corto y la luz dejará de
alumbrar para confirmar que el
control remoto ha sido conectado a
la alarma. La unidad de la alarma ya
responderá al control remoto.
4. Vuelva a colocar la tapa en el
compartimento para baterías de la
unidad principal y asegure el tornillo.
La alarma quedará en modalidad de
espera. NOTA: Se pueden agregar
controles remotos adicionales
al sistema siguiendo el mismo
procedimiento de programación.
INSTALACIÓN
La unidad está diseñada para ser
colocada en la pared y se incluye soporte
de ajuste que brinda flexibilidad para
Page 24

8
dirigir el sensor de movimiento hacia una
dirección en particular.
1. Elija la ubicación deseada, como
la esquina de una habitación. Esto
brindará mayor cobertura. NOTA: El
sensor tiene una zona de detección
de 4,6 a 6 metros, con ángulos
aproximados de 110° en sentido
horizontal x 70° en sentido vertical.
La altura que se recomienda para la
instalación es de 1,8 a 2,4 metros.
110˚
6
1,5
64,631,5
Metros
Metros
1,8-2,4
3
4,6
70˚
Page 25

9
2. Asegure el soporte de ajuste a
la pared con las bases de pared
que se suministran o atornillando
directamente en un travesaño. Una
vez el soporte esté bien instalado en
la pared, deslice el brazo del soporte
en la parte de atrás de la unidad y
ajuste bien. Usted oirá cuando el
soporte encaje en la alarma.
CÓMO OPERAR LA MODALIDAD ALARMA
1. Ubique el interruptor de ALARMA/
CAMPANA a un lado del control
remoto.
Chime Alar
m
2. Coloque el interruptor en la modalidad
ALARMA.
Page 26

10
CÓMO ACTIVAR LA ALARMA
1. Apunte el control remoto hacia
la parte del frente de la alarma y
presione el botón ACTIVAR. La alarma
emitirá un sonido y la luz indicadora
roja se encenderá y apagará
intermitentemente. Habrá un lapso
de 45 segundos para darle tiempo
para salir antes de que se accione
la alarma. Este lapso de tiempo le
permite salir del área protegida sin
que se accione la alarma.
2. Cuando se detecte movimiento, la
unidad de la alarma emitirá un sonido
corto y una luz roja se encenderá y
apagará de manera intermitente. La
alarma se activará en 30 segundos.
La sirena sonará por 30 segundos (a
menos que se desactive con el control
remoto) y luego se apagará. 15
segundos después la alarma revisará
Page 27

11
si hay movimiento. Si se detecta
movimiento, la sirena sonará de
nuevo. El ciclo se repetirá hasta que la
unidad sea desactivada con el control
remoto.
CÓMO DESACTIVAR LA ALARMA
Al regresar al área protegida, la unidad
emitirá un pito una vez si siente
movimiento.
1. Apunte el control remoto hacia la
parte frontal de la unidad de la alarma
y presione el botón DESACTIVAR en un
lapso de 30 segundos para desactivar
la alarma.
2. Si el control remoto con el código
de seguridad correcto no se utiliza
en 30 segundos, la alarma sonará.
Durante este lapso de entrada, la
luz indicadora roja se encenderá y
Page 28

12
apagará de manera intermitente.
Utilice el control remoto en cualquier
momento para desactivar la alarma.
NOTA: Al hacer una prueba, utilice un
pedazo de paño para cubrir la alarma
y reducir el riesgo de daño auditivo.
CÓMO OPERAR LA MODALIDAD DE
CAMPANA
La campana se utiliza para notificarle
cuando se sienta movimiento en el área.
1. Ubique el interruptor ALARMA/
CAMPANA en un lado del control
remoto.
2. Deslice el interruptor a la modalidad
CAMPANA
CÓMO ACTIVAR LA CAMPANA
Active la campana apuntando el control
remoto hacia la alarma y presionando el
botón “ACTIVAR”. La campana se disparará
cada vez que sienta movimiento.
Page 29

13
CÓMO DESACTIVAR LA CAMPANA
Desactive la campana apuntando
el control remoto hacia la alarma y
presionando el botón “DESACTIVAR”.
CARACTERÍSTICA DE EMERGENCIA
Si desea accionar la alarma
inmediatamente sin el lapso de tiempo,
apunte el control remoto hacia la
parte frontal de la alarma y mantenga
presionados los botones ACTIVAR y
DESACTIVAR del control remoto durante
2 segundos. Para apagar la alarma de
emergencia, apunte el control remoto
hacia la parte frontal de la alarma y
presione el botón DESACTIVAR.
CÓMO PROBAR LA OPERACIÓN DEL
SENSOR DE MOVIMIENTO
1. Ponga el control remoto en modalidad
de CAMPANA y presione el botón
ACTIVAR; la campana sonará una vez.
Page 30

14
2. Después de la campana inicial,
espere 15 segundos y mueva la mano
frente al sensor. Si la campana suena
inmediatamente es porque el sensor
funciona bien.
3. Para suspender la prueba, apunte el
control remoto hacia el frente de la
alarma y presione DESACTIVAR. Ponga
el control remoto en modalidad de
ALARMA.
CUIDADO Y MANTENIMIENTO
Para limpiar la parte exterior de la alarma,
pásele un paño levemente humedecido y
luego un paño seco. No utilice químicos
porque pueden dañar y desteñir la
unidad.
Page 31

15
ADVERTENCIA
Limitaciones de las alarmas
Este producto debe ser revisado periódicamente para
garantizar que esté funcionando bien. Si el producto
es utilizado adecuadamente, puede reducir el riesgo
de robo y otros eventos adversos. Sin embargo, JASCO
no es una aseguradora, este producto no es un seguro
ni una garantía de que se podrá evitar tal evento, y los
usuarios deben protegerse con un seguro adecuado.
JASCO no asegura que este producto no pueda
ser dañado o evadido, que proporcione una alerta
adecuada ni que evite lesiones personales, daños a
la propiedad u otras pérdidas. Al igual que cualquier
producto de alarma, incluyendo los costosos sistemas
comerciales, puede ser evadido, dañado y podría no
dar la alerta por varias razones, entre otras: instalación
o ubicación no adecuada, mantenimiento inadecuado,
sabotaje, baterías insuficientes o mal instaladas,
limitaciones en el sensor, fallas de los componentes,
receptores; para los productos infrarrojos, las
intrusiones pueden estar por fuera del rango diseñado
para el producto y algunas condiciones ambientales
podrían afectar el desempeño, y las señales audibles
de la alarma podrían estar por fuera del rango del
alcance auditivo, podrían ser silenciadas por puertas,
paredes y pisos, no escuchadas por personas
con sueño profundo o con problemas auditivos o
absorbidas por otros sonidos.
Page 32

16
ADVERTENCIA
Riesgo de lesiones personales
• La exposición prolongada a la sirena de la alarma
puede ocasionar una pérdida permanente de la
audición.
Advertencia sobre las baterías
• Retire las baterías antes de guardar la alarma por
períodos largos de tiempo.
• Las baterías pueden filtrar líquidos nocivos o
materiales combustibles o explotar y provocar daños
personales y al producto.
• No mezcle baterías nuevas y viejas y otros tipos de
baterías.
• Reemplace todas las baterías al mismo tiempo
• Reemplace inmediatamente las baterías descargadas.
Únicamente para ser utilizado en interiores: no utilizar en
lugares húmedos.
Este producto de Jasco tiene una garantía limitada
de 90 días. Contacte el Servicio al Cliente en 800-6548483, entre las 7:30 a.m. y las 5:00 p.m. CST o visite
nuestro sitio web (www.jascoproducts.com) si la unidad
sale defectuosa durante el período de garantía.
es una marca registrada de General Electric
Company y se utiliza bajo licencia a Jasco Products
Company LLC, 10 E. Memorial Road, Oklahoma City, OK
73114.
3555
51207-2
11/07/2012
Page 33

17
Este dispositivo cumple con la Parte 15 de los Reglamentos de
la FCC. Su Operación está sujeta a las siguientes condiciones:
(1) Este dispositivo no debe causar ninguna interferencia.
(2) Este dispositivo debe aceptar cualquier interferencia
recibida, incluyendo interferencia que pudiera causar una
operación indeseable.
Nota de la FCC: El fabricante no es responsable de ninguna
interferencia de radio o TV causada por modificaciones
inautorizadas a este equipo. Dichas modificaciones pueden
invalidar la autoridad del usuario para operar el equipo.
NOTA: Este equipo ha sido probado y se ha encontrado que
cumple con los límites para aparatos digitales clase B, de
acuerdo a la sección 15 de las Reglas de la FCC. Estos límites
están diseñados para brindar una protección razonable sobre
interferencias perjudiciales en instalaciones residenciales.
Este equipo usa, genera y puede transmitir energía de
radio frecuencia. Si no se instala o usa de acuerdo a las
instrucciones, puede causar interferencias perjudiciales a las
comunicaciones de radio. Sin embargo, no se garantiza que
interferencias de este tipo puedan ocurrir en determinadas
instalaciones. Si este equipo causa interferencias
perjudiciales a la recepción de radio o televisión, cosa que
se puede determinar prendiendo y apagando el equipo, el
usuario debe intentar reparar la interferencia siguiendo una
de las siguientes medidas:
• Reorientar o mover la antena receptora.
• Alejar el equipo del receptor.
• Conectar el equipo a un tomacorriente distinto a donde está
conectado el receptor.
• Contactar al distribuidor o a un técnico experto en radio y TV.
 Loading...