

Page 1
Safe*
Anti-Tip
lnstrutiions
Device,................................3,
....................3-5
26,33
Electric Range
●
~
,.. .
Problem Solver
More questions
✎✚✎✎
✌✌✎
‘..
GEAnswer&n&~ 80~626.2000
.
:..
?...call
. . . . . . . . . . . . . . . . . . . . . . . . . . . . . . .
34
Operating
Clock and
Features ........................................................6,
Oven . . . . . . . . . . . . . . . . . . . . . . . . . . . . . . . . . . . . . . . . . . . . . . . . . . . . . . .
Bating . . . . . . . . . . . . . . . . . . . . . . . . . . . . . . . . . . . . . . . . . . . . . . . . .
Broiling
Control Settings . . . . . . . . . . . . . . . . . . . . . . . . . . . . . . . . . . . . . . . . 12
Preheating . . . . . . . . . . . . . . . . . . . . . . . . . . . . 12.14, 16, 17
Roasting ..............................................1 9,20
Self<leaning instructions...............24, 25
Timed Baking
Surface
Canning Tips. . . . . . . . . . . . . . . . . . . . . . . . . . . . . . . . . . . . . . . . . . . . .
Control Settings
Cooktop
CooWare
Instrutiions, ~ps
Timer....................................l 1,
. . . . . . . . . . . . . . . . . . . . . . . . . . . . . . . . . . . . . . . . . . . . . . . .
12
.
12-25
.
14-18
21-23
7
Installation
Anti-Tip Device .............................................33
Flooring Under the Range ............................5
Leveling
Consumer Services ...................35
Appliance
.....................................l
Cooking......................................8-l
......................................8, 9
Comparison .................................8
Tps.............................................9
4-16
O
.
10
Important Phone
Model and Serial Location ...........................2
Warran~........................................Back
Models:
.............................................................5
Registration..................................2
JCS57
JCP67
Care and
tioKop..........................................................26
Door Removal ...............................................29
Oven Light
Self<leaning Instructions ..................24, 25
Standard
Surface
CIeaning....................26-3O
.....................................................28
0en..............................................3O
Uni&.................................................26
..................................31-33
Numbers........................35
Cover
GEAppfiances
Page 2

~LP
US
~LP
YOU
Before using your range,
read this guide carefilly.
It is intended to help you operate and maintain your
new range properly.
Keep it handy for answers to your questions.
If you don’t understand something or need more help,
write (include your phone number):
Consumer
GE Appliances
Applianu
buisville,
Write
~airs
Park
KY 40225
dom
the model
and serial numbers.
You’ll find them on a label on the front of the range,
behind the left oven or storage compartment door.
dso
These numbers are
Ownership Registration Card that came with your
range. Before sending in this
numbers here:
Model Number
on the Consumer Product
W4
please write these
If you received a damaged range...
Immediately contact the deder (or builder) that sold
you the range.
Save time and money.
Before you request service...
Check the Problem Solver in the back of this guide.
auses
It lists
can correct yourself.
of minor operating problems that you
Sena
Number
Use these
ds mncerning
To obtain service, see the Consumer Services page
in the back of this guide.
We’re proud of our service and want you to be
pleased If for some reason you are not happy with
servim
the
for further help.
FIRST, contact the people who
appliance. E~lain why you are not pleased. k most
cases, this will solve the problem.
numbem
you receive, here are three steps to follow
in any correspondent or
your range.
W YOU
servi=d your
serviw
~ED SERWCE
=,
if you are
detail-including your phone number—to:
Manager, Consumer Relations GE Applian=s
Appliance Park
huisville,
HNALLY,
Major
20
Chicago, IL 60606
if your problem is
Applian=
No* Wacker
stil
not
please~
KY 40225
stfll
Consumer Action Panel
Drive
write dl the
not
resolve~
write:
2
Page 3
Page 4
Page 5
Instilling the
Mnge
Your range, Me many
heavy and
as
cushoned tiyl
moving the range on this type of flooring. It
instded
material)
hveling
bveling
the base. By removing the bottom drawer you
level the range to an uneven floor by adjusting the
leveling legs.
can
setie hto sofi
on a 1/4” thick sheet of plywood (or
as
follows:
the
Mnge
screws maybe
otier
household
floor
or carpeting.
Iomted
on each
items,
covefings sud
Be
weful
omer
h
when
shodd be the floor covering. This
sitiar
of
m
men
the floor coveting
range, the
built up with plywood to the same level or higher than
moved for cl
To remove the drawer,
tit
up the front and remove it. To repla~, insert the
@ides
the range glides. Lift the drawer if necessary to insert
it easily.
it in to close.
area that the range
caning or servicing.
at the back of the drawer beyond the stop on
ht
the front of the drawer down, then push
enb
at the front of the
wtil
rest on should be
wfil
allow the range to be
pdl
the drawer out dl the way,
5
Page 6
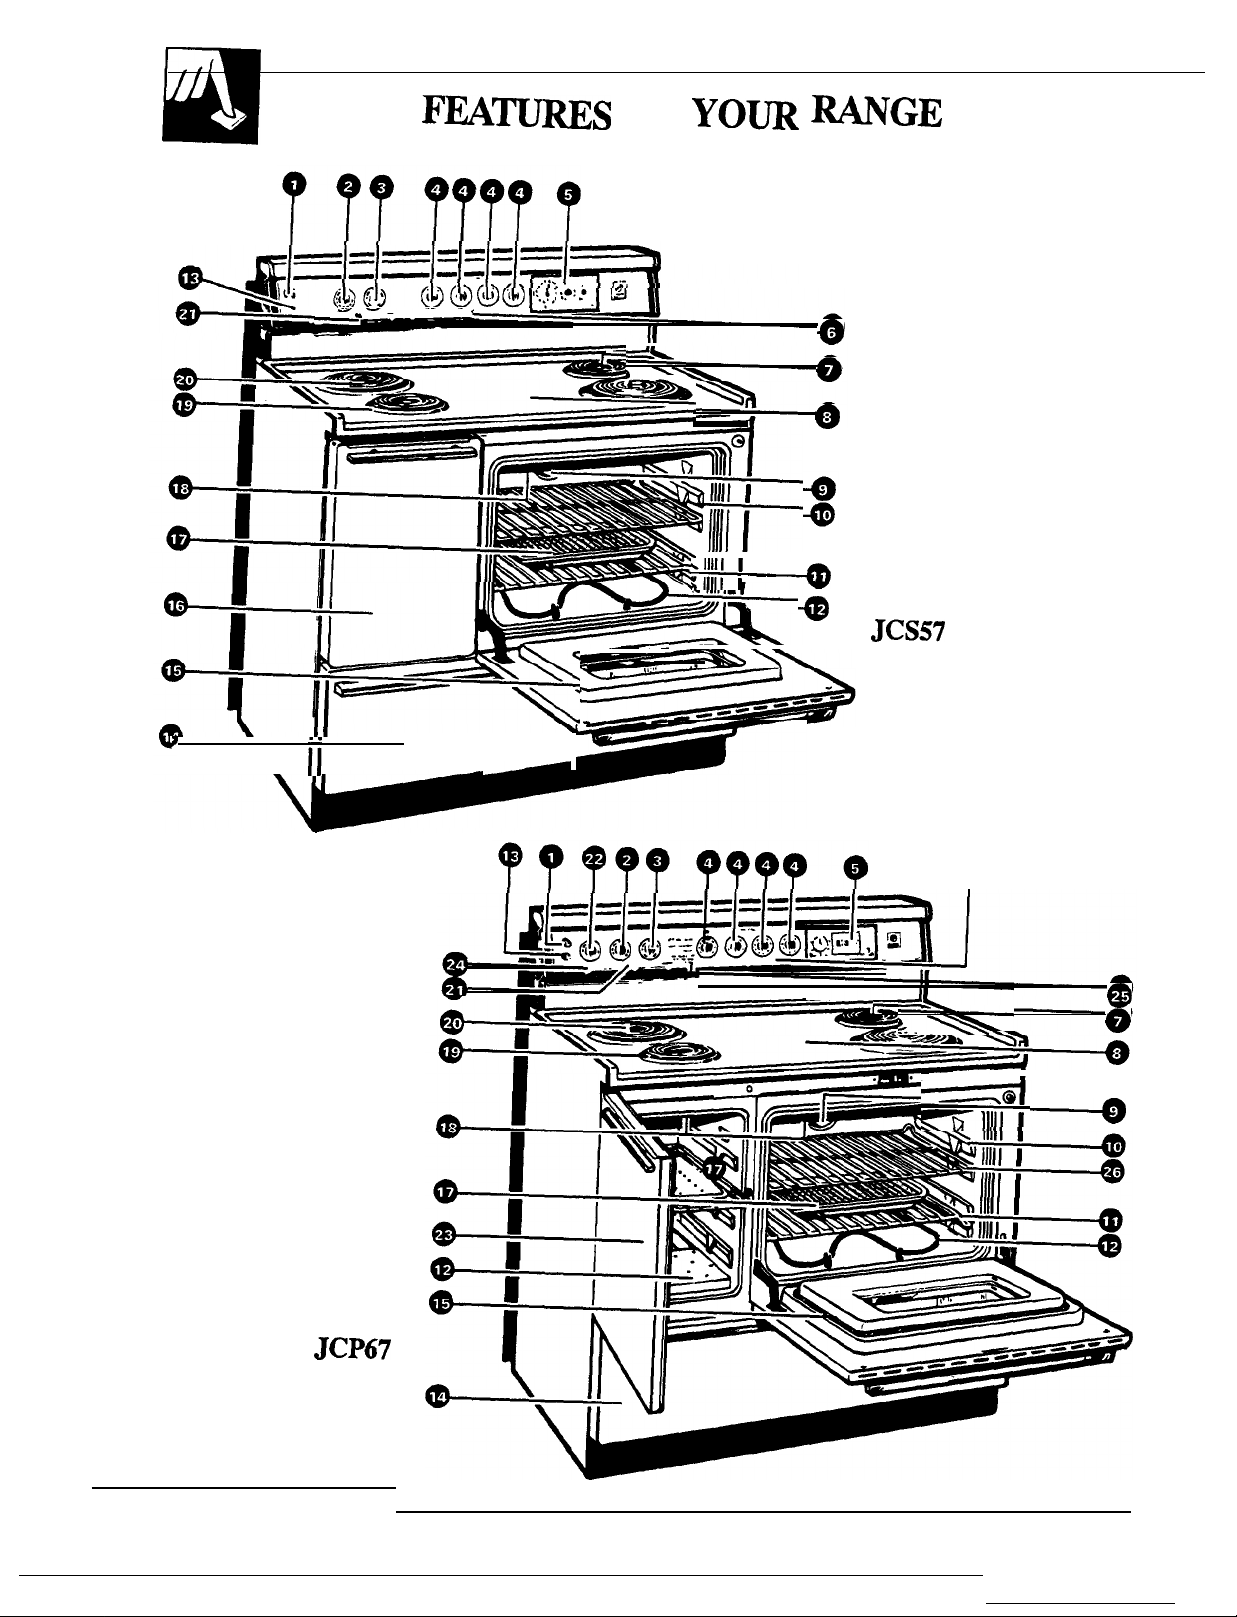
FwmS
OF
YOm WGE
<11111[
:111111
*
JCS57
)
‘\
i;
.
4
6
JCP67
Page 7
Featies
1 Surface Light Switch
2 Oven
3 Oven
4 Surface Unit Control
5 Automatic Oven Timer,
Temp nob
Setfiob
bobs
C1ockand Mnute
Timer
6 Surface Unit “ON” Indicator Light
7 Oven Vent
bcated
8 Lift-Up
under the right and left rear surface units.
Cooktop
9 Oven Interior Light
Comes on
10 Oven
suggested in the
11 Oven Shelves with
automatimlly
SheK
Supports Shelf positions for cooking are
when the door is opened.
Bting,
Roasting and Broiling
StoD-Locks
12 Bake Element k the right oven, maybe lifted
for wiping the oven floor.
13 Oven Light Switch
14 Storage Drawer
15 Lift-Off Oven Door with
16 Storage Compartment with
17 Broiler Pan and
Wck
Brofl
Stop Position
Shelf
(Model
JCS57)
Do not clean in the self-cleaning oven model
18 Broil Element
19 Drip Pans
20 Surface Uni*
21 Oven
Cychng
22 Left Oven Control
23 Companion
24
Companion
model
.
25
Oven
Cleaning Light (Model JCP6~
26 Self-Cleaning Oven
JCP6~
Light
oft)
@fi)
,
fiob model
Oven
Oven
~odel
Cycting
model JCP67)
JCP6~ 12,16,19,
JCP6~ 12,13,16,
Light
se~ions.
gentiy
JCP6~.
Explained
On Page
27
12,14,
15,19,21,
24,27
12, 14,
15,19,21,
24,27
8,9,27
11, 12,14,
15,24
8
4
26,27
13,28
13
13,17,18,
24,25,28
3,4,28
13
21, 2&29
27
19,21-24,
n
3,4,21,28
5, 10,26
>5,
*1O, 26
12,
1416. ~
-,
21,27
19,21,30
16
24,25
24,25,29
Page 8
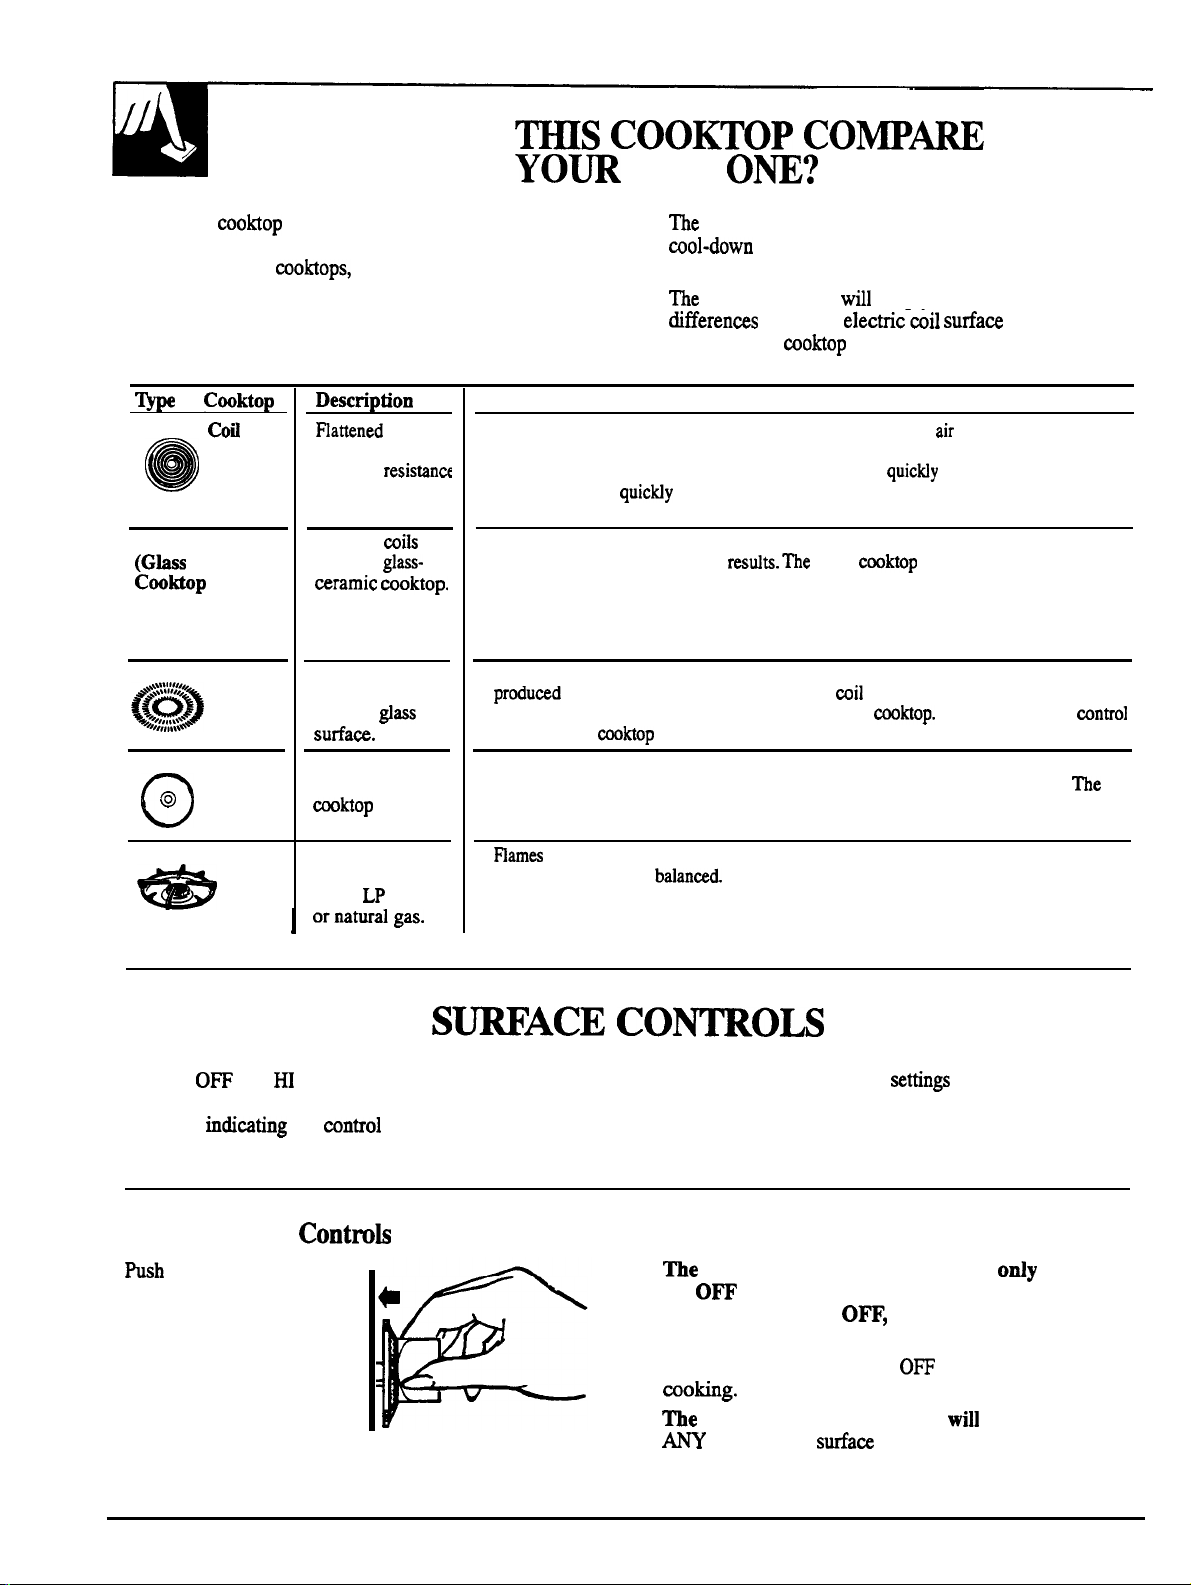
HOW DOES
TO
Your
new
cooktop
If you are used to cooking with gas burners or other
types of electric
differences when you use electric coils.
has electric coil surface units.
moktops,
you will notice some
~S
YOm
COOKTOP COmM
OLD
Om?
me
best types of cookware to use, plus heat-up and
mol-down
surface unit you have.
me
differen~s
other type of
times, depend upon the type of burner or
following chart
between
wfil
moktop
help you to understand the
electric-tiil sutiace
you may have used in the past.
units and any
~
of
Cooktop
Electric
@
Radiant
(Ghss
Cooktop
Coti
Ceramic)
o
Induction
gg~
Solid Disk
@
o
Gas Burners
*
Dewnption
Rattened
tubing containing
electric
wire suspended
over a drip pan.
Electric
under a
wramic moktop.
High frequency
induction coils
under a
surfa~.
Solid cast iron
disk sealed to the
cooktop
Regular or sealed
gas burners use
either LP gas
I ornaturalgas.
metal
resistana
coils
glass-
@ass
surface.
How
it Works
Heats by
cooking results, use good quality pans. Electric coils are more forgiving of
warped pans than radiant or solid disks. Heats up
heat settings as
continue cooking for a short time after they are turned off.
Heat travels to the glass surface and then to the cookware, so pans must be flat on
the bottom for good rooking
continue cooking after it is turned off. Remove the pan from the surface unit if
you want inking to stop.
Pans must be made of ferrous metals (metal that attracts a magnet). Heat is
produ~d by a magnetic circuit between the
and changes heat settings right away, like a gas
off, the glass
Heats by direct contact with the pan, so pans must be flat on the bottom for good
cooking results. Heats up and cools down more slowly than electric coils.
disk stays hot enough to continue cooking after it is turned off. Remove the pan
from the solid disk if you want the cooking to stop.
Rames
pans should be well
heat settings right away. When you turn the control off, cooking stops right away.
direct contact with the pan and by heating the
quicMy
as gas or induction. Electric roils stay hot enough to
resdts. fie
cooktop
is hot from the heat of the pan, but cooking stops right away.
heat the pans directly. Pan flatness is not critical to cooking results, but
balanmd.
Gas burners heat the pan right away and change
glass
cooktop
mil
and the pan. Heats up right away
cooktop.
air
under
the pan. For best
quictiy
but does not change
stays hot enough to
After turning the
wntrol
me
S~ACE
At both 0~ and ~ the control “clicks” into position.
You may hear slight “clicking” sounds during
rooking, indiating the ~ntrol is keeping the unit at
the heat level or power level you set.
How to Set the Contmh
fish
the knob in and
turn in either direction
to the desired heat setting.
8
CO~OLS
setings
Switching heats to higher
quicker change than switching to a lower setting.
me
control must be pushed into set
the 0~ position. When the control is in any
position other than
pushing it in.
Be sure you turn control to 0~ when you finish
Woking.
me
surface unit indicator light
N
heat on any surfa~ unit is on.
0~,
it may be turned without
always shows a
ody
will
glow when
from
Page 9
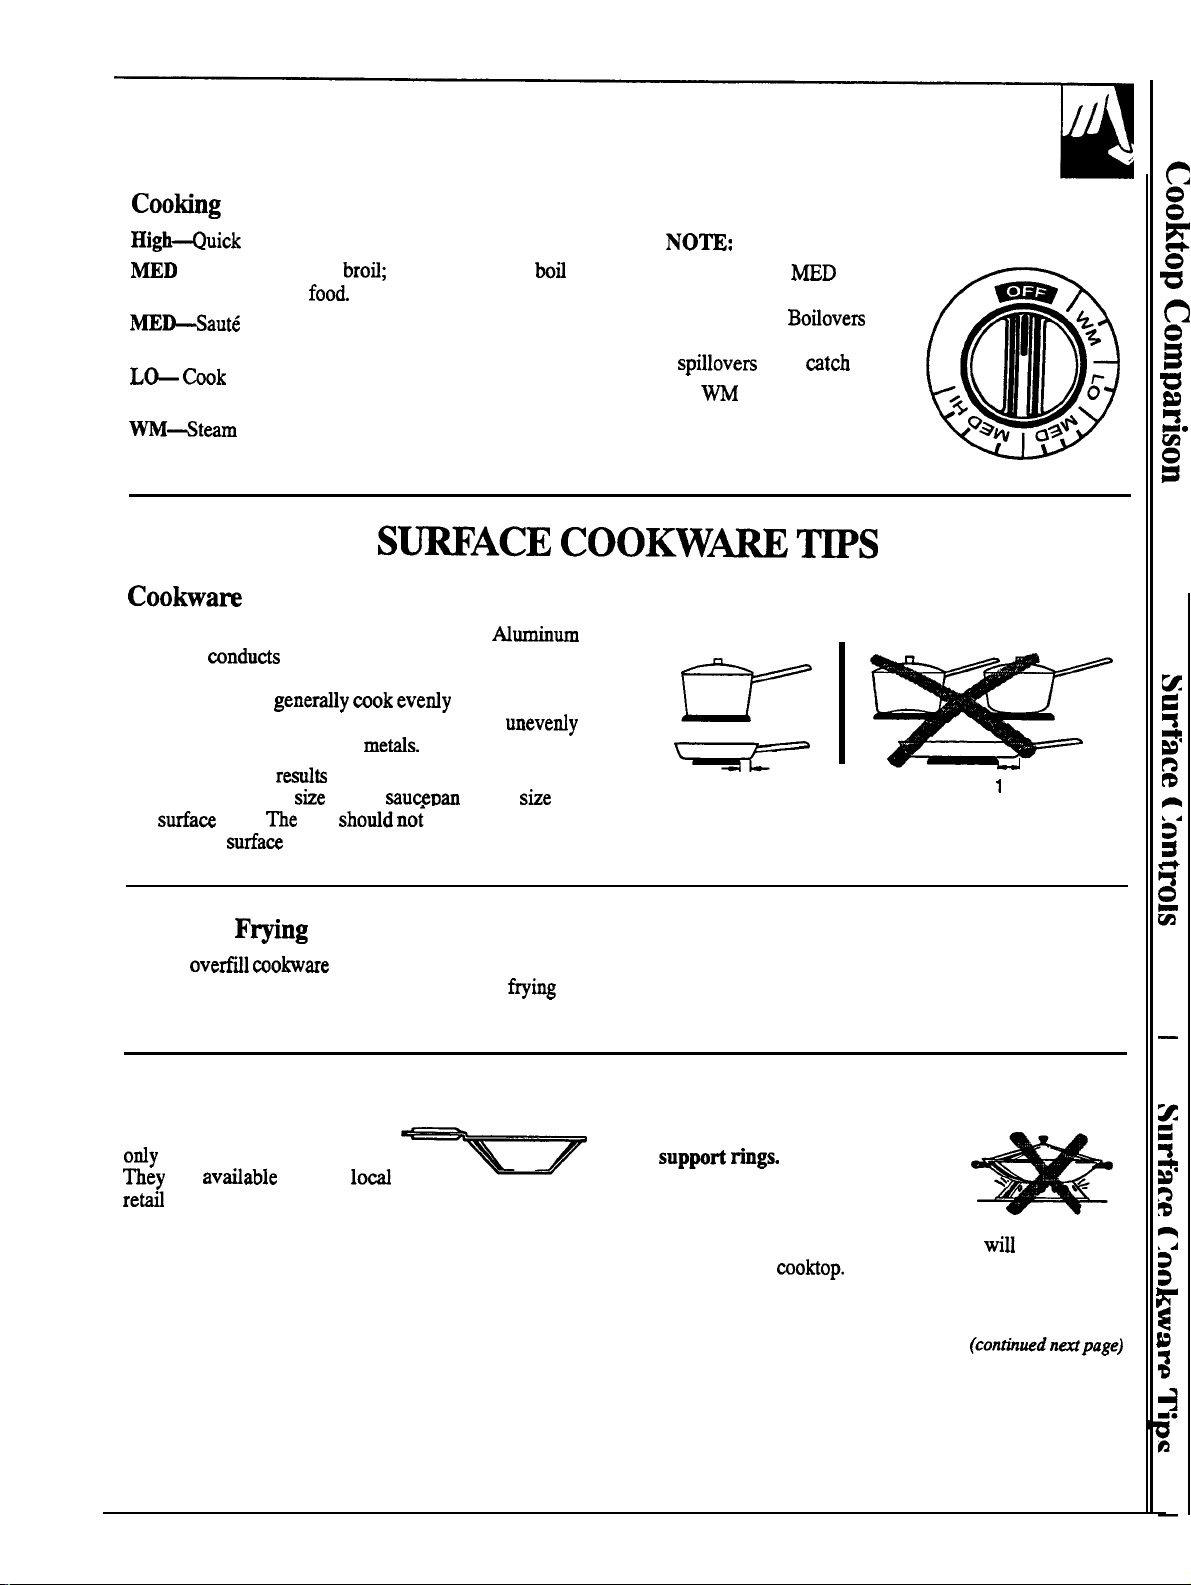
Cooting Guide for Using Heat Settings
High+uick
~D
HI—Fast fry, pan
start for rooking; bring water to a boil.
brofi;
maintains a fast
boti
on large amounts of food
~Haut6
and brown; maintain slow boil on large
amount of food.
L&
@ok after starting at High; cooks with little
water in covered pan.
~+team
rice, cereal; maintain serving
temperature of most foods.
Cookare
Use medium- or heavy-weight cookware.
cookware
mnducts
heat faster than other metals.
Cast-iron and coated cast-iron cookware are slow to
absorb heat, but
genedly mok
evedy at low to
medium heat settings. Steel pans may cook
if not combined with other
metis.
For best cooking resdts pans should be flat on the
bottom. Match the
the surfau unit. me pan
edge of the
surfau
stie
of the
sauceDan
shotid no~
extend over the
unit more than 1 inch.
Nurninum
unevedy
to the she of
NO~:
●
At High and ~D HI,
never leave food
unattended.
Botiovers
cause smoking; greasy
spillovers
●
At
may
WM
and LO, melt
~tch
fire.
chocolate, butter on a small
surface unit.
RIGHT
Not over 1 inch
WRONG
Over 1 inch
Deep Fat
Do not
F@ng
ovetidl wobare
with fat that may spill over when adding food.
Frosty foods bubble vigorously. Watch food @ing at high temperatures.
Keep the range and hood clean from grease.
Wok Cooking
We recommend that you use
ordy
a
flat-bottomed wok.
~ey
are avtiable at your
reti
store.
lod
Do not use woks
suppoti tings.
of woks, with or without the ring
in place, can be dangerous.
Placing the ring over the surface
unit will cause a build-up of heat that
the porcelain
without the ring. You could be seriously burned if the
wok tipped over.
that have
Use of these types
cooktop.
Do not try to use such woks
.%.
/-
*
will
damage
(contiudn&page)
9
Page 10
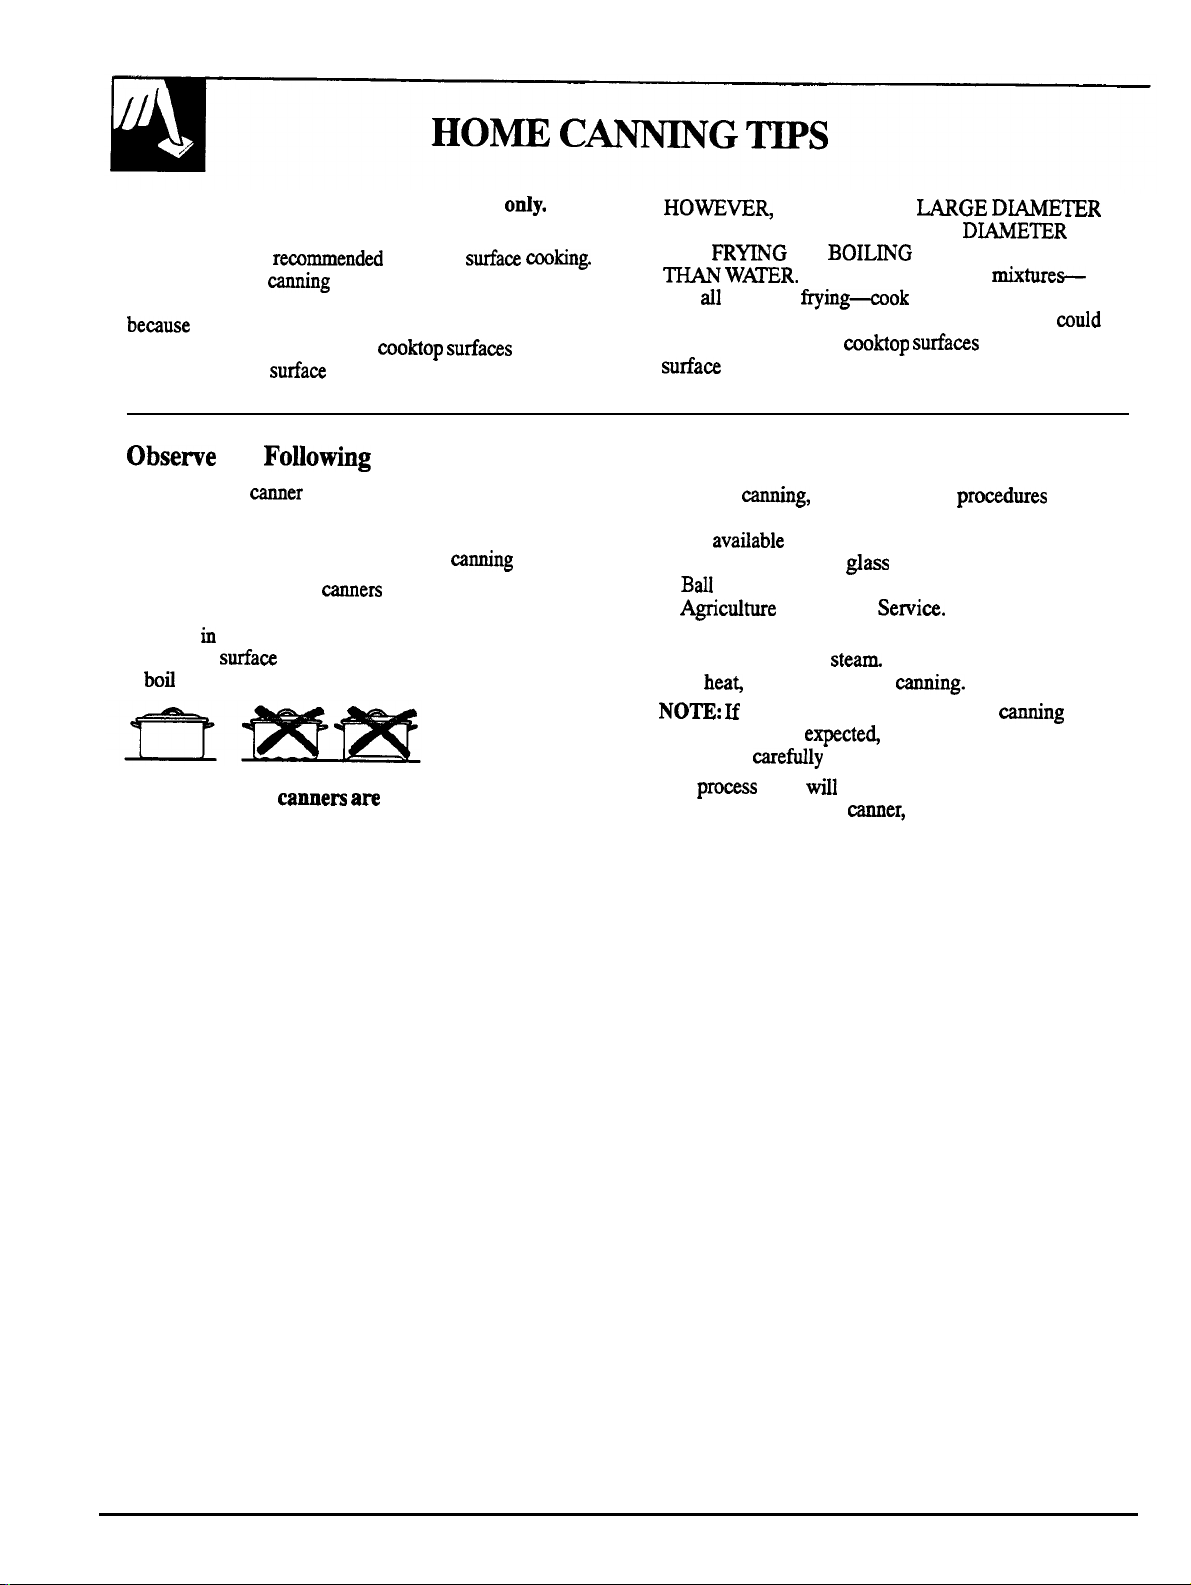
Canning should be done on surface units otiy.
Pots that extend beyond 1 inch of surface unit’s
drip pan are not
However, when
canner, larger-diameter pots may be used. This is
be~use boiling water temperatures (even under
pressure) are not harmful to
surrounding the
remmmended
ting
with water-bath or pressure
cooktop surfams
surfau
units.
for most
surfam aking.
HOWEWR,
CANNERS OR OTHER LARGE
FR~G
FOR
~
and dl types of
higher than boiling water. Such temperatures muld
eventually harm the
sutiaw units.
DO NOT USE
OR BOILmG FOODS OTHER
W~R.
Most syrup or sauce
frying+ok
woktop
MGE DWETER
DWETER
mix~re+
at temperatures much
surfatis surrounding
POTS
Obseme
1. Be sure the
surface unit. If your range or its location does not
allow the canner to be centered on the surface unit,
use smaller diameter pots for good
2. For best results, use
tinners with flanged or rippled bottoms (often
found in enamelware) don’t make good contact
with the
bofi
Hat-bottomed
the
stiaee
water.
Fo~ofig
~er
fits over the center of the
unit and take a long time to
cannem a~
Points in Canning
eating
mers
with flat bottoms.
recommended.
results.
3. When
reputable sources. Reliable recipes and procedures
are
manufacturers of
Bdl and Kerr; and the United States Department of
Agricdture
4. Remember that canning is a process that generates
large amounts of
or
NO~: H
take longer than
have been
The
(1) using a pressure
(2) starting with HOT tap water for fastest heating
ting,
avafiable
heag
be careful when
your house has low voltage,
promss
of large quantities of water.
use recipes and proudures from
from the manufacturer of your canner;
~ass
jars forming, such as
Extension
expecte~
caretily
time
til
Serviee.
stem
To avoid burns from steam
ting.
even though directions
followed.
be shortened by:
~er,
and
ting
may
10
Page 11
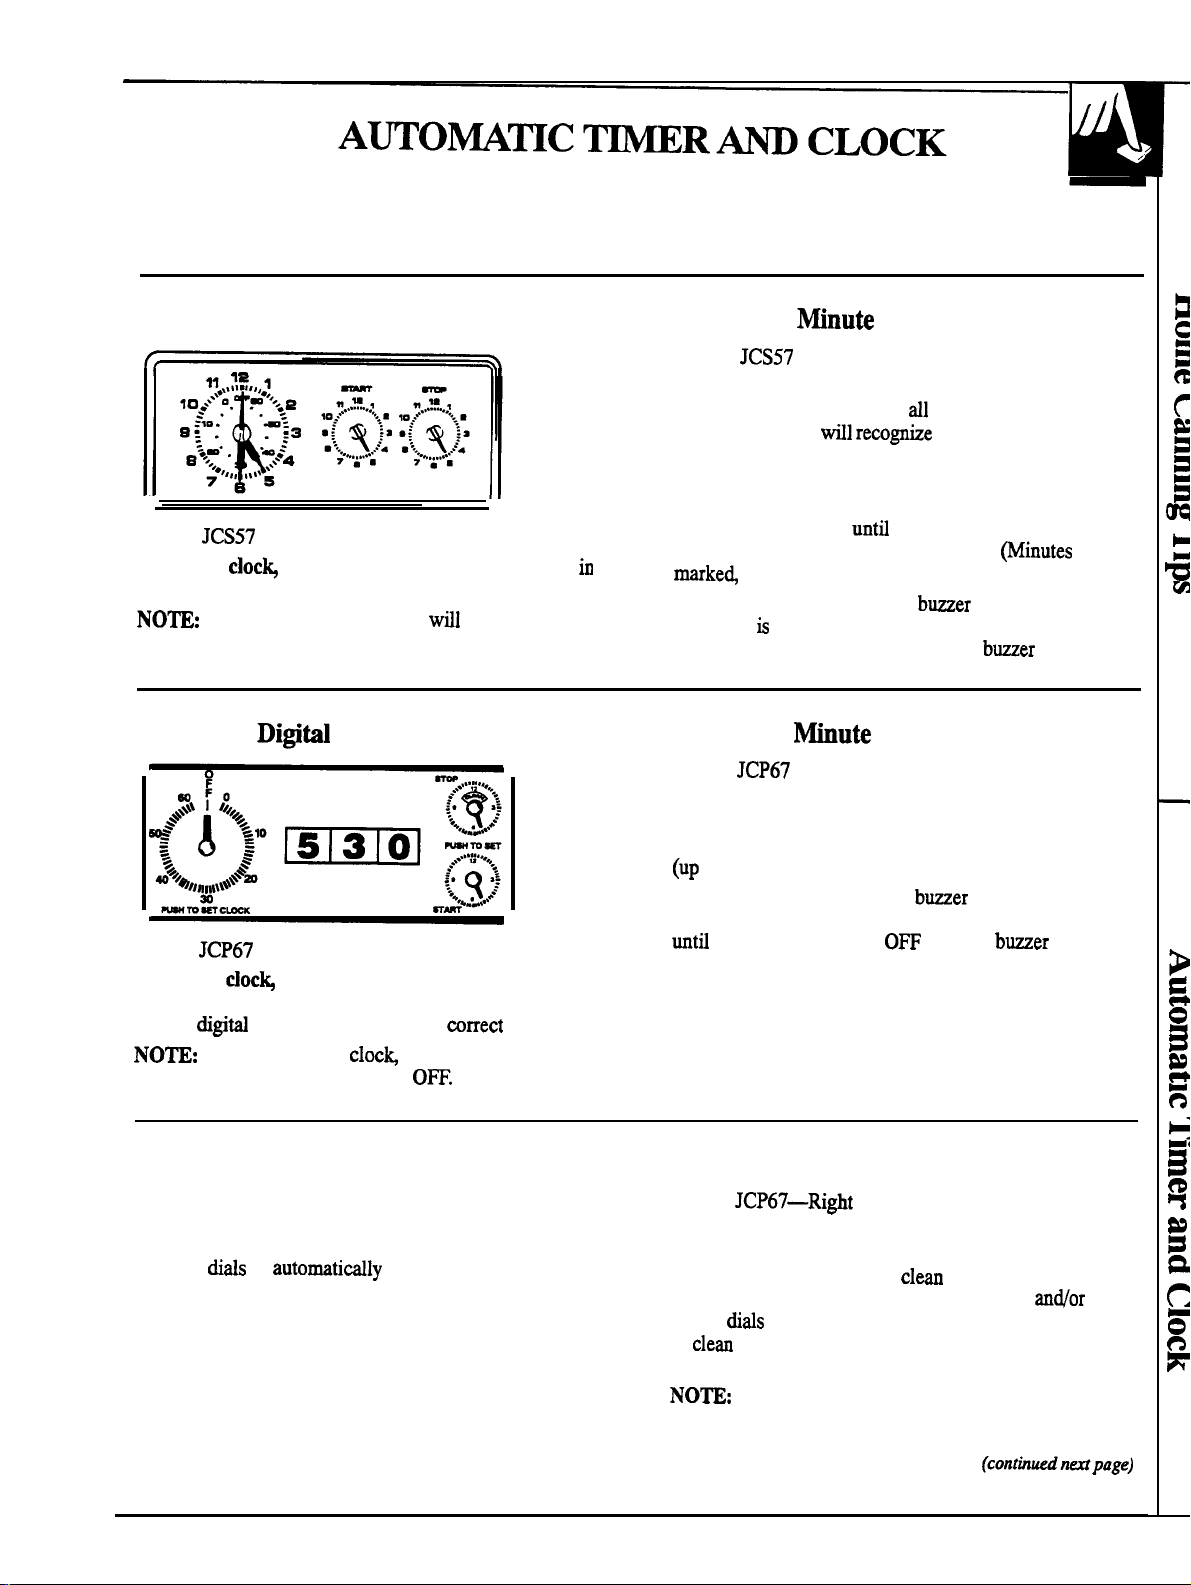
The automatic timer and clock on your range are helpful devices that serve
several purposes.
To Set the Clock
Model
To set the clock push the center knob of the clock
and turn the clock hands to the correct time.
NO~:
the knob out and turn the timer pointer to 12.
To Set the
Model
To set the
minute timer and turn the knob in either direction to
set the
NO~:
turn the minute timer pointer to
JCS57
The minute timer pointer
Digi@l
JCP67
doc~
digiti
clock numerals to the
After setting the
Clock
push in the center knob of the
clock
wfll
let the knob out, and
0~.
move also; let
mrrect
time.
in
To Set the Mnute Timer
Model
The minute timer has been combined with the
range clock. Use it to time
operations. You
the pointer which is different in color and shape than
the clock hands.
To set the
without pushing in,
number of minutes you wish to time.
marke~
At the end of the set time, a
you time is up. Turn the knob, without pushing in,
until the pointer reaches 12 and the
To Set the
Model
To set the minute
clockwise,
reaches the number of minutes you wish to time
(Up
At the end of the set time, a
time is up. Turn the center knob, without pushing in,
untfl
JCS57
dl
your precise rooking
til recogntie
minute timer, turn the
untd
up to 60, in the renter ring on the clock.)
mute
JCP67
without pushing in, until
to 60).
the pointer reaches 0~ and the
Timer
timer, turn
the minute timer as
center knob,
the pointer reaches the
minutes
bmer
sounds to tell
buer
the center knob
the pointer
b~er
sounds to tell you
bwer
are
stops.
stops.
Timed Baking Uses the Automatic Timer Self-Cleaning Uses the Automatic Timer
Using the automatic timer, you can Time Bake
with the oven starting immediately and turning off
at the Stop Time set or set both the STOP and the
START
at a later time of day. It takes the worry out of not
being home to start or stop the oven. See the Timed
Baking section.
dids
to automatidly start and stop the oven
Model
The self-cleaning function on your range uses the
automatic timer to set the length of time needed to
clean whether you wish to
delay the cleaning. By setting the START
STOP
or
See the Operating the Self-Cleaning Oven section.
NO~:
Self-Cleaning, make sure the oven clock shows
the correct time of day.
JCP67—Right
dids you may choose to begin immediately
clea
at low energy times such as during the night.
Before beginning Timed Baking or
Oven
cl-
immediately, or
(conthudn~page)
andor
11
Page 12

A~OmmC
-R
(continued)
~
CLOCK
Questions and
Q. How can I use the minute timer to make my
surface cooking easier?
A. The
Q. Can I use the minute timer during oven cooking?
A. The
minute timer will help time total rooking,
which includes time to boil food and change
temperatures. Do not judge cooking time by visible
steam
ordy.
even though you can’t see any steam.
minute timer can be used during any cooking
function. The automatic timers (START and STOP
dirds)
are used with
functions.
Food
&swers
wtil mok in
~ME
covered containers
BAKE and CLEAN
USmG
YOUR
Before Using Your Oven
1.
hok
at the
mntrols.
to set them properly. Read
the automatic oven timer so you understand their
use with the controls.
2. Check the oven interior.
Take a practice run at removing and replacing
them properly, to give sure, sturdy support.
Be sure you understand how
ov~r
the directions for
hok
at the shelves.
Q. Can I change the time of day on the clock
while I’m Time Baking in the oven?
A
The time of day on the clock
during any program that uses the oven timer. You
must either stop those programs or wait
finished before changing the time.
shotid
not be changed
untti
they are
OWN
3. Read over the information and
4. Keep this guide handy so you can refer to
especially during the first weeks of getting
a~uainted
with your range.
tips that
follow.
i~
Oven Controls
me
controls for the right oven
SET and
The
BAKE, CLEAN, BROIL and OFF.
The
you set from WARM
also at CLEAN (over
me
OWN.
temperature settings that range from
500”F.
OWN
TEMP.
OWN
SET knob has settings for ~ BAKE,
OWN TEMP
control for
The
L~ OWN wntrol
and BROIL.
knob maintains the temperature
(200°F.)
800°F.).
the left oven is marked
are marked
to BROIL
knob has
150°F.
12
OWN
(550°F.)
LE~
to
and
me
Oven
Cycting
reaches the selected temperature, then goes off and
on with the heating elements during rooking.
Preheating the oven, even to high temperature
settings, is speedy-rarely taking more than 5 to
6 minutes. Preheat the oven
Many foods
preheating. If you find preheating is necessary, see
the How to Set Your Range for Preheating section.
Light
wfil
wok satisfactorily without
glows until the oven
ordy
when necessary.
Page 13

Oven Interior Shelves
Right Oven
The shelves in the right oven are
stop-loch so that when placed
she~supports, the shelf will
completely out
removing food nor when placing food on them.
To remove a
forward
Be certain that the
To
the guides. Tilt the front up and slide
untfl
replace the
tim
the oven,
shelf from the right
it stops. Lift the front and slide it out.
she~
is cool before touching it.
sheMin
the oven,
de:i~ed
co~ctiy
..-
..
stip.befom
andtil
oven,,pull
fit the shelf onto
,.
,jG -.<
with
on
..,,
into
the
coming
not tilt when
the shelf
place.
Shelf Positions
Right Oven
The oven has four
shelf
suppo~
1
@ottom),
3 and 4 (top).
Shelf positions
for
cooting
suggested in the
Bting,
and Broiling
sections.
2,
are
Roasting
hft
Oven—Model
The left oven comes with a removable shelf for
easy cleaning.
To remove,
smooth motion. Be certain that the shelf
before touching it.
replace,
To
it into place.
hft
Oven—Model
This oven also has four shelf
2,3 and 4 (top). See the
Brofiing
pdl
tilt the front of the shelf up and slide
sections for the suggested shelf positions.
JCP67
the shelf out and up in one
is
cool
JCP67
suppo~l @ottom),
Bting,
Roasting and
me Offset Shelf
The
ofiet
shelf is provided for use in shelf position
1 to prevent contact with the deep
door when sliding the offset shelf in and out. This
shelf may dso be used in shelf position 4.
insti
the offset shelf with it
shelf stop placed to the rear.
Using Foil
E
you wish to use
a piece of
up the edges. Place the foil on the oven shelf below
the pan.
fod slightiy
Model
Comtly
foil
larger than the pan and turn
JCP67
plad
in the Oven
for possible
se~+leaning
upward and the
spdlovers,
oven
Aways
cut
Oven Light
The
light comes on automatidly when the door is
opened. Use the switch on the control panel to turn
the light on and off when the door is closed.
CAWON:
shelf in
CA~ON:
the oven bottom with foil. The
normal heat flow,
the oven interior.
On model
sheU
position 1.
Never wver an entire oven shelf or
JCP67,
never use the straight
Muse cooting
fofi u
failure and damage
obstruct
13
Page 14

Your oven temperature is controlled very accurately
using an oven control system. We recommend that
you operate the range for a number of weeks using the
time given on recipes as a guide to become familiar
with your new oven’s performance.
NO~:
When the oven gets hot, the top and outside
surfaces of the range get hot too.
How to Set the
Preheating is
should be preheated to the temperature you want
udess your recipe says not to.
To
avoid possible
correct position before you turn the oven on.
How to Set the
To
avoid possible
the correct position before you turn the oven on.
1. Turn the
the
in the recipe.
2. Check food for doneness at minimum time
in the recipe. Cook longer if necessary.
3. Turn the
to 0~ and then remove the food from the oven.
How to
O-
OWN TEMP
OWN
~me
Mnge
genertily
bum,
Mnge
b-s,
SET knob to
knob to the temperature
SET and the
Bake
for
Preheattig
done before baking. The oven
pla~
the shelves in the
for
BaMg
place the
B=
OWN TEMP
@ght
Oven)
shelvm
and
(Mght Oven)
@ght Oven)
in
knobs
1. Turn the OWN SET knob to
2. Turn the
temperature setting.
3. When the oven has
Light
reached the set temperature.)
@@
Ow
OWN ~MP
wfll
go out. ~s
muP
o
knob to the desired
preheate~
indi~tes
OWN
SH
B=.
the Oven Cycling
the oven has
The automatic oven timer controls are designed
to turn the oven on or off automatidly at specific
times that you set.
Automatic Stop (the oven turns on now and you set
it to turn off autornatidly) or Delay Start and
Automatic Stop (setting the oven to turn on
automatidly at a later time and turn off at the preset
Stop Time) till be described
On model
different in
However,
NO~:
shows the correct time of day.
JCP67,
th~~
Before beginning, make sure the clock
fiamples
the STOP and
a~warance ti
do operate in the same manner.
of Immediate Start and
ST~T
dids are
the dids on the
J~57.
14
[odels JCS57
Model
JCP67
and
JCS67
Page 15

How to Set Immediate
To
avoid possible
correct position before you turn the oven on.
The oven
selected length of time. At the end of Cook Time the
oven
wHI
wdl
turn off automatically.
‘2::’’-::=-’
.i
1. The
ST~T
the time of day on the clock. To set the Stop Time, Room temperature promotes the growth of
push in the knob on the STOP did and turn the bacteria. Be sure that the oven light is off because heat
pointer to the time you want the oven to turn off,
for example
b-s,
turn on immediately and cook for a
.,:43 ;{%~):;[p:a
.
●
J,,, ,,
7
*pearance
dial
shodd
7:00.
.-:
$*5
a~%:.
Stiti
and Automatic Stop
place the shelves in the
...
7#m
may vary.
be at the same position as
;%3.s;..
/)
@@t
Oven)
@@
OVEN
~MP
&pearance may vary.
2. Turn the
Turn the
temperature, for example,
NO~:
fish stuffings,
to sit for more than one hour before or after cooking.
from the bulb
OWN
-
OWN ~MP
Foods that sped
podtry
wfil
o—
OVEN
S=
SET knob to TMED
knob to the desired oven
fiO°F.
easfiy
such as@ eggs,
and pork
speed
shodd
not be allowed
~
bacteria growth.
B-.
h-
How to Set Delay
To avoid possible bums, place the shelves in the
correct position before you program the oven.
You can set the oven control to turn the oven on
automatidy,
and turn off automaticrdly.
1. To set the SW Time, push in the knob on the
ST~T did
want the oven to turn o% for example
2. To set the Stop Time, push in the knob on the
STOP
want the oven to turn off, for example
have now set the oven for
bake time.
NO~:
later than the time shown on the range clock
and the
cook for a specific
{’
~
and turn the pointer to the time you
did and turn the pointer to the time you
The time on the STOP did must be
ST~T
Stiti
and Automatic Stop
-
@pearance may vary.
dial.
lenmh
2%
hours of delayed
of time
6:30.
9:00.
You
@ght
men)
@@
OWN
=MP
*pearance
3.
Turn the
Turn the
you want.
Place the food in the oven, close the door and
automatidly the oven will be turned on and off
at the times
4. Turn the
to OFF and remove the food from the oven.
The
Oven
setiing
B=
&efuUy recheck the steps given. H dl operations are
done as
NO~:
fish
sags,
to sit for more than one hour before or after rooking.
Room temperature promotes the growth of
bactena.
from the bulb
OWN
OWN TEMP hob
~ou
OWN
CycHng
may work
setting.
explaine~
Foods that
podtry and pork shodd not be allowed
Be sure that the oven light is off because heat
wfll
o
OVEN
~
may vary.
SET knob to
have set.
SET and the
Light(s) at the
tierentiy
the oven will operate as it
spoti easfiy
speed
~
~ED B=.
to the temperature
0~ TEMP
~ED B~
than they do at the
such as d~ eggs,
bacteria growth.
knobs
shodd.
h-
(contiuedmpge)
Page 16

How to
To preheat the left oven, follow these directions:
1. Turn the
in the recipe and the left Oven Cycling Light
come on.
2.
Wen
@s
temperature.)
H
OW
Set
the
Mnge
LE~ OWN
the light goes out, put the food in the oven.
indicates that the oven has reached the desired
to
Set
the
~nge
for
Mheating (Lcft
knob to the temperature
wtil
for
BaKng @ft
Oven) Model
Oven) Model
JCP67
JCP67
Your left oven is designed for a variety of
loads that do not completely cover the oven shelf.
Cookie sheets and
cover the oven shelf are not recommended.
To
set the oven for Baking, proceed as follows:
To avoid possible burns,
mrrect
position before you turn the oven on.
Questions and
Q. Must the clock
of day when I wish to use the automatic timer
for baking?
A. Yes, if
Q.
A. No, your
you wish to use the
dids to turn on and off at the set times during
the time functions.
Can I Time
(model JCP6~?
Time Bake function.
the right oven.
oti-er m;kware
place the shelf in the
that completely
hswers
be set on the correct time
ST~T
Bake in the
mmpanion
compation ~eft)
oven is not equipped with a
E you want to Time Bake use
small
and STOP
oven
food
1.
Turn the
in the recipe.
2. Check the food for doneness at the minimum time
in the recipe. Cook
3.
Turn the LEFT OWN knob to OFF when the food
is done and remove the food.
Q.
mat
automatic timer functions?
A
Meats, fruits and vegetables usually cook well
using the Time Bake function. Foods of a
perishable nature such as
potitry and pork should not be cooked
automatidly
not more than one hour before and after cooking.
Food
it in the oven.
LE~ OWN
.
type of food should I cook using
urdess
shotid
be
knob to the temperature
longer
if
necessarv.
rnil~
standing time in the oven is
thorou~y chflled
.
eggs, fish, stuffing,
before placing
hi~y
16
Page 17

NO~: men
the oven is hot, the top and outside
sutiaws of the range get hot too.
Oven Shelves
For best
bating resdts,
follow these suggestions:
kange
shelf
the desired
w~e
the oven
orshelvesin ~
lo~tions
the oven is
cool. The correct
shelf position
depends on the kind
of food and the
browning
A
a
plaw
desired
gener~
rule, w
most foods in the
mid~e
of the oven, on either
.y
shelf position 2 or 3. See the chart for suggested shelf
wdl
positions. Two
be used more than 3.
fiheating
Preheat the oven if the recipe Ms for it. Preheat means
bringing the oven up to the
specfied
before putting the food in the oven. To preheat, set the
temperati~
temperature does not shorten preheat time.
temperature
lecting
a higheroven at the correct
~pe
of Food
Agel
food cake
I
Biscuits or muffins
Cookies or cupcakes
I
Brownies
hyer *es
I Bundt
or
Dound
cakes
.
Pies or pie shells
Shelf Position
1
1
I
I 2or3
2 or 3
!
I 2or3
2 or 3
I
I
1 or2
1
2 or 3
Frozen pies 1 (on cookie sheet)
&seroles
Roasting
Preheating is necessary for good
Aes,
cookies, pastry and breads. For most casseroles
and roasts, preheating is not necessary.
is
preheate~
place the food in the oven as
2 or 3
1 or 2
restits when baking
Mer
the oven
quic~y
possible to prevent heat from escaping.
I
I
I
I
I
as
Bating
Pans
Use the proper baking pan. The type of finish on the
til
pan determines the amount of browning that
●
Dark rough or
in a browner, crisper crust. Use this
●
Shiny, bright and smooth pans reflect heat,
in a lighter, more deliate browning.
ddl
pans absorb heat
restiting
~
Qkes
occur.
for pies.
resdting
and
wokies require this type of pan.
●
Glass baking dishes dso absorb heat.
in
@ars
baking dishes, the temperature may need to
be reduced by
ti°F.
men
baking
Pan Placement
For even rooking and proper
enough room for air
resdts
wfll
be better if baking pans are centered as
cirtiation
much as possible rather than being
or to the back of the oven.
shotid
Pans
oven.
not touch each other or
Mlow
1- to
11~-inch
as from the back of the oven, the door and the sides.
wo
If you use
directiy
above the other.
shelves, stagger the pans so one is not
brownin
g, there must be
in the oven. Baking
plawd
to the front
the
walls of the
space between pans as well
(contidtipage)
17
Page 18

B-G
~
BD
(mntinued)
Baking Guides
men
using prepared baking
for the best baking results.
ties,
follow package recipe or instructions
Cookies
Men
baking cookies, flat rookie sheets (without
sides) produce better-looking cookies. Cookies baked
dl
in a jelly roll pan (short sides
darker edges and pale or light browning may occur.
Do not use a cookie sheet so large that it touches the
walls or the door of the oven. Never entirely cover
a shelf with a large cookie sheet.
ordy
For best results, use
at a time.
one cookie sheet in the oven
around) may have
B-G
Pies
For best results, bake pies in dark rough or ddl pans
cwt.
to produce a browner, crisper
pans should be placed on an aluminum
for baking since the shiny
from the pie crust; the
Muminum
Never entirely cover a shelf with aluminum foil.
This will disturb the heat circulation and
poor baking. A
to catch a
several inches below the food
Foil
smrdler
spillover
by placing it on a lower shelf
fofi
aokie
sheet of
Frozen pies in
cookie
pan reflects heat away
sheet helps retain it.
result
fofi
may be used
fod
sheet
in
Cakes
Men
baking cakes, warped or bent pans
uneven baking restits and poorly shaped products.
tie
baked in a pan larger than the recipe
A
remrnmends til ustily
than it should be.
recomrnende~
ovefflow.
used is the one
it maybe undercooked and batter may
Check the recipe to make sure the pan size
rewrnmended.
be crisper, thinner and drier
H
baked in a pan
sdler
wfil
than
cause
Don’t
Set the timer for the estimated inking time and do
not open the door to look at your food. Most recipes time. Opening the oven door frequently during
provide minimum and
as
Peek
DO NOT open the door to check
muimurn
‘%ake
30-@ minutes.” longer. Your baking resdts may dso be
baking times such cooking allows heat to escape and makes baking times
untfl
the minimum
affected
18
Page 19

Roasting is cooking by dry heat. Tender meat or
poultry can be roasted uncovered in your oven.
Roasting temperatures, which should be low and
steady, keep spattering to a minimum.
How to Roast in the Right Oven
1.
Place the shelf in position 1 or 2. No preheating
is necessary.
2. Check the weight of the meat.
side-up, or poultry breast-side-up, on roasting rack
SM1OW
in a
pan. The melting fat will baste the
meat. Select a pan as close to the size of the meat as
me
possible.
for this.) Line the
broiler pan with rack is a good pan
brofler
when using the pan for marinating, cooking with
heatiy
fruits, cooking
cured meats or basting food
during cooking. Avoid spilling these
inside the oven or inside the oven door.
3. Turn the
OWN ~MP
be cooked at
4. After roasting is
the
O-
SET knob to
knob to
375°F.
OWN TEMP
325°F. S@l
for best browning.
mmplete,
knobs to OFF.
Plaa
the meat
pan with aluminum
matends
B=
and the
pOd~ my
turn the
OWN
SET and
fat-
fofi
Roasting is
meats.
or
~ED B-. ~ou
soun~
redly a baking procedure used for
~erefore,
oven controls are set to
B=
may hear a slight clicking
indicating the oven is working properly.)
Roasting is easy; just follow these directions:
Most meats
mntinue
to cook
slightiy
while standing,
after being removed from the oven. Standing time
remmmended
for roasts is 10 to 20 minutes. This
allows roasts to firm up and makes them easier to
wrve. Intemd
temperature will rise about 5° to
IO°F.
during standing. To compensate for this temperature
increase, remove the roast from the oven before it
reaches the temperature you want.
NO~:
●
You may wish to use Timed Baking to turn the oven
on and off automatically.
●
Remember that food
wU1
continue to cook in the
hot oven and therefore should be removed when
the desired
intemrd
temperature has been
reached
How to Roast in the
hfi Oven
Model
JCP67
Follow Steps 1 and 2 as outlined in the How to Roast
in the Right Oven section.
Then turn the
LE~ OWN
knob to the desired
temperature. See the Roasting Guide for suggested
temperate settings.
Questions and
Q.
Is
it necessary to check for doneness with
hswem
a meat thermometer?
A.
Checking the finished
intemd
temperature at the
completion of cooking time is recommended.
Temperatures are shown in Roasting Guide. For
roasts over 8
hour intervals after
Q.
my
is
to carve it?
A.
Roasts are easier to slice if allowed to cool 10 to
lbs.,
my roast
check with thermometer at
hdf
the time has passed.
crumbhng
when I try
hdf-
20 minutes after removing them from the oven.
Be sure to cut across the grain of the meat.
NO~: H
you use the broiler pa be sure to
use the pan designated for use in the left oven.
Q.
men
buying a
that would help me cook it more
A
Yes. Buy a roast as even in thickness as possible,
roas~
are there any special tips
everdy?
or buy rolled roasts.
Q. Do I need to preheat my oven each time
I cook a roast or
A
It is not necessary to preheat your oven.
Q.
Can I seal the sides of my
roasting a turkey?
A.
Sealing the foil will steam the meat.
poti~?
fofl “tent”
when
having
it unsealed allows the air to circulate and brown
the meat.
(contiwdnmpage)
10
Page 20

Frozen Roasts
ROAS~G GmE
Right Oven
Frozen roasts of beef, pork lamb, etc., can be started
rdlow
without thawing, but
additiond
time (10 minutes per pound for roasts under
10 to 25 minutes per pound
5 pounds, more time for larger roasts).
Oven
VW
Mat
Temperature
Tender cuts; rib, high quality
sirloin tip, rump or top round*
325° Rare:
Doneness
Medium:
Well Done:
hmb
leg or bone-in shoulder*
325° Rare: 21–25
Medium:
Well
Ved
shoulder, leg or loin*
Pork loin, rib or shoulder*
Ham, precooked
Poultry
Chicken or Duck
Chicken
pi-s
Turkey
*For boneless rolled roasts over 6 inches
tThe U. S. Department of Agriculture says “Rare beef is popular, but you should know that
food poisoning organisms may survive.”
325°
325°
325°
325°
375° Well Done:
325”
thick
add 5 to 10 minutes
(Sourm: Safe
Done:
Well Done:
Well Done:
To Warm:
Well Done:
Well Done:
Food Book. You
Thaw most frozen poultry before roasting to insure
even doneness. Some commercial frozen poultry can
be cooked successfully without thawing. Follow the
directions given on the package label.
Approximate Roasting Time
in Minutes per Pound
3 to 5
lbs.
%30
3&35
6 to 8
1%22
22-25
Ibs.
3M5 %33
a23
2%30
3&35
3W5
3W5
17-20 minutes per pound (any weight)
3 to 5
lbs.
3W0
3M0
10 to 15
Ibs.
1*25
per pound to times given above.
rfi
.tchen Gu
ide.
USDA Rev. June 1985.)
%:
3M
3W
Over 5
3@35
Over 15
1s20
aking
Ibs.
it to
Tempemture ‘F.
lbs.
ordy 140°F.
Internal
130°-1400~
150°–1600
170°-1850
140°-1500~
150°–1600
170°-1850
170°–180”
170°–1800
125°–1300
185°–1900
185°–1900
In
tbi~:
185°-1900
means some
ROAS~G GmE
kft
Oven—Model
Oven
Tempemture
Meat
Tender cuts; rib, high quality
sirloin tip, rump or top round*
Pork loin, rib or shoulder*
Ham, precooked
Poul@
Chicken
Chicken pieces
Comish
Hens
*For boneless rolled
tThe
U. S. Department of Agriculture says “Rare beef is popular, but you should know that
food poisoning organisms may survive.” (Source: &fe Food Book. Your
roasta
over 6 inches thick, add 5 to 10 minutes per pound to times given above.
325°
325°
325° To Warm: 1$20 minutes per pound (any weight)
350°
375° Well Done:
350°
Doneness
Rare:
Medium:
Well Done:
Well Done:
Well
Done:
Well Done:
JCP67
Approximate Roasting
in Minutes per Pound
3
to 4 lb~
%30
3@35
3-5
3M5
3 to 5
Ibs.
33m
1 to 1%
lbs.
1% hrs., approx. total
fitchen
Guide
time
aking
. USDA Rev. June 1985.)
tie
it to only
Interad
Temperature
130°–1400t
150°–1600
170°–1850
170°-1800
125 ”-130°
185°–1900
185°-1900
In tbi@:
185°–1900
140°F.
means some
‘F.
Page 21

BROmmG
Broiling is cooking food by intense radiant heat from the upper element
in the oven. Most fish and tender cuts of meat can be broiled. Follow these
directions to keep spattering and smoking to a minimum.
How to Broil in the
1.
If the meat has fat or gristle around the edge, cut
vertical slashes through both about 2 inches apart.
If
desire~
about 1/8” thick.
2. Place the meat on the broiler rack in the broiler pan.
Nways use the rack so the fat drips into the broiler
pan; otherwise the juices may become hot enough
to
3. Position the shelf on the recommended shelf
position as suggested in the Broiling Guide. Most
broding
4.
Gave
the
The
by itself, yet the proper
temperature is maintained
in the oven.
How to
Follow Steps 1 through 3 as outlined in the How to
Brofi
in the Right Oven section.
bave
LE~ OWN
before
Broding
the
Turn the food
foods for the first side according to the
the fat maybe
~tch
on fire.
is done on position 3.
the door
broil stop position.
door stays open
open
Bmti in
the door ajar about 3 inches. Then turn the
knob to BRO~. Preheat 10 minutes
broding
in the left oven. (See the notes in
Guide.)
ody on~
to
the
Ufi Oven
during
Mght
Oven
tnmrne~
leaving layer
m
m
broding.
Time the
Model JCP67
Broding
Guide.
5. Turn the
knobs to BROIL. Preheating the elements is not
necessary. (See the notes in Broiling Guide.)
6. Turn the food
Time the foods for the first side according to the
Brotiing
Turn the foo~ then use the times given for the
second side as a guide to the preferred doneness.
were
use the first times given for the thinnest fed)
7.
men finishd broiling.
and the
food immediately, leaving the
rack outside the oven to cool during
easiest cleaning.
Turn the
side as a guide to the preferred doneness.
thicknesses and times are given together use the first
times given for the thinnest food)
Turn the
immediately, leaving the pan outside the oven to cool
during the
OWN
SET and the
ordy
once during broiling.
Guide.
two thicknesses and times are given together,
turn the
OWN ~MP”&obs
foo~ then use the times given for the second
LE~ OWN
med for easiest cleaning.
knob to OFF. Serve the food
OWN TEMP
OWN
SET
to OFF. Serve the
broder
pan and
med for
were
two
Questions and
Q.
men
brotiing,
a rack in the pan?
A. Yes.
Q.
A. No.
Using the rack suspends the meat over the
pan. As the meat cooks, the juices
PW
th~
by the rack and stay cooler, thus preventing
excessive spatter and smoking. shelf position. Broil for the longest period of time
Shodd
evaporate. Aways
with
to escape.
each side often with butter.
keeping meat drier. Juices are protected
I
salt the meat before broiling?
Salt draws out the juices and allows them to
tongs; piercing meat with a fork allows juices
hswem
is it necessary to always use
f~
into the
sdt
after cooking.
Men
broiling poultry or fish, brush
Tum
meat
my
are
my
Q.
as they
A h
some areas, the power (voltage) to the oven
may be low.
before placing the
Check to see if you are using the recommended
indicated in the Broiling Guide. Turn food
once during broiling.
meats not turning out as brown
shodd?
k
these cases, preheat for 10 minutes
brofier
pan with food in the oven.
(contiedmpage)
ordy
21
Page 22

BROmmG G~E
Nght Oven
●
Nways
●
me
●
If
use the broiler pan and rack that comes with
your oven. It is designed to minimize smoking and
spattering by trapping juices in the shielded lower
part of the pan.
oven door should be open to the broil
stop position (or about 3“ for the small door).
desired
marinate meats or chicken before
broiling, or brush with barbecue sauce last 5 to
10 minutes
ordy.
●
men
arranging food on the pan, do not let
~ese
fatty edges hang over the sides.
could
soil the oven bottom.
●
~e
broiler does not need to be preheated. However,
for very thin foods, or to increase browning, preheat
if desired.
●
Frozen steaks can be
the oven shelf at next lowest shelf
brotied
by positioning
position
and
increasing cooking time given in tfis guide
1%
times per side.
Food
Bacon
Ground Beef
Well Done
Beef Steaks
Rare
M&ium
Well Done
Rare
Medium
(2 to 2%
Well Done
Chicken
(2 to 2%
split lengthwise
Bakery Products
Bread ~oast) or
2
Toaster Pastries
En@ish
Mtilns
hbster M
2 (split)
24
(6 to 8 oz. each)
Fish
1 inch thick
@recooked)
Pork
Chops
Well Done
kb
Chops
Medium
Well Done
Medium
Well
Done
Wieners
and
2 (1/2 inch thick)
2(1 inch thick),
about
2(1 inch thick),
about 10 to 12 oz.
2
about 1 lb.
l-lb. pkg. (10)
similar precooked
sausages,
bratwurst
Quanti~
andor
Thickness
1/2 lb.
(about 8
thin slices)
1 lb. (4 patties)
1/2 to
3/4
inch thick
1 inch thick
(1 to 1%
1%
Ibs.)
inch thick
lbs.)
1
whole
lbs.>
to
4
sli~s
1
pkg. (2)
l-lb.
fillets
1/4 to
1/2
inch thick
1 lb.
(1%
inch thick),
Shelf
PositioI
3
3
3
3
3
3
3
3
1
3
3
2
3
2
3
2
First Side
Time,
1Y>2
w
1%16
13
10
10
17
Minute!
3%
7
7
9
13
10
:
35
5
8
10
8
6
Second Side
me, Minutef
3%
7
9
13
74
1*16
2&25
l&15
1/2
Do not
turn over.
5
8
10
13
47
10
M
12-14
1-2
Comments
tiange
in single layer.
Spa= evenly.
Up to 8 patties take about same time.
Steaks less than 1 inch thick cook
through before browning. Pan frying
is recommended.
Slash fat.
Reduce time about 5 to 10 minutes
per side for cut-up chicken. Brush
each side with melted butter. Broil
skin-side-down first.
Space evenly.
Plae
English muffins
cut-side-up and brush with butter,
if
desired
Cut through back of shell. Spread
open.
Brush with melted butter before
broiling and after half of broiling time.
Handle and turn very carefully. Brush
with lemon butter before and during
cooking, if desired. Preheat broiler to
increase browning.
Increase time 5 to 10 minutes per side
1%
inch thick or home cured ham.
for
Slash fat.
Slash fat.
If
desired
split sausages in half
lengthwise; cut into 5-to
Ginch pi~s.
22
Page 23

●
Preheat the
BROmmG G~E
hft
left
oven 10 minutes before broiling.
Oven
@odel JCP67)
Food
Med
Med
Rare
Beef Steaks
Rare
Medium
Well
Done
Rare
Medium
Well Done
Pork Chops
Well Done
Wieners
similar
and l-lb. pkg. (10)
pr~ked
sausages,
bratwurst
Quantity
andor
~ckess
1 inch thick
(1 to 1%
1%
(2 to 2%
2 (1/2 inch thick)
2(1 inch
lbs.)
inch thick
Ibs.)
thick).
about 1 lb. “
Shelf
Position
4
4
A
4
4
4
4
4
4
4
4
4
Second Side
~~
Minutes
&9
w
5
:9
11–13
74
12-15
2&25
M
l&12
2-3
Co-ents
Space evenly.
Steaks less than 1 inch thick cook
through before browning.
Pan frying is recommend
Slash fat.
Slash fat.
If desire@ split sausages in half
lengthwise;
eut
into 5- to
&inch
pieces.
Page 24

OPEMmG ~
Before a Clean Cycle
SELF-CL~
Right Oven on Model
JCP67
G
OWN
The range must be completely cool in order to set
the
se~-clean cycle.
1.
Remove the
and any
withstand the high cleaning temperatures.
NO~: The
the self-cleaning oven. However, they will darken,
lose their luster and become hard to slide. Wipe the
shelf supports with @eking oil after self-cleaning
to make shelves slide more easily.
2. Wipe up heavy soil on the oven bottom. H you
use soap, rinse thorou@y before
to prevent staining.
NOTB:
element. Any soil will burn off when the elements
are heated. The bake element can be lifted
to clean the oven floor. H
accumdate
around the element with warm water.
3. Clean spatters or
oven door outside the gasket with a
The oven front frame and the oven door outside the
gasket do not get cleaned by the self-clean cycle.
brofler
pan, broiler rack, dl cookware
rdurninum
Do not clean the bake element or broil
around the bake element, gently wipe
foil from the oven—they can’t
oven shelves maybe cleaned in
seU+leaning
gendy
spillovers,
Flr
II
1
]-:
~en
iJ
-
sofi
on the oven front frame and the
residue or ash
enugm
en Front Frame
Door Gasket
Openings in Door
dampend
cloth.
On
these areas, use detergent and hot water or a
soap-filled steel wool pad. Rinse well with a
wtil
vinegar and water solution. This
a brown residue from forming when the oven is
heated. Buff these areas with a dry cloth. Do not
clean the gasket. Never use a commercial oven
cleaner in or around the self-cleaning oven.
Clean
the top,
door with soap and water.
oven cleaners.
Make sure the oven light bulb cover is in place.
Do not rub or clean the door
the fiberglass
extremely low resistance to abrasion. An intact
and well-fitting oven door gasket is essential for
energy-efficient oven operation and good baking
results. If you notice the gasket becoming worn,
frayed or
displaced on the door, you
Do not let water run down through openings in
the top of the door.
getting in these slots when
as far as it will go.
4. Close the oven door and make sure the oven
light is off. If the oven light is not turned off,
the life of the bulb will be shortened or it may
bum out immediately.
Do not use commercial oven cleaners or oven
protectom
A combination of any of these products plus the
high clean-cycle temperature may damage the
porcelain finish of the oven.
sides and outside front of the oven
Do not use abrasives or
matend
&rnaged
in or near the
of the gasket has an
in any way or if it has become
shotid have it replaced.
To help prevent water from
cleanin
se~-cleaning
help prevent
gasket—
g, open the door
oven.
How to Set the Oven for
@@
1.
Turn the
to
CLEAN.
2. Make sure that both the range clock and the START
dird
STOP time
time, MS autornatidly locks the door. (3 hours for
normal cleaning time.)
OWN
SET and the
show the correct time of
did on the timer to the desired cleaning
Cleantig
OWN ~MP
&y.
Push and turn the
knobs
●
The Oven Cleaning Light
●
The Oven Cycling Light
off and on when your oven has reached the clean
temperature.
●
The door
switch is turned off and the Oven Cleaning Light
is off.
til automaticrdly urdock
will be on continuously.
til
be on. It will cycle
when the oven
Page 25

Afier
a Clean Cycle
1.
When the
OVEN
Oven Cleaning Light is off,
TEMP
knob to OFF.
turn the
2. Turn the OVEN SET knob to OFF. The door
automatidly unlatch and dl signal lights
will
will be off.
NOTE: H you wish to start and stop clean at a later
time than shown on the
ST~T
did to the time you wish to start. Add the
clock push in and turn the
hours needed for the cleaning to this start time, then
push in and turn the STOP
desired time. The oven
(CL-
wi~
automatidly turn on
did to the
and off at the set times.
To Stop a
CA~ON:
Clan
Cycle
After setting the oven for a clean cycle,
do not try to open the oven door as this can damage
the automatic door-locking system.
If you want to use the
cycle is done, turn the OVEN SET and
TEMP knobs to
door will unlock and can then be opened.
CA~ON:
accidentily,
Should the oven door become locked
to
open the door, turn the OVEN SET
ov~n-any
0~. Mer
time before a clean
the
OVEN
the oven cools, the
knob back to CLEAN, push in and advan~ the STOP
did past the time of day. Wait one minute then turn
the OVEN SET knob to OFF. Wait a few seconds and
the door may be opened.
Questions and Answers
Q.
Kmy oven clock is not set to the correct time
of day, can I
A.
If the clock is not set to the correct time of day
til
you
at a specific time.
Q. k
the ‘Ccracfing’y
during cleaning normal?
A. Yes. This
cooling during both the cooking and cleaning
functions.
Q. My oven shelves do not
mat
is the matter?
A.
After many cleanings, oven shelves may become
so clean they do not slide
shelves slide more
function dampen fingers with a
cooking od and rub
where they
Q.
mat
causes the
surface of my oven?
A. This
is a
and cooling during cleaning. These lines do not
~ect
how your oven performs.
Q. Should there be any odor during the cleaning?
A. Yes,
there will be an odor during the first few
cleanings.
dso muse
stil
se~-clean my oven?
not be able to set a delay clean to end
or ‘@pping” sound I hear
is the sound of the metal heating and
sfide
easily.
easdy.
To make the
easdy,
after each self-cleaning
sdl
amount of
Iightiy
over sides of shelf
mntact
shelf supports.
hair-fike tines
noti conditio~
Fafiure
to wipe out exessive
on the enameled
resulting from heating
sofi
might
a strong odor when cleaning.
If the door latch finger becomes positioned so as
to keep the oven door from closing
can be corrected as follows:
“
Make sure the oven is
●
Open the oven door, turn the
mol.
aU
OWN
SET knob to
the way, this
CLEAN. Push in and advance the STOP dial past
the time of day. Push in the oven interlock button
@utton
is at the right top of the oven door opening)
and hold the button in for about 15 seconds.
●
Next, turn the OVEN SET knob to OFF and again
push in the oven interlock button for about 15 seconds.
The latch finger, being motor driven,
wfll
turn so the
oven door may be closed.
Q.
my
do I have ash left in my oven ~r cleaning?
A
Some types of soil will leave a deposit which is
ash. It can be removed with a damp sponge or cloth.
Q.
mat
should I do if excessive smoking occurs
during cleaning?
A.
~s
is caused by
ex~ssive sofl.
Turn the oven off.
Open the windows to rid the room of smoke. Wait
until the oven has cooled and the word “LOCK” is
SON
off in the display. Wipe up the excess
and reset
the clean cycle.
Q. Can I use commercial oven cleaners on any part
of my
se~-cleaning oven?
A
No cleaners
or coatings
shotid
be used around any
part of this oven. If you do use them and do not
thorougtiy
absolutely clean afterwards, the residue m
the oven surfa~ and damage
time the oven is
Q. My oven
se~-clean
A. Yes.
rinse the oven with water, wiping it
sa
meti
parts the next
automatidly cleaned.
shelv~
have become gray after the
cycle. h this normal?
After the self-clean cycle, the shelves may
lose some luster and change to a deep gray color.
Q.
my
won’t my oven clean
immediatiey
even
though I have set d] the time and clean knobs
Correctiy?
A.
~eck
to be sure that your
same time as the oven
ST~T dird
clock
is set to the
9<
Page 26

;.:;..:<
.:+,
C~MCL~G
w
Proper care and cleaning are important so your range will give you efficient
OI1OW
and satisfactory service. F
help assure safe and proper maintenance.
BE SURE
OF THE RANGE.
ELE~C PO~R
these directions carefully in caring for it to
IS OFF BEFORE CLEANING ANY PART
P
d
d
~
A
range is replaced. Failure to take this precaution could result in
tipping of the range and cause injury.
Sufiace Unifi
To clean the surface units,
highest setting for a minute. The coils will bum off
any soil.
CA~ON
●
Be sure
the surface units are cool before attempting to
remove them.
●
Do not immerse the surface units in
of any kind.
●
Do not clean the surface units in a dishwasher.
●
Do not bend the
●
Do not attempt to clean, adjust or in any way repair
the plug-in receptacle.
To remove a surface unit:
To remove the drip pans for cleaning, the surface units
must be removed first.
Lift the surface unit about 1 inch above the drip pan
and
Do not
If
you do, it may not he flat on the drip pan when
you plug it back in.
your range is removed for cleaning, servicing or any reason,
be sure the anti-tip device is
and
Dfip
Pans
tum
the control to the
all
the controls are turned to OFF and
surfam
unit plug
Sutiace
Unit
\
\
u’
pdl
it out.
tift
the surface unit more than 1 inch.
re-engaged
li~ids
terrninrds.
Drip Pan
properly when the
Drip Pans
Remove the surface units. Then lift out the drip pans.
For best
Place them in a covered container (or a plastic bag)
wi~
with a soap filled scouring pad if
with
The
Black
a self-cleaning oven after they have been
rinsed However, self-cleaning them may cause them
to lose their
Clean
Built-up
Do not cover the drip pans with
so close to the receptacle
damage to the range.
Repeated hfting of the surface unit more
than 1 inch above the drip pan can permanently
damage the receptacle.
To replace a surface unit:
●
Replace the drip pan into the recess in the
cooktop.
with the
c
Insert the terminals of the
opening in the drip pan and into the receptacle.
●
Guide the surface unit into plain so it rests
d
A
E
Make sure opening in the pan lines up
rewptacle.
surfaw
unit through the
everdy.
resdts, clean
1/4
CUP
ammonia to loosen the
clm
water and polish with a clean soft cloth.
tip
pans may dso be cleaned in the dishwasher.
drip pans (on some models) may be cleaned in
ong~
the area under the drip pans often.
sofl,
especially grease, may catch on fire.
the drip pans by hand.
sod.
n~ssary.
luster and shine.
foil.
Using foil
codd cause
shoc~
Then
scmb
Rinse
thorou@y
fire or
Pomelain
The porcelain enamel finish is sturdy but
breakable if misused.
However, any acid foods spilled (such as fruit
tomato or vinegar) should not be permitted to remain
on the finish.
x
Enamel
This finish is acid-resistant.
CooMop
juiws,
U
acids spill on the
a dry paper towel or cloth to wipe it up right away.
Men
the surface has
water. Rinse well.
For other
soap and water or cleansing
has
spi~s
woled.
Rinse well. Polish with a dry cloth.
cooktop while
coole~
such as fat
it is ho$
wash with soap and
spattenngs,
powdem
after the surface
use
wash with
Page 27

,.
.-.
-..
..
..:>,<
,,.
:
..-,
.,
u
Control Panel and
Clean
Remove heavier soil with warm, soapy water. be removed for easier
Clean control panel with mild liquid dish detergent
and a soft cloth. Rub
CA~ON:
on the control panel.
Lifi-Up
Clean the area under the
especially grease, may catch fire.
To make cleaning easier, the entire
lifted up and supported in the up position.
Be sure W surface units are turned off before
raising the
cooktop
not
however, you may remove one to make raising the
cooktoD
up any spills or
Do not use abrasives of any kind
CooMop
cootip.
and
lift. me
ne~d
to be removed before raising
easier.
.
fiobs
spattem
with a damp cloth. The control knobs may
wntrol
panel lightly.
cooktop
Grasp the front sides of the
surface units
often. Built-up soil,
cooktop
and .?tiD Dans
may be which may slide off
do
:tie ‘~oktop,
cleaning. To remove a
knob,
pdl
it straight off
the stem. Wash the
knobs in soap and
water but do not soak.
To
lifi
the
cooktop:
dl
1. Remove
the
cooktop.
2. With both hands,
grasp the front edge
of the
3. Lift the
4. Raise the support rod and let the
Clean under the
and a clean cloth.
To lower the
1. Lift the
2.
Lower the
items
cooktop.
cooktop.
cootip:
cooktop
moktop
coo~p
and lower the support rod
and allow it to lock into position.
with
cooktop
ho~
mild soapy water
rest on it.
Cleaning Under the
The area under the range can be reached
for cleaning by removing the bottom drawer.
To remove, pull the drawer out dl the way, tilt up the
front and remove it. To replace, insert
back of the drawer beyond the stop on range
Lift the drawer if
front of the drawer down, then push in to close.
Backplash Light
Press the backsplash light switch for ON.
Press again for
To replace the light
1.
If the light cover has screws, remove the four “
screws that hold it in position. Two are located
on top of the backsplash and two are
the backsplash overhang.
2.
If there are no screws or after they are
the cover away and twist out the
nwssary
O=.
Mnge
Iomted
eastiy
@ides
at the
to insert
in the backsplash:
easdy. tit
Ioated
removed
fluores%nt
@ides.
the
under
lift
light.
~1+
&
,-:=
CA~ON:
3. Insert the new fluorescent light and twist into the
lock position. (Check to make sure the new light
operates. If
4. Replace the backsplash cover and reinsert the
screws that hold it into position (on some models).
Be sure the light is cool before removing.
no~
the light maybe blown.)
1 ‘ “
1
(conthwdtipage)
27
Page 28

CM
N
(continued)
Oven Light
The
oven light has a
spring wire to protect the oven
the
CA~ON:
disconnect the electrical power for the range at the
main fuse or circuit breaker panel or pull the plug.
Be sure to let the light cover and btib cool
before removing or replacing.
-
oien.
Before replacing your oven bulb,
@ass
lens held in place with a
bdb
from the heat of
~mpletely
CL~G
To
remove the
1.
Swing the wire to the side and hold.
2. Lift off the
3. Remove the bulb.
To replace the light bulb:
1. Insert a new
2. Replace the lens over the socket.
3. Swing the wire over the glass lens.
4. Reconnect the
NO~:
the oven is in use.
The glass lens must be in
tight bdb:
@ass
lens.
~
watt appliance bulb.
electnd
power to the range.
pla~
whenever
Broiler Pan and
After broiling,
Remove the rack from the pan. Carefully pour out
grease from the pan into a proper container. Wash and
rinse the broiler pan and rack in hot water with a
soapfilled
If food has burned on,
detergent
or a dishcloth. Soaking the pan
on foods.
The broiler pan may be cleaned with a commercial
oven cleaner. Do not use an oven cleaner on the rack.
or plastic scouring pad.
whfie
Mck
remove the broiler pan from the oven.
sprirdde
hot and cover with wet paper towels
the rack with
wdl
remove burned
Oven Shelves
Clean the shelves with an abrasive cleanser or
steel wool.
clean water and dry with a clean cloth.
NO~:
self+l~ng
wtil darke~
Wipe the shelf supports with rooking
cleaning to make shelves slide more
After cleaning, rinse the shelves with
The oven shelves maybe cleaned in the
oven (on some models). However, they
lose their luster and become hard to slide.
oti
after
self-
easdy.
Both the
the dishwasher.
Do not store a soiled
in
the range.
Do
se~-cleaning oven (on some modek).
brofler
pan and rack can also be cleaned in
broder
pan and rack anywhere
not clean the broiler pan or rack in the
Oven Heating Elements
Do not clean the bake element or the
hy
soil will bum off when the elements are heated.
The bake element can be lifted gently to clean the
oven floor.
around the bake
element with warm water.
%
H sptilovers,
residue or ash accumulate
element gently wipe around the
broti element
Broil Element
Bake Element
Page 29

Lifi-Off Oven Door
Most normal oven cleaning can be done without
is
removing the oven door. The door
may need help removing and
hande.
lift the door by the
to break or can
To remove the
open it
dl
Remove
Muse
dooq
the way.
the
bracket
This
damage to
Scrw
(on some models) above
each hinge by taking out
the screws. Replace the
screws back into the
existing holes. Save the brackets.
Hold the door
fidy
on each side
lift it straight up and off the hinges.
NOTE: Be
carefi
not to place
between the hinge and the oven door
frame as the hinge could snap back
and pinch fingers.
To replace the
dooq
make sure the
hinges are in the special stop position.
Position the slots in the bottom of the
door squarely over the hinges at the
H
same time.
against the oven frame,
R>place
the hinges snap back
ptil them back out.
the brackets on-each hinge (on some models).
heavy. You
replac q
ca
th
.
/
a
hand-.
it. Do not
use
the glass
.?or.
~
‘+
TO
CLU ~E
Inside of door:
●
Clean the inside of the oven window with a mild
DOOR:
(not on self-cleaning models)
non-scratching cleaner and a damp cloth.
●
Soap
and water
spattering or
wU1
normally do the job.
spillovers
may require cleaning with
Heavy
add abrasive cleaner. Soapy, wet metal pads may
dso be used. Do not allow food
sugar or acid content (such as
spflls
ti~
tomatoes,
with a high
sauerkraut, fruit juices or pie filling) to remain on
ause
the surface. They may
a dull spot even after
cleaning.
●
If necessary, you may use an oven cleaner
(not on self-cleaning models).
Follow the package
directions.
Outiide of
●
Use soap and water to
doo~
thoroug~y
clean the top,
sides and front of the oven door. DO NOT let water
run down through openings in the top of the door.
dso
use a
@ass
Rinse well. You may
@ass
clean the
●
Spdlage
and basting
on the outside of the door.
of marinades, fruit juices, tomato
rnaterids
containing acids may cause
cleaner to
saums
discoloration and should be wiped up immediately.
men
the surface is
●
Do not use oven cleaners, cleansing powdem
or harsh abrasives on the
ml, cl-
and rinse.
ouhide
of the door.
(contiwd&page)
29
Page 30

POmelain Oven
With proper care, the
Interior
por~lain enamel
(JCS57—both
ovens;
finish on the
JCP67—lefi
inside of the oven—top, bottom, sides, back and
inside of the door— will stay new-looking for years.
bt
the range cool before cleaning. We
remmrnend
that you wear rubber gloves when cleaning the range.
Soap and water will normally do the job. Heavy
spattering or
mfid
abrasive cleaner. Soapy, wet metal pads may
be used. Do not allow food
acid content (such as
juices or pie filling) to remain on the surface.
may cause a
spillovers
ddl
may require cleaning with a
sptils
with a high sugar or
mfik,
tomatoes, sauerkraut, fruit
spot even after cleaning.
rdso
~ey
Household ammonia may make the cleaning job
easier. Place 1/2 cup in a shallow glass or pottery
mntainer
in a cold oven overnight. me ammonia
times will help loosen the burned-on grease and food.
oven only)
If necessary, you may use an oven cleaner.
Follow the package directions.
Cautions about using spray-on oven cleaners:
●
Do not spray on the
because it could cause a short circuit and
electrid
controls and switches
resdt
in
sparking or fire.
●
Do not allow a film from the cleaner to build up
on the temperature sensor—it could cause the oven
me
to heat improperly.
of the oven.)
tiefully
each oven cleaning, being
sensor is located at the top
wipe the sensor clean after
careti
not to move the
sensor as a change in its position could affect how
the oven bakes.
●
Do not spray any oven cleaner on the oven door,
handes or any exterior surface of the oven, cabinets
me
or painted surfaces.
cleaner =n damage these
surfaces.
30
Page 31

BEFORE YOU BEGIN
Read these instructions completely and
~ORT~:
Iocd electrid
WORTM:
and ordinances.
NOTE TO
instructions with the
ins~tion
N~ ~ CONS~R
We
Guide and
fiture
use.
Save these instructions for the
inspectors use.
Observed governing codes
~~~~
is completed.
kstiation kstructions
be
appfiance
&ep
this Use and
these
after
carefu~y
for
MODEM WITH
FA~ORY
CONNE~ED
POWER SUPPLY CORD
Some models may be equipped with a factory
connected 3 conductor power supply cord.
Mobfle
codes do not permit grounding through neutral,
a 4 conductor power supply cord kit rated at
125/250
investigated for use with ranges
Terrninds
loop or
home initiation or area where local
VOltS
minimum, 40
on end of wires must be either closed
open+nd spade lugs with upturned ends.
=PS
shd
and
be used.
ELECTRIU
This
appfiance maybe
of
permanent
kit
cord
It is the personal responsibtity of the customer
to contact a
the
electrid
conformance
10A
and
~E WGE
COPPER=
not be used to avoid
connections.
POWER SUPPLY CORD
This
app~ance
power supply cord kit.
kit rated at 125/250 volts
amps
and marked for use with ranges
used. Cord must have 3 conductors,
Mobtie
codes do not permit grounding through
a 4 conductor power
125/250
marked for use with ranges
Terminals on end of wires must be either closed
loop or
Cord must have strain
home initiation or area where
REQUIREMENTS
connected by
“hard wirin<
qu~ed
initiation is adequate and is in
with
the National Electrical Code
codes and ordinances.
MUST BE
ONLY. Numinum wire must
or power supply
technician to assure that
CONNE~D =
potentidy msatisfactory
mems
WT
maybe connected by means of a
Ordy
a power supply cord
minimum, 40
shd
be
lod
neuti,
supp~
cord kit rated at
VOltS
minimum, 40
open+nd spade lugs with upturned ends.
rehef
sh~
cbp.
=PS
and
be used.
apptiance
This
terminal connected to the frame.
1.
Uld
tie
wire of the copper power supply cord:
grounding conductor to the
A
Remove the screws and raise the terminal
block cover
B.
me
below the terminal block
N~:
C. Connect the
power supply cord to the center
teti
outer
Ring type terminals must be used on copper
power supply cord wires.
D.
Replace the terminal block cover.
is
mandctured
codes permit
~ower
part of the back wire cover).
terminal nuts are taped to the frame
Do not loosen
of the
ties
to the outer
neuti
teti
wire of the copper
with the
connetion
bctoryinstied
sflver
block and connect the
tetis.
neuti
See
neuti
of
nuts.
colored
Piie
tie
1.
FIGURE
l(conttimpage)
31
Page 32

2. Mconnectingto a four-wire electrical system
(mobile home):
A
Remove the screws and
terrnind
B.
block cover.
Remove the ground strap
terminal block and from the
frame.
Reti
the ground screw.
C. Connect the ground wire
tise
the
born
the
apptiance
been)
of the
copper power supply cord to the frame of
apptiance
the
with the ground screw, using
the hole in the frame where the ground
strap was removed.
D.
Connect the
neuti
%e F~e
(white) wire of the
2.
copper power supply cord to the center
sflver
colored
terrnind
of the
terrnind
block and connect the other wires to the
teds.
outer
E.
Replace the
terrnind
block cover.
To
ehate
surface elements,
the
hward
of reaching overheated
mbinets or storage spaces
should not be provided over a range.
Hcabinets are provided, the
reduced by
hotiontiy
insfig
a
minimum of 5“ beyond the botiom
a
h-d
rmge
can be
hood that projects
of the cabinets.
men ins~g
refer to figure below for the
needed. Do not
CA~ON: men
&scard the 4 shipping
levehg
Ha
legs.
service cord is used, the wd receptacle
the range between base cabinets,
ske
of the opening
sed
the range to cabinets.
unpacking the range, do not
bolb
as these are the
should be located in accordance with the
dimensions below.
~
Of Range
1
I
32
FIGURE
I
\
2
CORD.
J
~
=’
Dtiided Cootiop
‘~<*Note2
(40” Range)
\
Wall
\
2
Page 33

me
figure below shows the recommended
initiation relationship of the ranges to the
vertid wds
Please note the following:
N~:
1.
The
directiy
~ese
2.
“O”
spacing from the range to adjacent
WWS
above the countertop level. However, to
reduce possible scorching
~
surface unit use conditions such as high heat or
no pans, a minimum of 2“ spacing should be
provided on both sides of the
3. To
etiate
heated surface units, cabinet storage space
located above the surface units should be
avoided.
a
be reduced by
projects
the bottom of the cabinets.
of the surrounding structure.
back of the range maybe
against the rear
ranges conform to W requirements for
potential
the
E
a cabinet is to be provided, the
hotiontiy
WW
ofvertid wds
tie h-ds
h-d
of reaching over
ins-g
a
minimum of 5“ beyond
instiled
of the structure.
vertid
and to
under
cooktop.
a range hood that
abnoti
hwd
IMMRTUT WEm WMNIHG
This range
floor by using the included anti-tip
screws.
the range to
weight is placed on an open door or if a
chbs
spfled hot
to the instructions below for proper
N~: E
location, the anti-tip brackets must
moved and
~-~
~STUnON
Tools
5/16”
Adjustable Wrench
3/8”
3/16” Diameter Masonry
in concrete)
Brackets
to hold
tie
floor, be sure that screws do not penetrate
electrid
d
work in either wood or concrete.
1.
Unfold the paper template and pb it
tie
floor with the back and side edges positioned
-y
be
lomted
l~te
the brackets
must be properly secured to the
brackek
Fdure
upon it. Serious injury might result from
Rqtied:
Nutdriver
Electric
boti
wiring or plumbing. The screws provided
where the back and sides of the range
to
insti
the brackets
accidentiy
Equids
the range is ever moved to a different
a~ch
when
or from the range
kstied
BRAC~
Dfl
to the floor at the back of
rear leg levelers. When fastening to
instied. ~se
tip over if excessive
itse~.
ks~tion.
dso
with the range.
~~U~ONS
or
Nat
Head Screwdriver
& 3/16” Diameter Bit
Dfl (ifins~g
the diagram to
tithe
tempbte is not
and
cotid ~ow
ctid
Refer
be
tie
range
fit
on
W
a~ble.)
2. Mark on the floor the location of the 4
nounting holes shown on the
:asier
ins~ation,
1/2” deep
3. Remove
)n
the floor with turned up flanges to the
tie
up the holes in the brackets with marks on
he floor and attach with the 4 screws provided.
3rackets
lttaching
tiameter
t.
hvel
I
leg levelers with a wrench. @minimum
:learance
}f
the range and the rear
j.
Shale the range into place making sure the
ear legs are trapped by the ends of the brackets.
%e
range may need to be shifted
ideas it is being pushed back to
sgs
to
torage drawer to inspect brackets or grasp the
Bp
rear edge of the range and
~ tit
Iroper&
m
must be secured to a
to masonry floor, first
pflot
the range if necessary, by adjusting the
of 1/8” is required between the bottom
dgn
it forward to make sure the range is
anchored.
Bd
Edge of
3/16” diameter
be
~ed
tie
template and place the brackets
holes using a concrete bit
with the brackets. Remove the
Rmge
or Re~
I
tempkte.
into the
sohd floor. U
levekg
wefu~y
WAI
pflot
floor.
dfl
3/16”
feet)
stighfly
dow
For
holes,
tiont
to one
the rear
attempt
I
33
Page 34

●
USE
QUESmONS?
mS
PROBLEM
SOLmR
PROBLEM
I
POSSIBLE CAUSE
If you need more
The GE Answer Center”
800.626.2000
consumer information
34
help...dl,
setice
toll free
Page 35

Wdll
With the
information or
AGE
consumer service professional will provide expert repair service,
scheduled at a time that’s convenient for you. Many
company-perated
venience
Our factory-trained technicians know your appliance inside and out–so most
repairs can be handled
Be There
purhase ofyournew
assis~ce horn
locations offer you service today or tomorrow, or at your con-
(7:00
a.m. to
7:00
p.m. weekdays,
injust
one visit.
GE appliance, receive the
GE,
w~fl
9:00
be there.
GE Consumer Service
a.m. to
2:00
AUyou
p.m. Saturdays).
XSurance that
have to do k cdl–toll-free!
GEAnswer&nte~
ifyou
ever need
Whatever your question about any GE major appliance, GE Answer
information service is available to
answered
Center”
prompdyand
service is open 24 hours a day, 7 days a week.
courteously. And you can cdl anytime. GE Answer
For Customer
Upon request, GE will provide
Braille controls
appliances,
assist in
—
kitchen
mobflity.
free of charge,
hel~
Your
cdl—and yourquestion-will
W&
SpecialNeeds...
for atietyof
and
a brochure to
plannir~g
forpersonswith tiited
To obtain these items,
a barrier-free
cd
800.626.2000.
GE
CenterQ
be
Consumerswiti
access to a
cdl 80&TDK~C
information
TDD
orsefice.
SewiE &n@a*
80W2&2224
You =n have the secure feeling that GE Consumer
a
after your warranty expires. Purchase
in effect and you’ll receive a substantial discount. With a
you’re assured of future service at
GE contract while your
toda}”s
prices.
Servicetil
multipleyear
still be there
warranty is still
contract,
impaired hearing or speech who have
or a conventional
(80
W3~322)
teletyptiter
to request
may
Pa& andAassories
80~262002
k~dti
can have needed parts or accessories sent
their home. The GE parts system provides access to over
47,000 pm... and dl GE Genuine
fuuy
are accepted.
q-cd
warranted. VISA, MasterCard and Discover cards
to
-=
ti~-
Rened
apptieea
direcdy
Parts are
to
User
overptiures
Otier*einggen~tiodd
deepersonnd Gutionmustbe =tiproperaervi~rnay =use -e
fi_ce
titruedons ~ntiedrn W
intended to be
perfomedbyany=.
be
ref~to q~ed
operation.
boo~et
sina
Page 36

YOUR GE ELECTRIC
WARRANW
MNGE
Staple sales slip or
cancelled
check
here. Proof of original purchase date
is needed to obtain
under
warran~.
semice
WMT
WMT
IS
CO~RED
IS NOT COWRED
FULL ONE-YEAR
WARRANW
For one year from date of original
purchase, we will provide, free of
charge,
pans
and
sewics
labor in
your home to repair or replace
anypafi
of
tie
range
that fails
because of a manufacturing
defect.
●
Service trips to your home to teach
you how to use the product.
Read your Use and Care material.
If you then have any questions
about operating the product,
please contact your dealer or our
Consumer Affairs office at the
address below, or call, toll free:
GE Answer
CenteP
800.626.2000
consumer information
●
Improper installation.
seM.ce
If you have an installation problem,
contact your dealer or installer.
You are responsible for providing
adequate electrical, gas, exhausting
and other connecting facilities as
described in the Installation
Instructions provided with the
product.
This warranty is extended to
the original purchaser and any
succeeding owner for products
purchased for ordina~ home use
in the 48 mainland states, Hawaii
and Washington,
D.C.
In
Naska
the
warranty is the same except that it
is LIMITED because you must pay
to ship the product to the service
shop or for the service technician’s
travel costs to your home.
All warranty service will be
provided by our Factory
Sewice
Centers or by our authorized
Customer
Car@
servicers during
normal working hours.
Should your appliance need
service, during warranty period or
beyond,
=11
800-GE-CARES
(800-432-273~.
●
Replacement of house fuses or
resetting of circuit breakers.
●
Failure of the product if it is used
for other than its intended purpose
or used commercially.
●
Damage to product caused
by accident, fire, floods or acts
of God.
WARRANTOR IS
NOT
RESPONSIBLE FOR
CONSEQUENTIAL DAMAGES.
Some states do not allow the exclusion or
may not apply to you.
To know what your
Part
No, 164D2966P1M
Pub
No.
4S8564
1O-W CG
~is
warranty
Iegd
rights
If further help is needed concerning this warranty, write:
Manager<onsumer
1
gives you
ara
in your state, consult your
Iimbtion
of
incide~
specfic Iegd
Warrantor: General Electric Company
Affairs, GE Appliances, Louisville, W 40225
or consequential damages, so the above
rights, end you may
Iod
or state consumer
dso
have other
atirs ofice
lim~on
righ~
which vary
or your state’s Attorney General.
or exclusion
horn
state
to
state.
JCS57 JCP67
Ptinted
in Canada
208281-1010 Rev. 1
 Loading...