

Page 1
USER MANUAL
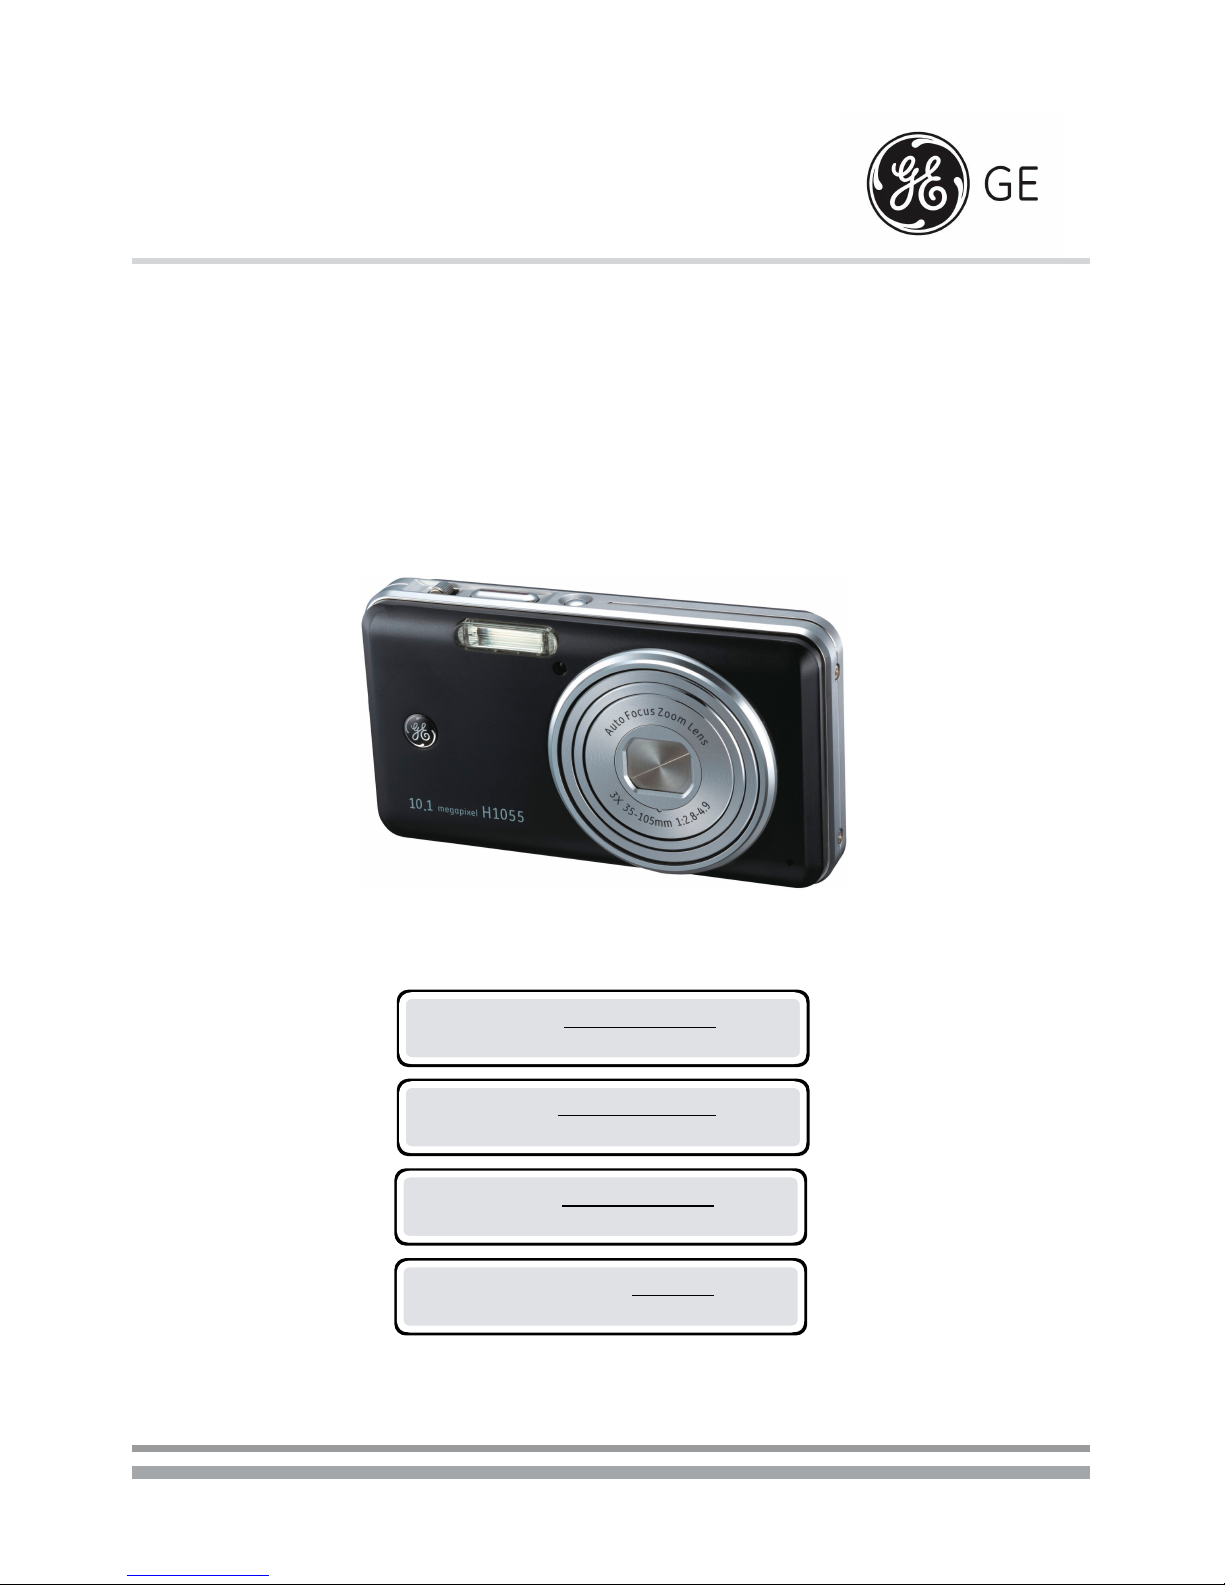
Digital Camera
H1055
ENGLISH
P.01
FRENCH
P.17
PORTUGUESE
P.49
SPANISH
P.33
Page 2

Page 3
1
EN
Thank you for purchasing GE digital cameras. Please read this manual
carefully and keep it in a safe place for future reference.
Copyright
© Copyright 2007 General Imaging Company All rights reserved.
No part of this publication may be reproduced, transmitted, transcribed,
stored in a retrieval system, or translated into any language or
computer language, in any form, by any means, without the prior written
permission of General Imaging Company.
Trademarks
All trademarks mentioned in this manual are used for identification
purposes only and may be properties of their respective owners.
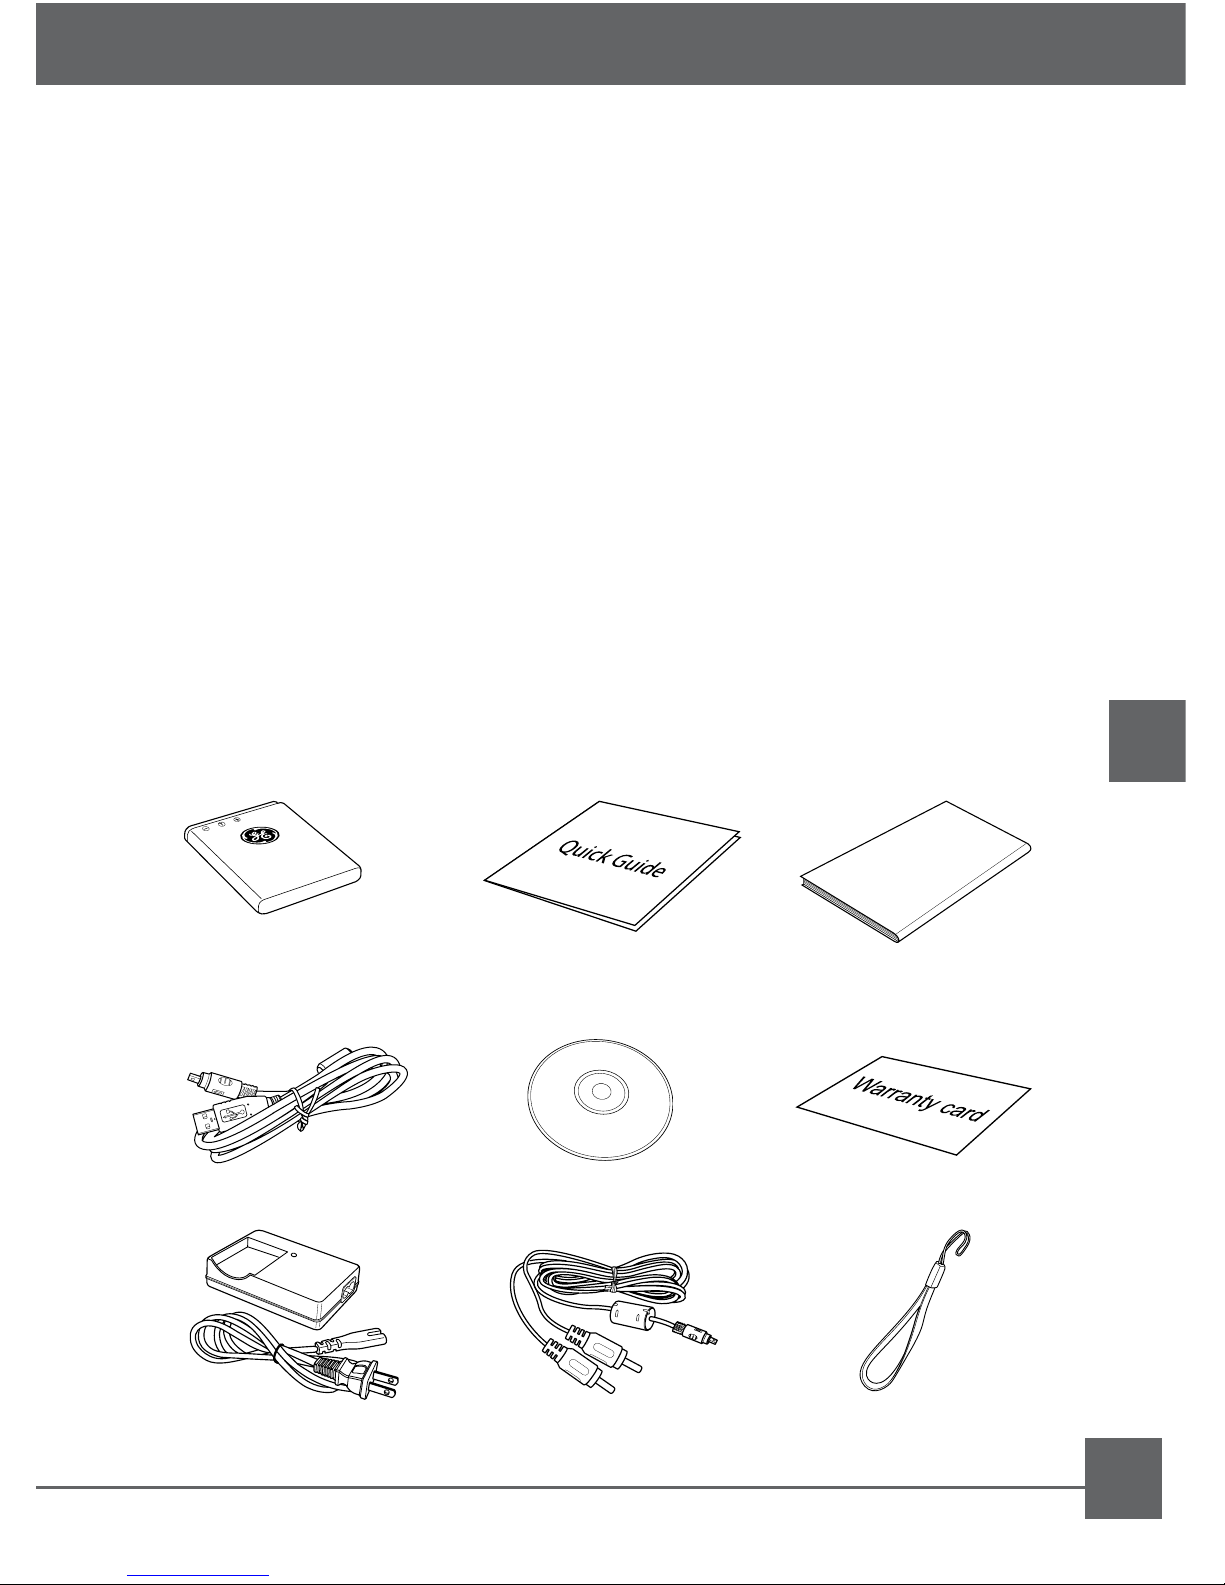
Unpacking
Your package should contain the camera model you purchased along
with the following items. If anything is missing or appears to be
damaged, please contact your vendor. (The accessories will vary based
on model purchased and are noted below.)
Preface
USB cable
AV cable
CD-ROM
User Manual
User Ma
n
ual
Warranty card
Wrist strap
Rechargeable
Lithium-ion battery
Battery charger
Quick start guide
Page 4

2
EN
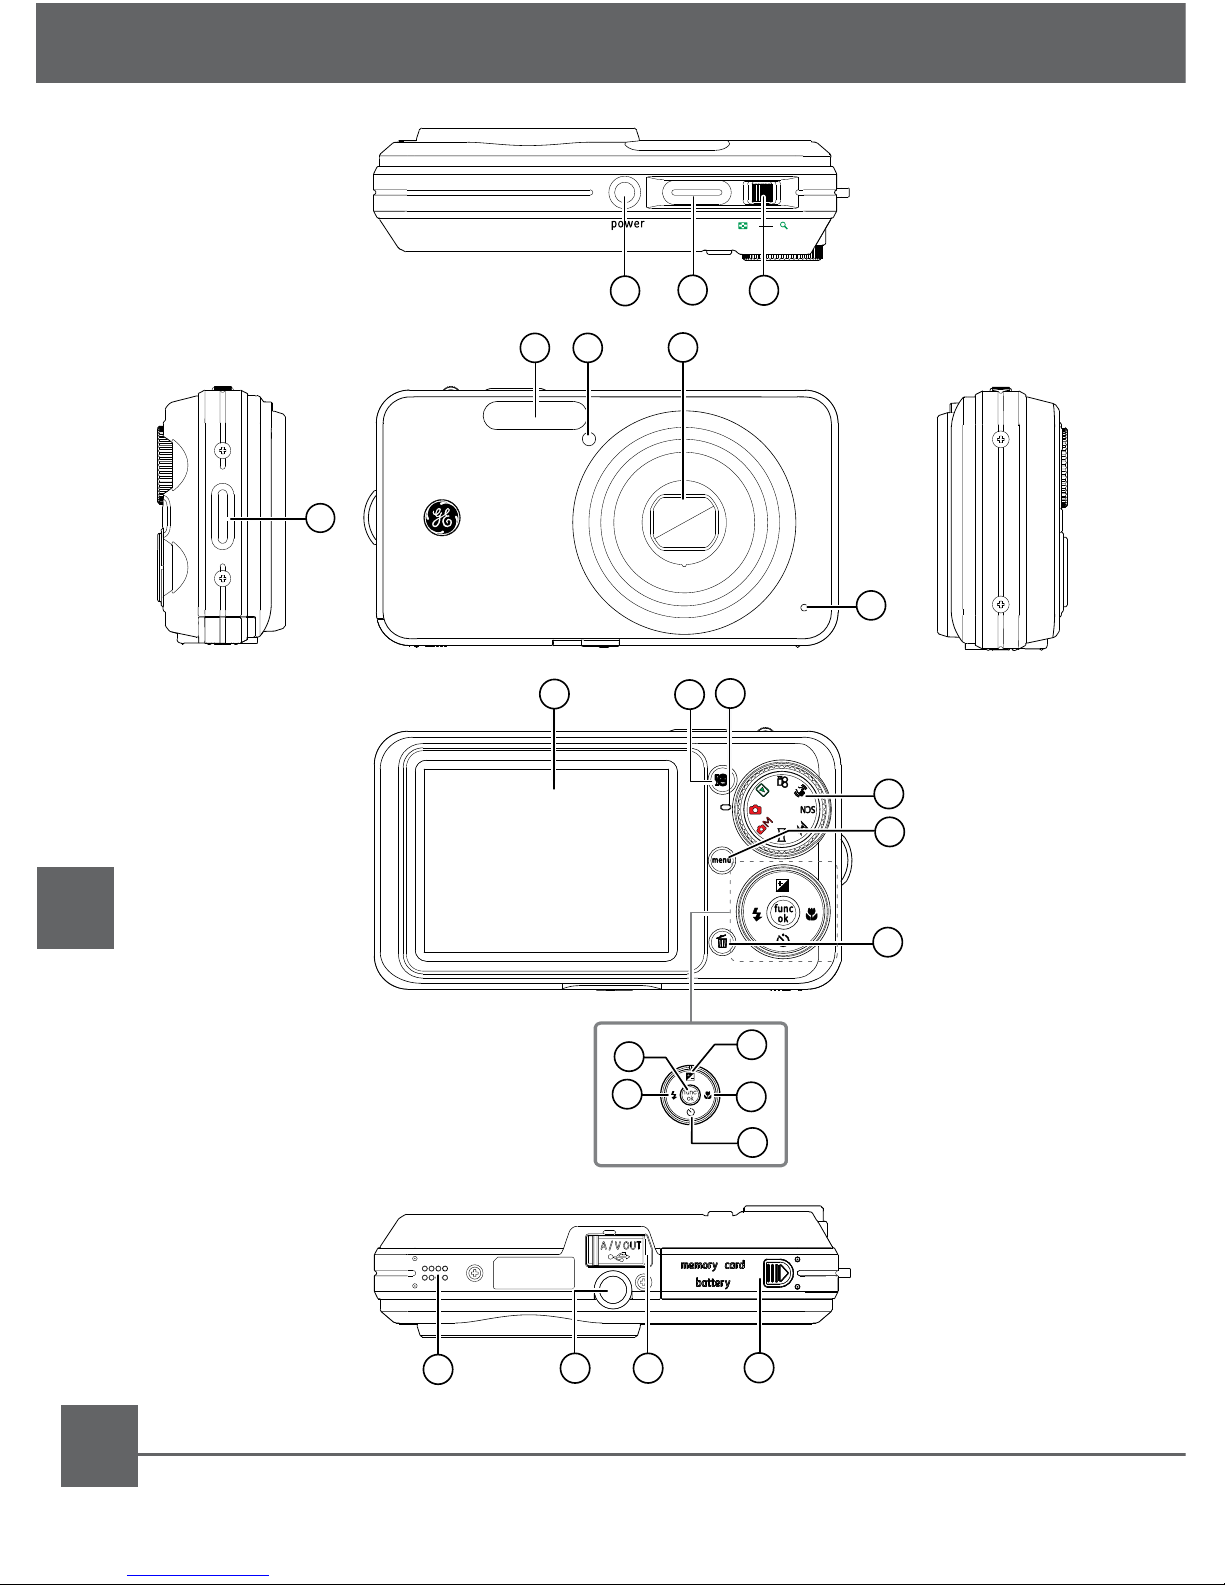
Camera Views : H1055
megap ix el
10.1
H 1055
1 2
3
4
5
7
6
8
9
10
11
12
13
14
15
W
T
16
17
18
19
20 21
22
23
Page 5

3
EN
Camera Views
1 Flash 13 Self-timer/ Down button
2 AF assist beam/
Timer indicator
14 Func/ok button
3 Lens 15 Flash mode/ Left button
4 Mic 16 Power button
5 LCD screen 17 Shutter button
6 Face detection AF button 18 Zoom scroll wheel
7 Status LED 19 Speaker
8 Mode dial 20 Tripod mount point
9 Menu button 21 USB/ AV port
10 Erase button 22 Memory card/
Battery compartment
11 Exposure compensation/
Up button
23 Wrist strap mount
12 Macro mode/ Right button
Page 6
4
EN
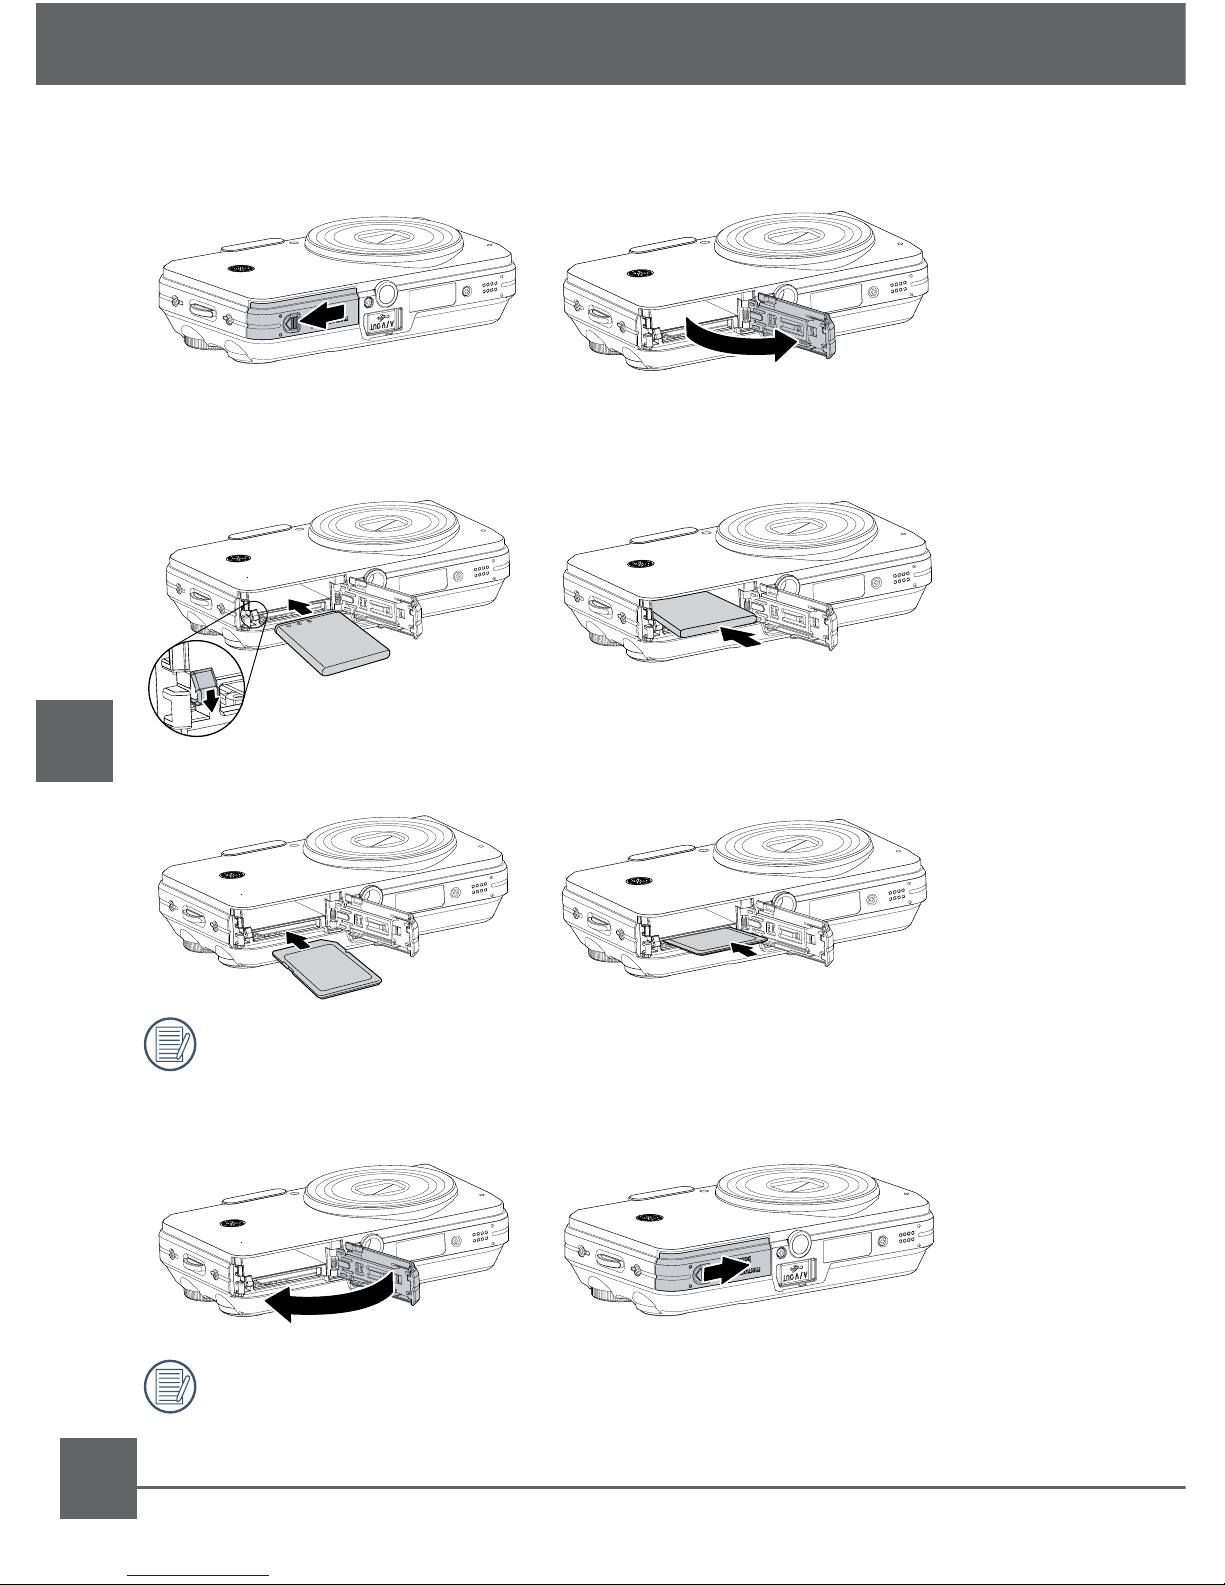
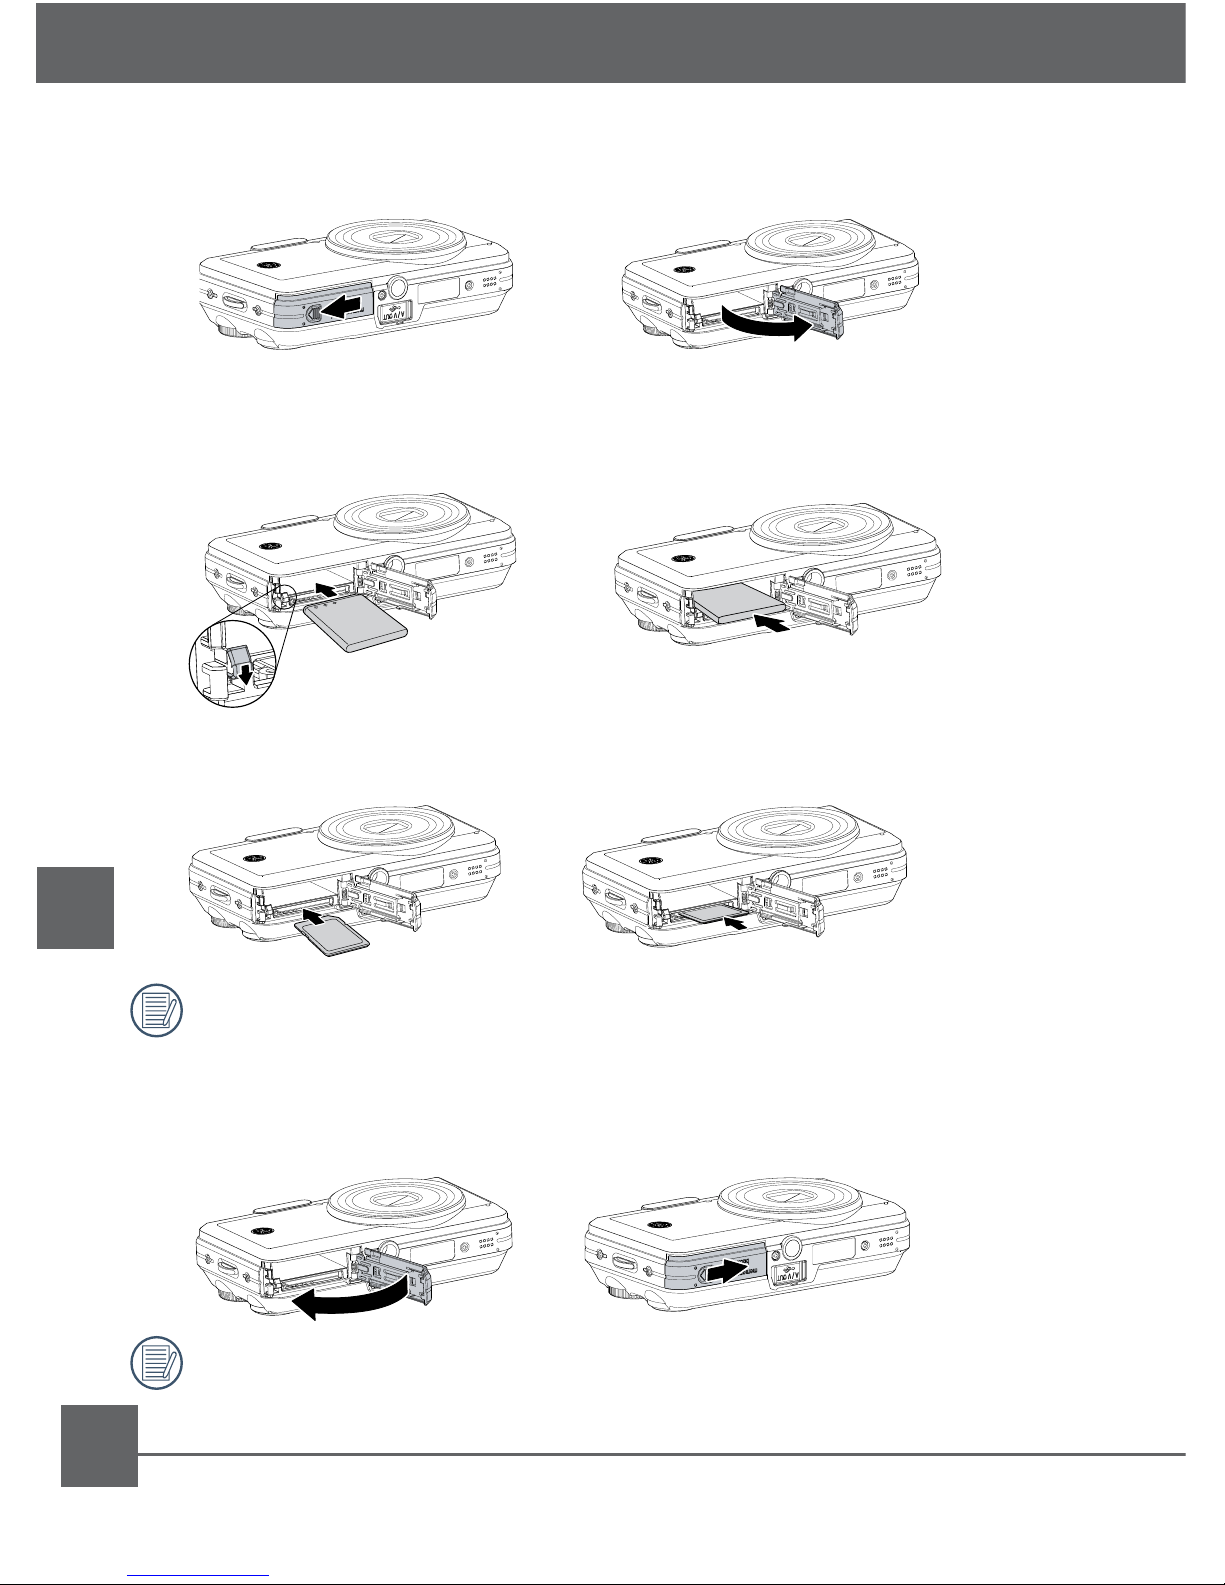
2. Insert the battery while observing the correct polarity. Use the side of
battery to press down the stopper as shown, allowing the battery to
be inserted properly.
Inserting the battery and SD/SDHC card
1. Slide the battery compartment out and lift it open.
Getting Started
3. Insert an optional SD/SDHC card into the memory card slot as shown.
To remove the SD/SDHC card, open the battery compartment and
gently push the card to release it. Pull the card carefully.
4. Close the battery compartment.
Optional SD/SDHC cards are not included. The use of 64MB to 4GB
memory card is recommended for reliable data storage.
Page 7

5
EN
Getting Started
Press the Power button to turn the camera on.
To turn o the camera, press the Power button again.
When turned on, the camera will
enter the mode according to the
mode dial setting. You can also
turn the mode dial to change the
modes after the camera is turned
on.
Turning on and off
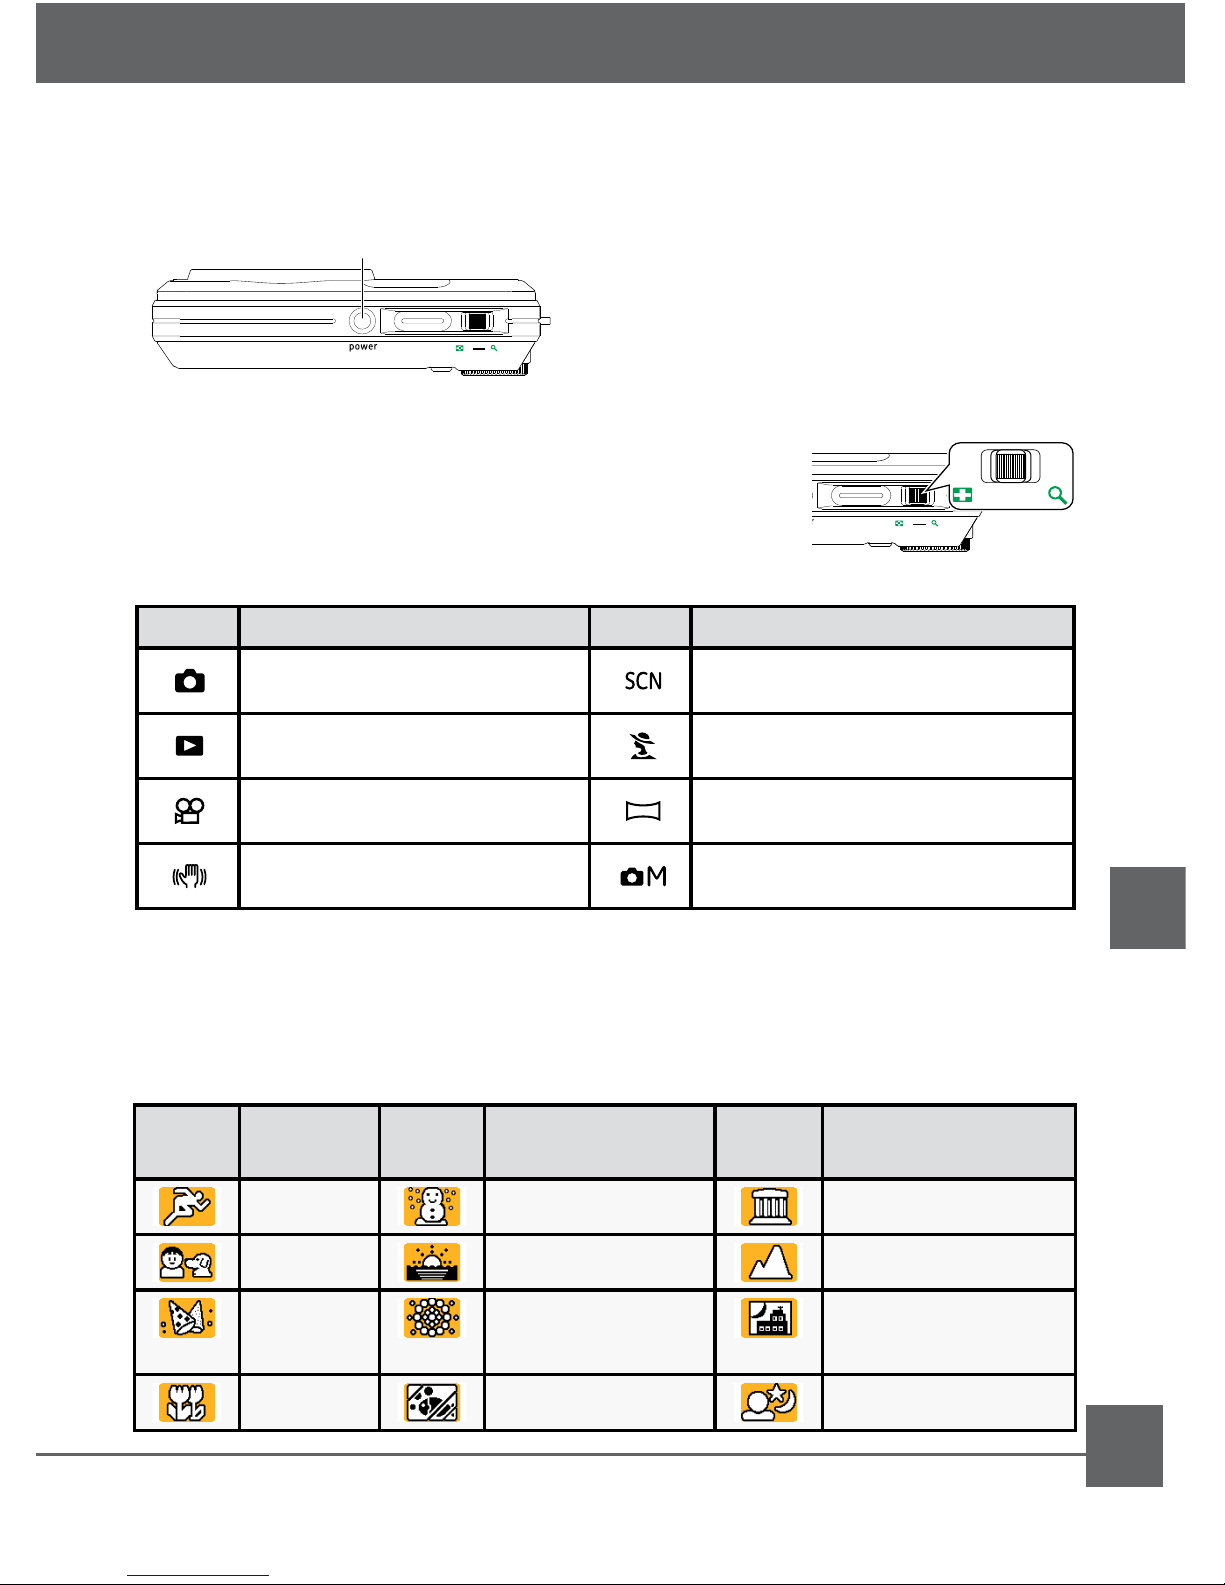
The GE camera provides a convenient mode
dial that allows you to switch between dierent
modes with ease. All the available modes are
listed as follows.
Using the mode dial
Icon Mode Name Icon Mode Name
Auto Scene
Playback Portrait
Movie Panorama
Image Stabilization Manual
Mode dial
In Scene mode, you can select from a total of 12 scene types to match
your needs. You just need to select the right scene for the occasion and
the camera will automatically adjust to the optimal settings for you.
Scene mode
Icon Mode Name Icon Mode Name Icon Mode Name
Sport Snow Museum
Children Sunset Landscape
Indoor Fireworks
Night landscape
Leaf Glass Night portrait
W
T
Power button
Page 8
6
EN
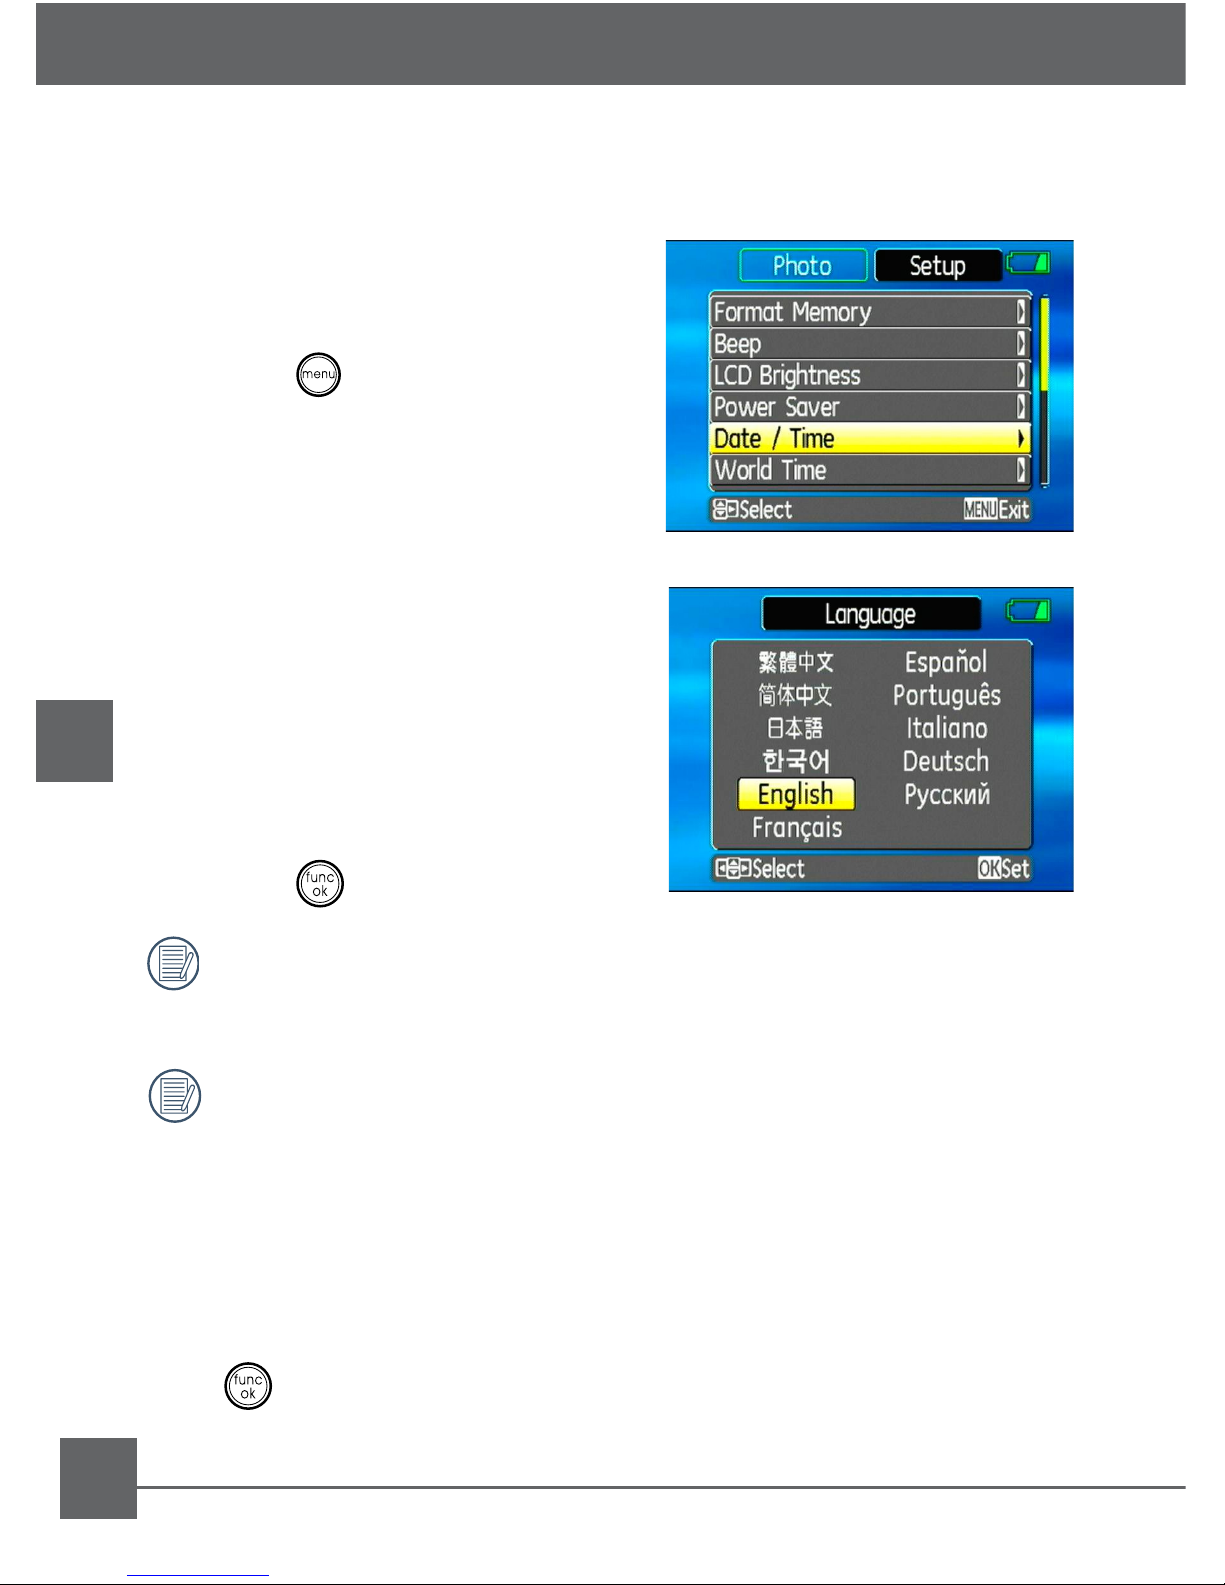
Setting display language, date, and time
When using the camera for the rst time, you need to set the language,
date, and time for your camera in the Setup menu.
Getting Started
To access the Setup menu, do the
following:
1. Press the Power button to turn the
camera on.
2. Press the button and use the
navigation buttons to select the
Setup menu.
3. Use the Up/Down navigation buttons
to select Date/Time or Language.
Then press the Right navigation
button to enter the setting.
4. (For Date/Time setting) Press the
Left/Right navigation buttons to
highlight each eld and use the Up/
Down navigation buttons to adjust
the value.
5. (For Language setting) Use the
navigation buttons to select the
desired language.
6. Press the button to conrm the
setting.
The Set date/time and language screen will automatically appear
when the camera is turned on the rst time.
Format Memory
We recommend that you format a memory card before using it for
the rst time after purchasing it, or whenever the card you are
using seems to be the cause of abnormal images.
Please note: formatting enables you to delete all content in the memory
card and built-in memory, including protected photo and movie les.
1. Select the Format Memory setting from the Setup menu as described
previously.
2. Use the Left/Right navigation buttons to select Yes or No, and press
the button to conrm.
3. The current media is formatted.
Page 9

7
EN
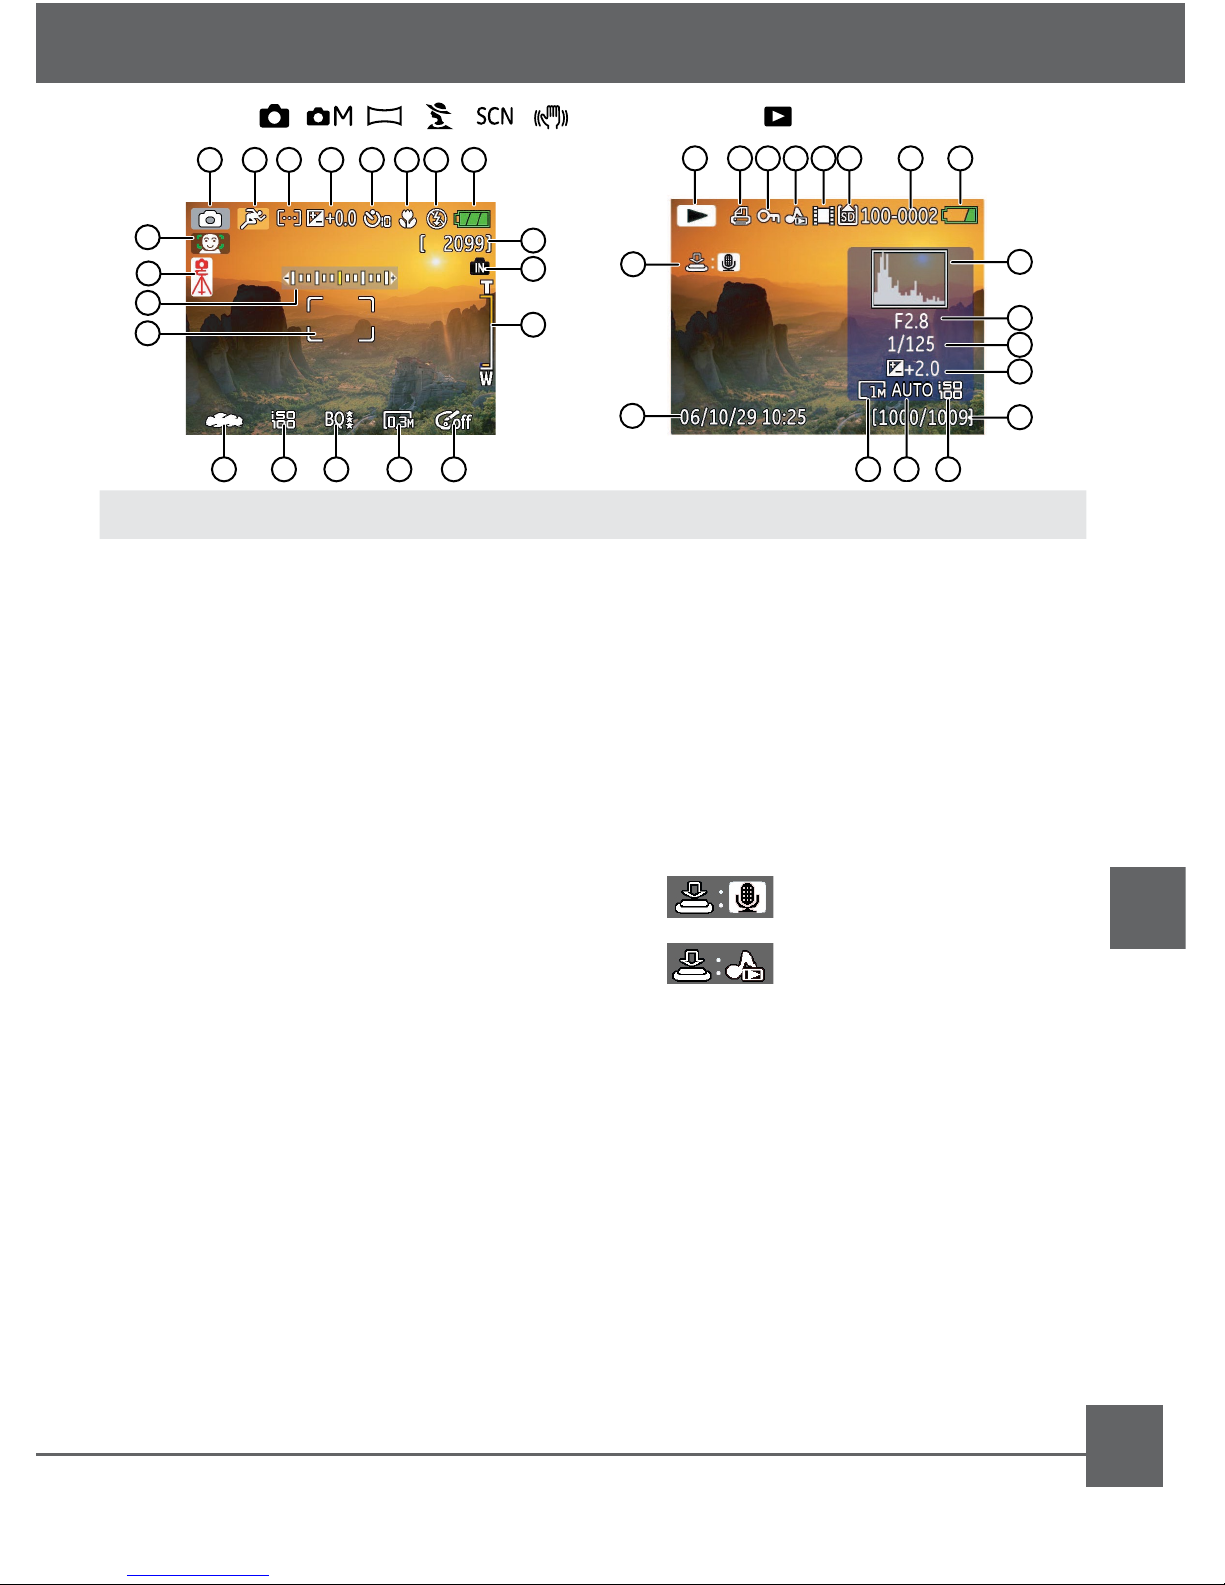
LCD Screen Display
Shooting mode display Playback mode display
1
2
3
4
5
6
7
8
9
10
11
12
13
14
15
16
17
18
19
20
Shooting mode icon
Scene mode icon (only available for
Scene mode)
Light metering method
EV value
Self-timer indicator
Macro mode indicator
Flash mode indicator
Battery status
Face detection “on” indicator
Remaining capacity
Focus frame
Zoom indicator
White balance
ISO speed
Image quality
Image size
Image color
Slow shutter warning indicator
Memory card/internal memory
indicator
EV adjustment slider
1
2
3
4
5
6
7
8
9
10
11
12
13
14
15
16
17
18
Playback mode icon
DPOF le icon
File protection icon
Audio le icon
Video le icon
Memory card/internal memory
indicator
Picture ID
Battery status
Photo audio status
(Press the shutter button to record sound)
(Press the shutter button to play sound)
Recording date and time
Histogram
Aperture value
Shutter speed
Exposure value
Memory capacity
(current picture/ total picture number)
ISO value
WB
Image size
Mode:
10
1
13 14 15 16 17
9
11
12
2 3 4 5 6 7 8
19
18
20
Mode:
10
9
1 2 3 4 5 6 7 8
12
13
14
15
11
18 17 16
Page 10
8
EN
Auto mode is the easiest mode to take photos. While operating in this
mode, the camera automatically optimizes your photos for best results.
To start shooting, do the following:
1. Set the mode dial to Auto mode ( ).
2. Press the Power button to turn the camera on.
3. Compose your picture on the LCD screen and press the shutter button
halfway to focus on the subject.
4. When the subject is in focus, the Focus Frame that appears on the
center of the LCD screen will turn green.
5. Press the Shutter button fully to capture the image.
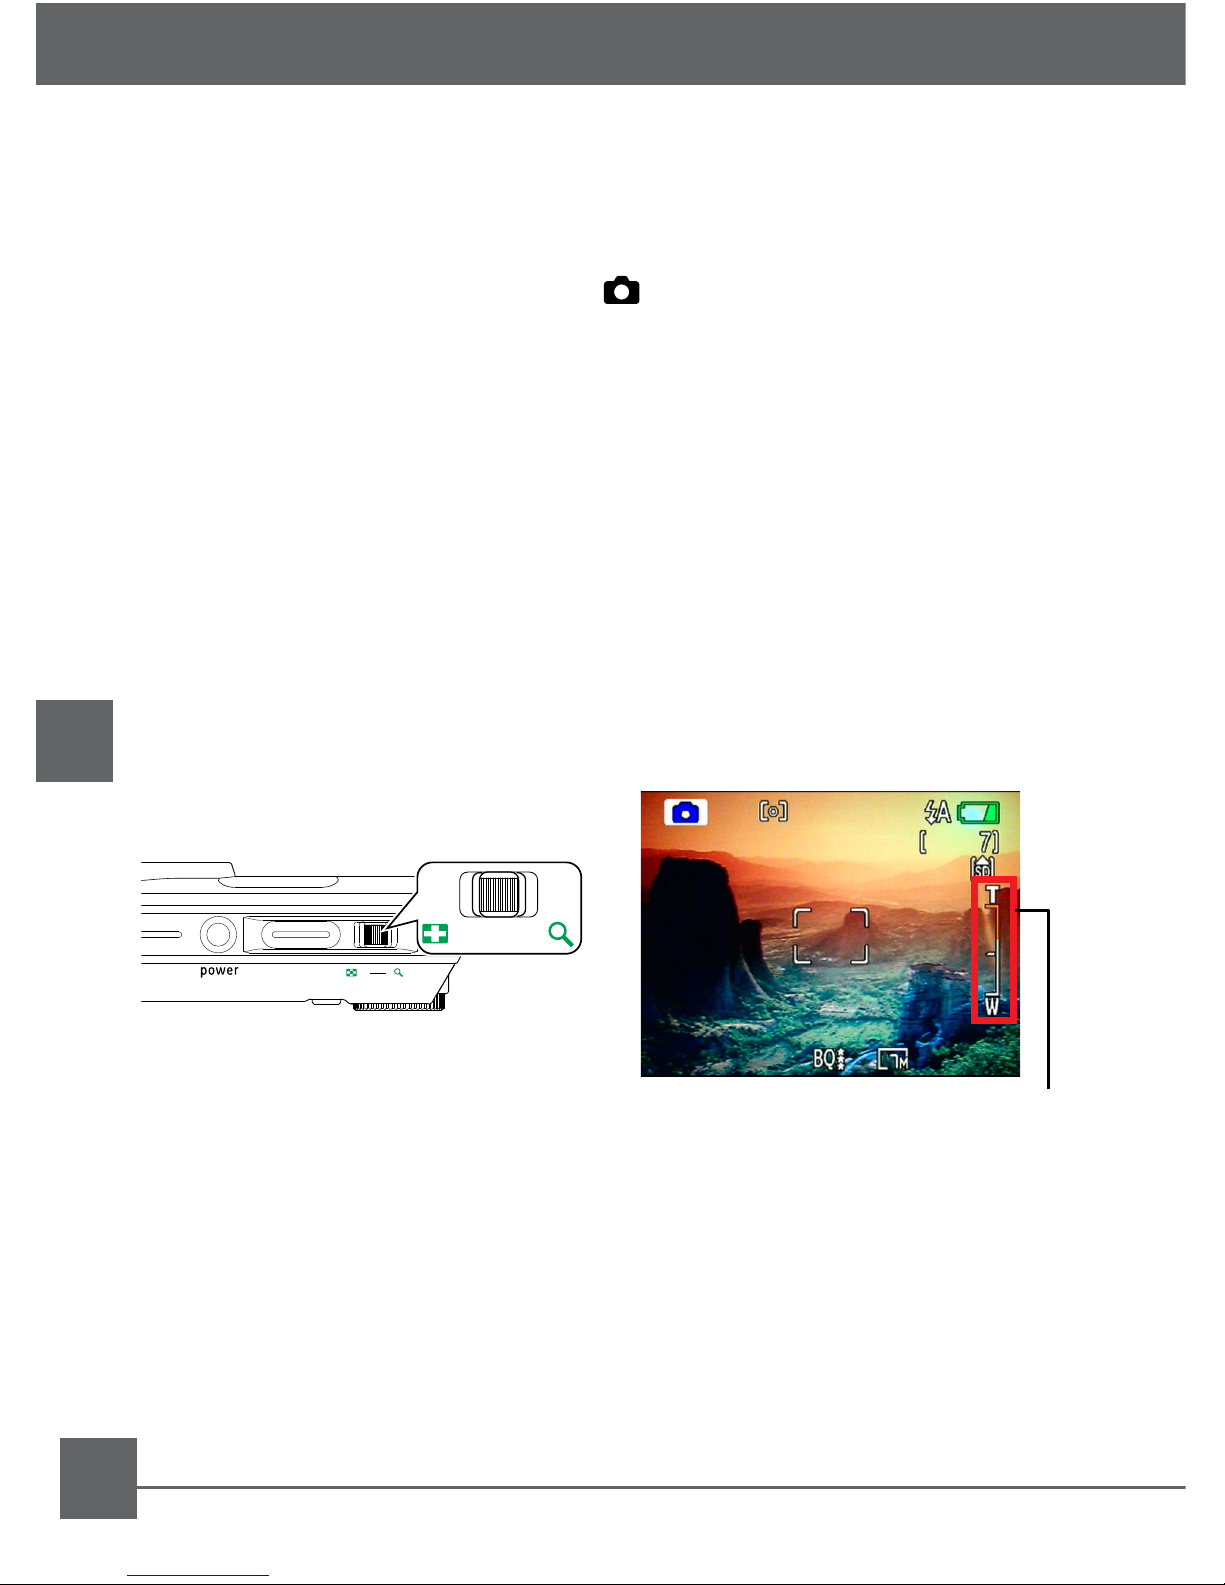
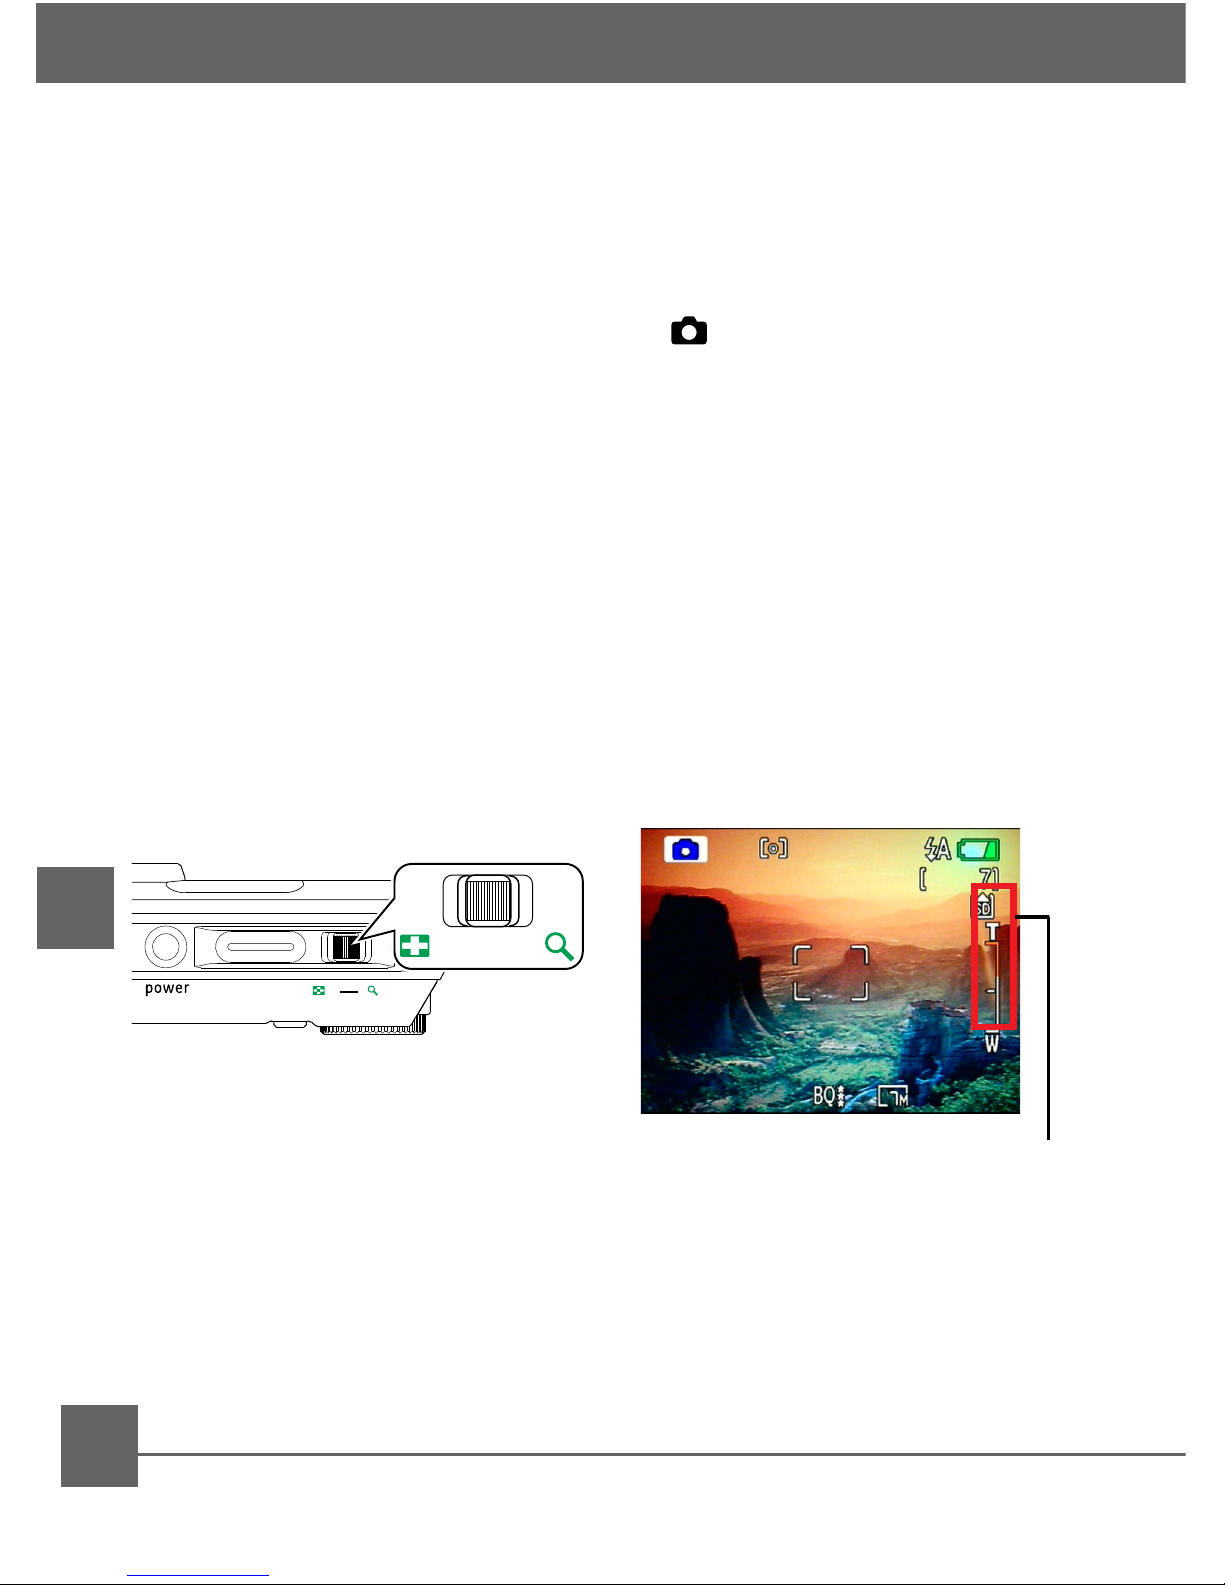
Using the zoom function
Basic Operation
Zoom indicator
Shooting in Auto mode
T&W button
W
T
W T
_
Your camera is equipped with two types of zoom: optical zoom and
digital zoom. Use the Zoom scroll wheel on the top of the camera to
zoom in or out on your subject while taking pictures.
When the optical zoom factor reaches its maximum value, it stops
momentarily. Keep the (Tele) zoom button depressed and zoom will
switch over to digital zoom automatically.
Page 11
9
EN
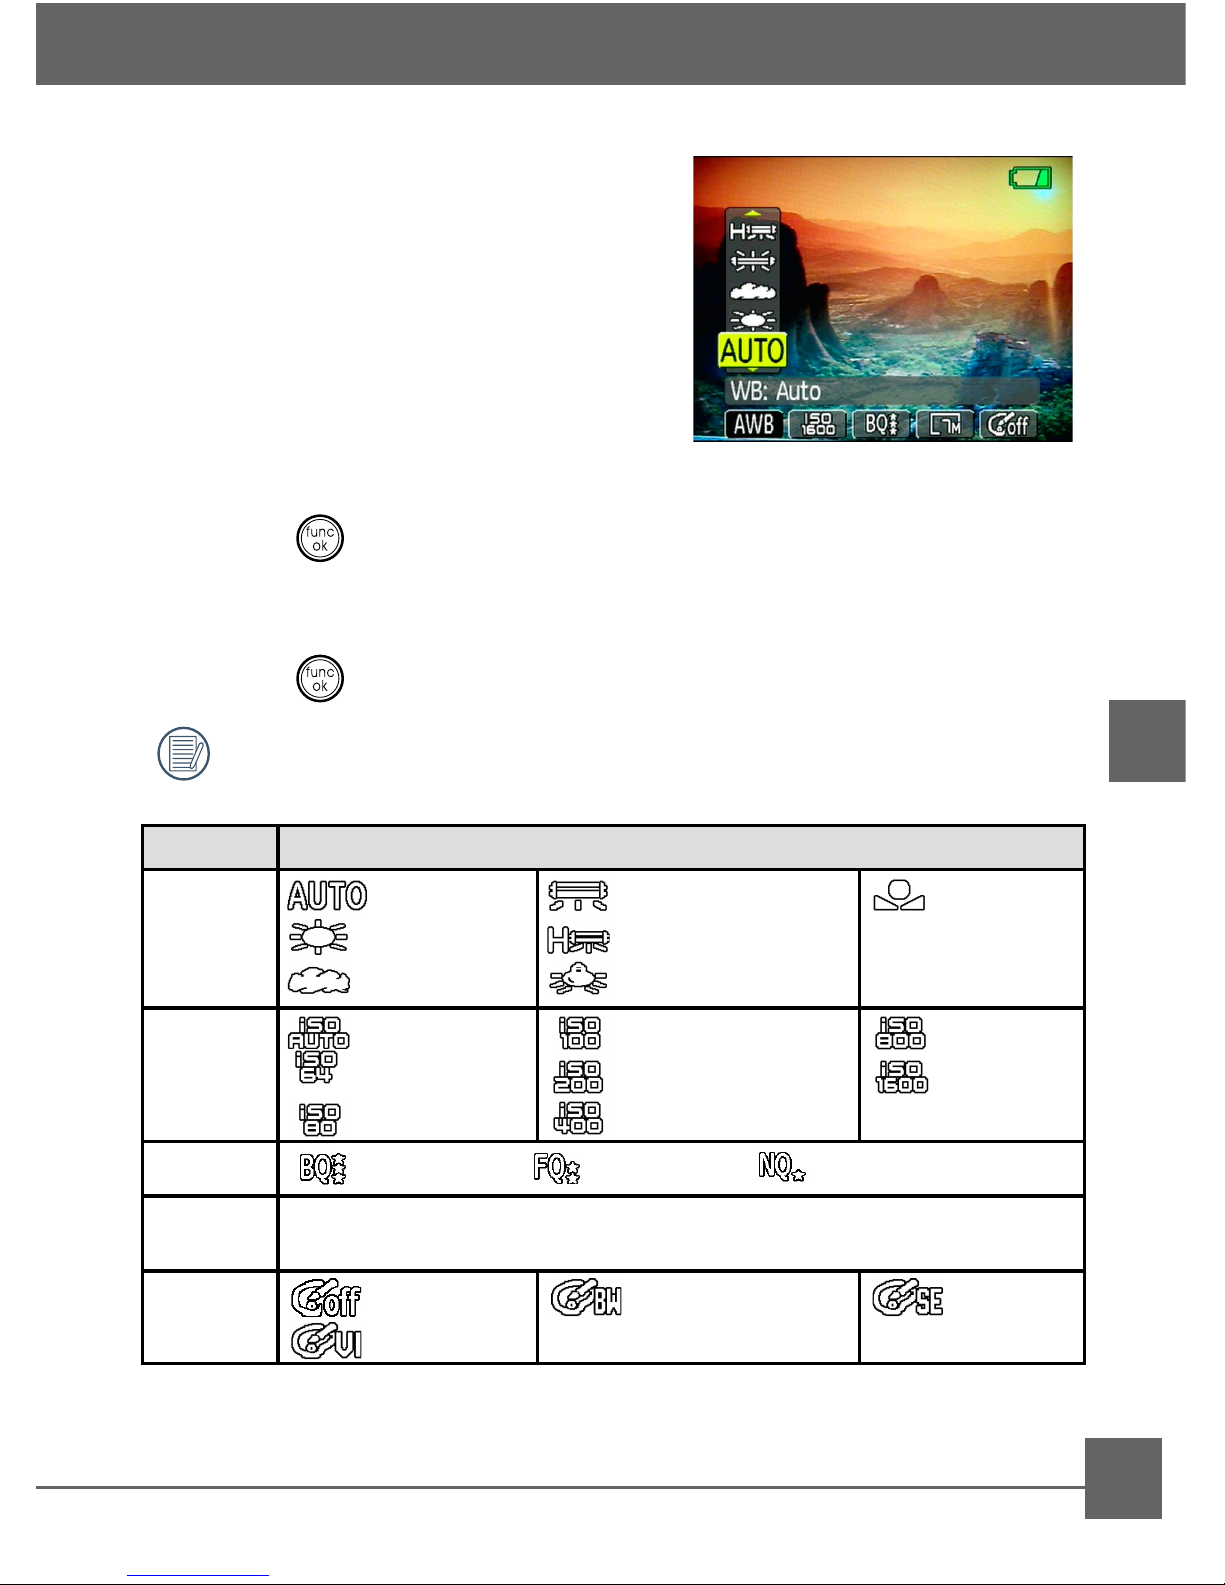
Basic Operation
Function menu
The Function menu allows you to
congure the following settings.
• WB (White Balance)
• ISO speed
• Quality
• Size
• Color
To access the Function menu, do the following:
1. Press the button to enter the Function menu.
2. Use the Left/Right navigation buttons to highlight a function.
3. Use the Up/Down navigation buttons to select a setting.
4. Press the button to conrm your setting.
The WB, ISO, and Color setting is only available when the camera is in the Manual mode.
Function Settings
WB
Auto
Day light
Cloudy
Fluorescent
Fluorescent CWF
Incandescent
Manual
ISO
Auto
64
80
100
200
400
800
1600
Quality
Best quality Fine quality Normal quality
Size You can change the record size settings to suit the purpose of the
image you are about to shoot.
Color
O
Vivid
Black & White Sepia
Page 12

10
EN
Viewing photos and videos
Playback
To view the captured photos and video clips on the LCD screen:
1. Turn your camera to Playback mode. The last recorded photo or video
clip is displayed.
2. Use the Left/Right navigation buttons to scroll through the photos or
video clips stored in the internal memory or memory card.
3. To play a selected video clip, press the button to enter the movie
playback mode.
4. Use the Left/Right navigation buttons to select a program button and
press the button to conrm the selection. The function of each
button is described in the following.
Video menu
1
2
3
4
5
6
7
Exit
Play
Slow motion
First frame
Previous frame
Next frame
Edit
1 2 3 4 5 6 7
Thumbnail view
When in Playback mode, move the zoom scroll wheel to the Wide
position ( ) once to display the thumbnail of photos and video clips
on the screen.
1. Use the zoom scroll wheel to switch between the 2x2, 3x3, and 4x4
thumbnail display.
2. Use Up/Down/Left/Right to select a photo or video clip to view.
If the indicator appears on the LCD, then a movie le is
currently being displayed.
Press the button to restore a preview icon to its original image
size.
Page 13
11
EN
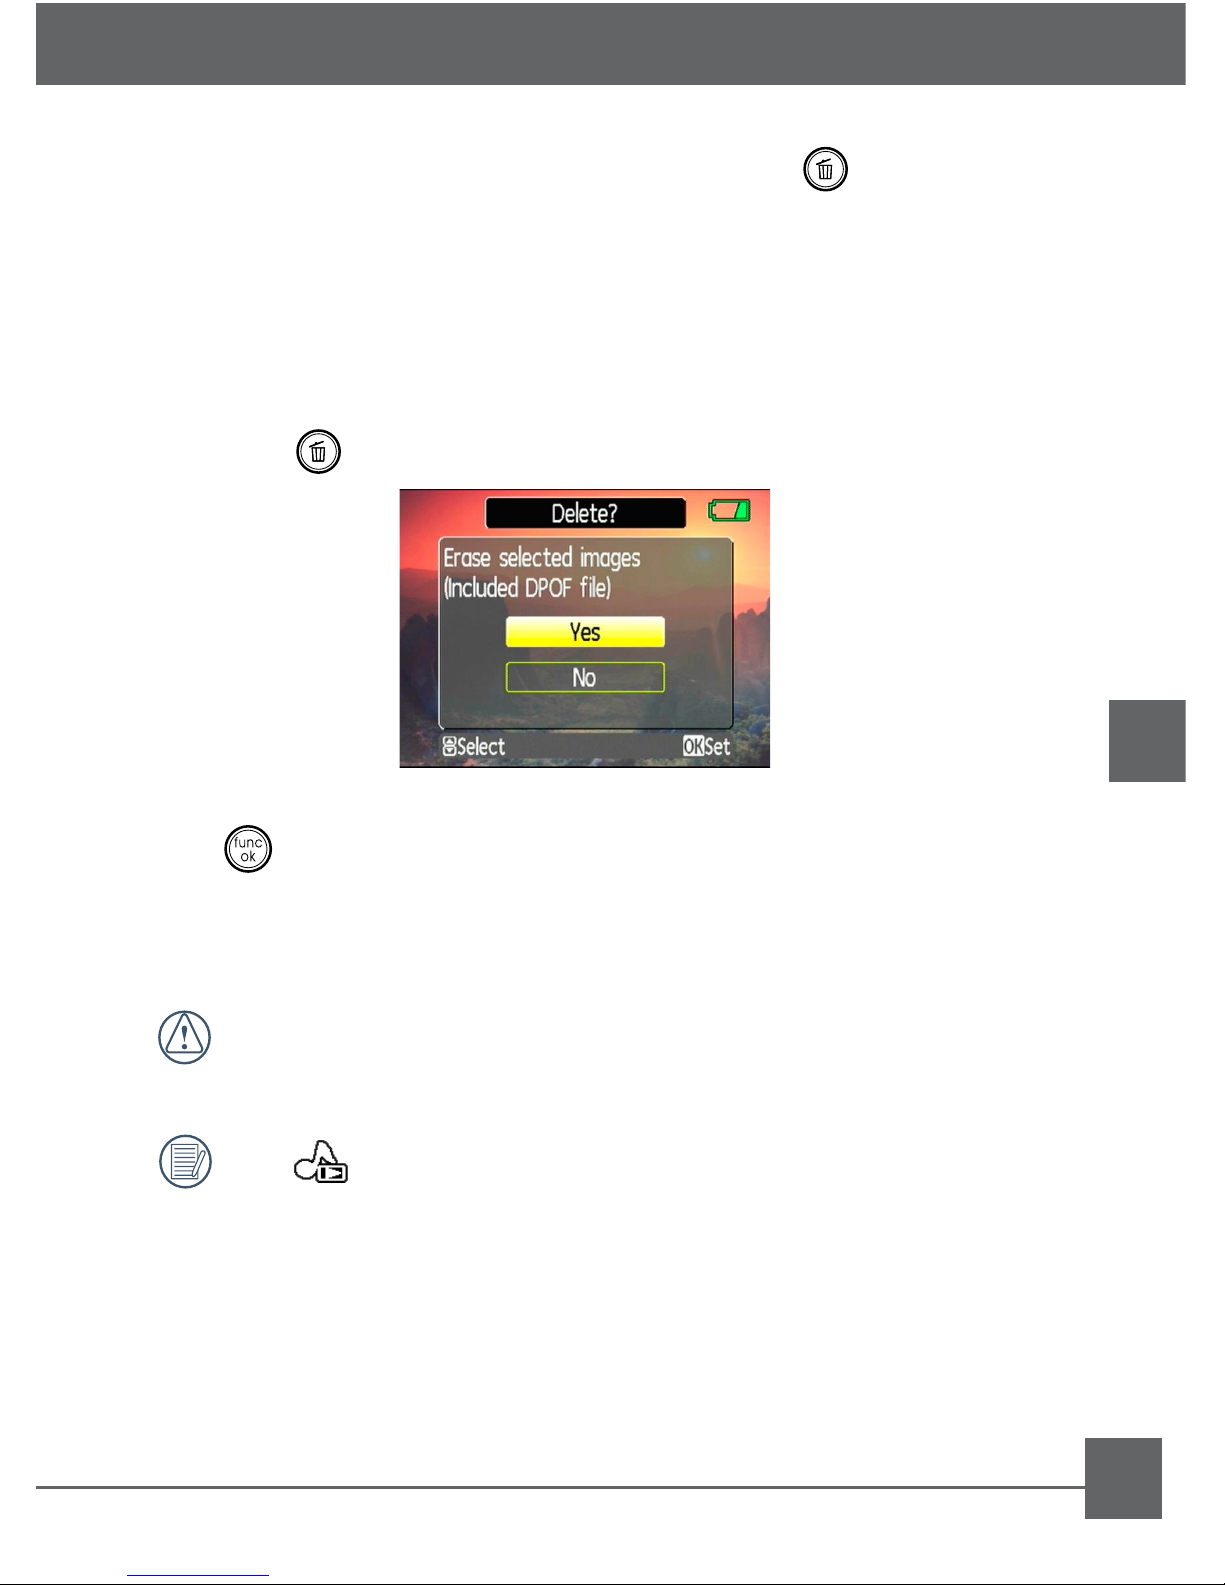
Using the Delete button
Playback
The camera is equipped with a quick Delete button for you to delete
photos or videoclips without entering the Playback menu.
To delete a photo or video:
1. Turn your camera to Playback mode.
2. Use the navigation buttons to select the photo/video clip you want to
delete.
3. Press the button. The Delete screen appears.
4. Press the Up/Down navigation buttons to select Yes or No. Then press
the button to conrm.
Erased photos/video clips cannot be recovered.
The indicator appears if the picture has a sound le
attached. You can choose to delete the attached sound le
alone or to delete both the picture and the sound le.
Page 14

12
EN
Using the Menus
Mode:
In still shooting modes, press the button to enter the Photo menu.
To congure the settings:
1. Use the Up/Down navigation buttons to scroll through the menu
items.
2. Press the Right navigation button to enter the submenu.
3. Use the Up/Down navigation buttons to select an option.
4. Press the button to conrm the setting and exit the menu.
For more detailed information on each setting, refer to the User Manual
located on the CD that was included with your camera.
Page 15
13
EN
Photo menu
Menu items Settings
AF mode Single-AF / Multi-AF
AF-Assist Beam On / O
Expo Metering Spot / Center-Weight / AiAE
Cont. Shot Unlimited/ 5 shots / 5 shots(Last) / Time-Lapse
Grid On / O
Quick Review O/ 1 sec / 2 sec / 3 sec
Digital zoom On / O
Histogram On / O
Slow Shutter O / Manual (2~30sec)
Date Imprint O / Date / Date and Time
Playback menu
Menu items Settings
Protect One / All / Reset
Delete One / All / Selected
DPOF One / All / Reset
Info. Box On / O
Trim To crop a portion of the picture.
Resize 1024X768 / 640X480 / Back
Rotate Counterclockwise 90 degrees /
Clockwise 90 degrees / Back
Slide show Eect / Time Interval / Repeat / Start / Cancel
Red-eye removal Yes / No
Movie menu
Menu items Settings
Expo Metering Spot AE / Center-Weight / AiAE
Stabilization On / O
Setup menu
Refer to the User Manual located on the CD.
Using the Menus
Page 16

14
EN
Model name H1055
Camera Eective Pixels 10.1 Megapixels
Image Sensor 1/1.7” Charge Coupled Device (CCD)
(Total number of pixels: 10.54 Megapixels)
Focal Length F = 7.5mm (Wide) ~ 22.5mm (Tele)
[35mm lm equivalent] 35mm (Wide) ~ 105mm (Tele)
F number F2.8 (Wide) ~ F4.9 (Tele)
Focusing Range Normal: (Wide) 60cm ~∞
Macro: (Wide) 6cm ~ ∞; (Tele) 40cm ~ ∞
Optical Zoom 3X
Digital Zoom 4.5X digital zoom (Combined Zoom: 13.5X)
Anti-Handshake Electronic Image Stabilization
LCD Display 2.7 inch TFT color LCD
Still Image Size 10MP, 9MP (3:2), 7MP(16:9), 5MP, 3MP, 2MP,
1MP, 0.3MP
Movie Clip Resolution 640x480pixels: 25fps/15fps
320x240pixels: 20fps/15fps
Face-detection Yes
Specications : H1055
Page 17

15
EN
Model name H1055
Panorama Stitching Yes
Red-eye Removal Yes
Continuous Shooting Approx. 1.39 fps (Large/Fine mode)
Recording Media Internal Memory: 26MB
Other Features PictBridge, ExifPrint Support, Multi-lan-
guage Support (11 languages)
Jacks USB2.0/AV-OUT (Integrated Proprietary
Connector)
Power Rechargeable Lithium-ion Battery GB-40,
3.7V 1050mAh
Shooting Capability
(Battery Performance)
Approx. 210 shots (based on CIPA standards)
Operation Environment Temperature: 0~40oC, Humidity: 0~90%
Dimensions (W x H x D) 103 x 56x 24 mm
Mass Approx. 145g (Body only)
Specications
Page 18

Page 19

17
FR
User Ma
n
ual
Préface
Merci d’avoir acheté cet appareil photo numérique de GE. Lisez attentivement
ce manuel et conservez-le dans un endroit sûr comme référence.
Copyright
© Copyright 2007 General Imaging Company. Tous droits réservés.
Aucune portion de ce document ne peut être reproduite, transmise,
enregistrée ou stockée dans un système de restitution, ni traduite en aucune
langue ou aucun autre langage informatique que ce soit, par quelque moyen
, sans l’autorisation écrite préalable de General Imaging Company
Marques commerciales
Toutes les marques qui sont mentionnées dans ce document sont à titre d’
information uniquement, et peuvent être des marques déposées de leurs
auteurs respectifs.
Déballage
La boîte de l’appareil photo que vous venez d’acheter devrait aussi contenir
les éléments suivants. Si l’un des éléments est manquant ou abîmé,
contactez votre revendeur. (les accessoires dépendent du modèle acheté et
sont indiqués ci-dessous).
Batterie rechargeable
au lithium
Manuel d’utilisation
Câble USB
CD-ROM
Carte de garantie
Bracelet
Câble AV
Chargeur de batterie
Guide de Mise
en route
Page 20
18
FR
Vues de l’appareil photo : H1055
megap ix el
10.1
H 1055
1 2
3
4
5
7
6
8
9
10
11
12
13
14
15
W
T
16
17
18
19
20 21
22
23
Page 21

19
FR
Vues de l’appareil photo
1 Flash 13
Bouton Retardateur/Bas
2
Rayon d’aide AF/Indicateur
de compteur
14
Bouton Fonction/Ok
3
Objectif
15
Bouton Mode du ash/Gauche
4 Microphone 16
Bouton Marche
5
Ecran LCD
17
Déclencheur
6
Bouton Détection faciale AF
18 Zoom scroll wheel
7
DEL d’état
19
Haut-parleur
8
Sélecteur de mode
20
Oillet de trépied
9
Bouton Menu
21
Port USB/AV
10
Bouton Eacer
22
Compartiment Carte mémoire/
Batteriet
11
Bouton Compensation
d’exposition/Haut
23
Attache de bracelet
12
Bouton Mode Macro/Droite
Page 22

20
FR
Prise En Main
3. Insérez une carte mémoire SD/SDHC dans la fente de la carte mémoire,
comme indiqué.
2. Insérer la batterie dans le sens indiqué. Utilisez le coté de la batterie pour
enfoncer la butée, comme indiqué, pour pouvoir insérer complètement
la batterie.
Installation de la batterie and carte mémoire SD/SDHC
1. Ouvrez le compartiment de la batterie.
Les cartes mémoires SD/SDHC sont vendues séparément. Il est recommandé
d’utiliser seulement des cartes entre 64Mo et 4Go et de marques connues
comme SanDisk, Panasonic et Toshiba pour plus de sécurité pour vos données.
4. Fermez le compartiment de la batterie.
Pour enlever la carte SD/SDHC, ouvrez le compartiment de la batterie et
appuyez gentiment sur la carte pour la faire sortir. Sortez ensuite la carte,
en faisant attention.
Page 23

21
FR
Icône Nom du mode Icône Nom du mode Icône Nom du mode
Sport Neige Musée
Enfants Coucher de
soleil
Paysage
Intérieur Feux d’artice Paysage de nuit
Feuillages Verre Portrait de nuit
Icône Nom du mode Icône Nom du mode
Auto
Scène
Lecture
Portrait
Film
Panorama
Stabilisation de l’image
Manuel
Bouton Marche
Bouton Zoom
W
T
W T
_
Allumer et éteindre
Prise en main
Lorsque vous l’allumez, l’appareil photo
utili s e autom atiquemen t le mode
sélectionné avec le sélecteur de mode.
Vous pouvez utiliser le sélecteur de mode
pour changer de mode une fois que l’
appareil photo est allumé.
Appuyez sur le bouton Marche pour allumer l’appareil photo. Pour éteindre l’
appareil photo, appuyez de nouveau sur le bouton Marche.
Utilisation du sélecteur de mode
L’appareil photo de GE utilise un sélecteur de mode
pour vous permettre de changer rapidement et
facilement de mode. Les modes disponibles sont décrits
ci-dessous.
Mode de scène
Le mode Scène vous donne la possibilité de choisir, parmi 12 types de contexte,
celui qui correspond le mieux à votre situation. Il vous sut de sélectionner le
type de scène approprié et l’appareil photo eectuera à votre place les réglages
les mieux adaptés.
Page 24

22
FR
Réglage de la langue, la date et l’heure
Pour régler la langue, la date et l’heure, les paramètres suivants doivent être
réglés dans le menu Conguration.
Prise en main
Lorsque vous allumez l’appareil photo la première fois, le menu de
sélection de la langue s’achera automatiquement.
Pour ouvrir le menu Conguration, procédez
de la façon suivante.
1. Appuyez sur le bouton Marche pour
allumer l’appareil photo
2. Appuyez sur le bouton et utilisez les
boutons Haut/Bas/Gauche/Droite pour
sélectionner le menu Conguration( ).
3. Utilisez les boutons Haut/Bas pour
sélectionner Date/Heure. Appuyez
ensuite sur le bouton Droite pour l’ouvrir.
3a.(Date/Heure) Utilisez les boutons
Gauche/Droite pour aller sur chaque
chiffre et utilisez les boutons Haut/Bas
pour changer les chires.
3b.(Langue d’achage) Utilisez les boutons
de navigation pour sélectionner la
langue désirée.
4. Appuyez sur le bouton pour conrmer
votre sélection.
Format
Nous vous recommandons de formater la carte mémoire avant de l’
utiliserpour la première fois (dés l’achat), ou lorsqu’elle présente des
anomalieslors de la visualisation des images qu’elle contient.
Remarque : Le formatage vous permet de supprimer tous les contenus de la
carte mémoire et de la mémoire intégrée, y compris les chiers de photo et
de lm protégés.
1. Sélectionnez Formater mémoire dans le menu Conguration comme
décrit ci-dessus.
2. Use the Left/Right navigation buttons to select Yes or No, and press the
button to conrm.
3. La mémoire sélectionnée est formatée.
Page 25

23
FR
Achage de l’écran LCD
Icônes du mode de captur photo
Icône du mode de lecture
Icônes du mode de captur
Icônes de scène (seulement
disponible en mode Scène)
Méthode de métrage
Indicateur EV
Indicateur de retardateur
Indicateur de mode Macro
Indicateur de mode
Etat de la batterie
Nom du mode
Nombre de photos que vous
pouvez prendre
Cadre de mise au point
Indicateur de zoom
Balance du blanc (seulement
disponible enmode Manuel)
ISO (seulement disponible en
mode Manuel)
Qualité de l’image
Taille de l’image
Couleur de l’image (seulement
disponible en mode Manuel)
Indicateur d’avertissement d’
obturateur lent
Indicateur de carte mémoire/
mémoire interne
Barre de réglage EV
Icône du mode de lecture
Icône de chier DPOF
Icône de protection de chier
Icône de chier audio
Icône de chier vidéo
Indicateur de carte mémoire/
mémoire interne
ID d’image
Etat de la batterie
Etat audio de la photo
(Pas d’enregistrement audio)
(Contient un enregistrement audio)
Date et heured’enregistrement
Histogramme
Valeur de l’ouverture
Vitesse d’obturation
Valeur d’exposition
Taille de la mémoire
(photo présente/toutes photos)
Valeur ISO
BB
Taille de l’image
Mode:
10
1
13 14 15 16 17
9
11
12
2 3 4 5 6 7 8
19
18
20
Mode:
10
9
1 2 3 4 5 6 7 8
12
13
14
15
11
18 17 16
1
2
3
4
5
6
7
8
9
10
11
12
13
14
15
16
17
18
19
20
1
2
3
4
5
6
7
8
9
10
11
12
13
14
15
16
17
18
Page 26
24
FR
Bouton Zoom
W
T
W T
_
Opérations de Base
Prise de photos en mode Auto
Le mode Auto est le mode le plus facile à utiliser pour prendre des
photos. Dans ce mode, l’appareil optimise automatiquement les
paramètres pour des photos de la meilleure qualité.
Pour prendre une photo, procédez de la manière suivante:
1. Mettez le sélecteur de mode surAuto ( ).
2. Appuyez sur le bouton Marche pour allumer l’appareil photo.
3. Cadrez la photo à l’aide de l’écran LCD et appuyez sur le déclencheur
jusqu’à mi-course pour faire la mise au point sur le sujet.
4. Lorsque la mise au point est achevée, un cadre de couleur verte s’
ache au centre de l’écran LCD.
5. Enfoncez complètement le Déclencheur pour prendre la photo.
Utilisation de la fonction zoom
Votre appareil photo dispose de deux types de zoom : Un zoom optique
et un zoom numérique. Utilisez la Roulette de zoom sur le dessus de l’
appareil photo pour effectuer des zooms avant ou arrière sur le sujet
avant de prendre des photos.
Indicateur de niveau de zoom
Lorsque le zoom optique atteint son niveau maximum, il s’arrête
momentanément. Maintenez le bouton de zoom (Télé) enfoncé et l’
appareil photo passera automatiquement en zoom numérique.
Page 27

25
FR
Au menu Fonctions vous permet
procédez de la manière suivante.
• BB (Balance du blanc)
• ISO sensibilité
• Qualité
• Taille
• Couleur
Pour régler menu Fonctions, procédez de la manière suivante:
1. Appuyez sur le bouton pour accéder au menu Fonction.
2. Utilisez les boutons de navigation Gauche/Droite pour aller sur la
fonction.
3. Utilisez les boutons de navigation Haut/Bas pour sélectionner le réglage
désiré.
4. Appuyez sur le bouton pour conrmer votre sélection.
(Le réglage des BB, ISO, couleurs n’est disponible qu’en mode
Manuel)
Fonctions Paramétrages
BB Auto
Lumière du jour
Nuageux
Fluorescent
Fluorescent CWF
Incandescent
Manuel
ISO Auto
64
80
100
200
400
800
1600
Qualité
Meilleure qualité
Qualité ne
Qualité normale
Taille
Vous pouvez modier les réglages relatifs à la taille
d’enregistrement de façon à répondre aux besoins de
l’image à capturer.
Couleur
O
Vif
Noir & Blanc
Sépia
Opérations de Base
Menu Fonctions Avancée
Page 28

26
FR
En mode
Lecture
, tournez la molette de zoom une fois jusqu’à la position
Large ( ) pour faire apparaître sur l’écran les diapos des photos et des
clips vidéo enregistrés.
1. Utilisez la molette de zoom pour choisir entre l’affichage diapo
2x2
,
3x3
et
4x4
2. Utilisez les boutons de navigation
Haut/Bas/Gauche/Droite
pour
sélectionner et regarder une photo ou un clip vidéo.
Si l’indicateur apparaît sur l’écran numérique, c’est qu’un
chier vidéo est lu.
Appuyez sur le bouton pour rétablir un icône de
prévisualisation à sa taille d’image originale.
Menu Clip vidéo
1
2
3
4
5
6
7
Quitter
Lecture
Ralenti
Première image
Image précédent
Image suivante
Editer lm
Vue par diapo
1 2 3 4 5 6 7
Lecture
Regarder les photos et les clips video
Pour regarder vos photos et clips vidéo sur l’écran LCD:
1. Allumez l’appareil photo et sélectionnez le mode Lecture. La dernière photo prise ou clip
vidéo enregistré s’ache.
2. Utilisez les boutons de navigation Gauche/Droite pour naviguer dans les photos ou clips
vidéo sur la mémoire interne ou la carte mémoire.
3. Pour jouer un clip vidéo, appuyez sur le bouton pour aller au mode de lecture vidéo.
4. Utilisez les boutons de navigation Haut/Bas pour sélectionner un bouton de programme
et appuyer sur le bouton pour conrmer votre sélection. La fonction de chaque
bouton est décrite dans la liste suivante.
Page 29

27
FR
L’appareil photo est équipé d’un bouton Supprimer pour que vous
pouvez utiliser pour supprimer rapidement des photos ou des clips vidéo
sans passer par le menu Lecture.
Pour supprimer une photo ou un clip vidéo.
1. Allumez l’appareil photo et sélectionnez le mode Lecture.
2. Utilisez les boutons de navigation pour sélectionner la photo/vidéo que
vous désirez supprimer.
3. Appuyez sur le bouton L’écran de suppression apparaît.
4. Utilisez les boutons de navigation Haut/Bas pour sélectionner Oui
ou Non. Appuyez ensuite sur le bouton pour confirmer votre
sélection.
Les photos/clips vidéo eacés ne pourront pas être récupérées.
L’indicateur apparaît si l’image est accompagnée d’un chier
sonore. Vous pouvez choisir de supprimer le chier sonore joint
ou de supprimer et le chier sonore et l’image.
Lecture
Utilisation du bouton Supprimer
Page 30

28
FR
Utilisation des menus
Mode:
Dans le mode de capture de photo, appuyez sur le bouton pour ouvrir
le menu Photo.
Pour changer les réglages des paramètres:
1. Utilisez les boutons de navigation Haut/Bas pour faire défiler les
éléments du menu.
2. Appuyez sur le bouton de navigation Droite pour ouvrir un sous-menu.
3. Utilisez les boutons de navigation Haut/Bas pour sélectionner une
option.
4. Appuyez sur le bouton pour conrmer votre sélection et quitter le
menu.
Vous trouverez un descriptif plus détaillé des fonctions dans le “Manuel de
référence”
Page 31

29
FR
Utilisation des menus
Menu Photo
Menu Élément Paramétrages
Mode AF AF-Unique / AF-Multiple
Rayon aide AF Arrêt / Marche
Mesure AE Spot / Centre pondéré / AiAE
Rafale Rafale / Vue 5X / Vue 5X (Dern) / Durée interv
Grille Arrêt / Marche
Visualisation Arrêt/1 sec / 2 sec / 3 sec
Zoom numérique Arrêt / Marche
Histogramme Arrêt / Marche
Bulb Shutter Arrêt /Manuel (2~30sec)
Impression de la date Arrêt / Date / Date/Heure
Menu Lecture
Menu Élément Paramétrages
Protéger Un / Tous / Réinitialiser
Supprimer Un / Tous / Sélectionnez
DPOF Un / Tous / Réinitialiser
Ach. texte Arrêt / Marche
Découper Pour découper une photo
Redimensionner 1024X768 / 640X480 / Retour
Pivoter pour sélectionner Oui pour corriger la photo ou
Retour pour annuler et retourner
Diporama Eet / Durée / Répéter/ Démarrer / Annuler
Supp. YxRouges Oui / Non
Menu Clip vidéo
Menu Film Paramétrages
Mesure AE Spot / Cent. pondérée / AiAE
Anti-bougé Arrêt / Marche
Menu Setup
le “Manuel de référence” sur le CD-ROM.
Page 32

30
FR
Caractéristiques techniques: H1055
Nom du modèle H1055
Capteur d’image
pixels eectifs
10.1 Mégapixels
Capteur d’image 10.54 Mégapixels [1/1.7” CCD – dispositif à
couplage de charges]
Distance focale F = 7.5mm (Large) ~ 22.5mm (Télé)
[(équivalent lm
35mm)
[35mm (Large) ~ 105mm (Télé)]
F-numéro F2.8 (Large) ~ F4.9 (Télé)
Mise au point Normal: (Large) 60cm ~∞
Macro: (Large) 6cm ~ ∞; (Télé) 40cm ~ ∞
Zoom optique 3X
Zoom numérique Zoom numérique 4.5X (Zoom combiné: 13.5X)
Anti-tremblement Fonction de stabilisation de l’image
électronique
Écran LCD Écran LCD 2,7 pouces LTPS (silicium
polycristallique à basse température) Écran TFT
LCD
Photo 10MP, 9MP(3:2), 7MP (16:9)), 5MP, 3MP, 2MP,
1MP, 0.3MP
Clip vidéo 640x480pixels: 25images/s/15images/s,
320x240pixels: 20images/s/15images/s
Détection faciale Oui
Page 33
31
FR
Caractéristiques techniques
Nom du modèle H1055
Suppression des
yeux rouges
Oui
Multi-panoramique Oui
Rafale Environ 1.39 images/s (Mode Large/Fine)
Média d’
enregistrement
Mémoire interne : 26Mo
Cartes SD/SDHC (supporte jusqu’à 4Go)
Autres
caractéristiques
PictBridge, Support d’impression Exif, Support
Multilingue (11 langues)
Ports USB2.0/SORTIE AV (Connecteur intégré
propriétaire)
Alimentation Batterie rechargeable au lithium GB-40, 3.7V
1050mAh
Capacité de capture
(Performances de la
batterie)
Environ 210 photos (basé sur les standards
CIPA)
Conditions d’
utilisation
Température: 0~40oC, Humidité: 0~90%
Dimensions
(L x H x D)
103 x 56 x 24 mm
Poids Environ 145g (sans la batterie)
Page 34

Page 35

33
ESP
Prefacio
User Ma
n
ual
Baterías de
iones de litio
Cargador de batería
Cable USB
Cable AV
CD-ROM
Manual del Usuario
Tarjeta de garantía
Correa de muñeca
Gracias por comprar una cámara digital GE. Por favor lea este manual
cuidadosamente y manténgalo para referencia futura.
Derechos de autor
© Copyright 2007 General Imaging Company Todos los derechos
reservados.
Ninguna parte de esta publicación podrá reproducirse, transmitirse,
transcribirse, almacenarse digitalmente o traducirse a cualquier idioma
o lenguaje informático, de cualquier forma, por cualquier medio, sin el
consentimiento previo por escrito de General Imaging Company.
Marcas Registradas
Todas las marcas registradas mencionadas en este manual se usan
para nes de identicación solamente y podrían ser propiedades de sus
dueños respectivos.
Desempaque
Su empaque debe contener el modelo de cámara que compró junto con
los siguientes artículos. Si cualquier falta cualquier cosa o parece estar
dañada, por favor contacte a su vendedor. (Los accesorios variarán de
acuerdo al modelo comprado y se presentan abajo)
Guía de inicio rápido
Page 36

34
ESP
Vistas de la Cámara: H1055
megap ix el
10.1
H 1055
1 2
3
4
5
7
6
8
9
10
11
12
13
14
15
W
T
16
17
18
19
20 21
22
23
Page 37

35
ESP
Vistas de la Cámara
1
Flash
13
Botón Autotemp./ abajo
2
Haz asist. EA/Indicador
temporizador
14
Botón func./OK
3
Lente
15
Botón ash/izquierda
4
Mic
16
Botón de encendido
5
Pantalla LCD
17
Botón obturad.
6
EA Detección de Rostroz
18
Rueda Deslizante del Zoom
7
LED de status
19
Altavoz
8
Dial de modo
20
Punto montaje trípode
9
Botón menú
21
Puerto USB/AV
10
Botón borrar
22
Compartimiento tarjeta
de memoria / batería
11
Botón de compensación
de exposición/arriba
23
Montaje correa muñeca
12
Botón modo macro/
derecha
Page 38
36
ESP
Cómo introducir la batería y una tarjeta SD/SDHC opcional
4.
Cierre el compartimiento de la batería.
1. Abra el compartimiento de la batería.
3. Introduzca una tarjeta SD/SDHC opcional en la ranura de la tarjeta de
memoria como se muestra.
Las tarjetas SD/SDHC opcionales no se incluyen. Se recomienda
el uso de tarjetas de memoria de 64MB hasta 4GB de fabricantes
reconocidos tales como SanDisk, Panasonic y Toshiba para el
almacenamiento conable de los datos.
Para sacar la tarjeta SD/SDHC, abra el compartimiento de la
batería y empuje la tarjeta suavemente para sacarla. Hale la tarjeta
cuidadosamente.
2. Introduzca la batería mientras observa que la polaridad sea la correcta.
Use el lado de la batería para presionar hacia abajo el tapón según se
muestra, permitiendo que la batería se introduzca de manera adecuada.
Preparación
Page 39
37
ESP
Preparación
Oprima el botón de encendido para encender la cámara. Para apagar la
cámara, oprima el botón de encendido nuevamente.
Cuando esté encendida, la cámara
pasará al modo correspondiente de
acuerdo a la conguración del dial de
modo. Usted también podrá girar el
dial de modo para cambiar los modos
después de haya encendido la cámara.
Encendido y apagado
La cámara GE suministra un oportuno dial de
modo que le permite cambiar a los diferentes
modos con facilidad. Todos los modos disponibles
se enumeran de la siguiente manera.
Cómo usar el Dial de Modo
En el modo Escena, puede seleccionar entre un total de 12 tipos de
escenas según sus necesidades. Sólo tendrá que seleccionar la escena
correcta para la ocasión y la cámara modificará automáticamente la
conguración óptima para usted.
Modo escena
Icono
Nombre
deModo
Icono
Nombre de Modo
Icono
Nombre de Modo
Deporte Nieva Museo
Niños Puesta de sol Paisaje
Interior Fuegos
Articiales
Paisaje nocturno
Hoja Cristal Retrato nocturno
Icono Nombre de Modo Icono Nombre de Modo
Auto
Escena
Reproducción
Retrato
Película
Panorama
Anti-temblor
Manual
W
T
Botón de encendido
Botón T&W
W
T
W
T
_
Page 40

38
ESP
Cómo congurar el idioma, fecha y hora visualizados
Para congurar el idioma, la fecha y la hora, deben congurase las
siguientes opciones en el menú Conguración.
Preparación
Para acceder al menú Conguración, haga
lo siguiente:
1 .Oprima el botón Power para encender
la cámara.
2. Oprima el botón use Arriba/Abajo/
Izquierda/Derecha para seleccionar el
menú Conguración ( ).
3. Use Arriba/Abajo para seleccionar
Fecha/Hora. Después oprima Derecha
para entrar a la conguración.
3a. (Fecha / Hora) Oprima Izquierda/
Derecha para resaltar cada campo
y use Arriba/Abajo para modificar el
valor.
3b. (Idioma en pantalla) Use los botones de
navegación para seleccionar el idioma
deseado.
4. Oprima el botón para conrmar la
conguración.
Cuando use la cámara por primera vez, el menú de idiomas aparecerá
automáticamente.
Formato
Le recomendamos que formatee una tarjeta de memoria antes de
utilizarla por primera vez después de adquirirla, o si la tarjeta que
utiliza parece ser la causa de imágenes anormales.
Recuerde: la operación de formato le permite eliminar todos los contenidos
de la tarjeta de memoria y la memoria integrada, incluyendo las fotografías
protegidas y archivos de película.
1. Seleccione la conguración Formato en el menú Conguración como se
describió anteriormente.
2. Use los botones de navegación Izquierda/Derecha para seleccionar Sí o No,
y oprima el botón para conrmar.
3. El medio actual está formateado.
Page 41

39
ESP
Visualización en Pantalla LCD
Modo de visualización de toma ja
Visualiza ción en modo reproducción
Icono modo de toma
Icono de escena (solo disponible para
modo de Escena)
Método de medición de iluminación
Indicador EV
Indicador Autotemp.
Indicador de modo Macro
Indicador de modo de Flash
Estatus de la Batería
Nombre de Modo
La cantidad restantes de fotos podrán
tomarse.
Marco de enfoque
Indicador de zoom
Balance de blanco (sólo disponible en
el modo Manual)
ISO (sólo disponible en el modo Manual)
Calidad de imagen
Tamaño de imagen
Color de imagen (sólo disponible en el
modo Manual)
Indicador de advertencia de obturación
lenta
Indicador de tarjeta de memoria/
memoria interna
Barra de modicación EV
Icono de Modo de Reproducción
Icono Archivo DPOF
Icono de Protección de Archivo
Icono Archivo de Audio
Icono Archivo de Video
Indicador de Tarjeta de Memoria/
Memoria Interna
Identicación de Imagen
Estatus de Batería
Estatus de audio de foto
(
No hay grabación de audio
)
(
Grabación de audio presentet
)
Grabación de fecha y hora
Histograma
Valor de apertura
Velocidad de obturación
Valor de exposición
Capacidad de memoria (imagen
actual /cantidad total de fotos)
Valor ISO
WB
Tamaño de imagen
Modo:
10
1
13 14 15 16 17
9
11
12
2 3 4 5 6 7 8
19
18
20
Modo:
10
9
1 2 3 4 5 6 7 8
12
13
14
15
11
18 17 16
1
3
2
4
5
6
7
8
9
10
11
12
13
14
15
16
17
18
19
20
1
2
3
4
5
6
7
8
9
10
11
12
13
14
15
16
17
18
Page 42

40
ESP
Operación Básica
Cómo usar la función zoom
Toma en Modo Auto
Su cámara viene equipada con dos tipos de zoom: zoom óptico y zoom
digital. Use la Rueda Deslizante del Zoom situada en la parte superior de la
cámara para acercar o alejar el sujeto cuando tome fotos.
Cuando el factor del zoom óptico llega su valor máximo, el mismo se
detiene momentáneamente. Mantenga el botón (Tele) zoom oprimido y el
zoom cambiará a zoom digital automáticamente.
Indicador de Zoom
W
T
Botón de encendido
El modo Auto es el modo más fácil en el que se pueden tomar fotos.
Mientras se opere en este modo, la cámara optimizará automáticamente
sus fotos para obtener los mejores resultados.
Para comenzar a tomar las fotos, haga lo siguiente:
1. Coloque el dial de modo en el modo Auto ( ).
2. Oprima el botón Power para encender la cámara.
3. Componga su imagen en la pantalla LCD y oprima el botón obturador
hasta la mitad para enfocar al sujeto.
4. Cuando el sujeto esté enfocado, el marco de enfoque de color verde
aparecerá en el centro de la pantalla LCD.
5. Oprima el Obturador para capturar la imagen completamente.
Page 43

41
ESP
Básica Operación
Menú de función avanzado
Menú de función le permite al Para
congurar las opciones.
• WB (Balance de Blanco)
• ISO
• Calidad
• Tamaño
• Color
Para congurar el Menú de función, haga lo siguiente:
1. Oprima el botón para entrar al menú Función.
2. Use los botones de navegación Izquierda/Derecha para resaltar la
función.
3. Use los botones de navegación Arriba/Abajo para seleccionar una
opción.
4. Oprima el botón para conrmar su conguración.
(La conguración WB, ISO, Color sólo estará disponible cuando
la cámara se encuentre en modo Manual).
Functión Conguración
WB Auto
Luz del día
Nuboso
Fluorescente
Fluorescente CWF
Incandescente
Manual
ISO Auto
64
80
100
200
400
800
1600
Calidad
Calidad mejor Calidad buena Calidad normal
Calidad Puede cambiar las opciones de grabación para adaptarlas a
la nalidad de la imagen que se dispone a capturar.
Color
Automático
Vivido
Blanco y Negro Sepia
Page 44

42
ESP
Cuando esté en el modo de
Reproducción
, mueva la rueda deslizante
del zoom hasta la posición ( ) una vez para visualizar las fotos en
miniatura y los videoclips en la pantalla.
1. Use la rueda deslizante del zoom para cambiar entre la visualización en
miniatura
2x2, 3x3, y 4x4
.
2. Use
Arriba/Abajo/Izquierda/Derecha para seleccionar la foto o
videoclips que desea visualizar.
Si aparece en la pantalla LCD el indicador , se está
reproduciendo un archivo de película.
Pulse el botón para que el icono de vista previa retorne a su
tamaño de imagen original.
Cómo visualizar fotos y videos
Reproducción
Para visualizar las fotos y los video clips en la pantalla LCD:
1. Cambie su cámara al modo de Reproducción. Se visualiza la última foto
o video clip grabado.
2. Use los botones de navegación Izquierda/Derecha para deslizarse a
través de las fotos o videos almacenados en la memoria interna o en la
tarjeta de memoria.
3. Para reproducir un video clip que se haya seleccionado, oprima el botón
para entrar al modo de reproducción de película.
4.Use los botones de navegación Izquierda/Derecha para seleccionar un
botón de programa y oprima el botón para conrmar la selección.
La función de cada botón se describe a continuación.
Menú Cine
1
2
3
4
5
6
7
Salir
Reproducir
Cámara lenta
Primera imagen
Imagen anterior
Siguiente Imagen
Editar Película
Vista en miniatura
1 2 3 4 5 6 7
Page 45

43
ESP
Reproducción
Cómo usar el botón Elimina
La cámara viene equipada con un botón de Eliminación rápida para
borrar las fotos o clips de video sin entrar al menú Reproducción.
Para borrar una foto o un video:
1. Cambie su cámara al modo de Reproducción.
2. Use los botones de navegación para seleccionar la foto o clip de video que
desea borrar.
3. Oprima el botón . Aparecerá la pantalla de eliminación
4. Oprima los botones de navegación Arriba/Abajo para seleccionar Sí o
No. Después oprima el botón para conrmar.
Las fotos y videos eliminados no podrán recuperarse.
Aparecerá el indicador si la imagen tiene un archivo de
sonido adjunto. Puede elegir entre eliminar el archivo de sonido
adjunto o eliminar el archivo de imagen y el de sonido.
Page 46

44
ESP
Cómo Usar Los Menús
Modo
:
El los modos de imágenes jas, oprima el botón para entrar al menú
Fijo.
Para congurar las opciones:
1. Use los botones de navegación Arriba/Abajo para deslizarse a través
de los elementos del menú.
2. Oprima el botón de navegación Derecha para entrar al submenú.
3. Use los botones de navegación Arriba/Abajo para seleccionar una
opción.
4. Oprima el botón
para conrmar la conguración y salir del menú.
Si desea información más detallada sobre las funciones aquí descritas,
consulte el “Manual de consulta”
Page 47

45
ESP
Cómo Usar Los Menús
Disparo menús
Menús Ítems Conguración
Mode EA EA-Único / EA-Múltiple
Haz Asist. EA Apagado / Encendido
Metro Punto AE / Conc. Centro / AiAE
Toma Cont. Toma Cont. / Toma 5x / Toma 5x Últimas / Tiem.
Inter.
Rejilla Apagado / Encendido
Revisar Encendido / 1 seg / 2 seg / 3 seg
Zoom Digital Apagado / Encendido
Histograma Apagado / Encendido
Bulb Shutter Apagado / Manual (2~30seg)
Impresión de fecha Apagado / Fecha / Fecha/hora
Reproducir menús
Menús Ítems Conguración
Proteger Uno / Todos/Recongurar
Eliminar Uno / Todos/Seleccionado
DPOF Uno / Todos / Recongurar
Visual. Texto Apagado / Encendido
Recortar Para recortar una foto.
Camb.Tamaño 1024X768 / 640X480 / Volver
Rotar para seleccionar la dirección de la rotación o Volver
Visual. Diap. Efecto / Tiem. Inter. / Repetir / Inicio / Cancelar
Elim. Ref. Ojos Sí / No
Película menús
Menús Ítems Conguración
Metro Punto AE / Conc. Centro / AiAE
Anti-temblor Apagado / Encendido
En el menú Conguración:
Consulte el “Manual de consulta”en CD-ROM.
Page 48

46
ESP
Especicaciones : H1055
Nombre de modelo H1055
Píxeles Efectivos
del Sensor de
Imágenes
10.1 Megapíxeles
Sensor de
Imagen
10.54Megapíxeles [1/1.7” Charge Coupled
Device (CCD)]
Longitud focal F = 7.5mm (Ancho) ~ 22.5mm (Tele)
[equivalente a
película de 35mm]
[35mm (Ancho) ~ 105mm (Tele)]
Número F F2.8 (Ancho) ~ F4.9 (Tele)
Intervalo de
Enfoque
Normal: (Wide) 60cm ~ ∞
Macro: (Ancho) 6cm ~ ∞; (Tele) 40cm ~ ∞
Zoom Óptico 3X
Zoom Digital 4.5X zoom digital (Zoom Combinado: 13.5X)
Anti-temblor Estabilización electrónica de imagen
Pantalla LCD LTPS de 2.7 pulgadas (silicón policristalino
de baja temperatura) LCD a color TFT
Imagen Fija 10MP, 9MP(3:2), 7MP (16:9)), 5MP, 3MP, 2MP,
1MP, 0.3MP
Película 640x480Píxeles: 25fps/15fps
320x240Píxeles: 15fps/15fps
Detección de
Rostro
Sí
Page 49

47
ESP
Especicaciones
Nombre de modelo H1055
Eliminar Reejo
Ojos
Sí
Combinación de
Panorama
Sí
Toma Continua Apróx. 1.39 fps (Modo Calidad Amplia/
Buena)
Medio de
Grabación
Memoria interna: 26MB
Tarjera SD /Tarjeta SDHC (Soporta hasta
4GB)
Otras
Características
PictBridge, Soporte Exif Print,
Soporte multilenguas (11 idiomas)
Conectores USB2.0/AV-OUT (Conector Patentado
Integrado)
Fuente de
Alimentación
Batería recargable de iones de litio GB-40,
3.7V 1050mAh
Capacidad de
Toma
(Desempeño de
Batería)
Apróx. 210 tomas (según las normas de la
CIPA)
Ambiente de
Operación
Temperatura: 0~40oC, Humedad: 0~90%
Dimensiones
(A x A x P)
103 x 56 x 24mm
Masa Apróx. 145g (sin la batería)
Page 50

Page 51

49
POR
Preface
User Ma
n
ual
Obrigado por ter comprado uma câmara digital GE. Leia atentamente
este manual e guarde-o num local seguro para consultas futuras.
Copyright
© Copyright 2007 General Imaging Company Reservados todos os
direitos.
Nenhuma parte deste documento pode ser reproduzida, transmitida,
transcrita, armazenada em qualquer sistema ou traduzida para qualquer
idioma ou código informático, sob qualquer forma ou por qualquer meio,
sem autorização prévia por escrito da General Imaging Company.
Marcas registadas
Todas as marcas registadas mencionadas neste documento servem
apenas para identificação e são marcas registadas dos respectivos
proprietários.
Conteúdo da embalagem
A embalagem da câmara deve incluir a câmara que comprou juntamente
com os seguintes itens. Se algum destes itens estiver em falta ou parecer
estar danicado, contacte o fornecedor. (Os acessórios variam conforme
o modelo que comprou e estão listados em baixo.)
Bateria de iões de
lítio recarregável
Manual do usuário
Cabo USB
CD-ROM
Certicado de garantia
Correia para
colocação no pulso
Cabo AV
Carregador para a bateria
Guia de consulta rápida
Page 52

50
POR
Vistas da câmara : H1055
megap ix el
10.1
H 1055
1 2
3
4
5
7
6
8
9
10
11
12
13
14
15
W
T
16
17
18
19
20 21
22
23
Page 53

51
POR
Vistas da câmara
1 Flash 13 Botão do temporizador/
para baixo
2 Luzdfocalização automática/
LEDdo temporizador
14 Botão de função/OK
3 Lente 15 Botão para seleção do modo
do ash/de deslocamento
para a esquerda
4 Microfone 16 Botão de alimentação
5 Visor LCD 17 Botão do obturador
6 Botão de detecção facial /
focalização automática
18 Botão de zoom
7 LED de estado 19 Alto-falante
8 Disco seletor de modo 20 Entrada do tripé
9 Botão Menu 21 Porta USB/AV
10 Botão Eliminar 22 Compartimento do cartão
de memória/da bateria
11 Botão de compensação da
exposição/de deslocamento
para cima
23 Orifício para colocação
da correia
12 Modo Macro/botão de
deslocamento para a direita
Page 54

52
POR
Introdução
Colocação da bateria um cartão de memória SD/SDHC
opcional
1. Abra o compartimento da bateria.
2. Introduza a bateria com os pólos na posição correcta. Utilize a parte lateral da
bateria para exercer pressão sobre a patilha de xação mostrada. Isto faz com
que a bateria seja correctamente introduzida na ranhura.
3. Introduza um cartão de memória SD/SDHC na respectiva ranhura e tal como
mostrado.
4. Feche o compartimento da bateria.
Os cartões de memória SD/SDHC opcionais não estão incluídos.
Recomendamos a utilização de cartões de memória de 64 MB a 4 GB e de
fabricantes reconhecidos como é o caso da SanDisk, da Panasonic e da
Toshiba.
Para remover o cartão de memória SD/SDHC, abra o compartimento da
bateria e exerça uma ligeira pressão sobre o cartão para que este seja
ejetado. Puxe cuidadosamente o cartão para fora do slot.
Page 55

53
POR
O modo Cenário
Ícone Nome do modo Ícone Nome do modo Ícone Nome do modo
Desporto Neve Museu
Crianças Pôr-do-sol Paisagem
Interior Fogo-de-
artifício
Paisagem
nocturna
Folhagem Vidro Retrato
nocturno
Ícone Nome do modo Ícone Nome do modo
Automático
Cenário
Reprodução
Retrato
Vídeo
Panorâmico
Anti-tremulação
Manual
Disco selector de modo
Introdução
Ligar e desligar a câmara
Prima o botão de alimentação para ligar a câmara. Para desligar a
câmara, prima novamente o botão de alimentação.
W
T
Botão de alimentação
Quando ligada, a câmera entra no
modo denido pelo disco seletor de
modo. Para mudar de modo basta
girar o disco seletor de modo depois
de ligar a câmera.
Utilização do disco selector de modo
A câmara GE inclui um conveniente disco selector de
modo que lhe permite alternar muito facilmente entre
os diferentes modos de funcionamento. Todos os modos
disponíveis estão listados em baixo.
No modo Cenário, pode seleccionar entre 12 tipos de cenários conforme
as suas necessidades. Apenas tem de escolher a opção adequada à
ocasião e a câmara ajustará automaticamente as respectivas denições.
Page 56

54
POR
Ao ligar a câmera pela primeira vez, o menu para escolha do idioma
é automaticamente apresentado.
Introdução
Denição do idioma, da data e da hora
Para denir o idioma, a data e a hora é necessário congurar
as seguintes denições no menu Congurar.
Para aceder ao menu Configurar, faça o
seguinte:
1. Prima o botão de alimentação para ligar
a câmara.
2. Prima o botão e utilize os botões
para cima/para baixo/para a esquerda/
para a direita para seleccionar o menu
Congurar ( ).
3. Utilize os botões para cima/para baixo
para seleccionar o item Data/Hora
Depois prima o botão para a direita para
aceder ao item pretendido.
3a. (Data/Hora) Prima o botão para a
esquerda/para a direita para seleccionar
cada campo e utilize o botão para cima/
para baixo para ajustar o valor.
3b. (Idioma) Utilize os botões de navegação
para seleccionar o idioma pretendido.
4. Prima o botão para confirmar a
denição.
Formatar
Recomendamos-lhe que formate o cartão de memória antes de o usar pela
primeira vez após a compra do mesmo ou sempre que o cartão que está
a usar pareça estar na origem de problemas em termos da qualidade das
imagens.
Por favor, tenha em atenção: a formatação permite-lhe eliminar todo o conteúdo
do cartão de memória e da memória integrada, incluindo fotos e ficheiros de
vídeo protegidos.
1. Seleccione a opção Formatar no menu Congurar tal como descrito
anteriormente.
2. Utilize o botão Para a esquerda/para a direita para selecionar Sim ou Não,
e prima o botão para conrmar.
3. O Mídia de armazenamento actual é formatado.
Page 57
55
POR
Modo decaptura de fotograas Modo de reprodução
1 2Ícone do modo de captura
Ícones de cenário (apenas disponíveis no modo
Cenário)
Método de medição da luminosidade
Ícone do valor da exposição
Ícone do temporizador
Ícone do modo Macro
Ícones dos modos do ash
Estado da bateria
Nome do modo
Número restante de fotos que podem ser
tiradas.
Moldura de focalização
Indicador de zoom
Balanço de brancos (apenas disponível no
modo Manual)
ISO (apenas disponível no modo Manual)
Qualidade da imagem
Resolução da imagem
Cor da imagem (apenas disponível no modo
Manual)
Indicador de aviso de botão ash
Ícone do cartão de memória / da memória
interna
Moldura de focalização
1 Ícone do modo de reprodução
Ícone do arquivo DPOF
Ícone de arquivo protegido
Ícone de arquivo de áudio
Ícone de arquivo de vídeo
Ícone do cartão de memória / da memória
interna
ID da imagem
Estado da bateria
Ícone de arquivo de áudio
(Sem arquivo de áudio)
(Com arquivo de áudio)
Data e hora da gravação
Histograma
Valor da abertura
Velocidade do obturador
Valor da exposição
Capacidade de memória(cheiro
actual/ número total de cheiros)
Valor ISO
BB
Resolução da imagem
Modo:
10
1
13 14 15 16 17
9
11
12
2 3 4 5 6 7 8
19
18
20
Modo:
10
9
1 2 3 4 5 6 7 8
12
13
14
15
11
18 17 16
Informação mostrada no ecrã LCD
3
4
5
6
7
8
9
10
11
12
13
14
15
16
17
18
19
20
2
3
4
5
6
7
8
9
10
11
12
13
14
15
16
17
18
Page 58

56
POR
Funções Básicas
Botão T e W
W
T
W T
_
Captura de imagens no modo Automático
O modo Automático é o modo mais fácil para tirar fotografias. Neste
modo, a câmera otimiza automaticamente as fotos para obter os
melhores resultados.
Para tirar fotograas, faça o seguinte:
1. Gire o disco seletor de modo para Automático ( ).
2. Aperte o botão de alimentação para ligar a câmera.
3. Componha a imagem no visor LCD e aperte o botão do obturador até
o meio para focar o objeto a fotografar.
4. Depois de feita a focalização, uma moldura verde aparece no centro
do visor LCD.
5. Aperte completamente o botão do obturador para tirar a fotograa.
Utilização da função de zoom
Quando o zoom óptico atinge o seu limite máximo, a função de zoom
é temporariamente interrompida. Mantenha o botão de zoom (modo
Tele) pressionado para passar automaticamente para o modo de zoom
digital.
Indicador de zoom
Quando o zoom óptico atinge o seu limite máximo, a função de zoom é
temporariamente interrompida. Mantenha o botão de zoom (modo Tele)
premido para passar automaticamente para o modo de zoom digital.
Page 59

57
POR
A função permite-lhe denir as
congurações a seguir.
• BB
• ISO
• Qualidade
• Resolução
• Cor
Para denir o equilíbrio de brancos, faça o seguinte:
1. Aperte o botão para aceder ao menu Função.
2. Utilize o botão para a esquerda/para a direita para selecionar a opção
3. Utilize o botão para cima/para baixo para escolher uma opção.
4. Aperte o botão para conrmar a denição.
Le réglage des BB, ISO, couleurs n’est disponible qu’en mode
Manuel).
Funções Denições
WB Automático
Luz do dia
Nublado
Fluorescente
Fluorescente CWF
Incandescente
Manual
ISO Auto
64
80
100
200
400
800
1600
Qualidade
Excelente Boa Normal
Resolução Pode alterar as denições relativas à duração da gravação
conforme o fim a que se destinam as imagens que vai
capturar.
Cor
Automática
Cores vivas
Preto e branco Sépia
Funções Básicas
Menu de funções avançadas
Page 60

58
POR
No modo de
Reprodução
, mova o botão de zoom para a posição ( ) para
ver as miniaturas das fotos e dos videoclipes no Visor.
1. Utilize o botão de zoom para alternar entre as seguintes opções para
visualização de miniaturas:
2x2, 3x3
, e
4x4
.
2. Utilize o botão para cima/para baixo/para a esquerda/para a
direita para selecionar a foto ou o clip de vídeo que deseja ver.
Se o indicador aparecer no LCD, um cheiro de vídeo encontra-se
em reprodução.
Prima a tecla para restaurar o ícone de pré-visualização para o seu
tamanho de imagem original.
Menu Vídeo
1
2
3
4
5
6
7
Sair
Reproduzir
Câmera lenta
Primeira imagem
Imagem anterior
Imagem seguinte
Editar vídeo
Visualização de miniaturas
1 2 3 4 5 6 7
Reprodução
Visualização de fotos e de videoclipes
Para ver as fotograas e os videoclipes gravados no visor LCD:
1. Gire o disco seletor de modo para o modo de Reprodução. A câmera
mostra a última foto ou videoclipes gravado.
2. Utilize o botão Para a esquerda/para a direita para se deslocar pelas
várias fotos ou videoclipes armazenados na memória interna ou no
cartão de memória.
3. Para reproduzir o videoclipe selecionado, aperte o botão para
acessar o modo de reprodução.
4. Utilize o botão Para a esquerda/para a direita para selecionar a opção
desejada e aperte o botão para conrmar. A função de cada botão
é descrita a seguir.
Page 61

59
POR
Reprodução
Utilização do botão Eliminar
A câmara está equipada com um botão para que possa Eliminar
rapidamente fotos ou clips de vídeo sem ter de aceder ao menu
Reproduzir.
Para eliminar uma foto ou um clip de vídeo:
1. Rode o disco selector de modo para o modo de Reprodução.
2. Utilize os botões de navegação para seleccionar a foto/o clip de vídeo
que quer eliminar.
3. Prima o botão . O ecrã Eliminar é apresentado.
4. Prima o botão Para cima/para baixo para seleccionar a opção Sim ou
Não. Depois, prima o botão para conrmar.
As fotos e os clips de vídeo eliminados não podem ser
recuperados.
O indicador aparece se a imagem possuir um ficheiro de
som anexado. Poderá escolher eliminar apenas o ficheiro de
som ou eliminar o cheiro de som e o de imagem.
Page 62

60
POR
Modo:
Com a câmara denida para um dos modos de captura, prima o botão
para aceder ao menu Fixa.
Para congurar as denições:
1. Utilize o botão Para cima/para baixo para se deslocar pelos vários
itens do menu.
2. Prima o botão Para a direita para aceder ao sub menu.
3. Utilize o botão Para cima/para baixo para escolher uma opção.
4. Prima o botão para conrmar a denição e sair do menu.
Consulte as secções seguintes para mais informações sobre cada
denição.
Para obter informações mais detalhadas sobre cada denição, consulte
o Manual do Usuário localizado no CD, que foi incluído com sua câmera.
Utilização Dos Menus
Page 63

61
POR
Utilização Dos Menus
O menu Fixa
Menu items Denições
Modo foc aut Foc aut única / Foc aut múlt
Luz foc aut Activar / Desactivar
Medição Spot AE / Ao centro / AiAE
Captura cont Captura cont / 5 imag / 5 imag(últ) / Intervalo
Grelha Activar / Desactivar
Ver 1 seg / 2 seg / 3 seg
Zoom digital Activar / Desactivar
Histograma Activar / Desactivar
Botão ash Desactivar / Manual (2~30seg)
Impressão de data Desactivar / Data / Data/hora
O menu Reproduzir
Menu items Denições
Proteger Um / Tudo
Eliminar Um / Tudo / Selecionado
DPOF Um / Tudo / Repor
Ver texto Activar / Desactivar
Aparar To trim a picture.
Redimensionar 1024X768 / 640X480 / Retroceder
Rodar seleccionar a direcção de rotação ou escolha
Retroceder
Apres diapos Efeito / Intervalo / Repetir / Iniciar/ Cancelar
Red olho verm Sim / Não
vidde menn
Menu items Denições
Medição Spot AE / Ao centro / AiAE
Anti-tremulação Activar / Desactivar
Conguração do menu:
Referem-se ao Manual do Usuário localizado no CD.
Page 64

62
POR
Especicações : H1055
Nome do modelo H1055
Pixels efetivos do
sensor de imagem
10.1 Megapixels
Sensor de imagem 10.54 Megapixels [1/1.7" Charge Coupled
Device (CCD)]
Distância focal F = 7.5mm (modo Wide) ~ 22.5 mm (modo Tele)
[equivalente a
película de 35 mm]
[35 mm (modo Wide) ~ 105mm (modo Tele)]
Número f: F2.8 (modo Wide) ~ F4.9 (modo Tele)
Alcance de
focalização
Normal: (Wide) 60cm ~∞;
Macro: (modo Wide) 6 cm ~ ∞
(modo Tele) 40cm ~ ∞
Zoom óptico 3X
Zoom digital Zoom digital de 4.5X
(zoom combinado:13.5X)
Anti-tremulação Estabilização eletrônica da imagem
Visor LCD LCD TFT LTPS (low-temperature
polycrystalline silicon) a cores, 2,7”
Fotograas 10MP, 9MP(3:2), 7MP (16:9), 5MP, 3MP, 2MP,
1MP, 0.3MP
Videoclipes 640x480 píxeis: 25 fps/15 fps,
320x240 píxeis: 20 fps/15 fps
Face-Detection Sim
Page 65

63
POR
Specications
Nome do modelo H1055
Redução do efeito
de olhos vermelhos
Sim
Modo panorâmico Sim
Captura contínua Aprox. 1.39 fps (modo grande/excelente)
Mídia de gravação Memória interna: 26 MB
Cartão de memória SD / cartão de
memória SDHC (até 4 GB)
Outras capacidades PictBridge, impressão Exif,
Mídia para vários idiomas (11 idiomas)
Conectores USB2.0 / saída AV-OUT (conector
proprietário integrado)
Alimentação Bateria de iões de lítio recarregável GB-40,
3.7 V e 1050 mAh
Capacidade de
captura
(com bateria)
Aprox. 210 fotos (com base nas normas
CIPA)
Condições
ambientais
TTemperatura: 0~40oC, Umidade: 0~90%
Dimensões
(L x A x C)
103 x 56 x 24 mm
Peso Aprox. 145 g (sem bateria)
Page 66

Page 67

Page 68

http://www.ge.com/digitalcameras
GE Digital Camera Customer Service
+1 (800) 730-6597
Printed in Chinaus
 Loading...