

Page 1
■ Use pipe thread-sealing tape (provided) on threaded
connections.
■ Tubing may be cut to desired length.
■ When connecting the kit to a refrigerator water dispenser,
a slightly lower dispenser water pressure may be noticed.
This is normal.
■ It is normal for the GREEN light to flash on the faucet monitor
when the icemaker or dispenser calls for water (on some
models).
■ Before installing the icemaker kit, install the Reverse Osmosis
Filtration System according to the installation instructions.
INSTALLATION NOTES
Fig. 1
To drain
point
RO water faucet
(lift lever to open)
Water supply
valve
GE SmartWater
Water Filtration System Icemaker Connection Kit (RVKIT)
INSTALLATION INSTRUCTIONS
For use with models GXRV10, GXRM10, PNRQ15, PNRQ20,
PNRV12 (beginning on page 1) and PNRV18 (beginning on page 4)
1
215C1044P031 (11-04 JR) 49-50138
www.GEAppliances.com
GENERAL ELECTRIC COMPANY, Appliance Park, Louisville, KY 40225
1. Turn off the icemaker.
2. Turn off the water supply to the Reverse Osmosis Filtration
System by closing the water supply valve (Fig. 1).
3. Drain the RO system and tank. Turn on the RO faucet located
on the sink or countertop (Fig. 1). Let the water drain from the
system until water has stopped flowing. On models equipped
with a tank shutoff valve, make sure the valve is open so that the
tank will drain. Close the RO faucet.
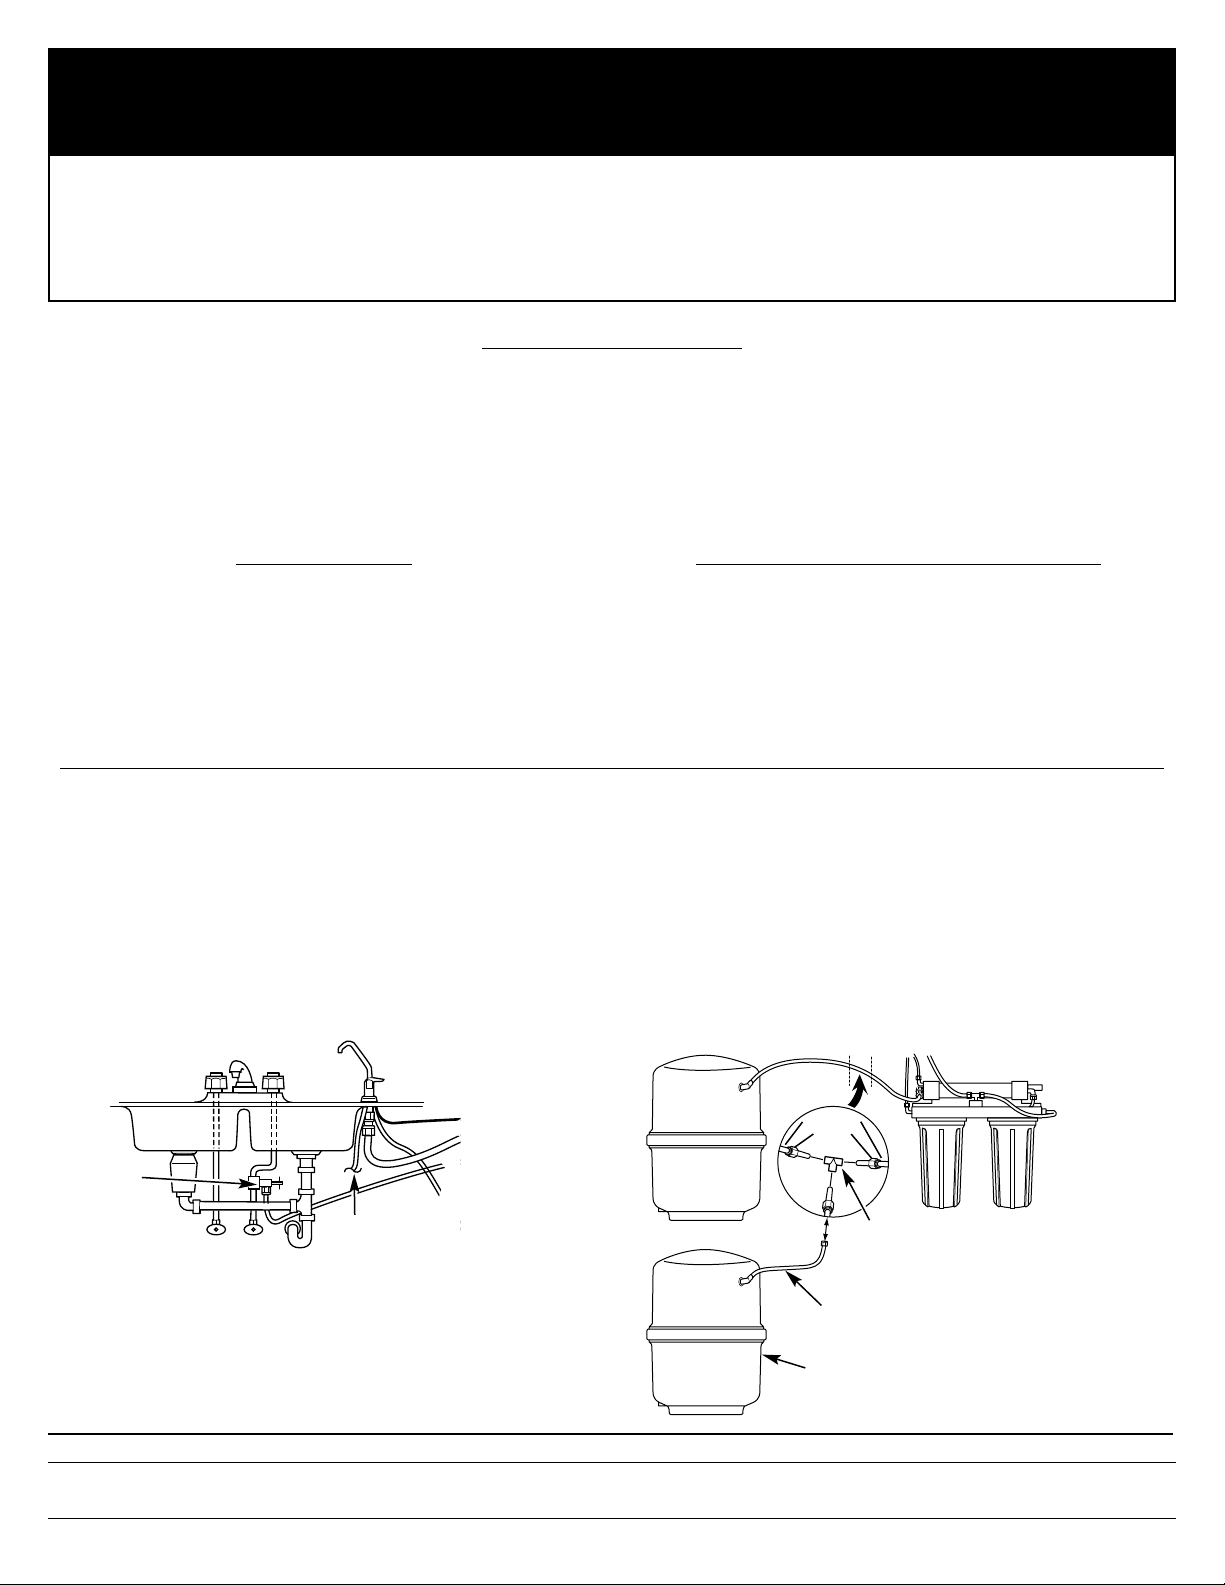
4. Cut the 3/8″ tubing that connects the storage tank to the RO
system (Fig. 2); this tubing will be either orange, gray or white,
depending on model. Make sure the cut is clean and straight
with no burrs or crimps. Insert on Tee fitting between the two
cut ends of the tubing (Fig. 2). Push the tubing into the fitting
until it stops—about 1/2″. Give tubing a tug to make sure it is
seated securely.
5. Connect the tank to the Tee using the 6 ft. length orange
tubing.
CONNECTING THE AUXILIARY TANK—FOR MODELS GXRV10, GXRM10, PNRQ15, PNRQ20, PNRV12
■ Storage tank
■ Tank adapter
■ 6 ft. 3/8″ orange tubing
■ 2 Tee fittings with
push-to-connect ends
■ Brass tubing adapter, nut and
washer assembly
■ 33 ft. 3/8″ blue tubing
■ Pipe thread tape
■ 1 ft. 3/8″ orange tubing
KIT CONTENTS
■ Utility knife
■ Pliers and adjustable jaw wrench
TOOLS AND MATERIALS REQUIRED
ColdHot
Fig. 2
Storage tank
Orange tubing
Auxiliary
storage tank
(included
with RVKIT)
Tee fitting
Nut
Tubing
Reverse Osmosis
system
Cut
Page 2
From water
supply valve
Te e
Tank shutoff valve
Storage tank
Electronics box
(on some models)
Fig. 3
This tubing adapter can be used
on most icemakers. Obtain needed
fitting for others.
Fig. 4
To drain
point
RO water
faucet
Cut
To
icemaker
Insert
Te e
fitting
Nut
Tubing
2
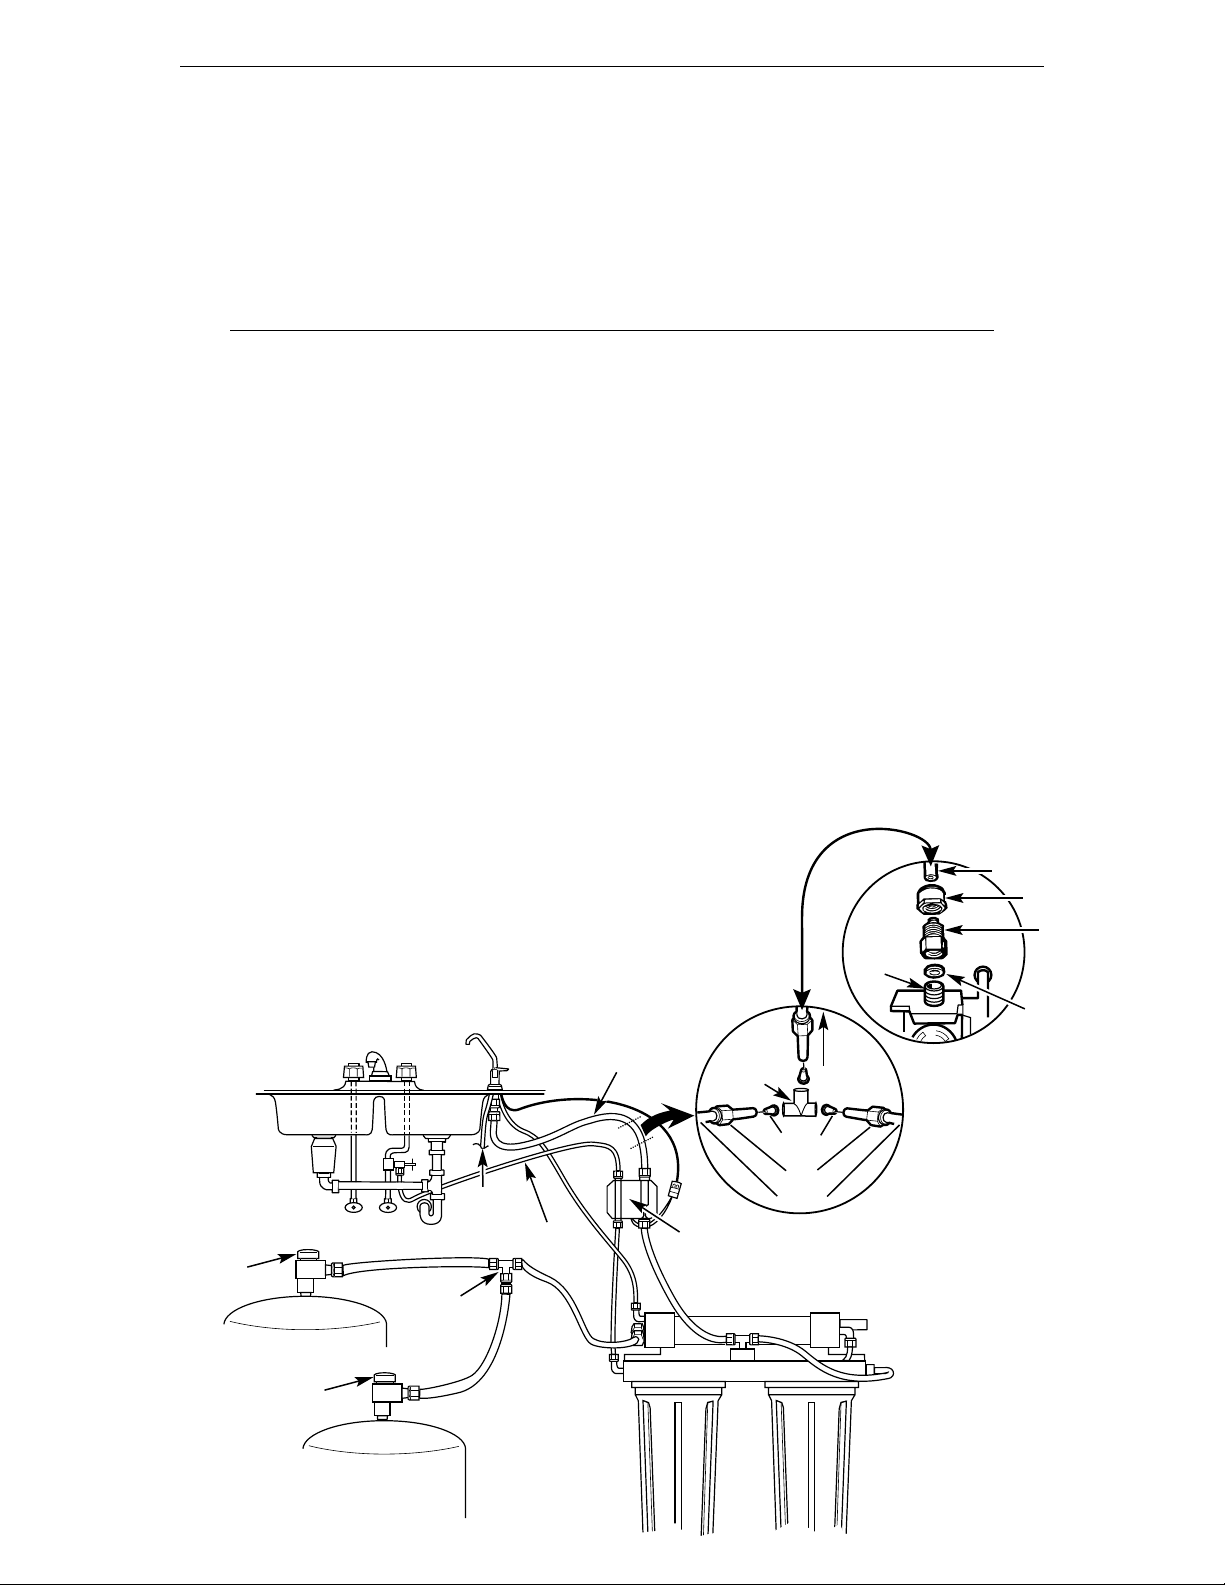
1. Locate the 3/8″ tubing that supplies the product water to the
RO faucet. It will be blue, gray or white, depending on the
model. Do not confuse the product water tubing with the drain
water tubing that also goes to the faucet (black or white on most
models). At a convenient point between the faucet and the
electronics box (on some models), cut the tubing and install
the second Tee fitting. Connect one end of the 33-foot length
of blue tubing as shown in Fig. 4.
2. Turn off icemaker water supply. Disconnect the water source
tubing from the refrigerator.
3. Connect the brass tubing adapter to the free end of the
33-foot length of blue tubing. Shorten tubing to desired length.
Attach the other end of the adapter to the icemaker water
valve. Be sure to install the plastic washer into the tubing
adapter as shown in Fig. 5.
CONNECTING TO THE ICEMAKER—FOR MODELS GXRV10, GXRM10, PNRV12
See your Reverse Osmosis System Owner’s Manual for complete
Sanitization Instructions.
1. Remove the sumps. Remove the filters and place in a clean
plastic bag. If it has been six months since you last replaced
filters, go ahead and discard them and replace with new filters.
2. Thoroughly wash sumps with dish soap. Thoroughly wipe
inside of head with a paper towel moistened with dish soap.
Rinse well.
3. Remove cap from RO cartridge housing. Remove the RO
cartridge and place in a clean plastic bag. Thoroughly wipe
inside the housing and cap with a paper towel or dish brush
moistened with dish soap. Rinse well.
4. Replace empty postfilter sump and RO housing cap.
5. Fill prefilter sump with water to within 1″ of o-ring. Add 2 oz.
(4 Tbsp.) of ordinary household bleach. Replace prefilter
sump.
6. Make sure both tanks are sitting at the same elevation.
Otherwise, the higher tank may not be sanitized properly. Turn
on water supply. Open RO faucet until water begins to flow,
then close. Allow system to fill for one minute.
7. Open the faucet and allow water to flow for 10 minutes. Close
faucet for one minute more, then open and allow water to flow
for another 10 minutes, or until the bleach odor is gone. Turn
off water supply again. Drain RO system.
8. Remove sumps. Insert filters. Lubricate o-ring with food-grade
silicone grease, if necessary. Do not use petroleum jelly. Tighten
sumps securely.
9. Remove cap from RO cartridge housing. Install RO cartridge,
o-ring end first. Lubricate cover o-ring with food-grade silicone
grease, if necessary. Do not use petroleum jelly. Tighten cap
securely.
10. Turn on water supply. Allow to fill. It may take 4–8 hours to fill
both tanks. Check for leaks.
11. If you replace the prefilter and postfilter, allow faucet to run a
few minutes to remove harmless carbon particles.
12. Once storage tanks are full, turn on icemaker. If you have a
concern that some of the bleach water may have backwashed
into the icemaker inlet lines, discard the first two batches of
ice. Or, drain your dispenser tank until water no longer runs
cold, and check for bleach taste and odor.
SANITIZING THE SYSTEM—FOR MODELS GXRV10, GXRM10, PNRV12
Secondary storage tank
(included with RVKIT)
Tank shutoff valve
(on some models)
Product
water tube
Fig. 5
Plastic
washer
Icemaker
water valve
Brass tubing
adapter
3/8″ tubing
Nut
Page 3

See your Reverse Osmosis System Owner’s Manual for complete
Sanitization Instructions.
1. Turn off the icemaker (if attached to the system).
2. Turn off the water supply to the system.
3. Turn on the RO faucet to drain that tank (it may take several
minutes). Turn OFF the faucet when the tank is empty.
CAUTION: Failure to close the water supply valve or to drain
the tank will cause water to spray or run when canisters are removed.
4. Remove the prefilter, postfilter and RO canister by rotating to
the left about 1/3 turn.
5. Fill the empty canister labeled “Sanitization Canister” with
water to within 1″ of the upper opening. Add 1 oz. (2 Tbsp.)
of ordinary household bleach. Install canister into the prefilter
canister position by turning to the right about 1/3 turn until
the alignment marks line up and the canister stops.
6. Install by-pass plugs into the RO canister and postfilter opening
in the manifold by turning to the right about 1/3 turn until the
alignment marks line up and the canister stops.
7. Turn on the water supply. Turn on the faucet until water begins
to flow from the faucet, then turn the faucet off. Allow the
system to fill for 10 minutes.
8. Turn the faucet on and allow water to flow for 20 minutes,
or until bleach odor is gone. Turn off the water supply again.
Turn on the faucet to drain the system.
9. Once the system is drained, turn the faucet off and remove the
canister and plugs by turning to the left about 1/3 turn. Keep
these in a safe place until needed the next time.
10. If you are replacing the canisters, remove the foil on the top
of the new replacement filter canisters or RO canister. Install
canisters into the manifold by turning to the right about 1/3
turn until the alignment marks line up and the canisters stop.
DO NOT OVERTIGHTEN.
11. Turn on the water supply to fill the system (it may take up to
4 hours). Check for leaks.
PNRQ15: Remove the battery tray and replace the battery to
reset timer in faucet base.
PNRQ20: Remove the batteries from the battery holder and
replace batteries to reset timer and 900 gallon monitor
functions.
12. If the prefilter and postfilter are replaced, turn the faucet
on and empty the filled storage tank.
13. Once the storage tank is full, turn on the icemaker.
SANITIZING THE SYSTEM—FOR MODELS PNRQ15, PNRQ20
3
Sink
p-trap
Hot
Cold
Disposer
Drain
Outlet
Inlet
Reverse osmosis system
Reservoir
7″
3/8″ drain tubing
RO product water faucet mounted through sink
C
u
t
To icemaker
Insert
Te e
fitting
Nut
Icemaker
water valve
Tubing
Plastic
washer
Brass tubing
adapter
3/8″ tubing
Nut
Fig. 6
Fig. 7
Fig. 8
Storage tank
Auxiliary
tank
Te e
fitting
Page 4

1. Turn off the water supply to the Reverse Osmosis system by
closing (clockwise rotation) the water supply valve (Fig. 9). Shut
off the water from the Reverse Osmosis tank of the postfilter by
closing the RED tank shutoff valve (Fig. 10). Lift the lever on the
RO water faucet located on the sink or countertop. Let water
drain from the system. Close the faucet when the water has
stopped flowing.
Fig. 10
Red tank shutoff valve
CLOSED OPEN
Fig. 11
Installation
with tee
Te e
Postfilter
CONNECTING THE AUXILIARY TANK—FOR MODEL PNRV18
4
2. Unscrew the 3/8″ tubing from the top of the postfilter. Using
one of the 3/8″ tee fittings from the parts bag, connect the
fitting to the end of the tube that was attached to the inlet of
the postfilter. Using the 12″ section of the 3/8″ orange tubing
(provided), connect the tee fitting to the postfilter (Fig. 11).
3. Remove the icemaker storage tank from its packing. Connect
the tank adapter to the tank. Use Teflon
™
tape on the threads.
4. Connect the tank to the tee fitting using the 6 ft. length of
orange tubing.
Fig. 9
To drain
point
RO water faucet
(lift lever to open)
Water supply
valve
ColdHot
FLOW
FLOW
Page 5

1. Locate 3/8″ tubing that supplies the product water to the
RO faucet. At a convenient point between the faucet and the
electronics box, cut the tubing and install the 3/8″ tee fitting.
Connect one end of the 33 ft. length of 3/8″ blue tubing to the
tee, as shown in Fig. 13.
2. Turn off the icemaker. Turn off current icemaker water source
(if applicable). Disconnect the present water source tubing
from the refrigerator.
3. Connect the brass tubing adapter from the parts bag to the
free end of the 33 ft. length of 3/8″ blue tubing. Attach the
other end of the adapter to the icemaker water valve. Be sure
to install the plastic washer into the tubing adapter as shown
in Fig. 14.
4. Turn on the water supply to the Reverse Osmosis system. Check
the shutoff valve on top of the extra storage tank to ensure it is
in the open position. Sanitize the system (see next page).
5. Check the installation for leaks. Turn the icemaker back on.
FLOW
Fig. 13
Fig. 14
Product water 3/8″ tubing
C
u
t
CONNECTING TO THE ICEMAKER—FOR MODEL PNRV18
5
Tank shutoff valve
Storage tank
Fig. 12
This tubing adapter can be used
on most icemakers. Obtain needed
fitting for others.
Icemaker
water valve
Nut
Electronics box
Te e
To drain
point
RO water
faucet
From water
supply valve
To
icemaker
Insert
Te e
fitting
Nut
Tubing
3/8″
tubing
Brass tubing
adapter
Plastic
washer
Page 6

Sanitize upon installation of the Reverse Osmosis system and after
servicing inner parts of the Reverse Osmosis system, including
replacement of prefilter, postfilter and Reverse Osmosis cartridge.
It is important to wash hands with anti-bacterial soap before handling
inner parts of the system.
CAUTION:
If installing unit in New Construction, ensure
house plumbing is flushed thoroughly before opening the water supply
valve. Also, before sanitizing, be sure to remove all cartridges as follows.
Chlorine will destroy the RO cartridge.
1. Be sure the water supply valve to the Reverse Osmosis system is
turned off and the RO water faucet is open. Allow the system
to drain completely (this takes several minutes).
2. Place a dry towel under unit. Remove the clamp retainers and
clamp sections from top of unit.
3. Lift the Reverse Osmosis cap straight up (a slight resistance
is normal) from the Reverse Osmosis housing (no need to
disconnect tubing) and move aside.
NOTE: If the cap o-ring seal remained in the RO housing, replace it
on the cap.
4. Remove the RO cartridge and outer prefilter cartridge from the
RO housing and place in a clean plastic bag. Dispose of water
from the RO housing.
5. Fill the RO housing with fresh cold water, to about 1″ from the
top. Add one ounce (2 Tbsp.) of ordinary 5.25% household
chlorine bleach and mix into the water. Do not add chlorine first.
Concentrated chlorine may damage plastics.
6. Replace RO cap, with the o-ring, and install the clamp
retainers.
7. Close the red tank shutoff valve and disconnect postfilter at
the tank shutoff valve. Connect the RO product water tubing
(disconnect at electronics box) directly to the tank shutoff
valve, isolating the carbon postfilter as shown in Fig. 15B.
8.
Open the red tank shutoff valve and the water supply valve to
the
Reverse Osmosis
system. Allow system to fill for one minute.
Now open the RO water faucet, locking the lever upward against
the spout.
9. Allow water to flow through the Reverse Osmosis system until
all the bleach odor is gone (approximately 20 minutes).
10. Turn off the water supply valve to the Reverse Osmosis system.
Close the RO water faucet AFTER the water flow stops.
11. Close the red tank shutoff valve. Disconnect the water product
line from the red tank shutoff valve and connect to the
electronics box. Reconnect postfilter line to red tank shutoff
valve. Open red tank shutoff valve.
12. a. Repeat steps two and three. Be careful of water in the
RO housing. Dispose of water.
b. Replace the RO cartridge with the o-ring seal downward
and the prefilter cartridge with “this side up” facing upward.
Be sure hands have been cleaned with an anti-bacterial soap.
c. Repeat step 6.
SANITIZING THE SYSTEM—FOR MODEL PNRV18
6
CLOSED OPEN
Tank shutoff valve
Automatic shutoff
assembly
Postfilter
Product water
tubing
Red tank
shutoff valve
Clamp
sections (2)
RO housing
Bottom
end
Flow
control
Cone screen
RO cap
Green
protective cap
Vacuum
relief valve
Postfilter line
Prefilter
cartridge
RO cartridge
Clamp
retainers (2)
Fig. 15A
Fig. 15B
Connect RO water tubing
to tank shutoff valve
Disconnect
postfilter
Postfilter
Electronics box
End with o-ring
seals downward
UP
FLOW
 Loading...