

Page 1
Installation Filter Replacement
Instructions GXRTLL
Your new GE Appliances icemaker water filter comes complete with all the necessary hardware for installation.
Each filter gives you up to 5 years of great-tasting water. Filter must be changed after 5 years of use.
REQUIRED TOOLS FOR INSTALLATION
• tube cutter
• knife
WARNING
unsafe or of unknown quality without adequate disinfection before
or after the system.
Small parts remaining after the installation could be a choke
hazard. Discard safely.
Do not use where water is microbiologically
• bucket or pan
• 7/16” and 1/2” wrenches
OPTIONAL TOOLS FOR INSTALLATION
• file • sandpaper
This GXRTLL model is Certified by IAPMO R&T
against NSF/ANSI Standard 42 for the reduction
of claims specified on the Performance Data
Sheet and at www.iapmort.org.
STATE OF CALIFORNIA PROPOSITION 65 WARNING:
WARNING
cancer and birth defects or other reproductive harm.
This product contains one or more chemicals
known to the State of California to cause
FILTER SPECIFICATIONS - GXRTLL
Filter capacity (gal): 5,250*
Filter life (years): 5*
Reduces: Chlorine Taste & Odor
Particulate Class II
Operating Temperature: 33°-100°F (0.6°-38°C)
Operating Pressure: 25-125 PSI (172-862 kPa)
Service Flow Rate: 0.5 gpm (1.9 lpm)
*Capacity may vary with local water conditions
REPLACEMENT FILTER CARTRIDGES
GXRTLL - Replacement Filter
If you have questions, or to order additional filter cartridge, visit our
website at gewaterfilters.com or call GE Appliances Parts and
Accessories, 877.959.8688. In Canada, call 800.661.1616
LIMITED 30-DAY WARRANTY
• What does this warranty cover?
- Any defect in materials or workmanship in the manufactured
product.
• What does this warranty not cover?
- Filter Cartridges.
- Service trips to your home to teach you how to use the
product.
- Improper installation, delivery or maintenance.
- Failure of the product if it is abused, misused, altered, used
commercially or used for other than the intended purpose.
- Use of this product where water is microbiologically unsafe or
of unknown quality, without adequate disinfection before or
after the system. Systems certified for cyst reduction may be
used on disinfected water that may contain filterable cysts.
- Damage to the product caused by accident, fire, floods or acts
of God.
- Incidental or consequential damage caused by possible
defects with this appliance, its installation or repair.
• For how long after the original purchase?
- Thirty (30) days.
GE Appliances, a Haier company, Louisville, KY 40225
INSTALLATION PRECAUTIONS
• Protect from freezing. Drain filter when room temperature is
expected to drop below 32°F (0°C).
• Use the in-line water filtering system on a potable, safe-to-drink,
home COLD water supply only.
The filter will not make unsafe water safe to drink. Do NOT use on
HOT water (100°F max).
• Do not install on line pressure above 125 psi (862 kPa) or below
25 psi (172 kPa).
• All of the refrigerator installation requirements must be met when
installing the filter.
• Do not install in direct sunlight.
• Installation must comply with existing state or local plumbing
codes.
• It is essential that operational, maintenance and filter replacement
requirements be carried out for this product to perform as
advertised. NOTE: Changes in taste, odor, and/or flow of the water
being filtered indicate that the filter should be replaced
• How do I make a warranty claim?
- Return to the retailer from which it was purchased, along with
a copy of the “Proof of Purchase.” A new or reconditioned unit
will be provided. This warranty excludes the cost of shipping
the product to your home.
EXCLUSION OF IMPLIED WARRANTIES - Your sole and
exclusive remedy is product exchange as provided in
this Limited Warranty. Any implied warranties, including
the implied warranties of merchantability or fitness for a
particular purpose, are limited to one year or the shortest
period allowed by law.
This warranty is extended to the original purchaser and any
succeeding owner for products purchased for home or office
use within the USA. In Alaska, the warranty excludes the cost
of shipping or service to your home or office.
Some states do not allow the exclusion or limitation of
incidental or consequential damages. This limited warranty
gives you specific legal rights, and you may also have other
rights, which vary from state to state. To know what your
legal rights are, consult your local or state consumer affairs
office or your state’s Attorney General.
Contact us at geapplianceparts.com, or call toll-free at
877.959.8688 in the U.S., or 800.661.1616 in Canada.
31-6000081 Rev. 2 10-18 GEA
Page 2
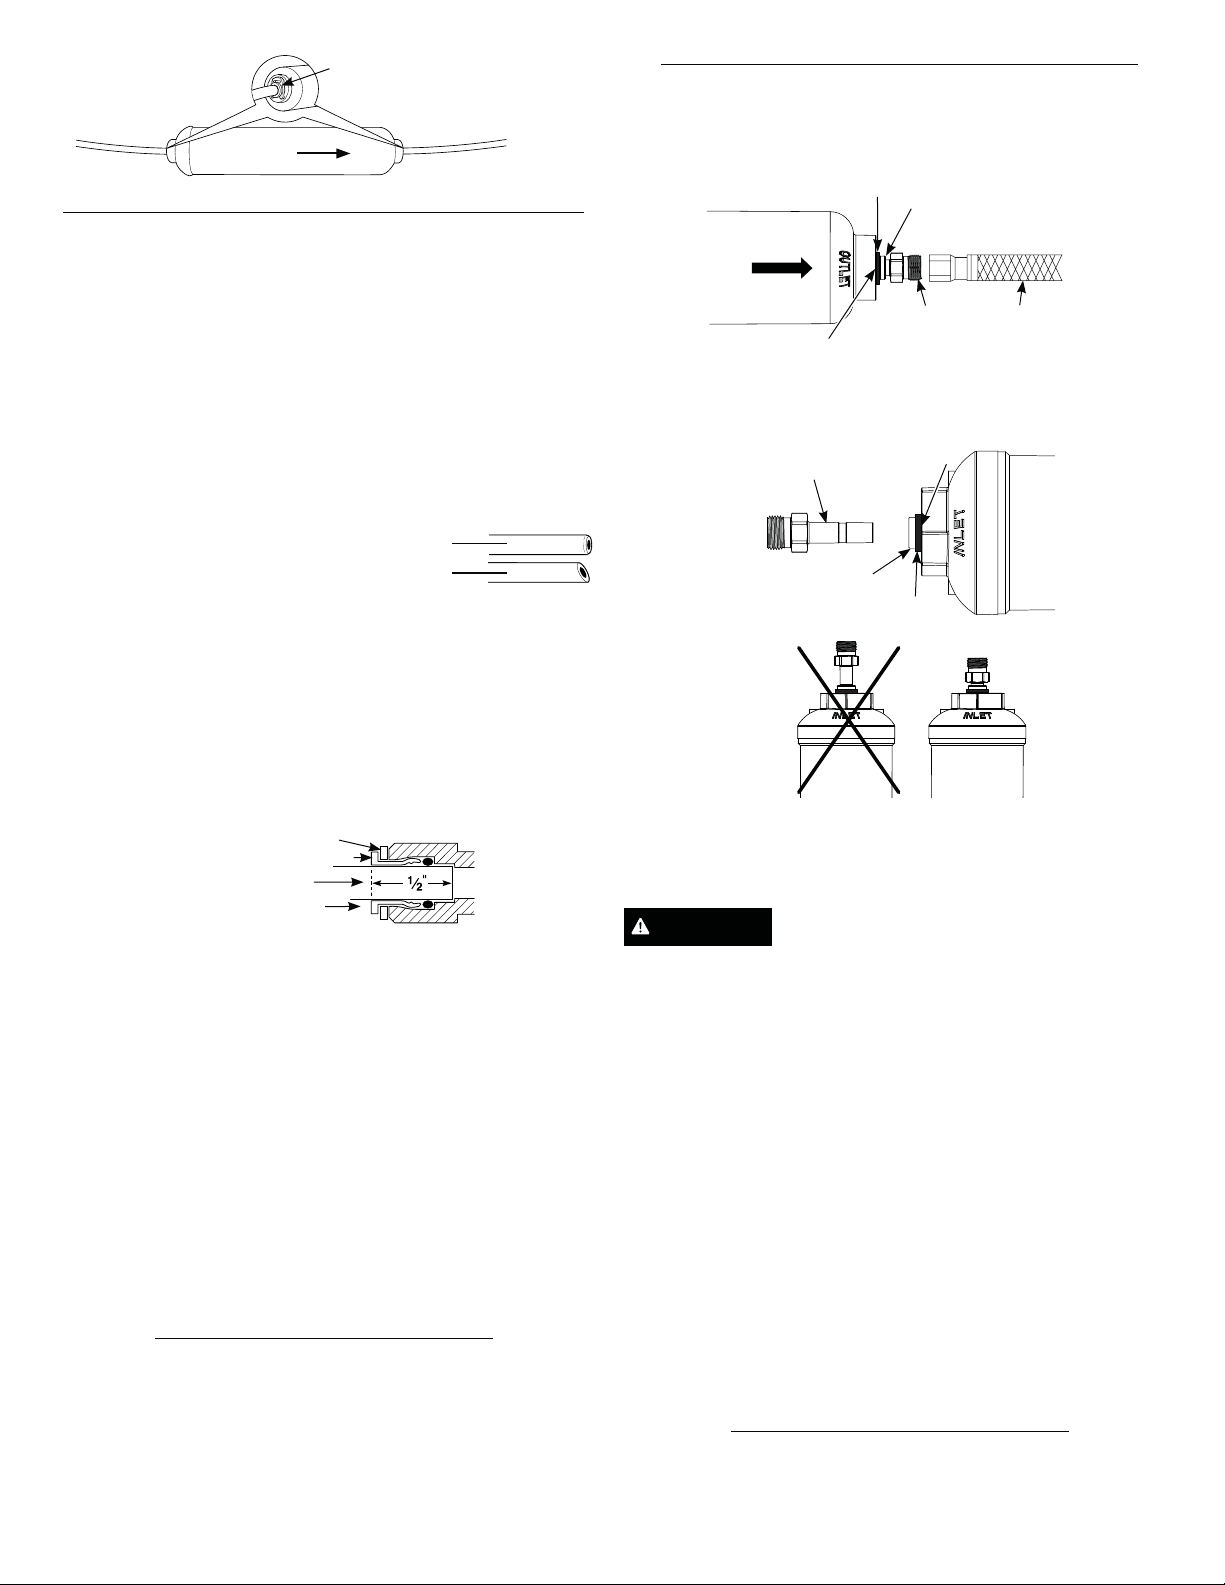
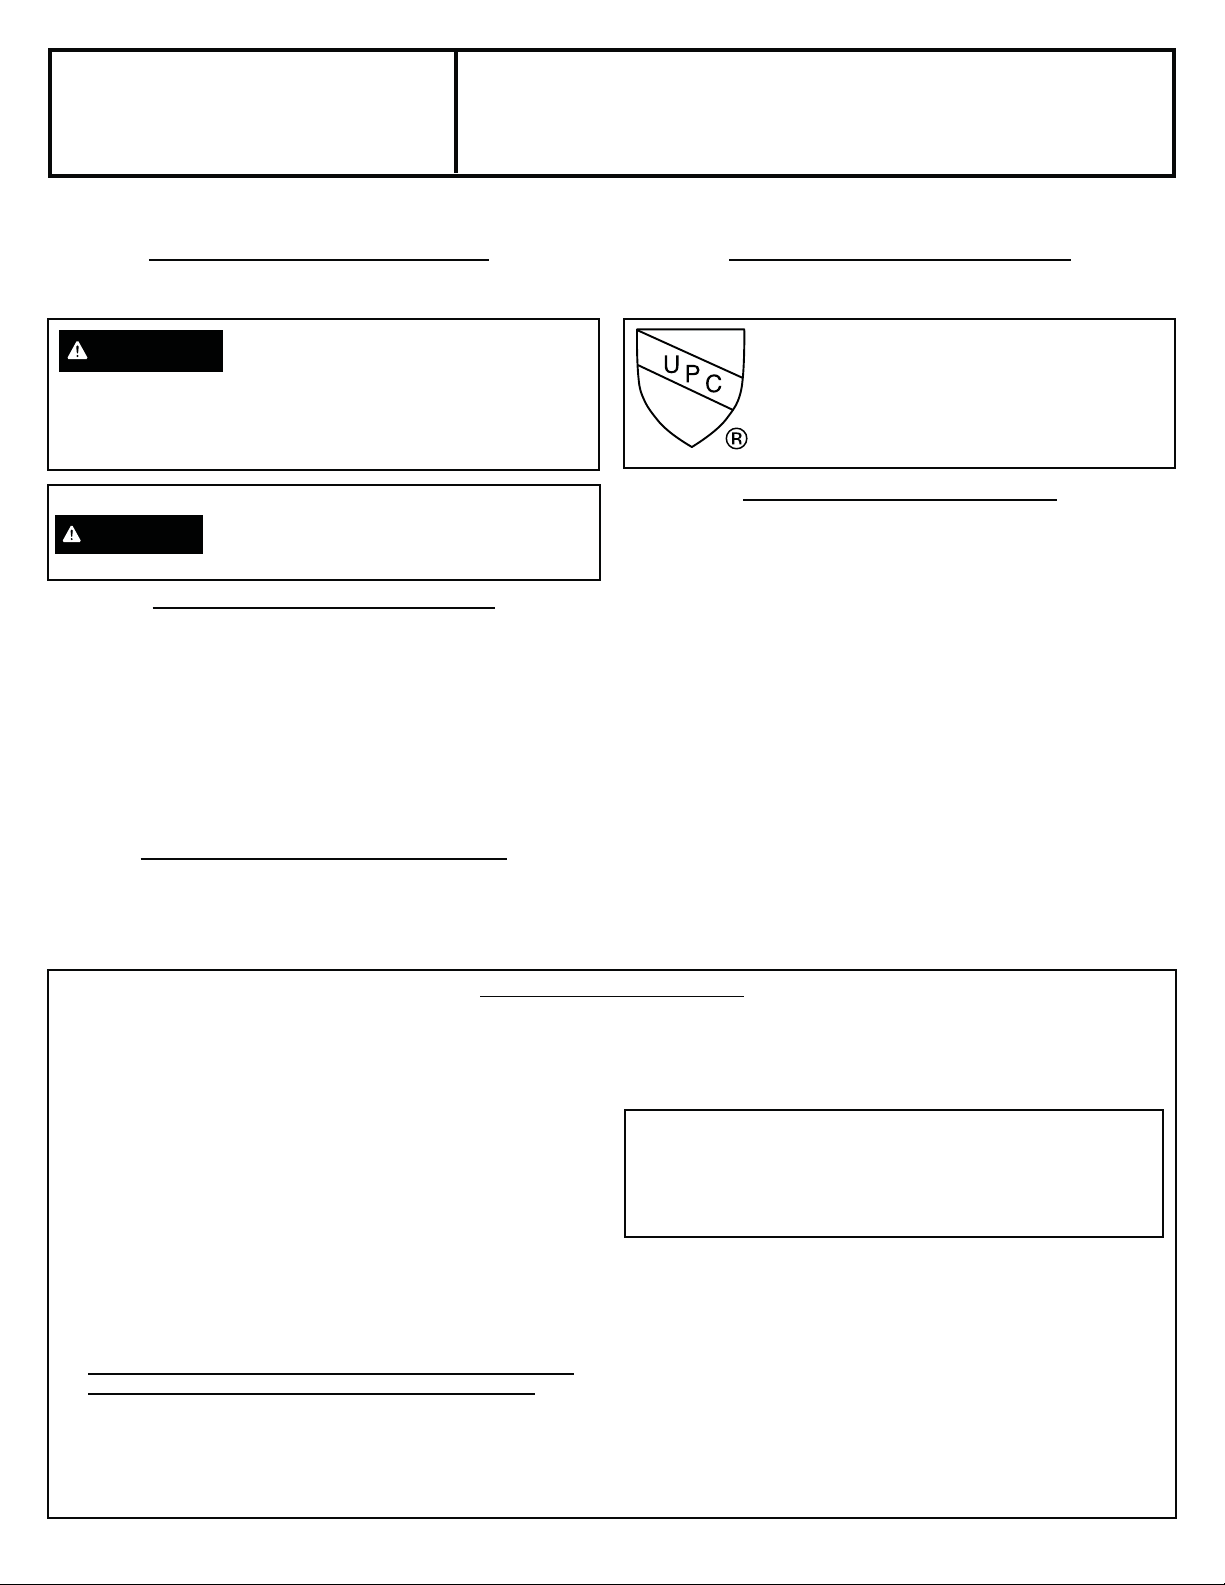
Figure 2
GXRTLL Installation
Inlet Tube
FLOW
Blue Locking Clip
Outlet Tube
INSTALLING THE FILTER ONTO 1/4” PLASTIC OR COPPER TUBING
1. All of the refrigerator installation requirements must be met when
installing the filter. NOTE: The only plastic tubing approved by GE
Appliances is that supplied in GE Appliances SmartConnectTM Icemaker
Water Line kits or Braided Icemaker Water Line kits. Certain types of
other plastic water supply lines may crack or rupture with age and cause
water damage to your home.
Cut Tubing
2. Shut off water supply. Dispense water from refrigerator door (if
applicable) to release pressure. Unplug the refrigerator.
3. The filter is to be inserted (spliced) into the 1/4s OD supply tube that
feeds water to the refrigerator. (Do not cut any water lines internal to the
refrigerator.) Locate the filter as close as possible to the supply water
shut-off valve. If the filter needs to be located behind the refrigerator,
there needs to be at least 6 inches of clearance between the wall and
the refrigerator. If the appliance must be moved, make sure there is
proper protection on the floor.
4. Cut the tubing, making sure the ends are
square and no burrs protrude. Deburr ends
with file or sandpaper if necessary.
Correct
Incorrect
Installing the Tubing
5. Make a line 1/2s from the end of each remaining piece of tubing. (Check
for roundness, smoothness, cuts, nicks, flat spots and sharp edges. It
may be necessary to recut the tubing.)
6. Locate fittings for the tubing on the side of the filtration system.
7. Make sure direction of water flow through the filter is correct.
NOTE: Refer to filter label for proper water flow direction. Failure to
follow will result in bad performance.
8. Push the tubing into the filter inlet until the line is flush with the fitting
collar. Do not install tubing on outlet until filter is flushed. See step 10.
(To remove tubing, remove blue locking clip. Then depress and
hold white collet; pull tubing out.)
Blue Locking Clip (Remove to uninstall tubing)
White Collet (DO NOT REMOVE)
Insertion line
Insert tubing
9. Pull out slightly on tubing to ensure a good seal.
Flush Filter
10. Place filter outlet over bucket or pan; fine particles of carbon may be
present - flush by turning on water supply valve. Fine carbon particles
will be removed during the flushing. Turn off water supply valve to
stop flushing after 2 to 3 gallons of water are flushed (approximately 5
minutes).
NOTE: It is normal for water to appear black for the first few seconds of
the flushing procedure.
Final Connection and Leak Check
11. Connect the outlet of the filter to the water line going to your refrigerator.
12. Turn on water supply.
13. Inspect for leaks.
14. If a leak occurs, remove tubing and reinstall.
15. Ensure blue locking clips are assembled back between filter and white
collets
16. Write the date on the filter.
17. Plug in the refrigerator.
PROCEDURE FOR REPLACING THE FILTER
1. Get a bucket and a towel.
2. Turn off water supply and unplug the refrigerator.
3. Remove blue locking clips between filter and collets.
4. Disconnect the old filter at its inlet first then its outlet.
To remove tubing, depress and hold white collet; pull tubing out. Some
water may spill or drip back through the filter.
5. Install new filter. See steps 6-17 in the Installing the Filter section.
INSTALLING THE FILTER ONTO A FLEXIBLE HOSE WITH NUT
1. All of the refrigerator installation requirements must be met when
installing the filter. NOTE: The only plastic tubing approved by GE
Appliances is that supplied in GE Appliances SmartConnectTM Icemaker
Water Line kits or GE Appliances Braided Icemaker Water Line kits.
Certain types of other plastic water supply lines may crack or rupture
with age and cause water damage to your home.
Blue Locking Clip
FLOW
Quick Connect Fitting
White Collet
Adapter
Fitting
Flexible Hose
with Nut
2. Shut off water supply. Dispense water from refrigerator door (if
applicable) to release pressure. Unplug the refrigerator.
3. Insert the adapter fittings into the quick connect fittings on the filter.
Ensure the adapter fittings are fully seated into the filter quick connects.
Quick Connect
Adapter Fitting
White Collet (DO
NOT REMOVE)
Improper Assembly Proper Assembly
Fitting
Blue Locking Clip
4. Make sure direction of water flow through the filter is correct.
NOTE: Refer the filter label for proper water flow direction. Failure to
follow will result in bad performance.
5. Attach the inlet side of the filter to the supply hose. Hand-tighten nut onto
threads of the adapter fitting.
CAUTION
Be careful not to cross thread the nut and the fitting.
6. Using 2 wrenches, tighten according to water line installation instructions
or approximately one to two full turns. Turn water supply on and inspect
for leaks.
Flush Filter
7. Place filter outlet over bucket or pan; fine particles of carbon may be
present - flush by turning on water supply valve. Fine carbon particles
will be removed during the flushing. Turn off water supply vavle to
stop flushing after 2 to 3 gallons of water are flushed (approximately 5
minutes).
NOTE: It is normal for water to appear black for the first few seconds of
the flushing procedure.
Final Connection and Leak Check
8. Connect the outlet of the filter to the water line going to your refrigerator
by repeating step 6.
9. Turn on water supply
10. Inspect for leaks.
11. If a leak occurs, gently tighten the nuts. If it continues to leak, disconnect
and reinstall.
12. Ensure blue locking clips are assembled back between filter and white
collets.
13. Write the date on the filter.
14. Plug in the refrigerator.
PROCEDURE FOR REPLACING THE FILTER
1. Get a bucket and a towel.
2. Turn off water supply and unplug the refrigerator.
3. Loosen nuts to disconnect the old filter at its inlet first, then its outlet.
Some water may spill or drip back through the filter.
4. Install new filter. See steps 3-14 in the Installing the Filter section.
 Loading...