

Page 1

GEAppliances.com
Safety Instructions ..........2-5
Operating Instructions
Care and Cleaning
of the Dryer ...................... 11
Care and Cleaning
of the Washer ...................... 9
Control Panel Dryer ...............10
Control Panel Washer .............. 6
Control Settings Dryer .............10
Control Settings Washer .........6, 7
Features Washer ...................8
Loading and Using
the Dryer ......................... 12
Loading and Using
the Washer ........................ 9
Troubleshooting
Troubleshooting Dryer ........ 16, 17
Troubleshooting Washer .......13-15
Consumer Support
Consumer Support ................20
Warranty ..........................19
Owner’s Manual
GTUP240
GUAP240
GTUP270
GUAP270
GTUN275*
* As an ENERGY STAR® partner,
GE has determined that this
product meets the ENERGY STAR®
guidelines for energy efficiency.
Write the model and serial
number here:
Model # _____________
Serial # ______________
Open Dryer door for Model
and Serial number tag.
Washer/Dryer
189D7218P001 49-90442 12-11 GE
Page 2

IMPORTANT SAFETY INFORMATION.
READ ALL INSTRUCTIONS BEFORE USING.
WARNING!
For your safety, the information in this manual must be followed to minimize the risk
of fire or explosion, electric shock, or to prevent property damage, personal injury, or
death.
Do not store or use gasoline or other
flammable vapors and liquids in the
vicinity of this or any other appliance.
Installation and service must be
performed by a qualified installer,
service agency or the gas supplier.
WHAT TO DO IF YOU SMELL GAS:
1
Do not try to light a match, or
cigarette, or turn on any gas or
electrical appliance.
2
Do not touch any electrical switch;
do not use any phone in your building.
3
Clear the room, building or area of all
occupants.
California Safe Drinking Water and Toxic Enforcement Act
This act requires the governor of California to publish a list of substances known to the state to cause
cancer, birth defects or other reproductive harm and requires businesses to warn customers of potential
exposure to such substances.
Gas appliances can cause minor exposure to four of these substances, namely benzene, carbon monoxide,
formaldehyde and soot, caused primarily by the incomplete combustion of natural gas or LP fuels.
Properly adjusted dryers will minimize incomplete combustion. Exposure to these substances can be
minimized further by properly venting the dryer to the outdoors.
4
Immediately call your gas supplier
from a neighbor’s phone. Follow the
gas supplier’s instructions carefully.
5
If you cannot reach your gas supplier,
call the fire department.
WATER HEATER SAFETY
Under certain conditions, hydrogen gas may be produced in a water heater that has not been
used for two weeks or more. Hydrogen gas can be explosive under these circumstances.
If the hot water has not been used for two weeks or more, prevent the possibility of damage or injury by
turning on all hot water faucets and allowing them to run for several minutes. Do this before using any
electrical appliance which is connected to the hot water system. This simple procedure will allow any
built-up hydrogen gas to escape. Since the gas is flammable, do not smoke or use an open flame or
appliance during this process.
2
Page 3
IMPORTANT SAFETY INFORMATION.
READ ALL INSTRUCTIONS BEFORE USING. GEApplances.com
PROPER INSTALLATION
This appliance must be properly installed and located in accordance with the Installation Instructions
before it is used. If you did not receive an Installation Instructions sheet, you can receive one by visiting
GEAppliances.com or by calling 800.GE.CARES (800.432.2737). In Canada visit www.GEAppliances.ca
or call 888.561.3344.
Properly ground appliance to conform with all
governing codes and ordinances. Follow details in
Installation Instructions.
Install or store where it will not be exposed to
temperatures below freezing or exposed to the
weather, which could cause permanent damage and
invalidate the warranty.
Connect to a properly rated, protected and sized
power supply circuit to avoid electrical overload.
Remove all sharp packing items and dispose of
all shipping materials properly.
Exhaust/Ducting
1
All dryers MUST be exhausted to the outside to
prevent large amounts of moisture and lint from
being blown into the room.
2
Use only rigid metal 4” diameter ductwork inside the
dryer cabinet. Use only UL approved rigid metal or
flexible metal 4” diameter ductwork for exhausting to
the outdoors. Never use plastic or other combustible,
easy-to-puncture ductwork.
For complete details, follow the Installation Instructions.
WARNING!
YOUR LAUNDRY AREA
Keep the area underneath and around your
appliances free of combustible materials,
(lint, paper, rags, etc.), gasoline, chemicals and
other flammable vapors and liquids.
Keep the floor around your appliances clean
and dry to reduce the possibility of slipping.
Keep all laundry aids (such as detergents,
bleaches, etc.) out of the reach of children,
preferably in a locked cabinet. Observe all
warnings on container labels to avoid injury.
Never climb on or stand on this stacked unit –
Laundry Center.
Do not allow anyone, in particular children, to
climb on, hang from, stand on, play on or in
the appliance. Close supervision of children
is necessary when the appliance is used near
children.
Do not store items that may burn or melt (such
as clothing, paper material, plastics or plastic
containers, etc) on top of the appliance nor hang
them from the door.
Keep the area around the exhaust opening
and adjacent surrounding areas free from the
accumulation of lint, dust and dirt.
Do not obstruct the flow of ventilating air. Do not
stack or place laundry or throw rugs against the
front or back of the dryer.
3
Page 4

IMPORTANT SAFETY INFORMATION.
READ ALL INSTRUCTIONS BEFORE USING.
WHEN USING YOUR APPLIANCE
Use this
appliance
only for its
intended
purpose as
described in
this Owner’s
Manual.
Do not mix chlorine bleach with ammonia or acids
such as vinegar and/or rust remover. Mixing different
chemicals can produce a toxic gas which may cause
death.
Never attempt to operate this appliance if it is
damaged, malfunctioning, partially disassembled, or
has missing or broken parts, including a damaged
cord or plug.
Never reach into the appliance while it is moving.
Before loading, unloading or adding clothes, wait until
the machine has completely stopped.
Clean the lint filter before each load to prevent lint
accumulation inside the dryer or in the room. DO NOT
OPERATE THE DRYER WITHOUT THE LINT FILTER IN
PLACE.
Do not wash or dry articles that have been cleaned in,
washed in, soaked in or spotted with combustible or
explosive substances (such as wax, oil, paint, gasoline,
degreasers, dry-cleaning solvents, kerosene, etc.).
These substances give off vapors that may ignite or
explode. Do not add these substances to the wash
water. Do not use or place these substances around
your appliance during operation.
Do not place items exposed to cooking oils in your
dryer. Items contaminated with cooking oils may
contribute to a chemical reaction that could cause a
clothes load to catch fire.
Any article on which you have used a cleaning
solvent or that contains flammable materials (such
as cleaning cloths, mops, towels used in beauty
salons, restaurants or barber shops, etc.) must not
be placed in or near the appliance until solvents or
flammable materials have been removed. There are
many highly flammable items used in homes such as
acetone, denatured alcohol, gasoline, kerosene, some
household cleaners, some spot removers, turpentines,
waxes, wax removers and products containing
petroleum distillates.
The laundry process can reduce the flame retardancy
of fabrics. To avoid such a result, carefully follow the
garment manufacturer’s care instructions.
Do not dry articles containing rubber, plastic or similar
materials such as padded bras, tennis shoes, galoshes,
bath mats, rugs, bibs, baby pants, plastic bags, pillows,
etc. that may melt or burn. Some rubber materials,
when heated, can under certain circumstances
produce fire by spontaneous combustion.
Garments labeled Dry Away from Heat or Do Not
Do not dry fiberglass articles in your dryer. Skin
To minimize the possibility of electric shock, unplug
The interior of the machine and the exhaust duct
If yours is a gas dryer, it is equipped with an automatic
You may wish to soften your laundered fabrics or
Do not spray any type of aerosol into, on, or near dryer
Tumble Dry (such as life jackets containing Kapok)
must not be put in your dryer.
irritation could result from the remaining particles that
may be picked up by clothing during subsequent dryer
uses.
this appliance from the power supply or disconnect
the appliance at the household distribution panel by
removing the fuse or switching off the circuit breaker
before attempting any maintenance or cleaning
(except the removal and cleaning of the lint filter).
NOTE: Turning the Cycle Selector knob to an off position
or pressing PAUSE does NOT disconnect the appliance
from the power supply.
connection inside the dryer should be cleaned at least
once a year by a qualified technician. See the Loading
and Using the Dryer section.
electric ignition and does not have a pilot light. DO
NOT ATTEMPT TO LIGHT WITH A MATCH. Burns may
result from having your hand in the vicinity of the
burner when the automatic ignition turns on.
reduce the static electricity in them by using a dryerapplied fabric softener or an anti-static conditioner.
We recommend you use either a fabric softener in
the wash cycle, according to the manufacturer’s
instructions for those products, or try a dryer-added
product for which the manufacturer gives written
assurance on the package that their product can
be safely used in your dryer. Service or performance
problems caused by use of these products are the
responsibility of the manufacturers of those products
and are not covered under the warranty to this
appliance.
at any time. Do not use any type of spray cleaner
when cleaning dryer interior. Hazardous fumes or
electrical shock could occur.
Do not store plastic, paper or clothing that may burn
or melt on top of the dryer during operation.
4
Page 5

IMPORTANT SAFETY INFORMATION.
READ ALL INSTRUCTIONS BEFORE USING. GEApplances.com
WHEN NOT IN USE
Grasp the plug firmly when disconnecting this
appliance to avoid damage to the cord while pulling.
Place the cord away from traffic areas so it will not be
stepped on, tripped over or subjected to damage.
Turn off water faucets to relieve pressure on hoses
and valves and to minimize leakage if a break or
rupture should occur. Check the condition of the fill
hoses; GE recommends changing the hoses every 5
years.
Before discarding the appliance, or removing it
from service, remove the washer and dryer lids to
prevent children from hiding inside.
Do not attempt to repair or replace any part of this
appliance or attempt any servicing unless specifically
recommended in this Owner’s Manual or in published
user-repair instructions that you understand and have
the skills to carry out.
Do not tamper with controls.
READ AND FOLLOW THIS SAFETY INFORMATION CAREFULLY.
SAVE THESE INSTRUCTIONS
5
Page 6

About the Washer control panel.
Fabric
Softener
Detergent
$GGGHWHUJHQW
$GGIDEULFVRIWHQHURSWLRQDO
$GGEOHDFKRSWLRQDO
Step 1
Liquid
Bleach
$GGFORWKHV
Step 2
6HOHFWORDGVL]HDQG
other wash options
6HOHFWZDVKF\FOH
Step 3
Step 4
&ORVHOLG
3XVKSTART
Quick Start Guide
WARNING!
To reduce the risk of fire, electric shock, or injury to persons, read the IMPORTANT SAFETY INSTRUCTIONS before operating
this appliance.
Throughout this manual, features and appearance may vary from your model.
Lid Lock
Your washer has a security system that prevents opening the lid during the spin cycle. The lid lock prevents
anyone (especially children) from reaching into the washer while the basket is spinning. The lid lock will be
release within 5 seconds after the basket stop spinning. Trying to open the lid while locked could result in
injuries. If the lid does not unlock after spinning, please contact service.
NOTE: If there is a power outage the lid lock can take 3 minutes to release.
D E
C
A
F
B
Note: This appliance is designed so that the washer and dryer can be operated at the same time.
Controls
Wash Cycle Selector
A
The wash cycle controls the length and intensity of the washing process. The knob can be turned in either direction. Turning the
Cycle Selector knob after starting a cycle will stop the washer and reset the cycle to the new selection. Press START to begin the
new cycle selection.
The chart below will help you match the wash cycle setting with your clothing. The chart is ranked from longest to shortest
cycle time and wash intensity. (Cycles vary by model.)
COTTONS - For heavy to lightly soiled cottons, household linens, work and play clothes.
PERMANENT PRESS - For wrinkle-free and permanent press items, and knits.
DELICATES - For lingerie and special-care fabrics with light to normal soil.
SPIN ONLY - For draining the tub and spinning water out of clothes.
QUICK RINSE - Rinses and spins non-soiled items where a rinse only is desired.
OFF - Washer is turned off and the START button does not function.
NOTE: When the control is turned to OFF, the STATUS lights are off.
6
NOTE: The cycle selector does not rotate during the operation of the washer.
Page 7

GEApplances.com
FABRIC SOFTENER
B
Set this option when adding fabric softener to the washer.
STATUS lights
C
The STATUS lights show the stage the washer is in. When the selector knob is set to a new cycle, the STATUS lights will flash
momentarily, showing the stages the cycle will go through.
STATUS light Illuminates
ON When the fabric softener option has been selected.
WASH When the washer is in the wash portion of the cycle.
RINSE When the washer is in the rinse portion of the cycle.
SPIN When the washer draining and/or spinning.
LID LOCKED
When the washer lid is locked. This feature prevents the lid from being opened while the
washer is in the spin cycle or coasting to a stop.
NOTE: If the STATUS lights are blinking, the operation of the washer has been paused. To resume operation
press the START button (the lid must be closed).
Temperature
D
Select the water temperature for the wash and rinse cycles. Always follow fabric manufacturer’s care label or instructions
when laundering.
PerfecTemp senses the incoming water temperature and adjusts the fill water to obtain a more precise temperature range
for all wash temperatures. For example, in a COLD wash selection, some warm water may be added to reach a temperature
needed to better dissolve detergents. Often, detergents are not completely dissolved in very cold water, especially in cooler
climates.
During winter months, when the water entering your home is colder, or for locations with very cold water year round, use the
PerfecTemp plus COLD to help dissolve powdered detergents and to improve the cleaning of your clothes.
The TAP COLD feature turns the PerfecTemp feature on your washer off, and uses your household tap water temperature for a
COLD wash. This can provide energy savings by reducing the amount of hot water used in your wash.
Load Size
E
Loosely load clothes no higher than the top row of holes in the washer basket.
AUTO LOAD SENSING- This selection automatically provides the correct amount of water suited to the size and type of load
placed in the unit.
START
F
Press START to begin the cycle. With the lid closed pressing START again will PAUSE the cycle and STATUS lights will blink. To
continue the cycle, close the lid and press START again. The water fill will continue with the lid opened, except when AUTO
LOAD SENSING is selected as the load size. (The lid must be closed to continue filling when AUTO LOAD SENSING is selected.)
If the lid is opened during the cycle, the cycle will PAUSE and the STATUS lights will blink. To resume the cycle, close the lid and
press START.
If the machine is paused for more than 24 hours, the cycle will be cancelled. To stop the cycle, turn the Cycle Selector to the
OFF position.
7
Page 8
About the Washer features.
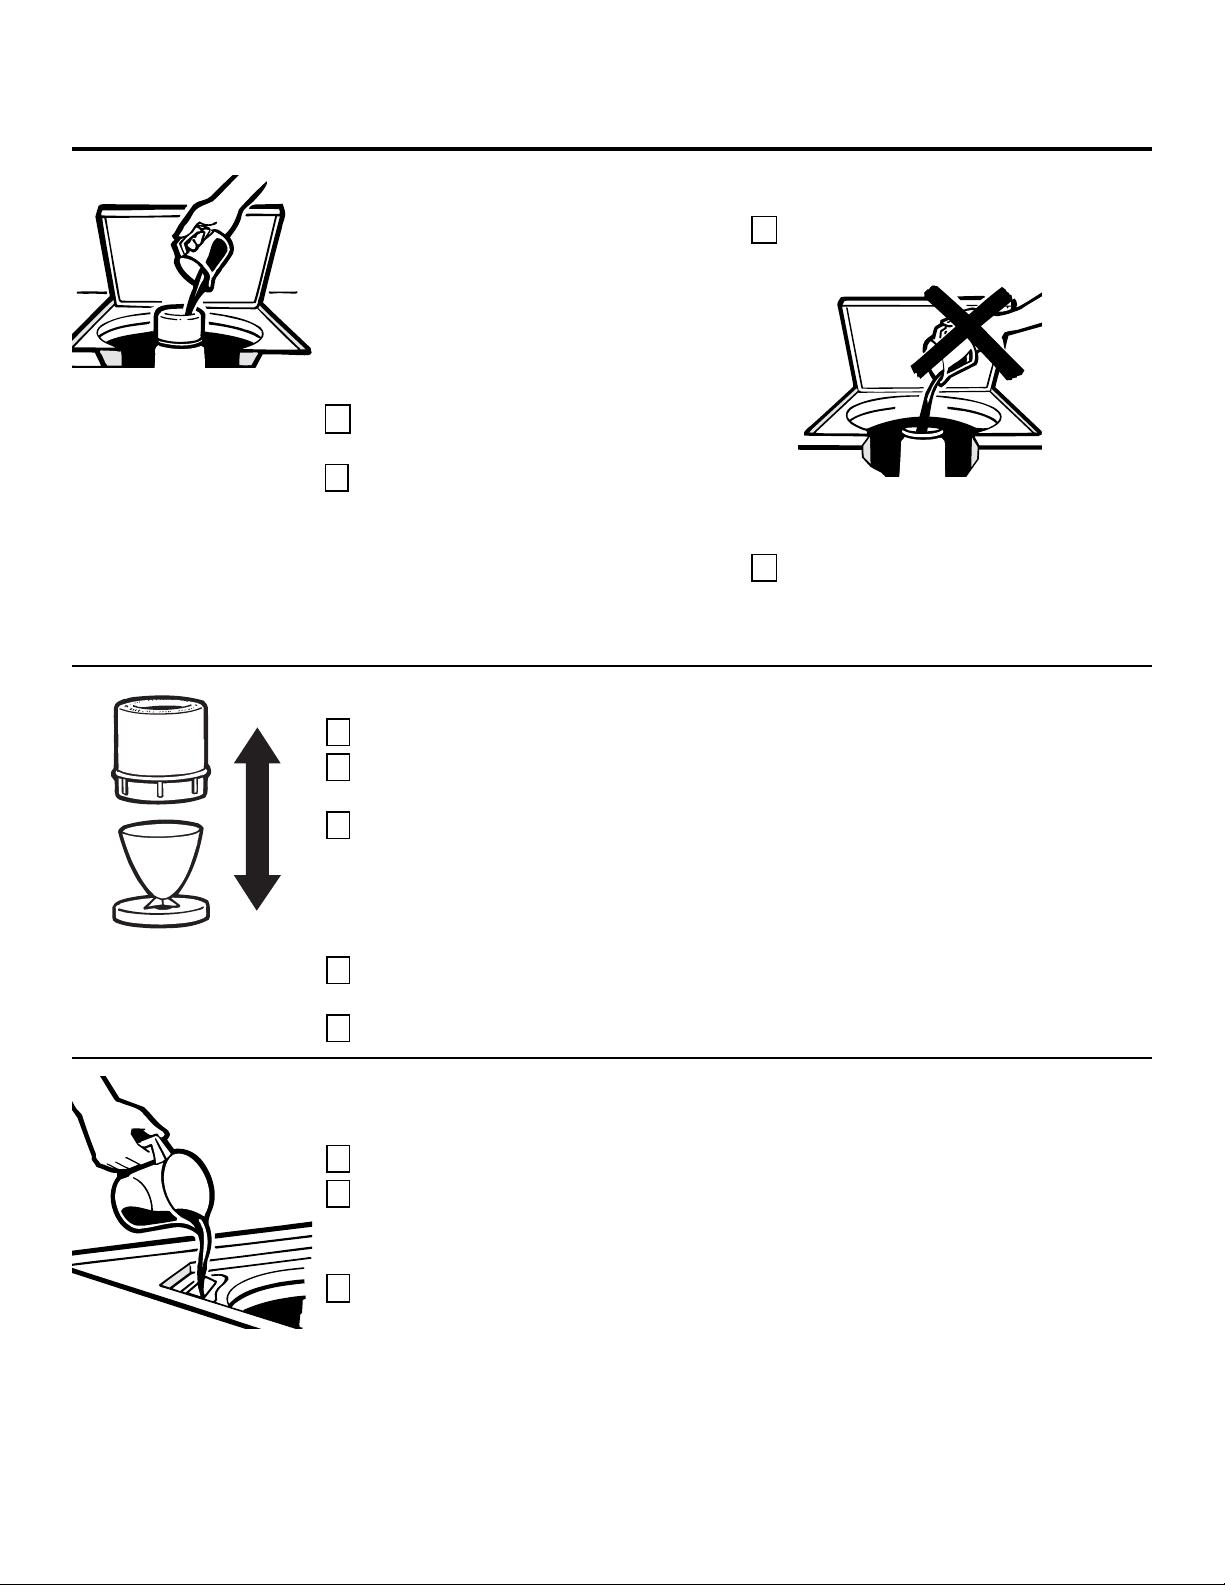
The Fabric Softener Dispenser
The fabric softener dispenser automatically
releases liquid fabric softener at the proper time
during the cycle.
Do not stop the washer during the first spin.
This will cause the dispenser to empty
too soon.
Add water to dispenser until it reaches the
3
maximum fill line.
To use, follow these steps:
Make sure dispenser is securely attached to
1
agitator.
Use only diluted liquid fabric softener.
2
Pour into dispenser, using amount
recommended on package.
Never pour fabric softener directly on clothes. It
may stain them.
NOTE: Do not pour bleach into FABRIC SOFTENER
dispenser.
Do not pour anything into the
agitator if the dispenser is removed.
Select FABRIC SOFTENER button on control
4
panel for proper dispersion of the fabric
softener.
Cleaning the Fabric Softener Dispenser
Remove the dispenser from the top of the agitator.
1
Separate the dispenser cup from the cover by grasping the top and pushing down on the inside of
2
the cup with your fingers. Dispenser cup will pop free from the cover.
Separate for cleaning
To clean the dispenser, soak both the dispenser cup and the dispenser cover in the following
3
solution:
1 US gallon (3.8 liters) warm water
1/4 cup (60 ml) heavy-duty liquid detergent
1 cup (240 ml) bleach
If necessary, loosen buildup with a clean, soft cloth after soaking. Do not use a stiff brush; you may
4
roughen the surface of the dispenser.
Rinse and reassemble dispenser. Place dispenser back on the agitator.
5
Liquid Bleach Funnel
The water fill dilutes liquid chlorine bleach as the washer fills for the wash cycle.
Check clothing care labels for special instructions.
1
Measure liquid bleach carefully, following instructions on the bottle.
2
Never pour undiluted liquid chlorine bleach directly onto clothes or into the wash basket.
Do not pour powdered bleach into bleach funnel.
Before starting the washer, pour measured amount of bleach directly into bleach funnel. Avoid
3
splashing or over-filling dispenser. If you prefer to use powdered bleach, add it into the wash basket
with your detergent.
Do not mix chlorine bleach with ammonia or acids such as vinegar and/or rust remover. Mixing
can produce a toxic gas which may cause death.
NOTE: Do not pour bleach into FABRIC SOFTENER dispenser.
8
Page 9
Loading and using the washer.
Always follow fabric manufacturer’s care label when laundering.
Sorting Wash Loads
Sort by color (whites, lights, colors), soil level,
fabric type (sturdy cottons, easy care, delicates)
and whether the fabric produces lint (terry cloth,
chenille) or collects lint (velveteen, corduroy).
Proper Use of Detergent
Add detergent and start the washer before adding
clothes so that the detergent can work effectively.
Using too little or too much detergent is a common
cause of laundry problems.
You can use less detergent if you have soft water,
a smaller load or a lightly soiled load.
Loading the Washer
Load dry items loosely, no higher than the top row of
holes in the washer basket. When loading wet items,
make sure you set the load/water level high enough
to allow the items to move freely. Water level should
just cover the clothes. To add items after washer has
started, lift the lid and submerge additional items next
to the agitator.
Do not wrap long items like sheets or pants
around the agitator.
Do not wash fabrics containing flammable materials
(waxes, cleaning fluids, etc.).
Agitation will not start with the lid up.
GEAppliances.com
Care and cleaning of the washer.
Wash Basket: Leave the lid open after washing to allow
moisture to evaporate. If you want to clean the basket,
use a clean soft cloth dampened with liquid detergent;
then rinse. (Do not use harsh or gritty cleaners.)
Fill Hoses: GE recommends changing the hoses every
5 years.
Exterior: Immediately wipe off any spills. Wipe with
damp cloth. Try not to hit surface with sharp objects.
Moving and Storage: Ask the service technician to
remove water from drain pump and hoses. See the
Installation Instructions packed with product for
information on how to reinstall the shipping rod to keep
the tub stationary when moving the washer. For more
information, visit GEAppliances.com or call
800.GE.CARES (800.432.2737). In Canada, visit
GEAppliances.ca or call 888.561.3344. Do not store the
washer where it will be exposed to the weather.
Long Vacations: Be sure water supply is shut off at
faucets. Drain all water from hoses if weather will be
below freezing.
9
Page 10

About the Dryer control panel.
WARNING!
Throughout this manual, features and appearance may vary from your model.
To reduce the risk of fire, electric shock, or injury to persons, read the
IMPORTANT SAFETY INSTRUCTIONS before operating this appliance.
1
2
Note: This appliance is designed so that the washer and dryer can be operated at the same time.
IMPORTANT: Clean the lint filter each time you use the dryer
1
Fabric Care/Temperature
REGULAR
or COTTONS
REG. HEAT
MEDIUM,
EASY CARE
MED. HEAT,
EASY CARE
or PERMA PRESS
MED. HEAT
DELICATES
LOW HEAT
QUICK FLUFF
NO HEAT
For regular to heavy cottons.
For synthetics, blends, delicates and items labeled permanent press.
For delicates, synthetics and items labeled tumble dry low.
For fluffing items without heat. Use the TIMED DRY cycle.
10
2
Automatic cycles automatically determine fabric dryness. Select LESS DRY if you want your clothes slightly damp at the
end of the drying cycle. Select MORE DRY if you want them to feel drier. Timed cycles run for a selected time.
Drying Cycles
COTTONS For cottons and most linens. For most loads, select OPTIMUM Dry.
EASY CARE/
PERMANENT PRESS
DELICATES For delicate items, special-care fabrics and knits.
TIMED DRY Set the Cycle Selector at the desired drying time.
DEWRINKLE For removing wrinkles from items that are clean and dry or that are very lightly damp.
QUICK FLUFF
For wrinkle-free, permanent press and delicate items, and knits.
For freshening or fluffing up already dry clothing, fabrics, linens and pillows. Use with FLUFF
NO HEAT. Provides 10 minutes of no heat tumbling.
Auto Cycle / Timed Cycle
AUTO CYCLE
TIMED DRY For manual drying. The timer rotates during the entire cycle.
For automatic sensored drying. The timer does not rotate during the cycle until the thermostats sense that the clothes are dry, then the timer rotates automatically to OFF.
START-Close the dryer door. Press START. Opening the door during operation will stop the dryer. To
restart the dryer, close the door and select START to complete the cycle.
Page 11
Care and Cleaning of the Dryer.
GEAppliances.com
The Exterior: Wipe or dust any spills or washing
compounds with a damp cloth. Dryer control panel
and finishes may be damaged by some laundry
pretreatment soil and stain remover products. Apply
these products away from the dryer. The fabric may
then be washed and dried normally. Damage to your
dryer caused by these products is not covered by your
warranty.
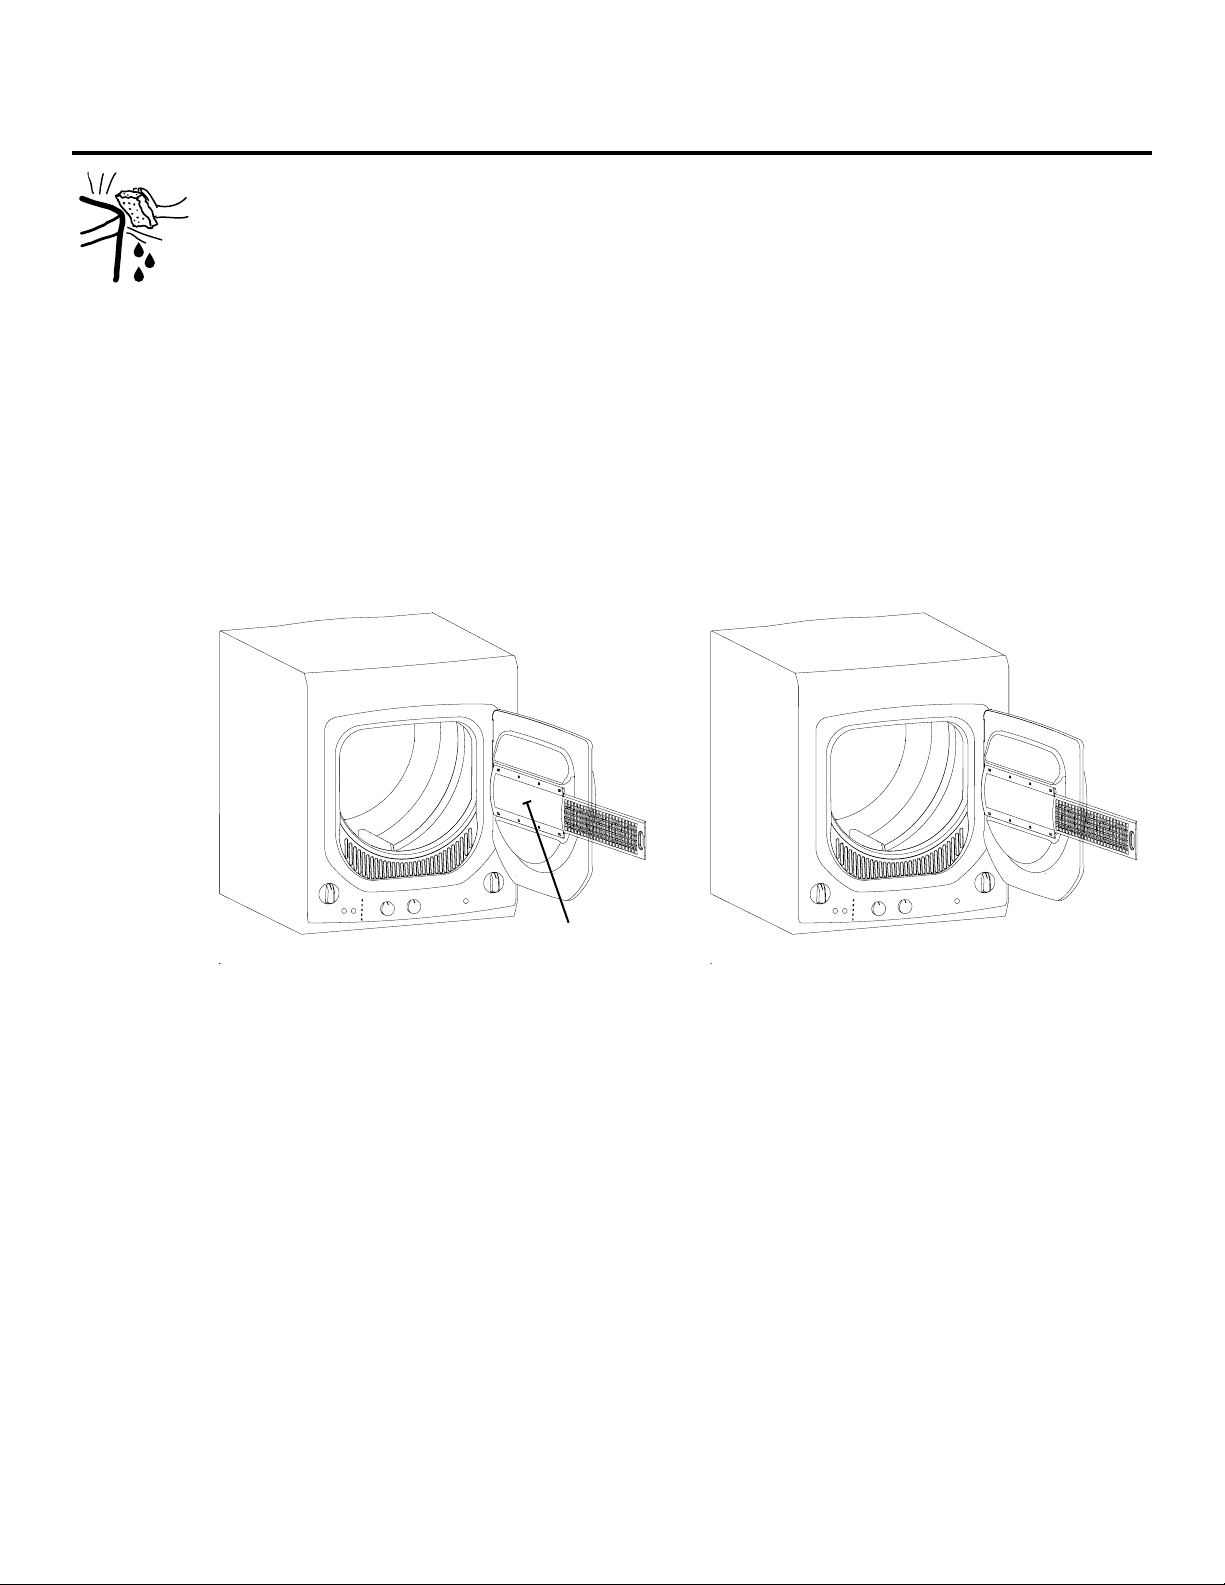
The Lint Filter: Clean the lint filter before each use.
Slide out the grid that covers the filter. Run your
fingers across the filter. A waxy buildup may form on
the lint filter from using dryer-added fabric softener
sheets. To remove this buildup, wash the lint screen
in warm, soapy water. Dry thoroughly and replace. Do
not operate the dryer without the lint filter and grid
in place. Have a qualified technician vacuum the lint
from the dryer once a year.
The Exhaust Duct: Inspect and clean the exhaust
ducting at least once a year to prevent clogging. A
partially clogged exhaust can lengthen the drying
time.
Follow these steps:
1. Turn off electrical supply by disconnecting the plug
from the wall socket.
2. Disconnect the duct from the dryer.
3. Vacuum the duct with the hose attachment and
reconnect the duct.
The Exhaust Hood: Check with a mirror that the
inside flaps of the hood move freely when operating.
Make sure that there is no wildlife (birds, insects, etc.)
nesting inside the duct or hood.
On some models
Clean lint
from mesh
11
Page 12
Loading and using the Dryer.
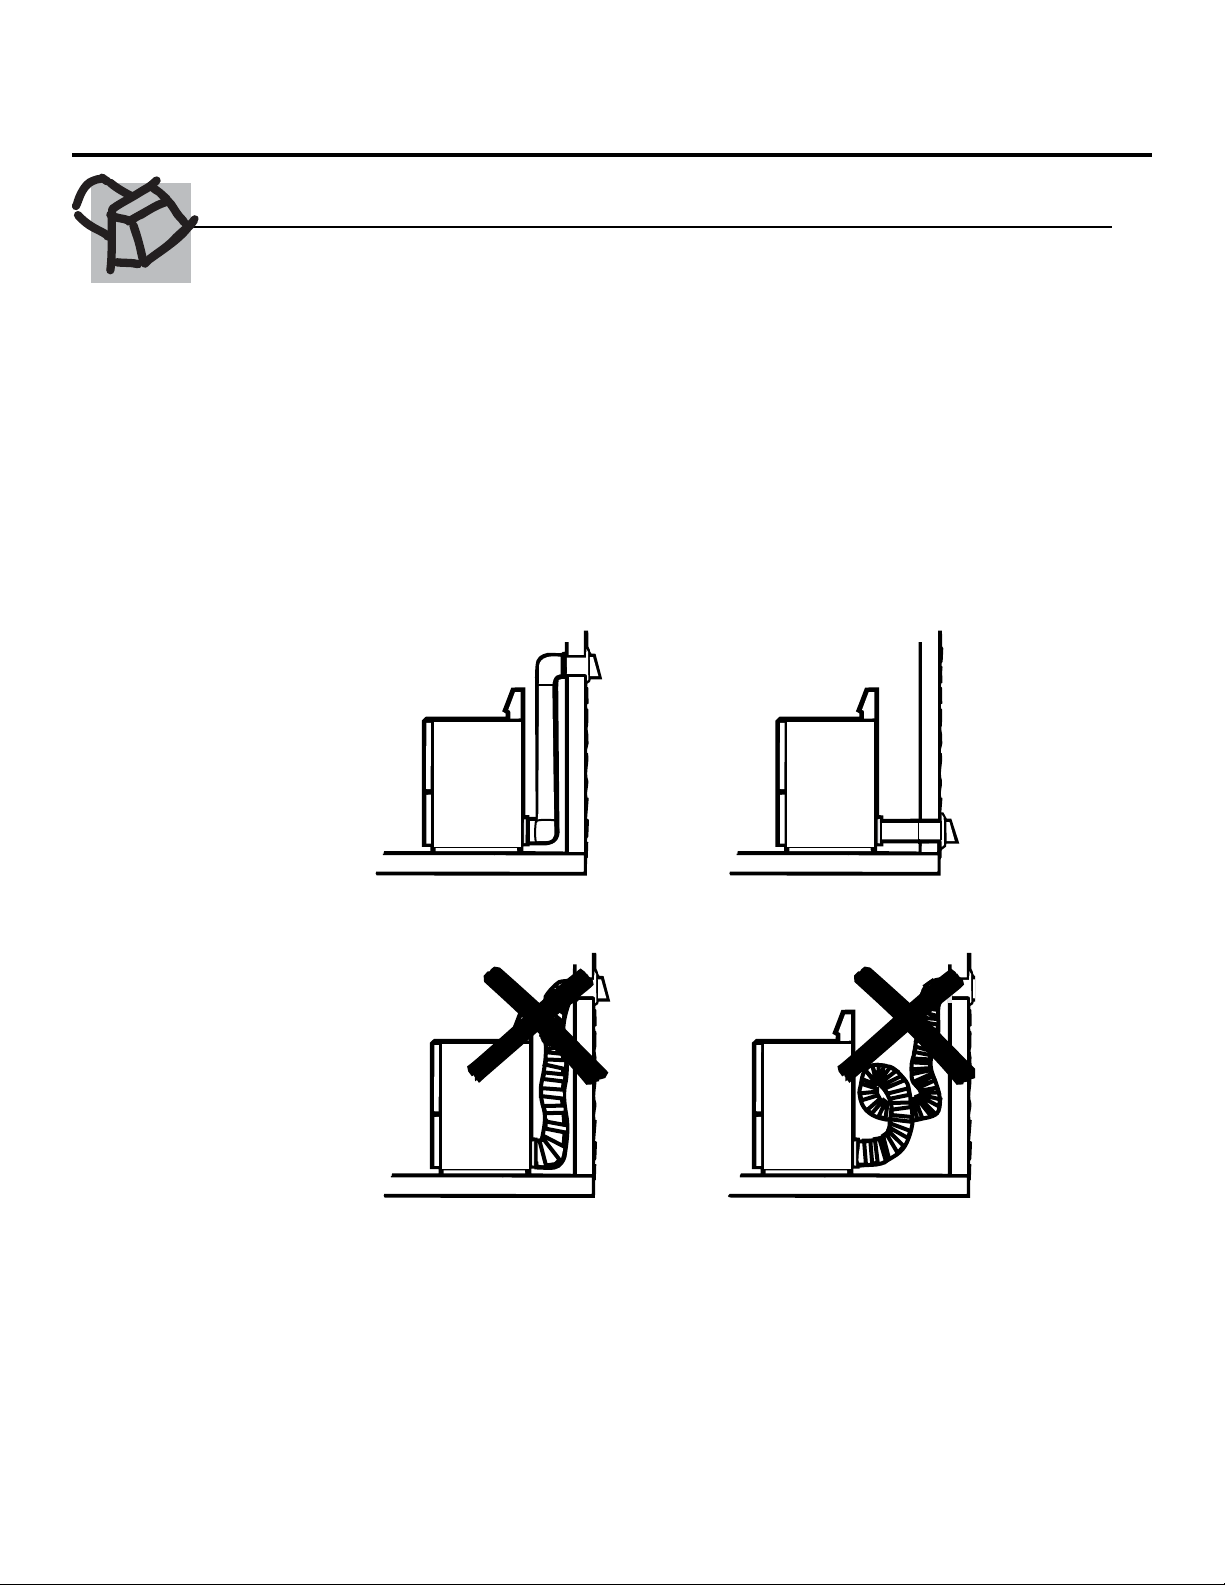
Venting the Dryer
For the best drying performance, the dryer needs to be properly vented. The dryer will use more energy
and run longer if it is not vented to the specifications below. Carefully follow the details on Exhausting in the
Installation Instructions.
Use only rigid metal 4” diameter ductwork inside the
dryer cabinet. Use only rigid metal or UL approved
flexible metal 4” diameter ductwork for exhausting
to the outside.
Do not use plastic or other combustible ductwork.
Use the shortest length possible.
Do not crush or collapse ductwork.
Avoid resting the duct on sharp objects.
Venting must conform to local building codes.
Correct
Venting
Incorrect
Venting
12
Page 13

Before you call for service…
Troubleshooting Tips
Save time and money! Review the charts on the following pages, or visit GEAppliances.com.
In Canada, visit GEAppliances.ca. You may not need to call for service.
Water Possible Causes What to do
Too many suds Too much detergent
Using too much
detergent
Fill hoses or drain
hose is improperly
connected
Water leaks
Water temperature
seems incorrect
Water pumped
out before cycle is
complete
Water won’t drain
Washer pauses during
spin cycle
Can hear but not see
water at the end of
the cycle
Household drain may
be clogged
Constant water
pressure to the fill
hoses at the water
source
Cooler water
temperatures provide
improved energy
efficiency
Water supply
is turned off or
improperly connected
Water valve screens
are stopped up
House water heater is
not set properly
Lid lifted or cycle was
put in pause for over
24 hours
Drain hose is kinked
or improperly
connected
This is normal The washer may pause during the spin cycle to remove soapy water more
This is normal
Measure your detergent carefully. Use less soap if you have soft water, a
smaller load or a lightly soiled load.
Use less detergent. Use less soap if you have soft water, a smaller load or a
lightly soiled load.
Make sure hose connections are tight at faucets and rubber washers are
installed. Make sure end of drain hose is correctly inserted in and secured to
drain facility.
Check household plumbing. You may need to call a plumber.
Tighten hoses at the faucets and turn the water off after
each use.
Check condition of the fill hoses; they should be replaced
every 5 years.
New laundry detergents have been formulated to work with cooler water
temperatures without affecting wash performance.
Turn both hot and cold faucets fully on and make sure hoses are connected to correct faucets.
Turn off the water source and remove the water connection hoses from the
upper back of the washer. Use a brush or toothpick to clean the screens in
the machine. Reconnect the hoses and turn the water back on.
Make sure house water heater is delivering water at 120°F–140°F (48°C–
60°C).
Reset cycle.
Straighten drain hose and make sure washer is not sitting on it.
Top of drain outlet should be less than 8 ft (2.5 m) above floor.
efficiently.
The pump pleaves a little water in its intake and this is diluted with clean
rinse water.
GEAppliances.com
13
Page 14
Before you call for service…
Washer Operation Possible Causes What to do
Washer is unplugged Make sure cord is plugged securely into a working outlet.
Water supply is turned off Turn both hot and cold faucets fully on.
Controls are not set prop-
erly
/LGLVRSHQ³VDIHW\IHDWXUH
Washer won’t operate
Movement inside
machine when shut
off
Washer Performance Possible Causes What to do
Clothes too wet Incorrect spin cycle selected
Colored spots
Grayed or yellowed
clothes
Lint or residue on
clothes
prevents agitation and
spinning when lid is up
Circuit breaker/fuse is
tripped/blown
Electronics need to be reset Unplug washer, wait 2 minutes, plug back in and press START.
START was not pressed Press START.
Lid magnet missing
Shifting mechanism is disengaging the motor
Incorrect use of fabric
softener
Dye transfer Sort whites or lightly colored items from dark colors
Not enough detergent
Hard water
Water is not hot enough
Washer is overloaded
Detergent is not dissolving
Dye transfer
Clothes are air or line dried
Incorrect sorting Separate lint producers from lint collectors.
Washing too long
Detergent not dissolving
Overloading
Incorrect use of fabric
softener
Check controls.
Close lid and reset cycle, to the beginning if necessary.
Check house circuit breakers/fuses. Replace fuses or reset breaker.
Washer should have separate outlet.
Call for service.
When the machine is manually turned off, the shifter will
disengage the motor before completely shutting down.
If lid is raised before the motor is disengaged, it will resume
when lid is closed.
Make sure the spin cycle selected matches the load you are
washing. Some fabrics will feel wetter when rinsed with cold water.
Check fabric softener package for instructions and follow directions
for using dispenser.
Pretreat stain and rewash.
Use more detergent (especially with larger loads). Be sure to follow
detergent manufacturer’s directions.
Use a water conditioner like Calgon brand or install
a water softener.
Make sure water heater is delivering water at 120°F–140°F (48°C–
60°C).
Select load size to match clothes load.
Add detergent as wash basket fills with water before you load
clothes.
Sort clothes by color. If fabric label states wash separately,
unstable dyes may be indicated.
If you do not dry your clothes with a clothes dryer, your
clothes may retain more lint.
Wash small loads for a shorter time than larger loads
Add detergent as wash basket fills with water, before you load
clothes.
Try a liquid detergent.
Use warmer water temperature.
Load clothes no higher than the top row of holes in the washer
basket.
Check fabric softener package for instructions and follow directions
for using dispenser.
14
Page 15
Before you call for service…
Washer Performance Possible Causes What to do
Pilling
Snags, holes, tears,
rips or excessive wear
Wrinkling
Result of normal wear on
poly-cotton blends and
fuzzy fabrics
Pins, snaps, hooks, sharp
buttons, belt buckles,
zippers and sharp objects
left in pockets
Undiluted chlorine bleach
Chemicals like hair bleach
or dye, permanent wave
solution
Improper sorting
Overloading or incorrect
water level
Incorrect wash and dry
cycles
Repeated washing in water
that is too hot
While this is not caused by the washer, you can slow the pilling
process by washing garments inside out.
Fasten snaps, hooks, buttons and zippers.
Remove loose items like pins, objects in pockets and sharp buttons.
Turn knits (which snag easily) inside out.
Check bleach package instructions for proper amount.
Never add undiluted bleach to wash or allow clothes to
come in contact with undiluted bleach.
Rinse items that may have chemicals on them before washing.
Avoid mixing heavy items (like work clothes) with light items (like
blouses).
Try a fabric softener.
Load your washer so clothes have enough room to move freely with
water covering all of the clothes.
Match Cycle selection to the type of fabric you are washing
(especially for easy care loads).
Wash in warm or cold water.
GEAppliances.com
Washer Soounds Possible Causes What to do
“Metallic clicking”
Back and forth
“swoosh” or light
“clicking” sound during
agitate
Quick short agitation
sounds at end of agitate
“Click” when water
stops filling
“Clicking” behind Control Panel during fill
Water volume changes
during fill
Motor “whining up” or
”coasting down” in spin
“Humming” Water drain pump
“Gurgling” Water drain pump
Shifter mechanism is
engaging or disengaging
Electric motor reversing
direction
Clothing redistribution At the end of agitate, the motor makes short agitation strokes to
Relay switch The relay makes a click sound when activated. The water level acti-
Automatic Temperature
Control Valve
Automatic Temperature
Control Valve
Motor ramping up/down
during spin cycle
The drive system will engage at the start of agitate and disengage
when agitate is complete. This occurs multiple times during the
wash.
This machine has a drive system that doesn’t use gears. This sound
is the motor rotating back and forth to agitate your laundry.
redistribute the load.
vates the relay and stops filling.
This valve mixes in cold and hot water. The “clicking” is the valve
turning on and off.
This valve mixes in cold and hot water. The sound changes when
the valves are turned on and off.
The motor will speed up incrementally during the spin cycle. When
spin is complete, it will coast until it stops.
The drain pump will make a humming sound when pumping out
water after agitation stops and continue until spin is complete.
When the pump starts drawing in air, It starts to gurgle. The washer
should then begin spinning and the sound will continue until it is
done spinning.
15
Page 16

Before you call for service…
Dryer Problem Possible Causes What to do
Make sure the dryer plug is pushed completely into
the outlet.
Check the house fuse/circuit breaker box and replace fuse or reset
breaker. Note: Most electric dryers use 2 fuses/breakers.
Check the house fuse/circuit breaker box and replace both fuses or
reset both breakers. Your dryer may tumble if only one fuse is blown
or one breaker tripped.
Move dryer to an even floor space, or adjust leveling legs as necessary until even.
Follow directions on fabric softener package.
Use your dryer to dry only clean items. Dirty items can stain clean
items and the dryer.
Sometimes stains which cannot be seen when the clothes are wet
appear after drying. Use proper washing procedures before drying.
See suggestions in this section under STATIC.
Empty all pockets before laundering clothes.
Try a fabric softener.
Bounce Fabric Conditioner Dryer Sheets have been approved for
use in all GE Dryers when used in accordance with the manufacturer’s instructions.
Try a fabric softener.
Adjust setting to LESS DRY or DAMP DRY.
Try a fabric softener.
Automatic drying times will vary according to the type of heat used
(electric, natural or LP gas), size of load, types of fabrics, wetness of
clothes and condition of exhaust ducts.
Dryer doesn’t start
Dryer doesn’t heat
Dryer shakes or makes
noise
Greasy spots on
clothes
Lint on clothes
Static occurs
Inconsistent drying
times
Dryer is unplugged
Fuse is blown/circuit
breaker is tripped
Fuse is blown/circuit
breaker is tripped; the dryer
may tumble but not heat
Gas service is off Make sure gas shutoff at dryer and main shutoff are fully open.
Some shaking/noise is
normal. Dryer may be
sitting unevenly
Improper use of fabric
softener
Drying dirty items with
clean ones
Clothes were not completely
clean
Lint filter is full Clean lint screen before each load.
Improper sorting Sort lint producers (like chenille) from lint collectors (like corduroy).
Static electricity can attract
lint
Overloading Separate large loads into smaller ones.
Paper, tissue, etc. left in
pockets
No fabric softener was
used
Overdrying
Synthetics, permanent
press and blends can cause
static
Type of heat
16
Page 17
Before you call for service…
Dryer Problem Possible Causes What to do
Improper sorting
Large loads of heavy fabrics
(like beach towels)
Controls improperly set Match control settings to the load you are drying.
Lint filter is full Clean lint filter before every load.
Separate heavy items from lightweight items (generally, a wellsorted washer load is a well-sorted dryer load).
Large, heavy fabrics contain more moisture and take longer to dry.
Separate large, heavy fabrics into smaller loads to speed drying
time.
Check installation instructions for proper ducting/venting.
GEAppliances.com
Clothes take too long
to dry
Clothes are wrinkled
Clothes shrink
Improper or obstructed
ducting
Blown fuses or tripped circuit breaker
Overloading/combining
loads
Underloading
Overdrying
Letting items sit in dryer
after cycle ends
Overloading Separate large loads into smaller ones.
Some fabrics will naturally
shrink when washed. Others can be safely washed,
but will shrink in the dryer
Make sure ducting is clean, free of kinks and unobstructed.
Check to see if outside wall damper operates easily.
Check the Installation Instructions to make sure the dryer venting is
correct.
Replace fuses or reset circuit breakers. Since most dryers
use 2 fuses/breakers, make sure both are operating.
Do not put more than one washer load in the dryer at a time.
If you are drying only one or two items, add a few items
to ensure proper tumbling.
Select a shorter drying time.
Remove items while they still hold a slight amount of
moisture. Select a LESS DRY or DAMP DRY setting.
Remove items when cycle ends and fold or hang immediately.
To avoid shrinkage, follow garment care labels exactly.
Some items may be pressed back into shape after drying
If you are concerned about shrinkage in a particular
item, do not machine wash or tumble dry it.
17
Page 18

Notes.
18
Page 19

This Appliance Warranty.
All warranty service provided by our Factory Service Centers,
or an authorized Customer Care
on-line, visit us at GEAppliances.com, or call 800.GE.CARES
(800.432.2737). In Canada, visit GEAppliances.ca or call 888.561.3344.
Please have serial number and model number availa ble when calling
®
technician. To schedule service,
Staple your receipt here.
Proof of the original purchase
date is needed to obtain service
under the warranty.
for service.
For The Period Of: We Will Replace:
One Year Any part of the washer which fails due to a defect in materials or workmanship. During this
From the date of the limited one-year warranty, we will also provide, free of charge, all labor and related service to
original purchase replace the defective part.
What Is Not Covered for Customers in the United States:
Service trips to your home to teach you how to use the
product.
Improper installation, delivery or maintenance.
Failure of the product if it is abused, misused, or used for
other than the intended purpose or used commercially.
Replacement of house fuses or resetting of circuit breakers.
Products which are not defective or broken, or which are
working as described in the Owner’s Manual.
Damage to the product caused by accident, fire, floods or
acts of God.
Incidental or consequential damage caused by possible
defects with this appliance.
Defects or damage due to operation in freezing
temperatures.
Damage caused after delivery.
Product not accessible to provide required service.
(;&/86,212),03/,(':$55$17,(6³<RXUVROHDQGH[FOXVLYHUHPHG\LVSURGXFWUHSDLUDVSURYLGHGLQWKLV/LPLWHG:DUUDQW\
Any implied warranties, including the implied warranties of merchantability or fitness for a particular purpose, are limited to
one year or the shortest period allowed by law.
This warranty is extended to the original purchaser and any succeeding owner for products purchased for home use within the USA. If the
product is located in an area where service by a GE Authorized Servicer is not available, you may be responsible for a trip charge or you
may be required to bring the product to an Authorized GE Service location. In Alaska, the warranty excludes the cost of shipping or service
calls to your home.
Some states do not allow the exclusion or limitation of incidental or consequential damages. This warranty gives you specific legal
rights, and you may also have other rights which vary from state to state. To know what your legal rights are, consult your local or state
consumer affairs office or your state’s Attorney General.
Warrantor: General Electric Company. Louisville, KY 40225
What Is Not Covered for Customers in Canada:
Service trips to your home to teach you how to use the
product.
Improper installation, delivery or maintenance.
If you have an installation problem, contact your dealer or
installer. You are resposible for providing adequate electrical,
exhausting and other connecting facilities.
Failure of the product if it is abused, misused, or used for
other than the intended purpose or used commercially.
Replacement of house fuses or resetting of circuit breakers.
Damage to the product caused by accident, fire, floods or
acts of God.
Damage caused after delivery.
(;&/86,212),03/,(':$55$17,(6³<RXUVROHDQGH[FOXVLYHUHPHG\LVSURGXFWUHSDLUDVSURYLGHGLQWKLV/LPLWHG:DUUDQW\
Any implied warranties, including the implied warranties of merchantability or fitness for a particular purpose, are limited to
one year or the shortest period allowed by law.
This warranty is extended to the original purchaser and any succeeding owner for products purchased in Canada for home use within
Canada. In home warranty service will be provided in areas where it is available and deemed reasonable by Mabe to provide.
WARRANTOR IS NOT RESPONSIBLE FOR CONSEQUENTIAL DAMAGES.
Warrantor: MABE CANADA INC.
19
Page 20

Consumer Support.
GE Appliances Website In the U.S. GEAppliances.com
Have a question or need assistance with your appliance? Try the GE Appliances Website 24 hours a day, any
day of the year! For greater convenience and faster service, you can now download Owner’s Manuals, order
parts or even schedule service on-line. In Canada: www.GEAppliances.ca.
Schedule Service In the U.S. GEAppliances.com
Expert GE repair service is only one step away from your door. Get on-line and schedule your service at your
convenience 24 hours any day of the year! Or call 800.GE.CARES (800.432.2737) during normal business hours.
In Canada, call 888.561.3344.
Real Life Design Studio In the U.S. GEAppliances.com
*(VXSSRUWVWKH8QLYHUVDO'HVLJQFRQFHSW³SURGXFWVVHUYLFHVDQGHQYLURQPHQWVWKDWFDQEHXVHGE\SHRSOHRI
all ages, sizes and capabilities. We recognize the need to design for a wide range of physical and mental abilities
and impairments. For details of GE’s Universal Design applications, including kitchen design ideas for people with
disabilities, check out our Website today. For the hearing impaired, please call 800.TDD.GEAC (800.833.4322).
In Canada: contact: Director, Consumer Relations, Mabe Canada Inc.
Suite 310, 1 Factory Lane
Moncton, N.B. E1C 9MC
Extended Warranties In the U.S. GEAppliances.com
Purchase a GE extended warranty and learn about special discounts that are available while your warranty is still in
effect. You can purchase it on-line anytime, or call 800.626.2224 during normal business hours. GE Consumer Home
Services will still be there after your warranty expires. In Canada, please visit our Website or contact your local
extended warranty providerl
Parts and Accessories In the U.S. GEAppliances.com
Individuals qualified to service their own appliances can have parts or accessories sent directly to their homes (VISA,
MasterCard and Discover cards are accepted). Order on-line today, 24 hours every day or by phone at 800.626.2002
during normal business hours.
Instructions contained in this manual cover procedures to be performed by any user. Other servicing generally
should be referred to qualified service personnel. Caution must be exercised, since improper servicing may cause
unsafe operation.
Customers in Canada can order parts and accessories on-line at GEAppliances.ca, or by phoe at 888.561.3344.
Contact Us In the U.S. GEAppliances.com
If you are not satisfied with the service you receive from GE, contact us on our Website with all the details including
your phone number, or write to: General Manager, Customer Relations
GE Appliances, Appliance Park
Louisville, KY 40225
In Canada: GEAppliances.ca, or write: Director, Consumer Relations, Mabe Canada Inc.
Suite 310, 1 Factory Lane
Moncton, N.B. E1C 9MC
Register Your Appliance In the U.S. GEAppliances.com
5HJLVWHU\RXUQHZDSSOLDQFHRQOLQH³DW\RXUFRQYHQLHQFH Timely product registration will allow for enhanced
communication and prompt service under the terms of your warranty, should the need arise. You may also mail in the
pre-printed registration card included in the packing material. In Canada: www.GEAppliances.ca.
Page 21

electromenagersge.ca
Instructions de Sécurité
....2, 5
Instructions d’Utilisation
Entretien et Nettoyage
de la Sécheuse ................... 11
Entretien et Nettoyage
de la Laveuse . . . . . . . . . . . . . . . . . . . . . . 9
Tableau de Contrôle
de la Sécheuse ....................10
Tableau de Contrôle de
la Laveuse ......................... 6
Paramètres de Contrôle
de la Sécheuse ....................10
Paramètres de Contrôle
de la Laveuse. ....................6, 7
Options de la Sécheuse ...........11
Options de la Laveuse ............. 8
Chargement et Usage
de la Sécheuse ................... 12
Chargement et Usage
de la Laveuse ......................9
Manuel du
Propriétaire
GTUP240
GUAP240
GTUP270
GUAP270
GTUN275*
Auto-dépannage
Auto-dépannage
de la Sécheuse .................13-15
Auto-dépannage
de la Laveuse .................16, 17
Aide au consommateur
Aide au consommateur ...........20
Garantie ..........................19
* En qualité de partenaire ENERGY
STAR®, GE a trouvé que ce produit
rencontre les directives d’ENERGY
STAR® en matière d’efficience
énergétique.
Ecrivez le model et le Numéro
de Série ci-dessous :
Modèle #_____________
Série # ______________
Ouvrez la porte de la Sécheuse
Laveuse/Sécheuse
pourtrouver le model et le numéro
de Série
Page 22

IMPORTANTES INFORMATIONS DE SECURITE.
VEUILLEZ LIRE TOUTES LES INSTRUCTIONS AVANT L’UTILISATION.
ATTENTION!
Pour votre sécurité, les informations de ce manuel doivent être suivies afin de
minimiser les risques d’incendie ou d’explosion, de choc électrique, ou pour éviter
dommages, blessures ou décès.
Ne pas garder ou utiliser d’essence ou
d’autres produits inflammables vapeurs
ou liquides à proximité de tout appareil
électroménager
l’Installation et le service doivent être
faits par un installateur professionnel,
une entreprise spécialisée ou le
fournisseur de gaz.
QUELS GESTES A SUIVRE SI VOUS SENTEZ DU GAZ :
Ne pas allumer d’allumette ou de
1
cigarette, ou mettre en marche tout
autre appareil fonctionnant au gaz ou
à l’électricité.
Ne pas toucher aux interrupteurs
2
électriques ; ne pas utiliser de
téléphone dans l’immeuble.
Evacuez la pièce, l’immeuble ou la zone
3
occupée.
Contactez immédiatement votre
4
fournisseur de gaz depuis le téléphone
d’un voisin. Suivre les instructions du
fournisseur attentivement.
Si vous n’arrivez pas à joindre votre
5
fournisseur, contaclez les pompiers.
SECURITE DU CHAUFF-EAU
Sous certaines conditions, l’hydrogène peut être produit dans un boiler qui n’a pas été utilisé pendant
deux semaines ou plus. L’hydrogène peut être explosif sous ces conditions.
Si l’eau chaude n’a pas été utilisée pendant deux semaines ou plus, réduisez les possibilités de
dommages ou blessures en allumant tous les robinets d’eau chaude et en les laissant couler
pendant plusieurs minutes. Répétez cette opération avant l’utilisation de tout appareil électrique
connecté au système d’alimentation d’eau chaude. Cette procédure simple permettra l’évacuation
du gaz hydrogène stocké. Puisque ce gaz est inflammable, ne pas fumer ou utiliser de flamme ou
d’appareil durant cette procédure.
2
Page 23

IMPORTANTES INFORMATIONS DE SECURITÉ.
VEUILLEZ LIRE TOUTES LES INSTRUCTIONS AVANT L’UTILISATION.
INSTALLATION APPROPRIÉE
Cet appareil doit être installé correctement et connecté conformément aux instructions d’installation
avant son utilisation. Si vous n’avez pas reçu votre fiche d’installation, vous pouvez vous en procurer
en visitant le site web electromenagersge.com ou en téléphonant au 888.561.3344.
Connectez correctement à la terre la sécheuse
pour être conforme avec tous les codes et les
réglementations. Suivez les détails dans les
‘Instructions d’Installation”.
Installez et gardez à des endroits où la sécheuse
ne sera pas exposée à des températures en bas du
point de congélation ou exposée à des conditions
qui peuvent causer des dommages permanents et
invalider la garantie.
Connectez à une source d’électricité classifiée,
protégée et dimensionnée correctement pour éviter
une surcharge électrique.
Enlevez tous les items pointus de l’emballage et jetez
correctement tous les matériaux de l’emballage.
D’échappement et de canalisation
L’évacuation de la sécheuse DOIT être orientée vers
1
l’extérieur pour empêcher de grandes quantités
d’humidité et de charpie d’être évacuées dans la
pièce.
À l’intérieur de la machine utilisez seulement
2
tuyaud’évacuation rigide, de métal d’un diamètre de
4in. Utilisez seulement tuyau de métal rigide
approuvé par UL ou tuyau flexible de métal de 4 in
diamètre pour l’évacuation à l’extérieur. N’utilisez
jamais des tuyaux en plastique ou autres matériaux
combustibles ou faciles à percer.
Pour des détails complètes suivez les Instructions
d’Installation.
electromenagersge.ca
ATTENTION!
VOTRE ZONE DE LAVAGE
Conservez la zone en-dessous et autour desappareils
libre de tout matériel inflammable,(tissu, papier, chiffon,
etc.) essence, produits chimiques et autres liquides ou
vapeurs inflammable.
Conservez le sol autour de vos appareils propre et sec
afin d’éviter tout risque de glissement.
Gardez les produits de lavage (tel que
détergents,javels, etc.) hors de portée des enfants, de
préférence dans une pièce fermée. Veuillez suivre les
consignes de sécurité inscrites sur les étiquettes afin
d’éviter tout dommage
Ne jamais grimper ou se tenir debout sur une pile de
linge dans la Zone de Lavage
Ne permettre à personne, particulièrement aux
enfants, de grimper, de se pendre, d’être debout, de
jouer dans ou sur l’appareil. La surveillance des enfants
est nécessaire pendant le fonctionnement de l’appareil
si celui-ci est à leur proximité.
Ne pas garder d’objets pouvant brûler ou fondre (tel
que vêtements, matériel en papier ou de récipients en
plastique, etc.) sur l’appareilou en penderie sur la porte.
Maintenez la zone près de l’ouverture de l’évacuation
et la zone environnante libres de toute charpie,
poussière et saleté.
N’obstruez pas le flux de l’air de ventilation. N’empilez
pas, ne placez pas du linge ou des tapis devant ou à
l’arrière de la sécheuse.
3
Page 24

IMPORTANTES INFORMATIONS DE SECURITÉ.
VEUILLEZ LIRE TOUTES LES INSTRUCTIONS AVANT L’UTILISATION.
QUAND VOUS UTILISEZ VOTRE APPAREIL
gomme, quand ils chauffent, peuvent sous certaines
circonstances prendre feu à caused’une combustion
spontanée.
Ne pas stocker du plastic, du papier ou des vêtements
qui pourraient brûler ou fondre sur la sécheuse
pendant son fonctionnement.
Ne pas sécher d’articles en fibre de verre dans votre
sécheuse. Les particules restantes et ramassées
par les vêtements pendant les séchages peuvent
provoquer une irritation de la peau.
Afin de minimiser les risques d’électrocution,
débrancher l’appareil du circuit électrique ou
déconnecter l’appareilen retirant le fusible avant
d’entreprendre tout entretienou nettoyage. (sauf pour
l’entretien et le retrait du filtre à peluches).
NOTE : Tourner le Sélecteur de Cycle sur la position
off ou le fait d’appuyer sur PAUSE n’interrompt pas
l’alimentation électrique.
L’intérieur de la machine et le conduit d’évacuation
doivent être nettoyés au moins une fois par an par
un technicien qualifié. Voir la partie Chargement et
Utilisation de la Sécheuse.
Si votre appareil est une Sécheuse à gaz, elle est
équipée avec un allumeur automatique électrique
etne comporte pas de position pilote. N’ESSAYEZ
ENAUCUN CAS DE L’ALLUMER EN UTILISANT
UNEALUMETTE. Des brûlures pourraient être
provoquées par le fait d’avoir votre main trop près du
réchaud quand l’allumeur automatique se déclenche.
Vous désirez peut-être adoucir vos vêtements ou
réduire l’électricité statique qu’ils comportent en
utilisant un adoucissant ou un produit antistatique.
Nous recommandons d’utiliser soit l’adoucissant
pendant le cycle du lavage, conformément aux
indications d’utilisation fournies par le fabriquant, ou
essayez un produit pour lavage a sec en s’assurant
que l’usage de ce produit dans une sécheuse soit bien
permist donc inscrit sur l’emballage. Les problèmes de
service ou de performance causés par ces produits
sont sous la responsabilité du fabriquant de ces
derniers et ne sont pas couverts par la garantie de
l’appareil
Ne pulvériser jamais tout type d’aérosol dans, sur ou
à coté de la sécheuse. N’utilisez pas de dégraisseur
en aérosol lorsque vous nettoyez l’intérieur de la
sécheuse. Des émanations dangereuses ou un choc
électrique peuvent survenir.
Utilisez cet
appareil
uniquement si
c’est dans le
cadre des raisons
décrites dan
le Manuel du
Propriétaire.
Ne pas mélanger la javel avec de l’ammoniac ou des
acides tels que vinaigre et/ou antirouille. Le mélange
de différents produits chimiques peut produire un gaz
toxique qui peut causer la mort.
N’essayez jamais d’utiliser l’appareil s’il est défectueux,
s’il fonctionne mal, s’il n’est que partiellement
assemblé, si des parties manquent ou sont cassées,
incluant les câbles ou les prises.
Ne jamais introduire les mains dans l’appareil
pendant le cycle. Avant de charger, décharger ou
d’ajouter des vêtements, attendez que la machine soit
complètement à l’arrêt.
Nettoyez le filtre à peluches avant chaque chargement
afin d’éviter l’accumulation de peluches dans la
sécheuse ou dans la pièce. NE PAS METTREEN
MARCHE LA SECHEUSE SANS LE FILTRE A PELUCHES
EN PLACE.
Ne lavez et ne séchez pas d’articles qui ont été
nettoyés, lavés, trempés ou tachés avec un produit
combustible ou explosif (cire, huile, peinture, essence,
dégraissant, solvant pour nettoyage à sec, kérosène,
etc.) qui pourrait s’enflammer ou provoquer une
explosion. N’ajoutez aucun de ces produits à l’eau
de lavage. N’utilisez pas ou ne disposez pas ces
substances autour de la laveuse ou de la sécheuse
pendant l’utilisation.
Ne pas placer d’objets exposés à des huiles brûlantes
dans votre sécheuse. Les objets contaminés par des
huiles brûlantes peuvent contribuer à la réaction
chimique qui pourrait causer l’incendie d’une pile de
linge.
Tout article sur lequel vous avez utilisé du solvant
ou qui contient un matériel inflammable (tel que
vêtements, balai éponge, serviette utilisés dans les
salons de beauté, restaurants ou barbier etc.) ne
doivent pas être placés dans ou près de la sécheuse
si les solvants ou objets inflammables n’ont pas été
écartés. Il existe beaucoup d’objets extrêmement
inflammables dans un foyer tel que l’acétone, l’alcool,
l’essence, kérosène, certains nettoyants, détachants,
térébenthines, cires, détache-cire et autres produits
contenant du pétrole distillé.
La procédure de lavage peut réduire le retardement
d’inflammabilité du fabriquant. Afin d’éviter ce résultat,
veuillez suivre attentivement les consignes d’entretien
du vêtement par le fabriquant.
Ne pas sécher d’articles contenant de la gomme,
du plastique ou d’autres matériaux similaires tel
que les soutiens-gorge rembourrés, chaussures de
sport, galoches, tapis de bain, petits tapis, bavettes,
pantalons de bébés, sacs en plastique, oreillers, etc.
qui pourraient fondre ou brûler. Certains matériaux en
4
Page 25

IMPORTANTES INFORMATIONS DE SECURITÉ.
VEUILLEZ LIRE TOUTES LES INSTRUCTIONS AVANT L’UTILISATION.
QUAND L’APPAREIL SE TROUVE HORS D’USAGE.
Tenir la prise bien en main lors du débranchemen
de l’appareil afin d’éviter des dommages au câble
au moment de tirer. Ne pas laisser le câble traîner à
proximité afin de ne pas le piétiner, de trébucher ou
de causer quelconque dommage.
Veuillez fermer les robinets d’eau afin de relâcher la
pression sur les valves et les tuyaux afin d’éviter les
fuites en cas de rupture. Vérifier la condition du tuyau
de remplissage ; GE recommande de changer les
tuyaux chaque 5 ans.
Avant de débrancher l’appareil ou de le mettre hors
d’usage, veuillez retirer les couvercles de la laveuse
et de la sécheuse afin d’éviter que des enfants s’y
cachent.
N’essayez pas de réparer ou de remplacer
quelconque partie de l’appareil ou d’entreprendre
quelconque manoeuvre qui ne soit pas recommandée
spécifiquement dans le manuel du propriétaire
ou publié dans les instructions dédiées à l’usager,
uniquement si vous êtes sûr de les comprendre et
d’avoir toutes les compétences nécessaires pour les
effectuer.
Ne pas tripoter au hasard les contrôles
LIRE ET SUIVRE CES INSTRUCTIONS DE SÉCURITÉ AVEC PRECAUTION.
GARDEZ CES INSTRUCTIONS.
electromenagersge.ca
5
Page 26

Concernant le tableau de bord de la Laveuse.
Adoucissant
Détergent
$MRXWHUGpWHUJHQW
$MRXWHUDGRXFLVVDQWDXFKRL[
$MRXWHUODMDYHODXFKRL[
Etape 1
Javel
Liquide
$MRXWHUOHVYrWHPHQWV
Guide pour Mise en marche Rapide
Etape 2
Etape 3
&KRLVLVVH]ODWDLOOHGXFKDUJHPHQW
et autres options de lavage
6HOHFWLRQQH]OHF\FOHGHODYDJH
)HUPH]OHFRXYHUFOH
$SSX\H]VXU
MARCHE
AVERTISSEMENT!
Afin de réduire le risque d’incendie, de décharge électrique, ou de blessure, lisez les MESURES DE SÉCURITÉ
IMPORTANTES avant de mettre cet appareil en marche.
Dans ce manuel, les caractéristiques et l’apparence peuvent varier selon votre modèle.
Verrous du
Couvercle
COUVERCLE
FERMÉ
Votre Laveuse possède un système de sécurite qui empêche l’ouverture du couvercle pendant le cycle. Cette sécurité empêche surtout les enfants d’introduire leurs mains dans la laveuse pendant le cycle de lavage.
La sécurité est desactivée 5 secondes après l’arrêt du tambour. N’essayez pas d’ouvrir le couvercle avec la
sécurité enclenchée, ceci pourrait provoquer des blessures. Si la sécurité ne se désactive pas après l’arrêt du
tambour, contactez un technicien.NOTE: En cas de panne d’électricité l’ouverture du couvercle peut prendre
jusqu’à 3 mn.
Etape 4
C D E
A
)
B
Note : Cet appareil est conçu pour permettre le fonctionnement simultané de la laveuse et de la
sécheuse si désiré.
Tableau Des Commandes
Selection du Cycle de Lavage
A
Le cycle de lavage contrôle le temps et l’intensité du processus de lavage. Le bouton peut être tourné dans les
deux directions. Si vous tournez le bouton Sélecteur de Cycle après le début de ce celui-ci, la laveuse s’arrête
et commence le nouveau cycle choisi. Appuyez sur START pour commencer le nouveau cycle.
Le tableau ci-dessous vous aide a choisir le bon cylcle pour le bon type de vêtements. Ce tableau est classé
du cylcle le plus long au plus court et par intensité de lavage. (Les Cycles peuvent varier selon le modèle.)
COTTONS - Pour des cottons très ou peu salis, vêtements de travail ou de ménage.
PERMANENT PRESSS - Pour des habits sans plis et ceux comportant des imprimés permanents, et tricots.
DELICATES - Pour la lingerie et les vêtements délicats sans tâches requérant un traîtement spécial.
SPIN ONLY - Pour draîner le tambour et essorer l’eau des vêtements.
QUICK RINSE - Rince et essore les vêtements propres quand juste un rinçage est désiré.
OFF - La laveuse est mise hors d’usage et le bouton MARCHE ne fonctionne pas.
NOTE: Quand les commandes sont sur OFF, les voyants du STATUT ne fonctionnent pas.
6
NOTE: Le sélecteur de cycle ne change pas de position pendant le fonctionnement de la laveuse.
Page 27

electromenagersge.ca
ADOUCISSANT
B
Veuillez utiliser cette option quand un adoucissant est ajouté à la laveuse.
Voyants lumineux du STATUT de l’appareil
C
Les voyants lumineux montre dans que cycle ou le statut dans lequel se trouve l’appareil. Quand le bouton sélecteur indique
le début d’un nouveau cycle, les voyants lumineux s’allument momentanément, en montrant les étapes du cycle qui vont être
traversées.
Voyant STATUT S’allume
ON Quand l’option de l’adoucissant a été choisie.
Wash Quand la laveuse se trouve dans une des étapes de lavage d’un cycle.
Rinse Quand la laveuse se trouve dans une des étapes de rincage d’un cycle.
Spin Quand la laveuse évacue l’eau ou fait tourner le tambour pour essorage.
Lid Locked
Quand le couvercle de la laveuse est bloqué. Cette particularité empêche
l’ouverture du couvercle pendant l’essorage ou quand la laveuse annonce un arrêt
prochainement.
NOTE: Si les voyants lumineux du STATUT clignotent, l’opération de la laveuse a été mise en pause. Pour
reprendre l’opération appuyez sur START (le couvercle doit être fermé).
Temperature
D
Choisissez la température de l’eau pour les cycles de lavage et de rinçage. Suivez tout le temps et attentivement les instructions
du fabriquant et les consignes d’utilisation pendant le lavage.
PerfecTemp (temp. parfaite) reconnait la température de l’eau à son arrivée et ajuste le remplissage afin d’obtenir une
température plus précise pour toutes les températures de lavage. Par exemple, durant un lavage COLD, un peu d’eau chaude
pourrait être ajouté pour atteindre une température favorable à la dissolution des détergents. Souvent, les détergents n’arrivent
pas à se dissoudre complètement dans une eau très froide, surtout dans des climats plus frais.
Pendant les mois d’hiver, quand l’eau de chez vous est plus froide, ou dans des endroits avec une eau très froide toute l’année,
utilisez PerfecTemp (Temp. Parfaite) plus COLD pour aider à dissoudre les détergents et pour optimiser le lavage de vos
vêtements.
L’option TAP COLD etteint l’option PerfecTemp (temp. parfaite) de votre laveuse et utilise la température de l’eau du robinet
pour un lavage COLD. Ceci aide à économiser de l’énergie grâce à la réduction de l’utilisateion d’eau chaude pendant le cyce.
Load Size
E
Ne chargez pas plus de vêtements plus haut que la dernière rangée de trous dans le tambour
AUTO LOAD SENSING - Cette séléction fournit automatiquement la quantité d’eau adéquate conformément à la taille et au
type de charge placée dans l’appareil.
START
)
Appuyez sur START pour commencer un cycle. Avec le couvercle fermé, appuyer sur START à nouveau provoquera la PAUSE
du cycle et les voyants lumineux STATUS clignoteront. Pour continuer le cycle, fermez le couvercle et appuyez sur START à
nouveau.
Le remplissage de l’eau continuera avec le couvercle ouvert, sauf quand l’option AUTO LOAD - SENSING est choisie comme
taille de la charge. (Le couvercle doit être fermé pour continuer le remplissage avec l’option AUTO LOAD - SENSING ).
Si le couvercle est ouvert pendant le cycle, il sera mis en PAUSE et les voyants lumineux STATUS clignoteront. Pour reprendre le
cycle, fermez le couvercle et appuyez sur START.
Si l’appareil est mis en PAUSE pour plus de 24 heures, le cycle sera automatiquement annulé. Pour arrêter un cylce, placez le
Sélecteur de Cycle sur la position OFF.
7
Page 28

Concernant les options de lavage.
Le diffuseur d’Adoucissant
Le diffuseur d’adoucissant diffuse automatique-
ment l’adoucissant au moment adéquat
pendant le cycle.
Ne pas arrêter la laveuse durant le premier tour.
Ceci causerait que le diffuseur se viderait trop
rapidement et trop tôt.
Suivez les pas suivants pour bon usage:
Assurez vous que le diffuseur est bien fixé à
1
l’agitateur.
Utilisez uniquement un adoucissant liquide.
2
Versez dans le diffuseur, en respectant les
doses indiquées sur l’emballage.
Ne jamais verser de l’adoucissant directement
sur les habits. Cela pourrait les endommager.
NOTE: ne pas verser de javel dans le DIFFUSEUR
D’ADOUCISSANT
Nettoyage du Diffuseur d’Adoucissant
Ajoutez de l’eau au diffuseur jusqu’au niveau
3
de la ligne de remplissage maximum.
Ne rien verser dans l’agitateur si le
diffuser n’est pas à sa place.
Choisissez l’option FABRIC SOFTENER sur le
4
tableau des commandes pour une diffusion
correcte de l’adoucissant.
Separez pour nettoyage
Quittez le diffuseur de son emplacement sur l’agitateur.
1
Separez le récipient du diffuseur de son couvercle en tenant le haut et en appuyant sur la partie
2
intérieure du récipient avec vos doigts. Le récipient du diffuseur se détachera de son couvercle.
Pour nettoyer le diffuseur, trempez le récipient du diffuseur et son couvercle dans la solution liquide
3
suivante:
1 US gallon (3.8 litres) d’eau chaude
1/4 de verre (60 ml) de détergent liquide pour tâches difficiles
1 verre (240 ml) de javel
Si nécessaire, quittez les résidus avec un linge propre et doux après avoir trempé. Ne pas utiliser de
4
brosse vous pourriez irriter la surface du diffuseur.
Rincez et rassemblez le diffuseur. Replacez le diffuseur sur l’agitateur.
5
Entonnoir pour la Javel liquide
De la javel au chlore liquide est diluée pendant le remplissage de la laveuse avant le début d’un cycle.
Vérifiez les indications de lavages des fabriquants indiquées sur les vêtements.
1
Mesurez la javel liquide avec précaution en suivant les instructions indiquées sur la bouteille.
2
Ne jamais verser de javel au chlore liquide directement sur les habits ou dans le tambour de la
laveuse.
Ne pas verser de javel en poudre dans l’entonnoir à javel.
Avant de commencer le lavage, versez une dose de javel directement dans l’entonnoir à javel.
3
Evitez d’eclabousser ou de surcharger le diffuseur. Si vous préférez utiliser de la javel en poudre,
ajoutez-là directement dans le tambour avec votre détergent.
Ne jamais mélanger de Javel au chlore avec de l’ammoniac ou d’autres acides tels que vinaigre et/
oudétache-rouille. Le mélange peut créer un gaz toxique pouvant provoquer la mort.
NOTE: Ne jamais verser de la javel dans le DIFFUSEUR D’ADOUCISSANT.
8
Page 29

Chargement et utilisation de la laveuse.
Toujours suivre les instructions d’utilisation du fabriquant pendant le lavage.
Triage des charges de vêtements
Triez par couleur (blancs, clairs, couleurs), degré de
saleté type de fabrication (cottons, soin facile, délicats)
et selon si le vêtement laisse des peluches (tissuéponge, chenille) ou attire les peluches (velvet, velours).
L’usage correct du détergent
electromenagersge.ca
Ajoutez du détergent et mettez en route la laveuse
avant de charger les habits afin que le détergent
fonctionne correctement. Le manque ou l’ajout
excessif de détergent et une cause commune des
problèmes de lingerie.
Vous pouvez utiliser moins de détergent si vous avez
de l’eau douce, une plus petite charge ou une charge
légèrement sale.
Chargement de la Laveuse
Chargez les habits secs, pas plus haut que la dernière
rangée de trous dans le tambour. Si vous chargez des
vêtements mouillés, assurez-vous d’ajuster le niveau
charge/eau assez haut pour permettre aux habits de
bouger librement. L’eau doit normalement juste couvrir
les habits. Pour ajouter des habits après le début du
lavage soulevez le couvercle et submergez les habits
additionnels près de l’agitateur.
Ne pas enrouler de longs articles tels que draps ou
pantalons autour de l’agitateur.
Ne pas laver de vêtements imbibés de produits
inflammables (waxs, nettoyants fluides etc.).
L’agitation ne débutera pas tant que le couvercle est
ouvert.
Entretien et nettoyage de la laveuse.
Tambour de la laveuse: Laissez le couvercle ouvert
pour permettre aux differents produits de s’évaporer. Si
vous voulez nettoyer le tambour,utilisez un linge doux
et propre trempé dans du détergent liquide, ensuite
rincez-le. (Ne pas utiliserde brosse ou de linge rapeux).
Tuyaux de remplissage: GE recommande de changer
les tuyaux chaque 5 ans.
Extérieur: nettoyer les flaques immédiatement. Nettoyer
avec un linge humide. Essayez de nepas toucher la
surface avec des objets coupants
Déplacement et Stockage: Demandez au technicien
de vider l’eau de la pompe et des tuyaux. Voir les
instructions d’installation de l’appareil pour savoir
comment déplacer l’appareil en gardant le cuvier
stationnaire et rassembler les tringles de transport. Pour
plus d’informations visitez le site electromenagersge.
ca ou téléphonez au 888.561.3344. Ne pas stocker la
laveuse dans un endroit exposé au climat.
Longue absence: Soyez certain d’avoir coupé l’arrivée
d’eau au niveau des robinets. Drainez toute l’eau des
tuyaux si le climat risque de passer à des températures
glacées.
9
Page 30

Concernant le tableau des Commandes de la Sécheuse
AVERTISSEMENT! Afin de réduire le risque d’incendie, de décharge électrique, ou de
blessure, lisez les MESURES DE SÉCURITÉ IMPORTANTES avant de mettre cet appareil en marche.
Dans ce manuel, les caractéristiques et l’apparence peuvent varier selon
votre modèle.
2
1
Note : Cet appareil est conçu pour permettre le fonctionnement simultané de la laveuse et de la
sécheuse si désiré.
IMPORTANT: NETTOYEZ LE FILLTRE À PELUCHES CHAQUE FOIS QUE VOUS UTILISEZ LA SÉCHEUSE
1
Soin des vêtements/ Température
REGULAR ou
COTTONS
REGULAR HEAT
MEDIUM, EASY CARE
MEDIUM HEAT
EASY CARE ou PERMA
PRESS MEDIUM HEAT
DELICATES
LOW HEAT
QUICK FLUFF
NO HEAT
Les cycles automatiques déterminent seuls le niveau de séhage. Utilisez MOINS SEC si vous voulez que votre linge soit
légèrement humide à la fin du cycle. Utilisez l’option PLUS sec si vous les voulez plus sec. Les cycles sont d’une durée
definie.
Pour cottons communs ou lourds.
Pour vêtements synthétiques, tissus mélangés, linges délicats ou imprimés permanents.
Pour linges délicats, synthétiques et articles indiquants un séchage en machine à basse temp
Pour habits à peluches utilisez l’option du séchage minuté.
Cycles de Séchages
COTTONS Pour cottons et la plupart du linge. Pour la majorité des charges, utilisez Séchage OPTIMAL
EASY CARE/
PERMANENT PRESS
DELICATES Pour habits délicats, vêtements avec instructions précises de lavages et tricots.
TIMED DRY Programmez à l’aide du Sélécteur de Cycle le temps de séchage désiré.
DEWRINKLE Pour enlever les plis des articles propres et secs ou qui sont encore légèrement humide.
QUICK FLUFF
Pour défaire les plis, imprimés permanents et linges délicats et tricots.
Pour enlever les peluches des vêtements déjà secs, tissus, linges et oreillers. Utilisez le mode.
PELUCHES SANS CHALEUR. La sécheuse fonctionne pendant dix minutes sans chaleur.
10
2
Cycle Automatique / Cycle minuté
Pour un séchage automatique programmé. Le minuteur ne tourne pas pendant le cycle
AUTO CYCLE
TIMED DRY Pour un séchage manuel. Le minuteur fonctionne pendant toute la durée du cycle.
jusqu’àce que le thermostat reconnaissent que les habits sont secs, le minuteur se place
DORUVVXU2))
START -)HUPHUODSRUWHGHODVpFKHXVH$SSX\H]VXUSTART. L’ouverture de la porte pendant le
cycle interrompra le fonctionnement de la sécheuse. Pour la remettre en marche, fermez la
et porte appuyez sur START pour compléter le cycle.
Page 31

Entretien et Nettoyage de la Sécheuse.
electromenagersge.ca
L’extérieur: Nettoyez ou dépoussiérer les résidus
de lavage avec un linge humide. Le tableau des
commandes pourrait être endommagé par certaines
saletés ou terre ou par certains détachants. Appliquez
ces produits loin de l’appareil. Le linge pourra ensuite
être lavé et séché normalement. Les dommages
causés à votre sécheuse par ces produits ne sont pas
couverts par votre garantie.
Le filtre à peluches: Nettoyez le filtre avant chaque
XVDJH)DLWHVJOLVVHUODJULOOHTXLFRXYUHOHILOWUH3DVVH]
vos doigts dans le filtre. un résidu cireux peut être
formé par l’utilisation d’adoucissants speciaux pour
séchage. Pour nettoyer ce résidu, lavez l’écran du
filtre dans de l’eau chaude et savonnée. Séchez-le et
replacez le filtre à sa place. Ne pas utilisez la sécheuse
VDQVOHILOWUHHWODJULOOHHQSODFH)DLWHVYHQLUXQ
téchnicien pour vider la sécheuse des peluches une
fois par an.
Le tuyau d’évacuation: Inspectez et nettoyer le
tuyaud’évacuation au moins une fois par an pour
éviter l’encrassement. Un tuyau encrassé peut
rallonger le temps de séchage.
Suivez les instructions suivantes
1. Débranchez l’apport en électricité en quittant le
cable de la prise électrique murale.
2. Débranchez le conduit de la sécheuse.
)DLWHVOHYLGHGXFRQGXLWjO·DLGHGXWX\DXG·HDXHW
reconnectez le conduit.
Le capot d’évacuation: Contrôlez à l’aide d’un
mirroir que les rabats intérieurs du capot puissent
ERXJHUOLEUHPHQWVSHQGDQWOHIRQFWLRQQHPHQW)DLWHV
attention qu’il n’y ait pas d’animaux ou d’insectes
dans le tuyau ou dans le capot.
Sur certains
modèles
)LOWUHjSHOXFKHV
derrière la grille
11
Page 32

Chargement et utilisation de la Sécheuse
Ventilation de la Sécheuse
Pour pouvoir fournir la meilleure eficacité de séchage, la sécheuse doit être ventilée correctement. La
sécheuse utilisera plus d’énergie et aura besoin de plus de temps si elle n’est pas ventilée correctement selon
les instructions ci-dessous. Suivez attentivement les instructions de Ventilations de l’appareil énumérées
ci-dessous.
Utilisez uniquement un métal rigide decoffrage de la sécheuse 4” de diamètre dans le Utilisez uniquement
un métal rigide ou un métal exible approuvé par UL de 4” de diamètre pour l’éch appement vers l’extérieur.
Ne pas utiliser de plastique ou d’autre conduit inammable.
Utilisez la longueur la plus courte possible.
Ne pas écraser ou plier en deux le conduit.
Ne pas laisser le conduit sur des objets coupants.
La Ventilation doit se passer conformément aux normes de construction locales
Ventilation
Correcte
Ventilation
Incorrecte
12
Page 33

Avant d’appeler le Service Réparation…
Astuces de réparation Economisez du temps et de l’argent! Révisez les
tableaux sur les pages suivantes, ou visitez www.electromenagersge.ca.
Cela vous évitera peut-être d’appeler le service réparation.
Eau Causes Possibles Que faire
Trop d’émulsion Trop de détergent
Usage de trop de
détergent
Les tuyaux de
remplis- sage ou
d’échappement
ne sont pas bien
Fuite d’eau
connectés
La sortie d’eau de la
maison est bouchée
Pression constante
sur le tuyau
deremplissage
àl’arrivée d’eau.
Mesurez votre détergent avec attention. Utilisez moins de savon si vous
utilisez de l’eau douce, une petite charge ou une charge peu salie.
Utilisez moins de détergent. Utilisez moins de savon si vous utilisez de l’eau
douce, une petite charge ou une charge peu salie.
Assurez-vous que les connections soient bien accrochées aux robinets et
les joints en gomme soient installés. Assurez-vous que l’embouchure du
tuyau d’échappementsoit installé correctement et bien fixé à l’appareil de
drainage.
Contrôlez la plomberie. Il faut peut-être appeler un plombier.
Resserez les tuyaux aux robinets et éteignez l’eau après chaque utilisation.
Vérifiez l’état des tuyaux de remplissage; ils doivent normalement
êtreremplacés chaque 5 ans.
electromenagersge.ca
La température de
l’eau semble incorrecte
L’eau est évacuée
avant que le cycle soit
complété
L’eau n’est pas evacuée
La laveuse se mets en
pause pendant le cycle
Vous entendez l’eau
mais vous ne la voyez
pas a la fin du cycle
Les températures
d’eauplus fraîches
augmentent
l’eficacité de l’énergie
L’apport d’eau est
etteint ou connecté
incorrectement.
Les écrans des valves
d’eau sont stoppés
Le chauff-eau de la
maison n’est pas bien
ajusté
Le couvercle est
ouvert ou le cycle
se trouve en pause
depuis + de 24 hr.
Le tuyau de drainage
est tordu ou il n’est
pas bien connecté
Ceci est normal Il est possible que la laveuse se mette en pause pendant le cycle pour
Ceci est normal La pompe garde un peu d’eau et la dilue avec de l’eau de rinçage propre.
Les nouveaux détergents pour le linge sont formulés de manière à
fonctionner avec de l’eau plus froide sans lésigner la performance du
lavage.
Ouvrir les deux robinets chaud et froid complètement et assurez-vous que
les tuyaux soient accrochés correctement aux robinets.
Eteignez l’arrivée d’eau et déconnectez les tuyaux de connection d’eau de
la partie arrière supérieure de la laveuse. Utilisez une brosse ou une tige
pour nettoyer les écrans de la machine. Rebranchez les tuyaux et rallumez
l’eau.
$VVXUH]YRXVTXHOHFKDXIIHDXGHODPDLVRQIDLWFKDXIIHUO·HDXj)²
)&&
Recommencez le cycle
Redressez le tuyau de drainage et assurez-vous que la laveuse n’est pas
posée dessus. La sortie d’eau doit se trouver à moins de 8 ft (2.5m) du sol.
évacuer l’eau savonneuse avec plus d’ecacité.
13
Page 34

Avant d’appeler le service réparation…
Opération de la
Causes Possibles Que faire
laveuse
La laveuse n’est pas
branchée
L’arrivée d’eau est coupée Ouvrez les robinets chaud et froid à fond.
Les commandes ne sont pas
ajustées correctement
Le couvercle est ouvert
La laveuse ne veut
pas fonctionner ou se
mettre en marche
- les verrous de sécurité
empêchent l’essorage et la
rotation
Le disjoncteur / le fusible a
laché / est cassé
Il faut réinitialiser
l’électronique
START n’a pas été appuyé Appuyez sur START.
L’éman du couvercle manque
Mouvement dans la
machine quand elle
est off
Performances de la
laveuse
Habits trop mouillés Mauvais cycle d’essorage
Endroits colorés
Vêtements devenus
grîsatre ou jaune
Peluches ou résidus sur
les vêtements
Le mécanisme de
démarrage allume et etteint
le moteur
Causes Possibles Que faire
Usage incorr
sant
Si des couleurs déteignent Triez les habits blancs ou à couleurs claires des habits sombres.
Pas assez de détergent
Eau calcaire
L’eau n’est pas assez chaude
La laveuse est surchargée
Détergent ne se dissousd pas
Si des couleurs déteignent
Habits séchés à l’air
Triage incorrect Séparez les linges qui font des peluches de ceux qui les attirent.
Lavage dure trop longtemps
Détergent ne se dissoud pas
Surcharge
Usage incorrect de
l’adoucissant
ect de l’adoucis-
14
Assurez-vous que le cable soit bien branché à une prise
fonctionnelle.
Vérifiez les commandes.
)HUPH]ELHQOHFRXYHUFOHHWUHFRPPHQFH]OHF\FOHGHSXLVOHGpEXWVL
nécessaire.
Vérifiez les fusibles et le disjoncteur. Remplacez les fusibles ou
rallumer le disjoncteur. La laveuse doit être branchée séparement.
Débranchez la laveuse, attendez 2 minutes, rebranchez et appuyez
START.
Appelez le Service de réparation.
Quand la machine est etteinte manuellement, le mécanisme
etteint le moteur avant la mise hors service complète de l’appareil.
Si le couvercle est levé avant l’arrêt du moteur, cette procédure se
complètera une fois le couvercle fermé.
Assurez-vous que le cycle d’essorage sélectionné concorde avec la charge
que vous lavez. Certains linge se sentent plus mouillés quand rincésà l’eau
froide.
Vérifiez les instructions de l’adoucissant sur l’emballage et suivez bien le
mode d’emploi quand vous l’employez avec le diffuseur.
Pré-traiter la tâche et relaver ensuite.
Utilisez plus de détergent (surtout avec les charges plus grosses). Suivezbien les instructions d’utilisation du détergent.
Utilisez un produit contre le calcaire tel que Calgon ou installez unfiltre à
calcaire pour adoucir l’eau.
Assurez-vous que le chauffe-eau alimente l’appareil avec une eau à
)²)&²&
Selectionnez la taille de la charge en fonction de la charge d’habits.
Ajoutez le détergent pendant que le tambour se remplit d’eau avant
demettre les habits.
Trier les habits par couleur, si les instructions sur l’habit stipule qu’il faut
laver séparément, il pourrait déteindre.
Si vous n’utilisez pas de sécheuse pour sécher votre linge, les habits
peuvent retenir plus de peluches.
Lavez de plus petites charges moins de temps que des grande charges
Ajoutez le détergent pendant que le tambour se remplit d’eau avant
demettre les habits
Essayez un détergent liquide.
Utilisez des températures d’eau plus chaude.
Ne chargez pas plus d’habits que la dernière rangée de trous dans le
tambour.
Quand la pompe commence à aspirer de l’air, elle produit un
gargouillement. La laveuse commence alors à essorer et le bruit continue
jusqu’à ce quel’essorage soit terminé.
Page 35

Avant d’appeler le Service Réparation…
Opération de la Laveuse Causes Possible Que faire
Boulochage
Accrochages, trous,
rayures, déchirures
ouusage excessif
Plis dans les habits
Résultat d’habits normaux sur
du poly-cotton et des linges qui
laissent des peluches
Pins, accroches, crochets,
boutons coupants, ceintures,
fermeture éclair et autres
objets laissés dans les poches
Javel au chlore non-diluée
Produits chimiques tels que
solutions pour les cheveux ou
solutions permanentes
Triage incorrect
Surcharge ou niveau d’eau
incorrect
Cycle de lavage ou de
sechage incorrect
Lavage répété dans de l’eau
trop chaude
Tant que l’incident n’est pas causé par la laveuse vous pouvez réduire le
boulochage en lavant les vêtements à l’envers (dehors/dedans).
)HUPH]OHVDFFURFKHVFURFKHWVERXWRQVHWIHUPHWXUHpFODLU
Quittez les objets tels que pins et autres se trouvant dans les poches.
Retournez les tricots (qui s’accrochent facilement).
Vérifiez les instructions du sachet de javel pour savoir le montant exact.
Ne jamais ajouter de la javel non-diluée pour le lavage ou permettre que les
habits entrent en contact avec de la javel non-diluée.
Rincez les articles qui ont des produits chimiques avant de les laver.
Evitez de mélanger les habits lourds (tels que habits de travail) avec
des habits légers (tels que des blouses).
Essayez un adoucissant pour vêtements.
Remplissez votre laveuse de manière à ce que les vêtements
puissent bouger librement en ayant le niveau d’eau couvrant juste
les habits.
Choisissez le cycle en fonction du type de linge que vous lavez
(spécialement pour les charges de vêtements faciles à laver).
Lavez dans de l’eau chaude ou froide.
electromenagersge.ca
Effets sonores de la
laveuse
“Bruits métaliques”
Un bruit d’aller-venue
ou un léger “click”
pendant l’agitation
De courts bruits
d’agita-tion à la fin de
l’essorage
“Click” quand l’eau finit
le remplissage
“Click” derrière le
tableaudes com.
pendant le remplissage
Le volume de l’eau
changependant le
remplissage
Le moteur “gémit“ ou
”s’apaise” pendant
l’essorage
“Bourdonnement”
“Gargouillement”
Causes Possibles Que faire
Mécanisme de transmission
s’active ou se désactive
Le moteur électrique
change de direction
Le système se mets en marche au début de l’agitation et se
désactive une fois l’agitation terminée. Ceci arrive plusieurs fois
pendant le lavage.
L’appareil comporte un système de transmission sans vitesses. Ce
bruit vient du moteur qui fait des aller-retours pour agiter votre
linge.
Redistribution des habits A la fin de l’agitation, le moteur provoque de coutes agitations pour
redistribuer la charge.
Relais du cycle à
l’interrupteur
Température automatique
Valve de Contrôle
Température automatique
Valve de Contrôle
Le moteur s’accélère/
ralentit pendant le cycle
d’essorage
La pompe d’évacuation
d’eau
La pompe d’évacuation
d’eau
Le relais produit un “click” quand il est activé. Le niveau de l’eau
active le relais et stoppe le remplissage.
Cette valve mélange l’eau chaude et l’eau froide. Ce “click”
représente la valve qui s’allume et s’etteint.
Cette valve mélange l’eau chaude et l’eau froide. Le son change
quand ces valves s’allument ou s’éteignent.
Le moteur va s’accélérer par niveau pendant le cycle d’essorage.
Quand l’essorage est complet, il va ralentir jusqu’à l’arrêt complet.
La pompe d’evacuation va produire un bourdonnement pendant
le pompage de l’eau après l’arrêt de l’agitation et jusqu’à la fin du
cycle.
Quand la pompe commence à aspirer de l’air, elle produit un
gar- gouillement. La laveuse commence alors à essorer et le bruit
continue jusqu’à ce que l’essorage soit terminé.
15
Page 36

Avant d’appeler le Service Réparation…
Problèmes de
Sécheuse
La sécheuse ne
demarre pas
La sécheuse ne
chauffe pas
La sécheuse tremble
ou fait du bruit
Tâches graisseuses
surles vêtements
Peluches sur les
habits
Electricité statique
7HPSVGHVČFKDJH
incomect
Causes Possibles Que faire
La sécheuse n’est pas
branchée
Le fusible est cassé ou le
disjoncteur a sauté
Le fusible est cassé ou le
dis-joncteur a sauté.
L’arrivée de gaz est éteinte Assurez-vous que l’arrivée de gaz est fermée ou ouverte pleinement.
Un certain tremblement/
bruitest normal. La
sécheuse n’est pas bien
posée à plat
L’utilisation incorrecte de
l’adoucissant
Séchage d’habits sales avec
d’autres propres
Les habits n’étaient pas
complètement propres
Le filtre à peluches est plein Nettoyez le filtre à peluches avant chaque charge.
Triage incorrect Triez les habits à peluches (chenille) de ceux qui les attirent (velours).
L’électricité statique peut
attirer les peluches
Surcharge Separez les grandes charges en de plus petites.
Papier, mouchoirs, etc.
laissés dans les poches
Quand aucun adoucissant
n’est utilisé
Surséchage
Habits synthétiques,
imprimés permanents
et autres linges causant
l’électricité statique
Type de chaleur
$VVXUH]YRXVTXHOHFkEOHGHODVČFKHXVHVRLWEUDQFKpH
correctement à la prise électrique.
Vérifiez la boîte à fusible/disjoncteur et remplacez les fuisbles au
rallumez le disjoncteur. Note:ODPDMRULWČGHVODYHXVHVXWLOLVHQW
fusibles/disjoncteurs.
Vérifiez la boîte à fusible/disjoncteur et remplacez les deux
fuisbles ou rallumez les deux disjoncteurs. Votre sécheuse tremble
justequand un des fusibles est cassé ou un disjoncteur a sauté.
Changez la sécheuse à un endroit plat ou ajustez le niveau des pieds
de l’appareil jusqu’à ce que la hauteur soit la même.
Suivez les instructions sur l’emballage.
Utilisez votre sécheuse uniquement pour sécher des habits propres.
Les habits sales peuvent salir les autres vêtements et aussi la
sécheuse.
Parfois, la saleté qui ne se voit pas quand les habits sont mouillés se
voit après le séchage. Lavez bien le linge avant de le sécher.
Voir les recommendations dans cette section sous STATIQUE.
Videz toutes les poches avant de laver les vêtements.
Essayez un adoucissant pour vêtements.
Bounce Conditioner Dryer Sheets pour vêtement ont été approuvées
pour usage dans toutes les sécheuses GE quand elles sont utilisées
conformément au mode d’emploi fourni par le fabriquant.
Essayez un adoucissant pour vêtements.
Ajustez le cycle sur LESS DRY ou DAMP DRY.
Utilisez un adoucissant pour vêtements
Les temps automatiques de séchages vont varier avec le type de
chaleur utilisé (électrique, naturel or LP gaz), taille de la charge,
habits, d’eau dans les vêtements et de la condition des tuyaux
d’évacuation.
16
Page 37

Avant d’apeller le Service Réparation…
electromenagersge.ca
Problèmes de
Sécheuse
Le linge met trop de
temps à sécher
Les habits sont
froissés
Les habits
rétrécissent
Causas Posibles Que faire
Triage incorrect
De grandes charges de
linge lourd (ex: serviettes de
plage)
Commandes pas bien
réglées
Le filtre à peluches est plein Nettoyez le filtre avant chaque charge.
Conduit sale ou obstrué
Fusibles ou disjoncteurs ont
sauté
Surcharge/mélange des
charges
Souscharge
Surséchage
Les habits restent dans la
sécheuse après la fin du
cycle
Surcharge Séparez les grandes charges en de plus petites.
Certains linges vont
automatiquement
rétrécissent au lavage
D’autres peuvent être
lavés mais rétrécissent au
séchage
Séparez les articles lourds des plus légers (en général, une charge
bien triée pour le lavage est une charge bien triée pour le séchage).
Les grands linges lourds contiennent plus d’humidité et prennent
plus longtemps pour sécher. Séparez les charges de linges lourds en
de plus petites afin de réduire le temps de séchage.
Ajustez les réglages conformément à la charge que vous séchez.
Vérifiez l’installation pour obtenir une ventilation/évacuation
correcte.
Assurez-vous que le conduit soit propre, dénoué et pas obstrué.
Vérifiez que l’evacuateur d’humidité extérieur fonctionne bien.
Vérifiez les instructions d’installation pour vous assurer que la
ventilation de la sécheuse se fait correctment.
Remplacez les fusibles ou rallumez les disjoncteurs. La plupart des
sécheuses utilisent 2 fusibles/disjoncteurs, vérifiez l’état de tous.
Ne pas placer plus d’une charge de lavage dans la sécheuse.
Si vous séchez juste un ou deux articles, ajoutez quelques articles
pour assurer une agitation et un séchage corrects.
Selectionnez un cycle de séchage plus court.
Enlevez les habits quand ils sont encore un peu humide. Choisissez
l’option LESS DRY ou DAMP DRY.
Enlevez les habits immédiatement aprè la fin du cycle et pliez-les ou
pendez-les tout de suite.
Pour éviter le rétrécissement, suivez les instructions de lavage sur le
linge
Certains habits peuvent retrouver leur taille normale après séchage.
Si vous êtes inquiet concernant le rétrécissement d’un habit en
particulier, ne le lavez pas en laveuse et ne le séchez pas dans la
sécheuse.
17
Page 38

Notes.
18
Page 39

La Garantie Appliance
Toutes les réparations saus garantie seront effectuées par nos
centres de réparation ou now réparterus autorisés. Appelez le
1.800.561.3344. Veuillez fournin le noméro de série et le numéro de
modèle lorsque vous appelez pour obtenir le service.
Ce qui n’est pas couvert:
Un an Toute pièce du Centre Buanderie qui se à cause d’un vice de matériau ou de la main-d’oeuvre.
à partir de la date Au cours de cette année de garantie limitée, GE fournira, gratuitement, toute la main-d’oeuvre
d’achat initial et el service à la maison nécessaries pour remplacer la pièce défectuerse.
Ce qui n’est pas couvert:
Agrafez le reçu ‘d’achat ici. Pour
obtenir le service sous garantie, vous
devrez fournir la preuve de l’achat
original.
Tout déplacement de service chez vous pour vous
apprendre à utiliser votre Centre Buanderie.
Toute mauvaise intallation.
Si vous avez un problème d’installation, appelez votre
revendeur ou un installateur. Vous êtes responsable
de fournir une bounne alimentation électrique, un bon
échappement et tout autre branchement nécessaire.
Toute panne du produit s’il a été malmené, mal usé
ou utilisé à une autre fin que celle prévue ou utilisé
commercialement.
(;&/86,21'(6*$5$17,(6,0/,&,7(6³9RWUHVHXOHWXQLTXHUHFRXUVHVWODUéparation du produit selon les dispositions
de cette Garantie limitée. Toutes les garanties implicites, incluant le garanties de commercialité et d’adéquation à un
usage spécifique, sont limitées a une année ou a la période la plus courte autorissée par la légistation.
Cette garantie est valuable pour le premier proprietaire et tout autre propriétaire du produit s’il acheté au Canada pour utilisation
domestique ou Canada. Le service à domicile sous garantie sera fourni là où il est disponible et dans les régions que Mabe
considère quo l’offre de service est raisonnable.
/(*5$171·(673$65(63216$%/('(66200$*(6&216e&87,)6
Garant: MABE CANADA, INC.
Tout remplacement des fusibles de la maison ou tout re
branchement de disjoncteurs.
Tout dommage occasionné par un accident, un incendie ,
une inondation ou un acte de Dieu.
Tout dommage subi aprés la livraison.
Le service s’ill est impossible davoir accès au produit pour
ce faire.
19
Page 40

Soutien au consommateur.
Site Web appareils électroménagers GE electromenagersge.ca
Vouse avez une question ou vous aves besoin d’aide pour votre appareil électroménager? Contactez-nous par
Internet au site www.electromenagersge.ca 24 heures par jour, tous les jours de l’année.
Service de réparations 1.800.561.3344
Service de reparations GE est tout près de vous.
Pour faire réparer votre électroménager GE, il suffit de nous téléphoner.
Studio de conception réaliste electromenagersge.ca
Sur demande, GE peut fournir une brochre sur l’aménagement d’une cuisine pour les personnes a mobilite
reduite.
Écrivez: Directeur, Reations ovc les conmmateurs, Mabe Canada Inc.
%XUHDX)DFWRU\/DQH
Moncton N.B. E1C 9M3
Prolongation de garantie electromenagersge.ca
Achetez un contrat d’entretien GE avant que votre garantie n’expire et bénéficez d’un rabais substantiel. Ainsi le
service apre’s-vente GE sera toujours là après expiration de la garantie:
Visitez notre site Web ou appelez-nous au 1.800.461.3636
Pièces et accessories electromenagersge.ca
Ceux qui désirent réparer eux-mêmes leurs électroménagers peuvent recevoir pièces et accessories directement à la
maison (cartes VISA, MasterCard et Discover acceptées).
Les directives stipulées dans le présent manuel peuvent être effectuees par n’importe quel utilisateur. les autres
réparations doivent généralement être effectuées par un technicien qualifié. Soyez predent, car une réparation
inadéquate peut affecter le fonctionnement sécuritaire de l’appareil.
Les consommateurs au Canada peuvent commander des pièces et des accessaires en ligne au site
www.electromenagersge.ca, 24 heures sur 24 et tous les jours, our par téléphone au 1.800.661.1616 pendant les
heures de bureau.
Contactez-nous electromenagersge.ca
Si vous n’êtes pas satisfait du service après-vente dont vous avez bénéficié:
Premièrement, communiquez avec les gens qui ont réparé votre appareil.
Ensuite, si vous n’êtes toujours pas satisfait envayez tous es détails-numéro de téléphone compris-au
Direceur, Relations avec les consommateurs, Mabe Canada Inc.
%XUHDX)DFWRU\/DQH
Moncton, N.B. E1C 9M3
Inscrivez votre appareil électroménager electromenagersge.ca
Inscrivez votre appareil électroménager en direct, aussitôt que possible. Cela améliorera nos
communications et notre service après-vente. Vous pouvez également nous envoyer par la poste le formulaire
d’inscription joint à votre documentation.
Page 41

GEAppliances.com
Instrucciones de Seguridad
Instrucciones de Funcionamiento
Cuidado y Limpieza
de la Secadora ....................... 11
Cuidado y Limpieza
de la Lavadora ........................ 9
Panel de Control de la Secadora ..... 10
Panel de Control de la Lavadora .......6
Ajustes de Control de la Secadora. . . . 10
Ajustes de Control de la Lavadora. . . 6, 7
Funciones de la Lavadora. . . . . . . . . . . . . .8
Carga y Uso de la Secadora ......... 12
Carga y Uso de la Lavadora...............9
Solución de la Problemas
Solución de la Problemas de la
Lavadora ..........................13-15
Solución de la Problemas de la
Secadora .........................16, 17
Atención al Cliente
Atención al Cliente ...................20
Garantía ............................. 19
....2-5
Manual del
Propietario
GTUP240
GUAP240
GTUP270
GUAP270
GTUN275*
* Como socio de Energy Star®, GE
ha confirmado que este producto
cumple las directrices de Energy
Star® relativas al rendimiento
energético.
Secadora
Escriba los números de modelo
Lavadora/
y de serie aquí:
Nº de Modelo _________
Nº de Serie ___________
Abra la puerta de la Secadora para
consultar la etiqueta con el número
de Modelo y Serie.
Page 42

INFORMACIÓN IMPORTANTE DE SEGURIDAD
LEA TODAS LAS INSTRUCCIONES ANTES DE USAR.
ADVERTENCIA!
Para su seguridad, la información contenida en este manual debe ser observada
para minimizar el riesgo de incendio o explosión, descargas eléctricas, o para evitar
daños a la propiedad, lesiones personales o la muerte.
No guarde ni use gasolina u otros
vapores inflamables y líquidos cerca de
este ni de otros electrodomésticos.
La instalación y las reparaciones
GHEHUiQVHUUHDOL]DGDVSRUXQWČFQLFR
calificado, agencia de servicios o el
proveedor de gas.
QUÉ DEBE HACER SI HUELE GAS:
1
No intente encender un fósforo o
cigarrillo, ni encienda ningún
electrodoméstico a gas o eléctrico.
2
No toque ningún interruptor eléctrico;
no use teléfonos en su edificio.
3
Haga que se retiren los ocupantes de
la sala, edificio o área.
Ley de Agua Potable Inocua y Tratamiento de Residuos Tóxicos de California (California Safe
Drinking Water and Toxic Enforcement Act)
Esta ley solicita al Gobernador de California que publique una lista de sustancias que el estado reconoce
como cancerígenas, que producen defectos de nacimiento u otros daños reproductivos y solicita
a los empresarios que adviertan a sus clientes sobre la posible exposición a tales sustancias. Los
electrodomésticos a gas pueden causar exposiciones menores a cuatro de estas sustancias, las cuales
son el benceno, monóxido de carbono, formaldehido y hollín, producidas principalmente por la combustión
incompleta de gas natural o combustibles LP. Las secadoras ajustadas adecuadamente minimizarán la
posibilidad de combustión incompleta. La exposición a estas sustancias puede ser minimizada aún más
gracias a una adecuada ventilación de la secadora al aire libre.
4
De inmediato llame a su proveedor de
gas desde el teléfono de un vecino.
Siga las instrucciones del proveedor de
gas detenidamente.
5
Si no se puede comunicar con su
proveedor de gas, llame al
departamento de bomberos.
SEGURIDAD DEL CALENTADOR DE AGUA
Bajo ciertas condiciones, se podrá producir gas de hidrógeno en un calentador de agua que no fue
usado por dos semanas o más. El gas de hidrógeno puede ser explosivo bajo estas circunstancias.
Si el agua caliente no se usó durante dos semanas o más, evite la posibilidad de daño o lesión
abriendo todos los grifos de agua caliente y permitiendo que el agua corra durante varios minutos.
Haga esto antes de usar cualquier electrodoméstico eléctrico que esté conectado al sistema de agua
caliente. Este procedimiento simple permitirá el escape de cualquier gas de hidrógeno acumulado.
Debido a que el gas es inflamable, no fume ni use una llama abierta o electrodoméstico durante este
proceso.
2
Page 43

INFORMACIÓN IMPORTANTE DE SEGURIDAD
LEA TODAS LAS INSTRUCCIONES ANTES DE USAR.
INSTALACIÓN ADECUADA
Este electrodoméstico se deberá instalar y ubicar de acuerdo con las instrucciones de instalación antes
de ser usado. Si no recibió una hoja de instrucciones de instalación, podrá acceder a una ingresando a
GEAppliances.com o llamando al 800.GE.CARES (800.432.2737).
Conecte el electrodoméstico a tierra de forma
adecuado siguiendo todos los códigos y ordenanzas
gubernamentales. Siga los detalles en las
instrucciones de instalación.
Instale o guarde donde no esté expuesto a
temperaturas inferiores a heladas o a los factores
climáticos, lo cual podrá ocasionar daños
permanentes e invalidar la garantía.
Conecte a un circuito de corriente eléctrica
adecuadamente calificado, protegido y medido a fin
de evitar una sobrecarga eléctrica.
Retire del embalaje todos los artículos cortantes y tire
todos los materiales de envío de la forma correcta.
Escape/ Conducto
Las secadoras DEBEN contar con escape al exterior
1
para impedir que grandes volúmenes de humedad y
pelusa ingresen a la habitación.
Use sólo material para el conducto de metal rígido
2
de 4” dentro del gabinete de la secadora. Use sólo
material para el conducto de metal rígido o flexible
de 4” de diámetro para el escape con salida al
exterior. Evite que el conducto sea de material de
plástico u otros materiales combustibles y que se
puedan pinchar con facilidad.
Para más detalles, siga las Instrucciones de Instalación.
ADVERTENCIA!
GEApplances.com
SU ÁREA DE LAVANDERÍA
Mantenga el área debajo y alrededor de sus
electrodomésticos libre de materiales combustibles,
(hilachas, papel, andrajos, etc.), gasolina, químicos u
otros vapores y líquidos inflamables.
Mantenga el piso alrededor de sus electrodomésticos
limpio y seco a fin de reducir la posibilidad de
resbalones.
Guarde todos los materiales de lavandería (tales como
detergentes, blanqueadores, etc.) fuera del alcance de
los niños, preferentemente en un gabinete cerrado. Siga
todas las advertencias de las etiquetas de los envases a
fin de evitar lesiones.
Nunca suba ni se pare sobre la unidad de
Almacenamiento – Centro de Lavado.
No permita que nadie, en particular los niños, se trepen
sobre, se cuelguen de, se paren sobre, jueguen sobre
o en el electrodoméstico. Cuando el electrodoméstico
se use cerca de niños, será necesario supervisarlos de
cerca.
No coloque artículos que se puedan incendiar o
derretir (tales como ropa, materiales de papel, plásticos
o envases de plástico, etc.) en la parte superior del
electrodoméstico ni colgando de la puerta.
Mantenga el área alrededor de la salida y las áreas
cercanas libres de acumulación de pelusas, polvillo y
suciedad.
No obstruya el flujo del aire ventilado. No apile, no
coloque ropa, no eche alfombras al frente o al respaldo
de la secadora.
3
Page 44

INFORMACIÓN IMPORTANTE DE SEGURIDAD
LEA TODAS LAS INSTRUCCIONES ANTES DE USAR.
AL USAR SU ELECTRODOMÉSTICO
goma pueden, bajo ciertas circunstancias, producir
fuego de forma expontánea.
No coloque plástico, papel ni ropa que se puedan
quemar o derretir sobre la secadora cuando la misma
esté en funcionamiento.
Las prendas con etiqueta Secar Lejos del Calor (Dry
Away from Heat) o No Secar en la Secadora (Do Not
Tumble Dry) (tales como chalecos salvavidas que
contengan kapok) no se deberán introducir en la
secadora.
No seque artículos de fibra de vidrio en la secadora.
Se podrá producir irritación de la piel debido a
partículas que queden sobre la ropa durante secados
subsiguientes.
A fin de minimizar la posibilidad de descarga
eléctrica, desenchufe el electrodoméstico del cable
de corriente o desconecte el electrodoméstico del
panel de distribución del hogar, retirando el fusible
o desconectando el disyuntor antes de intentar
cualquier mantenimiento o limpieza (excepto el retiro
y limpieza del filtro de pelusa). NOTA: Apagar la perilla
Cycle Selector (Selector de Ciclo) o presionar PAUSE
(PAUSA) NO desconecta el electrodoméstico del cable
de corriente.
El interior de la máquina y la conexión del conducto
de escape dentro de la secadora deberán ser
limpiados por lo menos una vez al año por un técnico
calificado. Consulte la sección Loading and Using the
Dryer (Carga y Uso de la Secadora).
Si pose una secadora a gas, estará equipada con un
encendido electrónico automático y no contará con
una luz piloto. NO INTENTE ENCENDER LA MISMA
CON UN FÓSFORO. Se podrán producir quemaduras
si coloca la mano cerca del quemador cuando el
encendido automático se active.
Es posible que desee ablandar las telas lavadas
o reducir la electricidad estática en las mismas
usando un suavizante de telas para secadoras o un
acondicionador anti estática. Le recomendamos que
use un suavizante de tela en el ciclo de lavado, de
acuerdo con las instrucciones del fabricante sobre
estos productos, o que intente con un producto para
secador sobre el cual el fabricante asegure por escrito
en el paquete del producto que es de uso seguro
en la secadora. En caso de problemas de servicio
o funcionamiento ocasionados por el uso de estos
productos, la responsabilidad será de los fabricantes
de dichos productos y no estarán cubiertos por la
garantía de este electrodoméstico.
Nunca pulverice cualquier tipo de aerosol en, sobre o
cerca de la secadora. No use ningun tipo de limpiador
aerosol al limpiar el interior de la secadora. Humos
peligrosos o choque eléctrico pueden ocurrir.
Use este
electrodoméstico
sólo para su
propósito original,
como se describe
en el Manual del
Propietario.
No mezcle blanqueador con cloro junto con amoníaco
o ácidos tales como vinagre y/o removedor de óxido.
La mezcla de diferentes químicos puede producir un
gas tóxico que puede ocasionar la muerte.
Nunca intente usar este electrodoméstico si se
encuentra dañado, funcionando mal, parcialmente
desensamblado, o tiene partes faltantes o rotas,
incluyendo un cable o enchufe dañado.
Nunca coloque la mano en el electrodoméstico
mientras se esté moviendo. Antes de cargar,
descargar o agregar ropa, espere hasta que la
máquina esté completamente detenida.
Limpie el filtro de pelusa antes de cada carga a fin de
evitar la acumulación de pelusa dentro de la secadora
o en la sala. NO UTILICE LA SECADORA SI EL FILTRO
DE PELUSA NO SE ENCUENTRA COLOCADO.
No lave o seque artículos que se hayan limpiado,
lavado, remojado o salpicado con sustancias
combustibles o explosivas (tales como cera, aceite,
pintura, gasolina, desengrasadores, solventes de
tintorería, kerosene). Estas sustancias producen
vapores que podrían incendiarse o explotar. No
agregue estas sustancias al agua de lavado. No use
ni coloque estas sustancias alrededor de la lavadora o
secadora durante su uso.
No coloque artículos expuestos a aceites de cocción
en su lavadora. Los artículos contaminados con
aceites de cocción podrán contribuir a una reacción
química que podría hacer que una carga de ropa se
prenda fuego.
Cualquier artículo sobre el cual haya usado un
solvente para limpieza o que contenga materiales
inflamables (tales como telas de limpieza, estropajos,
toallas usadas en salones de belleza, restaurantes
o peluquerías, etc.) no se deberá colocar en o cerca
de la secadora hasta que los materiales solventes o
inflamables se hayan eliminado. En los hogares se
usan muchos artículos altamente inflamables tales
como acetona, alcohol desnaturalizado, gasolina,
kerosene, algunos limpiadores de hogar, algunos
quitamanchas, aguarrás, ceras, quita ceras y
productos que contienen destilados de petróleo.
El proceso de lavandería puede reducir los retardantes
de las llamas sobre las telas. A fin de evitar dicho
resultado, siga cuidadosamente las instrucciones del
fabricante sobre el cuidado de las prendas.
No seque artículos que contengan goma,
plástico o materiales similares tales como
corpiños acolchonados, calzado deportivo, botas
impermeables, alfombrillas antideslizantes para
baño, tapetes, baberos, pantalones de bebé, bolsas
de plástico, almohadas, etc. que se puedan derretir
o quemar. Al ser calentados, algunos materiales de
4
Page 45

INFORMACIÓN IMPORTANTE DE SEGURIDAD
LEA TODAS LAS INSTRUCCIONES ANTES DE USAR.
CUANDO NO ESTÉ EN USO
Tome el cable de manera firme al desconectar este
electrodoméstico, a fin de evitar daños sobre el cable
al tirar del mismo. Coloque el cable lejos de las áreas
de tránsito, de modo que no se produzcan pisadas,
tropiezos ni daños.
Cierre los grifos de agua a fin de liberar la presión de
las mangueras y válvulas y para minimizar goteras
en caso de quiebre o rotura. Controle el estado de las
mangueras de llenado; GE recomienda el cambio de
mangueras cada 5 años.
Antes de descartar el electrodoméstico o de dejarlo
fuera de servicio, retire las tapas de la lavadora y la
secadora a fin de evitar que los niños se escondan
dentro.
No intente reparar ni reemplazar cualquier parte
del electrodoméstico, a menos que esto sea
específicamente recomendado en el Manual del
Propietario o en instrucciones publicadas sobre
reparaciones del usuario que usted entienda y para las
cuales posea las destrezas necesarias.
No manipule indebidamente los controles.
LEA Y SIGA ESTA INFORMACIÓN DE SEGURIDAD CUIDADOSAMENTE.
GUARDE ESTAS INSTRUCCIONES.
GEApplances.com
5
Page 46

Sobre el panel de control de la Lavadora
Suavizante
para Tela
Detergente
$JUHJXHGHWHUJHQWH
$JUHJXHVXDYL]DQWHSDUDWHOD
(opcional)
$JUHJXHEODQTXHDGRU
(opcional)
Paso 1
Blanqueador Líquido
$JUHJXHURSD
Guía de Inicio Rápido
Paso 2
Paso 3
6HOHFFLRQHHOWDPDxRGHODFDUJD\
otras opciones de lavado
6HOHFFLRQHHOFLFORGHODYDGR
Paso 4
&LHUUHODWDSD
3UHVLRQH67$57
(INICIAR)
ADVERTENCIA!
Para reducir el riesgo de incendio, descarga eléctrica o lesiones a personas, lea las INSTRUCCIONES IMPORTANTES DE
SEGURIDAD antes de utilizar este aparato.
A lo largo de este manual, las características y apariencia pueden ser diferentes a las de su modelo
Cierre de la
Tapa
Lid Lock
Su lavadora cuenta con un sistema de seguridad que evita la apertura de la tapa durante el ciclo de
centrifugado. El cierre de la tapa evita que cualquier persona (especialmente los niños) llegue a la lavadora
mientras la canasta está girando. El cierre de la tapa se liberará dentro de los 5 segundos luego de que la
canasta deje de girar. Intentar abrir la tapa mientras está cerrada puede producir lesiones. Si la tapa no se
destraba luego de girar, comuníquese al servicio técnico.
C D E
A
Nota: Este electrodoméstico está diseñado para que la lavadora y la secadora se puedan usar
al mismo tiempo, si así se desea.
F
B
Controles
Selector de Ciclo de Lavado
A
El ciclo de lavado controla la duración e intensidad del proceso de lavado. La perilla se puede girar
en cualquier dirección. Girar la perilla Cycle Selector (Selector de Ciclo) luego de iniciar un ciclo
detendrá la lavadora y reiniciará el ciclo en una nueva selección. Presione START (Iniciar) para
comenzar la selección del nuevo ciclo.
El siguiente cuadro le ayudará a configurar el ciclo de lavado correcto para su ropa. El cuadro
cuenta con un rango del ciclo de tiempo más largo al más corto y la intensidad de lavado. (Los
ciclos varían de acuerdo al modelo).
COTTONS (Algodones) - Para algodones con mucha o poca suciedad, ropa blanca, ropa de trabajo o de juego.
PERMANENT PRESS (Planchado Permanente) - Para artículos sin arrugas y planchado permanente, y tejidos.
DELICATES (ROPA DELICADA) - Para lencería y telas que requieren cuidado especial con suciedad entre suave y normal.
SPIN ONLY (Sólo Centrifugado) - Para drenar la bañera y el agua de la ropa.
QUICK RINSE (Enjuague Rápido) - Enjuaga y centrifuga artículos sin suciedad cuando sólo se desee un enjuague.
OFF (Apagar) - La lavadora se apaga y el botón START (Inicio) no funciona.
NOTA: Cuando el control se coloca en OFF (Apagar), las luces de STATUS (Estado) se apagan.
6
NOTA: El selector de ciclo no gira durante el funcionamiento de la lavadora.
Page 47

GEApplances.com
SUAVIZANTE PARA TELA
B
Configure esta opción al agregar suavizante para tela a la lavadora.
Luces de ESTADO
C
Las luces STATUS (Estado) muestran la etapa en la cual se encuentra la lavadora. Cuando la perilla selectora se configura en
un ciclo nuevo, las luces STATUS (Estado) parpadearán momentáneamente, mostrando las etapas que el ciclo atravesará.
Luz de ESTADO Ilumina
ON (Encender) Cuando la opción del suavizante de tela fue seleccionada.
Wash (Lavar) Cuando la lavadora está en la parte del lavado durante el ciclo.
Rinse (Enjuagar) Cuando la lavadora está en la parte del enjuague durante el ciclo.
Spin (Cetrifugar) Cuando la lavadora está drenando y/o girando.
Lid Locked
(Tapa bloqueada)
Cuando la tapa de la lavadora está bloqueada. Esta función evita que la tapa se
abra mientras la lavadora se encuentra en el ciclo de centrifugado o reduciendo
la velocidad para deternerse.
NOTA: Si las luces STATUS (Estado) están titilando, el funcionamiento de la lavadora se encuentra pausado.
Para reanudar el funcionamiento presione el botón START (Iniciar) la tapa deberá estar cerrada).
Temperatura
D
Seleccione la temperatura del agua para los ciclos de lavado y enjuague. Siempre siga la etiqueta sobre los cuidados y las
instrucciones del fabricante al realizar un lavado.
PerfecTemp (Temperatura Perfecta) detecta la temperatura del agua entrante y ajusta el agua de llenado para obtener un
rango de temperatura más precisa para todas las temperaturas de lavado. Por ejemplo, para una selección de lavado en COLD
(Frío), se podrá agregar un poco de agua tibia para que se alcance la temperatura necesaria para una mejor disolución de los
detergentes. Con frecuencia, los detergentes no se disuelven completamente en agua muy fría, especialmente en los climas
más fríos.
Durante los meses de invierno, cuando el agua que ingresa a su hogar es más fría, o en ubicaciones con agua muy fría
durante todo el año, use PerfecTemp (Temperatura Perfecta) más COLD (Frío) a fin de ayudar a disolver detergentes en polvo y
mejorar la limpieza de su ropa. La función TAP COLD (Ligeramente Fría) apaga la función PerfecTemp (Temperatura Perfecta)
en su lavadora, y usa la temperatura del agua corriente de su hogar para un lavado en COLD (Frío). Esto puede brindar un
ahorro de energía al reducir la cantidad de agua caliente usada durante el lavado.
Load Size (Tamaño de la Carga)
E
No cargue la lavadora en forma excesiva, evite que la ropa supere la fila superior de hoyos en la canasta de la lavadora.
AUTO LOAD SENSING (Sensor de Carga Automática)- Esta selección brinda automáticamente la cantidad correcta de agua
ajustada al tamaño y tipo de carga ubicada en la unidad.
START (Inicio)
F
Presione la tecla START (Inicio) para dar comienzo al ciclo. Con la tapa cerrada y presionando START (Inicio) nuevamente se
colocará en PAUSE (Pausa) el ciclo y las luces STATUS (Estado) parpadearán. Para continuar el ciclo, cierre la tapa y presione
START (Inicio) nuevamente. El llenado de agua continuará con la tapa abierta, excepto cuando AUTO LOAD SENSING (Sensor
de Carga Automática) sea seleccionado como el tamaño de la carga. La tapa se deberá cerrar a fin de continuar el llenado
cuando AUTO LOAD SENSING (Sensor de Carga Automática) sea seleccionado.
Si la tapa se abre durante el ciclo, éste se colocará en PAUSE (Pausa) y las luces STATUS (Estado) parpadearán. Para reiniciar el
ciclo, cierre la tapa y presione START (Inicio).
Si la máquina queda pausada por más de 24 horas, el ciclo será cancelado. A fin de detener el ciclo, coloque Cycle Selector
(Selector de Ciclo) en la posición OFF (Apagado).
7
Page 48

Acerca de las funciones de la Lavadora
El Dispensador de Suavizante para Tela
El dispensador de suavizante para tela libera
automáticamente suavizante para tela líquido en
el momento adecuado durante el ciclo.
No detenga la lavadora durante el primer
giro. Esto hará que el dispensador se vacíe
demasiado rápido.
Para un uso correcto, siga estos pasos:
Asegúrese de que el dispensador esté
1
adherido al agitador de forma segura.
Use sólo suavizante para tela líquido que esté
2
diluido. Vierta en el dispensador usando la
cantidad recomendada en el paquete.
Nunca vierta suavizante para tela directamente
sobre la ropa. Esto puede producir manchas.
NOTA: No vierta blanqueador sobre el dispensador
de FABRIC SFTENER suavizante para tela.
Limpieza del Dispensador de Suavizante para Tela
Agregue agua a la unidad del dispensador
3
hasta que llegue a la línea de llenado
máximo.
No vierta nada en el agitador si se
retiró el dispensador.
Seleccione el botón FABRIC SOFTENER
4
(Suavizante para Tela) en el panel de control
para una dispersión adecuada del suavizante
para tela.
Separe para realizar la
limpieza.
Retire el dispensador de la parte superior del agitador.
1
Separe la taza del dispensador de la tapa, tomando la parte superior y empujando hacia abajo en
2
el interior de la taza con los dedos. La taza del dispensador se liberará de la tapa.
Para limpiar el dispensador, ponga en remojo la taza del dispensador y la tapa del dispensador en
3
la siguiente solución:
1 Galón estadounidense (3.8 litros) de agua tibia r
1/4 de taza (60 ml.) de detergente líquido de alta resistencia
1 taza (240 ml.) de blanqueador
De ser necesario, afloje la acumulación de suciedad con un trapo limpio y suave luego de poner en
4
remojo. No use un cepillo rígido; esto podrá poner áspera la superficie del dispensador.
Enjuague y vuelva a ensamblar el dispensador. Vuelva a colocar el dispensador en el agitador.
5
Embudo del Blanqueador Líquido
El llenado de agua diluye el blanqueador de cloro a medida que la lavadora se llena para el ciclo de
lavado.
Controle las etiquetas de cuidado de la ropa para conocer las instrucciones especiales.
1
Mida el blanqueador líquido con cuidado, siguiendo las instrucciones de la botella.
2
Nunca vierta blanqueador de cloro líquido sin diluir directamente en la ropa o en la canasta de
lavado
1RYLHUWDEODQTXHDGRUHQSROYRHQHOHPEXGRGHOEODQTXHDGRU
Antes de encender la lavadora, vierta una cantidad medida de blanqueador directamente en el
3
embudo blanqueador. Evite salpicaduras o un llenado excesivo del dispensador. Si prefiere usar
blanqueador en polvo, agregue el mismo en la canasta de la lavadora con el detergente.
No mezcle blanqueador con cloro junto con amoníaco o ácidos tales como vinagre y/o removedor
de óxido. La mezcla puede producir un gas tóxico que podría ocasionar la muerte.
NOTA: No vierta blanqueador sobre el dispensador de FABRIC SFTENER suavizante para tela.
8
Page 49

Carga y uso de la lavadora .
Siempre siga las instrucciones del fabricante que figuran en la etiqueta sobre el cuidado de las telas al realizar lavados.
Cómo Ordenar las Cargas para los Lavados
Ordene por color (blancos, claros, por color), nivel de
suciedad, tipo de tela (algodones fuertes, de cuidado
fácil, ropa delicada) y si la tela produce pelusa (tejido
de rizo, felpilla) o acumula pelusa (pana, terciopelo).
Uso Adecuado de Detergente
GEAppliances.com
Agregue detergente y active la lavadora antes de
agregar la ropa, de modo que el detergente pueda
trabajar de forma efectiva. El uso de muy poco o
demasiado detergente es una causa común de
problemas de lavado.
Puede usar menos detergente si se trata de agua
blanda, una carga de menor cantidad o una carga con
poca suciedad.
Cómo Cargar la Lavadora
Cargue ropa seca libremente, de modo que no
supere la fila superior de los hoyos de la canasta de la
lavadora. Al cargar prendas mojadas, asegúrese de
configurar el nivel de la carga/ agua lo suficientemente
alto para permitir que las prendas se muevan
libremente. El nivel del agua sólo debería cubrir la
ropa. Para agregar prendas una vez iniciado el lavado,
levante la tapa y sumerja las mismas junto al agitador.
No envuelva las prendas largas tales como sábanas
o pantalones alrededor del agitador.
No lave telas que contengan materiales inflamables
(ceras, líquidos de limpieza, etc.).
La agitación no comenzará cuando la tapa se
encuentre levantada.
Cuidado y limpieza de la lavadora
Canasta de Lavado: Deje la tapa abierta luego del
lavado a fin de permitir que la humedad se evapore.
Si desea lavar la canasta, use una tela suave que
esté limpia y húmeda con detergente líquido; luego
enjuague. (No use limpiadores ásperos ni arenosos).
Mangueras de Llenado: GE recomienda el cambio de
las mangueras cada 5 años.
Exterior: Inmediatamente limpie cualquier derrame.
Limpie con una tela húmeda. Intente no golpear la
superficie con objetos cortantes.
Movimiento y Almacenamiento: Solicite al técnico del
servicio que elimine el agua de la bomba de drenaje
y de las mangueras. Consulte las Instrucciones de
Instalación que se encuentran con el paquete del
producto para obtener información sobre cómo volver
a instalar la varilla de embarque para mantener el
cesto metálico estacionario cuando se cambie de lugar
la lavadora. Para más información, visite GEAppliances.
com o llame al 800. GE.CARES (800.432.2737). No
coloque la lavadora en lugares donde pueda estar
expuesta a variables climáticas.
Vacaciones prolongadas: Asegúrese de cerrar el
suministro de agua en todos los grifos. Drene toda el
agua de las mangueras si la temperatura es bajo cero.
9
Page 50

Acerca del panel de control de la Secadora
ADVERTENCIA!
A lo largo de este manual, las características y apariencia pueden ser
diferentes a las de su modelo.
Para reducir el riesgo de incendio, descarga eléctrica o lesiones a personas, lea
las INSTRUCCIONES IMPORTANTES DE SEGURIDAD antes de utilizar este aparato.
1
2
Nota: Este electrodoméstico está diseñado para que la lavadora y la secadora se puedan usar al
mismo tiempo, si así se desea.
IMPORTANTE: LIMPIE EL FILTRO DE PELUSAS CADA VEZ QUE USE LA SECADORA.
1
Cuidado de las Telas/ Temperatura
REGULAR
o COTTONS
REG. HEAT
MEDIUM,
EASY CARE
MED. HEAT,
EASY CARE
o PERMA PRESS
MED. HEAT
DELICATES
LOW HEAT
QUICK FLUFF
NO HEAT
Para algodones de regular a pesados.
Para ropas sintéticas, combinadas, delicadas y prendas con etiqueta de planchado
permanente.
Para prendas delicadas, sintéticas y con etiqueta para secado bajo en la secadora.
Para prendas con pelusa sin calor. Use el ciclo TIMED DRY (SECADO POR TIEMPO).
10
2
Los ciclos automáticos determinan inmediatamente el nivel de secado de las telas. Seleccione LESS DRY (Menos Seco)
si desea que la ropa esté ligeramente húmeda al final del ciclo de secado. Seleccione MORE DRY (Más Seco) si desea
que estén más secas. Los ciclos por tiempo funcionan durante una cantidad de tiempo determinada.
Ciclos de Secado
COTTONS Para algodones y la mayoría de las prendas blancas. Para la mayoría de las cargas,
seleccione OPTIMUM Dry ( Secado ÓPTIMO).
EASY CARE/
PERMANENT PRESS
DELICATES Para prendas delicadas, telas y tejidos que requieren cuidado especial.
TIMED DRY Configure Cycle Selector (Selector de Ciclo) durante el tiempo de secado que desee.
DESARRUGAR Para eliminar arrugas de prendas que están limpias y secas y que están apenas húmedas.
QUICK FLUFF
Para prendas sin arrugas, planchado permanente, prendas delicadas y tejidos.
Para refrescar y quitar pelusas de prendas, telas, prendas blancas y almohadas ya secas.
Use con FLUFF NO HEAT (Esponjar Sin Calor). Brinda 10 minutos de centrifugado sin calor.
Ciclo Automático/ Ciclo por Tiempo
Para un secado con sensor automático. El temporizador no rota durante el ciclo hasta
AUTO CYCLE
TIMED DRY Para secado manual. El temporizador rota durante todo el ciclo.
que el sensor del termostato indica que la ropa está seca, entonces el temporizador rota
automáticamente a la posición OFF (Apagado).
START (Inicio)- Cierre la puerta de la secadora. Presione START (Iniciar). Abrir la puerta durante
el funcionamiento detendrá la secadora. Para reiniciar la secadora, cierre la puerta y
seleccione START (Iniciar) para completar el ciclo.
Page 51

Cuidado y Limpieza de la Secadora.
GEAppliances.com
El Exterior: Limpie y sacuda cualquier derrame o
compuesto del lavado con una tela húmeda. El panel
de control de la secadora y los acabados podrán ser
dañados por algunos productos de tratamiento para
quitar suciedad y manchas. Aplique estos productos
lejos de la secadora. Luego la tela podrá ser lavada y
secada normalmente. Cualquier daño en su secadora
ocasionado por estos productos no estará cubierto
por su garantía.
El Filtro de Pelusas: Limpie el filtro de pelusas antes
de cada uso. Deslice la rejilla que cubre el filtro hacia
afuera. Pase los dedos por el filtro. Es posible que se
forme una acumulación de cera en el filtro de pelusas
debido al uso de suavizantes de tela agregados a la
secadora. Para eliminar dicha acumulación, lave la
rejilla para atrapar pelusas con agua tibia y jabón.
Seque totalmente y realice el reemplazo. No utilice la
secadora sin el filtro de pelusas y la rejilla en su lugar.
Solicite a un técnico calificado que aspire la pelusa de
la secadora una vez al año.
El Conducto de Escape: Inspeccione y limpie el
conducto de escape por lo menos una vez al año a
fin de evitar obstrucciones. Un escape parcialmente
obstruido podrá extender el tiempo de secado
Siga estos pasos:
1. Apague el suministro eléctrico desconectando el
cable del tomacorriente.
2. Desconecte el escape de la secadora.
3. Vacíe el escape con el anexo de la manguera y
vuelva a conectar el escape.
La Campana de Escape: Controle con un espejo
que las solapas interiores de la campana se muevan
libremente al funcionar. Asegúrese de que no haya
nidos (de aves, insectos, etc.) dentro del conducto o la
campana.
En algunos
modelos
Limpie la
pelusa de la
malla.
11
Page 52

Carga y uso de la Secadora
Ventilación de la Secadora
Para un mejor funcionamiento del secado, es necesario que la secadora sea ventilada de forma apropiada.
La secadora usará más energía y funcionará durante más tiempo si no está ventilada de acuerdo con
las especificaciones siguientes. Siga cuidadosamente los detalles sobre el Escape en las Instrucciones de
Instalación.
Use sólo material para el conducto de metal rígido de 4” dentro del gabinete de la secadora. Use sólo
material para el conducto de metal rígido o flexible aprobado por UL de 4” de diámetro para el escape de
salida al exterior.
No use plástico ni otras tuberías combustibles.
Use la longitud más corta posible.
No aplaste ni pliegue los tuberías.
Evite que la tubería se apoye sobre objetos cortantes.
La ventilación deberá ser acorde con los códigos de construcción locales.
Ventilación
correcta
Ventilación
incorrecta
12
Page 53

Antes de Solicitar el Servicio Técnico…
Los Consejos para la Solución de Problemas le Permiten Ahorrar tiempo
y dinero! Revise los cuadros en las siguientes páginas, o visite
Agua Causas Posibles Qué hacer
Mida la cantidad de detergente con cuidado. Use menos jabón si se trata
de agua blanda, una carga de menor cantidad o una carga con poca
suciedad.
Use menos detergente. Use menos jabón si se trata de agua blanda, una
carga de menor cantidad o una carga con poca suciedad.
Asegúrese de que las conexiones de las mangueras estén ajustadas en
los grifos y que las arandelas de caucho estén instaladas. Asegúrese de
que el extremo de la manguera de drenaje esté correctamente insertado y
asegurado en la instalación de drenaje.
Controle las cañerías del hogar. Es posible que necesite llamar a un
plomero.
Ajuste las mangueras en los grifos y cierre el agua luego de cada uso.
Controle el estado de las mangueras de llenado; se deberán reemplazar
cada 5 años.
Demasiada espuma
Goteos de agua
Demasiado
detergente
Uso de demasiado
detergente
Las mangueras de
llenado o la manguera
de drenaje están
conectadas de forma
incorrecta
El drenaje del hogar
podrá estar obstruido
Presión de agua
constante para llenar
las mangueras en la
fuente de agua
GEAppliances.com
La temperatura del
agua parece ser
incorrecta
Se completó el bombeo
de agua antes del ciclo
El agua no drena
Pausas de la lavadora
durante el ciclo de
centrifugado
Pueden oír pero no
ver el agua al final del
ciclo
Las temperaturas
de agua más frías
brindan una mejor
eficiencia de la
energía
El suministro de
agua está apagado
o inadecuadamente
conectado
Los filtros de malla
de la válvula de agua
están obstruidos
El calefactor de
agua del hogar no
está correctamente
configurado
Se levantó la tapa o el
ciclo fue pausado por
más de 24 horas
La manguera
de drenaje está
enredada o
conectada de forma
incorrecta
Esto es normal La lavadora se podrá pausar durante el ciclo de centrifugado a fin de
Esto es normal
Los nuevos detergentes para lavado fueron formulados para trabajar con
temperaturas de agua más bajas sin afectar el rendimiento del lavado.
Abra totalmente los grifos de agua caliente y fría y asegúrese de que las
mangueras estén conectadas a los grifos correctos.
Cierre la llave de agua y quite la las mangueras de conexión de agua de la
parte superior trasera de la lavadora. Use un cepillo o mondadientes para
limpiar las válvulas de la máquina. Vuelva a conectar las mangueras y abra
la entrada de agua nuevamente.
Asegúrese de que el calefactor de agua de la casa provea el agua a una
temperatura de entre 120°F–140°F (48°C– 60°C).
Reiniciar el ciclo.
Enderece la manguera de drenaje y asegúrese de que la lavadora no esté
sobre la misma. La parte superior de la salida de drenaje deberá estar a
menos de 8 pies (2.5 m.) sobre el suelo.
eliminar agua con jabón de forma más eficiente.
La bomba deja un poco de agua en su entrada y la misma se diluye con
agua limpia y jabón.
13
Page 54

Antes de Solicitar el Servicio Técnico…
Funcionamiento de la
Lavadora
La lavadora no
funciona
Movimiento dentro de
la máquina cuando se
apaga
Rendimiento de la
lavadora
Ropa demasiado mojada
Manchas de colores
Prendas grises o
amarillentas
Pelusa o residuo en la
ropa
14
Causas Posibles Qué hacer
La lavadora está
desenchufada
El suministro de agua está
cerrado
Los controles no
están configurados
correctamente
Asegúrese de que el cable esté enchufado de forma seguro en un
tomacorriente que funcione.
Abra totalmente los grifos de agua fría y caliente.
Inspeccione los controles.
La tapa está abierta – la
función de seguridad
previene la agitación y el giro
Cierre la tapa y reinicie el ciclo, desde el comienzo si es necesario.
cuando la tapa está abierta
El disyuntor/ fusible está
desactivado/ quemado
Se deberá reiniciar la parte
electrónica
START (Iniciar) no fue
presionado
Falta el imán de la tapa
El mecanismo de cambio
se está desconectando del
motor
Controle los disyuntores/ fusibles del hogar. Reemplace los
fusibles o reinicie el disyuntor. La lavadora debería contar con un
tomacorriente individual.
Desenchufe la lavadora, espere 2 minutos, vuelva a enchufarla y
presione START (Iniciar).
Presione START (Iniciar).
Llame al servicio técnico.
Cuando la máquina se apague en forma manual, el cambiador
desconectará el motor antes de que se apague completamente.
Si se levanta la tapa antes de que el motor esté desconectado, el
funcionamiento se reiniciará cuando se cierre la tapa.
Causas Posibles Qué hacer
Ciclo de centrifugado
seleccionado incorrecto
Uso incorrecto de suavizante
de tela
Transferencia de colores Separe las prendas blancas o claras de aquellas de colores oscuros.
Cantidad de detergente
insuficiente
Agua pesada
El agua no está lo
suficientemente caliente
La lavadora está sobrecargada
El detergente no se está
disolviendo
Transferencia de colores
Las prendas se secan al aire o
en el tendedero
Orden incorrecto Separe los productores de pelusa de los recolectores de pelusa.
Lavado demasiado prolongado
El detergente no se disuelve
sobrecarga
Uso incorrecto del suavizante
de tela
Asegúrese de que el ciclo de centrifugado seleccionado concuerde con la
cantidad que está lavando. Algunas telas se sentirán más mojadas cuando
se enjuaguen con agua fría.
Consulte las instrucciones del paquete de suavizante de tela y siga las
instrucciones sobre el uso del dispensador.
Trate las manchas previamente y vuelva a lavar.
Use más detergente (especialmente con cargas más grandes). Asegúrese
de seguir las instrucciones del fabricante sobre el uso del detergente.
Use un acondicionador de agua tal como el de la marca Calgon o instale un
ablandador de agua.
Asegúrese de que el calefactor de agua provea el agua a una temperatura
de 120°F a 140°F (48°C a 60°C).
Seleccione el tamaño de la carga de modo que coincida con la carga de la
ropa.
Agregue detergente a medida que la canasta de lavado se llena de agua
antes de cargar la ropa.
Ordene la ropa por color. Si la etiqueta de la tela indica que se debe lavar
aparte, es posible que se indiquen los colores inestables.
Si no seca la ropa con un secador de ropa, es posible que las prendas
retengan más pelusa.
Lave cantidades pequeñas por un tiempo más corto que las cargas más
grandes.
Agregue detergente a medida que la canasta de lavado se llena de agua,
antes de cargar la ropa.
Intente usar un detergente líquido.
Use una temperatura de agua más caliente.
Cargue ropa de forma no excesiva de modo que no supere la fila superior
de hoyos de la canasta de la lavadora.
Controle las instrucciones del paquete del suavizante de telas y siga las
instrucciones para usar el dispensador.
Page 55

Antes de Solicitar el Servicio Técnico… GEAppliances.com
Funcionamiento de la
lavadora
Formación de bolitas
Enganches, agujeros,
desgarros, rasgones o
desgaste excesivo
Arrugas
Causas Posibles Qué hacer
Resultado del desgaste normal
de mezclas de algodón y
poliéster y telas con pelusa
Alfileres, broches, ganchos,
botones cortantes, hebillas
de cinturón, cierres y objetos
cortantes dejados en los
bolsillos
Blanqueador con cloro no
diluído
Químicos tales como
blanqueador para cabello
o tintura, solución para
permanente
Aunque esto no es causado por la lavadora, usted puede reducir el proceso
de formación de bolitas lavando las prendas dadas vuelta de afuera hacia
adentro.
Ajuste los broches, ganchos, botones y cierres.
Retire objetos sueltos tales como alfileres, objetos en los bolsillos y botones
cortantes.
Dé vuelta las prendas tejidas (que se enganchan fácilmente).
Controle las instrucciones del paquete de blanqueador a fin de usar la
cantidad adecuada.
Nunca agregue un blanqueador sin diluir para lavar ni permita que las
prendas tengan contacto con blanqueador sin diluir.
Enjuague las prendas que puedan contener químicos antes de lavarlas.
Evite mezclar las prendas pesadas (como la ropa de trabajo) con
Orden incorrecto
prendas livianas (como blusas).
Intente usar un suavizante de tela.
Sobrecarga o nivel
incorrecto de agua
Ciclos de lavado y secado
incorrectos
Lavado repetido en agua
demasiado caliente
Cargue la lavadora de modo que la ropa tenga suficiente espacio
para moverse libremente y que el agua cubra todas las prendas.
Haga coincidir la selección del ciclo con el tipo de tela que está
lavando (especialmente para cargas fáciles de limpiar).
Lavado repetido en agua demasiado caliente
Sonidos de la lavadora Causas Posibles Qué hacer
“Sonido de clic
metálico”
“Zumbido” de ida y
vuelta o sonido de
“clic” suave durante la
agitación
Sonidos rápidos de
agitación corta al final
El mecanismo de
conmutación está
enganchado o suelto
El motor eléctrico revierte
la dirección
Redistribución de la ropa Al final de la agitación, el motor produce golpes de agitación corta
El sistema de transmisión se engancha al iniciar la agitación y se
suelta cuando esta última se completa. Esto sucede muchas veces
durante el lavado.
Esta máquina cuenta con un sistema de transmisión que no usa
engranajes. Éste es el sonido del motor cuando rota hacia atrás y
adelante para agitar el lavado.
para redistribuir la carga.
de la agitación
Sonido de “clic” cuando
el agua finaliza el
llenado
Sonido de “clic” detrás
del Panel de Control
durante el llenado
El volumen del agua
cambia durante el
llenado
Interruptor de relevador
Válvula Automática de
Control de Temperatura
Válvula Automática de
Control de Temperatura
El relevador produce un sonido de clic cuando se activa. El nivel del
agua activa el relevador y deja de llenarse.
Esta válvula mezcla el agua fría y la caliente. El sonido de “clic” es la
válvula que se enciende y se apaga.
Esta válvula mezcla el agua fría y la caliente. El sonido cambia
cuando las válvulas se abren y se cierran.
El motor hace
un “chirrido” o
“desaceleración en
punto muerto” en el
El motor cambia la
velocidad durante el ciclo
de centrifugado
El motor se acelerará en forma progresiva durante el ciclo de
centrifugado. Una vez completado el centrifugado, continuará en
movimiento hasta que se detenga.
giro
La bomba de desagüe hará un zumbido cuando elimine el
“Zumbido” Bomba de desagüe
agua tras la agitación y continuará hasta que se complete el
centrifugado.
Cuando la bomba comienza a aspirar aire, hace un gorgoteo. La
“Gorgoteo” Bomba de desagüe
lavadora deberá comenzar entonces el centrifugado y el sonido
continuará hasta que éste se complete.
15
Page 56

Antes de Solicitar el Servicio Técnico…
Problema con la
Secadora
La secadora no se
inicia
La secadora no
calienta
La secadora se sacude
o hace ruido
Manchas de grasa en
la ropa
Pelusa en la ropa
Se produce estática
Tiempos de secado
inconsistentes
Causas Posibles Qué hacer
La secadora está
desenchufada
Se quemó el fusible/ el
disyuntor está desactivado
El fusible se quemó/ el
disyuntor está desactivado;
es posible que la secadora
seque pero que no caliente
El servicio de gas está
apagado.
Cierto nivel de sacudones/
ruido es normal. Es posible
que la secadora esté
apoyada sobre un piso
desnivelado
Uso incorrecto del
suavizante de tela
Secado de prendas sucias
con prendas limpias
La ropa no estaba
completamente limpia
El filtro de pelusa está lleno Limpie la rejilla para pelusas antes de cada carga.
Orden incorrecto
La electricidad estática
puede atraer pelusas
Sobrecarga Separe las cargas grandes y arme cargas más pequeñas.
Papel, pañuelos, etc. que
quedan en los bolsillos
No se usó ningún
suavizante de tela
Secado excesivo
Los materiales sintéticos,
planchado permanente y
mezclas pueden causar
estática
Tipo de calor
Asegúrese de que el cable de la secadora esté bien enchufado en el
tomacorriente.
Controle la caja de fusibles/ disyuntor de su hogar y reemplace el
fusible o reinicie el disyuntor. Nota: La mayoría de las secadoras
eléctricas usan 2 fusibles/ disyuntores.
Controle la caja de fusibles/ disyuntor de su hogar y reemplace
ambos fusibles o reinicie ambos disyuntores. La secadora podrá
secar sólo si un fusible está quemado o sólo un disyuntor está
desconectado.
Asegúrese de que la llave de la secadora y la llave principal estén
completamente abiertas.
Mueva la secadora a un espacio nivelado, o ajuste las patas
niveladoras tanto como sea necesario hasta que quede nivelada.
Siga las instrucciones que figuran en el paquete del suavizante de
tela.
Use la secadora para secar sólo prendas limpias. Las prendas sucias
podrán ensuciar las prendas limpias y la secadora.
A veces algunas manchas que no se pueden ver cuando la ropa
está mojada aparecen luego del secado. Use los procedimientos de
lavado adecuados antes de secar.
Ordene los productores de pelusa (como la felpilla) de los
recolectores de pelusa (como la pana).
Consulte las sugerencias en esta sección, en STATIC (Estática).
Vacíe todos los bolsillos antes de lavar la ropa.
Intente usar un suavizante de tela.
Los Acondicionadores de Secado de Tela Bounce® fueron aprobados
para su uso en todas las Secadoras GE, cuando se usen de acuerdo
con las instrucciones del fabricante.
Intente usar un suavizante de tela.
Ajuste la configuración a LESS DRY (Menos Seco) o DAMP DRY (Seco
con Humedad).
Intente usar un suavizante de tela.
Los tiempos de secado automático varían de acuerdo con el tipo de
calor usado (eléctrico, natural o gas LP), tamaño de la carga, tipo de
telas, humedad de la ropa y condición de los conductos de escape.
16
Page 57

Antes de Solicitar el Servicio Técnico…
GEAppliances.com
Problema con la
Secadora
La ropa tarda
demasiado tiempo en
secarse
La ropa está
arrugada
La ropa se encoge
Causas Posibles Qué hacer
Separe las prendas pesadas de las prendas livianas (generalmente,
Orden incorrecto
Grandes cargas de telas
pesadas (como las toallas
de playa)
Configuración inadecuada
de los controles
El filtro de pelusa está lleno Limpie la rejilla para pelusas antes de cada carga.
Conducto inadecuado u
obstruido
Fusibles quemados o
disyuntores desactivados
Sobrecarga/ combinación
de cargas
Carga insuficiente
Secado excesivo
Dejar las prendas en la
secadora una vez finalizado
el ciclo
Sobrecarga Separe las cargas grandes y arme cargas más pequeñas.
Algunas de las telas se
encoger naturalmente
cuando se lavan. Otras
pueden ser lavadas con
seguridad pero pueden
encogerse en la secadora.
una carga bien ordenada en la lavadora es una carga bien ordenada
en la secadora).
Las telas grandes y pesadas contienen más humedad y tardan más
tiempo en secarse. Separe las telas grandes y pesadas en cargas
más pequeñas a fin de acelerar el tiempo de secado.
Haga coincidir la configuración de los controles con la carga que
está secando.
Controle las instrucciones de instalación para un conducto/
ventilación adecuada.
Asegúrese de que el conducto esté limpio, desenroscado y sin
obstrucciones.
Controle que el regulador de la pared exterior funcione fácilmente.
Controle las Instrucciones de Instalación para asegurar que la
secadora cuente con la ventilación correcta
Reemplace los fusibles o reinicie los disyuntores. Debido a que la
mayoría de las secadoras usan 2 fusibles/disyuntores, asegúrese de
que ambos estén funcionando.
No coloque más de una carga de lavado por vez en la secadora.
Si sólo secará una o dos prendas, agregue algunas más a fin de
asegurar un secado adecuado.
Seleccione un tiempo de secado más corto.
Retire las prendas mientras aún tienen una pequeña cantidad de
humedad. Seleccione la configuración a LESS DRY (Menos Seco) o
DAMP DRY (Seco con Humedad).
Retire las prendas cuando el ciclo finalice y doble o cuelgue las
mismas de inmediato.
Para evitar que la ropa se encoja, siga las instrucciones de las
etiquetas de cuidado de las prendas en forma precisa.
Algunas prendas se podrán presionar para que regresen a su
tamaño original luego del secado.
Si le preocupa que una prenda específica se pueda encoger, no lave
ni seque la misma con la máquina.
17
Page 58

Notas.
18
Page 59

La Garantía de este Electrodoméstico
Todo el servicio de garantía es provisto por nuestros Centros de Servicio
de Fabricación, o un técnico autorizado de Servicio al Cliente (Customer
Care®). Para programar una visita del servicio técnico a través de
Internet, visítenos en GEAppliances.com, o llámenos al 800. GE.CARES
(800.432.2737). Cuando llame para solicitar el servicio, tenga los
números de serie y modelo disponibles.
Por el Período de: GE Reemplazará:
Un Año Cualquier pieza de la lavadora que falle debido a un defecto en los materiales o la fabricación
desde la fecha de Durante esta garantía limitada de un año, GE también proveerá, sin costo, todo el trabajo y el
compra original servicio relacionado con el reemplazo de la pieza que presente defectos.
Qué No Está Cubierto:
Engrape su recibo aquí. Para acceder
al servicio técnico de acuerdo con la
garantía deberá contar con la prueba
de la fecha original de compra.
Viajes del técnico del servicio a su hogar para enseñarle
sobre cómo usar el producto.
Instalación inadecuada, entrega o mantenimiento.
Fallas del producto en caso de abuso, uso inadecuado,
o uso para propósitos diferentes al original o uso
comercial.
Reemplazo de fusibles de la casa o reinicio de
disyuntores.
Productos que no presenten defectos ni estén rotos, o
que estén funcionando de acuerdo con lo descrito en el
(;&/86,Ï1'(*$5$17Ë$6,03/Ë&,7$6³6X~QLFD\H[FOXVLYDDOWHUQDWLYDHVODUHSDUDFLyQGHOSURGXFWRFRPRVHEULQGD
en la Garantía Limitada. Las garantías implícitas, incluyendo garantías implícitas de comerciabilidad o conveniencia
sobre un propósito particular, se limitan a un año o al período más corto permitido por la ley.
Esta garantía se extiende al comprador original y a cualquier dueño subsiguiente de productos comprados para uso hogareño
dentro de EE.UU. Si el producto se encuentra en un área donde no se encuentra disponible el servicio técnico de un Proveedor
de Servicio de GE Autorizado, usted será responsable por el costo del viaje o se podrá requerir que traiga el producto a una
ubicación del Servicio Técnico de GE Autorizado. En Alaska, la garantía excluye el costo de envío o llamadas del servicio a su
Algunos estados no permiten la exclusión o limitación de daños fortuitos o consecuentes. Esta garantía le da derechos legales
específicos y es posible que tenga otros derechos legales que varían entre un estado y otro. Para conocer cuáles son sus
derechos legales, consulte a la oficina de asuntos del consumidor local o estatal o al Fiscal de su Estado.
Manual del Propietario.
Daños ocasionados sobre el producto por accidente,
incendio, inundaciones o catástrofes naturales.
Daños consecuentes o incidentales causados por posibles
defectos sobre este producto.
Defectos o daños debido a funcionamiento en
temperaturas bajo cero.
Daño causado después de la entrega.
Producto no accesible para brindar el servicio requerido.
hogar.
Garante: General Electric Company. Louisville, KY 40225
19
Page 60

Atención al Cliente
Sitio Web de Electrodomésticos GE GEAppliances.com
Desea realizar una consulta o necesita ayuda con su electrodoméstico? ¡Intente a través del Sitio Web de
Electrodomésticos de GE las 24 horas del día, cualquier día del año! Para mayor conveniencia y un servicio más
rápido, ahora puede descargar el Manual del Propietario, ordenar piezas o incluso programar el servicio técnico
a través de Internet.
Programación del Servicio Técnico GEAppliances.com
El servicio de reparación de expertos de GE está a sólo un paso de su puerta. ¡Conéctese a través de Internet
y programe su servicio a su conveniencia las 24 horas del día cualquier día del año! O llame al 800.GE.CARES
(800.432.2737) durante el horario comercial habitual.
Estudio de Diseño de la Vida Real GEAppliances.com
GE apoya el concepto de Diseño Universal – productos, servicios y ambientes que pueden ser usados por
personas de todas las edades, tamaños y capacidades. Reconocemos la necesidad de realizar diseños para
una amplia gama de habilidades e incapacidades físicas y mentales. Para más detalles sobre las aplicaciones
de Diseño Universal de GE, incluyendo ideas de diseño de cocinas para personas con incapacidades, visite
nuestro sitio web hoy. Sobre casos de incapacidad auditiva, comuníquese al 800.TDD.GEAC (800.833.4322).
Garantías Extendidas GEAppliances.com
Adquiera una garantía extendida de GE y aprenda sobre descuentos especiales que están disponibles mientras
su garantía aún está vigente. Se puede adquirir a través de Internet en cualquier momento o llamando al
800.626.2224 durante el horario comercial habitual. Los Servicios para el Consumidor Hogareño de GE aún
estarán allí cuando su garantía caduque.
Piezas y Accesorios GEAppliances.com
Individuos calificados para realizar el servicio técnico de sus propios electrodomésticos podrán solicitar el envío de
piezas o accesorios directamente a sus hogares (se aceptan las tarjetas VISA, MasterCard y Discover). Ordene hoy a
través de Internet, las 24 horas del día o en forma telefónica llamando al 800.626.2002, durante el horario comercial
habitual.
Las instrucciones que figuran en este manual cubren los procedimientos que serán realizados por cualquier
usuario. Otros servicios técnicos generalmente deberían ser derivados a personal calificado del servicio. Se
deberá tener cuidado, ya que una reparación indebida podrá ocasionar que el funcionamiento no sea seguro.
LLámenos GEAppliances.com
Si no se encuentra satisfecho con el servicio que recibió de GE, comuníquese con nosotros a través de nuestro
sitio web con todos los detalles, incluyendo su número telefónico, o escriba a: General Manager, Customer
Relations
GE Appliances, Appliance Park
Louisville, KY 40225
Registre Su Electrodoméstico GEAppliances.com
Registre su electrodoméstico nuevo a través de Internet - ¡a su conveniencia! Un registro puntual de su
producto permitirá una mejor comunicación y un servicio más inmediato de acuerdo con los términos de su
garantía, en caso de surgir la necesidad. También puede enviar por correo la tarjeta de inscripción pre-impresa
que se incluye con el material empaquetado.
 Loading...