

Page 1

GEAppliances.com
Safety Instructions ............................. 2, 3
Operating Instructions
Control Panels ..................................................... 4
Control Settings
Features .............................................................6–9
Loading and Using the Washer
Cleaning the Washer
Installation Instructions ........... 14–19
Preparing to Install Your Washer
Location of Your Washer
Rough-In Dimensions
Unpacking Your Washer
Electrical Requirements................................ 16
Grounding Requirements
Water Supply Requirements
Drain Requirements
Installing the Washer
Replacement Parts
Adaptive Vibration Control
Troubleshooting Tips ................... 20–23
..............................................5 , 6
...........9, 10
............................. 11–13
............. 14
............................. 15
.................................... 15
.............................. 16
............................16
...................... 17
.......................................17
.............................17-18
.........................................18
.......................... 19
Owner’s Manual &
Installation Instructions
GFWH2400
GFWH2405
GFWS3500
GFWS3505
GFWS3600
GFWS3605
Consumer Support
Warranty ............................................................ 25
Service Telephone Numbers
As an EnErgy Star® partner,
GE has determined that this
Washers
product meets the EnErgy Star®
guidelines for energy efficiency.
Write the model and serial
numbers here:
Model #
Serial # __________________
_________________
..................... 26
You can find them on a label on the
side of the washer.
49-90390 GE 06/16/10
Page 2
IMPORTANT SAFETY INFORMATION.
READ ALL INSTRUCTIONS BEFORE USING.
WARNING!
WATER HEATER SAFETY
Under certain conditions, hydrogen gas may be produced in a water heater that has not been used for two weeks
or more. Hydrogen gas can be explosive under these circumstances.
If the hot water has not been used for two weeks or more, prevent the possibility of damage or injury by
turning on
appliance
gas to escape. Since the gas is flammable, do not smoke or use an open flame or appliance during this process.
PROPER INSTALLATION
This washer must be properly installed and located in accordance with the Installation Instructions before it is used.
n Install or store where it will not be exposed
to temperatures below freezing or exposed
to the weather, which could cause permanent
damage and invalidate the warranty.
all hot water faucets and allowing them to run for several minutes. Do this before using any electrical
which is connected to the hot water system. This simple procedure will allow any built-up hydrogen
For your safety, the information in this manual must be followed to minimize the risk
of fire or explosion, electric shock, or to prevent property damage, personal injury or
loss of life.
The instructions in this manual and all other literature included with this washer are
not meant to cover every possible condition and situation that may occur. Good, safe
practices and caution MUST be applied when installing, operating and maintaining
any appliance.
n Properly ground washer to conform with all governing
codes and ordinances. Follow details in Installation
Instructions.
Installation
YOUR LAUNDRY AREA
Instructions
n Keep the area underneath and around your
appliances free of combustible materials such as
lint, paper, rags and chemicals.
n Do not leave the washer door open. An open door
could entice children to hang on the door or crawl
inside the washer.
n Close supervision is necessary if this appliance is
used by or near children. Do not allow children to
play on, with or inside this or any other appliance.
Consumer Support Troubleshooting Tips Operating Instructions Safety Instructions
2
Page 3
GEAppliances.com
WHEN USING THE WASHER
Use this
appliance
only for its
intended
purpose as
described in
this Owner’s
Manual.
n Never reach into washer while it is moving.
Wait until the machine has completely stopped
before opening the door.
n Do not mix chlorine bleach with ammonia
or acids such as vinegar and/or rust remover.
Mixing different chemicals can produce a toxic
gas which may cause death.
n Do not wash or dry articles that have been
cleaned in, washed in, soaked in or spotted
with combustible or explosive substances (such
as wax, oil, paint, gasoline, degreasers, drycleaning solvents, kerosene, etc.) which may ignite
or explode. Do not add these substances to the
wash water. Do not use or place these substances
around your washer or dryer during operation.
n The laundry process can reduce the flame
retardancy of fabrics. To avoid such a result,
carefully follow the garment manufacturer’s
wash and care instructions.
n To minimize the possibility of electric shock,
unplug this appliance from the power supply
or disconnect the washer at the building’s
distribution panel by removing the fuse or
switching off the circuit breaker before attempting
any maintenance or cleaning. NOTE: Pressing the
power button does NOT disconnect the appliance
from the power supply.
n Never attempt to operate this appliance
if it is damaged, malfunctioning, partially
disassembled, or has missing or broken parts,
including a damaged cord or plug.
n Do not slam the washer door closed. Do not try
to force the door open when locked (LOCKED
indicator ON). This could result in damage to
the washer.
n The washer is equipped with an electrical
overload protector. The motor will stop
if it becomes overheated. The washer will
automatically restart after a cool-down
period of up to 2 hours, if the washer
has not been manually turned off
during this time.
Instructions
Installation
WHEN NOT IN USE
n Turn off water faucets to relieve pressure on
hoses and valves and to minimize leakage if
a break or rupture should occur. Check the
condition of the fill hoses; GE recommends
changing the hoses every 5 years.
n Before discarding a washer, or removing it
from service, remove the washer door to prevent
children from hiding inside.
n Do not attempt to repair or replace any part of
this appliance unless specifically recommended
in this Owner’s Manual, or in published user-repair
instructions that you understand and have the
skills to carry out.
n Do not tamper with controls.
READ AND FOLLOW THIS SAFETY INFORMATION CAREFULLY.
SAVE THESE INSTRUCTIONS
Consumer SupportTroubleshooting TipsOperating InstructionsSafety Instructions
3
Page 4
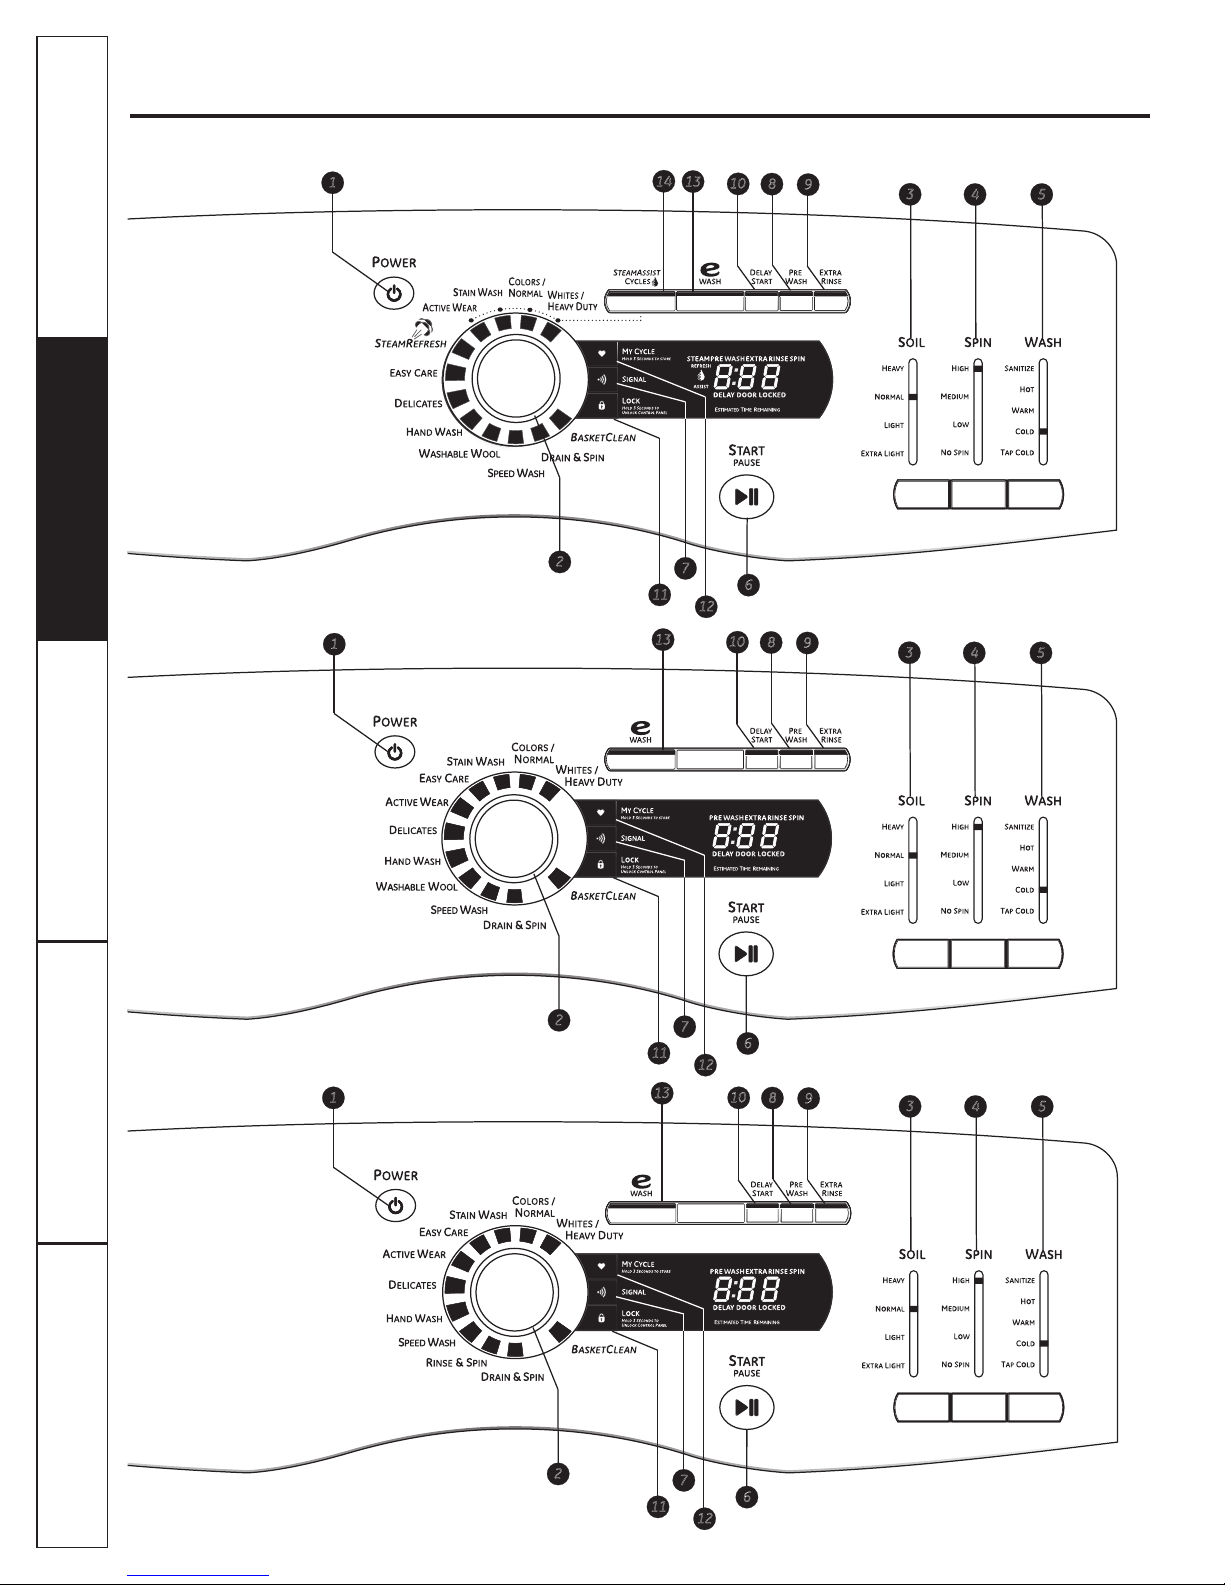
About the washer control panel.
Find the illustration that closely matches your model and see the cycle descriptions starting on page 6 for details.
14
1
13
10
8
9
3
4 5
Installation
2
1
7
11
13
6
12
10
8
9
3
4 5
Instructions
2
1
7
11
13
6
12
10
8
9
3
4
5
Consumer Support Troubleshooting Tips Operating Instructions Safety Instructions
4
2
7
11
6
12
Page 5
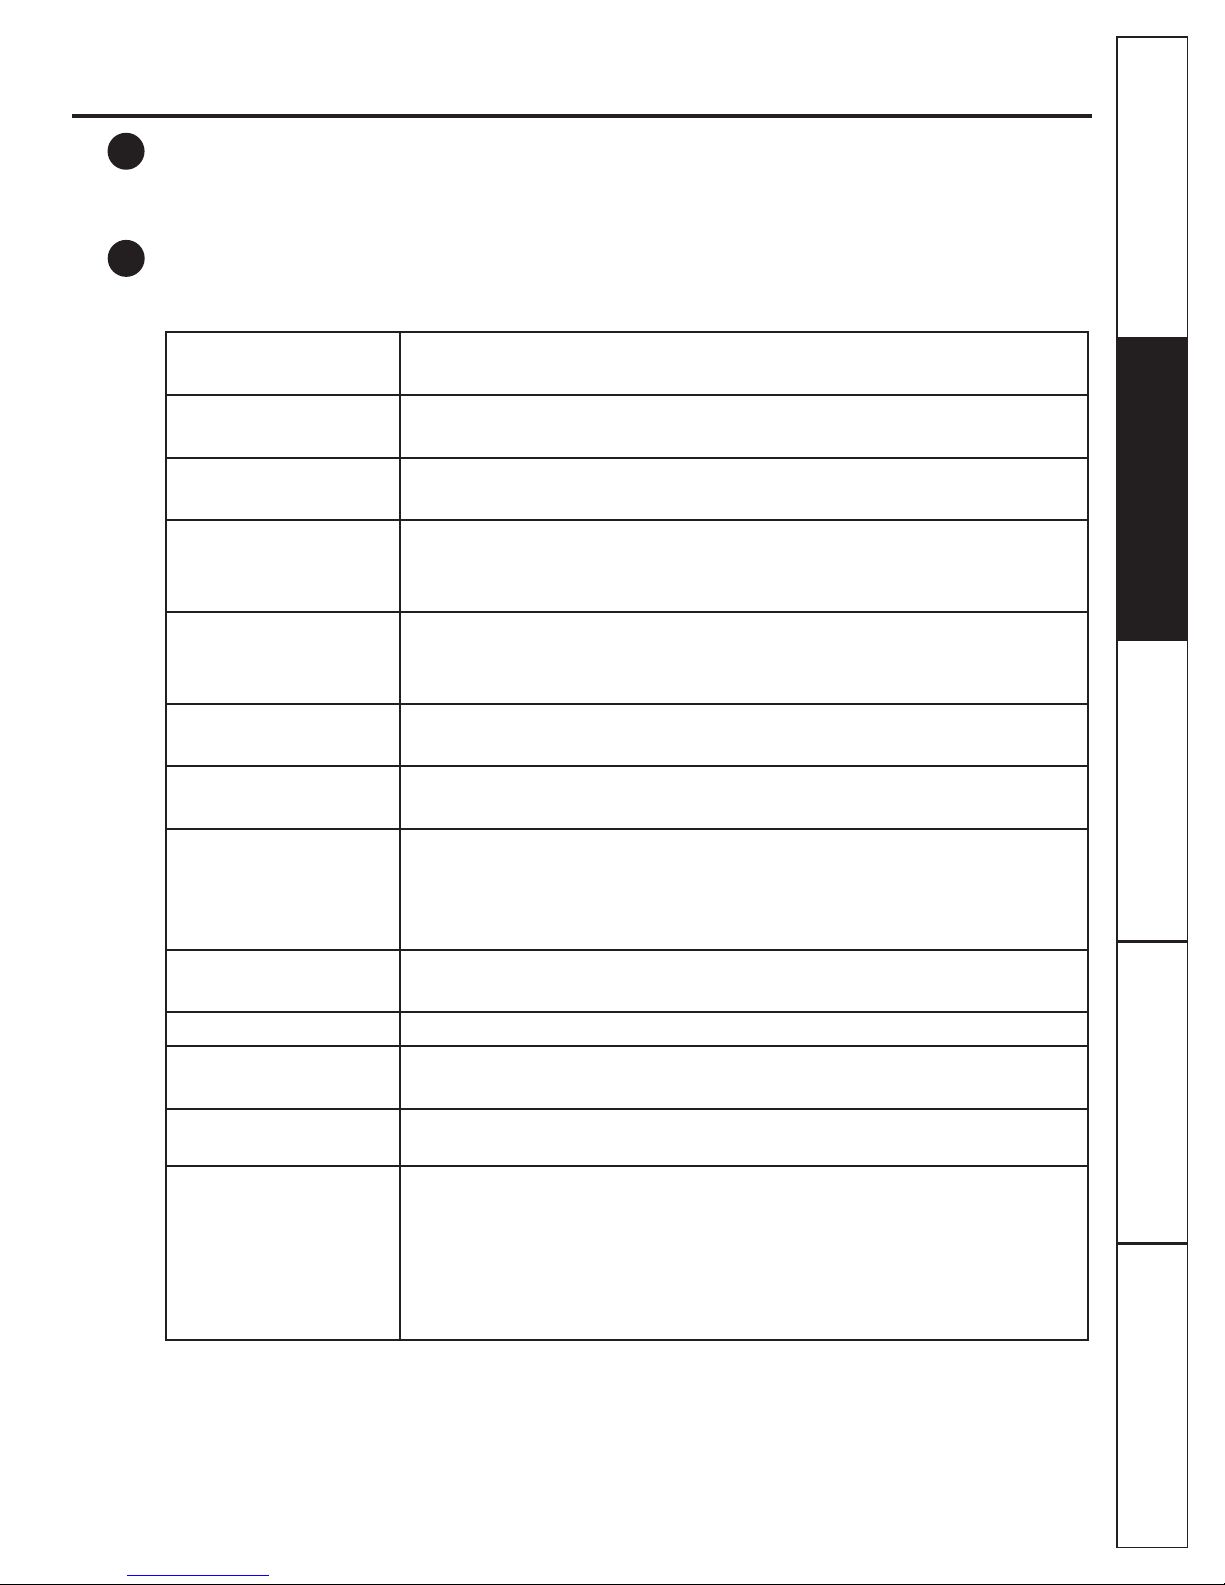
About the washer control settings. GEAppliances.com
Power
1
Press to “wake up” the display. If the display is active, press to put the washer into standby mode.
NOTE: Pressing POWER does not disconnect the appliance from the power supply.
Wash Cycles
2
The wash cycles are optimized for specific types of wash loads. The chart below will help you match the wash
setting with the loads. The GentleClean™ lifters lightly tumble the clothes into the water and detergent solution
to clean the load.
WHITES/HEAVY
DUTY
For heavily to lightly soiled white cottons, household linens, work
and play clothes.
COLORS/NORMAL
STAIN WASH
EASY CARE
(PERMA PRESS)
ACTIVE WEAR
DELICATES
HANDWASH
WASHABLE WOOL
(some models)
SPEED WASH
For heavy to lightly soiled colorfast cottons, household linens,
work and play clothes.
For heavy soiled colorfast cottons, household linens, work and
play clothes.
For wrinkle-free and permanent press items.
For active sports, exercise and some casual wear clothes. Fabrics
include modern technology finishes and fibers such as spandex,
stretch and micro-fibers.
For lingerie and special-care fabrics with light to normal soil.
Provides gentle tumbling and soak during wash and rinse.
For items labeled hand-washable with light soils. Provides gentle
rocking to mimic the handwashing action.
For the washing of machine washable wool products, provided
that they are washed according to the instructions on the
garment label. When selecting this cycle, you must use a
detergent suitable for washing wool.
For lightly soiled items that are needed in a hurry. Cycle time is
approximately 30 minutes, depending on selected options.
Instructions
Installation
DRAIN & SPIN Drain and spin at any time.
RINSE & SPIN
(some models)
BASKET CLEAN
STEAM REFRESH
(some models)
Rinse and spin at any time.
Use for cleaning the basket of residue and odor. Recommended use of once
per month.
To de-wrinkle 1 to 5 cotton blend items. This is not a wash cycle, but
a cycle that applies only steam to the garments. The washer will
beep upon completion of the cycle, and will continue to tumble for 30
minutes to keep wrinkles from setting in. Press Start/Pause to remove
clothes. If clothes are slightly damp after completion of the cycle,
hang dry clothes for 10 minutes before wearing.
Consumer SupportTroubleshooting TipsOperating InstructionsSafety Instructions
5
Page 6

About the washer control panel.
Soil Level
3
Changing the SOIL LEVEL increases or decreases the wash time to remove different amounts of soil.
To change the SOIL LEVEL, press the SOIL LEVEL button until you have reached the desired setting.
You can choose between Extra Light, Light, Normal or Heavy soil.
Spin Speed
4
Changing the SPIN SPEED changes the final spin speed of the cycles. Always follow the fabric
manufacturer’s care label when changing the SPIN SPEED.
To change the SPIN SPEED, press the SPIN SPEED button until you have reached the desired setting.
Higher spin speeds are not available on certain cycles, such as Delicates.
Higher spin speeds remove more water from the clothes and will help reduce dry time, but may also
increase the possibility of setting wrinkles on some fabrics.
Wash Temp
5
Adjust to select the proper water temperature for the wash cycle. The prewash and rinse water is
always cold to help reduce energy usage and reduce setting of stains and wrinkles.
Follow the fabric manufacturer’s care label when selecting the wash temperature.
To change the wash temperature, press the WASH TEMP button until you have reached the desired
setting. The Sanitized wash temperature is not available on certain cycles, such as Delicates.
When selecting the Sanitize wash temperature, the washer increases the water temperature
to sanitize and kill more than 99% of many common bacteria found in home laundry. The sanitize
wash temperature is only available on Stain Wash and Whites wash cycles. For best results, select
the heavy soil setting when using the Sanitize wash temperature setting.
Installation
NOTE: The first 10 seconds of the wash fill is always cold. This feature assists in conditioning the fabric
and preventing stains from setting on garments.
START/PAUSE
6
Press to start a wash cycle. If the washer is running, pressing it once will pause the washer and unlock
the door. Press again to restart the wash cycle.
NOTE: If the washer is paused and the cycle is not restarted within 2 hours, the current wash cycle will
Instructions
be cancelled.
NOTE: The washer performs automatic system checks after pressing the START button. Water will flow
in 45 seconds or less. You may hear the door lock and unlock before water flows; this is normal.
About the washer features.
NOTE: Features may not be available on all washer models.
7
8
Cycle Signal
Use the SIGNAL button to change
the volume of the end of cycle signal.
Prewash
Prewash is an extra wash before
the main wash. Use it for heavily soiled
clothes or for clothes with a care label
that recommends prewashing before
washing. Be sure to add high-efficiency
Press the button until you reach
the desired volume.
detergent, or the proper wash additive
to the prewash dispenser.
NOTE: When selecting prewash,
it is recommended to use powder
detergent in the main wash (detergent)
compartment.
Consumer Support Troubleshooting Tips Operating Instructions Safety Instructions
6
Page 7

About the washer features.
NOTE: Features may not be available on all washer models.
Extra Rinse
9
10
11
Use an extra rinse when additional rinsing
is desired to remove excess dirt and
detergent from soiled loads.
Delay Start
You can delay the start of a wash cycle
for 10–18 hours, depending on the model.
Press the DELAY START button to choose
the number of hours you want to delay
the start of the cycle, then press the START
button. The machine will count down and
start automatically at the correct time.
Lock
You can lock the controls to prevent any
selections from being made. Or you can
lock the controls after you have started
a cycle.
Children cannot accidentally start
the washer by touching pads with
this option selected.
NOTE: If you forget to fully close the door,
a reminder signal will beep reminding you
to do so.
NOTE: If you open the door when the delay
is counting down, the machine will enter
the pause state. You must close the door
and press START again in order to restart
the countdown.
To lock the washer, press and hold
the LOCK button for 3 seconds.
To unlock the washer controls, press
and hold the LOCK button for
3 seconds.
The control lock icon on the display will
light up when it is on.
NOTE: The POWER button can still be
used when the machine is locked.
GEAppliances.com
Instructions
Installation
12
13
14
MY CYCLE (on some models)
To save a favorite cycle, set the desired
settings for wash cycle, soil level, spin speed
and wash temp settings and hold down the
MY CYCLE button for 3 seconds. A beep will
sound to indicate the cycle has been saved.
To use your custom cycle, press the
MY CYCLE button before washing a load.
To change the saved cycle, set the
desired settings and hold down the MY
CYCLE button for 3 seconds.
ENERGY SAVINGS WASH
models)
Use "e" WASH to save energy on
specified wash cycles. "e" WASH cannot
be used with STEAM REFRESH, STAIN
WASH and BASKET WASH.
STEAM ASSIST
STEAM ASSIST adds steam into the
washer during WHITES/HEAVY DUTY,
COLORS/NORMAL, STAIN WASH or
ACTIVE WEAR cycles.
To use:
1. Turn power ON and select a wash
cycle.
(on some models)
(on some
NOTE: When using MY CYCLE, wash
options cannot be modified after the
cycle has been started.
NOTE: If you change wash options with
MY CYCLE before starting the cycle, the
MY CYCLE light will turn off and you will
be returned to the base cycle.
The STEAM ASSIST option is only
available on WHITES/HEAVY DUTY,
COLORS/NORMAL, STAIN WASH,
ACTIVE WEAR or EASY CARE cycles.
2. Select the STEAM ASSIST button to
activate Steam.
3. Press the START/PAUSE button.
Consumer SupportTroubleshooting TipsOperating InstructionsSafety Instructions
7
Page 8

Installation
About the washer features.
The Dispenser Drawer
Slowly open the dispenser drawer by pulling
it out until it stops.
After adding laundry products, slowly close
the dispenser drawer. Closing the drawer
too quickly could result in early dispensing
of the bleach, fabric softener or detergent.
Add pre-wash to
this
location
Detergent
selection insert
Instructions
For HE powder detergent remove
the Detergent selection insert and
add powder here
Adjustment
Rails
The Prewash Compartment
n Only use the Prewash Compartment if you
are selecting the Prewash cycle for heavily
soiled clothes. Add measured detergent or
prewash additive to the back left prewash
compartment of the dispenser drawer.
nDetergent or prewash additive is ushed
from the dispenser in the prewash cycle (if
selected).
The Detergent Compartment
n Only use high-eciency detergent
in this washer. DO NOT ll high-eciency
detergent over the MAX line. Use
detergent manufacturer’s rcommended
amount.
n Powder Detergent – Remove the Detergent
selection insert and place it in a safe
location outside of the washer. Follow the
detergent manufactrer’s instructions when
measuring the amount of powder to use.
n Liquid Detergent – Locate the
concentration of your detergent on the
bottle. Place the Detergent selection insert
in the corresponding location depending on
the concentration.
You may see water in the bleach and fabric
softener compartments at the end of the cycle.
This is a result of the ushing/siphoning action
and is part of the normal
operation of the washer.
Use only HE High-Eciency
detergent.
NOTE: Liquid detergent will drain
into the washer basket as it is added.
nDetergent usage may need to be adjusted
for water temperature, water hardness, size
and soil level of the load. Avoid using too
much detergent in your washer as it can
lead to over sudsing and detergent residue
being left on the clothes.
Move the insert by pulling it up and replace
n
it by sliding it down between two detergent
compartment rails. Make sure to push the
insert to the bottom of the compartment
so that it is ush to the bottom of the
compartment. It is not an issue if the
detergent leaks past the insert to the back
of the compartment.
n Detergent usage may need to be adjusted
for water temperature, water hardness,
size and soil level of the load. Avoid using
too much detergent in your washer as it
can lead to oversudsing, detergent residue
being left on the clothes, and could extend
wash times.
n Do not put clumped detergent in the
dispenser. Clumped detergent can cause a
leak.
For HE liquid detergent that is nonconcentrated, place the insert in the “1X”
position
For HE 2X liquid detergent, place
the insert in the “2X” position
The Liquid Bleach Compartment
If desired, measure out the recommended
amount of liquid bleach, not to exceed
1/3 cup (80 ml) and pour into the center
compartment labeled “LIQUID BLEACH”
marked with this symbol .
It is recommended to use High-Efciency (HE)
bleach in this front-load washer.
The Fabric Softener Compartment
If desired, pour the recommended amount
of liquid fabric softener into the compartment
labeled “FABRIC SOFTENER.”
Use only liquid fabric softener in the dispenser.
Consumer Support Troubleshooting Tips Operating Instructions Safety Instructions
Dilute with water to the maximum ll line.
8
For HE 3X liquid detergent, place
the insert in the “3X” position
Do not exceed the maximum ll line. Overlling
can cause early dispensing of the bleach which
could result in damaged clothes.
NOTE: Do not use powdered bleach in the
dispenser.
Do not exceed the maximum ll line. Overlling
can cause early dispensing of the fabric
softener, which could stain clothes.
NOTE: Do not pour fabric softener directly
on the wash load.
Page 9
The Fabric Softener
Compartment
If desired, pour the recommended amount
of liquid fabric softener into the compartment
labeled “FABRIC SOFTENER.”
Use only liquid fabric softener in the
dispenser.
Loading and using the washer.
Always follow fabric manufacturer’s care label when laundering.
Sorting Wash Loads
Sort laundry into loads that can be washed together.
GEAppliances.com
Dilute with water to the maximum fill line.
Do not exceed the maximum fill line.
Overfilling can cause early dispensing of the
fabric softener, which could stain clothes.
NOTE: Do not pour fabric softener directly
on the wash load.
Colors
Whites
Lights
Darks
nCombine large and small items in a load. Load large items first. Large items should not be more than
half the total wash load.
nWashing single items is not recommended. This may cause an out-of-balance load. Add one or two
similar items.
nPillows and comforters should not be mixed with other items. This may cause an out-of-balance load.
Soil
Heavy
Normal
Light
Fabric
Delicates
Easy Care
Sturdy Cottons
Lint
Lint Producers
Lint Collectors
Preparing Clothes
Follow these steps to maximize garment care.
nTo avoid snags during washing:
•Closegarmentzippers,snaps,buttonsandhooks.
•Mendseams,hems,tears.
•Emptyallitemsfrompockets.
•Removenonwashablegarmentaccessoriessuchasornamentsandnonwashabletrimmaterials.
nTo avoid tangling, tie strings, draw ties and belt-like materials.
nBrush away surface dirt and lint; treat spots and stains.
nPromptly wash wet or stained garments to maximize results.
nMix garments using recommended maximum load sizes on page 10.
nUse nylon mesh garment bags to wash small items.
nWash multiple garments at one time for best results.
Instructions
Installation
Consumer SupportTroubleshooting TipsOperating InstructionsSafety Instructions
9
Page 10
Loading and using the washer.
Loading the Washer
Installation
Wash drum may be fully loaded with loosely added
items. Do not wash fabrics containing ammable
materials (waxes, cleaning uids, etc.).
To add items after washer has started, press
START/PAUSE and wait until the door is unlatched.
The washer may take up to 30 seconds to unlock
the door after pressing START/PAUSE depending
on the machine conditions. Do not try to force open
the door when it is locked. After the door unlocks,
open gently. Add items, close the door and press
START/PAUSE to restart.
Maximum Loading Sizes*
WORKWEAR
4 Jeans
5 Workwear Shirts
5 Workwear Pants
10 Bath Towels/
12 Washcloths
7 Hand Towels/
2 Flat Queen-Sized
Instructions
LINENS
2 Bath Sheets
2 Terrycloth
Bath Mats
OR
Sheets
2 Fitted
Queen-Sized
Sheets
4 Pillowcases
MIXED LOAD
4 Pillowcases
2 Hand Towels
2 Flat Sheets/
2 Fitted Sheets
2 Bath Towels/
4 Washcloths
OR
6 Shirts (Men’s
or Women’s)
4 Pair Pants
(Khakis
or Twills)
5 T-Shirts
7 Pairs of Boxers
4 Pairs of Shorts
OR
6 T-Shirts
4 Pairs of
Sweatpants
4 Sweatshirts
2 Hoodies
7 Pairs of Socks
DELICATES**
7 Bras
7 Panties
3 Slips
2 Camisoles
4 Nightgowns
SPEED WASH
(2–4 GARMENTS)
2 Casual Wear
Work Shirts
1 Pair Casual Wear
Work Pants
OR
3 Soccer Uniforms
*Exceeding maximum recommended load sizes may affect cleaning performance and garment care.
**Using a nylon mesh bag for small items is recommended.
Consumer Support Troubleshooting Tips Operating Instructions Safety Instructions
10
Page 11
Cleaning the washer. GEAppliances.com
Care and Cleaning
Exterior: Immediately wipe off any spills. Wipe with damp cloth. Do not hit surface with sharp objects.
Moving and Storage: Ask the service technician to remove water from drain pump and hoses.
Do not store the washer where it will be exposed to the weather. When moving the washer,
the tub should be kept stationary by using the shipping bolts removed during installation.
See Installation Instructions in this book. If these parts are not available, they can be ordered
by visiting our Website at GEAppliances.com or by calling 800.GE.CARES.
Long Vacations: Be sure the water supply is shut off at the faucets. Drain all water from the hoses if the
weather will be below freezing.
Cleaning the Interior of the
Washer
To clean the interior of the washer, select
the BasketClean feature on the control
panel. The cycle will use more water, in
addition to bleach, to refresh your washer.
NOTE: Read the instructions below
completely before starting the
BasketClean cycle.
1. Remove any garments or objects from
the washer and ensure the washer
basket is empty.
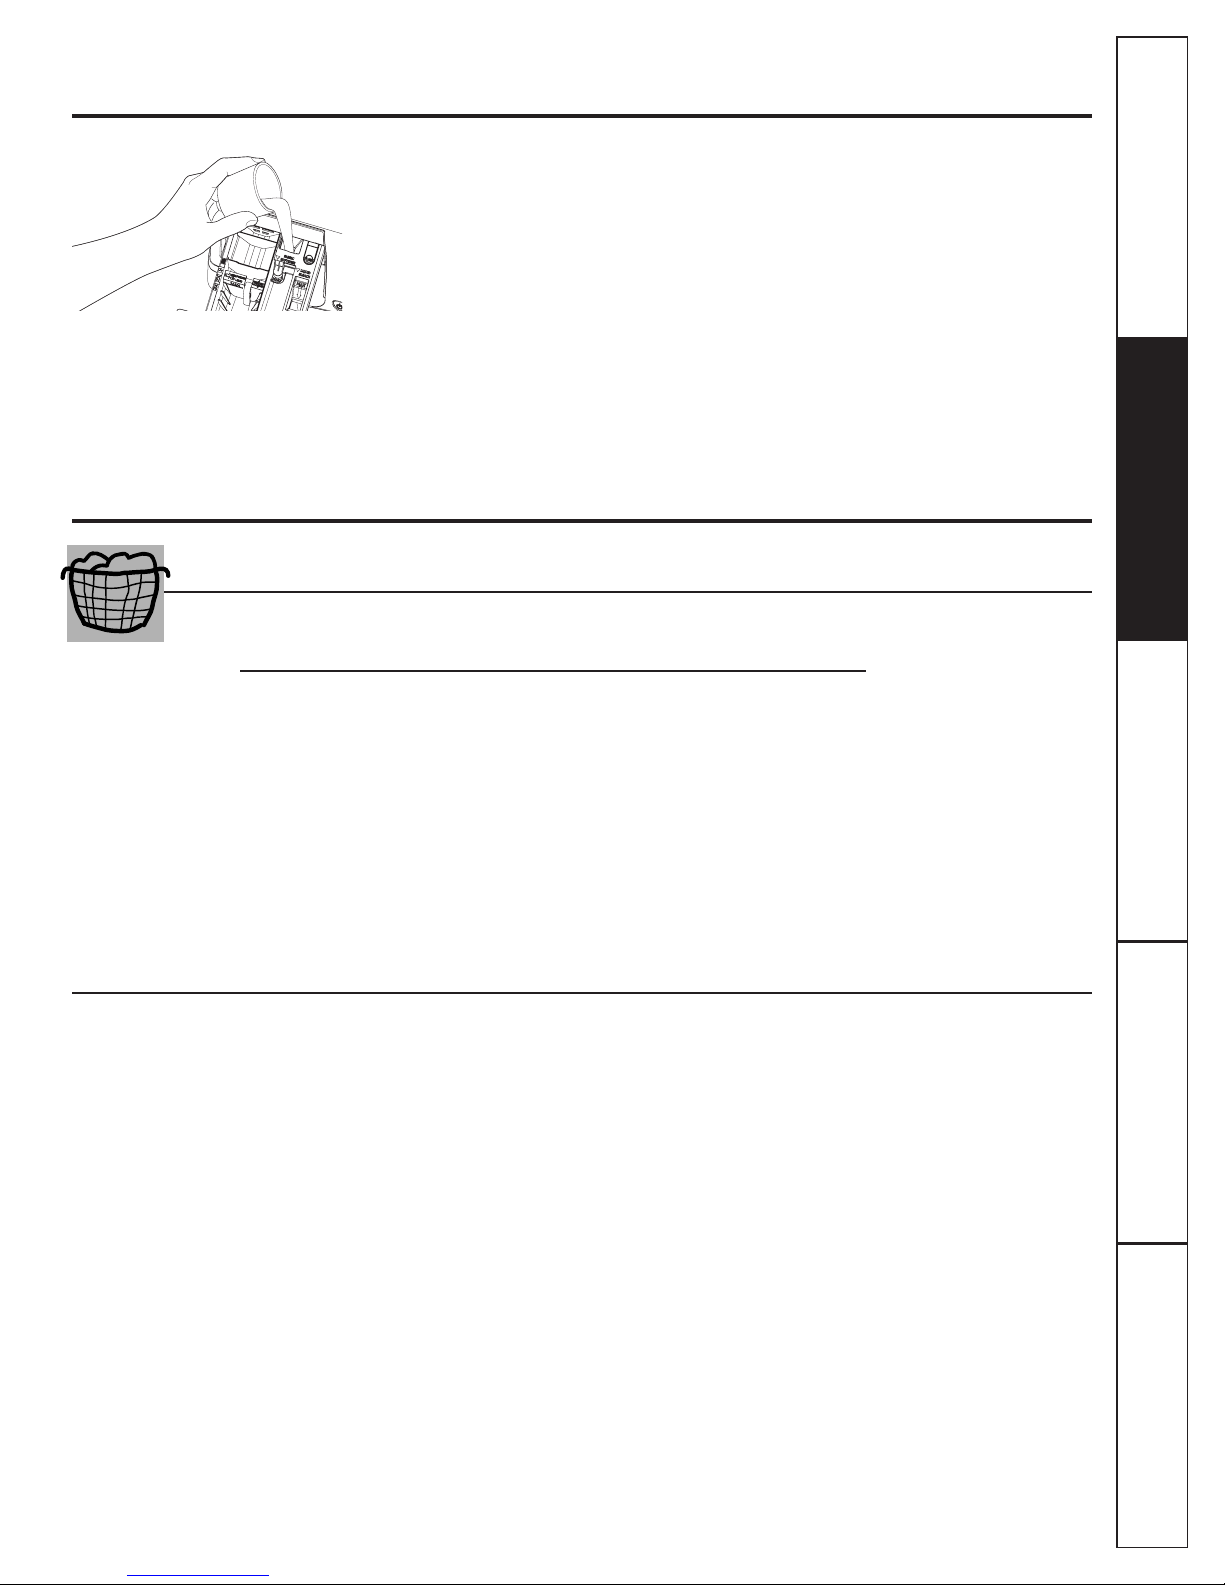
2. Open the washer door and pour one
cup or 250 ml of liquid bleach or other
washing machine cleaner into the
basket.
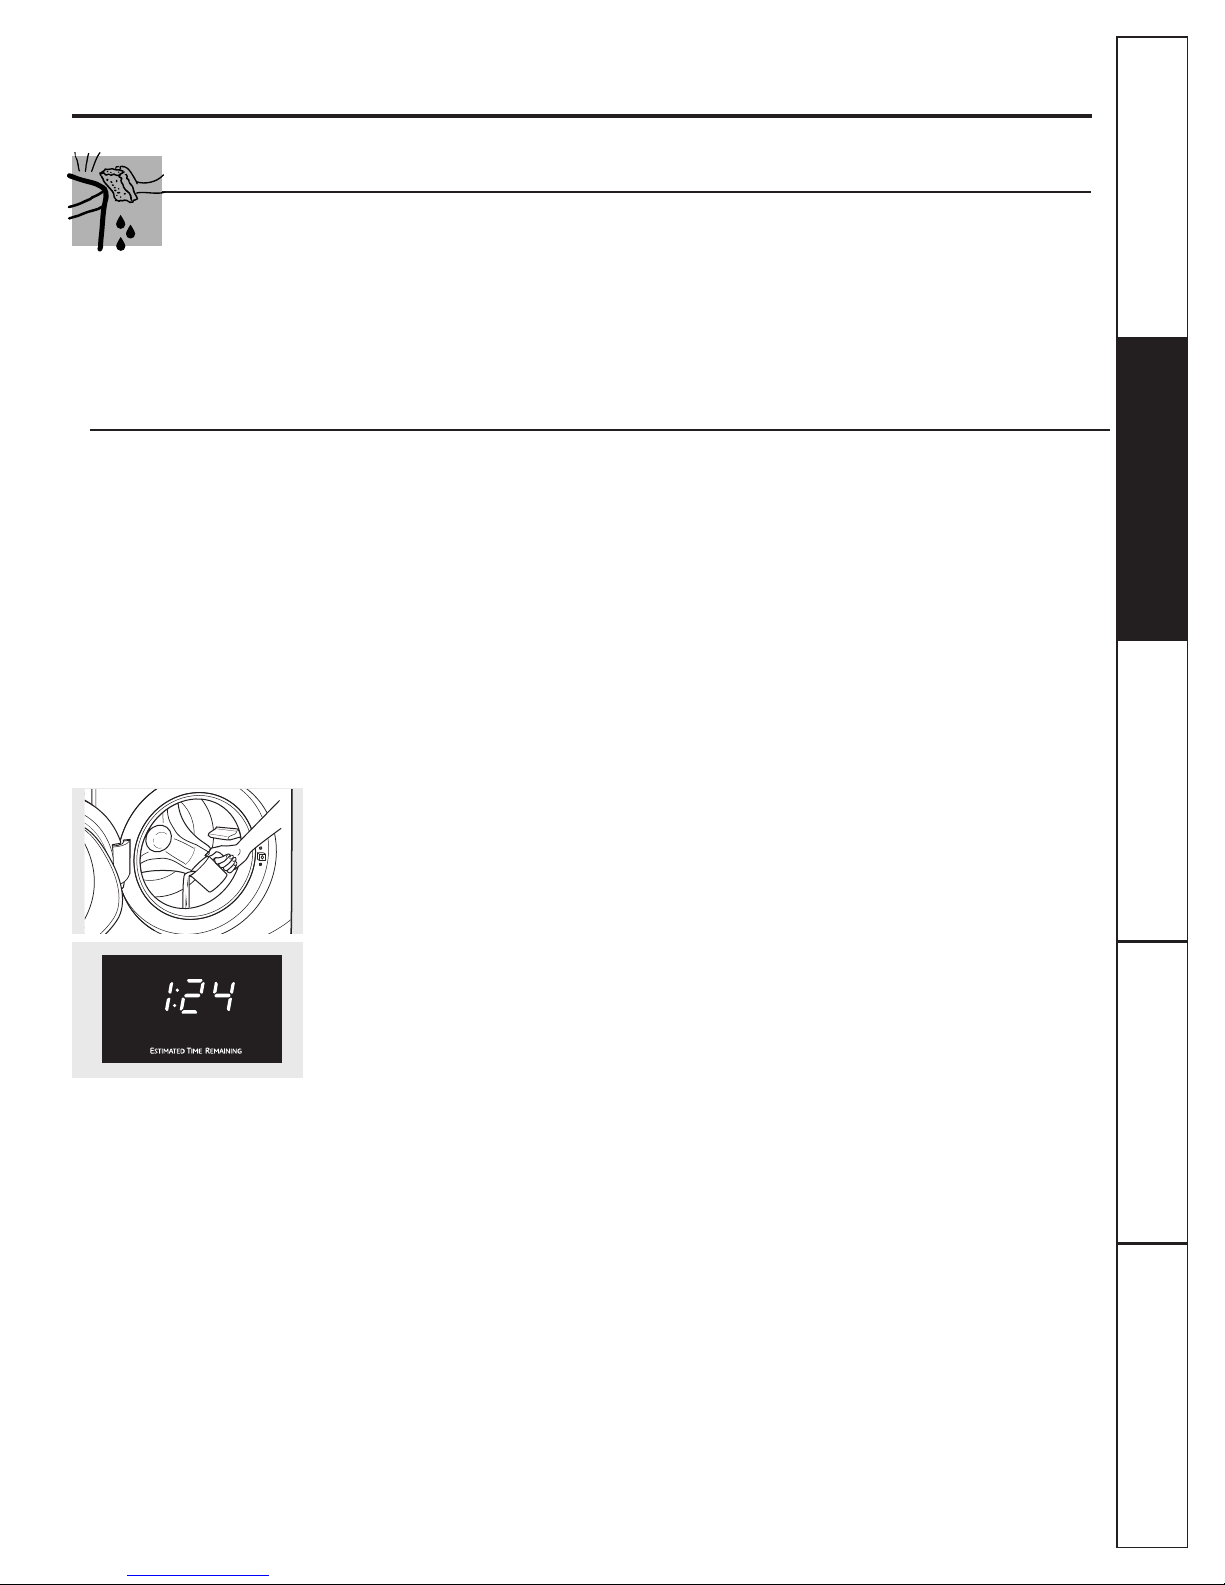
3. Close the door and select the
BasketClean cycle. Push the START
button.
4. When the BasketClean cycle is
working, you will see ESTIMATED TIME
REMAINING on the display. Do not
interrupt the cycle.
5. After the cycle is complete, leave the
door open slightly for better ventilation.
If for any reason the cycle needs to
be interrupted, the door will not open
immediately. Forcing open the door at this
stage may cause water to flood. The door
will open after the water is drained to a
level where it would not flood the floor.
BasketClean may be interrupted by
pressing the START/PAUSE button in
between cycles. A power outage in the
house might also interrupt the cycle. When
the power supply is back, the BasketClean
cycle resumes where it had stopped. When
interrupted, be sure to run a complete
BasketClean cycle before using the
washer. If the POWER button is pressed
during BasketClean, the cycle will be lost.
IMPORTANT:
n
Run BasketClean with 1 Cup (250 ml) of
bleach once a month.
n
After the completion of a BasketClean
cycle, the interior of your washer may
have a bleach smell.
n
It is recommended to run a light color
load after the BasketClean cycle.
Instructions
Installation
Consumer SupportTroubleshooting TipsOperating InstructionsSafety Instructions
11
Page 12
Cleaning the washer.
Cleaning the Pump Filter
Due to the nature of the front-load washer,
it is sometimes possible for small articles
to pass to the pump. The washer has a
filter to capture lost items so they are not
dumped to the drain. To retrieve lost items,
clean out the pump filter.
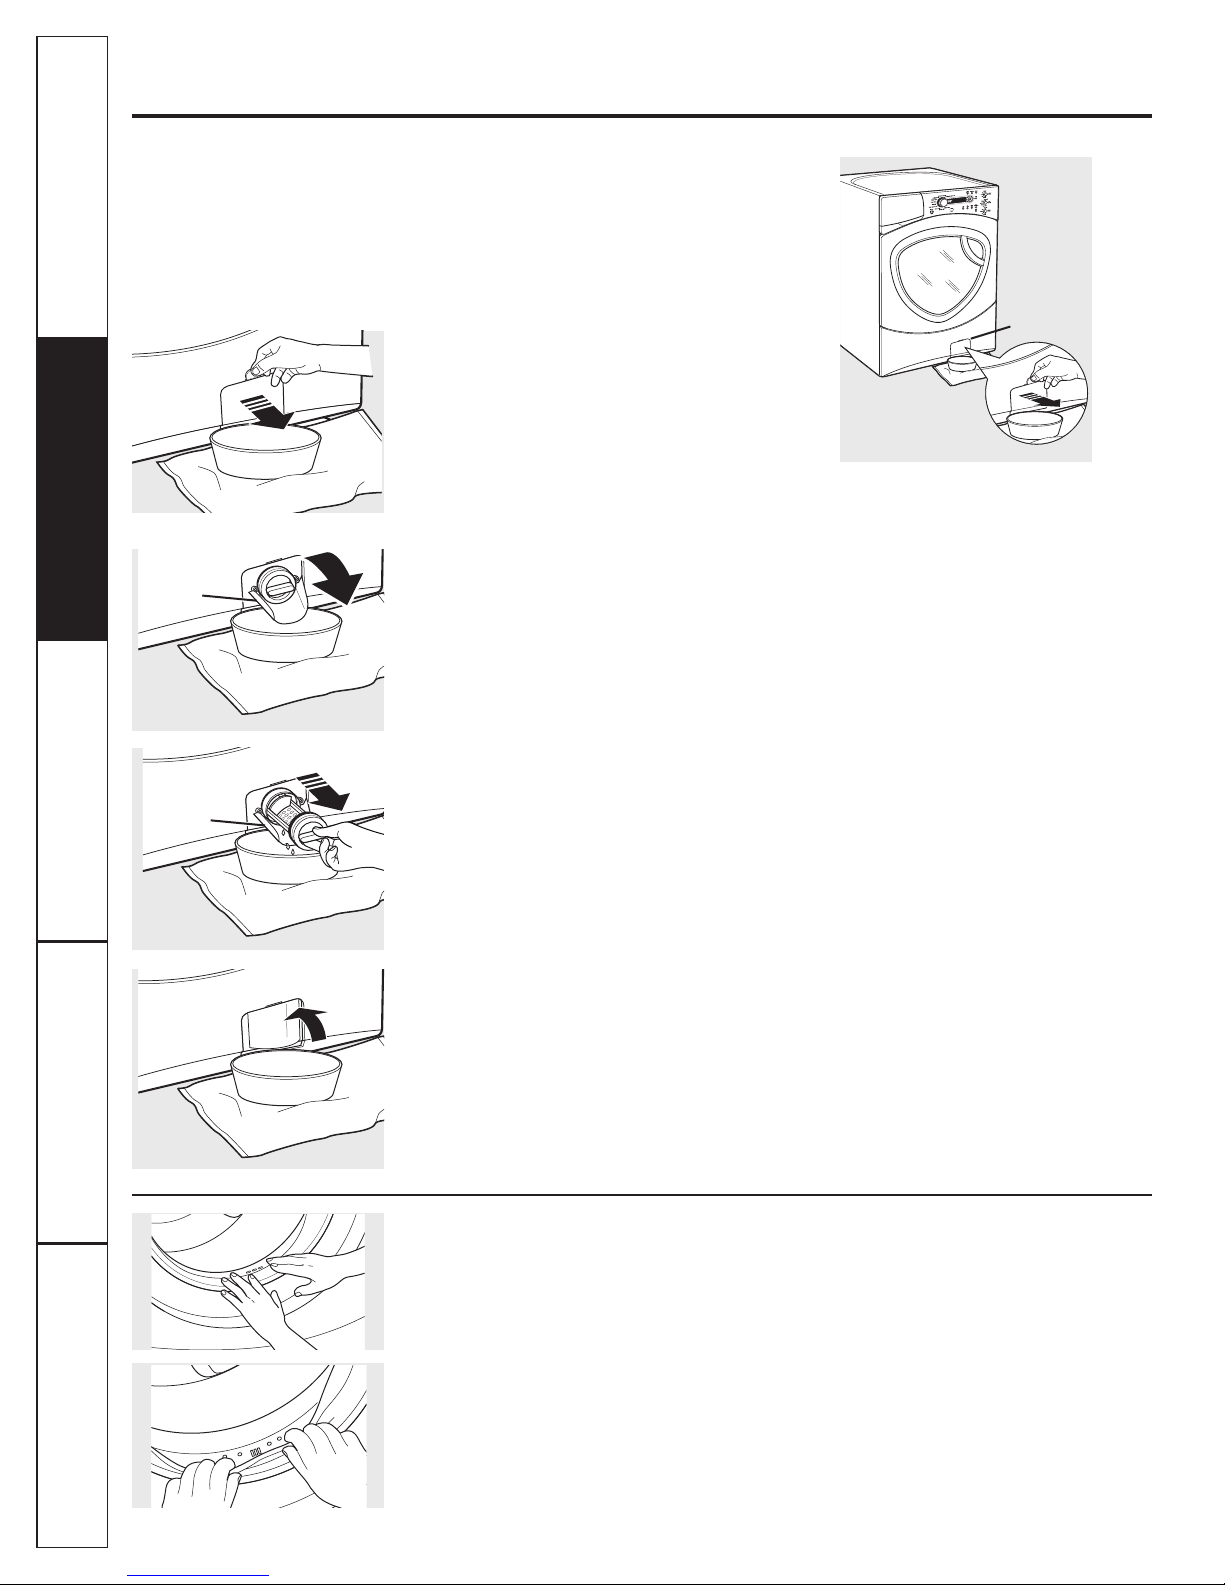
1. Using a small flathead screwdriver,
open the access door.
2. Place a shallow pan or dish under
the pump access door and towels
on the floor in front of the washer to
protect the floor. It is normal to catch
about a cup of water when the filter
is removed.
Pump
lter
Installation
Pour
spout
Pour
spout
Instructions
3. Pull down the pour spout.
4. Turn the pump filter counterclockwise
and remove the filter slowly, controlling
the flow of the draining water.
5. Remove the filter and clean the debris
from the filter.
6. Replace the filter and turn clockwise.
Tighten securely.
7. Flip up the pour spout.
8. Close the access door by hooking the
bottom tabs first, then rotating the
access door shut.
Cleaning the Door Gasket
Open the washer door. Using both hands,
press down the door gasket. Remove any
foreign objects if found trapped inside
the gasket. Make sure there is nothing
blocking the holes behind the gasket.
While holding down the door gasket,
inspect the interior gasket by pulling it
down with your fingers. Remove any
foreign objects if found trapped inside
this gasket. Make sure there is nothing
Consumer Support Troubleshooting Tips Operating Instructions Safety Instructions
blocking the holes behind the gasket.
12
When you are finished cleaning
the door gasket, remove your
hands and the gasket will return
to the operating position.
Page 13

Lock tab is visible only after
drawer has been pulled out
GEAppliances.com
Dispenser Drawer Area: Detergent and fabric softener may build up
in the dispenser drawer. Residue should be removed once or twice a month.
n Remove the drawer by first pulling it out until it stops. Then reach back into
the left rear corner of the drawer cavity and press down firmly on the lock tab,
pulling out the drawer.
n Remove the inserts from the bleach and fabric softener compartments
and the detergent insert. Rinse the inserts and the drawer with hot water
to remove traces of accumulated laundry products.
n To clean the drawer opening, use a small brush to clean the recess. Remove
all residue from the upper and lower parts of the recess.
n Return inserts to the proper compartments. Replace the dispenser drawer.
Instructions
Installation
Consumer SupportTroubleshooting TipsOperating InstructionsSafety Instructions
13
Page 14
Installation
Washer
Instructions
If you have any questions, call 800.GE.CARES (800.432.2737) or visit our Website at: GEAppliances.com
BEFORE YOU BEGIN
Read these instructions completely and carefully.
•
IMPORTANT – Save these instructions
for local inspector’s use.
•
IMPORTANT – Observe all governing
codes and ordinances.
• Note to Installer – Be sure to leave these
instructions with the Consumer.
• Note to Consumer – Keep these instructions
for future reference.
• Skill level – Installation of this appliance requires
basic mechanical and electrical skills.
• Completion time – 1-3 hours
• Proper installation is the responsibility of the installer.
• Product failure due to improper installation is not
covered under the Warranty.
FOR YOUR SAFETY:
WARNING
TOOLS REQUIRED FOR
WASHER INSTALLATION
o 1/4″ nut driver
o 3/8″ socket with ratchet
o 3/8″ open-end wrench
o Adjustable wrench or 7/16″ socket with ratchet
o Adjustable wrench or 9/16″ open-end wrench
o Channel-lock adjustable pliers
o Carpenter’s level
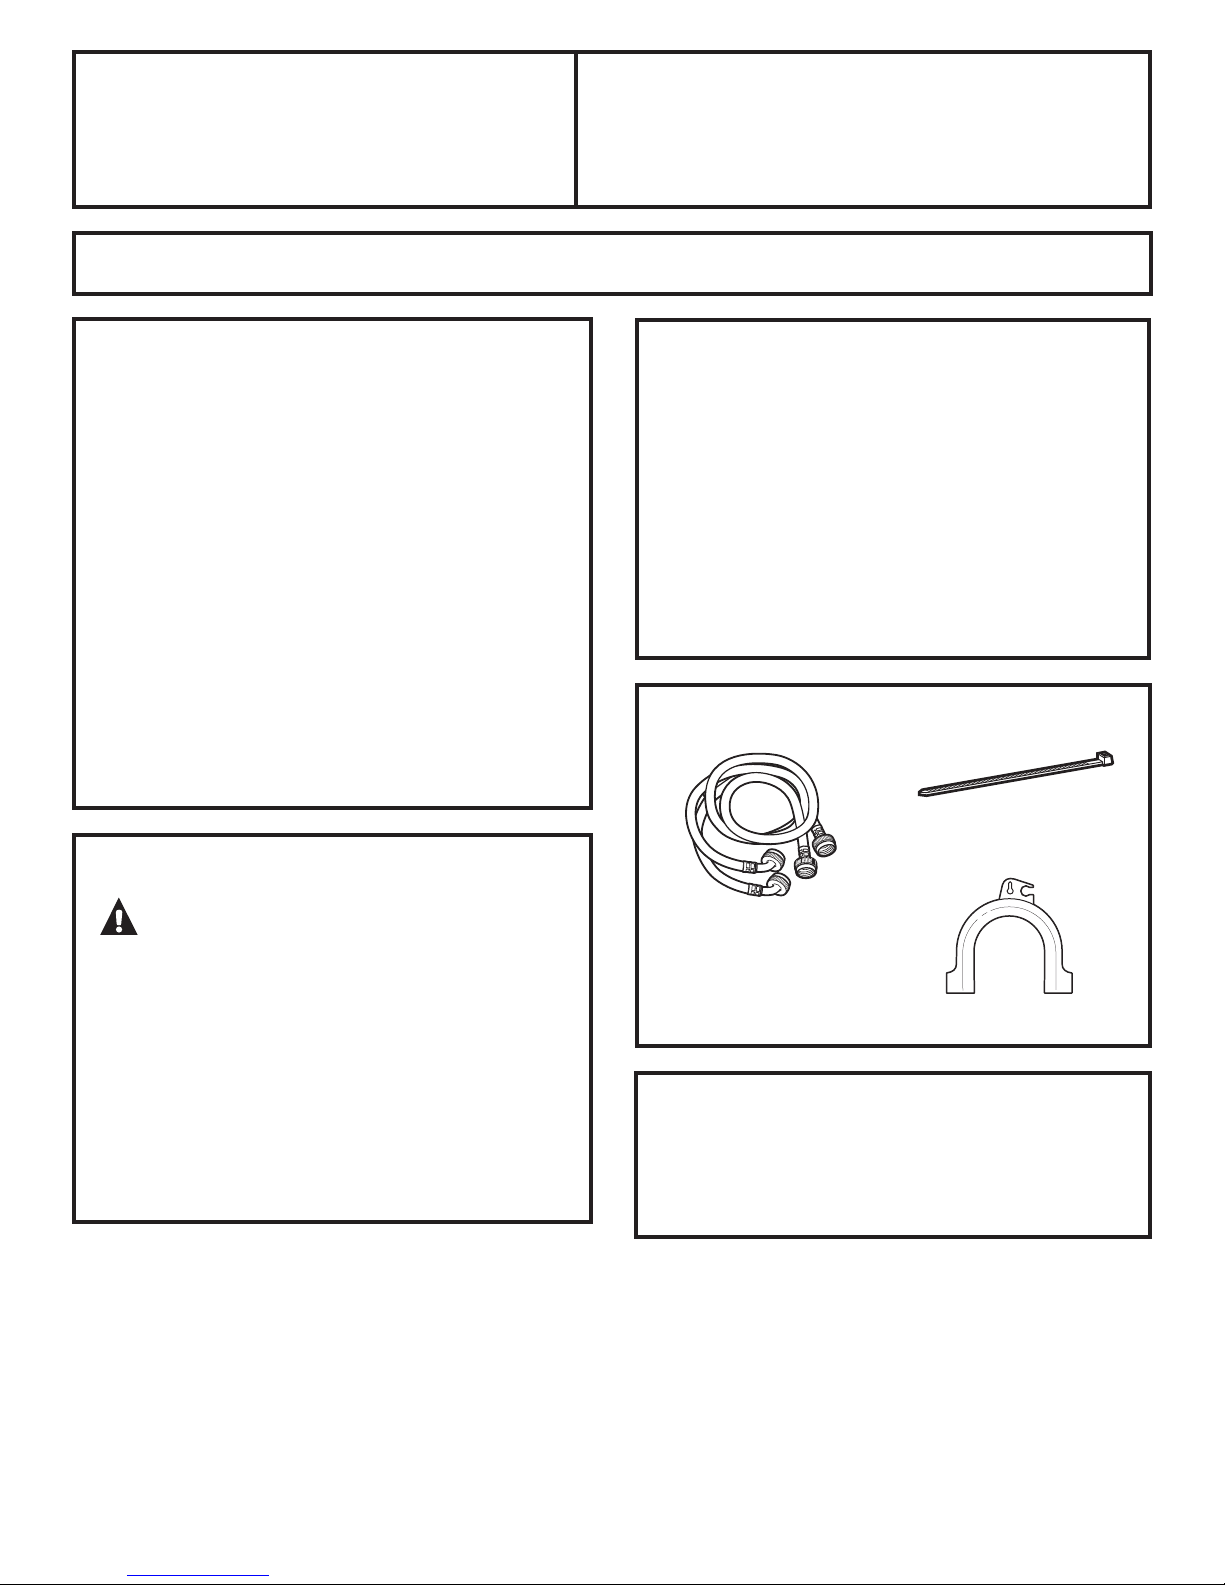
PARTS SUPPLIED
o Cable Tie
o Water Hoses (2)
• This appliance must be properly grounded and
installed as described in these Installation Instructions.
• Do not install or store the appliance in an area where
it will be exposed to water/weather. See the Location
of Your Washer section.
• NOTE: This appliance must be properly
grounded, and electrical service to the washer
must conform with local codes and ordinances
and the latest edition of the National Electrical
Code, ANSI/NFPA 70.
o Hose Guide
STACK BRACKET KIT
A stack bracket kit is available at additional cost.
It can be ordered in the United States by visiting
our website at GEAppliances.com or calling 800.
GE.CARES. Order kit #WE25X10018 or GEFLSTACK.
14
Page 15
Installation Instructions
27” (68.58 cm)
39.8” (101.1 cm)
LOCATION OF YOUR WASHER
Do Not Install the Washer:
1. In an area exposed to dripping water or outside
weather conditions. The ambient temperature should
never be below 60°F (15.6°C) for proper washer
operation.
2. In an area where it will come in contact with curtains
or drapes.
3. On carpet. The floor MUST be a hard surface with
a maximum slope of 1/2″ per foot (1.27 cm per
30 cm). To make sure the washer does not vibrate
or move, you may have to reinforce the floor.
NOTE: If floor is in poor condition, use 3/4″ impregnated
plywood sheet solidly attached to the existing floor
covering.
IMPORTANT:
Minimum Installation Clearances
• When installed in alcove: Sides, Rear,
Top = 0″ (0 cm)
• When installed in closet: Sides, Rear,
Top = 0″ (0 cm), Front = 1″ (2.54 cm)
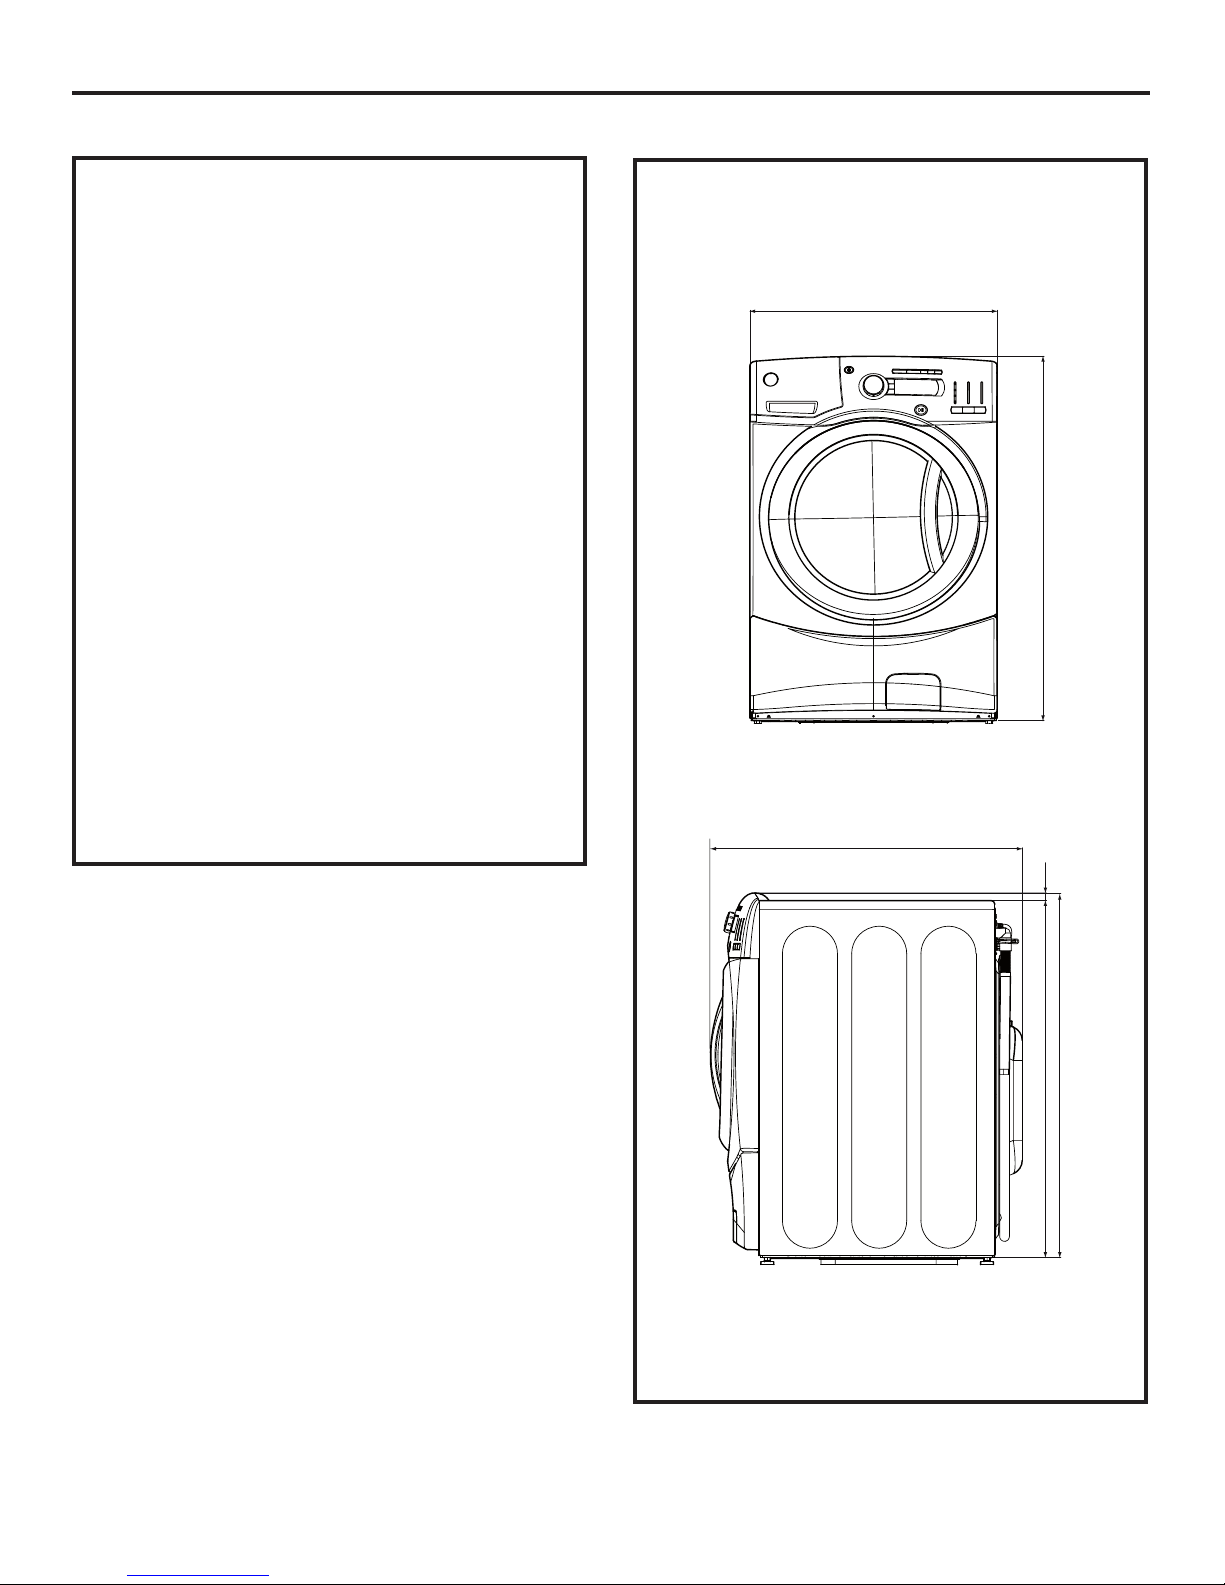
ROUGH-IN DIMENSIONS
FRONT
27” (68.58 cm)
39.8” (101.1 cm)
• Closet door ventilation openings required:
2 louvers each 60 square in. (387 cm2), located 3″
(7.6 cm) from top and bottom of door
SIDE
34” (86.36 cm)
*NOTE:
With Washer Legs: 40.5” (102.5 cm)
(0.75” adjustability)
With Pedestal: 53.75” (136.6 cm)
(0.75” adjustability)
Stacked: 82.75” (209.8 cm)
0.83” (2.1 cm)
39” (99.06 cm)
39.8” (101.1 cm)
15
Page 16
Installation Instructions
UNPACKING THE WASHER
WARNING: Recycle or destroy the carton
and plastic bags after the washer is unpacked. Make
materials inaccessible to children. Children might use
them for play. Cartons covered with rugs, bedspreads
or plastic sheets can become airtight chambers causing
suffocation.
1. Cut and remove the top and bottom packaging straps.
2. While it is in the carton, carefully lay the washer on its
side. DO NOT lay the washer on its front or back.
3. Turn down the bottom flaps—remove all base packaging,
including the cardboard, styrofoam base and styrofoam
tub support (inserted in center of base).
NOTE: If you are installing a pedestal, proceed to
the installation instructions that come with the pedestal.
4. Carefully return the washer to an upright position and
remove the carton.
5. Carefully move the washer to within 4 feet (122 cm)
of the final location.
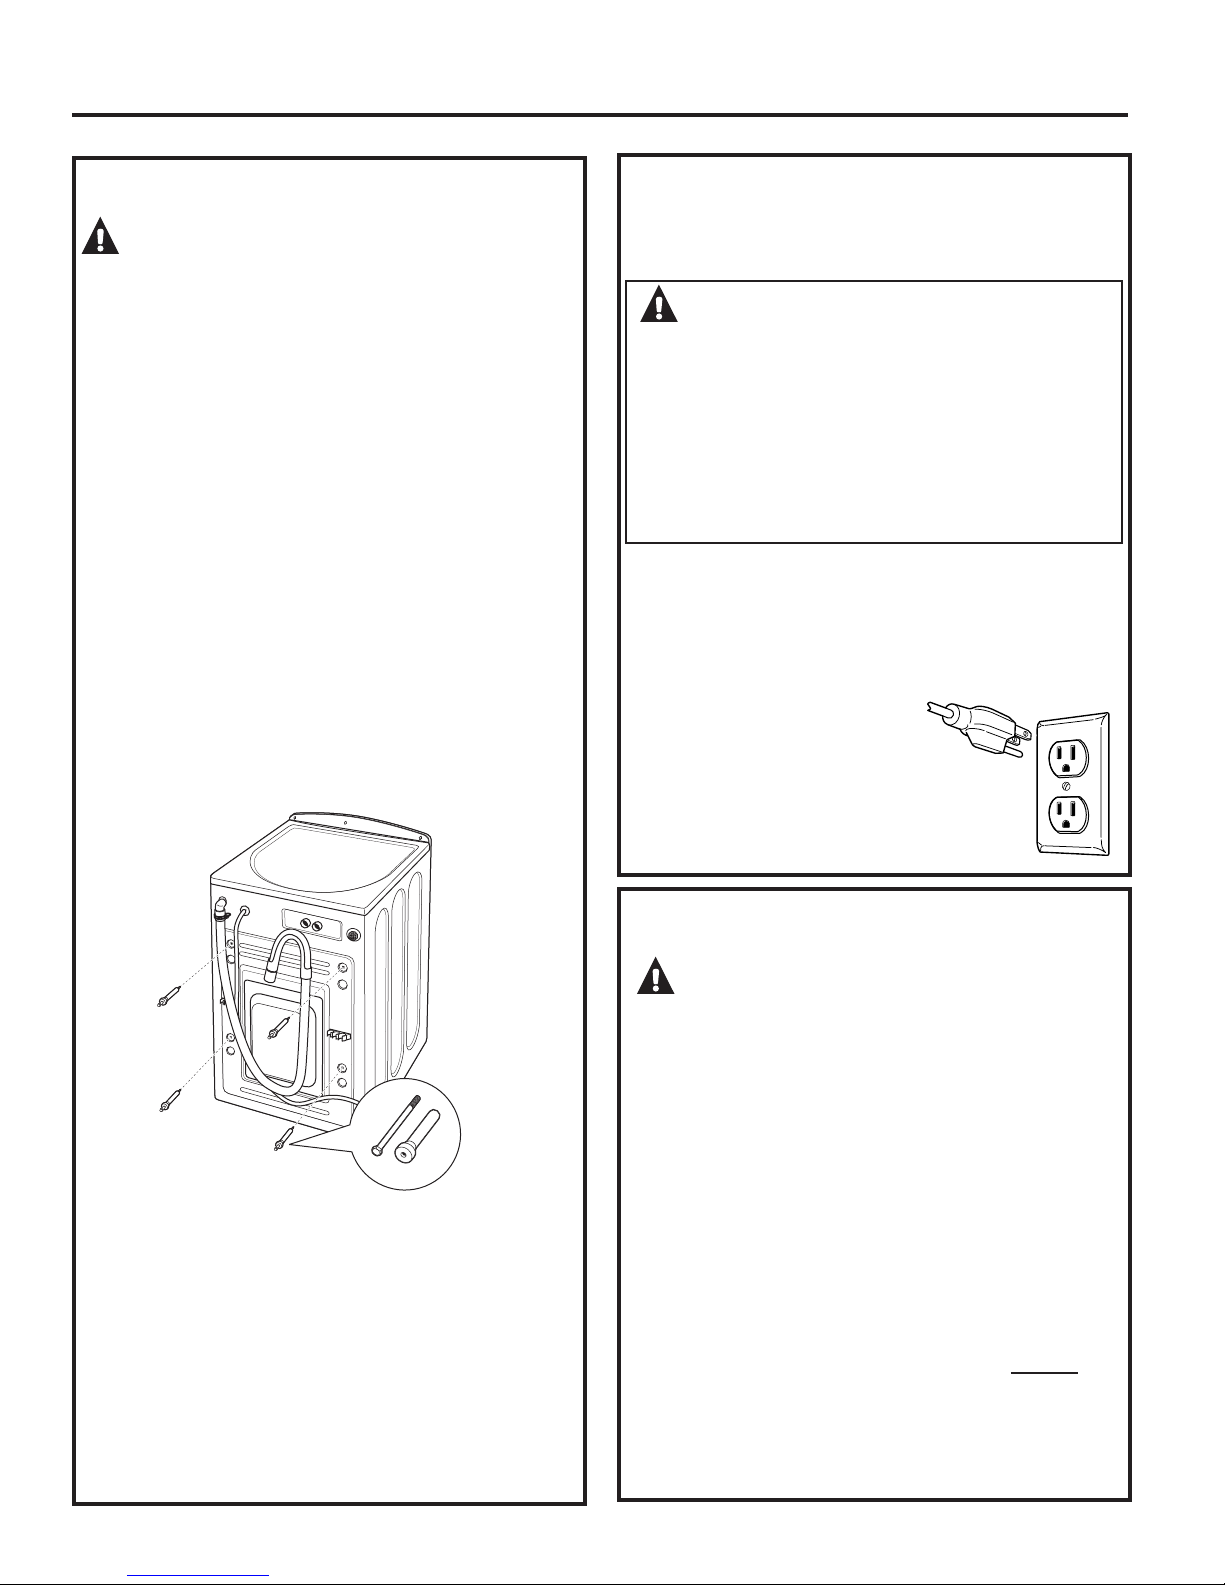
6. Remove the following from the back side of the washer:
4 bolts
4 plastic spacers (including rubber grommets)
4 power cord retainers
ELECTRICAL REQUIREMENTS
Read these instructions completely
and carefully.
WARNING: TO REDUCE THE RISK OF
FIRE, ELECTRICAL SHOCK AND PERSONAL INJURY:
• DO NOT USE AN EXTENSION CORD OR AN ADAPTER
PLUG WITH THIS APPLIANCE.
Washer must be electrically grounded in
accordance with local codes and ordinances, or in
the absence of local codes, in accordance with the
NATIONAL ELECTRICAL CODE, ANSI/NFPA NO. 70.
CIRCUIT – Individual, properly polarized and grounded
15-amp branch circuit fused with 15-amp time-delay fuse
or circuit breaker.
POWER SUPPLY – 2-wire, with ground, 120-volt,
single-phase, 60-Hz, alternating current.
OUTLET RECEPTACLE – Properly
grounded 3-prong receptacle to be
located so the power supply cord
is accessible when the washer is
in an installed position.
NOTE: Failure to remove the shipping braces can cause
the washer to become severely unbalanced.
Save all bolts for future use.
NOTE: If you must transport the washer at a later date,
you must reinstall the shipping support hardware to prevent
shipping damage. Keep the hardware in the plastic bag
provided.
In case you misplace your shipping bolts, replacements
are available at additional cost. They can be ordered in the
United States by visiting our website at GEAppliances.com
or calling 800.GE.CARES. Order kit #WH49X10039.
GROUNDING REQUIREMENTS
WARNING: Improper connection of the
equipment grounding conductor can result in a risk
of electrical shock. Check with a licensed electrician
if you are in doubt as to whether the appliance is
properly grounded.
1. The washer MUST be grounded. In the event of
malfunction or breakdown, grounding will reduce
the risk of electrical shock by providing a path of least
resistance for electrical current.
2. Since your washer is equipped with a power supply
cord having an equipment-grounding conductor and
a grounding plug, the plug MUST be plugged into an
appropriate, copper-wired receptacle that is properly
installed and grounded in accordance with all local
codes and ordinances or in the absence of local codes,
with the National Electrical Codes, ANSI/NFPA 70 (latest
edition). If in doubt, call a licensed electrician. DO NOT
cut off or alter the grounding prong on the power
supply cord. In situations where a two-slot receptacle is
present, it is the owner’s responsibility to have a licensed
electrician replace it with a properly grounded
three-prong grounding-type receptacle.
16
Page 17

Installation Instructions
WATER SUPPLY REQUIREMENTS
Hot and cold water faucets MUST be installed within
42 inches (107 cm) of your washer’s water inlet. The faucets
MUST be 3/4″ (1.9 cm) garden hose-type so inlet hoses
can be connected. Water pressure MUST be between 10
and 120 pounds per square inch. Your water department
can advise you of your water pressure. The hot water
temperature should be set to deliver water at 120° to 140°F
(48°–60°C) to provide proper Automatic Temperature Control
(ATC) performance.
NOTE: A water softener is recommended to reduce buildup
of scale inside the steam generator if the home water supply
is very hard.
DRAIN REQUIREMENTS
1. Drain capable of eliminating 17 gals (64.3 L)
per minute.
2. A standpipe diameter of 1–1/4″ (3.18 cm) minimum.
3. The standpipe height above the floor should be:
Minimum height: 24″ (61 cm)
Maximum height: 96″ (244 cm)
INSTALLING THE WASHER
1. Run some water from the hot and cold faucets to flush
the water lines and remove particles that might clog up
the water valve screens.
2. Remove the inlet hoses from the plastic bag.
3. (90° elbow end) Carefully
connect the inlet hose
marked HOT to the outside
“H” outlet of the water valve.
Tighten by hand, then tighten
another 2/3 turn with pliers.
Carefully connect the other
inlet hose to the inside “C”
outlet of the water valve.
Tighten by hand; then tighten
another 2/3 turn with pliers. Do not crossthread
or over-tighten these connections.
4. Connect the inlet hose ends to the HOT and COLD water
faucets tightly by hand, then tighten another 2/3 turn
with pliers. Turn the water on and check for leaks.
BACK
96 in.
(244 cm)
Max.
24 in.
(61 cm)
Min.
NOTE: The drain hose attached to the washer can reach
a 58″ (147 cm) high standpipe. For a higher standpipe,
contact an authorized parts distributor.
5. Carefully move the washer to its final location. Gently
rock the washer into position. It is important not to
damage the rubber leveling legs when moving your
washer to its final location. Damaged legs can increase
washer vibration. It may be helpful to spray window
cleaner on the floor to help move your washer into its
final position.
NOTE: To reduce vibration, ensure that all four rubber
leveling legs are firmly touching the floor. Push and pull
on the back right and then back left of your washer.
NOTE: Do not use the dispenser drawer or door to lift
the washer.
NOTE: If you are installing into a drain pan, you can use
a 24-inch long 2x4 to lever the washer into place.
17
Page 18

Installation Instructions
INSTALLING THE WASHER
6. With the washer in its final position, place a level on
top of the washer (if the washer is installed under
a counter, the washer should not be able to rock).
Adjust the front leveling legs up or down to ensure the
washer is resting solid. Turn the lock nuts on each leg
up towards the base of the washer and snug with a
wrench.
NOTE: Keep the leg extension at a minimum to prevent
excessive vibration. The farther out the legs are extended,
the more the washer will vibrate.
If the floor is not level or is damaged, you may have
to extend the rear leveling legs.
7. Attach the U-shaped hose guide to the end of
the drain hose. Place the hose in a laundry tub or
standpipe and secure it with the cable tie provided in
the enclosure package.
NOTE: Placing the drain hose too far down the drain pipe
can cause a siphoning action. No more than 7 inches of hose
should be in the drain pipe. There must be an air gap around
the drain hose. A snug fit can cause a siphoning action.
(cont.)
8. Plug the power cord into a grounded outlet.
NOTE: Check to be sure the power is off at the circuit
breaker/fuse box before plugging the power cord
into an outlet.
9. Turn on the power at the circuit breaker/fuse box.
10. Read the rest of this Owner’s Manual. It contains
valuable and helpful information that will save you
time and money.
11. Before starting the washer, check to make sure:
o Main power is turned on.
o The washer is plugged in.
o The water faucets are turned on.
o The unit is level and all four leveling legs are firmly
on the floor.
o The shipping support hardware is removed
and saved.
o The drain hose is properly tied up.
o There are no leaks at the faucet, drain line
or washer.
12. Run the washer through a complete cycle.
Check for water leaks and proper operation.
13. If your washer does not operate, please review
the Before You Call For Service section before
calling for service.
14. Place these instructions in a location near the washer
for future reference.
Cable Tie
Cable Tie
REPLACEMENT PARTS
If replacement parts are needed for your washer, they
can be ordered in the United States by visiting our
Website at GEAppliances.com or by calling 800.
GE.CARES.
Cable Tie
18
Page 19

Installation Instructions
ADAPTIVE VIBRATION CONTROL
Your GE washer is equipped with Adaptiive Vibration Control
Technology. Using information about the floor, this system
can reduce vibration and improve spin performance in
some installations by adapting the spin cycle. The DEFAULT
configuration is specially designed to provide optimal
performance across the widest range of floor types. Follow
the procedure below to enable more specific adaptive
settings. Your washer can be returned quickly and easily
to the DEFAULT configuration at any time using the same
procedure.
Floor Type Selection
1. With the unit powered off, press and hold EXTRA RINSE
and SPIN buttons simultaneously for 3 seconds.
3. Rotate the cycle knob and select PE1 or PE2 for
pedestal. Press the START button to make the
selection PE1 is YES and PE2 is NO.
Power
2. Rotate the cycle knob and select FL1, FL2, FL3, or FL4.
Cycle Knob
Press the START button to make the selection. See the
table below for suggested installations.
FL1 Default**
FL2 Concrete Floor
FL3 Strong Wood Floor
FL4 Normal Wood Floor
**The default setting is acceptable for most installations.
Extra Rinse and Spin
19
Page 20

Before you call for service…
Troubleshooting Tips
Save time and money! Review the charts on the
following pages first and you may not need to call for
service.
Problem Possible Cause What To Do
Not draining
Not spinning
Not agitating
Leaking water Door gasket is damaged
Installation
Instructions
Clothes too wet Load is out of balance
Load is out of balance
Pump clogged
Drain hose is kinked or
improperly connected
Household drain may be
clogged
Drain hose siphoning; drain
hose pushed too far down
the drain
Door gasket not damaged
Check back left of washer
for water
Fill hoses or drain hose is
improperly connected
Household drain may be
clogged
Dispenser clogged
Incorrect use of detergent
Dispenser box crack
Pump clogged
Overloading
Drain hose is kinked or
improperly connected
Household drain may be
clogged
Drain hose siphoning; drain
hose pushed too far down
the drain
• Redistribute clothes and run drain & spin or rinse & spin.
• Increase load size if washing small load containing heavy and light
items.
• See page 12 on how to clean the Pump Filter.
• Straighten drain hose and make sure washer is not sitting on it.
• Check household plumbing. You may need to call a plumber.
• Ensure there is an air gap between hose and drain.
• Check to see if gasket is seated and not torn. Objects
left in pockets may cause damage to the washer (nails,
screws, pens, pencils)
• Water may drip from the door when the door is opened.
This is a normal operation.
• Carefully wipe off rubber door seal. Sometimes dirt or
clothing is left in this seal and can cause a small leak
• If this area is wet, you have oversudsing condition.
Use less detergent.
• Make sure hose connections are tight at washer and faucets and
make sure end of drain hose is correctly inserted in and secured to
drain facility.
• Check household plumbing. You may need to call a plumber.
• Powder soap may cause clogs inside the dispenser and cause
water to leak out the front of the dispenser. Remove drawer and
clean both drawer and inside of dispenser box.
Please refer to Cleaning the Washer section.
• Use HE and correct amount of detergent.
• If new installation, check for crack on inside of dispenser box.
• Redistribute clothes and run drain & spin or rinse & spin.
• Increase load size if washing small load containing heavy
and light items.
• The machine will slow the spin speed down to 410 rpm if
it has a hard time balancing the load. This speed is normal.
• See page 12 on how to clean the Pump Filter.
• The dry weight of the load should be less then 16 lb.
• Straighten drain hose and make sure washer is not sitting on it.
• Check household plumbing. You may need to call a plumber.
• Ensure there is an air gap between hose and drain.
Consumer Support Troubleshooting Tips Operating Instructions Safety Instructions
20
Page 21

Before you call for service… GEAppliances.com
Problem Possible Cause What To Do
Incomplete cycle
or timer not
advancing
Loud or unusual
noise; vibration
or shaking
No power/
washer not
working or dead
Snags, holes,
tears, rips or
excessive wear
Control time
wrong or
changes
Not enough
water
Washer pauses
or has to be
restarted, or
washer door is
locked and will
not open
Door unlocks or
press START and
machine doesn’t
operate
Automatic load redistribution
Pump clogged
Drain hose is kinked or
improperly connected
Household drain may be
clogged
Drain hose siphoning; drain
hose pushed too far down the
drain
Cabinet moving
All rubber leveling legs are not
firmly touching the floor
Unbalanced load
Pump clogged
Washer is unplugged
Water supply is turned off
Circuit breaker/fuse is tripped/
blown
Automatic self system checks
Overloaded
Pens, pencils, nails, screws or
other objects left in pockets
Pins, snaps, hooks, sharp
buttons, belt buckles, zippers
and sharp objects left in
pockets
This is normal • During spin the washer may need to rebalance the load
This is normal • Horizontal washers do not require the tub to fill with water like
Pump clogged • See page 12 on how to clean the Pump Filter.
This is normal
Incorrect operation
• Timer adds 3 minutes to cycle for each rebalance. 11 or 15
rebalances may be done. This is normal operation.
Do nothing; the machine will finish the wash cycle.
• See page 12 on how to clean the Pump Filter.
• Straighten drain hose and make sure washer is not sitting on
it.
• Check household plumbing. You may need to call a plumber.
• Ensure there is an air gap between hose and drain.
• Washer is designed to move 1/4” to reduce forces transmitted
to the floor. This movement is normal.
• Push and pull on the back right and then back left of your
washer to check if it is level. If the washer is uneven, adjust the
rubber leveling legs so they are all firmly touching the floor and
locked in place. Your installer should correct this problem.
• Open door and manually redistribute load. To check machine,
run rinse and spin with no load. If normal, unbalance was
caused by load.
• See page 12 on how to clean the Pump Filter.
• Make sure cord is plugged securely into a working outlet.
• Turn both hot and cold faucets fully on.
• Check house circuit breakers/fuses. Replace fuses or reset
breaker. Washer should have separate outlet.
• First time the washer is plugged in, automatic checks occur. It
may take up to 20 seconds before you can use your washer. This
is normal operation.
• Do not exceed maximum recommended load sizes. See
recommended maximum load sizes on page 10.
• Remove loose items from pockets.
• Fasten snaps, hooks, buttons and zippers.
sometimes to reduce vibrations. When this happens, the
estimated time is increased causing time left to increase or
jump.
top-load washers.
• Front-load washers start up differently than top-load
washers, and it takes 30 seconds to check the system. The door
will lock and unlock.
• Simply open and close the door firmly; then press START.
Instructions
Installation
Consumer SupportTroubleshooting TipsOperating InstructionsSafety Instructions
21
Page 22

Before you call for service…
Problem Possible Cause What To Do
Water does not
enter washer or
enters slowly
Wrinkling Improper sorting
Grayed or
yellowed clothes
Automatic self system checks
Water supply is turned off
Water valve screens are
stopped up
Overloading
Incorrect wash cycle
Repeated washing in water
that is too hot
Not enough detergent
Not using HE (high efficiency)
detergent
Hard water
Water is not hot enough
• After START is pressed, the washer does several system
checks. Water will flow 60 seconds after START is pressed.
• Turn on both hot and cold faucets fully.
• Turn off the water source and remove the water connection
hoses from the upper back of the washer. Use a brush or
toothpick to clean the screens in the machine. Reconnect the
hoses and turn the water back on.
• Avoid mixing heavy items (like work clothes) with
light items (like blouses).
• Load your washer so clothes have enough room
to move freely.
• Match cycle selection to the type of fabric you are
washing (especially for easy care loads).
• Wash in warm or cold water.
• Use correct amount of detergent.
• Use HE detergent.
• Use hottest water safe for fabric.
• Use a water conditioner like Calgon brand or install
a water softener.
• Make sure water heater is delivering water at
120°–140°F (48°–60°C).
Installation
Detergent is not dissolving
Dye transfer
Instructions
Colored spots Incorrect use of fabric softener
Dye transfer
Water
temperature is
incorrect
Slight variation
in metallic color
Bad odor inside
your Washer
Water supply is improperly
connected
House water heater is not set
properly
This is normal • Due to the metallic properties of paint used for this unique
Washer unused for a long time,
not using recommended quality
of HE detergent or used too
much detergent
• Try a liquid detergent.
• Sort clothes by color. If fabric label states wash separately,
unstable dyes may be indicated.
• Check fabric softener package for instructions and follow
directions for using dispenser.
• Sort whites or lightly colored items from dark colors.
• Promptly remove wash load from washer.
• Make sure hoses are connected to correct faucets.
• Make sure house water heater is delivering water at 120°–
140°F (48°–60°C).
product, slight variations of color may occur due to viewing
angles and lighting conditions.
• Run a BasketClean cycle.
• In case of strong odor, you may need to run the BasketClean
cycle more than once.
• Use only the amount of detergent recommended on the
detergent container.
• Use only HE (high efficiency) detergent.
• Always remove wet items from the washer promptly after
machine stops running.
• Leave the door slightly open for the water to air dry. Close
supervision is necessary if this appliance is used by or near
children. Do not allow children to play on, with or inside this or
any other appliance.
Consumer Support Troubleshooting Tips Operating Instructions Safety Instructions
22
Page 23

GEAppliances.com
Problem Possible Cause What To Do
Detergent leak Incorrect placement of
detergent insert
• Make sure detergent insert is properly located and fully seated.
Never put detergent above max line.
Improper
dispensing of
softener or
bleach
This is normal
Dispenser clogged
Softener or bleach is filled
above the max line
Softener or bleach cap issue
• It is normal operation to see detergent leak on door gasket
about 20 seconds after filling the dispenser.
• Monthly clean the dispenser drawer to remove buildup of
chemicals.
• Make sure to have the correct amount of softener or bleach.
• Make sure softener and bleach cap for dispenser are seated
or they will not work.
Instructions
Installation
Consumer SupportTroubleshooting TipsOperating InstructionsSafety Instructions
23
Page 24

Notes.
24
Page 25

GE Washer Warranty.
All warranty service provided by our Factory Service Centers,
or an authorized Customer Care
Æ
technician. To schedule service,
visit us on-line at GEAppliances.com, or call 800.GE.CARES
(800.432.2737). Please have serial number and model number
availa ble when calling for service.
Staple your receipt here.
Proof of the original purchase
date is needed to obtain service
under the warranty.
For The Period Of: We Will Replace:
One Year Any part of the washer which fails due to a defect in materials or workmanship. During this
From the date of the limited one-year warranty, GE will also provide, free of charge, all labor and related service
original purchase costs to replace the defective part.
What Is Not Covered (in the United States):
n Service trips to your home to teach you how to use
the product.
n Improper installation, delivery or maintenance.
n Failure of the product if it is abused, misused, or used for
other than the intended purpose or used commercially.
n Damage after delivery.
n Replacement of house fuses or resetting of circuit
breakers.
n Damage to the product caused by accident, fire, floods
or acts of God.
n Incidental or consequential damage caused by possible
defects with this appliance.
n Product not accessible to provide required service.
EXCLUSION OF IMPLIED WARRANTIES—Your sole and exclusive remedy is product repair as provided in this Limited
Warranty. Any implied warranties, including the implied warranties of merchantability or fitness for a particular
purpose, are limited to one year or the shortest period allowed by law.
This warranty is extended to the original purchaser and any succeeding owner for products purchased for home use
within the USA. If the product is located in an area where service by a GE Authorized Servicer is not available, you may
be responsible for a trip charge or you may be required to bring the product to an Authorized GE Service location for
service. In Alaska, the warranty excludes the cost of shipping or service calls to your home.
Some states do not allow the exclusion or limitation of incidental or consequential damages. This warranty gives you
specific legal rights, and you may also have other rights which vary from state to state. To know what your legal rights
are, consult your local or state consumer affairs office or your state’s Attorney General.
Warrantor: General Electric Company. Louisville, KY 40225
25
Page 26

Consumer Support.
GE Appliances Website GEAppliances.com
Have a question or need assistance with your appliance? Try the GE Appliances Website, 24 hours a day, any
day of the year! For greater convenience and faster service, you can now download Owner’s Manuals, order
parts or even schedule service on-line.
Schedule Service GEAppliances.com
Expert GE repair service is only one step away from your door. Get on-line and schedule your service at
your convenience any day of the year! Or call 800.GE.CARES (800.432.2737) during normal business hours.
Real Life Design Studio GEAppliances.com
GE supports the Universal Design concept—products, services and environments that can be used by
people of all ages, sizes and capabilities. We recognize the need to design for a wide range of physical and
mental abilities and impairments. For details of GE’s Universal Design applications, including kitchen design
ideas for people with disabilities, check out our Website today. For the hearing impaired, please call 800.TDD.
GEAC (800.833.4322).
Extended Warranties GEAppliances.com
Purchase a GE extended warranty and learn about special discounts that are available while your warranty
is still in effect. You can purchase it on-line anytime, or call 800.626.2224 during normal business hours.
GE Consumer Home Services will still be there after your warranty expires.
Parts and Accessories GEAppliances.com
Individuals qualified to service their own appliances can have parts or accessories sent directly to their homes
(VISA, MasterCard and Discover cards are accepted). Order on-line today, 24 hours every day or by phone
at 800.626.2002 during normal business hours.
Instructions contained in this manual cover procedures to be performed by any user. Other servicing
generally should be referred to qualified service personnel. Caution must be exercised, since improper
servicing may cause unsafe operation.
Contact Us GEAppliances.com
If you are not satisfied with the service you receive from GE, contact us on our Website with all the details
including your phone number, or write to: General Manager, Customer Relations
GE Appliances, Appliance Park
Louisville, KY 40225
Register Your Appliance GEAppliances.com
Register your new appliance on-line—at your convenience! Timely product registration will allow for
enhanced communication and prompt service under the terms of your warranty, should the need arise.
You may also mail in the pre-printed registration card included in the packing material.
26
Printed in China
Page 27

GEAppliances.com
Instrucciones
de seguridad .................................... 2, 3
Instrucciones de funcionamiento
Paneles de control ............................................ 4
Parámetros de control
Funciones ..........................................................6–9
Carga y uso de la lavadora
Limpieza de la lavadora
Instrucciones
de instalación ..................................... 14–19
De la lavadora
Ubicación de la lavadora.............................15
Dimensiones aproximadas
Desembalaje de la lavadora
Requisitos eléctricos
Requisitos de conexión a tierra
Requisitos de suministro de agua
Requisitos de desagüe
Instalación de la lavadora
Piezas de repuesto
Control de vibración adaptativo
Consejos para la solución
de problemas ...................................... 20–23
..................................................14
................................5 , 6
................... 9, 10
....................... 11–13
......................... 15
...................... 16
...................................... 16
............... 16
........... 17
.................................. 17
...................17-18
......................................... 18
.............. 19
Owner’s Manual &
Installation Instructions
GFWH2400
GFWH2405
GFWS3500
GFWS3505
GFWS3600
GFWS3605
Consumer Support
Garantía (EE.UU.) ............................................. 25
Servicio al consumidor
As an EnErgy Star® partner,
GE has determined that this
product meets the EnErgy Star®
guidelines for energy efficiency.
Write the model and serial
numbers here:
Model #
Lavadoras
Serial # __________________
_________________
................................ 26
You can find them on a label on the
side of the washer.
49-90390 GE 05/13/10
Page 28

INFORMACIÓN DE SEGURIDAD IMPORTANTE.
LEA TODAS LAS INSTRUCCIONES ANTES DEL USO.)
Instrucciones de
Instrucciones de
seguridad
funcionamiento
¡ADVERTENCIA!
SEGURIDAD DEL CALENTADOR DE AGUA
En determinadas condiciones, en un calentador de agua que no se haya utilizado durante un mínimo
de dos semanas se puede producir gas hidrógeno. El gas hidrógeno puede resultar explosivo en determinadas
circunstancias
Si el agua caliente no se ha utilizado por dos semanas o más, prevenga la posibilidad de sufrir daños o lesiones
abriendo todos los grifos de agua caliente y dejándola correr durante varios minutos. Realice este proceso antes
de utilizar cualquier electrodoméstico que se conecte al sistema de agua caliente. Este sencillo procedimiento
le permitirá liberar todo el gas hidrógeno acumulado. Debido a que el gas es inamable, no fume ni utilice
ninguna llama o electrodoméstico durante el proceso.
INSTALACIÓN CORRECTA
La lavadora se debe instalar y colocar correctamente de acuerdo con las instrucciones de instalación, antes de
utilizarla..
n Instale o almacene la lavadora en un lugar donde
no esté expuesta a temperaturas bajo cero ni a las
inclemencias climáticas, ya que esto puede provocar
daños irreversibles e invalidar la garantía.
Para su seguridad, siga la información de este manual con el n de
minimizar el riesgo de incendio, explosión o descarga eléctrica, así como
para evitar daños materiales, lesiones o la muerte.
Las instrucciones de este manual, así como el resto de la documentación
que se incluye con la lavadora, no cubren todas las situaciones o
estados posibles que pueden producirse. El usuario DEBE adoptar
procedimientos correctos, seguros y prudentes al instalar, utilizar y
realizar el mantenimiento de cualquier electrodoméstico.
n Conecte correctamente a tierra la lavadora de
conformidad con todos los códigos y ordenanzas
regulatorias. Siga la información de Instrucciones
de instalación.
Instrucciones de
Consejos para la
instalaciÛn
soluciÛn de problemas
ZONA DE LAVADERO
n Mantenga las zonas debajo de los
electrodomésticos y en torno a ellos sin materiales
combustibles como pelusa, papel, trapos y
productos químicos.
n No deje la puerta de la lavadora abierta. Dicha
acción puede provocar que los niños se cuelguen
de la puerta o que gateen dentro de la lavadora.
n Es necesario vigilar con atención a los niños
si utilizan la lavadora o se encuentran en las
proximidades. No deje que los niños jueguen sobre éste u
otro electrodoméstico, con él o en su interior.
2
Servicio al consumidor
Page 29

GEAppliances.com
AL UTILIZAR LA LAVADORA
Instrucciones de
seguridad
Utilice este
electrodoméstico
sólo para el uso
que se describe
en este manual
del propietario.
n No abra nunca la lavadora mientras esté en
movimiento. Espere a que se detenga por
completo para abrir la puerta.
nNo mezcle blanqueadores clorados con
amoniaco o ácidos como vinagre o
desoxidantes. La mezcla de distintos productos
químicos puede producir gases tóxicos que
pueden causar la muerte.
n No lave ni seque prendas que se hayan
limpiado, lavado, empapado o manchado con
sustancias inflamables o explosivas (como
cera, aceite, pintura, gasolina, desengrasantes,
disolventes de limpieza en seco, queroseno,
etc.) que puedan prenderse o explosionar. No
añada ninguna de estas sustancias al agua de
lavado. No utilice ni coloque ninguna de estas
sustancias en torno a la lavadora o la secadora
durante el funcionamiento.
n El proceso de lavado puede reducir el tiempo
previo a la inflamación de los tejidos. Para evitar
este efecto, siga con atención las instrucciones
de lavado y cuidado del fabricante de la prenda.
n Para minimizar la posibilidad de descarga
eléctrica, desenchufe el electrodoméstico de
la corriente o desconecte la lavadora en el panel
de distribución de la vivienda quitando el fusible
o apagando el interruptor antes de realizar
cualquier tarea de mantenimiento o limpieza.
Nota: al pulsar el botón de apagado, NO
se desconecta la lavadora de la corriente.
n No intente en ningún caso utilizar la lavadora
si está dañada, funciona incorrectamente, está
parcialmente desmontada, le faltan piezas
o algunas están rotas, incluidos el cable
o el enchufe.
n No cierre la puerta bruscamente. No intente
forzar la puerta para abrirla cuando esté
bloqueada (el indicador LOCKED [Bloqueada]
está ENCENDIDO). Puede dañar la lavadora.
n La lavadora está equipada con un sistema de
protección de sobrecargas eléctricas. El motor
se detendrá si se recalienta. La lavadora
se iniciará de nuevo automáticamente después
de un período de enfriamiento de hasta 2 horas
si no se apaga manualmente durante ese
tiempo.
funcionamiento
instalaciÛn
soluciÛn de problemas
Instrucciones de
Instrucciones de
CUANDO NO ESTÉ EN USO
n Cierre los grifos de agua para aliviar la presión
sobre las mangueras y válvulas y para minimizar
las pérdidas si ocurriera una rotura o ruptura.
Verifique el estado de las mangueras de llenado; GE
recomienda cambiar las mangueras cada 5 años.
n Antes de deshacerse de una lavadora o de
desecharla, quite la puerta de la lavadora para
evitar que los niños se escondan en su interior.
n No intente reparar ni sustituir ninguna pieza
de este electrodoméstico, a menos que
se recomiende de manera explícita en el manual
del propietario o en instrucciones publicadas
de uso y reparación que sean comprensibles
y que pueda realizar usted.
n No manipule los controles.
LEA DETENIDAMENTE Y SIGA LA INFORMACIÓN
DE SEGURIDAD.
GUARDE ESTAS INSTRUCCIONES
Consejos para la
Servicio al consumidor
3
Page 30

Instrucciones de
El panel de control de la lavadora.
Busque la ilustración que más se ajusta a su modelo y para más detalles vea las descripciones de ciclo que
comienzan en la página 5.
14
1
seguridad
13
10
8
9
3
4 5
Instrucciones de
Instrucciones de
funcionamiento
instalaciÛn
2
1
2
1
7
11
13
7
11
13
6
12
10
8
9
6
12
10
8
9
3
3
4 5
4
5
Consejos para la
soluciÛn de problemas
4
Servicio al consumidor
2
7
11
6
12
Page 31

El panel de control de la lavadora GEAppliances.com
Encendido/apagado
1
Pulse este botón para “activar” la pantalla. Si la pantalla está activa, púlselo para poner la lavadora en modo
de espera.
NOTA: Al pulsar el botón de ENCENDIDO/APAGADO no se desconecta la lavadora de la corriente.
Ciclos de lavado
2
Los ciclos de lavado se han optimizado para tipos específicos de cargas de lavado. La siguiente tabla le
ayudará a combinar el tipo de lavado con las cargas. Los elevadores GentleClean™ hacen girar la ropa
suavemente en la solución de agua y detergente para limpiar la carga.
ROPA BLANCA/
RESISTENTES
ROPA DE COLOR/
NORMAL
LAVADO INTENSIVO
CUIDADO SENCILLO
[PLANCHADO
PERMANENTE]
ROPA DE EJERCICIO
PRENDAS
DELICADAS
LAVADO A MANO
LANAS LAVABLES
(algunos modelos)
LAVADO RÁPIDO
CENTRIFUGADO Y
DESAGÜE
ENJUAGADO Y
CENTRIFUGADO
(algunos modelos)
LIMPIEZA DE
TAMBOR
RENOVACIÓN POR
VAPOR
(Algunos modelos)
Para prendas de algodón, ropa de hogar, prendas de trabajo o deportivas de
color blanco con mucha o poca suciedad.
Para prendas de algodón, ropa de cama, prendas de trabajo o deportivas Para
prendas de algodón, ropa de cama, prendas de trabajo o deportivas
Para prendas de algodón, ropa de cama, prendas de trabajo o deportivas de
colores sólidos con mucha suciedad.
Para prendas en las que deseemos eliminar arrugas o conseguir un planchado
permanente.
Para prendas que se utilicen a la hora de practicar deportes, ejercicios, así
como algunas prendas sport. Entre los tejidos, se incluyen acabados y fibras de
última tecnología como spandex, telas elásticas y microfibras.
Para lencería y telas de cuidado especiales con poca o normal suciedad.
Proporciona una limpieza y un remojo suaves durante el lavado y el enjuagado.
Para prendas en las que se indique que se pueden lavar a mano con poca
suciedad. La ropa se sacude con ligereza a fin de imitar la acción del lavado a
mano.
Para lavar aquellos productos de lana lavables a máquina, siempre y cuando
se realice de acuerdo con las instrucciones de la etiqueta de la prenda. Cuando
seleccione este ciclo, debe utilizar un detergente apropiado para el lavado de la
lana.
Para prendas con poca suciedad que se necesiten en poco tiempo. La duración
del ciclo es de aproximadamente 30 minutos, dependiendo de las opciones
seleccionadas.
Para centrifugar y desaguar en cualquier momento.
Enjuague y centrifugue en cualquier momento
Utilícelo para limpiar el tambor de residuos y olor. Se recomienda su uso una
vez por mes.
Para estirar de 1 a 5 elementos de mezcla de algodón. Este no es un ciclo de
lavado, sino un ciclo que sólo aplica vapor a las prendas. La lavadora emitirá un
sonido cuando nalice el ciclo, y seguirá girando durante 30 minutos para evitar la
formación de arrugas. Presione Start/Pause (iniciar/pausa) para quitar las prendas.
Si la ropa queda ligeramente húmeda después de la nalización del ciclo, cuélguela
por aproximadamente 10 minutos antes de usarla.
seguridad
funcionamiento
instalaciÛn
soluciÛn de problemas
Instrucciones de
Instrucciones de
Instrucciones de
Consejos para la
Servicio al consumidor
5
Page 32

Instrucciones de
Instrucciones de
Instrucciones de
El panel de control de la lavadora.
Nivel de suciedad
3
Al cambiar el NIVEL DE SUCIEDAD, aumenta o disminuye el tiempo de lavado con el fin de eliminar
las distintas cantidades de suciedad.
Para cambiar el NIVEL DE SUCIEDAD, pulse el botón SOIL LEVEL (Nivel de suciedad) hasta obtener
seguridad
funcionamiento
instalaciÛn
el valor deseado. Puede elegir entre los niveles de suciedad Extra Light (Muy poca), Light (Poca), Normal
o Heavy (Mucha).
Velocidad de centrifugado
4
Al cambiar la Velocidad de centrifugado, cambia la velocidad final de centrifugado de los ciclos.
Siga siempre las indicaciones de la etiqueta de cuidado del tejido del fabricante al cambiar la
Velocidad de centrifugado.
Para cambiar la Velocidad de centrifugado, pulse el botón SPIN SPEED (Velocidad de centrifugado)
hasta obtener el valor deseado. Las velocidades de centrifugado más rápidas no están disponibles
en determinados ciclos, como Delicates (Prendas delicadas).
Con dichas velocidades, se elimina más agua de las prendas y se reduce el tiempo de secado, aunque
también puede aumentar la posibilidad de que se formen arrugas en algunos tejidos.
Temperatura de lavado
5
Ajuste este control para seleccionar la temperatura del agua adecuada para el ciclo de lavado. El agua
de prelavado y enjuagado está siempre fría para poder reducir el consumo de energía y las manchas
y arrugas.
Siga las indicaciones de la etiqueta de cuidado del tejido del fabricante al seleccionar la temperatura
de lavado.
Para cambiar la temperatura de lavado, pulse el botón WASH TEMP (Temperatura de lavado)
hasta obtener el valor deseado. La temperatura de lavado de desinfección no está disponible en
determinados ciclos, como Delicates (Prendas delicadas).
Al seleccionar la temperatura de Sanitize (Esterilización), la lavadora aumenta la temperatura
del agua para esterilizar y eliminar más del 99% de las bacterias que aparecen de forma frecuente
en los lavados hogareños. La temperatura de esterilización está disponible exclusivamente
en los ciclos de Stain Wash (Lavado de manchas) y Whites Wash (Lavado de prrendas blancas).
Para obtener mejores resultados, seleccione la configuración de suciedad excesiva cuando utilice
la opción de temperatura de Esterilización.
NOTA: Los 10 primeros segundos de la toma de agua, siempre está fría. Esta función permite
acondicionar el tejido y evitar que las manchas se adhieran a las prendas.
START/PAUSE (Iniciar/pausa)
6
Pulse este botón para iniciar un ciclo de lavado. Si la lavadora está en funcionamiento, al pulsarlo
una vez, la lavadora se detendrá y se desbloqueará la puerta. Vuelva a pulsar el botón para reiniciar
el ciclo de lavado.
NOTA: Si la lavadora está detenida y el ciclo no se reinicia en 2 horas, se cancelará el ciclo de lavado
actual.
NOTA: La lavadora realiza revisiones automáticas del sistema después de presionar el botón START
(Inicio). El flujo de agua se iniciará en 45 segundos o antes. Podrá escuchar la puerta al trabarse
y destrabarse antes de que comience a fluir el agua; esto es normal.
Consejos para la
Acerca de las funciones de la lavadora.
soluciÛn de problemas
NOTA: Puede que estas funciones no estén disponibles en todos los modelos de la lavadora.
7
8
Servicio al consumidor
6
Cycle Signal (Señal de ciclo)
Utilice el botón SIGNAL (Señal) para
cambiar el volumen de la señal de nal
del ciclo
Pre Wash (Prelavado)
El prelavado es un lavado adicional que
se realiza antes del lavado principal.
Utilícelo con prendas muy sucias o con
aquellas prendas en cuyas etiquetas
de cuidado se recomiende realizar
un prelavado. Asegúrese de añadir
detergente de alta eficacia o la sustancia
Pulse el botón hasta alcanzar el volumen
deseado.
de lavado correspondiente en la cubeta
de prelavado.
NOTA: Al seleccionar el prelavado, se
recomienda utilizar detergente en polvo
en el depósito de detergente del lavado
principal.
Page 33

Acerca de las funciones de la lavadora.
NOTA: Puede que estas funciones no estén disponibles en todos los modelos de la lavadora.
9
Extra Rinse (Enjuagado extra)
Utilice el botón SIGNAL (Señal) para
cambiar el volumen de la señal de nal
del ciclo.
Pulse el botón hasta alcanzar el
volumen deseado.
GEAppliances.com
Instrucciones de
seguridad
10
11
12
Delay Start (Retrasar inicio)
Se puede retardar el inicio de un ciclo
de lavado en 10–18 horas, dependiendo
del modelo. Pulse el botón DELAY START
(Retrasar inicio) para seleccionar el número
de horas que desee retardar el inicio del
ciclo y, a continuación, pulse el botón
START (Iniciar).La lavadora comenzará
la cuenta regresiva y se pondrá en
funcionamiento automáticamente a la
Lock (Bloquear)
Puede bloquear los controles para impedir
que se realice cualquier selección. O bien
puede bloquear los controles después de
haber iniciado un ciclo.
Con esta opción seleccionada, los niños
no podrán poner en marcha la lavadora
de manera fortuita aunque toquen el
panel.
Para bloquear la lavadora, presione
y sostenga el botón LOCK durante 3
MY CYCLE (MI CICLO) (en algunos modelos)
Para guardar el ciclo que preera,
establezca los valores deseados para los
ajustes de ciclo de lavado, nivel de suciedad,
velocidad de giro y temperatura de lavado
y mantenga pulsado el botón MY CYCLE (Mi
ciclo) durante 3 segundos. Sonará un pitido
para indicar que el ciclo se ha guardado.
Para utilizar el ciclo personalizado, pulse
el botón MY CYCLE (Mi ciclo) antes de
lavar una carga.
hora señalada.
NOTA: Si olvida cerrar por completo
la puerta, sonará una señal para
recordárselo.
NOTA: Si abre la puerta durante la cuenta
regresiva, la lavadora entrará en estado
de pausa. Debe cerrar la puerta y pulsar
de nuevo START (Iniciar) para reiniciar la
cuenta regresiva.
segundos.
Para desbloquear los controles de la
lavadora, presione y sostenga el botón
LOCK durante 3 segundos.
El icono de bloqueo de los controles que
aparece en la pantalla se encenderá
cuando esté activado.
NOTA: El botón de POWER (encendido/
apagado) puede seguir utilizándose
cuando la lavadora está bloqueada.
Para cambiar el ciclo guardado,
establezca los valores deseados y
mantenga pulsado el botón MY CYCLE (Mi
ciclo) durante 3 segundos.
NOTA: Al utilizar MY CYCLE (Mi ciclo), no se
pueden modicar las opciones de lavado una
vez que comience el ciclo.
NOTA: Si cambia las opciones de lavado
con MY CYCLE (Mi ciclo) antes de que el ciclo
comience, el indicador de MY CYCLE
(Mi ciclo) se apagará y volverá al ciclo base.
funcionamiento
instalaciÛn
soluciÛn de problemas
Instrucciones de
Instrucciones de
Consejos para la
13
LAVADO CON AHORRO DE
ENERGÍA
Utilice “e” WASH para ahorrar energía
en ciclos de lavado especícos. “e”
WASH no puede utilizarse con STEAM
14
STEAM ASSIST (ayuda de vapor)
(en algunos modelos)
STEAM ASSIST agrega vapor dentro de
la lavadora durante los ciclos WHITES/
HEAVY DUTY (blancos/resistentes),
COLORS/NORMAL (prendas de color/
normal), STAIN WASH (lavado de
manchas) o ACTIVE WEAR (ropa
deportiva).
Para usar:
1. Encienda el aparato (ON) y
seleccione un ciclo de lavado.
(en algunos modelos)
REFRESH (renovación por vapor), STAIN
WASH (lavado de manchas) y BASKET
WASH (lavado de tambor).
La opción STEAM ASSIST (ayuda de
vapor) sólo se encuentra disponible en
los ciclos WHITES/HEAVY DUTY (ropa
blanca/resistentes), COLORS/NORMAL
(prendas de color/normal), STAIN
WASH (lavado de manchas), ACTIVE
WEAR (ropa de ejercicio) o EASY CARE
(cuidado sencillo).
2. Seleccione el botón STEAM ASSIST
para activar Steam (vapor).
3. Presione el botón START/PAUSE
(iniciar/pausa).
Servicio al consumidor
7
Page 34

Instrucciones de
Instrucciones de
Instrucciones de
Acerca de las funciones de la lavadora.
Depósito de detergente
Abra lentamente el depósito de detergente
tirando de él hasta que se detenga.
seguridad
Agregue el
prelavado en esta
ubicación
Dispositivo de
inserción del
detergente
elegido
funcionamiento
Para colocar el detergente en polvo
instalaciÛn
HE retire el dispositivo de inserción
del detergente elegido y agregue el
polvo aquí.
Rieles de
Ajuste
Tras añadir los productos de lavado, ciérrelo
despacio. Si cierra el depósito demasiado rápido,
puede provocar que la lejía, el suavizante o el
detergente se administren antes de tiempo.
Compartimento de prelavado
n Utilice sólo el compartimento de prelavado si
va a seleccionar el ciclo Pre Wash (Prelavado)
para prendas muy sucias. Añada la cantidad
de detergente o de sustancia de prelavado al
compartimento de prevalado situado en la parte
posterior izquierda del depósito de detergente.
n El detergente o la sustancia de prelavado se
añaden desde el depósito durante el ciclo de
prelavado (en caso de que se seleccione).
Compartimento para el detergente
n Use sólo detergente con alto nivel de
eciencia en esta lavadora. NO supere
la línea MaX al colocar el detergente con
alto nivel de eciencia. Use la cantidad
de detergente recomendada por el
fabricante.
n Detergente en Polvo – Retire el espacio de
inserción del detergente elegido y coloque
el mismo en una ubicación segura afuera
de la lavadora. Siga las instrucciones
del fabricante de detergente al medir la
cantidad de polvo a usar.
n Detergente Líquido – Ubique la
concentración de su detergente en
la botella. Coloque el espacio de
inserción del detergente en la ubicación
correspondiente, dependiendo del nivel de
concentración.
n Mueva el espacio de inserción empujando
hacia afuera y reemplazando el mismo al
Es posible que observe agua en los
compartimentos de lejía y suavizante al nal del
ciclo. Este es el resultado de la acción de trasvase
y forma parte del funcionamiento normal de la
lavadora.
Use sólo detergente de alta
eciencia HE.
NOTA: El detergente líquido se vaciará en el tambor
de la lavadora a medida que se añada.
n Es posible que haya que ajustar el uso de
detergente a la temperatura del agua, a la
dureza de la misma, al tamaño y al nivel de
suciedad de la carga. Evite utilizar demasiado
detergente en la lavadora ya que puede
producir demasiado jabón y dejar restos
en las prendas.
deslizarlo entre los dos rieles del
compartimiento para detergente.
Asegúrese de empujar el espacio
de inserción en la parte inferior del
compartimiento, de modo que llegue hasta
el nal del compartimiento. No será un
problema que el detergente gotee afuera
del espacio de inserción sobre la parte
trasera del compartimiento.
n Es posible que el uso del detergente se
deba ajustar con relación a la temperatura
del agua, dureza del agua, tamaño y
nivel de suciedad de la carga. Evite usar
demasiado detergente en la lavadora,
ya que puede producir exceso de jabón,
residuos de detergente en la ropa, y podría
extender los tiempos de lavado.
n No use grandes cantidades de detergente
en el dispositivo de suministro de jabón, ya
que pueden provocar escapes.
Para detergente líquido HE que no es
concentrado, coloque el accesorio en la
posición “1X”.
Consejos para la
soluciÛn de problemas
Para colocar detergente líquido
HE 2 X, coloque el espacio de
inserción en la posición “2X”
Compartimento para lejía líquida
Si lo desea, mida la cantidad recomendada
de lejía líquida, que no sobrepase 1/3 del
recipiente (80 ml) y viértala en el compartimento
central con la etiqueta “Liquid Bleach” (Lejía
líquida) marcado con este símbolo .
Compartimento para el suavizante
Si lo desea, vierta la cantidad recomendada
de suavizante líquido en el compartimento
con la etiqueta “Fabric Softener” (Suavizante).
Utilice sólo suavizante líquido en el depósito.
8
Servicio al consumidor
Dilúyalo con agua hasta la línea de llenado
máximo.
Para colocar detergente líquido
HE 3 X, coloque el espacio de
inserción en la posición “3X”
Se recomienda el uso de lejía de alta eciencia
(HE) con esta lavadora de carga frontal.
No sobrepase la línea de llenado máximo. Un
llenado excesivo puede hacer que la lejía se
administre demasiado pronto y, como resultado,
dañe las prendas.
NOTA: No utilice lejía en polvo en el depósito.
No sobrepase la línea de llenado máximo. Un
llenado excesivo puede hacer que el suavizante
se administre demasiado pronto y manche las
prendas.
NOTA: No vierta directamente el suavizante
sobre la carga.
Page 35

GEAppliances.com
The Fabric Softener
Compartment
Si lo desea, vierta la cantidad recomendada
de suavizante líquido en el compartimento
con la labeled con la etiqueta “FABRIC
SOFTENER” (Suavizante)
Utilice sólo suavizante líquido en el depósito.
Dilúyalo con agua hasta la línea de llenado
máximo
No sobrepase la línea de llenado máximo.
Un llenado excesivo puede hacer que
el suavizante se administre demasiado
pronto y manche las prendas.
NOTE: Do not pour fabric softener directly
on the wash load.
Carga y uso de la lavadora.
Siga siempre las indicaciones de la etiqueta de cuidado del tejido del fabricante en el lavado y el planchado.
Separación de cargas
Ordene la ropa sucia en cargas que se puedan lavar juntas.
Instrucciones de
seguridad
Instrucciones de
funcionamiento
Colores
Ropa blanca
Ropa de colores
claros
Ropa de colores
oscuros
n Combine las prendas grandes y pequeñas en cada carga. Cargue primero las prendas grandes. Las
prendas grandes no deben representar más de la mitad de la carga total de lavado.
n No se recomienda lavar prendas sueltas. Esto puede producir una carga desequilibrada. Añada una o
dos prendas similares.
n Las almohadas y los edredones no deben mezclarse con otras prendas. Esto puede producir una carga
desequilibrada.
Suciedad
Mucha
Normal
Poca
Tejido
Prendas
delicadas
Prendas de fácil
cuidado
Prendas
resistentes de
algodón
Pelusas
Prendas que
sueltan pelusa
Prendas a las
que se adhiere la
pelusa
Preparación de las prendas
Siga estos pasos para maximizar el cuidado de las prendas.
nPara evitar enganches durante el lavado:
• Cierre las cremalleras, broches, botones y ganchos.
• Arregle las costuras, dobladillos y rasgones.
• Vacíe todos los elementos de los bolsillos.
• Quite los accesorios no lavables de las prendas tales como adornos y materiales de ribetes no lavables.
nPara evitar los enredos, ate los cordones, hebillas y materiales tipo cinturón.
nLimpie suciedad y pelusas superciales con un cepillo; trate las manchas.
nLave rápidamente las prendas húmedas o manchadas para maximizar los resultados.
nMezcle las prendas utilizando los tamaños máximos recomendados de carga en la página 10
nUtilice bolsas para prendas de malla de nylon para lavar elementos pequeños.
nPara un mejor resultado, lave muchas prendas al mismo tiempo.
Instrucciones de
instalaciÛn
soluciÛn de problemas
Consejos para la
Servicio al consumidor
9
Page 36

Instrucciones de
Cómo cargar y utilizar la lavadora.
Loading the Washer
seguridad
Puede que el tambor de la lavadora esté totalmente
lleno con prendas sueltas que se añadan. No lave
tejidos que contengan materiales inamables
(ceras, líquidos de limpieza, etc.).
Tamaños de carga máximos*
Para añadir prendas una vez que la lavadora esté
en marcha, pulse START/PAUSE (Iniciar/pausa)
y espere hasta que se desbloquee la puerta.
La lavadora puede tardar unos 30 segundos
en desbloquear la puerta después de pulsar
START/PAUSE (Iniciar/pausa) dependiendo de
las condiciones de la misma. No intente forzar la
puerta para abrirla cuando esté bloqueada. Una
vez que se desbloquee, ábrala con cuidado. Añada
prendas, cierre la puerta y pulse START/PAUSE
(Iniciar/pausa) para reiniciar el funcionamiento.
Instrucciones de
Instrucciones de
Consejos para la
funcionamiento
instalaciÛn
soluciÛn de problemas
ROPA
DE TRABAJO
4 Jeans
5 camisas
de trabajo
5 pantalones
de trabajo
ROPA
DE CAMA
2 toallones
grandes
10 toallas de
baño/
12 toallitas
7 toallas de mano/
2 alfombras de
baño de toalla
O
2 sábanas rectas
tamaño Queen
2 sábanas
ajustables
tamaño Queen
4 fundas
de almohada
CARGA MIXTA
4 fundas de
almohada
2 toallas de mano
2 sábanas rectas/
2 sábanas
ajustables
2 toallas de baño/
4 toallitas
O
6 camisas
(de hombre
o de mujer)
4 pantalones
(Khakis o
de sarga)
5 camisetas
7 boxers
4 shorts
O
6 camisetas
4 pantalones
de gimnasia
4 sudaderas
2 sudaderas
con capucha
7 pares de medias
DELICADOS**
7 sostenes
7 pantaletas
3 enaguas
2 camisolas
4 camisones
LAVADO RÁPIDO
(2–4 PRENDAS)
2 camisas de
trabajo informales
1 pantalón de
trabajo informal
O
3 uniformes
de fútbol
*Superar los tamaños máximos recomendados de carga puede afectar el desempeño de limpieza y el cuidado de
la prenda.
**Se recomienda el uso de una bolsa de malla de nylon para elementos pequeños.
10
Servicio al consumidor
Page 37

Limpieza de la lavadora. GEAppliances.com
Cuidado y limpieza
Exterior: Limpie inmediatamente cualquier vertido. Utilice un trapo húmedo. No aplique objetos afilados
a la superficie.
Desplazamiento y almacenamiento: Pida al técnico de servicio que elimine el agua de las tuberías
y la bomba de desagüe. No guarde la lavadora en un lugar donde esté expuesta a las inclemencias
climáticas. Al mover la lavadora, la cuba debe mantenerse estable utilizando los pernos de transporte
que se han extraído durante la instalación. Consulte las Instrucciones de instalación en este manual.
Instrucciones de
seguridad
Largas vacaciones: Asegúrese de cortar el agua de todas las llaves de paso. Vacíe todas las tuberías
de agua si la temperatura va a encontrarse por debajo de cero grados.
Cómo limpiar la parte interior e la
lavadora
Para limpiar la parte interna de la
lavadora, seleccione la característica
BasketClean (limpieza de tambor) del
panel de control. El ciclo usa más agua,
además de lejía, para refrescar su
lavadora.
NOTA: Lea las instrucciones por completo
antes de comenzar el ciclo BasketClean.
Quite las prendas u objetos de la
1.
lavadora y verique que el tambor de la
lavadora se encuentre vacío.
2. Abra la puerta de la lavadora y vierta
en la canasta una taza o 250 ml de
líquido blanqueador u otro limpiador
para lavadoras.
3. Cierre la puerta por completo y vuelva
a iniciar el ciclo BasketClean. Presione
el botón START (inicio).
4. Cuando el ciclo BasketClean se
encuentra en funcionamiento, podrá
verse ESTIMATED TIME REMAINING
(tiempo restante estimado) en la
pantalla. No interrumpa el ciclo.
5. Después de nalizado el ciclo, deje la
puerta un poco abierta para una mejor
ventilación..
Si por alguna razón debe interrumpirse el
ciclo, la puerta no se abrirá de inmediato.
Tratar de abrir la puerta en esta etapa
puede hacer que el agua se derrame. La
puerta se abrirá después de que el agua
haya drenado hasta un nivel en el que no
inunde el piso.
BasketClean puede interrumpirse
presionando el botón START/PAUSE
(inicio/pausa) entre ciclos. Un corte de
energía en el hogar también puede
interrumpir el ciclo. Cuando se reanuda
el servicio eléctrico, el ciclo BasketClean
continúa desde el punto en el que se
había detenido. Cuando se interrumpe,
asegúrese de realizar un ciclo completo de
BasketClean antes de utilizar la lavadora.
Si se presiona el botón POWER (encendido)
durante
BasketClean, el ciclo se perderá.
IMPORTANTE:
n
Haga funcionar el ciclo BasketClean
con 1 taza (250 ml) de lejía una vez por
mes. .
n
Después de nalizar un ciclo
BasketClean, la parte interior de su
lavadora puede tener olor a lejía.
n
Se recomienda lavar una carga de
colores claros después del ciclo
BasketClean.
funcionamiento
instalaciÛn
soluciÛn de problemas
Instrucciones de
Instrucciones de
Consejos para la
Servicio al consumidor
11
Page 38

Instrucciones de
Instrucciones de
Cómo limpiar la lavadora.
Cómo limpiar el ltro de la bomba
Debido a la naturaleza de la lavadora
de carga frontal, es posible que a veces
seguridad
funcionamiento
Pico
vertedor
pasen partículas pequeñas a la bomba.
La lavadora cuenta con un filtro para
capturar los elementos perdidos para que
no caigan en el drenaje. Para recuperar
los elementos perdidos, limpie el filtro de
la bomba.
1. Utilizando un destornillador de lados
planos, abra la puerta de acceso.
2. Coloque una bandeja o plato poco
profundos bajo la puerta de acceso y
toallas en el piso frente a la lavadora
para proteger el piso. Es normal que
salga alrededor de una taza de agua
cuando se quita el filtro.
3. Baje el pico vertedor.
Filtro de la
bomba
Instrucciones de
Consejos para la
4. Gire el filtro de la bomba en sentido
contrario a las agujas del reloj y quite
Pico
vertedor
instalaciÛn
soluciÛn de problemas
12
Servicio al consumidor
el filtro lentamente, controlando el flujo
del agua que sale.
5. Quite el filtro y limpie las suciedades.
6. Vuelva a colocar el filtro y gire en
sentido de las agujas del reloj. Ajuste
bien.
7. Eche al aire arriba el vierte chorro.
8. Cierre la puerta de acceso
enganchando las lengüetas del fondo
primero, luego girando y cerrando la
puerta de acceso.
Cleaning the Door Gasket
Abra la puerta de la lavadora. Usando
ambas manos, presione la junta de la
puerta hacia abajo. Quite los objetos
extraños que encuentre atrapados dentro
de la junta. Asegúrese de que no haya
ningún objeto bloqueando los oricios
ubicados detrás de la junta.
Mientras presiona la junta de la puerta
hacia abajo, inspeccione la junta interior
jalándola hacia abajo con los dedos.
Quite los objetos extraños que encuentre
atrapados dentro de esta junta. Asegúrese
de que no haya ningún objeto bloqueando
los oricios ubicados detrás de la junta.
Cuando haya terminado de limpiar la junta
de la puerta, quite las manos y la junta
volverán a la posición de funcionamiento.
Page 39

GEAppliances.com
Zona del depósito de detergente: El detergente y el suavizante pueden acumularse
en el depósito de detergente. Los residuos deben eliminarse una o dos veces al
mes.
n Saque el depósito tirando de él hasta que se detenga. En la esquina trasera
izquierda de la cavidad del cajón, presione rmemente en la pestaña de
bloqueo y tire a la vez del depósito.
Instrucciones de
seguridad
La lengüeta de bloqueo sólo es
visible tras sacar el depósito
n Extraiga las piezas de los compartimentos para lejía y suavizante, así como
la pieza del detergente. Lave las piezas y el depósito con agua caliente para
eliminar los restos de productos de limpieza acumulados.
n Para limpiar la abertura del depósito, utilice un cepillo pequeño a n de limpiar
los huecos. Retire todos los restos de las partes superior e inferior del hueco
n Vuelva a colocar las piezas en los compartimentos correspondientes. Introduzca
de nuevo el depósito de detergente.
funcionamiento
instalaciÛn
soluciÛn de problemas
Instrucciones de
Instrucciones de
13
Consejos para la
Servicio al consumidor
Page 40

Instrucciones
Lavadora
de instalación
Si tiene alguna pregunta, llame a 800.GE.CARES (1.800.432.2737) o visite nuestro sitio Web en: GEAppliances.com
ANTES DE COMENZAR
Lea detenidamente todas las instrucciones.
• IMPORTANTE – Guarde estas instrucciones para uso
del inspector local.
• IMPORTANTE – Cumpla todos los códigos y
ordenanzas regulatorias.
• Nota al instalador – Asegúrese de dejar estas
instrucciones al usuario.
• Nota al usuario – guarde estas instrucciones para
consultas futuras.
• Nivel de habilidad – la instalación de este
electrodoméstico requiere habilidades mecánicas y
eléctricas básicas.
• Duración – de 1 a 3 horas
• La instalación adecuada es responsabilidad del
instalador.
• La garantía no cubre fallas producidas por la
instalación inadecuada del producto.
PARA SU SEGURIDAD:
¡ADVERTENCIA!
HERRAMIENTAS NECESARIAS PARA LA
INSTALACIÓN DE LA LAVADORA
o Llave para tuercas de 1/4”
o Toma de corriente con trinquete de 3/8”
o Llave de boca de 3/8”
o Llave inglesa o toma de corriente con trinquete de 7/16”
o Llave inglesa o llave de boca de 9/16”
o Alicates ajustables Channel-lock
o Nivel de carpintero
PIEZAS INCLUIDAS
o Abrazadera de cable
o Tuberías de agua (2)
• Este electrodoméstico se debe conectar a tierra e
instalar correctamente tal y como se describe en
estas Instrucciones de instalación.
• No instale ni guarde este electrodoméstico en una
zona en la que esté expuesto al agua o al exterior.
Consulte la sección Ubicación de la lavadora.
• NOTA: Este electrodoméstico debe estar
correctamente conectado a tierra y la corriente
eléctrica de la lavadora debe cumplir los códigos y
ordenanzas locales, así como la última edición del
Código eléctrico nacional, ANSI/NFPA 70.
o Guía de tuberías
KIT DE SOPORTE DE APILADO
Un kit de soporte de apilado se encuentra disponible
a un costo adicional. Puede solicitarse en los Estados
Unidos visitando nuestro sitio Web en ge.com o
llamando a 800.GE.CARES. Solicite el kit #WE25X10018 o
STACKITIWW.
14
Page 41

Instrucciones de instalación
27” (68.58 cm)
39.8” (101.1 cm)
UBICACIÓN DE LA LAVADORA
No instale la lavadora:
1.En un área expuesta a goteras o a las condiciones del
exterior. La temperatura ambiente no debe ser nunca
inferior a 60°F (15,6°C) para que la lavadora funcione
correctamente.
2. En una zona en la que pueda entrar en contacto con
cortinas u otras telas.
3.Sobre una alfombra. El suelo DEBE ser una superficie
dura con una inclinación máxima de 1/2” por pie
(1,27 cm por cada 30 cm). Para asegurarse de que la
lavadora no vibre ni se mueva, es posible que
tenga que reforzar el suelo.
NOTA: Si el suelo se encuentra en mal estado, utilice
una plancha con 3/4” de contrachapado bien fija al
revestimiento existente en el suelo.
IMPORTANTE:
Distancias mínimas de separación para la
instalación
• Cuando se instale en alcoba: costados, parte trasera,
parte superior = 0” (0 cm)
DIMENSIONES APROXIMADAS
PARTE DELANTERA
27” (68.58 cm)
39.8” (101.1 cm)
• Cuando se instale en un armario: costados, parte
trasera, parte superior = 0” (0 cm), parte delantera = 1”
(2,54 cm)
• Aberturas de ventilación necesarias en la puerta del
armario:
2 listones, cada uno de 60 pulgadas cuadradas
(387 cm2), situados a 3” (7,6 cm) de las partes superior
e inferior de la puerta
COSTADO
34” (86.36 cm)
*NOTA:
Con las patas de la lavadora: 40.5” (102.5 cm)
(0.75” de posibilidad de ajuste)
Con pedestal: 53.75” (136.6 cm)
(0.75” de posibilidad de ajuste)
Apilada: 82.75” (209.8 cm)
0.83” (2.1 cm)
39” (99.06 cm)
39.8” (101.1 cm)
15
Page 42

Instrucciones de instalación
DESEMBALAJE DE LA LAVADORA
¡ADVERTENCIA! Recicle o
deseche la caja de cartón y las bolsas de plástico una
vez que haya desembalado la lavadora. Mantenga
estos materiales fuera del alcance de los niños, pues
éstos podrían utilizarlos para jugar. Las cajas de cartón
cubiertas con mantas, colchas o láminas de plástico
pueden convertirse en cámaras de aire herméticas y
producir asxia.and bottom packaging straps.
1. Corte y retire las bandas de embalaje superiores e
inferiores.
2. Mientras se encuentre dentro de la caja, coloque con
cuidado la lavadora sobre el costado de la misma.
NO la tumbe por la parte delantera ni trasera.
3. Abra las tapas inferiores y retire todo el embalaje de la
base, incluido el cartón, la base y el soporte de la cuba
de espuma de poliestireno (insertado en el centro de
la base).
NOTA: Si va a instalar una plataforma, continúe con
las instrucciones de instalación correspondientes de la
misma.
4. Vuelva a levantar la lavadora con cuidado y retire la
caja de cartón.
5. Desplace poco a poco la lavadora hasta 4 pies (122
cm) de su ubicación definitiva.
6. Quite las siguientes piezas de la parte trasera de la
lavadora:
4 pernos
4 separadores de plástico (incluidas las arandelas
de goma)
4 sujeciones del cable de alimentación
REQUISITOS ELÉCTRICOS
Lea detenidamente todas las instrucciones
¡ADVERTENCIA!
PARA MINIMIZAR EL RIESGO DE INCENDIO, DESCARGA
ELÉCTRICA O LESIONES PERSONALES:
• NO USE UN ENCHUFE ADAPTADOR O UN CABLE DE
EXTENSIÓN CON ESTE ELECTRODOMÉSTICO.
La lavadora debe ser conectado a tierra de acuerdo
con todos los códigos y ordenanzas locales o, a falta
de normativa local, con el Código eléctrico nacional
(National Electrical Code) ANSI/NFPA NO. 70.
CIRCUITO – circuito derivado de 15 amperios individual,
correctamente polarizado y conectado a tierra, con
interruptor o fusible de retardo de 15 amperios.
ALIMENTACIÓN ELÉCTRICA – corriente alterna de 60 Hz,
monofásica, de 120 voltios, con conexión a tierra, bilar.
RECEPTÁCULO DE SALIDA –
receptáculo correctamente
conectado a tierra con 3 clavijas,
situado de forma que se pueda
acceder al cable de alimentación
cuando la lavadora esté instalada.
REQUISITOS DE CONEXIÓN A TIERRA
NOTA: Si se retiran incorrectamente los pernos de
transporte, puede que la lavadora se vea gravemente
desequilibrada.
Guarde todos los pernos para uso futuro.
NOTA: Si necesitara transportar la lavadora
posteriormente, debe volver a colocar las piezas de
sujeción para el transporte con el n de evitar daños
durante el mismo. Guarde dichas piezas en la bolsa de
plástico que se incluye
Si pierde los pernos de embalaje, existen reemplazos
disponibles a un costo adicional. Pueden solicitarse en los
Estados Unidos visitando nuestro sitio Web en ge.com o
llamando a 800.GE.CARES. Solicite el kit #WH49X10039.
¡ADVERTENCIA! La conexión
incorrecta del conductor de tierra del equipo puede
causar riesgos de descargas eléctricas. Consulte a
un electricista calicado si tiene dudas acerca de la
conexión a tierra correcta del electrodoméstico.
1. La lavadora DEBE estar conectada a tierra. En caso de un
mal funcionamiento o avería, la conexión a tierra
reducirá el riesgo de descargas eléctricas al proporcionar
un recorrido de resistencia mínima a la corriente eléctrica.
2. Debido a que la lavadora está equipada con un cable
de alimentación que tiene un conductor para conexión
a tierra y una clavija de conexión a tierra, la clavija
se DEBE enchufar en el receptáculo de hilo de cobre
apropiado que se haya instalado y conectado a tierra
correctamente de acuerdo con todos los códigos y
ordenanzas locales o, a falta de normativa local, con el
Código eléctrico nacional, ANSI/NFPA 70 (última edición).
En caso de duda, llame a un electricista calicado. NO
corte ni modique la clavija de conexión a tierra del cable
de alimentación. En situaciones en las que exista un
receptáculo de dos ranuras, es responsabilidad del
propietario que un electricista calicado lo sustituya por
un receptáculo apropiado de tipo de conexión a tierra
para tres clavijas.
16
Page 43

Instrucciones de instalación
REQUISITOS DE SUMINISTRO DE AGUA
Las llaves de paso de agua caliente y fría DEBEN
encontrarse a 42 pulgadas (107 cm) como máximo de la
toma de agua de la lavadora. Las llaves de paso DEBEN
ser de 3/4≤ (1.9 cm) y tipo jardín para que se puedan
conectar las tuberías de entrada. La presión del agua
DEBE estar entre 10 y 120 libras por pulgada cuadrada.
La compañía de agua puede informarle de la presión del
agua. La temperatura del agua caliente se debe establecer
para suministrar agua a una temperatura de entre 120° y
140°F (48°– 60°C) para brindar un desempeño adecuado del
control automático de temperatura (ATC).
NOTE: A water softener is recommended to reduce buildup of
scale inside the steam generator if the home water supply is
very hard.
REQUISITOS DE DESAGÜE
1. Desagüe capaz de eliminar 17 galones (64,3 l) por minuto.
2. Diámetro mínimo de tubería vertical de 1 1/4” (3,18 cm).
3. La altura de la tubería vertical desde el suelo debe ser:
Altura mínima: 24” (61 cm)
Altura máxima: 96” (244 cm)
INSTALACIÓN DE LA LAVADORA
1. Deje correr un poco de agua de los grifos de agua
caliente y fría para purgar las tuberías de agua y
eliminar las partículas que puedan obstruir los ltros
de la válvula de agua.
2. Saque las tuberías de entrada de la bolsa de plástico.
3. (Extremo acodado de
90°) Conecte con cuidado
la tubería de entrada
marcada con HOT (Caliente)
a la salida “H” exterior de la
válvula de agua. Apriete con
la mano y, a continuación,
apriete 2/3 de vuelta con
los alicates. Conecte con
cuidado la otra tubería de entrada a la salida “C”
interior de la válvula de agua. Apriete con la mano y,
a continuación, apriete 2/3 de vuelta con los alicates.
No pase las roscas ni apriete excesivamente estas
conexiones.
4. Conecte los extremos de la tubería de entrada a
las tomas de agua CALIENTE y FRÍA ajustándolos
conla mano y, a continuación, apriete de nuevo 2/3
de vuelta con los alicates. Abra la llave de paso y
compruebe que no hay ninguna fuga.
PARTE TRASERA
96 in.
(244 cm)
Max.
24 in.
(61 cm)
Min.
NOTA: La tubería de desagüe de la lavadora puede alcanzar
la altura de una tubería vertical de 58≤ (147 cm). Para una
tubería vertical más alta, póngase en contacto
con un distribuidor de piezas autorizado
5. Traslade con cuidado la lavadora a su ubicación
final. Desplace la lavadora a su lugar con delicadeza.
Resulta importante no dañar las patas de nivelación
de goma cuando desplace la lavadora a su ubicación
final. Las patas dañadas pueden aumentar la
vibración de la lavadora. Puede resultar útil pulverizar
limpiador de ventanas sobre el piso para ayudar a
desplazar la lavadora a su posición final.
NOTA: Para reducir la vibración, asegúrese de que las
cuatro patas niveladoras de goma estén tocando el suelo
firmemente. Presione y tire de la parte trasera derecha y
luego de la parte trasera izquierda de su lavadora
NOTA: No utilice el cajón del depósito o la puerta para
levantar la lavadora.
NOTA: Si realiza la instalación en una bandeja colectora,
usted puede usar una de 2x4 de 24 pulg. de largo para
nivelar la lavadora en su lugar.
17
Page 44

Instrucciones de instalación
INSTALACIÓN DE LA LAVADORA (cont.)
6. Una vez situada la lavadora en su posición final,
coloque un nivel en la parte superior de la misma (si está
instalada debajo de un contador, la lavadora no debería
vibrar). Ajuste los soportes de nivelación delanteros hacia
arriba o hacia abajo para asegurarse que la lavadora se
apoya en una superficie sólida. Gire las contratuercas de
cada soporte hacia la base de la lavadora y apriételas
con una llave.
NOTA: Mantenga la extensión de los soportes al
mínimo para evitar una vibración excesiva. Cuanto
más se extiendan los soportes, más vibrará la
lavadora.
Si el suelo no está nivelado o está dañado, puede
que sea necesario extender los soportes de nivelación
traseros.
7. Coloque la guía de la tubería en forma de U en el
extremo de la tubería de desagüe. Coloque la tubería
en una pila de lavar o tubería vertical y sujétela con
la abrazadera de cable que se proporciona en el
paquete adjunto.
NOTA: Colocar la manguera de drenaje muy debajo de la
tubería de drenaje puede provocar un efecto de sifón. No
debe haber más de 7 pulgadas de manguera en la tubería
de drenaje. Debe haber un espacio de aire alrededor de la
manguera de drenaje. Si la manguera está muy ajustada,
también puede provocarse un efecto de sifón.
8. Enchufe el cable de alimentación en una salida de
conexión a tierra.
NOTA: Asegúrese de que la alimentación está
cortada en un interruptor/caja de fusibles antes de
enchufar el cable de alimentación a una toma de
corriente.
9. Conecte la alimentación a un interruptor/caja de
fusibles.
10. Lea el resto del Manual del propietario. Contiene
información valiosa y útil que supondrá un ahorro
de tiempo y dinero..
11. Antes de poner en funcionamiento la lavadora,
asegúrese de comprobar lo siguiente:
o La alimentación está conectada.
o La lavadora está enchufada
o Las llaves de paso están abiertas
o La lavadora está nivelada y que cada una de las
cuatro patas niveladoras estén en contacto con
el piso.
o Las piezas de sujeción para el transporte se han
quitado y guardado.
o La tubería de desagüe se ha asegurado
correctamente
o No existe ninguna fuga en la llave de paso, la
tubería de desagüe ni la lavadora.
12. Ponga en funcionamiento la lavadora en un ciclo
completo. Compruebe que no haya fugas de agua
y que funcione correctamente
13. Si la lavadora no funciona, revise la sección Antes
de llamar al servicio de asistencia técnica antes
de ponerse en contacto con el servicio de asistencia
técnica.
14. Coloque las instrucciones en un lugar próximo
a la lavadora para futuras consultas.
Abrazadera
de cable
Abrazadera de
cable
PIEZAS DE REPUESTO
Si se necesitan piezas de repuesto para la lavadora,
se pueden solicitar en Estados Unidos a través del sitio
Web ge.com o llamando a 800.GE.CARES.
Abrazadera de
cable
18
Page 45

Instrucciones de instalación
CONTROL DE VIBRACIÓN ADAPTATIVO
Su lavadora GE se encuentra equipada con Tecnología
de Control de Vibración Adaptativo. Al usar información
sobre el piso, el sistema puede reducir la vibración y
mejorar el desempeño giratorio en algunas instalaciones
adaptándose al ciclo giratorio. La configuración DEFAULT
(predeterminada) se encuentra especialmente diseñada
para brindar un desempeño óptimo a través de una amplia
gama de tipos de pisos. Siga el procedimiento de abajo
para activar configuraciones adaptativas más específicas.
Su lavadora puede volverse rápida y fácilmente a la
configuración DEFAULT (predeterminada) en cualquier
momento utilizando el mismo procedimiento.
SELECCIÓN DE TIPO DE PISO
1. Con la unidad apagada, presione y sostenga los
botones EXTRA RINSE (enjuague extra) y SPIN
(centrifugado) al mismo tiempo durante 3 segundos.
3. Gire la perilla de ciclos y seleccione PE1 o PE2 para el
pedestal. Presione el botón START (iniciar) para hacer
la selección; PE1 es SÍ y PE2 es NO.
Perilla de ciclos
Encendido
2. Gire la perilla de ciclos y seleccione FL1, FL2, FL3, o
FL4. Presione el botón de START (iniciar) para hacer
la selección. Ver la tabla de abajo para consultar las
instalaciones sugeridas.
FL1 Predeterminada**
FL2 Piso de concreto
FL3 Piso de madera resistente
FL4 Piso de madera normal
**La selección predeterminada es aceptable para la mayoría de las
instalaciones.
Enjuague extra y centrifugado
19
Page 46

Antes de llamar al servicio de asistencia técnica…
Consejos para la solución de problemas
¡Ahorre tiempo y dinero! Consulte primero las tablas
de las páginas siguientes y quizás no necesite llamar al
servicio de asistencia técnica.
seguridad
Instrucciones de
Instrucciones de
Problema Causas posibles Solución
No hay drenaje.
No hay rotación.
No hay agitación
funcionamiento
Fugas de agua La junta de la puerta está
La carga está desequilibrada
La bomba está tapada
La manguera de drenaje
está torcida o mal
conectada
El drenaje de la vivienda
puede estar obstruido
La manguera de drenaje
hace efecto sifón; la
manguera de drenaje
se ha empujado muy
profundamente dentro del
drenaje.
dañada
La junta de la puerta no está
dañada
• Redistribuya las prendas y accione el drenaje y centrifugado o
enjuague y centrifugado.
• Aumente el tamaño de la carga si lava una carga pequeña que
contiene elementos pesados y livianos
• Ver la página 12 sobre cómo limpiar el ltro de la bomba.
• Enderece la manguera de drenaje y verique que la lavadora no la
esté aplastando.
• Controle la cañería de la vivienda. Quizás deba llamar a un
plomero.
• Verique que haya un espacio de aire entre la manguera y el
drenaje.
• Revise que la junta esté colocada en su sitio y que no se haya
roto. Los objetos dejados en los bolsillos podrían lcausar daños a la
lavadora (clavos, tornillos, lápices, bolígrafos).
• El agua podría gotear de la puerta cuando la misma está abierta.
Esto forma parte del funcionamiento normal.
• Con cuidado limpie el burlete de la puerta. A veces, en el mismo
queda suciedad o ropa que pueden provocar un pequeño goteo.
Instrucciones de
Consejos para la
instalaciÛn
soluciÛn de problemas
Revise la parte posterior
izquierda de la lavadora
para vericar si hay
presencia de agua
Las tuberías de toma
de agua o la tubería
de desagüe no se han
conectado correctamente
Puede que la tubería de
desagüe de la vivienda esté
obstruida
Dispensador tapado
Uso incorrecto del
detergente
Fisura en el dispositivo de
suministro de jabón
• Si esta área se encuentra mojada, existe una condición de espuma
excesiva. Utilice menos cantidad de detergente.
• Asegúrese de que se han apretado correctamente las conexiones
de las tuberías de la lavadora y las llaves de paso y que el extremo
de la tubería de desagüe se ha introducido y jado correctamente al
desagüe.
• Compruebe las tuberías de la vivienda. Puede que sea necesario
llamar a un plomero
• El jabón en polvo puede provocar atascos dentro del dispensador y
hacer que salga agua desde el frente del dispensador. Retire el cajón
y limpie tanto el interior del cajón como de la caja de suministro. Lea
el capítulo de Limpieza de la Lavadora (Cleaning Washer).
• Utilice detergente de alta ecacia y la cantidad correcta de
detergente.
• Si se trata de una instalación nueva, controle que no haya suras
dentro de la caja del dispositivo de suministro.
20
Servicio al consumidor
Page 47

GEAppliances.com
Problema Causas posibles Solución
Las prendas
están demasiado
mojadas
La carga se encuentra
desbalanceada
• Redistribuya las prendas y realice un ciclo drain & spin (drenar
y girar) o rinse & spin (enjuagar y girar).
• Aumente el tamaño de la carga si va a lavar una carga
pequeña compuesta de elementos pesados y livianos.
• La máquina reducirá la velocidad de giro a 410 rpm, si se
presentan problemas para equilibrar la carga. Esta velocidad es
normal.
Instrucciones de
seguridad
Ciclo o
temporizador
incompleto
Obstrucción de la bomba
Sobrecarga
La tubería de desagüe está
torcida o no se ha conectado
correctamente
Puede que la tubería de
desagüe de la vivienda esté
obstruida
La manguera de drenaje está
un sifón; la manguera de
drenaje fue introducida de
manera demasiado profunda
en el drenaje
Redistribución automática de
carga
Obstrucción de la bomba
La tubería de desagüe está
torcida o no se ha conectado
correctamente
• Para obtener información sobre la limpieza del Filtro de la
Bomba, lea la página 12.
• El peso seco de la carga debe ser inferior a las 16 lbs.
• Enderece la tubería de desagüe y asegúrese de que la
lavadora no está situada sobre la misma.
• Compruebe las tuberías de la vivienda. Puede que sea
necesario llamar a un plomero.
• Asegúrese de que haya un espacio de aire entre la manguera
y el drenaje.
• El temporizador agrega 3 minutos al ciclo, la máquina ha
distribuido la carga once o quince veces. Esto forma parte
del funcionamiento normal. No debe hacer nada; la máquina
terminará el ciclo de lavado.
• Para obtener información sobre la limpieza del Filtro de la
Bomba, lea la página 12.
• Enderece la tubería de desagüe y asegúrese de que la
lavadora no está situada sobre la misma.
funcionamiento
instalaciÛn
soluciÛn de problemas
Instrucciones de
Instrucciones de
Ruido fuerte o
poco común;
vibración o
sacudidas
Puede que la tubería de
desagüe de la vivienda esté
obstruida
La manguera de drenaje está
un sifón; la manguera de
drenaje fue introducida de
manera demasiado profunda
en el drenaje
La lavadora se mueve
Las patas de nivelación no se
encuentran en contacto firme
con el piso
Carga desbalanceada
Obstrucción de la bomba
• Compruebe las tuberías de la vivienda. Puede que sea
necesario llamar a un plomero.
• Asegúrese de que haya un espacio de aire entre la manguera
y el drenaje.
• La lavadora está diseñada para desplazarse 1/4” para reducir
las fuerzas transmitidas al piso. Este movimiento es normal.
• Empuje y tire de la parte posterior derecha y luego posterior
izquierda de su lavadora para asegurarse de que se encuentre
nivelada. Si la lavadora no está nivelada, ajuste las patas
niveladoras de caucho de modo que cada una quede en
contacto firme con el piso y trabadas en su lugar. Su técnico
instalador debería corregir este problema.
• Abra la puerta y redistribuya la carga manualmente. Para
revisar la máquina, ejecute el ciclo de enjuague y giro sin carga.
Si esto es normal, la causa del desbalance fue la carga.
• Para obtener información sobre la limpieza del Filtro de la
Bomba, lea la página 12.
21
Consejos para la
Servicio al consumidor
Page 48

Antes de llamar al servicio de asistencia técnica…
Problema Causa posible Solución
Instrucciones de
No hay
suministro
eléctrico/
la lavadora
seguridad
no está en
funcionamiento
La lavadora está desconectada
El suministro de agua está
cerrado
El interruptor/fusible se ha
quemado/saltado
• Asegúrese de que el cable esté enchufado de manera segura
en un enchufe funcional.
• Abra por completo las llaves de paso de agua fría y caliente.
•Compruebe los interruptores/fusibles de la vivienda. Cambie
los fusibles o restablezca el interruptor La lavadora debe tener
una toma individual.
Instrucciones de
Instrucciones de
Consejos para la
Enganchones,
agujeros,
Ver rotos,
rasgaduras
o deterioro
excesivo
funcionamiento
Error o cambios
en el control de
tiempo
Cantidad de
agua insuciente
instalaciÛn
La lavadora
se detiene o se
debe reiniciar
o la puerta de
la lavadora
lavadora está
bloqueada y no
se abre
La puerta no se
destraba
o presiona START
(inicio) y
la máquina no
funciona
El agua no entra
en la lavadora o
soluciÛn de problemas
entra lentamente
Revisiones automáticas del
sistema
Sobrecargado
Lápices, bolígrafos, clavos,
tornillos u otros objetos
dejados en los bolsillos
Alfileres, broches, corchetes,
botones en punta, hebillas
de cinturones, cremalleras y
objetos puntiagudos olvidados
en los bolsillos
Esto es normal • Durante el giro, es posible que en ocasiones se necesite volver
Esto es normal • Las lavadoras horizontales no requieren que el tubo se llene
Obstrucción de la bomba • Para obtener información sobre la limpieza del Filtro de la
Esto es normal
Funcionamiento incorrecto
Revisiones automáticas del
sistema
• La primera vez que se enchufa la lavadora, se efectúan las
verificaciones automáticas. Podrían pasar hasta 20 segundos
antes de que pueda utilizar su lavadora. Esto forma parte del
funcionamiento normal.
• No supere los tamaños máximos recomendados de carga. los
tamaños máximos recomendados de carga en la página 10.
• Retire todos los elementos sueltos de los bolsillos.
• Abroche los corchetes, broches, botones y cremalleras.
a equilibrar la carga de la lavadora a fin de reducir vibraciones.
Cuando esto sucede, se produce como consecuencia una
prolongación en el tiempo estimado de lavado.
de agua, como sí ocurre con las lavadoras con carga superior.
Bomba, lea la página 12.
• Las lavadoras con tapa frontal comienzan su funcionamiento
de manera diferente que las lavadoras con carga superior, y
toma 30 segundos realizar un control del sistema. La puerta se
bloqueará y desbloqueará.
• Simplemente abra y cierre la puerta firmemente y luego
presione iniciar.
• Después de pulsar START (inicio), la lavadora realiza varias
revisiones del sistema. El agua fluirá durante 60 segundos luego
de que se presione el botón de START (inicio).
El suministro de agua está
cerrado
Los filtros de la válvula de agua
22
Servicio al consumidor
• Abra por completo las llaves de paso de agua fría y caliente.
• Cierre la llave de paso y quite las tuberías de conexión de
agua de la parte trasera superior de la lavadora. Utilice un
cepillo o un palillo de dientes para limpiar los filtros de la
lavadora. Vuelva a conectar las tuberías y abra la llave de paso.
Page 49

GEAppliances.com
Problema Causa posible Solución
Arrugas Separación incorrecta
• Evite mezclar prendas pesadas (como prendas de trabajo) con
prendas delicadas (como blusas).
Instrucciones de
seguridad
Prendas
oscurecidas o
amarillentas
Manchas de
color
La temperatura
del agua no está
correcta
Pequeña
variación del
color metálico
Mal olor dentro
de la lavadora
Goteo de
detergente
Sobrecarga
Ciclo de lavado incorrecto
Lavado constante en agua
demasiado caliente
No hay suficiente detergente
No se utiliza detergente de
Agua dura
El agua no está suficientemente
caliente
El detergente no se disuelve
Tinte
Uso incorrecto del suavizante
Tinte
El suministro de agua no está
conectado correctamente
El calentador de agua de la
vivienda no se ha ajustado
correctamente
Esto es normal •Debido a las propiedades metálicas de la pintura utilizada
La lavadora no se usó durante
un período prolongado,
no se utiliza una calidad
recomendada de detergentes
HE (alta eficiencia) o se está
usando demasiado detergente
Inserción incorrecta de
detergente
• Cargue la lavadora de manera que haya suficiente espacio
para que las prendas se muevan libremente.
• Combine la selección de ciclo con el tipo de tejido que va a
lavar (especialmente para cargas de prendas de fáci cuidado).
• Lave las prendas en agua tibia o fría.
• Utilice la cantidad adecuada de detergente.
•Utilice detergente de alta eficacia.
• Utilice agua lo más caliente posible para no dañar los tejidos.
• Utilice un acondicionador de agua como, por ejemplo, el de la
marca Calgon o instale un ablandador de agua.
• Asegúrese de que el calentador suministre agua a 120°–140°F
(48°–60°C).
• Pruebe un detergente líquido.
• Separe las prendas por colores. Si en la etiqueta de la prenda
se indica Lavar por separado, puede ser indicio de tintes con
poca fijación.
• Consulte el bote de suavizante para ver las instrucciones y siga
las indicaciones de uso del distribuidor.
• Separe las prendas blancas o de color claro de las prendas
oscuras.
• Saque inmediatamente la carga de la lavadora.
• Asegúrese de que las tuberías están conectadas a las tomas
correctas.
• Asegúrese de que el calentador de agua de la vivienda
suministre agua a 120°–140°F (48°–60°C).
con este producto único, pueden ocurrir pequeñas variaciones
de color debido ángulos de visualización y condiciones de
iluminación.
• Haga funcionar un ciclo BasketClean (limpieza de tambor).
• En caso de un fuerte olor, puede necesitarse el funcionamiento
del ciclo BasketClean (limpieza de tambor) más de una vez.
•Use sólo la cantidad de detergente recomendada en el
recipiente del detergente.
• Use sólo detergente HE (alta eficiencia).
• Deje la puerta un poco abierta para que el agua se seque.
Se requiere una supervisión estricta cuando este aparato es
utilizado por niños o en su cercanía. No permita que los niños
jueguen sobre, con o dentro de este o cualquier otro aparato.
•Asegúrese de que el detergente insertado esté adecuadamente
colocado y totalmente seguro. La cantidad de detergente nunca
debe superar la línea máxima.
funcionamiento
instalaciÛn
soluciÛn de problemas
Instrucciones de
Instrucciones de
Consejos para la
Servicio al consumidor
Esto es normal
• Es normal que durante el funcionamiento se observe una
pérdida en la junta de la puerta durante unos 20 segundos,
luego de llenar el dispositivo de suministro.
23
Page 50

Antes de llamar al servicio de asistencia técnica…
Suministro
inadecuado de
suavizante o
blanqueador
seguridad
Instrucciones de
Problema Causas posibles Solución
Obstrucción del dispositivo
de suministro
Se colocó suavizante o
blanqueador por sobre la
línea de carga máxima
• El dispositivo de suministro se debe limpiar en forma mensual a n
de eliminar la acumulación de químicos.
• Asegúrese de que la cantidad de suavizante o blanqueador sea
correcta.
Instrucciones de
Instrucciones de
funcionamiento
instalaciÛn
Problema con la tapa del
suavizante o blanqueador
• Asegúrese que la tapa del suavizante y del blanqueador para el
dispositivo de suministro estén ajustadas o no funcionarán.
Consejos para la
soluciÛn de problemas
24
Servicio al consumidor
Page 51

Garantía de la lavadora GE.
Todos los servicios de garantía se ofrecen a través de nuestros
centros de asistencia técnica o un técnico autorizado de Customer
Care®. Para programar servicio de asistencia técnica, en línea,
visite la página ge.com o llame al 800.GE.CARES (1.800.432.2737).
Cuando llame para solicitar servicio, por favor tenga a mano el
número de serie y el número de modelo.
Período: Se sustituirá:
Un año Cualquier pieza de la lavadora que falle debido a un defecto en los materiales
A partir de la fecha de o la fabricación. Durante este garantía limitada de un año, GE correrá además, sin cargo
adquisición original alguno, con todos los gastos de mano de obra y reparación relacionados para sustituir
la pieza defectuosa.
Exclusiones de la garantía (en Estados Unidos):
Engrape el recibo aquí.
Se necesita el comprobante
con la fecha de compra original
para que la gar3antía cubra
los servicios.
seguridad
funcionamiento
Instrucciones de
Instrucciones de
n Visitas de servicio a domicilio para mostrarle cómo
utilizar el producto.
n Instalación, envío o mantenimiento incorrectos.
n Fallas del producto por manipulación, uso incorrecto
o distinto al destinado o previsto comercialmente.
n Daños tras la entrega.
EXCLUSIÓN DE GARANTÍAS IMPLÍCITAS—Su único y exclusivo derecho es la reparación del producto,
tal y como se indica en esta Garantía limitada. Cualquier garantía implícita, incluyendo las garantías implícitas de
comerciabilidad o adecuación para un fin determinado, están limitadas a un año
o el período de tiempo más breve permitido por la ley.
Esta garantía se extiende al comprador original y cualquier comprador posterior de productos comprados para uso
residencial dentro des Estados Unidos. Si el producto está situado en un área que no dispone de servicio por parte
de un proveedor de servicio autorizado de GE, podría tener que hacerse cargo de los costes de envío o bien podría
solicitársele que lleve el producto a una centro de servicio de GE autorizado para realizar la reparación. En Alaska,
la garantía excluye el costo de envío o las visitas de servicio a su casa.
Algunos estados no permiten la exclusión o las limitaciones de daños incidentales o consecuenciales. Esta garantía
da derechos legales específicos, y usted podría tener otros derechos que variarán de estado a estado. Para saber
cuáles son sus derechos legales, consulte a la oficina de asuntos del consumidor local o la oficina del Prucurador
(Attorney General) en su localidad.
n Sustitución de los fusibles de la vivienda
o restablecimiento de los interruptores.
n Daños causados por accidentes, incendios, inundaciones
o fenómenos naturales.
n Daños emergentes o fortuitos causados por posibles
defectos del electrodoméstico.
n Producto no accesible para facilitar el servicio requerido
Instrucciones de
instalaciÛn
soluciÛn de problemas
Consejos para la
Warrantor: General Electric Company. Louisville, KY 40225
Servicio al consumidor
25
Page 52

Servicio al consumidor.
Página Web de GE Appliances GEAppliances.com
¿Tiene alguna pregunta sobre su electrodoméstico? ¡Pruebe la página Web de GE Appliances, 24 horas al día,
cualquier día del año! Para mayor conveniencia y servicio más rápido, ya puede descargar los Manuales
de los Propietarios, pedir piezas o incluso hacer una cita en línea para que vengan a realizar una reparación.
Solicite una reparación GEAppliances.com
El servicio de expertos GE está a tan sólo un paso de su puerta. ¡Entre en línea y solicite su reparación cuando
le venga cualquier día del año! O llame al 800.GE.CARES (800.432.2737) durante horas normales de ocina.
Real Life Design Studio (Estudio de diseño para la vida real)
GE apoya el concepto de Diseño Universal—productos, servicios y ambientes que pueden usar gente de
todas las edades, tamaños y capacidades. Reconocemos la necesidad de diseñar para una gran gama de
habilidades y dicultades físicas y mentales. Para más detalles cobre las aplicaciones de GE Diseño Universal,
incluyendo ideas de diseño para la cocina para personas con discapacidades, mire nuestra página Web hoy
mismo. Para personas con dicultades auditivas, favor de llamar al 800.TDD.GEAC (800.833.4322).
GEAppliances.com
Garantías ampliadas GEAppliances.com
Compre una garantía ampliada y obtenga detalles sobre descuentos especiales disponibles mientras su
garantía está aún activa. Puede comprarla en línea en cualquier momento, o llamar al (800.626.2224) durante
horas normales de oficina. GE Consumer Home Services estará aún ahí cuando su garantía termine.
Piezas y accesorios GEAppliances.com
Aquellos individuos con la calificación necesaria para reparar sus propios electrodomésticos pueden
pedir que se les manden las piezas o accesorios directamente a sus hogares (aceptamos las tarjetas
VISA, MasterCard y Discover). Haga su pedido en línea hoy, 24 horas cada día o llamar por teléfono
al 800.626.2002 durante horas normales de oficina.
Las instrucciones descritas en este manual cubren los procedimientos a seguir por cualquier usuario.
Cualquier otra reparación debería, por regla general, referirse a personal calificado autorizado. Debe
ejercerse precaución ya que las reparaciones incorrectas pueden causar condiciones de funcionamiento
inseguras.
Póngase en contacto con nosotros GEAppliances.com
Si no está satisfecho con el servicio que recibe de GE, póngase en contacto con nosotros en nuestra
página Web indicando todos los detalles así como su número de teléfono o escríbanos a:
General Manager, Customer Relations
GE Appliances, Appliance Park
Louisville, KY 40225
Registre su electrodoméstico GEAppliances.com
¡Registre su nuevo electrodoméstico en línea —cuando usted preera! El registrar su producto a tiempo
le proporcionará, si surgiera la necesidad, una mejor comunicación y un servicio más rápido bajo los términos
de su garantía. También puede enviar su tarjeta de registro pre-impresa que se incluye en el material
de embalaje o recorte y use el formulario de este Manual del Propietario.
26
Impreso en China
 Loading...