

GE GFW148SSL0WW Owner’s Manual

SAFETY INFORMATION ..........3
USING THE WASHER
Getting Started ...................... 5
Loading .............................11
CARE AND CLEANING ............12
INSTALLATION
INSTRUCTIONS .................... 14
TROUBLESHOOTING TIPS ......19
CONSUMER SUPPORT
Warranty ........................... 23
Consumer Support ................... 24
OWNER’S MANUAL &
INSTALLATION
INSTRUCTIONS
GFW148
ENGLISH/FRANÇAIS/
ESPAÑOL
Write the model and serial
numbers here:
Model # _________________
Serial # _________________
WASHERS
GE is a trademark of the General Electric Company. Manufactured under trademark license.
You can find them on a label
inside the door.
0020507767N 49-90570-1 02-17 GEA

THANK YOU FOR MAKING GE APPLIANCES A PART OF YOUR HOME.
Whether you grew up with GE Appliances, or this is your first, we’re happy to have you in the family.
We take pride in the craftsmanship, innovation and design that goes into every GE Appliances
product, and we think you will too. Among other things, registration of your appliance ensures that we
can deliver important product information and warranty details when you need them.
Register your GE appliance now online. Helpful websites and phone numbers are available in the
Consumer Support section of this Owner’s Manual. You may also mail in the pre-printed registration
card included in the packing material.
2 49-90570-1

IMPORTANT SAFETY INFORMATION
READ ALL INSTRUCTIONS BEFORE USING THE APPLIANCE
SAFETY INFORMATION
WARNING
Ŷ
Read all instructions before using the appliance.
Ŷ
DO NOT wash or dry articles that have been previously cleaned in, washed in, soaked in or spotted with
gasoline, dry-cleaning solvents, or other flammable or explosive substances, as they give off vapors that could
ignite or explode.
Ŷ
DO NOT add gasoline, dry-cleaning solvents, or other flammable or explosive substances to the wash water.
These substances give off vapors that could ignite or explode.
Ŷ
Under certain conditions, hydrogen gas may be produced in a hot-water system that has not been used for
2 weeks or more. HYDROGEN GAS IS EXPLOSIVE. If the hot water system has not been used for such a
period, before using a washing machine, turn on all hot-water faucets and let the water flow from each for
several minutes. This will release any accumulated hydrogen gas. As the gas is flammable, DO NOT smoke
or use an open flame during this time.
Ŷ
DO NOT allow children to play on or in this appliance. Close supervision of children is necessary when this
appliance is used near children. Before the washer is removed from service or discarded, remove the door or
lid. Failure to follow these instructions may result in death or injury to persons.
Ŷ
DO NOT reach into the appliance if the tub or agitator is moving to prevent accidental entanglement.
Ŷ
DO NOT install or store this appliance where it will be exposed to the weather.
Ŷ
DO NOT tamper with controls, repair or replace any part of this appliance or attempt any servicing unless
specifically recommended in the user maintenance instructions or in published user repair instructions that you
understand and have the skills to carry out.
To reduce the risk of death, fire, explosion, electric shock, or injury to persons when using
your appliance, follow basic precautions, including the following:
Ŷ
DO NOT operate this appliance if it is damaged, malfunctioning, partially disassembled, or has missing or
broken parts including a damaged cord or plug.
Ŷ
Unplug the appliance or turn off the circuit breaker before servicing. Pressing the Power button DOES NOT
disconnect power.
Ŷ
See “ELECTRICAL REQUIREMENTS” located in the Installation Instructions for grounding instructions.
READ AND SAVE THESE INSTRUCTIONS
49-90570-1 3

IMPORTANT SAFETY INFORMATION
READ ALL INSTRUCTIONS BEFORE USING THE APPLIANCE
PROPER INSTALLATION
This washer must be properly installed and located in accordance with the Installation Instructions before it is used.
Ŷ
Ensure that the hot water hose is connected to the “H” valve and the cold water hose is connected to the “C”
valve.
Ŷ
Install or store where it will not be exposed to temperatures below freezing or exposed to the weather, which
could cause permanent damage and invalidate the warranty.
Ŷ
Properly ground washer to conform with all governing codes and ordinances. Follow details in the Installation
Instructions.
- Electrical Shock Hazard
SAFETY INFORMATION
WARNING
Plug into a grounded 3 prong outlet.
DO NOT remove ground prong.
DO NOT use an adapter.
DO NOT use an extension cord.
Failure to follow these instructions can result in death, fire or electrical shock.
Ŷ
Ensure washer is properly leveled and washer legs are adjusted such that unit is stable.
Ŷ
Optional drain hose extension recommended for discharging heights from 60” - 96”.
Ŷ
GE Appliances strongly recommends the use of factory specified parts. A list of factory hoses available for
purchase are listed. These hoses are manufactured and tested to meet GE Appliances specifications.
Ŷ
GE Appliances strongly recommends the use of new water supply hoses. Hoses degrade over time and need
to be replaced every 5 years to reduce the risk of hose failures and water damage.
WHEN NOT IN USE
Ŷ
Turn off water faucets to minimize leakage if a break or rupture should occur. Check the condition of the fill
hoses; GE Appliances recommends changing the hoses every 5 years.
PARTS AND ACCESSORIES
Order on-line at GEApplianceparts.com today,
24 hours a day or by phone at 800.626.2002 during
normal business hours. In Canada, visit your local
GE Appliances parts distributor or call 800.661.1616.
Part Number Accessory
PM14X10002 4 ft rubber water supply hoses
Or
PM14X10005 4 ft braided water supply hoses
WX10X10011 Tide
®
Washing Machine Cleaner*
PM7X1 Washer Floor Tray
*Tide® is a registered trademark of Procter & Gamble
READ AND SAVE THESE INSTRUCTIONS
4 49-90570-1

Getting started
USING THE WASHER
WARNING
To reduce the risk of fire, electric shock, or injury to persons, read the IMPORTANT SAFETY
INFORMATION before operating this appliance.
Throughout this manual, features and appearance may vary from your model.
Step 1
Liquid Only
MAX
MAX
• Add fabric softener to the
fabric softener dispenser;
see page 10.
• Add the manufacturer’s
recommended amount of
detergent.
recommends
Efficiency
GE Appliances
the use of High
detergents such
as in your energy efficient
washer.
Place detergent pods
in the bottom of the wash
basket before adding clothes.
Step 2 Step 3
• Loosely add items.
Overloading may
negatively impact wash
performance. See page 11
for suggested loading
examples.
• Close door.
NOTE: Washer will not
start with door open.
• If the screen is dark,
press the Power
button to “wake up”
the display.
• Select a wash cycle.
(Defaults are set for
each wash cycle.
These default settings
can be changed. See
Control settings for
more information.)
Power
Step 4
Start
Pause
• Press the
Start/Pause
button.
Controls
K AJBL
Quick Wash
Delicates
Rinse + Spin
Tub Clean
Cold Wash
Stain Wash
With Steam
Casuals
With Steam
FILL WASH RINSE SPIN
Ex Hot
Max
Hot
High
Warm
Medium
Cool
Low
Cold
No Spin
Temp RinseSpin PreWashMy Cycle
D E F G H I
A
Ex Heavy
Heavy
Normal
Light
Ex Light
Soil
C
Power
Door
Locked
Extra
Est Time Remaining
My Cycle
PreWash
Hold to Set
DelayNormal
Delay
Wash
Whites
Heavy
Duty
Towels
Casuals
Active
Wear
Normal
Sanitize
Press to “wake up” the display. If the display is active, press to put the washer into standby mode.
NOTE: Pressing Power does not disconnect the appliance from the power supply.
Start
Pause
Powe r
49-90570-1 5

Getting started
Wash Cycles
B
The wash cycles are optimized for specific types of wash loads. The chart below will help you match the wash
setting with the loads. The Gentle Wash™ lifters lightly tumble the clothes into the water and detergent solution
to clean the load.
Items to Wash Cycle Soil
Cycle for normal,
regular, or typical
use for washing
up to a full load
of normally
soiled cotton
clothing.
Normal Ex. Heavy
USING THE WASHER
Whites and
household
linens.
Towels, sheets,
pillowcases and
dish rags.
Sturdy fabrics
with heavy to
medium soil.
Casual clothes,
lightly soiled
office wear.
Medium to lightly
soiled athletic
wear items of
technical or
synthetic fabrics.
Heavily soiled
colorfast items
with the need
for sanitization.
Lingerie and
special care
fabrics with
light soil.
Whites Ex. Heavy
Towels Ex. Heavy
Heavy
Duty
Casuals Ex.
Active
Wear
Sanitize Ex. Heavy
Delicates
Level
Heavy
Normal
Light
Ex. Light
Heavy
Normal
Light
Ex. Light
Heavy
Normal
Light
Ex. Light
Ex. Heavy
Heavy
Normal
Light
Ex. Light
Heavy
Heavy
Normal
Light
Ex. Light
Ex. Heavy
Heavy
Normal
Light
Ex. Light
Heavy
Normal
Light
Ex. Light
Ex. Heavy
Heavy
Normal
Light
Ex. Light
Wash Temp Spin
Extra Hot
Hot
Warm
Cool
Cold
Extra Hot
Hot
Warm
Cool
Cold
Extra Hot
Hot
Warm
Cool
Cold
Extra Hot
Hot
Warm
Cool
Cold
Extra Hot
Hot
Warm
Cool
Cold
Extra Hot
Hot
Warm
Cool
Cold
Extra Hot Max
Warm
Cool
Cold
Selection
Max
High
Medium
Low
No Spin
Max
High
Medium
Low
No Spin
Max
High
Medium
Low
No Spin
Max
High
Medium
Low
No Spin
Max
High
Medium
Low
No Spin
Max
High
Medium
Low
No Spin
High
Medium
Low
No Spin
High
Medium
Low
No Spin
Options Available Cycle Details
Prewash
Extra Rinse
Delay Wash
My Cycle
Prewash
Extra Rinse
Delay Wash
My Cycle
Prewash
Extra Rinse
Delay Wash
My Cycle
Prewash
Extra Rinse
Delay Wash
My Cycle
Prewash
Extra Rinse
Delay Wash
My Cycle
Prewash
Extra Rinse
Delay Wash
My Cycle
Prewash
Extra Rinse
Delay Wash
My Cycle
Prewash
Extra Rinse
Delay Wash
My Cycle
Cycle for normal, regular, or
typical use for washing up to
a full load of normally soiled
cotton clothing. Choose the
Heavy or Extra Heavy soil level
selection and Warm or Hot
water temperature selection as
appropriate for your clothes load
for a higher degree of cleaning.
Cycle tailored to clean and
brighten your whites.
Cycle designed for washing
towels, sheets, pillowcases and
dish rags. It is recommended that
towels and sheets be washed
separately for best care and
washing performance.
Incorporates multi-step wash
and soak periods combined
with extended wash periods
to effectively clean heavily to
medium soiled sturdy fabrics.
Wash cycle tailored to care for
casual clothes and office wear
items.
Cycle designed for care of
medium to lightly soiled active
wear, athletic wear and technical
fabrics.
Use this cycle to eliminate
99.9% of bacteria from fabrics.
Cycle uses an increased water
temperature and a longer
wash cycle to provide the
sanitization benefit. A longer
rinse is incorporated to remove
contaminates. For best results,
select the Extra Heavy soil
selection if available. See NOTE
below.
For lighty soiled items labeled
hand-washable. Provides gentle
tumbling and soak during wash
and rinse.
6 49-90570-1
Getting started
Wash Cycles - Continued
B
USING THE WASHER
Items to Wash Cycle Soil
Small loads of
lightly soiled
items that are
needed in a
hurry.
Cycle for washing
a full load of
normally soiled
cotton clothing in
cold water.
Cycle for heavily
soiled colorfast
laundry
Cycle for heavily
soiled casuals
laundry
For items that
need only to be
rinsed, use this
cycle.
Cleaning the
tub of residue
and odor. No
clothes to be
washed using
this
cycle.
Quick
Wash
Cold
Wash
Stain
Wash
with
Steam
Casuals
with
Steam
Rinse +
Spin
Tub
Clean
Level
Ex. Heavy
Heavy
Normal
Light
Ex. Light
Ex. Heavy
Heavy
Normal
Light
Ex. Light
Ex. Heavy
Heavy
Normal
Light
Ex. Light
Ex. Heavy
Heavy
Normal
Light
Ex. Light
Wash Temp Spin
Hot
Warm
Cool
Cold
Cool
Cold
Extra Hot
Hot
Warm
Cool
Cold
Extra Hot
Hot
Warm
Cool
Cold
Selection
Max
High
Medium
Low
No Spin
Max
High
Medium
Low
No Spin
Max
High
Medium
Low
No Spin
Max
High
Medium
Low
No Spin
Max
High
Medium
Low
No Spin
Options Available Cycle Details
Prewash
Extra Rinse
Delay Wash
My Cycle
Prewash
Extra Rinse
Delay Wash
My Cycle
Prewash
Extra Rinse
Delay Wash
My Cycle
Prewash
Extra Rinse
Delay Wash
My Cycle
Prewash
Extra Rinse
Delay Wash
My Cycle
For cleaning lightly soiled loads
in the fastest time possible.
Cycle time is approximately 33
minutes, depending on selected
options.
Cycle for washing a full load of
normally soiled cotton clothing in
cold water. This cycle uses cold
water only and extends the wash
time to get clothes clean.
Add steam to the washer to
assist with stain removal for
heavily soiled colorfast laundry.
Add steam to the washer to
assist with stain removal for
heavily soiled casual clothes and
office wear items.
To quickly rinse and spin out any
items at any time. Utilizes a high
speed spin to extract water from
wet items. To achieve a drain
and spin, delselect the Extra
Rinse option. This cycle will
dispense prewash detergent and
fabric softener.
Recommended use of at least
once per month to clean the
basket of residue and odor.
Never load laundry when using
this cycle; laundry may become
damaged. Cycle incorporates
a hot extended wash, intense
agitation action and a flush out of
the pump.
NOTE: The Sanitize cycle water temperatures CANNOT be changed. The Sanitize cycle is certified by NSF
International, an independent third party testing and certification organization.
The Sanitize certification verifies that the cycle reduced 99.9% of bacteria typically found in residential laundry
and that no significant contamination is transferred to subsequent washer loads. Only the Sanitize cycle has been
designed to meet the requirements of NSF Protocol P172 for sanitizing effectiveness.
NSF Protocol P172
Sanitization Performance of Residential and
Commercial, Family-Sized Clothes Washers
C
Soil
Soil
Changing the Soil level increases or decreases the wash time to remove different amounts of
soil.
To change the Soil level, press the Soil level button until you have reached the desired
setting. You can choose between Extra Light, Light, Normal, Heavy or Extra Heavy soil.
49-90570-1 7
Getting started
D
E
USING THE WASHER
F
Temp
Spin
Rinse
Temp
Adjust to select the proper water temperature for the wash cycle. The rinse water is always
cold to help reduce energy usage and reduce setting of stains and wrinkles.
Follow the fabric manufacturer’s care label when selecting the wash temperature.
To change the wash temperature, press the Temp button until you have reached the desired
setting. You can choose between Cold, Cool, Warm, Hot or Extra Hot.
Spin
Changing the Spin setting changes the final spin speed of the cycles. Always follow the
garment manufacturer’s care label when changing the Spin setting.
To change the Spin setting, press the Spin setting button until you have reached the
desired setting. You can choose between No Spin, Low, Medium, High or Max. Higher spin
speeds are not available on certain cycles, such as Delicates.
Higher spin speeds remove more water from the clothes and will help reduce dry time, but
may also increase the possibility of setting wrinkles on some fabrics.
Rinse
Changing Rinse will change the number of rinses the cycle will use. To change the rinse
option, press Rinse until you have reached the desired setting. You can choose between
Normal, Extra and no rinse. In order to select no rinse, press the Rinse button until no lights
are lit in the rinse window.
G
H
My Cycle
Hold to Set
PreWash
PreWash
Compartment
On Rinse+Spin cycle, a drain and spin cycle can be achieved by selecting no rinse.
My Cycle
To save a favorite cycle, set the desired settings for wash cycle, soil level, spin speed and
wash temp settings and hold down the My Cycle button for 3 seconds. A beep will sound to
indicate the cycle has been saved.
To use your custom cycle, press the My Cycle button before washing a load.
To change the saved cycle, set the desired settings and hold down the My Cycle button for
3 seconds.
NOTE: When using My Cycle, wash options cannot be modified after the cycle has been
started.
NOTE: If you change wash options with My Cycle before starting the cycle, the My Cycle
light will turn off and you will be returned to the base cycle.
PreWash
Prewash is an extra wash before the main wash. Use it for heavily soiled clothes or for
clothes with a care label that recommends prewashing before washing. Be sure to add liquid
or powder high-efficiency detergent, or the proper wash additive to the prewash dispenser.
The PreWash feature will fill the washer with water (adding the prewash detergent), tumble
the clothes, drain and spin. Then the washer will run the selected wash cycle.
NOTE: The PreWash is not selected automatically and must be selected before starting
the cycle.
8 49-90570-1

Getting started
USING THE WASHER
J
I
Delay
Wash
Delay Wash
Use to delay the start of your washer.
1. Choose your wash cycle and any options.
2. Press Delay Wash button. You can change the delay time in 1-hour increments (up to 24
hours) each time you press the Delay Wash button. Stop pressing the button when your
desired time is displayed.
3. Press the Start/Pause button to start the countdown.
The countdown time will be shown in the Est Time Remaining (Estimated Time Remaining)
display.
NOTES:
• If the door is opened while the washer is in Delay Wash, the countdown time will stop the
count down and the display will say “door”. The door must be closed and the Start/Pause
button must be pressed to continue the delay time count down.
• You can delay the start of a washer cycle up to 24 hours.
The light on the button will light up when Delay Wash is on.
Start/Pause
Start
Pause
Press to start a wash cycle. If the washer is running, pressing it once will pause the washer
and unlock the door. This function can be used to add garments during a cycle. Press again
to restart the wash cycle.
NOTE: If the washer is paused and the cycle is not restarted within 15 minutes, the current
wash cycle will be cancelled.
NOTE: In some cases the washer will drain first, then unlock the door when it is paused.
NOTE: The washer performs automatic system checks after pressing the Start/Pause
button. Water will flow in 45 seconds or less. You may hear the door lock and unlock before
water flows; this is normal.
K
L
Soil
Temp Spin
Temp
Lock
You can lock the controls to prevent any selections from being made. Or you can lock or
unlock the controls after you have started a cycle.
Children cannot accidentally start the washer by touching pads with this option selected.
To lock the washer, press and hold the Soil and Temp buttons together for 3 seconds.
To unlock the washer controls, press and hold the Soil and Temp buttons together for 3
seconds. A sound is made to indicate the lock/unlock status.
The control lock icon on the display will light up when it is on.
NOTE: The Power button can still be used when the machine is locked.
Signal
When the light is on, the washer will beep at the end of the cycle and every time you press a
button on the control panel.
To turn the signal off, press and hold the Temp and Spin buttons together for 3 seconds.
A sound is made to indicate the lock/unlock status.
49-90570-1 9
Getting started
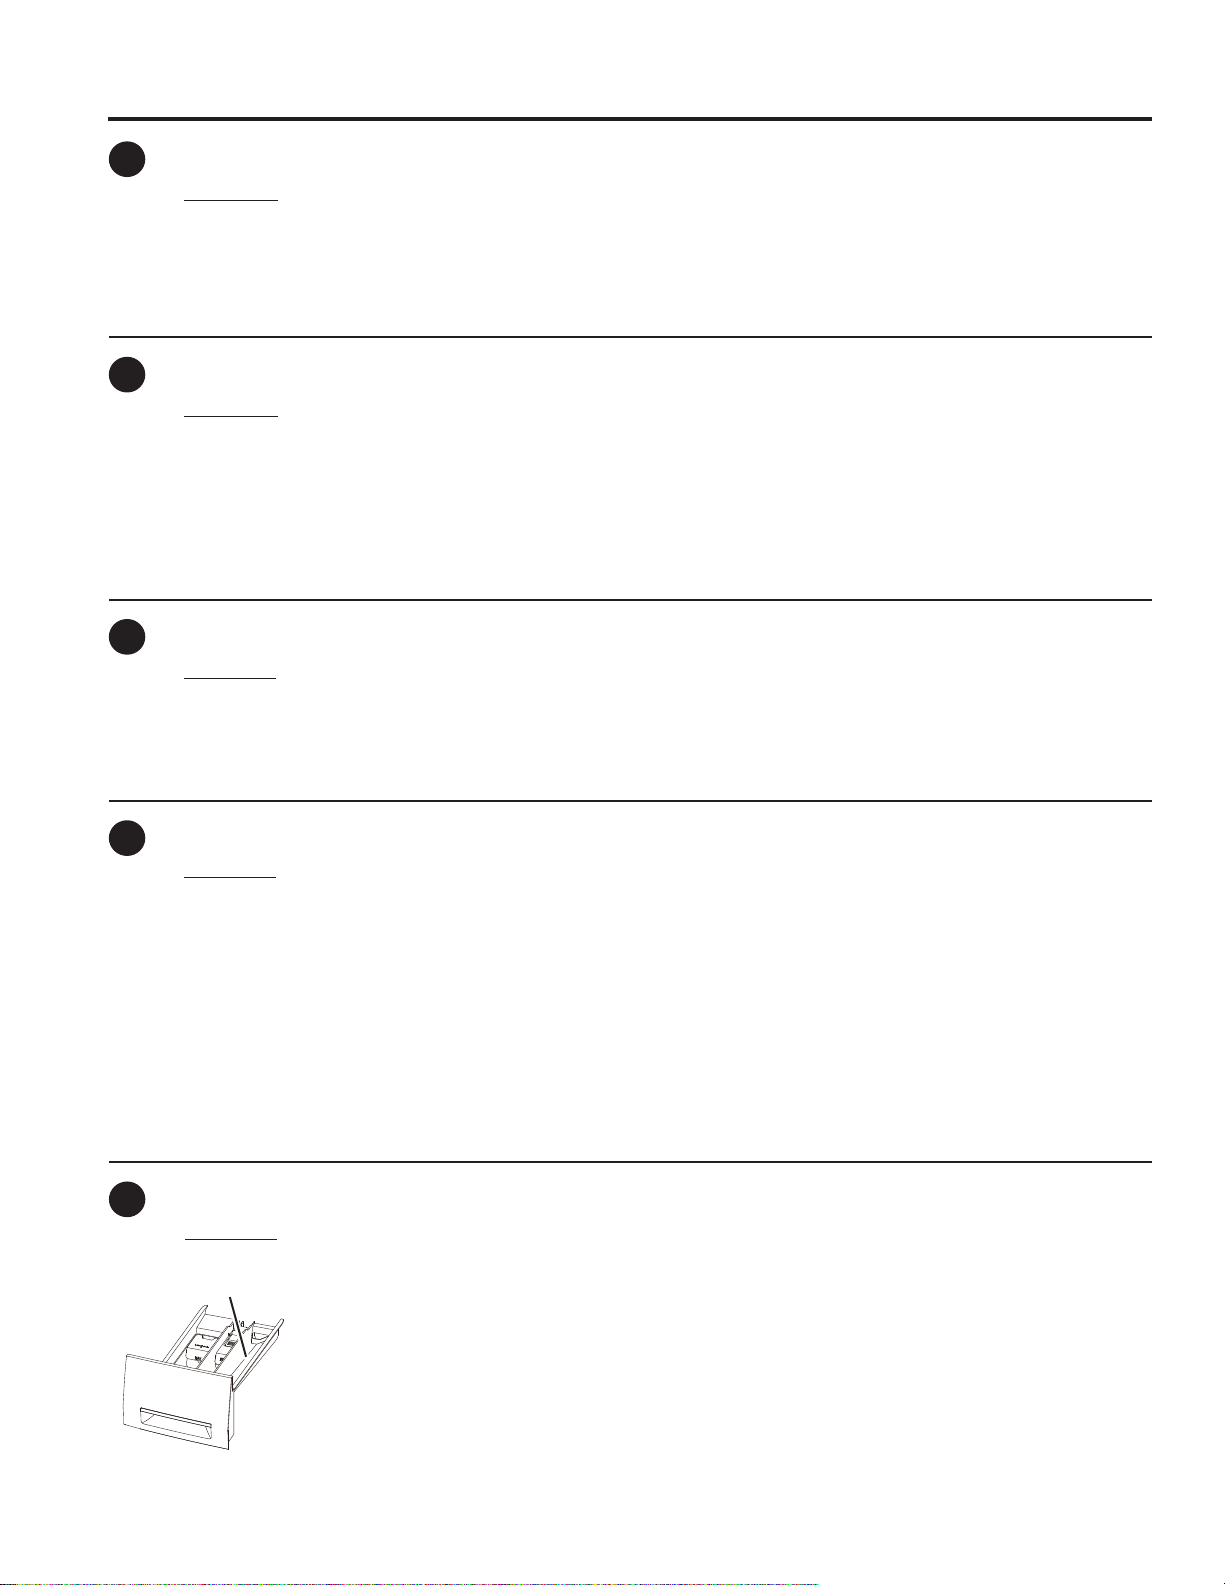
Dispenser Drawer
Slowly open the dispenser drawer by pulling it out until it
stops.
After adding laundry products, slowly close the dispenser
drawer. Closing the drawer too quickly could result in early
dispensing of the fabric softener or detergent.
You may see water in the fabric softener compartment at
the end of the cycle. This is a result of the flushing/siphoning
action and is part of the normal operation of the washer.
Use only HE High-Efficiency detergent.
USING THE WASHER
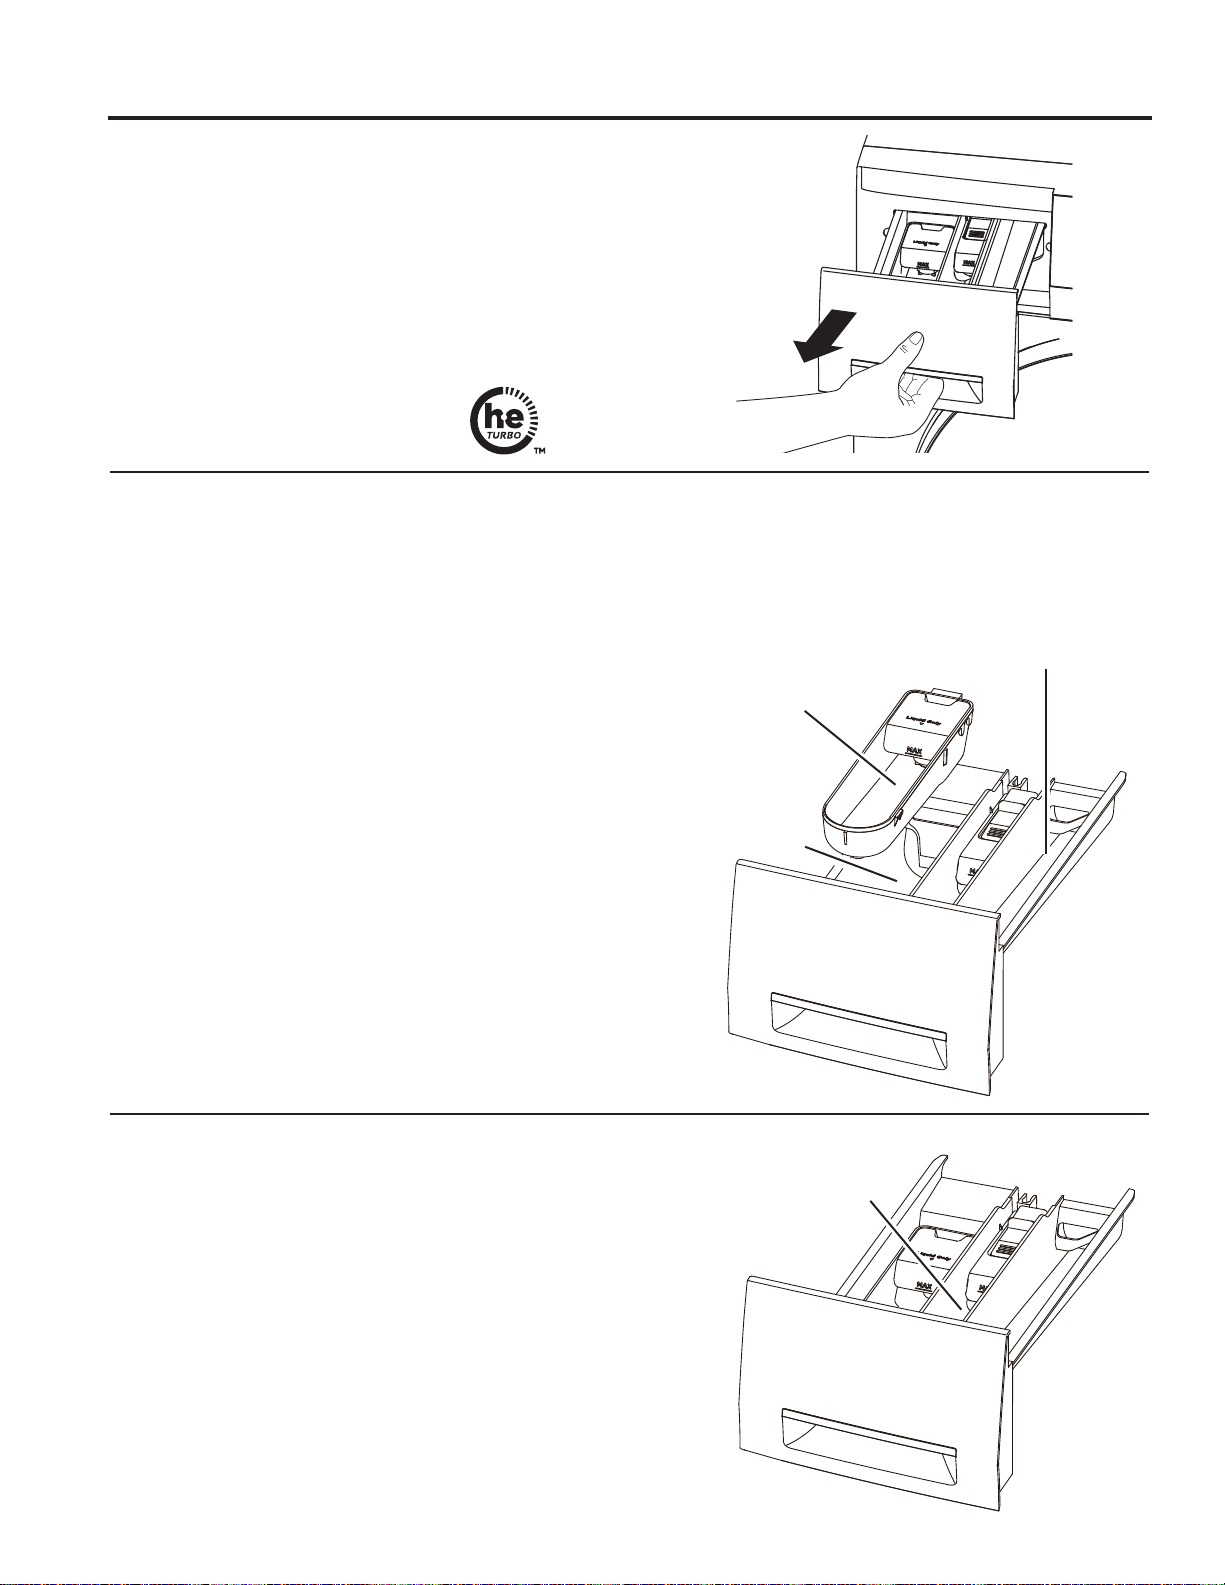
Detergent Compartment
• Only use high-efficiency detergent in this washer. Use
the detergent manufacturer’s recommended amount.
DO NOT fill above the MAX line.
The detergent compartment is in the left side of the dispenser
drawer. The detergent cavity (cup removed) is used for powder
detergent, and the detergent cup is used for liquid detergent.
• Powder Detergent – Remove the detergent cup and
pour the suggested amount of powder detergent into the
detergent cavity.
• Liquid Detergent – Leave the detergent cup in the drawer
and pour liquid detergent into the cup. Do not fill above the
MAX line.
• Add measured detergent to the left detergent compartment
of the dispenser drawer.
• Detergent is flushed from the dispenser at the beginning
of the wash cycle. Either powdered or liquid high-efficiency
detergent can be used.
• Detergent usage may need to be adjusted for water
temperature, water hardness, size and soil level of the
load. Avoid using too much detergent in your washer since
it can lead to oversudsing and detergent residue being left
on the clothes.
Main Wash Detergent Cup
– Use for Liquid
Detergent
Detergent
Cavity –
Use for
Powder
Detergent
PreWash Compartment
(no cup) – Use for Liquid
and Powder Detergent
Fabric Softener Compartment
If desired, pour the recommended amount of liquid fabric
softener into the compartment labeled “Fabric Softener.”
Use only liquid fabric softener in the dispenser.
Dilute with water to the maximum fill line.
Do not exceed the maximum fill line. Overfilling can cause
early dispensing of the fabric softener, which could stain
clothes.
NOTE: Do not pour fabric softener directly on the wash load.
10 49-90570-1
Fabric Softener
Compartment
Loading
Always follow fabric manufacturer’s care label when laundering.
Sorting Wash Loads
Sort by color (whites, lights, colors), soil level, fabric type (sturdy cottons, easy care, delicates) and whether the
fabric produces lint (terry cloth, chenille) or collects lint (velveteen, corduroy). Wash lint producers such as cotton
towels and socks separate from lint collectors including synthetic garments and dress pants.
USING THE WASHER
WARNING
DO NOT wash fabrics soiled with flammable liquids or cleaning solvents.
No washer can completely remove oil.
DO NOT wash or dry anything that has been soaked in or spotted with any type of oil (including cooking oils).
DO NOT reach into the washer until all moving parts have stopped.
Doing so can result in death, explosion, fire or amputation.
- Fire Hazard
Loading the Washer
The wash drum may be fully loaded with loosely added items.
To add items after the washer has started, press Start/Pause and wait until the door is unlatched. The washer may
take up to 30 seconds to unlock the door after pressing Start/Pause, depending on the machine conditions. Do not
try to force open the door when it is locked. After the door unlocks, open gently. Add items, close the door and press
Start/Pause to restart.
The wash drum may be fully loaded with loosely added items.
Loading Examples
WORKWEAR LINENS MIXED LOAD DELICATES* QUICK WASH
3 Jeans
3 Work Wear
Shirts
2 Work Wear
Pants
1 Bath Sheet
6 Bath
Towels/
8 Washcloths
4 Hand
Towels/
1 Terrycloth
Bath Mat
OR
1 Flat
Queen-Sized
Sheet
1 Fitted
Queen-Sized
Sheet
2
Pillowcases
2 Pillowcases
1 Hand Towel
1 Flat Sheet/
1 Fitted Sheet
2 Bath Towels/
2 Washcloths
OR
4 Shirts (Men’s or
Women’s)
3 Pair Pants (Khakis or
Twills)
3 T-shirts
4 Pairs of Boxers
2 Pairs of Shorts
OR
4 T-shirts
2 Pairs of Sweatpants
2 Sweatshirts
1 Hoodie
5 Pairs of Socks
4 Bras
4 panties
2 Slips
1 Camisole
3 Nightgowns
* Using a nylon mesh
bag for small items is
recommended.
(2–3 GARMENTS)
2 Casual Wear Work Shirts
1 Pair Casual Wear Work Pants
OR
3 Soccer Uniforms
49-90570-1 11
Care and cleaning
Water Supply Hoses
Hoses connecting washer to faucet should be replaced every 5 years.
Exterior
Immediately wipe off any spills. Wipe with damp cloth. Wipe or dust spills or washing compounds with a damp cloth.
Washer control panel and finishes may be damaged by some laundry pretreatment and stain remover products.
Apply these products away from the washer. The fabric may then be washed and dried normally. Damage to your
washer caused by these products is not covered by your warranty. Do not hit surface with sharp objects.
Interior
Dry around the washer door opening, flexible gasket (including attached hoses) and door glass. These areas should
always be clean to ensure a watertight seal.
CARE AND CLEANING
It is recommended to rinse the washer at least once per month with 1 cup of bleach (or other commercially available
product manufactured for this purpose, such as Tide® Washing Machine Cleaner) poured directly into the basket
without clothes and using the Tub Clean Cycle.
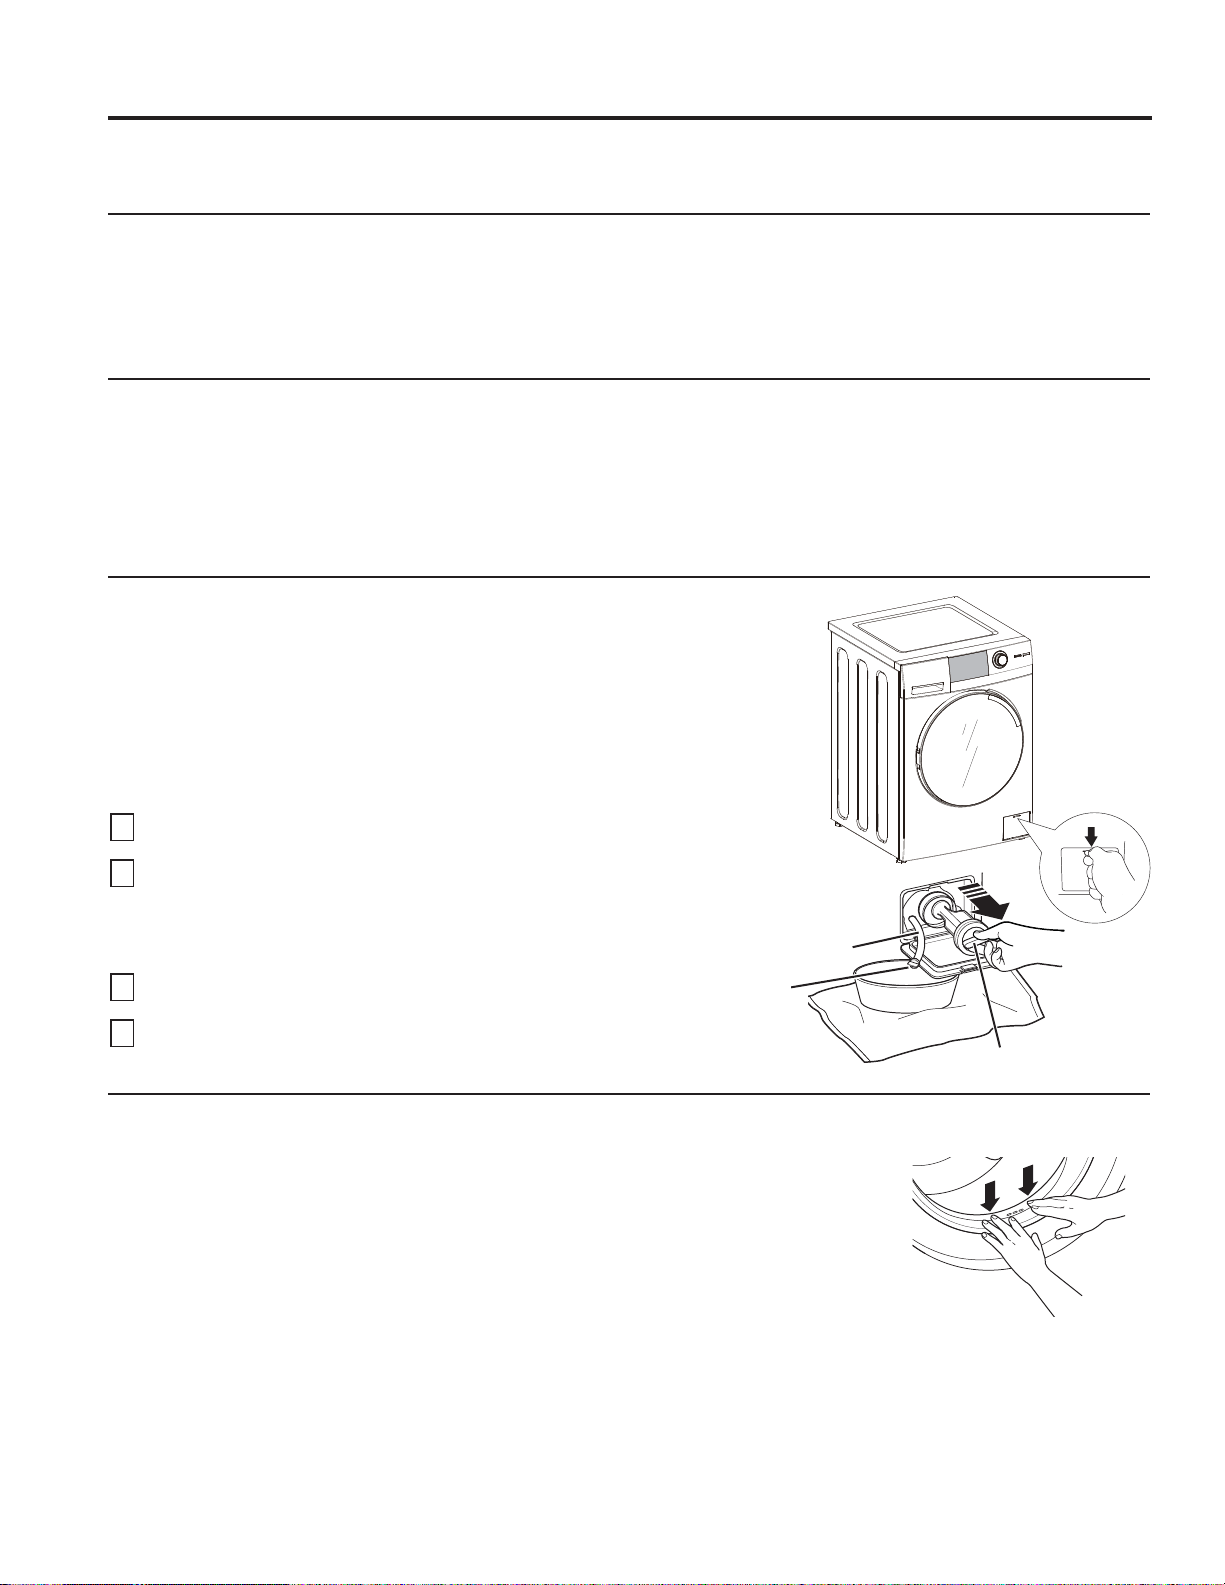
Pump Filter
Clean EVERY MONTH to remove any items that may have been caught in
the filter or housing.
Due to the nature of the front-load washer, it is sometimes possible for small
articles to pass to the pump. The washer has a filter to capture lost items so
they are not dumped to the drain. To retrieve lost items, clean out the pump
filter.
Open the door on the bottom right of the front of the unit.
1
Twist the small white cap counterclockwise a quarter turn and unhook the
2
small rubber hose. Pull the hose out of the hole and remove the white drain
hose plug above a small pan to capture any water that may drain. Drain the
excess water. Replace.
Unscrew the pump filter. Rinse off any debris. Replace.
3
Close the access door.
4
Drain Hose
Drain Plug
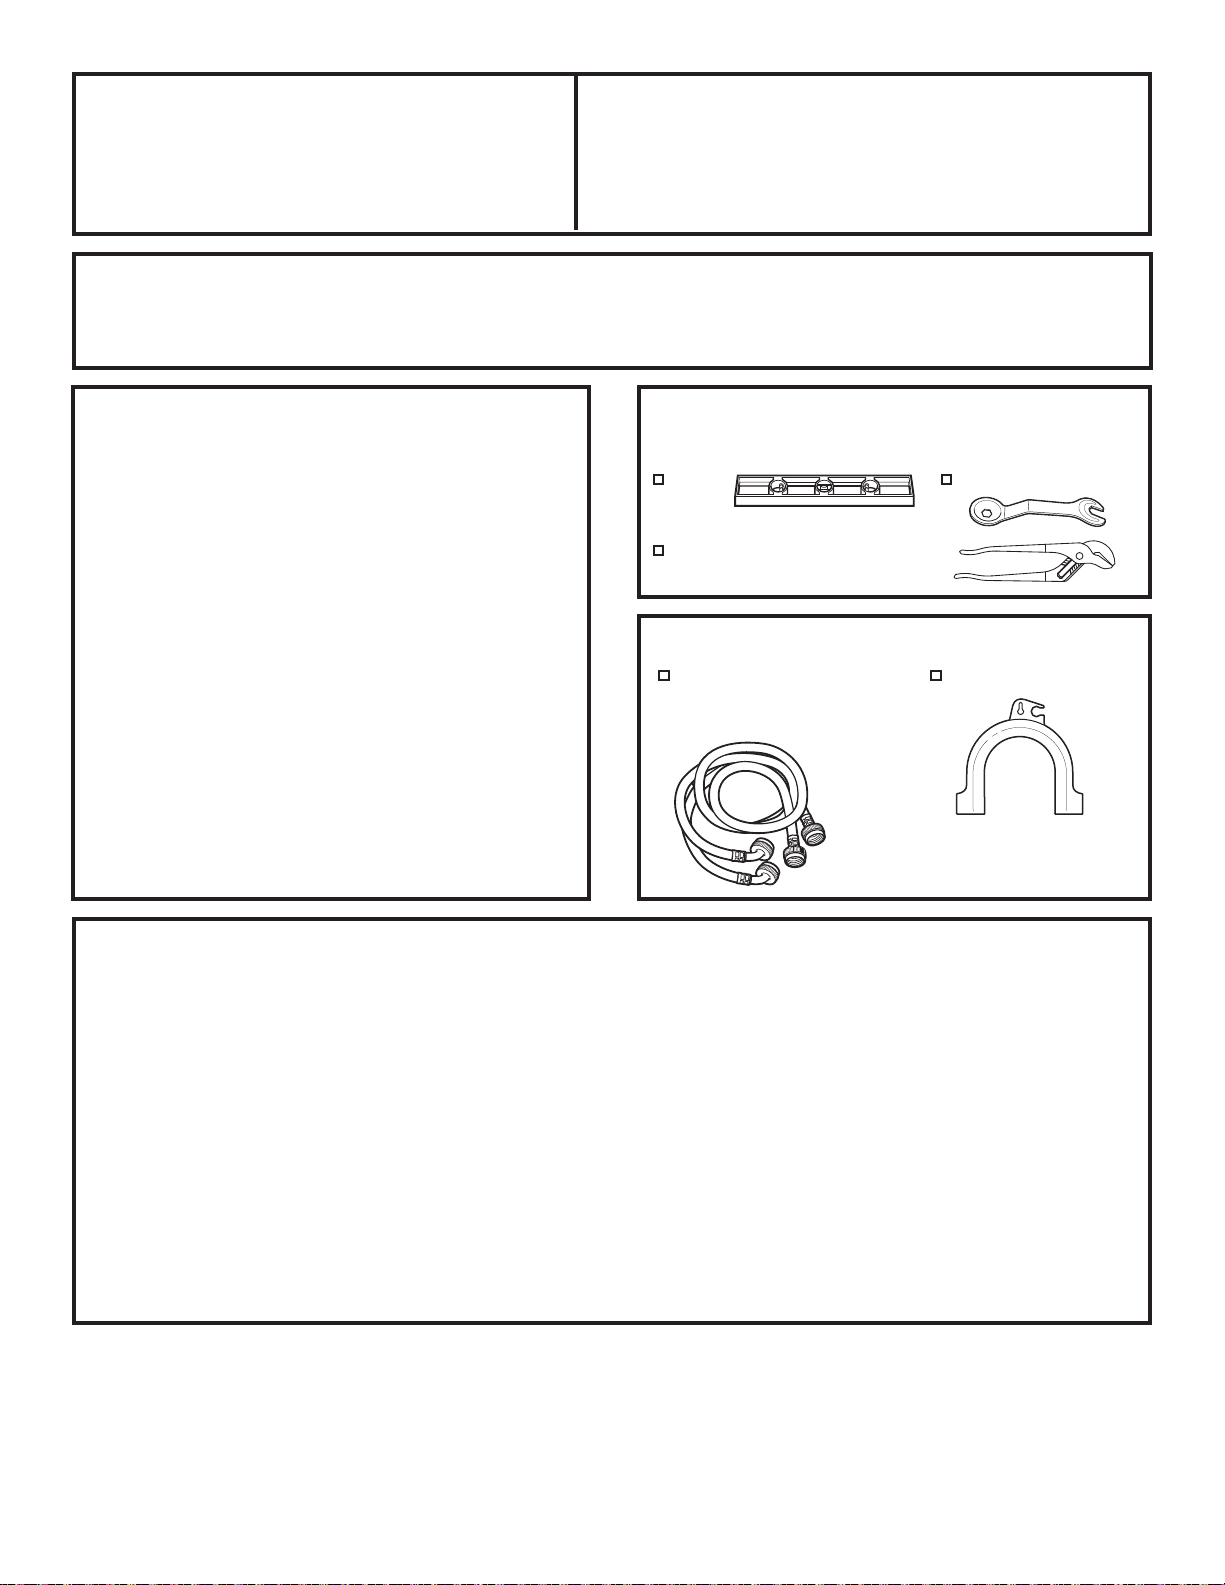
Door Gasket
Open the washer door. Using both hands, press down the door gasket. Remove any
foreign objects if found trapped inside the gasket. Make sure there is nothing blocking
the holes behind the gasket.
While holding down the door gasket, inspect the interior of the gasket by pulling it down
with your fingers. Remove any foreign objects if found trapped inside this gasket. Make
sure there is nothing blocking the holes behind the gasket.
Pump
Filter Door
Pump Filter
When you are finished cleaning the door gasket, remove your hands and the gaskets
will return to the operating position.
12 49-90570-1

Care and cleaning
Dispenser Drawer Area
Detergent and fabric softener may build up in the dispenser drawer.
Residue should be removed once or twice a month.
• Remove the drawer by first pulling it out until it stops. Then reach back into the
rear center of the drawer cavity and press down firmly on the lock tab, pulling
out the drawer.
CARE AND CLEANING
• Remove all cups and inserts from the dispenser drawer. Rinse the inserts, cups
and drawer with hot water to remove traces of accumulated laundry products.
Lock tab is visible
only after drawer has
been pulled out
• To clean the drawer opening, use a small brush to clean the recess.
Remove all residue from the upper and lower parts of the recess.
• Return inserts to the proper compartments. Replace the dispenser drawer.
• To reduce buildup in the Dispenser Drawer area:
Use only HE
High-Efficiency
detergent.
Lock
Tab
Moving and Storage
Ask the service technician to remove water from drain pump and hoses. Do not store the washer where it will be
exposed to the weather. When moving the washer, the tub should be kept stationary by using the shipping bolts
removed during installation. See Installation Instructions in this manual. If these parts are not available, they can be
ordered by visiting our Website at GEAppliances.com or by calling GE Appliances at 800.GE.CARES.
Long Vacations
Be sure water supply is shut off at faucets. Drain all water from hoses and water filter pump area if weather will be
below freezing.
49-90570-1 13
Installation
Washer
Instructions
If you have any questions, call GE Appliances at 800.GE.CARES
(800.432.2737)
In Canada, call 800.561.3344
or visit our Website at: GEAppliances.com
or visit www.GEAppliances.ca
BEFORE YOU BEGIN
Read these instructions completely and carefully.
•
IMPORTANT – Save these
instructions for local inspector’s use.
•
IMPORTANT – Observe all
governing codes and ordinances.
• Note to Installer – Be sure to leave these
instructions with the Consumer.
• Note to Consumer – Keep these
instructions for future reference.
• Skill level – Installation of this appliance requires
basic mechanical and electrical skills.
• Completion time – 1-3 hours
• Proper installation is the responsibility of the
installer.
• Product failure due to improper installation is not
covered under the Warranty.
LOCATION OF YOUR WASHER
DO NOT Install the Washer:
TOOLS REQUIRED FOR
WASHER INSTALLATION
Level Wrench (provided)
Channel-lock adjustable pliers
PARTS SUPPLIED
Water Hoses (2)
(Flat washers
pre-installed)
IMPORTANT:
Drain Hose Guide
1. In an area exposed to dripping water or outside weather
conditions. The ambient temperature should never be
below 60°F (15.6°C) for proper washer operation.
2. In an area where it will come in contact with curtains or
drapes.
3. On carpet. The floor MUST be a hard surface with a
PD[LPXPVORSHRIƎSHUIRRWFPSHUFP
To make sure the washer does not vibrate or move,
you may have to reinforce the floor.
NOTE:,IIORRULVLQSRRUFRQGLWLRQXVHƎLPSUHJQDWHG
plywood sheet solidly attached to existing floor covering.
14 49-90570-1
Minimum Installation Clearances
• :KHQLQVWDOOHGLQDOFRYH6LGHV5HDU7RS ƎFP
• :KHQLQVWDOOHGLQFORVHW6LGHV5HDU7RS ƎFP
)URQW ƎFP
• Consideration must be given to provide adequate
clearance for installation and service.
• Closet doors must be louvered or otherwise ventilated
and have at least 60 square inches (387.1 cm2) of open
area. If the closet contains both a washer and a dryer,
doors must contain a minimum of 120 square inches
(774.2 cm2) of open area.

Installation Instructions
CONNECTION DIMENSIONS ROUGH-IN DIMENSIONS
BACK
21-3/4”
(55.25 cm)
4-3/4”
(12 cm)
2-1/16”
(5.24 cm)
31-1/32”
(78.82 cm)
29-3/4”
(75.57 cm)
FRONT
23-7/16”
(59.5 cm)
*33-1/4”
(84.5 cm)
SIDE
25-5/8”
(65 cm)
*33-1/4”
(84.5 cm)
*NOTE:
Washer leveling legs retracted = 33-1/4” (84.5 cm)
Washer leveling legs extended = 33-3/4” (85.5 cm)
Stacked = 66-1/2” (169.0 cm)
49-90570-1 15
 Loading...