

Page 1

GE Fanuc Automation
Programmable Control Products
Series 90t-70
Remote I/O
Scanner
User’s Manual
GFK–0579B July 1992
Page 2

Warnings, Cautions, and Notes
as Used in this Publication
Warning notices are used in this publication to emphasize that hazardous voltages,
currents, temperatures, or other conditions that could cause personal injury exist in this
equipment or may be associated with its use.
In situations where inattention could cause either personal injury or damage to
equipment, a Warning notice is used.
Caution notices are used where equipment might be damaged if care is not taken.
GFL–002
Warning
Caution
Note
Notes merely call attention to information that is especially significant to understanding
and operating the equipment.
This document is based on information available at the time of its publication. While
efforts have been made to be accurate, the information contained herein does not
purport to cover all details or variations in hardware or software, nor to provide for
every possible contingency in connection with installation, operation, or maintenance.
Features may be described herein which are not present in all hardware and software
systems. GE Fanuc Automation assumes no obligation of notice to holders of this
document with respect to changes subsequently made.
GE Fanuc Automation makes no representation or warranty, expressed, implied, or
statutory with respect to, and assumes no responsibility for the accuracy, completeness,
sufficiency, or usefulness of the information contained herein. No warranties of
merchantability or fitness for purpose shall apply.
The following are trademarks of GE Fanuc Automation North America, Inc.
Alar m Master CIMST AR Helpmate PROMA CRO Series Six
CIMPLICITY GEnet Logicmaster Series One Series 90
CIMPLICITY 90–ADS Genius Modelmaster Series Three VuMaster
CIMPLICITY PowerTRA C Genius PowerTRA C ProLoop Series Five Workmaster
Copyright 1992 GE F anuc A utomation North America, Inc.
All Rights Reserved
Page 3

Content of this Manual
This book is a reference to installing, configuring, and using a GE Fanuc Series 90t–70
Remote I/O Scanner (IC697BEM733).
Chapter 1. Introduction: This chapter describes the Remote I/O Scanner and other
equipment that may be used with it. It discusses Geniust bus operation as it relates to
the Remote I/O Scanner, and describes how the Remote I/O Scanner can be used in
redundancy systems. Chapter 1 also describes configurable features of a remote drop,
and explains configuration methods.
Chapter 2. Installation: Explains how to properly install the components of a remote
drop, including Series 90–70 racks, a Remote I/O Scanner, and other Series 90–70
modules. Chapter 2 also explains how to complete the Genius bus connections and how
to connect a programmer to the Remote I/O Scanner.
Chapter 3. Remote I/O Scanner Operation: Describes the memory and operating
modes of the Remote I/O Scanner, and explains its operation. This chapter also explains
how option modules such as the Programmable Coprocessor Module (PCM) could be
used in a remote drop.
Preface
Chapter 4. Configuration with Logicmastert 90–70: Explains configuration steps
using Release 4 of the Logicmaster 90–70 configuration software.
Chapter 5. Logicmaster 90 Operation with a Remote Drop: Explains how to set up a
Logicmaster 90 programmer to communicate with a remote drop. This chapter also
describes functional differences in LM90 when it communicates with a remote drop.
Chapter 6. Remote Drop Configuration with a Hand–held Monitor: Explains how to
configure a remote drop using a Genius Hand–held Monitor.
Chapter 7. Monitoring and Controlling Remote Drop Data: Explains how the I/O data
for a remote drop can be displayed on a Hand–held Monitor or programmer. Chapter 7
also describes how I/O circuits can be forced, toggled, or overwritten.
Chapter 8. Diagnostics and Fault Clearing: Explains how diagnostic information from a
remote drop can be displayed on a Hand–held Monitor or programmer, and how faults
can be cleared.
Chapter 9. Remote I/O Scanner Datagrams: Describes datagrams that can be sent to a
Remote I/O Scanner. Chapter 9 also shows the format of the Remote I/O Scanner’s
Report Fault datagrams.
Appendix A. Estimating the Maximum Number of Remote Drops for a Bus: Shows
how to roughly estimate how many remote drops can be on a bus with one Bus
Controller, one Hand–held Monitor, no Genius blocks, and no programmed
communications.
Appendix B. Finding the I/O Configuration Data Total of a Remote Drop: Gives
instructions for finding the amount of configuration data needed for the I/O modules in
a remote drop.
iii
Page 4

Preface
Appendix C. Logicmaster 90–70, Release 3, Series 90–70 PLC Configuration
Instructions: Explains how to complete the PLC portion of the configuration if you are
using Release 3 of the Logicmaster 90–70 software.
Appendix D. Logicmaster 90–70, Release 3, Remote Drop Configuration Instructions:
Explains how to configure a remote drop if you are using Release 3 of the Logicmaster
90–70 software.
Related Publications
For more information, refer to these publications:
Genius I/O System User’s Manual (GEK–90486–1). Reference manual for system
designers, programmers, and others involved in integrating Genius I/O products in a
PLC or host computer environment. This book provides a system overview, and
describes the types of systems that can be created using Genius products. Datagrams,
Global Data, and data formats are defined.
Series 90–70 PLC Installation and Operation Manual (GFK–0262). This book describes
the modules of a Series 90–70 PLC system, and explains system setup and operation.
Logicmaster 90–70 User’s Manual (GFK–0263). Reference manual for system operators
and others using the Logicmaster 90–70 software to program, configure, monitor, or
control a Series 90–70 PLC and/or a remote drop.
Logicmaster 90 Software Reference Manual (GFK–0265). Reference manual which
describes program str ucture and defines program instructions for the Series 90–70 PLC.
Series Sixt
Controller, which interfaces a Genius bus to a Series Six PLC. This book describes the
installation and operation of the Bus Controller. It also contains the programming
information needed to interface Genius I/O devices to a Series Six PLC.
Series Five Bus Controller User’s Manual (GFK–0248). Reference manual for the Bus
Controller, which interfaces a Genius bus to a Series Five PLC. This book describes the
installation and operation of the Bus Controller. It also contains the programming
information needed to interface Genius I/O devices to a Series Five PLC.
Genius I/O PCIM User’s Manual (GFK–0074). Reference manual for the PCIM, which
interfaces a Genius bus to a suitable host computer. This book describes the installation
and operation of the PCIM. It also contains the programming information needed to
interface Genius I/O devices to a host computer.
Bus Controller User’s Manual (GFK–0171). Reference manual for the Bus
We Welcome Your Comments and Suggestions
At GE Fanuc automation, we strive to produce quality technical documentation. After
you have used this manual, please take a few moments to complete and return the
Reader’s Comment Card located on the next page.
Jeanne Grimsby
Senior technical writer
Series 90–70 Genius Bus Controller User’s Manual – July 1992iv
Page 5

Contents
Chapter 1 Introduction 1 . . . . . . . . . . . . . . . . . . . . . . . . . . . . . . . . . . . . . . . . . . . . . . .
Overview 1 . . . . . . . . . . . . . . . . . . . . . . . . . . . . . . . . . . . . . . . . . . . . . . . . . . . . . . .
Module Description 2 . . . . . . . . . . . . . . . . . . . . . . . . . . . . . . . . . . . . . . . . . . . . . . .
Required Equipment 4 . . . . . . . . . . . . . . . . . . . . . . . . . . . . . . . . . . . . . . . . . . . . . .
Parts of a Remote Drop 5 . . . . . . . . . . . . . . . . . . . . . . . . . . . . . . . . . . . . . . . . . . . .
Genius Bus 11 . . . . . . . . . . . . . . . . . . . . . . . . . . . . . . . . . . . . . . . . . . . . . . . . . . . . . .
Timing 12 . . . . . . . . . . . . . . . . . . . . . . . . . . . . . . . . . . . . . . . . . . . . . . . . . . . . . . . . . .
Redundancy 14 . . . . . . . . . . . . . . . . . . . . . . . . . . . . . . . . . . . . . . . . . . . . . . . . . . . . .
Configuration 18 . . . . . . . . . . . . . . . . . . . . . . . . . . . . . . . . . . . . . . . . . . . . . . . . . . . .
Chapter 2 Installation 21 . . . . . . . . . . . . . . . . . . . . . . . . . . . . . . . . . . . . . . . . . . . . . . . .
Hardware Packaging 21 . . . . . . . . . . . . . . . . . . . . . . . . . . . . . . . . . . . . . . . . . . . . . .
Preinstallation Check 21 . . . . . . . . . . . . . . . . . . . . . . . . . . . . . . . . . . . . . . . . . . . . . .
System Grounding Procedures 22 . . . . . . . . . . . . . . . . . . . . . . . . . . . . . . . . . . . . .
Rack Installation 23 . . . . . . . . . . . . . . . . . . . . . . . . . . . . . . . . . . . . . . . . . . . . . . . . . .
P ower Supply Installation 26 . . . . . . . . . . . . . . . . . . . . . . . . . . . . . . . . . . . . . . . . . .
Module Locations 27 . . . . . . . . . . . . . . . . . . . . . . . . . . . . . . . . . . . . . . . . . . . . . . . . .
Module Installation and Removal 28 . . . . . . . . . . . . . . . . . . . . . . . . . . . . . . . . . . .
Field Wiring to I/O Modules 29 . . . . . . . . . . . . . . . . . . . . . . . . . . . . . . . . . . . . . . . .
Multiple Racks in a Remote Drop 31 . . . . . . . . . . . . . . . . . . . . . . . . . . . . . . . . . . .
Genius Bus Connections: Single Bus Cable 32 . . . . . . . . . . . . . . . . . . . . . . . . . . .
Genius Bus Connections: Dual Bus Cables 33 . . . . . . . . . . . . . . . . . . . . . . . . . . . .
Programmer Connection at the Remote I/O Scanner 35 . . . . . . . . . . . . . . . . . . .
Multidrop Connections 38 . . . . . . . . . . . . . . . . . . . . . . . . . . . . . . . . . . . . . . . . . . . .
Chapter 3 Remote I/O Scanner Operation 43 . . . . . . . . . . . . . . . . . . . . . . . . . . . . . .
Overview 43 . . . . . . . . . . . . . . . . . . . . . . . . . . . . . . . . . . . . . . . . . . . . . . . . . . . . . . .
I/O Scan 44 . . . . . . . . . . . . . . . . . . . . . . . . . . . . . . . . . . . . . . . . . . . . . . . . . . . . . . . . .
I/O Scanner Memory 45 . . . . . . . . . . . . . . . . . . . . . . . . . . . . . . . . . . . . . . . . . . . . . .
Data Transfer with the Host 46 . . . . . . . . . . . . . . . . . . . . . . . . . . . . . . . . . . . . . . . .
Using Option Modules in a Remote Drop 50 . . . . . . . . . . . . . . . . . . . . . . . . . . . .
Chapter 4 Configuration with Logicmaster 90–70 53 . . . . . . . . . . . . . . . . . . . . . . .
Configuration Limits 53 . . . . . . . . . . . . . . . . . . . . . . . . . . . . . . . . . . . . . . . . . . . . . .
Filenames for Configuration Files 53 . . . . . . . . . . . . . . . . . . . . . . . . . . . . . . . . . . .
Using Release 3 Configuration Files with Release 4 Software 54 . . . . . . . . . . . .
“Attaching” Configuration Files 54 . . . . . . . . . . . . . . . . . . . . . . . . . . . . . . . . . . . . .
Configuring a Remote Drop 55 . . . . . . . . . . . . . . . . . . . . . . . . . . . . . . . . . . . . . . . .
Configure the Modules in the Remote Drop 65 . . . . . . . . . . . . . . . . . . . . . . . . . .
Completing the Remote Drop Configuration 68 . . . . . . . . . . . . . . . . . . . . . . . . .
Displaying Configured References 71 . . . . . . . . . . . . . . . . . . . . . . . . . . . . . . . . .
Copying, Deleting, and Undeleting 73 . . . . . . . . . . . . . . . . . . . . . . . . . . . . . . . . . .
Selecting an Existing Configuration File 74 . . . . . . . . . . . . . . . . . . . . . . . . . . . . . .
Storing the Configuration 75 . . . . . . . . . . . . . . . . . . . . . . . . . . . . . . . . . . . . . . . . . .
GFK–0579B Series 90–70 Remote I?O Scanner User ’s Manual – July 1992
v
Page 6

Contents
Chapter 5 Logicmaster 90 Operation with a Remote Drop 77 . . . . . . . . . . . . . . . .
Overview 77 . . . . . . . . . . . . . . . . . . . . . . . . . . . . . . . . . . . . . . . . . . . . . . . . . . . . . . .
Setting Up Programmer Communications with a Remote Drop 78 . . . . . . . . .
Status Display for a Remote Drop 79 . . . . . . . . . . . . . . . . . . . . . . . . . . . . . . . . . . .
Logicmaster 90 Software,
Programmer Differences for a Remote Drop 80 . . . . . . . . . . . . . . . . . . . . . . . .
Chapter 6 Remote Drop Configuration
with a Hand–held Monitor 83 . . . . . . . . . . . . . . . . . . . . . . . . . . . . . .
Overview 84 . . . . . . . . . . . . . . . . . . . . . . . . . . . . . . . . . . . . . . . . . . . . . . . . . . . . . . .
Set Up the Hand–held Monitor 86 . . . . . . . . . . . . . . . . . . . . . . . . . . . . . . . . . . . .
Display the Configuration Main Menu 87 . . . . . . . . . . . . . . . . . . . . . . . . . . . . . . .
Select the Device Number 88 . . . . . . . . . . . . . . . . . . . . . . . . . . . . . . . . . . . . . . . . .
Select a Series Six or Series Five PLC Reference Address 89 . . . . . . . . . . . . . . . .
Select the Baud Rate 90 . . . . . . . . . . . . . . . . . . . . . . . . . . . . . . . . . . . . . . . . . . . . . .
Select Series 90–70 Data Lengths 91 . . . . . . . . . . . . . . . . . . . . . . . . . . . . . . . . . . .
Select the Remote Drop ID 93 . . . . . . . . . . . . . . . . . . . . . . . . . . . . . . . . . . . . . . . . .
Display I/O Modules in Remote Drop 94 . . . . . . . . . . . . . . . . . . . . . . . . . . . . . . . .
Select Genius Bus Redundancy 95 . . . . . . . . . . . . . . . . . . . . . . . . . . . . . . . . . . . . .
Select BSM Control 95 . . . . . . . . . . . . . . . . . . . . . . . . . . . . . . . . . . . . . . . . . . . . . . .
Select CPU Redundancy 96 . . . . . . . . . . . . . . . . . . . . . . . . . . . . . . . . . . . . . . . . . . .
Select Configuration Protection 97 . . . . . . . . . . . . . . . . . . . . . . . . . . . . . . . . . . . . .
Chapter 7 Monitoring and Controlling
Remote Drop Data 99 . . . . . . . . . . . . . . . . . . . . . . . . . . . . . . . . . . . . . .
Overview 99 . . . . . . . . . . . . . . . . . . . . . . . . . . . . . . . . . . . . . . . . . . . . . . . . . . . . . . .
Monitoring/Controlling I/O Data:
Genius Hand–held Monitor 102 . . . . . . . . . . . . . . . . . . . . . . . . . . . . . . . . . . . . . .
Monitoring/Controlling I/O Data:
Logicmaster 90–70 107 . . . . . . . . . . . . . . . . . . . . . . . . . . . . . . . . . . . . . . . . . . . . . .
Monitoring/Controlling I/O Data:
Series Six PLC or Series Five PLC 109 . . . . . . . . . . . . . . . . . . . . . . . . . . . . . . . . . .
Monitoring/Controlling I/O Data:
Computer 112 . . . . . . . . . . . . . . . . . . . . . . . . . . . . . . . . . . . . . . . . . . . . . . . . . . . . . .
Chapter 8 Diagnostics and Fault Clearing 113 . . . . . . . . . . . . . . . . . . . . . . . . . . . . . .
Overview 113 . . . . . . . . . . . . . . . . . . . . . . . . . . . . . . . . . . . . . . . . . . . . . . . . . . . . . . .
Display and Clear Faults from a Genius Hand–held Monitor 114 . . . . . . . . . . .
Display and Clear Faults from Logicmaster 90–70 116 . . . . . . . . . . . . . . . . . . . . .
Display and Clear Faults from Logicmaster 5 or Logicmaster 6 121 . . . . . . . . . .
GFK–0579B Series 90–70 Remote I?O Scanner User ’s Manual – July 1992
vi
Page 7

Contents
Chapter 9 Remote I/O Scanner Datagrams 123 . . . . . . . . . . . . . . . . . . . . . . . . . . . . . .
Datagram Types 124 . . . . . . . . . . . . . . . . . . . . . . . . . . . . . . . . . . . . . . . . . . . . . . . . . .
Read Map 125 . . . . . . . . . . . . . . . . . . . . . . . . . . . . . . . . . . . . . . . . . . . . . . . . . . . . . . .
Read Map Reply 125 . . . . . . . . . . . . . . . . . . . . . . . . . . . . . . . . . . . . . . . . . . . . . . . . . .
Write Map 125 . . . . . . . . . . . . . . . . . . . . . . . . . . . . . . . . . . . . . . . . . . . . . . . . . . . . . . .
Report Fault Datagram Format 126 . . . . . . . . . . . . . . . . . . . . . . . . . . . . . . . . . . . . .
Appendix A Estimating the Number of Remote Drops for a Bus 129 . . . . . . . . . . . . .
Appendix B Finding the I/O Configuration Data Total
for a Remote Drop 131 . . . . . . . . . . . . . . . . . . . . . . . . . . . . . . . . . . . . . .
Appendix C Logicmaster 90–70, Release 3:
Series 90–70 PLC Configuration
for Remote Drops 133 . . . . . . . . . . . . . . . . . . . . . . . . . . . . . . . . . . . . . . .
Overview 133 . . . . . . . . . . . . . . . . . . . . . . . . . . . . . . . . . . . . . . . . . . . . . . . . . . . . . . .
Step 1: Create or Select a PLC Program Folder 134 . . . . . . . . . . . . . . . . . . . . . . . .
Step 2: Add the Remote I/O Scanner to the Genius Bus 134 . . . . . . . . . . . . . . . . .
Step 3: Configure the Remote I/O Scanner 137 . . . . . . . . . . . . . . . . . . . . . . . . . . .
Step 4: Store the Configuration to the PLC 140 . . . . . . . . . . . . . . . . . . . . . . . . . . .
Appendix D Logicmaster 90–70, Release 3:
Remote Drop Configuration Instructions 141 . . . . . . . . . . . . . . . . . .
Overview 141 . . . . . . . . . . . . . . . . . . . . . . . . . . . . . . . . . . . . . . . . . . . . . . . . . . . . . . .
Remote Drop Configuration Summary 142 . . . . . . . . . . . . . . . . . . . . . . . . . . . . . .
Step 1: Create a Folder 143 . . . . . . . . . . . . . . . . . . . . . . . . . . . . . . . . . . . . . . . . . . . . .
Step 2: Configure the Remote I/O Scanner 144 . . . . . . . . . . . . . . . . . . . . . . . . . . .
Step 3: Configure the Modules in the Remote Drop 148 . . . . . . . . . . . . . . . . . . . .
Step 4: Store the Configuration to the Remote Drop 150 . . . . . . . . . . . . . . . . . . .
GFK–0579B Series 90–70 Remote I?O Scanner User ’s Manual – July 1992
vii
Page 8
restart lowapp ARestart oddapp: ARestarts for autonumbers that do not restart in
Î
Î
Î
Î
Î
each chapter . figure bi level 1, reset table_big level 1, reset chap_big level 1, reset1
Lowapp Alwbox restart evenap:A1app_big level 1, resetA figure_ap level 1, reset
table_ap level 1, reset figure level 1, reset Figure 1. table level 1, reset Table 1.
these restarts oddbox reset: 1evenbox reset: 1must be in the header frame of
chapter 1. a:ebx, l 1 resetA a:obx:l 1, resetA a:bigbx level 1 resetA a:ftr level 1 resetA
c:ebx, l 1 reset1 c:obx:l 1, reset1 c:bigbx level 1 reset1 c:ftr level 1 reset1
Reminders for autonumbers that need to be restarted manually (first instance will
always be 4) let_in level 1: A. B. C. letter level 1:A.B.C. num level 1: 1. 2. 3.
num_in level 1: 1. 2. 3. rom_in level 1: I. II. III. roman level 1: I. II. III. steps level 1:
1. 2. 3.
Chapter 1 Introduction
section level 1 1
1
This chapter describes the Series 90t–70 Remote I/O Scanner (IC697BEM733) and
other equipment that may be used with it. It discusses Genius bus operation as it
relates to the Remote I/O Scanner, and describes how the Remote I/O Scanner can be
used in Genius redundancy systems.
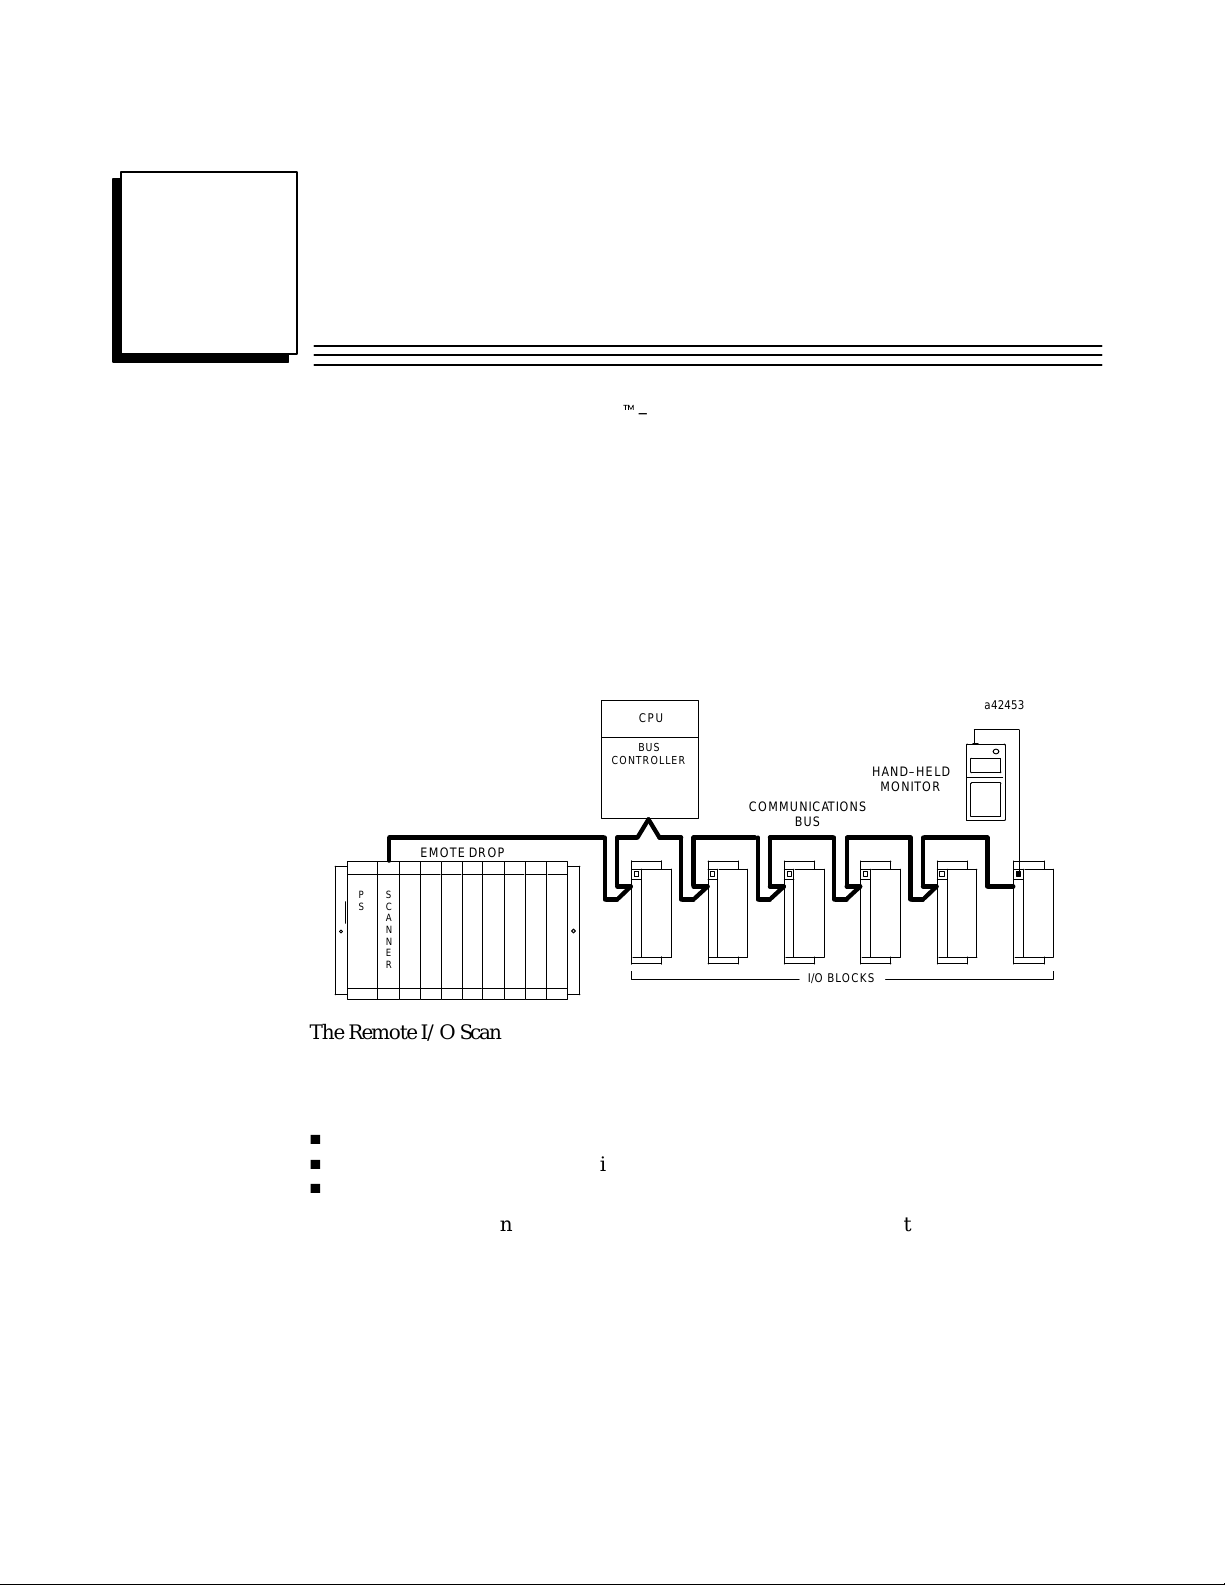
Overview
The Remote I/O Scanner is an intelligent module which mounts in a remote Series
90–70 rack, and inter faces Series 90–70 modules to a Genius bus.
figure bi level 1
table_big level 1
The Genius bus connects the Remote I/O Scanner to a Bus Controller in the host PLC
or computer. A dditional remote drops, Genius blocks, Bus Controllers, and
Hand–held Monitors can be attached to the same bus.
a42453
S
P
C
S
A
N
N
E
R
REMOTE DROP
CPU
BUS
CONTROLLER
COMMUNICATIONS
BUS
I/O BLOCKS
HAND–HELD
MONITOR
The Remote I/O Scanner can send up to 128 bytes of inputs from input boards in its
remote drop to the CPU, and can provide up to 128 bytes of outputs from the CPU to
output boards in the remote drop. The amount of data transferred is configurable.
Individual I/O circuits in the remote drop can be:
H
Forced and unforced from a Hand–held Monitor or the application program logic.
H
Overridden from a PLC application program.
H
Toggled from a Logicmaster 90–70 programmer.
The Remote I/O Scanner can be used in CPU redundancy (dual controller) and bus
redundancy (dual bus) systems.
The Host CPU
The Remote I/O Scanner is ideally suited for use in a Series 90–70 PLC system.
However, any type of PLC or computer capable of controlling a Genius bus can be
used as the host. Suitable hosts include Series Six PLCs, Series Five PLCs, and
computers equipped with a PCIM (P ersonal Computer Interface Module), QBIM
(Q–Bus Interface Module), or a third–party GENI–based interface.
1
Page 9

1
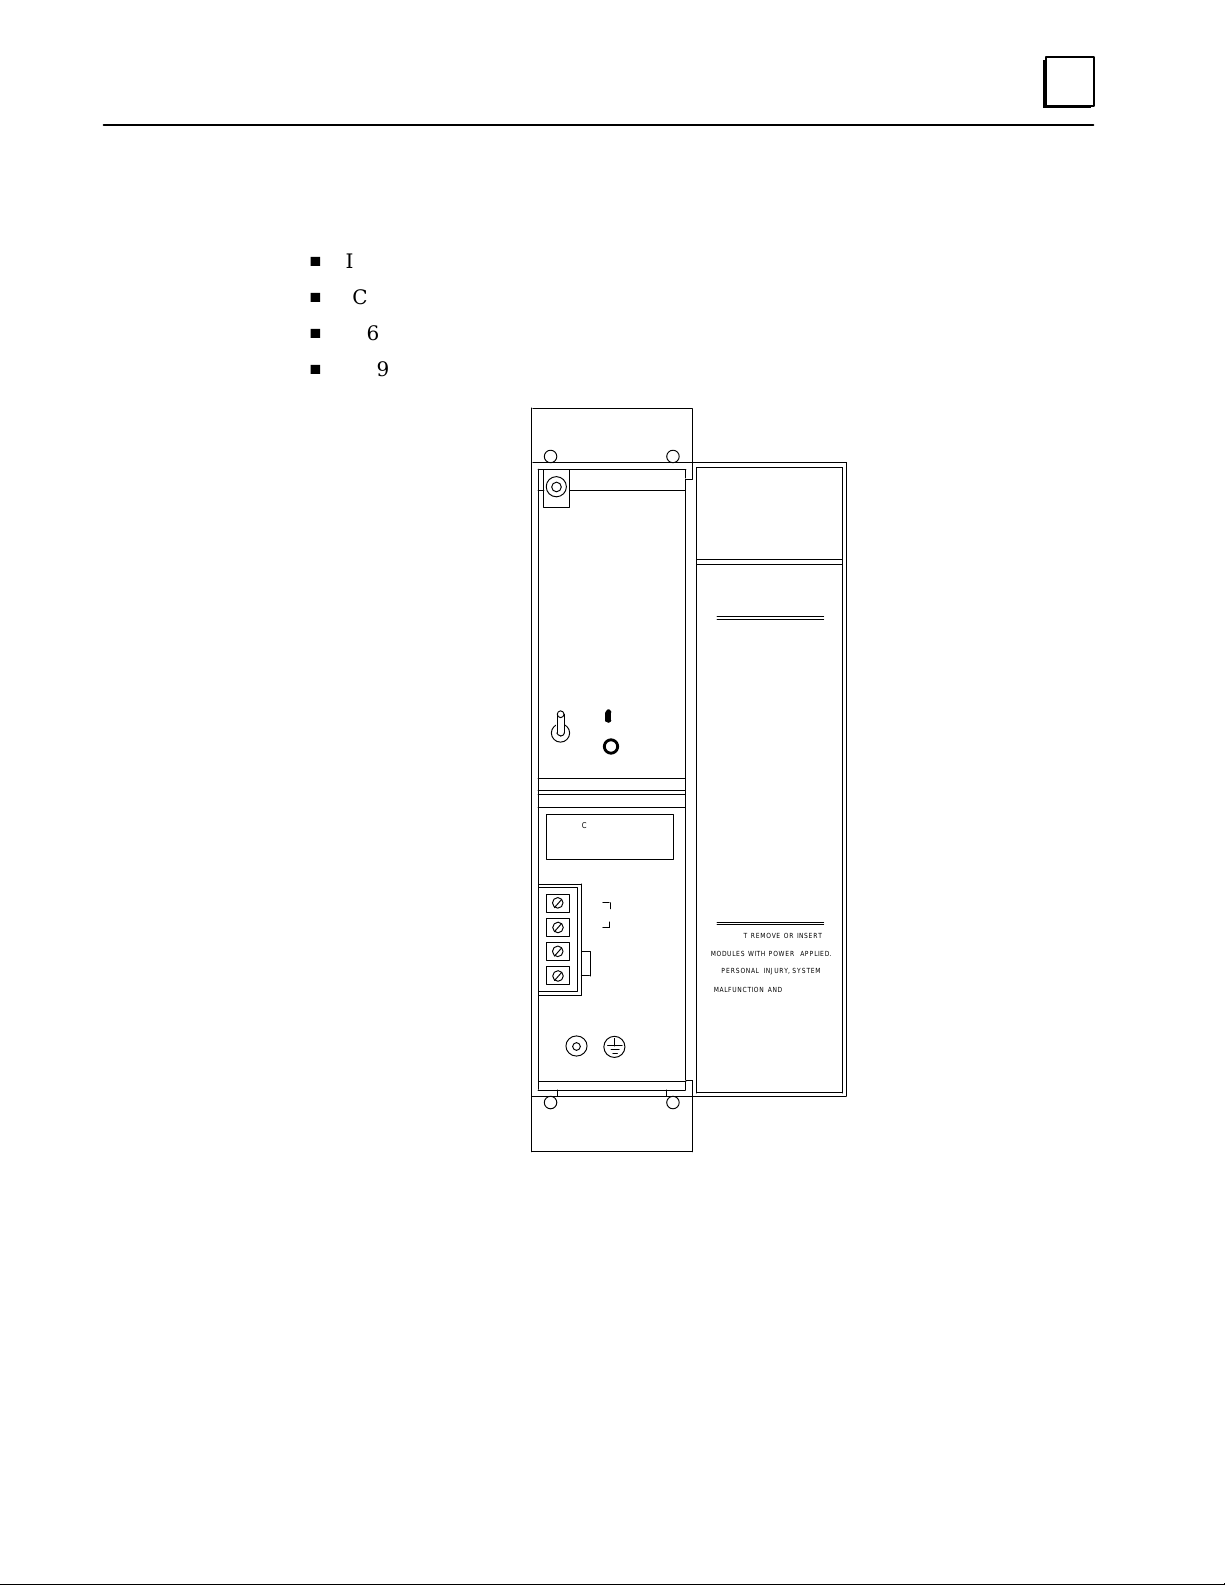
Module Description
The Series 90–70 Remote I/O Scanner consists of a single circuit board, with a hinged
door which serves as a faceplate. It occupies one slot in a Series 90–70 I/O rack.
MODULE OK LED
I/O ENABLED LED
BUS B ACTIVE LED
a44761
GENIUS
HAND HELD
MONITOR
CONNECTOR
SERIAL
PORT
RS–422/485
COMPATIBLE
GENIUS
BUS
TERMINALS
MODEL 70
BEM 733
MODULE OK
I/O ENABLED
BUS B ACTIVE
ON = OK, ACTIVE
MODULE FUNCTION
SERIES 90–70
GENIUS BUS
REMOTE I/O
SCANNER
GENIUS
HAND HELD
MONITOR
SERIAL PORT
RS–422/485
COMPA TIBLE
SER1
SER2
SER1A
R
E
D
SER2A
U
N
D
A
SER1B
N
C
Y
SER2B
MODULE
IC697BEM733
LABEL
44A726758–110R02
SHIELD
SHIELD
OUT
SHIELD
IN A
SHIELD
OUT A
SHIELD
IN B
SHIELD
OUT B
IN
BEM 733
The Remote I/O Scanner does not require batteries; the battery holder in the faceplate
is not used.
Series 90–70 Remote I/O Scanner User’s Manual – July 19922
Page 10
LEDs
Module OK
I/O Enabled
Bus B Active
The Remote I/O Scanner has three LEDs that show through the transparent portion at
the top of the door.
lights to indicate that the module has passed its powerup diagnostic
tests. If this LED flashes, it indicates a problem, as shown in the table
below . If this LED is off, there is a fatal error, which causes the Remote
I/O Scanner to go to stop/faulted mode.
lights when the Remote I/O Scanner is receiving the expected output
data from the CPU. If this LED flashes, it indicates either I/O data is
forced, or a Device Number conflict.
if the Remote I/O Scanner is installed on a dual (redundant) bus, this
LED lights if Bus B of the dual bus pair is the currently–active bus.
The following table summarizes the LED indications.
Module OK I/O Enabled Meaning
On On Normal operation
Blinking On Fault detected
On Blinking I/O data forced
Alter nate blinking Alternate blinking F ault detected, and I/O data forced
Synchronous blinking Synchronous blinking Device Number conflict
On Off Outputs not being updated from CPU
Off Off No power or fatal error
1
Connectors
The front of the module has three connectors:
H
9–pin male D Connector: the upper connector. Used for attaching a Genius
Hand–held Monitor.
H
15–pin female D Connector: the center connector. This connector is an RS–422
compatible RS–485 serial port. It can be used for communicating with a
programmer equipped with the serial version of Logicmaster 90–70, or for
connection to a multidrop communications network.
H
The connector at the bottom of the module attaches the Genius bus terminal strip.
Because the terminal strip is removable, it is possible to service or replace the
Remote I/O Scanner while the rest of the system is operating, without disrupting
bus communications.
3Chapter 1 Introduction
Page 11

1
Required Equipment
The following equipment is required to use a Remote I/O Scanner.
H
At least one Series 90–70 5–slot or 9–slot remote rack with Power Supply. A
remote drop may include multiple racks and power supplies.
H
If a Genius Hand–held Monitor will be used to configure or monitor a remote
drop, it must be version 4.0 (IC660HHM501G) or later.
H
If Logicmaster 90–70 configuration software will be used to configure the remote
drop, it must be release 3.0 or later:
A. IC641SWP701F (3.5”, 2DD, 5.25” 2S/HD)
B. IC641SWP704C (5.25” 2S/2D)
H
If the parallel version of Logicmaster 90–70 will be used with a remote drop, the
remote drop must include a Bus Transmitter Module (IC697BEM713) for
connection to the programmer.
H
If the remote drop will include more than one rack of modules, a Bus Transmitter
Module (IC697BEM713) one or more Bus Receiver Modules (IC697BEM711), and
appropriate cables are required.
H
For a Series 90–70 PLC
h
The Series 90–70 CPU firmware must be release 2.0 or later.
h
The Logicmastert 90–70 programming and configuration software must be
release 3.0 or later. Catalog numbers are given above.
h
A Series 90–70 Genius Bus Controller, release 3.0 or later. The Bus Controller
must be 4.0 or later for full diagnostics display from Logicmaster 90–70 (see
chapter 8), or for redundancy applications.
H
For a Series Sixt PLC
h
CPU: rev. 105 or later.
h
Logicmaster 6 Programming Software: release 4.02 or later.
h
Bus Controllers: IC660CBB902 or 903, version 1.7 or later.
H
For a Series Fivet PLC
h
CPU: rev . 3.2 (catalog number with E suffix) or later.
h
Logicmaster 5 Programming Software: release 2.01 or later.
h
Bus Controller: any version
H
For a Host Computer
h
PCIM: any version
h
QBIM: any version
Series 90–70 Remote I/O Scanner User’s Manual – July 19924
Page 12
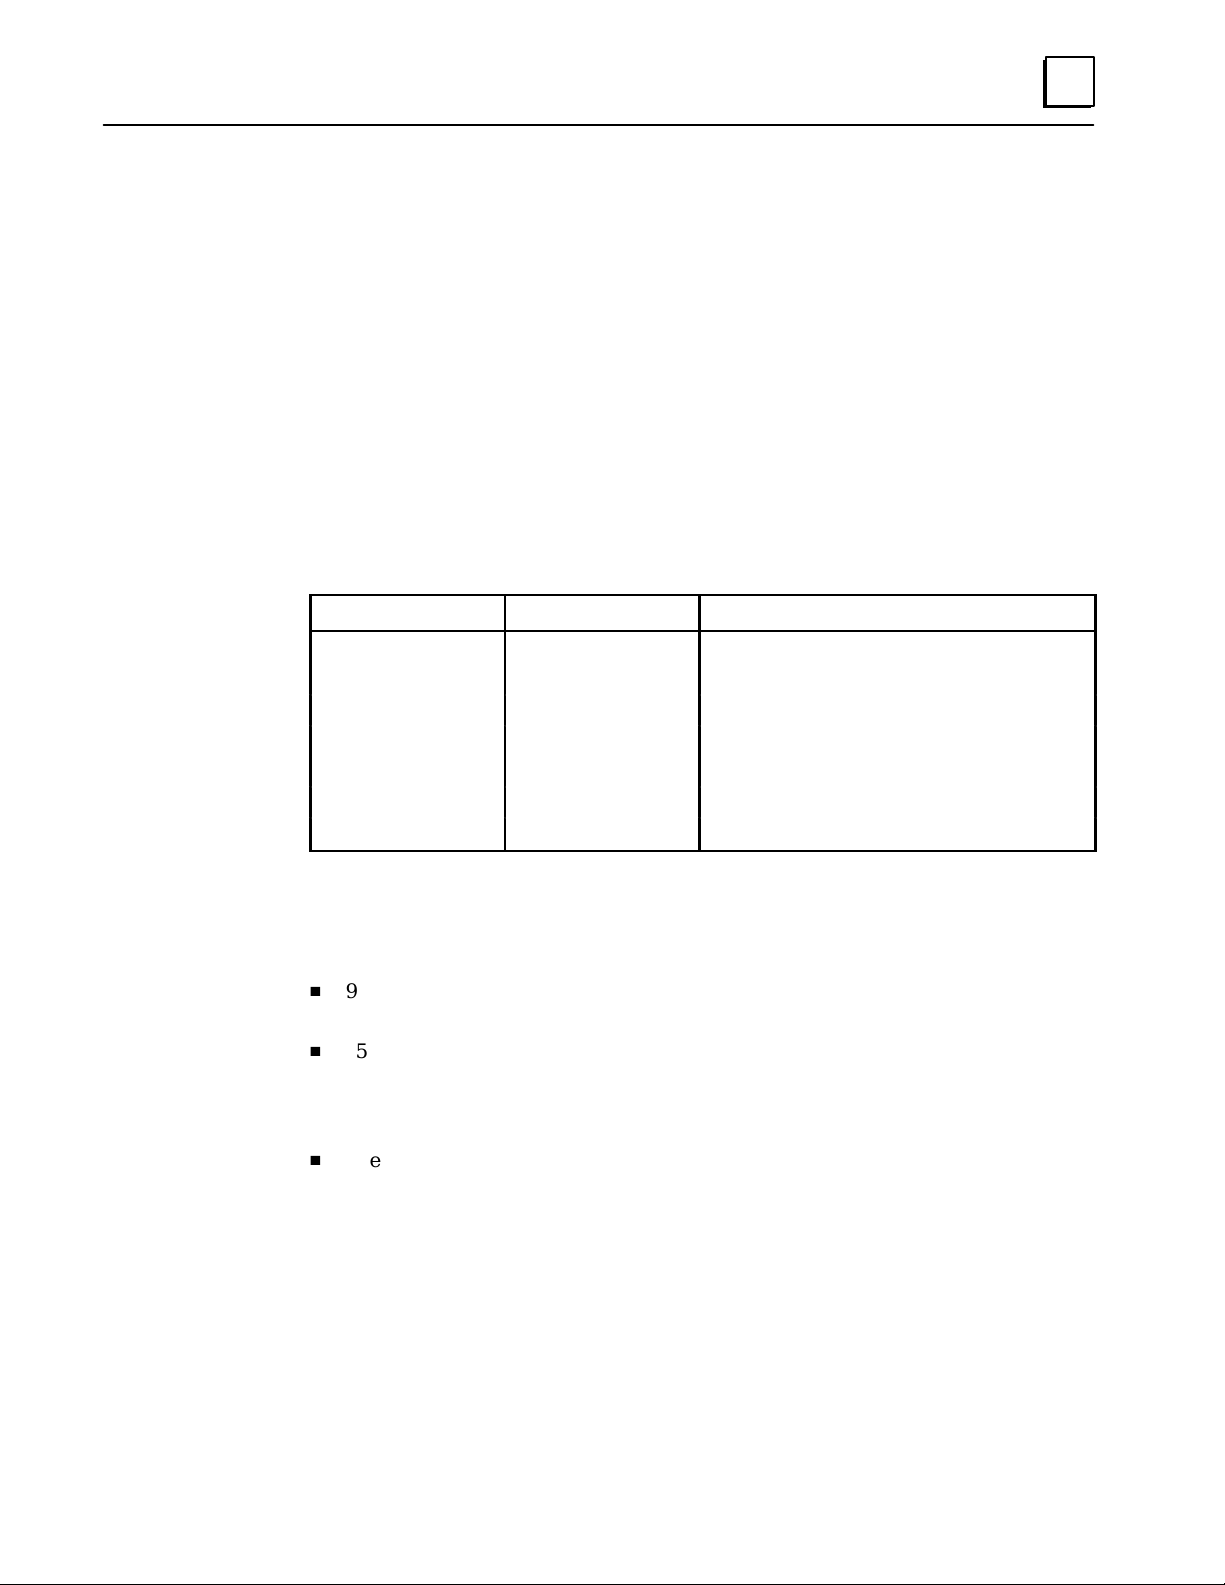
Parts of a Remote Drop
Together, a Remote I/O Scanner and the modules it serves make up a remote drop on
the Genius bus. The remote drop may consist of one to eight Series 90–70 racks.
1
P
S
S
B
C
T
A
M
N
N
E
R
GENIUS BUS
RACK 0
REMOTE DROP
PSB
RACK 7
R
M
RACK 1
P
B
S
R
M
UP TO 50 FEET
NOTE:
ALL RACKS MUST BE AT THE SAME GROUND POTENTIAL
PSB
RACK 6
R
M
a44875
Multiple R acks
When there are multiple racks, the Remote I/O Scanner must be located in the first
rack (rack 0). To link multiple racks in a remote drop, a Bus T ransmitter (IC697BEM713)
Module in rack 0 is connected to a Bus Receiver Module (IC697BEM711) in the first
expansion rack. Additional racks are also linked via Bus Receiver Modules.
All racks in a remote drop must be at the same ground potential.
Distance Between R acks in a Remote Drop
The maximum total cable length from the first Bus Transmitter to the last Bus Receiver
in a remote drop is 50 feet (15 meters). Since none of the daisy–chained signals (all at
the same ground potential) are broken at a rack, any rack can be independently
powered–down without affecting the operation of the rest of the system.
Data Quantities
Regardless of the number of racks used for a remote drop, the maximum amount of
data for a remote drop is 128 bytes of inputs and 128 bytes of outputs (8 discrete points
represent one byte and 1 analog channel uses 2 bytes).
5Chapter 1 Introduction
Page 13
1
Î
Î
Î
Î
Î
Î
Î
Î
Î
Î
Î
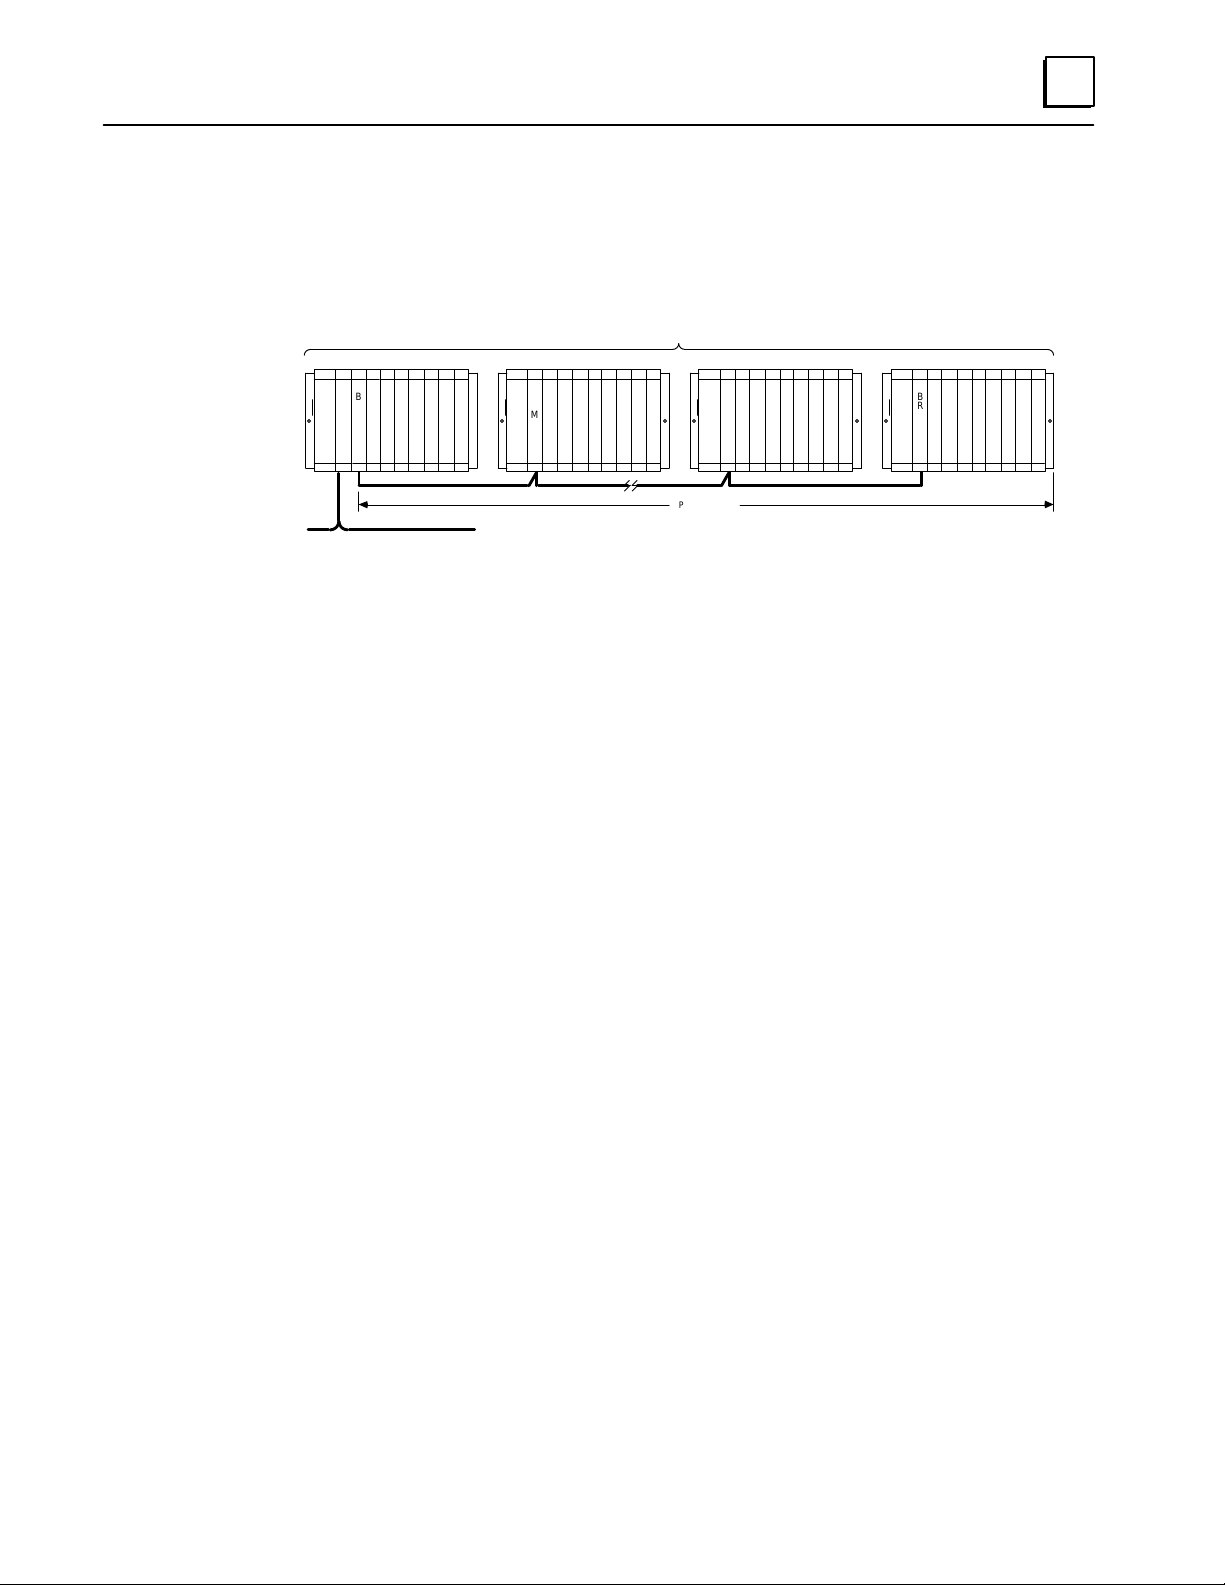
Series 90–70 Racks
Any of the following racks can be used in a remote drop:
H
5–slot, panel mount rack (IC697CHS750).
H
9–slot, panel mount rack (IC697CHS790).
H
9–slot, rack mount rack (IC697CHS791).
Each of these racks has an additional, wider slot for a P ower Supply. Rack sizes may be
mixed in a system installation to suit the requirements of your application.
The rack–mount Series 90–70 rack has flanges on the front for mounting on 19–inch
standard instrument rack hardware. The panel–mount racks have rear flanges for
mounting on electrical panels.
WITH OPTIONAL VME J2
BACKPLANE KIT
1.00
(25.4)
CONNECTOR
FOR
POWER
SUPPLY
SPACER
(QTY.4)
SIDE VIEW
I/O TERMINAL
RESTRAINING
STRAP
7.25
(184)
9.14
(232)
CABLE
ENTRANCE
FROM
BOTTOM
REMOVABLE
I/O
TERMINAL
BLOCK
Î
Î
Î
Î
Î
HINGED
DOOR
11.50
(292)
6.75
(172)
=
(19)
3.00
(76)
1.50
(38)
2.24
(57)
.34
(8.64)
.75
ОООООООООООО
ОООООООООООО
Î
GND
STUD
ОООООООООООО
Î
ОООООООООООО
Î
ОООООООООООО
Î
ОООООООООООО
Î
ОООООООООООО
Î
ОООООООООООО
DIMENSIONS
FOR
5 SLOT RACK
12.60
19.00
(320)
(483)
18.11
(460)
Î
Î
Î
Î
Î
Î
FRONT VIEW
11.71
(297)
17.04
(433)
10.64
(270)
.25 DIA. (TYPICAL)
DIMENSIONS IN INCHES, MILLIMETERS ARE IN PARENTHESIS
Series 90–70 racks do not require a fan for cooling as long as sufficient space is left
around the rack when it is mounted.
GND
STUD
a42984
Series 90–70 Remote I/O Scanner User’s Manual – July 19926
Page 14
Series 90–70 Power Supplies
These Series 90–70 Power Supplies can be used in a remote drop:
H
IC697PWR710, 120/240 VAC input, +5 VDC output, 55 Watts (shown below)
H
IC697PWR711, 120/240 VAC input, +5 VDC, +12 VDC, –12 VDC output, 100 Watts
H
IC697PWR721, 24VDC input, +5 VDC, +12 VDC, –12 VDC output, 90 Watts
H
IC697PWR731, 125VDC input, +5 VDC, +12 VDC, –12 VDC output, 60 Watts
a42818
LED
MODEL 70
PWR 710
POWER SUPPLY MODULE
INPUT
OUTPUT
BRANCH CIRCUIT FUSING
MUST BE PROVIDED
EXTERNALLY
RECOMMENDED TIGHTENING
TORQUE 1,5Nm (15kg cm)
ON
OFF
L1
N
SHORT FOR 120
OPEN FOR 240
120/240VAC
50/60HZ
1.5/0.8A
5V
11A
120
SELECT
INPUT
L1
240
L2
WARNING
EVEN IF THE POWER SUPPLY
IS SWITCHED OFF, HAZARDOUS
VOLTAGES FROM USER FIELD
WIRING MAY STILL BE PRESENT
ON THE I/O TERMINAL BOARDS
AS WELL AS THE POWER
SUPPLY TERMINAL BOARD.
CARE SHOULD BE TAKEN WHEN
HANDLING THE POWER SUPPLY
AND I/O MODULES AS WELL AS
ANY WIRING CONNECTED TO
THEM IN ORDER TO PREVENT
PERSONAL INJURY.
WARNING
DO NOT REMOVE OR INSERT
MODULES WITH POWER APPLIED.
PERSONAL INJURY, SYSTEM
MALFUNCTION AND/OR DAMAGE
TO THE EQUIPMENT MAY OCCUR.
1
MODULE IC697PWR710
LABEL 44A726758–501
Power supply selection will depend on the input power and load requirements of the
application. Load specifications for Series 90–70 modules are listed on page 9.
AC power supplies mount in the leftmost slot of a Series 90–70 rack. DC power
supplies can be mounted on the side of the rack or used as freestanding modules. The
DC power supplies require a power supply adapter, which installs in the power supply
slot and is connected to the power supply by a short cable.
7Chapter 1 Introduction
Page 15
1
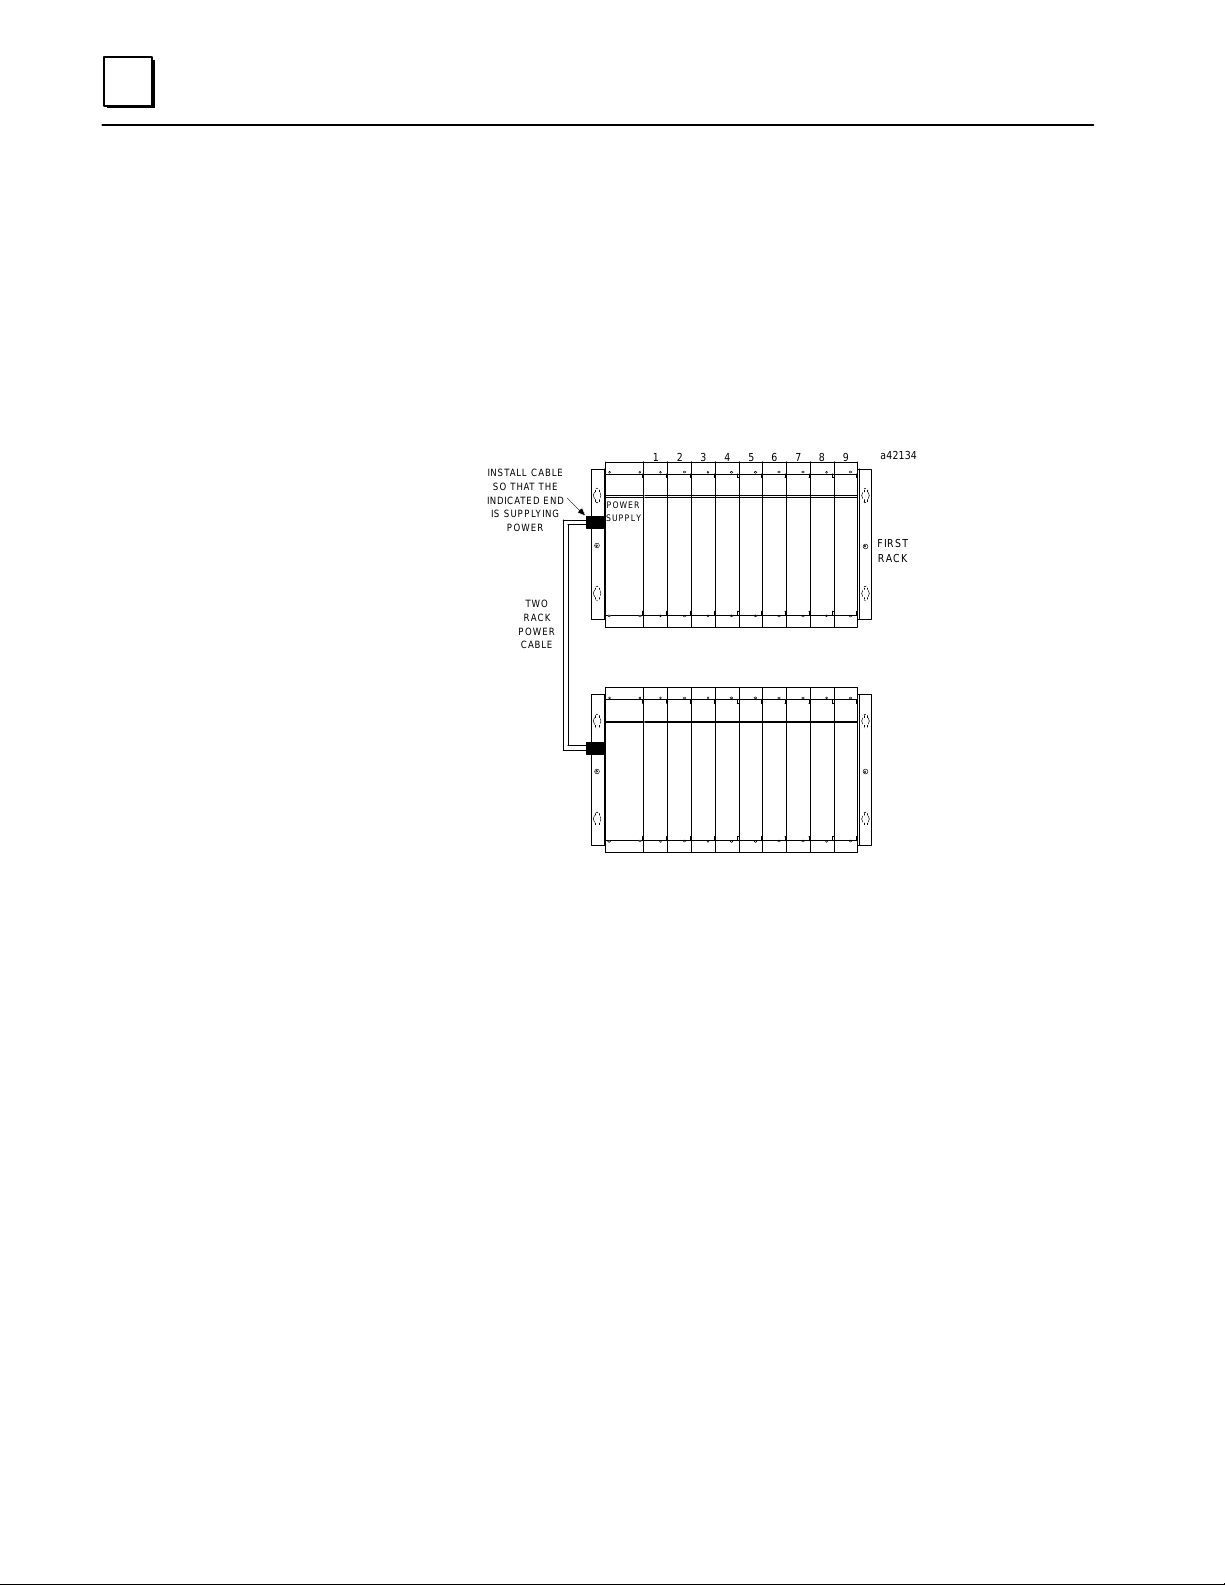
Powering Two Racks from a Single Power Source
Except for the 125VDC supply, each of these power supplies can be used to power two
racks if the total current requirement for both racks does not exceed the power
supply’s load capacity. The rack that does not contain the Power Supply must not have
a load greater than 5.2 amps.
Connection from the rack with the power supply to the second rack is made through a
cable (catalog number IC697CBL700) three feet (one meter) in length, which is
terminated at both ends with 9–pin D–connectors. This cable car ries both +5 volt
power and control signals (power sequencing signals only) to the second rack.
INSTALL CABLE
SO THAT THE
INDICATED END
IS SUPPLYING
POWER
TWO
RACK
POWER
CABLE
123456789
POWER
SUPPLY
FACE
PLATE
a42134
FIRST
RACK
SECOND
RACK
Series 90–70 Remote I/O Scanner User’s Manual – July 19928
Page 16
Series 90–70 Modules for a Remote Drop
The table below lists modules that can be placed in a remote drop, and gives their
catalog numbers, I/O capacities, and loads.
1
Module
Catalog
Number
IC697BEM733 Remote I/O Scanner 0.80
IC697BEM713 Bus T ransmitter Module 1.40
IC697BEM711 Bus Receiver Module 0.80
IC697MDL240 16 120 V A C Isolated, Input, 16 points 0.25
IC697MDL241 16 240 V A C Isolated, Input, 16 points 0.25
IC697MDL250 32 120 VAC Input, 32 point 0.35
IC697MDL650 32 24 VDC Input, 32 point 0.30
IC697MDL651 32 Input module, negative logic, TTL 0.525
IC697MDL652 32 12 VDC Pos/Neg Logic Input, 32 points 0.30
IC697MDL653 32 24 VDC Pos/Neg Logic Input, 32 points 0.30
IC697MDL654 32 48 VDC Pos/Neg Logic Input, 32 points 0.30
IC697MDL340 16 120 VAC Output, 16 point 0.25
IC697MDL341 16 120/240 V A C Isolated 2A Output, 16 points 0.25
IC697MDL350 32 120 VAC Output, 32 point 0.50
IC697MDL740 16 24/48 VDC Output, 16 point 0.25
IC697MDL750 32 24/48 VDC Output, 32 point 0.15
IC697MDL752 32 12 VDC 0.5A Output, 32 points 0.50
IC697MDL753 32 5/48 VDC 0.5A Neg Logic Output, 32 points 0.50
IC697MDL940 16 Relay Output 16 points 0.75
IC697ALG230 8 Analog Input Base Converter 0.80
IC697ALG440 16 Analog Input Current Expander 0.40
IC697ALG441 16 Analog Input Voltage Expander 0.40
IC697ALG320 4 High Level Analog Output, V oltage/Current 1.66
I/O Points
or
Channels
Module Description
Discrete Modules
Analog Modules
Load in
Amps at
+5 VDC
Option Modules
IC697PCM711 Programmable Coprocessor Module 1.00
IC697GDC701 Graphics Display Coprocessor Module 1.20
IC697ADC701 Alphanumeric Display Coprocessor Module 1.00
Remote Drop Capacity
The maximum number of I/O and option modules that can be installed in a remote
drop is 63, which requires eight 9–slot racks. There are two limits that cannot be
exceeded when locating modules in a remote drop:
H
There must not be too many option modules in a remote drop. See “Option
Modules”, below .
H
The configuration data for all the I/O modules in a remote drop must not add up to
more than 4500 bytes. This amount of configuration data will not be reached in
any remote drop where all I/O modules are included in the Remote I/O Scanner’s
configured I/O map. However, it is possible to have I/O modules in a remote drop
configured to use references outside the I/O map, as explained in chapter 3. If the
drop will have some modules configured outside the Remote I/O Scanner’s I/O
map, refer to appendix B.
9Chapter 1 Introduction
Page 17
1
Analog Modules: The maximum number of analog input modules that can provide
input data to the host is 8; however, there may be additional modules in the remote
drop configured outside the Remote I/O Scanner’s I/O map. The maximum number of
analog input modules that can be configured for a remote drop is 29. Similarly, while
the maximum number of analog output modules that can receive output data from the
host is 16, as many as 54 can be configured for a remote drop.
Option Modules: A remote drop with seven or fewer racks can contain up to 18 GDS
(Graphics Display Coprocessor), or ADS (Alphanumeric Display Coprocessor) modules,
or up to 9 PCM (Programmable Coprocessor) modules with daughterboards. Each
PCM/daughterboard combination counts as two option modules against the total of 18.
The following table shows how many GDS and/or ADS modules can be used with 0 to
9 PCMs.
Total Option Modules in a Remote Drop
Number of PCMs and
Daughterboards
0 18
1 16
2 14
3 12
4 10
5 8
6 6
7 4
8 2
9 0
Number of GDS and/
or ADS Modules
If there are 8 racks in the remote drop, one less PCM with daughterboard, or two less GDS or
ADS modules are permitted.
Analog Expanders: A remote drop can accommodate up to one analog input module
with eight expander modules. However, the maximum number of expanders that can
pass inputs to the CPU is three, due to the Remote I/O Scanner’s 128–byte input data
limit. If an analog module and three expanders were used, no additional input
modules (either analog or discrete) could communicate with the host from the remote
drop.
Modules Not Supported: A remote drop cannot have any I/O module interrupts, or
bus controllers or other modules that depend on COMREQ instructions for their
operations.
Third–party VME modules cannot be used in a remote drop.
Series 90–70 Remote I/O Scanner User’s Manual – July 199210
Page 18
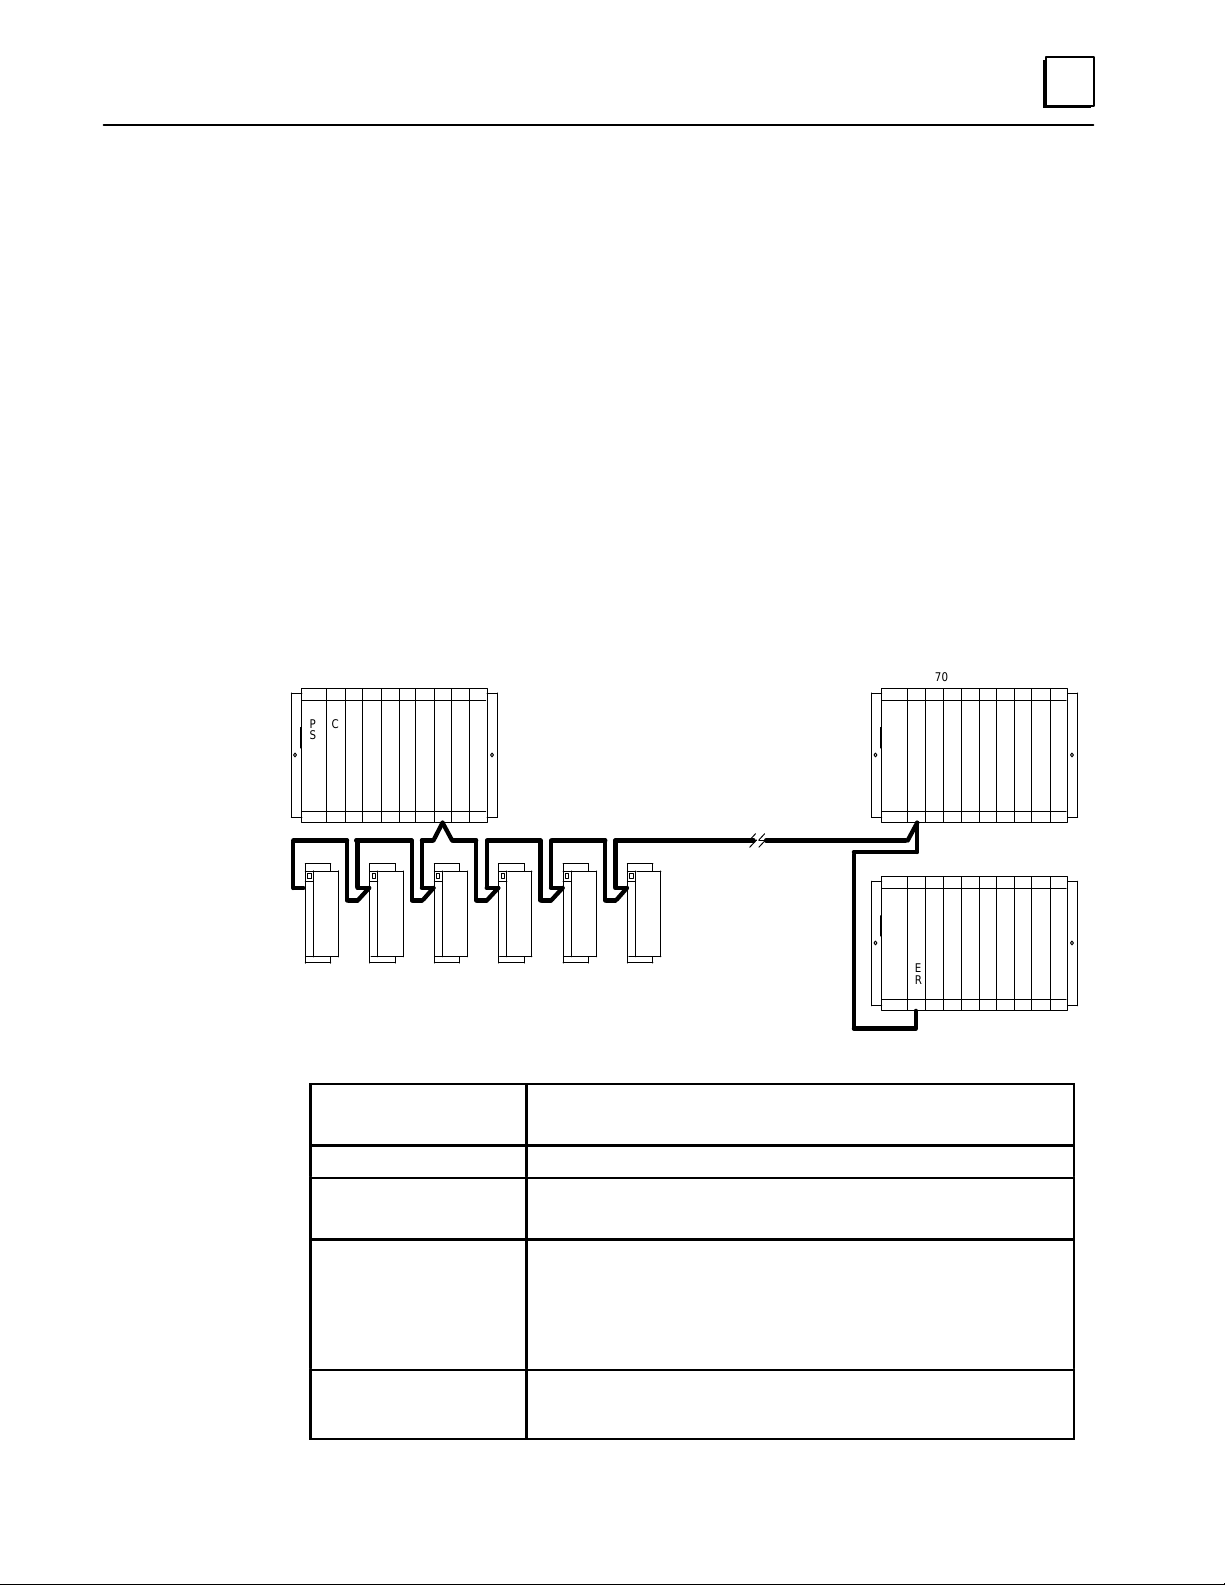
Genius Bus
1
The Genius bus is an industrially–hardened Local–Area–Network (LAN). It passes
I/O (control) data and background information (datagrams) between the Remote I/O
Scanner and a Genius bus controller. The communicated data is protected from
environmental interference and corruption in several ways. Each byte is
triply–encoded during transmission, and each message is checksummed with a cyclic
redundancy check (CRC). Embedded intelligence at either end also checks for correct
message length and type.
A Genius bus can support up to 32 devices. Each remote drop counts as one device on
the bus, regardless of the number or type of modules it includes. A bus can serve any
mix of remote drops, I/O blocks, Bus Controllers and Hand–held Monitors, provided
the bus scan time does not exceed 400mS. Typical busses reserve one location for a Bus
Controller and one for a Hand–held Monitor, leaving 30 for additional devices. The
illustration below shows a Bus Controller in a Series 90–70 PLC connected to a Genius
bus with I/O blocks and two single–rack remote drops.
PSC
P
U
Bus Type
Bus Termination
Baud Rate
7500 FEET WITH 16 DEVICES, AT 38.6K BAUD
B
C
3500 FEET WITH 32 DEVICES, AT 153.6K BAUD EXT.
MAXIMUM BUS LENGTH
90–70 REMOTE RACK
S
I
I
I
C
/
/
/
A
O
O
O
N
N
E
R
90–70 REMOTE RACK
S
I
I
I
C
/
/
/
A
O
O
O
N
N
E
R
a44669
I
I
I
I
/
/
/
/
O
O
O
O
I
I
I
I
/
/
/
/
O
O
O
O
Daisy–chained bus cable; single twisted pair plus shield or Twinax.
Fiber optics cable and modems can also be used.
75, 100, 120, or 150 ohm resistor at both ends of electrical bus cable.
Configurable. 153.6 Kbaud standard, 153.6 Kbaud extended,
76.8Kbaud, or 38.4 Kbaud.
Maximum Bus
Length
Maximum Number of
Devices
7500 feet at 38.4 Kbaud, 4500 feet at 76.8 Kbaud, 3500feet at 153.6
Kbaud extended, 2000 feet at 153.6 Kbaud, standard. Maximum
length at each baud rate also depends on cable type. The Genius I/O
System User’s Manual pro vides a complete list of cable types, showing corresponding bus lengths and baud rates. Greater bus lengths
are possible using sections of fiber optics cable with modems.
32 devices at 153.6 Kbaud standard, 153.6 Kbaud extended, or 76.8
Kbaud. 16 devices at 38.4 Kbaud. Includes Bus Controller and
Hand– held Monitor.
11Chapter 1 Introduction
Page 19
1
Total Amount of Input and
Total Amount of Input and
Output Data for
Timing
A fully–loaded (128 input bytes and 128 output bytes) remote drop adds at least 20mS
to the bus scan. The table below shows the bus scan time contribution, at each baud
rate, for remote drops with a total of 16, 32, 64, 128, and 256 bytes (fully–loaded),
when the Remote I/O Scanner receives outputs from only one bus controller at a time.
Contribution time in mS at each baud rate *
Remote Drop
16 bytes 2.09 2.16 3.83 7.16
32 bytes 3.24 3.31 6.12 11.74
64 bytes 5.52 5.60 10.69 20.89
128 bytes 10.10 10.17 19.85 39.20
256 bytes (fully–loaded) 19.25 19.32 38.15 75.80
* See below to calculate the exact scan time contribution for the application.
153.6 Kb
std
153.6 Kb
ext
76.8 Kb 38.4 Kb
Estimating Bus Scan Time for Remote I/O Drops
The scan time contribution for a remote drop depends on its I/O data usage. Follow
the procedure below to estimate the the scan time contribution of a remote drop.
(Each analog channels is 2 bytes. Eight discrete points are one byte).
1. Find the total number of input bytes and output bytes.
number of input bytes = ________
number of output bytes = ________
total bytes = ________
2. With this total, calculate a scan time contribution using the formula below that
corresponds to the Genius bus baud rate.
Formula for 153.6 Kbaud Standar d:
0.943mS + (0.0715 x total bytes) = ________ mS
Formula for 153.6 Kbaud Extended:
1.015mS + (0.0715 x total bytes) = ________ mS
Formula for 76.8 Kbaud:
1.538mS + (0.143 x total bytes) = ________ mS
Formula for 38.4 Kbaud:
2.583mS + (0.286 x total bytes) = ________ mS
Other devices on the bus, including the Bus Controller, Hand–held Monitor, and I/O
blocks also add to the bus scan time. The Genius I/O System Manual (Volume 1) shows
how to calculate bus scan time based on the devices actually present.
Series 90–70 Remote I/O Scanner User’s Manual – July 199212
Page 20

Number of R emote Drops on a Bus
The number of remote drops on a bus depends on the baud rate and the total number
of I/O points in the remote drops.
Since the maximum Genius bus scan time is 400mS, and the bus scan time contribution
of one fully–loaded remote drop is 20mS, only twenty fully–loaded remote drops are
supported on a single bus that operates at 153.6 Kbaud. If remote drops are not
fully–loaded, more may be used on a bus operating at these baud rates.
If some remote drops are not fully–loaded, more than the maximum number given
below can be used. The table in appendix A will help you estimate the total number of
remote drops and data bytes that can be accommodated on a bus that has one Bus
Controller, one Genius Hand–held Monitor, no datagrams or Global Data
communications, and no Genius I/O blocks. The Genius I/O System User’s Manual
explains how to calculate the bus scan time for a specific bus.
Maximum Number of Drops per Baud Rate
153.6K baud extended: Up to 20 fully–loaded drops, or up to 30 drops with the total
number of I/O bytes less than the limits listed in the table.
1
153.6K baud standard: Up to 20 fully–loaded drops, or up to 30 drops with the total
number of I/O bytes less than the limits listed in the table.
76.8K baud: Up to 10 fully–loaded drops, or up to 30 drops with the total number of
I/O bytes less than the limits listed in the table.
38.4K baud: Up to 5 fully–loaded drops, or up to 14 drops with the total number of
I/O bytes less than the limits listed in the table.
13Chapter 1 Introduction
Page 21
1
Redundancy
The Remote I/O Scanner can be used with CPU redundancy, bus redundancy, or both.
The suitability of redundancy features for any system depends on the requirements of
the application. For Series 90–70 PLC CPUs that are release 3 and earlier, some types
of redundancy are not supported.
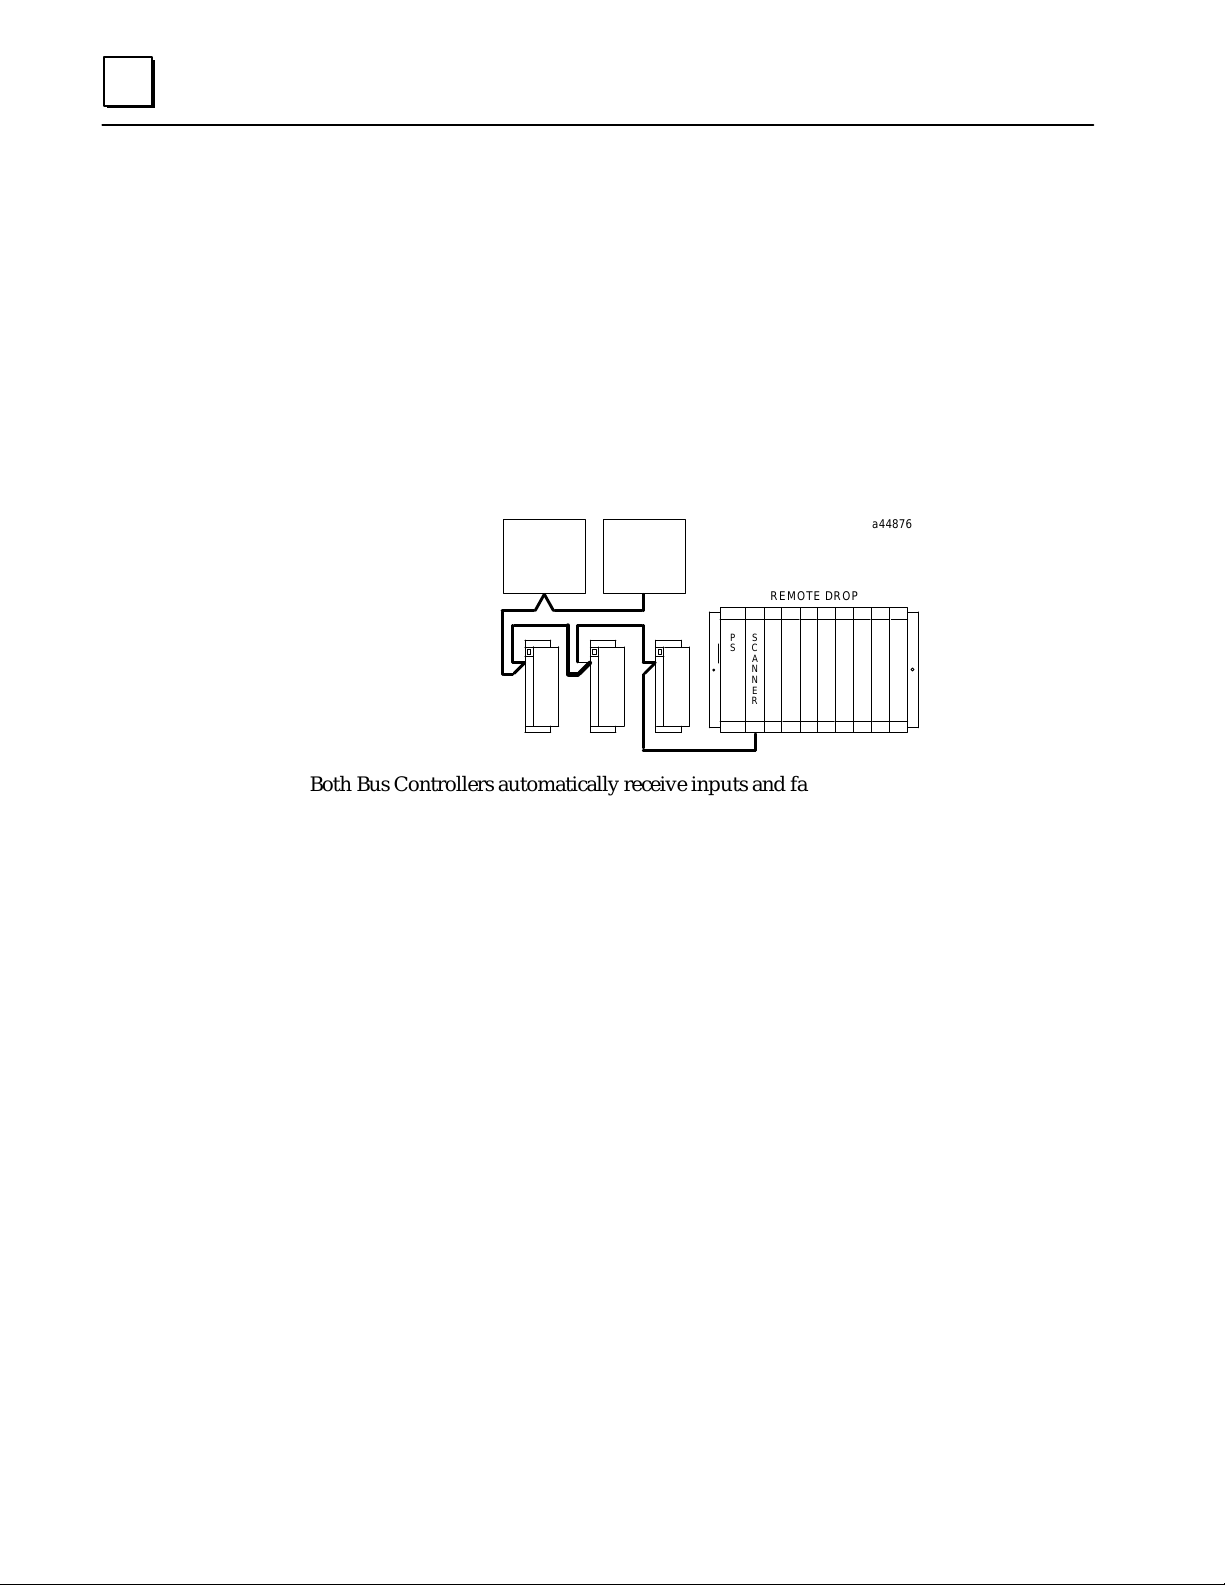
CPU Redundancy
Genius devices are considered to be controlled by the Bus Controller that sends them
outputs. In CPU redundancy, two Bus Controllers on the same bus can send control
outputs at the same time. The Bus Controllers must use Device Numbers 30 and 31.
BUS
CONTROLLER
(DEVICE 30)
BUS
CONTROLLER
(DEVICE 31)
S
P
C
S
A
N
N
E
R
REMOTE DROP
a44876
Both Bus Controllers automatically receive inputs and fault reports from all devices on
the bus that have been configured as being in “CPU Redundancy“ mode.
How the two sets of outputs are handled by devices that receive them depends on
whether the devices are set up for Hot Standby or Duplex redundancy. Both are
explained below . If the remote drop contains any analog modules, the only form of CPU
redundancy permitted is Hot Standby .
Hot Standby CPU Redundancy
A device configured to be in Hot Standby redundancy mode is normally controlled by
the Bus Controller assigned to Device Number 31. If no outputs are available from that
Bus Controller for a period of three bus scans, the device accepts outputs from the Bus
Controller assigned to Device Number 30. If outputs are not available from either Bus
Controller, outputs go to their configured defaults or hold their last state. In Hot
Standby redundancy, Device Number 31 always has priority, so that when that Bus
Controller is on–line, it has control of the outputs.
Duplex CPU Redundancy
A device configured to be in Duplex redundancy mode compares the outputs it
receives from the two bus controllers, to determine whether they match. If
corresponding outputs are the same, the device sets the output to that state. If
corresponding outputs are not the same, the device sets the output to its configured
ON or OFF Duplex Default State. If either Bus Controller stops sending outputs to a
device, its outputs are directly controlled by the remaining device. Only discrete devices
can operate in Duplex redundancy mode; do not use Duplex mode if the analog drop contains
any analog modules.
Series 90–70 Remote I/O Scanner User’s Manual – July 199214
Page 22
1
Genius Bus Redundancy
In Genius bus redundancy, there are two bus cables each connected to a Bus Controller.
The device communicates on only one bus at a time. Before the alternate bus can be
use for communications, a bus switchover must occur and the device must “log in“
with the Bus Controller(s) on the alternate bus. Bus switching can be handled by a Bus
Switching Module attached to a Genius block, or by a Remote I/O Scanner
(IC697BEM733 rev. B or later) which contains a built–in bus switching relay. Bus
Switching Modules and Remote I/O Scanners are the only devices that can be directly
connected to redundant bus cables.
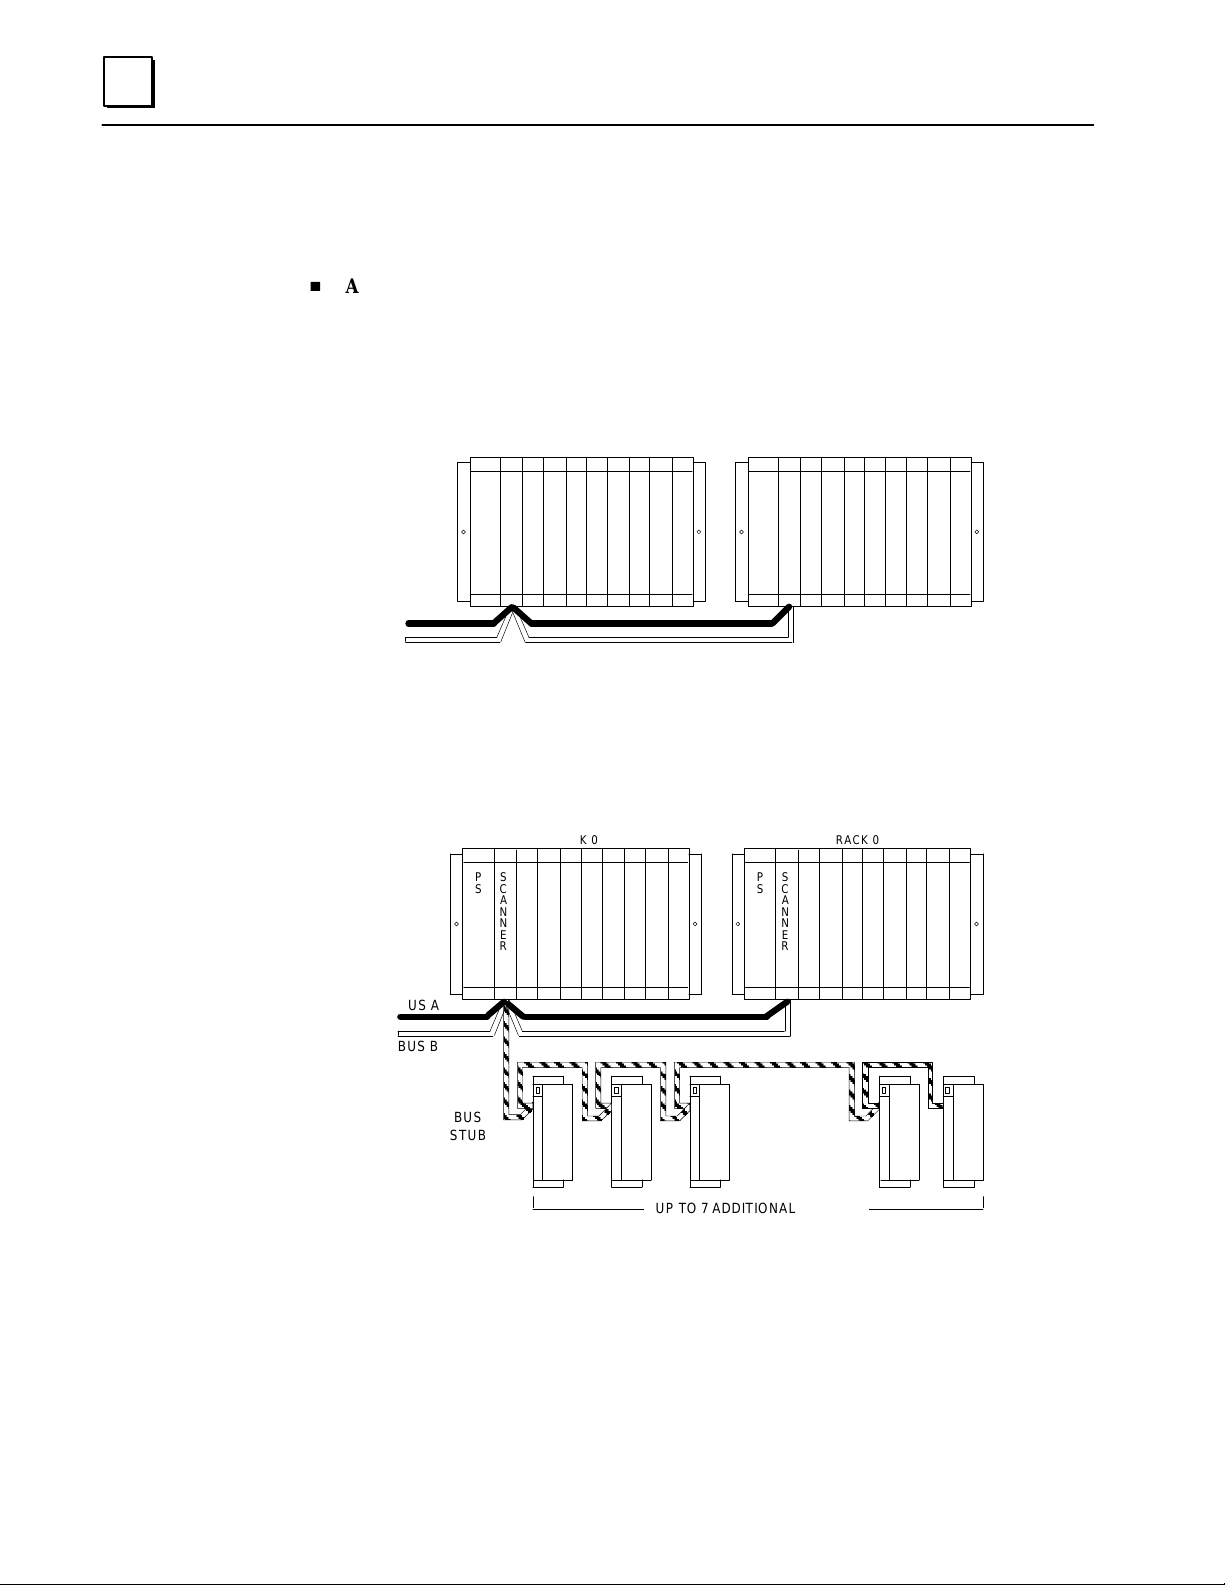
Bus Stubs Connect Other Devices to a Dual Bus
Other Genius devices, such as I/O blocks and additional Remote I/O Scanners, can be
interfaced to a dual bus by short lengths of unterminated cable called a bus stubs.
Typical arrangements are shown on the following pages. Up to seven devices can be
installed on a bus stub (plus the device that is connected to the dual bus). Each device
on a bus stub counts toward the total of 32 devices on the Genius bus.
The total length of all bus stubs on a bus should be 100 feet or less. Within each 20%
section of the actual bus length, the total maximum stub length is 20 feet. This can be
divided into shorter stubs, provided that the total length in each 20% of the bus is 20 ft.
or less.
a44976
20% 20% 20% 20% 20%
10’ 10’
20’
COMBINED = 100 FEET MAXIMUM
= REMOTE I/O SCANNER OR
BUS SWITCHING MODULE
20’
20’
For example, for a trunk cable 3000 ft. long, 20% of the trunk cable length is 600 ft.
Therefore, 20 ft. of bus stub cable can be located within any 600 ft. section of the bus.
There might be two 10 ft. stubs with up to 8 devices each, or four 5 ft. stubs, with fewer
devices on each.
15Chapter 1 Introduction
Page 23
1
Redundant Bus Configuations
Many different redundant bus configurations are possible. Three basic ways of using a
Remote I/O Scanner with a redundant bus are described below.
H
A Remote I/O Scanner can be installed directly on both cables of the dual bus
pair. The Remote I/O Scanner is configured to operate as a bus switching device in
addition to performing its normal remote drop functions.
Here, two single–rack remote drops are installed on a dual bus. The Remote I/O
Scanner in each remote drop would be set up as a bus switching device.
a44974
BUS A
BUS B
RACK 0
P
S
S
C
A
N
N
E
R
P
S
RACK 0
S
C
A
N
N
E
R
A bus stub may be connected to a Remote I/O Scanner that is configured as a bus
switching device, allowing up to seven additional devices to utilize its bus
switching action. Devices on a bus stub are independent Genius devices. When
bus switching is controlled by a Remote I/O Scanner , as shown below, the devices
on the bus stub are not part of the remote drop. Their data does not count toward
the remote drop’s data total.
a44878 RACK 0 RACK 0
P
BUS A
S
S
C
A
N
N
E
R
P
S
S
C
A
N
N
E
R
BUS B
BUS
STUB
UP TO 7 ADDITIONAL DEVICES
Series 90–70 Remote I/O Scanner User’s Manual – July 199216
Page 24
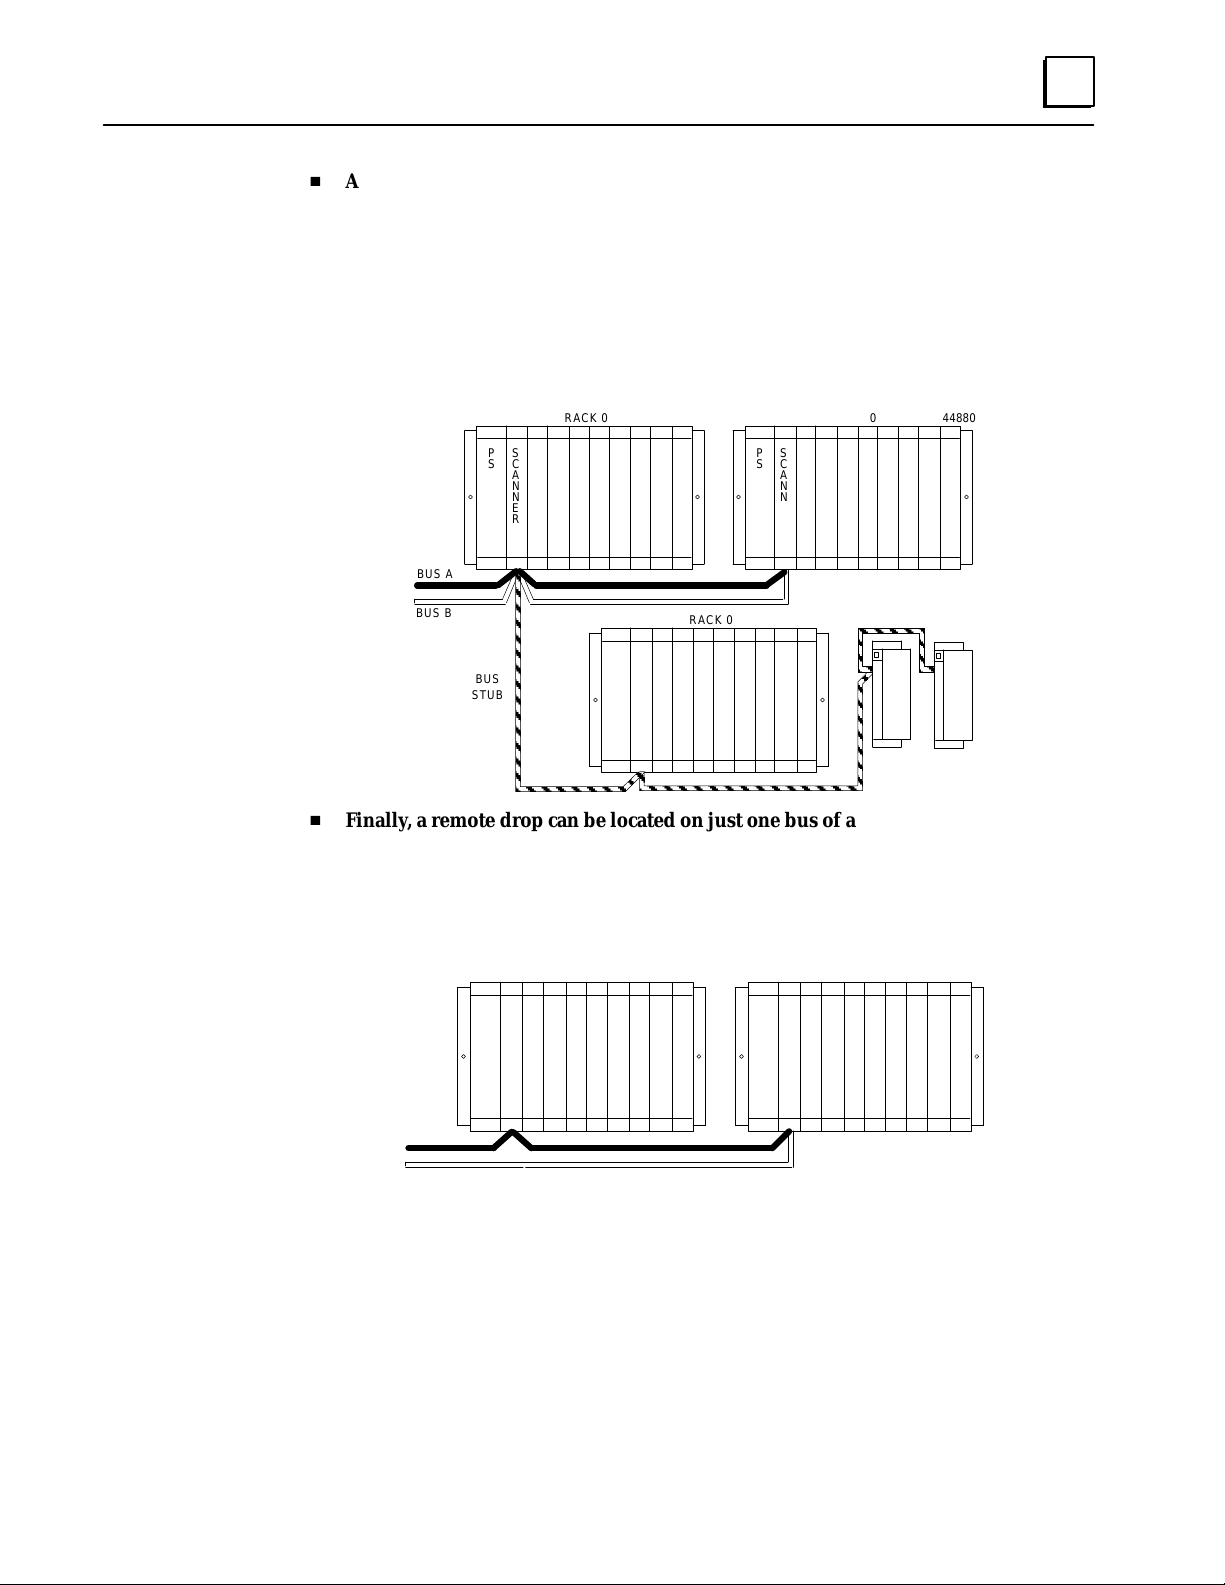
H
A Remote I/O Scanner can be located on a bus stub. The bus switching device to
which the bus stub is connected can be another Remote I/O Scanner, as shown
below, or a Genius block with a Bus Switching Module attached.
In this example, there are two remote drops installed directly on a dual bus. A
third remote drop and some Genius blocks are installed on a bus stub connected to
one of the Remote I/O Scanners. That Remote I/O Scanner acts as the bus
switching device. A remote drop on a bus stub can accommodate up to 128 bytes
of inputs and 128 bytes of outputs, and may include expansion racks.
1
RACK 0
P
S
S
C
A
N
N
E
R
BUS A
BUS B
P
BUS
STUB
H
Finally, a remote drop can be located on just one bus of a redundant bus pair, if
S
RACK 0
S
C
A
N
N
E
R
P
S
RACK 0
S
C
A
N
N
E
R
a44880
bus redundancy is not needed for the modules in that remote drop.
In this example, the remote drop on the right is connected to both Bus A and Bus
B; the remote drop on the left, which contains non–critical I/O modules, is
connected to Bus A only.
RACK 0
RACK 0
a44877
BUS A
BUS B
P
S
S
C
A
N
N
E
R
P
S
S
C
A
N
N
E
R
17Chapter 1 Introduction
Page 25

1
Configuration
A remote drop can be fully configured using Logicmaster 90–70, or automatically
configured using a Genius Hand–held Monitor. Differences between the two
methods are explained below. Optionally, a previously–configured remote drop can
be reconfigured using datagrams.
Remote Drop Configuration with Logicmaster 90–70
Logicmaster 90–70, release 3.0 or later can be used to configure a remote drop for any
type of host. Either serial or parallel Logicmaster can be used. For serial Logicmaster,
the connection to the remote drop can be direct, or via a multidrop network. Direct
connection or a Hand–held Monitor is needed to configure the SNP ID of the remote drop, before
multidrop communications with it are possible.
Logicmaster 90–70 release 4.01 or later, which provides reference checking through
the use of a common folder, is preferred for configuring a Series 90–70 PLC with
remote drops. Chapter 4 explains how to configure a remote drop using Logicmaster
90–70 software which is Release 4 or later.
Appendixes C and D give instructions for configuration using Release 3 Logicmaster
90–70 software.
Remote Drop Configuration with a Genius Hand–held Monitor
A Genius Hand–held Monitor , version 4.0 (IC660HHM501G) or later, can be used to
configure a remote drop that does not include Analog Expander modules. If Analog
Expanders are present, Logicmaster 90 must be used for configuration.
The I/O modules in the remote drop cannot be individually configured with a
Hand–held Monitor; they will operate in default mode. HHM configuration
instructions are given in chapter 6.
Configuring a Remote Drop using Datagrams
The configuration of a remote drop can be completed or changed by sending it
datagrams, as shown in the table on the following page. The Write Map datagram will
supply Series 90–70 data types and lengths, and a Series 90–70 SNP ID for the remote
drop.
Series 90–70 Remote I/O Scanner User’s Manual – July 199218
Page 26
Configurable Features
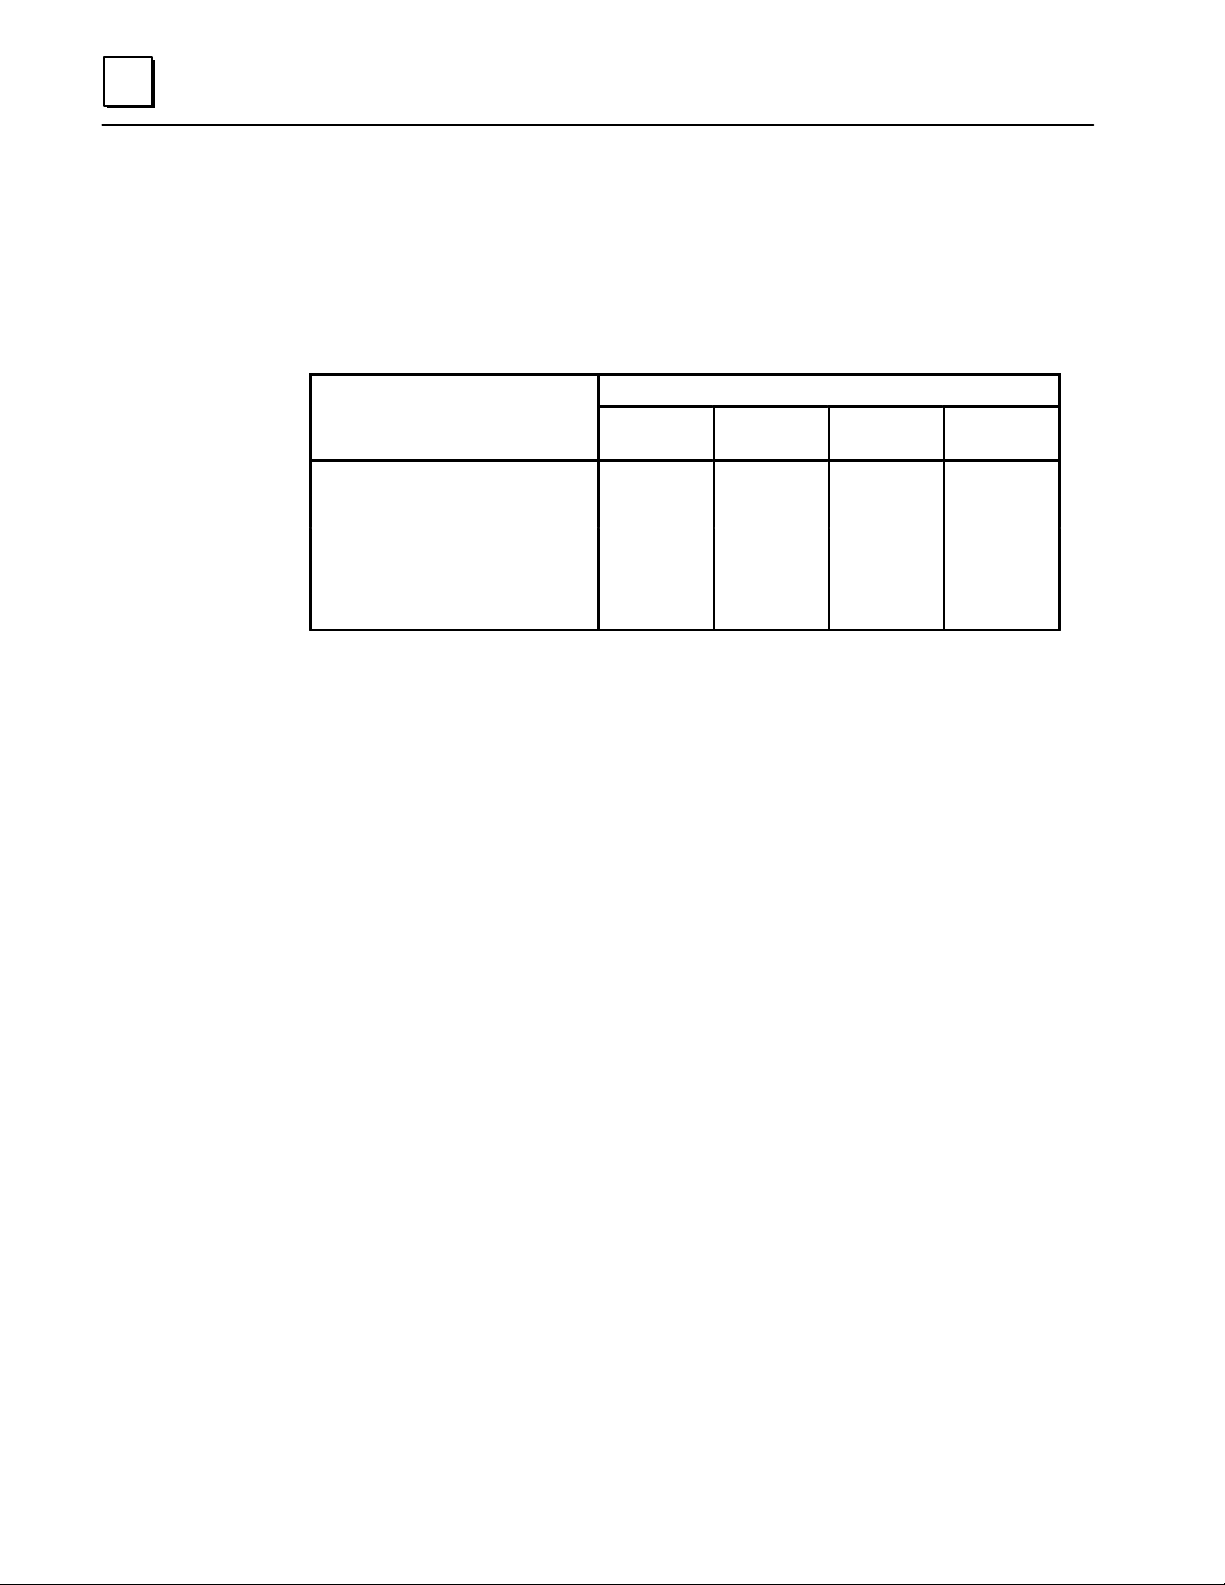
The following table summarizes configuration options for a remote drop, and
compares them to the PLC configuration required with a remote drop. The remote
drop can be configured, or reconfigured, using Logicmaster 90–70 or a Genius
Hand–held Monitor, or datagrams. If the configuration is not protected, as explained
on the next page, a reconfiguration will replace part or all of an existing configuration,
regardless of the configuration method originally used.
Remote Drop Configuration
Configuration Item
Logicmaster
90–70
Hand–held
Monitor
Datagrams
1
Device Number (SBA)
Series 90–70 References
Data Lengths
Series Six/Series Five References •
Baud Rate
Bus Controller Options:
Input Default
Outputs Enabled
I/O Module Options:
Input Filter Time
Outputs Default
V oltage/Current Range
Analog Expander Modules
PCM*, GDS*, ADS*
Genius Options:
BSM Controller *
BSM Present *
Timeout Select *
CPU Redundancy *
Duple x Default *
Configuration Protection
SNP P ort Options:
SNP ID W rite Map
Baud Rate
Stop Bits
Modem TT
Idle Time
n[ n
n[ n
n[ n
n[ n
n
n
n
n
n
n
n
n
n n
n n
n n
n n
n n
] n
n
n
n
n
n
W rite Map
W rite Map
Remote I/O Scanner Sweep Control:
Programmer Window
Communications Window
[
with release 3 software, PLC configuration must match the remote drop configuration.
• Only for a new Remote I/O Scanner , for which no Series Six/Series Five reference has been entered.
* Not approved for use with Remote I/O Scanner version IC697BEM733A;
upgrade to IC697BEM733B or later .
]
Automatically supplied.
n n
n n
19Chapter 1 Introduction
Page 27
1
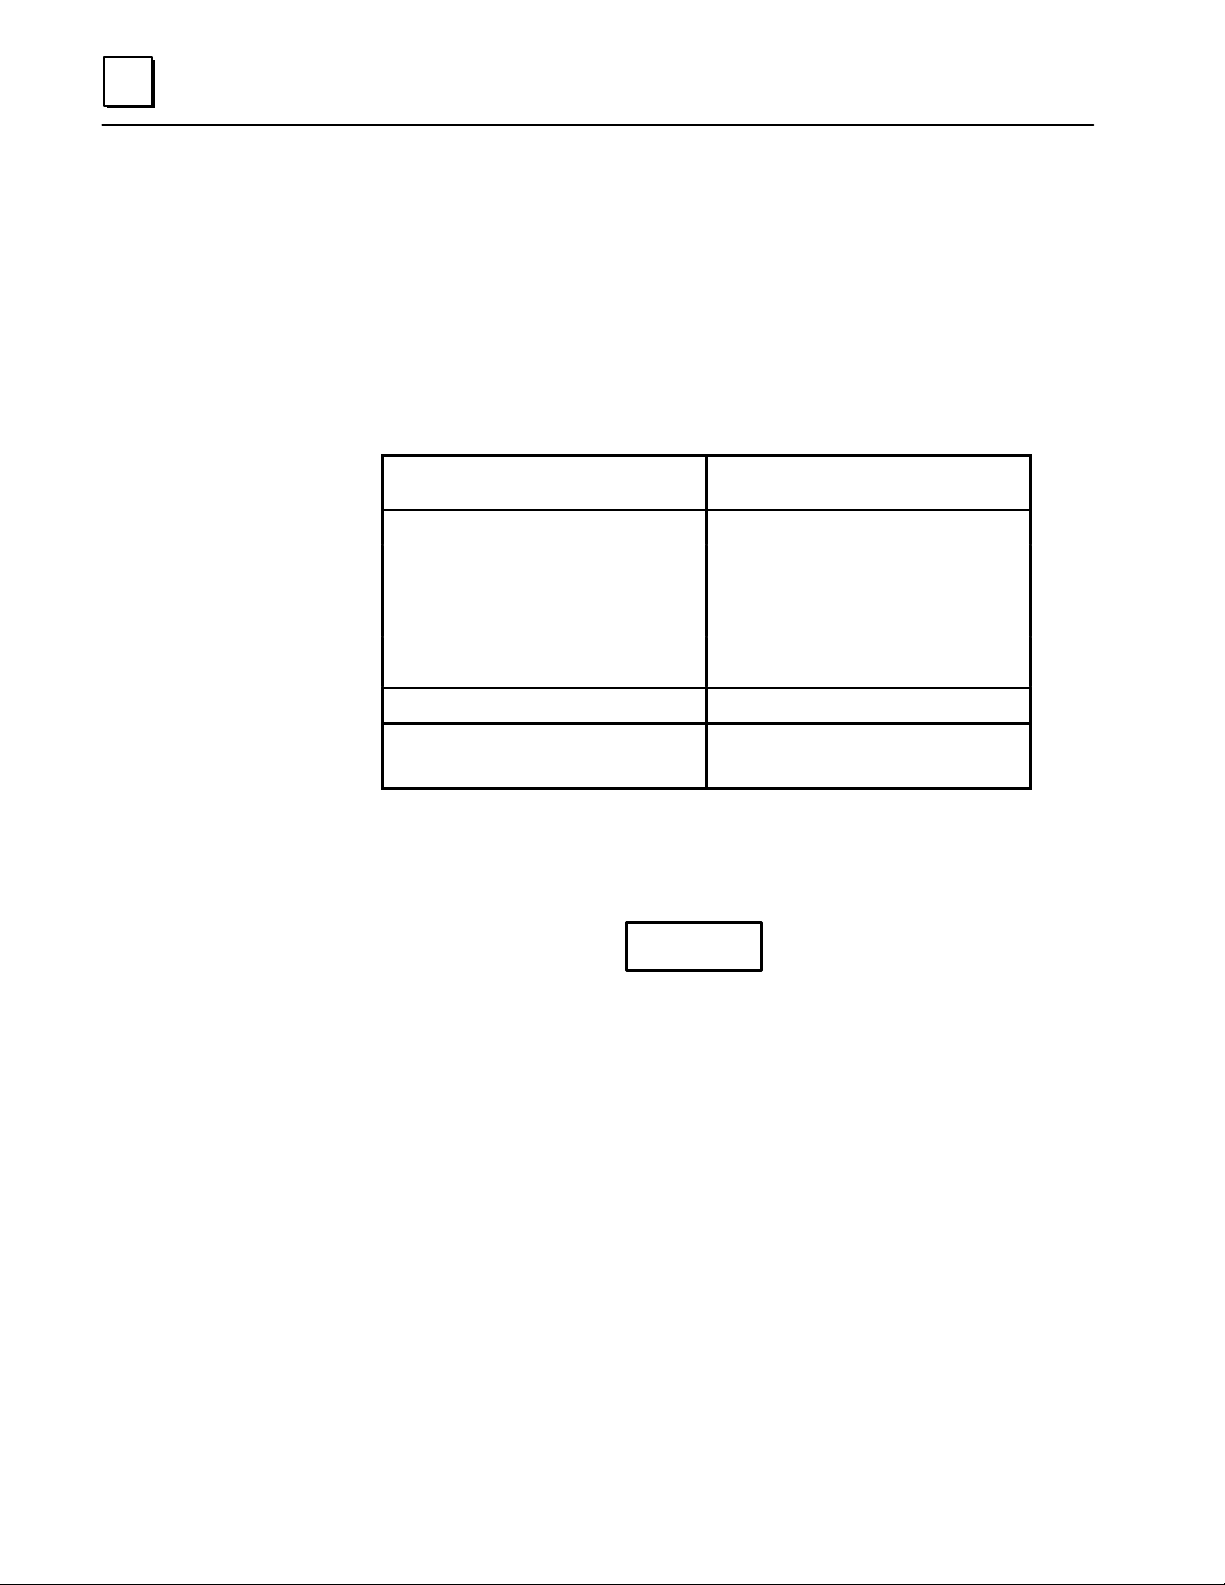
Configuration Protection
After configuring a Remote Drop, it is important to prevent inadvertent change while
the system is in operation. For this reason, Logicmaster 90–70 automatically protects
any configuration you download to a Remote I/O Scanner.
A configuration done with a Hand–held Monitor should be protected as described in
chapter 6.
Any Hand–held Monitor used with the system while it is operating should be set up
to prevent undesirable configuration changes:
Protect These Remote Drop Fea -
tures
Device Number (SBA) Change Block ID Disabled
Reference Address
Data Lengths (%I, %Q, %AI, %AQ)
Remote Drop ID
Module Options: Output Defaults
Input Filter T ime V oltage Range
Baud Rate Change Block Baud Disabled
Configuration Protection
Redundancy Options *
By Setting this HHM Option
Change Block Config Disabled
* Not available with Remote I/O Scanner version IC697BEM733A.
To prevent access to restricted HHM configuration options, remove the HHM key.
Caution
If configuration protection is removed from the Remote I/O Scanner
and the Hand–held Monitor’s Change Block ID option is
ENABLED, the HHM’s automatic configuration capability can
overwrite any existing I/O configuration, including one created using
Logicmaster 90–70, or downloaded using a Write Map datagram.
This automatic reconfiguration will also set any module options (see
the table above) back to their defaults.
Series 90–70 Remote I/O Scanner User’s Manual – July 199220
Page 28

Chapter 2 Installation
section level 1 1
2
This chapter describes procedures for installing the racks and modules in a remote
drop, grounding equipment, connecting the Genius bus, completing SNP connections,
and attaching a programmer.
Hardware Packaging
Each Series 90–70 rack is shipped in its own carton, without a power supply. The
power supply and all of the Series 90–70 modules are shipped in individual boxes.
When multiple modules are included in one shipment, individual module boxes are
packaged either two, five or ten boxes to a carton.
Verify that all components of the system have been received and that they agree with
your order. If the items received do not agree with your order, call Programmable
Control Customer Service, toll free, in Charlottesville, V A at 1–800–432–7521. A
Customer Service representative will assist you.
figure bi level 1
table_big level 1
Preinstallation Check
Carefully inspect all shipping containers for damage during shipping. If any part of
the system is damaged, notify the carrier immediately. The damaged shipping
container should be saved as evidence for inspection by the carrier.
As the consignee, it is your responsibility to register a claim with the carrier for damage
incurred during shipment. However , GE F anuc will fully cooperate with you, should
such action be necessary.
After unpacking the Series 90–70 PLC racks, modules, and other equipment, record all
serial numbers. Serial numbers are required if you should need to contact Product
Service during the warranty period of the equipment. Complete all software product
registration cards, and return them to to GE Fanuc.
All shipping containers and all packing material be saved should it be necessary to
transport or ship any part of the system.
21
Page 29
2
System Grounding Procedures
All components of a control system and the devices it is controlling must be properly
grounded.
H
Ground conductors should be connected in a tree fashion with branches routed to
a central earth ground point. This ensures that no ground conductor carries
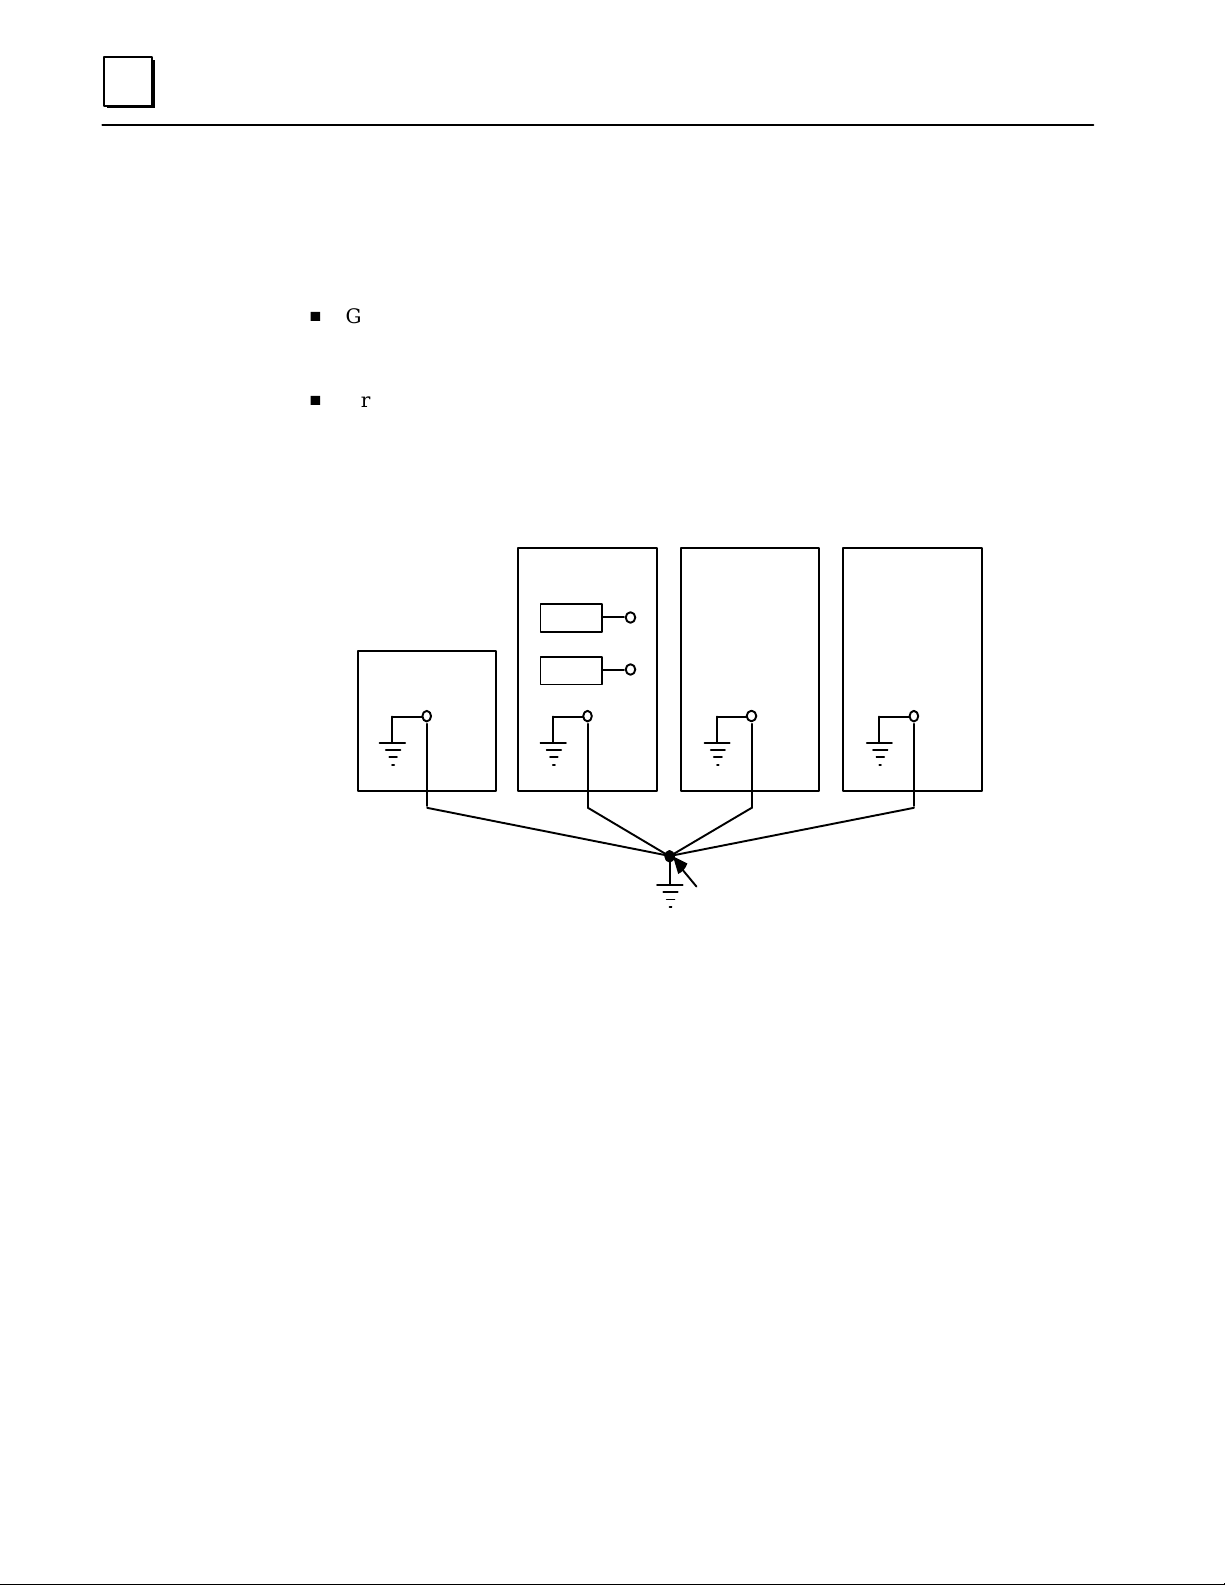
current from any other branch. This method is shown in the figure shown below.
H
Ground conductors should be as short and as large in size as possible. Braided
straps or ground cables (typically green insulation with a yellow tracer – AWG
#12 or larger) can be used to minimize resistance. Conductors must always be
large enough to carry the maximum short circuit current of the path being
considered.
SERIES 90–70
PLC CABINET
PROGRAMMING
DEVICE
RACK
RACK
MOTOR DRIVES
AND
OTHER
ELECTRICAL
CONTROL
EQUIPMENT
a42942
MACHINERY
EARTH
GROUND
CENTRAL
GROUND POINT
NOTE
SIGNAL AND POWER
CONNECTIONS
NOT SHOWN
Series 90–70 Remote I/O Scanner User’s Manual – July 199222
Page 30
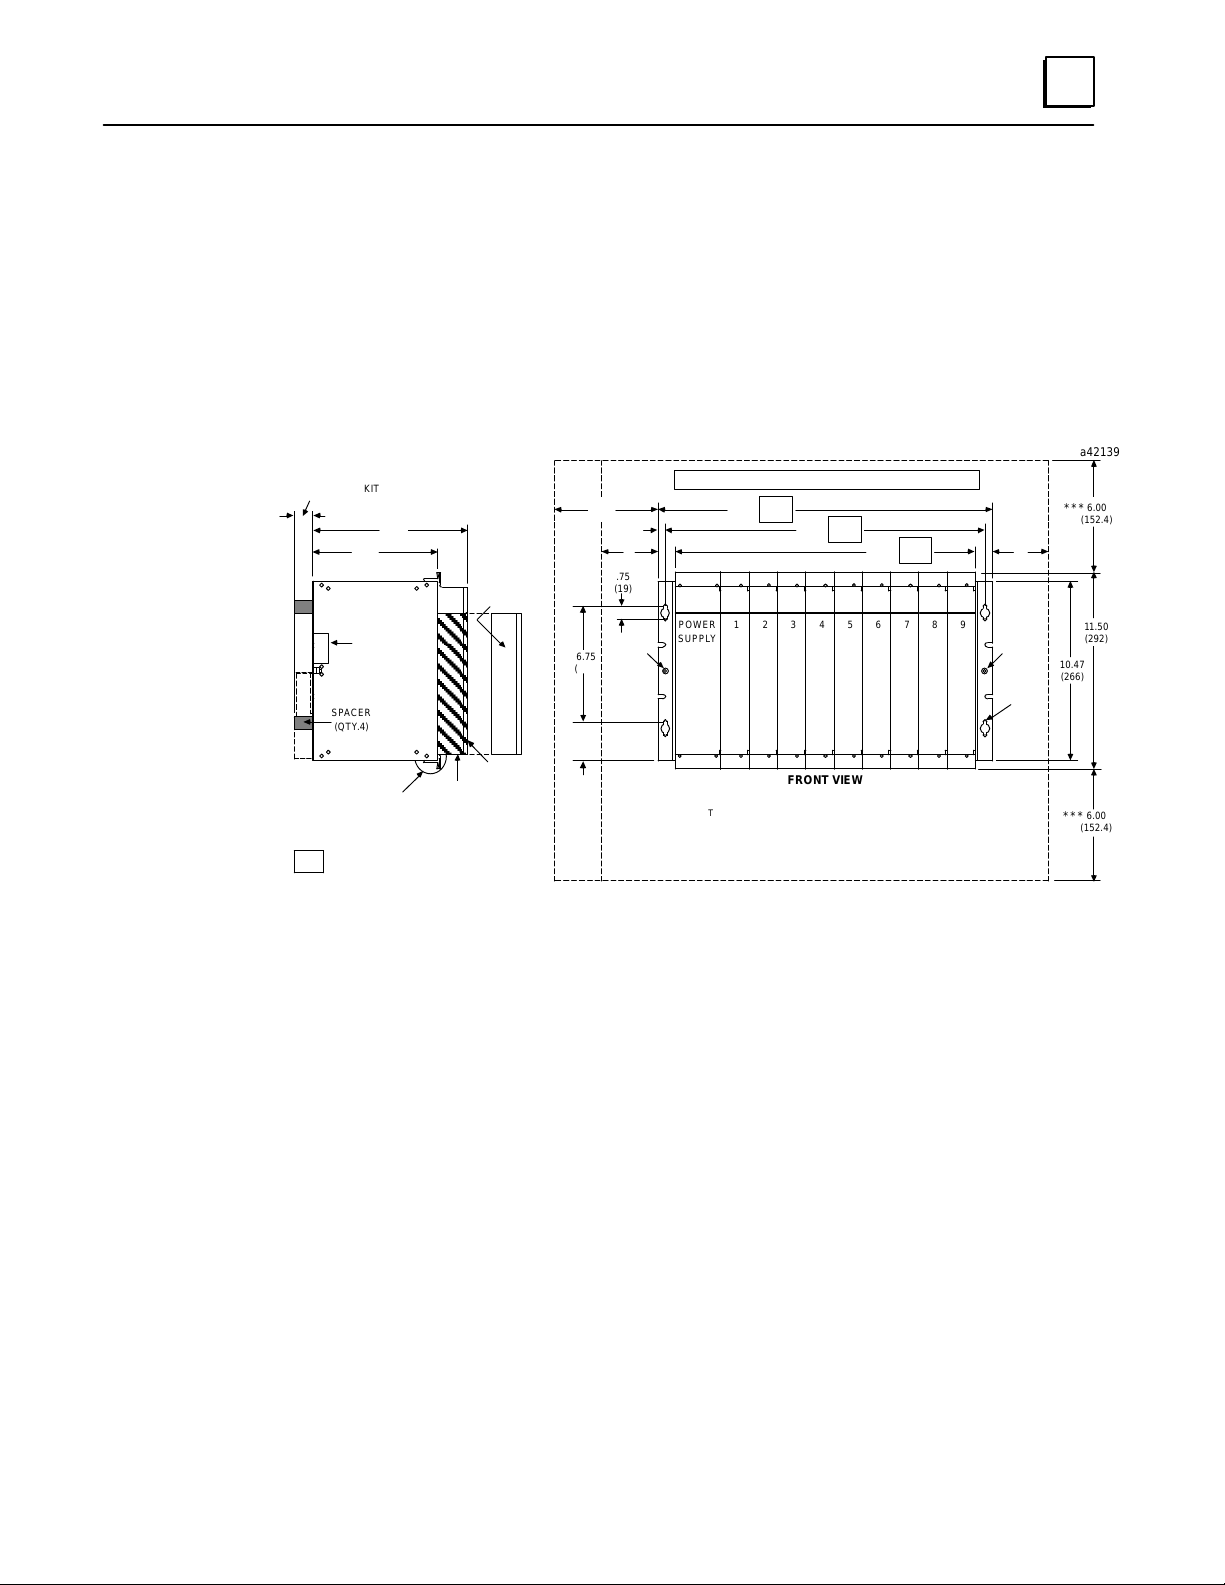
Rack Installation
Î
Î
Install the rack(s) in the orientation shown below. The illustration shows a 9–slot rack,
but a 5–slot rack could be used.
Series 90–70 PLC racks may be rack or panel mounted, depending on version
ordered. Rack dimensions for installation purposes are shown below.
The Series 90–70 rack does not require a fan as long as sufficient space is left around
the rack for cooling airflow .
WITH OPTIONAL VME J2
BACKPLANE KIT
1.00
(25.4)
SPACER
(QTY.4)
=
9.14
(232)
7.25
(184)
CONNECTOR
FOR
POWER
SUPPLY
SIDE VIEW
I/O TERMINAL
RESTRAINING
STRAP
DIMENSIONS FOR 5 SLOT RACK
CABLE
ENTRANCE
FROM
BOTTOM
REMOVABLE
I/O
TERMINAL
BLOCK
Î
Î
Î
Î
HINGED
DOOR
DIMENSIONS IN INCHES, MILLIMETERS ARE IN PARENTHESIS
12.60
6.75
(172)
2.24
(57)
6.00
**
(152.4)
.45
(11)
*
.75
(19)
GROUND
STUD
SUPPLY
19.00
(483)
123456789POWER
(320)
18.11
(460)
11.71
(297)
17.04
(433)
FRONT VIEW
ALLOW SUFFICIENT HORIZONTAL CLEARANCE FOR ACCESS TO GROUND STUDS
*
AT EACH END OF THE RACK.
IF THE EXTENSION CABLE IS USED, ALLOW APPROXIMATELY 6 INCH HORIZONTAL
**
CLEARANCE ON THE LEFT SIDE OF THE RACK FOR ACCESS TO THE CONNECTOR.
ALLOWANCE FOR COOLING ( If REQUIRED FOR ADDITIONAL COOLING, RACK FAN
***
ASSEMBLY (IC697ACC721 IS AVAILABLE. )
10.64
(264)
*
GROUND
STUD
.25 DIA.
(TYPICAL)
2
10.47
(266)
a42139
6.00
***
(152.4)
11.50
(292)
6.00
***
(152.4)
23Chapter 2 Installation
Page 31

2
Rack Grounding
H
Complete safety and reference ground connections from the GND terminal on the
rack to earth ground using minimum AWG #12 wire and a ring terminal. Use of a
nut and star washer for each wire on the GND lug is recommended to ensure
adequate grounding.
Warning
If the ground lug on the rack is not connected, the rack is not
grounded. The rack must be grounded to minimize electrical shock
hazard which may result in severe personal injury or may be fatal.
H
All racks that are grouped together MUST have a common ground connection.
This is especially important for racks which are not mounted in the same cabinet.
H
Connect the rack frame directly to the control panel or rack on which it is
mounted. Attach a ground strap from one of the ground lugs on either side of the
rack to the control panel or cabinet following applicable electrical safety codes.
H
Use the bottom rail of the rack for module shield grounding. Some modules have
a ground clip that contacts the conductive bottom rail when the module is fully
inserted. Shield connections in the user connector are routed to this ground clip
through conductors on the module.
Rack Number Selection
Before installing the power supply or power supply adapter in the rack, set the
rack–number jumpers. Each rack in a remote drop must have a rack number
between 0 and 7. Rack number 0 must always be present; in the remote drop, it is the
rack that contains the Remote I/O Scanner.
To select a rack number, move jumpers X1, X2, and X4 so that the sum of the numbers
in the 1 (right) position equals the desired rack number. Jumper X8 must always be in the
0 (left) position. The jumper plug connects the middle post under the 1 or 0 column as
shown in the following example, which shows jumper positions for rack 2.
a42823
01
8
4
RACK NUMBER =2
2
1
Series 90–70 Remote I/O Scanner User’s Manual – July 199224
Page 32

Do not confuse this rack number with the Device Number used by a Remote I/O
Scanner. Rack number refers to a rack’s position within a remote drop. A Device
Number is a Remote I/O Scanner’s assigned ID on the Genius bus. These two
numbers are not related. The following example shows rack numbering for three
remote drops. The Remote I/O Scanners for those remote drops are configured to use
Device Numbers 7, 8, and 9.
Do not select duplicate rack numbers in the same remote drop. After selecting the rack
number, record it on the inside of the Power Supply hinged door.
2
DEVICE
#7
GENIUS
BUS
DEVICE
#8
GENIUS
BUS
DEVICE
#9
GENIUS
BUS
a44879 RACK 3
PSB
RACK 1
R
M
RACK 0
P
S
B
S
C
T
A
M
N
N
E
R
PSB
RACK 2
PSB
R
M
R
M
RACK CONNECTION CABLE
RACK 0
P
S
S
C
A
N
N
E
R
PSB
RACK 1
R
M
RACK 0
P
S
B
S
C
T
A
M
N
N
E
R
PSB
RACK 2
R
M
RACK CONNECTION CABLE
25Chapter 2 Installation
Page 33

2
Î
Power Supply Installation
After setting the rack number selection jumpers, install the power supply as instructed
in its datasheet. An AC power supply installs directly in the leftmost slot of the rack.
For DC power supplies, a Power Supply Adapter installs in the leftmost slot. The DC
power supply itself can either be installed on the side of the rack or used as a
freestanding module up to 20 inches from the adapter module.
Power Supply Switch
On an AC power supply, the switch on the front of the power supply controls power to
the rack. With the switch in the up (ON) position, the power supply is on and power
flows to the rack. With the switch down (OFF), power is disconnected from the rack.
With a DC power supply, an external switch must be installed to control input power.
Power must be off when installing or removing modules.
Caution
Power Supplied to Two Racks
The 120/240VAC 55–Watt, 24VDC 90–Watt, and 120/240VAC 100–Watt power
supplies can be used to supply power to two racks. The 125VDC, 60–Watt supply
cannot provide power for two racks.
Connect the rack with the power supply to the second rack using the two–rack power
extension cable (catalog number IC697CBL700). Plug the cable into the connectors on
the left side of each rack. When using a DC power supply mounted on the side of the
rack, the power extension cable must be installed first; the DC power supply will block
access to the connector on the side of the rack.
Maximum cable length between two racks that share a power supply is 3 feet (1 meter).
INSTALL CABLE
SO THAT THE
INDICATED END
IS SUPPLYING
POWER
TWO
RACK
POWER
CABLE
123456789
POWER
SUPPLY
FACE
PLATE
a42134
FIRST
RACK
SECOND
RACK
Series 90–70 Remote I/O Scanner User’s Manual – July 199226
Page 34

Module Locations
Follow the guidelines below when planning module locations in a remote drop.
Remote I/O Scanner
Locate the Remote I/O Scanner in rack 0, slot 1, next to the power supply .
Bus Transmitter Module
A Bus Transmitter Module (BTM) can be located in any slot of rack 0; however, there
must be no empty slots between the Bus Transmitter and the Remote I/O Scanner. It is
recommended that the Bus T ransmitter be located in slot 2, next to the Remote I/O
Scanner.
Bus Receiver Module
In a multiple–rack remote drop, locate a Bus Receiver Module (BRM) in slot 1 of each
expansion rack, next to the power supply slot.
I/O and Option Modules
Generally , I/O and option modules can be installed in any slot. Some exceptions are
noted below.
2
Analog Expanders
A high–level analog input module and its associated expander modules must be
installed in the same rack of a remote drop. Locate the high–level analog input
module in the lowest slot position of the group. Locate the expander modules to its
right. A second high–level analog input module cannot be located between a
high–level analog module and its expander modules. It must either be placed to the
left of the first analog module, or to the right of the last expander module.
Analog output modules, discrete I/O modules, and/or special–function modules may
be located between the analog input module and any of its expander modules.
Empty Slots in the Rack
Empty slots are permitted between modules, with two exceptions:
A. There can be no empty slots to the left of a Bus Transmitter, analog, PCM, GDS, or
ADS module.
B. If, in the future, modules will be placed in the empty slots and a Hand–held
Monitor will be used to automatically reconfigure the remote drop, locate empty
slots to the right in the rack. Otherwise, automatic reconfiguration will change the
I/O references assigned to the boards already there.
P
S
REMOTE DROP
I/I
SCI
A
N
N
E
R
/
/
OOOOO
I/I
a44753
/
EMPTY
27Chapter 2 Installation
Page 35

2
Module Installation and Removal
Always be careful working near the power supply and the wiring to
I/O boards in the rack. Be sure a protective faceplate cover is
installed on each board. Voltages present on I/O wiring and power
supply could cause severe or fatal injury to personnel.
Do not insert or remove a module when power is applied to the rack.
This could cause the system to stop. Use care when inserting or
removing a module so that the printed circuit board or its
components are not damaged.
Warning
Caution
Installing a Module
Install each module with its component side to the right. The LEDs will be at the top
front.
1. Be sure the rack in which the module is to be inserted is powered–down.
2. Grasp the module firmly with your hand and insert it into the card guide.
3. Align the module’s printed circuit board with the connector on the rack backplane
and slide it towards the connector until it has started to seat.
4. Place one thumb on the left side of the top plastic flange and the other thumb on
the left side of the bottom plastic flange. Push the board into the connector until
the top and bottom latches click onto the rack rails.
5. Visually inspect the board to be sure it has seated properly.
6. If the rack is in a high–vibration area, use screws to secure the module in the rack.
Removing a Module
1. Be sure the rack is powered–down.
2. Grasp the module firmly at the top and bottom of the board cover with your
thumbs on the front of the cover and your fingers on the plastic clips on the back
of the cover.
3. Squeeze the rack clips on the back of the cover with your fingers to disengage the
clip from the rack rail and pull the board firmly to remove it from the backplane
connector.
4. Slide the printed circuit board along the card guide and remove it from the rack.
Series 90–70 Remote I/O Scanner User’s Manual – July 199228
Page 36

Field Wiring to I/O Modules
Basic procedures for completing module wiring are given on the next page. For
additional information about installing a specific module, please read the module
datasheet.
2
JACKSCREW JACKSCREW
TERMINAL
BOARD
CORD
TIE
CORD
TIE
CLEAT
STRAP
HINGED
DOOR
CORD
TIE
STRAP
CORD
TIE
CLEAT
STRAP
CLEAT
a43855
29Chapter 2 Installation
Page 37

2
1. Open the hinged door on the module to access the jackscrew which holds the
terminal board securely in place. Remove the terminal board by turning the
jackscrew counter–clockwise until it is fully disengaged.
2. Remove the terminal board by grasping the top and swinging it outward.
JACKSCREW
DO NOT
PULL
ON DOOR
a43747
WIRE BUNDLE CABLE TIE CLEAT
Caution
Do not use the hinged door to remove the terminal board. The
hinged door could be damaged if this is done.
3. Referring to the wiring information on the module door, complete the field wiring.
Use AWG #22 (0.324 mm) through AWG #14 (2.08 mm) wire. When using AWG
#14 wire and wiring all points, do not exceed a maximum insulation diameter of
.135 inch. To ensure proper connection, two wires may be ter minated on any one
terminal only if both wires are the same size.
4. After completing connections to all modules in a rack, secure the wire bundle.
Wrap a cable tie around the wire bundle and secure it tightly through the cable tie
cleat at the lower right corner of the terminal board. For large wire bundles, use
additional cable ties.
5. Record circuit wiring identification on the door label. Insert the label in the door’s
slot (crease the scored edge of the label if necessary).
6. Fasten the terminal board to the rack securely . Insert the terminal board strap into
the small rectangular slots in the bottom card guide grill on the rack.
7. Leave a ventilation space of at least 6 inches above and below the rack grill. Do
not obstruct the grill with wire bundles.
Warning
Ensure that the protective cover is installed over all terminal boards.
The cover protects against accidental shock hazard which could
cause severe or fatal injury to the operator or maintenance personnel.
Series 90–70 Remote I/O Scanner User’s Manual – July 199230
Page 38

Multiple Racks in a Remote Drop
If the remote drop has more than one rack, rack 0 must contain a Bus Transmitter
Module. The Bus T ransmitter should be installed in slot 2, ne xt to the Remote I/O
Scanner. Using the appropriate cable (see the table below), attach the bottom connector
of the Bus Transmitter to the top connector of a Bus Receiver Module in the next rack.
Continue this process to connect all of the racks in the drop. The maximum total cable
length from the Bus T ransmitter to the last Bus Receiver is 50 feet (15 meters).
Catalog Number Length
IC600WD005 5 feet (1.5 meters)
IC600WD010 10 feet (3.0 meters)
IC600WD025 25 feet (7.5 meters)
IC600WD050 50 feet (15.0 meters)
Terminator Plug
2
Each Bus Receiver Module is shipped with a termination resistor pack installed in the
lower connector. Only the last Bus Receiver in a remote drop may have the terminator
plug installed. If the remote drop has three or more racks, remove the terminator
plugs from the intermediate Bus Receivers.
When power is applied, the middle LED on the last Bus Receiver should be on to
indicate that the termination resistor is installed. The middle LED on all other Bus
Receivers should be off.
RACK 0
P
B
S
S
T
C
M
A
N
N
E
R
7 EXPANSION RACKS (MAXIMUM)
LAST RACK
B
P
R
S
M
I/O TERMINATOR PLUG
(IC697ACC702)
a44971
31Chapter 2 Installation
Page 39

2
ÑÑ
Ñ
Ñ
ÓÓ
Ó
Ó
ÎÎ
ÎÎ
Ó
Ó
Ñ
Î
Î
Genius Bus Connections: Single Bus Cable
To install the Remote I/O Scanner on a single bus cable, use the upper four terminals as
described below. Do not use the lower eight terminals.
R
E
D
U
N
D
A
N
C
Y
SER1
SER2
SER1A
Ó
SER2A
Ó
SER1B
Ñ
SER2B
Ñ
CONNECT
BUS TO
TOP FOUR
TERMINALS
NOT USED
FOR
SINGLE–CABLE
BUS
1. Connect Serial 1 to the Serial 1 terminals of the previous device and the next
device.
2. Connect Serial 2 to the Serial 2 terminals of the previous device and the next
device.
3. Conn ect the Remote I/O Scanner’s Shield In terminal to Shield Out of the preceding
device. Connect Shield Out to Shield In of the next device. If the Remote I/O Scanner
is the first device on the bus, Shield In can be left unconnected. If it is the last device
on the bus, Shield Out can be left unconnected. When making bus connections, the
maximum exposed length of bare wires should be two inches. For added protection,
each shield drain wire should be insulated with spaghetti tubing to prevent the Shield
In and Shield Out wires from touching each other, or the signal wires.
1
3
5 6
7
9
11
10
12
2
4
8
a44754
SHIELD
IN
SHIELD
OUT
SHIELD
IN A
Ó
SHIELD
OUT A
Ó
Î
SHIELD
IN B
Ñ
SHIELD
OUT B
ÑÑÎ
Note
The Genius bus connections for the Remote I/O Scanner are not the
same as for the Series 90–70 Bus Controller, even though the
terminals are physically identical.
SHIELD
OUT
SERIES 90–70
CONTROLLER
SER1
SER2
GENIUS
BUS
SHIELD
IN
SER1
SER2
REMOTE
I/O
SCANNER
a44755
SHIELD IN
SHIELD
OUT
Single Bus Termination
If the Scanner is at either end of the bus (electrically), connect a 75, 100, 120, or
150–ohm terminating resistor across the Serial 1 and Serial 2 terminals. Chapter 2 of
the Genius I/O System User’s Manual lists the correct impedance to use for each
approved type of bus cable.
Note
If the module will be powered up when not connected to a
properly–ter minated bus, connect a 75–ohm resistor across its Serial 1
and Serial 2 terminals to assure proper powerup.
Series 90–70 Remote I/O Scanner User’s Manual – July 199232
Page 40

Genius Bus Connections: Dual Bus Cables
Ñ
Ñ
Ó
Ó
To install a Remote I/O Scanner directly on both busses of a redundant bus, use the
lower eight terminals as described below. Do not attach an external Bus Switching Module
to a Remote I/O Scanner.
1
3
5 6
7
9
11
10
12
2
4
8
SHIELD
SHIELD
SHIELD
SHIELD
OUT A
SHIELD
SHIELD
OUT B
SER1
SER2
SER1A
Ó
R
E
Ó
D
SER2A
U
N
D
A
SER1B
Ñ
N
C
Y
Ñ
SER2B
Ñ
1. Connect bus A to terminals 5 – 8 on the Remote I/O Scanner, marked SER1A,
SER2A, SHIELD IN A and SHIELD OUT A.
IN
OUT
IN A
IN B
a44881
TERMINALS
FOR
BUS A
TERMINALS
FOR
BUS B
2
2. Connect bus B to terminals 9 – 12, marked SER2A, SER2B, SHIELD IN B, and
SHIELD OUT B.
3. For each bus, connect Serial 1 to the Serial 1 terminals of the previous device and
the next device. Connect Serial 2 to the Serial 2 terminals of the previous device
and the next device.
4. For each bus, connect the appropriate Shield In terminal to Shield Out of the
preceding device. Connect Shield Out to Shield In of the next device. If the
Remote I/O Scanner is the first device on a bus, its Shield In terminal for that bus
can be left unconnected. If it is the last device on the bus, its Shield Out terminal
for that bus can be left unconnected.
When making bus connections, the maximum exposed length of bare wires should be
two inches. For added protection, each shield drain wire should be insulated with
spaghetti tubing to prevent the Shield In and Shield Out wires from touching each
other or the signal wires.
Dual Bus Termination
If either trunk cable of the dual bus ends at the Remote I/O Scanner, install a
terminating resistor across the Serial 1 and Serial 2 terminals where that cable attaches
to the module. If both cables terminate at the Remote I/O Scanner, each must have its
own terminating resistor. Do not terminate dual bus stubs (see next page).
33Chapter 2 Installation
Page 41

2
Ñ
Ñ
Ñ
Ó
Ó
Connecting a Bus Stub to a Remote I/O Scanner
A bus stub must always be Belden 9182 or equivalent cable, regardless of the cable type
used for the dual bus trunk.
a44882
BUS
STUB
BELDEN
9182
OR
EQUIVALENT
BUS A
BUS B
TERMINATING RESISTOR NEEDED IF REMOTE
I/O SCANNER IS AT END OF A BUS.
NO TERMINATING RESISTOR
The total length of all stubs on a bus should be 100 feet or less. Within each 20%
section of the actual bus length, the total maximum stub length is 20 feet. This can be
divided into shorter stubs, provided that the total length in each 20% of the bus is 20 ft.
or less.
Bus Stub Connections
1. Bus stub cable attaches to the upper four terminals on a Remote I/O Scanner.
a44883
CONNECT
BUS
STUB CABLE
HERE
1
3
5 6
7
9
11
10
12
2
4
8
SHIELD
IN
SHIELD
OUT
SHIELD
IN A
SHIELD
OUT A
SHIELD
IN B
SHIELD
OUT B
R
E
D
U
N
D
A
N
C
Y
SER1
SER2
SER1A
Ó
Ó
SER2A
Ó
SER1B
Ñ
Ñ
SER2B
Ñ
2. Connect Serial 1 to Serial 1 of the next device. Connect Serial 2 to Serial 2 of the
next device. Connect Shield Out to Shield In of the next device. Connect
additional devices in the same way. If the Remote I/O Scanner is the bus switching
device (directly connected to the dual bus), its Shield In terminal can be left
unconnected. If it is the last device on the bus stub, the Shield Out terminal can be
left unconnected. The bus stub does not require a terminating resistor.
Series 90–70 Remote I/O Scanner User’s Manual – July 199234
Page 42

Programmer Connection at the Remote I/O Scanner
Î
Î
A Logicmaster 90–70 programmer can be connected to rack 0 of a remote drop.
(Logicmaster 6 or Logicmaster 5 cannot be used with a remote drop).
Refer to the instructions that follow, for the type of equipment you are using.
H
Logicmaster 90 Parallel version and Workstation Interface Board
H
Logicmaster 90 Serial version and Workstation Interface Board
H
Logicmaster 90 Serial version, no Workstation Interface Board
The Workstation Interface Board can be used for either parallel or serial
communications with a remote drop. The board provides ground isolation allowing
the programmer ground to vary by up to 500V.
Logicmaster 90 Parallel Version and Workstation Interface Board
If the programmer is equipped with the parallel version of Logicmaster 90–70 and a
W orkstation Interface Board (IC647WMI920 for W orkmaster II or IBM PS/2 computer ,
or IC640WMI910 for a Workmaster or IBM PC–XT/AT computer), connection is made
to a Bus Transmitter module located in the remote drop.
2
Grounding
For proper operation, the programmer must have a ground connection in common
with rack 0. Normally, the common ground connection is provided by connecting the
programmer’s power cord to the same power source (with the same ground reference
point) as the rack. If a common ground cannot be established, use GE Fanuc RS–422
Isolated Repeater/RS–232 Converter IC655CCM590, or an equivalent product.
Connection Instructions
For a Workmaster I or II computer , use cable IC647CBL703.
1. Attach the 37–pin male connector to the computer’s Workstation Interface board.
2. Attach the 37–pin female connector to the top connector on the Bus Transmitter
module.
a43562
WSI
PARALLEL
PARALLEL
CABLE
BTM
WORKMASTER II
ÎÎÎ
ÎÎÎ
35Chapter 2 Installation
Page 43

2
Î
Î
Logicmaster 90 Serial Version and Workstation Interface Board
If the programmer is equipped with the serial version of Logicmaster 90–70 and a
W orkstation Interface Board (IC647WMI920 for W orkmaster II or IBM PS/2 computer ,
or IC640WMI910 for a Workmaster or IBM PC–XT/AT computer), connection is made
to the Remote I/O Scanner’s RS–485 serial port. If the Remote I/O Scanner is not part
of a multidrop network, follow the instructions below. If the Remote I/O Scanner is
installed on a multidrop serial communications network, refer to the instructions on
page 39 instead.
The Workstation Interface Board can be used for either parallel or serial
communications with a remote drop. The board provides ground isolation allowing
the programmer ground to vary by up to 500V.
Grounding
For proper operation, the programmer must have a ground connection in common
with rack 0. Normally, the common ground connection is provided by connecting the
programmer’s power cord to the same power source (with the same ground reference
point) as the rack. If a common ground cannot be established, use GE Fanuc RS–422
Isolated Repeater/RS–232 Converter IC655CCM590, or an equivalent product.
Serial Port Termination
For direct programmer connection, the Remote I/O Scanner’s serial port must be
terminated. Connect a 220Ω resistor across pins 10 and 11 and another 220Ω resistor
across pins 8 and 15. These connections must be made inside the connector’s D–shell.
At the other end of the link, terminate the RD and CTS pins in the same way.
Connection Instructions
For a Workmaster I or II computer , use cable IC647CBL704.
1. Attach the 37–pin male connector to the Workstation Interface Board.
2. Attach the 15–pin male connector to the serial port connector on the Remote I/O
Scanner.
a44884
SCANNER
WSI
SERIAL
SERIAL
CABLE
ÎÎ
WORKMASTER II
ÎÎ
WORKMASTER
Series 90–70 Remote I/O Scanner User’s Manual – July 199236
Page 44

Logicmaster 90 Serial Version, No Workstation Interface Board
Î
If the programmer is equipped with the serial version of Logicmaster 90–70, and does
NOT have a Workstation Interface Board, connection must be made via an
intermediate RS422/RS485 to RS–232 Converter. If no isolation is required, use GE
Fanuc RS–232/RS–422 Converter IC690ACC900A. If isolation is required, use GE
Fanuc RS–422 Isolated Repeater/RS–232 Converter IC655CCM590, or an equivalent
product.
If the distance from the converter to the Remote I/O Scanner is more than 10 feet, +5
VDC must be provided using an external power supply. If the Remote I/O Scanner is
part of a multidrop network, follow the instructions on page 39. If the Remote I/O
Scanner is not part of a multidrop network, follow the instructions below.
Programmer to Conver ter Cable
For a Workmaster or IBM PC–XT or compatible computer, use cable IC690CBL701.
For an IBM PC–AT or compatible computer use cable IC690CBL702. For a Workmaster
II or IBM PS/2 or compatible computer, use cable IC690CBL705. These are all 10–foot
cables. For intormation about using longer cables, please refer to the Series 90–70
Installation and Operation Manual (GFK–0262, revision C or later).
2
Converter to Remote I/O Scanner Cable
Use standard 6–foot cable IC693CBL303.
1. For direct programmer connection, the Remote I/O Scanner’s serial port must be
terminated. Connect a 220Ω resistor across pins 10 and 11 and another 220Ω
resistor across pins 8 and 15. These connections must be made inside the
connector’s D–shell. At the other end of the link, terminate the RD and CTS pins
in the same way.
2. Be sure the remote drop is powered–down.
3. Connect the 25–pin male connector on the 10 foot cable to the 25–pin female
connector on the converter.
4. Connect the female connector on this cable to the male RS–232 connector (serial
port) on the programmer.
5. Connect the 6–foot cable to the converter and the Remote I/O Scanner. Both ends
of this cable are the same.
RACK 0
P
S
S
C
A
N
N
E
R
RS–485 RS–232
WORKMASTER II
ÎÎ
a44885
CONVERTER
37Chapter 2 Installation
Page 45

2
Multidrop Connections
Multidrop connections are described in the Series 90–70 Installation and Operation
Manual (GFK–0262). Additional instructions are given below. Connection is made
between the CPU and the serial port on the Remote I/O Scanner.
Terminating the Remote I/O Scanner’s Serial Port
The serial port on the Remote I/O Scanner must be terminated if the Remote I/O
Scanner will be at the end of a multidrop network. To terminate the serial port, connect
a 220Ω resistor across pins 10 and 11 and another 220Ω resistor across pins 8 and 15.
These connections must be made inside the connector’s D–shell. At the other end of
the link, terminate the RD and CTS pins in the same way.
SNP termination is the same for Series 90–70 CPUs IC697CPU731K or
later, and IC697CPU771H or later. For Series 90–70 CPUs
IC697CPU771J or earlier and IC697CPU771G or earlier, the jumper is
located between pins 9 and 10.
Note
Isolation for the Serial Port
Like the Series 90–70 CPU, the Remote I/O Scanner contains NO isolation circuitry at
the SNP port. If isolation is required, use the GE Fanuc RS–232/RS–422 converter
(catalog number IC655CCM590), or equivalent product.
Caution
If a multidrop network cannot be guaranteed to be on the same
electrical ground and served by the same phase on the mains,
isolation must be provided separately for each CPU and Remote I/O
Scanner .
Series 90–70 Remote I/O Scanner User’s Manual – July 199238
Page 46

2
Programmer Connections in a Multidrop Network
In a multidrop network, a programmer connected to the CPU can communicate with
the Remote I/O Scanner over the serial link, as shown below. A programmer can also
be connected directly at the remote drop. However, when the Remote I/O Scanner is
part of a multidrop network, its serial port, which is used for connection of the serial
link, is not available for direct connection of a programmer.
a44886PLC REMOTE DROP
PROGRAMMER
CONNECTION
(SERIAL)
ON
MULTIDROP
NETWORK
The illustrations that follow suggest how extra connectors may be installed to allow the
use of a programmer at various points in the system, without disturbing the serial link
between the PLC and the remote drop. When extra connectors are used, it is
important to be sure that the connections will be secure. For example, the connectors
can be permanently mounted on panels.
P
C
B
S
P
C
U
GENIUS BUS
SERIAL NETWORK CABLE
P
S
S
C
A
N
N
E
R
The illustrations show connections for a Workmastert II programmer, although a
different type of programmer could be used.
If the programmer does not have a Workstation Interface card, RS232–to–RS422
conversion must be provided at each location. A conversion box can be installed at
each drop, or one conversion box can be moved from location to location with the
programmer.
In locations where isolation is not a problem, the non–isolated RS232–to–RS422
Conversion Box (IC690ACC900) can be used.
In locations where ground potential differences may occur, it is important to provide
adequate ground isolation. Repeater/Converter Box (IC655CMM590) that provides
both RS232–to–RS422 conversion and isolation should be used.
39Chapter 2 Installation
Page 47

2
SNP Multidrop with WSI Board in Workmaster II
SERIES 90
PLC
SHLD
0V
RD ( A’ )
RD ( B’ )
SD ( A )
SD ( B )
RTS ( A )
RTS ( B )
CTS ( A’ )
CTS ( B’ )
15– PIN
MALE
PIN
1
7
10
11
12
13
6
14
15
8
MAXIMUM OF
(1,200 METERS)
SHIELDED
TWISTED PAIRS
UP TO A
4,000 FEET
RS–422 ISOLATED
REPEATER
(IC655CCM590)
J1 J2
PIN PIN
7
16
17
15
14
11
10
13
12
23
22
115
VAC
SERIES 90
REMOTE I/O
SCANNER
SHLD
0V
RD ( A’ )
RD ( B’ )
SD ( A )
SD ( B )
RTS ( A )
RTS ( B )
CTS ( A’ )
CTS ( B’ )
15– PIN
MALE
a44855
SHIELDED
TWISTED PAIRS
7
16
17
15
14
11
10
13
12
18
*
*
19
9
*
*
8
PIN
1
7
10
11
12
13
6
14
15
8
PIN
1
7
15
14
16
17
13
12
11
10
PIN
1
7
15
14
16
17
13
12
11
10
PORT
SHLD
0V
RD ( A’ )
RD ( B’ )
SD ( A )
SD ( B )
RTS ( A )
RTS ( B )
CTS ( A’ )
CTS ( B’ )
25– PIN
FEMALE
PLC/CPU
PANEL
REMOTE
PANEL
PORT
SHLD
0V
RD ( A’ )
RD ( B’ )
SD ( A )
SD ( B )
RTS ( A )
RTS ( B )
CTS ( A’ )
CTS ( B’ )
25– PIN
FEMALE
SHLD
0V
RD ( A’ )
RD ( B’ )
SD ( A )
SD ( B )
RTS ( A )
RTS ( B )
CTS ( A’ )
CTS ( B’ )
25– PIN
MALE
SHLD
0V
RD ( A’ )
RD ( B’ )
SD ( A )
SD ( B )
RTS ( A )
RTS ( B )
CTS ( A’ )
CTS ( B’ )
25– PIN
MALE
PIN
1
7
15
14
16
17
13
12
11
10
PIN
1
7
15
14
16
17
13
12
11
10
RECOMMENDED CABLE
1.
TYPES, BELDEN #9505 OR
#9832 (FIVE PAIR TWISTED)
2.
WIRE PAIRS MUST BE
CONSISTENT THROUGHOUT
LENGTH OF NETWORK.
OEM MUST GUARANTEE
3.
THERE IS NO MORE THAN A
" 7 VOLT COMMON MODE
VOLTAGE BETWEEN PANELS.
4.
FOR INFORMATION ON MULTIDROP
CONFIGURATIONS, REFER TO THE
SERIES 90 PLC SNP
COMMUNICATIONS DRIVER
USER’S MANUAL (GFK–0585).
*
120 OHM RESISTORS.
**
220 OHM–1/4 WATT–5%
RESISTORS.
SERIES 90
REMOTE I/O
SCANNER
SHLD
0V
RD ( A’ )
RD ( B’ )
SD ( A )
SD ( B )
RTS ( A )
RTS ( B )
CTS ( A’ )
CTS ( B’ )
15– PIN
MALE
WORKMASTER II
WSI
SERIAL/
PARALLEL
PORT
37– PIN
FEMALE
LAST
REMOTE
PANEL
**
PIN
1
7
10
11
12
13
6
14
15
8
*
*
PIN
37
SHLD
1
0V
27
SD ( A )
26
SD ( B )
35
RD ( A’ )
34
RD ( B’ )
31
CTS ( A’ )
30
CTS ( B’ )
33
RTS ( A )
32
RTS ( B )
37– PIN
MALE
PORT
PIN
SHLD
1
0V
7
RD ( A’ )
15
RD ( B’ )
14
SD ( A )
16
SD ( B )
17
RTS ( A )
13
RTS ( B )
12
CTS ( A’ )
11
CTS ( B’ )
10
25– PIN
FEMALE
Typical Wiring Diagram
PIN PIN
37
1
27
26
35
34
31
30
33
32
UP TO MAXIMUM OF 50 FEET (15.2 METERS)
PIN
SHLD
1
0V
7
RD ( A’ )
15
RD ( B’ )
14
SD ( A )
16
SD ( B )
17
RTS ( A )
13
RTS ( B )
12
CTS ( A’ )
11
CTS ( B’ )
10
25– PIN
MALE
1
7
15
14
16
17
13
12
11
10
Series 90–70 Remote I/O Scanner User’s Manual – July 199240
Page 48

SNP Multidrop without WSI Board in Workmaster II
2
SERIES 90
PLC
SHLD
0V
RD ( A’ )–
RD ( B’ )+
SD ( A )–
SD ( B )+
RTS ( A )–
RTS ( B )+
CTS ( A’ )–
CTS ( B’ )+
15– PIN
MALE
1.
RECOMMENDED CABLE
TYPES, BELDEN #9505 OR
#9832 (FIVE PAIR TWISTED)
2.
WIRE PAIRS MUST BE
CONSISTENT THROUGHOUT
LENGTH OF NETWORK.
OEM MUST GUARANTEE
3.
THERE IS NO MORE THAN A
+7 VOLT COMMON MODE
VOLTAGE BETWEEN PANELS
4.
FOR INFORMATION ON
MULTIDROP
CONFIGURATIONS, REFER
TO THE SERIES 90 PLC SNP
COMMUNICATIONS DRIVER
USER’S MANUAL (GFK–0585).
POWER SOURCE FOR
*
IC690ACC900 CONVERTER
10 FEET (3 METERS) ONLY.
CONVERTER POWER SOURCE
BEYOND 10 FEET (3 METERS)
MUST BE FROM EXTERNAL
SOURCE.
120 OHM RESISTORS.
**
220 OHM–1/4 WATT–5%
***
RESISTORS.
WORKMASTER II
RS–232
PORT
25–PIN
MALE
**
PIN
1
7
10
11
12
13
6
14
15
8
MAXIMUM OF
(1,200 METERS)
SHIELDED
TWISTED PAIRS
**
UP TO A
4,000 FEET
VAC
REMOTE I/O SCANNER
IC690CBL705 OR EQUIVALENT
SHIELDED PAIRS
PIN
TD
2
RD
3
RTS
4
CTS
5
DCD
8
DTR
20
GND
7
25–PIN
FEMALE
RS–422 ISOLATED
REPEATER
(IC655CCM590)
115
SERIES 90
SHLD
0V
RD ( A’ )–
RD ( B’ )+
SD ( A )–
SD ( B )+
RTS ( A )–
RTS ( B )+
CTS ( A’ )–
CTS ( B’ )+
15– PIN
MALE
SERIES 90
REMOTE I/O
SCANNER
SHLD
+5V
0V
RD ( A’ )–
RD ( B’ )+
SD ( A )–
SD ( B )+
RTS ( A )–
RTS ( B )+
CTS ( A’ )–
CTS ( B’ )+
15– PIN
MALE
RS–232
J1
PIN PIN
7
16
17
15
14
11
10
13
12
23
22
PIN
1
7
10
11
12
13
6
14
15
8
PIN
1
5
7
10
11
12
13
6
14
15
8
PIN
J2
16
17
15
14
11
10
13
12
18
19
7
9
8
3
2
5
4
8
7
1
25–PIN
MALE
RD
TD
CTS
RTS
DCD
GND
SHLD
***
***
***
***
FEMALE
RS–232
RS–232/RS–485
CONVERTER
(IC690ACC900)
25–PIN
FEMALE
PORT
SHIELDED
TWISTED PAIRS
15–PIN
RS–485
PORT
DCD ( A)–
DCD ( B )+
RD ( A’ )–
RD ( B’ )+
SD ( A )–
SD ( B )+
CTS ( A’ )–
CTS ( B’ )+
RTS ( A– )–
RTS ( B )+
SHLD
15– PIN
MALE
PORT
PIN
1
SHLD
5
+5V
7
0V
15
RD ( A’ )–
14
RD ( B’ )+
16
SD ( A )–
17
SD ( B )+
13
RTS ( A )–
12
RTS ( B )+
11
CTS ( A’ )–
10
CTS ( B’ )+
25– PIN
FEMALE
PLC/CPU
PANEL
REMOTE
PANEL
PORT
PIN
SHLD
1
+5V
5
0V
7
RD ( A’ )–
15
RD ( B’ )+
14
SD ( A )–
16
SD ( B )+
17
RTS ( A )–
13
RTS ( B )+
12
CTS ( A’ )–
11
CTS ( B’ )+
10
25– PIN
FEMALE
LAST
REMOTE
PANEL
PORT
PIN
SHLD
1
+5V
5
0V
7
RD ( A’ )–
15
RD ( B’ )+
14
SD ( A )–
16
SD ( B )+
17
RTS ( A )–
13
RTS ( B )+
12
CTS ( A’ )–
11
CTS ( B’ )+
10
25– PIN
FEMALE
TYPICAL WIRING DIAGRAM
PIN
RT
+5V
0V
PIN
2
2
3
10
11
12
13
15
14
*
*
3
10
11
12
13
9
9
15
8
8
6
6
14
5
5
7
7
1
1
UP TO MAXIMUM OF 50 FEET (15.2 METERS) *
SHIELDED
TWISTED PAIRS
SHLD
+5V
0V
RD ( A’ )–
RD ( B’ )+
SD ( A )–
SD ( B )+
RTS ( A )–
RTS ( B )+
CTS ( A’ )–
CTS ( B’ )+
25– PIN
MALE
SHLD
+5V
0V
RD ( A’ )–
RD ( B’ )+
SD ( A )–
SD ( B )+
RTS ( A )–
RTS ( B )+
CTS ( A’ )–
CTS ( B’ )+
25– PIN
MALE
SHLD
+5V
0V
RD ( A’ )–
RD ( B’ )+
SD ( A )–
SD ( B )+
RTS ( A )–
RTS ( B )+
CTS ( A’ )–
CTS ( B’ )+
25– PIN
MALE
PIN
16
17
15
14
13
12
11
10
5
7
1
a44973
PIN
1
5
7
15
14
16
17
13
12
11
10
PIN
1
5
7
15
14
16
17
13
12
11
10
PIN
1
5
7
15
14
16
17
13
12
11
10
41Chapter 2 Installation
Page 49

Chapter 3 Remote I/O Scanner Operation
section level 1 1
3
This chapter explains how a Remote I/O Scanner interacts with the modules in its
remote drop, how it stores data, and how it exchanges data with a PLC or other type of
system host.
Overview
The Remote I/O Scanner scans I/O modules in its remote drop in the same manner in
which a Series 90–70 PLC CPU scans I/O modules in the PLC. Its internal memories
store the remote drop’s I/O data.
A Remote I/O Scanner communicates with the host over the Genius bus, sending up to
128 bytes of input data and receiving up to 128 bytes of output data each Genius bus
scan.
figure bi level 1
table_big level 1
HOST
BUS
CONTROLLER
GENIUS
MESSAGE
INPUTS:
UP TO 128
BYTES
OUTPUTS:
UP TO 128
BYTES
REMOTE
I/O SCANNER
% AI
% I
% Q % AQ
REMOTE DROP
SCAN
a44975
INPUT
MODULES
OUTPUT
MODULES
PCM, GDS, and ADS modules can be located in a remote drop. There, they have
direct access to the input and output data for the I/O modules in the remote drop.
They also have indirect access to the host, through the Remote I/O Scanner’s internal
I/O tables.
43
Page 50

3
I/O Scan
Scanning begins immediately at powerup, unless a fatal diagnostic error occurs within
the module. At powerup, all I/O in the remote drop, except those that are presently
forced, default to Off. I/O that are forced at the time of powerup start operation in the
forced state or value.
Run Mode
Following a successful powerup, a Remote I/O Scanner goes into Run mode. It remains
in Run mode unless a fatal fault or other serious problem occurs. In Run mode, input
modules are scanned in rack and slot order. The Remote I/O Scanner stores the input
data in its own %I and %AI memories. These memories always contain the most
recent value for each input.
a44977REMOTE DROP
REMOTE
I/O SCANNER
% I
% AI
INPUT
MODULES
% Q % AQ
OUTPUT
MODULES
After the input scan, the Remote I/O Scanner scans the output modules in rack and slot
order, sending them the most recent output data from its internal %Q and %AQ
memories.
a44978REMOTE DROP
REMOTE
I/O SCANNER
% I
% AI
% Q
% AQ
INPUT
MODULES
OUTPUT
MODULES
Special–purpose modules, such as PCM, GDS, and ADS modules, are recognized by
the Remote I/O Scanner but are not scanned for I/O data. These modules may be
programmed to access the internal memories of the Remote I/O Scanner, where they
may deposit or acquire data.
Stop/Faulted Mode
If a fatal fault occurs, the Remote I/O Scanner goes to Stop/Faulted mode. The Module
OK LED is off . In Stop/Faulted mode, the Remote I/O Scanner can communicate with
Logicmaster 90–70; it may be possible to place the module back into Run mode by
clearing all faults from its CPU Fault Table and I/O Fault Table. This requires either a
direct programmer connection or communication with the remote drop on a multidrop
network. It is also possible to use a Hand–held Monitor to clear all faults to attempt a
return to Run mode. Stop/Faulted mode usually indicates a hardware fault. If the fault
condition is not corrected, the module will not be able to return to Run mode
successfully.
Remote I/O Scanner User’s Manual – July 199244
Page 51

I/O Scanner Memory
The Remote I/O Scanner has %I, %AI, %Q, %AQ, and %R internal memories. The
following table shows how much memory of each type the Remote I/O Scanner has,
and the maximum amount that may be transferred with the host.
3
Memory Type References Available in
Remote I/O Scanner
%I 12K up to 1024 bits
%Q 12K up to 1024 bits
%AI 8K up to 64 words
%AQ 8K up to 64 words
%R 16K not transferrable
Transferred with Host
I/O Memory in the Remote I/O Scanner
The Remote I/O Scanner’s %I, %AI, %Q, and %AQ memories are used for the remote
drop’s I/O data. They can also be used for data being transferred between the host and
option modules in the remote drop.
Individual I/O modules may be configured anywhere within available memory . If data
are to be exchanged with the CPU, the modules must be placed inside the configured
I/O map. Any I/O modules configured outside the I/O map will be scanned by the
Remote I/O Scanner, but the data will not be derived from or supplied to the CPU.
Configuring I/O References in a Series 90–70 PLC Application
When configuring I/O references for a Series 90–70 PLC:
1. A Logicmaster 90 program folder for the Series 90–70 contains the I/O map for
each remote drop.
2. A Logicmaster 90 program folder for a Remote I/O Scanner also contains an I/O
map.
3. For 90–70 applications, it recommended that both of these I/O maps agree.
4. The configured data lengths must agree.
For most applications, matching PLC and Remote I/O Scanner references are
recommended to avoid confusion. However, it is not mandatory to assign the same
references in the Remote I/O Scanner configuration and in the PLC configuration.
%R Memory in the Remote I/O Scanner
The Remote I/O Scanner has 12K bytes of %R memory that is not used for data
transfer with the host. However, it is available for other uses such as transferring data
with Programmable Coprocessor Modules in the remote drop.
45Chapter 3 Remote I/O Scanner Operation
Page 52

3
Data Transfer with the Host
Each bus scan, a Remote I/O Scanner exchanges the following data with the host PLC
or computer:
H
It sends an input message with up to 128 bytes of %I and/or %AI inputs.
H
It receives an output message with up to 128 bytes of %Q and/or %AQ outputs.
The exact length and content of these messages is determined by the remote drop I/O
map configured for the Remote I/O Scanner. The data from each table (%I, %AI, %Q,
and %AQ) must be contiguous. Data formats are explained on the following pages.
Communications on the Genius Bus
After a Remote I/O Scanner completes a successful login with the controlling PLC or
computer, it begins sending the input data it has scanned from the input modules and
accepting output data for the output modules it controls.
The scanner’s communications with the host are performed asynchronously. When
the scanner receives the Genius bus communications token, it sends the most recent
data from the configured portion of its %I and %AI memories on the bus. As
described above, these memories are repeatedly updated whenever the Remote I/O
Scanner scans the input modules in the remote drop.
The scanner receives new outputs from the host when the host’s bus controller has the
communications token. It places these outputs into the configured portion of its %Q
and %AQ output tables. These outputs are then passed to the devices in the remote
drop on the next I/O scan.
The Genius bus scan time may vary from 3–400mS, but 20–30mS is typical.
Update Rate
Depending on the number and types of I/O modules in a remote drop, the update rate
is typically in the range of 4–7mS, if there is no programmer activity. If the Logicmaster
90–70 programmer is physically attached to the Remote I/O Scanner, and is in
On–line mode, it slows the update rate by about 10mS.
Throughput
If an output in the remote drop is tied to an input in the same remote drop, the output
changes state (or value, in the case of an analog output module) within a few
milliseconds of the new output being sent from the bus controller to the Remote I/O
Scanner. (To guarantee that an output changes state, it must be present for at least one
Genius bus scan time).
The input which is tied to the output responds as soon as any load–effects have
settled out and input filtering is completed. This may occur as soon as the Remote I/O
Scanner’s next I/O scan.
An input must be present for at least one PLC sweep time plus one Genius bus scan
time to guarantee its detection by the host. If the input changes state only briefly, and
then changes again before the input data is sent on the bus, the change may be
overwritten by some new input state or value before it can be sent.
Remote I/O Scanner User’s Manual – July 199246
Page 53

3
Input Data Sent by the Remote I/O Scanner
When the Remote I/O Scanner has its turn on the bus, it sends one input data message
containing the latest values for all configured discrete inputs followed by all configured
analog inputs. Because they are broadcast (like all Genius inputs), they can be
obtained by any Bus Controller on the bus.
Input Data Message
(up to 128 bytes)
a
To CPU
The lengths of each portion are equal to the lengths of %I and %AI data selected when
configuring the Remote I/O Scanner. Either may be zero.
The discrete inputs appear in the input message in the same sequence as their
assigned input references. Each discrete input module occupies one byte per eight
circuits.
The analog inputs are also in the same sequence as their assigned input references.
Each analog input module occupies two bytes (one word) for each analog channel.
The Remote I/O Scanner sends this data from its internal %I and %AI memories,
beginning at the start locations selected during remote drop configuration of the
Remote I/O Scanner .
How the host handles this data depends on the host type:
H
A Series 90–70 PLC places the data in the %I and %AI references selected during
PLC configuration. These must be the same references selected during Remote I/O
Scanner configuration.
discrete inputs analog inputs
a Configured %I Length
'
a Configured %AI Length
%AI starting reference data%I starting reference data
'
H
A Series Six or Series Five PLC places the data into I/O table or register memory .
For a new Remote I/O Scanner, a beginning address in Series Six or Series Five I/O
Table memory can be entered by Logicmaster 90 configuration of the Remote I/O
Scanner. To assign references in register memory instead, or to change a
previously–entered I/O table assignment, a Hand–held Monitor must be used.
H
A host computer places the data into the input table segment that corresponds to
the Device Number of the Remote I/O Scanner.
Chapter 9 explains how each of these host devices handles the data it exchanges with a
Remote I/O Scanner .
47Chapter 3 Remote I/O Scanner Operation
Page 54

3
Outputs from the Host to a Remote Drop
Each time the host’s Bus Controller has the bus communications token, it sends any
outputs it has received from the CPU to the devices on the bus. Outputs for the
Remote I/O Scanner are sent in one output data message, with all configured discrete
outputs followed by all configured analog outputs.
Output Data Message
(up to 128 bytes)
a
To
Remote
Drop
The lengths of each portion are equal to the configured lengths of %Q and %AQ data
selected for the Remote I/O Scanner (regardless of the host CPU type or the actual
amount of output data needed for the modules physically present in the remote drop).
Either length may be zero.
The Series 90–70 Bus Controller automatically places the %Q data ahead of the %AQ
data, in accordance with the configuration supplied to the host PLC for the remote
drop. Other PLCs and computers need to prearrange the data in the order expected
by the remote drop. Each discrete output module will receive one byte of data for each
eight circuits. Each analog output module will receive two bytes (one word) for each
analog channel.
As soon as new output data is received, the Remote I/O Scanner checks it to be sure the
data is error–free and of the correct length. The length must match the combined
lengths of the discrete output data and analog output data that have been configured
for the Remote I/O Scanner. After verifying the accuracy of the data, the scanner puts
the data in the %Q and %AQ tables, and begins passing it to the output modules in the
remote drop.
discrete outputs analog outputs
a Configured %Q Length
'
a Configured %AQ Length
%AQ starting reference data%Q starting reference data
'
Output Defaults
On powerup, all outputs are turned off (analogs go to zero), except those inputs and
outputs which had previously been forced––they go immediately to their forced state
or value.
If CPU communications are lost for 3 bus scans, all outputs that are not presently
forced will either default or hold their last state, as configured using the Logicmaster
90–70 software. If all configuration for a remote drop is done with a Genius
Hand–held Monitor, this selection cannot be made and all outputs will default to Off
(or 0 for analogs).
Remote I/O Scanner User’s Manual – July 199248
Page 55

Configuring Extra References
Normally, there are no extra references configured for the Remote I/O Scanner, since
that would consume extra references in the host CPU, making them unavailable for
other modules. In addition, extra references add to the Genius bus scan time, so they
should be avoided if they are not actually needed.
However, reserving extra references or leaving vacancies at configuration time is a
convenient way to prepare for future additions to a remote drop. (If Logicmaster
90–70 is used for configuration, unused references may be placed anywhere in the
input message).
Input Data Message with Some Inputs Not Used
3
a
To CPU
discrete inputs analog inputs
a Configured %I Length
unused
discrete
references
'
a Configured %AI Length
%AI starting reference data%I starting reference data
unused
analog
references
'
Example
An application has two remote drops, which have been configured as #016 and #017.
Drop 016
%I0001 – %I0064
%AI0001 – %AI0008
%Q0001 – %Q0032
%AQ0001 – %AQ0008
At a later time, it becomes necessary to add a 32–point input module to drop 016.
However, in drop 016, there are already enough input modules to use all of the
assigned input references (%I0001 – %I0064). Ideally, the extra modules would be
added to remote drop 016 at %I00065, but this is already used as a reference in drop
017. The alternatives at this stage are:
Drop 017
%I0065 – %I0128
%AI0009 – %AI0016
%Q0033 – %Q0064
%AQ0009 – %AQ0016
1. Change the map of drop 017 to free up %I0065 – %I0096.
2. Change the map of drop 016 to start at higher references, such as %I0097 –
%I0160.
It would have been easier to add the module to drop 016 if extra references had been
configured originally, or if some vacancies had been allowed.
Drop 016
%I0001 – %I0096
%AI0001 – %AI0008
%Q0001 – %Q0032
%AQ0001 – %AQ0008
Drop 017
%I0097 – %I0160
%AI0009 – %AI0016
%Q0033 – %Q0064
%AQ0009 – %AQ0016
49Chapter 3 Remote I/O Scanner Operation
Page 56

3
Using Option Modules in a Remote Drop
PCMs (Programmable Coprocessor Modules), GDS (Graphics Display Coprocessor
Modules), and ADS (Alphanumeric Display Coprocessor Modules) can be located in a
remote drop.
These option modules look at the Remote I/O Scanner as though it were a Series
90–70 PLC CPU. They can read and write to any locations in the Remote I/O Scanner’s
internal %I, %AI, %Q, %AQ, and %R memories, including those portions of memory
that are outside the range configured for data transfer with the system host.
The Remote I/O Scanner’s %R memory is NOT used for data transferred with the
CPU, but it can be freely accessed by a PCM, GDS, or ADS module in the remote drop.
Accessing the Host CPU from Option Modules in a Remote Drop
When used in a remote drop, a PCM, GDS, or ADS module does not have direct access
to host CPU memory; to read or write host memory, the data must be transferred
through the configured memory area of the Remote I/O Scanner . The area used
should not correspond to a physical I/O module; it should correspond to an unused
portion of the remote drop I/O map configured for the remote drop.
Extending the I/O map of a remote drop will cause the Genius message to increase in
size, and will therefore increase the Genius bus scan time. Gaps may be anywhere in
the I/O map, but if they are added to the end, the corresponding I/O references cannot
be used for any other purpose by either the host or the Remote I/O Scanner.
Reading Host Data from an Option Module
a44887
HOST
CPU
MEMORIES
% Q
% AQ
GENIUS
MESSAGE
REMOTE I/O
SCANNER
MEMORIES
% Q
% AQ
OUTPUT
MODULES
READ
PCM, GDS
OR ADS
Remote I/O Scanner User’s Manual – July 199250
Page 57

3
Sending Data from an Option Module to the Host
To send data to the host CPU, the option module must place that data into the %I or
%AI memory area of the Remote I/O Scanner. The data must be located within the
range of %I or %AI memory configured for transfer to the host, and cannot correspond
to an input module. It must correspond to a gap in the input portion of the remote
drop I/O map.
a44888
HOST
CPU
REMOTE I/O
SCANNER
PCM, GDS
OR
ADS
MEMORIES
% I
% AI
MEMORIES
% I
% AI
INPUT
MODULES
WRITE
The transport delays between the CPU and the Remote I/O Scanner should be
considered when analyzing system timing.
51Chapter 3 Remote I/O Scanner Operation
Page 58

3
Direct Access to I/O by Option Modules
A PCM, GDS, or ADS module in the remote drop can read inputs from, and send
outputs to, any I/O module in the drop. This may include modules which do not
communicate with the system host at all.
It is possible to place I/O modules in a remote drop, and use Logicmaster 90 to assign
them references outside the range configured for the Remote I/O Scanner. Although
the host CPU would not be aware of such modules, the Remote I/O Scanner would
include them in its regular I/O scan. By reading or writing the assigned references in
the Remote I/O Scanner’s internal memory, an option module could independently
monitor or control I/O modules in the remote drop.
Example
A Remote I/O Scanner might be configured to receive from the CPU 256 outputs, from
%Q0001 to %Q0256, while output modules in the remote drop were configured using
Logicmaster 90 to use outputs %Q0001 to %Q0272. Although the module assigned to
references %Q00257 to %Q00272 would never receive outputs from the CPU, it could
be controlled by any PCM, GDS or ADS module in the remote drop. To control the
module, a PCM, GDS, or ADS module would send data to the corresponding %Q
outputs in the Remote I/O Scanner’s internal memory.
HOST
MEMORIES
%Q00001
%Q00256
SENDS
1–256
REMOTE I/O
SCANNER
MEMORIES
%Q00001
%Q00256
%Q00257
%Q00272
%Q00001
%Q00272
OUTPUT
MODULES
a44889
PCM
SENDS
257–272
Remote I/O Scanner User’s Manual – July 199252
Page 59

Chapter 4 Configuration with Logicmaster 90–70
section level 1 1
4
This chapter explains:
H
how to use Logicmaster 90–70 software to configure a Remote I/O Scanner and
the modules in a remote drop. See page 55.
H
how to convert Remote Drop configuration folders created with Release 3
Logicmaster software to Release 4 configuration folders. See page 54.
The instructions in this chapter are for rev. 4.01 or later of the Logicmaster 90–70
software. Either the serial or parallel version can be used. If you have an earlier
software version (3.0 or later is required for any Remote I/O Scanner configuration),
turn to appendix C for instructions.
Alternatively, a remote drop can be configured using a Hand–held Monitor (release
4.0 or later), provided there are no analog expanders in the remote drop. HHM
configuration does not provide all of the features that are available when configuring
with Logicmaster 90, such as I/O module options and support options. Differences
between the two configuration methods are listed in chapter 1. HHM configuration
instructions are given in chapter 6.
figure bi level 1
table_big level 1
Configuration Limits
These configuration limits must not be exceeded:
1. The maximum amount of data that may be exchanged with a Remote I/O Scanner
is 128 bytes of %I + %AI data and 128 bytes of %Q + %AQ data. For any particular
I/O type (I, Q, AI, AQ) of the I/O map, the length plus the offset cannot exceed the
current configured CPU limits.
2. The reference addresses of the I/O modules in the Remote Drop cannot exceed the
Remote I/O Scanner limits.
3. There must not be too many option modules in the remote drop. See chapter 1.
4. The I/O configuration data must not be greater than 4500 bytes total. This amount
of configuration data will never be reached in a remote drop where all of the I/O
modules are included in the Remote I/O Scanner’s I/O map. Turn to appendix B if
the remote drop drop will have I/O modules configured outside the I/O map.
Filenames for Configuration Files
With Release 4 Logicmaster software, filenames for remote drop configuration files are
in the format dropXXX.cfg. For example, the configuration file for Drop033 is named
drop033.cfg. To view the list of configuration files in the currently–selected folder,
press Alt/L.
53
Page 60

4
Using R elease 3 Configuration Files with Release 4 Software
With Release 3 of the Logicmaster software, multiple folders were needed for the
configuration: one for the PLC, and one for each remote drop. With Release 4 software,
all configuration files are contained within the same folder.
Instructions to convert existing, operational Release 3 remote drop folders to a Release
4 common folder are summarized below, and explained in detail on the following
pages.
1. Load the configuration of each Remote I/O Scanner to the folder that has the
central PLC configuration. To do this:
A. Select the folder that contains the central PLC configuration.
B. Load the configuration from each Remote I/O Scanner in the system. The
configuration files created by the load will be in the form dropXXX.cfg, where
XXX is the Drop ID.
2. If the conversion is being done on a system that is not operational, after you load a
configuration file to the folder , “attach” it to the PLC configuration as described
below .
“Attaching” Configuration Files
An unattached remote drop configuration file is one that exists in the same folder as
the PLC configuration, although it has not yet been included in the PLC configuration.
An example would be a Release 3 configuration file that has been loaded to the
common folder as described above. Although the file is present, the configuration data
it contains is still separate from the central PLC configuration. Follow these steps to
attach a remote drop configuration file to the PLC configuration.
1. If the file has not already been loaded to the PLC configuration folder, load it as
described above.
2. The Bus Controller must already be configured. If that has not been done,
configure it according to the instructions in the Series 90–70 Genius Bus Controller
User’s Manual.
3. Configure a new Remote I/O Scanner as a device on the bus.
4. Zoom (F10) into the new Remote I/O Scanner’s configuration screen and change
its Drop ID to match the Drop ID of the remote drop configuration file being
attached.
5. Press ESC to complete the attachment. The software saves the remote drop
configuration to disk and returns the display to the bus screen. At the next ESC
from the bus level, the software saves the entire configuration to disk, updating
both both the central PLC configuration and the remote drop configuration.
Series 90–70 Remote I/O Scanner User’s Manual – July 199254
Page 61

Configuring a Remote Drop
A Remote I/O Scanner must be configured as a device on a Genius bus. If the Bus
Controller has not been configured yet, refer to the configuration instructions in the
Series 90–70 Genius Bus Controller User’s Manual.
With the Bus Controller configured, select its slot on the rack configuration screen:
4
Adding a Remote I/O Scanner to the Bus
To add a Remote I/O Scanner to the bus, with the cursor on the Bus Controller’s slot,
press F10 (zoom) to go to the bus display:
55Chapter 4 Configuration with Logicmaster 90–70
Page 62

4
Selecting the Bus Address
Move the cursor to the Bus Address that will be used by the Remote I/O Scanner and
press F8 (Remote). (The Bus Address is the Remote I/O Scanner’s address on the
Genius bus; this number is not its DROP ID. See the explanations of Bus Address and
Drop ID on the next page if you would like more information.)
Next, this catalog list appears:
Press the Enter key . The Remote I/O Scanner is now entered at the selected Bus
Address. In the illustration, the Remote I/O Scanner is located at Bus Address 29.
The software assigns a DROP ID, as explained on the next page.
Press F10 (zoom) from this screen to configure the Remote I/O Scanner. The message
“ Now saving Central PLC configuration to disk...” appears.
Series 90–70 Remote I/O Scanner User’s Manual – July 199256
Page 63

After the configuration is saved, the Remote Drop rack configuration screen appears.
The Remote I/O Scanner is located in slot 1.
The configuration screen shows the rack and slot location of the Bus Controller, and
the Bus Address, Remote Drop rack, and Drop ID of the Remote I/O Scanner.
Location of
Bus Controller
Remote Drop Rack
Drop ID
Genius Bus Address
of the Remote I/O Scanner
4
Drop IDs and Bus Addresses
As mentioned, a Remote I/O Scanner’s Drop ID is not the same as its Bus Address:
Bus Address
Drop ID
The Bus Address is the Remote I/O Scanner’s communications address
on the Genius bus. The Bus Address is selected when the Remote I/O
Scanner is configured as a Genius bus device. The range of Bus
Addresses is 0 to 31. Each Bus Address is unique only on that bus.
The Drop ID is a unique number from 16 to 254 by which the central
PLC can uniquely identify any device connected as a remote drop on
the Genius bus. There are two such devices, the Remote I/O Scanner
and the Series 90–30 Enhanced Genius Communications Module
(IC693CMM302).
The Remote I/O Scanner makes further use of the Drop ID by
incorporating it into its SNP ID as DropXXX where XXX is the 3–digit
Drop ID. The Logicmaster software assigns the letters “DROP” by
default; these may be altered in the SNP ID screen, but the three last
digits may not.
As noted on the previous page, the software automatically assigns a
Drop ID to each Remote I/O Scanner. For the first Remote I/O Scanner
to be configured, the default Drop ID 33 should appear in the DROP
ID: field. Within a central PLC folder, Drop IDs are automatically
incremented from 033 – 254, and when those are used, 016 – 032. No
two remote drops can have the same Drop ID. If there is a “detached”
remote drop file in the current folder, its Drop ID is skipped in the
rotation.
If you prefer to use a Drop ID other than the one that has been
assigned, you can edit the Drop ID parameter on the Remote I/O
Scanner configuration screen.
57Chapter 4 Configuration with Logicmaster 90–70
Page 64

4
With the REMSCAN slot still selected, press F10 (zoom) to configure the Remote I/O
Scanner. The first configuration screen appears.
Auto I/O Map is ON
The next available Reference
Addresses within the PLC
configuration have been
automatically calculated
and assigned.
The information on this screen and entries you can make are described below.
Drop ID
The Remote I/O Scanner’s Drop ID also appears on this screen. It can be edited here, if
necessary.
Attaching a “Detached” File
To attach a configuration file that is present in the folder but not included in the PLC
configuration, change the Drop ID on this screen to match that used by the
configuration file. The file is read in and its configuration parameters are displayed.
Series 90–70 Remote I/O Scanner User’s Manual – July 199258
Page 65

4
I/O Map
The I/O map represents the boundaries of the I/O references assigned to the remote
drop which will be scanned by the central PLC. Before any modules are configured,
the I/O map begins at the next available reference in each data type, based on the PLC
configuration, and each reference type has a length of 0. You can change the reference
starting addresses and enter lengths manually , or you can use automatic I/O mapping.
The best method to use will depend on your application. If all I/O in the remote drop
will be scanned by the central PLC and no future additions to the remote drop are
planned, it is easiest to use automatic I/O mapping. However , if some I/O in the remote
drop will not be scanned by the central PLC, you may prefer not to have the software
automatically configure the I/O map. Details are on the following pages.
Ref A ddr
Length
The beginning configured reference for each data type. Initially, the
I/O map shows the next available reference in each data type, based on
the PLC configuration. If A uto I/O Map is ON, the software ensures
that all configured I/O will be scanned by the central PLC by adjusting
the I/O map. The first configured I/O module of a given data type will
have a starting reference offset that matches the offset of the I/O map.
Series Six or Series Five PLC: Reference Assignment You MUST
use a Hand–held Monitor to change a Series Six or Series Five
reference previously configured using either Logicmaster 90–70 or a
Hand–held Monitor . You also must use an HHM to assign a reference
in register (rather than I/O) memory. For a Series Six or Series Five PLC
system that uses I/O table references, a previously–unconfigured
Remote I/O Scanner will accept a reference entered here. It will be the
reference for the first data type (in the sequence listed above) for
which you enter a non–zero length. For example, if the remote drop
has only analog input and output boards, the data lengths for %I and
%Q would be 0. You would enter a data length for %AI and %AQ.
The beginning reference entered for %AI would become the beginning
Series Six or Series Five reference for the remote drop.
The amount of data of each type to be exchanged with the PLC. For %I
and %Q memory, length is in bits (points). For %AI and %A Q
memory, length is in words (each word is two bytes). If Auto I/O Map
is ON, it is not necessary to enter lengths in the I/O map; within the
limits given below, the software will increment the lengths as you
configure I/O modules in the remote drop.
Data Length Limits Each remote drop transfers any mix of discrete
and analog inputs up to 128 bytes, and any mix of discrete and analog
outputs up to 128 bytes. These limits reflect the maximum amount of
data that can be sent on the Genius bus in a single transmission. Bit
memories (%I and %Q) are assigned on byte boundaries. Reference
limits for the Remote I/O Scanner are listed below . Reference limits for
the host may not necessarily be the same. Whichever is smaller
determines the practical limits of the configuration.
Memory Type References
Available
%I 12K up to 1024 bits
%Q 12K up to 1024 bits
%AI 8K up to 64 words
%AQ 8K up to 64 words
Maximum
Quantity
59Chapter 4 Configuration with Logicmaster 90–70
Page 66

4
Using Auto I/O Map
Use Auto I/O Map if you want to use the software’s automatic I/O mapping feature.
With Auto I/O Map, the first I/O module of a given data type is assigned the same
offset as the offset of the I/O map. A uto I/O Map automatically supplies lengths for the
I/O map by incrementing the map as I/O modules are configured. In addition, if you
change the reference address of the first module configured for a data type, A uto I/O
Map changes the beginning address of the I/O map to match it.
If all I/O in the remote drop will be scanned by the central PLC:
For most applications, all I/O in the remote drop will be scanned by the central PLC:
I/O Map
Module Reference Addresses
If this is true for your application, begin with Auto I/O Map turned ON and use it to
configure the I/O map.
A. The software will use the beginning references in the I/O map for the first modules
of each type you configure. You can change the beginning reference for any
module.
B. As you configure additional modules, the software will update the I/O map.
C. After configuring modules, you can view the I/O map, and edit it if necessary.
If more I/O than is configured in the remote drop will be scanned by the PLC:
The extra references can be used for additional modules in the future, or for data
transfer between an intelligent module in the Remote Drop and the PLC CPU. The
extra references can be located before, between, or after the configured I/O module
references.
I/O Map
Assigned Module Reference Addresses
A uto I/O Map can be either ON or OFF. The best method to use depends on where the
extra references will be located.
A. To create extra references either before or after the I/O module references, turn
A uto I/O Map OFF and edit the offset and length of the I/O map directly.
Extra
a
References
Available
a
to assign
B. To create extra references between I/O modules, turn Auto I/O Map On. When
configuring I/O modules, change the module starting references to skip the desired
references. Because these will be scanned, and will add to the Genius bus scan
time, be sure to only add reference that will be needed in the future.
One way to configure a system that will be expanded in the future is to configure the
complete future installation with A uto I/O Map ON, then delete the
Series 90–70 Remote I/O Scanner User’s Manual – July 199260
Page 67

presently–unavailable modules. Alternatively, you can could configure the existing
equipment with A uto I/O Map ON, then turn it OFF and edit the length fields to
provide space for the future modules, You need to plan this early; if you don’t leave
enough room for future modules, extensive reconfiguration may be required later on.
If some I/O will not be scanned by the central PLC:
I/O data that is assigned to references outside the I/O map will not be exchanged with
the PLC during system operation. Such references would be controlled by an
intelligent module in the Remote Drop, as described in chapter 3. References outside
the I/O map can be located anywhere in the Remote I/O Scanner’s I/O memory .
4
I/O Map
Module Reference Addresses
For this type of application, Auto I/O Map can be turned OFF for part or all of the
Remote Drop configuration:
A. You can turn Auto I/O Map OFF before configuring any modules and enter in the
I/O Map lengths for each data type to be exchanged with the PLC. Then, configure
references for individual I/O modules that fall either inside or outside the I/O map,
as needed.
B. Or, you can begin with Auto I/O Map turned ON, and use it to configure all
modules that should be included in the I/O map. When you reach the point where
I/O references should be outside the I/O map, return to the Remote I/O Scanner’s
configuration screen, and turn Auto I/O Map OFF. The rest of the modules you
subsequently configure for this drop will be outside the I/O map.
Outside
I/O Map
b
Bus Scan Time Impact
As data lengths are incremented, either by entering them in the I/O map or with
automatic I/O mapping, the configuration software calculates the total number of
input and output bytes, and the amount of time the quantity of I/O specified will add
to the scan time of the Genius bus, based upon the configured baud rate. This
information is shown on the first Remote I/O Scanner configuration screen (this
information cannot be edited):
The Bus Scan Impact is the amount of time that will be added to the scan time of the
bus on which the Remote I/O Scanner is located by the quantity of data to be
exchanged with the host.
61Chapter 4 Configuration with Logicmaster 90–70
Page 68

4
Press the Page Down key to display the second configuration screen for the Remote
I/O Scanner.
The selections you can make on this screen are explained below.
Genius Interface Entries
Several of the Genius entries relate to both redundancy and CPU redundancy. These
features are described in detail in the Bus Controller User’s Manual. Revision 3 of the
Bus Controller and Series 90–70 CPU are required to use redundancy; however,
Revision 4 products, which provide more complete support, are recommended for
redundancy applications.
Baud Rate
Input Def
Out Enabled
This field is automatically filled in with the baud rate configured for
the bus controller for the bus on which the Remote I/O Scanner
resides. If you want to change the baud rate, return to the Bus
Controller configuration screen. Note that all devices on the bus must
be configured for the same baud rate.
Specifies the state presented to the PLC for all %I and %AI references
in the remote drop, in the event communications with the Remote I/O
Scanner are lost. The options are to default off or to hold last state.
Specifies whether output data will be transmitted from this Bus
Controller to the remote drop at powerup. The options are enabled or
disabled. If outputs are enabled on this screen, the Bus Controller
sends outputs to the remote drop automatically after it logs in. If
outputs are disabled on this screen, the Bus Controller does not
automatically send outputs to the remote drop when it logs in. If
outputs are disabled, the application program must subsequently send
a COMREQ to the Bus Controller to enable outputs for the remote
drop.
BSM CTRLR
Series 90–70 Remote I/O Scanner User’s Manual – July 199262
In a dual bus system, if the Remote I/O Scanner will be used to switch
busses, select YES. If this entry is set to YES, the following entry will
also be set to YES automatically.
Page 69

4
BSM Present
Timeout Sec
CFG Protect
Redund
Mode
Duplex Def
In a dual bus system, if the Remote Drop will be located downsteam of
another device that controls bus switching (either a Bus Switching
Module or another Remote I/O Scanner), set this entry to YES.
If either of the previous two entries is YES, and the total bus scan time
is expected to exceed 100mS, set this entry to 10. This entry is
equivalent to the Switch Time entry made for the Bus Controller. It is
the amount of time that will be allowed for switching on a dual bus.
The choices are 2.5 seconds and 10 seconds. If the Remote I/O Scanner
stops receiving output data from the Bus Controller, it will wait for this
specified time period before defaulting outputs in the Remote Drop.
After establishing the configuration for the Remote Drop, set this entry
to YES to prevent changes.
This entry determines the CPU redundancy mode of the system. For
most applications, it will be NONE, for no CPU redundancy. The other
choices are Hot Standby and Duplex. See the Bus Controller User’s
Manual for details. The Remote I/O Scanner can only be configured for
Duplex CPU redundancy if all of its modules are discrete.
If the entry for Redund Mode above was Duplex, the Remote I/O
Scanner will operate in Duplex mode. It will accept output data from
two Bus Controllers, and compare the corresponding outputs. If the
two outputs match, the Remote I/O Scanner sets the output to the
commanded state. If they do not match, the Remote I/O Scanner sets
the output to this configured default state. All outputs in the Remote
Drop will use this same default state.
Redundan cy?
Set this entry to YES if the Remote I/O Scanner will be a redundant
device on the bus of its bus controller. The bus controller must also be
set up for redundancy. Setting this to YES causes the configuration of
this Remote I/O Scanner to be automatically associated with any
“matching” internal bus controller.
SNP Port Entries
These are the SNP port communications parameters. If the Remote I/O Scanner will be
part of a Serial Network Protocol system, these parameters must be set to match the
SNP parameters of the PLC.
Baud Rate
Parity
Stop Bits
Modem TT
Idle Time
For multidrop communications, a unique SNP ID is required for each device in the
network. A Remote I/O Scanner automatically sets its SNP ID to the form DropXXX
Defaults to 19200 bps. The other choices are 300, 600, 1200, 2400, 4800,
and 9600 bits per second.
The number of parity bits added to each word. The default is ODD.
You can also choose EVEN and NONE.
All communications use at least 1 stop bit, which is the default. For
slower communications, select 2.
The modem turnaround time delay. 1 count = 1/100 second. 0 to 255
counts can be specified. The default is 0.
The maximum communications idle time, which can be 1 to 60
seconds. The default is 10 seconds.
63Chapter 4 Configuration with Logicmaster 90–70
Page 70

4
during the Store operation. XXX stands for a Drop ID of 016 to 254. This can be
changed on the SNP ID screen. The last three digits of the SNP ID refer to the Remote
I/O Scanner’s Drop ID and cannot be changed directly.
Sweep Control Entries
Most applications will use the default programmer and communications windows
times.
Prog W indow
Comm
Window
When you complete the Remote I/O Scanner configuration, press the ESC key to
return to the Remote Drop rack display.
If A uto I/O Map is turned ON and no lengths have yet been assigned, no I/O map
entries appear on this screen, as illustrated below.
Programmer window time. The range is 0 to 255 milliseconds. 10mS is
the default.
Communications window time. The range is 0 to 255 milliseconds.
255mS is the default.
If you have assigned a length to any data type, the beginning address for that data
type appears in the I/O map:
In the above example, lengths have been assigned to %I, %Q and %AI, but not to
%AQ.
Series 90–70 Remote I/O Scanner User’s Manual – July 199264
Page 71

Configure the Modules in the Remote Drop
Configuring modules in a Remote Drop is the the same as configuring modules in the
central PLC. First, select a slot:
4
Use the function keys to select a module type. When the catalog number screen
appears, you can either enter a catalog number or use the function keys again to
display a list of appropriate modules with their catalog numbers.
A module configuration screen like the following example appears:
Module R eference Address
You can use the module reference address shown, or enter a different one.
Module Characteristics
Some module configuration screens, like the one shown in this example, also list
selectable characteristics for that type of module. For this module, they are Interrupt
65Chapter 4 Configuration with Logicmaster 90–70
Page 72

4
Enabled/Disabled, T ransition Positive/Negative, and Input Filter Time. Configure such
selectable features as appropriate for your application.
Note
Such module features can only be selected using the Logicmaster
90–70 software. If a remote drop is configured (or reconfigured) using a
Genius Hand–held Monitor, the I/O boards in the remote drop will
operate in default mode only––optional features cannot be selected.
Return to the Rack Display
After configuring a module, press ESC to return to the Remote Drop rack display .
If A uto I/O Map is ON, the offset in the map determines the offset for the module. This
is the reference address displayed on the Remote Drop configuration screen, as shown
above. This beginning reference address can be changed on the I/O map (on the
Remote I/O Scanner configuration screen, or after module configuration, by
responding Y to the prompt).
If Auto I/O Map is OFF, entering a module or changing a reference address does not
change the I/O map.
Series 90–70 Remote I/O Scanner User’s Manual – July 199266
Page 73

Entering Additional Modules
Configure the rest of the modules in the Remote Drop in the same way. You can also
copy, delete, and undelete module configurations.
Modules of the same type are automatically given the next Reference Address that is
available in the remote drop.
Reference Address
increments automatically ,
based on limits for the
remote drop.
4
You can use this address, or change it. If you enter a higher address, the refer ences you
skip will remain part of the I/O map (assuming that the module lies within the span of
the I/O map limits). If you skip references, remember that you will be consuming
references in both the remote drop and the PLC, and adding to the Genius bus scan
time.
67Chapter 4 Configuration with Logicmaster 90–70
Page 74

4
Completing the Remote Drop Configuration
For the example configuration, the Remote Drop rack display looks like this:
The I/O map and references for each module are displayed.
When you are finished configuring the modules in the Remote Drop, press ESC.
If A uto I/O Map is ON, when you press ESC from the Remote Drop rack configuration
screen as instructed on the previous page, the software prompts:
This Remote Drop’s I/O MAP has been automatically configured: view it? (Y/N)
If A uto I/O Map is OFF, no prompt appears.
If you want to save the configuration and return to the bus screen without viewing or
changing the I/O map, enter N. If you want to view or edit the I/O map, enter Y.
If Auto I/O Map is OFF, when you press ESC from the Remote Drop rack configuration
screen, the configuration is saved, and the display returns to the bus configuration
screen. If you want to view or edit the I/O map, zoom (F10) to the Remote Drop rack
configuration screen, then zoom (F10) to the Remote I/O Scanner configuration screen.
Series 90–70 Remote I/O Scanner User’s Manual – July 199268
Page 75

Overlapping addresses
4
Reference Overlaps
If you have entered a conflicting reference address, the following warning appears:
Overlapping references are permitted in %Q and %AQ. Overlapping references in %I
and %AI are not permitted; such a configuration is not valid.
With the next press of any key after the message appears, the configuration is saved to
disk. Return to the Remote Drop configuration screens and remove the conflict.
In the example illustrated above, the duplicated references appear on the same screen,
so they are easy to locate and correct. If you are not sure where the conflicting
references are located, use the Reference View feature. See page 71 for more
information about Reference View.
69Chapter 4 Configuration with Logicmaster 90–70
Page 76

4
Changing Reference Addresses and Lengths
The I/O map shows the beginning Reference Address or Length assigned to the
Remote I/O Scanner for %I, %Q, %AI, and %AQ data.
You can change any reference address or length in the I/O map. If you change a
reference address after entering modules of that data type in the Remote Drop, you
can have the software automatically reassign their reference addresses to begin at the
new I/O map reference address by responding “Y” at the prompt.
I/O Map base address changed; adjust I/O presently inside map boundaries? (Y/N)
Viewing/Editing the I/O Map
If A uto I/O Map is ON, when you press ESC from the Remote Drop rack configuration
screen as instructed on the previous page, enter Y in response to the following prompt
if you want to view or edit the I/O map.
This Remote Drop’s I/O Map has been automatically configured, view it? (Y/N)
You can also view and edit the I/O map by returning to the Remote I/O Scanner
configuration screen at any time during Remote Drop configuration.
If A uto I/O Map is OFF, when you press ESC from the Remote Drop rack configuration
screen, the configuration is saved, and the display returns to the bus configuration
screen. If you want to view or edit the I/O map, zoom (F10) to the Remote Drop rack
configuration screen, then zoom (F10) to the Remote I/O Scanner configuration screen.
The Logicmaster software will not prevent you from configuring an I/O conflict. Be
careful not to enter an address that overlaps the references assigned to other modules.
If any module references are outside the I/O map, the screen displays:
***** NOTE: Configured modules(s) are outside the I/O MAP *****
Series 90–70 Remote I/O Scanner User’s Manual – July 199270
Page 77

Displaying Configured References
If you want to display references configured for the PLC or a Remote Drop, use
Reference View. Reference View shows any reference conflicts that have been created.
Viewing PLC References
To see the references in the Remote I/O Scanner’s I/O Map together with the rest of the
PLC configuration, select Reference View (shift–F3) from the rack or bus screen. The
illustrations below show Reference Views for a system with three Remote I/O
Scanners.
%I
4
%Q
%AI
%AQ
Reference Conflicts in the PLC Configuration
The PLC Reference View screens show reference conflicts between modules in the PLC
rack(s). Conflicts in the output tables (%Q and %AQ), which are not considered “fatal”
conflicts, are indicated with one asterisk. Conflicts in the input tables (%I and %AI) are
considered fatal; they are indicated with two asterisks. The illustration above shows a
conflict in the Analog Output (%AQ) Table between the I/O maps of two Remote I/O
Scanners (Drop IDs 017 and 034).
The PLC Reference View screens do NOT show conflicts among the modules in a
Remote Drop. If you want to view the references for a Remote Drop, cursor to the
Remote I/O Scanner entry, and press F1 (expand). Or if you want to correct a conflict in
the Remote I/O Scanner configuration, cursor to the Remote I/O Scanner entry and
press shift–F1 (RACK) or F10 (zoom).
71Chapter 4 Configuration with Logicmaster 90–70
Page 78

4
Drop ID of the
Remote Drop
Reference overlap (fatal)
Remote Drop
rack and slot
Viewing Remote Drop References
The Remote Drop Reference View screens show references assigned to individual
modules in a Remote Drop, and indicates reference overlaps as well as modules that
are outside the Remote I/O Scanners’s I/O Map. Y ou can reach the Remote Drop
Reference View Screens by selecting REF VU (shift–F3) while in a Remote Drop
configuration, or by selecting Expand (F1) from any PLC Reference View screen while
the Remote I/O Scanner entry is highlighted.
Each Remote Drop Reference View screen shows the references of that data type in the
I/O Map followed by the references assigned to the modules in the Remote Drop.
%I
%Q
Module outside
the I/O Map
%AI
%AQ
Reference Conflicts in the PLC Configuration
The Remote Drop Reference View screens show conflicts between modules in the
Remote Drop. These conflicts ar e not shown on the PLC configuration Refer ence View .
Modules with overlaps are indicated with asterisks. The illustration above shows an
overlap in the Remote I/O Scanner’s Discrete Input (%I) Table between the modules in
Remote Drop #34, rack 0, slots 2 and 3. If you want to go directly to a configuration
screen to correct an overlap, highlight the entry and press F10 (zoom).
Modules Outside the I/O Map
If a module is outside the I/O Map, an exclamation mark (!) appears to the left of its
description. In the example above, the output module in slot 7, rack 0 of remote drop
#34 has a beginning reference address of %Q00129, but the I/O Map only includes
%Q00097–%Q00128.
Series 90–70 Remote I/O Scanner User’s Manual – July 199272
Page 79

Copying, Deleting, and Undeleting
Individual modules in the Remote Drop configuration can be copied, deleted, and
undeleted in the same way as modules in the PLC configuration. You can also copy,
delete, and undelete Remote I/O Scanners and their remote drop configuration files
from the bus level. (A Remote I/O Scanner cannot be copied, deleted, or undeleted
from within the Remote Drop rack configuration.)
Copying a Remote Drop Configuration
Once a Remote I/O Scanner has been entered into the PLC configuration, it can be
copied to any other location on the Genius bus. The copy will include all modules that
are configured for the remote drop, in the same relative rack positions. To copy a
remote drop configuration, place the cursor on the Remote I/O Scanner in the bus
display and press the Copy key. In the bus display, move the cursor to the bus address
for the copy and press Enter. Press ESC to quit Copy mode.
In the copy, the Logicmaster 90–70 software automatically increments the Remote
Drop ID and Reference Addresses to the next ones available. The data lengths remain
the same. For instance, if the first Remote I/O Scanner has been assigned to use 32 bits
of %I memory, the duplicated configuration of the next Remote I/O Scanner would
also initially assign %I memory the length of 32 bits.
4
Fatal overlaps (%I or %AI) cannot be created by a copy.
Deleting a Remote Drop Configuration
To delete a Remote Drop configuration, go to the bus configuration screen and place
the cursor on the Remote I/O Scanner. Press DELETE (shift–F4). The screen prompts:
Delete Remote I/O Scanner from bus and corresponding configuration file? (Y/N)
To delete the Remote Drop, press Y.
The software retains the most recently–deleted module configuration. If you delete a
Remote Drop, the deleted configuration is saved until you: delete another module, exit
PLC configuration, zoom into another Remote Drop, or select another configuration
with the CFGSEL key. While it is saved, a deleted Remote Drop configuration can be
undeleted as described below.
Undeleting a Remote Drop Configuration
To get back the Remote Drop configuration you have deleted most recently, on the bus
configuration screen place the cursor on the intended slot. Press UNDEL (shift–F5).
The Remote I/O Scanner reappears in the slot.
A Remote I/O Scanner configuration can only be undeleted once.
73Chapter 4 Configuration with Logicmaster 90–70
Page 80

4
Selecting an Existing Configuration File
The Configuration Select feature can be used to display and select the available
configuration files. To use Configuration Select, use the CFGSEL (shift–F6) key from
any rack, bus, or Remote Drop rack screen.
You can enter the name of the file (for a Remote Drop, use the format dropXXX, as
discussed above), or select it from the list on the screen. When you select a
configuration file by pressing the Enter key, that configuration appears on your screen.
Rack 0 of the configuration is displayed.
Series 90–70 Remote I/O Scanner User’s Manual – July 199274
Page 81

Storing the Configuration
In addition to storing the central PLC configuration, a remote drop configuration
created with Logicmaster 90 software must be stored to each Remote I/O Scanner as
described below .
Storing the Configuration to the PLC
Use the Utility functions to store the program folder to the PLC as described in the
Logicmaster 90–70 User’s Manual.
Storing a Remote Drop Configuration
Follow the steps below to store a remote drop configuration to a Remote I/O Scanner.
1. Set up the programmer to communicate with the Remote I/O Scanner.
2. Go to the Program Utility Functions menu.
3. Select F2 ... Store from Programmer to PLC .
4. Press the Enter key. A list of the remote drop configurations in the folder appears:
4
S T O R E C O N F I G U R A T I O N D A T A
F R O M P R O G R A M M E R T O P L C
SELECT CONFIGURATION FILE TO STORE:
DROP017 DROP 033 DROP034
CUR
PLC
<< TO SELECT A CONFIGURATION FILE, CURSOR TO OR TYPE ITS FILE NAME >>
<< AND PRESS ENTER; USE PGUP/PGDN TO PAGE THROUGH CONFIGURATION >>
<< FILE NAMES; PRESS ESCAPE TO EXIT. >>
5. Select the configuration file to be stored by typing its filename or selecting it from
the list. If the list of filenames is long, you can use the Pg/Up, Pg/Dn, Home and
End keys to display other entries.
6. With the filename selected, press Enter again. The screen prompts: I/O scanning
will be suspended during STORE; continue store? (Y/N).
7. If you press Y, the configuration is stored.
8. After a successful store, the SNP ID for the Remote I/O Scanner is displayed in the
status area at the bottom of the Logicmaster screen.
75Chapter 4 Configuration with Logicmaster 90–70
Page 82

Chapter 5 Logicmaster 90 Operation with a Remote
5
Overview
Drop
This chapter explain how to set up a Logicmaster 90 programmer to communicate with
a remote drop. It also describes functional differences in Logicmaster 90 when it is
communicating with a remote drop.
A Logicmaster 90–70 programmer can be used to configure and monitor the operation
of a remote drop. Either serial or parallel Logicmaster can be used. With the serial
version, the connection to the remote drop can be direct or via a multidrop network.
With the parallel version, connection to the remote drop must be direct.
Chapter 2 explains how to complete the hardware connection between the
programmer and a Remote I/O Scanner. Be sure to follow the grounding instructions
for the programmer.
section level 1 1
figure bi level 1
table_big level 1
After starting up the programmer, use the Logicmaster 90 software to specify the type
of communications desired. This is explained on the next page. The same setup screen
is also used to communicate with remote drop when the programmer is connected at
another point on a multidrop network. The status line at the bottom of the
programmer screen will identify the device being communicated with.
Whether a direct or multidrop connection is made, the Logicmaster 90 software will
function slightly differently than it does with the programmer communicating with the
host. The specific differences are described in this chapter.
77
Page 83

5
Setting Up Programmer Communications with a Remote Drop
To set up the programmer for remote drop communications, follow these steps:
1. Go to the LM90–70 Programmer Setup Menu:
2. In the Setup Menu, choose F3 ..... Select SNP/P arallel Connections
The following screen appears:
This screen lists the available devices in the network. Each PLC or remote drop on
the network should be included here once its SNP ID has been configured.
3. If the remote drop will be part of a multidrop network, enter its SNP ID.
4. Check the current Port Connection method. It should be:
A. Parallel: if you want to physically connect a programmer using parallel
Logicmaster 90–70 to a Remote I/O Scanner. A Bus Transmitter Module must
be installed in the remote drop to permit connection of the programmer with
the parallel version of Logicmaster 90–70.
B. Direct: if you want to physically connect a programmer using serial
Logicmaster 90–70 to a Remote I/O Scanner.
C. Multidrop: if you want to communicate with a remote drop over a multidrop
serial communications network.
Series 90–70 Remote I/O Scanner User’s Manual – July 199278
Page 84

Status Display for a Remote Drop
When the programmer is communicating with the PLC CPU, the status lines at the
bottom of the screen display information about the CPU. When communicating with a
remote drop, the status lines display information about the Remote I/O Scanner .
The first field identifies the SNP ID for the remote drop. The second shows whether
the Remote I/O Scanner is presently running, and scanning the I/O modules in the
remote drop.
ID:DROP016 RUN/IOSCAN 7ms FIXED ONLINE L4: ACC: WRITE CONFIG CONFIG EQUAL
ID:DROP033 RUN/IOSCAN 7ms FIXED ONLINE L4: ACC: WRITE CONFIG CONFIG EQUAL
PRG: LESSON CONFIG VALID
PRG: LESSON CONFIG VALID
REPLACE
REPLACE
5
The third field shows the current I/O scan time of the Remote I/O Scanner. This is the
time required for the Remote I/O Scanner to scan all the I/O modules in the remote
drop. The scan cannot be stopped from the programmer.
The fifth field shows the access level of the programmer. When communicating with a
remote drop, it is always level 4. It cannot be changed.
79Chapter 5 Logicmaster 90 Operation with a Remote Drop
Page 85

5
Logicmaster 90 Software, Programmer Differences for a Remote Drop
When used with a remote drop, the features of the programmer are similar to the
features used with a Series 90–70 PLC.
Features Not Used for a Remote Drop
Certain programmer features are not used for a remote drop. If you try to select any of
those features while the programmer is communicating with the remote drop (either
by direct connection, or over a multidrop network), this message
Function not supported by Remote Drop
will appear at the top of the screen.
CPU Configuration F eature Differences
The following differences exist in the CPU Configuration portion of the programming
software.
From Remote Drop LM90–70 Folder
Feature
Time–of–Day Clock Time and date reflect the elapsed time since starting
up the remote drop. Date starts at 1–1–90. Time
and date cannot be reset with release 3 or earlier
versions of Logicmaster 90. The Equal function is
not supported by a remote drop, and new values
cannot be entered.
Assign SNP ID SNP ID is unique identifier consisting of the drop’s
ID (a number from 016 to 254), following 0–4 alphanumeric characters. If online and communi–
cating, initially the Assign SNP ID screen shows
DROPxxx, where xxx is the Drop ID. A different
name can be substituted, if desired. In offline
mode, only asterisks appear .
Memor y Allocation and Point
Fault Enable Screen
Fault Category Screen Function is not supported by remote drop.
Function is not supported by remote drop.
(Attached to R emote I/O Scanner)
Series 90–70 Remote I/O Scanner User’s Manual – July 199280
Page 86

Programming Software: Differences for a Remote Drop
The features of the Logicmaster 90–70 software have the differences described below
when used with the remote drop (versus normal PLC operation).
Feature From Remote Drop LM90–70 Folder (Attached to
Remote I/O Scanner)
Program Display/Edit When communicating directly with a remote drop,
programmer is NOT EQUAL to PLC. Real–time updates do not occur for the display , and online editing
changes cannot occur . PLC programs should not be
edited while the remote drop folder is selected.
Refer ence Tables When communicating directly with a remote drop,
%I,%AI, %Q, %AQ, %R, %S, %SA, %SB, and %SC
references can be viewed and reference states/values
can be toggled. The remote drop contains no information in %L, %M, %T, %P, and %G reference
tables.
PLC Control and Status Fault T ables The only function supported is the fault
table displays for the Remote I/O Scanner and I/O
modules in the remote drop. Faults can be cleared
from the tables. If the Remote I/O Scanner is in Stop/
Faulted mode, clearing faults from these tables may
return the module to Run mode.
5
Programmer Mode and Setup Normal operation.
Program Folder Functions Normal operation.
Utilities Load to Programmer: Only configurations can be
uploaded from a remote drop. The SNP ID of the
remote drop must be assigned already .
Store from Programmer: Only configurations can be
stored in the remote drop. The SNP ID of the remote
drop must be assigned already .
V erif y with P rogrammer: Only remote drop configuration can be verified against folders in Logicmaster
90–70. The SNP ID of the remote drop must be assigned already.
Clear Memory: Only remote drop configuration can
be cleared. The SNP ID of the remote drop must be
assigned already.
Configuration Print and
Refer ence V iew
Normal operation. Provides details of contents of
remote drop. See the Logicmaster 90–70 Softwar e
User’s Manual for details.
81Chapter 5 Logicmaster 90 Operation with a Remote Drop
Page 87

Chapter 6 Remote Drop Configuration
6
with a Hand–held Monitor
section level 1 1
figure bi level 1
table_big level 1
This chapter explains how to configure a Remote I/O Scanner and the I/O modules in a
remote drop using a Genius Hand–held Monitor. HHM version 4.0 (IC660HHM501G)
or later is required. If the remote drop includes any Analog Expander Modules,
Logicmaster 90 must be used for configuration; do not use a Hand–held Monitor.
Note
Do not use a Hand–held Monitor to change a remote drop
configuration previously entered from another source, unless you
want to replace the entire configuration and reset all module options
to their defaults.
Remote drops configured with Logicmaster 90–70 are automatically
protected. Please check carefully before removing configuration
protection with a Hand–held Monitor.
For Additional Information, Also See:
Chapter 1 for a table comparing the features available with each configuration method.
Chapter 4 for Logicmaster 90–70 configuration instructions. Also see chapter 4 for
information about adding configurations created with Release 3 of the Logicmaster
software to programs created with Release 4 software.
Appendix C for configuration instructions using Release 3 of the Logicmaster software.
The Hand–held Monitor datasheet for basic operating instructions.
83
Page 88

6
Overview
A Hand–held Monitor provides automatic configuration of I/O references for a remote
drop. The Hand–held Monitor automatically assigns references for the
presently–installed Series 90–70 I/O modules only. It does so in ascending order,
starting with the slot next to the Remote I/O Scanner. When a remote drop is
configured with a HHM, all I/O modules will operate in default mode; module options
can only be configured with the Logicmaster 90–70 software.
Configuration selections that are made with the Hand–held Monitor include:
H
The Device Number of the Remote I/O Scanner.
H
I/O or register addresses for a Series Six or Series Five PLC.
H
Baud rate for communicating on the Genius bus.
H
Series 90–70 data types (%I, %Q, %AI, and %AQ) and lengths for the Remote I/O
Scanner.
H
Remote Drop ID.
H
Redundancy features.
H
Configuration protection.
In addition, the Hand–held Monitor will display information about each of the
modules present in the remote drop:
H
A description of the module.
H
The module’s rack and slot location.
H
The module’s I/O type (%I, %Q, %AI, or %AQ).
H
The beginning reference assigned to the module by the Hand–held Monitor.
The module display screens are read–only. Module features and references cannot be
selected or changed.
Note
The Hand–held Monitor automatically creates a configuration for a
nine–slot rack, regardless of the actual rack size. If the remote drop
has a five–slot rack, the Hand–held Monitor will later assume that
there are unfilled slots. If this is a problem, Logicmaster 90–70 can be
used for configuration, or to edit an automatic configuration done with
a Hand–held Monitor. Then, the configuration can be stored to the
Remote I/O Scanner .
Series 90–70 Remote I/O Scanner User’s Manual – July 199284
Page 89

When configured with a Hand–held Monitor, the Remote I/O Scanner automatically
assigns I/O references to the modules in the remote drop starting with the reference(s)
assigned by the user via the Program Block ID screens. The left–most module of each
type (%I, %Q, %AI, or %AQ) in the rack receives the first available reference of the
appropriate type. The HHM then incrementally assigns references according to the
types and locations of modules in the rack, in left–to–right order.
Example
For this remote drop, %I, %Q, %AI, and %AQ references each begin at 0001. There is
no requirement that they all start at the same value.
Lef t ' reference values increase ' Right
6
Rack 0
32–ckt discrete input module: %I0001–%I0032
16–ckt discrete input module: %I0033–%I0048
32–ckt discrete output module: %Q0001–%Q0032
32–ckt discrete input module: %I0049–%I0080
16–ckt discrete output module: %Q0033–%Q0048
8–channel analog input module: %AI0001–%AI0008
8–channel analog input module: %AI0009–%AI0016
4–channel analog output module: %AQ0001–%AQ0004
PS
Scanner
IO 32IN
IO 16IN
IO 32OUT
IO 32IN
IO 16OUT
IO 8AIN
IO 8AIN
IO 4AOUT
85Chapter 6 Remote Drop Configuration with a Hand–held Monitor
Page 90

6
Î
Î
Î
Î
Î
Î
Î
Î
Î
Set Up the Hand–held Monitor
1. If the remote drop is connected to an operating bus, the Hand–held Monitor
must be the ONLY Hand–held Monitor plugged into any device on the bus.
If the remote drop that is NOT connected to a properly–terminated Genius bus,
install a 150Ω terminating resistor across the upper Serial 1 and Serial 2 terminals
on the Remote I/O Scanner. The resistor is needed only for off–line
communications between the HHM and the Remote I/O Scanner; it should be
removed prior to bus installation.
2. Begin with the HHM turned off . Attach it to the upper port on the Remote I/O
Scanner.
a44757
HAND
HELD
MONITOR
GENIUS
BUS
REMOTE DROP
Î
Î
Î
Î
3. Turn the Hand–held Monitor on. Adjust its baud rate if necessary.
Previously unconfigured Remote I/O Scanners will operate at 153.6 Kbaud
standard. You should be aware of the operating baud rate before trying to
communicate with the Remote I/O Scanner, and the Hand–held Monitor’s baud
rate should be set correspondingly.
After the Hand–held Monitor completes its powerup sequence, the Home menu
appears.
4. Be sure the HHM is set up for the type of host that will be controlling the system.
If necessary, go to the HHM Utilities to select the CPU host type.
If the message FUNCTION DISABLED appears, the corresponding HHM option has
been disabled. To continue, it will be necessary to change HHM options in the HHM
Utilities menu. If the message CONFIG PROTECTED appears, the Remote I/O Scanner
configuration has been protected. To continue, it will be necessary to “unprotect” the
remote drop’s configuration.
Series 90–70 Remote I/O Scanner User’s Manual – July 199286
Page 91

Display the Configuration Main Menu
To begin remote drop configuration, select F3 (Configuration). The configuration Main
Menu appears.
F1:PROG BLOCK ID
F2:CONFIG BLOCK
F3:COPY CONFIG
F4:
From this menu, select Program Block ID (F1) to complete the basic remote drop
configuration screens.
After completing these screens, press F2 (Configure Block) to complete the Genius
configuration screens, or to display information about the I/O modules in the remote
drop.
6
Select Device Number
for Remote I/O Scanner
bb
For Series Six or Series Five
PLC, select I/O or register
reference address.
bb
Select baud rate
bb
Select data types and lengths
bb
Select a Remote Drop ID
Display modules in the remote
drop (READ ONL Y)
Select bus redundancy *
Select BSM control *
Select bus redundancy *
Select configuration protection *
'
*Remote I/O Scanner version IC697BEM733B (or later) is required for Genius bus redundancy ,
bus switching operation, or CPU redundancy . A vailability of redundancy features depends on
the Bus Controller and host type.
87Chapter 6 Remote Drop Configuration with a Hand–held Monitor
Page 92

6
Select the Device Number
The first step in configuring any device on a Genius bus is to assign its Device Number
(bus address). This is a number from 0 to 31 representing the serial bus address of the
device. There are 32 available addresses on a bus. One is needed for the Hand–held
Monitor; typically this is Device Number 0. Another is needed for the Bus Controller.
Typically, this is Device Number 31. A Remote I/O Scanner is usually assigned a Device
Number from 1 to 30. Duplicate Device Numbers disrupt communications and are not
permitted.
If a Remote I/O Scanner has a Device Number conflict on an operating
bus, it will not scan the modules in the remote drop until the fault is
cleared.
The HHM configuration screen appearance depends on the host CPU type configured
for the Hand–held Monitor.
Note
HHM Display (PLC Host Mode)
PROG BLOCK ID
I/O ?– ??
BLOCK NO. ?
ref blk nxt
If the host is a Series 90–70 PLC, the F1 key function (ref) is not displayed.
HHM Display (PCIM Mode)
PROG BLOCK ID
__?__ #?
BLOCK NO. ?
ref nxt
Configuration Steps
1. Press F2 (Block). Then, enter the Device Number (1–30). If you make a mistake,
press F2 again, then enter the correct number.
2. Press the F3 (Enter) key. If you are configuring the Remote I/O Scanner on an
operating bus, an error message appears if the number has been used for another
device. If the Remote I/O Scanner is not online, be sure to assign a unique Device
Number, or there will be a Device Number conflict when it is powered up on the
bus.
Series 90–70 Remote I/O Scanner User’s Manual – July 199288
Page 93

Select a Series Six or Series Five PLC Reference Address
If the host is a Series Six PLC or Series Five PLC, an I/O or register reference address
must be assigned to the Remote I/O Scanner. This is done on the Program Block ID
screen. It is also necessary to configure Series 90–70 data types and lengths, as
described later in this chapter.
HHM Display (Series Six/Series Five Host CPU Mode)
PROG BLOCK ID
I/O ?– ??
BLOCK NO. ?
ref blk nxt
Configuration Steps
1. The Reference Address is entered in the same PROG BLOCK ID display. Press F1
(Reference).
6
2. To select register or I/O memory, press the F2 (Toggle) key to toggle the memory
type. With the correct memory type displayed, press F3 (Enter).
If I/O memory is used, the amount required is equal to the number of bits of
discrete data PLUS analog data. Each analog reference used consumes 16 points.
Data is stored beginning at the assigned I/O reference. In the Input Table, the
sequence is: discrete inputs then analog inputs. In the Output Table, the sequence
is discrete outputs then analog outputs. This is illustrated in chapter 3.
If register memory is used, an amount is required that is equal to the total number
of bytes of input data PLUS all of the output data. Data is stored beginning at the
assigned register reference. The sequence is: discrete inputs, then analog inputs,
then discrete outputs, and analog outputs last. See chapter 3 for more information.
3. Key in the number of the block’s beginning I/O reference. The Hand–held
Monitor will accept any number up to 65,535; the number you enter must be
appropriate for the PLC.
4. If you make a mistake entering the number, press F2 (Change), F1 (Reference),
then enter the correct number. Press the F3 (Enter) key. The HHM will
automatically supply the range of references correct for the block.
89Chapter 6 Remote Drop Configuration with a Hand–held Monitor
Page 94

6
Select the Baud Rate
Genius bus communications can occur at any of four baud rates: 153.6 Kbaud
standard, 153.6 Kbaud extended, 76.8 Kbaud, or 38.4 Kbaud. The default is 153.6 K
baud (standard). The Genius I/O System User’s Manual gives guidelines for baud rate
selection.
Each device’s communications baud rate must be the same as that used by all other devices on the
bus, or the bus will not operate.
HHM Display
SELECT BAUD RATE
ACTIVE=153.6K ST
PROG =153.6K ST
tgl entr nxt
Configuration Steps
1. If the baud rate should be changed, press F2 (toggle). When the desired baud rate
appears beside P R O G = , press F3 (enter).
2. If the baud rate is changed on any block that is currently installed on an operating
bus, it must be changed on all devices on that bus. After changing the baud rate,
you must cycle power at the same time to all devices on the bus to use the new
baud rate.
3. Press F4 (nxt) to continue configuring the Remote I/O Scanner.
Series 90–70 Remote I/O Scanner User’s Manual – July 199290
Page 95

Select Series 90–70 Data Lengths
The Remote I/O Scanner must be assigned a starting address and length for one or
more of the following data types that will be used by I/O modules in its remote drop:
%I the discrete input table
%Q the discrete output table
%AI the analog input table
%AQ the analog output table
These entries are required whether or not the host CPU is a Series 90–70 PLC. They
determine the amount of discrete and analog input data the Remote I/O Scanner will
send, and the amount of discrete and analog output data it will accept. They also
determine the relative assignments of modules of the same type which are present in
the remote drop.
If the host is a Series 90–70 PLC, these selections will usually correspond to the
memory assignments made for the remote drop during PLC configuration.
6
If the host is a Series Six or Series Five PLC, these selections are used only to determine
the amounts of data sent and received by the Remote I/O Scanner. F or the PLC to
handle the data correctly , a beginning address in I/O Table or Register Memory must
also be configured, as described previously .
The lengths selected should include all the I/O circuits or channels in the remote drop.
If a data length is too short, modules that overflow the configured limit will not be
serviced by the CPU. The Remote I/O Scanner will issue a diagnostic message. The
condition is not necessarily a fatal fault.
If the data length selected is longer than currently required, unassigned references will
remain at the end of the group. Although these references are not used by an actual
I/O board, they are considered to be part of the remote drop’s input or output data.
During system operation, the Remote I/O Scanner WILL transmit all %I and %AI
references assigned to it, including, under these circumstances, references that are not
used by input modules in the remote drop. Similarly, the host WILL send all the %Q
and %AQ references assigned to the Remote I/O Scanner, including references that are
not used by output modules in the remote drop. This transmission of unassigned
references lengthens the bus scan time, so it is not recommended unless the references
are needed for future expansion.
91Chapter 6 Remote Drop Configuration with a Hand–held Monitor
Page 96

6
The next screen that appears is used to assign the data types and lengths.
HHM Display
PROG REMOTE MAP
%I ____
LENGTH(PTS) ____
tgl ref send nxt
Configuration Steps
1. To select a data type, press F1 (tgl). In sequence, line 2 will display: %I (discrete
input bits), %Q, (discrete output bits), %AI (analog input words), %AQ (analog
output words). Pressing F1 (tgl) a fourth time displays the Drop ID configuration
screen.
2. With the desired data type displayed, press F2 (ref) to select the beginning Series
90–70 reference for that data type.
3. Press F3 (entr) to enter the desired data length. For %I and %Q, this is a value in
discrete bits ( P T S). It must begin on a byte boundary (a number which is 1 more
than a multiple of 8, such as 9, 17, or 25). For %AI and %AQ, the length value is in
channels ( C H S ), each of which is a 2–byte word.
The lengths entered must not add up to more than 128 bytes of inputs and 128
bytes of outputs. The Hand–held Monitor will check these totals before sending
the configuration to the Remote I/O Scanner.
4. Press the F1 (Tgl) key a fourth time to configure a Remote Drop ID as instructed
on the next page.
5. After setting up the desired remote I/O map and Remote Drop ID, press the F3
(send) key to download these selections to the Remote I/O Scanner. This causes
the Remote I/O Scanner to automatically configure the I/O modules physically
present in the remote drop at that time, as shown in chapter 4.
Caution
Pressing the F3 (send) key from this screen causes the Remote I/O
Scanner to automatically configure the remote drop. If a
configuration was previous entered from any source, this new
configuration will REPLACE it if the original configuration is not
protected. This can result in changed data lengths and Remote Drop
ID. In addition, any module options (such as output defaults, voltage
range, and input filter time) previously selected using Logicmaster
90–70 will be replaced with their default settings.
Series 90–70 Remote I/O Scanner User’s Manual – July 199292
Page 97

Select the Remote Drop ID
The same configuration screen is used to assign a Remote Drop ID. A Remote Drop ID
is a number between 16 and 254 that allows the Remote I/O Scanner to communicate
with serial Logicmaster 90–70 for multidrop programming. The ID distinguishes one
remote drop from another. A valid entry must be made on this screen even if the host
type is not a Series 90–70 PLC.
When configured from a Hand–held Monitor, the Remote Drop ID is used as part of
the “ folder” name, so a configuration stored in the Scanner can later be uploaded to
Logicmaster 90–70. The folder name will be DROPxxx, with xxx the Remote Drop ID
(016 – 254).
HHM display
6
PROG REMOTE MAP
DROP ID _____
tgl drp send nxt
Configuration Steps
1. Press F2 (drp), then enter a Remote Drop ID between 16 and 254.
2. After entering all the beginning addresses and lengths and a Remote Drop ID,
press F3 (send) to transmit this portion of the configuration to the Remote I/O
Scanner. When you press F3 (send), the Hand–held Monitor adds up the data
lengths to be sure they do not total more than 128 bytes of inputs and 128 bytes of
outputs. It also checks for the presence of a Remote Drop ID between 16 and 254.
If the entries are correct, the information is sent to the Remote I/O Scanner .
Otherwise, an error message appears. After pressing the Clear key, the
configuration must be changed to correct the error.
3. Press F4 (next) to return to the Program Block ID screen.
4. To configure remote drop configuration, press the n MENU key to display the
configuration menu.
Return to the Configuration Menu
To complete the Genius configuration or display the modules in the remote drop, press
F2 (configure block).
F1:PROG BLOCK ID
F2:CONFIG BLOCK
F3:COPY CONFIG
F4:
93Chapter 6 Remote Drop Configuration with a Hand–held Monitor
Page 98

6
Display I/O Modules in Remote Drop
When you enter the Configure Block screens, the Hand held–Monitor displays the
configuration of the first I/O module in the remote drop. An example is shown below .
This is a read–only function; I/O module configuration cannot be changed with the Hand–held
Monitor. Note that these displays will indicate the presence of Analog Expander
(16–channel analog), PCM, GDS, ADS, Bus Receiver (BERA), Bus Transmitter (BETA),
jumper modules and empty slots, even though none of these can be configured by the
Hand–held Monitor.
ID#143 R:0 S:2
32PT 120VAC %I
1
nxt
For each module, the display shows:
H
the Remote Drop ID (143 in this example)
H
R: the rack number. For Remote I/O Scanner version IC697BEM733A, this
must be rack 0.
H
S: the module’s slot number
H
% the module’s I/O type
H
the beginning I/O reference (in the example above, 1 in the third line
represents %I0001).
Pressing F4 (nxt) displays the next module. For example:
ID#143 R:0 S:3
32PT 120VAC %Q
1
nxt
In this example, the module in rack 0, slot 3 is a 32–point output board. Its beginning
output reference is %Q0001.
If a slot is not occupied, the HHM displays:
ID#143 R:0 S:4
EMPTY SLOT
nxt
Press F4 (nxt) to continue going through the module screens.
Series 90–70 Remote I/O Scanner User’s Manual – July 199294
Page 99

Select Genius Bus Redundancy
After the last module display screen, the Hand–held Monitor displays the redundancy
configuration screens for the Remote I/O Scanner.
The first of these indicates whether or not the Remote I/O Scanner will be located on a
dual bus or bus stub.
The default configuration for BSM Present is NO. It should be set to YES if the Remote
I/O Scanner will be used as a bus switching device itself, or located on a bus stub
downstream of another device (Remote I/O Scanner or Bus Switching Module
attached to a Genius block) that acts as a bus switching device.
HHM Display
6
BSM PRESENT ?
STATUS =NO
tgl entr nxt
Configuration Steps
1. If the selection should be changed, press F2 (tgl). Press F3 (entr).
2. Press F4 (nxt) to display the next configuration screen.
Select BSM Control
The next HHM menu is used to specify whether or not the Remote I/O Scanner will act
as the bus switching device, capable of switching between Bus A and Bus B in a dual
Genius bus system. Remote I/O Scanner version IC697BEM733B or later is required to
use this feature. Select YES if this Remote I/O Scanner is to be the bus switching
device. Default is NO.
HHM Display
BSM CONTROLLER
STATUS =NO
tgl entr nxt
Configuration Steps
1. If the selection should be changed, press F2 (tgl). Press F3 (entr).
2. Press F4 (nxt) to display the next configuration screen.
95Chapter 6 Remote Drop Configuration with a Hand–held Monitor
Page 100

6
Select CPU Redundancy
If the remote drop will be used on the same bus with two controllers (PLCs or host
computers), each of which will send it outputs, the Remote I/O Scanner must be set up
for CPU Redundancy . For a new Remote I/O Scanner as shipped from the factory , this
feature is not enabled. Remote I/O Scanner version IC697BEM733B or later is required
to use this feature.
The two types of CPU Redundancy, Hot Standby and Duplex, are described below. For
both types of CPU redundancy, inputs and diagnostics are automatically made
available to both CPUs.
If the remote drop contains any analog modules, the only form of CPU redundancy permitted is
Hot Standby . The Hand–held Monitor will permit selection of either type of CPU redundancy.
Do not select Duplex if ther e are any analog modules in the r emote drop.
Hot Standby CPU Redundancy
A device configured for Hot Standby redundancy receives outputs from both CPUs. It
is normally controlled by Device Number 31. If no outputs are available from Device
Number 31 for a period of three bus scans, the outputs are immediately controlled by
Device Number 30. If outputs are not available from either Device Number 30 or 31,
outputs go to their configured default or hold their last state. In Hot Standby
redundancy, Device Number 31 always has priority, so that when Device Number 31 is
on–line, the device always gives it control of the outputs.
Duplex CPU Redundancy
In Duplex mode, a device receives outputs simultaneously from both Device Number
30 and 31. The device compares the outputs. If corresponding outputs are the same,
the device sets the output to that state. If corresponding outputs are not the same, the
device will set the output to its configured ON or OFF Duplex Default State, which
must be configured for all outputs in the remote drop. If either Device Number 30 or
31 stops sending outputs to a device, its outputs are directly controlled by the
remaining device. Only discrete devices can operate in Duplex r edundancy mode. If both 30
and 31 stop sending outputs, the outputs in the remote drop either default to their
programmed default state (not the Duplex Default State), or hold their last state, as
configured.
HHM Display
CPU REDUNDANCY
NO CNTL REDUN
tgl entr nxt
Configuration Steps
1. If the selection should be changed, press F2 (tgl). Press F3 (entr).
2. Press F4 (nxt) to display the next configuration screen.
Series 90–70 Remote I/O Scanner User’s Manual – July 199296
 Loading...