

Page 1

www.GEAppliances.com
Safety Information
Connecting Electricity . . . . . . .2, 3
Safety Precautions . . . . . . . . . . . .2
Installation Instructions
Attaching the Discharge
Elbow . . . . . . . . . . . . . . . . . . . . . .6
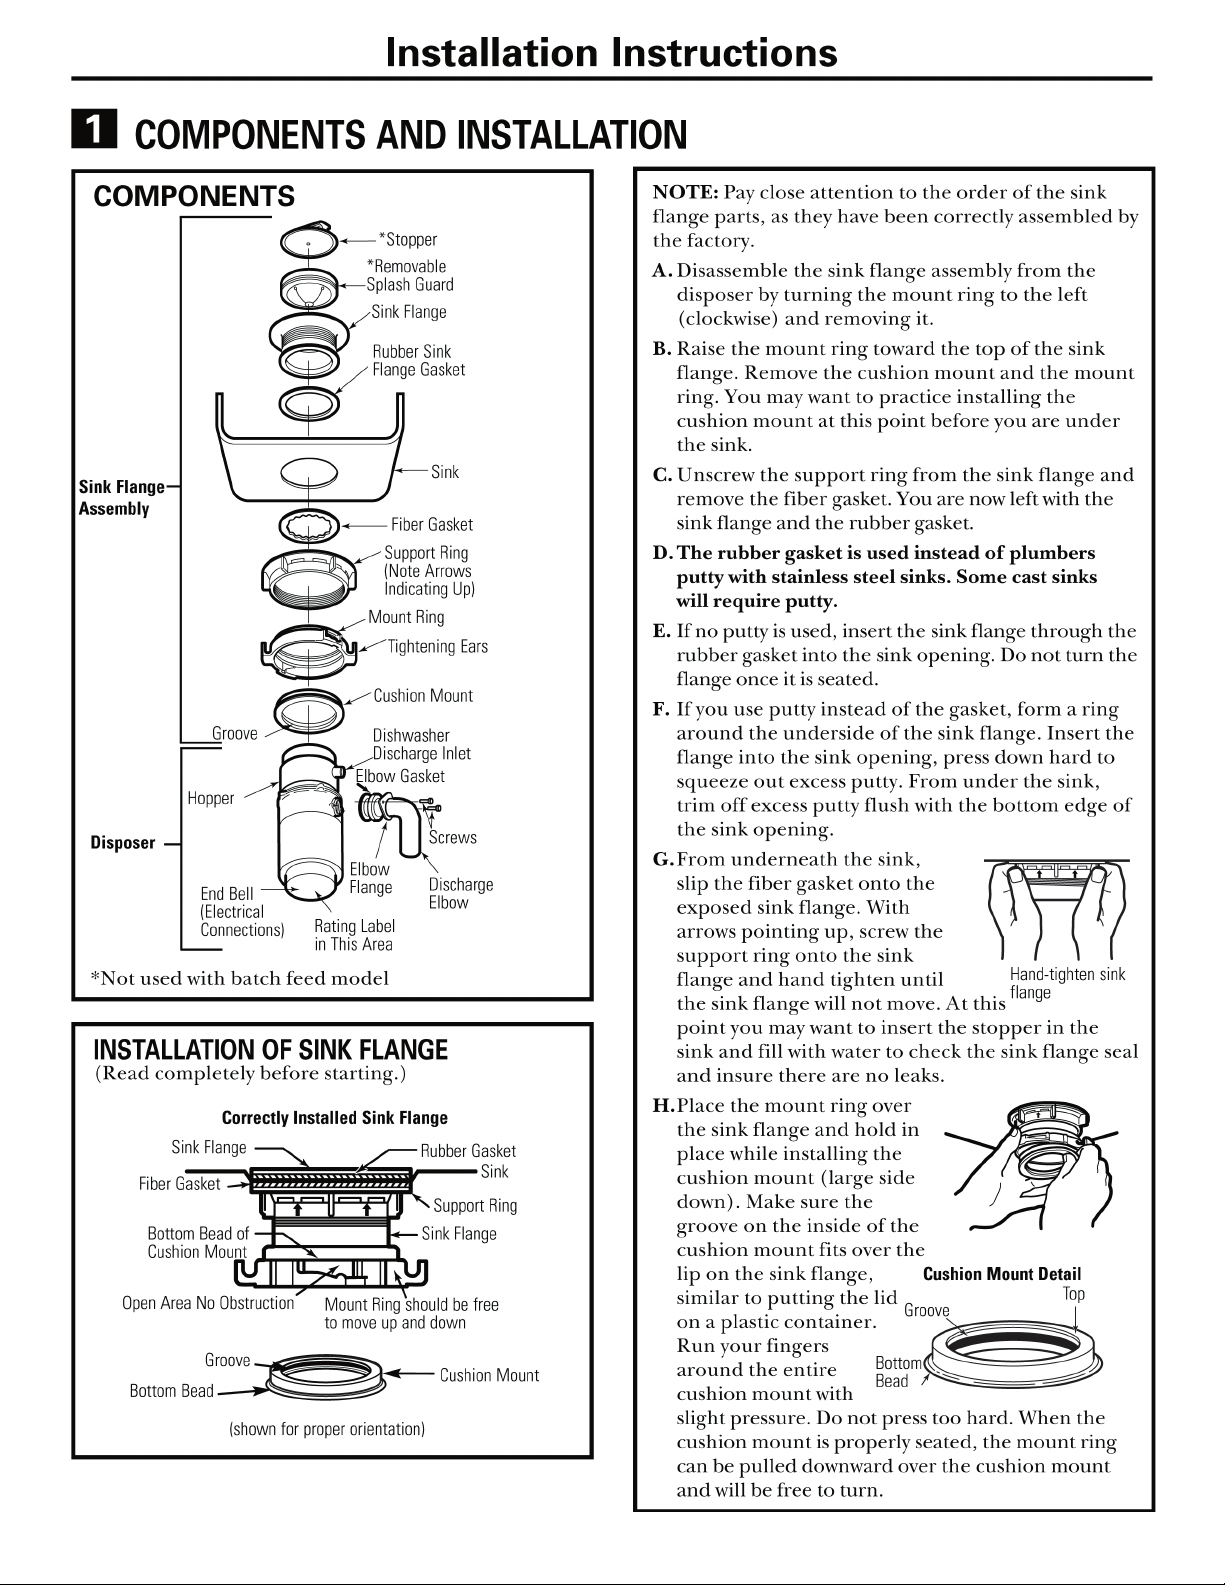
Components and Installation
of Sink Flange. . . . . . . . . . . . . . . .5
Connecting Disposer to
Sink Flange . . . . . . . . . . . . . . . . . .7
Dimensions/Typical
Installations . . . . . . . . . . . . . . . . .8
Dishwasher Connection . . . . . . . .6
Operating Instructions
Batch Feed Models . . . . . . . . . . . .9
Care and Maintenance . . . . . . .10
Food Waste Disposer
Continuous Feed Models. . . . . . .9
Troubleshooting Tips
Before You Call for
Service . . . . . . . . . . . . . . . . . . . . .11
Owner’s Manual
& Installation
Instructions
Model Line Series
GFC320V
GFC325V
GFC520V
GFC525V
GFC530V
GFC535V
GFC720V
GFB760V
GFC1020V
Disposall
Customer Service
Warranty . . . . . . . . . . . . . . . . . . .12
Write the model and serial numbers
for your Disposall here:
Model # _____________________
Serial # _____________________
You can nd them on a label on
the bottom of the disposer.
Pub. No. 49-5903-2
01/13
PC71868
Page 2
Safety Instructions
Installation Instructions
Operating Instructions
Troubleshooting tips
Consumer Support
2
Page 3
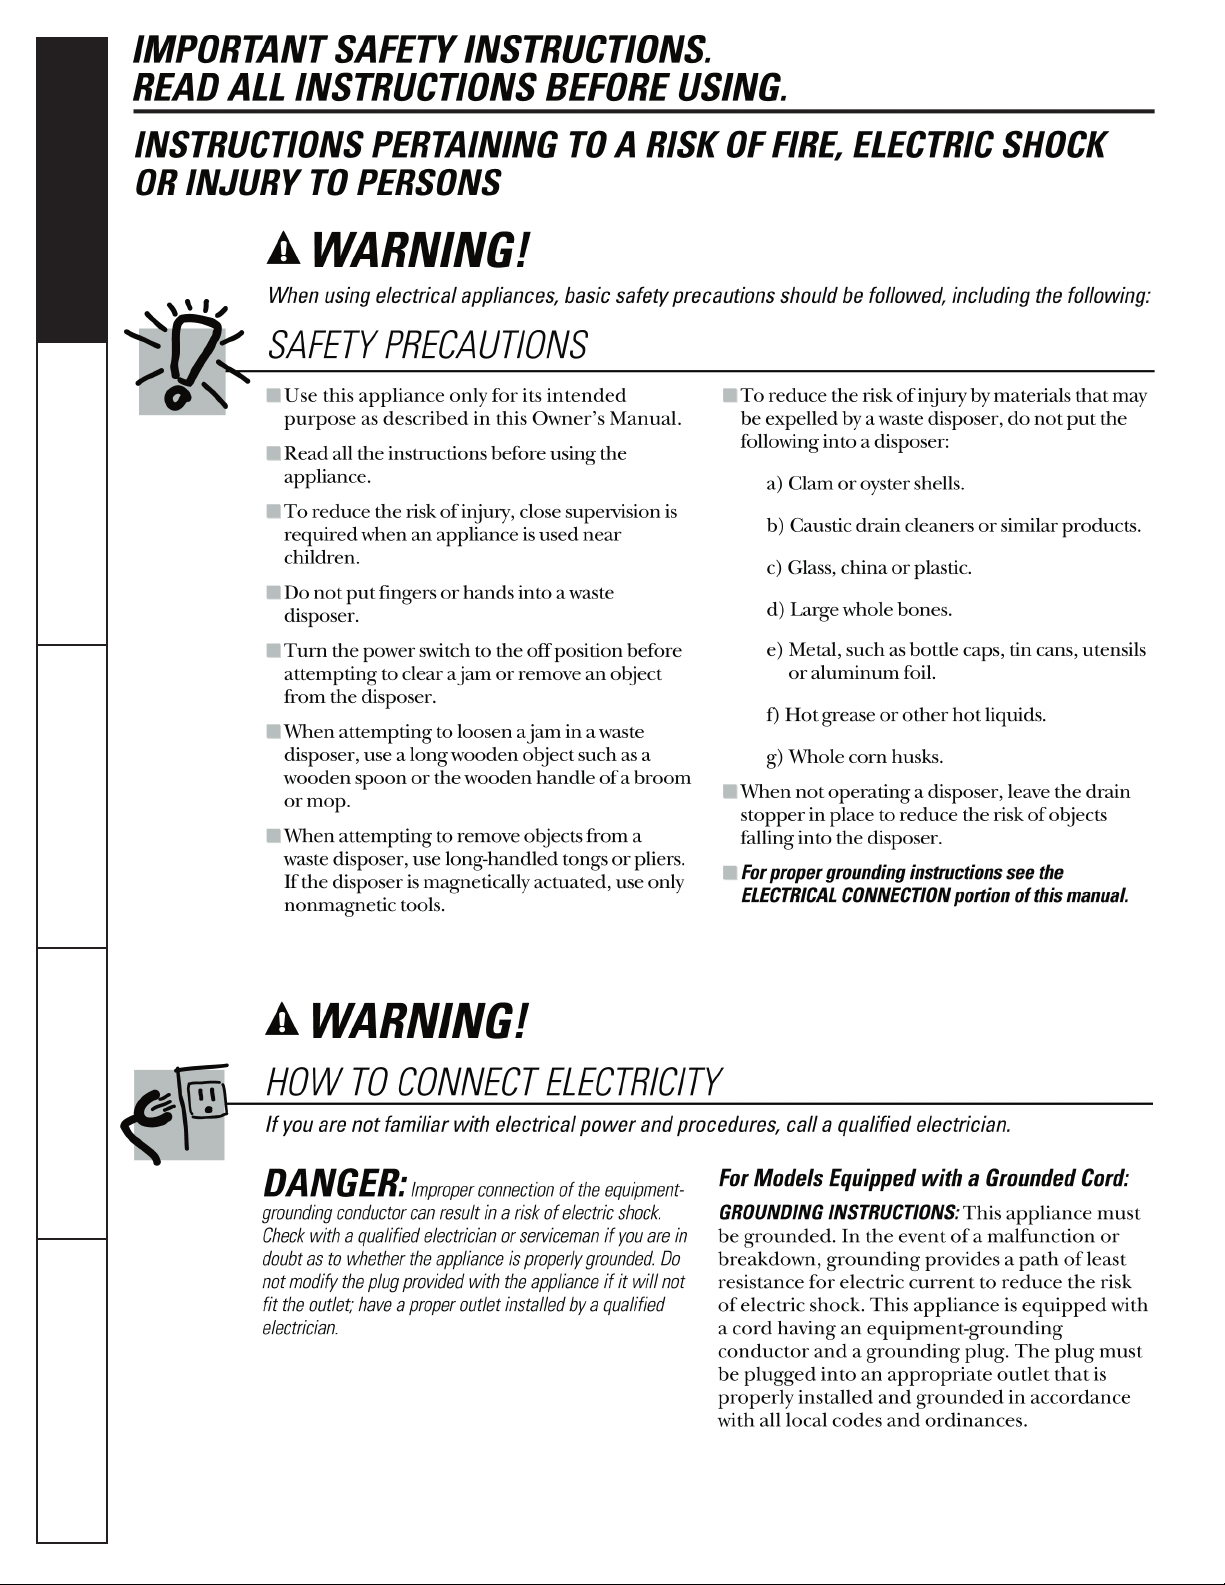
IMPORTANT SAFETY INSTRUCTIONS.
READ ALL INSTRUCTIONS BEFORE USING.
!
▲
WARNING!
HOW TO CONNECT ELECTRICITY (cont.)
If you are not familiar with electrical power and procedures, call a qualifi ed electrician.
The power cord and/or connections must comply
with the National Electrical Code, Section 422
and/or local codes and ordinances.
For Models Not Equipped with a Cord:
If your disposer does not come equipped with a
cord, you can connect it in two ways:
1. Attach a power cord, minimum 18” in length
and not to exceed 36” in length. Use GE Part
Number PM3X215.
or
2. Wire the disposer directly into the house
current.
To Attach a Power Cord:
GROUNDING INSTRUCTIONS: This appliance
must be grounded. In the event of malfunction
or breakdown, grounding provides a path of least
resistance for electric current to reduce the risk of
electric shock. The power cord (to be installed)
must have an equipment-grounding conductor and
a grounding plug. The plug must be plugged into
an appropriate outlet that is properly installed and
grounded in accordance with all local codes and
ordinances.
DANGER: Improper connection of the
equipment-grounding conductor can result in
a risk of electric shock. Check with a qualifi ed
electrician or serviceman if you are in doubt as to
whether the appliance is properly grounded.
NOTE:
Disconnect electric power to disposer circuit before
installation. Turn the circuit breaker to the OFF
position or remove the fuse.
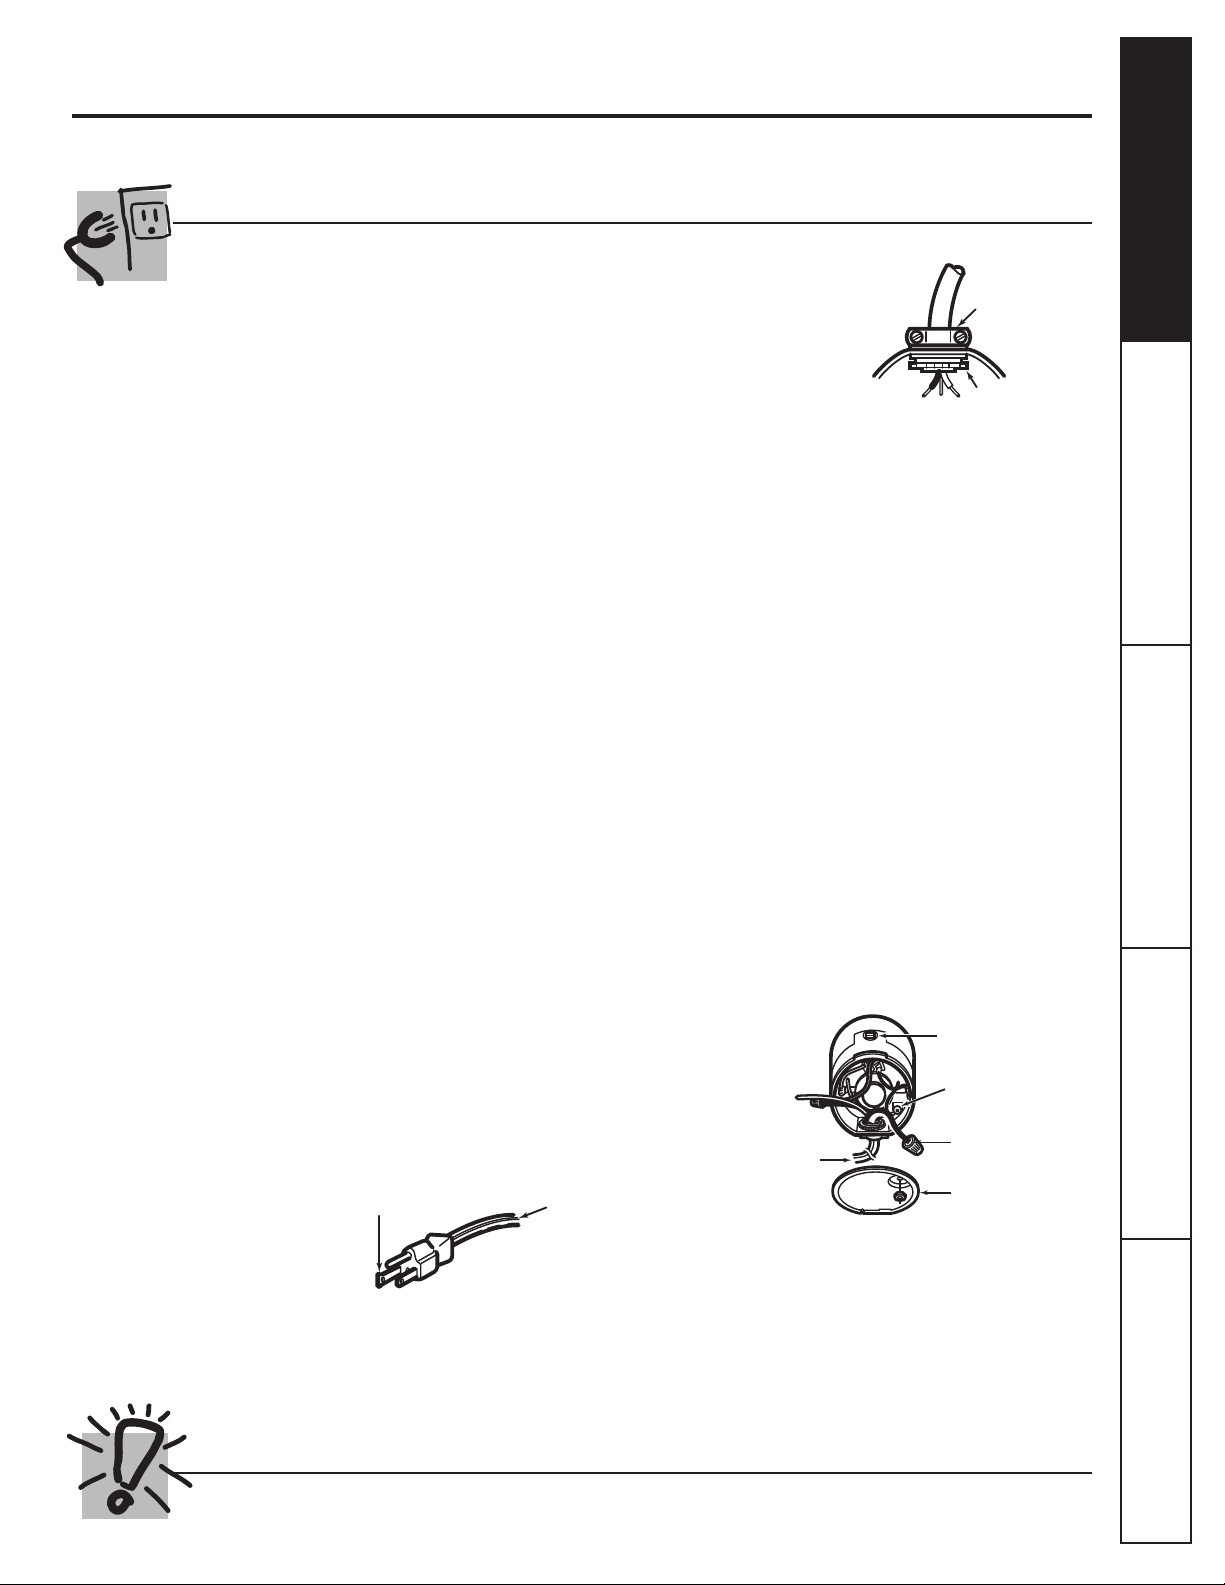
A. Connect the disposer to 110-120 Volt, 60 Hz AC
current only.
B. If a plug-in
cord is used,
use a threeprong plug.
Ground wire
should be
attached to
the ground
screw in the
bottom of
the disposer
(end bell).
Trace lead connected
to this blade and attach
that lead to white wire
on disposer. Ribbed Side
NOTE: When viewing face of
electrical plug with grounding pin at
top, the larger left blade is connected to
the identifi ed wire.
C. Use a cable clamp
strain relief
connector where
power cord enters
the disposer.
Heyco Box Connectors
Part No. 30403
To Wire Your
Disposer Directly into the House Current:
GROUNDING INSTRUCTIONS:
must be connected to a grounded, metal,
permanent wiring system; or an equipmentgrounding conductor must be run with the circuit
conductors and connected to the equipmentgrounding terminal or lead on the appliance.
A. If you use BX cable:
1. These products are designed for household use.
2. Connect white wire to white lead of disposer
with a wire nut. Connect black wire to black
lead of disposer with a wire nut. Connect bare
ground wire to the ground screw. The ground
wire should be clamped and held by a strain
relief.
3. Do not use a rigid conduit for the wiring
connection.
4. A dedicated acceptable motor switch, with the
off position marked, shall be provided for this
disposer at the time of installation. The switch
shall be mounted in sight of the disposer or the
sink opening for the disposer.
If BX cable is not used, provide a separate ground
wire to nearest reliable ground, using the screw in
the end bell for the ground wire.
To House Current
or Power Cord
B. If your power supply does not include a
ground wire, you must provide one unless
metal cable is used. Attach a copper wire
securely to disposer ground screw and attach
other end of wire to a reliable ground. Use
only UL approved ground clamp. If plastic
pipe is used in your home, a quali ed
electrician should install a proper ground.
Safety Instructions
www.GEAppliances.com
Strain Relief
Installation Instructions
Nut
This appliance
Operating Instructions Troubleshooting tips
Red Reset Button
Ground Screw
Wire Nuts
Remove
Bottom Cap
Bottom of the Disposer (end bell)
Consumer Support
READ AND FOLLOW THIS SAFETY INFORMATION CAREFULLY
SAVE THESE INSTRUCTIONS
3
Page 4
Installation
Disposer
Instructions
If you have questions, call 1-800-GECARES or visit our Website at: www.GEAppliances.com
BEFORE YOU BEGIN
Read these instructions completely and carefully.
• IMPORTANT – Save these
instructions for local inspector’s use.
• IMPORTANT – Observe all
governing codes and ordinances.
• Note to Installer – Be sure to leave these
instructions with the Consumer.
• Note to Consumer – Keep these instructions
for future reference.
• Skill level – Installation of this appliance
required basic mechanical skills.
• Completion time – 1 hour
• Proper installation is the responsibility of the
installer.
• Product failure due to improper installation is not
covered under the Warranty.
PREPARATION
1. Disconnect electrical power supply to disposer.
2. Remove old disposer or sink ange assembly.
3. Inspect drain line. If it is heavily coated with
hardened grease and accumulations, rout out
with a plumber’s snake.
4. Remove old sealing materials and gasketing from
sink opening, both top and bottom.
NOTE: Top and bottom of sink surfaces must be free
of any materials to prevent leaks.
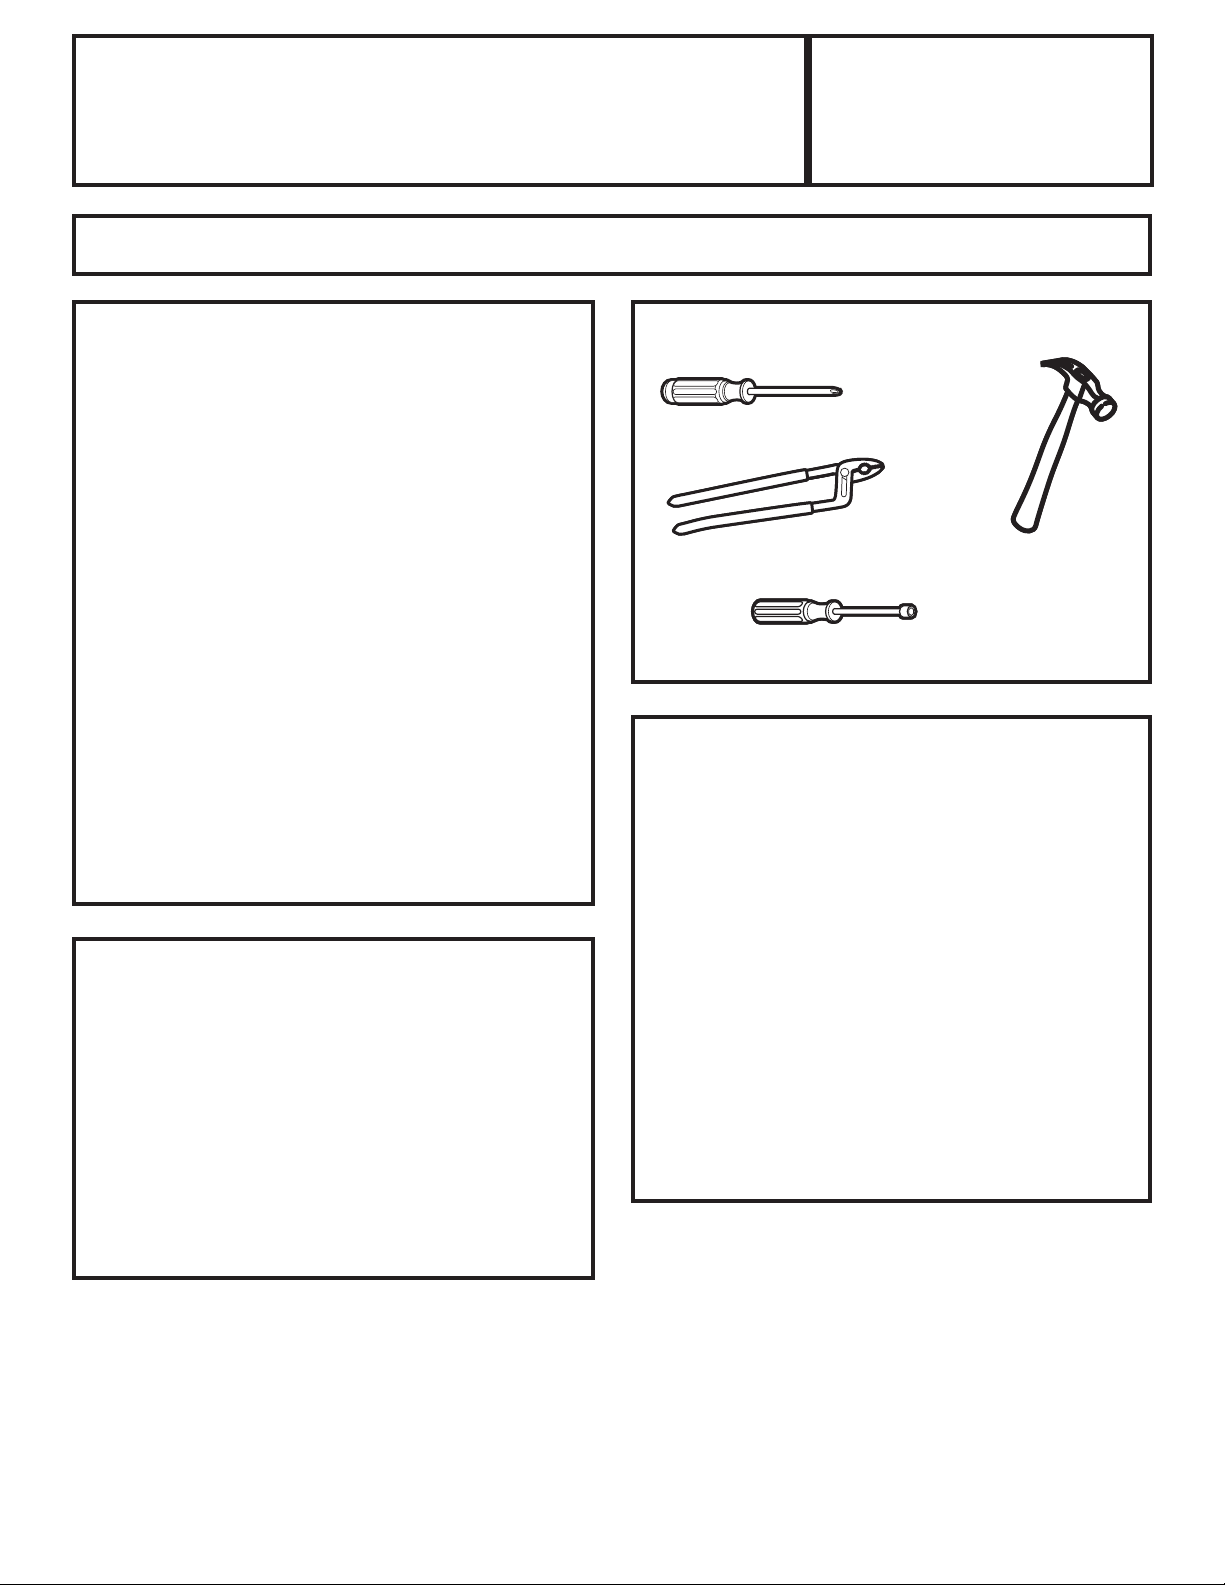
WHAT YOU WILL NEED
• Phillips and at blade screwdriver
• Channel lock pliers, slip joint
• Nut driver
• Hammer
ADDITIONAL MATERIALS YOU
MAY NEED
• Steel punch or wooden dowel
• Petroleum jelly or liquid soap
• Hose clamp
• Dishwasher drain connector
• Adjustable pipe wrench
• Plumber’s putty (for cast sinks)
• Stepped rubber drain adapter
• Wire nuts
• Cable connector
• Flexible drain pipe
• Power cord kit (Part Number PM3X215)
4
456
Page 5
Page 6
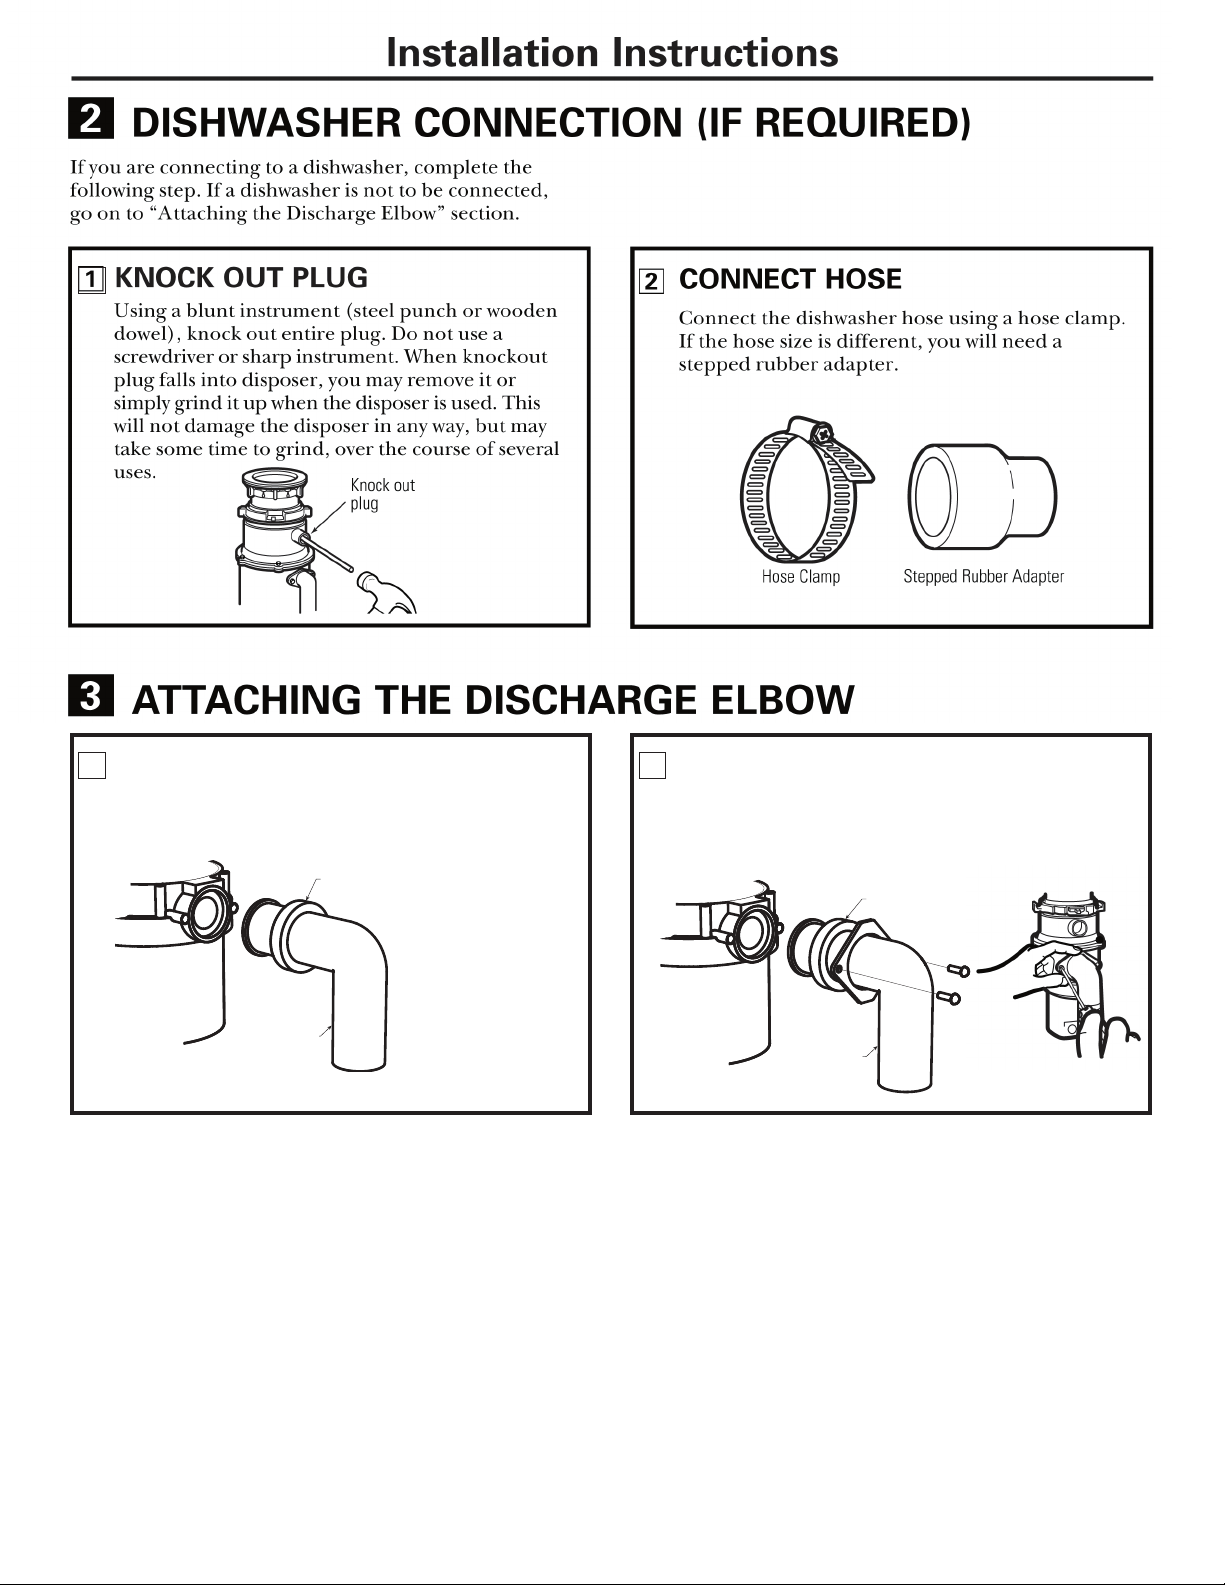
1 ATTACH RUBBER GASKET
Slide rubber gasket over elbow drain pipe.
Rubber
Rubber
Gasket
Gasket
Discharge
Discharge
Elbow
Elbow
2 CONNECT DISCHARGE ELBOW*
Slide bracket over discharge elbow and connect
to the disposer.** Make sure all plumbing
connections are tight.
Rubber
Rubber
Gasket
Gasket
Discharge
Discharge
Elbow
Elbow
*Discharge elbow must be installed by a professional.
** Some installations (see page 8 for examples) may
require the use of a exible drain pipe.
Page 7
7
Page 8
GFC320V
GFC325V
GFC720V GFC1020VGFB760V
Batch Feed Operation
GFC520V
GFC525V
GFC530V
GFC535V
NOTE: It is essential for
the proper operation of
the disposer that this
dimension be 9”–12”,
depending upon the models
listed above, to avoid standing
in water in disposer motor housing.
**Flexible drain pipe may be necessary
for this application.
8
Page 9
Safety Instructions
Installation Instructions
Operating Instructions
Troubleshooting tips
Consumer Support
9
Page 10
Installation Instructions
Operating Instructions
Troubleshooting tips
Consumer Support Safety Instructions
10
Page 11
Safety Instructions
Installation Instructions
Operating Instructions
Troubleshooting tips
11
Consumer Support
Page 12

Disposer Warranty.
All warranty service provided by our Factory Service Centers, or an
authorized Customer Care® technician. To schedule service online, 24 hours a day, contact us at www.GEAppliances.com, or call
800-GE-CARES (800-432-2737). Please have serial number and model
number available when call for service.
For The Period of: GE Will Replace:
One Year
From the date of the
original purchase
Additional One Year
From the date of the
original purchase
Additional Two Years
From the date of the
original purchase
Installation Instructions
Additional Four Years
from the date of the
original purchase
The entire disposer if there is a defect in materials or workmanship relating to functional
parts only (appearance parts are excluded). During this limited one-year warranty, GE will
also provide, free of charge, all labor charges related to replacing the original disposer along
with the replacement disposer within the rst year.
Models GFC520V, GFC525V: If there is a defect in materials or workmanship relating
to functional parts only (appearance parts are excluded). During the one-year extended
limited warranty period, you will be responsible for all installation charges relating to the
replacement disposer.
Models GFC530V, GFC535V: If there is a defect in materials or workmanship relating
to functional parts only (appearance parts are excluded). During this two-year extended
limited warranty period, you will be responsible for all installation charges relating to the
replacement disposer.
Models GFC720V, GFB760V: If there is a defect in materials or workmanship relating
to functional parts only (appearance parts are excluded). During this four-year extended
limited warranty period, you will be responsible for all installation charges relating to the
replacement disposer.
Staple your receipt here.
Proof of the original purchase
date is needed to obtain service
under the warranty.
Additional Six Years
From the date of the
original purchase
Model GFC1020V: If there is a defect in materials or workmanship relating to functional
parts only (appearance parts are excluded). During this six-year extended limited warranty
period, you will be responsible for all installation charges relating to the replacement
disposer.
Operating Instructions
What GE Will Not Cover”
■ Service trips to your home to teach you how to
use the product.
■ Improper installation or maintenance.
■ Failure of the product if it is abused, misused,
or used for other than the intended purpose or
used commercially.
■ Replacement of house fuses or resetting of
circuit breakers.
Troubleshooting tips
EXCLUSION OF IMPLIED WARRANTIES – Your sole and exclusive remedy is product repair as provided in the Limited
Warranty. Any implied warranties, including the implied warranties of merchantability or fi tness for a particular purpose,
are limited to one year or the shortest period allowed by law.
This warranty is extended to the original purchaser and any succeeding owner for products purchased for home use within
the USA. If the product is located in an area where service by a GE Authorized Servicer is not available, you may be responsible
for a trip charge or you may be required to bring the product to an Authorized GE Service location for service. In Alaska the
warranty excludes the cost of shipping or service calls to your home.
■ Damage to the product caused by accident, re,
oods or acts of God.
■ Incidental or consequential damage caused by
possible defects with this appliance.
■ Product not accessible to provide required service.
Some states do not allow the exclusion or limitation of incidental or consequential damages. This warranty gives you specifi c
legal rights, and you may also have other rights which vary from state to state. To know what your legal rights are, consult
your local or state consumer affairs offi ce or your state’s Attorney General.
Consumer Support Safety Instructions
12
Warrantor: General Electric Company. Louisville, KY 40225
Printed in China
Page 13

Línea de Modelos Serie
GFC320V
GFC325V
GFC520V
GFC525V
GFC530V
GFC535V
GFC720V
GFB760V
GFC1020V
PC71868
Page 14

Seguridad
Instalación
Operación
Solucionar problemas
Servicio al consumidor
2
Page 15

IMPORTANTE INSTRUCCIONES DE SEGURIDAD.
LEA TODAS LAS INSTRUCCIONES ANTES DEL USO.
!
▲
¡ADVERTENCIA!
CÓMO CONECTAR LA CORRIENTE ELÉCTRICA (Continuación)
Si no está familiarizado con la parte eléctrica y sus procedimientos, llame a un electricista califi cado.
El cable eléctrico y/ o las conexiones deben
cumplir con el código National Electric, Sección
422 y/ o códigos locales y ordenanzas.
Para modelos no equipados con un cable:
Si su triturador no viene equipado con un cable,
usted puede conectarlo de dos maneras:
1. Adhiera un cable eléctrico, de una longitud
mínima de 18” y que no exceda 36”. Usar la
pieza GE número PM3X215.
2. Conecte el triturador directamente al sistema
eléctrico de la casa.
Para conectar un cable eléctrico:
INSTRUCCIONES DE CONEXÍON A TIERRA: Este
aparato debe ser conectado a tierra. En el caso de
una avería o daño, la conexión a tierra suministra
una vía de menor resistencia para la corriente
eléctrica a n de reducir el riesgo de una descarge
eléctrica. El cable eléctrico (a instalar) debe tener un
conductor y un enchufe de conexión a tierra. El
enchufe debe conectarse a un tomacorriente
apropiado que esté instalado correctamente y con
conexión a tierra de acuerdo con todos los códigos y
regulaciones locales.
PELIGRO: La conexión incorrecta del
sistema de polo a tierra puede resultar en el
riesgo de descarga eléctrica. Consulte con un
electricista califi cado o con un proveedor de
servicios si tiene dudas de que el aparato esté
correctamente conectado a tierra.
NOTA:
Desconecte la energía eléctrica hacia el circuito del
triturador antes de la instalación. Fije el interruptor del
circuito en la posición de apagado (OFF) o retire el fusible.
A. Conecte el triturador únicamente a una corriente de
110-120 voltios, 60 Hz de corriente alterna (AC).
B. Si se utiliza un
enchufe con
cable, use un
enchufe de tres
patas. Se debe
agregar una
línea de tierra
al tornillo de
conecxión a
tierra en la
parte inferior
del triturador
(campana extremo).
Busque el conductor conectado
a esta hoja y una ese conductor
al cable blanco del triturador.
Lado con
costura
NOTA: Al ver el costado del enchufe eléctrico
con el dispositivo de conexión a tierra en la
parte superior, la hoja izquierda más larga se
conecta con el cable identifi cado.
C. Utilice un conectador
de alivio de presión
de la abrazadera del
cable donde el cable
de corriente entra al
triturador.
Pieza de conexión de la
caja HEYCO. NO.30403
Si está conectando el triturador directamente
a la corriente de la casa:
INSTRUCCIONES DE CONEXIÓN A TIERRA: Este aparato
se debe conectar a un sistema de cableado permanente,
metálico conectado a tierra, o se debe correr un conductor
de conexión a tierra para equipos con los conductores del
circuito y conectarse al terminal de conexión a tierra para
equipos o al conductor en el aparato.
A. Si utiliza un cable BX:
1. Estos productos están diseñados para uso doméstico.
2. Conecte el cable blanco al conductor blanco del
triturador con una tuerca para alambre. Conecte el
cable negro al conductor negro del triturador con una
tuerca para alambre. Conecte el cable a tierra sin forro
al tornillo de conexión a tierra. El cable de conexión a
tierra debe sujetarse y sostenerse con un liberador de
tensión.
3. No use un conducto rígido para la conexión del
cableado.
4. Debe proporcionarse un interruptor de motor
aceptable exclusivo para el triturador en el momento
de la instalación. El interruptor debe montarse a la vista
cerca del triturador o en la abertura del fregadero para
el triturador.
Si no se utiliza un cable BX, instale un cable por separado
de conexión a tierra a una conexión a
tierra con able más cercana, utilizando el tornillo en la
campana extremo para el cable de conexión a tierra.
Hacia la corriente de
la casa o cable de
corriente
Fondo del triturador (campana extremo)
B. Si su suministro de corriente no incluye un cable de conexión
a tierra, debe adquirir uno a menos que se utilice un cable
metálico. Conecte rmemente un cable de cobre al tornillo
de polo a tierra del triturador y conecte el otro extremo
del cable a una conexión a tierra con able. Use solamente
abrazaderas de conexión a tierra aprobadas por UL. Si en su
casa se utilizan tuberías de plástico, un electricista cali cado
debe instalar una conexión a tierra adecuada.
www.GEAppliances.com
Seguridad
Liberación
de presión
Tuerca
Instalación
Operación Solucionar problemas
Botón rojo para
reposición
Tornillo de conexión
a tierra
Tuercas del
cable
Retire la tapa
Servicio al consumidor
LEA Y SIGA CUIDADOSAMENTE ESTA INFORMACIÓN DE SEGURIDAD.
CONSERVE ESTAS INSTRUCCIONES
3
Page 16

Instrucciones para la
Triturador
instalación
Si tiene preguntas, llame al 1-800-GECARES o visite nuestra página en la red: www.GEAppliances.com
ANTES DE EMPEZAR
Lea estas instrucciones completa y cuidadosamente.
• IMPORTANTE – Guarde estas
instrucciones para uso del inspector local.
• IMPORTANTE – Observe todos los
códigos y órdenes de ley.
• Nota al instalador – Asegúrese de dejar estas
instrucciones con el consumidor.
• Nota al consumidor – Conserve estas
instrucciones para referencia futura.
• Nivel de destreza – La instalación de este
aparato requiere de destrezas mecánicas básicas.
• Tiempo de ejecución – 1 hora
• La instalación apropiada es la responsabilidad del
instalador.
• La falla del producto debido a una instalación
inadecuada no está cubierta por la garantía.
PREPARACIÓN
1. Desconecte el suministro del cable eléctrico hacia el
triturador.
2. Remueva el triturador viejo o la ensambladura de la
brida del lavaplatos.
3. Inspeccione la línea de drenaje. Si la línea de
drenaje se encuentra muy cubierta con grasa
endurecida y acumulaciones, serpentee con una
serpiente de plomero.
4. Remueva los materiales de sellado viejos y los
pedazos de juntas de la abertura del lavaplatos,
tanto arriba como abajo.
NOTA: Las super cies superiores e inferiores del
lavaplatos deben estar libres de materiales para
prevenir fugas.
QUÉ NECESITA
• Destornilladsor de estrella
y con hoja plana
• Martillo
• Alicates de cierre de canal,
de juntas deslizantes
• Llave
MATERIALES ADICIONALES QUE
USTED PODRÍA NECESITAR
• Punzón de acero o clavija de madera
• Petrolato o jabón liquido
• Abrazadera de manguera
• Conectador de drenaje para lavadora de platos
• Llave de tubos ajustable
• Masilla de plomero (para sellado del lavaplatos)
• Adaptador de drenaje de caucho escalonado
• Tuercas de alambre
• Cable conectador
• Tubería de drenaje exible
• Kit del cable eléctrico (Parte No. PM3X215)
4
Page 17

5
Page 18

1 CONECTE LA JUNTA DE CAUCHO
Deslice la junta de caucho sobre el codo de drenaje.
Empaque
Rubber
Gasket
de caucho
Codo de
Discharge
Elbow
descarga
2 CONECTE EL CODO DE DESCARGA*
Conecte el codo de descarga al triturador.**
Asegúrese de que todas las conexiones de la
tubería estén apretadas
Discharge
Elbow
Empaque
Rubber
de caucho
Gasket
Codo de
descarga
* El codo de descarga debe ser instalado por un
profesional.
** Algunas instalaciones (ver la página 8 para ejemplos)
puede que requieran el uso de una tubería de
drenaje exible.
6
Page 19

7
Page 20

GFC320V
GFC325V
GFC520V
GFC525V
GFC530V
GFC535V
GFC720V GFC1020V
Operación de alimentación
NOTA: Para lograr una operación del
triturador apropiada, es esencial que esta
dimensión sea 9”–12”. dependiendo de
los modelos enumerados anteriormente,
para evitar agua estancada en el
alojamiento del motor del triturdaor.
**Una tubería de drenaje exible podría
ser necesaria para esta aplicación.
GFB760V
por lote
8
Page 21

Seguridad
Instalación
Operación Solucionar problemas
Servicio al consumidor
9
Page 22

Instalación
Operación
Solucionar problemas
Servicio al consumidor Seguridad
10
Page 23

Seguridad
Instalación
Operación
Solucionar problemas
Servicio al consumidor
11
Page 24

Garantía del Triturador Doméstico de Desechos de Alimentos.
Todos los servicios de garantía son brindados por
nuestros centros de servicio de fábrica, o un técnico
autorizado de Customer Care ® 800-432-2737, tenga el
número de serie y el número de modelo a su alcance
cuando llame para pedir servicio.
Para el período de: GE reemplazará:
Un año
A partir de la fecha
de la compra original
Un año adicional
FA partir de la fecha
de la compra original
instalación
Instalación
Dos años adicionales
A partir de la fecha
de la compra original
Cuatro años
adicionales
A partir de la fecha
de la compra original
El triturador doméstico de desechos de alimentos será reemplazado en su totalidad si existe
algún defecto en los materiales o en la fabricación relacionado con las partes funcionales
solamente (excluyendo las partes de apariencia). Durante esta garantía limitada por un año,
GE proporcionará también, sin cargo, toda la mano de obra relacionada con el reemplazo
del triturador original junto con el triturador de reemplazo durante el primer año.
Los modelos GFC520V, GFC525V: Si existe algún defecto en los materiales o en la
fabricación relacionado con las partes funcionales solamente (excluyendo las partes de
apariencia). Durante este año de garantía extendida limitada, usted será responsable por de
todos los cargos de relacionados con el reemplazo del triturador.
Los modelos GFC530V, GFC535V: Si existe algún defecto en los materiales o en la fabricación relacionado con las partes funcionales solamente (excluyendo las partes de apariencia). Durante esta garantía extendida limitada de dos años, usted será responsable por de todos
los cargos de instalación relacionados con el reemplazo del triturador.
Para los modelos GFC720V, GFB760V: Si existe algún defecto en los materiales o en la
fabricación relacionado con las partes funcionales solamente (excluyendo las partes de
apariencia). Durante esta garantía extendida limitada de cuatro años, usted será responsable
por de todos los cargos de instalación relacionados con el reemplazo del triturador.
Grape su recibo aquí. Usted necesitará
una prueba de la fecha original de
su compra para obtener servicio
bajo la garantía.
Seis años
adicionales
Operación
A partir de la fecha
de a compra original
Los modelos GFC1020V: Si existe algún defecto en los materiales o en la fabricación
relacionado con las partes funcionales solamente (excluyendo las partes de apariencia).
Durante esta garantía extendida limitada de seis años, usted será responsable por de todos los
cargos de instalación relacionados con el reemplazo del triturador.
Lo que GE no cubrirá:
■ Los viajes de servicio hacia su casa para
enseñarle cómo usar el producto.
■ Instalación o mantenimiento inadecuado.
■ Remplazo de fusibles de su casa o reajuste del
sistema de interruptores de su casa.
■ Los fallos del producto si el mismo es abusado,
usado inapropiadamente, o usado para propósitos
no contemplados, o para usos comerciales.
Solucionar problemas
EXCLUSIÓN DE GARANTÍAS IMPLÍCITAS – Su único y exclusivo recurso es la reparación del producto según lo establecido en esta Garantía limitada. Cualquier garantía implícita, incluidas las garantías implícitas de comercialización o
idoneidad para un propósito específi co, están limitadas a un año o al período más corto permitido por la ley.
Esta garantía se extiende al comprador original y a cualquier propietario que lo suceda para el caso de productos comprados para
uso doméstico normal en los Estados Unidos. Si el producto se encuentra en un área donde no haya un Servicio autorizado de GE,
es posible que deba pagar un costo por traslado o que se le exija que traiga el producto a un centro de Servicio autorizado de GE
para obtener servicio.
■ Daños al producto causados por un accidente, incendio,
inundaciones o desastres naturales.
■ Daños incidentales o consecuentes causados por
posibles defectos de este dispositivo.
■ No es posible acceder al producto para proporcionar
el servicio requerido.
Algunos estados no permiten la exclusión o limitación de daños incidentales o consecuenciales. Esta garantía le proporciona
derechos legales específi cos, y puede tener otros derechos que pueden variar de un estado a otro. Para conocer los derechos
legales de su estado, consulte con su ofi cina local de asuntos del consumidor o al procurador general de su estado.
Servicio al consumidor Seguridad
12
Garantidor: General Electric Company. Louisville, KY 40225
Impreso en China
Page 25

www.GEAppliances.com
Renseignements relatifs
à la sécurité
Connexions électriques . . . . . .2, 3
Mesures de sécurité . . . . . . . . . . .2
Instructions d’installation
Fixation du coude de
refoulement . . . . . . . . . . . . . . . . .6
Composants et installation
du collet d’évier . . . . . . . . . . . . . .5
Connexion du broyeur
au collet d’évier . . . . . . . . . . . . . .7
Dimensions/Types
d’installation . . . . . . . . . . . . . . . .8
Connexion au lave-vaisselle . . . . .6
Broyeur de déchets
Mode d’emploi
Modèles à chargement
discontinu . . . . . . . . . . . . . . . . . . .9
Entretien et maintenance . . . . .10
Modèles à chargement
continu . . . . . . . . . . . . . . . . . . . . .9
Guide d’utilisation
et instructions
d’installation
Gamme de modèles
GFC320V
GFC325V
GFC520V
GFC525V
GFC530V
GFC535V
GFC720V
GFB760V
GFC1020V
Disposall
Astuces de dépannage
Avant d’appeler le service
d’assistance . . . . . . . . . . . . . . . . .11
Service à la clientèle
Garantie . . . . . . . . . . . . . . . . . . .12
Notez ci-après le modèle et le numéro
de série de votre broyeur Disposall :
Modèle : ____________________
Numéro de série : _____________
Ils sont indiqués sur l’étiquette
placée au bas du broyeur.
PC71868
Page 26

CONSIGNES DE SÉCURITÉ IMPORTANTES.
LIRE L’ENSEMBLE DES INSTRUCTIONS AVANT
www.GEAppliances.com
TOUTE UTILISATION.
INSTRUCTIONS RELATIVES AU RISQUE D’INCENDIE, D’ÉLECTROCUTION
OU DE BLESSURE.
!
▲
Consignes de sécurité
Instructions
d’installation
AVERTISSEMENT!
Lors de l’utilisation d’appareils électriques, respectez les précautions élémentaires de sécurité,
notamment :
MESURES DE SÉCURITÉ
■ N’utilisez cet appareil que dans le but décrit
par le présent guide d’utilisation.
■ Lisez l’ensemble des instructions avant
d’utiliser l’appareil.
■ Pour réduire les risques de blessure, surveillez
attentivement les enfants à proximité lors de
l’utilisation de l’appareil.
■ Ne placez pas les doigts ou les mains dans le
broyeur de déchets.
■ Pour réduire les risques de blessure provoquée
par l’expulsion de matériaux du broyeur de
déchets, ne jetez pas les déchets suivants dans
le broyeur :
a) coquilles d’huîtres ou de myes;
b) produits de débouchage caustiques
ou similaires;
c) verre, porcelaine ou plastique;
d) gros os entiers;
Mode d’emploi
Astuces de dépannage
Assistance à la clientèle
2
■ Éteignez l’appareil avant de tenter de déboucher
le broyeur ou d’en retirer un objet.
■ Lorsque vous tentez de déboucher le broyeur
de déchets, utilisez un objet long et en bois,
comme une cuillère en bois ou un manche à
balai en bois.
■ Pour tenter de retirer des objets du broyeur
de déchets, utilisez de longues pinces. Si
le broyeur est magnétisé, utilisez des outils
amagnétiques.
!
▲
AVERTISSEMENT!
e) métal, par exemple : boîtes de conserve,
canettes, ustensiles ou papier aluminium;
f) huile chaude ou autres liquides chauds;
g) épis de maïs entiers.
■ Lorsque vous n’utilisez pas le broyeur, laissez
le bouchon du drain en place pour éviter d’y
faire tomber des objets.
■ Consultez les instructions détaillées de mise à la
terre à la section CONNEXIONS ÉLECTRIQUES du
présent guide.
CONNEXIONS ÉLECTRIQUES
Si vous n’êtes pas à l’aise avec les procédures et connexions électriques, faites appel à un
électricien qualifi é.
DANGER : une connexion erronée du
connecteur de mise à la terre de l’appareil
peut entraîner des risques d’électrocution.
Consultez un électricien qualifi é en cas de
doute sur la mise à la terre de l’appareil.
N’altérez pas la prise fournie avec l’appareil
si elle ne correspond pas à la prise murale.
Le cas échéant, faites installer une prise
murale adaptée par un électricien qualifi é.
Pour les modèles équipés d’un câble de
mise à la terre :
INSTRUCTIONS DE MISE À LA TERRE : cet
appareil doit être mis à la terre. En cas de
dysfonctionnement ou de panne, la mise à la terre
fournit un chemin de moindre résistance pour
le courant électrique a n de réduire le risque
d’électrocution. Cet appareil est équipé d’un câble
doté d’un conducteur de mise à la terre et d’une
prise de mise à la terre. La prise doit être branchée
à une prise murale adaptée correctement installée
et mise à la terre conformément aux normes et
réglementations locales.
Page 27

CONSIGNES DE SÉCURITÉ IMPORTANTES.
Consignes de sécurité
LIRE L’ENSEMBLE DES INSTRUCTIONS AVANT
TOUTE UTILISATION.
!
▲
AVERTISSEMENT!
CONNEXIONS ÉLECTRIQUES (suite)
Si vous n’êtes pas à l’aise avec les procédures et connexions électriques, faites
appel à un électricien qualifi é.
Le câble d’alimentation et/ou les connexions
doivent être conformes au Code électrique
national, section 422, ou aux normes et
réglementations locales.
Pour les modèles non équipés de câble :
si votre broyeur n’est pas équipé de câble, il existe
deux moyens de le connecter :
1. xer un câble d’alimentation, d’une longueur
comprise entre 45 cm (18 po) et 90 cm (36 po);
Utiliser la pièce GE numéro PM3X215
ou
2. relier directement le broyeur au circuit
électrique domestique.
Pour fi xer un câble d’alimentation :
INSTRUCTIONS DE MISE À LA TERRE : cet
appareil doit être mis à la terre. En cas de
dysfonctionnement ou de panne, la mise à la terre
fournit un chemin de moindre résistance pour
le courant électrique a n de réduire le risque
d’électrocution. Le câble d’alimentation (à installer)
doit être équipé d’un connecteur de mise à la terre
et d’une prise de mise à la terre. La prise doit être
branchée à une prise murale adaptée correctement
installée et mise à la terre conformément aux
normes et réglementations locales.
DANGER : une connexion erronée du
connecteur de mise à la terre de l’appareil peut
entraîner des risques d’électrocution. Consultez
un électricien qualifi é en cas de doute sur la
mise à la terre de
l’appareil.
REMARQUE :
déconnectez
l’alimentation
électrique du circuit
du broyeur avant
l’installation. Éteignez
le disjoncteur du circuit
ou retirez le fusible
correspondant.
A. Connectez
exclusivement le
broyeur à un courant alternatif 110-120 V, 60 Hz
B. En cas d’utilisation d’un câble en chable, utilisez
une prise à trois ches. Le l de garde doit être
xé à la vis de borne de terre au bas le broyeur
(plaque-couvercle).
Suivez le fi l de sortie
connecté à cette broche
et fi xez-le au fi l blanc
sur le broyeur.
REMARQUE : en regardant la
prise électrique de face, avec la
broche de mise à la terre en haut,
la broche de gauche, la plus
grande, est connectée au fi l identifi é.
C. Utilisez un connecteur
collier de câble réducteur
de contrainte à l’entrée
du câble d’alimentation
dans le broyeur.
Pièce pour connexions à
la boîte HEYCO. No.3043
Pour relier directement votre broyeur au
circuit électrique domestique :
INSTRUCTIONS DE MISE À LA TERRE :
appareil doit être connecté à un circuit électrique
permanent, en métal, et mis à la terre, ou un conducteur
de mise à la terre de l’appareil doit être utilisé avec les
conducteurs du circuit et connecté à un terminal de mise à
la terre ou broche sur l’appareil.
A. Si vous utilisez un câble blindé BX :
1. Ces produits sont conçus pour une utilisation
résidentielle.
2. Raccordez le l blanc au conducteur blanc du broyeur
avec un serre- ls. Raccordez le l noir au conducteur
noir du broyeur avec un serre- ls. Raccordez le l
de masse nu à la vis de borne de terre. Le l de terre
devrait être pincé et retenu en place par un serre-câble.
3. N’utilisez pas de conduit rigide pour la connexion du
câblage.
4. Un interrupteur de moteur réservé acceptable avec
la position d’arrêt marquée doit être fourni pour ce
broyeur en l’installant. L’interrupteur doit être monté
en vue du broyeur ou de l’ouverture de l’évier pour le
broyeur.
Si vous n’utilisez pas de câble blindé BX, fournissez un l
de garde séparé à connecter à la mise à la terre able la
plus proche à l’aide de la vis de mise
Côté
nervuré
Circuit domestique
ou câble
d’alimentation
Bas du broyeur (plaque-couvercle)
B. Si votre alimentation n’inclut pas de l de garde, il vous
faut en fournir un, à moins qu’un câble en métal soit
utilisé. Fixez fermement une extrémité d’un l en
cuivre à la vis de mise à la terre du broyeur et l’autre
extrémité à une mise à la terre able. N’utilisez que des
colliers de câble de mise à la terre conformes à la norme
UL. Si votre installation électrique est dotée de tubes
en plastique, faites appel à un électricien quali é pour
installer la mise à la terre.
www.GEAppliances.com
Réducteur
de contrainte
Écrou
cet
à la terre.
Bouton rouge de
réinitialisation
Vis de mise à la terre
Serre-fi ls
Retirer le capuchon
en plastique
d’installation
Instructions
Mode d’emploi Astuces de dépannage
Assistance à la clientèle
LIRE ET APPLIQUER SCRUPULEUSEMENT CES CONSIGNES DE SÉCURITÉ.
CONSERVER CES INSTRUCTIONS
3
Page 28

Instructions
Broyeur
d’installation
Si vous avez des questions, appelez le 1-800-GECARES ou consultez notre site Web : www.GEAppliances.com
AVANT DE COMMENCER
Lisez attentivement ces instructions, dans
leur intégralité.
• IMPORTANT : conservez les présentes
instructions à l’attention de l’inspecteur local.
• IMPORTANT : respectez toutes les
normes et réglementations en vigueur.
• Remarque à l’installateur : assurez-vous
de fournir les présentes instructions à l’utilisateur.
• Remarque à l’utilisateur : conservez les
présentes instructions pour pouvoir vous y reporter
ultérieurement.
• Niveau de compétence : l’installation de cet
appareil requiert des compétences mécaniques
de base.
• Durée d’installation : 1 heure.
• La conformité de l’installation relève de la
responsabilité de l’installateur.
• Les défaillances du produit provoquées par une
installation incorrecte ne sont pas couvertes par
la garantie.
PRÉPARATION
1. Débranchez l’alimentation du broyeur.
2. Retirez l’ancien broyeur ou le collet d’évier.
3. Inspectez la conduite du drain. Si elle est recouverte
d’une épaisse couche de graisse durcie et autres
dépôts, débouchez-la à l’aide d’un furet de
plombier.
4. Retirez les anciens indicateurs d’entartrage et joints
de l’ouverture de l’évier, en haut et en bas.
REMARQUE : les surfaces supérieures et inférieures
de l’évier doivent être propres et sans dépôts, pour
éviter les fuites.
OUTILLAGE NÉCESSAIRE
• Tournevis cruciformes et tournevis plats
• Pince multiprise avec articulation
à boutonnière
• Tournevis à douille
• Marteau
OUTILLAGE SUPPLÉMENTAIRE
POSSIBLEMENT NÉCESSAIRE
• Poinçon d’acier ou goujon en bois
• Vaseline ou savon liquide
• Collier de serrage
• Connecteur au drain du lave-vaisselle
• Clé à tuyau réglable
• Mastic de plomberie (pour les éviers moulés)
• Adaptateur de drain en caoutchouc à baïonnette
• Serre- ls
• Raccord de câble
• Drain exible
• Trousse de câble d’alimentation (réf. PM3X215)
4
Page 29

Instructions d’installation
1
PIÈCES ET INSTALLATION
PIÈCES
*Bouchon
* Pare-éclaboussures
amovible
Collet d’évier
Joint en caoutchouc
Collet
d’évier
Rainure
Tré mie
Broyeur
* Non disponible pour les modèles à chargement discontinu
Plaquecouvercle
(connexions
électriques)
Zone de position de
l’étiquette
du collet d’éviert
Évier
Joint en fi bre
Bague de support
(fl èches vers le
haut)
Bague de montage
Pattes de serrage
Mousse compressible
Entrée de refoulement
du lave-vaisselle
Joint coude
Vis
Collet du
coude
Coude de
refoulement
INSTALLATION DU COLLET D’ÉVIER
(Lisez l’intégralité des instructions avant de commencer)
Installation correcte du collet d’évier
Collet d’évier
Joint en fi bre
Bord inférieur de la
mousse compressible
Zone ouverte, sans
obstruction
Rainure
Bouton
inférieur
(indiqué pour garantir l’orientation correcte)
Joint en caoutchouc
Évier
Bague de support
Collet d’évier
La bague de montage
doit pouvoir bouger
librement de haut en bas
Mousse
compressible
REMARQUE : notez bien l’ordre des pièces du collet
d’évier dans la con guration d’usine.
A. Démontez l’ensemble du collet d’évier du broyeur en
tournant la bague de montage vers la gauche (dans le
sens des aiguilles d’une montre) puis en la retirant.
B. Soulevez la bague de montage vers le haut du collet
d’évier. Retirez la mousse compressible et la bague
de montage. Vous pouvez tester l’installation de la
mousse compressible lors de cette étape, avant de
vous placer sous l’évier.
C. Dévissez la bague de support du collet d’évier et
retirez le joint en bre. Vous disposez désormais du
collet d’évier et du joint en caoutchouc.
D. Le joint en caoutchouc est utilisé au lieu du mastic de
plomberie sur les éviers en acier inoxydable. Certains
éviers moulés nécessitent l’utilisation de mastic.
E. Si l’utilisation de mastic n’est pas nécessaire, insérez
le collet d’évier dans l’ouverture de l’évier, à travers
le joint en caoutchouc. Ne faites pas tourner le collet
après l’avoir installé.
F. Si vous utilisez du mastic au lieu du joint, formez une
bague autour de la base du collet d’évier. Insérez
le collet dans l’ouverture de l’évier en serrant
fermement pour éliminer l’excès de mastic. En vous
positionnant sous l’évier, supprimez l’excès de mastic
à la base de l’ouverture de l’évier.
G. En vous positionnant sous l’évier, faites glisser le joint
en bre sur le collet d’évier exposé. En vous assurant
que les èches pointent vers le haut, vissez la bague
de support sur le collet d’évier
et serrez à la main jusqu’à ce
que le collet d’évier soit xe.
Vous pouvez désormais placer
le bouchon dans l’évier et le
remplir d’eau pour véri er
l’étanchéité des joints et
l’absence de fuites.
H. Placez la bague de montage
sur le collet d’évier et
maintenez-la en place tout
en installant la mousse
compressible (le côté le plus
large en bas). Assurez-vous
que la rainure intérieure
de la mousse compressible
s’emboîte dans l’encoche
du collet d’évier, comme
un couvercle sur un
récipient en plastique.
Faites le tour de la mousse
compressible avec vos
doigts en appliquant une
légère pression. N’appuyez
pas trop fort. Une fois
la mousse compressible
correctement installée, la
bague de montage peut
être tirée vers le bas pour
tourner librement.
Serrez à la main le
collet d’évier
Détails de la mousse
compressible
Rainure
Bouton inférieur
Partie supérieur
5
Page 30

Instructions d’installation
2
RACCORD AU LAVE-VAISSELLE (LE CAS ÉCHÉANT)
Pour raccorder le broyeur à un lave-vaisselle, suivez l’étape ci-dessous.
Si vous ne souhaitez pas raccorder le broyeur à un lave-vaisselle, passez
directement à la section « Fixation du coude de refoulement ».
1 2
BONDE RACCORD DU TUYAU
À l’aide d’un outil non tranchant (poinçon d’acier
ou goujon en bois), enfoncez entièrement la bonde.
N’utilisez pas de tournevis ou d’outil pointu. Une
fois la bonde tombée dans le broyeur, vous pouvez
la retirer ou tout simplement la broyer lors de
l’utilisation du broyeur. Ceci n’endommage en
aucun cas le broyeur, mais le broyage peut prendre
un certain temps et nécessiter plusieurs utilisations.
Bonde
3
FIXATION DU COUDE DE REFOULEMENT
1 ATTACHER LE JOINT EN CAOUTCHOUC
Glisser le joint en caoutchouc le long du tuyau
de drainage.
Joint en
Rubber
Gasket
caoutchouc
Raccordez le tuyau du lave-vaisselle à l’aide
du collier de serrage. Si la taille du tuyau est
différente, utilisez un adaptateur en caoutchouc
à baïonnette.
Collier de serrage
Adaptateur en caoutchouc
à baïonnette
2 RACCORDER LE COUDE
DE REFOULEMENT*
Raccordez le coude de refoulement au broyeur.**
Assurez-vous de bien serrer tous les raccords
de plomberie.
Joint en
Rubber
Gasket
caoutchouc
Discharge
Coude de
Elbow
refoulement
* Le coude de refoulement doit être installé par un
professionnel.
** Certaines installations (voir exemples à la page 8)
peuvent nécessiter l’utilisation d’un drain exible.
Coude de
Discharge
Elbow
refoulement
6
Page 31

Instructions d’installation
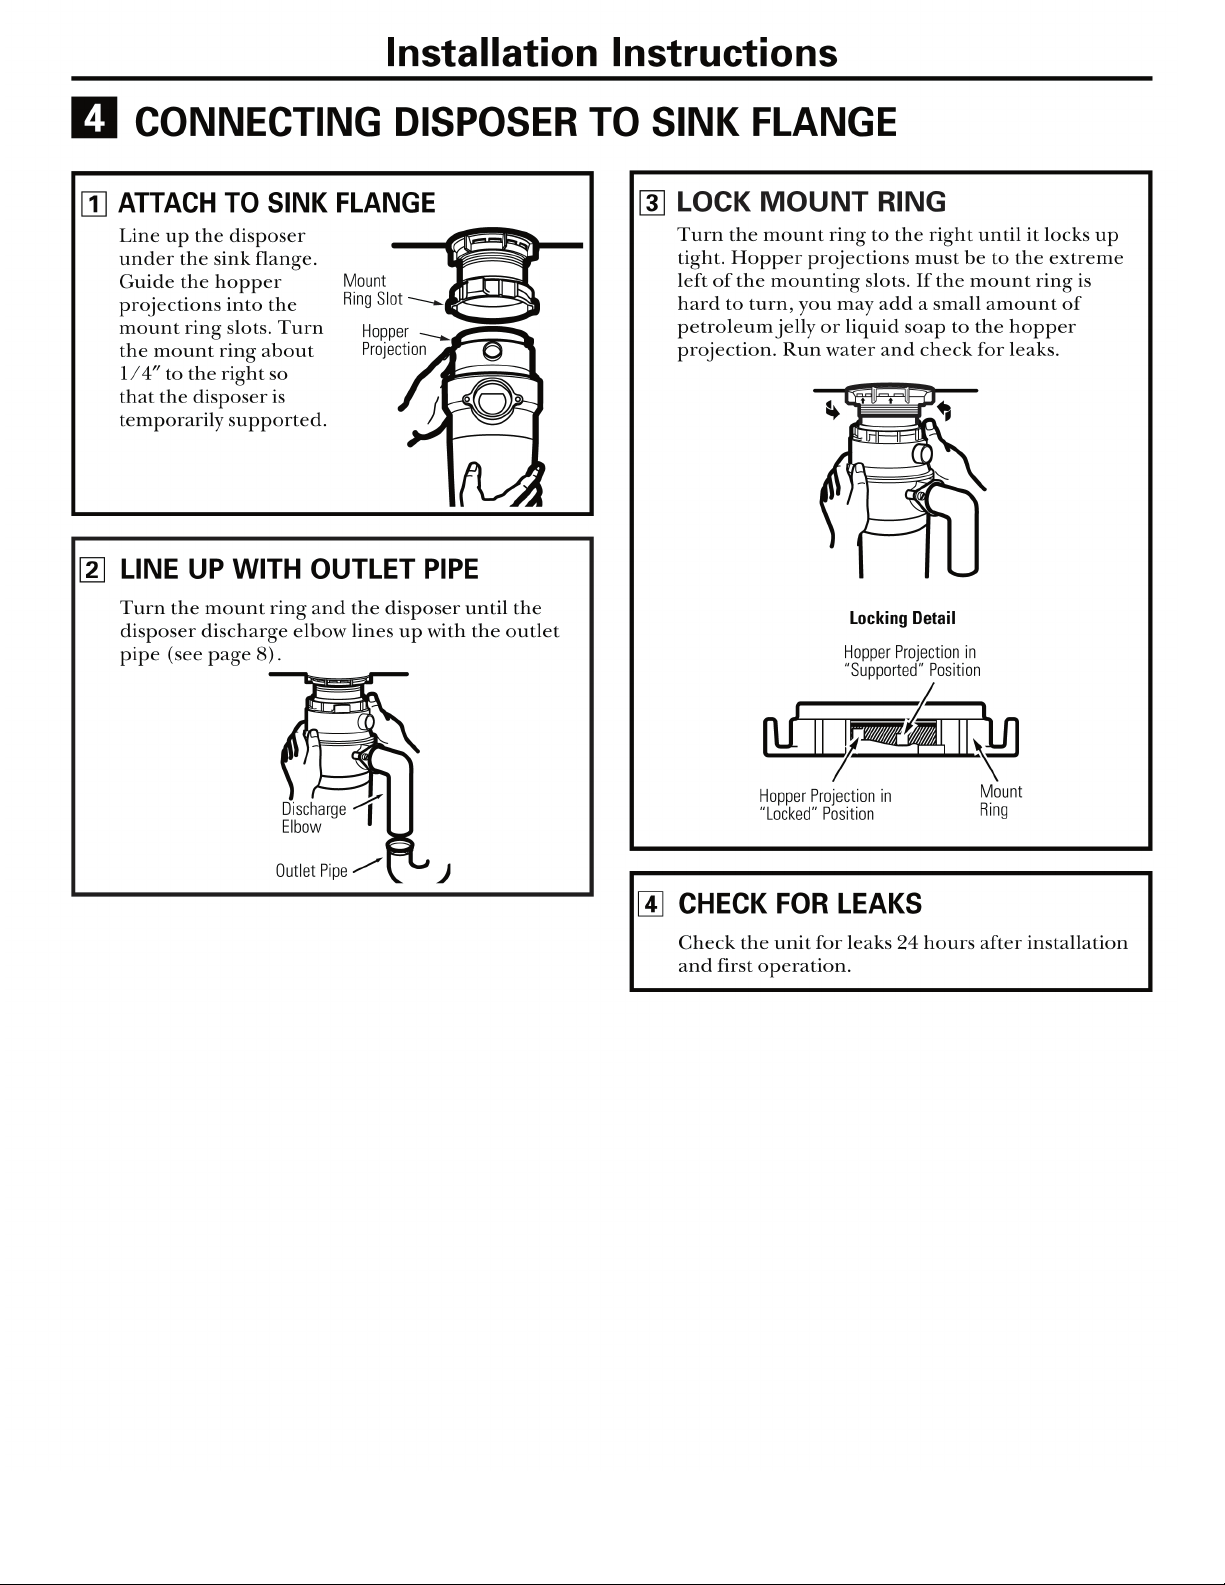
4
RACCORD DU BROYEUR AU COLLET D’ÉVIER
1 2
FIXATION AU COLLET D’ÉVIER
Alignez le broyeur
sous le collet d’évier.
Guidez les pattes de
la trémie dans les
emplacements de la
bague de montage.
Tournez la bague
de montage d’un
centimètre environ vers
la droite pour soutenir
temporairement
le broyeur.
3
ALIGNEMENT AVEC LE TUYAU
L’e nco ch e
de la bague
de montage
Patte de
trémie
D’ÉCOULEMENT
Tournez la bague de montage et le broyeur
jusqu’à ce que le coude de refoulement du
broyeur s’aligne avec le tuyau d’écoulement
(voir page 8).
VERROUILLAGE DE LA
BAGUE DE MONTAGE
Tournez la bague de montage vers la droite
et serrez-la fermement. Les pattes de la trémie
doivent se trouver à l’extrême gauche des
encoches de montage. Si la bague de montage
résiste, ajoutez une petite quantité de vaseline
ou de savon liquide sur les pattes de la trémie.
Faites couler de l’eau et assurez-vous de
l’absence de fuite.
Détails
Patte de la trémie en
position « support »
Flux
d’écoulement
Tuya u
d’écoulement
Patte de la trémie en
position « verrouillée »
4
CONTRÔLE DES FUITES
Véri ez l’absence de fuite 24 heures après
l’installation et la première utilisation.
Bague de montage
7
Page 32

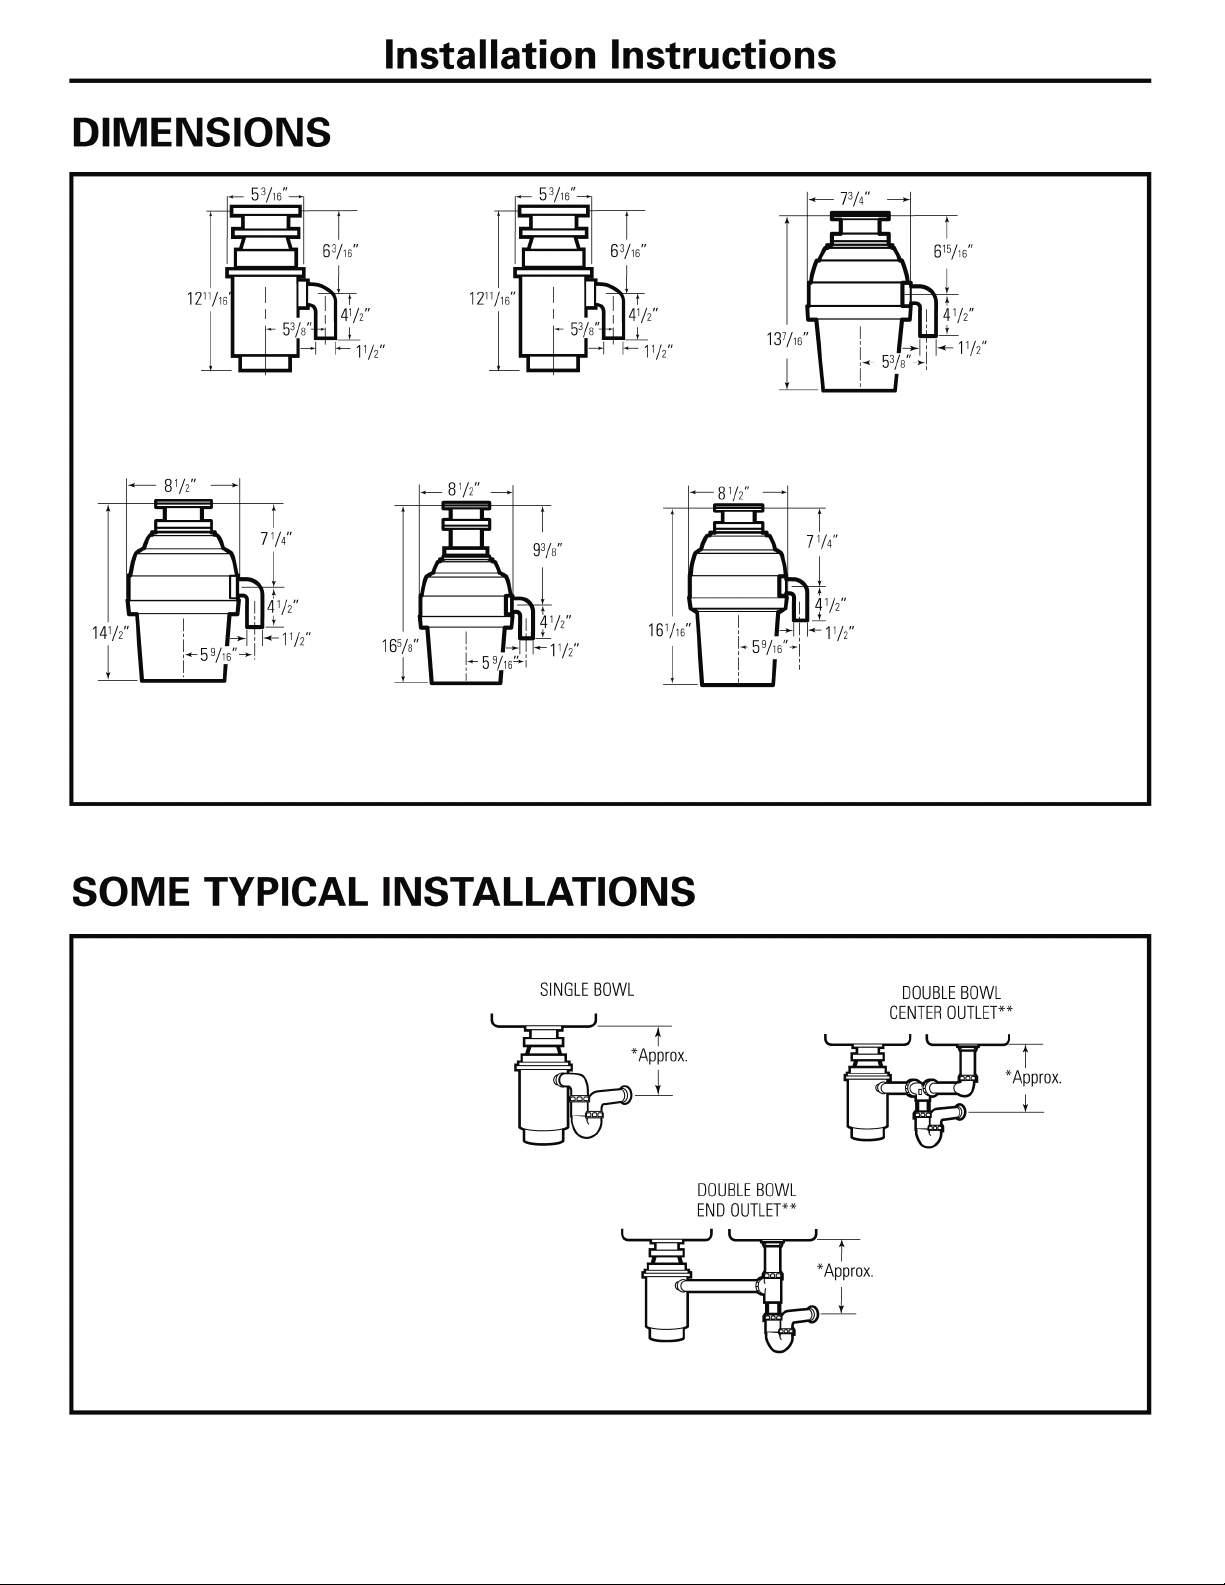
DIMENSIONS
Instructions d’installation
14-1/2 po
(368 mm)
12-11/16 po
(322 mm)
8-1/2 po
(215 mm)
GFC720V
5-9/16 po
(141 mm)
5-3/16 po
(131 mm)
5-3/8 po
(136 mm)
GFC320V
GFC325V
7-1/4 po
(184 mm)
1-1/2 po
(38 mm)
6-3/16 po
(157 mm)
12-11/16 po
4-1/2 po
(114 mm)
1-1/2 po
(38 mm)
4-1/2 po
(114 mm)
16-5/8 po
(422 mm)
(322 mm)
8-1/2 po
(215 mm)
5-9/16 po
(141 mm)
GFB760V
Fonctionnement en chargement discontinu
5-1/16 po
(128 mm)
5-3/8 po
(136 mm)
GFC520V
GFC525V
9-3/8 po
(238 mm)
4-1/2 po
(114 mm)
1-1/2 po
(38 mm)
6-1/8 po
(155 mm)
(114 mm)
16-1/6 po
(410 mm)
4-1/2 po
1-1/2 po
(38 mm)
13-7/16 po
(341 mm)
8-1/2 po
(215 mm)
5-9/16 po
(141 mm)
GFC1020V
(196 mm)
GFC530V
GFC535V
7-1/4 po
(184 mm)
(114 mm)
1-1/2 po
(38 mm)
7-3/4 po
(136 mm)
4-1/2 po
5-3/8 po
6-15/16 po
(176 mm)
4-1/2 po
(114 mm)
1-1/2 po
(38 mm)
TYPES D’INSTALLATION
REMARQUE : pour une installation correcte, il est
indispensable de respecter cette dimension de 228 à
304 mm (9 à 12 po) selon les modèles répertoriés
ci-dessus, pour éviter l’eau stagnante dans le boîtier
du moteur du broyeur.
** Un drain exible peut s’avérer nécessaire pour
cette application.
CUVETTE SIMPLE
DOUBLE CUVETTE,
ÉCOULEMENT EN
EXTRÉMITÉ**
*Environ
DOUBLE CUVETTE,
ÉCOULEMENT AU
CENTRE**
*Environ
*Environ
8
Page 33

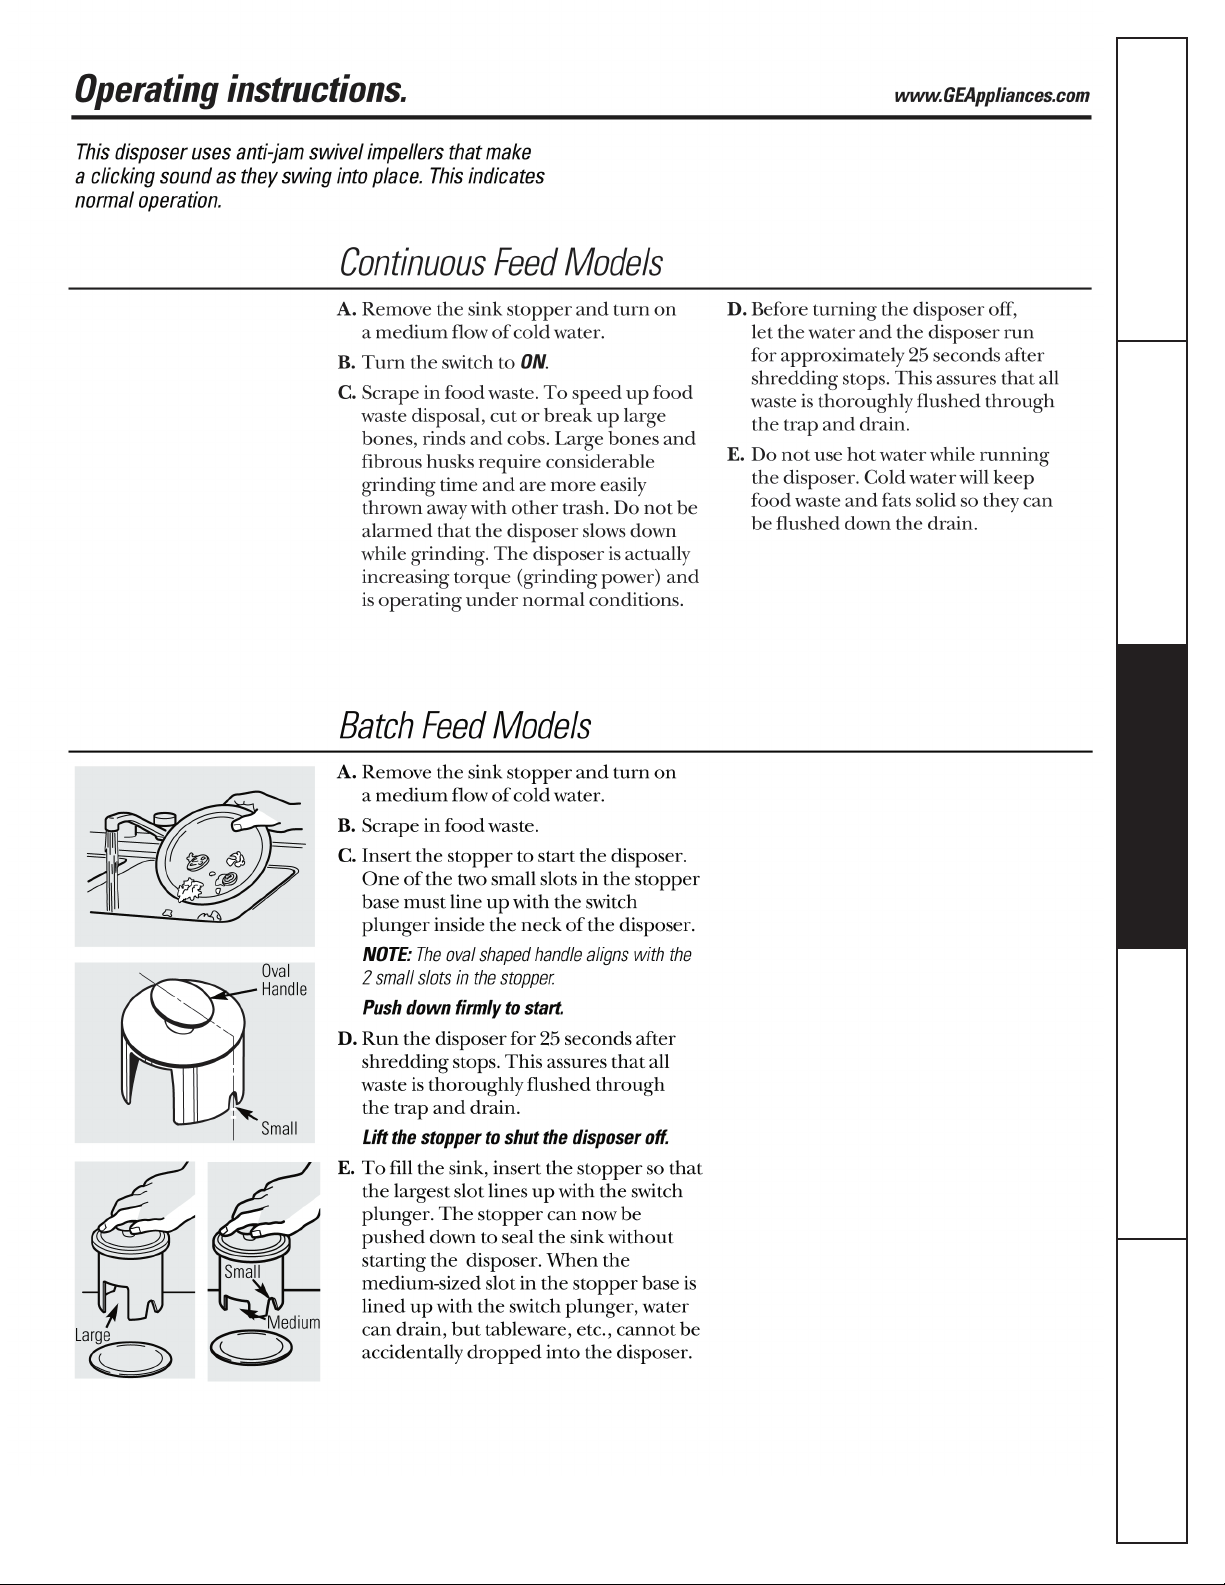
Mode d’emploi
Ce broyeur utilise des impulseurs anti-blocage pivotants qui
émettent un clic lors de leur positionnement. Ceci indique un
fonctionnement normal.
Modèles à chargement continu
www.GEAppliances.com
Poignée
ovale
A. Retirez le bouchon de l’évier et faites
couler de l’eau froide à pression moyenne.
B. Placez l’interrupteur en position allumée.
C. Jetez des déchets alimentaires. Pour accé-
lérer le broyage des déchets alimentaires,
coupez ou cassez les grands os, peaux ou
épis de maïs. Les grands os et les épis de
maïs breux nécessitent un temps de broyage considérable; il est plus facile de les
jeter aux ordures. Ne vous inquiétez pas
si le broyeur ralentit en cours de broyage.
Il s’agit d’un fonctionnement normal indiquant que le broyeur augmente sa torsion
(puissance de broyage).
D. Avant d’éteindre le broyeur, lais-
sez couler l’eau et maintenez le
broyeur allumé durant environ
25 secondes après la n du broyage. Ce laps de temps permet
de garantir que tous les déchets
sont correctement écoulés via le
siphon et le drain.
E. N’utilisez pas d’eau chaude lors
de l’activation du broyeur. L’eau
froide permet de maintenir l’état
solide des déchets alimentaires et
des graisses a n de les écouler via
le drain.
Modèles à chargement discontinu
A. Retirez le bouchon de l’évier et faites couler
de l’eau froide à pression moyenne.
B. Jetez des déchets alimentaires..
C. Insérez le bouchon pour démarrer le broyeur.
L’une des deux petites encoches sur la base
du bouchon doit s’aligner sur le plongeur
de l’interrupteur dans le bras du broyeur.
REMARQUE : la poignée ovale s’aligne sur les
deux petites encoches du bouchon.
Appuyez fermement pour démarrer.
d’installation
Instructions
Mode d’emploi Astuces de dépannage
Petite
Petite
D. Activez le broyeur pendant 25 secondes
supplémentaires après l’arrêt du broyage.
Ce laps de temps permet de garantir que
tous les déchets sont correctement écoulés
via le siphon et le drain.
Retirez le bouchon pour éteindre le broyeur.
E. Pour remplir l’évier, insérez le bouchon
de façon à ce que la plus grande encoche
s’aligne avec le plongeur de l’interrupteur.
Le bouchon peut maintenant être enfoncé
pour boucher l’évier sans démarrer le broy-
MoyenneGrande
eur. Lorsque l’encoche moyenne de la base
du bouchon est alignée avec le plongeur de
l’interrupteur, l’eau peut être évacuée mais
aucun objet ne peut être accidentellement
jeté dans le broyeur.
Assistance à la clientèleConsignes de sécurité
9
Page 34

Garantie de broyeur
Astuces utiles
www.GEAppliances.com
www.GEAppliances.com
A. Assurez-vous que le broyeur est vide avant
d’utiliser le lave-vaisselle a n de garantir
un écoulement correct.
B. Il est possible de laisser le bouchon sur
le drain lorsque le broyeur n’est pas
utilisé pour éviter la chute d’ustensiles
ou autres objets.
C. Le broyeur est robuste pour vous
assurer des années de fonctionnement
sans problème. Il gère tous les déchets
alimentaires normaux, MAIS ne broie
pas et n’évacue pas les objets tels que
les canettes, bouteilles et bouchons de
Instructions
d’installation
bouteilles, le verre, la porcelaine, le cuir,
les tissus, la vaisselle, le caoutchouc, le l,
les plumes ou les coquilles d’huîtres ou
de myes. Ces déchets doivent être jetés
dans une poubelle traditionnelle ou un
compacteur pour ordures ménagères.
D. POUR ACCÉLÉRER LE BROY-
AGE DES DÉCHETS ALIMENTAIRES... Coupez ou cassez les
grands os, écorces de melon,
peaux de pamplemousses ou épis
de maïs. Les déchets comme les
grands os et les éléments breux
comme les cosses de haricots ou
les épis de maïs nécessitent un
temps de broyage considérable.
C’est pourquoi vous préférerez
peut-être les jeter dans une
poubelle traditionnelle ou
un compacteur pour ordures
ménagères.
Entretien et maintenance
Mode d’emploi
Astuces de dépannage
LE MOTEUR À GRAISSAGE PERMANENT EST LUBRIFIÉ POUR TOUTE SA DURÉE DE
VIE. N’ESSAYEZ PAS DE LUBRIFIER VOTRE BROYEUR. Le broyeur est autonettoyant
et il assure une fonction dégraissante à chaque utilisation.
■ Ne versez JAMAIS de lessive ou autres
produits chimiques dans le broyeur
sous peine de provoquer une corrosion
dé nitive des parties métalliques.
■ Votre broyeur (sauf modèles à
chargement discontinu) est équipé d’un
pare-éclaboussures amovible pour un
nettoyage et une réinstallation faciles.
Retirez le pare-éclaboussures le tirant
vers le haut. Pour le replacer, insérez-le
dans le collet d’évier et appuyez jusqu’à
ce qu’il soit correctement installé.
■ En cas de mauvaises odeurs, jetez des
peaux d’orange ou de citron dans le
broyeur. Une douzaine de glaçons
saupoudrés d’une petite quantité de
poudre à récurer domestique permet
aussi d’éliminer les odeurs.
Assistance à la clientèle Consignes de sécurité
10
Page 35

Avant d’appeler le service d’assistance…
Astuces de dépannage
Économisez du temps et de l’argent! Consultez d’abord le tableau de cette page.
L’intervention du service d’assistance n’est peut-être pas nécessaire.
www.GEAppliances.com
www.GEAppliances.com
REMARQUE RELATIVE À LA SÉCURITÉ : avant de manipuler le broyeur pour rechercher une panne,
débranchez toujours l’alimentation.
!
▲
AVERTISSEMENT!
Avant la réinitialisation, débranchez l’alimentation. Voir la REMARQUE RELATIVE À LA SÉCURITÉ ci-dessus. Le
contrôle de surcharge protège le moteur des opérations impliquant une surcharge. Cette fonctionnalité protège
à la fois votre installation électrique et votre broyeur. En cas de surcharge, le moteur s’arrête automatiquement.
Problème Causes possibles Solution
d’installation
Instructions
Bruits forts (hors
broyage d’os ou
de noyaux).
Le broyeur ne
démarre pas.
Des couverts, bouchons de
bouteilles ou autres objets
étrangers sont tombés dans le
broyeur.
Le bouton de réinitialisation a
été enclenché.
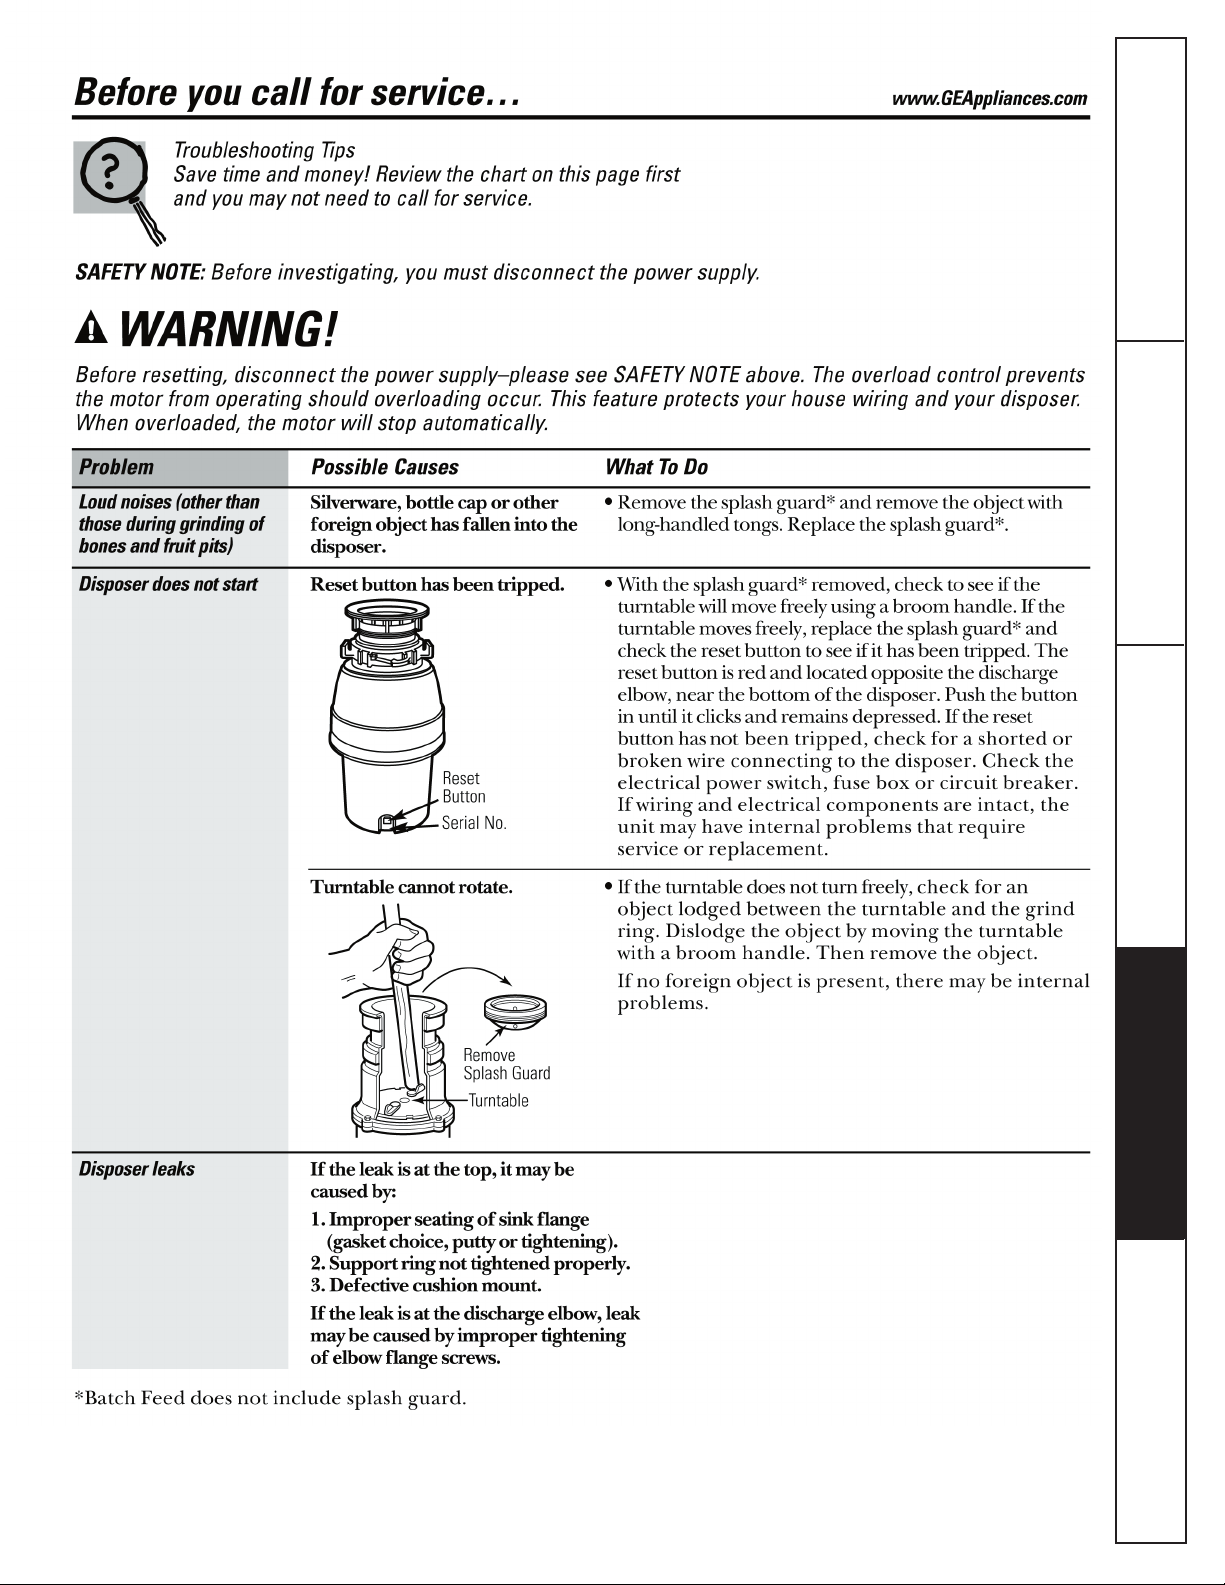
Bouton de
réinitialisation
Nº de série
Le plateau tournant ne
peut pas tourner.
Retirez le pareéclaboussures
Plateau
tournant
• Retirez le pare-éclaboussures* et extrayez
l’objet à l’aide de pinces longues. Replacez le
pare-éclaboussures*.
• Retirez le pare-éclaboussures* et véri ez si le
plateau tournant tourne librement à l’aide d’un
manche à balai, S’il tourne librement, replacez
le pare-éclaboussures* et véri ez si le bouton de
réinitialisation a été enclenché. Le bouton de
réinitialisation est rouge, et il est situé à l’opposé du
coude de refoulement, près de la base du broyeur.
Appuyez sur le bouton jusqu’à entendre un clic et
maintenez-le enfoncé. Si le bouton de réinitialisation
n’a pas été enclenché, recherchez un possible courtcircuit ou l rompu dans la connexion au broyeur.
Véri ez l’interrupteur d’alimentation électrique, le
coffret de fusibles ou le disjoncteur. Si les câbles et
les pièces électriques sont intacts, l’unité rencontre
peut-être des problèmes internes nécessitant une
réparation ou un remplacement.
•Si le plateau tournant ne tourne pas librement,
recherchez un possible objet étranger entre le plateau
tournant et la bague de broyage. Délogez l’objet
en faisant tourner le plateau tournant à l’aide d’un
manche à balai, puis retirez-le.
Si aucun objet étranger n’est présent, il peut s’agir
de problèmes internes.
Mode d’emploi
Astuces de dépannage
Fuite du broyeur
* Les modèles à chargement discontinu n’incluent pas de pare-éclaboussures.
Si la fuite vient de la partie supérieure,
elle peut être provoquée par :
1. une mauvaise installation du collet
d’évier (choix du joint, mastic ou
serrage);
2. une bague de serrage mal serrée;
3. une mousse compressible défectueuse.
Si la fuite vient du coude de refoulement,
elle peut être provoquée par un mauvais
serrage des vis du collet de refoulement.
Assistance à la clientèleConsignes de sécurité
11
Page 36

Garantie du broyeur :
Tous les services liés à la garantie sont fournis pas nos centres
d’assistance ou un technicien d’assistance à la clientèle agréé. Pour
prendre rendez-vous en ligne 24 heures sur 24, communiquez avec
www.GEAppliances.com ou appelez le 800-GE-CARES.
Agrafez ici votre ticket de caisse.
Une preuve de la date d’achat
original est requise pour solliciter
toute réparation sous garantie.
Pour la période de : GE assure le remplacement :
Un an
À partir de la date de
l’achat original
Un an supplémentaire
À partir de la date de
l’achat original
Instructions
d’installation
Deux ans
supplémentaires
À partir de la date de
l’achat original
Quatre ans
supplémentaires
À partir de la date de
l’achat original
Du broyeur dans son ensemble en cas de défaut de matériaux ou de fabrication lié aux pièces
fonctionnelles uniquement (les pièces esthétiques sont exclues). Durant cette année de garantie
complète, GE prend aussi gratuitement en charge toute la main-d’œuvre liée au remplacement du
broyeur d’origine outre le remplacement du broyeur pendant la première année.
Modèles GFC520V, GFC525V : en cas de défaut de matériaux ou de fabrication lié aux pièces
fonctionnelles uniquement (les pièces esthétiques sont exclues). Au cours de cette période
d’un an d’extension de garantie limitée, vous serez responsable de tous les frais d’installation
liés au remplacement du broyeur.
Modèles GFC530V, GFC535V : en cas de défaut de matériaux ou de fabrication lié aux
pièces fonctionnelles uniquement (les pièces esthétiques sont exclues). Au cours de cette
période de deux ans d’extension de garantie limitée, vous serez responsable de tous les frais
d’installation liés au remplacement du broyeur.
Modèles GFC720V, GFB760V : en cas de défaut de matériaux ou de fabrication lié aux
pièces fonctionnelles uniquement (les pièces esthétiques sont exclues). Au cours de cette
période de quatre ans d’extension de garantie limitée, vous serez responsable de tous les frais
d’installation liés au remplacement du broyeur.
Six ans
supplémentaires
À partir de la date de
l’achat original
Mode d’emploi
Modèle GFC1020V : en cas de défaut de matériaux ou de fabrication lié aux pièces
fonctionnelles uniquement (les pièces esthétiques sont exclues). Au cours de cette période
de six ans d’extension de garantie limitée, vous serez responsable de tous les frais d’installation
liés au remplacement du broyeur.
GE ne prend pas en charge :
■ les déplacements à domicile pour vous apprendre
à utiliser le produit;
■ une mauvaise installation;
■ une défaillance du produit suite à un abus, mauvaise
utilisation ou utilisation à des ns autres que celles
prévues ou utilisation commerciale;
■ le remplacement des fusibles résidentiels ou
réinitialisation des disjoncteurs;
Astuces de dépannage
EXCLUSION AUX GARANTIES IMPLICITES – Votre seul et unique recours est la réparation du produit tel qu’indiquée dans
la garantie limitée. Toutes garanties implicites, y compris les garanties implicites de commercialité ou d’adaptation à un
usage particulier, se limitent à une année ou à la plus courte période permise par la loi.
Cette garantie est offerte à l’acheteur original et à tout autre propriétaire suivant des produits achetés pour une utilisation
résidentielle aux É.-U. En Alaska, la garantie exclut le coût d’expédition ou les appels de service à la maison.
Certains états n’acceptent pas d’exclusion ou de limites aux dommages indirects et consécutifs. Cette garantie vous donne
des droits juridiques précis et vous pourriez aussi avoir d’autres droits qui varient d’une juridiction à l’autre. Pour connaître
vos droits juridiques, consultez votre bureau des affaires aux consommateurs local ou d’État ou l’avocat général de votre État.
■ les dommages au produit suite à un accident, un
incendie, une inondation ou un cas de force majeure;
■ les dommages indirects ou consécutifs causés par des
défauts possibles de cet appareil.
■ les produits non accessibles au service sollicité.
Assistance à la clientèle Consignes de sécurité
12
Garant : General Electric Company. Louisville, KY 40225 – É.-U.
Imprimé en Chine
 Loading...