

Page 1
GE Consumer & Industrial
Multilin
EPM 5300 Power Metering System
Chapter 1:
Instruction Manual
Software Revision: 4.5
Manual P/N: 1601-9027-A2
Manual Order Code: GEK-106557B
Copyright © 2007 GE Multilin
GE Multilin
215 Anderson Avenue, Markham, Ontario
Canada L6E 1B3
Tel: (905) 294-6222 Fax: (905) 201-2098
Internet:
*1601-0215-A4*
http://www.GEmultilin.com
GE Multilin's Quality
Management System is
registered to ISO9001:2000
QMI # 005094
Page 2

Page 3

Table of Contents
TABLE OF CONTENTS
1: AC POWER
MEASUREMENT
2: MECHANICAL
INSTALLATION
3: ELECTRICAL
INSTALLATION
SINGLE PHASE SYSTEM ................................................................................................................. 1
THREE-PHASE SYSTEM .................................................................................................................. 3
CONSUMPTION, DEMAND AND POOR POWER FACTOR ................................................. 5
WAVEFORM AND HARMONICS ..................................................................................................6
MECHANICAL INSTALLATION .....................................................................................................1
CONNECTING THE CURRENT CIRCUIT ....................................................................................5
CT CONNECTION ............................................................................................................................. 6
ELPFUL DEBUGGING TOOLS ............................................................................................6
H
CONNECTING THE VOLTAGE CIRCUIT ....................................................................................7
SELECTING THE VOLTAGE FUSES ............................................................................................. 8
CONNECTION TO THE MAIN POWER SUPPLY .....................................................................9
ELECTRICAL CONNECTION INSTALLATION ........................................................................... 10
IST OF CONNECTION DIAGRAMS ..................................................................................... 10
L
THE EPM 5300P-S ............................................................................................................................14
RELAY, PROTECTION AND PULSE OUTPUT ...........................................................................16
EPM 5300P R
ELAYS & 1 KYZ PULSE OUTPUT -NL OPTION ....................................................... 16
2 R
TANDARD RATE TABLE FOR WATTS* .............................................................................. 18
S
ELAY OVERVIEW ....................................................................................... 16
KYZ PULSE OUTPUTS: NL2 OPTION ........................................................................................19
4: COMMUNICATION
INSTALLATION
RS-232C ............................................................................................................................................... 21
RS-485 .................................................................................................................................................. 22
NETWORK OF INSTRUMENTS AND LONG DISTANCE COMMUNICATION .............. 26
ODEM CONNECTED TO COMPUTER (ORIGINATE MODEM) ......................................... 27
M
MODEM CONNECTED TO THE DEVICE (REMOTE MODEM) ............................................. 27
5: OVERVIEW ACCESSING THE POWER FUNCTIONS ..................................................................................... 31
ACCESSING VOLTAGE AND CURRENT PHASES ................................................................... 32
ACCESSING %THD FUNCTIONS ................................................................................................. 33
VIEWING INDIVIDUAL PHASE INDICATION FOR POWER FUNCTIONS ......................34
ACCESSING MAX/MIN VALUES ................................................................................................... 35
RESETTING VALUES ......................................................................................................................... 36
NPROTECTED RESET .........................................................................................................36
U
ROTECTED RESET ............................................................................................................... 37
P
RESETTING HOUR READINGS ..................................................................................................... 38
ACCESSING THE LM1/LM2 SET LIMITS ...................................................................................39
VOLTAGE PHASE REVERSAL AND IMBALANCE ................................................................... 40
ACCESS MODES ................................................................................................................................ 41
PRINT OPERATING DATA ............................................................................................................... 42
PRINT PROGRAMMING DATA ...................................................................................................... 43
ACCESSING FIRMWARE VERSION/LED TEST ........................................................................ 44
DISTRIBUTED DIGITAL FAULT RECORDER – INSTRUCTION MANUAL TOC–I
Page 4

TABLE OF CONTENTS
6: PROGRAMMING
OVERVIEW
GENERAL PROCEDURE .................................................................................................................. 45
SWITCH PACKS .................................................................................................................................46
PROGRAMMING MODE DATA ENTRY ....................................................................................... 47
STANDARD NUMERIC DATA ENTRY .......................................................................................... 48
7: EPM 5200P EPM 5200P .......................................................................................................................................... 49
8: ENTERING
PROGRAMMING MODE
9: PROGRAMMING
GROUP 0 - GLOBAL
METER SETUP
CHECKSUM ERROR—PROTECTIVE SELF-CHECKING ALGORITHMS ............................ 51
PASSWORD ENTRY .......................................................................................................................... 52
GROUP 0, FUNCTION 0—THE INTEGRATION INTERVAL .................................................. 54
GROUP 0, FUNCTION 2 — BAUD RATE ...................................................................................56
GROUP 0, FUNCTION 3 — SYSTEM CONFIGURATION ...................................................... 57
PEN DELTA SYSTEM INSTALLATION PROGRAMMING ................................................... 58
O
WITCHING COMMUNICATION PROTOCOLS, EI-BUS, MODBUS RTU/ASCII, DNP 3.0 59
S
MODBUS PLUS CAPABILITY .........................................................................................................60
RINTING OPTION ............................................................................................................... 60
P
GROUP 0, FUNCTION 3—PROGRAMMING PROCEDURE ..................................................61
RELAY MODE ..................................................................................................................................... 62
GROUP 0, FUNCTIONS 4–5—TIME DELAY FOR RELAYS 1 & 2 (OPTION – NL) ........65
GROUP 0, FUNCTION 6—KYZ PARAMETER SELECTION ................................................... 67
OW TO USE KYZ PULSE VALUE TABLE FOR MULTIPLICATION: ................................. 69
H
OW TO USE KYZ PULSE VALUE TABLE FOR DIVISION: ............................................... 70
H
GROUP 0, FUNCTION 7—NUMBER OF PHASES ................................................................... 72
10: PROGRAMMING
GROUP 1 – VOLTAGE,
AMP AND WATT SCALE
SETTINGS
11: PROGRAMMING
GROUP 2 - METER
CALIBRATION
12: GROUPS 4, 5 AND 6—
SET LIMITS AND
RELAYS
GROUP 1, FUNCTION 0 .................................................................................................................. 74
OLTAGE FULL SCALE: ........................................................................................................ 74
V
GROUP 1, FUNCTION 1 .................................................................................................................. 77
GROUP 1, FUNCTION 2 .................................................................................................................. 79
CALIBRATION REQUIREMENTS ................................................................................................... 84
GROUP 2, FUNCTIONS 0–2 .......................................................................................................... 85
TRIP RELAY .......................................................................................................................................... 90
TIME DELAYS & RELAY MODE ..................................................................................................... 91
GROUP 4: FUNCTIONS 0–3—LM1/LM2 SET LIMITS ........................................................... 92
GROUP 4: PROGRAMMING FORMAT FOR LIMIT CONDITION ........................................ 93
GROUP 5: FUNCTIONS 0–7—LM1/LM2 SET LIMITS ........................................................... 94
GROUP 6: LM1/LM2 SET LIMITS: ................................................................................................ 96
ROUP 6: THD SET - LIMITS / RELAYS (FOR OPTION -H) ..........................................96
G
GROUP 6: FUNCTIONS 0–5—LM1/LM2 SET LIMITS AND RELAY TRIGGERS FOR OVER/UN-
DER %THD CONDITIONS ..................................................................................... 97
LIMITS OR RELAYS PROGRAMMING PROCEDURE .............................................................. 98
TOC–II DISTRIBUTED DIGITAL FAULT RECORDER – INSTRUCTION MANUAL
Page 5

TABLE OF CONTENTS
13: PHASE REVERSAL
AND PHASE
IMBALANCE SET
LIMITS/RELAYS
14: EXITING
PHASE REVERSAL AND PHASE IMBALANCE ......................................................................... 101
TRIP RELAY .......................................................................................................................................... 102
GROUP 7, FUNCTION 0—VOLTAGE PHASE REVERSAL DETECTION ...........................103
GROUP 7, FUNCTION 1—PERCENTAGE VOLTAGE PHASE IMBALANCE .................... 105
EXITING PROGRAMMING MODE ................................................................................................ 107
PROGRAMMING MODE
15: PROGRAMMING
QUICK REFERENCE
ENTERING THE PROGRAMMING MODE .................................................................................. 109
DATA ENTRY SEQUENCE ............................................................................................................... 110
PROGRAMMING GROUPS .............................................................................................................111
ROUP 0: GLOBAL METER SETUP .................................................................................... 111
G
ROUP 1: FULL SCALE SETUP ........................................................................................... 112
G
ROUP 2: CALIBRATION ..................................................................................................... 112
G
ROUP 3: CALIBRATION RATIOS ....................................................................................... 113
G
ROUP 4: VOLT/CURRENT LIMITS ....................................................................................113
G
ROUP 5: POWER FUNCTION LIMITS ............................................................................... 113
G
ROUP 6: THD LIMITS ....................................................................................................... 113
G
ROUP 7: IMBALANCE/REVERSAL LIMITS ........................................................................ 114
G
ROUP 8: DC OUTPUT CALIBRATION ............................................................................... 114
G
16: ETHERNET OPTION ETHERNET MODULE ........................................................................................................................ 118
ETHERNET OPTION SETUP ........................................................................................................... 119
EFAULT IP ADDRESS ....................................................................................................... 119
D
UTOIP ................................................................................................................................ 119
A
ETTING THE IP ADDRESS .................................................................................................. 120
S
ETWORK CONFIGURATION .............................................................................................. 120
N
ONFIGURATION PARAMETERS ......................................................................................... 121
C
DISTRIBUTED DIGITAL FAULT RECORDER – INSTRUCTION MANUAL TOC–III
Page 6

TABLE OF CONTENTS
TOC–IV DISTRIBUTED DIGITAL FAULT RECORDER – INSTRUCTION MANUAL
Page 7
GE Consumer & Industrial
Multilin
EPM 5300 Series Meters
Chapter 1: AC Power
AC Power Measurement
The economics of electric power distribution networking dictate several configurations of
AC power transmission. The number of phases and voltage levels characterize these
configurations.
Measurement
1.1 Single Phase System
A single phase system is a basic two-wire system used in low power distribution
applications, such as residential communities or offices. Typically, the voltage is 120V AC.
For higher power requirements, such as small commercial facilities, the typical power
configuration is two lines of 120V AC opposite in phase (see Figure 1.1 B, below).
This system produces 120 volts from line to neutral for lighting and small appliance use.
The line-to-line voltage is 240V AC, used for higher loads such as water heaters, electric
dryers, ranges and machinery.
A)
Single Phase
2 W ires
B)
Single Phase
3 W ires
Line
Neutral
Line 1
Neutral
Line 2
FIGURE 1–1: Single Phase System: (A) Two-Wire, (B) Three-Wire
EPM 5300 SERIES ADVANCED POWER METERS – INSTRUCTION MANUAL 1–1
Page 8

SINGLE PHASE SYSTEM CHAPTER 1: AC POWER MEASUREMENT
e
The power (W) in a single phase system is:
Θcos • I • E = W
E = potential, I = current, and cosΘ = phase difference between the potential and the
current.
Power in a 120/240V AC system is:
)cos • I • (E + )cos • I • (E = W
ΘΘ
2 Line2 Line1 Line1 Line
Phase differential between the potential and the current results from a non-resistive load,
either reactive or capacitive.
Reactive power (VAR): The additional power consumed that does not produce any work
but must be delivered to the load: .
Θ⋅⋅ insIE=VAR
This is a measure of the inefficiency of the electrical system.
Apparent power (VA): The total power delivered to the load, and the vector sum of real
power and reactive power.
Power Factor (PF): The ratio between real power and apparent power:
Apparent Power (VA)
Real Power (W)
FIGURE 1–2: Relationship between apparent, real and reactive power
Reactiv
Power
(VAR)
Ideal power distribution should have a PF of 1. This condition can be met only if no reactive
power loads exist. In real life applications, many loads are inductive loads. Often, corrective
capacitors are installed to correct Poor Power Factor (see Section 1.3).
1–2 EPM 5300 SERIES ADVANCED POWER METERS – INSTRUCTION MANUAL
Page 9

CHAPTER 1: AC POWER MEASUREMENT THREE-PHASE SYSTEM
A
1.2 Three-Phase System
A three-phase system delivers higher levels of power for industrial and commercial
applications; the three phases correspond to three potential lines. A 120° phase shift exists
between the three potential lines.
A typical configuration has either a Delta connection or a Wye connection (see Figure 1.3,
below).
In a three-phase system, the voltage levels between the phases and the neutral are
uniform and defined by:
E
E
E
EEE
cnbnan
3
A
C
acbcab
=====
3
3
1) Delta
B
B
N
C
FIGURE 1–3: Three-Phase System: (1) Delta, (2) Wye
Voltages between the phases vary depending on loading factors and the quality of
distribution transformers. The three-phase system is distributed in different voltage levels:
208V AC, 480V AC, 2400V AC, 4160V AC, 6900V AC, 13800V AC, and so on.
Power measurement in a poly phase system is governed by Blondel's Theorem. Blondel’s
Theorem states that in a power distribution network which has N conductors, the number
of measurement elements required to determine power is N-1. A typical configuration of
poly phase system has either a Delta connection or a Wye connection (see Figure 1.4,
below).
2) Wye
EPM 5300 SERIES ADVANCED POWER METERS – INSTRUCTION MANUAL 1–3
Page 10

THREE-PHASE SYSTEM CHAPTER 1: AC POWER MEASUREMENT
1) Delta
C
A
2) Wye
A
B
X
P = E I
X
X
E I
E I
E I
AN A
AB A
AB A
CB C
+ E I
B
E I
BN B
X
N
P = E I + E I + E I
X
C
ABC
AN
E I
CN C
FIGURE 1–4: Poly Phase System: (1) Delta, (2) Wye
CB C
BN CN
1–4 EPM 5300 SERIES ADVANCED POWER METERS – INSTRUCTION MANUAL
Page 11

CHAPTER 1: AC POWER MEASUREMENT CONSUMPTION, DEMAND AND POOR POWER FACTOR
1.3 Consumption, Demand and Poor Power Factor
CONSUMPTION:
W = instantaneous power T = time in hours
The total electric energy usage over a time period is the consumption of WH.
Typically, the unit in which consumption is specif ied is the kilowatt-hour (KWH): one
thousand watts consumed over one hour. Utilities use the WH equation to determine the
overall consumption in a billing period.
DEMAND: Average energy consumed over a specified time interval. The utility determines
the interval, typically 15 or 30 minutes. The utility measures the maximum demand over a
billing period. This measurement exhibits a deviation from average consumption, causing
the utility to provide generating capacity to satisfy a high maximum consumption demand.
The highest average demand is retained in the metering system until the demand level is
reset.
POOR POWER FACTOR: Results in reactive power consumption. Transferring reactive
power over a distribution network causes energy loss. To force consumers to correct their
Power Factor, utilities monitor reactive power consumption and penalize the user for Poor
Power Factor.
T W=WH ×
EPM 5300 SERIES ADVANCED POWER METERS – INSTRUCTION MANUAL 1–5
Page 12
WAVEFORM AND HARMONICS CHAPTER 1: AC POWER MEASUREMENT
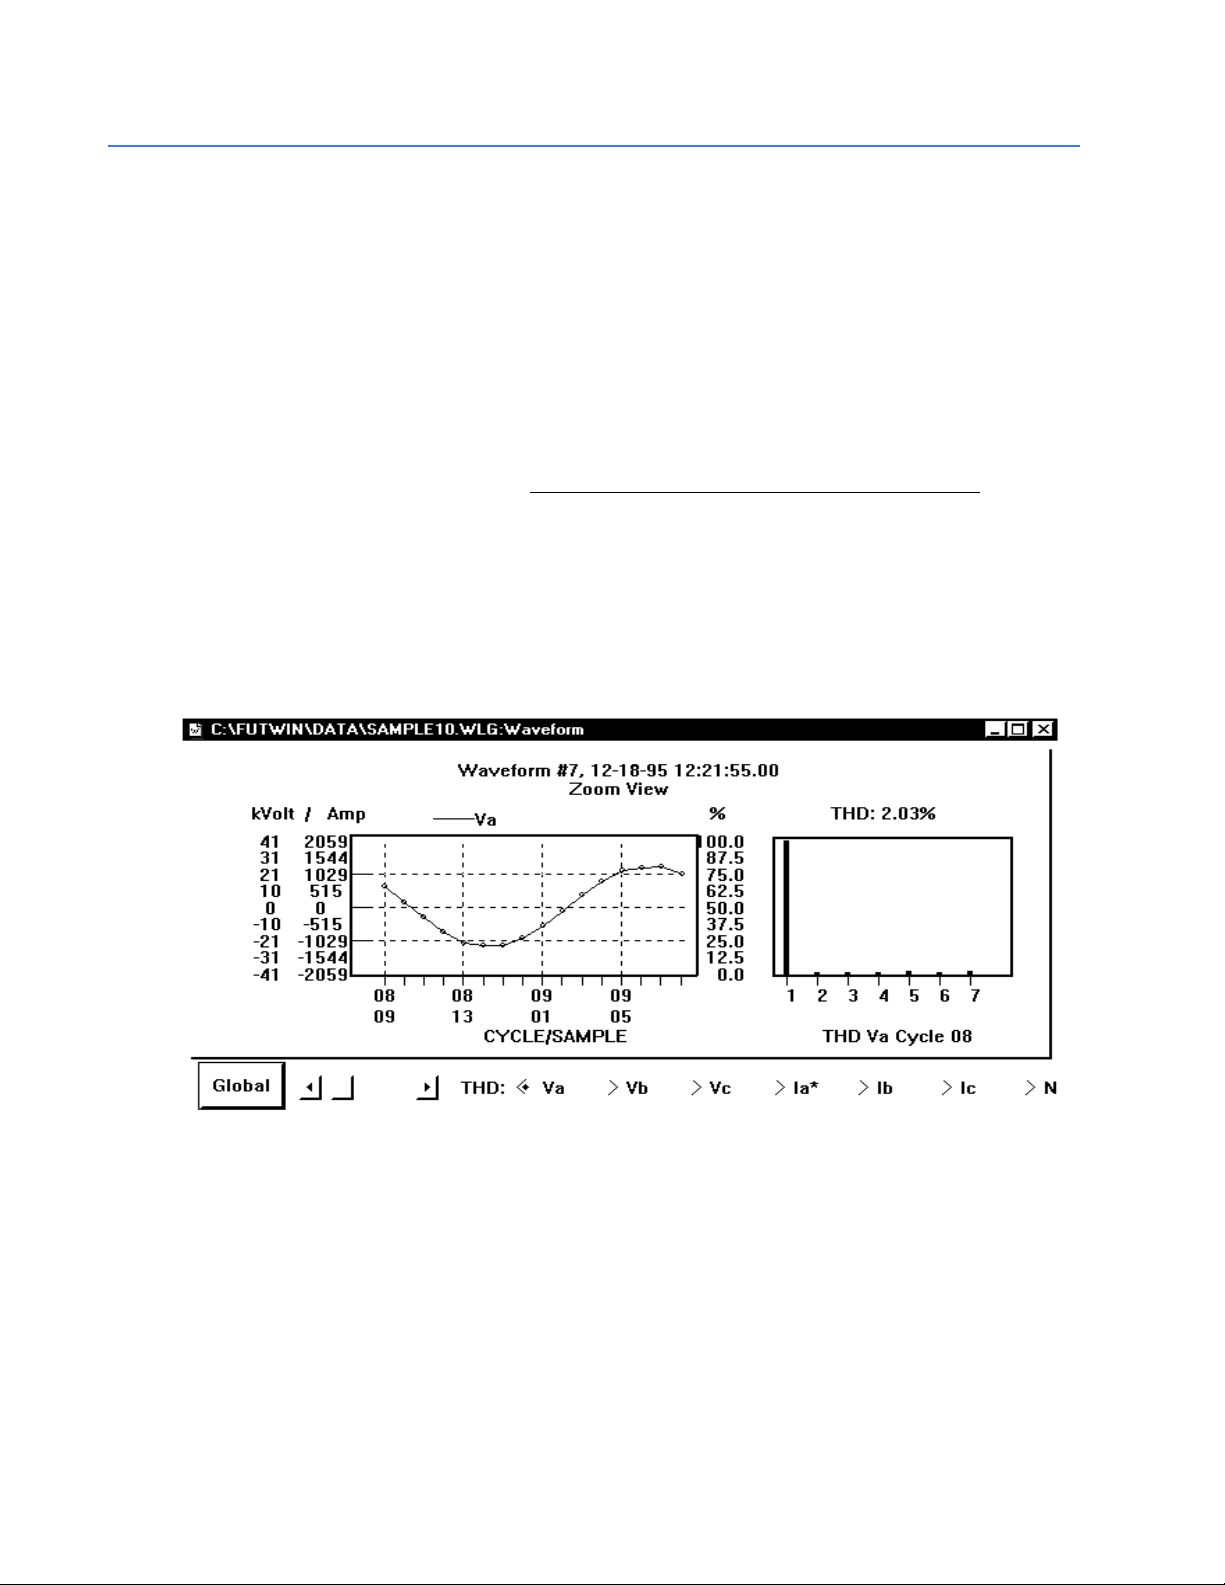
1.4 Waveform and Harmonics
Ideal power distribution has sinusoidal waveforms on voltages and currents. In real-life
applications, where inverters, computers, and motor controls are used, distorted
waveforms are generated. These distortions consist of harmonics of the fundamental
frequency.
SINUSOIDAL WAVEFORM:
DISTORTED WAVEFORM:
TOTAL HARMONIC DISTORTION (THD):
=THD of % ×
t)( sin •A ⋅ω
ωωωω
Signal DistortionHarmonic Total of RMS
L +t)•sin(•A+t)•sin(•A+t)•sin(•A+t) •sin( •A
332211
100
Signal lFundamenta the of RMS
HARMONIC DISTORTION: A destructive force in power distribution systems. It creates
safety problems, shortens the life span of distribution transformers, and interferes with the
operation of electronic devices. The Futura+ monitors the harmonic distortion to the 31st
harmonic. A waveform capture of distorted waveform is also available.
FIGURE 1–5: % THD GRAPH
1–6 EPM 5300 SERIES ADVANCED POWER METERS – INSTRUCTION MANUAL
Page 13

GE Consumer & Industrial
Multilin
EPM 5300 Series Meters
Chapter 2: Mechanical
Mechanical Installation
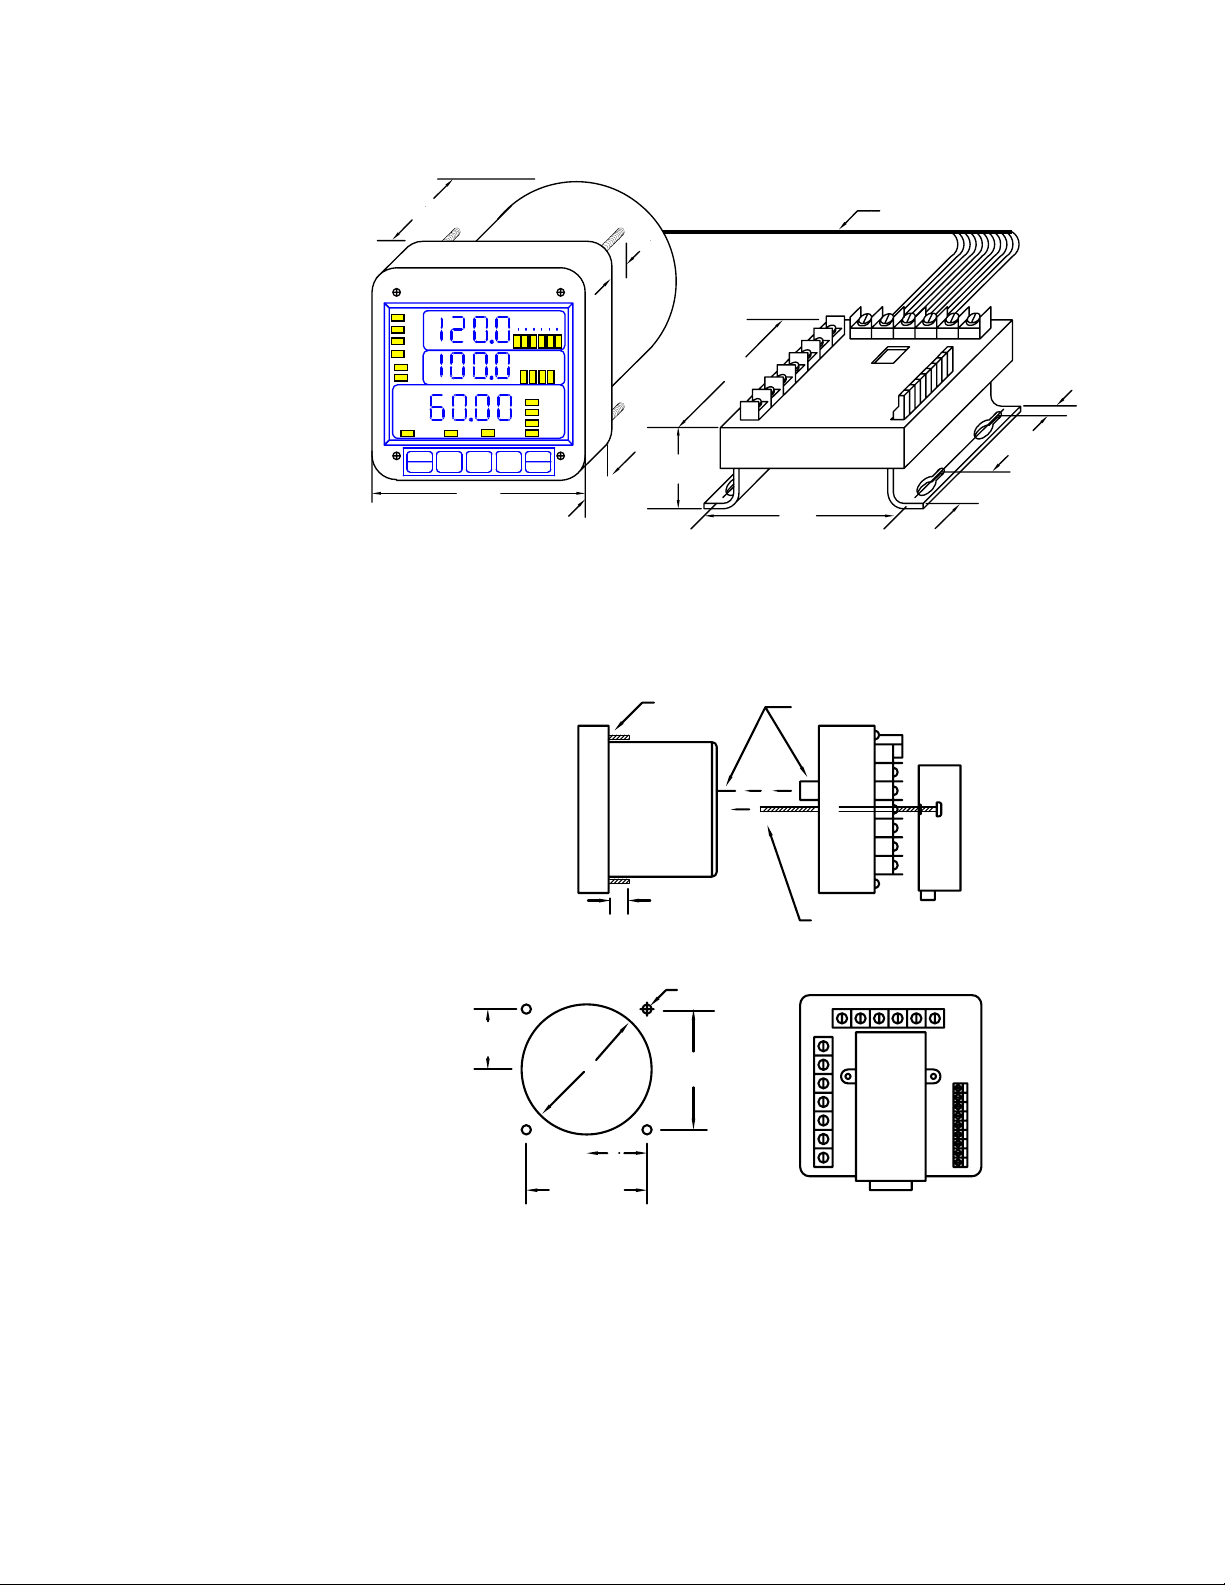
2.1 Mechanical Installation
Installation
These diagrams display the various possible mechanical installations and Communication
Converter installation. The various models use the same hookup and installation.
4.50
SQ.
AMPS
FREQKWHKV AH
POWER
AC VOLTS
A
NBNCNABBCCA
AC AMPS
POWER
PF
KW
KVA
KVAR
PHASE
NEXT
NCBA
2.0
3.0
0.890
MAX
MIN
LM1
MAX
THD
K
MAX/MIN
LIMITS
VOLTS
4.375
SQ.
FIGURE 2–1: Standard installation
EPM 5300 SERIES ADVANCED POWER METERS – INSTRUCTION MANUAL 2–1
Page 14
MECHANICAL INSTALLATION CHAPTER 2: MECHANICAL INSTALLATION
R
A
A
A
S
3.50
0.80
4.375
SQ.
FREQKWHKVAH
POWER
AC VOLT S
A
NBNCNABBC
AC AMPS
POWER
PHASE
NEXT
C
NCB
PF
KW
KV
KVA
4.50
SQ.
2.425
0.890
(4) 8-32 SCREWS
5.00
MAX
MIN
LM1
LM2
THD
K
MAX/MIN
LIMITS
VOLTS AMPS
FIGURE 2–2: Installation with K-110 option for limited space conditions
IDE VIEW
(4) 8-32 SCREWS
FIRST PUT (16) PIN
CONNECTOR TOGETHER.
3 FOOT CABLE
0.336
2.45
0.714
0.80
RECOMMENDED
(2) 8-32 SCREWS WILL
LINE UP WITH 2 PEMS
ON THE BACK PLATE.
CUTOUT
0.198 DIA.
1.6875
4.0 DIA.
3.375
1.6875
3.375
BACK VIEW
FIGURE 2–3: Standard cutout
2–2 EPM 5300 SERIES ADVANCED POWER METERS – INSTRUCTION MANUAL
Page 15
CHAPTER 2: MECHANICAL INSTALLATION MECHANICAL INSTALLATION
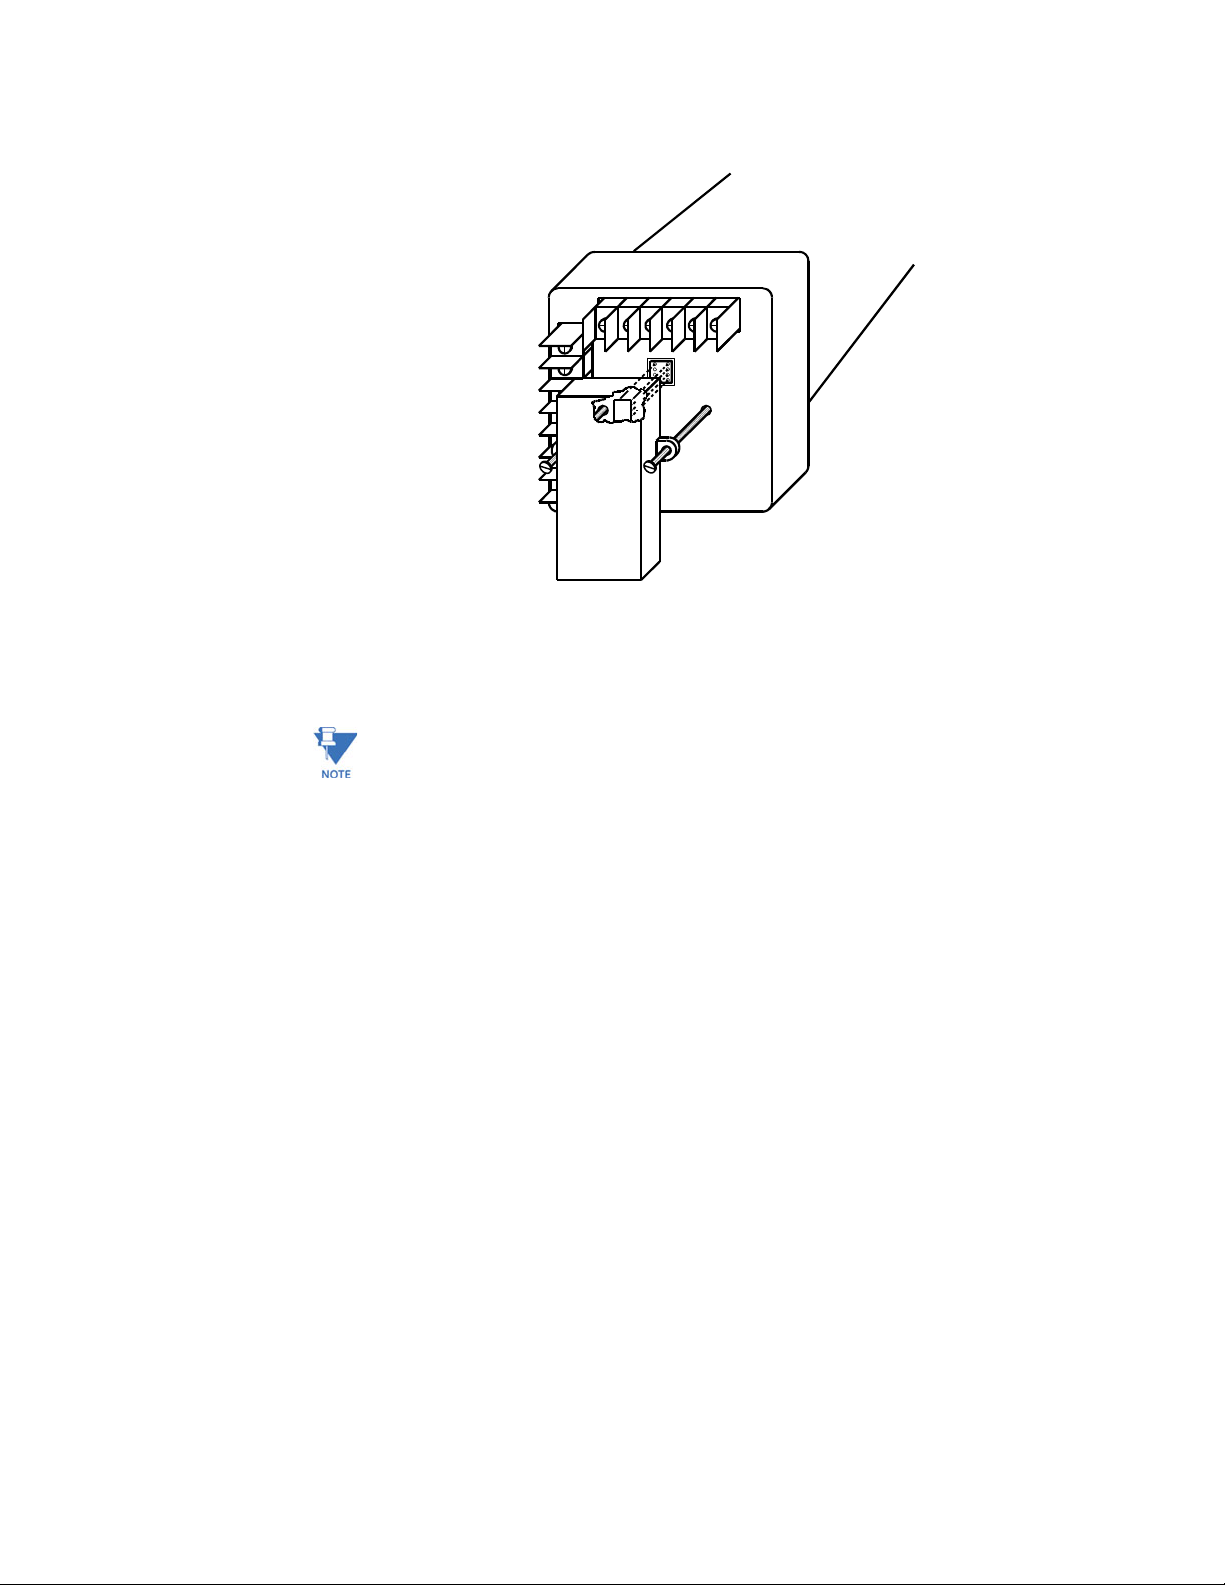
W Port
FIGURE 2–4: Optional Communication Converter or DC Output Module Installation
* Recommended wire gauge is 20 AWG for DC Output or RS-485 options.
Note
Carefully line up the guide screw and 8 pin port connector to prevent pin breakage.
EPM 5300 SERIES ADVANCED POWER METERS – INSTRUCTION MANUAL 2–3
Page 16

MECHANICAL INSTALLATION CHAPTER 2: MECHANICAL INSTALLATION
2–4 EPM 5300 SERIES ADVANCED POWER METERS – INSTRUCTION MANUAL
Page 17
GE Consumer & Industrial
Multilin
EPM 5300 Series Meters
Chapter 3: Electrical
Electrical Installation
3.1 Connecting the Current Circuit
Installation
Install the wiring for the current at 600V AC insulation as a minimum. The cable connector
should be rated for 6 Amps or greater and have a cross-sectional area of 16 AWG
minimum.
Mount the current transformers (CTs) as close as possible to the meter for best accuracy.
The following table illustrates the maximum recommended distances for various CT sizes,
assuming the connection is via 16 AWG cable.
Table 3–1:
CT Size Maximum Distance (CT to Meter)
2.5 VA 10 Feet
5.0 VA 15 Feet
7.5 VA 30 Feet
10.0 VA 40 Feet
15.0 VA 60 Feet
30.0 VA 120 Feet
DO NOT leave secondary of the CT open when primary current is flowing. This causes high
voltage that will overheat the secondary of the CT. Use a shorting block on the secondary
of the CT.
CT Size and Maximum Distance
EPM 5300 SERIES ADVANCED POWER METERS – INSTRUCTION MANUAL 3–5
Page 18

CT CONNECTION CHAPTER 3: ELECTRICAL INSTALLATION
3.2 CT Connection
If the meter is connected directly to the current (up to 10 Amps max.), maintain the exact
connection to avoid incorrect polarity.
When the meter is connected using the CTs, you must maintain the correct CT polarities. CT
polarities are dependent upon correct connections of CT leads, and upon the direction the
CTs are facing when clamped around conductors. The dot on the CT must face the line
side; the corresponding secondary connection must connect to the appropriate input on
the meter. Failure to connect CTs properly results in inaccurate power readings. If your
meter is not reading power properly, it is more than likely the CT is incorrectly wired.
Note
CTs are shorted if connected to the terminal block model DSP2 or 3 even if it is detached
from the meter.
3.2.1 Helpful Debugging Tools
Option 1: Isolating a CT Connection Reversal power reading
If your meter does not read the correct watts after installation, it almost always means
that the CT’s have been wired in the wrong polarity. To check the polarity of the CT after the
monitor has been installed, look at the single phase WATT readings to see that each of the
readings are positive (assuming you are consuming power). If one of the WATT readings is
negative, that particular phase CT is reversed.
To check the single phase WATT reading, press the Power button twice while the
annunciator is positioned to WATTS. Then press the Phase/Next button to cycle through
the phases. After connecting the polarity of the CTs, the WATT and VAR readings should be
correct.
Option 2: Isolating a CT Connection Reversal using Voltage Readings
Z KW reading. It should be positive.
Z If negative, reverse the CT wires on terminals 8 and 9.
Z Connect terminal number 6 potential. If KW decreases to about
zero, reverse CT wires on terminals 10 and 11.
Z Connect terminal number 7 potential. If KW is one-third of
expected reading, reverse CT wires to terminals 12 and 13.
3–6 EPM 5300 SERIES ADVANCED POWER METERS – INSTRUCTION MANUAL
Page 19

CHAPTER 3: ELECTRICAL INSTALLATION CONNECTING THE VOLTAGE CIRCUIT
3.3 Connecting the Voltage Circuit
For proper meter operation, the voltage connection must be maintained. The voltage must
correspond to the correct terminal.
The cable required to terminate the voltage sense circuit should have an insulation rating
greater than 600V AC and a current rating greater than 0.1 A.
EPM 5300 SERIES ADVANCED POWER METERS – INSTRUCTION MANUAL 3–7
Page 20

SELECTING THE VOLTAGE FUSES CHAPTER 3: ELECTRICAL INSTALLATION
3.4 Selecting the Voltage Fuses
We strongly recommend using fuses on each of the sense voltages and the control power,
although connection diagrams do not show them. Use a 1 Amp fuse on each voltage input .
The meter can handle a maximum voltage of 150V phase to neutral. PTs are required for
higher voltages. Suffix -G extends the maximum direct voltage to 300V phase to neutral,
600 volt phase to phase.
3–8 EPM 5300 SERIES ADVANCED POWER METERS – INSTRUCTION MANUAL
Page 21

CHAPTER 3: ELECTRICAL INSTALLATION CONNECTION TO THE MAIN POWER SUPPLY
3.5 Connection to the Main Power Supply
The meter requires separate control power to operate. Listed are the five different power
supply options and corresponding suffixes.
Table 3–2:
CONTROL POWER OPTION SUFFIX CURRENT
120V AC 115 A 0.1 AAC
240V AC 230 A 0.05 AAC
12V DC D4 0.10 ADC
24-48V DC D 0.25-0.5 ADC
125V AC/DC (universal) D2 0.10 AAC or DC
Control Power and Current
Note
For DC-powered units, polarity should be observed. Connect the negative terminal to L and
positive terminal to L1. An earth ground connection to chassis is mandatory for normal
operation (terminal three). Do not ground the unit through the negative of the DC supply.
Note
Externally fuse power supply with a slow-blow 3 Amp fuse.
EPM 5300 SERIES ADVANCED POWER METERS – INSTRUCTION MANUAL 3–9
Page 22

ELECTRICAL CONNECTION INSTALLATION CHAPTER 3: ELECTRICAL INSTALLATION
3.6 Electrical Connection Installation
Choose the diagram that best suits your application and maintain the CT polarity. Follow
the outlined procedure to verify correct connection.
Note
Note
IMPORTANT: For PT connections only, short terminals 3 and 4.
Connect local ground to terminal 3. This protects the unit from spikes and transients.
• The meter and terminal module DSP3 are factory calibrated together; the serial
numbers are matched on both. The DSP3 input module and the meter base MUST
MATCH!
• Mismatching of the meter and DSP3 input module will cause inaccurate readings
because calibration ratios are stored in the meter’s memory, not in the DSP3 input
module.
3.6.1 List of Connection Diagrams
Note
See phase reversal if a message of CBA appears after installation.
Fig 3-1 Three-Phase, Three-Wire System Delta with Direct Voltage and CTs
Three-Phase, Three-Wire Open Delta with two CTs and two PTs
(Open Delta System should only be used if the electrical system is a 3-wire 2
Fig 3-2
PT OPEN DELTA
Open Delta can be enabled or disabled in Programming GROUP 0,
FUNCTION 3, Chapter 9, section 9.4)
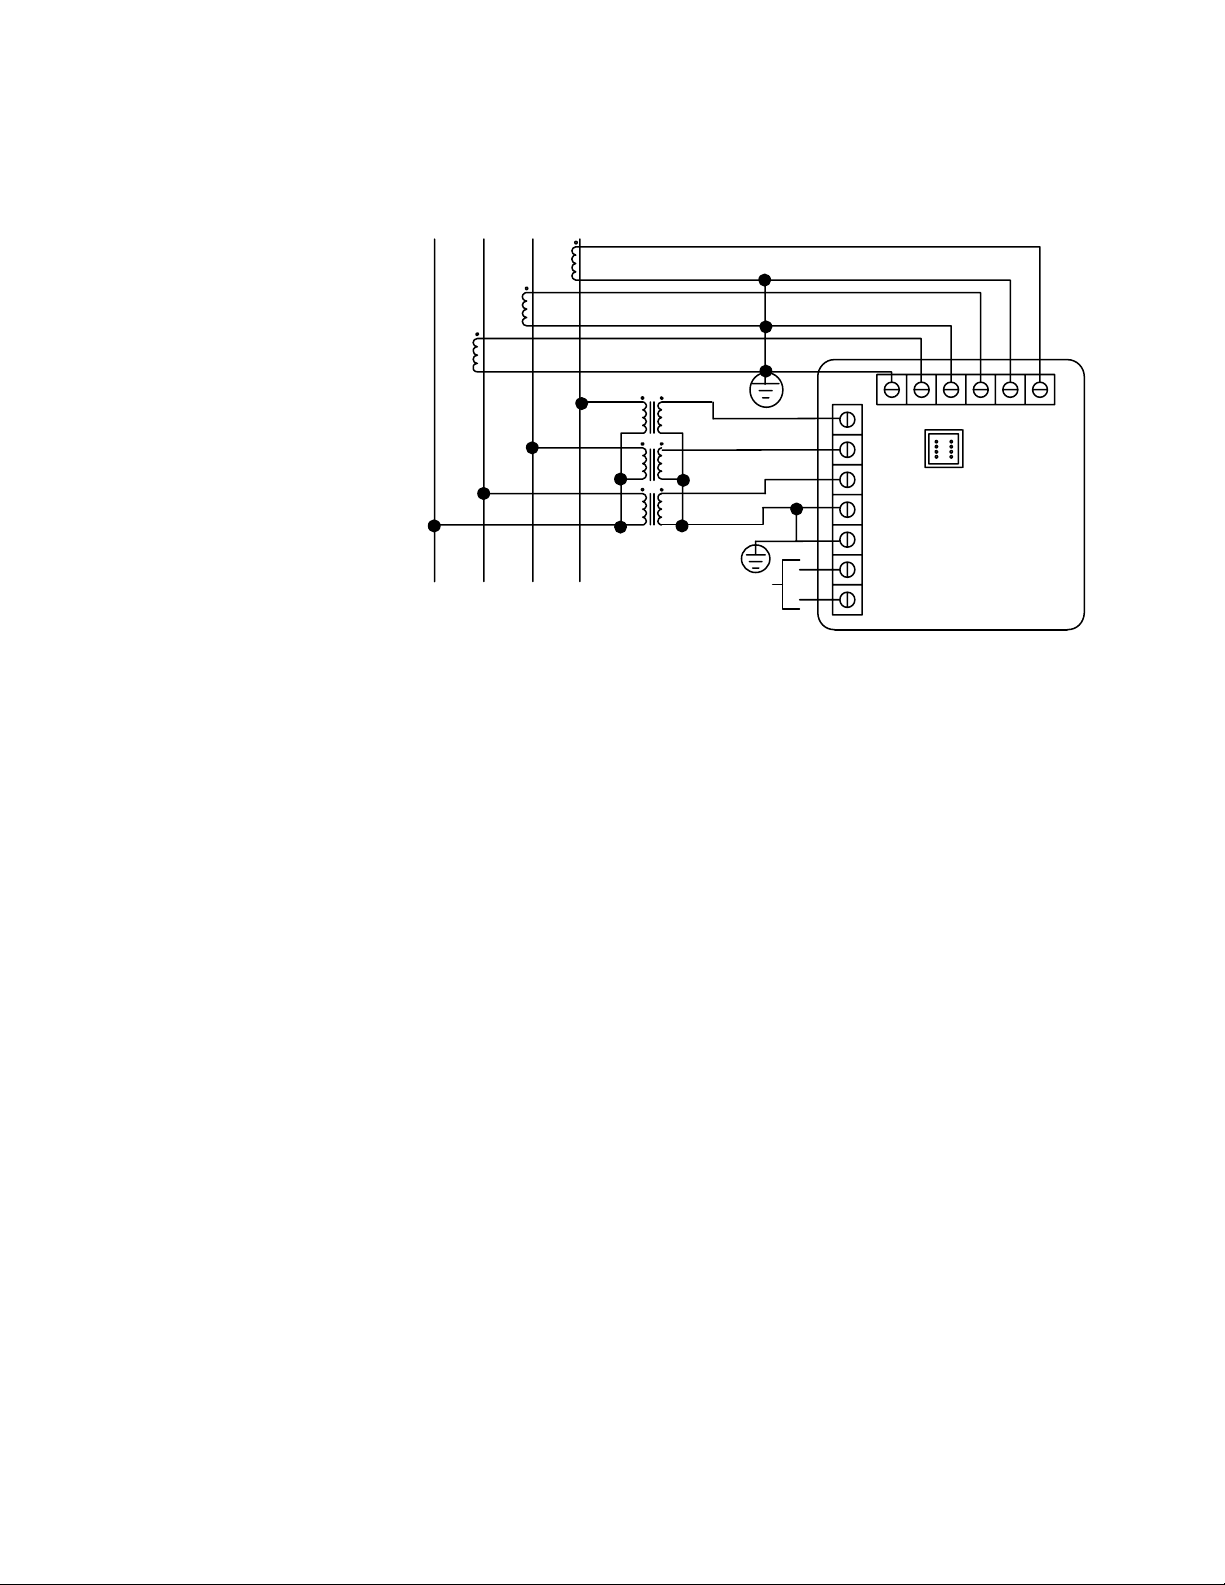
Fig 3-3 Three-Phase, Three-Wire Open Delta with three CTs and two PTs
Fig 3-4 Three-Phase, Four-Wire Wye with Direct Voltage and CTs
Fig 3-5 Three-Phase, Four-Wire Wye with CTs and PTs
VI Single Phase with CT and PT Connection
VII Dual-Phase System
VIII Three Phase System
3–10 EPM 5300 SERIES ADVANCED POWER METERS – INSTRUCTION MANUAL
Page 23
CHAPTER 3: ELECTRICAL INSTALLATION ELECTRICAL CONNECTION INSTALLATION
LINE
BC
A
CONTROL
POWER
LOAD
+
-
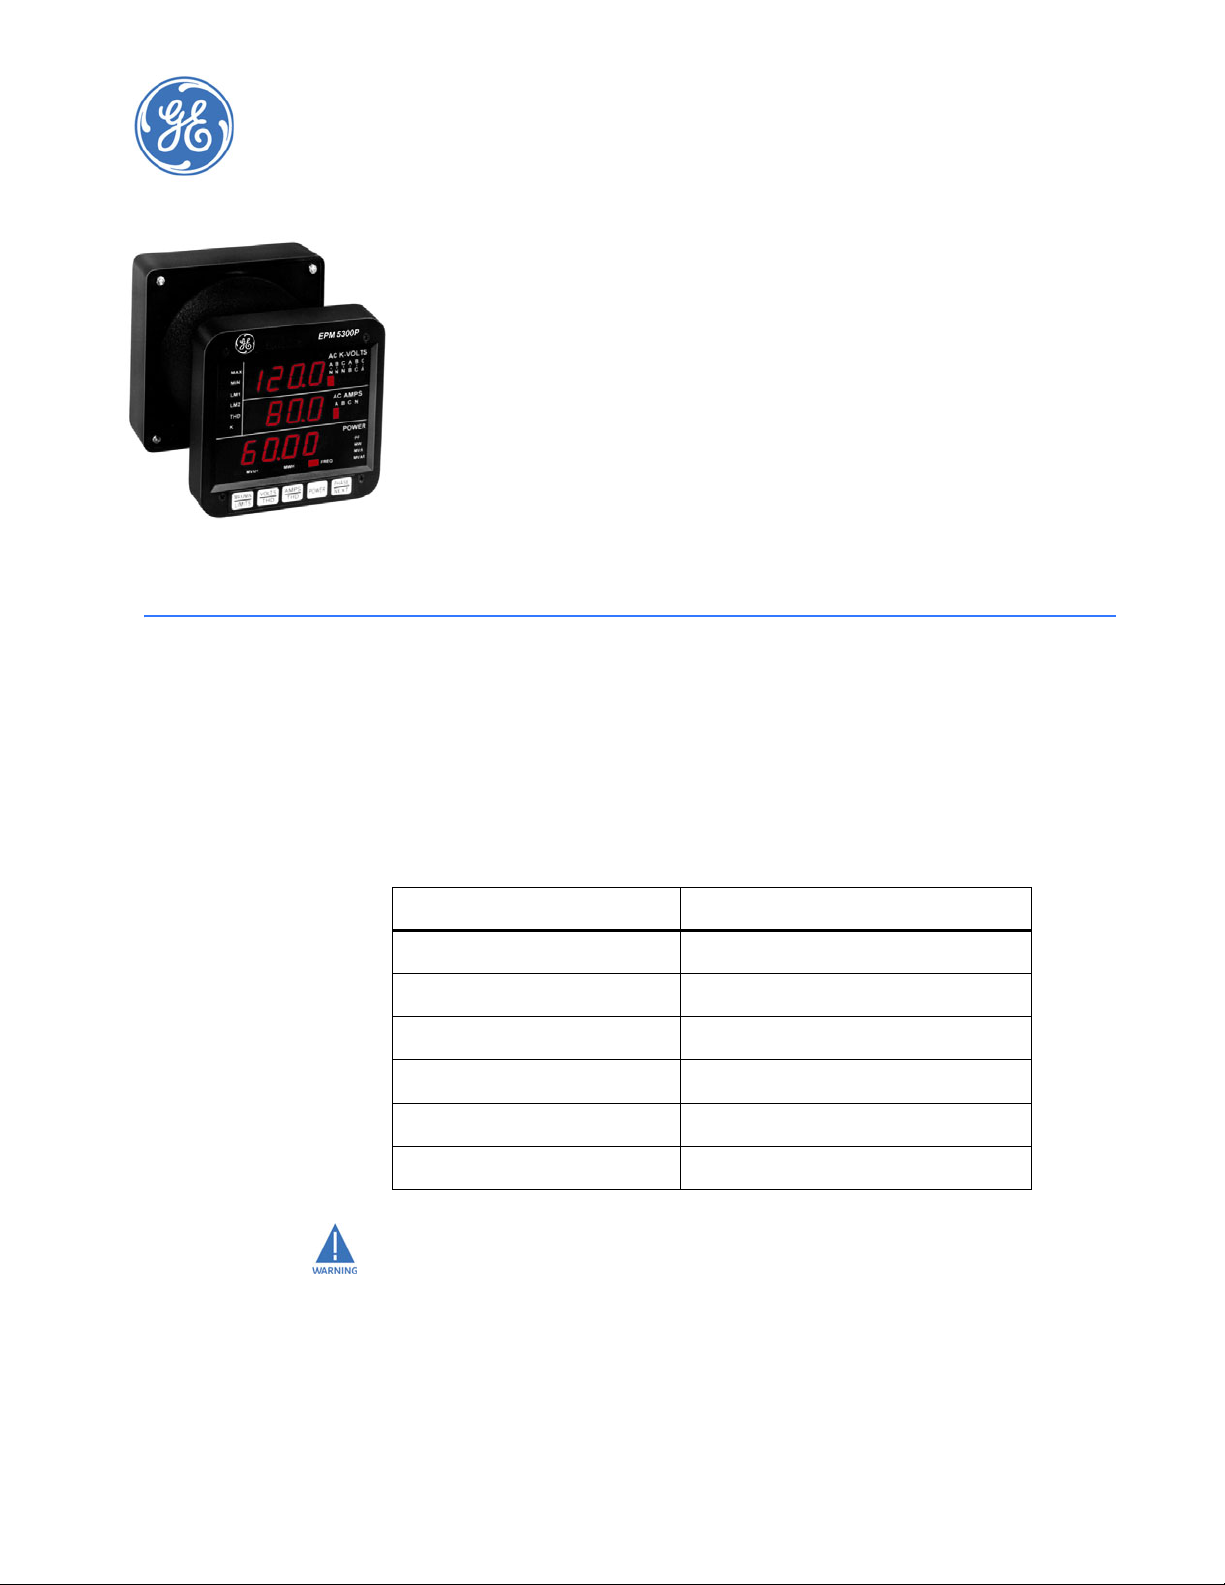
FIGURE 3–1: Three Phase, Three-Wire System Delta with Direct Voltage and CTs
Note
Remember to make sure Open Delta bit is programmed in the meters (See Chapter 9).
BACK VIEW
8
9
7
6
PORT
5
4
3
L1
2
L
1
10
11
12
13
A
LOAD
LINE
B C
POWER
+
-
BACK VIEW
8
10
9
7
6
PORT
5
4
3
2
L1
1
L
11 12
13
FIGURE 3–2: Three-Phase, Three-Wire Open Delta with two CTs and two PTs
EPM 5300 SERIES ADVANCED POWER METERS – INSTRUCTION MANUAL 3–11
Page 24
ELECTRICAL CONNECTION INSTALLATION CHAPTER 3: ELECTRICAL INSTALLATION
Note
Remember to make sure Open Delta bit is programmed in the meter (see section 9.4).
A
LOAD
LINE
B C
POWER
+
-
BACK VIEW
8
10
9
7
6
PORT
5
4
3
2
L1
1
L
11 12
13
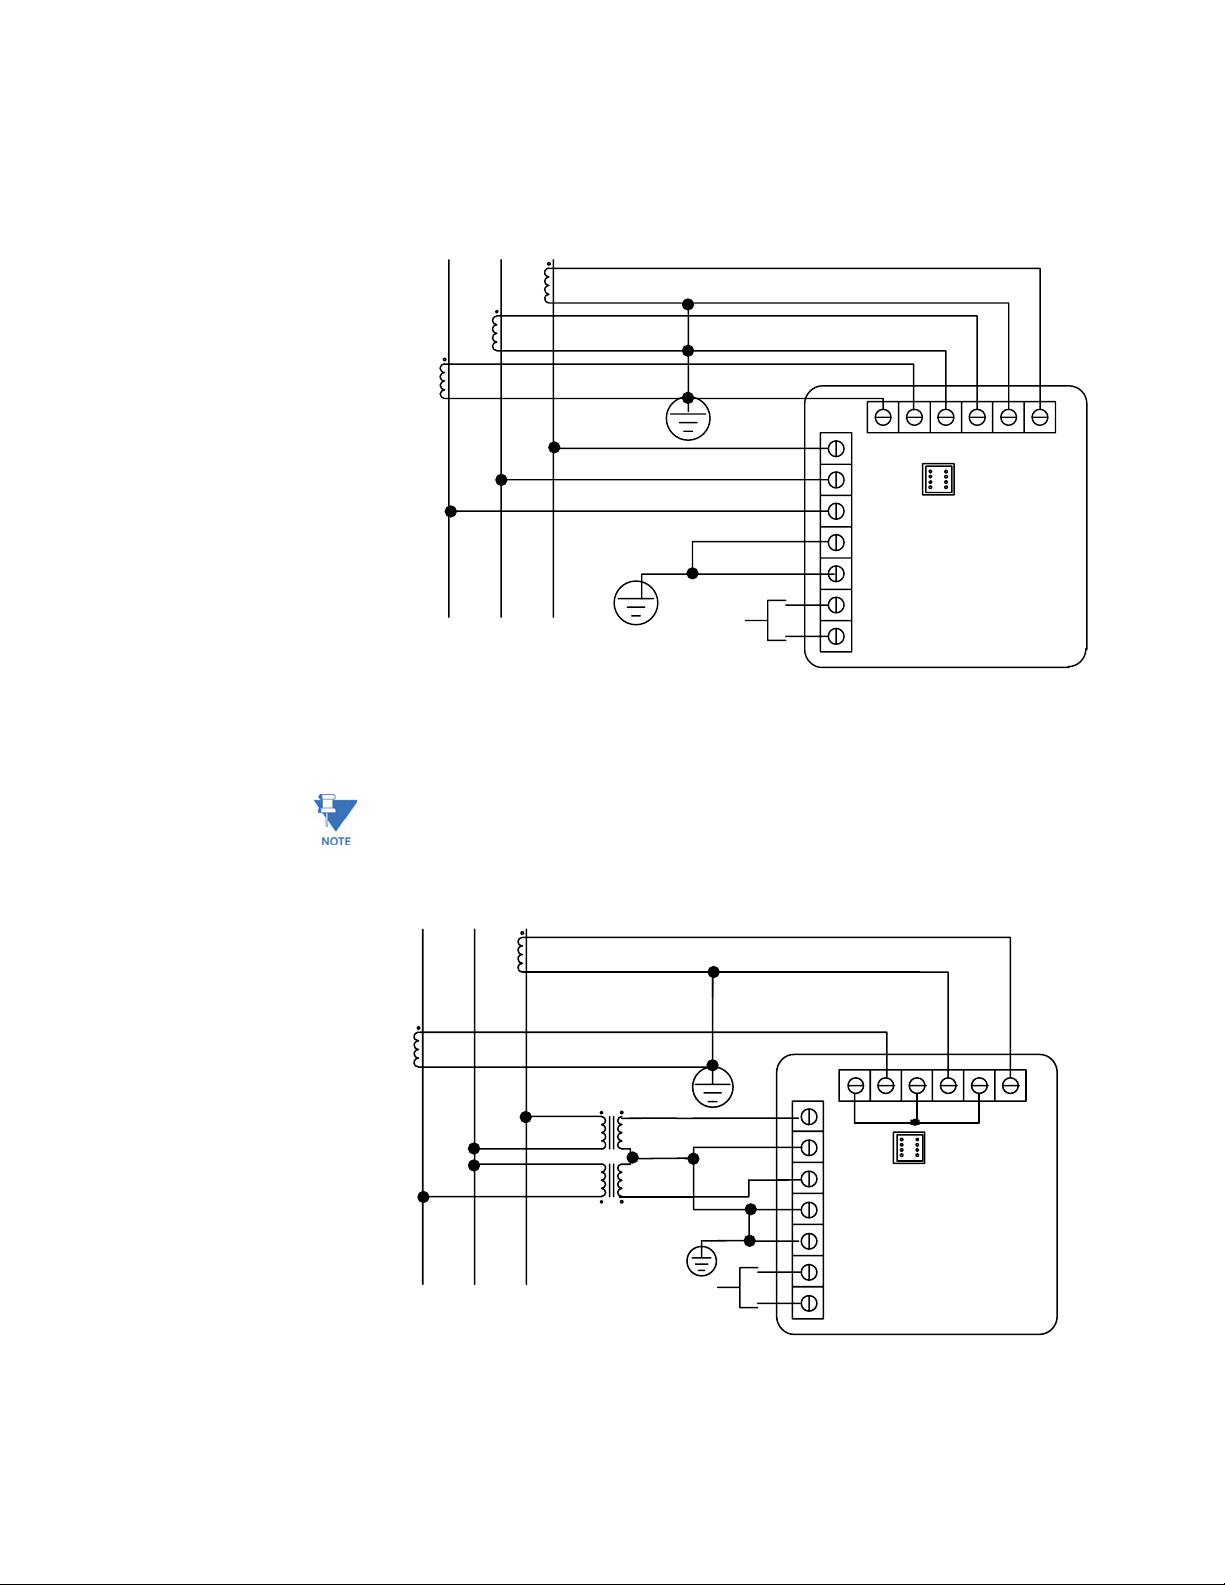
FIGURE 3–3: Three-Phase, Three-Wire Open Delta with three CTs and two PTs
Note
Remember to make sure Open Delta bit is programmed in the meter (see Chapter 9).
LINE
N A
LOAD
B C
CONTROL
POWER
+
-
BACK VIEW
8
10
9
7
6
5
4
3
2
1
PORT
L1
L
11
12
13
FIGURE 3–4: Three-Phase Four-Wire Wye with Direct Voltage and CTs
3–12 EPM 5300 SERIES ADVANCED POWER METERS – INSTRUCTION MANUAL
Page 25
CHAPTER 3: ELECTRICAL INSTALLATION ELECTRICAL CONNECTION INSTALLATION
LINE
NA
BC
BACK VIEW
LOAD
8
910
7
6
PORT
5
4
3
POWER
+
-
2
L1
1
L
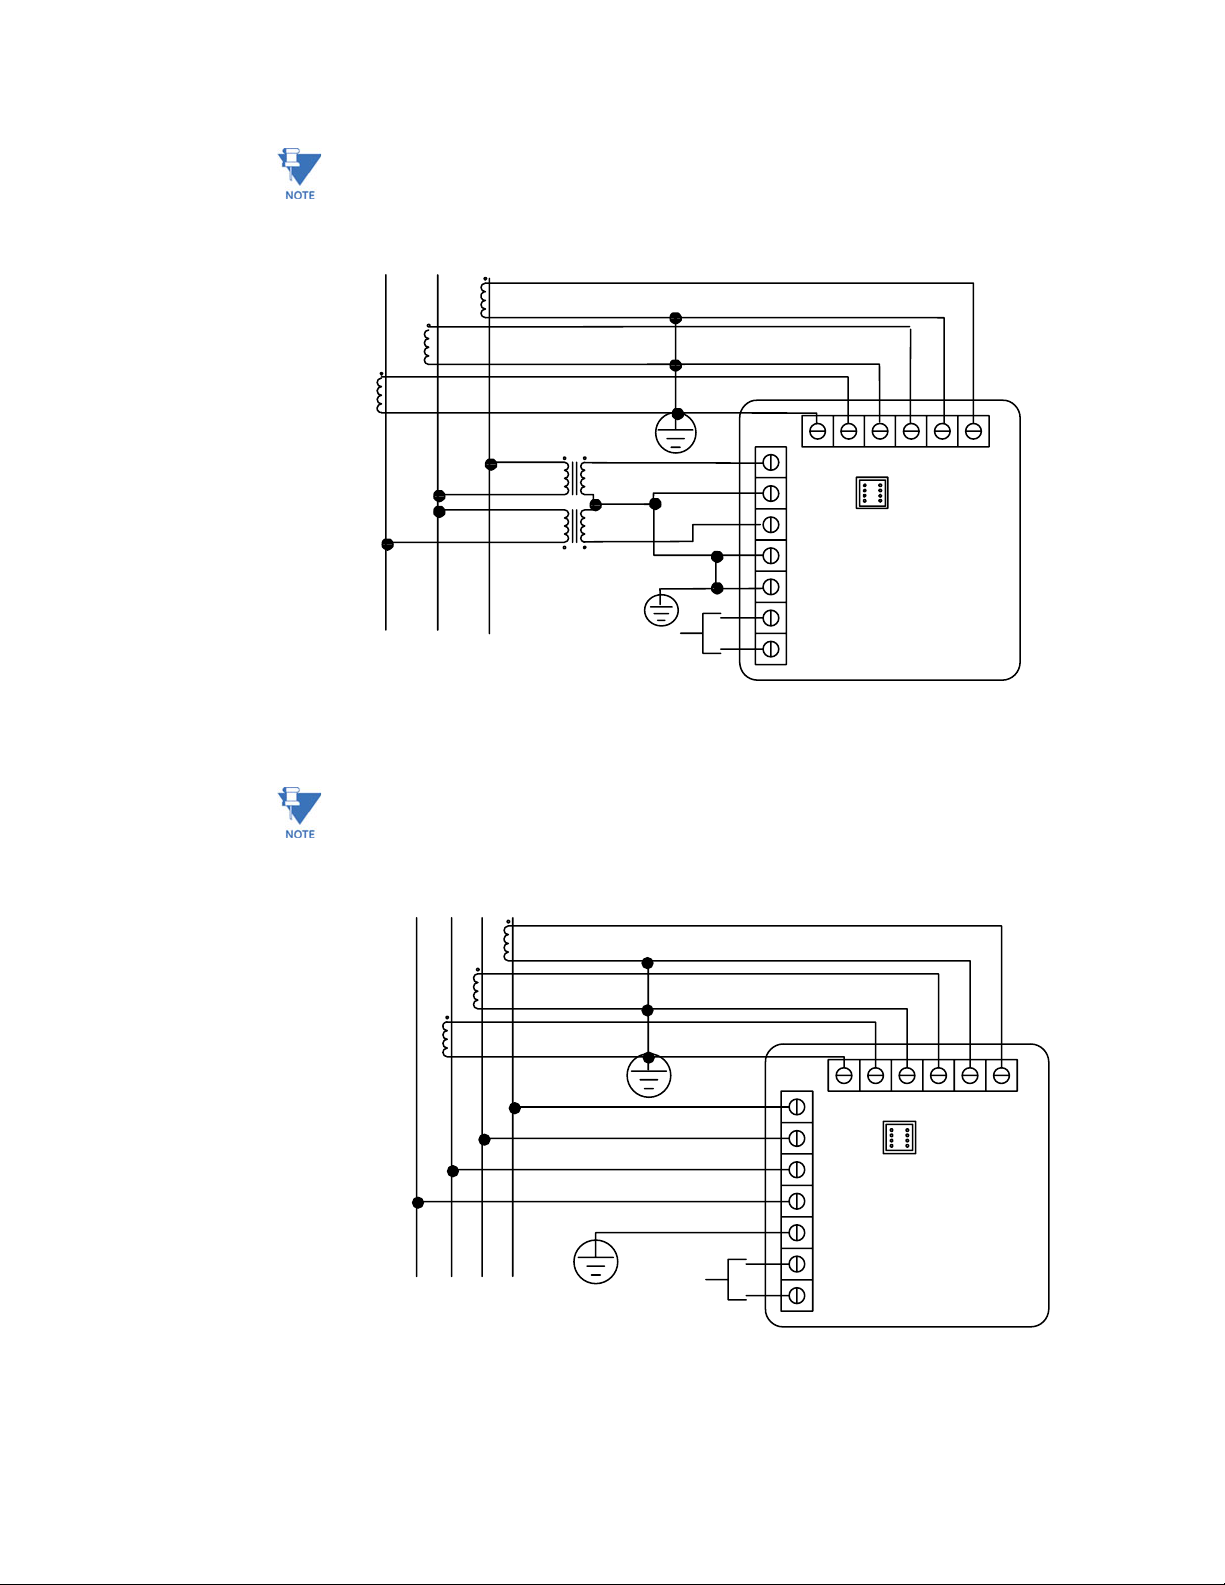
FIGURE 3–5: Three Phase Four-Wire Wye with CT and PTs
12 13
11
EPM 5300 SERIES ADVANCED POWER METERS – INSTRUCTION MANUAL 3–13
Page 26
THE EPM 5300P-S CHAPTER 3: ELECTRICAL INSTALLATION
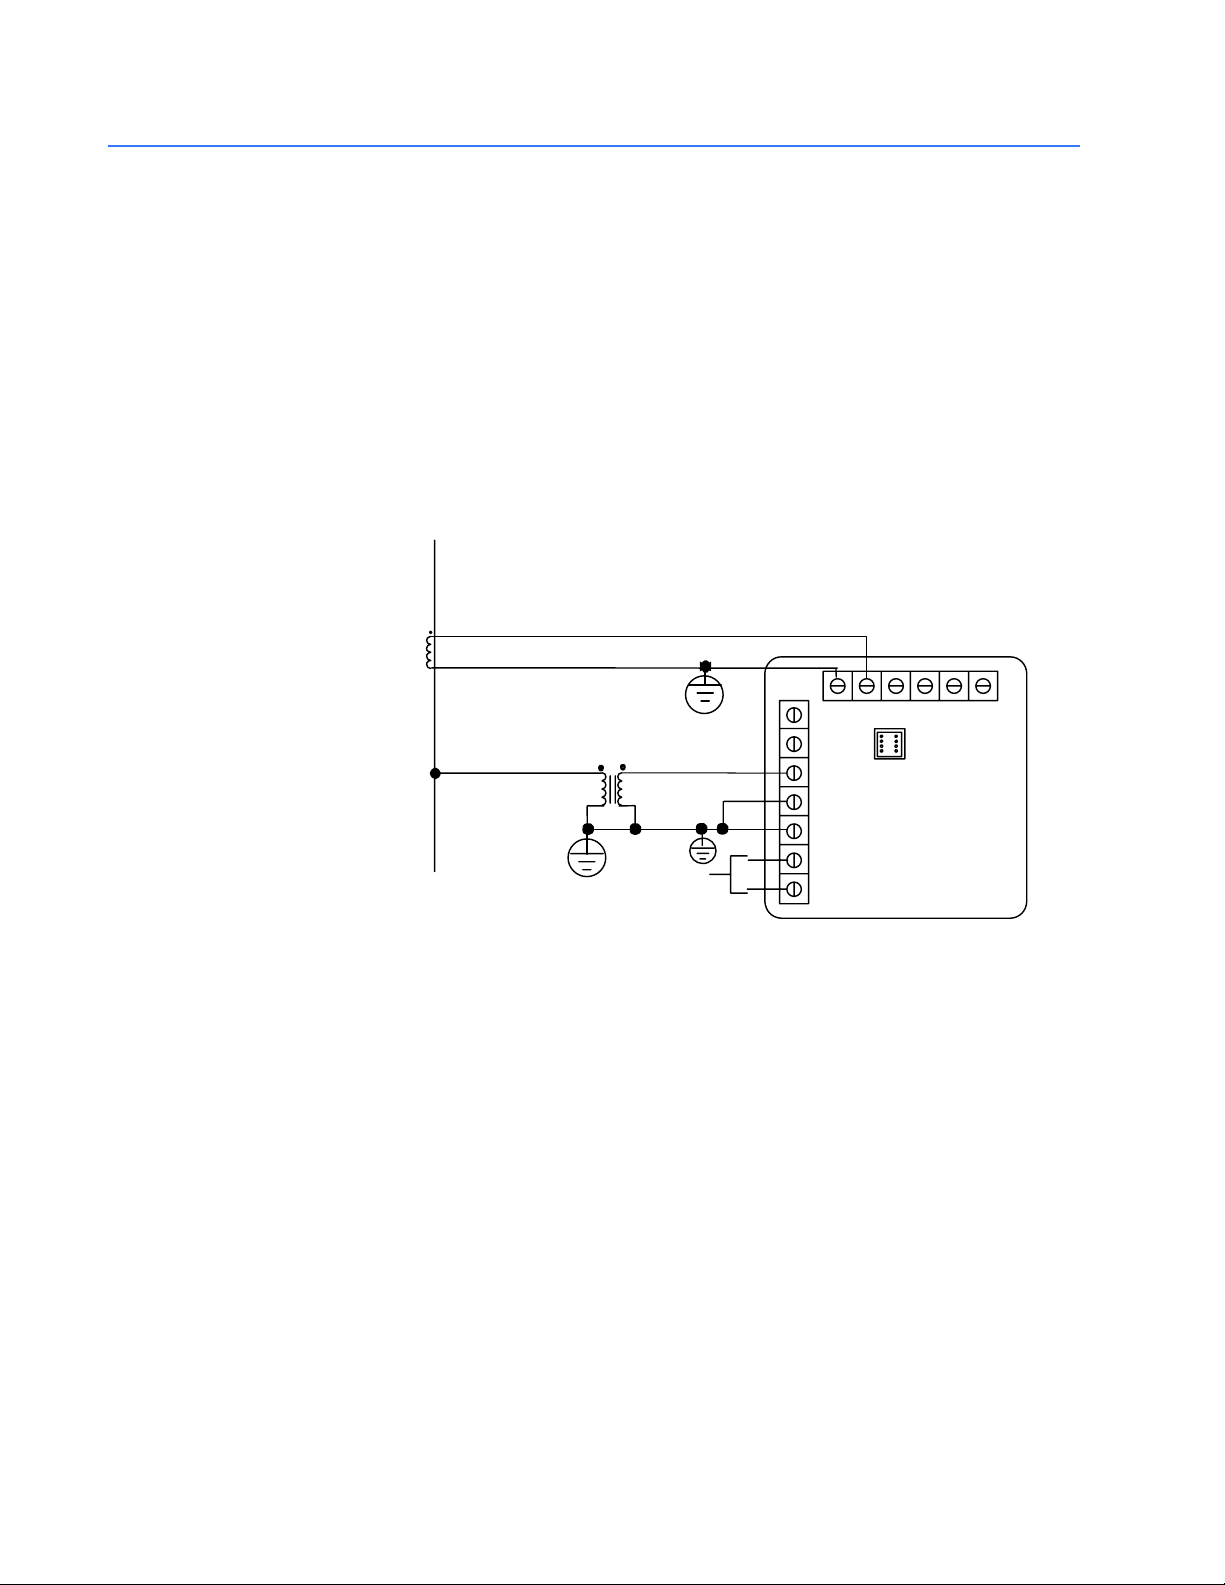
3.7 The EPM 5300P-S
The EPM 5300P-S is essentially the 5300P, where through the Programming Mode
calculations are changed to reflect either Single Phase or Dual Phase readings.
Single Phase—The connection MUST be identical to Diagram VI.
Dual Phase—The connection MUST be identical to Diagram VII.
Program 1 for Single Phase or 2 for Dual Phase in GROUP 0, FUNCTION 7 to remove ThreePhase indicators from view.
LINE
A
LOAD
BACK VIEW
8
10 11 12
9
7
POWER
+
-
6
PORT
5
4
3
2
L1
1
L
FIGURE 3–6: Single Phase with CT and PT Connection
13
3–14 EPM 5300 SERIES ADVANCED POWER METERS – INSTRUCTION MANUAL
Page 27
CHAPTER 3: ELECTRICAL INSTALLATION THE EPM 5300P-S
LINE
A
LOAD
B
POWER
+
-
BACK VIEW
8
9 10
7
6
PORT
5
4
3
2
L1
1
L
11
12 13
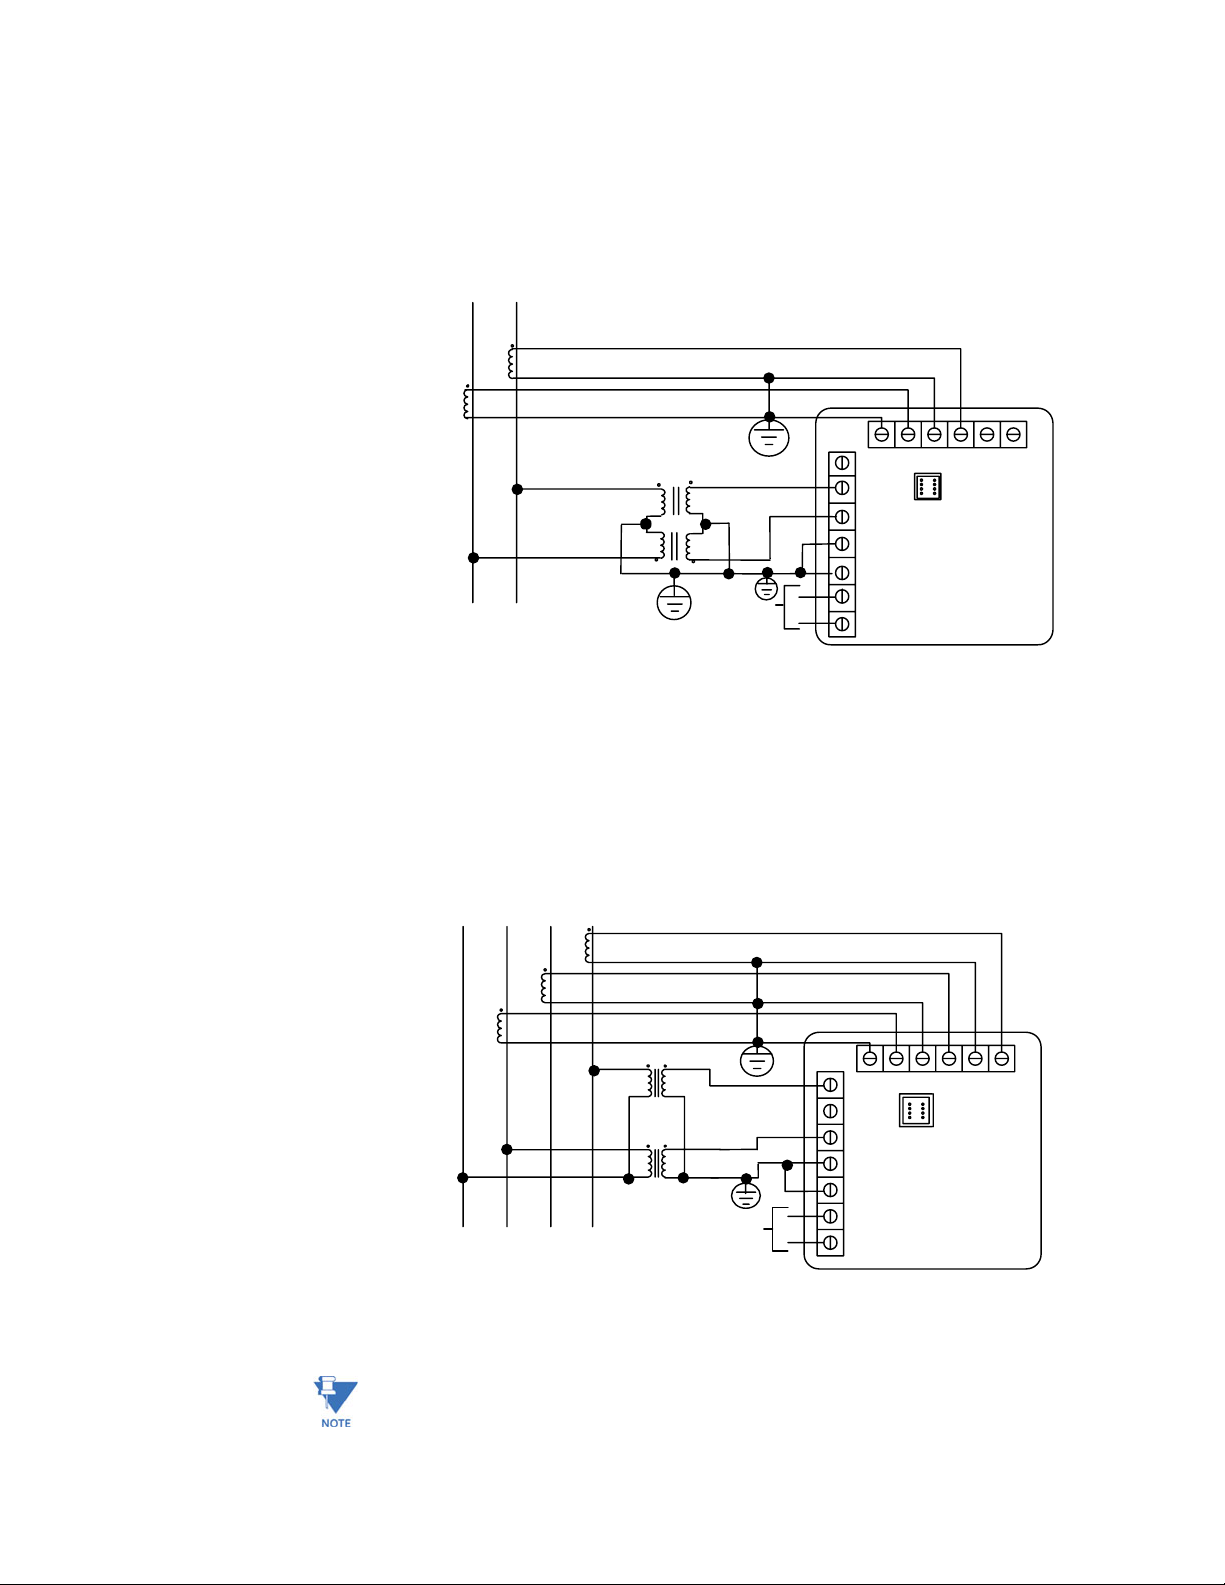
FIGURE 3–7: Dual-Phase with CTs and PTs
LINE
N A
LOAD
B C
CONTROL
POWER
+
-
BACK VIEW
8
9 10
7
6
PORT
5
4
3
2
L1
1
L
11
12 13
FIGURE 3–8: Three-Phase Four-Wire WYE with 2.5 Element
Note
The 2.5 element option must be custom configured from the factory. You must pre-order
this configuration.
EPM 5300 SERIES ADVANCED POWER METERS – INSTRUCTION MANUAL 3–15
Page 28

RELAY, PROTECTION AND PULSE OUTPUT CHAPTER 3: ELECTRICAL INSTALLATION
3.8 Relay, Protection and Pulse Output
(This section applies only to the -NL or -NL2 Relay Option.)
3.8.1 EPM 5300P Relay Overview
The EPM 5300P offers dry contact relay output capability. The EPM 5200P only offers KYZ
pulse outputs and cannot be configured to trip contacts on events.
FAIL-SAFE MODE: The EPM 5300P -NL option gives the user an adjustable tripping
bandwidth. The user specifies a range over which functions, such as frequency, phase
relation and voltage, are acceptable. The relay releases during times of normal operation,
and engages when functions are outside specified normal levels. The relay can be
programmed to engage during normal operating conditions, and release outside specified
normal range (particularly when power is lost). This is the fail-safe mode.
HYSTERISIS: The EPM 5300P -NL option also includes adjustable hysterisis. In addition to a
time delay on activating any contact, the user may specify a lower level to release the
relay, rather than releasing after the initial alarm point. This is ideal during load shedding
when an alarm activates at a certain level and the user does not want to turn off the alarm
until a much lower, safer level.
SETABLE DELAYS: After reaching the alarm point, a change in relay status may be delayed
for 255 seconds. The user also has the option of allowing the device to change relay status
without any delay. After the alarm condition passes, the relay can be stopped from
returning to a normal condition for a programmable time. Each delay time is independent
of one another.
AND/OR LOGIC: If several parameters are assigned to one relay, the user can trip the relay
if all functions are out of limit (and programming), or if one function is out of limit (or
programming). For example, if limits on Voltage, Kilowatts, and Phase Imbalance are
programmed and tied to Relay 1, the user can either trip the relay if one function is out of
limit, or if all functions are out of limit.
3.8.2 2 Relays & 1 KYZ Pulse Output -NL OPTION
The EPM 5300P's flexibility accesses a variety of relay options through the Programming
Mode (see programming sections). The relay option package consists of three relays: two
can be dedicated to alarm or controlled through communication (or both) and one for KYZ
pulse output.
If the relays are controlled through communication, there are two different modes:
• Lock ON: Relay will not be affected by any alarm condition.
• Lock OFF: Relay will not be affected by any alarm condition.
If the relays are used for communication and alarm, there are four different modes:
• Lock ON: Relay stays on regardless of any alarm condition.
• Lock OFF: Relay stays off regardless of any alarm condition.
• Free ON: Relay turns on unless other conditions force it off.
• Free OFF: Relay turns off unless other conditions force it on.
3–16 EPM 5300 SERIES ADVANCED POWER METERS – INSTRUCTION MANUAL
Page 29

CHAPTER 3: ELECTRICAL INSTALLATION RELAY, PROTECTION AND PULSE OUTPUT
A
A
Relay connection (see Figure 3.6, below): Form C relays, rated 250V, 5A–2 each.
KYZ relay output (Form C), rated 200V, 100mA–1 each.
20
21
22
23
24
25
26
27
28
N.O.
N.C.
COM
N.O.
N.C.
COM
K
Y
Z
LARM #1
LARM #2
PULSE
OUTPUT
FIGURE 3–9: Close-up of the Relay and KYZ pulse output on the rear panel.
Note
Note: The relays shown in the figure above are in the NOT energized state.
The instrument detects two levels of alarm for the following functions:
• Voltage: AN, BN, CN, AB, BC, CA
• Current: A, B, C, N
• Over and Reverse Power
• Under PF/KVAR Lead or Lag
•Over KVA
• Voltage Imbalance (One level only)
• Over/Under Frequency
• Voltage Phase Reversals (One level only)
• Over/Under %THD (Available only with option –H)
• Over/Under K-Factor
KYZ RELAYS: Provides pulses for energy management systems or any other type of
recording device. These pulses represent accumulated watt-hour, negative watt-hour, or
VA-hour. Accomplish this assignment through the Programming Mode (see programming
sections). The pulse value is determined by the decimal increment of the power function
assigned to the pulse. The EPM 5200P can be equipped with KYZ pulse outputs.
Note
Unless otherwise specified, standard KYZ setup represents positive watt hour. See table
below for standard rate. The scale factor for wattage (KW or MW) and Full Scale Decimal
Point Placement is selectable in Programming Mode GROUP 1, FUNCTION 2. Follow the
Decimal Point Placement corresponding to the Change in Level. A multiplication or division
factor can be programmed. See Programming GROUP 0, FUNCTION 6 for a different rate.
EPM 5300 SERIES ADVANCED POWER METERS – INSTRUCTION MANUAL 3–17
Page 30

RELAY, PROTECTION AND PULSE OUTPUT CHAPTER 3: ELECTRICAL INSTALLATION
3.8.3 Standard Rate Table for Watts*
Decimal Point Placement (Kw/mw) Change in Level
9999.000 1.0 Units W-Hour
999.900 0.1 Units W-Hour
99.990 0.01 Units W-Hour
9.999 0.001 Units W-Hour
*Units can be Kilowatts or Megawatts.
3–18 EPM 5300 SERIES ADVANCED POWER METERS – INSTRUCTION MANUAL
Page 31

CHAPTER 3: ELECTRICAL INSTALLATION KYZ PULSE OUTPUTS: NL2 OPTION
3.9 KYZ Pulse Outputs: NL2 Option
The -NL2 option for the meter is equipped with three KYZ outputs. KYZ relays provide
pulses for energy management systems or any other type of recording device. These
pulses represent accumulated positive watt-hour, negative watt-hour, VA-hour, positive
VAR-hour, or negative VAR-hour. Accomplish this through Programming Mode GROUP 0,
FUNCTION 6. The pulse value is dependent upon the Decimal Point Placement and is
determined by the decimal increment of the power function assigned to the pulse. Refer to
the situation that applies to the meter setting.
Note
Unless otherwise specified, standard KYZ setup for Pulse Output 0 is positive Watt Hour,
Pulse Output 1 is negative Watt-Hour, and Pulse Output 2 is VA-hour. See table below for
standard rate.
Note
With Option R (available only with the EPM 5200P) the setup for Pulse Output 0 is positive
Watt-Hour, Pulse output 1 is positive VAR-hour, and Pulse output 2 is negative VAR-hour.
The scale factor for Wattage (KW or MW) and Full Scale Decimal Point Placement is
selectable in Programming Mode GROUP 1, FUNCTION 2. Follow the Decimal Point
Placement corresponding to the Change in Level. A multiplication or division factor can be
programmed. See Programming GROUP 0, FUNCTION 6 for a different rate.
Table 3–3: Standard Rate Table for Watts*
DECIMAL POINT PLACEMENT (KW/MW) CHANGE IN LEVEL
9999.0 1.0 Units W Hour
999.9 0.1 Units W Hour
99.99 0.01 Units W Hour
9.999 0.001 Units W Hour
*Units can be KiloWatts or MegaWatts.
20
21
22
23
24
25
26
27
28
K
Y
Z
K
Y
Z
K
Y
Z
PULSE
OUTPUT 2
PULSE
OUTPUT 1
PULSE
OUTPUT 0
Figure 3-1: KYZ Relay Connection for -NL2 Option
KYZ relay output (Form C), rated 200V, 100mA: 3 separate KYZ Outputs (labeled 0 through
2).
EPM 5300 SERIES ADVANCED POWER METERS – INSTRUCTION MANUAL 3–19
Page 32

KYZ PULSE OUTPUTS: NL2 OPTION CHAPTER 3: ELECTRICAL INSTALLATION
3–20 EPM 5300 SERIES ADVANCED POWER METERS – INSTRUCTION MANUAL
Page 33

GE Consumer & Industrial
Multilin
4.1 RS-232C
EPM 5300 Series Meters
Chapter 4: Communication
Installation
Communication Installation
(This section applies to the RS-232C or RS-485.)
All EPM 5300P and 5200P instruments can be equipped with RS-232C or RS-485
communication.
RS-232C communication links a single instrument with a computer or device such as an
RTU or PLC. Its capability is up to 100 feet. A standard 9-pin female serial port connector
mounts on the instrument for direct connection to a computer with a 9-pin cable.
BACK VIEW
8 9 10 11 12 13
7
6
COMMUNICATION
5
CONVERTER
4
Model
3
SF-232DB3
2
1
DB-9 CONNECTOR
A DIRECT PIN-TO-PIN CABLE CAN BE USED.
NO NULL MODEM IS REQUIRED.
FIGURE 4–1: RS-232C Communication Connection Installation
RS-232 COMMUNICATION CONNECTION
20
21
22
23
24
25
26
27
28
CONNECTION FOR DB-9 FEMALE
PIN 2 - RECEIVE OF THE HOST/COMPUTER
PIN 3 - TRANSMIT OF THE HOST/COMPUTER
PIN 5 - GROUND OF THE HOST/COMPUTER
54321
98 67
DETAIL OF DB-9
LAPTOP
Note
To avoid ground loops, the neutral and safety ground (pin 3) should be connected together
at only one point.
EPM 5300 SERIES ADVANCED POWER METERS – INSTRUCTION MANUAL 4–21
Page 34

RS-485 CHAPTER 4: COMMUNICATION INSTALLATION
4.2 RS-485
Each EPM 5300P or 5200P instrument has a unique address up to four digits long. This
allows the user to communicate with up to 10,000 instruments. Available standard baud
rates are 1200, 2400, 4800, and 9600. To select the proper baud rate, apply the following
rules:
The unit operates up to 9600 baud. For a smaller number of instruments over a long
distance, use a lower baud rate. Optimal recommended baud rate is 1200 baud, if noisy
conditions exist.
RS-485 Hookup Diagram (2 wire) Half Duplex
5300P Instruments (rear view)
RS-485
Communications Port
Model#SF485DB
R
T
R
T
RS-485
RS-232
UNICOM 2500
(Bottom View Shown)
PC
(-)(+)
FIGURE 4–2: 2-Wire RS-485 Communication Connection Installation half duplex
4–22 EPM 5300 SERIES ADVANCED POWER METERS – INSTRUCTION MANUAL
Page 35

CHAPTER 4: COMMUNICATION INSTALLATION RS-485
RS-485 Hookup Diagram (2 wire) Half Duplex (Closed Loop)
5300P Instruments (rear view)
RS-485
Communications Port
Model #SF485DB
RS-232
UNICOM 2500
(Bottom View Shown)
RS-485
FIGURE 4–3: 2-Wire RS-485 Communication Connection Installation half duplex (closed loop)
RS-485 Hookup Diagram (2 wire) Half Duplex: Detail View
RS-485
Communications
Port
Model#
SF485DB
RS-485
Communications
Port
Model#
SF485DB
GR+T+R-T- GR+T+R-T-
R
T
RS-232
RS-485
T-
R-
T+
R+
Gnd
(-) (+)
UNICOM 2500
(Bottom View Shown)
FIGURE 4–4: 2-Wire RS-485 Communication Connection Installation half duplex, detail view
EPM 5300 SERIES ADVANCED POWER METERS – INSTRUCTION MANUAL 4–23
Page 36

RS-485 CHAPTER 4: COMMUNICATION INSTALLATION
RS-485 Hookup Diagram (4 wire) Full Duplex
5300P Instruments (rear view)
RS-485
Communications Port
Model#SF485DB
Note: This does not
represent a twisted pair. It
shows the cross-over from R
to T between the Unicom
and the rest of the bus.
RS-485
UNICOM 2500
(Bottom View Shown)
RS-232
PC
FIGURE 4–5: 4-Wire RS-485 Communication Connection Installation full duplex
Connecting 4-Wire bus to RS-485 Port:
• Connect the T- wire of the Unicom 2500 to the R- on the RS-485 port
• Connect the R- wire of the Unicom 2500 to the T- on the RS-485 port
• Connect the T+ wire of the Unicom 2500 to the R+ on the RS-485 port
• Connect the R+ wire of the Unicom 2500 to the T+ on the RS-485 port
T+ T-R-R+
4–24 EPM 5300 SERIES ADVANCED POWER METERS – INSTRUCTION MANUAL
Page 37

CHAPTER 4: COMMUNICATION INSTALLATION RS-485
RS-485 Hookup Diagram (4 wire) Full Duplex: Detail View
RS-485
RS-232
Note: This does not
represent a twisted pair.
It shows the cross-over
from R to T between the
Unicom and the rest of
the bus.
RS-485
T-
R-
T+
R+
Gnd
Communications
Port
Model#
SF485DB
GR+T+R-T- GR+T+R-T-
Communications
Enlarged view of twisted pair segments
R- R+
Receive Pair
UNICOM 2500
(Bottom View Shown)
Transmit Pair
T+T-
FIGURE 4–6: 4-Wire RS-485 Communication Connection Installation full duplex, detail view
RS-485
Port
Model#
SF485DB
R-R+
T+ T-
Connecting 4-Wire bus to RS-485 Port:
• Connect the T- wire of the Unicom 2500 to the R- on the RS-485 port
• Connect the R- wire of the Unicom 2500 to the T- on the RS-485 port
• Connect the T+ wire of the Unicom 2500 to the R+ on the RS-485 port
• Connect the R+ wire of the Unicom 2500 to the T+ on the RS-485 port
EPM 5300 SERIES ADVANCED POWER METERS – INSTRUCTION MANUAL 4–25
Page 38

NETWORK OF INSTRUMENTS AND LONG DISTANCE COMMUNICATION CHAPTER 4: COMMUNICATION INSTALLATION
4.3 Network of Instruments and Long Distance Communication
The RS-485 Transceiver is required for a large network of instruments.
• In a two-wire connection, a maximum of 900 instruments can be included in the
same network (Figure 4.7)
• In a four-wire connection, a maximum of 3600 instruments can be included in the
same network (Figure 4.8).
DEVICE
DEVICE
DEVICE
DEVICE
32 UNITS
32 UNITS
DEVICE
32
TRANSCEIVERS
DEVICE
RS-485
TRANSCEIVER
(Acts as Repeater)
RS-485
TRANSCEIVER
(Acts as Repeater)
COMPUTER
FIGURE 4–7: 2-Wire RS-485 Communication Installation Connection with Transceiver
RS-485
32 UNITS
32 UNITS
DEVICE
TRANSCEIVERS
DEVICE
TRANSCEIVER
(Acts as Repeater)
32
TRANSCEIVER
(Acts as Repeater)
COMPUTER
RS-485
FIGURE 4–8: 4-Wire RS-485 Communication Installation Connection with Transceiver
Use modems (dedicated or dial-up) when the instruments are located at great distances.
However, set the modem to auto answer at the recommended value of 1200 baud rate, if
noise conditions exist. Also, flow control must be disabled.
You may want to use a Modem Manager RS485-RS232 Converter
When speaking to most RS-485 or RS-232C based devices, the remote modem must be
programmed for the communication to work. This task is often quite complicated because
modems are quirky when talking to remote devices. To make this task easier, EIG has
4–26 EPM 5300 SERIES ADVANCED POWER METERS – INSTRUCTION MANUAL
Page 39

CHAPTER 4: COMMUNICATION INSTALLATION NETWORK OF INSTRUMENTS AND LONG DISTANCE COMMUNICATION
designed a Modem Manager RS-485 to RS-232C converter. This device automatically
programs the modem to the proper configuration. Also, if you have poor telephone lines,
modem manager acts as a line buffer, making the communication more reliable.
4.3.1 Modem Connected to Computer (Originate Modem)
Programming the Modem
Comply with the modem’s instruction manual and follow these instructions:
Restore modem to factory settings:
This procedure erases all previously programmed settings.
Set modem to display result codes:
The device uses the result codes.
Set modem to verbal result code:
The device uses the verbal codes.
Set modem to ignore DTR signal:
Necessary for the device to ensure connection with originate modem.
Set modem to disable flow control:
Necessary to communicate with remote modem connected to device.
Tell modem to write the new settings to activate profile:
Places these settings into nonvolatile memory; the settings take effect after the
modem powers up.
4.3.2 modem Connected to the Device (Remote Modem)
Programming the Modem
Comply with the modem’s instruction manual and follow these instructions:
Restore modem to factory settings:
This procedure erases all previously programmed settings.
Set modem to auto answer on N rings:
Sets the remote modem to answer the call after n rings.
Set modem to Auto Negotiate mode:
Sets the remote to auto negotiate to communicate successfully with EPM 5300P and
other devices in the modem.
Set modem to return numeric result codes:
Increases speed connection with EPM 5300P.
Set modem to ignore DTR signal:
Necessary for device to ensure connection with originate modem.
Set modem to disable flow control:
EPM 5300 SERIES ADVANCED POWER METERS – INSTRUCTION MANUAL 4–27
Page 40

NETWORK OF INSTRUMENTS AND LONG DISTANCE COMMUNICATION CHAPTER 4: COMMUNICATION INSTALLATION
Necessary to communicate with remote modem connected to EPM 5300P.
Tell modem to write the new settings to activate profile:
Places new settings into nonvolatile memory; settings take effect after the modem
powers up.
Debugging Communication Problems
If you experience NO communication, check these conditions:
• Is the Baud Rate set correctly (see Part II: Programming Section)?
• Is the Meter Address set correctly (see Part II: Programming Section)?
• Is the correct protocol set? Modbus, DNP 3.0?
• Set the meter for the appropriate protocol for the internal software.
4–28 EPM 5300 SERIES ADVANCED POWER METERS – INSTRUCTION MANUAL
Page 41

GE Consumer & Industrial
Multilin
EPM 5300 Series Meters
Chapter 5: Overview
Overview
The EPM 5300P displays 17 instantaneous electrical parameters. Values for each
parameter are accessed through the keypad on the meter's front panel (see Figure 5.1).
The EPM 5200P accesses information in the same manner as the 5300P. The key strokes for
each model are identical.
Volts Amps Power A, B, C
A-N A ± KW
B-N B ± KVAR
C-N C KVA
A-B N ± PF
B-C Freq
C-A
± Total KWH
Total KVAH (N/A on EPM 5200P)
EPM 5300 SERIES ADVANCED POWER METERS – INSTRUCTION MANUAL 5–29
Page 42

CHAPTER 5: OVERVIEW
PRESS MAX/MIN/LIMITS TO
ACCESS MAX, MIN, LM1 OR
LM2 VALUES.
MAX
MIN
LM1
LM2
THD
K
AC VOLTS
A
NBNCNABBCCA
AC AMPS
A GLOWING ANNUNCIATOR
INDICATES THE VALUE
CURRENTLY DISPLAYED.
NCBA
POWER
PF
KW
KVA
KVAH
MAX/MIN
LIMITS
VOLTS
KWH
AMPS
FREQ
POWER
KVAR
PHASE
NEXT
PHASE/NEXT SELECTS THE VOLTAGE AND
AMPERAGE PHASES, AS WELL AS THE POWER
FUNCTIONS.
FIGURE 5–1: The EPM 5300P front panel with display and keypad
5–30 EPM 5300 SERIES ADVANCED POWER METERS – INSTRUCTION MANUAL
Page 43

CHAPTER 5: OVERVIEW ACCESSING THE POWER FUNCTIONS
5.1 Accessing the Power Functions
FREQ
POWER
AC VOLTS
A
NBNCNABBCCA
AC AMPS
POWER
PF
KW
KVA
KVAR
PHASE
NEXT
NCBA
MAX
MIN
LM1
LM2
MAX/MIN
LIMITS
KVAH
KWH
VOLTS
AMPS
Step 1:
a. Press POWER to select the power category.
The display blanks and all annunciators in the
power section glow, confirming selection.
MAX
MIN
LM1
LM2
KWHKVAH
MAX/MIN
VOLTS
LIMITS
AMPS
Step 2:
a. Press PHASE/NEXT for the desired power
function.
The functions are accessed in a clockwise
FREQ
POWER
AC VOLTS
A
NBNCNABBCCA
AC AMPS
POWER
PF
KW
KVA
KVAR
PHASE
NEXT
NCBA
sequence.
Note
For KWH readings: The first digit on the left of the KWH counter will blank out on the
display when rollover at 199999 KWH occurs. The actual value of the first digit can only be
viewed through digital communications. Or, reset the KWH counter to zero to avoid
confusion.
EPM 5300 SERIES ADVANCED POWER METERS – INSTRUCTION MANUAL 5–31
Page 44

ACCESSING VOLTAGE AND CURRENT PHASES CHAPTER 5: OVERVIEW
V
5.2 Accessing Voltage and Current Phases
The EPM5300P displays four current measurements (phases A, B, C, and Neutral) and six
voltage measurements (phase-to-phase: A-B, B-C, C-A and phase-to-neutral: A-N, B-N,
C-N).
MAX
MIN
LM1
LM2
AC VOLTS
B
A
ABB
NCN
N
AC AMPS
CCA
NCBA
POWER
PF
KW
KVA
PHASE
NEXT
KVAR
KVAH
MAX/MIN
LIMITS
OLTS
KWH
AMPS
FREQ
POWER
Step 1:
a. To select the Amps (or Volts) category, press
AMPS (or VOLTS).
The display blanks and all annunciators in the
section glow, confirming selection.
MAX
MIN
LM1
LM2
AC VOLTS
B
ABB
A
NCN
N
AC AMPS
CCA
NCBA
POWER
PF
KW
KVA
PHASE
NEXT
KVAR
KVAH
MAX/MIN
LIMITS
KWH
VOLTS
AMPS
FREQ
POWER
Step 2:
a. Press PHASE/NEXT for the desired phase.
5–32 EPM 5300 SERIES ADVANCED POWER METERS – INSTRUCTION MANUAL
Page 45

CHAPTER 5: OVERVIEW ACCESSING %THD FUNCTIONS
5.3 Accessing %THD Functions
Harmonic Measurement readings are available on the EPM 5300P meter. The EPM 5300P
displays 6 parameters of total harmonic distortion. It measures harmonic waveforms and
%THD for voltage phases A-N, B-N and C-N, and current phases A, B and C. Measurement
capability reaches the 31
To access %THD:
st
harmonic order. All readings are faceplate accessible.
MAX
MIN
LM1
LM2
THD
K
AC VOLTS
A
NBNCNABBCCA
AC AMPS
NCBA
POWER
PF
KW
KVA
PHASE
NEXT
KVAR
KVAH
MAX/MIN
LIMITS
KWH
VOLTS
THD THD
AMPS
FREQ
POWER
Step 1:
a. To access %THD values for a voltage or current
phase press VOLTS/THD (or AMPS/THD) twice.
MAX
MIN
LM1
LM2
THD
K
AC VOLTS
B
ABB
A
NCN
N
AC AMPS
CCA
NCBA
POWER
PF
KW
KVA
PHASE
NEXT
KVAR
KVAH
MAX/MIN
LIMITS
VOLTS
THD
KWH
AMPS
THD
FREQ
POWER
The display blanks and indicates the %THD value
momentarily.
EPM 5300 SERIES ADVANCED POWER METERS – INSTRUCTION MANUAL 5–33
Page 46

VIEWING INDIVIDUAL PHASE INDICATION FOR POWER FUNCTIONS CHAPTER 5: OVERVIEW
5.4 Viewing Individual Phase Indication for Power Functions
The EPM 5300P normally displays a three-phase indication for PF, KW, KVAR, KVA readings.
To view the individual phase A, B and C for those power functions follow the procedure
below. This procedure is particularly useful for detecting a current transformer (CT) polarity
reversal. A CT polarity reversal will result in a low or negative KW indication, while the KVA
will be unaffected.
MAX
MIN
LM1
LM2
THD
K
AC VOLTS
B
ABB
A
NCN
N
AC AMPS
CCA
NCBA
POWER
PF
KW
KVA
PHASE
NEXT
KVAR
KVAH
MAX/MIN
LIMITS
VOLTS
THD
KWH
AMPS
THD
FREQ
POWER
Step 1:
a. Press POWER to select power readings. Press
PHASE/NEXT to select a specif ic power function (PF,
KW, KVAR, KVA).
MAX
MIN
LM1
LM2
THD
K
AC VOLTS
B
ABB
A
NCN
N
AC AMPS
CCA
NCBA
POWER
PF
KW
KVA
POWER
PHASE
NEXT
KVAR
KVAH
MAX/MIN
LIMITS
VOLTS
THD
KWH
AMPS
THD
FREQ
Step 2:
Press and hold the POWER button to scroll through
the instantaneous single-phase power readings.
5–34 EPM 5300 SERIES ADVANCED POWER METERS – INSTRUCTION MANUAL
Page 47

CHAPTER 5: OVERVIEW ACCESSING MAX/MIN VALUES
5.5 Accessing Max/Min Values
Max/min values represent the highest and lowest average demand over a user
programmable time period known as the Integration Interval. The readings are
calculated using a rolling average technique. Each second, a new reading is used to
calculate the max/min; the last reading of the interval is dropped off. The highest max
during an averaging period is stored until the user resets the max/min. This is similar to
amp demand meters. It is commonly referred to as Thermal Demand.
To access a max/min value while displaying a desired measurement, press MAX/MIN/
LIMITS—once for the max value; twice for the min. Examples given below are for voltage
and current phases. Use the same procedure for all other parameters.
FREQ
POWER
AC VOLTS
A
NBNCNABBCCA
AC AMPS
POWER
PF
KW
KVA
KVAR
PHASE
NEXT
NCBA
MAX
MIN
LM1
LM2
KVAH
MAX/MIN
LIMITS
VOLTS
KWH
AMPS
Step 1:
a. To select the Volts category, press
VOLTS.
The display blanks and all
annunciators glow, confirming
selection.
To access KW, KVAR and PF negative measurements indicating leading current, press
MAX/MIN/LIMITS five times for negative max and six times for negative min.
AMPS
FREQ
POWER
AC VOLTS
A
NBNCNABBCCA
AC AMPS
POWER
PF
KW
KVA
KVAR
PHASE
NEXT
NCBA
MAX
MIN
LM1
LM2
MAX/MIN
LIMITS
KWHKVAH
VOLTS
Step 2:
a. Press PHASE/NEXT for the desired
phase.
FREQ
POWER
AC VOLTS
A
NBNCNABBCCA
AC AMPS
POWER
PF
KW
KVA
KVAR
PHASE
NEXT
NCBA
MAX
MIN
LM1
LM2
MAX/MIN
LIMITS
VOLTS
KWHKVAH
AMPS
Step 3:
a. Press MAX/MIN/LIMITS once to
view the maximum reading for Volts
C-N.
The display blanks and
momentarily indicates the max value.
EPM 5300 SERIES ADVANCED POWER METERS – INSTRUCTION MANUAL 5–35
Page 48

RESETTING VALUES CHAPTER 5: OVERVIEW
5.6 Resetting Values
Use the reset function if a new value is desired. It is available in two different modes.
1.UNPROTECTED MODE: Allows quick and easy resetting of max/min values.
2.PROTECTED MODE: Prevents unauthorized resetting the max/min and totaled power
functions.
Note
Even if the unprotected mode is selected during programming, the KWH and negative
KWH are always in protected mode. The following examples are for the max/min.
5.6.1 Unprotected Reset
To reset the min of Amps A:
MAX
MIN
LM1
LM2
MAX/MIN
LIMITS
VOLTS
FREQ
POWER
AC VOLTS
A
NBNCNABBCCA
AC AMPS
POWER
PF
KW
KVA
KVAR
PHASE
NEXT
MAX
MIN
LM1
LM2
NCBA
KWH
KVAH
MAX/MIN
VOLTS
LIMITS
AMPS
AC VOLTS
A
NBNCNABBCCA
AC AMPS
NCBA
POWER
PF
KW
KVA
PHASE
NEXT
KVAR
FREQ
KWHKVAH
POWER
AMPS
MAX
MIN
LM1
LM2
KVAH
MAX/MIN
LIMITS
VOLTS
KWH
AMPS
FREQ
POWER
AC VOLTS
A
NBNCNABBCCA
AC AMPS
POWER
PF
KW
KVA
KVAR
PHASE
NEXT
NCBA
Step 1:
a. If not already in the Amps category
press AMPS, then PHASE/NEXT until
desired phase is indicated.
Step 2:
a. Press MAX/MIN/LIMITS twice to
access the min value for Amps A.
Step 3:
a. While the min value is displayed,
press PHASE/NEXT to reset it.
The display blanks; a checkmark
appears confirming reset .
Repeat this procedure for each
value you wish to reset.
5–36 EPM 5300 SERIES ADVANCED POWER METERS – INSTRUCTION MANUAL
Page 49

CHAPTER 5: OVERVIEW RESETTING VALUES
5.6.2 PROTECTED RESET
AMPS
FREQ
POWER
AC VOLTS
A
NBNCNABBCCA
AC AMPS
POWER
PF
KW
KVA
KVAR
PHASE
NEXT
NCBA
MAX
MIN
LM1
LM2
KVAH
MAX/MIN
LIMITS
KWH
VOLTS
Step 1:
a. Press MAX/MIN/LIMITS
once to access max value;
twice to access min value.
AMPS
FREQ
POWER
AC VOLTS
B
A
ABB
NCN
N
AC AMPS
POWER
PF
KW
KVA
KVAR
PHASE
NEXT
CCA
NCBA
MAX
MIN
LM1
LM2
KVAH
MAX/MIN
LIMITS
KWH
VOLTS
Step 2:
a. While the value is display,
press PHASE/NEXT to
commence protected reset.
The display blanks, three
dashes appear in middle
display and digits begin
scrolling in upper display.
The password is 005.
AMPS
FREQ
POWER
AC VOLTS
A
NBNCNABBCCA
AC AMPS
POWER
PF
KW
KVA
KVAR
PHASE
NEXT
NCBA
MAX
MIN
LM1
LM2
MAX/MIN
LIMITS
KVAH
KWH
VOLTS
Step 3:
a. Press PHASE/NEXT each
time a password digit
appears.
AMPS
FREQ
POWER
AC VOLTS
B
A
NCN
N
AC AMPS
POWER
PHASE
NEXT
MAX
MIN
LM1
LM2
KVAH
MAX/MIN
LIMITS
KWH
VOLTS
When the correct
password is entered, a
checkmark appears,
confirming reset.
ABB
PF
KW
KVA
KVAR
CCA
NCBA
EPM 5300 SERIES ADVANCED POWER METERS – INSTRUCTION MANUAL 5–37
Page 50

RESETTING HOUR READINGS CHAPTER 5: OVERVIEW
5.7 Resetting Hour Readings
AMPS
FREQ
POWER
AC VOLTS
A
NBNCNABBCCA
AC AMPS
POWER
PF
KW
KVA
KVAR
PHASE
NEXT
NCBA
MAX
MIN
LM1
LM2
KVAH
MAX/MIN
LIMITS
KWH
VOLTS
Step 1:
a. Press POWER once.
b. Press PHASE/NEXT for
the desired hour function.
This example uses KWH
function.
AMPS
FREQ
POWER
AC VOLTS
A
NBNCNABBCCA
AC AMPS
POWER
PF
KW
KVA
KVAR
PHASE
NEXT
NCBA
MAX
MIN
LM1
LM2
KVAH
MAX/MIN
LIMITS
KWH
VOLTS
Step 2:
a. Press MAX/MIN/LIMITS
once for positive hour reset
three times for negative
hour reset.
Four question marks
appear in lower display.
AMPS
FREQ
POWER
AC VOLTS
A
NBNCNABBCCA
AC AMPS
POWER
PF
KW
KVA
KVAR
PHASE
NEXT
NCBA
MAX
MIN
LM1
LM2
MAX/MIN
LIMITS
KVAH
KWH
VOLTS
Step 3:
a. While the question
marks are displayed, press
PHASE/NEXT. A password
entry is now required.
The password is 005.
b. Press PHASE/NEXT each
time a password digit
appears.
AMPS
FREQ
POWER
AC VOLTS
B
ABB
A
NCN
N
AC AMPS
POWER
PF
PHASE
NEXT
MAX
MIN
LM1
LM2
KVAH
MAX/MIN
LIMITS
KWH
VOLTS
Checkmarks appear,
indicating a successful
reset.
KW
KVA
KVAR
CCA
NCBA
5–38 EPM 5300 SERIES ADVANCED POWER METERS – INSTRUCTION MANUAL
Page 51

CHAPTER 5: OVERVIEW ACCESSING THE LM1/LM2 SET LIMITS
5.8 Accessing the LM1/LM2 Set Limits
The EPM 5300P has two manual set limits which monitor the instantaneous readings and
warn the user of any abnormal conditions. Each limit detects readings either above or
below a set level. The EPM 5200P does not have this feature.
SET LIMITS: Point when the relay changes position, if the EPM 5300P is equipped with the
Relay Option (Suffix -NL).
If a limit is exceeded, only the annunciator for LM1 and/or LM2 flash.
To view the setup of the LM1/LM2 set limits:
Z Press MAX/MIN/LIMITS 2 times. to view the LM1 set limit
momentarily.
Z Press MAX/MIN/LIMITS 3 times to view the LM2 set limit
momentarily.
To locate readings that exceeded Limit 1:
Z Press MAX/MIN/LIMIT 3 times
Z Press PHASE/NEXT.
The display blanks, the middle display indicates L1, and
annunciators for parameters that exceeded Limit 1 illuminate.
To locate readings that exceeded Limit 2:
Z press MAX/MIN/LIMIT 4 times
Z press PHASE/NEXT.
The display blanks, the middle display indicates L2, and
annunciators for parameters that exceeded Limit 2 illuminate.
MAX
MIN
LM1
LM2
KWH
KVAH
MAX/MIN
VOLTS
LIMITS
AMPS
FREQ
POWER
AC VOLTS
A
NBNCNABBCCA
AC AMPS
POWER
PF
KW
KVA
KVAR
PHASE
NEXT
NCBA
To access the set limit,
Z press MAX/MIN/LIMITS
• 3 times for LM1
• 4 times for LM2
EPM 5300 SERIES ADVANCED POWER METERS – INSTRUCTION MANUAL 5–39
Page 52

VOLTAGE PHASE REVERSAL AND IMBALANCE CHAPTER 5: OVERVIEW
5.9 Voltage Phase Reversal and Imbalance
In a three-phase power distribution system, normal phase shift between each line is 120°.
If the EPM 5300P detects an abnormality, it displays a message of PH. The EPM 5200P
does not have this feature.
VOLTAGE PHASE REVERSAL: If there is an incorrect connection, such as mistaking line A for
line B, a PH message appears. The correct sequence is a-b-c.
VOLTAGE PHASE IMBALANCE LIMIT: This is detected using the phase imbalance limit in
the Programming Mode. The phase imbalance is expressed as a percentage, with 0%
indicating a 120° phase shift between each line. A PH message appears if the limit is
exceeded.
MAX
MIN
LM1
LM2
KWH
KVAH
MAX/MIN
VOLTS
LIMITS
Step 1:
a. Press and hold down
PHASE/NEXT. While
holding down PHASE/
NEXT, press AMPS to
access the display.
(PH indicates both
Voltage Phase Reversals
and Voltage Phase
Imbalances.)
Note
AMPS
FREQ
POWER
AC VOLTS
A
NBNCNABBCCA
AC AMPS
POWER
PF
KW
KVA
KVAR
PHASE
NEXT
AMPS
FREQ
POWER
AC VOLTS
B
ABB
A
NCN
N
AC AMPS
POWER
PF
KW
KVA
KVAR
PHASE
NEXT
MAX
CCA
NCBA
MIN
LM1
LM2
MAX/MIN
LIMITS
KVAH
VOLTS
This display indicates a
Voltage Phase Imbalance.
KWH
AMPS
FREQ
POWER
MAX
MIN
LM1
NCBA
LM2
MAX/MIN
LIMITS
KVAH
Step 2:
a. Press PHASE/NEXT to
VOLTS
KWH
AMPS
FREQ
POWER
AC VOLTS
A
NBNCNABBCCA
AC AMPS
POWER
PF
KW
KVA
KVAR
PHASE
NEXT
MAX
MIN
LM1
LM2
NCBA
KVAH
MAX/MIN
VOLTS
LIMITS
This display indicates a
Voltage Phase Reversal.
KWH
select zero.
In the event Voltage Phase Reversal and Voltage Phase Imbalance occur simultaneously,
the display alternates between the incorrect phase sequence and the exceeded limit
percentage. After six seconds the display returns to the normal operating mode.
AC VOLTS
B
ABB
A
NCN
N
AC AMPS
POWER
PF
KW
KVA
KVAR
PHASE
NEXT
CCA
NCBA
5–40 EPM 5300 SERIES ADVANCED POWER METERS – INSTRUCTION MANUAL
Page 53

CHAPTER 5: OVERVIEW ACCESS MODES
5.10 Access Modes
The following access commands allow the user to perform specific operations.
ACCESS COMMANDS OPERATION
1 Print Operating Data
2 Print Programming Data
3 Enter Programming Mode (see Programming Section)
4Firmware Version/LED Test
Note
Print commands 1 and 2 are only available if enabled in the programming mode; they are
not recommended when using the multimeter connection RS-485.
EPM 5300 SERIES ADVANCED POWER METERS – INSTRUCTION MANUAL 5–41
Page 54

PRINT OPERATING DATA CHAPTER 5: OVERVIEW
V
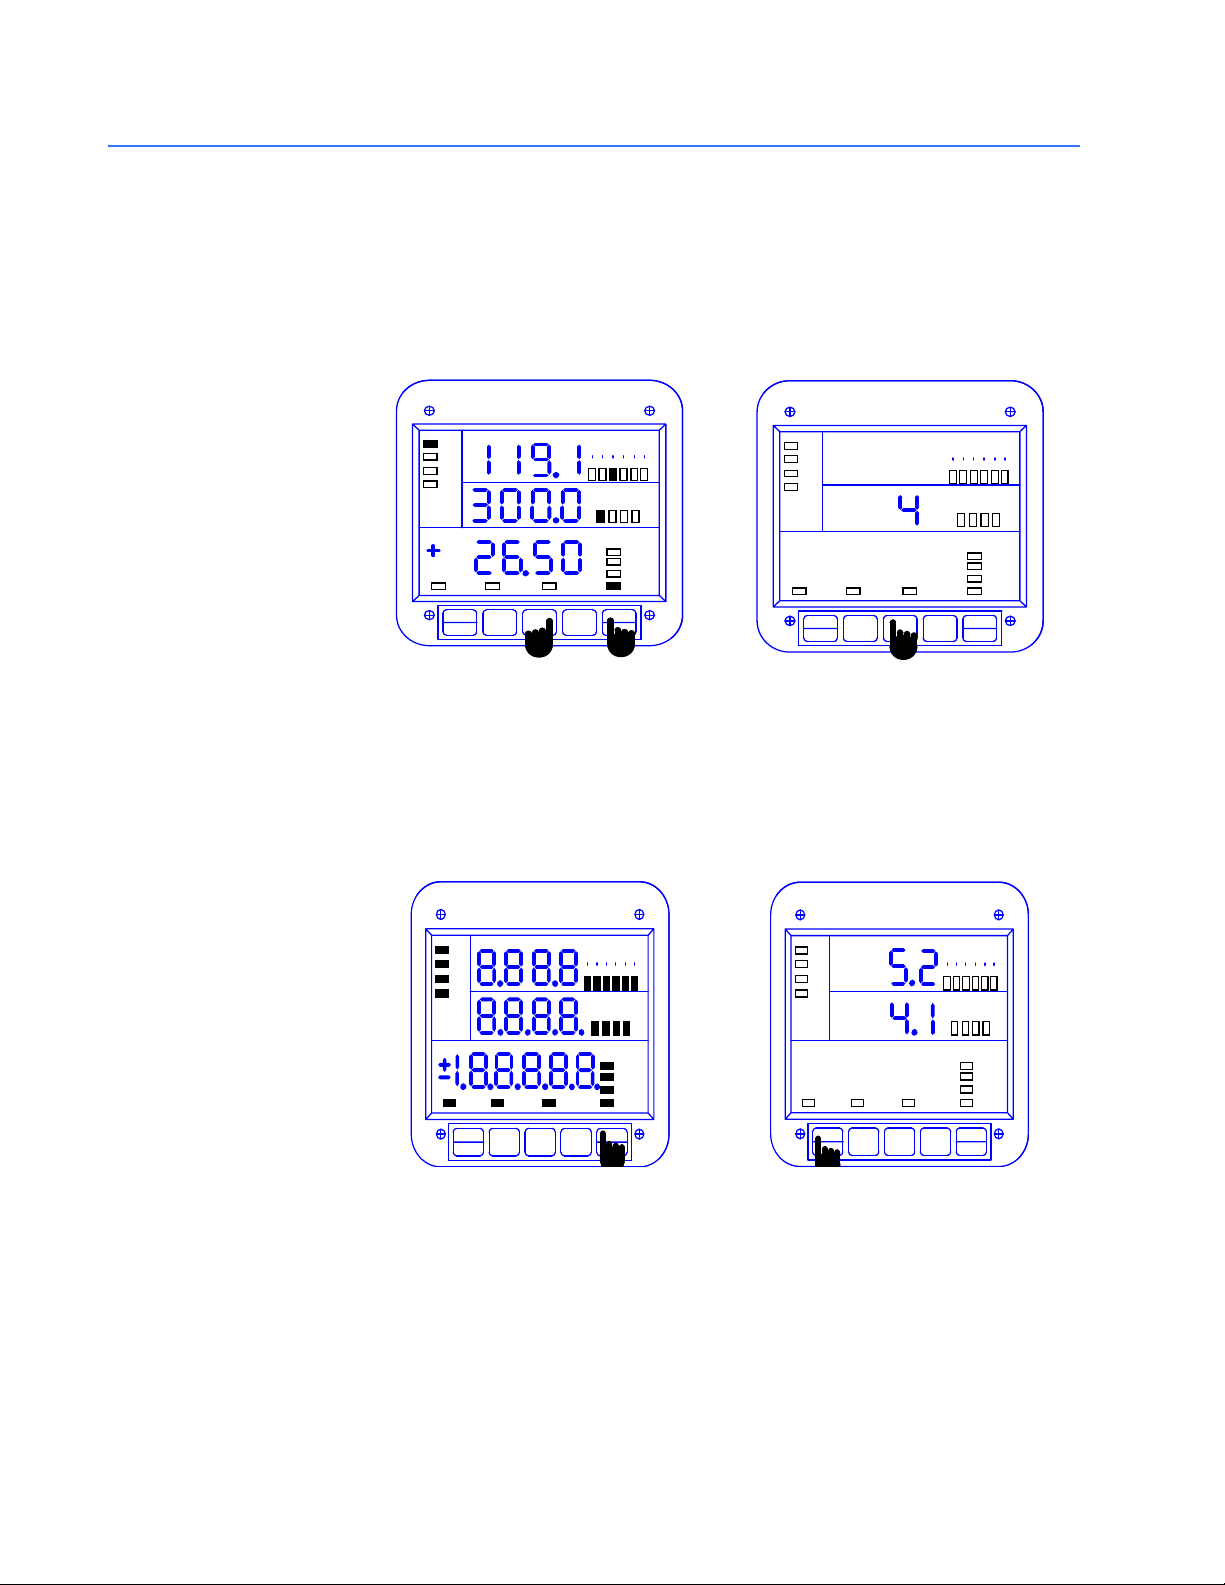
5.11 Print Operating Data
This function sends data to a serial printer, creating a hard copy of the instantaneous and
max/min data of all functions and the WH, VAH, and WH counters.
Note
MAX
MIN
LM1
LM2
FREQ
KWH
KVAH
MAX/MIN
LIMITS
VOLTS
AMPS
POWER
Step 1:
Press and hold PHASE/NEXT.
Press AMPS until a 0 appears in the
middle display.
This function applies only if a serial printer is connected to the EPM 5300P via an RS-232C
Communication Converter.
To print the operating data:
AC VOLTS
B
A
ABB
NCN
N
AC AMPS
POWER
PHASE
NEXT
CCA
NCBA
PF
KW
KVA
KVAR
MAX
MIN
LM1
LM2
KVAH
MAX/MIN
LIMITS
VOLTS
KWH
AMPS
FREQ
POWER
AC VOLTS
B
A
NCN
N
AC AMPS
POWER
PHASE
NEXT
ABB
PF
KW
KVA
KVAR
MAX
CCA
NCBA
MIN
LM1
LM2
KVAH
MAX/MIN
LIMITS
KWH
OLTS
AMPS
FREQ
POWER
AC VOLTS
A
NBNCNABBCCA
AC AMPS
POWER
PF
KW
KVA
KVAR
PHASE
NEXT
NCBA
Step 2:
a. Press AMPS until a 1 appears..
b. Press PHASE/ NEXT to select.
111 appears, confirming a
successful print command.
Release both buttons.
5–42 EPM 5300 SERIES ADVANCED POWER METERS – INSTRUCTION MANUAL
Page 55

CHAPTER 5: OVERVIEW PRINT PROGRAMMING DATA
A
V
5.12 Print Programming Data
This function sends the programming data (or the meter setup) to a serial printer for
verification and quick reference.
To print the programming data:
FREQ
POWER
AC VOLTS
B
ABB
A
NCN
N
AC AMPS
POWER
PHASE
NEXT
CCA
PF
KW
KVA
KVAR
NCBA
MAX
MIN
LM1
LM2
KVAH
MAX/MIN
LIMITS
VOLTS
KWH
AMPS
Step 1:
Press and hold PHASE/NEXT.
Press AMPS until a 0 appears in the
middle display.
Release both buttons.
MAX
MIN
LM1
LM2
AC VOLTS
B
A
ABB
NCN
N
AC AMPS
CCA
NCBA
POWER
PF
KW
KVA
MAX/MIN
LIMITS
VOLTS
FREQ
KWHKVAH
AMPS
POWER
PHASE
NEXT
KVAR
Step 2:
The display blanks.
a. Press AMPS until a 2 appears.
b. Press PHASE/NEXT to select.
MAX
MIN
LM1
LM2
AC VOLTS
A
NBNCNABBCCA
AC AMPS
B
POWER
FREQ
KWH
KVAH
MAX/MIN
LIMITS
OLTS
AMPS
POWER
PHASE
NEXT
222 appears, confirming a
successful print command.
NC
PF
KW
KVA
KVAR
EPM 5300 SERIES ADVANCED POWER METERS – INSTRUCTION MANUAL 5–43
Page 56
ACCESSING FIRMWARE VERSION/LED TEST CHAPTER 5: OVERVIEW
5.13 Accessing Firmware Version/LED Test
The EPM 5300P accesses the firmware version number of the analog and digital
microprocessors. It also performs an LED test to check if the LEDs and annunciators are
functioning properly.
FREQ
POWER
AC VOLTS
B
ABB
A
NCN
N
AC AMPS
POWER
PF
KW
KVA
KVAR
PHASE
NEXT
CCA
NCBA
MAX
MIN
LM1
LM2
KVAH
MAX/MIN
LIMITS
VOLTS
KWH
AMPS
Step 1:
Press and hold PHASE/NEXT.
Press AMPS until a 0 appears in the middle
display.
Release both buttons
MAX
MIN
LM1
LM2
AC VOLTS
A
NBNCNABBCCA
AC AMPS
NCBA
FREQ
POWER
AC VOLTS
A
NBNCNABBCCA
AC AMPS
MAX
MIN
LM1
LM2
MAX/MIN
LIMITS
KVAH
VOLTS
KWH
AMPS
Step 2:
a. Press AMPS until 4 appears.
MAX
MIN
LM1
LM2
AC VOLTS
B
A
NCN
N
AC AMPS
POWER
PF
KW
KVA
KVAR
PHASE
NEXT
ABB
CCA
NCBA
NCBA
FREQ
POWER
POWER
PF
KW
KVA
KVAR
PHASE
NEXT
POWER
PF
KW
KVA
KVAR
FREQ
KWH
KVAH
MAX/MIN
LIMITS
VOLTS
AMPS
POWER
PHASE
NEXT
Step 3:
a. Press PHASE/NEXT for the LED test .
All segments and annunciators glow.
KWHKVAH
MAX/MIN
VOLTS
LIMITS
AMPS
Step 4:
a. Follow Steps 1 and 2, then press MAX/
MIN/LIMITS for the firmware versions.
Firmware versions:
• Upper display—analog processor
version
• Middle display—digital processor
5–44 EPM 5300 SERIES ADVANCED POWER METERS – INSTRUCTION MANUAL
Page 57

GE Consumer & Industrial
Multilin
Programming Overview
6.1 General Procedure
EPM 5300 Series Meters
Chapter 6: Programming
Overview
Programming tasks are arranged into nine major GROUPS. Within each GROUP are the
specific meter FUNCTIONS. Outlined is the general approach to alter programming mode
values.
Enter the Programming Mode.
Select the desired GROUP.
Once the desired GROUP is selected, select a FUNCTION within the GROUP. For GROUP 0,
some functions are further divided into PACKS containing four switches referred to as
switches A, B, C, D (left to right).
After the FUNCTION selection, proceed with DATA ENTRY of the new value for the desired
parameter.
Proceed to program another location and/or exit the programming mode.
Note
IMPORTANT: The full exiting procedure must be followed to store any new programming.
EPM 5300 SERIES ADVANCED POWER METERS – INSTRUCTION MANUAL 6–45
Page 58

SWITCH PACKS CHAPTER 6: PROGRAMMING OVERVIEW
V
6.2 Switch Packs
GROUPS, Functions, and Switch PACKS
GROUP
FUNCTION
PACK
• GROUPS are the main category.
• Functions are sub categories of GROUPS.
• Switch PACKS are sub categories of FUNCTIONS.
Groups Functions Packs
MAX
MIN
LM1
LM2
KVAH
MAX/MIN
LIMITS
SWITCHES:
AC VOLTS
B
ABB
A
NCN
CCA
N
AC AMPS
NCBA
PREVIOUS
SETTING
POWER
PF
KW
KVA
KVAR
FREQ
KWH
PHASE
OLTS
A
POWER
AMPS
C
B
NEXT
D
NEW ENTRY
6–46 EPM 5300 SERIES ADVANCED POWER METERS – INSTRUCTION MANUAL
Page 59

CHAPTER 6: PROGRAMMING OVERVIEW PROGRAMMING MODE DATA ENTRY
6.3 Programming Mode Data Entry
The EPM 5300P and EPM 5200P programming mode utilizes only three out of the fivekeypad buttons: the MAX/MIN/LIMITS, VOLTS/THD, and AMPS/THD buttons.
MAX/MIN
LIMITS
VOLTS
THD THD
SED FOR PROGRAMMING
U
AMPS
POWER
PHASE
NEXT
SED FOR
U
ASSWORD ENTRY
P
Note
The EPM 5200P uses the same keypad strokes and methods. Although the keypad may
look slightly different, the keys match the EPM 5300P exactly. In the interest of brevity, all
keystrokes and programming functions are shown using the EPM 5300P keyboard.
Button Function Description
MAX/MIN/LIMITS ADVANCES
VOLTS/THD CHANGES VALUE
AMPS/THD STORES
Scrolls GROUPS, FUNCTIONS and advances to exit
point from FUNCTION and GROUP level.
Scrolls PACKS, digit counters and changes switch PACK
position UP or DOWN.
Activates new data entry and enters or exits from
GROUP or FUNCTION level.
EPM 5300 SERIES ADVANCED POWER METERS – INSTRUCTION MANUAL 6–47
Page 60

STANDARD NUMERIC DATA ENTRY CHAPTER 6: PROGRAMMING OVERVIEW
6.4 Standard Numeric Data Entry
Programmable FUNCTION values are always four digit numerical fields designed to accept
any value between 0000 and 9999 (a blank signifies a zero). When entering the value of a
FUNCTION, enter all four digits, leading zeros included. For instance, to enter the number
25, enter 0025.
6–48 EPM 5300 SERIES ADVANCED POWER METERS – INSTRUCTION MANUAL
Page 61

GE Consumer & Industrial
Multilin
7.1 EPM 5200P
EPM 5300 Series Meters
Chapter 7: EPM 5200P
EPM 5200P
The EPM 5200P is similar to the regular EPM 5300P with the following exceptions:
1. The size of the display digits is smaller (0.300” instead of 0.560”).
2. The following features are not available:
• The energy readings: VA/H, VAR/H.
• The limits: Lim1 and Lim2, and dry contact relay outputs.
• The harmonics readings: %THD and K-factor.
3. The layout of the keypad is slightly different (although the keys have exactly the same
functions).
Volts
Amps
Max
Min
FIGURE 7–1: The Keypad
Power
Next
Phase
4. The unit’s legend values are jumper-selectable: the user, if necessary, needs to open
the cover and choose between V and KV, A and KA, Kilo(k) and Mega (M) for power
relays.
5. The annunciators are highlighted one at a time.
EPM 5300 SERIES ADVANCED POWER METERS – INSTRUCTION MANUAL 7–49
Page 62

EPM 5200P CHAPTER 7: EPM 5200P
Note
The Ethernet model, EPM 5350P, is covered in detail in Chapter 16 of this manual. See p. 40
for a comparison of the three models covered in this manual.
Table 7–1: EPM 5300P vs EPM 5200P vs EPM 5350P
Feature 5300P 5200P 5350P
Voltage 3-Phase 4 4 4
Voltage Accuracy 0.2% 0.3% 0.2%
Current 3-Phase and Neutral 4 4 4
Current Accuracy 0.2% 0.3% 0.2%
Watts, VARS, VA, PF 4 4 4
Watts Accuracy 0.4% 0.6% 0.4%
Frequency 4 4 4
Watt/HR 4 4 4
VAR/HR (Optional) 4 4
VA/HR 4 4
Harmonics to 31
st
Order
44
Max/Min Demand 4 4 4
Limits 4 4
Relays and Logic 4 4
Pulse Outputs 444
Digital Communication 4 4 4
Modbus RTU 4 4
Modbus ASCII 4 4
DNP Protocol 4 4
Modbus Plus Capability 4 4
Analog Outputs 4
Modbus TCP 4
Ethernet 4
7–50 EPM 5300 SERIES ADVANCED POWER METERS – INSTRUCTION MANUAL
Page 63

GE Consumer & Industrial
Multilin
EPM 5300 Series Meters
Chapter 8: Entering
Programming Mode
Entering Programm ing Mode
8.1 Checksum Error—Protective Self-Checking Algorithms
This checksum error is a protective self-checking wealth algorithm designed to alert the
user when a procedure has not been correctly followed, ensuring that the meter does not
display inaccurate readings.
If the control power is interrupted while in Programming Mode or the user does not
completely exit, the meter enters a checksum mode. The max LED flashes. Press AMPS
and PHASE/NEXT simultaneously and the unit recovers. Follow the procedure to enter
Programming Mode to check program data. If the data is correct, then exit.
EPM 5300 SERIES ADVANCED POWER METERS – INSTRUCTION MANUAL 8–51
Page 64

PASSWORD ENTRY CHAPTER 8: ENTERING PROGRAMMING MODE
A
A
A
A
A
V
8.2 Password Entry
The EPM 5300P and 5200P are password protected. To enter the Programming Mode, key
in the following password: 555.
The password entry may seem awkward at first. It is designed to be difficult to use initially.
This secures unauthorized tampering. After you become familiar with password entry, you
will find it quick and easy to accomplish.
Note
AMPS
FREQ
POWER
AC VOLTS
B
NCN
N
B
AC AMPS
POWER
PF
KW
KV
KVAR
PHASE
NEXT
B
C
NCB
MAX
MIN
LM1
LM2
MAX/MIN
LIMITS
KWHKVAH
OLTS
Step 1:
a. Press and hold PHASE/NEXT.
b. While holding PHASE/NEXT,
press AMPS until a number
appears in middle display. Then
release both buttons.
If 3 is not already displayed:
c. Press AMPS until 3 appears.
d. Press PHASE/NEXT to multiply
the 3 to 333.
The meter will not store any programming unless properly exited (see Chapter 14 to Exit).
Entering Programming Mode:
AMPS
FREQ
POWER
AC VOLTS
A
NBNCNABBCCA
AC AMPS
POWER
PF
KW
KVA
KVAR
PHASE
NEXT
MAX
MIN
LM1
NCBA
LM2
KVAH
MAX/MIN
LIMITS
KWH
VOLTS
C
MAX
MIN
LM1
LM2
KVAH
MAX/MIN
LIMITS
KWH
VOLTS
Step 2:
Digits begin scrolling in upper
display.
⌦ The password is 555.
a. Press PHASE/NEXT each time
the digit 5 appears.
Selected digits appear in middle
display.
Display blanks and PPP flashes
in upper display, confirming a
correctly entered password.
PPP is replaced by 0. and the
meter is now in Programming
Mode, GROUP 0.
You are now in the Programming
Mode. CONGRATULATIONS!
AMPS
FREQ
POWER
AC VOLTS
A
NBNCNABBCCA
AC AMPS
POWER
PHASE
NEXT
PF
KW
KVA
KVAR
NCBA
333 flashes momentarily in
middle display.
Note
AUTO SCROLLING will automatically show all of the readings on the face of the meter
except LIMITS. To enter Auto Scrolling mode, follow the above steps except use the
numbers 666 as the password. To exit Auto Scrolling mode, use the same procedure as
described above.
8–52 EPM 5300 SERIES ADVANCED POWER METERS – INSTRUCTION MANUAL
Page 65

GE Consumer & Industrial
Multilin
EPM 5300 Series Meters
Chapter 9: Programming
Programming Group 0 - Global Meter Setup
The Global Meter Setup includes FUNCTIONS 0 through 7 that control configuration and
basic operation. FUNCTION 3 System Configuration contains Switch PACKS with various
options, including Open Delta installation, communications or DC Output setup. Global
Meter Setup is the section in which general features are programmed.
Group 0 - Global
Meter Setup
Function
Number
0. Integration Interval
1. Meter Address for Communication
2. Baud Rate for Communication
3. System Configuration (see Table 9-2)
4. Relay 1 Set-up / Time delay
5. Relay 2 Set-up / Time delay
6. KYZ Parameter Selection
7. Number of Phases
E. Exit Programming GROUP 0
Function
EPM 5300 SERIES ADVANCED POWER METERS – INSTRUCTION MANUAL 9–53
Page 66

GROUP 0, FUNCTION 0—THE INTEGRATION INTERVAL CHAPTER 9: PROGRAMMING GROUP 0 - GLOBAL METER SETUP
9.1 Group 0, Function 0—The Integration Interval
INTEGRATION INTERVAL: Time which all instantaneous readings are averaged to obtain a
max and min demand. The Integration Interval is entered in seconds. When entering 15
minutes, enter: 0900 seconds. The default value is 900 seconds.
To change the Integration Interval:
Note
Press MAX/MIN/LIMITS at any time to cancel before storing the last digit or switch.
MAX
MIN
LM1
LM2
MAX/MIN
VOLTS
LIMITS
AC VOLTS
B
ABB
A
NCN
CCA
N
AC AMPS
NCBA
POWER
PF
KW
KVA
KVAR
FREQ
KWHKVAH
PHASE
POWER
AMPS
NEXT
MAX
MIN
LM1
LM2
MAX/MIN
LIMITS
VOLTS
AC VOLTS
B
ABB
A
NCN
CCA
N
AC AMPS
NCBA
POWER
PF
KW
KVA
KVAR
FREQ
KWHKVAH
PHASE
POWER
AMPS
NEXT
Step 1:
a. Enter Group Level of Programming
Mode (see Chp. 8).
b. Press MAX/MIN/LIMITS until 0. appears
in upper display.
Function 00. appears in upper display.
The second 0 indicates Function 0
Lower display indicates current Interval
setting.
c. Press AMPS to activate the Group.
MAX
MIN
LM1
LM2
MAX/MIN
LIMITS
VOLTS
AC VOLTS
B
A
ABB
NCN
CCA
N
AC AMPS
NCBA
POWER
PF
KW
KVA
KVAR
FREQ
KWHKVAH
PHASE
POWER
AMPS
NEXT
MAX
MIN
LM1
LM2
MAX/MIN
LIMITS
KWHKVAH
VOLTS
AMPS
FREQ
POWER
AC VOLTS
A
NBNCNABBCCA
AC AMPS
POWER
PF
KW
KVA
KVAR
PHASE
NEXT
NCBA
Step 2:
a. Press AMPS once to begin Data Entry
Sequence.
The previous value shifts to middle
display and four dashes appear in lower
display.
b. Press VOLTS for desired number.
Repeat this procedure until new
Integration Interval is entered.
When complete, middle display blanks
and lower display indicates new
Integration Interval.
See Chapter 14 to Exit.
c. Press AMPS to store.
Group 0, Function 1 — The Meter Address
9–54 EPM 5300 SERIES ADVANCED POWER METERS – INSTRUCTION MANUAL
Page 67

CHAPTER 9: PROGRAMMING GROUP 0 - GLOBAL METER SETUP GROUP 0, FUNCTION 0—THE INTEGRATION INTERVAL
METER ADDRESS: Identifies the meter when communicating with digital communications.
When numerous meters are at one site, it is essential that each meter have its own
address. Otherwise, all meters speak at the same time and communication is useless.
To change the Meter Address:
Note
MAX
MIN
LM1
LM2
KVAH
MAX/MIN
LIMITS
Press MAX/MIN/LIMITS at any time to cancel before storing the last digit or switch.
AC VOLTS
B
ABB
A
NCN
CCA
N
AC AMPS
NCBA
POWER
PF
KW
KVA
KVAR
FREQ
KWH
PHASE
AMPS
POWER
NEXT
VOLTS
Step 1:
a. Enter Group Level of Programming Mode (see Chp.
8).
b. Press MAX/MIN/LIMITS until 0. appears.
c. Press AMPS to activate the Group.
AC VOLTS
MAX
MIN
LM1
LM2
LIMITS
MAX/MIN
VOLTS
FREQ
KWH KVAH
POWER
AMPS
B
A
C
A
N
N
N
B
AC AMPS
POWER
PHASE
NEXT
B
C
N C B A
PF
KW
KVA
KVAR
C
A
Step 2:
a. Press MAX/MIN/LIMITS until Function 01. appears in
upper display.
Lower display indicates the current Meter Address.
AMPS
FREQ
POWER
AC VOLTS
B
A
ABB
NCN
N
AC AMPS
POWER
PF
KW
KVA
KVAR
PHASE
NEXT
CCA
NCBA
MAX
MIN
LM1
LM2
MAX/MIN
LIMITS
KVAH
KWH
VOLTS
Step 3:
a. Press AMPS once to begin Data Entry Sequence.
The previous value shifts to middle display and
four dashes appear in lower display.
b. Press VOLTS for desired number.
c. Press AMPS to store each digit.
AMPS
FREQ
POWER
AC VOLTS
A
NBNCNABBCCA
AC AMPS
POWER
PF
KW
KVA
KVAR
PHASE
NEXT
NCBA
MAX
MIN
LM1
LM2
KVAH
MAX/MIN
LIMITS
KWH
VOLTS
Repeat this procedure until new Address is entered.
When complete, middle display blanks and lower
display indicates new Address.
See Chapter 14 to Exit.
EPM 5300 SERIES ADVANCED POWER METERS – INSTRUCTION MANUAL 9–55
Page 68
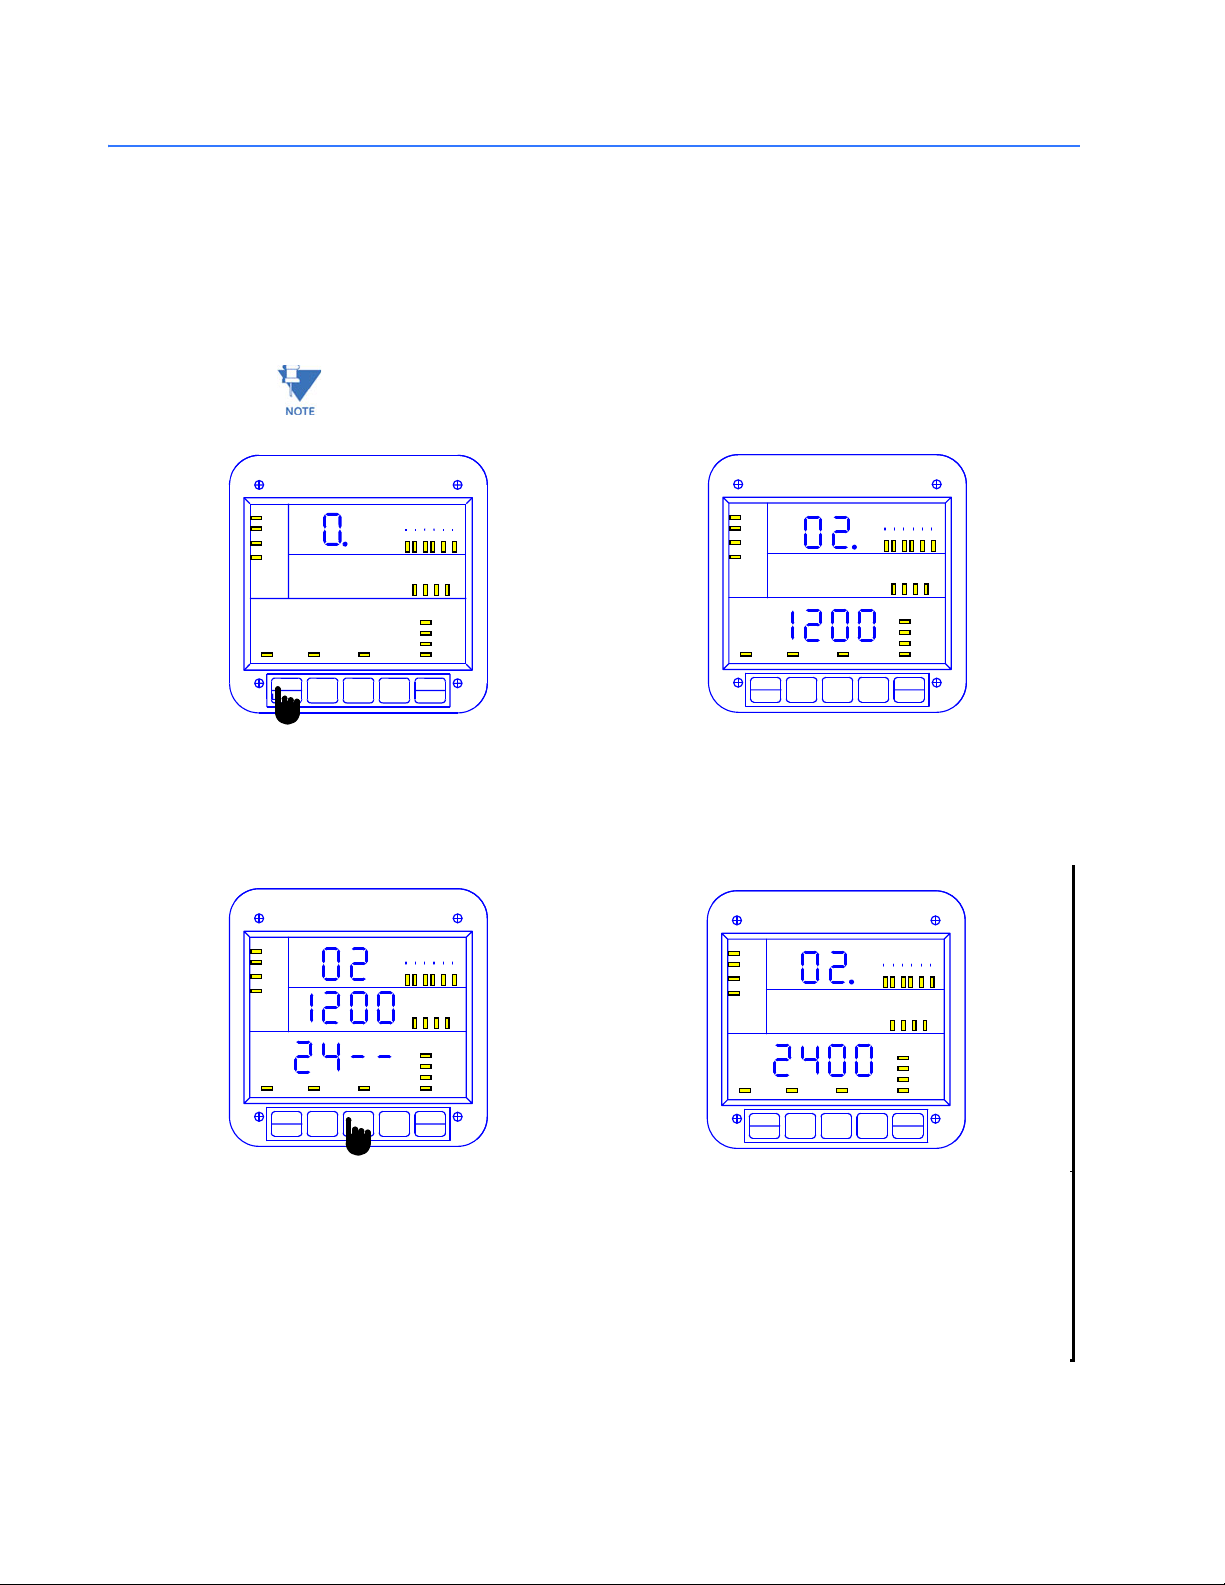
GROUP 0, FUNCTION 2 — BAUD RATE CHAPTER 9: PROGRAMMING GROUP 0 - GLOBAL METER SETUP
9.2 Group 0, Function 2 — Baud Rate
BAUD RATE: Speed at which data is transmitted between meter and remote computer or
serial printer. The rate programmed into the meter must match the rate used by the
remote device. Valid Baud Rates are 1200, 2400, 4800 and 9600.
To change the Baud Rate:
Note
MAX
MIN
LM1
LM2
KVAH
MAX/MIN
LIMITS
Press MAX/MIN/LIMITS at any time to cancel before storing the last digit or switch.
AC VOLTS
B
A
ABB
NCN
CCA
N
AC AMPS
NCBA
POWER
PF
KW
KVA
KVAR
FREQ
KWH
PHASE
AMPS
POWER
NEXT
VOLTS
Step 1:
a. Enter Group Level of Programming Mode (see Chp. 8).
b. Press MAX/MIN/LIMITS until 0. appears.
c. Press AMPS to activate the Group.
AMPS
FREQ
POWER
AC VOLTS
A
NBNCNABBCCA
AC AMPS
POWER
PF
KW
KVA
KVAR
PHASE
NEXT
NCBA
MAX
MIN
LM1
LM2
LIMITS
KVAH
MAX/MIN
KWH
VOLTS
Step 2:
a. Press MAX/MIN/LIMITS until Function 02. appears in
upper display.
Lower display indicates current Baud Rate.
MAX
MIN
LM1
LM2
KVAH
MAX/MIN
LIMITS
VOLTS
KWH
AMPS
FREQ
POWER
AC VOLTS
B
A
ABB
NCN
N
AC AMPS
POWER
PF
KW
KVA
KVAR
PHASE
NEXT
MAX
CCA
NCBA
MIN
LM1
LM2
MAX/MIN
LIMITS
KVAH
KWH
VOLTS
AMPS
FREQ
POWER
AC VOLTS
A
NBNCNABBCCA
AC AMPS
POWER
PF
KW
KVA
KVAR
PHASE
NEXT
NCBA
Step 3:
a. Press AMPS to begin Data Entry Sequence.
The previous value shifts to middle display and four
dashes appear in lower display.
b. Press VOLTS for desired number.
c. Press AMPS to store each digit.
9–56 EPM 5300 SERIES ADVANCED POWER METERS – INSTRUCTION MANUAL
Repeat this procedure until new Communication
Baud Rate is entered.
When complete, middle display blanks and lower
display indicates new Baud Rate.
See Chapter 14 to Exit.
Page 69
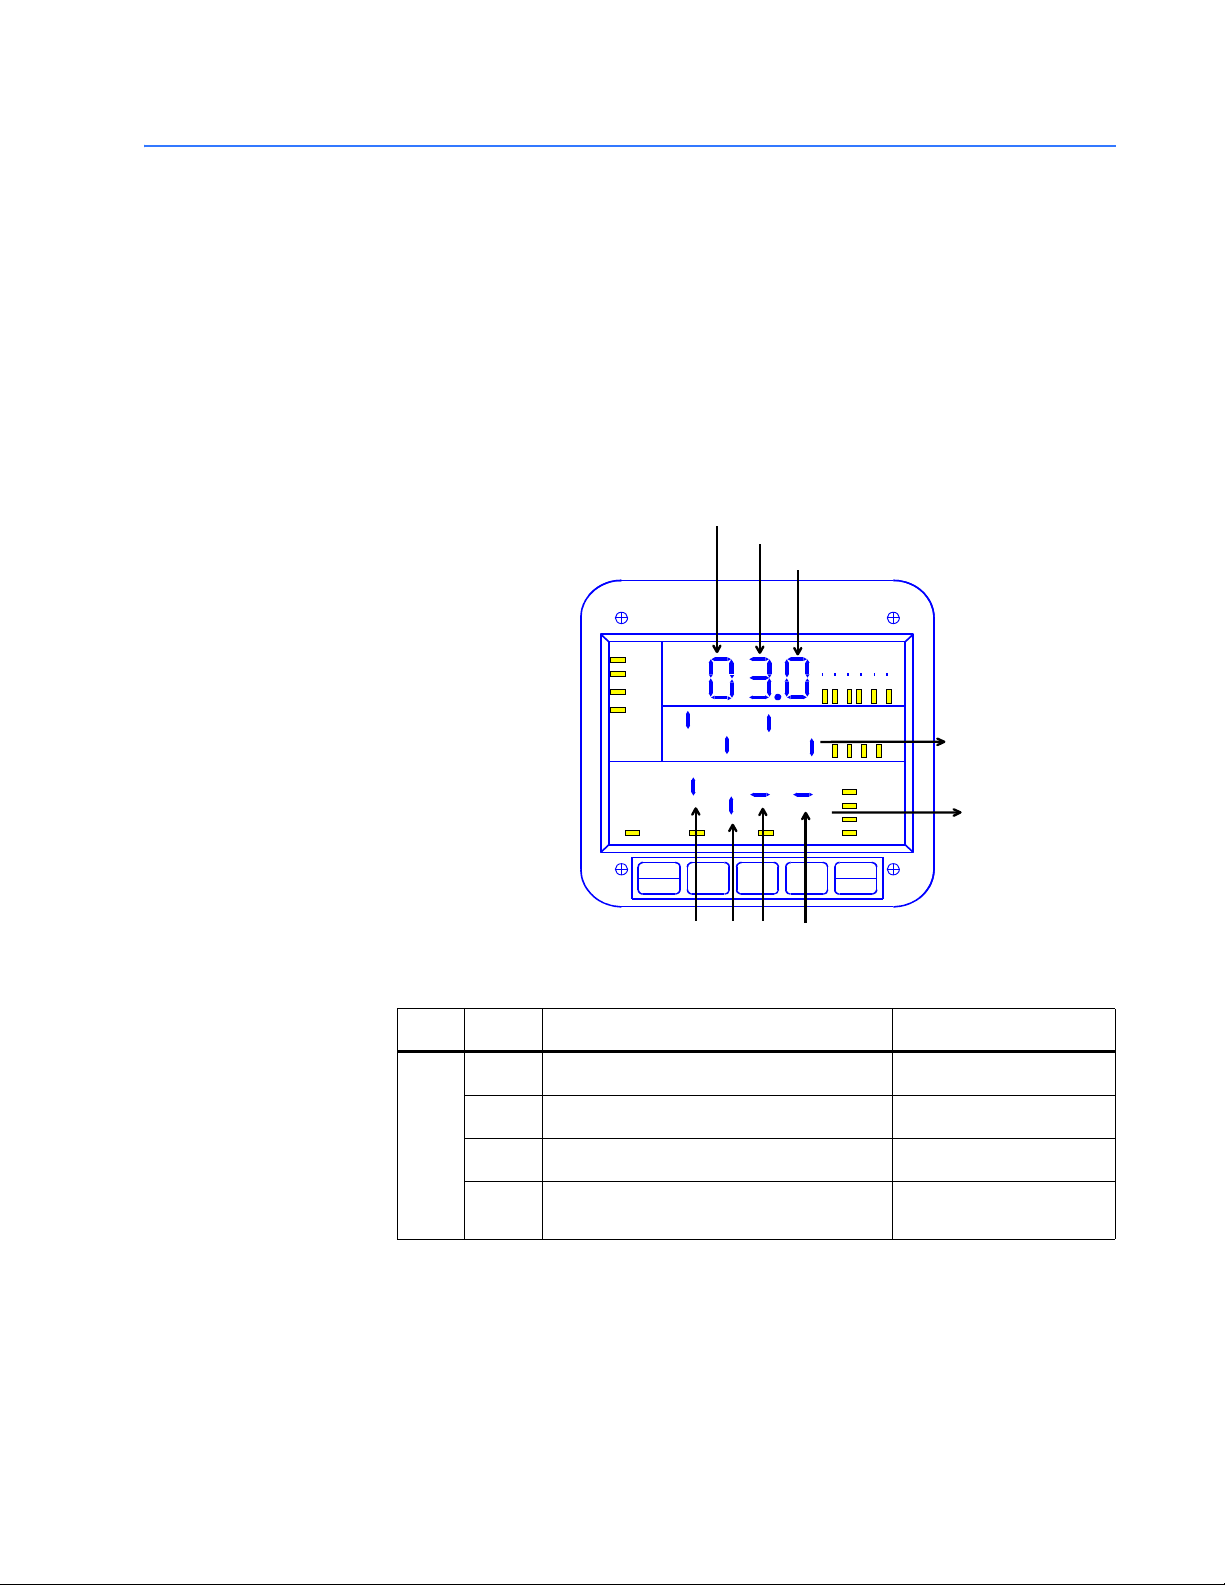
CHAPTER 9: PROGRAMMING GROUP 0 - GLOBAL METER SETUP GROUP 0, FUNCTION 3 — SYSTEM CONFIGURATION
A
9.3 Group 0, Function 3 — System Configuration
The System Configuration sets the EPM 5300P’s basic operational parameters. This
Function utilizes Switch PACKS.
FUNCTION 3 contains four different Switch PACKS: 0–3. Each PACK contains four individual
UP/DOWN segments.
• Toggling the segment between UP and DOWN, toggles the switch ON or OFF, or
chooses between two options.
• The meter displays one Switch PACK at a time.
Press VOLTS to scroll from PACK to PACK.
GROUP
FUNCTION
PACK
FREQ
POWER
C VOLTS
A
NBNCNABBCCA
AC AMPS
POWER
PF
KW
KVA
KVAR
PHASE
NEXT
NCBA
PREVIOUS
SETTING
NEW
SETTING
MAX
MIN
LM1
LM2
KVAH
MAX/MIN
LIMIT
SWITCHES:
KWH
AMP
VOLT
A B C D
Pack Switch Feature Segment Position
AReserved —
bReserved —
0
cReserved —
d Phase Reversal Limit Detection
UP: Enable
DOWN: Disable
EPM 5300 SERIES ADVANCED POWER METERS – INSTRUCTION MANUAL 9–57
Page 70

GROUP 0, FUNCTION 3 — SYSTEM CONFIGURATION CHAPTER 9: PROGRAMMING GROUP 0 - GLOBAL METER SETUP
a Non-significant will blank leading zero
Reset Protection
b
(see Part I: Installation and Operation)
UP: Enable
DOWN: Disable
UP: Enable
DOWN: Disable
1
c Phase Reversal Rotation Selection
Open Delta Installation
d
(see Part I: Installation and Operation)
a Limit/Relay Control
Power Factor Polarity Indicates +
b
2
(voltage referenced) or
- (current referenced)
UP: CBA Rotation
DOWN: ABC Rotation
UP: Enable
DOWN: Disable
UP: Average
DOWN: Instantaneous
UP: -PF
DOWN: +PF
For EI-BUS protocol: Switch C is DOWN, Switch D is DOWN.
c, d
For MODBUS protocol, ASCII framing: Switch C is UP, Switch D is UP.
For MODBUS protocol, RTU framing: Switch C is DOWN Switch D is UP.
For DNP 3.0 protocol: Switch C is UP, Switch D is DOWN.
Trip Relay Computer Control 1
a
(Relay Control 1 and 2 apply only if Relay
Option -NL was ordered.)
Trip Relay Computer Control 2
b
(Relay Control 1 and 2 apply only if Relay
Option -NL was ordered.)
UP: Enable
DOWN: Disable
UP: Enable
DOWN: Disable
3
RS-232 or RS-485 Communications or
c
Print
DC Output
(To operate DC Output, disable PACK 3,
Switch C)
d
or
Print Operating and Programming Data
(To print, set PACK 3 Switches C and D to
UP position.)
9.3.1 Open Delta System Installation Programming
A special switch is used to indicate that the electrical system being monitored is a Threephase WYE or Three-Wire Open Delta System using the connection installation (see
Chapter 3). The switch is located in GROUP 0, FUNCTION 3, Pack 1, Switch D.
This switch should be set to UP only if the electrical system is a Three-Wire Delta or
Open Delta, using 2 PTs. Otherwise, the switch should be set to DOWN. Failure to select
this switch results in Phase-to-Neutral readings, as well as incorrect power readings,
with the 2PT connection.
Special Open Delta Connection Installation should be followed in the Installation and
Operation section (Chapter 3).
UP: Enable
Communications
DOWN: Enable DC
Output
UP: Enable DC Output or
Print Communication
DOWN: Disable DC
Output and Print
9–58 EPM 5300 SERIES ADVANCED POWER METERS – INSTRUCTION MANUAL
Page 71

CHAPTER 9: PROGRAMMING GROUP 0 - GLOBAL METER SETUP GROUP 0, FUNCTION 3 — SYSTEM CONFIGURATION
9.3.2 Switching Communication Protocols, EI-BUS, MODBUS RTU/ASCII, DNP 3.0
• For EI-BUS protocol: PACK 2, Switch C is DOWN, Switch D is DOWN.
• For MODBUS protocol, ASCII framing: PACK 2, Switch C is UP, Switch D is UP.
• For MODBUS protocol, RTU framing: PACK 2, Switch C is DOWN Switch D is UP.
• For DNP 3.0 protocol: PACK 2, Switch C is UP, Switch D is DOWN.
Note
When programming for MODBUS protocol configuration of LIPA (Long Island
Power Authority) mapping options may be performed through communication.
EPM 5300 SERIES ADVANCED POWER METERS – INSTRUCTION MANUAL 9–59
Page 72

MODBUS PLUS CAPABILITY CHAPTER 9: PROGRAMMING GROUP 0 - GLOBAL METER SETUP
9.4 Modbus Plus Capability
When using the MPI Modbus Plus adapter, the meter values should be set to speak to
Modbus RTU with a meter address of 0001 and a baud rate of 9600 baud. The Modbus Plus
address is programmed into the MP1 Modbus Plus adapter directly.
9.4.1 Printing Option
To print, access Mode 1 and Mode 2 (see Part I: Installation and Operation). Printing serial
options should be disabled when using a multimeter communications connection RS485.
DISABLING PREVENTS:
1. Printing through the keypad.
2. Corrupting data at a computer terminal while multiple meters poll.
3. Corrupting printing commands through communications.
This option connects a serial printer to the RS232 port and prints the data. Disable this
feature when the meter is not using an RS232 port (i.e., when RS485 or DC outputs are
being used).
9–60 EPM 5300 SERIES ADVANCED POWER METERS – INSTRUCTION MANUAL
Page 73

CHAPTER 9: PROGRAMMING GROUP 0 - GLOBAL METER SETUP GROUP 0, FUNCTION 3—PROGRAMMING PROCEDURE
9.5 Group 0, Function 3—Programming Procedure
To change the System Configuration Switch Settings:
Note
MAX
MIN
LM1
LM2
MAX/MIN
LIMITS
Press MAX/MIN/LIMITS, at any time, to cancel before storing the last digit or switch.
AC VOLTS
A
NBNCNABBCCA
AC AMPS
NCBA
POWER
PF
KW
KVA
KVAR
FREQ
KWHKVAH
PHASE
AMPS
POWER
NEXT
VOLTS
Step 1:
a. Enter Group Level of Programming Mode (see Chp. 8).
b. Press MAX/MIN/LIMITS until 0. appears in upper
display.
c. Press AMPS to activate the Group.
AMPS
FREQ
POWER
AC VOLTS
A
NBNCNABBCCA
AC AMPS
POWER
PF
KW
KVA
KVAR
PHASE
NEXT
NCBA
MAX
MIN
LM1
LM2
MAX/MIN
LIMITS
KWHKVAH
VOLTS
Step 2:
a. Press MAX/MIN/LIMITS until Function 03.0 appears in
upper display.
Lower display indicates current PACK 0 Switch
Settings.
AMPS
FREQ
POWER
AC VOLTS
A
NBNCNABBCCA
AC AMPS
POWER
PF
KW
KVA
KVAR
PHASE
NEXT
NCBA
MAX
MIN
LM1
LM2
MAX/MIN
LIMITS
KWHKVAH
VOLTS
Step 3:
a. Press VOLTS until desired PACK appears.
b. Press AMPS to begin Data Entry Sequence.
The previous Switch settings shift to middle display
and four dashes appear in lower display.
c. Press VOLTS to toggle the segments up or down for
desired setting.
d. Press AMPS to store each setting.
AMPS
FREQ
POWER
AC VOLTS
B
A
ABB
NCN
N
AC AMPS
POWER
PF
KW
KVA
KVAR
PHASE
NEXT
CCA
NCBA
MAX
MIN
LM1
LM2
MAX/MIN
LIMITS
KVAH
KWH
VOLTS
Repeat procedure until new Switch Setting is entered.
The middle display blanks and new Switch Settings are
indicated on lower display.
(This example shows enabling of Open Delta Installation
switch).
See Chapter 14 to Exit.
EPM 5300 SERIES ADVANCED POWER METERS – INSTRUCTION MANUAL 9–61
Page 74

RELAY MODE CHAPTER 9: PROGRAMMING GROUP 0 - GLOBAL METER SETUP
9.6 Relay Mode
Note
Relays are not available for the EPM 5200P.
Switch Description Segment Position
A Reversal Imbalance Control
BAND/OR Logic
UPEnable
DOWNDisable
UPAND
DOWNOR
C & D Relay Control see Table 8-4
The Switch PACKS in FUNCTIONS 4 and 5 of programming GROUP 0 control the relay
position. Setting the switches in different combinations allows the user to specify the
conditions in which the relay will be “SET” or “RESET.” The following table indicates possible
configurations.
Switch C Switch D Description
FAIL-SAFE MODE—The normal or non-event condition is set.
UP UP
RESET relay on either out of limit condition. Relay acts as a
protective switch if power is interrupted. This alerts the user if
the meter or the meter power is out.
UP DOWN N/A (Reserved for future features).
DOWN UP N/A (Reserved for future features).
DOWN DOWN
RESET MODE—The normal or non-event condition is reset.
SET relay on either out of limit condition.
DEFINITIONS:
RESET: There is a short between “COM” and “N.C.” (Normally closed)
SET: There is a short between “COM” and “N.O.” (Normally open)
(See Part I: Installation and Operation.)
EXAMPLE 1: Fail-safe mode normally set—non-event condition is set relay
Relay 1 will be “SET” if the instantaneous reading for frequency is between 58 Hz and 62
Hz. When all other conditions exist, the relay will “RESET.”
Note
Under this setup the relay acts as a protective switch.
9–62 EPM 5300 SERIES ADVANCED POWER METERS – INSTRUCTION MANUAL
Page 75

CHAPTER 9: PROGRAMMING GROUP 0 - GLOBAL METER SETUP RELAY MODE
RESET
62 Hz
L 2
SET
58 Hz
RESET
0 Hz
NO POW ER TO THE UNIT
Programming Steps:
Z Enter in GROUP 0, FUNCTION 4, PACK ‘P’, Segment C and D: UP, UP.
Z Enter in GROUP 5, FUNCTION 4, LIMIT 1, Segments B, C, and D:
DOWN, UP, DOWN. Value: 58.00.
Z Enter in GROUP 5, FUNCTION 4, LIMIT 2, Segments B, C, and D: UP,
UP, DOWN. Value: 62.00.
EXAMPLE 2: Normally reset—non-event condition is reset relay
L 1
RESET
Relay 1 will be “SET” if the instantaneous reading for amps is below 4.00 or above 5.00
amps. Under all other conditions the relay will be “RESET”.
Note
Under this setup the relay will NOT act as a protective switch.
Programming Steps:
Z Enter in GROUP 0, FUNCTION 4, PACK ‘p’, Segments C and D:
DOWN, DOWN
Z Enter in GROUP 4, FUNCTION 2, LIMIT 1, Segments: B, C, and D: UP,
UP, DOWN. Value: 5.00
Z Enter in GROUP 4, FUNCTION 2, LIMIT 2, Segments: DOWN, UP,
DOWN. Value: 4.00
Group 0—Function Number Description
04.P Controls Relay 1
05.P Controls Relay 2 (and 3 if NL4)
To change the Relay Mode to either Fail-safe or Reset:
Note
Press MAX/MIN/LIMITS at any time to cancel before storing the last digit or switch.
EPM 5300 SERIES ADVANCED POWER METERS – INSTRUCTION MANUAL 9–63
Page 76

RELAY MODE CHAPTER 9: PROGRAMMING GROUP 0 - GLOBAL METER SETUP
A
A
V
A
A
V
A
AMPS
FREQ
POWER
AC VOLTS
B
ABB
A
NCN
N
AC AMPS
POWER
PF
KW
KV
KVAR
PHASE
NEXT
CCA
NCB
MAX
LM1
LM2
MIN
MAX/MIN
LIMITS
KWHKVAH
OLTS
Step 1:
a. Enter Group Level of Programming Mode (see Chp. 8).
b. Press MAX/MIN/LIMITS until 0. appears in upper
display.
c. Press AMPS to activate the Group.
AMPS
FREQ
POWER
AC VOLTS
A
NBNCNABBCCA
AC AMPS
POWER
PHASE
NEXT
PF
KW
KVA
KVAR
NCBA
MAX
LM1
LM2
MIN
KVAH
MAX/MIN
LIMITS
KWH
VOLTS
MPS
FREQ
POWER
AC VOLTS
B
ABB
A
NCN
N
AC AMPS
B
POWER
PHASE
NEXT
PF
KW
KV
KVAR
CCA
NC
MAX
MIN
LM1
LM2
KVAH
MAX/MIN
LIMITS
KWH
OLTS
Step 2:
Press MAX/MIN/LIMITS until 04.P (for Relay 1) or 05.P (for
Relay 2) appears in upper display.
Lower display indicates current setting.
AMPS
FREQ
POWER
AC VOLTS
A
NBNCNABBCCA
AC AMPS
POWER
PHASE
NEXT
PF
KW
KVA
KVAR
NCBA
MAX
MIN
LM1
LM2
MAX/MIN
LIMITS
KWHKVAH
VOLTS
Step 3:
a. Press AMPS to begin Data Entry Sequence.
The previous setting shifts to middle display and four
dashes appear in lower display.
b. Press VOLTS for desired switch position.
c. Press AMPS to store each setting.
9–64 EPM 5300 SERIES ADVANCED POWER METERS – INSTRUCTION MANUAL
Repeat this procedure until new switch setting is
entered.
When complete, middle display blanks and lower
display indicates the programming.
See Chapter 14 to Exit.
Page 77

CHAPTER 9: PROGRAMMING GROUP 0 - GLOBAL METER SETUPGROUP 0, FUNCTIONS 4–5—TIME DELAY FOR RELAYS 1 & 2 (OPTION – NL)
9.7 Group 0, Functions 4–5—Time Delay for Relays 1 & 2 (Option – NL)
GROUP 0, FUNCTIONS 4–5 sets the time delay for Relays 1 and 2 between 0
and 255 seconds. This allows conditions (example below) to exist for a userspecified time period before the relay or alarm activates. If a time greater than 255
seconds is entered, the meter defaults to the maximum value of 255 seconds.
Example: If Relay 1 is set for 300 amps and the amps increase to 301, the Relay trips only
after a programmed delay period. If the meter then measures 299 Amps, the Relay returns
to its original position, after the programmed delay.
Relay 1: Located in 04.0 & 04.1.
Relay 2: Located in 05.0 & 05.1.
(Procedures for both relays are the same).
Group and Function Number Description
04.0 Relay 1: On to Off Delay Time
04.1 Relay 1: Off to On Delay Time
05.0 Relay 2: On to Off Delay Time
05.1 Relay 2: Off to On Delay Time
To change Time Delays:
Note
Press MAX/MIN/LIMITS at any time, to cancel before storing the last digit or Switch.
EPM 5300 SERIES ADVANCED POWER METERS – INSTRUCTION MANUAL 9–65
Page 78

GROUP 0, FUNCTIONS 4–5—TIME DELAY FOR RELAYS 1 & 2 (OPTION – NL)CHAPTER 9: PROGRAMMING GROUP 0 - GLOBAL METER SETUP
AMPS
FREQ
POWER
AC VOLTS
A
NBNCNABBCCA
AC AMPS
POWER
PF
KW
KVA
KVAR
PHASE
NEXT
NCBA
MAX
MIN
LM1
LM2
LIMITS
MAX/MIN
KWHKVAH
VOLTS
Step 1:
a. Enter Group Level of Programming Mode
(see Chp. 8).
b. Press MAX/MIN/LIMITS until 0. appears in upper
display.
c. Press AMPS to activate the Group.
AMPS
FREQ
POWER
AC VOLTS
B
A
ABB
NCN
N
AC AMPS
POWER
PHASE
NEXT
PF
KW
KVA
KVAR
CCA
NCBA
MAX
MIN
LM1
LM2
MAX/MIN
LIMITS
KWHKVAH
VOLTS
Step 2:
To program Relay 1:
a. Press MAX/MIN/LIMITS until Function 04.P appears
in upper display.
To program Relay 2 and 3:
a. Press MAX/MIN/LIMITS until Function 05.P appears.
b. Press VOLTS once to display 04.0 (On to Off delay time).
c. Press VOLTS twice to display 04.1 (Off to On delay
time).
Lower display indicates current Time Delays.
MAX
MIN
LM1
LM2
MAX/MIN
LIMITS
VOLTS
AC VOLTS
A
NBNCNABBCCA
AC AMPS
NCBA
POWER
PF
KW
KVA
KVAR
FREQ
KWHKVAH
PHASE
POWER
AMPS
NEXT
MAX
LM1
LM2
MIN
MAX/MIN
LIMITS
KWHKVAH
VOLTS
AMPS
FREQ
POWER
AC VOLTS
A
NBNCNABBCCA
AC AMPS
POWER
PHASE
NEXT
PF
KW
KVA
KVAR
NCBA
Step 3:
a. Press AMPS to begin Data Entry Sequence.
The previous value shifts to middle display and four
dashes appear in lower display.
b. Press VOLTS until number appears.
Repeat this procedure until new Time Delay is entered.
When complete, middle display blanks and lower
display indicate the new Time Delay.
See Chapter 14 to Exit.
c. Press AMPS to store each number.
9–66 EPM 5300 SERIES ADVANCED POWER METERS – INSTRUCTION MANUAL
Page 79

CHAPTER 9: PROGRAMMING GROUP 0 - GLOBAL METER SETUP GROUP 0, FUNCTION 6—KYZ PARAMETER SELECTION
9.8 Group 0, Function 6—KYZ Parameter Selection
Note
FUNCTION 6 applies only if Option -NL or -NL2 was ordered.
OPTION -NL: This option gives the meter 2 Relays and one KYZ pulse. The KYZ pulse can be
programmed to the below features.
Select a single parameter from Table 9-5 according to the EPM 5300P model being
programmed.
OPTION -NL2: This option offers 3 distinct KYZ pulses instead of Relays.
Only three separate parameters may be selected: FUNCTION 6.0 (KYZ Port 0), FUNCTION
6.1 (KYZ Port 1), and FUNCTION 6.2 (KYZ Port 2). The available parameters vary according to
the EPM 5300P model being programmed. For exact port positions see Installation
Sections.
Table 9–1: KYZ Parameters
Parameter Description
0 Disable KYZ
1 Positive Watt Hour KYZ
2VA Hour KYZ
3 Negative Watt Hour KYZ
4Positive VAR Hour KYZ
5 Negative VAR Hour KYZ
APPLICABLE SELECTIONS: 5300P - +WH, -WH, VAH
5300P - +WH, -WH, +VARH, -VARH
To perform the KYZ Parameter Selection:
Note
Press MAX/MIN/LIMITS at any time to cancel before storing the last digit or switch.
EPM 5300 SERIES ADVANCED POWER METERS – INSTRUCTION MANUAL 9–67
Page 80
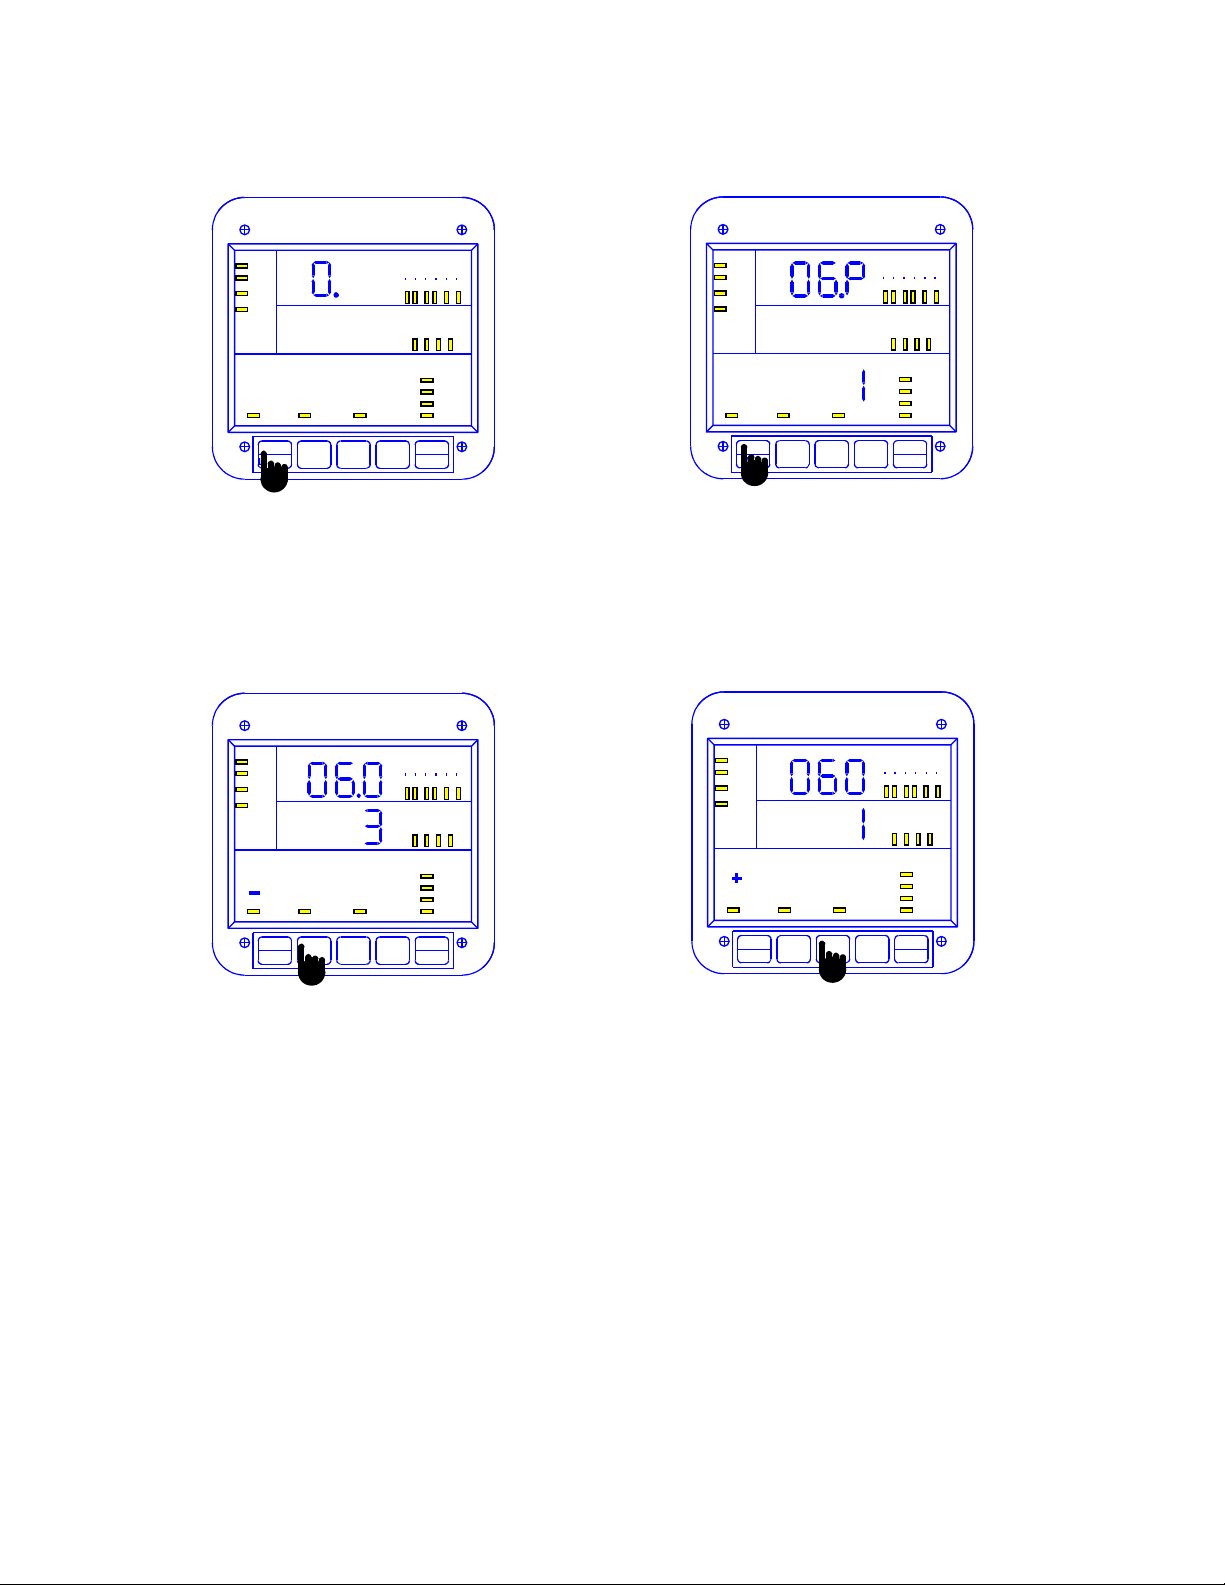
GROUP 0, FUNCTION 6—KYZ PARAMETER SELECTION CHAPTER 9: PROGRAMMING GROUP 0 - GLOBAL METER SETUP
A
V
A
V
A
A
V
A
V
A
MAX
MIN
LM1
LM2
AC VOLTS
B
A
ABB
NCN
N
AC AMPS
B
CCA
NC
POWER
PF
KW
KVA
MAX/MIN
LIMITS
OLTS
FREQ
KWHKVAH
AMPS
POWER
PHASE
NEXT
KVAR
Step 1:
a. Enter Group Level of Programming Mode (see Chp. 8).
b. Press MAX/MIN/LIMITS until 0. appears in upper
display.
c. Press AMPS to activate the Group.
FREQ
POWER
AC VOLTS
B
A
ABB
NCN
N
AC AMPS
POWER
PF
KW
KV
KVAR
PHASE
NEXT
CCA
NCB
MAX
MIN
LM1
LM2
KVAH
MAX/MIN
LIMITS
OLTS
KWH
AMPS
MAX
MIN
LM1
LM2
AC VOLTS
B
A
ABB
NCN
N
AC AMPS
B
CCA
NC
POWER
PF
KW
KVA
POWER
PHASE
NEXT
KVAR
KVAH
MAX/MIN
LIMITS
OLTS
KWH
FREQ
AMPS
Step 2:
a. Press MAX/MIN/LIMITS until 06.P appears in upper
display.
(Standard Selection is 1).
MPS
FREQ
POWER
AC VOLTS
A
NBNCNABBCCA
AC AMPS
POWER
PF
KW
KVA
KVAR
PHASE
NEXT
NCB
MAX
MIN
LM1
LM2
MAX/MIN
LIMITS
KVAH
KWH
OLTS
Step 3:
a. Press VOLTS once and 06.0 appears in
upper display.
Middle display indicates preset value.
Lower display indicates polarity of selected parameter
and an annunciator indicates the selected parameter.
Step 4:
a. Press AMPS once to select a different parameter.
b. Press MAX/MIN/LIMITS to increase the parameter
number
—or—
c. Press VOLTS to decrease (until desired parameter
appears).
d. Press AMPS to store.
A decimal appears in upper level. (Models with -NL
Option, FUNCTION 6 is complete).
9–68 EPM 5300 SERIES ADVANCED POWER METERS – INSTRUCTION MANUAL
Page 81

CHAPTER 9: PROGRAMMING GROUP 0 - GLOBAL METER SETUP GROUP 0, FUNCTION 6—KYZ PARAMETER SELECTION
Applies to -NL2 Option only:
Step 5:
MAX
MIN
LM1
LM2
MAX/MIN
LIMITS
KVAH
VOLTS
KWH
AMPS
FREQ
POWER
AC VOLTS
B
ABB
A
NCN
N
AC AMPS
POWER
PF
KW
KVA
KVAR
PHASE
NEXT
CCA
NCBA
a. Press VOLTS to proceed to another port (06.1 or 06.2).
Repeat this procedure to change parameters.
See Chapter 14 to Exit.
Table 9–2: KYZ Pulse Value
Selection
in 06P
KYZ PULSE VALUE per
Watt HOUR
FSW=9999.
KYZ PULSE VALUE per
Watt HOUR
FSW=999.9
KYZ PULSE VALUE
per Watt HOUR
FSW=99.99
KYZ PULSE VALUE per
Watt HOUR
FSW=9.999
Multiply by 1 1.0 unit WH 0.1 unit WH 0.01 unit WH 0.001 unit WH
Multiply by 2
0.5 unit WH
➋
0.05 unit WH
➧
0.005 unit WH 0.0005 unit WH
Multiply by 10 0.1 unit WH 0.01 unit WH 0.001 unit WH 0.0001 unit WH
Multiply by 20 0.05 unit WH 0.005 unit WH
0.0005 unit WH
➥
0.00005 unit WH
➌
Divide by 1 1.0 unit WH 0.1 unit WH 0.01 unit WH 0.001 unit WH
Divide by 2 2.0 unit WH 0.2 unit WH 0.02 unit WH 0.002 unit WH
Divide by 10
10.0 unit WH
❨
Divide by 20 20.0 unit WH 2.0 unit WH
Note
The unit WH refers to the counter value on the meter, where the unit equals Kilo or Mega
1.0 unit WH
0.1 unit WH 0.01 unit WH
0.2 unit WH
③
user-defined.
The FSW number is used only for decimal point placement (see Chapter 10).
9.8.1 How to Use KYZ Pulse Value Table for Multiplication:
SITUATION 1: FSW=9999.
Selection is Multiply by 2
This means that every .5 unit WH =1 pulse.
Unit=Kilo (see Group 1, Function 2)
Result: For every 1 KWH increment on the
counter, the meter will output 2 pulses.
ITUATION 2: FSW=999.9
S
Selection is Multiply by 2
This means that every .05 unit WH=1 pulse.
Unit=Kilo (see Group 1, Function 2)
Result: For every 1 KWH increment on the
counter, the meter will output 20 pulses.
0.02 unit WH
❪
EPM 5300 SERIES ADVANCED POWER METERS – INSTRUCTION MANUAL 9–69
Page 82

GROUP 0, FUNCTION 6—KYZ PARAMETER SELECTION CHAPTER 9: PROGRAMMING GROUP 0 - GLOBAL METER SETUP
SITUATION 3: FSW=99.99
Selection is Multiply by 20
This means that every .0005 unit WH=1 pulse.
Unit=Kilo (see Group 1, Function 2)
Result: For every 1 KWH increment on the
counter, the meter will output 2,000 pulses.
9.8.2 How to Use KYZ Pulse Value Table for Division:
ITUATION 1: FSW=9999.
S
Selection is Divide by 10
This means that every 10 unit WH=1 pulse.
Unit=Kilo (see Group 1, Function 2)
Result: For every 10 KWH increment on the
counter, the meter will output 1 pulse.
ITUATION 3: FSW=99.99
S
Selection is Divide by 20
ITUATION 4: FSW=9.999
S
Selection is Multiply by 20
Unit=Kilo (see Group 1, Function 2)
This means that every .00005 WH=1 pulse.
Result: For every 1 KWH increment on the
counter, the meter will output 20,000 pulses.
ITUATION 2: FSW=999.9
S
Selection is Divide by 10
This means that every 1 unit WH=1 pulse.
Unit=Kilo (see Group 1, Function 2)
Result: For every 1 KWH increment on the
counter, the meter will output 1 pulse.
ITUATION 4: FSW=9.999
S
Selection is Divide by 20
This means that every .2 unit WH=1 pulse.
Unit=Kilo (see Group 1, Function 2)
Result: For every 1 KWH increment on the
counter, the meter will output 5 pulses.
Unit=Kilo (see Group 1, Function 2)
This means that every .02 WH=1 pulse.
Result: For every 1 KWH increment on the
counter, the meter will output 50 pulses.
9–70 EPM 5300 SERIES ADVANCED POWER METERS – INSTRUCTION MANUAL
Page 83
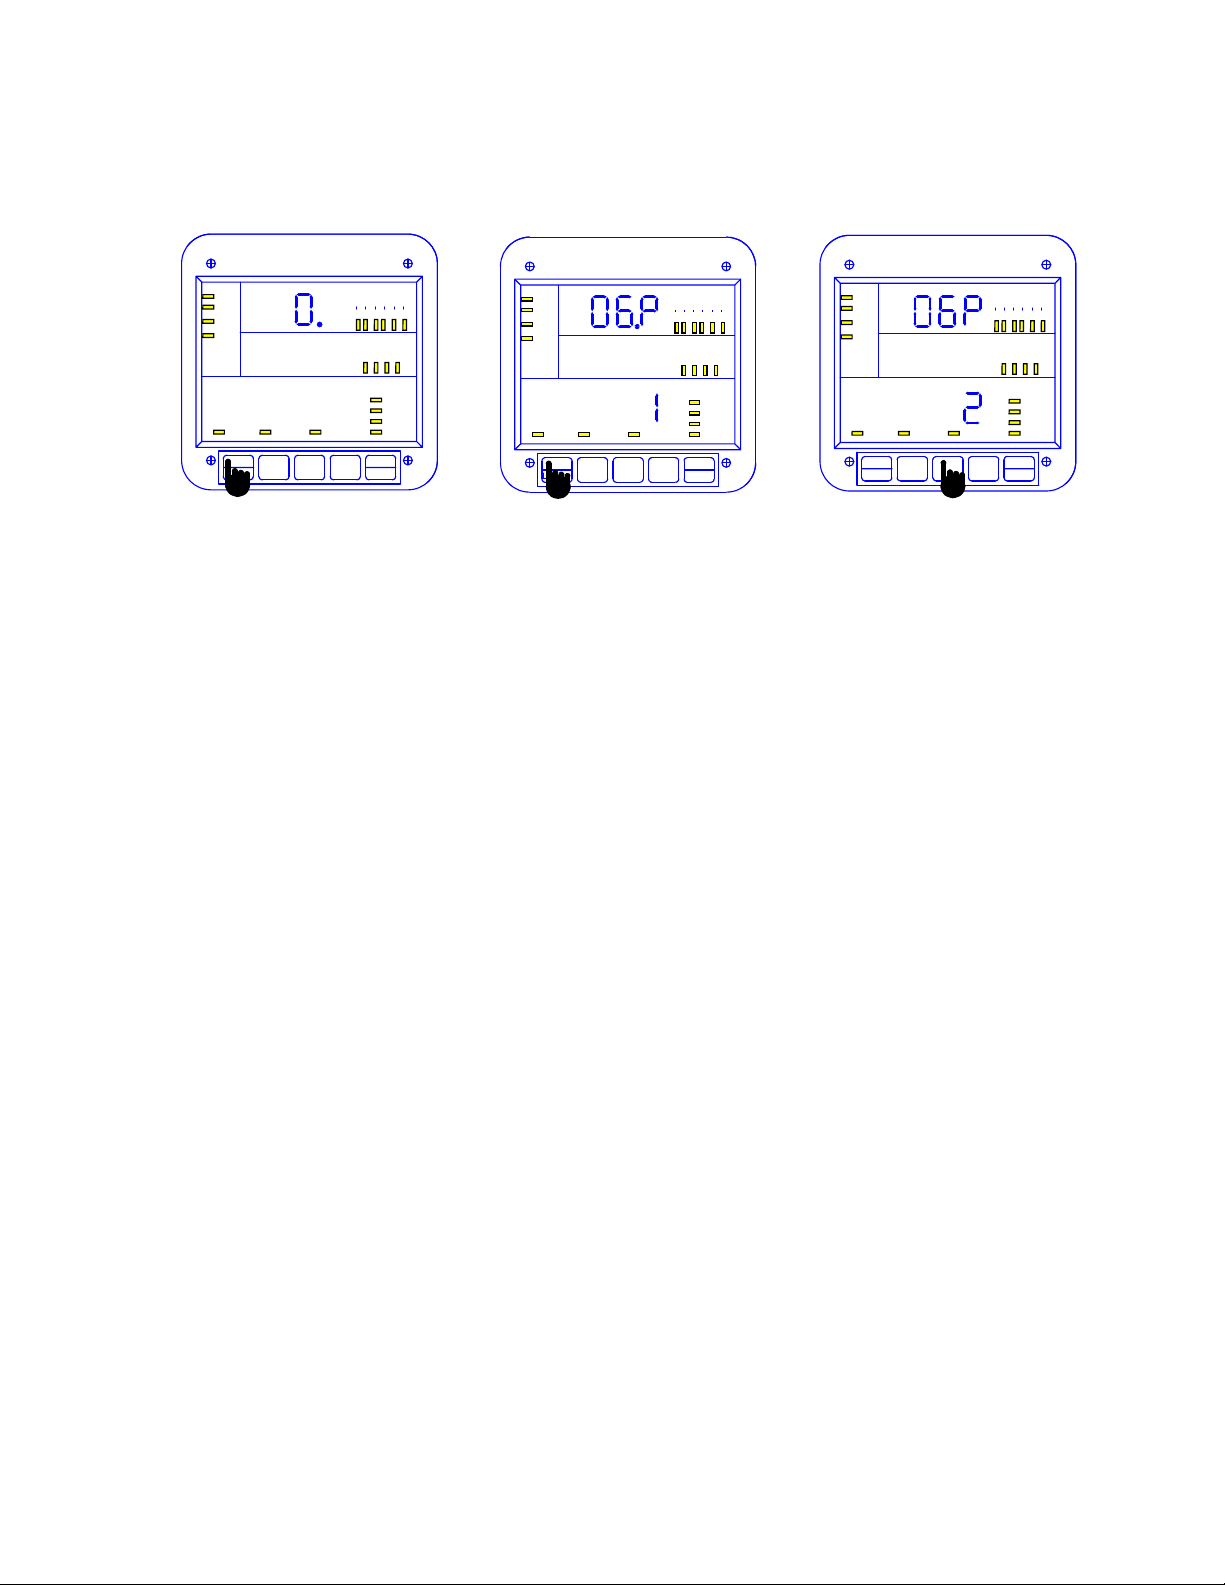
CHAPTER 9: PROGRAMMING GROUP 0 - GLOBAL METER SETUP GROUP 0, FUNCTION 6—KYZ PARAMETER SELECTION
To change the KYZ pulse value:
AMPS
FREQ
POWER
AC VOLTS
A
NBNCNABBCCA
AC AMPS
POWER
PF
KW
KVA
KVAR
PHASE
NEXT
NCBA
MAX
MIN
LM1
LM2
KVAH
MAX/MIN
LIMITS
KWH
VOLTS
Step 1:
a. Enter Group Level of Programming
Mode, (see Chp. 8).
b. Press MAX/MIN/LIMITS until 0.
appears in upper display.
c. Press AMPS to activate the Group.
AMPS
FREQ
POWER
AC VOLTS
A
NBNCNABBCCA
AC AMPS
POWER
PF
KW
KVA
KVAR
PHASE
NEXT
NCBA
MAX
MIN
LM1
LM2
MAX/MIN
LIMITS
KVAH
KWH
VOLTS
Step 2:
a. Press MAX/MIN/LIMITS until 06.P
appears in upper display.
The lower display indicates
multiplication or division factor.
AMPS
FREQ
POWER
AC VOLTS
A
NBNCNABBCCA
AC AMPS
POWER
PF
KW
KVA
KVAR
PHASE
NEXT
NCBA
MAX
MIN
LM1
LM2
MAX/MIN
LIMITS
KVAH
KWH
VOLTS
Step 3:
a. Press AMPS to change current
setting.
The decimal point next to the 6
disappears.
b. Press MAX/MIN/LIMITS to
advance selections. -or-
c. Press VOLTS to reverse.
(Until desired factor appears).
Division is indicated by div
appearing in the middle display.
When middle display is blank, it
indicates multiplication.
d. Press AMPS to store.
EPM 5300 SERIES ADVANCED POWER METERS – INSTRUCTION MANUAL 9–71
Page 84

GROUP 0, FUNCTION 7—NUMBER OF PHASES CHAPTER 9: PROGRAMMING GROUP 0 - GLOBAL METER SETUP
9.9 Group 0, Function 7—Number of Phases
Note
Note
Step 1:
MAX
MIN
LM1
LM2
KVAH
MAX/MIN
LIMITS
VOLTS
KWH
AMPS
FREQ
POWER
ENTER 1 FOR SINGLE PHASE/SINGLE WIRE.
Enter 2 for single phase/two wire.
Enter 3 for three phase/three or four wire.
*Standard factory set-up is three-phase FOUR-WIRE
Press MAX/MIN/LIMITS at any time to cancel before storing the last digit or
switch.
AMPS
FREQ
POWER
AC VOLTS
B
A
ABB
NCN
N
AC AMPS
POWER
PF
KW
KVA
KVAR
PHASE
NEXT
MAX
CCA
NCBA
MIN
LM1
LM2
KVAH
MAX/MIN
LIMITS
VOLTS
KWH
AMPS
Step 3:
AC VOLTS
A
NBNCNABBCCA
AC AMPS
POWER
PF
KW
KVA
KVAR
PHASE
NEXT
MAX
MIN
LM1
NCBA
LM2
MAX/MIN
LIMITS
KWHKVAH
VOLTS
Step 2:
FREQ
POWER
AC VOLTS
A
NBNCNABBCCA
AC AMPS
POWER
PF
KW
KVA
KVAR
PHASE
NEXT
NCBA
a. Enter Group Level of Programming
Mode. (Chapter 8)
b. Press MAX/MIN/LIMITS if 0. does
not appear.
c. Press AMPS to activate the
Group.
00. appears in upper display.
a. Press MAX/MIN/LIMITS until 07
appears in upper display.
b. Press AMPS to activate the Group.
a. Press VOLTS to select numbers 1, 2
or 3.
b. Press AMPS to store. See Chapter
14 to Exit.
9–72 EPM 5300 SERIES ADVANCED POWER METERS – INSTRUCTION MANUAL
Page 85
GE Consumer & Industrial
Multilin
EPM 5300 Series Meters
Chapter 10: Programming
Group 1 – Voltage,
Amp And Watt
Scale Settings
Programming Group 1 – Voltage, Amp And Watt Scale Settings
Note
The EPM 5300P and 5200P full scales will already be programmed if the order specified
current and voltage transformer ratios. The meter label indicates any full scale setup.
Programming Group 1 contains voltage, amperage and full scale power selection, along
with scale factor selection and decimal point placement.
The user can re-scale without removing the EPM 5300P for calibration. The 5300P has been
calibrated at standard levels in GROUP 2. Mathematically convert any full scale ratios to
those calibrated levels. If a different current or voltage transformer is used, program the
primary value of its ratio. If necessary, convert the ratio to a secondary value of five amps
standard current (1 amp is a special order) and 120V or 75V nominal voltage (options L
only).
Formulas:
Primary
Secondary
It may be necessary to convert the full scale to a larger unit. There is a resolution limitation
for all full scales of 2000. If a display reading exceeds 2000, it may be unstable and subject
to zeroing problems.
Example: The full scale for a CT ratio of 3000/5 should be 03.00 kA.
When changing a PT or CT full scale, calculate the new watts full scale and make any
necessary changes. The watts full scale will not auto range.
Primary
Vx 120
Secondary
75Vx
Primary
Secondary
5Ax
EPM 5300 SERIES ADVANCED POWER METERS – INSTRUCTION MANUAL 10–73
Page 86

GROUP 1, FUNCTION 0 CHAPTER 10: PROGRAMMING GROUP 1 – VOLTAGE, AMP AND WATT SCALE SETTINGS
10.1 Group 1, Function 0
- FULL SCALE VOLTAGE SETTINGS, SCALE & DECIMAL POINT PLACEMENT -
Table 10–1: Group 1 Programming Format
Group and Function Number Function
10. Full Scale Selection for Volts
11. Full Scale Selection for Amps
12. Full Scale Selection for Watts
1E. Exit Programming GROUP 1
Note
Tables 10-2 and 10-3 contain Full Scale Settings for typical voltages and currents
(PT and CT arrangements).
Table 10–2: TYPICAL Full Scale Settings for Volts
Secondary PT Values PT Ratio Full Scale
75 V (Suffix 75) L-N MAX 120:1 9.00 KV
120/208 V 1:1 (Direct) 120.0
120/208 V 4:1 0480 V
120/208 V 120:1 014.4 KV
277/480 V (Suffix G) 1:1 (Direct) 0300 V
120/208V 600:1 072.0 KV
120/208 1150:1 138.0 KV
If PT is connected line to line, the full scale can be 14.40 KV. Full scale is 300 V L-N, not 277,
because the factory calibration is 300 V. Be sure the table is based on a meter regulation of
2000 A/D counts. Thus, for best accuracy, all settings should be placed within that range.
10.1.1 Voltage Full Scale:
To change the Full Scale Settings:
Note
10–74 EPM 5300 SERIES ADVANCED POWER METERS – INSTRUCTION MANUAL
Press MAX/MIN/LIMITS at any time to cancel before storing the last digit or switch.
Page 87

CHAPTER 10: PROGRAMMING GROUP 1 – VOLTAGE, AMP AND WATT SCALE SETTINGS GROUP 1, FUNCTION 0
A
A
A
A
V
R
A
A
A
A
V
FREQ
POWE
AC VOLTS
NBNCNABBC
AC AMPS
POWER
PF
KW
KV
KVAR
PHASE
NEXT
C
NCB
MAX
MIN
LM1
LM2
MAX/MIN
LIMITS
OLTS
KWHKVAH
AMPS
Step 1:
a. Enter Group Level of Programming Mode (see Chp. 8).
b. Press MAX/MIN/LIMITS until 1. appears in upper
display.
AMPS
FREQ
POWER
AC VOLTS
NBNCNABBC
AC AMPS
POWER
PF
KW
KV
KVAR
PHASE
NEXT
C
NCB
MAX
MIN
LM1
LM2
MAX/MIN
LIMITS
KWHKVAH
OLTS
MAX
MIN
LM1
LM2
AC VOLTS
B
A
ABB
NCN
N
AC AMPS
CCA
NCBA
POWER
PF
KW
KVA
MAX/MIN
LIMITS
KWHKVAH
VOLTS
FREQ
AMPS
POWER
PHASE
NEXT
KVAR
Step 2:
a. Press AMPS to activate GROUP 1.
10. appears in upper display.
Middle display indicates Scale Factor Setting.
Lower display indicates Full Scale for voltage.
FREQ
POWER
AC VOLTS
A
NBNCNABBCCA
AC AMPS
POWER
PF
KW
KVA
KVAR
PHASE
NEXT
NCBA
MAX
MIN
LM1
LM2
MAX/MIN
LIMITS
KVAH
VOLTS
KWH
AMPS
Enering the Scale Factor:
Step 3:
a. Press AMPS to begin Data Entry Sequence.
Lower display is replaced with a single dash.
Decimal Point Selection:
Step 4:
a. Press VOLTS to move decimal point .
b. Press AMPS to store.
b. Press VOLTS to move the segment UP or
DOWN to set Scale Factor.
UP signifies - Kilovolts
DOWN signifies - Volts
c. Press AMPS to store.
EPM 5300 SERIES ADVANCED POWER METERS – INSTRUCTION MANUAL 10–75
Page 88
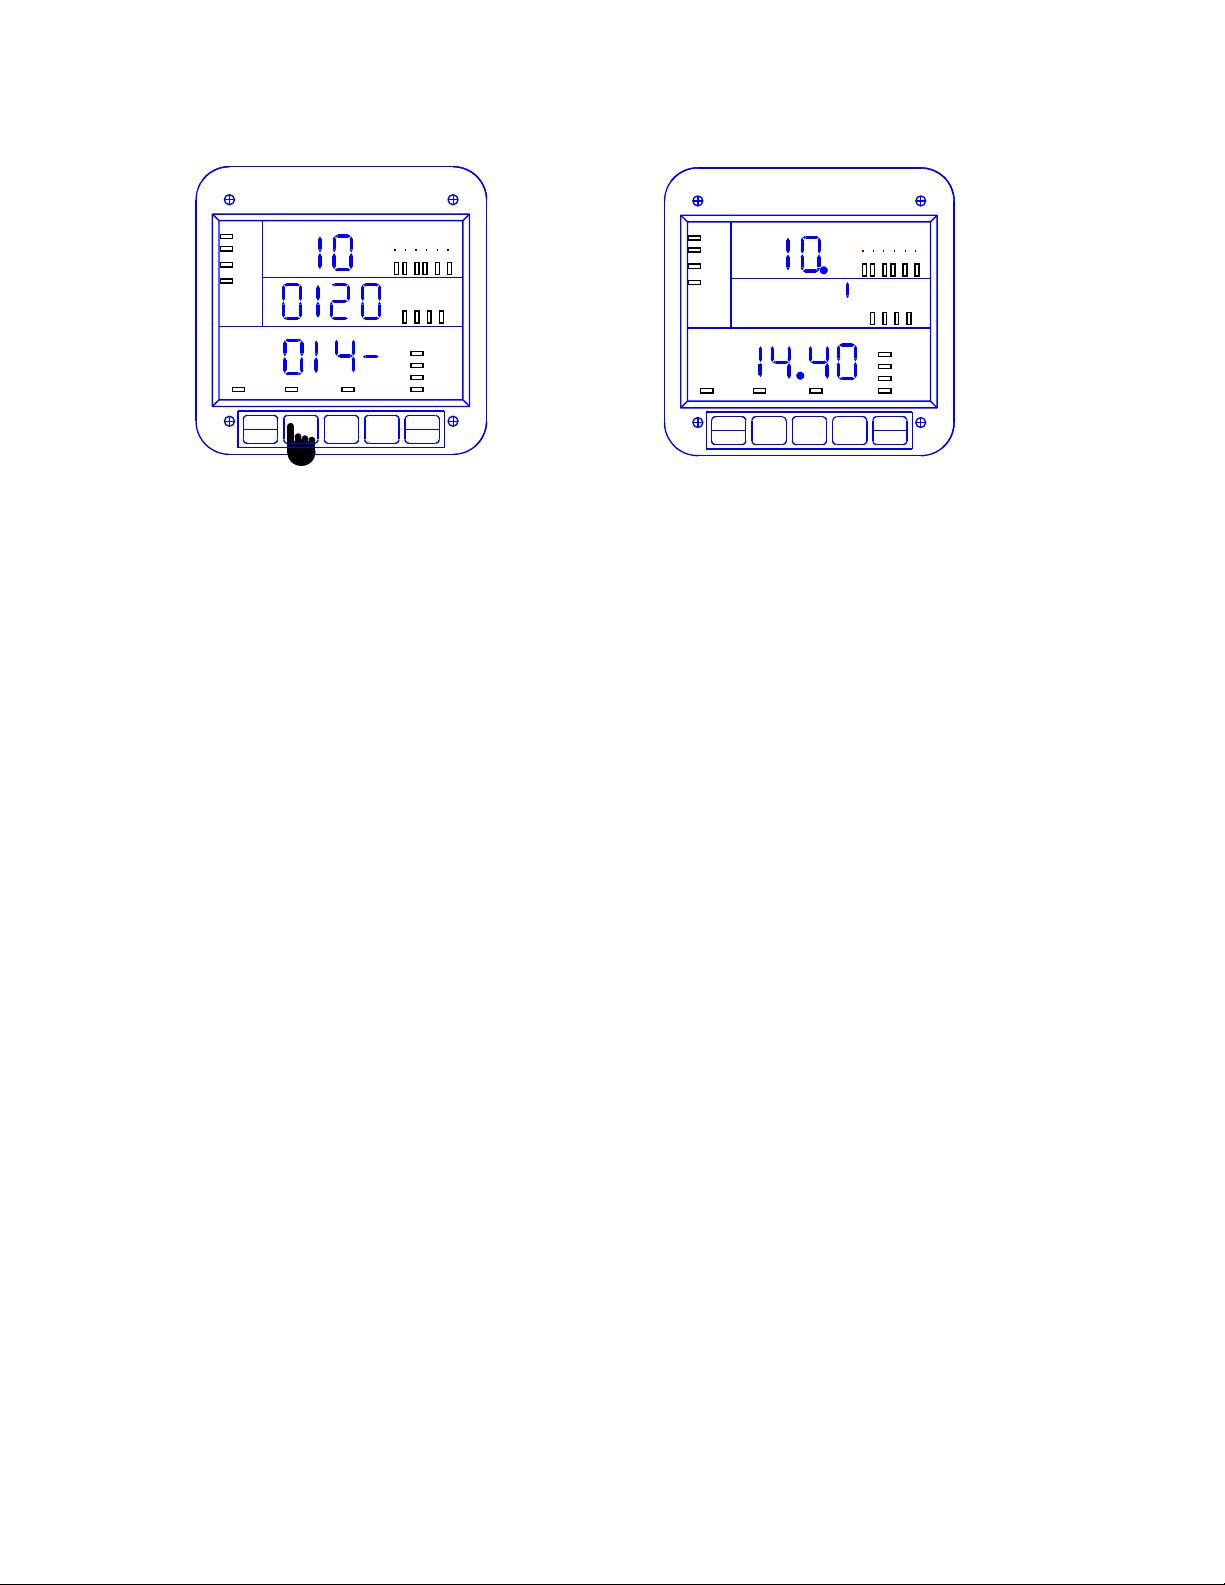
GROUP 1, FUNCTION 0 CHAPTER 10: PROGRAMMING GROUP 1 – VOLTAGE, AMP AND WATT SCALE SETTINGS
A
A
A
A
V
A
A
A
A
A
A
V
A
MAX
MIN
LM1
LM2
AC VOLTS
NBNCNABBC
AC AMPS
B
C
NC
POWER
PF
KW
KV
MAX/MIN
LIMITS
OLTS
FREQ
KWHKVAH
AMPS
POWER
PHASE
NEXT
KVAR
Step 5:
Middle display indicates present Full Scale for volts.
Four dashes appear in lower display.
Enter the four digit full scale.
a. Press VOLTS to increase the digit number.
b. Press AMPS to store each digit.
MAX
MIN
LM1
LM2
C VOLTS
B
NCN
N
B
AC AMPS
B
C
B
C
NC
POWER
PF
KW
KV
MAX/MIN
LIMITS
OLTS
FREQ
KWHKVAH
MPS
POWER
PHASE
NEXT
KVAR
Repeat this procedure until desired value is entered.
Lower display indicates new Full Scale Setting.
Middle display indicates Scale Factor.
Group and Function Number (including decimal point)
appear in upper display.
See Chapter 14 to exit.
10–76 EPM 5300 SERIES ADVANCED POWER METERS – INSTRUCTION MANUAL
Page 89

CHAPTER 10: PROGRAMMING GROUP 1 – VOLTAGE, AMP AND WATT SCALE SETTINGS GROUP 1, FUNCTION 1
A
A
A
A
A
V
A
A
A
A
V
10.2 Group 1, Function 1
- AMPERAGE FULL SCALE -
Table 10–3: Full Scale Settings for Amps
CT Type Full Scale
Direct Input 05.00 A
600/5 0600 A
1000/5 1000 A
2000/5 2000 A
3000/5 03.00 KA
5000/5 05.00 KA
Also note that the meter reads with digital accuracy to a 2000 count range. Thus all CT and
PT full scale settings in the meter should reflect that limitation. The table above shows the
proper settings.
To change the Full Scale Settings:
Note
MAX
MIN
LM1
LM2
MAX/MIN
LIMITS
Step 1:
a. Enter Group Level of Programming Mode
(see Chp. 8).
b. Press MAX/MIN/LIMITS until 1. appears in upper
display.
Press MAX/MIN/LIMITS at any time to cancel before storing the last digit or switch.
AC VOLTS
B
NCN
N
B
AC AMPS
POWER
PF
KW
KV
KVAR
FREQ
KWHKVAH
PHASE
AMPS
POWER
NEXT
OLTS
AMPS
FREQ
POWER
AC VOLTS
NBNCNABBC
AC AMPS
B
POWER
PF
KW
KV
KVAR
PHASE
NEXT
C
NC
C
B
C
NCB
MAX
MIN
LM1
LM2
MAX/MIN
LIMITS
KWHKVAH
OLTS
Step 2:
a. Press AMPS to activate the Group.
b. Press MAX/MIN/LIMITS until 11. appears in upper
display.
Middle display indicates Scale Factor Setting.
Lower display indicates Full Scale.
EPM 5300 SERIES ADVANCED POWER METERS – INSTRUCTION MANUAL 10–77
Page 90

GROUP 1, FUNCTION 1 CHAPTER 10: PROGRAMMING GROUP 1 – VOLTAGE, AMP AND WATT SCALE SETTINGS
W
A
A
A
A
A
V
W
A
A
A
A
A
V
A
WKVA
A
A
A
A
V
WKVA
A
A
A
A
V
MAX
MIN
LM1
LM2
AC VOLTS
B
NCN
N
B
AC AMPS
B
C
B
C
NC
POWER
PF
K
KV
KVAR
FREQ
KWH
KVAH
MAX/MIN
LIMITS
OLTS
AMPS
POWER
PHASE
NEXT
Entering the Scale Factor:
Step 3:
a. Press AMPS to begin Data Entry Sequence.
Lower display is replaced with a single dash.
b. Press VOLTS to move the segment UP or DOWN to set
Scale Factor.
UP signifies - Kiloamps.
DOWN signifies - Amps.
c. Press AMPS to store.
MAX
MIN
LM1
LM2
AC VOLTS
B
NCN
N
AC AMPS
B
POWER
FREQ
KWH
KVAH
MAX/MIN
LIMITS
OLTS
MPS
POWER
PHASE
NEXT
Decimal Point Selection:
Step 4:
a. Press VOLTS to move decimal point.
b. Press AMPS to store.
B
PF
K
KV
KVAR
C
B
C
NC
MAX
MIN
LM1
LM2
AC VOLTS
B
NCN
N
B
AC AMPS
B
C
B
C
NC
POWER
PF
K
KVAR
FREQ
KWH
KVAH
MAX/MIN
LIMITS
OLTS
AMPS
POWER
PHASE
NEXT
Step 5:
The Full Scale for current is indicated in middle
display.
Four dashes appear in lower display.
Enter the four digit full scale.
Press VOLTS until the number appears.
b. Press AMPS to store.
AMPS
FREQ
POWER
AC VOLTS
B
NCN
N
B
AC AMPS
B
POWER
PF
K
KVAR
PHASE
NEXT
C
B
C
NC
MAX
MIN
LM1
LM2
KVAH
MAX/MIN
LIMITS
KWH
OLTS
Repeat this procedure until the value is entered.
Lower display indicates new Full Scale Setting.
Middle display indicates Scale Factor.
Group and Function Number appear (including a
decimal point) in upper display.
10–78 EPM 5300 SERIES ADVANCED POWER METERS – INSTRUCTION MANUAL
Page 91

CHAPTER 10: PROGRAMMING GROUP 1 – VOLTAGE, AMP AND WATT SCALE SETTINGS GROUP 1, FUNCTION 2
10.3 Group 1, Function 2
- SCALE SELECTION AND DECIMAL PLACEMENT FOR WATTS -
Programming GROUP 1 also provides decimal positioning for maximum resolution. The
following examples assist in selecting the best decimal position for FUNCTION 2.
Note
Shift the decimal left to increase resolution. Wattage should not exceed a numeral value
of 2500. Shift the decimal one position right to decrease resolution.
Full Scale Wattage (FSW) is the product of FSV and FSA. For FSW for three phases multiply
the FSW per phase by 3.
Example 1: Full Scale Voltage (FSV)=120 V
Full Scale Amperage (FSA)=5.00 A
FSW (one phase) =120 Vx5.00 A
FSW (one phase)=600 W
FSW (three phase)=600 Wx3 = 1,800 W
Here the FSW is too small a value for a Megawatt meter. FSW in the Kilowatt meter equals
1.800 KW. In FUNCTION 2, four 9s appear. Place the decimal point after the first digit. The
user cannot change the four digits. The user can only move the decimal point placement.
Example 2: 480/120 PT, 1000/5 CT
FSV=480 V
FSA=1000 A
FSW (one phase)=480 V ⋅ 1000 A
FSW (one phase)=480,000 W
⋅
FSW (three phase)=480,000 W
3 = 1,440,000 W
FSW for a Kilowatt meter equals 1440. KW. FSW for a Megawatt meter equals 1.440 MW. In
FUNCTION 2 place the decimal point after the last digit for a Kilowatt meter and after the
first digit for a Megawatt meter. It is important to note which type of bezel labeling you
have when making this decision.
Example 3: 14.4 KV/120, 1000/5 CT
FSV=14.40 KV
FSA=1000 A
FSW (one phase)=14,400 Vx1000 A
FSW (one phase)=14,400,000 W
FSW (three phase)=14,440, 000 Wx3 = 43,200,000 W
FSW for a Kilowatt meter equals 43,200 KW. Here the FSW is too large a value for a
Kilowatt meter (the range is 000–2500). FSW for a Megawatt meter equals 043.2 MW. In
FUNCTION 2, place the decimal after the third digit .
Note
In some applications where the load is normally very low, the watts resolution can be
increased by moving the decimal point one position left.
EPM 5300 SERIES ADVANCED POWER METERS – INSTRUCTION MANUAL 10–79
Page 92
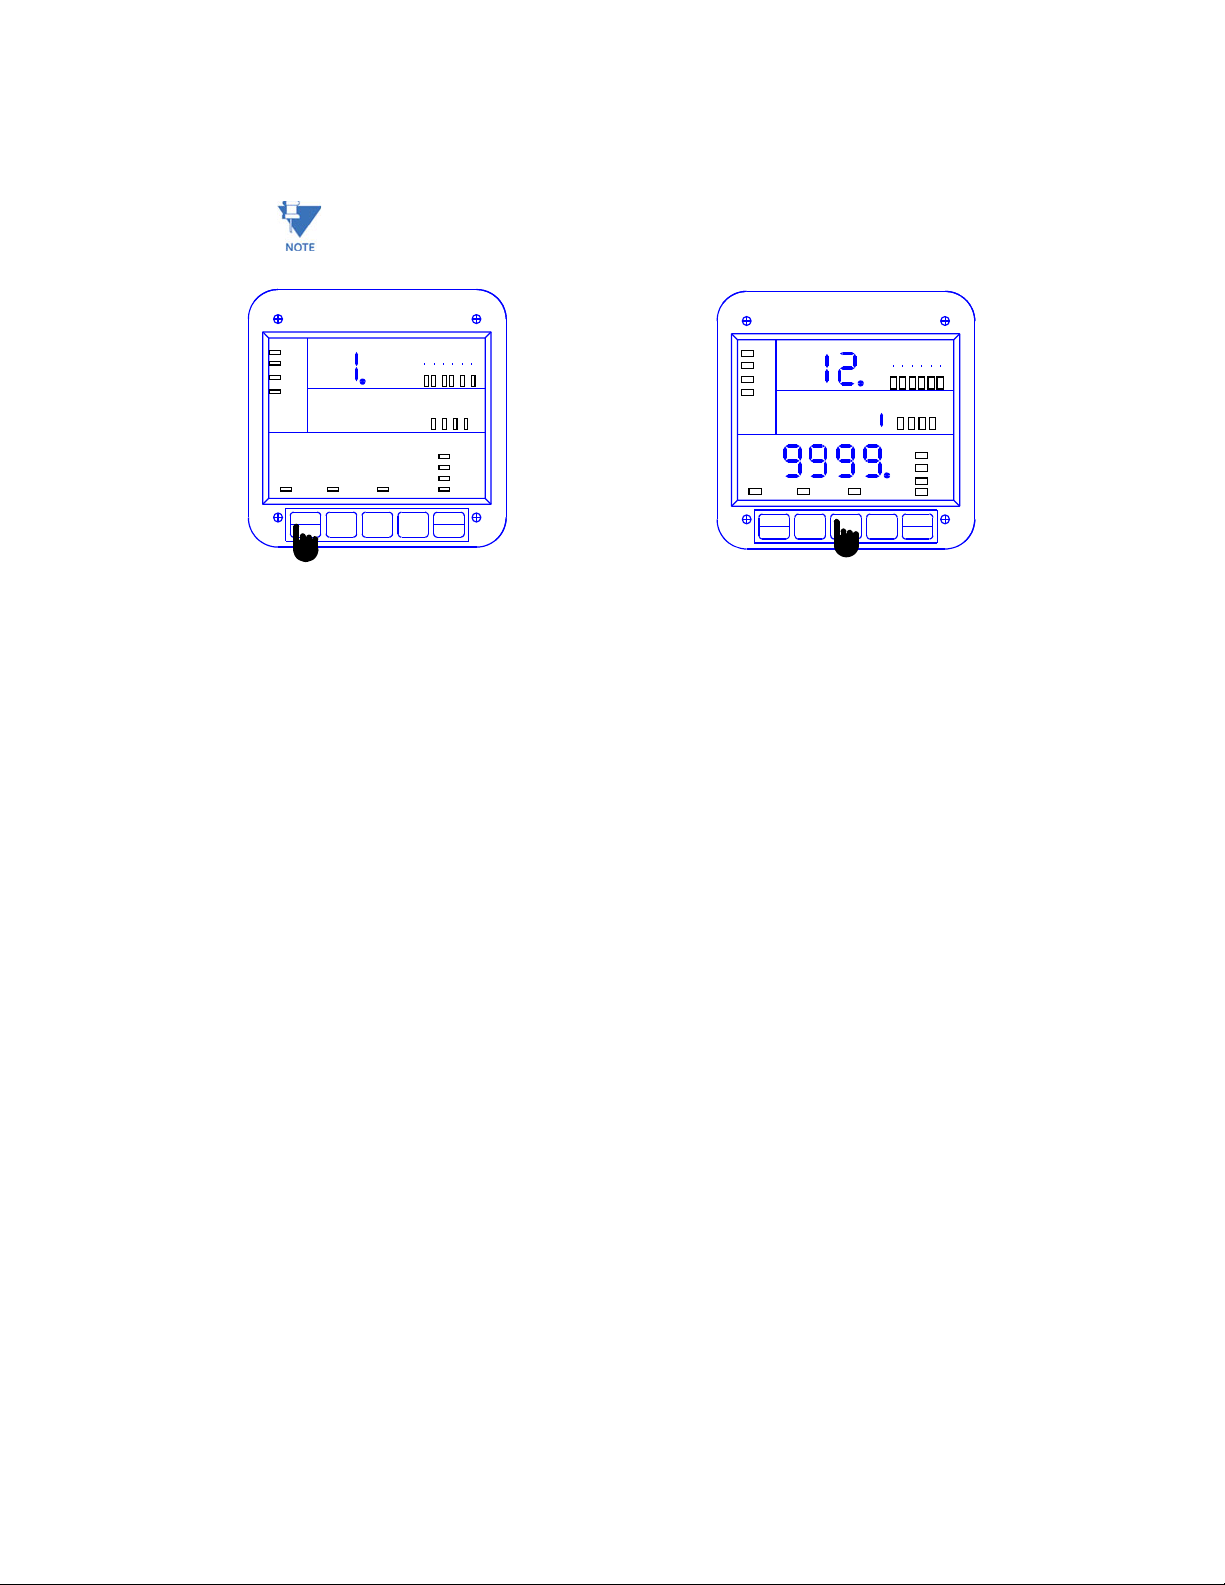
GROUP 1, FUNCTION 2 CHAPTER 10: PROGRAMMING GROUP 1 – VOLTAGE, AMP AND WATT SCALE SETTINGS
WKVA
A
A
A
A
V
R
A
A
A
A
V
A
A
To change the scale factor setting for wattage:
Note
MAX
MIN
LM1
LM2
MAX/MIN
LIMITS
Press MAX/MIN/LIMITS at any time to cancel before storing the last digit or switch.
AC VOLTS
B
C
B
NCN
C
N
B
AC AMPS
NCB
POWER
PF
K
KVAR
FREQ
KWHKVAH
PHASE
AMPS
POWER
NEXT
OLTS
Step 1:
a. Enter Group Level of Programming Mode (see Chp. 8).
b. Press MAX/MIN/LIMITS until 1. appears in upper
display.
MPS
FREQ
POWER
AC VOLTS
B
NCN
N
B
AC AMPS
B
POWE
PHASE
NEXT
B
C
NC
PF
KW
KV
KVAR
C
MAX
MIN
LM1
LM2
KVAH
MAX/MIN
LIMITS
KWH
OLTS
Step 2:
a. Press AMPS to activate the Group.
b. Press MAX/MIN/LIMITS until 12. appears in upper
display.
Middle display indicates current Scale Factor
Setting.
Lower display indicates 9999 (including current
decimal placement).
10–80 EPM 5300 SERIES ADVANCED POWER METERS – INSTRUCTION MANUAL
Page 93

CHAPTER 10: PROGRAMMING GROUP 1 – VOLTAGE, AMP AND WATT SCALE SETTINGS GROUP 1, FUNCTION 2
AMPS
FREQ
POWER
AC VOLTS
A
NBNCNABBCCA
AC AMPS
POWER
PHASE
NEXT
NCBA
PF
KW
KVA
KVAR
MAX
MIN
LM1
LM2
KVAH
MAX/MIN
LIMITS
KWH
VOLTS
Entering the Scale Factor:
Step 3:
a. Press AMPS to begin Data Entry Sequence.
Lower display is replaced with a single dash.
b. Press VOLTS to move the segment
UP signifies - megawatts.
DOWN signifies - kilowatts..
c. Press AMPS to store.
AMPS
FREQ
POWER
AC VOLTS
A
NBNCNABBCCA
AC AMPS
POWER
PHASE
NEXT
NCBA
PF
KW
KVA
KVAR
MAX
MIN
LM1
LM2
KVAH
MAX/MIN
LIMITS
KWH
VOLTS
Decimal Point Selection:
Step 4:
Display blanks and 9999 appears in lower display
(including current decimal setting).
a. Press VOLTS to move decimal.
b. Press AMPS to store.
See Chapter 14 to Exit.
EPM 5300 SERIES ADVANCED POWER METERS – INSTRUCTION MANUAL 10–81
Page 94

GROUP 1, FUNCTION 2 CHAPTER 10: PROGRAMMING GROUP 1 – VOLTAGE, AMP AND WATT SCALE SETTINGS
10–82 EPM 5300 SERIES ADVANCED POWER METERS – INSTRUCTION MANUAL
Page 95

GE Consumer & Industrial
Multilin
EPM 5300 Series Meters
Chapter 11: Programming
Programming Group 2 - Meter Calibration
WARNING—READ THIS SECTION CAREFULLY BEFORE PROCEEDING:
• Any rescaling, such as a change in a transformer ratio, can be accomplished in
GROUP 1. Calibration is not necessary.
• Meter calibration cannot be performed if the meter is installed for service. The
sensing inputs must be connected to a power supply with variable voltage and
separate current outputs.
• The calibration procedure requires highly accurate and stable input signals.
Incorrect readings result from improper calibration procedures. If unsure, return
unit to the factory for calibration.
• BEFORE calibrating any channel, make a note of its Full Scale Setting (see Chapter
10). Set the Full Scale in accordance with Table 10-2 for calibration. Restore
original Full Scale Setting when calibration is completed.
Group 2 - Meter
Calibration
EPM 5300 SERIES ADVANCED POWER METERS – INSTRUCTION MANUAL 11–83
Page 96

CALIBRATION REQUIREMENTS CHAPTER 11: PROGRAMMING GROUP 2 - METER CALIBRATION
11.1 Calibration Requirements
Calibration on the EPM 5300P requires precise inputs of 120 Volts, 5 Amps, and 2.5 Amps.
The EPM 5300P -G model requires precise inputs of 300 Volts, 5 Amps, and 2.5 Amps. If this
equipment is unavailable, contact us for assistance.
Table 11–1: Group 2 Programming Format
Group and Function Number Function
20. High End Calibration—Volts AN, BN, CN
21. High End Calibration—Amps A, B, C
22. Low End Calibration—Amps A, B, C
2E. Exit Programming Group 2
Note
The voltage and current scales are calibrated with the maximum range value 2000 for
current, 14.40 for voltage, 300 for option G. The calibration value can be identical to the
full scale value in GROUP 1, for better accuracy than the specification. However, if a full
scale is ever changed to a higher value than the calibrated value, the value may be less
accurate.
Table 11–2: Calibration Source, Full Scale and Value Settings for Calibration
Voltage Range Input Source Group 2 Value
69.3/120V 75V 1440
120/208V 120V L-N 1440
277/480V 300V 0300
5A CT High End 5A 2000
2.5A Low End 2.5A 1000
11–84 EPM 5300 SERIES ADVANCED POWER METERS – INSTRUCTION MANUAL
Page 97

CHAPTER 11: PROGRAMMING GROUP 2 - METER CALIBRATION GROUP 2, FUNCTIONS 0–2
11.2 Group 2, Functions 0–2
- HIGH END CALIBRATION OF VOLTAGE CHANNELS, HIGH AND LOW END
CALIBRATION OF AMPERAGE CHANNELS -
To change the calibration (high end—Functions 0 and 1):
Note
MAX
MIN
LM1
LM2
MAX/MIN
LIMITS
Press MAX/MIN/LIMITS at any time to cancel before storing the last digit or switch.
AC VOLTS
A
NBNCNABBCCA
AC AMPS
POWER
FREQ
KWHKVAH
PHASE
AMPS
POWER
NEXT
VOLTS
Step 1:
a. Enter Group Level of Programming Mode
(see Chp. 8).
b. Press MAX/MIN/LIMITS until 2. appears in
upper display.
c. Press AMPS to activate the Group.
PF
KW
KVA
KVAR
AMPS
FREQ
POWER
AC VOLTS
B
A
ABB
NCN
N
AC AMPS
POWER
PF
KW
KVA
KVAR
PHASE
NEXT
CCA
NCBA
MAX
MIN
LM1
NCBA
LM2
MAX/MIN
LIMITS
KWHKVAH
VOLTS
Step 2:
Refer to Table 11-1 for Function Number that
corresponds to the area requiring calibration. Calibration
for each area begins with A and then moves to B and C.
a. Press MAX/MIN/LIMITS to change Function number.
A one-digit password is required to continue.
d. Press VOLTS until 5 appears.
e. Press AMPS to select.
EPM 5300 SERIES ADVANCED POWER METERS – INSTRUCTION MANUAL 11–85
Page 98
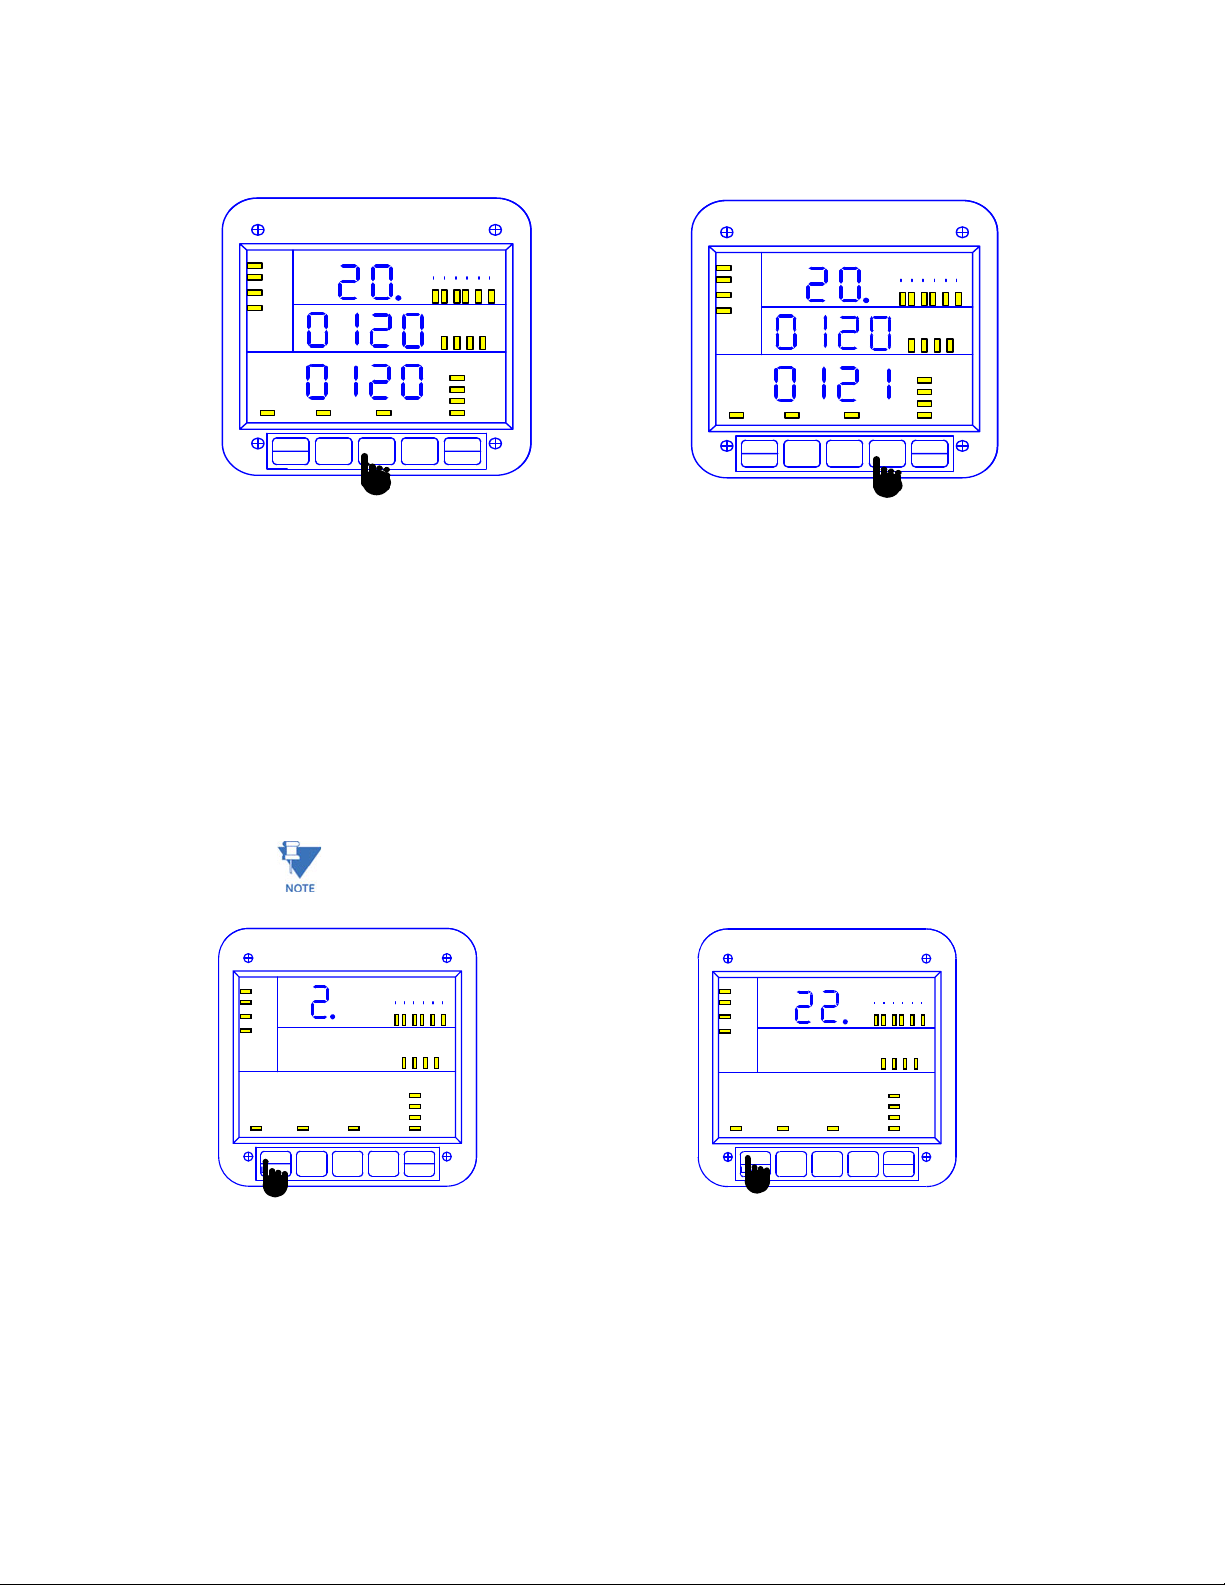
GROUP 2, FUNCTIONS 0–2 CHAPTER 11: PROGRAMMING GROUP 2 - METER CALIBRATION
A
A
A
MAX
MIN
LM1
LM2
AC VOLTS
B
A
ABB
NCN
N
AC AMPS
CCA
NCBA
POWER
PF
KW
KVA
PHASE
NEXT
KVAR
KVAH
MAX/MIN
LIMITS
VOLTS
KWH
AMPS
FREQ
POWER
Step 3:
a. Press AMPS to activate calibration.
Digits move to middle display.
After a moment, digits appear in lower display also.
For Amps Low End (Function 2):
Note
Press MAX/MIN/LIMITS at any time to cancel before storing the last digit or switch.
MAX
MIN
LM1
LM2
AC VOLTS
B
A
ABB
NCN
N
AC AMPS
CCA
NCBA
POWER
PF
KW
KVA
PHASE
NEXT
KVAR
KVAH
MAX/MIN
LIMITS
VOLTS
KWH
AMPS
FREQ
POWER
Step 4:
a. Press POWER to increase the value and PHASE/NEXT
to decrease the value.
Digits in lower display disappear momentarily, then
reappear indicating the new value.
b. Press AMPS to store and move to the next phase or
Amp within the group.
See Chapter 14 to Exit.
MAX
MIN
LM1
LM2
MAX/MIN
LIMITS
VOLTS
AC VOLTS
B
A
ABB
NCN
CCA
N
AC AMPS
NCBA
POWER
PF
KW
KVA
KVAR
FREQ
KWHKVAH
PHASE
POWER
AMPS
NEXT
MAX
MIN
LM1
LM2
MAX/MIN
LIMITS
KWHKVAH
VOLTS
MPS
FREQ
POWER
AC VOLTS
B
A
ABB
NCN
N
AC AMPS
B
POWER
PF
KW
KV
KVAR
PHASE
NEXT
CCA
NC
11–86 EPM 5300 SERIES ADVANCED POWER METERS – INSTRUCTION MANUAL
Page 99

CHAPTER 11: PROGRAMMING GROUP 2 - METER CALIBRATION GROUP 2, FUNCTIONS 0–2
A
Step 1:
a. Enter Group Level of Programming Mode
(see Chp. 8).
b. Press MAX/MIN/LIMITS until 2. appears in upper
display.
c. Press AMPS to activate the Group.
A one digit password is required to continue.
d. Press VOLTS until 5 appears.
e. Press AMPS to select.
MAX
MIN
LM1
LM2
KVAH
MAX/MIN
LIMITS
Step 2:
a. Press MAX/MIN/LIMITS until 22. appears in upper
display.
b. Press AMPS to activate. (Calibration begins with Amps
A, then moves to B and C).
Middle and lower displays blank.
AC VOLTS
B
A
ABB
NCN
CCA
N
AC AMPS
NCBA
POWER
PF
KW
KVA
KVAR
FREQ
KWH
PHASE
MPS
POWER
NEXT
VOLTS
Step 3:
New value moves to middle display.
Lower display indicates the calibrated reading after
10-15 seconds.
To enter the half scale value in lower display,
a. Press VOLTS to select digits.
b. Press AMPS to store and proceed to B or C within the
group.
c. Press MAX/MIN/LIMITS to end calibration procedure.
See Chapter 14 to Exit.
EPM 5300 SERIES ADVANCED POWER METERS – INSTRUCTION MANUAL 11–87
Page 100

GROUP 2, FUNCTIONS 0–2 CHAPTER 11: PROGRAMMING GROUP 2 - METER CALIBRATION
11–88 EPM 5300 SERIES ADVANCED POWER METERS – INSTRUCTION MANUAL
 Loading...