

Page 1
MODEL CSFE4M
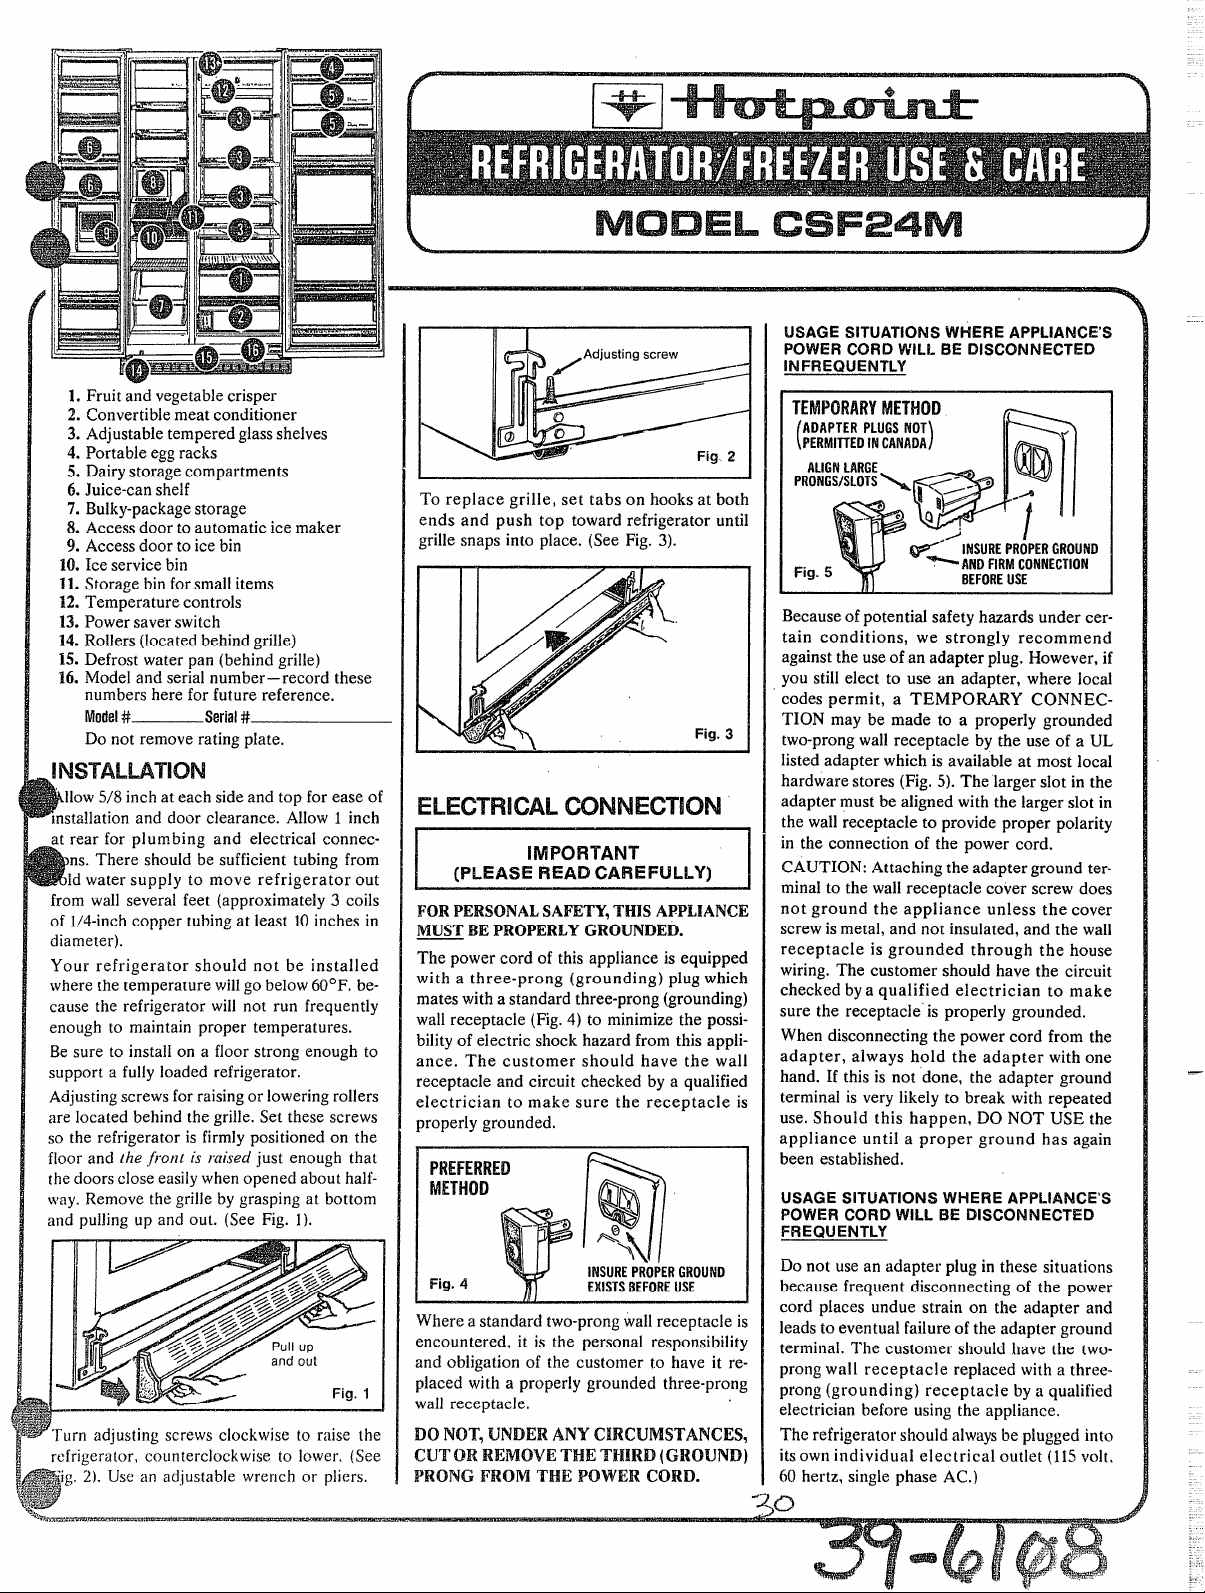
1 Fruit and vegetable crisper
2. Convertible meat conditioner
3. Adjustable tempered glass shelves
4. Portable eggracks
5. Dairystorage compartments
6. Juice-can shelf
7. Bulky-packagestorage
8. Access door to automatic ice maker
9. Access door to ice bin
10. Ice service bin
11. Storage binfor small items
12. Temperature controls
13. Power saver switch
14.Rollers (located behind grille)
15. Defrost water pan (behind grille)
16. Model and serial number– record these
numbers here for future reference.
McIdel# Serial#—
Do not remove rating plate.
!NSTALMTION
I1OW5/8 inch at each side and top for ease of
installation and door clearance. Allow 1 inch
at r-earfor plumbing and electrical connec-
ns. There should be sufficient tubing from
Idwater supply to move refrigerator out
from wall severai feet (approximately 3 coils
of l/4-inch copper tubingat least 10inches in
diameter).
Your refrigerator should not be installed
where the temperature willgo below60*F. because the refrigerator will not run frequently
enough to maintain proper temperatures.
Be sure to install on a floor strong enough to
support a fully loaded refrigerator.
Adjustingscrews for raisingor lowering rollers
are located behind the grille. Set these screws
so the refrigerator is firmly positioned on the
floor and the .fio~ztis raised just enough that
the doors close easilywhenopened about halfway. Remove the grille by grasping at bottom
and pulling up and out. (See
;
‘+. “’
- -y,
\
. .
(:
J
S
~Turn adjusting screws clockwise to raise the
rcfriger;~tor,counterclockwise to lower. (See
‘ig. 2). Use an adjustable wrench or pliers,
i-!”
g..”
5
Fig. 1).
Pull up
andout
Fig. 1
To replace grille, set tabs on hooksat both
ends and push top toward refrigerator until
grille snaps into place. (See Fig. 3).
Fig. 3
ELECTRICALCONNECTION
IMPORTANT
(PLEASEREADCAREFULLY)
I
IFORPERSONALSAFETY,THIS APPLIANCE
MUST BE PROPERLYGROUNDED.
The power cord of this appliance is equipped
with a three-prong (grounding) plug which
mates with a standard three-prong (grounding)
wall receptacle (F]g.4) to minimize the possibility of electric shock hazard from this appliance. The customer should have the wall
receptacle and circuit checked by a qualified
electrician to make sure the receptacle is
properly grounded.
PREFERRED
METHOD
Fig. 4
Where a standard two-prongwall receptacle is
encountered, it is the personal responsibility
and obligation of the customer to have it replaced with a properly grounded three-prong
wall receptacle,
DONOT, UNDERANYCIRCUMSTANCES,
CUTOR REMOVETHE TkIftRD(GROUND)
PRONG FROM THE POWER CORD.
Q
‘9
%
Q
‘3\
n
INSUREPROPERGROUND
EXISTSBEFOREUSE
USAGE SITUATIONS WHERE APPLIANCE’S
POWERCORD WiLL
INFREQUENTLY
TEMPORARY
ADAPTER PLUGSNOT
PERMITTEDIN CANADA
(
ALIGNLARGE
PRONGS/SLOTS\ <“ - 0 .ti
Fig. 5
Because of potential safety hazards under certain conditions, we strongly recommend
against the use of an adapter plug. However, if
you still elect to use an adapter, where local
codes permit, a TEMPORARY CONNECTION may be made to a properly grounded
two-prongwall receptacle by the use of a UL
listed adapter which is available at most local
hardware stores (Fig, 5). The larger slot in the
adapter must be aligned with the larger slot in
the wall receptacle to provide proper polarity
in the connection of the power cord.
CAUTION: Attaching the adapter ground ter-
1
minal to the wallreceptacle cover screw does
not ground the appliance unless the cover
screw is metal, and not insulated, and the wall
receptacle is grounded through the house
wiring. The customer should have the circuit
checked bya qualified electrician to make
sure the receptacle is properly grounded.
When disconnecting the power cord from the
adapter, always hold the adapter with one
hand. If this is not done, the adapter ground
terminal is very likely to break with repeated
use. Should this happen, DO NOT USE the
appliance until a proper ground has again
been established.
USAGE SITUATIONS WHERE APPLIANCE’S
POWER CORD WILL BE DISCONNECTED
FREQUENTLY
Do not use an adapter plug in these situations
because frequent disconnecting of the power
cord places undue strain on the adapter and
leads to eventual failure of the adapter ground
terminal. The customer should have the twoprong wall receptacle replaced with a threeprong (grounding) receptacle by a qualified
electrician before using the appliance,
The refrigerator should alwaysbe plugged into
itsown individual electrical outlet (115volt,
60 hertz, single phase AC.)
BE DISCONNECTED
)
@
! ~’
m
Q
~~’;\~;~:;:OP;;;();;D
BEFOREUSE
/
Page 2
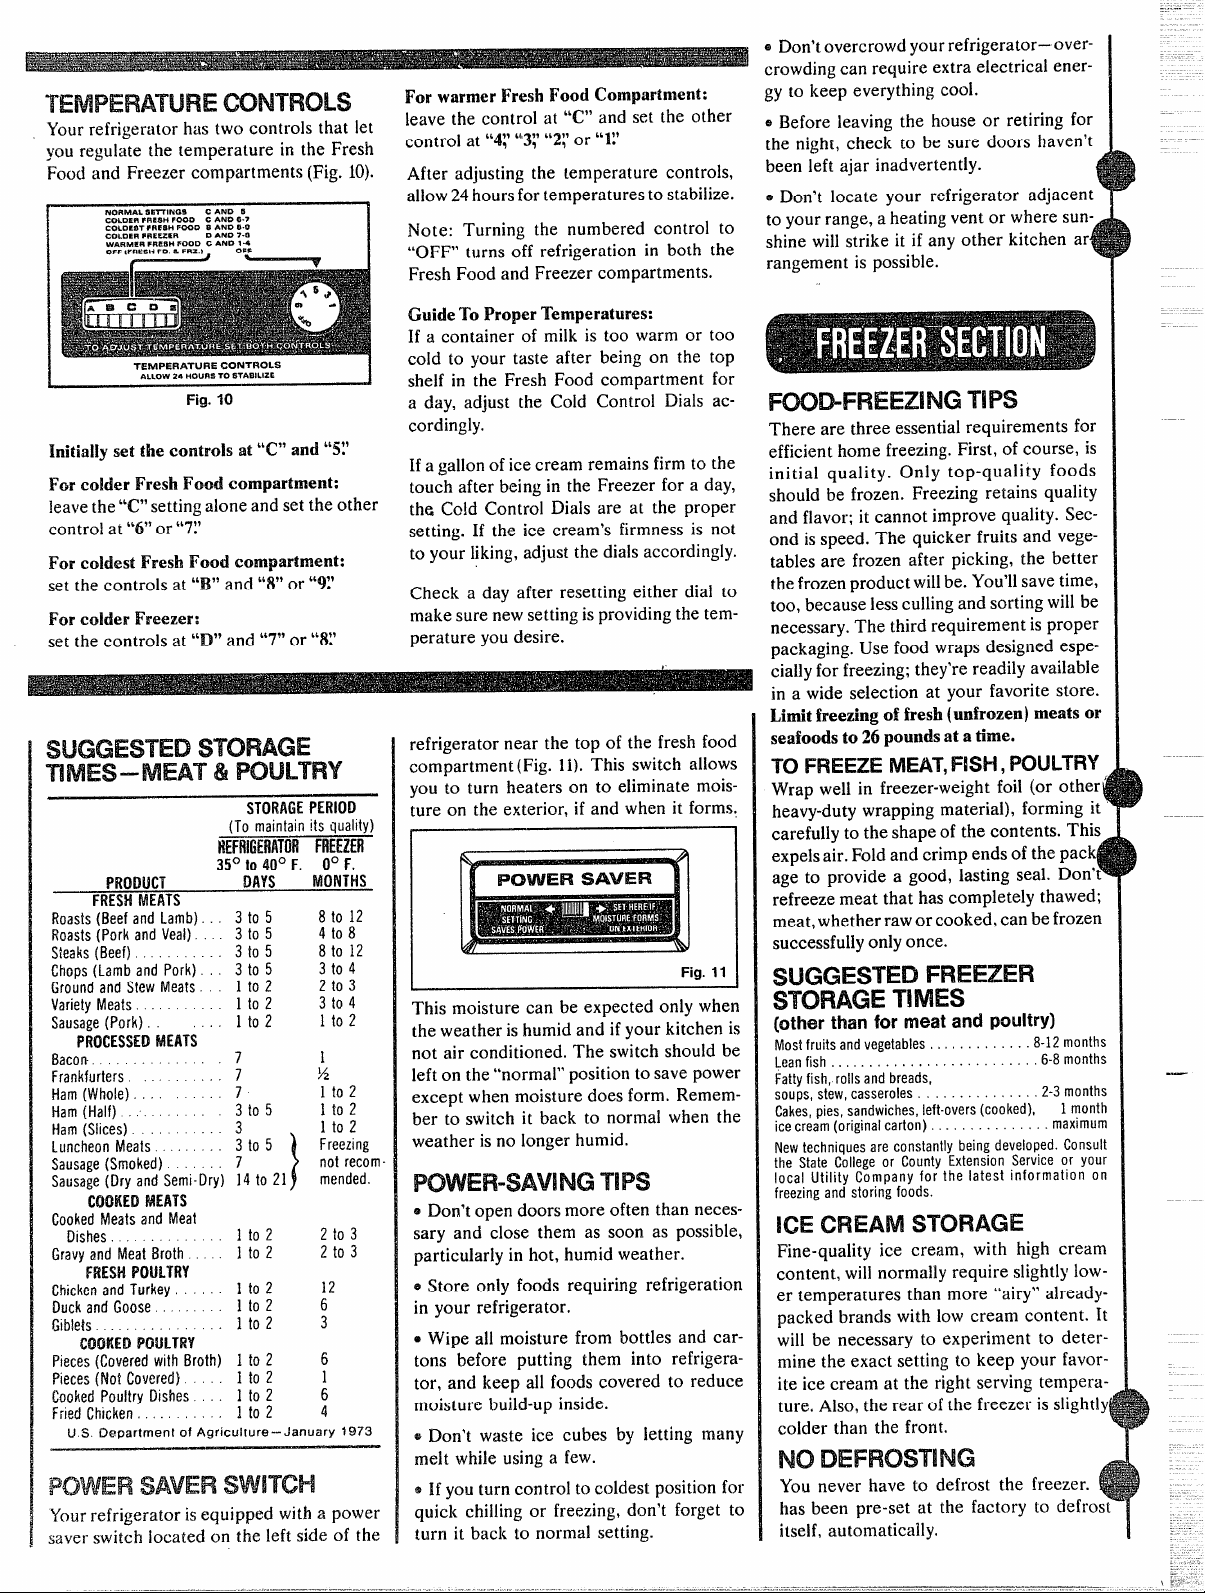
TEMPERATuREmNTRoLs
Your refrigerator has two controls that let
you regulate the temperature in the Fresh
Foodand Freezer compartments (Fig.
NORMAL aKrTINas CAND S
C~OSR FfW!SHP~O C ANO 6-7
COLOEO1FRE6H FOOD B AND 6.0
COLDER PRe5zER
WARMHR PRESHFOOD C AND 24
OFF IFRPSHFO & FRZ.I .
TEMPERATURE CONTROLS
ALLOW 24 HOURSTOSTABILIZE
Initially set the controls at “C”and “5!’
For colder FreshFood compartment:
D ANO 7-0
Fig. 10
OPP
leavethe“C”setting alone and set the other
control at “6” or “7Y
For coldest Fresh Food compartment:
set the controls at “B” and
Forcolder Frreezer:
set
the controls at “D” and “7” or”$
“8”or “W
SUGGESTEDSTORAGE
mMEs–MEAT & POULTRY
STORAGEPERIOQ
maintain its quality)
REFRIGERATORFREEIEfl
35°
to40°F. 0° F.
PRODUCT
FRESHMEATS
(Beef and Lamb). 3 to 5 8 to 12
Roasts
Steaks(i3eef). . . . . . . . 3t05
ChoPs
DAYS
PROCESSEDMEATS
%acon. . 7
Frankfurters. 7
tiam(Who!e). . . . 7 lto2
Ham(Half)... 3105
Ham(Slices). 3
MONTHS
8 to 12
1
%
lto2
lto2
For warmer Fresh Food Compartment:
leave the control at “C” and set the other
control at “4; ’“3;“2r or “~v
After adjusting the temperature controls,
allow 24 hours for temperatures to stabilize.
*
Note: Turning the numbered control to
“OFF” tl~rns off refrigeration in both the
Fresh Food and Freezer compartments.
Guide To ProperTemperatures:
If a container of milk is too warm or too
cold to your taste after being on the top
!
shelf in the Fresh Food compartment for
a day, adjust the Cold Control Dials ac-
cordingly.
—
If a gallon of ice cream remains firm to the
touch after being in the Freezer for a day,
the Cold Control Dials are at the proper
setting. If the ice cream’s firmness is not
to your liking, adjust the dials accordingly.
Check a day after resetting either dial to
makesure newsettingisprovidingthe temperature you desire.
refrigerator near the top of the fresh food
compartment (Fig. 11).This switch allows
you to turn heaters on to eliminate mois-
ture on the exterior, if and when it forms.
POWER
I
This moisture can be expected onlywhen
the weather ishumidand ifyour kitchen is
not air conditioned. The switch should be
left on the“normal”positiontosave power
except when moisturedoes form. Remember to switch it back to normal when the
weather isno longerhumid.
Fig. 11 I
~ Don’tovercrowdyour refrigerator—overcrowdingcan require extra electrical ener-
keep everythingcool.
~Before leaving the houseor retiring for
the night, check to be sure doors haven’t
been left ajar inadvertently.
~Don’t locate your refrigerator adjacent
to yourrange,a heatingvent or where sunshine willstrike it if any other kitchen ar
rangement is possible.
4
FmDFREEzlNGTIPS
There are three essentialrequirements for
efficienthome freezing.First, of course, is
initial quality. Only top-quality foods
should be frozen. Freezing retains quality
and flavor; it cannot improvequality. Second is speed. The quicker fruits and vege-
tables are frozen after picking, the better
thefrozenproductwillbe. You’llsave time,
too, becauselesscullingandsortingwillbe
necessary.The third requirementis proper
packaging.Usefood wraps designedespeciallyforfreezing;they’rereadilyavailable
in a wide selection at your favorite store.
freezing of fresh (unfrozen) meats or
Limit
seafoods to 26 poundsat atime.
To FREEZEMEAT,FISH,POULTRY
Wrap well in freezer-weightfoil (or other’
heavy-dutywrappingmaterial), formingit
carefullyto the shapeof the contents. This
expelsair. Foldandcrimp endsofthe pac
age to provide a good, lasting seal. Don’t
refreeze meat that hascompletely thawed;
meat,whetherraworcooked,can befrozen
successfullyonlyonce.
SUGGESTED FREEZER
STORAGE T!MES
(other than for meatand poultry)
Most
4
f
[
.—
tO 2
I
2t03
2
6
COOKEKtMEATS
CookedMeats and
rREsHPOULTRY
Pieces(NotCovered) 1to 2 1
Cooked
U S of 1973
p~w~~ ~~~~~ ~w~~~~
Your refrigerator is equipped with a power
saver switch iocated on the left side of the
POWER-SAVINGTIPS
o Don’topen doorsmore often than necessary and close them as soon as possible,
particularly in hot, humidweather.
~ Store only foods requiring refrigeration
in your refrigerator.
e Wipe all moisture from bottles and cartons before putting them into refrigera-
tor, and keep all foods covered to reduce
moisture build-upinside.
~ Don’t waste ice cubes by letting many
melt while usinga few.
~If youturn control to coldest positionfor
quick chilling or freezing,don’t forget to
turn it back to normal setting.
Fine-quality ice cream, with high cream
content, will normallyrequire slightlylower temperatures than more “airy”ah-eadypacked brands with low cream content. It
will be necessary to experiment to determine the exact setting to keep your favorite ice cream at the right serving temperature. Also,the rear ofthe freezer is slightly[
colder than the front.
No DEFROSTING
You never have to defrost the freezer.
has been pre-set at the factory to defrost
4
itself, automatically.
Page 3

(1)
—
If your refrigerator is operated before wa-
terconnection ismade, keep manualswitch
in OFF position.
Whenrefrigerator has been connected to
watersupply,raiseaccessdoor toicemaker
and turn manual switch to Oh’position
Fig.
Ice
cube molds will automatically fill with
water after temperature reaches freezing
level. First cubes normally freeze after
several hours. At”time ofinstallation, depress water dispenser “pillow” for about
two minutes to remove trapped air from water line and to fill water reservoir automatically. Allow about 24hours for cooling to
proper temperature.
Onceyour icemaker isin operation,throw
the first few batches of ice cubes.
away
This will flushaway any impurities in the
water line. Do the same thing after vacations or extended periods when ice isn’t
used.
If ice is used infrequently,“old”cubeswill
bec~e cloudy and taste stale. Empty ice
storage bin periodicallyand washin lukewarm water. When a large supply of ice
willbe needed,makean extrasupplyahead
of time. Empty bin, put cubes in plastic
bags or containers and store in freezer
proper while bin refills.
To HELPYOURSELFTOICE
Ice cubes are accessible through the ice
accessdoor inthe freezerdoor (Fig.7).
CAUTION: Under certain rare cirrcumastances ice cubes may be discolored, Msudly appeatingwitha green-bluish hue. The
cause of t~ls unusual discoloration is apparently due to a combination of factors
such as local waters of certain characteristics, household p~umbingand the accumulation of copper saltsin aminactive water supply line wtich feeds the ice maker.
Gntinued consumption of such &scoIored
ice cubes may be injurious to health. If
such &scoIoration is obsemed, tiscmd the
ice cubes andcontact yourHotpoint Dealer
or Authorized Hotpoint Service Agent.
To DRAWCOLDWATER
Press glass gently but firmly against the
rubber“pillow”(Fig.8).
I
--)
Tostopflow,releasepressure from“pillow;
withdrawingslowlyto catch last drops. Do
notdiscardwaterin spillshelfgrille;discard
itinthekitchen sink.Excessivespillsshould
be mopped dry immediately (Fig. 9)–the
spill shelf grille is not a drain. Both shelf
andgrilleshouldbecleaned regularly.
II
If desired, the binful of cubes can be removed from the freezer and taken where
needed. Toremove bin,open mainfreezer
door,liftup frontof binwithone handand,
supportingit at rear withother hand, pull
bin past the “stop” location and out of
freezer.
Fig. 9
Turn manual switchto OFFpositionwhen
ice storagebin is to be removed for a periodof timeor ifhomewater supplyisto be
turned offforseveralhours.
During vacations, be surevalvein water
supplylineto refrigeratoristurned off.
If this is your first icemaker, you’ll hear
occasional soundsthat maybe unfamiliar.
They’renormalicemakingsounds and are
not cause for concern,
The kilowatt hours per month (Kwh/Mo.) shown on the fact tag
attached to the inner door is the measure of the power consumed
The approximate monthly cost of operation can be calculated by
multiplying the Kwh/Mo. by the cost per kilowatt hour from
The 48-ounce reservoir providessixsue
cessive 8-ounce glassfuls —after which,
timemust beallowedfor replenished water supplyto cool, It is not likely that you
willdrainallthe chilled waterfrom the reservoirona singleoccasion.
For cooler water, simply add desired
amountofice cubes to container before
drawingwater.
your
when tested in accordance with AHAM Standard HRF-2ECFT local powercompany.Costof operation varies under actual usage
with power saver switch at the normal setting and at tl~esetting
conditions.
recommended when moistureforms on refrigerator exterior,
Page 4

MAKEYOUROWNSELF-SERVICECHECKBEFORECALLINGFORHOTPOINTPRODUCT
SERVIC
foods dry out
Automatic icemaker does not work
❑ ON-OFF control in OFF position
Water supplyturned off or not
connected
❑ Freezer compartment too warm
❑ Cubes too small–shut-off valve
connectingrefrigerator to home
water line maybe clogged
Slow
ice cube freezing
❑ Freezer door may have been
left ajar
Off-f!avortaste in water & ice
❑ Plumbingattachment on non-
circulating “deadend” home
water supplyline
❑ Seasonalchanges in water
suppliedto your home
Q Uncovered foods stored in refrig-
erator or freezer sections will
transfer odors to ice
Freezer too warm
❑ Freezer door may have been
left ajar
❑ Packagemaybeholdingdoor open
❑ Grille and condenser need
cleaning
Frost on frozen food
❑ Too-frequentand too-longfreezer
door openings
❑ Freezer door may have been
left ajar
Frozen
❑ Packages not wrappedor sealed
properly
Moisture forms on outside of
refrigerator
Moisture not unusualduring
Q
periods of highhumidity
U Movepower saver
switch to right
Moisture collects inside
Too-frequent and too-longdoor
H
openings
❑ Hot-humidweather increases rate
of frost build-up and internal
sweating
Cabinet has odor
❑ Certain foods produce odor–
should be covered
❑ Interior needs cleaning
n Defrost-water pan needs cleaning
Retigerator
Modern refrigerators ;re larger
and run colder—require more
running time
Doors kept open too long
Temperature controls set too cold
Normal at time of installation or
after refrigerator has been turned off
Grille and condenser need
cleaning
runs too long
Refrigeratorruns too frequently
❑ Required to provide even
temperature
❑ Too-frequent and too-longdoor
openings
Cabinet vibrates
❑ Rollerscrews need adjusting
U Check for weak floor
Fresh food temperature too cold
❑ Temperature control dial set in
too cold position
Fresh
food temperature too warm
Temperature control not set in
H
cold enoughposition
a Too-frequent and too-longdoor
openings
❑ Package ho!dingdoor open
❑ Grille and condenser need
cleaning
Fresh foods dry out
❑ Foodsshould be covered
Noisy
Noiselevel is slightlyhigheron
modern, larger refrigerators
Fan air flow– this is normal
❑
Defrost-water pan not in correct
❑
position
Roller screws need adjusting
❑
❑
Check for weak floor
Refrigeratordoes not run
❑ Temperature control in OFF
position
❑ Notpluggedin
❑ Nopower at outlet
❑ Housefuse blown
Hot air from bottom of refriger
❑ Normalair flowof fan-cooled
condenser
Wateron floor
❑ Defrost-waterpan full, missing,
or not in position
hterior light does not ~iht
❑ No power at outlet
❑ Lightbulb needs replacing
To
replace a burned-out iight buib:
Unplugrefrigerator.
a.
b. Removetop shelf temporarily.
c. Reachin, feel for bulb behind light
panel,andunscrewit (see illustrations
below).
d. Replacewithsame-sizebulb.
Freshfood
compartment
#
compartment
RAPiD ELECTRICAL DUAGNOSUS
Freezer
#
FULL ONE”YEARwARRANw-
HOTPOINTREFRIGERATOR
From Hotpoint to You–
This warranty is extended by Hotpoint to the original purchaser and to
anysucceeding ownerand appliesto products purchased in the United
States, retained withinthe 48 contiguousstates, the State of Hawaii,or
the District of Columbiaand employedin ordinary home use.
mat we Wifl Do–
If your Hotpoint Refrigerator fails because of a manufacturing defect
within one year from the date of original purchase, we will repair the
product without charge to you. Parts and service labor are included.
Servicewillbe provided in the home in the 48 contiguousstates, in.the
State of Hawaii,or in the District of Columbia.
HowTo
Obtain Service–
Service will be provided by our local Customer Care” factory service
organizationor byone of our franchi~edCustomer Care servicersduring
normalbusinesshoursafter younotifyus of the need for service. Service
canbearrangedby telephone.Lookup“HotpointCustomerCare Service”
inthe yellowpagesor writeto theaddressgivenbelow,
What Is
Not Covered –
This warranty does not cover the failure of your refrigerator if it is damaged while in your possession,used for commercial purposes, or if the
failureis caused byunreasonable use including use on house wiringnot
inconformance with electrical codes, low power voltage, and failure to
providereasonableandnecessarymaintenance.In
be Iiab!efor consequential\ damages.
State of Alaska, nor to the Virginislands, Guam, American Samoa or
the Canal Zone or the Commonwealthof Puerto Rico.
Some States do not allow the exclusion or limittition of incidental or
consequential damages, so that the preceding limitations or exclusion
maynot apply to you. This warranty givesyou specific legal rights, and
? YOUmayaiso haveother rights whichvary from state to stite,
This warranty does not apply to the
no event shaIIHotpoint
ADDITIONALFULL FOUR-YEARWARRANTY
ONTHESEALED
REFRIGERATINGSYSTEM
The sealed refrigerating system(compressor, condenser, evaporator and
connecting tubing—see diagram) is c
coveredin the above full warranty. In
additiontothatwarrantywewillrepair
thissealed systemif it failsbecause of
amanufacturingdefect withinthe secondthrough fifth year after original
purchase.Wewillbear the cost of both
parts and labor.
All other provisions are the same as
thosestated in the above fullwarranty,
PRESSOR
Applicabletothe stateofAlaska
Inthe StateofAlaska,freeserviceincludingpartswillbeprovidedtocorrect
manufacturingdefects at our nearest service shop location or in your
home, but we do not cover the cost of transportation of the product to
the shop or for the travel cost of a technician to your home. You are
responsiblefor those costs. All other provisionsof this limited warranty
are the same as those stated in the abovewarranties.
+
m
Appliance park, l-ouisville, Kentuclty 40225
Page 5

AMUSTABLE
TEMPEREDGross SHELVES
o adjust shelf,lift front straight up and
b
pullout(Fig.12).Select desiredshelfheight
andsimplyengagerear ofshelfwithproper
tches at rear of cabinet. Then lower
b
rent untilshelflocksinto position.
CRISPERCOVERSHELF
To remove bottom shelf, which also serves
as a cover for the vegetable crisper:
1. Remove
andtemporarilyrelocate shelf higherup in
cabinet. Then remove food from crisper
and crisper cover.
2. Reach in, push down on top surface of
flexibleair duct cover and pry its top edge
out from under the louvered vent attached
torear cabinet wall(Fig. 13).
). Lift bottom of air duct cover out of
~roove on gasket attached to rear of
;risper cover shelf. Remove air duct cover
rom cabinet.
. Push crisper cover shelf toward back of
abinet until it clears front corner shelf re~iners.
food from shelf above crisper
Tilt shelfand take it out (Fig. 14).
2. Put cover shelfback in place.
Insert bottom of air duct cover in
3.
groove in gasket on cover shelf (Fig. 15).
4. Push top edge of air duct cover in[
place under louvered vent,
STORAGEDRAWERS
Slide-out drawers at the bottom of the fre:
food section are for vegetables and meat
To remove any drawer, lift
pull past “stop”’iocation.
up slightlyan
CONVERTIBLEMEAT
CONDITIONER
The meat compartment has its own co]
air duct to allow a stream of cold air to flo
around the pan. For storing fresh mea
longer,control levershould be positione
at MEATS,which is the coldest settin
(Fig.16).
At VEGETABLESsetting, cold air duct i
turned off completely, converting drawe
to normal refrigerator temperature an
providing extra vegetable storage spact
(Variablesettings between these extreme
can be selected as user desires.)
ADJUSTABLEmR SHELVES
Three of the door shelves are adjustable
To adjust positioning,just lift up
select desired shelf height, engage she
supports in door slots and push in: she
will lock in place (Fig. 17),
and ou
with,waxpaper,aluminumfoilor placed in
a plastic bag. Carefully wrap to expel air
and preventmold, Packagedcheesecan be
stored inits ownwrapping.
Vegetables– Vegetabledrawershave been
speciallydesignedtopreservenatural moisture and freshness,Crispnesscan be maintained by coveringvegetableswitha moist
towel. As a further aid to freshness, it is
suggestedthat pre-packagedvegetablesbe
stored intheir originalwrapping.
Inside– Clean both refrigerator and freez-
er sections at least once a year. It is recommended that the refrigerator be unpluggedbeforecleaning.If thisis not practical, wringexcess moistureout of sponge
or cloth when cleaning in the vicinity of
switches,lights, or controls.
Usewarm water and baking soda solution
—abouta tablespoon of baking soda ‘toa
quartofwater.Rinsethoroughlywithwater
and wipedry. Followthis same procedure
for cleaning door gaskets, vegetable and
meat pans, and all plastic parts. Wash ice
storage bucket in lukewarm water only.
To remove crisper andmeat pans when refrigerator
and fresh food compartment door cannot
open fu~ly:
1.
Removecrisper covershelfby following
previousinstructions.
2. Slide cover of metit pan forward until
the notch on its right side lines up with
tab on right-handcover support (Fig. 18).
I
3. Tilt andtake out meatpancover (Fig.19)..
is located in a right-handcorner
I
....-
Fig.18
ubber gasket on rear of cover shelf can
: peeled off for cleaning.
i
D replace:
Put gasket back on rear of cover shelf if
‘~.
rcrnovedfor cleaning.
[
‘ig.
17
FmD STORAGE
UnfrozenMeats, Vish7Poultry–Meats, fis
andpoultry purchased from the store var
quality and ~~ge;consequently, safe stol
agetime in your refrigerator will vary.Al
waysremove store wrapping from meats
fishandpoultry.Rewrap infoil,filmor wa
paperand refrigerate immediately,
Cheese-–Cheese should be well wrappe~
4. Tilt meat pan and take it out (Fig.20).
i
#J-Jb I K11# \ II
Fig. 20
Page 6

After cleaning, simply replace in reverse
{Jrder.
Outside– To clean and protect the finish,
useliquidpolishor waxsuitable for useon
appliances.lNeveruseoilyfurniture polish,
cleaningpowders,ora~kalinesoaps.
Whenmovingrefrigerator,alwayspullcabinet straight out and return to position by
pushing straight in. Moving refrigerator in
a side direction can cause damage to floor
covering by rollers.
In the refrigeration process, it is normal
that heat be expelled in the area under the
refrigerator. Some synthetic floor coverings
which are relatively new on the market will
discolor at these normal and safe operating
temperatures. Your floor covering supplier
should be consulted if you object to this
discoloration.
Defrost Water Pan– Pan located behind
grilleshouldbecleanedatleastonce a year.
it is located at bottom left behindgrille.
Condenser – For
most efficient operation, remove the
grille and either
sweep away or vac-
uum up dust that’s
readily accessible.
This easy cleaning
operation should be
done at least once a
year.
No DEFROSTING
I
It isnot necessaryto defrost the fresh food
section of your refrigerator; it will defrost
itselfautomatically.
Ifyoushutoffthe house powerfor extended vacations,removefoodand clean interior withsodasolutionusingone tablespoon
of soda per each quart of water. Wipedry.
To prevent formation of odor, place open
boxofsoda in refrigerator and leavedoors
open.
If you leave for shorter absences, remove
perishable foodsand leavecontrol dials at
normalsetting. If,however,roomtemperatt~reis expected to go below 60°F., turn
control dials to OFF, remove food, clean
interior,ieave doorsopenand remove plug
from wail receptacle.
Flip manual switch on ice maker to OFF
position and be sure to shut off water
~ SUPPIYtO ice maker and cold water dis- ~ 6. Your refrigerator is equipped with roll-
penser. (Askinstaller to point out location
ofshut-offvalveat timeof irtstalJation.)
1
Disconnect power cord from wallrecepta-
cle. Remove a]] foods and C]eaninteri(>r,
I
Such looseitems as grille, shelves, storage
pans, ice storage bin, coversand removable parts should be protected or secured
with tape, This prevents their coming
looseand causingdamage, Your refrigerator is on wheels: be sure it is properly secured inmovingvan to prevent rollingand
damage.Handlewith care: exterior should
be protected withblanketcovering.
The suggestionsnoted below apply to the
operation of your household electric refrigerator.Hotpoint recommends these
safety precautions:
1. Ifyourold refrigeratorisstillaround the
housebut not inuse, besure to remove the
doors. This will reduce the possibility of
danger to children.
2. Some refrigerators are equipped with
automatic icemakers. Donot place fingers
or hands on the automatic icemaking
mechanism while the refrigerator is
pluggedin. This will prevent contact with
themovingparts of theejector mechanism,
or with the heating element that releases
the cubes.
3. The refrigerator should always be
plugged into its own individual electrical
outlet (115volt,60cycle,singlephaseAC).
Thisisrecommendedfor bestperformance
and to prevent overloadinghouse wiring
circuits, which could cause a possible fire
hazard fromoverheatingwires.
1
USE OF EXTENSIONCORDS– Because
of potential safety hazards under certain
conditions,westronglyrecommend against
the use of an extension corci. However, if
you still elect to use an extension cord, it
isabsolutelynecessarythat it be a ULlisted
3-wiregroundingtype appliance extension
cord and that the current carrying rating
ofthe cord in amperesbe equal to orgreater than the branch circuit size shown on
the rating nameplate of this appliance.
Such extension cords are obtainable
through your local service organization.
4. Repair or replace immediately all electric service cords that have become frayed
or otherwise damaged. Do not use a cord
that shows cracks or abrasion damage
alongitslength or at either the plugorconnector end,
5. Never unplug your refrigerator by pullingonthe wire.Alwaysgripthe plugfirmly
and pull straight out from the receptacle.
ers so that it can be easilymovedout from
the wall. When rollingout the refrigerator
I
be carefulnot to rollover the service cord,
7. Do not operate your refrigerator in the
presence of explosivefumes.
8. A {Jurned-out light bu~bmight break
when being replace-d.In order to avoid
contact with a live wire filament, it is recommended that tl~erefrigerator firstbe un-
oluggedwhenreplacinga light bulb,
Note: Turning control to OFF position
doesnot removepower to the light circuit.
9, Always remove the power cord from
walloutlet befc)reremovingthe base grille.
10.Don’trefreezefrozenfoodswhichhave
thawed completely unless you cook them
after they have thawed, The United States
Department of Agriculture in Home and
Garden BulletinNo. 69 says, “... if foods
have thawed only partially and there are
still ice crystals in the package, they may
safelyberefrozen. ..
be used as soon as possible.
“If foods have slowly thawed and have
warmedgraduallyover a period of several
days to a temperature of 40°F., they are
not likely to be fit for refreezing. Under
theseconditions,meats, poultry, most vegetables and some prepared foods may become unsafe to eat; most fruits and fruit
products soon develop an undesirable
flavor.”
A/so note and ,fol[o VVother precautions
contained in this Use & Care Book.
If your refrigerator appears to have stopped operating (except during the defrost
cyclewhen themotor and fanare normally
shut off completely for the length of the
cycle),make these simple tests before tailing for service:
1. Check temperature control dial. It may
beturnedtotheOFFposition.
2. If interior light is not on, check to see if
refrigeratorispluggedinat wallreceptacle.
3. Ifplugissecure and the refrigerator still
failsto operate, plug another appliance intothe same outlet to determine ifthere isa
burned-outfuse.
4. Followchecklist onback coverfor other
possibletroublespots.
:81110111illllllllllllllG1811188111181111111111s1111118sliltlllla111ta11t8#181018c
2
Complaint
We maintain a staff of Customer RelationsManagersat major market locations
to whomyoumayappeal for service help
ifyouare not satisfiedwith the assistance
received through the normal channels
specified in the warranty on the back
cover under “Ho\vTo Obtain Service,”A
listingoflodationsand telephone numbers
is provided with the product, We also
maintain a working relationship with
MACAP,the Major Appliance C~jnsunler
Action Panel, 20 North Wacker Drive,
Chicago, Illinois60606,”so that yo(~may
contact them for help in resolvinga complaint but only after you huvc tried to
resolve ‘the problem through our Customer Rel~tionsOffices,
:
.11! II1llJIII 111411,1 1111111 llatlttlllltt tllllll lt~ltlll~l?lll 1111111111! 111111111;
Refrozenfoodshould
Handling
:
.———-.
1-
:
.
:
1
-.
 Loading...