

Page 1

GEAppliances.com
C
0
U
(]9
>
C
0
U
Oh
C
_m
C
_D
U
Lf3
C
[D
CD
£Z2
Safety Instructions ...... 2-7
Operating Instructions
Convection Oven .......... 21-25
Roasting Guide .............. 24
Timed Convection Baking ...... 25
Griddle ....................... 8, 9
Restaurant-Quality Steak ........ 9
Lower Oven Drawer .......... 30
Range Lockout ................. 27
Surface Units .............. 10-13
Thermostat ................ 29, 30
Upper Oven ............... 14-32
Aluminum Foil ............... 16
Baking or Roasting .......... 16
Broiling Guide ............... 17
Clock and Timer ............. 18
Oven Controls ............... 14
Preheating ................... 16
Probe ........................ 20
Sabbath Feature ............ 28
Self-Cleaning ............. 31,32
Special Features ......... 26, 27
Timed Baking and
Roasting Features ........... 19
Care and Cleaning
Control Panel and Knobs ..... 36
Glass Cooktop Surface .... 38, 39
Griddle ........................ 33
Lift-Off Oven Door ............ 34
Lower Oven Drawer .......... 35
Oven Air Vents ................ 36
Oven Heating Elements ....... 34
Oven Light Replacement ...... 37
Oven Racks ................... 37
Self-Cleaning .............. 31, 32
Stainless Steel Surfaces ....... 33
Installation
Instructions ............ 40-47
Anti-Tip Device ............ 40, 46
Dimensions and
Clearances .................... 41
Electrical Connections ...... 42-45
Level the Range ............... 46
Location Guidelines ........... 41
Safety Instructions ............ 40
Troubleshooting
Tips ...................... 48-50
Accessories .................. S3
Consumer Support
Consumer
Support .............. Back Cover
Ownership Registration
for Customers in
Canada only ............. 51,52
Warranty for Customers
in Canada ..................... 55
Warranty for Customers
in the U.S.A.................... 54
CS980
In Canada contact us at:
www.GEAppliances.ca
Write the model and serial
numbers here:
Model #
Serial #
You can find them on a label on the
front of the range behind the lower
oven drawer.
183D6379P054 49-88040 05-09JR
Page 2
i/iiii;ii_,_,i_;iiYiill
iiiiii'ii_iiiiiiiii'_iii
IMPORTANT SAFETY INFORMATION.
READ ALL INSTRUCTIONS BEFORE USING.
WARNING!
For Four safety, the information in this manual must be followed to minimize the risk of fire
or explosion, electric shock, or to prevent property damage, personal injury, or loss of life.
i
)
i
"0
i
_t
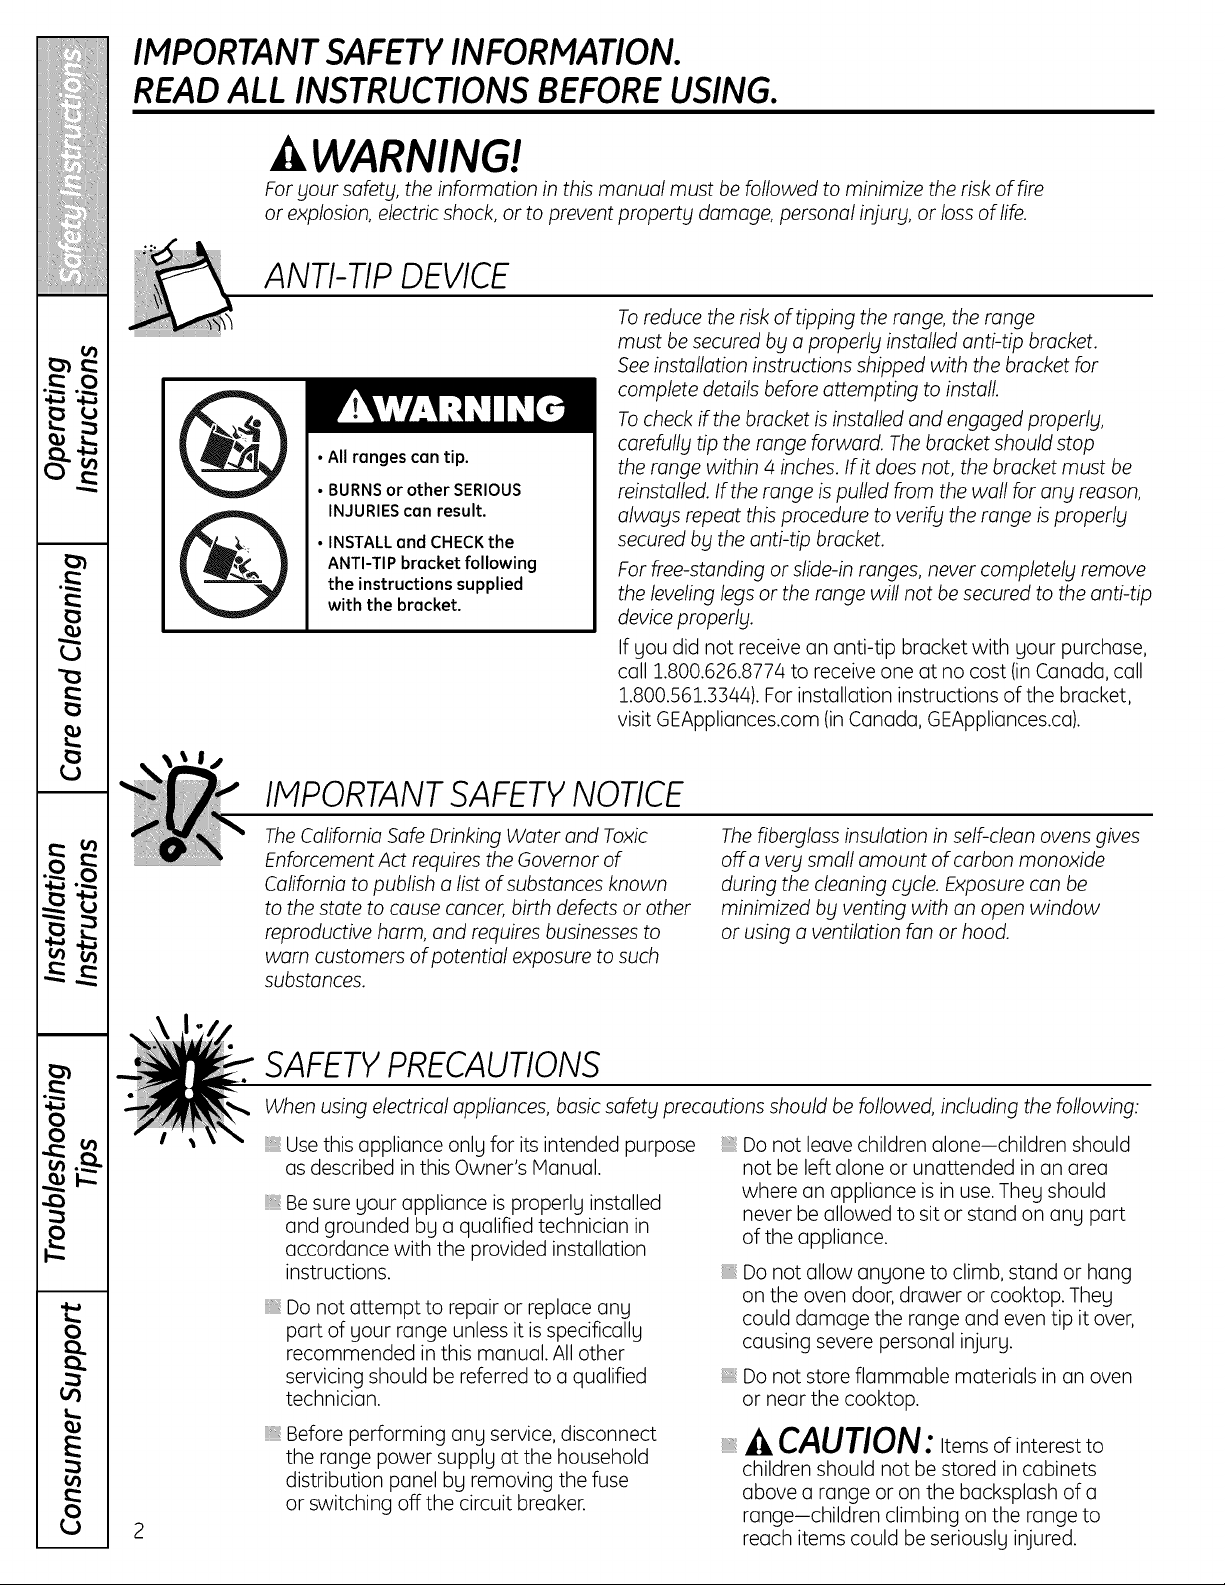
ANTI-TIP DEVICE
Toreduce the risk of tipping the range, the range
must be secured bg a properly installed anti-tip bracket.
See installation instructions shipped with the bracket for
complete details before attempting to install.
Tocheck ff the bracket is installed and engaged properly,
•All ranges can tip.
• BURNS or other SERIOUS
INJURIES can result.
• INSTALL and CHECK the
ANTI-TIP bracket following
the instructions supplied
with the bracket.
carefully tip the range forward. The bracket should stop
the range within 4 inches. Ifit does not, the bracket must be
reinstalled. If the range is pulled from the wall for any reason,
always repeat this procedure to verif_l the range isproperl_l
secured b_lthe anti-tip bracket.
For flee-standing or slide-in ranges, never completely remove
the leveling legs or the range will not be secured to the anti-tip
device properl_l.
If you did not receive an anti-tip bracket with your purchase,
call 1.800.626.8774 to receive one at no cost (in Canada, call
1.800.561.3344). For installation instructions of the bracket,
visit GEAppliances.com (in Canada, GEAppliances.ca).
IMPORTANT SAFETY NOTICE
The California Safe Drinking Water and Toxic
Enforcement Act requires the Governor of
California to publish a list of substances known
to the state to cause cancer, birth defects or other
reproductive harm, and requires businesses to
warn customers of potential exposure to such
substances.
The fiberglass insulation in self-clean ovens gives
off a very small amount of carbon monoxide
during the cleaning cycle. Exposure can be
minimized by venting with an open window
or using a ventilation fan or hood.
J
i
a
o
Q
Q
E
SAFETYPRECAUTIONS
When using electrical appliances, basic safety precautions should be followed, including the following:
Use this appliance only for its intended purpose
as described in this Owner's Manual.
Be sure your appliance is properly installed
and grounded by a qualified technician in
accordance with the provided installation
instructions.
Do not attempt to repair or replace any
part of your range unless it is specifically
recommended in this manual. All other
servicing should be referred to a qualified
technician.
Before performing any service, disconnect
the range power supply at the household
distribution panel by removing the fuse
or switching off the circuit breaker.
2
iiiiiiiiiiiii!Do not leave children aloneichildren should
not be left alone or unattended in an area
where an appliance is in use. They should
never be allowed to sit or stand on any part
of the appliance.
Do not allow anyone to climb, stand or hang
on the oven door, drawer or cooktop. They
could damage the range and even tip it over,
causing severe personal injury.
Do not store flammable materials in an oven
or near the cooktop.
CAUTION:Items of interest to
children should not be stored in cabinets
above a range or on the backsplash of a
rangeichildren climbing on the range to
reach items could be seriously injured.
Page 3
GEAppliances.com
COOK MEATAND POULTRYTHOROUGHLY...
Cook meat and poultry thoroughly-meat to at least an INTERNALtemperature of 160°F and poultry
to at least an INTERNALtemperature of 180°E Cooking to these temperatures usually protects against
foodbome illness.
WARNING!
SAFETY PRECAUTIONS
Never wear loose-fitting or hanging garments
while using the appliance. Be careful when
reaching for items stored over the range.
Flammable material could be ignited if brought
in contact with hot surface units or heating
elements and may cause severe burns.
Use only dry pot holders-moist or damp pot
holders on hot surfaces may result in burns
from steam. Do not let pot holders touch hot
surface units or heating elements. Do not use
a towel or other bulky cloth.
For your safety, never use your appliance for
warming or heating the room.
Do not let cooking grease or other flammable
materials accumulate in or near the range.
Do not use water on grease fires. Never pick
up a flaming pan. Turn the controls off.
Smother a flaming pan on a surface unit by
covering the pan completely with a well-fitting
lid, cookie sheet or flat tray. Use a multi-
purpose dry chemical or foam-type fire
extinguisher.
Flaming grease outside a pan can be put out
by covering it with baking soda or, if available,
by using a multi-purpose dry chemical or
foam-type fire extinguisher.
Flame in the upper oven or lower oven drawer
can be smothered completely by closing the
oven door or drawer and turning the oven off,
or by using a multi-purpose dry chemical or
foam-type fire extinguisher.
Be sure all packaging materials are
removed from the range before operating
it to prevent fire or smoke damage should
the packaging material ignite.
After prolonged use of a range, high floor
temperatures may result and many floor
coverings will not withstand this kind of use.
Never install the range over vinyl tile or
linoleum that cannot withstand such type
of use. Never install it directly over interior
kitchen carpeting.
Do not touch the surface units, the heating
elements or the interior surface of the oven.
These surfaces may be hot enough to burn
even though they are dark in color. During and
after use, do not touch, or let clothing or other
flammable materials contact, the surface
units, areas nearby the surface units or any
interior area of the oven; allow sufficient time
for cooling first.
Potentially hot surfaces include the cooktop,
areas facing the cooktop, oven vent opening,
surfaces near the opening, crevices around
theoven doorand metaltrimpartsabove
thedoor.
REPIEPIBER:The inside surface of the oven
may be hot when the door is opened.
Do not store or use combustible materials,
gasoline or other flammable vapors and
liquids inthe vicinity of this or any other
appliance.
Keep the hood and grease filters clean
to maintain good venting and to avoid
grease fires.
Never block the vents (air openings) of the
range. They provide the air inlet and outlet
that are necessary for the range to operate
properly. Air openings are located at the rear
of the cooktop, at the top and bottom of the
oven door, and at the bottom of the range
under the lower oven drawer.
Teach children not to play with the controls
or any other part of the range.
Always keep dish towels, dish cloths, pot
holders and other linens a safe distance from
your range.
Always keep wooden and plastic utensils and
canned food a safe distance from your range.
Always keep combustible wall coverings,
curtains or drapes a safe distance from
your range.
Page 4
IMPORTANT SAFETY INFORMATION.
READ ALL INSTRUCTIONS BEFORE USING.
WARNING!
RADIANT SURFACEUNITS
Use proper pan size-select cookwore having flat bottoms large enough to cover the surface unit
heating element. The use of undersized cookwore will expose a portion of the surface unit to direct
contact and may result in ignition of clothing. Proper relationship of cookwore to surface unit will also
improve efficiency.
Never leave the surface units unattended at
high heat settings. Boilovers cause smoking
and greasy spillovers that may catch on fire.
Only certain types of glass, glass/ceramic,
earthenware or other glazed containers are
suitable for cooktop service; others may
break because of the sudden change in
temperature.
To minimize the possibility of burns, ignition of
flammable materials and spillage, the handle
of a container should be turned toward the
center of the range without extending over
nearby surface units.
Always turn the surface units off before
removing cookware.
Do not flame foods on the cooktop. If you do
flame foods under the hood, turn the fan on.
Keep an eye on foods being fried athigh
or medium high heat settings.
Foods for frying should be as dry as possible.
Frost on frozen foods or moisture on fresh
foods can cause hot fat to bubble up and over
the sides of the pan.
iiiiiiiiiiiii!
Use little fat for effective shallow or deep fat
frying. Filling the pan too full of fat can cause
spillovers when food is added.
If a combination of oils or fats will be used in
frying, stir together before heating, or as fats
melt slowly.
Always heat fat slowly, and watch as it heats.
iiiiiiiiiiiii!
Use a deep fat thermometer whenever
possible to prevent overheating fat beyond
the smoking point.
Do not leave plastic items on the cooktop-
they may melt if left too close to the vent.
Do not leave any items on the cooktop. The hot
air from the vent may ignite flammable items
and will increase pressure in closed containers,
which may cause them to burst.
4
Page 5

RADIANT SURFACEUNITS
GEAppliances.com
Use care when touching the cooktop.
The glass surface of the cooktop will retain
heat after the controls have been turned off.
Avoid scratching the glass cooktop.
The cooktop can be scratched with items such
as sharp instruments, rings or otherjewelrg
and rivets on clothing.
Large scratches or impacts to glass
doors or cooktops can lead to broken
or shattered glass.
Do not operate the radiant surface units
if the glass is broken. Spillovers or cleaning
solution mag penetrate a broken cooktop
and create o risk of electrical shock. Contact
o qualified technician immediotelg should
gour glass cooktop become broken.
Never use the glass cooktop surface as
a cutting board.
Do not place or store items that can melt
or catch fire on the glass cooktop, even when
it is not being used.
Be careful when placing spoons or other
stirring utensils on the glass cooktop surface
when it isin use. They may become hot
and could cause burns.
Clean the cooktop with caution. If a wet
sponge or cloth is used to wipe spills on a hot
surface unit, be careful to avoid steam burns.
Some cleaners can produce noxious fumes if
applied to o hot surface.
NOTE: We recommend that you avoid wiping
any surface unit areas until theg have cooled
and the indicator light has gone off. Sugar spills
are the exception to this. Please see Cleoning
the gloss cooktop section.
When the cooktop iscool, use onlg the
recommended cleaning cream to clean
the cooktop.
To avoid possible damage to the cooking
surface, do not applg cleaning cream
to the glass surface when it is hot.
After cleaning, use a drg cloth or paper towel
to remove oil cleaning cream residue.
Read and follow all instructions and warnings
on the cleaning cream labels.
Do not lift the cooktop. Lifting the cooktop
can lead to damage and improper operation
of the range.
Page 6
IMPORTANT SAFETY INFORMATION.
READ ALL INSTRUCTIONS BEFORE USING.
WARNING!
LOWEROVENDRAWER
The purpose of the warm setting of the lower
oven drawer is to hold hot cooked foods at
serving temperature. Always start with hot
food; cold food cannot be heated or cooked
using the warm setting of the lower oven
drawer.
Do not use the lower oven drawer to dry
newspapers. If overheated, they can catch
on fire.
Do not leave paper products, plastics, canned
food or combustible materials in the drawer.
Neverleavejars orcans of fat drippings
in ornear your lower oven drawer.
Do not warm food in the lower oven drawer
for more than two hours.
Do not touch the heoting element or the
interior surface of the lower oven drawer.
These surfaces may be hot enough to burn.
REMEMBER:The inside surface of the lower
oven drawer may be hot when the drawer
is opened.
Use care when opening the lower oven
drawer. Open the drawer a crack and let
hot air or steam escape before removing
or replacing food. Hot air or steam which
escapes can cause burns to hands, face
and/or eyes.
Do not use aluminum foil to line the lower
oven drawer. Foil is an excellent heat insulator
and will trap heat beneath it. This will upset
the performance of the drawer and it could
damage the interior finish.
Never place, use or self-clean the lower oven
drawer pan in the upper oven.
6
Page 7

GEAppliances.com
UPPEROVEN
Stand away from the range when opening the door of a hot oven. The hot air and steam that escape
can cause burns to hands, face and eyes.
Do notuse theoven fora storagearea.
Itemsstoredintheoven can ignite.
Keep the oven free from grease buildup.
Place the oven racks in the desired position
while the oven is cool. Ifracks must be
handled when hot, do not let pot holder
contact the heating elements.
Pulling out the rack to the stop-lock is a
convenience in lifting heavy foods. It is also
a precaution against burns from touching hot
surfaces of the door or oven walls. The lowest
position "R" is not designed to slide.
Do not heat unopened food containers.
Pressure could build up and the container
could burst, causing an injury.
SELF-CLEANING UPPER OVEN
Be sure to wipe up excess spillage before
self-cleaning operation.
Before self-cleaning the oven, remove
the racks, any broiler pan, grid and
other cookware.
Never place, use or self-clean the lower oven
drawer pan in the upper oven.
Do not clean the door gasket. The door gasket
isessential for a good seal. Care should be
taken not to rub, damage or move the gasket.
iiiiiiiiiiiii!
When using cooking or roasting bags in the
oven, follow the manufacturer's directions.
iiiiiiiiiiiii!
Do not use your oven to dry newspapers.
If overheated, they can catch fire.
iiiiiiiiiiiii!
Do not leave paper products, cooking utensils
or food in the oven when not in use.
iiiiiiiiiiiii!
Keep the oven vent unobstructed.
iiiiiiiiiiiii!
Make sure any broiler pan is in place correctly
to reduce the possibility of grease fires.
iiiiiiiiiiiii!
If you should have a grease fire in a broiler
pan, press the CLEAR/OFF pad and keep
the oven door closed to contain fire until
it burns out.
iiiiiiiiiiiii!
Never place, use or self-clean the lower oven
drawer pan in the upper oven.
iiiiiiiiiiiii!
Clean only parts listed in this Owner's Manual.
iiiiiiiiiiiii!
If the self-cleaning mode malfunctions, turn
the oven off and disconnect the power supply.
Have it serviced by a qualified technician.
iiiiiiiiiiiii!
Do not use oven cleaners. No commercial
oven cleaner or oven liner of any kind should
be used in or around any part of the oven.
Residue from oven cleaners will damage
the inside of the oven when the self-clean
cycle is used.
READAND FOLLOWTHISSAFETYINFORMATIONCAREFULLY.
SAVE THESE INSTRUCTIONS
Page 8
0
.w,,_
13
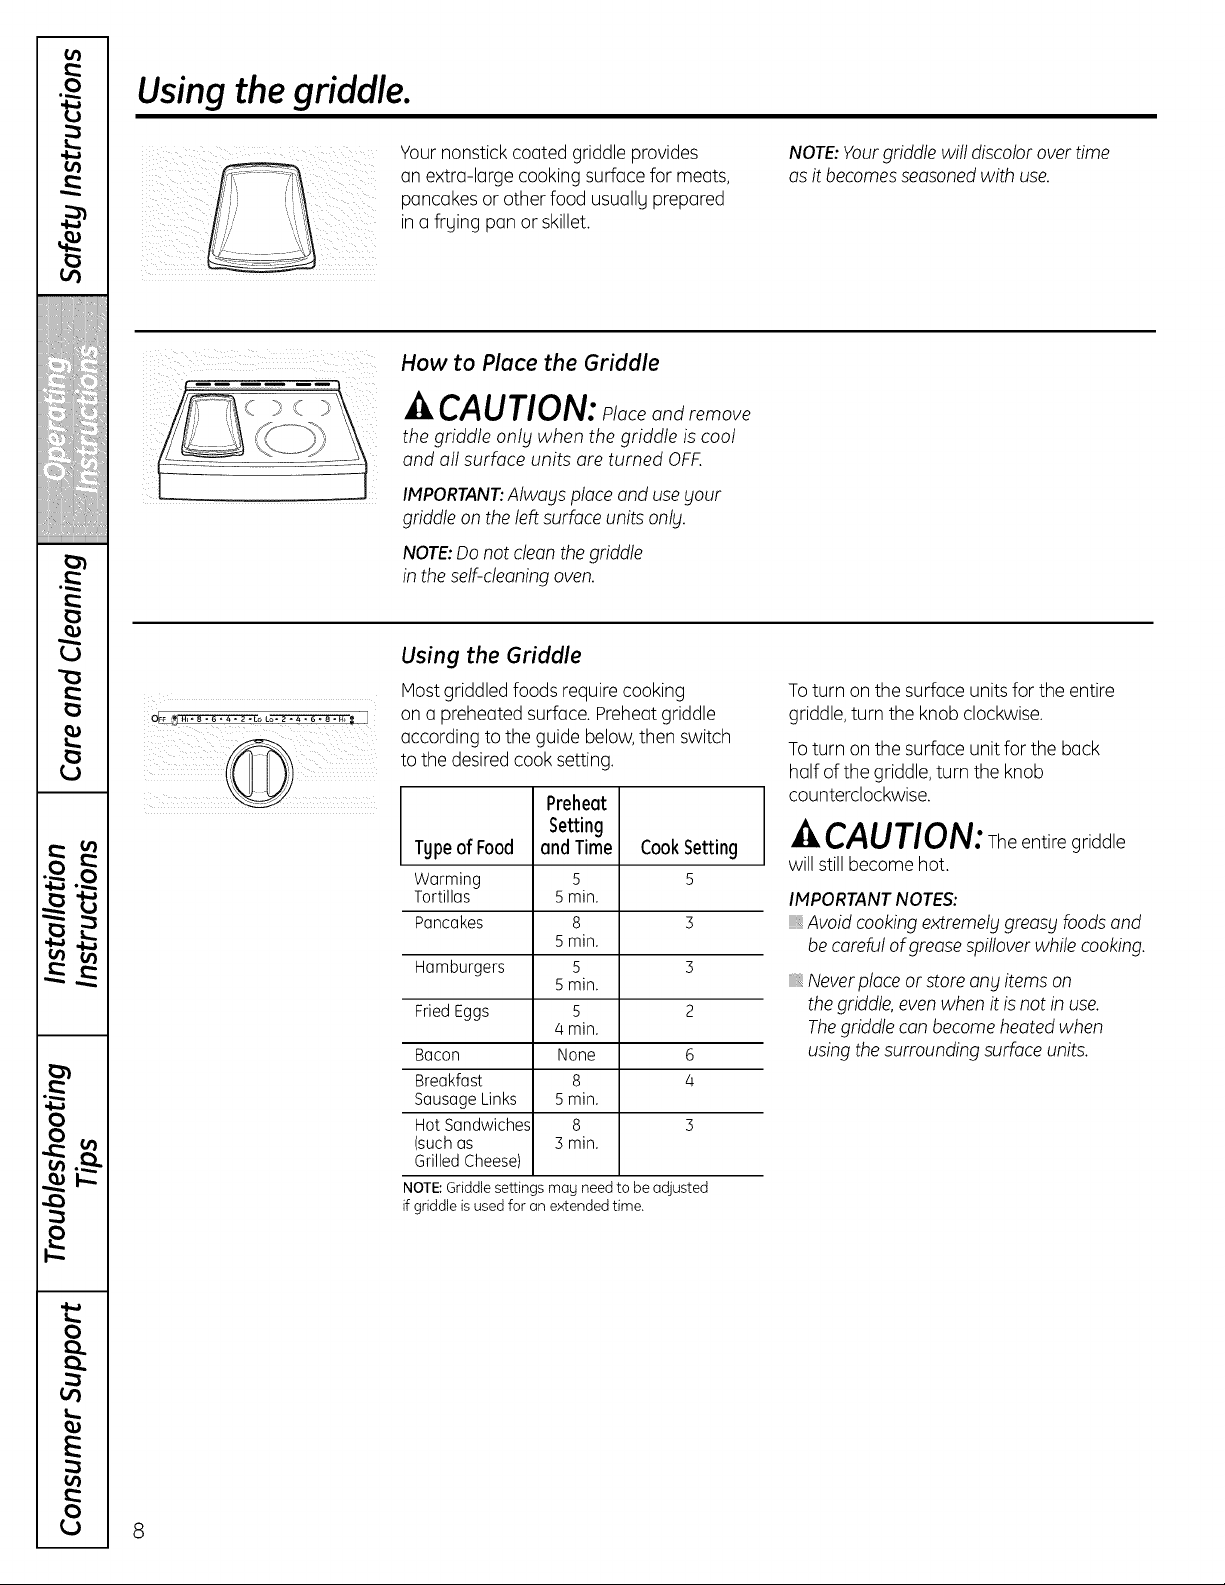
Usingthe griddle.
m
.w,,_
Q,}
"o
"0
k_
w
w • •
_l j I I't
o
_-. {Jl
£
Yournonstick coated griddle provides
an extra-large cookingsurface for meats,
NOTE:Yourgriddle will discolor overtime
asit becomesseasonedwith use.
pancakes or other food usuallg prepared
in a frging pan orskillet.
How to Place the Griddle
J
........... L0..... ,.... -,,-._ on a preheated surface. Preheatgriddle
v
CAUTION: placeandremove
the griddle only when the griddle is cool
and all surface units are turned OFF.
IMPORTANT:Alwags placeand useyour
griddle on the left surfaceunits only.
NOTE:Donot clean the griddle
in the self-cleaningoven.
Using the Griddle
Most griddled foods require cooking
according to the guide below,then switch
to the desired cook setting.
PreTeot
Setting
TgpeofFood and Time Cook Setting
Warming 5 5
Tortillas 5min.
Pancakes 8 3
Hamburgers S S
Fried Eggs 5 2
Bacon None 6
Breakfast 8 4
SausageLinks 5min.
Hot Sandwiches 8 S
(suchas 3 min.
Grilled Cheese)
NOTE:Griddle settings may need to be adjusted
if griddle isused for an extended time.
Smin.
Smin.
4min.
Toturn on the surfaceunits for the entire
griddle,turn the knob clockwise.
Toturn on the surfaceunit for the back
half of the griddle, turn the knob
counterclockwise.
CAUTION:Theentire griddle
will still become hot.
IMPORTANTNOTES:
_,Avoid cooking extremelggreasy foodsand
be careful of greasespillover while cooking.
Neverplace or store any itemson
the griddle,evenwhen it is not in use.
Thegriddle con becomeheated when
using thesurrounding surface units.
L)
s...
0
E
{11
0
8
Page 9
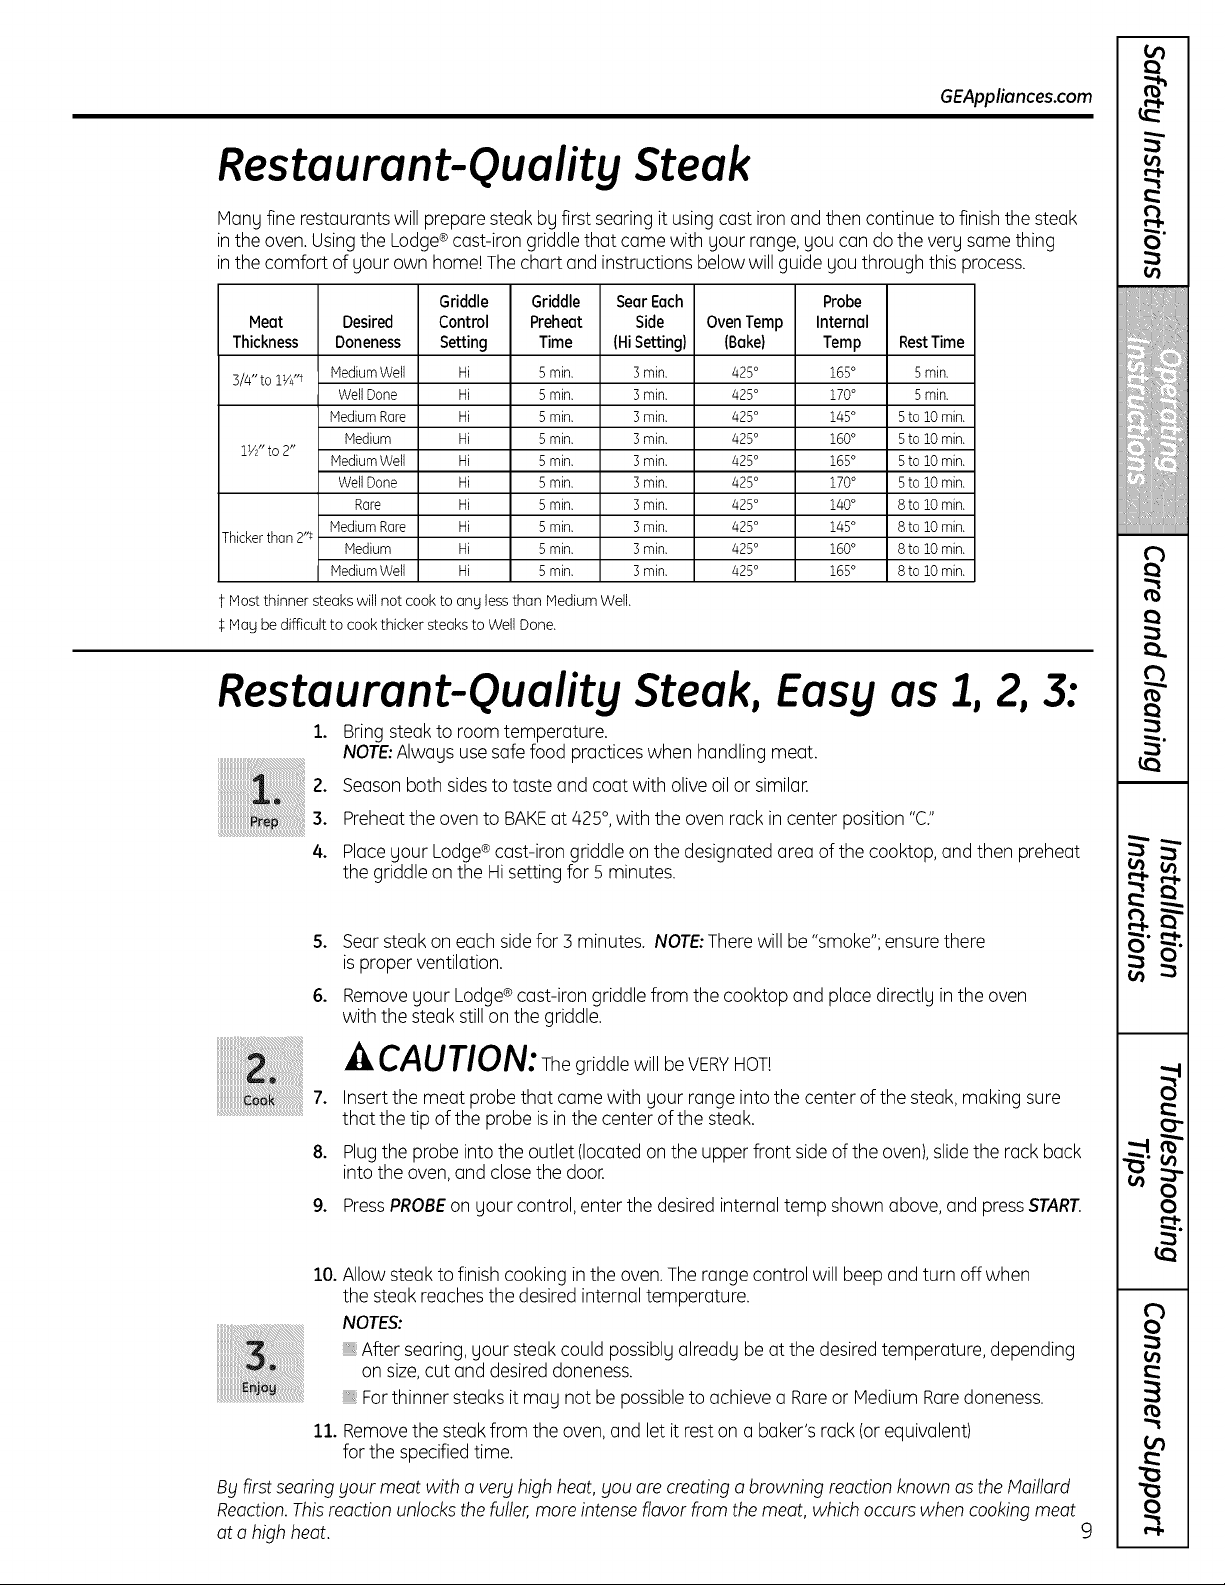
Restaurant-Quality Steak
i
GEAppliances.com
Many finerestaurants will prepare steak by first searing it usingcast iron and then continue to finish the steak
in the oven. Usingthe Lodge®cast-iron griddlethat came with your range, you can do the very samething
in the comfort of your own home! Thechart andinstructions below willguide you through this process.
Griddle Griddle Sear Each Probe
Meat Desired Control Preheat Side Oven Temp Internal
Thickness Doneness Setting Time (Hi Setting) (Bake) Temp Rest Time
3/4" to lY4"t Medium Well Hi 5 min. 3 min. 425° 165 ° 5 min.
1W' to 2"
Thicker than 2"_
Most thinner steaks will not cook to any lessthan Medium Well
$May be difficult to cook thicker steaks to Well Done
Well Done Hi 5 min. 3 min. 425° 170 ° 5 min.
Medium Rare Hi 5 min. 3 min. 425° 145 ° 5to 10 min.
Medium Hi 5 min. 3 min. 425° 160 ° 5to 10 min.
Medium Well Hi 5 min. 3 min. 425° 165 ° 5to 10 min.
Well Done Hi 5 min. 3 min. 425° 170 ° 5to 10 min.
Rare Hi 5 min. 3 min. 425° 140 ° 8 to 10 min.
Medium Rare Hi 5 min. 3 min. 425° 145 ° 8 to 10 min.
Medium Hi 5 min. 3 min. 425° 160 ° 8 to 10 min.
Medium Well Hi 5 min. 3 min. 425° 165 ° 8 to 10 min.
Restaurant-Quality Steak, Easy as 1, 2, 3:
1. Bringsteakto room temperature.
NOTE:Always usesafe food practiceswhen handling meat.
2. Seasonboth sidesto taste and coat with oliveoil or similar.
t_
or}
i
tb
to
5"
i
3. Preheatthe oven to BAKEat 425%with the oven rack incenter position "C."
4. Placeyour Lodge®cast-iron griddle on the designated area of the cooktop, and then preheat
the griddle onthe Hisetting for5 minutes.
5. Searsteak on each sidefor 3 minutes. NOTE:Therewill be "smoke"; ensure there
is proper ventilation.
6. Removeyour Lodge®cast-iron griddle from thecooktop and place directly inthe oven
with thesteak still on the griddle.
iiiiiiiiiiii!¸fill!i!¸I¸I¸i_il;!!!!!iiiiiiiiiiiiiiiiiiiiiiiiiiiiiiiiiii
A CAUTION:Thegriddle will beVERYHOT!
...............
BFfirst searingFour meat with a verFhigh heat,Fou are creatinga browning reactionknown asthe Maillard
Reaction.Thisreaction unlocksthe fuller,more intenseflavor from the meat, which occurswhen cookingmeat
at o highheat.
7. Insert the meat probe that come with your range into the center of the steak,making sure
that the tip of the probe isin the center of the steak.
8. Plugthe probe intothe outlet (locatedon the upper front side of the oven),slide the rock back
into the oven,and closethe door.
9. PressPROBEon your control, enter the desired internal temp shown above, and pressSTART.
10.
Allow steakto finish cookingin the oven.Therange control will beep and turn offwhen
the steak reaches the desiredinternal temperature.
NOTES:
After searing,your steak could possibly already be at the desiredtemperature, depending
on size,cut and desireddoneness.
Forthinner steaks it may not be possibleto achieve a Rareor Medium Raredoneness.
11.
Removethe steak from the oven, and let it reston a baker's rack (or equivalent)
for the specifiedtime.
A
w
w# A
0
0
to
0
Page 10
0
"o
"0
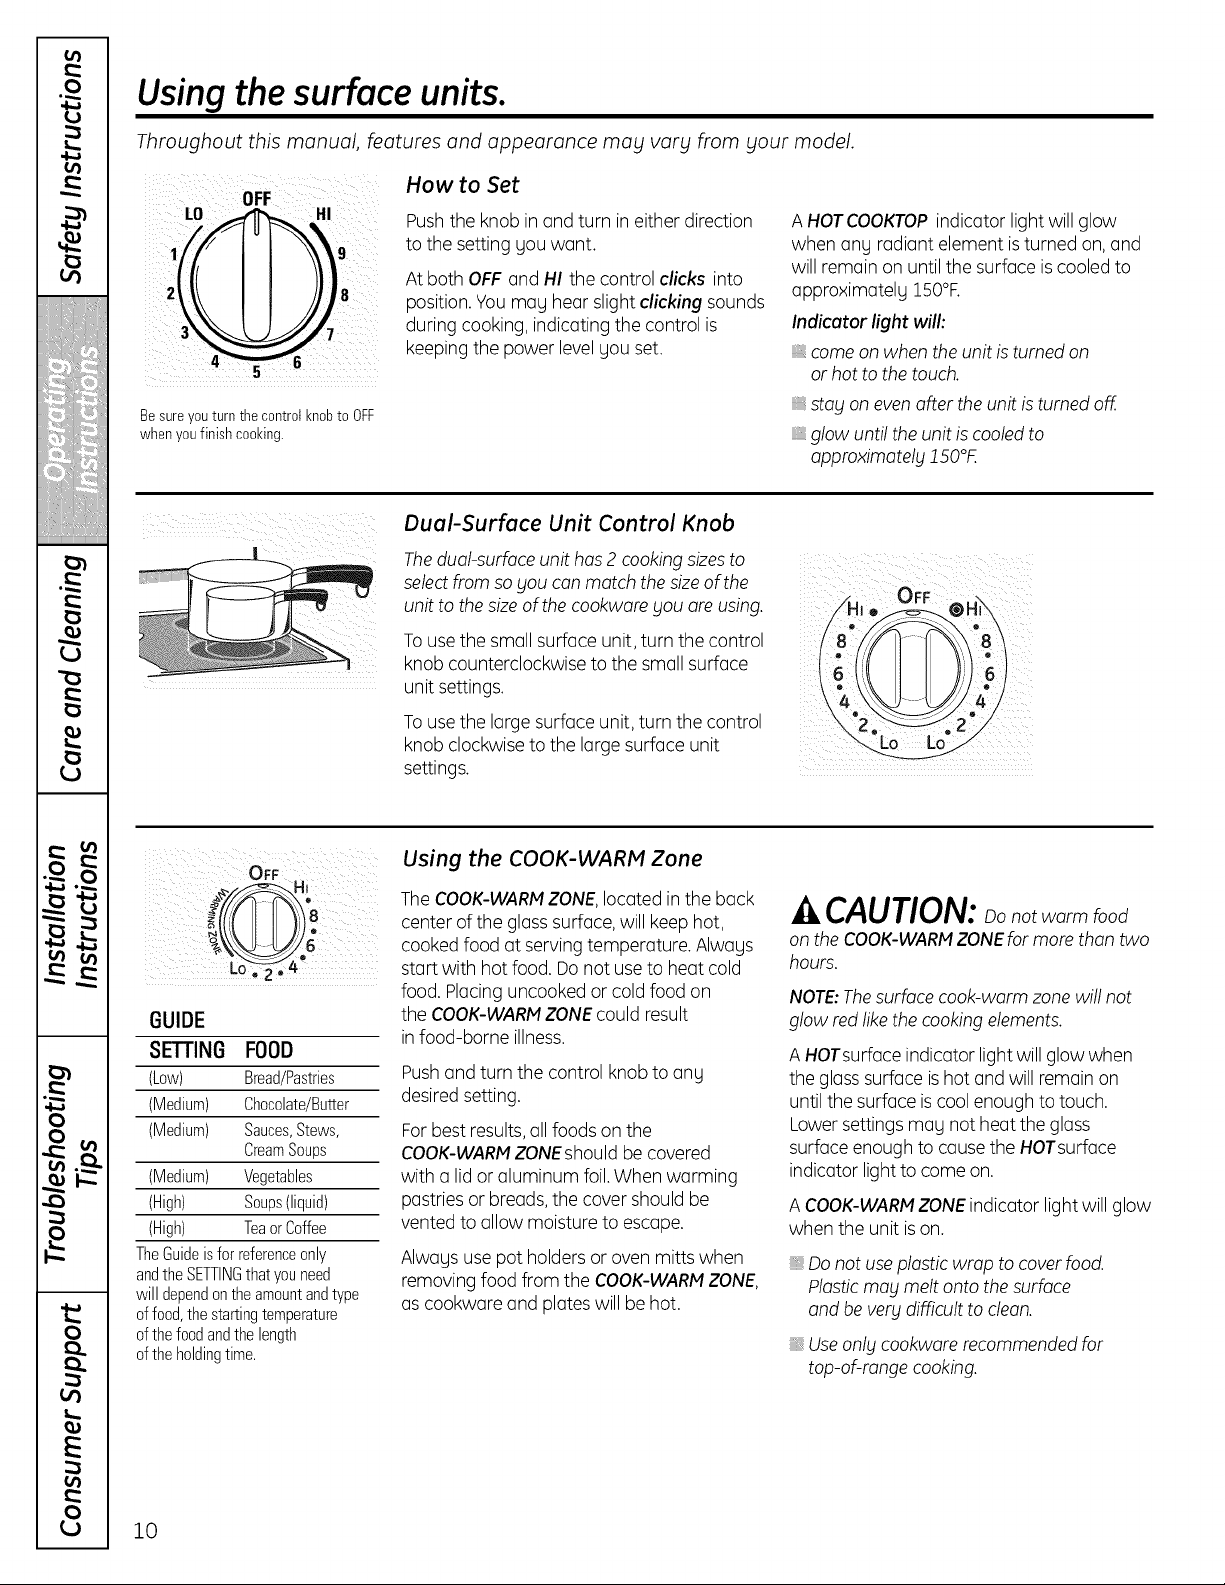
Using the surface units.
Throughout this manual, features and appearance may vary from your model.
How to Set
Besure youturnthe control knobto OFF
whenyoufinish cooking.
Pushthe knob in and turn in either direction
to the setting you want.
At both OFF and HI the control clicks into
position.Youmay hear slight clicking sounds
during cooking, indicating the control is
keepingthe power levelyou set.
Dual-Surface Unit Control Knob
Thedual-surfoce unit has2 cooking sizesto
selectfrom so gou canmatch thesizeof the OFF
unit to thesize ofthe cookware gou are using.
Tousethe smallsurface unit, turn the control
knob counterclockwise to the small surface
unit settings.
Tousethe largesurface unit, turn the control
knob clockwiseto the large surface unit
settings.
A HOTCOOKTOPindicator light will glow
when any radiant element isturned on,and
will remain on until thesurface iscooled to
approximatelg 150°R
Indicetor light will:
come on when theunit isturned on
or hot to the touch.
stag on evenafter the unit is turned off.
, glow until the unit is cooledto
approximatelg 150°F.
w
w • .
o
£
0
-_-,_ H
v
TheGuideisfor referenceonly
andtheSETTINGthat youneed
will dependontheamountandtype
offood,thestartingtemperature
ofthefoodandthelength
oftheholdingtime.
__,
LO, 2'
GUIDE
SETTING FOOD
(Low) Bread/Pastries
(Medium) Chocolate/Butter
(Medium) Sauces,Stews,
(Medium) Vegetables
(High) Soups(liquid)
(High) TeaorCoffee
OFF
CreamSoups
Using the COOK-WARM Zone
TheCOOK-WARM ZONE,located inthe back
center of the glass surface,will keephot,
cooked food at serving temperature. Always
start with hot food. Donot useto heat cold
food. Placinguncooked or coldfood on
the COOK-WARMZONEcould result
in food-borne illness.
Pushand turn the control knob to ang
desiredsetting.
Forbest results,all foodson the
COOK-WARMZONEshould be covered
with a lid or aluminum foil.When warming
pastries or breads, the cover should be
vented to allow moistureto escape.
Always use pot holders or oven mitts when
removing food from the COOK-WARMZONE,
as cookware and plateswill be hot.
CAUTION: notwarm food
on the COOK-WARMZONEfor more than two
hours.
NOTE:Thesurfacecook-warm zonewill not
glow redlikethe cooking elements.
A HOTsurface indicator light willglow when
the glass surface is hot and will remain on
until the surface is cool enough to touch.
Lowersettings mag not heat the glass
surface enough to causethe HOTsurface
indicator light to come on.
A COOK-WARMZONEindicator lightwill glow
when the unit ison.
_,Donot useplasticwrap to coverfood.
Plasticmag melt onto the surface
and be vergdifficult to clean.
Useonlg cookware recommendedfor
top-of-range cooking.
E
0
10
Page 11
Throughout this manual, features and appearance may vary from your model.
Temperature Limiter
Ill
GEAppliances.com
Every radiant surface unit has o temperature
Iimiter.
Thetemperature limiter protects the glass
cooktop from getting too hot.
Home Canning Tips
Besurethe conner iscentered over
the surface unit.
Make sure the conner is flat onthe bottom.
To prevent burns from steam or heat,
usecaution when conning.
Wok Cooking
Werecommend that _lOUuse onl_l
a fiat-bottomed wok. They are available
at your local retail store.
Do not usewoks that hovesupport rings.
Thetemperature limiter may cycle the units
off for o time if:
The pan boils drg.
The pan bottom is not fiat.
The pan is off-center.
There is no pan on the unit.
Userecipesand proceduresfrom
reputablesources.Theseareavailablefrom
manufacturerssuchasBoll® and Kerr® and
theDepartmentofAgricultureExtension
Service.
Fiat-bottomed conners ore recommended.
Useof water both connerswith rippled
bottoms may extend the time required
to bring the water to o boil.
Donot useround bottom woks.Youcouldbe
seriouslyburned if the wok tipped over.
to
5"
i
_J IPI
Useonly fiat-bottomedwoks.
A
w
ir_
w# A
0
tO
0")
0
LQ
11
0
Page 12

0
t_
m
Using the surface units.
The following information will help you choose cookware which will give good performance on glass cooktops.
About the rodiont surfoce units...
URFACE
;OOKJN6
beneatha smoothglasssurface.
Thrdncooopfurhngun
cooktop isusedfor the first time. It is caused
NOTE:A slightodor isnormal when a new
Nevercookdirectl onthe glass.
Always usecookware.
Alwaysplacethe panin thecenter
ofthe surfaceunityouarecookingon.
bytheheatingofnew_artsandinsulating
materials and will disappear in a shorttime.
NOTE:Onmodels with light-coloredglass
cooktops,it is normal for the cookingzones to
change colorwhen hot or cooling down.This
istemporary andwill disappearasthe glass
cools to room temperature.
Thesurface unit will cycle on and offto
maintain your selected control setting.
It is safe to place hot cookware on the glass
surface even when the cooktop is cool.
Evenafter the surface units areturned off,
the gloss cooktop retains enough heat to
continue cooking. To ovoid overcooking,
remove pans from the surface units when
the food iscooked.Avoid placing anything
on the surface unit until it hascooled
completely.
rj;;[ .....
Donot slide cookwareacrossthe cooktop
becauseit can scratch theglass-the gloss
isscratch-resistant,not scratchproof
Water stains (mineraldeposits)are
removableusing thecleaning cream
or full-strength white vinegar.
Useof window cleanermaF leavean
iridescentfilm on the cooktop. Thecleaning
cream will removethis discoloration.
Don'tstore heavy itemsabove thecooktop.
If theg drop onto the cooktop,theg can
causedamage.
_,Do not use the surface as a cutting board.
uz
w
v
o
£
0
E
0
12
Page 13
Selectingtypesofcookware.
GEAppliances.com
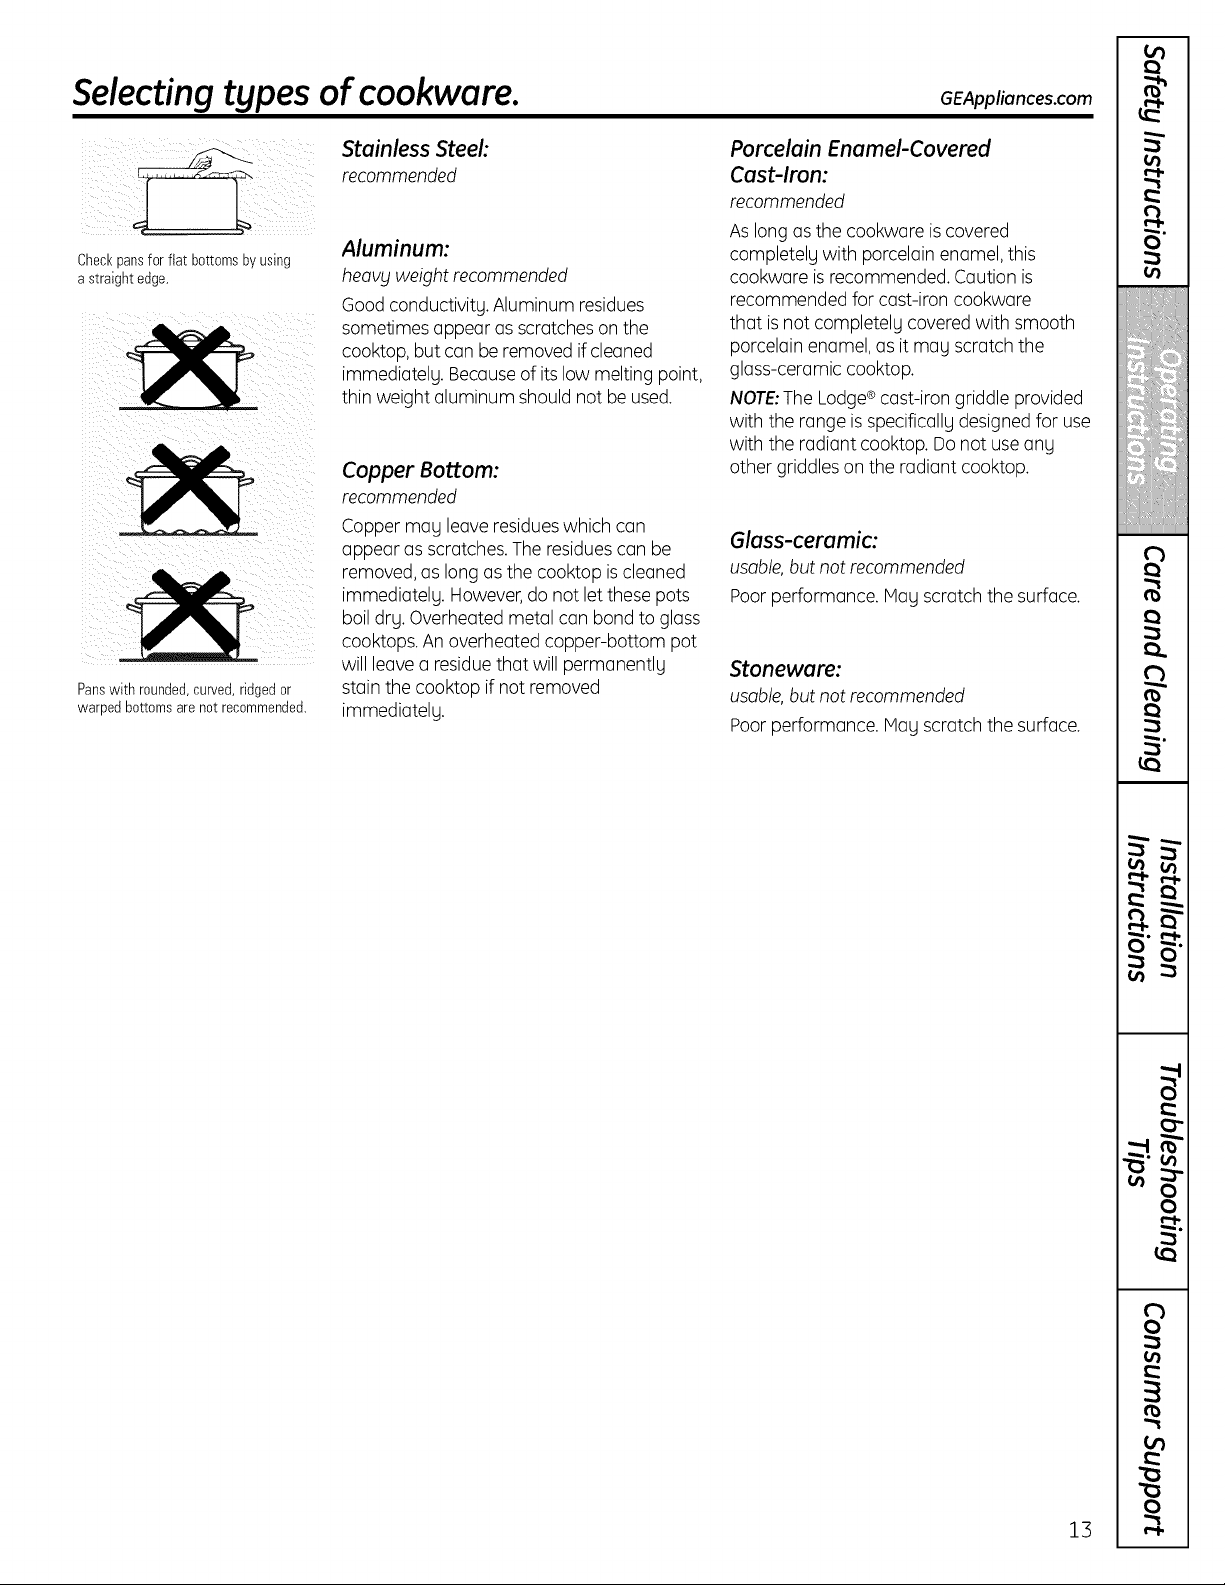
Checkpansfor flat bottomsbyusing
a straight edge.
Panswith rounded,curved,ridgedor
warpedbottomsarenot recommended.
Stainless Steel:
recommended
Aluminum:
heavgweight recommended
Good conductivitg. Aluminum residues
sometimes appear as scratches on the
cooktop, but can be removed if cleaned
immediatelg. Because of its low melting point,
thin weight aluminum should not be used.
Copper Bottom:
recommended
Coppermag leaveresidueswhich can
appear as scratches.The residuescan be
removed,as long as the cooktop iscleaned
immediatelg. However,do not let these pots
boil drg. Overheated metal can bond to glass
cooktops.An overheated copper-bottom pot
will leavea residuethat will permanentlg
stain the cooktop if not removed
immediatelg.
Porcelain Enamel-Covered
Cast-Iron:
recommended
As long as the cookware is covered
completelg with porcelain enamel, this
cookware is recommended. Caution is
recommended for cast-iron cookware
that is not completelg covered with smooth
porcelainenamel, as it mag scratch the
glass-ceramic cooktop.
NOTE:TheLodge®cast-iron griddle provided
with the range isspecificallg designedfor use
with the radiant cooktop. Do not useany
other griddleson the radiant cooktop.
Glass-ceramic:
usable, but not recommended
Poor performance. Hag scratch the surface.
Stoneware:
usable,but not recommended
Poorperformance. Hag scratch the surface.
t_
ca
<b
to
5"
VJ IPI
A
w
ir_
w# A
tb
0
to
0
13
0
Page 14

0
Using the upper ovencontrols.
(Throughout this manual, features and appearance mabl varbl from blour model.)
o + e
OVEN CONTROLS TiME CONTROLS
Features and appearance may vary.
Oven Control, Clock, Timer and Features
Q,I
"o
"0
w
w • .
_l j I I't
o
_-. {Jl
s...
0
E
{11
0
L)
BAKEPad
Touchto selectthe bakefunction.
BROILHI/LOPad
Touchto selectthe broilfunction.
CONVECTIONBAKEMULTI/1RACKPad
Touchto selectbaking with the convection
function.
CONVECTIONROASTPad
Touchto selectroastingwith the convection
function.
v
14
STARTPad
Mustbetouched to start any cookingor
cleaningfunction.
Disp!a_l
Showsthe time of dau, oventemperature, v
whether the oven is inthe bake,broil
or self-cleaningmode,thetimessetfor
thetimer orautomatic ovenoperations,
and if the range islocked.
SELF-CLEANPad
Touchto selectself-cleaningfunction.
Seethe Usingtheself-cleaningovensection.
If "F-" and a number or letterflash in thedisplag V
and the ovencontrolsignals,thisindicates a
function errorcode.TouchtheCLEAR/OFFpad.Allow
theoventocoolforonehour.Puttheovenbackinto
operation.If thefunctionerrorcoderepeats,disconnect
thepowerto theovenand callforservice. _j
If gour ovenwasset for utimed ovenoperation
and a power outageoccurred,theclockand all
programmedfunctionsmustbereset.
Thetime of dug will flash in thedisplay when there
has beena power outage.
OVENLIGHTPad
Touchto turn theovenlighton or off.
DELAYSTARTPad
Usealongwith COOKINGTIMEorSELF
CLEANpadsto set theovento startand
stop outomoticollUat o time Uouset.
COOKINGTIMEPad
0
Touchand thentouchthenumberpadsto set
the amount of time gouwant gourfood to
cook.Theovenwillshut offwhenthe cooking
time has run out.
CLEAR/OFFPad
Touchto cancelALL upperovenoperations
excepttheclock,timer and RangeLockout.
CLOCKPad
Touchbeforesettingthe clock.
Number Pads
Usetoset anUfunctionrequiringnumbers
suchasthe time ofdaUon the clock,the
timer,the oven temperature,the internalfood
temperature,the starttime andlengthof
operationfortimed bakingand self-cleaning.
KITCHENTIMERON/OFFPad
Touchto selectthetimer feature.
PROBEPad
Touchwhen usingthe probeto cookfood.
RANGELOCKOUTPad
Touchthe RANGELOCKOUTpadand then
touch the STARTpadto lock/unlockthesurface
units,oven burnersand controlpanelso theU
cannot/can beactivated.
Page 15

Using the upper oven.
To avoid possible burns, place the racks in the desired position before you turn the oven on.
Before you begin...
Therocks hovestop-locks, so that when
placed correctly on the supports, they will
stop before coming completely out and
will not tilt.
When placing and removing cookwore,
pull the rock outto the bump on the rock
support.
Theovenhas 5rackpositions.
It also hasaspecial low rack position(R)
for extra largeitems,suchas a large
turkey.
Toremove e reck, pullit toward you,
tilt thefront end up and pull itout.
Toreplece, placethe end of the rock
(stop-locks)on the support, tilt upthe front
and push the rock in.
NOTE:The rack is not designed to slide out
at the special low rack (R)position.
GEAppliances.com
t_
HHiiiiii__JH_"_,,i_,',iiiiii_+i_:_,_'+,,+,
Plasticitems onthe cooktopmaymelt
if left too closeto thevent.
Ventappearanceand locationvary.
Upper Oven Vent
Youroven isvented through ducts at the rear
of the range. Do not block these ducts when
cooking in the oven-it is important that
the flow of hotair from the oven and fresh
air to the oven burner be uninterrupted.
Avoidtouching the vent openings or nearby
surfaces during oven or broiler operation-
they may become hot.
Upper Oven Light
Touchthe OVENLIGHTpad to turn the light
on or off.
_,Handles ofpots andpans on the cooktop
mog becomehot ifleft too closeto the vent.
Do not leave plastic items on the cooktop-
theg mog melt ifleft too close to the vent.
Do not leave ong items on the cooktop. The
hot airfrom the vent mog ignite flammable
items and will increase pressure in dosed
containers, which mog cause them to burst.
Metal items willbecome verg hot iftheg are
left on the cooktop, and could cause burns.
r_
to
5"
litil I_I
A
w
i::::
15
ll.i ,_
w# A
0
to
0
0
Page 16
0
It,
Using the upper oven.
m
Q,!
"o
"0
w
w • •
_l j I I't
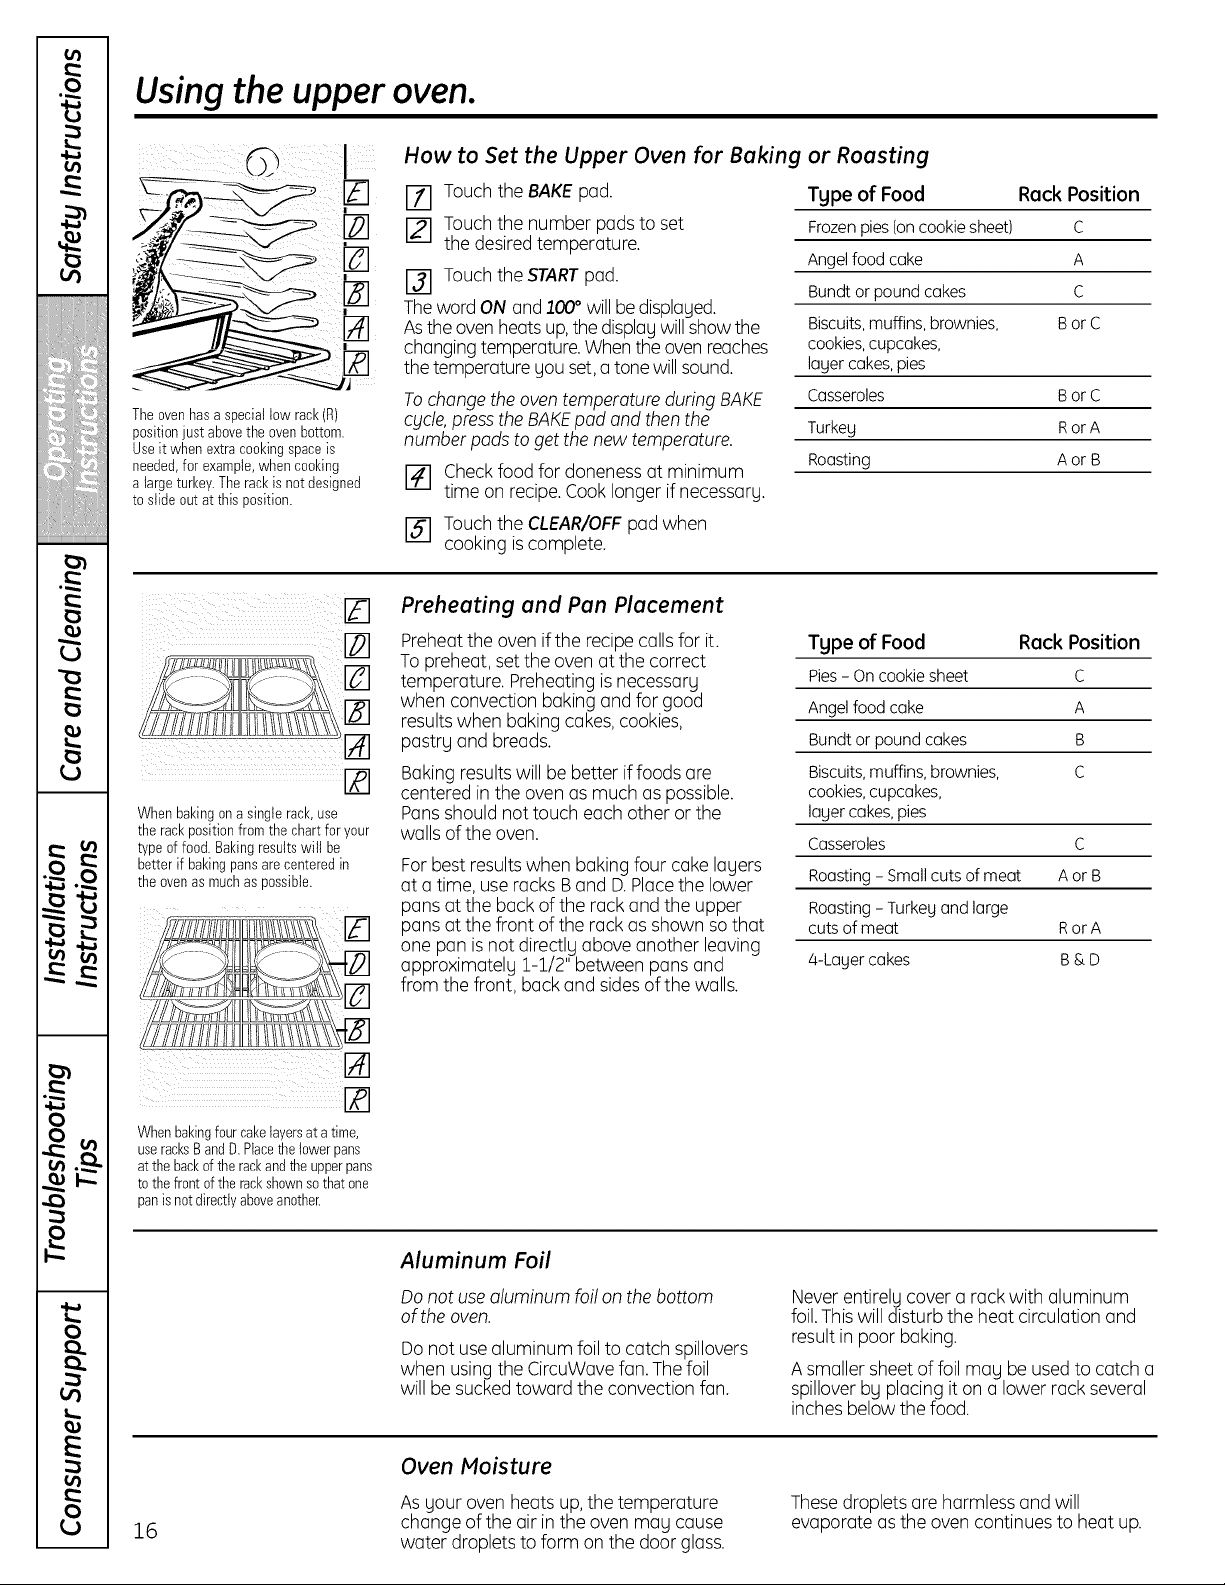
Theovenhasa speciallow rack(R)
positionjust abovethe ovenbottom.
Useit when extracookingspaceis
needed,for example,whencooking
a largeturkey.Therackis notdesigned
toslide out at this position.
When bakingon asingle rack,use
the rackpositionfromthe chartfor your
type offood. Bakingresultswill be
betterif bakingpansare centeredin
the ovenasmuchas possible.
v
How to Set the Upper Oven for Baking
r-_ Touch the BAKEpad.
[] Touch the number padsto set
the desiredtemperature.
[] Touch the STARTpad.
Theword ON and1OO° will be displayed.
Asthe ovenheatsup,thedisplay willshow the
changingtemperature.Whenthe ovenreaches
the temperature you set, atone willsound.
Tochange the oven temperature during BAKE
cycle,press the BAKEpad and then the
number pads toget the new temperature.
r-_ Checkfood for doneness at minimum
time onrecipe.Cook longer ifnecessary.
[] Touch the CLEAR/OFFpod when
cooking is complete.
Preheating and Pan Placement
Preheatthe oven if the recipecallsfor it.
To preheat, set the oven at the correct
temperature. Preheatingisnecessary
when convection baking and for good
resultswhen baking cakes,cookies,
pastry and breads.
Baking resultswill be better if foodsare
centered in the oven as much aspossible.
Pansshould not touch each other or the
walls of theoven.
For best results when baking four coke lagers
at o time, use rocks Band D.Placethe lower
pans otthe back of the rock and the upper
pans at the front of the rack as shown sothat
one pan is not directly above another leaving
approximately 1-$/2" between pans and
from thefront, back and sidesofthe walls.
or Roasting
Tgpe of Food Rack Position
Frozenpies(oncookiesheet) C
Angelfood cake A
Bundtorpoundcakes C
Biscuits, muffins, brownies, BorC
cookies,cupcakes,
layercakes,pies
Casseroles BorC
Turkey RorA
Roasting Aor B
Tgpe of Food Rack Position
Pies - On cookie sheet C
Angelfoodcake A
Bundtorpoundcakes B
Biscuits,muffins,brownies, C
cookies,cupcakes,
layercakes,pies
Casseroles C
Roasting - Small cuts of meat A or B
Roasting - Turkey and large
cuts of meat Ror A
/4-Lager cakes B & D
o
_-. {Jl
£
s...
0
E
{11
0
L)
Whenbakingfourcakelayersat atime,
useracksB andD.Placethe lowerpans
atthe backoftherackandthe upperpans
to thefront ofthe rackshownsothat one
panisnotdirectlyaboveanother.
16
Aluminum Foil
Donot use aluminum foilon the bottom
of the oven.
Do not usealuminum foil to catch spillovers
when usingthe CircuWavefan.Thefoil
will be suckedtoward the convection fan.
Oven Moisture
Asyour oven heats up, the temperature
change of the air in the oven may cause
water dropletsto form on the door glass.
Neverentirely covera rackwith aluminum
foil.Thiswill disturb the heat circulation and
result in poor baking.
A smaller sheet of foil may beusedto catch o
spillover by placing it on o lower rockseveral
inches below the food.
Thesedroplets ore harmless and will
evaporate as the oven continues to heat up.
Page 17
How to Set the Upper Oven for Broiling--Close the oven door
i
GEAppliances.com
Placethe meat or fish on abroiler grid
I-il in a broiler pan.
[] Followsuggested rack positionsin
the BroilingGuide.
[_] The oven door must be closed during
Closethedoor.Alwaysbroilwith
the doorclosed.
NOTE:Broilwilt notwork if the
temperatureprobeis pluggedin.
broiling.
r-_ Touch the BROILHI/LO padonce for
HI Broil.
To change to LOBroil, touch
the BROIL HI/LO pad again.
Broiling Guide
Thesize,weight,thickness,
startingtemperatureandyour Food
preferenceofdonenesswillaffect
broilingtimes.Thisguideisbased
onmeatsatrefrigerator
temperature.
tThe U.S. Department of Agriculture Medium
sags "Rare beef is popular, but you Well Done
should know that cooking it to only Rarer
140°F means some food poisoning Medium
organisms may survive." (Source: Well Done
Safe Food Book Your Kitchen Chicken
Guide. USDA Rev. June 1985.)
Ground Beef
Beef Steaks
Rarer
BokergProduct
Bread(toast)
EnglishMuffin
Lobster Tails
Fish Fillets
Salmon
Steaks
Fillets
Hum Slices
(precooked)
Pork Chops
WellDone
Ouantitg and/
or Thickness
1 lb.(4 putties)
1/{' to 3/4"thick
4 Ibs.(16 putties)
+/#' to 1" thick
1 to 1V2 Ibs.
i whole cut up
2to 2V2Ibs.,
split lengthwise
Breast
2to 4 slices
2(split)
2-4
1 lb.(VJ' to b" thick)
2(1" thick)
2(V2"to s/4"thick)
V2"thick
1" thick
2(Y2"thick)
2(1" thick) about 1lb.
Rack
Position
E
D
D
C
C
D
B
B
D
E
B
D
D
C
C
C
C
[] Touchthe STARTpad.
NOTE:Thedisplay will always automatically
remind you to close thedoor.
_] When broilingis finished,touch
the CLEAR/OFFpad.
Servethe food immediately, and leave
the pan outsidethe ovento cool during
the meal for easiestcleaning.
UseLO Broil to cook foods suchas poultry
or thick cuts of meat thoroughly without
over-browning them.
First Side
Time(min.)
13
15
6
8
iO
iO
15
2O
25
25
3
3-4
18-20
i0
i0
6
8
i0
15
SecondSide
Time (min.)
11
4
6
8
8
10-12
2O
25
15
1
Do not
turn
oveE
6
8
10
15
Comments
Spaceevenly.
Steakslessthan 3A"thick
aredifficultto cook rare.
Slashfat.
Brusheach sidewith
melted butter.
Broilskin-side-down first.
Spaceevenly. PlaceEnglish
muffinscut-side-up and
brush with butter ifdesired.
Cutthrough back ofshell.
Spreadopen. Brushwith
melted butter before
broilingand after half
of broiling time.
Handleand turn very
carefully. Brushwith
lemon butter before
andduring cooking,
if desired.
Turncarefully. Donot
turn skin side down.
Slashfat.
HH_m__P_'_,,_,,,m_m_:>_<'_'_',,_,,,
i
to
5"
i
I,_l IPi
I",t1
A
w
w# A
0
LQ
tb
0
17
tO
0
Page 18

0
13
Using the clockand timer.
Not all features are on all models.
ToSet the Clock
m
"o
"0
L,}
w
w • •
_l j I I't
Makesure theclock isset to thecorrect
time ofday.
Thetimer isa minutetimer only.
TheCLEAR/0FFpaddoesnotaffect
thetimer.
v
¸
Theclock must be set to the correct time
of dag for the automatic oven timing
functions to work properlg.Thetime of dug
cannot be changed during a timed baking
or self-cleaningcgcle.
E_] Touchthe CLOCKpod.
[] Touch the number pods.
Touch the number pods the somewou gou
read them. For example, to set 12:34,touch
the number podsl, 2,3 and4 inthat order.
If number pods ore not touched within
one minute offer you touch the CLOCKpod,
the display revertsto the original setting.
If this happens,touch the CLOCKpod
and reenter the time of day.
[_] Touchthe STARTpod until the time
of dou shows in the displou.This enters
the time and starts the clock.
Tocheck the time of dog when the displog
isshowing other informotion,simplg touch
the CLOCKpod. Thetime of doy shows until
onother pod is touched.
To Set the Timer
Thetimer doesnot controloven operations.
Themaximum setting on the timer is9 hours
and 59 minutes.
Touch the KITCHENTIMERON/OFF pad.
%
Touch the number pads until the
amount of time you want shows in
the display.The maximum number
of minutes that can beentered is60.
Toset additional time, you will need
to setit by hours and minutes.
Forexample,to enter 1 hour and
30 minutes, touch 1,3 and 0 in
that order.
Ifyou make o mistake,pressthe KITCHEN
TIMERON/OFFpod and begin again.
Touch the STARTpad.After pressing
%
the STARTpad,SETdisappears;this tells
you the time iscounting down, although
the displaydoes not change until one
minute has passed.
When the timer reaches:00, the control
[]
will beep3 times followed by onebeep
every 6 seconds until the KITCHEN
TIMERON/OFFpad istouched.
The6-secondtone con be conceledby
following the steps in the Speciolfeotures
ofyour upperoven control sectionunder
Tonesot the Endo1:oTimedCycle.
o
_-. {Jl
£
s...
0
E
{11
0
L)
18
To Reset the Timer
Ifthe disploy is still showing the time
remaining, you may change it by touching
the KITCHEN TIMER ON/OFF pad; then touch
the number pads until the time you want
appears in the display.
To Cancel the Timer
Touch the KITCHENTIMERON/OFF pad twice.
Power Outage
Ira flashingtime is in the display,you hove
experiencedo power failure.Resettheclock.
If the remaining time isnot inthe display
(clock,delay start orcooking time are in
the display),recallthe remaining time by
touching the KITCHENTIMERON/OFF pad
and then touching the number pads to enter
the new time you want.
To resetthe clock,touch the CLOCKpad.
Enterthe correct time of day by touching
the appropriate number pads.Touch the
STARTpad.
Page 19

Usingthe timed baking and
roasting features(upperovenonlyL
NOTE: Foods that spoil easily-such as milk, eggs, fish, stuffings, poultry and porkishould not be allowed to sit for
more than 1hour before or after cooking. Room temperature promotes the growth of harmful bacteria. Be sure that
the oven light is off because heat from the bulb will speed harmful bacteria growth.
How to Set an Immediate Start and Automatic Stop
io ¸¸0¸¸¸®0/0:
@ ®@ ® @
@® @ ® ®
@® ® ® @
The upper oven willturn on immediately and
cook for o selected length of time. At the end
of the cooking time, the oven willturn off
automaticallg.
1-71Touch the BAKEpad.
[] Usingthe number pads,enter
the desiredtemperature.
r-_ Touch the COOKING TIME pad.
NOTE:If gout recipe requires preheating, gou
mag need to odd additional time to the length
of the cooking time.
Usingthe number pads,enter
[]
the desiredbaking time. The oven
temperature and the cooking time
that you entered will bedisplayed.
r51 Touch the START pad.
Theword ON and 100° will bedisplayed.
Thecook time will begin to count down.
Asthe oven heats up,the display will show
the changing temperature. When the oven
reaches the temperature you set, 3beeps
will sound.
Atthe endof timed baking,the ovenwill turn
off.Theend of cycle tone will sound.
Touchthe CLEAR/OFFpadto clear
the display.
GEAppliances.com
t_
e,,i.
q
q
to
q
@®®@@
@®@®@
@
®®®@@
®®®®@
@
®@®@@
@®@®@
@
@
How to Set a Delayed Start and Automatic Stop
You can set the upper oven control
to delag-start the oven, cook for o specific
length of time and then turn off automaticallg.
Make sure the clock shows the correct
time of day.
[Z] Touch the BAKE pad.
Usingthe number pads,enter
the desiredtemperature.
F3] Touch the COOKINGTIMEpad.
NOTE:If gout recipe requires preheating, gou
mag need to odd additional time to the length
of the cooking time.
r-_ using the number pads,enter
the desiredbaking time.
[] Touch the DELAVSTARTpad.
F61 using the number pads,enter the time
of day you want the ovento turn on
and start cooking.
[] Touch the STARTpad.
If you would like to checkthe times
you have set,touch the DELAVSTARTpad
to check the start time you have set or touch
the COOKINGTIME pad to checkthe length
of cooking time you have set.
Theovenwill turn on automatically.
Theword ON and 100° will be displayed.
Thecook time will beginto count down.
Asthe oven heats up,the display will show
the changing temperature. The oven will cook
for the programmed cooking time and shut
off automatically.
At the end oftimed baking,the ovenwill
turn off.The end of cycletone will sound.
Touchthe CLEAR/OFFpadto clear
the display.
5"
_J IPI
A
w
ir_
w# A
0
0
NOTE:An attention tone will sound ifgou ore
using timed baking and do not touch the
STARTpod offer entering the baking
temperature.
to
0
19
Page 20

0
Usingthe probe.
It,
For mang foods, especially roasts and poultrg, internal food temperature is the best test for doneness.
The temperature probe takes the guesswork out of roasting bg cooking foods to the exact doneness gou want.
Useof probesother than theone providedwith _%,_ cable
this productmag resultindamage to theprobe. Plug(())
€,n
inserting and removing them from the food
Usethe handlesof the probe and plugwhen -If l_r/b_
and outlet.
Toavoiddamaging Fourprobe, do not use
tongs to pull on the cable when removing it. Neverleaveyour probe insidethe oven
Toavoid breaking the probe,make surefood
Thetemperatureprobehasa skewer-like
probeat oneendanda plug at the other
endthat goesinto the outlet inthe oven.
i
iscompletelgdefrostedbefore inserting. , Donot storethe probe in the oven.
_,Toprevent possibleburns, do not unplug
theprobe from the outlet until theoven
hascooled.
during a self-cleaningcgcle.
ol,,_
"o
"0
w
w • •
_l j I I't
o
_-. {Jl
£
s...
0
E
{11
0
L)
After preparing the meat and placing
iton atrivet or on a broiler pan grid,
follow these directionsfor proper probe
placement.
Insertthe probecompletely into the meat.
It should not touch the bone,fat or gristle.
v
®@®®@
®®@® ®
® ®®
20
How to Set the Upper Oven For Roasting When Using the Probe
17-1 Insert the probe into the food.
Plugthe probe into the outlet
[] inthe oven. Makesure it's pushed
all the wau in. Closethe oven door.
Touch the PROBEpad.
Touch the number pads
to setthe desired internal food
or meat temperature.
Touch the BAKEpad.
Touch the number pads to set
the desiredoven temperature.
IZ] Touchthe STARTpad.
Thedisplag will flash ifthe probe is inserted
into theoutlet andgou havenot set a probe
temperature andtouched the STARTpod.
After the internal temperature ofthe food
reaches lO0°F,the changing internal
temperature will be shown inthe display.
Forroastswith no bone,insert the probeinto
the meatiest part of the roast. Forbone-in
ham or lamb, insert the probe intothe center
of the lowest large muscle.
Insertthe probe into the center of dishes
such as meat loaf or casseroles.
Insertthe probe into the meatiest part of the
inner thigh from below and parallelto the leg
of a whole turkeg.
I_] When the internal temperature of the
food reaches the number Uou have set,
the probe andthe oven turn off andthe
oven control signals.Tostop the signal,
touch the CLEAR/OFFpad.Usehot pads
to remove the probe from the food.
Donot usetongs to pull on it-they
might damage it.
Tochange the oventemperature during
the Roastcycle, touch the BAKEpad and
then the number pads to set the new
temperature.
If the probe isremoved from the food
beforethe final temperature is reached,
a tonewillsound and thedisplag willflash
until the probe isremoved from the oven.
_,Youcan usethe timer eventhough gou
cannot use timed oven operations while
using theprobe.
Page 21

Usingthe convectionoven. GEAppliances.com
The convection oven fun shuts off when the oven door isopened. DONOTleove the door open for long periods of time
while using convection cooking.
Ina convectionoven,a fancirculates
hotair over,underandaroundthefood.
This circulatinghotair is evenly
distributedthroughoutthe ovencavity.
Asa result, foodsareevenlycooked
andbrowned--often inbesstime than
with regularheat.
NOTE:Tomaximizecookingevenness,
thefan is designedto rotate inboth
directionswith a pausein between.
This is normal.
Tohelp you understand the difference
between convection bake and roastand
traditional bakeand roast, here are some
general guidelines.
Convection Bake
Preheat the oven. See Preheating and Pan
Placement in the Using the upper oven
section.
Ideal forfoods cooked on multiple rocks.
Good for large quantities of baked foods.
Good results with cookies, biscuits,
brownies, cupcakes, cream puffs,
sweet rolls,angel food cake and bread.
The convection fan circulates the heated
air evenly over and around the food.
Convection Roast
Good for large tender cuts of meat,
uncovered.
Theconvection fan circulates the heated air
evenly over and around the food. Meat and
poultry are browned on oil sidesas if they
were cooked on o rotisserie. Heated air will
be circulated over,under and around the
food being roasted.Theheated air sealsin
juices quicklyfor o moist and tenderproduct
while, at the sametime, creatingo rich
golden brown exterior.
Roasts or poultry should be cooked on rack
position (A).
When you are convection roasting,it is
important that you useo broilerpan andgrid
for bestconvection roasting results.The pan
isusedto catch grease spillsand the grid is
usedto prevent greasespatters.
_,Placethe rack in rack position (A).
HH++++++__p'_,,+_,',++++++_++_:_,_'+,,+,
to
5"
VJ IPI
A
Cookware for Convection Cooking
Beforeusing your convection oven,check
to see ifyour cookwore leavesroom for air
circulation inthe oven. If you are baking with
several pans,leave space between them.
Also,be surethe pans do not touch each
other orthe walls of the oven.
Paper and Plastic
Heat-resistant paper and plastic containers
that are recommended for use in regular
ovens can be usedin convection ovens.
Plasticcookwore that is heat-resistant to
temperatures of 400°Fcan also be used,
when oven isbelow 400°F.
Metal and Glass
Any type of cookworewill work inyour
convection oven. However,metal pans heat
the fastest and are recommended for
convection baking.
_,Darkened or matte-finished pans will bake
faster than shiny pans.
Glassor ceramicpans cookmore slowly.
When baking cookies,you will get the best
resultsif you usea flat cookiesheet instead
of a panwith low sides.
Forrecipes likeoven-baked chicken,use a
pan with low sides.Hot aircannot circulate
well around food in apan with high sides.
21
w
ir_
w# A
tb
0
to
0
0
Page 22

i
i
0
Q,t
"O
"0
Usingthe convectionoven.
How to Set the Upper Oven for Convection Baking or Roasting
Touchthe CONVECTIONBAKEMULTI/
@@
@@@@@
@®@®@
@
@
%
.l RACKpad once for multi-rack
convection baking.This mode is used
for cooking food items on more than
one rack (i.e.,2, 3 or more racks) at the
same time inconvection bake.Seethe
Multi-RockBaking section for more
information. Touch the CONVECTION
BAKEIvfULTI/.1.RACKpad twice for one
rack convection baking.This mode is
usedfor cookingfood items on only
one rack in convection bake.
Touch the CONVECTIONROASTpad
for convection roasting.
Touchthe number padsto set
the desiredoven temperature.
Rememberto adjust baking
temperature accordingly.
Seethe Adapting Recipessection.
r-_ Touch the STARTpad.
Tochange the oven temperature, touch
the CONVECTIONBAKEor CONVECTION
ROASTpad and then the number pads
to set the new temperature.
When the oven starts to heat the changing
temperature, starting at 100°F,will be
displayed.When the oven reachesthe
temperature you set, 3 beeps will sound.
[] Touchthe CLEAR/OFFpad when finished.
NOTE:Youwill hear a fan while cookingwith
convection.Thefan will stopwhen thedoor
isopened but the heat will not turn off.
Thefan will not startuntil the preheat
temperature isreached.
Inconvection bake modes, for maximum
cooking evenness,the fan is designedto rotate
in both directions, with apausein between.
Thisisnormal.
NOTE:When convection baking, the oven
temperature will be 25°F(14°C)lower than
theset temperature.SeeAuto RecipeTM
Conversion in the Special Featuressection
for more information. When convection
roasting, oventemperature will not auto
convert.
w
w • •
_l j I I't
o
_-. {Jl
£
s...
0
E
{11
0
L)
v
1
When convectionbakingwith only
1rack,follow therackpositions
recommendedin the Usingthe
Ovensection.
22
Multi-Rack Baking
Becauseheated air iscirculated evenly
throughout the oven,foods can be baked
with excellent results using multiple racks.
Multi-rack bakingmay increasecook times
slightly for some foods but the overallresult
istime saved.Cookies,muffins, biscuits,
and other quick breads givevery good
resultswith multi-rack baking.
Tocook food on more than one rack in
convection bake,use CONVECTIONBAKE
MULTI.
When baking larger foods on3 racks,
placeone rack inthe 2nd (A)position,
one on the 4th (C)positionand the third rack
inthe 6th (E)position.
When baking cookies,placethe racks
inthe 3rd (B),4th (C)and 5th (D)positions.
Page 23

GEAppliances.com
How to Set the Upper Oven for Convection Roasting when Using the Probe
Forbestresultswhen roastinglarge
turkeysand roasts,we recommend
usingthe probeincludedin the
convectionoven.
®@®@@
@®@®@
®®®@@
®®@®@
@
@
Thedisplagwill flash PROBEand the oven
control will signalif the probe is inserted into
the outlet, and you have not set a probe
temperature and touched the STARTpad.
[] Placethe rackinthe rackposition(A).
Insertthe probe completelg into thefood.
Plugthe probe into the outlet
[]
in the oven. Make sure it ispushed
all the wag in. Closethe oven door.
Touch the CONVECTION ROAST pad.
%
Touch the number padsto set
[]
the desiredoven temperature.
[] Touchthe PROBEpad.
[] Touchthe number padsto set
the desired internalfood temperature.
Tochange the oven temperature during
the Convection Roast cgcle, touch the
CONVECTIONROASTpad and then touch
the number pads to set the new desired
temperature.
[] Touch the START pad.
When the oven starts to heat, the word
LO will be in the displag.
After the internal temperature of the food
reaches IO0°F,the changing internal
temperature will be shown inthe displag.
[] When the internal temperature of the
food reachesthe number gou haveset,
the probeand the oven turn off and the
oven control signals.Tostop the signal,
touch the CLEAR/OFFpad.Use hot
padsto removethe probe from the
food. Do not use tongs to pull on it-
theg might damage it.
CAUTION: Toprevent possible
bums, do not unplug the probe from the
oven outlet until the oven has cooled.
Do not store the probe in the oven.
NOTE:
Ifthe probe isremoved from the food
before the final temperature isreached,
a tone willsound and the displa£ willflash
until the probe is removed from the oven.
Youwill hear a fanwhile cookingwith
this feature. Thefan will stop when
the door is opened but the heat will
not turn off.
You can use the timer even though gou
cannot use timed oven operations while
using the probe.
t_
e_
to
5"
.-'--'- ....i
ti,_j IPl
A
l"--h
"_ F-I
w
In "_
23
ir_
w# A
0
to
0
{::::
0
Page 24

III
0
Usingthe convectionoven.
III
o,1
i
ol,_l
"O
i
w
w • •
_l j I I't
o
_-. Ill
Convection Rousting Guide
Meats Minutes/Lb. Oven Temp. Internal Temp.
Beef Rib(5to 5 Ibs.) RareT 20-24 525°F 140°F
Medium 24-28 325°F 160°F
Well 28-32 325°F 170°F
BonelessRib,TopSirloin Rarer 20-24 325°F 140°F
BeefTenderloin Rarer 10-14 525°F 140°F
PotRoast(2i/2to 3 Ibs.)chuck,rump 55-45 300°F 170°F
Pork Bone-in(3to SIbs.) 23-27 325°F 170°F
Boneless(5to SIbs.) 25-27 525°F 170°F
PorkChops(W'to 1"thick) 2chops 50-3Stotal 325°F 170°F
Ham Canned(3Ibs.fully cooked) 14-18 325°F 140°F
Butt(5Ibs.fully cooked) 14-18 325°F 140°F
Shank(5Ibs.fullycooked) 14-18 325°F 140°F
Lamb Bone-in(5to 5Ibs.) Medium 17-20 525°F 160°F
Boneless15to SIbs.) Medium 17-20 325°F 160°F
Seafood Fish,whole 15to SIbs.) 30-40 total 400°F
LobsterTails16to 8oz.each) 20-25 total 3SO°F
Poultry WholeChicken121/2to 31/2Ibs.) 24-26 3SO°F 180°-185°F
CornishHensUnstuffed(1to 11/2Ibs.) 50-55 total 350°F 180°-185°F
CornishHensStuffed11to 11/2Ibs.) 55-60 total 3SO°F 180°-185°F
v
Duckling14to SIbs.) 24-26 325°F 180°-185°F
Turkeg,whole*
Unstuffed(10to 16 Ibs.) 8-11 525°F 180°-185°F
Unstuffed118to 24 Ibs.) 7-10 525°F 180°-185°F
TurkegBreast14to 6Ibs.) 16-19 325°F 170°F
* Stuffed birds generalfg require 50-45 minutes additional roasting time. Shield legs and breast with foil to prevent
overbrowning and drging of skin.
TheU.S.Department of Agriculture sags "Rare beef is popular, but gou should know that cooking it to onl_1140°F
means some food poisoning organisms mag survive." (Source:Safe Food Book. YourKitchen Guide. USDARev.
June 1985.)
Medium 24-28 325°F 160°F
Well 28-32 325°F 170°F
Medium 14-18 325°F 160°F
4 chops 55-40 total 325°F 170°F
6chops 40-45 total 325°F 170°F
Well 20-24 325°F 170°F
Well 20-24 525°F 170°F
L)
i...
0
E
{11
0
24
Page 25

Usingthe timed convection
baking features [upperovenonly].
You will hear a fan while cooking with this feature. The fan will stop when the door is opened but the heat
will not turn off.
NOTE: Foods that spoil easilyJsUCh as milk, eggs, fish, stuffings, poultry and porkJshould not be allowed to
sit for more than 1 hour before or offer cooking. Room temperature promotes the growth of harmful bacteria.
Be sure that the oven light is off because heat from the bulb will speed harmful bacteria growth.
How to Set an Immediate Start and Automatic Stop
The upper oven willturn on immediately and
cook for a selected length of time. At the end
of the cooking time, the oven willturn off
automatically.
[-il Touchthe CONVECTIONBAKEMULTI/
1 RACKpadonce for multi-rack
convection baking.Thismode isusedfor
cookingfood items on more than one
rack (i.e.,2, 3 or more racks)at the same
time inconvection bake.Seethe Multi-
RackBakingsectionfor more information.
Touchthe CONVECTIONBAKEMULTI/
1 RACKpadtwice for one rack convection
baking.Thismodeisusedfor cookingfood
itemson only onerack in convectionbake.
Touch the CONVECTIONROASTpad
for convection roasting.
[] Touch the number padsto set
the desiredoven temperature.
I-_ Touchthe COOKINGTIMEpad.
NOTE:Ifyour recipe requires preheating, you
mag need to odd additional time to the length
of the cooking time.
r_ Touchthe number padsto set
the desired length of cooking time.
Theminimum cooking time you
can set is 1minute.
Theoventemperature that you set and
the cooking timethat you entered will be
in the display.
[] Touchthe STARTpad.
Thedisplay shows the oven temperature
that gou set and the cooking time
countdown. The display starts changing
once the temperature reaches ZOO°F.
[] Atthe endof timed convection bake
the oven will turn off.The end of cycle
tone will sound.Touch the CLEAR/OFF
pad to clear the display if necessarg.
[] Removethe food from the oven.
Remember,foods that are left
in the oven continue cooking
after the controls are off.
GEAppliances.com
t_
or}
tb
q
q
to
q
5"
i
®®®®@
@®@®@
@
@®®®@
®®®®@
@
®®®®®
@®@®@
@
@
How to Set a Delayed Start and Automatic Stop
You can set the upper oven control
to delag-start the oven, cook for a specific
length of time and then turn off automaticalI£.
Make sure the clockshows the correct
time ofdag.
[-_ Touchthe CONVECTIONBAKE
MULTI/1RACKpad once for multi-rack
convection baking.This mode is used
for cooking food items on more than
one rack (i.e.,2, 3 or more racks)
at the same time inconvection bake.
Seethe Multi-RockBaking section
for more information. Touch the
CONVECTIONBAKEMULTI/1 RACKpad
twice for one rack convection baking.
This mode isusedfor cooking food items
on only one rack inconvection bake.
Touch the CONVECTIONROASTpad
for convection roasting.
Touch the number padsto set
the desiredoven temperature.
Touch the COOKING TIME pad.
@
NOTE:Ifgout recipe requires preheating, you
mag need to add additional time to the length
of the cooking time.
r_ Touch the number padsto set
the desiredcooking time.
Touchthe DELAVSTARTpad.
[_] Touchthe number padsto set the time
of day you want the ovento turn on
and start cooking.
If gou would liketo check the times gou have
set, touch the DELAVSTARTpad to check
the start time gou have set ortouch the
COOKINGTIME pad to check the length
of cooking time you have set.
IZ] Touchthe STARTpad.
NOTE:An attention tone will sound if you are
using timed baking and do not touch the START
pad after entering the baking temperature.
When the oven turns onat the time of
dag gou have set,the displag will show
the changing temperature (startingat ZOO°F)
and the cooking time countdown.
At the end oftimed convection bakethe oven
will turn off.Theend of cycle tone willsound.
Touchthe CLEAR/OFFpadto clear
[]
the displag if necessary. When baking
isfinished,remove the food from
the oven. Remember,even though
the oven shuts off automaticallg,
foods continue cooking after
the controls areoff. 25
VJ IPI
A
w
ir_
w# A
0
to
0")
0
0
Page 26

.£
It,
Special features of your upper ovencontrol.
your new touch pad control has additional features that blOUmay choose to use. The following are the features
and how blOUmay activate them.
The special feature modes can onl_l be activated while the displ%l is showing the time of d%l. The_lremain
in the control's memor_l until the steps are repeated.
When the displag shows your choice, touch the STARTpad. The special features will remain in memor_l after
a power failure.
12 Hour Shut-Off
m
"O
"0
w
w • •
_l j I I't
o
_-. {Jl
With thisfeature,shouldgou forget andleave
theovenon,the controlwill automaticallgturn
off the ovenafter 12hoursduringbaking
functionsor after 3 hours duringa broilfunction.
If gou wishto turn OFF this feature,
follow thesteps below.
[] Touch the BAKEand BROILHI/LO pads
at the same time for 3 secondsuntil
the displag showsSF.
Touchthe DELAYSTARTpad.
[]
Thedisplagwill show 12shdn (12hour
shut-off).Touch the DELAYSTARTpad
again and the displagwill show no shdn
(noshut-off).
Touchthe STARTpadto activate
@
the no shut-off and leavethe control
set in this specialfeatures mode.
Fahrenheit or Celsius Temperature Selection
Yourovencontrol isset to usetheFahrenheit
temperature selectionsbut gou mog change
this to use the Celsiusselections.
171 Touch the BAKE and BROIL HI/LO pads
at the same time for 3 seconds until
the displag shows SF.
v
Tones at the End of a Timed Cycle
At the end of a timed cgcle,3 short beepswill
sound followed bg one beep everg 6 seconds
until the CLEAR/OFFpad is touched. This
continuale-secondbeepmaubecanceled.
Tocancel the 6-second beep:
_t_hh _haemBe1_eafndr BsReOc/oLn_fLOtPads
the displag showsSF.
Touchthe BROILHI/LO pad.The displag
will show F (Fahrenheit).
I-_ Touchthe BROILHI/LO pad again.
Thedisplagwill show C (Celsius).
[] Touchthe STARTpad.
Touchthe KITCHENTIMERON/OFF
pad.Thedisplag shows CONBEEP
(continual beep).Touchthe KITCHEN
TIMERON/OFF pad again. Thedisplay
shows BEER(Thiscancelsthe one beep
every 6seconds.)
[] Touch the START pad.
£
L)
i...
0
E
{11
0
26
Page 27

i iIIi III i:i! i ii
Range Lockout
Yourcontrol will allow gou to lock out
thesurface units,ovenburners and control
panel so theg cannot be activated.
To lock/unlock the controls:
[] Turn oil surface units off.
[] Touch the RANGELOCKOUTpod
and then the STARTpod.
I-_ Tounlock the control,touch the RANGE
LOCKOUTpod and then the STARTpod.
12 Hour, 24 Hour or Clock Black-Out
Your control is set to use a 12-hour clock.
If you would preferto hove o 24-hour military
time clockor blockout the clock display,
follow thesteps below.
FT] Touchthe BAKEand BROILHI/LO
pods at the some time for 3seconds
until the display shows SF.
Touch the CLOCKpod once.
The display will show 12hr.
If this isthe choice you wont,
touch the STARTpod.
GEAppliances.com
When this feature ison and the touch
podsore touched, the control will beep
and the displog will show LOC.
, Thecontrol lock-outmode affects oil
controls. No controls will work when
this feature isactivated.
The adjustment will be retained in memory
offer a power failure.
Touchthe CLOCKpod again to change
to the 24-hour military time clock.Thedisplay
will show 24 hr. If this is the choice you wont,
touch the STARTpod.
Touchthe CLOCKpod again to block out
the clock display.Thedisplay will show OFF.
Ifthis isthe choice you wont, touch
the STARTpod.
NOTE: Ifthe clock is in the black-out mode, you
will not be able to use the Delay Start function.
t_
i'.I.
to
5"
i
Auto Recipe T"Conversion
/ i
iill
Youcon use gour favorite recipes in the
convection oven.
When using CONVECTIONBAKE,the oven
i !i
will automatically convert the oven
temperature from regular baking to
Convection Bake temperatures.
Thedisplay will show the actual converted
(reduced)temperature. Forexample, ifyou
enter o regular recipetemperature of35OOF
Toturn off thisfeature:
F-_ Touchthe BAKEand BROILHI/LO pods
at the some time for 3 seconds until
the displag showsSF.
I-_ Touchthe CONVECTIONBAKEMULTI/
1 RACKpad.Thedisplag will show
CONON.Touch the CONVECTIONBAKE
MULTI/1RACKpod again. The displog
will showCONOFF.
VJ IPI
A
w
(177°C)and touch the STARTpod, the display
will show CONand theconverted
temperature of 325 °F(163°C).
NOTE:Thisfeature only converts cooking
temperatures, not cooking times. When
r-_ Touch the STARTpod.
Toturn on thisfeature, repeat steps 1-5
above but touch the STARTpod when
CONON isin the displog.
ir_
w# A
0
convection roosting, the oven temperature
will not auto convert.
Use pan size recommended in the recipe.
Some package instructions for frozen
casseroles, main dishes or baked goods
hove been developed using commercial
0
convection ovens. For best results in
this oven, preheat the oven and use
the temperature for regular baking
to
on the package.
0")
27
0
Page 28

Using the Sabbath Feature.(onsome modds)
.£
IS
m
(Designed for useon the Jewish Sabbath and Holidays)
The Sabbath feature can be used for baking/roasting in the upper oven only. It cannot be used for convection,
broiling, self-cleaning, or Delay Start cooking.
NOTE: The oven light comes on automatically when the door is opened and goes off when the door is closed.
The bulb may be removed. See the Oven Light Replacement section.
How to Set for Regular Baking/Roasting
®® ® ®®
Whenthedisplay showsm theovenis
set in Sabbath.Whenthedisplay show
m c the ovenis baking/roasting.
Makesure the clockshows the correct time of da£
and the ovenisoff
ET] Pressand holdboth the BAKEand BROIL
HI/LO pads,at the same time, until
the displag shows SF.
['2---]Tap the DELAYSTARTpad until SAbbAtH
appears inthe displag.
[-_ Touch the STARTpadand m will appear
in the displag.
[] Touch the BAKE pad. Nosignal will be given.
[] Using the number pads, enter the desired
temperature between 170°and 550°.
No signal or temperature will be given.
[-_ Touch the STARTpad.
[Z] After arandom delag period of
approximatelg 30 secondsto i minute, m c
will appear in the displag indicating that the
oven is baking/roasting.If m c doesn't appear
inthe displag, start again at Step 4.
Toadjust the oven temperature, touch
the BAKEpad, enter the new temperature using
the number pads,and touch the STARTpad.
NOTE:TheCLEAR/OFFand COOKINGTIMEpads
are active during the Sabbath feature.
"O
"o
w
w • •
_l j I I't
o
_-. {Jl
£
i...
0
E
{11
0
L)
How to Set for Timed Baking/Roasting--Immediate Start and Automatic Stop
Makesure the clockshows the correct time of da£
and the ovenisoff
[] Pressand hold both the BAKEand BROIL
HI/LO pads,at the some time, until
the displag shows SF.
[-2--] Tap the DELAYSTARTpad until SAbbAtH
appears inthe displag.
v
Whenthedisplay showsm theovenis
set in Sabbath.Whenthedisplay shows
m c the ovenis baking/roasting.
iii¸¸ How to Exit the Sabbath Feature
28
[] Touch the STARTpad and D will appear
in the displag.
[-4-] Touch the COOKINGTIME pad.
r_--] Touchthe number padsto set the desired
length of cooking time between 1 minuteand
9 hours and 99 minutes. Thecooking time
that gou entered willbe displaged.
I_1 Touch the STARTpad.
[Z] Touch the BAKEpad. Nosignal will be given.
ET] Touchthe CLEAR/OFFpad.
[] If the oveniscooking, wait for a random
delag periodof approximatelg 30 seconds
to 1 minute,until onlg D isin the displag.
E_] Pressand hold both the BAKE and BROIL
HI/LO pads,at the same time, until
the displag shows SE
r-4--]Tapthe DELAYSTARTpad until 12shdn
or no shdn appears inthe displag.
1"8--1Usingthe number pads,enter the desired
temperature. No signal or temperature will
begiven.
r-_l Touch the STARTpad.
[] After arandom delag period of
approximatelg 30 secondsto 1 minute, D C
will appear in the displag indicating that the
oven is baking/roasting,If D C doesn't appear
inthe displag, start again at Step 7.
Toadjust the oven temperature, touch
the BAKEpad, enter the new temperature using
the number pads,and touch the STARTpad.
When cooking isfinished,the displag will change
from D C to D and 0:00will appear,indicating that
the oven hasturned OFFbut isstill set in Sabbath.
Removethe cooked food.
12 shdn indicates that the oven will
automaticallg turn off after 12hours.
no shdn indicates that the ovenwill not
automaticallg turn off.
[-5-] Touch the STARTpad.
NOTE: If a power outage occurred while the oven
was in Sabbath, the oven wilt automatically turn
off ond stag off even when the power returns.
The oven control must be reset.
Page 29

Adjust the upper oven thermostat--Do it yourself! GEAppliances.com
You may find that your new oven cooks differently than the one it replaced. Use your new oven for a few
weeks to become more familiar with it. If blou still think your new oven is too hot or too cold, you can adjust
the thermostat yourself
Do not use thermometers, such as those found in grocery stores, to check the temperature setting of blour
oven. These thermometers mabl vary 20-40 degrees.
NOTE: This adjustment will not affect the broiling or the self-cleaning temperatures. The adjustment will
be retained in memory after a power failure.
To Adjust the Thermostat
t_
®®®®®
®®®®®
@
[] Touch the BAKEand BROILHI/LO pads
at the same time for 3 secondsuntil
the displag showsS_
[] Touch the BAKEpad. A two digit number
shows in the displag.
Touch BAKEonceto decrease (-)
the oven temperature, ortwice to
increase (+).
The oventemperature can be adjusted
@
up as much as55°For down as much
as 35°F.Touchthe number padsthe
same wag you read them. Forexample,
to change the oventemperature 15°F,
touch 1 and 5.
r_ When gou have made the adjustment,
touch the STARTpad to go back to
the time of dag displag.Usegour
oven as gou would normallg.
NOTE:The thermostat adjustment for Baking
willalso affect Convection Baking or
Convection Roasting.
The type of margarine will affect baking performance!
Most recipes for baking have been developed using high-fat products such as butter or margarine (80% fat).
If blou decrease the fat, the recipe may not give the same results as with a higher fat product.
to
5"
VJ IPI
A
w
Recipe failure can result if cakes, pies, pastries, cookies or candies are made with low-fat spreads.
The lower the fat content of a spread product, the more noticeable these differences become.
Federalstandards require products labeled "margarine" to contain at least 80%fat bgweight. Low-fat spreads,
on the other hand, contain lessfat and more water.Thehigh moisture content of these spreadsaffects the texture
and flavor of bakedgoods. Forbest resultswith gour old favorite recipes,use margarine,butter or stick spreads
containing at least 70% vegetable oil.
29
ir_
w# A
0
to
0
0
Page 30

m
Or}
0
Or}
"O
Using the lower oven drawer.
The lower oven drawer may be used to bake foods using the same times and temperatures as a standard oven.
Foods ideal for baking in the lower oven drawer include pizza, frozen foods, casseroles, biscuits, rolls and many
desserts.
To Use the Lower Oven Drawer
I-il Pushinand turn the lower ovendrawer
knobto ang desiredsetting.
Allow the lower oven drawer to preheat.
,The ONsignal light islocated on the upper
right sideof the knob and glows when the
knob isin the ONposition.It remainsON
until the knob is moved to the OFFposition.
The "Heating"signallight is located below
the ONsignallight and glowswhen the
heating elements are active.Preheatis
complete after the "Heating" signal has
turned off for the first time with eachuse.
Pushin andturn the lowerovendrawer
knobto anydesiredsetting.
NOTES:
Alwags use the included drawer rack when
using the Lower Oven Drawer.
The lower oven drawer cannot be used
during a self-dean cgcle of the upper oven.
Do not put food, foilor cookware directly
on the bottom of the lower oven drawer.
Alwags use the included drawer rack.
Iffoods require a cover, use onlg foilor lids
able to withstand baking temperatures.
Do not use plastic.
Maximum height of foods that can be
placed in the lower oven drawer is 4".
Do not put liquid or water in the lower oven
drawer.
_,Never placeplastics,paper, canned foods
or combustiblematerial in thelower oven
drawer.
w
w • •
_l j I I't
o
_-. {Jl
£
s...
0
E
{11
0
L)
Thelower oven drawer useslessenergy than the upper oven.
Allow the following approximate times for preheating:
Desired Lower Preheat
Oven Temperature Time
WARM 10 minutes
350°1: 20 minutes
v
425°F 30 minutes
Adjust the lower oven thermostat--Do it yourself!
You may find that your new oven cooks differently than the one it replaced. Use your new oven for a few weeks
to become more familiar with it. If you still think your new oven is too hot or too cold, you can adjust the
thermostat yourself.
Do not use thermometers, such as those found in grocery stores, to check the temperature setting of your oven.
These thermometers may vary 20-/40 degrees.
NOTE:This adjustment will not affect the broiling temperatures.
Backof LowerOvenKnob
(Appearancemayvary.)
30
Pullthe OVENCONTROLknob off
171
the range and lookatthe backside.
To make anadjustment, loosen
(approximatelg one turn), but do not
completelg remove,the two screws
on the back of the knob.
With the back of the knob facing gou,
hold the outer edge of the knobwith one
hand and turn the front of the knob with
the other hand.
To raisethe oven temperature, movethe
top screw toward the right. You'llhear a
clickfor each notch goumove the knob.
To lowerthe temperature, move the top
screwtoward the left.
Each click will change the oven temperature
approximatelg lO°K (Range is_+60°R from
the arrow.) We suggest that gou make the
adjustment one click from the original setting
and check oven performance before making
any additional adjustments.
r-_ After the adjustment is made, retighten
screws so theg are snug, but be careful
not to overtighten.
Reinstall knob on range and check
performance.
Page 31

/
Usingtheself-cleaningupper oven.
The oven door must be closed and all controls set correctly for the cycle to work properly.
Before a Clean Cycle
Wipe up heavysoil onthe ovenbottom.
Forthe first self-clean cycle, we recommend
venting your kitchen with an openwindow
or usinga ventilationfan or hood.
Removethe rocks,any broiler pan,
broiler grid, probe,all cookware and
any aluminum foil from the oven.
Theoven rackscan be self-cleaned,
but they will darken,lose their luster
and become hard to slide.
Soilon the front frame of the rangeand
outside the gasketon the door will need
to becleaned by hand. Cleanthese areas
with hot water, soap-filled scouring pads or
cleanserssuch as Soft Scrub? Rinsewell
with cleonwater and dry.
Donot cleon the gasket. Thefiberglass
material ofthe ovendoor gasket cannot
withstand abrasion. It is essential for the
gasket to remain intact. Ifyou notice it
becoming worn or frayed, replace it.
Wipe up any heavy spilloverson the oven
bottom.
Makesurethe oven light bulb cover is
in place and the oven light is off.
IMPORTANT:The healthof some birdsis
extremely sensitiveto the fumes given off
during the self-cleaning cycle of any range.
Hove birds to another well-ventilated room.
NOTE:Usecaution when opening the upper
oven offer the self-cleon cycle has ended.
Theoven may stillbe hot.
GEAppliances.com
¢3
/
¢b
@(9@(9
@(9@(9@
How to Set the Upper Oven for Cleaning
Turn off all surface burners.
NOTE:Thesurface burnerswill not
function during theself-cleoncycle.
[] Touch the SELFCLEANpad.
[] Usingthe number pods,enter the
desiredcleon time, ifa time other than
4 hoursis needed.
Cleancycle time isnormally 4 hours.Youcan
change the clean time to any time between
3 hours and 5 hours,depending on how dirty
your oven is.
r41 Touch the STARTpad.
NOTE:Thesurface units should be
turned off during theself-cleancycle.
Thedoor and control will lock automatically.
Thedisplay will show the cleantime
remaining. It will not be possibleto open
the ovendoor until the temperature drops
below the lock temperature and the LOCKED
DOOR light goesoff.
Theoven shuts off automatically when
the cleancycle iscomplete.
[] When the LOCKEDDOORlight isoff,
the door will unlock automatically.
Thewords LOCKDOORwill flashand
the oven control will signal ifyou set
the cleon cycle and forget to close
the oven door.
To stop aclean cycle, touch the
CLEAR/OFFpad, When the LOCKEDDOOR
light goes off indicatingthe oven has
cooled below the locking temperature,
you may open the door.
Donot usethe loweroven drawer during
a self-clean cycle.
Thewords ERRand TURNSURFACE
BURNERSOFFwill flash and the control
will signal ifyou set the clean cycle and
forget to turn the surface burners off.
i
_J IPI
A
w
ir_
w# A
to
5"
0
0
to
0")
31
0
Page 32

m
OFI
0
It,
OFI
"o
Usingtheself-cleaningupper oven.
Theoven door must be closed and all controls set correctly for the cycle to work properly.
How to Delay the Start of Cleaning
GC}®G@
Make sure the clock shows the correct time
of day.
Touchthe RANGELOCKOUTpod
and then the STARTpod to turn it off.
Seethe RangeLockoutsection.
NOTE: Thesurface units must be turned
off prior to theself-dean start time.
[_] Touchthe SELFCLEAN pod.
Usingthe number pods,enter
the desiredcleon time.
Touchthe DELAVSTARTpod.
Theearliest start time you con
set will appear in the display.
Usingthe number pods,enter the time
@
of day you wont the cleoncycle
to start.
Touchthe STARTpod.
Thedoor locks automatically. Thedisplay will
show the start time. Itwill not be possibleto
open the oven door until the temperature
drops belowthe lock temperature and
the LOCKEDDOORlight goes off.
Theoven shuts off automatically when
the cleoncycle iscomplete.
When the LOCKEDDOORlight isoff,
the doorwill unlock automatically.
Thewords LOCKDOORwill flash and the
oven control will signal ifyou setthe cleon
cycle and forget to close the oven door.
, Tostop ocleon cycle, touch the
CLEAR/OFFpod.When the LOCKEDDOOR
light goesoff indicating the oven has
cooled below the locking temperature,
you may open the door.
w
w • •
o
£
0
After a Clean C_cle
Youmay notice somewhite ash
in the oven. Wipe it up with odamp
cloth offer the oven cools.
If white spotsremain, remove them
v
with asoap-filled scouring pad and rinse
thoroughlg with o vinegar and water mixture.
Thesedepositsore usuallyo saltresidue
that cannot be removed by the cleoncycle.
If the oven is not cleon offer one cleon cycle,
repeat the cycle.
You cannot setthe oven for cooking until
the oven iscool enough for the door to
unlock.
Whilethe oven isself-cleaning,you con
touch the CLOCKpodto displaythe time
of day. To return to the cleon countdown,
touch the COOKINGTIME pod.
Ifthe rocks become hardto slide,apply
o smallamount of vegetable oilor cooking
oil to o papertowel and wipe the edges
of the oven rockswith the papertowel.
E
0
32
Page 33

Care and cleaning of the range. 6EAppliances.com
Be sure electrical power is off and all surfaces are cool before cleaning any part of the range.
WARNING: Ifyourrangeisremovedforcleaning,servicingoranyreason,
be sure the anti-tip device is reengaged properly when the range is replaced. Failure
to take this precaution could result in tipping of the range and cause injur_l.
Lodge ® Cast Iron Griddle
rT] Rinsewith hot water (donot usesoap),
and dry thoroughly.
[] Beforecooking, prepare the surface
with cooking spray orvegetable oil.
[] After cooking, cleanthe griddlewith
a stiffbrush and hot water. Usingsoap
is not recommended, and harsh
detergents should never be used.
r_ Towel dry immediately and apply a light
coat of cooking spray orvegetable oil
while the griddle isstillwarm.
Griddle Precautions:
If something has spilled under thegriddle,
it should be cleanedup as soon as possible
to prevent"bakedon" food soil.See
the Cleaningthe glasscooktopsection.
Do not allow grease to accumulate
under the griddle asit can bea timhazard.
Cleanunder the griddle assoon as it is cool.
Seethe Cleaningtheglasscooktop section.
Do not placeFour griddle in the microwave
oven.
[] Storeina cool,dry place.
[] Do not wash ina dishwasher.
Stainless Steel Surfaces
Protecting
Stainlesssteelhas a reputation for
withstanding tough abusefor years.Thisisa
key reasonwhy it is so popular with the food
serviceindustry.
However,stainlesssteel appliances can
have surface imperfections, discolorations
or blemishesthat consumers with a critical
eye notice andfind unattractive inthe home.
Thesediscolorations or blemishes can be
caused by something assimple as leaving
fingerprint smudges on the stainlesssteel
surface overnight.
Forstainless steelappliances where
blemishesare prone to show on the surface,
we recommend APPLYINGA COATOFCERANA
BRYTE®StainlessSteelCleaning Polish&
Conditioner (purchased separately-follow
instructions).
Thiswillhelpyou to maintainthe brightnessand
appearanceof your stainlesssteelappliance.
Cleaning
Do not use a steel wool pad; it will scratch
the surface.
Inorder to avoid any discolorations and/or
greasestains,we recommend cleaning
and removing any spills,spots and grease
from the range after use.
It is important to usea soft cloth or paper
towel every time the range iscleaned to
avoidany scratches.
Readcarefully the instructions on the back
of the Brightener(includedwith your range)
for better results.
_,AlwaFsturn offall surface units before
removing the griddle. Usecaution when
handling a hot griddle.
Cleaning Instructions:
r-_ Wash usingwarm, soapy water:
wet soft cloth orpaper towel
(avoidusingexcessivewater).
Wipe the surface in the direction
of the grain (followingthe steel lines).
Rinseand wring out a soft cloth or paper
towel and dry the range.
r_ Apply a degreaserthat does not contain
sodium hydroxide or StainlessSteel
Cleaner(follow instructions).
Apply Cerama Brute®StainlessSteel
Brightener(follow instructions).
[] Repeatsteps2-4 asmany timesas needed.
Follow these instructions for any Stainless
Steelsurface on your range.
DONOTUSEthe following products for
cleaningtheCooktopor StainlessSteelparts:
• Caustic Lye(Sodium Hydroxide)or cleaners
containing this chemical
• Hard or SteelWool Pads
• Abrasive Materialsor Chemicals
To inquire about purchasing stainlesssteel
appliance cleaner or polish,or to find the
location of adealer nearest you, pleasecall
our toll-free number:
National Parts Center 800.626.2002IU.S.I
800.661.1616(Canada)
GEAppliances.com IU.S.I
www.GEAppliances.ca (Canada)
33
Page 34

Care and cleaning of the range.
Lift-Off Oven Door
Lift thedoor straight upandoff
thehinges,
i Toreplace the door, make surethe hinges
Thegasketisdesignedwith a gap
atthe bottomto allow for proper
aircirculation.
Donot rubor clean thedoorgasket--
it hasanextremelylow resistance
toabrasion.
If younotice the gasketbecomingworn,
frayedor damagedin anyway or if it
hasbecomedisplacedon thedoor,
oushouldhaveit replaced.
Theoven door isremovable,but it is heavy.
Youmay needhelp removing and replacing
the door.
Donot liftthe door bblthehandle.Makesure
the oveniscompletelblcool.
Toremove the door, open it afew inches
to the special stop position that will holdthe
door open. Grasp firmly on each sideand lift
the door straight up and offthe hinges.
NOTE:Be carefulnot to place hands between
the hinge and the oven door frameas the
hinge could snap back and pinch fingers.
are inthe special stop position. Positionthe
slots inthe bottom of the door squarely over
the hinges.Then lower the door slowly and
evenly over both hinges at the same time.
If the hingessnap back against the oven
frame, pull them back out.
Toclean the inside of the door:
Donot allow excesswater to run into
any holesor slots inthe door.
Becausethe area insidethe gasket is
cleanedduring the self-clean cycle, you do
not need to clean this by hand.Any soap
left on the liner causes additional stains
when the oven isheated.
Thearea outside the gasket can
be cleaned with asoap-filled plastic
scouring pad.
Donot allow food spillswith a high sugar
or acid content(suchas milk, tomatoes,
sauerkraut, fruitjuices or pie filling)to remain
on the surface.Theblmoblcauseo dullspot
evenafter cleaning.
Tocleontheoutside of the door:
Usesoap and water to thoroughly clean
the top, sidesand front of the oven door.
Rinsewell.You may also usea glass
cleaner to cleanthe glasson theoutside
of the door.
Spillage of marinades, fruit juices,tomato
sauces and basting materials containing
acids may cause discolorationand should
bewiped up immediately.When the
surface iscool,clean and rinse.
Donot useoven cleaners,cleansing
powders or harsh abrasiveson the outside
of the door.
34
Oven Heating Elements
Donot cleanthe bake elementor the broil
element.Anblsoilwill burn off when
the elementsoreheated.
Tocleanthe ovenfloor,gently lift the bake
element. Cleanwith warm, soapy water.
Page 35

6EApp/iunces.com
¸¸
?
Removable Lower Oven Drawer
NOTE:Beforeperforming any adjustments,
deaning or service,disconnectthe range
electricalpower supplg at the househdd
distribution pond bg removingthe fuseor
switching off thedrcuit breaker.Makesure
the drawer heatingdement iscool.
Most cleaning can be done with the drawer
removedsoapinplaCe.andHOwever,the draweriffurtherwarmwater tocleaningiSthoraughlgneededmaybeclean.USe
To remove the drawer:
I-il it stops.Pullthe drawer straight out until
pulling thePress the tabSdmwer forwardOnboth sideSand freein,while
Removable Lower Oven Drawer Pan
\
NOTE:Beforeperforming any adjustments,
cleaningor service,disconnecttherange
d ectricalpower supplgat thehousehold
distribution pond bg removingthe fuseor
switching off thedrcuit breaker.Makesure
the drawer heating elementiscool.
NOTE: Allow lower oven drawer to cool
before removing pan.
NOTE: Wipe spills promptly after each use.
To replace the drawer
%
thePlacetheinnerleftleftrailguide and slidedrawer rail around
it in slightlg to hookit.
thePlacetheinner rightrightraildrawerguideandrail ar°undslide
it in slightly to hook it.
[_] Slidethe drawer all the wag in.
Neverplace, useor self-dean the lower
oven drawer pan in the upper oven.
, Loweroven drawer has a removable pan
for easycleaning. Cleanwith hot, soapg
water and a spongeor dish towel. Drg
with a clean cloth.An ovencleaner,such
as Ea%-Offf, may also be used.Besure to
follow thedirections on the oven cleaner.
Replacethe pan inthe lower oven drawer.
Glass Window
Tocleanthe outsideglassfinish,usea glass
deaner.Rinseandpolishwith a drudoth.
35
Page 36

Care and cleaning of the range.
Oven Air Vents
Never block the vents (airopenings)of the
range.Theg providethe air inlet and outlet
that are necessargfor the range to operate
properlg.
Air openings are located at the rear of
Vent appearance and bocation vary.
the cooktop, at the top and bottom of the
oven door,and at the bottom of the range,
under the lower oven drawer.
Oven Control Panel
Surfaceunit knob
Lockout the touch pads beforecleaning.
Seethe RangeLockoutinformation
in the Specialfeaturesof gout upper
ovencontrol section inthis manual.
Cleanup splatters with a damp cloth.
Youmag also usea glasscleaner.
Control Panel and Knobs
It'sa goodidea to wipe the control panel
after each use of the oven.Clean with
mild soap and water or vinegar andwater,
rinsewith cleanwater and polishdry with
a soft cloth.
Do not useabrasive cleansers,strong liquid
cleaners,plastic scouring pads or oven
cleaners on the control panel-theu will
damage the finish.A 50/50 solution of
vinegar and hot water works well.
Removeheavier soilwith warm, soapgwater.
Donot useabrasives of ang kind.
Unlockthe touch pads after cleaning.
Thecontrol knobsmay be removed for easier
cleaning.
Hake sure the knobs are in the OFFpositions
and pull them straight off the stems for
cleaning.
Theknobs can be washed with soapand
water.Hake sure the insidesof the knobs
are dru before replacing.
NOTES:
_,Do not wash theknobs in an automatic
dishwasher.
_,Do not useang chemicalor abrasive
substancesto cleanthe knobs-thebl could
be permonentlbldamaged.
Replacethe knobs in the OFF position
to ensure proper placement.
36
Metalparts can be cleaned with soap
and water. Do not use steelwool,abrasives,
ammonia, acidsor commercialovencleaners.
Drywith asoft cloth.
NOTE:Thelower ovendrawer control knob
isnot interchangeable with the surfaceunit
knobs.Besureto reinstall the lower oven
drawer knobto theoriginal location.Thelower
ovendrawer knob mablbe identified bg the
increasingnumbers from "WM"to "450."
Page 37

Oven Racks and Drawer Racks
m
GEAppliances.com
Wire coverholder.
Cleanthe racks with an abrasive cleanser.
The oven racks may becleaned in the
self-cleaning oven. However,the racks
will darken in color,losetheir luster and
become hard to slideif cleaned during
the self-cleaning cycle.
Oven Light Replacement
CAUTION: eforereplacing
Four oven light bulb, disconnect the electrical
power to the range at the main fuse or drcuit
breaker panel. Be sure to let the light cover
and bulb cool completel F.
The oven light bulb iscovered with a
removable glasscover that isheld in place
with a bail-shaped wire. Removethe oven
door,ifdesired,to reach cover easily.
Toremove:
Holda hand under the cover soit
%
doesn't fall when released.With fingers
of the same hand, firmly push back the
wire cover holder.Lift off the cover.
Tomake the racksslidemore easily,apply
a small amount of vegetable oil or cooking
oil to a paper towel andwipe the edges
of the oven racks with the paper towel.
Toreplace cover:
Placeit into the groove of the light
%
receptacle. Pullthe wire forward to
the center of the cover until it snaps into
place. When in place, the wire holdsthe
cover firmly. Becertain thewire is inthe
depression in the center of the cover.
Connect electrical power to the range.
t_
o
C
tt
,iiiiiiiiiiii!#ii
iiiiiiiiiiii#_'iiii
ii//iiHi!!iiiiii/ii#i
iiiJJl;{iiii
Do not remove ang screws to remove
the cover.
[] Donot touch hot bulbwith awet cloth.
Replacebulb with a/40-watt household
appliance bulb.
¢
C
C
C
C
0
37
L_
0
0
0
Page 38

Cleaningthe glass cooktop.
Normal Dailg Use Cleaning
ONLY useCERAMABRYTE®CeramicCooktop
Cleaneron the glass cooktop. Othercreams
may not be as effective.
[] Shakethe cleaning cream well. Apply
a few drops of CERAHABRYTE®Ceramic
CooktopCleanerdirectly to the cooktop.
Cleanyourcooktopafter
each spill.Use CERAMA
BRYTE®Ceramic Cooktop
Cleaner.
Usea CERAMABRYTE_CleaningPad
for CeramicCooktops.
(9
Tomaintain and protect the surface of your
glass cooktop, follow thesesteps:
Beforeusingthe cooktop for the first
r?]
time,clean it with CERAMABRYTE®
CeramicCooktop Cleaner.This helps
protect the top and makes cleanup
easier.
[] Daily use ofCERAMABRYTE®Ceramic
CooktopCleanerwill help keep
the cooktop looking new.
Burned-On Residue
CAUTION: DAMAGEto gour
glass surface mag occur if gou use scrub
pads other than those recommended.
EZ] Allow the cooktop to cool.
Spread a few drops of CERAMABRYTE®
CeramicCooktop Cleaneron the entire
burned residue area.
Using the included CERAMABRYTE®
%
CleaningPadfor CeramicCooktops,rub
the residue area, applying pressure as
needed.
[] Usea papertowel or CERAMABRYTE®
CleaningPadfor CeramicCooktops
to clean the entire cooktop surface.
[] Use a dry cloth or paper towel
to remove all cleaning residue.
No need to rinse.
NOTE:It isverg important that gou DO NOT
heat the cooktop until it has been cleaned
thoroughlg.
If any residue remains, repeat
the steps listed above as needed.
For additional protection, after all
residue has been removed, polish
the entire surface with CERAHA
BRYTE®CeramicCooktop Cleaner
and a paper towel.
TheCERAMABRYTE®CeramicCooktop
Scraperandall recommendedsupplies
areavailablethrough ourPartsCenter.
Seeinstructionsunder"To OrderParts"
sectiononnextpage.
NOTE:Do notusea dull ornicked
blade.
38
Heavg, Burned-On Residue
Allow the cooktop to cool.
%
Use a single-edgerazorbladescraper
atapproximatelya 45° angleagainst
theglasssurfaceand scrapethesoil.
Itwillbe necessarytoapplypressure
to the razor scraper in order to
remove the residue.
After scraping with the razor scraper,
%
spread a few drops of CERAHABRYTE®
CeramicCooktop Cleaneron the entire
burned residue area. Usethe CERAHA
BRYTE®CleaningPadto remove any
remaining residue.
Foradditional protection, after all
residue has been removed, polish
the entire surface with CERAHA
BRYTE®CeramicCooktop Cleaner
and a paper towel.
Page 39

i
Metal Marks and Scratches
Be careful not to slide pots and pans
%
across gour cooktop. It will leave
metal markings on the cooktop
surface.
These marks are removable using
the CERAMABRYTE®Ceramic Cooktop
Cleanerwith the CERAMABRYTE®
Cleaning Padfor CeramicCooktops.
Cooktop Seal
To clean the cooktop seal around the
edges of the glass, lag a wet cloth on it
GEAppliances.com
[] If pots with a thin overlag of
aluminum or copper are allowed to
boil drg, the overlag mag leave black
discoloration on the cooktop. This
should be removed immediatelg
before heating again or the
discoloration mag be permanent.
CAUTION: Carefullycheck
the bottom of pans for roughness that
would scratch the cooktop.
for a few minutes, then wipe clean with
nonabrasive cleaners.
i',.Ip
t'3
.
i
C
."-€::
tt
• I""
il;iiiiiiiiii_!]iii!ii]
ii[iHi!!iiiiiiiiiiii
Glass surface--potential for permanent damage.
Ourtesting showsthat
if youare cookinghigh
sugarmixturessuch as
jellyorfudge and have
a spillover,itcancause
permanentdamageto
the glasssurfaceunless
the spilloverisimmediately
removed.
Damage from Sugary Spills and Melted Plastic
E_] Turn off all surface units.
Remove hot pans.
Wearing an oven mitt:
[]
a. Usea single-edge razor blade
scraper (CERAMABRYTE®Ceramic
Cooktop Scraper) to move the spill
to a cool area on the cooktop.
b. Remove the spill with
paper towels.
To Order Parts
To order CERAHABRYTE®CeramicCooktop
Cleanerand the cooktop scraper, please
call our toll-free number:
National Parts Center .... 800.626.2002
CERAPIABRVTE®Ceramic
Cooktop Cleaner ......... # WXIOX300
CERAPIABRVTE®Ceramic
Cooktop Scraper ......... # WX10X0302
Kit ....................... # WB64XS027
(Kit includes cream and cooktop scraper)
CERAPIABRVTE®Cleaning Pads for
Ceramic Cooktops ....... # WX10X350
[_] Any remaining spillover should be left
until the surface of the cooktop has
cooled.
[_] Don't use the surface units again until
all of the residue has been completelg
removed.
NOTE:If pitting or indentation in the glass
surface has olreodg occurred, the cooktop
glass will have to be replaced. In this case,
service will be necessorg.
i
¢
C
C
C
C
0
39
0
0
0
Page 40

Installation
Free-Standing
Instructions
I r_ Questions? Call 800.GE.CARES (800.432.2737) or visit our Website at: GEAppliences.com I
BEFORE YOU BEGIN
Read these instructions completely
and cerefullg.
• IMPORTANT - savetheseinstructions
for local inspector's use.
Electric Ranges
FOR YOUR SAFETY:
Be sure your appliance is properly installed
and grounded by a qualified technician.
Make sure the cabinets and wall coverings around
the range can withstand the temperatures (up to 200%)
generated by the range.
• IMPORTANT- Observea,governing
codes and ordinances.
• Note to Installer - Be sure to leave these
instructions with the Consumer.
• Note to Consumer - Keep these instructions for
future reference.
• Skill level -Installation of this appliance requires
basic mechanical skills.
• Completion time - i to :3hours
• Proper installation is the responsibility
of the installer.
• Product failure due to improper installation is not
covered under the Warranty.
-&WARNING - This appliance must be
properly grounded.
FOR YOUR SAFETY:
-&WARN ING - Beforebeginningthe
installation,switchpower offatservicepaneland lock
theservicedisconnectingmeans topreventpower
from beingswitchedon accidentally.When theservice
disconnectingmeans cannotbe locked,securely
fasteno prominentwarningdevice,such aso tog,
totheservicepanel.
All rough-in and spacing dimensions must be met for
safe use of your range. Electricity to the range can be
disconnected at the outlet without moving the range
if the outlet is in the preferred location (remove lower
drawer).
To reduce the risk of burns or fire when reaching over
hot surface elements, cabinet storage space above
the cooktop should be avoided. If cabinet storage
space is to be provided above the cooktop, the risk can
be reduced by installing a range hood that sticks out
at least 5" beyond the front of the cabinets. Cabinets
installed above a cooktop must be no deeper than 13".
- WARNING!
ANTI-TIP DEVICE
•All ranges can tip.
• BURNSor other SERIOUS
INJURIEScan result.
• INSTALLend CHECKthe
ANTI-TIP bracket following
the instructions supplied
with the bracket.
Toreduce the risk of tipping the range, the range must
be secured bg a properlg installed anti-tip bracket. See
installation instructions shipped with the bracket for
complete details before attempting to install.
Tocheck if the bracket is installed and engaged properlg,
carefullg tip the range forward. The bracket should stop
the range within 4 inches. If it does not, the bracket must
be reinstalled. If the range ispulled from the wall for ang
reason, alwags repeat this procedure to verifg the range
is properlg secured bg the anti-tip bracket.
For flee-standing or slide-in ranges, never completelg
remove the leveling legs or the range will not be secured
to the anti-tip device properlg.
If you did not receive on anti-tip bracket with gour
purchase, coil 1.800.626.8774 to receive one at no cost
(in Canada, coil 1.800.561.3344). For installation
instructions of the bracket, visit GEApplionces.com
(in Canada, GEApplionces.co).
40
Page 41

Installation Instructions
PREPARE TO INSTALL THE RANGE
MATERIALS YOU MAY NEED
TinSnips LagBolts AnchorSleeves
(ForAnti-Tip Bracket Mounted on Concrete Floors 0nly)
(UL-Approved40AMP)
4-WireCord OR 3-Wire Cord (ForConduit
4' Long 4' Long Installations Only)
SqueezeConnector
TOOLS YOU WILL NEED
Drillwith 1/8" Bit
AdjustableWrench
SafetyGlasses
TapeMeasure
PREPARE THE OPENING
D
Allow IW' spacing from the range to adjacent
vertical walls above the cooktop surface.
Allow 30" minimum clearance between the
surface units and the bottom of unprotected
wood or metal top cabinet, and 15" minimum
between the countertop and adjacent cabinet
bottom.
EXCEPTION:Installation of a listed microwave
oven or cooking appliance over the cooktop
shall conform to the installation instructions
packed with that appliance.
If cabinet storage is installed, reduce the risk by
installing a range hood that projects horizontally
a min. of 5" beyond the bottom of the cabinets.
Make sure the wall covering, countertops and
cabinets around the range can withstand heat
generated by the range, oven or cooktop up
to 200°F.
Hood thewidthof
5" Min.
Notlessthan
therange
G_
Pliers
1/4" NutDriver
PhillipsScrewdriver
Flat-BladeScrewdriver
PARTS INCLUDED
Anti-TipBracketKit
REMOVE SHIPPING MATERIALS
Remove packaging materials. Failure to
remove packaging materials could result
in damage to the appliance.
Locatetheoutletboxwithin
eithershadedarea.
Pencil
Level
Installthe
outletbox
oneither
sideofthegL
Cord
Flooring under the range
Your range, like mang other household items,
is heavg and can settle into soft floor coverings
such as cushioned vingl or carpeting.
When moving the range on this type of flooring,
it should be installed on o 1/4" thick sheet
of plywood (or similar material) as follows:
When the floor covering ends at the front
of the range, the area that the range will rest
on should be built up with plywood to the same
level or higher than the floor covering. This will
allow the range to be moved for cleaning or
servicing.
41
Page 42

Installation Instructions
ELECTRICAL CONNECTIONS
ELECTRICAL REQUIREMENTS
-A CAUTION: Forpersonal sofetg, do
not use an extension cord with this appliance.
Remove house fuse or open circuit breaker before
beginning installation.
This appliance must be supplied with the proper
voltage and frequency, and connected to an
individual properly grounded branch circuit,
protected by a circuit breaker or fuse having
amperage as specified on the rating plate. The
rating plate is located behind the oven drawer
on the oven frame.
Locationof model
ratingI
We recommend you have the electrical wiring
and hookup of your range connected by a qualified
electrician. After installation, have the electrician
show you where your main range disconnect
is located.
Check with your local utilities for electrical codes
which apply in your area. Failure to wire your oven
according to governing codes could result in a
hazardous condition. If there are no local codes,
your range must be wired and fused to meet
the requirements of the National Electrical Code,
ANSl/NFPA No. 70iLatest Edition. You can get
a copy by writing:
National Fire Protection Association
Effective January 1, 1996, the Notional Electrical
Code requires that new construction (not existing}
utilize o 4-conductor connection to on electric
range.
When installing an electric range in new
construction, follow Steps 3 and S for 4-wire
connection.
i
Batterymarch Park
Quincy, P1A 02269
ALL NEW CONSTRUCTIONS,
MOBILE HOMES AND
INSTALLATIONS WHERE LOCAL
CODES DO NOT ALLOW
GROUNDING THROUGH
NEUTRAL
Use only a 3-conductor or a 4-conductor UL-listed
range cord. These cords may be provided with ring
terminals on wire and a strain relief device.
A range cord rated at/40 amps with 125/250
minimum volt range is required. A S0-amp range
cord is not recommended but if used, it should
be marked for use with nominal 1B/8" diameter
connection openings. Care should be taken
to center the cable and strain relief within
the knockout hole to keep the edge from
damaging the cable.
• Because range terminals are not accessible
after range is in position, flexible service conduit
or cord must be used.
NOTE: If conduit is being used, go to Step :3Dand
then to Step 6 or 7.
• On some models, a filter capacitor may be
connected between the black and white leads
on the junction block.
You must use a B-wire, single-phase A.C. 208Y/120
Volt or 240/120 Volt, 60 Hertz electrical system. If
you connect to aluminum wiring, properly installed
connectors approved for use with aluminum wiring
must be used.
If the electrical service provided does not meet
the above specifications, have a licensed electrician
install an approved outlet.
42
Page 43

Installation Instructions
[TI POWER CORD AND STRAIN RELIEF
INSTALLATION
Remove the wire cover (on the lower back
rR1
of the range) by removing two (2) screws
using a 2/4" nut driver.
Do not discard these screws.
removewire
2 screws to
cover
Retainingtab
[]
For power cord installations only
(see the next step if using conduit), assemble
the strain relief in the hole. Insert the power
cord through the strain relief and tighten.
Allow enough slack to easily attach the cord
terminals to the terminal block. If tabs are
present at the end of the winged strain relief,
they can be removed for better fit.
NOTE: Do not install the power cord
without a strain relief. The strain relief
bracket should be installed before
reinstalling the rear range wiring cover.
_,_/_/ x Terminalblock
® ®
Backof range
Wirecover
[]
Remove the knockout ring (lyg')located
on bracket directly below the terminal block.
To remove the knockout, use a pair of pliers
to bend the knockout ring away from
the bracket and twist until ring is removed.
_ Terminalblock
(appearancemayvary)
/ /
Power cord Bracket
Skip to Step 4 or 5.
@
For conduit installations only, purchase a
squeeze connector matching the diameter of
your conduit and assemble it in the hole. Insert
the conduit through the squeeze connector and
tighten. Allow enough slack to easily attach the
wires to the terminal block.
NOTE: Do not install the conduit without a
squeeze connector. The squeeze connector
should be installed before reinstalling the rear
range wiring cover.
!'_r... Terminal
block
Knockoutring removed
in bracket
noc
Squeeze
connector
Conduit Bracket
Skip to Step 6 or 7.
43
Page 44

Installation Instructions
ELECTRICAL CONNECTIONS (CONT.)
3-WIRE POWER CORD INSTALLATION
WARNI NG: The neutral or ground
wire of the power cord must be connected
to the neutrel terminel located in the center
of the terminel block. The power leeds must
be connected to the lower left end the lower
right terminels of the terminel block.
Remove the :3 lower terminal screws from
rm
the terminal block. Insert the :3terminal screws
through each power cord terminal ring and
into the lower terminals of the terminal block.
Be certain that the center wire (white/neutral)
is connected to the center lower position of
the terminal block. Tighten screws securelg
into the terminal block.
DO NOT remove the ground strep
connection.
(appearance
may vary)
Groundplate
block
Neutral
terminal
Ground
strap
4-WIRE POWER CORD INSTALLATION
A
WARNING:The neutral wire
of the supply circuit must be connected
to the neutral terminel Ioceted in the lower
center of the terminel block. The power leeds
must be connected to the lower left end the
lower right terminels of the terminel block.
The 4th grounding lead must be connected
to the frame of the range with the ground
plate end the ground screw.
Remove the :3lower terminal screws from
the terminal block. Remove the ground screw
and ground plate and retain them.
Cut end discerd the ground strep.
DO NOTDISCARDANYSCREWS.
Insert the one ground screw into the power cord
ground wire terminal ring, through the ground
plate and into the frame of the range.
Insert the :3terminal screws (removed earlier)
@
through each power cord terminal ring and into
the lower terminals of the terminal block. Be certain
that the center wire (white/neutral) is connected
to the center lower position of the terminal block.
Tighten screws securelg into the terminal block.
_ Groundstrap
Before
Termina,/_]_
block
Groundstrap_
Neutral
terminal
Powercord
r_ Skip to step 8 and proceed with
the installation.
After ,// /J \
// r _[ = \ j Neutral
/'!_d_,t/'_ _ _ _ terminal
Terminal/ _[! _ Y _]_
(o__._)- ] _ _ y u (groundingto
r_ Skipto step 8 and proceed with the installation.
44
Page 45

Installation Instructions
3-WIRE CONDUIT INSTALLATION
Loosen the 3 lower terminal screws from
the terminal block. Insert the center bare wire
(white/neutral) tip through the bottom center
terminal block opening. On certain models,
the wire will need to be inserted through
the ground strap opening and then into the
bottom center block opening. Insert the two side
bare wire tips into the lower left and the lower
right terminal block openings. Tighten the screws
until the wire is firmlLl secure (approximatelLl
20 inch-lbs.).
NOTE: ALUMINUM WIRING:
Aluminum building wire mall be used but it
must be rated for the correct amperage and
voltage to make connection. Connect wires
according to this Step 6 or Step 7 depending
on number of wires.
block
Wireti
I-_ 4-WIRE CONDUIT INSTALLATION
Loosen the three lower terminal screws from
the terminal block. Remove the ground screw
and ground plate and retain them. Cut and
discard the ground strap. DO NOT DISCARD
ANY SCREWS.
Insert the ground bare wire tip between the range
frame and the ground plate (removed earlier) and
secure it in place with the ground screw (removed
earlier). Insert the bare wire (white/neutral) tip
through the bottom center of the terminal block
opening. Insert the two side bare wire tips into
the lower left and the lower right terminal block
openings. Tighten the screws until the wire isfirmlll
secure (approximatelll 20 inch-lbs.).
Before
Terminal
block
Groundstrap
Groundstrap
Neutral
Bracket
Wire used, location and enclosure of splices,
etc., must conform to good wiring prectices
end Iocel codes.
rB1 Skip to Step 8 and proceed with
the installation.
Conduit
After ,_
'_ Groundplate
(groundingto
range)
Ground
screw
Bracket
Wire used, location and enclosure of splices,
etc., must conform to good wiring prectices
end Iocel codes.
r_l Proceed to step 8.
45
Page 46

INSTALL THE RANGE
Installation Instructions
REPLACE THE WIRE COVER
Replace the wire cover on the range back by
sliding its right edge under the retaining tab and
replacing the two screws removed earlier. Make
sure that no wires are pinched between the cover
and the range back.
2screwsto
replacewire
cover
\
Backof range
[_ ANTI-TIP DEVICE INSTALLATION
An Anti-Tip bracket is supplied with instructions
for installation in a variety of locations. The
instructions include all necessary information
to complete the installation. Read the Safety
Instructions and the instructions that fit your
situation before beginning installation.
Attachmentto Wall or Floor
Bracket Wall SillPlate
__ wood orconcrete _t
J Screwmustenter
LEVEL THE RANGE
[]
Install the oven racks in the oven and position
the range where it will be installed.
Check for levelness by
placing o spirit level or o
cup, partially filled with Spiritlevel
water, on one of the oven
racks. If using o spirit level,
take two readings-with the
level placed diagonally first
in one direction and then the other.
The rear leveling legs must be adjusted prior
[]
to moving the range into position. They can
be adjusted from the bottom at the back
of the range.
Adjustfrom
the bottomback
of range(warming
drawermodels)
\
_1_ Lower /
Backof range
Use an open-end or adjustable wrench to
@
adjust the leveling legs until the range is level.
Replacethedrawer or panel.
After the range is level, slide the range away
r-cq
from the wall so that the Anti-Tip device can be
installed.
_eg
leveler
_ge
Screw must enter wood
AWARNING:
• Range must be secured with an approved Anti-Tip
device.
• Unless properly installed, the range could be tipped
by you or a child standing, sitting or leaning on an
open door.
• After installing the Anti-Tip device, verify that it is
in place by carefully attempting to tilt the range
forward.
• This range has been designed to meet all recognized
industry tip standards for all normal conditions.
• The use of this device does not preclude tipping
of the range when not properly installed.
• If the Anti-Tip device supplied with the range does
not fit this application, use the universal Anti-Tip
device WB02K10254.
46
Page 47

Installation Instructions
I_1 FINAL INSTALLATION CHECKLIST
• Check to make sure the circuit breaker is closed
(RESET)or the circuit fuses are replaced.
• Be sure power is in service to the building.
• Note (on some models): If the clock flashes
"bAd" and then "LinE" with a loud tone, the
neutral connection to the range is not wired
correctly. Check the terminal block connections
and/or house wiring to correct.
• Check to be sure that all packing materials
and tape have been removed. This will include
tape on metal panel under control knobs
(if applicable), adhesive tape, wire ties, cardboard
and protective plastic. Failure to remove these
materials could result in damage to the appliance
once the appliance has been turned on and
surfaces have heated.
• Check to make sure that the rear leveling leg
is fully inserted into the Anti-Tip bracket and
that the bracket is securely installed.
I_1 OPERATION CHECKLIST
Turn on one of the surface units to observe that
the element glows within 60 seconds. Turn the
unit off when glow is detected. If the glow is not
detected within the time limit, recheck the range
wiring connections. If change is required, retest
again. If no change is required, have building
wiring checked for proper connections and
voltage.
Check to make sure the Clock (on models so
equipped) display is energized. If a series of
horizontal red lines appear in the display,
disconnect power immediately. Recheck the
range wiring connections. If change is made
to connections, retest again. If no change is
required, have building wiring checked for proper
connections and voltage. It is recommended that
the clock be changed if the red lines appear.
Be sure all range controls are in the OFF position
before leaving the range.
47
Page 48

Troubleshooting tips.
Possible Causes What To Do
Surface units will not
maintain a rolling boil
or cooking is not
fast enough
Surface units do not Cooktop controls • Checkto seethe correct control isset for the surface
work properly improperly set. unit gouare using.
Scratches(magappear
as cracks)oncooktop
glass surface
Areas of discoloration Food spillovers not cleaned • See the Cleaning the gloss cooktop section.
on the cooktop before next use.
Improper cookware
being used.
A fuse in gour home mag be • Replace the fuse or reset the circuit breaker.
blown or the circuit breaker
tripped.
Incorrect cleaning
methods being used.
Cookware with rough bottoms
being usedor coarse particles
(salt or sand}were between
the cookware andthe surface
of the cooktop.
Cookware has been slid
across the cooktop surface.
Hot surface on a model • This is normal. The surface may appear discolored
with a light colored glass when it is hot. Thisis temporary and will disappear
cooktop, as the glass cools.
• Use pans which are flat and match the diameter
of the surface unit selected.
• Scratches arenot removable.Ting scratcheswill become
lessvisible intime asa resultof cleaning.
• Toavoid scratches,use the recommended cleaning
procedures.Make sure bottoms of cookware are clean
before use,and usecookware with smooth bottoms.
Plastic melted to Hot cooktop came into • Seethe Glass surface potential for permanent damage
the surface contact with plastic placed section in the Cleaning the gloss cooktop section.
on the hot cooktop.
Pitting (or indentation) Hot sugar mixture spilled • Call a qualified technician for replacement.
of the cooktop on the cooktop.
Frequent cgcling Improper cookware • Useonly flat cookware to minimize cycling.
off and on of being used.
surface units
Control signals after Youforgot to enter • Pressthe BAKEpad and desired temperature
entering cooking time a bake temperature or the SELF CLEAN pad and desired clean time.
or delag start or cleaning time.
Fooddoes not bake Oven controls improperlg set. • Seethe Usingtheupper oven section.
or roast properlg Rackposition isincorrect • Seethe Usingthe upper oven section.
or the rack is not level.
Incorrect cookware or • Seethe Usingthe upper oven section.
cookware of improper
size being used.
Oven thermostat needs • See the Adjust the oven thermostat Do it gourself!
adjustment, section.
"Close Door" scrolls The displag will alwags
in the displag when automaticallg remind gouto
BROIL is set close the door.
• This is a normal reminder to close the door when
broiling.
48
Page 49

GEAppliances.com
i_,_ Possible Causes What To Do
Fooddoes not Oven controls improperlgset. • Hake sure you touch the BROILHI/LO pad.
broil properly
in the upper oven Oven door not closed. • Seethe Usingthe upper oven section.
Improper rack position • Seethe Broiling Guide.
being used.
Food being cooked in • Forbest results,use a pan designed for broiling.
a hot pan. Hake sure it iscool.
Cookware not suited • Forbest results,use a pandesignedfor broiling.
for broiling.
Oven bottom not securely • Seethe Installation Instructions.
seated in position.
Upper oven temperature Oven thermostat • SeetheAdjust theoven thermostat Do it yourself!
too hot or toocold needs adjustment, section.
Clockand timer Plug on range is not completelg • Hake sureelectrical plug isplugged into a live,
do not work inserted in the electrical outlet, properly grounded outlet.
A fuse in gour home may be • Replacethe fuse or resetthe circuit breaker.
blown or the circuit breaker
tripped.
Oven controls improperly set. • Seethe Usingthe clock and timer section.
Upper oven light Light bulb isloose or defective. • Tighten or replacethe bulb.
doesnot work
Upperoven will not The oven temperature is too • Allow the range to coolto room temperature and
self-clean high to set a self-clean operation, reset the controls.
"Crackling"or This is the soundof the • Thisisnormal.
"popping" sound metal heating and cooling
Excessivesmoking Excessivesoil. • Touchthe CLEAR/OFFpad.Open the windows to
Ovendoor will not open Oven too hot. • Allow the ovento cool below locking temperature.
after a clean cycle
Ovennot clean after Oven controlsnot properlg set. • Seethe Usingthe self-cleaningupper oven section.
a clean cycle Oven was heavilgsoiled. • Cleanup heavy spillovers before starting the clean cgcle.
Plug on range is not completelg • Hakesureelectrical plug isplugged into a live,
inserted in the electrical outlet, properly grounded outlet.
Oven controlsimproperlgset. • Seethe Usingthe self-cleaning upper oven section.
during both the cooking
and cleaning functions.
rid the room of smoke.Wait until the LOCKEDDOOR
light goes off.Wipe up the excesssoiland reset
the clean cucle.
Heavilgsoiledovens mag needto self-clean again or
for a longer period of time.
"LOCKDOOR"flashes Theself-cleancgcle hasbeen • Closethe oven door.
in thedisplay selected but the door is not
closed.
LOCKEDDOORlight Theoven door is locked • Touchthe CLEAR/OFFpad.Allowthe ovento cool.
is on when you want because the temperature
to cook inside the oven has not
dropped below the
locking temperature.
49
Page 50

13
££
Lt}
O
Lt}
Troubleshooting tips.
To Do
Who
"F--" and anumber or You have a function error code. • Touchthe CLEAR/OFFpad.Allow the ovento coolfor
letter flash inthe display one hour. Putthe oven back into operation.
If the function code repeats. ° Disconnect all power to the range for 5 minutes
and then reconnect power. Ifthe function error code
repeats,call for service.
"Probe" appears in Thisis reminding you to enter ° Entera probetemperature.
the display a probe temperature after
plugging inthe probe.
Display goes blank A fuse in gour home may be • Replacethe fuse or resetthe circuit breaker.
blown or the circuit breaker
tripped.
Theclock isinthe • Seethe Specialfeatures of your upper ovencontrol section.
black-out mode.
i
£J
i
n
w
VJ ff_
Display flashes Power failure. • Resetthe clock.
Unable to get the Oven control pads were • TheBAKEand BROILHI/LO pads must be touched at
display to show "SF" not pressed properly, the same time and heldfor 3seconds.
Power outage, Power outage or surge. ° Resetthe clock. Ifthe oven was in use,you must reset
clock flashes it by touching the CLEAR/OFFpad, setting the clock
and resetting any cooking function.
"Burning" or "oily" This is normal in a new oven • Tospeedthe process,set a self-cleancycle for a
odor emitting from and will disappear in time. minimum of 3hours. Seethe Usingthe self-cleaning
thevent upper oven section.
Strongodor An odor from the insulation • Thisis temporary.
LOCappears in The RangeLockout feature • Besurethe surface unit controls areturned OFF.
the display is activated. Turn this feature off to usethe range.
v
Fan noise The convection fan may turn • This isnormal. To maximize cooking evenness,
Convection fan Preheat temperature ° Fanwill start automatically once the preheat
not working not reached, temperature isreached.
Drawer does not slide The drawer isout of alignment. ° Fullyextend the drawer and pushitall the way in.
smoothly or drags Seethe Careand cleaningof the rangesection.
around the inside of the oven
is normal for the first few times
the oven isused.
Seethe RangeLockoutsection.
on and off automatically, the fan is designed to operate in both directions
with a pause in between.
Drawer is overloaded or load • Reduceweight. Redistributedrawer contents.
is unbalanced.
Loweroven drawer A fuse in your home may be • Replacethe fuse or resetthe circuit breaker.
will not work blown or the circuit breaker
_iiii_iiiiiiiiiiiiiii!iiiii//iiiiiii!iiii!ii
iliiii!/l! iiii!l ili
O
Excessivecondensation Liquid in drawer. • Removeliquid.
in thedrawer
E
8
Fooddries out in the Moisture escaping. • Coverfood with lid or aluminum foil.
lower oven drawer
50
tripped.
The upper oven is self-cleaning. • Wait for the self-clean cycle to finish and the oven
to cool.
Controls improperly set. • Seethe Lower oven drawer section.
Uncovered foods. • Coverfood with lid or aluminum foil.
Temperature setting too high. • Reducetemperature setting.
Oven drawer not fully closed. • Pushdrawer in until latch engages.
Page 51

Please place in envelope and mail to:
Veuillez mettre dans une enveloppe et envoyez _ :
OWNERSHIPREGJSTRATJOH
P.O. BOX1780
MISSJSSAUGA,OHTARJO
L4Y4G1
(FORCAHADJAHCOHSUMERSOHLY)
51
Page 52

For Canadian
Customers
Pour les
Consommateurs
Canadiens
Pleaseregisteryour product to enableusto contactyou
in theremote eventasafetynolJceisissuedforthis product
Z
andto allow for efficientcommunicaOonunderthe terms
ofyour warranty, shouldthe need arise.
REGISTERON-LINE: www.geappiiances.ca MAILTO:
ENREGISTREMENTSURINTERNE[_,:_.eJectremenagersge.ca POSTERA:
Z
[][]MISS/MLLE.MR'/M[][]Ms.MRS'/MME'FIRSTNAME/PRENOM LASTNAME/NOM
rr"
STREETNO/ N°RUE STREETNAME/ RUE
rr"
C3
CrIY/VILLE
Z
uJ
Z
.-J
AREACODE/IND.RE_G.[TELEPHONE JE-MAIL
DIDYOUPURCHASEA SERVICECONTRACTFORTHISAPPLIANCE? YES/OUI FI IFYES/ SlOUI:EXPIRATION
AVEZ-VOUSACHETEUNCONTRATDESERVICEPOURCETAPPAREIL? NO/NON []
_9
Z
NAME OFSELLINGDEALER/ NOMDU MARCHAND MODEL / MODt _LE
INSTALLA]IONDATE/DATED'INSTALLA]ION
Y/A M D/J CORRESPONDENCE [] ENGLISH
I
I
I
[] Ido notwishtoreceiveanypromotionaloffersregardingthisproduct.
I
I
[] Jened6sirepasrecevoird'offrespromotionnellesconcernantceproduit
I
I
I ............................................................................................................................................................................................................................................................................................................................................................................................................................................................................................................................................................................................................................................................................................................................................................................................................................................................
L
CORRESPONDANCE [] FRAN(_AIS
Veuilbzenregis_erv_e produ&afindenouspermet[rede
communiqueravecvoussijamaisunavisdes6cur_ concemant
ceproduit6tait6mbetdecommuniquerfacibmentavecvousen
ve_ devo_egararrde,silebesoins'enfairsen_r.
RO.BOX1780,MISSISSAUGA
ONTARIO,L4Y461
A_. NO/APP./RR#
PROVINCE POSTALCODE/ POSTAL
Y/A M D/J
SERIAL/St_RIE
52
Page 53

Accessories. GEApplionces.co.
Looking For Something More?
You can find these accessories and many more at GEAppliances.com (U.S.)or
www.GEAppliances.ca (Canada), or call 800.626.2002 (U.S.)or 800.661.1616 (Canada)
(during normal business hours). Have your model number ready.
0
LightBulbs Knobs Cleaner
CleaningPads Scraper
Tired of discolored racks? Wishing you had extra-heavy-duty oven racks?
NOW AVAILABLE for your range:
GE's innovative, self-cleanable porcelain-coated oven racks!
• Heavy Duty
• Durable
• Able to be cleaned in a self-cleaning oven
Visit GEAppliances.com (U.S.)or www.GEAppliances.ca (Canada)
for more information.
53
Page 54

GEElectric Range Warrantg. iForcustomerstheunitedstotesl
All warranty service provided by our Factory Service Centers,
or an authorized Customer Care ®technician. To schedule
service, visit us on-line at GEAppliances.com, or call
800.GE.CARES (800.432.2737). Please have serial number
and model number available when calling for service.
GE Will Replace:
Ang part of the range which fails due to adefect in materials or workmanship. Duringthis
From the dateofthe
origind purchase
From the dateofthe
originol purchase
Service trips to gour home to teach gou how to use
the product.
Improper installation, deliverg or maintenance.
Failure of the product if it is abused, misused,
or usedfor other than the intended purpose or
usedcommerciallg.
limited one-gear warrants, GEwill also provide,free ofcharge, alllabor and in-home service
to replacethe defective part.
A replacement gloss cooktop if itshould:crack due to thermal shock;discolor;crack at the
rubber seal betweenthe glasscooktop andthe porcelain edge,or ifthe pattern wears off.
A replacement radiant surface unit if itshould burnout.
Duringthis fimited additional four-gear warrantg, you will be responsiblefor any labor or
in-home service.
Staple Four receipt here.
Proof of the original purchase
dote is needed to obtain service
under the warrant F.
Damage to the glass cooktop caused bg use of cleaners
other than the recommended cleaning creams.
Replacement of housefuses or resetting of circuit
breakers.
Damage to the product caused bg accident, fire, floods
or acts of God.
Damage to the glass cooktopcaused bg hardened
spills ofsugarg materials or melted plastic that
are not cleaned according to the directions in
the Owner's Manual.
EXCLUSION OF IMPLIED WARRANTIES--Your sole and exclusive remedg is product repair as provided in this Limited
Warrants. Ang implied warranties, including the implied warranties of merchantabilitg or fitness for a particular
purpose, are limited to one gear or the shortest period allowed bg law.
This warranty is extended to the original purchaser and any succeeding owner for products purchased for home
use within the USA. If the product is located in an area where service by a GEAuthorized Servicer is not available,
you may be responsible for a trip charge or you may be required to bring the product to an Authorized GEService
location for service. In Alaska, the warranty excludes the cost of shipping or service calls to your home.
Some states do not allow the exclusion or limitation of incidental or consequential damages. This warranty
gives you specific legal rights, and you may also have other rights which vary from state to state. To know
what your legal rights are, consult your local or state consumer affairs office or your state's Attorney General.
Incidental or consequential damage caused bg possible
defects with this appliance.
Damage caused after deliverg.
Product not accessible to provide required service.
54
Warrantor: General Electric Compang. Louisville, KY 40225
Page 55

Service trips to gour home to teach gou how to use
the product.
Damage to the glass cooktop caused bg use ofcleaners
other than the recommended cleaning creams.
installation, deliverg or maintenance.
Replacement of house fuses or resetting of circuit
breakers.
Failure of the product if it is abused, misused,
or used for other than the intended purpose or
used commerciallg.
Damage to the glass cooktop caused bg hardened
spills ofsugarg materials or melted plastic that
are not cleaned according to the directions in
the Owner's Manual.
EXCLUSION OF IMPLIED WARRANTIES--Your sole and exclusive remedg is product repair as provided in this Limited
Warrantg. Ang impfied warranties, including the implied warranties of merchantabilitg or fitness for a particular
purpose, are limited to one gear or the shortest period allowed bg law.
Damage to the product caused bg accident, fire, floods
or acts of God.
Incidental or consequential damage caused bg possible
defects with th is a ppliance.
Damage caused after delivery.
Product not accessible to provide required service.
This warrants is extended to the original purchaser and ang succeeding owner for products purchased in Canada
for home use within Canada. In-home warrontbl service will be provided in areas where it is available and deemed
reasonable bblMabe to provide.
Some provinces do not allow the exclusion or limitation of incidental or consequential damages, so the above
exclusion mag not applg to blOU.This warrants gives blOUspecific legal rights, and blOUmabl also have other rights
which varblfrom province to province. To know what your legal rights are in your province, consult your local or
provincial consumer affairs office.
Warrantor: Mabe Canada Inc.,
Burlington, Ontario
55
Page 56

Consumer Support.
GEAppliances Website Inthe U.S.:GEAppliances.com
Have a question or need assistance with your appliance?Try the GEAppliances Website 24 hours a day, any day
of the year! Forgreater convenienceand faster service,you can now download Owner's Hanuals,order parts or even
schedule service on-line. In Canada:www,GEAppliences,ce
ScheduleService Inthe U.S.:GEAppliunces.com
Expert GErepair service isonly one step away from your door.Geton-line and schedule your serviceat your
convenience any day of the year! Orcall 800.GE.CARES(800.432.2737)during normal businesshours.
In Canada, cell1.800.561.3344
Real Life Design Studio Inthe U.S.:GEAppliances.com
GEsupports the UniversalDesignconcept-products, services and environments that can be used by people of all
ages,sizesand capabilities.We recognizethe needto designfor awide range of physical and mental abilitiesand
impairments. Fordetails of GE'sUniversalDesignapplications, including kitchen design ideasfor peoplewith disabilities,
check out our Websitetoday. Forthe hearingimpaired, pleasecall800.TDD.GEAC(800.833.4322).
In Canada, contact: Hanager, Consumer Relations,Habe Canada Inc.
Suite310, 1 Factory Lane
Honcton, N.B.EIC 9H3
ExtendedWarranties
Purchasea GEextendedwarranty and learn about special discounts that are available while your warranty isstill
in effect. You can purchase it on-line anytime, or call800.626.2224during normal businesshours. GEConsumer Home
Serviceswill stillbe there after your warranty expires. In Cenede,cull1.888.261.2133
Ports and Accessories
Individualsqualified to servicetheir own appliances can have parts or accessoriessent directly to their homes
(VISA,MasterCardand Discovercards are accepted).Orderon-line today, 24 hours every day or by phoneat
800.626.2002during normal businesshours.
Instructions contained in thismanual coverproceduresto beperformed byany user.Other servicing generally should be
referredto qualified servicepersonnel.Caution must be exercised,sinceimproper servicingmug causeunsafeoperation.
Customers in Cenede should consult the yellow pages for the nearest Mabe service center,or call 1.800.881.1818.
Contact Us
If you are not satisfiedwith the service youreceivefrom GE,contact uson ourWebsite with allthe details including
your phone number,or write to: General Hanager, Customer Relations
GEAppliances,Appliance Park
Louisville,KY40225
In Canada: www.GEAppliences.ce, or write to: Director,Consumer Relations,Habe Canada Inc.
Suite310, 1 Factory Lane
Honcton, N.B.EIC 9H3
In the U.S.:GEAppliences.com
In the U.S.:GEAppliences.com
In the U.S.:GEAppliunces.com
Register your new appliance on-line--at your convenience! Timely product registration will allow for enhanced
I Register YourAppliance IntheU.S.:GEAppliences.com
communication and prompt serviceunder the terms of your warranty, should theneed arise.You may also mail
in the pre-printed registration card included in the packing material.In Canada: www,GEAppliences,ce
Printed in Mexico
This book isprinted on recycled paper.
 Loading...