

Page 1

CIC ProTM Clinical
Information Center
Operator’s Manual
Software Version 4.1
2001099-183 Revision A
g
GE Medical Systems
Information Technologies
gemedicalsystem.com
Page 2

NOTE:
The information in this manual only applies to CIC Pro Clinical Information Center software version 4.1.
It does not apply to earlier software versions. Due to continuing product innovation, specifications in this
manual are subject to change without notice.
Listed below are GE Medical Systems Information Technologies trademarks used in this document. All other
trademarks contained herein are the property of their respective owners.
APEX and CD TELEMETRY are trademarks of GE Medical Systems Information Technologies registered in
the United States Patent and Trademark Office.
APEXPRO, CD TELEMETRY
®
-LAN, CENTRALSCOPE, CIC PRO, and OCTACOMM are a trademarks of
GE Medical Systems Information Technologies.
© GE Medical Systems Information Technologies, 2004. All rights reserved.
T-2 CIC Pro Clinical Information Center Revision A
2001099-183 22 April 2004
Page 3

CE Marking Information
CE Marking Information
Compliance
The CIC Pro Clinical Information Center bears CE mark CE-0459
indicating its conformity with the provisions of the Council Directive 93/
42/EEC concerning medical devices and fulfills the essential
requirements of Annex I of this directive. The product is in radiointerference protection class A in accordance with EN 55011.
The country of manufacture can be found on the equipment labeling.
The product complies with the requirements of standard EN 60601-1-2
“Electromagnetic Compatibility - Medical Electrical Equipment”.
The CE marking prescribed above is only found on the equipment
labeling of the 230V European equipment. Only applicable equipment
will bear the CE marking.
The safety and effectiveness of this device has been verified against
previously distributed devices. Although all standards applicable to
presently marketed devices may not be appropriate for prior devices (i.e.
electromagnetic compatibility standards), this device will not impair the
safe and effective use of those previously distributed devices. See user’s
information.
CE Marking Information Exceptions
EMC: Immunity Performance
Users should be aware of known RF sources, such as radio or TV stations
and hand-held or mobile two-way radios, and consider them when
installing a medical device or system.
Be aware that adding accessories or components, or modifying the
medical device or system may degrade the EMI performance. Consult
with qualified personnel regarding changes to the system configuration.
Revision A CIC Pro Clinical Information Center CE-1
2001099-183
Page 4

CE Marking Information
Specified Electromagnetic Environment.
The CIC Pro and ApexPro server is suitable for use in the specified
electromagnetic environment. The customer and/or the user of the CIC
Pro and ApexPro server should assure that it is used in an
electromagnetic environment as described below:
CE Exception Table
EN60601-1-2 Clause 36 Exception Electromagnetic Environment Guidance
36.202.1 Immunity: ESD Direct - Discharges of 6 KV or greater to the
rear I/O connector area may cause the system
to lock up, thus experiencing loss of data and
loss of functionality. Operator intervention may
be required.
Likelihood of occurrence: Remote
During testing there were 2 occurrences out of
1,920 discharges.
The rear I/O connector area is not considered
to be user accessible during normal operation.
36.202.3.1 Immunity: Fast Transient Transients on the AC power line of +/- 1 KV or
higher may cause momentary network packet
loss (i.e. waveform and/or numeric data), thus
experiencing momentary loss of data at the
time of the surge.
36.202.3.2 Immunity: Fast Surges Surges on the AC power line of +/- 1 KV or
higher may cause momentary network packet
loss (i.e. waveform and/or numeric data), thus
experiencing momentary loss of data at the
time of the surge.
Floors should be wood, concrete, or ceramic
tile. If floors are covered with synthetic
material, the relative humidity should be at
least 30 %.
Mains power quality should be that of a typical
commercial and/or hospital environment.
Mains power quality should be that of a typical
commercial and/or hospital environment.
CE-2 CIC Pro Clinical Information Center Revision A
2001099-183
Page 5

General Information
This manual is an integral part of the product and describes its
The symbol means ATTENTION: Consult accompanying
Information which refers only to certain versions of the product is
The warranty does not cover damages resulting from the use of
GE Medical Systems Information Technologies is responsible for the
CE Marking Information
intended use. It should always be kept close to the equipment.
Observance of the manual is a prerequisite for proper product
performance and correct operation and ensures patient and operator
safety.
documents.
accompanied by the model number(s) of the product(s) concerned.
The model number is given on the nameplate of the product.
accessories and consumables from other manufacturers.
effects on safety, reliability, and performance of the product, only if:
assembly operations, extensions, readjustments, modifications,
or repairs are carried out by persons authorized by GE Medical
Systems Information Technologies;
the electrical installation of the relevant room complies with the
requirements of the appropriate regulations; and,
the Clinical Information Center is used in accordance with the
instructions for use.
All publications conform with the product specifications and
applicable IEC publications on safety and essential performance of
electromedical equipment as well as with applicable UL and CSA
requirements and AHA recommendations valid at the time of
printing.
The quality management system complies with the international
standards EN ISO 9001, ISO 13485 and EN 46001, and the Council
Directive on Medical Devices 93/42/EEC.
Revision A CIC Pro Clinical Information Center CE-3
2001099-183
Page 6

For your notes
CE Marking Information
CE-4 CIC Pro Clinical Information Center Revision A
2001099-183
Page 7

Contents
1 The Basics . . . . . . . . . . . . . . . . . . . . . . . . . . . . . . . . . . . . . 1-1
About This Manual . . . . . . . . . . . . . . . . . . . . . . . . . . . . . . . . . . . . . . . . . . . . . . . . . . . 1-3
Manual Purpose . . . . . . . . . . . . . . . . . . . . . . . . . . . . . . . . . . . . . . . . . . . . . . . . . . . 1-3
Intended Audience . . . . . . . . . . . . . . . . . . . . . . . . . . . . . . . . . . . . . . . . . . . . . . . . . 1-3
Definitions . . . . . . . . . . . . . . . . . . . . . . . . . . . . . . . . . . . . . . . . . . . . . . . . . . . . . . . 1-4
Illustrations and Names . . . . . . . . . . . . . . . . . . . . . . . . . . . . . . . . . . . . . . . . . . . . .1-4
Revision History . . . . . . . . . . . . . . . . . . . . . . . . . . . . . . . . . . . . . . . . . . . . . . . . . . . 1-5
About the Clinical Information Center . . . . . . . . . . . . . . . . . . . . . . . . . . . . . . . . . . . 1-6
Power . . . . . . . . . . . . . . . . . . . . . . . . . . . . . . . . . . . . . . . . . . . . . . . . . . . . . . . . . . . . . 1-8
Turning Power On . . . . . . . . . . . . . . . . . . . . . . . . . . . . . . . . . . . . . . . . . . . . . . . . . 1-8
. . . . . . . . . . . . . . . . . . . . . . . . . . . . . . . . . . . . . . . . . . . . . . . . . . . . . . . . . . . . . . . .1-8
Controls . . . . . . . . . . . . . . . . . . . . . . . . . . . . . . . . . . . . . . . . . . . . . . . . . . . . . . . . . . . 1-9
Mouse . . . . . . . . . . . . . . . . . . . . . . . . . . . . . . . . . . . . . . . . . . . . . . . . . . . . . . . . . . 1-9
Optional Touchscreen Display . . . . . . . . . . . . . . . . . . . . . . . . . . . . . . . . . . . . . . . 1-11
Keyboard . . . . . . . . . . . . . . . . . . . . . . . . . . . . . . . . . . . . . . . . . . . . . . . . . . . . . . . 1-12
Display Formats . . . . . . . . . . . . . . . . . . . . . . . . . . . . . . . . . . . . . . . . . . . . . . . . . . . . 1-13
Terminology . . . . . . . . . . . . . . . . . . . . . . . . . . . . . . . . . . . . . . . . . . . . . . . . . . . . . . . 1-14
Bedside Monitoring . . . . . . . . . . . . . . . . . . . . . . . . . . . . . . . . . . . . . . . . . . . . . . . 1-14
Telemetry Monitoring . . . . . . . . . . . . . . . . . . . . . . . . . . . . . . . . . . . . . . . . . . . . . . 1-14
Locked or Unlocked Beds . . . . . . . . . . . . . . . . . . . . . . . . . . . . . . . . . . . . . . . . . . 1-15
Multiple Patient Viewer . . . . . . . . . . . . . . . . . . . . . . . . . . . . . . . . . . . . . . . . . . . . . . 1-16
Telemetry and Network Bed Names . . . . . . . . . . . . . . . . . . . . . . . . . . . . . . . . . . 1-18
Locked/Unlocked Beds . . . . . . . . . . . . . . . . . . . . . . . . . . . . . . . . . . . . . . . . . . . . 1-18
Waveform Window . . . . . . . . . . . . . . . . . . . . . . . . . . . . . . . . . . . . . . . . . . . . . . . . 1-19
ECG Parameter Window . . . . . . . . . . . . . . . . . . . . . . . . . . . . . . . . . . . . . . . . . . . 1-21
Initiating a Manual Graph . . . . . . . . . . . . . . . . . . . . . . . . . . . . . . . . . . . . . . . . . . . 1-22
User Help Message Area . . . . . . . . . . . . . . . . . . . . . . . . . . . . . . . . . . . . . . . . . . . 1-22
Alarm Condition Indicators . . . . . . . . . . . . . . . . . . . . . . . . . . . . . . . . . . . . . . . . . . 1-23
Main Menu Buttons . . . . . . . . . . . . . . . . . . . . . . . . . . . . . . . . . . . . . . . . . . . . . . . 1-23
Single Patient Viewer . . . . . . . . . . . . . . . . . . . . . . . . . . . . . . . . . . . . . . . . . . . . . . . 1-24
Data Source . . . . . . . . . . . . . . . . . . . . . . . . . . . . . . . . . . . . . . . . . . . . . . . . . . . . . . . 1-25
Revision A CIC Pro Clinical Information Center i
2001099-183
Page 8

Time Focus . . . . . . . . . . . . . . . . . . . . . . . . . . . . . . . . . . . . . . . . . . . . . . . . . . . . . . . . 1-26
Viewing Alarm Histories . . . . . . . . . . . . . . . . . . . . . . . . . . . . . . . . . . . . . . . . . . . . 1-26
Viewing Graphic Trends . . . . . . . . . . . . . . . . . . . . . . . . . . . . . . . . . . . . . . . . . . . . 1-26
Viewing Vital Signs . . . . . . . . . . . . . . . . . . . . . . . . . . . . . . . . . . . . . . . . . . . . . . .1-27
Viewing Full Disclosure . . . . . . . . . . . . . . . . . . . . . . . . . . . . . . . . . . . . . . . . . . . . 1-27
Web Browser . . . . . . . . . . . . . . . . . . . . . . . . . . . . . . . . . . . . . . . . . . . . . . . . . . . . . . 1-28
Browser Configuration . . . . . . . . . . . . . . . . . . . . . . . . . . . . . . . . . . . . . . . . . . . . .1-28
Menu Formats . . . . . . . . . . . . . . . . . . . . . . . . . . . . . . . . . . . . . . . . . . . . . . . . . . . . . 1-29
Main Menu . . . . . . . . . . . . . . . . . . . . . . . . . . . . . . . . . . . . . . . . . . . . . . . . . . . . . . 1-29
Popup Menus . . . . . . . . . . . . . . . . . . . . . . . . . . . . . . . . . . . . . . . . . . . . . . . . . . . . 1-29
Text Entry Fields . . . . . . . . . . . . . . . . . . . . . . . . . . . . . . . . . . . . . . . . . . . . . . . . . 1-30
Controls . . . . . . . . . . . . . . . . . . . . . . . . . . . . . . . . . . . . . . . . . . . . . . . . . . . . . . . . . . 1-31
Radio Buttons . . . . . . . . . . . . . . . . . . . . . . . . . . . . . . . . . . . . . . . . . . . . . . . . . . .1-31
Check Boxes . . . . . . . . . . . . . . . . . . . . . . . . . . . . . . . . . . . . . . . . . . . . . . . . . . . . 1-31
Scroll Bars . . . . . . . . . . . . . . . . . . . . . . . . . . . . . . . . . . . . . . . . . . . . . . . . . . . . . . 1-32
System Environment Monitor Notification . . . . . . . . . . . . . . . . . . . . . . . . . . . . . . 1-33
2 Safety . . . . . . . . . . . . . . . . . . . . . . . . . . . . . . . . . . . . . . . . . 2-1
For Your Safety . . . . . . . . . . . . . . . . . . . . . . . . . . . . . . . . . . . . . . . . . . . . . . . . . . . . . 2-3
Intended Use . . . . . . . . . . . . . . . . . . . . . . . . . . . . . . . . . . . . . . . . . . . . . . . . . . . . . 2-3
Terminology . . . . . . . . . . . . . . . . . . . . . . . . . . . . . . . . . . . . . . . . . . . . . . . . . . . . . . 2-3
Monitor Safety . . . . . . . . . . . . . . . . . . . . . . . . . . . . . . . . . . . . . . . . . . . . . . . . . . . . 2-4
Reference Literature . . . . . . . . . . . . . . . . . . . . . . . . . . . . . . . . . . . . . . . . . . . . . . 2-11
Equipment Symbols . . . . . . . . . . . . . . . . . . . . . . . . . . . . . . . . . . . . . . . . . . . . . . . . 2-12
Classification . . . . . . . . . . . . . . . . . . . . . . . . . . . . . . . . . . . . . . . . . . . . . . . . . . . . 2-14
Underwriters Laboratories, Inc. . . . . . . . . . . . . . . . . . . . . . . . . . . . . . . . . . . . . . . 2-14
3 Maintenance . . . . . . . . . . . . . . . . . . . . . . . . . . . . . . . . . . . 3-1
Biocompatibility . . . . . . . . . . . . . . . . . . . . . . . . . . . . . . . . . . . . . . . . . . . . . . . . . . . . . 3-3
Inspection . . . . . . . . . . . . . . . . . . . . . . . . . . . . . . . . . . . . . . . . . . . . . . . . . . . . . . . . . . 3-4
Cleaning . . . . . . . . . . . . . . . . . . . . . . . . . . . . . . . . . . . . . . . . . . . . . . . . . . . . . . . . . . . 3-5
General Cleaning . . . . . . . . . . . . . . . . . . . . . . . . . . . . . . . . . . . . . . . . . . . . . . . . . . 3-5
Cleaning the Touchscreen . . . . . . . . . . . . . . . . . . . . . . . . . . . . . . . . . . . . . . . . . . . 3-6
Technical Maintenance . . . . . . . . . . . . . . . . . . . . . . . . . . . . . . . . . . . . . . . . . . . . . . . 3-7
ii CIC Pro Clinical Information Center Revision A
2001099-183
Page 9

4 CIC Setup . . . . . . . . . . . . . . . . . . . . . . . . . . . . . . . . . . . . . . 4-1
Introduction . . . . . . . . . . . . . . . . . . . . . . . . . . . . . . . . . . . . . . . . . . . . . . . . . . . . . . . . 4-3
CIC Defaults . . . . . . . . . . . . . . . . . . . . . . . . . . . . . . . . . . . . . . . . . . . . . . . . . . . . . . . . 4-4
CIC Defaults Controls . . . . . . . . . . . . . . . . . . . . . . . . . . . . . . . . . . . . . . . . . . . . . . 4-5
Telemetry Unit Defaults . . . . . . . . . . . . . . . . . . . . . . . . . . . . . . . . . . . . . . . . . . . . . . . 4-9
Telemetry Unit Defaults Controls . . . . . . . . . . . . . . . . . . . . . . . . . . . . . . . . . . . . . 4-10
Telemetry Alarm Control Defaults . . . . . . . . . . . . . . . . . . . . . . . . . . . . . . . . . . . . . 4-12
Telemetry Alarm Control Defaults Controls . . . . . . . . . . . . . . . . . . . . . . . . . . . . .4-13
Current Telemetry Listings . . . . . . . . . . . . . . . . . . . . . . . . . . . . . . . . . . . . . . . . . . . 4-14
Current Telemetry Listings Controls . . . . . . . . . . . . . . . . . . . . . . . . . . . . . . . . . .4-15
Alpha-Numeric TTX ID Numbering . . . . . . . . . . . . . . . . . . . . . . . . . . . . . . . . . . . 4-15
Display Format . . . . . . . . . . . . . . . . . . . . . . . . . . . . . . . . . . . . . . . . . . . . . . . . . . . . . 4-16
Display Format Controls . . . . . . . . . . . . . . . . . . . . . . . . . . . . . . . . . . . . . . . . . . .4-17
Changing the Display Format . . . . . . . . . . . . . . . . . . . . . . . . . . . . . . . . . . . . . . .4-18
Assigning Patients to Patient Slots . . . . . . . . . . . . . . . . . . . . . . . . . . . . . . . . . . . 4-20
Screen Calibration . . . . . . . . . . . . . . . . . . . . . . . . . . . . . . . . . . . . . . . . . . . . . . . . . . 4-21
Service Password . . . . . . . . . . . . . . . . . . . . . . . . . . . . . . . . . . . . . . . . . . . . . . . . . . 4-22
Full Disclosure Defaults . . . . . . . . . . . . . . . . . . . . . . . . . . . . . . . . . . . . . . . . . . . . . 4-23
Full Disclosure Controls . . . . . . . . . . . . . . . . . . . . . . . . . . . . . . . . . . . . . . . . . . . . 4-24
Full Disclosure Off-line Storage (Minute Rule) . . . . . . . . . . . . . . . . . . . . . . . . . . . 4-26
Bedside Status Messages . . . . . . . . . . . . . . . . . . . . . . . . . . . . . . . . . . . . . . . . . . . . 4-27
5 Printing . . . . . . . . . . . . . . . . . . . . . . . . . . . . . . . . . . . . . . . . 5-1
Initiating and Stopping a Graph . . . . . . . . . . . . . . . . . . . . . . . . . . . . . . . . . . . . . . . . 5-3
Initiating a Graph . . . . . . . . . . . . . . . . . . . . . . . . . . . . . . . . . . . . . . . . . . . . . . . . . . 5-3
Stopping a Graph . . . . . . . . . . . . . . . . . . . . . . . . . . . . . . . . . . . . . . . . . . . . . . . . . . 5-3
Graph All Patients . . . . . . . . . . . . . . . . . . . . . . . . . . . . . . . . . . . . . . . . . . . . . . . . . . . 5-4
Initiating a Graph All Patients Request . . . . . . . . . . . . . . . . . . . . . . . . . . . . . . . . . 5-5
Graph Paper Out Indicator . . . . . . . . . . . . . . . . . . . . . . . . . . . . . . . . . . . . . . . . . . . . 5-6
Graph Location Settings . . . . . . . . . . . . . . . . . . . . . . . . . . . . . . . . . . . . . . . . . . . . . . 5-7
Graph Setup Tab Sheet . . . . . . . . . . . . . . . . . . . . . . . . . . . . . . . . . . . . . . . . . . . . . . . 5-8
Graph Waveforms Controls . . . . . . . . . . . . . . . . . . . . . . . . . . . . . . . . . . . . . . . . . .5-9
Graph Location Controls . . . . . . . . . . . . . . . . . . . . . . . . . . . . . . . . . . . . . . . . . . . 5-11
Graph Speed Controls . . . . . . . . . . . . . . . . . . . . . . . . . . . . . . . . . . . . . . . . . . . . . 5-14
Laser Printer . . . . . . . . . . . . . . . . . . . . . . . . . . . . . . . . . . . . . . . . . . . . . . . . . . . . . . . 5-15
Revision A CIC Pro Clinical Information Center iii
2001099-183
Page 10

6 Alarm Control . . . . . . . . . . . . . . . . . . . . . . . . . . . . . . . . . . 6-1
Alarm Structure . . . . . . . . . . . . . . . . . . . . . . . . . . . . . . . . . . . . . . . . . . . . . . . . . . . . . 6-3
Patient Status Alarms . . . . . . . . . . . . . . . . . . . . . . . . . . . . . . . . . . . . . . . . . . . . . .6-3
System Status Alarms . . . . . . . . . . . . . . . . . . . . . . . . . . . . . . . . . . . . . . . . . . . . . . 6-5
Alarm Control Tab Sheet . . . . . . . . . . . . . . . . . . . . . . . . . . . . . . . . . . . . . . . . . . . . . . 6-6
Printing Alarm Settings . . . . . . . . . . . . . . . . . . . . . . . . . . . . . . . . . . . . . . . . . . . .6-12
Silencing Alarms . . . . . . . . . . . . . . . . . . . . . . . . . . . . . . . . . . . . . . . . . . . . . . . . . 6-13
7 Admit/View a Patient . . . . . . . . . . . . . . . . . . . . . . . . . . . . . 7-1
Admitting a Patient . . . . . . . . . . . . . . . . . . . . . . . . . . . . . . . . . . . . . . . . . . . . . . . . . . 7-3
Ways to Monitor . . . . . . . . . . . . . . . . . . . . . . . . . . . . . . . . . . . . . . . . . . . . . . . . . . . 7-3
Admit Instructions . . . . . . . . . . . . . . . . . . . . . . . . . . . . . . . . . . . . . . . . . . . . . . . . .7-5
Special Considerations for Rover Monitoring . . . . . . . . . . . . . . . . . . . . . . . . . . . . . 7-8
Discharging a Patient . . . . . . . . . . . . . . . . . . . . . . . . . . . . . . . . . . . . . . . . . . . . . . . . 7-9
Discharge Procedure . . . . . . . . . . . . . . . . . . . . . . . . . . . . . . . . . . . . . . . . . . . . . . . 7-9
New Patient . . . . . . . . . . . . . . . . . . . . . . . . . . . . . . . . . . . . . . . . . . . . . . . . . . . . . . . 7-12
Move Telemetry Patients . . . . . . . . . . . . . . . . . . . . . . . . . . . . . . . . . . . . . . . . . . . . . 7-13
Moving Locked/Unlocked Beds . . . . . . . . . . . . . . . . . . . . . . . . . . . . . . . . . . . . . . 7-13
Viewing a Patient . . . . . . . . . . . . . . . . . . . . . . . . . . . . . . . . . . . . . . . . . . . . . . . . . . . 7-14
View Patient Tab Sheet . . . . . . . . . . . . . . . . . . . . . . . . . . . . . . . . . . . . . . . . . . . .7-15
Viewing Other Patients . . . . . . . . . . . . . . . . . . . . . . . . . . . . . . . . . . . . . . . . . . . . . . 7-16
View Other Button . . . . . . . . . . . . . . . . . . . . . . . . . . . . . . . . . . . . . . . . . . . . . . . . 7-16
Viewing Patients Through Alarm Condition Indicators . . . . . . . . . . . . . . . . . . . . . 7-17
Viewing PDS Data For a Discharged Patient . . . . . . . . . . . . . . . . . . . . . . . . . . . . 7-17
8 Alarm Histories . . . . . . . . . . . . . . . . . . . . . . . . . . . . . . . . . 8-1
Alarm Histories . . . . . . . . . . . . . . . . . . . . . . . . . . . . . . . . . . . . . . . . . . . . . . . . . . . . . 8-3
Alarm Histories Controls . . . . . . . . . . . . . . . . . . . . . . . . . . . . . . . . . . . . . . . . . . . . 8-5
Printing Alarm Histories . . . . . . . . . . . . . . . . . . . . . . . . . . . . . . . . . . . . . . . . . . . . . . 8-9
iv CIC Pro Clinical Information Center Revision A
2001099-183
Page 11

9 Graphic Trends . . . . . . . . . . . . . . . . . . . . . . . . . . . . . . . . . 9-1
Graphic Trends . . . . . . . . . . . . . . . . . . . . . . . . . . . . . . . . . . . . . . . . . . . . . . . . . . . . . 9-3
Graphic Trends Tab Sheet . . . . . . . . . . . . . . . . . . . . . . . . . . . . . . . . . . . . . . . . . . . 9-4
Graphic Trends Controls . . . . . . . . . . . . . . . . . . . . . . . . . . . . . . . . . . . . . . . . . . . . 9-5
Printing Graphic Trends . . . . . . . . . . . . . . . . . . . . . . . . . . . . . . . . . . . . . . . . . . . . . . 9-9
10 Vital Signs . . . . . . . . . . . . . . . . . . . . . . . . . . . . . . . . . . . . 10-1
Vital Signs . . . . . . . . . . . . . . . . . . . . . . . . . . . . . . . . . . . . . . . . . . . . . . . . . . . . . . . . 10-3
Vital Signs Controls . . . . . . . . . . . . . . . . . . . . . . . . . . . . . . . . . . . . . . . . . . . . . . . 10-4
Printing Vital Signs . . . . . . . . . . . . . . . . . . . . . . . . . . . . . . . . . . . . . . . . . . . . . . . . . 10-6
11 Full Disclosure . . . . . . . . . . . . . . . . . . . . . . . . . . . . . . . . 11-1
Full Disclosure . . . . . . . . . . . . . . . . . . . . . . . . . . . . . . . . . . . . . . . . . . . . . . . . . . . . . 11-3
Full Disclosure Tab Sheet . . . . . . . . . . . . . . . . . . . . . . . . . . . . . . . . . . . . . . . . . . 11-4
Full Disclosure Window . . . . . . . . . . . . . . . . . . . . . . . . . . . . . . . . . . . . . . . . . . . . 11-5
Full Disclosure Controls . . . . . . . . . . . . . . . . . . . . . . . . . . . . . . . . . . . . . . . . . . . . 11-7
Printing Full Disclosure Information . . . . . . . . . . . . . . . . . . . . . . . . . . . . . . . . . . 11-10
Print Report . . . . . . . . . . . . . . . . . . . . . . . . . . . . . . . . . . . . . . . . . . . . . . . . . . . . 11-10
Printing from the Main Menu . . . . . . . . . . . . . . . . . . . . . . . . . . . . . . . . . . . . . . . 11-13
Calipers . . . . . . . . . . . . . . . . . . . . . . . . . . . . . . . . . . . . . . . . . . . . . . . . . . . . . . . . . . 11-14
Measurement Table . . . . . . . . . . . . . . . . . . . . . . . . . . . . . . . . . . . . . . . . . . . . . . 11-15
Calipers Measurement Window . . . . . . . . . . . . . . . . . . . . . . . . . . . . . . . . . . . . . 11-16
Performing a Calipers Measurement . . . . . . . . . . . . . . . . . . . . . . . . . . . . . . . . .11-18
Revision A CIC Pro Clinical Information Center v
2001099-183
Page 12

12 Parameter Monitoring . . . . . . . . . . . . . . . . . . . . . . . . . . . 12-1
Introduction . . . . . . . . . . . . . . . . . . . . . . . . . . . . . . . . . . . . . . . . . . . . . . . . . . . . . . . 12-3
Data Synchronization . . . . . . . . . . . . . . . . . . . . . . . . . . . . . . . . . . . . . . . . . . . . . . 12-3
ECG Monitoring . . . . . . . . . . . . . . . . . . . . . . . . . . . . . . . . . . . . . . . . . . . . . . . . . . . . 12-4
ECG Controls . . . . . . . . . . . . . . . . . . . . . . . . . . . . . . . . . . . . . . . . . . . . . . . . . . . . 12-4
SpO2/Respiration Monitoring . . . . . . . . . . . . . . . . . . . . . . . . . . . . . . . . . . . . . . . . . 12-8
SpO
Controls . . . . . . . . . . . . . . . . . . . . . . . . . . . . . . . . . . . . . . . . . . . . . . . . . . . 12-8
2
Respiration Controls . . . . . . . . . . . . . . . . . . . . . . . . . . . . . . . . . . . . . . . . . . . . . .12-9
Pressure Monitoring . . . . . . . . . . . . . . . . . . . . . . . . . . . . . . . . . . . . . . . . . . . . . . . 12-11
NBP Controls . . . . . . . . . . . . . . . . . . . . . . . . . . . . . . . . . . . . . . . . . . . . . . . . . . . 12-12
Invasive Pressure Controls . . . . . . . . . . . . . . . . . . . . . . . . . . . . . . . . . . . . . . . . 12-13
A Abbreviations and Symbols . . . . . . . . . . . . . . . . . . . . . . . .A-1
Abbreviations . . . . . . . . . . . . . . . . . . . . . . . . . . . . . . . . . . . . . . . . . . . . . . . . . . . . . . . A-3
Symbols . . . . . . . . . . . . . . . . . . . . . . . . . . . . . . . . . . . . . . . . . . . . . . . . . . . . . . . . . . . A-8
B Supplies . . . . . . . . . . . . . . . . . . . . . . . . . . . . . . . . . . . . . . . .B-1
Contact Information . . . . . . . . . . . . . . . . . . . . . . . . . . . . . . . . . . . . . . . . . . . . . . . . . . B-3
Index . . . . . . . . . . . . . . . . . . . . . . . . . . . . . . . . . . . . . . . Index-1
vi CIC Pro Clinical Information Center Revision A
2001099-183
Page 13

1 The Basics
Revision A CIC Pro Clinical Information Center 1-1
2001099-183
Page 14

For your notes
1-2 CIC Pro Clinical Information Center Revision A
2001099-183
Page 15

About This Manual
Manual Purpose
This operator manual has been prepared by the Technical Writing staff
of GE Medical Systems Information Technologies. It provides operating
instructions for the CIC Pro with GE Medical Systems Information
Technologies patient monitors and interface devices.
The CIC Pro can be used as a central station for viewing bedside
monitored patients, telemetry patients, or both. All of the basic operating
instructions for the CIC Pro itself are in this manual. Information
presented in this manual applies when the type of monitoring (using
either a bedside patient monitor or telemetry) is not a factor in CIC Pro
operation. For information about monitoring functions that are specific
to the patient monitor or telemetry system, refer to the operator’s
manual for that product.
Intended Audience
The Basics: About This Manual
This manual is geared for clinical professionals. Clinical professionals
are expected to have working knowledge of medical procedures,
practices, and terminology as required for monitoring of critically ill
patients.
Revision A CIC Pro Clinical Information Center 1-3
2001099-183
Page 16

Definitions
The Basics: About This Manual
The following formats are used in this manual to highlight various web
viewer features and functions.
Black text Indicates keys on the keyboard, text to be entered, or hardware items such as buttons or
switches on the equipment.
Italicized text Indicates software terms that identify menu items, buttons, or options in various windows.
Ctrl+Esc Indicates a keyboard operation. A (+) sign between the names of two keys indicates that
you must press and hold the first key while pressing the second key once.
For example, “Press Ctrl+Esc” means to press and hold down the Ctrl key while pressing
the Esc key.
<Space> Indicates you must press the spacebar. When instructions are given for typing a precise text
string with one or more spaces, the point where the spacebar must be pressed is indicated
as: <Space>. The purpose of the < > brackets is to ensure you press the spacebar when
required.
Enter Indicates you must press the “Enter” or “Return” key on the keyboard. Do not type “enter”.
Illustrations and Names
All illustrations in this manual are provided as examples only. They may
not necessarily reflect your monitoring setup or data displayed on your
monitor.
In this manual, all names appearing in examples and illustrations are
fictitious. The use of any real person’s name is purely coincidental.
1-4 CIC Pro Clinical Information Center Revision A
2001099-183
Page 17

Revision History
The Basics: About This Manual
This manual has a revision letter, located at the bottom of each page.
This revision letter changes whenever the manual is updated. Revision A
is the initial release of the document.
Revision Date Comments
A 22 April 04 Manual released with this document number to
correspond with CIC Pro software version 4.1
Revision A CIC Pro Clinical Information Center 1-5
2001099-183
Page 18

The Basics: About the Clinical Information Center
About the Clinical Information Center
This manual addresses the operation of the Clinical Information Center.
The Clinical Information Center is referred to as the CIC Pro throughout
the rest of this document.
The CIC Pro displays data from up to 16 bedside devices (patient
monitors, Unity Network
transmitters, etc.) at one time. This data is collected for each individual
monitor and sent to the CIC Pro via the Unity Network. Included are the
bed number, the primary ECG waveform, heart rate, alarm messages,
etc.
The vital sign numerics displayed are determined at the GE Medical
Systems Information Technologies bedside monitor or the telemetry
receiver cabinet. GE bedside monitors send numerics for all actively
monitored parameters as well.
Control is provided through the mouse or optional touchscreen display
and keyboard.
ID connectivity devices, telemetry
Telemetry Compatibility
The following page shows an illustration of the CIC Pro with the various
components, indicators, and controls labeled.
Refer to the service manual for installation instructions, including
mounting and support requirements.
The following issues apply with regard to compatibility with CIC Pro
software version 4.1
Due to changes in Telemetry Unit Defaults and Telemetry Alarm
Control defaults, Centralscope
TM
central stations and previous
software versions of CIC are not in-unit compatible with CIC Pro
software version 4.1.
The CD Telemetry-LAN software is compatible with all versions of
CIC Pro software.
The ApexPro telemetry system software 3.x is only compatible with
CIC Pro software version 4.x.
The ApexPro telemetry system software 1.7 and 2.x is compatible
with CIC software version 3.x.
The ApexPro telemetry system software 1.x is compatible with CIC
software version 2.x.
The ApexPro telemetry system is not compatible with versions of CIC
software earlier than 2.x.
1-6 CIC Pro Clinical Information Center Revision A
2001099-183
Page 19

Front View
The Basics: About the Clinical Information Center
001B
Clinical Information Center
The components shown in the photograph above are representative of a
typical CIC Pro. They may not appear identical to the components of
your system. The CIC Pro processing unit is not shown.
Revision A CIC Pro Clinical Information Center 1-7
2001099-183
Page 20

Power
Turning Power On
The Basics: Power
WARNING
Check the service manual for AC power requirements
before installation.
When you properly connect all cables, press the power switches on the
back of the processing unit and the monitor. (Refer to the service manual
for information on system connections.) A green indicator light means
the power is on. (Refer to the figure on the previous page.)
CAUTION
Do NOT load any software other than that specified by
GE Medical Systems Information Technologies onto the
CIC Pro. Installation of software not specified by GE
Medical Systems Information Technologies may cause
damage to the server or loss or corruption of data.
1-8 CIC Pro Clinical Information Center Revision A
2001099-183
Page 21

Controls
Mouse
The Basics: Controls
Operating the CIC Pro is done with the mouse, the keyboard or an
optional touchscreen display.
The mouse is the primary means of user interaction with the CIC Pro.
Left Mouse Button Right Mouse Button
Mouse Pointer Shapes
027A
Depending on your action, or the mode of operation, the mouse pointer on
the CIC Pro screen shapes differently.
Arrow
The mouse pointer is arrow-shaped when you operate in user
mode. When the mouse pointer is arrow-shaped, you can choose
028A
commands, highlight options, and move from window to
window.
I-Beam
The mouse pointer is shaped like an I-beam when you are in a
030A
text entry field.
Cross
The mouse pointer is cross-shaped when you are operating in
service mode. For more information on the CIC Pro’s service
029A
mode, refer to the service manual.
Revision A CIC Pro Clinical Information Center 1-9
2001099-183
Page 22

Left Mouse Button
Right Mouse Button
The Basics: Controls
Use the left mouse button for making patient-oriented selections and
initiating actions on the screen of the CIC Pro.
Use the right mouse button for making system-oriented selections. When
you press the right mouse button, the right-click menu opens.
NOTE
The right mouse button only opens the right-click menu. It does not
highlight selections or initiate actions other than the items you
select.
Right-Click Menu—Example
Right-click menu items available within the user mode are:
Select Care Unit then Bed Number
Select Waveform #1 color
Select Waveform #2
Select Waveform #3
Select Waveform #4
023B
1-10 CIC Pro Clinical Information Center Revision A
2001099-183
Page 23

The Basics: Controls
“Clicking” the Mouse
For purposes of this manual, the term “clicking” refers to positioning the
mouse pointer on a selection and pressing the left mouse button.
NOTE
In situations where the right mouse button is pressed, this is
specifically called out. In all other cases, assume you should press the
LEFT mouse button.
Optional Touchscreen Display
The touchscreen display is an optional component of the CIC Pro. A
touchscreen display (or simply touchscreen) is a screen with areas that
are sensitive to touch. Essentially, any area that can be selected using
the mouse pointer, can be selected using the touchscreen.
Guidelines for using the touchscreen display:
The touchscreen feature does not function properly if tape or paper is
stuck to the screen’s surface.
Do not use pencils, pens, and other sharp, pointed objects to activate
the touchscreen.
The right mouse click function cannot be used with a touchscreen
display.
NOTE
Any time the manual says to “click with the mouse” you can
optionally tap the display control with a finger.
Revision A CIC Pro Clinical Information Center 1-11
2001099-183
Page 24

Keyboard
Use the keyboard to enter patient information when you admit a patient.
To enter patient data, position the mouse pointer in the text entry field.
When the mouse pointer is positioned correctly, its shape changes from
an arrow to an I-beam. The I-beam mouse pointer indicates that you can
type, select text, or reposition the insertion point.
Silence Alarms Keyboard Key
Press the Silence Alarms key located on the keyboard to silence the
audible alarm tones.
This sends a silence alarms command to those beds displayed in the
multiple patient viewer or single patient viewer who have queued or are
sounding an audio alarm on the CIC Pro.
The Basics: Controls
107A
1-12 CIC Pro Clinical Information Center Revision A
2001099-183
Page 25

Display Formats
The Basics: Display Formats
NOTE
Display format is subject to licensing restrictions. Refer to the service
manual for licensing information.
You can configure the CIC Pro to display patient information for one to
16 patients. Set up the display format in the CIC Setup window. For
more information on configuring the display, refer to Chapter 4, “CIC
Setup”.
Revision A CIC Pro Clinical Information Center 1-13
2001099-183
Page 26

Terminology
Bedside Monitoring
Telemetry Monitoring
The Basics: Terminology
For the purposes of this document, the following terms apply:
A bedside monitor is a stationary monitor (user-configured or factory
configured).
These monitors are connected directly to the patient. They are set up
with a unit name as well as a bed name (e.g., IMC-BED4). For a userconfigured monitor, data is processed by an acquisition module. For a
factory-configured monitor, data is processed within the monitor itself.
Telemetry monitoring occurs when ECG data is transmitted by a
telemetry transmitter to a telemetry receiver cabinet over an established
antenna system and viewed at a designated location. The display
monitor identifies a telemetry bed by placing an asterisk next to the bed
name (e.g., IMC-BED4*). ECG data is processed by the telemetry
receiver cabinet.
Switching Transmitters
If you wish to switch to an ApexPro transmitter from a CDT-LAN
transmitter (e.g. Apex, Apex S) or vice versa, while a patient is admitted,
you must:
Discharge the patient (losing stored data).
Switch transmitters.
Re-admit the patient.
Monitoring stops if you switch transmitters while a patient is admitted.
1-14 CIC Pro Clinical Information Center Revision A
2001099-183
Page 27

Locked or Unlocked Beds
The clinical information center can be configured with the bed names
either in locked or unlocked mode. When locked, the bed names are
permanently assigned to specific windows. For more information, refer to
“Locked/Unlocked Beds” on page 1-18.
NOTE
It is possible to admit a patient to a window with a bed name that is
locked to NONE. To avoid duplication of patient waveforms, a
window locked as NONE should not be used to admit a patient.
The Basics: Terminology
Revision A CIC Pro Clinical Information Center 1-15
2001099-183
Page 28

The Basics: Multiple Patient Viewer
Multiple Patient Viewer
The multiple patient viewer of the CIC Pro displays information for up to
16 patients along with the Main Menu buttons. (For more information on
the Main Menu buttons, refer to “Main Menu Buttons” on page 1-23.)
Each patient slot contains an ECG parameter window and ECG
waveform. Any default and user-selected leads appear in the waveform
window. Depending on the selected display format, additional monitored
parameters display for patients monitored on a GE Medical Systems
Information Technologies bedside monitor. Refer to Chapter 4, “CIC
Setup”, for information on modifying display formats.
1-16 CIC Pro Clinical Information Center Revision A
2001099-183
Page 29

The Basics: Multiple Patient Viewer
Q
P
O
N
M
L
K
A
B
C
D
E
F
G
H
J
I
031C
Clinical Information Center Multiple Patient Viewer
A Browse button J Alarm Condition/Quick Access Buttons
B Click Here to Open This Patient’s Single Patient Viewer K Message Area
C Colored Border Alarm Indicator L Patient Name
D Alarm Message M Bed Name / Unit Name
E Empty Patient Window N Additional Parameter Information
F Admit Button O Patient’s Waveform Window
G Click Here to Print this Patient’s Waveforms P Patient’s ECG Parameter Window
H Click Here to Open Graph All Patients Menu Q Header bar: Displays time, maker of software, product name,
I Main Menu Buttons
and server name.
Revision A CIC Pro Clinical Information Center 1-17
2001099-183
Page 30

The Basics: Multiple Patient Viewer
Telemetry and Network Bed Names
Telemetry bed names are designated with an asterisk (*) to distinguish
them from bedside monitored patients.
Network beds (such as Unity Network ID) are designated with a plus
sign (+).
The same bed may be used for patients connected to a bedside monitor,
an Unity Network ID connection, and the telemetry monitoring system.
Duplicate bed numbers are not allowed, so the system adds these
designators to accommodate this feature.
Monitor Setup Bed Name Designation
ECG Source = Bedside Monitor Unit Name | Bed Name
ECG Source = Telemetry Unit Name | Bed Name*
ECG Source = Bedside Monitor with Unity Network ID connection Unit Name | Bed Name+
ECG Source = Telemetry with Unity Network ID connection Unit Name | Bed Name*+
Table 1. Bed Name Designations
Locked/Unlocked Beds
Throughout this document, references are made to “locked” beds. If a bed
is locked, it means that a particular bed is allocated permanently to a
particular slot on the CIC Pro and users are unable to move the bed to
another slot on the CIC Pro.
Within the service mode, this option is
enabled. You can choose between
LOCK and UNLOCK.
034B
Lock/Unlock Beds Right-Click Menu
1-18 CIC Pro Clinical Information Center Revision A
2001099-183
Page 31

Locking or Unlocking a Bed
NOTE
In order to lock or unlock a bed,
you MUST be in service mode.
To lock or unlock a bed:
1. Position the mouse pointer in the patient’s waveform window.
2. Press the right mouse button to open the right-click menu.
3. Check either LOCK or UNLOCK. The right-click menu closes, and
Waveform Window
Each patient’s primary ECG lead displays, along with lead label and gain
(if not 1x), at a display speed of 25 mm/second.
Designating Waveform Color
To designate the color for your primary ECG lead (waveform #1):
1. Position the mouse pointer in the patient’s waveform window.
The Basics: Multiple Patient Viewer
the change takes effect immediately.
2. Press the right mouse button to open the right-click menu.
034B
Set Waveform Color Right-Click Menu
3. Highlight the Select waveform #1 color option. The color menu opens.
Revision A CIC Pro Clinical Information Center 1-19
2001099-183
Page 32

The Basics: Multiple Patient Viewer
4. Select and click the desired color. The right-click menu closes, and
the color change takes effect immediately.
NOTE
Displaying Additional Waveforms
You can display up to three additional waveforms in a patient’s
waveform window. To select a second waveform for display:
For UNLOCKED hardwire bed (referring to monitors such as
Dash, Solar, etc), the modification remains in effect regardless of
a discharge and re-admit. However, the color returns to the
default color setting after the bed is moved to a different position
on the display.
For UNLOCKED telemetry bed, the modification remains in
effect until the bed is removed from the display, discharged or
moved to a different position on the display. The color then
returns to the default setting.
On an LOCKED bed, this color modification remains in effect
until the user manually changes the color. A “discharge” does
NOT return the waveform colors to the default settings.
1. Position the mouse pointer in the patient’s waveform window.
2. Press the right mouse button to open the right-click menu.
033B
Select Waveforms Right-Click Menu
3. Select the Select waveform #2 option to open a list of available
waveforms.
4. Highlight the desired waveform in the second position and click on it.
The right-click menu closes and the waveform appears immediately.
1-20 CIC Pro Clinical Information Center Revision A
2001099-183
Page 33

The Basics: Multiple Patient Viewer
5. Repeat Steps 1 – 3 until a maximum of 4 waveforms display in the
patient’s waveform slot.
NOTE
This modification remains in effect until you remove the bed from
the display or to a different slot on the display.
Optional: Designate a color for the waveform you’ve just
selected. Refer to “Designating Waveform Color” on
page 1-19.
CAUTION
On an unlocked bed this color modification remains in
effect until the bed is removed from the display
“discharged” or until the bed is moved to a different slot
on the display. At this time, the color returns to the
default.
On a locked bed, this color modification remains in effect
until the user changes the color manually. A “discharge”
or moving the bed does not return the waveform colors to
their default settings.
NOTE
ECG Parameter Window
A patient’s ECG parameter window contains heart rate information,
PVC/minute information, ST measurement (if available), and pace
detection indicator if pace detection is enabled, as calculated by the
monitoring device. If an alarm is silenced, an icon appears inside the box.
PVC Information
ST Information
If pressure waveforms are requested, they are scaled for display at
the CIC Pro, but no scale indicators are provided.
Pace Detection
Silence Alarm icon
Heart Rate
035C
ECG Parameter Window
Revision A CIC Pro Clinical Information Center 1-21
2001099-183
Page 34

Initiating a Manual Graph
To initiate a manual graph, click the mouse pointer in the desired
patient’s ECG parameter window. The manual graph continues
indefinitely until it is stopped by clicking the mouse pointer again in the
patient’s ECG parameter window.
To set manual graph locations, see “Graph Location Controls” on page 5-
11.
User Help Message Area
Messages are displayed in the lower left corner of the CIC screen.
Messages presented here can include descriptions of button functions,
and information about what action is initiated by clicking the mouse in
the cursor’s current location. Refer to “Clinical Information Center
Multiple Patient Viewer” on page 1-17 to see an example of this.
The Basics: Multiple Patient Viewer
User Help Message
Area
032C
Alarm Condition Indicators
1-22 CIC Pro Clinical Information Center Revision A
2001099-183
Page 35

The Basics: Multiple Patient Viewer
Alarm Condition Indicators
The four highest priority alarms within the care unit may be displayed
simultaneously. The highest priority alarm always displays first
(displayed on the left), with the next three highest priority alarms
displayed (in left-to-right order of descending priority).
To open a single patient view of one of these beds, use the mouse to click
on the alarm condition indicator. For more information, refer to Chapter
7, “Admit/View a Patient”.
Main Menu Buttons
There are six Main Menu buttons at the bottom of the CIC Pro display.
They are Auto Display, View Other, Setup CIC, Silence Alarms, Print,
and Close.
AUTO DISPLAY—The Auto Display button toggles between configuring
the CIC Pro display in the optimal configuration for the number of
patients admitted (i.e., the number of patient windows is equal to the
number of patients admitted), and optimal plus an empty bed window for
admitting a new patient. For more information on Auto Display, refer to
Chapter 4, “CIC Setup”.
VIEW OTHER—The View Other button allows you to access the menus
of any patient on the network, including those displayed at your CIC Pro.
For more information on the View Other button, refer to Chapter 7,
“Admit/View a Patient”.
SETUP CIC—The Setup CIC button opens the CIC Setup window, which
contains a “stack” of tab sheets for customizing the CIC Pro. For more
information on CIC Pro setup, refer to Chapter 4, “CIC Setup”.
SILENCE ALARMS—The Silence Alarms button silences an audible
alarm tone for one minute. For more information on silencing alarms,
refer to Chapter 6, “Alarm Control”.
PRINT—The Print button opens the Graph All Patients window, or
initiate a printout of the single patient viewer.
CLOSE—The Close button closes the single patient viewer.
Revision A CIC Pro Clinical Information Center 1-23
2001099-183
Page 36

The Basics: Single Patient Viewer
Single Patient Viewer
To access an enlarged view of a single patient’s information, click
anywhere except the ECG parameter window inside that patient’s
window on the multiple patient viewer.
NOTE
Clicking on the patient’s ECG parameter window initiates a manual
graph of that patient’s data. Clicking a second time stops a manual
graph.
Viewed patient’s
waveform window is
indicated with a white
border
Clinical Information Center Single Patient Viewer
Viewed
Patient
Window
032C
1-24 CIC Pro Clinical Information Center Revision A
2001099-183
Page 37

Data Source
The Basics: Data Source
The Data Source option allows the user to select the specific data source
from which historical patient data (Alarm Histories, Graphic Trends, and
Vital Signs) can be retrieved. The Data Source option is only available
when PDS is Enabled (refer to “Telemetry Unit Defaults” on page 4-9).
The Data Source option is labeled Data Source and exists on the left side
of the screen, between the Multi-patient viewer and the Single view
window. Next to this label are two radio buttons that indicate the
possible data sources:
Bedside — This can be either a telemetry or a hardwire bedside. The
amount of historical data is limited to the specific data source. For
most hardwire bedsides, there is a limit of around 32 history events
and 24 hours of trend data.
PDS — This server gathers and stores trend and history events from
hardwire bedsides and telemetry transmitters (refer to the
compatibility list in the Unity Network Patient Data Server (PDS)
Operator’s Manual. Patient data recorded during previous (72 hours)
bedside or telemetry device admissions can be viewed as a single
“patient centric” session. Up to 72 hours of trend data and 500
history events can be stored for a single patient.
The radio button for PDS data source will be disabled in the Alarm
Histories, Graphic Trends and Vital Signs tab sheets for a bedside that is
not being monitored by PDS.
Data Source:
Once the user makes a data source selection for a specific patient, the
setting remains in effect, allowing the user to interact with the data from
the selected data source. Data for printing will be consistent with the
currently selected data source. Selecting a different patient in the multiviewer or re-selecting the same patient will automatically change the
data source to be the bedside device.
NOTE
If the operator is on a tab sheet other than Alarm Histories, Graphic
Trends, or Vital Signs, no selection of the data source is possible. For
any application where information needs to be retrieved, such as
patient name, patient ID and alarm control information, the bedside
device will be used.
~
Bedside
{
PDS
Revision A CIC Pro Clinical Information Center 1-25
2001099-183
Page 38

Time Focus
The CIC Pro has a feature called Time Focus. When you are viewing an
alarm history event, time focus allows you to view the patient’s vital
signs, graphic trends, and full disclosure data for the same given time
stamp (within one minute). The user can choose to look at a particular
time and click on either the Alarm Histories, Graphic Trends, Vital
Signs, or Full Disclosure tabs and view data at the same time interval
the user selected on the previous tab.
NOTE
Viewing Alarm Histories
The Basics: Time Focus
Since graphic trends are only visible for the period of time specified
in the Graphic Trends tab sheet (refer to Chapter 9, “Graphic
Trends”, for more details), it is possible to view an alarm history
event for which the graphic trend is no longer stored on the clinical
information center. In this case, clicking on the Graphic Trends tab
takes you to the most recent graphic trend, not the trend that
corresponds to the alarm history you are viewing.
To open the Alarm Histories tab sheet from Graphic Trends, use the
mouse to click on the Alarm Histories tab in the single patient viewer.
The Alarm Histories tab sheet moves to the front, displaying the alarm
history event that occurred closest to the time focus.
Viewing Graphic Trends
To open the Graphic Trends tab sheet from Alarm Histories, use the
mouse to click on the Graphic Trends tab in the single patient viewer.
The Graphic Trends tab sheet moves to the front, with data
corresponding to the time focus at the cursor location.
1-26 CIC Pro Clinical Information Center Revision A
2001099-183
Page 39

Viewing Vital Signs
To open the Vital Signs tab sheet from Alarm Histories, use the mouse to
click on the Vital Signs tab in the single patient viewer. The Vital Signs
tab sheet moves to the front, with data corresponding to the time focus
highlighted.
Viewing Full Disclosure
To open the Full Disclosure tab sheet from Alarm Histories, use the
mouse to click on the Full Disclosure tab in the single patient viewer. The
Full Disclosure tab sheet moves to the front, displaying the full
disclosure data corresponding to the time focus highlighted.
The Basics: Time Focus
Revision A CIC Pro Clinical Information Center 1-27
2001099-183
Page 40

Web Browser
The Basics: Web Browser
CAUTION
SECURITY — The web browser which runs in
conjunction with the CIC Pro is intended for hospital
INTRANET use only. If confidential patient information
is made available from the hospital intranet, the security
of the data is the responsibility of the hospital.
The Browse option is at the top right corner of the title bar of the CIC Pro
display screen. Select this button to launch (start) a separate Microsoft
Internet Explorer
If a patient monitoring alarm occurs while the browser is open, the CIC
Pro window moves to the foreground of the display, and the browser
window moves to the background of the display. To restore the browser
window, select the Browse option again or select the Internet Explorer
button from the lower task bar.
TM
application.
Browser Configuration
The web browser runs independently of CIC Pro operation. However, if
the CIC Pro detects 15 minutes of web browser inactivity, the web
browser window closes. Subsequent web browser activity then requires
you to select the Browse option to relaunch the program.
Refer to “Browser Configuration” on page 4-7 for information on Browser
Configuration.
1-28 CIC Pro Clinical Information Center Revision A
2001099-183
Page 41

Menu Formats
Main Menu
Popup Menus
The Basics: Menu Formats
A menu, like the name implies, is a selection of available options. These
options are accessed with the mouse.
There are six Main Menu buttons at the bottom of the CIC Pro display.
They are Auto Display, View Other, Setup CIC, Silence Alarms, Print,
and Close. These buttons are top-level control buttons, and are always
visible on the CIC Pro.
When some menu options are selected, a small menu “pops up” from the
selected menu option. These are called popup menus. To use a popup
menu, click the mouse pointer on the desired selection. The popup menu
closes. The choice either becomes effective immediately, or when the
window it was accessed from closes.
Revision A CIC Pro Clinical Information Center 1-29
2001099-183
Page 42

Text Entry Fields
Text Entry Fields
The Basics: Menu Formats
In a text entry field, you must use the keyboard to enter the required
information. To enter text:
1. Position the mouse pointer so it is inside the text entry field. When
the mouse pointer is inside a text entry field, it is shaped like an Ibeam. Click the mouse.
037B
2. Type the appropriate information. Press the Tab key to move to the
next field, or position the mouse pointer in the next field. Click the
mouse.
Backspace Key
036A
NOTE
Press the Backspace key on the keyboard to delete characters
when you change or correct entered information in the text entry
field.
1-30 CIC Pro Clinical Information Center Revision A
2001099-183
Page 43

Controls
Radio Buttons
The Basics: Controls
To use a radio button control, click on the label text or in the adjacent
white circle. When selected, a black dot displays in this white circle. To
deselect a radio button control, click on another selection. When
deselected, no black dot displays.
Radio Buttons —
“dot” in center
indicates active
selection.
Check Boxes
007A
To use check box controls, click on the label text or in the square. When
selected, a check mark displays in this square. To deselect a check box
control, click again on the label text or in the square. When deselected,
no check mark displays.
Check Boxes —
indicates active
selection.
078A
Revision A CIC Pro Clinical Information Center 1-31
2001099-183
Page 44

Scroll Bars
The Basics: Controls
Use horizontal and vertical scroll bars to move a window’s content left/
right and up/down. Place the mouse pointer on the appropriate arrow to
move the scroll bar, or click and hold the mouse down while dragging the
scroll bar until the desired information is displayed.
Vertical
Scroll
Bar
024C
Horizontal Scroll
Bar
1-32 CIC Pro Clinical Information Center Revision A
2001099-183
Page 45

The Basics: System Environment Monitor Notification
System Environment Monitor Notification
The System Environment Monitor Notification feature notifies the user
in the event one of the system environment parameters goes out of range.
The CIC Pro responds by displaying a message window identifying the
parameter(s).
The CIC Pro supports the following notifications:
5v Power supply out of range
12v Power supply out of range
CPU fan speed out of range
Chassis fan out of range
CPU temperature out of range
Enclosure temperature out of range
Internal speaker unplugged
External speaker unplugged
HDD failure
125A
CAUTION
When a system environment monitor notification
appears, contact your service personnel.
Revision A CIC Pro Clinical Information Center 1-33
2001099-183
Page 46

For your notes
The Basics: System Environment Monitor Notification
1-34 CIC Pro Clinical Information Center Revision A
2001099-183
Page 47

2 Safety
Revision A CIC Pro Clinical Information Center 2-1
2001099-183
Page 48

For your notes
2-2 CIC Pro Clinical Information Center Revision A
2001099-183
Page 49

For Your Safety
Intended Use
Safety: For Your Safety
The Clinical Information Center (CIC) Pro Central Station is intended
for use under the direct supervision of a licensed healthcare practitioner.
The intended use is to provide clinicians with adult, pediatric and
neonatal patient data in a centralized location within a hospital or
clinical environment.
The CIC Pro Central Station is intended to collect information from a
network and display this data. This data includes physiological, patient
demographic and / or other non-medical information.
Physiological parameters and waveforms from GE Medical Systems
Information Technologies monitors and telemetry systems can be
displayed and printed from the CIC Pro Central Station. Beat to beat
patient information for all parameters and waveforms from the bedside
and telemetry systems can be displayed.
Terminology
The CIC Pro Central Station supports the ability to access information
from GE Medical Systems Information Technologies’ products in a web
browser format. Additionally, CIC Pro Central Station supports the
ability to access patient information collected from the Unity network
and stored on a network server.
The terms danger, warning, and caution are used throughout this
manual to point out hazards and to designate a degree or level of
seriousness. Familiarize yourself with their definitions and significance.
Hazard is defined as a source of potential injury to a person.
DANGER indicates an imminent hazard which, if not avoided, will
result in death or serious injury.
WARNING indicates a potential hazard or unsafe practice which, if not
avoided, could result in death or serious injury.
CAUTION indicates a potential hazard or unsafe practice which, if not
avoided, could result in minor personal injury or product/property
damage.
NOTE provides application tips or other useful information to assure
that you get the most from your equipment.
Revision A CIC Pro Clinical Information Center 2-3
2001099-183
Page 50

Monitor Safety
Dangers
Warnings
Safety: For Your Safety
The safety statements presented in this chapter refer to the equipment
in general. Look for additional device safety information throughout the
rest of this manual.
The order in which safety statements are presented in no way implies
order of importance.
There are no dangers that refer to the equipment in general. Specific
“Danger” statements may be given in the respective sections of this
manual.
WARNINGS
ACCIDENTAL SPILLS — To avoid electric shock or
device malfunction liquids must not be allowed to enter
the device. If liquids have entered a device, take it out of
service and have it checked by a service technician before
it is used again.
ACCURACY — If the accuracy of any value displayed on
the screen or printed on a graph strip is questionable,
first determine the patient’s vital signs by alternative
means and then verify that the clinical information
center and printer are working correctly.
ALARMS — Do NOT rely exclusively on the audible
alarm system for patient monitoring. Adjustment of
alarm volume to a low level or off during patient
monitoring may result in a hazard to the patient.
Remember that the most reliable method of patient
monitoring combines close personal surveillance with
correct operation of monitoring equipment.
After connecting the monitor to the central station and/or
nurse-alert system, verify the function of the alarm
system. Repeat this verification periodically, including a
check of all connected speakers.
CIC Pro audible alarms will not sound for patients with
bedside monitoring devices configured to “Operating
Room” mode.
2-4 CIC Pro Clinical Information Center Revision A
2001099-183
Page 51

Safety: For Your Safety
WARNING
BEFORE INSTALLATION — Compatibility is critical to
safe and effective use of this device. Please contact your
local sales or service representative prior to installation
to verify equipment compatibility.
BEFORE USE — Before putting the system into
operation visually inspect all connecting cables for signs
of damage. Damaged cables and connectors must be
replaced immediately.
Before using the system, the operator must verify that it
is in correct working order and operating condition.
Periodically, and whenever the integrity of the product is
in doubt, test all functions.
DISCHARGE TO CLEAR PATIENT DATA — When
admitting a new patient, you must clear all previous
patient data from the system. To accomplish this,
disconnect patient cables then do a discharge.
DISCONNECTION FROM MAINS — When
disconnecting the system from the power line, remove the
plug from the wall outlet first. Then you may disconnect
the power cord from the device. If you do not observe this
sequence, there is a risk of coming into contact with line
voltage by inserting metal objects, such as the pins of
leadwires, into the sockets of the power cord by mistake.
DISPOSAL — Dispose of the packaging material,
observing the applicable waste control regulations and
keeping it out of children’s reach.
EXPLOSION HAZARD — Do NOT use this equipment in
the presence of flammable anesthetics, vapors or liquids.
Revision A CIC Pro Clinical Information Center 2-5
2001099-183
Page 52

Safety: For Your Safety
WARNINGS
INTERFACING OTHER EQUIPMENT — Devices may
only be interconnected with each other or to parts of the
system when it has been determined by qualified
biomedical engineering personnel that there is no danger
to the patient, the operator, or the environment as a
result. In those instances where there is any element of
doubt concerning the safety of connected devices, the user
must contact the manufacturers concerned (or other
informed experts) for proper use. In all cases, safe and
proper operation should be verified with the applicable
manufacturer’s instructions for use, and system
standards IEC 601-1-1/EN 60601-1-1 must be complied
with.
LEAKAGE CURRENT TEST — When interfacing with
other equipment, a test for leakage current must be
performed by qualified biomedical engineering personnel
before using with patients.
LOSS OF MONITORING — If the monitoring at the CIC
Pro is temporarily interrupted, alternate monitoring
devices or close observation should be used until the
monitoring function at the CIC Pro is restored.
Indications of a loss of the monitoring function at the CIC
Pro are as follows.
RED SCREEN indicates the CIC Pro application is
restarting itself and patient monitoring at the CIC
Pro is NOT occurring. The monitoring function at the
CIC Pro will automatically resume. No user action is
required.
BLUE SCREEN indicates the Windows operating
system has a functional error and patient monitoring
at the CIC Pro is NOT occurring. If the CIC Pro does
not automatically restart after 60 seconds, the
monitoring function at the CIC Pro will not resume
until you turn off the power to the CIC Pro and then
turn the power back on. The monitoring function
should resume in approximately 2 to 3 minutes.
Once the monitoring function at the CIC Pro has been
restored, you should verify the correct monitoring state
and alarm function.
2-6 CIC Pro Clinical Information Center Revision A
2001099-183
Page 53

Safety: For Your Safety
WARNINGS
LOSS OF MONITORING — If the browser function is
inappropriately used, loss of monitoring function may
result. Use alternate monitoring devices or close patient
observation until the monitoring function at the CIC Pro
is restored.
When using the browser function, follow these
restrictions:
Do not attempt to access the file systems of the CIC
Pro through the use of the browser.
Do not attempt to download files of any type. This
includes, but is not limited to, audio or video files.
Do not play user defined audio (i.e. Media Player,
streaming radio stations).
NETWORK INTEGRITY — The clinical information
center resides on the hospital’s computer network, and it
is possible that inadvertent or malicious network activity
could adversely affect patient monitoring. The integrity
of the computer network is the responsibility of the
hospital.
POWER SUPPLY — The device must be connected to a
properly installed power outlet with protective earth
contacts only.
GE Medical Systems Information Technologies
recommends the use of a UPS with the CIC Pro. If a UPS
is NOT used, improper shut downs of the system could
result in the event of a power outage and cause a lengthy
disk scan procedure when the unit reboots. You could
also lose data in the event of a power outage if you do not
use a UPS.
All devices of a system must be connected to the same
power supply circuit. Devices which are not connected to
the same circuit must be electrically isolated when
operated (electrically isolated RS232 interface).
Revision A CIC Pro Clinical Information Center 2-7
2001099-183
Page 54

Cautions
Safety: For Your Safety
WARNINGS
RATE METERS — Keep pacemaker patients under close
observation. Rate meters may continue to count the
pacemaker rate during cardiac arrest and some
arrhythmias. Therefore, do NOT rely entirely on rate
meter alarms.
SITE REQUIREMENTS — Do NOT route cables in a
way that they may present a stumbling hazard. For
devices installed above the user, adequate precautions
must be taken to prevent them from dropping.
CAUTIONS
DISPOSAL — At the end of its service life, the product
described in this manual, as well as its accessories, must
be disposed of in compliance with the guidelines
regulating the disposal of such products. If you have
questions concerning disposal of the product, please
contact GE Medical Systems Information Technologies or
its representatives.
EMC — Magnetic and electrical fields are capable of
interfering with the proper performance of the device.
For this reason make sure that all external devices
operated in the vicinity of the monitor comply with the
relevant EMC requirements. X-ray equipment or MRI
devices are a possible source of interference as they may
emit higher levels of electromagnetic radiation.
INSTRUCTIONS FOR USE — For continued safe use of
this equipment, it is necessary that the listed
instructions are followed. However, instructions listed in
this manual in no way supersede established medical
practices concerning patient care.
2-8 CIC Pro Clinical Information Center Revision A
2001099-183
Page 55

Safety: For Your Safety
CAUTIONS
LOSS OF DATA — Should the monitor at any time
temporarily lose patient data, the potential exists that
active monitoring is not being done. Close patient
observation or alternate monitoring devices should be
used until monitor function is restored.
If the monitor does not automatically resume operation
within 60 seconds, power cycle the monitor using the
power on/off switch. Once monitoring is restored, you
should verify correct monitoring state and alarm
function.
MAINTENANCE — Regular preventive maintenance
should be carried out annually. You are responsible for
any requirements specific to your country.
MPSO — The use of a multiple portable socket outlet
(MPSO) for a system will result in an enclosure leakage
current equal to the sum of all individual earth leakage
currents of the system if there is an interruption of the
MPSO protective earth conductor. Do NOT use an
additional extension cable with the MPSO as it will
increase the chance of the single protective earth
conductor interruption.
NEGLIGENCE — GE Medical Systems Information
Technologies does not assume responsibility for damage
to the equipment caused by improperly loaded software,
failure or data loss due to not using a UPS, and/or
improperly vented cabinets, or improper or faulty power.
OPERATOR — Medical technical equipment such as this
monitor/monitoring system must only be used by persons
who have received adequate training in the use of such
equipment and who are capable of applying it properly.
Revision A CIC Pro Clinical Information Center 2-9
2001099-183
Page 56

Safety: For Your Safety
CAUTIONS
POWER REQUIREMENTS — Before connecting the
device to the power line, check that the voltage and
frequency ratings of the power line are the same as those
indicated on the unit's label. If this is not the case, do not
connect the system to the power line until you adjust the
unit to match the power source.
In U.S.A., if the installation of this equipment will use
240V rather than 120V, the source must be a centertapped, 240V, single-phase circuit.
RESTRICTED SALE — U.S. federal law restricts this
device to sale by or on the order of a physician.
SECURITY — The web browser which runs in
conjunction with the clinical information center is
intended for hospital INTRANET use only. If confidential
patient information is made available from the hospital
intranet, the security of the data is the responsibility of
the hospital.
SUPERVISED USE — This equipment is intended for
use under the direct supervision of a licensed health care
practitioner.
UNINTENTIONAL RADIO FREQUENCY (RF)
INTERFERENCE — Unintentional RF interference
could degrade the reliability and performance of the
wireless data link. The facility must maintain an RF
environment free from unintentional interference. Refer
to the service manual for more information.
VENTILATION REQUIREMENTS — Set up the device
in a location which affords sufficient ventilation. The
ventilation openings of the device must not be obstructed.
The ambient conditions specified in the technical
specifications must be ensured at all times.
2-10 CIC Pro Clinical Information Center Revision A
2001099-183
Page 57

Notes
Reference Literature
Safety: For Your Safety
Choose a location which affords an unobstructed view of the clinical
information center’s screen and easy access to the operating controls.
This product is not likely to cause abnormal operation of other
patient-connected equipment such as a cardiac pacemaker or other
electrical stimulators.
This equipment is suitable for connection to public mains as defined
in CISPR 11.
This equipment is suitable for use in the presence of electrosurgery.
Medical Device Directive 93/42/EEC
EN 60601-1/1990 + A1: 1993 + A2: 1995: Medical electrical equipment.
General requirements for safety
EN 60601-1-1/9.1994 + A1 12.95: General requirements for safety.
Requirements for the safety of medical electrical systems.
IEC Publication 513/1994: Fundamental aspects of safety standards for
medical equipment.
Revision A CIC Pro Clinical Information Center 2-11
2001099-183
Page 58

Equipment Symbols
NOTE
ATTENTION: Consult accompanying documents.
CAUTION: To reduce the risk of electric shock, do NOT remove cover. Refer servicing to
qualified service personnel.
TYPE B APPLIED PART: Non-isolated applied part suitable for intentional external and
internal application to the patient, excluding direct cardiac application.
[Medical Standard Definition:] Applied part complying with the specified requirements of IEC
601-1/UL 2601-1/CSA 601.1 Medical Standards to provide protection against electric shock,
particularly regarding allowable leakage current.
TYPE BF APPLIED PART: Isolated (floating) applied part suitable for intentional external and
NOTE
The rating of
protection against
electric shock
(indicated by symbol
for CF or BF) is
achieved only when
used with patient
applied parts
recommended by GE
Medical Systems
Information
Technologies.
internal application to the patient excluding direct cardiac application. “Paddles” outside the
box indicate the applied part is defibrillator proof.
[Medical Standard Definition:] F-type applied part (floating/isolated) complying with the
specified requirements of IEC 601-1/UL 2601-1/CSA 601.1 Medical Standards to provide a
higher degree of protection against electric shock than that provided by type B applied parts.
TYPE CF APPLIED PART: Isolated (floating) applied part suitable for intentional external and
internal application to the patient including direct cardiac application. “Paddles” outside the
box indicate the applied part is defibrillator proof.
[Medical Standard Definition:] F-type applied part (floating/isolated) complying with the
specified requirements of IEC 601-1/UL 2601-1/CSA 601.1 Medical Standards to provide a
higher degree of protection against electric shock than that provided by type BF applied
parts.
Safety: Equipment Symbols
Some symbols may not appear on all equipment.
Fuse
Equipotential Stud: A ground wire from another device can be tied here to ensure the devices
share a common reference.
Alternating current (AC)
2-12 CIC Pro Clinical Information Center Revision A
2001099-183
Page 59

Safety: Equipment Symbols
Power; I = ON; O = OFF
KEYBOARD ICON: Denotes the keyboard port.
MOUSE ICON: Denotes the mouse port.
USB PORT ICON: Denotes the USB port. Not used for CIC Pro.
VGA MONITOR ICON: Denotes the VGA monitor port.
PARALLEL (PRINTER) PORT ICON: Denotes the parallel port into which the optional laser
printer is connected.
SERIAL COMMUNICATION (COM) PORT ICON: Denotes the communication (COM) ports,
used for:
Optional Service Modem (COM 1) and
Optional PRN-50/PRN-50M Writer (COM 2).
IOIOI
ETHERNET ICON: Denotes the ethernet ports, used for the Unity MC network connection.
SPEAKER OUT ICON: Denotes the speaker port connection.
Revision A CIC Pro Clinical Information Center 2-13
2001099-183
Page 60

PRESS
Indicates where to press to open the door on printer.
Silence Alarms keyboard key.
Classification
The device is classified, according to IEC/UL/EN 60601-1, as:
Type of protection against electrical shock Class I
Safety: Equipment Symbols
Degree of protection against electrical
shock
Degree of protection against harmful
ingress of water
Degree of safety of application in the
presence of a flammable anesthetic
mixture with air or with oxygen or nitrous
oxide
Method(s) of sterilization or disinfection
recommended by the manufacturer
Mode of operation Continuous operation
Not applicable (No Applied Parts)
IPX0 (enclosed equipment without protection against ingress of water)
Equipment not suitable for use in the presence of a flammable anesthetic mixture
with air or with oxygen or nitrous oxide
Not applicable
Underwriters Laboratories, Inc.
Medical Equipment
With respect to electric shock, fire and mechanical hazards
only in accordance with UL 60601-1, and CAN/CSA C22.2
NO. 601.1. and IEC, EN 60601-1.
2-14 CIC Pro Clinical Information Center Revision A
2001099-183
Page 61

3 Maintenance
Revision A CIC Pro Clinical Information Center 3-1
2001099-183
Page 62

For your notes
3-2 CIC Pro Clinical Information Center Revision A
2001099-183
Page 63

Biocompatibility
Maintenance: Biocompatibility
When used as intended, the parts of the product described in this
operator manual, including accessories that come in contact with the
patient during the intended use, fulfill the biocompatibility requirements
of the applicable standards. If you have questions about this matter,
please contact GE Medical Systems Information Technologies or its
representatives.
Revision A CIC Pro Clinical Information Center 3-3
2001099-183
Page 64

Inspection
Maintenance: Inspection
All equipment needs to be maintained on a regular basis to ensure
reliability. This chapter describes inspection and cleaning procedures.
Refer to the service manual for technical maintenance information.
An effective maintenance schedule should be established for your
monitoring equipment and reusable supplies. This should include
inspection as well as general cleaning on a regular basis.
CAUTION
Failure on the part of the responsible hospital or
institution employing the use of this monitoring
equipment to implement a satisfactory maintenance
schedule may cause undue equipment failure and
possible health hazards.
Check with your Biomedical Department to be sure preventive
maintenance and calibration has been done. The applicable service
manuals contain detailed information.
Follow these guidelines when inspecting the equipment:
Inspect the equipment for obvious physical damage and replace
damaged items.
Inspect all cords for fraying or other damage. Inspect all plugs and
connectors for bent prongs or pins. Repair or replacement must be
performed by qualified service personnel.
Inspect all cable insulation. Qualified service personnel should repair
or replace damaged or deteriorated cables.
GE Medical Systems Information Technologies is available 24 hours a
day by calling 800-558-7044.
3-4 CIC Pro Clinical Information Center Revision A
2001099-183
Page 65

Cleaning
General Cleaning
Maintenance: Cleaning
Your equipment should be cleaned on a regular basis. Follow these
guidelines when preparing to clean, disinfect, or sterilize the equipment:
Consult your hospital’s policies and procedures for cleaning,
disinfecting, or sterilizing equipment.
Refer to Material Safety Data Specifications (MSDS) or hospital
guidelines when choosing a cleaning, disinfecting, or sterilizing
agent.
The exterior surfaces of the equipment may be cleaned with a lint-free
cloth, dampened with a diluted cleaning solution. Drying off excess
cleaning solution is recommended. Following are examples of tested cold
cleaning/disinfectant/sterilizing solutions:
ammonia (diluted),
CompuBlend B (ammonium chloride),
Virex (ammonium chloride),
Cidex (glutaraldehyde),
sodium hypochlorite bleach (diluted), or
mild soap (diluted).
To avoid damage to the equipment, follow these rules:
CAUTION
Failure to follow these rules may melt, distort, or dull the
finish of the case, blur lettering on the labels, or cause
equipment failures.
ALWAYS dilute the solutions according to the manufacturer’s
suggestions.
NOTE
Damage to equipment caused from submersion or from use of
unrecommended cleaning agents is not covered by warranty.
Always refer to your hospital/MSDS guidelines when choosing a
cleaning/disinfectant/sterilizing agent.
Revision A CIC Pro Clinical Information Center 3-5
2001099-183
Page 66

ALWAYS wipe off all the cleaning solution with a dry cloth after
cleaning.
NEVER use wax containing a cleaning substance.
NEVER SUBMERSE, POUR OR SPRAY water or any cleaning
solution on the equipment or permit fluids to run behind switches,
into the connectors, or into any ventilation openings in the
equipment.
Never use these cleaning agents:
abrasive cleaners or solvents of any kind,
acetone,
alcohol based cleaning agents,
Betadine
Cleaning the Touchscreen
NOTE: Turn the display power off before cleaning the touchscreen.
Clean the touchscreen with one of the following approved solutions:
Household glass cleaner,
Virex (full strength), or
Cavicide (diluted: 1/2 oz per gallon of water).
Maintenance: Cleaning
To avoid damage to the equipment, follow these rules:
CAUTION
Failure to follow these rules may melt, distort, or dull the
finish of the case, blur lettering on the labels, or cause
equipment failures.
Always dampen the towel and then clean the touchscreen.
Do NOT spray cleaner directly on the touchscreen.
Do NOT use these chemicals on the touchscreen:
Acetone
Methylene chloride
Methyl ethyl ketone
Hexane
Ammonia-based glass cleaners
3-6 CIC Pro Clinical Information Center Revision A
2001099-183
Page 67

Maintenance: Technical Maintenance
Technical Maintenance
Schematic diagrams, specifications, and other relevant technical
information can be found in the service manuals supplied with this
equipment. Comply with the policies of your institution’s Biomedical
Department, or the recommendations made within the Preventive
Maintenance section of the product’s service manual.
Revision A CIC Pro Clinical Information Center 3-7
2001099-183
Page 68

For your notes
Maintenance: Technical Maintenance
3-8 CIC Pro Clinical Information Center Revision A
2001099-183
Page 69

4 CIC Setup
Revision A CIC Pro Clinical Information Center 4-1
2001099-183
Page 70

For your notes
4-2 CIC Pro Clinical Information Center Revision A
2001099-183
Page 71

Introduction
CIC Setup: Introduction
The Setup CIC button in the Main Menu opens the CIC Setup window,
which contains a “stack” of tab sheets for customizing the clinical
information center.
The tab sheets include:
CIC Defaults,
Telemetry Unit Defaults,
Telemetry Alarm Control Defaults,
Current Telemetry Listings,
Display Format,
Screen Calibration,
Service Password, and
Full Disclosure Defaults.
While the user can view all of the tab sheets within the CIC Setup
window, many of the functions on these tab sheets may only be
configured using the service mode.
The functions available on these tab sheets that can only be configured in
service mode are discussed in detail in the service manual.
Revision A CIC Pro Clinical Information Center 4-3
2001099-183
Page 72

CIC Defaults
In user mode, these
are the only active
controls.
CIC Setup: CIC Defaults
NOTE
In user mode, most of the controls on the CIC Defaults tab sheet are
view-only and appear grayed-out in color. The only controls on this
tab sheet that are active from user mode are the Alarm Volume drop-
down menu and the Cancel Print Jobs buttons.
When in service mode, the CIC Defaults window allows you to modify
several elements of the clinical information center display. To open the
CIC Defaults tab sheet, follow these steps.
1. Use the mouse to click on Setup CIC in the Main Menu.
2. Click on the CIC Defaults tab to bring it to the front.
005E
CIC Defaults Tab Sheet
NOTE
To access the service mode, use the mouse pointer to click on the
Service Password tab sheet. Then type in the service password.
Select OK to activate the password. The service password is available
only to the appropriate personnel.
4-4 CIC Pro Clinical Information Center Revision A
2001099-183
Page 73

CIC Defaults Controls
Name
Alarm Volume
CIC Setup: CIC Defaults
CENTRAL NAME —This option allows you to enter the name for this
clinical information center.
UNIT NAME—This option allows you to enter the care unit name for use
on the GE Medical Systems Information Technologies Unity IS network.
The current alarm volume can be set to any level above the minimum
alarm volume that was designated in the service mode. To adjust the
current alarm volume:
1. Click on the Current drop down menu in the Alarm Volume control
area. The Current drop down menu opens.
2. Click on the desired alarm volume level. The choice becomes effective
immediately.
063C
Alarm Volume Popup Menu
NOTE
You must enter the service mode to change the minimum alarm
volume.
Revision A CIC Pro Clinical Information Center 4-5
2001099-183
Page 74

Mirror Central Display
CIC Setup: CIC Defaults
You can set up a mirrored CIC Pro for remote monitoring. This is set in
the service mode. When a mirrored CIC Pro is set up, these rules are in
place:
The main and mirrored CIC Pro display the same patients and the
same number of patient slots. However, if the user selects new
parameters to view on one display, those parameters are NOT
mirrored on the other display.
Auto Display should be set to disabled at the mirrored CIC Pro when
a mirrored CIC Pro is set up. However, Auto Display is still active on
the main CIC Pro. See “Changing the Display Format” on page 4-18.
When using the mirror feature on the CIC Pro product, both the
main and mirrored CIC Pro must be set to the same display format
for the mirror feature to work correctly. Set the Number of Patients
in the Display Format tab of the mirrored CIC Pro to match the main
CIC Pro. See “Changing the Display Format” on page 4-18.
The title bar of the mirror CIC Pro displays mirror of [CIC
SELECTED].
Waveforms
ECG 1 — This waveform is defined by the ECG source.
WAVEFORMS 2 – 4—These selections allows you to define multiple
patient viewer waveforms.
4-6 CIC Pro Clinical Information Center Revision A
2001099-183
Page 75

Browser Configuration
Printer/Writer
CIC Setup: CIC Defaults
This control allows you to disable/enable and configure the web browser
(refer to “Web Browser” on page 1-28). When enabled, the Browser
Configuration includes the following possibilities.
Single Monitor—Browser Integrated into Single Patient Viewer,
Single Monitor—Browser Free Floating
Dual Monitor—Browser into second monitor.
To exit the web browser, select the Close button on the CIC Pro.
Dual Monitor
The CIC Pro allows for the use of a secondary monitor when using the
web browser. The browser displays full screen on the secondary monitor.
Please refer to your CIC Pro service manual for configuration.
LASER PRINTER —This control allows you to designate the default
laser printer for this clinical information center.
DDW —This control allows you to designate the default DDW for this
clinical information center.
FULL DISCLOSURE—This control allows you to designate the default
printer to print Full Disclosure for this clinical information center.
Revision A CIC Pro Clinical Information Center 4-7
2001099-183
Page 76

Cancel Print Jobs
Color Set
CIC Setup: CIC Defaults
This control allows you to cancel a print job to the Laser printer or Full
Disclosure printer. Click on the Cancel Print Jobs to cancel any printing
jobs. This only cancels print jobs that originate from the same CIC Pro.
You cannot cancel print jobs at another CIC Pro.
This control allows you to set a color scheme for waveforms. Preset
choices are Clinical, Transducer, or Custom.
Clinical
This sets the colors for single-parameter or double-parameter
patient monitoring. ECG waveforms display in orange; ART, PA,
FEM, CVP, RA, LA, ICP, SP, UAC, and UVC display in green;
and RESP, SPO2, and CO2 display in blue.
Transducer
This sets the colors for multi-parameter patient monitoring.
Display colors are: ECG in brown, ART in red, PA in yellow, FEM
in red, CVP and RA in blue, LA and ICP in white, SP in green,
UAC in red, UVC in blue, RESP and SPO2 in green, and CO2 in
white.
Custom
This selection allows you to set each waveform color individually.
4-8 CIC Pro Clinical Information Center Revision A
2001099-183
Page 77

CIC Setup: Telemetry Unit Defaults
Telemetry Unit Defaults
NOTE
In user mode, all of the controls on the Telemetry Unit Defaults tab
sheet are view-only. You must enter the service mode to make
modifications to the Telemetry Unit Defaults tab sheet.
In service mode, Telemetry Unit Defaults can be reviewed and modified
at the clinical information center. To open the Telemetry Unit Defaults
tab sheet:
1. Click on Setup CIC in the Main Menu.
2. Click on the Telemetry Unit Defaults tab.
011F
Telemetry Unit Defaults Tab Sheet
Revision A CIC Pro Clinical Information Center 4-9
2001099-183
Page 78

CIC Setup: Telemetry Unit Defaults
Telemetry Unit Defaults Controls
NOTE
For more information on setting Telemetry Unit Defaults, refer to
the telemetry system’s operator manual.
Graph Setup
MANUAL GRAPH LOCATION —This option allows you to designate the
default manual graph location for telemetry patients.
ALARM GRAPH LOCATION —This option allows you to designate the
default alarm graph location for telemetry patients.
PRINT WINDOW LOCATION —This option allows you to designate the
default print window location for telemetry patients.
Graph Waveforms
ECG 1:—This option allows you to designate the primary ECG lead for
printing.
Transmitter Graph
Alarm Graph
Event Marker Graph
WAVEFORM 2 – 4—This option allow you to enable/disable graphing for
subsequent ECG leads. Choices are Off, I, II, III, V, aVR, aVL, and aVF.
This option allows you to turn on/off transmitter graph printing.
This option allows you to turn on/off alarm graph printing.
This option allows you to turn on/off event marker graph printing.
4-10 CIC Pro Clinical Information Center Revision A
2001099-183
Page 79

ECG
CIC Setup: Telemetry Unit Defaults
DISPLAY LEAD—This option allows you to set the primary ECG lead
for display in the patient’s waveform window. Choices are I, II, III, V,
aVR, aVL, and aVF.
ARRHYTHMIA—This option allows you to enable/disable an arrhythmia
analysis program. Choices are Full, Lethal, and Off.
LEAD ANALYSIS—This option allows you to designate Single-Lead or
Multi-Lead analysis for ECG and arrhythmia analysis.
ST ANALYSIS—This option allows you to enable/disable ST analysis.
Choices are On or Off.
VA LEAD/VB LEAD—This option allows you to set the default for the V
leads that will be monitored in these positions. A 6-lead cable is required
for multiple V-lead monitoring. Choices for Va are V1, V2, V3, V4, V5,
and V6. Choices for Vb are V2, V3, V4, V5, and V6.
DETECT PACE—This option allows you to enable/disable pacer
detection. Choices are Pace 1, Pace 2, and Off.
PDS
Patient Age
Transmitter Alarm Pause
Alarm Pause Breakthrough
Event Marker
This option allows you to enable/disable use of the Patient Data Server.
This option allows you to set patient age. Choices are 0–2 years, 3–11
years, 11–13 years, and Adult.
This option allows you to turn on/off transmitter alarm pausing. Choices
are Enabled, Disabled, and Off.
This option allows you to turn on/off transmitter pause breakthrough.
Choices are Always on and Always off.
This option allows you to turn on/off transmitter event marker.
Revision A CIC Pro Clinical Information Center 4-11
2001099-183
Page 80

CIC Setup: Telemetry Alarm Control Defaults
Telemetry Alarm Control Defaults
NOTE
In user mode, all of the controls on the Telemetry Alarm Control
Defaults tab sheet are view-only. You must enter the service mode to
make modifications to the Telemetry Alarm Control tab sheet.
In service mode, the Telemetry Alarm Control Defaults tab sheet allows
you to set default limits and alarm settings for telemetry patients. To
open the Telemetry Alarm Control Defaults tab sheet:
1. Use the mouse to click on Setup CIC in the Main Menu.
2. Click on the Telemetry Alarm Control Defaults tab.
010D
Telemetry Alarm Control Defaults Tab Sheet
4-12 CIC Pro Clinical Information Center Revision A
2001099-183
Page 81

CIC Setup: Telemetry Alarm Control Defaults
Telemetry Alarm Control Defaults Controls
NOTE
For more information on setting Telemetry Alarm Control Defaults,
refer to the telemetry system’s operator manual.
Parameter Limits And Alarm Levels
This option allows you to set default parameter alarms limits and alarm
levels for the following parameters: HR, NBP-S, NBP-D, NBP-M, SPO2,
SPO2-R, ST-I, ST-II, ST-III, ST-V, ST-V2, ST-V3, ST-V4, ST-V5, ST-V6,
ST-aVR, ST-aVL, ST-aVF, and PVC.
Arrhythmia Alarm Levels
This option allows you to set default alarm levels for the following
arrhythmia calls: ASYSTOLE, VFIB/VTAC, V TACH, VT>2, V BRADY,
ACC VENT, PAUSE, TACHY, BRADY, R ON T, COUPLET, BIGEMINY,
TRIGEMINY, PVC, IRREGULAR and ATRIAL FIB.
System Alarm Levels
The default alarm levels for ASYSTOLE and VFIB/VTACH cannot be
moved from the Crisis level.
This option allows you to set default alarm levels for the following system
alarms: CHANGE BATTERY, OFF NETWORK, ARR SUSPEND,
LEADS FAIL, PROBE OFF.
WARNING
ADJUSTING SYSTEM ALARM LEVELS — The LEADS
FAIL alarm indicates that one or more electrodes are not
connected to the patient and, as a result, there is loss of
all waveforms and arrhythmia analysis. The ARR
SUSPEND alarm indicates that arrhythmia conditions
are not being detected and therefore alarms associated
with arrhythmias will not occur. The LEADS FAIL and
ARR SUSPEND alarms should be adjusted to a lower
priority level only by experienced qualified personnel and
with great caution. Adjusting these alarms to a lower
priority level may result in reduced awareness of
conditions that indicate the loss of patient monitoring.
Revision A CIC Pro Clinical Information Center 4-13
2001099-183
Page 82

CIC Setup: Current Telemetry Listings
Current Telemetry Listings
NOTE
In user mode, the Current Telemetry Listings tab sheet is view-only.
You must enter the service mode to make modifications to the
Current Telemetry Listings tab sheet.
In service mode, the Current Telemetry Listings tab sheet allows you to
view and modify characteristics of telemetry settings. To open the
Current Telemetry Listings tab sheet:
1. Click on Setup CIC in the Main Menu.
2. Click on the Current Telemetry Listings tab.
012C
Current Telemetry Listings Tab Sheet
4-14 CIC Pro Clinical Information Center Revision A
2001099-183
Page 83

CIC Setup: Current Telemetry Listings
Current Telemetry Listings Controls
The Admitted Telemetry Patients control is for information only. The Bed
and Transmitters controls can only be modified from within service
mode.
Admitted Telemetry Patients
NOTE
This overview covers the controls in a row. Each row contains
information for one telemetry patient.
The second line of an entry shows the current software level for the
patient bed in question.
TOWER—indicates which telemetry receiver cabinet (tower) this
telemetry patient is communicating with.
RECEIVER—indicates which receiver assembly inside the telemetry
receiver cabinet this telemetry patient is communicating with.
UNIT|BED—indicates the unit and bed to which this patient has been
assigned.
TYPE—indicates the type of patient this is: Tele Bed or Tele Combo.
TRANSMITTER—indicates the identification number assigned to this
patient’s transmitter.
Bed and Transmitters
TELEMETRY BEDS—allows you to add, modify, or delete a telemetry
bed name.
HARDWIRE BEDS—allows you to add, modify, or delete a hardwire bed
name.
TRANSMITTERS—allows you to add, modify, or delete a telemetry
transmitter.
Alpha-Numeric TTX ID Numbering
During setup, the CIC Pro does NOT allow the user to enter alphanumeric transmitter numbers. However, by entering the transmitter ID
number (found in parenthesis on the back of the ApexPro transmitter),
the CIC Pro automatically converts the ID to an alphanumeric
numbering scheme and displays this number under the patient’s bed
window.
NOTE
The TTX ID number is composed of either a three, four, or five-digit
number.
Revision A CIC Pro Clinical Information Center 4-15
2001099-183
Page 84

Display Format
“Map” of new
display format
CIC Setup: Display Format
The Display Format tab sheet allows you to format the clinical
information center’s multiple patient viewer with the required number of
patient windows.
NOTE
Modifications to display format are subject to licensing restrictions.
To open the Display Format tab sheet:
1. Click on Setup CIC in the Main Menu.
2. Click on the Display Format tab.
006B
Display Format Tab Sheet
4-16 CIC Pro Clinical Information Center Revision A
2001099-183
Page 85

Display Format Controls
Columns
This control allows you to designate the number of columns of patient
windows in the multiple patient viewer.
Rows
This control allows you to designate the number of rows of patient
windows in the multiple patient viewer.
Map Of New Display
This control reflects the current Columns/Rows selections graphically.
When the Columns or Rows selections change, this map is immediately
updated.
AUTO DISPLAY BUTTON—allows you to set the function of the Auto
Display button in the Main Menu, or to disable it. Choices are Maximize
Waveform Length, Maximize Number of Waveforms, and Disable Auto
Display Button.
CIC Setup: Display Format
Revision A CIC Pro Clinical Information Center 4-17
2001099-183
Page 86

CIC Setup: Display Format
Changing the Display Format
You must remove admitted beds from the display before you can select a
display format that would eliminate those patient slots from the display.
To do this, right-click the mouse pointer in the appropriate slot, and
choose None from the Select Care Unit then Bed Number menu.
NOTE
An alarm will sound when removing admitted beds from the display
if the beds are not viewed on another CIC Pro.
To change the display format, follow these steps.
1. Click on the selection corresponding to the number of columns you
want in the multiple patient viewer.
2. Click on the selection corresponding to the number of rows you want
in the multiple patient viewer.
3. Visually verify in the map of the new display that the new setting is
what you want.
4. Click Apply in the lower left corner of the CIC Setup window to apply
your changes. The display updates immediately to reflect your
changes.
5. Select OK to save your changes and close the CIC Setup window, or
Cancel to close the window without making changes to the format.
4-18 CIC Pro Clinical Information Center Revision A
2001099-183
Page 87

Patient Window
CIC Setup: Display Format
The clinical information center identifies the patient windows and
assigns an internal number in a top-to-bottom, left-to-right format. Refer
to the figure below.
Slot 1
Slot 2
Slot 3
Slot 4
Slot 5
Slot 6
Slot 7
Slot 8
ICU | BED 1
SMITH,DAVID
II
ICU | BED 2
JONES,BETH
II
ICU | BED 3
MASON,ANN
II
ICU | BED 4
DUNN,PAUL
II
ICU | BED 5
OTTO,DONALD
II
ICU | BED 6
REED,JAMES
II
ICU | BED 7
KANE,MARY
II
ICU | BED 8
TATE,ERIC
II
HR
PVC
ICU | BED1
V5
SMITH,DAVID
HR
PVC
ICU | BED1
V5
SMITH,DAVID
HR
PVC
ICU | BED1
V5
SMITH,DAVID
HR
PVC
ICU | BED1
V5
SMITH,DAVID
HR
PVC
ICU | BED1
V5
SMITH,DAVID
HR
PVC
ICU | BED1
V5
SMITH,DAVID
HR
PVC
ICU | BED1
V5
SMITH,DAVID
HR
PVC
ICU | BED1
V5
SMITH,DAVID
P
0
69
-0.1
P
0
-0.1
P
0
-0.1
P
0
-0.1
P
0
-0.1
P
0
-0.1
P
0
-0.1
P
0
-0.1
67
84
62
70
69
94
66
II
II
II
II
II
II
II
II
ICU | BED 9
EVANS,TERESA
ICU | BED 10
PERKINS,JOHN
ICU | BED 11
SMITH,JOSEPH
ICU | BED 12
BRADY,PETER
ICU | BED 13
MICHAELS,TINA
ICU | BED 14
CHASE,KATE
ICU | BED 15
WARNER,JOAN
ICU | BED 16
YOUNG,BETTY
HR
PVC
ICU | BED1
V5
SMITH,DAVID
HR
PVC
ICU | BED1
V5
SMITH,DAVID
HR
PVC
ICU | BED1
V5
SMITH,DAVID
HR
PVC
ICU | BED1
V5
SMITH,DAVID
HR
PVC
ICU | BED1
V5
SMITH,DAVID
HR
PVC
ICU | BED1
V5
SMITH,DAVID
HR
PVC
ICU | BED1
V5
SMITH,DAVID
HR
PVC
ICU | BED1
V5
SMITH,DAVID
P
0
65
-0.1
P
0
72
-0.1
P
0
77
-0.1
P
0
69
-0.1
P
0
67
-0.1
P
0
83
-0.1
P
0
74
-0.1
P
0
69
-0.1
Slot 9
Slot 10
Slot 11
Slot 12
Slot 13
Slot 14
Slot 15
Slot 16
072A
Example
Assume your CIC Pro’s display is configured to show eight rows and two
columns of patient slots (16 patient slots).
If you change the clinical information center display format to show four
rows and two columns of patient slots (eight patient slots), you would
“lose” patient slots 9 – 16, since the new configuration only
accommodates the first eight patient slots (refer to the note on page 4-
18).
Revision A CIC Pro Clinical Information Center 4-19
2001099-183
Page 88

CIC Setup: Display Format
Assigning Patients to Patient Slots
There are two ways to assign patients to the available slots on the
clinical information center.
Admit Button
If the patient slot is empty, except for an Admit button, use the mouse to
click anywhere in the slot. The single patient viewer for that patient slot
opens, with the Admit tab sheet in front. Proceed with the Admit
procedure as outlined in Chapter 7, “Admit/View a Patient”.
Right-click Shortcut
Click the RIGHT mouse button anywhere in the slot you want to fill. The
right-click shortcut menu opens. Slide the mouse over the Select Care
Unit then Bed Number text, without pressing either mouse button. The
text highlights, and a list of units on the network pops up. For more
information, refer to “Viewing Other Patients” on page 7-16.
4-20 CIC Pro Clinical Information Center Revision A
2001099-183
Page 89

Screen Calibration
NOTE
Screen calibration adjusts the gain and sweep speed of the displayed
waveforms. Accurate sweep speed is important for all waveforms.
To open the Screen Calibration tab sheet:
1. Click on Setup CIC in the Main Menu.
2. Click on the Screen Calibration tab.
CIC Setup: Screen Calibration
In user mode, the Screen Calibration tab sheet is view-only. You
must enter the service mode to perform the Screen Calibration
procedure.
008B
Screen Calibration Tab Sheet
For information on performing the screen calibration procedure, refer to
the service manual.
Revision A CIC Pro Clinical Information Center 4-21
2001099-183
Page 90

Service Password
CIC Setup: Service Password
CAUTION
The service mode is intended for use only by qualified
personnel with training and experience in its use. The
consequences of misuse include loss of alarm
configuration, loss of patient data, corruption of the
clinical information center operating system software, or
disruption of the entire Unity network.
The Service Password tab sheet contains a field for entering the
password for accessing the clinical information center’s service mode.
To open the Service Password tab sheet:
1. Click on Setup CIC in the Main Menu.
2. Click on the Service Password tab.
009B
Service Password Tab Sheet
3. To change from the user mode to the service mode, use the keyboard
to enter the service password, then click Apply. The Current
Permission entry changes from User to Service.
NOTE
Contact your biomedical engineering department or your GE Medical
Systems Information Technologies representative to access the
service mode.
4-22 CIC Pro Clinical Information Center Revision A
2001099-183
Page 91

CIC Setup: Full Disclosure Defaults
Full Disclosure Defaults
The Full Disclosure Defaults tab sheet allows you to view full disclosure
settings. To open the Full Disclosure Defaults tab sheet:
1. Click on Setup CIC in the Main Menu.
2. Click on the Full Disclosure Defaults tab.
082C
Full Disclosure Defaults Tab Sheet
Revision A CIC Pro Clinical Information Center 4-23
2001099-183
Page 92

Full Disclosure Controls
Report
DURATION—This control allows you to designate how much data is
included in the report. The maximum report duration is 72 hours.
To set the report duration, place the cursor on the scroll bar below the
Report Duration display field. Move the scroll bar to the left for shorter
duration or to the right for longer duration.
HOLE LOCATION—This control allows space for binding printed
reports. Options are none, top, bottom, left, and right.
Include
This control allows you to enable print characteristics. Options include
Graybar, Arrhythmia Annotations, and Heart Rate. You may select all or
none of these options.
CIC Setup: Full Disclosure Defaults
Line Time
Strip
In Graybar, every other line of the report appears on a shaded
background to provide visual differentiation from other lines.
In Arrhythmia Annotations, the name of an applicable arrhythmia
call appears underneath its occurrence in the report.
In Heart Rate, the last active heart rate included in the report
appears at the end of the report line.
This control allows you to designate how much data shows on an
individual report line. Choices are 15sec, 30sec, and 1min.
LOCATION—This control allows you to designate how much data is
included in the strip. The maximum strip duration is 60 minutes.
To set the strip duration, place the cursor on the scroll bar below the
Strip Duration display field. Move the scroll bar to the left for shorter
duration or to the right for longer duration.
HOLE LOCATION—This control allows space for binding printed report
strips. Options are none, top, bottom, left, and right.
4-24 CIC Pro Clinical Information Center Revision A
2001099-183
Page 93

Unit License Default
Start Data Storage
CIC Setup: Full Disclosure Defaults
FULL DISCLOSURE LICENSE TYPE—This control shows a list of Full
Disclosure license options. Choices are none, 24 hours, 48 hours, and 72
hours.
NOTE
If the default does NOT match the actual license, Full Disclosure
does NOT work.
If licenses are added to the system, the 1 hour licenses that were
issued with the system are no longer available.
OFFLINE STORAGE—This control allows you to select a time period for
the monitor to be off line before Full Disclosure data is deleted.
This control allows you to designate how full disclosure is enabled for
patients at the time of admission. Choices are automatically for all beds,
automatically if listed, and manually.
Bed List
NOTE
In user mode, the Start Data Storage, Bed List, Unit License Default:
Full Disclosure License Type, and Offline Storage controls are view-
only. You must enter the service mode to modify these control
settings.
Bed List shows a listing of beds for which full disclosure data is
automatically stored.
Revision A CIC Pro Clinical Information Center 4-25
2001099-183
Page 94

CIC Setup: Full Disclosure Defaults
Full Disclosure Off-line Storage (Minute Rule)
The Full Disclosure Minute Rule exists as a precautionary measure
when contact with a monitor has been lost. The feature is applied most
often when the monitor is being used in the Rover application, since the
monitor “roves” from room to room, on and off the network.
If a discharge/admit cycle occurs off the network for a bed that is being
full disclosed, the Full Disclosure sub-system is unaware that the patient
has changed. When the bed returns to the network, Full Disclosure will
present the data from the discharged and admitted patients as part of
the more recent patient’s data. The Full Disclosure Minute Rule helps to
prevent this by assuming that the patient has been discharged if the
monitor is off the network for greater than the number of minutes
selected with the Offline Storage control.
To modify an offline storage time period, follow these steps.
1. Use the mouse to click on the Offline Storage field. A down arrow
icon is displayed next to the current offline time period.
2. Click on the down arrow to display a list of time periods and select
the desired time period. Choices are 30 mins, 1, 2, 4, 8, and 12 hours.
3. A prompt appears. Select YES if you are sure you want to change the
offline storage time. The offline storage menu closes, with the
selected time remaining visible.
4-26 CIC Pro Clinical Information Center Revision A
2001099-183
Page 95
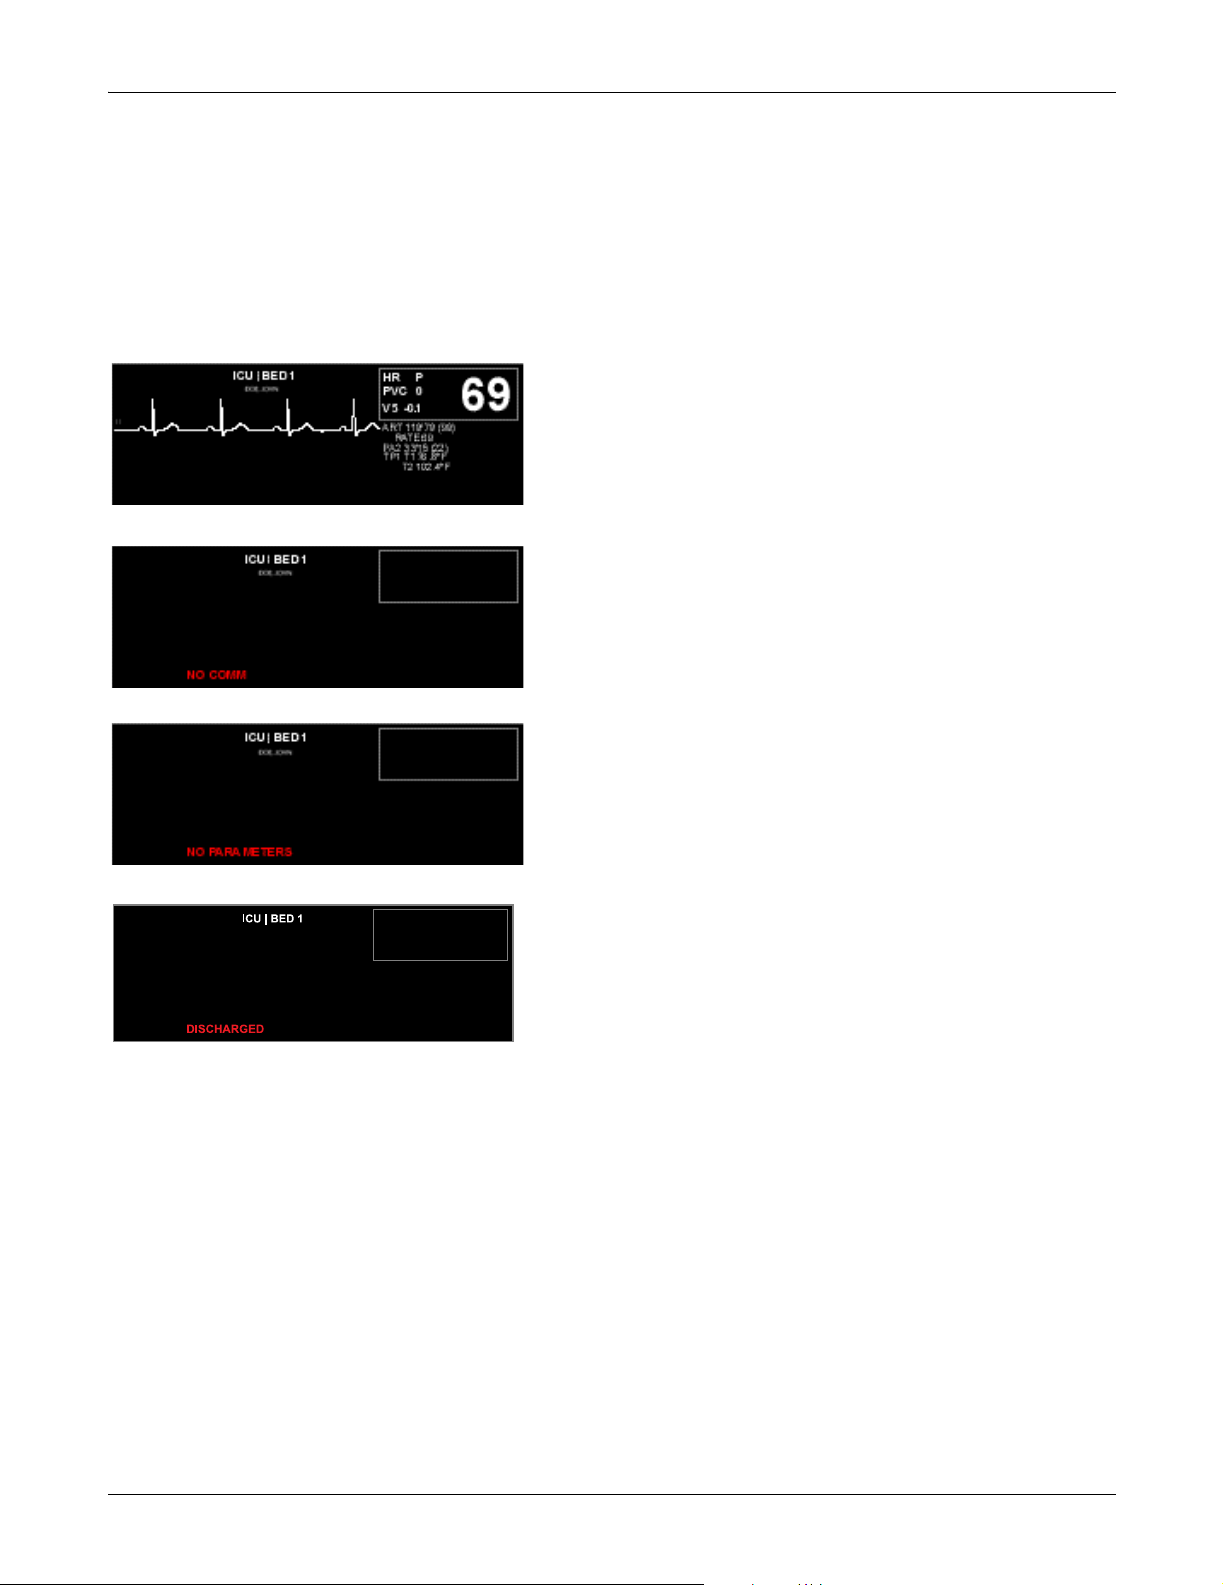
CIC Setup: Bedside Status Messages
Bedside Status Messages
On the clinical information center display, there are up to 16 waveform
slots which display information from up to 16 bedside monitors. If no
information appears in a waveform slot, a message indicating the status
of the bedside monitor displays.
064A
065A
This waveform slot indicates that the bedside monitor
is communicating with the clinical information
center.
NO COMM indicates there is no communication
between a bedside monitor and the clinical
information center. The bedside monitor may be
turned off.
ICU | BED1
SMITH,DAVID
NO PARAMETERS indicates there is no patient data
to be sent. The bedside monitor has no module, or no
cables are attached to the module.
067A
DISCHARGED indicates that the bedside monitor is
in discharged mode.
NOTE
If the bed number is unlocked, all discharged bed
068A
numbers are available for selection when ADMIT
is selected in an empty patient slot.
Revision A CIC Pro Clinical Information Center 4-27
2001099-183
Page 96

CIC Setup: Bedside Status Messages
LEADS FAIL indicates that the patient’s leads are
not transmitting data. Check the lead contact with
the skin and that the leads are still plugged into the
transmitter or the bedside monitor.
097A
NO TELEM indicates there is no communication
between telemetry and the clinical information
center. The telemetry system may be turned off.
096A
ALL ALARMS OFF indicates that the alarm feature
is turned off (telemetry only).
095A
NOTE
The unit name and bed number entered at both the CIC Pro and the
bedside monitor must match exactly for communication between
bedside monitor and a CIC Pro.
4-28 CIC Pro Clinical Information Center Revision A
2001099-183
Page 97

5 Printing
Revision A CIC Pro Clinical Information Center 5-1
2001099-183
Page 98

For your notes
5-2 CIC Pro Clinical Information Center Revision A
2001099-183
Page 99

Printing: Initiating and Stopping a Graph
Initiating and Stopping a Graph
Initiating a Graph
If you use the mouse to click on a patient’s ECG parameter window (the
small box in the upper right corner of the patient slot), a continuous
graph initiates for the patient.
The DDW (Direct Digital Writer) prints patient data (generally referred
to as a graph or graph strip). Data can also print to a laser printer.
NOTE
Full Disclosure and the Vital Signs tab sheet cannot print to a DDW.
They must print to a laser printer.
When you use a bedside monitor, the bedside monitor’s graph menu
controls printing formats, including the waveforms graphed, graph
speed, and graph location. Refer to the patient monitor’s operator’s
manual.
When you use telemetry, the CIC Pro controls these functions.
Stopping a Graph
To stop a graph request that has been sent to a DDW, press the GRAPH
STOP button on the DDW or click on the patient’s ECG parameter
window. This stops any graph already in process. If this key is pressed
when no graph is in process, it advances the paper in the writer.
To stop a graph request sent to a laser printer, click on a patient’s ECG
parameter window.
Revision A CIC Pro Clinical Information Center 5-3
2001099-183
Page 100

Graph All Patients
NOTE
The Graph All Patients function is
only available when no single
patient view is open.
Printing: Graph All Patients
The Graph All Patients command sends a graph request to all beds
displayed on this clinical information center, initiating a 10-second graph
for each admitted telemetry patient, and a 20-second graph for bedside
monitor patients.
If a single patient view is open,
selecting Print from the Main
Menu initiates a printout of
whichever tab sheet is in front.
When you select this option for telemetry patients, graph requests
always print at a speed of 25 millimeters per second. For bedside monitor
patients, however, the graph prints at the speed selected at the monitor.
The Graph All Patients process stops automatically. If you press the
GRAPH STOP control key on the external DDW, the current patient’s
graph stops and the writer begins to print a 10-second graph for the next
patient.
If a patient’s data is currently graphing or is being saved to graph when a
Graph All Patients request is initiated, this patient’s data is not included
in the Graph All Patients graph. This patient’s data graphs
independently of the Graph All Patients graph.
Using the mouse to click on the ECG parameter window for a patient
whose data is saving cancels the Graph All Patients request for that
patient.
If, while a Graph All Patients request is running, an arrhythmia alarm
sounds for a patient, the alarm data replaces the data that was saved for
the Graph All Patients request.
If, while a Graph All Patients request is running, a telemetry patient
initiates a graph from his or her telemetry transmitter, the Graph All
Patients graph for that patient is replaced by a transmitter graph.
5-4 CIC Pro Clinical Information Center Revision A
2001099-183
 Loading...