

GE AHW50LMG1, AHW30LMG1, AHR65LMG1, AHR50LMG1, AHR30LMG1 Owner’s Manual
...
:13
Safety Instructions ............ 2, 3
Operating Instructions
About the Controls
on the Dehumidifier ............ 4
Automatic Defrost ............... 5
Choosing a i,ocation ............. 5
How the Dehumidifier Operates ...5
Removing Collected Water ....... 6
Water Level .................... 6
Care and Cleaning
Air Filter ...................... 7
Grille and Case ................. 7
Water Bucket ................... 7
Troubleshooting Tips ........... 8
ge.com
AMMSO
AMR30
AMR40
AMRSO
AMR65
AMW30
AMWSO
A HW6 5
Ddshumidificateur
Consumer Support
Consumer Support ...... Back Cover
Ownership Registration for
Customers in Canada only ..... 9, 10
Warranty for Customers
in Canada ..................... 13
Warranty for Customers
in the U.S.A .................... 12
ENERGY STAR ® labeled product
ENERGYSTAR
As all ENERGY STAR ® )artneI; (;E has
determined that this 3roduct meets the
ENERGYSTAR®guidelines for energy,
ef_icienc>
La section fran_'aise commence ?_la page 14
Deshumedificador
La secci6n en esJ)a_o[ empieza en [a pdgina 26
Write themodelandserial numbershere:
Model #
Serial #
You can find them on a label on the back
of the dehumidifier
In Canada, contact us at:
www.GEAppliances.ca
49-7598-1 12-08JR
IMPORTANTSAFETYINFORMATION.
READALLINSTRUCTIONSBEFOREUSING.
A WARNING!
For your safety, the information in this manual must be followed to minimize the risk of fire, electric shock
or personal injury.
SAFETYPRECAUTIONS
When using this dehumidifier, always follow basic safety precautions, including the following:
• Use this appliance only for its intended
purpose as described in this Owner's
Manual.
• Th_ dehumidifier must be properly
irtstalled and grounded as described
in this manual before it Lsused.
Never operate thLs dehumidifier in an area
that is likely to accumulate standing water.
If this condition develops, for your s_ety
disconnect the power supply betbre
stopping into the water
Never unplug your dehumidifier by pulling
on the power cord. Always grip plug firmly
and pull straight out from the receptacle.
Replace immediately all dectfic service
cords that have become flayed or otherwise
damaged. A damaged power supply cord
must be replaced with a new power supply
cord obtained from the manufacturer and
not repaired. Do not use a cord that shows
cracks or abrasion damage along its length
or at either the plug or connector end.
Turn the dehumidifier OFFand unplug it
befbre cleaning.
GE does not support any servicing of
the dehumidifier. We strongly recommend
that you do not attempt to service the
dehumidifier yourself.
For your safety, do not store or use
combustible materials, gasoline or other
flammable vapors or liquids in the vicinity
of this or any other appliance.
All dehumidifiers contain refiigerants,
which under federal law must be removed
prior to product disposal. If you are getting
rid of an old product with refiigerants,
check with the company handling disposal
about what to do.
Do not use outdoor.
This dehumidifier is intended for
indoor residential applications only.
This dehumidifier should not be used
for commercial or industrial applications.
If the receptacle does not match the plug,
the receptacle must be changed out by a
qualified electrician.
HOWTOCONNECTELECTRICITY
Do not, under any circumstances, cut or remove
the third (ground) prong from the power cord.
For personal safety, this appliance must be
properly grounded.
DO NOTusean adapter plug with this appliance.
The power cord of this appliance is equipped
with a 3-prong (grounding) plug which mates
with a standard 3-prong (grounding) wall
outlet to minimize the possibility of electric
shock hazard fiom this appliance.
Have the wall outlet and circuit checked by a
qualified electrician m make sure the outlet is
properly _ounded.
2
Where a 2-prong wall outlet is encounmred,
it is your personal responsibility and obligation
to have it replaced with a properly grounded
3-prong wall outlet.
The dehumidifier should always be
plugged into its own individual electrical
outlet, which has a voltage rating matching
the rating plate.
This provides the best perfbrmance and also
prevents overloading house wiring circuits,
which could cause a fire hazard fiom
overheamd wires.
USEOFEXTENSIONCORDS
ge.com
Because of potential safety hazards under
certain conditions, we strongly recommend
against the use of an extension cord.
However, if you must use an extension
cord, it is absolutely necessary that it be
a Ui,-listed, 14 -gauge, 3-wire grounding
type appliance extension cord having
a grounding-type plug and outlet and
that the electrical rating of the cord be
15 amperes (minimum) and 195 volts.
READANDFOLLOWTHISSAFETYINFORMATIONCAREFULLY.
SAVETHESEINSTRUCTIONS
3
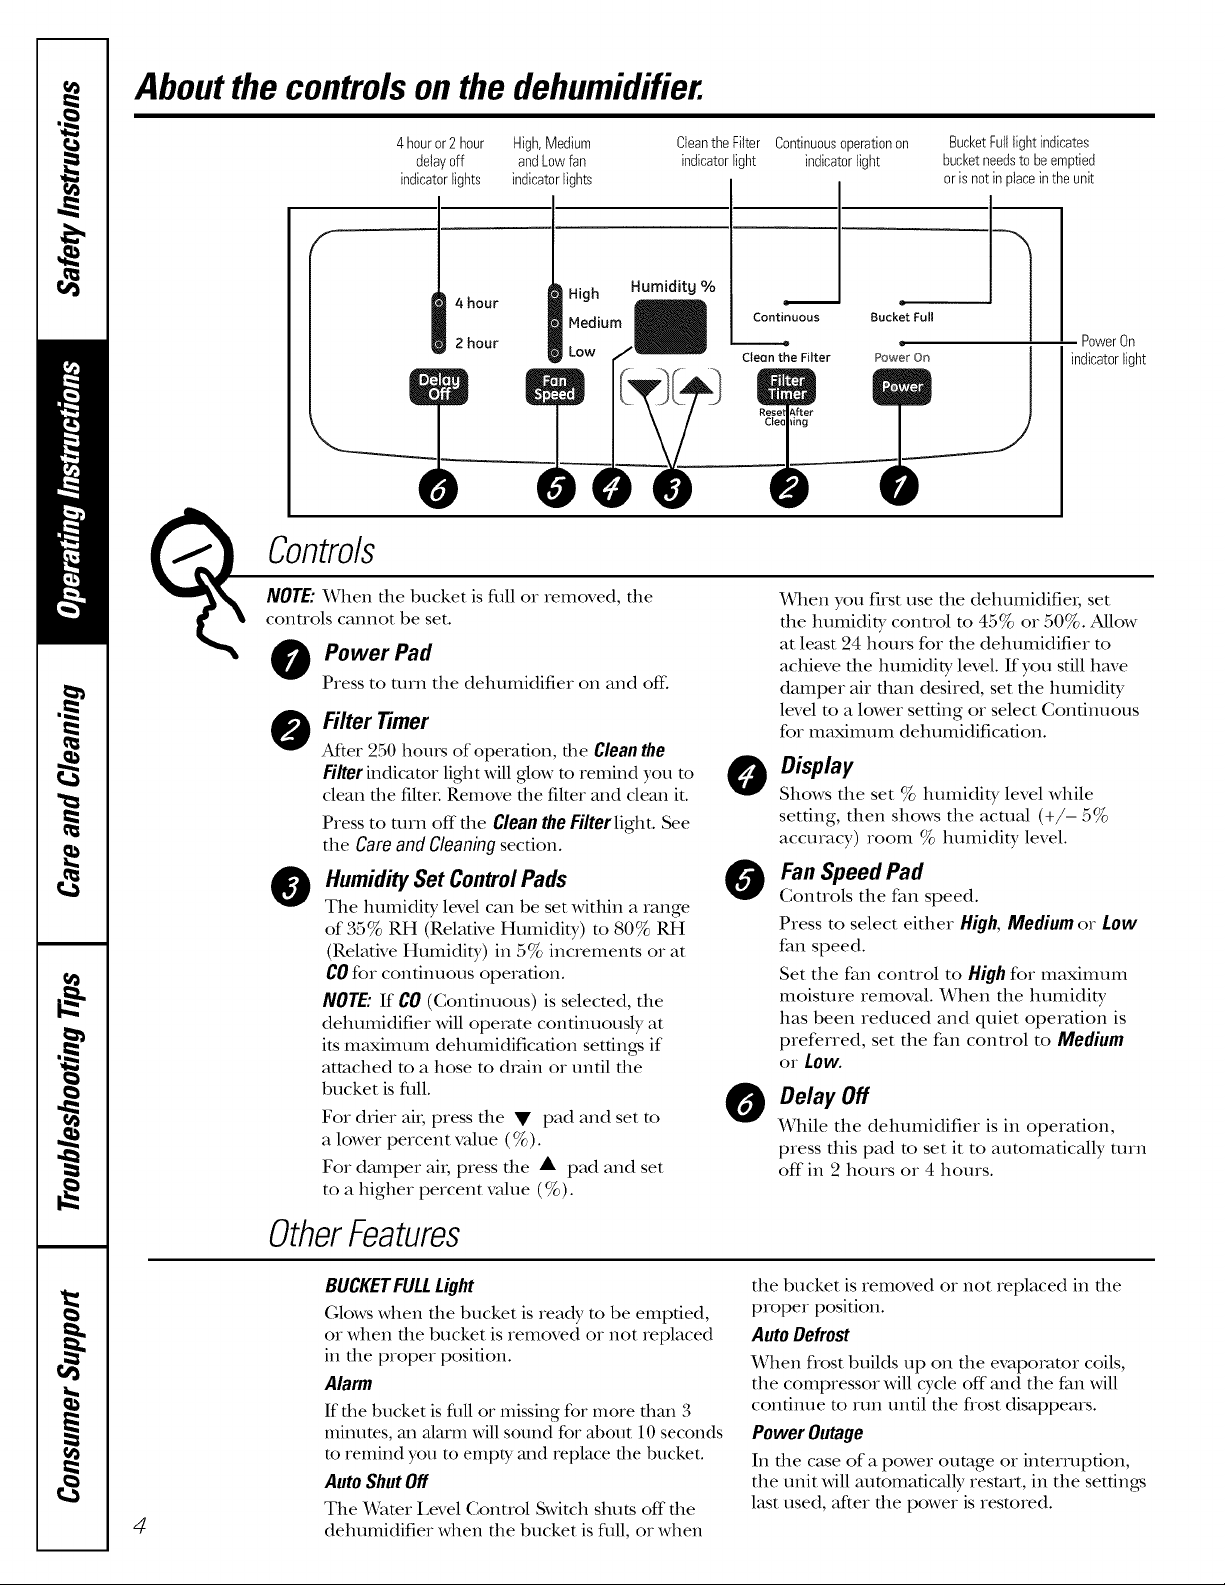
Aboutthe controlsonthe dehumidifier.
4houror2 hour High,Medium
detayoff andLow fan
indicatorbights indicatorbights
4 hour
2 hour
NOTE:_¥hen the bucket is full or removed, the
Contro/s
controls cannot be set.
O Power Pad
Press to turn the dehumidifier on and off:
High
Nediul
Low
O Filter Timer
After 250 hours of operation, the Clean the
Filter indicator light will glox_ to remind you to
clean the filtel: Remove the filter and clean it.
Press to turn off the Clean the Filterlight. See
the CareandCleaningsection.
Humidity Set Control Pads
@
The humidity level can be set within a range
of 35% RH (Relative Humidity) m 80% RH
(Relative Humidity) in 5% increments or at
COfor continuous operation.
NOTE: If CO (Continuous) is selected, the
dehumidifier will operate continuously at
its maximum dehumidification settings if
attached m a hose m drain or undl the
bucket is flfll.
For drier aiI; press the • pad and set to
a lower percent value (%).
For damper aix; press tim • pad and set
to a higher percent value (%).
CleantheFilter
indicatorlight
Humidity %
Continuousoperationon
indicatorlight
Continuous
Cteen the Filter
When you first use the dehumidifiei; set
the humidit T conuol m 45% or 50%. Aflow
at least 24 hours for the dehumidifier to
achieve file humidity level. If you still have
damper mr titan desired, set the humidity
level to a lower setting or select Continuous
for maximum dehumidification.
Display
Shows the set % humidity level while
setting, then shows the actual (+/- 5%
accuracy) room % humidity level.
Fan Speed Pad
O
Controls the fan speed.
Press to select either High, Mediumor Low
fan speed.
Set the fan control to High for maximum
moisture removal. When the humidity
has been reduced and quiet operation is
preferred, set the fan control to Medium
or Low.
Delay Off
0
While the dehumidifier is in operation,
press this pad to set it to automatically turn
off in 2 hours or 4 hours.
Bucket Full
BucketFulllightindicates
bucketneedstobeemptied
orisnotinplaceintheunit
1
PowerOn
indicator light
OtherFeatures
BUCKETFULLLight
Glowswhen the bucket is ready to be emptied,
or when the bucket isremoved or not replaced
in the proper position.
Alarm
If the bucket is full or missing for more than 3
mintttes, m_alarm _dll sotmd for abottt 10 seconds
to remind you to empty mad replace the bucket.
AutoShutOff
4
The Water Level Control Switch shuts off the
dehumidifier when the bucket is full, or when
the bucket is removed or not replaced in the
proper position.
AutoDefrost
When frost builds up on file evaporator coils,
the compressor will cycle off and the fan will
continue m run until the frost disappears.
PowerOutage
In the case of a power outage or interruption,
the unit will automa6cally restart, in the settings
last used, after the power isrestored.
Usingthe dehumidifier, geoom
When first using the dehumidifier, operate the unit continuously for24 hours.
How the Dehumidifier Operates Automatic Defrost
Moist, humid air is drawn over a cold refligerated
dehumidifying coil. Moisulre in the air condenses
on this coil and drains into a bucket (or through
a hose and drain).
DD,, clean air is drawn through the condenser
where it is heated and discharged out the top grille
into the room.
It isnormalfor thesurroundingair to becomeslightly
warmeras thedehumidifieroperates.
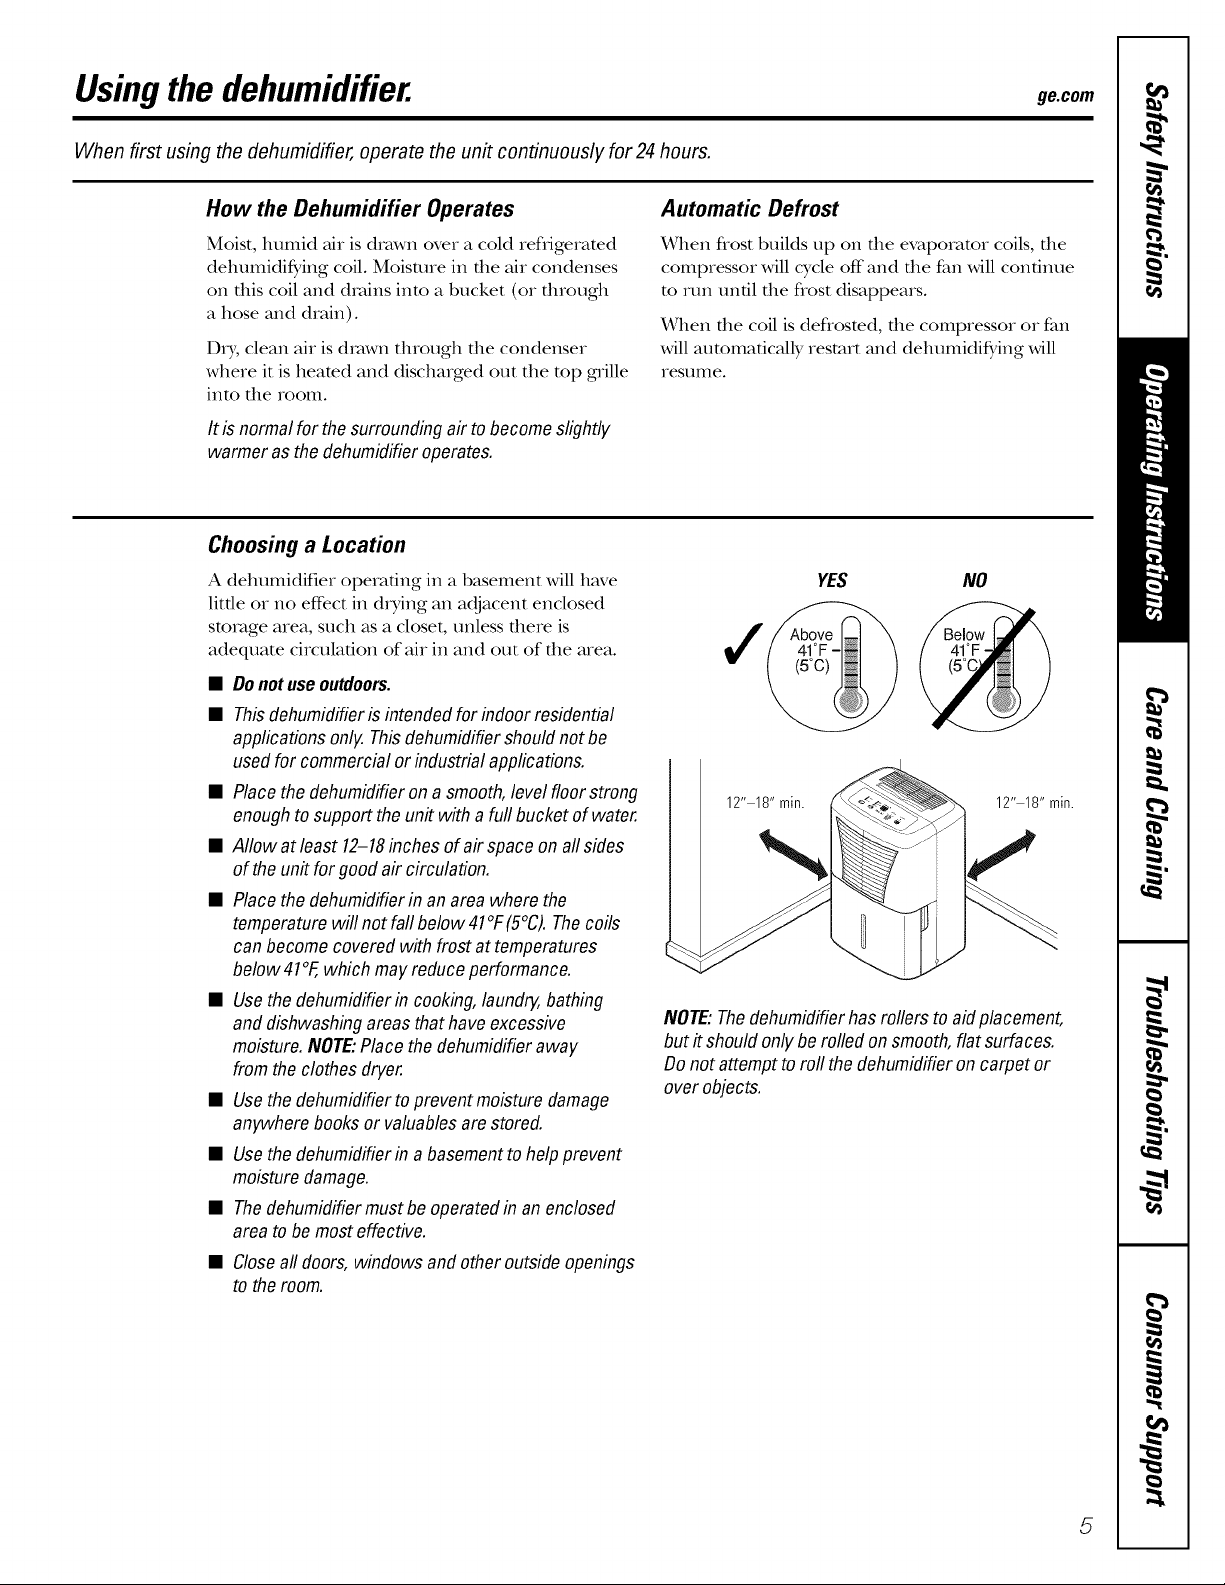
Choosing a Location
A dehumidifier operating in a basement will have
litde or no effbct in &Ting an adjacent enclosed
storage area, such as a closet, unless there is
adequate circulation of air in and out of the area.
• Do not use outdoors.
• Thisdehumidifieris intendedforindoorresidential
applicationsonly.Thisdehumidifiershouldnot be
usedfor commercialor industrialapplications.
• Placethedehumidifieron asmooth,levelfloorstrong
enoughtosupport theunit with a full bucket ofwater.
• Allow atleast 12-18inches of air space onallsides
of theunit for goodair circulation.
• Placethedehumidifierin an area wherethe
temperaturewillnot failbelow 41°F(5°C).Thecoils
can becomecoveredwith frostat temperatures
below41°F,which mayreduce performance.
• Usethe dehumidifierin cooking,laundry,bathing
and dishwashingareasthathave excessive
moisture.NOTE:Placethedehumidifieraway
from theclothesdryer.
• Usethe dehumidifierto prevent moisturedamage
anywherebooksor valuablesarestored.
• Usethe dehumidifierin abasementto help prevent
moisturedamage.
• Thedehumidifiermustbe operatedin an enclosed
area tobe most effective.
• Closeall doors,windowsandotheroutsideopenings
to theroom.
x_qlen flost builds up on the evaporator coils, the
compressor will cycle off" and the fan will continue
to run un61 the frost disappears.
X_qmn the coil is deflosted, the compressor or fan
will automatically restart and dehumidifying will
restllile.
YES NO
12" 18" rain.
12" 18" rain.
N
NOTE:Thedehumidifierhasrollers toaid placement,
but itshould onlybe rolledonsmooth,flat surfaces.
Donot attempttoroll thedehumidifieroncarpet or
over objects.
5
Usingthe dehumidifier.
Always make sure the water bucket is locked into place on the dehumidifier.
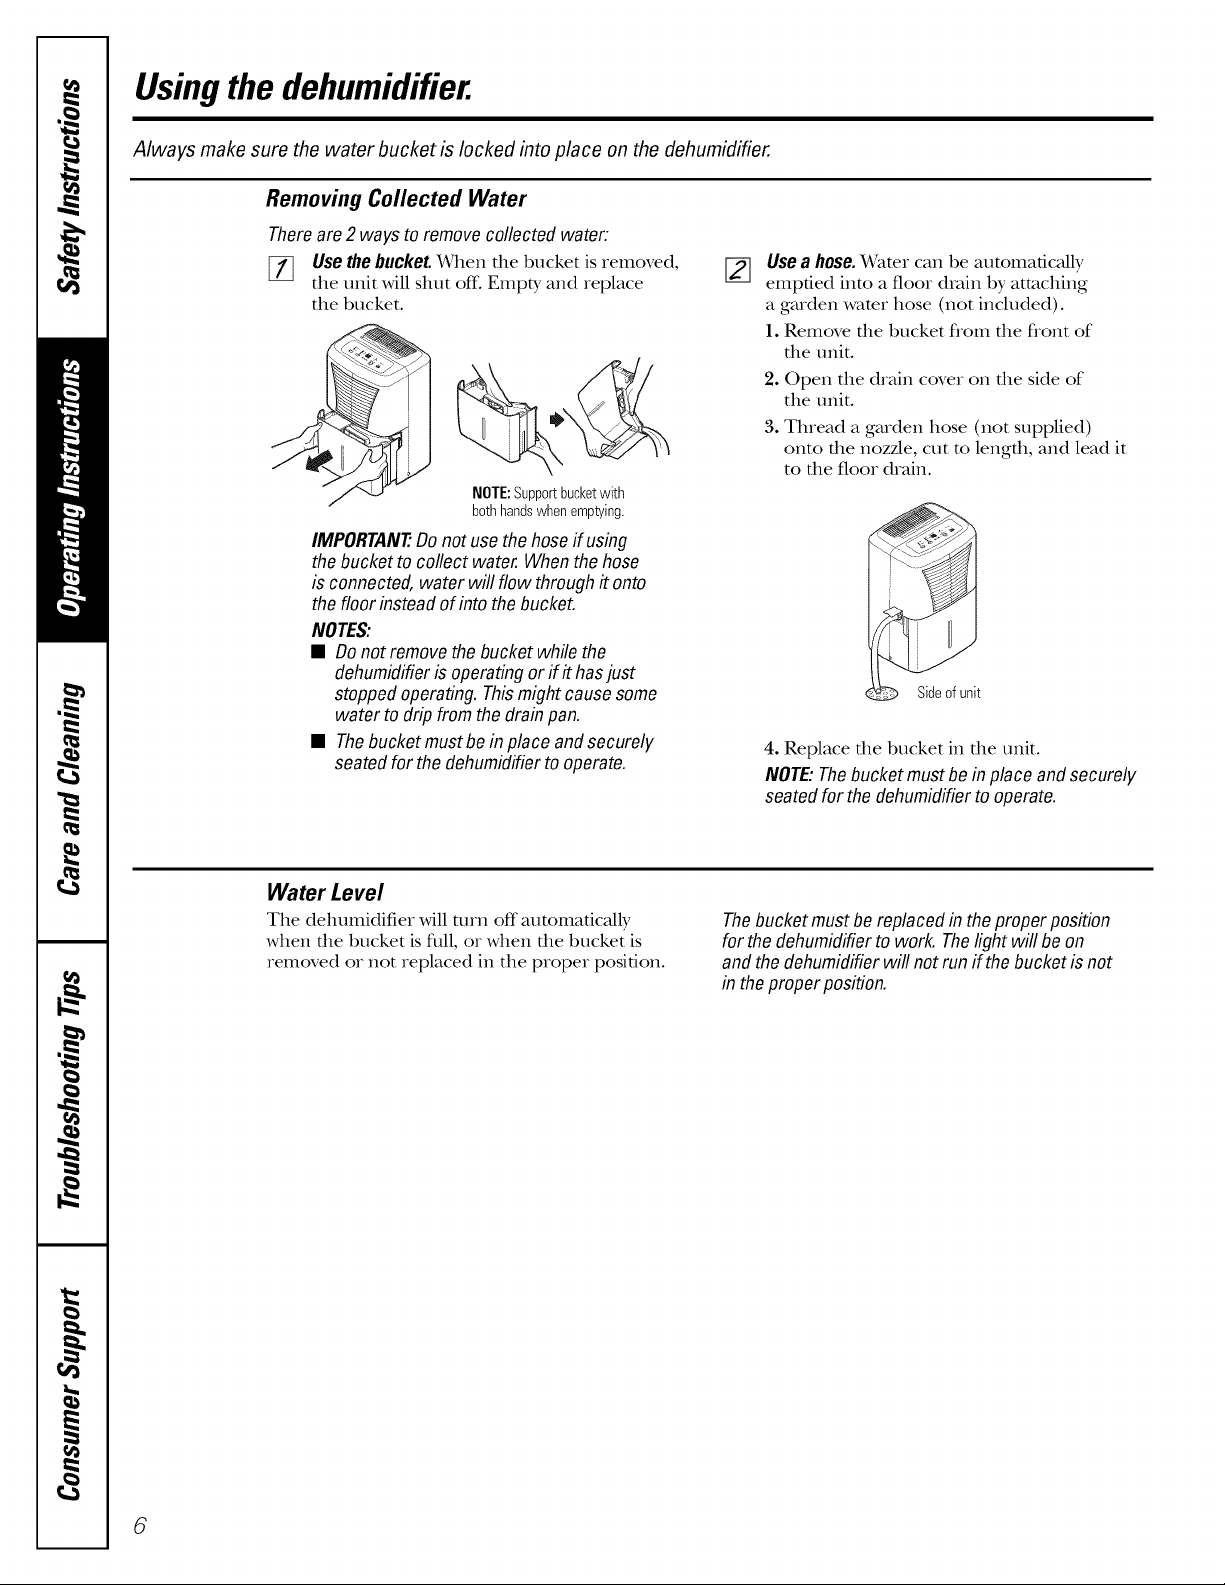
Removing Collected Water
Thereare2 waystoremovecollected water.
[_ Usethebucket._When the bucket is iemoved,
the unit will shut off: Empty and replace
the bucket.
NOTE:Supportbucketwith
bothhandswhenemptying.
IMPORTANT'.Donot usethehoseif using
thebucketto collect water.Whenthe hose
is connected,water will flow through # onto
thefloorinsteadof intothe bucket.
NOTES:
• Donotremove the bucketwhile the
dehumidifieris operatingorif #hasjust
stoppedoperating.Thismight causesome
water todrip from thedrainpan.
• Thebucketmustbein place andsecurely
seatedfor thedehumidifiertooperate.
[]
Use a hose. X_rateI can be automatically
emptied into a floor drain by attaching
a garden water hose (not included).
1. Remove the bucket flom the flont of
the unit.
2. Open the drain cover on the side of
the unit.
3. Thread a garden hose (not supplied)
onto the nozzle, cut to length, and lead it
to the floor drain.
Sideofunit
4. Replace the bucket in the unit.
NOTE:Thebucketmustbeinplace andsecurely
seatedfor thedehumidifiertooperate.
Water Level
The dehumidifiei will tmn off automatically
when the bucket is flfll, or when the bucket is
removed or not replaced in the proper position.
Thebucket mustbe replaced in the properposition
for thedehumidifierto work. Thelight will beon
and thedehumidifierwill notrun if thebucketis not
in theproper position.
6
Careand cleaning ofthe dehumidifier, ge.com
Turn off the dehumidifier and remove the plug from the wall outlet before cleaning.
Grille and Case
Tocleanthecase:
Use water and a mild detergent. Do not use
bleach or abrasives.
Water Bucket
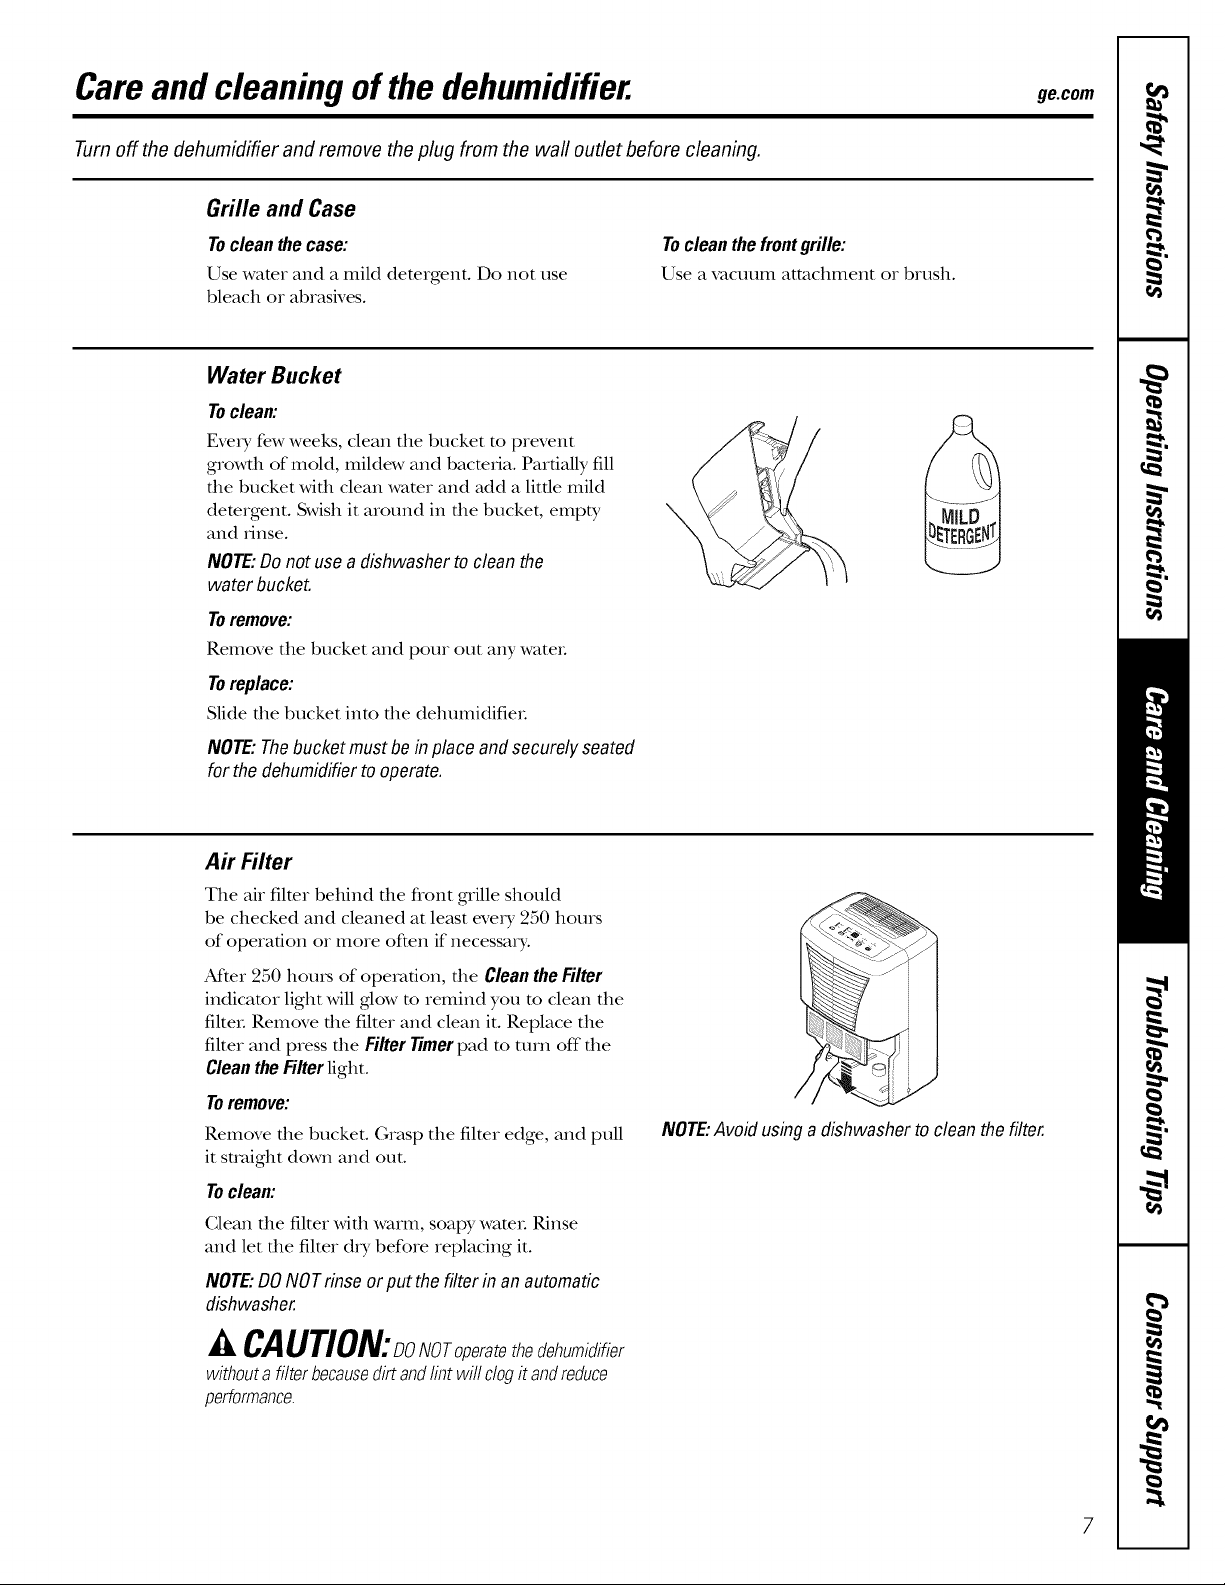
TOc_a_
Eve U few weeks, clean the bucket m prevent
growth of mold, mildew and bactelJa. Partially fill
the bucket with clean water and add a little mild
demrgent. Swish it around in the bucket, empty
and rinse.
NOTE:Donot useadishwashertocleanthe
water bucket.
Toremove:
Remove the bucket and pour out any wateI.
Toreplace:
Slide the bucket into the dehumidifieL
Tocleanthefrontgrille:
Use a vacuunl attachment or brush.
NOTE:Thebucketmustbeinplace andsecurely seated
for the dehumidifierto operate.
A# Filter
The air filmr behind file flont grille should
be checked and cleaned at least eveI y 250 hours
of operation or more often if necessm y.
Aider 250 hems of operation, the CleantheFilter
indicator light will glow to remind you to clean the
filteI. Remove the filter and clean it. Replace the
filter and press the Filter 77merpad m mrn off the
CleantheFilterlight.
Toremove:
Remove die bucket. Grasp the filmr edge, and pull
it straight down and out.
Toclean'.
Clean file filter wifll warm, soapy wami. Rinse
and let the filter di y before replacing it.
NOTE:DONOTrinseorput the filterin an automatic
dishwasher.
NOTE:Avoidusinga dishwashertoclean thefilter.
CAUTION:DoNoropere,e,hedehumidifier
withoutafilterbecausedirtandlintwill clogit andreduce
performance.
7
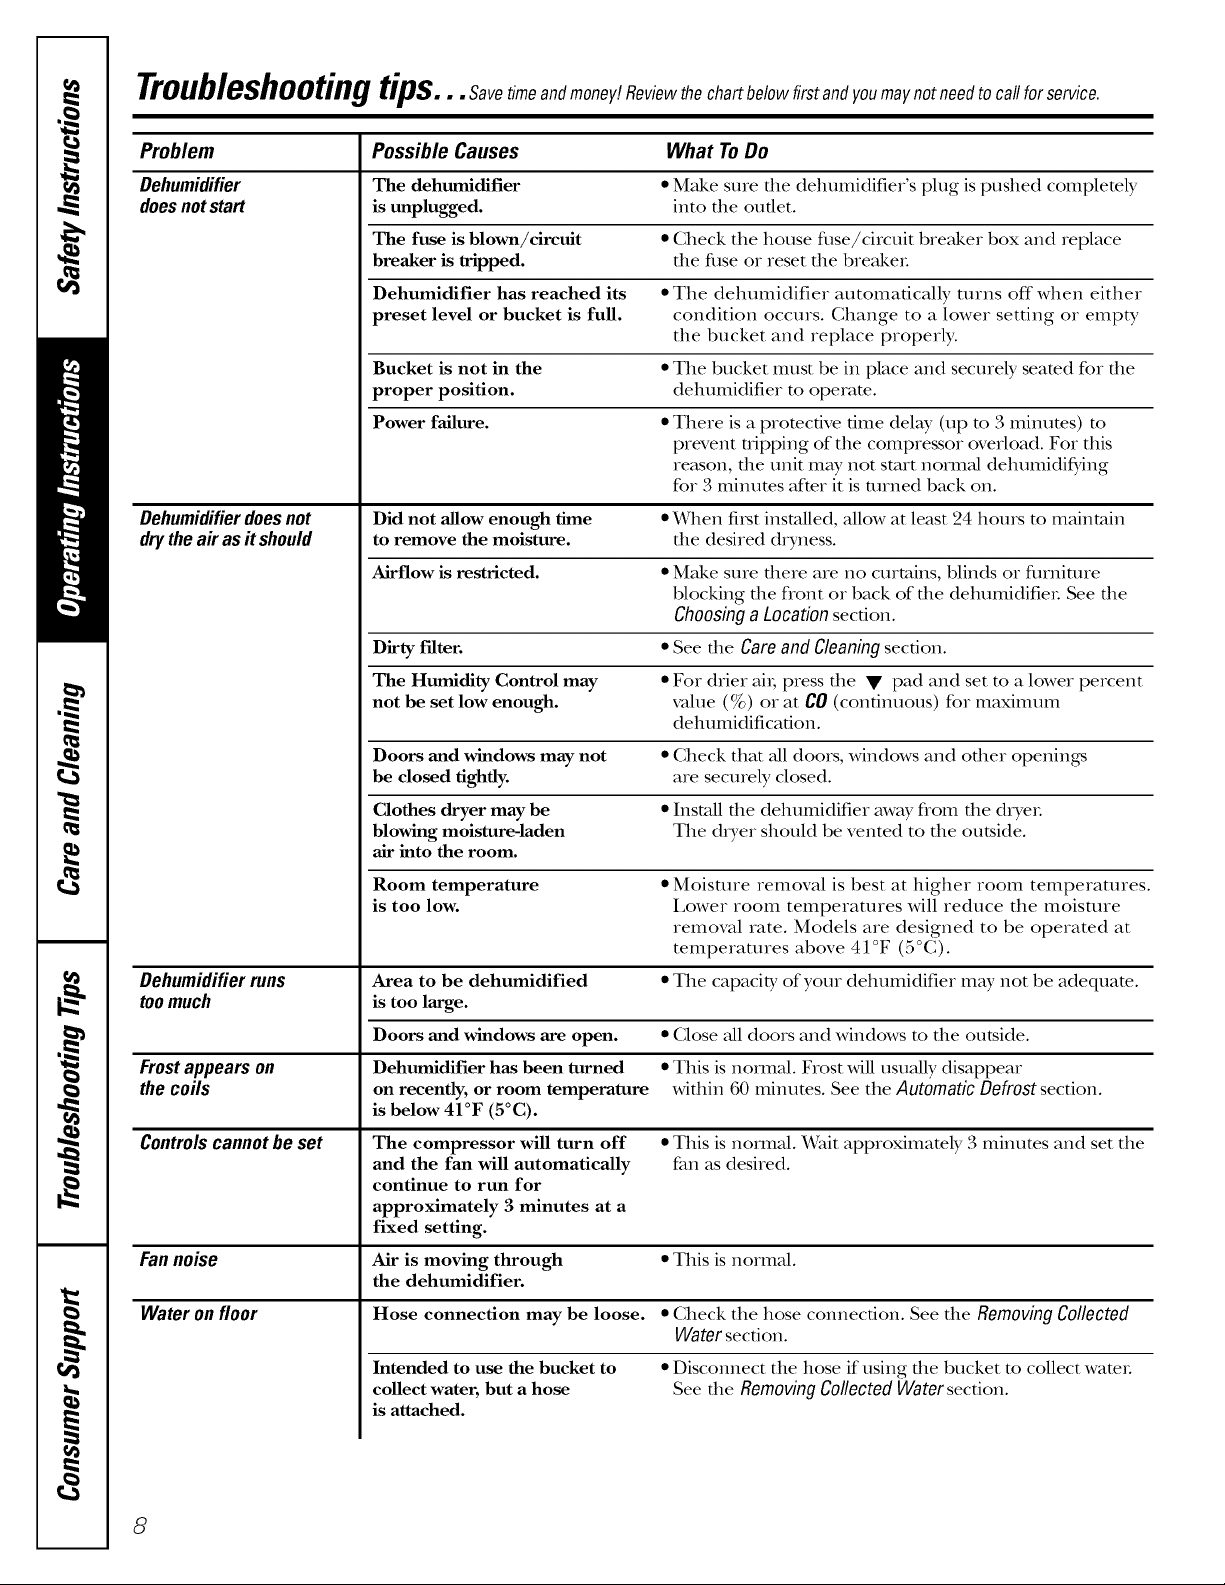
Troubleshootingtips...Savetimeandmoney:Reviewthecha belowhrstandyoumaynotneedtoca,forservice.
Problem Possible Causes What To Do
Dehumidifier The dehumidifier * Make sure the dehumidifier's plug is pushed completely
does not start is unplugged, into the outlet.
The fuse is blown/circuit • Gheck the house disc/circuit breaker box and replace
breaker is tripped, the filse or reset the breakeL
Dehumidifier has reached its * The dehumidifier automatically turns off"when either
preset level or bucket is full. condition occurs. Change to a lower setting or empty
the bucket and replace properly.
Bucket is not in the * The bucket must be in place and securely seared for the
proper position, dehumidifier m operam.
Power failure. • There is a protective time delay (up to 3 minutes) to
prevent tripping of the compressor overload. Fox this
reason, the unit m W not start norm_d dehumidifying
for 3 minums after it is turned back on.
Dehumidifier does not Did not allow enough time • When fixst instaUed, allow at least 24 hours m maintain
dry the air as #should to remove the moisture, file desired dxyness.
Airflow is restricted. • Make sure dlere are no curtains, blinds or filrniture
blocking die flont or back of file debumidifieL See file
Choosing a Location section.
Dirty filter. • See die Care and Cleaning section.
The Humidity Control may • Fox drier ai_; press the • pad and set m a lower percent
not be set low enough, value (%) or at CO (continuous) for maximum
dehumidification.
Doors and windows may not • Check that all doors, windows and other openings
he closed tightly, are securely closed.
Clothes dryer may be • Install the dehumidifier away flom the dryeL
blowing moisture-laden The dryer should be vented to the outside.
air into the room.
Room temperature • Moisture removal is best at higher room temperatures.
is too low. Lower room temperatures will reduce the moisture
removal rate. Models are designed to be operated at
temperatures above 41°F (5°(;).
Dehumidifierruns Area to be dehumidified • The capacity ofyoux dehumidifiex may not be adequam.
toomuch is too large.
Doors and windows are open. • (;lose all doors and windows to die outside.
Frost appears on Dehumidifier has been turned • This is normal. Frost will usuaUy disappear
the coils on recently, or room temperature wifldn 60 minutes. See the Automatic Defrost secdon.
is below 41°F (5°C).
Controls cannot be set • This is normal. "Wait approximately 3 minutes and set the
Fan noise Air is moving through • This is normal.
The compressor will turn off
and the fan will automatically
continue to run for
approximately 3 minutes at a
fixed setting.
the dehumidifier.
fan as desired.
Water onfloor Hose connection may be loose. • Gheck the hose connection. See file Removing Collected
Water secdon.
Intended to use the bucket to
collect water, but a hose
is attached.
• Disconnect the hose if using the bucket to collect WamL
See the Removing Collected Water section.
8
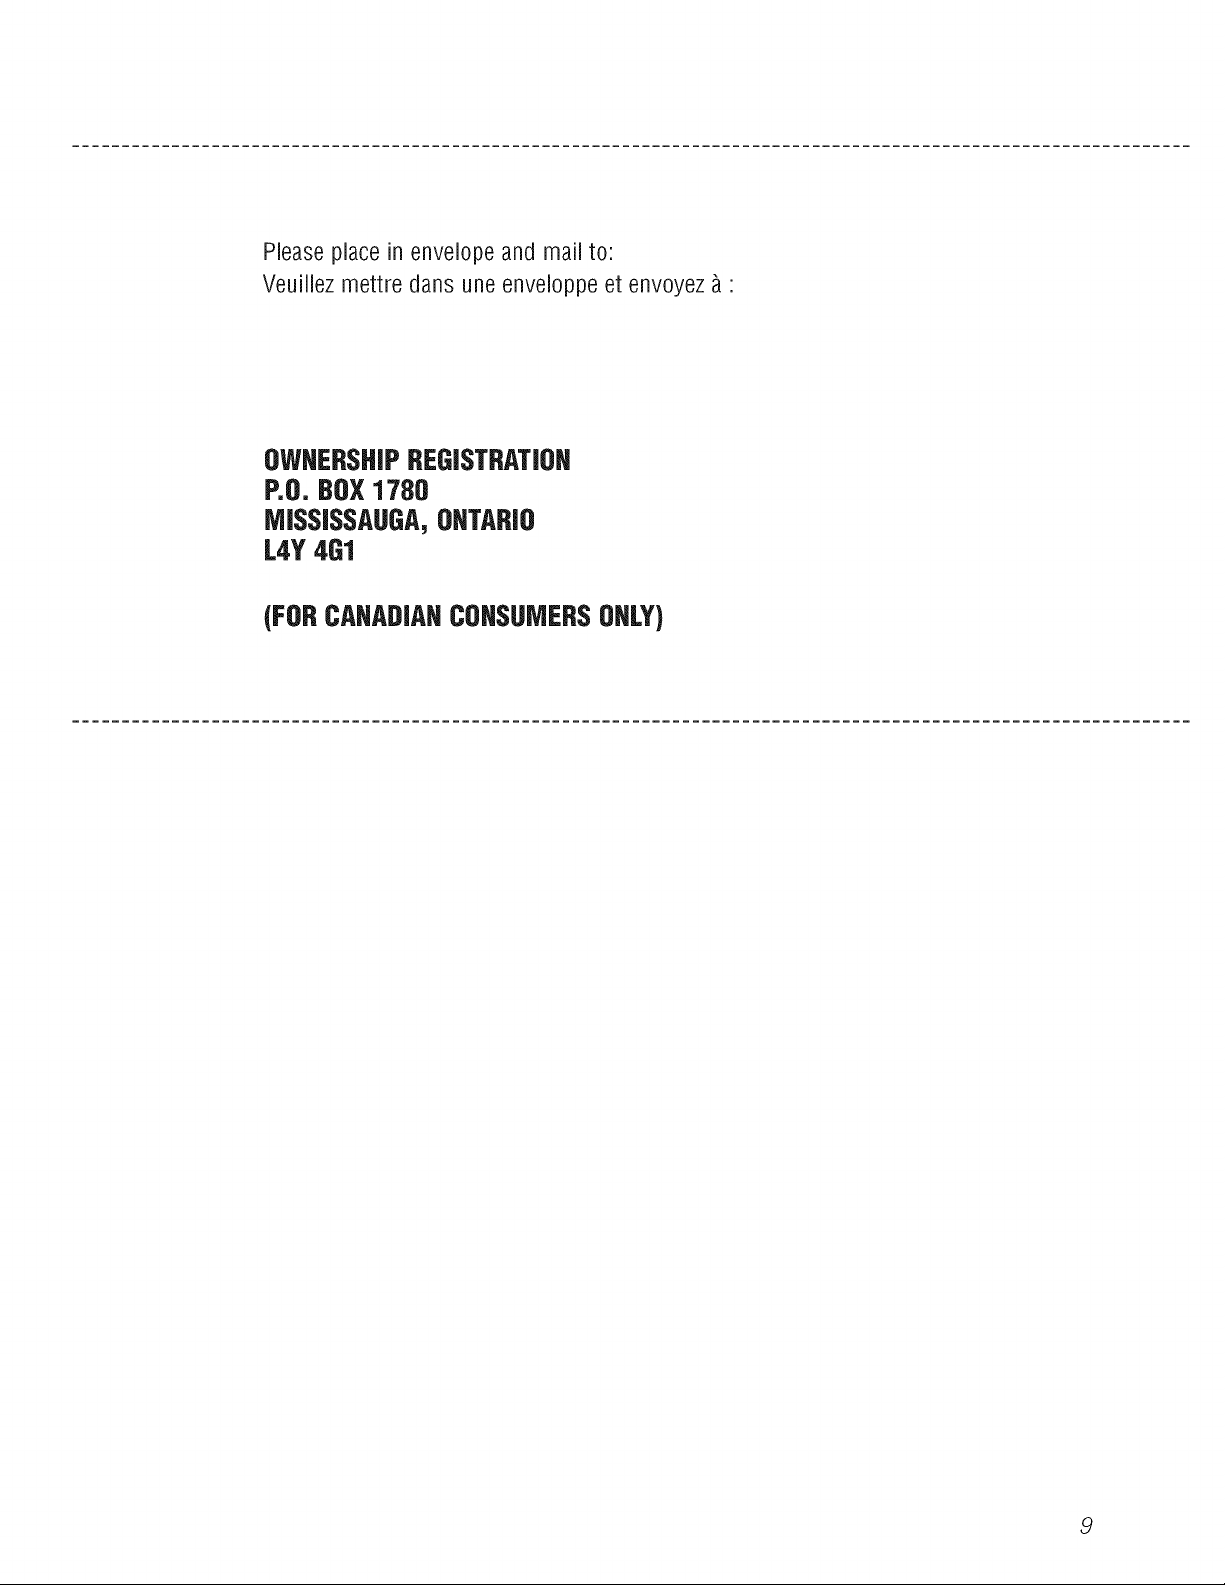
Please place in envelope and mail to:
Veuillez mettre dans une enveloppe et envoyez _ :
OWHERSHJPREGJSTRATJOH
P.O. BOX1780
MISSISSAUGA,OHTARIO
L4Y4G1
(FORCAHADJAHCOHSUMERSOHLY)
9
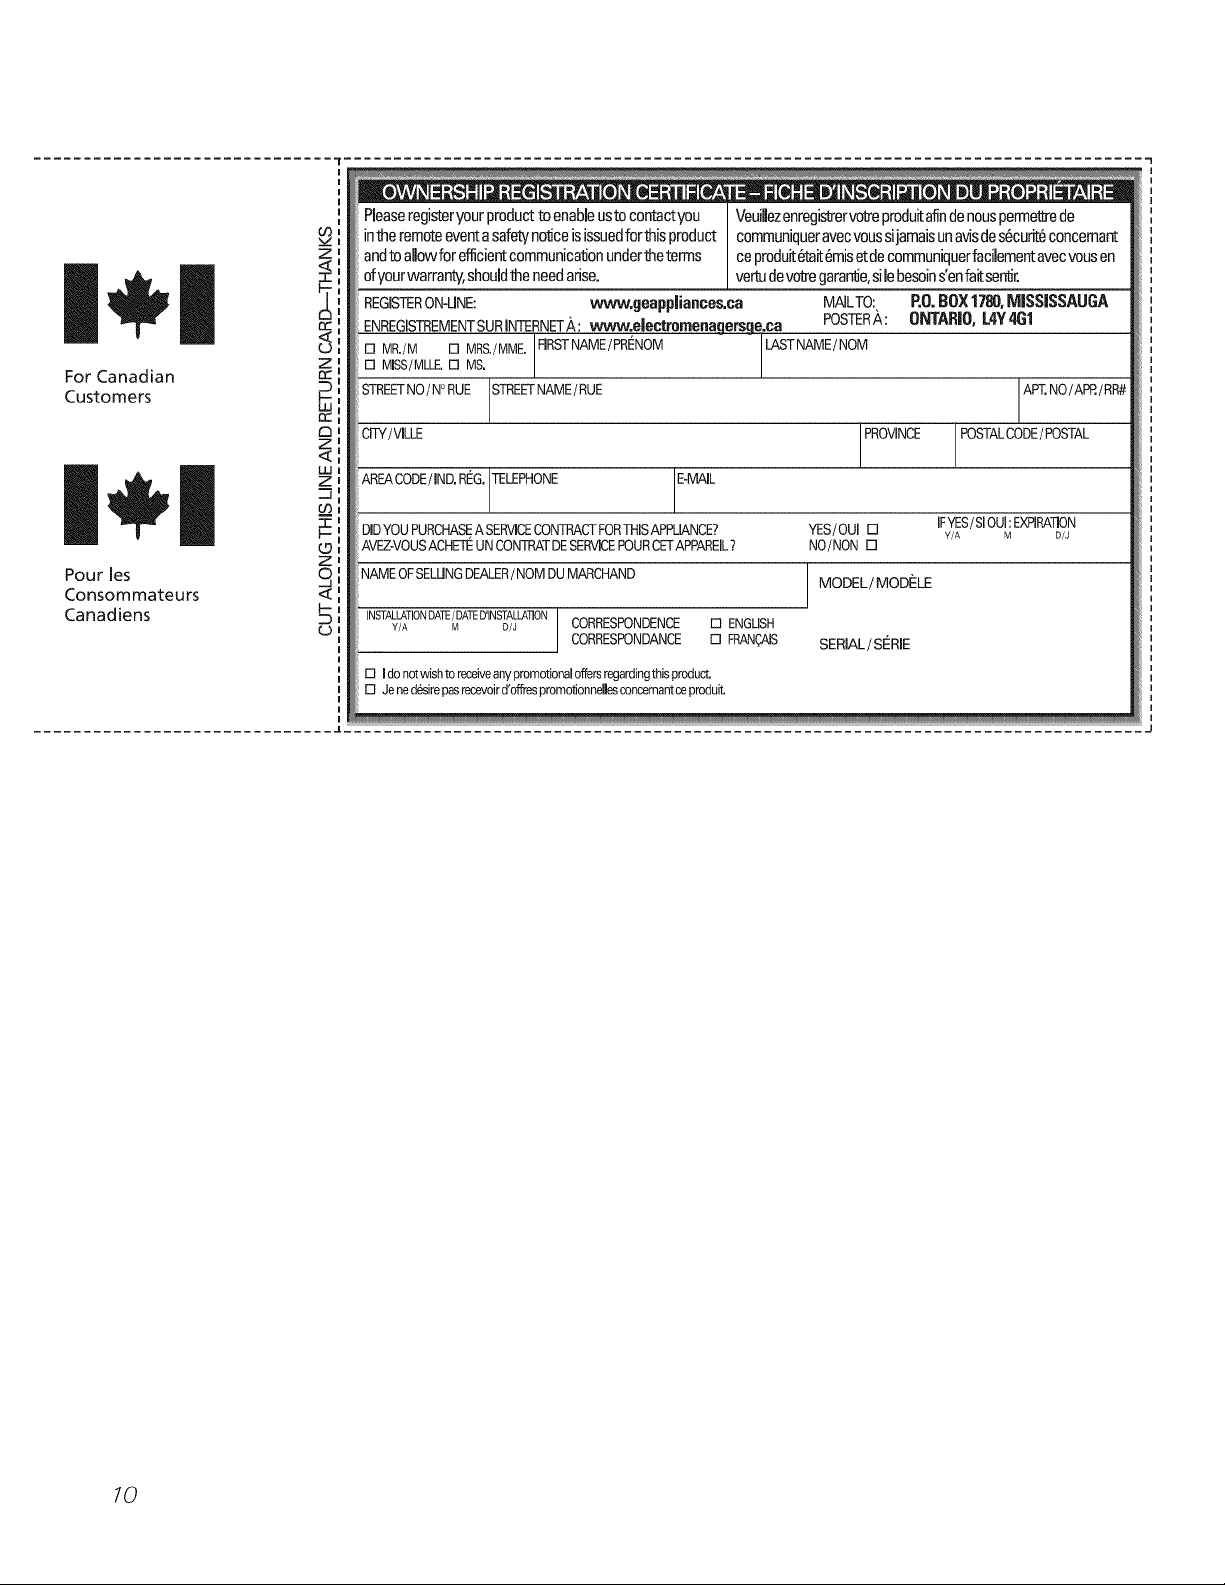
For Canadian
Customers
Pour les
Consommateurs
Canadiens
Peaseregisteryourproducttoenableustocontactyou Veuiflezenregistrervob:eproduitafindenouspermel/_ede
intheremoteeventasafetynonceisissuedforthisproduct communiqueravecvoussijamaisunavisdes6curi_cencemant
Z I
andtoaflowforefficientcommunicationundertheterms ceprodu#,_ait_misetdecommuniquerfacilementavecvousen
ofyourwarranty,shouldtheneedarise, vertudev_e gararrde,silebesoins'enfairserrdr.
Fr.i
REGISTERON-UNE: wwvv.geappliances.ca MAILTO:, P.O.BOX1780,MISSISSAUGA
ENREGISTREMENTSURINTERNET/_,:w_ev.electromenagersge.ca POSTERA: ONTARIO,L4Y4G1
Z I
[][] MISS/NLLE.MR'/N[][] Ms.MRS'/MME"F1RSTNAME/PRt'NOM LASTNAME/NOM
STREETNO/N° RUE STREF NAME/RUE
ral
CITY/VlLLE
LUI
Zl
I
AREACODE/IND. Rt_G.[TELEPHONE [E-MtdL
II
DiDYOU PURCHASEASERVICECONTRACTFORTHISAPPUANCE?
l.-I
AVEZ-VOUSACHETEUN CONTRATDESERVICEPOURCETAPPAREIL?
Z I
NAMEOF SELUNGDEALER/ NOM DU MARCHAND MODEL / MOD_:LE
Y/A M D/J CORRESPONDENCE [] ENGLISH
INSTALLATIONDATE/DATED'INSTALLATON]
[] Ido notwishto receiveanypromotionaloffersregardingthisproduct.
[] Jenedesirepasrecevoird'offcespromotionneflesconcemantceproduit.
CORRESPONDANCE [] FRANC,,AIS SERmALiSERE
YES/OUI[]
NO/NON[]
PROVINCE POSTALCODE/ POSTAL
IFYES/SlOUl: EXPIRA]ION
Y/A M D/J
APT.NO/APP./RR#
10
Notes.
ge.com
w
m
11
m
_B
 Loading...