

Page 1
©
0
Safety Instructions . .......... 2, 3
Operating Instructions ......... 4, .5
Care and Cleaning
Air Fiher ...................... 5
Grille and Case ................. 5
Outdoor Coils .................. 5
Installation Instructions
Through-the-Wall
Installation--Optional .......... 12
Window Installation .......... 7-11
Troubleshooting Tips ....... 14, 15
ge.com
AEE 0 8
AEE12
Climatiseur
La section fran(aise commence ?zla page 19
0
Consumer Support
Consumer Support ..... Back Cover
Ownership Registration for
Customers in Canada only .... 15, 16
Warranty fbr Customers
in Canada .................... 17
Warranty for Customers
in the U.S.A ................... 18
Writethemodelandserial numbershere:
Acondicionador
de aire
La seccidn en espa_,ol empieza en la pdgina 35
Model #
Serial #
Find these numbers on a label on the
side of the air condifione_.
In Canada, contact us at:
xs_s_u.GEAppliances.ca
49-7611 12-08Jfl
Page 2
IMPORTANTSAFETYINFORMATION.
READALLINSTRUCTIONSBEFOREUSING.
WARNING!
Foryour safety, the information in this manual must be followed to minimize the risk of fire, electric shock
or personal injun/
SAFETYPRECAUTIONS
iiiil}i
Use this appliance only fbr its intended
purpose as described in this Owner's
Manual.
iii}i}}li_
This air conditioner must be properly
installed in accordance Mth the Installation
Instructions before it is used.
iii}i}}li_
Never unplug your air conditioner by pulling
on the power cord. Always grip plug firmly
and pull straight out fiom the receptacle.
iii}i}}li_
Replace immediately all electric service
cords that have become fiayed or otherwise
damaged. A damaged power supply cord
must be replaced with a new power supply
cord obtained fiom the manufacturer and
not repaired. Do not use a cord that shows
cracks or abrasion damage along its len_h
or at either the plug or connector end.
}} If the receptacle does not match the plug,
the receptacle must be changed out by a
qualified electrician.
}} Turn the unit OFFand unplug your air
conditioner before making any repairs
or cleaning.
NOTE: Westronglyrecommendthatanyservicing
be performedby a qualified individual.
_:_For your safety...do not store or use
combustible materials, gasoline or other
flammable vapors or liquids in the x,icinity
of this or any other appliance.
_:_All air conditioners contain refiigerants,
which under federal law must be removed
prior to product disposal. Ifyou are getting
rid of an old product with refrigerants,
check with the company handling disposal
about what to do.
HOWTOCONNECTELECTRICITY
Do not, under any circumstances, cut or remove
the third (ground) prong from the power cord. For
personal safety, this appliance must be properly
grounded.
DO NOT use an adapter plug with this appliance.
The power cord of this appliance is equipped
with a 3-prong (grounding) plug which mates
with a standard 3-prong (grounding) wall
outlet to minimize the possibility of electric
shock hazard from this appliance.
Power cord includes a current intermpmr
dex,ice. A test and reset button is prox,ided on
the plug case. The dex,ice should be tested on a
periodic basis by first pressing the TESTbutton
and then the RESETbutton. If the TESTbutton
does not trip or if the RESETbutton will not
stay engaged, discontinue use of the air
conditioner and contact a qualified ser\,ice
mchnician.
Have the wall outlet and circuit checked by a
qualified electrician to make sure the outlet is
properly _ounded.
Where a 2-prong wall outlet is encounmred,
it is your personal responsibility and obligation
to have it replaced with a properly grounded
3-prong wall outlet.
The air conditioner should always be
plugged into its own individual electrical
outlet which has a voltage rating that matches
the rating plate.
This prox,ides the best performance and also
prevents overloading house xdring circuits
which could cause a fire hazard from
overheated Mres.
See the Installation Instructions, Electrical
Requirements section for specific electrical
connection requirements.
2
Page 3
WARNING!
CORDS--115-Volt modelsonl
ge.com
Because of potential safety hazards under certain
conditions, we strongly recommend against the
use of an extension cord.
However; if you must use an extension cord,
it is absolutely necessa U that it be a UL-listed,
14 gauge, 3_wiregrounding type appliance
exmnsion cord ha\,ing a grounding type plug
and outlet and that the electrical rating of the
cord be 15 amperes (minimum) and 125 volts.
CAUTION:
DONOT use an extension cord with any of the
230/208 volt models.
READANDFOLLOWTHISSAFETYINFORMAtiONCAREFULLY
SAVETHESEINSTRUCTIONS
3
Page 4
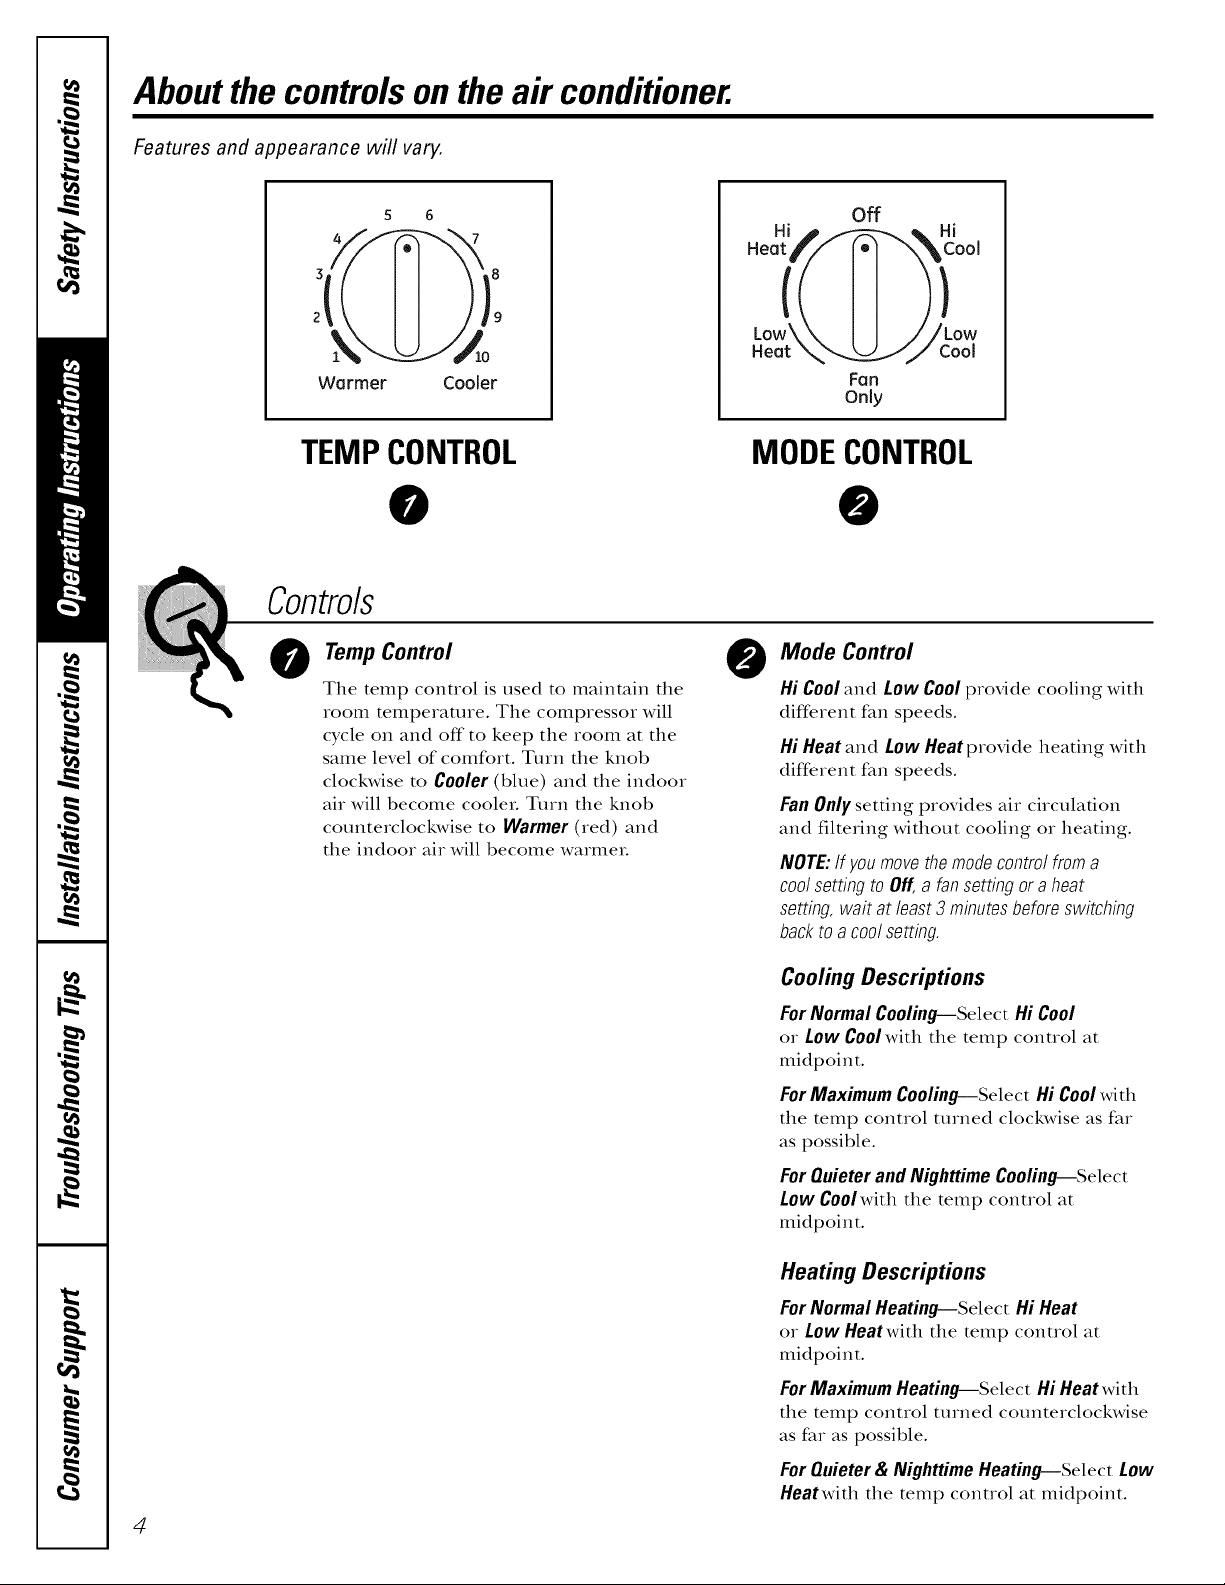
Aboutthe controlsontheair conditioner.
Features and appearance will vary.
5 6
K ,,go
Warmer Cooler
TEMPCONTROL
@
Controls
TempControl
@
The temp control is used to maintain the
room temperature. The compressor will
cycle oi1 and off to keep the rooln at the
same level of comfort. Turn the knob
clockwise to Cooler (blue) and the indoor
air will become cooler. Turn the knob
counterclockwise to Warmer (red) and
the indoor air will become warmeL
Hi h _ % Hi
Low\\ I I J/Low
Heat __J Cool
off
Fan
Only
MODECONTROL
@
Mode Control
@
Hi Cooland Low Coolprovide cooling with
different fan speeds.
Hi Heatand Low Heatprovide heating with
dift>rent fan speeds.
FanOnlysetting provides air circulation
and filtering without cooling or heating.
NOTE:If youmovethemodecontrolfroma
coolsettingtoOff,a fansettingora heat
setting,wait atleast3minutesbeforeswitching
backtoacoolsetting.
Cooling Descriptions
ForNormal Cooling--Select Hi Cool
or Low Coolwith the temp control at
midpoint.
For Maximum Cooling-Select Hi Cool with
the temp control turned clockwise as far
as possible.
For Quieter and Nighttime Cooling--Select
Low Coolwith the temp control at
midpoint.
Heating Descriptions
For Normal Heating--Select Hi Heat
or Low Heatwith the temp control at
midpoint.
ForMaximum Heating--Select Hi Heatwith
the temp control turned counterclockwise
as far as possible.
ForQuieter& Nighttime Heating--Select Low
Heatwith the temp control at midpoint.
4
Page 5
Additional important information.
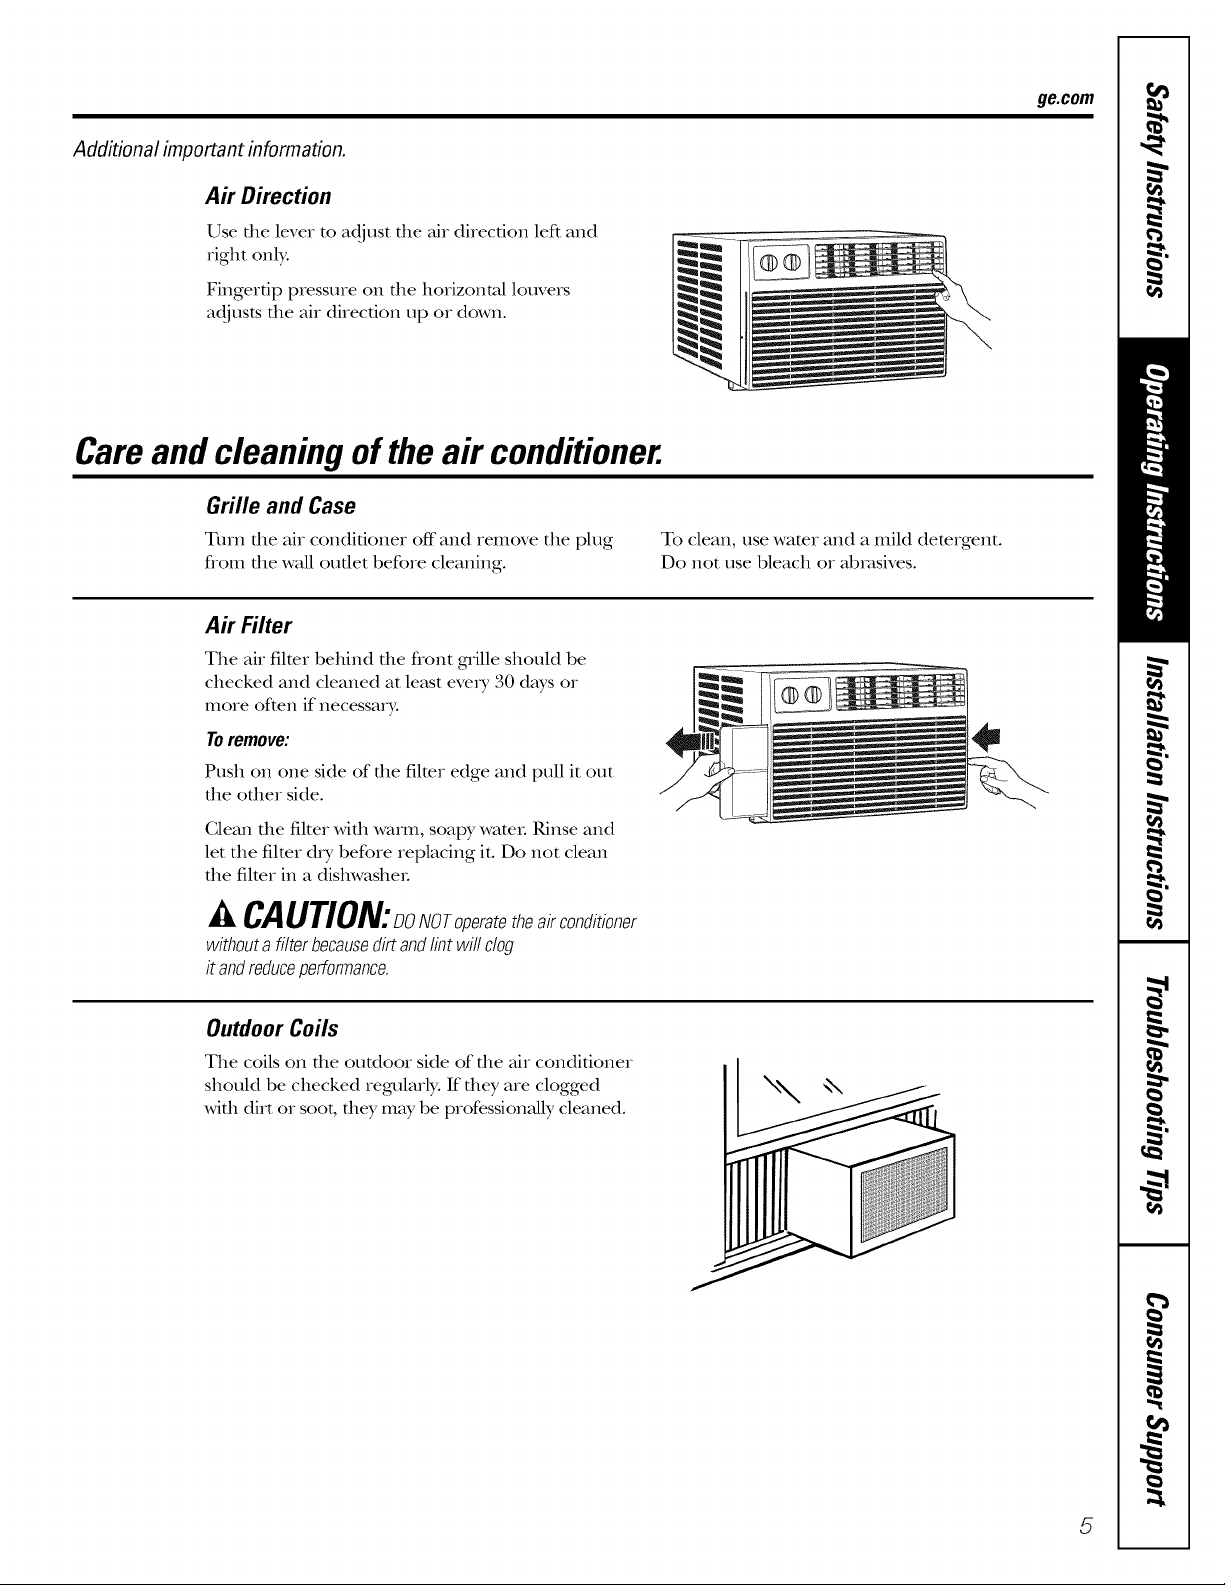
Air Direction
Use the lever to adjust the air direction left and
right onl):
Fingertip pressure on the horizontal louvers
adjusts the air direction up or down.
Careand cleaningof theair conditioner.
Grille and Case
Turn the air conditioner off and remove the plug To clean, use water and a miM detergent.
flom the wall outlet before cleaning. Do not use bleach or abrasives.
Air Filter
The air filter behind the front grille should be
checked and cleaned at least eve_y 30 dws or
more often if necessary.
Toremove:
Push on one side of the filter edge and pull it out
the other side.
ge.com
Glean the filter with warm, soapy wateL Rinse and
let the filter dry before replacing it. Do not clean
the filter in a dishwasheL
^,.CAUTION:DoNoToperatetheairconditioner
withoutafilterbecausedirtandlintwillclog
it andreduceperformance.
Outdoor Coils
The coils on the outdoor side of the air conditioner
should be checked regularly. If they are clogged
with dirt or soot, they may be professionally cleaned.
5
Page 6
ilnsta,,at,onnstruct,onsl'irC°ndit'°nerl
I
IF_ Questions? Call 800.GE.CARES (800.432.2737) or visit our Website at: ge.com I
In Canada, call 1.800.561.3344 or visit www.GEAppliances.ca
I
BEFORE YOU BEGIN
Read these instructions completely and carefully.
• IMPORTANT - Savethese
instructions for local inspector's use.
• IMPORTANT - Observeall
governing codes and ordinances.
• Note to Installer- Be sure to leave these
instructions with the Consumer.
• Note to Consumer- Keep these
instructions for future reference.
• Skill level -Installation of this appliance
requires basic mechanical skills.
• Completion time- Approximately 1 hour
• We recommend that two people install
this product.
• Proper installation is the responsibility
of the installer.
Product failure due to improper installation
is not covered under the Warranty.
You MUST use all supplied parts and use
proper installation procedures as described
in these instructions, and any separate kit
instructions, when installing this air
conditioner.
-&CAUTION:
Do not, under any circumstances, cut or
remove the third (ground) prong from the
power cord.
Do not change the plug on the power cord
of this air conditioner.
Aluminum house wiring may present special
problems--consult a qualified electrician.
If the sill support bolts do not contact the
window sill, or if you have a window
without a sill, you must order accessory kit
RAK87 to properly install this air conditioner.
Call 800.626.2002 or visit ge.com.
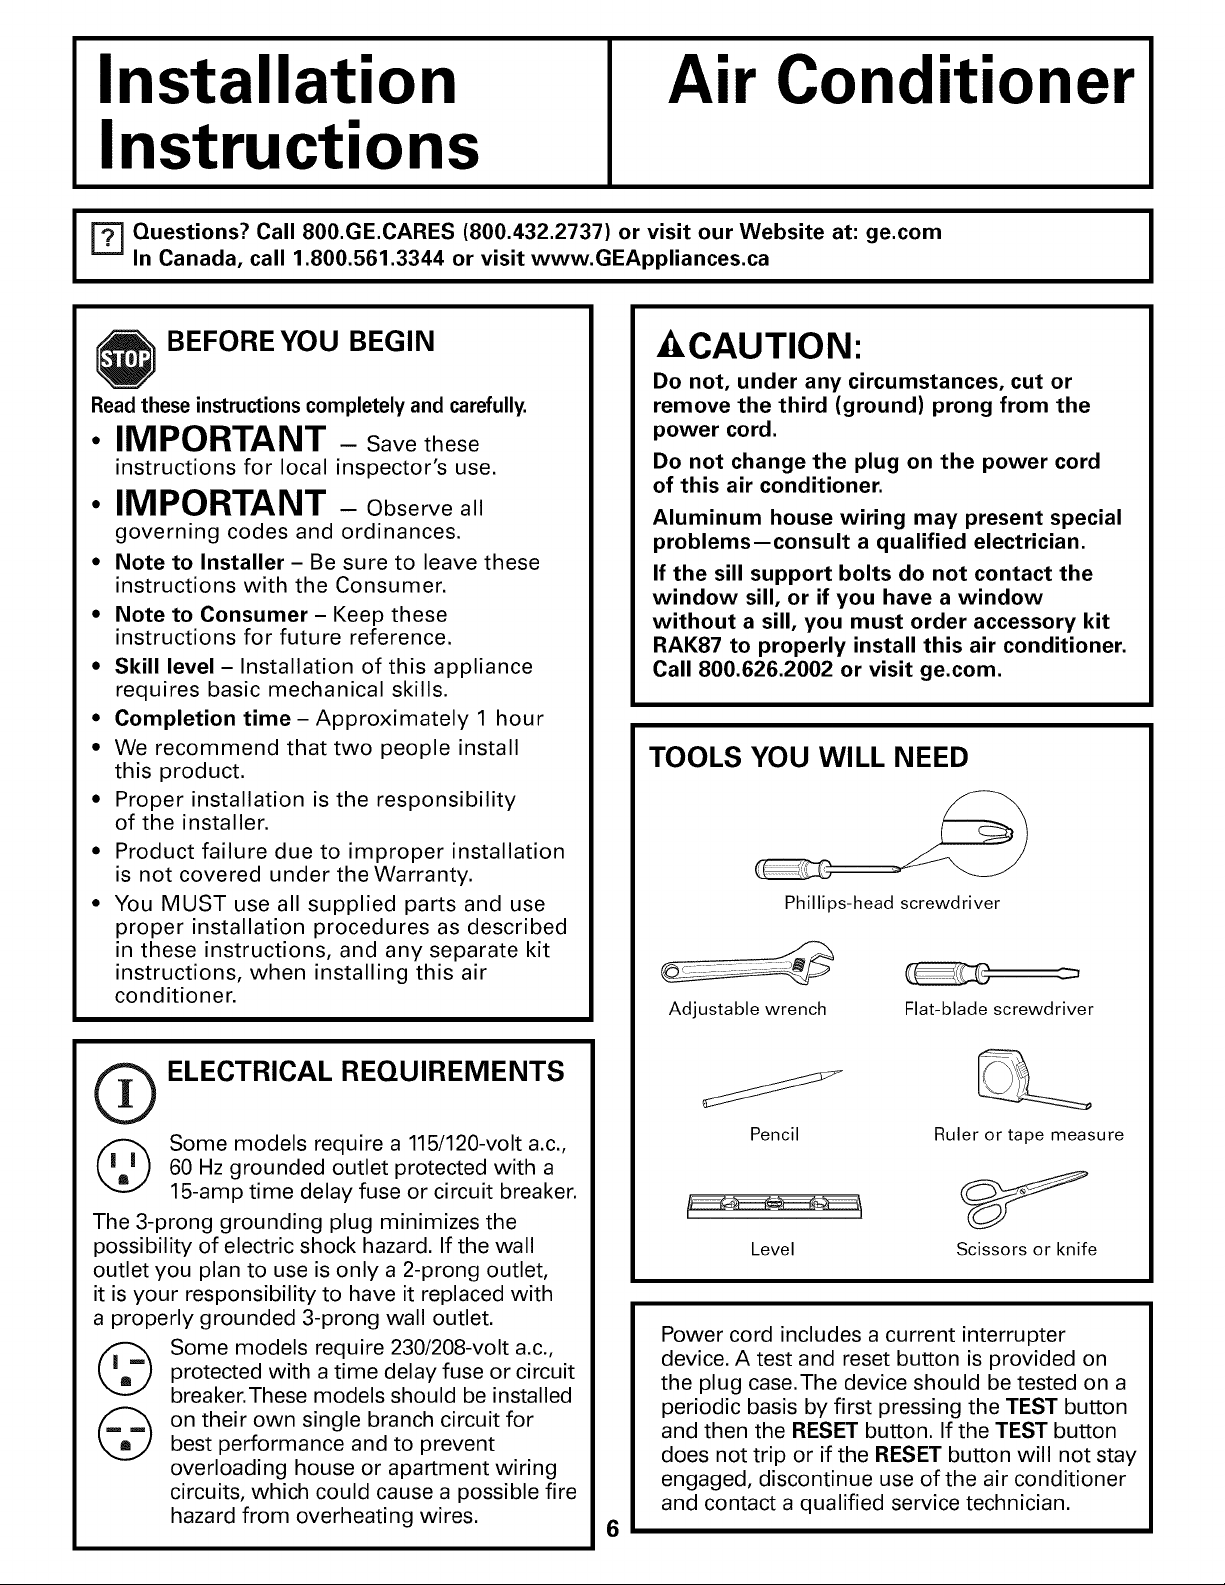
TOOLS YOU WILL NEED
Phillips-head screwdriver
Adjustable wrench
Flat-blade screwdriver
O ELECTRICAL REQUIREMENTS
(_ Some models require a 115/120-volt a.c.,
The 3-prong grounding plug minimizes the
possibility of electric shock hazard. If the wall
outlet you plan to use is only a 2-prong outlet,
it is your responsibility to have it replaced with
a properly grounded 3-prong wall outlet.
©
60 Hz grounded outlet protected with a
15-amp time delay fuse or circuit breaker.
Some models require 230/208-volt a.c.,
protected with a time delay fuse or circuit
breaker.These models should be installed
on their own single branch circuit for
best performance and to prevent
overloading house or apartment wiring
circuits, which could cause a possible fire
hazard from overheating wires.
Pencil
Level
Power cord includes a current interrupter
device. A test and reset button is provided on
the plug case.The device should be tested on a
periodic basis by first pressing the TEST button
and then the RESET button. If the TEST button
does not trip or if the RESET button will not stay
engaged, discontinue use of the air conditioner
and contact a qualified service technician.
6
Ruler or tape measure
Scissors or knife
Page 7

Window Installation Instructions
PARTS INCLUDED
(appearance may vary)
Foam top
window gasket
Left
accordion.
panel
Case bottom seal
(thin, adhesive-backed)
Type A (6) Type B (7) Type C (6)
Type D (3)
Sill support (2)
Nut (2)
Bolt (2)
Top mounting rail
Right
accordion
panel
Window locking
bracket (2)
7
Page 8
Window Installation Instructions
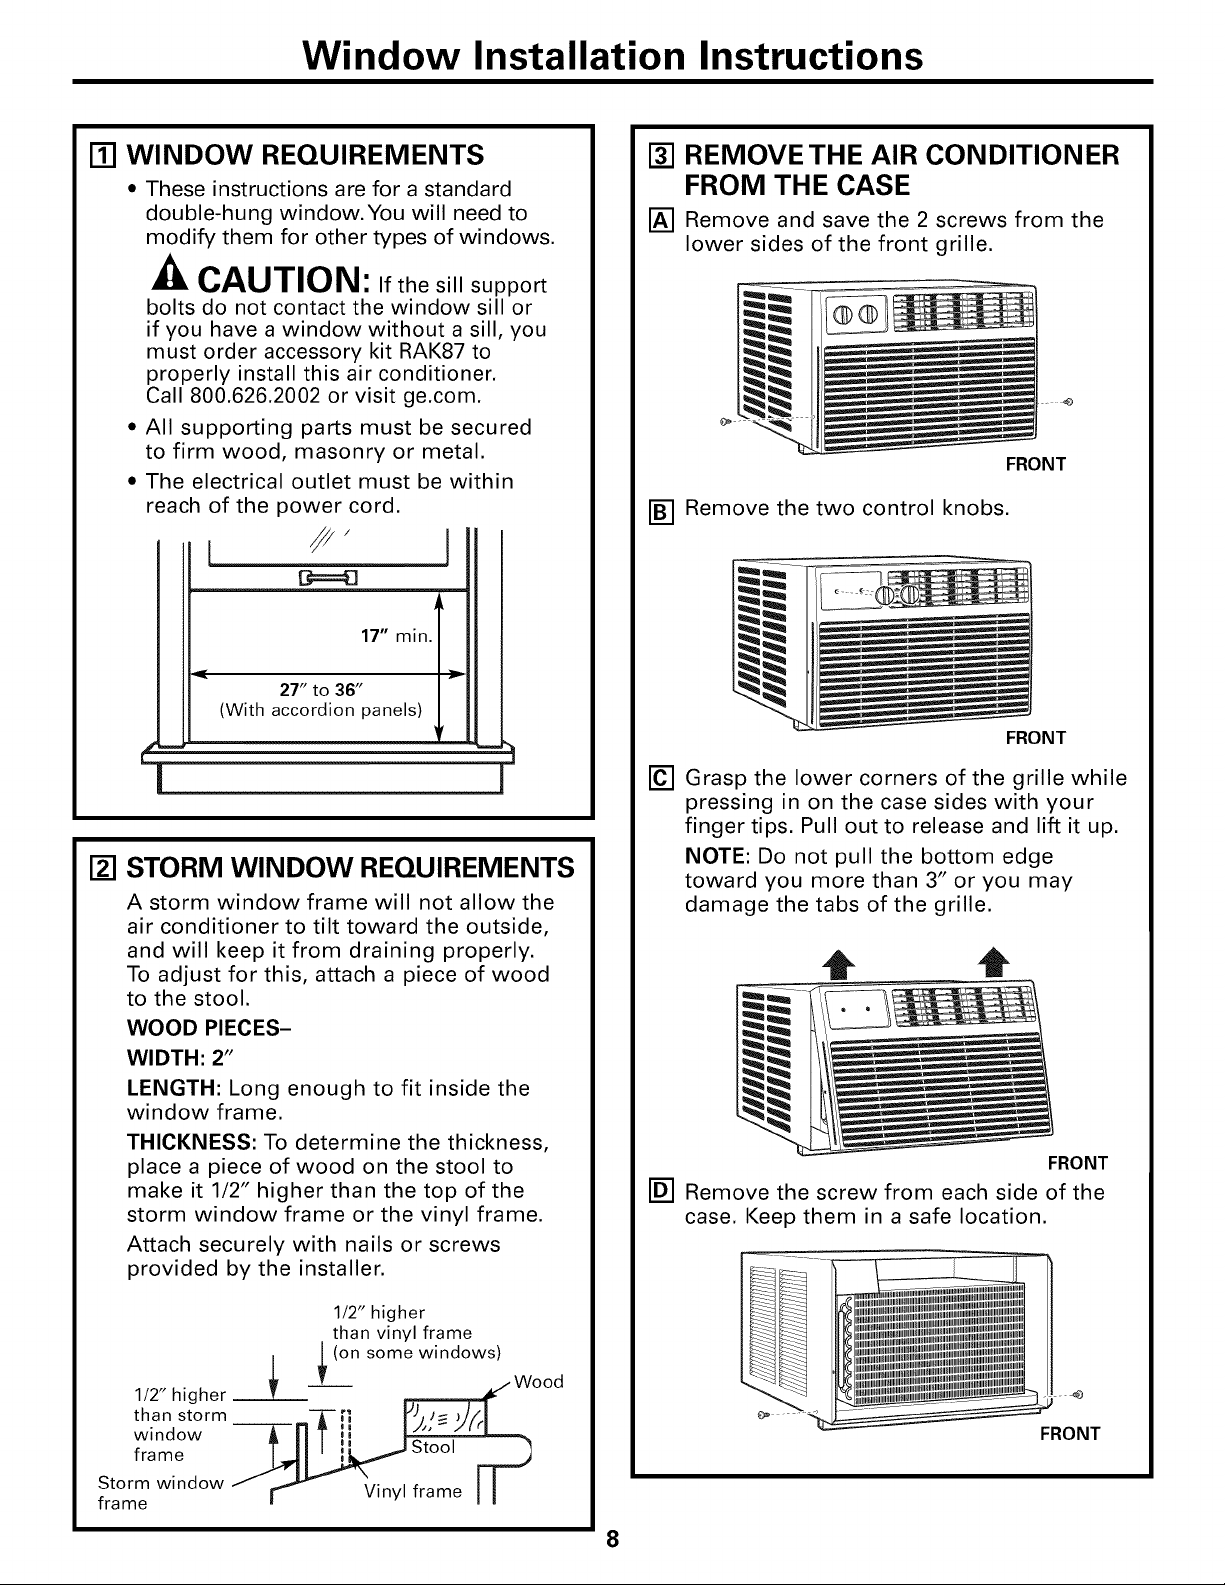
ITI WINDOW REQUIREMENTS
• These instructions are for a standard
double-hung window.You will need to
modify them for other types of windows.
CAUTION: If the sill support
bolts do not contact the window sill or
if you have a window without a sill, you
must order accessory kit RAK87 to
properly install this air conditioner.
Call 800.626.2002 or visit ge.com.
All supporting parts must be secured
to firm wood, masonry or metal.
The electrical outlet must be within
reach of the power cord.
17" min.
27" to 36"
(With accordion panels)
[] REMOVE THE AIR CONDITIONER
FROM THE CASE
IA] Remove and save the 2 screws from the
lower sides of the front grille.
FRONT
[] Remove the two control knobs.
FRONT
i i
[] STORM WINDOW REQUIREMENTS
A storm window frame will not allow the
air conditioner to tilt toward the outside,
and will keep it from draining properly.
To adjust for this, attach a piece of wood
to the stool.
WOOD PIECES-
WIDTH: 2"
LENGTH: Long enough to fit inside the
window frame.
THICKNESS: To determine the thickness,
place a piece of wood on the stool to
make it 1/2" higher than the top of the
storm window frame or the vinyl frame.
Attach securely with nails or screws
provided by the installer.
1/2" higher
than vinyl frame
L (on some windows)
/
w
Grasp the lower corners of the grille while
pressing in on the case sides with your
finger tips. Pull out to release and lift it up.
NOTE: Do not pull the bottom edge
toward you more than 3" or you may
damage the tabs of the grille.
t t
FRONT
r_ Remove the screw from each side of the
case. Keep them in a safe location.
than storm
1/2"higher _______ _Wood
window !1
frame _St°°l FT _
Storm window
frame - r_ Vinyl frame ] ]
FRONT
8
Page 9
Window Installation Instructions
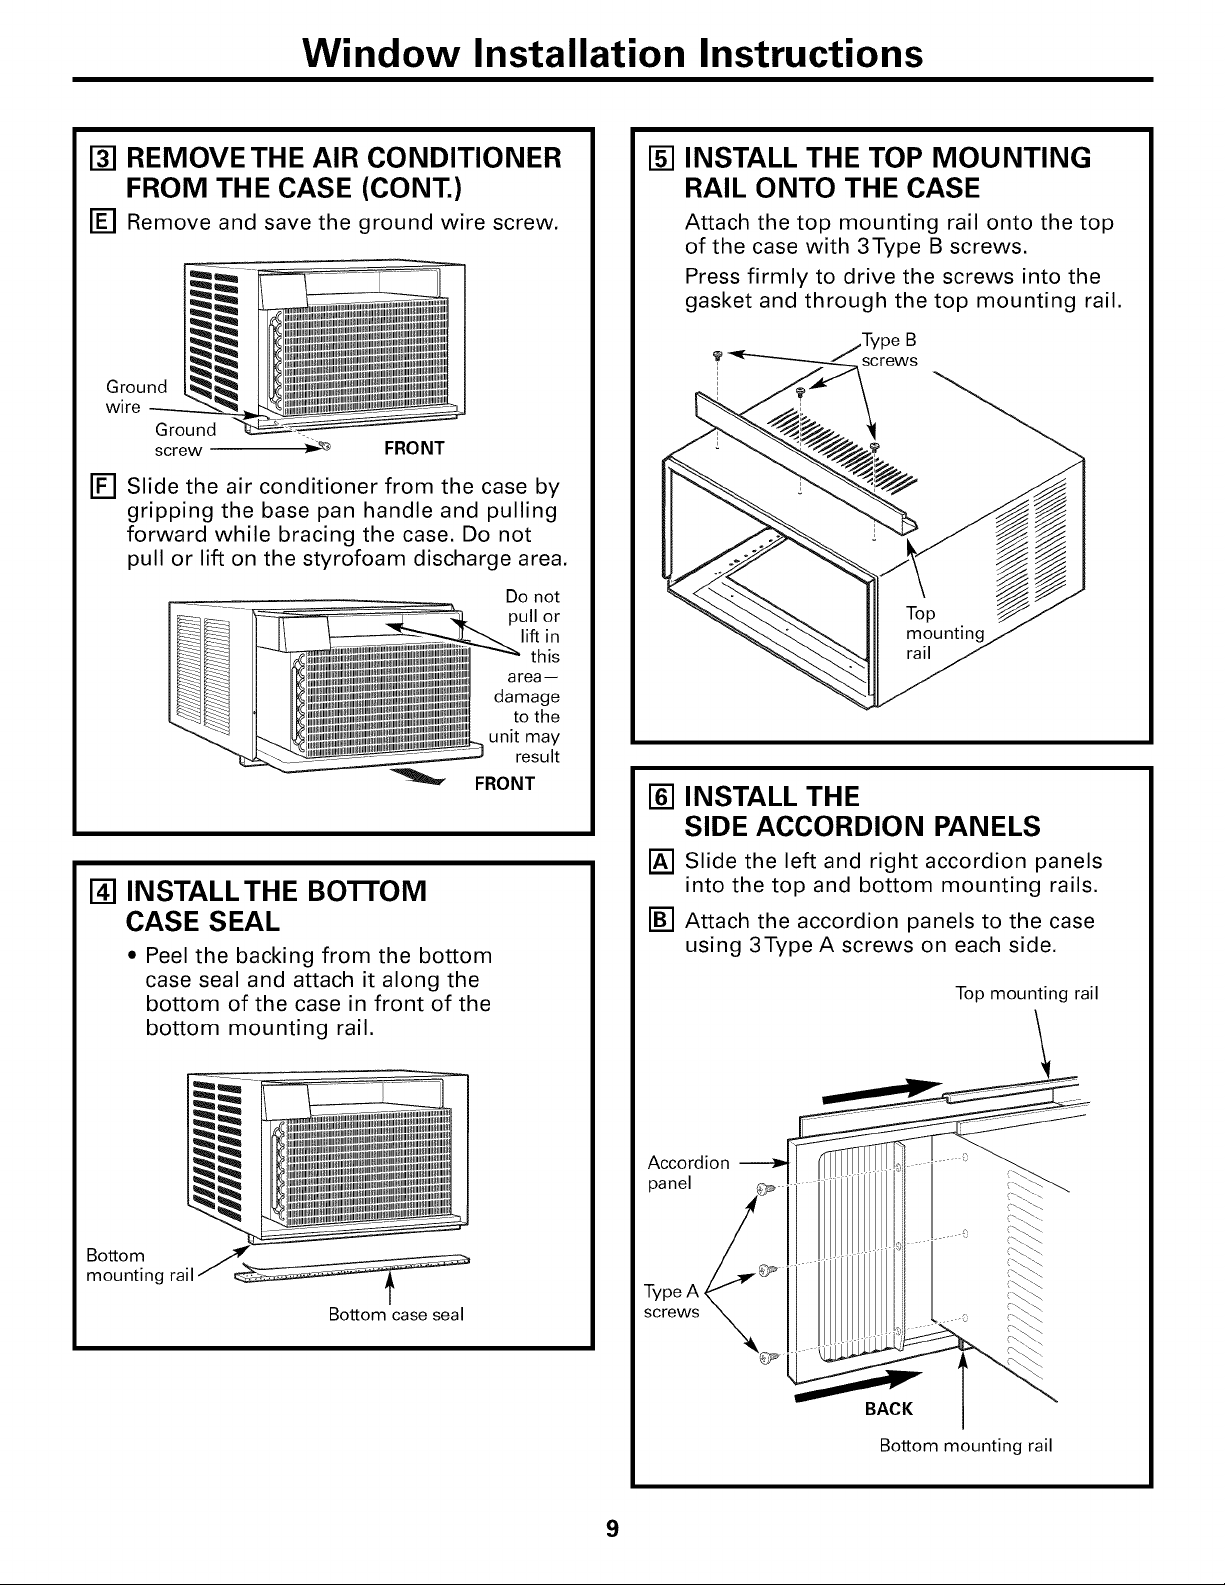
13] REMOVE THE AIR CONDITIONER
FROM THE CASE (CONT.)
[] Remove and save the ground wire screw.
[i.
IUl#{I
IllllJll
IIl_ltll
GroundL_
wire _
Ground
screw
r_ Slide the air conditioner from the case by
gripping the base pan handle and pulling
forward while bracing the case. Do not
pull or lift on the styrofoam discharge area.
iiIlm+
IIMII+
Illl++ll
II_llll+
_Jllll+
_ FRONT
Do not
pull or
lift in
this
area-
damage
to the
unit may
result
FRONT
I-5]INSTALL THE TOP MOUNTING
RAIL ONTO THE CASE
Attach the top mounting rail onto the top
of the case with 3Type B screws.
Press firmly to drive the screws into the
gasket and through the top mounting rail.
3e B
screws
[] INSTALL THE
SIDE ACCORDION PANELS
_] INSTALLTHE BOTTOM
CASE SEAL
• Peel the backing from the bottom
case seal and attach it along the
bottom of the case in front of the
bottom mounting rail.
Bottom
mounting
Bottom case seal
IA1 Slide the left and right accordion panels
into the top and bottom mounting rails.
r_ Attach the accordion panels to the case
using 3Type A screws on each side.
Top mounting rail
Accordion
panel
Type A
screws
\\
BACK
Bottom mounting rail
9
Page 10

Window Installation Instructions
1711NSTALLTHE CASE IN THE
WINDOW
[_] Open the window and mark the centerline of
the window stool.
['_ Carefully place the case on the window stool
and align the center mark on the bottom front
with the centerline of the stool.
['_ Pull the window down behind the top
mounting rail.
NOTE: Do not shut the window so tightly that
movement of the accordion panels is
restricted.
['_ Select the position that will place the sill
supports near the outermost point on the sill.
Place the short side of the sill supports, on the
case bottom, toward the window. Attach the
sill supports to the case track hole in relation
to the selected position using 2Type B screws
in each support.
-&CAUTION: Do not install this air
conditioner in a window if the bolts do not
contact the window sill.
I I
[] INSTALLTHE CASE INTHE
WINDOW (CONT.)
['_ Secure the case to
the window stool
by using
3Type D screws. Sill _ ]_
Pull the accordion
i1.-i
panels to each
window sash track.
Attach them on each
side to the window
sash and the window
stool using
4Type C screws.
support
1-81SECURE THE CASE IN THE
WINDOW AND INSTALL THE
FOAM TOP WINDOW GASKET
IA].&CAUTION:
To prevent broken glass
or damage to windows,
on vinyl or other
similarly constructed
windows, attach the
support bracket to the
window side jam.
Attach the window
locking brackets
(one on each side)
with Type C screws.
Vinyl
Wood
Long side
of sill
supports
OUTSIDE
['_ Adjust the bolt and the nut in
each support so that the case is installed with
a slight tilt to the outside. Use a level; no more
than 1/2 bubble will be the correct case slant
to the outside.
-& CAUTION: Ifthesillsupport bolts
do not contact the window sill or if you have a
window without a sill you must order accessory
kit RAK87 to properly install this air conditioner.
Call 800.626.2002 or visit ge.com.
10
Cut the foam top window gasket to the
[]
window width.
Stuff the foam
[]
between the glass
and the window to
prevent air and
insects from
getting into the
room.
NOTE: If the gasket supplied does not fit your
window, obtain appropriate material locally to
provide a proper installation seal.
Page 11
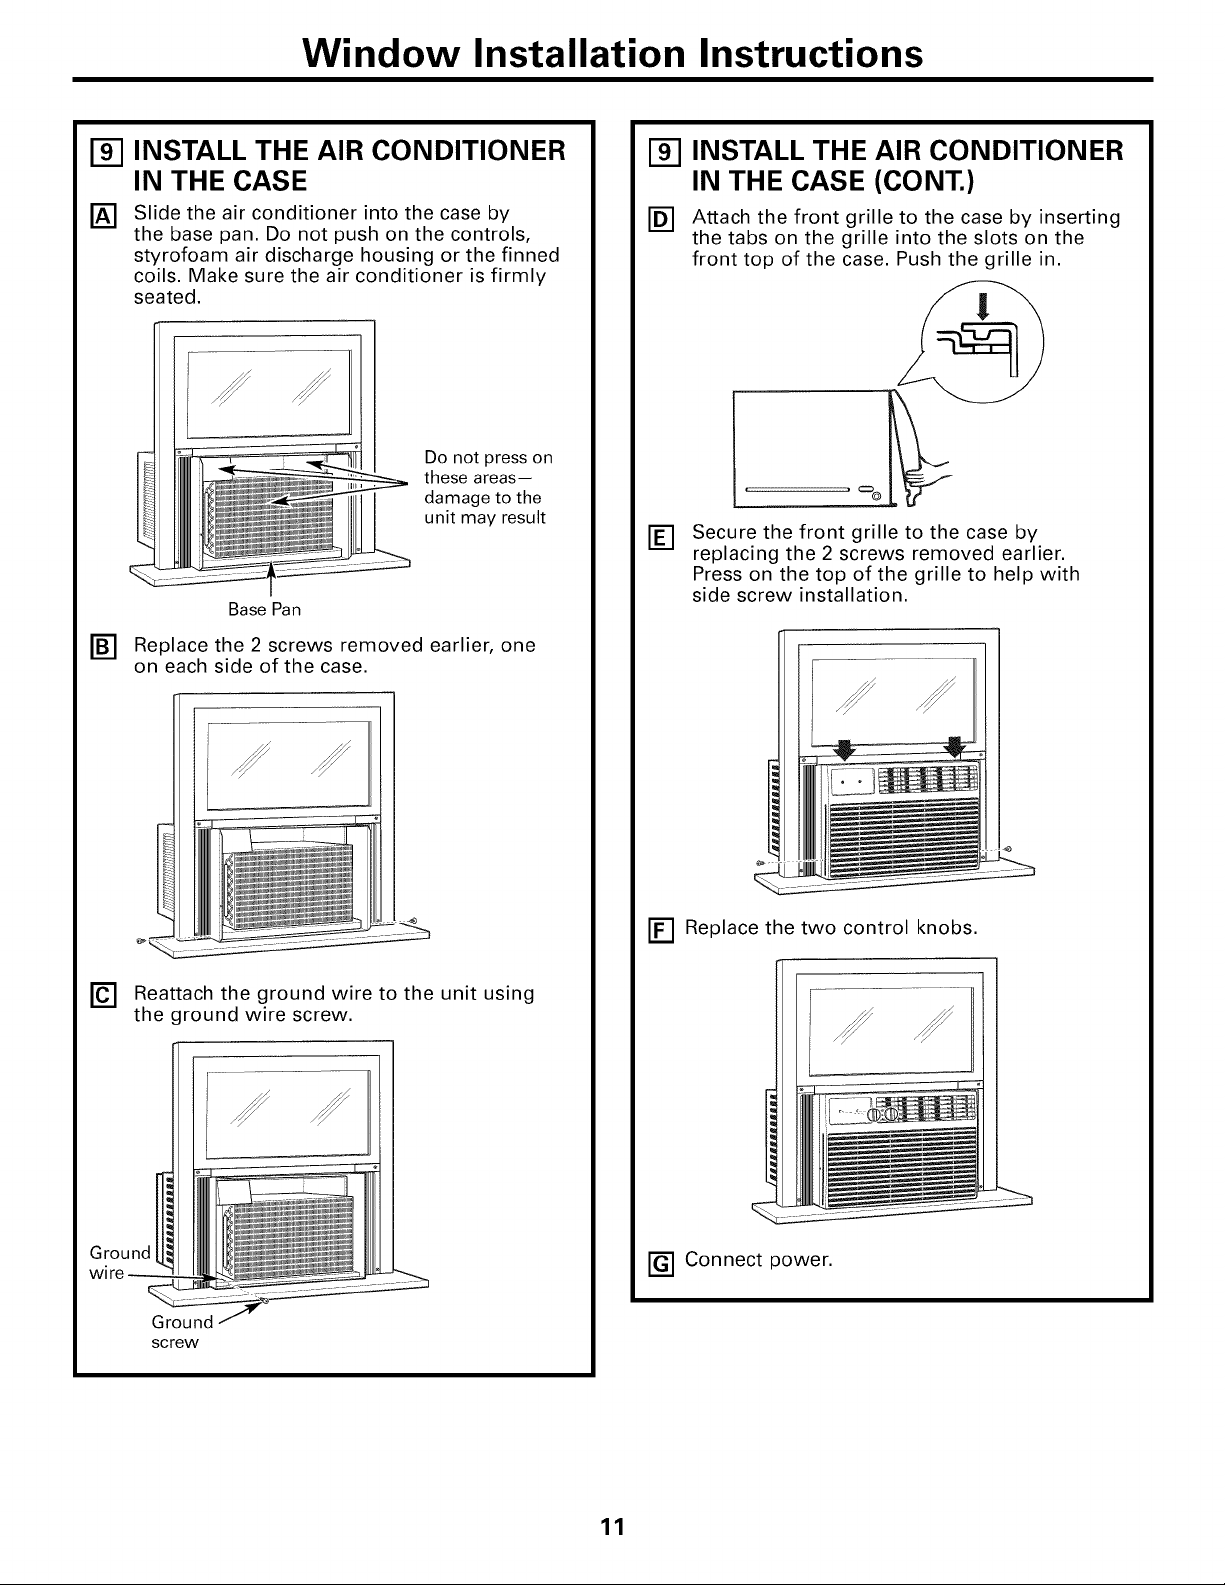
Window Installation Instructions
_-I INSTALL THE AIR CONDITIONER
IN THE CASE
Slide the air conditioner into the case by
the base pan. Do not push on the controls,
styrofoam air discharge housing or the finned
coils. Make sure the air conditioner is firmly
seated.
Do not press on
these areas-
damage to the
unit may result
BasePan
r_ Replace the 2 screws removed earlier, one
on each side of the case.
_-I INSTALL THE AIR CONDITIONER
IN THE CASE (CONT.)
FD] Attach the front grille to the case by inserting
the tabs on the grille into the slots on the
front top of the case. Push the grille in.
Secure the front grille to the case by
replacing the 2 screws removed earlier.
Press on the top of the grille to help with
side screw installation.
r_ Reattach the ground wire to the unit using
the ground wire screw.
Ground
Ground
screw
r_ Replace the two control knobs.
rG-] Connect power.
11
Page 12
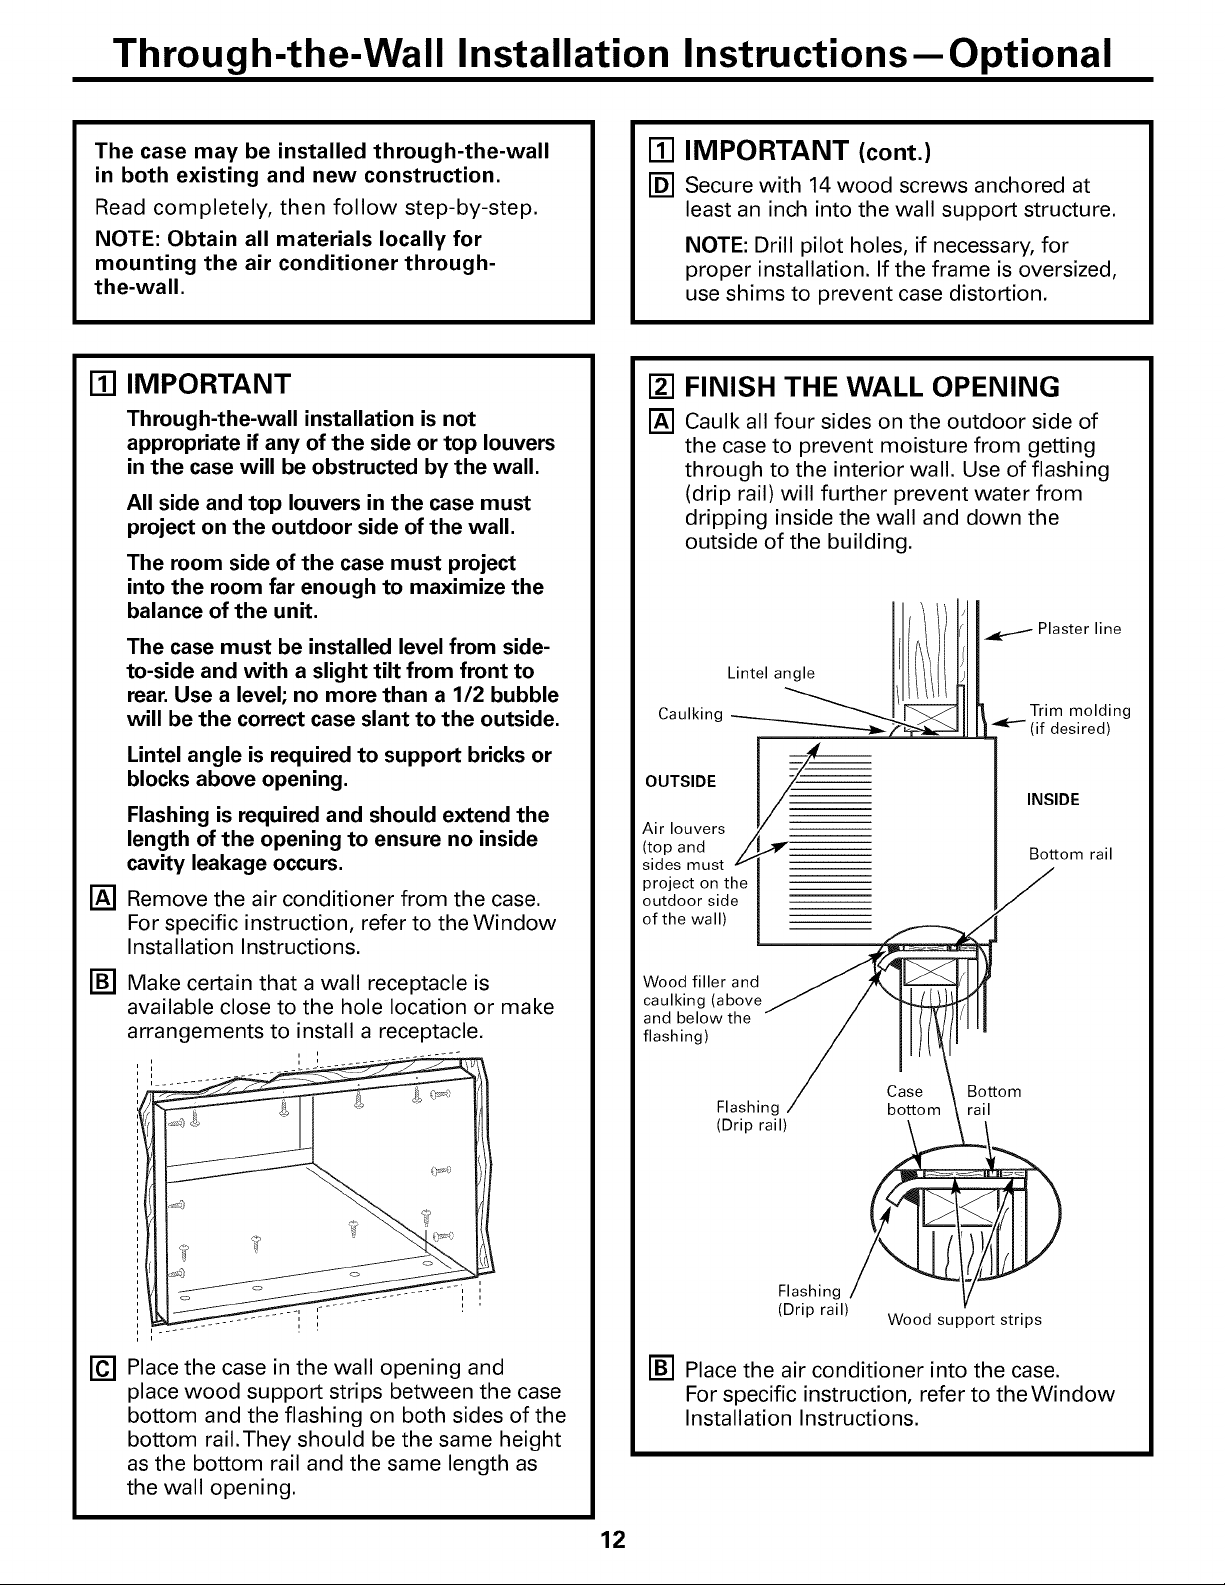
Through-the-Wall Installation Instructions--Optional
The case may be installed through-the-wall
in both existing and new construction.
Read completely, then follow step-by-step.
NOTE: Obtain all materials locally for
mounting the air conditioner through-
the-wall.
ITI IMPORTANT
Through-the-wall installation is not
appropriate if any of the side or top louvers
in the case will be obstructed by the wall.
All side and top louvers in the case must
project on the outdoor side of the wall.
The room side of the case must project
into the room far enough to maximize the
balance of the unit.
The case must be installed level from side-
to-side and with a slight tilt from front to
rear. Use a level; no more than a 1/2 bubble
will be the correct case slant to the outside.
Lintel angle is required to support bricks or
blocks above opening.
Flashing is required and should extend the
length of the opening to ensure no inside
cavity leakage occurs.
[] Remove the air conditioner from the case.
For specific instruction, refer to the Window
Installation Instructions.
[] Make certain that a wall receptacle is
available close to the hole location or make
arrangements to install a receptacle.
m IMPORTANT (cont.)
[] Secure with 14 wood screws anchored at
least an inch into the wall support structure.
NOTE: Drill pilot holes, if necessary, for
proper installation. If the frame is oversized,
use shims to prevent case distortion.
[] FINISH THE WALL OPENING
[] Caulk all four sides on the outdoor side of
the case to prevent moisture from getting
through to the interior wall. Use of flashing
(drip rail) will further prevent water from
dripping inside the wall and down the
outside of the building.
Plaster line
Trim molding
(if desired)
INSIDE
Bottom rail
J
Wood filler and
caulking (above
and below the
flashing)
! ,
Place the case in the wall opening and
place wood support strips between the case
bottom and the flashing on both sides of the
bottom rail.They should be the same height
as the bottom rail and the same length as
the wall opening.
Flashing
(Drip rail)
Flashing
(Drip rail)
_] Place the air conditioner into the case.
For specific instruction, refer to the Window
Installation Instructions.
Wood support strips
12
Bottom
rail
Page 13
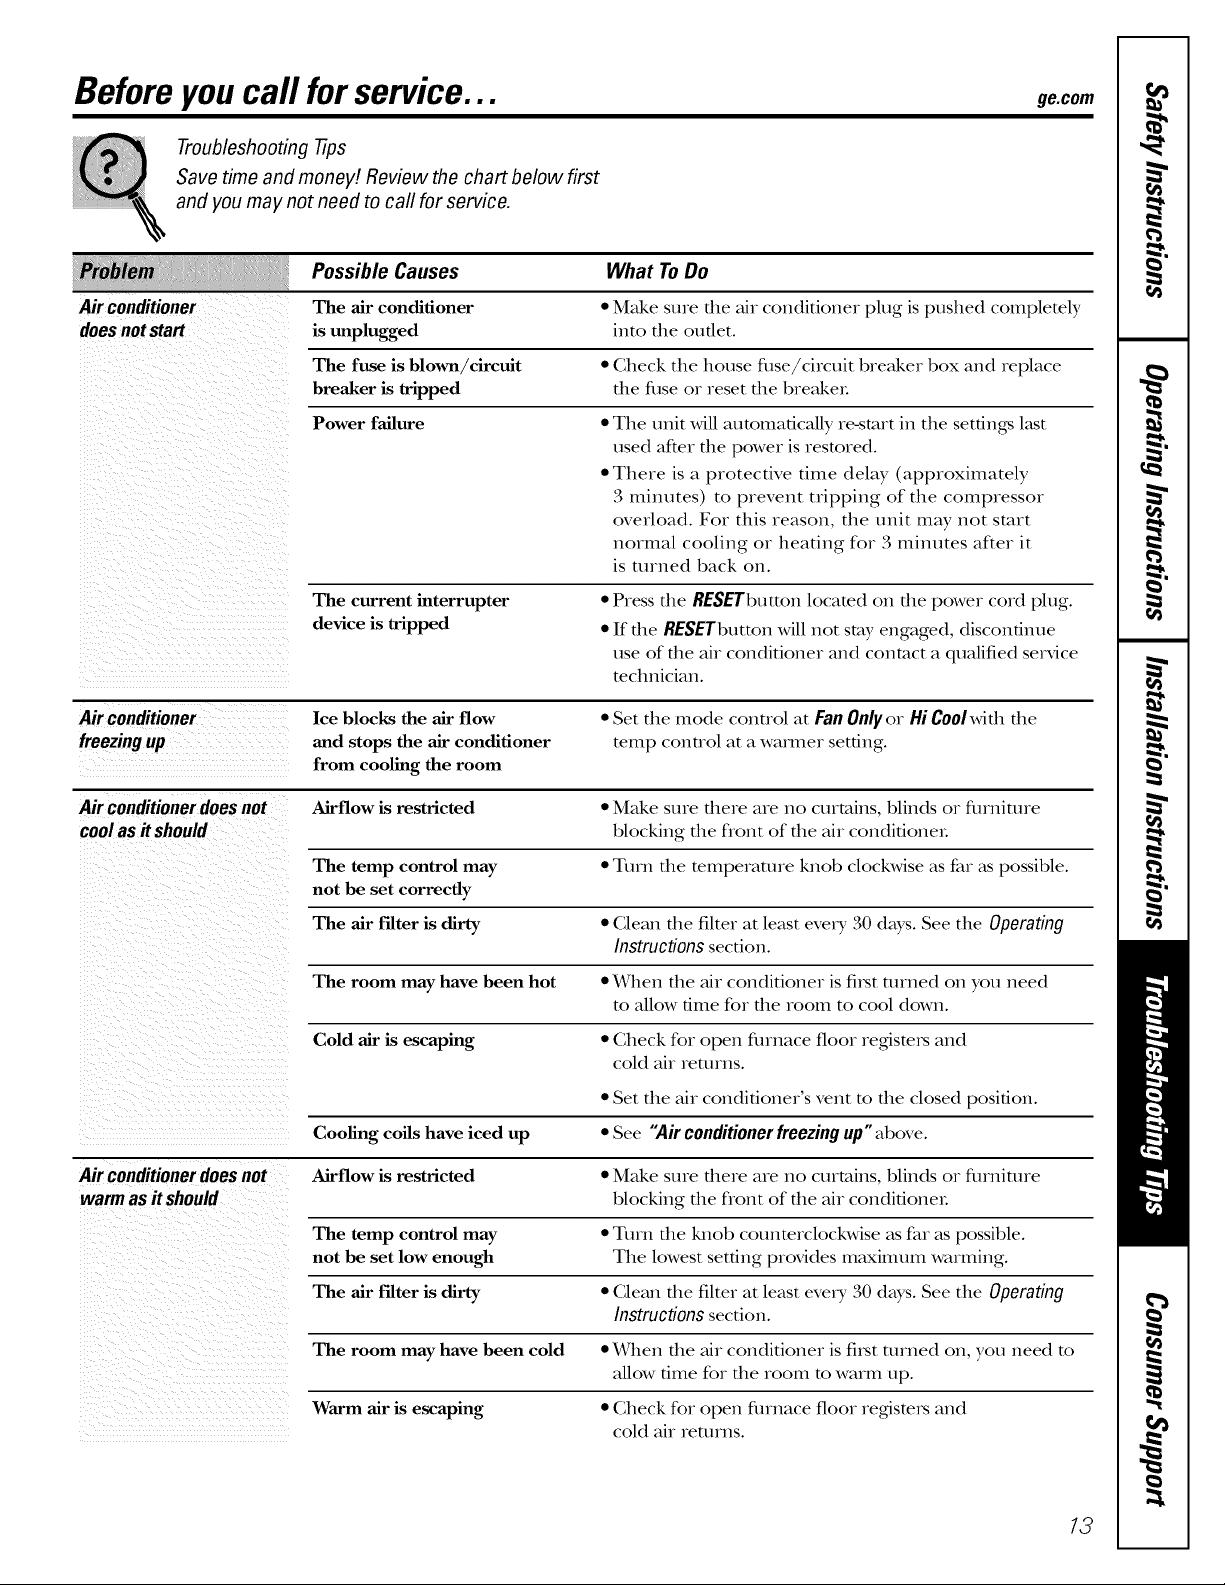
Beforeyoucall forservice...
ge.com
Troubleshooting tips
Save time and money! Review the chart below first
and you may not need to call for service.
Possible Causes What ToDo
Air conditioner The air conditioner * Make sure the air conditioner plug is pushed completely
does notstart is unplugged into the outlet.
The fuse is blown/circuit • Gheck the house flise/circuit breaker box and replace
breaker is tripped the flise or reset the breakeL
Power failure * The unit will automatically re-start in the settings last
used after file power is restored.
• There is a protective time delay (approximately
3 minutes) to prevent tripping of the compressor
overload. For this reason, the unit may not start
normal cooling or heating for 3 minutes after it
is unned back on.
The current interrupter
device is tripped
*Press the RESETbutton located on the power cord plug.
*If the RESETbutmnwill not stay engaged, discontinue
use of the air conditioner and contact a qualified selMce
mclmician.
Air conditioner Ice blocks the air flow * Set the mode conuol at Fan Onlyor Hi Coolwifll file
freezing up and stops the air conditioner temp control at a wamler setting.
from cooling the room
Air conditioner does not Airflow is restricted * Make sure there are no curtains, blinds or flnnimre
cool as it should blocking file flont of file air condifioneL
The temp control may * Turn file temperature knob clockwise as far _tspossible.
not be set correctly
The air filter is dirty * Glean the filter at least eve_y 30 days. See the Operating
Instructions section.
The room may have been hot *When file air conditioner is fi]st unned on you need
to allow time for file room to cool down.
Cold air is escaping * (;heck for open flnnace floor regfiste_s and
cold air reuirns.
• Set the air conditioner's vent m the closed position.
Cooling coils have iced up * See "Air conditioner freezing up"above.
Air conditioner does not Airflow is restricted • Make sure fllere are no curtains, blinds or furniune
warm as #should blocking file flont of file air condifioneL
The temp control may * Turn the knob counterclockwise as far as possible.
not be set low enough The lowest setting provides maxinauln warming.
The air filter is dirty * (_lean the filter at least eve_y 30 days. See the Operating
Instructions section.
The room may have been cold *When file air conditioner is fi_st turned on, you need to
allow time for file room to warm lip.
Warm air is escaping * Check for open finnace floor reg,iste_s and
cold air reuirns.
13
Page 14
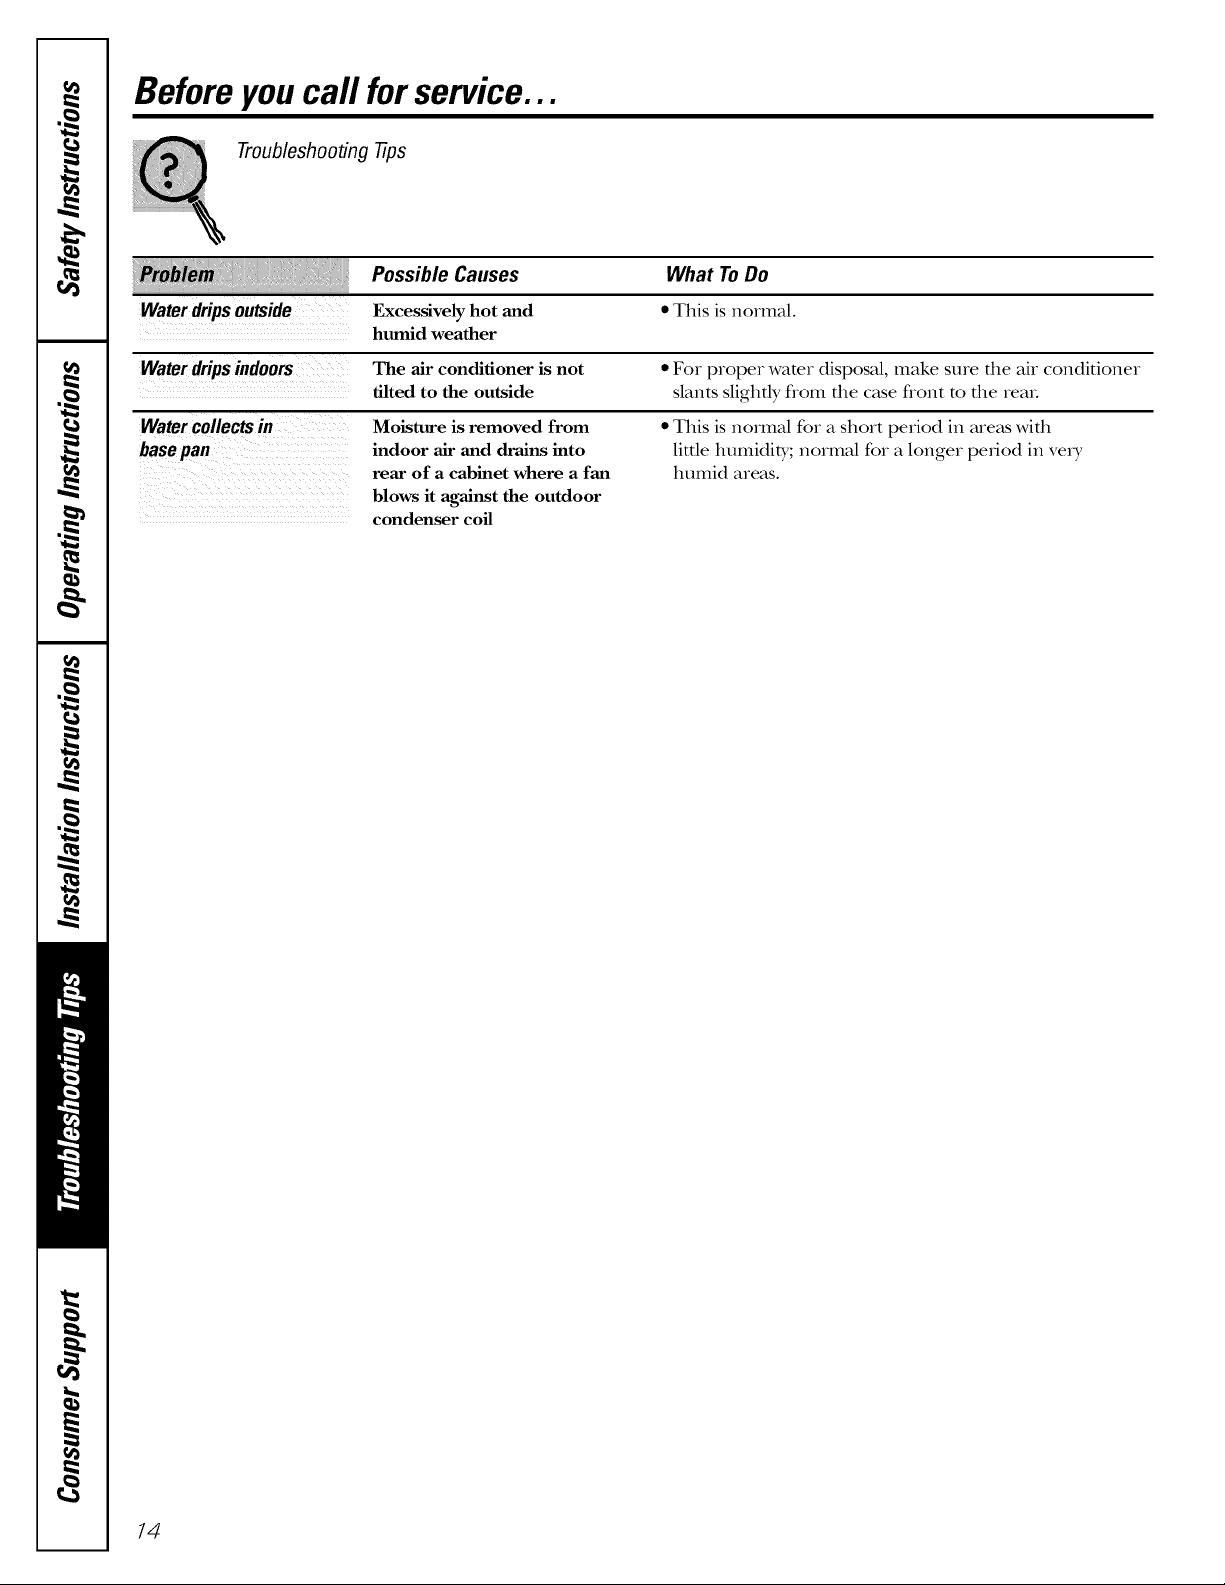
Beforeyoucall forservice...
Troubleshooting tips
Possible Causes
Waterdripsoutside
Water drips indoors The air conditioner is not • For proper water disposal, make sure the air conditioner
Watercollectsin
basepan
Excessively hot and
humid weather
tilted to the outside slants slightly flom the case flont to the real
Moisture is removed from
indoor air and drains into
rear of a cabinet where a fan
blows it against the outdoor
condenser coil
What ToDo
• This is normal.
• This is normal for a short period in areas with
little humidity; normal for a longer period in very
humid areas.
14
Page 15
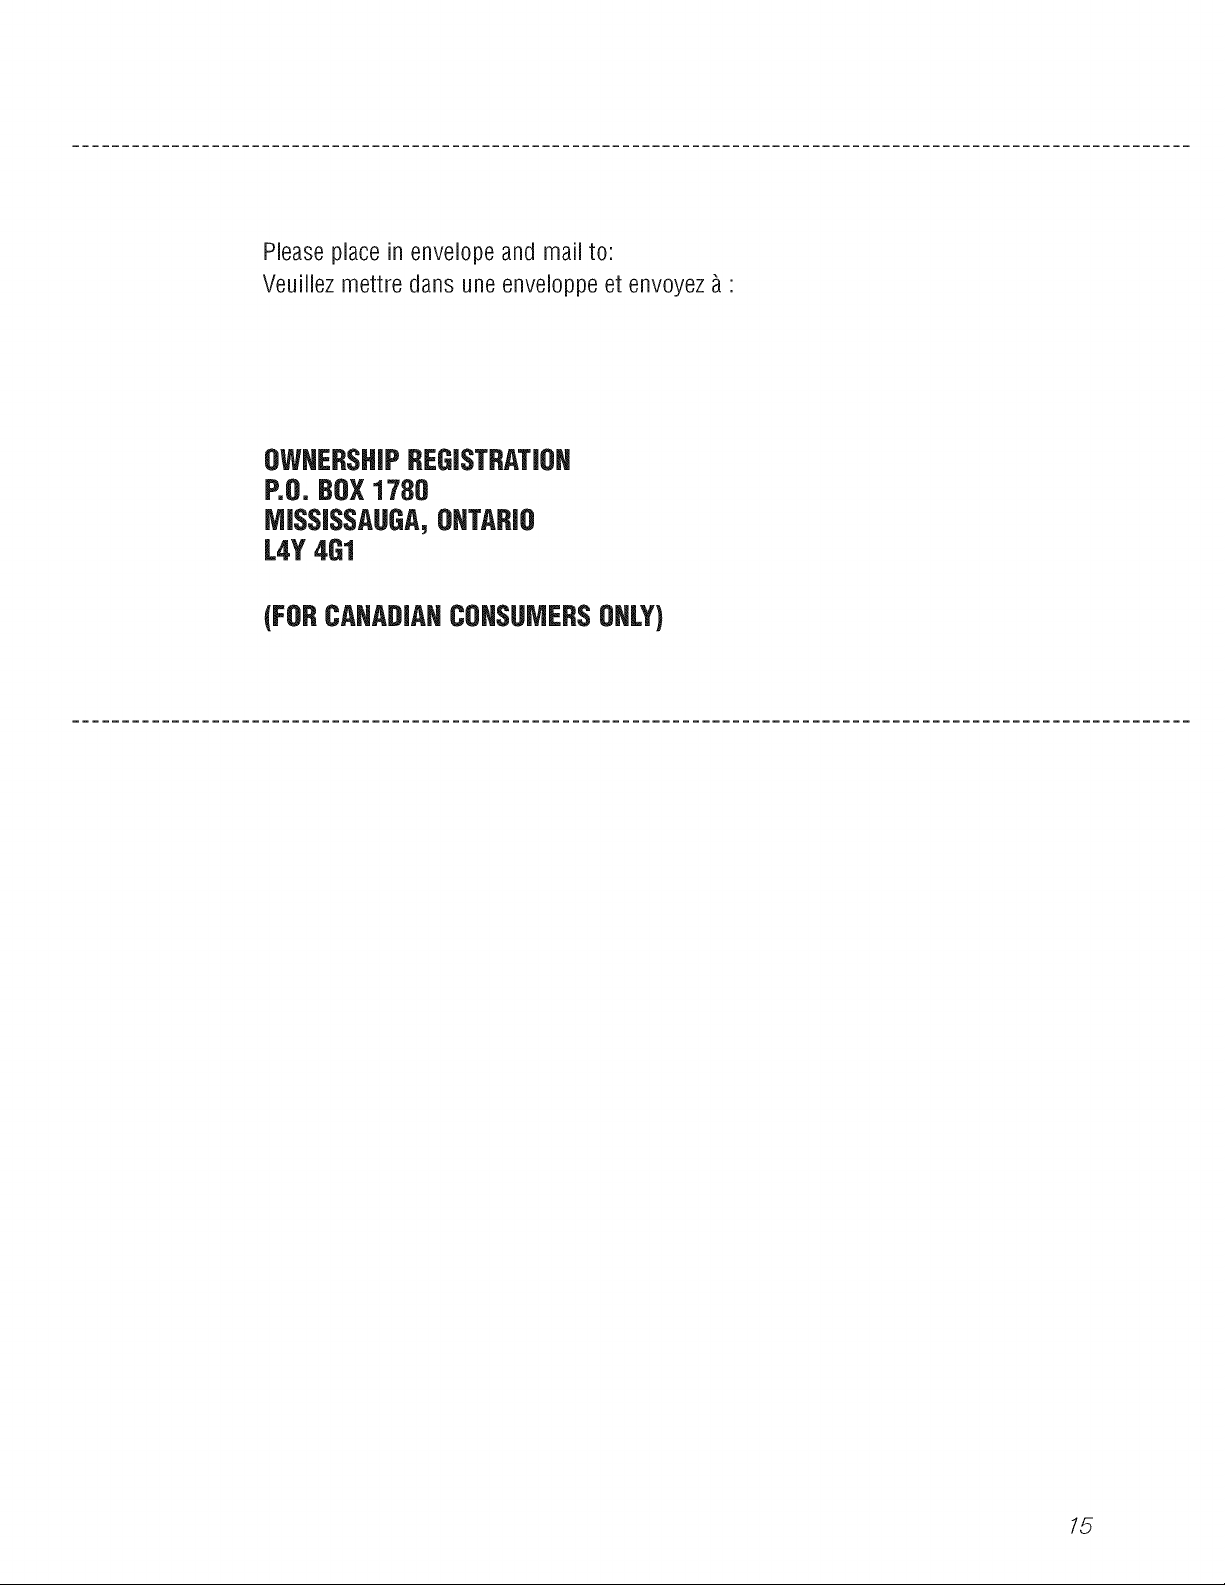
Please place in envelope and mail to:
Veuillez mettre dans une enveloppe et envoyez _ :
OWHERSHJPREGJSTRATJOH
P.O. BOX1780
MISSISSAUGA,OHTARIO
L4Y4G1
(FORCAHADJAHCOHSUMERSOHLY)
15
Page 16
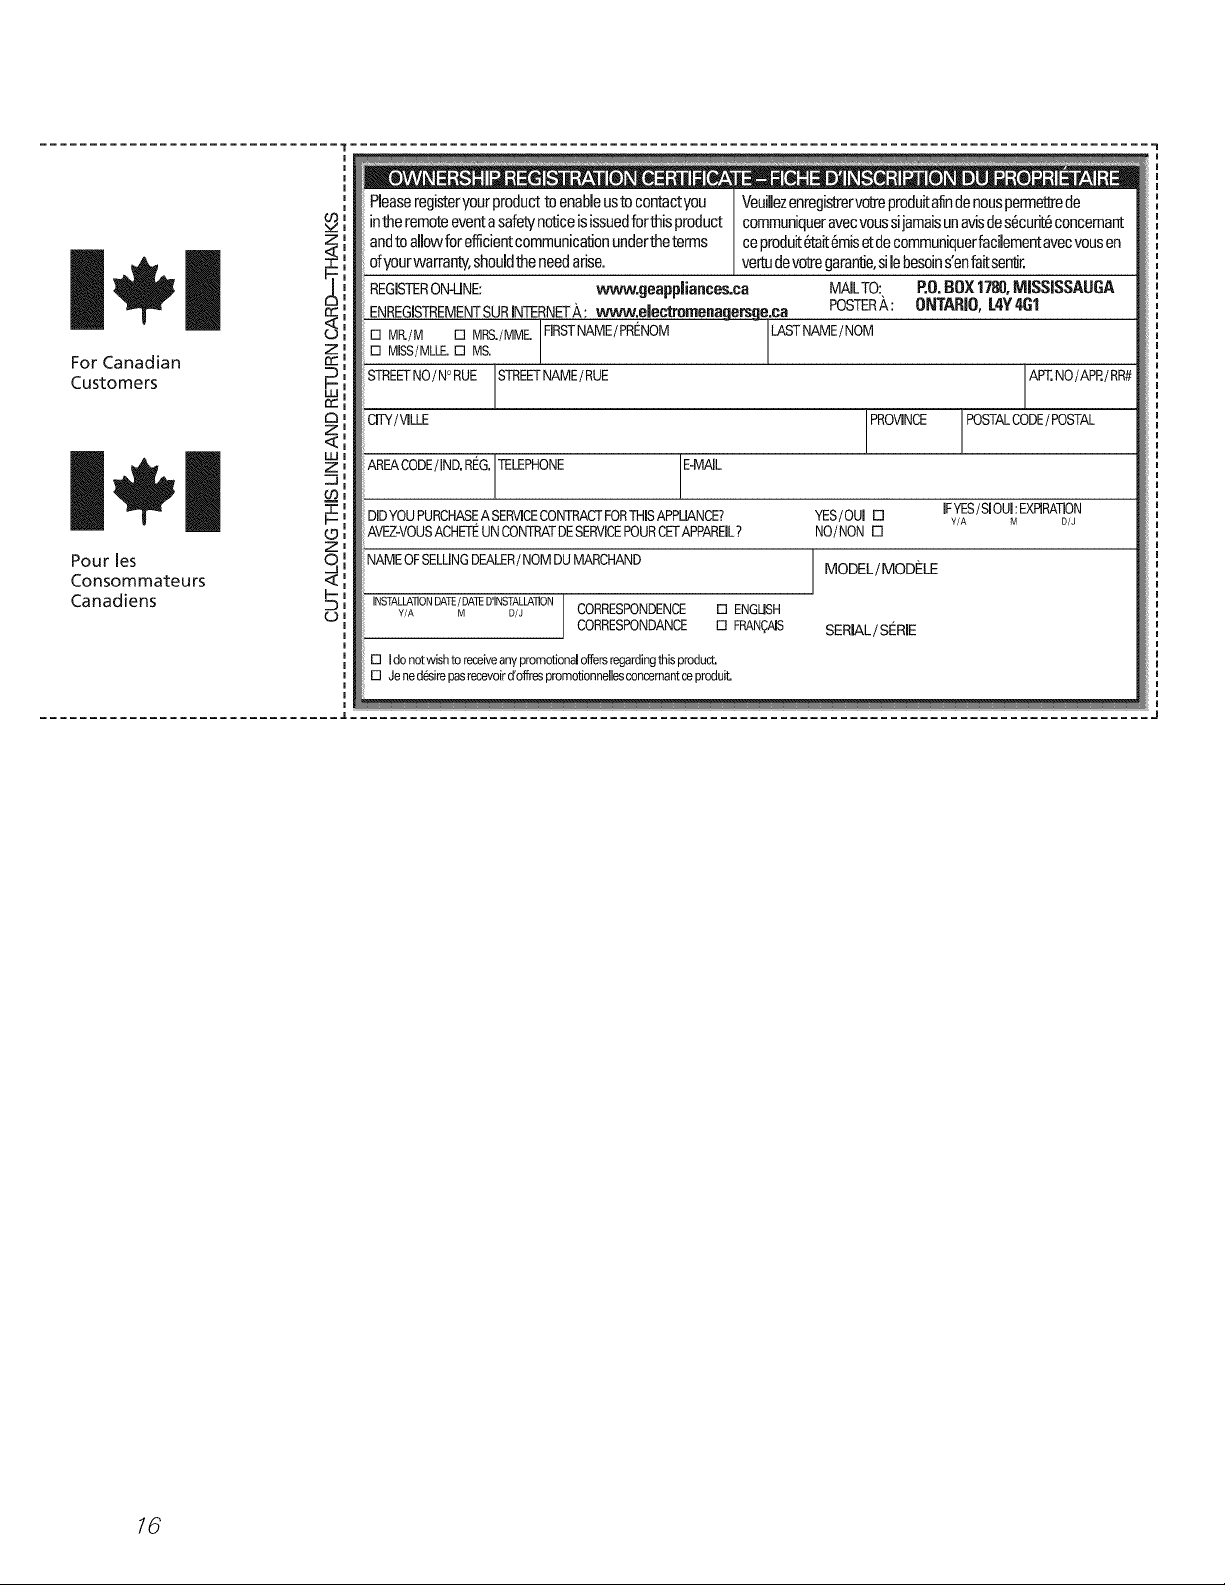
I,i,I
For Canadian
Customers
Pour les
Consommateurs
Canadiens
Pleaseregisteryourproducttoenabbustocontactyou
intheremoteeventasafetynoticeisissuedforthisproduct
Z
and to allow for efficient communication under the terms
of your warranty, should the need arise.
REGISTERON-UNE: www.geappliances.ca
ENREGISTREMENTSUR INTERNETA: wvvw.electromenagersge.ca
Z
[] MP_/M [] MRS./MME. FIRSTNAME/PRI'NOM[] MISS/MLLE.[] MS.
ec"
STREETNO/N° RUE STREETNAME/ RUE
e¢"
£3
CITY/VILLE
Z
w
Z
AREACODE/ IND.RING.JTELEPHONE _E-MAIL
DIDYOUPURCHASEA SERVICECONTRACTFORTHISAPPLIANCE?
AVEZ-VOUSACHETEUN CONTRATDESERVICEPOURCETAPPAREIL?
L9
Z
C
NAME OFSELLINGDEALER/NOMDU MARCHAND MODEL / MODt_LE
b
INSTALLA'I1ONDATE/DATED'INSTALLA]ION
©
Y/A M D/J CORRESPONDENCE [] ENGLISH
CORRESPONDANCE [] FRAN?AIS SERIAL/St_RE
[] Ido notwishto receiveanypromotionaloffersregardingthisproduct.
[] Je ned_sirepasrecevoird'offrespromotionnellesconcernantceproduit
Veuillezenregi_ervo_eproduitafindenousperrne_ede
communiqueravecvoussijamaisunavisdes6curft6concemant
ceproduit6tait6misetdecommuniquerfacibmentavecvousen
ve_ devotregarage,silebesoins'enfaitserdr.
MAILTO:
POSTER,_:
LASTNAME/ NOM
YES/OUI [] IFYES/SIOUl: EXPIRATION
NO/NON []
P.O.BOX1780,MISSISSAUGA
ONTARIO,L4Y461
AP%NO/APR/RR#
PROVINCE POSTALCODE/POSTAL
Y/A M D/J
16
Page 17

GEAir Conditioner--One- YearLimited Warranty.(For customers in the U.S.A.)
All warranty service provided by our Factory Service Centers,
or an authorized Customer Care_ technician. Toschedule service,
visit us on-line at ge.com, or call 800.GE.CARES(800.432.2737).
Have serial number and model number available when calling
for service.
GE Will Replace:
Anypartof file ah conditioner which fails due to a defect in mmerials or workmanship.
Fromthedateof the
originalpurchase
Service trips to your home to teach you how to
use the product.
Improper installation, delivery or maintenance. If you
have an installation problem, or if the air conditioner
is of improper cooling capacity for the intended use,
contact your dealer or installer. You are responsible
for providing adequate electrical connecting facilities.
Failure of the product resulting from modifications to
the product or due to unreasonable use including failure
to provide reasonable and necessary maintenance.
In commercial locations, labor necessary to move the
unit to a location where it is accessible for service
by an individual technician.
During this limited one-year warranty, GE will also provide, free of charge,all labor and related
se_Mce to replace the defective part.
Staple your receipt here.
Proof of the originalpurchase
date is needed to obtain service
under the warranty.
Replacement of house fuses or resetting of circuit
breakers.
Failure due to corrosion on models not corrosion-
protected.
Damage to the product caused by improper power supply
voltage, accident, fire, floods or acts of God.
Incidental or consequential damage caused by possible
defects with this air conditioner.
Damage caused after delivery.
EXCLUSION OFIMPLIED WARRANTIES--Your sole and exclusive remedy is product repair as provided in this
Limited Warranty. Any implied warranties, including the implied warranties of merchantability or fitness for a
particular purpose, are limited to one year or the shortest period allowed by law.
This warranty is extended to the original purchaser and any succeeding owner for products purchased for home
use within the USA. If the product is located in an area where service by a GEAuthorized Servicer is not available,
you may be responsible for a trip charge or you may be required to bring the product to an Authorized GE Service
location for service. In Alaska, the warranty excludes the cost of shipping or service calls to your home.
Some states do not allow the exclusion or limitation of incidental or consequential damages. This warranty gives
you specific legal rights, and you may also have other rights which vary from state to state. Toknow what your
legal rights are, consult your local or state consumer affairs office or your state's Attorney General
Warrantor: General Electric Company.Louisville, KY 40225
17
Page 18

GEAir Conditioner--One- YearLimitedWarranty. ForcustomersintheCanada
All warranty service provided by our Factory Service Centers,
or an authorized Customer Care_ technician. For service, call
1.800.561.3344.Please have serial number and model number
available when calling for service.
Mabe Will Replace:
Anypartof file air conditioner which fails due to a defect in materials or workmanship.
Fromthedate Ofthe
originalpurchase
Service trips to your home to teach you how to
use the product.
Improper installation, delivery or maintenance. If you
have an installation problem, or if the air conditioner
is of improper cooling capacity for the intended use,
contact your dealer or installer. You are responsible
for providing adequate electrical connecting facilities.
Failure of the product resulting from modifications to
the product or due to unreasonable use including failure
to provide reasonable and necessary maintenance.
In commercial locations, labor necessary to move the
unit to a location where it is accessible for service
by an individual technician.
During this limitedone-yearwarranty,Mabe will also provide, free of charge, all labor and
related service to replace the defective part.
Staple yourreceipt here.
Proof of the original purchase
date is needed to obtain service
under the warranty.
Replacement of house fuses or resetting of circuit
breakers.
Failure due to corrosion on models not corrosion-
protected.
Damage to the product caused by improper power supply
voltage, accident, fire, floods or acts of God.
Incidental or consequential damage caused by possible
defects with this air conditioner.
Damage caused after delivery.
EXCLUSION OFIMPLIED WARRANTIES--Your sole and exclusive remedy is product repair as provided in this
Limited Warranty. Any implied warranties, including the implied warranties of merchantability or fitness fora
particular purpose, are limited to one year or the shortestperiod allowed by law.
This warranty is extended to the original purchaser and any succeeding owner for products purchased in Canada
for home use within Canada. In-home warranty service will be provided in areas where it is available and deemed
reasonable by Mabe to provide.
Some provinces do not allow the exclusion or limitation of incidental or consequential damages, so the above exclusion
may not apply to you. This warranty gives you specific legal rights, and you may also have other rights which vary from
province toprovince. Toknow what your legal rights are in your province, consult your local orprovincial consumer
affairs office.
Warrantor: Mabe Canada Inc.,
Burlington, Ontario
18
Page 19

Consignes de s&_rit_ ............ 20, 21
Consignes d'utilisation ............. 22, 23
Entretien et nettoyage
Filtre _ air .......................... 23
Retrait du cadre de la grille ........... 23
Serpentins ext4rieurs ................. 23
Instructions de montage
Instructkms de montage pour une
installation a travers un mur--En option ...30
Instructions de montage
darts une fenOtre ................. 25-29
Conseils de d@annage .............. 33
Service & la clientOle
Service _ la clientele .................. 36
Garantie ............................ 35
Enregistrement du titre
de propri_t_ ..................... 31, 32
Inscrivezici les humerusde modele etde s&ie :
Numem de modele :
Numem de Serie :
Vous trouverez ces num&os sur l'_tiquette
appos_e sur le c6t_ du climadseur
Au Canada, visitez-nous au •
www.electromenagersge.ca
_N
_N
Page 20

F F
/MPORTANTESCONS/GNESBESECUR/TE.
VEU/UEZt/RE TOUTESLESCONS/GNESAVANTUT/USAT/ON.
!
m
Pour votre s#curit#, les informafions contenues dans ce manuel doivent #tre suivies afin deminimiser
les risques d'incendie, de chocs filectriques ou deblessures corporefles.
CONSIGNESDESE-CUfllTE
}}N'utilisez cet appareil qu'aux fins pr&_ms }}
d_crites dans le mamml d'udlisadon.
iii}i}i
Ce climatiseur dolt _tre correctement
install_ corffbrm_ment aux Instructions
d'Installadon infant toute udlisadon.
iii}i}}li_
Ne d_branchezjamais votre climadseur en
iii}i}i
drant sur le cordon d'a|imentadon. Prenez
toqjours refinement la fiche en main et drez
pour la sordr de la prise.
iii}i}}li_
Remplacez imm&liamment tout cordon
iii}i}}li_
_lectrique us_ ou endommag_. Un cordon
d'alimentadon endommag_ dolt atre
remplac_ par un nouveau cordon
d'alimentation obmnu &l fhbricant. Ne
iii}i}}li_
r@arez pas le cordon endommagd. N'udlisez
pas un cordon fissur4 ou pr4sentant des
dommages &_saux ffottements soit sur
sa longueur ou aux extr_mit_s &l c6t_
de la fiche ou &l raccord.
Si la prise de courant est d'un tbrmat
dirt>rent de la fiche, cette prise dolt _tre
chang_e par un _lectricien qualifi_.
Eteignez votre climatiseur et d_branchez-le
m,'ant d'effecmer des r@aradons ou de
le nettoyer.
REMARQUE: Nousvousrecommandonsdefaire
effectuer la maintenancepar un technicienqualifi_.
Pour votre sdcuritd, ne stockez pas et
n'udlisez pas de matdriaux combustibles,
d'essence ou d'autres vapeurs et liquides
inflammables dans les parages de cet
appareil ou de rout autre appareil.
Tousles climadseurs contiennent des fluides
fligorigbnes qui, corfformdment, itla
l_slation t_d&ale doivent Otre redr_s avant
la mise au rebut de l'appareil. Si vous mettez
au rebus un ancien appareil contenant des
fluides frigorigbnes, v&ifiez la procd&lre it
suivre aupras de la compagnie responsable
de l'41iminadon.
20
BRANCHEMENTSELECT.RIOUES
Ne coupez pas ou n'enlevez pas, sous aucun
pr#texte, la troisi#me broche de mise _ la terre
du cordon d'alimentafion. Pour des raisons
de s#curit#, cet appareil dolt gtre correctement
mis _ la terre.
N'utilisez PAS d'adaptateur avec cet appareil.
Le cordon d'alimentadon de cet appareil
est _quip_ d'une fiche it trois broches (pour
une mise it la terre) qui s'adapm a la prise
de courant standard it 3 broches (pour une
mise it la terre) pour minimiser les risques
de chocs _lectriques par cet appareil.
Le cordon d'alimentadon est _quip_ d'un
dispositif d'intermpdon du courant. Un
bouton d'essai et de r_enclenchement est
fi)urni sur le boider de la prise. Vous devez
roster le mdcanisme rdguli_rement en
appuyant d'abord sur le bouton rest(Ess.i)
puis sur le bouton RESET(R_enclenchement)
lorsque l'appareil est branch,. Si le bouton
TEST(Ess.i)ne bascule pas ou si le bouton
RESET(Rdenclenchement) ne reste pas
enclenchd, cessez d'utiliser votre dimadseur
et appelez un technicien de ser_,ice qualifid.
Faites vdrifier la prise murale et le circuit
dlectrique par un dlectricien qualifid pour
s'assurer que le systbme est correctement
mis it la terre.
Dans le cas d'une prise biphasde,
l'installateur a la responsabilitd et l'obligadon
de la remplacer par une prise triphasde
correctement mise it la terre.
Le climatiseur dolt toujours _tre branchd
it sa propre prise dlectrique d'une mnsion
nominale correspondant it celle indiqude
sur sa plaque signalddque.
Ceci permet d'obtenir un meilleur rendement
du climafiseur et &ite de surcharger les circuits
dlectriques du domicile qui risque
d'occasionner un incendie en surchmNant.
Consultez les Consignes d'lnstallations, dans
la secdon Exigences Electriques pour les
exigences de branchements dlectriques
pardculiers.
Page 21

www.electromenagersge.ca
VERTISSEMENT!
UTILISATIONDERALLONGES--modUes_ 115Vo/tsuniquement
Nous dficonseillons fortement I'utilisafion d'une
raflonge _ cause des risques potentiels clans
certaines conditions,
Cependant, si l'utilisadon d'une rallonge est
nF.cessaire, cette demiF.re dolt obligau)irement
F.tre homologuF.e UI., de calibre 14, a trois
brins avec mise a la terre pour appareil
F.lectromF.nager et dolt F.treFquipF.e d'une
fiche et d'une prise temelle avec terre.
Les caractF.ristiques F.lectriques de la rallonge
doivent F.trede 15 ampF.res (minimum)
et de 125 volts.
MISEENGARDE:
N'UTIUSEZ PAS de rallongeavec un mod#ie
230/208 Volts.
LISEZETSU/VEZSOIGNEUSEMENTCESCONSIGNESDESECUR/TE
CONSERVEZCESINSTRUCTIONS
21
Page 22

P proposdescommandosdu cfimatiseur--
mode.losdot_,sde boutonsde commando.
Los fonctions et I'aspect peuvent varlet.
5 6
Warmer CooJer
COMMANDESDELATEMPI'-'_RATURE
O
Commandes
Commandede/a Temperature
0
i,es commandes de la temperature sont utilis(_es
pour maintenir la temperature
de la pi(_ce,i,e compresseur se met en marche et
s'arr_te {tintervalles r_guliers pour maintenir la
pi(_ce{tun niveau de con%rt constant. Tournez le
bouton dam le sens des aiguillesd'une montre
vers Cooler(PlusIroid)(bleu) et Fair ambiant se
refioidira. Tournez le bouton dans le sens inverse
des aiguilles d'une montre sur Warmer(Plus
o/laud)(rouge) et Fair ambiant se r&hauffera.
@
Off
I'1 oo,
ko_\_ I I //Low
Heat _'_-._._.V_._/J Cool
Fan
Only
COMMANDESDUMODE
O
CommandesdeMode
HiCool(Fortrefroidissement)et LowCool
(Refroidissementfaiflle)permettent de refioidir
_tdes vitessesde xentilation difi%rentes.
i,es rOglages Hi Heat(Chauffagefort) et Low Heat
(Chauffagefaible)permettent de r(_chauffer fi
des vitesses de _entilation diff&entes.
i,e r_glageFanOnly(Venti/ateuruniquement)
permet aussi de f_drecirculer Fair et de le filtrer
sans le refroidir ou le r&hauf_er.
REMARQUE: Sivouspassezd'unmodederefroidissement
surArr6t_unmodedeventilationou_unmodede
chauffage,attendezaumoins3minutesavantderepasser
unmodederefroidissement.
22
DescriptionsdesModesdeRefroidissement
PourunrefroidissementNormal--S_lecdonnezHiCool
(Fortrefroidissement)ou LowCool(gefroidissement
faib/e)avecun r_glagesurune temperature moyenne.
PourunrefreidissementMaximal--S(_lectionnez
HiCool(Fartrefraidissement)avec le bouton de
r(_glagede la temp&amre tourn_ au maximun_
dans le sens des aiguilles d'une montre.
PourunRefroidissementplusSilencieuxouDurantla
Nuit--S_lecdonnezle mode LowCool(Refroidissement
faib/e)avecun r_glagesurune temperature moyenne.
Descriptionsdesmodesdechauffage
PourunchauffageNormal--S_lectionnez HiHeat
(Chauffagefort)ou LowHeat(Chauffagefaible)avec
un r(_glagesur une temperature moyenne.
PourunohauffageMaximal--S_lectionnez HiHeat
(Chauffagefort)avecle bouton de r(_glagede la
temp&ature tourn(f au maximmn dans le sens
inverse des aiguilles d'une montre.
PourunChauffageplusSi/encieuxouOurantla
Nuit--S_lectionnez le mode LowHeat(Chauffage
faible)avec unr(_glagesur une temp(_rature
nlo)'eilne.
Page 23

Information suppl#mentaire importante.
Bireetion de/',4#
Udlisez le levier pour rSgler la direction de fair vers
la gauche ou vers la droite seulernent.
Une 15g_re pression du bout des doigts sur les
persiennes vous permet de rSgler la direction de
l'air vers le haut ou vers le bas.
Entretien et nettoyage du climatiseur.
Grille et Boitier
www.e/ectromenagersge.ca
Eteignez et d_branchez le climatiseur avant tout
nett()age.
Filtre a Air
Le filtre Ztair derriere la grille fionm/e dolt &re
v_rifi_ et nettoy_ au bout de 30jours de
foncfionnement ou plus souvent si n_cessaire.
Pour rotiror le filtro :
Poussez sur les bords du filtre et firez-le de l'autre
c&t&
Nettoyez le filtre avec de l'eau savonneuse d_(te.
Rincez le filtre et laissez-le s_cher avant de le
remettre darts le climadseur Ne nettoyez pas votre
filtre au lave-vaisselle.
A MISEENGARBE:N:fai s
fonctionnerle climatiseursans le filtre souspeine de le
boucheravecde lapoussbre et de la charpieet de rdduireson
efficacitd.
Serpentins Extorieurs
Les se_i)enfins sire& du c6t_ ext_rieur du
climadseur doivent &tre rSguli_rement v6dfiSs. S'ils
sont obsmlSs par des poussi_res ou de la suie, il est
possible de les faire nettoyer par des profe.ssionnels.
Pour le netto_er, utilisez de l'eau et un dStergent
dotlx. N'utilisez pas d'eau de Javel ou de nett()ants
abrasif;.
23
Page 24

I structi
Cli atiseur
ntage
j F=_ Questions? Composez le 1.800.361.3400 ou visitez notre site web a •www.electromenagersge.ca j
AVANT DE COMMENCER
Lisez ces instructions entierement et
attentivement.
• IMPORTANT - Conservezces
instructions pour I'inspecteur electrique local.
• IMPORTANT - Respectez tousles
codes et reglements en vigueur.
• Remarque pour I'installateur - Assurez-vous
de remettre cos instructions au client.
• Remarque pour le client - Conservez ces
instruct=ons pour toute ref@ence future.
• Niveau de competence - Einstallation de cet
appareil demande des connaissances de base
en mecanlque.
• Delai d'execution - Environ 1 heure
• Nous recommandons que I'installation de ce
produit soit effectuee par deux personnes.
• Einstallateur est responsable de I'installation
correcte de I'appareil.
• La panne de !'appareil due a une mauvaise
installation nest pas couverte par la garantie.
,, Vous DEVEZ utiliser toutes les pieces
fournies et suivre les procedures correctes
d installation decrites dans cette notice
ainsi que toutes les instructions concernant
certaines pieces separees Iors de
I installation de ce climatiseur.
- MISE EN GARDE :
Ne coupez pas ou n'enlevez pas, sous aucun
pretexte, la troisi_me broche de raise a la
torte du cordon d alimentation.
N,e changez pas la fiche du cordon
d alimentation du climatiseur.
Un c_blage en aluminium du domicile pout
occasionner des problemes particuliers--
consultez un electricien qualifie.
Siles boulons de maintien au rebord ne font
pas contact avec le rebord de la fen_tre, ou
si vous avez une fen_tre sans rebord, vous
devez commander le jeu d'accessoires
RAK87 pour installer correctement ce
climatiseur. Al_pelez le 800.626.2002 ou
consultez le s_te Internet
www.electromenagersge.ca.
OUTILLAGE NI_CESSAIRES
Tournevis cruciforme Phillips
CI6 _ molette
EXIGENCES ELECTRIQUES
mise a la terre de 115/120Volts AC, 60 Hz,
Certains modeles necessitent une prise
proteg6e par un fusible a action differ6e
ou par un disjoncteur.
La fiche triphasee avec terre reduit le risque de
choc electri.c)ue. Si la prise murale que vous
envisagez d utiliser est biphasee, vous avez la
responsabilite et I obligation de la remplacer par
une prise triphasee correctement mise a la terre.
Certains modeles necessitent une prise
©
@
@
mise a la terre de 230/208Volts AC,
proteg6e par un fusible a action differ6e ou
par un disjoncteur. Ces modeles doivent
_tre instal/es sur leur propre circuit deriv6
pour eviter de surcharger les circuits
_lectriques du domicile ,qui peut
occasionner un risque d mcendie par
surchauffe des cables.
24
Tournevis _ t&te plate
Crayon
Niveau
Le cordon d'alimentation est equip6 d'un dispositif
d interruption du courant. Un bouton d essai et
de reenclenchement est fourni sur le bo_tier de
la prise. Vous devez tester le mecanisme
regulierement en appuyant d abord sur
lebouton TEST (Essai) puis sur le bouton RESET
(Reenclenchement) Iorsque I appareil est branche.
Sile bouton TEST (Essai) ne bascule pas ou si le
bouton RESET (Reenclenchement) ne reste pas
enclenche, cessez d'utiliser votre climatiseur et
appelez un technicien de service qualifie.
R_gle ou m_tre
Ciseaux ou couteau
Page 25

instructions de montage darts une fen_tre
PIECES INCLUES
(l'aspect peut varier}
Jo!nt d'6ta_
s u Pedr:elUarfen 6t re_--_ _
Panneau en
accord6on
gauche
Joint inf6rieur du Iogement
(fin, adh6sif au dos)
Type A (6) Type B (7) Type C (6) Type D (3)
Support de seuil (2)
¢crou (2)
Boulon (2)
Rail de montage
sup6rieur
Panneau en
accord6on
droit
Ferrure de verrouillage
de la fen6tre (2)
25
Page 26

instructions de montage darts une fen tre
ITI iNSTRUCTiON RELATIVEA
LA FENETRE
• Ces instructions sont valables pour une fen_tre
standard ,_guillotine _ deux chassis mobiles.
Vous devrez modifier les instructions pour les
autres types de fen_tres.
_tklVliSEENGARDE:silesboulons
de maintien au rebord ne font pas contact avec le
rebord de la fen_tre ou si vous avez une fen_tre
sans rebord, vous devez commander le jeu
d'accessoires RAK87 pour installer correctement
ce climatiseur. Appelez le 800.626.2002 ou
consultez le site Internet ge.com.
• Toute laferrure de montage doit _tre soNdement
fixee au bois, a la ma?onnerie ou au metal.
• La prise d'alimentation electrique dolt se trouver
portee du cordon d'aNmentation.
B===8
17porain.
4_=====_36po
(Aveclespanneaux
27 po i_ "
en accord6on)
! !
[_] iNSTRUCTIONS RELATIVEA
LA CONTRE-FENI_TRE
Le cadre de la contre-fen_tre emp6che le
climatiseur de pencher vers I'exterieur, et donc de
se drainer correctement. Pour regler ce probleme,
fixez un morceau de bois au rebord
de la fen_tre.
MORCEAU DE BOB
LARGEUR: 2 po
LONGUEUR : Suffisamment long pour se Ioger
& I'interieur du cadre de la fen_tre.
#PAISSEUR : Pour determiner I'epaisseur, placez un
morceau de bois sur le rebord de la fen_tre de
fa?on ace que le morceau de bois soit
1/2po plus elev6 que le dessus du cadre
de la contre-fen_tre ou du cadre en vinyle.
Fixezsolidement &I'aide de vis ou de clous fournis
par I'installateur.
1/2po plus 61ev6 que le cadre en
vinyle (sur certaines fen6tres)
F_ RETRAIT DU CLINIATISEUR DE
SON LOGEMENT
[] Retirez et mettez de c6te les deux vis des c6tes
inferieurs de la grille frontale.
AVANT
r_ Retirez les deux boutons de commande.
AVANT
r_ Attrapez les deux coins inferieurs de la grille
tout en appuyant sur les c6tes du Iogement avec
le bout des doigts.Tirez vers vous pour liberer
la grille puis sortez-la en levant.
REMARQUE : Ne tirez pas le bord inferieur vers
vous de plus de 3 po ou vous risquez
d'endommager les languettes de la grille.
t ,i-
AVANT
F_ Retirez les vis de chaque c6te du Iogement du
climatiseur. Mettez-les dans un endroit sQr.
1 L L Bois
/2 po plus _lev6 __ . ,
que le cadre de TI, IJJsJ.__)(.I
lacontre-fenetre ]_---I17,, --_-- *_
41,,j:kj ooo,op
Cadre de la U _ Cadre "1
contre-fen_tre Cadre en vinyle
AVANT
26
Page 27

instructions de montage darts une fen tre
_=] RETRAIT DU CLIMATISEUR
DE SON LOGEMENT (SUITE)
['_ Retirez et mettez de c6te la vis de mise
la terre.
I_ II__i_',=i41 I
Filde l_
terre
terre :_,_'_ AVANT
[_] Sortez le climatiseur de son Iogement en le
faisant glisser et en attrapant la poignee du
conteneur de fond et en tirant vers vous
tout en maintenant le Iogement. Ne tirez pas
et ne soulevez pas la zone d'evacuation en
mousse de polystyrene.
Ne tirez pas et
ne soulevez pas
cette zone,
vous risquez
d'endommager
votre appareil
INSTALLATION DU RAiL DE
[]
MONTAGE SUPERIEUR SUR
LE LOGEMENT
Fixez le rail de montage superieur sur
le Iogement _ I'aide de 3 vis de type B.
Appuyez fermement pour enfoncer
les vis dans le joint et _ travers le rail
de montage superieur.
type B
[] INSTALLATION DU JOINT
INF(=RIEUR DU LOGEMENT
,, Decollez la pellicule au dos du joint
inferieur du Iogement et collez-le le long
du bas du Iogement devant le rail de
montage inferieur.
Rail de
montage
inf6rieur
Joint inf6rieur du Iogement
AVANT
[] INSTALLATION DES PANNEAUX
EN ACCORDEON SUR LES C0TES
[] Fakes glisser les panneaux en accordeon
gauche et droit dans les rails de montage
inferieur et superieur.
r_] Fixez les panneaux en accordeon au
Iogement _ I'aide de 3 vis de type A
de chaque c6te.
Rail de montage sup6rieur
Panneau en
accord6on
\\
27
ARRIERE
Rail de montage inf6rieur
Page 28

instructions de montage darts une fen tre
171iNSTALLATiON DU LOGEMENT
DANS LA FENETRE
INSTALLATION DU LOGENIENT
%
DANS LA FENETRE (SUITE}
[_=] Ouvrez la fen6tre et marquez I'axe central
du rebord de la fen6tre.
F_ Placez delicatement le Iogement sur le rebord
de la fen6tre et alignez la marque centrale sur
la partie inferieure avant avec I'axe central
du rebord de la fen6tre.
[] Tirez la fen6tre vers le bas derriere le rail
de montage superieur.
REIVlARQUE : Ne fermez pas la fen6tre
completement pour eviter que le mouvement
des panneaux en accordeon soit restreint.
F_ Choisissez la position qui placera les ferrures
du rebord sur le point le plus externe du
rebord. Placez les c6tes courts des ferrures du
rebord sur le bas du Iogement vers la fen6tre.
Fixez les ferrures du rebord aux trous dans les
rails du Iogement en accord avec la position
choisie en utilisant 2 vis de type B par ferrure.
-&MISE EN GARDE ".
N'installez pas ce climatiseur darts une fen_tre
si les boulons ne sent pas en contact avec
le reberd de la fen_tre.
r_ Attachez le
Iogement au
rebord de la
fen6tre en utilisant
3 vis de type D.
Tirez les panneaux
NI
en accordeon vers
chaque rail de la
fen6tre a guillotine.
Fixez-les de chaque
c6te du cadre et du
rebord de la fen6tre
I'aide de 4 vis de
type C.
S_II I
[] FIXATION DU LOGEMENT DANS LA
FENETREET INSTALLATIONDU JOINT
D'I'TANCHI'ITE SUPI_RIEUREN
MOUSSE DELA FENETRE
[] -&lVlISEEN GARDE :
Pour preventez la verre brisez
dans les fen_tres, attachez une
ferrure de support a lac6te du
fen_tre.
Fixez les ferrures de
verrouillage de la fen6tre
(une de chaque c6te) avec
des vis de type C.
Vinyle
Bois
I
Long c6t6
desferrures
de rebord
EXTERiEUR
F_ Ajustez le boulon et I'ecrou sur chaque ferrure
de fa!;on ace que le Iogement soit legerement
incline vers I'exterieur. Utilisez un niveau,
environ 1/2 bulle donnera la pente correcte
vers I'exterieur.
IVlISEENGARDE:Silesboulonsde
maintien au rebord nefont pascontactavec lerebord
de lafen_tre ousivousavez unefen_tre sansrebord,
vousdevez commanderlejeu d'accessoJresRAK87
pourinstallercorrectementce climatiseur.Appelez
le 800.626.2002ou consultezle siteIntemet go.com.
F_ D_coupez le joint
d'6tancheit_
sup6rieur en mousse
FC=]_ la largeur de la
fen_tre.
Ins_rez la mousse
entre la vitre et la fen_tre pour emp_cher Fair et les
insectes de p_netrer dans la piece.
NOTE : Sile joint d'_tancheit_ fourni ne s'adapte
pas avotre fen_tre, procurez-vous Iocalement
I'article approprie afin d'obtenir une _tancheit6
adequate de I'installation.
28
Page 29

Instructionsde montage dartsune fen tre
[_[] INSTALLATION DU CLiMATISEUR
DANS SON LOGEMENT
Faites glisser le climatiseur dans le Iogement
[]
par le conteneur du fond. Ne poussez pas sur
les commandes, sur le boftier en mousse de
polystyrene pour la sortie d'air ni sur les
serpentins a ailettes. Assurez-vous que le
climatiseur est correctement positionne.
N'appuyez pas
sur ces zones,
vous pourriez
endommager
votre appareil
Conteneur de fond
Remettez en place les deux vis de mise
[]
la terre retirees plus t6t, une de chaque c6te
du Iogement.
[_] INSTALLATION DU CLIMATISEUR
DANS SON LOGEMENT (SUITE)
Fixez la grille frontale en inserant les
@
languettes de la grille dans les fentes situees
dans la pattie superieure avant du Iogement.
Poussez sur la grille.
Attachez la grille frontale au Iogement
[]
en remettant en place les 2 vis retirees
auparavant. Appuyez sur le dessus de
la grille pour permettre la mise en place
des vis de c6te.
r_ Reinstallez le fil de mise a la terre sur
I'appareil a I'aide des vis de mise a la terre.
Fil de
terre
Visde
terre
[_] Remettez les deux boutons de commande
en place.
rG---1Branchez I'alimentation.
29
Page 30

Inst ctionsde montagepouruneinstallationatraversun mur-En option
Le Iogement peut _tre installe a travers un
tour darts une habitation existante ou neuve.
Veui!lez life entierement ces instructions,
puis les suivre etape par etape.
REMARQUE : Excepte pour les supports en V
(fournis}, veuillez obtenir tous les materiau×
Iocalement pour I'installation du climatiseur
travers un tour.
[] IMPORTANT
Une installation a travers un tour West pas
appropriee si une ou plusieursdes persiennessur
le c6te ou sur le dessussont obstruees par le tour.
Toutes los persiennes sur le c6te ou sur le dessus
doivent depasser du c6te exterieur du tour.
Le c6te interieur du Iogement dolt depasser
suffisamment dans la piece pour equilibrer
I'appareil.
Le Iogement dolt 6tre installe de niveau de droite
gauche et legerement poncho de I'avant vers
I'arriere. Utilisez un niveau, environ 1/2 bulle
donnera la pente correcte vers I'exterieur.
Une corniere de linteau est necessaire pour
maintenir los briques ou los blocs au-dessus
de I'ouverture.
m IMPORTANT (suite}
[-_ Fixez le Iogement a I'aide de 14 visa bois ancrees
d'au moins un pouce dans la structure du mur.
REMARQUE •Si necessaire, percez des trous de
guidage pour permettre une installation correcte.
Si le cadre est trop grand, utilisez des cales pour
eviter toute distorsion.
[]
FINITION DE L'OUVERTURE DANS
LE MUR
Calfeutrez les quatre c6tes du c6te exterieur
%
du Iogement pour eviter que I'humidite ne
penetre par lemur interieur. Lutilisation
d'un solin (rail d'ecoulement) permettra
davantage d'eviter que I'eau ne s'ecoule
dans le mur et le long du mur exterieur.
Couche de
pl_tre
Corniere de linteau
Calfeutrage
Moulure
(s'il y a lieu)
INTERIEUR
Un solin est necessaire et dolt se prolonger
le long de I'ouverture pour eviter toute fuite
vers I'interieur du tour.
Retirez le climatiseur de son Iogement. Pour
%
des instructions particulieres, veuillez vous ref6rer
aux Instructions de Montage dans une fen_tre.
[_ Assurez-vous qu'une prise murale se trouve
proximite de I ouverture ou installez-en une.
[-_ Positionnez le Iogement dans I'ouverture dans
lemur et placez les bandes de maintien en bois
entre le bas du Iogement et le solin des deux
c6tes du rail inferieur. Elles doivent _tre de la
m_me hauteur que le rail inferieur et de la m_me
Iongueur que I'ouverture dans le mur.
Rail inf_rieur
J
Remplissage des
trous et calfeutrage
(au-dessus et en
dessous du solin)
Supports
Solin (Rail
d'6coulement)
Solin (Rail
d'6coulement) Bande de maintien en bois
I-_ Placez le climatiseur dans le Iogement. Pour
des instructions particulieres, veuillez vous
referer aux Instructions de Montage dans
une fen_tre.
Rail
inf_rieur
30
Page 31

Please place in envelope and mail to:
Veuillez mettre dans une enveloppe et envoyez _ :
OWNERSHIPREGJSTRATJOH
P.O. BOX1780
MISSJSSAUGA,OHTARJO
L4Y4G1
(FORCAHADJAHCOHSUMERSOHLY)
31
Page 32

For Canadian
Customers
Pour les
Consommateurs
Canadiens
Pleaseregisteryour product to enableusto contact you
in theremote eventa safetynolJceisissuedforthis product
z
andto allow for efficientcommunicaOonunderthe terms
ofvour warranty, shouNthe needarise.
REGISTERON-LINE: wwvv,geappJiances,ca MAILTO:
ENREGISTREMENTSURINTERNED_,:_.electtemenaqersge.ea POSTER_,:
Z
[][]MISS/MLLE.MR'/M[][]Ms.MRS'/MME'FIRSTNAME/PRENOM LASTNAME/NOM
rr"
STREETNO/ N°RUE STREETNAME/RUE
rr"
C3
crrY/VILLE
Z
uJ
Z
..-1
AREACODE/IND.RE_G.[TELEPHONE JE-MAIL
DIDYOUPURCHASEA SERVICECONTRACTFORTHISAPPLIANCE? YES/OUI El IFYES/ SlOUI:EXPIRATION
AVEZ-VOUSACHETI_UN CONTRATDESERVICEPOURCETAPPAREIL? NO/NON []
_9
Z
NAME OFSELLINGDEALER/ NOM DU MARCHAND MODEL / MODt _LE
INSTALLA11ONDATE/DATED'INSTALLA11ON
Y/A M D/J CORRESPONDENCE [] ENGLISH
I
I
I
[] Ido notwishto receiveanypromotionaloffersregardingthisproduct.
I
I
[] Jened6sirepasrecevoird'offrespromotionnellesconcemantceproduit
I
I
I ............................................................................................................................................................................................................................................................................................................................................................................................................................................................................................................................................................................................................................................................................................................................................................................................................................................................
L
CORRESPONDANCE [] FRAN(_AIS
Veuilbzenregis_ervolreproduitafindenouspermet_ede
communiqueravecvoussijamaisunavisdes6cur_ concemant
ceproduit6tait_misetdecommuniquerfacibmentavecvousen
ver_devo_egaranlJe,silebesoins'enfairsen_r.
p.o.BOX1780,MISSISSAUGA
ONTARIO,L4Y461
A_. NO/APP./RR#
PROVINCE POSTALCODE/POSTAL
Y/A M D/J
SERIAL/St_RIE
32
Page 33

Avantd'appe/er/e service... .+c,rom+nag+ g+.ca
Causespossib/es Quefaire
te c/imatiseur ne se Le climatiseur * Assurez-vous qne la fiche dn clim_(tisenr soit bien bx_mch(_e
metpas en march+ est d_branch_, dans la prise mm_de.
Le fusible a sauL6/ * \,%vifiez la Ix)he {_flJsible/{_ disjonc/eurs et remplacez le flJsible
le disjoncteur est ouvert, on rebmnchez le disjonctem:
I1y a une panne de courant. • S'il se produit une panne de coumnt, d6bmnchez le clim_ttiseur
en le metrant en position Off (art&). Qnand le com'ant revient,
attendez 3 minutes mant de remettre en marche le climatisem;
pour &'iter de (Kclencher la surcharge du compresseuL
Le m@anisme d'interrupfion * Appuyez sin le lx)uk)n RESET(remise en marche) sired snr la fiche
de courant est d@lanch_. (lu cordon (qec/fique.
• Si le lxmton RESETne reste [)asenfonc( _,alv_tez le clim;_fiseur
d'air et al)pelez un technicien quulifi(_.
L+climatiseur La glace bloque la circulation • R(%lez les commandes sin HIGHFAN (xJtesse du ventilatenr (qe%e)
gbl+ d'air et emp_che le climatiseur ou HighCool (fort refioidissement) et r(%lez le thermos/at sur une
de refroidir la chambre, teml)(_lature plus _lev(_e.
Le climatiseurne refroidit La circulation d'air est bloqu_e. * Assmez-_ous qu il n'y a pas de fi(leau, de s/ore ou de meuble
pas autant qn'i//e d+vrait qui bloque le de_ant du climatiseuL
Le contrgle de temp6rature * En mode COOL(fiais) appu}ez snr la touche OECREASEV pad.
n'est pas bien r6g16. * Sur les mocl#les dot(_s de boutons de commandes, tournez
le bouton de tempdlamre sur une valeur plus dle%e.
Le _dtre h air est sale. * Nettoy'ez le filtre m/moins tons les 30jom_. Consulter la section
Instructions do fonctionnomont.
La chambre _tait chaude. *Apr_s avoir mis en marche le climatisem; attendez que
L'air froid s'@happe *\.%lJfiez les grilles h registre de plancher et les reprises d'air fioid.
de la chambre.
Les serpentins sont gel6s, * Consultez "L+ climatiseurd'airgel+"ci<lessous.
la chambre se refioidisse.
to c/imetiseurno chauffo La circulation d'air +Assurez-vous que des fideaux, des stores on des meubles
pasataantqu'i//odovreit est restreinte, ne bloquent [)as le (levant du climatiseuL
La commande de la temp@ature * Tournez le bomon aussi loin que possible dans le sens inverse
n'est peut btre pas r_gl6e des aiguilles d'une montre. Les r_glages les plus bas donnent
assez has. le chauft_Ne n_axinmm.
Le Ntre h air est sale. +Nettoy'ez le filtre au moins t(ms les 30jom_. Consultez la section
La temperature dans la piece +Apr_s axtfir mis le climatiseur en marche, attendez que
_tait peut&tre basse, la/emp_lamre dans la piece se r_chaufIe.
L'air chaud s%chappe. *\.%fifiez les grilles it registre au sol du Ibm et les letoms d ail fioid.
Oe/'+an con& a I'+xterieur n fait tr_s chaud et humide, * C est normal.
Instructions d'Utilisation.
DeI'+aucoul+a I'int&ieur Le cfimatiseur nest pas * Pour obtenir une bonne (_vac|mtion de 1eau, assurez-vous
inclin6 vers I ext_rieur, que le climvttisem soil 16g_,ement inclin6 de 1a, ant
t'eau s'amasse darts L'humidit6 est extraite de
I+plateaudu fond Fair de la chambre et passe
darts le plateau du fond.
du boitier ve_s 1mfi&_e.
* C est normal pendant une p6fiode courte dans des r6gions
pen humides; normal pendant des p6fiodes plus longues
dans des r6gions tr_s humides.
33
Page 34

Notes.
b
34
Page 35

C/imatiseurGE Garantie LimiMe B'un An.
Lesservices sous garantie sont dispens#s par nos centres de
r@aration ou par nos r@arateurs Customer Care_autoris#s.
Pour obtenir le service, appelez le 1.800.561.3344.Veuillezfoumir
le num#ro de s#rie et le num#ro de module Iorsque vous appelez
pour obtenir le service.
Nous remplacemns :
Ufleannee
A compterde la date
d'achatinitial
Les d_placements de service &votre maison pour vous
apprendre h utiliser le produit.
Un montage, une fivraison ou un entrefien
d_ficient. Si vous avez un probl_me de montage
ou si le climatiseur n'a pas la bonne capacit& de
refroidissement pour son usage pr_vu, appelez votre
revendeur ou votre iustallateur. _Sus _tes respousable
de fournir une installation de raccordement &lectrique
convenable.
Les pannes occasionn_es par des modifications
au produit ou une utilisation non raisonnable, en
particulier une absence d'entretien raisonnable
et n&cessaire.
Toute piece de le climadseur manif_smnt m_ vice de mat_riao oo de fhbdcafion. Din ant cette
pSxiode de garantie limitbe d'une annee, Mabe fbmnira aussi, gratuitement, la main-d_oeuvre
et le service de r_parafion connexe poor le reml)lacement de la piece d_f_ctueuse.
Agrafez le regud'achat icL
Pour obtenir le service sous
garantie, vous devrez fournir la
preuve deI'achat original
Le remplacement des fusibles de la maison ou la
r_activation des disjoncteurs.
Les pannes occasionn_es par la corrosion sur les
modules qui ne sont pas proteges contre la corrosion.
Les dommages occasionn6s par un mauvais voltage de
l'alimentation 61ectrique, un accident, un incendie, une
inondation ou une calamit_ naturelle.
Les dommages indirects et cons_cutifs &la propri&t_
personnelle occasionn_s par des vices possibles de
ce dimatiseur.
Les dommages occasionn&s par la livraison.
Dans les emplacements commerciaux, la main-d'oeuvre
n_cessaire pour d_m_nager l'appareil jusqu'i_ un
emplacement ou il est accessible par un teclmicien
particulier.
EXCLUSIONBE GARANTIES IMPLICITES- Votreseul et unique recours est la r#paration du produit
selon les dispositions de cette Garantie limit#e. Toutesles garanties implicites, incluant les garanties
de commercial## et d'ad#quation a un usage sp#cifique, sont limit#es a une ann#e ou a la p#riode
la plus courte autoris#e par la legislation.
Cettegarantie est valable pour le premier propri#taire et tout autre propridtaire @ pro@it s'il achet# au Canada pour
utilisation domestique clans Canada. Le service _ domicile sous garantie sera foumi I_ o# il est disponible et clansles
r@ions que Mabe considfire que I'offre de service est raisonnable.
Dans certaines provinces, il est interdit d'exclure ou de limiter les dommages directs ou indirects, fl est alors possible
que les limitations ou exclusions ci-dessus ne s'appliquent pas dans votre ca& La pr#sente garantie vous conffire
des droits juridiques spdcifiques. Vouspouvez bdndficier d'autres droits, qui varient d'une province _ I'autre. Pour
connaTtreles droits dont vous b#ndficiez clans votre province, communiquez avec le bureau des relations avec les
consommateurs de votre r@ion.
Garant: Mabe Canada inc.,
Burlington, Ontario
35
Page 36

Assistancea/a clientele.
SiteIntemetGE www.electromenagersge.ca
pal Internet au site www.eleetromenagersge.ea 24 heures parjoui; tous lesjoui_ de l'annSe.
Vousavez une question ou vous avez besoin d'aide pour votre appareil 5lecuom&_ager? Contactez-nous
Serviceder_parations
Service de r_parafions GE est tout [)__s de vous.
Pour f_d,e r_parer voue 51ectrom&_ager GE, il suffit de nous tS16phonei-
1.800.561.3344
Studiodeconceptionr_aliste www. electromenagersge, ca
Sur demande, (;E peut fournir une brochuie sur l'am&_agement d'une cuisine pour los pei_onnes
{_mobilit_ r_duite.
Ec,ivez: Directetm Relations avec les consolIlIIlamuis, Mabe Canada Inc.
Bureau 310, 1 Factoi y Lane
Moncton, N.B. E1C 9M3
Prolongationdegarantie www.electromenagersge.ca
Achetez un contrat d'enuetien GE event que vot_e garantie n'expi_e et b&_ficiez (t' un rabais substantiel.
Ainsi le service apr&s-vente GE sera tot{jours 1_apr&s expiration de la garande.
Visitez notre site Web ou appelez-nous au 1.888.261.2133.
Pibceset accessoires
www. electromenagersge, ca
Ceux qui d&irent r6pare_ eux-m&mes leurs &lecuom&lagers peuvent iecevoii pi6ces et accessoires
direcmment {_la maison (carms \qSA, MasmrCmd et Discover accept6es).
Losdirectivesstipulees densle presentmanuelpeuvent_tree#ectueesparn'impertequelutilisateur.Losautres
reparationsdoiventgenera/ement_tree#ectueesparun technicienqualifie.Seyezprudent,carune reparation
inadequatepoutaffecterle fenctiennementsecuritaire derappamil.
\fous trouverez dans les pagesjaunes de voue annuai,e le num&o du Centre de service Mabe le plus
proche. Autrement, appelez-nous au 1.800.5611.3344.
Contactez-nous
Si vous n'6tes pas safisf_fitdu service apr&_vente dent vous avez b6n6fici6 :
Premi_rement, communiquez avec les gens qui ont r_par_ voue appareil.
EnsuRe, si vous n'_tes toujouIs pas safisf_dt envoyez tousles d&ails--num&o de t_l_phone compris--au
Directetm Relations avec les consolIlIIlamui3, Mabe Canada Inc.
Bureau 310, 1 Factoi T Lane
Moncton, N.B. E1C 9M3
Inscrivezvotreappareildectrom_nager
Inscrivez votre apparei161ectrom6nager en direct, aussitSt que possible. Cela amdliorera nos
communications et noue seevice apr&s-vente. Vous pouvez dgalement nous envoyer pal la poste
le fbmmlahe d'inscriptionjoint _ votre documentation.
www. electromenagersge, ca
www. electromenagersge, ca
36
Page 37

Instruccionesdeseguridad .......... 38, 39
Instrucciones de operaci6n ........... 40, 41
Cuidado y limpieza
Bobinas para extefiores ................. 41
Film) de aire .......................... 41
Remoci6n del armaz6n
de la parrilla ........................... 41
Instrucdones de instalad6n
lnstrucciones de instalaci6n
a tra%s de la pared--opcional ........... 48
Instrucciones de
instalaci6n en una ventana ........... 42-47
Soludonar problemas ................. 49
Setwicio al consumidor
Garantfa .............................. 50
Servicio al consumidor .................. 51
@
Escribalos numerosdemodelo
y serie aqui:
# de Mode/o
# de Serie
Puede encontIaI es{os n/lIIleIos
en tma efiquem en el cosmdo
del acondicionador de aire.
g
?7
Page 38

/NFORMACIONIMPORTANTEBESEGUR/DAD.
LEATODAS/.ASINSTRUCC/ONESANTESBEUSAR.
&iAOVERTENC/A!
Por su seguridad, se debe seguir la informacidn en este manual para minimizar el riesgo de incendios,
descarqas elfictricas o lesiones personales,
PRECAUCIONESDESEGURIDAD
}}Use este electrodomF.sdco solamente para }}
el prop6sito determinado seg_n se describe
en el Manual del propietario.
}}Este acondicionador de aire debe instalarse }}
correctamente de acuerdo con las
Instrucciones de instalaci6n antes de su uso.
iii}i}i
Nunca desenchufe su acondicionador de
aire drando del cable elF.ctrico. Siempre
agarre firmemente el enchufe y tire de
F.1directamente hacia afuera.
iii}i}}li_
Reemplace inmediatamente todos los cables
elF.ctricos que se hayan pelado o que se
hayan dafiado de alguna otra manera.
Un cable de corriente dafiado no debe
repararse, sino que debe ser sustituido por
uno nuevo que se adquiera del fhbricante.
No use un cable elF.ctrico que muestre
ex,idencias de deterioro, o dafios de abrasi6n
en su superficie en alguno de sus extremos.
iii}i}i
iii}i}}li_
Si el receptaculo no coincide con el
enchufe, un electricista calificado debe
reemplazar el receptaculo.
Apague la unidad (OFF)ydesenchufe, el
acondicionador de aire antes de efF.ctuar
reparaciones o la limpieza.
NOTA:Recomendamosenf#ticamenteque
un t#cnicocalificadorealice/asreparaciones.
Por su seguridad...no almacene ni use
materiales combustibles, gasolina u otros
vapores o lfquidos inflamables en la
proximidad de F.ste o algSn otro
electrodomF.stico.
Todos los acondick)nadores de aire
contiene refrigerantes, los que por i,ey
Federal deben ser remo_,idos ante.s de
desecharlos. Si usmd planea deshacerse de
alg0n producto que contenga refkigerantes,
p6ngase en contacto con la compafifa que
se encarga de recoger su basura para que
le indiquen quF.hacer.
38
COMOCONECTARLAELECTRICIDAD
Bajo ninguna circunstancia, corte o remueva la
tercera pOa (tierra) del cable el#ctrico, Enpos
de la seguridad personal, este electrodomfistico
debe siempre conectarse a tierra,
NO use unenchufe adaptadorcon este
e/ectrodom#stico.
E1cable elF.ctrico de este electrodomF.stico esta
equipado con un enchufe de tres pdas (tierra)
que combina con un tomacorrienm estandar
de tres u)mas de pared para minimizar la
posibilidad de una descarga elF.ctrica.
E1cable de alimentaci6n incluye un
dispositivo para inmrmpci6n de corriente.
Se incluye un bot6n de prueba y de reinicio
en el dispositivo. E1dispositivo debe ponerse
a pmeba peri6dicamenm: primero se presiona
el bot6n de rEST (prueba) y luego RESET
(reinicio) mientras se encuentra enchufhdo al
mmacorriente. Si el bot6n TESTno se dispara
o si el bot6n RESETno queda enganchado,
deje de utilizar el acondickmador de aire y
comunfquese con un tF.cnico calificado.
Pida a un tF.cnico que inspeccione el
tomacorriente y el circuito para cerciorarse
de que el tomacorriente esta conectado a
tierra de la manera apropiada.
Donde exista un tomacorriente de dos
tomas, es su responsabilidad y obligaci6n
personal hacer que dicho tomacorriente
sea reemplazado por uno de tres tomas
con conexi6n a tierra.
E1acondicionador de aire deberfa siempre
estar conectado a un tomacorriente indix,idual
con su circuito de volta.je correspondiente.
Esto proporciona el mayor rendimiento y
ademas ex,itaque los circuitos del resto de
la casa se sobrecarguen, lo cual podrfa causar
incendios por el sobrecalentamiento del
cableado.
Ver las Instmcciones de instalaci6n, en la
secci6n Requisitos El_ctricos para los requisitos
especfficos de conexi6n.
Page 39

_e. COrn
i
USODECABLESDEEXTENSION--Mode/osde115voltiossolamente
Debido al potencial de fiesgos de seguridad bajo
ciertas condiciones, en_rgicamente recomendamos
contra el uso de cables de extensidn,
Sin embargo, si usted se ve en la necesidad
de usar un cable el_ctrico de extensi6n, es
absolutamente necesario que el mismo est_
listado bajo UI,, sea calibre 14, del tipo de
3 tomas con conexi6n a derra para
electrodom4sticos y el fndice el4ctrico debe
set de 15 amperios (mfnimo) y 125 voltios.
-4,PRECAUC/ON:
NO USEun cable de extension con ningune
de los modeles de 230/208 volties
LEAYSIGAESTASINSTRUCCIONESDESEGURIDADCUIDADOSAMENTE.
I
GUARBEESTASINSTRUCCIONES
39
Page 40

Pcerca de loscontrolesen el acondicionador
de aire--modeios conbotonesde control.
Las funciones y el aspecto pueden variar,
5 6
Warmer Cooler
CONTROLDETEMPERATURA
0
Contro/es
Controldetempereture
0
E1control de temperatura se udliza para
mantener la temperamra de la habitaci6n.
E1compresor se encender_ y apagar_ para
mantener la habitaci6n con el mismo nivel de
confort. Gire la perilla en sentido de las ag/gas
del reloj a Cooler(masfrio)(color azul) } el aire
interior ser_ m_s fik/. Gire la perilla en sentido
contrario alas agtgas del reloj a Warmer(mas
tibio) (color r(oo) y el aire interior se entibiar_.
Hi ,0 _ _ Hi
off
°°'
Low\\ I I //Low
Heat __J Cool
Fan
Only
CONTROLDEMODO
@
Controldemodo
O
Hi Cool(frioalto)v LowCool(friobajo)brindan
reffigeraci6n con diferentes velocidades de
ventilado_:
HiHeat(caloralto)y LowHeat(ca/orbajo)
brindan calefacci6n con diferentes velocidades
de ventilador.
La configuraci6n FanOnly(sOloventilador)
oflece circulaci6n y filtro de aire sin
reffigeraci6n o calefacci6n.
NOT,d: Si usteddesplazael controldemododeuna
configurac/bnfrfaa Off (apagado),unaconfiguracibn
de venti/adorodeca/efacci6n,esperepot/o menos
3 m/nutosantesdecambiara una configuraci6ndefrfo.
40
Descripciones derefrigeracion
Para una refrigeration normal--Seleccione
Hi Cool(frioalto) o Low Cool(friobajo)con el
control de temperamra en la posici6n media.
Parauna refrigeration maxima--Seleccione
Hi Cool(frioalto) con el control de temperatura
girado en sentido de las ag,gas del relco en su
posici6n m_xima.
Paraunarefrigeracionsilenciosay noctuma--
Seleccione LowCool(friobajo)con el control
de temperatura en la posici6n media.
Descripciones decalefaccion
Paraunacalefaccionnormal--Seleccione
HiHeat(taler alto)o LowHeat(calorbajo)con
el control de temperatu,'a en la posici6n media.
Paraunacalefacci6nmaxima--SeleccioneHi
Heat(ca/oralto)con el control de temperatura
girado en sentkto contrario alas ag/gasdel
relc_ en su posici6n m_xima.
Paraunacalefaccionsilenciosaynocturna--
SeleccioneLowHeat(calorbajo)con el control
de temperatura en la posici6n media.
Page 41

InformaciSn importante adicionale.
Bireeei#n de/aire
Udlice la palanca para _jusmr la direcci6n del aire
s61o de izquierda a derecha.
Mediante una presidn de los dedos sobre las
persianas hofizonmles, la direcci6n del aire puede
_jusmrse en direcci6n ascendente o descendente.
Cuidadoy limpiezade/acondicionadordeaim.
Rejil/a y caja
Apague el acondicionador de ahe y retire el
enchufe del tomacorfienm de la pared antes
de limpiar
Para limpiai; use agua y tm detergente suave.
No use cloro o materiales abrasivos.
#e. COrn
Filtro de aim
E1filtro de aire detrgs de la rejilla flonml debe
inspeccionarse y limpia_e pot lo menos cada
30 dfas o m_s a menudo si fuese necesario.
Pararetirar/o:
Empt{je en un lado del borde del filtro y tirek)
del otto lado.
iJmpie el filuo con agua tibia yjabdn. E_j udguelo y
pemlim que se seque antes de colocarlo otra vez en
su lugar No lave el filtro en un lavav_{jillas.
I
A PRECAUCION:Noo fRf /
acondicionadordeairesinel filtrodebidoaquelasuciedad
y/aspelusasIoobstruirdnyreducirdnsurendimiento.
Bobinas para exteriores
Se deben inspeccionar con flecuencia las bobinas
en el lado exterior del acondicionador de aire. Si
las Inismas est;in obsuuid_Ls con suciedad u hollfn,
podrfan limpim_e profesionNmenm.
41
Page 42

[]
st |
m
st
|
=_ _Preguntas? Llame 800.GE.CARES (800.432.2737) o visite nuestra pagina en la red en: ge.com J
I
Ace i i
[]
e |
ANTES DE INICIAR
PRECAUCION:
Baje ninguna circunstancia certe e remueva
Lea estas instrucciones completa ¥
cuidadosamente.
• IMPORTANTE - euardeestas
instrucciones para uso del inspector local.
• IMPORTANTE - Observetodos
los c6digos y ordenes de ley.
• Nora al instalader- AsegOrese de dejar
estas instrucciones con el consumidor.
• Nora al consumider- Conserve estas
instrucciones para referencia futura.
• Nivel de destreza - La instalaci6n de este
aparato requiere de destrezas mecanicas
basicas.
• Tiempe de ejecuci6n - Aprox. 1 hera
• Recomendamos dos personas para
la instalaci6n de este producto.
• La instalaci6n apropiada es la
responsabilidad del instalador.
• La falla del producto debido a una
instalaci6n inadecuada no esta cubierta
per la garantia.
• Cuando instale este acondicionador
de aire, DEBE usar todas las piezas
suministradas y usar procedimientos
adecuados de instalaci6n come describe
en estas instrucciones y algunas
instrucciones de kit separadas.
El cable de alimentaci6n incluye un dispositivo
para interrupci6n de corriente. Se incluye un
bot6n de prueba y de reinicio en el dispositivo.
El dispositivo debe ponerse a prueba
peri6dicamente: primero se presiona el bot6n de
TEST (prueba) y luego RESET (reinicio) mientras
se encuentra enchufado al tomacorriente. Si el
boron TEST no se dispara o si el bot6n RESET
no queda enganchado, deje de utilizar el
acondicionador de aire y comuniquese con
un tecnico calificado.
la tercera pfia (cene×i6n a tierra) del cable
electrice.
No cambie el enchufe en el cable electrice
de este acendicionader de aire.
Los cables caseres de aluminie pedrian
presentar preblemas especiales. Censulte
a un tecnice electricista calificade.
Si los ternilles de soperte del umbral no
tienen centacte con el umbral de la ventana
o si cuenta con una ventana sin umbral,
debe erdenar el kit de acceseries RAK87
para instalar de ferma adecuada este
acondicienader de aire. Llame a
800.626.2002 e visite ge.com.
O REQUISITES ELECTRICOS
AIgunos modelos requieren
@
El enchufe de tres pOas con conexi6n a tierra
minimiza la posibilidad de descargas electricas. Si
el tomacorriente de la pared que usted planea usar
solamente tiene 2 tomas, es su responsabilidad
hacer que un tecnico Io reemplace por uno de tres
tomas con conexk_n a tierra.
©
G
G
tomacorrientes de 115/120 voltios de
corriente alterna y 60 Hz conectados
a tierra, protegidos con un fusible de
dilataci6n de tiempo de 15 amperios
o un cortacircuitos.
AIgunos modelos requieren 230/208
voltios, de corriente alterna, protegidos
por un fusible de dilataci6n de tiempo
o un cortacircuitos. Estos modelos
deberian instalarse en un ramal exclusivo
del circuito para un rendimiento mas
notable y para prevenir sobrecargas en
los circuitos de cableados de su casa o
apartamento, Io cual podria representar
un riesgo de incendio por el
sobrecalentamiento de los alambres.
42
Page 43

Instrucciones de instalaci6n en una ventana
HERRANllENTAS QUE NECESITARA
Un destornillador de estrella
PARTES INCLUIDAS
(apariencia puede variar)
Panel de
acorde6n
izquierdo \'_
Llave ajustable
Tijeras o cuchilla
Empaque sup_
espuma de la ventana __
Un destornillador
con hoja plana
Nivel
L_piz
Una regla o cinta m6trica
Tuerca (2)
_:---- oporte del umbral (2)
Perno (2)
Sellado de la carcasa
inferior (fino, con
adhesivo en la parte
Tipo A (6) Tipo B (7)
posterior)
Tipo C (6)
Tipo D (3)
Riel de montaje
superior
Panel de
acorde6n
derecho
Soporte para bloqueo
de ventana (2)
43
Page 44

Instrucciones de instalaci6n en una ventana
m REQUISITOS PARA LA VENTANA
®Estas instrucciones son para una ventana
estandar de dos pliegues. Usted necesitara
modificar el proceso para otros tipos de ventanas.
PRECAUCiON:s,,ostornillos
de soporte del umbral no tienen contacto con el
umbral de la ventana o si cuenta con una ventana
sin umbral, debe ordenar el kit de accesorios
RAK87 para instalar de forma adecuada este
acondicionador de aire. klame a 800.626.2002
o visite ge.com.
®Todas las partes de apoyo deben quedar
totalmente aseguradas a algQn metal,
mamposteria o a la madera.
® El tomacorriente electrico debe estar al alcance
del cable electrico del acondicionador de aire.
! I
13====8
17" min.
27" a 36" (con
paneles de acorde6n)
m m
[_] REQUISITOS DE UNA VENTANA
DE TORMENTAS
Un marco de ventana de tormentas no permitira
que el acondicionador de aire se incline hacia el
exterior y evitara que drene apropiadamente. Para
solucionar este problema, adhiera un pedazo de
madera a el umbral.
PEDAZOS DE MADERA
ANCHO: 2"
LONGITUD: Lo suficientemente largo como para
ajustar en el interior del marco de la ventana.
GRUESO: Para determinar el grueso, coloque un
pedazo de madera en el umbral para hacerla 1/2"
mas alta que la parte superior del marco de la
ventana de tormentas o del marco vinilo.
Peguelo firmemente con clavos o con tornillos
proporcionados por el instalador.
[] QUITE EL ACONDICIONADOR
DE AIRE DE LA CARCASA
[] Quite y conserve los 2 tornillos de los lados
inferiores de la parrilla frontal.
FRENTE
r_ Retire las dos perillas de control.
FRENTE
[] Tome las esquinas inferiores de la parrilla
mientras presiona hacia adentro sobre los
costados de la carcasa con sus dedos.Tire
hacia afuera para liberar y levantelo.
NOTA: No tire del borde inferior hacia usted
mas de 3" porque puede da_ar las lengQetas
de la parrilla.
t t
FRENTE
['_ Quite los tornillos de cada lado de la carcasa.
Conservelos en una ubicaci6n segura.
| 1/2" mas alto que el
_ marco vinilo (en algunas1/2" m_s alto '---_-ventanas)
que el marco , _,j Madera
de tormentas
de ventana [__Jm _rra_b
Marco de
ventanade ""____ Marcovinilo I !
tormentas
FRENTE
44
Page 45

Instrucciones de instalaci6n en una ventana
131QUITE EL ACONDICIONADOR DE
AIRE DE LA CARCASA (CONT.)
F_ Quite y conserve el tornillo de cable a tierra.
iiiii!ili!iUiH
Cablea I._ I I__]iilllll
tierra ""__
Tornil
conexion a tierra _ FRENTE
[_ Deslice el acondicionador de aire de la carcasa
tomando la manija de la bandeja inferior y
tirando hacia adelante mientras se sujeta la
carcasa, No tire o levante el area de descarga
de poliestireno,
No tire o
levante
esta zona
porque
pueden
provocarse
da_os a la
unidad.
[] INSTALE EL RIEL DE MONTAJE
SUPERIOR EN LA CARCASA
Sujete el riel de montaje superior a la parte
superior de la carcasa con 3 tornillos tipo B.
Presione firmemente para introducir los
tornillos dentro de la junta y a traves del riel
de montaje superior.
Tornillos
Tipo B
% FRENTE
[_] INSTALE EL SELLADO DE
LA CARCASA INFERIOR
® Pele el papel que cubre el sellado de
la carcasa inferior e instalelo a Io largo
de la parte inferior de la carcasa frente
al riel de montaje inferior,
Riel de
montaje
inferior
Sellado de lacarcasainferior
INSTALE LOS PANELES EN
ACORDEON LATERALES
Deslice los paneles en acorde6n izquierdo
[]
y derecho dentro de los rieles de montaje
superior e inferior.
Sujete los paneles en acorde6n a la carcasa
[]
utilizando 3 tornillos tipo A en cada lado.
Riel de montaje superior
Panel en
acorde6n
Tornillos "\
tipo A \."
45
PARTETRASERA
Riel de montaje inferior
Page 46

Instrucciones de instalaci6n en una ventana
[] INSTALE LA CARCASA
EN LA VENTANA
r_ Abra la ventana y marque la linea central
del alfeizar de la ventana.
F_ Con cuidado coloque la carcasa en el alfeizar
de la ventana y alinee la marca central sobre
el frente inferior con la linea central del
alfeizar.
[] Baje la ventana detras del riel de montaje
superior.
NOTA: No cierre la ventana con tanta firmeza para
que el movimiento de los paneles en
acorde6n se vea restringido.
INSTALE LA CARCASA
EN LA VENTANA (CONT.)
r_ Fije la carcasa al
alfeizar de la
ventana utilizando
3 tornillos tipo D. Sill
Tire los paneles en
[]
acorde6n hacia cada
carril de los marcos
de la ventana.
Sujetelos sobre cada
lado al marco de la
ventana y al alfeizar
de la ventana
utilizando 4 tornillos
tipo C.
FIJE LA CARCASA EN LAVENTANA
[]
support
E INSTALE LA JUNTA SUPERIOR
DE ESPUNIA DE LAVENTANA
[_] Seleccione la posici6n en la que los soportes
del alfeizar quedaran mas cerca del punto mas
alejado del alfeizar. Coloque el lado corto de
los soportes del alfeizar, en la parte inferior
de la carcasa, hacia la ventana. Sujete los
soportes del alfeizar al orificio de la carcasa
en relaci6n con la posici6n seleccionada
utilizando 2 tornillos tipo Ben cada soporte.
f
PRECAUCION: .oi° °lo
acondicionador de aireen una ventana si los pemos
no hacen contacto con el alfeizar de la ventana.
I I_ Costado largo
I | de los soportes
I ! del alf6izar
-'-[ J EXTERIOR
F_ Ajuste el tornillo y la tuerca de cada soporte
de modo que la carcasa quede instalado con
una ligera inclinaci6n hacia el exterior. Utilice
un nivel; la inclinaci6n correcta hacia el
exterior no debera ser de mas de 1/2 burbuja.
A "
PRECAUClON: s,,o.to.°.,o.
de soporte del urnbral no tienen contacto
con el urnbral de la ventana o si cuenta con
una ventana sin urnbral, debe ordenar el kit
de accesorios RAK87 para instalar de forma
adecuada este acondicionador de aire. Marne
a 800.626.2002 o visite 9e.com.
46
@
PRECAUCi6N:
En ventanas construidas Vinilo
de vinil o de similar
construcci6n, conecte el
soporte a el marco de la
ventana para prevenir
da_o a la ventana y vidro
quebrado.
Sujete los soportes de
fijaci6n de la ventana
(uno en cada lado) con
tornillos tipo C.
Corte la junta de espuma superior de la
[]
ventana al ancho de la ventana.
Rellene la espuma
entre el vidrio y la
ventana para evitar
que aire e insectos
se introduzcan en la
habitaci6n.
NOTA: Si la junta provista no es adecuada para
su ventana, obtenga el material apropiado
Iocalmente para realizar una adecuada
instalaci6n de sellado.
Madera
Page 47

Instrucciones de instalaci6n en una ventana
INSTALE EL ACONDICIONADOR
@
EN LA CARCASA
Deslice el acondicionador de aire dentro de la
[]
carcasa de la bandeja inferior. No haga presi6n
sobre los controles, carcasa de poliestireno de
la descarga de aire o las serpentinas de aletas.
Verifique que el acondicionador de aire se
encuentre firmemente asentado.
No presione
en estas &reas
porque puede
da_arse la
unidad.
Bandeja inferior
F_ Vuelva a instalar los 2 tornillos quitados
antes, uno en cada lado de la carcasa.
_=] INSTALE ELACONDICIONADOR
EN LA CARCASA (CONT.}
Sujete la parrilla frontal a la carcasa
@
introduciendo las leng6etas de la parrilla
dentro de las ranuras de la parte superior
frontal de la carcasa. Presione la parrilla
hacia adentro.
Fije la parrilla frontal a la carcasa reinstalando
los 2 tornillos quitados con anterioridad.
Haga presi6n sobre la parte superior de
la parrilla para ayudar con la instalaci6n
de tornillos laterales.
[] Reinstale el cable a tierra a la unidad
utilizando el tornillo de cable de a tierra.
Cable a
tierra
Tornillo de
conexi6n a tierra
[_] Reinstale las dos perillas de control.
F_ Conecte la electricidad.
47
Page 48

Instrucciones de Instalacion a Traves de la Pared-Opcional
La carcasa puede instalarse a traves de la pared en
censtruccienes existentes y nuevas.
Lea per complete y luego siga todos los pasos.
NOTA: Cen exception de les mentajes de sepertes
en V (incluides), ebtenga tedes les materiales en
ferma local para mentar el acendicienader de aire
a trav@s de la pared.
ITI IMPORTANTE
La instalacion a traves de la pared ne es apropieda
si alguna de [as persianas [aterales e superieres
de lacarcasa quedaran obstnJidasper la pared.
Tedas las persianas laterales y superieres de
la carcasa deben preyectarse sebre la pared
exterior de la pared.
El lade interior de la carcasadebe preyectarse
dentre de la habitacion Io suficiente para petenciar
al maxime el equilibrie de la unidad.
La carcasadebe estar instalada de lade a lade y
con una pequeffa inclinacion del ffente haciala
parte trasera. Utilice un nivel; la inclination correcta
de lacarcasa hacia el exterior ne debera ser de
rnas de 1/2 burbuja.
Se requiem un angulo de dintel parasestener
ladrilles e bieques sebre laabertura.
Se requiere un revestimiente de aislacion que
debe extenderse per la Iongitud de la abertura
para asegurar que ne haya perdidas en las
cavidades intemas.
Quite el acondicionador de aire de la caja.
%
Para instrucciones especificas, consulte las
Instrucciones de instalaci6n en una ventana.
AsegQrese de que haya un tomacorriente cerca
de la ubicaci6n del orificio o efectQe arreglos
para instalar un tomacorriente.
ITI IMPORTANTE (cont.)
Fije con 14tornillos para madera sujetos per Io menos
una pulgada dentro de la estructura de soporte de
la pared•
NOTA:Pefforeorificios piloto, si fuera necesario,para
una instalaci6n adecuada.Si el armaz6n esmas grande,
utilice cu_as paraprevenir la deformaci6n dela carcasa.
F2=ITERMINE LA ABERTURA
DE LA PARED
Utilice calafateo en los cuatro costados del lade
%
exterior de la carcasa para que no ingrese
humedad a la parte interna. El use de
revestimiento de aislaci6n (riel de goteo) evitara
aQn mas el ingreso de agua dentro de la 3ared
yen la parte exterior del edificio.
/
_ Linea
de yeso
• /
aire (la parte _
_°s,P::'s_rc_°s [_ '_ Riel inferior
aeuen [ /
proyectarse [ /
sobre el lado [ /
externo de
[a pared) I
Relleno de madera
y calafateo (por
encima Y dmebe
de revesti
de aislaci6n)
en V Parte inferior ielSoportes
Revestimiento \
de aislaci6n \_,_
de la carcasa inferior
INTERIOR
Coloque la carcasa en la abertura de la pared
I-_y coloque guias de soporte de madera entre
la parte inferior de la carcasa y el revestimiento
de aislaci6n sobre ambos lades del riel inferior.
Deben ser de la misma altura del riel inferior y
de la misma Iongitud de la abertura de la pared.
(rieldegoteo) _ _
Revestimiento de /
aislaci6n (rie[ de goteo)
Guias de soporte de madera
[-B-IColoque el acondicionador de aire dentro de la
i ,=,- i
carcasa. Para instrucciones especificas, consulte
las Instrucciones de instalaci6n en una ventana.
48
Page 49

So/ucionarpmb/emas.
Causasposib/es Quehater
ElacondMonadordeaim E1acondicionador de aire * Cercidrese de que el acondicionador de aire es/_
noenciende esN desconectado, enclmf_t(lo totahnente en el tomacortJente.
E1 fusible se dispar6 / * [nspeccione los fi/sibles / c_!iade interruptores de la casa
el cortacircuitos se dispar6, y'reemplace cualquier fltsible o re_us/e el interrnpt(,.
Interrupcidn en el
suministro el6ctrico.
El disposifivo de interrupcidn * Presione el botdn RESETubicado en el cable de alimentaci6n.
de corriente se ha acfivado. * Si el botdn RESETno se mantiene en su lugat; no milice m_s
ElacondMonoderdeaim El hielo bloquea el flnjo * Coloque los controles en HighFan(ventilador alto) 6 HighCool
se esM congelando de aire hacia el acondicionador (fi-fo alto) y @ts/e el tempos/ate a tma temperature m_s alto.
de aire evitando que se enfrie
la habitacidn.
Elacondicionodorde airo Elflujo de aire estfi restringido. * Cercidrese de que no exis/e ninguna cortina, persiana o
noenfriacomedeberia nmeble bloqueando el fiente del acondicionador de aire.
El control de temperatura no • En los modelos con teclado: En el mode Cool (Frio),presione la tecla
estfi ajustado apropiadamente. ReductionT.
El f'fltro de aire estfi sucio. • Limlfie el filtro carla 30 dfas per lo menos. \,_r la seccidn
La habitacidn podria haber • Cuando el acondicionador de aire se enciende, usted
estado cMiente, necesita darle tiempo l)ata que enfiJ( _la habitacidn.
El aire frio se estfi escapando. * Cerci6rese de que los regis/ros de la calefitccidn no es/An
Los bobinas de enfriamiento • X,_r "AcondMonadorde aimcongeNndose" m_s adelante.
se congelaron.
ElaeendMonadorde oire El flnjo de aire estfi *\._tJfiqne que no haya cortinas persianas o nmebles
nocalientacomedeberia restringido, bloqueando el fiente del acondicionador de aire.
El control de temperatura , Gire la perilla en sentido conttafio a los agqjas del relc_ al m_ximo.
no estfi configurado lo [.a configm'aci6n m_s b_a offere una calef_tcci6n m(_xima.
suficientemente bajo.
El Ntro de aire estfi sucio. * [Jmpie el filtro per lo menos coda 30 dfas. \._r la secci6n
La habitacidn estaba fria. , Cuando reci(_n se enciende el acondicionador de aire, debe pasar
El aire caliente se escapa. • Controle que no ha)'a abiertas rejillas de piso de calder'as
* l[a unidad se reinicim'5 automSficamente con la configumci6n
utilizada per 61tima ;_z luego de reesmblecer la electficidad.
* Exism un reuaso de tiempo per promccidn (de aproximadamenm
3 minutes) pata e:vimr la desconexi6n per sobrecar_a del compresox:
Per esm mzdn, es posible que la unidad no comience a enfi_iar de
ffmna nomml hasm ttanscurtJ(tos 3 minutes desde que voM6 a
encen(lexNe.
el acondicionador de aire y conmnfquese con tin t&nico calificado.
• En los modelos con botones, gire la mnq)etatuta atm nfimero mayor:
de CtlidadoJ/limpioza.
abiertos y'se encuenttan retornando el aire fi-fo.
/nstruccionos do oporacidn.
un tiempo hasta que la habitacidn se caliente.
o retornos de aire flfo.
Haltagua gotea_era Tiempo hfimedo y caliente. • Es/o es hernial.
Hayagua_teando on el El acondicionador de aire • Pat'a drenar el agua al)ropiadamente, cercforese de que
interiordelahabitacion no estfi inclinado hacia afuera, el acondicionador de aire es/_ inclinado ligeramente
desde el fiente hacia att'As.
Seacumulaagga en
/abandeja
La humedad removida del aire * Esto es nomml per un corto perfodo en fireas con poca
y se drena basra la bandeja, humedad; nomml per un perfodo de tiempo m_s postergado
en _reas m_s hfimedas.
49
Page 50

Garantiadesuacondicionadordeaim garantia /imitadadeuna#o.
Todos los servicios de garantfa los proporcionan nuestros Centros
de ReparaciSn de F#brica o nuestros t#cnicos Customer Care®
autorizados. Para concertar una cita de reparaciSn, en Ifnea,
24 horas al dfa, visitenos al ge.com, o flame al 8OO.GE.CARES
(800.4322737). Cuando flame para soficitar servicio, pot favor
tenga a mano el nE_merode serie y el nE_merode modelo.
GEreemplazara:
Unafio
A part# de lafecha
dela compraoriginal
Viajes de servicio a su casa para mostrarle c6mo
funciona el equipo.
lnstalaci6n o entrega inapropiada, o mantenimiento
impropio. Si usted tiene un problema durante la
instalaci6n, o si su acondicionador de afire no tiene la
capacidad de enfriamiento que usted necesita, p6ngase
en contacto con nuestro distribuidor o instalador.
Usted es responsable de proporcionar las faciiidades
de conexi6n el6ctrica necesarias.
Fallo del producto resultante de modificaciones al
producto o debido a uso irrazonable incluyendo no
proporcionar mantenimiento razonable y necesario.
En locales comerciales, la mano de obra necesaria para
retirar la unidad hacia un lugar para revisi6n por parte
de un t&cnico individual.
Cualquierparte del acondicionador de aire que f_dle debido a def_ctos en los materiales o en
la fhbricaci6n. Dinante esm garan#a limitada de un a#o, GE mmbi_n p_oporcionar£ sin costo
alguno, toda la mano de ob_a y el se_vicio relacionado---para reemplazar partes defbcmosas.
Grape aqui su recibo.
Se requiere facilitar prueba
de la fecha de compra original
para obtener un servicio
bajo la garantfa.
Reemplazo de fusibles de la casa o reajuste del sistema
de circuitos.
Fallos debido a la corrosi6n en modelos que no estSn
protegidos contra la corrosi6n.
Dafio al producto causado por voltaje inapropiado hacia
el equipo, accidentes, incendios, inundaciones o actos
de la naturaleza de fuerza mayor.
Dafios incidentales o consecuenciales causados por
defectos posibles con este acondicionador de aire.
Dafios despu&s de la entrega.
EXCLUSION BE GARANTJAS IMPLJC/TAS--Su (mico y exclusivo derecho es la reparacion de/pmducto, ta/ y
como se indica en esta Garantia limitada. Cua/quier garantia implicita, incluyendo /as garantias implicitas de
comerciabilidad o adecuaci6n para un fin determinado, esMn /imitadas a un a#o o el periodo de tiempo mas
breve permitido pot la /ey.
Esta garantia so extiende al comprador original y cualquier comprador posterior de productos comprados para uso
residencial dentro de Estados Unidos. Si el producto est# situado en un #rea que no dispone de servicio por parte
de un proveedor de servicio autorizado de GE,podrfa tener que hacerse cargo de los costes de env[o o bien podrfa
soficit#rsele que fieve el producto a una centro de servicio de GE autorizado para realizar la reparaci6n. EnAlaska,
la garantia excluye el costo de envio o las visitas de servicio a su casa.
Algunos estados no permiten la exclusidn o las limitaciones de dafios incidentales o consecuenciales. Esta garantia
da derechos legales especificos, y usted podria tener otros derechos que variarbn de estado a estado. Para saber cubles
son sus derechos legales, consulte a la oficina de asuntos del consumidor local o la oficina del Attomey General en
su Iocalidad.
Garante: General Electric Company. touisvifle, KY 40225
50
Page 51

Soporteai consumidor.
P_ginaWebde GEAppliances
dTiene alguna pregunta sobre su electrodom_sdco? ;Pmebe la Digina Web de GE Appliances 24 horns a/
dfa, cualquier dfa del aflo! Para mayor conveniencia y servicio m_s r_pido, ya puede descargar los Manua/es
de los Propiem_ios, pedir piezas o incluso hacer una cim en lfnea para que vengan a reaUzar una
reparaci6n.
Soliciteunareparacidn
E1servicio de expertos GE est_ia tan s61o un paso de su puerto, iEntre en lfnea y solicite su reparaci6n
cuando le venga bien 24 horas al dfa cualquier dfa del aflo! O llame al 800.GE.CARES (800.432.2737)
durante horas normales de oficina.
RealLifeDesignStudio(Estudiodedisefioparalavidareal)
GE apoya el concepto de Disefio Universa/--productos, servicios y ambientes que pueden usar genre de
to&ks 1asedades, tamaflos y capacidades. Reconocemos la necesidad de diseflar para una gran gama de
habilidades y dificulmdes fYsicasymenm/es. Para rods demUes cobre las aplicaciones de GE Diseflo Universal,
incluyendo ideas de diseflo para la cocina para pex_onas con discapacidades, mire nuesua pdgina Web hoy
mismo. Para persom_s con dificulmdes auditivas, favor de llmnar a/800.TDD.GEAC (800.833.4322).
garantfasamplbdas
Conlpre una garantfa ampliada y obtenga demlles sobre descuentos especiales disponibles mientras su garantfa
est_iaOn activa. Puede comprarla en lfnea en cualquier momento, o llamar al (800.626.2224) durante horas
normales de oficina. GE Consumer Home Services esmr_i adn ahf cuando su garantfa termine.
ge.corn
ge.corn
ge.corn
ge.corn
Piezasyaccesorios
Aquellos individuos con la caUficacidn necesaria para repaint sus propios elecuodom4sdcos pueden
pedir que se les manden las piez_s o accesorios directamenm a sus hogares (aceptamos las m_jetas
\qSA, MasterCard y Discover). Haga su pedido en lfnea hoy, 24 horas cada dfa o llamar pot ml£fbno
a/ 800.626.2002 dumnm hon_s noitll{-des de oficina.
tas instruccionesdescritaseneste manualcubmn lospmcedimientos a seguirper cualquier usuario.Cualquier
otrareparaciondeberia,per mglageneral,referirse a personalcalificado autorizado.Debeejercerse pmcaucion
ya que/asreparacionesincorrectas puedencausarcondiciones defuncionamientoinseguras.
P6ngaseencontactoconnosotros
Si no est_i satisfe.cho con el servicio que recibe de GE, pdngase en conmcto con nosotros en nuestra pggina
Web indicando todos los demlles asf como su nfimero de tel_fbno o escrfbanos a:
General Manage_; Customer Relations
GE Appliances, Appliance Park
Louisville, KY 40225
Registresuelectrodom_stico
iRegistre su nuevo dectrodom6sfico en linea---euando usted prefiera! E1 registrar su producto a fiempo le
proporcionar£ si surgiera la necesidad, una mejor comunicacidn y un servicio m_s r_pido b_jo los t_mflnos
de su garantfa. Tdmbi&_ puede enviar su mrjem de registro pre-impresa que se incluye en el mamriN
de emba/_je.
ge.corn
ge.corn
ge.corn
51
Page 52

ConsumerSupport.
GEAppliancesWebsite IntheU.S.A.ge.com
Have a question or need assistance with your appliance? Try tile GE Appliances Website 24 hours a day,
any day of tile year! For greater convenience and faster service, you can now download Owner's Manuals,
order parts or even schedule service on-line. In Canada: www.GEApplianees.ea
ScheduleService /ntheU.S.A.ge.com
Expert GE repair service is only one step away f}om your door Get on-line and schedule your service at your
) " C
c( nvemence 24 hours any day of the year! Or call 800.GE.CARES (800.432.2737) during nomml business hom_.
In Canada, call 1.800.561.3344
RealLifeDesignStudio In the U.S.A.ge.com
GE supports the Universal Design concept--products, services and envhonments that can be used by people of all
ages, sizes and capabilities. We recognize the need to design for a wide range of physical and mental abilities and
impaimlents. For derails of GE's Universal Design applications, including kitchen design ideas for people with
disabilities, check out our Website today. For the hearing impaired, please ca/1 800.TDD.GEAC (800.833.4322).
In Canada, contact" Manage_; Consumer Relations, Mabe Canada Inc.
Suite 310, 1 FactoI T Lane
Moncton, N.B. E1C 9M3
ExtendedWarranties
Purchase a GE extended warranty and learn about special discounts that are available while your warranty is still
in effect. You can purchase it on4ine an?<ime, or call 800.626.2224 during nomml business hotn_. GE Consumer
Home Se,a'ices will still be there after your warranty expires. In Canada, call 1.888.261.2133
PartsandAccessories
Individuah quaUfied to service flleir own appliances can have parts or accesscnJes sent directly to their homes
(VISA, MasmrCard and Discover cards are accepmd). Order on-line today, 24 hours every day or by phone at
800.626.2002 during ncmnal business ]louis.
instructions contained in this manual cover procedures tobe performed by ang user. Other servicing generally should he
referred to qualified service personnel. Caution must be exercised, since improper servicing may cause unsafe operation.
Customers in Canada should consult the yellow pages for the nearest Mabe service cente,; or ca/1 1.800.561.3344.
ContactUs
If you are no[ satisfied wit1 file service you receive flom (;E, contact us on our Websim wit1 all file details
including your phone numbe_; or w_Jm to: General Manage_; Customer Relations
GE Appliances, Appliance Park
Louisville, l_f 40225
In Canada: www.GEApplianees.ea, or wlJte to: Direct(n; Consumer Relations, Mabe Canada Inc.
Suim 310, 1 Factory Lane
Moncton, N.B. E1C 9M3
In the U.S.A.ge.com
In the U.S.A.ge.com
In the U.S.A.ge.com
RegisterYourAppliance IntheU.S.A.ge.com
Register your new appliance on-line--at your convenience! Timely product registration will allow for enhanced
communication and prompt se_a'ice under the temls of your warranty; shoukt the need arise. You may also mail
in the pre-printed registration card included in the packing material. In Canada: www.GEApplianees.ea
Printed in China
 Loading...