

GE ACSK15 Owner’s Manual

Safety Instructions . . . . . . . . . .2
Operating Instructions
Controls . . . . . . . . . . . . . . . . . . . . . .3–4
Inlet and Outlet Vents . . . . . . . . . . . .4
Location . . . . . . . . . . . . . . . . . . . . . . . .4
Tip-Over Switch . . . . . . . . . . . . . . . . .4
Care and Cleaning
Case . . . . . . . . . . . . . . . . . . . . . . . . . . .5
Rear Vent Filter . . . . . . . . . . . . . . . . . .5
Remote Control . . . . . . . . . . . . . . . . . .5
Storage . . . . . . . . . . . . . . . . . . . . . . . . .5
Troubleshooting Tips . . . . . . . .6
Consumer Support
Consumer Support . . . . . . . . . . . . . . .8
Warranty . . . . . . . . . . . . . . . . . . . . . . .7
49-7576 06-07 JR
Write the model and serial
numbers here:
Model # __________________
Serial # ____________________
You can find them on a label on
the back of the heater.
Room Heater
ge.com
Portable
ACSK15
ACTK15
Owner’s Manual
Consumer Support Troubleshooting Tips
Operating Instructions
Safety Instructions
Care and Cleaning
WARNING!
When using electrical appliances, basic precautions should always be followed to reduce the risk of fire,
electric shock and injury to persons, including the following:
■ Read all instructions before using this heater.
■ This heater is hot when in use. To avoid burns,
do not let bare skin touch hot surfaces. Use
handle when moving this heater. Keep
combustible materials, such as furniture,
pillows, bedding, papers, clothes and curtains
at least 3 feet (0.9 m) from the front of the
heater and keep them away from the sides
and rear.
■ Extreme caution is necessary when any heater
is used by or near children or invalids and
whenever the heater is left operating and
unattended.
■ Always unplug heater when not in use.
■ Do not operate any heater with a damaged
cord or plug or after the heater malfunctions,
has been dropped or damaged in any manner.
Return heater to authorized service facility for
examination, electrical or mechanical
adjustment or repair.
■ Power cord includes a current interrupter
device. A test and reset button is provided
on the plug case. The device should be tested
on a periodic basis, while plugged in, by first
pressing the TEST button and then the RESET
button. If the TEST button does not trip or if
the RESET button will not stay engaged,
discontinue use of the heater and contact
a qualified service technician.
■ Do not use outdoors.
■ This heater is intended for indoor residential
applications only. This heater should not be
used for commercial or industrial applications.
■ This heater is not intended for use in
bathrooms, laundry areas and similar indoor
high humidity locations. Never locate heater
where it may fall into bathtub or other water
container.
■ Always place the heater on a flat, level
surface. Do not place on top of furniture
or other places where the heater may fall,
dislodging or breaking parts inside the heater.
This could result in a fire or shock hazard.
■ Do not run cord under carpeting. Do not
cover cord with throw rugs, runners or similar
coverings. Arrange cord away from traffic
area and where it will not be tripped over.
■ To disconnect heater, first turn controls to off,
then remove plug from outlet.
■ Do not insert or allow foreign objects to enter
any ventilation or exhaust opening as this
may cause an electric shock or fire, or
damage the heater.
■ To prevent a possible fire, do not block air
intakes or exhaust in any manner. Do not use
on soft surfaces, like a bed, where openings
may become blocked.
■ A heater has hot and arcing or sparking parts
inside. Do not use it in areas where gasoline,
paint, flammable liquids or gases are used or
stored.
■ Keep flammable materials away from heater.
■ Use this heater only as described in this
manual. Any other use not recommended
by the manufacturer may cause fire, electric
shock or injury to persons.
■ Avoid the use of an extension cord because
the extension cord may overheat and cause
a risk of fire. However, if you must use an
extension cord, the cord shall be No. 14 AWG
minimum size and rated not less than 1875
watts.
■ This heater draws 12.5 amps during operation.
To prevent overloading a circuit, do not plug
the heater into a circuit that already has other
appliances working.
■ It is normal for the plug to feel warm to
the touch; however, a loose fit between
the AC outlet (receptacle) and plug may cause
overheating and distortion of the plug. Contact
a qualified electrician to replace loose or worn
outlets or if the plug becomes very hot.
■ The output of this heater may vary and its
temperature may become intense enough
to burn exposed skin. Use of this heater is
not recommended for persons with reduced
sensitivity to heat or an inability to react to
avoid burns.
■ Never unplug your portable room heater by
pulling on the power cord. Always grip the
plug firmly and pull straight out from the
receptacle.
■ Turn the portable heater off, allow it to cool
completely and then unplug it before cleaning.
■ GE does not support any servicing of
the portable room heater. We strongly
recommend that you do not attempt
to service the heater yourself.
SAVE THESE INSTRUCTIONS
SAFETY PRECAUTIONS
2
IMPORTANT SAFETY INFORMATION.
READ ALL INSTRUCTIONS BEFORE USING.
About the controls on the portable room heater. ge.com
3
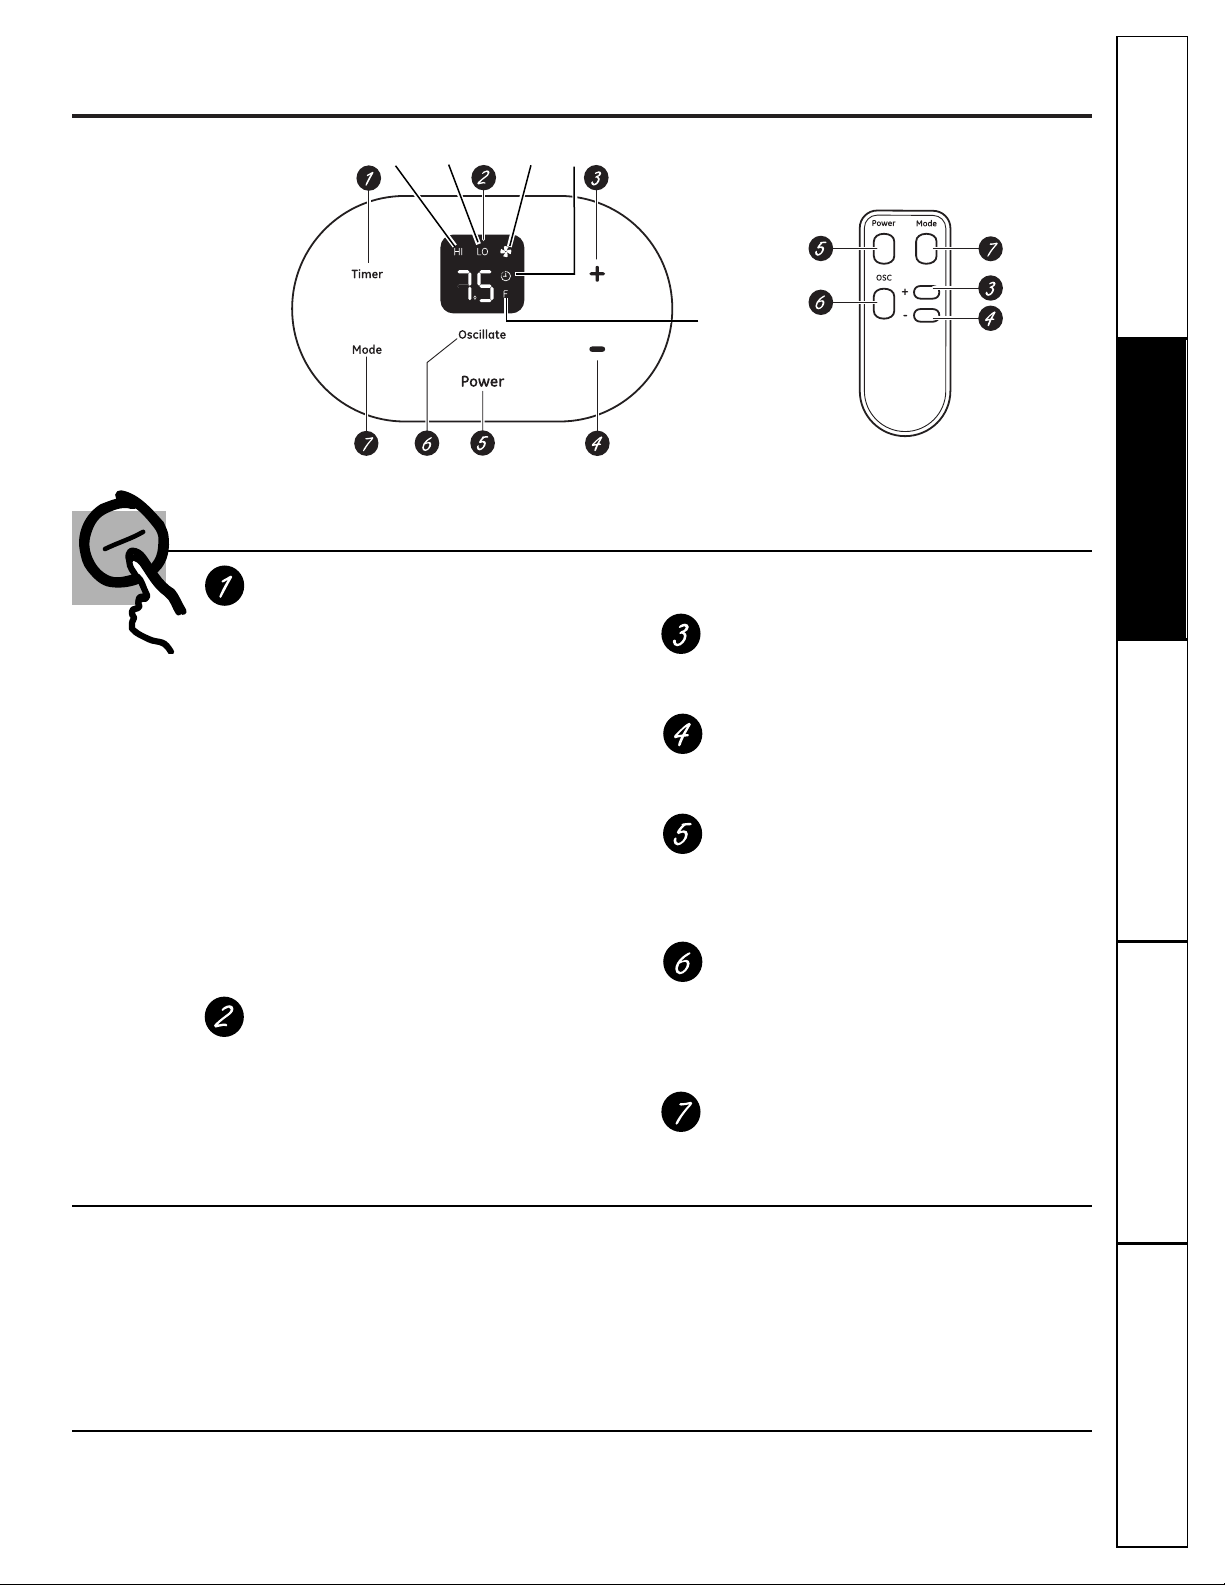
Portable Heater Control Remote Control
(on some models)
Controls
Timer Pad (on some models)
When the heater is on, it can be set to
automatically turn off in 1/2 (0.5) to 9 1/2 (9.5)
hours.
1. Press the Timer pad. The display will blink.
2. Press the + or – pad to set the desired time
for the unit to stop. (Each time you touch
the + or – pad, the set time will advance
by 1/2 hour between 0 and 91⁄2 hours.)
After settings have been made, the display
will change back to show the room
temperature.
To cancel the timer, press the Timer pad
and press the Decrease pad until 0.0
appears in the display.
NOTE: If the Timer was set before a power
outage, it will need to be reset after power
is restored.
Display
Shows the room temperature. Shows the set
temperature while setting the temperature in
LO or HI heat modes. Shows whether set in
LO heat, HI heat or fan mode. Shows time
remaining on timer.
NOTE: The display will change to show the
room temperature after settings have been
made. To recall the set temperature, press the
Increase or Decrease pads.
Increase (+) Pad
Use to increase the set temperature (when
in the heat mode) or to increase the timer
shut off time.
Decrease (–) Pad
Use to decrease the set temperature (when
in the heat mode), to decrease the timer
shut off time or to cancel (0.0) the timer.
Power Pad
Press to turn the heater on. It will turn on in the
standby mode. The display will show the room
temperature.
Press again to turn the heater off.
Oscillate Pad (on some models)
Turn on to provide continuous side-to-side
air circulation.
For fixed side-to-side air direction, turn on until
the desired air direction is obtained, then turn
it off.
Mode Pad
Press to set to LO heat, HI heat, fan mode or
to return to the standby mode.
Use the fan mode to provide air circulation
without heating.
Since the fan setting does not provide heating,
a temperature setting will not be displayed.
Fan Mode
When in the HI or LO heat mode, use the
Increase/Decrease pads to set the desired
temperature between 40°F and 90°F in 1°F
increments.
A thermostat is used to maintain the room
temperature. The heater will cycle on and off to
keep the room at the set level of comfort. Set the
thermostat at a higher temperature and the indoor
air will become warmer. Set the thermostat at a
lower temperature and the indoor air will become
less warm.
Heat Mode
Consumer SupportTroubleshooting TipsOperating InstructionsSafety Instructions
Installation
Instructions
HI
heat on
LO
heat on
Fan
only on
Features and
appearance
may vary.
Timer
on
Temperature
is displayed
in degrees
Fahrenheit.
About the portable room heater.
Consumer Support Troubleshooting Tips
Operating Instructions
Safety Instructions
Care and Cleaning
4
Choosing a Location
■ Do not use outdoors.
■ This heater is intended for indoor residential
applications only. This heater should not be used
for commercial or industrial applications.
■ To prevent a possible fire, do not block air intakes
or exhaust in any manner. Do not use on soft
surfaces, like a bed, where openings may become
blocked.
■ Always place the heater on a flat, level surface.
Do not place on top of furniture or other places
where the heater may fall, dislodging or breaking
parts inside the heater. This could result in a fire or
shock hazard.
■ Keep combustible materials, such as furniture,
pillows, bedding, papers, clothes and curtains at
least 3 feet (0.9 m) from the front of the heater and
keep them away from the sides and rear.
■ Do not use it in areas where gasoline, paint,
flammable liquids or gases are used or stored.
■ Keep flammable materials away from heater.
■ This heater draws 12.5 amps during operation.
To prevent overloading a circuit, do not plug the
heater into a circuit that already has other
appliances working.
■ Close all doors, windows and other outside
openings to the room.
NOTE: Always use the handle when moving this
heater.
■ This heater is not intended for use in bathrooms,
laundry areas and similar indoor high humidity
locations. Never locate heater where it may fall
into bathtub or other water container.
■ The heater must be operated in an enclosed area
to be most effective.
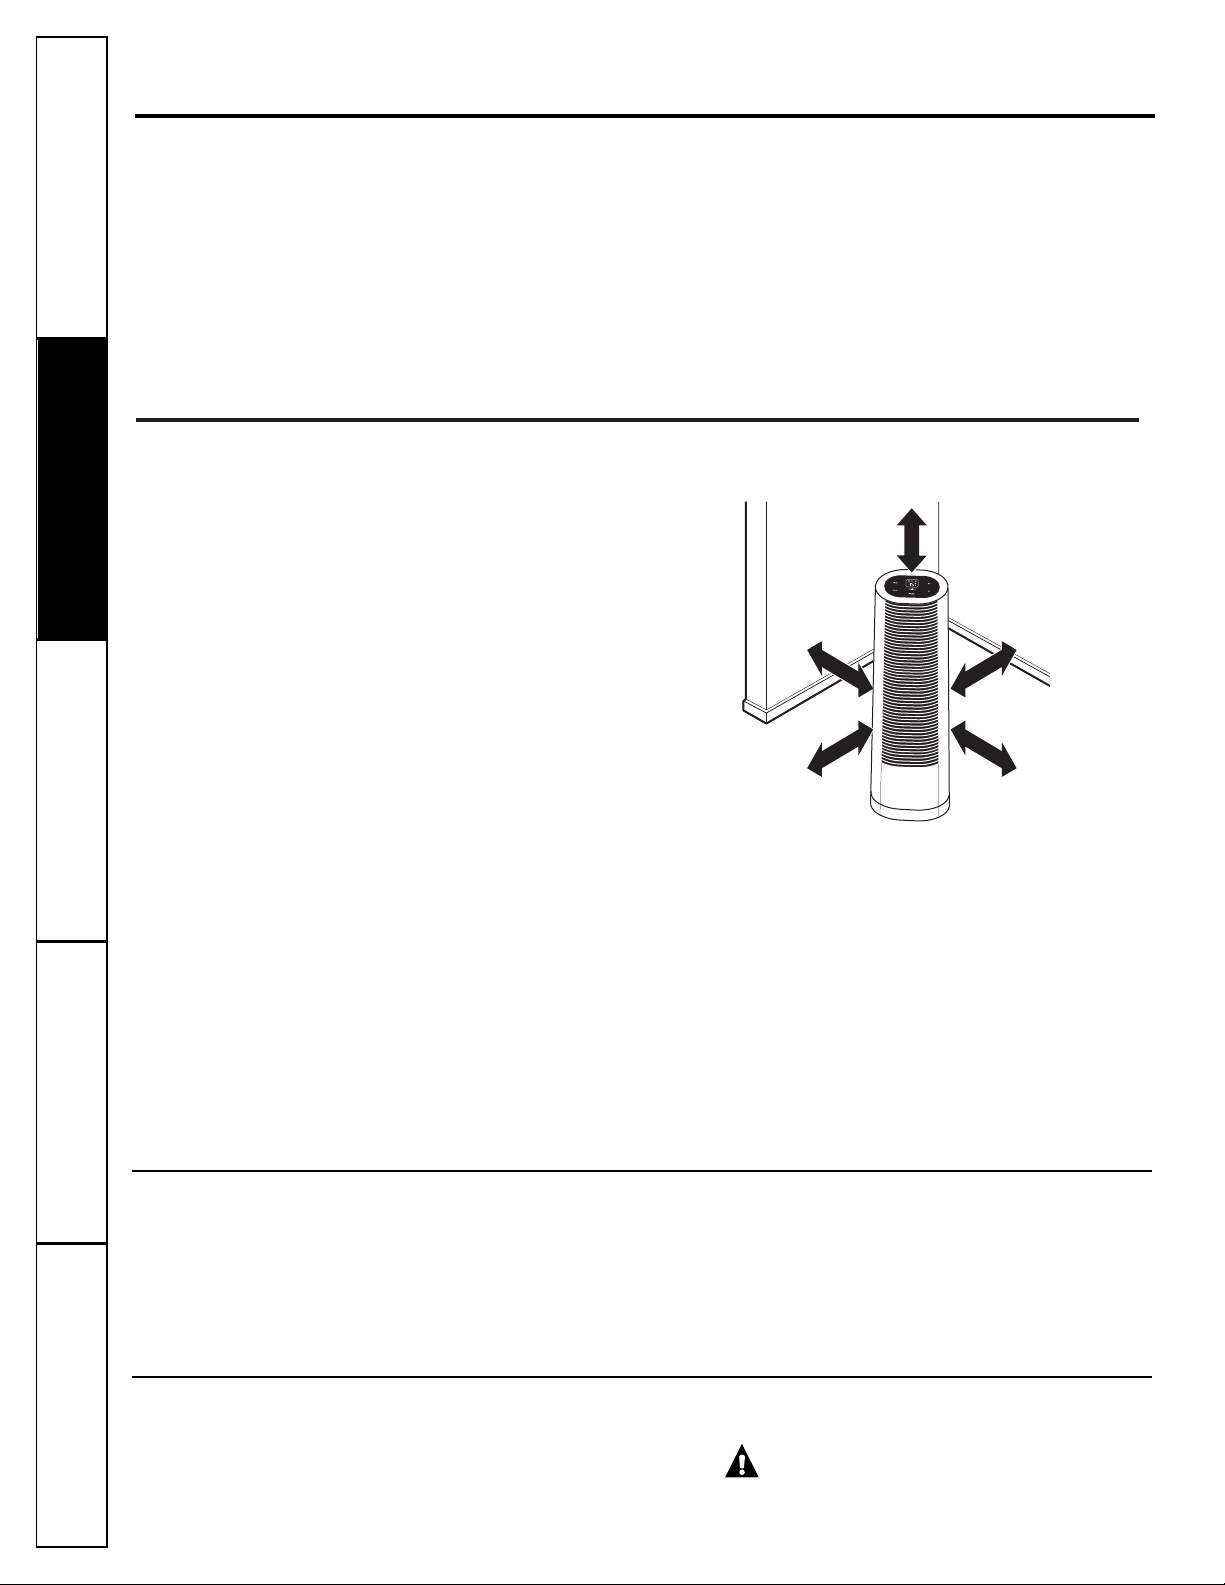
Appearance may vary.
Always maintain 3 feet (0.9 m) minimum
clearance on all sides of the heater.
Inlet and Outlet Vents
Take care never to place the heater where the inlet or
outlet is blocked or to place any object near the inlet
or outlet.
Always maintain 3 feet (0.9 m) minimum clearance on
all sides of the heater.
If the inlet or outlet become blocked, the heater may
automatically shut off. Relocate the heater or remove
the object causing the blockage, wait approximately
15 minutes and restart the heater.
Tip-Over Switch (on some models)
Take care never to knock or tip over the heater.
However, if the heater is ever accidentally knocked
or tipped over, it has a tip-over switch that will
automatically shut off the heater.
CAUTION: If the heater is knocked
or tipped over, use the handle to sit it upright, wait
approximately 5 minutes and it will automatically
restart in the last setting used.
■ To ensure proper operation, aim the remote control
at the front of the heater.
■ The remote control signal has a range of
up to approximately 10 feet.
■ Make sure nothing is between the heater and
the remote control that could block the signal.
■ Make sure batteries are fresh and installed
correctly—see the Care and Cleaning section.
Remote Control (on some models)
About the controls on the portable room heater. (cont.)
Consumer SupportTroubleshooting Tips
Operating Instructions
Safety Instructions Care and Cleaning
5
Case
To clean the case:
Wipe the outer surface of the heater with a clean,
soft, dry cloth. Do not use a wet cloth for cleaning.
Do not use bleach, chemicals or abrasives since they
might damage the paint.
WARNING: Never immerse the heater
in water.
Care and cleaning of the portable room heater. ge.com
Turn the portable heater off, allow it to cool completely and then unplug it before cleaning.
Remote Control (on some models)
To replace the battery:
1. Slide the battery cover open on the back
of the remote control.
2. Remove the old batteries.
3. Insert new batteries, placing them so their
polarities (+ and –) match the markings in the
battery compartment.
4. Slide the cover back into position.
NOTE: Replace with the same size batteries as
removed. Remove the batteries from the remote
control if the system is not going to be used for
a long time.
CAUTION: Do not mix old and new
batteries; replace batteries in sets. Discard old
batteries safely. Keep batteries out of reach of
children.
Extended Storage
Save and use the original box and packaging when
storing the heater for extended periods of time. Store
the heater in a cool, dry place.
Rear Vent Filter (on some models)
Clean the rear vent filter when visibly dirty or dusty.
Use a vacuum to remove dust and dirt by passing it
over the grille surface.
NOTE: The rear vent filter is not removable and should
only be cleaned with a vacuum cleaner.
 Loading...