

Page 1

840146100
106651N
HAND MIXER
BATTEUR À MAIN
BATIDORA DE MANO
g
READ BEFORE USE
LIRE AVANT L’UTILISATION
LEA ANTES DE USAR
For Customer Assistance, call Customer Service at
1-877-207-0923 (US) or 1-877-556-0973 (Canada)
Pour l’assistance à la clientèle au Canada : 1-877-556-0973
Para comunicarse con Asistencia al Cliente en México: 01-800-343-7378
Le invitamos a leer cuidadosamente este instructivo antes de usar su aparato.
840146100 ENv00 1/12/06 10:06 AM Page 1
Page 2

2
When using electric appliances, basic safety precautions should always be followed, including the
following:
1. Read all instructions.
2. To reduce the risk of electrical shock,
do not put cord, plug, or mixer body in
water or other liquid.
3. Close supervision is necessary when any
appliance is used by or near children.
4. Unplug from outlet when not in use, before
putting on or taking off parts,
and before cleaning.
5. Avoid contacting moving parts. Keep hands,
hair, and clothing, as well as
spatulas and other utensils, away from
beaters during operation to reduce risk
of injury to persons, and/or damage
to mixer.
6. Remove beaters from mixer before washing.
7. Do not operate any appliance with a
damaged cord or plug, or after the
appliance malfunctions or is dropped or
damaged in any manner. Call our toll-free
customer assistance number for information on examination, repair, or electrical or
mechanical adjustment.
8. The use of attachments not recommended
or sold by the appliance manufacturer for
use with this model may cause fire, electric shock, or injury.
9. Do not use outdoors.
10. Do not let cord hang over edge of
table or counter, or touch hot surfaces,
including stove.
11. Do not place on or near a hot gas or elec-
tric burner, or in a heated oven.
12. Check that control is off before plugging
cord into wall outlet. To disconnect, turn
control to OFF, then remove plug from wall
outlet.
13. Do not use appliance for other than
intended purpose.
This appliance is intended for household use only.
WARNING: To reduce risk of personal injury, always unplug mixer before inserting or
removing beaters.
BEFORE FIRST USE: Wash attachments in hot, soapy water. Rinse and dry.
Shock Hazard
• Do not immerse this appliance in water or other liquid.
• This appliance has a polarized plug (one wide blade) that reduces the risk of electrical shock.
The plug fits only one way into a polarized outlet. Do not defeat the safety purpose of the
plug by modifying the plug in any way or using an adaptor. If the plug does not fit, reverse
the plug. If it still does not fit, have an electrician replace the outlet.
WARNING
IMPORTANT SAFEGUARDS
SAVE THESE INSTRUCTIONS!
Other Consumer Safety Information
840146100 ENv00 1/12/06 10:06 AM Page 2
Page 3
3
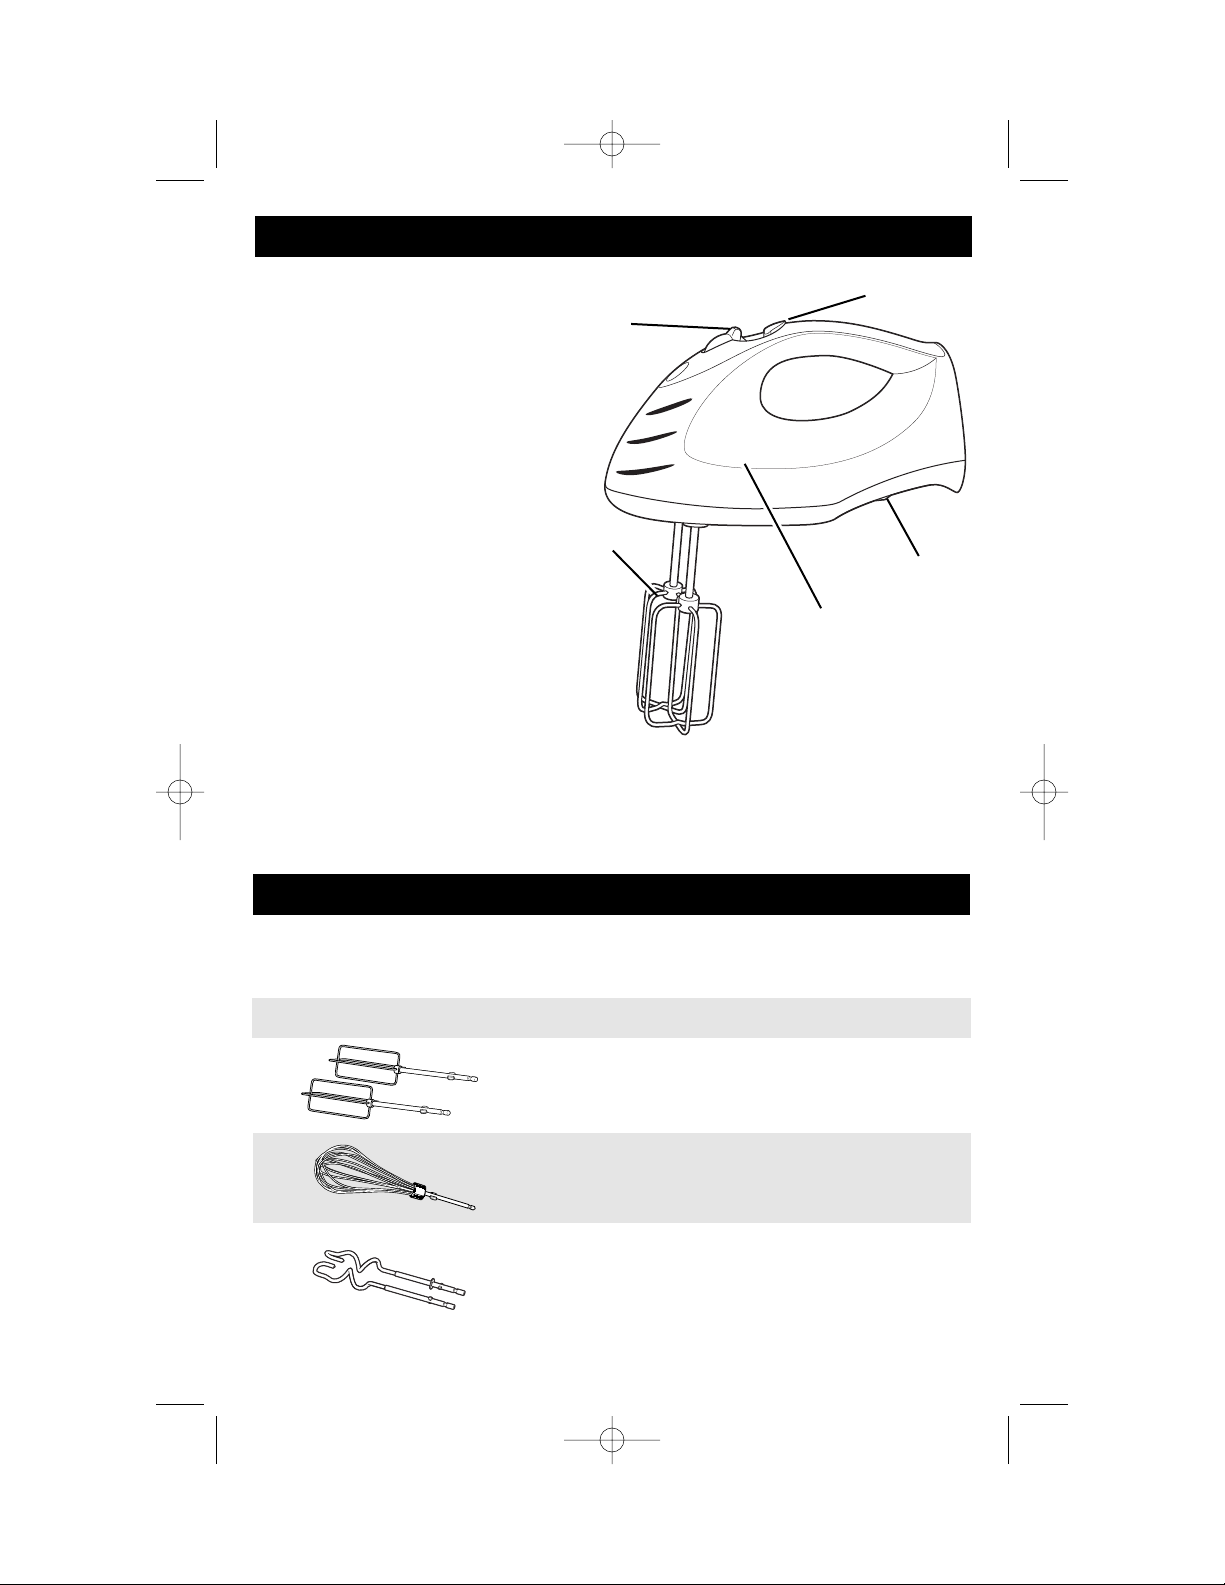
1. Speed Control (On/Off) and Eject
2. Beaters
3. Mixer Body
4. Hand Mixer Stabilizer
5. Power Surge Button*
*Available on selected models
Description
The wire beaters are designed for general
mixing purposes.
The single whisk is perfect for whipping cream or
beating egg whites. The whisk may be inserted into
either opening.
The dough hooks can perfectly knead a one loaf
bread recipe. Only use dough hooks on speeds
3 through 6. Available on selected models.
To ensure safety, unplug mixer from electrical outlet before inserting or
removing attachments.
Attachment
PARTS AND FEATURES
5
1
2
3
4
ATTACHMENTS
840146100 ENv00 1/12/06 10:06 AM Page 3
Page 4

1. Make sure mixer is unplugged and speed control is set to 0 (OFF).
2. Insert a beater into an opening on the bottom of the mixer. Push until it clicks into
place. Repeat with other beater.
1. Make sure mixer is unplugged and speed control is set to 0 (OFF).
2. Insert whisk into either opening on the bottom
of the mixer. Push until it clicks into place.
4
1. Make sure mixer is unplugged and speed control is set to 0 (OFF).
2. Insert dough hook with collar into left-side opening on the bottom of the mixer.
Push until it clicks into place. Repeat with the dough hook
that does not have a collar in the other opening.
3. Use dough hooks with speeds 3 to 6 to knead dough. Do not knead dough continu-
ously for more than 5 minutes or the mixer may overheat. Do not knead more than
one loaf at a time.
TO INSERT BEATERS
TO INSERT WHISK
TO INSERT DOUGH HOOKS
(ON SOME MODELS)
840146100 ENv00 1/12/06 10:06 AM Page 4
Page 5

5
1. Make sure mixer is unplugged and speed control is set to 0 (OFF). Insert beaters.
2. Plug mixer into electrical outlet. Place beaters into bowl.
3. Move the speed control to desired speed, starting at 1 and increasing to a higher
speed as necessary.
4. When finished mixing, move the speed control to 0 (OFF) and unplug mixer.
5. To eject beaters, with speed control set at 0 (OFF) push straight down on the
speed control.
Speed
Control
OFF
Power Surge (on selected models)
Press and hold down the button for additional power at any speed.
NOTE: Do not use Power Surge for more than two minutes at
a time or motor may overheat.
Hand Mixer Stabilizer
CAUTION: Never use the stabilizer when the mixer is on. Do not use the stabilizer on
small (11⁄2 quart) mixing bowls or plastic mixing bowls. This feature can be used on most large mixing bowls. Use the stabilizer
while adding ingredients or checking a recipe. To use, TURN
MIXER OFF, then set the mixer on the edge of the bowl
HOW TO USE YOUR MIXER
MIXER FEATURES
Power
Surge
840146100 ENv00 1/12/06 10:06 AM Page 5
6
4
2
0
Eject
5
3
1
0
Eject
Surge
Page 6

6
The following mixing guide is a suggestion for selecting mixing speeds for the
6 speed mixers. Begin on speed 1 and increase to desired speed depending on the
recipe consistency.
FUNCTION
OFF and/or Eject
LOW speed for folding or mixing in dry ingredients, muffins, or
quick breads
To cream butter and sugar; most cookie dough
MEDIUM speed for most packaged cake mixes; bread dough
Frosting and mashed potatoes; bread dough
Beating egg whites; bread dough
HIGH speed for whipping cream; bread dough
6 SPEED
0
1
2
3
4
5
6
Cookie dough is one of the thickest doughs to mix. Make it easier by
following these tips:
• Use a large mixing bowl so that the ingredients spread out for easier mixing.
• Have butter or margarine at room temperature.
• Add ingredients one at a time and thoroughly mix after each addition.
• Add flour one cup at a time.
• To add chips or nuts to a very thick dough or batter, we recommend stirring them in
by hand at the very end of the recipe.
1. Always turn off and unplug mixer from electrical outlet before ejecting attachments.
2. Wash attachments in hot, soapy water; rinse and dry.
3. Wipe the mixer body and cord with a clean, damp cloth.
NOTES:
• Do not use abrasive cleaners or scouring pads.
• To reduce the risk of electrical shock do not immerse the mixer body or cord in water
or other liquid.
• The optional storage case should be wiped clean with a damp cloth. It is not dishwasher safe.
NOTE: Dough hooks should only be used on speeds 3 through 6.
MIXING GUIDE
COOKIE DOUGH MIXING TIPS
CLEANING YOUR MIXER
840146100 ENv00 1/12/06 10:06 AM Page 6
Page 7

7
Baked Spinach-Parmesan Dip
10-ounce package frozen chopped spinach, thawed
1 cup mayonnaise
3-ounce package creamcheese, room temperature
1
⁄2 cup onion, minced
1 clove garlic, minced
1 cup grated Parmesan cheese
1
⁄8 teaspoon pepper
1
⁄2 teaspoon paprika
1 baguette, thinly sliced
Squeeze spinach to remove liquid. In a medium bowl combine spinach, mayonnaise,
cream cheese, onion, garlic, cheese, and pepper. With hand mixer, beat ingredients at
MEDIUM speed until well blended, about one minute. Spoon the mixture into a three or
four cup baking dish that has been sprayed with nonstick cooking spray. Sprinkle evenly with paprika. Bake at 350°F until hot in center and lightly browned on top, about 25
to 30 minutes. Serve hot to spread on baguette slices. Makes appetizers for 10.
Zesty Mashed Potatoes
8 large baking potatoes (peeled, cubed, cooked, and drained)
1
⁄
2 cup sour cream
8-ounce package cream cheese, room temperature
1
⁄2 cup butter, room temperature
1
⁄
2 cup milk
1
⁄2 to 1 teaspoon minced garlic
Salt and pepper to taste
Place hot potatoes into a large bowl. Start mixing the potatoes at MEDIUM speed until
they are smooth. Add sour cream, cream cheese, butter, milk, garlic, salt, and pepper
and continue beating until thoroughly mixed. Pour into a greased 9x13-inch baking
dish. Baked uncovered for 30 minutes at 400ºF. Makes 8 servings.
Wedding Cookies
1 cup butter, room temperature
4 tablespoons sugar
2 teaspoons vanilla
11⁄2 cups flour
2 cups finely chopped pecans*
11⁄2 cups confectioners sugar
In a medium bowl, cream butter and sugar on MEDIUM speed with hand mixer. Add
vanilla and continue mixing on MEDIUM. Add flour and mix on LOW until blended. Pour
in pecans and continue mixing on LOW until completely blended. Roll dough into 1-inch
balls and place on an ungreased baking sheet. Bake for 25 minutes at 325ºF. Place a
paper towel over a wire rack. Remove cookies onto wire rack. Place confectioners sugar
into plastic or paper bag. Drop 3 or 4 cookies into bag. Shake bag to coat cookies and
return cookies to rack to cool completely. Continue until all cookies have been coated
with confectioners sugar. Before storing cookies, shake cookies in bag of confectioners
sugar one more time. Makes 41/2 dozen.
* 2 cups pecan halves or pieces is equivalent to 2 cups finely chopped.
RECIPES
840146100 ENv00 1/12/06 10:06 AM Page 7
Page 8

8
Triple Chocolate Cookies
1
⁄
4 cup flour
1
⁄4 cup unsweetened baking cocoa
1
⁄4
teaspoon baking powder
1
⁄8
teaspoon salt
6 tablespoons butter, room temperature
7 tablespoons sugar
2 eggs
8 ounces semisweet baking chocolate, melted and cooled
1 cup milk chocolate chips
1 cup chopped walnuts
Combine flour, cocoa, baking powder, and salt in a medium bowl. Set aside. With mixer,
beat together butter, sugar, and eggs at MEDIUM speed until smooth. Add melted chocolate and continue mixing on MEDIUM speed until blended. Reduce speed to LOW and add
dry ingredients. Add chocolate chips and walnuts; mix well. Drop by tablespoons onto
cookie sheets, one inch apart. Bake at 350ºF until cookies look dry and cracked, but feel
soft when lightly pressed, about 11 minutes. Let cookies stand on sheet for 5 minutes.
Transfer to racks and cool completely. Makes about 2 dozen.
Creamy Peanut Butter Pie
1 cup butter
1 cup packed brown sugar
1 cup peanut butter
12-ounce container frozen whipped topping, thawed
9-inch graham crust
2 ounces semi-sweet baking chocolate
2 tablespoons butter
1 tablespoon milk
In a medium saucepan, combine 1 cup butter and brown sugar. Cook over medium heat
until butter is melted and mixture is smooth, stirring frequently. Refrigerate 10 minutes.
In large bowl, beat peanut butter and brown sugar mixture at LOW speed until blended.
Increase speed and beat one minute at HIGH speed. Reduce speed to LOW and add
whipped topping; beat one additional minute. Pour into graham crust and refrigerate. In
a small saucepan over low heat, melt chocolate, 2 tablespoons butter, and milk. Stir constantly until smooth. Cool slightly then spread over top of pie. Refrigerate for several
hours or overnight before serving. Makes one 9-inch pie.
Orange Pineapple Cake
181⁄4-ounce box yellow cake mix
4 eggs
11-ounce can mandarin oranges, undrained
1
⁄2 cup vegetable oil
151⁄4-ounce can crushed pineapple, undrained
1-ounce box vanilla sugar-free instant pudding
12-ounce container frozen light whipped topping, thawed
In a large bowl, blend cake mix, eggs, oranges, and oil at MEDIUM speed for 3 to 5 minutes.
Divide batter into two greased and floured 9-inch round cake pans. Bake approximately 45
minutes at 325ºF. Let cake cool on wire racks. To make icing, in a medium bowl, beat
pineapple, pudding, and whipped topping mix at LOW speed for 3 minutes. Ice the cooled
cake and store in the refrigerator. Makes 8-12 servings.
(Tip: Cake flavor is enhanced if left overnight in refrigerator.)
840146100 ENv00 1/12/06 10:06 AM Page 8
Page 9

9
Pound Cake
1 cup butter, room temperature
3 cups sugar
6 eggs
1 teaspoon vanilla extract
1 teaspoon almond extract (optional)
1 cup whipping cream
3 cups flour
In a large mixing bowl, cream together butter and sugar on MEDIUM speed. Add eggs,
one at a time, and beat thoroughly after each addition. Add vanilla and almond
extracts and continue mixing. Reduce speed to LOW and alternately add cream and
flour. Pour batter into a greased and floured 10-inch tube pan. Bake for about 1 hour
and 20 minutes at 325ºF, or until tests done. Makes 16 servings.
Brown Sugar Butterscotch Cookies
1 cup butter, room temperature
1 cup white sugar
1 cup brown sugar
2 eggs
2 teaspoon vanilla
21⁄
2 cups flour
1
⁄2 teaspoon salt
1 teaspoon baking soda
4 cups crispy rice cereal
2 cups butterscotch chips
In a large mixing bowl, on MEDIUM speed mix butter and sugars. Add eggs and vanilla
and continue mixing. Add flour, salt, and baking soda and mix on MEDIUM until just
mixed. Add rice cereal and chips and mix on MEDIUM until mixed. Drop by spoonfuls
onto cookie sheet. Bake at 350ºF for 12 to 15 minutes or until lightly browned.
Makes 6 dozen.
Basic White Bread
1 package active dry yeast
11⁄4 cups warm water
11⁄2 tablespoons butter or margarine, melted
11⁄2 tablespoons sugar
1 teaspoon salt
3 to 31⁄2 cups all-purpose flour
In a large mixing bowl, combine yeast and 1⁄4 cup of warm water. Stir until dissolved.
Add remaining warm water, butter, sugar, and salt. Stir until mixed. Add 3 cups of flour
and using dough hooks on speed 4 or 5 mix until blended. Add enough of remaining
flour until dough forms a smooth ball that is slightly sticky to the touch. Place dough in
large, greased bowl. Cover and let rise until double in size, about 1 hour. Punch dough
down and shape into loaf. Place loaf into 9x5-inch greased loaf pan and let rise until
double in size, about 1 hour. Bake in 350ºF oven for 40 minutes. Makes 1 loaf.
840146100 ENv00 1/12/06 10:06 AM Page 9
Page 10

10
If you have a claim under this warranty, please call our Customer Assistance Number.
For faster service please have model, series, and type numbers ready for operator to
assist you. These numbers can be found on the bottom of your appliance.
MODEL: ________________ TYPE: _________________ SERIES: ________________
Customer Assistance Number 1-877-207-0923 (US) or 1-877-556-0973 (Canada)
Keep these numbers for future reference!
For more information, please visit us at www.walmart.com
Two-Year Limited Warranty
What does your warranty cover?
• Any defect in material or workmanship.
For how long after the original purchase?
• Two years.
What will we do?
• Provide you with a new one.
• For those items still under warranty but no
longer available, WAL-MART reserves the
right to replace with a similar GE branded
product of equal or greater value.
How do you make a warranty claim?
• Save your receipt.
• Properly pack your unit. We recommend
using the original carton and packing
materials.
• Return the product to your nearest
WAL-MART store or call Customer
Assistance at 1-877-207-0923 (US) or
1-877-556-0973 (Canada)
What does your warranty not cover?
• Parts subject to wear, including, without
limitation, glass parts, glass containers,
cutter/strainer, blades, seals, gaskets,
clutches, motor brushes, and/or agitators,
etc.
• Commercial use or any other use not found
in printed directions.
• Damage from misuse, abuse, or neglect,
including failure to clean product regularly
in accordance with manufacturer’s instructions.
How does state law relate to this warranty?
• This warranty gives you specific legal
rights, and you may also have other rights
which vary from state to state or province
to province.
• THIS WARRANTY IS IN LIEU OF ANY OTHER
WARRANTY OR CONDITION, WHETHER
EXPRESS OR IMPLIED, WRITTEN OR ORAL,
INCLUDING, WITHOUT LIMITATION, ANY
STATUTORY WARRANTY OR CONDITION OF
MERCHANTABILITY OR FITNESS FOR A PARTICULAR PURPOSE.
• WAL-MART, GE, AND THE PRODUCT
MANUFACTURER EXPRESSLY DISCLAIM ALL
RESPONSIBILITY FOR SPECIAL, INCIDENTAL,
AND CONSEQUENTIAL DAMAGES OR
LOSSES CAUSED BY USE OF THIS APPLIANCE. ANY LIABILITY IS EXPRESSLY LIMITED
TO AN AMOUNT EQUAL TO THE PURCHASE
PRICE PAID WHETHER A CLAIM, HOWEVER
INSTITUTED, IS BASED ON CONTRACT,
INDEMNITY, WARRANTY, TORT (INCLUDING
NEGLIGENCE), STRICT LIABILITY, OR OTHERWISE. SOME STATES OR PROVINCES DO
NOT ALLOW THIS EXCLUSION OR LIMITATION OF INCIDENTAL OR CONSEQUENTIAL
LOSSES SO THE FOREGOING DISCLAIMER
MAY NOT APPLY TO YOU.
What if you encounter a problem with this
product while using it outside the country
of purchase?
• The warranty is valid only in the country of
purchase and you follow the warranty
claim procedure as noted.
CUSTOMER SERVICE
840146100 ENv00 1/12/06 10:06 AM Page 10
 Loading...