

Page 1
g
www.GE-Interlogix.com
Part No:
60-883-95R
466-1938 Rev C
May 2003
GE Interlogix
CareGard
Installation Instructions
Page 2
Notices
FCC Part 15 Information to the User
Changes or modifications not expressly approved by GE Interlogix can void the user’s authority to operate the equipment.
FCC Part 15 Class B
This equipment has been tested and found to comply with the limits for a Class B digital device, pursuant to part 15 of the FCC Rules. These limits are designed
to provide reasonable protection against interference in a residential installation.
This equipment generates, uses, and can radiate radio frequency energy and, if not installed and used in accordance with the instructions, may cause harmful
interference to radio communications. However, there is no guarantee that interference will not occur in a particular installation.
If this equipment does cause harmful interference to radio or television reception, which can be determined by turning the equipment off and on, the user is
encouraged to try to correct the interference by one or more of the following measures:
• Reorient or relocate the receiving antenna.
• Increase the separation between the equipment and receiver.
• Connect the affected equipment and the panel receiver to separate outlets, on different branch circuits.
• Consult the dealer or an experienced radio/TV technician for help.
ACTA Part 68
This equipment complies with Part 68 of the FCC Rules. Located on this equipment is a label that contains, among other information, the FCC registration number and the ringer equivalence number (REN) for this equipment. If requested, this information must be provided to the telephone company.
FCC Part 68 Registration No. B4Z-USA-46042-AL-T
The REN is used to determine the maximum number of devices that may be connected to your telephone line. Excessive RENs on a telephone line may result in
devices not ringing in response to an incoming call. In most areas, the sum of all device RENs should not exceed five (5.0). To be certain of the number of
devices that may be connected to a line, as determined by the total RENs, contact the local telephone company. For products approved after July 23, 2001, the
REN for this product is part of the product identifier that has the format US:AAAEQ##TXXXX. The digits represented by ## are the REN without a decimal
point (e.g., 03 is a REN of 0.3). For earlier products, the REN is separately shown on the label.
A plug and jack used to connect this equipment to the premises wiring and telephone network must comply with the applicable FCC Part 68 rules and requirements as adopted by ACTA. A compliant telephone cord and modular plug is provided with this product. It is designed to be connected to a compliant modular
jack that is also compliant. See the Installation Instructions for details.
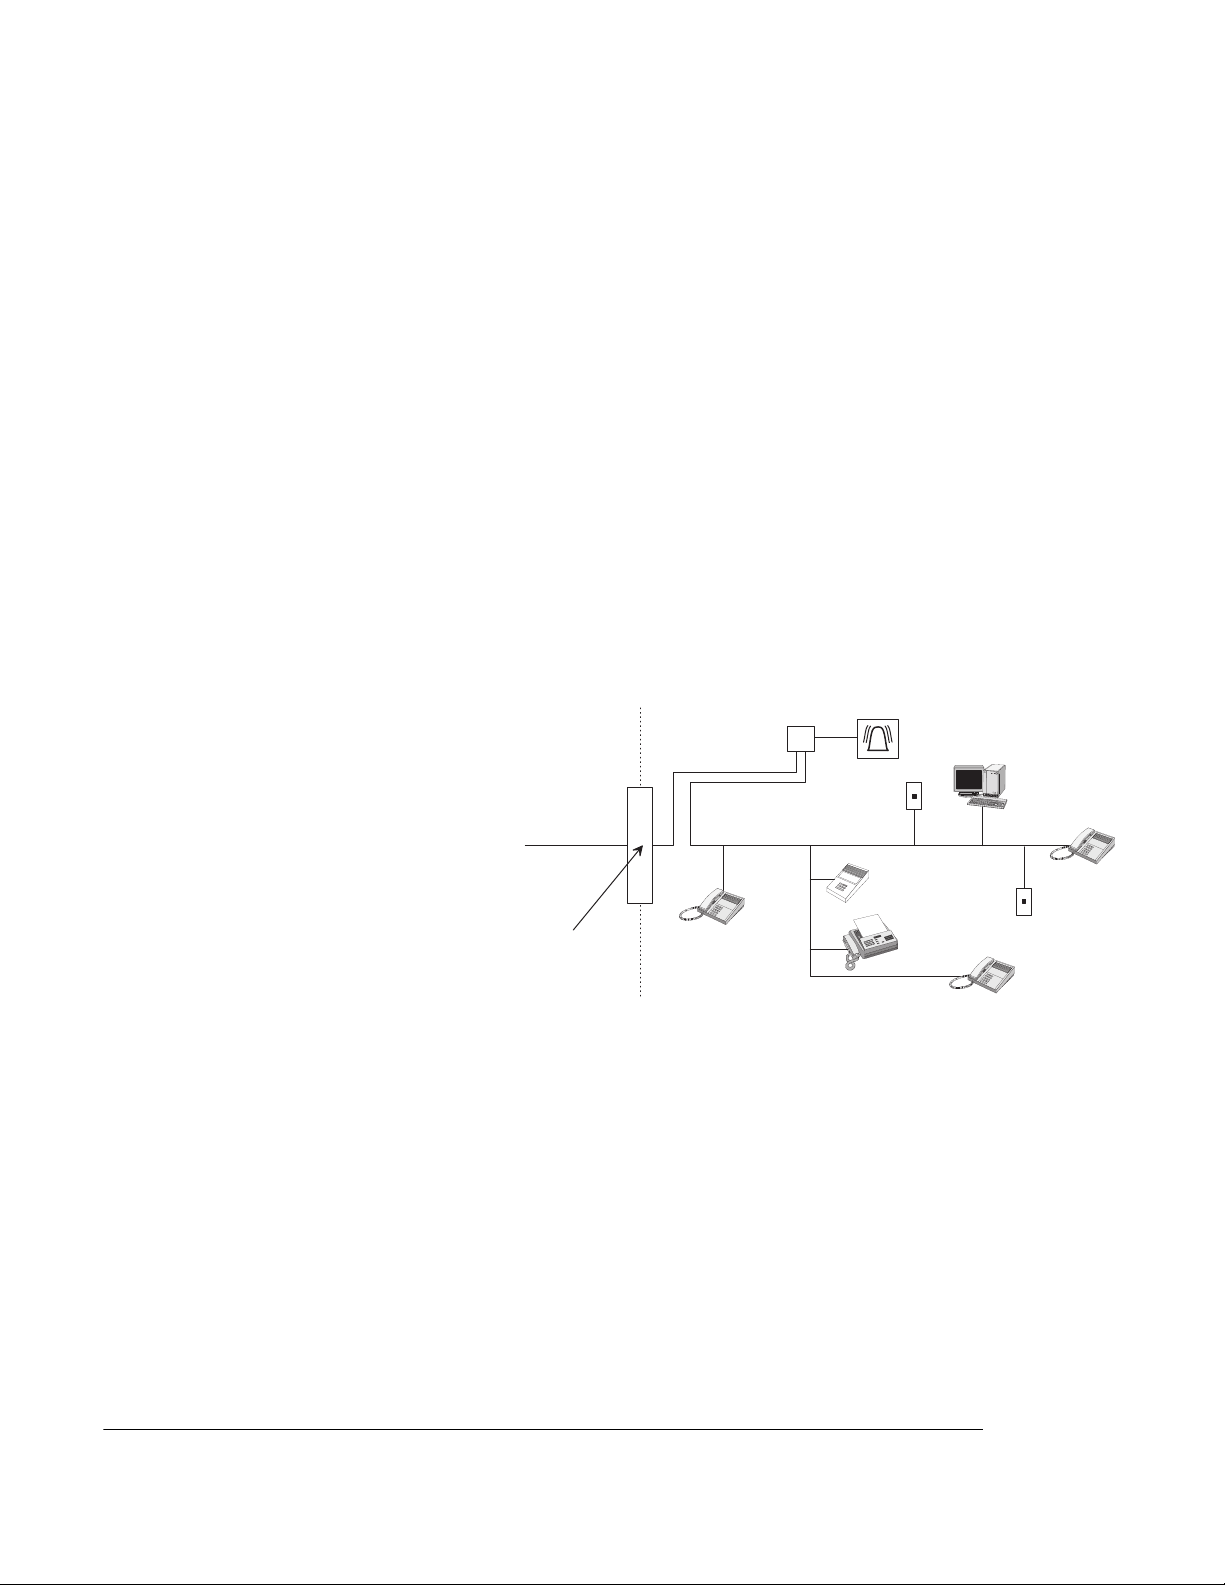
Alarm dialing equipment must be able to seize the telephone
line and place a call in an emergency situation. It must be
able to do this even if other equipment (telephone, answering
system, computer modem, etc.) already has the telephone line
in use. To do so, alarm dialing equipment must be connected
to a properly installed RJ31X jack that is electrically in series
and ahead of all other equipment attached to the same telephone line. Proper installation is depicted in the following
diagram. If you have any questions concerning these instructions, consult your local telephone company or a qualified
installer about installing an RJ31X jack and alarm dialing
equipment for you.
If this equipment causes harm to the telephone network, the
telephone company may temporarily disconnect your service.
If possible, you will be notified in advance. When advance
notice is not practical, you will be notified as soon as possible. You will also be advised of your right to file a complaint
with the FCC.
The telephone company may make changes in its facilities,
equipment, operations, or procedures that could affect the
operation of the equipment. You will be given advance notice
in order to maintain uninterrupted service.
If you experience trouble with this equipment, please contact the company that installed the equipment for service and/or repair information. The telephone company may ask you to disconnect this equipment from the network until the problem has been corrected or you are sure that the equipment is not malfunctioning.
This equipment may not be used on coin service provided by the telephone company. Connection to party lines is subject to state tariffs.
Patent Information
This product and the use of this product may be covered by one or more of the following patents: 4,864,636, 5,805,063, 5,872,512, 5,942,981, 5,686,896,
5,686,855, 4,855,713. Except as expressly provided herein, the purchase of this product shall not constitute a license or otherwise provide a right to practice a
method covered by any of the identified patents. GE Interlogix hereby grants the purchaser of this product a limited non-exclusive license to practice the methods
patented in the identified patents solely with products manufactured, sold or licensed by GE Interlogix. This license grant does not extend to the use of unlicensed third party products with this product.
N e t w o r k
S e r v i c e
P r o v i d e r ' s
F a c i l i t i e s
T e l e p h o n e
L i n e
N e t w o r k
D e m a r c a t i o n
P o i n t
C u s t o m e r P r e m i s e s E q u i p m e n t a n d W i r i n g
R J 3 1 X
J a c k
U n u s e d
R J - 1 1 J a c k
A n s w e r i n g
S y s t e m
T e l e p h o n e
F a x M a c h i n e
A l a r m D i a l i n g
E q u i p m e n t
T e l e p h o n e
C o m p u t e r
U n u s e d
R J - 1 1 J a c k
T e l e p h o n e
g
©2003 GE Interlogix. All trademarks are properties of their owners.
All rights reserved.
GE Interlogix
2266 Second Street North
North Saint Paul, MN 55109
Technical Support: (800)-777-2624
Page 3

Contents
About this Manual 1
Special Installation Requirements .............................................................................................................. 1
System Components 2
Control Panel .............................................................................................................................................. 2
Multi-Purpose Panic ................................................................................................................................... 2
Optional Components 2
Setting up the System 3
Locating the Panel ...................................................................................................................................... 3
Plugging in the Phone Line......................................................................................................................... 3
Plugging in the Power................................................................................................................................. 4
Powering up the System ............................................................................................................................. 4
Adjusting the Speaker Volume ................................................................................................................... 4
ETL Listed Installations.......................................................................................................................... 1
Central Station Reporting ....................................................................................................................... 1
Line Seizure ............................................................................................................................................ 3
No Line Seizure ...................................................................................................................................... 3
Basic Operation 4
To activate a portable panic sensor:........................................................................................................ 4
To activate the panel Call button: ........................................................................................................... 4
After initiating a call the panel will... ..................................................................................................... 5
Programming 5
Access Codes .............................................................................................................................................. 5
Master Access Code................................................................................................................................ 5
Utility Access Code 1 (Dealer Code) ..................................................................................................... 5
Utility Access Code 2 (Installer Code) ................................................................................................... 5
Entering Program Mode.............................................................................................................................. 6
Setting the Clock......................................................................................................................................... 6
Changing an Access Code .......................................................................................................................... 6
Programming Options 7
Option 1: Panel Voice .................................................................................................................................8
Option 2: Account Number .........................................................................................................................9
Option 3: Primary Phone Number .............................................................................................................. 9
Option 4: Secondary Phone Number .......................................................................................................... 9
Option 5: Numeric Pager/Voice Event Notification Phone Number .......................................................... 9
Option 6: Call Waiting ................................................................................................................................ 9
Option 7: Downloader Phone Number ..................................................................................................... 10
Option 8: Phone Lock ...............................................................................................................................10
Option 9: Downloader Code ..................................................................................................................... 10
i
Page 4

Option 10: Phone Mod 1 ...........................................................................................................................10
Option 11: Phone Mod 2 ...........................................................................................................................11
Option 12: Numeric Pager/Voice Event Notification Phone Mod 3 ........................................................ 11
Option 13: DTMF Dialing ........................................................................................................................ 12
Option 14: Auto Phone Test ..................................................................................................................... 12
Option 15: RF Timeout ............................................................................................................................. 12
Option 16: Manual Phone Test ................................................................................................................. 12
Option 17: AC Power Failure Report ....................................................................................................... 12
Option 18: CPU Low Battery Report .......................................................................................................13
Option 19: Fail to Communicate .............................................................................................................. 13
Option 20: Ring/Hang/Ring ......................................................................................................................13
Option 21: Call Button Enable ..................................................................................................................14
Option 22: Downloader Enable ................................................................................................................14
Option 23: 300 Baud ................................................................................................................................. 14
Option 24: Audio Verification .................................................................................................................. 14
Option 25: Trouble Beeps ......................................................................................................................... 14
Option 26: AVM Mode .............................................................................................................................14
Option 27: RF Jam Detect ........................................................................................................................15
Option 28: Access Code Length ...............................................................................................................15
Option 29: RF Phone Answer ................................................................................................................... 15
Option 30: Demo Mode ............................................................................................................................16
Option 31: Programming Report ..............................................................................................................16
Option 32: Supervisory Time ................................................................................................................... 16
Option 33: Modem Sensitivity ..................................................................................................................16
Option 34: VOX Mic Gain .......................................................................................................................16
Option 35: VOX Gain Range .................................................................................................................... 16
Option 36: Manual Mic Gain .................................................................................................................... 17
Option 37: VOX Receiver Gain ................................................................................................................ 17
Option 38: Alarm Cancel Timeout ...........................................................................................................17
Option 39: No Audio on Alarm Cancel ....................................................................................................17
Option 40: Report Medication Failures at Supervisory Time ................................................................... 17
Option 41: Activity Check ........................................................................................................................17
Option 42: Siren Time Out .......................................................................................................................18
Option 43: House Code .............................................................................................................................18
Exiting Programming Mode ..................................................................................................................... 18
Resetting Memory to Defaults.................................................................................................................. 18
Activity Check 18
Using CareGard with Activity Check Set ................................................................................................. 18
Home and Away........................................................................................................................................ 19
Medication Reminders 19
Setting up Medication Reminders............................................................................................................. 19
Acknowledging Medication Reminders ................................................................................................... 19
Home and Away........................................................................................................................................ 20
Adding/Replacing Sensors 20
Supervised vs. Not Supervised ................................................................................................................. 20
To Add or Replace a Sensor using the Menu Button on the back of the Panel ........................................ 20
ii
Page 5

To Add or Replace a Sensor using the Programming Buttons under the Panel Cover............................. 22
Deleting Sensors 23
System Monitoring 23
AC Power.................................................................................................................................................. 23
Backup Battery ......................................................................................................................................... 23
Replacing the Backup Battery .............................................................................................................. 24
Sensor Low Battery .................................................................................................................................. 24
Sensor Supervisory Failure ....................................................................................................................... 24
Automatic Phone Test............................................................................................................................... 25
Sensor Testing 25
Phone Communication Testing 25
Phone Test................................................................................................................................................. 25
Central Station Communication................................................................................................................ 25
Pager Communication............................................................................................................................... 26
Voice Event Notification........................................................................................................................... 26
Remote Phone Operation .......................................................................................................................... 26
Troubleshooting 28
iii
Page 6

About this Manual
This manual provides advanced information for planning, installing programming, operating, and
testing a CareGard system. Complete operation instructions are available in the CareGard User
Instructions (Part No. 466-1936).
Special Installation Requirements
This system is designed to be used as an emergency notification system. Some installations may
require configurations dictated by city or state codes, or insurance.
ETL Listed Installations
The following are requirements for ETL listed installations:
Basic System
• Control Panel
• Backup Battery
• Standard Class II 9 VAC 700 mA Power Transformer
• Wrist Panic
Digital Alarm Communicator System (UL 1635)
These options are required only if the system is set up for central station reporting.
• Option 3: Primary Phone Number programmed
• Option 10: Phone Mod 1 set to 0 or 1
• Option 14: Auto Phone Test set to 001
• Option 15: RF Timeout set to 4 hours
• Option 17: AC Power Failure Report set to 15 minutes
• Option 18: CPU Low Battery Report set to on
• Option 27: RF Jam Detect set to on
Home Health Care Signaling Equipment (UL 1637)
• Basic System
• Panic Sensor
Central Station Reporting
The panel has been tested with the following central station receivers using SIA and Contact ID
reporting formats:
• Radionics D6600 Central Station Receiver
• Sur-Gard Central Station Receiver with models SG-DRL2A and SG-CPM2
1
About this Manual
Page 7
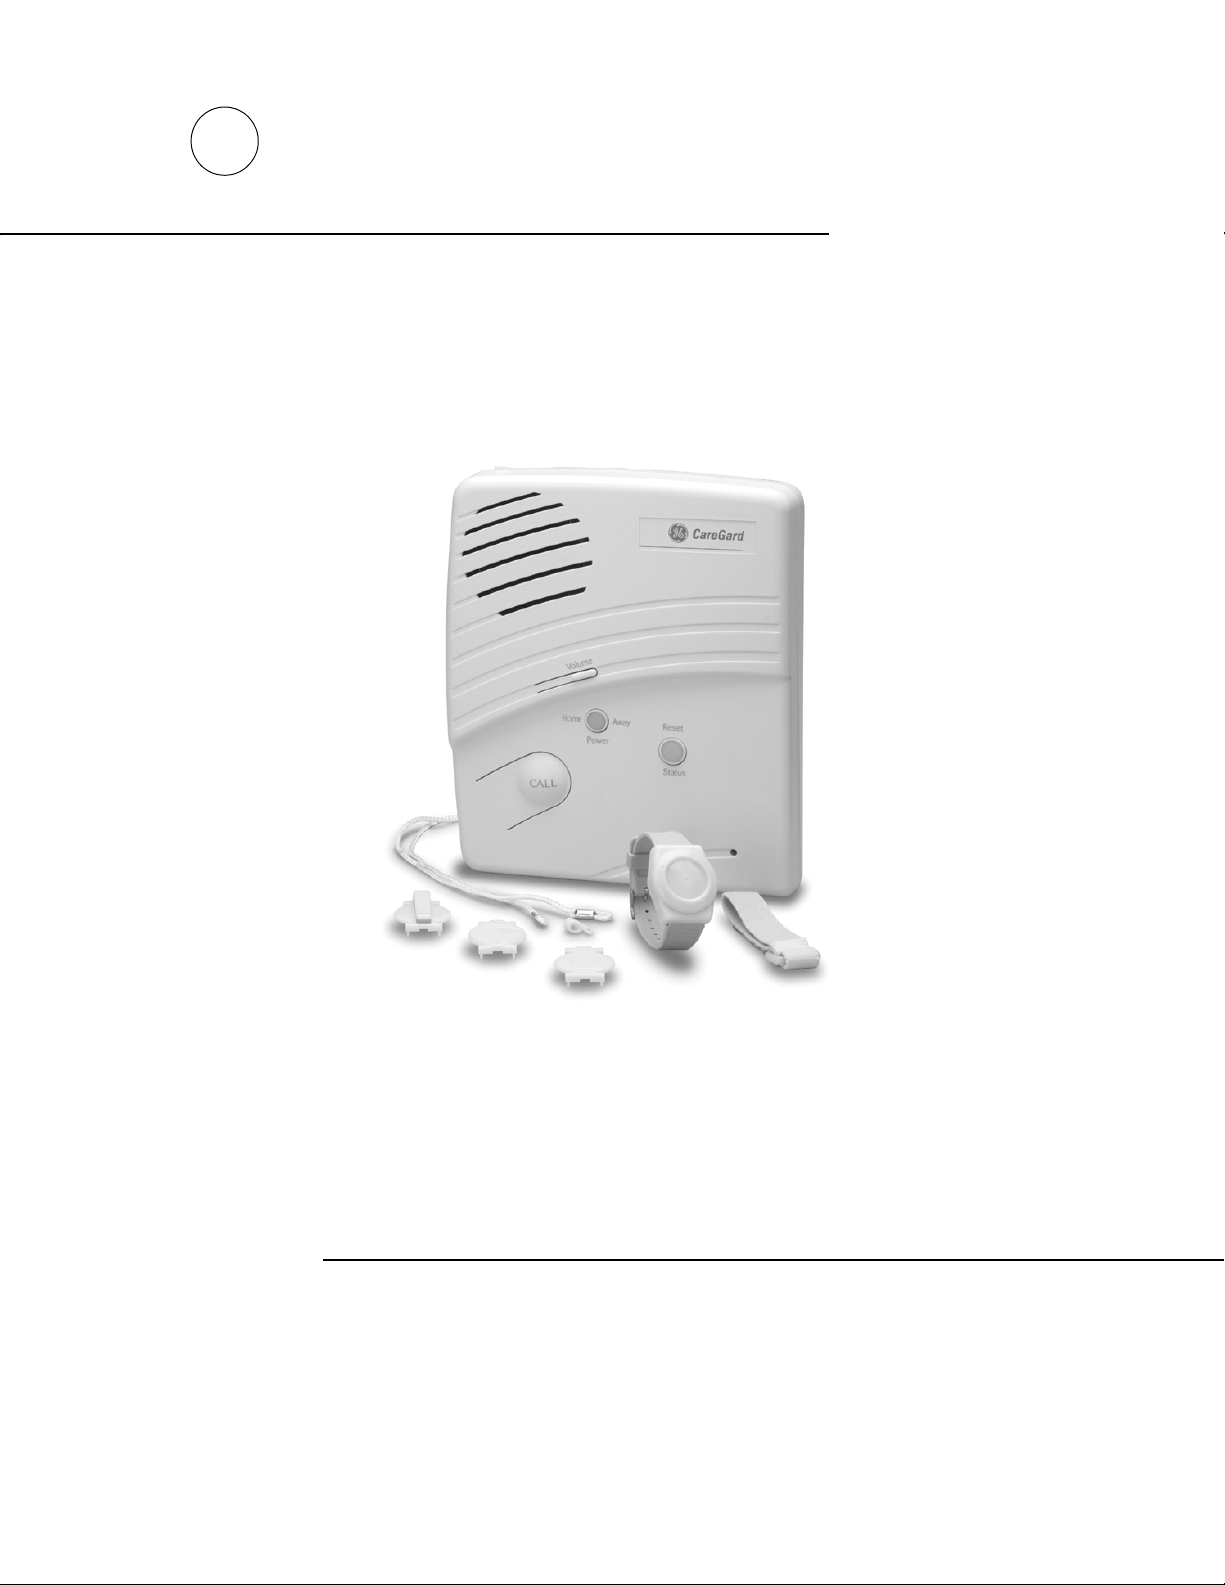
System Components
The CareGard® system is composed of
the control panel and a multi-purpose
panic sensor.
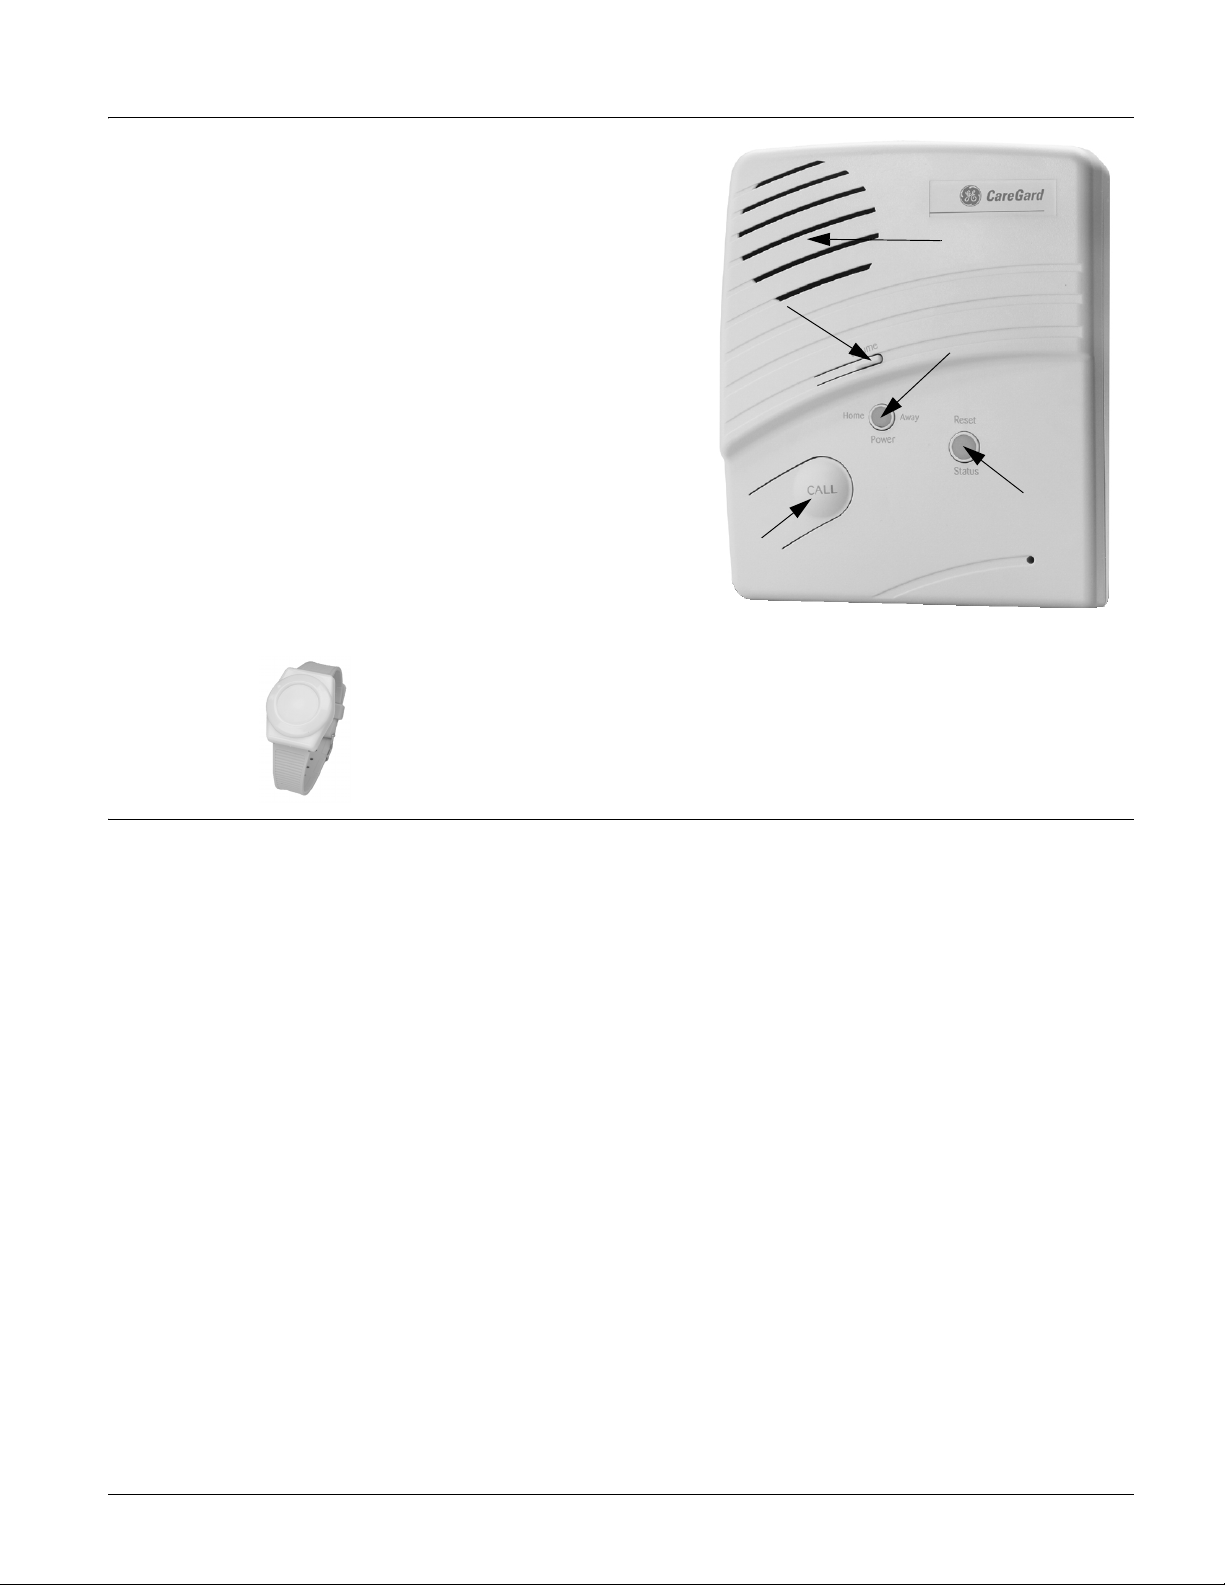
Control Panel
The control panel (60-883-95R) is the
processing unit for all functions. It
receives signals from panic sensors and
reports emergencies through the phone
line. Medication reminders and activity
timers are scheduled using the control
panel and reminders are given through
the panel speaker.
When the panel cover is closed, the
panel buttons operate the emergency
notification system. The user operates
the panel by pressing panel buttons. See
the CareGard User Instructions for
complete operating instructions.
When the panel cover is open, the but-
tons are used to program the emergency
notification system. The panel can be
programmed on-site by the installer or
user.
Vol ume
Call Button
Figure 1. Front of the CareGard Panel
Speaker
Power
Home/Away
Button
Reset/Status Button
Multi-Purpose Panic
The Multi-Purpose Panic Sensor (60-906-95) is a wireless device designed to be used throughout
the installation site. The sensor is worn on the wrist, as a pendant, or on a belt. The panel can be
programmed to supervise the Wrist Panic.
Optional Components
The usefulness of the CareGard system can be increased by adding the following wireless
devices.
The optional Pendant Panic Sensor (60-578)* is a wireless device designed to be used through-
out the installation site. The sensor can be worn around the neck with a removable cord
(included) or on the user’s belt with an optional leather belt holster. The panel can be pro-
grammed to supervise the Pendant Panic.
A Repeater (60-615-10-319.5)* can be added to the CareGard System in order to boost the range
of the wireless sensors.
Smoke Alarms (60-848-02-95)* can be added to the CareGard System to provide warning in
case of fire.
The optional Carbon Monoxide Alarm (60-652-95)* is used to detect hazardous levels of carbon
monoxide.
Freeze Sensors (60-742-95R)* send a signal to the CareGard panel when the temperature drops
below a certain level. They can be used to detect a broken furnace or windows left open.
Water Sensors (60-744-95R)* can alert users to a flooding basement or an overflowing bathtub
or sink.
Door/Window Sensors (60-670-95R)* can be added to the system and set up to work with the
activity timer function of CareGard.
Motion Sensors (60-807-95R)* can be added to the CareGard system and set up to work with the
activity timer function of CareGard. Motion sensors detect movement within a certain area. They
can be set up to reduce false detections caused by pets.
An Interrogator
tem to expand the range of 2-way voice communication to other rooms or floors of the home.
®
200 Audio Verification Module (60-787)* can be added to the CareGard Sys-
* Not investigated for use by ETL.
System Components 2
Page 8

Setting up the System
This section describes how to set up the CareGard system. Installing the system consists of the
following procedures:
1. Locating the panel
2. Plugging in the phone line
3. Plugging in the power
4. Powering up the system
5. Adjusting the speaker volume
Locating the Panel
The following should be considered when determining a location for the CareGard panel:
• The control panel must have access to an incoming phone line and a standard outlet (110
VA C ) .
• The panel should be centrally located on a table or countertop where it is convenient to use
(such as on a nightstand near a bed).
• The panel should not be in or near a bathroom.
Plugging in the Phone Line
There are two methods for connecting the panel to a phone line; line seizure and no line seizure.
Note
All devices that use a phone line must be plugged into the PHONE Jack on the CareGard panel for it to
function properly. This includes devices that were plugged into other phone jacks in the home. The use
of Line Grabbers or the installation of an RJ31X jack are also acceptable methods of obtaining Line Seizure.
Line Seizure
This method requires that the panel be wired ahead (or in front) of all other phones, answering
machines, computers or any other devices on the phone line. This allows the panel to take over
(seize) the phone line, even if another device on the line is in use.
1. Plug the smaller end of the included phone cord into a phone jack in the home.
2. Plug the larger end into the LINE jack on the back of the panel.
3. Plug additional devices such as phones and answering machines to the PHONE jack on the
back of the panel.
No Line Seizure
Note
Connecting the panel to a standard phone (voice) line using the no line seizure method should be
avoided. Other devices in use at the same time the panel is using the line can prevent reports from
going through.
This method is typically used where DSL (Digital Subscriber Line) service exists. DSL allows
multiple devices on a single phone line to be used simultaneously. Simply connecting the panel
LINE jack to an available phone jack on the premises using the phone cord is all that is required.
An in-line filter may be required to ensure panel reporting is successful.
3
Setting up the System
Page 9
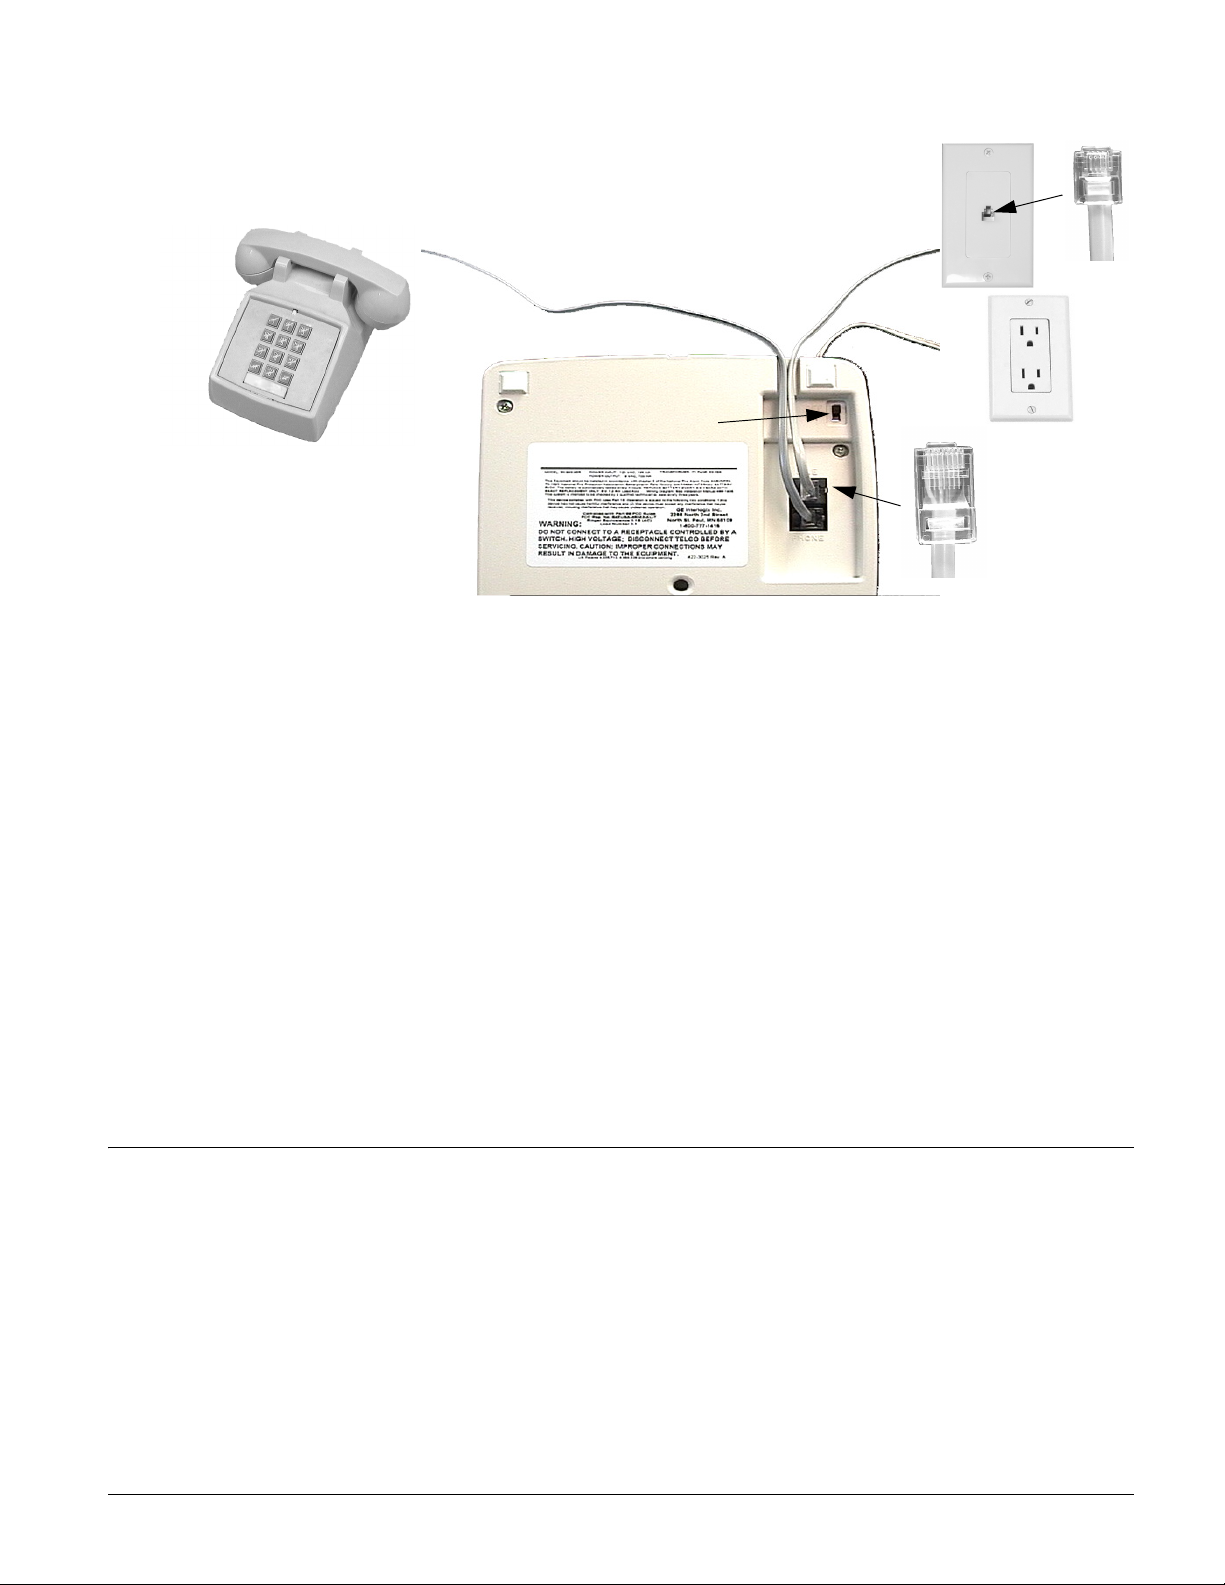
To Home
Phone Jack
To Phone or Answering
Machine
Power Switch
PHONE
Figure 2. Connecting the CareGard System to the Phone Line
To AC Outlet
LINE
Plugging in the Power
The panel is pre-wired for power. Simply plug the transformer into an available standard outlet
(110 VAC).
Important !
Make sure the outlet is not controlled by a switch or part of a ground fault interrupt circuit (GFIC).
Powering up the System
Turn the Power switch on the back of the panel to On. The panel voice should announce “Hello,
system X is OK.”
Note
After power up the system may announce “System Low Battery” and the Status light will flash. It may
take several hours for the battery to fully change after it is initially plugged in.
Adjusting the Speaker Volume
The Volume button on the front of the panel controls the volume of announcements from the
speaker and the volume during a 2-way talk session.
Adjust the built-in speaker volume using the Volume button on the front of the panel. Each time
the Volume button is pressed it increases the speaker volume one level and announces the volume
level.
Adjust the volume the same way during a 2-way talk session.
Basic Operation The main function of the CareGard system is to respond to the wrist or pendant panic and the
panel Call button.
To activate a portable panic sensor:
• Wrist Panic - Press the button until its red light blinks.
• Pendant Panic - Press and hold the button for 2 seconds.
To activate the panel Call button:
Depending on how Option 21 (Call Button Enable) is set, the Call button operates with a single
press or two presses. If Option 21 is set to off, the panel Call button cannot be used to initiate an
emergency call.
Basic Operation 4
Page 10

Note
There may be a slight delay
between the time the button
is pressed and when the
panel announces it is contacting the station.
Note
This message will be
repeated every 60 seconds
until contact is made with the
central station or there is a
communication failure. The
panel will try each programmed phone number 8
times. If the panel fails to
make contact it will go into
communication failure.
¾ Single Press - Option 21 set to 1:
1. Press the Call button.
2. The system announces “Contacting emergency phone number, please remain calm, or press
Status to cancel.”
¾
Two Presses or Press and Hold - Option 21 set to 2:
1. Press the Call button once. The panel announces “Press call again for Emergency call, or
press Status to cancel.”
Note
If Option 1 is Off the announcement will not be made.
2. Press the Call button again to initiate an emergency call or press Status to cancel the call.
You may also initiate an emergency call by holding down the Call button for 5 seconds or until
the system announces “Contacting emergency phone number, please remain calm.”
After initiating a call the panel will...
• start blinking the Status light.
• dial the central station.
• announce “Contacting emergency phone number, please remain calm.”
• report an alarm to the central station.
• begin a 2-way audio session between the resident and the central station operator if the sys-
tem is set up for 2-way audio. This depends on Options 24 and 26.
Programming The CareGard system can be customized for different installation situations by setting certain
options. See the “Programming Options” section of this manual for a descriptions of all the
options and their settings.
Programming involves these basic steps:
¾
1. Enter Program Mode
2. Set the Clock
3. Change Access Codes
4. Program Options
Access Codes
There are 3 codes you can use to enter program mode.
Master Access Code
Depending on how Option 28: Access Code Length is set, the default Master Access Code is
123456, 12345, 1234 (factory default), or 123. The Master Access Code can be used to change
the following: Options 1, 5, 22, 29 and the Master Access Code. The Master Access Code is also
used for the Remote Phone Control options of the CareGard system. (See “Option 20: Ring/
Hang/Ring” and “Remote Phone Operation” in this manual.)
Utility Access Code 1 (Dealer Code)
Depending upon how Option 28: Access Code Length is set, the default utility access code is
654321, 54321, 4321 (factory default), or 321. This code can be used for all programming.
Utility Access Code 2 (Installer Code)
Depending upon how Option 28: Access Code Length is set, the default utility access code is
654321, 54321, 4321 (factory default), or 321. When the system is started for the first time Utility Access Code 2 will have the same privileges as Utility Access Code 1. When Utility Access
Code 1 or 2 is changed Utility Access Code 2 can modify all but the following options: Options
3, 4, 7-11 and 28.
5
Programming
Page 11
Note
Do not remove panel power
while in program mode. Programming changes are
saved only when exiting program mode (closing the
cover).
Entering Program Mode
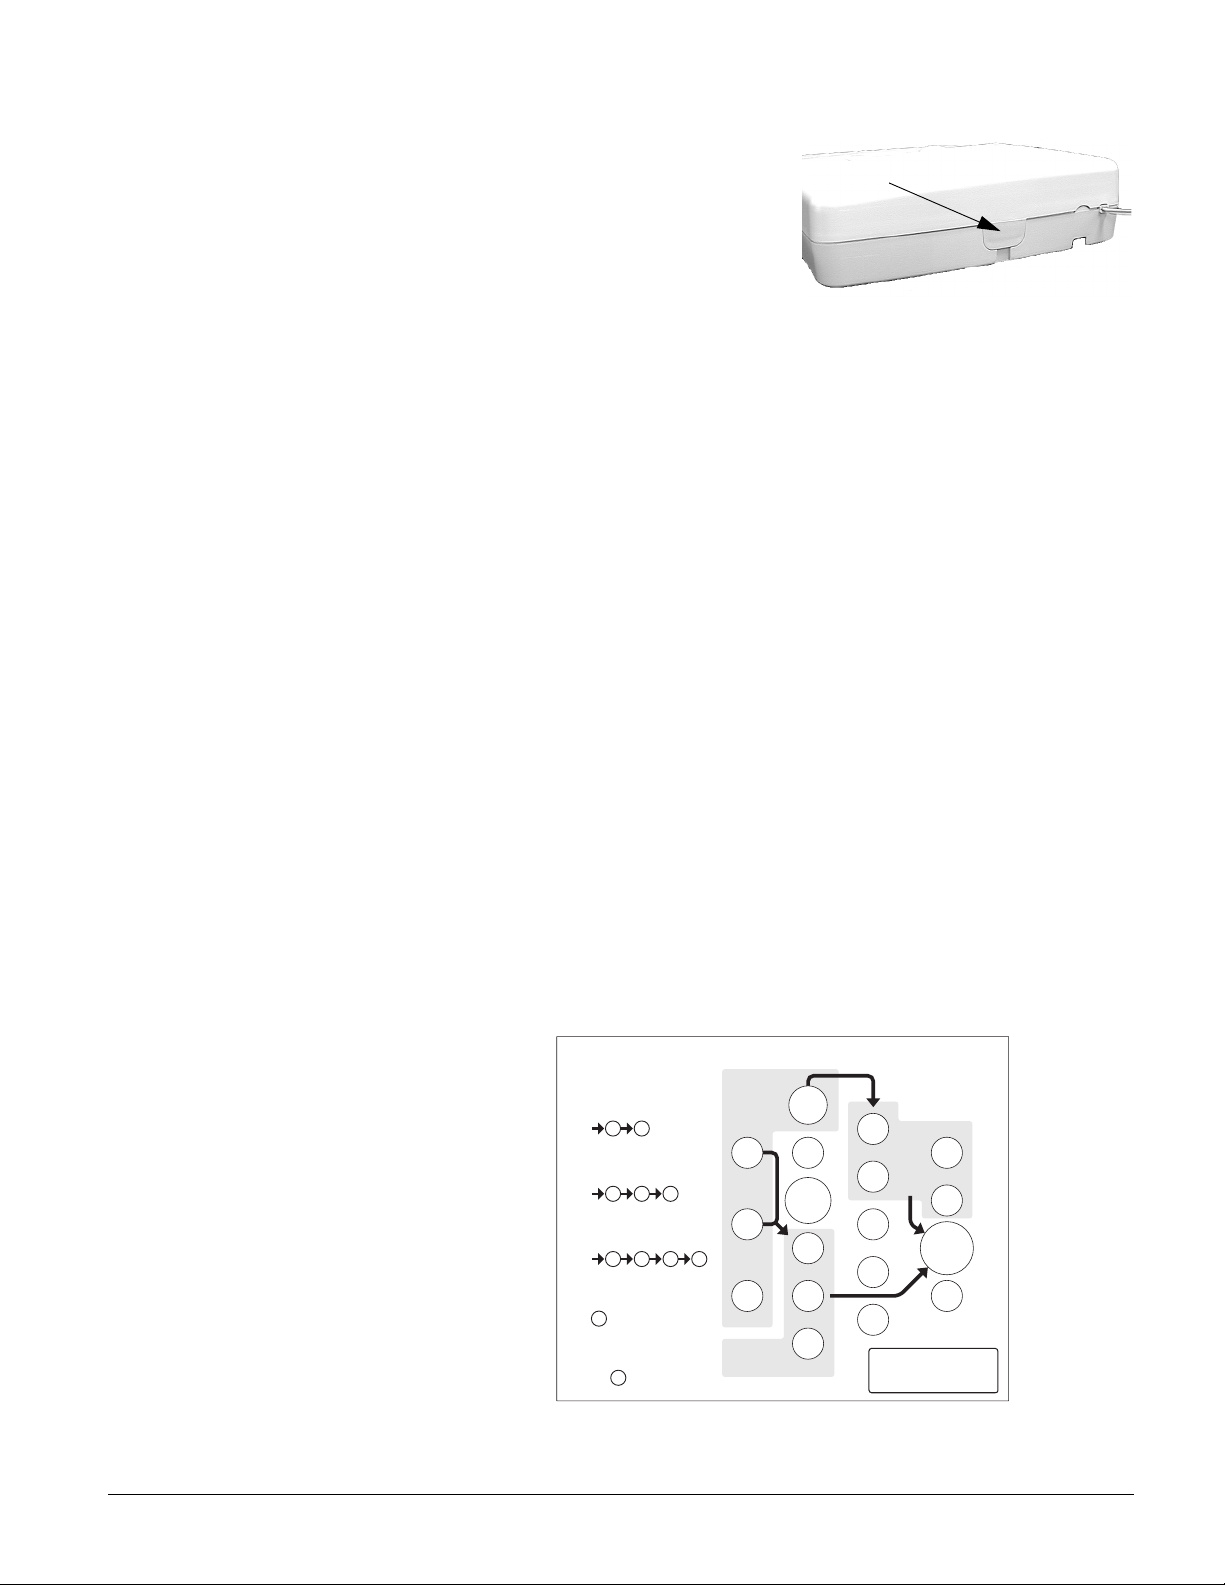
1. Open the panel cover by lifting on the tab at the top of the panel.
Tab
2. Enter Utility Access Code 1 or 2 using the numbered keys.
The panel is now in program mode. Follow the programming arrows on the panel overlay. The system
prompts you through programming steps with beeps
and voice messages.
Figure 3. Cover Tab Location
Setting the Clock
¾ To set the clock:
1. Press Clock Set from the Start Menu. (The system will announce the programmed time and say “To change, press Hours and Minutes, then press Done.”)
Note
If 6 seconds passes without a key press the panel will announce the time and say “Time is x:xx A.M./
P.M., press hours and minutes, then press done or press cancel to quit.”
2. Press the Hours + and - buttons and listen to the voice prompts. Stop when panel voice announces the correct hour.
3. Press the Minutes + and - buttons and listen to the voice prompts. Stop when the panel announces the correct minutes.
4. Press Done. The panel announces the set time.
Changing an Access Code
¾ To change an Access Code:
1. Enter Program Mode.
2. Verify the Access Code Length (Option 28).
3. Press the Add button from the Start Menu.
4. Press the Access Code button until you hear the name of the Access Code you want to change.
5. Press the Done button to select the Access Code.
6. Using the numbered keys, enter the new access code. The panel will repeat the Access Code after the last digit is entered.
Pressing the Cancel button after entering an access code will not revert to the old access code.
Go through the steps again if you make a mistake.
I N S T R U C T I O N S
Add Option
Panel Voice Enable
Option #1:
Option #2:
Account No.
Phone No.
Option #3:
Press and follow
voice prompts.
Add Access Code
Press
use red numbers to enter access code.
Set Clock
Press
Delete
To delete an option or access code
press
Cancel
If you make a mistake or want to start
over press
See Note
d
Ad
Option #
See Note
Add
Access Code
Clock Set
Hours
and follow voice prompts.
Delete
Cancel
DONE
See Note
Minutes
Figure 4. Programming Overlay
START MENU
Clock Set
Add
, then
Delete
DONE
Test
MAIN MENU
Press for program information.
*
Access Code
*
Sensor
*
Option #
1
+
Hours
2
-
3
4
5
Note:
Hold key or press repeatedly
until you hear the desired item.
422-3013 Rev C
6
+
Minutes
7
-
8
9
0
DONE
Cancel
Programming 6
Page 12

Programming Options
The following options let you customize system operation according to dealer and user needs.
The Numbered Options Settings table lists all system options and their characteristics. Fill in the
last column of the table before programming to help speed up the programming process.
¾
To hear the current setting for each option:
• Press the Option # button. The panel will announce each option number and setting in order.
Press Cancel to stop.
• To jump to a specific option, press the Option # button, then enter the 2 digit option number
using the red numbered keys. The panel will continue to announce the option settings. Press
Cancel to stop.
Note
Although the panel voice
prompts you through programming, it is not necessary to wait for the complete
message before pressing
the next button in the programming sequence.
¾ To change an option setting:
• Press Add or Delete, then press Option # repeatedly until you hear the option you want
changed.
Or
• Press Add or Delete, Option #, then enter the 2 digit option number using the red numbered
keys.
Table 1: Numbered Options Settings
No. Function Default Range Desired Setting
1 Panel Voice On On/Off
2 Account Number 00000 0-9, A-F
3 Primary Phone Number Off 26 digits
4 Secondary Phone Number Off 26 digits
5 Numeric Pager/ Voice Event Notification Phone Number Off 26 digits
6 Call Waiting Off 26 digits
7 Downloader Phone Number (Not available in version 1.2) Off 26 digits
8 Phone Lock Off On/Off
9 Downloader Code 12345 00000-99999
10 Phone Mod 1 0 0-3
11 Phone Mod 2 0 00-10
12 Numeric Pager/Voice Event Notification Phone Mod 3 10 08-10
13 DTMF Dialing On On/Off
14 Auto Phone Test Off 1-254 days
15 RF Timeout 12 Hours 02 to 24 Hours
16 Manual Phone Test On On/Off
17 AC Power Failure Report 60 5-254 minutes
18 CPU Low Battery Report On On/Off
19 Fail to Communicate On On/Off
20 Ring/Hang/Ring 1 1-4, Off
7
Programming Options
Page 13

Table 1: Numbered Options Settings
No. Function Default Range Desired Setting
21 Call Button Enable 1 1, 2, Off
22 Downloader Enable (Not Currently Available) On On/Off
23 300 Baud On On/Off
24 Audio Verification On On/Off
25 Trouble Beeps On On/Off
26 AVM Mode Off On/Off
27 RF Jam Detect Off On/Off
28 Access Code Length 4 3-6
29 RF Phone Answer On On/Off
30 Demo Mode Off On/Off
31 Programming Report Off On/Off
32 Supervisory Time 12:00
33 Modem Sensitivity Off On/Off
34 VOX Mic Gain 14 01-64
35 VOX Gain Range 20 01-64
36 Manual Mic Gain 64 01-64
37 VOX Receiver Gain 6 01-10
38 Alarm Cancel Timeout 005 minutes 003-254
39 No Audio after Cancel Off On/Off
40 Report Medication Failures At Supervisory Time Off On/Off
41 No Activity Hours Off 02-48
42 Siren Time Out 4 minutes 002-254
43 House Code A A-P
Option 1: Panel Voice
When this option is Off and Option 21 is set to 2 the panel will not announce
“Press again for emergency call, or press Status to cancel.” This option is
ignored when the panel is in program mode.
A.M. Any time of day
255 = Off
Range = On/Off (Default = On)
¾
To turn Panel Voice On or Off:
1. Press Add or Delete.
2. Press Option #.
3. Press 0, then 1.
4. Press Done.
Programming Options 8
Page 14

Option 2: Account Number
Range = 0-9, A-F (Default = 00000)
Lets you program (Add) up to a 10-character alphanumeric account number.
Use the numbered buttons to enter numbers. To enter a letter, press the 9 button then use the Minutes + button to program letters A-F. Deleting this
option sets Account Number back to 00000.
Note
If Option 10 or 11 are set to Contact ID do not use the letter A in an account number.
Option 3: Primary Phone Number
Lets you program (Add) a central monitoring station receiver phone number
for monitored systems (up to 26 digits long). Deleting this option sets it to
the default of Off.
When programming a Primary Phone Number use the Add button to enter a
* symbol. Use the Delete button to enter a # symbol. Use the Test button to
enter a pause.
Note
A primary phone number must be programmed for ETL (UL 1635) listed systems.
Option 4: Secondary Phone Number
Lets you program (Add) a central monitoring station receiver/numeric
pager/voice event notification phone number (up to 26 digits long). Deleting
this options sets it to the default of Off.
When programming a Secondary Phone Number use the Add button to enter
a * symbol. Use the Delete button to enter a # symbol. Use the Test button to
enter a pause.
¾ To program an Account Number:
1. Press Add.
2. Press Option #.
3. Press 0, then 2.
4. Enter the Account Number.
5. Press Done.
Range = 26 Digits (Default = Off)
¾ To program a Primary Phone Number:
1. Press Add.
2. Press Option #.
3. Press 0, then 3.
4. Enter the Number using the numbered buttons and the Add, Delete, and Test buttons
as necessary.
5. Press Done.
Range = 26 Digits (Default = Off)
¾
To program a Secondary Phone Number:
1. Press Add.
2. Press Option #.
3. Press 0, then 4.
4. Enter the Number using the numbered buttons and the Add, Delete, and Test buttons
as necessary.
5. Press Done.
Option 5: Numeric Pager/Voice Event Notification Phone Number
Lets you program (Add) a phone number for numeric pager or voice event
notification (up to 26 digits long). Deleting this option turns it Off.
When programming a Numeric Pager/Voice Event Notification Phone Number use the Add button to enter a * symbol. Use the Delete button to enter a #
symbol. Use the Test button to enter a pause.
Note
It may be necessary to enter up to 5 pauses after a pager phone number in order
for it to work properly.
If the CareGard panel fails to report to a numeric pager, try adding pauses one at
a time until the system reports to the pager.
Option 6: Call Waiting
Lets you program up to a 26-digit number or code that disables call waiting
or any other phone service before dialing central station, pager or voice
event notification phone number (on). When this option is turned off, the
panel dials only the central station or pager phone numbers.
Range = 26 Digits (Default = Off)
¾ To program a Numeric Pager/Voice Event
Notification Phone Number:
1. Press Add.
2. Press Option #.
3. Press 0, then 5.
4. Enter the Number using the numbered buttons and the Add, Delete, and Test buttons
as necessary.
5. Press Done.
Range = 26 Digits (Default = Off)
¾
To program a Call Waiting code:
1. Press Add.
2. Press Option #.
3. Press 0, then 6.
4. Enter the Call Waiting code using the numbered buttons.
5. Press Done.
9
Programming Options
Page 15

Option 7: Downloader Phone Number
Lets you program up to a 26-digit phone number for a computer modem for
using GE Interlogix CareGard Configurator/Programmer, or delete an existing phone number (off).
Use the Add button to enter a * symbol. Use the Delete button to enter a #
symbol. Use the Test button to enter a pause.
Range = 26 Digits (Default = Off)
¾
To program a Downloader Phone Number:
1. Press Add.
2. Press Option #.
3. Press 0, then 7.
4. Enter the Number using the numbered buttons.
5. Press Done.
Option 8: Phone Lock
Prevents resetting of phone/reporting related to Options 3, 4, 6-11 and Utility Access Code 1 when a memory clear is performed (on), or resets all
options to their default values when a memory clear is performed (off).
Option 9: Downloader Code
Lets you set a unique 5-digit code that is required for initiating CareGard
Remote Programmer sessions or sets the code to its default (off).
The code must be 5 digits long and can range from 00000 to 99999. The
Downloader Code must match the downloader access code in the CareGard
Remote Programmer account to perform downloader sessions.
Note
The Downloader Code should always be changed from the default setting to
avoid competitor theft.
Option 10: Phone Mod 1
Determines what (content) and how (format) the panel should report through
the primary phone number (Option 3), if one is programmed. Table 2
describes the available settings for Phone Mod 1.
Note
Phone Mod 1 must be set to 0 or 1 for ETL (UL 1635) listed systems.
Range = On/Off (Default = Off)
¾
To Add or Delete Phone Lock:
1. Press Add or Delete.
2. Press Option #.
3. Press 0, then 8.
4. Press Done.
Range = 00000-99999 (Default = 12345)
¾ To program a Downloader Code:
1. Press Add.
2. Press Option #.
3. Press 0, then 9.
4. Enter a Downloader Code using the numbered buttons.
5. Press Done.
Range = 0-3 (Default = 0)
¾ To program Phone Mod 1:
1. Press Add.
2. Press Option #.
3. Press 1, then 0.
4. Enter a Phone Mod 1 using the numbered buttons.
5. Press Done.
Table 2: Phone Mod 1 Settings
Setting Content Format
0All SIA
1 All Contact ID
2 Alarms Only SIA
3 Alarms Only Contact ID
Programming Options 10
Page 16

Option 11: Phone Mod 2
Determines what (content) and how (format) the panel should report through
the secondary phone number (Option 4), if one is programmed. Table 3
describes the choices. All Entries must be 2 digits.
Table 3: Phone Mod 2 Settings
Setting Content Format
00 All SIA
01 All Contact ID
02 Alarms Only SIA
03 Alarms Only Contact ID
04 Non-Alarms Only SIA
05 Non-Alarms Only Contact ID
06 Phone 1 Failure SIA
Range = 00-10 (Default = 00)
¾
To program Phone Mod 2:
1. Press Add.
2. Press Option #.
3. Press 1, then 1 again.
4. Enter a Phone Mod 2 using the numbered buttons.
5. Press Done.
07 Phone 1 Failure Contact ID
08 AC Power Restorals/Failures, Medication Reminder,
Activity Timer and Phone Test
09 Same as 08 plus Alarms Pager
10 Alarms only (See Options 5 and 12) Voice Event
Option 12: Numeric Pager/Voice Event Notification Phone Mod 3
Determines what (content) and how (format) the panel should report through
a Numeric Pager/Voice Event Notification Phone Number (Option 5), if one
is programmed. Table 4 describes the choices. All entries must be 2 digits.
Table 4: Phone Mod 3 Settings
Setting Content Format
08 AC Power Restorals/Failures, Medication Reminder,
Activity Timer and Phone Test
Pager
Notification
Range = 08-10 (Default = 10)
To program Phone Mod 3:
¾
1. Press Add.
2. Press Option #.
3. Press 1, then 2.
4. Enter a Phone Mod 3 setting using the numbered buttons.
5. Press Done.
Numeric
pager
11
09 Same 08 plus Alarms Numeric
Pager
10 Alarms Only Voice Event
Notification
Programming Options
Page 17

Option 13: DTMF Dialing
Determines whether the panel uses DTMF (on) or pulse (off) for dialing programmed phone numbers.
Option 14: Auto Phone Test
Determines whether the panel automatically performs a periodic phone test.
The test interval can be from 001 to 254 days. Entries must be 3 digits. The
time of day the panel performs the test is determined by Option 32: Supervisory Time, which must be turned on for this feature to work.
Note
Auto Phone Test must be set to 001 for ETL (UL 1635) listed systems.
Option 15: RF Timeout
Determines the time period within which the panel must receive at least one
supervisory signal from a learned sensor before identifying a sensor failure
for that sensor and sounding trouble beeps. Any sensor failure is reported
immediately and again at the supervisory time (Option 32: Supervisory
Time). See “Sensor Supervisory Failure” in the System Operation section
for more information.
The Timeout can be set from 02 to 24 hours. Entries must be 2 digits.
Note
Setting this feature to 2 hours may cause false reports.
RF Timeout must be set to 4 hours for ETL (UL 1635) listed systems.
Range = On/Off (Default = On)
¾
To Add or Delete DTMF Dialing:
1. Press Add or Delete.
2. Press Option #.
3. Press 1, then 3.
4. Press Done.
Range = Off, 001-254 days (Default = Off)
¾ To program Auto Phone Test:
1. Press Add.
2. Press Option #.
3. Press 1, then 4.
4. Enter the desired Auto Phone Test days using the numbered buttons.
5. Press Done.
Range = 02-24 hours (Default = 12 hours)
¾ To program Auto Phone Test:
1. Press Add.
2. Press Option #.
3. Press 1, then 4.
4. Enter the desired Auto Phone Test days using the numbered buttons.
5. Press Done.
Option 16: Manual Phone Test
Determines whether the user can perform a manual phone test to verify communication to a central station/pager (on), or not (off).
Option 17: AC Power Failure Report
Determines whether the panel sends AC Power failure reports to a central
station or pager after the programmed time period expires (on), or not (off).
After 30 seconds without AC Power the panel lights turn off. When the
panel is without AC Power for the programmed time, an AC power failure is
reported. The AC Power Failure Report time period can be set from 5 to 254
minutes. Entries must be 3 digits. The panel reports an AC power restoral
when AC power returns to the panel.
Note
AC Power Failure Report must be set to 15 minutes for ETL listed systems.
Range = On/Off (Default = On)
¾
To Add or Delete Manual Phone Test:
1. Press Add or Delete.
2. Press Option #.
3. Press 1, then 6.
4. Press Done.
Range = Off, 0-254 Min (Default = 60 Min)
¾ To program an AC Power Failure Report
Time:
1. Press Add.
2. Press Option #.
3. Press 1, then 7.
4. Enter the desired AC Power Failure Report
Time in minutes using the numbered buttons.
5. Press Done.
Programming Options 12
Page 18

Option 18: CPU Low Battery Report
Range = On/Off (Default = On)
Determines whether the panel sends a low CPU battery report to the central
station when the panel backup battery voltage drops below 5.4 volts (on), or
not (off).
A CPU Low Battery Report is also sent at the time specified by Option 32:
Supervisory Time. When the backup battery is restored a system battery
restoral report will be sent to the central station.
Note
CPU Low Battery Report must be turned on for ETL (UL 1635) listed systems.
Option 19: Fail to Communicate
Determines whether the panel sounds trouble beeps if it is unable to successfully send a report to a central station or pager (on), or not (off).
Note
The panel will try each programmed phone number 8 times before announcing a
system phone communication failure.
If Option 11 is set to 6 or 7 after 3 failed attempts with the phone 1 number a
phone communication failure occurs
Option 20: Ring/Hang/Ring
Determines when the panel answers a remote phone access call. Depending
on whether an answering machine exists at the panel location, off-site access
to the panel can be achieved with a series of phone calls or just one. Table 5
shows the available settings.
¾
For off-site access where an answering machine exists, the user
must perform the following steps:
1. Call the panel location.
2. Let the Phone ring once, then hang up.
3. Wait at least 10 seconds but not more than 40, then call the panel location again. The panel should answer on the first ring.
• If set to 1, perform steps 1-3 once.
• If set to 2, perform steps 1-3 twice.
• If set to 3, perform steps 1-3 three times.
See “Phone Communication” in the Testing the System section of this manual for the commands used for remote phone control.
Note
For off-site access where an answering machine does not exist, the user simply
calls the panel location once and listens for 10 rings. The panel should answer
after the tenth ring.
¾ To Add or Delete CPU Low Battery
Report:
1. Press Add or Delete.
2. Press Option #.
3. Press 1, then 8.
4. Press Done.
Range = On/Off (Default = On)
¾ To Add or Delete Fail to Communicate:
1. Press Add or Delete.
2. Press Option #.
3. Press 1, then 8.
4. Press Done.
Range = On/Off (Default = 1)
¾ To program Ring/Hang/Ring:
1. Press Add.
2. Press Option #.
3. Press 2, then 0.
4. Enter a Ring/Hang/Ring setting using the numbered buttons.
5. Press Done.
13
Table 5: Ring/Hang/Ring Settings
Setting Control Panel answers after:
1 ring/hang/ring or 10 rings
2 ring/hang/ring/hang/ring or 10 rings
3 ring/hang/ring/hang/ring/hang/ring or 10
rings
4 10 rings
Off Disabled - no remote (off-site) access
Programming Options
Page 19

Option 21: Call Button Enable
Range = 1, 2, Off (Default = 1)
Determines how the panel Call button activates alarms. When set to 1, a single press of the Call button will activate an alarm. When set to 2, pressing
the Call button twice or pressing and holding the Call button will activate an
alarm. Delete will disable the Call button.
Note
When this option is set to 2 and Option 1 is on, the panel will prompt the user to
“Press again for emergency call or press Status to cancel.”
Option 22: Downloader Enable
Determines whether the panel can be accessed using CareGard Configurator
(on), or not (off).
Note
Downloader is not currently supported.
Option 23: 300 Baud
Determines whether the baud rate used by the panel for central station or
modem communications is 300 bps (on) or 110 bps (off).
Option 24: Audio Verification
¾ To program Call Button Enable:
1. Press Add.
2. Press Option #.
3. Press 2, then 1.
4. Enter a Call Button Enable setting using the numbered buttons.
5. Press Done.
Range = On/Off (Default = On)
¾ To Add or Delete Downloader Enable:
1. Press Add or Delete.
2. Press Option #.
3. Press 2, then 2 again.
4. Press Done.
Range = On/Off (Default = On)
¾
To Add or Delete 300 Baud:
1. Press Add or Delete.
2. Press Option #.
3. Press 2, then 3.
4. Press Done.
Range = On/Off (Default = On)
Determines whether the system can perform 2-way voice audio sessions
with a central station operator (on), or not (off).
Note
If this option is off, Option 26: AVM Mode will not work.
Option 25: Trouble Beeps
Determines whether the panel sounds six beeps every minute when a trouble
condition occurs (on) or not (off) The following conditions cause trouble
beeps:
• AC Power Failure
• Low CPU Battery
• Sensor Failure (supervisory)
• Sensor Trouble (low battery)
• Fail to communicate
•RF Jam
Trouble beeps can be silenced by pressing the Status button. Trouble beeps
resume 4 hours later if the trouble condition is not cleared.
Option 26: AVM Mode
Determines whether the panel hangs up and waits for a call-back from the
central station operator before starting an audio session (on) or stays on line
with the central station for an instant audio session (off).
Note
Option 24: Audio Verification must be on for this feature to work.
Option 26 affects the primary phone number only.
¾ To Add or Delete Audio Verification:
1. Press Add or Delete.
2. Press Option #.
3. Press 2, then 4.
4. Press Done.
Range = On/Off (Default = Off)
¾
To Add or Delete Trouble Beeps:
1. Press Add or Delete.
2. Press Option #.
3. Press 2, then 5.
4. Press Done.
Range = On/Off (Default = Off)
¾ To Add or Delete AVM Mode:
1. Press Add or Delete.
2. Press Option #.
3. Press 2, then 6.
4. Press Done.
Programming Options 14
Page 20

Option 27: RF Jam Detect
Range = On/Off (Default = Off)
Determines whether the panel checks for and reports RF interference/jam to
the central station (on), or not (off).
If this option is on and the panel receives a constant 319.5 MHz signal, the
panel announces “RF interference detected” when the Status button is
pressed and reports the condition to the central station. If this option is off,
the panel does not detect an RF jam.
Note
The panel will not detect RF Jams for 4 hours after the initial power up or a memory clear.
RF Jam Detect must be turned on for ETL (UL 1635) listed systems.
Option 28: Access Code Length
Determines how many digits are in each access code.
This option lets you set the access code length to 3, 4, 5 or 6 digits. Turning
off (deleting) this option resets access code length and all access codes to
their default.
Read the following before changing this option.
• This option affects all access codes.
• Changing the access code length resets the Master, Utility 1 and Utility 2
access codes to their respective defaults as described in Table 6.
Note
If the customer wants the Access Code Length changed, it should be set before
programming any new (unprogrammed) access codes, whenever possible.
Table 6: Access Code Length Defaults
¾ To Add or Delete RF Jam Detect:
1. Press Add or Delete.
2. Press Option #.
3. Press 2, then 7.
4. Press Done.
Range = 3-6 (Default = 4)
¾ To program Access Code Length:
1. Press Add.
2. Press Option #.
3. Press 2, then 8.
4. Enter the desired Access Code Length using the numbered buttons.
5. Press Done.
Setting Default Code
3 Master - 123
Utility 1 - 321
Utility 2 - 321
4 Master - 1234
Utility 1 - 4321
Utility 2 - 4321
5 Master - 12345
Utility 1 - 54321
Utility 2 - 54321
6 Master - 123456
Utility 1 - 654321
Utility 2 - 654321
Option 29: RF Phone Answer
When this option is on pressing a panic button or the panel call button will
answer a ringing phone. Pressing it again will hang-up the phone.
Important !
The phone must be hung up by pressing the panic button. If the phone is not hung
up the phone line may be held (unavailable) for up to 30 minutes.
Note
If a different panic than the one used to answer the phone is used to hang-up the
phone, the panel will disconnect and go into alarm.
Range = On/Off (Default = On)
¾ To Add or Delete RF Phone Answer:
1. Press Add or Delete.
2. Press Option #.
3. Press 2, then 9.
4. Press Done.
15
Programming Options
Page 21

Option 30: Demo Mode
Determines whether the panel operates as a demonstration model (on) or a
standard panel (off).
Turning on this feature disables low battery supervision.
When a panic is pressed the panel will announce “Contacting emergency
number. Please remain calm.” There will be a 10 second pause then the
panel will say “This is the response center, we have received your alarm. Do
you have an emergency?”
Range = On/Off (Default = Off)
¾
To Add or Delete Demo Mode:
1. Press Add or Delete.
2. Press Option #.
3. Press 3, then 0.
4. Press Done.
Option 31: Programming Report
Determines whether the panel sends a report to the central station anytime
programming mode is entered/exited (on) or not at all (off).
When Programming Report is on the panel sends a report whenever the
dealer (Utility 1) or installer (Utility 2) code is used to enter programming
mode and again when the programming session ends. The report is also sent
when the Menu button on the back of the panel is used to enter add a sensor
mode, and again when the sensor is added.
Option 32: Supervisory Time
Determines the time of day the panel reports supervisory conditions - sensor
failures, system low battery, sensor low battery and automatic phone tests to
the central station. If Option 40 is On Medication Reminders will be
reported also.
Note
The panel clock must be set to the correct time for this option and Option 14: Auto
Phone Test to work correctly.
Option 33: Modem Sensitivity
Determines whether the modem sensitivity is set to normal (off) or high
(on).
Note
This feature should be used only if the panel experiences consistent trouble
reporting to the central station. Otherwise, leave this option off.
Range = On/Off (Default = Off)
¾
To Add or Delete Programming Report:
1. Press Add or Delete.
2. Press Option #.
3. Press 3, then 1.
4. Press Done.
Range = any time (Default = 12:00 A.M.)
¾ To program Supervisory Time:
1. Press Add.
2. Press Option #.
3. Press 3, then 2.
4. Enter the desired Supervisory Time using the Hours and Minutes buttons.
5. Press Done.
Range = On/Off (Default = Off)
¾ To Add or Delete Modem Sensitivity:
1. Press Add or Delete.
2. Press Option #.
3. Press 3, then 3 again.
4. Press Done.
Option 34: VOX Mic Gain
Sets the mic gain (sensitivity) when using voice-activated switching
(Speaker Phone).
Room size, acoustics and furnishings where the panel is located will influence the setting. The available settings are 01 (low) to 64 (high). Entries
must be 2 digits.
¾
To program VOX Mic Gain:
1. Press Add.
2. Press Option #.
3. Press 3, then 4.
Range = 01-64 (Default = 14)
4. Enter the desired VOX Mic Gain using the numbered buttons.
5. Press Done.
Option 35: VOX Gain Range
Sets the gain range for the voice-activated switching (VOX). The available
setting are 01 (low) to 64 (high). Entries must be 2 digits. For correct performance this option should be set equal to or greater than Option 34: VOX
Mic Gain.
Note
This option works in conjunction with Option 34: VOX Mic Gain. It is important to
follow the setting recommendations as described to achieve acceptable operation.
¾ To program VOX Gain Range:
1. Press Add.
2. Press Option #.
3. Press 3, then 5.
4. Enter the desired VOX Gain Range using the numbered buttons.
Range = 01-64 (Default = 20)
5. Press Done.
Programming Options 16
Page 22

Option 36: Manual Mic Gain
Determines the mic gain level (sensitivity) during 2-way audio sessions,
when manually switching between listen and talk.
Room size, acoustics, and furnishings where the panel is located will influence the setting. The available settings are 01 (low) to 64 (high). Entries
must be 2 digits.
Range = 01-64 (Default = 64)
¾
To program Manual Mic Gain:
1. Press Add.
2. Press Option #.
3. Press 3, then 6.
4. Enter the desired Manual Mic Gain using the numbered buttons.
5. Press Done.
Option 37: VOX Receiver Gain
Determines the receiver gain level during 2-way audio sessions.
If the VOX is switching the speaker on when the central station operator is
not talking, lower both this setting and Option 34: VOX Mic Gain. If the
VOX is not switching the speaker on when the central station operator is
talking, raise this setting and lower Option 34: VOX Mic Gain.
This option can be set from 01 to 10. Entries must be 2 digits.
Note
Changing this setting does not affect speaker volume.
Option 38: Alarm Cancel Timeout
Determines the number of minutes the user has to cancel an alarm. If the
alarm is cancelled within the Alarm Cancel Timeout period, an alarm cancel
report is generated.
Note
If this option is Off alarms cannot be cancelled and the panel will not announce “or
press Status to cancel.”
Option 39: No Audio on Alarm Cancel
Determines if an audio session occurs after an alarm has been cancelled. By
default an audio session will occur after a cancelled alarm. Turn this option
on to disable audio after an alarm cancel.
Range = 01-10 (Default = 6)
¾ To program VOX Receiver Gain:
1. Press Add.
2. Press Option #.
3. Press 3, then 7.
4. Enter the desired VOX Receiver Gain using the numbered buttons.
5. Press Done.
Range = (Off), 003-254 Min (Default = 005)
¾ To program Alarm Cancel Timeout:
1. Press Add.
2. Press Option #.
3. Press 3, then 8.
4. Enter the desired Alarm Cancel Timeout using the numbered buttons.
5. Press Done.
Range = On/Off (Default = Off)
¾
To Add or Delete No Audio on Alarm Cancel:
1. Press Add.
2. Press Option #.
3. Press 3, then 9.
4. Press Done.
Option 40: Report Medication Failures at Supervisory Time
If this option is on, a failure to take medication is reported to the central
monitoring station at Supervisory Time. When this option is off (default) a
failure to take medication is reported immediately. Pager and voice event
notifications occur immediately.
Option 41: Activity Check
This option determines the number of hours that may pass without the CareGard system detecting activity before a no activity alarm/report is generated.
17
Range = On/Off (Default = Off)
¾
To Add or Delete Report Medication Failure at Supervisory Time:
1. Press Add.
2. Press Option #.
3. Press 4, then 0.
4. Press Done.
Range = 02-48 Hours (Default = Off)
¾
To Add or Delete Activity Timer:
1. Press Add.
2. Press Option #.
3. Press 4, then 1.
4. Enter the desired No Activity Hours using the numbered buttons.
5. Press Done.
Programming Options
Page 23

Option 42: Siren Time Out
This option determines how long sirens will sound in the event a smoke
alarm or carbon monoxide alarm are activated.
Range = 002-254 Min (Default = 004)
¾
To Add or Delete Siren Time Out:
1. Press Add.
2. Press Option #.
3. Press 4, then 2.
4. Enter the desired Siren Time Out using the numbered buttons.
5. Press Done.
Option 43: House Code
The CareGard system can be set up to turn X10 module controlled lights on
and off before an Activity Alarm occurs or during a Medication Reminder.
This option sets the House Code for X10 devices. The House Code programmed in the panel must match the House Code set on the device. See the
instructions with your X10 module for complete instructions on setting it up.
Important !
To use X10 modules with the CareGard panel you must replace the factory transformer with the special X10 transformer (60-972). Complete Installation Instructions are included with the transformer.
Exiting Programming Mode
¾ To exit programming mode and save the changes:
Reattach the panel cover.
When you close the cover, the panel reverts to operating mode. The control panel speaker beeps
once.
At any time during programming you can reattach the cover and the changes made to the system
will be saved. When you are ready to continue programming, remove the cover and re-enter an
access code.
Important !
Wait at least 5 seconds before shutting off the CareGard panel after reattaching the cover. This gives
the system time to save the programming changes.
Resetting Memory to Defaults
Note
If Option 8: Phone Lock is
on, Options 3, 4, 6-11 and
Utility Access Code 1 will not
reset to their defaults.
It will be necessary to reset
the clock after resetting
memory.
¾ If it becomes necessary to reset panel programming to the defaults, perform the follow-
ing steps:
1. Turn the ON/OFF switch on the back of the panel to OFF.
2. Open the panel cover.
3. While pressing the Done, 0, and Test buttons turn the ON/OFF switch to ON. Hold the buttons until the panel announces “Hello, system X OK.”
4. Release the buttons.
Range = A-P (Default = A)
¾ To Add or Delete House Code:
1. Press Add.
2. Press Option #.
3. Press 4, then 3.
4. Enter the desired House Code using the 9 button. Each press of the 9 button will advance the House Code 1 letter.
5. Press Done.
Activity Check The CareGard system can be set up to report an alarm if no activity is detected within a certain
period of time. Setting Option 41 determines how much time can pass with no activity being
detected before an alarm is generated. See “Option 41: Activity Check” on page 17 for information on setting Option 41.
Using CareGard with Activity Check Set
Once the Activity Check option is set the CareGard system must detect activity during the number of hours selected. The user must press the Status button or activate an activity sensor at least
once during the selected Activity Check time. For example, if the Activity Check is set to 10, at
least every 10 hours the user must press the Status button on the panel or activate an activity sensor. Pressing the Status button resets the timer and the user has another 10 hours to press the Status button or activate a sensor within.
Sensors can be set up to detect movement and prevent an Activity Check alarm. For example, a
motion sensor can be placed in the home and as long as the motion sensor detects movement at
Activity Check 18
Page 24

least once during the selected time period, no alarm will be sent. See “Adding/Replacing Sensors” on page 20 for information on setting up sensors to work with Activity Check.
If activity is not detected within the Activity Check time period the system announces “activity
time warning, please press status” once a minute and the Status button will begin flashing. If the
system includes X10 controlled lights they will begin turning on and off 4 times a minute. If the
Status button is not pressed within 15 minutes the system will report a no activity alarm to the
monitoring station.
Home and Away
If you will be away from the CareGard system, it’s necessary to temporarily shut off the Activity
Check.
When you’re Away from home:
¾
Press the Power/Home/Away button. The system announces “Activity Check Off”. If Medi-
cation Reminders are scheduled they will be turned off as well and an additional announcement will be made. The Power/Home/Away button will blink when the Activity Check is off.
When you return Home:
¾
Press the Power/Home/Away button. The system announces “Activity Check On”. If Medica-
tion Reminders are scheduled they will be turned on as well and an additional announcement
will be made.
Medication Reminders
The CareGard system can be set up to remind the user they need to take medication. Up to 8
reminders can be set.
Setting up Medication Reminders
¾ To set a Medication Reminder:
1. Press the Menu button on the back of the panel until it announces “Medication Reminder, press Status to select.”
2. Press the Status button on the front of the panel. The panel announces “Medication reminder one time is off, press Power to change.”
Note
Pressing the volume button at any time when setting a medication reminder turns it off.
3. Press the Power button until you hear the correct time for the medication reminder. The time
starts at 6:00
4. Repeat steps 2-3 for each reminder that needs to be set.
To turn a Medication Reminder off:
¾
1. Repeatedly press the Menu button on the back of the panel until it announces “Medication Reminder, press Status to select.”
2. Press the Status button on the front of the panel repeatedly until you hear the Medication
Reminder you need to turn off. The panel will announce the number and time of each Medication Reminder.
3. After the panel has announced the Medication Reminder you want to shut off, press the volume button and the panel will announce the number of the Medication Reminder and off.
A.M. and cycles through every half hour.
Acknowledging Medication Reminders
When the medication reminder time arrives the panel will announce “Medication Reminder”
once a minute and the Status button will begin flashing. If the system includes X10 controlled
lights they will begin turning on and off 4 times a minute.
19
To acknowledge a Medication Reminder:
¾
Press the status button to acknowledge the medication reminder.
If the medication reminder is not acknowledged within 15 minutes the panel will immediately
report to any voice event notification or pager phone numbers programmed into the system. If
Option 40 is Off the monitoring station will also be called immediately. If Option 40 is on the
monitoring station will not be notified of the failure to acknowledge the medication reminder
until Supervisory Time. (See “Option 32: Supervisory Time” on page 16 and “Option 40: Report
Medication Failures at Supervisory Time” on page 17.)
Medication Reminders
Page 25

Home and Away
If you will be away from home or unable to acknowledge medication reminders it’s necessary to
temporarily turn them off.
¾
When you’re Away from home:
Press the Power/Home/Away button. The system announces “Medication Reminder Off”. If
the Activity Check is scheduled it will be turned off as well. The Power/Home/Away button
will blink when Medication Reminders are off.
When you return Home:
¾
Press the Power/Home/Away button. The system announces “Medication Reminder On.” If
the Activity Check is scheduled it will be turned on as well.
Adding/ Replacing Sensors
Sensor Type To Program
CareGard allows up to 24 sensors to be learned into the system. There are two methods for adding a sensor to the system. The first method uses the menu button on the back of the panel, the
second uses the programming buttons.
Supervised vs. Not Supervised
Most sensors supported by CareGard can be programmed to be supervised or not supervised. The
panel monitors supervised sensors and sounds trouble beeps or turns the Status light on when
there is a problem with the sensor.
In most situations sensors should be left in the Supervised state. Portable panic sensors should be
Not Supervised.
To Add or Replace a Sensor using the Menu Button on the back of the Panel
Note
Pressing the Menu button cycles through 5 functions; Phone Test, Sensor Test, Medication Reminder,
Add Sensors and Delete all Sensors. The panel will announce the current function each time the button
is pressed.
Important !
It is necessary to move quickly between the steps when adding sensors. Read these steps carefully
before attempting to add a sensor. You may have as little as 5 seconds to move between steps.
The following table describes how to program each type of sensor. For complete programming
and mounting instructions see the Installation Instructions for the device.
Table 7: Programming Sensors
Personal Help Button
Pendant Help Button
Adding/Replacing Sensors 20
1. Repeatedly press the Menu button on the back of the panel until the panel announces “Add
sensor. Press Status to select.”
2. Press the Status button on the front of the panel.
3. Press the button on the sensor.
4. Repeatedly press the Power/Home/Away button until you hear the sensor type you want.
Personal Help Button type possibilities:
Emergency Sensor type not supervised
Emergency Sensor type supervised
5. Press the Status button to accept the sensor.
The system will announce the sensor name, type and number.
Page 26

Table 7: Programming Sensors
Sensor Type To Program
Door/Window Sensor 1. Remove the cover from the Door/Window Sensor.
2. Repeatedly press the Menu button on the back of the panel until the panel announces “Add
sensor. Press Status to select.”
3. Press the Status button on the front of the panel.
4. Press the Program button on the top of the Door/Window Sensor.
5. Repeatedly press the Power/Home/Away button until you hear the sensor type you want.
Door/Window Sensor type possibilities:
Activity Sensor type supervised
Activity Sensor type not supervised
6. Press the Status button to accept the sensor.
The system will announce the sensor name, type and number.
Freeze Sensor 1. Remove the cover from the Freeze Sensor.
2. Repeatedly press the Menu button on the back of the panel until the panel announces “Add
sensor. Press Status to select.”
3. Press the Status button on the front of the panel.
4. Press the Program button on the top of the Freeze Sensor.
5. Repeatedly press the Power/Home/Away button until you hear the panel announce “Press
status to accept Freeze Sensor type supervised”
6. Press the Status button to accept the sensor.
The system will announce the sensor name, type and number.
Water Sensor 1. Remove the cover from the Water Sensor.
2. Repeatedly press the Menu button on the back of the panel until the panel announces “Add
sensor. Press Status to select.”
3. Press the Status button on the front of the panel.
4. Press the Program button on the top of the Water Sensor.
5. Repeatedly press the Power/Home/Away button until you hear the panel announce “Press
status to accept Water Sensor type supervised”
6. Press the Status button to accept the sensor.
The system will announce the sensor name, type and number.
Smoke Alarm 1. Repeatedly press the Menu button on the back of the panel until the panel announces “Add
sensor. Press Status to select.”
2. Press the Status button on the front of the panel.
3. Remove the base of the Smoke Alarm.
4. Press the Status button to accept the sensor.
The system will announce the sensor name, type and number.
Carbon Monoxide Alarm See the instructions for adding or replacing a sensor using the programming buttons to add a
Carbon Monoxide Alarm.
Motion Sensor 1. Repeatedly press the Menu button on the back of the panel until the panel announces “Add
sensor. Press Status to select.”
2. Press the Status button on the front of the panel.
3. Remove the Motion Sensor from its mounting plate.
4. Repeatedly press the Power/Home/Away button until you hear the sensor type you want.
Motion Sensor type possibilities:
Activity Sensor type supervised
Activity Sensor type not supervised
5. Press the Status button to accept the sensor.
The system will announce the sensor name, type and number.
Repeater 1. Remove the Repeater cover.
2. Repeatedly press the Menu button on the back of the panel until the panel announces “Add
sensor. Press Status to select.”
3. Press the Status button on the front of the panel.
4. Press the tamper switch spring on the circuit board of the Repeater.
5. Press the Status button to accept the sensor.
The system will announce the sensor name, type and number.
21
Adding/Replacing Sensors
Page 27

Note
The sensor number can be
changed during program
mode by pressing the numbered keys after pressing
the sensor button. Sensors
can be numbered 01 to 24.
Be sure to enter 0 before the
number for sensor numbers
1 to 9. The sensor number
cannot be changed after it
has been programmed.
Sensor Type To Trip Sensor Type Options
To Add or Replace a Sensor using the Programming Buttons under the Panel Cover
1. Open the front cover.
2. Enter the Utility 1 or Utility 2 Access Code.
3. Press the Add button from the Start menu. The panel announces “Select from Main Menu.”
4. Press Sensor from the Main Menu.
The panel will announce “Press button on sensor X.” X is the next available sensor number. If
24 sensors are already programmed into the panel the panel says “Invalid. Twenty-four sensors already programmed.”
5. Trip the sensor. See Table 8 for descriptions of how to trip each type of sensor. The panel will announce “Press status to accept sensor.” DO NOT press Status at this time. Move on to Step 6.
6. If necessary, change the Sensor name by pressing the Option # button. See Table 8 for Sensor Type Options.
7. Press the Done button to program the sensor. The system will announce the sensor name, type and number.
Table 8: Programming Sensors
Personal Help Button Press the help button on the sensor. Emergency Sensor Type Not Supervised
Pendant Help Button Press the help button on the sensor. Emergency Sensor Type Not Supervised
Door/Window Sensor With the Door/Window Sensor cover
Freeze Sensor With the Freeze Sensor cover
Water Sensor With the Water Sensor cover
Smoke Alarm Remove the base of the Smoke Alarm Smoke Sensor type Supervised
Carbon Monoxide (CO)
Alarm
Motion Sensor Remove the sensor from its mounting
Repeater With the Repeater cover removed,
removed, press the Program button on
the top of the sensor.
removed, press the Program button on
the top of the sensor.
removed, press the Program button on
the top of the sensor.
Plug in the CO Alarm. Within 60 seconds of plugging in, press and hold the
Test/Reset button until you hear 6
beeps.
plate.
press the tamper switch spring on the
circuit board.
Emergency Sensor type Supervised
Emergency Sensor type Supervised
Activity Sensor type Supervised
Activity Sensor type Not Supervised
Freeze Sensor type Supervised
Water Sensor type Supervised
Carbon Monoxide Sensor type Supervised
Activity Sensor type Supervised
Activity Sensor type Not Supervised
Repeater module type Supervised
Adding/Replacing Sensors 22
Page 28

Deleting Sensors
You can delete a single sensor or all sensors at once.
To delete a single sensor:
¾
1. Open the front cover.
2. Enter the Utility 1 or Utility 2 Access Code.
3. Press the Delete button. The panel announces “Select from Main Menu.”
4. Press Sensor from the Main Menu. The panel says “Sensor X panic. Press Sensor again for next sensor or done to delete.”
Note
If no sensors have been learned into the panel the panel says “Function not available” after the sensor
button is pressed.
5. Press the Sensor button until the panel announces the number of the sensor you wish to delete.
6. Press the Done button to delete the sensor.
¾
To delete all sensors:
1. With the front cover closed, press the Menu button on the back of the panel until the panel announces “Delete all sensors. Press status to delete all sensors.”
Note
Pressing the Menu button cycles through 5 functions; Phone Test, Sensor Test, Medication Reminder,
Add Sensor and Delete all Sensors. The panel will announce the current function each time the button
is pressed.
2. Press the Status button on the front of the panel to delete all sensors. The panel says “All sensors deleted.”
System Monitoring
Note
If Status is pressed during
an AC power failure the system will announce “AC
power failure” and the system will stop beeping for 4
hours.
Note
If Status is pressed during a
CPU low battery, the system
will announce “Time is x:xx,
system low battery” and the
panel will stop beeping for 4
hours.
The CareGard system constantly monitors system conditions to ensure proper operation.
AC Power
¾ The panel Power light either blinks or remains lit if AC power is connected. If AC power
is not detected for 6 seconds or more, the following occurs:
1. The panel Power light turns off.
2. After 4 minutes, a non-reporting AC fail report will be placed in the event buffer.
3. If Option 25: Trouble Beeps is enabled, six trouble beeps will sound once a minute.
4. After the AC Power Failure Report time (Option 17) expires, the panel reports an AC power failure message to the central station.
¾
When AC Power is restored for more than 2 seconds:
1. The panel sends a AC power restoral message to the central station if an AC failure message was sent. If an AC failure message was not sent, the panel places the AC restoral message in the event buffer as a non-reporting event.
2. The Power light turns on (or blinks).
3. Trouble beeps stop.
4. If the power has been removed for a while the panel may indicate it has a low battery. The message will stop when the battery is recharged.
Backup Battery
¾ If the rechargeable backup battery reaches the low battery threshold during a battery
test or if operating on battery backup during an AC failure, the following occurs:
1. The panel sends a CPU low battery report to the central station if Option 18: CPU Low Battery is enabled.
2. If Option 25: Trouble Beeps is enabled, six trouble beeps will sound once a minute.
When the battery is charged or replaced and a sensor test is performed, the system sends a CPU
low battery restoral report to the central station if Option 18: CPU Low Battery is on.
23
Deleting Sensors
Page 29

Battery Cover
Speaker Screws
Replacing the Backup Battery
¾ To replace the backup battery:
1. Turn the ON/OFF switch on the back of the panel to OFF.
2. Remove the panel cover by lifting on the tab at the top of the panel.
3. Loosen the speak screws. This makes removing the battery easier.
4. Remove the battery cover screw and cover. (See Figure 3)
Cover Screw
Backup Battery
Slide cover off to the
right
Note
Lifting the panel and tilting it
toward yourself should aid in
the removal of the battery.
Note
If Status is pressed during a
sensor low battery, the system announces “Time is
x:xx, sensor X panic, low
battery” and the panel will
stop beeping for 4 hours.
I N S T R U C T I O N S
Add Option
Panel Voice Enable
Option #1:
Account No.
Option #2:
Phone No.
Option #3:
See Note
Press and follow
Ad
Option #
d
voice prompts.
Add Access Code
See Note
Press
Add
DONE
Access Code
use red numbers to enter access code.
Set Clock
See Note
Press
Minutes
Clock Set
Hours
Delete
To delete an option or access code
press
and follow voice prompts.
Delete
Cancel
If you make a mistake or want to start
over press
Cancel
START MENU
Add
, then
Delete
DONE
Test
MAIN MENU
Press for program information.
*
Clock Set
Access Code
*
Sensor
*
Option #
1
+
Hours
2
-
3
4
5
6
+
Minutes
7
-
8
9
Cancel
0
Note:
Hold key or press repeatedly
until you hear the desired item.
422-3013Rev A
DONE
Figure 5. Replacing the backup battery
5. Remove the old battery.
6. Disconnect the cables from the old battery and connect them to the new one.
7. Install the new battery, positioning it under the edge of the speaker.
8. Carefully place the connecting wires above the speaker.
9. Tighten the speaker screws.
10. Replace the battery cover.
11. Replace and tighten the cover screw.
12. Replace the panel cover.
Sensor Low Battery
¾ If the panel gets a low battery message from a sensor, the following occurs:
1. The panel sends a Sensor Low Battery report to the central station.
2. The Status light turns on.
3. If Option 25: Trouble Beeps is enabled, six trouble beeps will sound once a minute.
When the low battery condition is fixed, the panel stops the trouble beeps and turns off the Status
light. See the sensor manual for information on replacing its battery.
Sensor Supervisory Failure
¾ If the panel does not hear from a sensor within the programmed RF Timeout (Option 15)
the following occurs:
1. The panel sends a Sensor Supervisory Failure report to the central station.
2. The Status light turns on.
3. If Option 25: Trouble Beeps is enabled, six trouble beeps will sound once a minute.
System Monitoring 24
Page 30

When the sensor supervision failure is fixed, the panel stops the trouble beeps and turns off the
Status light. Pressing Status during a sensor supervisory failure silences trouble beeps for 4
hours.
Automatic Phone Test
The panel verifies its ability to contact the central station every 1 to 254 days, depending on how
Option 14: Auto Phone Test is set.
¾
If the Auto Phone Test fails to contact the central station, the following occurs:
1. The Status light turns on.
2. If Option 25: Trouble Beeps is enabled, six trouble beeps will sound once a minute.
Pressing Status during an Auto Phone Test Failure silences trouble beeps for 4 hours.
Sensor Testing We recommend that you test the sensors after all programming is completed and whenever a sen-
sor related problem occurs.
To test sensors:
¾
Note
Pressing the Menu button
cycles through 5 functions;
Phone Test, Sensor Test,
Medication Reminder, Add
Sensor and Delete all Sensors. The panel will
announce the current function each time the button is
pressed.
Note
The panel will prompt for
each sensor in the order
they were programmed. If
there are no sensors programmed the panel says
“Function not available.”
Phone Communication Testing
1. Press the Menu button on the back of the panel until the panel announces “Sensor test. Press Status to select.”
2. Press the Status button on the front of the panel to start a sensor test. The panel announces “Sensor test is on, test sensor 1.”
3. Trip a sensor according to the instructions for that sensor or as described in Table 8.
4. The system will continue to prompt for sensors that have not yet been tested. When all the sensors have been tested the panel will announce, “Sensor test complete, press status.”
5. Press Status. The panel says “Sensor test OK.”
For testing instructions for other sensors see the Installation Instructions for the sensor.
Perform phone tests to check the programmed phone numbers, off-site phone operation and
phone communication between the panel and the central station. While the following tests are
similar, they should all be performed in order to verify the system is working correctly.
Important !
The phone line must be plugged in for phone tests to be completed successfully.
Phone Test
Phone Test sends a test signal to the central monitoring station, pager and/or voice event notification number. Perform a phone test to verify the panel dials the phone numbers correctly.
Note
If you don’t get the phone
test option, verify a phone
number (Options 3, 4, 5) is
programmed and Manual
Phone Test (Option 16) is
on.
25
To test the programmed phone numbers:
¾
1. Press the Menu button on the back of the panel once. The panel announces “Phone test. Press Status to select.”
2. Press the Status button on the front of the panel. The panel says “Phone test is on” once a minute while the phone test is being completed.
3. If all phone numbers are dialed successfully the panel says “Phone test OK.” If any phone number is not dialed successfully the panel says “System phone communications failure.” The panel will attempt each phone number 8 times.
Central Station Communication
¾ To test communication with the central station:
1. Call the central station and tell the operator you will be testing the system. If there are voice event notification or pager numbers programmed notify them also.
2. Test each of the panic buttons to verify they are working correctly.
3. When you finish testing the system, call the central station to verify that the alarms were received.
Sensor Testing
Page 31

Pager Communication
¾ To test pager communication:
1. Call the central station and tell the operator you will be testing the system. If there are voice event notification or pager numbers programmed notify them also.
2. Verify the pager is on.
3. Test each of the panic buttons to verify they are signaling the pager correctly. (See Table 9.)
Table 9: Pager Reporting Message
Report Pager Display
Phone Test -101-101
AC Power Restoral -102-102
AC Power Failure -103-103
Medication Reminder Failure -104-104
Activity Timer Failure -105-105
Note
After the panel has
announced the alarms it
says “Press star for alarm”
again. To hear the alarms
again press *. To end the call
go to step 5.
Note
You must terminate the call
by pressing #. Otherwise the
panel may not disconnect
from the phone line for up to
2 minutes.
Call Button, Wrist or Pendant
Panic
Smoke Alarm -109-109
-107-107
Voice Event Notification
Testing this feature requires two people; one at the installation site and the other at the location
the panel is programmed to call (Option 4 and/or 5). The phone test will fail if the phone is not
answered.
Note
Option 11 and /or 12 must be set to 10.
1. Contact the central monitoring station to inform them you are testing the system and not to dispatch help.
2. At the system site, activate a portable panic or press the system Call button.
3. At the calling location, pick up the phone after it starts ringing. You should hear the panel voice announce “Press star for alarm.”
4. Press the * button on the phone and the panel voice announces “Time is x:xx, sensor xx panic alarm.” If the * button is not pressed and the call is ended the panel will call back 8 times.
Note
Pressing 5 on the phone at this point will start a 2-way session with the panel. See Table 10 for the
remote phone commands.
5. After listening to the alarm information and/or having a 2-way conversation, press # to terminate the call.
6. At the system site, press the Status button to clear the status message. The panel will announce the time and the type of alarm.
If you press the Status button before the panel has delivered the Voice Event Notification the system clears the alarm message and only the time will be announced.
Remote Phone Operation
Test the system from a remote (off-site) phone using the commands in Table 10. See “Option 20:
Ring/Hang/Ring” in the Programming section for information on connecting to CareGard from a
remote phone. After a successful Ring/Hang/Ring, enter the Master Access Code + a Phone
Command from Table 10.
Phone Communication Testing 26
Page 32

Table 10: Remote Phone Operation
System Function Phone Command
Tal k 0 o r 1
2-Way Conversation 2
Listen 3 or 6
Terminate Session #
27
Phone Communication Testing
Page 33

Troubleshooting
Table 11: Troubleshooting Guide
Problem Solution
The system does not respond when the Call button
or panic button are activated.
I can’t select an option number I need to change.
I don’t get the phone test option when I press the
Menu button on the back of the panel.
The system is beeping.
The system is announcing “System phone communications failure.”
The system is announcing “System low battery.”
• Verify the phone line is plugged into the LINE jack
in the back of the panel.
• Make sure the Primary Phone Number (Option 3) is
programmed.
• Make sure Option 21: Call Button Enable is set to 1
or 2.
• Be sure you have entered Utility Access Code 1 or
Utility Access Code 2. The Master Access Code can
only change Options 1, 5, 22 and 29
• Make sure a Phone Number (Option 3-5) is programmed.
• Make sure Manual Phone Test (Option 16) is on.
• Press the Status button.
• Refer back to this table or the System Operation section for information on correcting the problem.
• Verify the phone line is connected correctly.
• Verify a Phone Number (Option 3-5) is programmed
correctly.
• If testing a voice event notification number the
phone must be answered in order for the phone test
to pass.
• Make sure the battery is fully charged and connected
properly. It may take several hours for the system to
charge after first being plugged in.
• Replace the backup battery.
• Perform a sensor test.
I performed a sensor test and the panel announces
“Function not available.”
• The sensor(s) has been deleted or not programmed
into the system.
• Follow the instructions for Adding/Replacing sensors.
The system is announcing “Sensor low battery.”
• Replace the sensors battery. Refer to the sensor manual for battery replacement instructions.
My access code doesn’t work.
• The Access Code Length may have been changed.
Try using one of the default codes from Table 6 on
page 15.
Troubleshooting 28
Page 34

Index
Numerics
10 rings 13
2-way talk 4
300 Baud 14
A
AC Power Failure Report 12
Access Code Length 6, 15
Account Number 9
Audio Verification 14
Auto Phone Test 12
Automatic Phone Test 25
AVM Mode 14
B
Backup Battery 24
Battery Cover 24
Numeric pager 11
Numeric Pager/Voice Event Notification Phone Mod 3 11
Numeric Pager/Voice Event Notification Phone Number 9
O
Option # 7
P
Pager 11
Panel Voice 8
Pendant Panic 4
PHONE jack 3
Phone Lock 10
Phone Mod 1 10
Phone Mod 2 11
Power light 23
Primary Phone Number 9
Program Mode 6
Programming 5
Programming Report 16
C
Call Button Enable 14
Call Waiting 9
clock 6
Contact ID 10
Cover Screw 24
CPU Low Battery Report 13
D
Dealer Code 5
Demo Mode 16
Digital Subscriber Line 3
Downloader Code 10
Downloader Enable 14
Downloader Phone Number 10
DSL 3
DTMF Dialing 12
F
Fail to Communicate 13
Full Line Seizure 3
G
GFIC 4
ground fault interrupt circuit 4
I
in-line filter 3
Installer Code 5
L
LINE jack 3
low battery threshold 23
R
Radionics D6600 Central Station Receiver 1
rechargeable 23
repeater 2
RF Jam 14
RF Jam Detect 15
RF Phone Answer 15
RF Timeout 12
Ring/Hang/Ring 13
S
Secondary Phone Number 9
Sensor Low Battery 24
Sensor Supervisory Failure 24
SG-CPM2 1
SG-DRL2A 1
SIA 10
Single Press 5
Status light 24
Supervisory Time 16
Sur-Gard Central Station Receiver 1
T
Trouble Beeps 14
Two Presses 5
V
Voice Event Notification 11
volume 4
VOX 17
VOX Gain Range 16
VOX Mic Gain 16
VOX Receiver Gain 17
M
Manual Mic Gain 17
Manual Phone Test 12
Modem Sensitivity 16
N
No Line Seizure 3
29
W
Wrist Panic 4
Index
 Loading...