

Page 1
ROTISSERIE
CONVECTION
OVEN
Model Number;
169220 17
UPC: 68113169220
Customer Assistance
1 877 207 0923 (US)
1 877 556 0973 (Conada)
Thank you for purchasing this GE appliance.
In keeping with the GE ecomogination initiotive, please consider the option to recycle
the packaging material ond donate any appliance you are no longer using.
To read more about GE’s ecomagination commitment, visit:
ge.ecomagination.cow
Page 2

IMPORTANT SAFEGUARDS
When using electrical appliances, basic safety precautions should always be followed,
including the following:
Read all Instructions.
Check that the voltage on the appliance rating plate corresponds to the voltage
of your mains supply. Only connect the appliance to an earthed wall outlet which
complies with electrical standards.
To protect against risk of electrical shock, do not immerse the cord or the oven in
water or other liquid. If oven or cord falls into liquid, unplug the cord from outlet
immediately. Do not reach into the liquid.
Close supervision is necessary when oven is used near children. Never allow a child
to use this product.
To disconnect the oven first turn the time control knob to off, then disconnect the
plug from the wall outlet.
The appliance is switched off, when the time control knob is in off position.
To prevent electric shock, unplug from outlet when not in use, before putting on or
taking off parts and before cleaning. Allow to cool down before putting on or taking
off parts and before cleaning.
Do not operate appliance with a damaged cord or plug, or after the appliance
malfunctions or is dropped or damaged in any manner. Call our toll-free customer
assistance number for information on examination, repair, ar adjustment.
Do not abuse the cord. Never use the cord for corrying, pulling or unplugging the
oppliance.
Do not let cord hang over edge of table or counter or touch hot surfaces.
The use of attachments, not recommended by the manufacturer may cause injury
to persons.
Do not use outdoors or in a damp area.
Do not place appliance on or near a hot burner (gas or electric).
The oven is not designed to be built-in.
Keep at least four inches of free space around the oven during operation for
adequate ventilation.
Do not cover the oven or let it touch flammable materials like curtains, draperies,
walls or alike during operation. This can create a risk of fire.
In the event of food flare-ups keep door closed, switch off the appliance and unplug
from wall outlet.
Do not move the appliance while in use.
Page 3

IMPORTANT SAFEGUARDS
Do not touch hot surfaces. Always use knobs or handles. Danger of burnsi
Use extreme caution when moving a baking / dripping pan containing hot oil or
other hot liquids.
Use extreme coution when removing tray, racks or disposing of hot grease, oil or
other hot liquids. Danger of burnsi
Do not cover crumb tray or other parts of the oven with metal foil. This may cause
the oven to overheat.
Do not clean the oven with obrasives.
Do not clean the inside of the oven with metal scouring pads. Pieces can break off
the pad and touch electric parts, creating a risk of electric shock.
Do not scratch the glass door surface or edges. Although the door is made of strong,
tempered safety glass, it may still break around the edges.
Do not insert oversized foods or metal utensils in the oven as they can create a risk
of fire or electric shock.
Ensure nothing is touching the upper or bottom elements of the oven.
Do not use cooking / boking containers made of other material than metal or
ovenproof glass.
Do not place any of the following materiols inside the oven: cardboard, plastic,
paper or alike.
Do not store any item on top of the oven when in operation.
Do not store objects other than the accessories recommended by the manufacturer
inside the oven.
Do not place any objects on the opened glass door.
Always wear protective insulated oven gloves when inserting or removing items
from the hot oven.
Do not use appliance for other than intended use.
The manufacturer does not accept responsibility for any damages due to
commerciol use, inappropriate use or failure to comply with the instructions. This
will void the warranty.
SAVE THESE INSTRUCTIONS!
Page 4
ADDITIONAL SAFEGUARDS
This appliance is far HOUSEHOLD USE ONLY.
DO NOT OPERATE APPLIANCE IF THE LINE CORD SHOWS ANY DAMAGE OR
APPLIANCE WORKS INTERMITTENTLY OR STOPS WORKING ENTIRELY.
IF
EXTENSION CORDS
A short power-supply cord is to be provided to reduce the risk resulting from becoming
entangled in or tripping over o longer cord. Longer detachable power-supply cords or
extension cords ore available and may be used if core is exercised in their use. If o longer
detachable power-supply cord or extension cord is used,
1) The marked electrical rating of the cord set or extension cord should be at least as
great as the electrical rating of the appliance, and
2) The cord should be arranged so that it will not drape over the countertop or tabletop
where it con be pulled on by children or tripped over unintentionally.
3) If the appliance is of grounded type,the extension cord should be grounding type
3-wire cord.
GROUNDING INSTRUCTIONS
This appliance must be grounded while in use.
CAUTION: To ensure continued protection against risk af electric shock, connect to
properly ground outlets only.
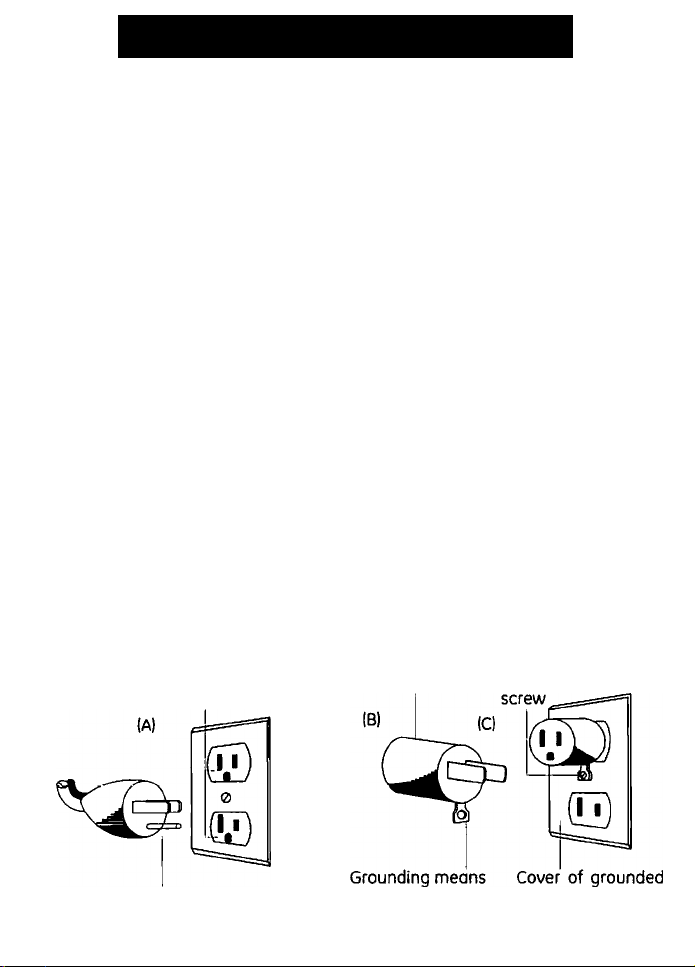
GROUNDING INSTRUCTIONS - US ONLY
The opplionce has a plug that looks like Figure A. An adaptor, as shown in Figure B, should
be used for connecting a 3-prong grounding plug to a 2-wire receptacle. The grounding
tab, which extends from the adaptor, must be connected to a permanent ground such
as a properly grounded receptacle as shown in Figure C, using a metal screw.
Circuit graunding conductar
cannected properly
Adapter
Metal mounting
Grounding prong
AA220 outlet box
Page 5
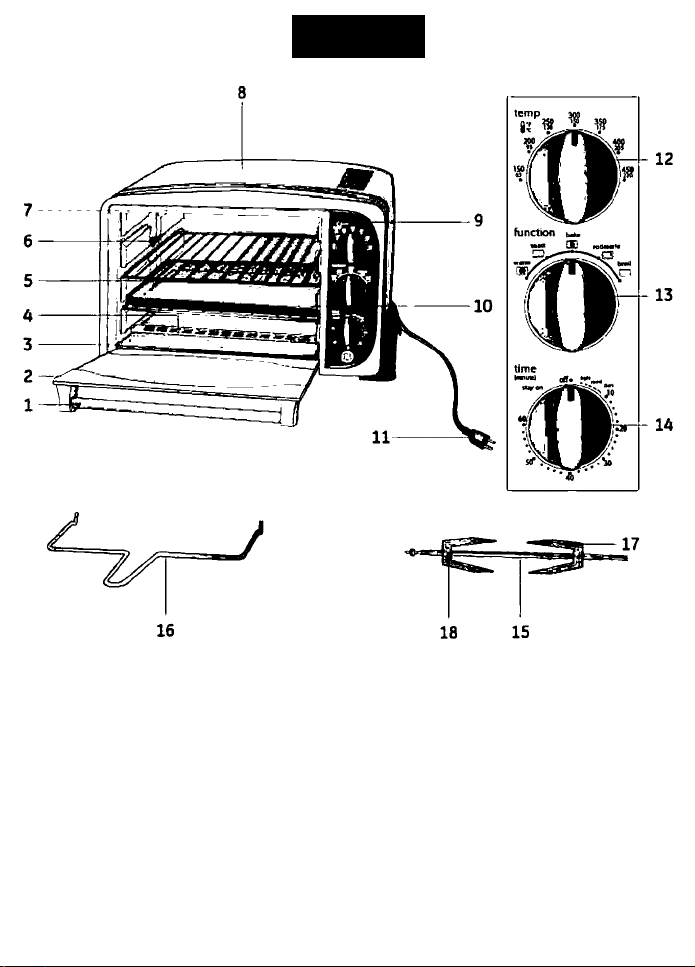
PARTS
1 Doorhandle
2 Gloss door
3 Crumb troy
4 Lower heating elements
5 Wire rock (x2)
6 Spit holder
7 Upper heating elements
8 Housing
9 Power ON light
10 Baking / dripping pan
11 Power cord with power plug
12 Temperature control knob
13 Function control knob
14 Time control knob
15 Rôtisserie spit
16 Rôtisserie handle
17 Skewer
18 Thumbscrew
Page 6
ILLUSTRATIONS
Page 7

OPERATION
Before first use
• Remove all packaging materials, labels and/or stickers from the oven.
• Clean the oven thoroughly before using for the first time I*-» Cleaning). The oven
must not be connected to wall outlet during cleaning.
Warningl
A
Before first use, we recommend to run the oven empty for about 15 minutes at the
highest temperature (450“F) in toast function with the glass door (2) opened. This
removes any packing residues and odor traces thot may be present.
Note: Slight odor and smoke may occur in the first 15 minutes of operation. This is
normal and hormless.
Do not immerse the oven in water or any other liquids. This may cause
electric shock or damage the appliance.
Wash all accessories in hot soapy water or in o dishwasher. Handle sharp ends of
the rôtisserie spit (15) and the skewers (17) with care.
Dry all parts thoroughly, before inserting them into the oven.
Place the oven on a heat resistant work-surface.
Connect the power plug (11) to a suitable wall outlet.
Turn the temperature control knob (12) to 450°F.
Turn the function control knob (13) to toast
Turn the time control knob (14) to 15 minutes.
The oven heats and a bell will ring to indicóte the end of the toast cycle.
Let the oven cool down before removing accessories.
A
A
Warningl
Never touch hot surfaces during operation to ovoid risk of injury or bums
nil. (35/Only touch the door handle (1) or the control knobs (12,13 ond 14).
Warningl
Always use extreme care when removing rôtisserie spit (15), wire rack (5),
crumb tray (3) or baking / dripping pan (10) from a hot oven. Always use
rôtisserie handle (16) or oven gloves.
Page 8

OPERATION
Warningl
A
Operating instructions
Always disconnect the power plug 111) from the wall outlet when inserting or removing
accessories!
Before plugging in the oven, check that the electrical circuit is not overlooded with other
appliances.
The aven is operated by the following controls:
Control knob Function
Temperature (12) Setting the desired
Function (13) Switching between
Time (14)
Do not leave the oven unattended during operation.
Possible settings
150°F-45Cr’F
temperature
worm (keep cooked food warm)
the oven functions
Setting the desired
operating time
toast (bread, muffins, frozen waffles etc.)
bake (cakes, pies, meat etc.)
rôtisserie (up to 5 lb roast or chicken)
broil (fish, steak, poultry, pork chops etc.)
off
1-60 min.
stay on (stay on until manually set to off)
Turning On and Off
• To turn the oven on, turn the time control knob (14) to any desired position, that is
not the off position.
• To turn the oven off, turn the time control knob (14) back to the off position.
Note: For best results in short cooking times, always turn the timer dial ten minutes past
the desired time, then turn the timer back to the desired cooking time. This will ensure
the highest timer accuracy.
Power On light
The power On light (9) is illuminated whenever the oven is switched on.
Convection fan
The convection fan works automatically in the convection bake function.
Page 9

OPERATION
Accessories
Wire rock (51: For toasting, baking and generally for cooking with other
containers made of metal or ovenproof gloss.
Baking / dripping pan (10): For broiling and roasting meat, poultry, fish and various other
foods.
Rôtisserie spit (15):
Rôtisserie handle (16):
Crumb tray (3):
Warning!
A
A
Only use accessories recommended by the manufacturer.
Do not use cooking / baking containers made of material other than metal
or ovenproof glass.
Do not place any of the following materials inside the oven: cardboard,
plastic, paper, etc.
Warning!
Always wear protective insulated oven gloves when inserting or removing
items from the hot oven.
Keep warm function
Keep food warm for up to 30 minutes. We do not recommend keeping food warm for
longer time periods as the food may become dry or will spoil. Use the wire rack (5) to
support food that is to be kept warm.
• Turn the temperature control knob (12) to 180°F.
• Turn the function control knob (13) to warm.
• Place food to be kept warm on the wire rack (5).
• Turn the time control knob (14) to stay on.
• When finished keeping food worm, turn the time control knob (14) to off.
For roasting a variety of meats and poultry.
For removing the rôtisserie spit from the oven after roasting
is done.
For easily removing all kinds of crumbs or other food residues
from the oven after operation.
A
Warning!
Always wear protective insulated oven gloves when inserting or removing
items from the hot oven. Use extreme care when sliding the wire rack (5) in
or out the oven.
Page 10

OPERATION
Toast function
The oven allows for toosting A to 5 slices of bread, 6 muffins, frozen waffles or frozen
pancakes. The wire rock (5) should be placed in the middle of the oven when toasting.
Place the wire rock (5) in the middle rock guide.
Turn the temperature control knob (12) to 450*F.
Turn the function control knob (13) to toast
Place food to be toasted on the wire rock (5).
Turn the time control knob (14) to the desired toasting time.
The bell will ring to indicate the end of the toasting cycle.
Recommended toast times
Light 4 min.
Medium 5 min.
Dork 7 min.
Warningl
A
A
Do not leave food longer thon recommended above in the oven when
toasting. Longer toasting will burn the food.
Warningl
Never leave the oven unattended during operation.
Page 11

OPERATION
Convection bake function
Convection baking / cooking enables a very constant and even heating. The fan
circulates the hot air around the food. With different temperature and time settings, this
function can be used for:
• Baking cookies, cakes and pies
• Baking pizza
• Roasting beef, pork, ham, chicken, turkey or other meot
Baking cakes and cookies
• Place the wire rack (5) in the lower or middle rack guide.
• Turn the temperature control knob (12) to the desired baking temperature.
• Turn the function control knob (13) to bake.
• Preheat the oven if indicated in the recipe by turning the time control knob (14) to
the desired preheating time.
• Place the baking dish with the item(s) to be baked on the wire rack (5).
• Turn the time control knob (14) to stay on.
• When baking is complete, turn the time control knob (14) to off.
Warning)
A
Baking pizza
You can bake you favorite frozen pizza in the oven. Use the wire rack (S) in the middle
rack guide to tioke a 12 inch frozen pizza.
• Place the wire rack (5) in the middle rack guide.
• Turn the temperature control knob (12) to 4S0"F.
• Turn the function control knob (13) to bake.
• Preheat the oven for 15 minutes by turning the time control knob (14) to 15
• After preheating, lower the temperature according the baking instructions on the
• Place the frozen pizza on the wire rack (5). If you want to bake a freshly made pizza,
• Turn the time control knob (14) as indicated on the package.
• The oven heats and bell will ring to indicate the end of the baking cycle.
Always weor protective insulated oven gloves when inserting or removing
items from the hot oven.
minutes.
packoge of the pizza.
place the dough on the baking / dripping pan (10) or o pizza pan (not included).
Page 12

OPERATION
Roasting
You con roost your favorite meat to perfection. The oven con roost up to on 5 lb. chicken
or turkey and up to o 5 lb. roost. We recommend using a meat thermometer to check
the roosting progress.
• Place the baking / dripping pan (10) in the lowest rack guide.
• Turn the temperature control knob (12) to the desired roosting temperature.
• Turn the function control knob (13) to bake.
• Preheat the oven by turning the time control knob (14) to the desired preheating
time.
• Place the food to be roasted on the baking / dripping pan (10).
• Turn the time control knob (14) to stay on.
• When roasting is complete, turn the time control knob (14) to off.
Warningl
A
The following roasting temperatures and times are recommendations only. Adjust them
to your personal preferences. They are based on meats at refrigerator temperatures
and an oven that was preheated at 450“F for 15 minutes. Roasting of frozen meats in a
cold oven will take considerably longer. We recommend using a meat thermometer to
check the roasting progress.
Meat Temperature Time per (b.
Beef roast 300 - 325”F 25 - 30 min.
Pork roost
Ham 300 - 325‘’F 35 - 40 min.
Chicken 350'F 25 - 30 min.
Turkey
Always wear protective insulated oven gloves when inserting or removing
items from the hot oven or when checking the roast.
325°F
350'F
40 - 45 min.
25 - 30 min.
Page 13

OPERATION
Rôtisserie function
We recommend not to cook o roost larger than 5 lb. on the rôtisserie spit (15). Chicken
should be bound in string to prevent the chicken legs or wings from unroveling during
roasting and to allow the rôtisserie assembly to rotate smoothly. We recommend using
a meat thermometer to check the roasting progress.
• Slide one of the rôtisserie skewers (171 onto the rôtisserie spit (15) so that the pointed
end of the skewer faces the pointed end of the spit (15). Tighten the thumbscrew
(18) to secure the skewer in place.
• Slide the roast / poultry onto the rôtisserie spit (15). Make sure to center the spit
(15) in the meat and push until the skewer (17) penetrates the meat, securing it in
place.
• Slide the second rôtisserie skewer (17) onto the rôtisserie spit (15) so that the pointed
end of the skewer (17) penetrates the meat. Push it firmly into the meat. Tighten the
thumbscrew (18) to secure the skewer in place.
• Make sure the roast / poultry is centered and tightly secured to the rôtisserie spit (15).
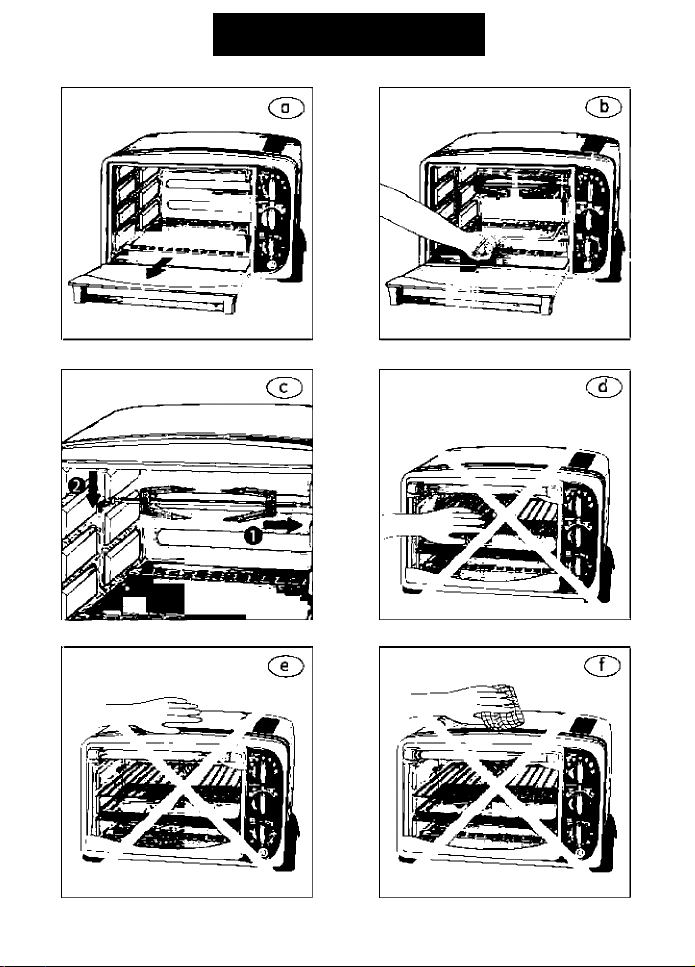
• Insert the pointed end of the rôtisserie spit (15) into the drive socket located on the
right hand side of the inner oven wall (ill. (J^l.
• Place the square end of the rôtisserie spit (15) on the spit holder (6) located on the
left bond side of the inner oven wall.
• Place the baking / dripping pan (10) in the lowest rack guide.
• Turn the temperature control knob (12) to 450°F.
• Turn the function control knob (13) to rôtisserie.
• Turn the time control knob (14) to stay on.
• When roasting is complete, turn the time control knob (14) to off.
• Remove the rôtisserie spit (15) by placing the hooks of the rôtisserie handle (16)
under the grooves on either side of the rôtisserie spit (15) (ill. C£)A Lift the left side
of the spit (15) off the rôtisserie spit support first by lifting it upwards. Then pull the
right end of the spit (15) out of the drive socket ond carefully remove the roast from
the oven.
• Open the thumbscrew (18) and remove the skewers (17) and remove the meat from
the rôtisserie spit (15).
A
Warningl
Always use extreme care when removing rôtisserie spit (15) or baking /
dripping pan (10) from a hot oven. Always use rotissery handle (16) and oven
gloves.
Page 14

OPERATION
The following roasting temperatures and times ore recommendations only. Adjust them
to your personal preferences. They are based on meats at refrigerator temperatures
and an oven that was preheated at 450°F for 15 minutes. Frozen meats in a cold oven
will take considerably longer. We recommend using a meat thermometer to check the
roasting progress.
Meat Temperature Time per lb.
Beef roost 325‘‘F 30 - 35 min.
Pork roast 325°F 45 - 50 min.
Ham 325°F 45 - 50 min.
Chicken 350“F
Turkey
350°F 30 - 40 min.
Broil function
In the broiling function the upper heating elements (71 cycle on and off to maintain a
maximum temperature in the oven. During broiling the baking /dripping pan (10) must
be placed underneath the food to catch drippings.
• Place the baking / dripping pan (10) in the lowest rack guide.
• Turn the temperature control knob (12) to 450'F.
• Turn the function control knob (13) to broil.
• Preheat the oven for 15 minutes by turning the time control knob (14) to 15
minutes.
• Place the food to be broiled on the wire rock (5). Brush food with sauces or oil as
desired.
• Place the wire rack (5) in the highest possible rack guide. Food should be placed as
close as possible to the upper heating elements (7) without touching them.
• Turn the temperature control knob (12) to the desired temperature.
• Turn the time control knob (14) to stay on. We suggest keeping the oven door slightly
ajar. This will keep the upper heating element on and will ensure a more consistent
temperature in the oven.
• When broiling is complete, turn the time control knob (14) to off.
30 - 40 min.
A
Warningl
Always wear protective insulated oven gloves when inserting or removing
items from the hot oven.
Page 15

OPERATION
The following broiling temperatures and times are recommendations only. Adjust them
to your personal preferences. They are based on foods at refrigerator temperatures and
an oven that was preheated at A50°F for 15 minutes. Broiling of frozen foods in a cold
oven will take considerably longer.
Meat Temperature Time per lb.
Rib steak 400°F 20-25 min.
T-bone steak
Hamburger
Pork chops AQO^F
Lamb chops A00”F 20 - 25 min..
Chicken legs
Fish filets
Salmon steak
400*F
400“F
A00°F
350°F
350°F
20-25 min.
15 - 20 min.
20-25 min.
30-35 min.
20 - 25 min.
20-25 min.
CLEANING
Warning!
A
Accessories
• All accessories can be washed in hot soapy water or in a dishwasher.
• Do not use on abrasive cleaner or a steel wool scouring pad on the baking / dripping
Always unplug the power plug (11) from the wall outlet and allow to cool
down before cleaning.
pan (10) as this may damage the finish.
Page 16

CLEANING
Oven interior
• Disconnect the power plug (Ц) from the woll outlet and allow to cool down before
cleaning.
• Take out the crumb tray (3) to remove crumbs after toasting (ill.
• Take out the baking / dripping pan (10) after use, to remove drippings. Wait for hot oils
to cool. Use oven gloves to remove the baking / dripping pan (10).
• Wipe the walls with a damp sponge, cloth, or nylon scouring pad and some mild
detergent if needed.
• Take extra care when cleaning near the lower or upper heating elements in order
not to damage them.
• Do not clean the inside of the oven with metal scouring pads, abrasive cleaners or
scrape the walls with a metal utensil. All of these methods will damage the oven.
Metal pieces can break off the pads and touch electric parts, creating a risk of
electric shock.
Oven exterior
• Clean the oven housing (8) with a damp sponge or cloth.
• Do not use an abrasive cleaner as this may damage the housing finish (
Gloss door
Wipe the glass door (2) with a damp sponge or cloth.
Let all parts and surfaces dry thoroughly before use. Make sure that all parts and
surfaces are completely dry before connecting the oven to a wall outlet.
Storage
• clean and dry all parts before storing.
• Store all accessories inside the oven.
• Store the oven in its original packaging or in a clean, dry place.
1/-Ш.
Page 17

TROUBLESHOOTING
PROBLEM CAUSE
Oven does network
Oven does not reach
temperature
The power cord is not
correctly plugged in
Fuse blown or circuit
breaker tripped
The outlet fails to feed
power to the device
The gloss door is not
properly closed
TECHNICAL DATA
Roted voltage:
Roted current:
Roted power output:
Capacity:
Dimensions:
Weight (without packoge): S700g (without package)
120V ~ , 50Hz
12.5A
1500W
24 Liters
292mm x 367mm x 389mm
SOLUTION
Unplug, then plug in again
after 10 seconds
Check for overloading of
circuit
Hove 0 technician reploce
the fuse or reset the
circuit breaker
Test the outlet with other
electrical appliances
Close the glass door
Page 18

CUSTOMER ASSISTANCE
If you have a claim under this warranty, please call our Customer Assistance Number. For faster
service, please have the model number and product name ready for the operator to assist you. This
number con be found on the bottom of your appliance and on the front page of this manual.
Model Number;
Customer Assistance Number 1.877.207.0923 (U.S.) or 1.877.556.0973 (Canada).
Keep these numbers for future referencel
For more information, please visit us at WWW.GEHOUSEWARES.COM
Two-year limited warranty
what does your warranty cover?
• Any defect in materiol or workmanship.
For how long after the originol purchase?
• Two years.
What will we do?
• Provide you with a new one.
• For those items still under warranty but no
longer ovailoble, WAL-MART reserves the
right to replace with o similar GE branded
product of equal or greater value.
How do you make a warranty claim?
• Save your receipt.
• Properly pack your unit. We recommend
using the original carton and packing
materials.
• Return the product to your nearest
WAL-MART store or call Customer
Assistance at 1-877-207-0923 (U.S.)
or 1-877-556-0973 (Canada).
What does your warranty not cover?
• Parts subject to wear, including, without
limitation, glass parts, glass containers,
cutter/strainer, blades, seals, gaskets,
clutches, motor brushes, and/or agitators,
etc,
• Commerciol use or any other use not
found in printed directions.
• Damage from misuse, abuse, or
neglect, including failure to clean
product regularly in accordance with
manufacturer's instructions.
_________________
is a trademark of General Electric
Company ond is used under the
license by Wal-Mart Stores Inc.,
Bentonville, AR 72716
Product Nome: ____________________
How does state low relate to this warranty?
• This warranty gives you specific legal
rights, and you may also have other rights
which vary from state to state or province
to province.
• This warranty is in lieu of any other
warranty or condition, whether express or
implied, written or oral, including, without
limitation, any statutory warranty or
condition of merchantability or fitness for
a particular purpose.
• WAL-MART, GE and the product
monufacturer expressly disclaim all
responsibility for special, incidental, and
consequential damages or losses coused
by use of this appliance. Any liability is
expressly limited to an amount equol to
the purchase price paid whether a claim,
however instituted, is based on contract,
indemnity, warranty, tort (including
negligence), strict liability, or otherwise.
Some states or provinces do not allow
this exclusion or limitotion of incidentol
or consequential losses, so the foregoing
disclaimer moy not apply to you.
What if you encounter a problem with this
product while using it outside the country of
purchase?
• The warranty is valid only in the country of
purchase ond if you follow the warranty
claim procedure as noted.
Marketed in Canada by;
Wol-Mort Canada Corp
19A0 Argentia Road, Mississauga,
Ontorio L5N1P9
 Loading...